CATEYE USBCU USB Dongle Transceiver User Manual Manual CY300 en
CATEYE Co., Ltd. USB Dongle Transceiver Manual CY300 en
UserManual.wiki
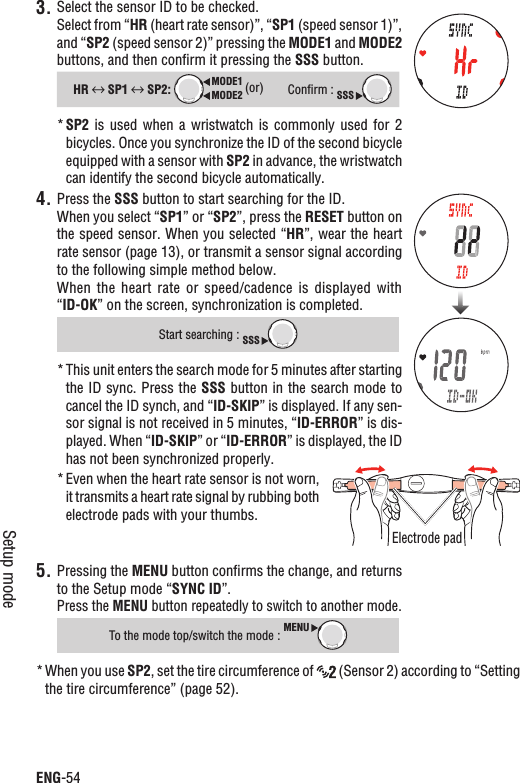
>
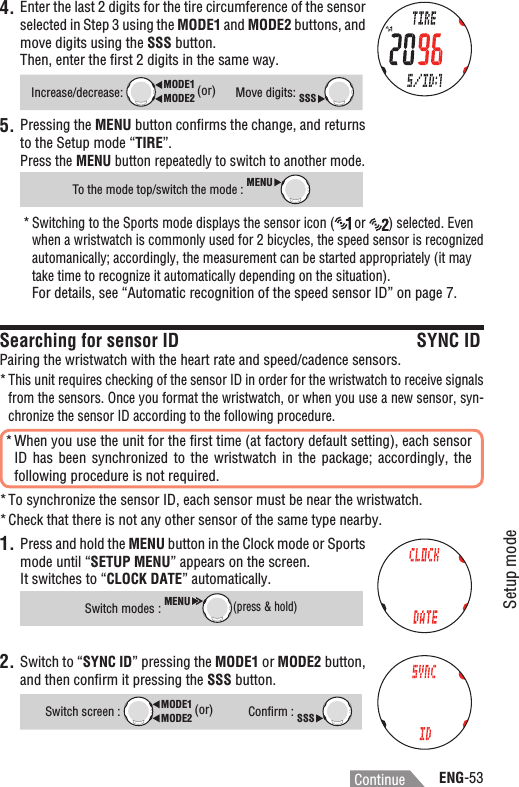
CATEYE
>
USBCU User Manual
ON5USBCU & 5672A-USBCU User Manual
Navigation menu
Upload a User Manual
Namespaces
Wiki Guide
HTML
PDF
Info
Views
User Manual
Discussion / Help
Navigation
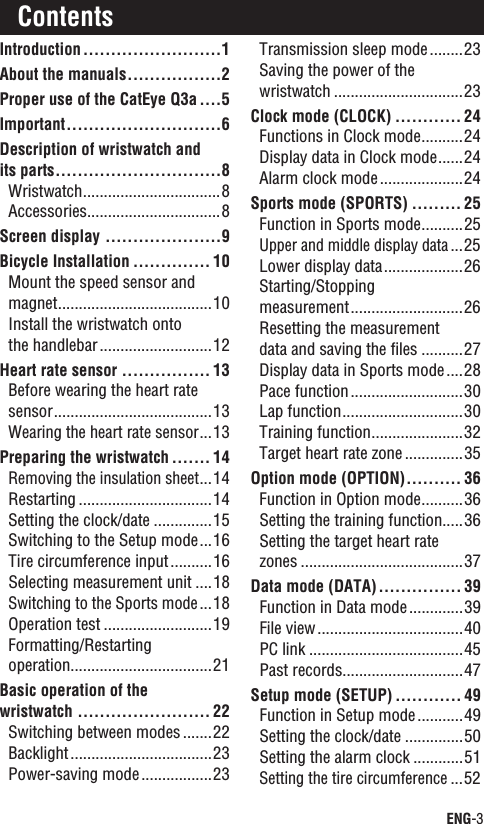
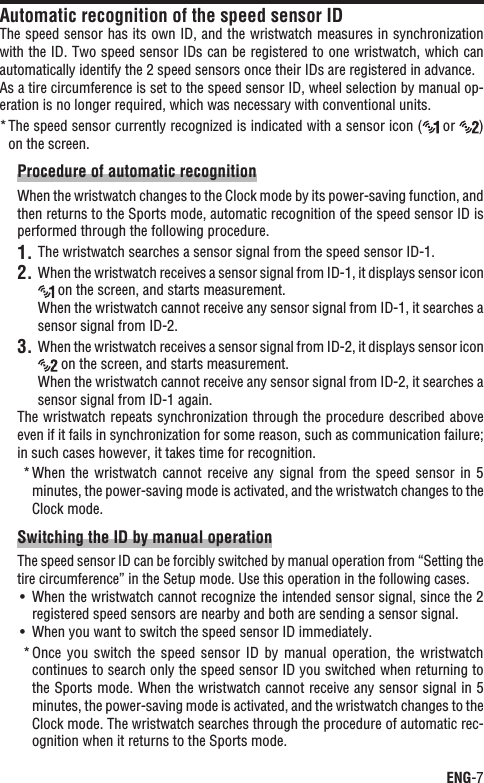
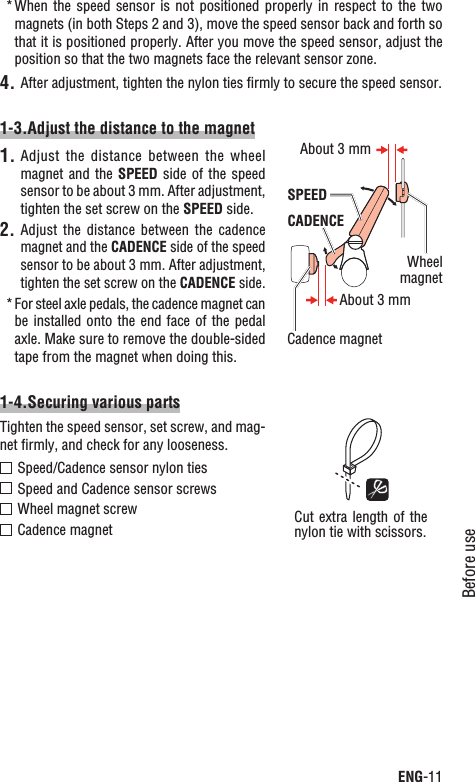
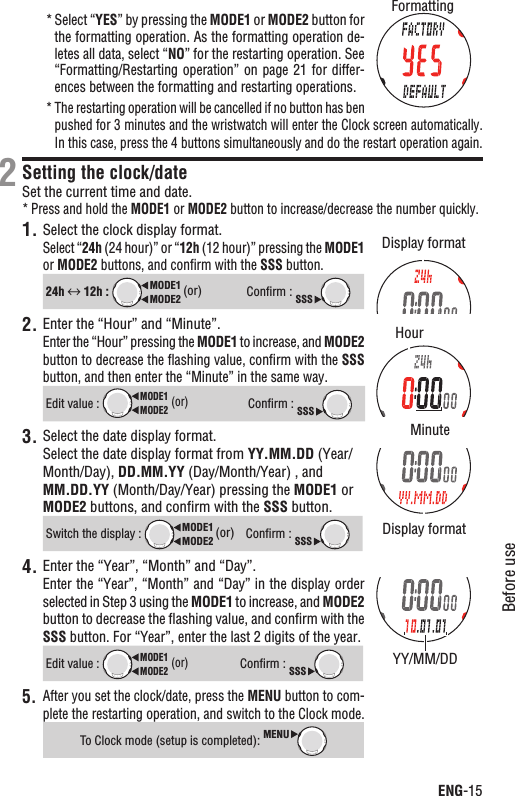
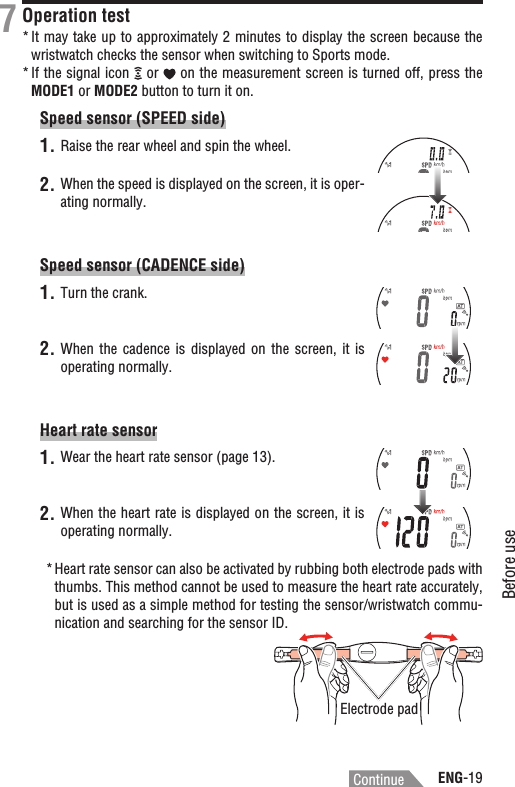

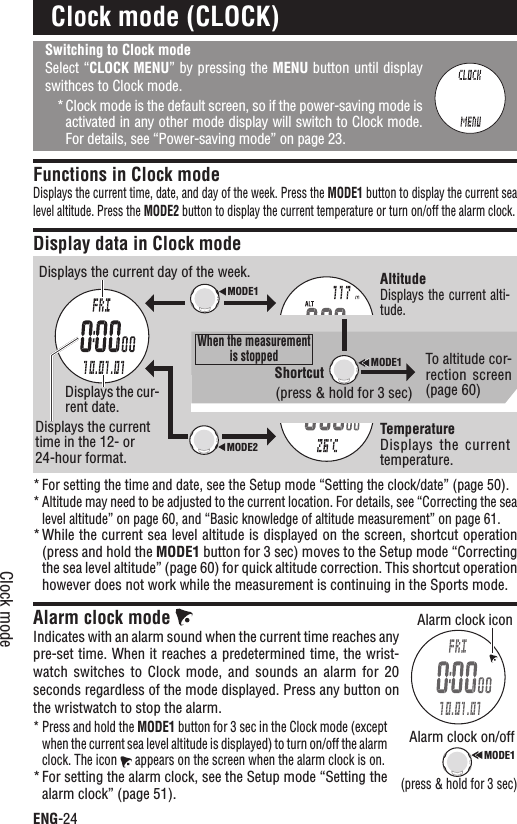
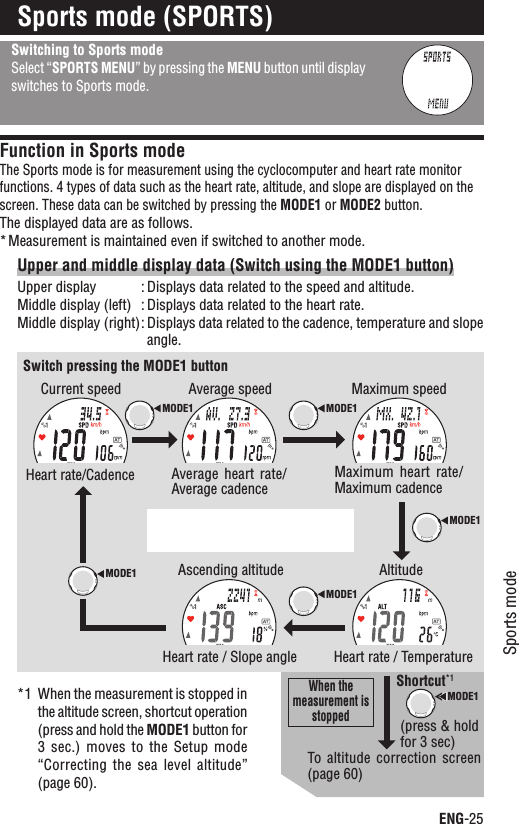
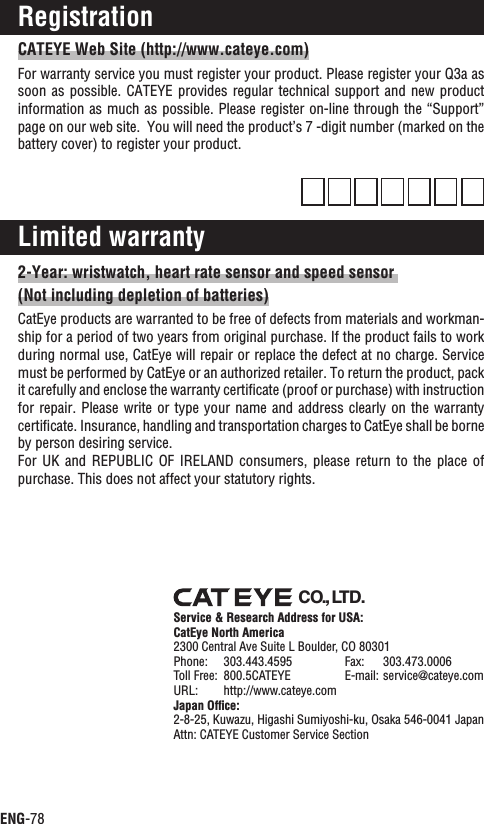
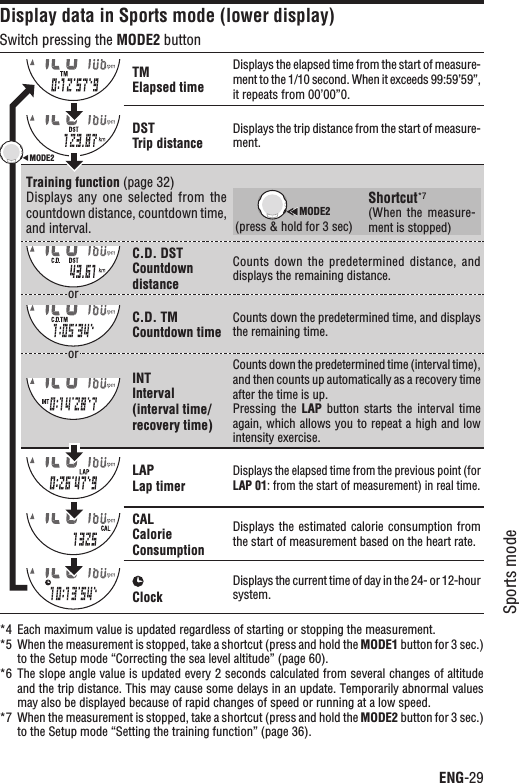
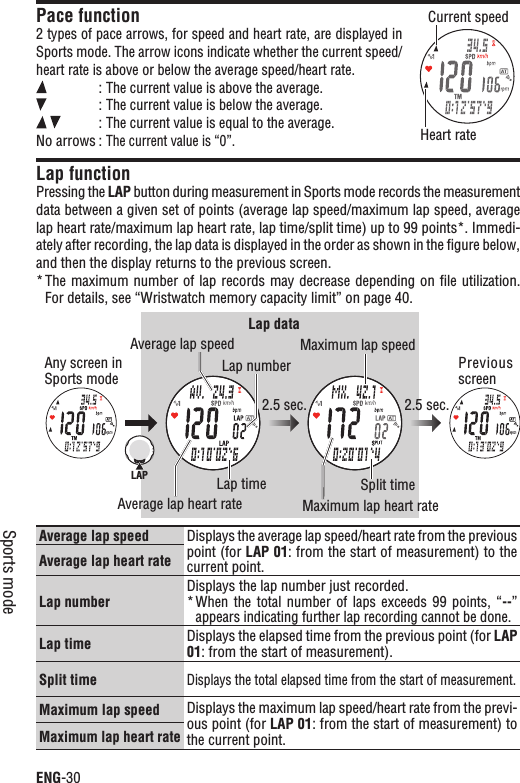
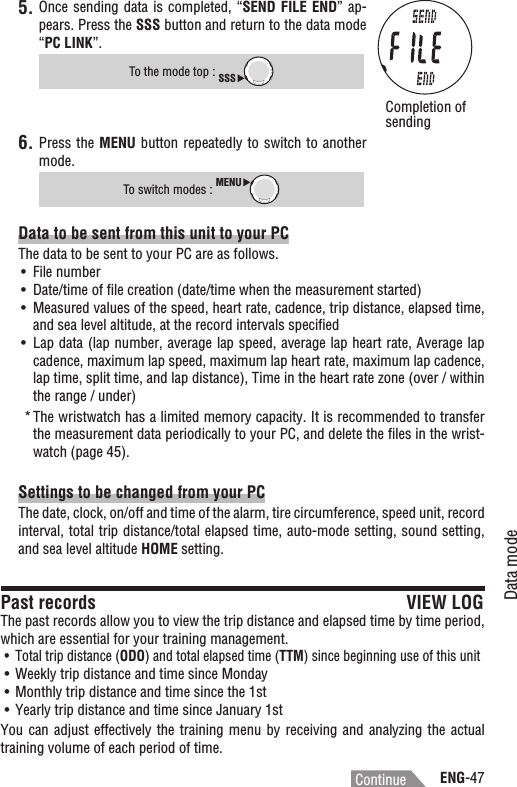
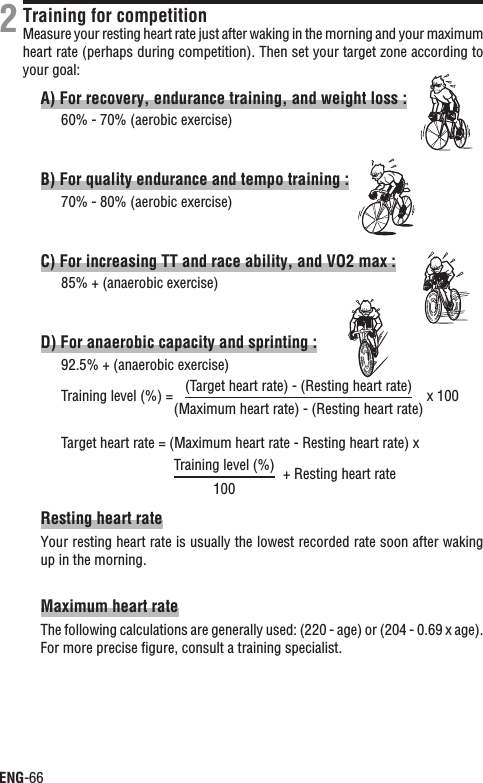
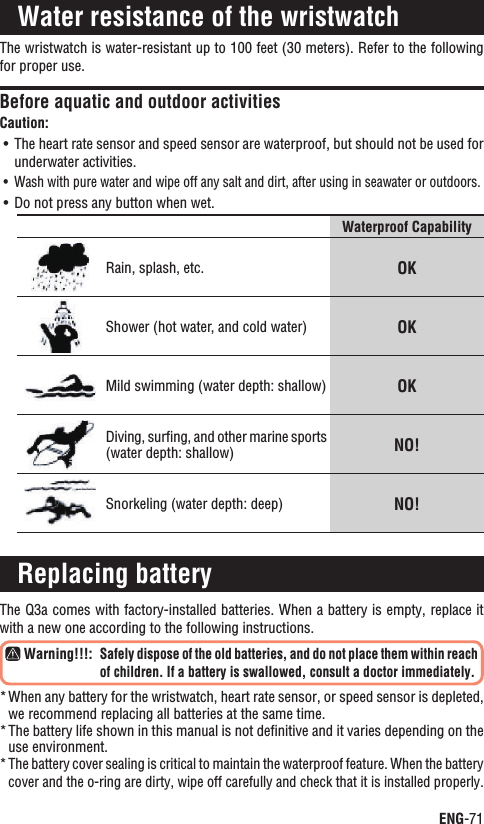
![ENG-26Sports modeLower display data (Switch using the MODE2 button)Displays additional ride data.*1 The training function screen displays one of the following; countdown distance, countdown time, or interval. For details, see “Training function (countdown func-tion and interval function)” on page 32.*2When measurement is stopped in the training function screen, shortcut operation (press and hold the MODE2 button for 3 sec.) moves to the Setup mode “Setting the training function” (page 36).Starting/Stopping measurement”km/h [mph]” or “m[ft]” icon flashes during speed measurement. Initially, the auto-mode function which starts or stops measure-ment automatically in sync with the bicycle motion is ON. Auto measurement is switched to manual measurement and vice versa by ON/OFF operation in the auto-mode. For details, see the Setup mode “Setting the auto-mode” (page 58). The maximum speed, maximum heart rate, and maximum cadence are updated regardless of starting/stopping the measurement.To use this unit as a heart rate monitor, start/stop the measure-*ment using the SSS button in the manual measurement. When the auto-mode is on, you cannot start the measurement.Auto-mode (automatic measurement)When the auto-mode is on, appears on the screen. The wristwatch detects the wheel spinning, and starts/stops the measurement automatically.When the transmission is stopped and Sensor signal icons * and are off, the measurement will not start even after the bicycle starts. If a bicycle is stopped for more than 5 minutes or if heart rate sensor is either far from the bicycle or off the body, it will go into sleep. This normally happens when taking a rest during the ride. To recover from the transmission sleep, press the MODE1 or MODE2 button to turn on the sensor signal icons. For details, see “Transmission sleep mode” on page 23.AT iconSwitch pressing the MODE2 buttonElapsed timeClockTrip distanceCalorie ConsumptionTraining function*1Lap timerMODE2MODE2MODE2MODE2MODE2MODE2MODE2Shortcut*2(press & hold for 3 sec)To the setting count-down screen in Option mode (page 36)When the measurement is stopped](https://usermanual.wiki/CATEYE/USBCU/User-Guide-1467069-Page-27.png)
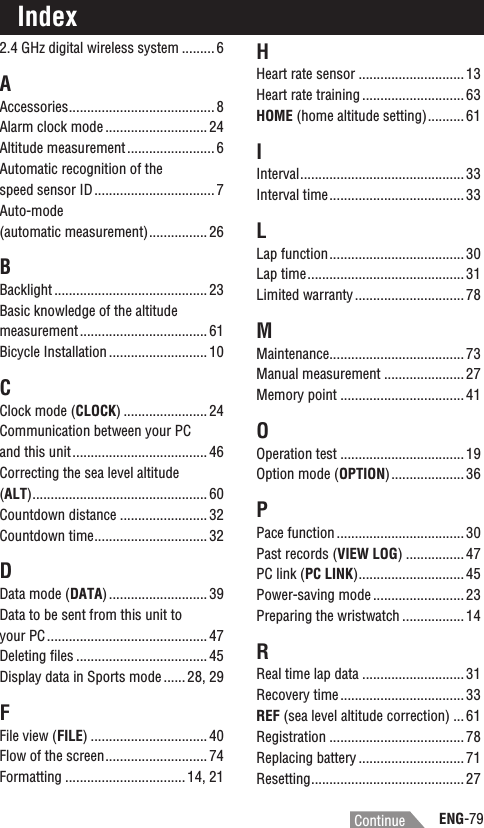
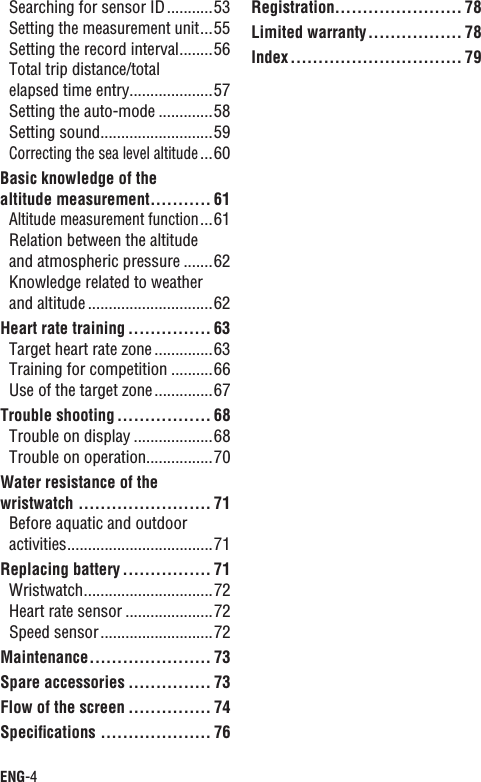
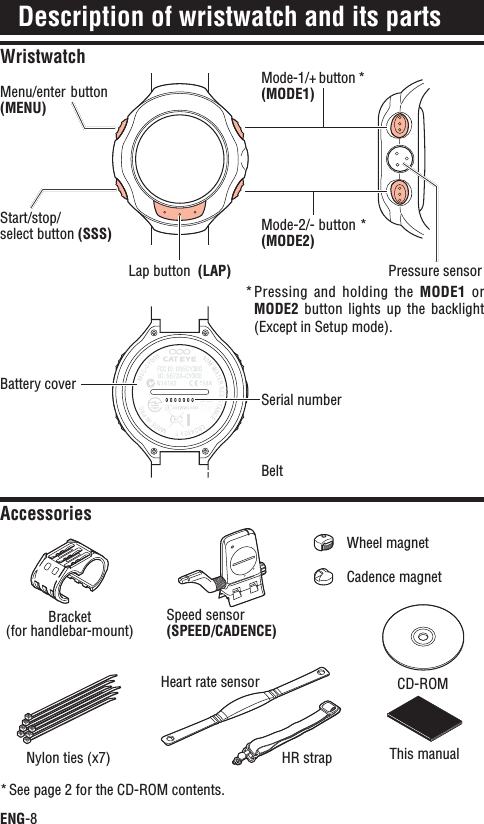
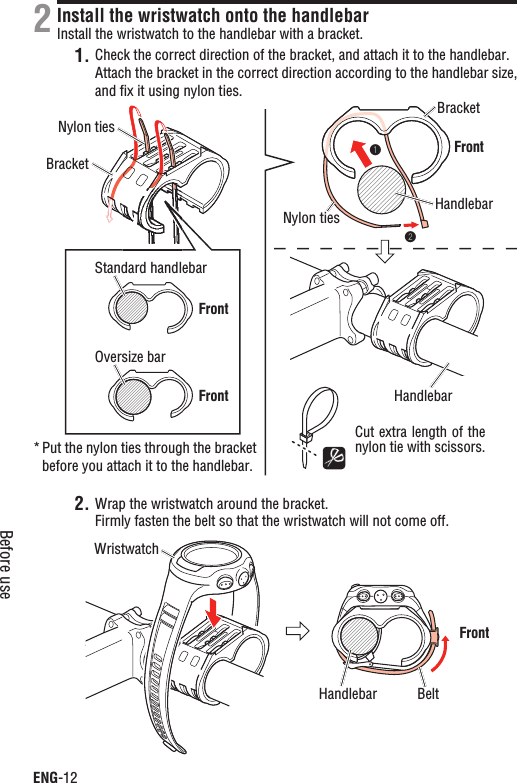
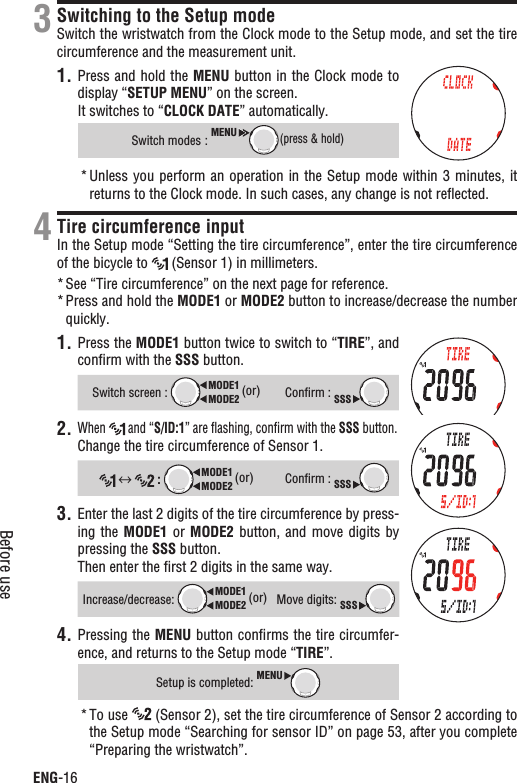
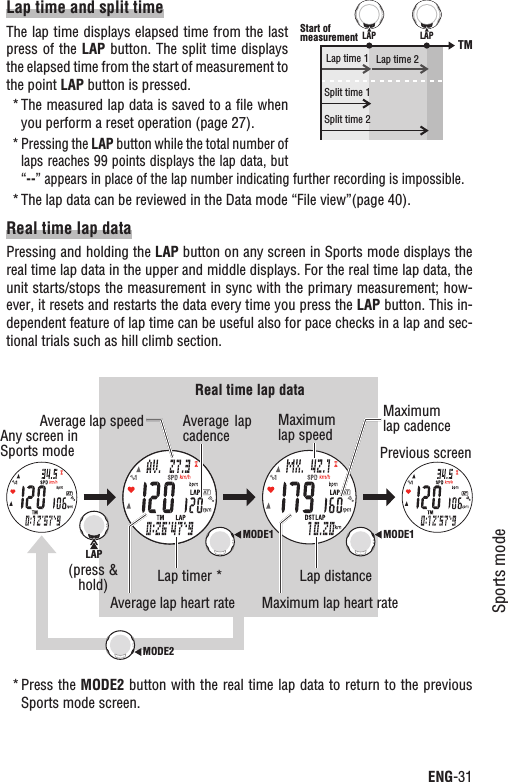
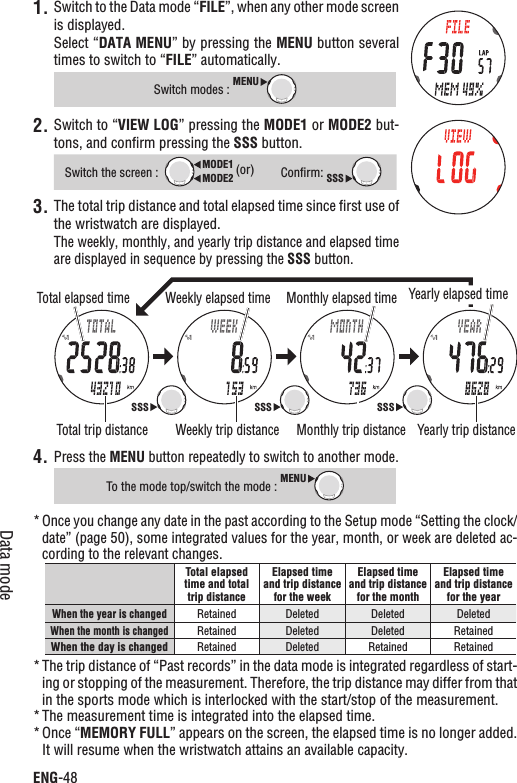
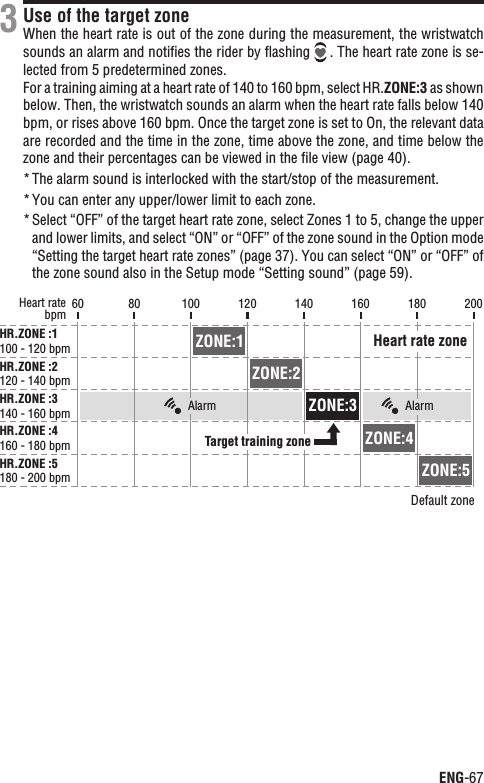
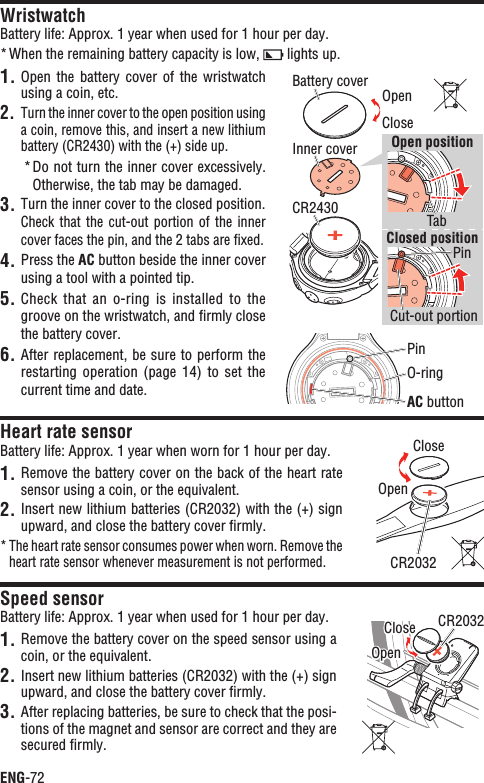
![ENG-28Sports modeDisplay data in Sports mode (upper and middle display)Switch pressing the MODE1 buttonCurrent speed Displays the current speed in real time. Updates every second.Heart rate Displays the current heart rate in real time. Updates every second.CadenceDisplays the current number of pedal rotations per minute. Updated every second.Average speed*1 Displays the average speed since the start of measurement.Average heart rate*1*2Displays the average heart rate since the start of measurement. The time with no heart rate measured is not reflected on the average rate.Average cadence*1*3Displays the average cadence since the start of measurement. Any time with no pedaling is not reflected on the average cadence.Maximum speed*4Displays the maximum speed since the start of measurement.Maximum heart rate*4Displays the maximum heart rate since the start of measurement.Maximum cadence*4Displays the maximum cadence since the start of measurement.Sea Level Altitude Displays the sea level altitude at the current loca-tion point.Temperature Displays the current temperature.Ascending altitudeDisplays the accumulated altitude from the point you reset to the current point.* Any descending altitude is not counted.Slope angle*6 Displays a ±value on the basis that the slope angle of 45° is 100%.*1 Each average value is displayed on the screen replaced with the character “E” when the elapsed time (TM) exceeds 100 hours. Clear the data by resetting (page 27). The average speed is displayed in the same way as above when the trip distance exceeds 10000 km [mile].*2 This device stops calculating the average when the heart rate sensor is detached, and resumes the calculation when the heart rate sensor is worn again. This feature produces actual averages with the heart rate sensor worn.*3This device calculates the average excluding the time when you stop pedaling. This feature pro-duces actual averages, unlike other models that calculate averages also to include any zero values.MODE1MODE1(press & hold for 3 sec) (When the measurement is stopped)Shortcut*5](https://usermanual.wiki/CATEYE/USBCU/User-Guide-1467069-Page-29.png)
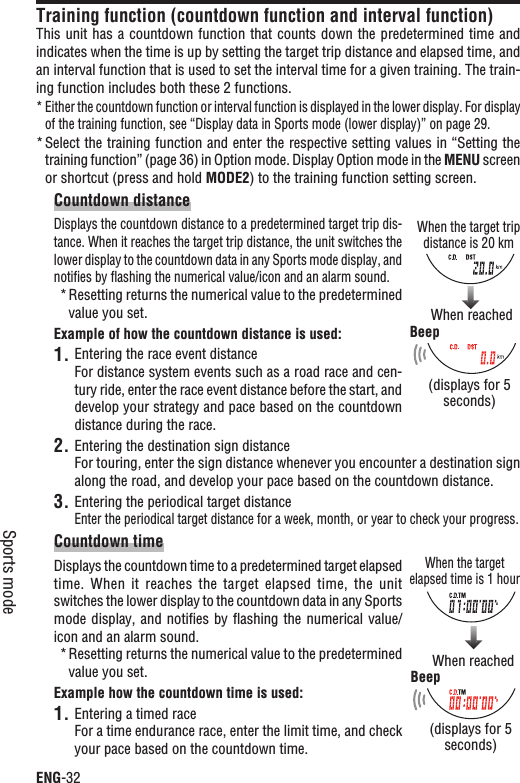
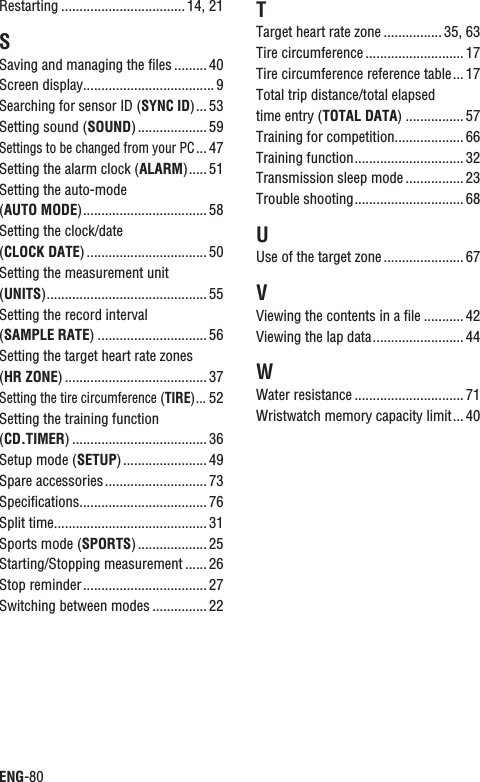
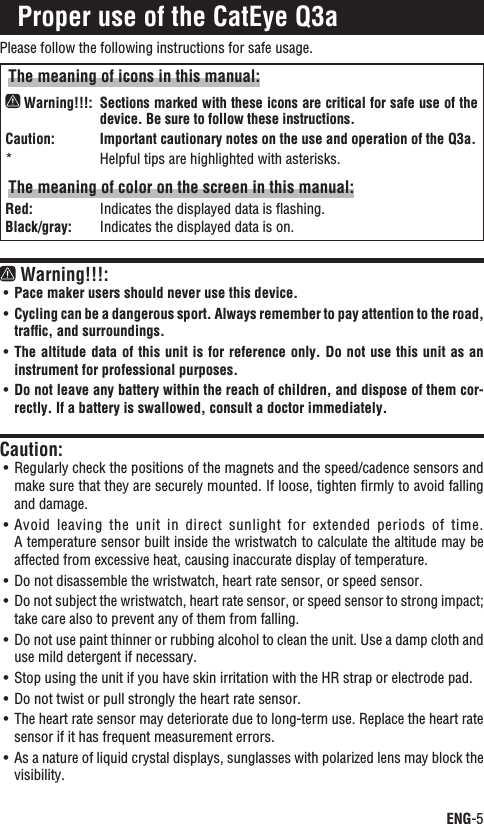
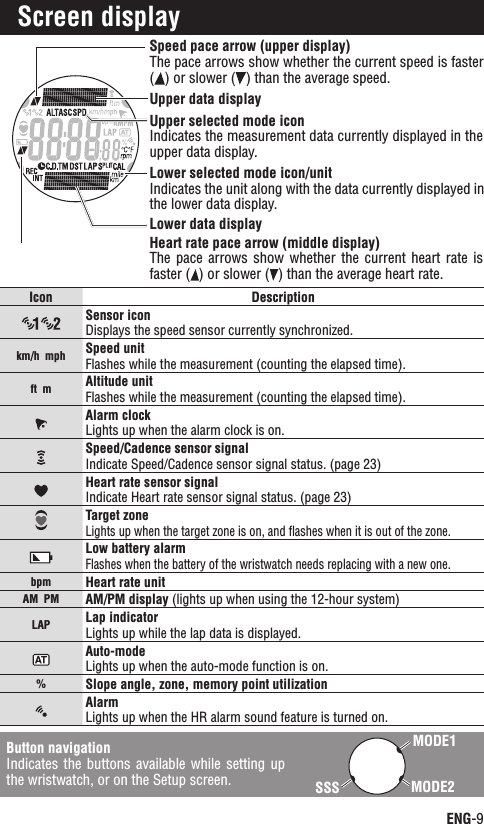
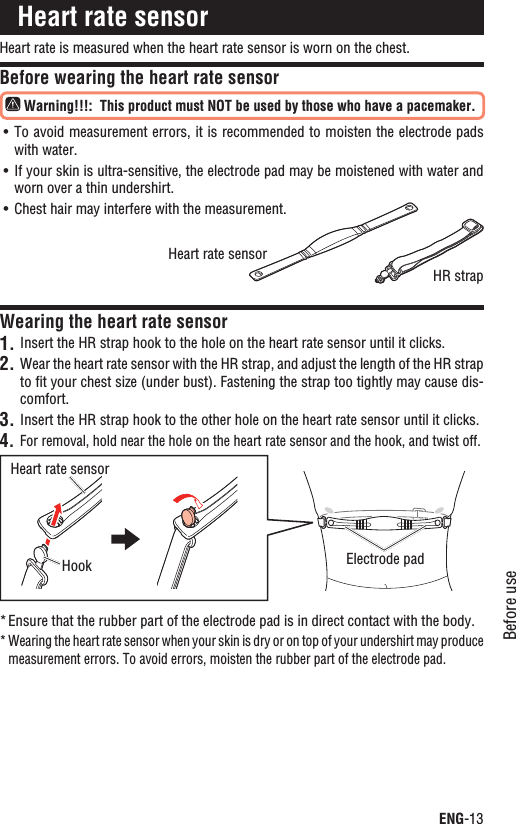
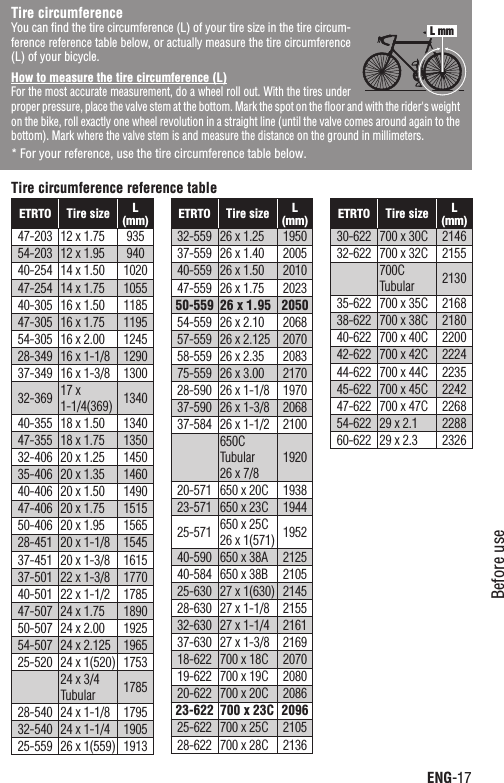
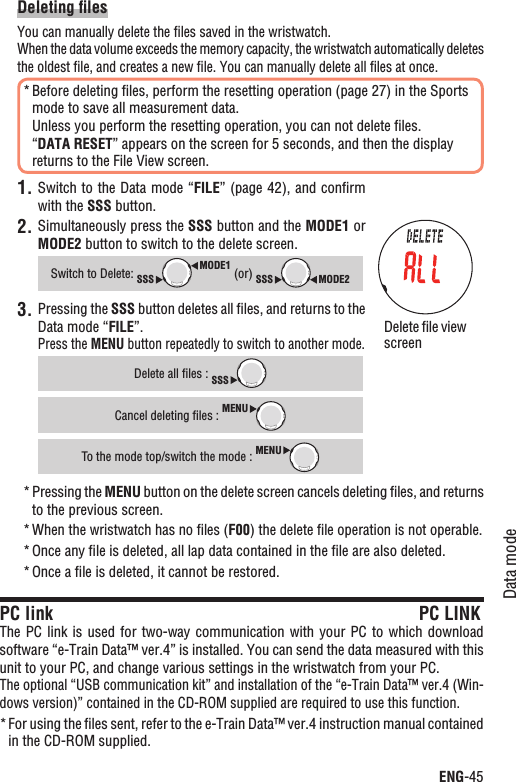
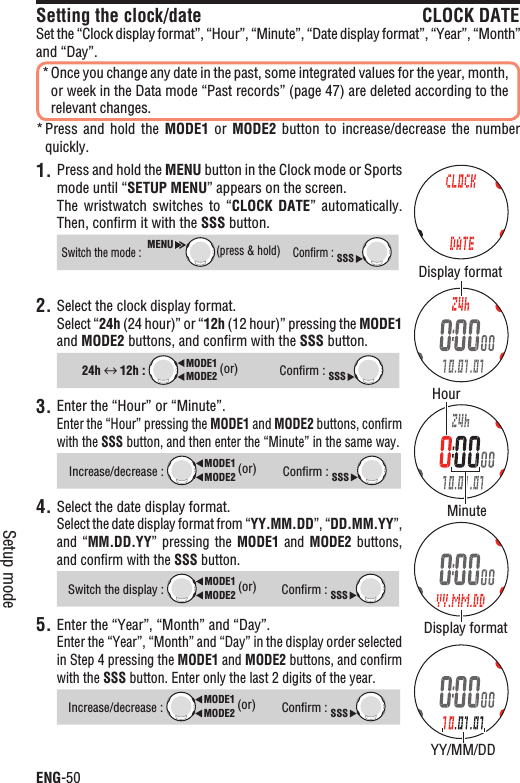
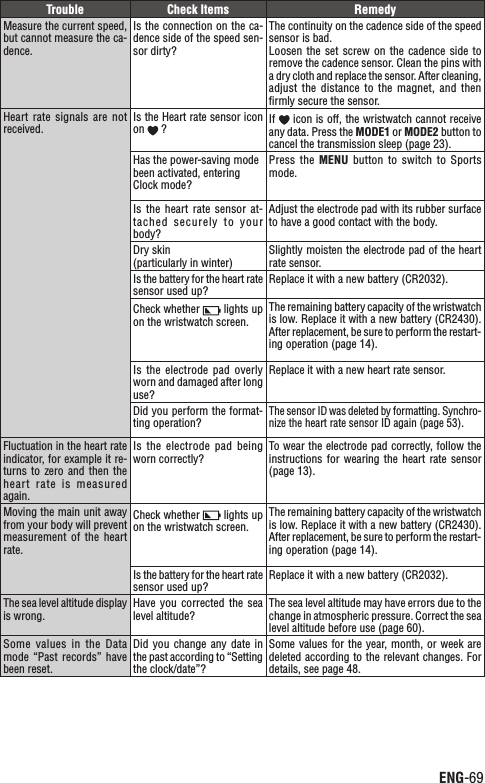
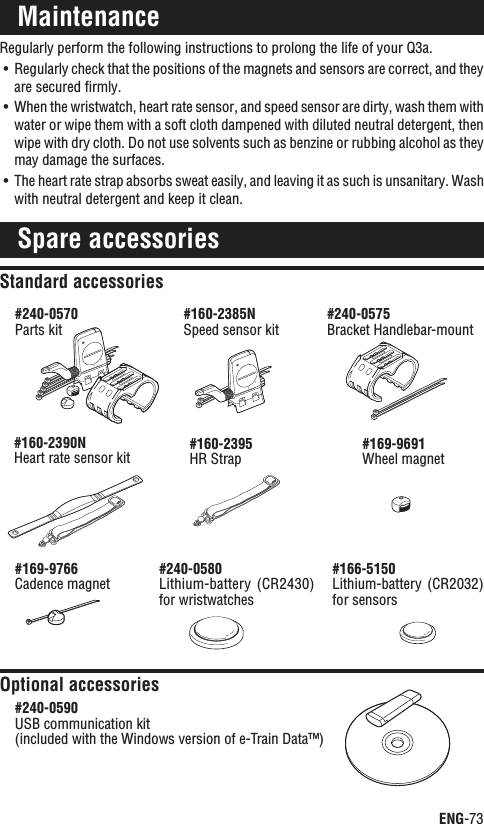
![ENG-43Data modeContinueFlow of file viewSSSSSSSSSSSSSSSSSSSSSSSSTrip time (hour/minute/second)Trip distance (km [mile])Average speedAverage heart rateAverage cadenceCalorie consumption(kcal)Maximum speedMaximum heart rateMaximum cadenceTime above the zone, and the percentage *1Time below the zone, and the percentage *1Heart rate zone numberUpper zone limitLower zone limit Time in zone, and percentage *1Maximum altitude Minimum altitudeMaximumtemperatureMinimumtemperatureAscending altitudeMaximum slope angleData mode “FILE”(Displayed alternately)(Displayed alternately)(Displayed alternately)(Displayed alternately)*1: The zone percentage is displayed as a guide only, and the total percentage of 3 zones does not come to 100%.MODE2SSSMODE1SSSSSSDelete file view screen(or)ReturnDelete all files(to the top screen of the File view) MENU](https://usermanual.wiki/CATEYE/USBCU/User-Guide-1467069-Page-44.png)

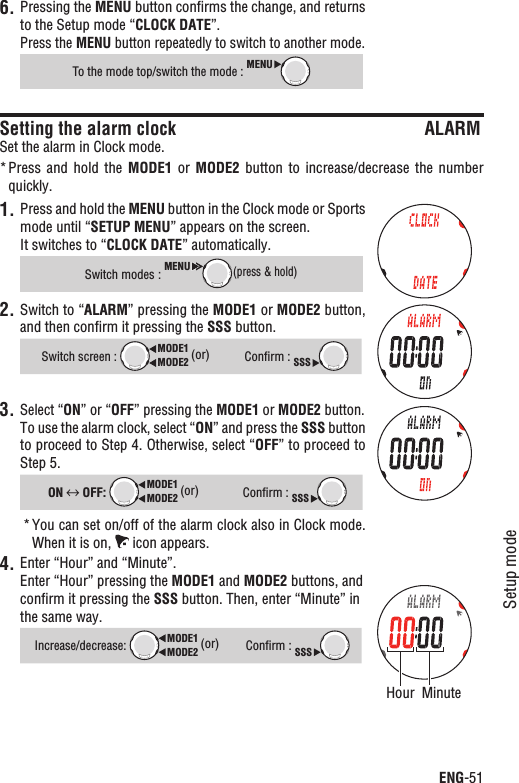


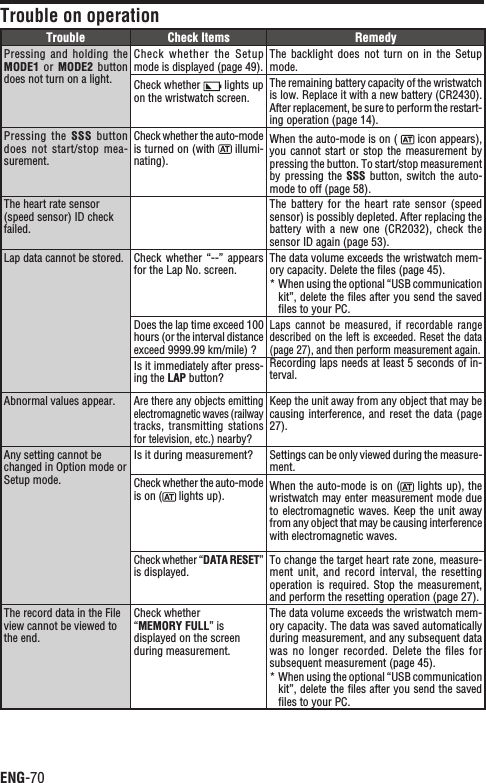
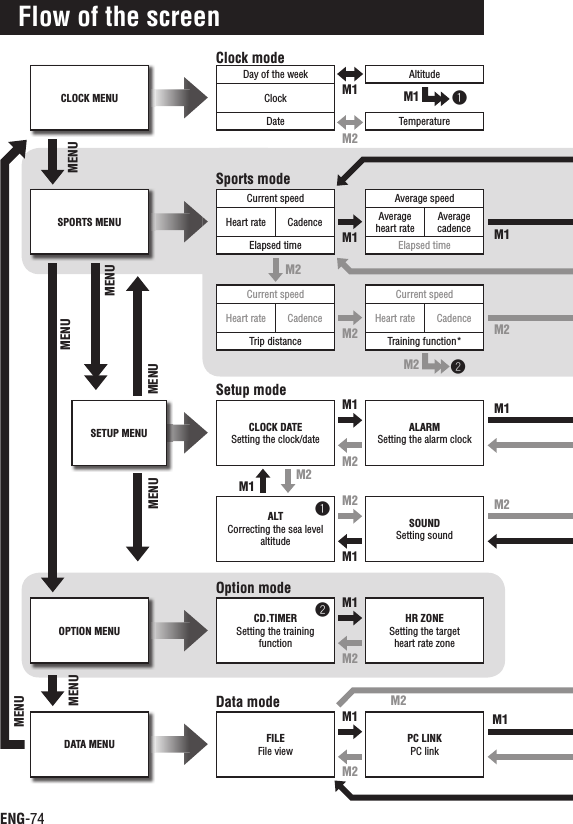
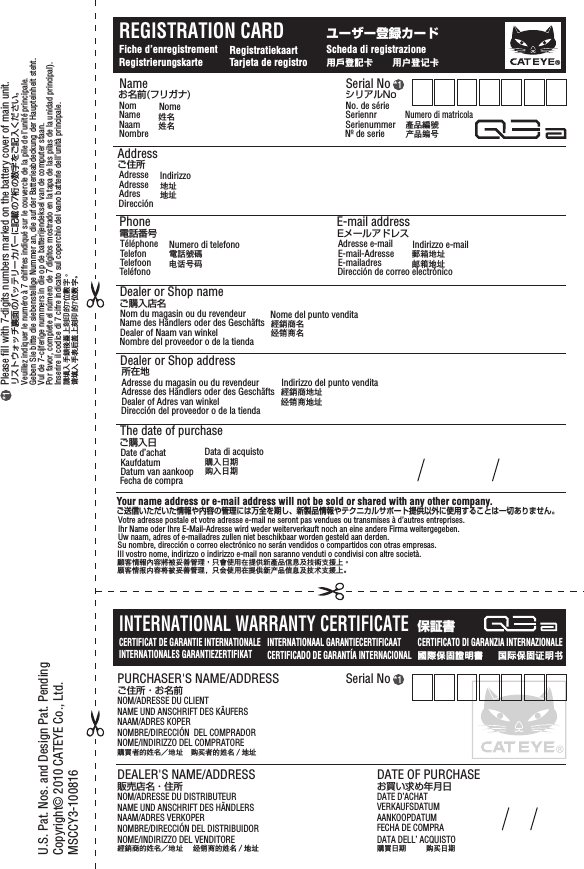
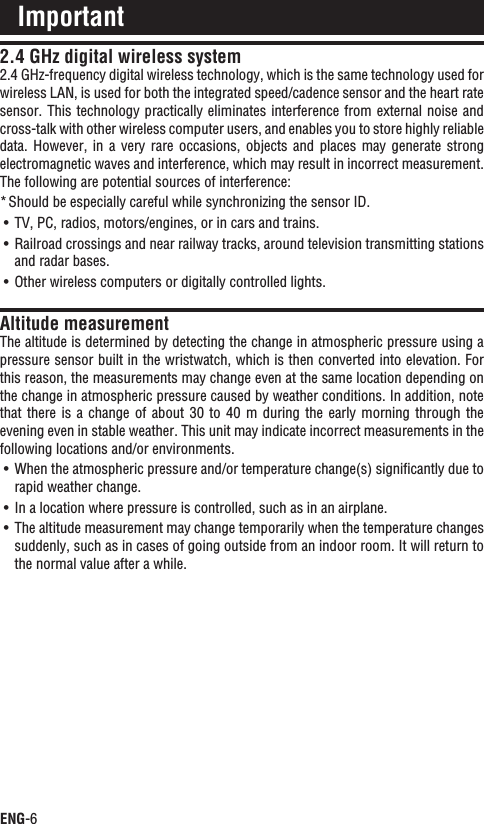
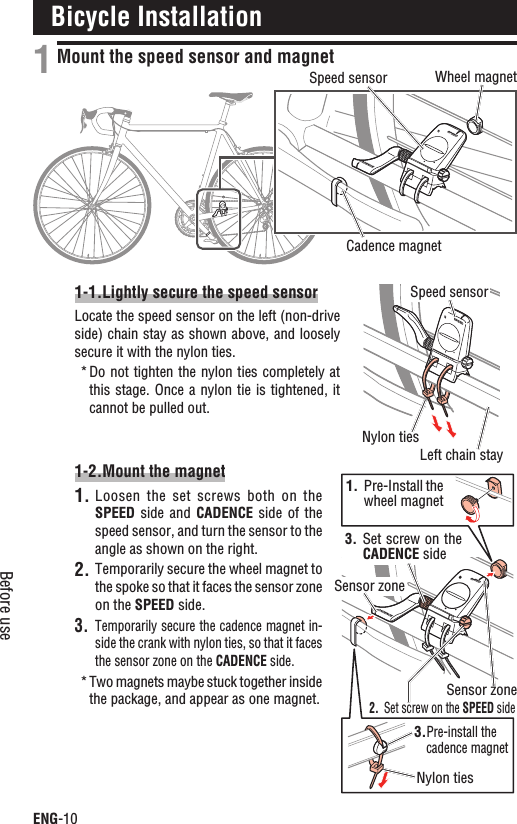
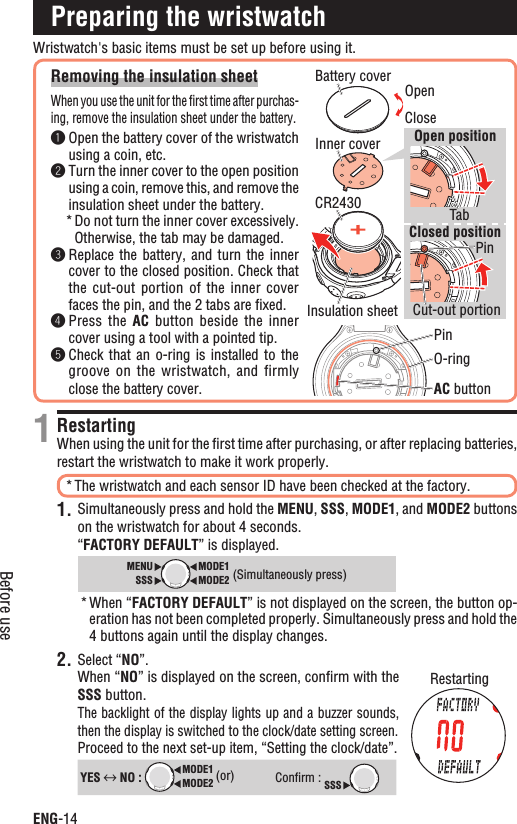
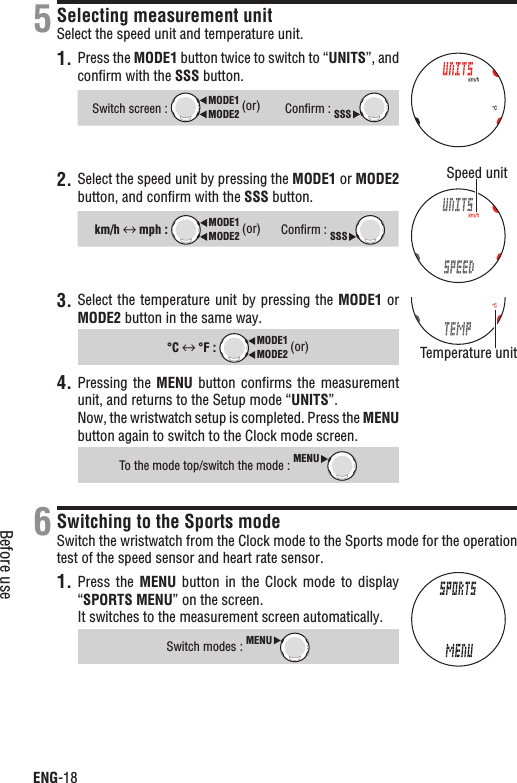
![ENG-76Measurement functionUpper displayCurrent speed 0.0 (4.0) – 150.0 km/h 0.0 (3.0) – 93.0 mph] (For 27-inch tire size)Average speed 0.0 – 150.0 km/h [0.0 – 93.0 mph]Maximum speed 0.0 (4.0) – 150.0 km/h [0.0 (3.0) – 93.0 mph]Altitude -500 – 9000 m [-1640 – 29600 ft]Ascending altitude 0 – 99999 m [ft]Average lap speed 0.0 – 150.0 km/h [0.0 – 93.0 mph]Maximum lap speed 0.0 (4.0) – 150.0 km/h [0.0 (3.0) – 93.0 mph]Middle displayHeart rate 0 (30) – 240 bpmAverage heart rate 0 – 240 bpmMaximum heart rate 0 (30) – 240 bpmAverage lap heart rate 0 – 240 bpmMaximum lap heart rate0 (30) – 240 bpmCadence 0 (20) – 199 rpmAverage cadence 0 – 199 rpmMaximum cadence 0 (20) – 199 rpmAverage lap cadence 0 – 199 rpmMaximum lap cadence0 (20) – 199 rpmTemperature -10 – +50 ˚C [+14 – +122 ˚F ]Slope angle 0 – ±99 % (100 % = 45°)Lap number 01 – 99Lower displayElapsed time 0:00’00”0 – 0:59’59”9 / 1:00’00” – 99:59’59”Trip distance 0.00 – 9999.99 km [mile]Countdown distance 9999.90 – 0.00 km [mile] (setting range : 9999.9 – 0.0 km [mile])Countdown time 99:59’00” – 0:00’00” (setting range : 99:59’ – 0:00’)Interval timer 99:59’59” – 1:00’00” / 0:59’59”9 – 0:00’00”0(setting range : 99:59’59” – 0:00’00”)Recovery time 0:00’00”0 – 0:59’59”9 / 1:00’00” – 99:59’59”Lap timer 00’00”0 – 0:59’59”9 / 1:00’00” – 99:59’59”Calorie consumption 0 – 999999 kcal (calculation-based estimation only)Clock 0:00’00” – 23:59’59” [AM 1:00’00” – PM 12:59’59”](Both 12 and 24-hour modes can be selected)Date 00.01.01 – 99.12.31 (display format can be switched)Lap time 00’00”0 – 0:59’59”9 / 1:00’00” – 99:59’59”Split time 00’00”0 – 0:59’59”9 / 1:00’00” – 99:59’59”Lap (With the real time lap function)Lap display:Upper display (average lap speed, maximum lap speed)Middle display (average lap heart rate, lap number, maximum lap heart rate)Lower display (lap time, split time)Real time lap display:Upper display (average lap speed, maximum lap speed)Middle display (average lap heart rate, maximum lap heart rate, cadence)Lower display (lap timer, lap distance)Specifications](https://usermanual.wiki/CATEYE/USBCU/User-Guide-1467069-Page-77.png)
![ENG-77ContinueIntervalUpper display (current speed, average speed, and maximum speed)Middle display (current heart rate, average heart rate, maximum heart rate, current cadence, average cadence, and maximum cadence)Lower display(interval time, number of intervals, trip distance in an interval, and recovery time)Saving the dataSaves the data at the time of resetting(The oldest file will be deleted automatically when exceeding 30 files)(The oldest file will be deleted and the data during the measurement will be saved automati-cally when “MEMORY FULL” is displayed.)Control system8 bit one-chip microcomputer, crystal oscillatorDisplay systemLiquid crystal display (EL backlight)Speed/Cadence sensor signal detection systemNoncontact magnetic sensorSensor signal transmission and reception2.4 GHz ISM Band (With ID. Two IDs of SP1 and SP2 can be set for the speed sensor.)Sensor coverage distance5 m (above 5 m, transmission distance may vary due to environmental conditions) Operating temperature range32 °F – 104 °F [0 °C – 40 °C] (This product will not function appropriately when exceeding the working temperature range. Slow response or black LCD at lower or higher temperature may happen respectively.)Storage temperature range-4 °F – 122 °F [-20 °C – 50 °C]Wheel circumference set range0100 to 3999 mm: 1 size for each speed sensor ID (default setting: SP1 = 2096, SP2 = 2050)Power supply/battery lifeWristwatch : CR2430 x 1 / Approx. 1 year (When using 1 hour/day)Heart rate sensor : CR2032 x 1 / Approx. 1 year (When worn about 1 hour per day)Speed sensor : CR2032 x 1 / Approx. 1 year (When using 1 hour/day)Dimensions/WeightWristwatch : 55.0 x 46.5 x 15.0 mm (excluding the projection and belt) / 56.4 g (With batteries)Heart rate sensor : 12-13/16” x 1-1/4” x 1/2” (325.0 x 31.4 x 12.2 mm) / 1.41 oz (40 g) (With batteries)Speed sensor : 2-9/16” x 3-9/16” x 9/16” (65.0 x 90.5 x 14.4 mm) / 1.25 oz (36 g) (With batteries)When the elapsed time exceeds 100 hours, or the trip distance exceeds 9999.99 km/h, “* E” appears in place of the average speed.When the elapsed time exceeds 100 hours, “* E” appears in place of the average heart rate and average cadence.Designs and specifications are subject to change without notice, due to modifications or improvements.*](https://usermanual.wiki/CATEYE/USBCU/User-Guide-1467069-Page-78.png)