CCL ELECTRONICS 3110A1703 Transmitter User Manual
CCL ELECTRONICS LTD Transmitter
User Manual
Big Digit Multi-Channel Wireless Thermo-Hygrometer
with Self-Calibration & Auto-Night Light
Model: C2064A
User Manual
Thank you for purchasing this delicate Big Digit Multi-Channel Wireless
Thermo-Hygrometer with Self-Calibration & Auto-Night Light. Utmost
care has gone into the design and manufacture of the clock. This
manual is used for US version. Please read the instructions carefully
according to the version you purchased and keep the manual well for
future reference.
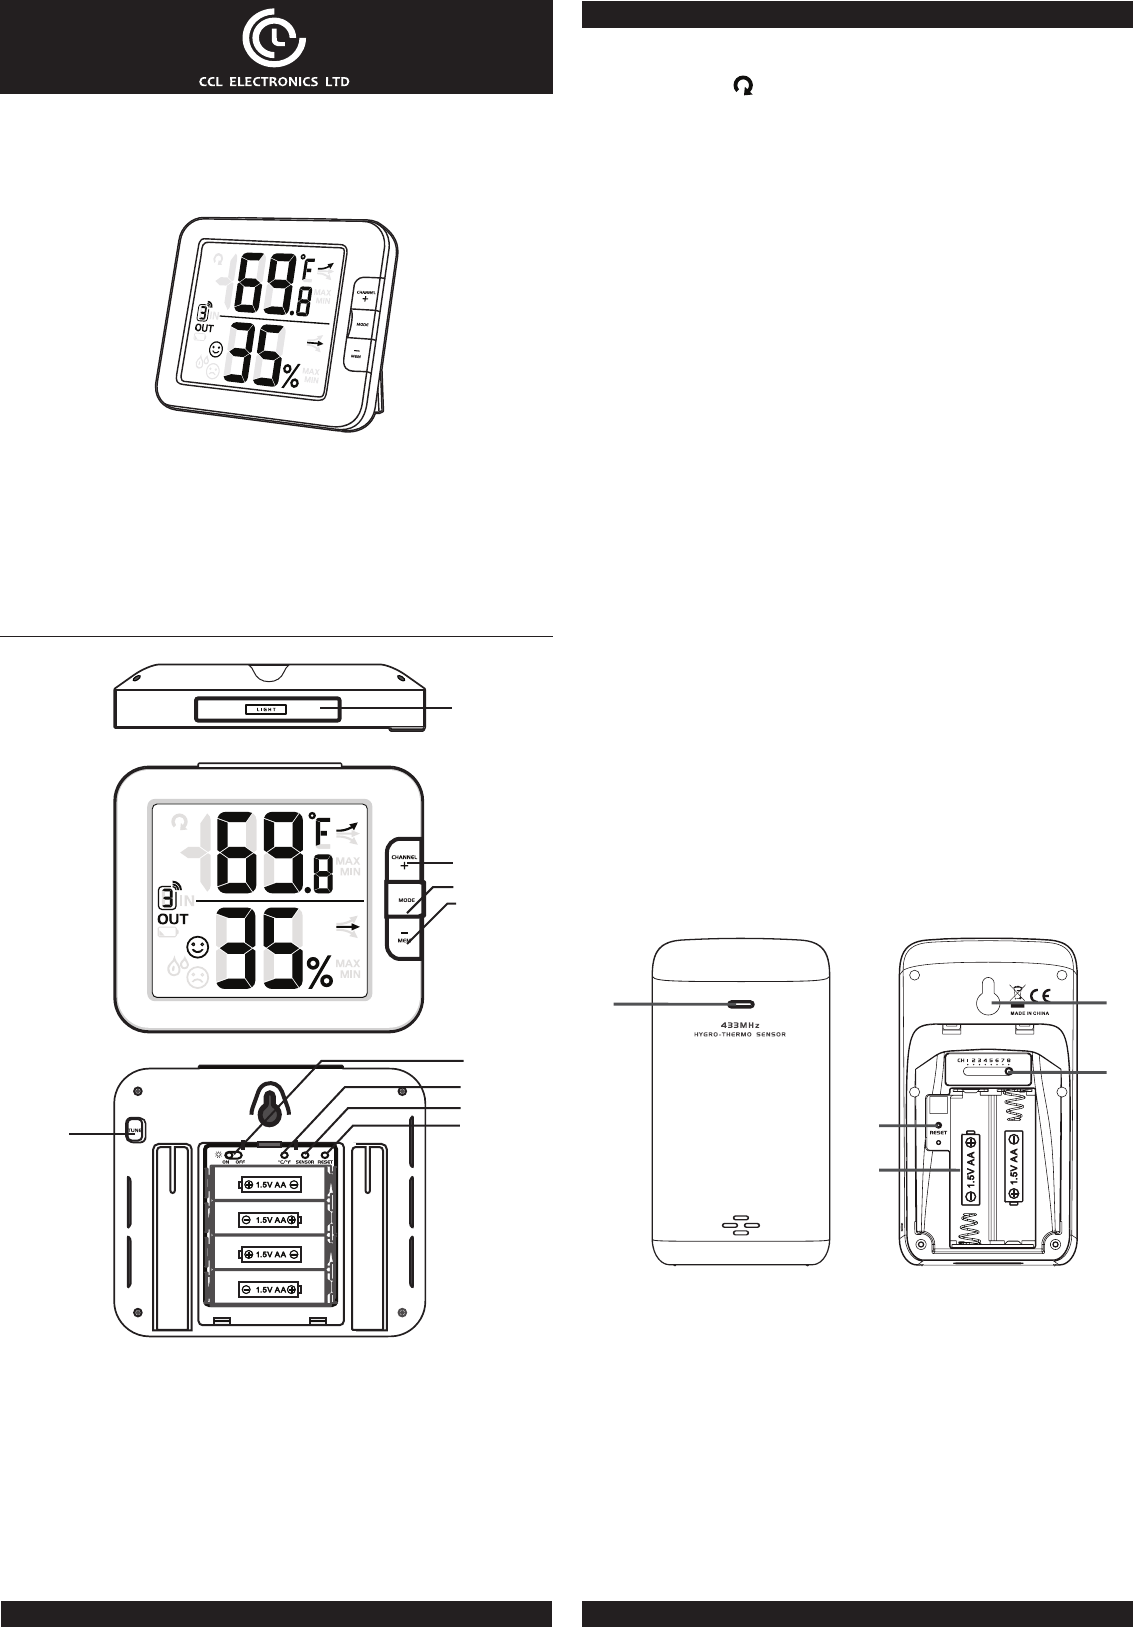
OVERVIEW
MAIN UNIT
2
3
4
1
5
6
7
8
9
1. [ LIGHT ] key
- In normal mode, press once for 5-second backlight.
- When using the [ LIGHT ] key to activate the backlight, operating
other function keys will re-time the 5-second backlight.
2. [ CHANNEL / + ] key
- In temperature and humidity calibration mode, press to increase
the value.
- In normal mode, press to switch between INDOOR, Channel
1,2,3,4,5,6,7 and 8.
- In normal mode, press and hold for 2 seconds to enter auto-
cycle mode that Channel 1~8 and INDOOR’s temperature
and humidity readings will alternately be displayed at 4 second
intervals. The “ ” icon will display during auto-cycle mode.
- During auto-cycle mode, press once to return to normal mode.
3. [ MODE ] key
- In temperature and humidity calibration mode, press once to
switch between setting options.
- In temperature and humidity calibration mode, press and hold for
2 seconds to clear modied data in order to display sensor’s data.
4. [ MEM / - ] key
- In temperature and humidity calibration mode, press to decrease
the value.
- In normal mode, press once to check maximum and minimum
temperature and humidity records. Press again to return to
normal mode.
- When the maximum and minimum temperature and humidity
records are displayed, press and hold for 2 seconds to erase the
current records.
5. [ TUNE ] key
- In normal mode, press and hold for 2 seconds to enter
temperature and humidity calibration mode.
- In temperature and humidity calibration mode, press and hold for
2 seconds to return to normal mode.
6. Auto night-light slide switch
- Slide to [ ON ] position to activate night-light function. When it
is ON, the backlight will automatically turn on in dim and dark
environment detected by the light sensor. The brightness of night-
light is weaker than normal backlight.
- Slide to [ OFF ] position to turn o the night-light function
7. [ °C / °F ] key
- Press to switch between °C/°F.
8. [ SENSOR ] key
- In normal mode, press once to manually enter current channel’s
receiving mode. The unit will receive active sensor’s signals for 5
minutes and erase the current channel’s records
9. [ RESET ] key
- Press once to perform overall function and display option resets.
- In case of malfunction, the unit may be required to reset.
WIRELESS HYGRO-THERMO SENSOR
1
4
5
3
2
1. Transmission status LED
- Flashes when the sensor is transmitting.
2. Wall mounting holder
3. [ CHANNEL ] slide switch
- Assign the sensor to Channel 1,2,3,4,5,6,7 or 8.
4. [ RESET ] key
- Press to restart the sensor.
5. Battery compartment
- Accommodates 2 x AA size batteries.
GETTING STARTED
WIRELESS SENSOR
1. Remove the battery door of the sensor.
2. Insert 2 x AA size batteries into the battery compartment. Make
sure you insert them the right way according to the polarity
information marked on the battery compartment.
3. Close the battery door.
Note:
- Once the channel is assigned to one sensor, you can only
change it by removing the batteries or resetting the unit.
- Avoid placing the sensor in direct sunlight, rain or snow.
MAIN UNIT
1. Remove the battery door of the main unit.
2. Install 4 new AA size batteries according to the polarity
information marked on the battery compartment and then press
[ RESET ] key by using a metal wire to reset the unit.
3. Close the battery door.
4. Once the batteries are installed, all the segments of the LCD will
be shown.
Note:
To avoid the wireless sensor and main unit pairing failure, please
power up the sensor/s rst, and then press [ RESET ] key on the
main unit (no need on sensors).
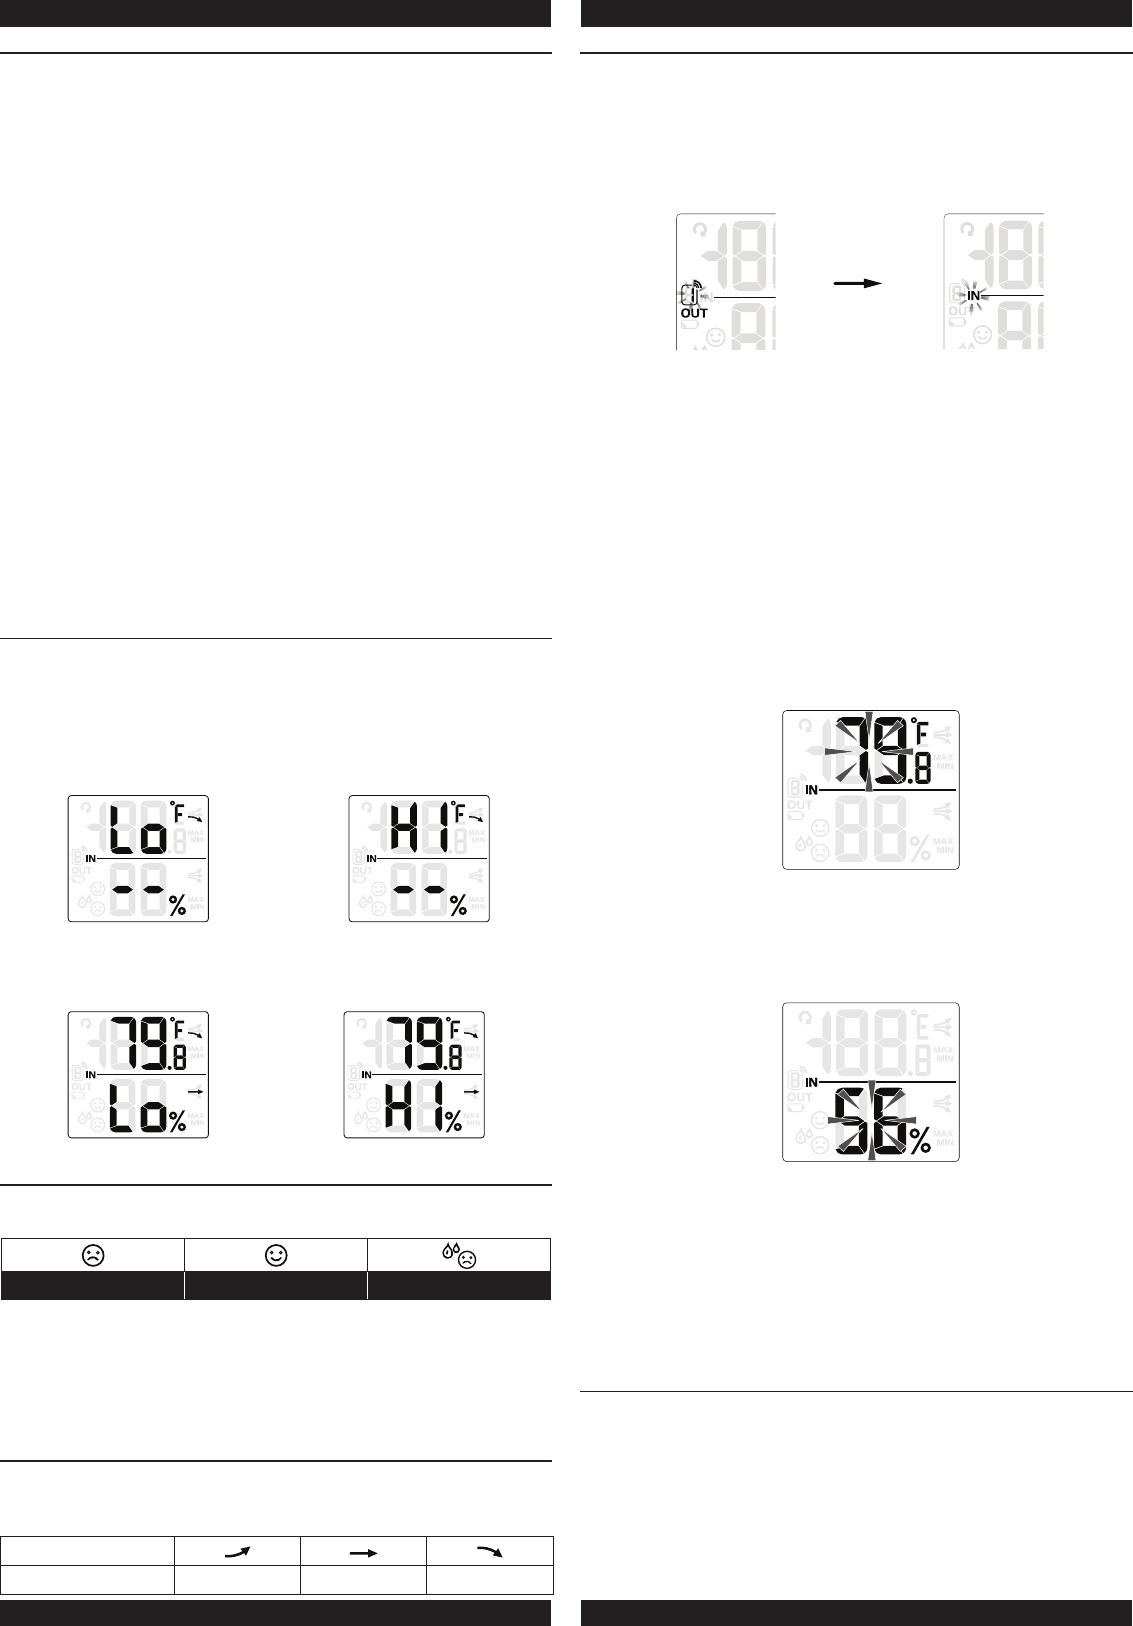
INDOOR TEMPERATURE AND HUMIDITY FUNCTION
1. Press [ °C / °F ] key to switch between °C / °F. Decimal point is
eective for both settings.
2. When the temperature is below -40°F or above 158°F, “Lo” or
“Hi” will be displayed respectively. The humidity display will show
“--”.
Temperature below -40°C Temperature above 70°C
3. When the humidity is below 1% or above 99%, “Lo” or “Hi” will be
indicated respectively.
Humidity below 1% Humidity above 99%
COMFORT INDICATION
The comfort indication is a pictorial indication based on indoor air
temperature and humidity in an attempt to determine comfort level.
Too cold Comfortable Too hot
Note:
- Comfort indication can vary under the same temperature,
depending on the humidity.
- There is no comfort indication when temperature is below 0°C
(32°F) or over 60°C (140°F).
TEMPERATURE & HUMIDITY TREND
The temperature & humidity trend indicator shows the trends of
changes in the forthcoming few minutes. Arrows indicate a rising,
steady or falling trend.
Arrow indicator
Trend Rising Steady Falling
TEMPERATURE AND HUMIDITY CALIBRATION
1. In normal mode, press and hold [ TUNE ] key for 2 seconds to
enter temperature and humidity calibration mode in which the
current outdoor channel or “IN” icon will ash. Press [ CHANNEL
/ + ] or [ MEM / - ] key to choose for INDOOR or dierent
CHANNEL.
Choose Channel
2. Press [ MODE ] key again to switch between temperature and
humidity. Press [ CHANNEL / + ] or [ MEM / - ] key to adjust the
value.
3. When nished, press [ TUNE ] key for 2 seconds or leave the unit
for 60 seconds to return to normal mode.
4. Pressing [ MODE ] key for 2 seconds during temperature and
humidity calibration mode will reset the value to the actual or
uncalibrated measurement.
5. Reset the temperature and humidity values for each channel
individually. There is no batch reset.
6. Calibration mode sequence: channel → temperature → humidity
7. In temperature calibration mode, press [ CHANNEL / + ] key or
[ MEM / - ] key to modify 0.1 °C or °F of the value. Long press to
quick-adjust the value.
Temperature calibration mode
8. In humidity calibration mode, press [ CHANNEL / + ] or
[ MEM / - ] key to modify 1% of the value. Long press to quick-
adjust the value.
Humidity calibration mode
9. If the current reading of the selected channel displays the ashing
“--”, “Hi” or “Lo”, it will be impossible to adjust. Pressing
[ CHANNEL / + ] or [ MEM / - ] key will not change the value.
10. If re-enter temperature and humidity calibration mode, the
adjusted value will reset to the original value.
11. The comfort indication is based on calibrated temperature and
humidity values to calculate.
MAX/MIN TEMPERATURE AND HUMIDITY RECORD
The unit preserves the MAX/MIN temperature and humidity records
since the last manual reset.
1. In normal mode, press [ MEM / - ] key once to show the current
maximum temperature and humidity values; press again to show
the minimum values; press the third time to return to normal
mode.
2. When the MAX/MIN records are shown, the display will return to
normal mode after leaving the unit for 5 seconds.
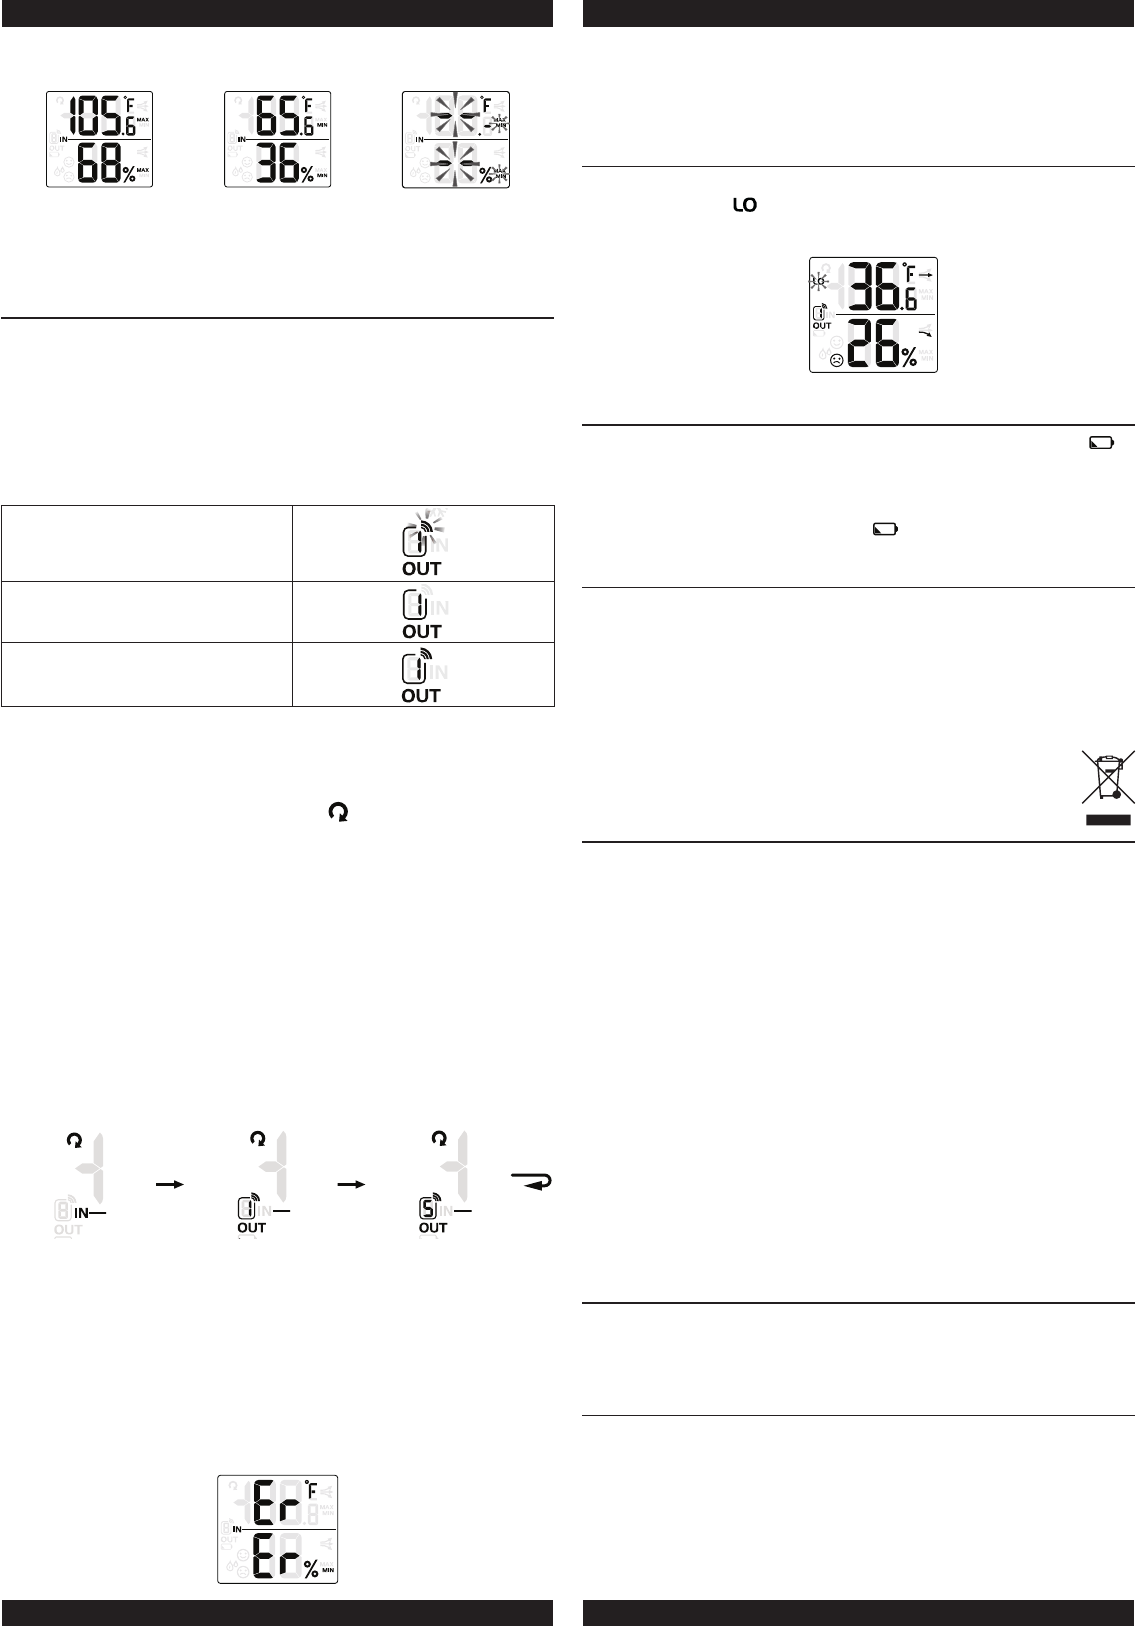
MAX record MIN record Erase MAX/MIN
records
3. Perform a manual reset or press and hold [ MEM / - ] key for
2 seconds when the unit is displaying MAX/MIN records or in
normal mode to erase the records.
WIRELESS SENSOR SIGNAL RECEIVING AND DISPLAY
1. In normal mode, press [ SENSOR ] key once to start receiving
and reset the current displaying channel. The signal icon will ash
along.
For example, when CH1 is displayed, pressing [ SENSOR ] key
will start receiving for CH 1 only.
2. The signal icon will ash until the reception succeeded. If no
signal is received within 5 mins the icon will disappear.
Receiving wireless signal after
manual reset or the [ SENSOR ]
key is pressed
When waiting for signals, “--” will
display in the readings eld
Fair wireless sensor signal
3. In normal mode, press [ CHANNEL / + ] key to switch the display
between INDOOR and CHANNEL 1~8.
4. In normal mode, press and hold [ CHANNEL / + ] key for 2
seconds to toggle auto-cycle mode, which alternately displays the
channels at 4 second intervals. The “ ” icon will show on the
display.
5. During auto-cycle mode, press [ CHANNEL / + ] key once to stop
auto-cycle and display the current channel.
6. To check the validity of the signals from each wireless sensor,
press [ CHANNEL / + ] key repeatedly in normal mode to display
each channel. Using auto-cycle mode will only display the
communicated channels.
For example, when CHANNEL 1 and 5 have received the signals
from the corresponding sensors, you can press and hold
[ CHANNEL / + ] key for 2 seconds to display the readings of
INDOOR, CHANNEL 1 and 5.
INDOOR CHANNEL 1 CHANNEL 5
7. If the signal for Channel 1~8 has discontinued and does
not recover within 1 hour, the signal icon will disappear. The
temperature and humidity will display “Er” for the corresponding
channel.
8. If the signal does not recover within 48 hours, the “Er” display will
become permanent. You need to replace the batteries of the “Er”
channel’s sensors and then press [ SENSOR ] key to pair up with
the sensors per each “Er” channel again.
Signal discontinued
Note:
You need to press [ SENSOR ] key to manually receive the sensor’s
signal after you’ve placed the new batteries to the wireless sensor, or
the main unit fail to receive the wireless sensor’s signal.
THE LOW TEMPERATURE ICON
When the outdoor temperature is 37.4°F or below, the low
temperature icon “ ” will display.
Outdoor 37.4°F or below (icon ashes)
THE LOW BATTERY ICON
If the main unit or sensor is low in battery, the low battery icon “ ”
will display. The icon will only appear when the corresponding
channel is displayed.
For example, the sensor of CHANNEL 1 is low in battery. When
CHANNEL 1 is displayed, the icon “ ” will show.
IMPORTANT NOTE
- Attention! Please dispose of used unit or batteries in an
ecologically safe manner.
- Always place the unit away from interfering sources such as TV
set, computer, etc.
- Avoid placing the unit on or next to metal plates.
- Technical specications and user manual contents for this product
are subject to change without notice.
SPECIFICATION
MAIN UNIT
Indoor operating temperature range 23°F ~ 122°F (-5°C ~ 50°C)
Humidity display range 1% ~ 99 %
Resolution of temperature 0.1°C/°F
Resolution of humidity 1%
Wireless SENSOR
Outdoor operating temperature
range (based on Lithium battery)
-40°F ~140°F ( -40°C ~ 60°C)
Outdoor operating humidity range 1% ~ 99 %
Resolution of temperature 0.1°C/°F
Resolution of humidity 1%
Wireless sensor signal 433MHz
No. of remote sensor Up to 8 units
RF transmission range Maximum 30 meters
POWER
Main unit 1.5V AA X 4 (alkaline battery recommended)
Wireless sensor 1.5V AA X 2 (alkaline battery recommended)
DIMENSION
Main unit 130(W) x 112 (H) x 27.5(D)mm
Wireless sensor 61(W) x 113.6 (H) x 39.5(D)mm
Warning: Changes or modifications to this unit not expressly
approved by the partyresponsible for compliance could void the
user’s authority to operate the equipment.
NOTE: This equipment has been tested and found to comply
with the limits for a ClassB digital device, pursuant to Part 15
of the FCC Rules. These limits are designed to provide
reasonable protection against harmful interference in a
residential installation.
This equipment generates, uses and can radiate radio frequency
energy and, if notinstalled and used in accordance with the
instructions, may cause harmful interferenceto radio
communications.
However, there is no guarantee that interference will not occur
in a particularinstallation. If this equipment does cause harmful
interference to radio or televisionreception, which can be
determined by turning the equipment off and on, the user is
encouraged to try to correct the interference by one or more
of the following measures:
- Reorient or relocate the receiving antenna.
- Increase the separation between the equipment and receiver
- Connect the equipment into an outlet on a circuit different from
that to which the receiver is connected
- Consult the dealer or experienced radio/TV technician for help
“This device complies with Part 15 of the FCC Rules.
Operation is subject to the following two conditions:
(1) This device may not cause interference, and
(2) This device must accept any interference,
including interference that may cause undesired
operation of the device.”
“This radio transmitter (identify the device by certification
number, or model number if Category II) has been approved
by Industry Canada to operate with the antenna types listed
below with the maximum permissible gain indicated.
Antenna types not included in this list, having a gain greater
than the maximum gain indicated for that type, are strictly
prohibited for use with this device.”
“Caution: To maintain the compliance with the RF exposure
guideline, place the unit at least 20 cm from nearby persons.”
Le présent appareil est conforme aux CNR d’ Part 15 of the FCC
applicables aux appareils radio exempts de licence.
Le fonctionnement est autorisé aux deux conditions suivantes :
1) l’appareil ne doit pas produire de brouillage;
2) l’appareil doit accepter tout brouillage radioélectrique subi,
même si le brouillage est susceptible d’en compromettre le
fonctionnement.
Le présent émetteur (identifier l’appareil par son numéro
d’homologation ou par son numéro de modèle, s’il s’agit d’un
appareil de catégorie II) a été approuvé par Industrie Canada
pour fonctionner avec les types d’antennes énumérées
ci-dessous et ayant un gain admissible maximal. Il est
strictement interdit d’utiliser les types d’antennes non incluses
dans cette liste, et dont le gain est supérieur au gain maximal
indiqué, avec cet appareil.
Mise en garde : Pour assurer la conformité aux lignes
directrices concernant l’exposition aux RF, placer l’appareil
à au moins 20 cm des personnes.