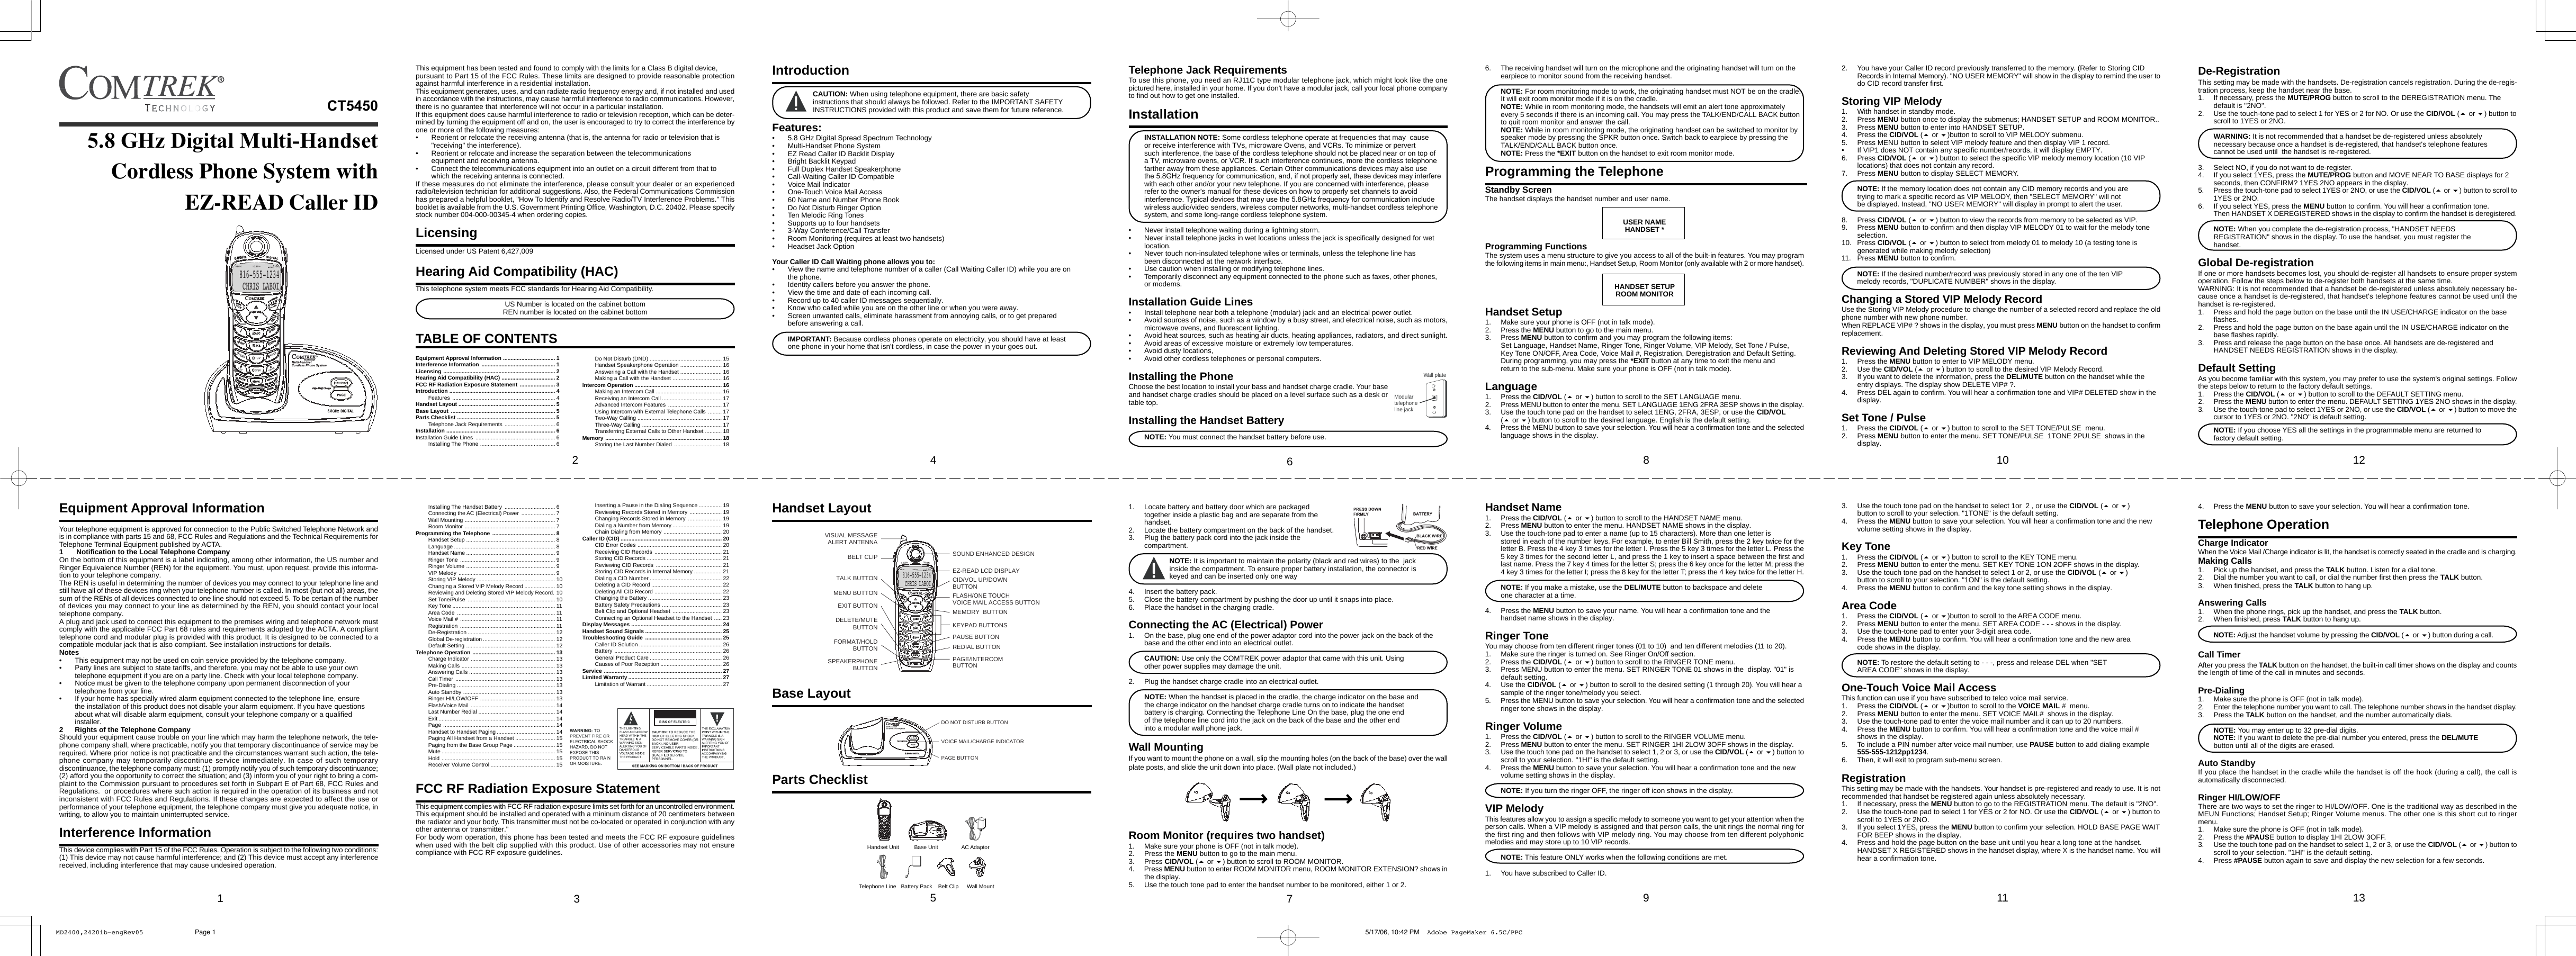
CCT Tech Advanced CT5450 5.8GHz Cordless Phone User Manual MD2400 2420ib engRev05

CCT Tech Advanced Products Limited 5.8GHz Cordless Phone MD2400 2420ib engRev05

User Manual

This equipment has been tested and found to comply with the limits for a Class B digital device,pursuant to Part 15 of the FCC Rules. These limits are designed to provide reasonable protectionagainst harmful interference in a residential installation.This equipment generates, uses, and can radiate radio frequency energy and, if not installed and usedin accordance with the instructions, may cause harmful interference to radio communications. However,there is no guarantee that interference will not occur in a particular installation.If this equipment does cause harmful interference to radio or television reception, which can be deter-mined by turning the equipment off and on, the user is encouraged to try to correct the interference byone or more of the following measures:• Reorient or relocate the receiving antenna (that is, the antenna for radio or television that is"receiving" the interference).• Reorient or relocate and increase the separation between the telecommunicationsequipment and receiving antenna.• Connect the telecommunications equipment into an outlet on a circuit different from that towhich the receiving antenna is connected.If these measures do not eliminate the interference, please consult your dealer or an experiencedradio/television technician for additional suggestions. Also, the Federal Communications Commissionhas prepared a helpful booklet, "How To Identify and Resolve Radio/TV Interference Problems." Thisbooklet is available from the U.S. Government Printing Office, Washington, D.C. 20402. Please specifystock number 004-000-00345-4 when ordering copies.LicensingLicensed under US Patent 6,427,009Hearing Aid Compatibility (HAC)This telephone system meets FCC standards for Hearing Aid Compatibility.US Number is located on the cabinet bottomREN number is located on the cabinet bottomTABLE OF CONTENTSEquipment Approval Information .................................. 1Interference Information ................................................ 1Licensing ......................................................................... 2Hearing Aid Compatibility (HAC) ................................... 2FCC RF Radiation Exposure Statement ....................... 3Introduction ..................................................................... 4Features ................................................................... 4Handset Layout ............................................................... 5Base Layout .................................................................... 5Parts Checklist ................................................................ 5Telephone Jack Requirements ................................. 6Installation ....................................................................... 6Installation Guide Lines .................................................... 6Installing The Phone ................................................. 62Installing The Handset Battery ................................. 6Connecting the AC (Electrical) Power ...................... 7Wall Mounting ........................................................... 7Room Monitor ........................................................... 7Programming the Telephone ......................................... 8Handset Setup .......................................................... 8Language .................................................................. 8Handset Name .......................................................... 9Ringer Tone .............................................................. 9Ringer Volume .......................................................... 9VIP Melody ............................................................... 9Storing VIP Melody ................................................... 10Changing a Stored VIP Melody Record .................... 10Reviewing and Deleting Stored VIP Melody Record. 10Set Tone/Pulse ......................................................... 10Key Tone ................................................................... 11Area Code ................................................................ 11Voice Mail # .............................................................. 11Registration .............................................................. 11De-Registration ......................................................... 12Global De-registration ............................................... 12Default Setting .......................................................... 12Telephone Operation ...................................................... 13Charge Indicator ....................................................... 13Making Calls ............................................................. 13Answering Calls ........................................................ 13Call Timer ................................................................. 13Pre-Dialing ................................................................ 13Auto Standby ............................................................ 13Ringer HI/LOW/OFF ................................................. 13Flash/Voice Mail ....................................................... 14Last Number Redial .................................................. 14Exit ............................................................................ 14Page ......................................................................... 14Handset to Handset Paging ...................................... 14Paging All Handset from a Handset .......................... 15Paging from the Base Group Page ........................... 15Mute .......................................................................... 15Hold .......................................................................... 15Receiver Volume Control .......................................... 15Do Not Disturb (DND) ............................................... 15Handset Speakerphone Operation ........................... 16Answering a Call with the Handset ........................... 16Making a Call with the Handset ................................ 16Intercom Operation ......................................................... 16Making an Intercom Call ........................................... 16Receiving an Intercom Call ....................................... 17Advanced Intercom Features ................................... 17Using Intercom with External Telephone Calls ......... 17Two-Way Calling ....................................................... 17Three-Way Calling .................................................... 17Transferring External Calls to Other Handset ........... 18Memory ............................................................................ 18Storing the Last Number Dialed ............................... 183IntroductionCAUTION: When using telephone equipment, there are basic safetyinstructions that should always be followed. Refer to the IMPORTANT SAFETYINSTRUCTIONS provided with this product and save them for future reference.Features:•• Multi-Handset Phone System• EZ Read Caller ID Backlit Display• Bright Backlit Keypad• Full Duplex Handset Speakerphone• Call-Waiting Caller ID Compatible• Voice Mail Indicator• One-Touch Voice Mail Access• 60 Name and Number Phone Book• Do Not Disturb Ringer Option• Ten Melodic Ring Tones• Supports up to four handsets• 3-Way Conference/Call Transfer• Room Monitoring (requires at least two handsets)• Headset Jack OptionYour Caller ID Call Waiting phone allows you to:• View the name and telephone number of a caller (Call Waiting Caller ID) while you are onthe phone.• Identity callers before you answer the phone.• View the time and date of each incoming call.• Record up to 40 caller ID messages sequentially.• Know who called while you are on the other line or when you were away.• Screen unwanted calls, eliminate harassment from annoying calls, or to get preparedbefore answering a call.IMPORTANT: Because cordless phones operate on electricity, you should have at leastone phone in your home that isn't cordless, in case the power in your goes out.Handset Layout816-555-1234CHRIS LABOI06SOUND ENHANCED DESIGNEZ-READ LCD DISPLAYCID/VOL UP/DOWNBUTTONFLASH/ONE TOUCHVOICE MAIL ACCESS BUTTONMEMORY  BUTTONKEYPAD BUTTONSPAUSE BUTTONREDIAL BUTTONPAGE/INTERCOMBUTTONEXIT BUTTONDELETE/MUTEBUTTONFORMAT/HOLDBUTTONSPEAKERPHONEBUTTONMENU BUTTONTALK BUTTONVISUAL MESSAGEALERT ANTENNABELT CLIPBase LayoutDO NOT DISTURB BUTTONVOICE MAIL/CHARGE INDICATORPAGE BUTTONParts Checklist54Telephone Jack RequirementsTo use this phone, you need an RJ11C type modular telephone jack, which might look like the onepictured here, installed in your home. If you don't have a modular jack, call your local phone companyto find out how to get one installed.InstallationINSTALLATION NOTE: Some cordless telephone operate at frequencies that may  causeor receive interference with TVs, microware Ovens, and VCRs. To minimize or pervertsuch interference, the base of the cordless telephone should not be placed near or on top ofa TV, microware ovens, or VCR. If such interference continues, more the cordless telephonefarther away from these appliances. Certain Other communications devices may also usewith each other and/or your new telephone. If you are concerned with interference, pleaserefer to the owner's manual for these devices on how to properly set channels to avoidwireless audio/video senders, wireless computer networks, multi-handset cordless telephonesystem, and some long-range cordless telephone system.• Never install telephone waiting during a lightning storm.• Never install telephone jacks in wet locations unless the jack is specifically designed for wetlocation.• Never touch non-insulated telephone wiles or terminals, unless the telephone line hasbeen disconnected at the network interface.• Use caution when installing or modifying telephone lines.• Temporarily disconnect any equipment connected to the phone such as faxes, other phones,or modems.Installation Guide Lines• Install telephone near both a telephone (modular) jack and an electrical power outlet.• Avoid sources of noise, such as a window by a busy street, and electrical noise, such as motors,microwave ovens, and fluorescent lighting.• Avoid heat sources, such as heating air ducts, heating appliances, radiators, and direct sunlight.• Avoid areas of excessive moisture or extremely low temperatures.• Avoid dusty locations,• Avoid other cordless telephones or personal computers.Installing the PhoneChoose the best location to install your bass and handset charge cradle. Your baseand handset charge cradles should be placed on a level surface such as a desk ortable top.Installing the Handset BatteryNOTE: You must connect the handset battery before use.Modulartelephoneline jackWall plate1. Locate battery and battery door which are packagedtogether inside a plastic bag and are separate from thehandset.2. Locate the battery compartment on the back of the handset.3. Plug the battery pack cord into the jack inside thecompartment.NOTE: It is important to maintain the polarity (black and red wires) to the  jackinside the compartment. To ensure proper battery installation, the connector iskeyed and can be inserted only one way4. Insert the battery pack.5. Close the battery compartment by pushing the door up until it snaps into place.6. Place the handset in the charging cradle.Connecting the AC (Electrical) Power1. On the base, plug one end of the power adaptor cord into the power jack on the back of thebase and the other end into an electrical outlet.CAUTION: Use only the COMTREK power adaptor that came with this unit. Usingother power supplies may damage the unit.2. Plug the handset charge cradle into an electrical outlet.NOTE: When the handset is placed in the cradle, the charge indicator on the base andthe charge indicator on the handset charge cradle turns on to indicate the handsetbattery is charging. Connecting the Telephone Line On the base, plug the one endof the telephone line cord into the jack on the back of the base and the other endinto a modular wall phone jack.Wall MountingIf you want to mount the phone on a wall, slip the mounting holes (on the back of the base) over the wallplate posts, and slide the unit down into place. (Wall plate not included.)Room Monitor (requires two handset)1. Make sure your phone is OFF (not in talk mode).2. Press the MENU button to go to the main menu.3. Press CID/VOL ( or ) button to scroll to ROOM MONITOR.4. Press MENU button to enter ROOM MONITOR menu, ROOM MONITOR EXTENSION? shows inthe display.5. Use the touch tone pad to enter the handset number to be monitored, either 1 or 2.Handset Unit AC AdaptorWall MountTelephone Line Belt ClipBattery Pack766. The receiving handset will turn on the microphone and the originating handset will turn on theearpiece to monitor sound from the receiving handset.NOTE: For room monitoring mode to work, the originating handset must NOT be on the cradle.It will exit room monitor mode if it is on the cradle.NOTE: While in room monitoring mode, the handsets will emit an alert tone approximatelyevery 5 seconds if there is an incoming call. You may press the TALK/END/CALL BACK buttonto quit room monitor and answer the call.NOTE: While in room monitoring mode, the originating handset can be switched to monitor byspeaker mode by pressing the SPKR button once. Switch back to earpiece by pressing theTALK/END/CALL BACK button once.NOTE: Press the *EXIT button on the handset to exit room monitor mode.Programming the TelephoneStandby ScreenThe handset displays the handset number and user name.USER NAMEHANDSET *Programming FunctionsThe system uses a menu structure to give you access to all of the built-in features. You may programthe following items in main menu:, Handset Setup, Room Monitor (only available with 2 or more handset).HANDSET SETUPROOM MONITORHandset Setup1. Make sure your phone is OFF (not in talk mode).2. Press the MENU button to go to the main menu.3. Press MENU button to confirm and you may program the following items:Set Language, Handset Name, Ringer Tone, Ringer Volume, VIP Melody, Set Tone / Pulse,Key Tone ON/OFF, Area Code, Voice Mail #, Registration, Deregistration and Default Setting.During programming, you may press the *EXIT button at any time to exit the menu andreturn to the sub-menu. Make sure your phone is OFF (not in talk mode).Language1. Press the CID/VOL ( or ) button to scroll to the SET LANGUAGE menu.2. Press MENU button to enter the menu. SET LANGUAGE 1ENG 2FRA 3ESP shows in the display.3. Use the touch tone pad on the handset to select 1ENG, 2FRA, 3ESP, or use the CID/VOL( or ) button to scroll to the desired language. English is the default setting.4. Press the MENU button to save your selection. You will hear a confirmation tone and the selectedlanguage shows in the display.Handset Name1. Press the CID/VOL ( or ) button to scroll to the HANDSET NAME menu.2. Press MENU button to enter the menu. HANDSET NAME shows in the display.3. Use the touch-tone pad to enter a name (up to 15 characters). More than one letter isstored in each of the number keys. For example, to enter Bill Smith, press the 2 key twice for theletter B. Press the 4 key 3 times for the letter I. Press the 5 key 3 times for the letter L. Press the5 key 3 times for the second letter L, and press the 1 key to insert a space between the first andlast name. Press the 7 key 4 times for the letter S; press the 6 key once for the letter M; press the4 key 3 times for the letter I; press the 8 key for the letter T; press the 4 key twice for the letter H.NOTE: If you make a mistake, use the DEL/MUTE button to backspace and deleteone character at a time.4. Press the MENU button to save your name. You will hear a confirmation tone and thehandset name shows in the display.Ringer ToneYou may choose from ten different ringer tones (01 to 10)  and ten different melodies (11 to 20).1. Make sure the ringer is turned on. See Ringer On/Off section.2. Press the CID/VOL ( or ) button to scroll to the RINGER TONE menu.3. Press MENU button to enter the menu. SET RINGER TONE 01 shows in the  display. "01" isdefault setting.4. Use the CID/VOL ( or ) button to scroll to the desired setting (1 through 20). You will hear asample of the ringer tone/melody you select.5. Press the MENU button to save your selection. You will hear a confirmation tone and the selectedringer tone shows in the display.Ringer Volume1. Press the CID/VOL ( or ) button to scroll to the RINGER VOLUME menu.2. Press MENU button to enter the menu. SET RINGER 1HI 2LOW 3OFF shows in the display.3. Use the touch tone pad on the handset to select 1, 2 or 3, or use the CID/VOL ( or ) button toscroll to your selection. "1HI" is the default setting.4. Press the MENU button to save your selection. You will hear a confirmation tone and the newvolume setting shows in the display.NOTE: If you turn the ringer OFF, the ringer off icon shows in the display.VIP MelodyThis features allow you to assign a specific melody to someone you want to get your attention when theperson calls. When a VIP melody is assigned and that person calls, the unit rings the normal ring forthe first ring and then follows with VIP melody ring. You may choose from ten different polyphonicmelodies and may store up to 10 VIP records.NOTE: This feature ONLY works when the following conditions are met.1. You have subscribed to Caller ID.982. You have your Caller ID record previously transferred to the memory. (Refer to Storing CIDRecords in Internal Memory). "NO USER MEMORY" will show in the display to remind the user todo CID record transfer first.Storing VIP Melody1. With handset in standby mode.2. Press MENU button once to display the submenus; HANDSET SETUP and ROOM MONITOR..3. Press MENU button to enter into HANDSET SETUP.4. Press the CID/VOL ( or )button to scroll to VIP MELODY submenu.5. Press MENU button to select VIP melody feature and then display VIP 1 record.• If VIP1 does NOT contain any specific number/records, it will display EMPTY.6. Press CID/VOL ( or ) button to select the specific VIP melody memory location (10 VIPlocations) that does not contain any record.7. Press MENU button to display SELECT MEMORY.NOTE: If the memory location does not contain any CID memory records and you aretrying to mark a specific record as VIP MELODY, then "SELECT MEMORY" will notbe displayed. Instead, "NO USER MEMORY" will display in prompt to alert the user.8. Press CID/VOL ( or ) button to view the records from memory to be selected as VIP.9. Press MENU button to confirm and then display VIP MELODY 01 to wait for the melody toneselection.10. Press CID/VOL ( or ) button to select from melody 01 to melody 10 (a testing tone isgenerated while making melody selection)11. Press MENU button to confirm.NOTE: If the desired number/record was previously stored in any one of the ten VIPmelody records, "DUPLICATE NUMBER" shows in the display.Changing a Stored VIP Melody RecordUse the Storing VIP Melody procedure to change the number of a selected record and replace the oldphone number with new phone number.When REPLACE VIP# ? shows in the display, you must press MENU button on the handset to confirmreplacement.Reviewing And Deleting Stored VIP Melody Record1. Press the MENU button to enter to VIP MELODY menu.2. Use the CID/VOL ( or ) button to scroll to the desired VIP Melody Record.3. If you want to delete the information, press the DEL/MUTE button on the handset while theentry displays. The display show DELETE VIP# ?.4. Press DEL again to confirm. You will hear a confirmation tone and VIP# DELETED show in thedisplay.Set Tone / Pulse1. Press the CID/VOL ( or ) button to scroll to the SET TONE/PULSE  menu.2. Press MENU button to enter the menu. SET TONE/PULSE  1TONE 2PULSE  shows in thedisplay.3. Use the touch tone pad on the handset to select 1or  2 , or use the CID/VOL ( or )button to scroll to your selection. "1TONE" is the default setting.4. Press the MENU button to save your selection. You will hear a confirmation tone and the newvolume setting shows in the display.Key Tone1. Press the CID/VOL ( or ) button to scroll to the KEY TONE menu.2. Press MENU button to enter the menu. SET KEY TONE 1ON 2OFF shows in the display.3. Use the touch tone pad on the handset to select 1 or 2, or use the CID/VOL ( or )button to scroll to your selection. "1ON" is the default setting.4. Press the MENU button to confirm and the key tone setting shows in the display.Area Code1. Press the CID/VOL ( or )button to scroll to the AREA CODE menu.2. Press MENU button to enter the menu. SET AREA CODE - - - shows in the display.3. Use the touch-tone pad to enter your 3-digit area code.4. Press the MENU button to confirm. You will hear a confirmation tone and the new areacode shows in the display.NOTE: To restore the default setting to - - -, press and release DEL when "SETAREA CODE" shows in the display.One-Touch Voice Mail AccessThis function can use if you have subscribed to telco voice mail service.1. Press the CID/VOL ( or )button to scroll to the VOICE MAIL #  menu.2. Press MENU button to enter the menu. SET VOICE MAIL#  shows in the display.3. Use the touch-tone pad to enter the voice mail number and it can up to 20 numbers.4. Press the MENU button to confirm. You will hear a confirmation tone and the voice mail #shows in the display.5. To include a PIN number after voice mail number, use PAUSE button to add dialing example555-555-1212pp1234.6. Then, it will exit to program sub-menu screen.RegistrationThis setting may be made with the handsets. Your handset is pre-registered and ready to use. It is notrecommended that handset be registered again unless absolutely necessary.1. If necessary, press the MENU button to go to the REGISTRATION menu. The default is "2NO".2. Use the touch-tone pad to select 1 for YES or 2 for NO. Or use the CID/VOL ( or ) button toscroll to 1YES or 2NO.3. If you select 1YES, press the MENU button to confirm your selection. HOLD BASE PAGE WAITFOR BEEP shows in the display.4. Press and hold the page button on the base unit until you hear a long tone at the handset.HANDSET X REGISTERED shows in the handset display, where X is the handset name. You willhear a confirmation tone.1110De-RegistrationThis setting may be made with the handsets. De-registration cancels registration. During the de-regis-tration process, keep the handset near the base.1. If necessary, press the MUTE/PROG button to scroll to the DEREGISTRATION menu. Thedefault is "2NO".2. Use the touch-tone pad to select 1 for YES or 2 for NO. Or use the CID/VOL ( or ) button toscroll to 1YES or 2NO.WARNING: It is not recommended that a handset be de-registered unless absolutelynecessary because once a handset is de-registered, that handset's telephone featurescannot be used until  the handset is re-registered.3. Select NO, if you do not want to de-register.4. If you select 1YES, press the MUTE/PROG button and MOVE NEAR TO BASE displays for 2seconds, then CONFIRM? 1YES 2NO appears in the display.5. Press the touch-tone pad to select 1YES or 2NO, or use the CID/VOL ( or ) button to scroll to1YES or 2NO.6. If you select YES, press the MENU button to confirm. You will hear a confirmation tone.Then HANDSET X DEREGISTERED shows in the display to confirm the handset is deregistered.NOTE: When you complete the de-registration process, "HANDSET NEEDSREGISTRATION" shows in the display. To use the handset, you must register thehandset.Global De-registrationIf one or more handsets becomes lost, you should de-register all handsets to ensure proper systemoperation. Follow the steps below to de-register both handsets at the same time.WARNING: It is not recommended that a handset be de-registered unless absolutely necessary be-cause once a handset is de-registered, that handset's telephone features cannot be used until thehandset is re-registered.1. Press and hold the page button on the base until the IN USE/CHARGE indicator on the baseflashes.2. Press and hold the page button on the base again until the IN USE/CHARGE indicator on thebase flashes rapidly.3. Press and release the page button on the base once. All handsets are de-registered andHANDSET NEEDS REGISTRATION shows in the display.Default SettingAs you become familiar with this system, you may prefer to use the system's original settings. Followthe steps below to return to the factory default settings.1. Press the CID/VOL ( or ) button to scroll to the DEFAULT SETTING menu.2. Press the MENU button to enter the menu. DEFAULT SETTING 1YES 2NO shows in the display.3. Use the touch-tone pad to select 1YES or 2NO, or use the CID/VOL ( or ) button to move thecursor to 1YES or 2NO. "2NO" is default setting.NOTE: If you choose YES all the settings in the programmable menu are returned tofactory default setting.4. Press the MENU button to save your selection. You will hear a confirmation tone.Telephone OperationCharge IndicatorWhen the Voice Mail /Charge indicator is lit, the handset is correctly seated in the cradle and is charging.Making Calls1. Pick up the handset, and press the TALK button. Listen for a dial tone.2. Dial the number you want to call, or dial the number first then press the TALK button.3. When finished, press the TALK button to hang up.Answering Calls1. When the phone rings, pick up the handset, and press the TALK button.2. When finished, press TALK button to hang up.NOTE: Adjust the handset volume by pressing the CID/VOL ( or ) button during a call.Call TimerAfter you press the TALK button on the handset, the built-in call timer shows on the display and countsthe length of time of the call in minutes and seconds.Pre-Dialing1. Make sure the phone is OFF (not in talk mode).2. Enter the telephone number you want to call. The telephone number shows in the handset display.3. Press the TALK button on the handset, and the number automatically dials.NOTE: You may enter up to 32 pre-dial digits.NOTE: If you want to delete the pre-dial number you entered, press the DEL/MUTEbutton until all of the digits are erased.Auto StandbyIf you place the handset in the cradle while the handset is off the hook (during a call), the call isautomatically disconnected.Ringer HI/LOW/OFFThere are two ways to set the ringer to HI/LOW/OFF. One is the traditional way as described in theMEUN Functions; Handset Setup; Ringer Volume menus. The other one is this short cut to ringermenu.1. Make sure the phone is OFF (not in talk mode).2. Press the #PAUSE button to display 1HI 2LOW 3OFF.3. Use the touch tone pad on the handset to select 1, 2 or 3, or use the CID/VOL ( or ) button toscroll to your selection. "1HI" is the default setting.4. Press #PAUSE button again to save and display the new selection for a few seconds.1312Cordless Phone System withEZ-READ Caller IDEquipment Approval InformationYour telephone equipment is approved for connection to the Public Switched Telephone Network andis in compliance with parts 15 and 68, FCC Rules and Regulations and the Technical Requirements forTelephone Terminal Equipment published by ACTA.1 Notification to the Local Telephone CompanyOn the bottom of this equipment is a label indicating, among other information, the US number andRinger Equivalence Number (REN) for the equipment. You must, upon request, provide this informa-tion to your telephone company.The REN is useful in determining the number of devices you may connect to your telephone line andstill have all of these devices ring when your telephone number is called. In most (but not all) areas, thesum of the RENs of all devices connected to one line should not exceed 5. To be certain of the numberof devices you may connect to your line as determined by the REN, you should contact your localtelephone company.A plug and jack used to connect this equipment to the premises wiring and telephone network mustcomply with the applicable FCC Part 68 rules and requirements adopted by the ACTA. A complianttelephone cord and modular plug is provided with this product. It is designed to be connected to acompatible modular jack that is also compliant. See installation instructions for details.Notes• This equipment may not be used on coin service provided by the telephone company.• Party lines are subject to state tariffs, and therefore, you may not be able to use your owntelephone equipment if you are on a party line. Check with your local telephone company.• Notice must be given to the telephone company upon permanent disconnection of yourtelephone from your line.• If your home has specially wired alarm equipment connected to the telephone line, ensurethe installation of this product does not disable your alarm equipment. If you have questionsabout what will disable alarm equipment, consult your telephone company or a qualifiedinstaller.2 Rights of the Telephone CompanyShould your equipment cause trouble on your line which may harm the telephone network, the tele-phone company shall, where practicable, notify you that temporary discontinuance of service may berequired. Where prior notice is not practicable and the circumstances warrant such action, the tele-phone company may temporarily discontinue service immediately. In case of such temporarydiscontinuance, the telephone company must: (1) promptly notify you of such temporary discontinuance;(2) afford you the opportunity to correct the situation; and (3) inform you of your right to bring a com-plaint to the Commission pursuant to procedures set forth in Subpart E of Part 68, FCC Rules andRegulations.  or procedures where such action is required in the operation of its business and notinconsistent with FCC Rules and Regulations. If these changes are expected to affect the use orperformance of your telephone equipment, the telephone company must give you adequate notice, inwriting, to allow you to maintain uninterrupted service.Interference InformationThis device complies with Part 15 of the FCC Rules. Operation is subject to the following two conditions:(1) This device may not cause harmful interference; and (2) This device must accept any interferencereceived, including interference that may cause undesired operation.1816-555-1234CHRIS LABOI06Inserting a Pause in the Dialing Sequence ............... 19Reviewing Records Stored in Memory ..................... 19Changing Records Stored in Memory ...................... 19Dialing a Number from Memory ................................ 19Chain Dialing from Memory ...................................... 20Caller ID (CID) .................................................................. 20CID Error Codes ....................................................... 20Receiving CID Records ............................................ 21Storing CID Records ................................................. 21Reviewing CID Records ........................................... 21Storing CID Records in Internal Memory .................. 21Dialing a CID Number ............................................... 22Deleting a CID Record .............................................. 22Deleting All CID Record ............................................ 22Changing the Battery ................................................ 23Battery Safety Precautions ....................................... 23Belt Clip and Optional Headset ................................ 23Connecting an Optional Headset to the Handset ..... 23Display Messages ........................................................... 24Handset Sound Signals .................................................. 25Troubleshooting Guide .................................................. 25Caller ID Solution ...................................................... 26Battery ...................................................................... 26General Product Care ............................................... 26Causes of Poor Reception ........................................ 26Service ............................................................................. 27Limited Warranty ............................................................. 27Limitation of Warrant ................................................. 27FCC RF Radiation Exposure StatementThis equipment complies with FCC RF radiation exposure limits set forth for an uncontrolled environment.This equipment should be installed and operated with a mininum distance of 20 centimeters betweenthe radiator and your body. This transmitter must not be co-located or operated in conjunction with anyother antenna or transmitter."For body worn operation, this phone has been tested and meets the FCC RF exposure guidelineswhen used with the belt clip supplied with this product. Use of other accessories may not ensurecompliance with FCC RF exposure guidelines. Base UnitMD2400,2420ib-engRev05 5/17/06, 10:42 PMPage 1 Adobe PageMaker 6.5C/PPC5.8 GHz Digital Multi-HandsetCT54505.85.8 GHz Digital Spread Spectrum Technologythe 5.8GHz frequency for communication, and, if not properly set, these devices may interfereinterference. Typical devices that may use the 5.8GHz frequency for communication include5.85.85.8
Handset Speakerphone OperationNOTE: If you are using the speakerphone, remain close to handset so the party youare speaking to can hear you.Answering a Call with the Handset1. When the phone rings, press the SPK button on the handset.2. When finished, press the SPK button again to hang up.Making a Call with the Handset1. Make sure the phone is OFF (not in talk mode).2. Dial the desired number, or Press the CID/VOL ( or ) button to select the desiredrecord, or Press MEM button and then use CID/VOL ( or )button to scroll to desired memoryrecord.NOTE: If you are using the handset and want to switch to the speakerphone, press theSPK button, press SPK again to end conversation. If you are using the speakerphoneand want to switch to the handset, press the TALK button, press TALK again toend conversation.3. Press SPK to dial number.4. When finished, press the SPK button again to hang up.Intercom Operation (requires two handset)The intercom feature allows you to have a conversation with another registered handset without tyingup the telephone line. And since the telephone line is not in use, you may still receive incoming calls.Making an Intercom Call1. Make sure the phone is OFF (not in talk mode).2. Press the PAGE/INT button on the handset.3. Use the touch-tone pad to select the handset you want to page.NOTE: To cancel page, press the PAGE/INT button again or the *EXIT button on thesending handset.4. Wait for the person at the receiving handset to press the PAGE/INT button.NOTE: If the receiving handset does not answer within two minutes, the intercomcall is automatically canceled. The originating handset displays "NO ANSWER".5. When finished, press the *EXIT button or PAGE/INT button on either handset to deactivate theintercom.NOTE: The system is expandable up to 4 handsets (by purchase of optional ModelMD2420 handset with recharge cradle). When 4 handsets are registered, the systemcan handle 2 separate intercom operations at once, for example, 1st handsetintercoms with 2nd handset while 3rd handset intercoms with 4th handset.Receiving an Intercom CallWhen you receive an intercom call, your handset beeps. To answer the call press the PAGE/INT buttonor TALK button.Advanced Intercom FeaturesReceiving an Incoming Telephone Call During an Intercom CallIf you receive a telephone call during an intercom call, the intercom call is immediately terminated andboth handsets ring. Either handset user may press the TALK button to answer the call.Using Intercom with External Telephone CallsDuring a telephone call, you may use the intercom/paging function to page another handset and havean off line, private (two-way) intercom conversation. You may also have a three-way conversationbetween the external caller and the handsets, or you may transfer the external telephone call to an-other handset.NOTE: Before you intercom/page another handset, you must decide whether youwant to create a two-way or a three-way conversation.Two-Way Calling1. During an external call, press the PAGE/INT button, and use the touch-tone pad to enter thehandset number (1 or 2) you want to call.NOTE: The receiving handset presses the PAGE/INT button to answer the intercom call.Both intercom users may speak privately. The external caller will not hear the intercomconversation.2. When finished, press the *EXIT button or PAGE/INT button to end the intercom call, return to thetalk mode, and resume your original telephone conversation.Three-Way Calling1. During an external call, press the PAGE/INT key. LINE ON HOLD EXTENSION? shows inthe display.2. Use the touch-tone pad to select Handset 1 or Handset 2. You will hear a paging tone andPAGING shows in the originating handset's display.NOTE: "PAGING FROM..." shows in the display on the receiving handset, and thereceiving handset presses the PAGE/INT or TALK button to answer the intercom.17163. When the receiving handset connects, press the FORMAT/CONF button on the originatinghandset to conference with the receiving handset and the external caller. CONFERENCE showsin the display on the originating and receiving handsets.NOTE: A handset can enter conference mode directly by pressing TALK on thesecond handset during a call.Transferring External Calls to Other HandsetsDuring an external call, you may transfer the external call to another handset.1. Press the PAGE/INT button on the originating handset to put an external call on hold, and thenpage the receiving handset.2. Use the touch-tone pad on the handset to select Handset 1 or Handset 2. You will hear a pagingtone. PAGING shows on the originating handset's display, and PAGING FROM... shows on thereceiving handset's display.3. When the receiving handset connects, press the TALK button on the originating handset totransfer the call.-OR-4. Press the TALK button on the originating handset to transfer the call.If the receiving handset does not answer within 30 seconds, the originating handset rings backand displays CALL BACK. If the originating handset does not answer within 20 seconds, the callis automatically dropped.MemoryYou may store sixty 15-character names and 20-digit telephone numbers in the handset memory.Storing a Name and Number in Memory1. Make sure the phone is OFF (not in talk mode).2. Press the MEM key to display SELECT MEMORY 01-60.3. Press the desired memory location button (01 through 60) or use the CID/VOL ( or ) button toscroll to desired the memory location.NOTE: If the memory location is occupied, the memory location number and storedname and telephone number appear in the display. If the memory location is empty,"EMPTY" appears in the display.4. Press the MEM key. The display shows ENTER NAME.5. Use the touch-tone pad to enter a name (up to 15 characters). More than one letter isstored in each of the number keys. For example, to enter Bill Smith, press the 2 key twice for theletter B. Press the 4 key 3 times for the letter I. Press the 5 key 3 times for the letter L. Press the5 key 3 times for the second letter L, and press the 1 key to insert a space between the first andlast name. Press the 7 key 4 times for the letter S; press the 6 key once for the letter M; press the4 key 3 times for the letter I; press the 8 key for the letter T; press the 4 key twice for the letter H.NOTE: If you make a mistake press the DEL button to backspace and erase thewrong character(s) or number(s).6. Press the MEM key to confirm and save the record. The display shows ENTER TEL NUMBR.7. Use the touch-tone pad to enter the telephone number (up to 20 digits, including pauses(press #PAUSE button)), and press the MEM key again to save the record. The unit beeps toconfirm.NOTE: The system treats PAUSES as delays or spaces in the dialing sequence.8. To enter another name and number in a different memory location, return to step 2 andrepeat the process.Storing the Last Number Dialed1. Repeat steps 1 through 6 in Storing a Name and Number in Memory.2. Press the REDIAL button on the handset.3. Press the MEM button to save. You will hear a confirmation tone.NOTE: If the redial number has more than 20 digits, it cannot be stored in memory.Inserting a Pause in the Dialing Sequence (of a Stored Number)Press the # button on the handset's touch-tone pad to insert a delay in dialing sequence when a pauseis needed to wait for a dial tone (for example, after you dial 9 for an outside line, or to wait for acomputer access tone.) Each pause counts as one digit in the dialing sequence.Reviewing Records Stored in Memory1. Make sure the phone is OFF (not in talk mode).2. Press the MEM key to display SELECT MEMORY 01-60.3. Press the CID/VOL ( or )buttons to scroll the records, or use the handset's touch-tone pad toenter the memory location number.Changing Records Stored in MemoryFollow the procedure for Storing Names and Numbers in Memory, except replace a stored telephonenumber with a new one.Deleting Records Stored in Memory1. Make sure the phone is OFF (not in talk mode).2. Press the MEM key to display SELECT MEMORY 01-60.3. Press the CID/VOL ( or ) button to scroll to the record you want to delete or use thetouch-tone pad to enter the desired memory location.4. Press the DEL button to mark the record for deletion. The display shows DELETE?5. Press the DEL button to delete the record. DELETED shows in the display.NOTE: If you don't want to change or delete a record, simply press the *EXIT button,or wait for one minute to exit the review mode automatically.Dialing a Number from Memory1. Make sure the phone is ON (in talk mode) by pressing the TALK button.2. Press the MEM key to display memo # - -.3. Use the touch tone pad to enter the memory location number. The number dials automatically.-OR-19181. Make sure the phone is OFF (not in talk mode).2. Press the MEM key to display SELECT MEMORY 01-60.3. Press the memory location for the phone number you want to dial, or use the CID/VOL (or)button to scroll to the number you want to dial.4. Press the TALK button. The number dials automatically.Chain Dialing from MemoryUse this feature to make calls which require a sequence of numbers, such as a calling card numberused for a frequently called long distance number. The following example shows how you can storeeach part of the dialing sequence and use chain dialing to make a callthrough a long distance service:The Number For Memory LocationLong Distance Access Number 7Authorization Code 8Frequently called long distance number 91. Make sure the phone is ON (in talk mode) by pressing the TALK/CALLBACK.2. Press the MENU button to access the option menu.3. When you hear the access tone, repeat steps 1 through 6 in Dialing a Number from Memory, andthen press 08.4. At the next access tone, repeat steps 1 through 6 in Dialing a Number from Memory, and thenpress 09.Caller ID (CID)Caller ID (CID) is a service available from your local telephone company. For Caller ID to work on thissystem, you must subscribe to Caller ID service. To receive Caller ID information for a Call Waiting call,you must subscribe to the combined Call Waiting Caller ID service.This telephone system receives and displays CID information transmitted by your local telephonecompany. This information may include the phone number, date and time; or the name, phone number,and date and time.CID Error CodesVarious Caller ID error messages may appear in the display. Refer to the Display Messages section ofthis User's Guide for more information.Receiving CID RecordsWhen you receive a call, the Caller ID information is transmitted between the first and second ring. TheCaller ID information appears on the display while the phone rings, giving you a chance to monitor theinformation and decide whether or not to answer the call.Storing CID Records (In Caller ID Memory)If you are not at home or cannot answer, your telephone's Caller ID memory stores the data for the 40most recent calls you received so you can see who called while you were unavailable. When the 41stcall is received, the oldest Caller ID record (1st call) is automatically deleted.You may review the stored information at any time. Calls received since your last review show as NEWin the display.Reviewing CID RecordsAs calls are received and stored, the display is updated to let you know how many callshave been received. To scroll CID records:1. Make sure the phone is OFF (not in talk mode).2. Press the CID/VOL ()button to review the newest CID record.3. Press the CID/VOL ()button to review the oldest CID record first.As you review CID records, the display shows you the following information for each call:• The telephone number of the caller.• The number of the call, with regard to the order received.• The name of the caller, if this service is available in your area.• Time and date the call was received.• NEW appears for all calls that have not been previously reviewed.• REPT shows in the display for a call that has not been previously reviewed but is received fromthe same number more than once.NOTE: Check with your local phone company regarding name service availability.Storing CID Records in Internal MemoryYou may also store CID information in the phone's internal memory. You may not reformat CID recordsstored in memory.TIP: To prevent the CID information from automatically being deleted, you may want to storeit in the phone's memory.NOTE: It is important that you format CID records correctly before storing in internal memory.1. Make sure the phone is OFF (not in talk mode).2. Use the CID/VOL ( or )button to scroll to the desired CID record.3. Press the MEM key to display SELECT MEMORY 01-50.4. Use the touch-tone pad to enter a memory location number (for example, press 01 to store therecord in memory location one).NOTE: If the memory location is occupied, "REPLACE MEMO?" is displayed, and you mustconfirm replacement by pressing the MEM button.NOTE: Press the *EXIT button once to keep the previous setting and return to the sub-menu.2120816-555-1234CHRIS LABOI06Dialing a CID NumberWhile reviewing CID records, you may dial the phone number showing in the display.1. Make sure the phone is OFF (not in talk mode).2. Press CID/VOL ( or ) button until the desired CID record shows in the display.NOTE: Depending on (a) how the incoming caller's phone number is formatted when it isreceived, and (b) whether or not you previously pre-programmed your local area code into theset up menu, you may need to adjust the format of the incoming caller's stored phonenumber before making the call.Available formats include:Number of digits Explanation ExampleEleven digits long distance code "1 " 1-317-888-8888+3-digit area code+7-digit telephone number.Ten digits 3-digit area code + 317-888-88887-digit telephone number.Seven digits 7-digit telephone number. 888-88883. If the number does not dial as shown, press the format/conference button. Repeat if  necessary,until the correct number of digits show in the display.4. Press the TALK/END/CALL BACK button on the handset. The number dials automatically.NOTE: If the telephone number is corrupted, such as an alphabetical character in anumber field, you will hear an error tone and the number is not dialed. Unit displays"UNABLE TO DIAL".Deleting a CID Record1. Make sure the phone is OFF (not in talk mode).2. Use the CID/VOL ( or ) button to display the CID record you want to delete.3. Press the DEL button. The display shows DELETE CALL ID?4. Press the DEL button to erase the record showing in the display. The display shows DELETED.NOTE: Press the *EXIT key to return to the standby mode.Deleting All CID Record1. Make sure the phone is OFF (not in talk mode).2. Use the CID/VOL ( or )button to scroll to any CID record.3. Press and hold the DEL button until DELETE ALL? shows in the display.4. Press DEL button to erase all of the current CID records. The display shows DELETEDfollowed by NO CALLS.NOTE: Press the *EXIT key on the handset to return to the standby mode.Changing the BatteryCAUTION: To reduce the risk of fire or personal injury, use only the battery thatis compatible with this unit.1. Make sure the telephone is OFF (not in talk mode) before you replace battery.2. Remove the battery compartment cover.3. Disconnect the cord attached to the battery pack from the jack inside the batterycompartment and remove the battery pack from the handset.4. Insert the new battery pack and reconnect the battery plug.5. Put the battery compartment cover back on.6. Place handset in the base or handset charge cradle to charge. If you don't charge thehandset battery properly (for 16 hours) when you first set up the phone and/or when you install anew battery pack, the battery's long-term performance will be compromised.NOTE: If the battery is not properly installed in the handset, or if the battery pack isnot properly connected to the jack inside the battery compartment. "NO BATTERY"shows in the display when the handset is placed in the charging cradle. the jack insidethe battery compartment.Battery Safety Precautions• Do not burn, disassemble, mutilate or puncture. Like other batteries of this type, toxic mate rialscould be released which can cause injury.• Keep batteries out of the reach of children.• Remove batteries if storing over 30 days.Belt clip and Optional HeadsetConnecting the Belt Clip1. To attach the belt clip, insert the sides of the belt clip into the slots on each side of the handset.2. Snap the ends of the belt clip into place.Connecting an Optional Headset to the HandsetEach handset can be used with an optional headset hands free operation.1. Connect the headset to the headset jack on the side of the handset The handset receiver andmicrophone are disabled when the headset is connected.2. Adjust the headset to rest comfortably on top of your head and over your ear. Move themicrophone to approximately two to three inches from your mouth.3. Press the TALK/END/CALL BACK button to answer a call or make calls using the headset.4. To return to normal operation, unplug the headset from the jack.2322Display MessagesThe following messages shows the status of the phone, provides Caller ID information, or helps youset up and use your phone.INCOMPLETE DATA CID information is interrupted during transmission or the phone line isexcessively noisy.HANDSET NAME Prompt telling you to enter the user name for the registered handset.ENTER NAME Prompt telling you to enter a name in one of the 50 memory location.LINE IN USE Displays on handset while the line is in use.ENTER TEL NUMBER Prompt telling you to enter a telephone number in one of the 60 memorylocation.DELETE ALL? Prompt asking if you want to erase all CID records.DELETE CALL ID? Prompt asking if you want to erase the CID record showing on the display.DELETE? Prompt asking if you want to erase one of the 50 records stored in the phone’smemory.END OF LIST Indicates that there is no additional information in CID memory.NEW Indicates call or calls which have not been reviewed.UNKNOWN CALLER Indicates incoming call is from an area not serviced by CID or the CIDinformation was not sent.NO BATTERY Indicates the battery is not properly installed in the handset, or the batterypack is not properly connected to the jack inside the battery compartment.NO USER Memory NOTE: If the memory location does not contain any CID memory recordsand you are trying mark a specific record as VIP MELODY, then SELECTMemory will not be displayed. Instead, NO USER MEMORY will be promptedto alert the user.DUPLICATE NUMBER Under VIP melody feature, if the desired number/record was selected in antone of TEN/VIP melody records before, DUPLICATE NUMBER shows in thedisplay.HANDSET NEEDS REGISTRATIONIndicates you must register a non-registered handset prior to use.SEARCHING Indicates handset is searching for the base.OUT OF RANGE Indicates handset is too far away from the base. Move closer to the base.PAGING OR PAGING FROMSomeone pressed the page/int button on the base or handset.BLOCKED NUMBER Indicates the person is calling from a number which is blocked fromtransmission.REPT Indicates a repeat call message. Indicates a new call from the same numberwas received more than once.NO CALLS Indicates there are no CID records in memory.NO DATA Indicates no CID information was received, you are not subscribed to CIDservice, or service is not working.NEW CALL XX XX represents the number of new CID records not reviewed.LOW BATTERY Indicates the battery needs to be charged.LONG DISTANCE Indicates CID record is from a long distance call.Handset Sound SignalsSignal MeaningA long warbling tone (with ringer on) Signals an incoming callThree short beeps Page signalOne short beep  (every 7 seconds) Low battery warningTroubleshooting GuideTelephone SolutionsNo dial tone• Check or repeat installation steps:Make sure the base power cord is connected to a working electrical outlet.Make sure the telephone line cord is connected to the base and the wall jack.• Connect another phone to the same jack. If it doesn't work, the problem might be yourwiring or local service.• The handset may be out of range of the base. Move closer to the base• Make sure the battery is properly charged (for 16 hours).• Make sure the battery pack (in the handset) is properly installed.• The handset should beep when you press the TALK button, and the charge indicator on the baseshould be lit when the handset rests in the cradle. If not, the battery may need to be charged.Place handset in charge cradle for at least 20 seconds to reset the unit.Handset does not ringMake sure the handset ringer software switch is set to on.The handset may be out of range of the base. Move closer to the base.You may have too many extension phones on your line. Try unplugging some extension phones.Check for a dial tone.You experience static, noise, or fading in and out• The handset may be out of range of the base. Move closer to base.• Make sure base is not plugged into an electrical outlet with another household appliance. Ifnecessary, relocate the base.• Charge the battery (for 16 hours).Unit beeps• Clean the charging contacts on the cordless handset and base charge cradle with a soft cloth oran eraser.• See solutions for "No dial tone" on previous page.• Replace the battery.Memory dialing doesn't work• Did you program the memory location keys correctly?• Did you follow proper dialing sequence?Unit locks up and no communication between the base and cordless handset• Unplug the power adaptor from the electrical outlet and the back of the base. Remove the handsetbattery. Wait for 30 seconds and plug the power adaptor back into the base and electrical outlet.Reconnect the battery and charge for 16 hours.Charge Indicator on the Base Flashes• Provided your phone company offers voice messaging service and you subscribe to it, the chargeindicator on the base flashes when the phone is not in use to indicate there is a message waiting.It's stops flashing after the message has been reviewed.2524Flash/Voice MailIf you subscribe to the combined Call Waiting Caller ID service from your local telephone company, youwill receive Caller ID information (if available) on Call Waiting calls. During a phone call, you will hear abeep to indicate another call is waiting on the line and Caller IDinformation for the waiting call shows on the handset display.• To connect to the waiting call, press the FLASH button on the handset, and your original call is puton hold.• To switch between the two calls, press the FLASH button.TIP: Do not press the TALK button on the handset to activate a custom calling service,such as call waiting, or call will disconnect.If you subscribe to the voice mail service from your telco provider, you can press the Voice Mail buttonon the handset to retrieve the voice mail when there is a voice mail in OFF mode. The antenna LEDand the base voice mail LED will flashing if there is voice mail for indication.Last Number RedialYou may redial a number up to 32 digits long.To quickly redial the last number you dialed:1. Press the TALK button.2. Press the REDIAL button.-OR-3. Press the REDIAL button first, then use the CID/VOL ( or ) button to select the desiredredial number.• Press the CID/VOL () to review the oldest call and scroll toward the most recent calls(higher numbers).• Press the CID/VOL ()to review the newest call and scroll to older calls (lower numbers).NOTE: You may choose from  three last dialed numbers.4. Press the TALK button. The number dials automatically.If you get a busy signal and want to keep dialing the number, press the REDIAL button toquickly redial the number.ExitPress the *EXIT button to exit a menu function and return to the standby screen.PageThe page feature helps you locate a misplaced handset. To send and receive pages, all handsets mustbe registered. If your handset is not registered, follow the instructions in the Registration section of thismanual.Handset to Handset Paging (not apply on MD2400)Dual handsets are respectively named as Handset 1 and Handset 2.1. Make sure the phone is OFF (not in talk mode).2. Press and release the PAGE/INT button on a handset. PAGING EXTENSION? shows in thedisplay.3. Use the touch-tone pad to enter the handset number you want to page.4. To cancel the page, press the *EXIT button.Paging All Handsets from a Handset1. Make sure the originating phone is OFF (not in talk mode).2. Press and release the PAGE/INT button on a handset. PAGING EXTENSION? shows in thedisplay.3. Use the touch-tone pad to enter the handset number you want to page. (1= to page Handset 1,2=to page handset 2, etc., and 5=to page all handsets)4. To cancel the page, press the *EXIT or PAGE/INT button. On the originating handset, you maypress TALK.Paging from the Base/Group PageUse the base-only to page both registered handsets at the same time.1. Press the page button on the base. All handsets beep for two minutes, and PAGING FROM BASEshows on each handset's display.2. To cancel the page, press the page button on the base, or press the TALK button or the *EXITbutton on each handset.MuteTo have a private, off-line conversation, use the MUTE feature. The party on the telephone line cannothear you, but you can hear them.1. Press the MUTE button. The handset display shows MUTE ON.2. Press the MUTE button to cancel and return to your phone conversation.HoldDuring phone conversation, you want to hold the line, use the HOLD feature. The party on the tele-phone line will be on hold.1. Press the HOLD / FORMAT button. The handset display shows LINE ON HOLD.2. Press the HOLD / FORMAT button to cancel and return to your phone conversation.Note: The line will be on hold forever if you forget to press the hold to release the holdeven tough you recradle the Handset on base or charger.Receiver Volume ControlWhen the handset is ON (in talk mode) you may adjust the receiver volume by pressing the CID/VOL( or )button. There are four volume levels to choose from. When the maximum or minimum volumelevel is reached, the phone beeps twice. VOL 1 is minimum and VOL 4 is maximum.Do Not Disturb (DND)DND allows you to mute the ringer of the handset.In the standby mode, press and hold the DO NOT DISTURB button on the base. The DND backlitindicator will light and DO NOT DISTURB shows in handset display. To cancel, press DO NOT DIS-TURB again.1514Caller ID SolutionsNo Display• Charge the battery (for 16 hours). Or replace the battery.• Make sure the unit is connected to a non-switched electrical outlet. Disconnect the power adaptorfrom the base and reconnect it.Caller ID Error Message• The unit displays this message if it detects anything other than valid Caller ID information duringthe silent period after the first ring. This message indicates the presence of noise on the line.No Caller ID• You must be subscribed to the standard Name/Number Caller ID service from your localtelephone company to receive CID information.BatteryIf you experience any of the following problems, even after recharging the battery, you may need toreplace the battery pack:• Short talk time• Poor sound quality• Limited range• Charge indicator fails to turn onGeneral Product CareTo keep your unit working and looking good, follow these guidelines:• Avoid dropping the handset, as well as other rough treatment to the phone.• Clean the phone with a soft cloth.• Never use strong cleaning agents, paint thinner, abrasive powder, alcohol, or other chemicalproducts to clean the unit. Doing so will damage the finish.• Retain the original packaging in case you need to ship the phone at a later date.• Periodically clean the charge contacts on the handset and base with a clean pencil eraser.Causes of Poor Reception• Aluminum siding.• Foil backing on insulation.• Heating ducts and other metal construction that can shield radio signals.• You 're too close to appliances such as microwaves, stoves, computers, etc.• Atmospheric conditions, such as strong storms.• Base is installed in the basement or lower floor of the house.• Base is plugged into AC outlet with other electronic devices.• Baby monitor is using the same frequency.• Handset battery is low.• You're out of range of the base.2726ServiceThis product is warranted to be free from manufacturing defects for a period of one year from theoriginal date of consumer purchase. This warranty is limited to the repair or replacement of this productonly and does not extend to consequential or incidental damage to other products that may be usedwith this unit. This warranty is in lieu of all other warranties expressed or implied. If the unit should bedefective with the warranty period, please call Customer Service Departmentat 1-888-839-0834.Limited WarrantyWhat your warranty does not cover:• Customer instruction. (Your Owner's Manual provides information regarding operatinginstructions and user controls. Any additional information, should be obtained from youdealer.)• Installation and setup service adjustments.• Batteries.• Damage from misuse or neglect.• Products which have been modified or incorporated into other products.• Products purchased or serviced outside the USA.• Acts of nature, such as but not limited to lightning damage.Limitation of Warranty:• The warranty stated above is the only warranty applicable to this product. All other warranties,express or implied (including all implied warranties of merchantability of fitness for aparticular purpose) are hereby disclaimed. No verbal or written information given by MarketDirect, it's agent, or employees shall create a guaranty or in any way increase the scope of thiswarranty.• Repair or replacement as provided under this warranty is the exclusive remedy of theconsumer. Market Direct shall not be liable for incidental or consequential damagesresulting for the use of this product or arising out of any breach of any express or implied warrantyon this product. This disclaimer of warranties and limited warrant are governed by the laws of theState of Massachusetts. Except to the extent prohibited by applicable law, any implied warrant ofmerchantability or fitness for a particular purpose on this product is limited to the applicablewarranty period set forth above.Market Direct, 143 York Road, Mansfield, MA02048, USAMD2400,2420ib-engRev05 5/17/06, 10:42 PMPage 2 Adobe PageMaker 6.5C/PPC

Navigation menu