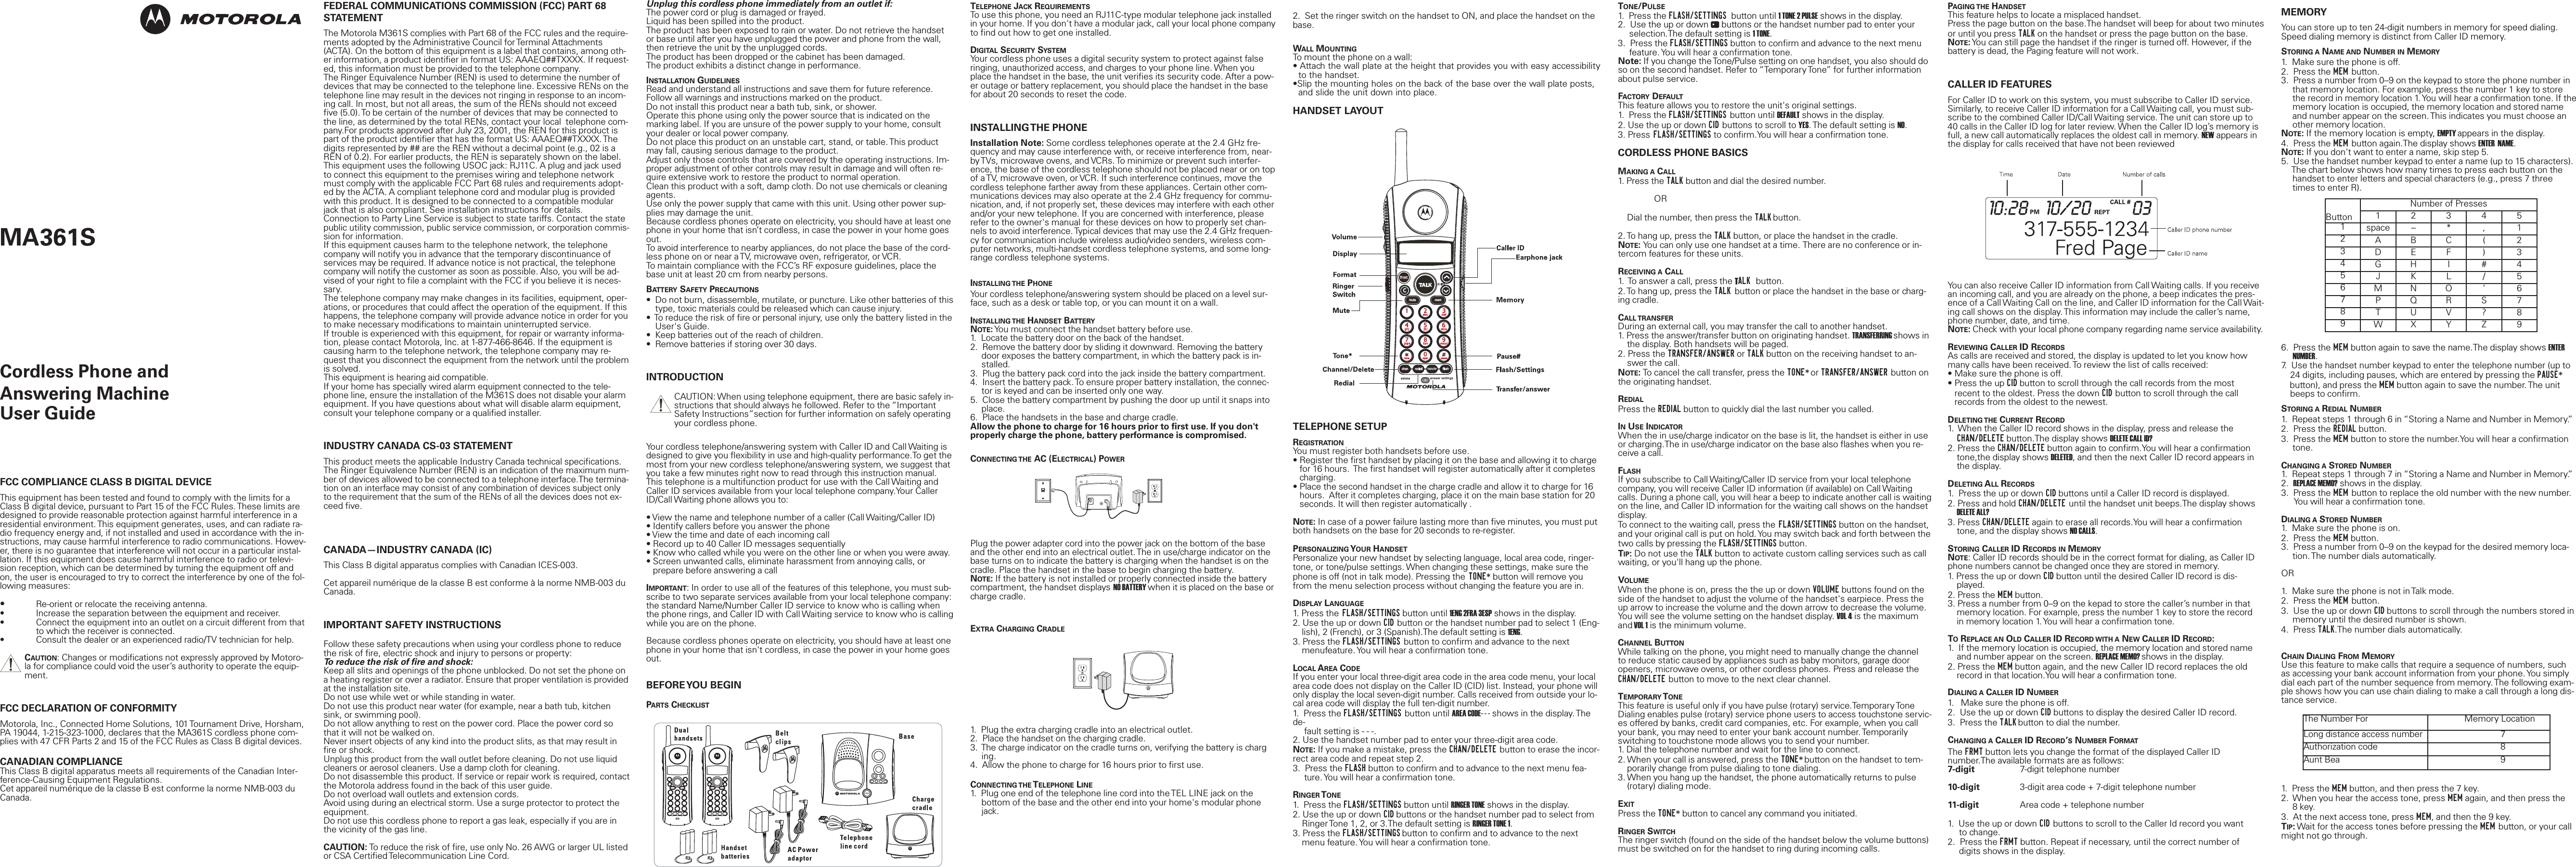
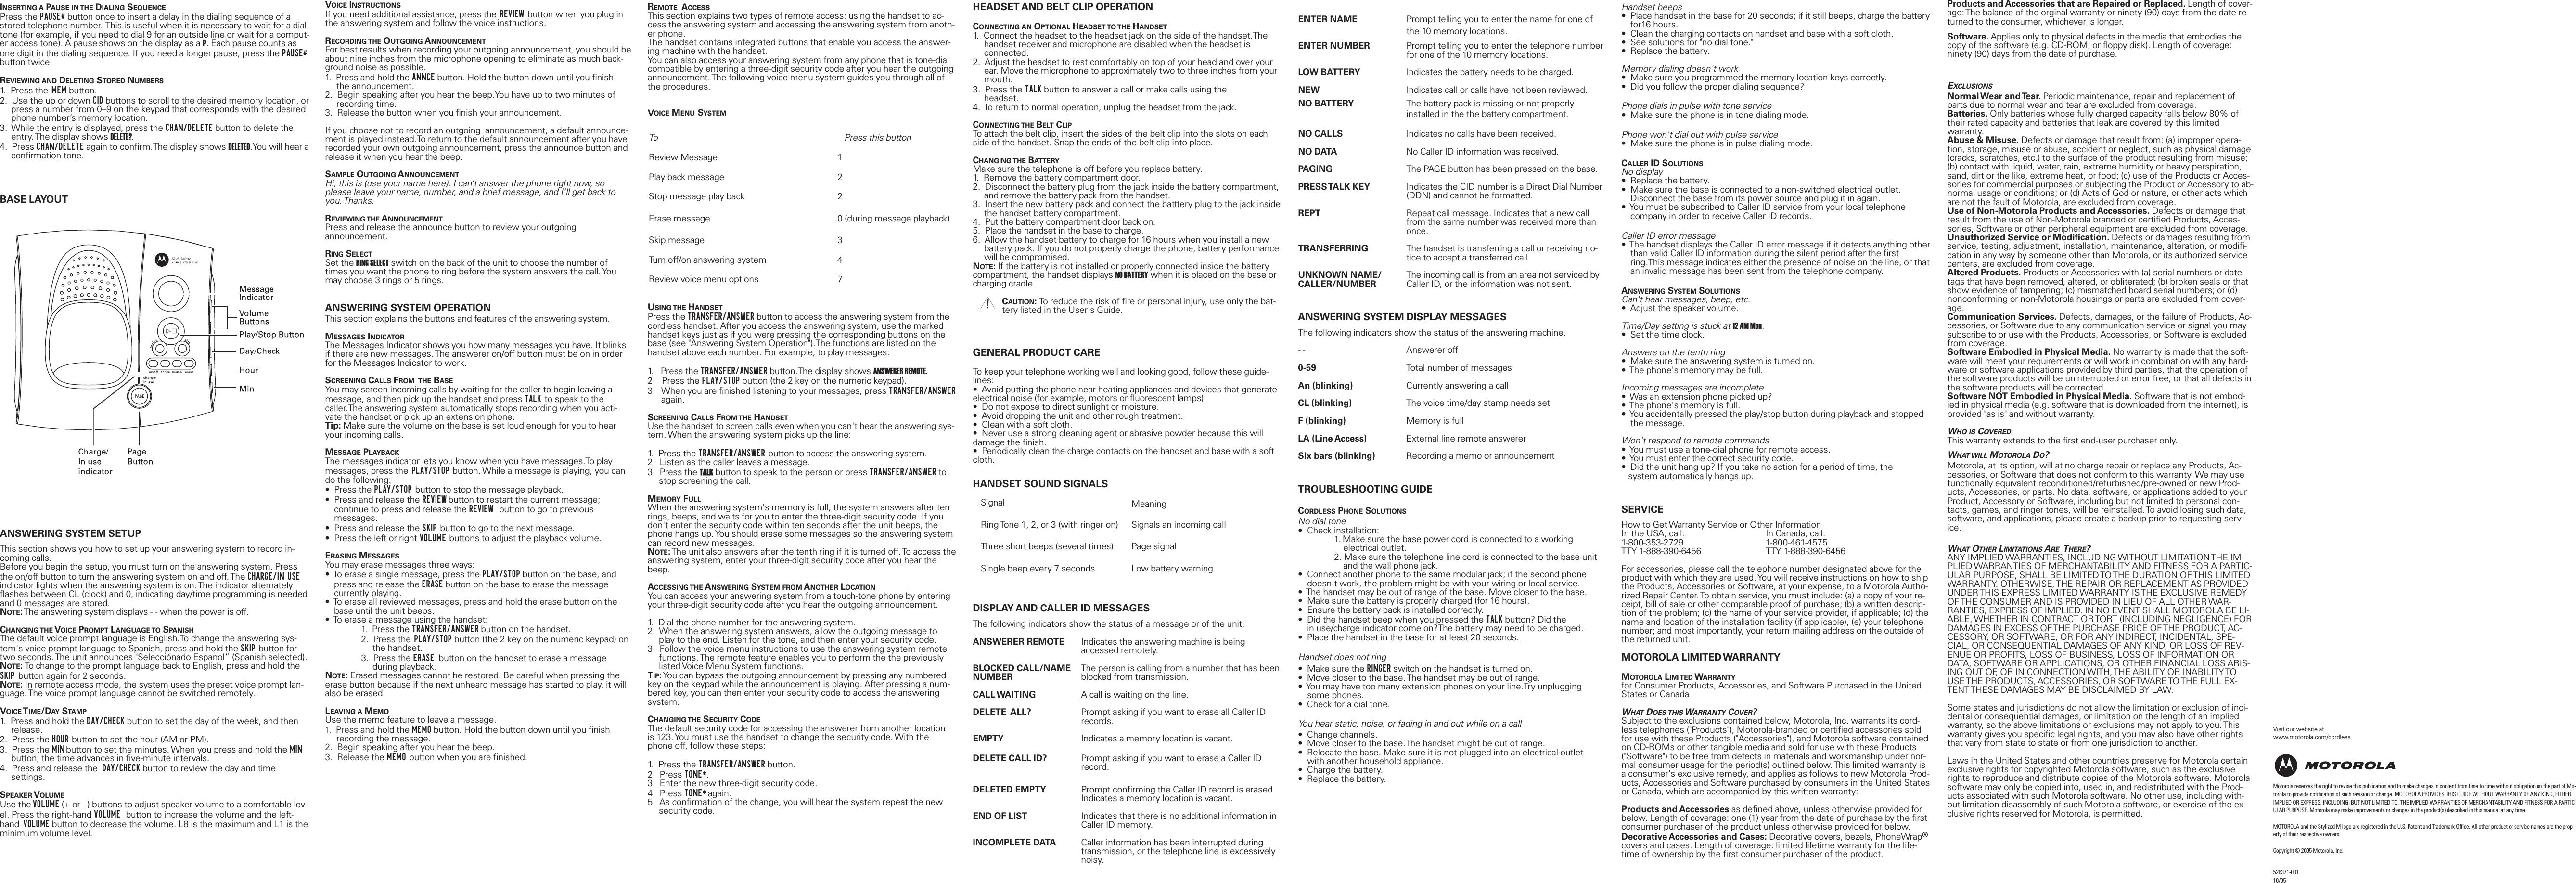
CCT Tech Advanced MA361SH 900MHz/2.4GHz 40 Channel Cordless Phone (Handset) User Manual Layout 1 Page 1

CCT Tech Advanced Products Limited 900MHz/2.4GHz 40 Channel Cordless Phone (Handset) Layout 1 Page 1

User Manual

Unplug this cordless phone immediately from an outlet if:The power cord or plug is damaged or frayed. Liquid has been spilled into the product. The product has been exposed to rain or water. Do not retrieve the handsetor base until after you have unplugged the power and phone from the wall,then retrieve the unit by the unplugged cords. The product has been dropped or the cabinet has been damaged. The product exhibits a distinct change in performance. INSTALLATION GUIDELINESRead and understand all instructions and save them for future reference. Follow all warnings and instructions marked on the product. Do not install this product near a bath tub, sink, or shower. Operate this phone using only the power source that is indicated on themarking label. If you are unsure of the power supply to your home, consultyour dealer or local power company. Do not place this product on an unstable cart, stand, or table. This productmay fall, causing serious damage to the product. Adjust only those controls that are covered by the operating instructions. Im-proper adjustment of other controls may result in damage and will often re-quire extensive work to restore the product to normal operation. Clean this product with a soft, damp cloth. Do not use chemicals or cleaningagents. Use only the power supply that came with this unit. Using other power sup-plies may damage the unit.Because cordless phones operate on electricity, you should have at least onephone in your home that isn’t cordless, in case the power in your home goesout.To avoid interference to nearby appliances, do not place the base of the cord-less phone on or near a TV, microwave oven, refrigerator, or VCR.To maintain compliance with the FCC’s RF exposure guidelines, place thebase unit at least 20 cm from nearby persons.BATTERY SAFETY PRECAUTIONS•  Do not burn, disassemble, mutilate, or puncture. Like other batteries of thistype, toxic materials could be released which can cause injury.•  To reduce the risk of fire or personal injury, use only the battery listed in theUser's Guide.•  Keep batteries out of the reach of children.•  Remove batteries if storing over 30 days.INTRODUCTIONCAUTION: When using telephone equipment, there are basic safely in-structions that should always he followed. Refer to the “ImportantSafety Instructions”section for further information on safely operatingyour cordless phone. Your cordless telephone/answering system with Caller ID and Call Waiting isdesigned to give you flexibility in use and high-quality performance.To get themost from your new cordless telephone/answering system, we suggest thatyou take a few minutes right now to read through this instruction manual.This telephone is a multifunction product for use with the Call Waiting andCaller ID services available from your local telephone company.Your CallerID/Call Waiting phone allows you to:• View the name and telephone number of a caller (Call Waiting/Caller ID)• Identify callers before you answer the phone• View the time and date of each incoming call• Record up to 40 Caller ID messages sequentially• Know who called while you were on the other line or when you were away.• Screen unwanted calls, eliminate harassment from annoying calls, orprepare before answering a callIMPORTANT: In order to use all of the features of this telephone, you must sub-scribe to two separate services available from your local telephone company:the standard Name/Number Caller ID service to know who is calling whenthe phone rings, and Caller ID with Call Waiting service to know who is callingwhile you are on the phone. Because cordless phones operate on electricity, you should have at least onephone in your home that isn't cordless, in case the power in your home goesout.BEFORE YOU  BEGINPARTS CHECKLISTMEMORYYou can store up to ten 24-digit numbers in memory for speed dialing.Speed dialing memory is distinct from Caller ID memory.STORING A NAME AND NUMBER IN MEMORY1.  Make sure the phone is off.2.  Press the MEM button.3.  Press a number from 0–9 on the keypad to store the phone number in that memory location. For example, press the number 1 key to store the record in memory location 1. You will hear a confirmation tone. If thememory location is occupied, the memory location and stored name and number appear on the screen. This indicates you must choose another memory location.NOTE:If the memory location is empty, EMPTY appears in the display.4.  Press the MEM button again.The display shows ENTER  NAME.NOTE:If you don't want to enter a name, skip step 5.5.  Use the handset number keypad to enter a name (up to 15 characters).The chart below shows how many times to press each button on the handset to enter letters and special characters (e.g., press 7 three times to enter R). 6.  Press the MEM button again to save the name.The display shows ENTERNUMBER.7.  Use the handset number keypad to enter the telephone number (up to 24 digits, including pauses, which are entered by pressing the PAUSE*button), and press the MEM button again to save the number. The unit beeps to confirm.STORING A REDIAL NUMBER1.  Repeat steps 1 through 6 in “Storing a Name and Number in Memory.”2.  Press the REDIAL button.3.  Press the MEM button to store the number.You will hear a confirmation tone.CHANGING A STORED NUMBER1.  Repeat steps 1 through 7 in “Storing a Name and Number in Memory.”2.  REPLACE MEMO? shows in the display.3.  Press the MEM button to replace the old number with the new number.You will hear a confirmation tone. DIALING A STORED NUMBER1.  Make sure the phone is on.2.  Press the MEM button.3.  Press a number from 0–9 on the keypad for the desired memory loca-tion. The number dials automatically.OR1.  Make sure the phone is not in Talk mode.2.  Press the MEM button.3.  Use the up or down CID buttons to scroll through the numbers stored inmemory until the desired number is shown.4.  Press TALK.The number dials automatically.CHAIN DIALING FROM MEMORYUse this feature to make calls that require a sequence of numbers, suchas accessing your bank account information from your phone. You simplydial each part of the number sequence from memory. The following exam-ple shows how you can use chain dialing to make a call through a long dis-tance service.1.  Press the MEM button, and then press the 7 key.2.  When you hear the access tone, press MEM again, and then press the8 key.3.  At the next access tone, press MEM, and then the 9 key.TIP:Wait for the access tones before pressing the MEM button, or your callmight not go through.PAGING THE HANDSETThis feature helps to locate a misplaced handset.Press the page button on the base.The handset will beep for about two minutesor until you press TALK on the handset or press the page button on the base.NOTE:You can still page the handset if the ringer is turned off. However, if thebattery is dead, the Paging feature will not work.CALLER ID FEATURESFor Caller ID to work on this system, you must subscribe to Caller ID service.Similarly, to receive Caller ID information for a Call Waiting call, you must sub-scribe to the combined Caller ID/Call Waiting service. The unit can store up to40 calls in the Caller ID log for later review. When the Caller ID log’s memory isfull, a new call automatically replaces the oldest call in memory. NEW appears inthe display for calls received that have not been reviewedYou can also receive Caller ID information from Call Waiting calls. If you receivean incoming call, and you are already on the phone, a beep indicates the pres-ence of a Call Waiting Call on the line, and Caller ID information for the Call Wait-ing call shows on the display. This information may include the caller’s name,phone number, date, and time.NOTE:Check with your local phone company regarding name service availability.REVIEWING CALLER ID RECORDSAs calls are received and stored, the display is updated to let you know howmany calls have been received. To review the list of calls received:• Make sure the phone is off.• Press the up CID button to scroll through the call records from the most recent to the oldest. Press the down CID button to scroll through the call records from the oldest to the newest.DELETING THE CURRENT RECORD1.  When the Caller ID record shows in the display, press and release the CHAN/DELETE button.The display shows DELETE CALL ID?2. Press the CHAN/DELETE button again to confirm.You will hear a confirmationtone,the display shows DELETED, and then the next Caller ID record appears in the display.DELETING ALL RECORDS1.  Press the up or down CID buttons until a Caller ID record is displayed.2. Press and hold CHAN/DELETE until the handset unit beeps.The display shows DELETE ALL?3. Press CHAN/DELETE again to erase all records.You will hear a confirmation tone, and the display shows NO CALLS.STORING CALLER ID RECORDS IN MEMORYNOTE: Caller ID records should be in the correct format for dialing, as Caller IDphone numbers cannot be changed once they are stored in memory.1. Press the up or down CID button until the desired Caller ID record is dis-played.2. Press the MEM button.3. Press a number from 0–9 on the kepad to store the caller’s number in that memory location. For example, press the number 1 key to store the record in memory location 1. You will hear a confirmation tone. TOREPLACE AN OLD CALLER ID RECORD WITH A NEW CALLER ID RECORD:1.  If the memory location is occupied, the memory location and stored name and number appear on the screen. REPLACE MEMO? shows in the display.2. Press the MEM button again, and the new Caller ID record replaces the oldrecord in that location.You will hear a confirmation tone.DIALING A CALLER ID NUMBER1.   Make sure the phone is off.2.  Use the up or down CID buttons to display the desired Caller ID record.3.  Press the TALK button to dial the number.CHANGING A CALLER ID RECORD’SNUMBER FORMATThe FRMT button lets you change the format of the displayed Caller IDnumber.The available formats are as follows:7-digit 7-digit telephone number10-digit 3-digit area code + 7-digit telephone number11-digit Area code + telephone number 1.  Use the up or down CID buttons to scroll to the Caller Id record you wantto change.2.  Press the FRMT button. Repeat if necessary, until the correct number ofdigits shows in the display.2.  Set the ringer switch on the handset to ON, and place the handset on thebase.WALL MOUNTINGTo mount the phone on a wall:• Attach the wall plate at the height that provides you with easy accessibilityto the handset.•Slip the mounting holes on the back of the base over the wall plate posts, and slide the unit down into place.HANDSET LAYOUTTELEPHONE SETUPREGISTRATIONYou must register both handsets before use.• Register the first handset by placing it on the base and allowing it to charge for 16 hours.  The first handset will register automatically after it completescharging.• Place the second handset in the charge cradle and allow it to charge for 16 hours.  After it completes charging, place it on the main base station for 20seconds. It will then register automatically .NOTE:In case of a power failure lasting more than five minutes, you must putboth handsets on the base for 20 seconds to re-register.PERSONALIZING YOUR HANDSETPersonalize your new handset by selecting language, local area code, ringer-tone, or tone/pulse settings. When changing these settings, make sure thephone is off (not in talk mode). Pressing the TONE* button will remove youfrom the menu selection process without changing the feature you are in.DISPLAY LANGUAGE1. Press the FLASH/SETTINGS button until 1ENG 2FRA 3ESP shows in the display.2. Use the up or down CID button or the handset number pad to select 1 (Eng-lish), 2 (French), or 3 (Spanish).The default setting is 1ENG.3. Press the FLASH/SETTINGS button to confirm and advance to the next menufeature. You will hear a confirmation tone. LOCAL AREA CODEIf you enter your local three-digit area code in the area code menu, your localarea code does not display on the Caller ID (CID) list. Instead, your phone willonly display the local seven-digit number. Calls received from outside your lo-cal area code will display the full ten-digit number.1.  Press the FLASH/SETTINGS button until AREA CODE- - - shows in the display. Thede-fault setting is - - -.2. Use the handset number pad to enter your three-digit area code.NOTE:If you make a mistake, press the CHAN/DELETE button to erase the incor-rect area code and repeat step 2.3.  Press the FLASH button to confirm and to advance to the next menu fea-ture. You will hear a confirmation tone.RINGER TONE1.  Press the FLASH/SETTINGS button until RINGER TONE shows in the display.2. Use the up or down CID buttons or the handset number pad to select from Ringer Tone 1, 2, or 3.The default setting is RINGER TONE 1.3. Press the FLASH/SETTINGS button to confirm and to advance to the next menu feature. You will hear a confirmation tone.TELEPHONE JACK REQUIREMENTSTo use this phone, you need an RJ11C-type modular telephone jack installedin your home. If you don't have a modular jack, call your local phone companyto find out how to get one installed.DIGITAL SECURITY SYSTEMYour cordless phone uses a digital security system to protect against falseringing, unauthorized access, and charges to your phone line. When youplace the handset in the base, the unit verifies its security code. After a pow-er outage or battery replacement, you should place the handset in the basefor about 20 seconds to reset the code.INSTALLING THE  PHONEInstallation Note: Some cordless telephones operate at the 2.4 GHz fre-quency and may cause interference with, or receive interference from, near-by TVs, microwave ovens, and VCRs. To minimize or prevent such interfer-ence, the base of the cordless telephone should not be placed near or on topof a TV, microwave oven, or VCR. If such interference continues, move thecordless telephone farther away from these appliances. Certain other com-munications devices may also operate at the 2.4 GHz frequency for commu-nication, and, if not properly set, these devices may interfere with each otherand/or your new telephone. If you are concerned with interference, pleaserefer to the owner's manual for these devices on how to properly set chan-nels to avoid interference. Typical devices that may use the 2.4 GHz frequen-cy for communication include wireless audio/video senders, wireless com-puter networks, multi-handset cordless telephone systems, and some long-range cordless telephone systems.INSTALLING THE PHONEYour cordless telephone/answering system should be placed on a level sur-face, such as a desk or table top, or you can mount it on a wall.INSTALLING THE HANDSET BATTERYNOTE:You must connect the handset battery before use.1.  Locate the battery door on the back of the handset.2.  Remove the battery door by sliding it downward. Removing the battery door exposes the battery compartment, in which the battery pack is in-stalled.3.  Plug the battery pack cord into the jack inside the battery compartment.4.  Insert the battery pack. To ensure proper battery installation, the connec-tor is keyed and can be inserted only one way.5.  Close the battery compartment by pushing the door up until it snaps into place.6.  Place the handsets in the base and charge cradle.Allow the phone to charge for 16 hours prior to first use. If you don'tproperly charge the phone, battery performance is compromised.CONNECTING THE AC (ELECTRICAL) POWERPlug the power adapter cord into the power jack on the bottom of the baseand the other end into an electrical outlet. The in use/charge indicator on thebase turns on to indicate the battery is charging when the handset is on thecradle. Place the handset in the base to begin charging the battery.NOTE:If the battery is not installed or properly connected inside the batterycompartment, the handset displays NO BATTERY when it is placed on the base orcharge cradle.EXTRA CHARGING CRADLE1.  Plug the extra charging cradle into an electrical outlet.2.  Place the handset on the charging cradle.3.  The charge indicator on the cradle turns on, verifying the battery is charging.4.  Allow the phone to charge for 16 hours prior to first use.CONNECTING THE TELEPHONE LINE1.  Plug one end of the telephone line cord into the TEL LINE jack on the bottom of the base and the other end into your home's modular phone jack.TONE/PULSE1.  Press the FLASH/SETTINGS button until 1 TONE 2 PULSE shows in the display.2.  Use the up or down CID buttons or the handset number pad to enter your selection.The default setting is 1 TONE.3.  Press the FLASH/SETTINGS button to confirm and advance to the next menu feature. You will hear a confirmation tone.Note: If you change the Tone/Pulse setting on one handset, you also should doso on the second handset. Refer to “Temporary Tone” for further informationabout pulse service.FACTORY DEFAULTThis feature allows you to restore the unit's original settings.1.  Press the FLASH/SETTINGS button until DEFAULT shows in the display.2. Use the up or down CID buttons to scroll to YES. The default setting is NO.3. Press FLASH/SETTINGS to confirm.You will hear a confirmation tone.CORDLESS PHONE BASICSMAKING A CALL1. Press the TALK button and dial the desired number. OR Dial the number, then press the TALK button.2. To hang up, press the TALK button, or place the handset in the cradle.NOTE:You can only use one handset at a time. There are no conference or in-tercom features for these units.RECEIVING A CALL1.  To answer a call, press the TALK  button. 2. To hang up, press the TALK button or place the handset in the base or charg-ing cradle.CALL TRANSFERDuring an external call, you may transfer the call to another handset.1. Press the answer/transfer button on originating handset. TRANSFERRING shows inthe display. Both handsets will be paged.2. Press the TRANSFER/ANSWER or TALK button on the receiving handset to an-swer the call.NOTE:To cancel the call transfer, press the TONE* or TRANSFER/ANSWER button onthe originating handset.REDIALPress the REDIAL button to quickly dial the last number you called.INUSE INDICATORWhen the in use/charge indicator on the base is lit, the handset is either in useor charging.The in use/charge indicator on the base also flashes when you re-ceive a call.FLASHIf you subscribe to Call Waiting/Caller ID service from your local telephonecompany, you will receive Caller ID information (if available) on Call Waitingcalls. During a phone call, you will hear a beep to indicate another call is waitingon the line, and Caller ID information for the waiting call shows on the handsetdisplay. To connect to the waiting call, press the FLASH/SETTINGS button on the handset,and your original call is put on hold. You may switch back and forth between thetwo calls by pressing the FLASH/SETTINGS button.TIP:Do not use the TALK button to activate custom calling services such as callwaiting, or you'll hang up the phone.VOLUMEWhen the phone is on, press the the up or down VOLUME buttons found on theside of the handset to adjust the volume of the handset's earpiece. Press theup arrow to increase the volume and the down arrow to decrease the volume.You will see the volume setting on the handset display. VOL 4 is the maximumand VOL 1 is the minimum volume. CHANNEL BUTTONWhile talking on the phone, you might need to manually change the channelto reduce static caused by appliances such as baby monitors, garage dooropeners, microwave ovens, or other cordless phones. Press and release theCHAN/DELETE button to move to the next clear channel.TEMPORARY TONEThis feature is useful only if you have pulse (rotary) service.Temporary ToneDialing enables pulse (rotary) service phone users to access touchstone servic-es offered by banks, credit card companies, etc. For example, when you callyour bank, you may need to enter your bank account number. Temporarilyswitching to touchstone mode allows you to send your number.1. Dial the telephone number and wait for the line to connect.2. When your call is answered, press the TONE* button on the handset to tem-porarily change from pulse dialing to tone dialing.3. When you hang up the handset, the phone automatically returns to pulse(rotary) dialing mode.EXITPress the TONE* button to cancel any command you initiated.RINGER SWITCHThe ringer switch (found on the side of the handset below the volume buttons)must be switched on for the handset to ring during incoming calls.FCC COMPLIANCE CLASS B DIGITAL DEVICEThis equipment has been tested and found to comply with the limits for aClass B digital device, pursuant to Part 15 of the FCC Rules. These limits aredesigned to provide reasonable protection against harmful interference in aresidential environment. This equipment generates, uses, and can radiate ra-dio frequency energy and, if not installed and used in accordance with the in-structions, may cause harmful interference to radio communications. Howev-er, there is no guarantee that interference will not occur in a particular instal-lation. If this equipment does cause harmful interference to radio or televi-sion reception, which can be determined by turning the equipment off andon, the user is encouraged to try to correct the interference by one of the fol-lowing measures:•Re-orient or relocate the receiving antenna.• Increase the separation between the equipment and receiver.• Connect the equipment into an outlet on a circuit different from thatto which the receiver is connected.• Consult the dealer or an experienced radio/TV technician for help.CAUTION: Changes or modifications not expressly approved by Motoro-la for compliance could void the user’s authority to operate the equip-ment.FCC DECLARATION OF CONFORMITYMotorola, Inc., Connected Home Solutions, 101 Tournament Drive, Horsham,PA 19044, 1-215-323-1000, declares that the MA361S cordless phone com-plies with 47 CFR Parts 2 and 15 of the FCC Rules as Class B digital devices.CANADIAN COMPLIANCEThis Class B digital apparatus meets all requirements of the Canadian Inter-ference-Causing Equipment Regulations.Cet appareil numérique de la classe B est conforme la norme NMB-003 duCanada.FEDERAL COMMUNICATIONS COMMISSION (FCC) PART 68STATEMENTThe Motorola M361S complies with Part 68 of the FCC rules and the require-ments adopted by the Administrative Council for Terminal Attachments(ACTA). On the bottom of this equipment is a label that contains, among oth-er information, a product identifier in format US: AAAEQ##TXXXX. If request-ed, this information must be provided to the telephone company.The Ringer Equivalence Number (REN) is used to determine the number ofdevices that may be connected to the telephone line. Excessive RENs on thetelephone line may result in the devices not ringing in response to an incom-ing call. In most, but not all areas, the sum of the RENs should not exceedfive (5.0). To be certain of the number of devices that may be connected tothe line, as determined by the total RENs, contact your local  telephone com-pany.For products approved after July 23, 2001, the REN for this product ispart of the product identifier that has the format US: AAAEQ##TXXXX. Thedigits represented by ## are the REN without a decimal point (e.g., 02 is aREN of 0.2). For earlier products, the REN is separately shown on the label.This equipment uses the following USOC jack: RJ11C. A plug and jack usedto connect this equipment to the premises wiring and telephone networkmust comply with the applicable FCC Part 68 rules and requirements adopt-ed by the ACTA. A compliant telephone cord and modular plug is providedwith this product. It is designed to be connected to a compatible modularjack that is also compliant. See installation instructions for details. Connection to Party Line Service is subject to state tariffs. Contact the statepublic utility commission, public service commission, or corporation commis-sion for information.If this equipment causes harm to the telephone network, the telephonecompany will notify you in advance that the temporary discontinuance ofservices may be required. If advance notice is not practical, the telephonecompany will notify the customer as soon as possible. Also, you will be ad-vised of your right to file a complaint with the FCC if you believe it is neces-sary.The telephone company may make changes in its facilities, equipment, oper-ations, or procedures that could affect the operation of the equipment. If thishappens, the telephone company will provide advance notice in order for youto make necessary modifications to maintain uninterrupted service.If trouble is experienced with this equipment, for repair or warranty informa-tion, please contact Motorola, Inc. at 1-877-466-8646. If the equipment iscausing harm to the telephone network, the telephone company may re-quest that you disconnect the equipment from the network until the problemis solved.This equipment is hearing aid compatible.If your home has specially wired alarm equipment connected to the tele-phone line, ensure the installation of the M361S does not disable your alarmequipment. If you have questions about what will disable alarm equipment,consult your telephone company or a qualified installer.INDUSTRY CANADA CS-03 STATEMENTThis product meets the applicable Industry Canada technical specifications.The Ringer Equivalence Number (REN) is an indication of the maximum num-ber of devices allowed to be connected to a telephone interface.The termina-tion on an interface may consist of any combination of devices subject onlyto the requirement that the sum of the RENs of all the devices does not ex-ceed five.CANADA—INDUSTRY CANADA (IC)This Class B digital apparatus complies with Canadian ICES-003.Cet appareil numérique de la classe B est conforme à la norme NMB-003 duCanada.IMPORTANT SAFETY INSTRUCTIONSFollow these safety precautions when using your cordless phone to reducethe risk of fire, electric shock and injury to persons or property: To reduce the risk of fire and shock:Keep all slits and openings of the phone unblocked. Do not set the phone ona heating register or over a radiator. Ensure that proper ventilation is providedat the installation site. Do not use while wet or while standing in water. Do not use this product near water (for example, near a bath tub, kitchensink, or swimming pool). Do not allow anything to rest on the power cord. Place the power cord sothat it will not be walked on.   Never insert objects of any kind into the product slits, as that may result infire or shock. Unplug this product from the wall outlet before cleaning. Do not use liquidcleaners or aerosol cleaners. Use a damp cloth for cleaning. Do not disassemble this product. If service or repair work is required, contactthe Motorola address found in the back of this user guide. Do not overload wall outlets and extension cords. Avoid using during an electrical storm. Use a surge protector to protect theequipment. Do not use this cordless phone to report a gas leak, especially if you are inthe vicinity of the gas line.CAUTION: To reduce the risk of fire, use only No. 26 AWG or larger UL listedor CSA Certified Telecommunication Line Cord. ButtonNumber of Presses123451space – * , 12A B C ( 23D E F ) 34G H I # 45J K L / 56M N O ‘ 67P Q R S 78T U V ? 89W X Y Z 9MA361SCordless Phone and Answering MachineUser GuideThe Number For Memory LocationLong distance access number 7Authorization code 8Aunt Bea 9
INSERTING A PAUSE IN THE DIALING SEQUENCEPress the PAUSE# button once to insert a delay in the dialing sequence of astored telephone number. This is useful when it is necessary to wait for a dialtone (for example, if you need to dial 9 for an outside line or wait for a comput-er access tone). A pause shows on the display as a P. Each pause counts asone digit in the dialing sequence. If you need a longer pause, press the PAUSE#button twice.REVIEWING AND DELETING STORED NUMBERS1.  Press the MEM button.2.  Use the up or down CID buttons to scroll to the desired memory location, or press a number from 0–9 on the keypad that corresponds with the desired phone number’s memory location.3.  While the entry is displayed, press the CHAN/DELETE button to delete the entry. The display shows DELETE?.4.  Press CHAN/DELETE again to confirm.The display shows DELETED.You will hear a confirmation tone.BASE LAYOUTANSWERING SYSTEM SETUPThis section shows you how to set up your answering system to record in-coming calls. Before you begin the setup, you must turn on the answering system. Pressthe on/off button to turn the answering system on and off. The CHARGE/IN USEindicator lights when the answering system is on. The indicator alternatelyflashes between CL (clock) and 0, indicating day/time programming is neededand 0 messages are stored.NOTE:The answering system displays - - when the power is off.CHANGING THE VOICE PROMPT LANGUAGE TO SPANISHThe default voice prompt language is English.To change the answering sys-tem's voice prompt language to Spanish, press and hold the SKIP button fortwo seconds. The unit announces "Selecciónado Espanol” (Spanish selected).NOTE:To change to the prompt language back to English, press and hold theSKIP button again for 2 seconds.NOTE:In remote access mode, the system uses the preset voice prompt lan-guage. The voice prompt language cannot be switched remotely.VOICE TIME/DAY STAMP1.  Press and hold the DAY/CHECK button to set the day of the week, and then release.2.  Press the HOUR button to set the hour (AM or PM).3.  Press the MIN button to set the minutes. When you press and hold the MINbutton, the time advances in five-minute intervals.4.  Press and release the  DAY/CHECK button to review the day and time settings.SPEAKER VOLUMEUse the VOLUME (+ or - ) buttons to adjust speaker volume to a comfortable lev-el. Press the right-hand VOLUME  button to increase the volume and the left-hand  VOLUME button to decrease the volume. L8 is the maximum and L1 is theminimum volume level. VOICE INSTRUCTIONSIf you need additional assistance, press the REVIEW button when you plug inthe answering system and follow the voice instructions.RECORDING THE OUTGOING ANNOUNCEMENTFor best results when recording your outgoing announcement, you should beabout nine inches from the microphone opening to eliminate as much back-ground noise as possible.1.  Press and hold the ANNCE button. Hold the button down until you finish the announcement.2.  Begin speaking after you hear the beep.You have up to two minutes of recording time.3.  Release the button when you finish your announcement.If you choose not to record an outgoing  announcement, a default announce-ment is played instead.To return to the default announcement after you haverecorded your own outgoing announcement, press the announce button and release it when you hear the beep.SAMPLE OUTGOING ANNOUNCEMENTHi, this is (use your name here). I can’t answer the phone right now, soplease leave your name, number, and a brief message, and I’ll get back toyou. Thanks.REVIEWING THE ANNOUNCEMENTPress and release the announce button to review your outgoing  announcement.RING SELECTSet the RING SELECT switch on the back of the unit to choose the number oftimes you want the phone to ring before the system answers the call. Youmay choose 3 rings or 5 rings.ANSWERING SYSTEM OPERATIONThis section explains the buttons and features of the answering system.MESSAGES INDICATORThe Messages Indicator shows you how many messages you have. It blinksif there are new messages. The answerer on/off button must be on in orderfor the Messages Indicator to work.SCREENING CALLS FROM THE BASEYou may screen incoming calls by waiting for the caller to begin leaving a message, and then pick up the handset and press TALK to speak to thecaller.The answering system automatically stops recording when you acti-vate the handset or pick up an extension phone.Tip: Make sure the volume on the base is set loud enough for you to hearyour incoming calls.MESSAGE PLAYBACKThe messages indicator lets you know when you have messages.To playmessages, press the PLAY/STOP button. While a message is playing, you cando the following:•  Press the PLAY/STOP button to stop the message playback.•  Press and release the REVIEW button to restart the current message; continue to press and release the REVIEW  button to go to previous messages.•  Press and release the SKIP button to go to the next message.•  Press the left or right VOLUME buttons to adjust the playback volume.ERASING MESSAGESYou may erase messages three ways:•  To erase a single message, press the PLAY/STOP button on the base, and press and release the ERASE button on the base to erase the message currently playing.•  To erase all reviewed messages, press and hold the erase button on the base until the unit beeps.•  To erase a message using the handset:1.  Press the TRANSFER/ANSWER button on the handset.2.  Press the PLAY/STOP button (the 2 key on the numeric keypad) on the handset.3.  Press the ERASE button on the handset to erase a message during playback.NOTE:Erased messages cannot he restored. Be careful when pressing theerase button because if the next unheard message has started to play, it willalso be erased.LEAVING A MEMOUse the memo feature to leave a message.1.  Press and hold the MEMO button. Hold the button down until you finish recording the message.2.  Begin speaking after you hear the beep.3.  Release the MEMO button when you are finished.REMOTE ACCESSThis section explains two types of remote access: using the handset to ac-cess the answering system and accessing the answering system from anoth-er phone.The handset contains integrated buttons that enable you access the answer-ing machine with the handset.You can also access your answering system from any phone that is tone-dialcompatible by entering a three-digit security code after you hear the outgoingannouncement. The following voice menu system guides you through all ofthe procedures.VOICE MENU SYSTEMUSING THE HANDSETPress the TRANSFER/ANSWER button to access the answering system from thecordless handset. After you access the answering system, use the markedhandset keys just as if you were pressing the corresponding buttons on thebase (see "Answering System Operation").The functions are listed on thehandset above each number. For example, to play messages:1.   Press the TRANSFER/ANSWER button.The display shows ANSWERER REMOTE.2.   Press the PLAY/STOP button (the 2 key on the numeric keypad).3.   When you are finished listening to your messages, press TRANSFER/ANSWER again.SCREENING CALLS FROM THE HANDSETUse the handset to screen calls even when you can't hear the answering sys-tem. When the answering system picks up the line:1.  Press the TRANSFER/ANSWER button to access the answering system.2.  Listen as the caller leaves a message.3.  Press the TALK button to speak to the person or press TRANSFER/ANSWER to stop screening the call.MEMORY FULLWhen the answering system's memory is full, the system answers after tenrings, beeps, and waits for you to enter the three-digit security code. If youdon't enter the security code within ten seconds after the unit beeps, thephone hangs up. You should erase some messages so the answering systemcan record new messages.NOTE:The unit also answers after the tenth ring if it is turned off. To access theanswering system, enter your three-digit security code after you hear thebeep.ACCESSING THE ANSWERING SYSTEM FROM ANOTHER LOCATIONYou can access your answering system from a touch-tone phone by enteringyour three-digit security code after you hear the outgoing announcement.1.  Dial the phone number for the answering system.2.  When the answering system answers, allow the outgoing message to play to the end. Listen for the tone, and then enter your security code.3.  Follow the voice menu instructions to use the answering system remote functions. The remote feature enables you to perform the the previously listed Voice Menu System functions.TIP:You can bypass the outgoing announcement by pressing any numberedkey on the keypad while the announcement is playing. After pressing a num-bered key, you can then enter your security code to access the answeringsystem.CHANGING THE SECURITY CODEThe default security code for accessing the answerer from another locationis 123. You must use the handset to change the security code. With thephone off, follow these steps:1.  Press the TRANSFER/ANSWER button.2.  Press TONE*.3.  Enter the new three-digit security code.4.  Press TONE* again.5.  As confirmation of the change, you will hear the system repeat the new  security code.HEADSET AND BELT CLIP OPERATIONCONNECTING AN OPTIONAL HEADSET TO THE HANDSET1.  Connect the headset to the headset jack on the side of the handset.The handset receiver and microphone are disabled when the headset is connected.2.  Adjust the headset to rest comfortably on top of your head and over your ear. Move the microphone to approximately two to three inches from your mouth.3.  Press the TALK button to answer a call or make calls using the headset.4.  To return to normal operation, unplug the headset from the jack.CONNECTING THE BELT CLIPTo attach the belt clip, insert the sides of the belt clip into the slots on eachside of the handset. Snap the ends of the belt clip into place.CHANGING THE BATTERYMake sure the telephone is off before you replace battery.1.  Remove the battery compartment door.2.  Disconnect the battery plug from the jack inside the battery compartment, and remove the battery pack from the handset.3.  Insert the new battery pack and connect the batttery plug to the jack insidethe handset battery compartment.4.  Put the battery compartment door back on.5.  Place the handset in the base to charge.6.  Allow the handset battery to charge for 16 hours when you install a new battery pack. If you do not properly charge the phone, battery performancewill be compromised.NOTE:If the battery is not installed or properly connected inside the batterycompartment, the handset displays NO BATTERY when it is placed on the base orcharging cradle.CAUTION:To reduce the risk of fire or personal injury, use only the bat-tery listed in the User's Guide.GENERAL PRODUCT CARETo keep your telephone working well and looking good, follow these guide-lines:•  Avoid putting the phone near heating appliances and devices that generateelectrical noise (for example, motors or fluorescent lamps)•  Do not expose to direct sunlight or moisture.•  Avoid dropping the unit and other rough treatment.•  Clean with a soft cloth.•  Never use a strong cleaning agent or abrasive powder because this willdamage the finish.•  Periodically clean the charge contacts on the handset and base with a softcloth.HANDSET SOUND SIGNALSDISPLAY AND CALLER ID MESSAGESThe following indicators show the status of a message or of the unit.ANSWERER REMOTE Indicates the answering machine is being accessed remotely.BLOCKED CALL/NAME The person is calling from a number that has been NUMBER blocked from transmission.CALL WAITING A call is waiting on the line.DELETE  ALL? Prompt asking if you want to erase all Caller ID records.EMPTY Indicates a memory location is vacant.DELETE CALL ID? Prompt asking if you want to erase a Caller ID record.DELETED EMPTY Prompt confirming the Caller ID record is erased.Indicates a memory location is vacant.END OF LIST Indicates that there is no additional information in Caller ID memory.INCOMPLETE DATA Caller information has been interrupted during transmission, or the telephone line is excessively noisy.ENTER NAME Prompt telling you to enter the name for one of the 10 memory locations.ENTER NUMBER Prompt telling you to enter the telephone number for one of the 10 memory locations.LOW BATTERY Indicates the battery needs to be charged.NEW Indicates call or calls have not been reviewed.NO BATTERY The battery pack is missing or not properly installed in the the battery compartment.NO CALLS Indicates no calls have been received.NO DATA No Caller ID information was received.PAGING The PAGE button has been pressed on the base.PRESS TALK  KEY Indicates the CID number is a Direct Dial Number (DDN) and cannot be formatted.REPT Repeat call message. Indicates that a new call from the same number was received more than once.TRANSFERRING The handset is transferring a call or receiving no-tice to accept a transferred call.UNKNOWN NAME/ The incoming call is from an area not serviced byCALLER/NUMBER Caller ID, or the information was not sent.ANSWERING SYSTEM DISPLAY MESSAGESThe following indicators show the status of the answering machine. - - Answerer off0-59 Total number of messagesAn (blinking) Currently answering a callCL (blinking) The voice time/day stamp needs setF (blinking) Memory is fullLA (Line Access) External line remote answererSix bars (blinking) Recording a memo or announcementTROUBLESHOOTING GUIDECORDLESS PHONE SOLUTIONSNo dial tone•  Check installation: 1. Make sure the base power cord is connected to a workingelectrical outlet.2. Make sure the telephone line cord is connected to the base unit and the wall phone jack.•  Connect another phone to the same modular jack; if the second phone doesn't work, the problem might be with your wiring or local service.•  The handset may be out of range of the base. Move closer to the base.•  Make sure the battery is properly charged (for 16 hours).•  Ensure the battery pack is installed correctly.•  Did the handset beep when you pressed the TALK button? Did the in use/charge indicator come on?The battery may need to be charged.•  Place the handset in the base for at least 20 seconds. Handset does not ring•  Make sure the RINGER switch on the handset is turned on.•  Move closer to the base. The handset may be out of range.•  You may have too many extension phones on your line.Try unplugging some phones.•  Check for a dial tone.You hear static, noise, or fading in and out while on a call•  Change channels.•  Move closer to the base.The handset might be out of range.•  Relocate the base. Make sure it is not plugged into an electrical outlet with another household appliance.•  Charge the battery.•  Replace the battery.Handset beeps•  Place handset in the base for 20 seconds; if it still beeps, charge the batteryfor16 hours.•  Clean the charging contacts on handset and base with a soft cloth.•  See solutions for "no dial tone."•  Replace the battery.Memory dialing doesn't work•  Make sure you programmed the memory location keys correctly.•  Did you follow the proper dialing sequence?Phone dials in pulse with tone service•  Make sure the phone is in tone dialing mode.Phone won't dial out with pulse service•  Make sure the phone is in pulse dialing mode.CALLER ID SOLUTIONSNo display•  Replace the battery.•  Make sure the base is connected to a non-switched electrical outlet. Disconnect the base from its power source and plug it in again.•  You must be subscribed to Caller ID service from your local telephone company in order to receive Caller ID records.Caller ID error message•  The handset displays the Caller ID error message if it detects anything other than valid Caller ID information during the silent period after the first ring.This message indicates either the presence of noise on the line, or that an invalid message has been sent from the telephone company.ANSWERING SYSTEM SOLUTIONSCan't hear messages, beep, etc.•  Adjust the speaker volume.Time/Day setting is stuck at 12 AM Mon.•  Set the time clock.Answers on the tenth ring•  Make sure the answering system is turned on.•  The phone's memory may be full.Incoming messages are incomplete•  Was an extension phone picked up?•  The phone's memory is full.•  You accidentally pressed the play/stop button during playback and stopped the message.Won't respond to remote commands•  You must use a tone-dial phone for remote access.•  You must enter the correct security code.•  Did the unit hang up? If you take no action for a period of time, the system automatically hangs up.SERVICEHow to Get Warranty Service or Other InformationIn the USA, call: In Canada, call:1-800-353-2729 1-800-461-4575TTY 1-888-390-6456 TTY 1-888-390-6456For accessories, please call the telephone number designated above for theproduct with which they are used. You will receive instructions on how to shipthe Products, Accessories or Software, at your expense, to a Motorola Autho-rized Repair Center. To obtain service, you must include: (a) a copy of your re-ceipt, bill of sale or other comparable proof of purchase; (b) a written descrip-tion of the problem; (c) the name of your service provider, if applicable; (d) thename and location of the installation facility (if applicable), (e) your telephonenumber; and most importantly, your return mailing address on the outside ofthe returned unit. MOTOROLA LIMITED WARRANTYMOTOROLA LIMITED WARRANTYfor Consumer Products, Accessories, and Software Purchased in the UnitedStates or CanadaWHAT DOES THIS WARRANTY COVER?Subject to the exclusions contained below, Motorola, Inc. warrants its cord-less telephones ("Products"), Motorola-branded or certified accessories soldfor use with these Products ("Accessories"), and Motorola software containedon CD-ROMs or other tangible media and sold for use with these Products("Software") to be free from defects in materials and workmanship under nor-mal consumer usage for the period(s) outlined below. This limited warranty isa consumer's exclusive remedy, and applies as follows to new Motorola Prod-ucts, Accessories and Software purchased by consumers in the United Statesor Canada, which are accompanied by this written warranty:Products and Accessories as defined above, unless otherwise provided forbelow. Length of coverage: one (1) year from the date of purchase by the firstconsumer purchaser of the product unless otherwise provided for below.Decorative Accessories and Cases: Decorative covers, bezels, PhoneWrap®covers and cases. Length of coverage: limited lifetime warranty for the life-time of ownership by the first consumer purchaser of the product.Products and Accessories that are Repaired or Replaced. Length of cover-age: The balance of the orginal warranty or ninety (90) days from the date re-turned to the consumer, whichever is longer.Software. Applies only to physical defects in the media that embodies thecopy of the software (e.g. CD-ROM, or floppy disk). Length of coverage:ninety (90) days from the date of purchase.EXCLUSIONSNormal Wear  and Tear. Periodic maintenance, repair and replacement ofparts due to normal wear and tear are excluded from coverage.Batteries. Only batteries whose fully charged capacity falls below 80% oftheir rated capacity and batteries that leak are covered by this limited warranty.Abuse & Misuse. Defects or damage that result from: (a) improper opera-tion, storage, misuse or abuse, accident or neglect, such as physical damage(cracks, scratches, etc.) to the surface of the product resulting from misuse;(b) contact with liquid, water, rain, extreme humidity or heavy perspiration,sand, dirt or the like, extreme heat, or food; (c) use of the Products or Acces-sories for commercial purposes or subjecting the Product or Accessory to ab-normal usage or conditions; or (d) Acts of God or nature, or other acts whichare not the fault of Motorola, are excluded from coverage.Use of Non-Motorola Products and Accessories. Defects or damage thatresult from the use of Non-Motorola branded or certified Products, Acces-sories, Software or other peripheral equipment are excluded from coverage.Unauthorized Service or Modification. Defects or damages resulting fromservice, testing, adjustment, installation, maintenance, alteration, or modifi-cation in any way by someone other than Motorola, or its authorized servicecenters, are excluded from coverage.Altered Products. Products or Accessories with (a) serial numbers or datetags that have been removed, altered, or obliterated; (b) broken seals or thatshow evidence of tampering; (c) mismatched board serial numbers; or (d)nonconforming or non-Motorola housings or parts are excluded from cover-age.Communication Services. Defects, damages, or the failure of Products, Ac-cessories, or Software due to any communication service or signal you maysubscribe to or use with the Products, Accessories, or Software is excludedfrom coverage.Software Embodied in Physical Media. No warranty is made that the soft-ware will meet your requirements or will work in combination with any hard-ware or software applications provided by third parties, that the operation ofthe software products will be uninterrupted or error free, or that all defects inthe software products will be corrected.Software NOT Embodied in Physical Media. Software that is not embod-ied in physical media (e.g. software that is downloaded from the internet), isprovided "as is" and without warranty. WHO IS COVEREDThis warranty extends to the first end-user purchaser only.WHAT WILL MOTOROLA DO?Motorola, at its option, will at no charge repair or replace any Products, Ac-cessories, or Software that does not conform to this warranty. We may usefunctionally equivalent reconditioned/refurbished/pre-owned or new Prod-ucts, Accessories, or parts. No data, software, or applications added to yourProduct, Accessory or Software, including but not limited to personal con-tacts, games, and ringer tones, will be reinstalled. To avoid losing such data,software, and applications, please create a backup prior to requesting serv-ice.WHAT OTHER LIMITATIONS ARE THERE?ANY IMPLIED WARRANTIES, INCLUDING WITHOUT LIMITATION THE IM-PLIED WARRANTIES OF MERCHANTABILITY AND FITNESS FOR A PARTIC-ULAR PURPOSE, SHALL BE LIMITED TO THE DURATION OF THIS LIMITEDWARRANTY. OTHERWISE, THE REPAIR OR REPLACEMENT AS PROVIDEDUNDER THIS EXPRESS LIMITED WARRANTY IS THE EXCLUSIVE REMEDYOF THE CONSUMER AND IS PROVIDED IN LIEU OF ALL OTHER WAR-RANTIES, EXPRESS OF IMPLIED. IN NO EVENT SHALL MOTOROLA BE LI-ABLE, WHETHER IN CONTRACT OR TORT (INCLUDING NEGLIGENCE) FORDAMAGES IN EXCESS OF THE PURCHASE PRICE OF THE PRODUCT, AC-CESSORY, OR SOFTWARE, OR FOR ANY INDIRECT, INCIDENTAL, SPE-CIAL, OR CONSEQUENTIAL DAMAGES OF ANY KIND, OR LOSS OF REV-ENUE OR PROFITS, LOSS OF BUSINESS, LOSS OF INFORMATION ORDATA, SOFTWARE OR APPLICATIONS, OR OTHER FINANCIAL LOSS ARIS-ING OUT OF, OR IN CONNECTION WITH, THE ABILITY OR INABILITY TOUSE THE PRODUCTS, ACCESSORIES, OR SOFTWARE TO THE FULL EX-TENT THESE DAMAGES MAY BE DISCLAIMED BY LAW. Some states and jurisdictions do not allow the limitation or exclusion of inci-dental or consequential damages, or limitation on the length of an impliedwarranty, so the above limitations or exclusions may not apply to you. Thiswarranty gives you specific legal rights, and you may also have other rightsthat vary from state to state or from one jurisdiction to another.Laws in the United States and other countries preserve for Motorola certainexclusive rights for copyrighted Motorola software, such as the exclusiverights to reproduce and distribute copies of the Motorola software. Motorolasoftware may only be copied into, used in, and redistributed with the Prod-ucts associated with such Motorola software. No other use, including with-out limitation disassembly of such Motorola software, or exercise of the ex-clusive rights reserved for Motorola, is permitted.To Press this buttonReview Message 1Play back message 2Stop message play back 2Erase message 0 (during message playback)Skip message 3Turn off/on answering system 4Review voice menu options 7Signal MeaningRing Tone 1, 2, or 3 (with ringer on) Signals an incoming callThree short beeps (several times) Page signalSingle beep every 7 seconds Low battery warningMotorola reserves the right to revise this publication and to make changes in content from time to time without obligation on the part of Mo-torola to provide notification of such revision or change. MOTOROLA PROVIDES THIS GUIDE WITHOUT WARRANTY OF ANY KIND, EITHERIMPLIED OR EXPRESS, INCLUDING, BUT NOT LIMITED TO, THE IMPLIED WARRANTIES OF MERCHANTABILITY AND FITNESS FOR A PARTIC-ULAR PURPOSE. Motorola may make improvements or changes in the product(s) described in this manual at any time.MOTOROLA and the Stylized M logo are registered in the U.S. Patent and Trademark Office. All other product or service names are the prop-erty of their respective owners.Copyright © 2005 Motorola, Inc.  Visit our website atwww.motorola.com/cordless526371-00110/05

Navigation menu