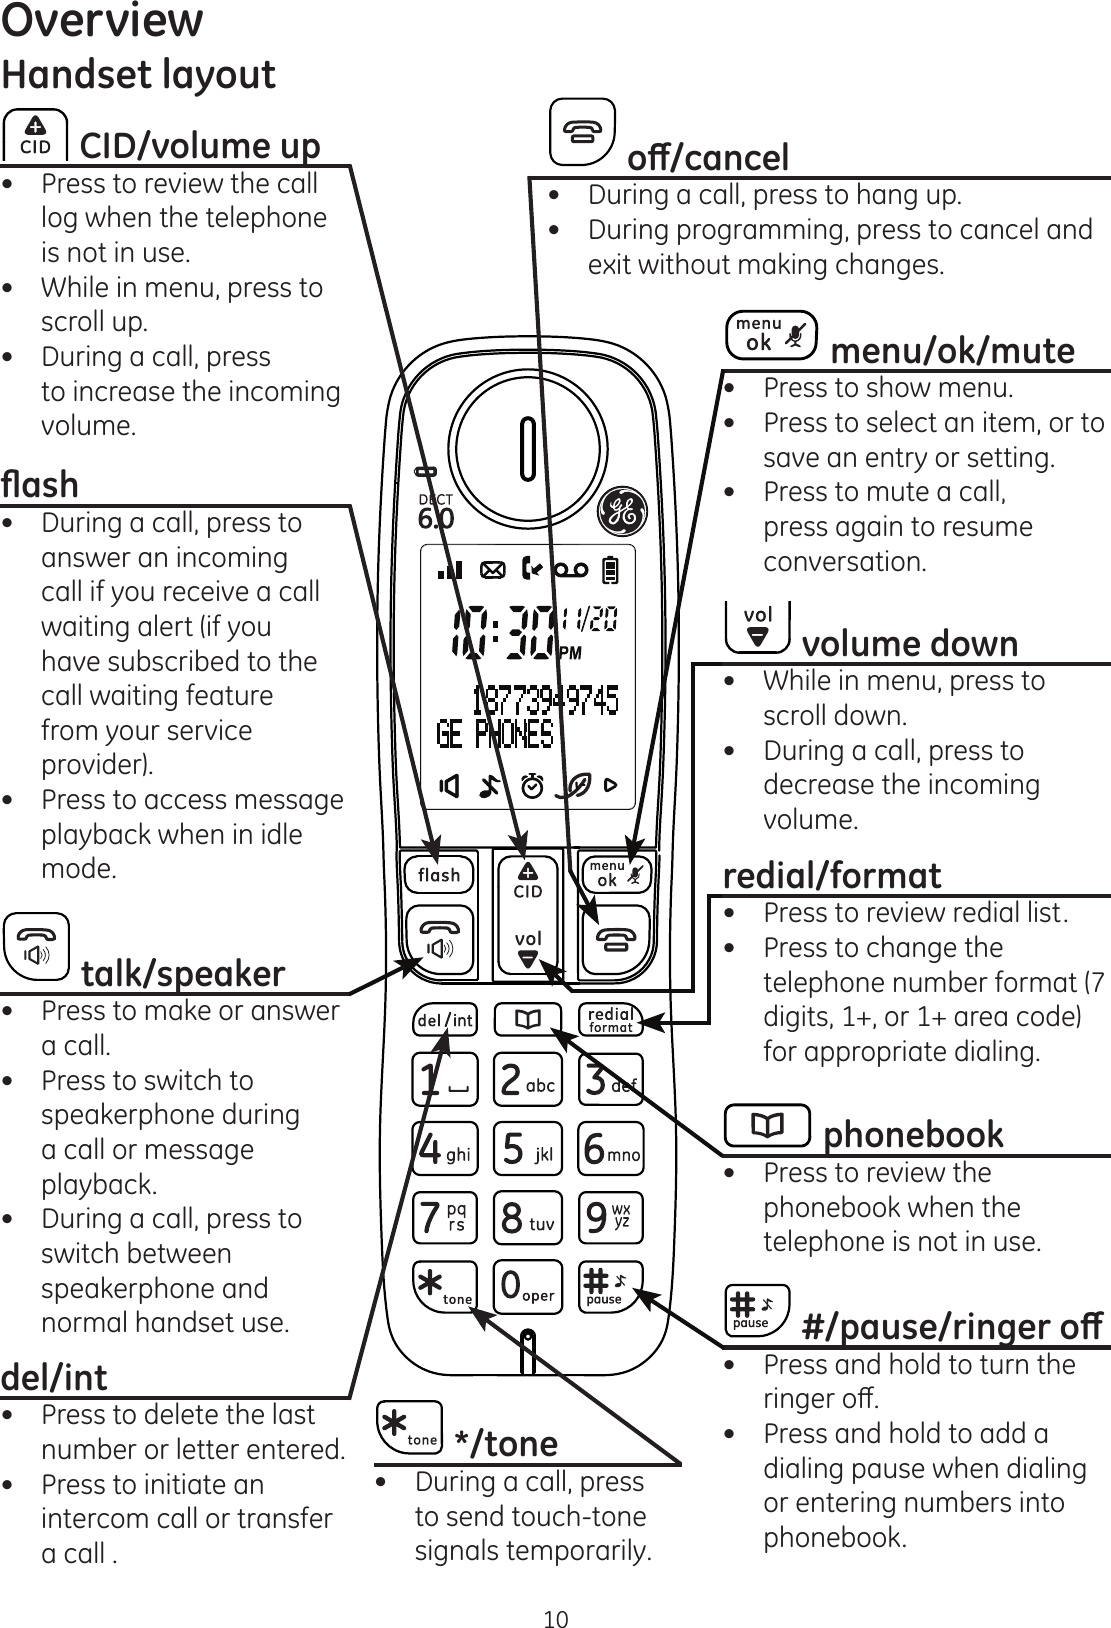
CCT 30529 DECT PHONE(HANDSET PP) User Manual 30522 English UG 021511
CCT Marketing, Ltd DECT PHONE(HANDSET PP) 30522 English UG 021511
UserManual.wiki
>
CCT
>
30529 User Manual
>
Users Manual 1
Contents
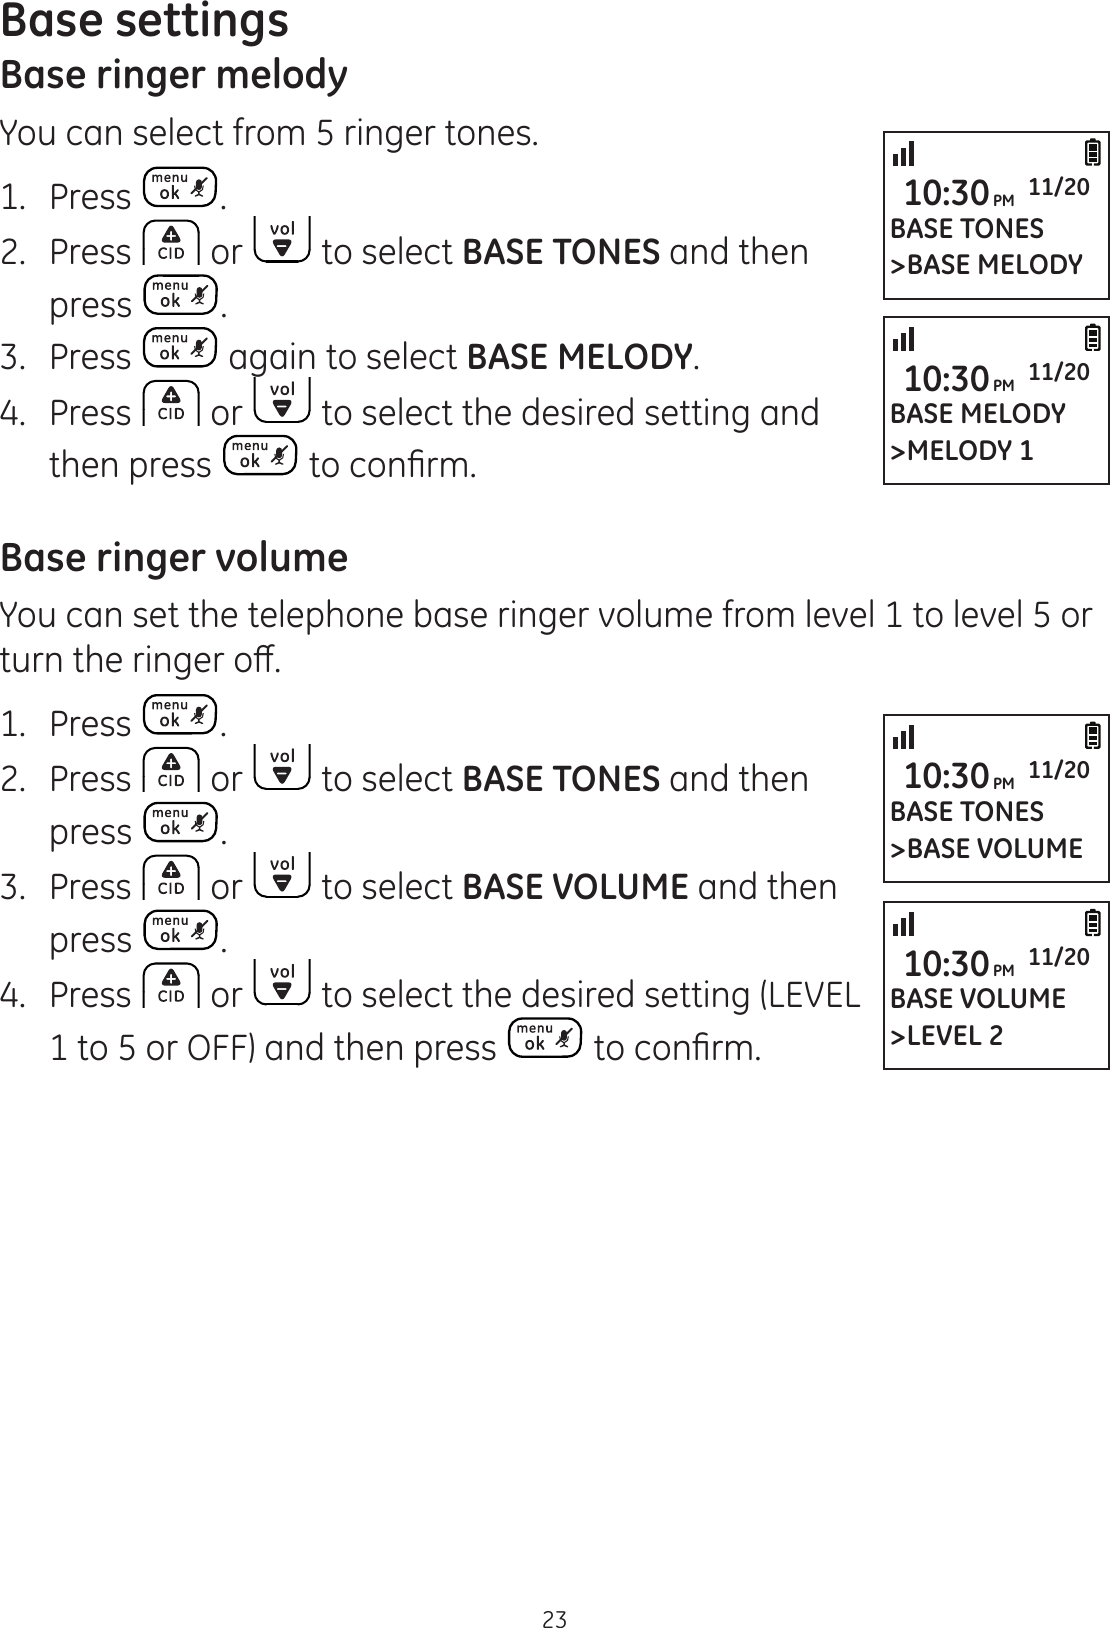
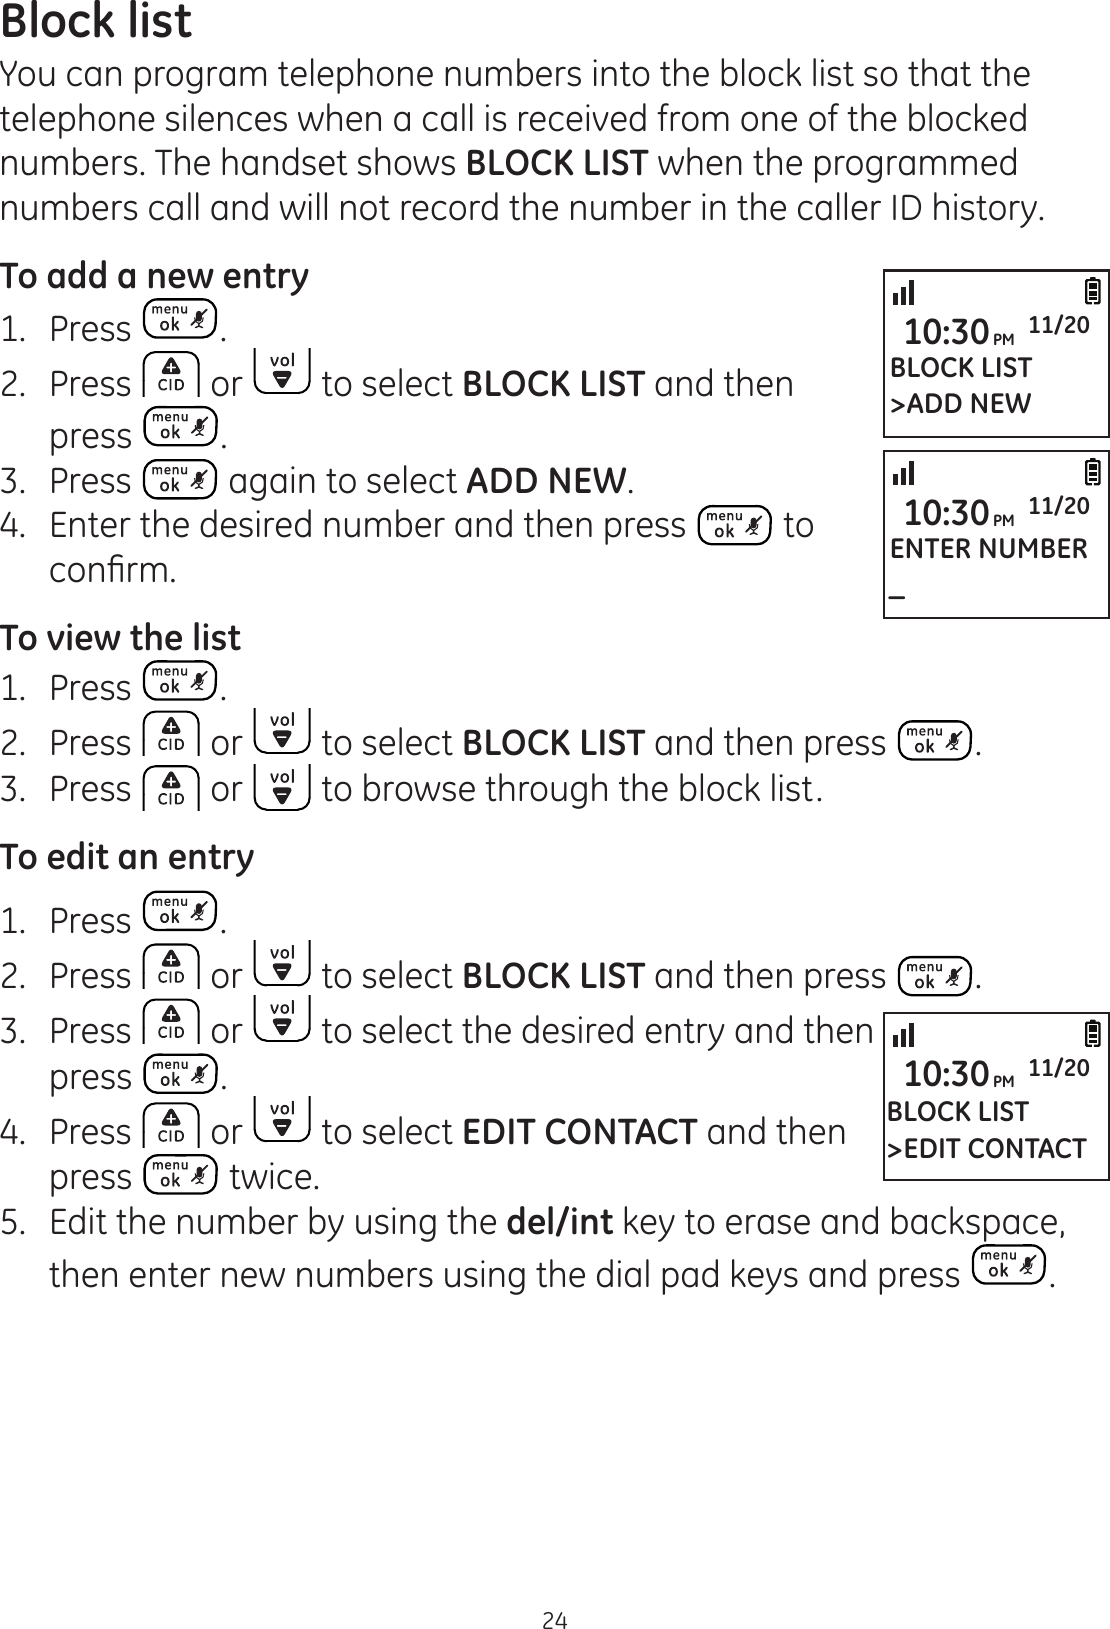
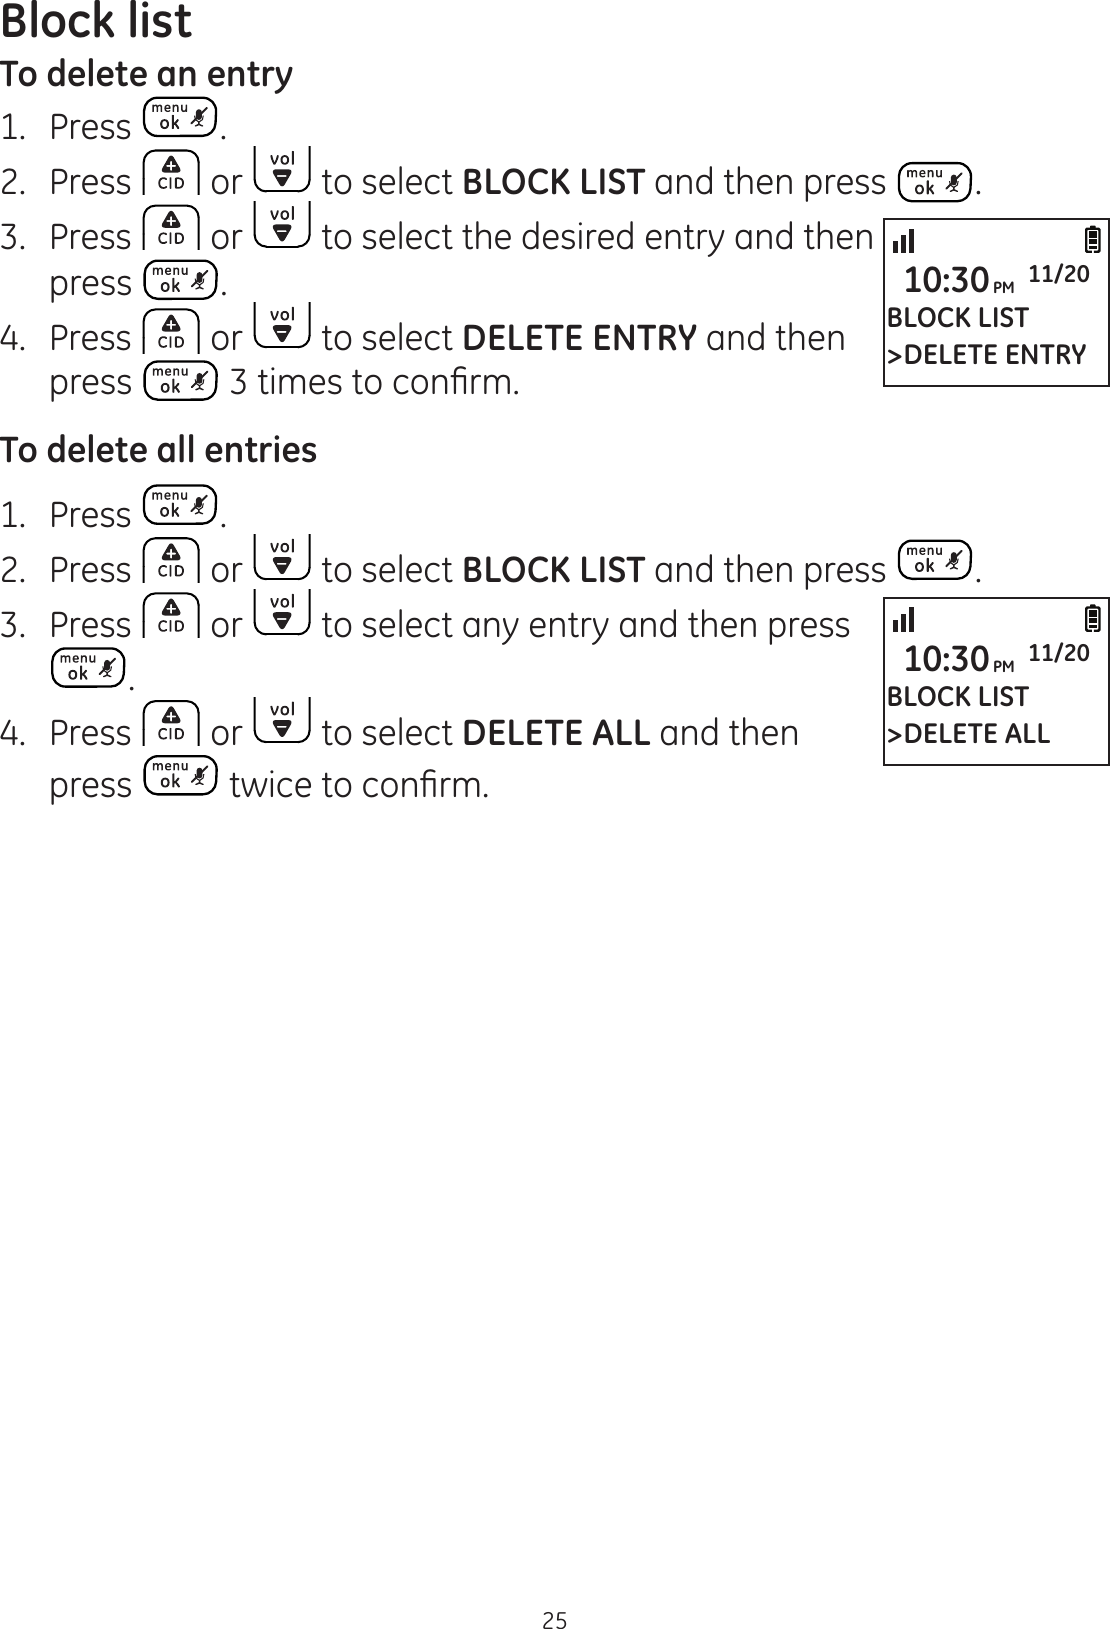
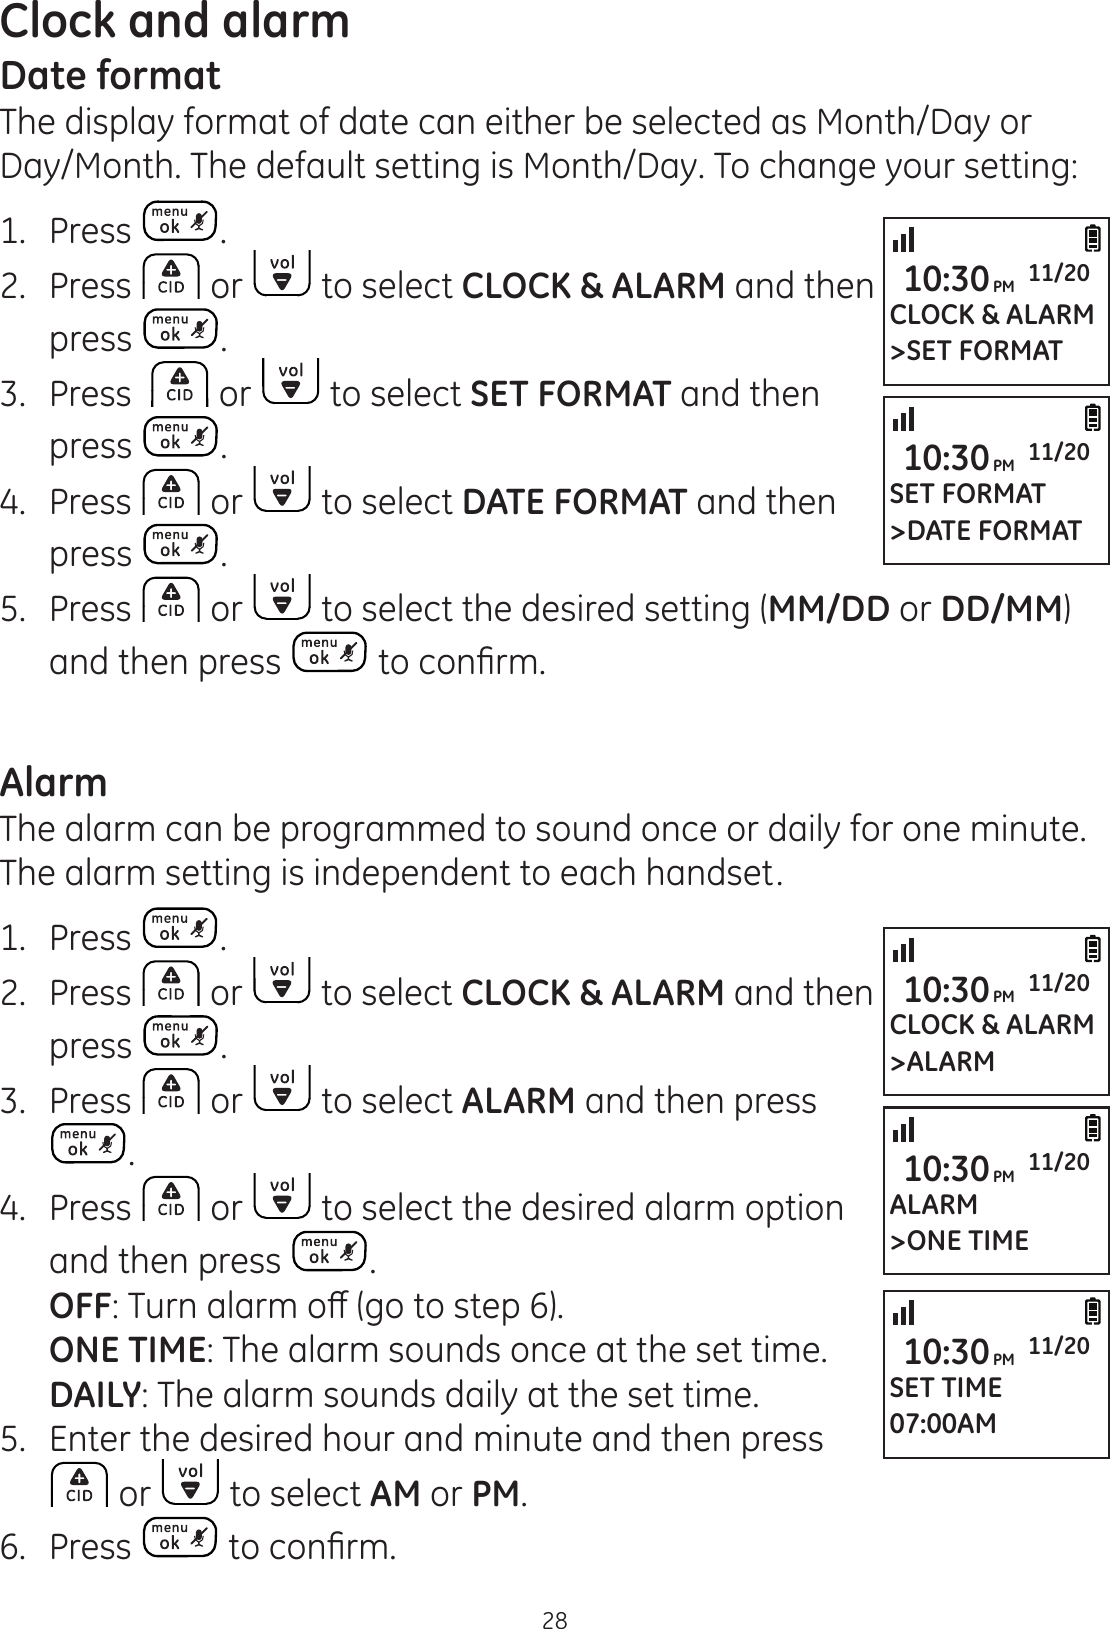
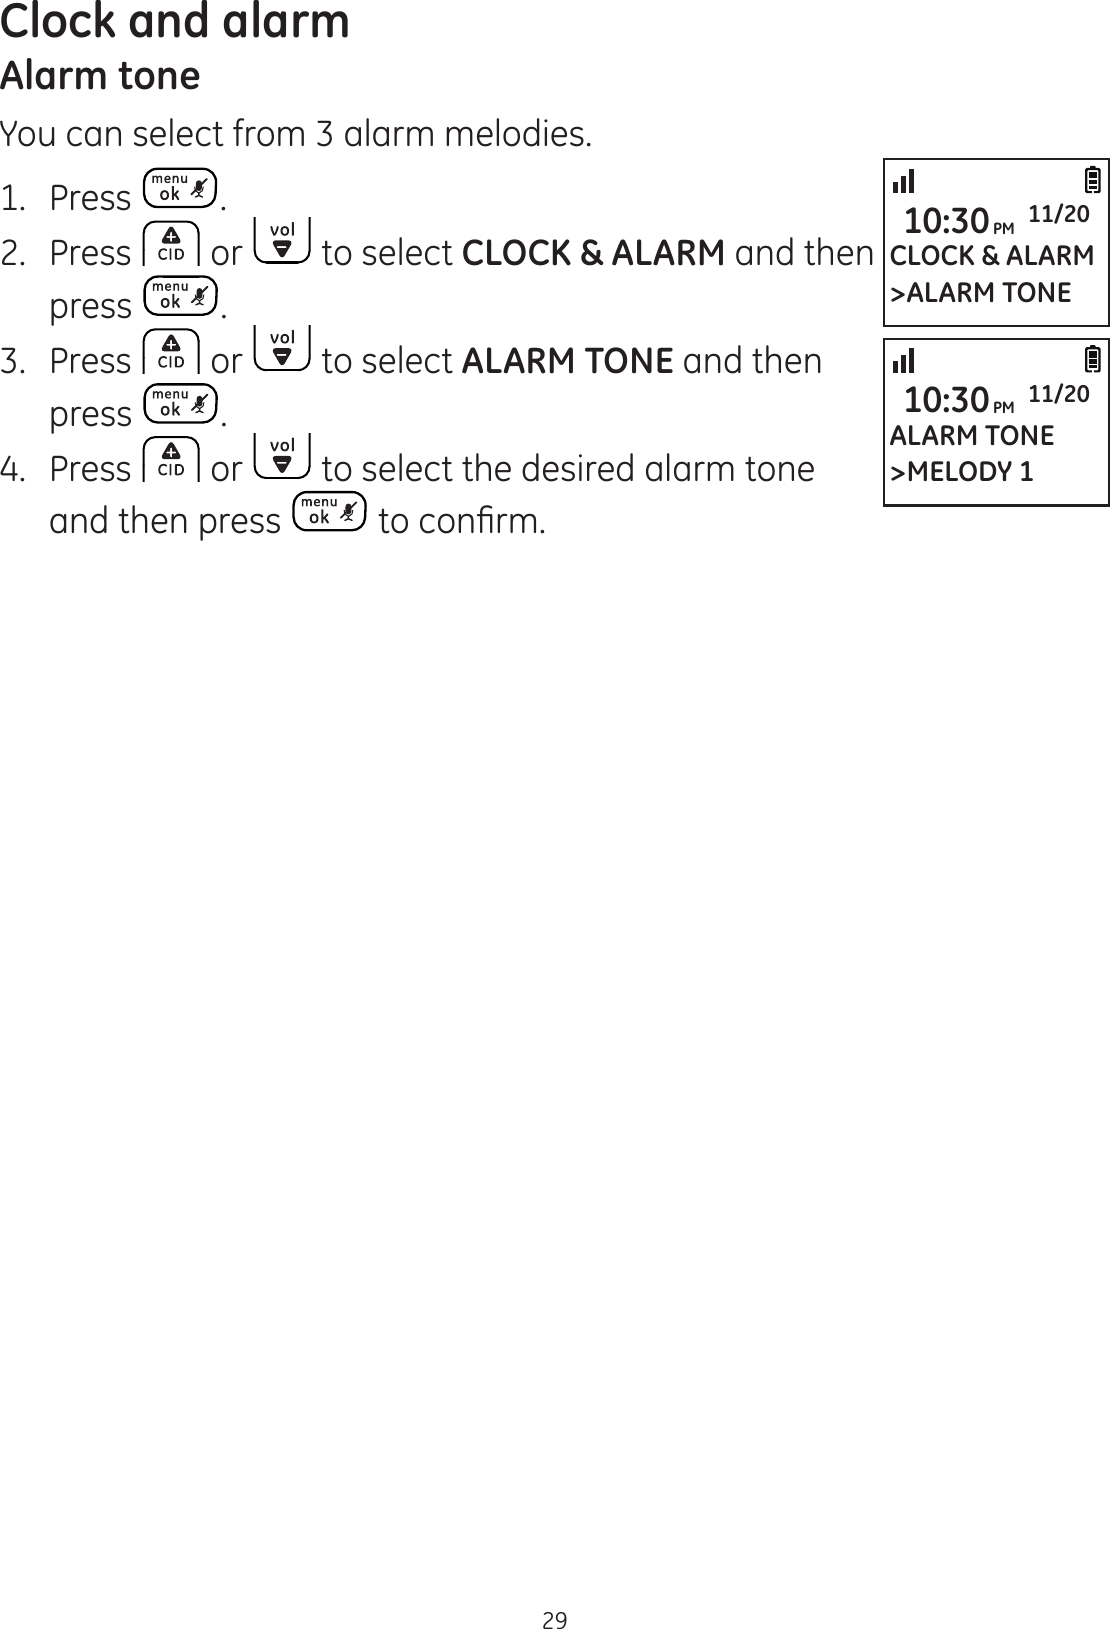
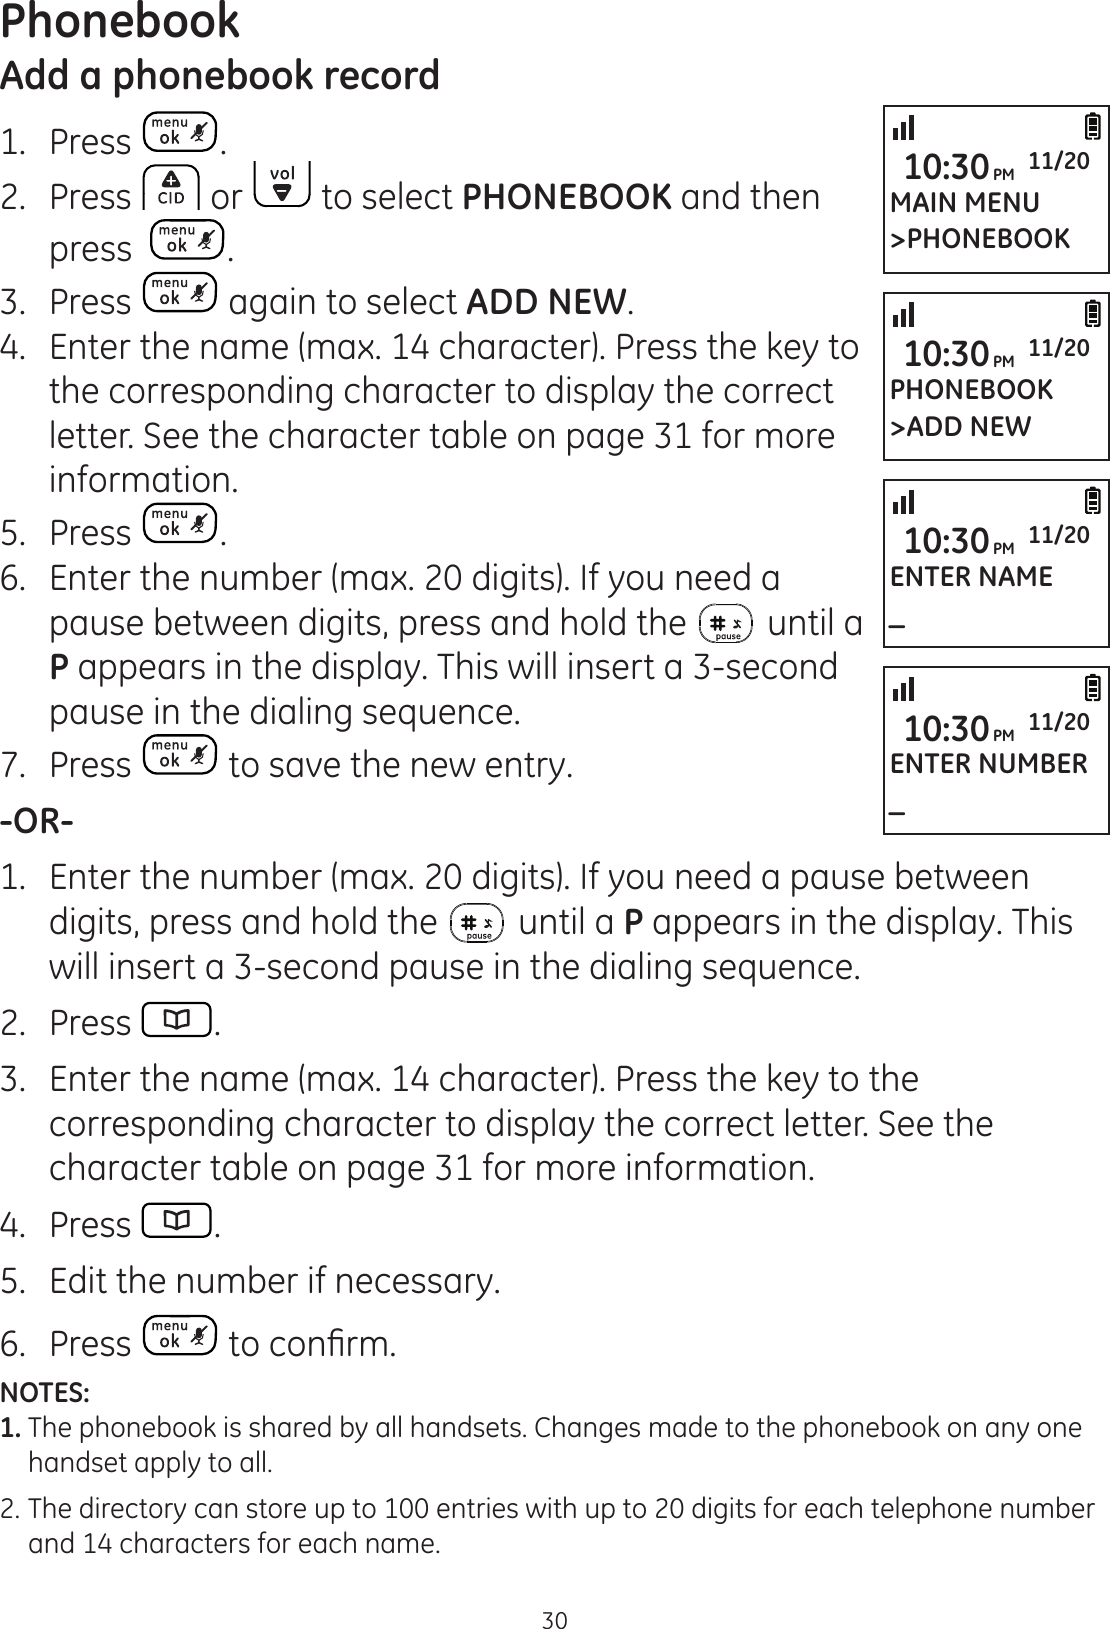
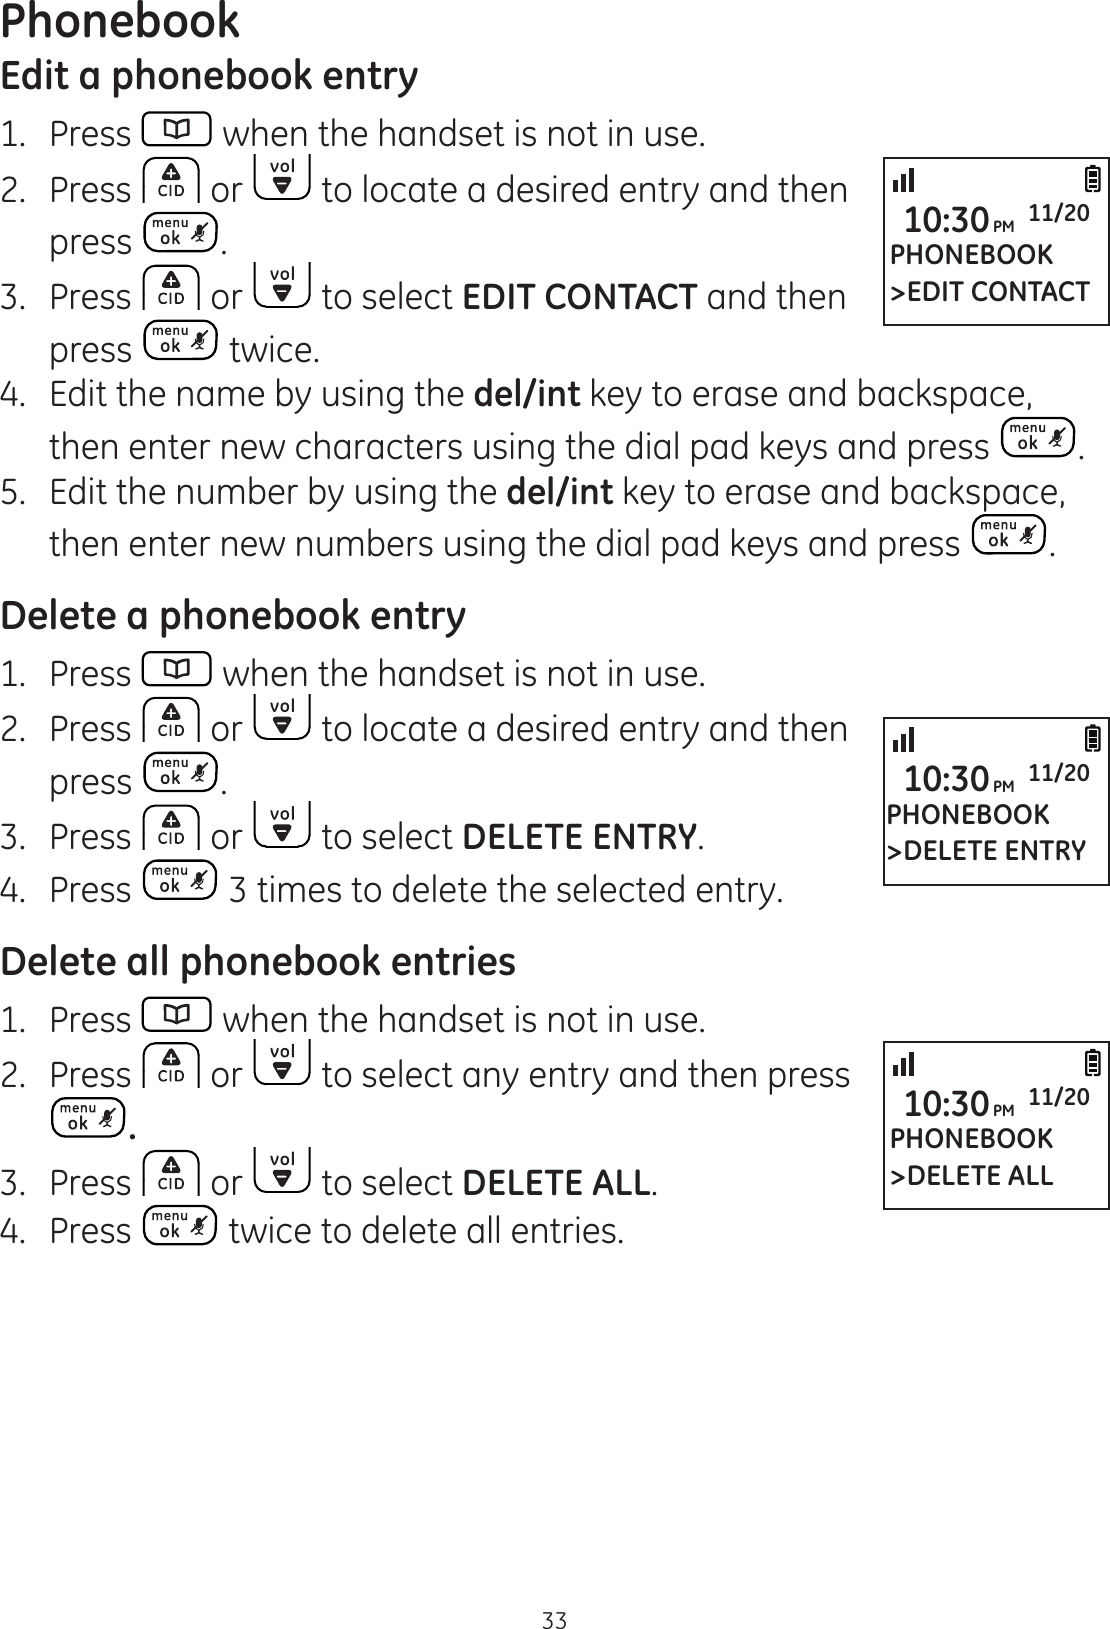
1.
Users Manual 1
2.
Users Manual 2
Users Manual 1
Navigation menu
Upload a User Manual
Namespaces
Wiki Guide
HTML
PDF
Info
Views
User Manual
Discussion / Help
Navigation


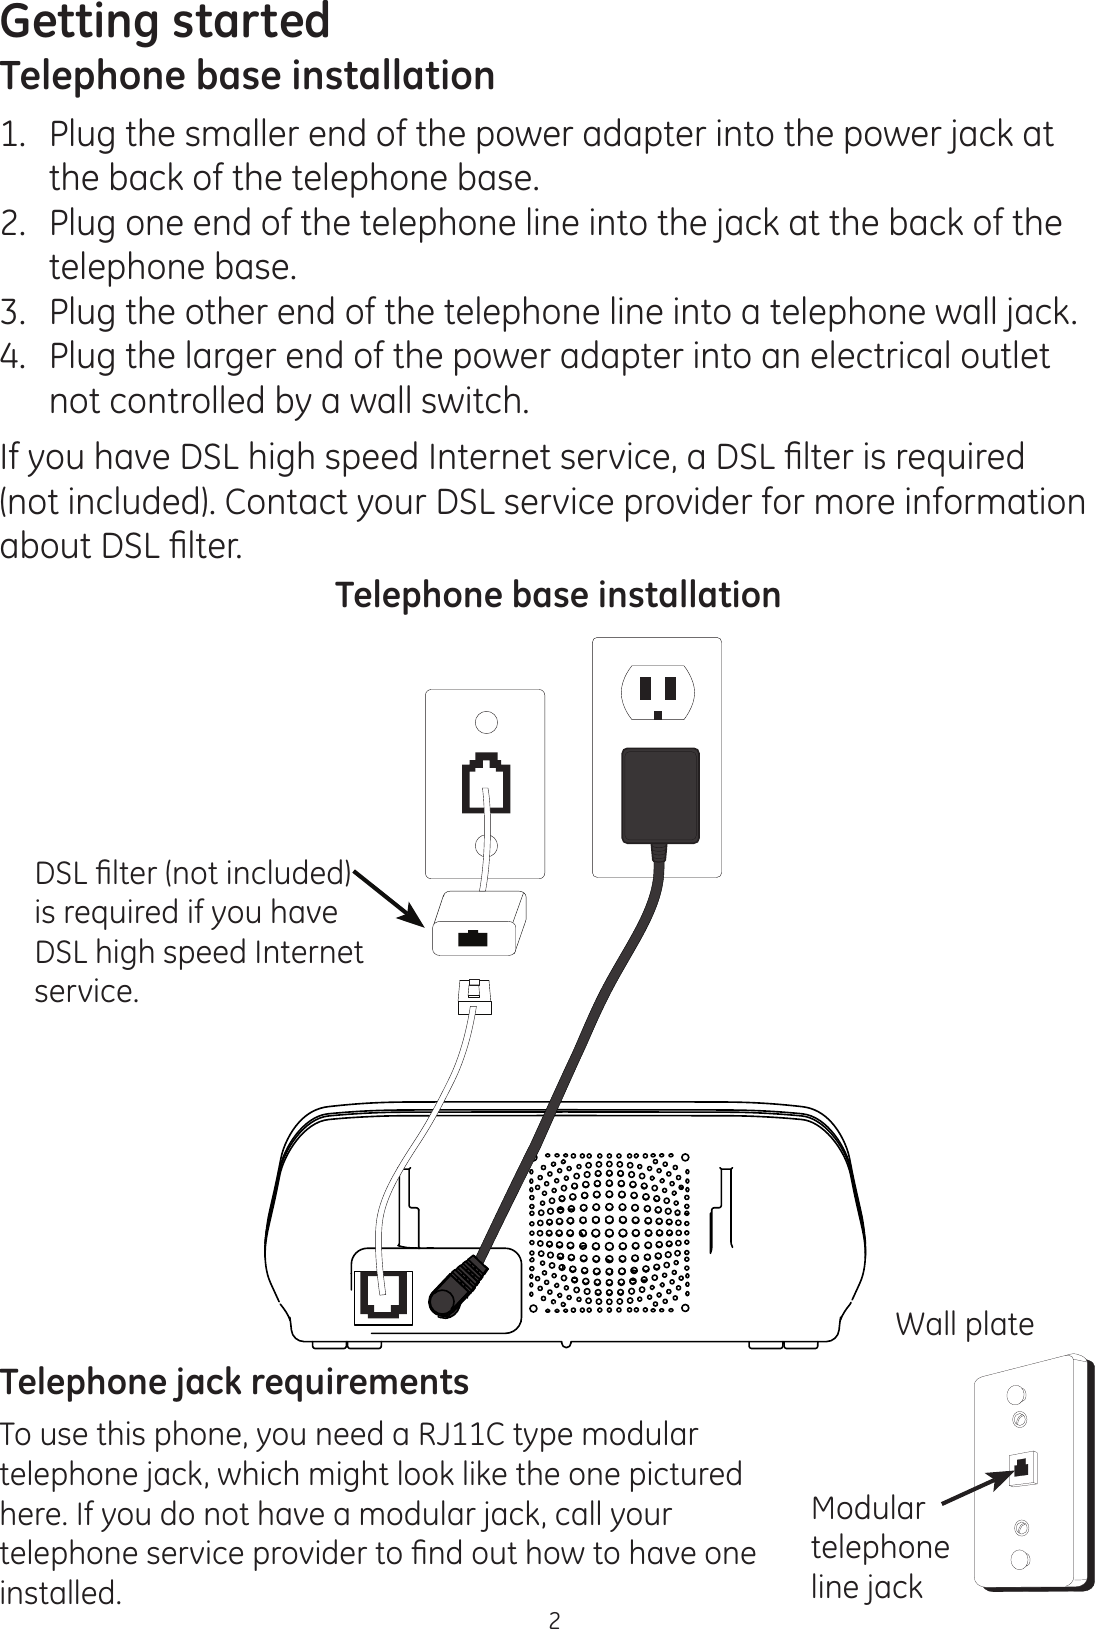
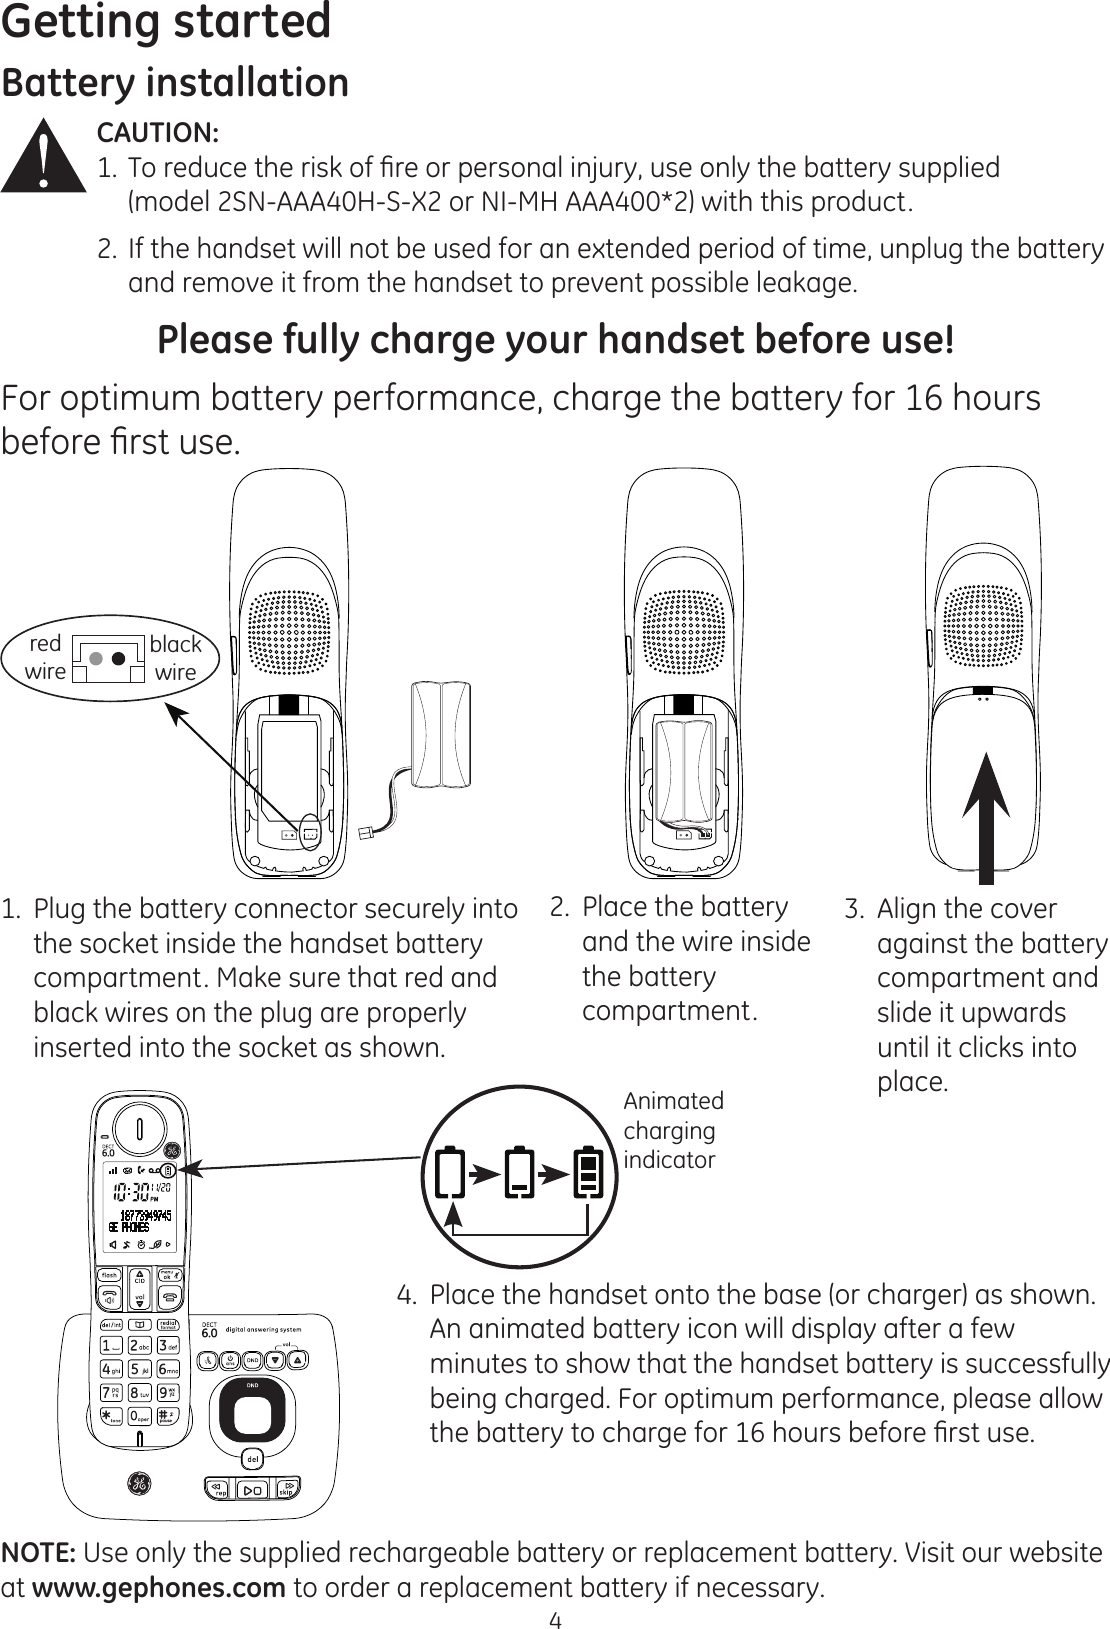
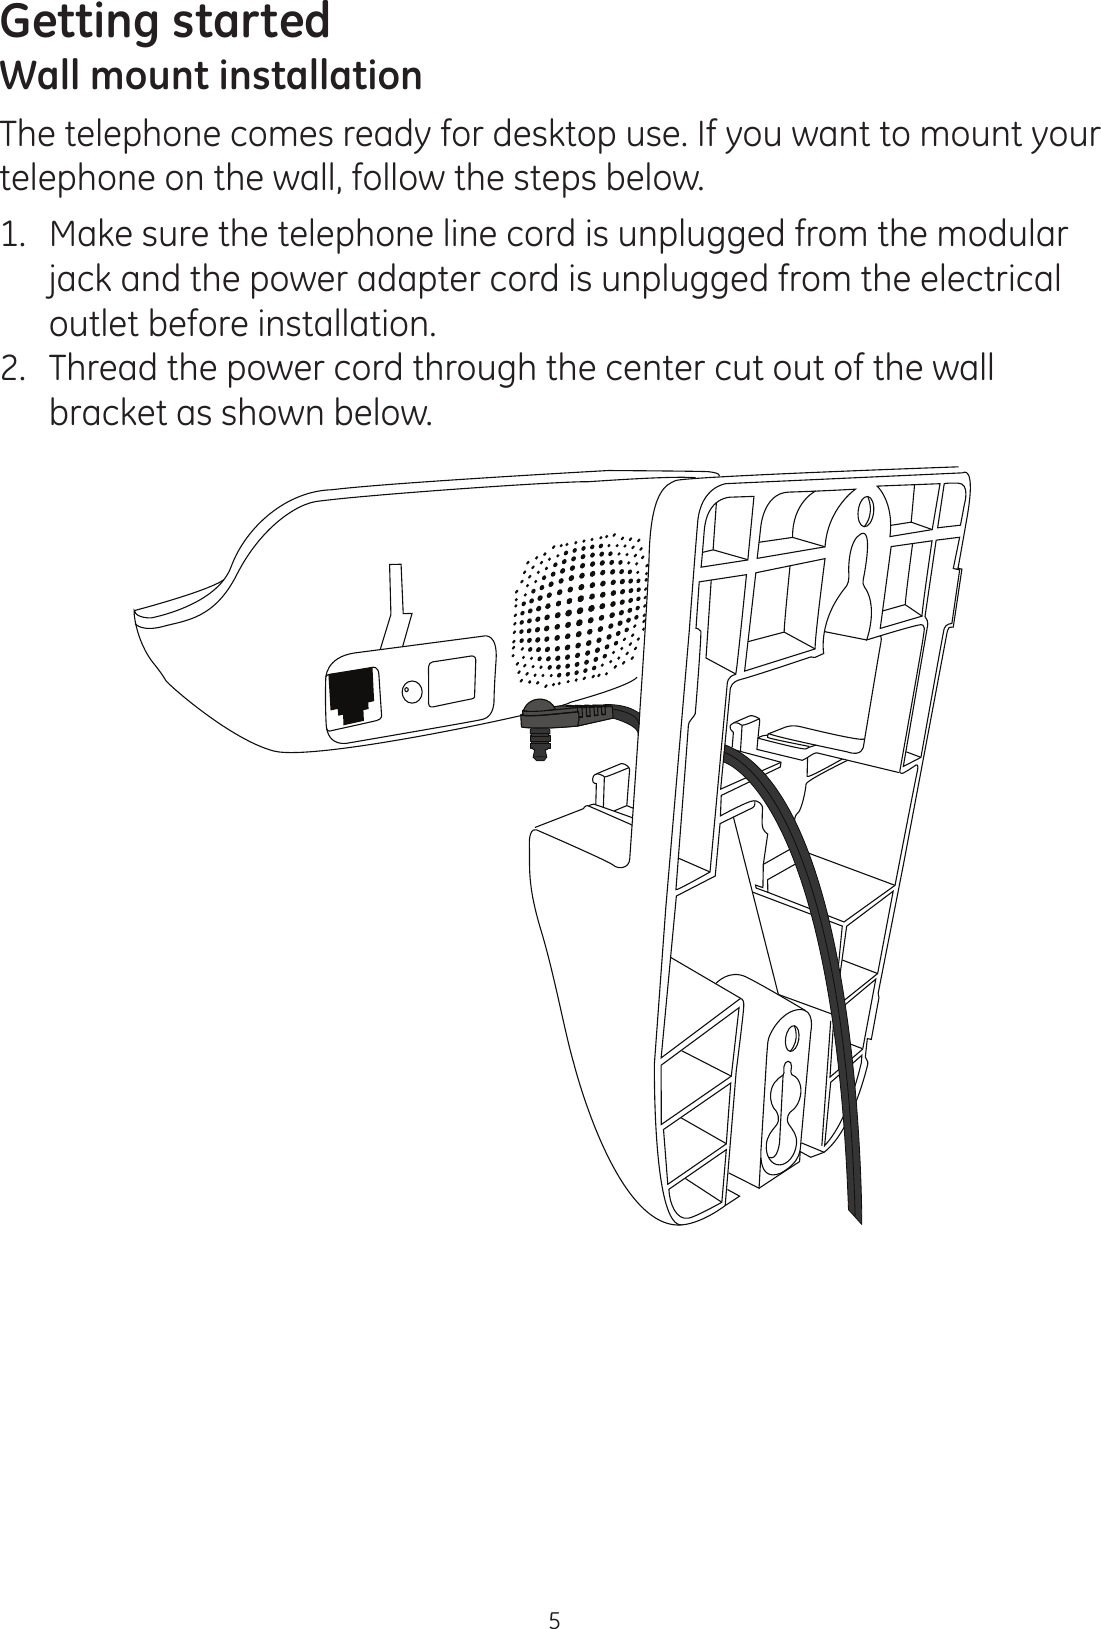
![Getting started3CAUTION: 1. Use only the power adapter that came with this unit. Using other power adapters may damage the unit.7RSUHYHQW¿UHRUHOHFWULFDOVKRFNKD]DUGGRQRWH[SRVHWKLVSURGXFWWRUDLQRU moisture. Charger installation (For models with additional handsets)1. Plug the smaller end of the power adapter into the jack on the back of the charger. 2. Plug the larger end of the power adapter into an electrical outlet not controlled by a wall switch.](https://usermanual.wiki/CCT/30529.Users-Manual-1/User-Guide-1421255-Page-7.png)

![26Do not disturbWhen DO NOT DISTURB (DND) mode is activated, all incoming calls will be silent. This feature only silences the ringer, the incoming number, if you have subscribed to the caller ID service from your telephone service provider, will be recorded in the caller ID history as normal. Global DNDWhen global DND is activated, all system handsets and the telephone base will be silent when there is an incoming call. Press the DND EXWWRQRQWKHWHOHSKRQHEDVHWRWXUQWKLVIHDWXUHRQRURȺHandset DNDYou can program individual handset to silence during predetermined time frames. This setting is independent to each handset and only silences the ringer of the handset programmed. To program the DND time for individual handset1. Press . 2. Press or to select PROGRAM DND and then press .3. Press or to select the desired option and then press WRFRQ¿UP ONE TIME: The telephone silences once during the set time. DAILY: The telephone silences daily during the set time. OFF7XUQ'1'RȺVHWWLQJVFRPSOHWHG4. Enter the desired start time. For example, 9:30 should be entered as [0], [9], [3], [0]. Press or to select AM or PM and then press WRFRQ¿UP5. Enter the desired stop time. For example, 7:30 should be entered as [0], [7], [3], [0]. Press or to select AM or PM and then press WRFRQ¿UPNOTES: When global DND is turned on, individual handset will continue to be in DND mode even after the set DND time on the handset ends. PROGRAM DND>ONE TIME10:30PM 11/20START TIME09:30 PM10:30PM 11/20STOP TIME07:30 AM10:30PM 11/20](https://usermanual.wiki/CCT/30529.Users-Manual-1/User-Guide-1421255-Page-30.png)
![27Clock and alarmDate and timeYou can set the date and time of the telephone system as follows.1. Press .2. Press or to select CLOCK & ALARM and then press .3. Press again to select SET DATE/TIME.4. Enter the current month, day and year. For example, May 16, 2010 should be entered as [0], [5], [1], [6], [1], [0].5. Press WRFRQ¿UP6. Enter the current hour and minute. For example, 9:30 should be entered as [0], [9], [3], [0]. Press or to select AM or PM and then press WRFRQ¿UPTime formatThe display format of time can either be selected as 12 hour or 24 hour. The default setting is 12 hour. To change your setting:1. Press .2. Press or to select CLOCK & ALARM and then press .3. Press or to select SET FORMAT and then press .4. Press again to select TIME FORMAT.5. Press or to select the desired setting (12 HOURS or 24 HOURS) and then press to FRQ¿UPCLOCK & ALARM>SET DATE/TIME10:30PM 11/20SET DATE05/16/1010:30PM 11/20SET TIME09:30 PM10:30PM 11/20CLOCK & ALARM>SET FORMAT10:30PM 11/20SET FORMAT>TIME FORMAT10:30PM 11/20](https://usermanual.wiki/CCT/30529.Users-Manual-1/User-Guide-1421255-Page-31.png)
![Phonebook31Character tableUse the dial pad and the chart below to enter a name (up to 14 characters). Each press of a particular key displays the character in the following order:Dial pad keyCharacter by number of key presses1 2 3 4 5 6[1] space 1 _ < > ?[2] A B C 2[3] D E F 3[4] G H I 4[5] J K L 5[6] M N O 6[7] P Q R S 7[8] T U V 8[9] W X Y Z 9[0] 0 - / ||| # +NOTE: Press del/int to correct an error.](https://usermanual.wiki/CCT/30529.Users-Manual-1/User-Guide-1421255-Page-35.png)

![Appendix4913. Do not expose the product to extreme temperatures such as areas near a hot radiator, stove or in a hot car. Do not place product upon other consumer electronic products such as; computer monitors, power DPSOL¿HUVHWF14. Do not place lighted candles, cigarettes, cigars, etc., on or near the telephone. 15. Never touch uninsulated telephone wires or terminals unless the telephone line has been disconnected at the network interface.16. Never install or modify telephone wiring during a lightning storm. 17. Never install jacks or telephones in wet locations. 18. Use caution when installing or modifying telephone lines to prevent HOHFWULFDOVKRFNDQGRU¿UH19. Under the following conditions, unplug this product from the wall outlet and UHIHUVHUYLFLQJWRTXDOL¿HGVHUYLFHSHUVRQQHO A. The power supply cord or plug is damaged or frayed. B. The product has been exposed to rain or water. C. The product does not operate normally by following the operating instructions. D. The product’s cabinet has been damaged. E. The product exhibits a distinct change in performance. 20. Avoid using a telephone during an electrical-storm. There may be a remote risk of electric shock from lightning. 21. Do not use the telephone to report a gas leak in the vicinity of the leak. 22. Do not place this product on an unstable cart, stand, or table. The product may fall, causing serious damage to the product. 2QO\XVHDWWDFKPHQWVDFFHVVRULHVVSHFL¿HGE\WKHPDQXIDFWXUHU24. Unplug this apparatus during lightning storms or when unused for long periods of time.IF YOUR PRODUCT UTILIZES BATTERIES, THE FOLLOWING ADDITIONAL PRECAUTIONS SHOULD BE OBSERVED:8VHRQO\WKHW\SHDQGVL]HEDWWHU\LHVVSHFL¿HGLQWKHXVHU·VPDQXDO2. Do not use this product if the battery door is removed or missing.3. Replace batteries that appear to be swollen or have damaged wiring.](https://usermanual.wiki/CCT/30529.Users-Manual-1/User-Guide-1421255-Page-53.png)