CCT 30789 DECT 6.0 BLUETOOTH CORDED/CORDLESS TELEPHONE User Manual
CCT Marketing, Ltd DECT 6.0 BLUETOOTH CORDED/CORDLESS TELEPHONE Users Manual
UserManual.wiki
>
CCT
>
30789 User Manual
Users Manual
Navigation menu
Upload a User Manual
Namespaces
Wiki Guide
HTML
PDF
Info
Views
User Manual
Discussion / Help
Navigation


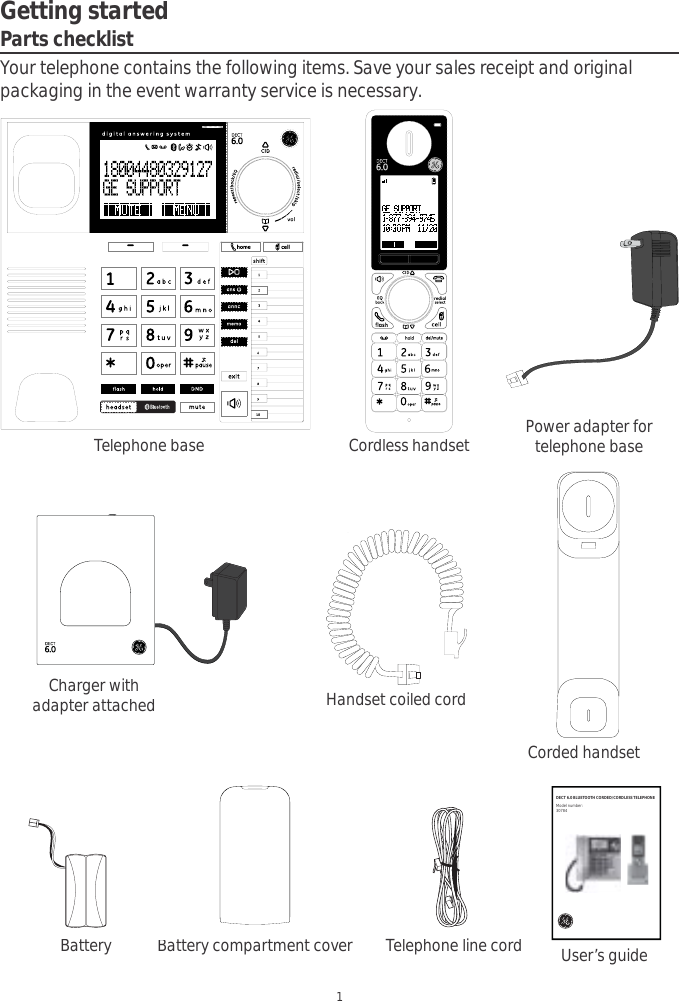

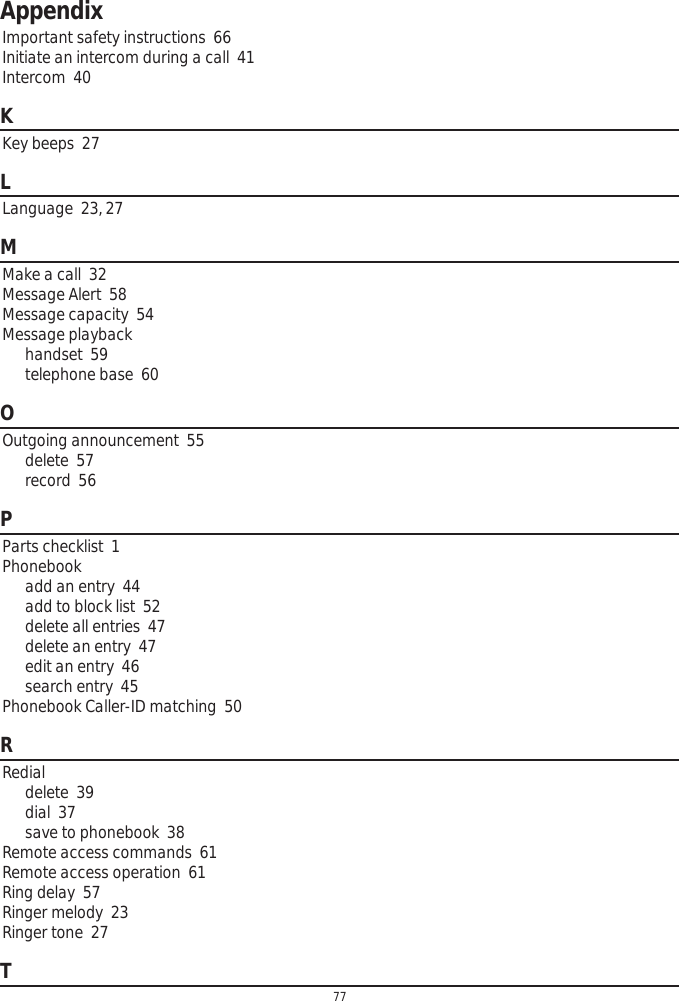
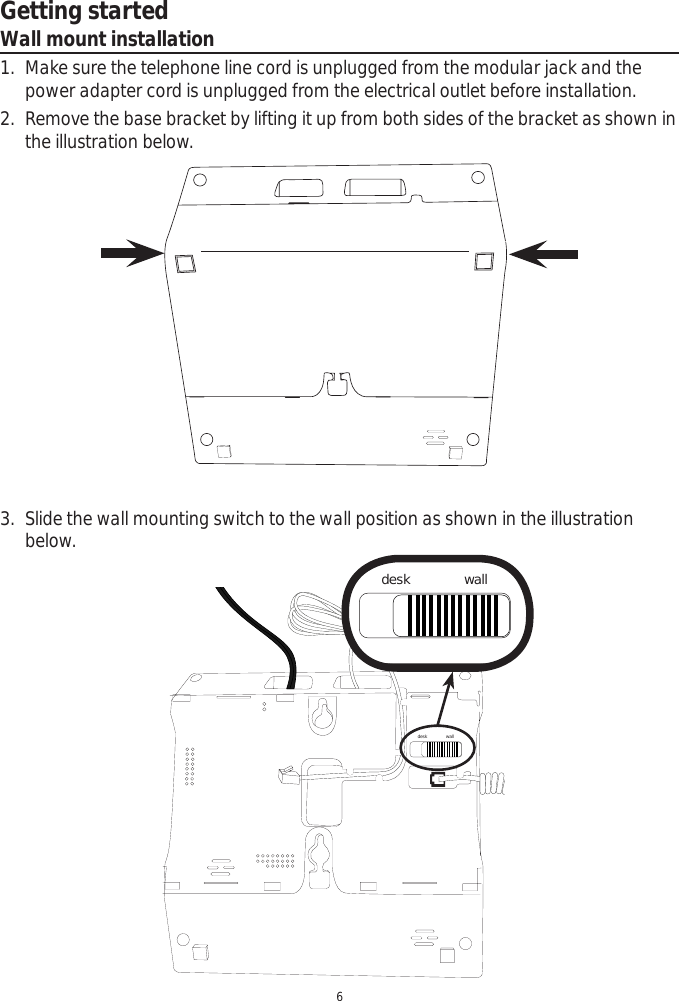
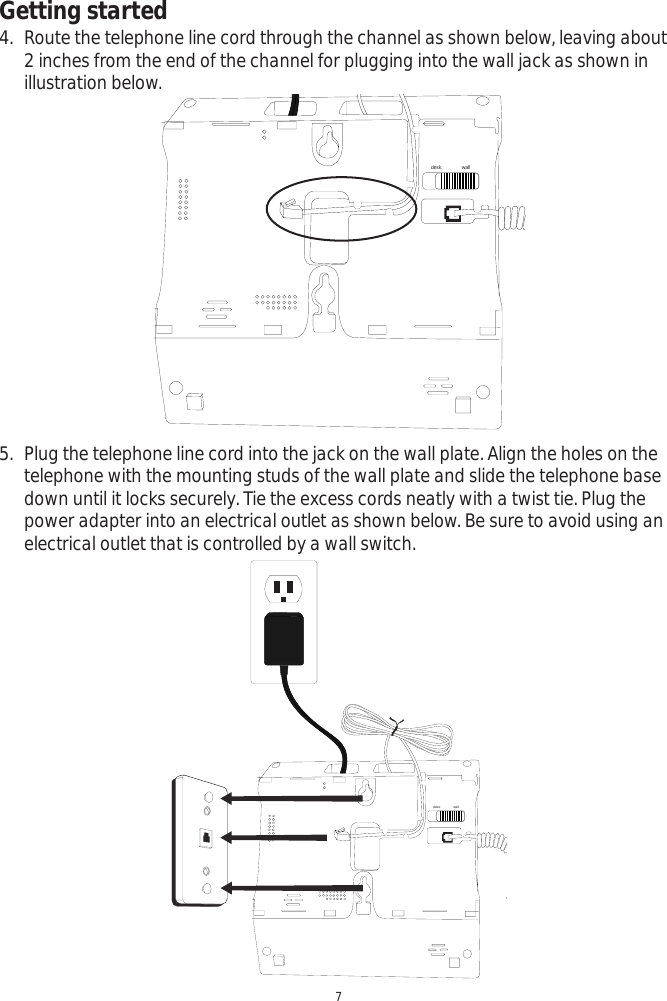
![Getting started3CAUTION:1. Use only the power adaptor that came with this unit. Using other power adaptors may damage the unit.7RSUHYHQW¿UHRUHOHFWULFDOVKRFNKD]DUGGRQRWH[SRVHWKLVSURGXFWWRUDLQRUPRLVWXUHFigure 3desk wall4. Replace the bracket to the telephone base. 5. Plug the smaller end of the power adapter into the power jack at the back of the telephone base.6. Plug one end of the telephone line into the jack at the back of the telephone base.7. Plug the other end of the telephone line into a telephone wall jack.8. Plug the larger end of the power adapter into an electrical outlet not controlled by a wall switch.](https://usermanual.wiki/CCT/30789/User-Guide-1461600-Page-7.png)


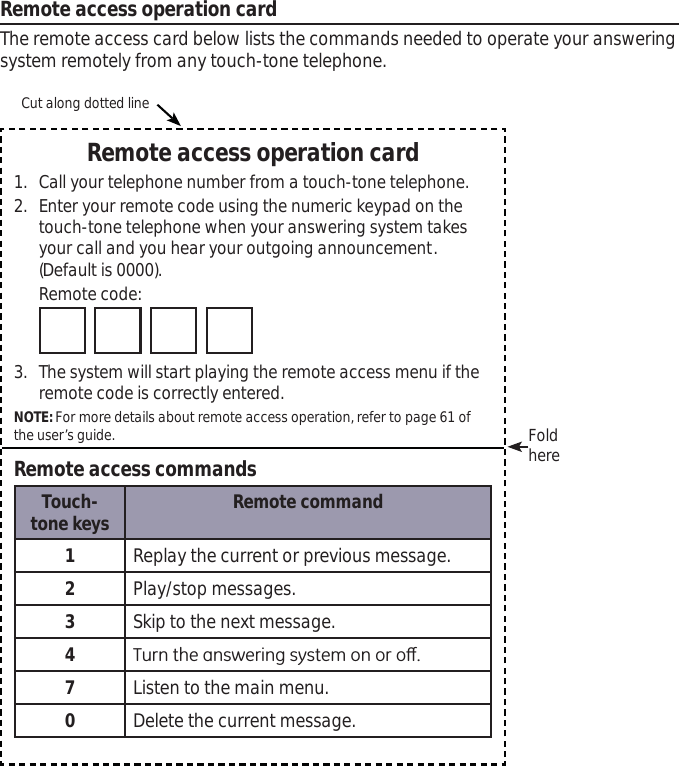
![Handset settings25entered as [0], [5], [1], [6], [1], [0], and then press the NextVRIWNH\WRFRQ¿UP5. Enter the current hour and minute. For example, 9:30 should be entered as [0], [9], [3], [0]. Press / or use the scroll wheel to select AM or PM.6. Press the SaveVRIWNH\WRFRQ¿UPDate Format1. Press the Menu softkey when the handset is in idle mode.2. Press / or use the scroll wheel to select Clock & Alarm and then press the Select softkey.3. Press / or use the scroll wheel to select Set Format and then press the Select softkey.4. Press / or use the scroll wheel to select Date Format and then press the Select softkey.5. Press / or use the scroll wheel to select MM/DD/YYYY or YYYY/DD/MM,and then press the Select VRIWNH\WRFRQ¿UPTime Format1. Press the Menu softkey when the handset is in idle mode.2. Press / or use the scroll wheel to select Clock & Alarm and then press the Select softkey.3. Press / or use the scroll wheel to select Set Format and then press the Select softkey.4. Press / or use the scroll wheel to select Time Format and then press the Select softkey.5. Press / or use the scroll wheel to select 12 Hours or 24 Hours, and then press the SelectVRIWNH\WRFRQ¿UPAlarmThe alarm can be programmed to sound once or daily for one minute. The alarm setting is independent to each handset and base.1. Press the Menu softkey when the handset is in idle mode.2. Press / or use the scroll wheel to select Clock & Alarm and then press the Select softkey.3. Press / or use the scroll wheel to select Set Alarm and then press the Select softkey.4. Press / or use the scroll wheel to select On, and then press the Selectsoftkey.5. Enter the desired hour and minute, and then press / or use the scroll wheel to select AM or PM.6. Press the Next softkey.7. Press / or use the scroll wheel to select Once or Daily.(Once: The alarm sounds once at the set time.Daily: The alarm sounds daily at the set time.)](https://usermanual.wiki/CCT/30789/User-Guide-1461600-Page-29.png)

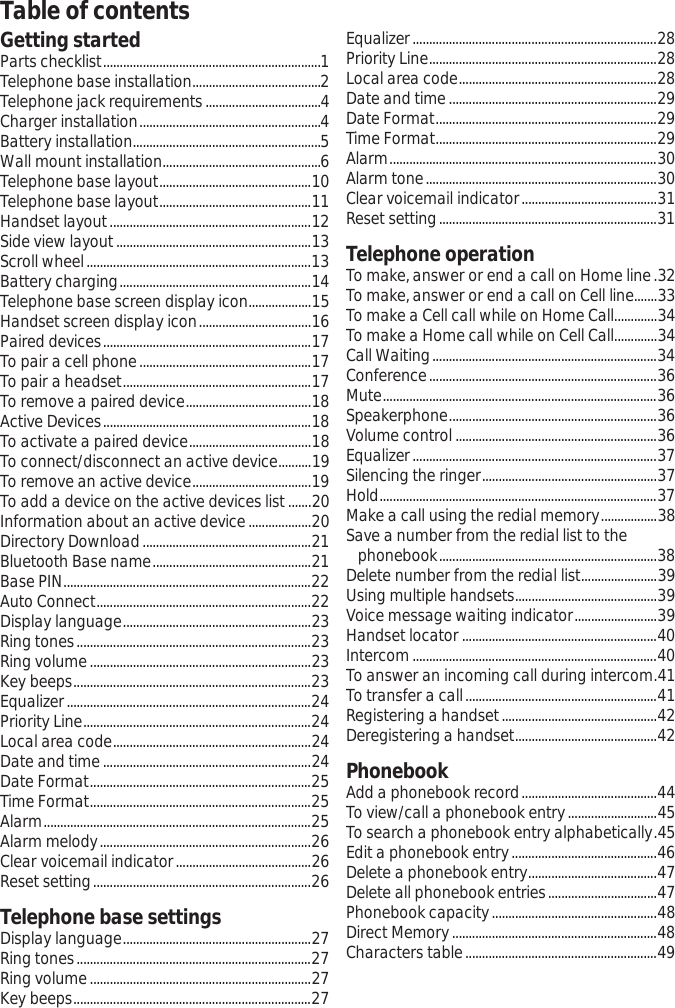
![Telephone base settings29Date and timeIn order for your answering system to accurate mark your messages you must set the date and time.1. Press the Menu softkey when the handset is in idle mode.2. Press / or use the scroll wheel to select Clock & Alarm and then press the Select softkey.3. Press / or use the scroll wheel to select Set Date/Time and then press the Select softkey.4. Enter the current month, day and year. For example, May 16, 2010 should be entered as [0], [5], [1], [6], [1], [0], and then press the NextVRIWNH\WRFRQ¿UP5. Enter the current hour and minute. For example, 9:30 should be entered as [0], [9], [3], [0]. Press / or use the scroll wheel to select AM or PM.6. Press the SaveVRIWNH\WRFRQ¿UPDate Format1. Press the Menu softkey when the handset is in idle mode.2. Press / or use the scroll wheel to select Clock & Alarm and then press the Select softkey.3. Press / or use the scroll wheel to select Set Format and then press the Selectsoftkey.4. Press / or use the scroll wheel to select Date Format and then press the Selectsoftkey.5. Press / or use the scroll wheel to select MM/DD/YYYY or YYYY/DD/MM, and then press the Select VRIWNH\WRFRQ¿UPTime Format1. Press the Menu softkey when the handset is in idle mode.2. Press / or use the scroll wheel to select Clock & Alarm and then press the Select softkey.3. Press / or use the scroll wheel to select Set Format and then press the Selectsoftkey.4. Press / or use the scroll wheel to select Time Format and then press the Select softkey.5. Press / or use the scroll wheel to select 12 Hours or 24 Hours, and then press the SelectVRIWNH\WRFRQ¿UP](https://usermanual.wiki/CCT/30789/User-Guide-1461600-Page-33.png)
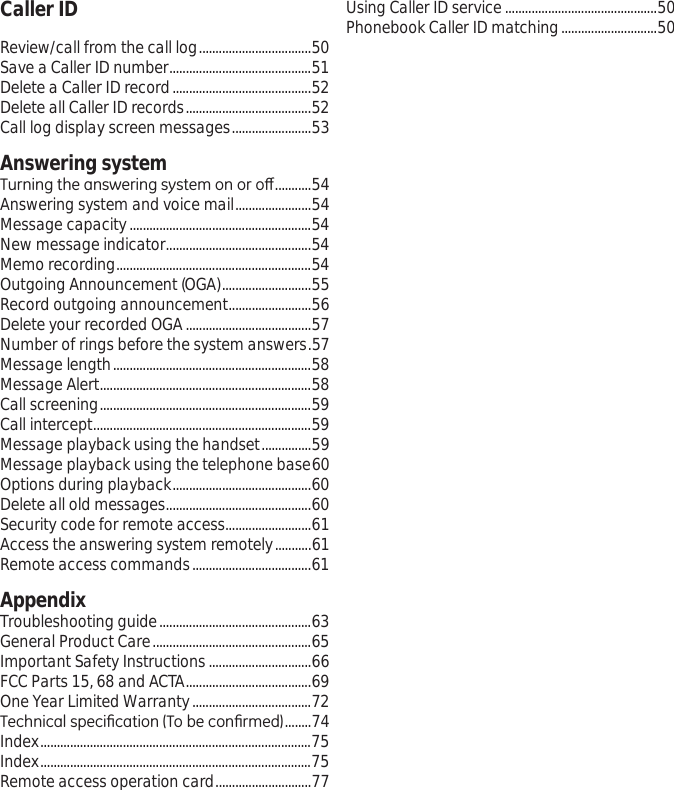
![Phonebook49dialed automatically using the speakerphone.-OR-1. Lift the corded handset, or press or .2. Press the desired memory location button on the telephone base. To call from Cell line1. Press on the telephone base when in idle mode. 2. Press the desired memory location button, then press the Dial softkey. To edit/delete a memory location number1. Press the Menu softkey when the telephone base is in idle mode. 2. Press / or use the scroll wheel to select Direct Memory, then press the Selectsoftkey. 3. Press the desired memory location button (1-10 for locations 1-10, or shiftfollowing by 1-10 for locations 11-20).4. To edit the number, press del to delete the existing numbers. Then use the dial pad keys to enter the new number (max. 24 digits). If you need a pause between digits, press and hold the until a P appears in the display. This will insert a 3-second pause in the dialing sequence.-OR-To delete the number, press and hold del until all numbers erased on the screen. 5. Press the Save VRIWNH\WRFRQ¿UPCharacters tableUse the dial pad and the chart below to enter a name (up to 16 characters). Each press of a particular key displays the character in the following order:Dial padkey Character by number of key presses123456[1] space 1 # ‘ , - . &[2] ABC2[3] DEF3[4] GH I 4[5] JKL5[6] MNO6[7] PQRS7[8] TUV8[9] WX Y Z 9[0] 0](https://usermanual.wiki/CCT/30789/User-Guide-1461600-Page-53.png)


![Appendix67B. The product has been exposed to rain or water. C. The product does not operate normally by following the operating instructions.D. The product’s cabinet has been damaged. E. The product exhibits a distinct change in performance. 20. Avoid using a telephone during an electrical-storm. There may be a remote risk of electric shock from lightning. 21. Do not use the telephone to report a gas leak in the vicinity of the leak. 22. Do not place this product on an unstable cart, stand, or table. The product may fall, causing serious damage to the product. 2QO\XVHDWWDFKPHQWVDFFHVVRULHVVSHFL¿HGE\WKHPDQXIDFWXUHU24. Unplug this apparatus during lightning storms or when unused for long periods of time.IF YOUR PRODUCT UTILIZES BATTERIES, THE FOLLOWING ADDITIONAL PRECAUTIONS SHOULD BE OBSERVED:8VHRQO\WKHW\SHDQGVL]HEDWWHU\LHVVSHFL¿HGLQWKHXVHU·VJXLGH2. Do not use this product if the battery door is removed or missing.3. Replace batteries that appear to be swollen or have damaged wiring. 'RQRWGLVSRVHRIWKHEDWWHU\LHVLQ¿UH7KH\PD\H[SORGH&KHFNZLWKORFDOFRGHVIRUpossible special disposal instructions. 5. Do not open or mutilate the battery(ies). Released electrolyte is corrosive and may cause damage to the eyes or skin. It may be toxic if swallowed. 6. Exercise care in handling battery(ies) in order not to short out the battery(ies) with conducting materials such as rings, bracelets, and keys. The battery(ies) or conductor may overheat and cause burns. 'RQRWDWWHPSWWRUHFKDUJHWKHEDWWHU\LHVSURYLGHGZLWKRULGHQWL¿HGIRUXVHZLWKWKLVproduct that are not rechargeable. The battery(ies) may leak corrosive electrolyte or explode. 'RQRWDWWHPSWWRUHMXYHQDWHWKHEDWWHU\LHVSURYLGHGZLWKRULGHQWL¿HGIRUXVHZLWKWKLVproduct by heating them. Sudden release of the battery(ies) electrolyte may occur causing burns or irritation to eyes or skin.9. When replacing battery(ies), all batteries should be replaced at the same time. Mixing fresh and discharged batteries could increase internal cell pressure and rupture the discharged battery(ies). (Applies to products employing more than one separately replaceable primary battery.) 10. When inserting battery(ies) into this product, the proper polarity or direction must be observed. Reverse insertion of battery(ies) may result in leakage or explosion. 11. When inserting battery(ies) into this product, do not twist or pinch the wires or allow wires to become pinched in battery door. 12. If storing over 30 days, remove battery(ies) from this product because the battery(ies) could leak and damage the product. 13. Discard “dead” battery(ies) as soon as possible since “dead” batteries are more likely to leak in a product.](https://usermanual.wiki/CCT/30789/User-Guide-1461600-Page-71.png)