Users Manual
pi-topCEED
INSTRUCTION
MANUAL
Welcome
Welcome to the pi-top family!
pi-topCEED is very special to us (and so are you, of course!).
We are hugely passionate about this product and are thrilled to
provide excellent content so you can learn to make anything.
Your support has helped to make this a reality and we thank you
for joining us on this exciting maker journey!
We believe pi-topCEED is the best way to get started with
hardware and soware. Open up your box and immediately
immerse yourself in a new way of exploring computing -
unlocking a world of possibilities. As you grow and learn,
pi-topCEED will be part of your journey to expand your
knowledge - the only limit is your imagination!
So, let’s get started! Set up your pi-topCEED following our
manual so you can log-in and start your own cool projects, play
our educational game CEEDuniverse and more!
Step through the world’s gateway to technology.
With love,
The pi-top Team
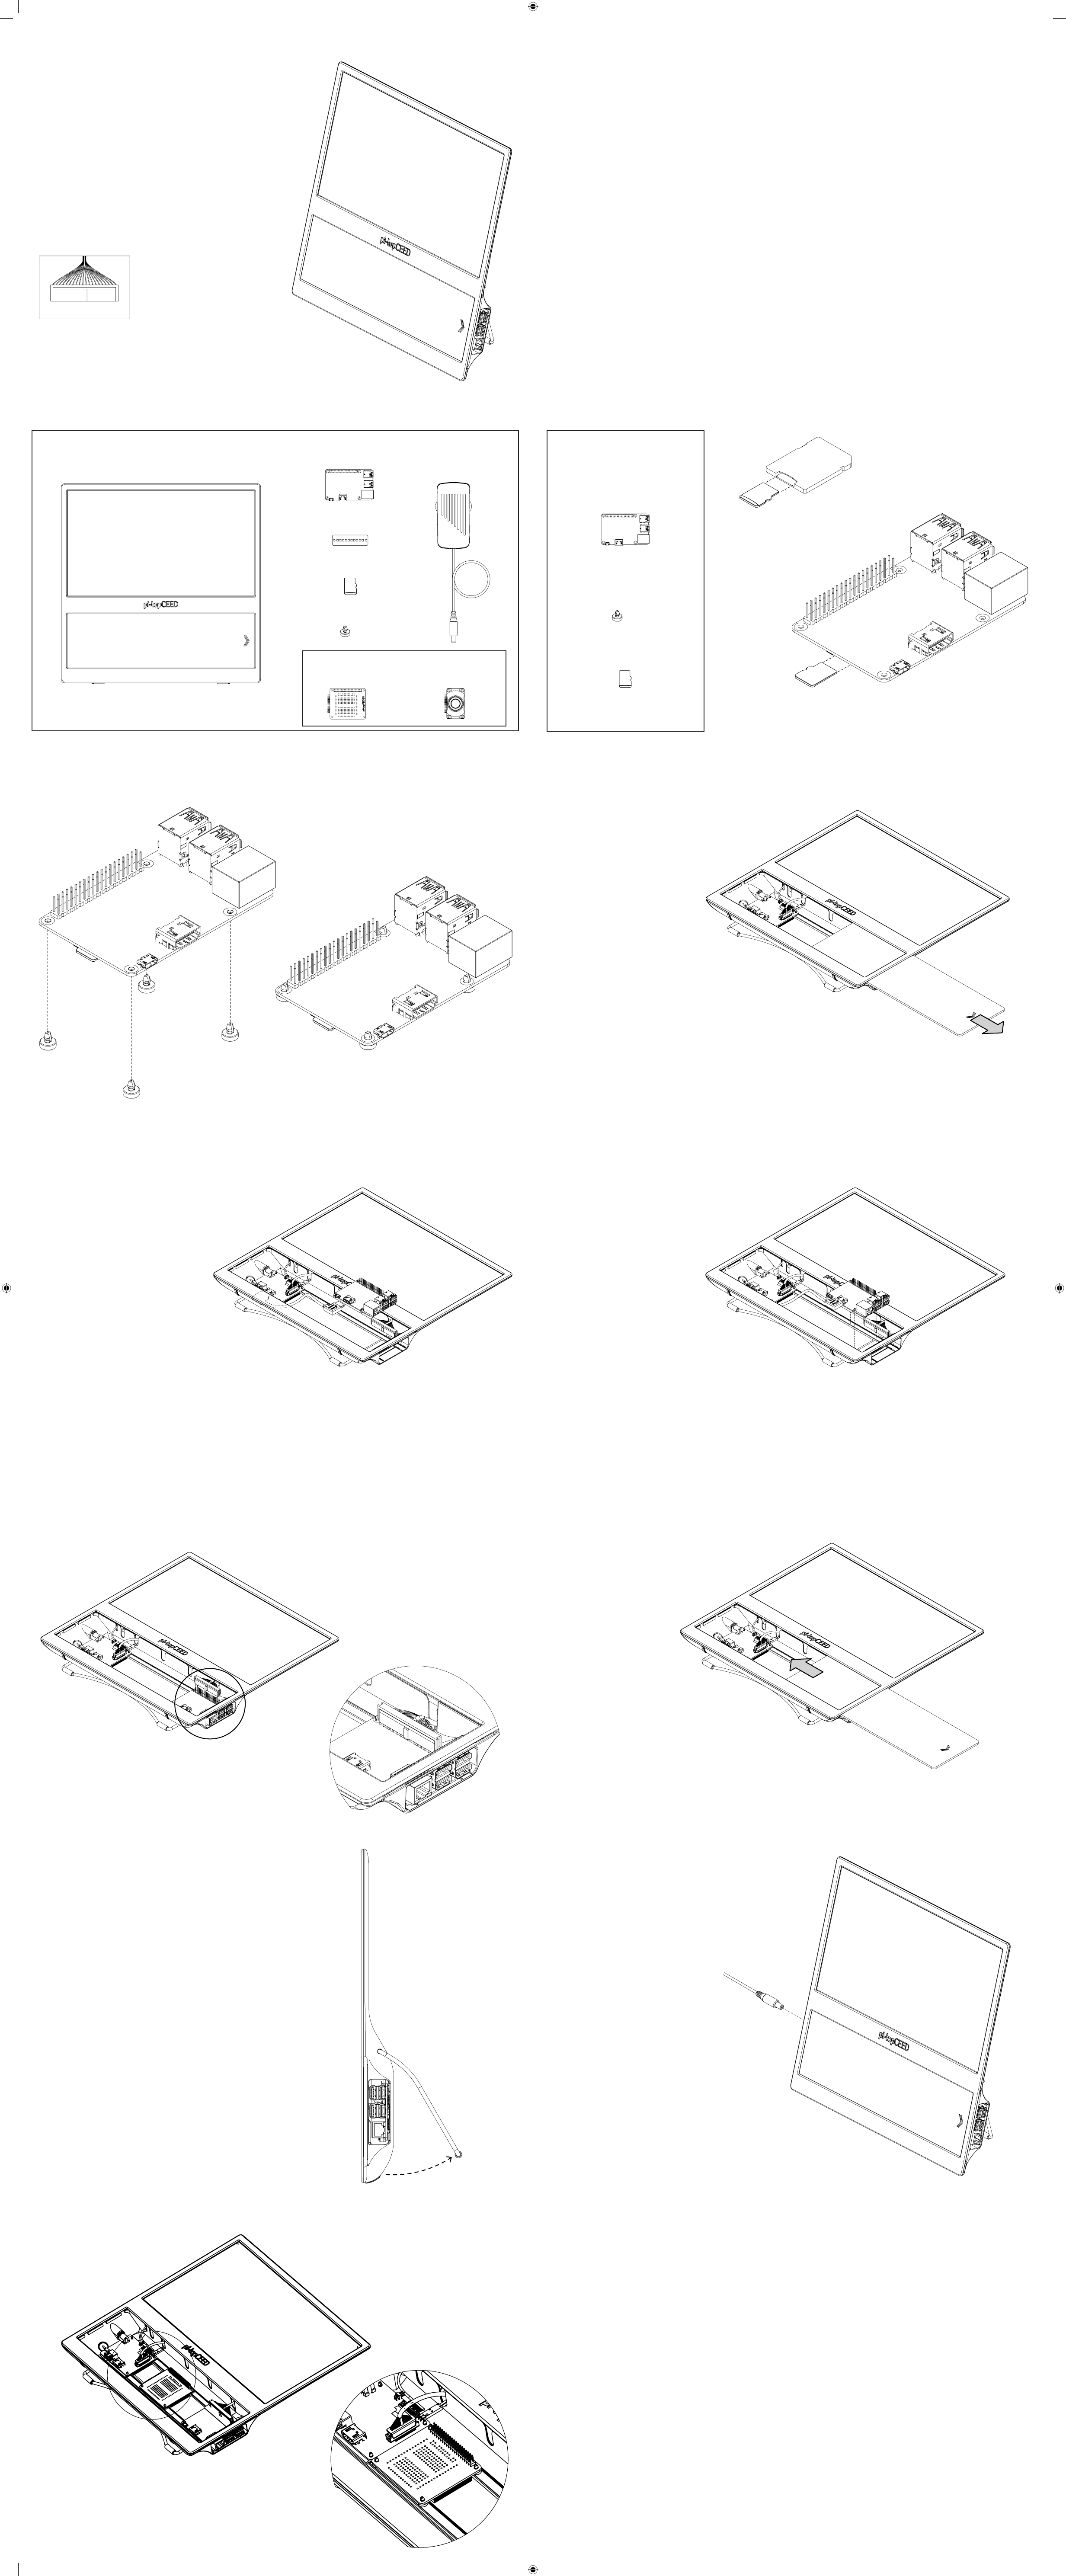
Getting Ready: What’s in the Box? Step 1: Inserting MicroSD Card
Step 2: Inserting Mag Clips
YOU WILL NEED
Follow this side if your pi-topCEED has
GPIO Breakout Cable.
This cable makes your pi-topCEED
compaitble with pi-top Add-ons.
Push Mag Clips into your Micro Computer.
Step 3: Preparing pi-topCEED
Step 5: Inserting Micro Computer
Step 7: Sliding in Acrylic Slice
Step 9: Connecting Power Supply
Step 4: Connecting HDMI Cable
Step 6: Connecting GPIO
Step 8: Adjusting Kick Stand
Step 10: Place pi-top Add-ons on the Mag Rails
Remove the Acylic Slice from
your pi-topCEED.
Connect the HDMI Cable into your
Micro Computer.
Place your Micro Computer onto the
Mag Rail and slide it to the end.
Ensure the two Mag Clips on the right
are lied over the bumps at the end of
the Mag Rail.
Adjust the Kick Stand so your
pi-topCEED sits on a desk at a
comfortable viewing angle.
Place your pi-top Add-on on the
Mag Rails and slide it towards the
Hub PCB.
Plug in the Power Supply and hold
the Power Button beside it for 2-3
seconds to turn on your pi-topCEED.
You can now begin your journey into
the world of computing!
pi-topCEED
X4
*Warning: Small parts can be choking hazards and should
be kept away from children under 3 yr old.
*MICRO SD CARD
Power SupplyMICRO COMPUTER
GPIO CARD
*MAG CLIPS
OPTIONAL ADD-ONS
X4
pi-topSPEAKERpi-topPROTO
pi-topCEED
INSTRUCTION
MANUAL
Welcome
Welcome to the pi-top family!
pi-topCEED is very special to us (and so are you, of course!).
We are hugely passionate about this product and are thrilled to
provide excellent content so you can learn to make anything.
Your support has helped to make this a reality and we thank you
for joining us on this exciting maker journey!
We believe pi-topCEED is the best way to get started with
hardware and soware. Open up your box and immediately
immerse yourself in a new way of exploring computing -
unlocking a world of possibilities. As you grow and learn,
pi-topCEED will be part of your journey to expand your
knowledge - the only limit is your imagination!
So, let’s get started! Set up your pi-topCEED following our
manual so you can log-in and start your own cool projects, play
our educational game CEEDuniverse and more!
Step through the world’s gateway to technology.
With love,
The pi-top Team
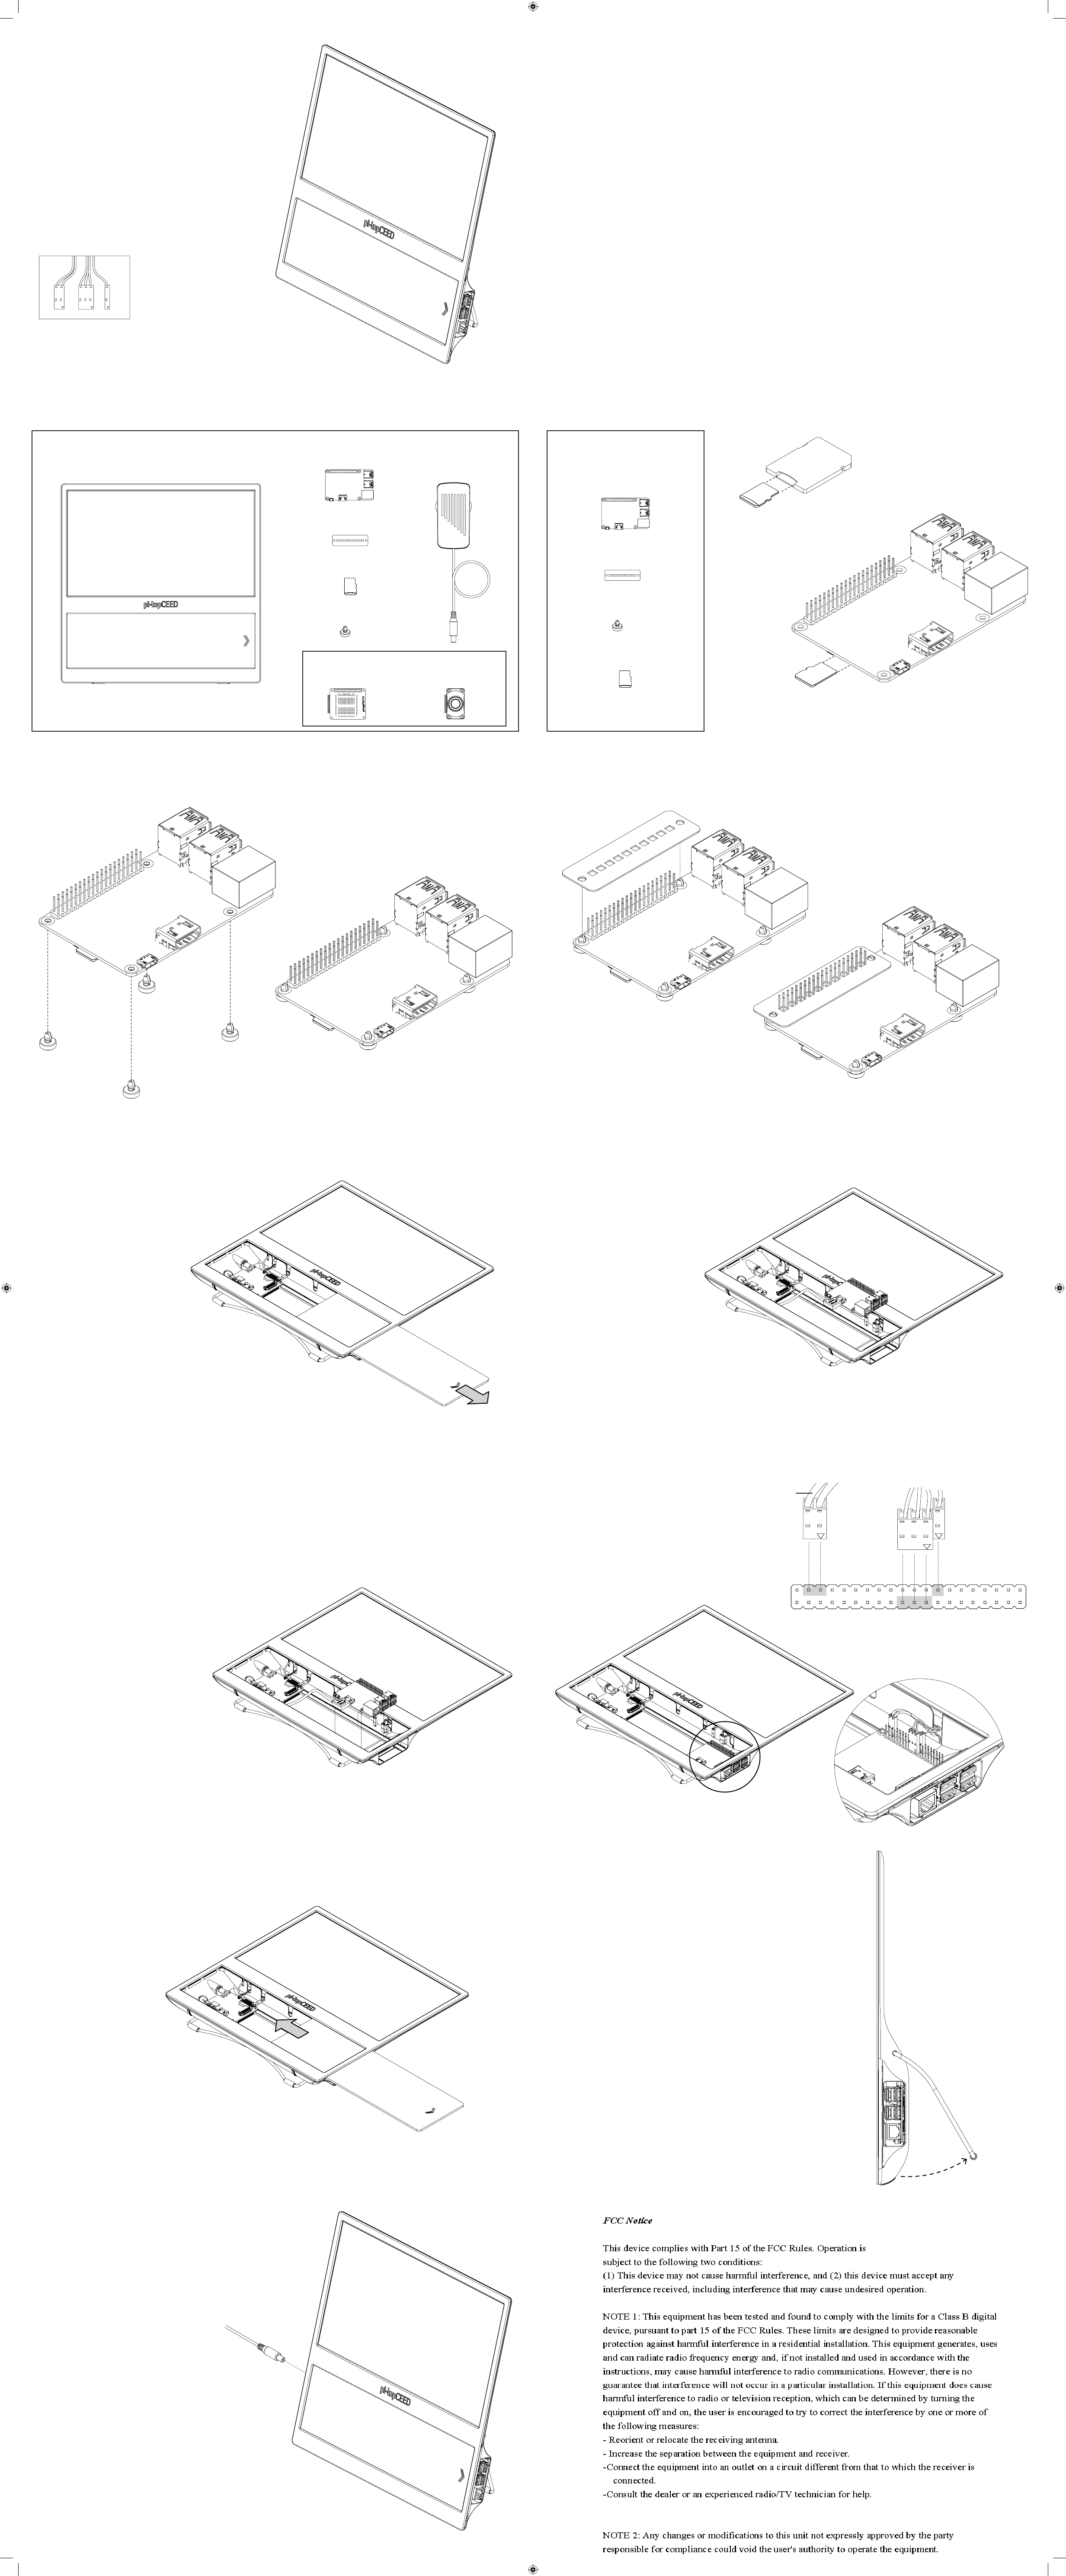
Getting Ready: What’s in the Box?
*MICRO SD CARD
Power SupplyMICRO COMPUTER
GPIO CARD
pi-topCEED
Place the GPIO Card onto your Micro
Computer.
Step 1: Inserting MicroSD Card
YOU WILL NEED Remove the Micro SD Card from
the adapter and insert into the slot
underneath your Micro Computer.
Step 2: Prepare PCBs Step 3: Adding GPIO Card
Push Mag Clips into your Micro Computer.
Step 4: Prepare pi-topCEED
Step 6: Inserting Micro Computer Step 7: Connecting GPIO
Remove the Acylic Slice from
your pi-topCEED.
Step 5: Connecting HDMI Cable
Connect the HDMI Cable into your
Micro Computer.
Step 8: Sliding in Acrylic Slice Step 9: Adjusting Kick Stand
Adjust the Kick Stand so your
pi-topCEED sits on a desk at a
comfortable viewing angle.
Step 9: Connecting Power Supply
Plug in the Power Supply and hold
the Power Button beside it for 2-3
seconds to turn on your pi-topCEED.
You can now begin your journey into
the world of computing!
*MAG CLIPS
OPTIONAL ADD-ONS
X4
X4
*Warning: Small parts can be choking hazards and should
be kept away from children under 3 yr old.
Place your Micro Computer onto the
Mag Rail and slide it to the end.
Ensure the two Mag Clips on the right
are lied over the bumps at the end of
the Mag Rail.
Connect the the female jumpers onto
your Micro Computer. Ensure the arrow
on the jumper is facing your Micro
Computer to avoid damage.
Red
3.3V PWR
I2C SDA
I2C SDL
GPIO 4
GND
GPIO 17
GPIO 27
GPIO 22
3.3V PWR
SPI MOSI
SPI MISO
SPI SCLK
GND
ID_SD
GPIO 5
GPIO 6
GPIO 13
GPIO 19
GPIO 26
GND
5V PWR
5V PWR
GND
UART TX
UART RX
GPIO 18
GND
GPIO 23
GPIO 24
GND
GPIO 25
SPI CS0
SPI CS1
ID_SC
GND
GPIO 12
GND
GPIO 16
GPIO 20
GPIO 21
pi-topSPEAKERpi-topPROTO
Caution: Take extra care with the 2-pin jumper cable (the one with the red wire), not
assembling exactly as shown will cause damage to your Micro Computer / pi-topCEED.
Follow this side if your pi-topCEED has
jumper cables.
The jumper cables offer the most flexible
usage of your Micro Computer’s GPIO pins.