CHINA ELECTRONICS M1ATS BLUETOOTH SPEAKER User Manual
China Electronics Shenzhen Company BLUETOOTH SPEAKER
User Manual
M1 User Manual
Product Overvie
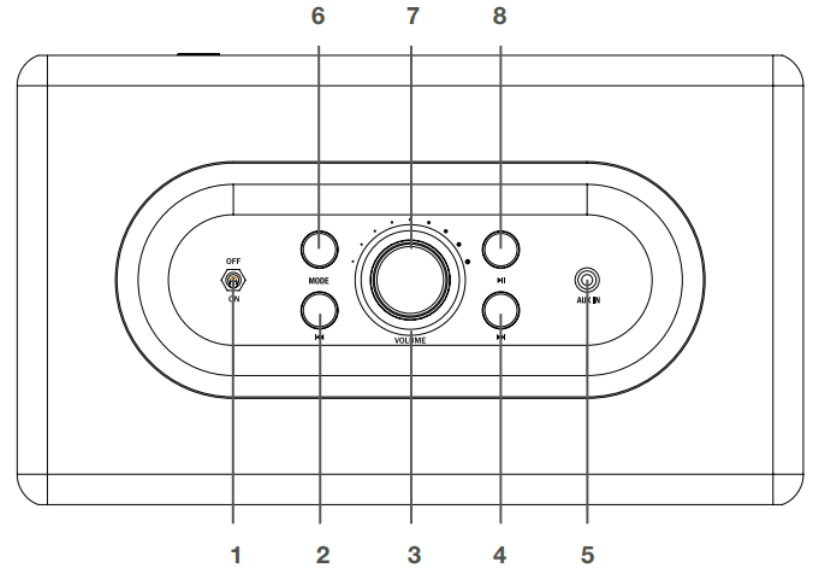
Top View
1 Power On/Off : Toggle to turn the unit On/Off.
2 Previous Track: Press to go to the previous track.
3 Volume: Volume control knob.
4 Next Track: Press to go to the next track.
5 AUX In: Connect audio devices using a 3.5mm Audio cable.
6 Mode: Press the Mode button to change between Bluetooth and
AUX In modes.
7 LED Status light: Shows power and Bluetooth connection status.
8 Play/Pause: Press to pause or play.
Product Overview (Cont.)
Rear View

9 DC IN: DC14V 2A
Package contents
1 x Retro Bluetooth Speake
1 x AC/DC Power adapter
1 x 3.5mm Audio cable
1 x Instruction Manual
Instructions
Powering On/Off
1. Plug the DC adapter into the wall socket and the other end into your Retro Speaker .
2. Turn the Retro Speaker on by moving the Power switch to On.
NOTE: After switching on, the blue LED will flash quickly to indicate it is ready to pair.
Pairing the Device
1. Place the Retro Speaker within 10m of the Bluetooth-enabled device.
2. Turn the Power switch to ON.
• The blue LED will flash quickly when ready to pair.
3 Follow the instructions of your device to search and connect to the speaker. Now you can select
"M1" from your Bluetooth enabled device.
4. If a PIN is required, enter "0000."
5. The blue LED becomes solid when pairing is complete.
6. You can control the music selection through your device and the Retro Speaker.
Bluetooth playback
• Turn the volume control knob clockwise to increase the volume.
• Turn the volume control knob anti-clockwise to decrease the
volume.
• Press ⏯ to Pause or Resume Playback.
• Press ⏯ to go to previous track.
• Press ⏯ to go to next track.
AUX Input mode
1 Before connecting any devices, ensure that the master volume is low or the unit is turned off.
2 Press the Mode button to switch between Bluetooth mode and AUX In mode. Bluetooth mode
is indicated by two short tones. Press the mode button again to enter AUX in mode.
3 The AUX IN port is located on the top right of the Retro Speaker.
4 Connect one end of the included 3.5mm to 3.5mm audio cable to your Retro Speaker and the
other end to the earphone socket of an external audio source. (E.g. iPod, MP3 player)
5 Start playing music from the external source.
LED Indicator: Meaning
The blue LED flashes: Ready to pair
The blue LED remains solid: Paired / connect
FAQs
If you experience problems with your Retro Speaker, check the table below for solutions to
common problems. If the problem persists after checking the suggested solutions, please contact
our after sales support line for advice. Do not attempt to repair the product yourself.
Problem Solution
Bluetooth is not pairing:The unit will search and connect to the previously connected Bluetooth
device automatically. To search and pair a different Bluetooth device, please unpair the previous
Bluetooth device first.
Low sound volume:
*The unit is at the default low level output. Turn up the volume of the unit.
*The output volume of the connected Bluetooth device is low. Turn up the volume of the
Bluetooth device.
Bluetooth has a short connection range:There may be a obstruction between the unit and the
Bluetooth device. Remove the obstruction.
A pause or interruption occurs during normal use:
*There may be a obstruction between the unit and the connected Bluetooth device. Remove the
obstruction.
*The distance between the Retro Speaker and the connected Bluetooth device may exceed
the connection range. Place the unit closer to the Bluetooth device.

Specifications
Adapter Voltage :
AC Input :100-240V~50/60Hz
DC Output :14V 2A
Bluetooth specifications: V4.2
Devices supported :Most Bluetooth enabled devices
Maximum connectivity range: up to 10m
Inputs: Bluetooth, AUX In
Audio output: 12W x 2
Frequency Response: 80Hz-16kHz
Driver: 2 x 3"
SNR: >65dB
Product Size: (L)260 x (W)150 x (H)150mm
Product Weight: 1970g
FCC Warnning:
This equipment has been tested and found to comply with the limits for a Class B digital device,
pursuant
to part 15 of the FCC Rules. These limits are designed to provide reasonable protection against
harmful interference in a residential installation. This equipment generates, uses and can radiate
radio frequency energy and, if not installed and used in accordance with the instructions, may
cause harmful interference to radio communications. However, there is no guarantee that
interference will not occur in a particular installation. If this equipment does cause harmful
interference to radio or television reception, which can be determined by turning the equipment
off and on, the user is encouraged to try to correct the interference by one or more of the
following measures:
•Reorient or relocate the receiving antenna.
•Increase the separation between the equipment and receiver.
•Connect the equipment into an outlet on a circuit different from that to which the receiver is
connected.• Consult the dealer or an experienced radio/TV technician for help.
Caution: Any changes or modifications to this device not explicitly approved by manufacturer
could void your authority to operate this equipment.
This device complies with part 15 of the FCC Rules. Operation is subject to the following two
conditions:
(1)This device may not cause harmful interference, and (2) this device must accept
any interference received, including interference that may cause undesired operation.
This equipment complies with FCC radiation exposure limits set forth for an uncontrolled
environment. This equipment should be installed and operated with minimum distance 20cm
between the radiator and your body.
This transmitter must not be co-located or operating in conjunction with any other antenna or
transmitter.