CHINALEAP CL-AMRXXX MOBILE INTERNET TERMINAL User Manual
CHINALEAP (HK) TECHNOLOGY CO., LIMITED MOBILE INTERNET TERMINAL Users Manual
Users Manual

Contents
1 Spjecifications .............................................................................. 1
2 Interface /button description ....................................................... 2
3 Main menu .................................................................................... 3
4 Basic Operation ........................................................................... 4
l On /Off ..................................................................................... 4
l Screen timeout, Wake up, unlock ......................................... 4
l Software install and uninstall ................................................. 4
l Locale and text ........................................................................ 4
l Desktop Shortcuts .................................................................. 4
l Networks controls ................................................................... 5
l USB Mode Select ................................................................... 5
l Connect to PC, and read the local disk ................................ 5
l Software Update ..................................................................... 5
5 Questions and Answers .............................................................. 5
6 Maintenance Guidellines ............................................................. 6

1
1 Spjecifications
�Display Screen : 7 “ WVGA 800*480 TFT
�Memory: 128MB SDRAM
�
Flash: 8GB
�CPU: RK2808A
�Support audio format: MP3,WMA,WAV,APE,OGG,FLAC,AAC.
�
Support video format: AVI,3GP/MP4,RM/RMVB,FLV,MKV,MOV,WMV
�Support photo format: JPG/JPEG/BMP/GIF/PNG
�Screen timeout: Adjust the delay before the screen automatically turns off.
�
Support video output : HDMI& YPBPR
�Support for multiple languages
�USB2.0 High-speed transmission
�
Support the t hird-party software install and uninstall , such as: games, other application software .
�Audio Input / Output: built-in stereo speakers, external microphone input, headphone output
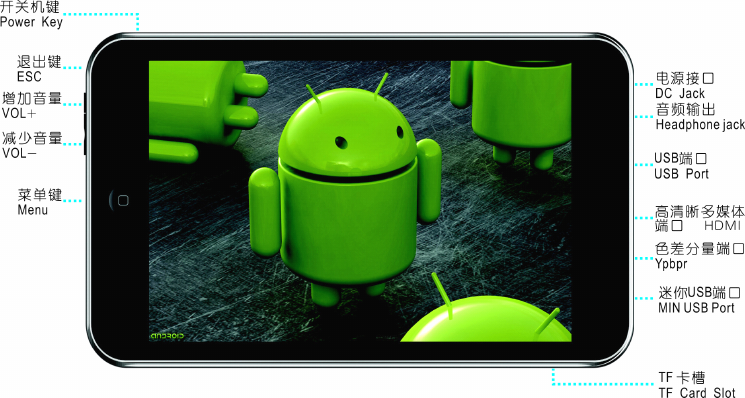
�Port: DC jack, Headphone jack, USB 2.0*1,MINI USB*1,HDMI*1, YPBPR*1
�
Use temperature: -5 to 40 degrees Celsius

2
2 Interface /button description

3
3 Main menu
Applications
Applications
Applications
Applications
Function
Function
Function
Function &
&
&
& Description
Description
Description
Description
Alarm Clock Set the alarm to alert the user to do something .
Audio Player Play Audio File . Support audio format : MP3,WMA,WAV,APE,OGG,FLAC,AAC.
Browser Web browsing .
Calculator
To
carry out mathematical operations
Email Users can receive / editor / Send mail
Explorer Resource Management: SD Card \Internal Memory \USB
Photo Browser Support photo format: JPG/JPEG/BMP/GIF/PNG
Settings Users can set various parameters of the system
Sound Recorder Saved automatically after recording
Video Player Play Video File. Support video format: AVI,3GP/MP4,RM/RMVB,FLV ,MKV,MOV,WMV
4
4 Basic Operation
�
�
�
�
On
On
On
On /Off
/Off
/Off
/Off
(1) On: Slide the power key to the left side , and hold on for 3 seconds .
(2) Off: Slide the power key to the left side , and hold on for 3 seconds , and then pop-up a shutdown interface, click the item "Power off".
�
�
�
�
Screen
Screen
Screen
Screen timeout,
timeout,
timeout,
timeout, Wake
Wake
Wake
Wake up,
up,
up,
up, unlock
unlock
unlock
unlock
(1) "Settings 启" → "Sound & display" → "Screen timeout", can adjust the delay before the screen automatically turns off.
(2) When screen turns off, press power key to wake up.
(3) When display "Screen locked", press menu key to unlock.
�
�
�
�Software
Software
Software
Software install
install
install
install and
and
and
and uninstall
uninstall
uninstall
uninstall
Copy the APK package which you want to install to the U disk / TF Card / Local disk, then you can install or uninstall it as follow:
(1) Install
Install
Install
Install ---Find the APK package which is in SD Card/Internal Memory/USB, Click it to Install.(The first time you install the APK package, you must
pitch on the item "Settings" → "Applications" → "Unknown sourtce" )
(2) Uninstall
Uninstall
Uninstall
Uninstall ---"Settings" → "Applications" → "Manage applications", at this interface, you can click the applications which you do not need to uninstall.
�
�
�
�
Locale
Locale
Locale
Locale and
and
and
and text
text
text
text
(1) "Settings" → "Locale & text",you can set locale(language and region), text input and auto-correction option.
(2)
You
can switch the input method, or you can choose the other input method for text editing.
(3) Switch input method: Hold and press The first key in the last row of the keyboard ,and then will pop up a interface, you just need to choose the item
"input method".
�
�
�
�Desktop
Desktop
Desktop
Desktop Shortcuts
Shortcuts
Shortcuts
Shortcuts
(1) Press in black of the home screen and hold on, there will be appeared the "Add to home screen" interface.
(2) Optional items: Shortcuts / Widgets / Folders / Wallpapers.

5
�
�
�
�Networks
Networks
Networks
Networks controls
controls
controls
controls
(1) "Settings" → "Networks controls", you can click the "Wi-Fi" to turn on wireless device,
(2) Press "Wi-Fi settings" to set up & manage wireless access points; you can select one point from the "Wi-Fi networks" list.
�
�
�
�USB
USB
USB
USB Mode
Mode
Mode
Mode Select
Select
Select
Select
(1) "Settings" → "USB Mode select" → "Host mode",Select USB work as host mode, then you can mount U-disk or 3G modules.
(2) Insert the USB device, the upper left corner will be prompted for "USB disk inserted".
�
�
�
�Connect
Connect
Connect
Connect to
to
to
to PC,
PC,
PC,
PC, and
and
and
and read
read
read
read the
the
the
the local
local
local
local disk
disk
disk
disk
(1) "Settings" → "USB mode select", unselect the item "Host mode".
(2) Connect the unit and PC with mini USB cable, then pop-up the "USB connected" interface, click "Mount" button, the local disk will appear on the
PC, you can copy files to the local disk.
Note: When you connect to PC first time, should update the USB drivers, which can be found "USB DRIVER" in the Drivers CD.
�
�
�
�Software
Software
Software
Software Update
Update
Update
Update
The method of update Software, please see the www.chinaleap.com/service.aspx
5 Questions and Answers
Questions
Questions
Questions
Questions Answers
Answers
Answers
Answers
Do not boot .
Connect the power adapter for charging , and then boot again . if do not boot, please contact
our distributors.
Do not connect to the computer Make s ure the USB cable is n't damaged.
Do not copy file Make sure the internal memory is n't full

6
Machine exception, can not be used . The back of the m achine , there is a small hole .T hrough this hole user can reset.
I can ' t open some of my photo s?
Some of the photo or picture file format may not be supported.Please refer to the previous
[ specificatons ].
I can't play some of my music.
Some of the music file format may not be supported.Please refer to the previous
[ specificatons ].
I can't play some of my video.
Some of the video file format may not be supported.Please refer to the previous
[ specificatons ].
C an I delete the image, music or video in the
external storage device?
Yes, you can.
C an I delete the image, music or video in the
internal storage device?
Yes, you can.
A customer service phone? Hotline :400-6385-800
6 Maintenance Guidellines
To
enhance the performance and extend the life of the M1:
1. Do not open the M1 or attempt to service this product yourself. If the M1 is not operating properly or has been dropped or damaged, contact your
reseller, or service provider.
2. Keep the M1 in a well-Ventilated area, away from excessive light, heat ,or moisture.
3. Unplug the M1 from the power outlet before cleaning.
4. Do not use liquid cleaners or aerosol cleaners.
5. Do not drop the M1 or place it on an unstable surface.
6. Do not use ammonia, alcohol, or abrasive detergent cleaning agents.
7. Use a clean, soft, lint-free cloth to remove dust and loose particles.
8. Do not apply too much pressure on the screen to avoid damaging it.
FCC WARNING
This device complies with Part 15 of the FCC Rules. Operation is
subject to the following two conditions:
(1) this device may not cause harmful interference, and
(2) this device must accept any interference received, including interference that may cause
undesired operation.
NOTE: This equipment has been tested and found to comply with the limits for a Class B
digital device, pursuant to part 15 of the FCC Rules. These limits are designed to provide
reasonable protection against harmful interference in a residential installation. This equipment
generates, uses and can radiate radio frequency energy and, if not installed and used in accordance
with the instructions, may cause harmful interference to radio communications. However, there is
no guarantee that interference will not occur in a particular installation. If this equipment does
cause harmful interference to radio or television reception, which can be determined by turning
the equipment off and on, the user is encouraged to try to correct the interference by one or more
of the following measures:
- Reorient or relocate the receiving antenna.
- Increase the separation between the equipment and receiver.
-Connect the equipment into an outlet on a circuit different from that to which the receiver is
connected.
-Consult the dealer or an experienced radio/TV technician for help.
NOTE: The manufacturer is not responsible for and radio or TV interference caused by
unauthorized modifications to this equipment. Such modifications could void the user’s authority
to operate the equipment.