CHM Soft4Boost Screen Recorder Recorder_en En
://soft4boost.com/s/ScreenRecorder_en ScreenRecorder_en Site Map - by www.xml-sitemaps.com
User Manual: CHM ScreenRecorder_en
Open the PDF directly: View PDF ![]() .
.
Page Count: 10
S4B Screen Recorder
Soft4Boost Help
S4B Screen Recorder
www.sorentioapps.com
© Sorentio Systems, Ltd. All rights reserved
Contact Us
If you have any comments, suggestions or questions regarding S4B Screen Recorder or if you
have a new feature that you feel can be added to improve our product, please feel free to contact
us.
When you register your product, you may be entitled to technical support.
General information: info@soft4boost.com
Technical support: support@soft4boost.com
Sales: sales@soft4boost.com
Technical Support
S4B Screen Recorder do not require any professional knowledge. If you experience any problem
or have a question, please refer to the S4B Screen Recorder Help. If you cannot find the
solution, please contact our support staff.
Note: only registered users receive technical support
S4B Screen Recorder provides several forms of automated customer support
Soft4Boost Support System
You can use the Support Form on our site to ask your questions.
E-mail Support
You can also submit your technical questions and problems via e-mail to
support@soft4boost.com
Note: for more effective and quick resolving of the difficulties we will need the following information:
Name and e-mail address used for registration
System parameters (CPU, hard drive space available, etc.)
Operating System
Detailed step by step describing of your action
Resources
Documentation for S4B Screen Recorder is available in a variety of formats:
In-product (.chm-file) and Online Help:
You will be able to use help file (.chm) through the Help menu of the installed S4B Screen
Recorder.
Online Help include all the content from the In-product help file and updates and links to
additional instructional content available on the web. You can find the Support at our web-site -
http://sorentioapps.com. Please note, that the most complete and up-to-date version of S4B
Screen Recorder help is always on the web.
PDF Documentation
The offline help is also available as a pdf-file that is optimized for printing. PDF help file is
available for download at the program page at Soft4Boost web-site. To be able to read and print
S4B Screen Recorder PDF help file you will need to have a PDF reading program installed.
User Guides
You have access to a wide variety of resources that help you make S4B Screen Recorder. The
step-by-step user guides will be of help not only to the novice users but also to the users that face
a certain task to be performed and look for a way to do it. Please, visit our Support section of
Soft4Boost web-site at to read the detailed instructions for various software and tasks.
Technical Support
Visit the Support at our web-site http://sorentioapps.com to ask your questions concerning
S4B Screen Recorder installation, registration and use. Feel free to also use our e-mail
address support@soft4boost.com
Downloads
Visit the Downloads section of our web-site to find free updates, tryouts, and other useful
software. We constantly update the software, new versions of the most popular programs and new
software are also frequently released.

Overview
Soft4Boost Screen Recorder is a utility for recording mouse movements and snapshots.
Soft4Boost Screen Recorder’s interface provides all the tools needed for recording. The options
shown on its small window are Start Capture, Snapshot, Drawing, and Settings. There are also
three buttons used for selecting the part of the screen to record.
These are:
– Full Screen – for recording the entire screen.
– Selected Area – for selecting a specific area of the screen to record.
– Selected View – for recording one of the opened windows on the desktop.
Once a selection has been made, users can click on the Start Capture button to record a video.
The Snapshot button can be used to capture an image file. The image file will be saved in the
computer’s hard drive as BMP, JPEG, or PNG.
The Drawing Tools can be used while recording is ongoing. This is useful for creating
instructional videos. There are lines, shapes, arrows, and a pencil tool. Users can set the color,
and the thickness for the tools. These tools are disabled when the desktop is not being recorded.
To start Soft4Boost Screen Recorder go to Start menu and choose All Programs -> Soft4Boost
-> Screen Recorder –> Screen Recorder.
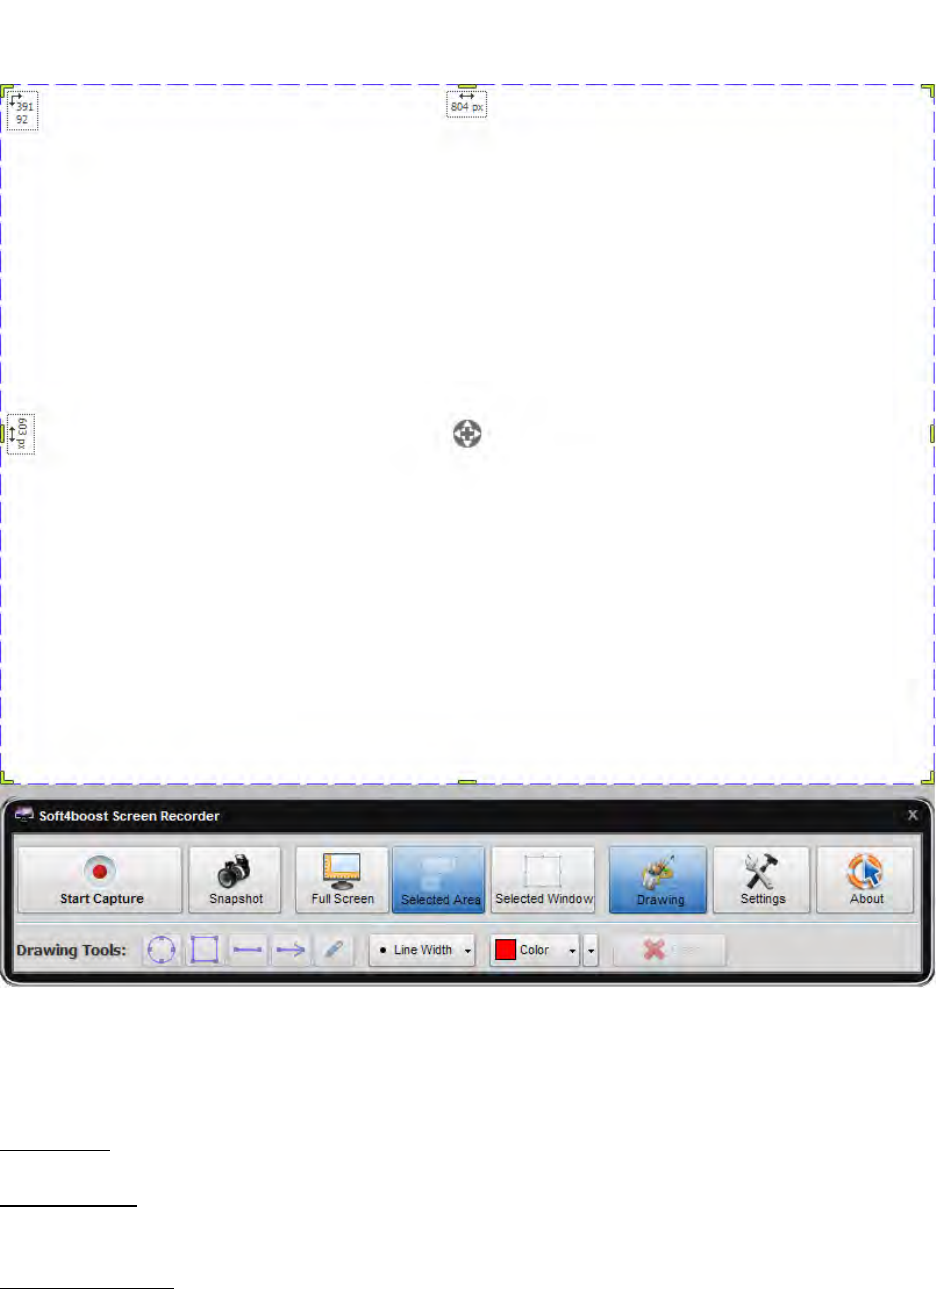
Program Interface
Soft4Boost Screen Recorder interface is quite simple to use and lets the user perform all the
actions with a few mouse clicks. The program Main Window looks the following way:
Once the application is launched, you can proceed in the following way:
Step 1. First of all you need to select an area to record. Click one of the available buttons:
Full Screen – Use this button to select the whole screen for capturing.
Selected Area – Use this button to select а specific area on the screen for capturing. You can
change the dimension and location of the selected area.
Selected Window – Use this button to select one of the opened windows on the screen and
capture any actions within this window.
Step 2. Click the Start Capture button. When you capture the screen within the selected area or
window, this button will be divided into Pause and Stop buttons which help you interrupt or stop
the recording process.
Step 3. Use the Snapshot button to capture a specific moment and save it as an image file
in PNG, JPEG or BMP format.
Step 4. Draw lines, shapes and arrows of different colors and thickness pointing to a particular
part of the screen with the Drawing Tools.
Previewing and Saving Video
As soon as you stop capturing the Soft4Boost Screen Recorder Viewer emerges. It operates as
a common media player with a preview window, a navigation slider and several control buttons.
To save the captured video, click the Save Video button under the preview area of the Viewer
window.
The Save As dialog window will pop up. Select the appropriate location for your file and press
the Save button.
Drawing Tools
Once you click the Start Capture button you can begin drawing lines, shapes and arrows of
different colors and thickness within the recording area you selected. To activate the painting
tools hit the Drawing button.
The Drawing Tools panel comprises the following buttons:
Ellipse – Use this button to draw circles and ellipses of various sizes and colors.
Rectangle – Use this button to draw rectangles of various sizes and colors.
Line – Use this button to draw straight lines with no angles or bends.
Arrow – Use this button to draw straight arrows of various sizes and colors.
Pencil – Use this button to draw any shape you need or write your own text.
Line Width – Use this button to change the thickness of the lines you are going to draw. Click
the black arrow and select the line width from the drop-down menu. The size varies from 1 to 8
pixels.
Color – Use this button to change the color of the lines you are going to draw. Click the black
arrow and select the desired color from the drop-down menu. Or use the Color button to create
your own color with the help of the Color window.
Clear – Use this button to delete everything you have drawn within the recording area.
Note: if the capturing process isn't launched, several buttons of the Drawing Tools panel will be disabled. You'll be
able to set the width and color settings only.
Capture Settings
You can adjust the Soft4Boost Screen Recorder sound and cursor parameters as well as select
an output file format, temporary folder and capture hotkey combinations in the Settings window
of the program. To open it click the Settings button on the application Toolbar.
The Settings window contains the following tabs:
1) The General settings tab allows you to edit the following parameters:
Directory for temporary files – a folder used to store temporary captured files. Click the
Browse button, if you want to change this temp folder. Make sure you have enough free disc
space for them. The information on the selected drive space is indicated below the directory box.
Stop Capture Hotkey – a combination of keys that will be used to stop a capturing process.
Assign these hotkeys by checking the corresponding fields.
Pause Capture Hotkey – a combination of keys that will be used to pause a capturing process.
Assign these hotkeys by checking the corresponding fields.
Snapshot Capture Hotkey – a combination of keys that will be used to take snapshots during
the capturing process. Assign these hotkeys by checking the corresponding fields.
Select a skin style allows to change current skin application.
2) The Video settings tab allows you to edit the following parameters:
Video File Format – a format for an output file with your captured video; select between FLV
(delivering video over the Internet), WMV (video compatible with many portable players)
or AVI (multiple purposes).
Note: when you select the AVI file format you will get an uncompressed .avi file. It gives the best video quality but
the file size is very large. Make sure that the free disk space within the temporary directory is enough to store
captured video files.
3) The Sound settings tab allows you to edit the following parameters:
Record sound – if you activate this checkbox your captured video will be recorded with the
sound. Select the required audio source device and its input jack with the help of the
corresponding drop-down boxes in the Audio source field.
Add mouse click sound – if you activate this checkbox your captured video will be recorded
with mouse click sounds.
4) The Mouse Cursor settings can be modified only if you include a mouse cursor in the
resulting file which is done by checking the Include mouse cursor box. The tab includes
the following parameters that modify cursor effects:
Highlight cursor – if you want the cursor to be more easily seen activate this checkbox. You
can select its shape from the drop-down list and check the necessary size in the corresponding
box.
Highlight clicks – if you activate this checkbox each mouse click will be highlighed with the
help of a moving object. You can select its shape from the drop-down list and color from the
pop-up window. To see the way the click will be reproduced in your captured video press
the Play button. You can set different properties for left and right clics.
5) The Snapshots settings tab allows you to edit the following parameters:
Snapshot File Format - a format for an output image file created during the capturing process;
select between PNG, JPEG and BMP format.
Indicate a file path before saving a snapshot – activate this checkbox if you'd like to assign the
directory each time you save a new file.
Save snapshots to the specified folder – check this box and select the destination folder to store
the created snapshots clicking the Browse button.
Each tab contains the OK button to accept all the changes made and Cancel to close the window
without saving any of them.
