CHUANGXIANG TOYS FACTORY CXMODEL010A rc drone User Manual SOUNDLOGIC LOGO
CHUANGXIANG TOYS FACTORY rc drone SOUNDLOGIC LOGO
Users Manual
1
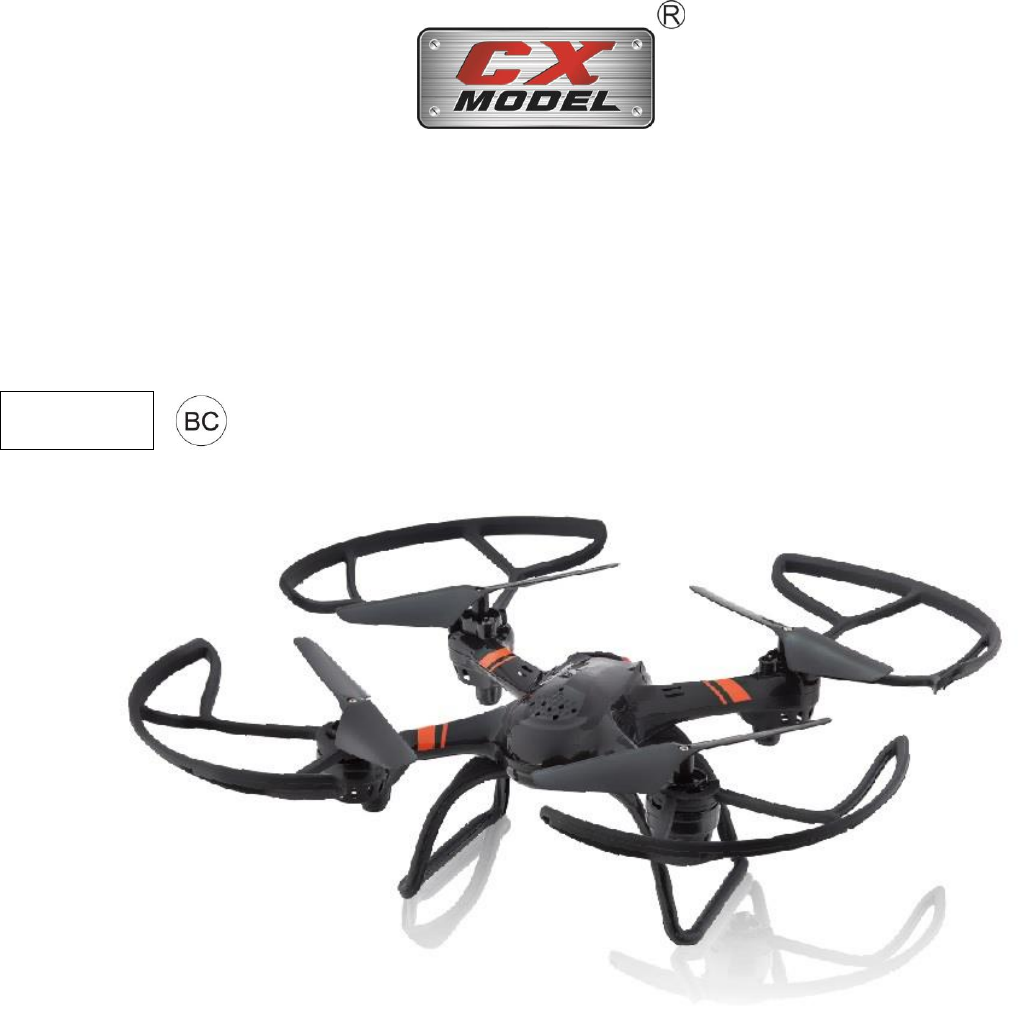
CX010 DRONE
4 Channel Quadcopter
INSTRUCTION MANUAL
Please read all instructions carefully and retain for future use
FOR AGE
14+
2
Note: Physical damage to the product or its parts, caused due to operational reasons is not covered in the
warranty. Manufactures/distributors/retailers are not responsible and/or liable for any damage or loss of
property caused due to use of this product.
Welcome!
Thank you for purchasing X360 Aerodrone, a 8 inch Rechargeable 4 Channel Quadcopter. Please
store this manual in a safe place for future reference.
GETTING STARTED
Remove the product from the box.
Remove any packaging from the product.
Please read all instructions and retain all packaging until you have checked and counted all of the
parts.
PACKAGE CONTENTS
8 inch Rechargeable 4 Channel Quadcopter
Remote Controller
USB Charging Adapter
2 Landing Skids
2 Protecting Frames
Instruction Manual
INSTRUCTIONS FOR USE
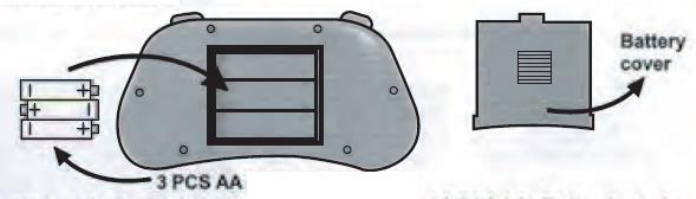
Battery installation on the Remote Controller
Slide out the battery cover of the remote controller. Install 3 x “AA” batteries (not included) in the
battery compartment as indicated. Then, put back the battery cover.
Notice:
1. Install the battery as per the indicated polarity.
2. Do not mix different types of batteries.
3. Do not mix new and old batteries.
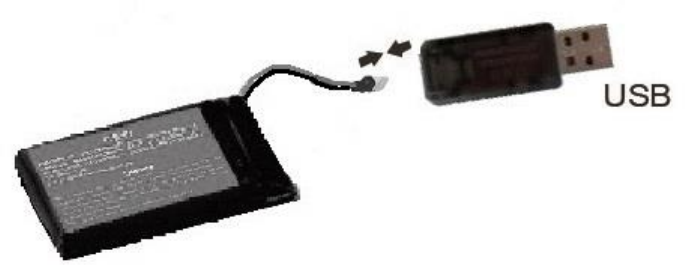
Instructions to charge the Quadcopter:
1. Disconnect the battery connector from the power socket and take out the battery..
2. Insert the USB Charging Adapter (included) into the computer USB port or other suitable USB
source and connect its output to the battery connector of the battery.
3. Red LED light on the USB Charging Adapter is on while charging. After the battery is fully
charged, the Red LED light will turn off. It takes about 35-40 minutes to fully charge the battery.
4. Disconnect the battery connector and reconnect the battery to the Quadcopter.
3
5. Once fully recharged, the Quadcopter can fly for about 5-7 minutes. Actual fly time can vary
based on individual handling & flying conditions.
Note: Battery life / Flying time may vary depending on flying conditions, handling, control
range etc.
Caution:
If the Quadcopter needs to be recharged, allow 10-15 minutes for it to cool down before
recharging.
Do not overcharge the battery.
If the battery becomes too hot while charging then remove it from charging immediately and allow
it to cool down.
Do not reconstruct battery.
Do not connect the battery to an electrical outlet.
SUITABLE FLYING CONDITIONS
1. Places with no or few obstacles are recommended.
2. Do not fly your Quadcopter in strong winds as it may affect the remote-control system and
interfere with your control leading to a crash or damage to the Quadcopter.
3. Do not fly in rain/damp conditions.
Caution:
Never allow young children to use this product alone.
Parental guidance is highly recommended during the use of this product.
DO NOT operate your Quadcopter if someone else is operating a similar device in the same
operating range, as it may interfere with the frequency range and impact the controlling capacity of
the Quadcopter. Multiple Quadcopter operating simultaneously must be on different frequency
bands.
PREPARE FOR TAKE OFF
1. Install the fully recharged battery into the bottom bracket of Quadcopter, and connect the battery
connector to the power socket from Quadcopter. Blue and Green LED lights will flash.
2. Place the Quadcopter on flat surface.
3. Recheck the area to make sure it is clear from people, pets, trees, buildings, high voltage wires,
and other obstructions.
4
4. Turn on the remote controller with red indicator light flashing, push the left throttle stick upward to
the highest position, and then pull it back to the lowest position. After a long sound “Di”, the
indicator light stays on, then you can operate the Quadcopter.
5. Push the left throttle stick upward. If the Quadcopter spins in the air; please refer to “Fine-tuning
adjustment”.
Note: The Green LED must on the front position to move forward, while Blue LED must on the rear
position.
Caution: Always turn OFF the controller before you unplug the battery from the Quadcopter.
Do not push the throttle sticks excessively, while taking off as it may lead to a quick ascend
which may cause injury.
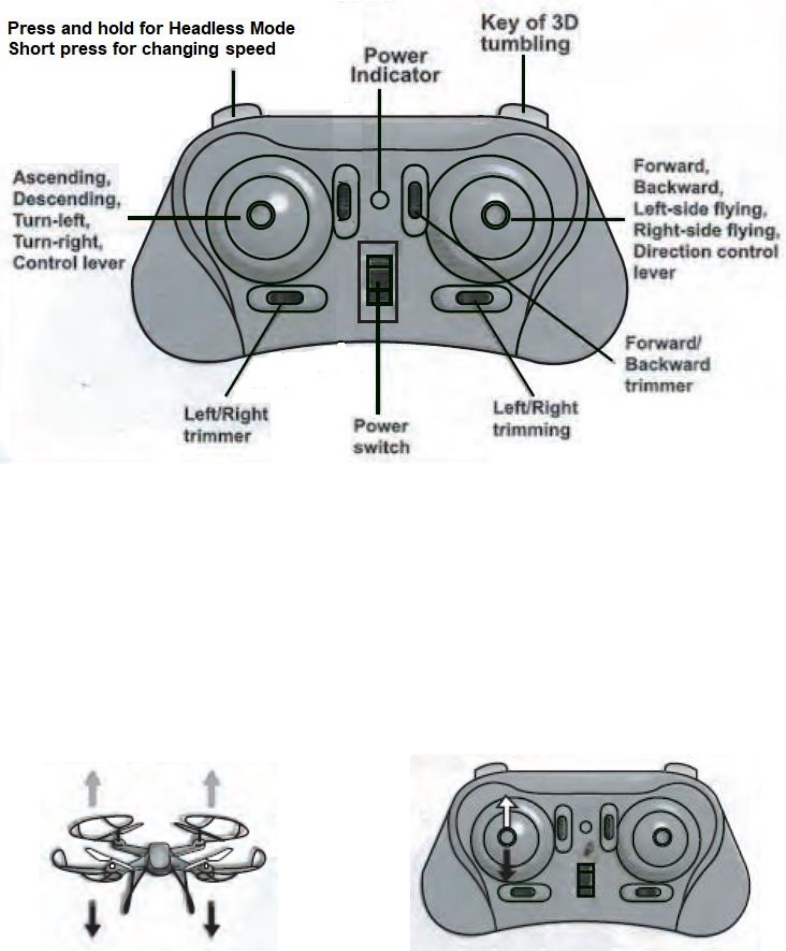
Description of Parts:
Remote Control
CONTROL METHOD
Warning: Do not fly in strong wind, as it may overpower your Quadcopter and lead to loss of control.
Flying time: On a full charge, and in low wind conditions, the Quadcopter will fly for about 5-7
minutes.
Note: Battery life / Flying time may vary depending on flying conditions, handling, control
range etc.
Ascend/Descend
When you push the left throttle stick upward/downward, the Quadcopter will begin to ascend/descend.
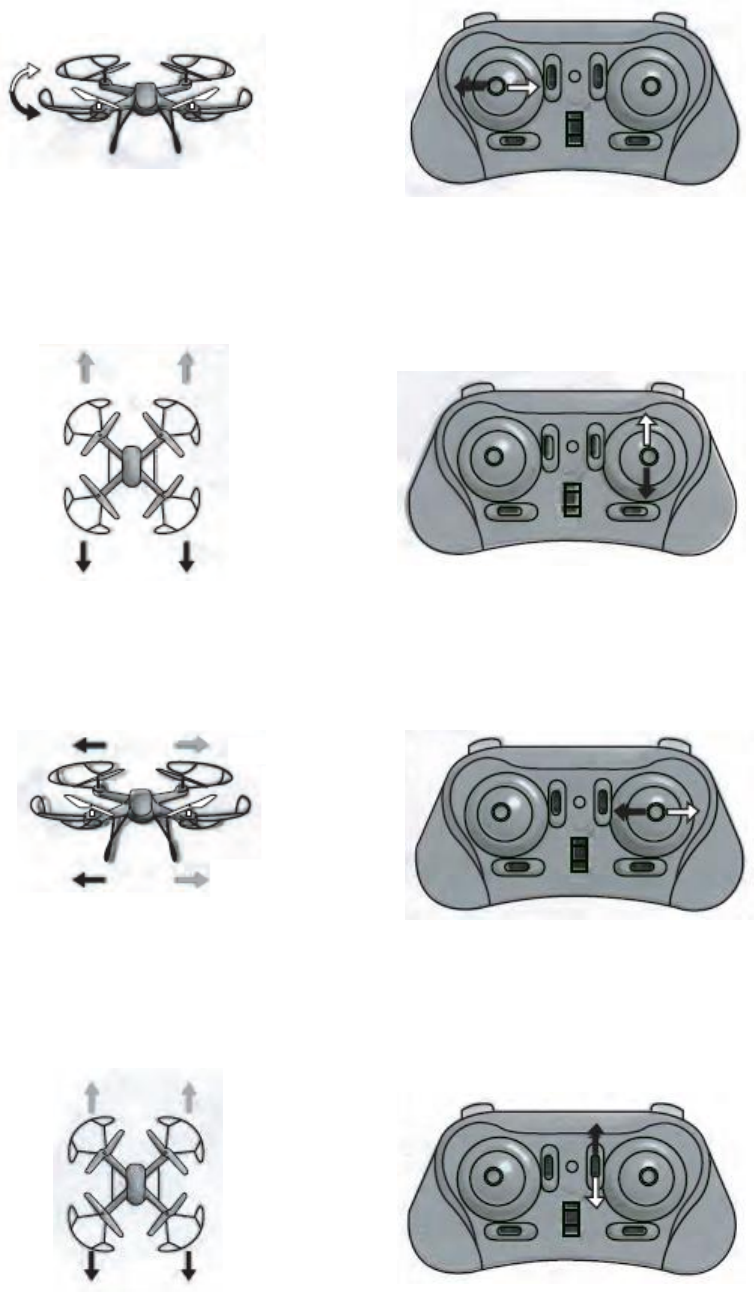
5
Turn Left/Right
When the left throttle stick is pushed to the left/right, the Quadcopter turns left/right.
Forward/Backward
When you push the right throttle stick upward/downward, the Quadcopter will begin to fly
forward/backward.
Fly Left/Right
When the right throttle stick is pushed to the left/right, the Quadcopter flies left/right.
Trimming
In the case that the Quadcopter is hovering and still flies forward or backward, you
can correct it by pushing the trimmer upward or downward.

6
In the case that the Quadcopter is hovering and still flies to the left or to the right, you can
correct it by pushing the Left/Right trimming to the right or to the left.
When the Quadcopter spins left or right continuously, you can correct it by pushing the Left/Right
trimmer to the right or to the left.
Instruction on 3D Flip
Fly the Quadcopter 10 Feet high, press the FLIP STUNT key on the right up corner of the Transmitter,
and push the right direction rudder to make tumbling action like forward flip, backward flip, left–flip,
right-flip.
During the process of flying this Quadcopter or during the course of tumbling, if the Quadcopter falls
on the ground please do not operate the control immediately, and wait for 5-10 seconds and the gyro
will restore its original position automatically.
Headless Mode Function
Regardless of where the Quadcopter turns, the direction of flight always corresponds exactly to the
direction specified with the control for forward/backwards and sideways movements.
Place the Quadcopter on the level surface facing away from you. Turn on the Quadcopter and
connect the controller.

7
Press and hold the left top button of the Transmitter to initiate the Headless Mode flight, you will hear
a beep sound and LED light flashes to indicate that the unit is in Headless mode.
Press and hold the left top button again to exit from Headless Mode, you will hear a beep sound and
LED light stays on without flashing.
Changing speed
Short press the left top button of the Tramsmitter each time for changing speed: slow, medium & fast.
One press automatic return function
Long press the FLIP STUNT key on the right up corner of the Transmitter, and the Quadcopter will
automatically return to its initial take off position.
TROUBLESHOOTING GUIDE
Problem
Possible Cause
Solution
The controller
indicator doesn’t
work
Batteries installed with
incorrect polarity.
Check and make sure that the batteries are installed as per
correct polarity.
Batteries are drained.
Install new batteries.
No control
Windy Environment
Do not fly in windy environment. As it will limit or disturb
your flying control.
The Quadcopter does not
receive signal correctly.
Push the left throttle stick upward, then pull it back in to the
original position.
Quadcopter is
not flying high
enough
Rotor speed is too slow.
Pushing up the left throttle stick
Quadcopter is not fully
charged.
Fully charge your Quadcopter.
Quadcopter
doesn’t take-off
Remote Control &
Quadcopter need to Sync
Turn off the Remote Control & disconnect Quadcopter
power switch. Reconnect Quadcopter power switch & turn
on the Remote Control. This should sync them again.
ADDITIONAL INFORMATION
1. The control distance will get shortened when the Quadcopter is under low power condition.
2. Windy environment may reduce the remote controlling capacity.
3. Following practices can help enhance Quadcopter’s performance:
a. If the Quadcopter doesn’t fly high enough, stop flying and unplug the battery.
b. If the Quadcopter has not been used for a long period of time, fully charge the batteries before flying
the Quadcopter.
c. If the Quadcopter gets damaged or deformed, refrain from using it until fully repaired.
d. If you don’t intend to use the remote control for a long time, remove all batteries, in order to avoid
battery leakage from damaging this device
4. Hard crashes and/or falls of the Quadcopter can lead to irreparable damage and/or shorten Quadcopter’s
life
WARNING
1. You are responsible for the using of the Quadcopter with necessary precautions to ensure that it doesn’t
harm or cause any injury to anyone or damage to any property.
2. When you assemble and fly the Quadcopter, you must operate it accordingly to the instruction manual.
8
3. The user is responsible completely for correct operation and use of this product. We and the dealer accept
no responsibility or liability for damage and/or loss caused due to inappropriate usage and operation of this
item.
4. Not recommended for children under 14 years of age.
CARE AND MAINTENANCE
Clean the unit with a soft, damp cloth. Never use chemicals or hard abrasives.
Keep this unit away from wet or damp surroundings.
The crossed out wheelie bin symbol on this item indicates that this product needs to be disposed of in an
environmentally friendly way when it becomes of no further use or has worn out. Contact your local authorities
for details of where to take the item for re-cycling.
FCC INSTRUCTIONS
Changes or modifications not expressly approved by the party responsible for compliance could void the user’s
authority to operate the product.
NOTE: This product has been tested and found to comply with the limits for a Class B digital device, pursuant
to Part 15 of the FCC Rules. These limits are designed to provide reasonable protection against harmful
interference in a residential installation. This product generates, uses and can radiate radio frequency energy
and, if not installed and used in accordance with the instructions, may cause harmful interference to radio
communications. However, there is no guarantee that interference will not occur in a particular installation. If
the product does cause harmful interference to radio or television reception, which can be determined by
turning the equipment off and on, the user is encouraged to try to correct the interference by one or more of the
following measures:
- Reorient or relocate the receiving antenna.
- Increase the separation between the product and receiver.
- Connect the product into an outlet on a circuit different from that to which the receiver is connected.
- Consult the dealer or an experienced radio/TV technician for help.
The device complies with Part 15 of the FCC Rules. Operation is subject to the following two conditions: (1)
this device may not cause harmful interference, and (2) this device must accept any interference received,
including interference that may cause undesired operation.
The device has been evaluated to meet general RF exposure requirement. The device can be used in portable
exposure condition without restriction.
LIMITED WARRANTY
This manufacturer's product warranty extends to the original consumer purchaser of the product. Neither the
retailer nor any other company involved in the sale or promotion of this product is a co-warrantor of this
manufacturer warranty.
WARRANTY DURATION: All materials and workmanship are warranted to the original consumer purchaser
for a period of thirty (30) days from the original purchase date.
WARRANTY COVERAGE: This product is warranted against defective materials or workmanship. This
warranty is void if the product has been damaged by accident, in shipment, unreasonable use, misuse, neglect,
improper service, commercial use, repairs by unauthorized personnel or other causes not arising out of defects
in materials or workmanship. This warranty doesn’t cover the following which may be supplied with this product,
including but not limited to; LCD Screens, glass parts, lenses, etc. This warranty is effective only if the product
is purchased and operated in USA, and does not extend to any units which have been used in violation of
written instructions furnished by manufacturer or to units which have been altered or modified or, to damaged
products or parts thereof which have had the serial number removed, altered, defaced or rendered illegible.

9
WARRANTY DISCLAIMERS: This warranty is in lieu of all warranties expressed or implied and no
representative or person is authorized to assume for manufacturer any other liability in connection with the sale
of our products. There shall be no claims for defects or failure under any theory of tort, contractor commercial
law including but not limited to, negligence, gross negligence, strict liability, breach of warranty and breach of
contract. Under no circumstances will Manufacturer’s / Distributor’s maximum liability exceed the retail value of
the product.
WARRANTY PERFORMANCE: During the above 30 day warranty period, a product with a defect will be either
repaired or replaced with a reconditioned comparable model (at manufacturer's option). The repaired or
replacement product will be in warranty for the balance of the 30 day warranty period and an additional one-
month period. No charge will be applicable for such repair or replacement.
SERVICE AND REPAIR: If service is required for this product, you should first contact Midwest Trading Group
Customer Service at info@mtradinggroup.com or by calling 1 (866) 815-4714, Monday to Friday to 6pm EST.
NOTE: Manufacturer cannot assume responsibility for loss or damage during incoming shipment. As a
precautionary measure, carefully package the product for shipment, and insure it with the carrier. Be sure to
enclose the following details with the product: your full name, return address and daytime phone number, a
note describing the problem you experienced, a copy of your sales receipt or other proof of purchase to
determine warranty status. C.O.D. shipments cannot be accepted.