User Manual

Mobile Phone
Plum Model:Caliber
User Manual
English
1

Contents
User Manual ----------------------------------------------------------------------------- 2
Contents ---------------------------------------------------------------------------------- 3
Safety and Maintenance------------------------------------------------------------- 5
Basic Knowledge -------------------------------------------------------------------- 10
BRIEF INTRODUCTION .......................................................................... 10
Your Mobile Phone------------------------------------------------------------------ 11
1.1 APPEARANCE ................................................................................ 11
1.2 KEY DESCRIPTION .......................................................................... 12
1.3 STATE ICONS................................................................................. 13
1.4 SCREEN BACKGROUND LIGHT .......................................................... 13
Instructions before Use ----------------------------------------------------------- 14
2.1 INSTALL AND CHARGE THE PHONE .................................................... 14
2.2 POW ER ON/OFF ............................................................................. 14
2.3 SECURITY PASSWORD .................................................................... 14
Quick Guide --------------------------------------------------------------------------- 16
3.1 DIAL NUMBERS .............................................................................. 16
3.2 EMERGENCY CALL.......................................................................... 18
3.3 ANSWER CALL ............................................................................... 18
3.4 TERMINATE CALL ........................................................................... 19
3.5 CALL OPTIONS ............................................................................... 19
3.6 KEYBOARD LOCK ........................................................................... 20
Basic Functions---------------------------------------------------------------------- 21
4.1 DIAL PHONE .................................................................................. 21
4.2 ANSWER INCOMING CALL ................................................................ 22
4.3 MAKE EMERGENCY CALL ................................................................. 22
4.4 MAKE INTERNATIONAL LONG-DISTANCE CALL..................................... 23
4.5 TALK OPTIONS ............................................................................... 23
3
4.6 TEXT EDIT ..................................................................................... 24
4.7 BASIC ENGLISH AND NUMBER INPUT MODE ........................................ 25
4.8 QUIT FROM THE MENU .................................................................... 25
Menu Function List ----------------------------------------------------------------- 26
Menu Functions ---------------------------------------------------------------------- 28
6.1 PHONEBOOK ................................................................................. 28
6.2 CALL HISTORY ............................................................................... 29
6.3 MOBILE INTERNET.......................................................................... 31
6.4 FUN & GAMES ............................................................................... 31
6.5 MESSAGING .................................................................................. 32
6.6 VIDEO CALL ................................................................................... 34
6.7 ORGANIZER................................................................................... 35
6.8 SETTINGS ..................................................................................... 36
6.9 MULTIMEDIA .................................................................................. 39
6.10 EMAIL ......................................................................................... 42
6.11 MY FAVORITES ............................................................................ 42
6.12 EXTRA ........................................................................................ 42
6.13 MSN .......................................................................................... 43
6.14 EBUDDY...................................................................................... 43
6.15 FACEBOOK .................................................................................. 43
FAQ -------------------------------------------------------------------------------------- 44
T-Flash Card Introduction -------------------------------------------------------- 47
T-FLASH CARD INSTALL/REMOVE .......................................................... 47
T-FLASH CARD USE ............................................................................. 47
4
Safety and Maintenance
While using the cell phone, please check it with the following table:
• Before use, please read instruction manual carefully.
• Do not power on the cell phone when use of cell phone is prohibited
or it may cause interruption or danger.
• Please keep your cell phone off when you are on a plane. If functions
that will automatically power on your cell phone, such as alarm clock or
calendar, are setup, please check and cancel the configuration before
boarding the plane.
• While using the cell phone, please keep away from heat source and
high voltage environment, such as electric appliances or electric
cooking devices. Please use the cell phone under normal temperature.
Use it under temperature above 55℃ or below -10℃ may damage
the phone.
• Pay attention to fire prevention. Power off the phone while near
flammable materials, such as gas-filling station and fuel storage.
• Do not hold the cell phone in your hand while driving. Do not put
the phone above air bag or within reach of airbag so as to prevent
damage when airbag is inflated.
• Standard battery, charger and accessories approved by Novo
should be used. Novo is not responsible for any consequence
caused by use of third party accessories.
• Cell phone may cause interference to nearby electronic devices,
so keep it away from electronic devices such as TV set, radio, PC,
pacemaker and hearing aid, etc. Do not place the cell phone near
credit card or magnetic field. Please power off your cell phone in
5
hospital and other special places according to specific regulations
there.
• Keep the cell phone away from mechanic vibration or shaking.
Do not hit the screen of your phone with sharp tool.
• If plastic cover or case is used for cell phone, surface coating
may be damaged.
• Do not disassemble the cell phone boldly.
• Do not use benzene, thinner or alcohol to clean the cover of your
cell phone. Keep your cell phone away from corrosive chemicals
such as detergent. Use clean and soft cloth instead and wipe
gently.
• Prevent your cell phone from insulation or places with excessive
smoke or dust.
• Your cell phone is not water-proof, so please keep it dry. Do not
use it in damp environment, such as bathroom. Keep it away from
rain and moisture.
• If your cell phone has external antenna, do not touch the
antenna when it is not necessary. Use original antenna only, for
use of unauthorized antenna may cause damage to the phone.
• When you are to pull the charger away from your cell phone or
cut off power supply of charger, please hold the connector tightly
and then pull out. Do not drag the power cable.
• Do not rely on cell phone only as communication device for
emergency, such as medical rescue.
• Keep the cell phone out of reach of children so as to avoid
danger.
6
While using battery, please observe following points:
• Before use, please read instructions for use and as well as label on
the surface of battery.
• Please charge the battery in a cool and well-ventilated room.
Otherwise, high environment temperature may lead to overheat,
smoking, burning, distortion or even explosion of battery.
• There are special protection circuits and devices inside battery, so do
not open the battery; Otherwise it may lead to short circuit or
electrolyte leak. If electrolyte enters eyes, there is danger of blindness.
In such case, immediately wash eyes with clean water (Do remember
not to rub the eyes with hands) and then go to hospital for treatment.
• Do not squeeze the battery and keep it away from mechanical
vibration and shaking. Do not short connect the battery, for this may
damage the battery and components connected to it. Short circuit may
be caused by coin or clip directly connecting anode and cathode of the
battery, so do not put the battery together with metal objects.
• Please keep the metal contact points and battery clean.
• Do not use damaged or depleted battery.
• The battery should be replaced when it can not meet the requirement
for performance. Battery can be charged hundreds of times before it
should be replaced. Battery belongs to consumables. Though it can be
charged hundreds of times, its quantity of electric charge may
decrease gradually. When service time (talk time and standby time) is
found to have decreased, the battery shall be replaced.
• Prevent the battery from exposure to the sin or places with excessive
smoke or dust. Do not use it in damp environment, such as bathroom.
The battery is not waterproof; so keep it away from rain and moisture.
7
• Do not put the battery in places that are too hot or too cold.
Temperature above 55℃ or below -10℃ may affect performance of
the battery.
• Do not put the battery in fire so as to avoid explosion.
• Do not put the battery in water so as to avoid short circuit inside,
resulting in battery overheat, smoking, distortion, damage or even
explosion.
• Treat battery according to local regulations (for example, recycling).
Do not treat battery as domestic garbage so as to avoid explosion and
pollution.
• Special charger should be used for this battery for charging, and
charging time should not exceed 12 hours.
• Keep battery out of reach of children to avoid danger.
While using battery charger, please observe following points:
• Before use, please read instructions for use and as well as label on
the surface of the charger.
• Do not disassemble or modify the charger or use it when power cable
is damaged; otherwise there will be electric shock or fire, or the
charger may be damaged.
• Do not touch the charger with wet hands. If the charger contacts
water or other liquid, immediately cut off the power supply.
• Do not short connect the charger and keep it away from mechanical
vibration or shaking and direct sun shine. Do not use it in damp
environment, such as bathroom. The battery charger is not waterproof;
so keep it away from rain and moisture.
• Do not use the charger near electric appliances such as TV set and
radio.
8
• When to pull out the plug, hold the charger instead of dragging the
power cable so as to avoid damage of power cable.
• Keep the charger out of reach of children so as to avoid danger.
9

Basic Knowledge
Brie
f
Introduction
Thank you for choosing the GSM/WCDMA function cell phone.
You will know how to use this phone roundly after reading the
manual.
Design this cell phone is aim at WCDMA network environment,
except the call function, there are basic English input mode,
contacts, individuated ringtone/image, MP3 ringtone, short
message, multimedia message, camera, media player, alarm,
calculator, auto on/off, calendar, world clock, stopwatch, E-book,
T-Flash, link internet in GPRS, keyboard lock, video recorder, etc.
This cell phone interface is individual, the function of design is
perfect. It can satisfy your deferent demand.
10
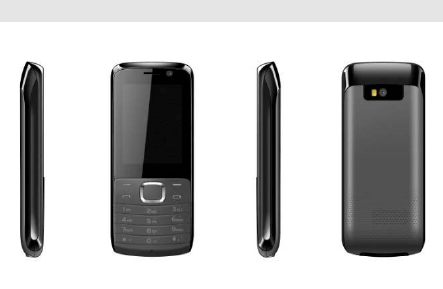
Your Mobile Phone
1.1 Appearance
11
1.2 Key description
Key Description
Send
key Making or answering a call. In standby mode, press this
key to access the Call History.
End key End calls or reject calls. Long press: Power on, power
off.
Left soft
key In standby mode, press left soft key to enter main menu.
Right
soft key In standby mode, press right soft key to Phonebook.
Shortcut
key In standby mode, press the key to enter media player.
OK key Confirm operations you have operated.
Number
key Input numbers, letters, and some special characters.
* key In standby mode, continuous press this key to input the
symbol ‘*, +, p, w’; and input symbol in input interface.
# key In standby mode, long press this key to activate silent
mode, and to switch input method in input interface.
12
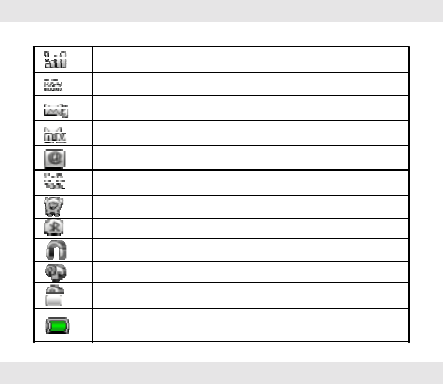
1.3 State icons
<Icons on the screen: >
Indicates SIM Card signal strength.
That is using 3G network of USIM.
SIM card received new short message(s)
New multimedia message(s) received.
Received new emails
Missed phone.
Alarm clock has been activated.
Indicate Bluetooth
Indicates a headset is connected to the phone.
Indicates vibration mode has been activated.
Keypad has been locked.
Indicates battery power level.
1.4 Screen background light
Background light can illuminate the screen. When you power on your
cell phone, background light will turn on for a certain period. If no key is
pressed within the period, the background light will turn off
automatically so as to save battery. Setup background light brightness
in [Settings] –[Phone Setup] – [Misc settings] – [LCD Backlight].
13

Instructions before Use
2.1 Install and charge the phone
1. Remove the battery cover
2. Insert the SIM card
3. Install the battery
4. Plug the travel adapter into the phone
2.2 Power on/off
Long press the End Key to power on / off the phone.
2.3 Security password
You can set access password to avoid your SIM card is used by
others.
2.3.1 PIN code
If your cell phone has enabled PIN code protection, there will be
prompt for entering PIN code. If wrong PIN code is entered for
three times, SIM card will be automatically locked. You have to
enter PUK code so as to unlock it. PIN code is related to SIM card
instead of the cell phone, and is provided by network service
operator.
2.3.2 PUK code
PUK code, referring to personal unlock code, is used to unlock
SIM card that is locked because of wrong input of PIN code. If
14
wrong input of PUK code amounts to ten times, SIM card will lose
efficacy. PUK code is provided by network service operator.
15

Quick Guide
3.1 Dial numbers
When logo of network provider appears on the screen, you can dial or
answer calls. Information bars at upper right corner of the screen show
intensity of network signal. (Four information bars represent most
intense signal.)
Since quality of call is greatly affected by barrier, movement in
small range can effectively improve quality of call.
3.1.1 Make domestic phone call
Use number keys to input phone number in standby state and then
press send key to start the call. If the phone number needs to be
changed, please delete characters by pressing right soft key. After
the call, please press End key to hang up the call.
You can enter domestic phone numbers according to the followings:
Area code Phone number Send key
3.1.2 Call extension of fixed phone
Some fixed phone extension cannot be put through directly. Instead,
you need to enter exchange number first and then press [*] key, then
enter extension number when “p” appears on the screen.
You can dial fixed phone extension number according to following
consequence:
16

Area code Exchange number p Extension number
Send key
3.1.3 Make international Call
To make an international call, press [*] key for international
long-distance call appears on the screen
You can enter international phone number according to following
sequence:
+ Country code Complete phone number Send key
After pre-fix, enter country code and complete phone number you want
to dial. According to conventions, county code for Germany is 49, and
44 for UK and 46 for Sweden, etc.
Similar to making an international call, “0” before city code should be
removed.
For example, you must dial +86 21 114 if you want to dial Shanghai’s
service hotline from another country.
Note: In some networks, it is not allowed to use “+” to dial
international phone numbers.
3.1.4 Dial a number in the list
Every phone number you dialed or received is saved in Call history in
your mobile phone. Phone numbers you dialed or received recently are
recorded in three sub-menus under the list according to category,
17

namely missed, Received and Dialed. Phone number of the call you
received most recently is located at the top of every list. When phone
number list is full, old numbers will be deleted automatically. Operate
as follows:
Press Send key to view record of dialed numbers and press [Ok key]
to view details of dialed calls.
Phone numbers appear in the lists can be dialed directly by pressing
Send key.
3.2 Emergency call
As long as you are within coverage of network (which can be found out
by checking network signal intensity indicating bars on upper left
corner of the screen), you can call emergency service. If your network
provider does not provide roaming service for the area, “Restricted
Service” will be displayed on the screen. As long as you are within
coverage of network, you can make an emergency call even without
card.
Note: Some networks do not allow dialing 112 for
emergency call.
3.3 Answer call
You can choose different ways to answer calls. You can press
Send key or OK key to answer. If An y Ke y Answ er is activated
in answer mode, you can press any key beside End ke y and
Right soft key to answer calls.
18

3.4 Terminate call
When there is an incoming call, press End key to reject the call.
During the call, press End key to terminate current call.
Call that has just been dialed can be cancelled by pressing End
key.
3.5 Call options
In talk state, press Left soft key “Options” to enter talk options.
Operation method of talk options is the same as that of function
menu.
Talk options can only be seen in the process of talk, and functions
such as call wait and multi-party talk have to be supported by network.
Please contact your network provider.
You can directly enter phone number at current talk screen and press
Send key to dial new phone number.
In talk options, you can make following operations:
Hold/Release single call
Hold current talk or resume hold talk.
End single call
End the call.
New call
Make a new call.
Main menu
Enter the main menu.
Switch to video call (Only support 3G network)
Switch the current call to video call.
Sound recorder
Record the call.
19

Background sound
Open or close the function, and select different background sound.
Mute
Open or close Mute.
DTMF
Open or close DTMF.
Swap *
Switch between current talk and hold talk.
Conference *
Enter multi-party talk state. You can hold multi-party talk or terminate
the call.
Note: Menu items marked with * appear in specific conditions
only. For example, “Swap” appears only when calls in talk state
and hold state exist at the same time. Besides, multi-party talk
function should be applied from network service operator.
3.6 Keyboard lock
You can select time for automatic keyboard lock via
[Settings]Æ[Security setup]Æ[keyboard lock], so that your cell phone
can automatically locks the keyboard.
You can also press [left soft key] and [*] key to lock keyboard in
standby state.
Once keyboard is locked, you can press [left soft key] and [*] key to
unlock the keyboard.
20

Basic Functions
4.1 Dial phone
4.1.1 Direct dial
In standby state, press number keys to enter the telephone
number you want to dial.
If you input wrong number, press [right soft key] to delete the
number before the cursor. Once phone number to dial has been
input, press [Send key].
If the phone number being dialed out can be recognized by
phonebook, name and icon of contact person will be displayed on
dialing screen, and calling animation is displayed at the same
time.
Press end key to end a call.
4.1.2 Quick dial from contacts list
Press right soft key enter contacts interface.
Slide up/down the cursor to select the phone number you want to
dial.
Press [Send key] to dial out the number.
4.1.3 Quick dial from dialed phone number list
Press [Send key] to enter dialed phone number record page.
Slide up/down the cursor to select the person you want to call or
the number you want to dial.
Press [Send key] to dial out the number.
21

4.2 Answer incoming call
When there is an incoming call, incoming call animation will be
displayed together with special ringtone or vibration. If phone
number of the caller can be recognized, the number will be
displayed on incoming call screen. If information about the
number is stored in contacts, caller’s name and icon will also be
displayed. At the same time, specified ringtone will be played or
play music or vibrate according to current settings. If caller hides
his/her number or the network bans call indication, the incoming
call is displayed as ******.
Press [Ok key] or [Send key] to answer calls. If Any Key Answer is
selected, you can press any key apart from [End key] and [Right
soft key] to answer calls.
When you want to reject the incoming call, press [End key]
directly.
4.3 Make emergency call
As long as you are within coverage of network, you can make
emergency call even you have not registered to local network or
do not have a SIM card. Input 112, and then press [Send key] to
make an emergency call.
Note: In Input PIN code prompt screen while boot-up, press
[Send] key to make an emergency call. However, some
networks do not allow dialing 112 for emergency call.
22

4.4 Make international long-distance call
Press [*] key before international phone number can be dialed. “+”
sign tells the network you are making an international call.
Input country code, area code (without 0) and phone number and
then press [Send key].
Note: Some networks do not allow “+” for dialing international
numbers.
4.5 Talk options
The cell phone provides some talk control functions in the process
of talk. Press [Options] soft key to access the talk control functions
in the process of talk.
4.5.1 Hold/release talk state
If network supports, you can hold current talk.
Press [Options] soft key and select Hold option in the menu.
To activate held talk, press [Options] soft key and select Retrieve
option in the menu.
4.5.2 Dial second number
When you are making a call, you can dial another number.
Enter the second number or press [Main menu] option in [Options]
soft key to select in phonebook and then press [Send key]. When
the second number is put through, the first call will be held
automatically.
4.5.3 Answer second incoming call
23

If there is a second incoming call in the process of talk, the screen
will display a second call is waiting. Call wait function is only
available when the network supports this service and you have set
to Enabled in Call wait menu.
Press [Answer soft key] or [Send key] to answer second call.
When the second call is put through, the first call will be switched
to hold state.
Press [End key] to terminate the second call.
4.5.4 Select current phone number
Information of the other side is indicated by small icon in title area
of the screen.
Select the number in talking and press [Option] soft key to display
following options:
Swap: Current call enters hold state, while the held call is
activated.
Conference: Add held call to conference call.
End single call: End one call.
End all calls: End all calls.
New call: Dial a new call.
Main menu: Enter the main menu.
4.6 Text edit
When you use your cell phone, you may need to enter text. For
example, to save a name in phonebook, write a short message,
and create a task. You can enter letters, symbols and numbers
through keyboard of your cell phone.
24

In edit state, press [#] key to select proper text input mode. This
cell phone provides English capital/small letter, Number input
modes, symbol and so on.
Default input mode after power-on is smart ABC. Enter symbol
through the [*] key.
4.7 Basic English and number input mode
In Basic English input mode, you may press a key on the
keyboard to enter a letter.
In number input mode, press a number key on the keyboard to
enter number.
4.8 Quit from the menu
You can press right soft key or end key to quit from the menu.
25

Menu Function List
5.1 Phonebook
5.2 Call History
5.2.1 Call history
5.2.2 Call history
5.3 Mobile Internet
5.4 Fun & Games
5.4.1 Entertainment
5.4.2 Games
5.4.3 Java
5.5 Messaging
5.6 Video call
5.7 Organizer
5.7.1 File manager
5.7.2 Calendar
5.7.3 Tasks
5.7.4 Alarm
5.7.5 World clock
5.7.6 Notes
5.7.7 PHB backup entries
5.8 Settings
5.8.1 Dual SIM switch
5.8.2 Dual SIM settings
5.8.3 User profiles
5.8.4 Phone settings
26

5.8.5 Network settings
5.8.6 Security settings
5.8.7 Connectivity
5.8.8 Restore factory settings
5.8.9 Sound effects
5.9 Multimedia
5.9.1 Camcorder
5.9.2 Media player
5.9.3 FM radio
5.9.4 Image viewer
5.9.5 Photo editor
5.9.6 Sound recorder
5.9.7 Schedule FM record
5.9.8 Melody composer
5.9.9 Slide show
5.10 Email
5.11 My favorites
5.12 Extra
5.12.1 Calculator
5.12.2 Currency converter
5.12.3 Stopwatch
5.12.4 Ebook reader
5.13 MSN
5.14 eBuddy
5.15 Facebook
27

Menu Functions
You can press left soft key in standby state to enter the main
menu.
Once you have entered the main menu, you can select
corresponding options by using direction keys to move the cursor.
When the cursor moves to an option, icon of the option will be
highlighted in the original position with blue box.
Stop the cursor on an option and press [OK] key to enter the
function window of the option.
You can also use short-cut method, i.e. press the number key
from 1 to 15 directly to enter function window of corresponding
option.
Press [Right soft key] or [End key] to return to standby mode.
6.1 Phonebook
You can select ‘add new contact’ operation to add a new contact or a
caller groups in the phonebook list interface, and you can select
‘phonebook settings’ to do the following:
1. Preferred storage: Select priority storage location for a new contact.
2. Speed dial: Set speed dial from phonebook, and you can dial the
contact by press the number of key in standby mode.
3. My number: Set personal business cards and send.
4. Extra numbers: Use the menu to view the other numbers stored in
the SIM card or in phone.
5. Memory status: View memory status about phone and card.
6. Copy contacts: Use the menu to copy all records between the SIM
card and the phone.
7. Move contacts: Use the menu to move all records between the SIM
28

card and the phone.
8. Delete all contacts: Use the menu to delete records from the SIM
card or phone.
Note: This phone can store 1000 phone numbers.
6.2 Call history
6.2.1 Call history
1. SIM1/SIM2 call history
Move the direction keys to view all calls, dialed, received or missed
calls. In the missed、dialed、received calls interface, press [ok key] to
view the details: type, time, number. Press options to operate the
following: send message, call, delete, add to blacklist, edit, delete and
advanced. Enter advanced interface, you can view call times and call
cost, also view or reset the quantity of the message you received and
sent and the bytes of the GPRS you received and sent.
6.2.2 Call settings
1. SIM Call settings
Enter the menu to set the followings:
Caller ID
If you choose [Hide ID]. Your phone number can’t display when
you make telephone calls.
Call waiting
Activate: Activate the Call waiting function.
Deactivate: Deactivate the Call waiting function.
Query Status: Query the status of the function.
Call divert:
29
Divert the incoming calls to the other phone number. It have to
be supported by network.
Call barring:
Use the menu to set the call barring. It contains outgoing calls,
incoming calls, Cancel all, Change barring password.
Line switching:
You can change the line 1 or line 2.
Closed user group:
You can add or close your group.
2. Advance settings
1). Black list
Activate blacklist mode and edit the blacklist numbers. You can’t
receive the calls in the list.
2). Auto redial
Open or close the function.
3). IP dial
Use the function to make long distance telephone.
4). Background sound
Open or close the function, you can set volume, play mode
and effect.
5). Call time display
Open or close the function, display the times when calling.
6). Call time reminder
Open or close the function, remind with a warning tone during
the calling.
7). Auto quick end
Automatically end the calling when time is on.
30

8). Text phone
It needs supports by some instrument.
6.3 Mobile Internet
Home page: Connect to home page.
Bookmarks: Enter bookmarks where have two bookmarks.
Input Address: Input a web page
Last web address: Enter the last web page.
Recent Pages: Enter the history page.
Stored pages: View stored pages.
Service Inbox: Get the service message
Settings: It contains select SIM card, profiles, browser options,
preferences, security settings, service message settings and
restore browser settings.
6.4 Fun & Games
6.4.1 Entertainment
It contains five entertainments: MSN, Yahoo, Facebook, Skeye, Twitter.
These entertainments need supports by network service.
6.4.2 Games
Provide two games: Puzzle, Magic sushi. You can open or close BGM,
Sound effect, Vibration by games settings.
6.4.3 Java
Provide nine types java: eBuddy, Opera mini, Snaptu and so on. It
needs the support of the network service provider. View the java
settings, and also you can change java default setting and java
31

network.
6.5 Messaging
Enter the function, you can do the following:
1. Write Message
In the edit mode, you can edit message or MMS, and press the
[options] to operate the followings:
Send to: Send the message by SIM1 or SIM2.
Writing language: Select input language you want.
Add picture: Add picture in the MMS from phone or memory card,
and also you can take picture for the MMS.
Add sound: Add sound from phone or memory card, and also you
can record sound for the MMS.
Add video: Add video from phone or memory, and also record
video for the MMS.
Add subject: Add subject for the MMS.
Slide options: Add a new slide behind or before the MMS.
Switch to MMS: Switch SMS mode to MMS mode.
Advanced: You can insert text template, attachment, contact
number, contact name or bookmark in MMS or SMS by the
function.
Save: Save SMS or MMS to drafts.
Details: View details of the SMS or MMS.
2. Inbox
32
The SMS and MMS you received are all stored in inbox. Open a
SMS or MMS and press [options] key, you can call the sender,
delete, copy or move the SMS or MMS and so on.
3. Drafts
Save the SMS and MMS that were not sent to drafts.
4. Outbox
Save the SMS and MMS that were sent failed to outbox.
5. Sent messages
Save the SMS and MMS that you sent when you open the
function that save sent message and send and save of MMS.
6. Archive
You can move SMS and MMS to archive from inbox and outbox.
7. SIM messages
View messages that saved to SIM card.
8. Delete messages
Delete the messages from inbox, from drafts, from outbox, from
sent messages or from archive, and also you can delete all
messages once through the function.
9. Email
First, set the Email accounts,then you can send or receive e-mail.
The details as follows:
1). Start to create account: Input your email account address.
2). Select the email’s protocol: select pop3 or IMAP4.
3). Select Data account: select data account from GPRS account.
(Notes: The APN of WCDMA is uninet).
4). Input receiver email’s server.
5). Input send email’s server.
33

6). Input your user name.
7). Input your user password.
8). Activate the account you set.
9). Account optionsÆEditÆAdvanced settingsÆOutgoing server
Æ
Authentication Æ on
10). You can edit email and send or receiver.
NOTES: In email accounts menu, select email accounts
Æ
optionÆeditÆ advanced settings, you can set outgoing/incoming
server, signature and account settings.
10. Broadcast message
Use the menu to set the broadcast message.
11. Templates
Use the templates to the SMS or MMS.
12. Message settings
Use the menu to set text message and multimedia message. Text
message setting contains profile settings, voicemail server,
common settings, memory status. MMS setting contains profiles,
compose, sending, retrieval, preferred storage, memory status.
6.6 Video call
In standby mode, you can input number then press [left key] to select
video call, and also you can make a video call through the function.
Enter the function and press [options], you can do the following:
Make video call: make a new video call.
Stop camera: close camera during the video call.
Use rear camera: select rear camera during the video call.
Turn on night mode: turn on night mode during the video call.
34

V
ie
A
dd
Edit
Sea
r
c
h
Delete
Switch picture: switch between large and small picture.
Hide small picture: close small picture.
Video call settings: it contains four options: answer mode, dial mode,
image in video call and audio options.
Advanced: setting video quality.
6.7 Organizer
6.7.1 File manager
Manage the files that saved in the phone and memory card.
You can play, edit, send, delete, and use the files.
6.7.2 Calendar
Enter the menu, press [options] to set the followings:
View Tasks: Set or view the task.
Add event: Add a new task.
Delete event: Delete a task.
Jump to date: Jump to the date you selected.
Go to today: Jump to current date of the mobile phone.
Go to weekly view: View calendar by weekly.
6.7.3 Tasks
Enter the menu, view the task lists and choose the task you saved.
Press [Option] to set the followings:
w: You can view the task.
: Add a new task.
: Edit the task you selected.
: Search the task by time or by subject.
: Delete the task what you select.
35

Delete overdue
Delete All
: Delete
Jump to date
: Ju
m
V
iew uncompleted
Send vCalendar
: Delete the task that overdue.
all the tasks in the phone.
p to the specified date.
: View the task that is uncompleted.
: It provides four options: send by SMS, send by MMS,
send by Bluetooth.
Save as file: Save to file.
6.7.4 Alarm
In edit mode, press [Edit] to set the followings: time, Repeat, Audio
options, Snooze(mins), Alert type.
6.7.5 World clock
You can look up the time of the other city in the world.
6.7.6 Notes
Use the menu to add a new note.
6.7.7 PHB backup entries
Use the menu to set the backup for the phonebook. It contains Output
all entries to csv, Input entries from csv, Help.
6.8 Settings
6.8.1 Dual SIM switch
You have two selections for dual SIM mode: select with SIM status or
use default mode.
6.8.2 Dual SIM setting
There is four selections: dual SIM open, only SIM1 open, only
SIM2 open and flight mode.
36

6.8.3 User profiles
It provides six profiles: General, Meeting, Outdoor, indoor, Headset,
Bluetooth.
Press [options] to set the followings:
Activate: Activate the profile.
Customize: It contains six options: Tone setup, Volume, Alert type,
Ring type, Extra tone, Answer mode.
6.8.4 Phone Settings
1.Time and Date
Use the menu to set time and date. It contains three options: Set
home city, Set time/date, Set format.
2. Schedule power on/off
Use the menu to schedule the time of power on/off
3. Language
Use the menu to set the language: English, Italiano and so on.
4. Writing language
Use the menu to set default input language.
5. Encoding
Use the menu to select encoding mode.
6. Display
Use the menu to set display characteristic. It contains six options:
Wallpaper, Screen saver, Power on display, Power off display, Show
date and time, Screen switch effect.
7. Themes
You can select different theme by the menu.
8. Dedicated key
View or set the functions of Four-way navigation key.
37

9. Auto Update of Date and Time
Open or close the auto update of data and time.
10. UART setting
Select SIM1 or SIM2 for UART setting.
11. Misc. settings
You can set the LCD Backlight. Change the brightness and time of
the background light by the left and the right direction key.
6.8.5 Network setup
1. Network selection: you can search the network you want by
manual/auto
2. Preferences: press left soft key, you can do the following
options: add from the list, new, change priority, delete.
3. Service selection: select service for 3G SIM card, the function
provides three choices: GSM/GPRS, WCDMA, automatic.
4. Network information: View the network information of the
current SIM card.
6.8.6 Security Settings
1. SIM1/SIM2 security setup
Use the menu to open or close the SIM1/SIM2 lock, or change the
password of SIM PIN. The default PIN code is 1234.
2 .Phone lock
Use the menu to set the phone lock. The default password is 1122.
3. Auto keypad lock
Open the mode, and then choose the waiting time.
4. Change password
Change the password of the phone.
6.8.7 Connectivity
38

1. Bluetooth
Enter the menu to set the followings: Power, Visibility, My device,
Search audio device, My name, Advanced.
2. Conn. management
View the current data transmission situation.
3. Data account
GSM Data: Add or edit the GSM account.
GPRS: Add or edit the GPRS account.
6.8.8 Restore Factory Setting
The default password is 1122.
6.8.9 Sound effect
You can select different effect by the function.
6.9 Multimedia
6.9.1 Camcorder
Enter the menu and press [left soft key] to choose camera or video
recorder. In camera interface press [OK key] to capture photos, and
press [left soft key] to set the following: switch to front camera, capture
mode, image size, highlight, self-timer, white balance, effects, storage,
image quality, time stamp, shutter sound, anti-flicker and restore
default. In video recorder interface press [left soft key] to set the
following: scene mode, record size, highlight, white balance, effects,
record limit, storage, video quality, record audio, anti-flicker and
restore default.
6.9.2 Media player
First, you must create a new playlists:
My Playlist—Options—New—Named this new playlist, then re-open
39

Channel List
Manual Inpu
t
A
uto Search
Setting
s
Record
:
A
ppend
File list:
this playlist, options—Add—Memory Card—Choose the Storage Music
Folder—Options—Select, now the mobile phone will set the music by
itself.
Open the playlist you just set, and choose the music you prefer to
enjoy.
In the player interface, move the four-way navigation keys to select
different operations: start or stop the current music, play the previous
or next song, and press number key of two or eight to adjust volume.
[Right soft key]: Quit audio player.
[Left soft key]: View current playlist and settings. The settings contain
player settings, audio settings, video settings and network settings.
6.9.3 FM radio
Use the menu to listen to the radio. Press down navigation key to turn
on/off FM radio, press up navigation key to open the automatic
search function, press left/right navigation key to select last channel
or next channel, press [OK key] to record voice, and you can adjust the
sound by the symbolic key of * or #. Press [options] to set the
followings:
: List the channel of the FM radio.
: Input the channel of the FM radio.
: Preset Auto search.
: To set Background play and Loud speaker.
To record the voice.
: To record the voice on the basic of the current file.
To view the list of record.
6.9.4 Image viewer
Enter the menu, press [options] to set the followings: View, Slide show,
40

Edit, Image information, Print, Browse style, Use as, Send, Rename,
Delete, Delete all files, Sort by, Storage.
6.9.0 Photo editor
Select a photo from phone or memory card, or capture a photo from
camera, and then change the image size. You can do the operation
according to clip help.
6.9.6 Sound recorder
Use the menu to record the voice .Choose the file you saved to
operate the followings:
New record: Record the new file.
Play: Play the recorder file.
Append: Append the new record to the file what you select.
Rename: Rename the video file.
Delete: Delete the video file.
List: View the list of files.
Delete all files: Delete all the video files in the phone.
Settings: It contains two options: storage, File format.
Use as: It can be used to user profiles.
Send: You can send the file to MMS, Email and Bluetooth
6.9.7 Schedule FM record
Use the menu to schedule the FM file of one channel, press [edit]
to set the followings: time, repeat, channel settings and record
settings.
6.9.8 Melody composer
You can add a new melody what you want by the function.
41

Left navigation key
Right navigation key
Up navigation key:
A
Down navigation ke
y
OK
6.9.9 Slide show
Choose images from phone or memory card to play by way of slide
show.
6.10 Email
The operation method is same as the function in message menu.
6.11 My favorites
The function is the same as the menu of file manager.
6.12 Extra
6.12.1 Calculator
Use the menu to do basic calculations, such as addition,
subtraction, multiplication and division.
Key operations:
:
Multipli
cat
ion
.
: Division.
ddition.
: Subtracti
on
.
: Equal. Press the key to display calculation result.
Press [Clear] to clear the contents you input.
6.12.2 Currency converter
Input the currency rate, and then press OK to input local currency.
6.12.3 Stopwatch
42

Enter the menu to use the stopwatch. It provides two options: Typical
stopwatch, nWay stopwatch.
6.12.4 Ebook reader
Enter the menu, choose the book you saved, press[options] to operate
the followings: Open E-Book, Clean up bookshelf, Global settings,
Book info, Delete, Delete all files, Sort by, Apply global settings, Help.
6.13 MSN
Use the menu to enter MSN, and it needs the support of the network
service provider.
6.14 eBuddy
Use the menu to enter eBuddy, and it needs the support of the network
service provider.
6.15 Facebook
Use the menu to enter Facebook, and it needs the support of the
network service provider.
43
FAQ
If any problems are encountered while using the cell phone,
please solve them with reference to following items. If the
problems still exit, please contact dealers or service provider
appointed by Novo immediately.
■ “Enter PIN code" appears on the screen:
Enter valid PIN code of your SIM card. Please contact network
service operator immediately if you do not know the code.
■ “Enter PUK code" appears on the screen:
Your SIM card will be locked if you enter wrong PIN code for three
times. To unlock your SIM card, you have to enter PUK code.
Please contact network service operator immediately.
■ “Insert SIM card" appears on the screen:
Make sure SIM card is correctly installed. Check if SIM card works
properly. It may have defects or faults. If so, hand it over to
network service operator.
■ ‘Not in service area. Network failure.’ is displa
ye
d.
Check signal intensity indicator. If there is no signal, you may be
in the basement or network blind area in a building. Please move
to other locations to receive signal. Another situation is that you
are not covered by network. You can ask your network service
operator to provide network coverage.
■ Poor sound quality, echo or noise makes
communication difficult:
Hang-up your phone and dial again. Network service operator
may connect you to a line with better communication quality.
44
■ Standby time declines:
Signal at your location is weak so that the cell phone has to
search signal for a long time. When you don’t want to answer any
call, please power off for a time being. It is also possible that the
battery has been used for a long time and approaches its life-span.
In this case, please replace the battery.
■ Cell phone fails to boot:
Check battery volume or charge the battery. Try to power on while
charging. If your cell phone is put off for a long time, the battery is
likely to discharge excessively. You cannot power on it in this case,
and the phone will give no response for quite a long time. The
phone cannot be powered on until battery is restored.
■ Can not send short message:
Please check your service center number option to see if you
have set up service center number or if the number is correct.
Perhaps you have not open SMS service, or recipient of short
message is invalid, or network service operator of your region
does not support this service.
■ Can not charge:
There are three possibilities: 1. Charger of your cell phone does
not work properly. You can contact nearest service provider or
dealer appointed by Novo; 2. Ambient temperature is not
appropriate. Please change charging environment; 3. Poor
contact. Please check plug of your charger.
■ Can not add entries into phonebook:
Phonebook is full. Please delete some useless entries.
45
■ Can not select some functions:
The service is not available or network service operator of your
location does not support this service. Please contact service
provider or dealer or network service operator appointed by Novo
immediately.
46

T-Flash Card Introduction
The cell phone support T-Flash card to enlarge the storage.
Operations as follows:
T-Flash card install/remove
The T-Flash card is on the left of the SIM socket. Take out battery
first if you install the T-Flash card, and then directly into the
T-Flash card. If you remove it, operate as contrary operations of
installing.
T-Flash card use
T-Flash as one of the memorizer of cell phone, format it when you
first use, operations as follows:
1. Ensure you already installed the T-Flash card properly.
2. Press OK key into main menu, then into Documents,T-Flash , select
T-Flash Format option, press OK key. Later on, restar the phone, then
you can use the T-Flash card normally.
You can use T-Flash card connect with computer by the
commutator, and then, can copy data from the computer.
User can check-up whether there are catalogs in the root, the
catalog like these: AUDIO,VIDEO, PHOTO, SMS,BOOK,
PHONEBOOK. Without, you can establish them. These catalogs
47
saved relevant files only, otherwise, can’t show what you save. for
example:
AUDIO can save these format files: amr, mid, MP3.
BOOK can save the format file: txt.
PHONEBOOK can save the contacts what exported from the cell
phone.
PHOTO can save these format files: bmp, gif, jpg.
SMS can save the messages what exported from the cell phone.
VIDEO can save these format files: MP4, 3GP.
48
Federal
Communication Commission
Interference
Statement
This equipment has been tested and found to comply with the limits for a
Class B digital device, pursuant to Part 15 of the FCC Rules. These limits
are designed to provide reasonable protection against harmful interference
in a residential installation. This equipment generates, uses and can
radiate radio frequency energy and, if not installed and used in accordance
with the instructions, may cause harmful interference to radio
communications. However, there is no guarantee that interference will not
occur in a particular installation. If this equipment does cause harmful
interference to radio or television reception, which can be determined by
turning the equipment off and on, the user is encouraged to try to correct the
interference by one of the following measures:
z
Reorient or relocate the receiving antenna.
z
Increase the separation between the equipment and receiver.
z
Connect the equipment into an outlet on a circuit different from
that to which the receiver is connected.
z
Consult the dealer or an experienced radio/TV technician for help.
FCC Caution: Any changes or modifications not expressly approved by the
party responsible for compliance could void the user's authority to operate
this equipment.
This device complies with Part 15 of the FCC Rules. Operation is subject to
the following two conditions: (1) This device may not cause harmful
interference, and (2) this device must accept any interference received,
including interference that may cause undesired operation.
IMPORTANT
NOTE:
Federal Communication Commission (FCC) Radiation Exposure
49
Statement
This EUT is compliance with SAR for general population/uncontrolled
exposure limits in ANSI/IEEE C95.1-1999 and had been tested in
accordance with the measurement methods and procedures specified in
OET Bulletin 65 Supplement C. This equipment should be installed and
operated with minimum distance 1.5cm between the radiator & your body.
50
This device was tested for typical body-worn operations. To comply with RF exposure requirements,
a minimum separation distance of 1.5 cm must be maintained between the user’s body and the
handset, including the antenna. Third-party belt-clips, holsters, and similar accessories used by this
device should not contain any metallic components. Body-worn accessories that do not meet these
requirements may not comply with RF exposure requirements and should be avoided. Use only the
supplied or an approved antenna.