CNet Technology 0232USB611 Wireless USB Adapter User Manual USB Adapter User s Guide
CNet Technology Inc Wireless USB Adapter USB Adapter User s Guide
Contents
- 1. Users manual 1
- 2. Users manual 2
Users manual 2
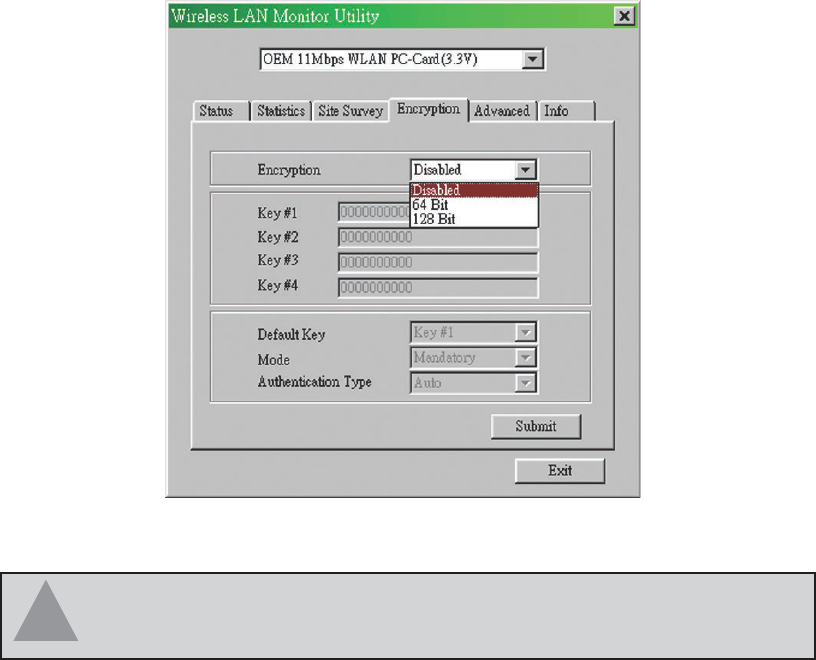
Encryption
On the Encryption screen, show in Fig 4-5, you can set the level of security with which you will
be using the WLAN PC Card.
Under the drop-down box, you can choose to have WEP encryption Disabled, 64-Bit, or 128-
Bit Wired Equivalent Privacy (WEP) is an encryption scheme use to protect wireless data communi-
cation. If you decide to use encryption, you can choose any of the available WEP keys (1 to 4). You
also have option to select the WEP mode (Mandatory/optional). If you select “Mandatory”, then not
only WEP will be used, but also any other station needs to use WEP encryption in order to establish
a communication with your station. This requirement is in line with the IEEE 802.11b standard. If, on
the other hand, you choose “Option”, then your station can communication with every other station
regardless if they use WEP or not. The Disabled setting prevents the sharing of data with other
computers on the WEP network. When Enable encryption for the WEP Key entry, enter the hexa-
decimal number (the letters “A” through “F” and the numbers “0” through “9”) set by the other
wireless WEP settings; these settings must be identical to the WEP encryption on all points in your
wireless network in order to network to your WLAN PC Card. The security keys are four 10 digit key
for the 64-Bit WEP setting and four 26 digit key for the 128-Bit WEP setting.
Fig 4-5
15
NOTE: The WEP Key Entry must match the Key on all other devices on the
wireless network or this device will be unable to transmit or receive data.
33
33
3
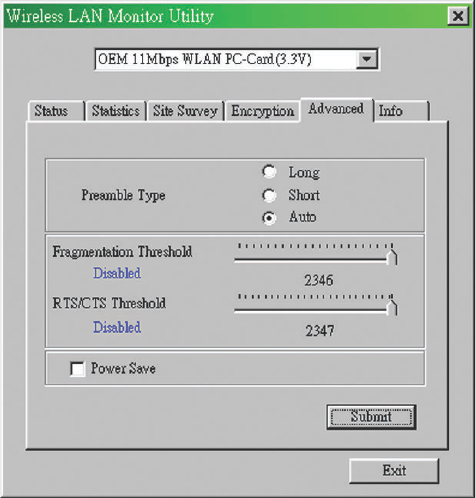
Advanced
The Advanced screen (Fig 4-6) allows you to set Fragmentation Threshold, the RTS/CTS
Threshold, and the Preamble Type. The Fragmentation Threshold Value indicates how much of
the network resources is devoted to recovering packet errors. The value should remain at its default
setting of 2,432. If you experience high packet error rates, you can decrease this value but it will
likely decrease overall network performance. Only minor modifications of this value are recom-
mended.
Fig 4-6
For Authentication Type, you may choose between Open System or Shared Key.
Shared Key is when both the sender and recipient share a secret key. Both units this key for
an extended length of time, sometimes indefinitely. Any eavesdropper that discovers the key may
decipher all packets unit the key is changed.
Open System the default setting, is when the sender and the recipient do not share a secret
key. Each party generates its own key-pair and asks the receiver to accept the (usually randomly)
generated key. Once accepted, this key is use for short time only: then a new key is generated and
agrees upon.
16
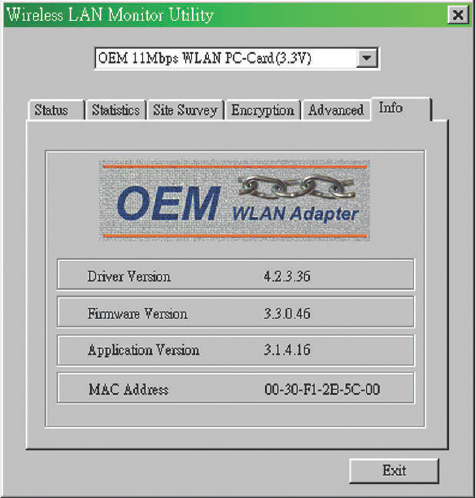
The About screen (Fig 4-7) shown the release information for the Driver Version, Firmware
Version, Application Version, and MAC Address. User the “Exit” button in order to exit the application.
About
Fig 4-7
17
The RTS Threshold Value should remain at its default setting of 2,432. A preamble is a signal
used to synchronize the transmission timing between two or more systems. A series of transmission
pulses is sent before the data to indicate that “someone is about transmit data.” this ensures that
systems receive the information correctly when the data transmission stars.
The Preamble Type should be set to Short (if the network environment is “noisy”) or Long (if
the environment is “clear”) Click Submit to complete the configuration.
18
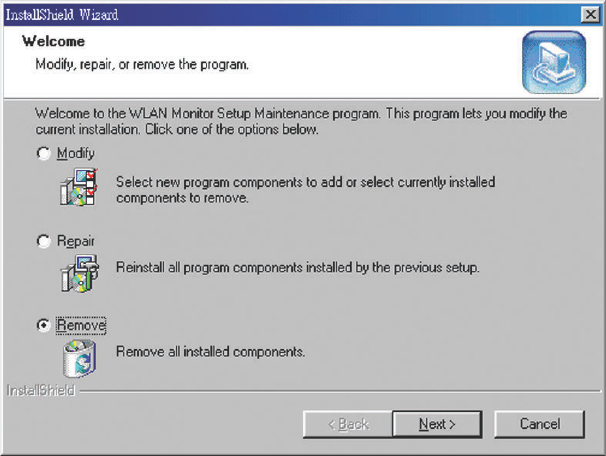
How to Uninstall the configuration & Monitor Utility
In order to uninstall the Configuration & Monitor Utility from Windows 95/98/ME, you can RUN
Setup utility again then you will see Fig 4-7 then step by step remove all installed components.
It is recommended to stop the WLAN adapter and “Exit” the application prior to staring the
uninstallation procedure.
Fig 4-8

Chapter 5: Installation Procedure Under
Windows NT 4.0 (Only For PCMCIA)
About Windows NT 4.0
Use the procedures described in this section to install and configure the WLAN adapter under
MS Windows NT 4.0.
Although Windows NT 4.0 are similar in appearance wit Windows 95/98/ME, and Windows
2000, they have different philosophy when installing a new hardware.
Throughout this section it is assumed that you have basic working knowledge of Windows NT
4.0 and how to install new network cards on them. However, in this paragraph, some specific
features of Windows NT 4.0 are briefly explained.
Unlike Windows 95/98/ME, and Windows 2000. Windows NT 4.0 do not support the “Plug &
Play” and “Hot Swapping” features.
In Windows NT 4.0 you need to inform the operating system about the existence of the new
card in order to star installing the driver. Also, if you want to swap cards, you need to restart the PC
in order to recognize the card.
Another difference between Windows 95/98/ME and Windows NT 4.0 is how these operating
systems handle the “User Profiles” feature. Windows 2000 handle “User Profiles” in the same way
as Windows NT 4.0.
In Windows 95/98/ME, the “User Profiles” are use only in order to customize the appearance of
the desktop between the different users. However, in Windows NT 4.0, “User Profiles” play the role
of accounts and are associated with certain privileges on the machine. Therefore, we have different
“User Profiles” (and privileges) for simple users, power users, and administrators. The privilege
settings for each user are set in the “User Manager” program of Windows NT 4.0.
Installing the Driver
NOTE: In order to be able to install the WLAN adapter on to your PC
running under Windows NT 4.0, you will need to log on as “Administrator”. Also to
have at least NT Service Pack 4 installed.
33
33
3
First of all, in order to obtain the necessary privileges for the driver installation, you need to log
on as Administrator to Windows NT 4.0.
Since Windows NT 4.0 do not support “Plug & Play”, you must enable the detection of PC
cards by the operating system by following the following procedure:
1. Click Start XSettingsXControl Panel.
2. Double click the “Devices” icon.
3. Select “PCMCIA” from the list and click the “Startup” button.
19

4.Set the startup type to “Boot” and click “OK”.
5. Click “Close” on the “Device” window.
In order to let the operating system know about your new card, you must enable the Network
support by following the next steps:
1. Click Start XSettingsXControl Panel.
2. Double click the “Network” icon.
3. In the “Network Settings” window you will be prompted to install Windows NT Networking in
case no network has been installed yet. Click “Yes” and follow the instruction on the screen. If
networking had been already installed, you will see a dialog with several tabs. In the “Adapters” tab
click the “Add” button. Windows NT Networking Setup will determine the type of network adapter
card that you are going to use.
4. When prompted to select a driver, locate the driver provided with your Firmware, Driver, and
Software Tools CD.
5. During the installation, a dialog box appears asking for the I/O base and IRQ resource
information. In order to find out which values to use, go to Start XProgramsXAdministrative Tools
XWindows NT DiagnosticsXselect the “Resources” tab Xpress the “IRQ” button. Select one free
IRQ from the list. Next, press the button “I/O Port” and choose an 0x20 free I/O space. Add these
values into the dialog box. If at any point after the installation you want to change these values, go to
the Control PanelXNetwork, select the Adapters tab, press the Properties button, and fill in the new
values.
6. Next Windows will start copying the files. In case there is a version conflict between one or
more of the files being copied and files in your system, you should normally keep the latest version.
7. Finally, when the installation has been completed, you will need to restart your computer.
NOTE: If the card is not working properly, after a restart procedure, you
should make sure that your system has free resources ever it may shows them
as being available.
33
33
3
Configuration / Uninstall
In order to configure the card, please use the Configuration and Monitor Utility described in a
different section of this document. This application lies on the system tray of your machine, as long
as the card is inserted into your system, and permits you to change the parameters of the card “on
the fly”.
To uninstall the WLAN adapter from Windows NT 4.0. you must double click on the “Network”
option in the “Control Panel” (Start XSettingsXControl Panel). Select the “OEM 11 Mbps WLAN PC-
Card (3.3V)” card from the list and press the “Remove” button.
20

21
Chapter 6: Installation Procedure Under
Windows XP
About Windows XP
Use the procedures described in this section to install and configure the WLAN adapter under
MS Windows XP
Throughout this section it is assumed that you have a basic working knowledge of WinXP.
However, in this paragraph, some specific feature of WinXP are briefly explained.
WinXP operating system supports the “Plug & Play” feature. That means that once you insert
the WLAN adapter into your PC for the very first time, the operating system will detect the card and
automatically install the driver.
Furthermore WinXP supports “Hot Swapping”. with this feature, you can remove and reinsert
the card whenever you want.
Installing the Driver
1. Insert the Software Tools CD into your CD-ROM driver.
2. When the “New Hardware Wizard” is opened, select the “install from a list or specific
location (Advanced)” option and press “Next”
3. As soon as the “Include this location in the search” option appears you provide the
appropriate path for the WinXP Driver folder in the CD-ROM (Driver XOEM_PCMCIA
XWinXP).
4. Upon completion of the Hardware Installation, you can safely press the “Continue Anyway”
button and then “Finish”.
Configuration Under WinXP
In order to configure the card, please use the WinXP build-in Application.
Uninstall Procedure Under WinXP
In order to uninstall the WLAN adapter from WinXP, you must right click on the “Properties”
option under “My computer” icon. Then, under the “Hardware” tab, select the “Device Manager” and
expand the “Network Adapters”. After you right click on the “OEM 11 Mbps WLAN PC-Card” option,
press “Uninstall”. Finally, on the “Confirm Device Removal” window, select “OK”.

22
Appendix A: Troubleshooting
Adapter Installation Problems
If your computer can not find the WLAN PC card or the network driver doesn’t install correctly,
check the following:
Make sure the adapter is securely seated in the PCMCIA slot. When you insert the wire-
less adapter into the notebook’s slot, a beep should be heard if the adapter is properly inserted.
Check for any hardware problems, such as physical damage to the card’s connector.
Try the card in another PCMCIA slot. If this also fails, test your computer with another
WLAN PC Card that is known to operate correctly.
When operating under Windows NT, make sure a PCMCIA slot and socket services driver
is installed in your computer. Also check for resource conflicts using the Windows NT Diagnostics
utility.
Make sure your computer is using the latest BIOS.
If there are other network adapters in the computer, they may be causing conflict. Remove
all other adapters from the computer and test the wireless adapter separately.
Check for a defective computer or PCMCIA slot by trying the adapter in another computer
that is known to operate correctly.
Network Connection Problems
If the LED on the PC Card does not light, or if you can not access any network resources from
the computer. Check the following:
Make sure the correct software driver is installed for your operating system. If necessary,
try reinstalling the driver.
Make sure the computer and other network devices are receiving power.
The Access Point you want to attach to may be defective. Try using another Access Point.
If you can not access a Windows or NetWare service on the network, check that you have
enabled and configured the service correctly. If you can not connect to particular server, be sure that
you have access rights and a valid ID and password.
If you can not access the Internet, be sure you have configured your system for TCP/IP.
If your wireless station can not communicate with a computer in the Ethernet LAN when
configured for Infrastructure mode, Check the following:
⌧ Make sure the Access Point that the station linked is power on.
⌧ If you still can not connect, change the Access Point to another radio channel.
⌧ make sure the BSS ID is the same as the Access Point for a station with roaming
disabled, or the SSID is the same as the Access Point for station with roaming enabled.
⌧ Ensure that the station is configured with the same security options as the Access Point.
23
Appendix B: Glossary
Access Point- An internetworking device that seamlessly connects wired and
wireless networks together.
Ad-Hoc- An Ad-Hoc wireless LAN is a group of computers each with wireless
adapters, connected as an independent wireless LAN.
Backbone- The part of a network that connects most of the systems and networks
together and handles the most data.
Bit- A binary digit. The value - 0 or 1 used in the binary numbering system. Also,
the smallest form of data.
Backbone- The core infrastructure of a network, the portion of the network that
transports information from one central location to another central location. The
information in then off-loaded onto a local system.
BSS- Stands for Basic Service Set. An Access Point associated with several
stations.
Domain- A subnetwork comprised of a group of clients and servers under the
control of one security database. Dividing LANs into domains improves perfor
-mance and security.
DSSS- Direct Sequence Spread Spectrum is very widely known and the most used
of the spread spectrum types, owing most of its popularity to its ease of implemen-
tation and high data rates.
Encryption- A security method that applies a specific algorithm to data in order to
alter the data’s appearance and prevent other devices from reading the information
ESS- Stands for Extended Service Set. More than one BSS can be configured as
an Extended Service Set. An ESS basically a roaming domain.
Ethernet- A popular local area data communications network, originally developed
by Xerox Corp., which accepts transmission from computers and terminals.
Ethernet operates on 10 Mbps baseband transmission over shielded coaxial cable
or over shielded twisted pair telephone wire.
Firmware- Code that is written onto read-only memory (ROM) or programmable
read-only memory (PROM). Once firmware has been written onto the ROM or
PROM, it is retained even when the device is turned off.
24
Fragmentation- Breaking a packet into smaller units when transmitting over a
network medium that cannot support the original size of the packet.
Infrastructure- An integrated wireless and wired LAN is called an infrastructure
configuration.
IRQ- Interrupt ReQuest, A hardware interrupt on a PC. There are 16 IRQ lines
used to signal the CPU that peripheral event has started or terminated. In most
cases, two devices cannot use the same line.
PCMCIA- Personal Computer Memory Card International Association, which
develops standards for PC cards, formerly known as PCMCIA cards, are available
in three types which are about the same length and width as credit cards, but
range in thickness from 3.3mm(Type I), 5.0mm(Type II), to 10.5mm(Type III).
These cards can be used for many functions, including memory storage, as
landline modems and as wireless LAN.
Roaming- A function that allow one to travel with a mobile end system (wireless
LAN mobile station, for example) through the territory of domain(an ESS, for
example) while continuously connecting to the infrastructure.
RTS- Request to Send, An RS-232 signal sent from the transmitting station to the
receiving station requesting permission to transmit.
Throughput- The amount of data moved successfully from one place to another
in a given time period.
Tx Rate- Transmission Rate.
WEP- Wired Equivalent Privacy, A data privacy mechanism based on a 64-bit or
128-bit shared key algorithm, as described in IEEE 802.11 standard.
Appendix C: Specifications
Radio: Complies with IEEE 802.11b
Frequency Band: 2400 ~ 2483.5MHz ( for US, Canada, and ETSI)
2400 ~ 2497MHz (for Japan)
Modulation TYPE: CCK,BPSK,QPSK
Operating Channels: IEEE 802.11b compliant
11 channels (US, Canada)
13 channels (ETSI)
14 channels (Japan)
Radio Technology: Direct Sequence Spread Spectrum
Data Rate: 1 / 2 / 5.5 / 11 Mbps
Output Power: > +15dBm, 10mW/MHz for Japan
Receive sensitivity: Min. -80dBm for 11Mbps (@BER 10E-5)Min. -84dBm for
5.5/2/1 Mbps (@BER 10E-5)
Antenna Type: Build-in diversity chip antenna
Current Consumption: 5V, Tx mode 450 mA (Max.)
Rx mode 250 mA (Max.)
Package : USB 1.1
Certification: Radio: EU: ETS 300 328; USA: FCC Part 15C
Japan: RCR STD-33 & ARIB STD-T66
Taiwan: DGT
EMC: EU ETS 300 826;
USA: FCC Part 15B
Safety: EN60950
Driver : Windows 95/98/NT/2000/XP/WinCE/Linux Red Hat
25
USB-02-07-010