CORNEA TECHNOLOGY CT1810 LCD Monitor User Manual Ct1810 intro1 A1
CORNEA TECHNOLOGY CO., LTD. LCD Monitor Ct1810 intro1 A1
User Manual
TABLE OF CONTENTS
ADJUSTING YOUR LCD MONITOR --------------
2
• General safety precautions ………………….…………… 2
• Unpacking your monitor ………………………………… 5
• Viewing angle ……………………………………………… 6
• How to open the back cover ……………………………… 6
• Connecting your monitor ………………………………… 7
• User controls ……………………………………………… 8
• OSD (On-screen display settings) …………….…..……… 9
• Menu adjustments …………………………….…..……… 10
• Refining the picture ………………………….…..……… 12
APPENDIX -----------------------------------
- 13
• Power management function …………….…..……..…… 13
• Video input terminal ……………………………..……..… 13
• Display modes ………………………………….………… 15
• Troubleshooting …………………………………………… 16
• Specifications ……………………………………………… 18
Adjusting your lcd monitor
2
General safety precautions
This Monitor has been engineered and manufactured to assure your safety. Please
read this manual and comply with the warnings and the procedures to avoid any
serious electrical shock and other serious damage.
1.
2.
3.
4.
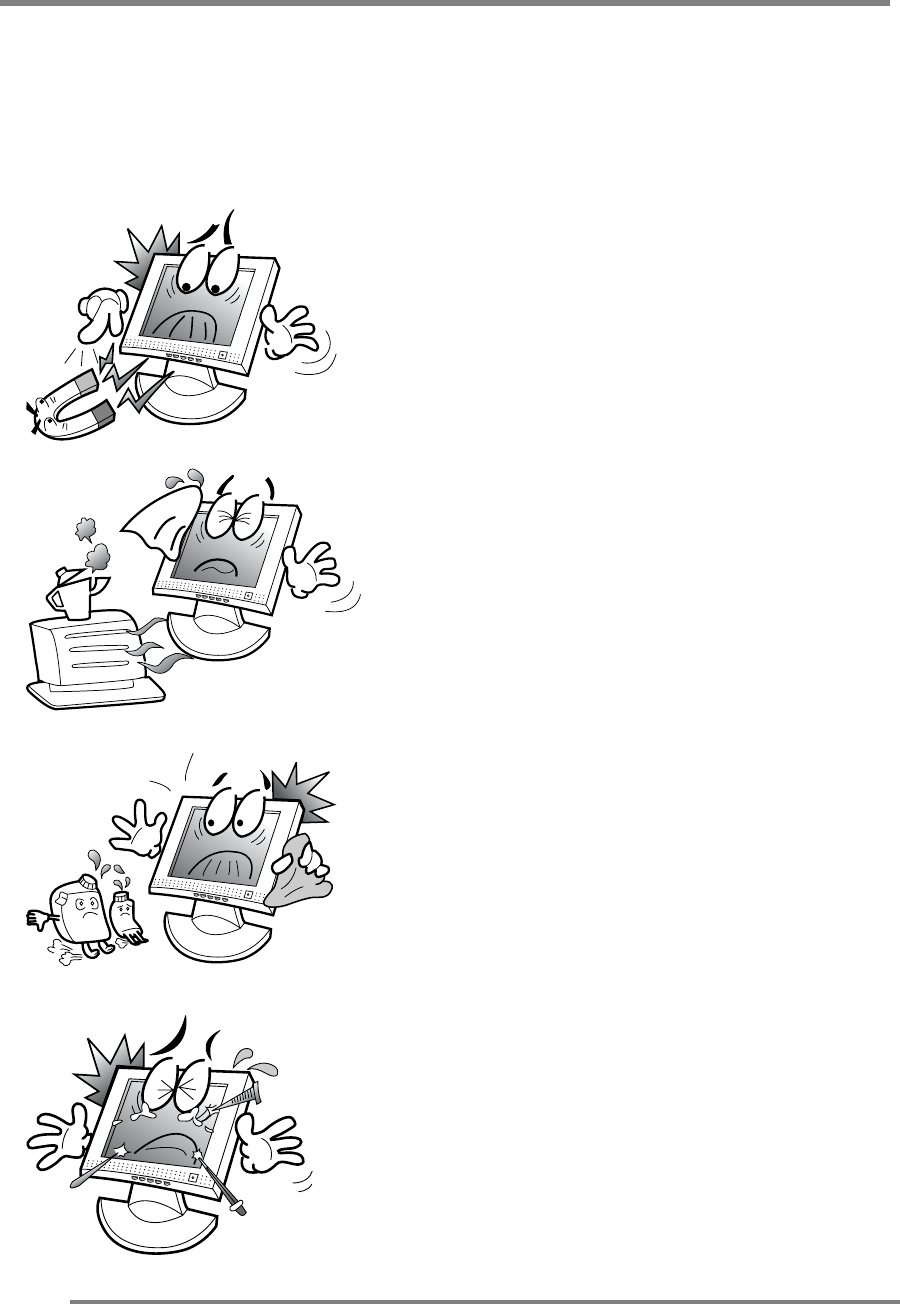
Do not place anything heavy, wet or
magnetic on the monitor or power cord.
Do not cover the ventilation openings
nor touch them with metallic or
flammable material.
High temperature can cause troubles.
Avoid operating the monitor in extreme
heat, humidity or dusty areas. Extreme
temperature may cause discoloration or
damages.
Ambient Temperature : 0°C ~ 40°C
Do not use a solvent, such as benzene, to
clean the monitor to prevent any
damages to the LCD surface.
Do not use fine tools such as a pin or a
pencil near the monitor to prevent any
scratch to the LCD surface.
Adjusting your lcd monitor
3
5.
6.
7.
8.
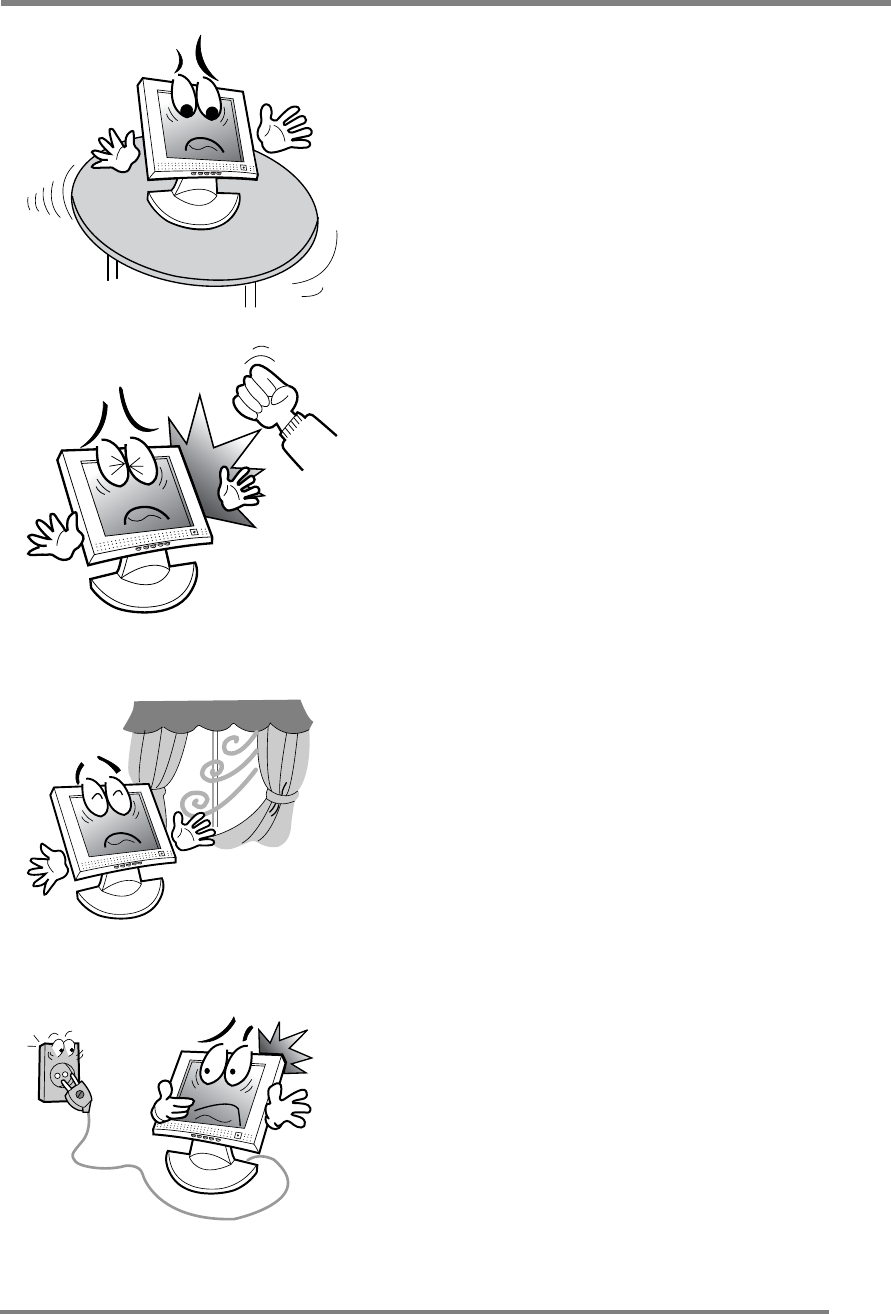
Place the monitor on a flat surface to
prevent it from falling.
Do not apply any mechanical shocks to
the machine.
Install it in a well-ventilated area or
secure enough space for ventilation.
Turn the monitor off before connecting it
to the power outlet.
Adjusting your lcd monitor
4
CAUTION : RISK OF ELECTRIC SHOCK, DO NOT OPEN
9.
1
0
.
11.
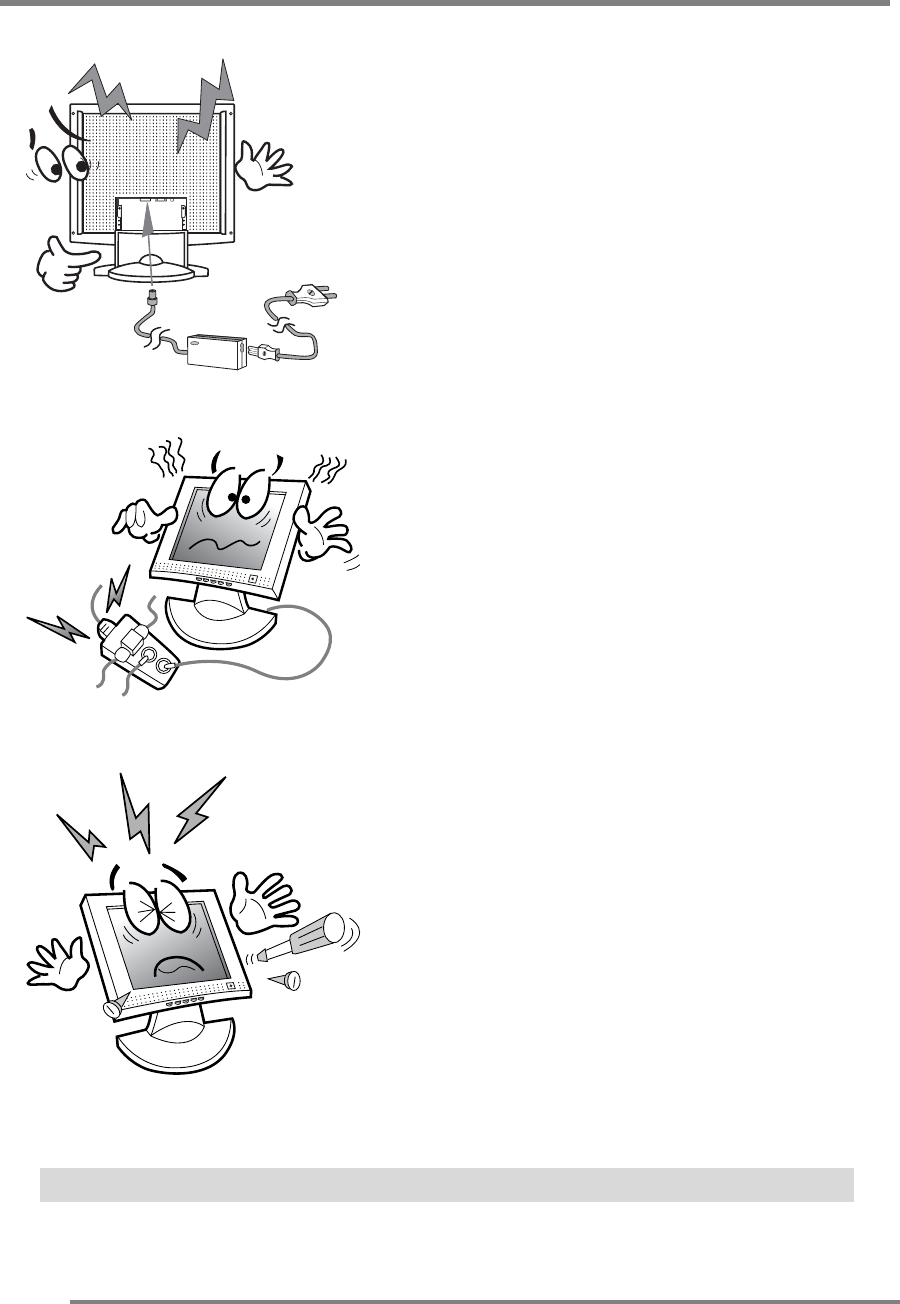
Make sure that the power cord and the
other cords are properly connected.
Overloaded AC outlets and extension
cords are dangerous. Also, the frayed
power cords and the broken plugs may
cause electric shock or fire.
Do not open the monitor. There are no
user-serviceable components inside.
There is a risk of exposure to high-
voltage electricity inside, even when
power is turned off. If the display
monitor does not operate properly,
unplug the power cord and contact your
dealer. Handling the electrical
equipment carelessly will cause a
serious electrical shock and other
hazards.
Adjusting your lcd monitor
5
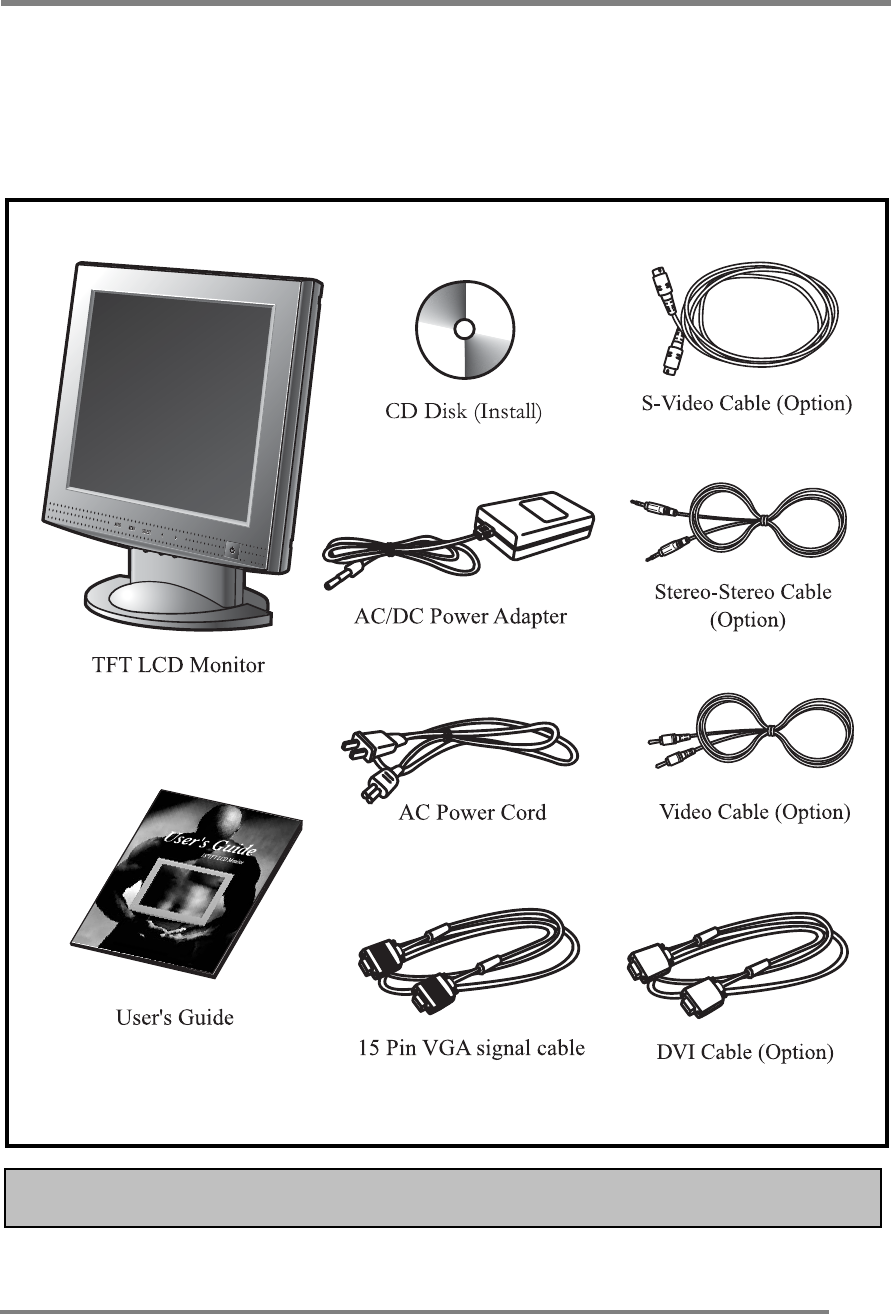
Unpacking your monitor
Please make sure the following items are included with your monitor.
If you find that any of these items are missing or appear damaged, contact your
dealer immediately.
The power cord can be different depending upon different voltage areas.
Adjusting your lcd monitor
6
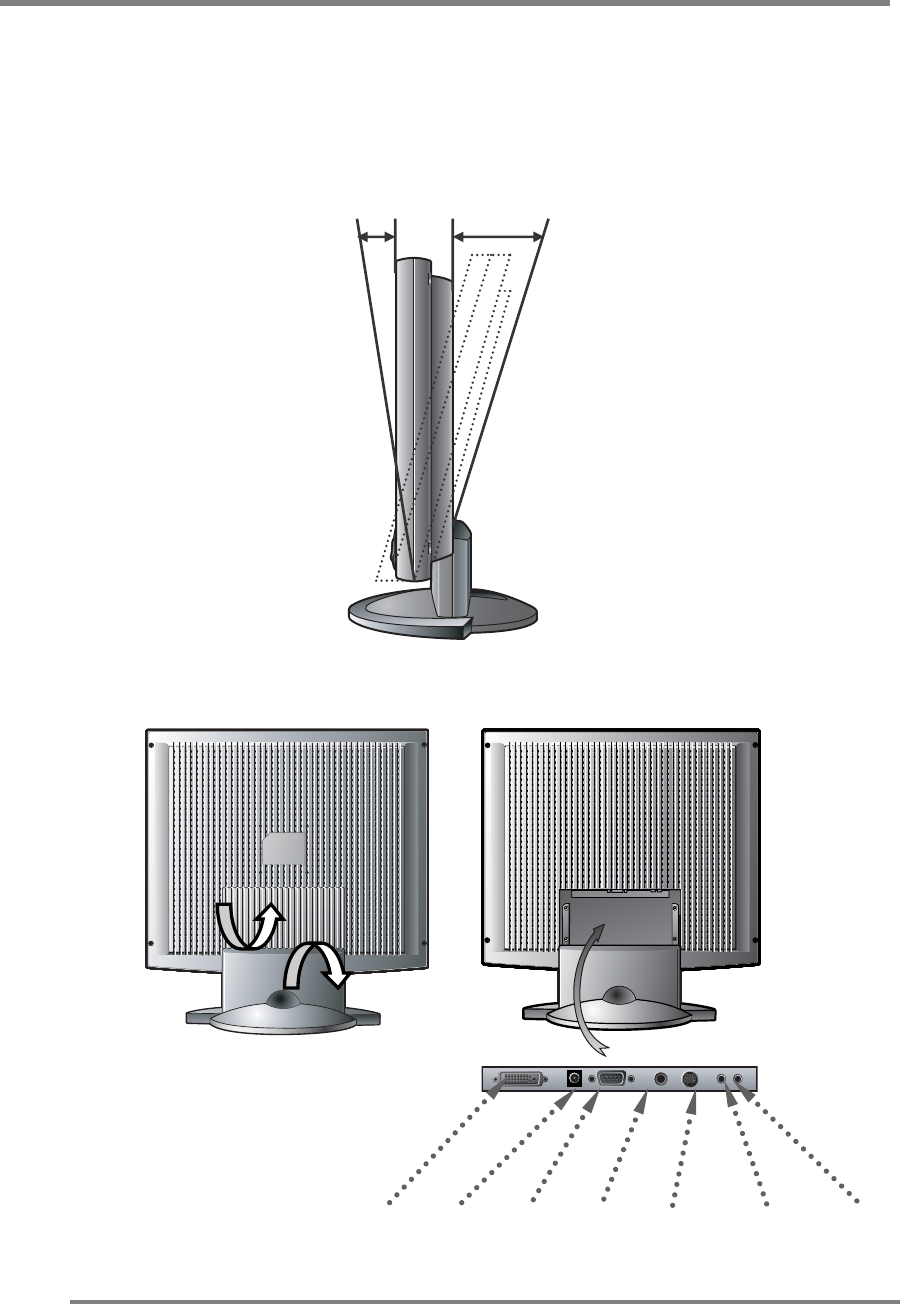
Viewing angle
Your monitor was designed to allow you to adjust it to a comfortable viewing angle.
The viewing angle can be adjusted 5° to 30° forward and backward respectively as
indicated by the arrow marks below.
5° 30°
How to open the back cover
DVI, Power, VGA, Video, S-Video, Audio in, Audio out
Adjusting your lcd monitor
7
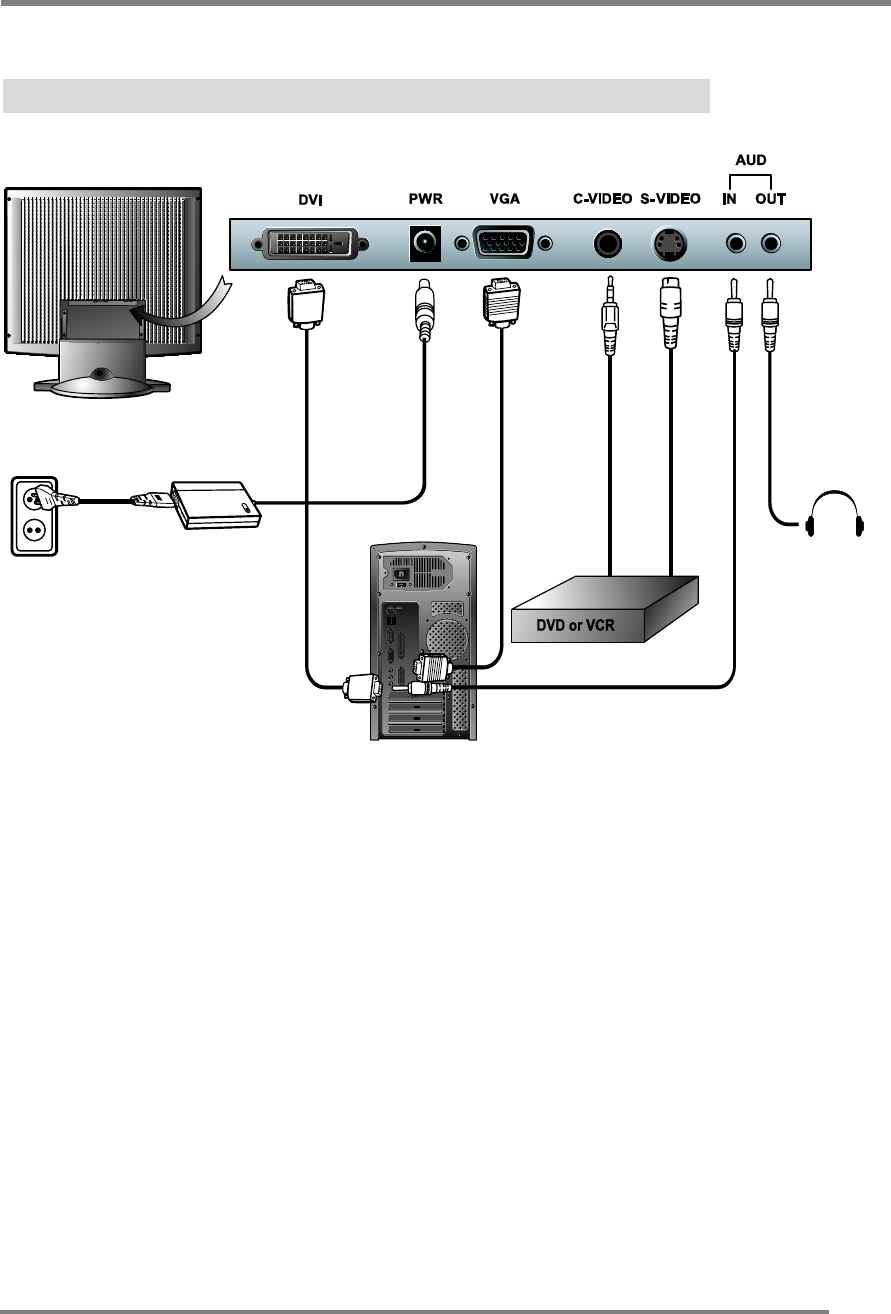
Connecting your monitor
Be sure to turn the computer off before connecting the monitor
Cable connections
g Connect the Video cable or S-Video cable to your DVD,VCR or camcorder.
g Connect the video signal cable (15Pin connector) to the system’s VGA
connector which is located on the back panel of the computer.
g Connect the power adaptor cord to the monitor and then to the power supply.
g Insert the audio out jack to the ear phone jack and insert the audio in jack to the
sound card port at the back of the computer, DVD or VCR.
g After powering on the computer, DVD or VCR, adjust the display using the
various controls provided. For further information on the installation procedure,
please refer to the operating guide of the computer being used.
Adjusting your lcd monitor
8
User controls
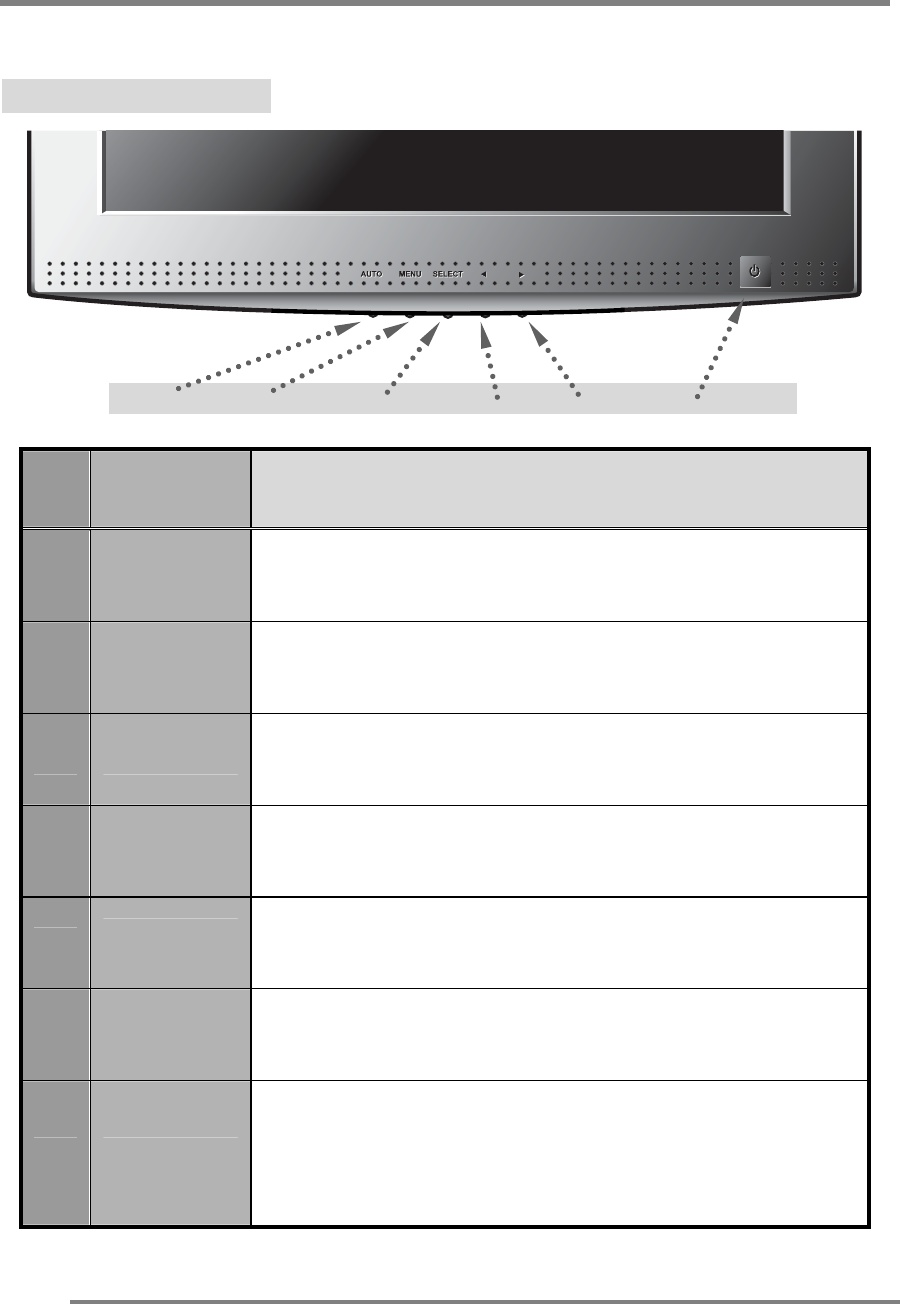
Front control buttons
AUTO MENU SELECT DOWN UP POWER/ LED
No. Key name Description
1 AUTO Activates the auto adjustment function.
2 MENU Opens the OSD menu.
3 SELECT Selects the main menu items and sub-menu items.
4 ◀ Moves to the lower menu item or sub-menu item.
Decreases the value of the parameter.
5 ▶ Moves to the upper menu item or sub-menu item.
Increases the value of the parameter.
6 POWER Turns on/off the monitor.
7 LED
Indicates the status of the monitor.
• Green : Normal operation.
• Amber : Power saving mode or disconnected signal
cable.
Adjusting your lcd monitor
9
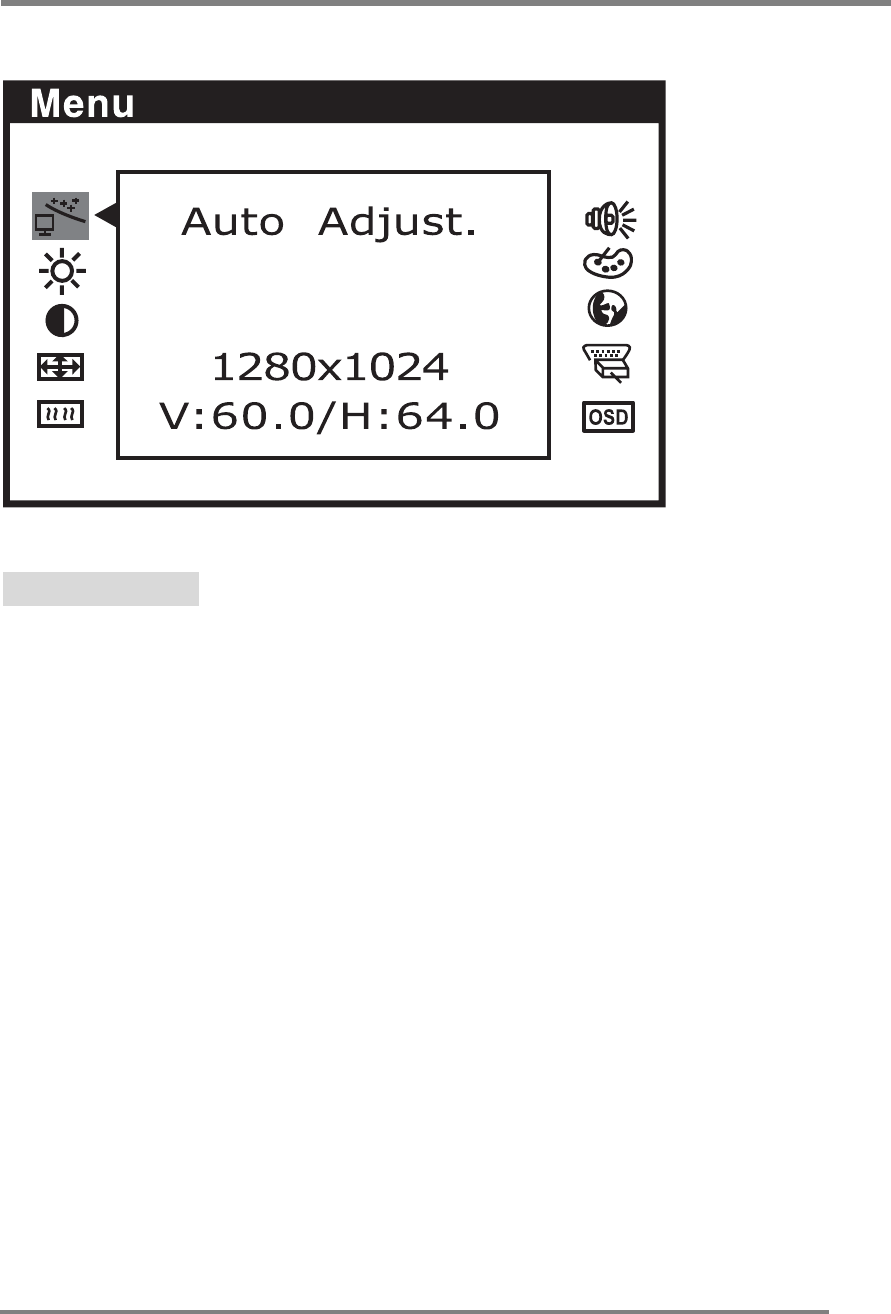
OSD (On-screen display settings)
OSD Operation
1. Press the menu button to open the menu system and display the main
function menu.
2. Push the “◀”and “▶” buttons to move between the function icons. As
you move from one icon to the other, the function name changes to
reflect the function or group of functions represented by that icon. See the
menu adjustments table to view a complete list of all the functions
available for the monitor.
3. Push the select button once to activate the highlighted function. Use the
“◀”and “▶” buttons according to the indicators on the menu to make
your changes.
4. To exit from the OSD menu at any time during the operation, press the
auto button. If no keys are pressed for a short period of time, the OSD
menu will automatically disappear.
Adjusting your lcd monitor
10
Menu adjustments
Icon Setting
menu Sub-menus Description
Auto Adjust.
• Adjusts the Auto Config. (position & phase brief)
Brightness • Adjusts the screen intensity.
Contrast
• Adjusts the contrast of the screen image.
H-Position
• Adjusts the horizontal position of the screen image.
Position
V-Position
• Adjusts the vertical position of the screen image.
Clock • Adjusts the width of the screen image.
Image
Phase • Adjusts the noise of the screen image.
Volume • Adjusts the volume.
Audio
Mute • Mute the sound temporarily.
Preset color 1 • One of factory set of white balance.
Preset color 2 • One of factory set of white balance
Color
(Analog/
digital)
User color • User can change the white level
Sharpness • Adjust the Sharpness.
Color • Adjust the color saturation.
Color
(video/
S-Video)
Tint • Adjust the color tone.
English •Selects the English language.
Deutsch •Selects the Deutsch language.
Français •Selects the Français language.
Español •Selects the Español language.
Language
Italiano •Selects the Italiano language.
Adjusting your lcd monitor
11
Icon Setting
menu Sub-menus Description
Analog •Selects the Analog RGB.
Digital •Selects the Digital RGB.
Video •Selects the Video.
Input
Select
S-Video •Selects the S-Video.
H Position
• Adjusts the horizontal position of the OSD menu.
V Position
• Adjusts the vertical position of the OSD menu.
OSD
Function
Off Timer
•
Adjusts the OSD display time during the
absence of user control
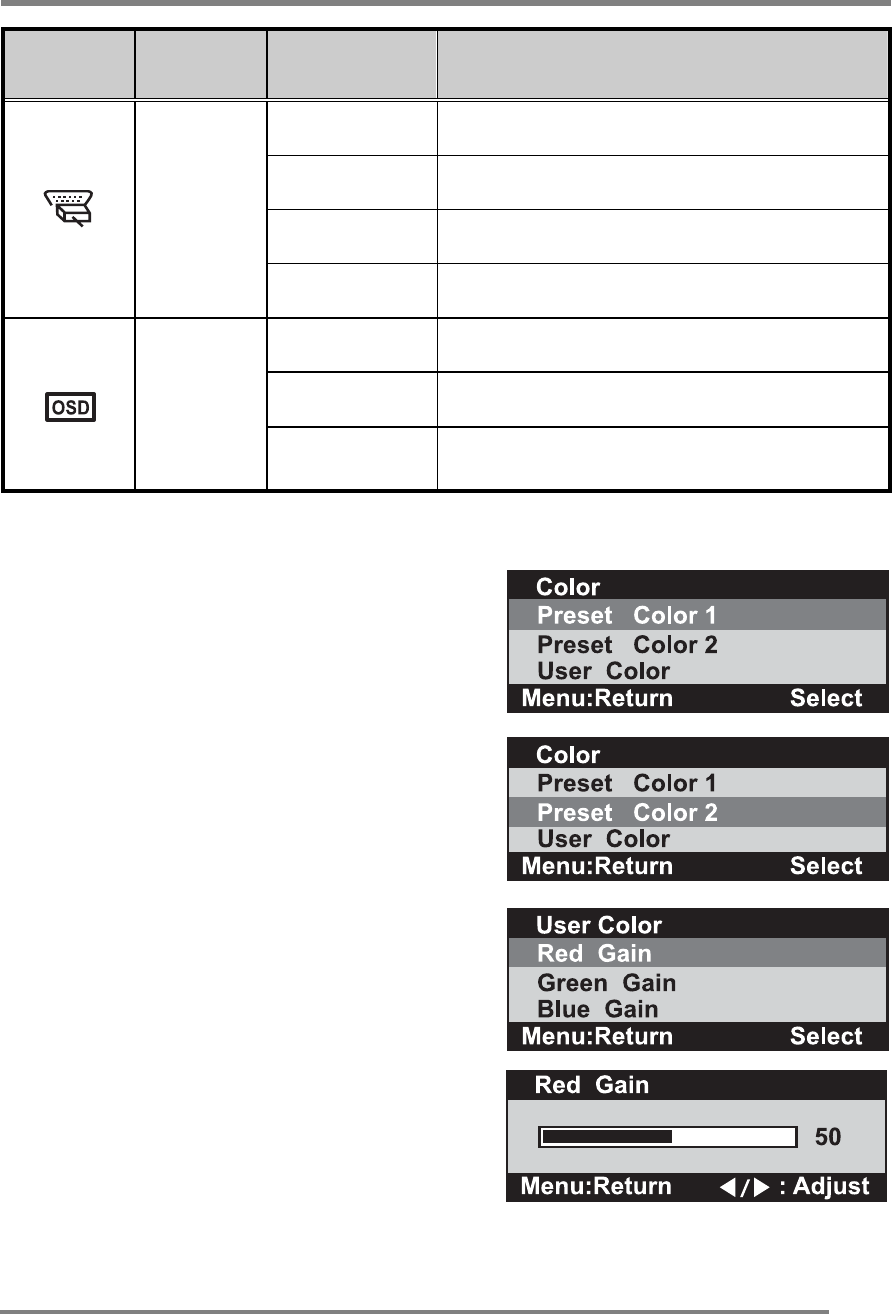
Preset Color 1
One of factory set of white balance.
Preset Color 2
One of factory set of white balance.
User Color
User can change the white level
The left (◀) and right (▶) buttons select the
kind of color and press select button.
Change the white level with left (◀) and
right (▶) button and return.
Adjusting your lcd monitor
12
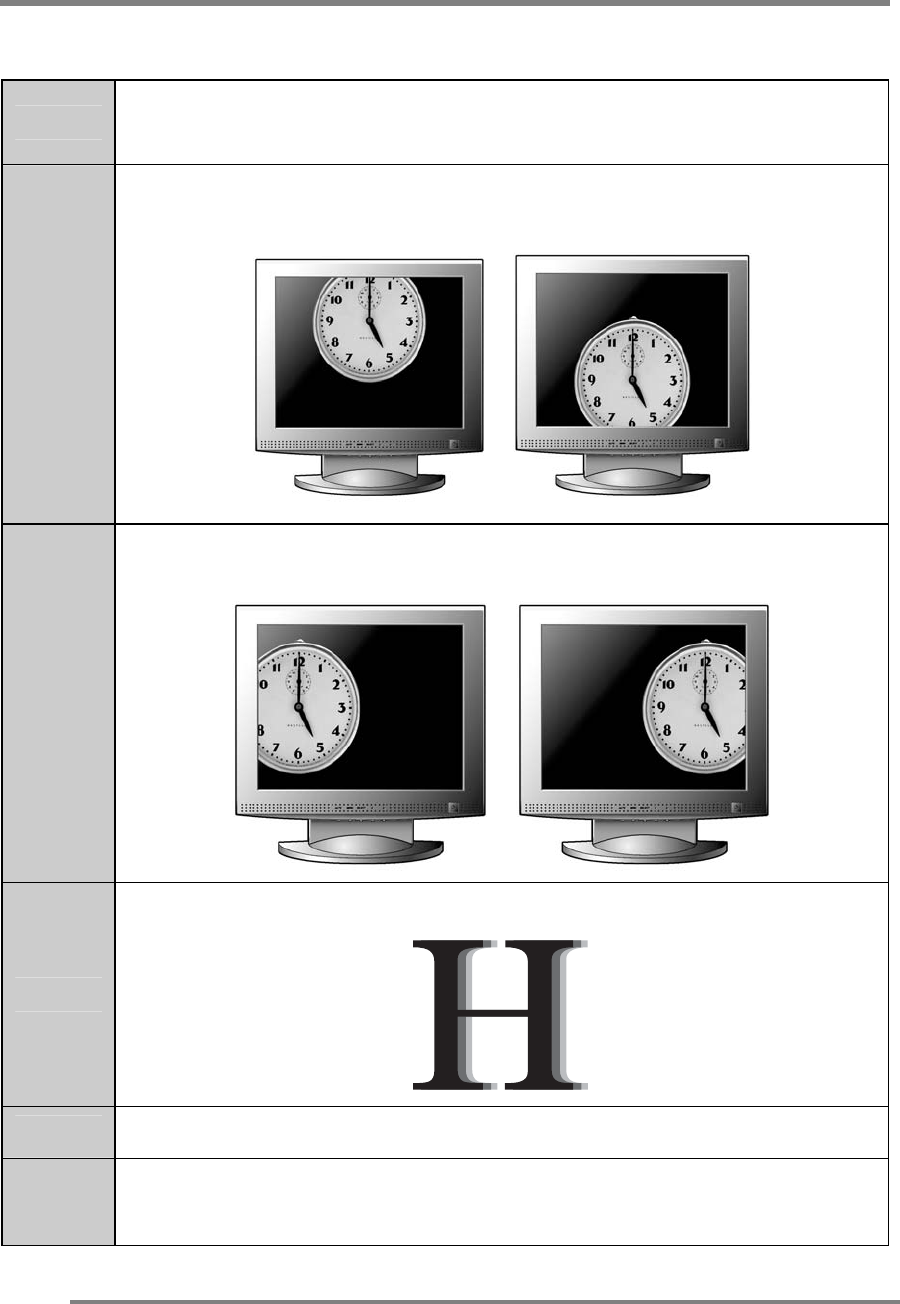
Refining the picture
Step 1 At first display, a full screen, such as window background or "H"
character should be achieved by using editor.
Step 2
Adjust the screen to the center of the display (LCD), by using the top
and bottom display controls (i.e. using V-Position menu).
Step 3
Adjust the screen to the center of the display (LCD) by using the right
and left display controls (i.e. using H-Position menu).
Step 4
Adjust the Phase until the "H" character displays clear.
Step 5 Using the Contrast, Brightness, set the Color to your preference.
Step 6 When you finish the adjustment, you can save your settings by
pressing on the menu until the OSD screen has disappeared.
APPENDIX
13
Power management function
This monitor is equipped with a DPMS(Display Power Management Signaling)
function that automatically cuts the power dissipation down to less than 5W when
the computer is left unattended.
Although the monitor can be left in power-saving mode for longer periods, we
recommend that you turn it off after your daily work.
Status Description
Green Power on.
Amber Power saving.
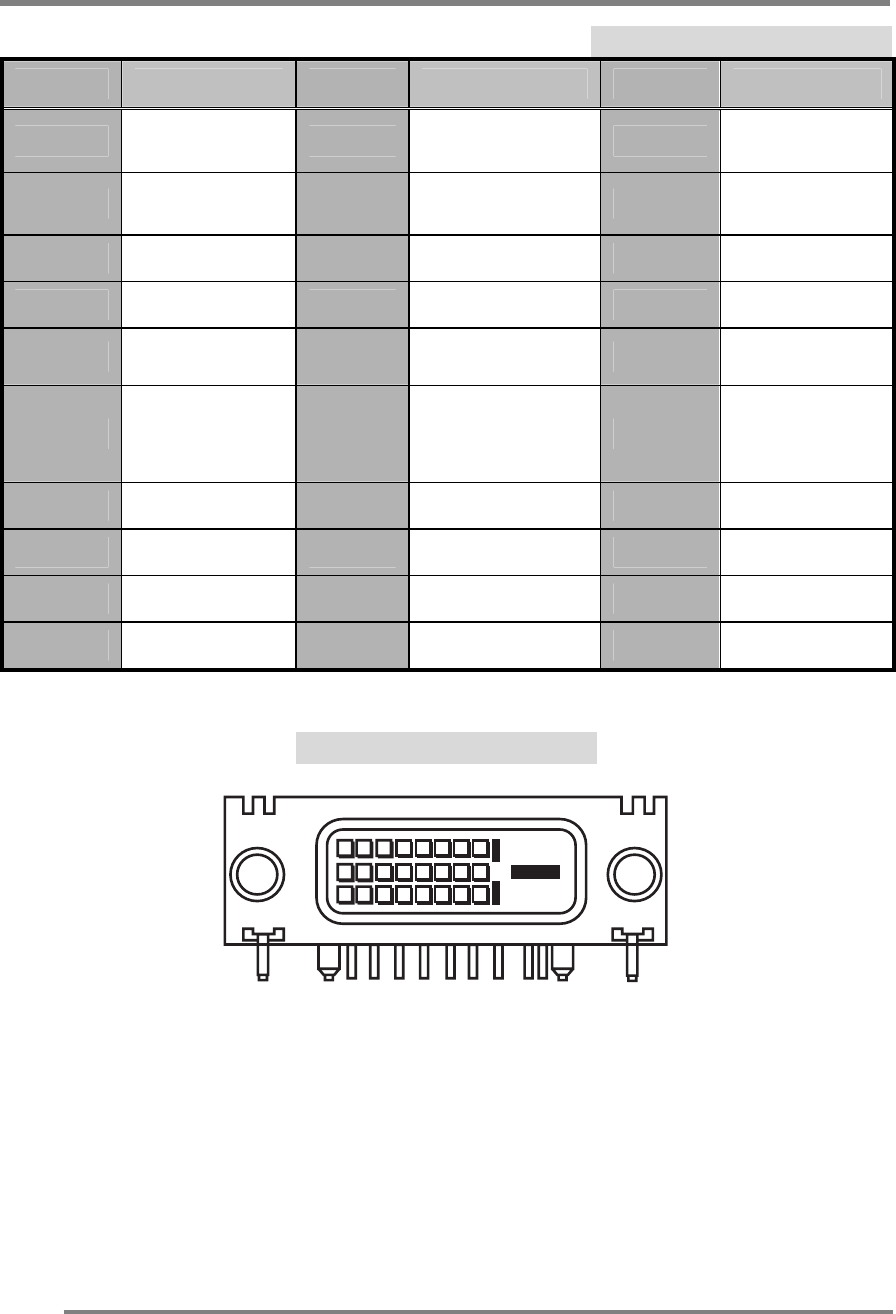
Video input terminal
A 15Pin D-Sub connector is used as the input signal connector.
Each pin and assignment is shown in the table below.
(Analog)
Pin No. Signal Name Pin No. Signal Name
1 RED 9 N.C.
2 GREEN 10 GROUND
3 BLUE 11 GROUND
4 GROUND 12 DDC SDA
5 GROUND 13 H-Sync
6 RED Ground 14 V-Sync
7 GREEN Ground 15 DDC SCL
8 BLUE Ground
15Pin D-Sub connector
APPENDIX
14
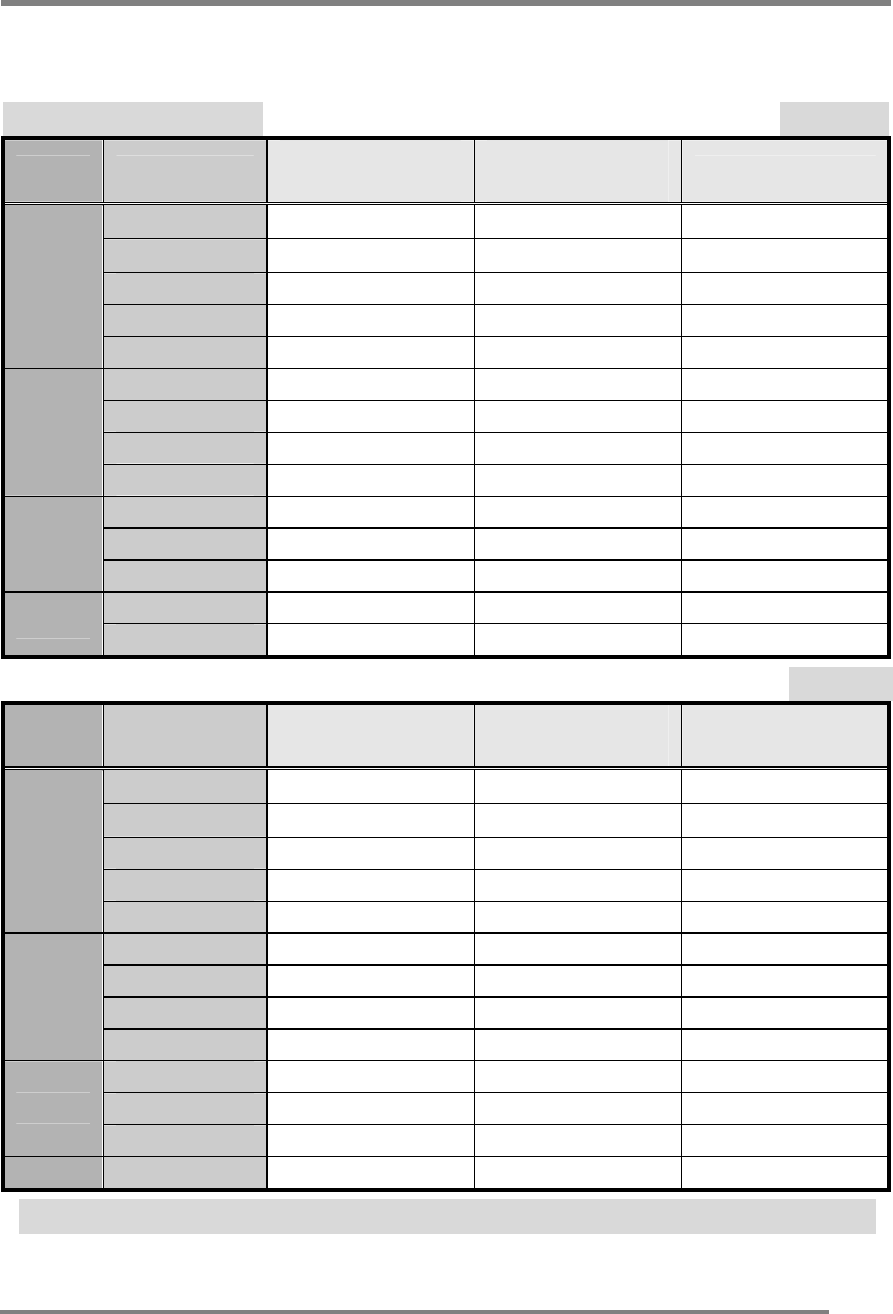
(DVI-V tmds digital RGB)
Pin No. Assignment Pin No. Assignment Pin No. Assignment
1 DATA2- 11 DATA
SHIELD 21 DATA 5+
2 DATA2+ 12 DATA 3- 22 CLOCK
SHIELD
3 SHIELD 13 DATA 3+ 23 CLOCK+
4 DATA 4- 14 +5V POWER 24 CLOCK-
5 DATA 4+ 15 GROUND(5V)
6 DDC
CLOCK 16 HOT PLUG
DETECT
7 DDC DATA 17 DATA 0-
8 N.C 18 DATA 0+
9 TATA1- 19 SHIELD
10 DATA1+ 20 DATA 5-
D-SUB DRAWING(CN10)
APPENDIX
15
Display modes
For the display modes listed below, the screen image has been optimized during production.
Preset timing modes. (Analog)
Mode
Display Mode
Horizontal
Frequency (KHz)
Vertical
Frequency (Hz)
Standard Type
640 x 350 31.5KHz 70Hz IBM
720 x 400 31.5KHz 70Hz IBM
640 x 480 31.5KHz 60Hz Industry Standard
640 x 480 37.9KHz 72Hz VESA Standard
VGA
640 x 480 37.5KHz 75Hz VESA Standard
800 x 600 35.2KHz 56Hz VESA Guidelines
800 x 600 37.9KHz 60Hz VESA Guidelines
800 x 600 48.0KHz 72Hz VESA Standard
SVGA
800 x 600 46.9KHz 75Hz VESA Standard
1024 x 768 48.4KHz 60Hz VESA Guidelines
1024 x 768 56.5KHz 70Hz VESA Standard
XGA
1024 x 768 60.0KHz 75Hz VESA Standard
1280 x 1024 64.0KHz 60Hz VESA Standard
SXGA 1280 x 1024 80.0KHz 75Hz VESA Standard
(Digital)
Mode
Display Mode
Horizontal
Frequency (KHz)
Vertical
Frequency (Hz)
Standard Type
640 x 350 31.5KHz 70Hz IBM
720 x 400 31.5KHz 70Hz IBM
640 x 480 31.5KHz 60Hz Industry Standard
640 x 480 37.9KHz 72Hz VESA Standard
VGA
640 x 480 37.5KHz 75Hz VESA Standard
800 x 600 35.2KHz 56Hz VESA Guidelines
800 x 600 37.9KHz 60Hz VESA Guidelines
800 x 600 48.0KHz 72Hz VESA Standard
SVGA
800 x 600 46.9KHz 75Hz VESA Standard
1024 x 768 48.4KHz 60Hz VESA Guidelines
1024 x 768 56.5KHz 70Hz VESA Standard
XGA
1024 x 768 60.0KHz 75Hz VESA Standard
SXGA 1280 x 1024 64.0KHz 60Hz VESA Standard
※ Our Monitor is not supported outside of this display modes listed above.
APPENDIX
16
Troubleshooting
Warning : This section will try to anticipate potential problems that you may
encounter in the day-to-day use of your monitor.
If after trying the suggested solutions, your monitor’s symptom
remains the same, contact your authorized service center.
Troubleshooting problems
Problems Corrective Actions
LED Green • Using OSD, adjust Brightness and Contrast to
maximum or reset to their default settings.
LED OFF
• Check the power switch.
• Check if the AC power cord is properly
connected to the AC adapter.
No Picture
LED Amber
• Check if video signal cable is properly
connected at the back of monitor.
• Check if the power to computer system is ON.
Display is not clear • Adjust the Frequency and Phase settings.
Too light or too dark • Adjust the Brightness and Contrast settings.
Image is not centered • Adjust the Horizontal and Vertical position
settings using the OSD.
APPENDIX
17
Problems Corrective Actions
Out of Range • Check the maximum resolution and the
frequency on the video port of your computer.
Picture is scrambled • Check the signal cable connection between
the computer and monitor.
Picture is fuzzy • Perform Auto adjust.
Picture bounces or has
wavy oscillations
• Check the signal cable connection between
computer and monitor.
Picture appears to be
ghosting
• Check the signal cable connection between
computer and monitor.
Color is not uniform • Adjust the color settings using the color
temperature menu.
The colors are distorted
with dark or shadowed
areas
• Adjust the color settings using the color
temperature menu.
The power indicator is
blinking amber
• The monitor is using its power management
system. Check the power management
utility on your computer.
APPENDIX
18
Specifications
Type 18.1” viewable diagonal TFT type
Pixel pitch 0.2805mm(H) x 0.2805mm(V)
Viewable angle
Horizontal / Vertical / Up / Down : 80 degrees
LCD
viewable
size
Glass surface
Hard coating(3H), Anti-glard treatment of the front
polarizer, Haze(13%)
Contrast ratio 300:1 (Typical)
Response time 17ms(Rising), 18ms(Falling)
Display mode Normally Black
Brightness 250 cd/ m2
INPUT VGA
RGB Analog, Digital DVI-D(V)
Fh : 31.5 to 80 KHz Fv : 56 to 75 Hz
Input resolution From VGA up to 1280 x 1024 at 75Hz
I/O Connectors VGA 15-pin D-sub, DVI-D(V), DC Power in
Stereo Audio In / Out, Video, S-Video
Power AC 100~240V, 50/60Hz Input
12V, 5A Max DC Output
User controls
Auto-Adjustment, Brightness, Contrast, Position, Image,
Audio, Color, Language, Source select, Miscellaneous
Displayable color 16.7 M (Full Color)
Displayable area 359.040mm(H) x 287.232mm(V)
Operation
0°C ~ 40°C (32°F ~ 104°F)
Temperature
Storage
-25°C ~ 60°C (-13°F ~ 140°F)
Dimensions
Physical
444.0mm(W) x 452.7mm(H) x 241.4mm(D)
Net
7.9Kg (17.41lbs)
Weight
Gross
10.8Kg(23.80lbs)
Regulations UL/cUL, CE, FCC-B, VCCI
Plug & play VESA DDC 1/2B
Power management VESA DPMS Compatible