COVALUE COMMUNICATIONS DM6000-1 Mobile Radio User Manual
SHENZHEN COVALUE COMMUNICATIONS CO., LTD. Mobile Radio
User Manual

Instruction Manual
DM6000-1 /DM6100-1
Mobile Radio
Thank you for purchasing a COVALUE mobile radio.
This simple to use radio adopts the latest advances in technology, providing
reliable communication in today’s demanding communication environment.
Notices to the User:
When condensation occurs inside the transceiver:
·Condensation may occur inside the transceiver when the room is warmed using a heater
on a cold day or when the transceiver is quickly moved from a cold location to a warm
location.
• When condensation occurs,the microcomputer and /or the transmit/receive circuits may
become unstable,resulting in transceiver malfunction.
• If this happens,turn OFF the transceiver and wait for a while.
• When the condensed droplets disappear,the transceiver will function normally.
Do not touch the metal surface of the transceiver while it is in use.
Do not mount the transceiver such that the chassis can come in contact with skin.
High temperatures may burn your skin.
PRECAUTIONS
Please observe the following precautions to prevent fire, personal injury, and/or
transceiver damage:
• Do not attempt to configure your transceiver while driving; it is simply too dangerous.
• Be aware of local laws pertaining to the use of headphones/headsets while driving on
public roads.
If in doubt, do not wear headphones while mobiling.
• Do not transmit with high output power for extended periods; the transceiver may
overheat.
• Do not modify the transceiver unless instructed by this manual or other COVALUE
documentation.
• Do not expose the transceiver to long periods of direct sunlight nor place it close to
heating appliances.
• Do not place the transceiver in excessively dusty,humid or wet areas, nor on unstable
surfaces.
• If an abnormal odor or smoke is detected coming from the transceiver, turn OFF the
power immediately. Contact a COVALUE service station or your dealer.
• This transceiver is designed for a 12 V power source. Never use a 24 V battery to
power the transceiver.
SUPPLIED ACCESSORIES
After carefully unpacking the transceiver, identify the
items listed in the table below. We recommend you keep
the box and packaging for shipping.
Accessory Qty
Microphone (DTMF Mic) 1
DC power cable(Blade) 1
Fuse(Blade) 1
Mounting bracket 1
Screw set 1
Microphone hanger 1
Instruction manual 1
CHAPTER 1 PREPARATION
MOBILE INSTALLATION
To install the transceiver, select a safe, convenient
location inside your vehicle that minimizes danger to your
passengers and yourself while the vehicle is in motion.
Consider installing the unit at an appropriate position so
that knees or legs will not strike it during sudden braking
of your vehicle. Try to pick a well ventilated location that
is shielded from direct sunlight.
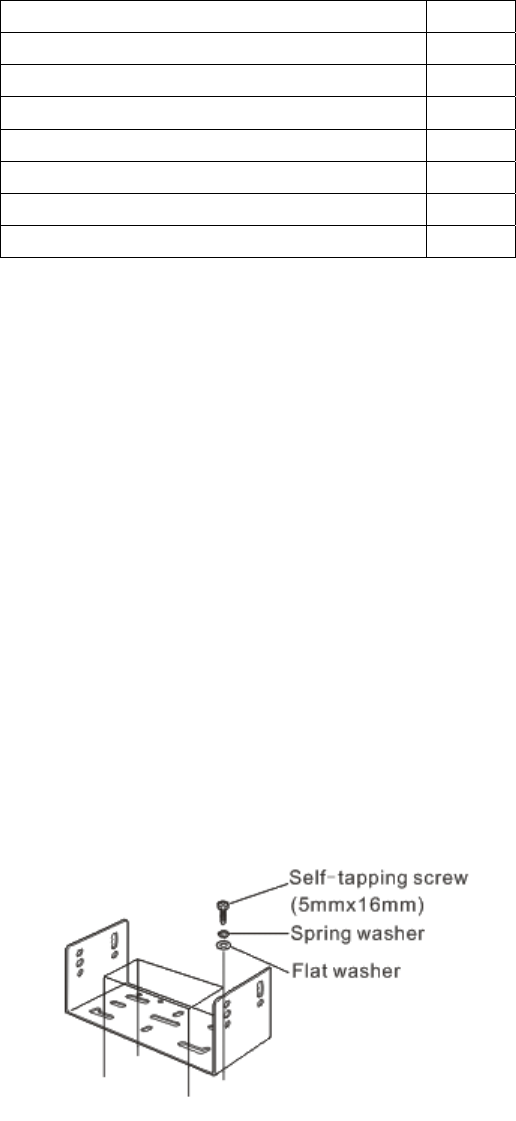
1 Install the mounting bracket in the vehicle using the
supplied self-tapping screws (4), flat washers (4), and
Spring washers (4).
The bracket must be installed so that the 3 screw long
hole
positions on the side of the mounting bracket are towards
The rear of the bracket.
2 Position the transceiver, then insert and tighten
the supplied hexagon SEMS screws (4) and flat
washers (4).
Double check that all hardware is tightened to prevent
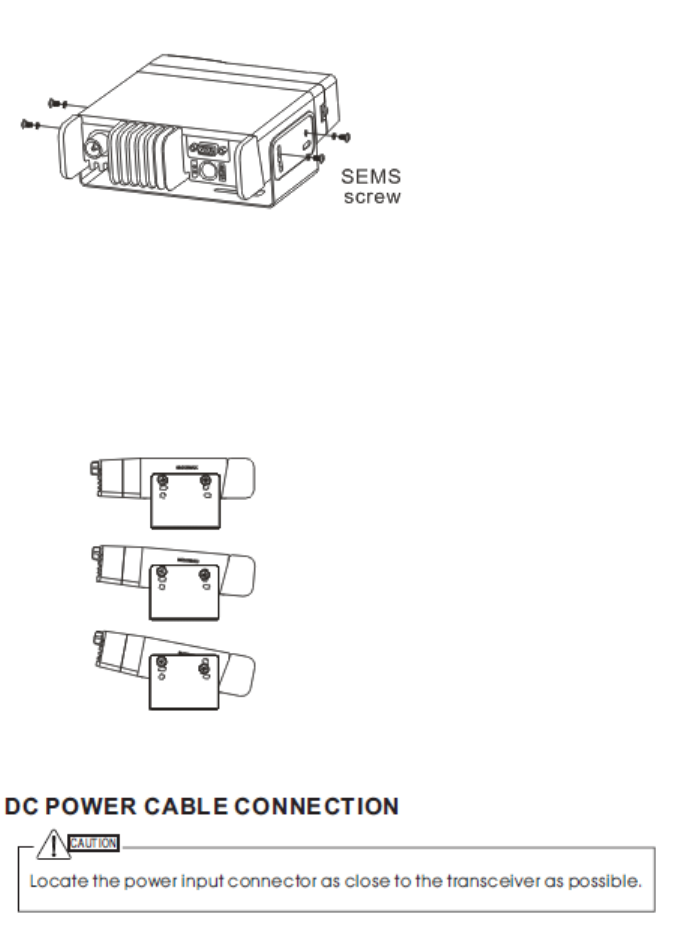
vehicle vibration from loosening the bracket or
transceiver.
Determine the appropriate angle of the transceiver, using
the 3 screw hole positions on the side of the mounting
bracket.
MOBILE OPERATION
The vehicle batter y must have a nominal rating of 12 V.
Never connect the transceiver to a 24 V batter y. Be sure
to use a 12 V vehicle batter y that has sufficient current
capacity. If the current to the transceiver is insufficient,
the display may darken during transmission, or transmit
output power may drop excessively.
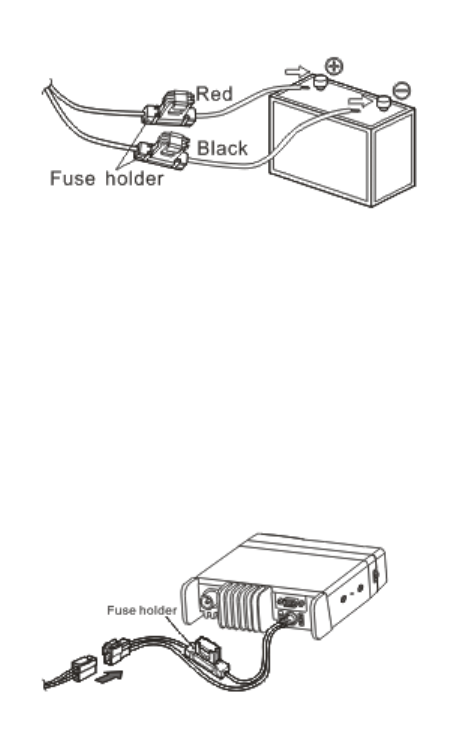
1 Route the DC power cable supplied with the
transceiver directly to the vehicle's batter y terminals
using the shortest path from the transceiver.
If using a noise filter, it should be installed with an
insulator to prevent it from touching metal on the vehicle.
We recommend you do not use the cigarette lighter
socket as some cigarette lighter sockets introduce an
unacceptable voltage drop.
The entire length of the cable must be dressed so it is
isolated from heat, moisture, and the engine secondar y
(high voltage) ignition system/ cables.
2 After the cable is in place, wrap heat-resistant tape
around the fuse holder to protect it from moisture and
tie down the full run of cable.
3 To prevent the risk of short circuits, disconnect other
wiring from the negative (–) batter y terminal before
Connecting the transceiver.
4 Confirm the correct polarity of the connections, then
attach the power cable to the batter y terminals;
red connects to the positive (+) terminal and black
connects to the negative (–) terminal.
Use the full length of the cable without cutting off excess
e v e n i f t h e c a b l e i s l o n g e r t h a n r e q u i r e d . I n
particular,never remove the fuse holders from the
Cable.
5 Reconnect any wiring removed from the negative
terminal.
6 Connect the DC power cable to the transceiver's
power supply connector.
Press the connectors firmly together until the locking tab
connectors firmly together until the locking tab
clicks
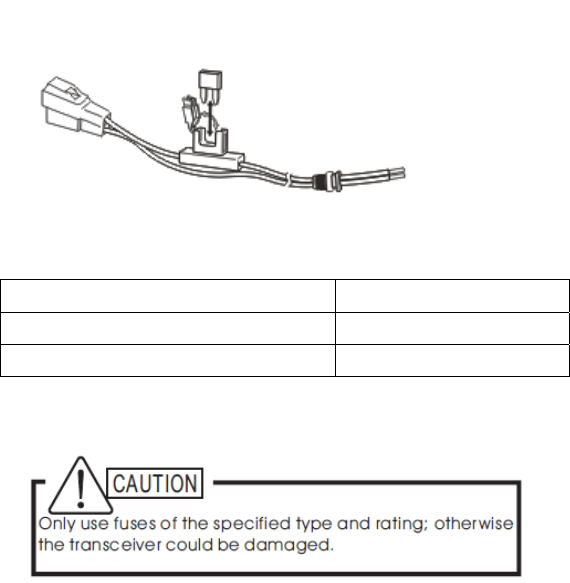
REPLACING FUSES
If the fuse blows, determine the cause, then correct the
problem. After the problem is resolved, replace the fuse.
If newly installed fuses continue to blow, disconnect
the power cable and contact your authorized CSI
Dealer or an authorized CSI service center for assistance.
Fuse Location Fuse Current Rating
Transceiver 15 A
Supplied Accessory DC Power Cable 20 A
Note:
If you use the transceiver for a long period when the
vehicle batter y is not fully charged, or when the engine is
OFF, the batter y may become discharged, and will not
have sufficient reserves to start the vehicle. Avoid using the
transceiver under these conditions.
ANTENNA CONNECTION
Before operating, install an efficient, well-tuned antenna.
The success of your installation will depend largely on
the type of antenna and its correct installation. The
transceiver can give excellent results if the antenna
system and its installation are given careful attention.
Use a 50Ωimpedance antenna and low-loss coaxial feed
Line that has a characteristic impedance of 50Ω, to
match the transceiver input impedance. Coupling the
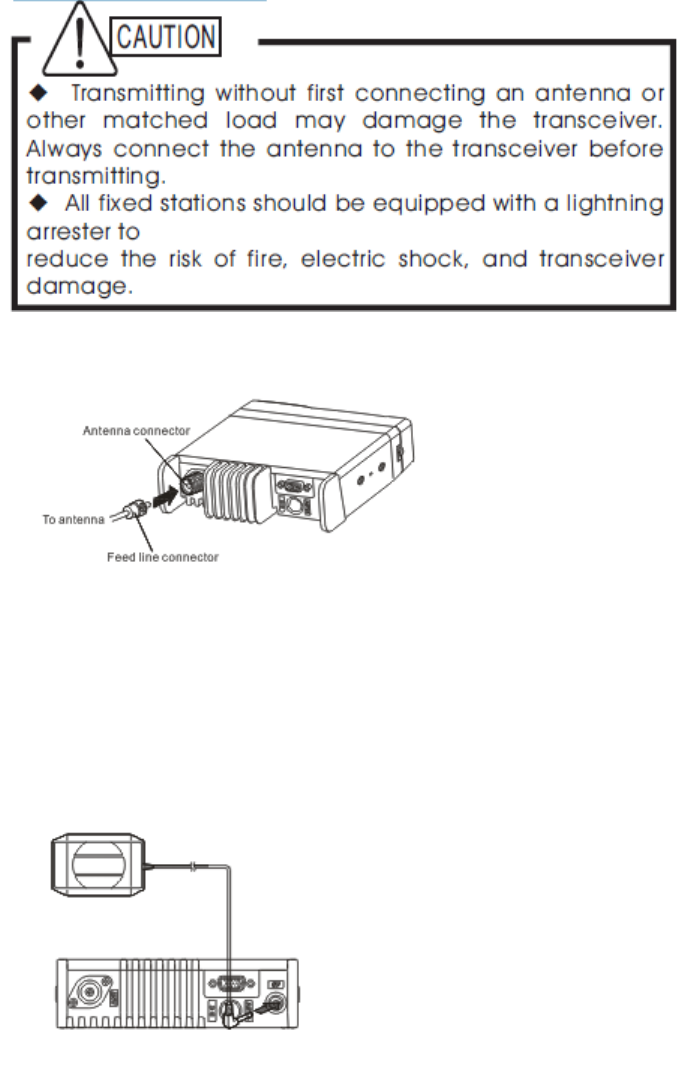
antenna to the transceiver via feed lines having an
impedance other than 50 Ωreduces the efficiency of the
antenna system and can cause interference to nearby
broadcast television receivers, radio receivers, and other
electronic equipment.
ACCESSORY CONNECTIONS
EXTERNAL SPEAKER
If you plan to use an external speaker, choose a speaker
with an impedance of 8 Ω. The external speaker jack
accepts a 3.5 mm (1/8") mono (2-conductor) plug.
MICROPHONE
For voice communications, connect a 600 Ω microphone
equipped with an 8-pin modular plug into the modular
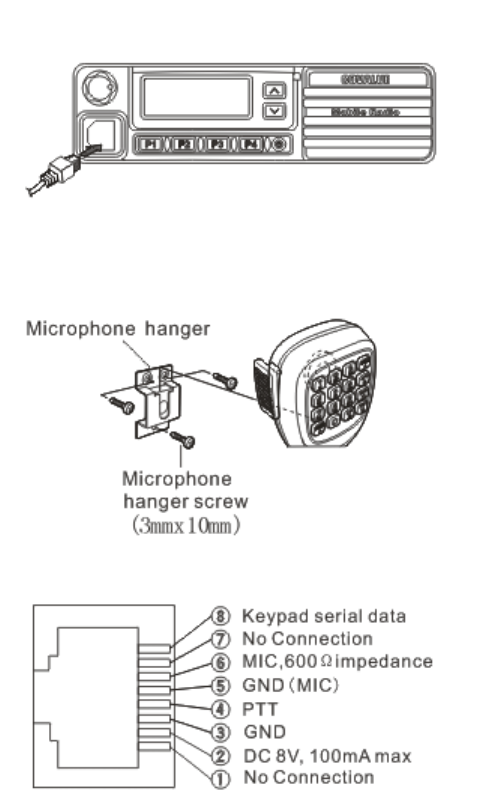
socket on the front of the main unit. Press firmly on the
plug until the locking tab clicks.
Attach the supplied microphone hanger in an appropriate
location using the screws included in the screw set.
PC CONNECTION 1
To utilize the optional PC programming software, you must
first connect the transceiver to your PC using an optional
Programming Cable (via the rear DB15 connector).
Note: Ask your dealer about purchasing a Programming
Cable.
YOUR FIRST QSO
Are you ready to give your transceiver a quick tr y?
Reading this section should get your voice on the
air right away. The instructions below are intended
only as a quick guide. If you encounter problems
or there is something you would like to know more,
read the detailed explanations given later in this
manual.
1 Press [ ] (Power) briefly to switch the transceiver
power ON.
A power on beep sounds and a Power-on
message appears momentarily. The various indicators
and the current operating channel alias appear on the
LCD.
The transceiver stores the current parameters when it is
turned OFF and automatically recalls those parameters
the next time you turn the transceiver ON.
2 Turn the Volume control clockwise to increase the
volume or reverse.
The transceiver stores the current parameters when it is
turned OFF and automatically recalls those parameters
the next time you turn the transceiver ON.
3 Turn the Up/Down control to select a reception
channel.
You may further turn the Volume control to adjust the
volume level of the signal.
4 To transmit, hold the microphone approximately 5 cm
(2 inches) from your mouth.
5 Press and hold Mic [PTT], then speak in your normal
tone of voice.
6 Release Mic [PTT] to receive.
7 Repeat steps 4, 5, and 6 to continue
communication.
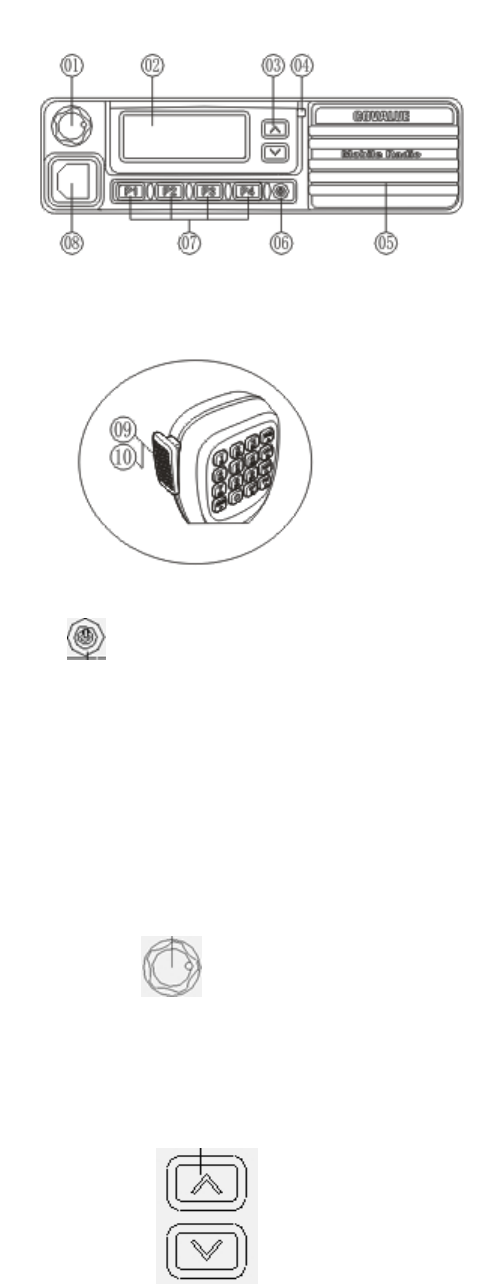
FRONT PANEL
Note: This section describes only the main functions of the
front panel controls. Explanations for functions not
described here are provided in the appropriate sections of
this instruction manual.
1 (Power) switch
Press to switch the transceiver power ON or OFF
2 MENU key could be programmed to press or by your dealer
Note: To brief, this manual just uses as the MENU/OK key later
3 Navigation Key could be programmed to turn or press or
in menu mode
Note: To brief, this manual just uses as the navigation key in menu later
4 Cancel Key only could be programmed to press , if Menu key enabled.
5 Channel UP/DOWN or Zone UP/DOWN or volume UP/DOWN could be programmed to turn
or press
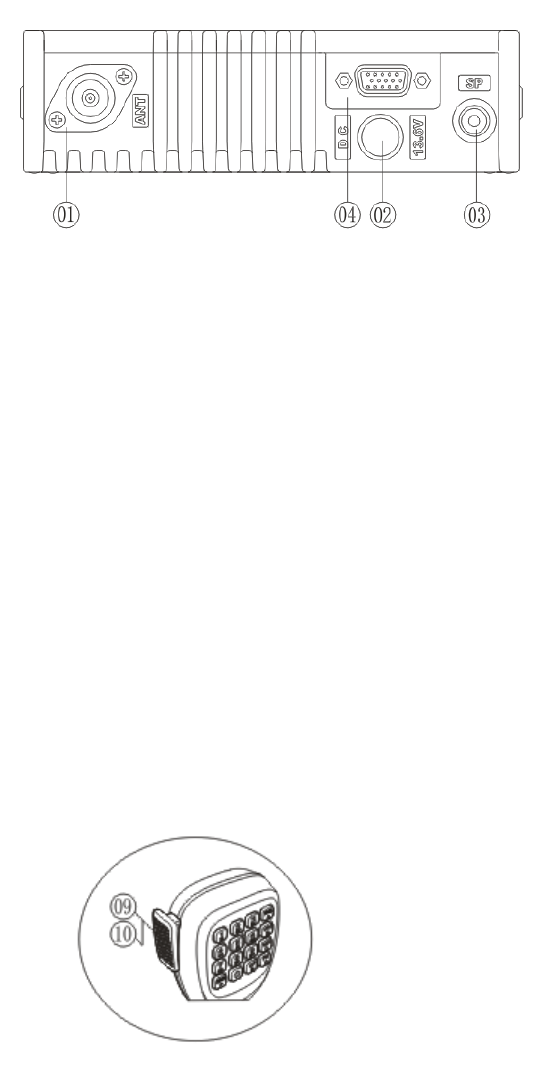
REAR PANEL
① Antenna connector
Connect an external antenna here. When
making test transmissions, connect a dummy load in
place of the antenna. The antenna system or load
should have an impedance of 50 Ω.
② Power Input 13.6 V DC cable
Connect a 13.6 V DC power source here. Use the
supplied DC power cable.
③ SP (speaker) jack
If desired, connect an optional external speaker for
clearer audio. This jack accepts a 3.5 mm (1/8")
mono (2-conductor) plug.
④ DB15 Connector
This connector is used for an extension feature, such as
GPS, control line etc.
MICROPHONE
1 PTT(Push-to-Talk) Switch
Press and hold to transmit. Release to receive.
2 D key (Menu/OK key)
3 A key(Cancel Key)
4 B,C(Navigation Key)
5 1,2,3,4,5,6,7,8,9,*,0,#(Number Key)
7▲ Make a Call
Selecting a Zone

A zone is a group of channels. Your radio supports up to 250 zones, with a maximum of 16 channels per zone.
Use the following procedure to select a zone.
Procedure:
Press the programmed Zone button and proceed to step 2.
OR Follow the procedure below.
1. Press to enter menu, and press / to Zone and press to select.
2. The current zone is displayed an indicated by a √.
3. Press / to the required zone and press to select.
4. The display shows <Zone> Selected momentarily.
▲ Selecting a Radio Channel, Subscriber ID, or Group ID
Procedure:
Once the required zone is displayed, if you have multiple zones in your radio, turn the programmed channel Selector
Knob to select the channel, subscriber alias or ID, or group alias or ID.
▲ Receiving and Responding to a Radio Call
Once the channel, subscriber ID or group ID is displayed, you can proceed to receive and respond to calls.
To unscramble a privacy-enabled call, your radio must have the same Privacy Key, OR the same Key Value and Key
ID (programmed by your dealer), as the transmitting radio (the radio you are receiving the call from)
▲ Receiving and Responding to a Group Call
To receive a call from a group of users, your radio must be configured as part of that group.
Procedure:
When you receive a Group Call (while on the Home screen);
1. The green LED lights.
2. The first line of the display shows the caller alias and the RSSI icon. The second line displays the group alias and
the Group Call icon (in Digital mode only).
3. Hold the radio vertically 1 to 2 inches(2.5 to 5.0 cm) from your mouth.
If the Channel Free Indication feature is enabled, you will hear a short alert tone the moment the transmitting
radio releases the PTT button, indicating the channel is free for you to respond.
4. Press the PTT button to respond to the call and the RED LED turns on.
5. Wait for the Talk Permit Tone to finish (if enabled) and speak clearly into the microphone.
6. Release the PTT button to listen.
7. If there is no voice activity for a predetermined period of time, the call ends.
▲ Receiving and Responding to a Private Call
A Private Call is a call from an individual radio to another individual radio.
There are two types of Private Calls. The first type is where a radio presence check is performed prior to setting up the
call. The other type sets up the call immediately.
Procedure:
1. The green LED turns on.
2. The first line of the display shows the subscriber alias or ID, and the RSSI icon. The second line displays Private
Call and the Private Call icon.
3. Hold the radio vertically 1 to 2 inches(2.5 to 5.0 cm) from your mouth. If the Channel Free Indication feature is
enabled, you will hear a short alert tone the moment the transmitting radio releases the PTT button, indicating the
channel is free for you to respond.
4. Press the PTT button to respond to the call. The RED LED turns on.
5. Wait for the Talk Permit Tone to finish (if enabled) and speak clearly into the microphone.
6. Release the PTT button to listen.
7. If there is no voice activity for a predetermined period of time, the call ends.
8. You hear a short tone. The display shows Call Ended.
▲ Receiving an All Call
An All Call is a call from an individual radio to every radio on the channel. It is used to make important
announcements requiring the user’s full attention.
Procedure:
When you receive an All Call:
1. A Tone sounds and the Green LED turns on.
2. The first line of the display shows the caller alias and the RSSI icon. The second line displays All Call and the All
Call icon.
3. Once the All Call ends, the radio returns to the previous screen before receiving the call.
If the Channel Free Indication feature is enabled, you will hear a short alert tone the moment the transmitting radio
releases the PTT button, indicating the channel is now available for use.
You cannot respond to an All Call.
NOTE: the radio stops receiving the All Call if you switch to a different channel while receiving the call.
During an All Call, you will not be able to use any programmed button functions until the call ends.
▲ Making a Radio Call
You can select a channel, subscriber ID, or group by using:
•The Channel Selector Knob
•A programmed One Touch Call button
•The Contacts list
•Manual Dial (Via Contacts) —This method is for Private Calls only and is dialed using the keypad.
NOTE: Your radio must have the Privacy feature enabled on the channel to send a privacy-enabled transmission. Only
target radios with the same Privacy Key OR the same Key Value and Key ID as your radio will be able to unscramble
the transmission.
▲ Making a Call with the Channel Selector Knob
□
Making a Group Call
To make a call to a group of users, your radio must be configured as part of that group.
Procedure:
1. Turn the Channel Selector Knob to select the channel with the active group alias or ID.
2. Hold the radio vertically 1 to 2 inches (2.5 to 5.0cm) from your mouth.
3. Press the PTT button to make the call. The RED LED turns on. The display shows the group alias or ID and the
Group Call icon.
4. Wait for the Talk Permit Tone to finish (if enabled) and speak clearly into the microphone.
5. Release the PTT button to listen. When the target radio responds, the LED blinks green. You see the Group Call
icon, the group alias or ID, and transmitting radio alias or ID on your display.
6. If the Channel Free Indication feature is enabled, you will hear a short alert tone the moment the target radio
releases the PTT button, indicating the channel is free for you to respond. Press the PTT button to respond.
OR
If there is no voice activity for a predetermined period of time, the call ends.
7. Radio returns to the previous screen you were on prior to receiving the call.
You can also make a Group Call via Contacts.
□ Making a Private Call
Procedure:
1. Turn the Channel Selector Knob to select the channel with the active subscriber alias or ID.
2. Hold the radio vertically 1 to 2 inches (2.5 to 5.0 cm)
from your mouth.
3. Press the PTT button to make the call. The RED LED turns on. The first line displays the subscriber alias or ID. The
second line displays Private Call and the Private Call icon.
4. Wait for the Talk Permit Tone to finish (if enabled) and speak clearly into the microphone.
5. Release the PTT button to listen. When the target radio responds, the Green LED turns on.
6. If the Channel Free Indication feature is enabled, you will hear a short alert tone the moment the target radio
releases the PTT button, indicating the channel is free for you to respond. Press the PTT button to respond.
OR
If there is no voice activity for a predetermined period of time, the call ends.
7. You hear a short tone. The display shows Call Ended.
You can also make a Private Call via Contacts or perform a quick alphanumeric search for the required alias via a
keypad entry.
11
□ Making a All Call
This feature allows you to transmit to all users on the channel. Your radio must be programmed to allow you to use this
feature.
Procedure:
1. Turn the Channel Selector Knob to select the channel with the active All Call group alias or ID.
2. Hold the radio vertically 1 to 2 inches (2.5 to 5.0 cm) from your mouth.
3. Press the PTT button to make the call. The RED LED turns on. The display shows the All Call group alias or ID and
the All Call icon.
4. Wait for the Talk Permit Tone to finish (if enabled) and speak clearly into the microphone.
NOTE: Users on the channel cannot respond to an All Call.
▲ Making a Group or Private Call with the One Touch Call Button
The One Touch Call feature allows you to make a Group or Private Call to a predefined alias or ID easily. This feature
can be assigned to a short or long programmable button press.
You can ONLY have one alias or ID assigned to a One Touch Call button. Your radio can have multiple One Touch Call
buttons programmed.
Procedure:
1. Press the programmed One Touch Call button to make a Group or Private Call to the predefined alias or ID.
2. Hold the radio vertically 1 to 2 inches (2.5 to 5.0 cm) from your mouth.
3. Press the PTT button to make the call. The RED LED turns on. The display show the group/subscriber alias or ID,
and the Group/Private Call icon.
4. Wait for the Talk Permit Tone to finish (if enabled) and speak clearly into the microphone.
5. Release the PTT button to listen. When the target radio responds, the Green LED turns on.
6. If the Channel Free Indication feature is enabled, you will hear a short alert tone the moment the target radio
releases the PTT button, indicating the channel is free for you to respond. Press the PTT button to respond.
OR
12If there is no voice activity for a predetermined period of time, the call ends.

▲ Talkaround
You can continue to communicate when your repeater is not operating, or when your radio is out of the repeater’s
range but within talking range of other radios. This is called “talkaround”.
Procedure:
Press the programmed Repeater/Talkaround button to toggle between talkaround and repeater modes.
OR
Follow the procedure below.
1.Press to access the menu.
2.Press / to Utilities and press to select
3.Press / to Radio Settings and press to select
4.Press / to Talkaround and press to confirm or press to cancel.
5.After confirmation, the display shows “Talkaround On” OR “Talkaround Off”
6.Press or wait the presetting time to exit the menu state.
The Talkaround setting is retained even after powering down.
▲ Monitoring Features (Analog)
□ Monitoring a Channel
Use the Monitor feature to make sure a channel is clear before transmitting by listening for activity on the channel.
Procedure:
1. Press the programmed Monitor button and listen for activity. The monitor icon appears on the display.
2. If you hear activity on the channel the channel is busy. If you hear “white noise” on the channel the channel is free.
▲ Advanced Features
Radio Check
If enabled, this feature allows you to determine if another radio is active in a system without disturbing the user of that
radio. No audible or visual notification is shown on the target radio.
This feature is only applicable for subscriber aliases or Ids.

□ Sending a Radio Check
Procedure:
Use the menu.
1.Press to access the menu.
2.Press / to Contacts and press to select
3. Press / to the required subscriber alias or ID and press to select
OR
Press / to Manual Dial and press to select. Key in the subscriber alias or ID and Press.
4. Press / to Radio Check and press to select.
5. Wait for acknowledgement
6. If the target radio is active in the system, a tone sounds and the display briefly shows Target Radio Available.
OR
If the target radio is not active in the system, a tone sounds to show Target Radio Not Available.
7. Radio returns to the subscriber alias or ID screen.
▲ Remote Monitor
Use the Remote Monitor feature to turn on the microphone of a target radio(subscriber alias or IDs only). No audible or
visual indication is given to the target radio. You can use this feature to monitor, remotely, any audible activity
surrounding the target radio.
Your radio must be programmed to allow you to use this feature.
□ Initiating Remote Monitor
Procedure:
Use the programmed Remote Monitor button.
Use the menu.
1. Press to access the menu.

2. Press / to Contacts and press to select
3. Press / to the required subscriber alias or ID and press to select
OR
Press / to Manual Dial and press to select. Key in the subscriber alias or ID and Press to
select.
4. Press / to Remote Mon. and press to select.
5. Wait for acknowledgement
6. The display shows Remote Monitor Successful.
OR
The display shows Remote Monitor Failed.
7. If successful:
The radio starts receiving audio from the monitored radio for a programmed duration.
Once the timer expires, the radio sounds an alert tone. The display shows Remote Monitor Ended.
OR
If unsuccessful:
The radio repeats the attempt until the programmed number of tries expires.
▲ Scan Lists
Scan lists are created and assigned to individual channels/groups. Your radio scans for voice activity by cycling
through the channel/group sequence specified in the scan list for the current channel/group.
Your radio can support up to 250 scan lists, with a maximum of 16 members in a list. Each scan list supports
a mixture of both analog and digital entries.
You can add, delete, or prioritize channels by editing a scan list.
Procedure:
1. Press to access the menu.
2. Press / to Scan and press to select
3. Press / to View/Edit List and press to select

4. Press / to view each member on the list.
▲ Scan
When you start a scan, your radio cycles through the programmed scan list looking for voice activity. The LED blinks
Orange while in scan mode. During a dual mode scan, if you are on a digital channel, and your radio locks onto an
analog channel, it automatically switches from digital mode to analog mode for the duration of the call. This is also true
for the reverse.
There are two ways of initiating scan:
• Main Channel Scan (Manual): Your radio scans all the channels/groups in your scan list. On entering scan, your
radio may, depending on the settings, automatically start on the last scanned “active” channel/group or on the
channel where scan was initiated.
• Auto Scan(Automatic): Your radio automatically starts scanning when you select a channel/group that has Auto Scan
enabled.
□ Starting and Stopping Scan
Procedure:
Press the programmed Scan button to start or stop Scan.
OR
Follow the procedure below.
1. Use the Channel Selector Knob to select a channel programmed with a scan list.
2. Press to access the menu.
3. Press / to Scan and press to select
4. The display shows Turn On if scan is disabled.
OR
The display shows Turn Off if scan is enabled.
5. Press to select. The LED blinks orange when Scan is enabled. Or the LED turns off when Scan is disabled.
□Responding to a Transmission During a Scan
During scanning, your radio stops on a channel/group where activity is detected. The radio stays on that channel for a
programmed time period known as “hang time”
Procedure:
1. Hold the radio vertically 1 to 2 inches (2.5 to 5.0 cm) from your mouth.
If digital channel and the Channel Free Indication feature is enabled, you will hear a short alert tone the moment the
transmitting radio releases the PTT button, indicating the channel is free for you to respond.
2. Press the PTT button during hang time. The RED LED turns on.
3. Wait for the Talk Permit Tone to finish if enabled and speak clearly into the microphone.
4. Release the PTT button to listen.
5. If you do not respond within the hang time, the radio returns to scanning other channels/groups.O
□ Deleting a Nuisance Channel
If a channel continually generates unwanted calls or noise (termed a “nuisance” channel), you can temporarily remove
the unwanted channel from the scan list.
This capability does not apply to the channel designated as the Selected Channel.
Procedure:
1. When your radio locks on to an unwanted or nuisance channel, press the programmed Nuisance Channel Delete
button until you hear a tone.
2. Release the Nuisance Channel Delete button. The nuisance channel is deleted.
Deleting a “nuisance” channel is only possible through the programmed Nuisance Channel Delete button. This
feature is not accessible through the menu.
□ Restoring a Nuisance Channel
Procedure:
To restore the deleted nuisance channel, do ONE of the following:
• Turn the radio off and then powering it on again.
• Stop and restart a scan via the programmed Scan button or menu.
• Change the channel via the Channel Selector Knob.
▲ Contacts Settings

Contacts provides “address-book” capabilities on your radio. Each entry corresponds to an alias or ID that you use to
initiate a call.
Additionally, each entry, depending on context, associates with ONE of five types of calls: Group Call, Private Call, All
Call, PC Call or Dispatch Call.
PC Call and Dispatch Call are data-related. They are only available with the applications. Refer to the data
applications documentation for more information.
NOTE: If the Privacy feature is enabled on a channel, you can make privacy-enabled Group Call, Private Call, and All
Call on that channel. Only target radios with the same Privacy Key OR the same Key Value and Key ID as your radio
will be able to unscramble the transmission.
Each entry within Contacts displays the following information:
16
• Call Type
• Call Alias
• Call ID
NOTE: You can add, delete, or edit subscriber IDs for the Digital Contacts list.
□ Making a Group Call from Contacts
Procedure:
1. Press to access the menu.
2. Press / to Contacts and press to select. The entries are alphabetically sorted.
3. Press / to the required group alias or ID.
4. Press the PTT button to make the call.
□ Making a Private Call from Contacts
Procedure:
1. Press to access the menu.
2. Press / to Contacts and press to select. The entries are alphabetically sorted.
3. Press / to the required subscriber alias or ID.

OR
Press / to Manual Dial and press to select. Use the keypad to enter a new subscriber alias or ID.
Press the PTT button to make the call
▲ Call Indicator Settings
□ Activating and Deactivating Call Ringers for Private Calls
You can turn on or off the ringing tones for a received Private Call.
Procedure:
1. Press to access the menu.
2. Press / to Utilities and press to select.
3. Press / to Radio Settings and press to select.
4. Press / to Tone/Alerts and press to select.
5. Press / to Call Ringers and press to select.
6. Press / to Private Call and press to select.
7. The display shows Turn On. Press to enable Call Ringers for Private Calls. The display shows Private Call
Ringer On.
OR
The display shows Turn Off. Press to disable Call Ringers for Private Calls. The display shows Private Call
Ringer Off.
□ Activating and Deactivating Call Ringers for Text Message
You can turn on or off the ringing tones for a received Text Message.
Procedure:
1. Press to access the menu.
2. Press / to Utilities and press to select.
3. Press / to Radio Settings and press to select.
4. Press / to Tone/Alerts and press to select.

5. Press / to Call Ringers and press to select.
6. Press / to Text Message and press to select.
7. The current tone is indicated by a √.
8. Press / to the preferred tone and press to select. The display shows Tone <Number> Selected and
a √ appears left of the selected tone.
OR
Press / to Turn Off and press to select. The display shows Text Message Ringer Off and a √
appears left or Turn Off.
□ Assigning Ring Styles (Available after Version 2)
You can program your radio to sound one of then predefined ringing tones when receiving a Call Alert or a Text
Message from a particular contact.
Procedure:
1. Press to access the menu.
2. Press / to Contacts and press to select. The entries are alphabetically sorted.
3. Press / to the required alias or ID and press to select.
4. Press / to Ring Style and press to select.
5. A√ indicates the current selected tone.
6. Press / to the required tone and press to select.
7. The display shows Tone <Number> Selected and a √ appears left of the selected tone.
OR
Press / to Turn Off and press to select.The display shows Text Message Ringer Off and a √ appears
left or Turn Off.
□ Escalating Alarm Tone Volume (Available after Version 2)
You can program your radio to continually alert you when a radio call remains unanswered. This is done by
automatically increasing the alarm tone volume over time. This feature is known as Escalert.
Procedure:
1. Press to access the menu.

2. Press / to Utilities and press to select.
3. Press / to Radio Settings and press to select.
4. Press / to Tones/Alerts and press to select.
5. Press / to Escalert and press to select.
6. The display shows Turn On. Press to enable Escalert. The display shows Escalert On.
OR
The display shows Turn Off. Press to disable Escalert. The display shows Escalert Off.
▲ Call Log Features
Your radio keeps track of all recent outgoing, answered, and missed Private Calls. Use the Call log feature to view and
manage recent calls.
You can perform the following tasks in each of your call lists:
• Store ID to Contacts
• Delete
□ Viewing Recent Calls
The lists are Missed, Answered, and Outgoing.
Procedure:
1. Press to access the menu.
2. Press / to Call Log and press to select.
3. Press / to preferred list and press to select.
4. The display shows the most recent entry at the top of the list.
5. Press / to view the list.
Press the PTT button to start a Private Call with the current selected alias or ID.
□ Missed Call Screen

Whenever a call is missed, your radio displays a missed call message. Select View to view it immediately or View
Later to view at a later time.
19NOTE: The radio exits the Missed Call screen and sets up a Private Call if you press the PTT button while viewing
a missed call number.
1. The display shows Missed Calls, along with the number of calls missed and View?
2. Press to view the missed call ID. The missed call log list appears on display.
Press to store or delete the entry.
OR
Press / to view Later and press to select. You return to the Home screen.
□ Storing an Alias or ID from the Missed Call List
Procedure:
1. Press to access the menu.
2. Press / to Call Log and press to select.
3. Press / to Missed and press to select.
4. Press / to the required missed call alias or ID and press to select.
5. Press / to Store and press to select.
6. A blinking cursor appears. If needed, key in the alias for
that ID and press
7. The display shows Contact Saved.
You can also store an ID without an alias.
□ Deleting a Call from a Call List
Procedure:
1. Press to access the menu.
2. Press / to Call Log and press to select.
3. Press / to the required list and press to select.

4. Press / to the required alias or ID and press to select.
5. Press / to Delete Entry? And press to select. The display show Entry Deleted.
OR
6. Press / to No to return to the previous screen.
When you select a call list and it contains no entries, the display shows List Empty, and sounds a low tone if Keypad
Tones are turned on.
▲ Call Alert Operation
Call Alert paging enables you to alert a specific radio user to call you back when they are able to do so.
This feature is applicable for subscriber aliases or IDs only and is accessible through the menu via Contacts or manual
dial.
□ Receiving and Acknowledging a Call Alert.
Procedure:
1. You hear a repetitive tone.
2. Press and release the PTT button to acknowledge the alert.
OR
Press to select Ignore and to exit the Call Alert.
Making a Call Alert from the Contacts List
1. Press to access the menu.
2. Press / to Contacts and press to select.
3. Press / to the required subscriber alias or ID and press to select.
OR
Press / to Manual Dial and press to select. A blinking cursor appears.
Enter the subscriber ID you want to page and press .
4. Press / to Call Alert and press to select.
5. The display shows Call Alert: <Subscriber Alias or ID>, indicating that the Call Alert has been sent.
6. The RED LED turns on when your radio is sending the Call Alert.
7. If the Call Alert acknowledgement is received, a tone sounds and the display shows Call Alert Successful.
OR
If the Call Alert acknowledgement is not received, a tone sounds and the display shows Call Alert Failed.
▲ Emergency Operation
An Emergency Alarm is used to indicate a critical situation. You are able to initiate an Emergency at any time on any
screen display even when there is activity on the current channel.
Your radio supports 3 Emergency Alarms:
• Emergency Alarm
• Emergency Alarm with Call
• Emergency Alarm with Voice to Follow
In addition, each alarm has the following types:
• Regular —Radio transmits an alarm signal and shows audio and/or visual indicators.
• Silent - Radio transmits an alarm signal without any audio or visual indicators. There will be no response (call) from
the target radio until you press the PTT button to initiate the call.
• Silent with Voice —Radio transmits an alarm signal and is able to receive an incoming call without any audio or visual
indicators until you press the PTT button to initiate or respond to the call.
Only ONE of the Emergency Alarms above can be assigned to the programmed Emergency button.
□ Receiving an Emergency Alarm
Procedure:
1. When receiving an Emergency Alarm, the display shows the Emergency icon, the number of alarms received, and
Alarm Rcvd, which alternates with alias ID of the sender.
2. A tone sounds.
3. If enabled, your radio automatically acknowledges the Emergency Alarm.
When your radio receives an Emergency Alarm, it displays the Emergency Alarm received indications until
acknowledgement is sent and you exit the Emergency mode.
You will not be able to receive any other indications or displays for any other calls until you exit the Emergency Alarm
received screen.
NOTE: Short press, then long press the programmed Emergency button to clear the Emergency Alarm received
indications and exit Emergency mode.
□ Responding to an Emergency Alarm
Procedure:
When receiving an Emergency Alarm:
1. Press any button to stop all Emergency Alarm received indications.
2. Hold the radio vertically 1 to 2 inches (2.5 to 5.0cm) from your mouth.
If the Channel Free Indication feature is enabled, you will hear a short alert tone the moment the transmitting radio
releases the PTT button, indicating the channel is now available for use.
3. Press PTT button to initiate a call with the emergency initiating radio. The RED LED turns on. Your radio remains in
the Emergency mode.
4. Wait for the Talk Permit Tone to finish (if enabled) and speak clearly into the microphone.
5. Release the PTT button to listen. When the emergency initiating radio responds, you see the Group Call icon, the
group ID, and transmitting radio ID on your display.
6. Once your call ends, short press , then long press the programmed Emergency button to clear the Emergency
Call received indications and exit Emergency mode.
7. The radio returns to the Home screen.
□ Sending an Emergency Alarm
This feature allows you to send an Emergency Alarm, a non-voice signal, which triggers an alert indication on another
radio.
Procedure:
1. Press the programmed Emergency button.
2. The display shows “Sending Alarm”, which alternates with your radio ID. The RED LED turns on and the Emergency
icon appears on the Home screen display.
3. When an Emergency Alarm acknowledgment is received, the Emergency tone sounds and the GREEN LED turns
on. The display shows Emergency Alarm Successful.
OR
If your radio does not receive an Emergency Alarm acknowledgment, and after all retries have been exhausted, a
tone sounds and the display shows Emergency Alarm Failed.
4. Radio exits the Emergency Alarm mode and returns to the Home screen.
If your radio is set to Silent, it will not display any audio or visual indicators during Emergency mode.
□ Sending an Emergency Alarm with Call
This feature allows you to send an Emergency Alarm to another radio. Upon acknowledgment, both radios can
communicate over a programmed Emergency channel.
23
Procedure:
1. Press the programmed Emergency button.
2. The display shows “Sending Alarm”, which alternates with your radio ID. The RED LED turns on and the Emergency
icon appears on the Home screen display.
3. When an Emergency Alarm acknowledgment is received, the Emergency tone sounds and the GREEN LED turns
on. The display shows “Emergency Alarm Successful”.
4. Hold the radio vertically 1 to 2 inches(2.5 to 5.0cm) from your mouth.
5. Press PTT button to make the call. The RED LED lights turns on and the group icon appears on the display.
6. Wait for the Talk Permit Tone to finish if enabled and speak clearly into the microphone.
7. Release the PTT button to listen.
8. If the Channel Free Indication feature is enabled, you will hear a short alert tone the moment the target radio
releases the PTT button, indicating the channel is free for you to respond
OR
Long press the programmed Emergency button to exit the Emergency mode.
9. The radio returns to the Home screen.
If your radio is set to Silent, it will not display any audio or visual indicators during Emergency mode, or receive a
response (Call) from the target radio until you press the PTT button to initiate the call.
If your radio is set to Silent with Voice, it will not display any audio or visual indicators during Emergency mode, or
when you are receiving a call from the target radio. The indicators will only appear once you press the PTT button to
initiate or respond to the call.
□ Sending an Emergency Alarm with Voice to Follow
This feature allows you to send an Emergency Alarm to another radio. Upon acknowledgment, your radio’s
microphone is automatically activated, allowing you to communicate with the other radio without pressing the PTT
button.
This activated microphone state is also know as “hot mic”. If you press the PTT button during the programmed
24
hot mic transmission period, the radio ignores the PTT press and remains in Emergency mode.
Procedure:
1. Press the programmed Emergency button.
2. The display shows Sending Alarm. The RED LED turns on and the Emergency icon is displayed.
3. Once the display shows Emergency Alarm successful, speak clearly into the microphone. When hot mic has been
enabled, the radio automatically transmits without a PTT press until the hot mic duration expires.
4. While transmitting, the RED LED turns on and the Emergency icon appears on the display.
5. Once the hot mic duration expires, the radio automatically stops transmitting. To transmit again, press the PTT
button.
If your radio is set to Silent, it will not display any audio or visual indicators during Emergency mode, or receive any
response from the target radio until the programmed hot mic transmission period is over, and you press the PTT butto.
If your radio is set to Silent with Voice, it will not display
any audio or visual indicators during Emergency mode when you are making the call with hot mic or when the target
radio responds after the programmed hot mic transmission period is over. The indicators will only appear when you
press the PTT button.
NOTE: If the Emergency Alarm request fails, the radio returns to the Home screen.
□ Exiting an Emergency Mode
Your radio exits Emergency mode when one of the following occurs:
• Emergency Alarm acknowledgement is received. (for Emergency Alarm only), OR
• All retries to send the alarm have been exhausted, OR
• The programmed Emergency button is long pressed.

NOTE: If your radio is powered off, it exits the Emergency mode. The radio will not reinitiate the Emergency mode
automatically when it is turned on again.
▲ Text Message Features
Your radio is able to receive data, for example a text message, from another radio or an e-mail application.
The maximum length of characters for a text message, including the subject line is 138
NOTE: press at any time to return to the previous screen or long press to return to the Home screen.
□ Writing and Sending a Text Message
Procedure:
1. Press to access the menu.
2. Press / to Messages and press to select.
3. Press / to Write and press to select.
4. A blinking cursor appears.
Use the keypad to type your message.
Press to move one space to the left.
Press or the # key to move one space to the right.
Press the *DEL key to delete any unwanted characters.
5. Press once message is composed..
6. Press / to the required alias or ID and press to select.
OR
Press / to Manual Dial and press to select.
Key in the subscriber ID and press .
7. The display shows Text Message: <Subscriber/Group Alias or ID>, confirming your message is being sent.
8. If the message is sent, a tone sounds and the display shows Message Sent.
OR
If the message is not sent, a low tone sounds and the display shows Message Send Failed.

If the message fails to send, the radio returns you to the Resend option screen.
□ Sending a Quick Text Message
Procedure:
Your radio supports a maximum of ten (10) Quick Text messages as programmed by your dealer.
While Quick Text messages are predefined, you can edit each message before sending it.
1. Press to access the menu.
2. Press / to Messages and press to select.
3. Press / to Quick Text and press to select.
4. Press / to the required Quick Text and press to select.
5. A blinking cursor appears.
Use the keypad to edit the message, if required.
Press to move one space to the left.
Press or the # key to move one space to the right.
Press the *DEL key to delete any unwanted characters.
6. Press once message is composed.
7. Press / to the required alias or ID and press to select.
OR
Press / to Manual Dial and press to select.
Key in the subscriber ID and press .
8. The display shows Text Message: <Subscriber/Group Alias or ID>, confirming your message is being sent.
9. If the message is sent, a tone sounds and the display shows Message Sent.
OR
If the message is not sent, a low tone sounds and the display shows Message Send Failed.
If the message fails to send, the radio returns you to
the Resend option screen.

□ Sending a Quick Text Message with the One Touch Call Button
Procedure:
1. Press the programmed One Touch Call button to send a predefined Quick Text message to a predefined alias or ID.
2. The display shows Text Message: <Subscriber/Group Alias or ID>, confirming your message is being sent.
3. If the message is sent, a tone sounds and the display shows Message Sent.
OR
If the message is not sent, a low tone sounds and the display shows Message Send Failed.
If the message fails to send, the radio returns you to the Resend option screen.
□ Managing Fail-to-Send Text Messages
You can select one of the following options while at the Resend Option screen:O
• Resend
• Forward
• Edit
□ Resending a Text Messages
Procedure:
1. Press to resend the same message to the same subscriber/group alias or ID.
2. If the message is sent, a tone sounds and the display shows Message Sent.
OR
If the message is not sent, a low tone sounds and the display shows Message Send Failed.
□ Forwarding a Text Message
Select Forward to send the message to another subscriber/group alias or ID.
Procedure:

1. Press to access the menu.
2. Press / to Messages and press to select.
3. Press / to Inbox and press to select.
4. Press / to the required Message and press to select.
5. Press and press / to Forward and press to select.
6. Press / to the required alias or ID and press to select.
OR
Press / to Manual Dial and press to select.
Key in the subscriber ID and press.
7. The display shows Text Message: <Subscriber/Group Alias or ID>, confirming your message is being sent.
8. If the message is sent, a tone sounds and the display shows Message Sent.
OR
If the message is not sent, a low tone sounds and the display shows Message Send Failed.
□ Managing Sent Text Messages
Once a message is sent to another radio, it is saved in Sent Items. The most recent sent text message is always
added to the top of the Sent Items list.O
The Sent Items folder is capable of storing a maximum of thirty last sent messages. When the folder is full, the next
sent text message automatically replaces the oldest text message in the folder.
□ Viewing a Sent Text Message
Procedure:
1. Press to access the menu.
2. Press / to Messages and press to select.
3. Press / to Sent Items and pres to select.
4. Press / to the required Message and press to select.

□ Sending a Sent Text Message
You can select one of the following options while viewing a sent text message:
• Resend
• Forward
• Edit
• Delete
□ Deleting all Sent Text Messages from Sent Items
Procedure:
1. Press to access the menu.
2. Press / to Messages and press to select.
3. Press / to Sent Items and press to select.
4. Press / to Delete All and press to select.
5. At Delete Message?, press to select Yes. The display shows Sent Items Cleared.
OR
At Delete Message? , Press / to No and press to return to the previous screen.
When you select Sent Items and it contains no text messages, the display shows List Empty.
□ Receiving a Text Message
When your radio receives a message, the display shows the alias or ID of the sender and the message icon at the far
left of the screen.
You can select one of the following options when receiving a text message:
• Read?
• Read Later
• Delete
□ Reading a Text Message
Procedure:

1. Press / to Read? And press to select.
2. Press to Reply, forward, or delete the text message.
OR
Press / to access the Read Later or Delete option screen:
• Select Read Later to return to the screen you were on prior to receiving the text message.
• Select Delete to delete the text message.
□ Managing Received Text Messages
Use the Inbox to manage your text messages. The Inbox is capable of storing a maximum of 50 messages.
Your radio supports the following options for text messages:
• Reply
• Forward
• Delete
• Delete All
Text messages in the Inbox are sorted according to the most recently received.
NOTE:
□ Viewing a Text Message from the Inbox
Procedure:
1. Press to Messages and press to select.
2. Press / to Inbox and press to select.
3. Press / to view the messages.
4. Press to select the current message, and press again to reply,forward, or delete that message.
Unread messages are indicated with an exclamation mark(!).
□ Viewing a Text Message from the Inbox

Procedure:
1. Press / to Messages and press to select.
2. Press / to Inbox and press to select.
3. Press / to the required message and press to select .
4. Press once more to access the sub-menu.
5. Press / to Reply and press to select.
6. Press / to Write and press to select.
A blinking cursor appears. Use the keypad to write your message.
OR
Press / to Quick Text and press to select.
A blinking cursor appears. Use the keypad to edit your message, if required.
7. Press once message is composed.
8. The display shows Text Message: <Subscriber/Group Alias or ID>, confirming your message is being sent.
□ Deleting a Text Message from the Inbox
Procedure:
1. Press / to Messages and press to select.
2. Press / to Inbox and press to select.
3. Press / to the required message and press to select .
4. Press once more to access the sub-menu.
5. Press / to Delete and press to select.
6. At Delete Message?, Press / to Yes and press
to select.
7. The Display shows message Deleted.
8. The screen returns to the Inbox.

□ Deleting All Text Messages from the Inbox
Procedure:
1. Press / to Messages and press to select.
2. Press / to Inbox and press to select.
3. Press / to Delete All and press to select .
4. At Delete Message?, Press / to Yes and press
to select.
5. The Display shows Inbox Cleared.
When you select the Inbox and it contains no text messages, the display shows List Empty.
▲ Privacy
If enabled, this feature helps to prevent eavesdropping by unauthorized users on a channel by the use of a software
based scrambling solution. The signaling and user identification portions of a transmission are not scrambled.
Your radio must have privacy enabled on the channel to send a privacy-enabled transmission, although this is not a
necessary requirement for receiving a transmission. While on a privacy-enabled channel, the radio is still able to
receive clear (unscrambled) transmissions.
Your radio supports two types of privacy:
• Basic Privacy
• Enhanced Privacy
Only ONE of the privacy types above can be assigned to the radio.
To unscramble a privacy-enabled call or data transmission, your radio must be programmed to have the same Privacy
Key (for Basic Privacy), OR the same Key Value and Key ID (for Enhanced Privacy) as the transmitting radio.
If your radio receives a scrambled call that is of a different Privacy Key, OR a different Key Value and Key ID, you will
either hear a garbled transmission (Basic Privacy) or nothing at all(Enhanced Privacy).
Procedure:
1. Press / to Utilities and press to select.
2. Press / to Radio Settings and press to select.
3. Press / to Privacy and press to select .

4. The display shows Privacy and Turn On. press to enable privacy. The display shows the secure icon and
Privacy On.
OR
The display shows Privacy and Turn Off. press to disable privacy. The display shows the unsecure icon and
Privacy Off.
□ Dual Tone Multi Frequency (DTMF) (Analog)
The Dual Tone Multi Frequency (DTMF) feature allows the radio to operate in a radio system with an interface to
telephone systems.
Procedure:
To initiate a DTMF call.
1. Press and hold PTT button.
2. Enter the desired number.
You can turn off the DTMF tone by disabling all radio tones and alerts.O
▲ Security
You can enable or disable any radio in the system. For example, you might want to disable a stolen radio, to prevent
the thief from using it, and enable that radio, when it is recovered.
NOTE: Performing Radio Disable and Enable is limited to radios with these functions enabled. Check with your dealer
or system administrator for more information.
□ Radio Disable
Procedure:
1. Press / to Contacts and press to select. The entries are alphabetically sorted.
2. Press / to the required alias or ID and press to select.
OR
Press / to Manual Dial and press to select .
Key in the subscriber alias or ID and press .
3. Press / to Radio Disable and press to select.

4. The display shows Radio Disable: <Subscriber Alias or ID> and the LED lights up RED.
5. Wait for acknowledgment.
6. If successful, a tone sounds and the display shows Radio Disable Successful.
OR
If not successful, a tone sounds and the display shows Radio Disable Failed.
□ Radio Enable
Procedure:
1. Press / to Contacts and press to select. The entries are alphabetically sorted.
2. Press / to the required alias or ID and press to select.
OR
Press / to Manual Dial and press to select .
Key in the subscriber alias or ID and press .
3. Press / to Radio Enable and press to select.
4. The display shows Radio Enable: <Subscriber Alias or ID> and the LED lights up RED.
5. Wait for acknowledgment.
6. If successful, a tone sounds and the display shows O
Radio Enable Successful.
OR
If not successful, a tone sounds and the display shows
Radio Enable Failed.
▲ Utilities
□ Locking and Unlocking the Keypad
You can lock your radio’s keypad to avoid inadvertent key entry.
Procedure:

1. Press / to Utilities and press to select.
2. Press / to Radio Settings and press to select.
3. Press / to Keypad Lock and press to select.
4. The display shows Keypad Locked and returns to the Home screen.
5. To unlock the keypad, press followed by *.
6. The display shows Keypad Unlocked and returns to the Home screen.
□ Turning Keypad Tones On or Off
You can enable and disable keypad tones if needed.
Procedure:
1. Press / to Utilities and press to select.
2. Press / to Radio Settings and press to select.
3. Press / to Tones/Alerts and press to select.
4. Press / to Keypad Tones and press to select.
5. The display shows Turn On. Press to enable keypad tones. The display shows Keypad Tone On.
OR
The display shows Turn Off. Press to disable keypad tones. The display shows Keypad Tone Off.
□ Setting the Squelch Level (Analog)
You can adjust your radio’s squelch level to filter out unwanted calls with low signal strength or channels that have a
higher than normal background noise.
Settings: Normal is the default. Tight filters out (unwanted) calls and/or background noise. However, calls from remote
locations may also be filtered out.
Procedure:
Press the programmed Squelch button to toggle squelch level between normal and tight.
OR
1. Press / to Utilities and press to select.

2. Press / to Radio Settings and press to select.
3. Press / to Squelch and press to select.
4. Choose either Tight or Normal and press to select.
Screen returns to the previous menu.
□ Setting the Power Level
You can customize your radio’s power setting to high or low for each channel.
Settings: High enables communication with radios located at a considerable distance from you. Low enables
communication with radios in closer proximity.
Procedure:
Press the programmed Power Level button to toggle transmit power level between high and low.
OR
1. Press / to Utilities and press to select.
2. Press / to Radio Settings and press to select.
3. Press / to Power and press to select.
4. Change your current setting as prompted on the
display.
5. Press to select a new power level.
Screen returns to the previous menu.
□ Turning the Voice Operating Transmission(VOX) Feature On or Off
This feature allows you to initiate a hands-free voice activated call on a programmed channel. The radio automatically
transmits, for a programmed period, whenever the microphone on the VOX-capable accessory detects voice.
Pressing the PTT button during radio operation will disable VOX. To re-enable VOX, do one of the following:
• Turn the radio off and powering it on again, OR
• Change the channel via the Channel Selector Knob, OR
• Follow the procedure below.

NOTE: Turning this feature on or off is limited to radios with this function enabled. Check with your dealer or system
administrator for more information.
Procedure:
Press the programmed VOX button to toggle the feature on or off.
OR
1. Press / to Utilities and press to select.
2. Press / to Radio Settings and press to select.
3. Press / to VOX and press to select.
4. The display shows VOX On. Press to disable VOX. The display shows VOX Off.
OR
The display shows VOX Off. Press to enable VOX. The display shows VOX On.
□ Controlling the Display Backlight
You can enable or disable the radio’s display backlight as needed. The setting also affects keypad backlighting
accordingly.
Procedure:
Press the programmed Backlight button to toggle the backlight settings.
OR
1. Press / to Utilities and press to select.
2. Press / to Radio Settings and press to select.
3. Press / to Backlight and press to select.
4. The display shows Auto On. Press to enable the display backlight. The display shows Backlight Auto On.
OR
The display shows Turn Off. Press to disable the display backlight. The display shows Backlight Turn Off.
The display backlight and keypad backlighting are automatically turned off if the LED indicator is disabled.
□ Turning the Radio Tones/Alerts On or Off

You can enable or disable the radio tones and alerts(except for the incoming Emergency alert tone) if needed.
Procedure:
Press the programmed All Tones/Alerts button to toggle all tones on or off.
OR
1. Press / to Utilities and press to select.
2. Press / to Radio Settings and press to select.
3. Press / to Tones/Alerts and press to select.O
4. Press / to All Tones and press to select.
5. The display shows Turn On. Press to enable all tones and alerts. The display shows All Tones On.
OR
The display shows Turn Off. Press to disable all tones and alerts. The display shows All Tones Off.
□ Turning the Talk Permit Tone On or Off
You can enable or disable the Talk Permit Tone if needed.
Procedure:
1. Press / to Utilities and press to select.
2. Press / to Radio Settings and press to select.
3. Press / to Tones/Alerts and press to select.
4. Press / to Talk Permit and press to select.
5. The display shows Turn On. Press to enable the Talk Permit Tone. The display shows Talk Permit Tone On.
OR
The display shows Turn Off. Press to disable the Talk Permit Tone. The display shows Talk Permit Tone Off.
□ Turning the LED Indicator On or Off
You can enable or disable the LED Indicator if needed.
Procedure:

1. Press / to Utilities and press to select.
2. Press / to Radio Settings and press to select.
3. Press / to LED Indicator and press to select.
4. The display shows Turn On. Press to enable the LED Indicator. The display shows All LEDs On.
OR
The display shows Turn Off. Press to disable the LED Indicator. The display shows All LEDs Off.
The display backlight, buttons, and keypad backlighting are automatically turned off if the LED indicator is disabled.
□ Turning the Introduction Screen On or Off
You can enable or disable the Introduction Screen if needed.
Procedure:
1. Press / to Utilities and press to select.
2. Press / to Radio Settings and press to select.O
3. Press / to Intro Screen and press to select.
4. The display shows Turn On. Press to enable the Introduction Screen. The display shows Intro Screen On.
OR
The display shows Turn Off. Press to disable the Introduction Screen. The display shows Intro Screen Off.
The display backlight, buttons, and keypad backlighting are automatically turned off if the LED indicator is disabled.
□ Accessing General Radio Information
Your radio contains information on the following:
• Radio ID
• Software Version
• Codeplug Version
Procedure:
1. Press / to Utilities and press to select.

requirement is 12VDC
2. Press / to Radio Info and press to select.
3. Press / to My Number or Firmware Ver. Or CP Ver. and press to select.
4. The display shows the radio ID or the current firmware version or codeplug version.
■ Trouble shooting
No. Problems Solutions
1 The transceiver will not
power up after connecting
a 12VDC power supply
and pressing the
(Power) switch. Nothing
appears on the display.
·The power cable was
connected
backwards.
·Connect the supplied DC
power cable correctly:
Red→(+);Black→(-).
·One or more of the power
cable
fuses are open.
·Look for the cause of the blown
fuse(s).After inspecting
and correcting any problems,
install a new fuse(s) with
the same ratings.
2 The display is too dim,even though you
selected a high brightness level.
·The supply voltage is too low.
·The supply voltage
15% (11.7 V to 15.8 V DC).If
the input voltage is outside this
range,adjust your regulated
power supply and/or check all
power cable connections.
3 Cannot talk to or hear other members in your
group.
·Digital: Make sure the CC, ID
Time Slot is set right.
·Analog: Make sure the
signaling is set right.
·Beyond the radio efficient
communication range.

4 Other voices from non-group members are
heard on the channel.
Analog: Change the
CTCSS/DCS tone, and make
sure change the tone on all
radios in your group
5 Communication range is too small. ·Make sure the antenna is well
connected.
·Make sure the antenna is the
originally supplied one.
·Ask your local dealer to adjust
the squelch level.
6 You cannot transmit even
though you press Mic
[PTT].
·The microphone plug was not
inserted completely into the
front panel connector.
·Switch OFF the power, then
insert the microphone plug until
the locking tab clicks in place.
·You selected a transmit offset
that places the
transmit frequency outside
the allowable transmit
frequency range.
7 Noise is too loud. ·Beyond the efficient
communication range.

One or more of the following statements may be applicable:
FCC WARNING
This equipment generates or uses radio frequency energy. Changes or modifi cations to this
equipment may cause harmful interference unless the modifi cations are expressly approved in the
instruction manual. The user could lose the authority to operate this equipment if an unauthorized
change or modifi cation is made.
INFORMATION TO THE DIGITAL DEVICE USER REQUIRED BY THE FCC
This equipment has been tested and found to comply with the limits for a Class B digital device,
pursuant to Part 15 of the FCC Rules. These limits are designed to provide reasonable protection
against harmful interference in a residential installation.
This equipment generates, uses and can generate radio frequency energy and, if not installed and
used in accordance with the instructions, may cause harmful interference to radio communications.
However, there is no guarantee that the interference will not occur in a particular installation. If this
equipment does cause harmful interference to radio or television reception, which can be determined
by turning the equipment off and on, the user is encouraged to try to correct the interference by one
or more of the following measures:
• Reorient or relocate the receiving antenna.
• Increase the separation between the equipment and receiver.
• Connect the equipment to an outlet on a circuit different from that to which the receiver is
connected.
• Consult the dealer for technical assistance.
NOTICES TO THE USER
◆ Government law prohibits the operation of unlicensed transmitters within the territories under
government control.
◆ Illegal operation is punishable by fi ne and/or imprisonment.
◆ Refer service to qualifi ed technicians only.
SAFETY: It is important that the operator is aware of, and understands, hazards
common to the operation of any transceiver.
◆
EXPLOSIVE ATMOSPHERES (GASES, DUST, FUMES, etc.)
Turn OFF your transceiver while taking on fuel or while parked in gasoline service stations. Do
not carry spare fuel containers in the trunk of your vehicle if your transceiver is mounted in the
trunk area.
◆
INJURY FROM RADIO FREQUENCY TRANSMISSIONS
Do not operate your transceiver when somebody is either standing near to or touching the
antenna, to avoid the possibility of radio frequency burns or related physical injury.
◆
DYNAMITE BLASTING CAPS
Operating the transceiver within 500 feet (150 m) of dynamite blasting caps may cause them
to explode. Turn OFF your transceiver when in an area where blasting is in progress, or where
“TURN OFF TWO-WAY RADIO” signs have been posted. If you are transporting blasting caps
in your vehicle, make sure they are carried in a closed metal box with a padded interior. Do not
transmit while the caps are being placed into or removed from the container.
To comply with RF exposure requirements, a minimum separation distance of 80cm and with
80 cm
PRECAUTIONS
Observe the following precautions to prevent fi re, personal injury, and transceiver
damage.
• Do not attempt to confi gure the transceiver while driving; it is too dangerous.
• Do not disassemble or modify the transceiver for any reason.
• Do not expose the transceiver to long periods of direct sunlight, nor place it near heating
appliances.
• If an abnormal odor or smoke is detected coming from the transceiver, switch the
transceiver power off immediately, and contact your COVALUE dealer.
• Use of the transceiver while you are driving may be against traffi c laws. Please check
and observe the vehicle regulations in your area.
• Do not use options not specifi ed by .
◆ The transceiver operates in 12 V negative ground systems only! Check the battery polarity and
voltage of the vehicle before installing the transceiver.
◆ Use only the supplied DC power cable or a optional DC power cable.
◆ Do not cut and/or remove the fuse holder on the DC power cable.
For passenger safety, install the transceiver securely using the supplied mounting bracket and
screw set so the transceiver will not break loose in the event of a collision.
COVALUE
COVALUE
Antenna substitution:
Donot substitute any antenna for theone supplied
or recommended by themanufacturer or radiodealer.
Youmaybe exposing personor persons to excess radio frequency radiation.
Youmay contact your radio dealeror themanufacturer for further instructions.
Maintain a separation distance from the antenna to person(s) of
at least , 50% duty Cycle.
ìThis transmitter is authorized to operate with a maximum duty factor of 50%, in
typical push-to-talk mode, for satisfying FCC RF exposure compliance requirements.î
a 2dB cable loss is required between antenna and all public persons.
IC RSS warning
The term “IC:” before the certification/registration number only signifies that the Industry Canada
technical specifications were met.
Le terme "IC:" devant le numéro de certification / enregistrement signifie seulement que les
spécifications techniques d'Industrie Canada ont été respectées.
Nominal antenna port impedance / Impédance nominale antenne Port 50 Ω.
IC radiation exposure statement
This radio is intended for use in occupational/controlled applications where users have been made
aware of the potential for exposure and can exercise control over their exposure. This
radio device is not authorised for general population, consumer or similar use. This transmitter must
not be co-located or operating in conjunction with any other antenna or transmitter.
The antenna should be installed and operated with a minimum distance of 0.8m to any person.
Cette radio a été conçue pour un usage professionnel dans un
environnement contrôlé, où les utilisateurs sont pleinement
conscients du danger potentiel de l’exposition à laquelle ils sont
soumis et peuvent exercer un contrôle sur cette exposition. Ce
dispositif radio N’EST PAS autorisé pour l’ensemble de la
population, les consommateurs en général, ni pour une
utilisation similaire. Cet émetteur ne doit pas être co-localisés
ou fonctionner en conjonction avec une autre antenne ou
émetteur.
L’antenne doit être installé et utilisé avec un minimum de 0.8m
de distance de toute personne.