CUB ELECPARTS VS60U004 TPMS SENSOR PROGRAMMING & DIAGNOSTIC DEVICE User Manual
CUB ELECPARTS INC TPMS SENSOR PROGRAMMING & DIAGNOSTIC DEVICE Users Manual
Users Manual

sensorAID
Owner's Manual

sensorAID
Table of contents
1. Sensor AID Introduction
2. Diagnosing a Sensor / Results Description
3. New Sensor
4. Auto Duplicate
5. Manual Duplicate
6. Program Blank Sensor
7. Sensor AID Settings
8. Software Update
9. Warranty
1
Owner's Manual
sensorAID
Setting
TPMS Sensor Programming
& Diagnostic Device
sensorAID
Sensor AID Introduction
Sensor AID is design to Diagnose and interacts with tire pressure sensor
through wireless(radio frequency) communication to:
2
ITM Autoparts | 1-310-225-5555 | www.itmautoparts.com
• Retrievedatafromtirepressuresensor
• Verifytheidentityofeachtirepressuresensormountedonthewheels
• AssisttechniciansserviceTPMS
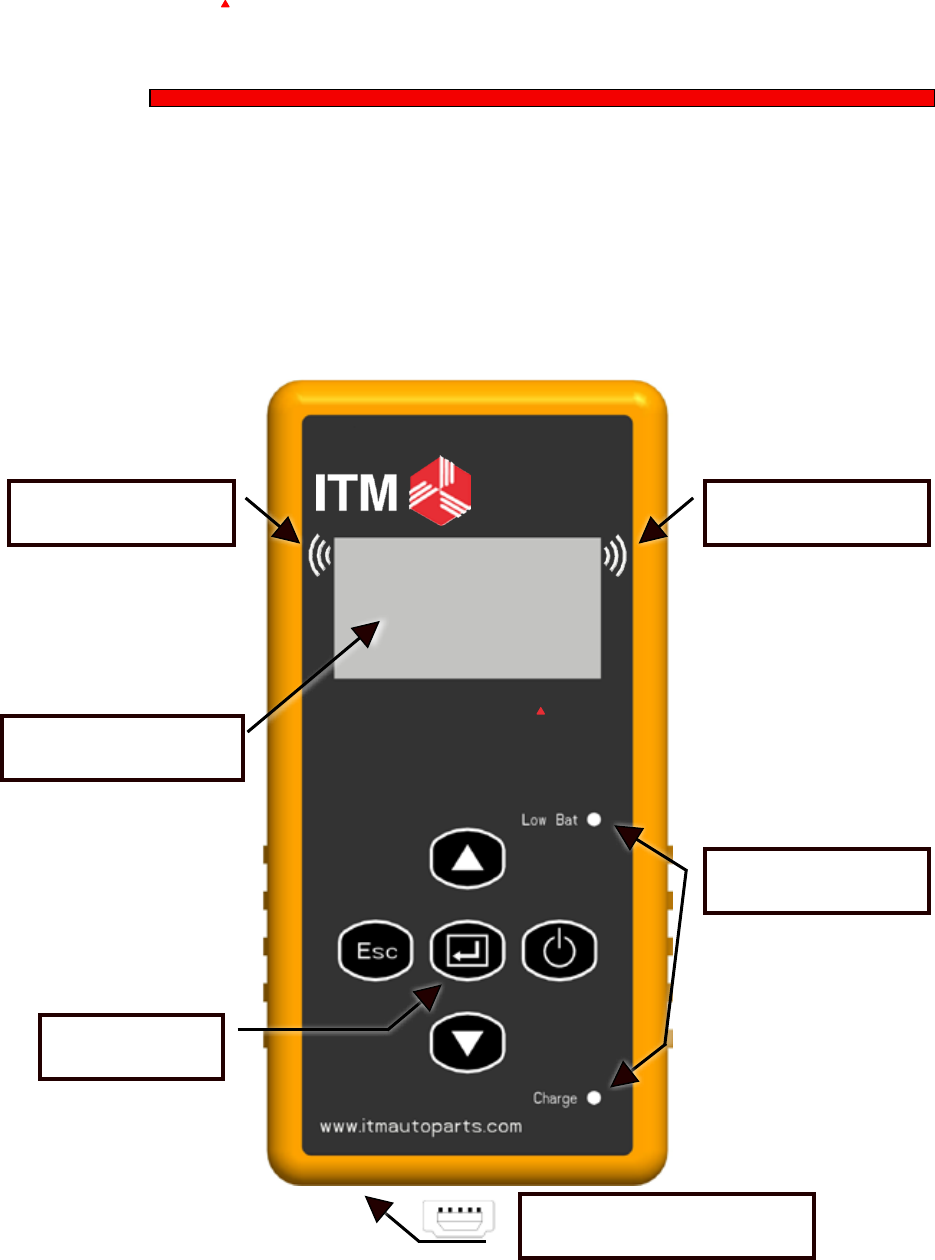
Keypad
LF AntennaLF Antenna
LCDDisplay
Indicators
USB Connector
sensorAID
Keypad Summary
3
Owner's Manual
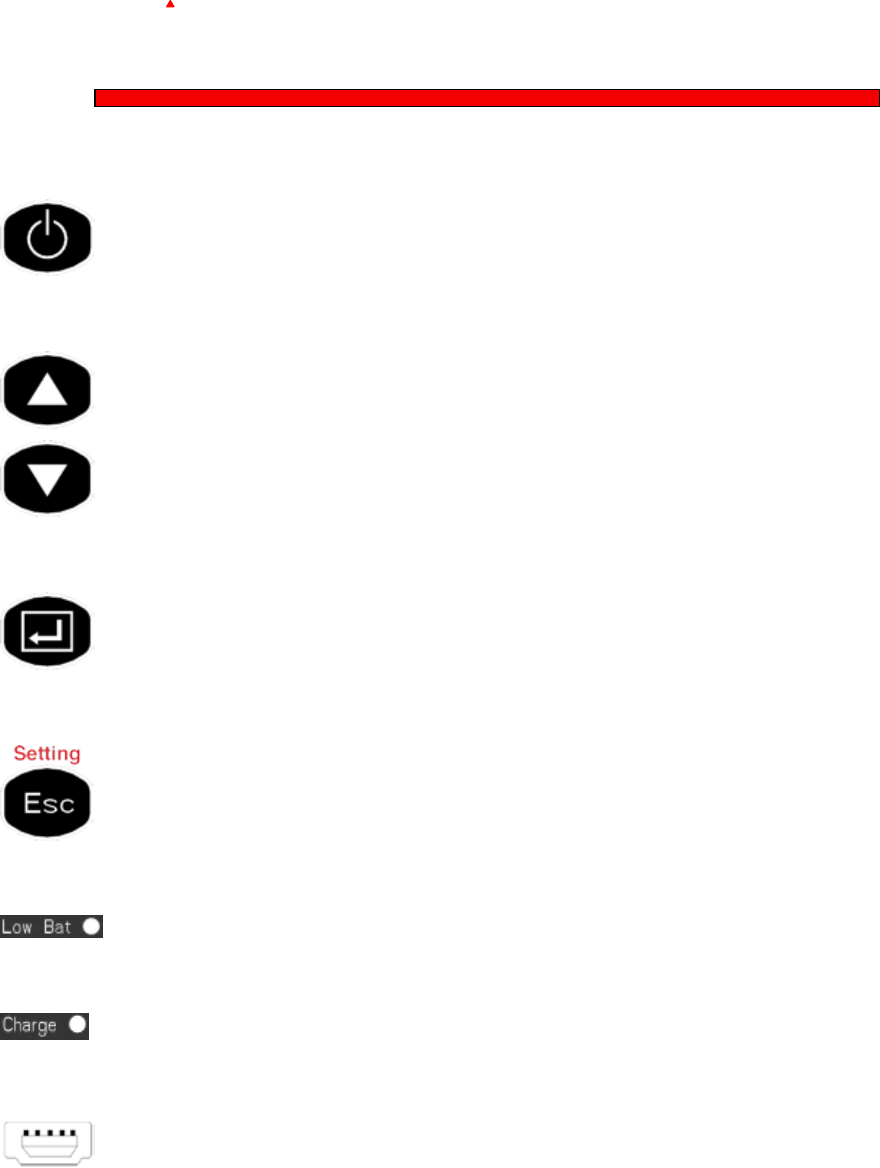
PowerOn/Off
Navigationthroughmenuandcruise
parameterupanddown
Selectionkey,pressentertoselect
functionorvalidateaparameter
Esc key, press to return to the previous
menuwithoutparametervalidation,setting
keyconguresettingoftheSensorAID
Indicatorwillturnredwhenbatteryislow
Indicatorwillturnorangewhencharging
TheUSBconnectionallowssoftware
updateviaITMsoftware
Sensor AID Introduction

sensorAID
Power On The Device
Press and hold the power key to power on the device
4
ITM Autoparts | 1-310-225-5555 | www.itmautoparts.com
Duringpoweron,Thedevice
displaytheITMlogo.
0.1 ® 2011. 8
Softwarerevisionnumber
followsaftertheITMlogo.
MAKER SELECTION
A B C D E F G H I J
K L M N O P Q R S T
U V W X Y Z
Nowthedeviceisatthemaker
selectionmenu
Sensor AID Introduction

5
Owner's Manual
sensorAID
Diagnose Sensor
Diagnosing a Sensor
Use arrow key to scroll up and down between maker
Makerselection:
Usethearrowkeyto
b r o w s e a l p h a b e t s o f
carmakers,enterbyusingthe
"selection"key
B
BMW
Buick
BMW
3SERIES
5SERIES
6SERIES
MAKER SELECTION
A B C D E F G H I J
K L M N O P Q R S T
U V W X Y Z
Makerselection:
Usethearrowkeyto
browse automakers, enter by
usingthe"selection"key
Modelselection:
Usethearrowkeyto
browsemodels,enterbyusing
the"selection"key
6
ITM Autoparts | 1-310-225-5555 | www.itmautoparts.com
sensorAID
Diagnose Sensor
Diagnosing a Sensor
Use arrow key to scroll up and down between maker
Yearselection:
Usethearrowkeyto
Selectyearandenterbyusing
the"selection"key
5 SERIES
2002-05(433)
2006-11(433)
Functionselection:
Usethearrowkeyto
SelectDiagnosesensorand
presstheselectionkeyto
Diagnose
5 SERIES
DIAGNOSESENSOR
NEWSENSOR
DiagnosingSensor:
SensorAIDwillnowactivate
thesensor,sensorrespond
timemayvery,dependson
snesortypeandbrand.
SensorAIDwillbeepafter
recevingsensorinformation
5 SERIES
(Esc):Stop
DIAGNOSINGSENSOR

7
Owner's Manual
sensorAID
Results Description
Diagnosing a Sensor
5 SERIES
1C1B7C9C29.76PSI
77℉433MHzBAT:OK
(Esc):BACK( ↵):TEST
SensorID
Tire
Tempurature
Battery
Status
Tire
Pressure
VehicleModel
SensorFrequency
The picture below is an example of sensor
data communication result
**Note: The Sensor AID will identify the
sensor information that is transmitted.
Not all sensors transmit every piece of
information shown.

8
ITM Autoparts | 1-310-225-5555 | www.itmautoparts.com
sensorAID
Duplicate an O.E sensor
New Sensor
This function is design for you to by pass OBD II and automatically
duplicate an O.E Sensor.
Makerselection:
Usethearrowkeyto
browsethoughtAlphabets,
enterbyusingthe"selection"
key
B
BMW
Buick
BMW
3SERIES
5SERIES
6SERIES
MAKER SELECTION
A B C D E F G H I J
K L M N O P Q R S T
U V W X Y Z
Makerselection:
Usethearrowkeyto
browsethoughtautomakers,
enterbyusingthe"selection"
key
Modelselection:
Usethearrowkeyto
browsethoughtmodels,enter
byusingthe"selection"key
** Note: Duplicate and Program funcation will only
work with ITM's Uni-sensor and Uni-sensor only.

9
Owner's Manual
sensorAID
Duplicate an O.E sensor
New Sensor
This function is design for you to by pass OBD II and automatically
duplicate an O.E Sensor.
NEW SENSOR
AUTODUPLICATE
MANUALDUPLICATE
PROGRAMBLANKSENSOR
Functionselection:
Usethearrowkeyto
selectautoduplicateand
presstheselectionkeyto
enter.
Makerselection:
Usethearrowkeyto
Selectyearandfrequency
enterbyusingthe"selection"
key
5 SERIES
2002-05(433)
2006-11(433)
Functionselection:
Usethearrowkeyto
Selectnewsensorandpress
theselectionkeytoEnter
5 SERIES
DIAGNOSESENSOR
NEWSENSOR
** Note: Duplicate and Program funcation will only
work with ITM's Uni-sensor and Uni-sensor only.

10
ITM Autoparts | 1-310-225-5555 | www.itmautoparts.com
sensorAID
DuplicateSensor:
SensorAIDwillnowdisplay
theO.EsensorID,pressthe
selectionkeytoprogram
Uni-sensor
NEW SENSOR
(Esc):Stop
SEARCHIDPROCESSING
Auto Duplicate an O.E sensor
Auto Duplicate
This function is design for you to by pass OBD II and automatically
duplicate an O.E Sensor.
SearchIDProcess:
SensorAIDwillnowsearch
thesensorID,sensorrespond
timemayvery,dependson
snesortypeandbrand.
SensorAIDwillbeepafter
recevingsensorinformation
NEW SENSOR
1C1B7C9C
(Esc):BACK( ↵):PROGRAM
DuplicateComplete:
SensorAIDwillnowduplicate
thesensorforyou,following
byErasingFlash,Program
sensorandVerifying,youwill
hear2shortbeepwhenthe
sensorisduplicated.
NEW SENSOR
PROGRAMMEDSUCCESSFUL
(Esc):BACK( ↵):PROGRAM
** Note: Duplicate and Program function will only
work with ITM's Uni-sensor and Uni-sensor only.

11
Owner's Manual
sensorAID
O.EIDLocator:
UsetheO.EIDLocatorwill
helpyoundtheSensorIDon
adeadO.Esensor.
enterbyusingthe"selection"
key
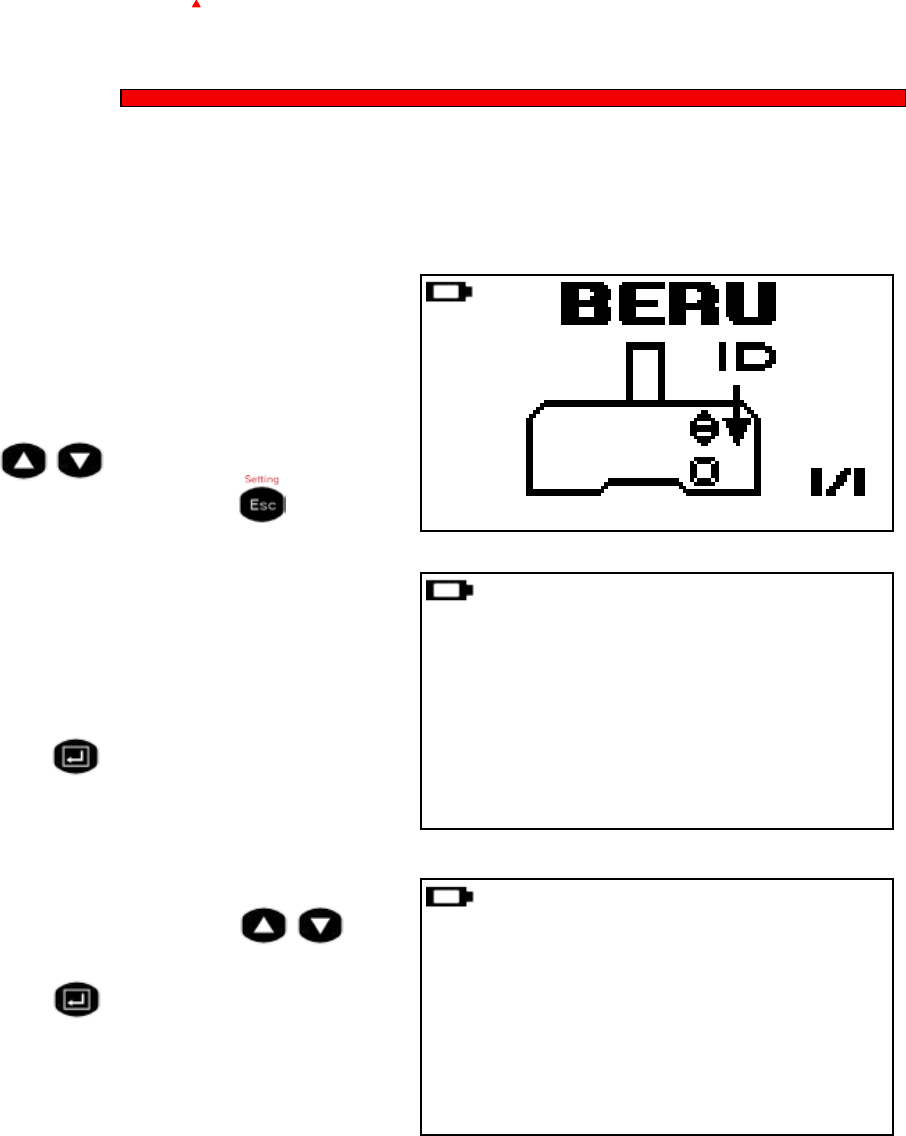
Manual Duplicate an O.E sensor
Manual Duplicate
This function is design for you to by pass OBD II and manually duplicate
an O.E Sensor.
MANUAL DUPLICATE
O.EIDLOCATOR
INPUTID
ManufactureSelection:
Use thearrowkey to
selectthemanufactureofthe
O.Esensor.
enterbyusingthe"selection"
key
Manufacture
VDO
BERU
LEAR
** Note: Duplicate and Program function will only
work with ITM's Uni-sensor and Uni-sensor only.
NEW SENSOR
AUTODUPLICATE
MANUALDUPLICATE
PROGRAMBLANKSENSOR
Functionselection:
Usethearrowkeyto
selectmanualduplicateand
presstheselectionkeyto
enter.
12
ITM Autoparts | 1-310-225-5555 | www.itmautoparts.com
** Note: Duplicate and Program function will only
work with ITM's Uni-Sensor and Uni-sensor only.
sensorAID
InputSensorID:
Usethearrowkeyto
browse,presstheselection
keytoentertheID
Manual Duplicate an O.E sensor
Manual Duplicate
This function is design for you to by pass OBD II and manually duplicate
an O.E Sensor.
MANUAL DUPLICATE
O.EIDLOCATOR
INPUTID
5 SERIES
0123456789↵
IDLocator:
ThiswillshowyouwheretheID
islocatedsomemanufacture
mayhavemorethanonetype
ofsensorsusethearrowkey
tobrowse,togoback
presstheEsckey
InputID:
UsetheInputIDfunctionwill
allowyoutoinputtheIDfrom
O.ESensortoprogramthe
Uni-sensor,presstheselection
keytoenter

13
Owner's Manual
sensorAID
Programming a blank sensor
Program Blank Sensor
This function is design for you to program a blank sensor to O.E format
for vehicle with autorelarn function.
Programcompelete:
WhentheProgramprocess
iscomplete,youwillhear2
shortbeepwhenthesensoris
programed.
** Note: Duplicate and Program function will only
work with ITM's Uni-sensor and Uni-Sensor only.
NEW SENSOR
AUTODUPLICATE
MANUALDUPLICATE
PROGRAMBLANKSENSOR
Functionselection:
Usethearrowkeyto
selectprogramblanksensor
andpresstheselectionkey
toenter.
**Notemakesurethecorrect
sensorisinsertinthecradle.
NEW SENSOR
(Esc):Stop
PROGRAMSENSOR...
ProgramBlankSensor:
SensorAIDwillnowprogram
thesensorforyou,following
byErasingFlash,Program
sensorandVerifying.
NEW SENSOR
PROGRAMMEDSUCCESSFUL
(Esc):BACK( ↵):PROGRAM

sensorAID
Device Setting
14
ITM Autoparts | 1-310-225-5555 | www.itmautoparts.com
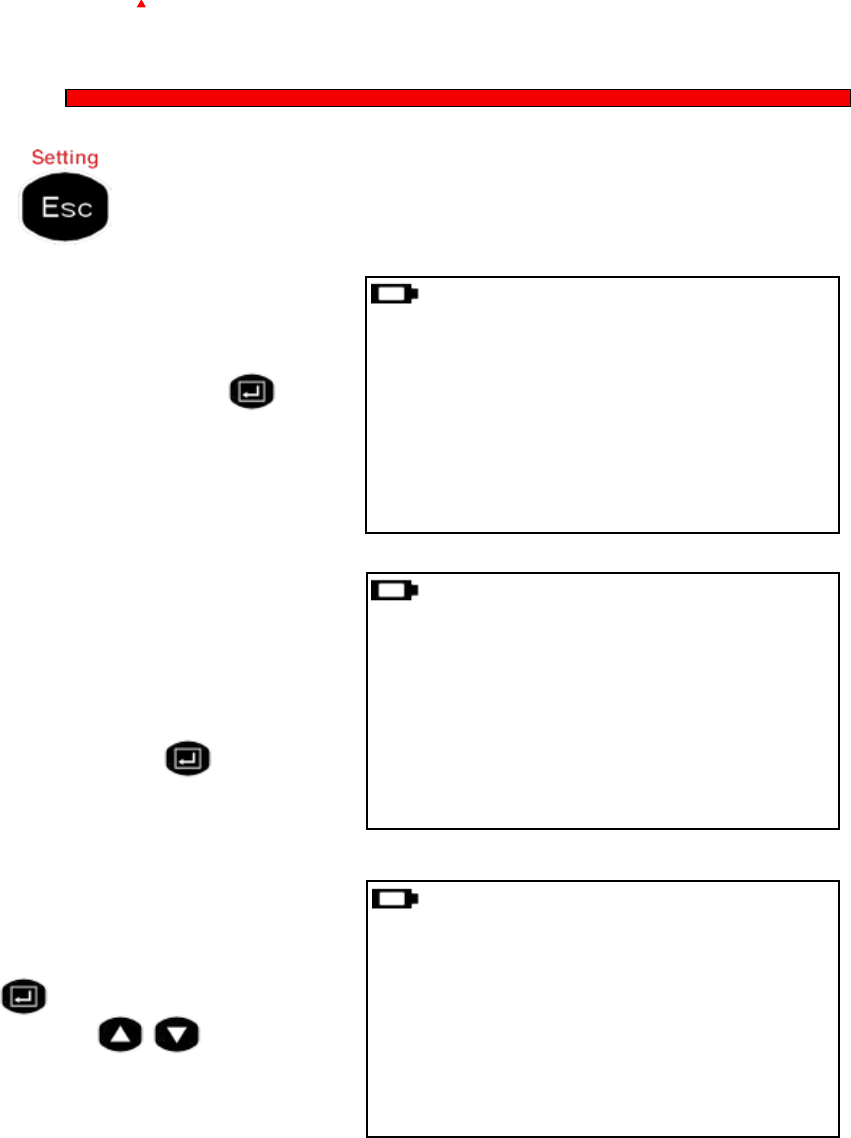
Sensor AID Settings
Press Esc to go in to setting at maker selection menu
SETTING
LANGUAGE:English
TEMPERATURE:℉
PRESSURE:PSI
Language:
Usetheselectionkeyto
choose the language you
perfer.
*English,French,Spanish.
SETTING
LANGUAGE:English
TEMPERATURE:℉
PRESSURE:PSI
Temperature:
Usetheselectionkeyto
choosebetweenFahrenheit
andCelsius.
SETTING
LANGUAGE:English
TEMPERATURE:℉
PRESSURE:PSI
Pressure:
Usetheselectionkeyto
choosebetweenPSIandkPa.
15
Owner's Manual
sensorAID
Device Setting
Sensor AID Introduction
Press Esc to go in to setting at maker selection menu
SETTING
IDFORMAT:Auto
AUTOOFF:3min
DISPLAYCONTRAST:05
IDFormat:
ChangetheIDformatbetween
decimalandhexadecimal
withtheselectionkeythe
presetsettingisAUTOthat
automaticallychangeformat
basedoninput.
Autooff:
Usercanadjusthowquickly
the tool will turn off after a
periodofnon-use.Thisfeature
canalsobedisabled.press
theselectionkeytoselect
desiredautoofftime
Displaycontrast:
Usercanadjustthecontrast
ofdisplay.presstheselection
keytohighlightanduse
the arrows to adjust
between01to30
SETTING
IDFORMAT:Auto
AUTOOFF:3min
DISPLAYCONTRAST:05
SETTING
IDFORMAT:Auto
AUTOOFF:3min
DISPLAYCONTRAST:05
16
ITM Autoparts | 1-310-225-5555 | www.itmautoparts.com
sensorAID
Device Setting
Sensor AID Introduction
Press Esc to go in to setting at maker selection menu
DeviceS/N:
Thedeviceseirealnumberis
foryoutoupdatethedevice's
rmwareviaCDorinternet.
**Notealltheupdatermware
isSynchronoustothedevice's
seriealnumber.
SETTING
BUZZER:ON
DEVICES/N:ITM00730
Press Esc again to go back to maker selection
LANGUAGE:English
Buzzer:
Usercanadjustthedevice
tobeepafterreceivingtire
sensorinformation.pressthe
selectionkeytobuzzer
andusethearrowsto
adjustbetweenonandoff
SETTING
BUZZER:ON
DEVICES/N:ITM00730
LANGUAGE:English
17
Owner's Manual
sensorAID
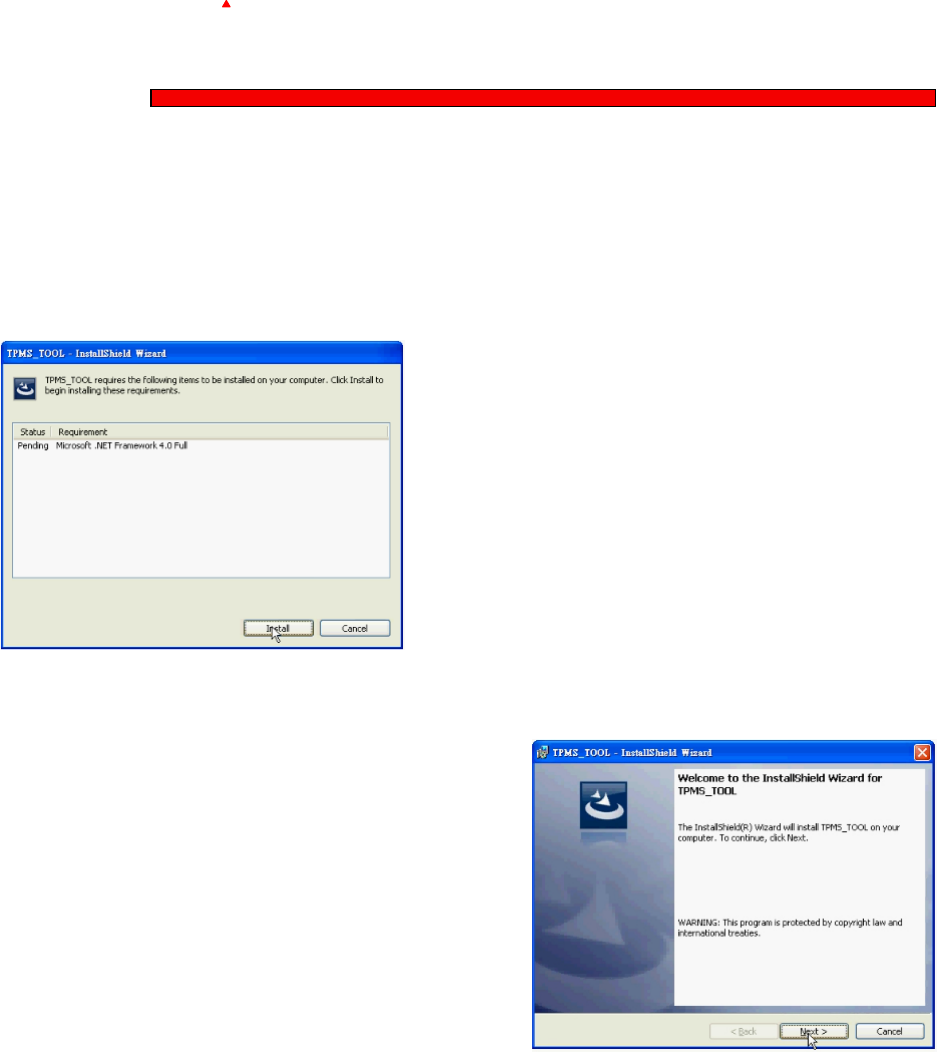
Software Installation
Software Update
1. Insert the CD, supplied with instrument, into the PC
drive and click on the ITM icon to start the installation
2. The following screen will appear. Click " Install "
** Note This screen will
only appear if you don't have
Microsoft .Net Framwork 4.0
installed.
This process will take a while
to complete.
3. The following window will appear, Please click " Next "
** Note Please read the
license agreement carefully,
and select " I accept the terms
in the license agreement " and
click " Next " to complete the
software installation.
18
ITM Autoparts | 1-310-225-5555 | www.itmautoparts.com
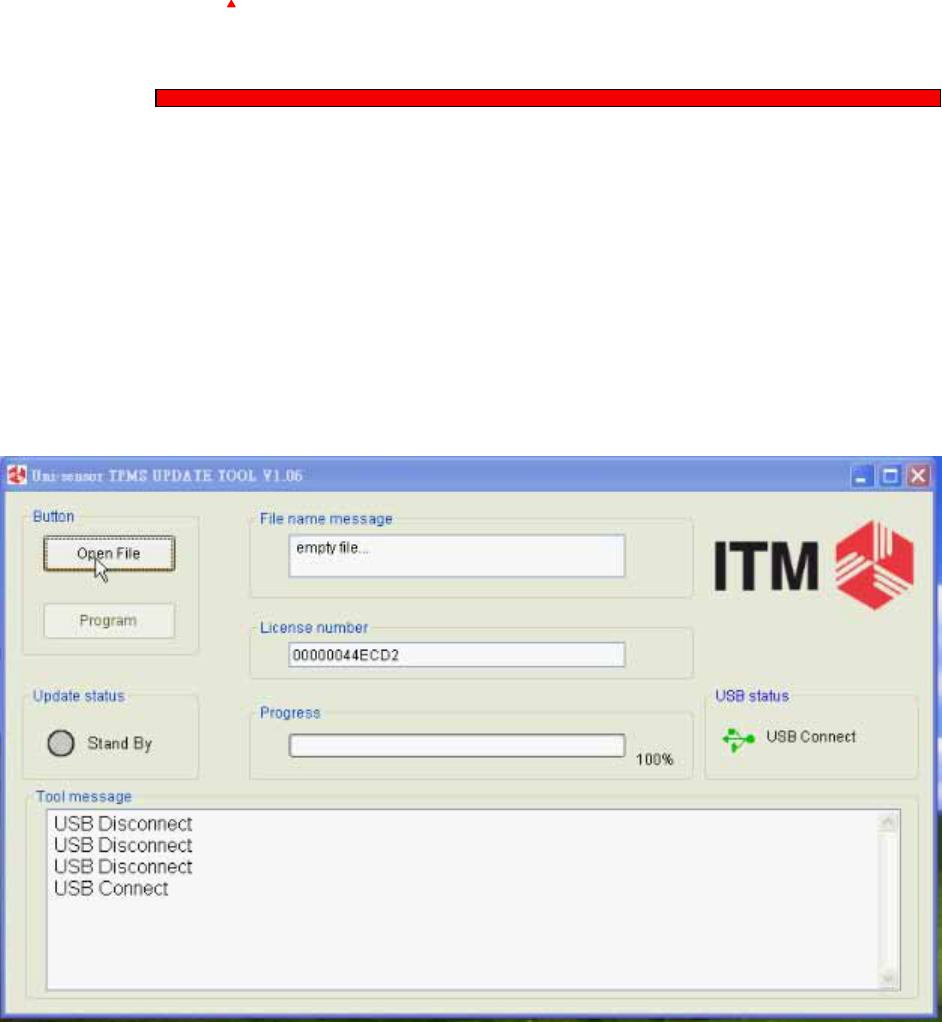
sensorAID
Device Software Update
Software Update
1. Connect the USB cable from Sensor AID to the PC,
Clickon the ITM TPMS update icon to start the program.
2. The following screen appears, When you see USB
connected, Click open le to select the newest update le
you download from the web or the newest CD you obtain
3. Click program after the le is selected to start the update
process.
** Note Every device have it's unique license number, the
software must match the license number to update.
19
Owner's Manual
sensorAID
Device Software Update
Software Update
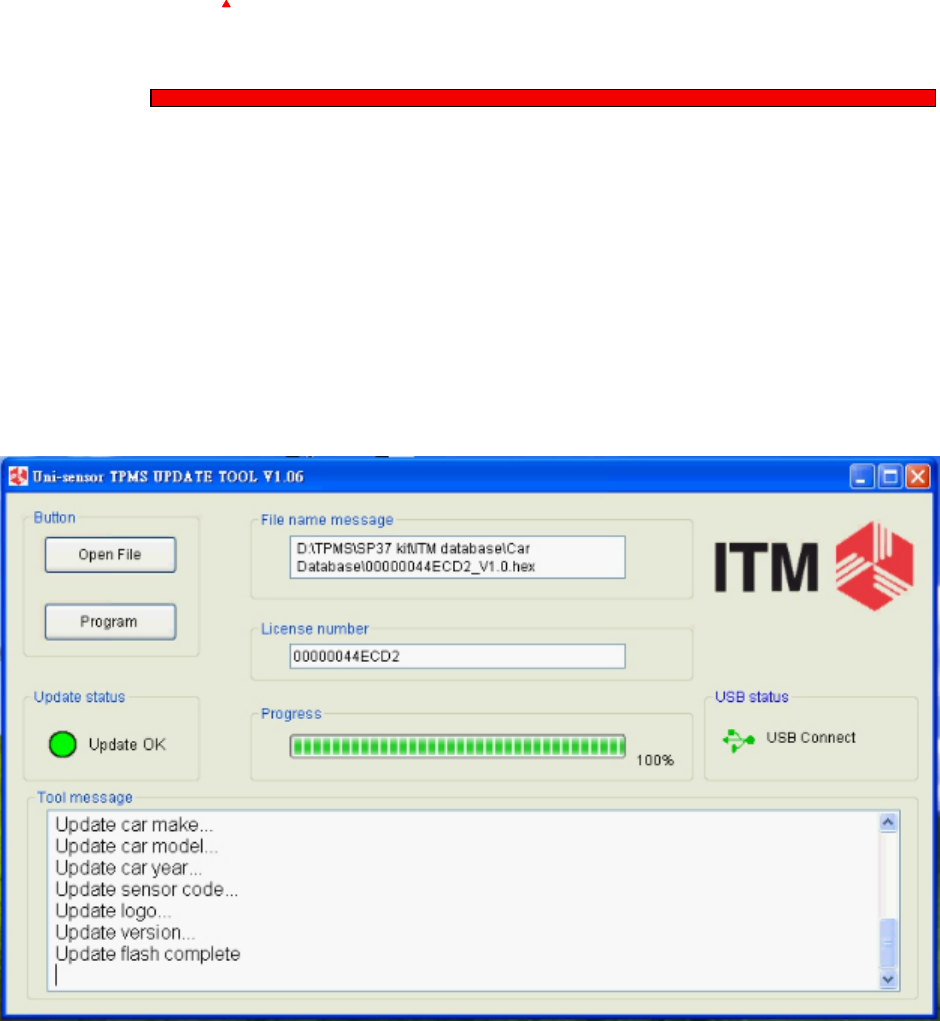
4. The update process should look like the following
window, the update status light will ash yellow light during
the update.
5. when the update is complete the update status light will
be soild green
** Note Every Device will be provided with 1 year free
software update.
For the latest version of the software please visit
www.itmautoparts.com/TPMSupdate

20
ITM Autoparts | 1-310-225-5555 | www.itmautoparts.com
sensorAID
Device Warranty
Warranty
ITM autoparts products are guaranteed from material defects for
365 days after the date of purchase. If the product fails under
normal circumstances within the first year, ITM autoparts will
repair or replace the product. Product will not be replaced or
repaired if damaged from misuse or incorrect application. To
obtain repair or replacement of the product under warranty,
contact ITM autoparts at 1-310-225-5555. Proof of purchase and
date of purchase is required to validate the warranty claim.
ITM autoparts is not liable for any direct or consequential loss or
property damage arising from use of product.
Note: Warranty does not cover tire valves or screws for tire valves.
The tire valves and screws need to be replaced when rotating
tires, changing tires or changing the TPMS sensors. If installing/
reinstalling a TPMS sensor, new valves and screws should be
used.
Warning: Only use ITM autoparts replacement parts. Using other
brands will not allow the system to work and will void the warranty.
FCC Statement
This equipment has been tested and found to comply with the limits for a Class B digital device, pursuant
to Part 15 of the FCC Rules.
These limits are designed to provide reasonable protection against harmful interference in a residential
installation.
This equipment generates, uses and can radiate radio frequency energy and, if not installed and used in
accordance with the instructions,
may cause harmful interference to radio communications. However, there is no guarantee that
interference will not occur in a particular installation.
If this equipment does cause harmful interference to radio or television reception, which can be
determined by turning the equipment off and on,
the user is encouraged to try to correct the interference by one of the following measures:
- Reorient or relocate the receiving antenna.
- Increase the separation between the equipment and receiver.
- Connect the equipment into an outlet on a circuit different from that to which the receiver is connected.
- Consult the dealer or an experienced radio/TV technician for help.
FCC Caution
Any changes or modications not expressly approved by the party responsible for compliance could void
the user's authority
to operate this equipment. . This device and its antenna(s) must not be co-located or operating in
conjunction with any other
antenna or transmitter.
FCC Notice
This device complies with Part 15 of the FCC Rules. Operation is subject to the following two conditions:
(1) This device may not cause harmful interference, and
(2) this device must accept any interference received, including interference that may cause undesired
operation.
IC Statement
TherequirementisspeciedinRSS-GENSection5.3.
ThisdevicecomplieswithIndustryCanadalicence-exemptRSSstandard(s).Operationissubjecttothe
followingtwoconditions:(1)thisdevicemaynotcauseinterference,and(2)thisdevicemustacceptany
interference,includinginterferencethatmaycauseundesiredoperationofthedevice.
LeprésentappareilestconformeauxCNRd'IndustrieCanadaapplicablesauxappareilsradioexempts
delicence.L'exploitationestautoriséeauxdeuxconditionssuivantes:(1)l'appareilnedoitpasproduire
debrouillage,et(2)l'utilisateurdel'appareildoitacceptertoutbrouillageradioélectriquesubi,mêmesi
lebrouillageestsusceptibled'encompromettrelefonctionnement.

sensorAID
ITM reserve the right to change the content with out notice