CZUR TECH M3000 Czur Scanner User Manual
CZUR TECH CO., LTD. Czur Scanner
User manual

CZUR TECH CO., LTD
Email: support@changer.hk
Web: www.czurtek.net
Skype: Czur.support
Office address: Room1404, Block A, Building No.32 Chuangye
Mansion, Huoju road, High-tech park, Dalian City, China.
USER MANUAL
(Czur scanner)

CHARPTER 1. INTRODUCTION
1.1 SUMMARY .........................................................................1
1.2 APPEARANCE AND DIMENSIONS......................................2
1.3 ASSEMBLY INSTRUCTIONS................................................2
1.4 INDEX OF FUNCTIONS......................................................3
1.5 PARAMETERS....................................................................5
1.6 PACKAGE CONTENTS........................................................6
CHPATER 2. OPERATION INSTRUCTION
2.1 PC MODE (USB)................................................................7
2.1.1 Scanning Preparation..............................................7
2.1.2 Function Preview.....................................................8
2.2 VISUAL PRESENTER MODE (HDMI)...................................9
2.2.1 Presentation Preparation........................................9
2.2.2 Function Preview.....................................................9
2.3 WI-FI MODE......................................................................9
2.3.1 Scanning Preparation..............................................9
2.3.2 Function Preview...................................................13
2.4 DEVICE HARDWARE UPDATE...........................................13
2.5 RESTORE FACTORY SETTING...........................................13
CHARPTER 3. QUESTION AND ANSWER
3.1 PC MODE (USB)..............................................................14
3.2 VISUAL PRESENTATION (HDMI)......................................15
3.3 WI-FI MODE....................................................................16
CHAPTER 4. SERVICE AND DECLARATION
4.1 AFTER SALE SERVICE AND ENSURE................................17
4.2 WARRANTY PROCESS......................................................18
4.3 CONTACT INFORMATION................................................18
Contents
Czur scanner hereinafter referred to as device.
CZUR TECH CO., LTD.
CHARPTER 1. INTRODUCTION
1.1 SUMMARY
Czur scanner is a new type of intelligent scanner, suitable for
enterprise users,industry customers,professionals, home and
personal. Czur scanner can quickly scan files, books, documents,
forms, bills, certificates, business cards, objects, etc.
Equipped with MIPS CPU (millions of instructions per second), HD
sensor, laser line and other high-end configuration, Czur scannerr
can provide HD and gorgeous image quality for users. Czur
scanner supports three working modes, including Wireless
Network (Wi-Fi), PC (USB), Visual Presenter (HDMI).
Czur scanner’s intelligent software, with core algorithm, can
automatically handle the complicated work, including flattening
curve, erasing fingerprint, smart paging, correcting position and
edge cutting. Czur scanner provides users the rich and colorful
scanning effect and completely changed the concept of
traditional scanners. Czur scanner shows a new concept of
intelligent modern scanners, presented a smart, efficient,
energy-saving office device for users.
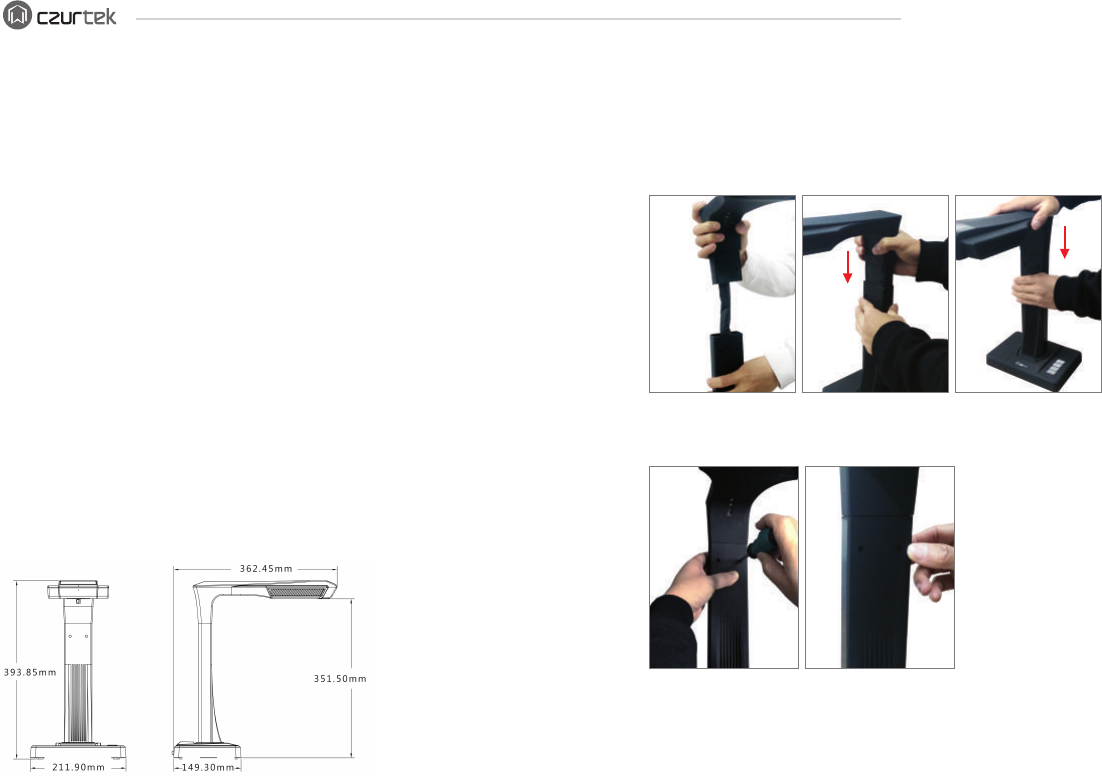
1.2 APPEARANCE AND DIMENSIONS
Insert internal cable into upper hole, and then force the
camera head into the vertical bar.
1.
Install screws and insert rubber into the hole.2.
1.3 ASSEMBLY INSTRUCTIONS
1 2
CZUR TECH CO., LTD.
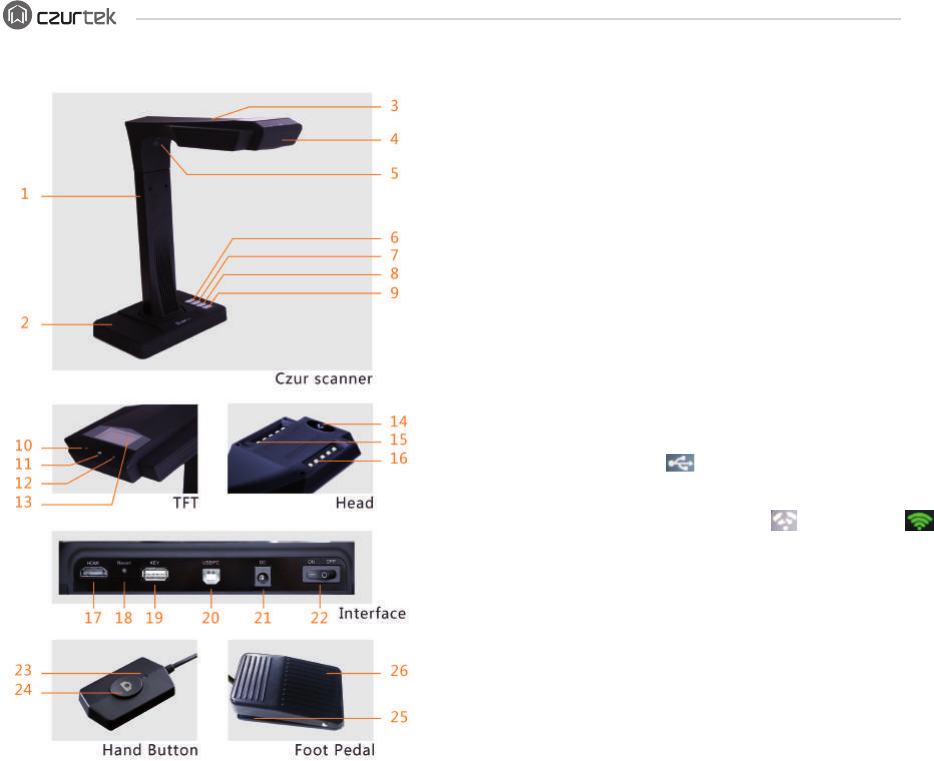
INSTRUCTION.
1, 2, 3, 4, 5 vertical bar, base, head, microphone, and laser
respectively.
6 LED light button, with two gear level adjustable.
7, 8 Zoom in and Zoom out (HDMI mode only).
9 Scan button.
10 WI-FI indicator light.
1) Green & Blue lights flash alternately, waiting for sound
wave input.
2) Green light flash, searching network or connecting network.
3) Green light on, connecting with router successfully.
4) Blue light on, image uploading to Czur cloud.
11 Scan indicator light.
1)Red light on, image capturing, don’t move the page.
2)Red light off, image capture finished, turn next page.
12 Power indicator light, White.
13 TFT screen.
1) HDMI mode, TFT screen off.
2) PC(USB)mode.
☆ PC mode.
☆ X/Y, uploading/uploaded (to PC).
3) WI-FI mode.
☆ Networking icon Not networking, networking successfully.
☆ X/Y, uploading/uploaded (to Czur cloud).
14 HD CMOS camera.
15, 16 LED light, auxiliary LED light.
17 HDMI interface.
18 “Reset” button.
1)
2)
“Short press” into WI-FI searching mode, green light flash
(without ”WI-FI name” and ”WI-FI password”, flash one
time only).
“Long press” 6 Seconds, erase ”WI-FI name” and ”WI-FI
password”, waiting for sound wave input, green &blue lights
flash alternately.
1.4 INDEX OF FUNCTIONS
3 4

CZUR TECH CO., LTD.
19 A mode USB interface, for “hand press button” or “foot pedal” connecting.
20 B mode USB interface, for PC connecting.
21 DC interface, for adapter connecting (9V /2A).
22 Power switch.
23, 24 Hand button “scan indicator” and “scan button”.
Note, scan next page after the light off.
25, 26 “foot pedal” base and cover. Heels on ground, toes touch.
(Suggestion, use foot pedal to scan, use hand to operate the book).
1.5 PARAMETERS
Spec\Model
Pixel
Resolution
Speed
Format
Video Format
Picture Format
WIFI
HDMI
USB
TFT
MIC
DDR3
Flash
Cache images
Side Light
Hand button
Foot Pedal
Cradle
ET16
16M
4608*3456
<1.5S
≤A3
YUV、MJPG
JPG、PDF
√
√
√
√
√
1Gbit
2G Byte
150
Optional
√
Optional
soft texture
1.6 PACKAGE CONTENTS
Item
CD-ROM
User manual
Quality Certificate
Warranty Card
Soft texture pad
Screw
Screw plug
Screw driver
Hand press
Foot pedal
USB cable
AC/DC Power adapter
Specification
CD-R,D=120MM
Color printing,72.25*105MM
White card, 55x90MM 250g
Art paper, 120x100MM 210g
530*395*2.0MM
Black headф3*8MM
Black rubber, D=5.3MM,H=0.9MM
Cross point、alloy steel、magnetic
USB interface,1.2M
USB interface,2.0M
USB interface,1.5M
Input AC :100-240V-50/60HZ 0.6A
output DC:9V/2A
Amount (pcs)
1
1
1
1
1
2
2
1
1
Optional
1
1
5 6
CZUR TECH CO., LTD.
Open “Czur scanner” software on PC, choose “scanner”, →
click Scan → select “single” or “books”, to the scan preview
interface.
Open “Czur scanner”, choose “Icon” of visual presenter , to next
interface. function includes real time presenter, mark, freeze, record,
etc. for more details , please refer to《Device software instruction》.
Install Device software on PC, for more details, please refer
to《 Device software instruction》.
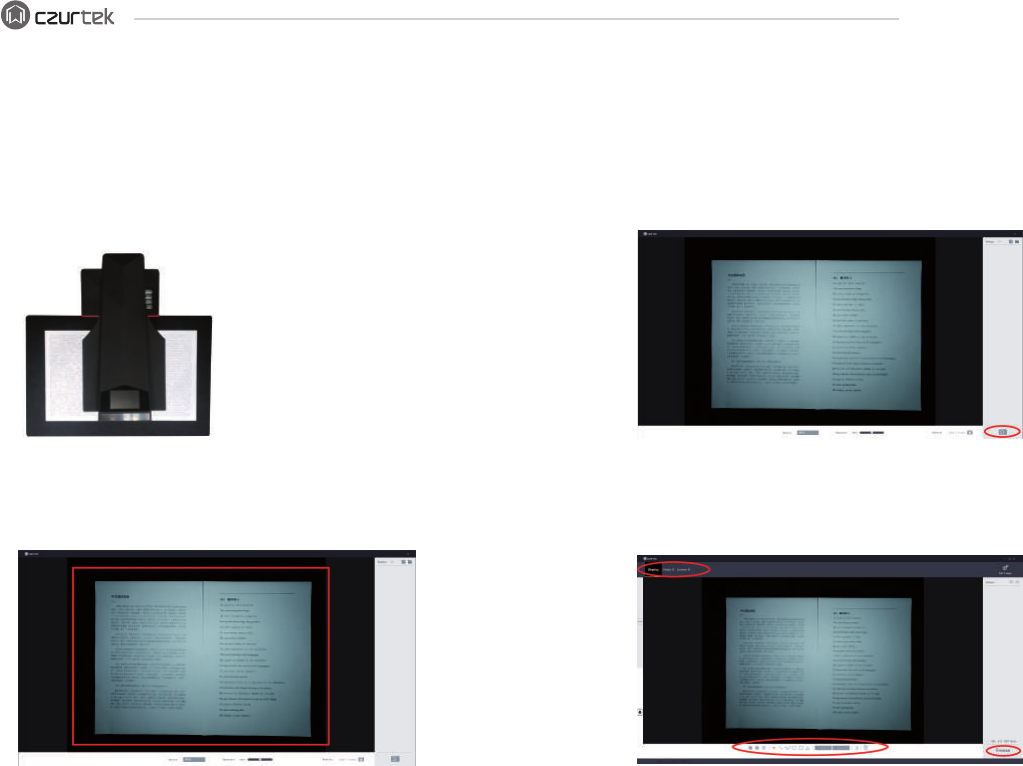
Put Black soft texture pad close to the device (see figure),
connect the adapter for power
supply, insert and connect the
device with PC via USB cable.
1.
2.
Below red box area must be in the black soft texture pad range.
Open “Czur scanner” software on PC, choose “scanner”, →
click Scan → select “single” or “books”, to the scan preview
interface.
3.
CHPATER 2. OPERATION INSTRUCTION
2.1 PC MODE (USB)
2.1.1 Scanning Preparation
2.1.2 Function Preview
Main function includes “scanner” and “visual presenter”, for more
details, please refer to《Device software instruction》.
1. Scanner.
2. Visual presenter(PC mode).
7 8

CZUR TECH CO., LTD.
1.
2.
3.
Plug in power adapter, connect device with projector, TV or
electronic board via HDMI cable.
Power on device, enter visual presenter mode automatically.
Note.
1)
2)
If projector or TV shows no signal, switch “signal source”,
choose HDMI port.
In HDMI mode, DEVICE should be disconnect with PC.
1)
2)
First time usage, green light flash one time only (without
“Wi-Fi name” and “Wi-Fi password”).
If device was connected with Wi-Fi before, the “Wi-Fi
name” and “Wi-Fi password” will be saved, green light
flash until light on (Device connect to router successfully).
2.2 VISUAL PRESENTER MODE (HDMI)
2.2.1 Presentation Preparation
2.3 WI-FI MODE
2.3.1 Scanning Preparation
1.
2.
3.
Zoom out” and “Zoom in” button have six levels 12 times to
zoom the displayed screen.
In HDMI mode, TFT screen shut automatically.
Adjust the object/ document to show the correct orientation
on the displayed screen.
1.
2.
“Czur cloud” account registration method.
Visit “www.czur.cc” web on PC, and register your account use
your E-mail.
Put Black soft texture pad close to the device, power on device.
2)
3)
4)
to login the web page.
Long press “Reset” (back side of device) for 6 Seconds,
until Wi-Fi indicator“green & blue”flash alternately. Device
is waiting for sound wave input.
Now your Mobile phone is into “sound wave ready”
page, click “indicator flash, continue” page, turn on
the mobile phone sound, click “sound wave play” icon,
mobile phone sounding “Beep …” follow the mobile
phone instruction to finish the device networking.
Green indicator light on means device connects to
router successfully.
First time usage, input “cloud account name and
password” click “confirm binding”.
Click “Device networking”, input “Wi-Fi name” and
“Wi-Fi password”, click “continue” to “sound wave
generation” page.
☆
☆
1) Scan”QR code” (under the device base) by mobile phone
3. Network setting.
1)
2)
3)
4)
1)
2)
Green indicator light on (Wi-F indicator) means device
connects to router successfully.
Device connect to router successfully, TFT screen shows
“Connecting to Czur …”, means waiting for connecting to
“Czur cloud ” server.
TFT screen show“Disconnected”, means fail to connect to
“Czur cloud” server, please check your network.
TFT screen show“Connected”, means connect to “Czur
cloud” successfully.
4.
5.
“Czur cloud” server connecting.
TFT screen show“Ready” “User and account name”,
means device ready for scanning.
TFT screen show“No user”, means device release usage
authority, user can login “Czur cloud” account, apply the
usage authority.
“Czur cloud” account connection.
Connected “Czur cloud” server, Press “scan” button for 1
time.
2.2.2 Function Preview
910
CZUR TECH CO., LTD.
Visit “Czur cloud” website https://www.czur.cc/ to register
account.
Scan”QR code” (under the device base) by mobile phone
to login the web page, input the registered Czur account
name and password, click “confirm binding”.
☆
☆
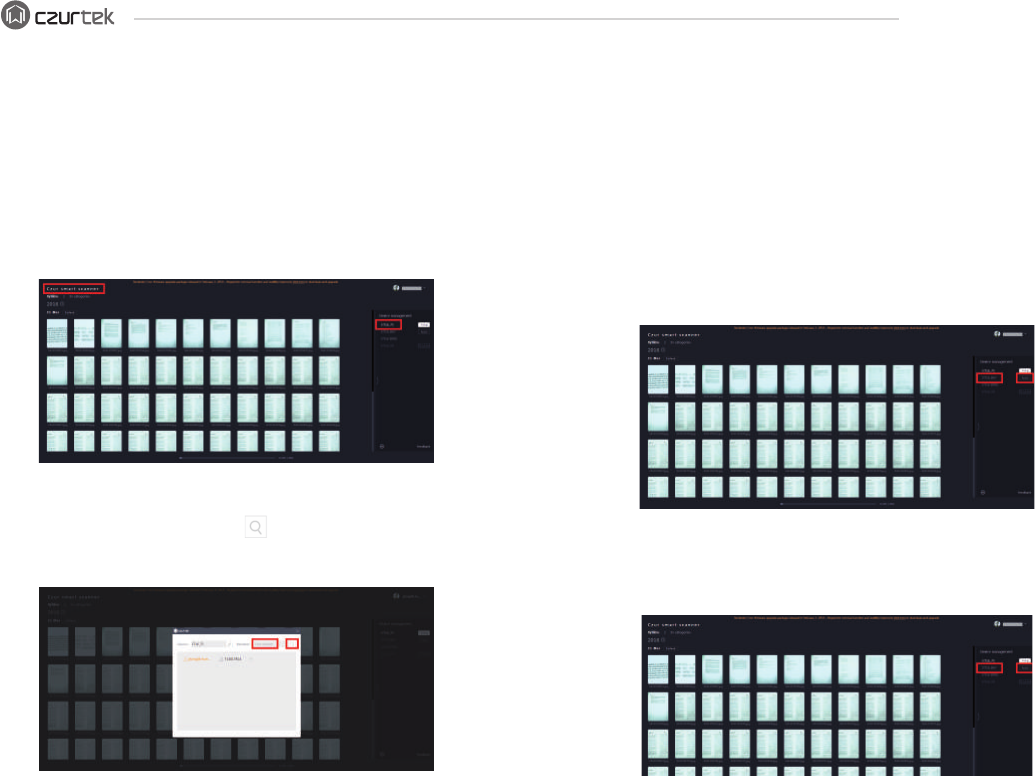
Login“Czur cloud”account, enter “ET scanner” page.☆
Click “device management”, and choose the device name.
On the following page, input the Czur account name you
want to share with. Click search, click the “+” or “-”
followed with the searching account name to add or
delete the account.
☆
1)
2)
Account binding.
Device sharing.
6. Czur cloud” account binding, apply for usage and authority
release.
11 12
Automatically authority release, Wi-Fi mode, 15 minutes
without uploading images or any operation, device
standby and automatically release authority. Shared users
can apply for usage authority.
Manually authority release, Wi-Fi mode, Long press“scan”
button 3 seconds, TFT screen show“Completed”, device
release authority successfully, shared users can apply for
usage authority.
☆
☆
Device in idle status, Login“Czur cloud” account, Click
“Apply for usage”.
☆
3)
4)
Authority release.
Usage application.
Device in occupied status, release authority first and then
refresh”Czur cloud” web page, click “apply for usage”.
Note, After releasing authority, it will still show occupied
without refresh the web page.
☆

CZUR TECH CO., LTD.
Unable to turn on device, TFT screen and the power
indicator light is not bright.
The software can not be installed.
1.
2.
3.
4.
CHARPTER 3. QUESTION AND ANSWERING
3.1 PC MODE (USB)
2.3.2 Function Preview
1)
2)
Find the update file “Update.brn”.
Plug in device power adapter, connect device with PC via
USB cable.
1)
2)
3)
Check if the power supply socket is energized, the adapter
is properly connected, the power switch is turned on.
Restart the device.
Wrong hardware upgrade process may cause this issue,
please contact customer service.
1)
2)
3)
4)
1)
2)
Software supports win7/8/10 system, and does not
support XP, Vista or Mac system.
Ensuring input the correct serial number.
Check the anti-virus software and firewall, shut down
antivirus software and firewall, add trust, or reduce the
defense level.
If download the software on official website, please make
sure that the software has been downloaded fully, then
install.
Serial number error.
Please recheck the input serial number, make sure letters
and numbers are separated. Note, there is no number 1 in
serial number.
Check whether the operating system is win7 and above
system, the system currently supports WIN7/8/10.
1)
When first time usage, open the device software, and
nothing shows in preview frame, unable to scan.
Re-plug in the USB cable or restart the device, restart the
computer software device. Device is equipped standard
UVC protocol, with the drive of Windows system, will
automatic identification device.
1)
2)
3)
4)
1)
2)
Long press “Zoom in” button, keep pressing the button
and power on device, after about 3 seconds, you enter
into “Device U disc” mode.
Copy update file “Update.brn” to root directory of “Device
U disc”.
Plug out USB cable, the device start updating automatically,
scan indicator red flash (on the camera head).
“Scan indicator off” means updating finished, restart the
device.
2.4 DEVICE HARDWARE UPDATE
1.
2.
3.
Update preparation.
2.5 RESTORE FACTORY SETTING
Plug in power adapter, then long press”Zoom out” button.
Keep pressing the button and power on device, you can enter
restore factory setting, TFT screen show “Initializing...”, restore
factory setting finished when TFT screen show “Initialized”.
For more details about networking, share, scan, upload, cloud
application and management platform, you can login Czur cloud
account to try and know more. Cloud web, www.czur.cc.
Update instruction.
Note.
13 14
Enter “Device U disc”for updating, don’t change any system
file.
While scan indicator red flash, don’t power off the device.

CZUR TECH CO., LTD.
1.
2.
The first time usage, unable to connect the router.
WI-FI mode, unable to scan.
Scanned images occur distortion,deformation,font stretch
and so on.
Power on device, connect device with projector or TV
display device via HDMI cable, there is no image, can not
enter the visual presenter function.
5.
2)
3)
4)
5)
6)
7)
Replace another USB port, USB port of the computer
usually perform different.
Exit the anti-virus software, security guards or defensive
software, etc.
The device does not support the Windows XP operating
system, replace the system or computer.
Check whether the computer "device manager" identify
device, if occur yellow exclamation mark / unknown
device, right click to update drive or you can disable it
and then enable, then restart the device software.
Enter "device manager" , then disable the other "scanner"
"control" "camera" driver, try device again.
Restart or change another computer.
1)
2)
3)
To ensure that the gap of the "black soft pad" align with
device, "the preview area" do not exceed the "soft black
pad". See chapter 2.1.1.
Scanning material should not go beyond the preview area.
Nothing except scanning material should be in the "the
preview area", or will interference algorithm and affect the
scanning effect. Such as "hand" USB button "line" "mobile
phone" and "pen" etc.
"Scanning material" include documents, books, records,
forms, bills, documents, objects, cards, etc.
1) Check whether the USB cable disconnected with the
computer, when the USB cable and HDMI cable are inserted
2)
3)
Check whether the source of projector or TV switch to the
"HDMI" port.
"Zoom out" and "Zoom in" button only available in visual
presenter mode (HDMI).
at the same time, the default mode is PC mode (USB).
3.2 VISUAL PRESENTER (HDMI)
1)
2)
3)
4)
In WI-FI mode, USB cable and HDMI cable must disconnect
with the computer and projector.
Device indicator light, green light flash means searching
network, green light on means connected to the router.
Check the input "WI-FI name" and "WI-FI password" when
sound wave networking.
Restart or change another router.
1)
2)
3)
4)
5)
Make sure the USB cable and HDMI cable disconnected
with PC and projector.
Check the router connecting, if the green light on, it
means device is connected to the router successfully, or
please re-connect the device with router.
Check the server, if TFT screen shows ”Connecting to
Czur …””Connected” means the server works well, or
please check the network.
Check the account connecting, press scan button for one
time, TFT screen shows “Ready” and “User name”, means
connected to “Czur cloud”, or please check whether
already add the “Device sharing”, login “Czur cloud”,
enter “ET smart scanner” page, click ”Apply for usage” at
the right side. Please check the network as well.
Blue light on means transmitting scanned images.
3.3WI-FI MODE
15 16

CZUR TECH CO., LTD.
The after-sale service of this product is according to
national regulations.
Environment Highest temperature : 45
As long as the malfunction is caused by the product
quality problems under normal circumstances, you can
return it in seven days and one year free maintaining
service.
There must be the complete package with the "Warranty
card" filled out when the product needs to repair.
Warranty covers main part, power adapter, manual press,
foot pedal. Consumables and appearance are not covered
under warranty.
The non warranty coverage (the following non warranty
malfunction, will be in accordance with the provisions of
the company charges, even though in the warranty period).
1.
2.
3.
4.
5.
6
During the reparation period, for buyers of vested
interests and predict the possible damage, Czurtek
company does not take any responsibility.
The subsequent upgrade or update the product without
extra notice, the company reserves the right to final
interpretation of the above terms.
7.
8.
CHAPTER 4. SERVICE AND DECLARATION
4.1 AFTER SALE SERVICE AND ENSURE
Please send email to us or contact us online to confirm
the malfunction initially.
Disassemble the device and post the faulty parts
together with the filled out warranty card to company.
Czur tech company will finish the maintenance according
to the warranty card in two days and return parts to the
customer.
Note, one《warranty card》can be used for four times.
1.
2.
3.
4.2 WARRANTY PROCESS
Get technical support and information by following ways.
4.3 CONTACT INFORMATION
1)
2)
3)
4)
5)
6)
Parts don’t belong to device or users change the parts
that don’t buy in the authorized store.
Malfunction caused by the incorrect installation, operation
or using product in the wrong environment.(eg.Temperature
is too high or too low, too wet or dry, high altitude,
unstable voltage or current, high ground voltage, etc.)
Malfunction caused by the abuse (including excess
workload).
Malfunction caused by improper storage such as rodents
or liquid and so on.
Malfunction caused by unauthorized disassemble and ultra
vires modification.
Malfunction caused by the repair operated by the
unauthorized service center.
8)
virus.
Malfunction caused by the human factors.
7) Malfunction caused by the setting of other software and
Email: support@changer.hk
Web: www.czurtek.net
Skype: Czur.support
Office address: Room1404, Block A, Building No.32 Chuangye
Mansion, Huoju road, High-tech park, Dalian City, China.
Factory address: 2nd Floor, 2nd Building, Baoshi Industrial Park,
No.12 Baoshi Road, Jiaoyitang Village, Tangxia Town, Dongguan,
China.(Zip code: 523723).
☆
☆
☆
☆
☆
17 18

This device complies with Part 15 of the FCC Rules. Operation is
subject to the following two conditions:
(1) This device may not cause harmful interference, and
(2) This device must accept any interference received, including
interference that may cause undesired operation.
Warning: Changes or modifications not expressly approved by
the party responsible for compliance could void the user's
authority to operate the equipment.
NOTE: This equipment has been tested and found to comply
with the limits for a Class B digital device, pursuant to Part 15
of the FCC Rules. These limits are designed to provide
reasonable protection against harmful interference in a
residential installation.
This equipment generates uses and can radiate radio frequency
energy and, if not installed and used in accordance with the
instructions, may cause harmful interference to radio
communications. However, there is no guarantee that
interference will not occur in a particular installation. If this
equipment does cause harmful interference to radio or
television reception, which can be determined by turning the
equipment off and on, the user is encouraged to try to correct
the interference by one or more of the following measures:
Reorient or relocate the receiving antenna.
Increase the separation between the equipment and receiver.
Connect the equipment into an outlet on a circuit different
from that to which the receiver is connected.
Consult the dealer or an experienced radio/TV technician for
help.
FCC STATEMENT
This equipment complies with FCC radiation exposure limits set
forth for an uncontrolled environment. This equipment should
be installed and operated with minimum distance 20cm
between the radiator & your body
FCC Radiation Exposure Statement
19