Cadmus Micro UBTBR2T Bluetooth USB Dongle User Manual 2
Cadmus Micro, Inc. Bluetooth USB Dongle Users Manual 2
Contents
- 1. Users Manual 1
- 2. Users Manual 2
Users Manual 2

34
Synchronize Microsoft Outlook-this item type will be synced with its matching entry in
Microsoft Outlook, regardless of the PIM that contains this entry on the remote device. If a
matching Outlook entry does not exist, it will be created
Synchronize Outlook-Express-this item type will be synced with its matching entry in
Express, regardless of the PIM that contains this entry on the remote device. If a matching
Express entry does not exist, it will be created
Synchronize Lotus Notes-this item type will be synced with its matching entry in Lotus
Notes, regardless of the PIM that contains this entry on the remote device. If a matching
Notes entry does not exist, it will be created.
NOTE: All choices are not available for all items. For example, Notes items can only
be synchronized in Microsoft Outlook, therefore Lotus Notes and Outlook Express
do not appear as options in the "Notes" item shortcut menu.
Personal Information Managers that are not installed on this computer do not
appear as options in the shortcut menus.
Email attachments. The only option is include or do not include attachments with email that
is sent or received on this computer using this service.

35
3.8. Serial port setting
The Bluetooth Serial Port service allows two Bluetooth devices to establish a wireless
connection through virtual communications ports and then use that connection as if it were
a hardwired serial cable between the devices.
To establish a Bluetooth serial port connection:
Connections are initiated from the client:
1. On the client, in the Folders pane of "My Bluetooth Places", select "Entire Bluetooth
Neighborhood".
2. In the right pane of "Entire Bluetooth Neighborhood", right-click anywhere except on
a device name and select "Refresh" from the pop-up menu.
3. In the Folders pane of "My Bluetooth Places", right-click the server you want to
establish a connection with and select "Discover Available Services" from the popup
menu to update the available services list. The available services will be displayed in
the right pane of "My Bluetooth Places".
4. In the right pane of "My Bluetooth Places", double-click "Bluetooth Serial Port". A
dialog box appears that contains the communications port number assigned to this
connection by the client. The application that will use this connection must be
configured to send data to this port.
Depending on the security configuration, the dialog box that provides communications port
information may not appear until after Authentication and Authorization have been
accomplished.
The application on the server must be configured to use the correct communications port.
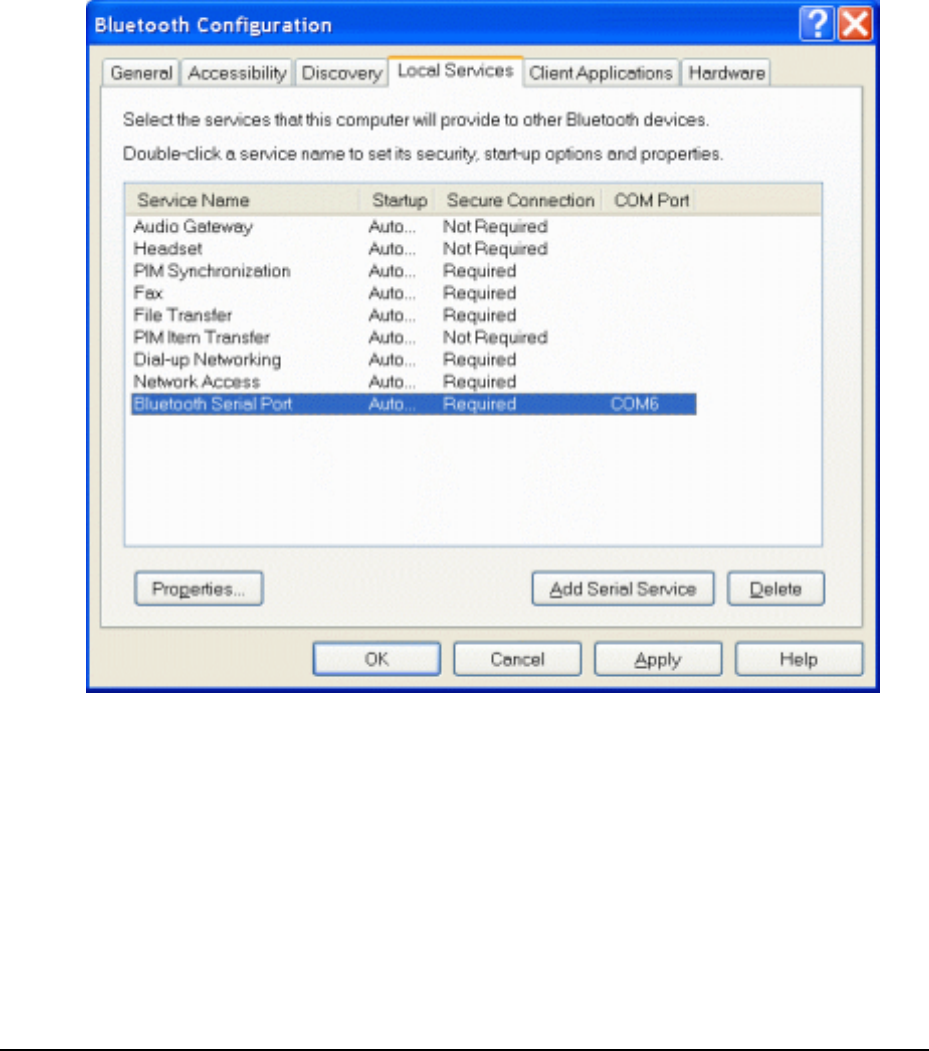
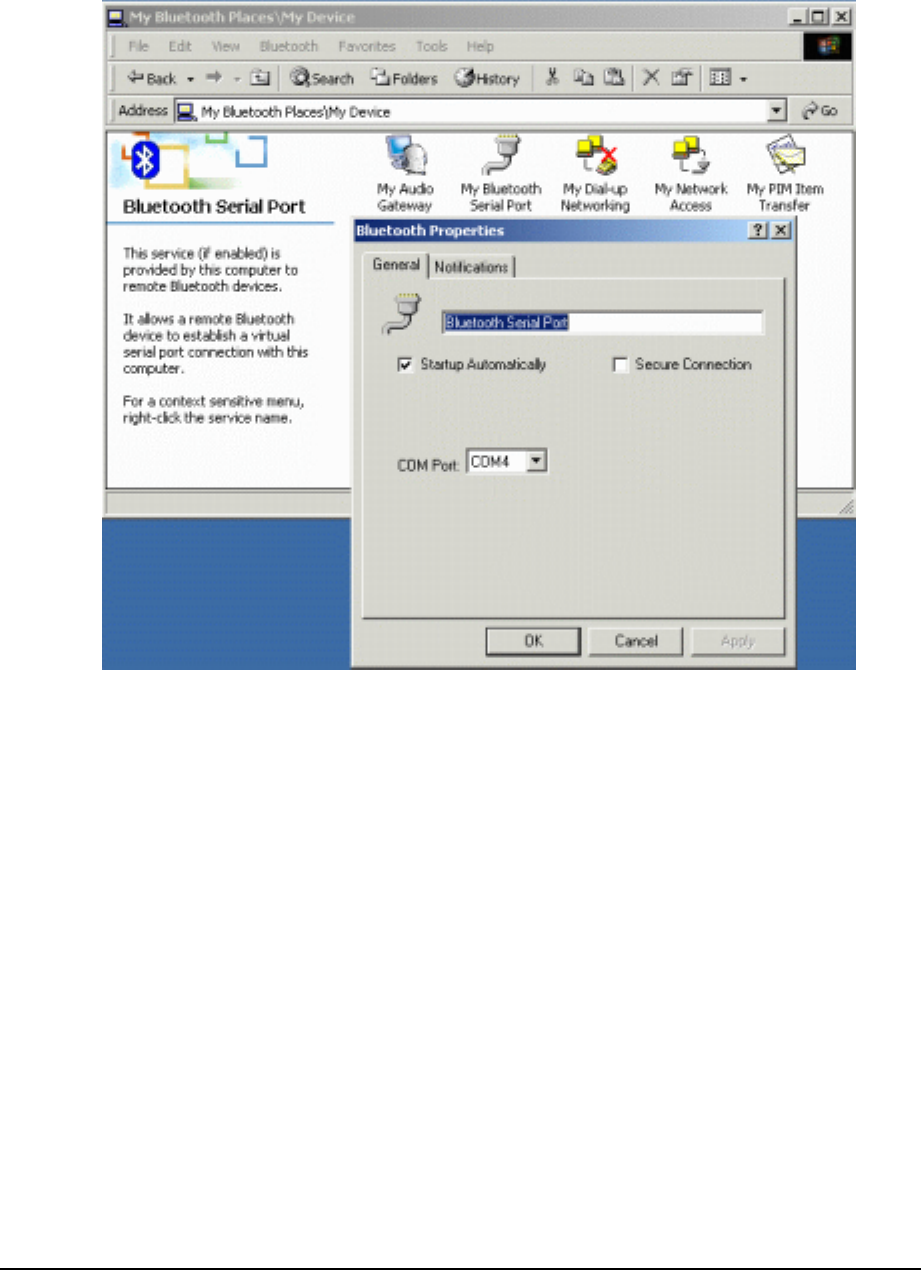
To determine the communications port being used by the service:
* On the server, in the Folders pane of "My Bluetooth Places", right-click "My Device"
and select "Properties" from the pop-up menu
* In the "Bluetooth Configuration Panel", select the "Local Services" tab.
* Double-click the "Bluetooth Serial Port" service to display its "Service Properties"
dialog box. The "Service Properties" dialog box shows the communications port the
connection is using.
To close a Bluetooth serial port connection
Connections are normally closed from the client:
* On the client, in the Folders pane of "My Bluetooth Places", select (highlight) the device
that is providing the "Bluetooth Serial Port" service.
* In the right pane of "My Bluetooth Places", right-click "Bluetooth Serial Port" and then
select "Disconnect Bluetooth Serial Port" from the pop-up menu. Though not
recommended, connections can also be closed from the server:
* On the server, in the Folders pane of "My Bluetooth Places", select (highlight) "My
Device".
* In the right pane of "My Bluetooth Places", right-click "Bluetooth Serial Port" and then
select Stop to close the service. The service must be re-started before it will be available to
remote devices (right-click Bluetooth Serial Port and select Start from the pop-up menu).
36
3.9. ActiveSync setting
ActiveSync setting for Windows
1. Right-click on Bluetooth Configuration icon from the toolbar in the desktop window.
Select Setup and then open Configuration window.
2. Select Local Service tab from the Bluetooth Configuration window. In the Service
Properties window, please learn by heart the current COM port this computer uses, for
example: COM 6, in order to identify this value with the configuration of Microsoft
ActiveSync later.
37
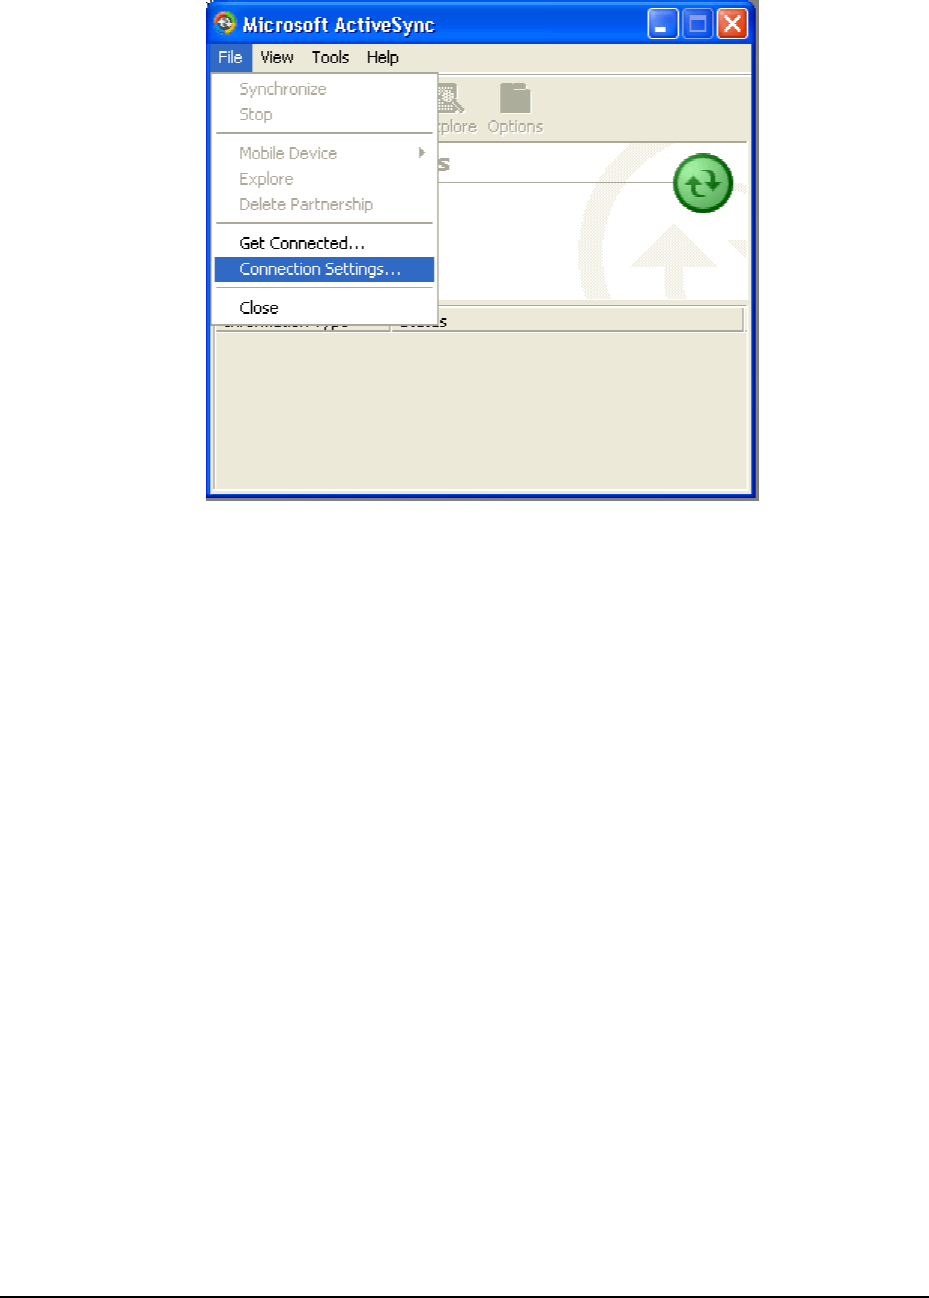
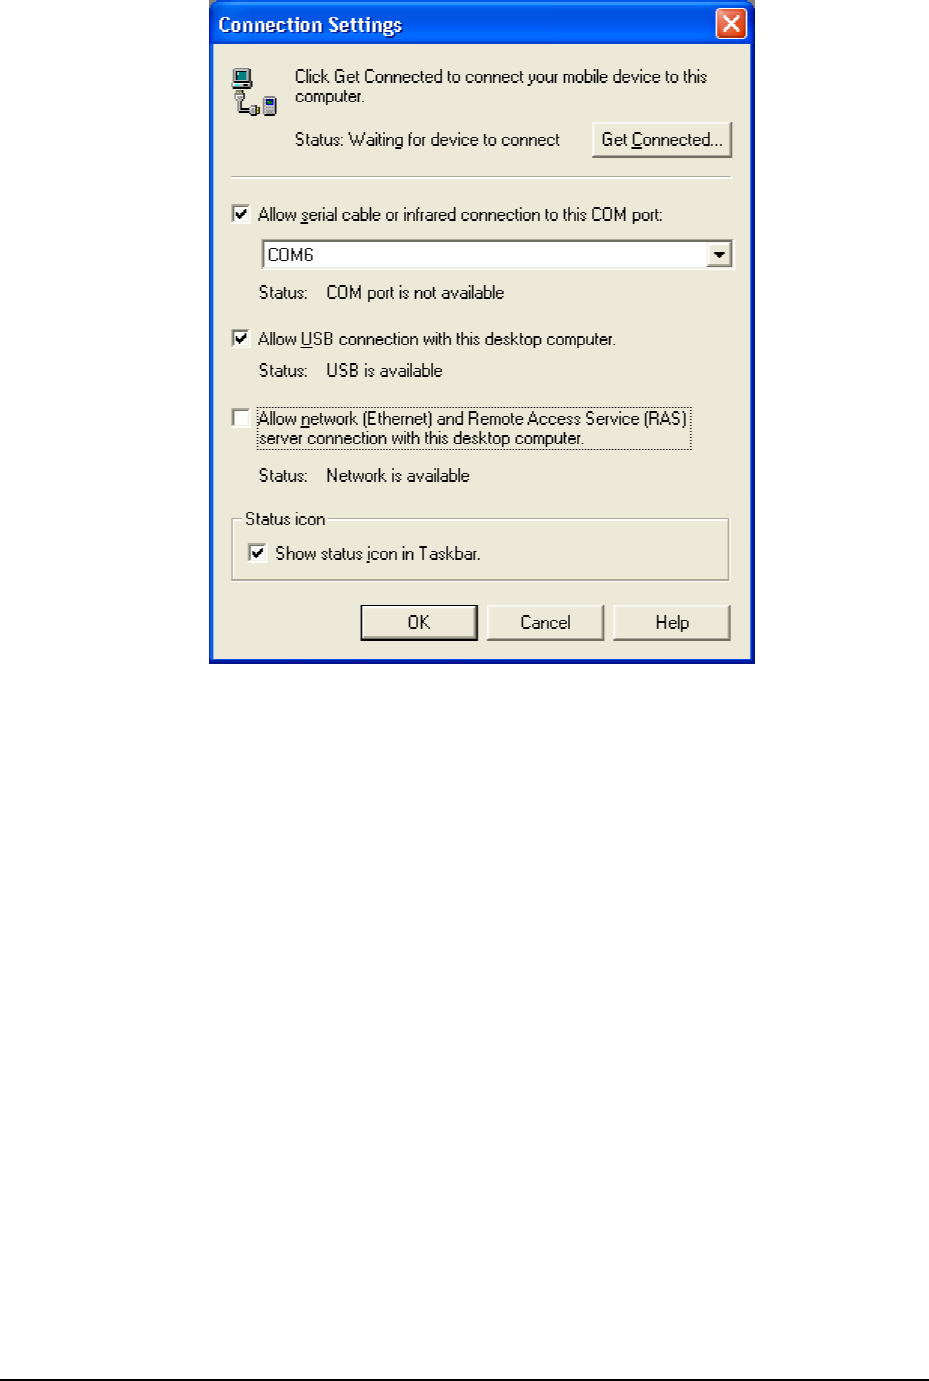
3. In the Microsoft ActiveSync window, select Connection Settings... from drop-down list
of File menu.
4. Choose the same COM port. (in this case, it is COM 6 that Bluetooth Serial port uses
shown in the Step 2.)
38
5. Please refer to the PDA ActiveSync Setting to complete the Bluetooth ActiveSync
Configuration Process
39
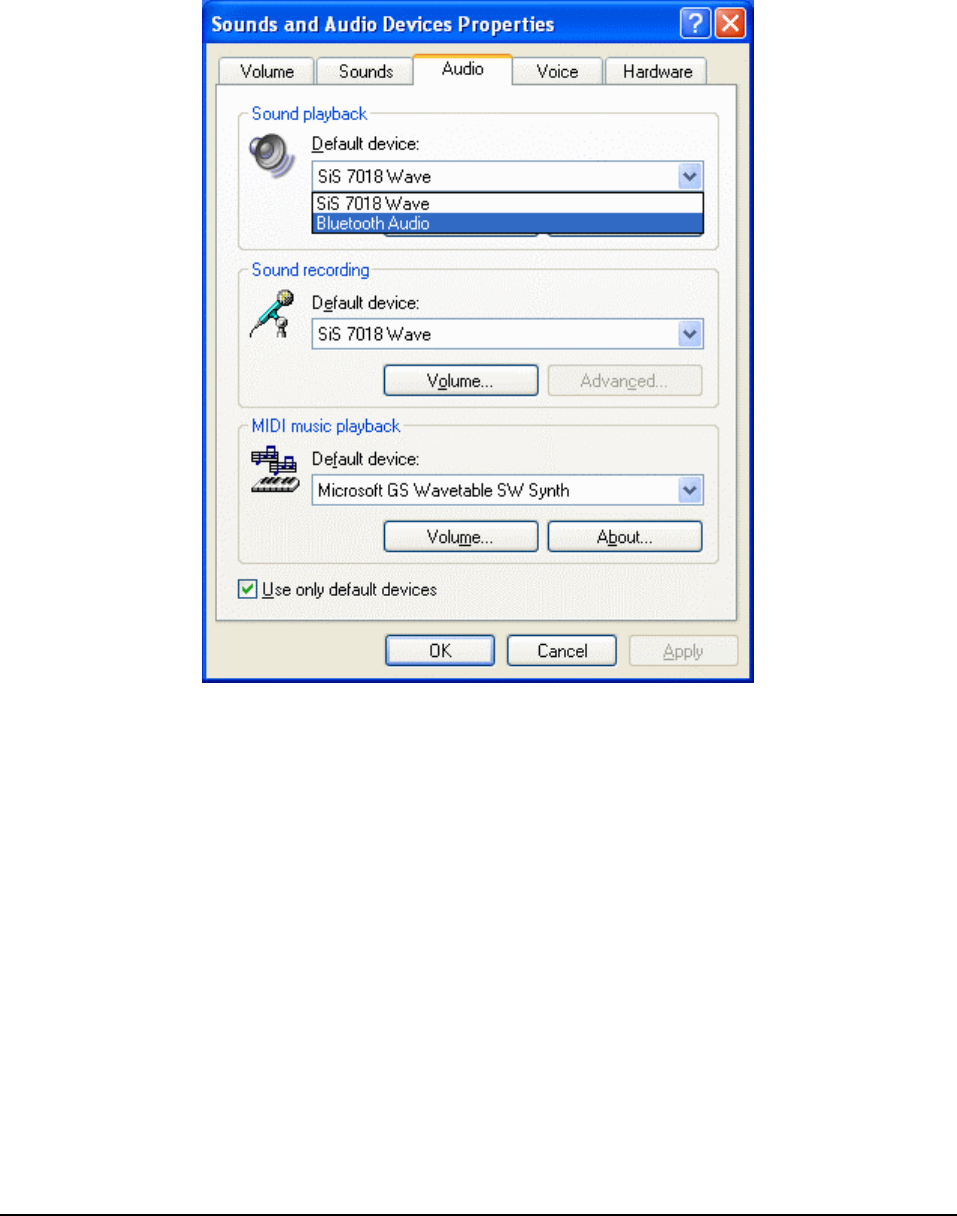
3.10. Audio Gateway setting for windows
The Audio Gateway Application allows a remote Bluetooth device to use this computer's
microphone and speakers as the remote device's audio input and output devices.
*Remember please switch your Audio device to "Bluetooth Audio" from control panel.
Open a connection to the Audio Gateway service that is provided by another Bluetooth
device using one of these techniques:
• Windows system tray, Bluetooth icon
• From Bluetooth Explorer
• Using the Bluetooth Setup Wizard
40
From Bluetooth Explorer to connection your headset device.
Key in headset pair key or PIN code. (Refer to the Headset's user's manual for reference)
Close an audio gateway connection:
If the connection was established via the Bluetooth icon in the Windows system tray; click
the Bluetooth icon, select Quick Connect, Audio Gateway and then select the device that
is providing the service (active connections have a checkmark in front of them). Or No
matter how the connection was created, In My Bluetooth Places, right-click the service
name and select Disconnect.Configure The Bluetooth Configuration Panel > Client
Applications > Audio Gateway > General tab provides options to configure:
• The application name-- to change it, highlight the existing name and enter the new
name.
• Enable or disable secure connection. To enable secure connection, place a
checkmark in the box.
41
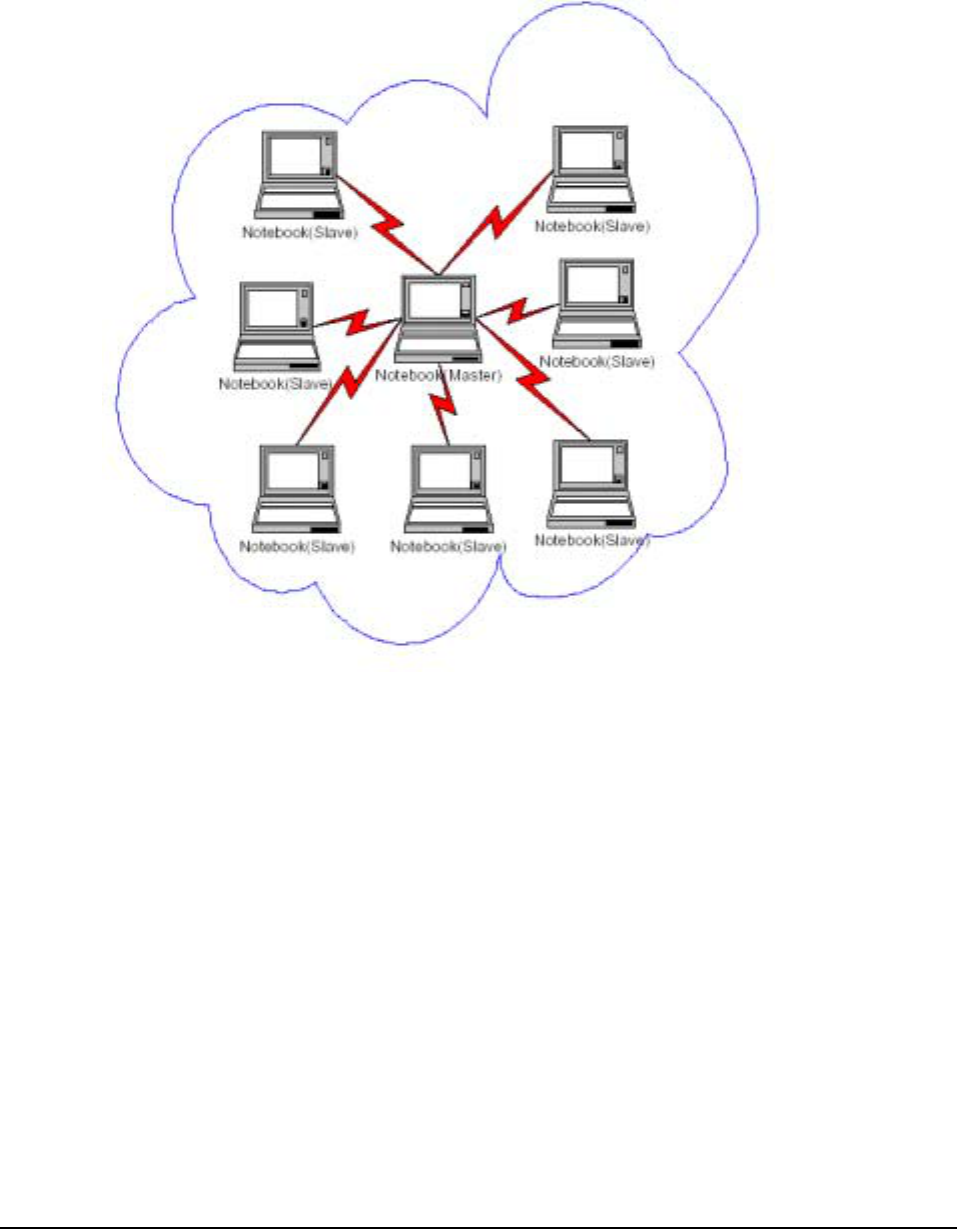
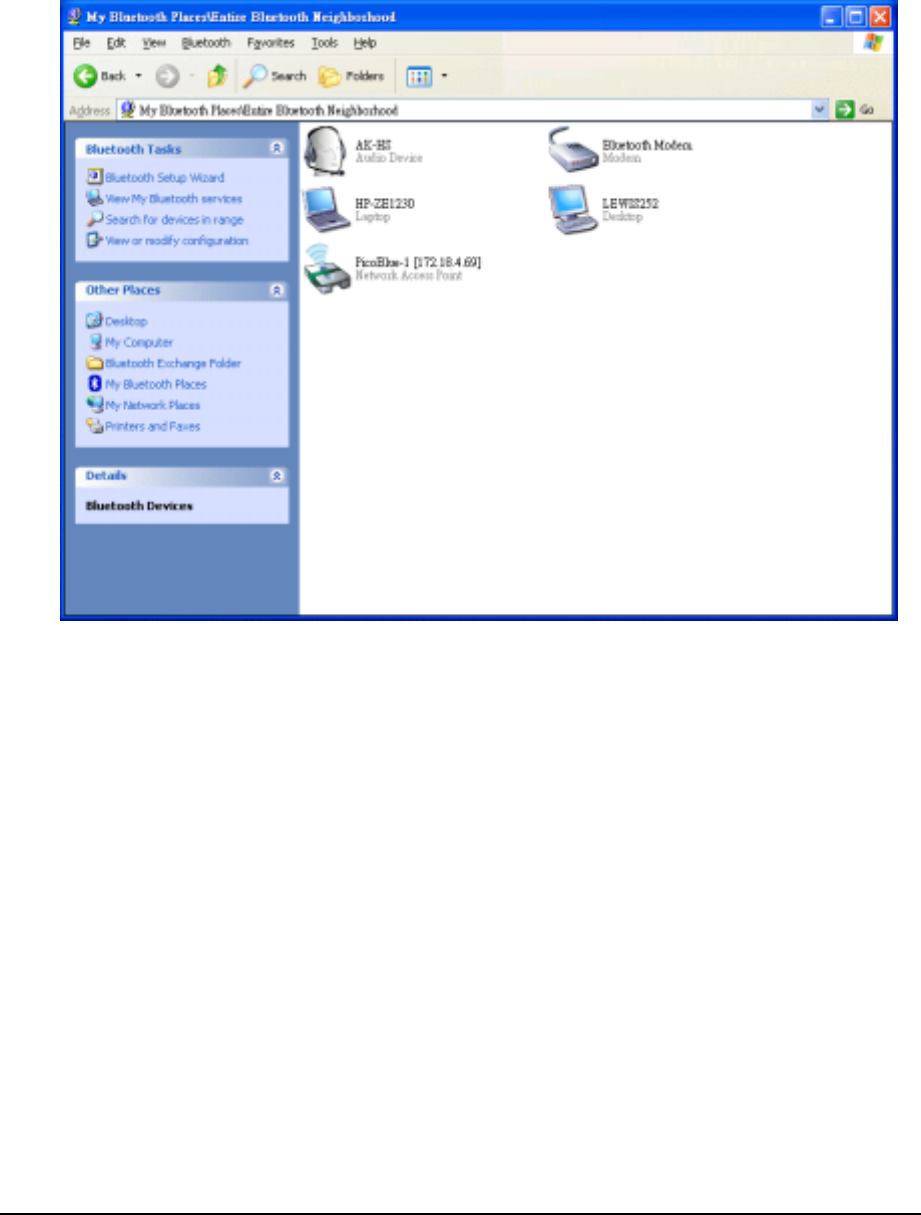
3.11. Personal area network setting for windows
The Personal Area Networking (PAN) chapter will show you how two or more Bluetooth
enabled devices can form an ad-hoc network and how the same mechanism can be used
to access a remote network through a network access point.
42
How to setup an Ad-hoc Network
1. On the client, in the Folders pane of "My Bluetooth Places", select "Entire Bluetooth
Neighborhood".
2. In the right pane of "Entire Bluetooth Neighborhood", right-click anywhere except on
a device name and select Refresh from the pop-up menu.
3. In the right pane of "My Bluetooth Places", right-click the server that will provide the
Networking Access Service and select Discover Available Services from the pop-up
menu to update the available services list. The available services will be displayed in
the right pane of "My Bluetooth Places".
Double click Network Access to establish a PAN network.
43
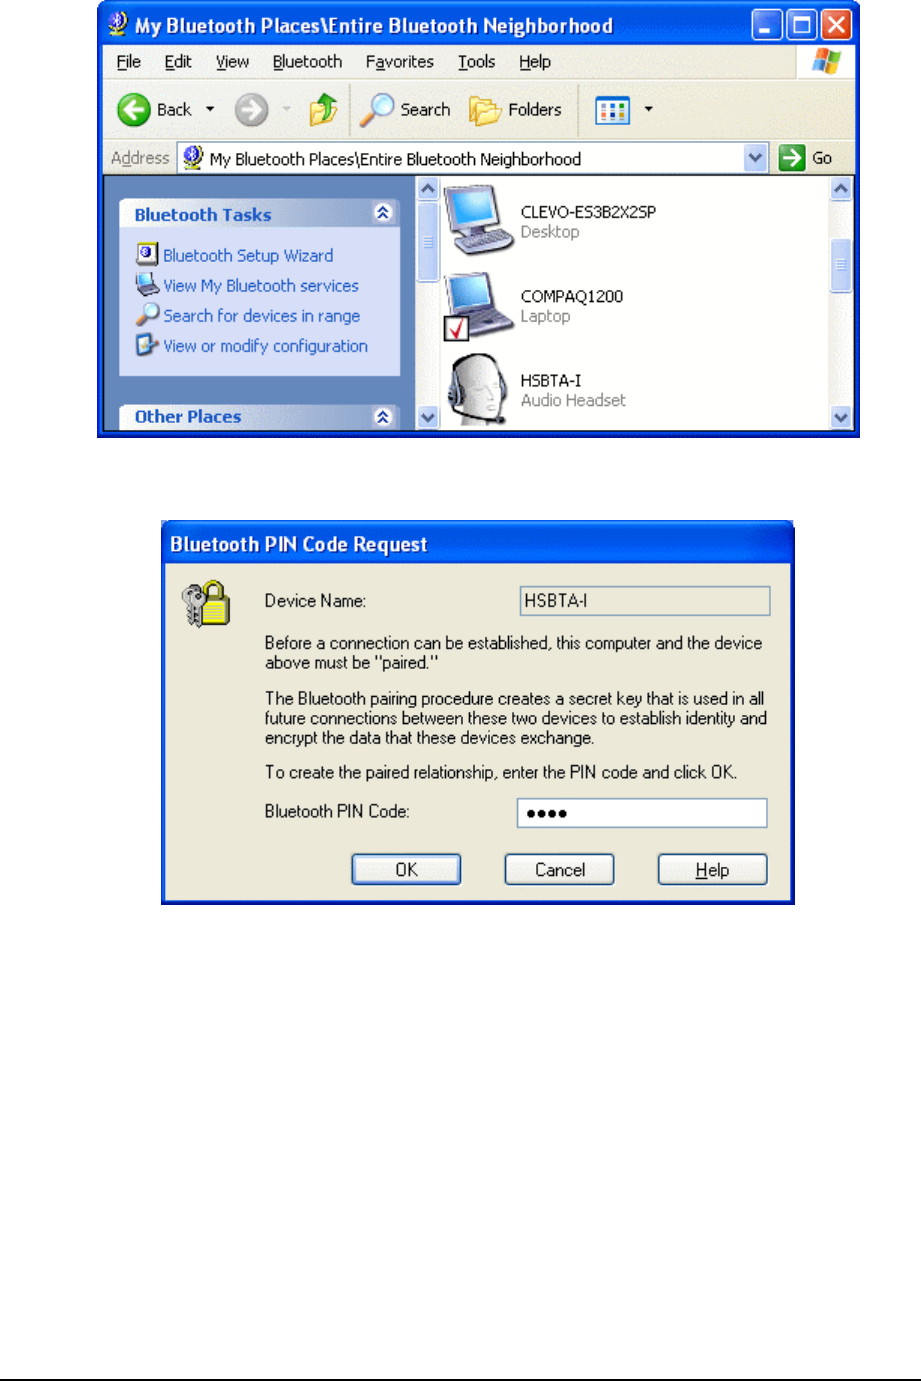
If the system pops up a "Bluetooth PIN Code Request" window please key in the same
passkey or PIN code between the two devices.
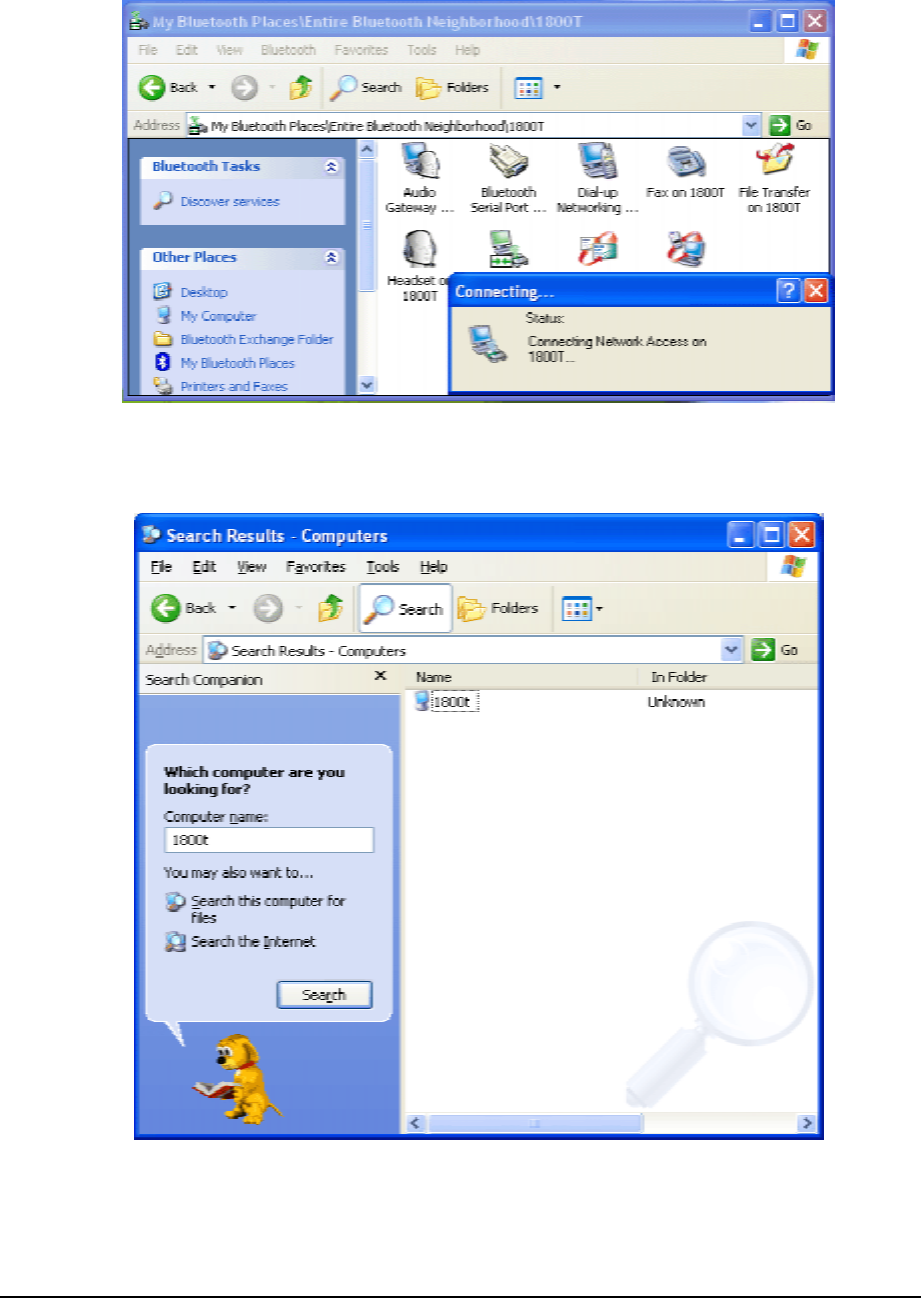
Once connected, you can check your Bluetooth PAN network neighborhood from the file
explorer or by the "Search Computers" function.
44
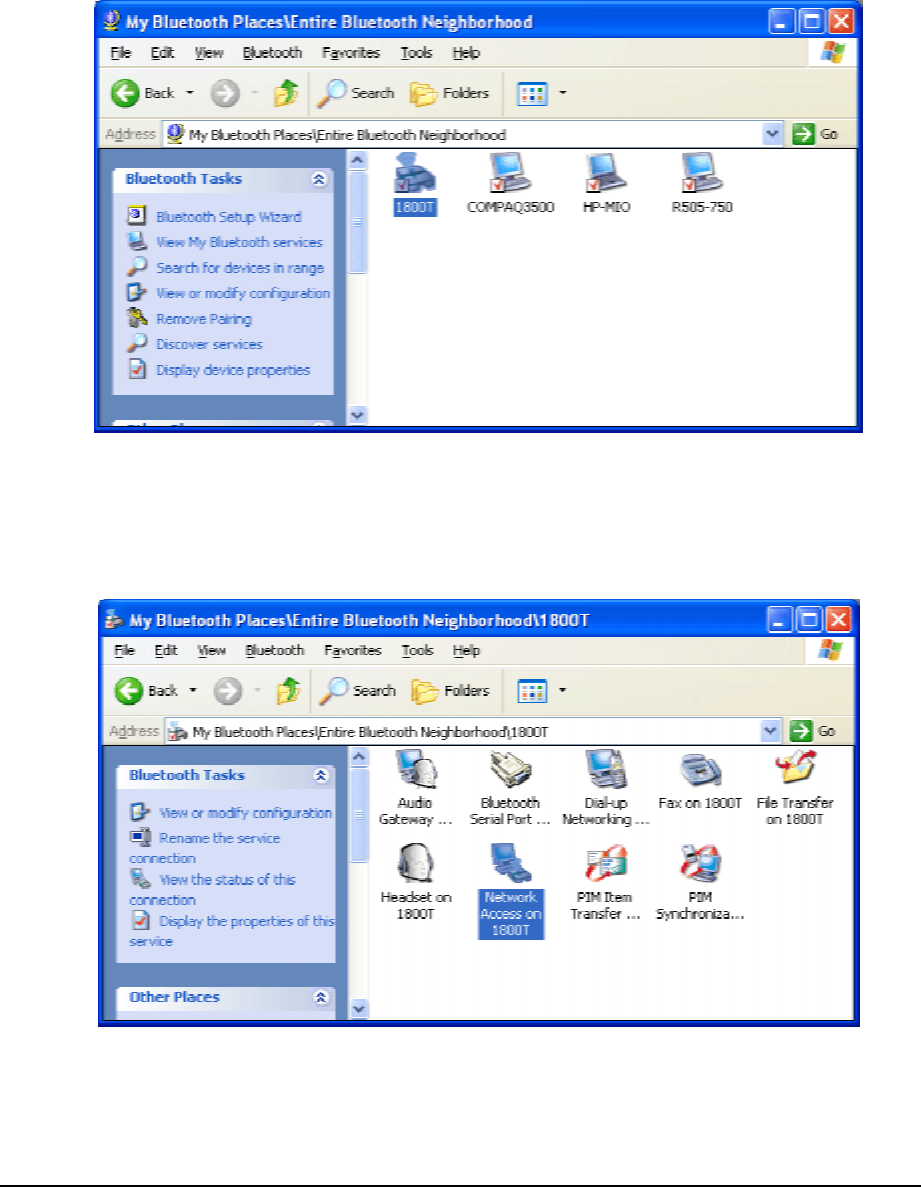
How to setup with Bluetooth Network Access Point
The Bluetooth Software makes it easy to join an existing personal network, hosted by
another Bluetooth device (PocketPC, desktop, etc.) From the My Bluetooth Places,
choose Entire Bluetooth Neighborhood, and select the Bluetooth device that you want
to establish a PAN connection and double click the device icon.
45
It will list out all the available services of this device, please select the LAN Access.
Right click the LAN Acess and select "Connect to Network Access Point", your PC will
initially connect to the Network Access Point.
After enter the Buletooth PIN Code, a connection will then be established between your
PC and the host over the personal network.
46
Chapter 4
Advanced features
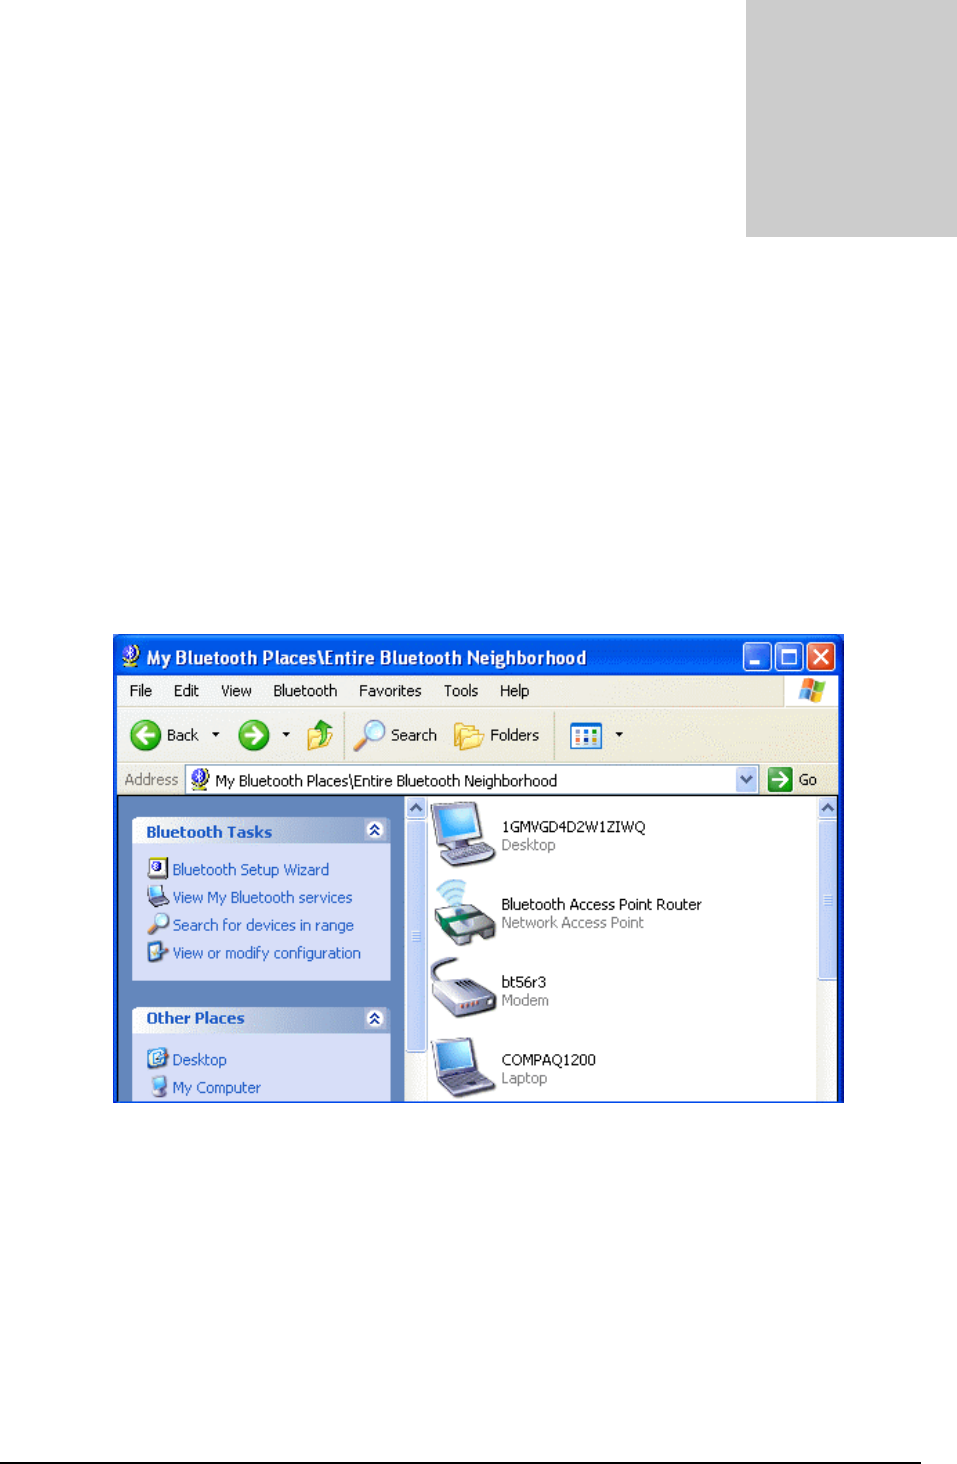
4.1. How to set up HyperTerminal for Bluetooth transfer
1. Install Bluetooth Software on two separate notebooks or desktop PCs (referred to as
server and client in the following document).
2. With Bluetooth adapter inserted, do a "Search for devices" on client to find near by
Bluetooth devices.
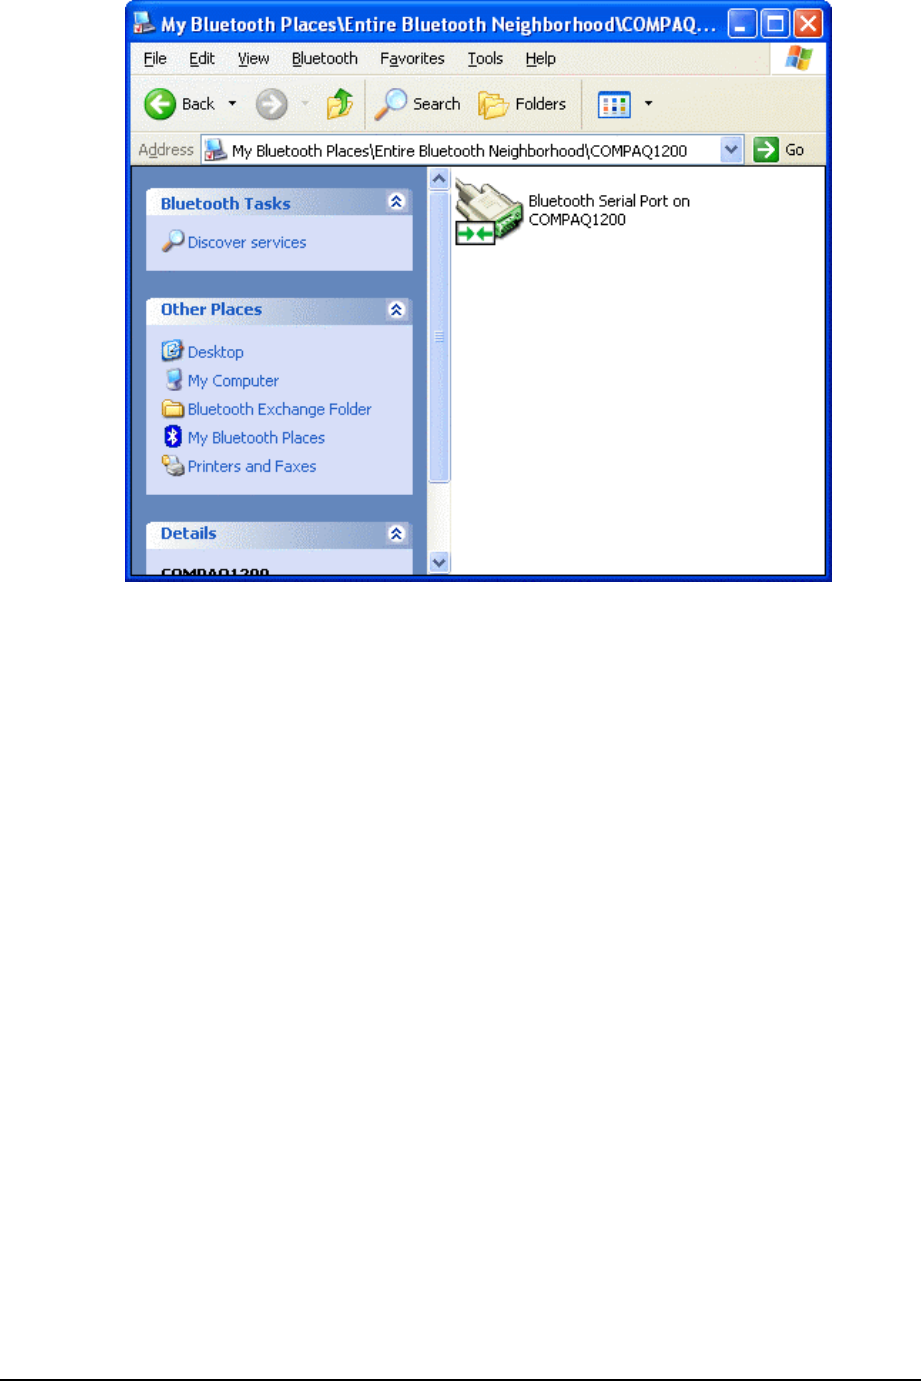
3. Double click on the Bluetooth device you wish to connect to (e.g. COMPAQ1200, the
server).
4
4
47
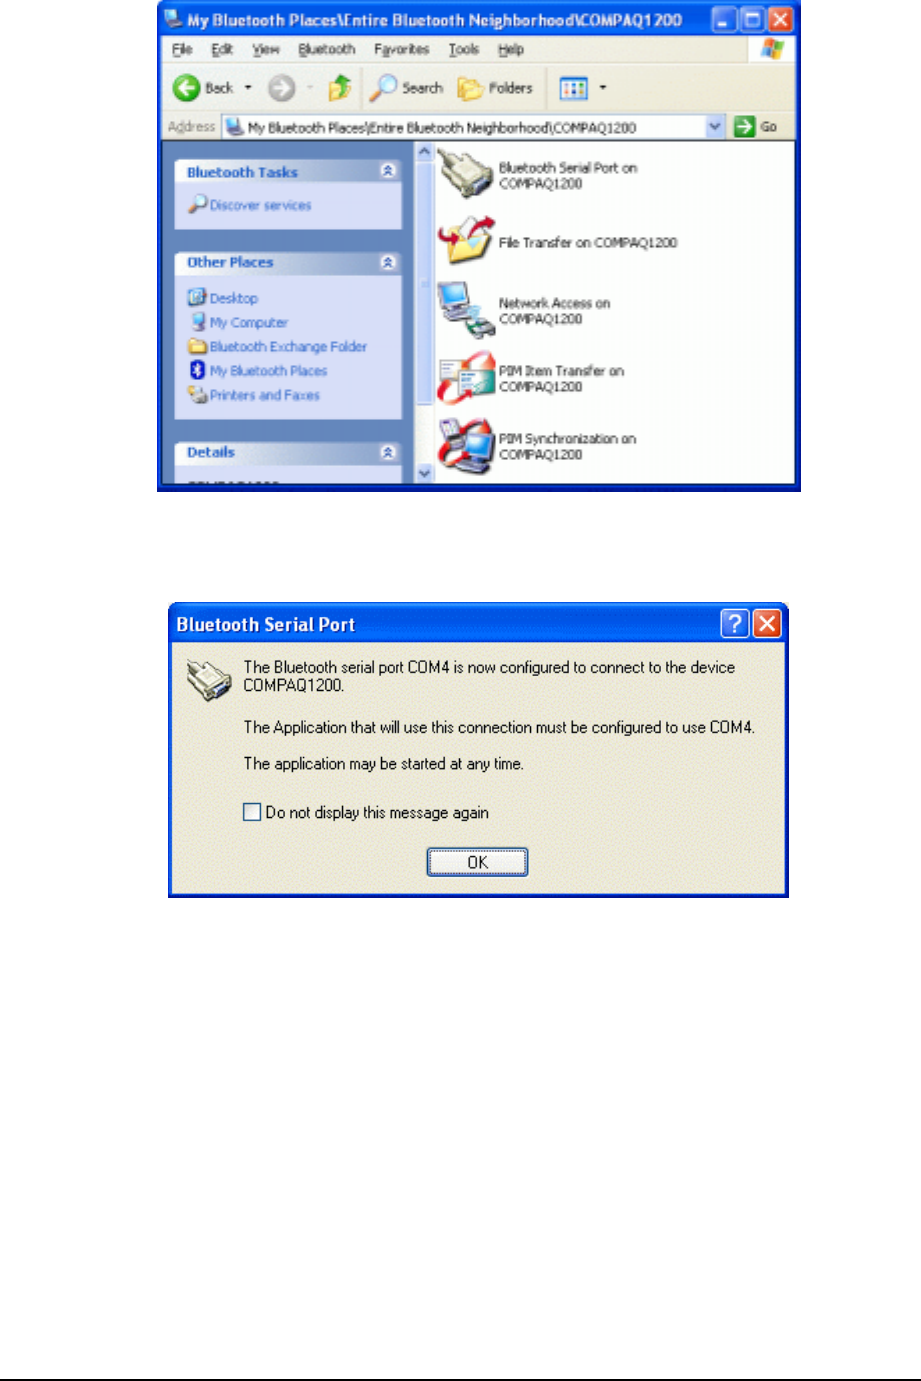
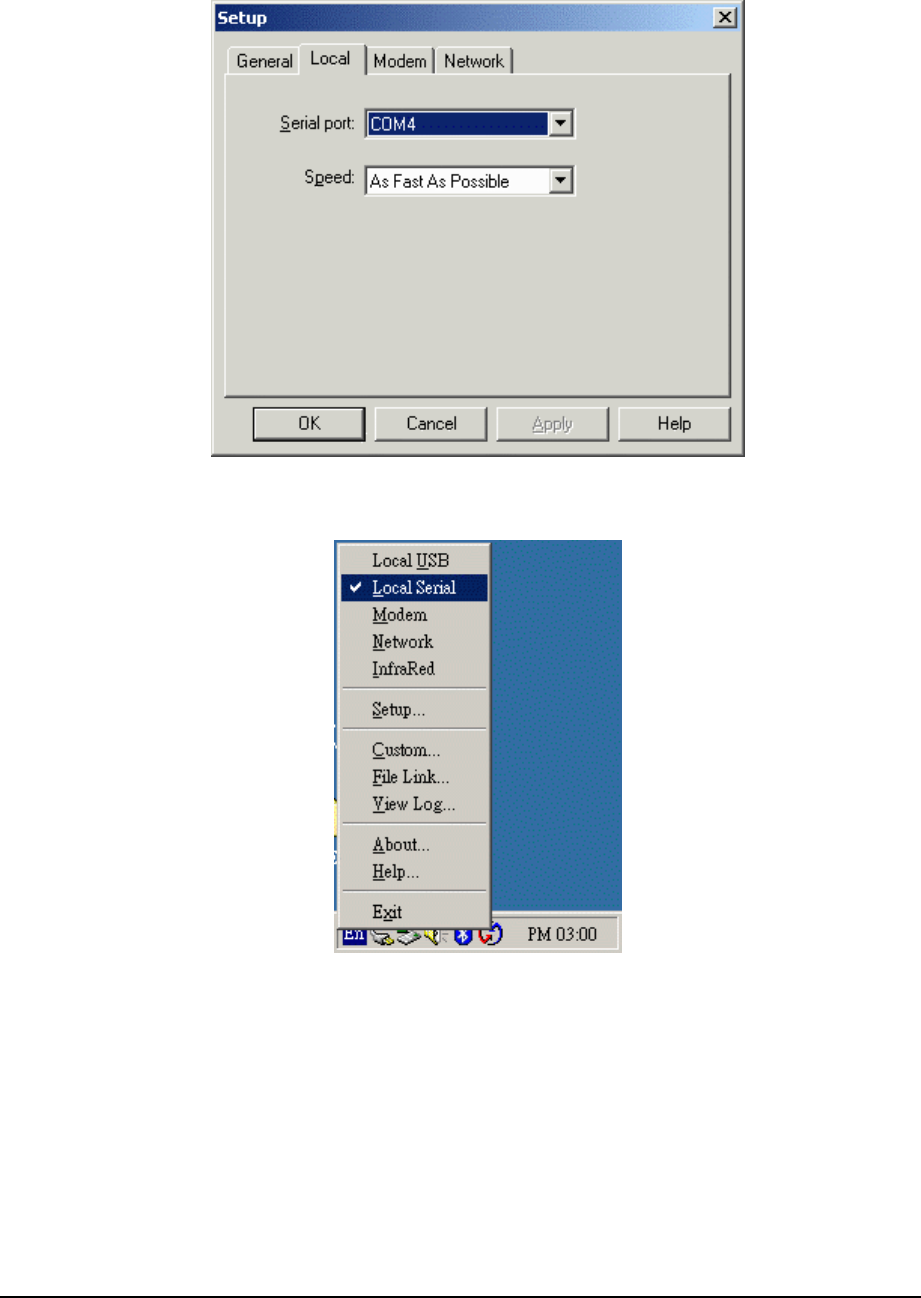
4. Double click on "Bluetooth Serial Port"; take a note of the COM port used by this
connection (e.g. COM4).
5. The Bluetooth Serial connection should now be established.
48
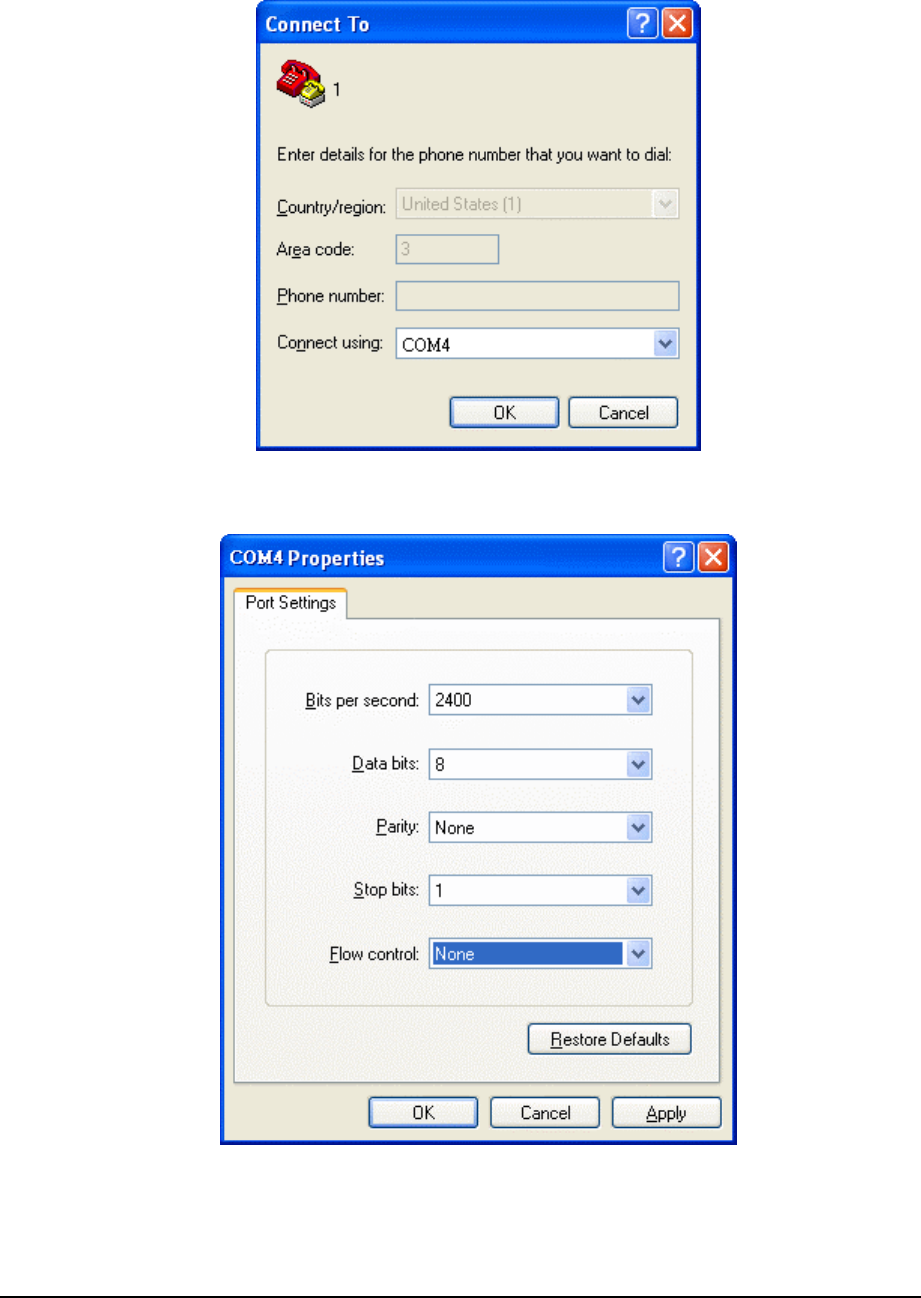
49
6. On the client side, open HyperTerminal. Choose the COM port used by the Serial
connection in step 4.
7. Set the baud rate and other settings as required.
50
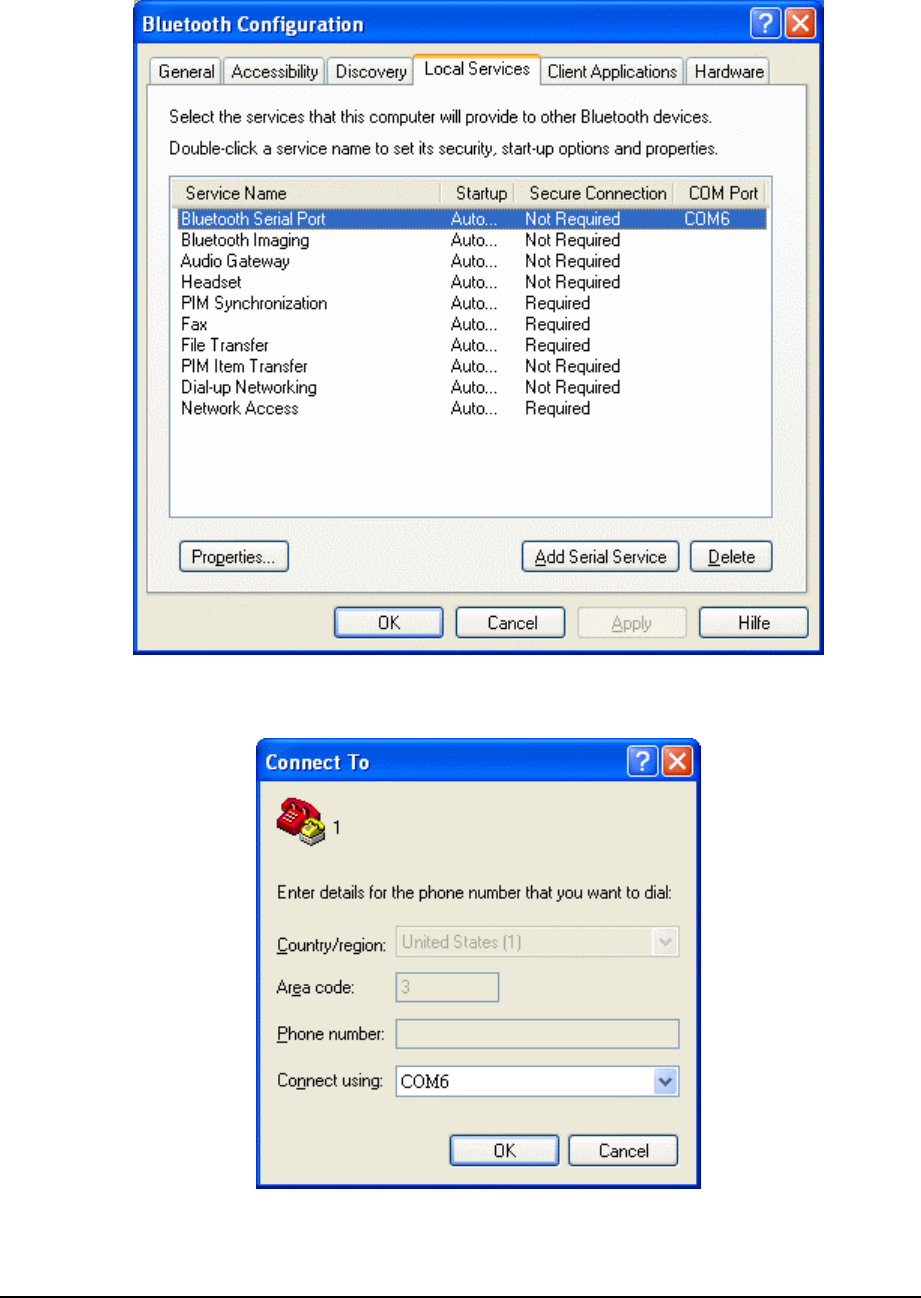
8. On the server side, check the local COM port used by the system in the Bluetooth
Configuration window (e.g. COM6).
9. Open HyperTerminal, choose the COM port used by the system in step 8.
51
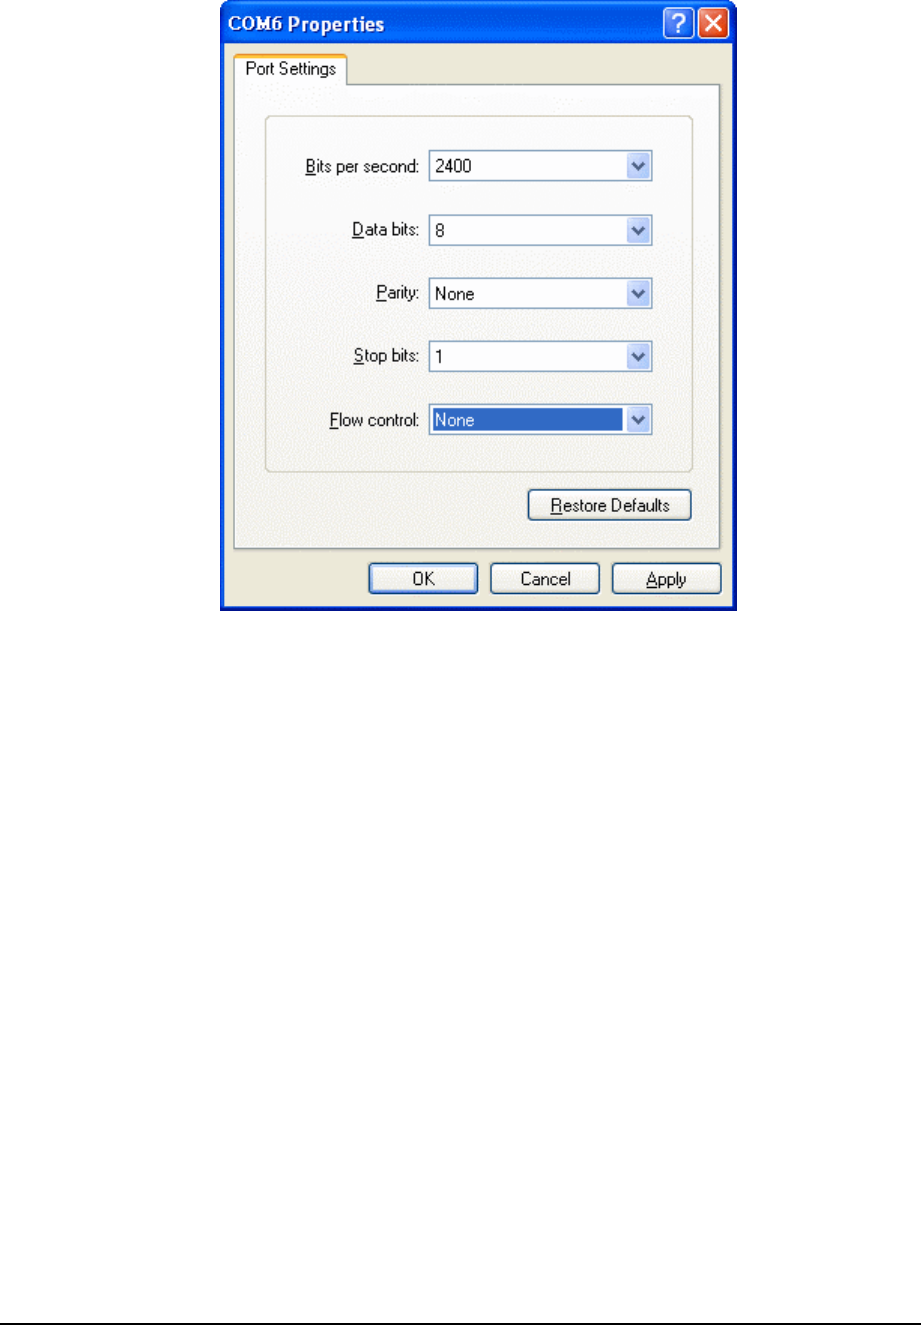
10. Set the baud rate and other settings as required.
11. The HyperTerminal connection should now be established. Type something on the
client side and the same thing will appear on the server.
12. To transfer files, select "Send File" from the menu bar of the client system, and select
the file you wish to transfer.
13. The received file should be placed on the C: drive of the server system (default
location).

52
4.2. How to HotSync with Palm Bluetooth SDIO and Tungsten T
Please make sure you have installed Bluetooth software and Palm Desktop on your
notebook or desktop PC before proceeding to the setup instructions below.
1. From the Palm main panel, tap the HotSync icon.
2. Tap HotSync and select "Connection Setup" from the menu bar.
3. Tap "New".
4. Give the new connection a name, e.g. BTConnection.
5. Change "Connect to:" to "PC".
6. Change "Via:" to "Bluetooth".
7. The "Device:" option will pop up, tap to find the Bluetooth system you wish to HotSync
with.
8. Select the Bluetooth system you wish to HotSync with and tap OK.
9. Tap "Yes" when prompted with "Do you want to add *** to your trusted device list?".
10. Key in the same passkey on Palm and your notebook or desktop PC to complete the
pairing process.
11. Tap "OK" and "Done" to return to the HotSync panel.
12. Tap the dropdown menu to select the Bluetooth connection you have just created. E.g.
BTConnection.
53
13. From the notebook, find out the local COM port used by "Bluetooth Serial Port", e.g.
COM4. (My Bluetooth Places->My Device, right click My Bluetooth Serial Port and
select Properties)
54
14. Change the COM port setting in Palm HotSync to match the COM port found in step 11,
e.g. COM4.
15. Change the connection type to "Local Serial" in the HotSync Manager.
16. Tap the HotSync silk button on Palm, and the HotSync process should begin in a few
seconds.

55
4.3. How to dial-up from Palm Tungsten T to my PC's modem to
surf the Internet
1. Enable Bluetooth on your PC and make sure you can dial up to the ISP with your
modem.
2. On your Palm, in the main panel, tap "Prefs", select "Communication", and select
"Network".
3. Tap "New" button.
4. Key in a new name for "Service:", e.g. pcmodem.
5. Key in the "User Name:".
6. Key in the "Password:".
7. Tap on "Connection" and select "Edit Connections..." to create a new connection
setup.
8. Tap "New" button.
9. Key in a new name for "Name:", e.g. btmodem.
10. Tap on "Connect to:" and select "Modem".
11. Tap on "Via:" and select "Bluetooth".
12. Tap on "Device:", wait for your PC to be found.
13. Select your PC and tap "OK".
14. Palm will ask you to add your PC to the trusted device list, tap "Yes".
15. Key in a numeric passkey, e.g. 1, and tap "OK".
16. Type in the same passkey on your PC, now the pairing process is complete.
17. Make sure "Dialing:" is set at "Touch Tone".
18. Tap the "OK" button and "Done" to return to the Network page.
19. Tap on "Connection:" and select the connection setup you've just created.
20. Tap on "Phone:" and enter the phone number of your ISP.
21. Tap the "Connect" button and the modem on your PC should start dialing.
22. Once connected, launch a web browser and you should be surfing the Internet.
56
4.4. Sending FAX via mobile phone with WinFax Pro
NOTE: Please make sure you have subscribed to the FAX sending/receiving feature with
your mobile service provider.
1. Please install WinFax Pro according to WinFax Pro's installation instructions.
2. Before installing WinFax Pro, Please make sure that your computer is connected with
a physical Fax Modem.
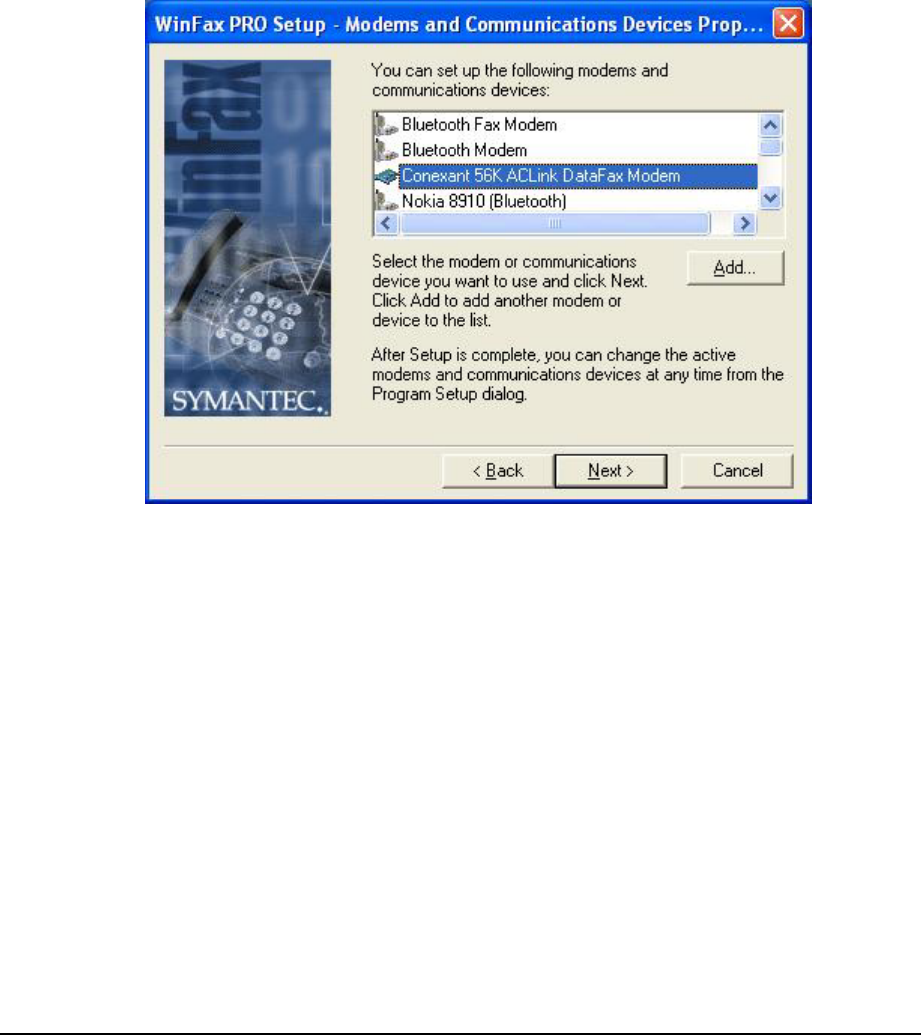
3. After installing WinFax Pro, the following window will pop up, choose your physical
modem at this stage. Do NOT choose "Bluetooth Fax Modem".
57
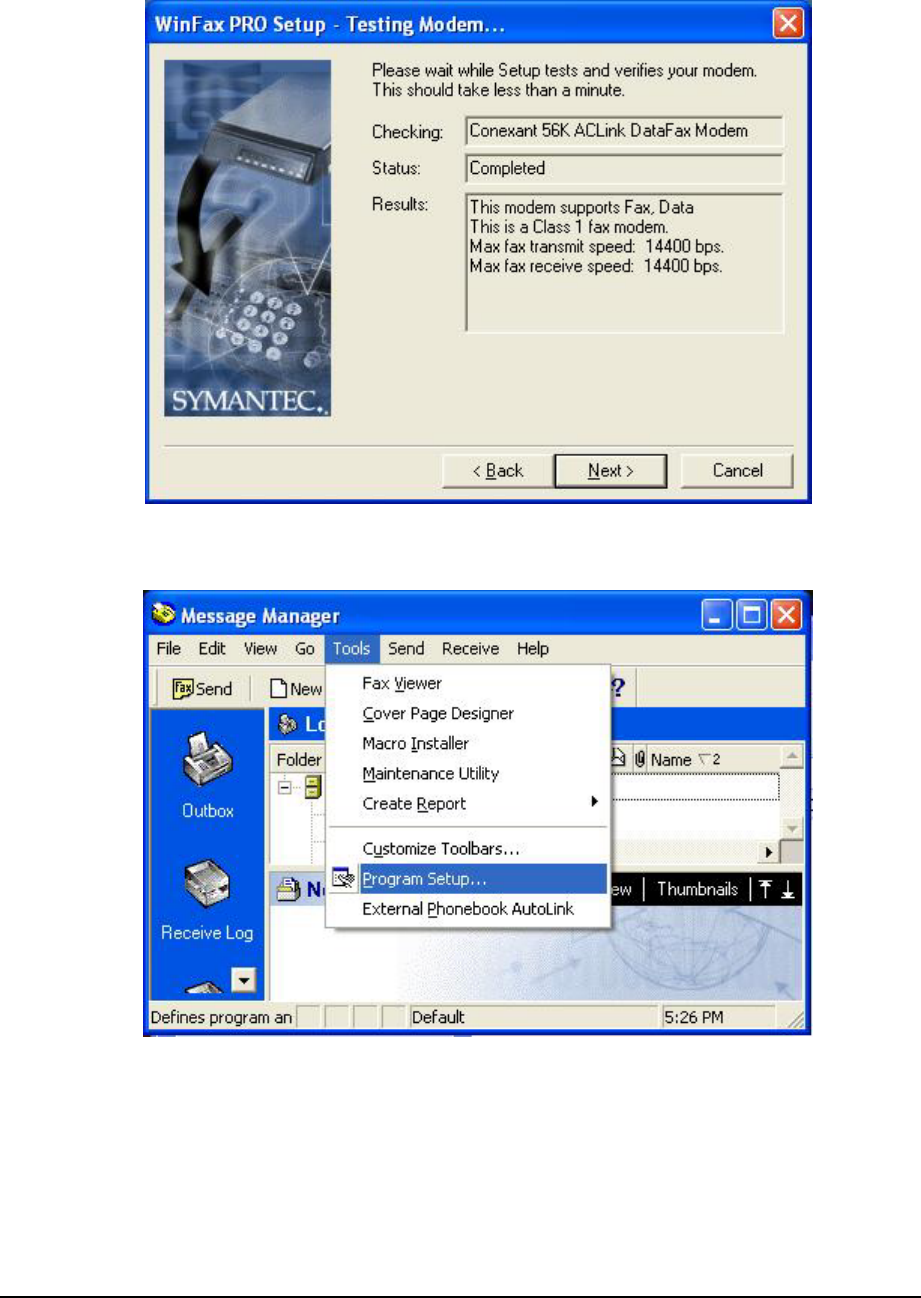
4. WinFax Pro will start testing the Fax Modem, once it's completed, click Next to
continue.
5. After installation, launch WinFax Pro. Click on Tools→Program Setup.
58
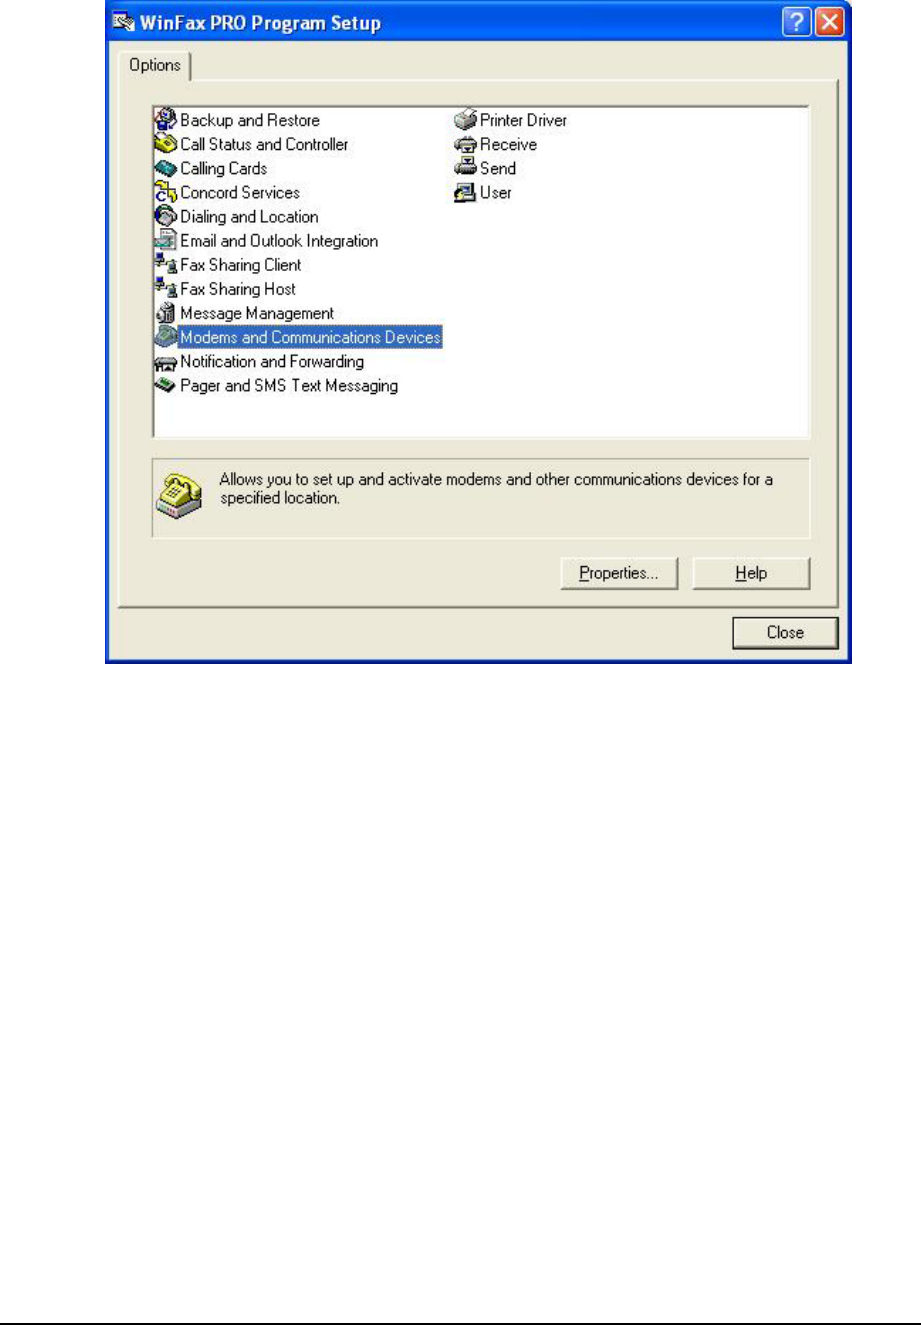
6. Double click "Modems and Communications Devices".
59
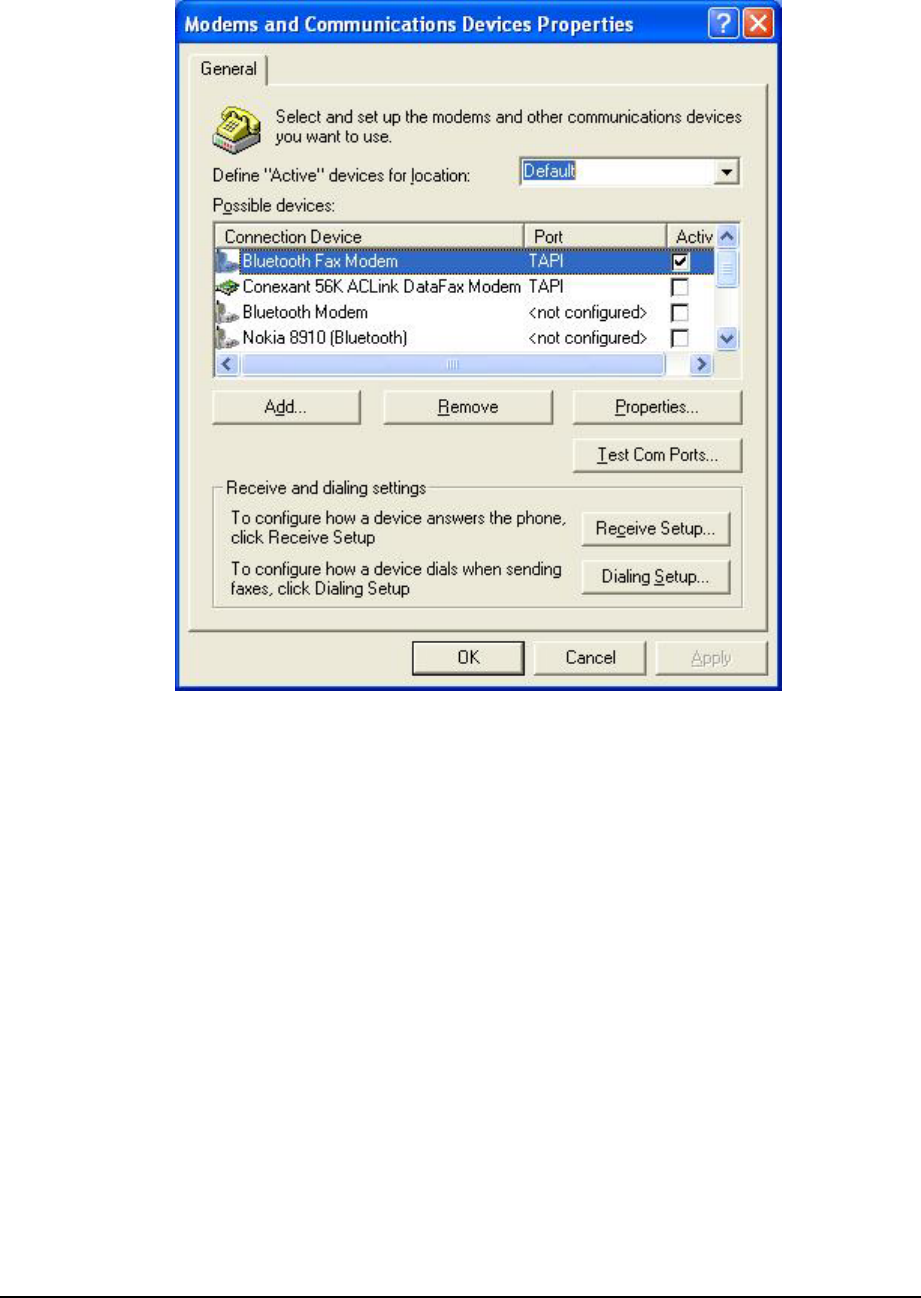
7. Tick the checkbox next to Bluetooth Fax Modem. Uncheck the checkbox next to your
physical modem.
60
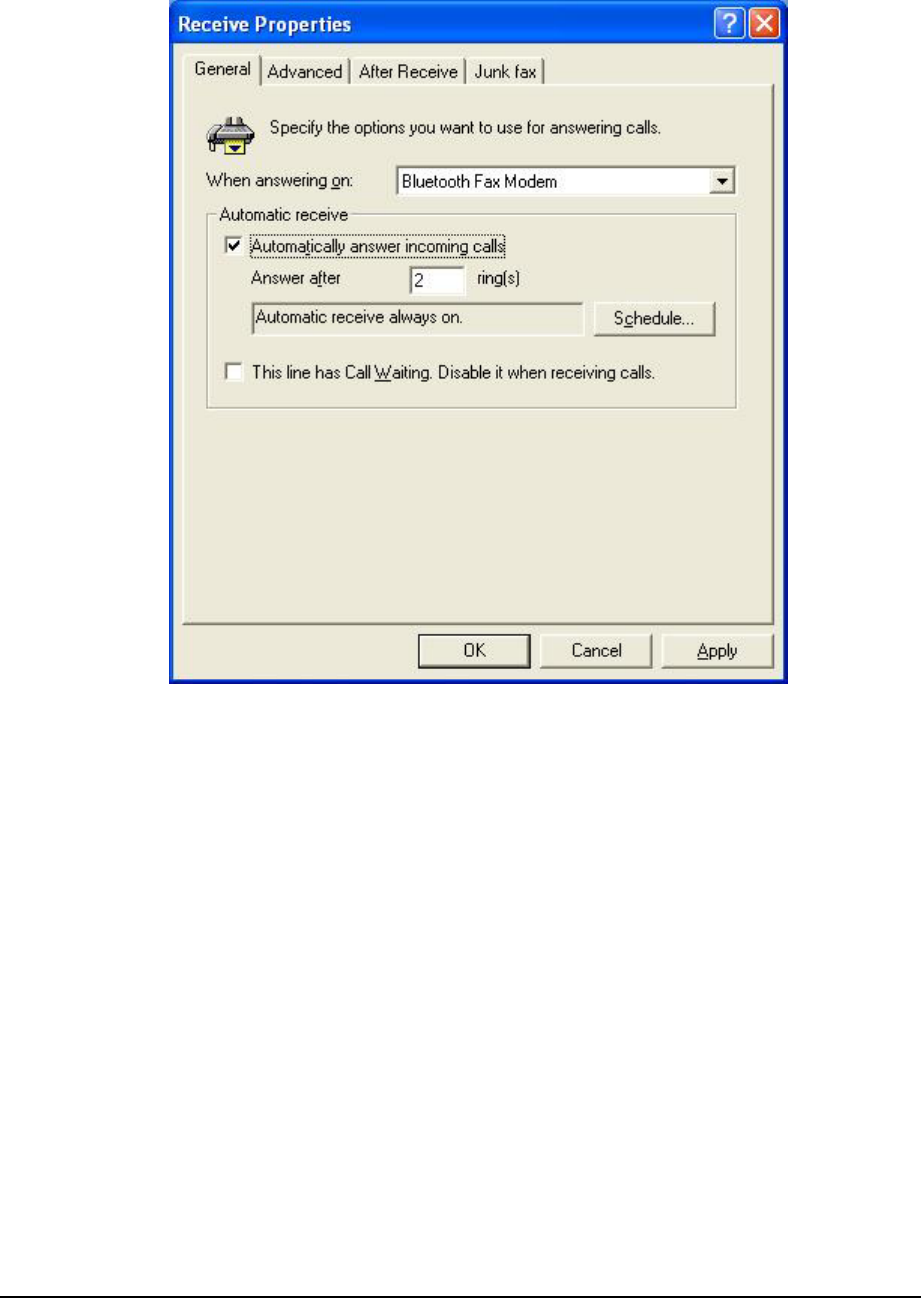
8. Click the "Receive Setup" button, tick the "Automatically answer incoming calls"
checkbox. Click "OK" to complete the process.
9. Now create a new fax and click the "Send" button when done. Your can now send
faxes via your mobile phone.
61
Troubleshooting
Q1: Why couldn't my Bluetooth device find any nearby Bluetooth devices?
A1: (1) Please check that your Bluetooth device is enabled by opening the Bluetooth
Configuration window.
62
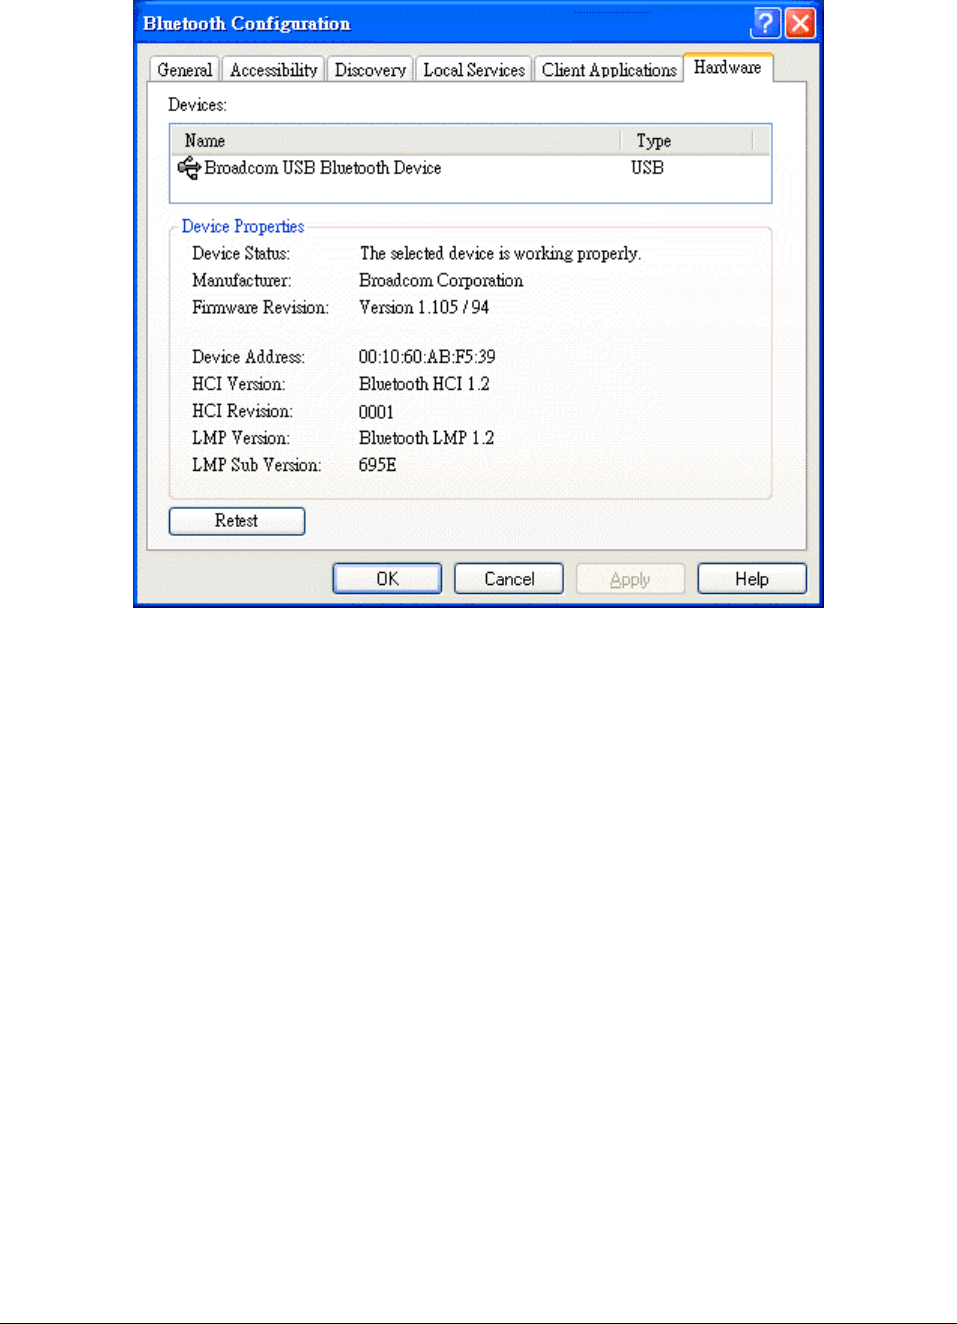
(2) If the Bluetooth device is enabled, you will see something of the following nature.
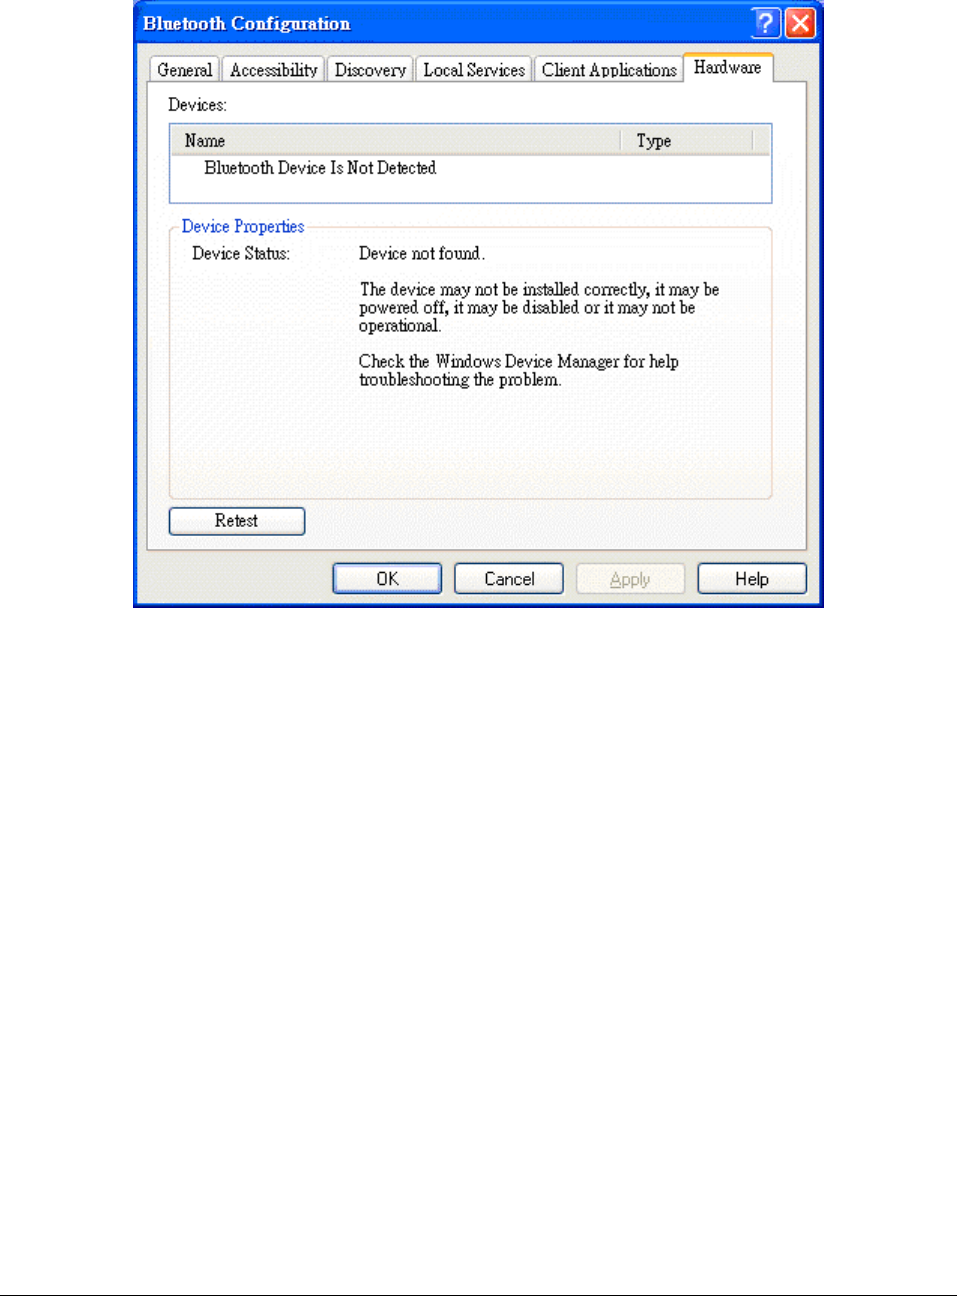
63
(3) Otherwise, for USB Bluetooth adapter, please unplug then plug in the USB
Bluetooth adapter to enable the device.
Q2: Why can't I transfer files from Nokia 7650 to my PC?
A2: If you are having trouble sending files from Nokia 7650 to your notebook or PC, follow
the steps below:
(1) Execute "regedit" from the Run command (Start->Run)
(2) Locate the key:
HKEY_CURRENT_USER\Software\Widcomm\BTConfig\Services\0004, and locate
the entry "Accept other".
(3) Set this key to 0x0000001.
If the "Accept other" key does not exist, simply create it with type DWORD and fill in
the value.
Save and exit Regedit. Reboot if necessary, now you should be able to send files
from Nokia 7650 to your notebook or PC.

64
Q3: How come some devices within the connection range may not show up in the list of
devices found?
A3: Your device is configured to report only specific types or classes of devices (Bluetooth
Configuration Panel > Discovery tab, on your device). The unlisted device is
configured to be non-discoverable (Bluetooth Configuration Panel > Accessibility tab,
on the un-listed device).
Q4: Cannot connect to a paired device.
A4: Paired devices are always displayed in My Bluetooth Places, even if the remote
device is out of range or not powered up.
Verify that the remote member of the pair is within radio range, and powered up, and
then attempt the connection again.
Q5: Cannot discover services on an un-paired remote device
A5: The remote device may not be powered up or may be out of range.
Verify that the remote device is powered up.
Verify that the remote device is in Connectable mode (Bluetooth Configuration
Panel > Accessibility tab).
Perform a Search for Devices to verify that the device is within range.
Q6: Dial-up networking service does not start.
A6: The Dial-up Networking service will not start unless a properly configured modem is
attached to the server.
Verify that the modem is usable as a local device on the computer to which it is
attached. In the Bluetooth Configuration PanelLocal Services tab double-click
the Dial-up Networking serviceClick the down arrow in the Modem field and
select the modem that will be used to dial out, click the OK button to close the
Bluetooth Configuration Panel.
Q7: Determine the Bluetooth device address (BDA) of my hardware device.
A7: In the Bluetooth Configuration Panel, on the Hardware tab, in the Devices section,
select the device you want to determine the address of. In the Device Properties
section of the dialog box, the fourth entry, Device Address, is the BDA of the selected
Bluetooth device.
Q8: Determine the version of the host controller interface (HCI)
A8: In the Bluetooth configuration panel, on the hardware tab, in the device properties
Section, the fifth entry provides Bluetooth specification compliance information for the
host controller interface.
The sixth entry contains the specification revision information for the host controller
Interface, if appropriate.
Q9: Determine the version of the link manager protocol (IMP)
A9: In the Bluetooth configuration panel, on the hardware tab, in the device properties
section, the seventh entry provides link manager protocol version number
information.
The eighth entry contains the link manager protocol sub-version number information,
if appropriate.
Q10: How to find information about the Bluetooth hardware attached to my computer?
A10: In the Bluetooth configuration panel, select the hardware tab.
Q11: Internet connection sharing does not work

65
A11: This occurs because Internet connection sharing was enabled when Bluetooth was
installed (this is a Microsoft windows behavior and is considered proper operation).
To resolve the “problem”:
1. Disable sharing for the Ethernet adapter:
(a) Windows control panel > network and dial-up connections
(b) Right-click “local area connection,” select properties, and then select the
Sharing tab.
(c) Clear (uncheck) the box for “enable internet connection sharing for this
“Connection” and click ok.
2. Re-enable sharing for the Ethernet adapter; repeat step 1.c.), and select (check)
the sharing box.
If offered an option to select an adapter, select “Bluetooth network adapter” (this
option will not appear unless more than one adapter is available.) If asked to reboot
the computer, do so.
Q12: Test a network access connection.
A12: If the client is hardwired to the LAN, unplug the hardwired connection to ensure that
the Test checks the wireless connection rather than the hardwired connection.
If the server has access to the Internet, open a browser on the client and connect to
the World Wide Web.
You may also ping the server from the dos prompt.
Q13: Unknown port message when using a Bluetooth serial port.
A13: The “unknown port” error message usually means an attempt was made to connect
a port that was in use. Additional Bluetooth serial ports can be added if they are
required.
Q14: Bluetooth headset doesn’t always function under Win98.
A14: Windows 98 cannot convert audio files with the extension m3u (e.g., myfile.m3u) into
the pulse code modulation (pcm) audio format used by Bluetooth headsets; this is a
limitation of windows 98.
Other versions of windows (2000, me and XP) can translate m3u audio files into the
pcm format.
Possible solutions are:
Upgrade to a newer version of Windows
Use an m3u-to-mp3 conversion utility to convert the file(s) into a format that is
supported by Windows 98. (Conversion utilities are available as freeware or
shareware on the Internet.)
Q15: How to shift the Buletooth driver to the original one in Windows XP sp2. Please
follow below instrcutions:
A15: (1)Click on Start Control Panel Performance and Maintenance System,
choose Hardware and then Device Manager on System Properties. After open
the Device Manager, right click your Buletooth Device, select “Properties”.
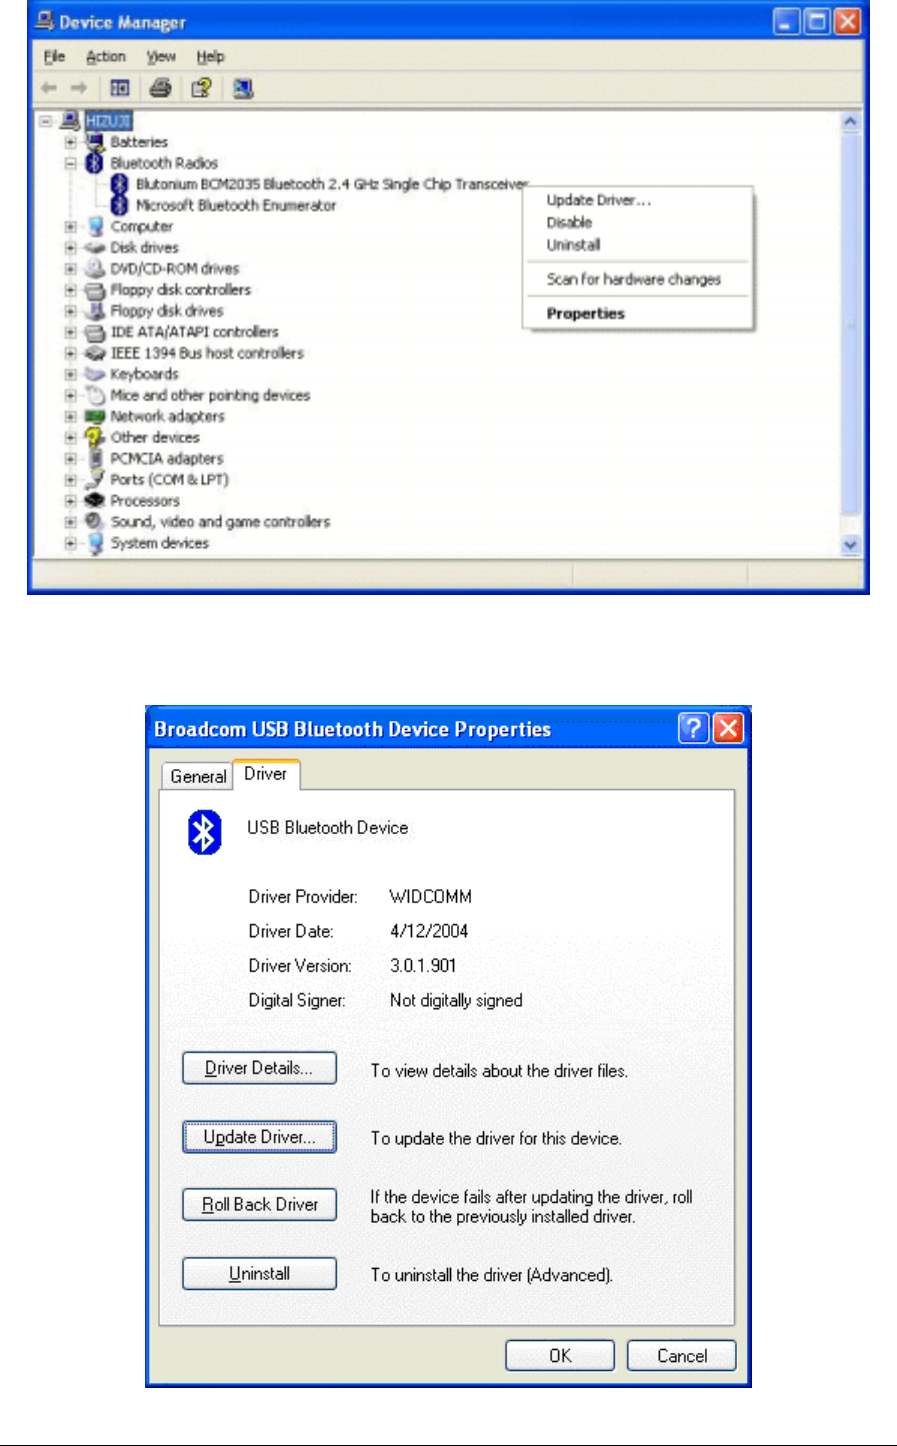
66
(2) Select “Driver” on Broadcom USB Bluetooth Device Properties, then click
“Update Driver”.
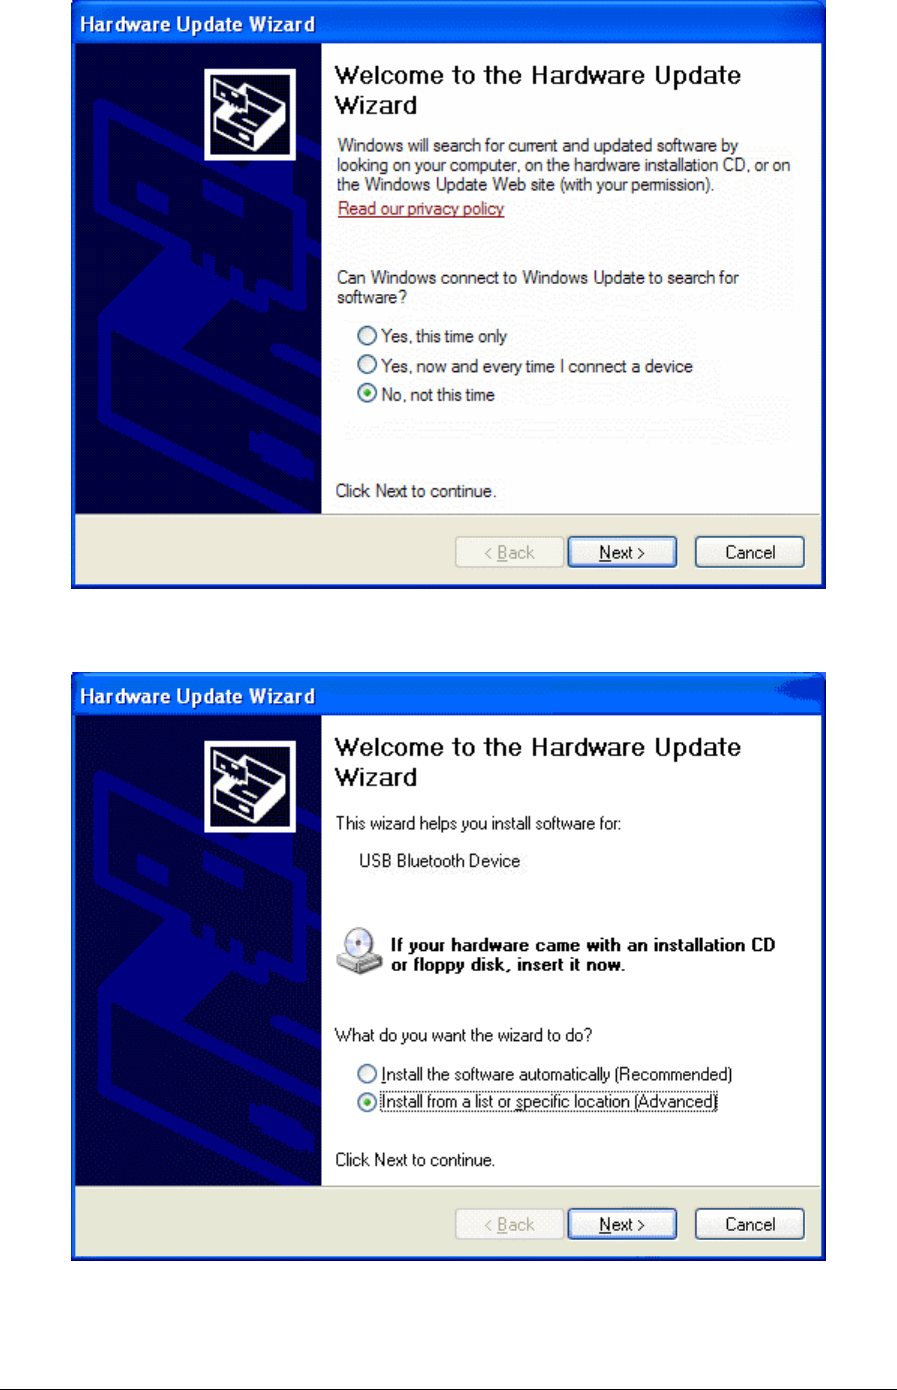
67
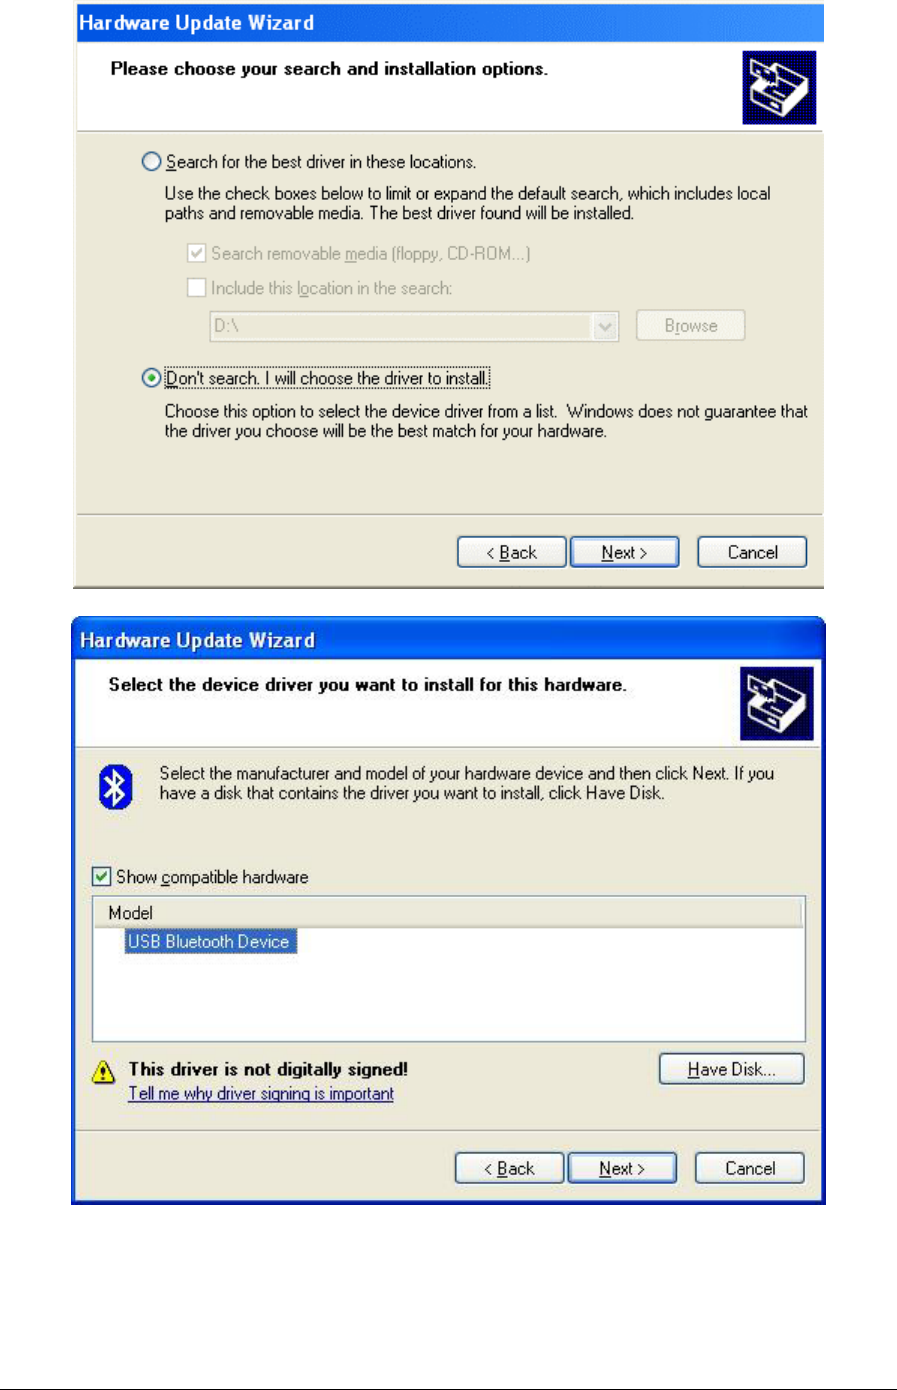
(3) Choose “No, not this time”
(4) Choose “install from a list or specific location”.
68
(5) Choose “Don’t search. I will choose the driver to install”
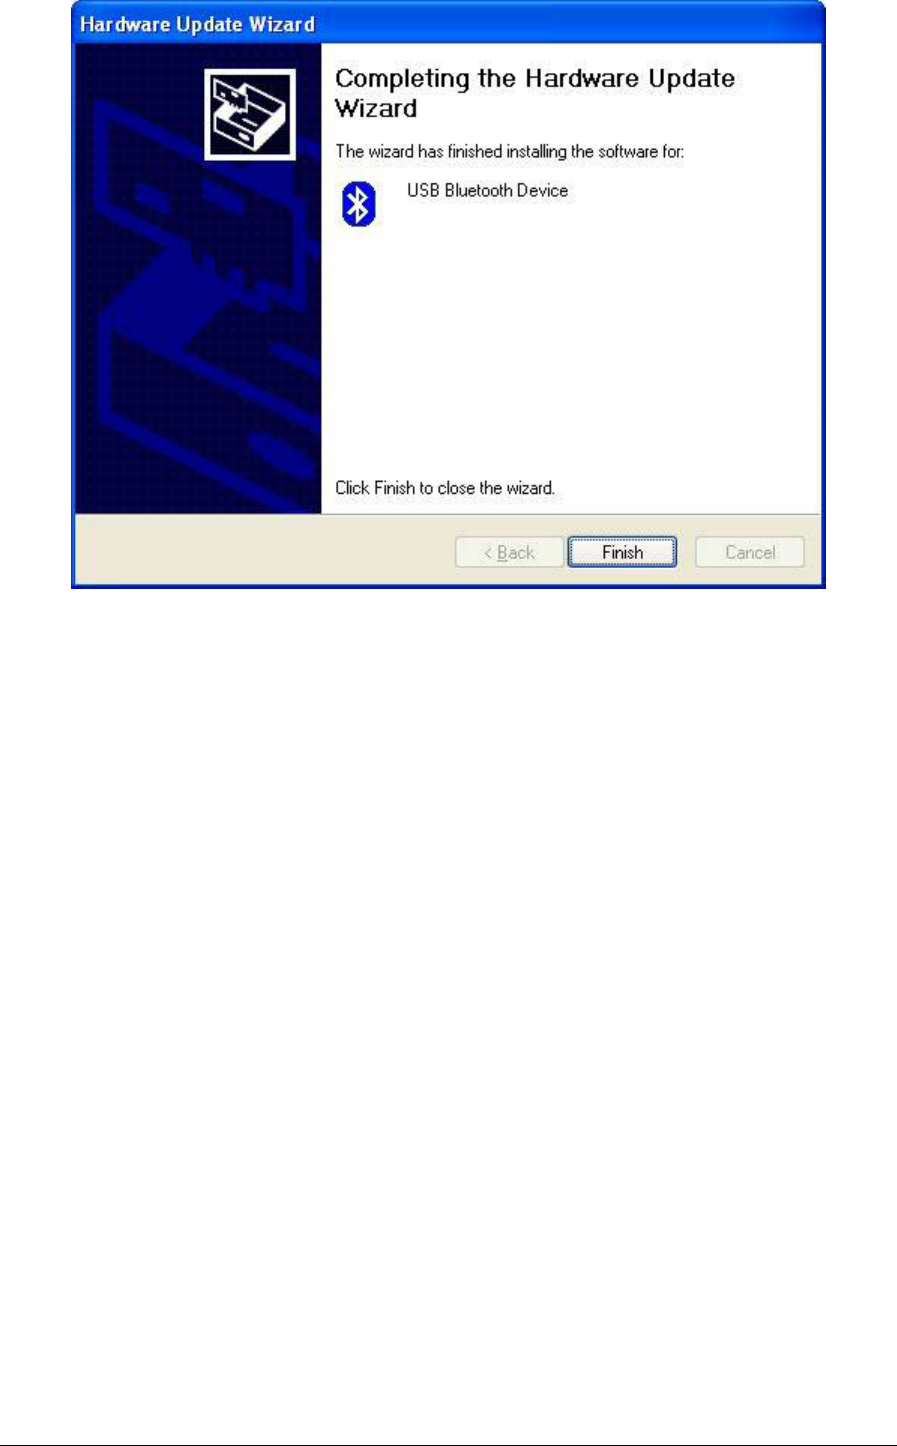
(6) Click “Finish button to accomplish driver shift.
69