CalAmp 500003 CalAmp Corp. Directed AP User Manual AP 1500 QIG
CalAmp Corp. CalAmp Corp. Directed AP AP 1500 QIG
CalAmp >
manual
12/29/04 © 2004 All Rights Reserved.
90-100tbd-000 Rev 1 (Preliminary 3)
AS 1500 Intelligent RF AP Quick Installation Guide
PRELIMINARY 3
Multi-Antenna Airespace Access Point Quick Installation Guide
System Release x.x
Print This Document
This Guide contains several sections allowing you to install an AS 1500 (AS-1500-ABG-INT) Airespace
Access Point. This model contains internal 802.11a and 802.11b/g antennas and no connectors for
optional external antennas.
•Overview
•Step 1: Collecting Required Tools and Supplies
•Step 2: Configuring the Airespace AP Before Installation
•Step 3: Preparing Mounting Locations
•Step 4: Mounting the Airespace APs
•Step 5: Returning MAC Information
•Planning Notes
•FCC Statements for Airespace APs
ATTENTION!Special Considerations
While Airespace Access Points have been engineered for easy installation, there are some guidelines
that are very important to the end users:
•PLACE Airespace Access Points NO MORE THAN 140 FEET APART FROM EACH OTHER. Placing
Airespace APs further apart almost always results in poor coverage.
•DO NOT MOUNT Airespace APs OUTSIDE BUILDINGS.
•DO NOT MOUNT Airespace APs ON BUILDING PERIMETER WALLS UNLESS THE OPERATOR
WANTS TO PROVIDE COVERAGE OUTSIDE THE BUILDING.
•MAKE SURE that plenum-mounted Airespace APs are powered using Power Over Ethernet (POE)
and use only the metal brackets (not the Ceiling-Mount Base or the Hanging-Ceiling Clips) to
comply with safety regulations.
•MAKE SURE THAT THE Airespace Access Points ARE INSTALLED VERTI-
CALLY. Airespace Access Points ARE DESIGNED TO BE INSTALLED
VERTICALLY, either standing up in a plenum or hanging from a ceiling,
to create the largest coverage area per Airespace AP. Hanging the
Airespace AP from the ceiling provides the best RF coverage.

12/29/04 Overview
90-100tbd-000 Rev 1 (Preliminary 3) 2
•DO NOT MOUNT Airespace Access Point ANTENNAS WITHIN ONE METER (3 FT.) OF ANY METAL
OBSTRUCTIONS. THE RF WAVES FROM Airespace Access Points ARE BLOCKED AND/OR
REFLECTED BY METAL OBJECTS, such as metal HVAC ducts, conduit, pipes, bookcases, elevator
shafts, stairwells, and metal walls. REFER TO THE Airespace Access Point Deployment Guide
BEFORE MOUNTING Airespace APs NEAR METAL OBSTRUCTIONS.
OverviewOverview
This guide is designed to provide you with the information needed to mount AS 1500 Airespace Access
Points (Airespace APs). Airespace APs are part of the innovative Airespace Wireless Enterprise Platform
(Airespace System), and require no manual configuration after they are mounted.
This document assumes that a site survey has been performed as described in the Airespace Access
Point Deployment Guide section in the Airespace Product Guide, that Airespace AP locations have been
selected, and that you have one Airespace AP per indicated location.
After the site survey is done, you should have a map indicating the following:
•AP locations in the middle of a ceiling or hallway.
•AP power options: power supplied by the AC-to-DC power supply orderable from the factory, or
Power over Ethernet (PoE) from the Airespace WLAN Switch, another network device, or a PoE
injector/hub (usually located in a wiring closet).
If you do not have a map, make one so you can record the MAC addresses from each location and
return them to the to the person who is planning or managing this wireless network.
Refer to the following sections to install the Airespace APs.
For more details about Airespace AP installations, refer to the Planning Notes section at the end of this
document.
Step 1: Collecting Required Tools and SuppliesStep 1: Collecting Required Tools and Supplies
•One Airespace AP per location with included mounting clips.
•Optional Airespace AP Mounting Kits, factory-orderable.
•Optional external AC-to-DC power supplies, factory-orderable.
•Map showing Airespace AP locations and power options.
•Screwdrivers, drills, and ladder.
•CAT-5 (or higher) cables to connect the Airespace AP locations and the Airespace WLAN Switch
or other network device.
Continue with Step 2: Configuring the Airespace AP Before Installation.
Note: Plenum-mounted Airespace APs and REAPs MUST BE powered using Power
Over Ethernet (POE) to comply with safety regulations.
Note: When mounting Airespace APs, make sure to maintain a 20 cm (8 in.) separa-
tion between the Airespace APs and bystanders to comply with FCC RF exposure
regulations. Refer to the FCC Statements for Airespace APs section for more
information.
12/29/04 Step 2: Configuring the Airespace AP Before Installation
90-100tbd-000 Rev 1 (Preliminary 3) 3
Step 2: Configuring the Airespace AP Before InstallationStep 2: Configuring the Airespace AP Before Installation
The following procedures are designed to make sure that your Airespace AP physical installation goes
smoothly and that initial operation is as expected. If you are unable to prepare your Airespace AP for
deployment, this Step also describes RMA (Return Material Authorization) procedures.
Configuration SetupConfiguration Setup
Configuration Steps for an Airespace APConfiguration Steps for an Airespace AP
1. Configure the Airespace Switch or Appliance for LWAPP Layer 2 Mode (use the CLI command
show switchconfig to determine the mode; if it is set to layer 3, use the CLI command config
switchconfig mode L2 to change it to Layer 2). Make sure the Airespace Switch or Appliance DS
Port is connected to the network. Use CLI, Web Browser and/or ACS procedures as described in
the Airespace Switch and Appliance Quick Installation GuideAirespace Switch and Appliance
Quick Install Guide and the Airespace Product GuideAirespace Product Guide.
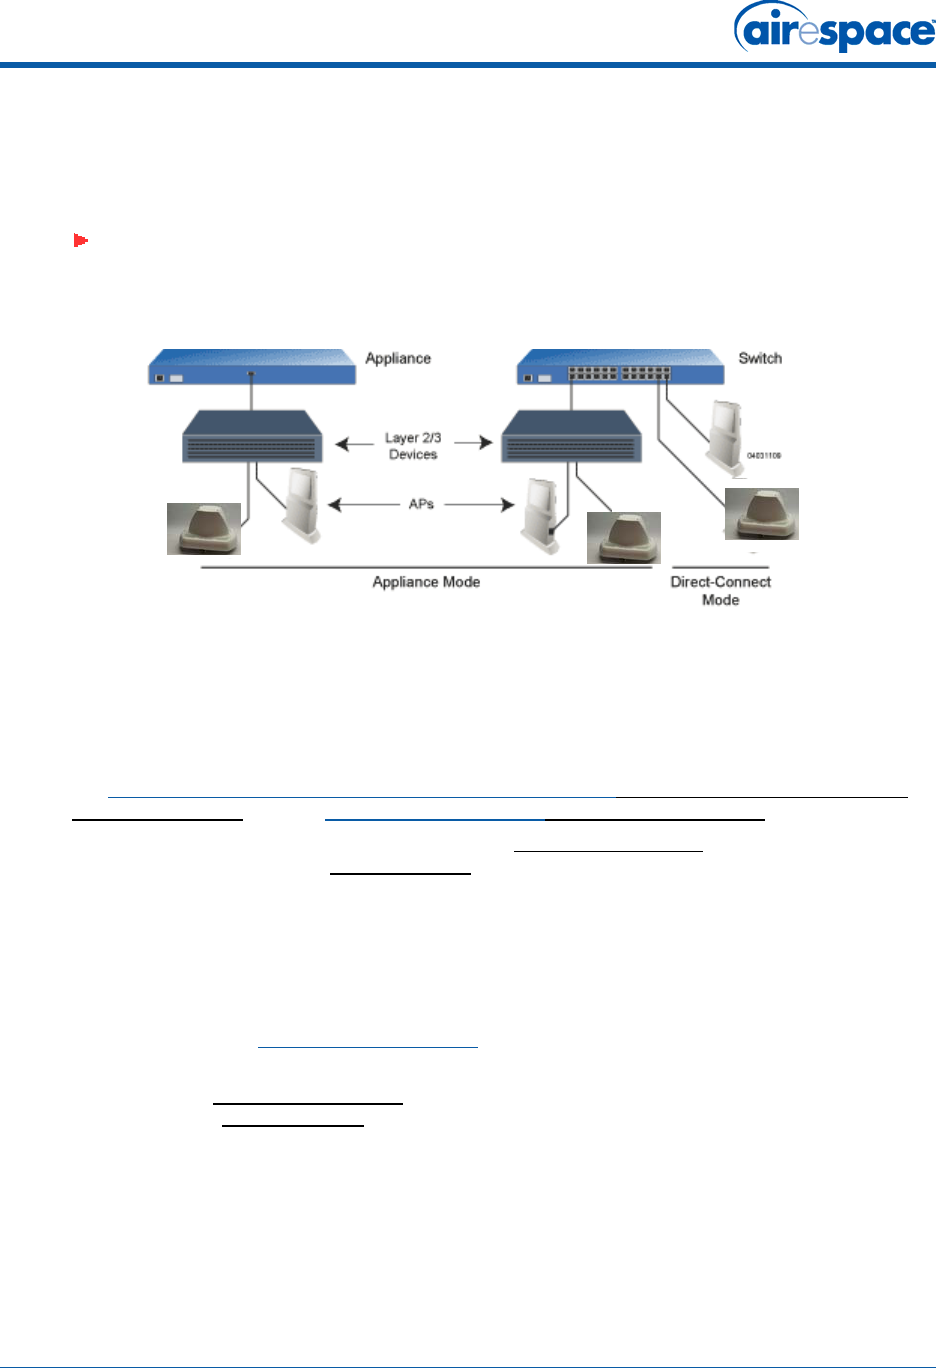
-Make sure AP ports are available (either Direct-Connect Mode through the Switch
physical ports, or in Appliance Mode through the Airespace Switch or Appliance
Management/AP-Manager Interface).
-Set the Airespace Switch or Appliance as the Master, so new Airespace APs always
associate with it. Use the CLI command show network config to determine if the
Airespace Switch or Appliance DS Port is the Master. If it is not, make it the Master with
the CLI command config network master-base enable. Make sure to use the CLI
command config network master-base disable after you have configured the AP(s).
-Refer to the Airespace Product Guide for other settings.
2. Take the Airespace AP out of the box and plug it into a front-panel 10Base-T connector on the
Master Switch (Direct-Connect Mode), or through the same subnet that Airespace Switch or
Appliance is on (Appliance Mode).
3. Apply power to the AP:
-Use 802.3af-compatible Power Over Ethernet (PoE) from the Airespace Switch or
Appliance or from an orderable inline power injector. If you do not have PoE available,
use an orderable external AC-to-48 VDC Power Supply plugged into the side of the AP.
-After powering up the AP, the RED Alarm LED comes on for a short period (about 15-20
seconds) and then all the LEDs blink sequentially back and forth, indicating that the AP
is trying to connect to an Airespace Switch or Appliance. This can continue for up to five
Note: Perform the following procedure on each Airespace AP BEFORE deploying the
Airespace AP in its final location.

12/29/04 Step 2: Configuring the Airespace AP Before Installation
90-100tbd-000 Rev 1 (Preliminary 3) 4
minutes. If the AP remains in this mode for more than five minutes, the AP is unable to
find the Master Airespace Switch or Appliance. Check the connection between the AP
and the Airespace Switch or Appliance and make sure the Airespace AP and the
Airespace Switch or Appliance are on the same subnet.
-If the Power light does not come on, check the power (it can be powered either with
Power over Ethernet or a from an orderable AP External Power Supply.
-Make sure that a DHCP server is configured in the Airespace Switch or Appliance for
both the Management Interface and AP-Manager Interface using the CLI, Web Browser,
or ACS interface, and that the DHCP server is operating correctly.
-Once the AP finds the Airespace Switch or Appliance, it attempts to download the new
Airespace Operating System code if the AP code version differs from the Airespace
Switch or Appliance code version. While this is happening, the LEDs on the top of the
AP blink on and off together.
4. Once the Airespace Operating System code download is successful, the AP reboots. The GREEN
LED turns on and the two AMBER/AMBER LEDs indicate the states of the 802.11a and 802.11b/
g networks. If a AMBER/AMBER LED remains off.
-Note that the Red LED can light for a short period (10-20 seconds) when the AP
reboots. If the RED LED comes on AND STAYS ON for more than a minute, disconnect
the AP and call Airespace Global Services & Support.
-Use the CLI command show ap summary. If the new AP appears on the list, it has been
configured successfully.
-From the CLI, Web Browser or ACS interface, configure the AP with its Primary,
Secondary and Tertiary Airespace Switch or Appliance names as described in the
Airespace Product Guide.
-If you will be using the AP in a mobility or a WPS group, set the mobility or WPS group
name using the CLI, Web Browser or ACS interface.
-If required, use the CLI, Web Browser or ACS interface to customize the AP-specific
802.11a, 802.11b and 802.11g network settings. Once again, the two AMBER/AMBER
LEDs indicate the states of the 802.11a and 802.11b/g networks. If any part of the
network is disabled, the corresponding AMBER/AMBER LED remains off.
5. If everything works correctly (the GREEN LED is on and the RED LED is off), disconnect the
Airespace AP and take it to its final destination and install it as described in this document. If
your Airespace AP fails this visual test, refer to RMA Procedures in the Airespace Product Guide
to return your Airespace APs.
6. When you have installed and powered up the Airespace AP in its final destination, verify that
the LEDs are in the same state they were in at the end of Step 4.
-If no LEDs are on, the AP is most likely not receiving power.
-If the LEDs blink sequentially back and forth for more than five minutes, the Airespace
AP is unable to find its Primary, Secondary or Tertiary Airespace Switch or Appliance.
Check the connection between the Airespace AP and the Airespace Switch or Appliance,
and make sure the AP and the Airespace Switch or Appliance are either on the same
subnet or that the AP has a route back to its Primary, Secondary and Tertiary Airespace
Switches and Appliances.
-If the Airespace AP is not on the same subnet as the Airespace Switch or Appliance,
make sure there is a DHCP server on the same subnet as the Airespace AP. Also, make
sure that the route between the Airespace AP and the Airespace Switch or Appliance
can process IP fragmented packets.
12/29/04 Step 3: Preparing Mounting Locations
90-100tbd-000 Rev 1 (Preliminary 3) 5
After you have prepared all Airespace APs, reconfigure the Airespace Switch or Appliance so it is not the
Master. A Master Airespace Switch or Appliance should only be used for configuring Airespace APs and
not in a working network. Note that the Master Airespace Switch or Appliance is normally not used in a
deployed network, so the Master Airespace Switch or Appliance setting is automatically disabled upon
reboot or AireOS code upgrade.
After completing Step 2: Configuring the Airespace AP Before Installation for all Airespace APs and
REAPs, continue with Step 3: Preparing Mounting Locations.
Step 3: Preparing Mounting LocationsStep 3: Preparing Mounting Locations
On your map, you should have the Airespace AP locations, mounting options, and power options.
•Find the required mounting locations.
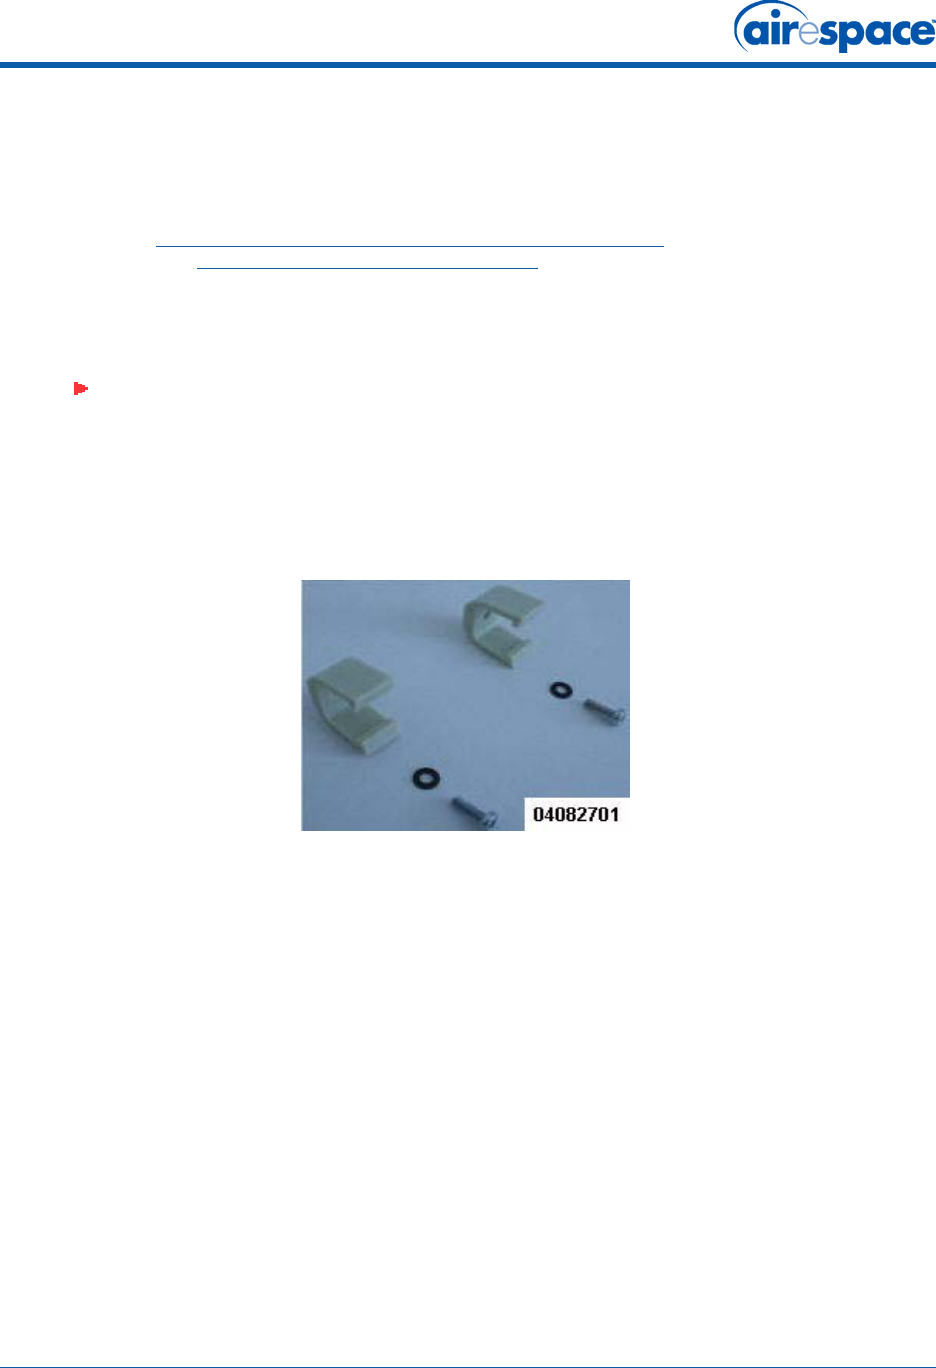
Figure - Factory-Supplied Mounting Clips
•Attach the hanging ceiling clips to the Airespace AP. Make sure you leave enough space around
the Airespace AP to plug the CAT-5 cable, optional external antenna cable(s), optional power
supply cable, and optional Kensington MicroSaver Security Cable into the sides of the Airespace
AP.
•Alternatively, use the optional mounting bases and/or brackets to mark the wall or ceiling
locations for sheet metal, drywall, or other screws. Make sure you leave enough space around
the Airespace AP and brackets to plug the CAT-5 cable, optional external antenna cable(s),
optional power supply cable, and optional Kensington MicroSaver Security Cable into the sides
of the Airespace AP.
Note: MAKE SURE that plenum-mounted Airespace APs use only the metal Projec-
tion-Mount and Flush-Mount brackets (not the Hanging-Ceiling Clips) and are
powered using Power Over Ethernet (POE) to comply with safety regulations.

12/29/04 Step 3: Preparing Mounting Locations
90-100tbd-000 Rev 1 (Preliminary 3) 6
Figure - Factory-Orderable Mounting Brackets
•If necessary, drill holes for the various cables where they can be mostly hidden from casual
view. When you are mounting the Airespace AP using an optional separately-orderable
projection-mount L-bracket (the one with two long legs), the cables can be routed through the
5/8-inch (15.9 mm) holes in the bracket.
•Route the CAT-5, optional power supply, optional external antenna cable(s), and optional
Kensington MicroSaver Security cables to where they can plug into the Airespace AP. Make sure
to leave about 6 inches (15 cm) of slack in the cables for future modifications.
•Attach the brackets to the wall or ceiling, or install screws for ceiling-mount base:
-Where you are going to use the projection-mount or flush-mount bracket, use
customer-supplied sheet metal, drywall, or other screws to attach the bracket to the
ceiling or wall.
•Where you are going to use the ceiling-mount base, install customer-supplied sheet metal,
drywall, or other screws with 1/4 inch (6.35 mm) or smaller heads protruding from the ceiling
about 0.1 inch (2.5 mm).
•If necessary, drill holes for the various cables where they can be mostly hidden from casual
view.
•Route the CAT-5, optional power supply, optional external antenna cable(s), and optional
Kensington MicroSaver Security cables to where they can plug into the Airespace AP. Make sure
to leave about 6 inches (15 cm) of slack in the cables for future modifications.
You are now ready to install the Airespace APs. Continue with Step 4: Mounting the Airespace APs.
TBD
12/29/04 Step 4: Mounting the Airespace APs
90-100tbd-000 Rev 1 (Preliminary 3) 7
Step 4: Mounting the Airespace APsStep 4: Mounting the Airespace APs
Using the supplied or optional separately-orderable Airespace AP mounting kits, mount each Airespace
AP in its indicated location, oriented as shown on the map. Note that you can mount the Airespace APs
in the ceiling plenum or below the ceiling, but the Airespace APs perform best when mounted below the
ceiling.
The Airespace APs can be mounted in one of three configurations:
•Ceiling-Mount Rail Clips
•Projection Wall Mount
•Ceiling-Mount Slotted Clips
Ceiling-Mount Rail ClipsCeiling-Mount Rail Clips
When you are mounting the Airespace AP on the extruded aluminium rails of a hanging ceiling, use the
ceiling-mount clips to mount the Airespace AP as shown in the following figure and as described below:
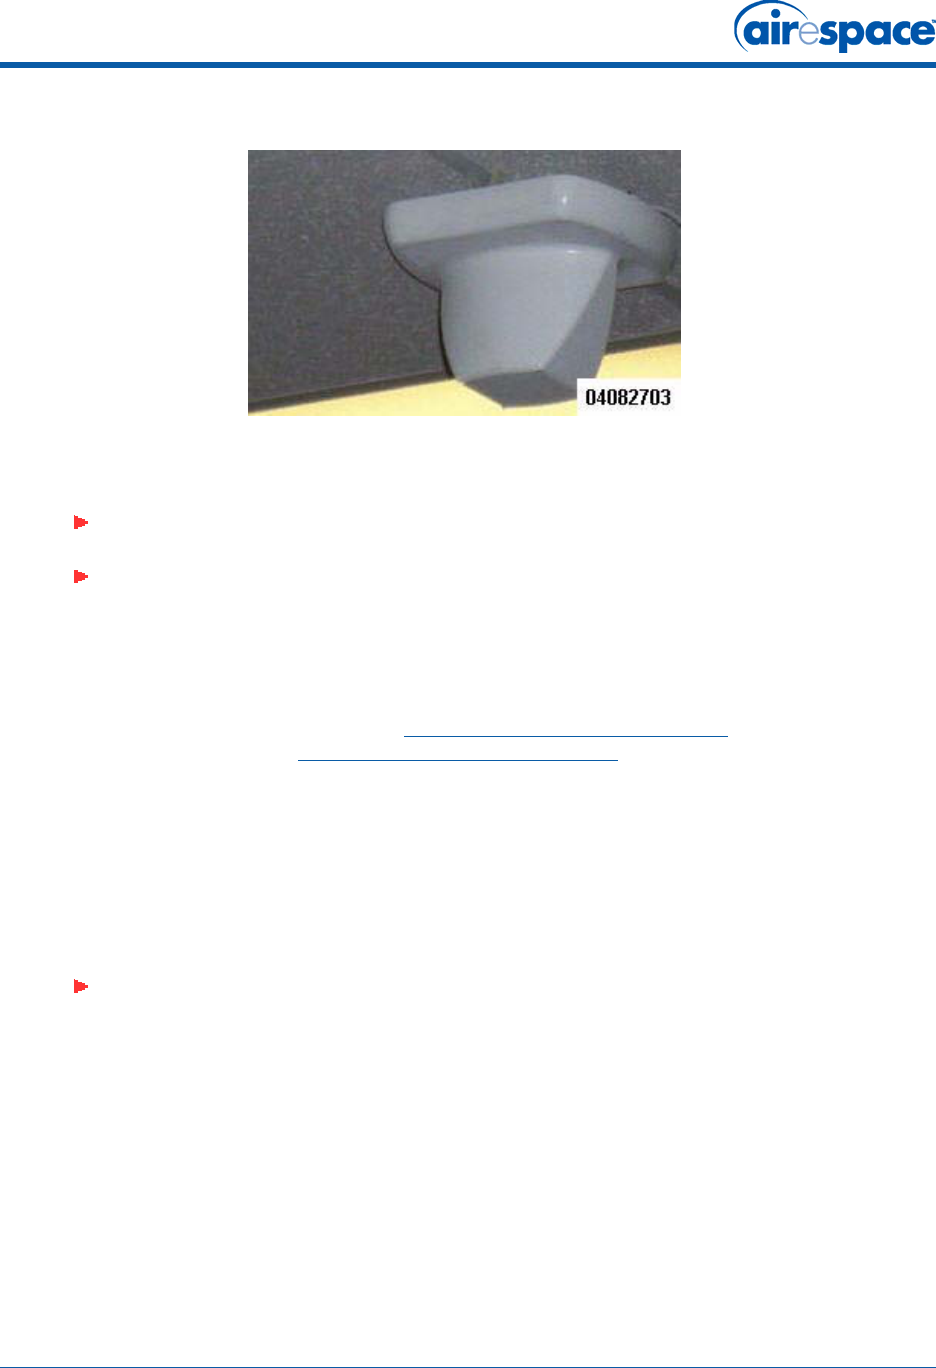
Figure - Airespace AP with Optional Ceiling-Mount Clips Installed
•Copy the MAC address(es) from the label(s) on the Airespace AP onto the corresponding
location on the map. MAC addresses have the format 000B85xxxxxx.
•Attach the ceiling-mount clips to the bottom of the Airespace AP using the factory-supplied
machine screws and washers.
•Snap the ceiling-mount clips onto a hanging ceiling rail.
12/29/04 Ceiling-Mount Rail Clips
90-100tbd-000 Rev 1 (Preliminary 3) 8
Figure - Clipping the Airespace AP and Ceiling-Mount Clips to a Hanging-Ceiling Rail
•Attach the cables to the sides of the Airespace AP.
You have installed the Airespace AP. Repeat Step 4: Mounting the Airespace APs for each Airespace AP
location, and then continue with Step 5: Returning MAC Information.
Projection Wall Mount (Details TBD)Projection Wall Mount
When you are mounting the Airespace AP out from a wall (flat sides along the wall or hallway), use an
optional factory-orderable projection wall-mount L-bracket.
•Before proceeding, gently screw the two factory-supplied screws and spring washers into the
bottom of the Airespace AP. Make sure the spring washers have their convex (high center
sections) pointing toward the screw heads.
Note: Make sure the cables are routed away from the Airespace AP antennas.
Note: When the Airespace AP is powered up and is associated with an Airespace
Switch or Appliance (Green/Power and Amber/802.11b/g and/or Amber/802.11a
LEDs lit), the Airespace AP is broadcasting its beacon signal(s). When this happens,
complete the installation as quickly as possible to remove yourself from within
8 inches (20 cm) of the Airespace AP to comply with FCC RF radiation exposure
guidelines.
Note: The Airespace AP threaded holes have precision-depth threads. Do not over-
tighten the screws, or the bracket will not fit under the screw heads.

12/29/04 Ceiling-Mount Rail Clips
90-100tbd-000 Rev 1 (Preliminary 3) 9
Figure - Assembling the Mounting Screws and Spring Washers to the Airespace AP
•Copy the MAC address(es) from the label(s) on the Airespace AP onto the corresponding
location on the map. MAC addresses have the format 000B85xxxxxx.
•You have already attached the projection wall-mount L-bracket to the wall in Step 3: Preparing
Mounting Locations.
•Slide the screws into the keyhole slots on the mounting bracket as shown in the following
figure.
Figure - Assembling the Airespace AP to the Optional Projection Wall-Mount Bracket
•Attach the cables to the sides of the Airespace AP.
Note: If the screws do not securely hold the bracket, remove the Airespace AP and
adjust the screws until they securely hold the bracket.
TBD
TBD
12/29/04 Ceiling-Mount Slotted Clips
90-100tbd-000 Rev 1 (Preliminary 3) 10
You have installed the Airespace AP. Repeat Step 4: Mounting the Airespace APs for each Airespace AP
location, and then continue with Step 5: Returning MAC Information.
Ceiling-Mount Slotted Clips (Details TBD)Ceiling-Mount Slotted Clips
When you are mounting the Airespace AP on the extruded aluminium rails of a hanging ceiling requiring
a slotted connector, use the ceiling-mount slotted clips to mount the Airespace AP as shown in the
following figure and as described below:
•Before proceeding, gently screw the two factory-supplied screws and spring washers into the
bottom of the Airespace AP. Make sure the spring washers have their convex (high center
sections) pointing toward the screw heads.
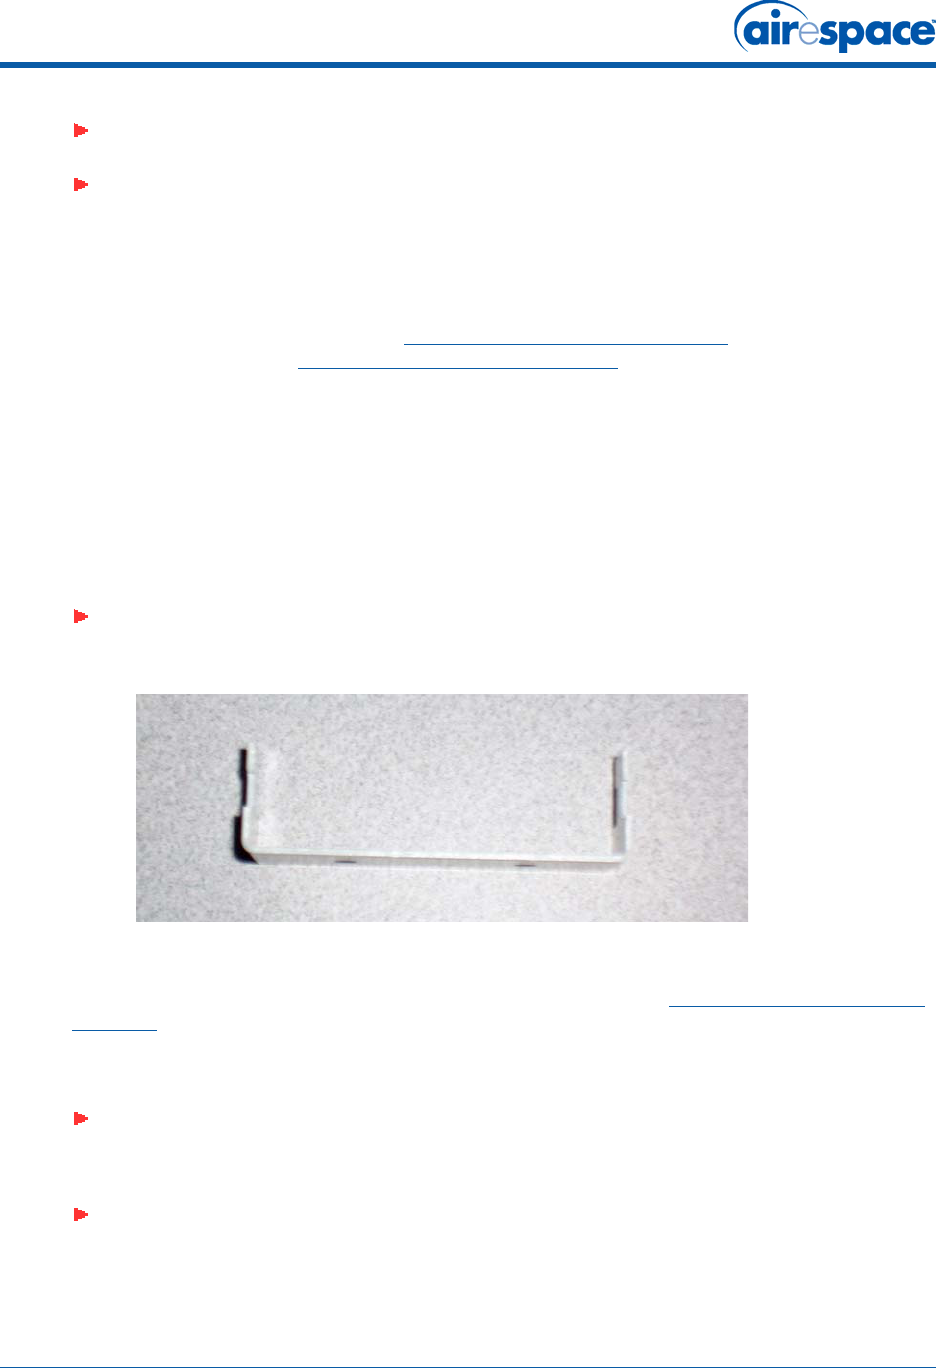
Figure - Optional Ceiling-Mount Slotted Clips for Ceiling Mounting
•Copy the MAC address(es) from the label(s) on the Airespace AP onto the corresponding
location on the map. MAC addresses have the format 000B85xxxxxx.
•You have already attached the flush-mount bracket to the wall in Step 3: Preparing Mounting
Locations.
•Slide the screws into the keyhole slots on the mounting bracket as shown in the following
figure.
Note: Make sure the cables are routed away from the Airespace AP antennas.
Note: When the Airespace AP is powered up and is associated with an Airespace
Switch or Appliance (Green/Power and Yellow/802.11b/g and/or Yellow or Amber/
802.11a LEDs lit), the Airespace AP begins broadcasting its beacon signal(s). When
this happens, complete the installation as quickly as possible to remove yourself
from within 8 inches (20 cm) of the Airespace AP to comply with FCC RF radiation
exposure guidelines.
Note: The Airespace AP threaded holes have precision-depth threads. Do not over-
tighten the screws, or the bracket will not fit under the screw heads.
Note: Make sure the side of the Airespace AP with the door is facing away from the
wall. This ensures that the correct antenna is facing the building, and makes future
upgrades easier.
Note: If the screws do not securely hold the bracket, remove the Airespace AP and
adjust the screws until they securely hold the bracket.
12/29/04 Step 5: Returning MAC Information
90-100tbd-000 Rev 1 (Preliminary 3) 11
Figure - Assembling the Airespace AP to the Slotted Clips
•Attach the cables to the sides of the Airespace AP.
You have installed the Airespace AP. Repeat Step 4: Mounting the Airespace APs for each Airespace AP
location, and then continue with Step 5: Returning MAC Information.
Step 5: Returning MAC InformationStep 5: Returning MAC Information
When you have completed the installations as outlined in Step 4: Mounting the Airespace APs, return
the MAC addresses and their locations on the maps or floor plans to the network planner or manager.
The Airespace Control System Software (ACS Software) operators will use the MAC address and
location information to create maps for precise wireless Airespace Operating System management.
Also return any unused mounting clips and external power supplies to the network planner or manager
for use in future deployments.
Note: Make sure the cables are routed away from the Airespace AP antennas.
Note: When the Airespace AP is powered up and is associated with an Airespace
Switch or Appliance (Green/Power and Yellow/802.11b/g and/or Yellow or Amber/
802.11a LEDs lit), the Airespace AP begins broadcasting its beacon signal(s). When
this happens, complete the installation as quickly as possible to remove yourself
from within 8 inches (20 cm) of the Airespace AP to comply with FCC RF radiation
exposure guidelines.
Note: Please remind the Network Planner or Manager that now is a good time to
register the Airespace APs at http://www.airespace.com/.
TBD
12/29/04 Planning Notes
90-100tbd-000 Rev 1 (Preliminary 3) 12
Planning NotesPlanning Notes
•About Cables
•About External Antennas
•About Mounting Options
•About Physical Security
•FCC Statements for Airespace APs
•Safety Considerations
•Environmental Responsibility
About CablesAbout Cables
•You will run one CAT-5 Ethernet cable from the Airespace AP to the Airespace WLAN Switch,
another network device, or a PoE injector/hub.
When the Airespace AP will be mounted below the ceiling using the ceiling mount or wall mount
brackets, you may have to drill a hole into the ceiling plenum to run the CAT-5 cable to the wir-
ing closet. When the CAT-5 cable cannot be run through the ceiling plenum, find another path
to route the cable from the Airespace AP to the wiring closet.
When the Airespace AP will be mounted above the ceiling using the ceiling mount or wall mount
brackets, run the CAT-5 cable to the wiring closet through the ceiling plenum. When the CAT-5
cable cannot be run through the ceiling plenum, find another path to route the cable from the
Airespace AP to the wiring closet.
•When you are powering the Airespace AP from AC power, route the power supply cable from
the AC convenience outlet to the Airespace AP. Make sure you secure the AC power plug so it
will be difficult for people to pull on the power cord or unplug the power supply from the AC
power outlet.
•When you are powering the Airespace AP from a PoE source (Airespace WLAN Switch, another
network device, or a PoE injector/hub), you do not need to route a separate power cable to the
Airespace AP, because the Airespace AP will receive its power across the CAT-5 Ethernet cable.
Return the power supply to the wireless network planner/manager.
About External AntennasAbout External Antennas
•The AS-1500-ABG-INT AP is designed to be used exclusively with the internal high-gain
antennas, and have no provisions for external antennas.
About Mounting OptionsAbout Mounting Options
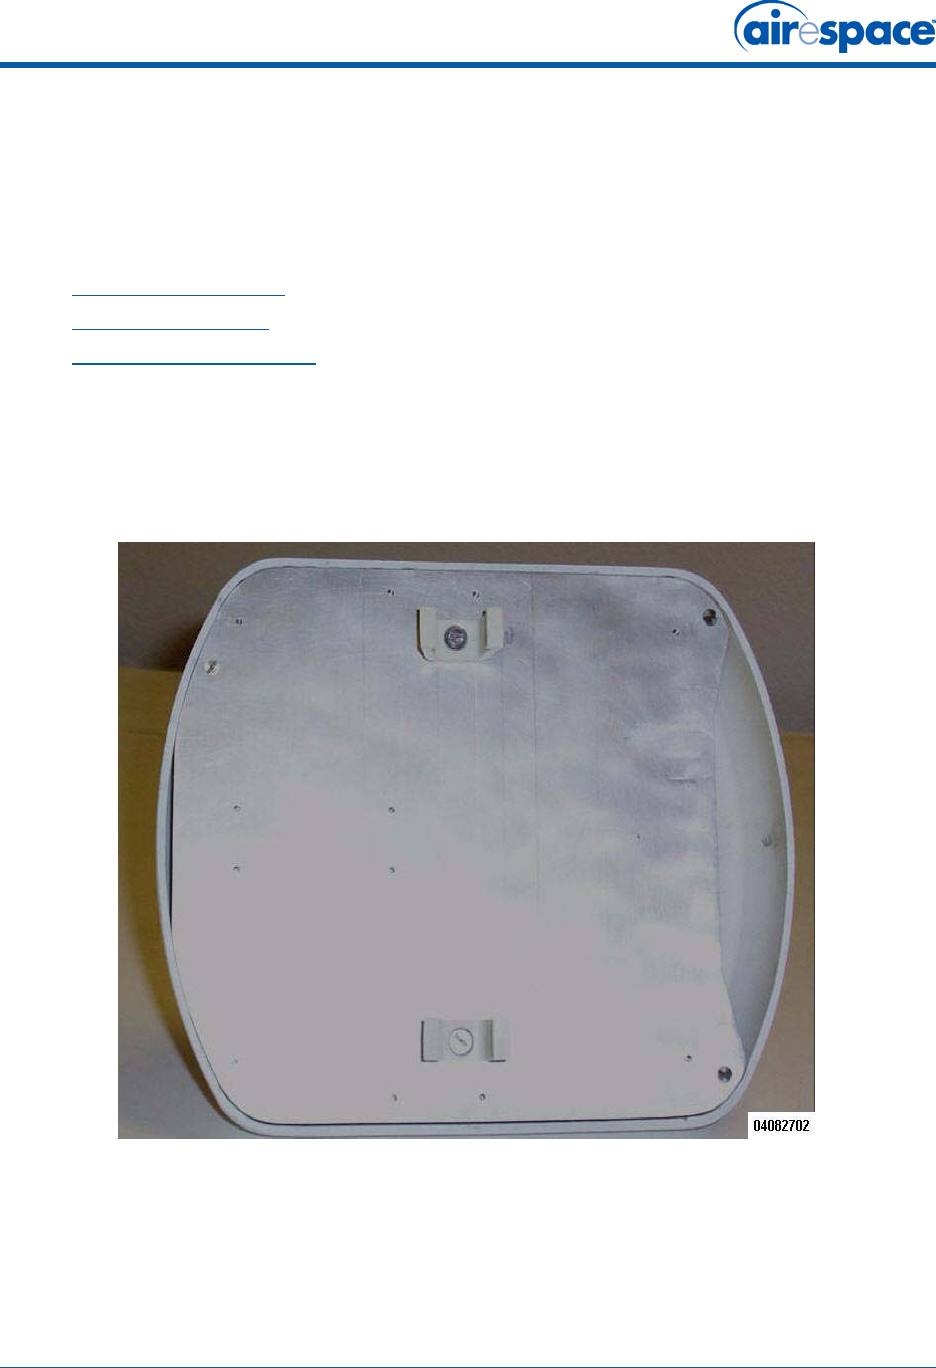
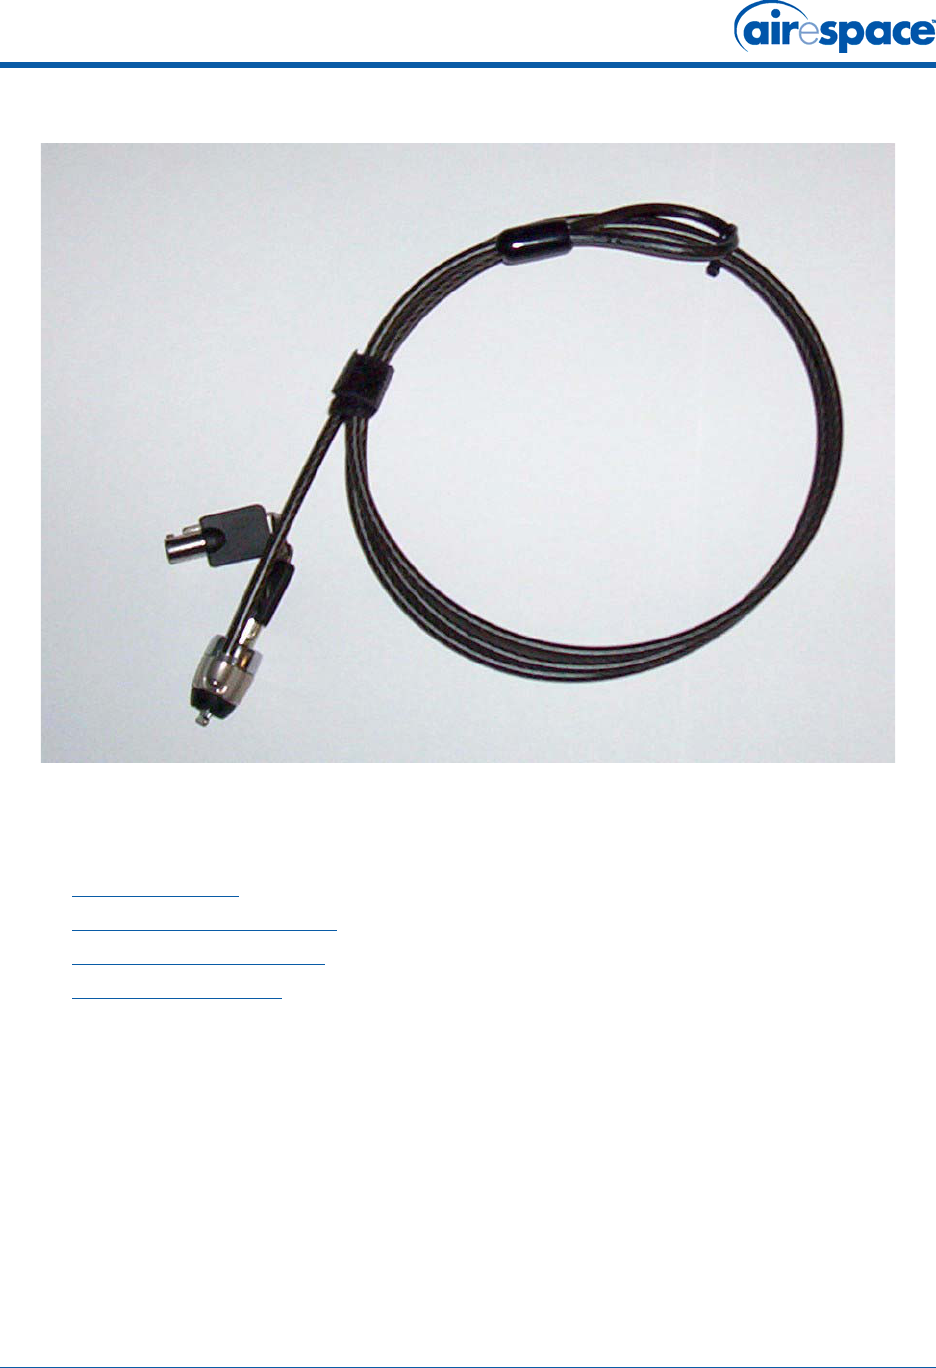
About Physical Security (Details TBD)About Physical Security
The Airespace AP can be secured with a Kensington MicroSaver Security Cable. If required, use any
MicroSaver Security Cable (example shown below) to attach either side of your Airespace AP to a solid
beam, pipe, or support. The back plate of the Airespace AP contains a special slot for this purpose.
Note: Because the Airespace AP internal antennas have been designed to reduce
inter-floor interference, it is strongly recommended that you mount the Airespace AP
standing or hanging straight up or down.
12/29/04 FCC Statements for Airespace APs
90-100tbd-000 Rev 1 (Preliminary 3) 13
FCC Statements for Airespace APsFCC Statements for Airespace APs
This section includes the following FCC statements for the Airespace AP:
•Class A Statement
•RF Radiation Hazard Warning
•Non-Modification Statement
•Deployment Statement
Class A StatementClass A Statement
This equipment has been tested and found to comply with the limits for a Class A digital device,
pursuant to Part 15 of the FCC Rules. These limits are designed to provide reasonable protection
against harmful interference when the equipment is operated in a commercial environment. This
equipment generates, uses, and can radiate radio frequency energy and, if not installed and used in
accordance with the instruction manual, may cause harmful interference to radio communications.
Operation of this equipment in a residential area is likely to cause harmful interference in which case
the user will be required to correct the interference at his own expense.
RF Radiation Hazard WarningRF Radiation Hazard Warning
To ensure compliance with FCC RF exposure requirements, this device must be installed in a location
such that the antenna of the device will be greater than 20 cm (8 in.) from all persons. Using higher
12/29/04 Safety Considerations
90-100tbd-000 Rev 1 (Preliminary 3) 14
gain antennas and types of antennas not covered under the FCC certification of this product is not
allowed.
Installers of the radio and end users of the Airespace Wireless Enterprise Platform must adhere to the
installation instructions provided in this manual.
Non-Modification StatementNon-Modification Statement
Use only the supplied internal antenna, or external antennas supplied by the manufacturer. Unautho-
rized antennas, modifications, or attachments could damage the badge and could violate FCC
regulations and void the user’s authority to operate the equipment.
Deployment StatementDeployment Statement
This product is certified for indoor deployment only. Do not install or use this product outdoors.
Safety ConsiderationsSafety Considerations
The 1500 Airespace APs with or without external antenna ports are only intended for installation in
Environment A as defined in IEEE 802.3af. All interconnected equipment must be contained within the
same building including the interconnected equipment's associated LAN connections.
Environmental ResponsibilityEnvironmental Responsibility
Airespace is very concerned about Environmental Responsibility. Accordingly, you are encouraged not
to dispose of this product into a system that ultimately results in landfill. Instead, AireSpace encour-
ages you to contact a local charitable organization that will reclaim the aluminum, connectors and
precious metals - minimizing waste. By these means Charities obviously win, you win because their
disposal charges are reduced, and the Environment wins because less resources are harvested from the
earth, and less waste is returned to it.
Note: Refer to the Airespace System Release Notes for 802.11a external antenna
information. Contact Airespace for a list of FCC-approved 802.11a and 802.11b/g
external antennas.