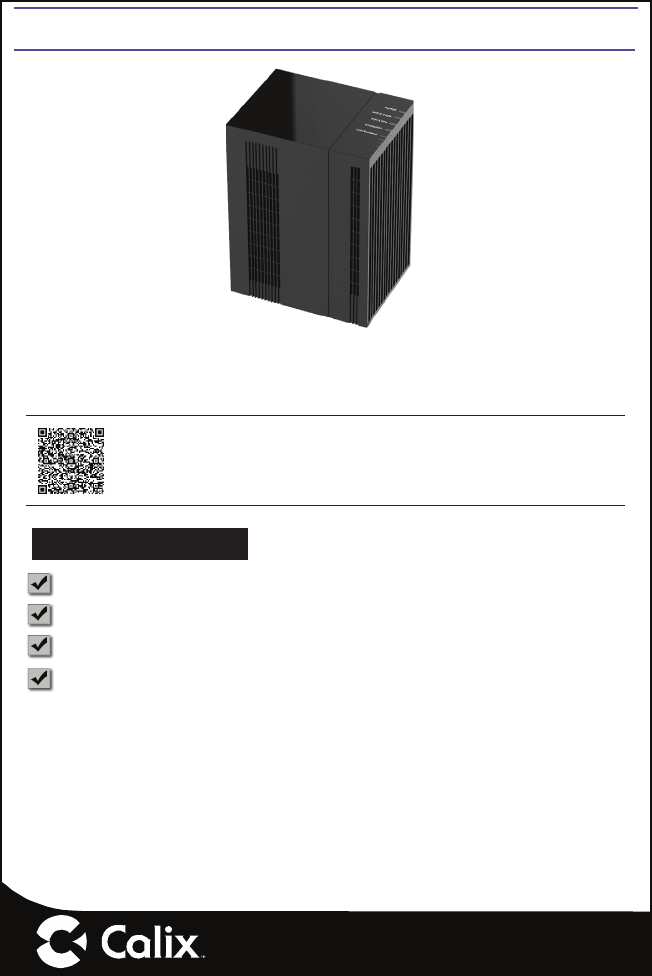
Calix 804MESH 804Mesh Dual Wi-Fi User Manual 804Mesh Quick Start Guide
Calix Inc. 804Mesh Dual Wi-Fi 804Mesh Quick Start Guide
Calix >
Contents
- 1. 2ABLK-804MESH_User Manual
- 2. 2ABLK-804MESH_Regulatory Statements
2ABLK-804MESH_User Manual
P/N 220-01041, Rev 10
804Mesh Quick Start Guide
www.calix.com
This document provides general installation practices for the Calix 804Mesh Satellite.
This document also provides guidance for site preparation, installation, and basic
troubleshooting.
Scan the QR code at left to access the installation instructions for
this product. All product documentation is available online from the
Calix Resource Center (support.calix.com).
Package Contents
GigaMesh - Model 804
Power Adapter (Type A or Type C)
804Mesh Quick Start Guide (this document)
Product identifi cation labels with login credentials (x2)
— 2 —
A Quick Look
Brief Overview
The 804Mesh offers the following key features:
Extremely User-Friendly Installation - The subscriber pairs the 804Mesh to the Gi-
gaCenter or GigaHub by initiating the WPS feature on both devices at the same time.
The GigaCenter (or Gigahub) and 804Mesh begin the pairing process and once com-
plete, discovery, confi guration, and synchronization steps are completed automatically.
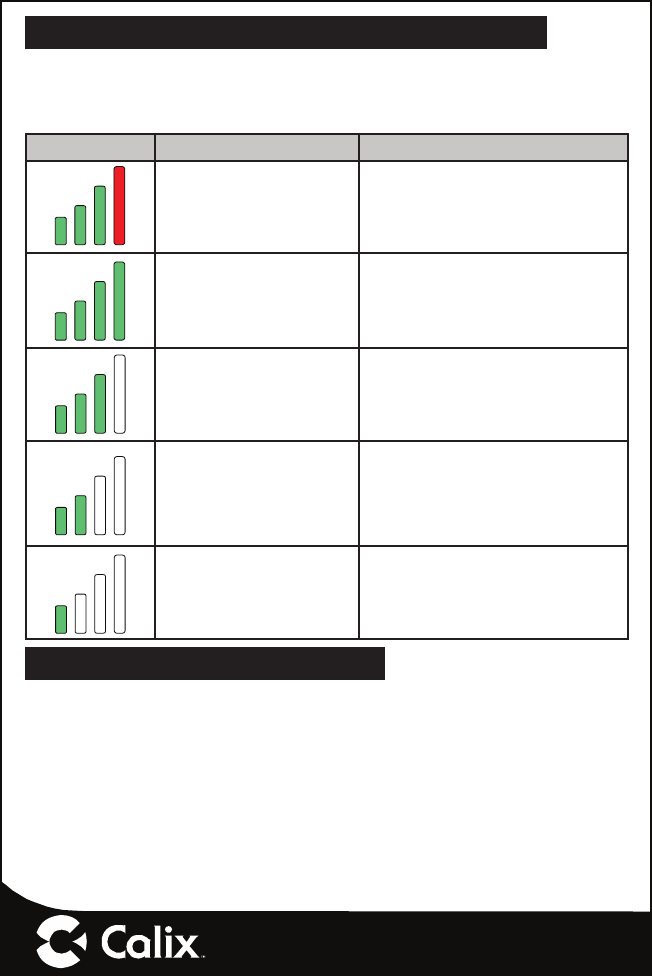
Wi-Fi Backhaul Signal Strength - The 804Mesh has a signal strength bar (Wi-Fi
Backhaul LED) to indicate the relative 5 GHz backhaul signal associated with that
particular 804Mesh device.
Note: When deploying the 804Mesh device, avoid placing the 804Mesh too close
to the host GigaCenter or GigaHub. If the signal strength indicator has 3 Green bars
illuminated with 1 Red bar, it means the 804Mesh is too close to the GigaCenter/
GigaHub. Calix recommends placing the 804Mesh at a distance such that 2 or 3 green
LEDs are lit.
Lastly, if only the 1st signal bar fl ashes, it indicates the 804Mesh is too far from the
GigaCenter/GigaHub and the performance may be less than expected.
For advanced user, the 804Mesh can be confi gured as an Ethernet Wireless Access
Point (WAP) with an Ethernet cable (not provided) connected between a GigaCenter/
GigaHub and the 804Mesh. While using Ethernet WAP use case, the Wi-Fi Backhaul
LED will not be lit indicating the 804Mesh is under Ethernet WAP control.
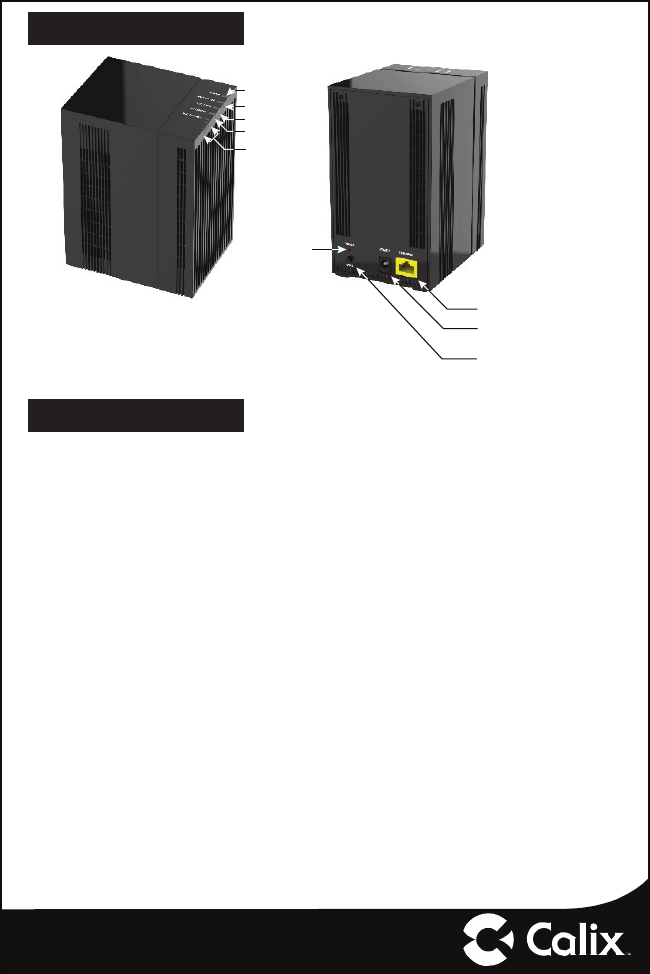
7718
Power
Wi-Fi Backhaul
Ethernet
5 GHz Wi-Fi
2.4 GHz Wi-Fi
Ethernet Port
Power Interface
Wi-Fi Protected
Set-up (WPS)
Reset
— 3 —
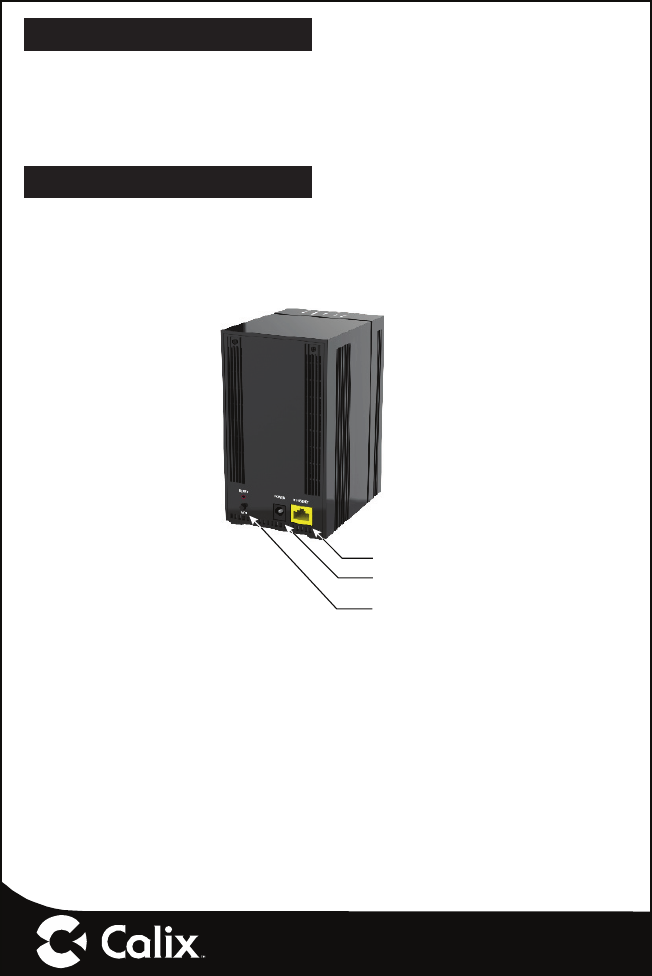
Mounting the 804Mesh
The 804Mesh can be placed in one of two confi gurations:
1. Placed on a tabletop or shelf in an upright orientation.
2. The 804Mesh also supports wall or ceiling mount using the optional mounting
bracket (ordered separately).
Powering the 804Mesh
To power the equipment:
1. Remove any protective packaging or fi lms prior to powering up the 804Mesh.
2. Plug in the power adapter to an available wall socket and attach the other end to
the 804Mesh’s power port. Note the power cord is 5 feet (1.5 meters) long.
7719
Ethernet Port
(Optional)
Power Interface
Wi-Fi Protected
Set-up (WPS)

— 4 —
804Mesh Management
The 804Mesh can be managed via a Calix Cloud/Consumer Connect Plus application.
With this interface, service providers or subscriber’s can view statistical information
and/or troubleshoot various service delivery problems. The 804Mesh is part of the
entire GigaFamily eco-system.
Home Gateway Settings
To complete the network connection, two options are available:
1. The 804Mesh is connected to the upstream GigaCenter via the WPS functionality
built into both products. When initially powered up, the 804Mesh associates with
the GigaCenter.
2. The 804Mesh is hard-wired to the upstream GigaCenter. Once the Ethernet
cable is connected, the 804Mesh automatically learns the network topography.
— 5 —
About Received Signal Strength Indicator (RSSI)
Backhaul signal strength can be monitored via the bank of LED’s located on the top
of the 804Mesh. This four LED array provides information as to the relative signal
strength of each 804Mesh in the network. The following table displays possible LED
states as it pertains to RSSI.
LED Display Description Comment
RSSI>= -50 dBm The 804Mesh is too close to the
host device (GigaCenter/GigaHub).
-50 dBm > RSSI >= -60
dBm
Distance between the 804Mesh
and the GigaCenter/GigaHub is not
optimal. Consider moving the two
devices farther apart.
-60 dBm > RSSI >= -70
dBm
Calix recommended RSSI indica-
tion.
-70 dBm > RSSI >= -80
dBm
The distance between the
804Mesh and the host device
(GigaCenter/GigaHub) provides
adequate results.
RSSI < -80 dBm
The distance between the
804Mesh and the GigaCenter/
GigaHub exceeds the preferred
distance.
Frequently Asked Questions
Q: How do I reset the device without having to unplug the unit?
A: If the RESET button is depressed for less than 5 seconds, it resets the unit using
the current confi guration settings.
Q: How do I reset the device back to factory settings?
A: Pressing the RESET button on the back of the unit for at least 5 seconds, or
access the “Restore Defaults” reset button located in the “Utilities” section of the
Embedded Web Interface.
— 6 —
Q: What if the User Name or login keys are forgotten?
A: Press the reset button of the 804Mesh for at least fi ve seconds.
Q: What mounting options are available for installing the 804Mesh?
A: The 804 Mesh has an optional mounting bracket for ceiling or wall mounting. It can
also be installed on a desktop or shelf without additional hardware.
Q: What is the difference of “Ethernet-WAP mode” vs “Wi-Fi backhaul mode” of the
804Mesh?
A: In Ethernet-WAP mode, the 5 GHz Wi-Fi bandwidth is shared with all client devices
and employs an Ethernet cable to support backhaul traffi c.
In the Wi-Fi backhaul mode, the 5 GHz Wi-Fi bandwidth is shared with the backhaul
traffi c on all client devices.
Q: Who do I contact for service and support?
A: Contact your service provider.
Potentially Explosive Atmosphere
Do not use the 804Mesh in an area where a potentially explosive atmosphere exists.
Atmosphère potentiellement explosive
N’utilisez pas le 804Mesh dans un endroit où existe une atmosphère potentiellement
explosive.
Intended Use
This product is classifi ed as telecommunication equipment not intended for direct pur-
chase by the public.
This product is designed and approved for use in an indoor location only.
!
CAUTION! Use of any controls, adjustments, or procedures other
than those specifi ed herein may result in hazardous radiation expo-
sure.
Utilisation prévue
Ce produit est classé comme équipement de télécommunication non destiné à l’achat
direct par le public.
Ce produit est conçu et approuvé pour utilisation en intérieur uniquement.
!
MISE EN GUARDE ! L’utilisation de contrôles, réglages ou
procédures autres que ceux spécifi és dans ce manuel peut entraîner
une exposition dangereuse à des rayonnements.
— 7 —
Power Supply
• Ensure that a suitable AC power outlet is situated near the 804Mesh and easily
accessible.
• Connect the power supply cord only to the AC power outlet that meets the speci-
fi cations marked next to the appliance AC power inlet on the 804Mesh.
• Never alter the AC power cord. If necessary have the correct outlet installed by a
qualifi ed electrician or call your service provider for assistance.
• To reduce the risk of damage to the electric cord, remove it from the outlet by
holding onto the AC power adapter rather than the cord. Make sure the cord is
positioned so that it will not be stepped on, tripped over or otherwise subjected to
damage or stress.
WARNING! Do not use any other power adapter except the one that
accompanies this unit or a power supply identifi ed in the list below. Use
of another adapter could result in damage to the unit. To prevent elec-
trical shock, please do not open the cover. The following power adapter
is qualfi ed for use with this 804Mesh.
This GigaHub must be powered by Frecom
F18L10-120150SPAU or equivalent UL Listed LPS power source rated at:
Input: 90-264 VAC, 47/63 Hz, 1.0A,
Output: Nominal 12 VDC, 1.5A Minimum, 18W
Alimentation électrique
• Assurez-vous qu’une prise de courant C.A. appropriée est située près du
804Mesh et qu’elle soit facile d’accès.
• Connectez le câble d’alimentation uniquement à une prise de courant qui corre-
spond aux spécifi cations indiquées à côté de l’entrée d’alimentation du 804Mesh.
• Ne modifi ez jamais le câble d’alimentation. Si nécessaire, faîtes installer la bonne
prise de courant par un électricien qualifi é ou Contactez votre prestataire de
services pour assistance.
• Pour réduire le risque de dommage au câble électrique, retirez-le de la prise de
courant en tenant l’adaptateur secteur plutôt que le câble. Assurez-vous que le
câble est positionné de manière à éviter qu’il soit possible de marcher ou trébu-
cher dessus, ou de l’endommager.
— 8 —
Attention ! N’utilisez pas d’autre adaptateur secteur que celui qui ac-
compagne cet appareil ou une alimentation électrique autre que celle
identifi ée dans la liste ci-dessous. L’utilisation d’un autre adaptateur
pourrait endommager l’appareil. Pour éviter les chocs électriques,
n’ouvrez pas le couvercle. L’adaptateur électrique suivant est qualifi é
pour être utilisé avec le 804Mesh.
L’adaptateur électrique suivant est qualifi é pour être utilisé avec le 804Mesh
Ce 804Mesh doit être alimenté par un adapteur Frecom
F18L10-120150SPAU ou une source d’alimentation équivalente certifi ée UL LPS de capac-
ité:
Entree: 90-264 VCA, 47/63 Hz, 1.0A,
Sortie: Valeur nominale 12 VDC, 1.5A Minimum, 18W
Children
Do not allow children to play with the 804Mesh. It contains small parts that could
become detached and create a choking hazard.
Environmental Conditions
Maximum environmental values during use:
Temperature: 0° C to +40° C (32° to 104° F), Humidity: 10% to 90% RH, non-condens-
ing, 200 - 10,000 feet altitude.
License Information
Open Source Software Utilization Notice
The 804Mesh uses Open Source Software Programs. Such software programs are
made available subject to certain third party terms and conditions.
The fact that you are about to begin using or have purchased this product requires that
you be informed of the use of these software packages and or libraries and in some
cases, the third party terms and conditions applicable to such software. This infor-
mation can be found on the manufacturer’s support portal. Refer to the appropriate
software release notes for additional information on Open Source Software Programs
used by this product.
Federal Communications Commission (FCC) Interference Statement
This equipment has been tested and found to comply with the limits for a Class B digital device,
pursuant to Part 15 of the FCC Rules.
These limits are designed to provide reasonable protection against harmful interference in a
residential installation. This equipment generate, uses and can radiate radio frequency energy
and, if not installed and used in accordance with the instructions, may cause harmful
interference to radio communications.
However, there is no guarantee that interference will not occur in a particular installation. If this
equipment does cause harmful interference to radio or television reception, which can be
determined by turning the equipment off and on, the user is encouraged to try to correct the
interference by one of the following measures:
Reorient or relocate the receiving antenna.
Increase the separation between the equipment and receiver.
Connect the equipment into an outlet on a circuit different from that to which the receiver is
connected.
Consult the dealer or an experienced radio/TV technician for help.
This device complies with Part 15 of the FCC Rules. Operation is subject to the following two
conditions:
(1) This device may not cause harmful interference, and (2) this device must accept any
interference received, including interference that may cause undesired operation.
FCC Caution: Any changes or modifications not expressly approved by the party responsible
for compliance could void the user’s authority to operate this equipment.
RF exposure warning
This equipment complies with FCC radiation exposure limits set forth for an uncontrolled
environment. This equipment should be installed and operated with minimum distance 20cm
between the radiator and your body