Calix 814G-1 GigaHub User Manual 814G GigaHub Viewable R10 indd
Calix Inc. GigaHub 814G GigaHub Viewable R10 indd
Calix >
Contents
- 1. Users Manual
- 2. Users Manual_Statement
Users Manual
Scan the QR code at left to access the installation
instructions for this product. All product documentation
is available online from the Calix Resource Center
(support.calix.com).
220-01068 Rev 10
814G GigaHub Quick Start Guide
This document provides general installation practices for the GigaHub model
814G.
This document also provides guidance for site preparation, installation, and
basic troubleshooting.
Package Contents
GigaHub - Model 814G
Power Adapter (Optional - may ship separately or with UPS*)
Tabletop Mounting Stand
GigaHub Quick Start Guide (this document)
Product identifi cation labels with login credentials (x2)
* NOTE: For instructions on installing the optional UPS, refer to the
GigaHub Installation Guide.
www.calix.com

— 2 —
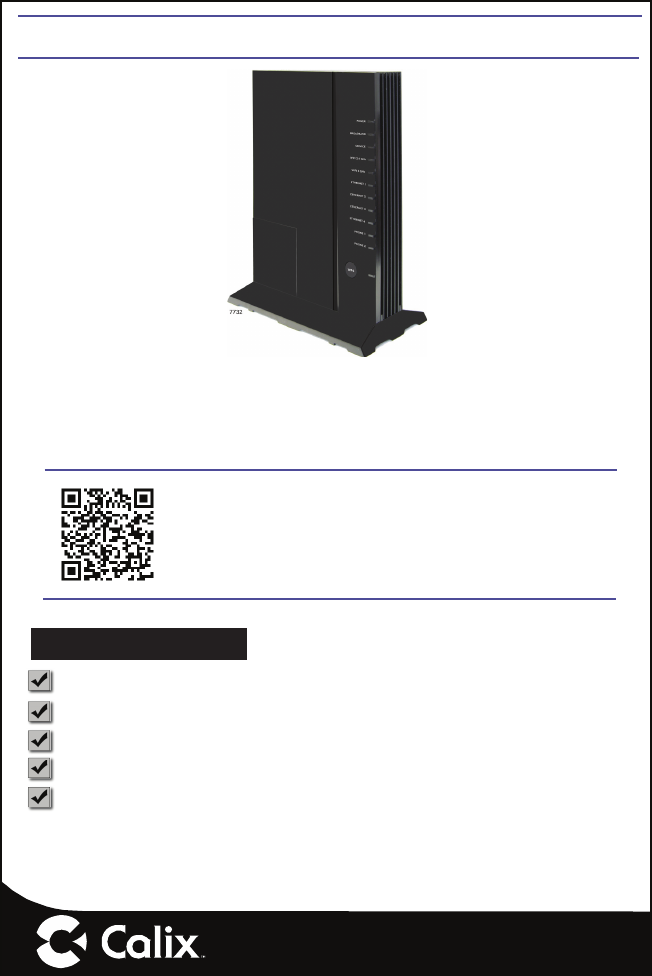
A Quick Look
Installation Variables
Before installing the 814G GigaHub, consider what additional services may
be implemented. Various Ethernet and telephone ports are available on the
back of the unit which may or may not be used. Prior to determining the
unit’s fi nal location, you need to account for the following variables:
• Where will the telephone lines be routed?
• Where will the Ethernet cables be routed?
• Where in the home will the 814G GigaHub be placed? Understanding
Wi-Fi coverage before determining the GigaHubs location is required.
• What type of building material is used in the home? Make sure you have
the appropriate drills, drill bits and fasteners for routing subscriber ser-
vices and/or power cables as they pass through walls and the like.
Power
Broadband
Service
2.4, 5 GHz Wi-Fi
Ethernet (1-4)
Telephone (1-2)
Wi-Fi Protected
Set-up (WPS)
Reset Button
Telephone
Ports (x2)
(RJ-11)
Ethernet Ports (x4)
(RJ-45)
Power Adapter Port
Tabletop Stand
7759
WPS Model 814G-1,
814G-2
2-Pin Barrel
Power
Connector
Fiber Access
Cover Screw
POWER
BROADBAND
SERVICE
WiFi 2.4 GHz
WiFi 5 GHz
ETHERNET 1
ETHERNET 2
ETHERNET 3
ETHERNET 4
PHONE 1
PHONE 2 Power On/Off
EU, UK Models only
— 3 —
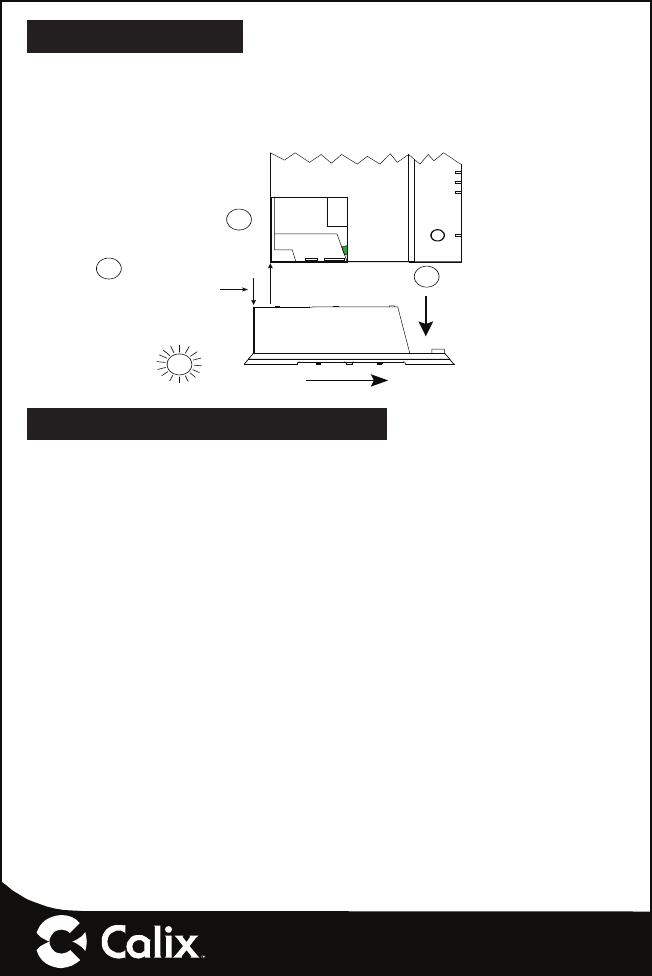
Tabletop Mounting
Calix GigaHubs can be mounted on a tabletop in a “tower” confi guration
using the tabletop stand shipped with the product.
Assemble the tabletop stand and the GigaHub as shown in the following
diagram.
Line-up GigaHub and
Desktop Stand as Shown.
Allow a 9/16” Offset Between
Bottom Corner of GigaHub
and the Top Edge of the Desktop Stand
1
Slide GigaHub Down
Onto Desktop Stand until
Flush
23
Push Stand to the right while
Pulling the GigaHub to the
left until locked into place.
Remove Fiber Access Cover
(remove screw) and set aside
WPS
ETHERNET 3
ETHERNET 4
PHONE 1
PHONE 2
7761
Assembling Stand onto
the 814G GigaHub
4
CLICK !
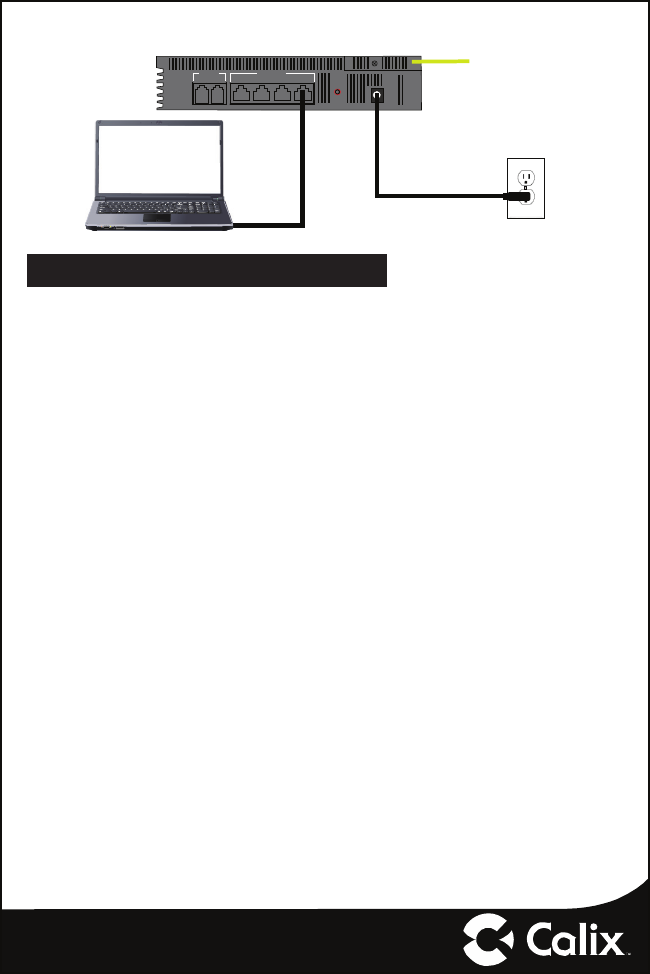
Connecting the Equipment
In order to facilitate table-top mounting of the 814G GigaHub, do the follow-
ing:
1. Remove the 814G GigaHub from its packaging and inventory all parts.
2. Remove the fi ber access cover and set aside temporarily.
3. Attach the fi ber pigtail to the bulkhead fi tting on the GigaHub until it
snaps into place. Make sure the fi ber does not violate manufacturer’s
bend radius specifi cations and that the fi ber is not kinked or pinched.
Re-install the fi ber access cover.
4. Plug in the power adapter to an available wall socket.
5. Plug in the 2-pin barrel connector into the GigaHub. The power-up
sequence begins and will complete in about 3 minutes.
NOTE: To ensure proper airfl ow around the unit, do not block the
sides of the GigaHub.
— 4 —
7762
1 2 3 4
ETHERNET
1 2
PHONE
WAN Interface
(Fiber)
Power Adapter (110/220 VAC)
Ethernet Cable
POWER
RESET
Connecting Outside Services
Subscriber voice, IP video and data services are attached to the rear of the
GigaHub.
1. Locate the telephone, video, and data cables coming from the home.
2. Connect the incoming telephone lines to the RJ-11 connectors on the
GigaHub.
3. Connect CAT5 or better to the LAN Ethernet (RJ-45) ports for direct-at-
tached devices.
4. Secure all subscriber service wiring as appropriate.

— 5 —
Default Device Settings
Inserted inside the shipping carton of each 814G GigaHub, the inventory
label (x2) provides necessary product information. This information may be
attached to a work order or applied to the exterior of the device for future
reference.
• Serial Number of the 814G GigaHub
• ONU MAC address
• Default Wi-Fi security type
• Wi-Fi security key (WPA Key)
• Default IP address of the home gateway router (needed at initial turn-
up)
• Default login credentials (User Name/Password)
Getting Started
To turn up network services on the 814G GigaHub, two options are avail-
able:
1. Connect an active optical fi ber to the 814G GigaHub’s bulkhead fi tting,
power the unit on, and allow the network OLT (for example, a Calix E7)
to discover the device as an unprovisioned ONT. At the OLT, the net-
work administrator will provision the GigaHub and provide operational
parameters remotely.
2. With the fi ber disconnected, access the Smart Activate or Voice Acti-
vate application included with the 814G and then enter the Registration
ID into the application. With the Registration ID having previously been
entered at the OLT, once the fi ber is connected, the GigaHub will come
up as a provisioned ONT based on the pre-provisioning that was com-
pleted for that Registration ID.

— 6 —
Home Gateway Settings
To turn up home gateway services on the GigaHub, complete the following
tasks:
1. Connect your PC to any LAN Ethernet port on the GigaHub using a
standard Ethernet cable.
2. Open a browser and enter the IP address of the GigaHubs Embedded
Web Interface (EWI): http://192.168.1.1.
Status Quick Start Wireless Utilities Advanced
Home Logon AboutHelp
3. Enter the credentials provided on the label shipped inside the GigaHub
box.
4. Navigate to the Quick Start Menu and set-up the following:
a. Choose how to connect to the Internet
b. Confi gure your 2.4 GHz or 5 GHz wireless network
c. Set the local time zone (may be automatically set by network)
For more information about device provisioning from the EWI, refer to the
GigaFamily Service Providers Guide.

— 7 —
Frequently Asked Questions
Q: How do I reset the device without having to unplug the unit?
A: If the RESET button is depressed for less than 5 seconds, it resets the
unit using the current confi guration settings.
Q: How do I reset the device back to factory settings?
A: Pressing the RESET button on the back of the unit for at least 5 seconds,
or access the “Restore Defaults” reset button located in the “Utilities”
section of the Embedded Web Interface.
Q: How does the WPS button work?
A: Pressing the WPS button broadcasts the GigaHubs credentials (network
password) to other WPS capable devices for a period of 2 minutes, allow-
ing these devices to gain access to the wireless network.
Q: Are the wireless radios on by Default?
A: Yes.
Q: Is Wireless Security on by Default?
A: Yes, unit is set with WPA2 Key Wi-Fi security type and login/password
credentials that are printed on the inventory label and the product label
affi xed to the device.
Q: What if the User Name or login keys are forgotten?
A: Try setting up the wired connection and confi guring the wireless encryp-
tion again.
Press the reset button of the wireless router for at least fi ve seconds.
Device reverts to factory default settings
Custom confi guration options (such as SSID names) are reset as well.

— 8 —
Q: My Wi-Fi signal strength is lower than I expected?
A: A wireless signal degrades with distance and obstructions. Common
signal impairments include walls, ceilings, metal, concrete, cinder blocks,
fl uorescent lights, microwaves, furniture, etc. While the 814G has been
optimized to provide wireless coverage for most applications, there may
be dependencies based on the location where the device is installed.
Please contact your service provider for troubleshooting assistance.
Q: What mounting options are available for installing the 814G?
A: The 814G should be installed using the tabletop stand or wall mount
bracket to ensure best Wi-Fi performance and proper fi ber optic cable
management. The 814G can be installed in a fl at orientation on a desk-
top independent of the tabletop stand. Please ensure that the fi ber optic
cable can be properly routed to the device without excessive bends or
pinching of the cable.
Q: What do I do if I cannot log on to the 814G gateway?
A: Contact your service provider.
Q: Who do I contact for service and support?
A: Contact your service provider.
Potentially Explosive Atmosphere
Do not use the GigaHub in an area where a potentially explosive atmo-
sphere exists.
Atmosphère potentiellement explosive
N’utilisez pas le GigaHub dans un endroit où existe une atmosphère poten-
tiellement explosive.
Intended Use
This product is classifi ed as telecommunication equipment not intended for
direct purchase by the public.
This product is designed and approved for use in an indoor location only.

— 9 —
!CAUTION! Use of any controls, adjustments, or procedures
other than those specifi ed herein may result in hazardous
radiation exposure.
Utilisation prévue
Ce produit est classé comme équipement de télécommunication non des-
tiné à l’achat direct par le public.
Ce produit est conçu et approuvé pour utilisation en intérieur uniquement.
!MISE EN GUARDE ! L’utilisation de contrôles, réglages ou
procédures autres que ceux spécifi és dans ce manuel peut
entraîner une exposition dangereuse à des rayonnements.
Power Supply
• Ensure that a suitable AC power outlet is located near the GigaHub
and easily accessible.
• Connect the power supply cord only to the AC power outlet that meets
the specifi cations marked next to the appliance AC power inlet on the
GigaHub.
• Never alter the AC power cord. If necessary have the correct outlet
installed by a qualifi ed electrician or call your service provider for assis-
tance.
• To reduce risk of damage to the electric cord, remove it from the outlet
by holding onto the AC power adapter rather than the cord. Make sure
the cord is positioned so that it will not be stepped on, tripped over or
otherwise subjected to damage or stress.
!WARNING! Do not use any other power adapter except the
one that accompanies this unit or a power supply identifi ed in
the list below. Use of another adpater could result in damage
to the unit. To prevent electrical shock, please do not open
the cover. The following power adapters are qualifi ed to be
used with this GigaHub.

— 10 —
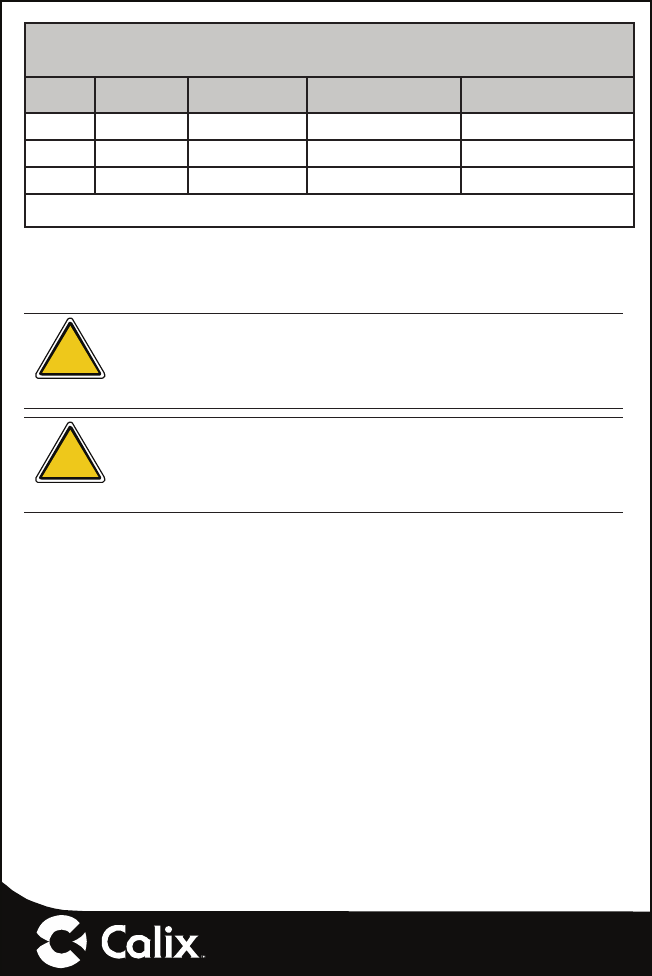
Power Supply Specifi cations
Note: All power supplies must be a UL listed, LPS power source
ONT
Model Region Adapter Model
Number Input Output
814G-1 North America
(NA) Amigo AMS157-1202500FU 90-264 VAC, 47/63 Hz, 2.5A Nominal 12 VDC, 2.5A Maximum, 30W
814G-1 European Union Amigo AMS157-1202500FV 90-264 VAC, 47/63 Hz, 2.5A Nominal 12 VDC, 2.5A Maximum, 30W
814G-2 European Union Amigo AMS157-1202000FV 90-264 VAC, 47/63 Hz, 2A Nominal 12 VDC, 2A Maximum, 24W
Note: The above table refl ects Power Adapter certifi cations only. This is not intended to suggest that the ONTs themselves are certifi ed for use in
all listed countries/regions.
Alimentation électrique
• Assurez-vous qu’une prise de courant C.A. appropriée est située près
du GigaPoint et qu’elle soit facile d’accès.
• Connectez le câble d’alimentation uniquement à une prise de courant
qui correspond aux spécifi cations indiquées à côté de l’entrée d’alimen-
tation du GigaHub.
• Ne modifi ez jamais le câble d’alimentation. Si nécessaire, faîtes installer
la bonne prise de courant par un électricien qualifi é ou Contactez votre
prestataire de services pour assistance.
• Pour réduire le risque de dommage au câble électrique, retirez-le de
la prise de courant en tenant l’adaptateur secteur plutôt que le câble.
Assurez-vous que le câble est positionné de manière à éviter qu’il soit
possible de marcher ou trébucher dessus, ou de l’endommager.
Attention ! N’utilisez pas d’autre adaptateur secteur que celui
qui accompagne cet appareil ou une alimentation électrique
autre que celle identifi ée dans la liste ci-dessous. L’utilisation
d’un autre adaptateur pourrait endommager l’appareil. Pour
éviter les chocs électriques, n’ouvrez pas le couvercle. L’ad-
aptateur électrique suivant est qualifi é pour être utilisé avec le
GigaHub.
— 11 —
Specifi cations de l’alimentation du 814G-1, 814G-2
Remarque: Toutes les sources d’alimentation doivent être une source d’alimentation LPS homologuée
UL.
ONT Model Région Numéro de modèle de
l’adaptateur Entrée Sortie
814G-1 Amérique du Nord Amigo AMS157-1202500FU 90-264 VCA, 47/63 Hz, 2.5A Nominal 12 VVC, 2.5A Maximum, 30W
814G-1 Union européenne Amigo AMS157-1202500FV 90-264 VCA, 47/63 Hz, 2.5A Nominal 12 VVC, 2.5A Maximum, 30W
814G-2 Union européenne Amigo AMS157-1202000FV 90-264 VCA, 47/63 Hz, 2A Nominal 12 VVC, 2A Maximum, 24W
Remarque: Le tableau ci-dessus refl ète uniquement les certifi cations de l’adaptateur secteur. Cela n’a pas pour but de suggérer que les ONT eux-mêmes sont
certifi és pour être utilisés dans tous les pays / régions listés.
Children
Do not allow children to play with the GigaHub. It contains small parts that
could become detached and create a choking hazard.
!CAUTION! Changes or modifi cations to this product not
expressly approved by the party responsible for compliance
could void your authority to operate the equipment and inval-
idate approvals.
!MISE EN GUARDE ! Les changements ou modifi cations non
approuvés expressément par l’autorité responsable de la
conformité peuvent annuler l’autorisation accordée à l’utilisa-
teur d’utiliser cet équipement.
Environmental Conditions
Maximum environmental values during use:
Temperature: 0° C to +40° C (32° to 104° F), Humidity: 5% to 95% RH,
non-condensing

License Information
Open Source Software Utilization Notice
The 814G GigaHub uses Open Source Software Programs. Such software
programs are made available subject to certain third party terms and condi-
tions.
The fact that you are about to begin using or have purchased this product
requires that you be informed of the use of these software packages and
or libraries and in some cases, the third party terms and conditions applica-
ble to such software. This information can be found on the manufacturer’s
support portal. Refer to the appropriate software release notes for additional
information on Open Source Software Programs used by this product.
— 12 —