Cambium Networks XIAC3470 802.11abgn/ac module User Manual
Xirrus, Inc. 802.11abgn/ac module
Contents
- 1. Manual
- 2. Notices to User
Manual

2
Wireless AP Installation Guide
Wireless Access Point Expansion Pack
Quick Installation Guide
The Xirrus XI -AC3470 802.11ac Wave 2
Wireless Access Points (APs) are modules that
enable you to evolve the wireless capacity of
your XR Series Arrays as your needs grow.
Features
Each AP includes four high gain
directional antennas focusing the RF
signal for maximum range and reliability.
The modular design fitting Xirrus XR-2000/4000/6000 Series Arrays enables future in-
place upgrades and network designs that aim RF coverage where needed.
Configurable to operate in 2.4GHz or 5GHz bands.
Basic Installation Requirements
Wave 2 radios require ArrayOS (AOS) Release 8.0 or higher. You must upgrade the Array
to at least Release 8.0 BEFORE you install any Wave 2 modules. You must have a Xirrus
license for your AOS release (8.0 or higher) and for the enhanced capabilities for this
specific Array (802.11ac Wave 2, higher software release). See “Licensing New Modular
APs” on page 10.
You may not mix Wave 2 radios with different radio types on the same XR Array. If you
have 802.11ac Wave 2 radios and other types of radios on the same Array, all of the non-
Wave 2 radios will be ignored.
Xirrus highly recommends that the upgraded Array have a radio count that matches one of
our standard Arrays (e.g., XR-4000 with 4 or 8 radios, XR-2000 with 2 or 4).
No. 2 Phillips head screwdriver
Sharp cutting tool (box-cutter, etc.)—only needed for XR Arrays with removable gaskets
(models XR-2000 and above that end in “0”), if you will move modules within the Array.
Computer with a terminal emulator such as PuTTY for using the Array CLI via SSH. You
may also use the Xirrus Xircon utility to connect to the Array. Download Xircon from
Download Central at support.xirrus.com.
A Cat 5e/Cat 6 connection to a powered switch port or a Power over Ethernet injector that
is appropriate for this Array model. The Array must have a data connection to your
network. If you are using Xircon to communicate with the Array, the Array must be on the
same local subnet as your workstation.

Wireless AP Installation Guide
3
Recommended: Anti-static workstation (anti-static mat and anti-static wrist strap)
Open the Array
1. Make sure that you have installed a license that supports both Wave 2 802.11ac radios (i.e.,
4x4 radios) and the required AOS release as described above, then upgrade the Array
before installing the Wave 2 modules. Otherwise, the Array may not boot up when the
installation is complete.
a. Log in to the Array’s WMI and open the System Tools page. In the Configuration
Management section, click Start on the Auto-provisioning line to install the latest
license for this Array.
b. In the System (top) section, on the Operating System Software Upload line, click
Choose File and browse to the AOS software image that you have already downloaded
to your file system from your account at support.xirrus.com. Click the Upload button
when it appears. When the Status information at the bottom of the page informs you
that the file transfer is complete, set the Active Software Image to this new image. Click
the Save & Reboot button to complete the upgrade.
2. Prepare a location for performing the upgrade. Xirrus recommends using an anti-static
work station with an anti-static wrist strap attached to an anti-static mat per the
manufacturer’s directions. Wear the wrist strap while working with the Array.
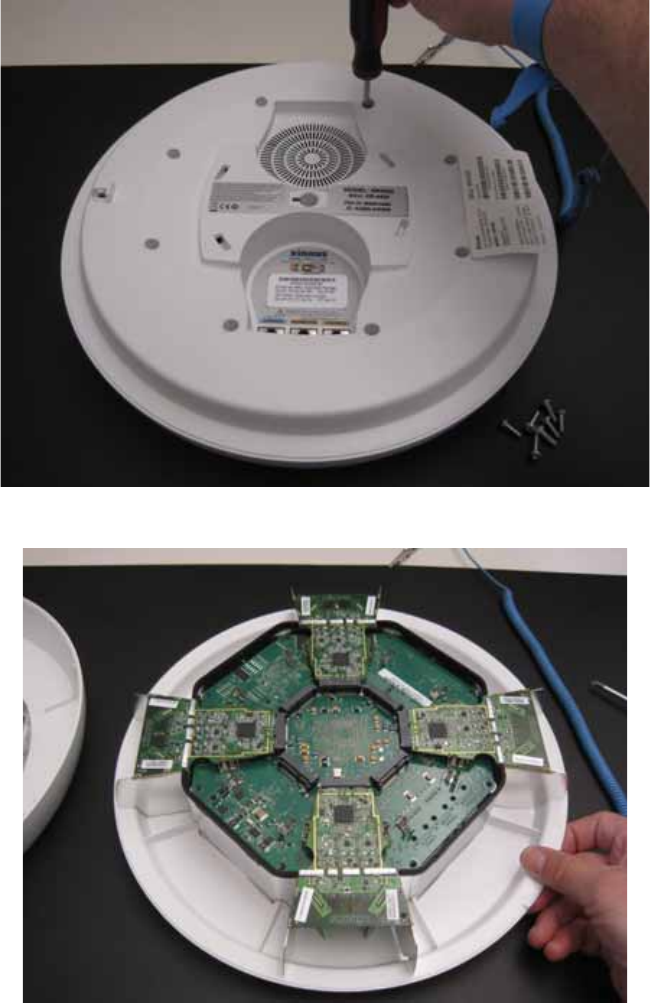
3. Remove screws from the bottom of the Array with a No. 2 Phillips screwdriver as shown.
To save the screws for later, it is most convenient to lift the back away from the front cover
and let the screws drop into the cover as you turn the back over.
4
Wireless AP Installation Guide
4. Carefully turn the unit over. Remove the top cover of the Array and set it aside.
5. Continue to one of the following sections:
“Add Modular APs” on page 5 to install modular APs in empty slots.
“Upgrade APs” on page 7 to change modular APs.
“Test and Close the Array” on page 9 to move APs to different slots.

Wireless AP Installation Guide
5
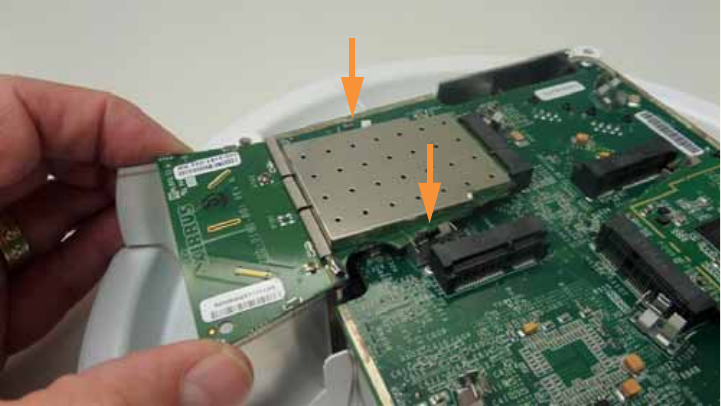
Add Modular APs
1. If you have an Array model with removable gaskets, remove the gasket from the desired
target location. Some Arrays (typically, those whose model numbers end in a 5 or 6) do not
have this kind of gasket.
2. Insert the new modular AP into the connector as shown below for an XR-2225.
6
Wireless AP Installation Guide
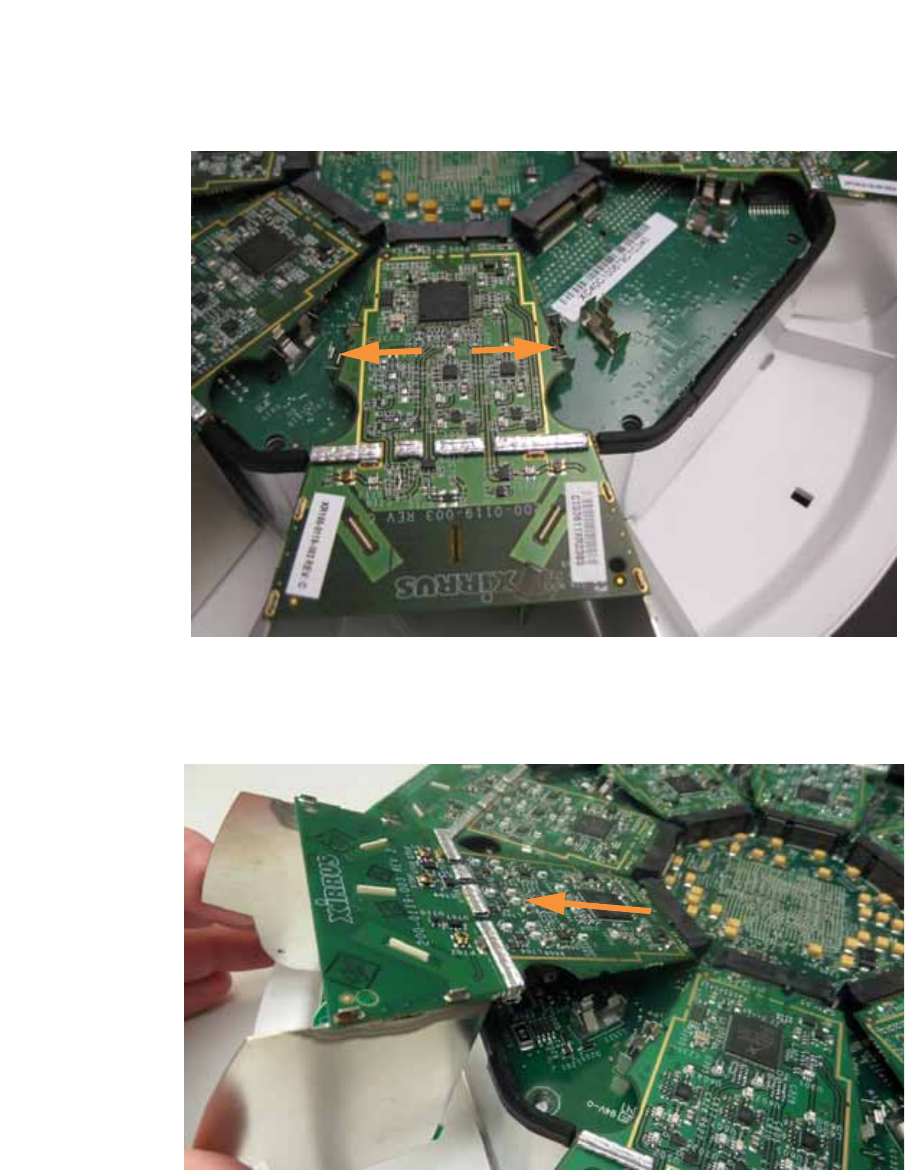
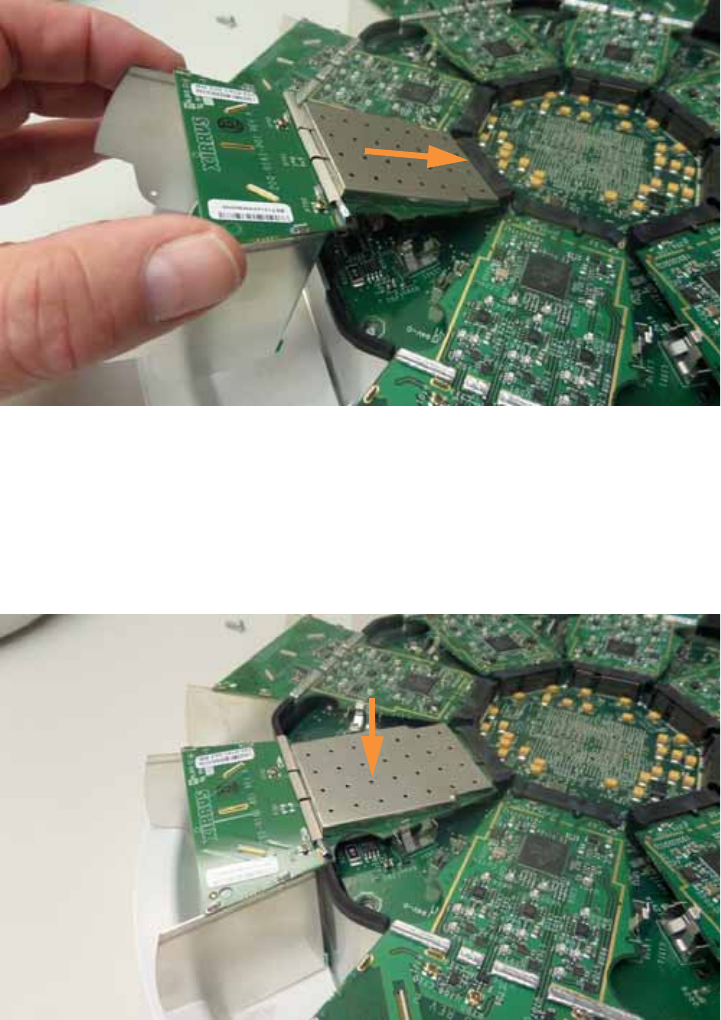
3. Carefully push the modular AP down until it latches on both sides.
4. Repeat for each new modular AP.
5. Proceed to “Test and Close the Array” on page 9.
Important: For XR Arrays that have movable gaskets, there must
be a gasket installed in all slots that have no radio card!
Wireless AP Installation Guide
7
Upgrade APs
If you are upgrading your APs to Wave 2 modular APs, use this procedure to switch APs. (XR-
4836 shown below)
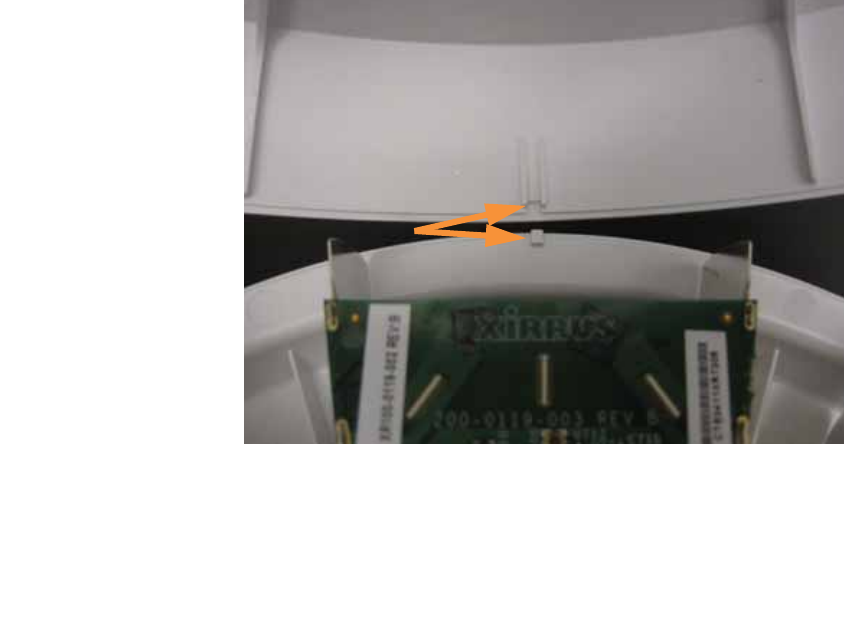
1. Push apart both spring clips (indicated below) with one hand, then carefully lift the old
modular AP with other hand.
2. Gently pull the old modular AP out of the connector.

Wireless AP Installation Guide
9
Test and Close the Array
After adding or changing radio modules, the Array determines its own model number based
on the number and type of radios that it now contains. For example, suppose you modify an
XR-4426 that initially has four 2x2 802.11ac Wave 1 APs. If you remove the existing radio
modules and fill all eight slots with Wave 2 802.11ac 4x4 radios, the Array will identify itself as
a model that has eight Wave2 radios.
Use the following steps to check the installation of the AP modules before closing the Array.
1. With the Array still open on the workbench, supply data and appropriate power to the
Gigabit1 port using a Cat 5e/Cat 6 connection.
2. Verify that the fan works and that the Gigabit1 LED is flashing with data traffic on its
connection. If this fails, make sure that you are using a power supply recommended by
Xirrus for this Array, and check your power and data connections.
3. The Array LEDs will light, and after a while the LEDs for the radios will blink in a rotating
sequence. When this sequence stops, the Array has finished booting.
4. Verify that the new and old radio modules are properly connected:
Open a session to the Array CLI:
Using SSH via a terminal emulator, connect to the hostname of the Array. The
factory default hostname is the Array’s serial number, found on a label on the
back of the Array and on the shipping box.
Or, using Xircon, make sure that the Array is on the same local subnet as the
computer on which Xircon is running. The Array should be found automatically.
Log in to CLI using the username/password for this Array (the factory defaults are
admin/admin).
Enter the CLI command show array-info. This displays (among other things) a list of
all the modular APs that are seated properly and operational.
Enter the CLI command show iap. This lists the radio type and settings of each AP.
5. If any of the APs are not working properly, they will not show up in the show array-info
list. In this case, power down the Array and then re-seat the faulty APs. Power up the Array
and perform the tests again. If all APs are still not functioning properly please review
“Troubleshooting ” on page 12.
10
Wireless AP Installation Guide
6. Once all APs are functional, reinstall the Array’s plastic cover by aligning the interior tab on
the bottom with the notch on the top cover. Then reinstall the screws, being careful not to
over-tighten them.
Licensing New Modular APs
The Array requires a new license from Xirrus to enable expanded capabilities if you have added
11ac Wave 2 radios where there were none before. Please make sure that you have purchased a
license for the enhanced capabilities for this specific Array, based on its serial number.
Most customers employ the Xirrus Management System (XMS) for continuing management of
Xirrus devices. XMS simplifies installing the upgraded license on the Array, and in some cases
will automatically install it.
XMS Cloud Next Generation (XMS-CL-9500-x)
Soon after the upgraded Array has Internet connectivity, the new license will automatically
be installed.
XMS Enterprise
(Also available as a cloud-deployed solution: XMS-9000-CL-x) You may use the XMS
Configure > Import Licenses menu option to update the licenses of all Arrays to be
modified in one step. Note that if you are upgrading modified Arrays to a new minor or
major software release, and if the software upgrade is being performed for a profile
network, then XMS will automatically install the latest available licenses on the profile’s
member Arrays before the software upgrade occurs.

Wireless AP Installation Guide
11
If you are not using XMS, new licenses are provided by Xirrus in the form of an Excel file (.xls).
Each license is keyed to an individual Array’s serial number, and may only be used on that
Array. Using the Array WMI on your browser, go to the System Tools page. You may either
click the Auto-provisioning Start button to automatically fetch a new license from the Xirrus
license server and install it (if the Array has Internet connectivity), or enter this Array’s new
License Key manually. Please see the ArrayOS User Guide for more information. The User
Guide is available from http://support.xirrus.com (login required). Select the Libraries tab and
click the ArrayOS - XR Platform Latest Release link on the left.
To verify the features supported by the newly installed license, go to the WMI’s Array
Information page. The License Features section (under Software) will show how many APs
and what type are authorized by the new license.
12
Wireless AP Installation Guide
Troubleshooting
Modular AP not operating
1. Re-seat the modular APs that are not functioning.
2. If a modular AP still is not functioning properly, power down the Array.
3. Swap the location of the non-functioning modular AP to a slot that was functioning (see
“Test and Close the Array” on page 9) and perform the tests again.
4. If the same modular AP is still not functioning in the new slot, there may be a problem with
that modular AP. If the same modular AP is now working in the new slot, re-install it in the
original slot. If the original slot is still not functioning, there may be a problem with that slot
on the Array.
5. If everything works, then reinstall the cover as shown on page 10.
Fan not operating
1. Verify that you are using a power injector or powered switch port that Xirrus recommends
for this Array.
2. Remove all of the modular APs. Remove the four (4) screws holding the CPU board in the
chassis and lift the CPU board. Verify that the fan connector is plugged into the CPU board
(the fan might have come unplugged).
3. If the fan still does not operate, disconnect the power injector or powered switch port, and
connect a different one (the power source may be bad).
4. If the fan still does not operate, call Xirrus Customer Support.
Customer Support
The Xirrus Customer Support web site provides online documents and tools for
troubleshooting and resolving technical issues with Xirrus products and technologies. Access to
all tools on the Xirrus Customer Support Website requires a login user ID and password. If you
have a valid service contract but do not have a user ID or password, you can register at:
http://support.xirrus.com.
To request additional assistance, please contact Xirrus Customer Support via:
Email at: support@xirrus.com.
Live chat with one of the Xirrus Customer Support Representatives at:
http://support.xirrus.com.
Call Xirrus at the following numbers:

Wireless AP Installation Guide
13
Hardware Warranty Agreement
PLEASE READ THIS AGREEMENT CAREFULLY BEFORE USING THIS PRODUCT
BY USING THIS PRODUCT, YOU ACKNOWLEDGE THAT YOU HAVE READ AND
UNDERSTOOD ALL THE TERMS AND CONDITIONS OF THIS AGREEMENT AND THAT
YOU ARE CONSENTING TO BE BOUND BY THIS AGREEMENT. IF YOU DO NOT AGREE
TO ALL OF THE TERMS OF THIS AGREEMENT, RETURN THE UNUSED PRODUCT TO
THE PLACE OF PURCHASE FOR A FULL REFUND.
LIMITED WARRANTY. Xirrus warrants that for a period of one year from the date of purchase
by the original purchaser (“Customer”): (i) the Xirrus Equipment (“Equipment”) will be free of
defects in materials and workmanship under normal use; and (ii) the Equipment substantially
conforms to its published specifications. Except for the foregoing, the Equipment is provided
AS IS. This limited warranty extends only to Customer as the original purchaser. Customer's
exclusive remedy and the entire liability of Xirrus and its suppliers under this limited warranty
will be, at Xirrus' option, repair, replacement, or refund of the Equipment if reported (or, upon
request, returned) to the party supplying the Equipment to Customer. In no event does Xirrus
warrant that the Equipment is error free or that Customer will be able to operate the Equipment
without problems or interruptions.
This warranty does not apply if the Equipment (a) has been altered, except by Xirrus, (b) has
not been installed, operated, repaired, or maintained in accordance with instructions supplied
by Xirrus, (c) has been subjected to abnormal physical or electrical stress, misuse, negligence, or
accident, or (d) is used in ultra-hazardous activities.
DISCLAIMER. EXCEPT AS SPECIFIED IN THIS WARRANTY, ALL EXPRESS OR IMPLIED
CONDITIONS, REPRESENTATIONS, AND WARRANTIES INCLUDING, WITHOUT
LIMITATION, ANY IMPLIED WARRANTY OF MERCHANTABILITY, FITNESS FOR A
United States and Canada +1.800.947.7871 (US Toll Free) or
+1.805.262.1600 (Direct)
Europe, Middle East, and Africa +44.20.3239.8644
Australia 1300.947.787 (within Australia Only)
Asia and Oceania +61.2.8006.0622
Latin, Central, and South America +1.805.262.1600
14
Wireless AP Installation Guide
PARTICULAR PURPOSE, NONINFRINGEMENT OR ARISING FROM A COURSE OF
DEALING, USAGE, OR TRADE PRACTICE, ARE HEREBY EXCLUDED TO THE EXTENT
ALLOWED BY APPLICABLE LAW.
IN NO EVENT WILL XIRRUS OR ITS SUPPLIERS BE LIABLE FOR ANY LOST REVENUE,
PROFIT, OR DATA, OR FOR SPECIAL, INDIRECT, CONSEQUENTIAL, INCIDENTAL, OR
PUNITIVE DAMAGES HOWEVER CAUSED AND REGARDLESS OF THE THEORY OF
LIABILITY ARISING OUT OF THE USE OF OR INABILITY TO USE THE EQUIPMENT EVEN
IF XIRRUS OR ITS SUPPLIERS HAVE BEEN ADVISED OF THE POSSIBILITY OF SUCH
DAMAGES. In no event shall Xirrus' or its suppliers' liability to Customer, whether in contract,
tort (including negligence), or otherwise, exceed the price paid by Customer.
The foregoing limitations shall apply even if the above-stated warranty fails of its essential
purpose. SOME STATES DO NOT ALLOW LIMITATION OR EXCLUSION OF LIABILITY FOR
CONSEQUENTIAL OR INCIDENTAL DAMAGES.
The above warranty DOES NOT apply to any evaluation Equipment made available for testing
or demonstration purposes. All such Equipment is provided AS IS without any warranty
whatsoever.
Customer agrees the Equipment and related documentation shall not be used in life support
systems, human implantation, nuclear facilities or systems or any other application where
failure could lead to a loss of life or catastrophic property damage, or cause or permit any third
party to do any of the foregoing.
All information or feedback provided by Customer to Xirrus with respect to the Product shall
be Xirrus' property and deemed confidential information of Xirrus.
Equipment including technical data, is subject to U.S. export control laws, including the U.S.
Export Administration Act and its associated regulations, and may be subject to export or
import regulations in other countries. Customer agrees to comply strictly with all such
regulations and acknowledges that it has the responsibility to obtain licenses to export, re-
export, or import Equipment.
This Agreement shall be governed by and construed in accordance with the laws of the State of
California, United States of America, as if performed wholly within the state and without
giving effect to the principles of conflict of law. If any portion hereof is found to be void or
unenforceable, the remaining provisions of this Warranty shall remain in full force and effect.
This Warranty constitutes the entire agreement between the parties with respect to the use of
the Equipment.
Manufacturer is Xirrus, Inc. 2101 Corporate Center Drive Thousand Oaks, CA 91320