Cambium Networks XS3900A XS-3900 Wireless LAN Array User Manual xirrus array userguide2
Xirrus, Inc. XS-3900 Wireless LAN Array xirrus array userguide2
Contents
- 1. Users Manual Revised 032006 Part 1
- 2. Users Manual Revised 032006 Part 2
Users Manual Revised 032006 Part 2
Wireless LAN Array
106 Configuring the Xirrus Array
Statistics (for all radios)
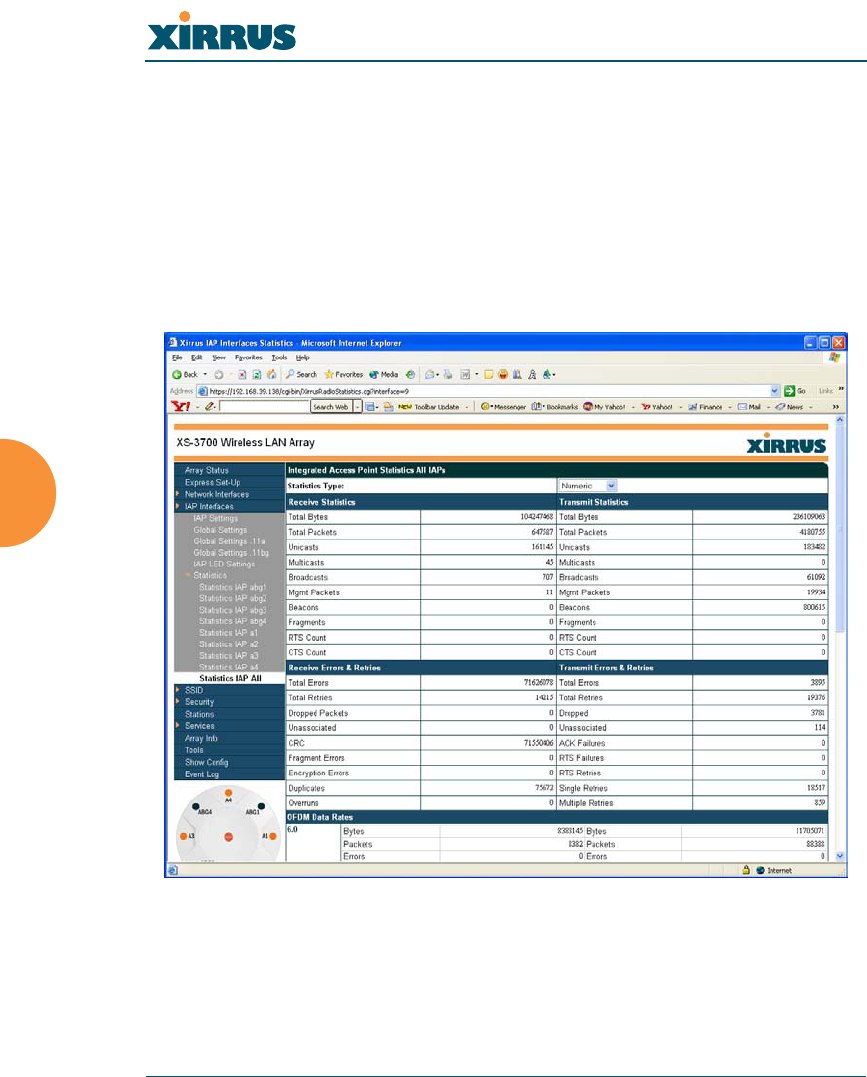
This page provides a detailed statistical summary of the performance of all radios,
displayed either numerically or by percentage (your choice). The following image
shows an example from the XS-3700 product.
The default Statistics Type is NUMERIC, but you can change this to
PERCENTAGE from the pull-down menu at the top of the page. In addition, you
can Refresh or Clear the data on this page at any time by clicking on the
appropriate button.
Figure 74. WMI: Statistics for All IAPs Page (XS-3700)
Wireless LAN Array
Configuring the Xirrus Array 107
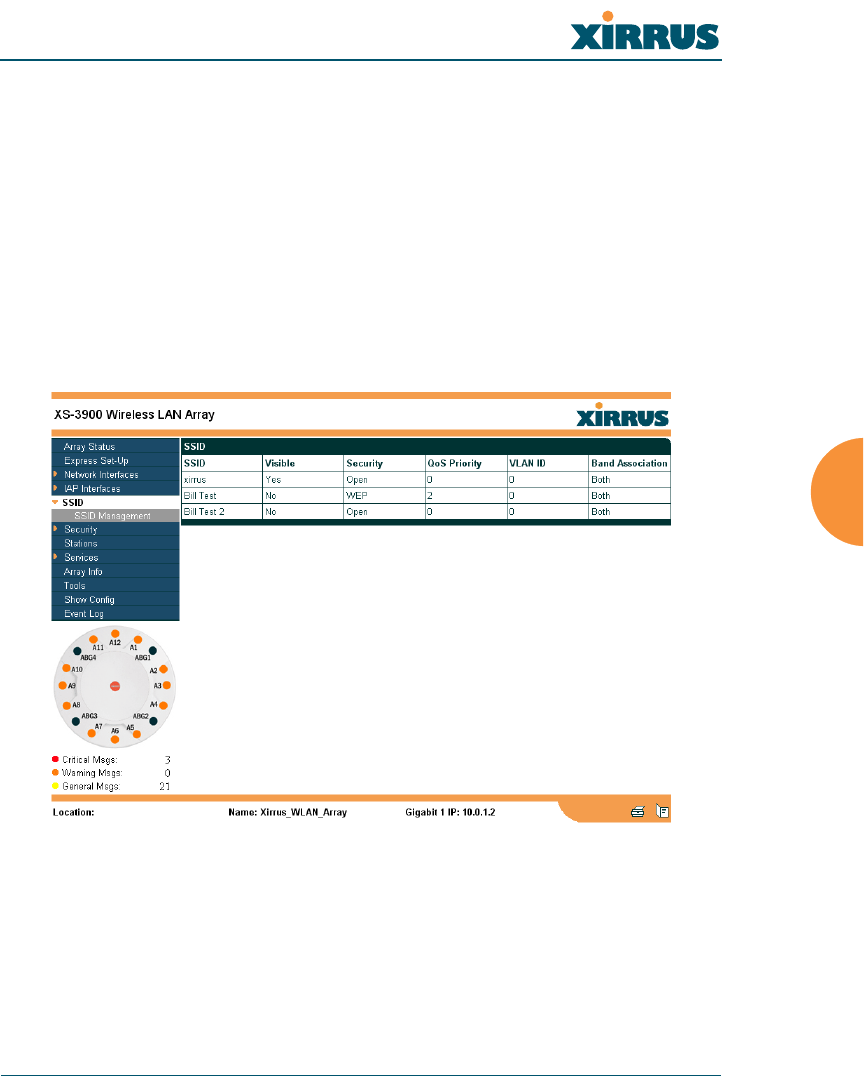
SSID
This is a status only page that allows you to review SSID (Service Set IDentifier)
assignments. It includes the SSID name, whether or not an SSID is visible on the
network, any security and QoS parameters defined for each SSID, associated
VLAN IDs, and radio availability per SSID. There are no configuration options
available on this page, but if you are experiencing problems or reviewing SSID
management parameters, you may want to print this page for your records.
For information to help you understand SSIDs and how multiple SSIDs are
managed by the XS-3900, go to the Multiple SSIDs section of “Frequently Asked
Questions” on page 222.
Figure 75. WMI: SSID Page

Wireless LAN Array
108 Configuring the Xirrus Array
Understanding SSIDs
The SSID (Service Set Identifier) is a unique identifier that wireless networking
devices use to establish and maintain wireless connectivity. Multiple access points
on a network or sub-network can use the same SSIDs. SSIDs are case-sensitive
and can contain up to 32 alphanumeric characters (do not include spaces when
defining SSIDs).
Multiple SSIDs
A BSSID (Basic SSID) refers to an individual access point radio and its associated
clients. The identifier is the MAC address of the access point radio that forms the
BSS. A group of BSSs can be formed to allow stations in one BSS to communicate
to stations in another BSS by way of a backbone that interconnects each access
point.
The Extended Service Set (ESS) refers to the group of BSSIDs that are grouped
together to form one ESS. The ESSID (often referred to as SSID or “wireless
network name”) identifies the Extended Service Set. Clients must associate to a
single ESS at any given time. Clients ignore traffic from other Extended Service
Sets that do not have the same SSID.
Legacy access points typically support one SSID per access point. Xirrus Wireless
LAN Arrays support the ability for multiple SSIDs to be defined and used
simultaneously.
Using SSIDs
The creation of different wireless network names allows system administrators to
separate types of users with different requirements. The following policies can be
tied to an SSID:
zThe wireless security mode needed to join this SSID.
zThe wireless Quality of Service (QoS) desired for this SSID.
zThe wired VLAN associated with this SSID.
Wireless LAN Array
Configuring the Xirrus Array 109
As an example, one SSID named accounting might require the highest level of
security, while another SSID named guests might have low security requirements.
Another example may define an SSID named voice that supports voice over
Wireless LAN phones with the highest possible Quality of Service (QoS)
definition. This type of SSID might also forward traffic to specific VLANs on the
wired network.
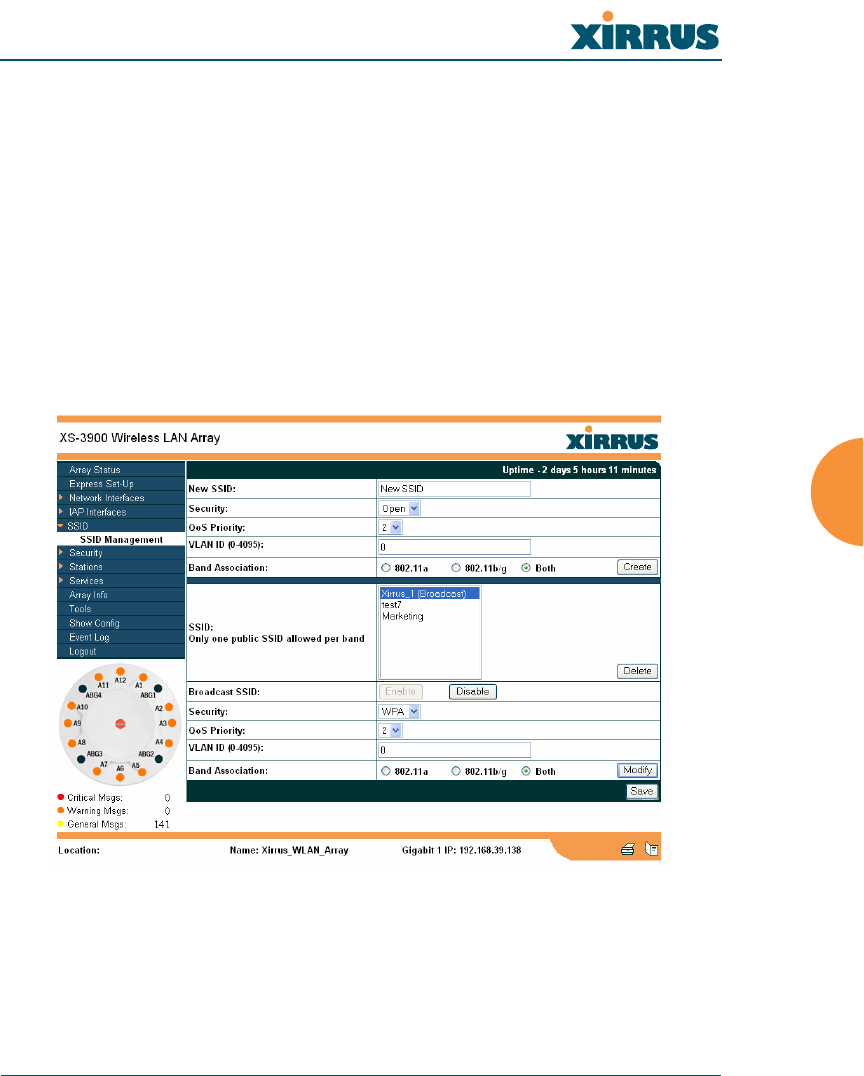
SSID Management
This page allows you to manage SSIDs (create, edit and delete), and assign
security parameters and VLANs on a per SSID basis. When finished, click on the
Save button to save your changes, otherwise your changes will not take effect.
Figure 76. WMI: SSID Management Page
Wireless LAN Array
110 Configuring the Xirrus Array
Procedure for Managing SSIDs
1. New SSID: Enter a new SSID definition.
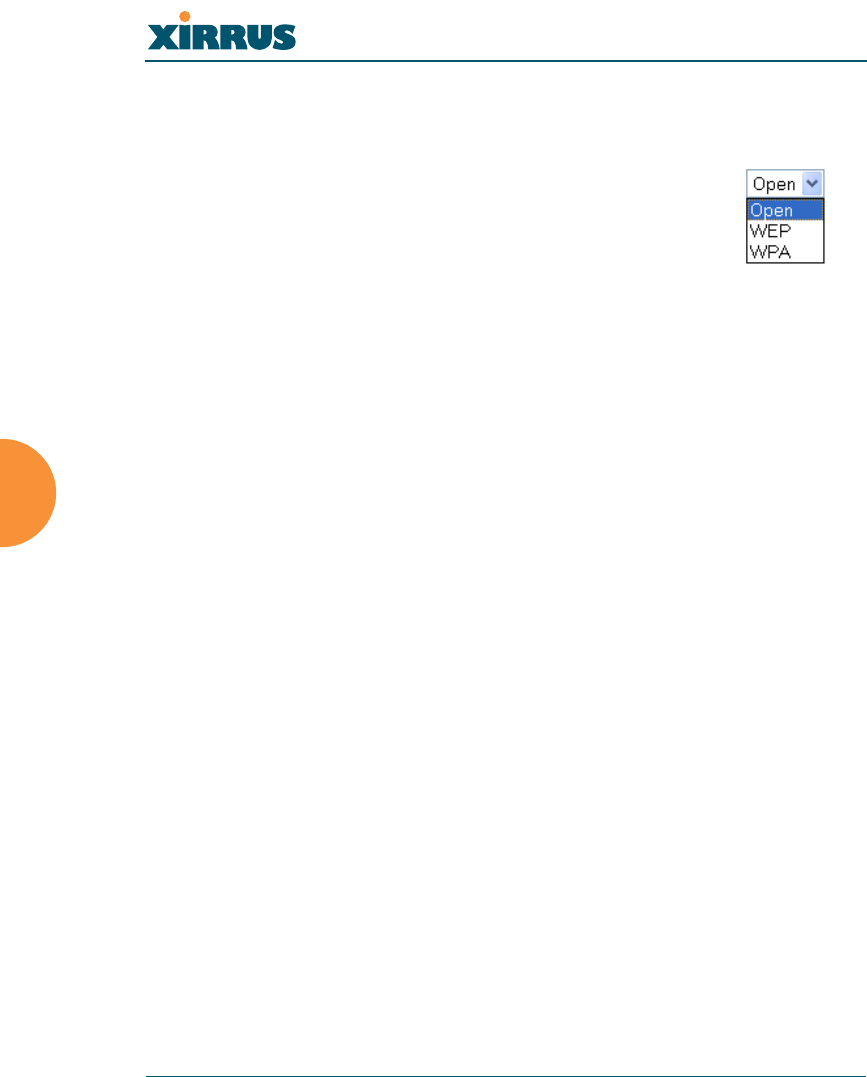
2. Security: From the pull-down list, choose the security
that will be required by users for this SSID, either
Open, WEP or WPA. The Open option provides no
security and is not recommended. For an overview of
the security options, go to “Security Planning” on
page 35.
3. Qos Priority: From the pull-down list, select a Quality of Service (QoS)
setting. The QoS setting you define here will prioritize wireless traffic for
this SSID over other SSID wireless traffic. This step is optional.
4. VLAN ID: From the pull-down list, select a VLAN that you want this
traffic to be forwarded to on the wired network. This step is optional.
5. Band Association: The Array allows you to choose which wireless band
the SSID will be beaconed on. Select either 802.11a,802.11b/g or Both.
6. Click on the Create button to create this SSID. The SSID you just created
will appear in the SSID List below.
Editing SSIDs
7. SSID: Choose the SSID that you want to edit or delete from the list. If you
are deleting a selected SSID, click on the Delete SSID button, otherwise
go to Step 2.
8. Broadcast SSID: Click on the Enable button to make the selected SSID
visible to all clients on the network. Although the XS-3900 will not
broadcast SSIDs that are hidden, clients can still associate to a hidden
SSID if they know the SSID name to connect to it. Choose Disable if you
do not want this SSID to be visible on the network.

Wireless LAN Array
Configuring the Xirrus Array 111
9. Security: From the pull-down list, choose the security
that will be required by users for the selected SSID—
either Open, WEP or WPA. The Open option
provides no security and is not recommended. For an
overview of the security options, go to “Security
Planning” on page 35.
10. QoS Priority: From the pull-down list, select a Quality of Service (QoS)
setting. The QoS setting you define here will prioritize wireless traffic for
the selected SSID over other SSID wireless traffic. This step is optional.
11. VLAN ID: From the pull-down list, select a VLAN that you want this
traffic to be forwarded to on the wired network. This step is optional.
12. Band Association: The Array allows you to choose which wireless band
to associate with each SSID. Select either 802.11a,802.11b/g or Both.
13. Click on the Modify button to edit the selected SSID.
14. Click on the Save button to save your changes (otherwise your new
settings will not take effect).
Wireless LAN Array
112 Configuring the Xirrus Array
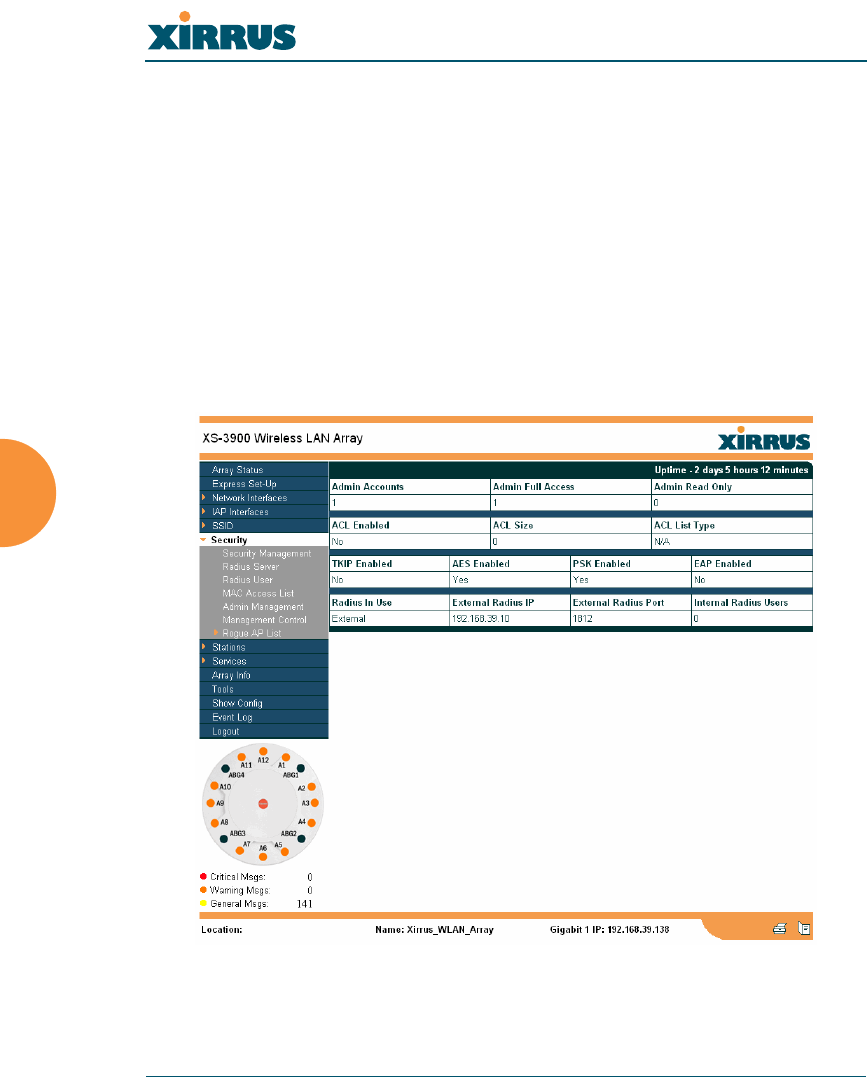
Security
This is a status only page that allows you to review the Array’s security
parameters. It includes the assigned network administration accounts, Access
Control List (ACL) values, WEP and WPA status, and RADIUS configuration
settings. There are no configuration options available on this page, but if you are
experiencing issues with security, you may want to print this page for your
records.
For additional information about wireless network security, refer to:
z“Security Planning” on page 35.
zThe Security section of “Frequently Asked Questions” on page 222.
Figure 77. WMI: Security Page
Wireless LAN Array
Configuring the Xirrus Array 113
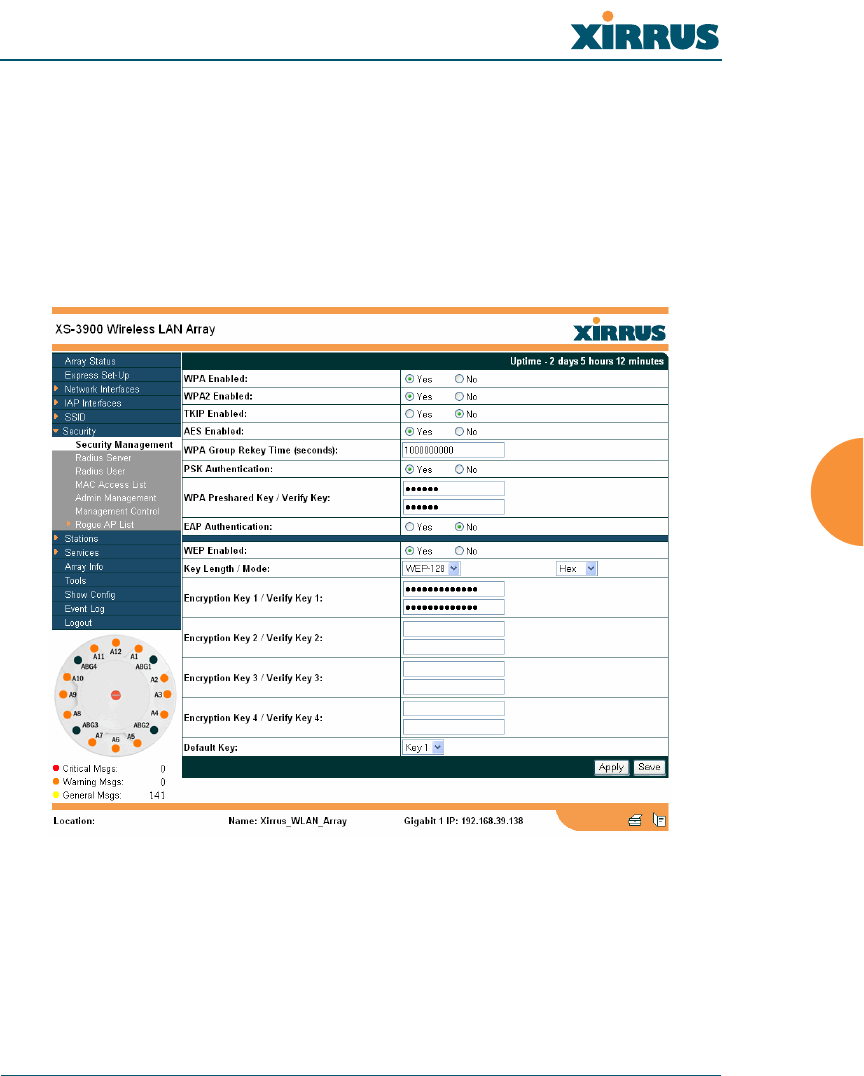
Security Management
This page allows you to establish the security parameters for your wireless
network, including WEP, WPA and RADIUS authentication. When finished, click
on the Apply button to apply the new settings to this session, then click on the
Save button to save your changes.
For additional information about wireless network security, refer to “Security
Planning” on page 35.
Figure 78. WMI: Security Management Page

Wireless LAN Array
114 Configuring the Xirrus Array
Understanding Security
The Xirrus Wireless LAN Array incorporates many security features that
administrators can configure. After initially installing an Array, always change
the default administrator password (the default is admin), and choose a strong
replacement password (a strong password contains letters, numbers and special
characters). When appropriate, issue read only administrator accounts.
Other security considerations include:
zSSH versus Telnet: Be aware that Telnet is not secure over network
connections and should be used only with a direct serial port connection.
When connecting to the unit’s Command Line Interface over a network
connection, you must use a Secure SHell (SSH) utility. The most
commonly used freeware providing SSH tools is PuTTY.
zConfiguration auditing: The optional Xirrus Wireless Management
System (XM-3300) offers powerful management features for small or
large Xirrus Wireless LAN deployments, and can audit your
configuration settings automatically. In addition, using the XM-3300
eliminates the need for an FTP server.
zChoosing an encryption method: Wireless data encryption prevents
eavesdropping on data being transmitted or received over the airwaves.
The Array allows you to establish the following data encryption
configuration options:
zOpen—this option offers no data encryption and is not
recommended, though you might choose this option if clients are
required to use a VPN connection through a secure SSH utility,
like PuTTy.
zWEP (Wired Equivalent Privacy)—this option provides minimal
protection (though much better than using an open network). An
early standard for wireless data encryption and supported by all
Wi-Fi certified equipment, WEP is vulnerable to hacking and is
therefore not recommended for use by Enterprise networks.

Wireless LAN Array
Configuring the Xirrus Array 115
zWPA (Wi-Fi Protected Access)—this is a much stronger
encryption mode than WEP and uses TKIP (Temporal Key
Integrity Protocol) or AES (Advanced Encryption Standard) to
encrypt data.
WPA solves security issues with WEP. It also allows you to
establish encryption keys on a per-user-basis, with key rotation
for added security. In addition, TKIP provides Message Integrity
Check (MIC) functionality and prevents active attacks on the
wireless network.
AES is the strongest encryption standard and is used by
government agencies; however, old legacy hardware may not be
capable of supporting the AES mode (it probably won’t work on
older wireless clients). Because AES is the strongest encryption
standard currently available, it is highly recommended for
Enterprise networks.
Any of the above encryption modes can be used, but only one may be
used per SSID. If multiple security methods are needed, you must define
multiple SSIDs.
zChoosing an authentication method: User authentication ensures that
users are who they say they are. For this purpose, the Array allows you to
choose between the following user authentication methods:
zPre-Shared Key—users must manually enter a key (passphrase)
on the client side of the wireless network that matches the key
stored by the administrator in the Array.
This method should be used only for smaller networks when a
RADIUS server is unavailable. If PSK must be used, choose a
strong passphrase containing between 8 and 63 characters (20 is
preferred). Always use a combination of letters, numbers and
special characters. Never use English words separated by spaces.

Wireless LAN Array
116 Configuring the Xirrus Array
zRADIUS 802.1x with EAP—802.1x uses a RADIUS server to
authenticate large numbers of clients, and can handle different
EAP (Extensible Authentication Protocol) authentication
methods, including EAP-TLS, EAP-TTLS and EAP-PEAP. The
RADIUS server can be internal (provided by the XS-3900) or
external. An external RADIUS server offers more functionality
and security, and is recommended for large deployments. When
using this method, user names and passwords must be entered
into the RADIUS server for user authentication.
The Xirrus Wireless LAN Array will accept up to 512 ACL
entries.
zMAC Address ACLs (Access Control Lists)—MAC address
ACLs provide a list of client adapter MAC addresses that are
allowed or denied access to the wireless network. Access Control
Lists work well when there are a limited number of users—in this
case, enter the MAC addresses of each user in the Allow list. In
the event of a lost or stolen MAC adapter, enter the affected MAC
address in the Deny list.
Procedure for Configuring Network Security
1. WPA Enabled: Choose Yes to enable WPA (Wi-Fi Protected Access), or
choose No to disable WPA.
2. WPA2 Enabled: Choose Yes to enable WPA2 (Wi-Fi Protected Access 2),
or choose No to disable WPA2.
3. TKIP Enabled: Choose Yes to enable TKIP (Temporal Key Integrity
Protocol), or choose No to disable TKIP.
4. AES Enabled: Choose Yes to enable AES (Advanced Encryption
Standard), or choose No to disable AES.
5. WPA Group Rekey Time (in seconds): Enter a value to specify the group
rekey time (in seconds). The default is 600.

Wireless LAN Array
Configuring the Xirrus Array 117
6. PSK Authentication: Choose Yes to enable PSK (Pre-Shared Key)
authentication, or choose No to disable PSK.
7. WPA Preshared Key / Verify Key: If you enabled PSK, enter a passphrase
here, then re-enter the passphrase to verify that you typed it correctly.
8. EAP Authentication: Choose Yes to enable EAP (Extensible
Authentication Protocol) or choose No to disable EAP.
9. WEP Enabled: Choose Yes to enable WEP (Wired Equivalent Privacy) or
choose No to disable WEP.
10. Key Length / Mode: If you enabled WEP, choose the desired key length
(either 40 or 128) and the mode (either ASCII or Hex) from the pull-down
lists. You must now provide the encryption key(s).
a. Encryption Key 1 / Verify Key 1: Enter an encryption key of the
length specified (either 10 hex or 26 hex characters), then re-enter the
key to verify that you typed it correctly—hexadecimal characters are
defined as ABCDEF and 0-9.
b. Encryption Key 2 / Verify Key 2 (optional): If desired, enter a second
encryption key, then re-enter the key to verify that you typed it
correctly.
c. Encryption Key 3 / Verify Key 3 (optional): If desired, enter a third
encryption key, then re-enter the key to verify that you typed it
correctly.
d. Encryption Key 4 / Verify Key 4 (optional): If desired, enter a fourth
encryption key, then re-enter the key to verify that you typed it
correctly.
11. Default Key: Choose which key you want to assign as the default key.
Make your selection from the pull-down list.
12. Click on the Apply button to apply the new settings to this session.
#A RADIUS server must be defined to use EAP.
Wireless LAN Array
118 Configuring the Xirrus Array
13. Click on the Save button to save your changes.
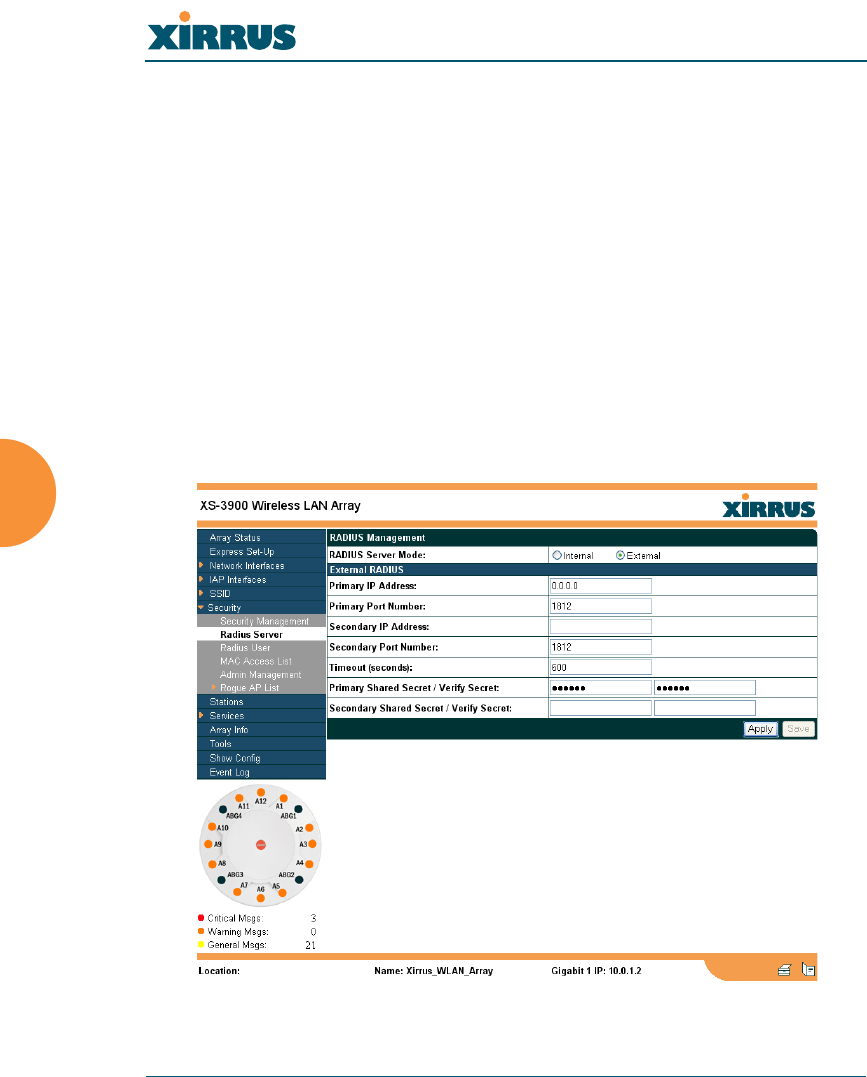
Radius Server
This page allows you to set up the Array’s internal RADIUS server, or define the
use of an external RADIUS server for user authentication.
When finished, click on the Apply button to apply the new settings to this
session, then click on the Save button to save your changes.
Figure 79. WMI: Radius Server Page
#After configuring network security, the configuration must be
applied to an SSID for the new functionality to take effect.
#The internal RADIUS server will only authenticate wireless clients that
want to associate to the Array. This can be useful if an external RADIUS
server is not available.

Wireless LAN Array
Configuring the Xirrus Array 119
Procedure for Configuring Radius Servers
1. Radius Server Mode: Choose Internal if you want to use the XS-3900’s
internal RADIUS server, or choose External to use an external RADIUS
server.
2. Primary IP Address: If you are using an external RADIUS server, enter
the primary server’s IP address.
3. Primary Port Number: If you are using an external RADIUS server, enter
the primary port number.
4. Secondary IP Address (optional): If desired, enter the secondary RADIUS
server’s IP address.
If the primary RADIUS server becomes off-line, the Array will “failover”
to the secondary RADIUS server (defined here).
5. Secondary Port Number: If desired, enter the secondary port number.
6. Timeout: Define the maximum idle time (in seconds) before the RADIUS
session times out. The default is 600 seconds.
7. Primary Shared Secret / Verify Secret: If you are using RADIUS, enter
the primary shared secret, then re-enter the primary shared secret to
verify that you typed it correctly.
8. Secondary Shared Secret / Verify Secret: If you are using RADIUS, enter
the secondary shared secret, then re-enter the secondary shared secret to
verify that you typed it correctly.
9. Click on the Apply button to apply the new settings to this session.
10. Click on the Save button to save your changes (otherwise your new
settings will not take effect).
Wireless LAN Array
120 Configuring the Xirrus Array
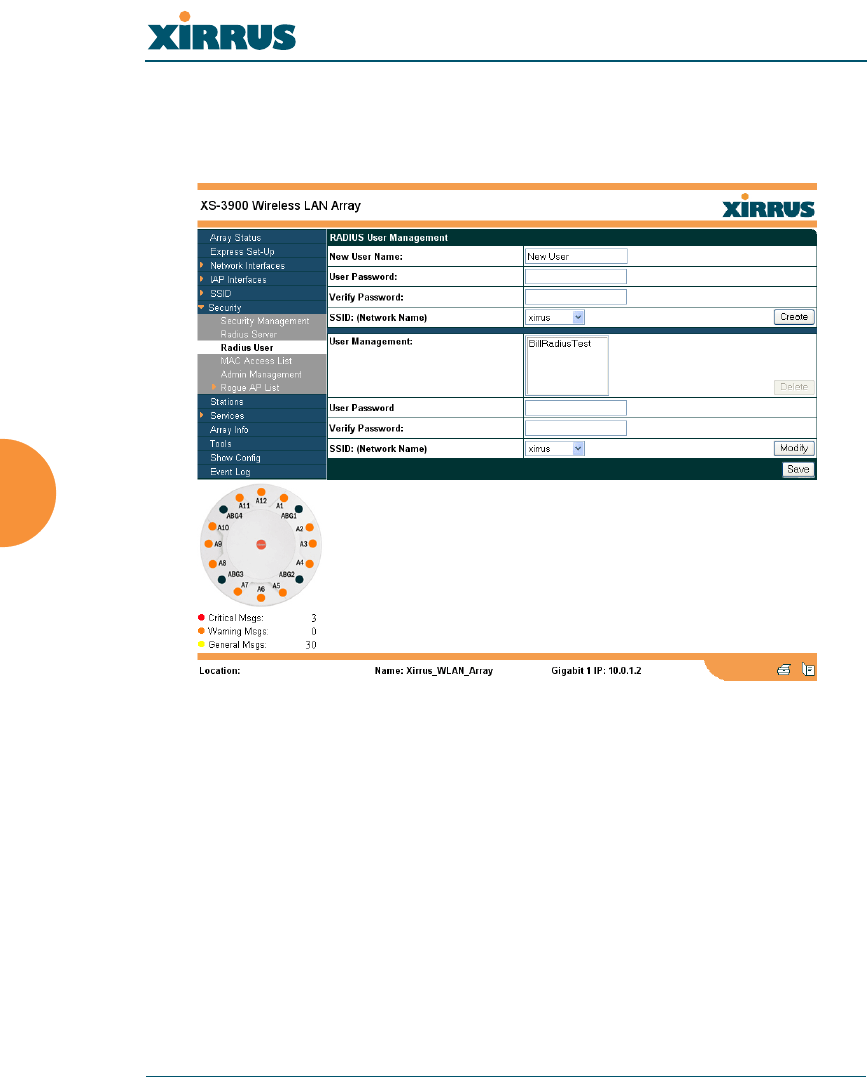
Radius User
This page allows you to manage local RADIUS user accounts (create, modify and
delete). When finished, click on the Save button to save your changes.
Figure 80. WMI: Radius User Page

Wireless LAN Array
Configuring the Xirrus Array 121
Procedure for Configuring Radius Users
1. New User Name: Enter a new RADIUS user name.
2. User Password: Enter a password for this user.
3. Verify Password: Re-enter the user password to verify that you typed it
correctly.
4. SSID (Network Name): Choose an SSID from the pull-down list (this will
be the only SSID a user can associate to).
5. Click on the Create User button to add this user to the list.
Editing Radius Users
6. User Management: If you want to edit an existing RADIUS user account,
select the user from the list. You must now enter the user password and
select an SSID.
a. User Password: Enter the password of the user account you want to
edit.
b. Verify Password: Re-enter the password to verify that you typed it
correctly.
c. SSID (Network Name): Choose an SSID from the pull-down list.
When you have finished making your edits, click on the Modify button to
apply the changes.
7. Alternatively, you can delete users by selecting the user from the list and
clicking on the Delete button.
8. Click on the Save button to save your changes (otherwise your new
settings will not take effect).
Wireless LAN Array
122 Configuring the Xirrus Array
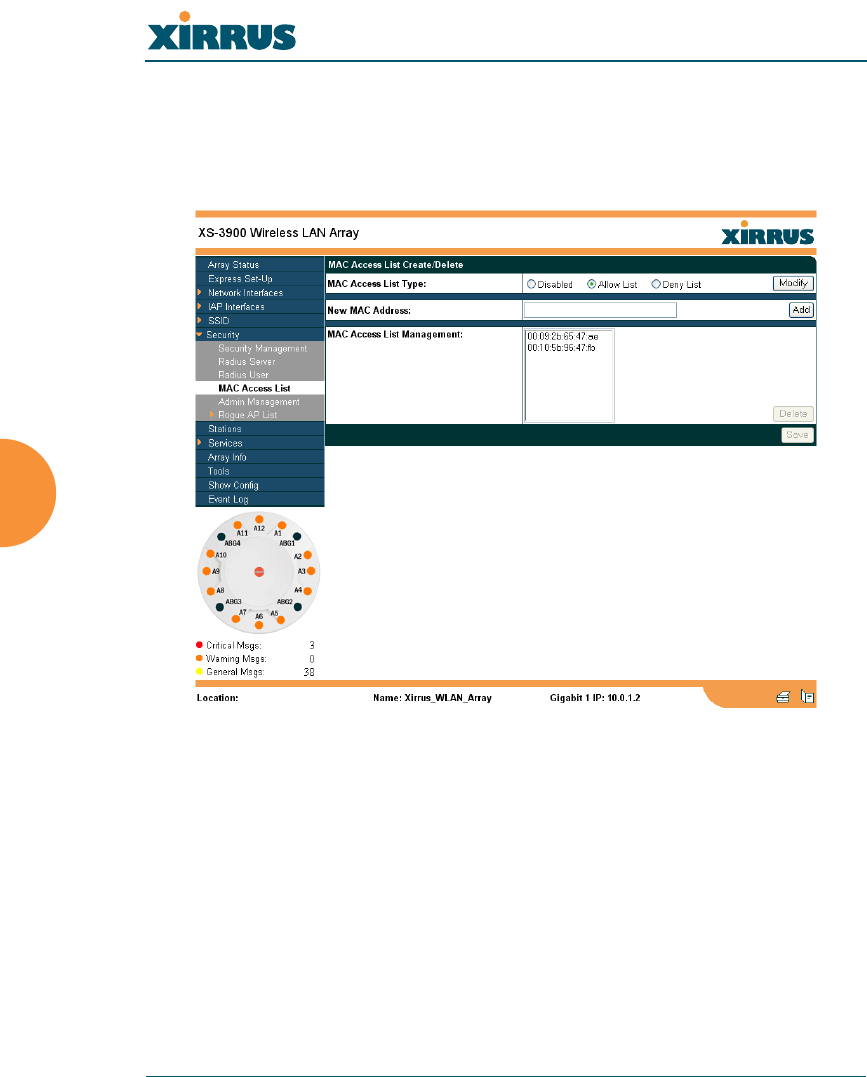
MAC Access List
This page allows you to create new MAC access lists, delete existing lists, and
add/remove MAC addresses. When finished, click on the Save button to save
your changes.
Figure 81. WMI: MAC Access List Page

Wireless LAN Array
Configuring the Xirrus Array 123
Procedure for Configuring MAC Access Lists
1. MAC Access List Type: Select the MAC Access List type—either
Disabled,Allow List or Deny List, then click on the Modify button to
apply your changes.
zAllow List: Only allows these MAC addresses to associate to the
Array.
zDeny List: Allows all MAC addresses except the addresses
defined in this list.
2. New MAC Address: If you want to add a MAC address to the ACL, enter
the new MAC address here, then click on the Add button. The MAC
address is added to the ACL.
3. MAC Access List Management: You can delete a MAC Access List by
selecting the list you want to delete then clicking on the Delete button.
4. Click on the Save button to save your changes (otherwise your new
settings will not take effect).
#In addition to these lists, other authentication methods (for
example, RADIUS) are still enforced for users.
Wireless LAN Array
124 Configuring the Xirrus Array
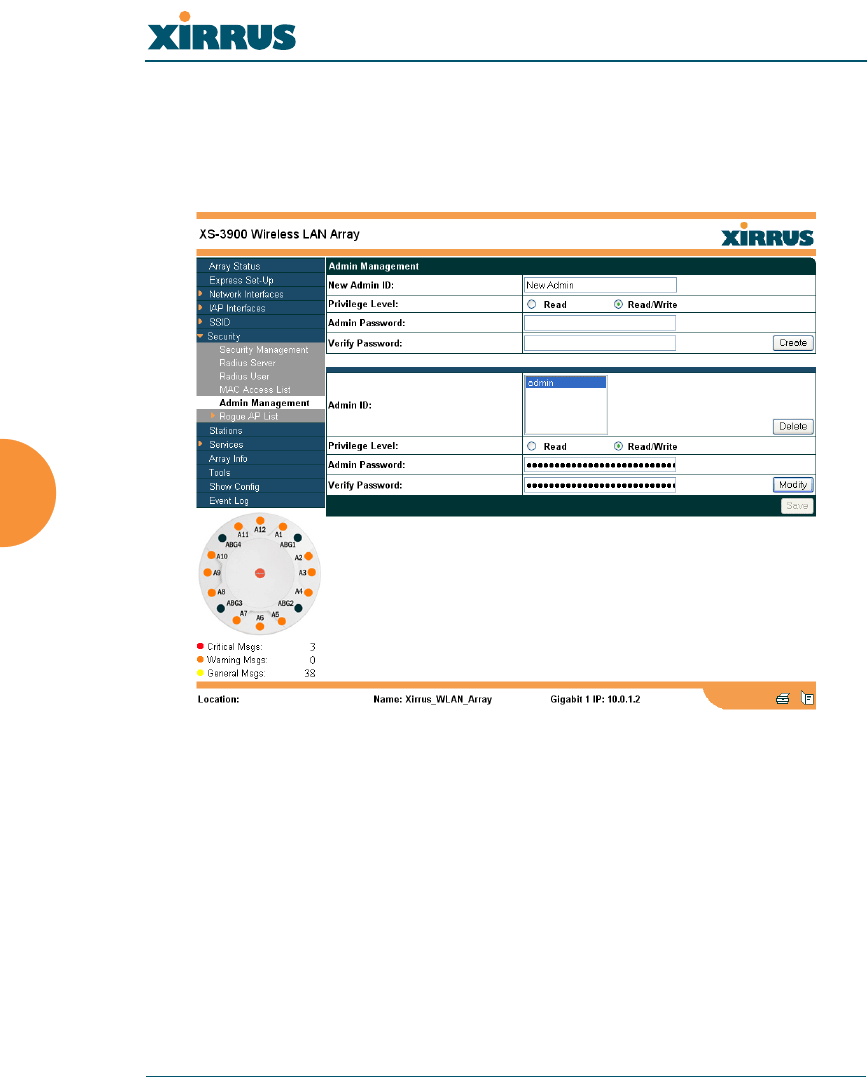
Admin Management
This page allows you to manage network administrator accounts (create, modify
and delete). It also allows you to limit account access to a read only status. When
finished, click on the Save button to save your changes.
Figure 82. WMI: Admin Management Page

Wireless LAN Array
Configuring the Xirrus Array 125
Procedure for Creating Network Administrator Accounts
1. New Admin ID: Enter a meaningful description for this new network
administrator ID.
2. Privilege Level: Choose Read to restrict this administrator ID to read
only status, or choose Read/Write if you want to give this administrator
ID full read/write privileges. In the read only mode, administrators
cannot save changes to configurations.
3. Admin Password: Enter a password for this ID.
4. Verify Password: Re-enter the password in this field to verify that you
typed the password correctly. If you do not re-enter the correct password,
an error message is displayed).
5. Click on the Create button to add this administrator ID to the list.
Editing Network Administrator Accounts
6. Admin ID: Choose the administrator ID you want to edit or delete from
the list. If you are deleting the selecting administrator ID, click on the
Delete button, otherwise go to Step 7.
7. Privilege Level: Choose Read to restrict the selected administrator ID to
read only status, or choose Read/Write if you want to give this
administrator ID full privileges.
8. Admin Password: Enter the password for the selected administrator ID.
9. Verify Password: Re-enter the password in the right field (this field must
match the Admin Password field).
10. Click on the Modify button to apply the new settings to this session.
11. Click on the Save button to save your changes (otherwise your new
settings will not take effect).
Wireless LAN Array
126 Configuring the Xirrus Array
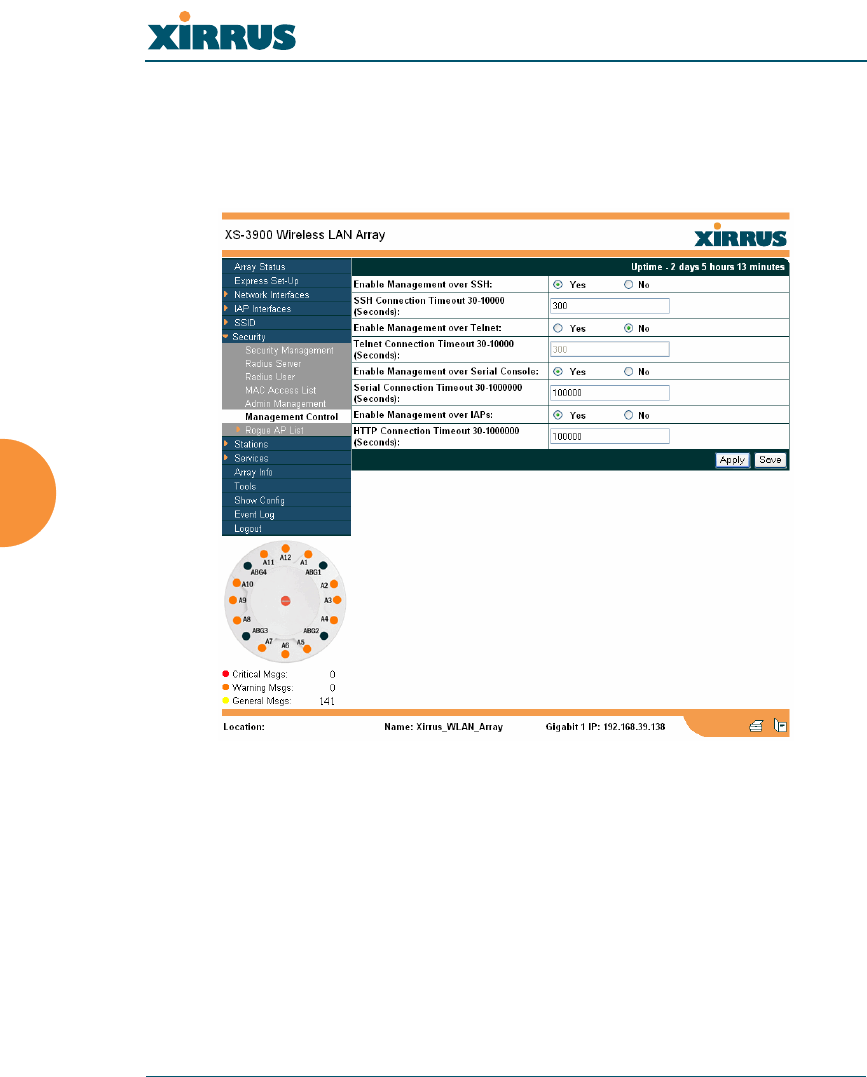
Management Control
This page allows the Array management interfaces to be enabled and disabled
and their inactivity time-outs set. The supported range is 300 (default) to 100,000
seconds.
Figure 83. Management Control
Wireless LAN Array
Configuring the Xirrus Array 127
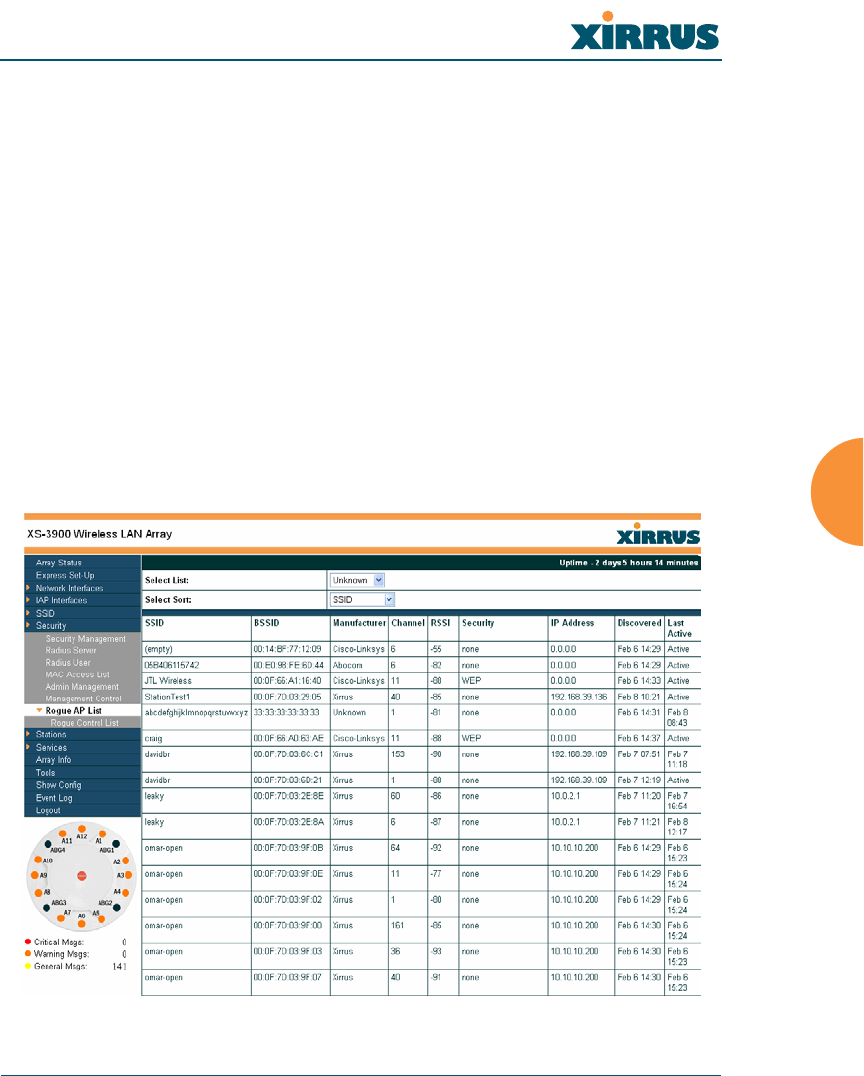
Rogue AP List
This page displays rogue APs, according to the list you select (either Unknown,
Known or Approved). In addition, you can sort the results based on the following
parameters:
zSSID
zBSSID
zChannel
zRSSI
zSecurity
zIP Address
zDiscovered
zLast Active
You can refresh the list at any time by clicking on the Refresh button.
Figure 84. WMI: Rogue AP List Page
Wireless LAN Array
128 Configuring the Xirrus Array
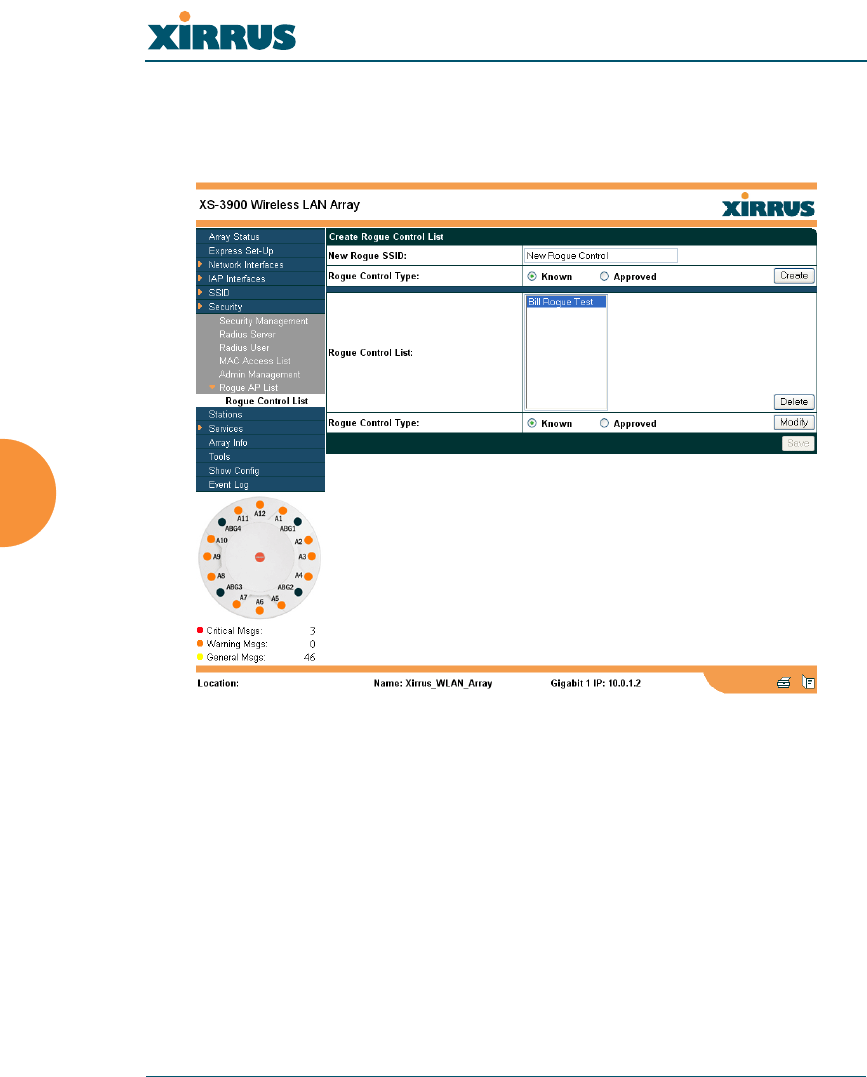
Rogue Control List
This page allows you to set up a control list for rogue APs, based on a type that
you define. When finished, click on the Save button to save your changes.
Figure 85. WMI: Rogue Control List Page

Wireless LAN Array
Configuring the Xirrus Array 129
Procedure for Establishing Rogue AP Control
1. New Rogue SSID: Enter the SSID for the new rogue AP.
2. Rogue Control Type: Define the type, either Known or Approved.
3. Click on the Create button to add this rogue AP to the Rogue Control List.
4. Rogue Control List: If you want to edit the control type for a rogue AP,
select the rogue from the list.
a. After selecting the rogue, redefine whether this rogue is Known,
Approved or Unknown, then click on the Modify button to apply
your change.
5. Alternatively, if you want to delete the selected rogue AP from the list,
click on the Delete button.
6. Click on the Save button to save your changes (otherwise your new
settings will not take effect).
Wireless LAN Array
130 Configuring the Xirrus Array
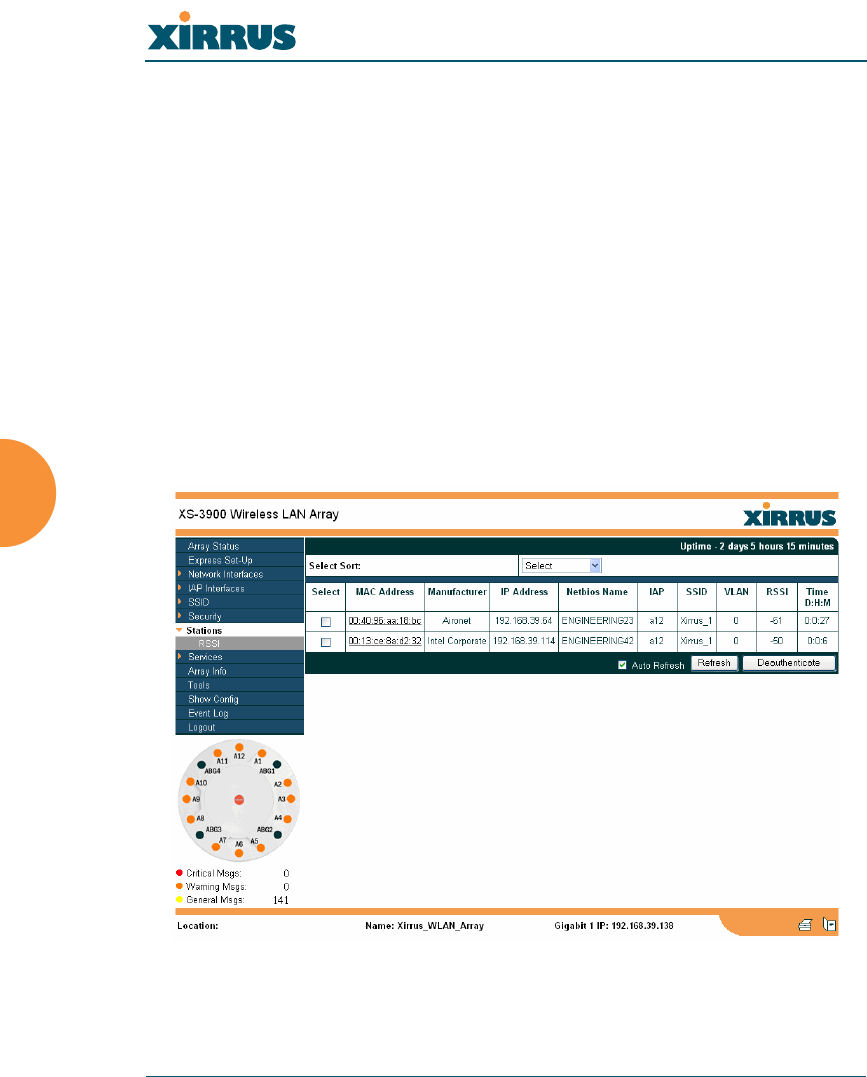
Stations
This page displays stations (clients) that are currently associated with the Array.
You can sort the results based on the following parameters:
zMAC Address
zManufacturer
zIP Address
zNetbios Name
zIAP
zSSID
zVLAN
zRSSI
zTime
Figure 86. WMI: Stations Page
Wireless LAN Array
Configuring the Xirrus Array 131
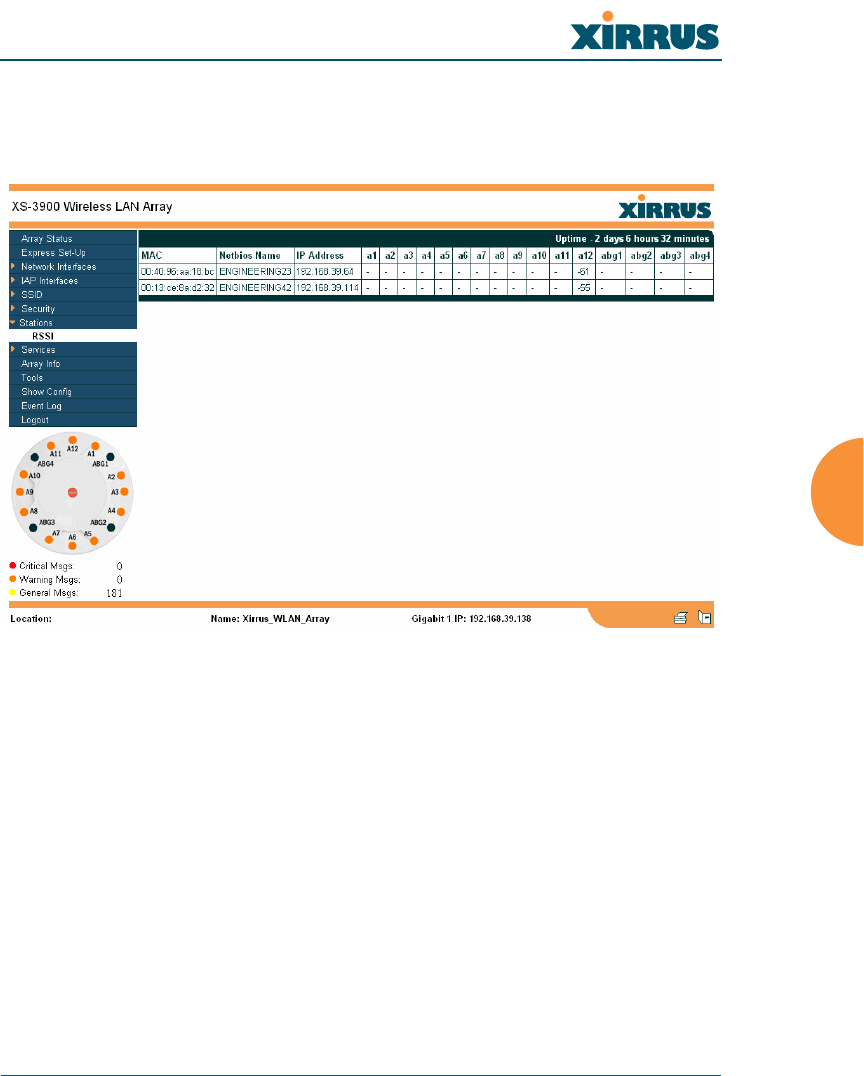
RSSI
An alternative display is given on the RSSI page, which shows each associated
station and their RSSI value (signal strength) as seen by the WLAN Array.
Figure 87. RSSI Page
Wireless LAN Array
132 Configuring the Xirrus Array
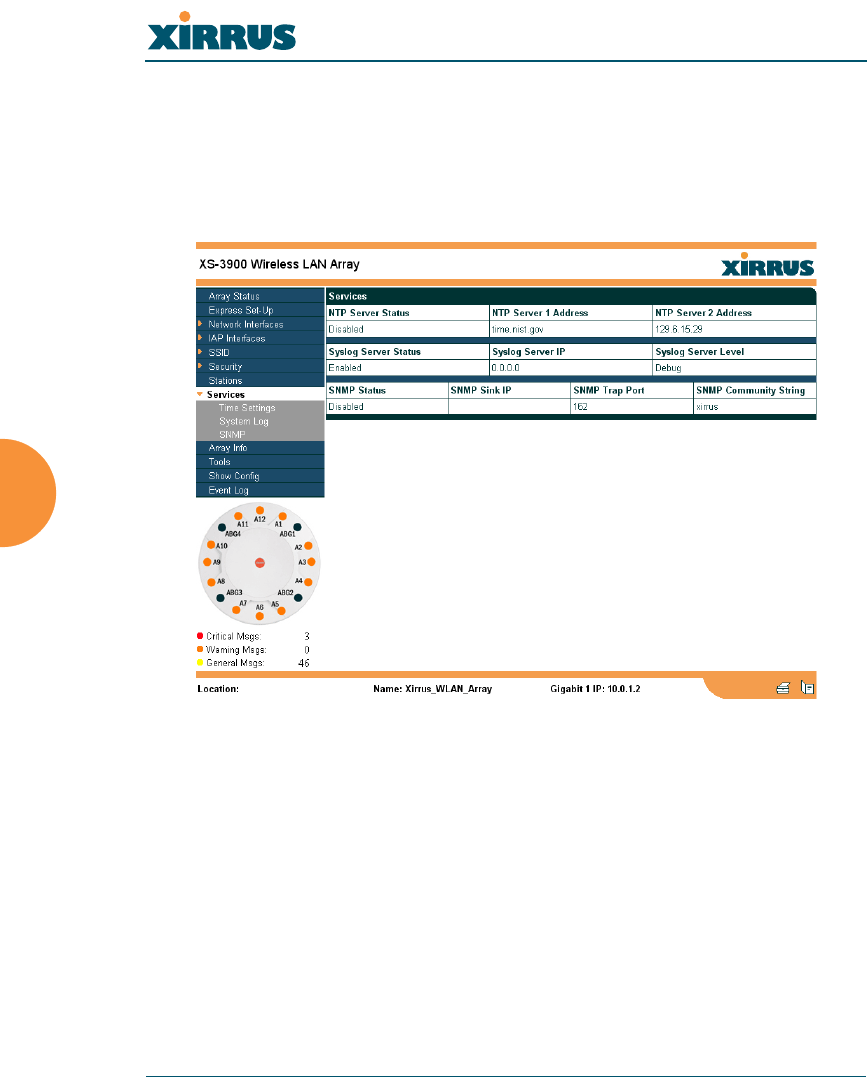
Services
This is a status only page that allows you to review the current status of syslog
and SNMP services. There are no configuration options available on this page, but
if you are experiencing issues with network services, you may want to print this
page for your records.
Figure 88. WMI: Services Page
Wireless LAN Array
Configuring the Xirrus Array 133
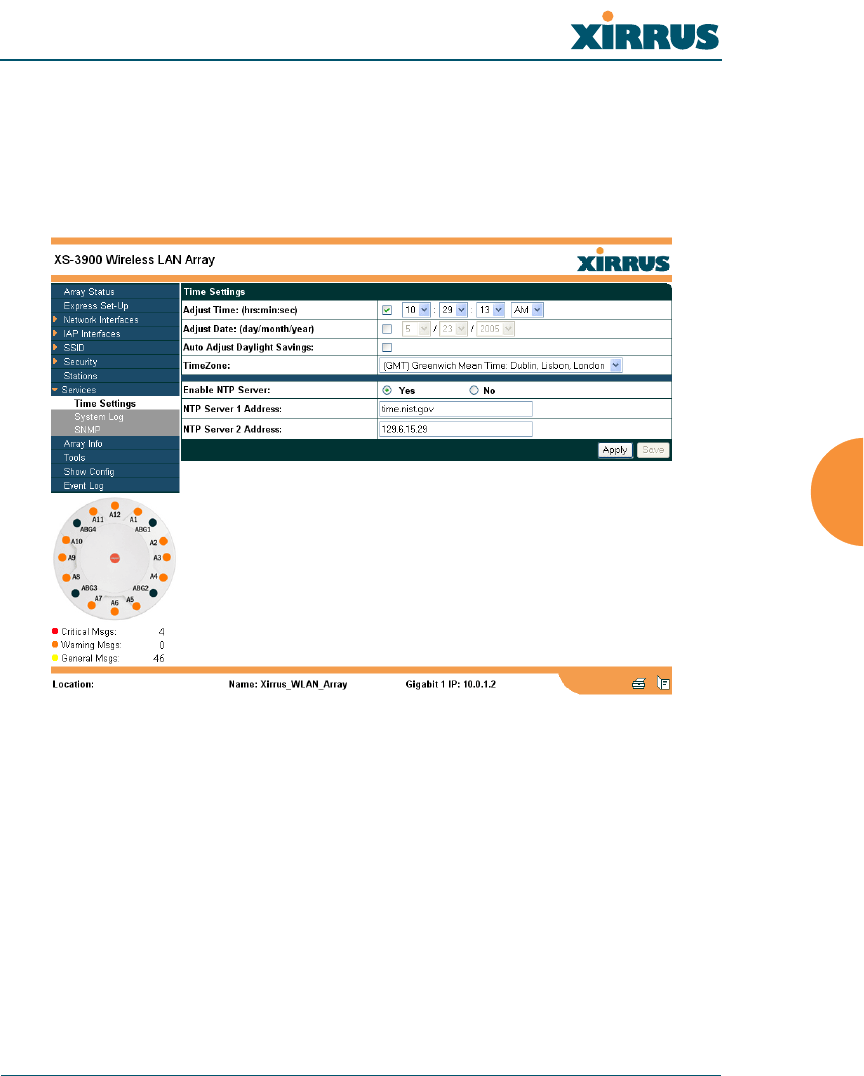
Time Settings
This page allows you to manage the Array’s time settings, including
synchronizing the Array’s clock with a universal clock from an NTP (Network
Time Protocol) server. Synchronizing the Array’s clock with an NTP server
ensures that syslog time-stamping is maintained across all units.
Figure 89. WMI: Time Settings Page

Wireless LAN Array
134 Configuring the Xirrus Array
Procedure for Managing the Time Settings
Manual Time
1. Adjust Time: Check this box to allow manual adjustment of the time in
hours, minutes and seconds (hrs:min:sec).
2. Adjust Date: Check this box to allow manual adjustment of the date
(day/month/year).
3. Auto Adjust Daylight Savings: Check this box if you want the system to
automatically adjust the time for daylight savings.
4. Time Zone: Select the time zone you want to use (normally your local
time zone) from the pull-down list.
Using an NTP Server
5. Enable NTP Server: Check this box if you want to use an NTP (Network
Time Protocol) server to synchronize the Array’s clock. Without an NTP
server assigned (no universal clock), each Array will use its own internal
clock and stamp times accordingly, which may result in discrepancies.
When this box is checked, the NTP Server 1 Address and NTP 2 Server 2
Address fields become active. If you don’t want to use an NTP server,
leave this box unchecked (default), otherwise enter the IP address or DNS
name of the NTP server(s).
6. NTP Server 1 Address: Enter the IP address or DNS name of the primary
NTP server.
7. NTP Server 2 Address: Enter the IP address or DNS name of the
secondary NTP server.
8. Click on the Apply button to apply the new settings to this session.
9. Click on the Save button to save your changes (otherwise your new
settings will not take effect).
Wireless LAN Array
Configuring the Xirrus Array 135
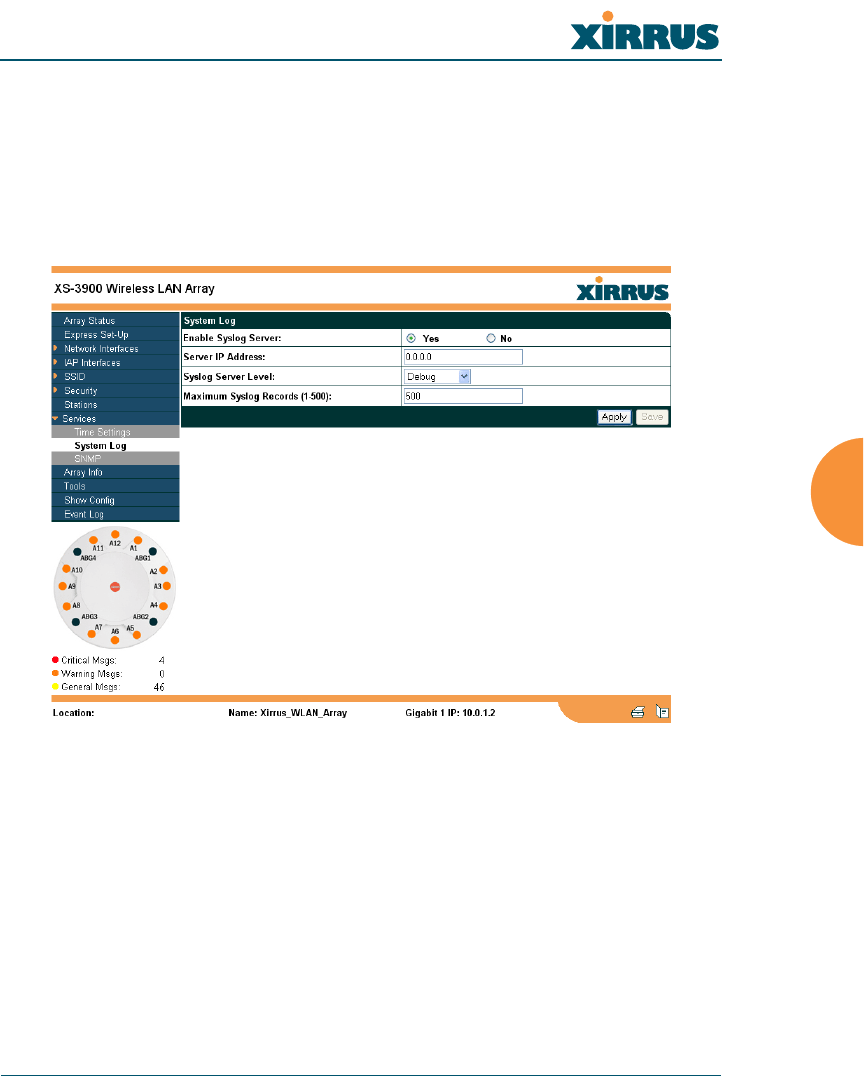
System Log
This page allows you to enable or disable the Syslog server, define the server’s IP
address, and set the level for Syslog reporting—the Syslog service will send
Syslog messages to the defined Syslog server. When finished, click on the Apply
button to apply the new settings to this session, then click on the Save button to
save your changes.
Figure 90. WMI: System Log Page

Wireless LAN Array
136 Configuring the Xirrus Array
Procedure for Configuring Syslog
1. Enable Syslog Server: Choose Yes to enable Syslog functionality, or
choose No to disable this feature.
2. Server IP Address: If you enabled Syslog, enter the IP address of the
Syslog server.
3. Syslog Server Level: Choose the level of Syslog
reporting from the pull-down list. Levels
include:
zEmergency
zAlerts
zCritical
zError
zWarning
zNotification
zInformation
zDebug
The default level is Information.
4. Maximum Syslog Records: Enter a value in this field to define how many
syslog records are processed (up to a maximum of 500).
5. Click on the Apply button to apply the new settings to this session.
6. Click on the Save button to save your changes (otherwise your new
settings will not take effect).
Wireless LAN Array
Configuring the Xirrus Array 137
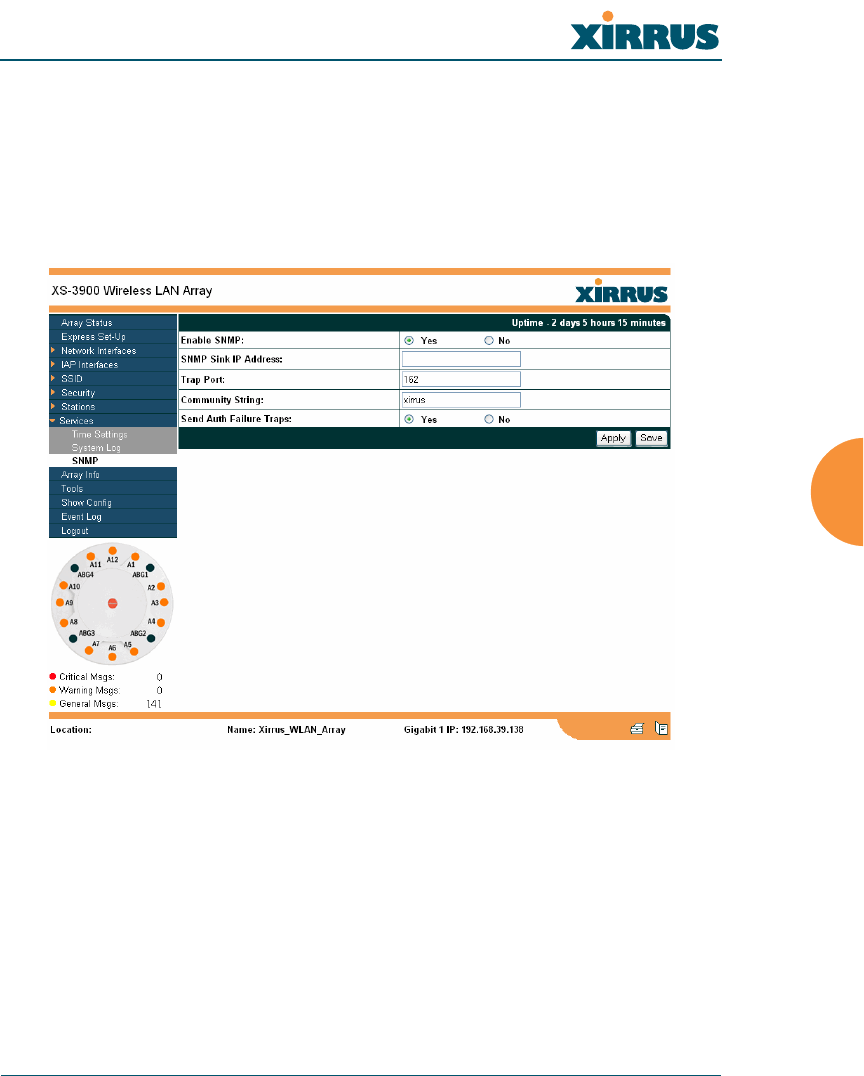
SNMP
This page allows you to enable or disable SNMP and define the SNMP
parameters. SNMP allows remote management of the Array by the Xirrus
Management System (XM-3300), or other SNMP-based management system.
When finished, click on the Apply button to apply the new settings to this
session, then click on the Save button to save your changes.
Figure 91. WMI: SNMP Page

Wireless LAN Array
138 Configuring the Xirrus Array
Procedure for Configuring SNMP
1. Enable SNMP: Choose Yes to enable SNMP functionality, or choose No
to disable this feature.
2. SNMP Link IP Address: Enter the IP address of the SNMP link.
3. Trap Port: Enter the trap port.
4. Community String: Enter the community string.
5. Send Auth Failure Traps: Choose Yes to log authentication failure traps
or No to disable.
6. Click on the Apply button to apply the new settings to this session.
7. Click on the Save button to save your changes (otherwise your new
settings will not take effect).
#SNMP must be enabled on each array when used with the XM-
3300 Management Platform.
Wireless LAN Array
Configuring the Xirrus Array 139
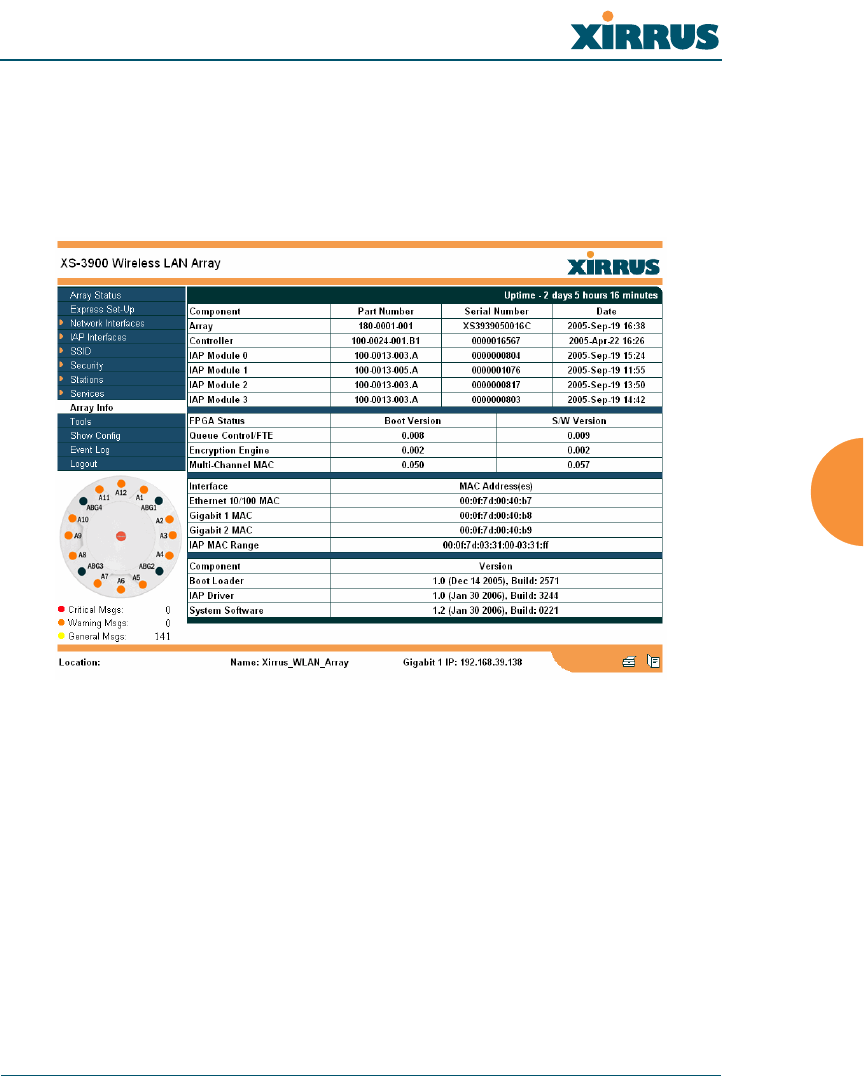
Array Info
This is a status only page that allows you to review the current status of the Array.
There are no configuration options available on this page, but if you are
experiencing issues with network services, you may want to print this page for
your records.
Figure 92. WMI: Array Info Page
Wireless LAN Array
140 Configuring the Xirrus Array
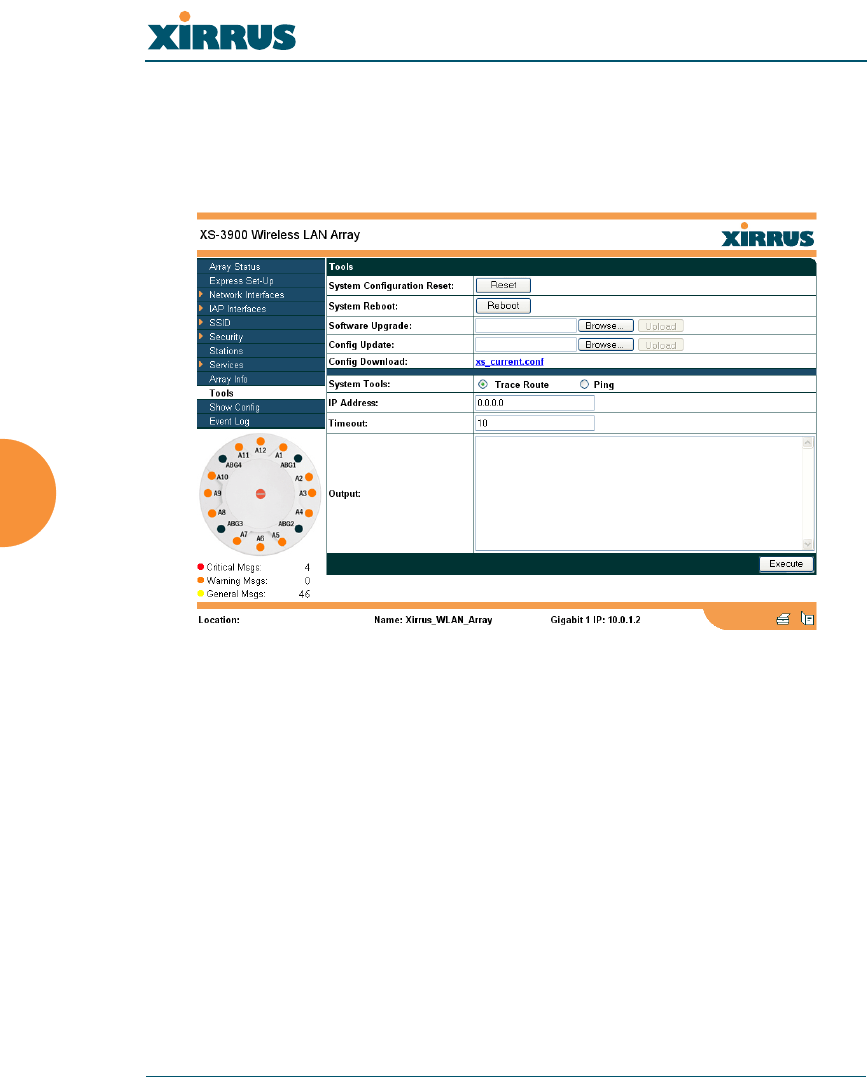
Tools
This page allows you to reset the system’s configuration parameters to their
factory default values, reboot the system, and ping other IP addresses for
diagnostic purposes.
Figure 93. WMI: Tools Page

Wireless LAN Array
Configuring the Xirrus Array 141
Procedure for Configuring System Tools
1. System Configuration Reset: Click on the Reset button to reset the
system’s current configuration settings to the factory default values—all
previous configuration settings will be lost.
2. System Reboot: Click on the Reboot button to reboot the system—you
must reboot the Array.
3. Software Upgrade: Enter the filename and directory location (or click on
the Browse button to locate the software upgrade file), then click on the
Upload button to upload the new file to the Array.
4. Config Update: This field allows you to define the path to a configuration
file (one that you previously saved—see next step). Click on the Browse
button if you need to browse for the location of the file, then click on the
Upload button to update your configuration settings.
5. Config Download: Click on this link to save the Array’s current
configuration settings to a file (that you can upload at a later date). The
system will prompt you for a destination for the file.
6. System Tools: Choose Trace Route or Ping.
7. IP Address: Enter the IP address of the target device.
8. Timeout: Enter a value (in seconds) before the action times out.
9. Click on the Execute button to perform the test. Results are displayed in
the Output frame.
Wireless LAN Array
142 Configuring the Xirrus Array
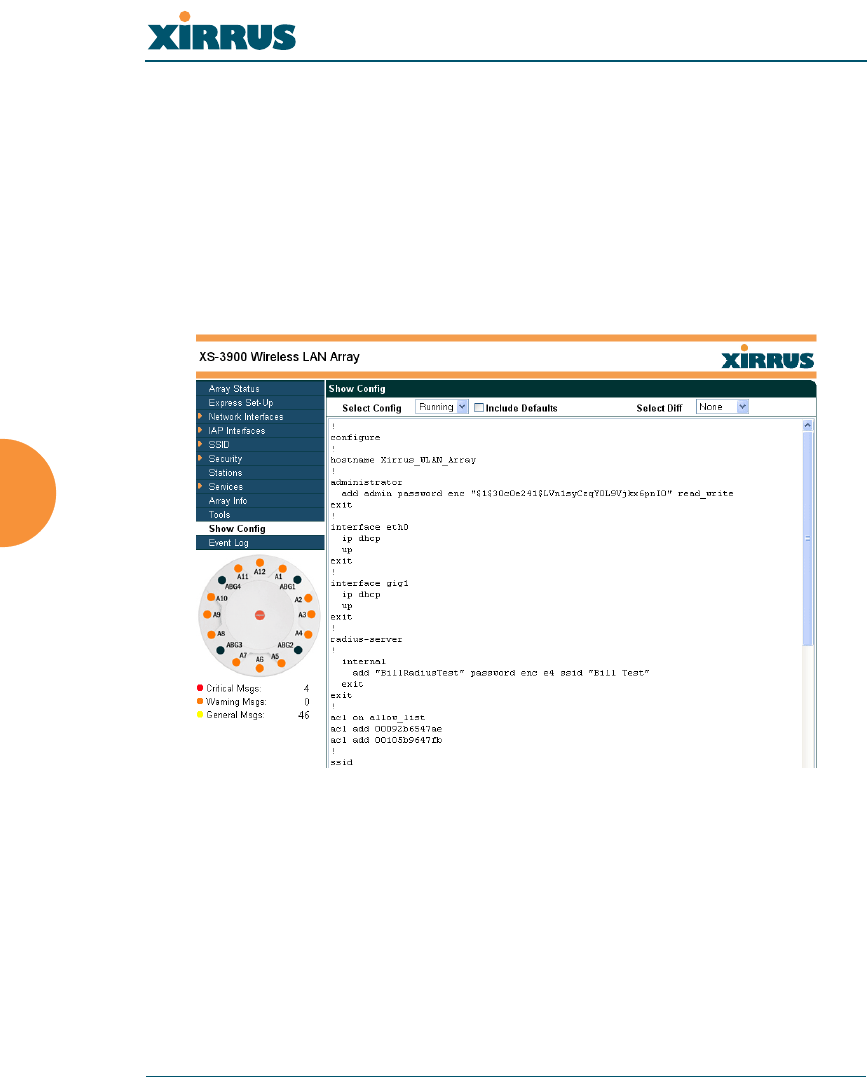
Show Config
This page allows you to display the configuration settings for the Array, based on
the following sort options:
zRunning—Displays the current configuration (the one running now).
zSaved—Displays the saved configuration from this session.
zStartup—Displays the configuration at start up.
zFactory—Displays the configuration established at the factory.
Figure 94. WMI: Show Config Page
If you want to see just the differences between the Running, Saved, Startup, and
Factory configurations, you can do this by choosing a configuration from the
Select Config pull-down menu then selecting an alternative configuration from
the Select Diff pull-down menu.
You also have the option of including the default configuration settings. To do
this, choose your configuration then click in the Include Defaults check box.
Wireless LAN Array
Configuring the Xirrus Array 143
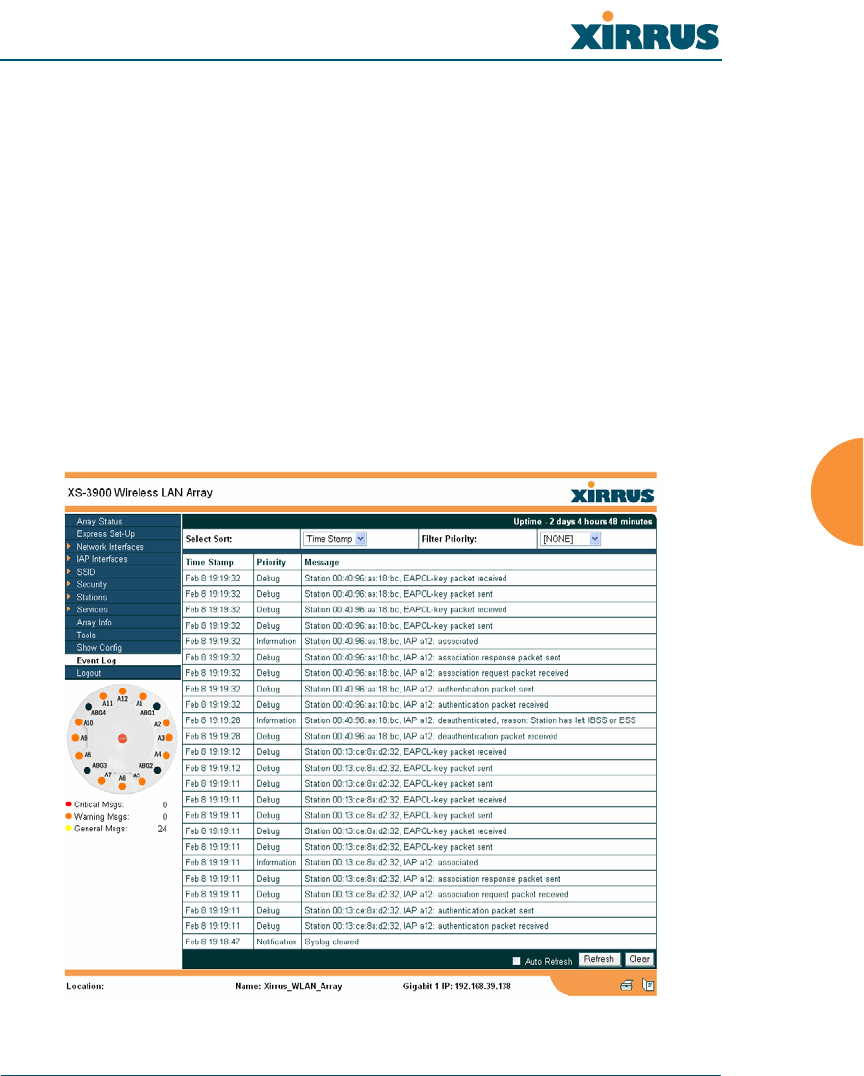
Event Log
This is a status only page that allows you to review the event log, where system
alerts and messages are displayed. Although there are no configuration options
available on this page, you do have the choice of deciding how the event
messages are sorted (Time Stamp, Priority, or Message).
The displayed messages may also be filtered by using the Filter Priority setting,
which allows control of the minimum displayed priority. For example, you may
choose (under Services/System Log) to log messages at the Debug level but to
display only messages of Information level and above.
zTime Stamp—sorts the list based on the time the event occurred.
zPriority—sorts the list based on the priority assigned to the message.
zMessage—sorts the list based on the message category.
Figure 95. WMI: Event Log Page

Wireless LAN Array
144 Configuring the Xirrus Array
Click on the Refresh button to refresh the messages, or click on the Clear button
to delete all messages. If you are experiencing problems with your network you
may want to print this page for your records.
Wireless LAN Array
The Command Line Interface 145
The Command Line Interface
This chapter covers configuration and management tasks using the product’s
Command Line Interface (CLI), and includes a procedure for establishing a Telnet
connection to the Xirrus Array. Section headings for this chapter include:
z“Establishing a Secure Shell (SSH) Connection” on page 145
z“Basic Commands” on page 146
z“Command Modes” on page 147
z“Selecting Interfaces” on page 150
z“Commands” on page 151
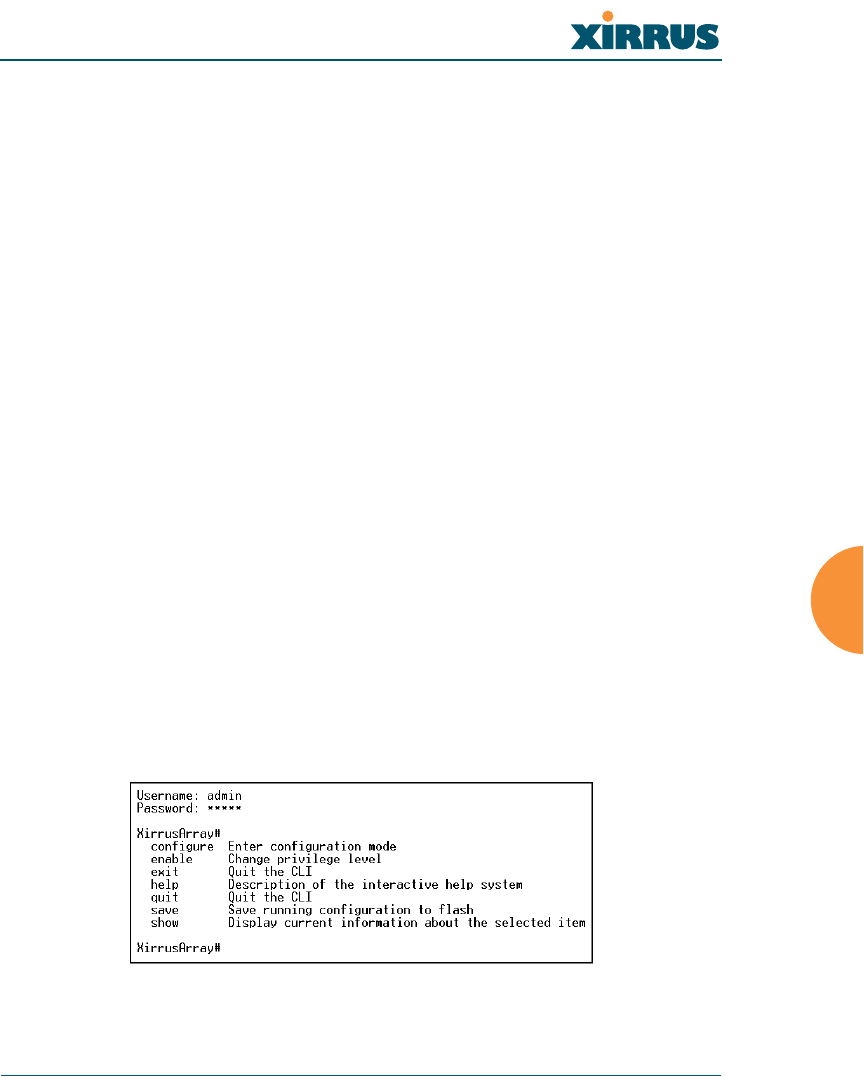
Establishing a Secure Shell (SSH) Connection
Use this procedure to initialize the system and log in to the Command Line
Interface (CLI) via a Secure Shell (SSH) utility, such as PuTTY.
1. Start your SSH session and communicate with the XS-3900 via its default
IP address (10.0.1.1).
When connected to the Array, a login prompt appears on your screen. The
default login user name and password is admin (for both). Login names
and passwords are case-sensitive.
2. Enter admin when prompted for a user name and password. You are now
logged in to the Array’s Command Line Interface.
Figure 96. Command Line Interface

Wireless LAN Array
146 The Command Line Interface
Basic Commands
Help
To get help at any point type help or ? to view the interactive help system.
Tab Key
The Tab key allows auto-completion of commands such that only a few unique
characters need to be entered followed by the Tab key, which will automatically
fill in the rest of the command.
? Key
The ? key displays the list of available commands at any point of typing in the
command line.
Save
You must type save to save the current configuration to flash memory so that
changes are kept when the Array is rebooted.
Show
Displays the current settings and is useful when verifying the current
configuration settings.
End
Returns you to the to top-level configure mode.
Exit
Exits the current command mode level, and enters the next level up.
Quit
Exits the command line interface.
No
Disables an item that is currently enabled; or sets the selected item to the default
value.

Wireless LAN Array
The Command Line Interface 147
Command Modes
Configure Mode
Allows major functional changes to interfaces and Array configuration.
Requires read/write administrator privileges
From the default prompt, type configure then press <ENTER>
Xirrus-Array# configure
Xirrus-Array(config)#
The prompt changes to show the current mode in parentheses.
Admin Mode
Allows you to manage user accounts, including adding accounts, deleting
accounts, and displaying current user account information.
Requires read/write administrator privileges
From the configure mode, type admin then press <ENTER>
Xirrus-Array(config)# admin
Xirrus-Array(config-admin)#
Contact Info Mode
Allows you to display the current contact information for the Array, or modify the
existing contact information.
Requires read/write administrator privileges
From the configure mode, type contact then press <ENTER>
Xirrus-Array(config)# contact
Xirrus-Array(config-contact-info)#
#When inputting commands you need only type as many characters as
the system requires before it recognizes your input.

Wireless LAN Array
148 The Command Line Interface
Date & Time Mode
Allows you to configure the date and time settings used by the Array.
Requires read/write administrator privileges
From the configure mode, type date then press <ENTER>
Xirrus-Array(config)# date
Xirrus-Array(config-date-time)#
DHCP Mode
Allows you to enable, disable and configure the DHCP server.
Requires read/write administrator privileges
From the configure mode, type dhcp then press <ENTER>
Xirrus-Array(config)# dhcp
Xirrus-Array(config-dhcp-server)#
DNS Mode
Allows you to configure the DNS settings.
Requires read/write administrator privileges
From the configure mode, type dns then press <ENTER>
Xirrus-Array(config)# dns
Xirrus-Array(config-dns)#
Radius Mode
Allows you to make configuration changes to the internal RADIUS server.
Requires read/write administrator privileges
From the configure mode, type radius then press <ENTER>
Xirrus-Array(config)# radius
Xirrus-Array(config-radius-server)#

Wireless LAN Array
The Command Line Interface 149
Run Test Mode
Allows you to execute diagnostic run tests (for example, pings and trace routes).
Requires read/write administrator privileges
From the configure mode, type run-tests then press <ENTER>
Xirrus-Array(config)# run-tests
Xirrus-Array(run-test)#
Security Mode
Allows you to set security parameters for the Array.
Requires read/write administrator privileges
From the configure mode, type security then press <ENTER>
Xirrus-Array(config)# security
Xirrus-Array(config-security)#
SNMP Mode
Allows you to enable, disable or configure SNMP.
Requires read/write administrator privileges
From the configure mode, type snmp then press <ENTER>
Xirrus-Array(config)# snmp
Xirrus-Array(config-snmp)#
SSID Mode
Allows you to add, delete and modify SSIDs, or display the current definitions for
a selected SSID.
Requires read/write administrator privileges
From the configure mode, type ssid then press <ENTER>
Xirrus-Array(config)# ssid
Xirrus-Array(config-ssid)#

Wireless LAN Array
150 The Command Line Interface
Syslog Mode
Allows you to enable, disable and configure the Syslog server.
Requires read/write administrator privileges
From the configure mode, type syslog then press <ENTER>
Xirrus-Array(config)# syslog
Xirrus-Array(config-syslog)#
Selecting Interfaces
From the configure mode select the desired interface.
interface {console | iap | gig1 | gig2 | eth0};
console asynchronous serial console port
iap integrated access point interface
gig1 gigabit Ethernet interface
gig2 gigabit Ethernet interface
eth0 10/100 Ethernet interface
Example:
Xirrus-Array(config)# interface iap
Xirrus-Array(config-iap)#

Wireless LAN Array
The Command Line Interface 151
Commands
This section contains detailed information for each CLI command, organized
alphabetically. The following table provides a listing of the commands. Click on
any command in this list to “jump” to that command.
administrator more
acl radius-server
console reboot
contact-info reset
copy run-script
date-time run-tests
dhcp-server save
dir security
dns show
erase snmp
eth0 ssh
ftp syslog
gig1 telnet
gig2
hostname
iap
iap global_settings
iap global_a_settings
iap global_bg_settings
location

Wireless LAN Array
152 The Command Line Interface
administrator
DESCRIPTION
Adds and edits administrator accounts and privileges—available from the
config command mode.
SYNTAX
administrator [add <uid> password [enc] <passwd> {read_only |
read_write} | del <uid> ]
PARAMETERS
add <uid> Add user ID
read_only Read only permissions
read_write Read/write permissions
password Define user password
enc Enter password in encrypted form (must be in
quotes)
DEFAULTS
None.
USAGE GUIDELINES
The show command within the config-admin mode will display all
administrator accounts and privileges.
Wireless LAN Array
The Command Line Interface 153
EXAMPLE
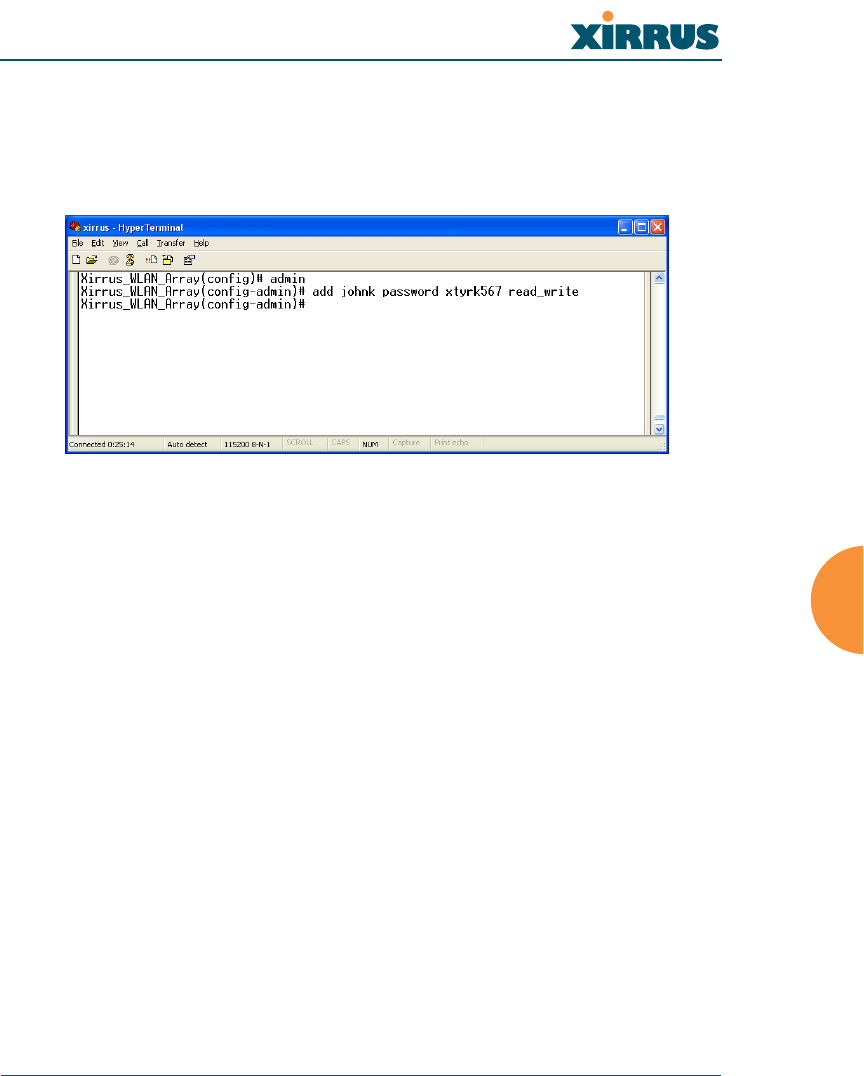
To add a new administrator account:
config-administrator
(config-admin)# add johnk password xtyrk567 read_write
Figure 97. CLI: Adding a New Administrator Account
SEE ALSO
None.

Wireless LAN Array
154 The Command Line Interface
acl
DESCRIPTION
Configures the MAC based Access Control Lists to allow or limit the
association of stations to the Array.
SYNTAX
acl {off | on {allow_list | deny_list} | add <amac> | del <dmac>}
PARAMETERS
on Enable access control list
off Disable access control list
allow_list Enable allow list, where this list is a list of users
to allow association to the array
deny_list Enable deny list, where this list is used to deny
association to the array
add Add MAC address to the list
del Delete MAC address from the list
DEFAULTS
None.
USAGE GUIDELINES
None.
EXAMPLE
To allow association to the array, type:
Xirrus_WLAN_Array(config)# acl on allow_list
Xirrus_WLAN_Array(config)# acl add 00:00:a1:cd:45
SEE ALSO
None.
Wireless LAN Array
The Command Line Interface 155
console
DESCRIPTION
Configures the Console Interface (serial port)—available from the config-
interface command mode.
SYNTAX
console { {baud <brate> | bytesize <bsz> | stopbits <sbit> | parity {none |
odd | even} | timeout <idleto>}@}
PARAMETERS
timeout Console inactivity timeout in seconds
baud Async port baud rate 2400 - 115,200 bps
bytesize Async port word size 7 or 8 bits
stopbits Async port number of stop bits 0, 1, or 2
parity Async port number of parity bits
none No parity
odd Odd parity
even Even parity
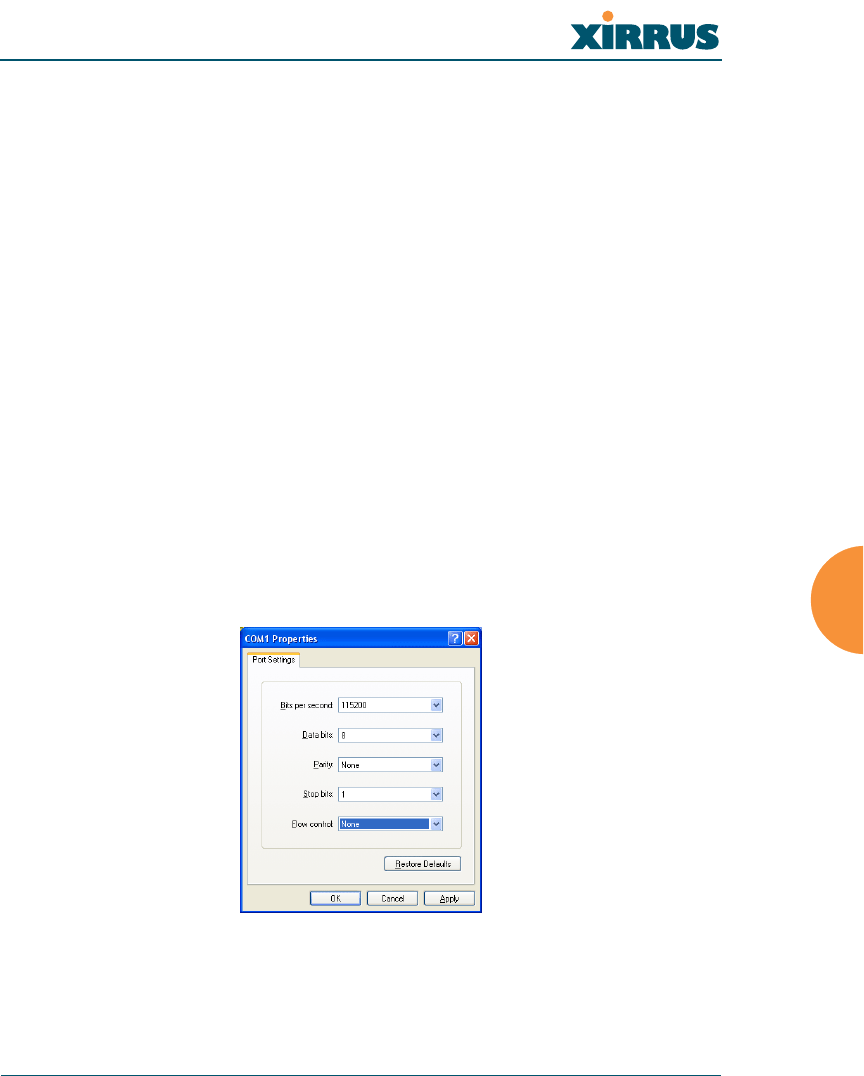
DEFAULTS
115,200, 8bit, No Parity, 1 Stop bit, No Flow Control.
Figure 98. CLI: Default Serial Port Settings
Wireless LAN Array
156 The Command Line Interface
USAGE GUIDELINES
None.
EXAMPLE
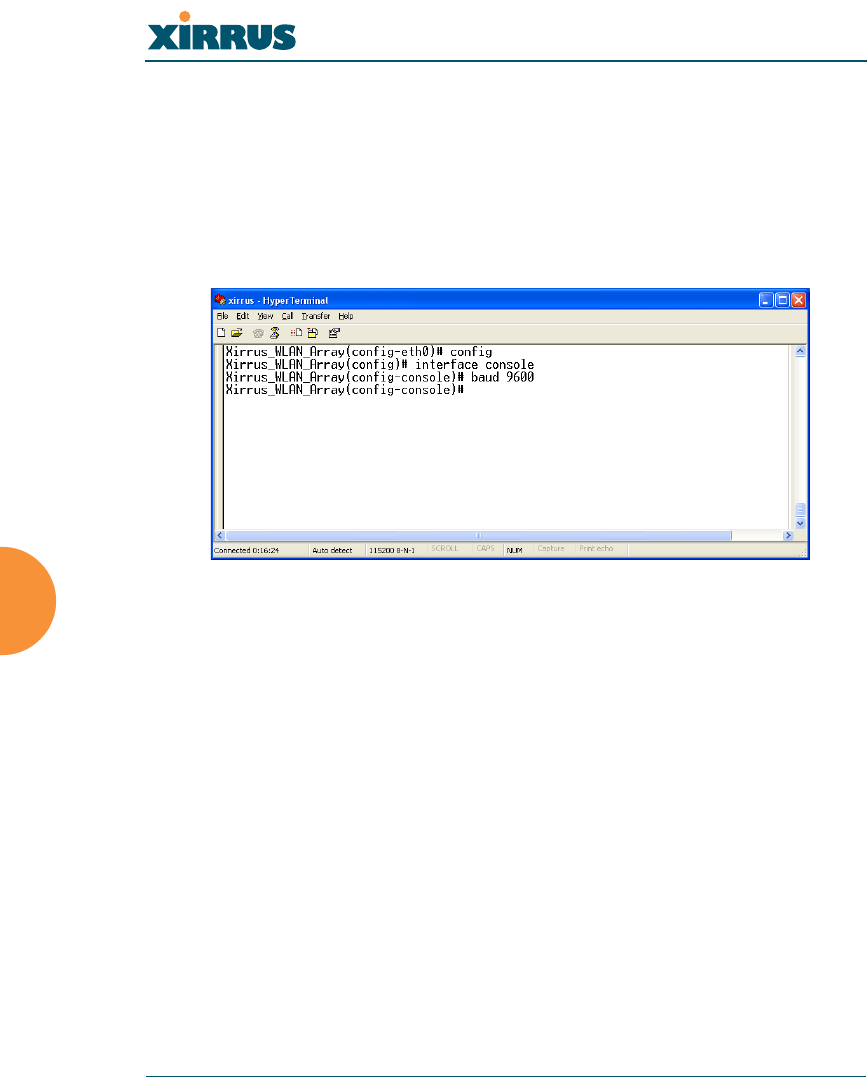
To set the baud rate of the console serial port to 9600 baud:
config-interface console
(config-console)# baud 9600
Figure 99. CLI: Setting the IP Address for the Serial Port
SEE ALSO
None.
Wireless LAN Array
The Command Line Interface 157
contact-info
DESCRIPTION
Sets the contact information for this Array—available from the config
command mode.
SYNTAX
contact-info {name [<conname>] | email [<emailcontact>] | phone
[<contele>]}@
PARAMETERS
contact-info Contact information for assistance on this Array
name Contact name (must be within quotes)
email Contact email address (must be within quotes)
phone Contact telephone number (must be within quotes)
DEFAULTS
None.
USAGE GUIDELINES
None.
EXAMPLE
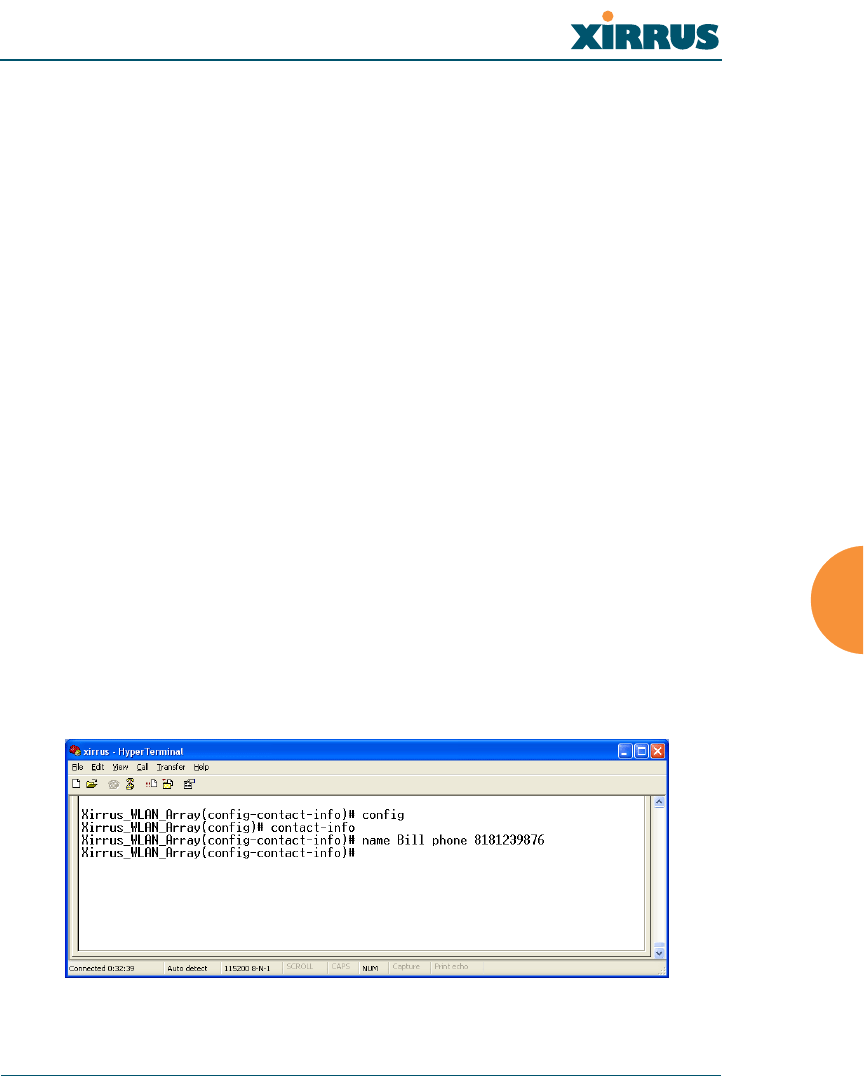
To add new contact information (name and telephone number):
config-contact-info
(config-contact-info)# name Bill phone 8181239876
Figure 100. CLI: Adding a New Administrator Account

Wireless LAN Array
158 The Command Line Interface
SEE ALSO
None.
copy
DESCRIPTION
Creates a copy of the specified file on the Flash file system.
SYNTAX
copy <sourcefile> <destinationfile>
PARAMETERS
sourcefile The existing source file name
destinationfile The new destination file name
DEFAULTS
None.
USAGE GUIDELINES
None.
EXAMPLE
To create a backup of the current system image file, type:
Xirrus_WLAN_Array(config)# copy XS-39-1.1.0 XS-39-1.1.BAK
SEE ALSO
dir
delete

Wireless LAN Array
The Command Line Interface 159
date-time
DESCRIPTION
Set the date/time for the Array—available from the config command
mode, using the format hh:mm mm/dd/yyyy.
SYNTAX
date-time <date/time>
PARAMETERS
dst_adjust Adjust daylight savings
no Disable daylight savings
ntp Configure the NTP server
set Set the date and time for the Array
timezone Configure the time zone
DEFAULTS
None.
USAGE GUIDELINES
You access the date-time command mode from the config mode.
Wireless LAN Array
160 The Command Line Interface
EXAMPLE
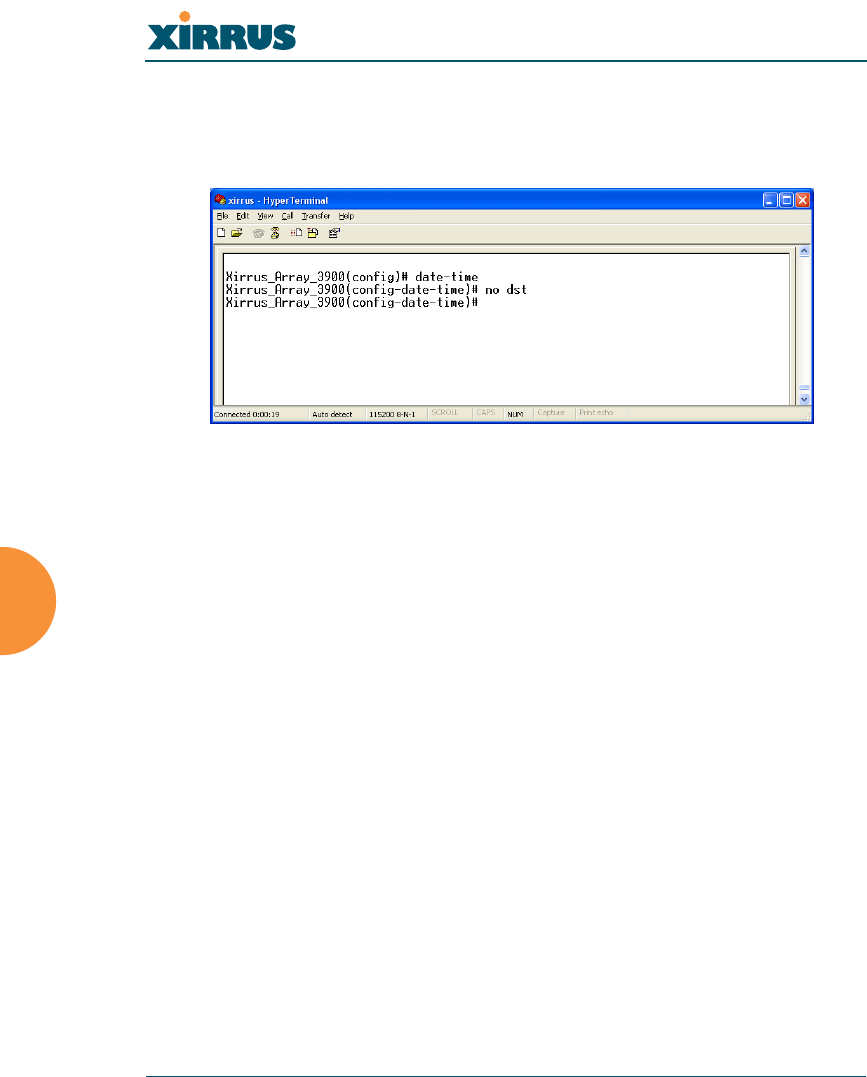
To disable daylight savings, type:
(config-date-time)# no dst
Figure 101. CLI: Disabling Daylight Savings
SEE ALSO
None.
dhcp-server
DESCRIPTION
Configures the local DHCP server settings—available from the Config->
dhcp-server command mode.
SYNTAX
dhcp {on | off | {start-ip-range <sipr> | end-ip-range <eipr> | default-
lease <defl> | max-lease <maxl>}@}

Wireless LAN Array
The Command Line Interface 161
PARAMETERS
on Enable the DHCP server
off Disable the DHCP server
start-ip-range Starting IP address for the lease pool
end-ip-range Ending IP address for the lease pool
default-lease Default lease period (in minutes), if one is not
requested
max-lease Maximum lease period allowed
show Display the current DHCP server settings
DEFAULTS
Default lease time 300
Maximum lease time 300
USAGE GUIDELINES
None.
EXAMPLE
To set the IP address range for the local DHCP server and enable the server,
type:
Xirrus_WLAN_Array(config)# dhcp-server
Xirrus_WLAN_Array(config-dhcp-server)# start-ip-range 192.168.1.100
end-ip-range 192.168.1.200
Xirrus_WLAN_Array(config-dhcp-server)# show
DHCP Server Settings Summary
----------------------------
State disabled
Address range start 192.168.1.100
Address range end 192.168.1.200
Default lease time 300
Maximum lease time 300
SEE ALSO
None.

Wireless LAN Array
162 The Command Line Interface
dir
DESCRIPTION
Lists the contents of the local Flash file system directory.
SYNTAX
dir
PARAMETERS
None.
DEFAULTS
None.
USAGE GUIDELINES
None.
EXAMPLE
To list the local Flash file system directory contents, type:
Xirrus_WLAN_Array(config)# dir
The following will appear:
.
..
lastboot
xs37-1.0.37.bin
SEE ALSO
Delete
Copy

Wireless LAN Array
The Command Line Interface 163
dns
DESCRIPTION
Used to configure the DNS settings—available from the Config-> dns
command mode.
SYNTAX
dns { domain [<dom>] | server1 [<srv1>] | server2 [<srv2>] | server3
[<srv3>]}
PARAMETERS
domain Enter your domain name
(Example: www.mydomain.com)
server1 Enter the first DNS server IP address
server2 Enter the second DNS server IP address
server3 Enter the third DNS server IP address
DEFAULTS
None.
USAGE GUIDELINES
Server1, Server2, and Server3 IP addresses must be entered using the
standard A.B.C.D notation.
EXAMPLE
To configure the first DNS server, type:
Xirrus_WLAN_Array(config)# dnsy
Xirrus_WLAN_Array(config-dns)# server1 10.10.10.1
SEE ALSO
None.

Wireless LAN Array
164 The Command Line Interface
erase
DESCRIPTION
Erases the specified file from the Flash file system.
SYNTAX
Erase <filename>
PARAMETERS
filename existing file to delete.
DEFAULTS
None.
USAGE GUIDELINES
None.
EXAMPLE
To erase the file old-configuration, type:
Xirrus_WLAN_Array(config)# erase old-configuration
SEE ALSO
dir
copy

Wireless LAN Array
The Command Line Interface 165
eth0
DESCRIPTION
Configures the 10/100 Ethernet Interface Settings—available from the
config-interface command mode.
SYNTAX
eth0 {[no] autoneg [on | off] | defaults | duplex {half | full} | speed
<spdsel> | mtu <mtusz> | down | up | ip {dhcp | {addr <statip> | mask
<ipmask> | gateway <gway>}@}}
PARAMETERS
half Half duplex
full Full duplex
mtu Set the maximum MTU size allowed (64-17940)
defaults Reset the interface to default values
duplex Half or full duplex mode
speed 10M or 100M operations
down Shut this interface down
up Bring this interface up
ip Set IP address (A.B.C.D)
dhcp IP address, mask and gateway are obtained
through DHCP
addr <IP Address> Static IP address (A.B.C.D)
gateway <IP Address> Gateway IP address (A.B.C.D)
mask <mask> IP mask (A.B.C.D)
autoneg Autonegotiation on or off
on Enable autonegotiation
off Disable autonegotiation
DEFAULTS
None.
USAGE GUIDELINES
None.
Wireless LAN Array
166 The Command Line Interface
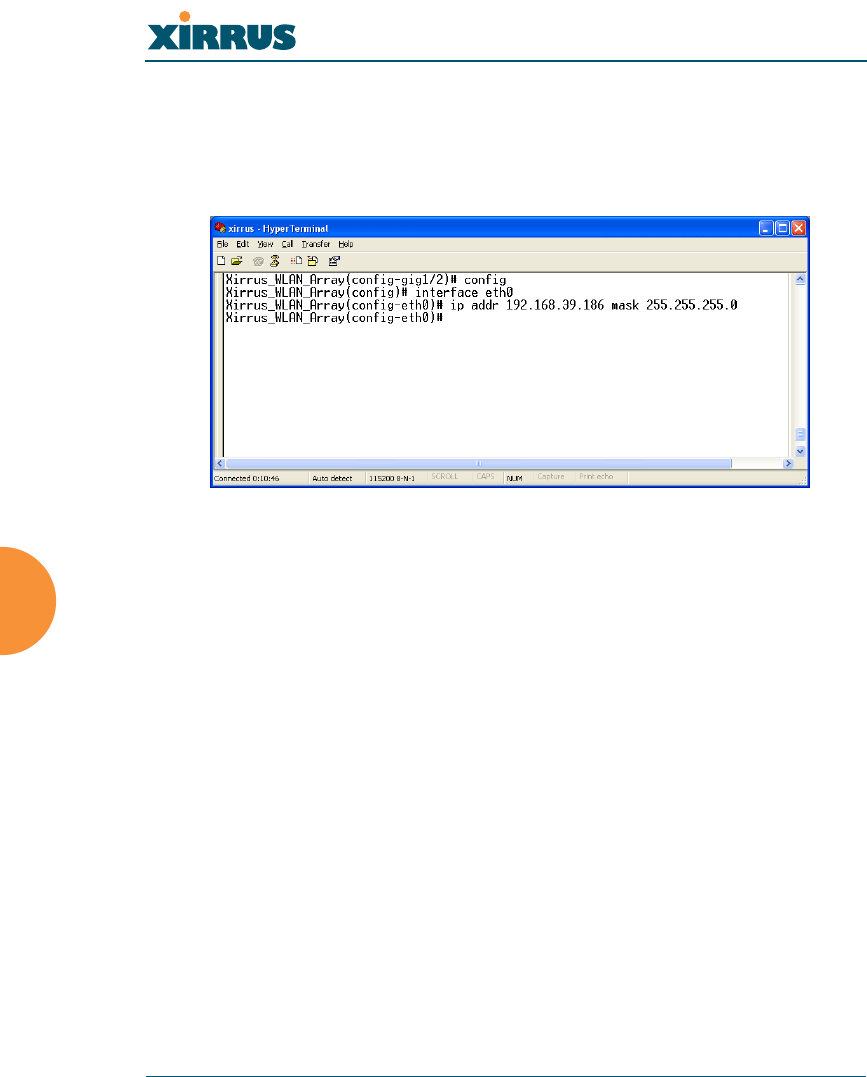
EXAMPLE
To set the IP address of the 10/100 Ethernet interfaces:
config-interface eth0
(config-eth0)# ip addr 192.168.39.186 mask 255.255.255.0
Figure 102. CLI: Setting the IP Address for the Fast Ethernet Interface
SEE ALSO
config-interface gig1
config-interface gig2

Wireless LAN Array
The Command Line Interface 167
ftp
DESCRIPTION
Opens an ftp connection to a remote system.
SYNTAX
ftp <ip-address>
PARAMETERS
<ip-address> IP address of remote ftp host (in A.B.C.D format)
DEFAULTS
None.
USAGE GUIDELINES
Once an ftp connection is established, the following commands are
available from the ftp prompt:
EXAMPLE
None.
SEE ALSO
None.
binary delete ls recv
bye dir mkdir rename
cd disconnect open rmdir
cdup get put send
chmod hash pwd size
close help quit ?

Wireless LAN Array
168 The Command Line Interface
gig1
DESCRIPTION
Configures the Gigabit 1 Ethernet Interface Settings—available from the
config-interface command mode.
SYNTAX
gig1 {[no] autoneg [on | off]; | [no] management [on | off] | down | up |
defaults | duplex {half | full} | speed <spdsel> | mtu <mtusz> | ip {dhcp
| {addr <statip> | mask <ipmask> | gateway <gway>}@}}
PARAMETERS
half Half duplex
full Full duplex
mtu Set the maximum MTU size allowed
defaults Reset the interface to default values
duplex Half or full duplex mode
speed <speed> 100M or 1000M operation
down Shut this interface down
up Bring this interface up
ip Set the IP address
dhcp IP address, mask and gateway are obtained
through DHCP
addr <IP Address> Static IP address (A.B.C.D)
gateway <IP Address> Gateway IP address (A.B.C.D)
mask <mask> IP mask (A.B.C.D)
management Enable or disable management via interface
no Managed elsewhere
on Enable management
off Disable management
autoneg Autonegotiation on or off
no Disable selected feature
on Enable autonegotiation
off Disable autonegotiation
Wireless LAN Array
The Command Line Interface 169
DEFAULTS
None.
USAGE GUIDELINES
Setting the Gigabit1 interface parameters will automatically set the Gigabit2
parameters to the same values.
EXAMPLE
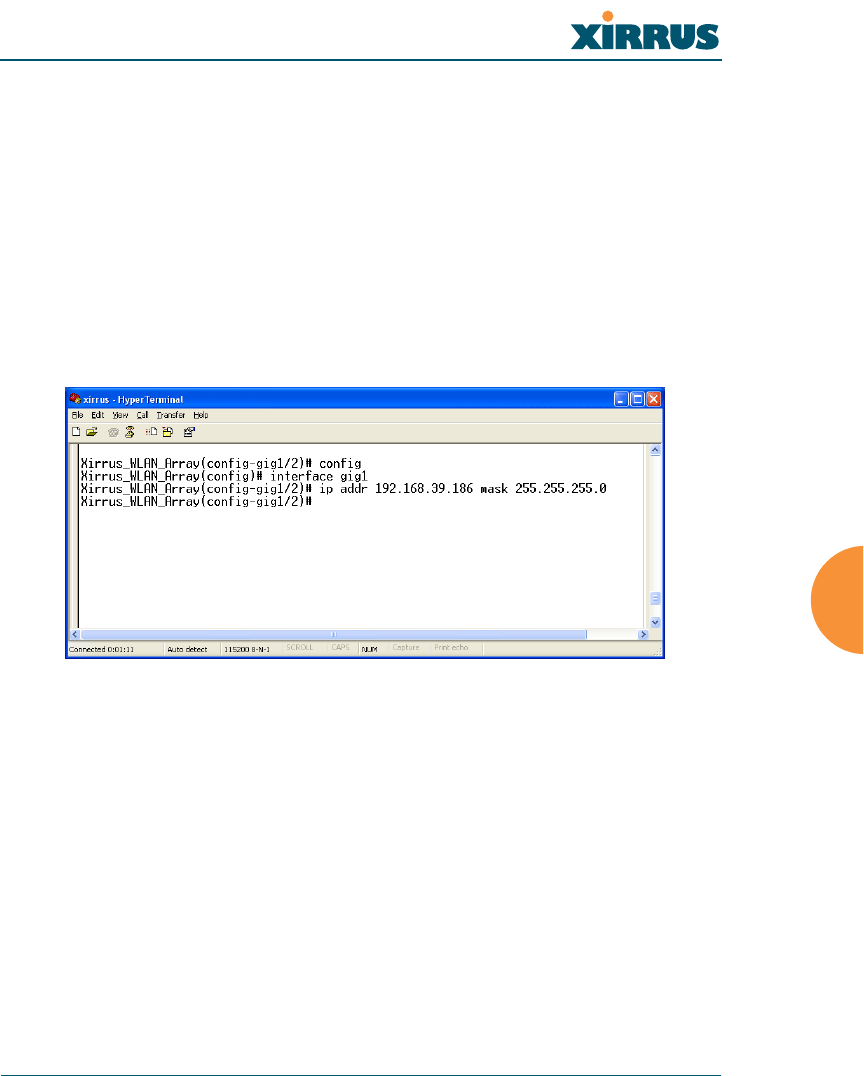
To set the IP address of the gigabit Ethernet interfaces:
config-interface gig1
(config-gig1/2)# ip addr 192.168.39.186 mask 255.255.255.0
Figure 103. CLI: Setting the IP Address for the Gigabit 1 Interface
SEE ALSO
config-interface gig2
config-interface eth0

Wireless LAN Array
170 The Command Line Interface
gig2
DESCRIPTION
Configures the Gigabit 2 Ethernet Interface Settings—available from the
config-interface command mode.
SYNTAX
gig2 {[no] autoneg [on | off]; | [no] management [on | off] | down | up |
defaults | duplex {half | full} | speed <spdsel> | mtu <mtusz> |
ip {dhcp | {addr <statip> | mask <ipmask> | gateway <gway>}@}}
PARAMETERS
half Half duplex
full Full duplex
mtu Set the maximum MTU size allowed
defaults Reset the interface to the default values
duplex Half or full duplex mode
speed <speed> 100M or 1000M operation
down Shut this interface down
up Bring this interface up
ip Set the IP address
dhcp IP address, mask and gateway are obtained
through DHCP
addr <IP Address> Static IP address (A.B.C.D)
gateway <IP Address> Gateway IP address (A.B.C.D)
mask <mask> IP mask (A.B.C.D)
management Enable or disable management via interface
no Managed elsewhere
on Enable management
off Disable management
autoneg Autonegotiation on or off
no Disable selected feature
on Enable autonegotiation
off Disable autonegotiation
DEFAULTS
None.
Wireless LAN Array
The Command Line Interface 171
USAGE GUIDELINES
Setting Gigabit2 Interface parameters will automatically set the Gigabit1
parameters to the same values for failover purposes.
EXAMPLE
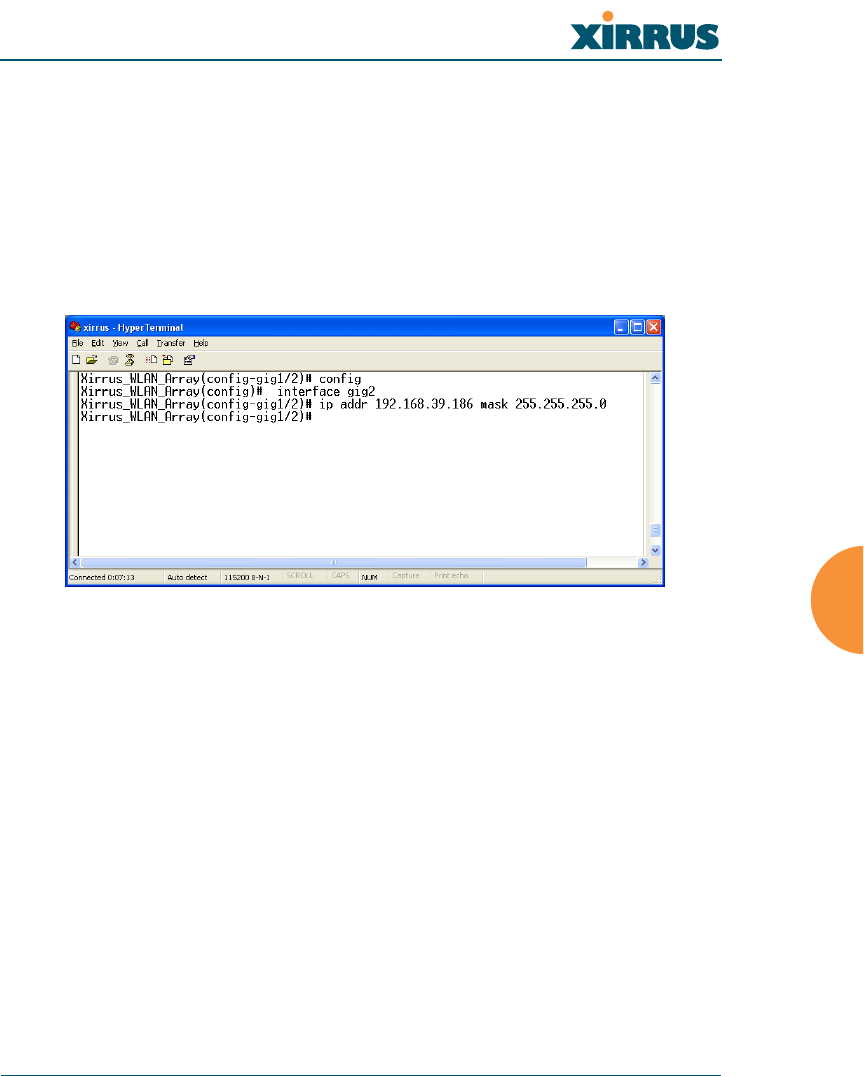
To set the IP address of the gigabit Ethernet interfaces:
config-interface gig2
((config-gig1/2)# ip addr 192.168.39.186 mask 255.255.255.0
Figure 104. CLI: Setting the IP Address for the Gigabit 2 Interface
SEE ALSO
config-interface gig1
config-interface eth0
Wireless LAN Array
172 The Command Line Interface
hostname
DESCRIPTION
Sets the host name for this Array—available from the config command
mode.
SYNTAX
hostname <hname> “hostname string”
PARAMETERS
None.
DEFAULTS
None.
USAGE GUIDELINES
None.
EXAMPLE
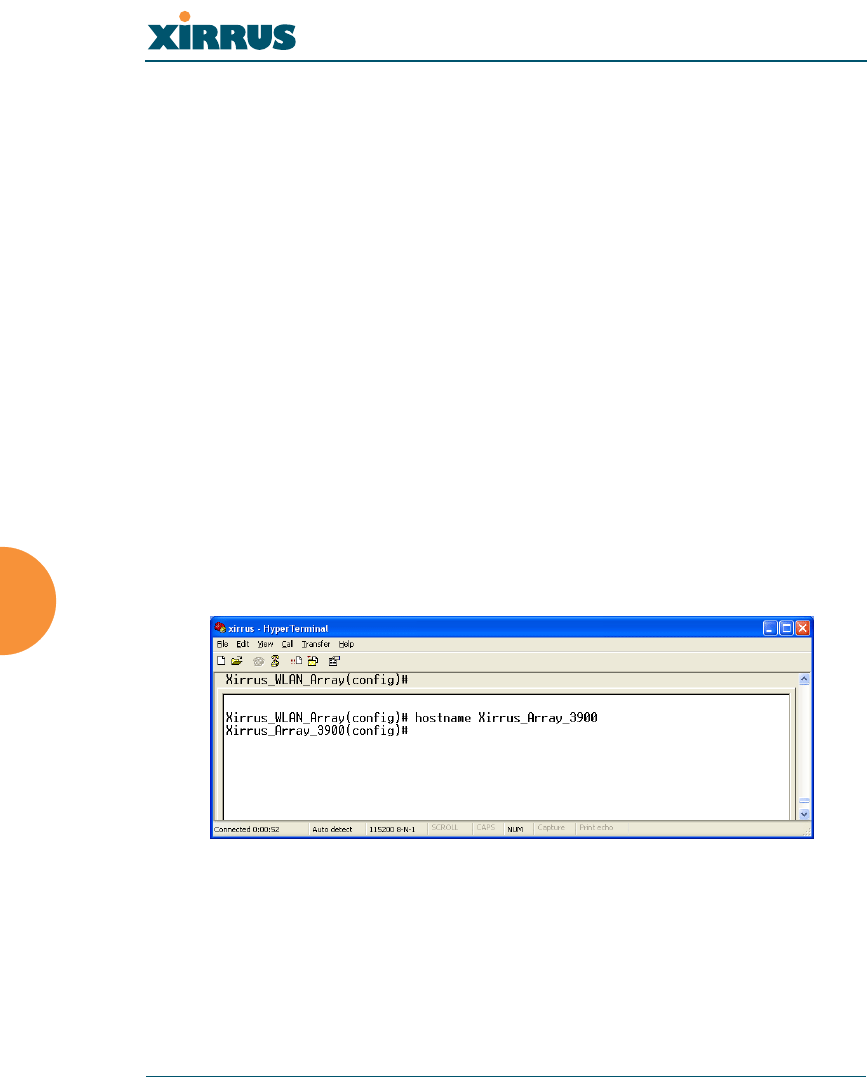
To set the hostname for the Xirrus Array:
(config)# hostname Xirrus_Array_3900
Figure 105. CLI: Setting the Host Name of the Array
The hostname is displayed immediately below the command line, as
follows:
Xirrus_Array_3900(config)#

Wireless LAN Array
The Command Line Interface 173
SEE ALSO
None.
iap
DESCRIPTION
Changes the configuration of a specific Integrated Access Point (IAP) radio
interface—available from the config-interface command mode. Groups of
interfaces can be accessed via the following interface commands.
ziap number: Configuration for a specific IAP. The prompt will change
to: IAP number (config-iap-a12)#.
zglobal_a_settings: Common configuration for all 802.11a IAPs.
The prompt will change to: (config-iap-global-a)#.
zglobal_bg_settings: Common configuration for all 802.11b/g IAPs.
The prompt will change to: (config-iap-global-bg)#.
zglobal_settings: Common configuration for all IAPs. The prompt will
change to: (config-iap-global)#.
SYNTAX
interface iap <IAP number> {channel <cnum> | description <dot11desc> |
down | up | cellsize {small | medium | large} | rx-threshold <thresrx> |
tx-power <powertx>} }
PARAMETERS
cellsize Cell size setting
channel Channel number
description Name to identify this IAP (up to 32 characters)
down Shut down (disable) this IAP
rx-threshold Deferred threshold (receive sensitivity)
tx-power Maximum transmit power
up Bring up (enable) this IAP
dot11a Set 802.11a mode
dot11bg Set 802.11b/g mode (only available on abg1, 2, 3, 4)
antenna Select the antenna for the IAP
internal Internal directional 2.4GHz antenna
Wireless LAN Array
174 The Command Line Interface
monitor Internal omni-directional monitor antenna
(available on abg2 IAP only)
external Select the external antenna (Available on IAP abg1,
abg3, and abg4 only)
DEFAULTS
None.
USAGE GUIDELINES
None.
EXAMPLE
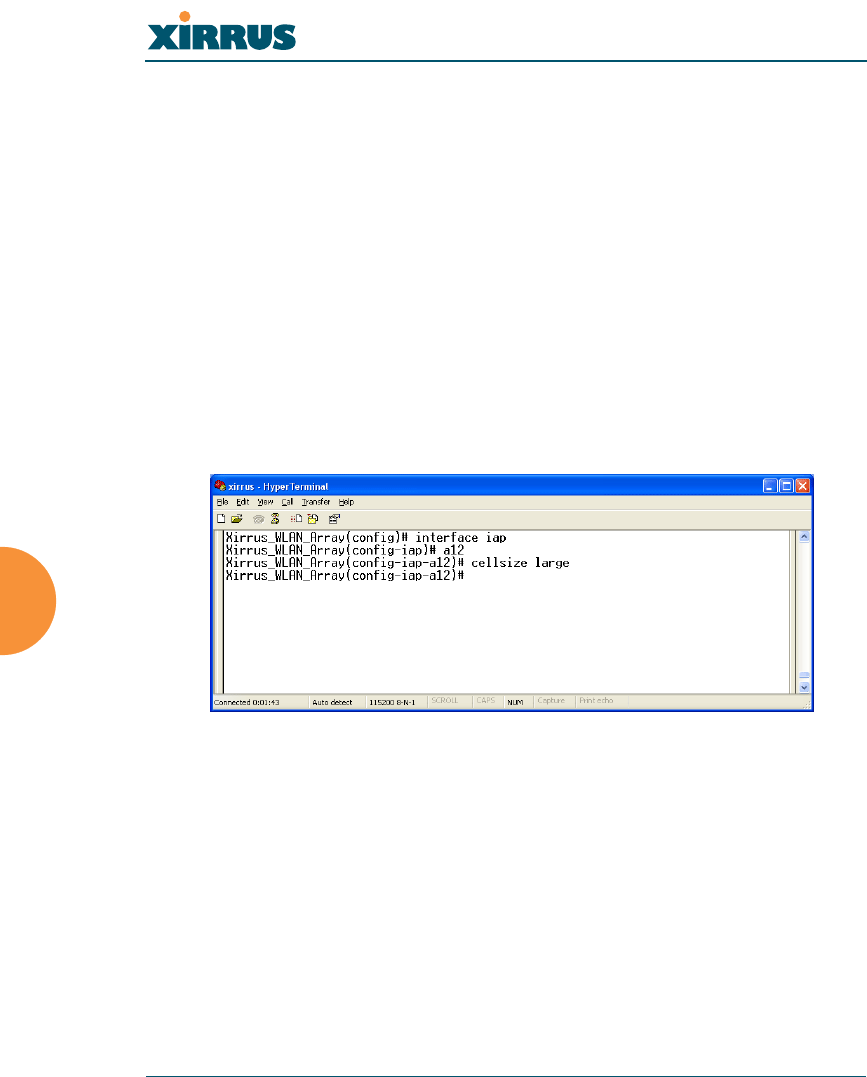
To set the cell size to large for the integrated access point a12:
(config-iap)# a12
(config-iap-a12)# cellsize large
Figure 106. CLI: Setting the Cell Size of an IAP
SEE ALSO
iap global_a_settings
iap global_bg_settings
iap global_settings
show iap all

Wireless LAN Array
The Command Line Interface 175
iap global_settings
DESCRIPTION
Makes global configuration changes to all Integrated Access Point (IAP)
radio interfaces—available from the config-interface command mode.
This command allows configuration changes to all IAP interfaces. Other
global settings can be made for specific groups of IAPs by using one of the
below parameters in the interface IAP command mode:
ziap number: Configuration for a specific IAP. The prompt will change
to: IAP number (config-iap-a12)#
zglobal_a_settings: Common configuration for all 802.11a IAPs. The
prompt will change to: (config-iap-global-a)#
zglobal_bg_settings: Common configuration for all 802.11b/g IAPs.
The prompt will change to: (config-iap-global-bg)#
zglobal_settings: Common configuration for all IAPs. The prompt will
change to: (config-iap-global)#
SYNTAX
iap global_settings {all_down | all_up | [no] rogue_detect [ on | off |
add <ssa> {approved | known} | del <ssd> | list ] | auto_channel
[no][power_up [ on | off ] | schedule [<ts>]] | long-retries <lrl> | short-
retries <srl> | cellsize {small | medium | large} | rx-threshold <thresrx> |
tx-power <powertx> | beacon-rate <brate> | beacon-dtim <bdtim> |
inactive-time <at> | reauth-period <ht> | led {disable | enable {iap_up |
associated}} | led_activity {beacon | tx_data | rx_data | tx_mgmt |
rx_mgmt | broadcast | probe_req | assoc}}
PARAMETERS
led Enable or disable the IAP leds
disable Do not turn IAP leds on
enable Turn an IAP led on when up (default) or when a
station is associated
iap_up Turn an IAP led on when the IAP is up
associated Turn an IAP led on when at least one station is
associated with it

Wireless LAN Array
176 The Command Line Interface
led_activity Set IAP led behavior based on certain conditions
beacon Blink an IAP led when a beacon is transmitted
tx_data Blink an IAP led when a data frame is transmitted
rx_data Blink an IAP led when a data frame is received
tx_mgmt Blink an IAP led when a management frame is
transmitted
rx_mgmt Blink an IAP led when a management frame is
received
broadcast Blink an IAP led when a broadcast frame is
transmitted
probe_req Blink an IAP led when a probe request is received
assoc Blink an IAP led heartbeat when stations are
associated
beacon-rate Time between beacons in kilo-microseconds (Kusec)
beacon-dtim Beacons between Delivery Traffic Indication
Messages (DTIM)
all_down Shut down (disable) all IAPs
all_up Bring up (enable) all IAPs
short-retries Short retry limit
long-retries Long retry limit
inactive-time Time that an AP tracks an inactive station
reauth-period Time between 802.1x re-authentication attempts
rogue_detect Enable/disable rogue AP detection on IAP abg2
on Enable rogue AP detection
off Disable rogue AP detection
add Add SSID to rogue database
del Delete SSID from rogue database
approved Mark SSID as approved (stop reporting and
displaying)
known Mark SSID as known (stop reporting but display
with an *)
list List rogue database
cellsize Cell size setting
small Small cell size
medium Medium cell size
large Large cell size
rx-threshold Deferred threshold
tx-power Maximum transmit power
Wireless LAN Array
The Command Line Interface 177
auto_channel Automatically assign channels to all IAPs
power_up Automatically run automatic channel assignment at
power up
schedule Run automatic channel assignment at scheduled
time(s)
on Enable autochannel at power up
off Disable autochannel at power up
DEFAULTS
None.
USAGE GUIDELINES
None.
EXAMPLE
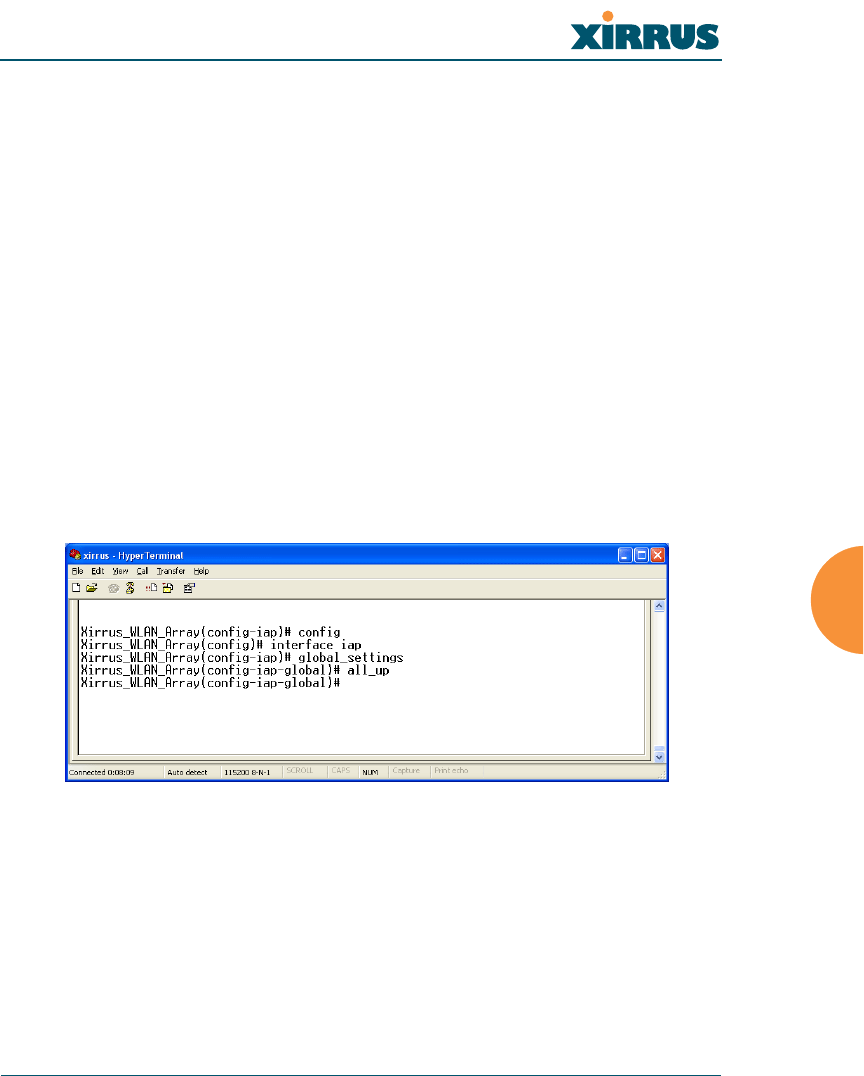
To enable all the radio interfaces:
(config-iap)# global_settings
(config-iap-global)# all_up
Figure 107. CLI: Enabling All Radio Interfaces
SEE ALSO
iap global_a_settings
iap global_bg_settings
iap global_settings
show iap all

Wireless LAN Array
178 The Command Line Interface
iap global_a_settings
DESCRIPTION
Makes global configuration changes to all 802.11a Integrated Access Point
(IAP) radio interfaces—available from the Config->Interface command
mode.
This command allows configuration changes to all 802.11a IAP interfaces.
Other global settings can be made for specific groups of IAPs by using one
of the following parameters in the interface IAP command mode:
ziap number: Configuration for a specific IAP. The prompt will change
to: IAP number (config-iap-a12)#
zglobal_bg_settings: Common configuration for all 802.11b/g IAPs.
The prompt will change to: (config-iap-global-bg)#
zglobal_settings: Common configuration for all IAPs. The prompt will
change to: (config-iap-global)#
SYNTAX
iap global_a_settings {all_down | all_up | rts-threshold <rtst> | frag-
threshold <fragt> | auto_channel | cellsize {small | medium | large} | rx-
threshold <thresrx> | tx-power <powertx> | rates {defaults |
optimize_range | optimize_throughput | { basic { <br1> [<br2> [<br3>
[<br4> [<br5> [<br6> [<br7> [<br8>]]]]]]]} | supported { [<sr1> [<sr2>
[<sr3> [<sr4> [<sr5> [<sr6> [<sr7> [<sr8>]]]]]]]]}}}}
PARAMETERS
frag-threshold 802.11a fragmentation threshold packet size
above which a packet will be fragmented
rts-threshold 802.11a RTS threshold packet size above which
an RTS is issued before sending
auto_channel Automatically assign channels to 802.11a IAPs
rates Set allowed 802.11a data rates by listing the rates
that will be used ( 6, 9, 12, 18, 24, 36, 48, 54, etc.)
basic Set 802.11a basic (required) rates by listing the
rates a client must support to associate
supported Set the 802.11a supported (accepted) rates
defaults Use the default 802.11a rates
Wireless LAN Array
The Command Line Interface 179
optimize_range Set 802.11a rates for the best range
optimize_throughput Set 802.11a rates for the best throughput
all_down Shut down (disable) all 802.11a IAPs
all_up Bring up (enable) all 802.11a IAPs
cellsize Cell size setting
small Small cell size
medium Medium cell size
large Large cell size
rx-threshold Deferred threshold, packets with a lower signal
strength that the rx-threshold will be ignored
tx-power Maximum transmit power in dB
parameter (-100,0) thresrx Deferred threshold value
parameter (0,20) powertx Maximum transmit value
DEFAULTS
None.
USAGE GUIDELINES
None.
EXAMPLE
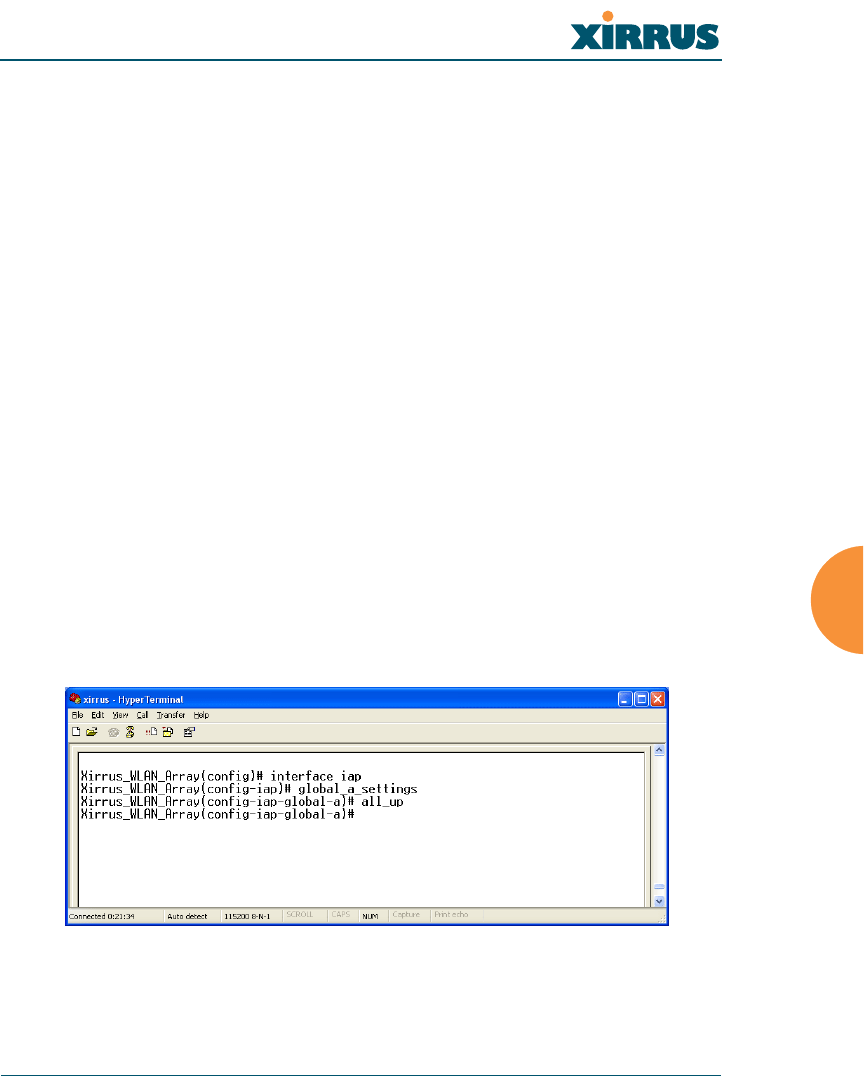
To enable all 802.11a radio interfaces:
((config-iap)# global_a_settings
(config-iap-global-a)# all_up
Figure 108. CLI: Enabling All 802.11a Radio Interfaces

Wireless LAN Array
180 The Command Line Interface
SEE ALSO
iap global_bg_settings
iap global_settings
show iap all
iap global_bg_settings
DESCRIPTION
Makes global configuration changes to all 802.11bg Integrated Access Point
(IAP) radio interfaces—available via the Config-> Interface command
mode.
This command allows configuration changes to all 802.11bg IAP interfaces.
Other global settings can be made for specific groups of IAPs by using one
of the below parameters in the Interface IAP command mode::
ziap number: Configuration for a specific IAP. The prompt will change
to: IAP number (config-iap-a12)#
zglobal_bg_settings: Common configuration for all 802.11b/g IAPs.
The prompt will change to: (config-iap-global-bg)#
zglobal_settings: Common configuration for all IAPs. The prompt will
change to: (config-iap-global)#
SYNTAX
IAPGlobalBG {all_down | all_up | slot_time {short_slot | long_slot} |
[no] dot11g_protect [on | off] | [no] dot11g_only [on | off] | cellsize {small
| medium | large} | rx-threshold <thresrx> | tx-power <powertx> |
preamble {short_preamble | long_preamble} | auto_channel |
rts-threshold <rtst> | frag-threshold <fragt> | rates {defaults |
optimize_range | optimize_throughput | { basic { <br1> [<br2> [<br3>
[<br4> [<br5> [<br6> [<br7> [<br8> [<br9> [<br10> [<br11>
[<br12>]]]]]]]]]]]} | supported { [<sr1> [<sr2> [<sr3> [<sr4> [<sr5> [<sr6>
[<sr7> [<sr8> [<sr9> [<sr10> [<sr11> [<sr12>]]]]]]]]]]]]}}}}

Wireless LAN Array
The Command Line Interface 181
PARAMETERS
frag-threshold 802.11b/g fragmentation threshold packet size
above which a packet will be fragmented
rts-threshold 802.11b/g RTS threshold packet size above
which an RTS is issued before sending
auto_channel Automatically assign channels to 802.11b/g IAPs
rates Set allowed 802.11b/g bit rates
basic Set 802.11b/g basic (required) rates
supported Set 802.11b/g supported (accepted) rates
defaults Set default 802.11b/g rates
optimize_range Set 802.11b/g rates for best range
optimize_throughput Set 802.11b/g rates for best throughput
all_down Shut down (disable) all 802.11b/g IAPs
all_up Bring up (enable) all 802.11b/g IAPs
preamble Set 802.11b preamble length
short_preamble Enable cck short preamble (56 sync bits)
long_preamble Use only cck long preamble (128 sync bits)
slot_time Set 802.11b/g slot time
short_slot Enable short slot time (9 us)
long_slot Use only long slot time (20 us)
dot11g_protect Enable or disable 802.11g protection
dot11g_only Enable or disable 802.11g only mode
on Enable 802.11g only (or protection) mode
off D i s a b l e 8 0 2 . 1 1 g o n l y ( o r p r o t e c t i o n ) m o d e
cellsize Cell size setting
small Small cell size
medium Medium cell size
large Large cell size
rx-threshold Deferred threshold (receive sensitivity)
tx-power Maximum transmit power
DEFAULTS
None.
USAGE GUIDELINES
None.
EXAMPLE
None.

Wireless LAN Array
182 The Command Line Interface
SEE ALSO
None.
location
DESCRIPTION
Defines the location description for this Xirrus Array—available from the
config command mode.
SYNTAX
location <locname>
PARAMETERS
locname Input location name for this Array
DEFAULTS
None.
USAGE GUIDELINES
Quotes must be used around the location text if spaces are used between
words.
Typing location with no parameters will clear any set value.
EXAMPLE
To set the location description for the Xirrus Array:
(config)# location “Building 11 Floor 2"
SEE ALSO
None.

Wireless LAN Array
The Command Line Interface 183
more
DESCRIPTION
Lists the contents of a file, one screen at a time.
SYNTAX
More <file name>
PARAMETERS
<file name> The file name for which to display the contents
DEFAULTS
None.
USAGE GUIDELINES
None.
EXAMPLE
None.
SEE ALSO
None.
radius-server
DESCRIPTION
Configures the external or internal (local) radius server settings—available
from the Config-> radius-server command mode
SYNTAX
radius-server [no] external [ {on | off | ip <pri_ip> | port <pri_port> |
secret [enc] [<pri_secret>] | timeout <tmout>}@ ] | secondary [ {ip
[<sec_ip>] | port [<sec_port>] | secret [enc] [<sec_secret>]}] |
[no] internal [ {on | off | {add <aid> password [enc] <passwd> ssid <ss>} |
del <did>} ]

Wireless LAN Array
184 The Command Line Interface
PARAMETERS
external Configure the primary external RADIUS server
parameters
Prompt will change to (config-radius-external)#
secondary Configure the secondary external RADIUS
server parameters
Prompt will change to (config-radius-secondary)#
ip IP address of the RADIUS server
port Authentication port of the RADIUS server
secret Shared secret for the RADIUS server
enc Enter encrypted shared secret for the RADIUS
server
on Enable external RADIUS server
off Disable external RADIUS server
timeout Timeout (in seconds) before the server is retried
after it initially failed
internal Configure internal RADIUS server parameters
on Enable internal RADIUS server
off Disable internal RADIUS server
add Add this user
del Delete this user
password User password
enc Enter encrypted password
ssid SSID with which the user is allowed to associate
show Display current radius server settings
DEFAULTS
None.
USAGE GUIDELINES
None.
EXAMPLE
None.
SEE ALSO
None.

Wireless LAN Array
The Command Line Interface 185
reboot
DESCRIPTION
Reboots the Xirrus Array.
SYNTAX
reboot
PARAMETERS
None.
DEFAULTS
None.
USAGE GUIDELINES
When rebooting the Array, you must respond to the following prompts:
zThe system will prompt you to save any unsaved configuration
changes.
zThe system will prompt you to confirm the reboot action.
EXAMPLE
To reboot the Xirrus Array type the following.
Xirrus_WLAN_Array(config)# reboot
Do you want to save changes to flash? [yes/no]: y
are you sure you want to reboot? [yes/no]: y
SEE ALSO
None.

Wireless LAN Array
186 The Command Line Interface
reset
DESCRIPTION
Resets all settings to the factory defaults, then reboots the Xirrus Array.
SYNTAX
reset
PARAMETERS
None.
DEFAULTS
None.
USAGE GUIDELINES
When you enter the reset command, the system will prompt you to confirm
the reset action.
EXAMPLE
To reset the Xirrus Array back to factory defaults, type:
Xirrus_WLAN_Array(config)# reset
Are you sure you want to reset to factory settings and reboot? [yes/no]:y
SEE ALSO
reboot
run-script
DESCRIPTION
Run a CLI command script.
SYNTAX
run-script <file name>
PARAMETERS
<file name> name of command script file

Wireless LAN Array
The Command Line Interface 187
DEFAULTS
None.
USAGE GUIDELINES
None.
EXAMPLE
None.
SEE ALSO
None.
run-tests
DESCRIPTION
Runs network diagnostic tests from the run-test command mode—available
from the config-run-tests command mode.
SYNTAX
traceroute <tracename> | ping <pingname>
PARAMETERS
traceroute <IP Address or DNS name> Run a trace on IP route or
DNS name
ping <IP Address or DNS name> Execute ping utility
DEFAULTS
None.
USAGE GUIDELINES
You access the run-tests command mode from the config mode.
Wireless LAN Array
188 The Command Line Interface
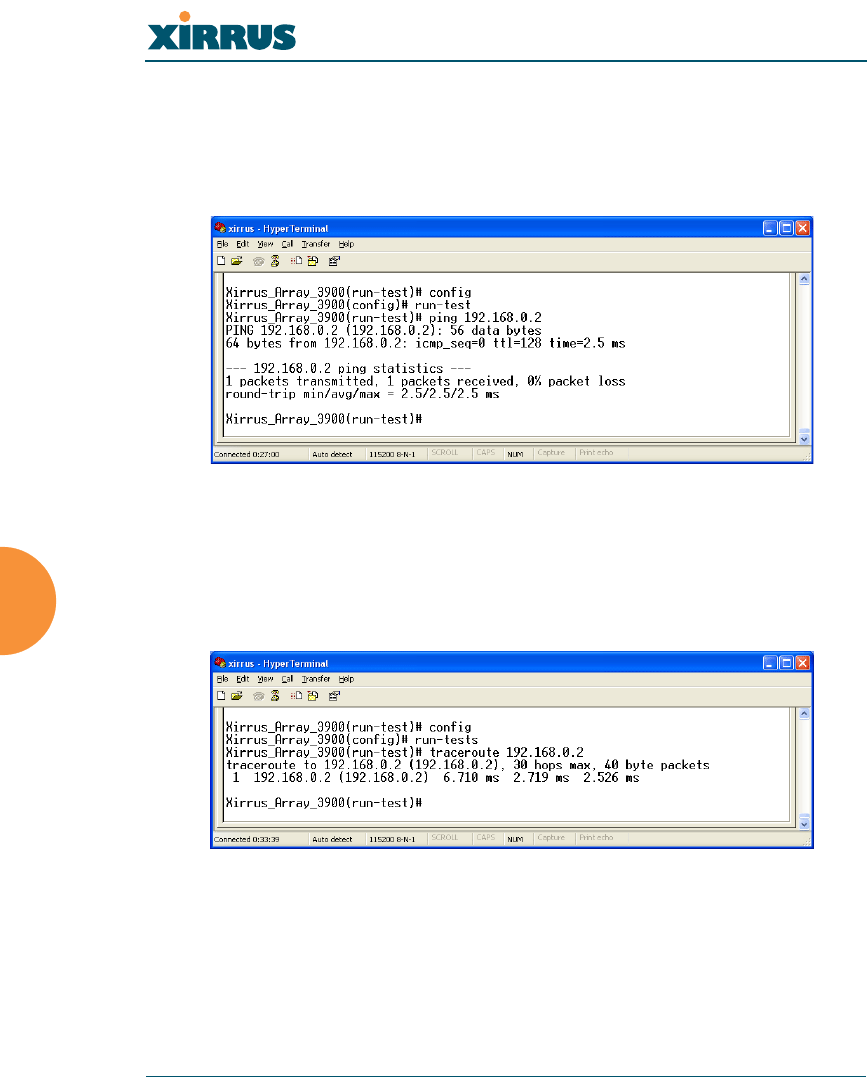
EXAMPLE
To test connectivity to a client device at IP address 192.168.0.2 type:
(config)# run-tests
(config-run-test)# ping 192.168.0.2
Figure 109. CLI: Testing Client Connectivity
To view the network routing to another device use traceroute:
(config)# run-tests
(config-run-test)# traceroute 192.168.0.2
Figure 110. CLI: Viewing the Routing to a Client
SEE ALSO
None.

Wireless LAN Array
The Command Line Interface 189
save
DESCRIPTION
Permanently saves the current configuration so that changes will be
available at the next system boot.
SYNTAX
save
PARAMETERS
None.
DEFAULTS
None.
USAGE GUIDELINES
None.
EXAMPLE
To permanently save the current configuration, type:
Xirrus_WLAN_Array(config)# save
SEE ALSO
None.
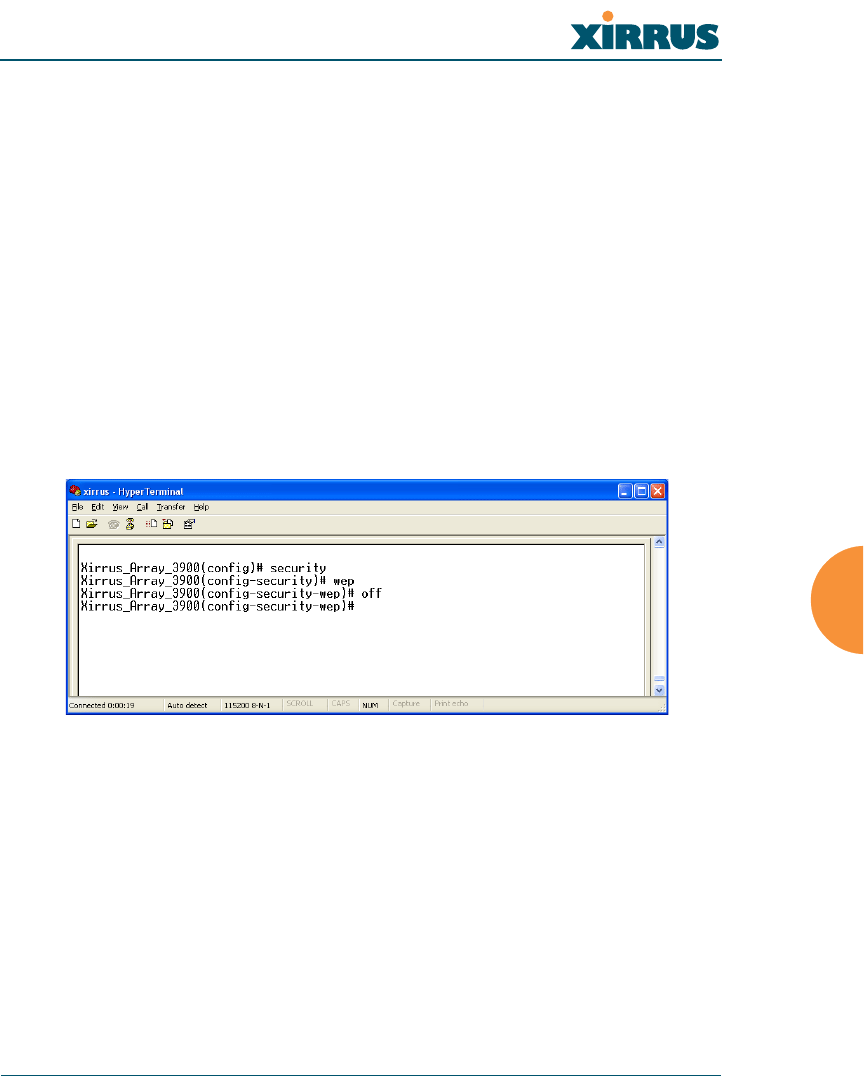
security
DESCRIPTION
Set wireless and other security parameters for the Xirrus Array. Available
via the config-security command mode.
There are two options available from the Security command mode:
zwep: Set WEP encryption parameters
zwpa: Set WPA encryption parameters

Wireless LAN Array
190 The Command Line Interface
SYNTAX
wep { on | off | default_key <keyid> | key {<keynum> size [not_set |
<wepsz> { ascii | hex | enc } <keystr> ] } }
PARAMETERS
on Enable WEP encryption
off Disable WEP encryption
key Set static WEP key number 1-4
size Key size (40 or 128 bits, default = 128)
ascii ASCII characters
hex Hex digits
enc Encrypted form
default_key Default key ID 1-4
SYNTAX
wpa { on | off | rekey { never | <ti> } | { no ] tkip [ on | off } | [ no ] aes [ on
| off ] | [ no ] eap [ on | off ] | [ no ] psk [ on | off ] | passphrase { not_set |
<pstr> | enc <epstr> }}
PARAMETERS
on Enable WPA encryption
off Disable WPA encryption
rekey Time interval for rekeying broadcast encryption
keys
never Disable rekeying broadcast encryption keys
tkip Enable or disable Temporal Key Integrity
Protocol (TKIP)
on Enable TKIP
off Disable TKIP
aes Enable or disable AES in counter mode with
CBC-MAC (CCMP)
on Enable AES
off Disable AES
eap Enable or disable 802.1x EAP
on Enable EAP
off Disable EAP
psk Enable or disable Pre-Shared Key (PSK)
on Enable PSK
off Disable PSK
passphrase WPA PSK (Pre-Shared Key) passphrase
Wireless LAN Array
The Command Line Interface 191
enc Enter an encrypted form of the passphrase in
double quotes
DEFAULTS
None.
USAGE GUIDELINES
None.
EXAMPLE
To disable WEP encryption, type:
(config)# security
(config-security) wep
(config-security-wep) off
Figure 111. CLI: Disabling WEP Encryption
SEE ALSO
None.

Wireless LAN Array
192 The Command Line Interface
show
DESCRIPTION
Displays settings and information, and is useful when verifying the current
configuration of the Array.
SYNTAX
show [ acl| admin | array_info | console | contact_info | date_time |
dhcp_server | diff | dns | ethernet | external_radius | factory_config | iap
| internal_radius | log | rogue_ap | running_config | saved_config |
security | snmp | ssid | startup_config | stations | statistics ]
PARAMETERS
acl Display access control list
admin Display administrator accounts list
array_info Display system information
console Display terminal settings
contact_info Display contact information
date_time Display date and time settings summary
dhcp_server Display internal DHCP server settings summary
diff Display the differences between configurations
dns Display DNS summary
ethernet Display eth0 and gig1/gig2 interface summary
external_radius Display external RADIUS server settings
summary
factory_config Display the array configuration from the factory
iap Display IAP configuration summary
internal_radius Display all users defined for the embedded
RADIUS server
log Display the event log
rogue_ap Display rogue AP information
running_config Display the array configuration that is currently
running
saved_config Display the array configuration that was last
saved
security Display security settings summary
snmp Display SNMP summary
ssid Display SSID summary
startup_config Display the array configuration from the last
boot
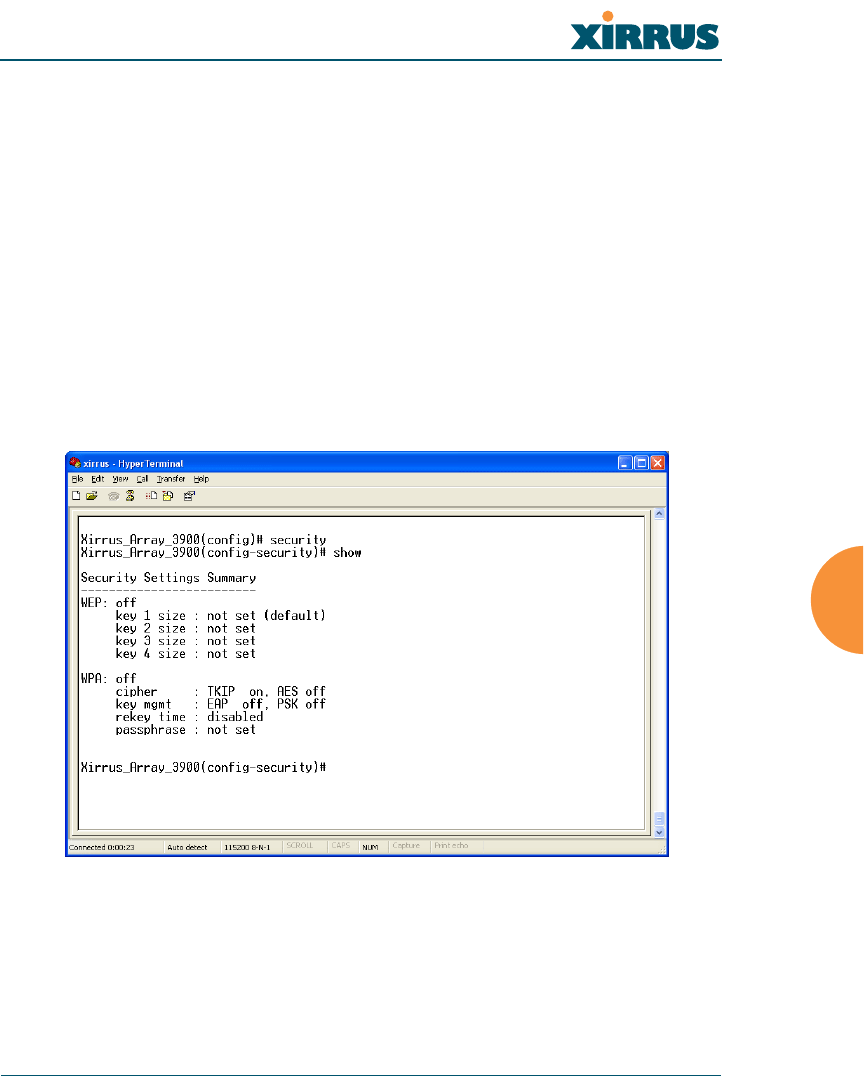
Wireless LAN Array
The Command Line Interface 193
stations Display station (client) information
statistics Display interface statistics
DEFAULTS
None.
USAGE GUIDELINES
None.
EXAMPLE
To display the current security settings, type:
(config)# security
(config-security) show
Figure 112. CLI: Displaying the Current Security Settings
SEE ALSO
None.

Wireless LAN Array
194 The Command Line Interface
snmp
DESCRIPTION
Configures SNMP (Simple Network Management Protocol). This command
is available from the config->snmp command mode.
SYNTAX
snmp {on | off | [no] trap [enable | disable] | host [<thsnmp>] | port
<tpsnmp> | community <csnmp>}
PARAMETERS
on E n a b l e S N M P
off D i s a b l e S N M P
host S N M P t r a p I P a d d r e s s o r h o s t n a m e
port S N M P t r a p p o r t
community S N M P c o m m u n i t y s t r i n g N o t e n o s p a c e s o r
special characters may be used
trap S e n d t r a p s f o r a u t h e n t i c a t i o n f a i l u r e s
no D i s a b l e s e l e c t e d f e a t u r e
enable E n a b l e t r a p s
disable D i s a b l e t r a p s
DEFAULTS
SNMP is disabled by default.
USAGE GUIDELINES
SNMP community string cannot have spaces or special characters.
EXAMPLE
None.
SEE ALSO
None.

Wireless LAN Array
The Command Line Interface 195
ssh
DESCRIPTION
Enables or disables ssh (secure shell) access to the Command Line Interface.
SYNTAX
ssh {on | off}
PARAMETERS
on Enable ssh access
off Disable ssh access
DEFAULTS
None.
USAGE GUIDELINES
None.
EXAMPLE
None.
SEE ALSO
telnet.

Wireless LAN Array
196 The Command Line Interface
syslog
DESCRIPTION
Configures the syslog server settings. This command is available from the
config->syslog command mode.
SYNTAX
syslog {on | off | {ipsyslog <ip address> | [no] console [on | off] | level
<slev> | buffered <logfilesz> | show}}
PARAMETERS
on E n a b l e S y s l o g s e r v e r
off Disable Syslog server
ipsyslog <ip address> Syslog IP address (in A.B.C.D format)
level S y s l o g m e s s a g e l e v e l ( l o g a l l m e s s a g e s w i t h
this level and lower)
buffered Set the size of the local Syslog file
console Enable or disable display of Syslog messages on
the console
no Disable console feature
on Enable Syslog messages on the console
off Disable Syslog messages on the console
show Show current syslog messages
DEFAULTS
None.
USAGE GUIDELINES
None.
EXAMPLE
None.
SEE ALSO
None.

Wireless LAN Array
The Command Line Interface 197
telnet
DESCRIPTION
Enables or disables telnet access to the Command Line Interface.
SYNTAX
telnet {on | off}
PARAMETERS
on Enable telnet access
off Disable telnet access
DEFAULTS
None.
USAGE GUIDELINES
None.
EXAMPLE
None.
SEE ALSO
None.

Wireless LAN Array
198 The Command Line Interface
Page is intentionally blank

Wireless LAN Array
199
Appendices

Wireless LAN Array
200
Page is intentionally blank
Wireless LAN Array
Appendix A: Servicing the Xirrus Array 201
Appendix A: Servicing the Xirrus Array
This chapter contains procedures for servicing the Xirrus Array, including the
removal and reinstallation of major hardware components. Section headings for
this chapter include:
z“Removing the Access Panel” on page 202
z“Reinstalling the Access Panel” on page 204
z“Replacing the FLASH Memory Module” on page 205
z“Replacing the Main System Memory” on page 206
z“Replacing the Integrated Access Point Radio Module” on page 207
z“Replacing the Power Supply Module” on page 209
!
!
Always turn OFF the Array’s power switch and disconnect the AC power cord
before attempting to remove or replace components. Never work on the unit
with the power connected.
You must be grounded and the work surface must be static-free.
Figure 113. Disconnecting Power from the Array
#Most service activities are performed with the Array placed face-down on a flat
work surface. To avoid damaging the finished enclosure, we recommend using
a protective material between the work surface and the unit (a clean sheet of
paper will do the trick).
Power switch
AC power cord receptacle
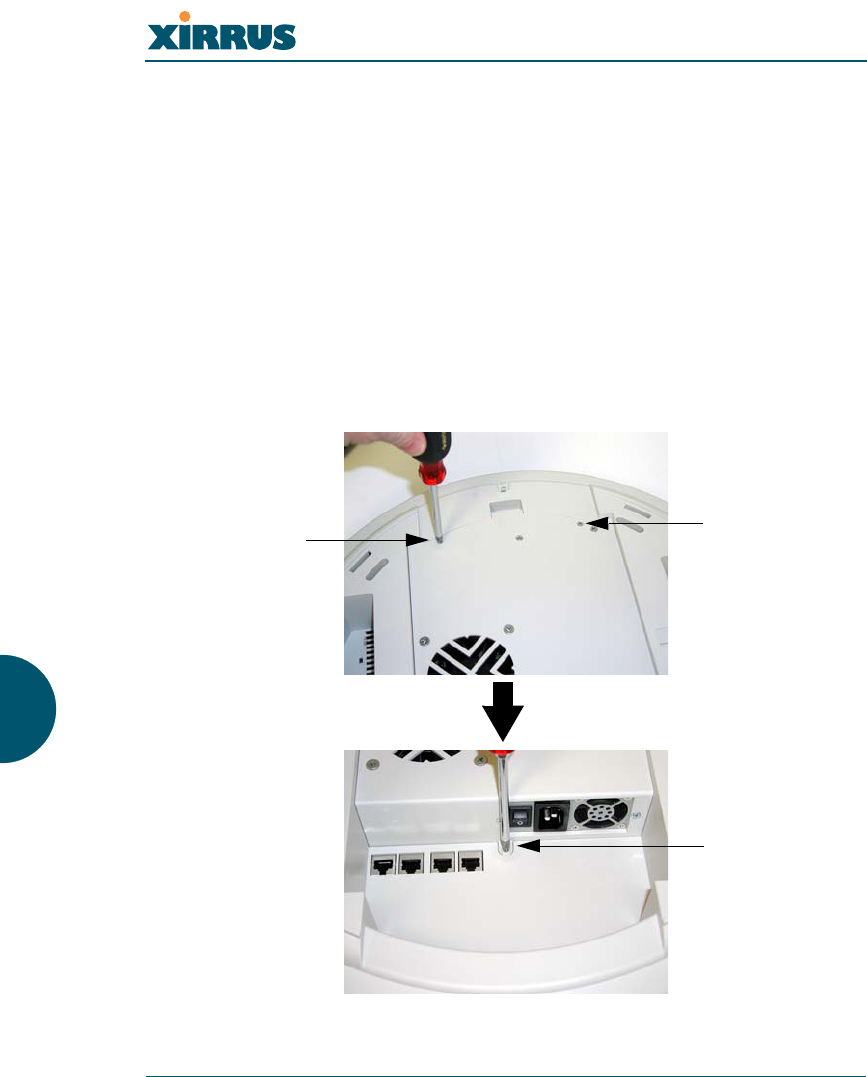
Wireless LAN Array
202 Appendix A: Servicing the Xirrus Array
Removing the Access Panel
Use this procedure when you want to remove the system’s access panel. You must
remove this panel whenever you need to service the internal components of the
Array.
1. Turn OFF the Array’s main power switch.
2. Disconnect the AC power cord from the Array.
3. Place the Array face-down on a flat surface. Avoid moving the unit to
reduce the risk of damage (scratching) to the finished enclosure.
4. Remove the screws (3 places) that secure the access panel to the main
body of the Array.
Figure 114. Removing the Access Panel Screws
Screw
Screw
Screw
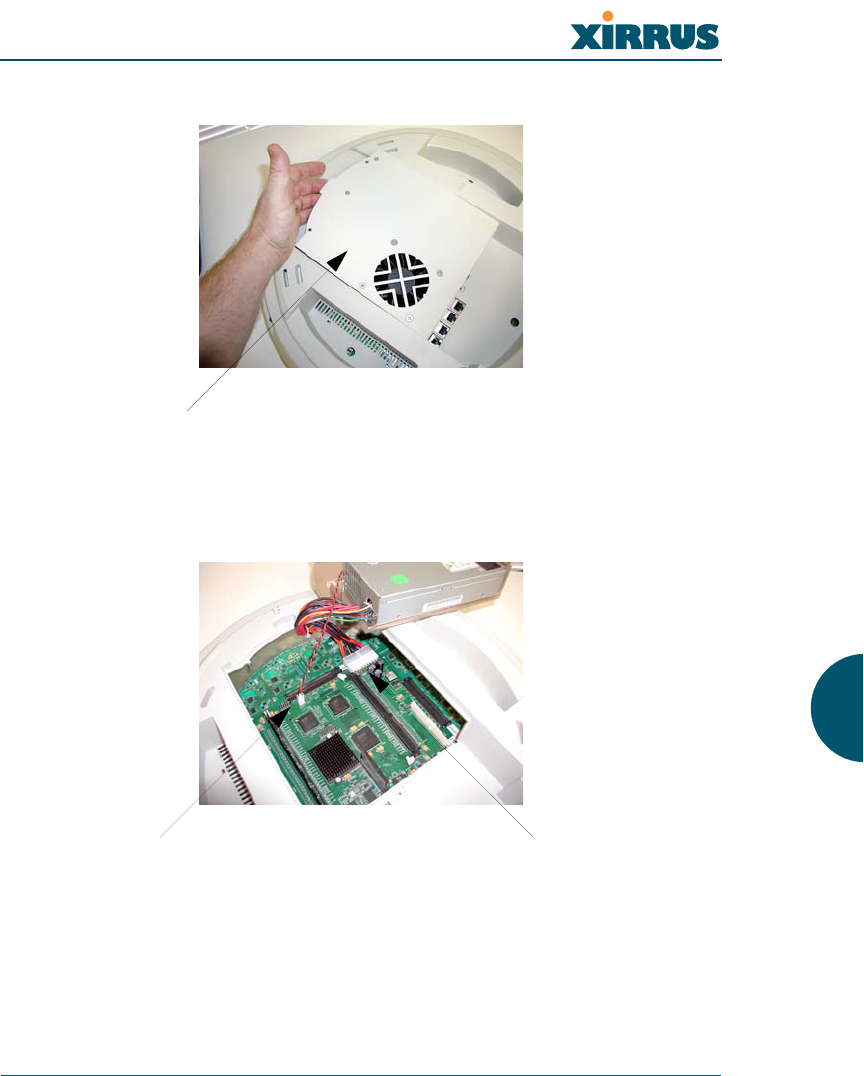
Wireless LAN Array
Appendix A: Servicing the Xirrus Array 203
5. Lift up the access panel to reveal the main system board.
Figure 115. Removing the Access Panel
6. Disconnect the connectors to the power supply and the fan.
Figure 116. Disconnecting the Power Supply and Fan
7. The access panel can now be safely removed.
Lift up the access panel
Power supply connectorFan connector
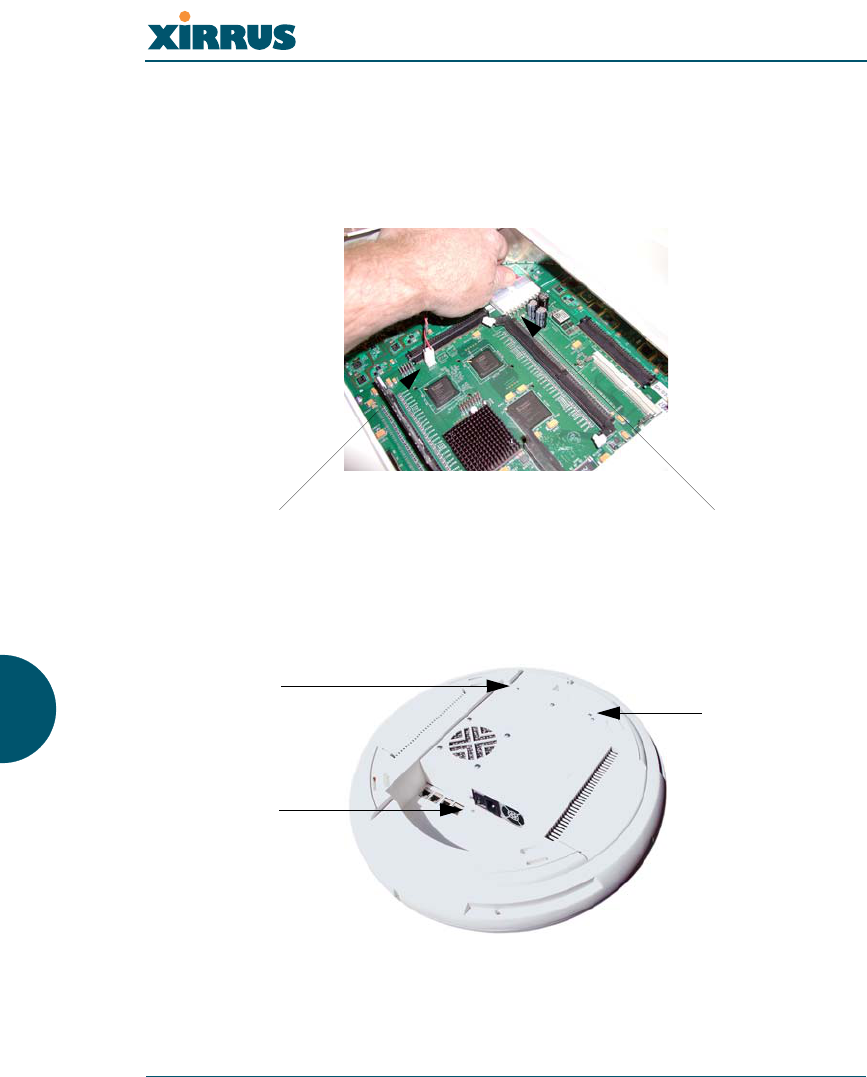
Wireless LAN Array
204 Appendix A: Servicing the Xirrus Array
Reinstalling the Access Panel
Use this procedure when you need to reinstall the access panel after servicing the
XS-3900’s internal components.
1. Reconnect the fan and power supply.
Figure 117. Reconnecting the Fan and Power Supply
2. Reinstall the access panel and secure the panel with the three screws.
Figure 118. Reinstalling the Access Panel
3. Reconnect the AC power cord and turn ON the main power switch.
Power supply connectorFan connector
Screw
!Do not
overtighten
Screw
!Do not
overtighten
Screw
!Do not
overtighten
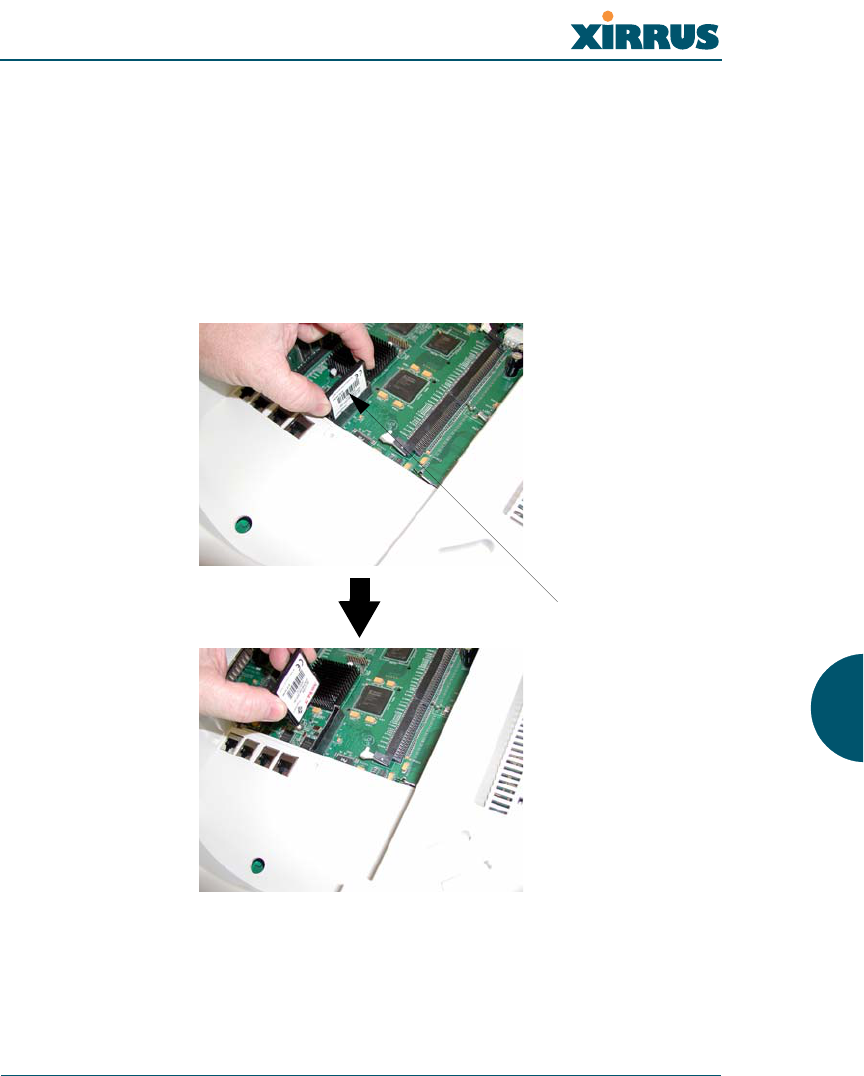
Wireless LAN Array
Appendix A: Servicing the Xirrus Array 205
Replacing the FLASH Memory Module
Use this procedure when you want to replace the system’s FLASH memory
module.
1. Remove the system’s access panel. Refer to “Removing the Access Panel”
on page 202.
2. Remove the FLASH memory module, taking care not to “wiggle” the
module and risk damaging the connection points.
Figure 119. Removing the FLASH Memory Module
3. The removal procedure is complete. You can now reinstall the FLASH
memory module (or install a new module).
FLASH memory module
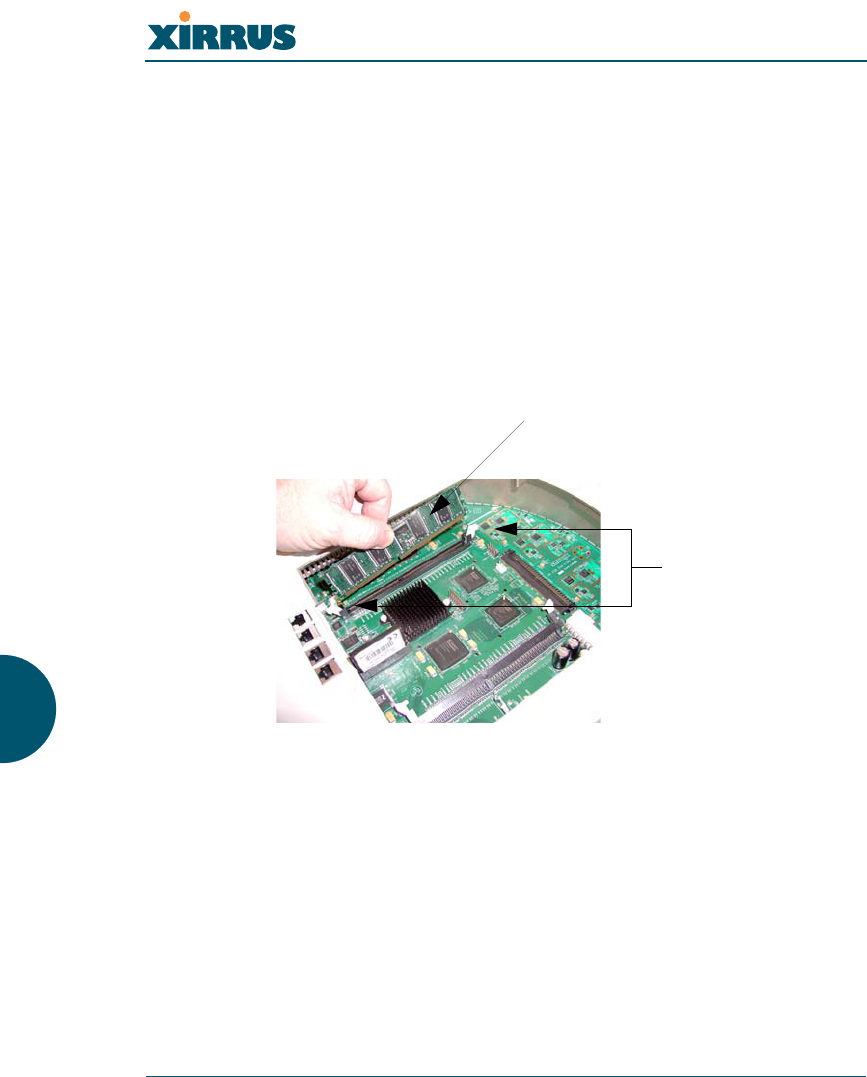
Wireless LAN Array
206 Appendix A: Servicing the Xirrus Array
4. Reinstall the access panel (refer to “Reinstalling the Access Panel” on
page 204).
Replacing the Main System Memory
Use this procedure when you want to replace the main system memory.
1. Remove the access panel (refer to “Removing the Access Panel” on
page 202).
2. Remove the DIMM memory module, taking care not to “wiggle” the
module and risk damaging the connection points.
Figure 120. Removing the DIMM Memory Module
3. The removal procedure is complete. You can now reinstall the DIMM
memory module (or install a new module). Ensure that the DIMM
memory module is seated evenly and the locking tabs are in the upright
position.
4. Reinstall the access panel (refer to “Reinstalling the Access Panel” on
page 204).
#The DIMM memory module is keyed to fit in its socket in one direction only.
DIMM memory module
Push down on
the two locking
tabs to release
the DIMM
memory module
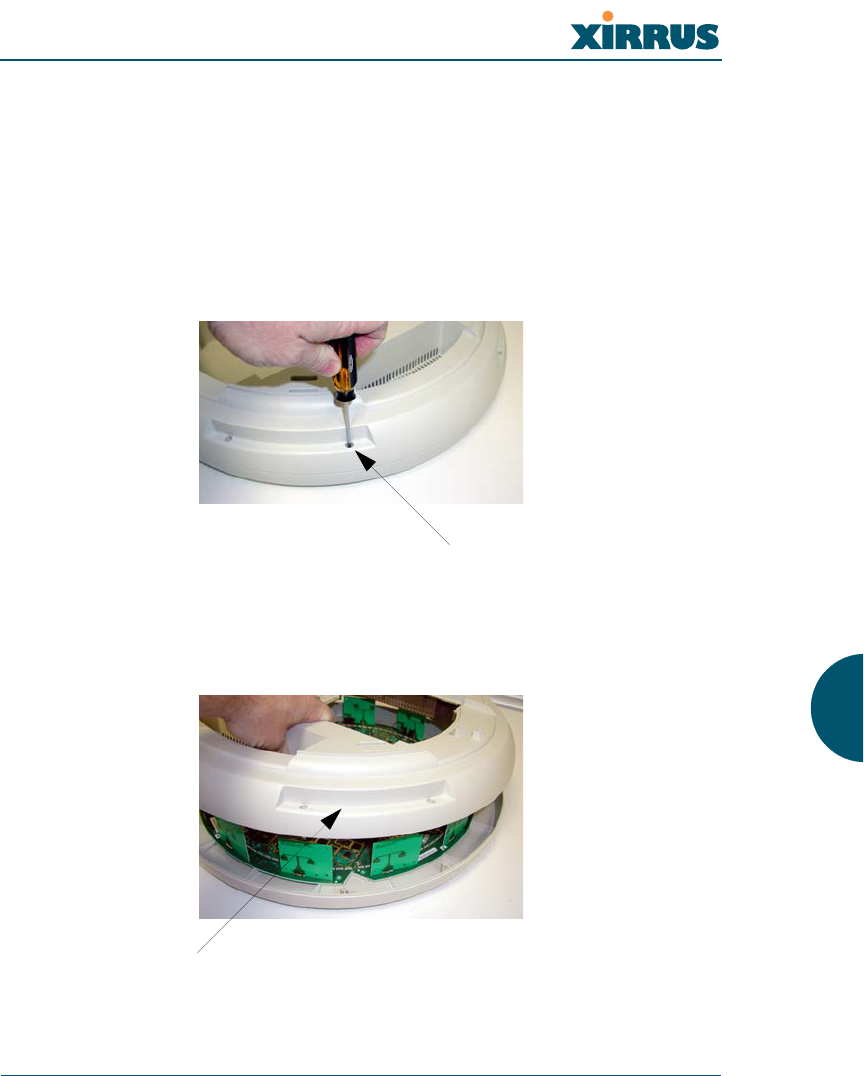
Wireless LAN Array
Appendix A: Servicing the Xirrus Array 207
Replacing the Integrated Access Point Radio Module
Use this procedure when you want to replace the integrated access point radio
module.
1. Remove the access panel (refer to “Removing the Access Panel” on
page 202).
2. Remove the nylon locking screws (8 places) that secure the chassis cover
to the main body of the XS-3900.
Figure 121. Removing the Chassis Cover Nylon Screws
3. Lift and remove the chassis cover.
Figure 122. Removing the Chassis Cover
Nylon screws (8 places)
Remove the chassis cover
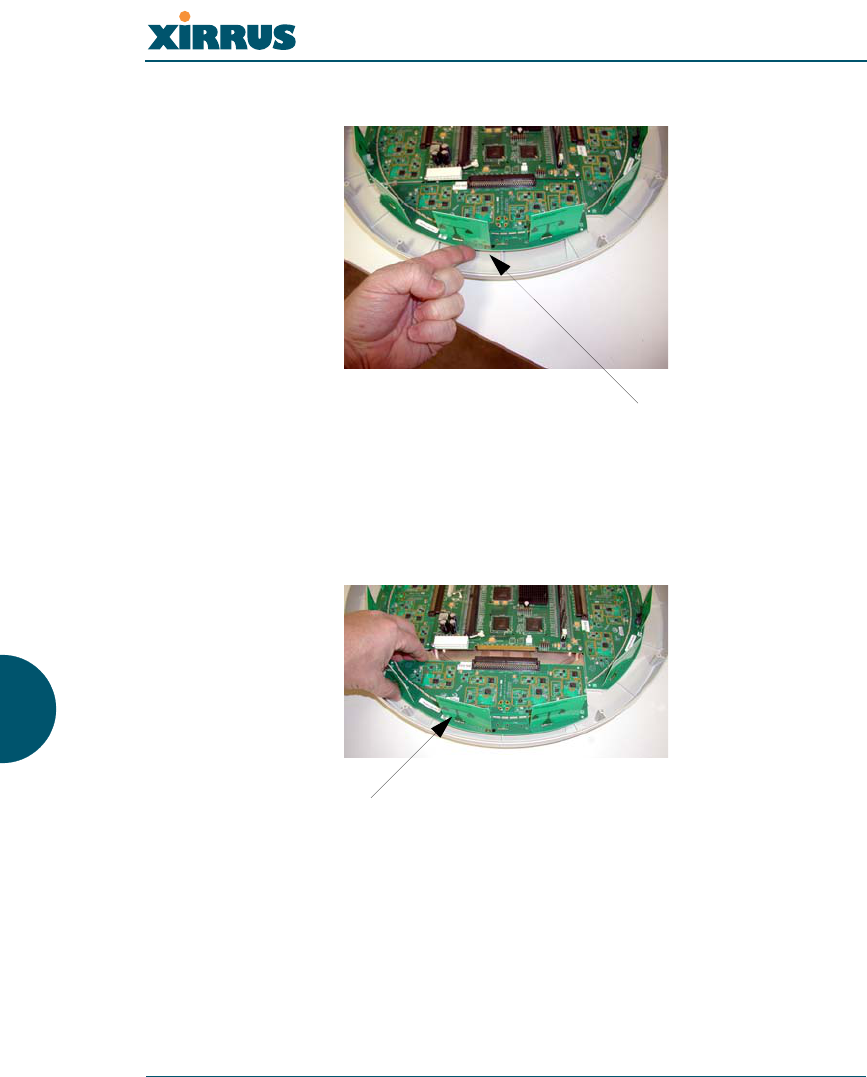
Wireless LAN Array
208 Appendix A: Servicing the Xirrus Array
4. Lift the edge of the integrated access point module.
Figure 123. Lifting the Integrated Access Point Module
5. Slide the integrated access point module away from the unit to disconnect
it from the main system board.
Figure 124. Disconnect the Integrated Access Point Module
6. The removal procedure is complete. You can now reinstall the integrated
access point module (or install a new module).
Lift here (do not force)
Disconnect the module
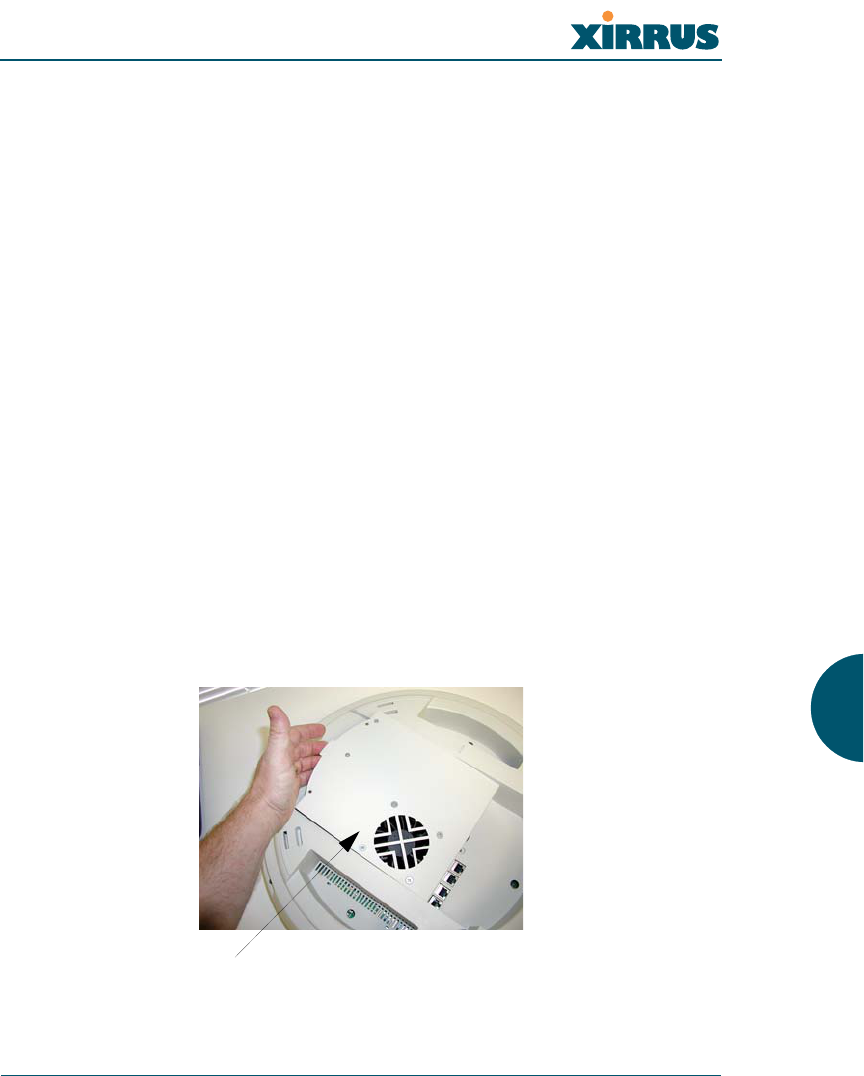
Wireless LAN Array
Appendix A: Servicing the Xirrus Array 209
7. Reinstall the chassis cover (see warnings).
8. Reinstall the nylon locking screws (8 places) to secure the chassis cover in
place—do not overtighten.
9. Reinstall the access panel (refer to “Reinstalling the Access Panel” on
page 204).
Replacing the Power Supply Module
Use this procedure when you want to replace the power supply module.
1. Remove the access panel (refer to “Removing the Access Panel” on
page 202).
2. Because the power supply unit is molded into the access panel, you must
install a new access panel assembly (with the power supply attached).
Refer to “Reinstalling the Access Panel” on page 204.
Figure 125. Installing a New Access Panel (with Power Supply)
!
!
When reinstalling the chassis cover, take care to align the cover correctly to
avoid damaging the antenna modules. Do not force the chassis cover onto the
body of the unit.
Do not overtighten the nylon locking screws.
Access panel (with power supply and fan)

Wireless LAN Array
210 Appendix A: Servicing the Xirrus Array
Page is intentionally blank
Wireless LAN Array
Appendix B: Quick Reference Guide 211
Appendix B: Quick Reference Guide
This chapter contains product reference information. Use this chapter to locate the
information you need quickly and efficiently. Section headings for this chapter
include:
z“Review of WMI Pages” on page 211
z“Factory Default Settings” on page 215
z“Keyboard Shortcuts” on page 220
Review of WMI Pages
This section provides a review of the product’s WMI pages, with a brief
explanation of their function and content. Click on any of the listed pages to go to
the corresponding procedure at the referenced destination.
Page Function
Array Status Provides a snapshot of the global
configuration settings for all Array
network interfaces and radios.
Express Setup Establish global configuration
settings that will enable basic XS-3900
functionality.
Network Interfaces Provides a snapshot of the
configuration settings currently
established for the network interfaces.
Network Settings Establish basic configuration settings
for the network interfaces.
Network Statistics Provides statistical data associated
with network interfaces and their
activity.
DHCP Settings Enable or disable DHCP (Dynamic
Host Configuration Protocol) server
functionality.
Wireless LAN Array
212 Appendix B: Quick Reference Guide
DNS Settings Set up a DNS server (or multiple
servers), if you want to offer clients
associating with the Array the ability
to use meaningful domain names
(URLs) instead of numerical IP
addresses.
IAP Interfaces Provides a snapshot of global
configuration data associated with
radios.
IAP Settings Enable or disable radios, define the
wireless mode for each radio,
establish the transmit and receive
parameters, and define global settings
for the beacon interval and DTIM
period.
Global Settings Establish global IAP (radio) settings.
Global IAP settings include enabling
or disabling all radios (regardless of
their operating mode).
Global Settings .11a Establish global 802.11a IAP (radio)
settings.
Global Settings .11bg Establish global 802.11b/g IAP (radio)
settings.
IAP LED Settings Set the behavior of LEDs.
Statistics Provides an overview of statistical
data associated with individual
radios.
Page Function

Wireless LAN Array
Appendix B: Quick Reference Guide 213
SSID Provides a snapshot of SSID (Service
Set IDentifier) assignments. It
includes the SSID name, whether or
not an SSID is visible on the network,
any security and QoS parameters
defined for each SSID, associated
VLAN IDs, guest access, and radio
availability per SSID.
SSID Management Manage SSIDs (create, modify or
delete). It also allows you to assign
security parameters and VLANs on a
per SSID basis.
Security Provides a snapshot of Array global
security configuration parameters,
including administration accounts,
ACL values, WEP/WPA/WPA2
status, and RADIUS configuration
settings.
Security Management Establish the security parameters for
your wireless network, including
WEP, WPA and RADIUS
authentication.
Radius Server Set up the XS-3900’s internal RADIUS
server, or set up an external RADIUS
server for user authentication.
Radius User Create, delete and manage RADIUS
user accounts.
MAC Access List Create new MAC-based Access
Control Lists (ACLs), delete existing
ACLs, and add, remove, or restore
MAC addresses.
Admin Management Manage network administrator
accounts (create, modify or delete),
restore accounts, or limit account
access to a read only status.
Page Function

Wireless LAN Array
214 Appendix B: Quick Reference Guide
Management Control Displays rogue APs, according to the
sort list you select (either Unknown,
Known or Approved).
Rogue Control List Establishes a control list for rogue
APs, based on a type that you define.
Stations Displays stations that are currently
associated with the Array.
Services Provides a current status of Syslog
and SNMP services.
Time Settings Synchronizes the Array’s clock with a
universal clock from an NTP server.
System Log Enable or disable the Syslog server,
define the server’s IP address, and set
the level for Syslog reporting.
SNMP Enable or disable SNMP and define
the SNMP parameters.
Array Info Displays the current status of the
Array.
Tools Ping the Array and obtain a status of
the unit’s performance.
Show Config Displays the configuration settings
(Current/Saved/Start) for the Array.
Event Log Provides an event log for the network.
Page Function
Wireless LAN Array
Appendix B: Quick Reference Guide 215
Factory Default Settings
The following tables show the Array’s factory default settings.
Network Interfaces
Serial
Gigabit 1 and Gigabit 2
Setting Default Value
Baud Rate 115200
Word Size 8 bits
Stop Bits 1
Parity No parity
Time Out 10 seconds
Setting Default Value
Enabled Yes
DHCP Bind Yes
Default IP Address 10.0.1.2
Default IP Mask 255.0.0.0
Default Gateway None
Auto Negotiate On
Duplex Full
Speed 1000 Mbps
MTU Size 1504
Management Enabled Yes
Wireless LAN Array
216 Appendix B: Quick Reference Guide
Fast Ethernet
Integrated Access Points (IAPs)
Setting Default Value
Enabled Yes
DHCP Bind Yes
Default IP Address 10.0.1.1
Default IP Mask 255.0.0.0
Default Gateway None
Auto Negotiate On
Duplex Full
Speed 100 Mbps
MTU Size 1500
Management Enabled Yes
Setting Default Value
Antenna 0
Mode 11a for a1 to a12
11g for abg1 to abg4
Channel Auto
Maximum Transmit Power 0
Cell Size Medium
Wireless LAN Array
Appendix B: Quick Reference Guide 217
Server Settings
DHCP
External RADIUS
Setting Default Value
Enabled No
Maximum Lease Time 300 minutes
Default Lease Time 300 minutes
IP Start Range 192.168.1.100
IP End Range 192.168.1.200
Setting Default Value
Enabled Yes
Primary Server 0.0.0.0
Primary Port 1812
Primary Secret xirrus
Secondary Server null (no IP address)
Secondary Port 1812
Secondary Secret null (no secret)
Time Out (before primary server is retired) 600 seconds
Wireless LAN Array
218 Appendix B: Quick Reference Guide
Internal RADIUS
NTP
Syslog
SNMP
Setting Default Value
Enabled No
The user database is cleared upon reset to the factory defaults. For the
Internal RADIUS Server you have a maximum of 200 entries.
Setting Default Value
Enabled No
Primary time.nist.gov
Secondary 192.6.15.29
Setting Default Value
Enabled No
Setting Default Value
Enabled No
Community String xirrus
Trap Host null (no setting)
Trap Port 162
Authorization Fail Port 1
Wireless LAN Array
Appendix B: Quick Reference Guide 219
Default SSID
Encryption
Setting Default Value
ID xirrus
VLAN None
Encryption Off
Encryption Type None
QoS None
Enabled Yes
Setting Default Value
Enabled Yes
WEP Keys null (all 4 keys)
WEP Key Length null (all 4 keys)
Default Key ID 0
WPA Enabled No
TKIP Enabled Yes
AES Enabled No
EAP Enabled Yes
PSK Enabled No
Pass Phrase null
Group Rekey 600

Wireless LAN Array
220 Appendix B: Quick Reference Guide
Administrator Account and Password
Management
Keyboard Shortcuts
The following table shows the most common keyboard shortcuts.
Setting Default Value
ID admin
Password admin
Setting Default Value
Telnet On
SSH On
Action Shortcut
Cut selected data and place it on the
clipboard. Ctrl + X
Copy selected data to the clipboard. Ctrl + C
Paste data from the clipboard into a document
(at the insertion point). Ctrl + V
Copy the active window to the clipboard. Alt + Print Screen
Copy the entire desktop image to the
clipboard. Print Screen
Abort an action at any time. Esc
Go back to the previous screen. b
Access the Help screen. ?

Wireless LAN Array
Appendix C: Technical Support 221
Appendix C: Technical Support
This chapter provides valuable support information that can help you resolve
technical difficulties. Before contacting Xirrus, review all sections in this chapter
and try to determine if your problem resides with the Array or your network
infrastructure. Section headings for this chapter include:
z“General Hints and Tips” on page 221
z“Frequently Asked Questions” on page 222
z“Contact Information” on page 228
General Hints and Tips
This section provides some useful tips that will optimize the reliability and
performance of your Xirrus Arrays.
zThe Array requires careful handling. For best performance, units should
be mounted in a dust-free and temperature-controlled environment.
zIf using multiple Arrays at the same location, we recommend
maintaining a distance of at least 50 feet between units.
zKeep the Array away from electrical devices or appliances that generate
RF noise. Because the Array is generally mounted on ceilings, be aware of
its position relative to lighting (especially fluorescent lighting).
zIf using AC power, each Array requires its own dedicated AC power
outlet. Do not attempt to “piggy-back” AC power to multiple units. If
deploying multiple units, consider using the optional Xirrus Remote DC
Power System (XP-3100).
zIf you are deploying multiple units, ensure that the “clock face” of all
units is aligned in the same direction.
zThe Array should only be used with Wi-Fi certified client devices.

Wireless LAN Array
222 Appendix C: Technical Support
Frequently Asked Questions
This section answers some of the most frequently asked questions, organized by
functional area.
Multiple SSIDs
Q. What Are BSSIDs and SSIDs?
A. BSSID (Basic Service Set Identifier) refers to an individual access point
radio and its associated clients. The identifier is the MAC address of the
access point radio that forms the BSS.
A group of BSSs can be formed to allow stations in one BSS to
communicate to stations in another BSS by way of a backbone that
interconnects each access point.
The Extended Service Set (ESS) refers to the group of BSSIDs that are
grouped together to form one ESS. The ESSID (often referred to as SSID or
“wireless network name”) identifies the Extended Service Set. Clients
must associate to a single ESS at any given time. Clients ignore traffic
from other Extended Service Sets that do not have the same SSID.
Legacy access points typically support one SSID per access point. Xirrus
Wireless LAN Arrays support the ability for multiple SSIDs to be defined
and used simultaneously.
Q. What would I use SSIDs for?
A. The creation of different wireless network names allows system
administrators to separate types of users with different requirements. The
following policies can be tied to an SSID:
zMinimum security required to join this SSID.
zThe wireless Quality of Service (QoS) desired for this SSID.
zThe wired VLAN associated with this SSID.
As an example, one SSID named accounting might require the highest
level of security, while another SSID named guests might have low
security requirements.

Wireless LAN Array
Appendix C: Technical Support 223
Another example may define an SSID named voice that supports voice
over Wireless LAN phones with the highest possible Quality of Service
(QoS) definition. This type of SSID might also forward traffic to specific
VLANs on the wired network.
Q. How do I set up SSIDs?
A. Use the following procedure as a guideline. For more detailed
information, go to “SSID” on page 107.
1. From the Web Management Interface, go to the SSID
Management page.
2. Select Yes to make the SSID visible to all clients on the network.
Although the XS-3900 will not broadcast SSIDs that are hidden,
clients can still associate to a hidden SSID if they know the SSID
name to connect to it.
3. Select the minimum security that will be required by users for
this SSID.
4. If desired (optional), select a Quality of Service (QoS) setting for
this SSID. The QoS setting you define here will prioritize wireless
traffic for this SSID over other SSID wireless traffic.
5. If desired (optional), select a VLAN that you want this traffic to
be forwarded to on the wired network.
6. If desired (optional), you can select which radios this SSID will
not be available on—the default is to make this SSID available on
all radios.
7. Click on the Apply button to apply your changes to this session.
8. Click on the Save button to save your changes.
9. If you need to edit any of the SSID settings, you can do so from
the SSID Management page.

Wireless LAN Array
224 Appendix C: Technical Support
Security
Q. How do I know my management session is secure?
A. Follow these guidelines:
zAdministrator passwords
Always change the default administrator password (the default
is admin), and choose a strong replacement password. When
appropriate, issue read only administrator accounts.
zSSH versus Telnet
Be aware that Telnet is not secure over network connections and
should be used only with a direct serial port connection. When
connecting to the unit’s Command Line Interface over a network
connection, you must use a Secure SHell (SSH) utility. The most
commonly used freeware providing SSH tools is PuTTY.
zConfiguration auditing
Do not change approved configuration settings. The optional
Xirrus Wireless Management System (XM-3300) offers powerful
management features for small or large XS-3900 deployments,
and can audit your configuration settings automatically. In
addition, using the XM-3300 eliminates the need for an FTP
server.
Q. Which wireless data encryption method should I use?
A. Wireless data encryption prevents eavesdropping on data being
transmitted or received over the airwaves. The XS-3900 allows you to
establish the following data encryption configuration options:
zOpen
This option offers no data encryption and is not recommended,
though you might choose this option if clients are required to use
a VPN connection through a secure SSH utility, like PuTTy.

Wireless LAN Array
Appendix C: Technical Support 225
zWEP (Wired Equivalent Privacy)
This option provides minimal protection (though much better
than using an open network). An early standard for wireless data
encryption and supported by all Wi-Fi certified equipment, WEP
is vulnerable to hacking and is therefore not recommended for
use by Enterprise networks.
zWPA (Wi-Fi Protected Access)
This is a much stronger encryption model than WEP and uses
TKIP (Temporal Key Integrity Protocol) with AES (Advanced
Encryption Standard) to prevent WEP cracks.
TKIP solves security issues with WEP. It also allows you to
establish encryption keys on a per-user-basis, with key rotation
for added security. In addition, TKIP provides Message Integrity
Check (MIC) functionality and prevents active attacks on the
wireless network.
AES is the strongest encryption standard and is used by
government agencies; however, old legacy hardware may not be
capable of supporting the AES mode (it probably won’t work on
older wireless clients). Because AES is the strongest encryption
standard currently available, it is highly recommended for
Enterprise networks.
Any of the above encryption modes can be used (and can be used at
the same time).
Q. Which user authentication method should I use?
A. User authentication ensures that users are who they say they are. For this
purpose, the Array allows you to choose between the following user
authentication methods:
zPre-Shared Key
Users must manually enter a key (pass phrase) on the client side
of the wireless network that matches the key stored by the
administrator in the XS-3900.

Wireless LAN Array
226 Appendix C: Technical Support
zRADIUS 802.1x with EAP
802.1x uses a RADIUS server to authenticate large numbers of
clients, and can handle different EAP (Extensible Authentication
Protocol) authentication methods, including EAP-TLS, EAP-
TTLS and EAP-PEAP. The RADIUS server can be internal
(provided by the XS-3900) or external. An external RADIUS
server offers more functionality and is recommended for large
Enterprise deployments.
When using this method, user names and passwords must be
entered into the RADIUS server for user authentication.
zMAC Address ACLs (Access Control Lists)
MAC address ACLs provide a list of client adapter MAC
addresses that are allowed or denied access to the wireless
network. Access Control Lists work well when there are a limited
number of users—in this case, enter the MAC addresses of each
user in the Allow list. In the event of a lost or stolen MAC
adapter, enter the affected MAC address in the Deny list.
Q. Why do I need to authenticate my XS-3900 units?
A. When deploying multiple Arrays, you may need to define which units
are part of which wireless network (for example, if you are establishing
more than one network). In this case, you need to employ the Xirrus
Wireless Management System (XM-3300) which can authenticate your
Arrays automatically and ensure that only authorized units are
associated with the defined wireless network.
Q. What is rogue AP (Access Point) detection?
A. The Xirrus Array has a dedicated radio (abg/4) which constantly scans
the local wireless environment for rogue APs (non-Xirrus devices that are
not part of your wireless network), unencrypted transmissions, and other
security issues. Administrators can then classify each rogue AP and
ensure that these devices do not interrupt or interfere with the network.

Wireless LAN Array
Appendix C: Technical Support 227
VLAN Support
Q. What Are VLANs?
A. VLANs (Virtual Local Area Networks) are a logical grouping of network
devices that share a common network broadcast domain. Members of a
particular VLAN can be on any segment of the physical network but
logically only members of a particular VLAN can see each other.
VLANs are defined and implemented using the wired network switches
that are VLAN capable. Packets are tagged for transmission on a
particular VLAN according to the IEEE 802.1Q standard, with VLAN
switches processing packets according to the tag.
Q. What would I use VLANs for?
A. Logically separating different types of users, systems, applications, or
other logical division aids in performance and management of different
network devices. Different VLANs can also be assigned with different
packet priorities to prioritize packets from one VLAN over packets from
another VLAN.
VLANs are managed by software settings—instead of physically
plugging in and moving network cables and users—which helps to ease
network management tasks.
Q. What are Wireless VLANs?
A. Wireless VLANs allow similar functionality to the wired VLAN
definitions and extend the operation of wired VLANs to the wireless side
of the network.
Wireless VLANs can be mapped to wireless SSIDs so that traffic from
wired VLANs can be sent to wireless users of a particular SSID. The
reverse is also true, where wireless traffic originating from a particular
SSID can be tagged for transmission on a particular wired VLAN.
Sixteen SSIDs can be defined on the XS-3900, allowing a total of sixteen
VLANs to be accessed (one per SSID).

Wireless LAN Array
228 Appendix C: Technical Support
As an example, to provide guest user access an SSID of guest might be
created. This SSID could be mapped to a wired VLAN that segregates
unknown users from the rest of the wired network and restricts them to
Internet access only. Wireless users could then associate to the wireless
network via the guest SSID and obtain access to the Internet through the
selected VLAN, but would be able to access other privileged network
resources.
Contact Information
Xirrus, Inc. is located in Westlake Village, California, just 45 minutes northwest of
downtown Los Angeles and 45 minutes southeast of Santa Barbara.
Xirrus, Inc.
370 North Westlake Blvd, Suite 200
Westlake Village, CA 91362
USA
Tel: 1.805.497.0955
Fax: 1.805.449.1180
www.xirrus.com

Wireless LAN Array
Glossary of Terms 229
Glossary of Terms
802.11a
A supplement to the IEEE 802.11 WLAN specification that describes radio
transmissions at a frequency of 5 GHz and data rates of up to 54 Mbps.
802.11b
A supplement to the IEEE 802.11 WLAN specification that describes radio
transmissions at a frequency of 2.4 GHz and data rates of up to 11 Mbps.
802.11d
A supplement to the Media Access Control (MAC) layer in 802.11 to promote
worldwide use of 802.11 WLANs. It allows Access Points to communicate
information on the permissible radio channels with acceptable power levels for
user devices. Because the 802.11 standards cannot legally operate in some
countries, 802.11d adds features and restrictions to allow WLANs to operate
within the rules of these countries.
802.11g
A supplement to the IEEE 802.11 WLAN specification that describes radio
transmissions at a frequency of 2.4 GHz and data rates of up to 54 Mbps.
802.1Q
An IEEE standard for MAC layer frame tagging (also known as encapsulation).
Frame tagging uniquely assigns a user-defined ID to each frame. It also enables a
switch to communicate VLAN membership information across multiple (and
multi-vendor) devices by frame tagging.
AES
(Advanced Encryption Standard) A data encryption scheme that uses three
different key sizes (128-bit, 192-bit, and 256-bit). AES was adopted by the U.S.
government in 2002 as the encryption standard for protecting sensitive but
unclassified electronic data.

Wireless LAN Array
230 Glossary of Terms
authentication
The process that a station, device, or user employs to announce its identify to the
network which validates it. IEEE 802.11 specifies two forms of authentication,
open system and shared key.
bandwidth
Specifies the amount of the frequency spectrum that is usable for data transfer. In
other words, it identifies the maximum data rate a signal can attain on the
medium without encountering significant attenuation (loss of power).
beacon interval
When a device in a wireless network sends a beacon, it includes with it a beacon
interval, which specifies the period of time before it will send the beacon again.
The interval tells receiving devices on the network how long they can wait in low
power mode before waking up to handle the beacon. Network administrators can
adjust the beacon interval—usually measured in milliseconds (ms) or its
equivalent, kilo-microseconds (Kmsec).
bit rate
The transmission rate of binary symbols ('0' and '1'), equal to the total number of
bits transmitted in one second.
BSS
(Basic Service Set) When a WLAN is operating in infrastructure mode, each access
point and its connected devices are called the Basic Service Set.
BSSID
The unique identifier for an access point in a BSS network. See also, SSID.
cell
The basic geographical unit of a cellular communications system. Service
coverage of a given area is based on an interlocking network of cells, each with a
radio base station (transmitter/receiver) at its center. The size of each cell is
determined by the terrain and forecasted number of users.

Wireless LAN Array
Glossary of Terms 231
channel
A specific portion of the radio spectrum—the channels allotted to one of the
wireless networking protocols. For example, 802.11b and 802.11g use 14 channels
in the 2.4 GHz band, only 3 of which don't overlap (1, 6, and 11). In the 5 GHz
band, 802.11a uses 8 channels for indoor use and 4 for outdoor use, none of which
overlap.
CoS
(Class of Service) A category based on the type of user, type of application, or
some other criteria that QoS systems can use to provide differentiated classes of
service.
default gateway
The gateway in a network that a computer will use to access another network if a
gateway is not specified for use. In a network using subnets, a default gateway is
the router that forwards traffic to a destination outside of the subnet of the
transmitting device.
DHCP
(Dynamic Host Configuration Protocol) A method for dynamically assigning IP
addresses to devices on a network. DHCP issues IP addresses automatically
within a specified range to client devices when they are first powered up.
DHCP lease
The DHCP lease is the amount of time that the DHCP server grants to the DHCP
client for permission to use a particular IP address. A typical DHCP server allows
its administrator to set the lease time.
DNS
(Domain Name System) A system that maps meaningful domain names with
complex numeric IP addresses. DNS is actually a separate network—if one DNS
server cannot translate a domain name, it will ask a second or third until a server
is found with the correct IP address.

Wireless LAN Array
232 Glossary of Terms
domain
The main name/Internet address of a user's Internet site as registered with the
InterNIC organization, which handles domain registration on the Internet. For
example, the “domain” address for Xirrus is: http://www.xirrus.com, broken
down as follows:
zhttp:// represents the Hyper Text Teleprocessing Protocol used by all Web
pages.
zwww is a reference to the World Wide Web.
zxirrus refers to the company.
zcom specifies that the domain belongs to a commercial enterprise.
DTIM
(Delivery Traffic Indication Message) A DTIM is a signal sent as part of a beacon
by an access point to a client device in sleep mode, alerting the device to a packet
awaiting delivery.
EAP
(Extensible Authentication Protocol) When you log on to the Internet, you're most
likely establishing a PPP connection via a remote access server. The password,
key, or other device you use to prove that you are authorized to do so is controlled
via PPP’s Link Control Protocol (LCP). However, LCP is somewhat inflexible
because it has to specify an authentication device early in the process. EAP allows
the system to gather more information from the user before deciding which
authenticator to use. It is called extensible because it allows more authenticator
types than LCP (for example, passwords and public keys).
EDCF
(Enhanced Distributed Coordinator Function) A QoS extension which uses the
same contention-based access mechanism as current devices but adds “offset
contention windows” that separate high priority packets from low priority
packets (by assigning a larger random backoff window to lower priorities than to
higher priorities). The result is “statistical priority,” where high-priority packets
usually are transmitted before low-priority packets.
encapsulation
A way of wrapping protocols such as TCP/IP, AppleTalk, and NetBEUI in
Ethernet frames so they can traverse an Ethernet network and be unwrapped
when they reach the destination computer.

Wireless LAN Array
Glossary of Terms 233
encryption
Any procedure used in cryptography to translate data into a form that can be
decrypted and read only by its intended receiver.
Fast Ethernet
A version of standard Ethernet that runs at 100 Mbps rather than 10 Mbps.
FCC
(Federal Communications Commission) US wireless regulatory authority. The
FCC was established by the Communications Act of 1934 and is charged with
regulating Interstate and International communications by radio, television, wire,
satellite and cable.
frame
Apacket encapsulated to travel on a physical medium, like Ethernet or Wi-Fi. If a
packet is like a shipping container, a frame is the boat on which the shipping
container is loaded.
Gigabit 1
The primary Gigabit Ethernet interface. See also, Gigabit Ethernet.
Gigabit 2
The secondary Gigabit Ethernet interface. See also, Gigabit Ethernet.
Gigabit Ethernet
The newest version of Ethernet, with data transfer rates of 1 Gigabit (1,000 Mbps).
host name
The unique name that identifies a computer on a network. On the Internet, the
host name is in the form comp.xyz.net. If there is only one Internet site the host
name is the same as the domain name. One computer can have more than one
host name if it hosts more than one Internet site (for example, home.xyz.net and
comp.xyz.net. In this case, comp and home are the host names and xyz.net is the
domain name.
IPsec
A Layer 3 authentication and encryption protocol. Used to secure VPNs.

Wireless LAN Array
234 Glossary of Terms
MAC address
(Media Access Control Address) A 6-byte hexadecimal address assigned by a
manufacturer to a device.
Mbps
(Megabits per second) A standard measure for data transmission speeds (for
example, the rate at which information travels over the Internet). 1 Mbps denotes
one million bits per second.
MTU
(Maximum Transmission Unit) The largest physical packet size—measured in
bytes—that a network can transmit. Any messages larger than the MTU are
divided into smaller packets before being sent. Every network has a different
MTU, which is set by the network administrator. Ideally, you want the MTU to be
the same as the smallest MTU of all the networks between your machine and a
message's final destination. Otherwise, if your messages are larger than one of the
intervening MTUs, they will get broken up (fragmented), which slows down
transmission speeds.
NTP
(Network Time Protocol) An Internet standard protocol (built on top of TCP/IP)
that ensures the accurate synchronization (to the millisecond) of computer clock
times in a network of computers. Running as a continuous background client
program on a computer, NTP sends periodic time requests to servers, obtaining
server time stamps and using them to adjust the client's clock.
packet
Data sent over a network is broken down into many small pieces—packets—by
the Transmission Control Protocol layer of TCP/IP. Each packet contains the
address of its destination as well the data. Packets may be sent on any number of
routes to their destination, where they are reassembled into the original data. This
system is optimal for connectionless networks, such as the Internet, where there
are no fixed connections between two locations.
PLCP
(Physical Layer Convergence Protocol) Defined by IEEE 802.6, a protocol
specified within the Transmission Convergence layer that defines exactly how
cells are formatted within a data stream for a particular type of transmission
facility.

Wireless LAN Array
Glossary of Terms 235
preamble
Preamble (sometimes called a header) is a section of data at the head of a packet
that contains information that the access point and client devices need when
sending and receiving packets. PLCP has two structures, a long and a short
preamble. All compliant 802.11b systems have to support the long preamble. The
short preamble option is provided in the standard to improve the efficiency of a
network's throughput when transmitting special data, such as voice, VoIP (Voice-
over IP) and streaming video.
private key
In cryptography, one of a pair of keys (one public and one private) that are created
with the same algorithm for encrypting and decrypting messages and digital
signatures. The private key is provided only to the requestor and never shared.
The requestor uses the private key to decrypt text that has been encrypted with
the public key by someone else.
PSK
(Pre-Shared Key) A TKIP passphrase used to protect your network traffic in WPA.
public key
In cryptography, one of a pair of keys (one public and one private) that are created
with the same algorithm for encrypting and decrypting messages and digital
signatures. The public key is made publicly available for encryption and
decryption.
QoS
(Quality of Service) QoS can be used to describe any number of ways in which a
network provider guarantees a service's performance, such as an average or
minimum throughput rate.
RADIUS
(Remote Authentication Dial-In User Service) A client-server security protocol,
developed to authenticate, authorize, and account for dial-up users. The RADIUS
server stores user profiles, which include passwords and authorization attributes.
RDPS
(Remote Distribution Power Supply) A Xirrus proprietary power supply used for
delivering power from a remote source to the Xirrus family of products.

Wireless LAN Array
236 Glossary of Terms
Remote DC Power System (XP-3100)
An optional Xirrus proprietary product that provides distributed DC power to
multiple XS-3900 units, eliminating the need to run dedicated AC power to each
unit and facilitating backup power when connected via a UPS.
RSSI
(Received Signal Strength Indicator) A measure of the energy observed by an
antenna when receiving a signal.
SDMA
(Spatial Division Multiple Access) A wireless communications mode that
optimizes the use of the radio spectrum and minimizes cost by taking advantage
of the directional properties of antennas. The antennas are highly directional,
allowing duplicate frequencies to be used for multiple zones.
SNMP
(Simple Network Management Protocol) A standard protocol that regulates
network management over the Internet.
SNTP
(Simple Network Time Protocol) A simplified version of NTP. SNTP can be used
when the ultimate performance of the full NTP implementation described in RFC
1305 is not needed or justified.
SSH
(Secure SHell) Developed by SSH Communications Security, Secure Shell is a
program to log into another computer over a network, to execute commands in a
remote machine, and to move files from one machine to another. It provides
strong authentication and secure communications over insecure channels. SSH
protects a network from attacks, such as IP spoofing, IP source routing, and DNS
spoofing. Attackers who has managed to take over a network can only force SSH
to disconnect—they cannot “play back” the traffic or hijack the connection when
encryption is enabled. When using SSH's slogin (instead of rlogin) the entire login
session, including transmission of password, is encrypted making it almost
impossible for an outsider to collect passwords.

Wireless LAN Array
Glossary of Terms 237
SSID
(Service Set IDentifier) Every wireless network or network subset (such as a BSS)
has a unique identifier called an SSID. Every device connected to that part of the
network uses the same SSID to identify itself as part of the family—when it wants
to gain access to the network or verify the origin of a data packet it is sending over
the network. In short, it is the unique name shared among all devices in a WLAN.
subnet mask
A mask used to determine what subnet an IP address belongs to. An IP address
has two components: (1) the network address and (2) the host address. For
example, consider the IP address 150.215.017.009. Assuming this is part of a Class
B network, the first two numbers (150.215) represent the Class B network address,
and the second two numbers (017.009) identify a particular host on this network.
TKIP
(Temporal Key Integrity Protocol) Provides improved data encryption by
scrambling the keys using a hashing algorithm and, by adding an integrity-
checking feature, ensures that the encryption keys haven’t been tampered with.
transmit power
The amount of power used by a radio transceiver to send the signal out. Transmit
power is generally measured in milliwatts, which you can convert to dBm.
VLAN
(Virtual LAN) A group of devices that communicate as a single network, even
though they are physically located on different LAN segments. Because VLANs
are based on logical rather than physical connections, they are extremely flexible.
A device that is moved to another location can remain on the same VLAN
without any hardware reconfiguration.

Wireless LAN Array
238 Glossary of Terms
VLAN tagging
(Virtual LAN tagging) Static port-based VLANs were originally the only way to
segment a network without using routing, but these port-based VLANs could
only be implemented on a single switch (or switches) cabled together. Routing
was required to transfer traffic between unconnected switches. As an alternative
to routing, some vendors created proprietary schemes for sharing VLAN
information across switches. These methods would only operate on that vendor's
equipment and were not an acceptable way to implement VLANs. With the
adoption of the 802.1Q standard, traffic can be confined to VLANs that exist on
multiple switches from different vendors. This interoperability and traffic
containment across different switches is the result of a switch's ability to use and
recognize 802.1Q tag headers—called VLAN tagging. Switches that implement
802.1Q tagging add this tag header to the frame directly after the destination and
source MAC addresses. The tag header indicates:
1. That the packet has a tag.
2. Whether the packet should have priority over other packets.
3. Which VLAN it belongs to, so that the switch can forward or filter it
correctly.
WEP
(Wired Equivalent Privacy) An optional IEEE 802.11 function that offers frame
transmission privacy similar to a wired network. The Wired Equivalent Privacy
generates secret shared encryption keys that both source and destination stations
can use to alter frame bits to avoid disclosure to eavesdroppers.
Wi-Fi Alliance
A nonprofit international association formed in 1999 to certify interoperability of
wireless Local Area Network products based on IEEE 802.11 specification. The
goal of the Wi-Fi Alliance's members is to enhance the user experience through
product interoperability.
Wireless LAN Array (XS-3900)
A Xirrus proprietary high capacity wireless access point utilizing multiple
channels, specifically designed for the Enterprise market.
Wireless Management System (XM-3300)
A Xirrus proprietary product used for managing large XS-3900 deployments from
a centralized Web-based interface.

Wireless LAN Array
Glossary of Terms 239
WPA
(Wi-Fi Protected Access) A Wi-Fi Alliance standard that contains a subset of the
IEEE 802.11i standard, using TKIP as an encryption method and 802.1X for
authentication.
XM-3300
The Xirrus Wireless Management System (XM-3300) is a Xirrus proprietary
product used for managing large XS-3900 deployments from a centralized Web-
based interface.
XP-3100
The Xirrus Remote DC Power System (XP-3100) is an optional Xirrus proprietary
product that provides distributed DC power to multiple XS-3900 units,
eliminating the need to run dedicated AC power to each unit and facilitating
backup power when connected via a UPS.
XS-3900
The Xirrus Wireless LAN Array (XS-3900) is a high capacity, multi-wireless access
point specifically designed for the Enterprise market.

Wireless LAN Array
240 Glossary of Terms
Page is intentionally blank

Wireless LAN Array
Index 241
Index
Numerics
802.11a 11
802.11a/b/g 11
802.11b/g 11
802.11e 12
802.11p 12
802.11q 12
A
access panel
reinstalling 204
removing 202
AES 12
authentication 12
B
beam distribution 11
benefits 10
C
channels
non-overlapping 12
character restrictions 68
chassis cover 207
CLI
Telnet connection 145
Command Line Interface 145
commands
CLI 145
configuration changes
applying 68
contact information 228
coverage
extended 11
critical messages 67
D
default settings 215
deployment
ease of 12
DHCP server 23,85
DIMM module
replacing 206
DNS settings 87
E
EAP-MDS 12
EAP-TLS 12
EAP-TTLS 12
encryption 12
event log 143
event messages 67
express setup 54,73
external RADIUS server 802.1x 23
F
factory default settings 215
FAQs 222
features 10
FLASH memory
replacing 205
frequently asked questions 222
FTP server 23
G
glossary of terms 229
H
help button 68
HyperTerminal 22
I
installation 21,199
installing the MCAP-3616 41

Wireless LAN Array
242 Index
mounting the unit 43
requirements 21
unpacking the unit 40
workflow 39
installation workflow 39
integrated radio module
replacing 207
interfaces
Web 65
Internet Explorer 22
K
key features 10
keyboard shortcuts 220
L
logging 135,143
logging in 69
M
MIC 12
mounting the unit 43
N
Netscape Navigator 22
network
interfaces 79
settings 80
statistics 84
network installation 21,199
non-overlapping channels 12
O
overview 6
P
password 69
PEAP 12
performance 10
power cord 202
power outlet 21
power supply
replacing 209
power switch 202
print button 68
product installation 21,199
product overview 6
product specifications 13,17
PuTTy 22
Q
QoS 12
Quality of Service 12
quick reference guide 211
R
radio distribution 10
RADIUS server 23,118,120
rogue detection 11
S
Secure Shell 22
security 6,12,112
management 113
RADIUS server 118,120
serial port 22
services 132
servicing the unit 199
SNMP 9,137
specifications 13,17
SSH 22
SSID
management 107
statistics 84
status bar 68
system log 135
system memory

Wireless LAN Array
Index 243
replacing 206
T
technical support
contact information 228
frequently asked questions 222
Telnet
establishing a connection 145
TKIP 12
tools 140
U
unpacking the unit 40
user interface 65
V
VoWLAN 12
W
warning messages 67
Web interface 65
structure and navigation 67
WEP 12
workflow 39
WPA2 6
X
Xirrus Management System 6,9,12,23
Xirrus Remote Power System 21,23
XMS 6,9,12,23
XRPS 21,23
XS 3900
management 69

Wireless LAN Array
244 Index
Page is intentionally blank