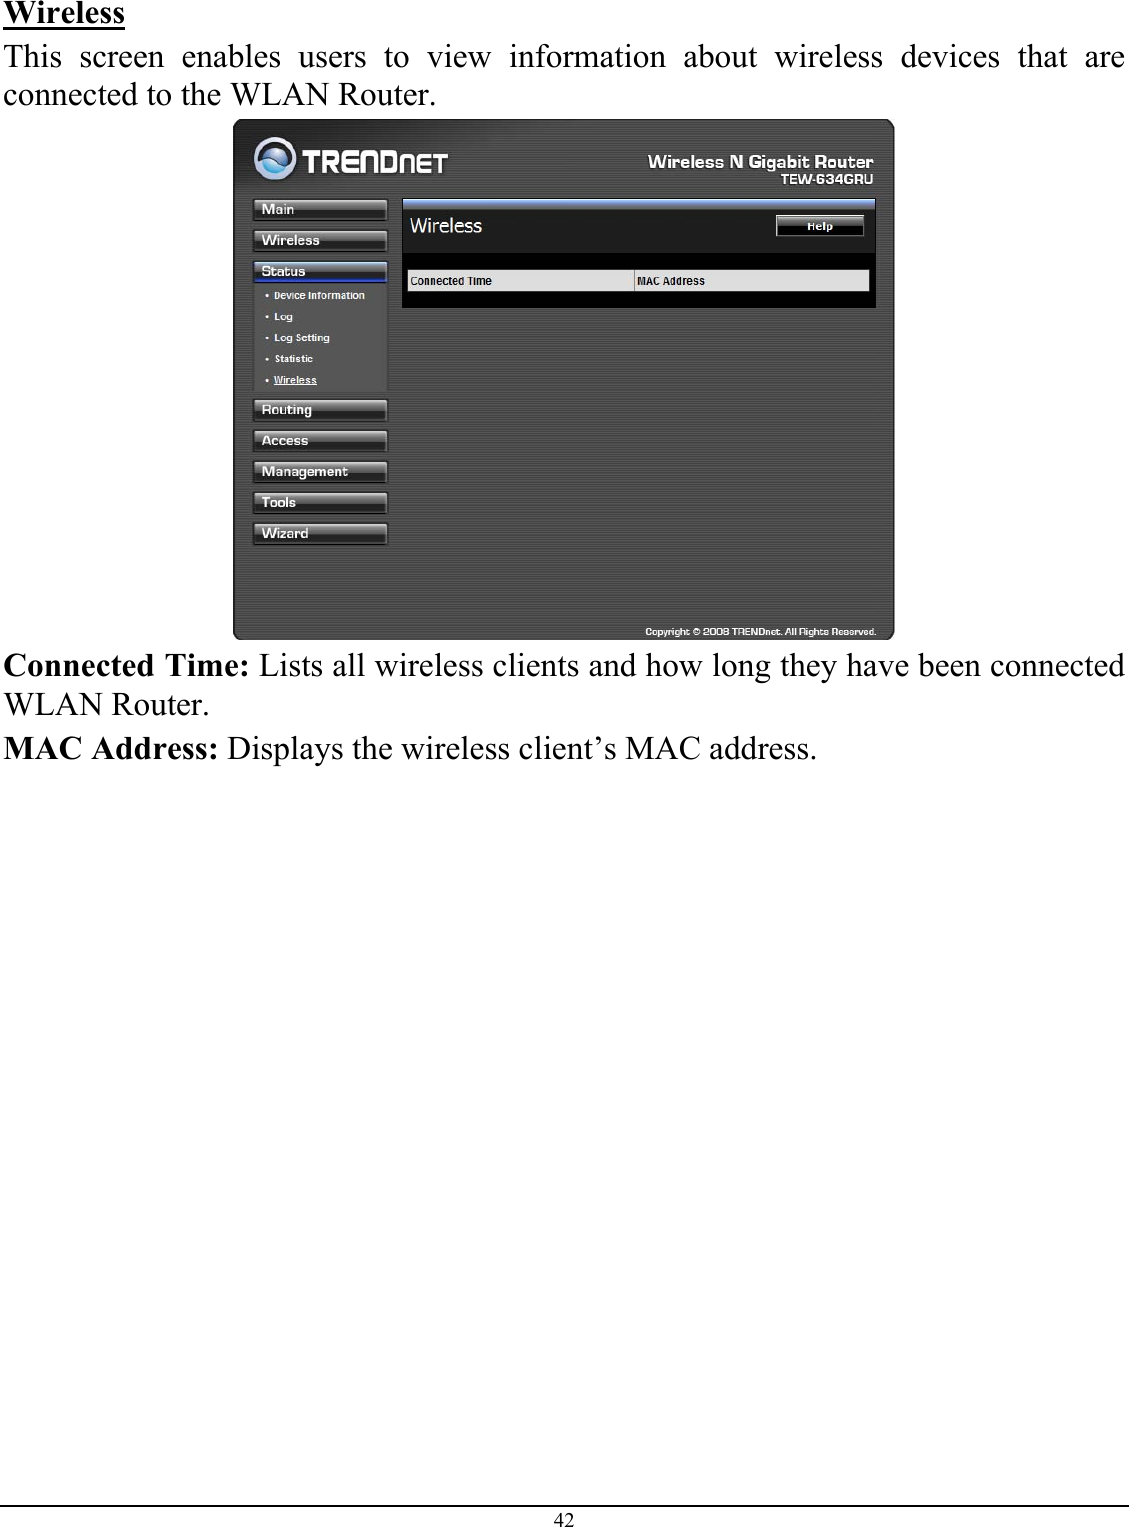
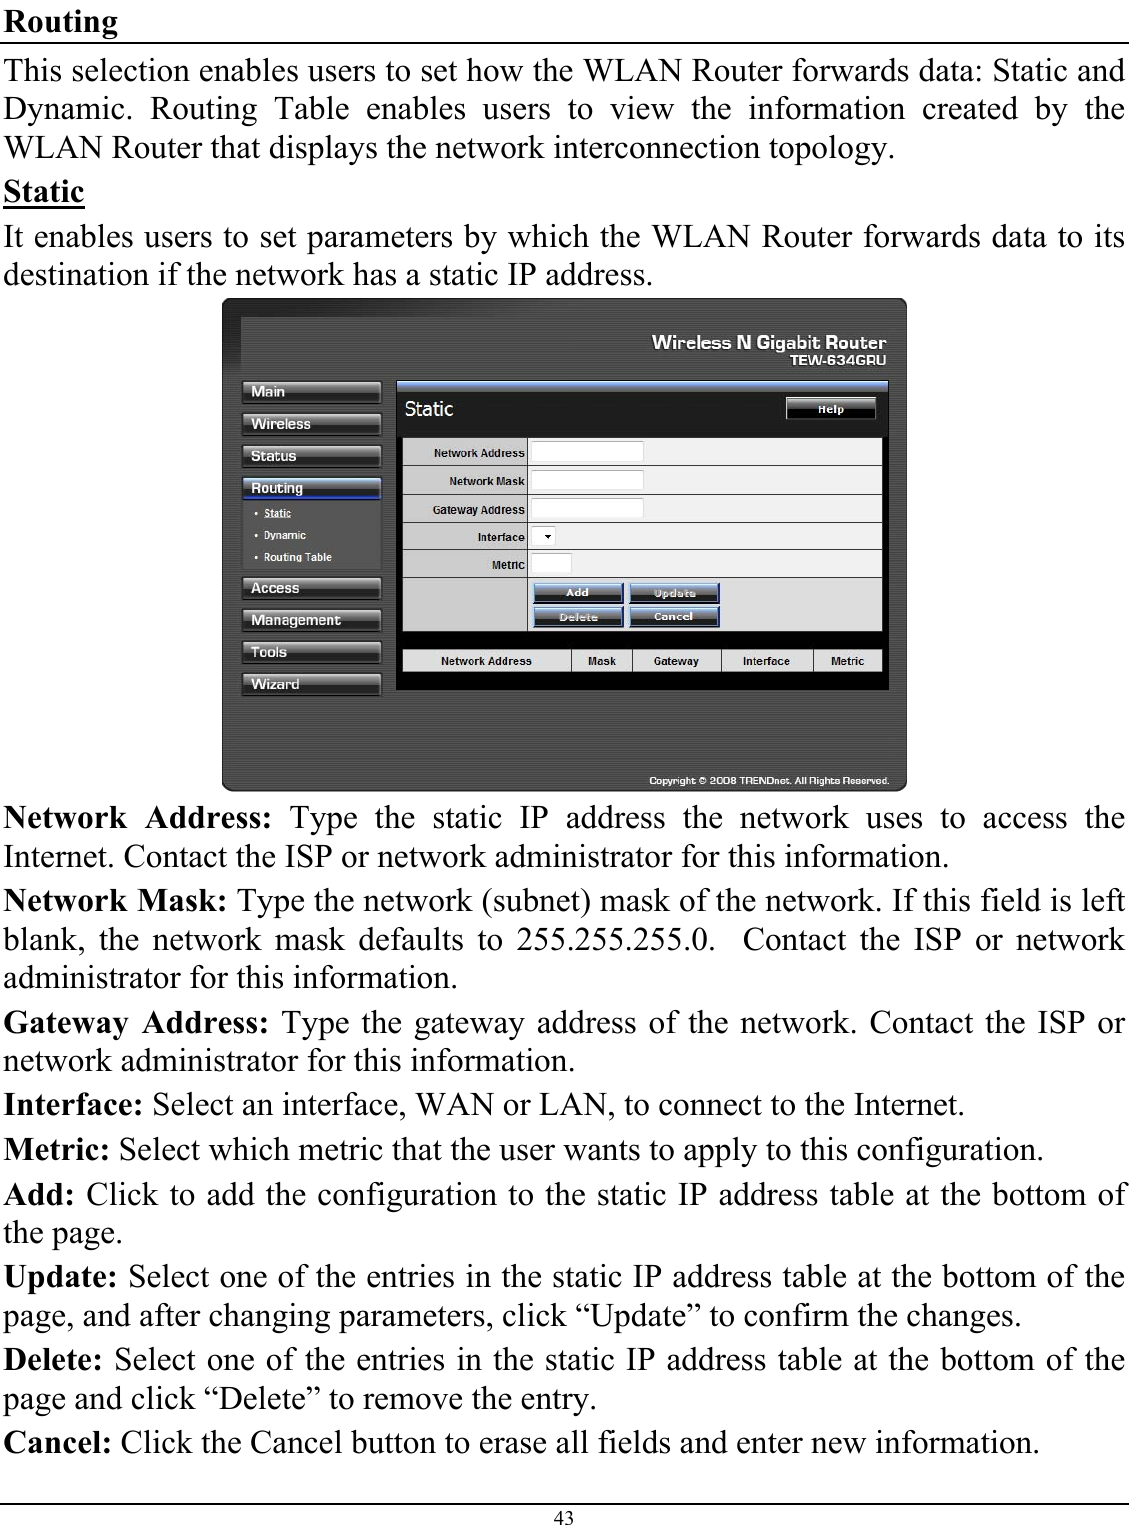
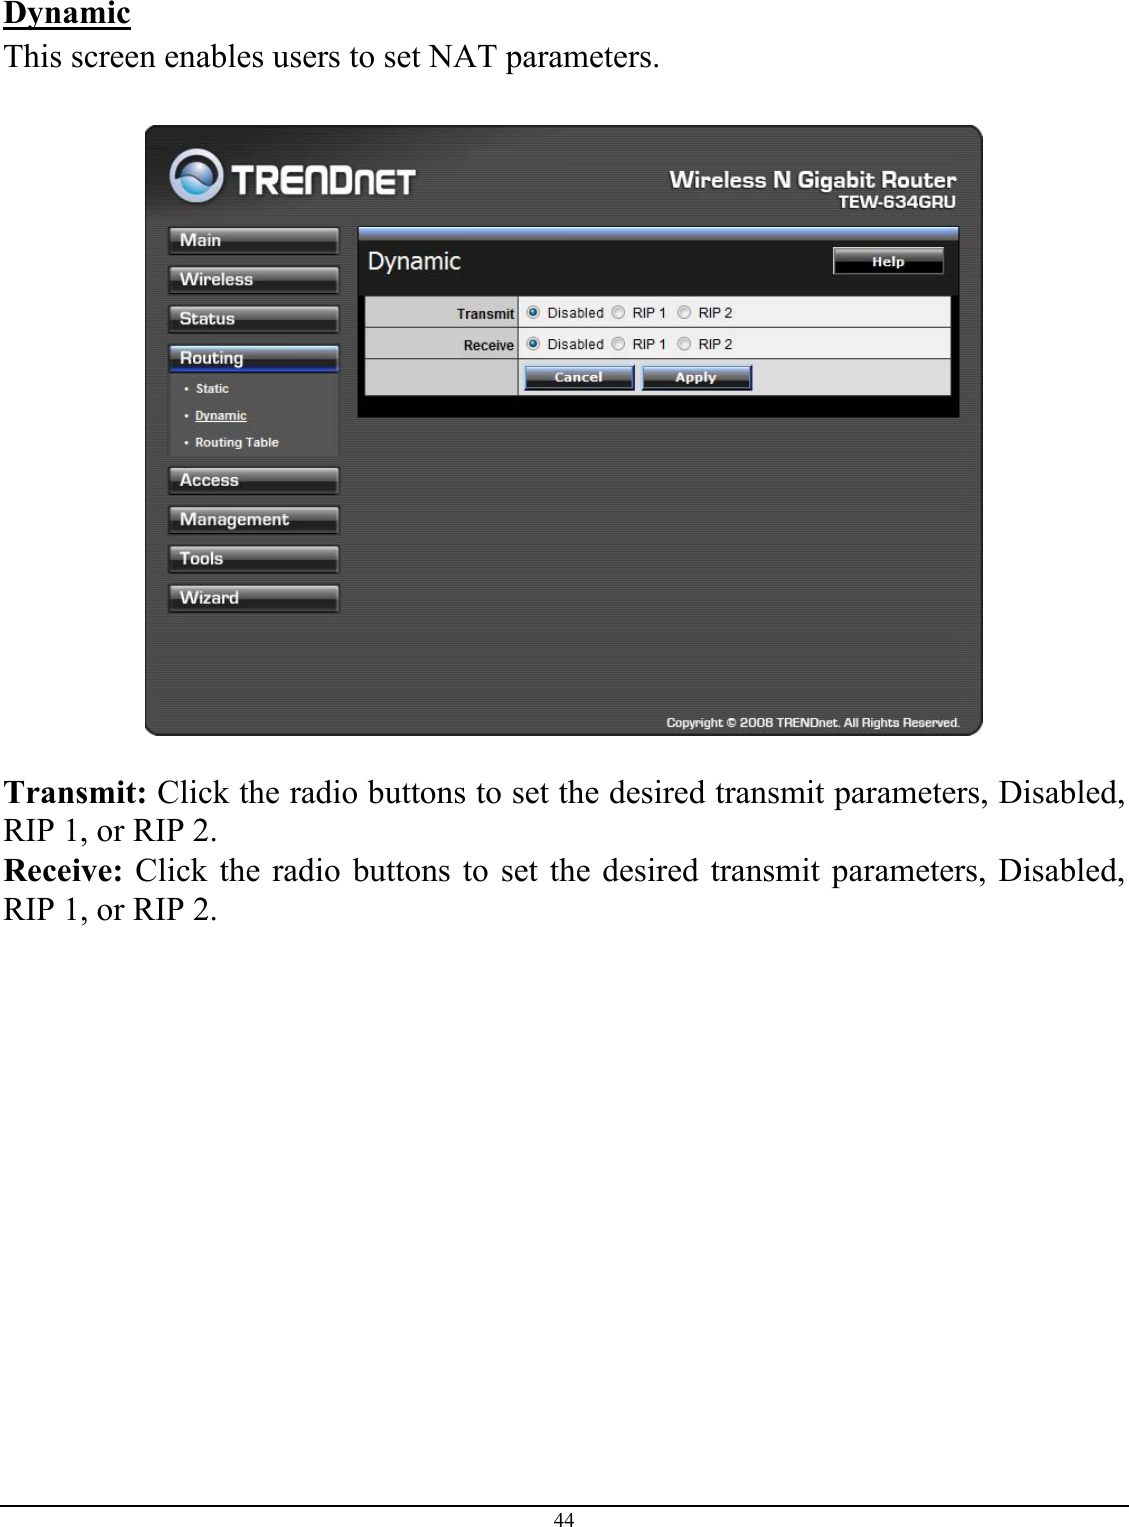
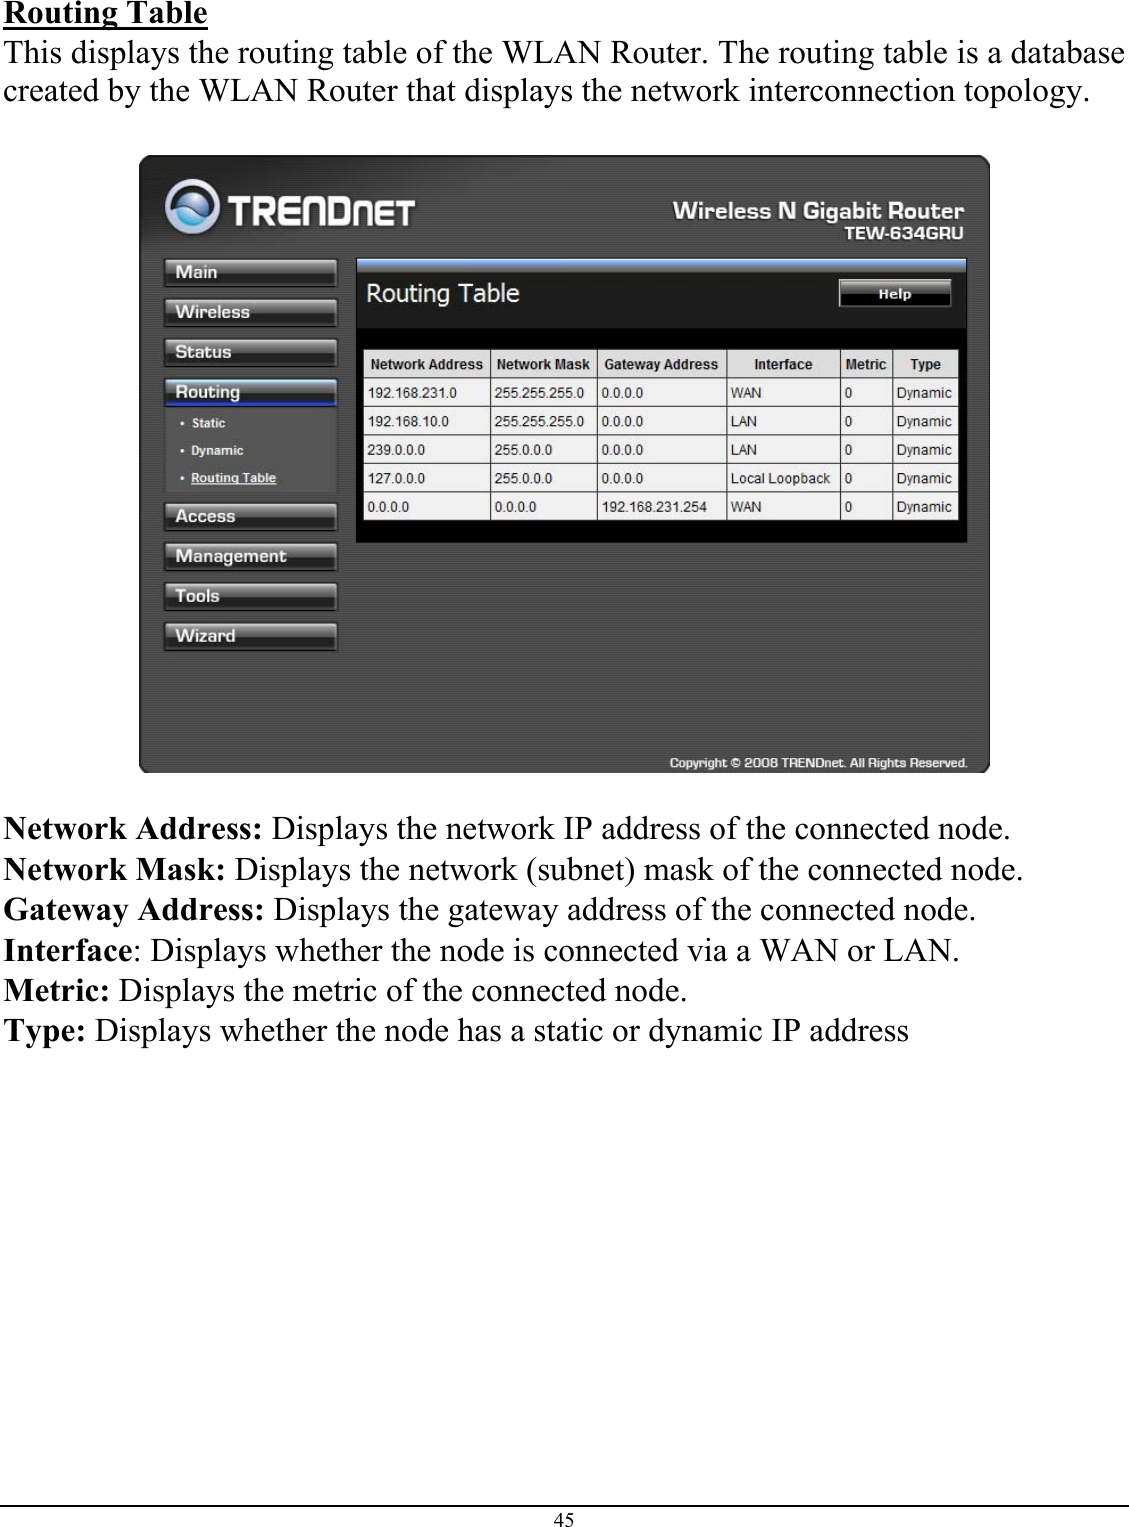
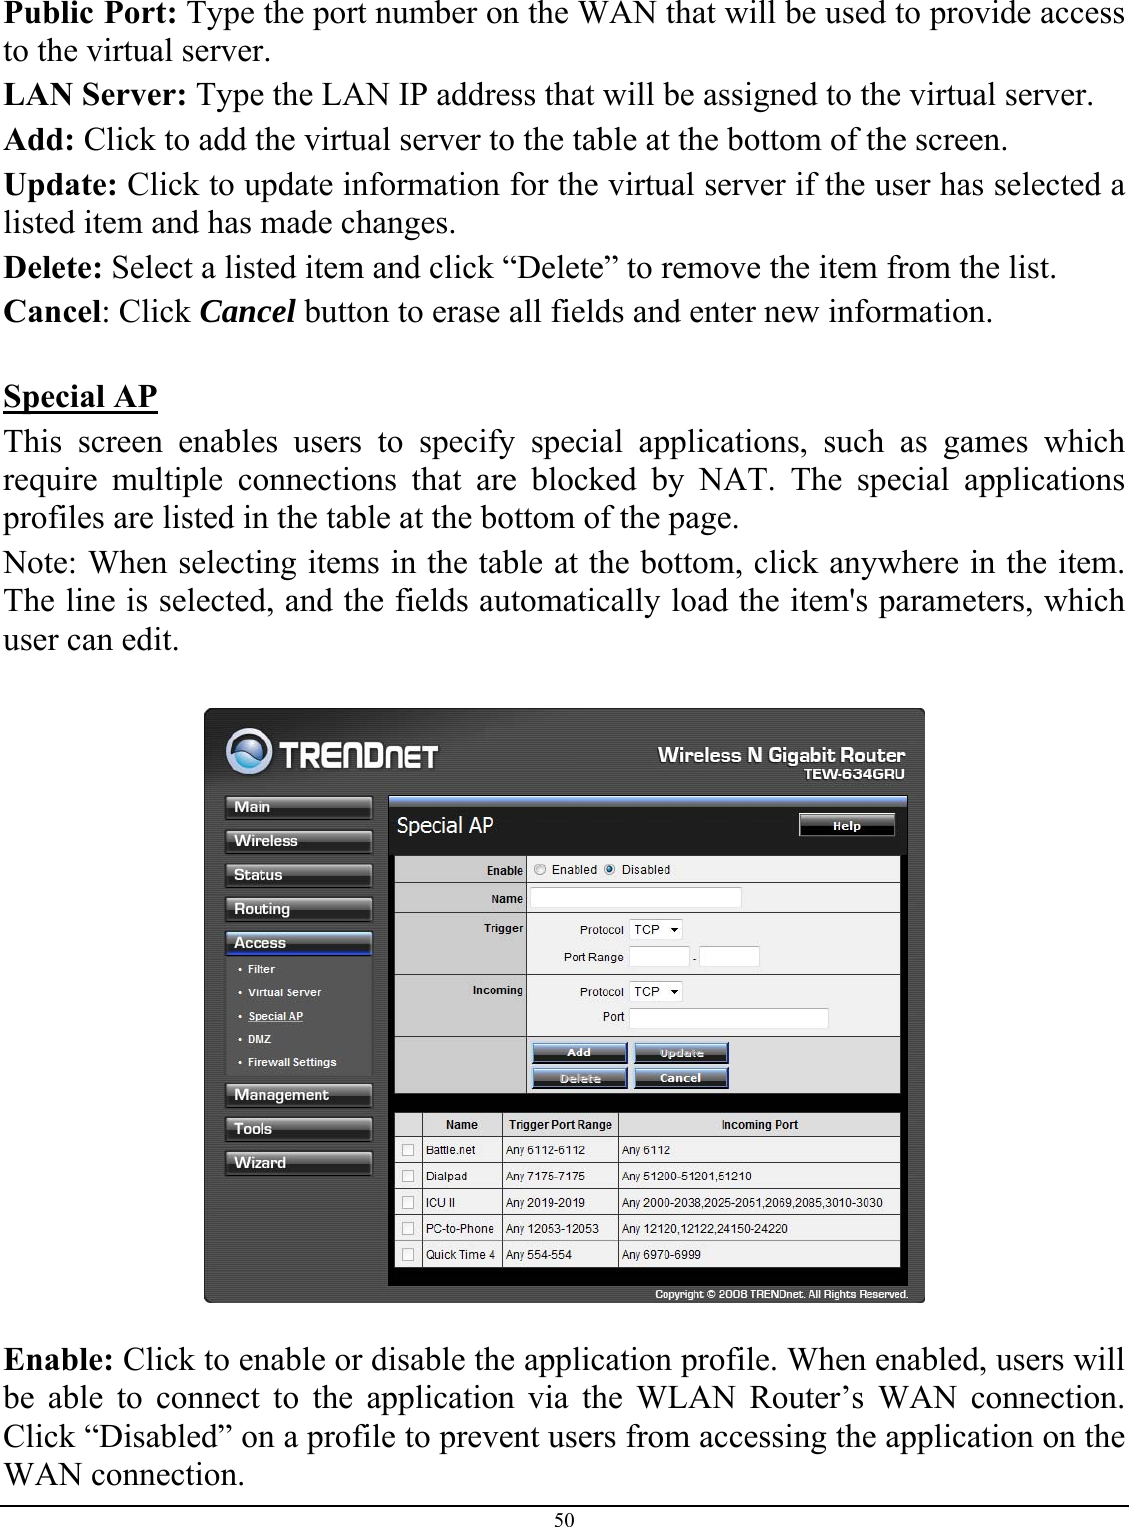
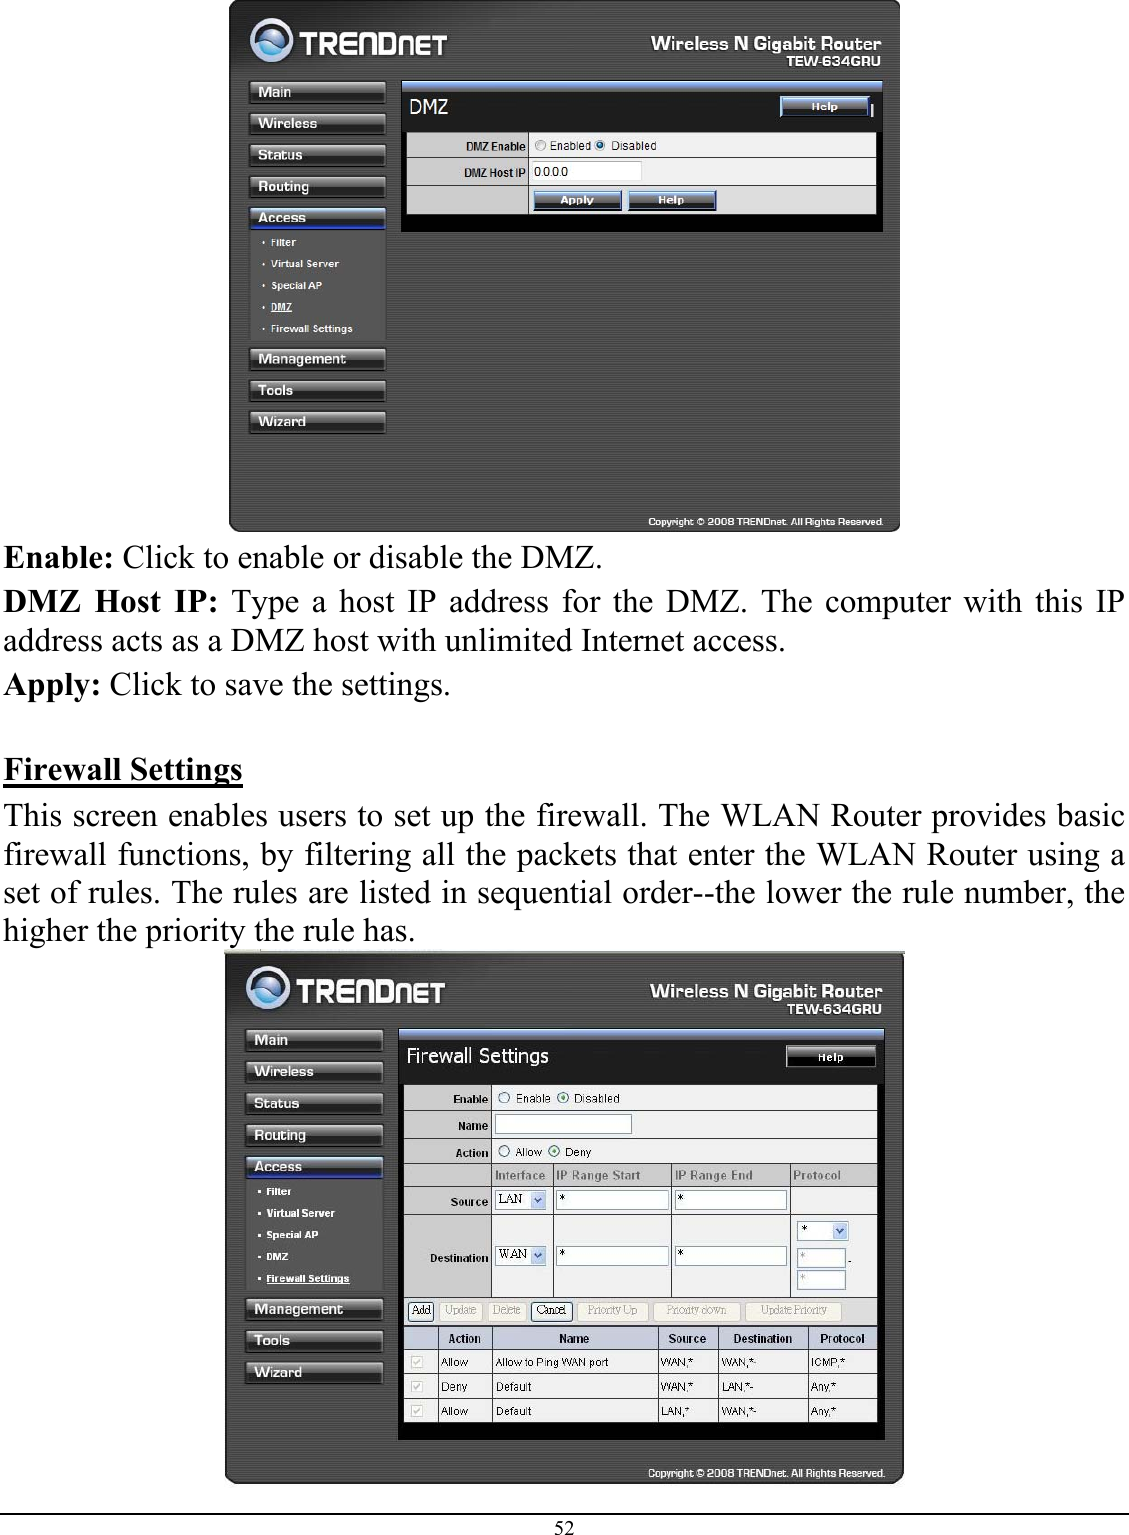
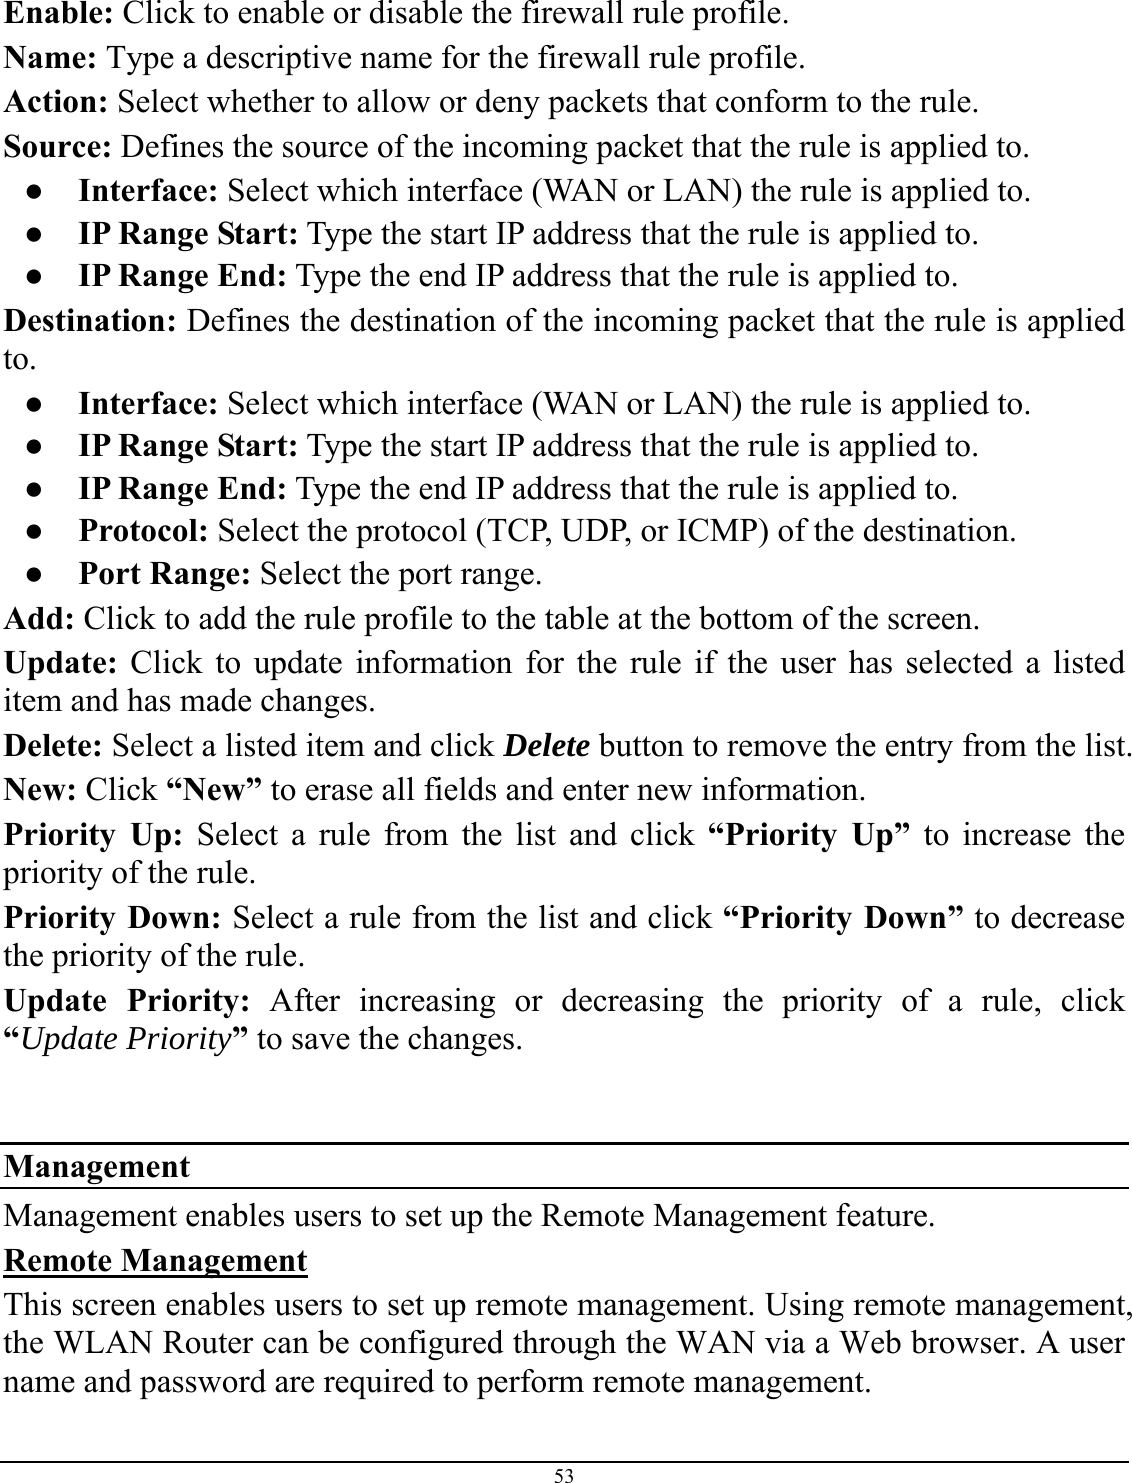
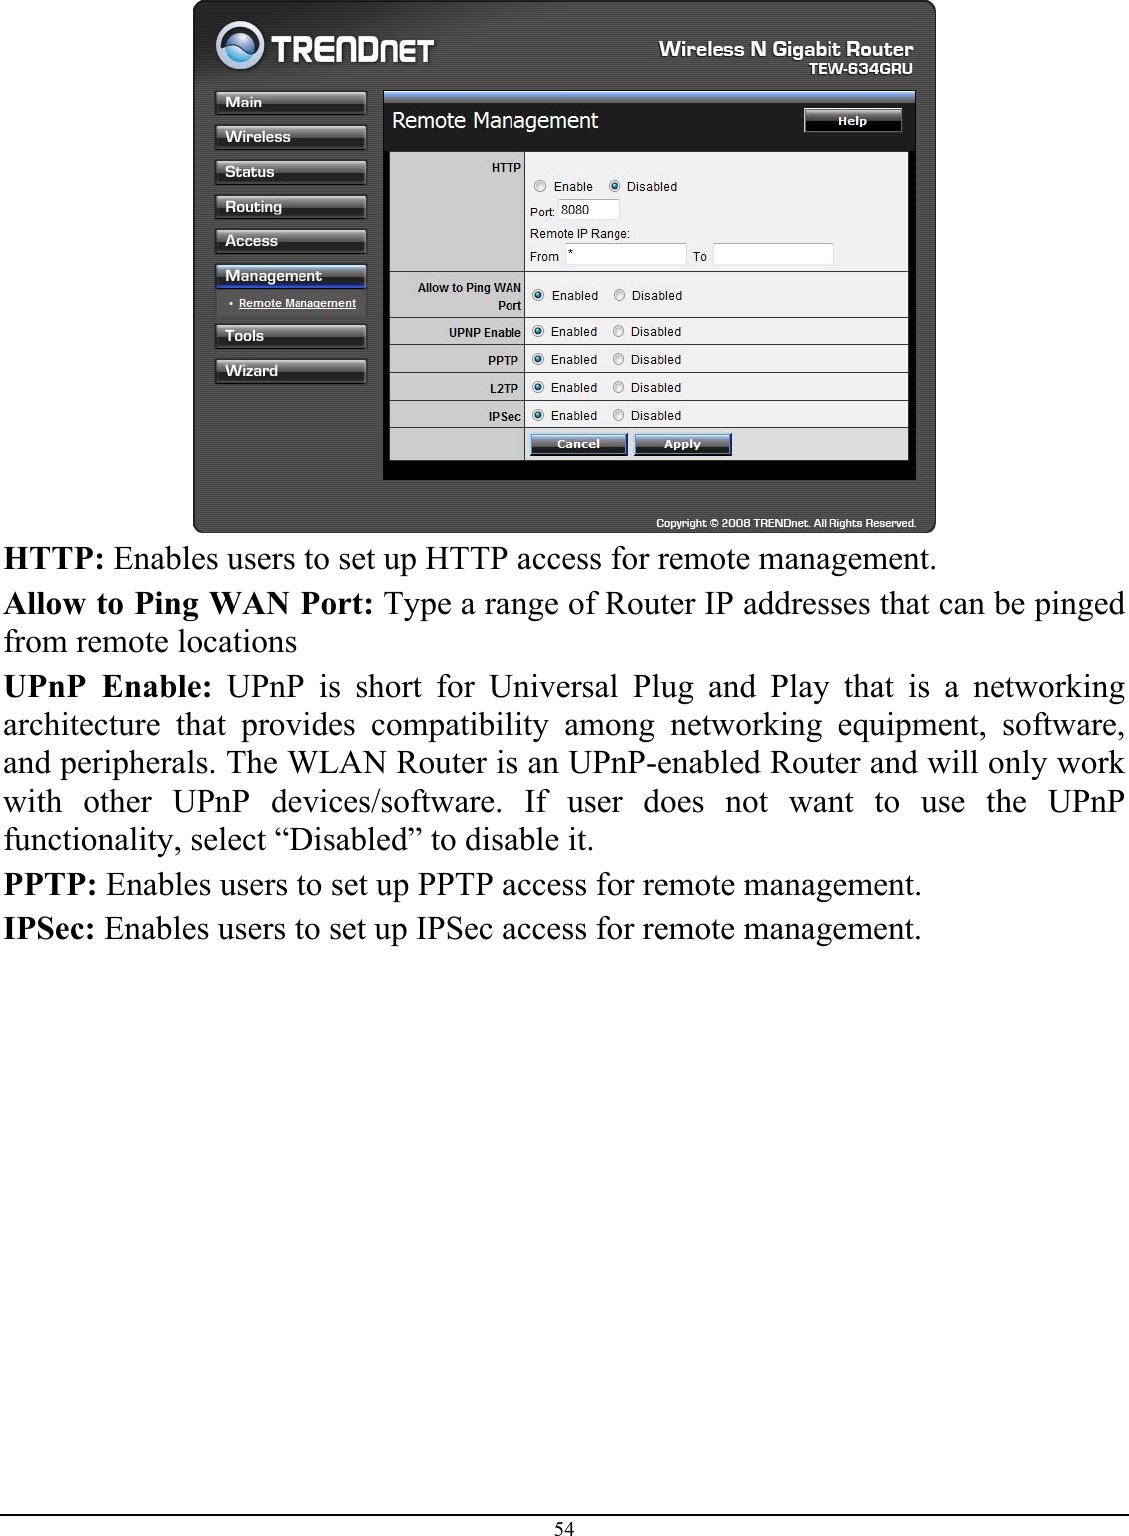
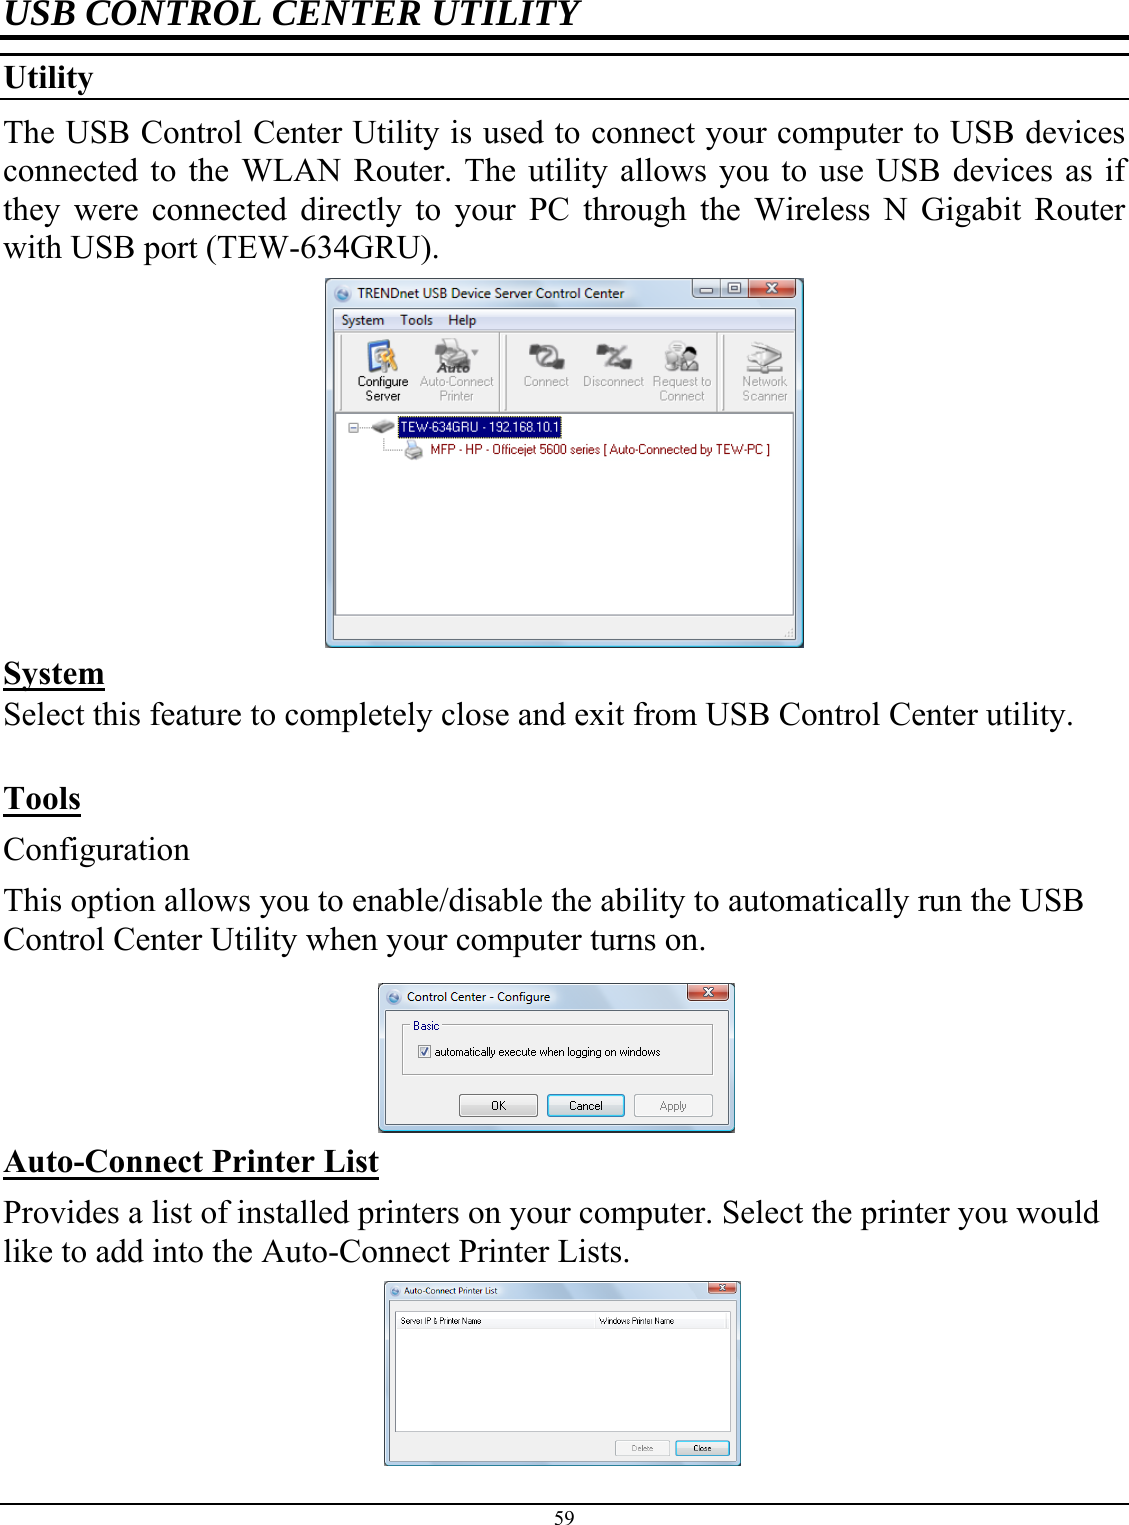
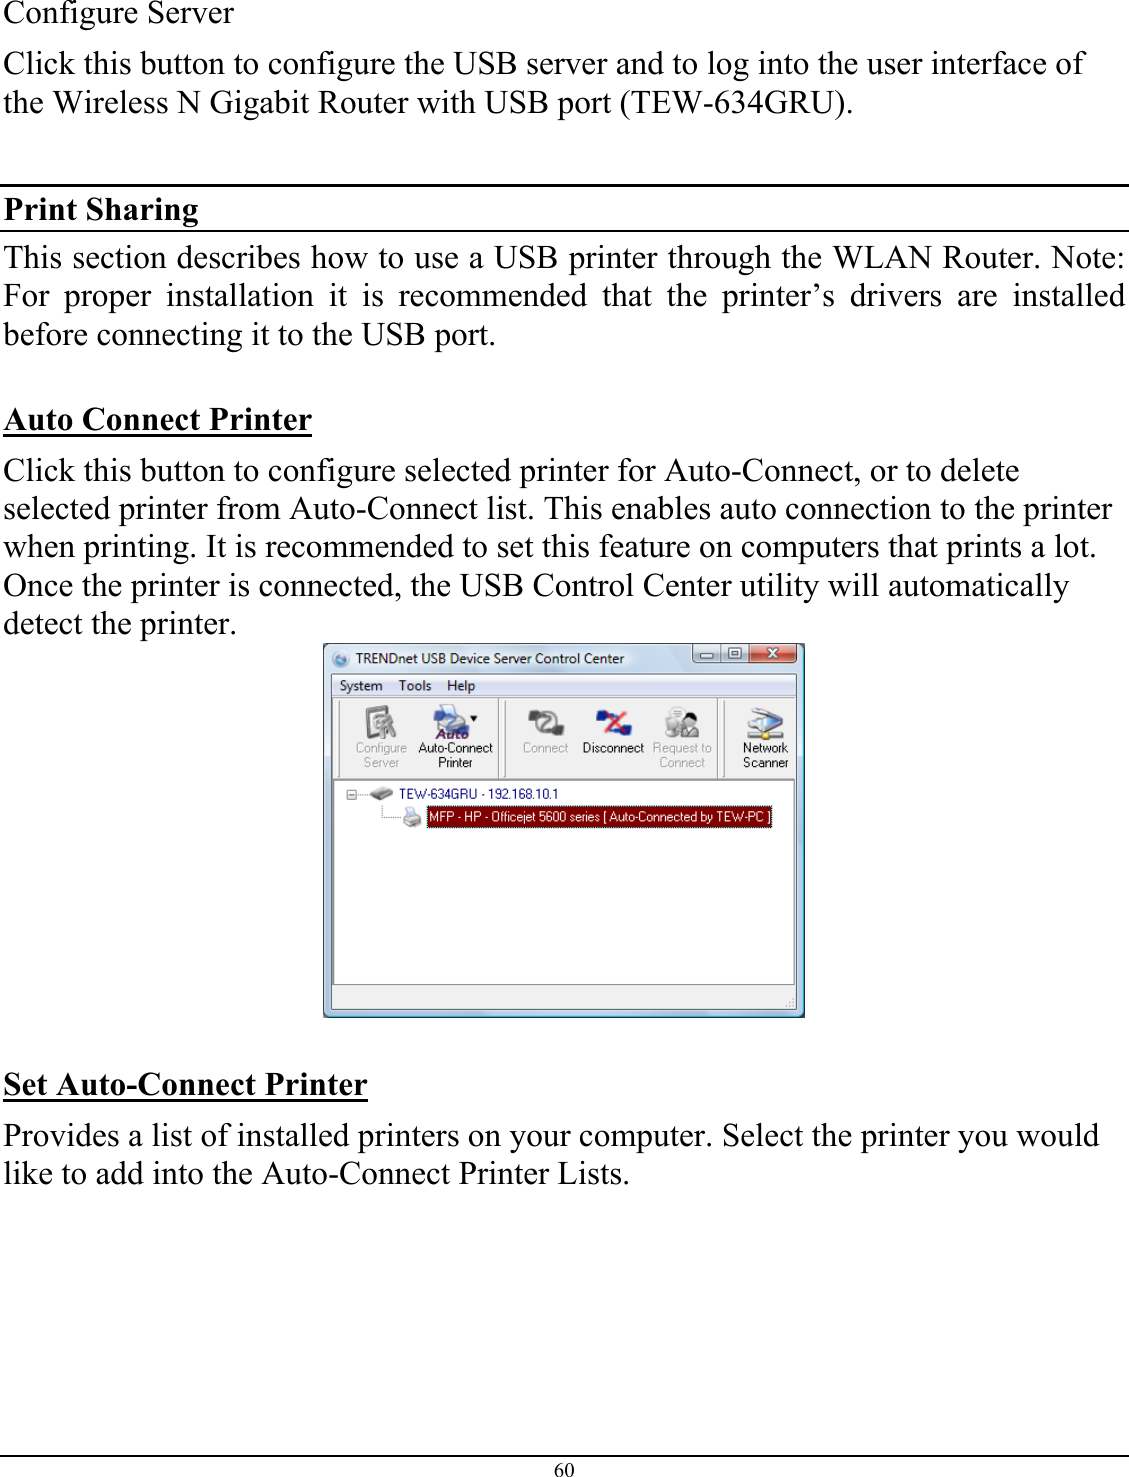
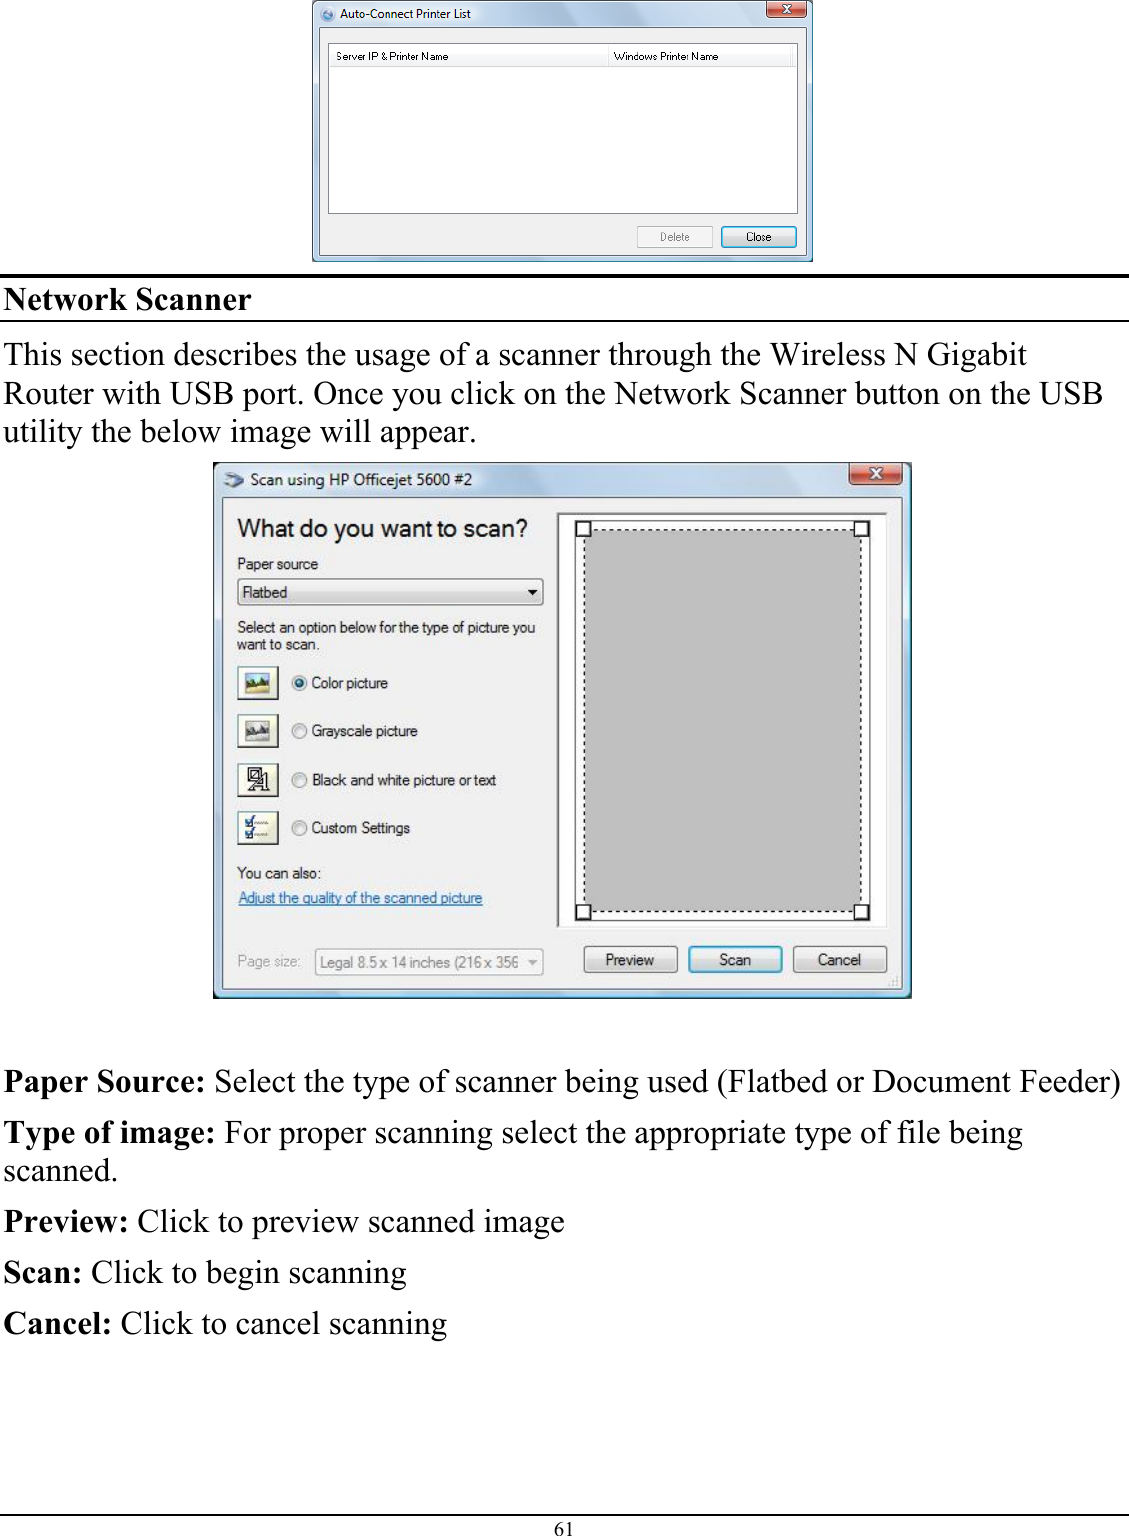
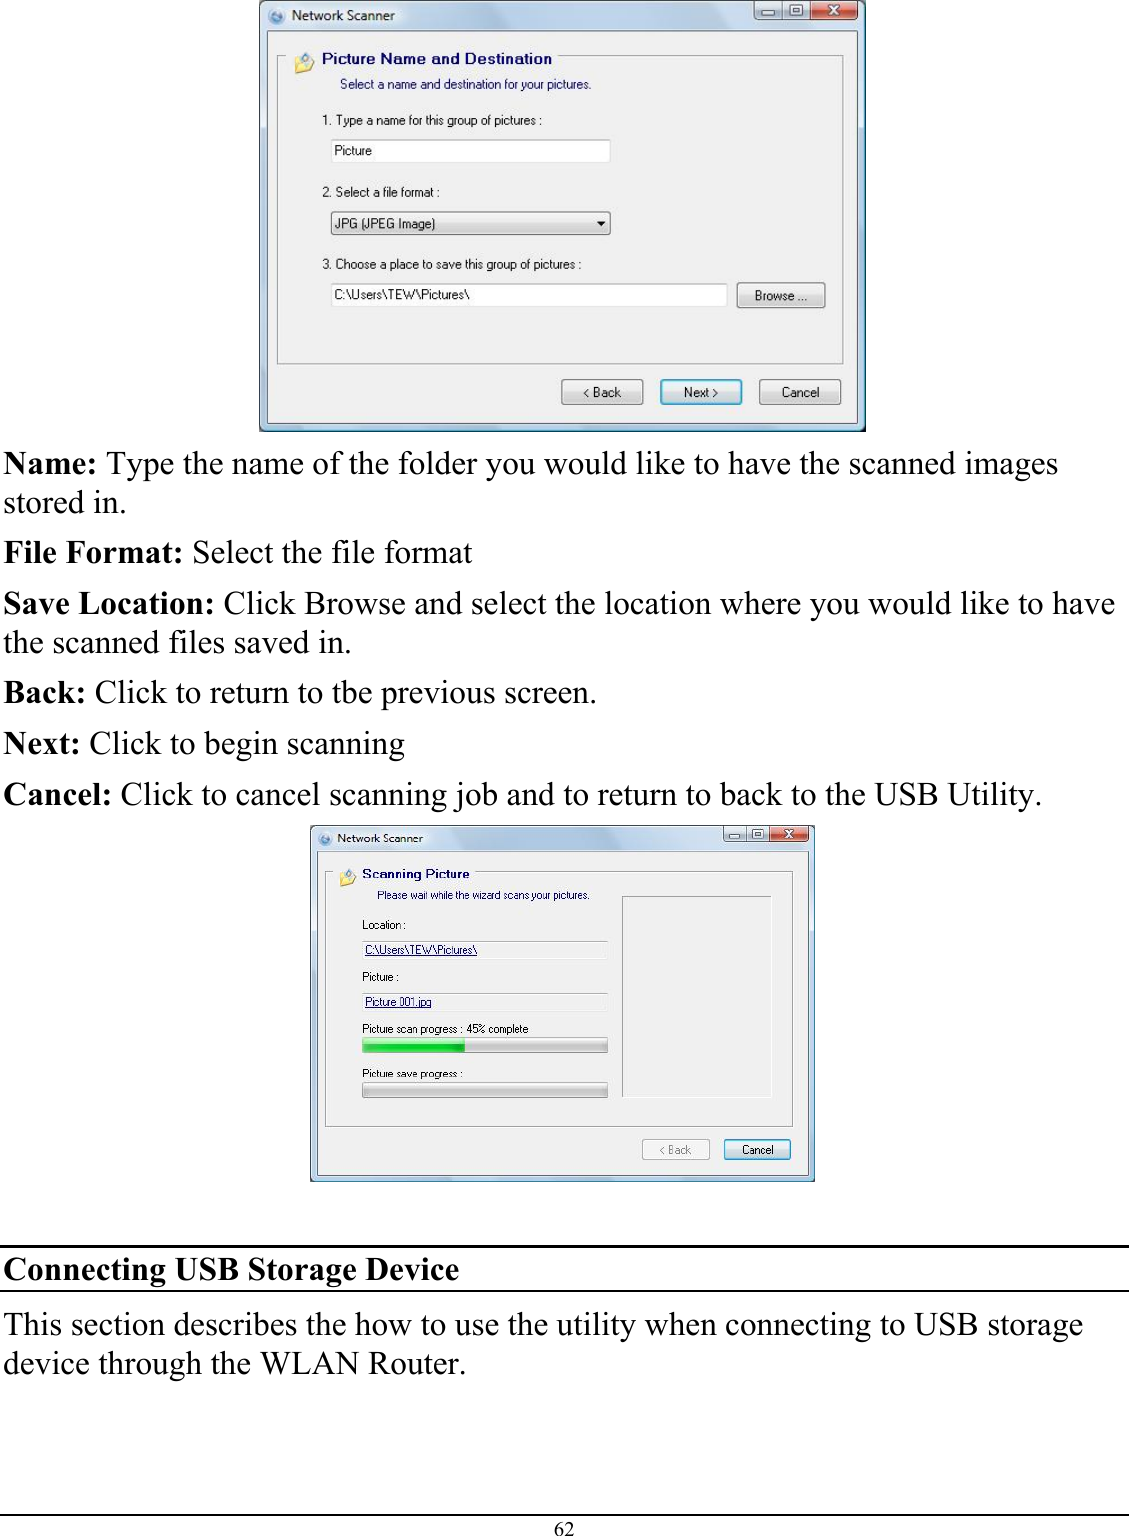
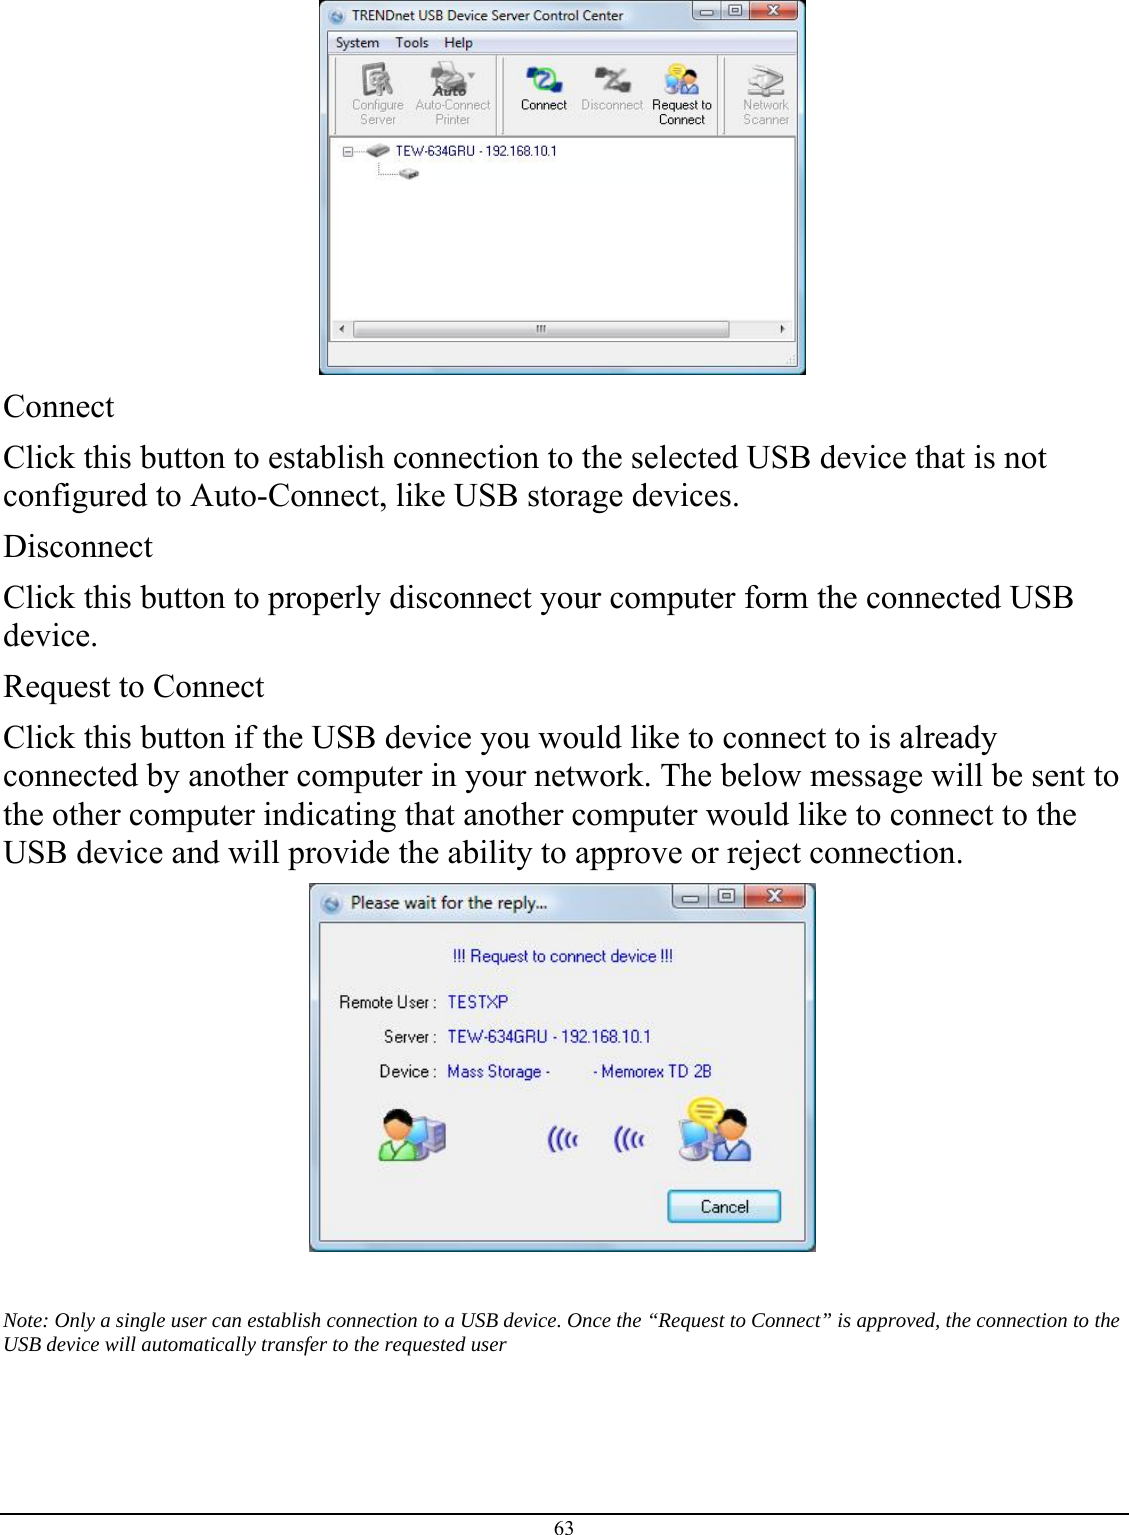
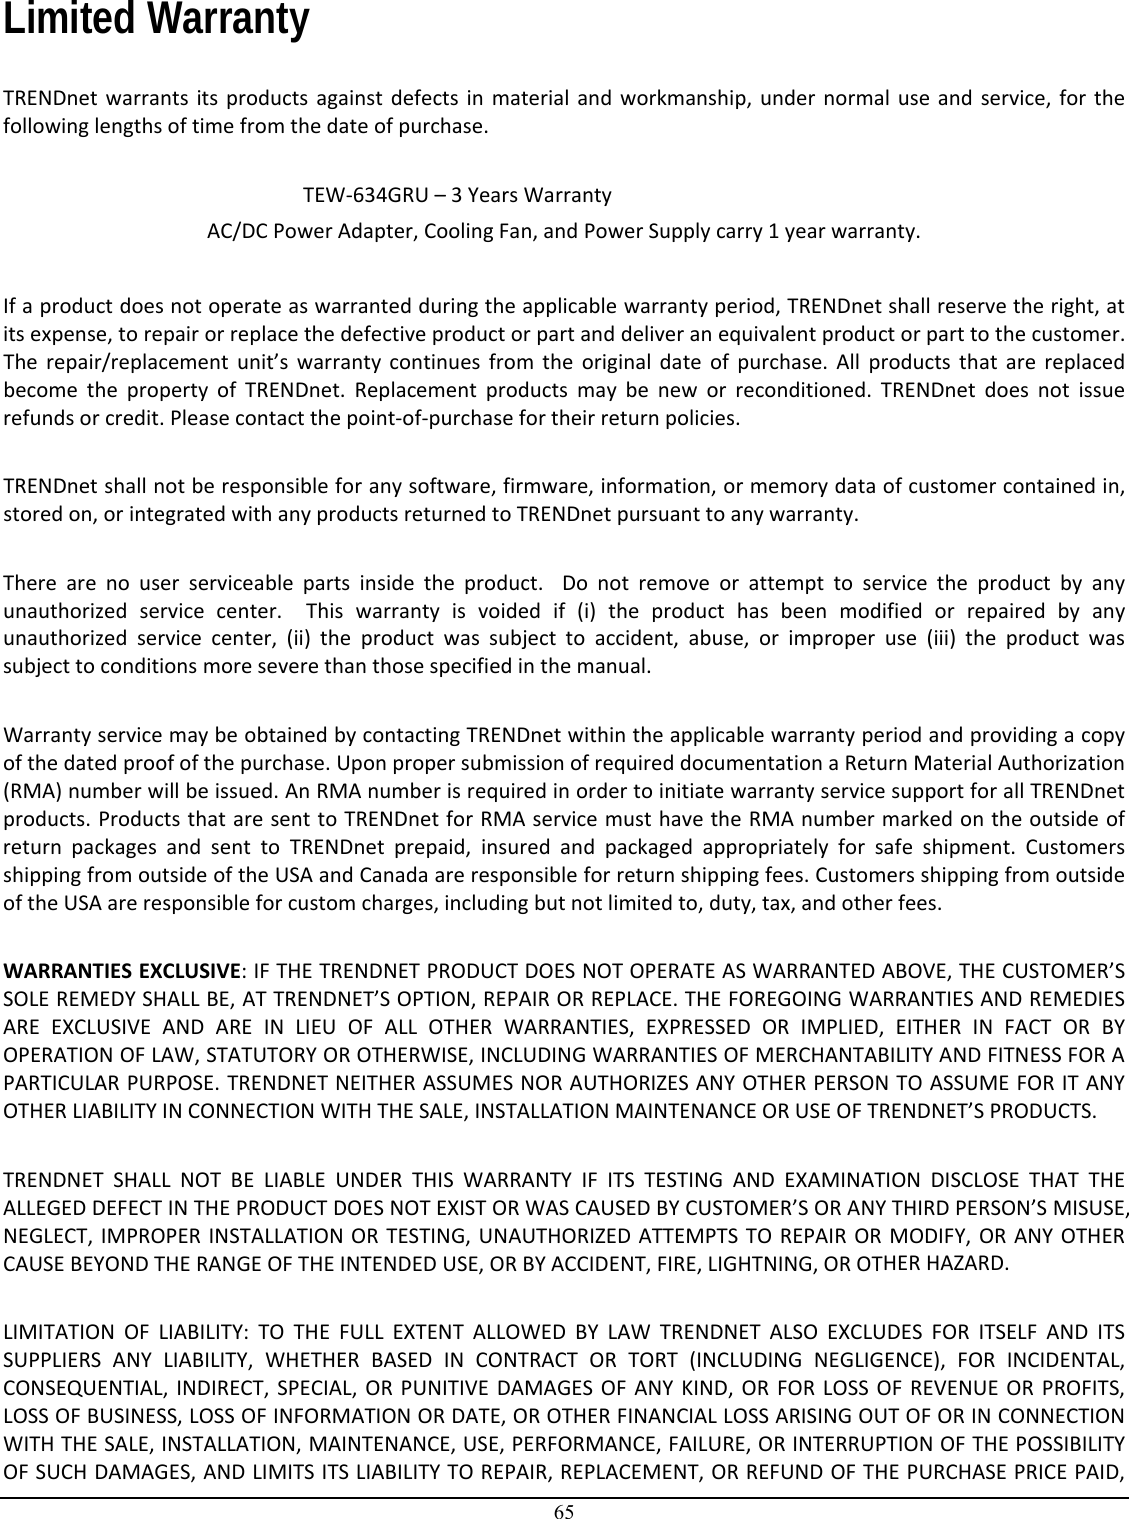
Cameo Communications WLN2209 IEEE802.11n Draft 2.0 Wireless LAN Gigabit Router User Manual TEW 634GRU v1 0R

Cameo Communications Inc IEEE802.11n Draft 2.0 Wireless LAN Gigabit Router TEW 634GRU v1 0R

Contents

Manual 2

42  Wireless This screen enables users to view information about wireless devices that are connected to the WLAN Router.  Connected Time: Lists all wireless clients and how long they have been connected WLAN Router. MAC Address: Displays the wireless client’s MAC address.
43  Routing This selection enables users to set how the WLAN Router forwards data: Static and Dynamic. Routing Table enables users to view the information created by the WLAN Router that displays the network interconnection topology. Static It enables users to set parameters by which the WLAN Router forwards data to its destination if the network has a static IP address.  Network Address: Type the static IP address the network uses to access the Internet. Contact the ISP or network administrator for this information. Network Mask: Type the network (subnet) mask of the network. If this field is left blank, the network mask defaults to 255.255.255.0.  Contact the ISP or network administrator for this information. Gateway Address: Type the gateway address of the network. Contact the ISP or network administrator for this information. Interface: Select an interface, WAN or LAN, to connect to the Internet. Metric: Select which metric that the user wants to apply to this configuration. Add: Click to add the configuration to the static IP address table at the bottom of the page. Update: Select one of the entries in the static IP address table at the bottom of the page, and after changing parameters, click “Update” to confirm the changes. Delete: Select one of the entries in the static IP address table at the bottom of the page and click “Delete” to remove the entry. Cancel: Click the Cancel button to erase all fields and enter new information.
44  Dynamic This screen enables users to set NAT parameters.    Transmit: Click the radio buttons to set the desired transmit parameters, Disabled, RIP 1, or RIP 2. Receive: Click the radio buttons to set the desired transmit parameters, Disabled, RIP 1, or RIP 2.
45  Routing Table This displays the routing table of the WLAN Router. The routing table is a database created by the WLAN Router that displays the network interconnection topology.    Network Address: Displays the network IP address of the connected node. Network Mask: Displays the network (subnet) mask of the connected node. Gateway Address: Displays the gateway address of the connected node. Interface: Displays whether the node is connected via a WAN or LAN. Metric: Displays the metric of the connected node. Type: Displays whether the node has a static or dynamic IP address
46  Access This page defines access restrictions, set up protocol and IP filters, create virtual servers, access for special applications such as games, and set firewall rules. Filters Using filters to deny or allow the users to access.  Five types of filters to select: MAC, URL blocking, IP, Protocol filter and Domain blocking. MAC Filters    MAC Filter: Enables you to allow or deny Internet access to users within the LAN based upon the MAC address of their network interface. Click the radio button next to Disabled to disable the MAC filter. Disable: Disable the MAC filter function. Allow: Only allow computers with MAC address listed in the MAC Table. Deny: Computers in the MAC Table are denied Internet access. MAC Table: Use this section to create a user profile which Internet access is denied or allowed.  The user profiles are listed in the table at the bottom of the page.  (Note: Click anywhere in the item. Once the line is selected, the fields automatically load the item's parameters, which you can edit.) Name: Type the name of the user to be permitted/denied access.
47  MAC Address: Type the MAC address of the user's network interface. Add: Click to add the user to the list at the bottom of the page. Update: Click to update information for the user, if you have changed any of the fields. Delete: Select a user from the table at the bottom of the list and click Delete to remove the user profile. Cancel: Click the Cancel button to erase all fields and enter new information.  Domain/URL Blocking You could specify the domains that allow users to access or deny by clicking one of the two items.  Also, add the specified domains in the text box.    Disable: Disable the Domain/URL Blocking function. Allow: Allow users to access all domains except “Domains List”. Deny: Deny users to access all domains except “Domains List”. Domains List: List Domain/URL you will Denied or Allowed. Add: Click to Add button to add domain to the Domains list. Cancel: Select a user from the table at the bottom of the list and click Cancel to remove the user profile.
48  IP Filters This screen enables you to define a minimum and maximum IP address range filter; all IP addresses falling within the range are not allowed Internet access.  The IP filter profiles are listed in the table at the bottom of the page. (Note: Click anywhere in the item. Once the line is selected, the fields automatically load the item's parameters, which you can edit.)    Enable: Click to enable or disable the IP address filter. Name: Type the name of the user to be denied access. Protocol: Select a protocol (TCP or UDP) to use for the virtual server. Port: Type the port range of the protocol. IP Range: Type the IP range. IP addresses falling between this value and the Range End are not allowed to access the Internet. Add: Click to add the IP range to the table at the bottom of the screen. Update: Click to update information for the range if you have selected a list item and have made changes. Delete: Select a list item and click Delete to remove the item from the list.
49  Cancel: Click the Cancel button to erase all fields and enter new information. Virtual Server This screen enables users to create a virtual server via the WLAN Router. If the WLAN Router is set as a virtual server, remote users requesting Web or FTP services through the WAN are directed to local servers in the LAN. The WLAN Router redirects the request via the protocol and port numbers to the correct LAN server. The Virtual Sever profiles are listed in the table at the bottom of the page. Note: When selecting items in the table at the bottom, click anywhere in the item. The line is selected, and the fields automatically load the item's parameters, which user can edit.    Enable: Click to enable or disable the virtual server. Name: Type a descriptive name for the virtual server. Protocol: Select a protocol (TCP or UDP) to use for the virtual server. Private Port: Type the port number of the computer on the LAN that is being used to act as a virtual server.
50  Public Port: Type the port number on the WAN that will be used to provide access to the virtual server. LAN Server: Type the LAN IP address that will be assigned to the virtual server. Add: Click to add the virtual server to the table at the bottom of the screen. Update: Click to update information for the virtual server if the user has selected a listed item and has made changes. Delete: Select a listed item and click “Delete” to remove the item from the list. Cancel: Click Cancel button to erase all fields and enter new information.  Special AP This screen enables users to specify special applications, such as games which require multiple connections that are blocked by NAT. The special applications profiles are listed in the table at the bottom of the page. Note: When selecting items in the table at the bottom, click anywhere in the item. The line is selected, and the fields automatically load the item's parameters, which user can edit.    Enable: Click to enable or disable the application profile. When enabled, users will be able to connect to the application via the WLAN Router’s WAN connection. Click “Disabled” on a profile to prevent users from accessing the application on the WAN connection.
51  Name: Type a descriptive name for the application. Trigger: Defines the outgoing communication that determines whether the user has legitimate access to the application. ● Protocol: Select the protocol (TCP, UDP, or ICMP) that can be used to access the application. ● Port Range: Type the port range that can be used to access the application in the text boxes. Incoming: Defines which incoming communications users are permitted to connect with. ● Protocol: Select the protocol (TCP, UDP, or ICMP) that can be used by the incoming communication. ●      Port: Type the port number that can be used for the incoming communication. Add: Click to add the special application profile to the table at the bottom of the screen. Update: Click to update information for the special application if user have selected a list item and have made changes. Delete: Select a list item and click Delete to remove the item from the list. Cancel: Click Cancel button to erase all fields and enter new information.  DMZ This screen enables users to create a DMZ for those computers that cannot access Internet applications properly through the WLAN Router and associated security settings.  Note: Any clients added to the DMZ exposes the clients to security risks such as viruses and unauthorized access.
52   Enable: Click to enable or disable the DMZ. DMZ Host IP: Type a host IP address for the DMZ. The computer with this IP address acts as a DMZ host with unlimited Internet access. Apply: Click to save the settings.  Firewall Settings This screen enables users to set up the firewall. The WLAN Router provides basic firewall functions, by filtering all the packets that enter the WLAN Router using a set of rules. The rules are listed in sequential order--the lower the rule number, the higher the priority the rule has.
53   Enable: Click to enable or disable the firewall rule profile. Name: Type a descriptive name for the firewall rule profile. Action: Select whether to allow or deny packets that conform to the rule. Source: Defines the source of the incoming packet that the rule is applied to. ● Interface: Select which interface (WAN or LAN) the rule is applied to. ●  IP Range Start: Type the start IP address that the rule is applied to. ●  IP Range End: Type the end IP address that the rule is applied to. Destination: Defines the destination of the incoming packet that the rule is applied to. ● Interface: Select which interface (WAN or LAN) the rule is applied to. ●  IP Range Start: Type the start IP address that the rule is applied to. ●  IP Range End: Type the end IP address that the rule is applied to. ● Protocol: Select the protocol (TCP, UDP, or ICMP) of the destination. ● Port Range: Select the port range. Add: Click to add the rule profile to the table at the bottom of the screen. Update: Click to update information for the rule if the user has selected a listed item and has made changes. Delete: Select a listed item and click Delete button to remove the entry from the list. New: Click “New” to erase all fields and enter new information. Priority Up: Select a rule from the list and click “Priority Up” to increase the priority of the rule. Priority Down: Select a rule from the list and click “Priority Down” to decrease the priority of the rule. Update Priority: After increasing or decreasing the priority of a rule, click “Update Priority” to save the changes.    Management Management enables users to set up the Remote Management feature. Remote Management This screen enables users to set up remote management. Using remote management, the WLAN Router can be configured through the WAN via a Web browser. A user name and password are required to perform remote management.
54   HTTP: Enables users to set up HTTP access for remote management. Allow to Ping WAN Port: Type a range of Router IP addresses that can be pinged from remote locations UPnP Enable: UPnP is short for Universal Plug and Play that is a networking architecture that provides compatibility among networking equipment, software, and peripherals. The WLAN Router is an UPnP-enabled Router and will only work with other UPnP devices/software. If user does not want to use the UPnP functionality, select “Disabled” to disable it. PPTP: Enables users to set up PPTP access for remote management. IPSec: Enables users to set up IPSec access for remote management.
55  Tools This page enables users to restart the system, save and load different settings as profiles, restore factory default settings, run a setup wizard to configure WLAN Router settings, upgrade the firmware, and ping remote IP addresses. Restart Click “Restart” to restart the system in the event the system is not performing correctly.
56  Settings This screen enables users to save settings as a profile and load profiles for different circumstances. User can also load the factory default settings, and run a setup wizard to configure the WLAN Router and Router interface.    Save Settings: Click “Save” to save the current configuration as a profile that can load when necessary. Load Settings: Click “Browse” and go to the location of a stored profile. Click “Load” to load the profile's settings. Restore Factory Default Settings: Click “Restore” to restore the default settings. All configuration changes will lose.
57  Firmware This screen enables users to keep the WLAN Router firmware up to date.    Please follow the below instructions: Download the latest firmware from the manufacturer's Web site, and save it to disk. Click “Browse” and go to the location of the downloaded unzipped firmware file.  Select the file and click “Upgrade” to update the firmware to the latest release.
58  Ping Test The ping test enables users to determine whether an IP address or host is present on the Internet. Type the host name or IP address in the text box and click Ping.
59  USB CONTROL CENTER UTILITY Utility  The USB Control Center Utility is used to connect your computer to USB devices connected to the WLAN Router. The utility allows you to use USB devices as if they were connected directly to your PC through the Wireless N Gigabit Router with USB port (TEW-634GRU).   System Select this feature to completely close and exit from USB Control Center utility.   Tools Configuration This option allows you to enable/disable the ability to automatically run the USB Control Center Utility when your computer turns on.     Auto-Connect Printer List Provides a list of installed printers on your computer. Select the printer you would like to add into the Auto-Connect Printer Lists.
60   Configure Server Click this button to configure the USB server and to log into the user interface of the Wireless N Gigabit Router with USB port (TEW-634GRU).  Print Sharing  This section describes how to use a USB printer through the WLAN Router. Note: For proper installation it is recommended that the printer’s drivers are installed before connecting it to the USB port.  Auto Connect Printer Click this button to configure selected printer for Auto-Connect, or to delete selected printer from Auto-Connect list. This enables auto connection to the printer when printing. It is recommended to set this feature on computers that prints a lot.  Once the printer is connected, the USB Control Center utility will automatically detect the printer.    Set Auto-Connect Printer  Provides a list of installed printers on your computer. Select the printer you would like to add into the Auto-Connect Printer Lists.
61   Network Scanner This section describes the usage of a scanner through the Wireless N Gigabit Router with USB port. Once you click on the Network Scanner button on the USB utility the below image will appear.   Paper Source: Select the type of scanner being used (Flatbed or Document Feeder) Type of image: For proper scanning select the appropriate type of file being scanned.  Preview: Click to preview scanned image Scan: Click to begin scanning  Cancel: Click to cancel scanning
62   Name: Type the name of the folder you would like to have the scanned images stored in.  File Format: Select the file format  Save Location: Click Browse and select the location where you would like to have the scanned files saved in.  Back: Click to return to tbe previous screen. Next: Click to begin scanning Cancel: Click to cancel scanning job and to return to back to the USB Utility.   Connecting USB Storage Device This section describes the how to use the utility when connecting to USB storage device through the WLAN Router.
63   Connect Click this button to establish connection to the selected USB device that is not configured to Auto-Connect, like USB storage devices.  Disconnect Click this button to properly disconnect your computer form the connected USB device.  Request to Connect Click this button if the USB device you would like to connect to is already connected by another computer in your network. The below message will be sent to the other computer indicating that another computer would like to connect to the USB device and will provide the ability to approve or reject connection.    Note: Only a single user can establish connection to a USB device. Once the “Request to Connect” is approved, the connection to the USB device will automatically transfer to the requested user
64 TECHNICAL SPECIFICATIONS Hardware Standards Wired: IEEE 802.3/u Fast Ethernet, IEEE 802.3ab Gigabit Ethernet Wireless: IEEE 802.11b, IEEE 802.11g, IEEE 802.11n (draft 2.0), IEEE 802.11e QoS USB: v1.0, 1.1, 2.0 WAN  1 x 10/100Mbps Auto-MDIX port (Internet) LAN  4 x 10/100/1000Mbps Auto-MDIX ports WPS Button  Enable Wi-Fi Protected Setup function USB  1 x USB 2.0, 1.1 Compliant USB Type A Port Connection Type  Dynamic IP, Static (Fixed) IP, PPPoE, PPTP, L2TP, BigPond Internet Access Control  MAC Address Filter, Domain/URL Filter, Protocol/IP Filter LED Indicator  Power, LAN1~LAN4, WAN, WLAN, USB Power Adapter  12V DC, 2A external power adapter Power Consumption  18watts (max.) Dimension (L x W x H)  201 x 115.8 x 37 mm ( 7.91 x 4.55 x 1.45 inches) W x D x H Weight  383g (13.5 oz) Temperature  Operation: 0°~ 40°C (32°F~ 104°F); Storage: -10°~ 70°C (14°F~158 °F) Humidity  10%~95% RH, no condensation Certifications CE, FCC Wireless Frequency  2412~2484MHz ISM band Antenna  2 x 2dBi detachable dipole antennas Media Access Protocol  CSMA/CA with ACK Modulation Technique  DBPSK/DQPSK/CCK/OFDM (BPSK/QPSK/16-QAM/64-QAM) Data Rate 802.11b: 11Mbps, 5.5Mbps, 2Mbps, and 1Mbps 802.11g: 54Mbps, 48Mbps, 36Mbps, 24Mbps, 18Mbps, 12Mbps, 9Mbps and 6Mbps 802.11n: up to 300Mbps Security WEP(HEX/ASCII): 64/128-bit  WPA(AES/TKIP): WPA/WPA2, WPA-PSK/WPA2-PSK  Enable/Disable broadcast SSID Protocol filtering Domain filtering QoS  WMM enable/disable feature Output Power (Average) 802.11b: 15dBm (typical)  802.11g: 15dBm (typical) 802.11n: 15dBm (typical)  Receiving Sensitivity  802.11b: 11Mbps -85dBm (typical) @ 10% per 802.11g: 54Mbps  -68dBm (typical) @ 10% per  802.11n: 300Mbps -59dBm (typical) @ 10% per Channels  1~ 11 (FCC), 1~13 (ETSI)
65  Limited Warranty  TRENDnetwarrantsitsproductsagainstdefectsinmaterialandworkmanship,undernormaluseandservice,forthefollowinglengthsoftimefromthedateofpurchase.TEW‐634GRU–3YearsWarrantyAC/DCPowerAdapter,CoolingFan,andPowerSupplycarry1yearwarranty.Ifaproductdoesnotoperateaswarrantedduringtheapplicablewarrantyperiod,TRENDnetshallreservetheright,atitsexpense,torepairorreplacethedefectiveproductorpartanddeliveranequivalentproductorparttothecustomer.Therepair/replacementunit’swarrantycontinuesfromtheoriginaldateofpurchase.AllproductsthatarereplacedbecomethepropertyofTRENDnet.Replacementproductsmaybeneworreconditioned.TRENDnetdoesnotissuerefundsorcredit.Pleasecontactthepoint‐of‐purchasefortheirreturnpolicies.TRENDnetshallnotberesponsibleforanysoftware,firmware,information,ormemorydataofcustomercontainedin,storedon,orintegratedwithanyproductsreturnedtoTRENDnetpursuanttoanywarranty.Therearenouserserviceablepartsinsidetheproduct.Donotremoveorattempttoservicetheproductbyanyunauthorizedservicecenter.Thiswarrantyisvoidedif(i)theproducthasbeenmodifiedorrepairedbyanyunauthorizedservicecenter,(ii)theproductwassubjecttoaccident,abuse,orimproperuse(iii)theproductwassubjecttoconditionsmoreseverethanthosespecifiedinthemanual.WarrantyservicemaybeobtainedbycontactingTRENDnetwithintheapplicablewarrantyperiodandprovidingacopyofthedatedproofofthepurchase.UponpropersubmissionofrequireddocumentationaReturnMaterialAuthorization(RMA)numberwillbeissued.AnRMAnumberisrequiredinordertoinitiatewarrantyservicesupportforallTRENDnetproducts.ProductsthataresenttoTRENDnetforRMAservicemusthavetheRMAnumbermarkedontheoutsideofreturnpackagesandsenttoTRENDnetprepaid,insuredandpackagedappropriatelyforsafeshipment.CustomersshippingfromoutsideoftheUSAandCanadaareresponsibleforreturnshippingfees.CustomersshippingfromoutsideoftheUSAareresponsibleforcustomcharges,includingbutnotlimitedto,duty,tax,andotherfees.WARRANTIESEXCLUSIVE:IFTHETRENDNETPRODUCTDOESNOTOPERATEASWARRANTEDABOVE,THECUSTOMER’SSOLEREMEDYSHALLBE,ATTRENDNET’SOPTION,REPAIRORREPLACE.THEFOREGOINGWARRANTIESANDREMEDIESAREEXCLUSIVEANDAREINLIEUOFALLOTHERWARRANTIES,EXPRESSEDORIMPLIED,EITHERINFACTORBYOPERATIONOFLAW,STATUTORYOROTHERWISE,INCLUDINGWARRANTIESOFMERCHANTABILITYANDFITNESSFORAPARTICULARPURPOSE.TRENDNETNEITHERASSUMESNORAUTHORIZESANYOTHERPERSONTOASSUMEFORITANYOTHERLIABILITYINCONNECTIONWITHTHESALE,INSTALLATIONMAINTENANCEORUSEOFTRENDNET’SPRODUCTS.TRENDNETSHALLNOTBELIABLEUNDERTHISWARRANTYIFITSTESTINGANDEXAMINATIONDISCLOSETHATTHEALLEGEDDEFECTINTHEPRODUCTDOESNOTEXISTORWASCAUSEDBYCUSTOMER’SORANYTHIRDPERSON’SMISUSE,NEGLECT,IMPROPERINSTALLATIONORTESTING,UNAUTHORIZEDATTEMPTSTOREPAIRORMODIFY,ORANYOTHERCAUSEBEYONDTHERANGEOFTHEINTENDEDUSE,ORBYACCIDENT,FIRE,LIGHTNING,OROTHERHAZARD.LIMITATIONOFLIABILITY:TOTHEFULLEXTENTALLOWEDBYLAWTRENDNETALSOEXCLUDESFORITSELFANDITSSUPPLIERSANYLIABILITY,WHETHERBASEDINCONTRACTORTORT(INCLUDINGNEGLIGENCE),FORINCIDENTAL,CONSEQUENTIAL,INDIRECT,SPECIAL,ORPUNITIVEDAMAGESOFANYKIND,ORFORLOSSOFREVENUEORPROFITS,LOSSOFBUSINESS,LOSSOFINFORMATIONORDATE,OROTHERFINANCIALLOSSARISINGOUTOFORINCONNECTIONWITHTHESALE,INSTALLATION,MAINTENANCE,USE,PERFORMANCE,FAILURE,ORINTERRUPTIONOFTHEPOSSIBILITYOFSUCHDAMAGES,ANDLIMITSITSLIABILITYTOREPAIR,REPLACEMENT,ORREFUNDOFTHEPURCHASEPRICEPAID,
66  ATTRENDNET’SOPTION.THISDISCLAIMEROFLIABILITYFORDAMAGESWILLNOTBEAFFECTEDIFANYREMEDYPROVIDEDHEREINSHALLFAILOFITSESSENTIALPURPOSE.GoverningLaw:ThisLimitedWarrantyshallbegovernedbythelawsofthestateofCalifornia.SomeTRENDnetproductsincludesoftwarecodewrittenbythirdpartydevelopers.ThesecodesaresubjecttotheGNUGeneralPublicLicense("GPL")orGNULesserGeneralPublicLicense("LGPL").Gotohttp://www.trendnet.com/gplorhttp://www.trendnet.comDownloadsectionandlookforthedesiredTRENDnetproducttoaccesstotheGPLCodeorLGPLCode.ThesecodesaredistributedWITHOUTWARRANTYandaresubjecttothecopyrightsofthedevelopers.TRENDnetdoesnotprovidetechnicalsupportforthesecodes.Pleasegotohttp://www.gnu.org/licenses/gpl.txtorhttp://www.gnu.org/licenses/lgpl.txtforspecifictermsofeachlicense.PWP05202009v2
67

Navigation menu