Camera Vision Solutions SHDX On-board Video Vehicle Recorder User Manual Manual
Camera Vision Solutions, Inc. On-board Video Vehicle Recorder Manual
Manual
2
Phone 512-651-5277
www.sentinelhdx.com
support@sentinelhdx.com
Operating Environment and Unit Placement Considerations
Prior to installation, some thought must be taken to determine the optimum placement of the
recorder unit in regards to video capture windows, power cable routing, and radio frequency
attenuation of the wireless subsystems.
The recorder unit contains two (2) 140 degree visible angle image sensor capture devices.
Care must be taken to optimize viewing angle both internally and externally in the vehicle. The
large viewing angle grants a great deal of flexibility in mounting locations. Ideally, the internal
capture window will include both the driver and passenger’s torsos. In a passenger vehicle, the
unit is typically placed behind the rear view mirror with the rear-facing image sensor protruding
below. In commercial trucking environments, the unit is generally placed where a centerline
again captures both occupants’ torsos. In either installation, it is imperative to generate test
recordings using the panic button to confirm optimum viewing angle.
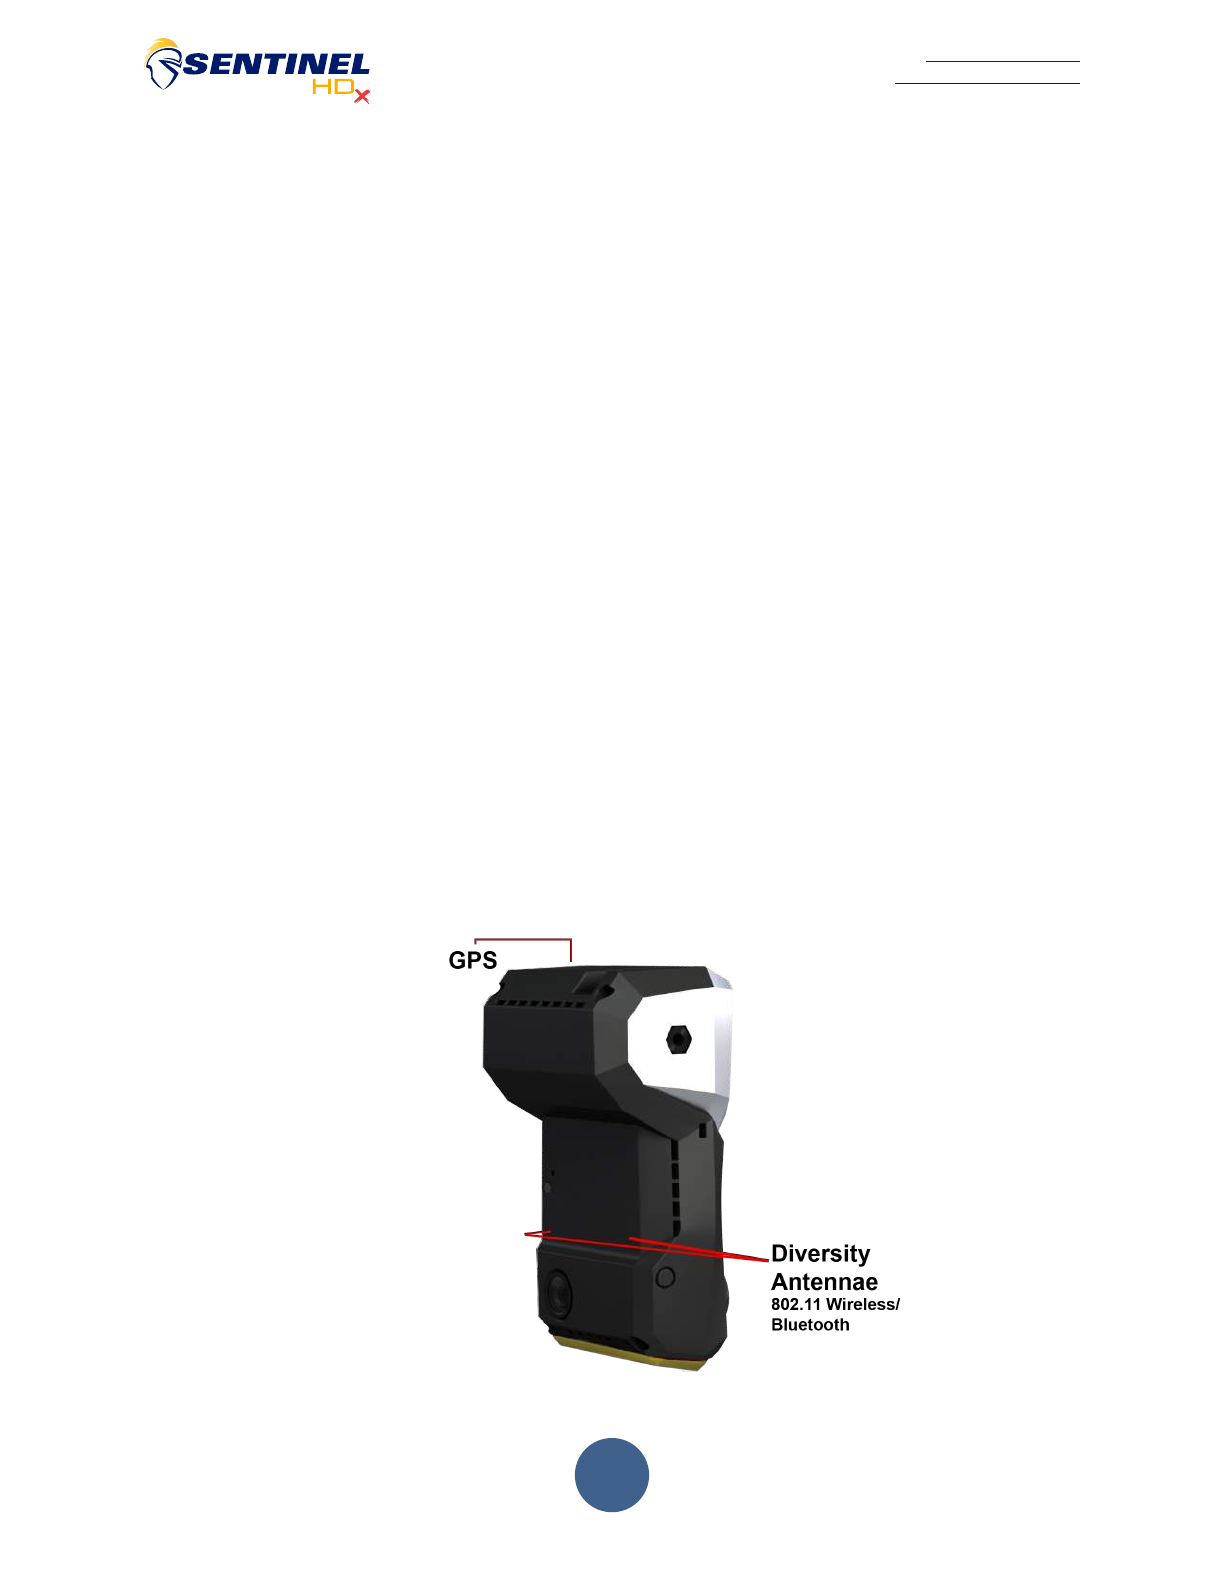
The Sentinel HDx unit contains 3 distinct radio subsystems including GPS, 802.11 wireless, and
Bluetooth. A common concern across the systems is the Faraday Cage effect the vehicle’s
metal body presents to an RF signal. In general, the more unimpeded a line of sight between
the recorder and the device it is communicating with, the better the signal.
The GPS module is located at the top of the HDx unit. This antenna receives signals from the
Global Positioning Satellite system located in geosynchronous orbit around the earth. Optimum
GPS positioning information relies upon communication with the greatest number of individual
satellites on the horizon. The same locations referenced above, behind the rear-view mirror in
passenger automobiles and similar position of the windshield in commercial trucks, generally
represents the best option for signal reception.

3
Phone 512-651-5277
www.sentinelhdx.com
support@sentinelhdx.com
The 802.11 wireless radio shares many of the same considerations as the GPS unit, the main
difference is the fact that the signal path is terrestrial. Wireless signal strength, integrity, and
associated data transfer rates are highly dependent on the wireless network’s topology. Access
point locations, antenna geometries, and localized wireless spectrum dynamics all have an
effect on link quality. Detailed guidance in this regard is beyond the scope of this document.
Please consult your IT professional for optimization in your particular environment. In general,
direct line of sight with the access point, the shortest physical distance, and minimizing external
interference represent the best plan. This equipment should be installed and operated with
minimum distance 10 cm between the radiator and your body.
The HDx Bluetooth module is the least sensitive of the 3 radios to unit placement. Following
above considerations will accommodate the requirements of Bluetooth without further
requirements
Installation Procedures
The following instructions represent a general overview of the installation process in most
vehicles. Each and every vehicle environment is unique and it is beyond the scope of this
document to address all possible considerations unique to your setting.
Important: An industry specialist familiar with your specific vehicle should be
consulted at any point that you feel the safety or operating characteristics of the
vehicle will be impacted.
The installation of the Sentinel HDx unit consists of the following major elements:
•Mounting bracket placement
•Electrical harness routing and connection
•Mounting and connecting the recorder
•Test recording and assessment
•Calibration of the Unit
4
Phone 512-651-5277
www.sentinelhdx.com
support@sentinelhdx.com
Mounting Bracket Placement
The two most important factors involved in bracket installation are test fitting the camera unit
and surface preparation of the windshield mating surface. The Sentinel HDx unit utilizes 3M’s
VHB (Very High Bonding) adhesive mounting tape to ensure the best possible result in any
installation.
Important: The ideal temperature for application is between 70ºF to 100ºF (21ºC to
38ºC), it is highly recommended the vehicle’s defroster be used to bring up the
surface temperature where required. Optionally the process can be performed in a
heated garage.
Important: DO NOT REMOVE the adhesive’s protective backing strip from the back
of the 3M Tape until you are ready to adhere the bracket to the windshield
1. Perform the installation with the vehicle parked on as level of a surface as possible, ideally
with an unimpeded view of the horizon for subsequent camera angle adjustment.
2. Test various placements with the camera and bracket to obtain the most optimal position for
your environment based upon the criteria in the first section of this document.
3. Use the provided surface wipe to completely clean the associated mating surface for the
bracket’s adhesive pad. Allow the surface to dry completely before proceeding.
4. Once again, place the camera and bracket assembly in the desired final installation position.
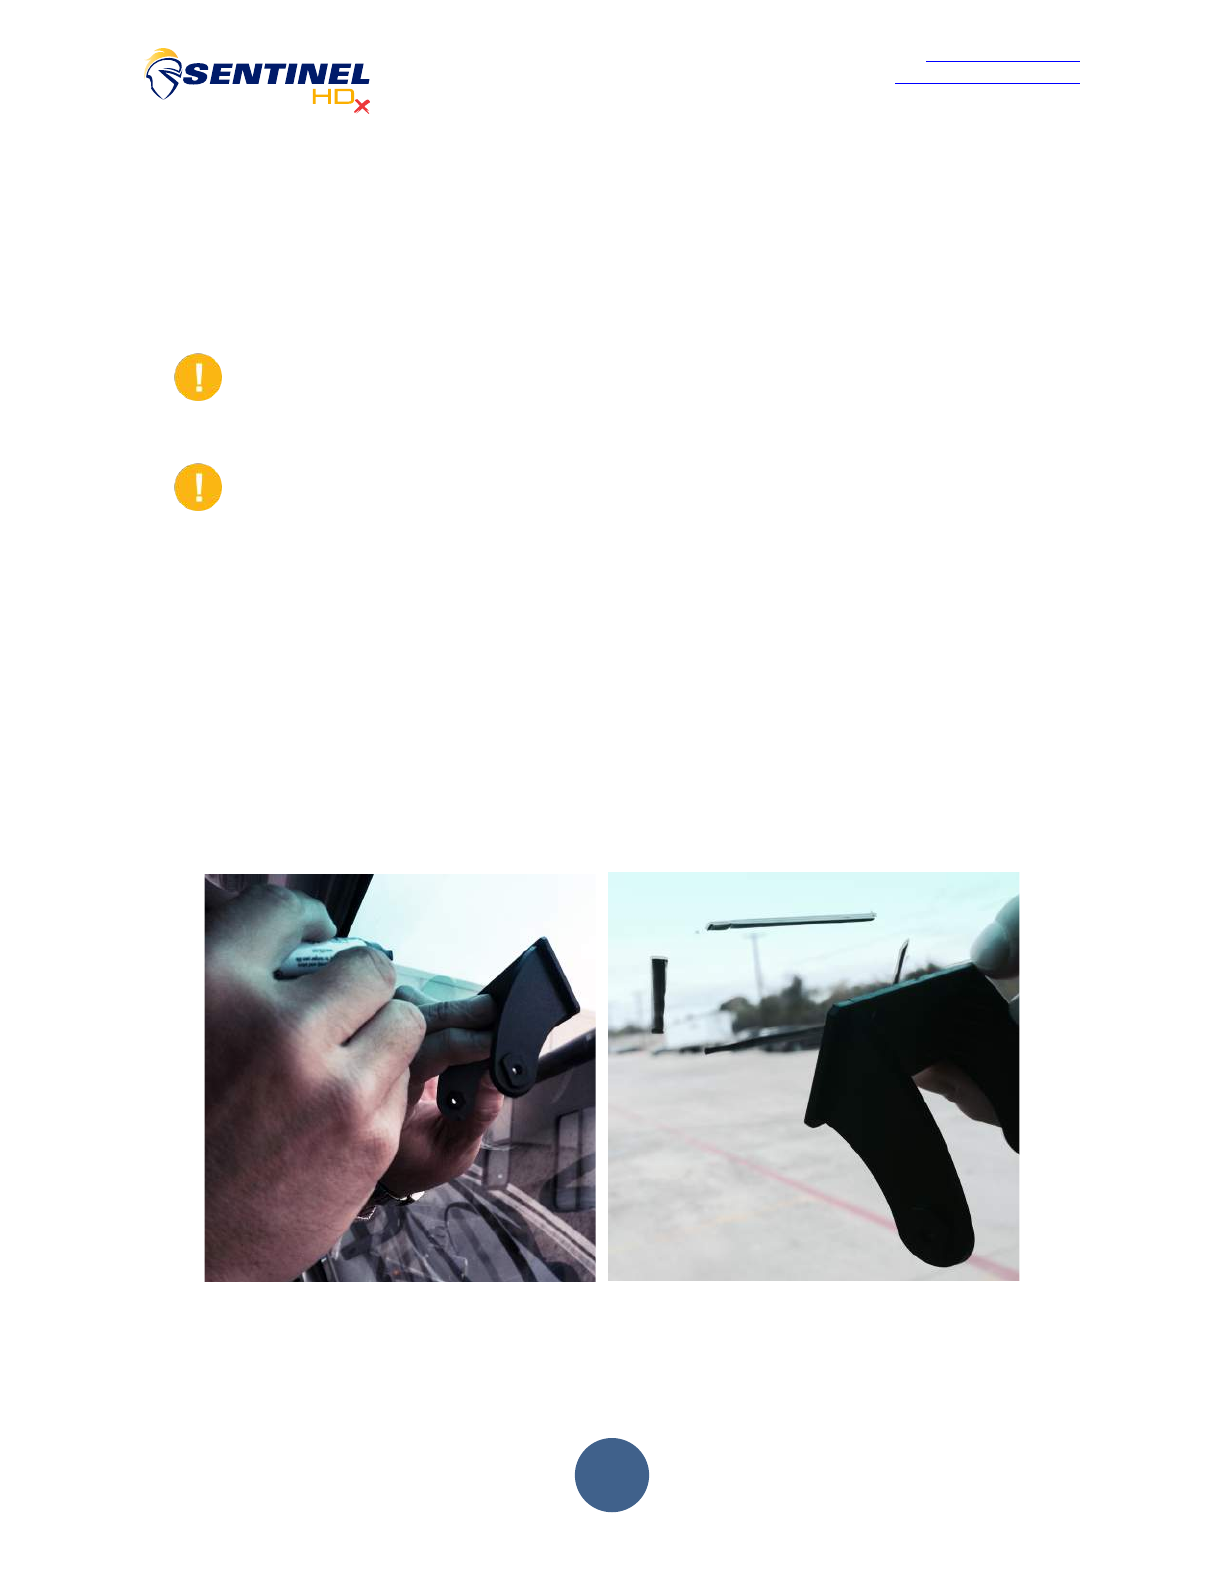
Using an Expo or similar felt-tipped marker, trace the bracket outline onto the windshield
itself. Remove the camera and bracket assembly.
5. If necessary, separate the camera unit from the bracket. Remove the adhesive’s protective
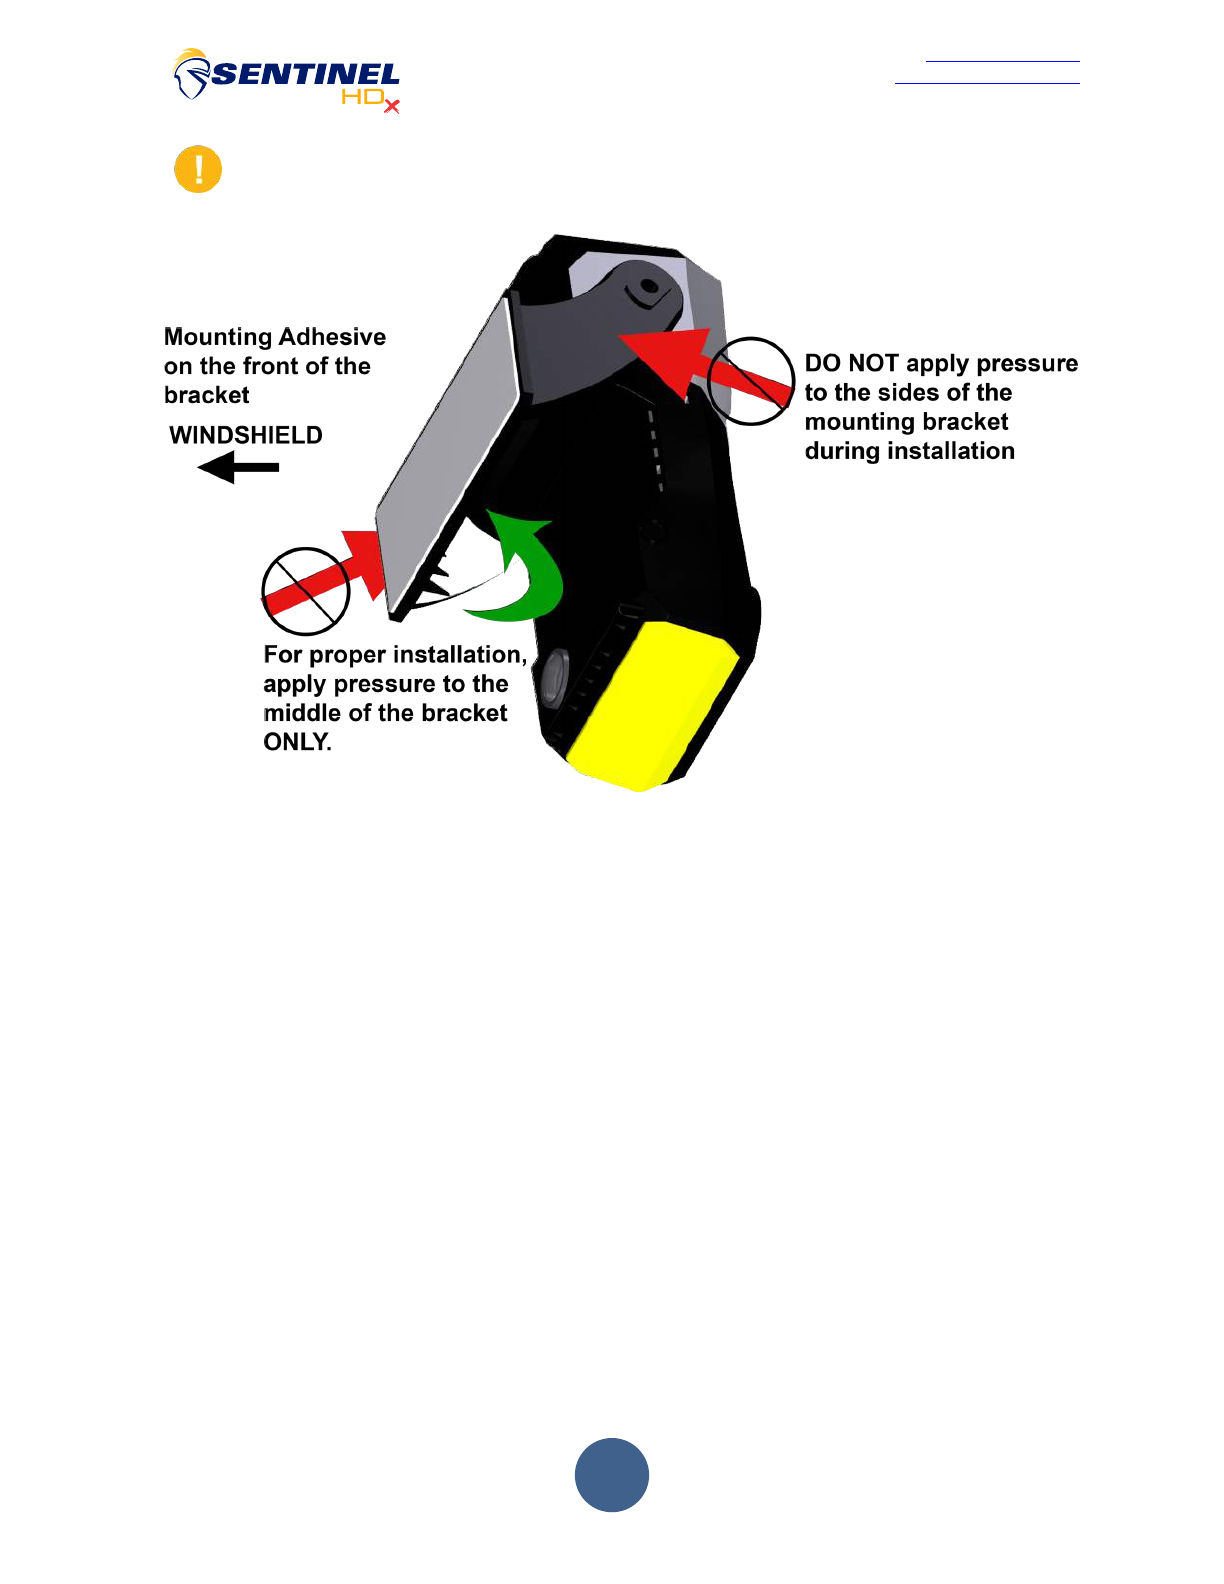
backing strip. Place the bracket against the mating surface within the traced outline and
apply firm pressure directly in the center of the bracket to ensure thorough adhesive contact.
5
Phone 512-651-5277
www.sentinelhdx.com
support@sentinelhdx.com
Important: Do not apply lateral pressure on the wings of the bracket. Firm pressure
should be applied only to the center per the illustration.
6. Mount the camera to the bracket assembly using the provided screws. It is important to
ensure the unit is positioned as perfectly vertical as possibly using the slotted location
notches to ensure proper operation.
6
Phone 512-651-5277
www.sentinelhdx.com
support@sentinelhdx.com
Electrical Harness Routing and Connection
The Sentinel HDx unit is designed to operate directly off of your vehicle’s 12 volt electrical
system via a (2) two wire installation. Most vehicles provide two basic types of 12 volt supply;
switched on and off with the vehicle’s ignition and always on. The HDx should always be
connected to the 12 volt always on power source. The basic Sentinel harness DOES NOT
include an inline fuse, so installations should always make connection at the vehicle’s fuse
panel or utilize an optional fuse harness assembly.
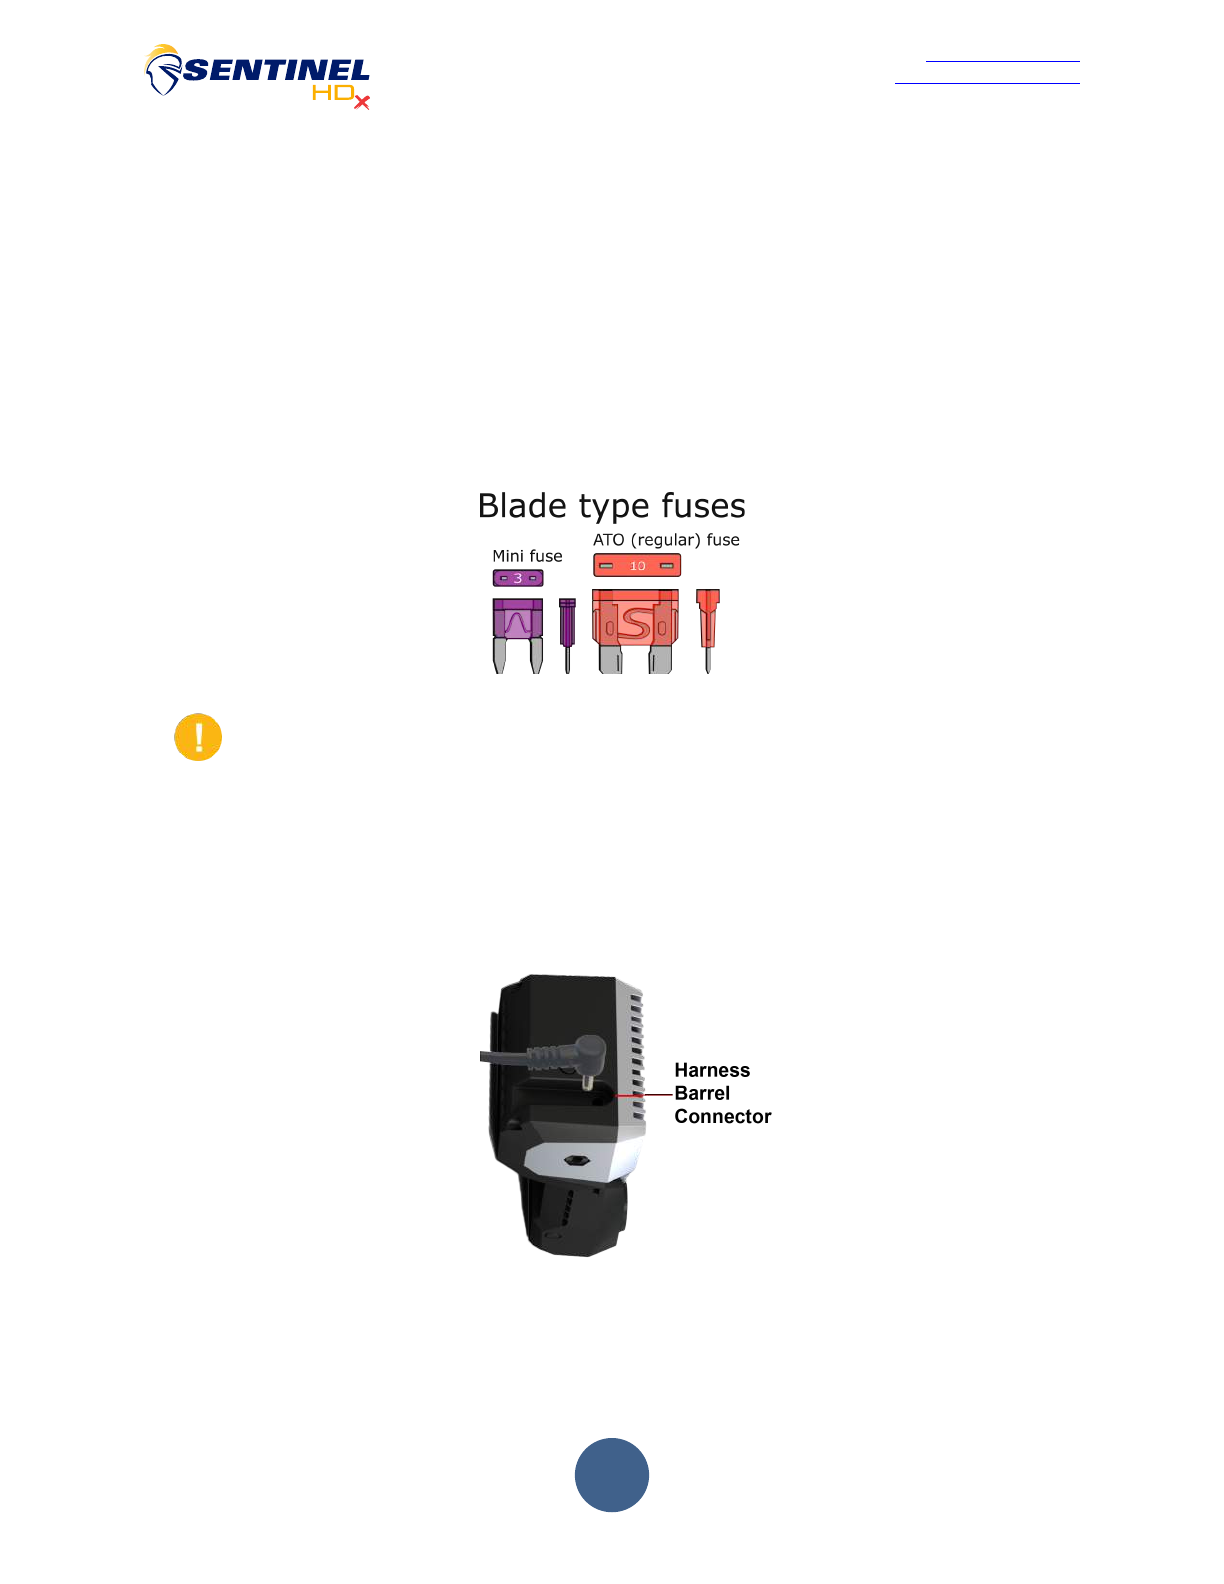
There are numerous options for connection to the vehicle’s fuse panel. Sentinel HDx provides a
basic tap for ATC/ATO sized fuses with the harness assembly. Refer to the diagram below to
help determine your fuse type.
!
Important: If you have any doubt as to your ability to safely install the HDx unit,
please consult a professional familiar with the electrical system of your vehicle’s
manufacturer.
1. Beginning at the mounted camera assembly, work back from the installation site to the
vehicle’s fuse panel.
2. Place the cable harness barrel connector into the mating receptacle on the top of the
camera assembly.
3. Securely route the harness wire behind trim work from the camera down to the vehicle fuse
panel. DO NOT remove the two magnetic assemblies from the camera end of the wiring
harness. They are required for EMI reduction. If the harness needs to be trimmed or
extended, do so at the opposite (fuse panel) end of the cable.
7
Phone 512-651-5277
www.sentinelhdx.com
support@sentinelhdx.com
4. Select an appropriate accessory fuse circuit in the panel with enough amperage to safely
accommodate the camera’s load of 1 Amp.
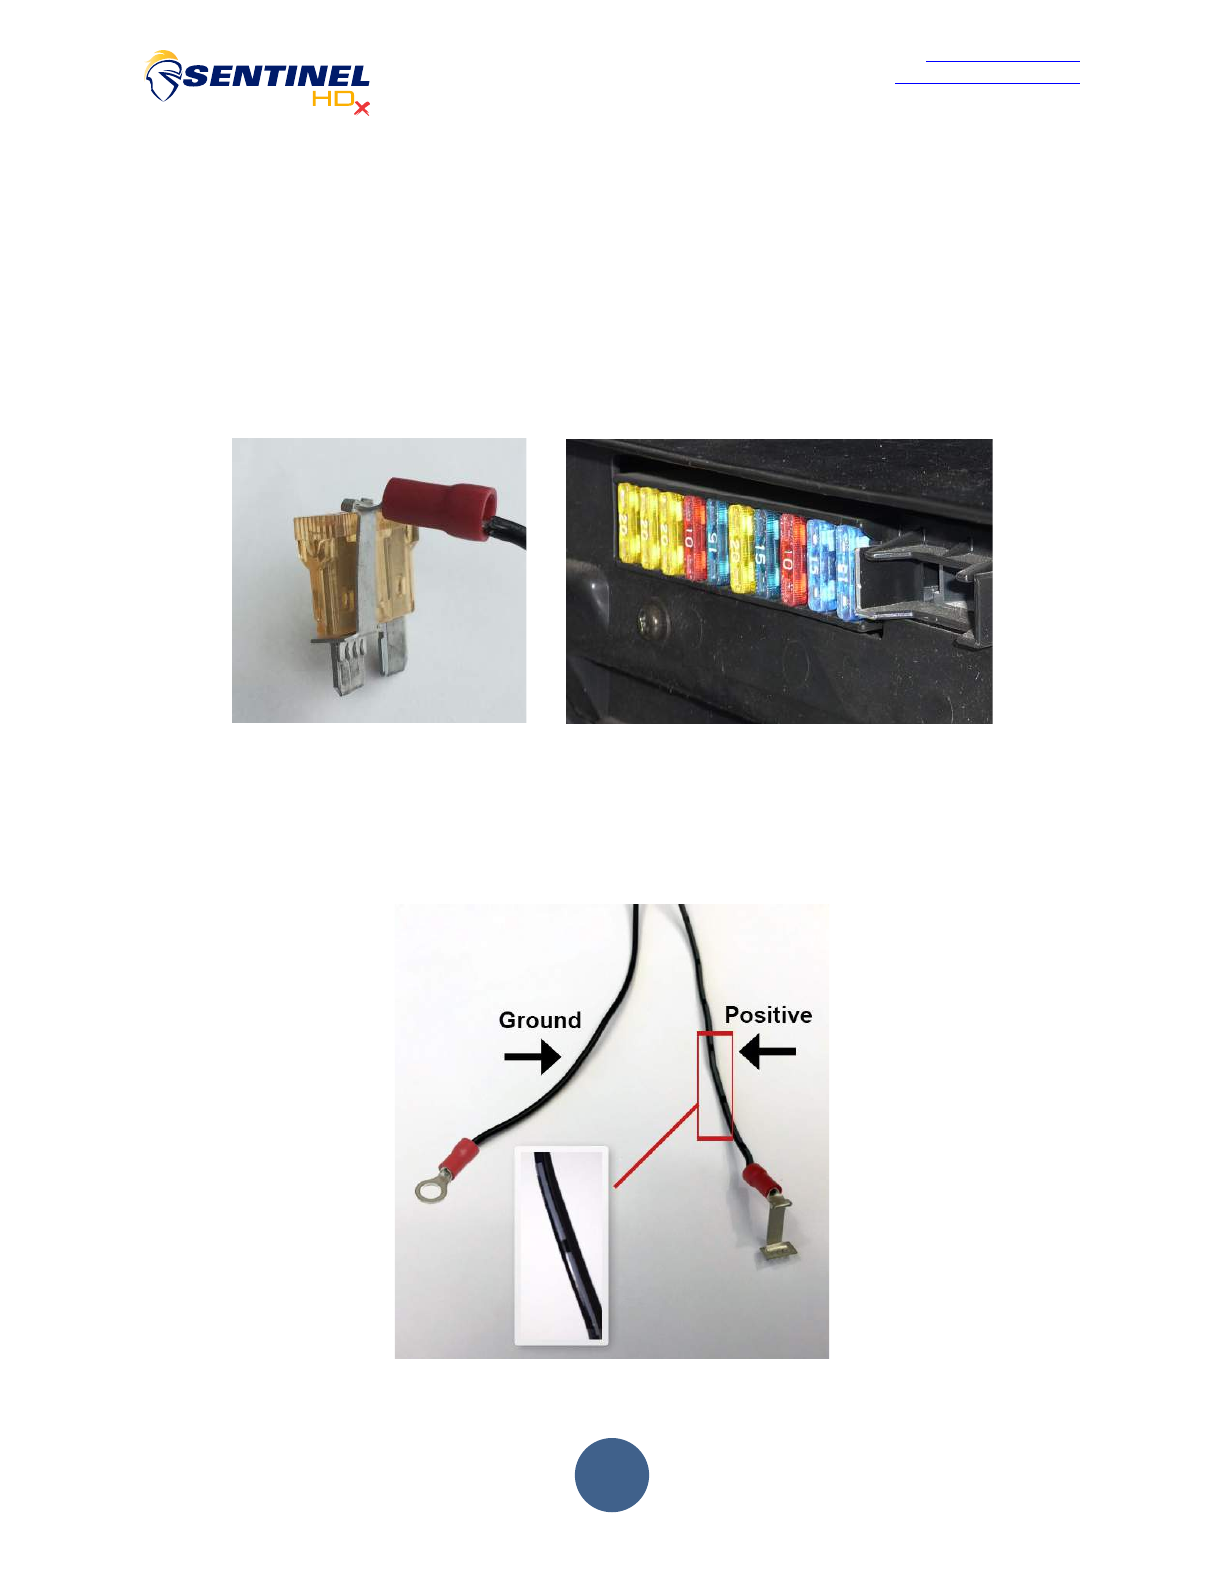
5. Remove the ATC/ATO fuse from its socket. Using a voltmeter or 12V test lamp, determine
which leg of the supply socket has 12 volt continuous supply. You will want to use the
opposite leg of the fuse to make the power tap. This allows the vehicle’s fuse protection
system to function normally and blow in the event of an over-current draw. Utilizing the
supply-side leg will provide voltage to the camera even in the event of a blown fuse which is
highly undesirable and dangerous. Slide the fuse tap over the leg of the fuse opposite the
12 volt continuous supply and reinsert the fuse.
6. Route the positive wire of the camera harness to the red receptacle on the fuse tap
assembly and firmly crimp the connector.
7. Route the ground wire of the camera harness to an appropriate grounding location. Crimp
the ring terminal to the ground wire and securely mount at the ground location.
8. Secure all loose wiring and reattach any vehicle trim panels removed during the harness
installation.
8
Phone 512-651-5277
www.sentinelhdx.com
support@sentinelhdx.com
Test Recording and Assessment
The Sentinel HDx unit should now be physically mounted in the proper location on the vehicle’s
windshield and powered by a 12 volt continuous fused power circuit. It is now time to run a test
recording to confirm proper camera angles and vertical level adjustment.
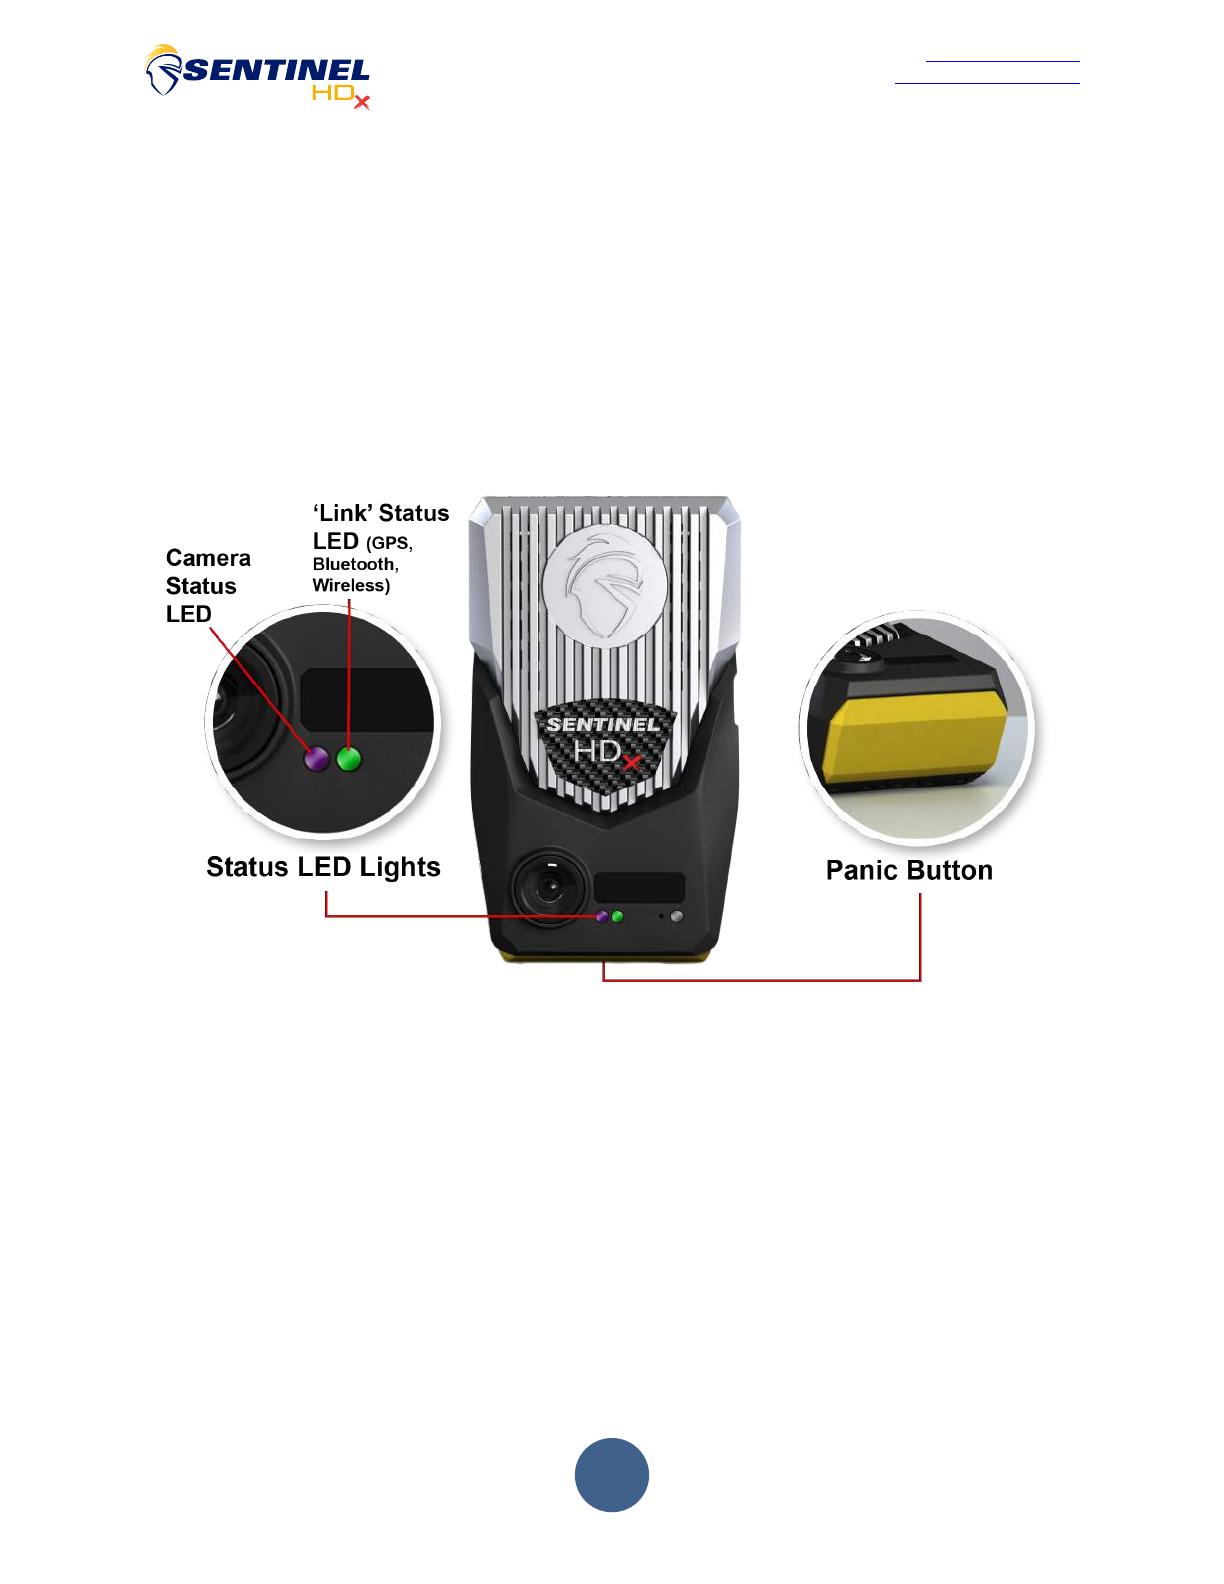
1. Locate and depress the yellow colored Panic Button on the bottom portion of the camera
unit. You will witness the camera status LED illuminate solid Purple, indicating that an
event is being recorded
2. Utilizing the AEGIS software installation, review the video for proper operation and
levelness. If you have enabled the optional audio recording feature, verify proper audio
reproduction of the test.
9
Phone 512-651-5277
www.sentinelhdx.com
support@sentinelhdx.com
3. If necessary. The camera mounting screws can be loosened and the camera rotated in
the adjustment slots to provide a better viewing angle.
4. Verify the following areas before concluding the installation session.
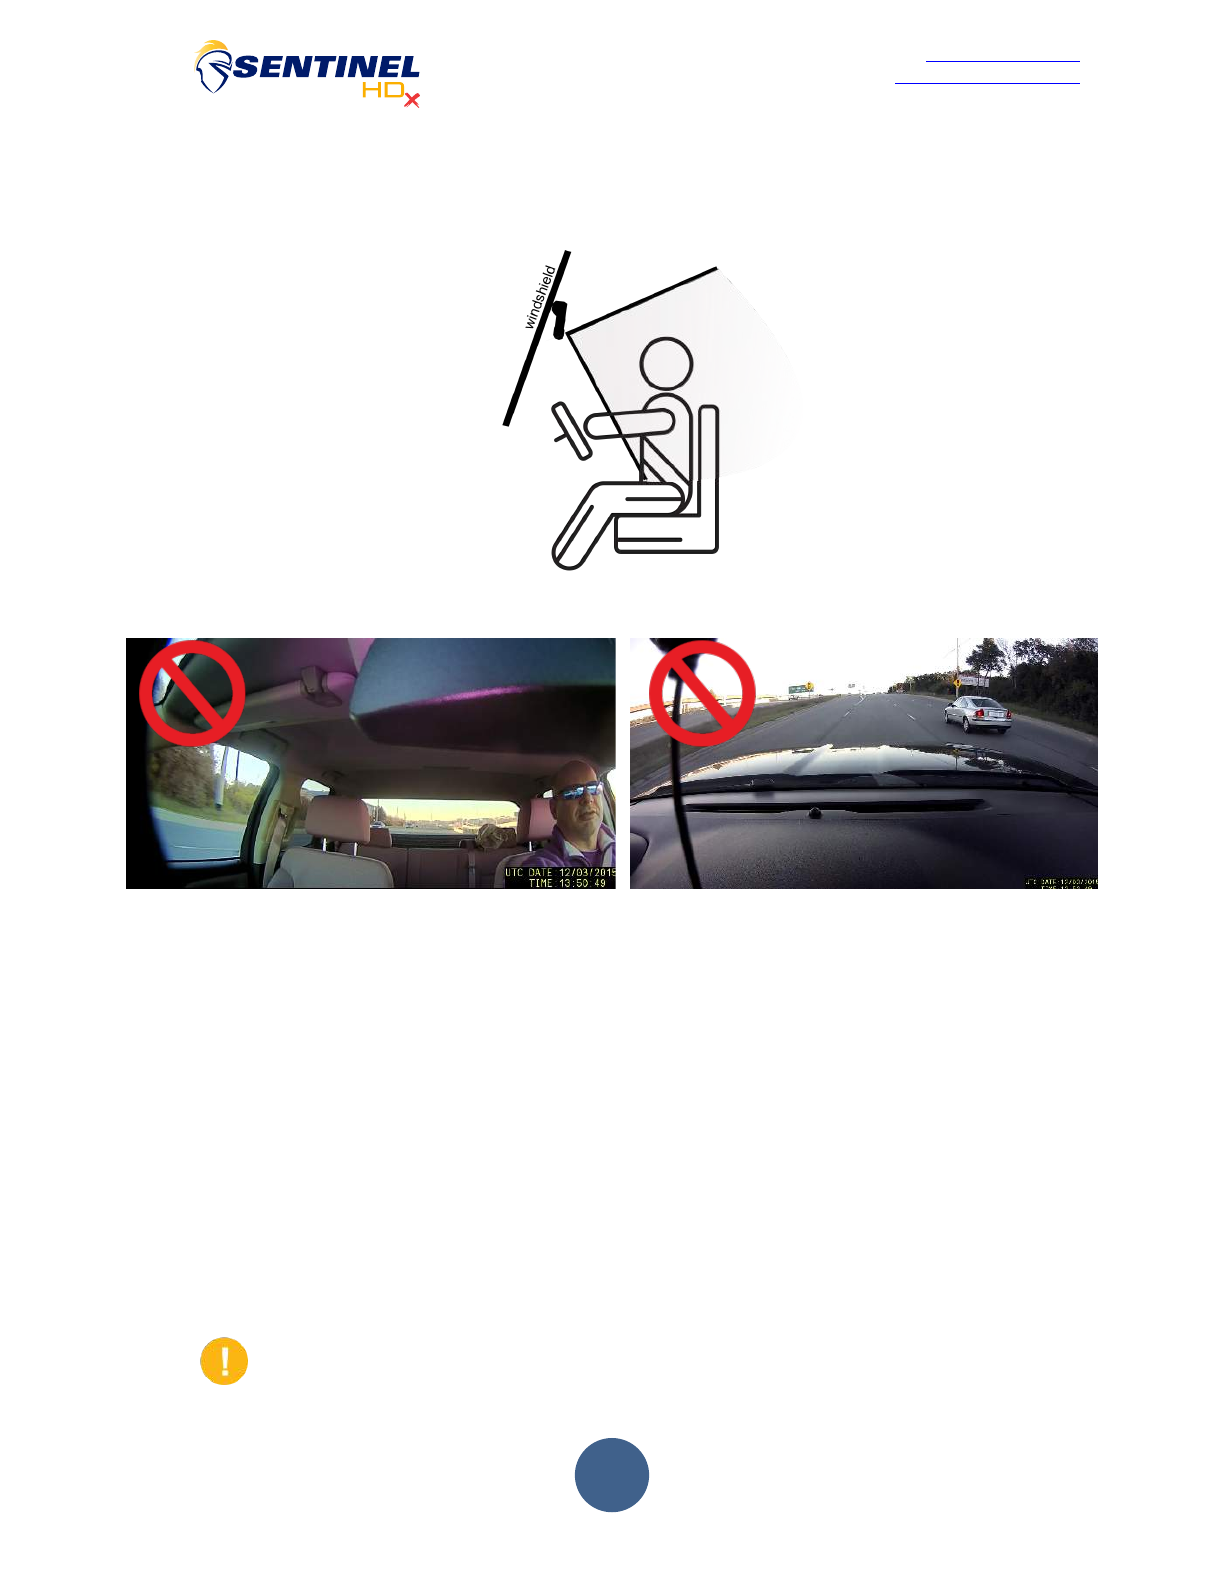
•Is the horizon of the recording centered in the forward-facing video?
•Is the rear window (in the case of a passenger automobile) roughly centered in the
rear-facing video?
•Are both the driver and passenger torsos visible with reasonable centering left to
right?
•Is unit calibrated? Check by holding the panic button for 10 seconds, then release.
You will hear an audible beep and the unit will check if unit is properly mounted. If
incorrect, then status LED will show magenta. Either unit can be adjusted for better
placement, or you can calibrate unit to this mounting setting if that is the preferred
position of the camera for the installation. To calibrate to this position, press and hold
the panic button again for an additional 10 seconds and the unit will auto calibrate
and provide double audible beep when complete
Important: If the vehicle has a very curved or angled windshield, consider the use
of the HDx optional adjustable windshield mount. Ask your Sentinel HDx sales
representative for details.
Adjustments to camera angle can prevent poor viewing angles as shown below
10
Phone 512-651-5277
www.sentinelhdx.com
support@sentinelhdx.com
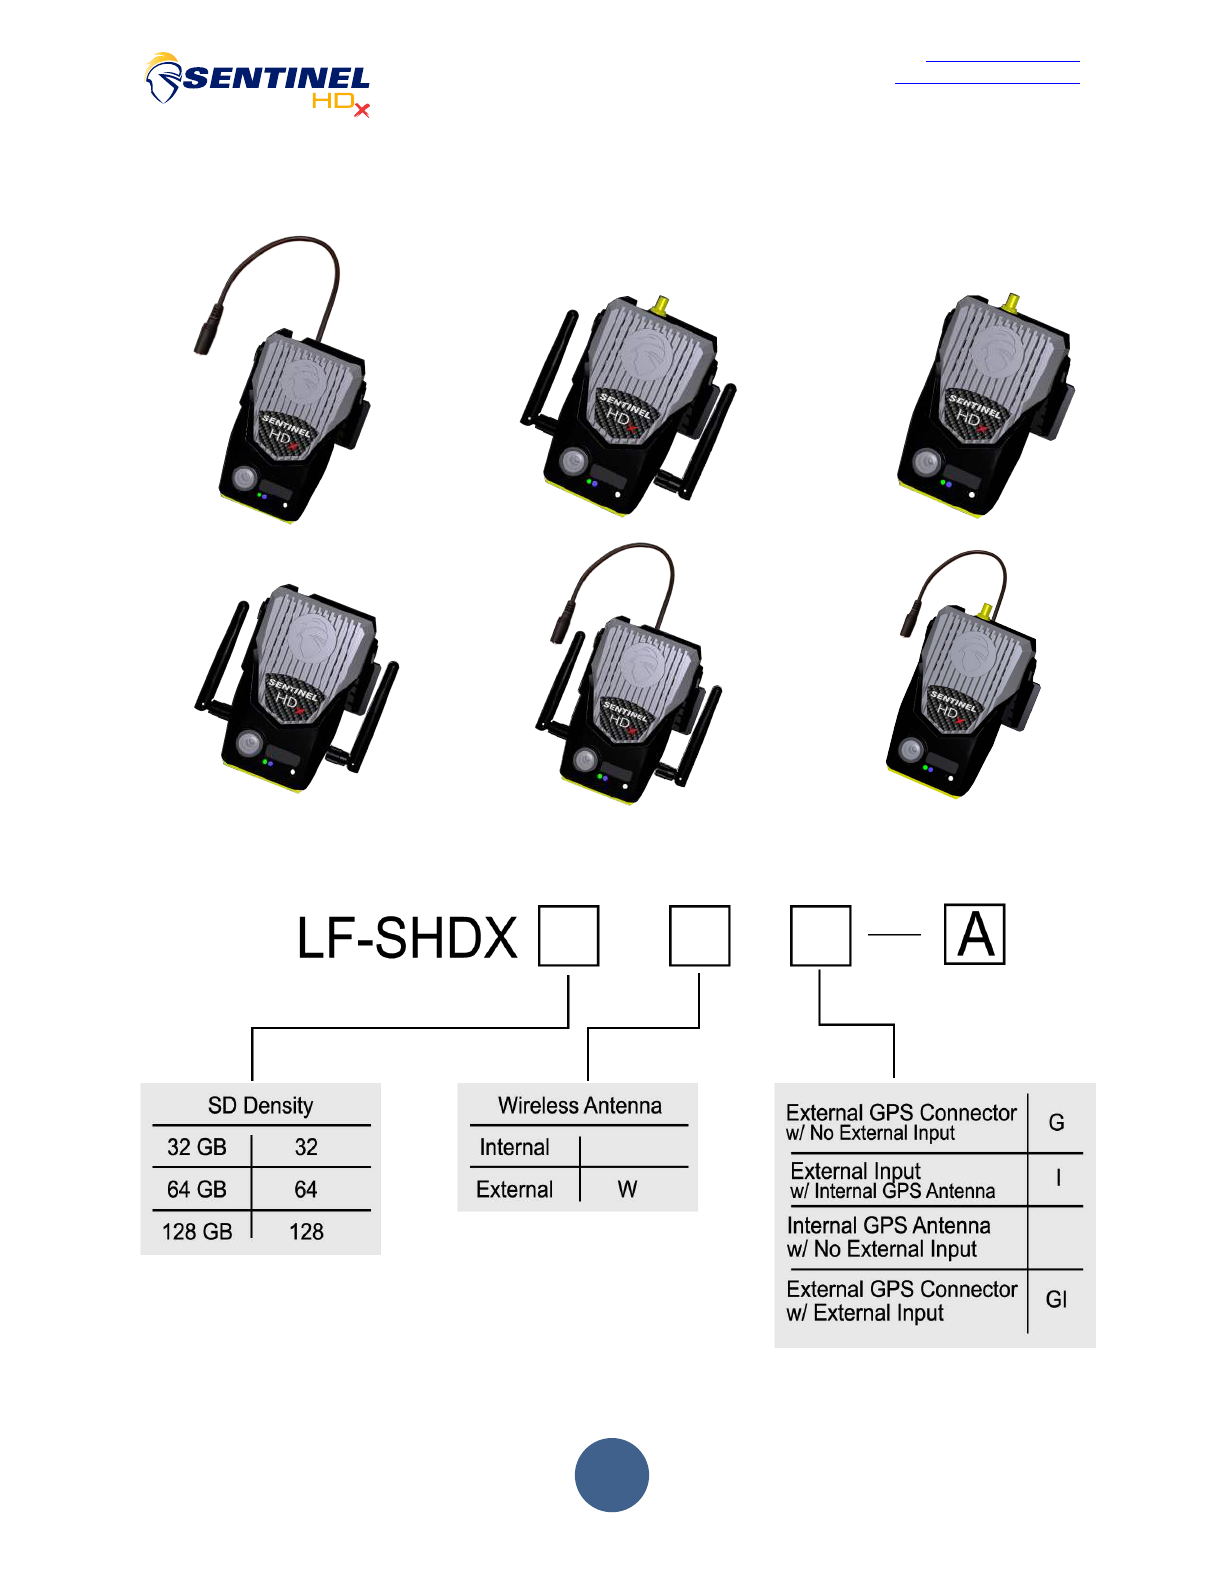
I indicates External Input
W indicates External Wireless Antennae
G indicates External GPS Connector
SKU Numbers and Production Variations
W
GW
G
I
For Example:
LF-SHDX-32-A = Standard ordering part number with 32 GB card and both antennas internal
GI
WI

11
Phone 512-651-5277
www.sentinelhdx.com
support@sentinelhdx.com
FCC Declaration
FCC ID: 2AFS2-SHDX
This device complies with Part 15 of the FCC Rules.
Operation is subject to the following two conditions:
1. This device may not cause harmful interference, and
2. This device must accept any interference received, including interference that may
cause undesired operation.
NOTE: This equipment has been tested and found to comply with the limits for a Class B
digital device, pursuant to part 15 of the FCC Rules. These limits are designed to
provide reasonable protection against harmful interference when the equipment is
operated in a commercial environment. This equipment generates, uses and can radiate
radio frequency energy and, if not installed and used in accordance with the instructions,
may cause harmful interference to radio communications. However, there is no
guarantee that interference will not occur in a particular installation. If this equipment
does cause harmful interference to radio or television reception, which can be
determined by turning the equipment off and on, the user is encouraged to try to correct
the interference by one or more of the following measures:
—Reorient or relocate the receiving antenna.
—Increase the separation between the equipment and receiver.
—Connect the equipment into an outlet on a circuit different from that to which the
receiver is connected.
—Consult the dealer or an experienced radio/ TV technician for help.
Changes or modifications not expressly approved by the party responsible for
compliance could void the user’s authority to operate the equipment. This equipment
should be installed and operated with minimum distance of 4 inches (10 cm) between
the radiator and your body.
Service and Repair
Camera unit is not field serviceable. User should not tamper with seal on unit or attempt to open
the unit for any reason. Only qualified personnel should service the camera or install the camera
in a vehicle. Faulty installation or service may be dangerous and may invalidate any warranty
applicable to the device. If Camera is damaged, malfunctions, or is believed to be in need of
repair, please contact your dealer or a Camera Vision Solutions Provider and refer all servicing
to qualified service personnel.
