Canon Imagepress Server Q2 V2 Users Manual
Canon-Imagepress-C7000Vp-Users-Manual-241011 canon-imagepress-c7000vp-users-manual-241011
C7000VP to the manual 74642db2-53a2-4f40-b037-762b60bca67e
2015-03-09
: Canon Canon-Imagepress-Server-Q2-V2-Users-Manual-585915 canon-imagepress-server-q2-v2-users-manual-585915 canon pdf
Open the PDF directly: View PDF ![]() .
.
Page Count: 38

Fiery JDF Connector Workow Collaboration
Installation Manual
For Prinect PrePress Manager & Prinect Digital Print Manager

Contents
1-1. InstallingJDFConnectorsoftware.............................................................................................................5
1-2. SelectingLanguage............................................................................................................................................6
1-3. StartofInstallationWizard..............................................................................................................................7
1-4. SelectingInstallComponent.........................................................................................................................7
1-5. LicenseAgreement.............................................................................................................................................8
1-6. SelectingdetailedSetup..................................................................................................................................8
1-7. StartofInstallation..............................................................................................................................................9
2-1. CheckingsettingsofJDFConnector..................................................................................................... 11
2-2. RegisteringFieryServer................................................................................................................................. 16
2-3. LoginSetting....................................................................................................................................................... 18
2-4. JDFDeviceIDSetting..................................................................................................................................... 18
2-5. AutoSubmitSetting........................................................................................................................................ 19
2-6. MediaSetting...................................................................................................................................................... 20
3-1. ChangingsettingsofregisteredFieryServer.................................................................................... 21
3-2. DeletingFieryServer....................................................................................................................................... 21

4-1. InstallingCommandWorkStation........................................................................................................... 22
4-2. Tocongureanewentry............................................................................................................................. 22
4.2.1. Tocongureanewentry......................................................................................................... 22
4.2.2. Toeditanentry............................................................................................................................. 24
4-3. ExportingthePaperCatalogdatabase................................................................................................. 29

Preface
Thank you for purchasing this Canon product. Please read this manual thoroughly before operating the
product in order to familiarize yourself with its capabilities, and to make the most of its many functions.
After reading this manual, store it in a safe place for future reference.
Displays Used in This Manual
Unless otherwise noted, the screen shots used in this manual show the imagePRESS C7000VP and
imagePRESS Server A3100 connected to the Prinect Prepress Manager.
Dierences across the copier/printer to which the product is connected are noted wherever appropriate.
Functions that are unavailable due to a particular combination of accessories and optional equipment are
not displayed on the web browser. Therefore, screen shots of computer operation screens used in this
manual may dier from the ones you actually see, depending on the model or options that come with your
machine.
Trademarks
Other product and company names herein may be the trademarks of their respective owners.
Copyright
Copyright 2008 by Canon Inc. All rights reserved.
No part of this publication may be reproduced or transmitted in any form or by any means, electronic
or mechanical, including photocopying and recording, or by any information storage or retrieval system
without the prior written permission of Canon Inc.
1. Installation of JDF Connector
Install the JDF Connector software using "EFI Fiery JDF Connector SOFTWARE & DOCUMENTATION V1.6" CD
in the media pack that accompany with imagePRESS Server.
The following table lists the minimum system requirements.
Host Machine PS Controller Fiery JDF
Connector
Device
Capability Files
Prinect Digital
Print Maneger
Prinect Print
Ready
imagePRESS C7000VP
imgaePRESS Server A3000/A2000 v.1.5.2 SP2
v1.6 or later
3.5.0.29 3.5.721.1
imgaePRESS Server A3100/A2100 v1.6 4.0 4.0
imagePRESS C6000VP imgaePRESS Server A3100/A2100 v1.6 4.0 4.0
imagePRESS C6000 imgaePRESS Server A3100/A2100/A1100 v1.6 4.0 4.0
imagePRESS C1 imgaePRESS Server Q2 v1.6 4.0 4.0
[Note]
The Prinect Digital Print Manager v4.0 and Prinect Print Ready v4.0 is configured to permit a single
connection for the imagePRESS Server.
The following shows the table of function combination applicable with the respective JDF connector version.
Function JDF Connector FJC1.5.2SP2 JDF Connector FJJC1.6
1-sided/2-sided print OK OK
Staple setting OK OK
Punch setting OK OK
Saddle stitching OK OK
Paper cassette setting OK OK
Paper description setting OK OK
Delivery slot setting OK OK
Delivery surface setting OK OK
Color mode setting OK OK
Number of copy sets setting OK OK
Collate OK OK
Shift sort per specied No. of copy sets OK OK
Print No. of copy sets OK OK
BOX&Hold OK OK
Trimming (on one side) OK OK
Tandem delivery OK OK
Screening OK OK
Printing tab on tab paper OK OK

To install the JDF Connector software on your computer, your computer must meet the software
requirement as shown below.
Software requiements
Server and Client
Windows® Vista (All Editions),
32-bit
Windows® 2003 Server
(Standard, Enterprise and
Datacenter Editions)
Windows® XP Professional,
with Service Pack 2
Windows® 2000 (Professional
and Server, all with service
pack 2 or higher)
Click “jdf connector-setup.exe” in the CD.
When starting Installer, the screen displays the dialog box for language selection. The displayed language
on UI changes according to the language selected (the function is the same).
The language selected here can be switched later by changing the setting on Client UI (the Client PC needs
to be restarted after changing the setting).
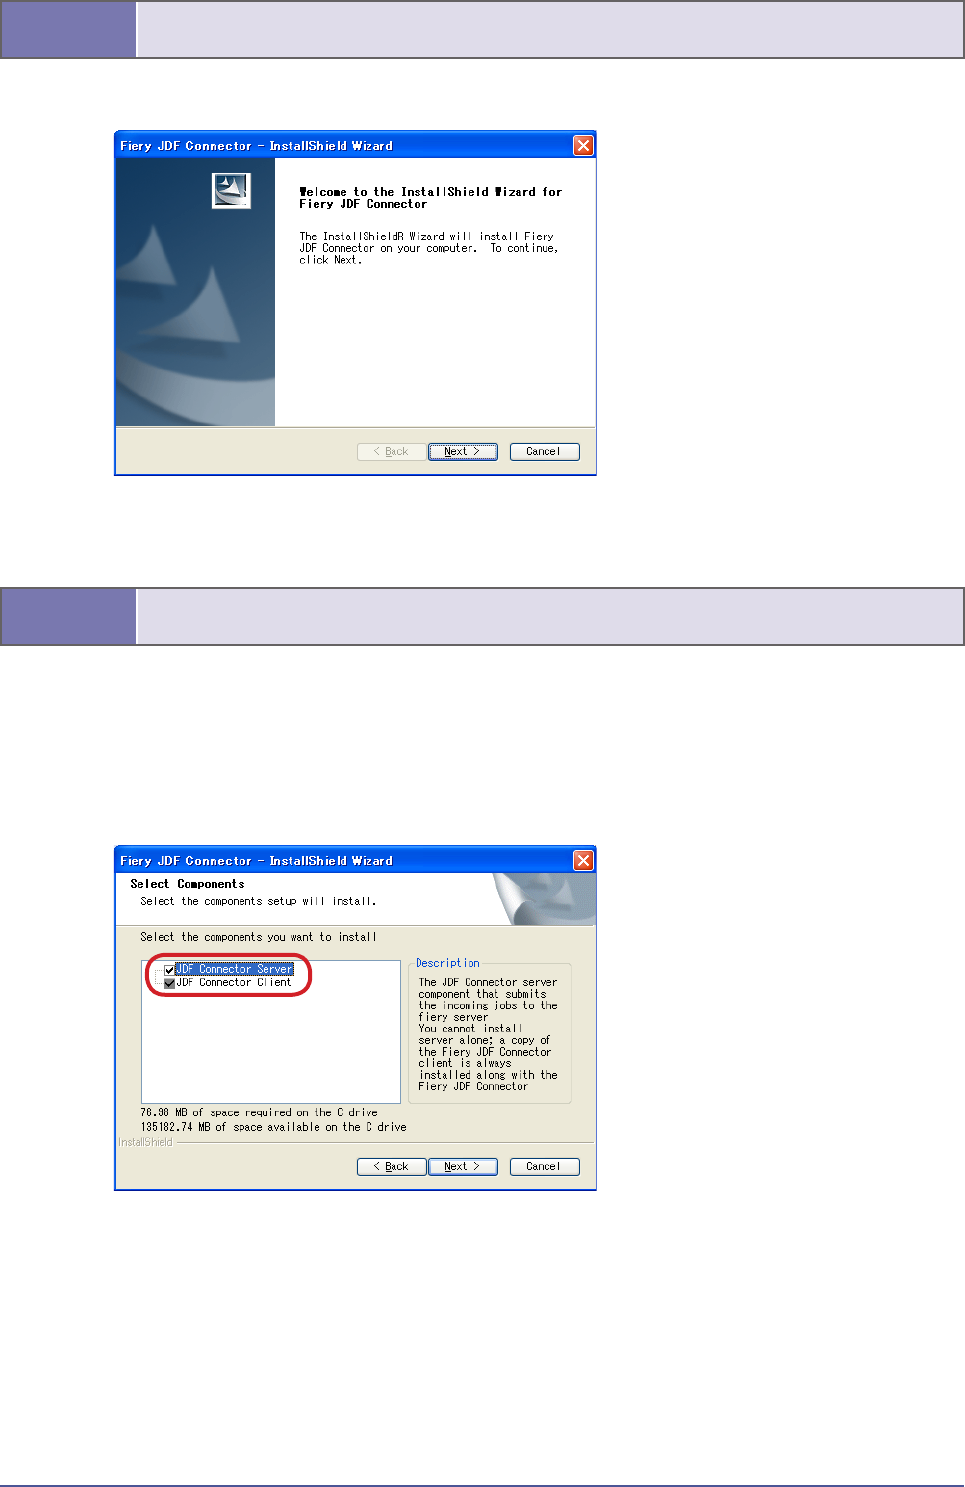
Click Next to proceed.
Default setting installs JDF Connector Client only.
In the case of installing JDF Connector Server, select the checkbox for JDF Connector Server.
If there is no connectable JDF Connector Server, both JDF Connector Server and JDF Connector Client need
to be installed.
(*In the case of installing Client only, see the later description)
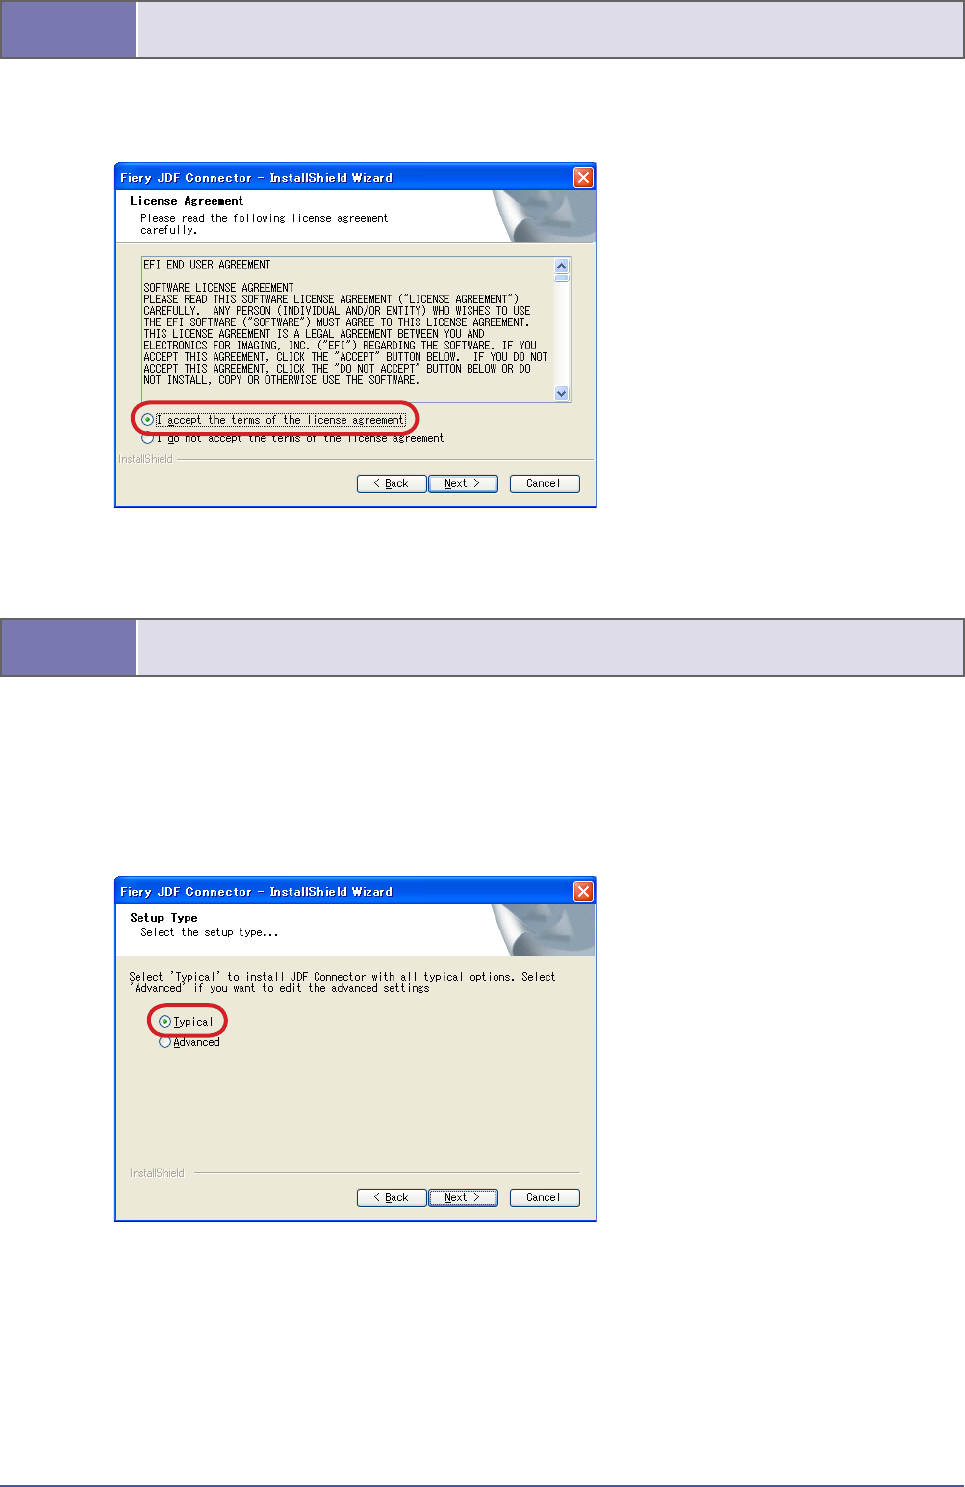
After checking the License description, select “I accept the terms of the license agreement” if you agree the
terms, and then click Next to proceed.
In the case of customizing Installation destination of the program or File location of the database, select
“Advanced”.
Items to be set in “Advanced” can be modied on JDF Connector UI, too.
We recommend selecting Typical because the setting customization is not required when installing both
the Server and the Client on the same PC.
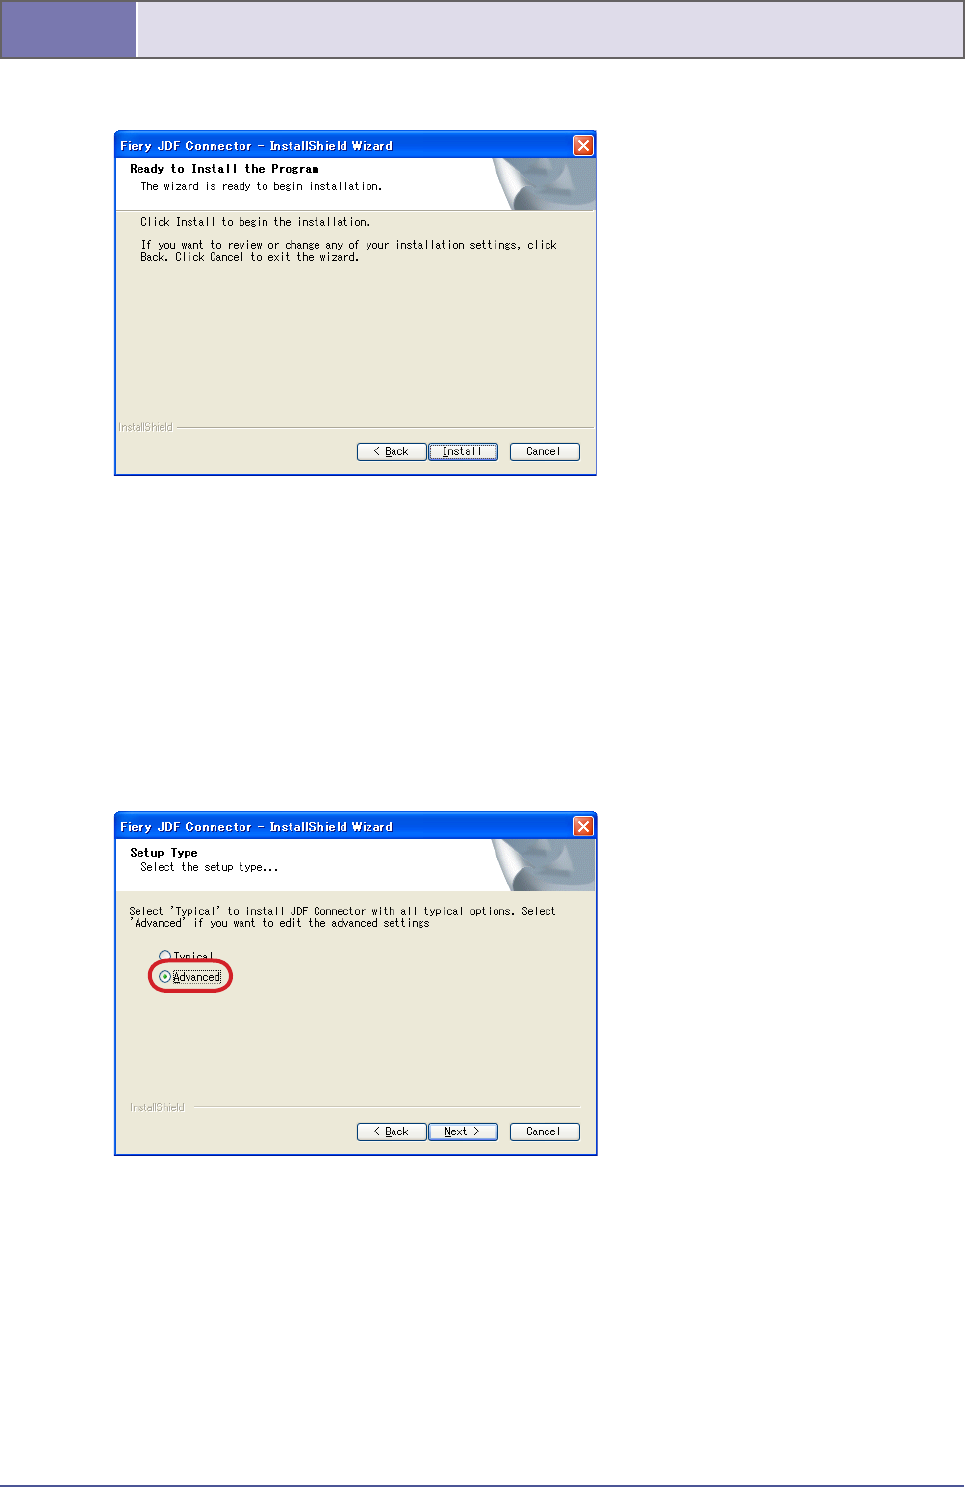
If there is no change in the setting so far, click Install to start installation.
Restart the system after installation is completed.
Installation work is complete now.
* In the case of installing JDF Connector Client only
In the case of installing JDF Connector Client to connect to existing JDF Connector Server, clear the
checkbox for Server in Select Components dialog box to perform installation in step “1-4. Selecting Install
Component”.
Select “Advanced” in step “1-6. Selecting detailed Setup”.

10
In Client Settings dialog box, specify the IP address of JDF Connector Server to connect in JDF Server
Name eld.
Also specify Database Path in which the database was simultaneously installed with Server. Be sure to
specify the absolute path of JDFCONNECTOR.GDB le in Server PC. (To check the database, after starting
Client on Server-installed PC, see the displayed dialog box by selecting the following: Congure → JDF
Connector Server).
The Server to connect can be specied on UI after starting Client.
Specify Server in the dialog box to be displayed by selecting the following: Congure → JDF Connector
Server.

11
2. Registering New Fiery Server
The service personnel installs JDF Connector software in advance.
Please check the points shown below to conrm the properly installation of JDF Connector software.
Check the following points.
1
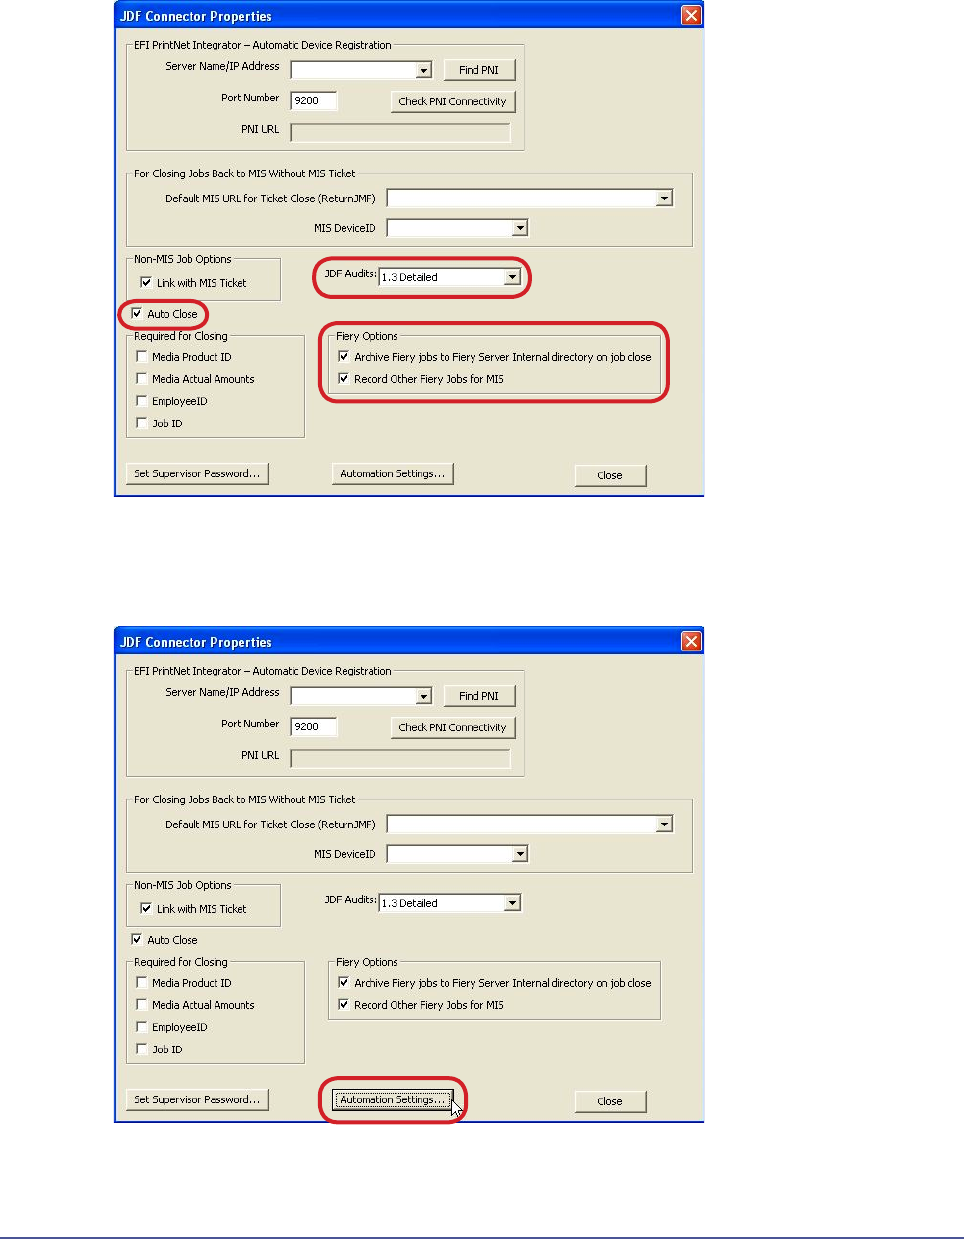
Changing JDF settings (dedicated for connecting to Prinect)
To link with Prinect Digital Print Manager, the following 5 items need to be specied:
A. Select “Auto Close”
B. Select “Archive Fiery Jobs” and “Fiery Server Internal Directory on job close”.
C. Select “Record Other Fiery Jobs for MIS”.
D. Select “1.3 Detailed” for “JDF Audits”
E. Select “None” or “Print” for “Test Mode” at Settings property.
Following describes how to make settings for the above 5 items:
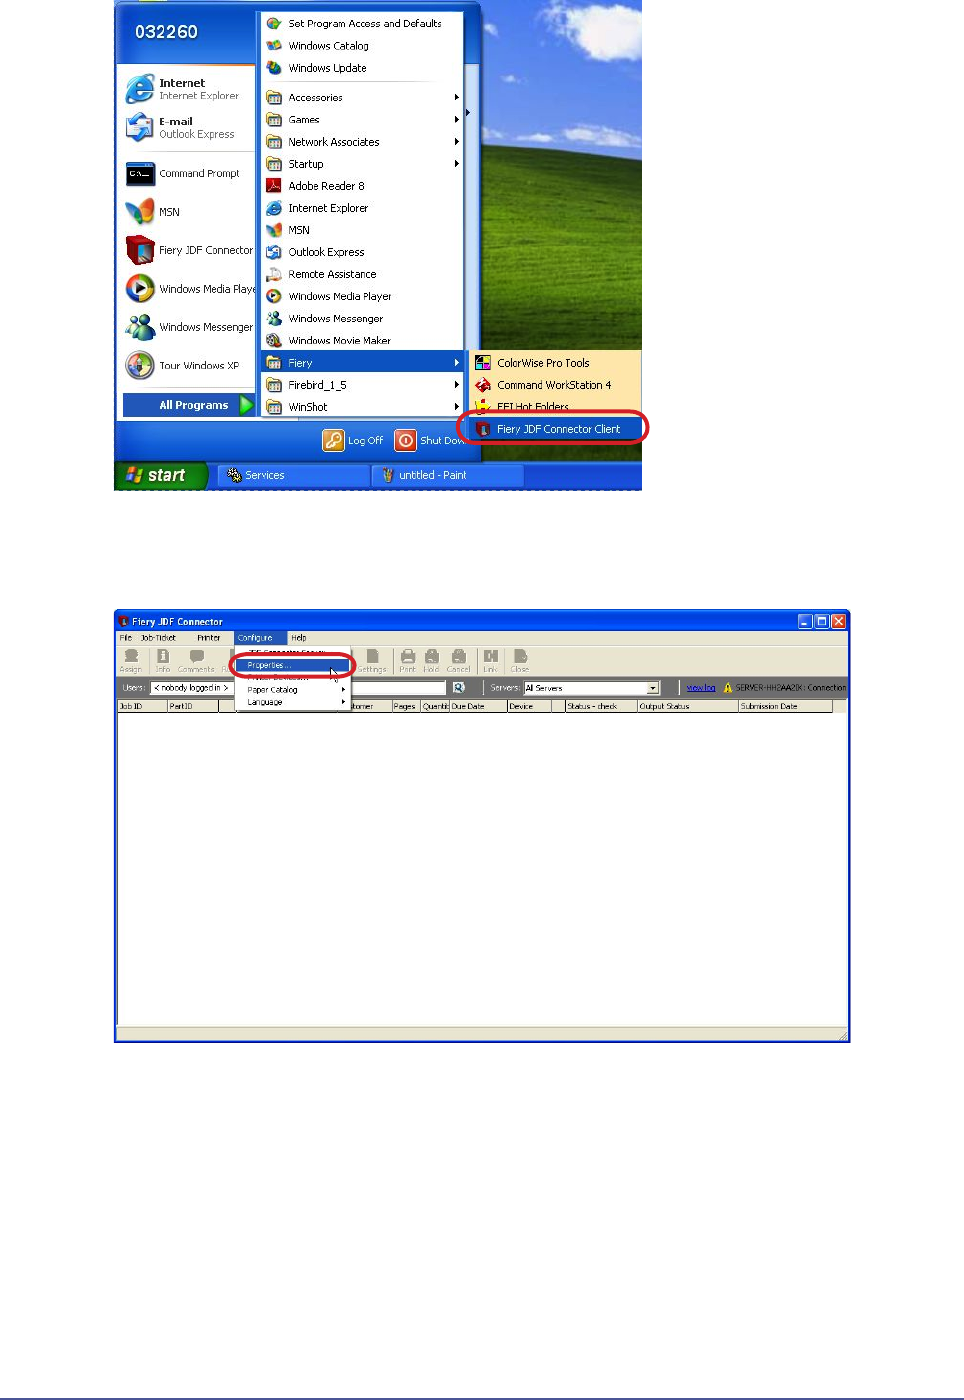
1
From the pulldown menu of “Congure” at “Fiery JDF Connector”, select “Properties”.
1
A. D.
B.
C.

1
Conrm if you can access to Prinect properly. Selecting Language.
E.
1
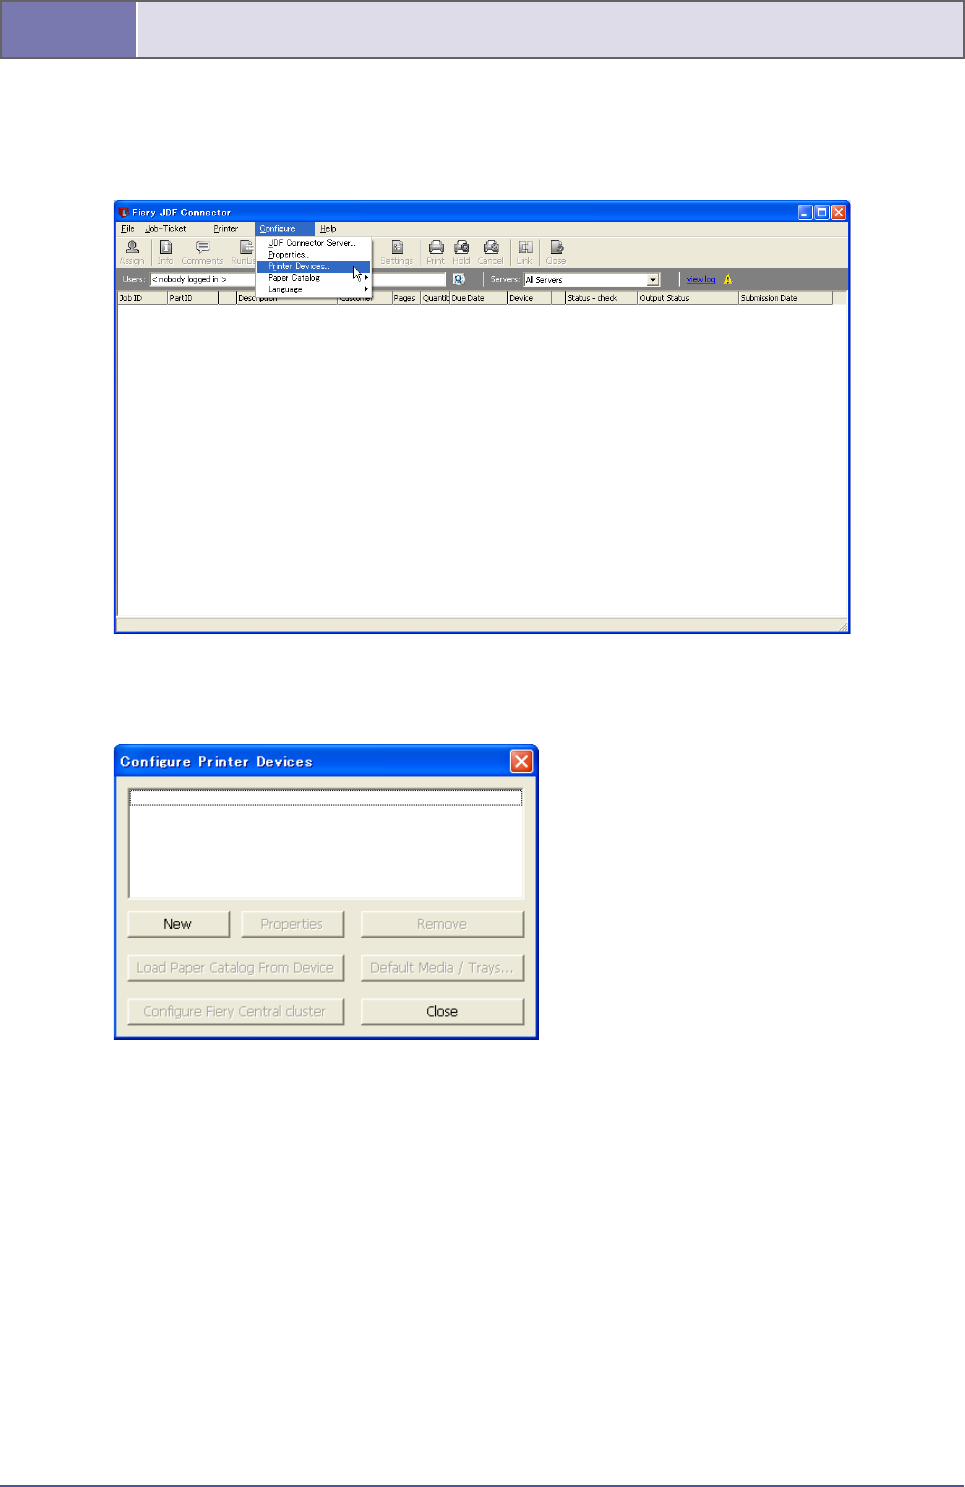
Select the following to start JDF Connector Client: Start Menu → Programs → Fiery → Fiery JDF Connector
Client
On Client UI, select the following to make connection setting with Fiery Server: Congure > Printer Devices.
Congure Printer Devices dialog box is displayed. Click New (as this is a new entry).

1
Available Servers dialog box is displayed. Specify Fiery Server to connect.
Once Auto Search tab is open, the system automatically starts searching to display a list of connectable Fiery
Servers. Select the server to connect and click Add.
If connectable Server is not found in AutoSearch, Server can be specied manually with Manual tab. Select
Manual tab to enter IP address of Fiery Server in Server IP address eld.

1
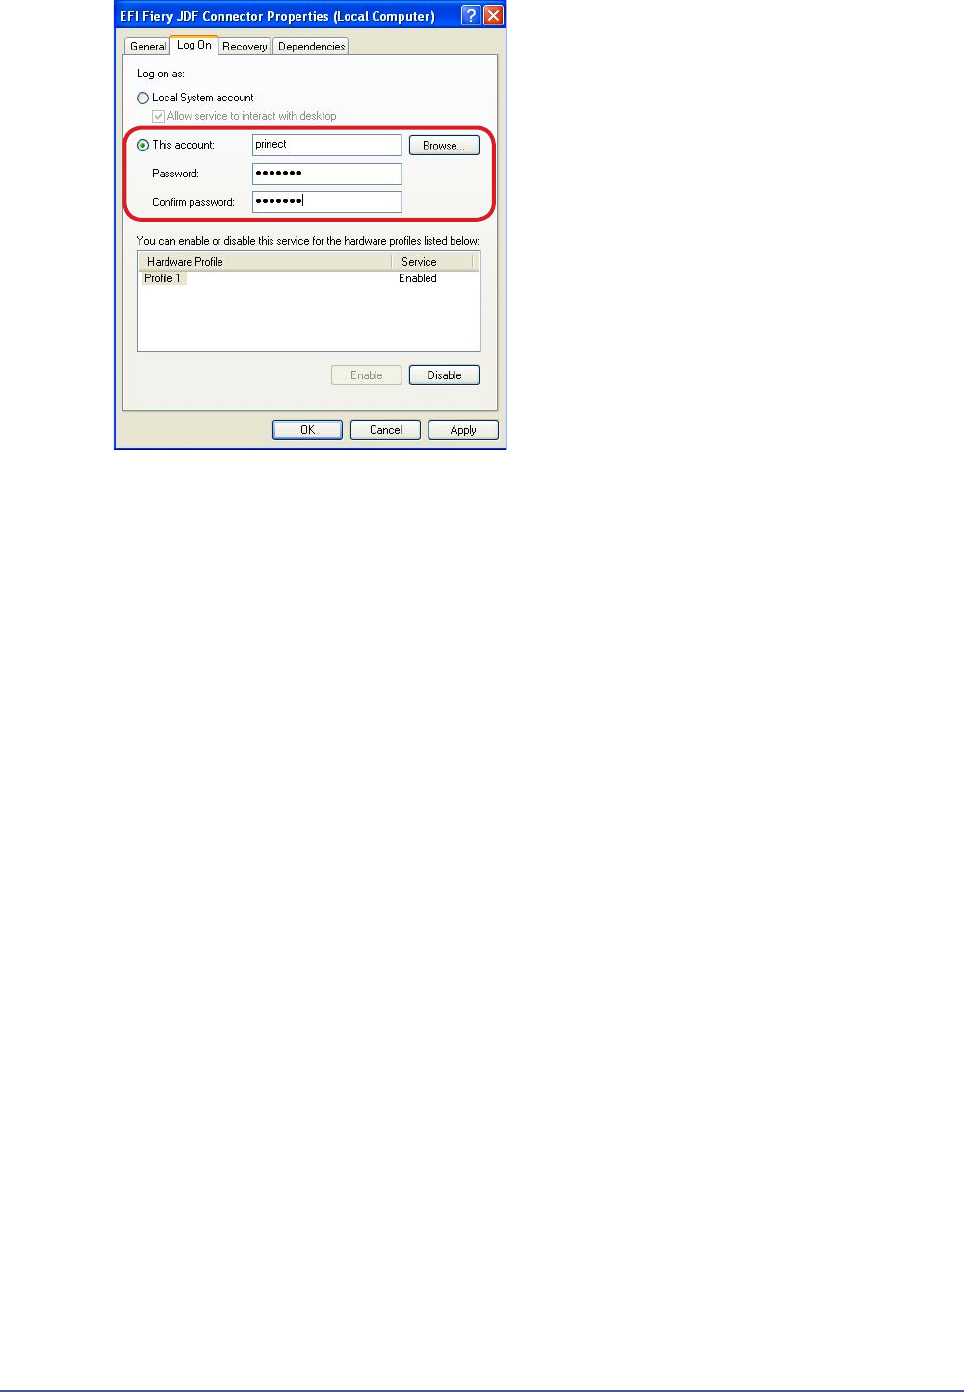
After succeeding in connecting to the specied Fiery Server, make Login setting to Server in Login To Server
dialog box.
If System Administrator’s login password is set in Fiery server, specify the System Administrator’s password
in “Administrator password” eld.
Click Next.
Printer Device Properties dialog box is displayed.
JDF Device ID to be set here determines JMF URL that is the destination when sending JDF job from
JDF-generated application. Change the JDF Device ID to the name of copier machine you use. Enter
"imagePRESS-C7000VP" for Canon imagePRESS-C7000VP, and "imagePRESS-C1" for Canon imagePRESS-C1.
See the following table for more details.
Click Next. (No need to change the setting although User can change JDF Device ID into any characters).
1
Host Machine Device ID
imagePRESS C7000VP
imagePRESS-C7000VPimagePRESS C6000VP
imagePRESS C6000
imagePRESS C1
imagePRESS-C1
imagePRESS C1+
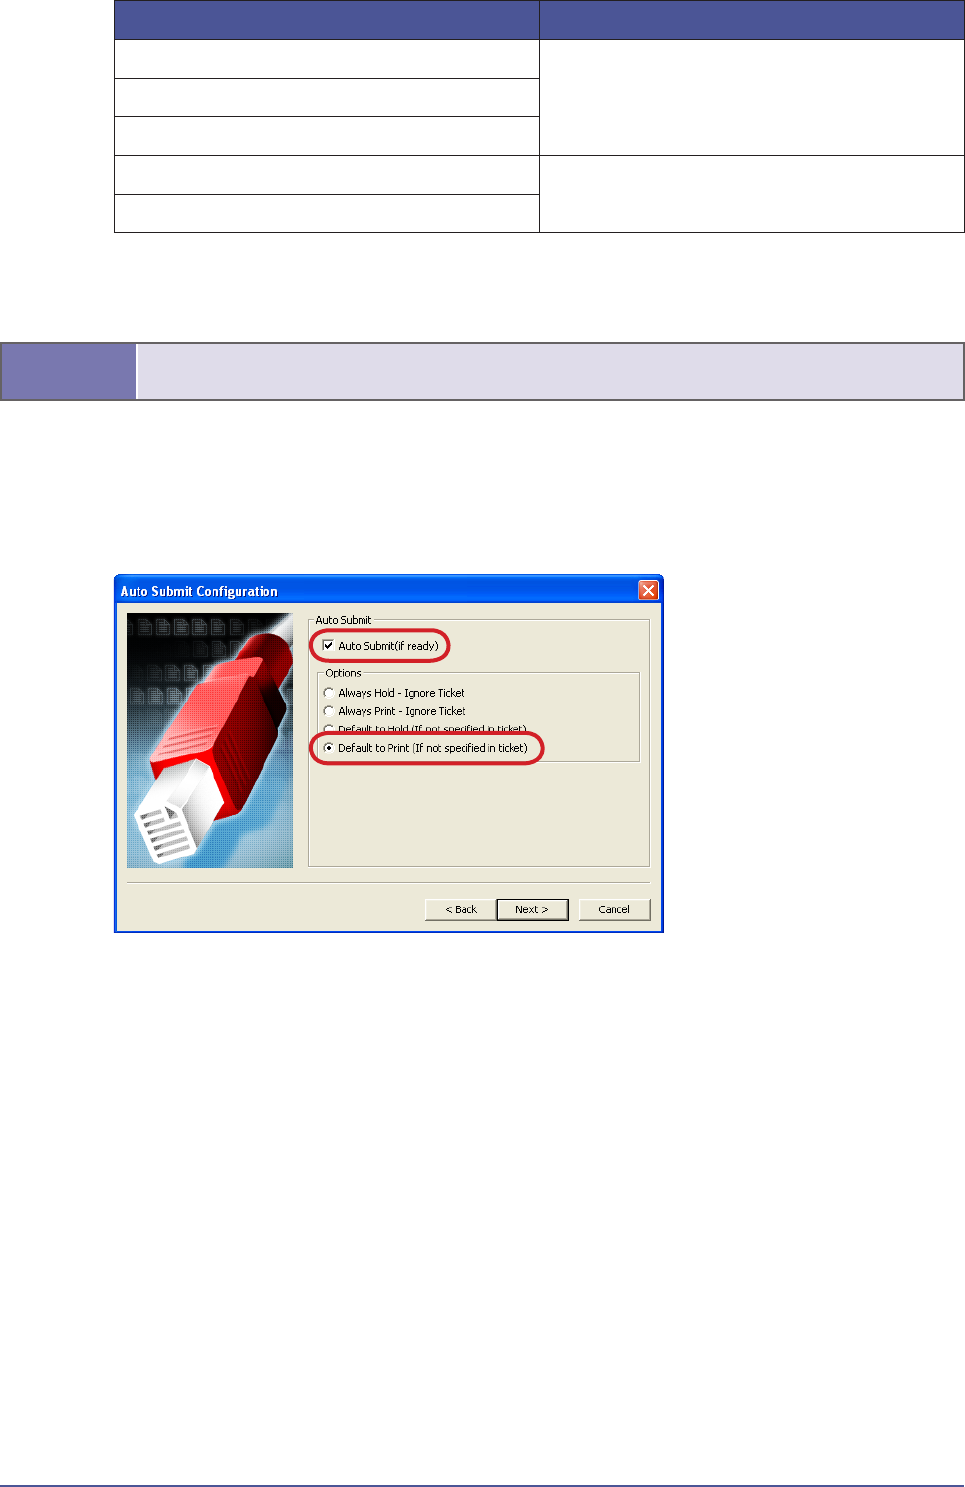
Auto Submit Configuration dialog box is displayed. This dialog box specifies the operation when JDF
Connector Client receives job.
We recommend selecting Auto Submit (if ready) and Default to Print (If not specied in ticket) for Options to
execute printing unless specied to Hold in JMF setting when receiving job.
0
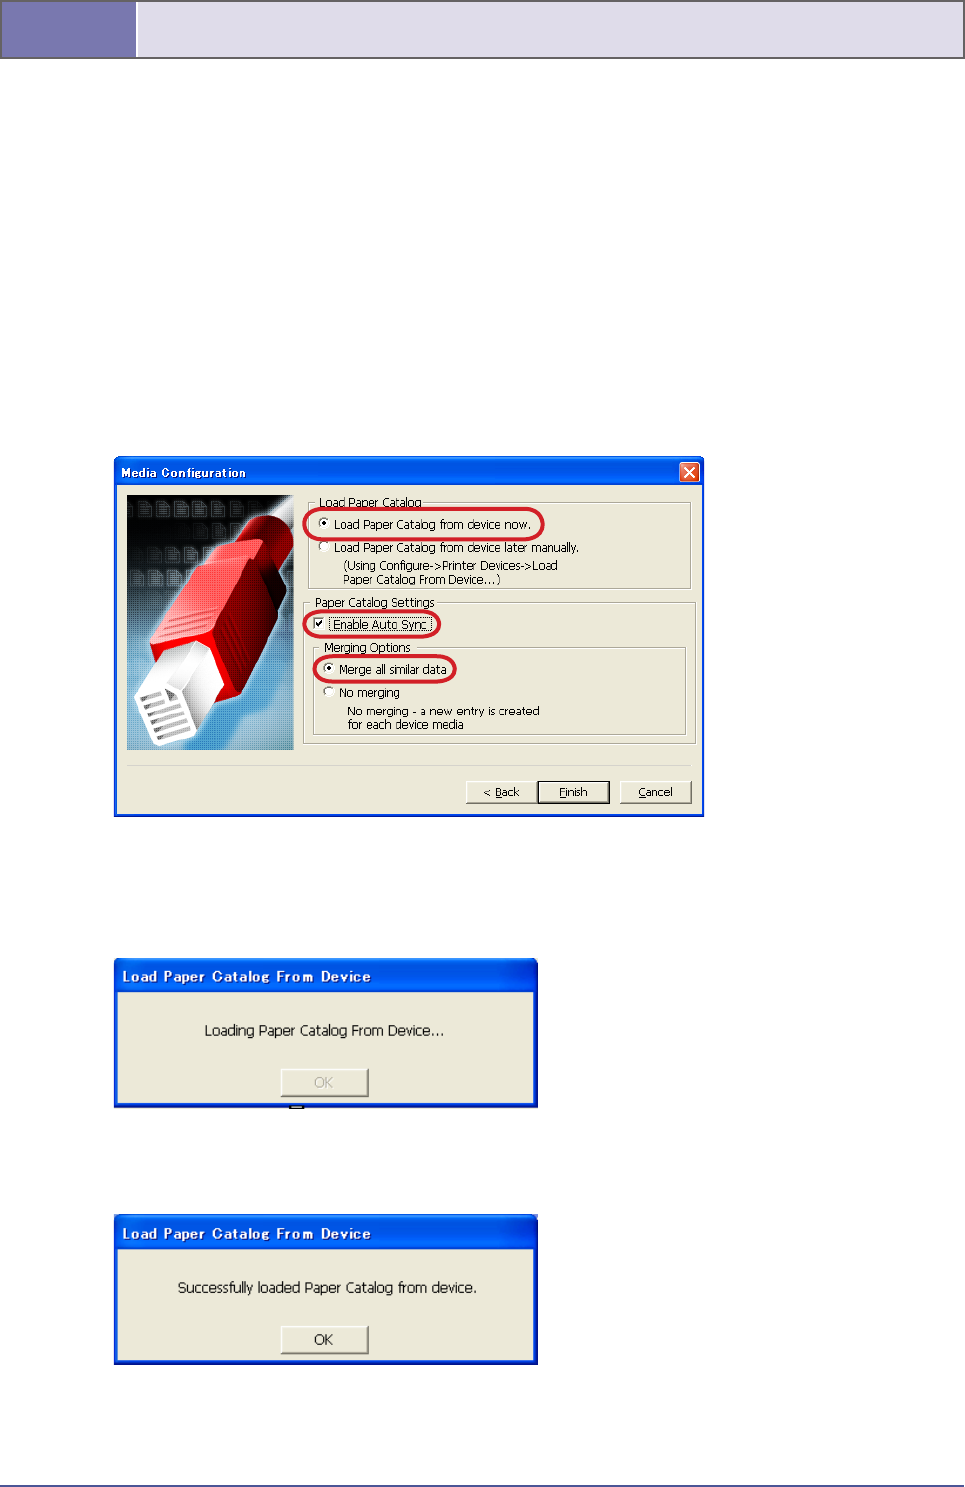
Media Conguration dialog box is displayed.
This dialog box makes settings to perform synchronization in media setting: between Paper Catalog of JDF
Connector (referencing is available by selecting the following on Client PC: Congure → Paper Catalog →
Browse) and Paper Catalog of Fiery Server.
We recommend selecting “Load Paper catalog from device now” to perform synchronization when initially
connecting to Fiery Server.
We also recommend selecting Enable Auto Sync in Paper Catalog Setting and “Merge all similar data” in
Merging Option to continue to perform automatic synchronization and prevent repeated registration of the
same media from multiple Fiery Servers.
Click Finish to complete the settings.
In the case of selecting “Load Paper catalog from device now”, loading of Paper Catalog is started after the
setting is complete.
The following message dialog box is displayed when loading is succeeded.

1
3. Changing/Deleting Connection Setting of Fiery Server
In the case of changing settings of registered Fiery Server, it is not available on Client UI to change any
settings other than those relate to Administrator password and Paper catalog. Thus, to change setting items
other than those relate to Administrator password and Paper catalog, we recommend deleting registered
Fiery Server once to newly register it again.
Delete Fiery Server in Printer Devices dialog box by selecting the following: Congure → Printer Devices.
When deleting registered Server, all jobs from Fiery Server need to be deleted by Client. Display Fiery jobs (to
delete) from the Server on Client UI to delete them before deleting registered Server.
The following message dialog box is displayed if there remain Server jobs (to delete) when
deleting registration.
Job Delete
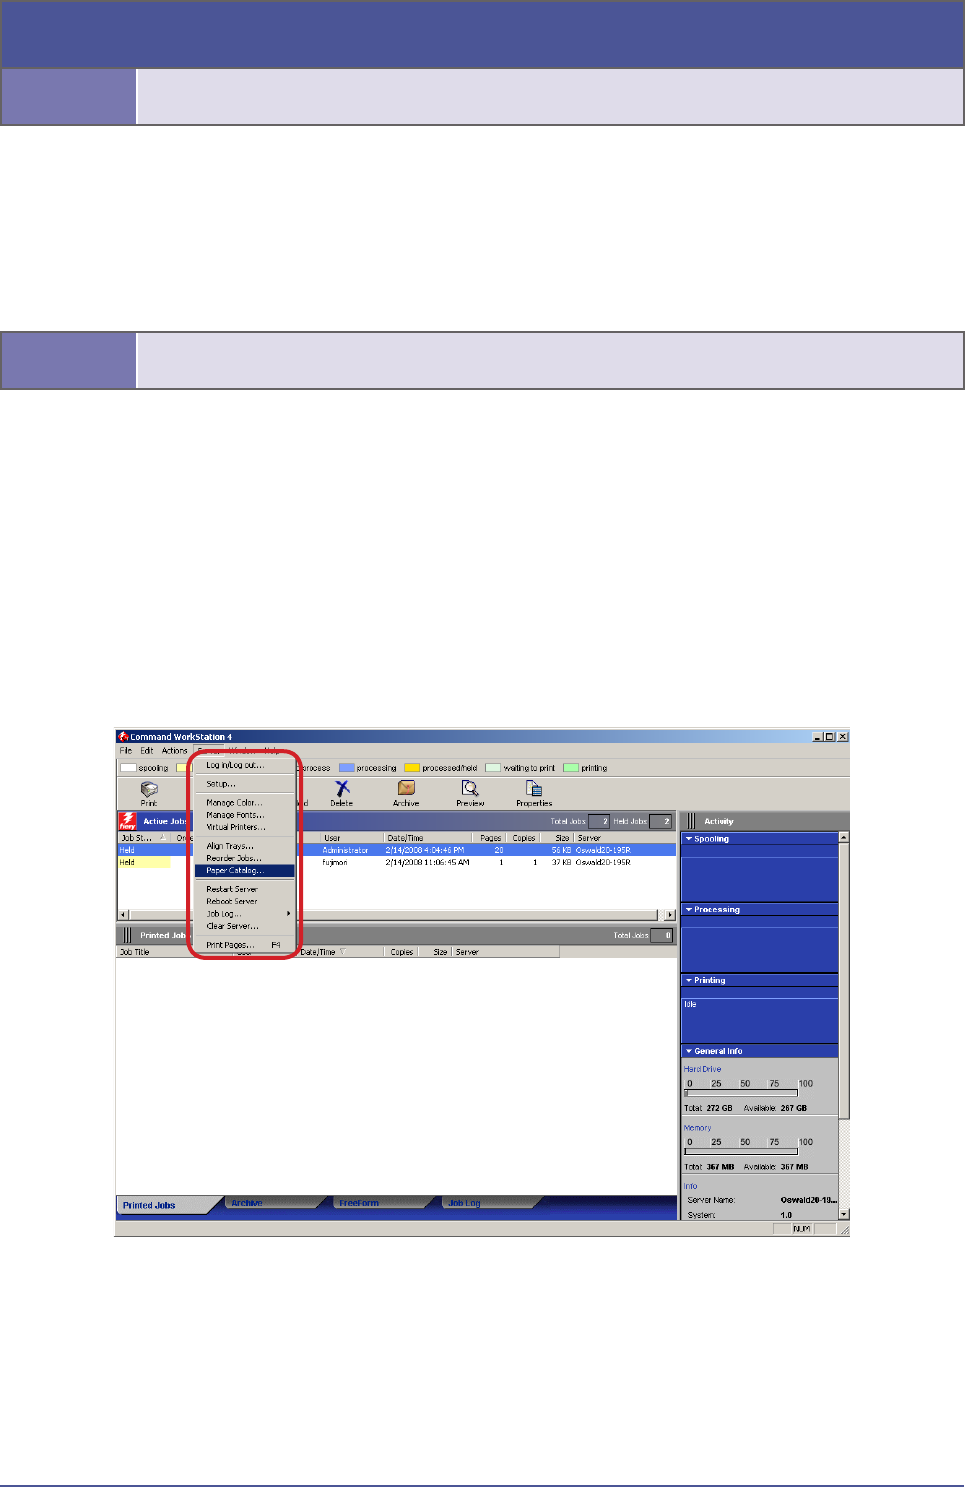
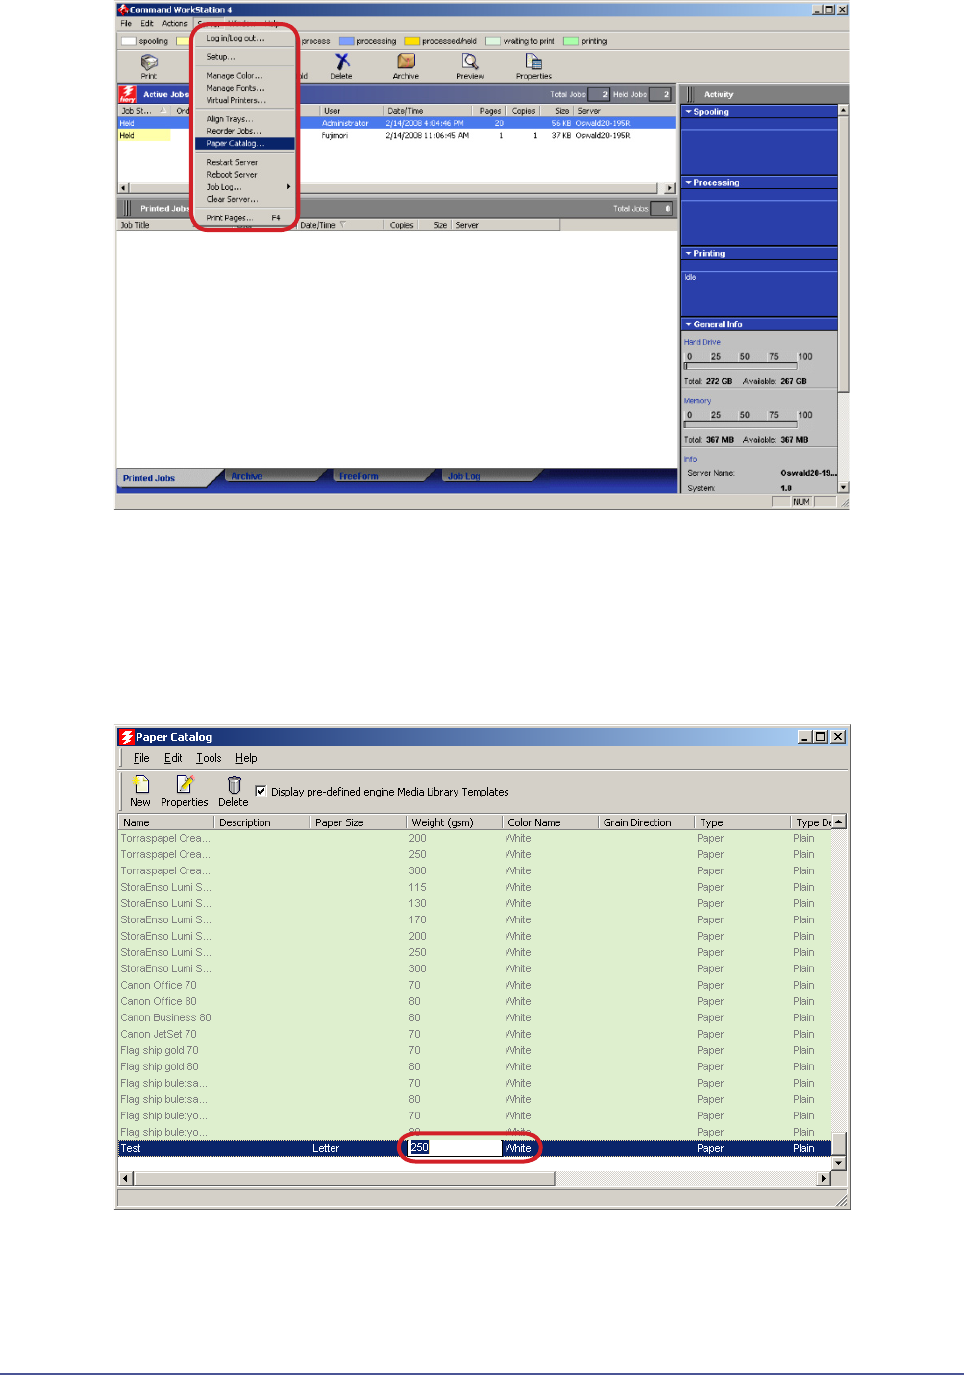
4. Installing Command WorkStation
The Paper Catalog feature is available from Command WorkStation. To install and how to use Command
WorkStation and Paper Catalog, see "Utilities.pdf" in the User Documentation CD or Command WorkStation
and Paper Catalog Help.
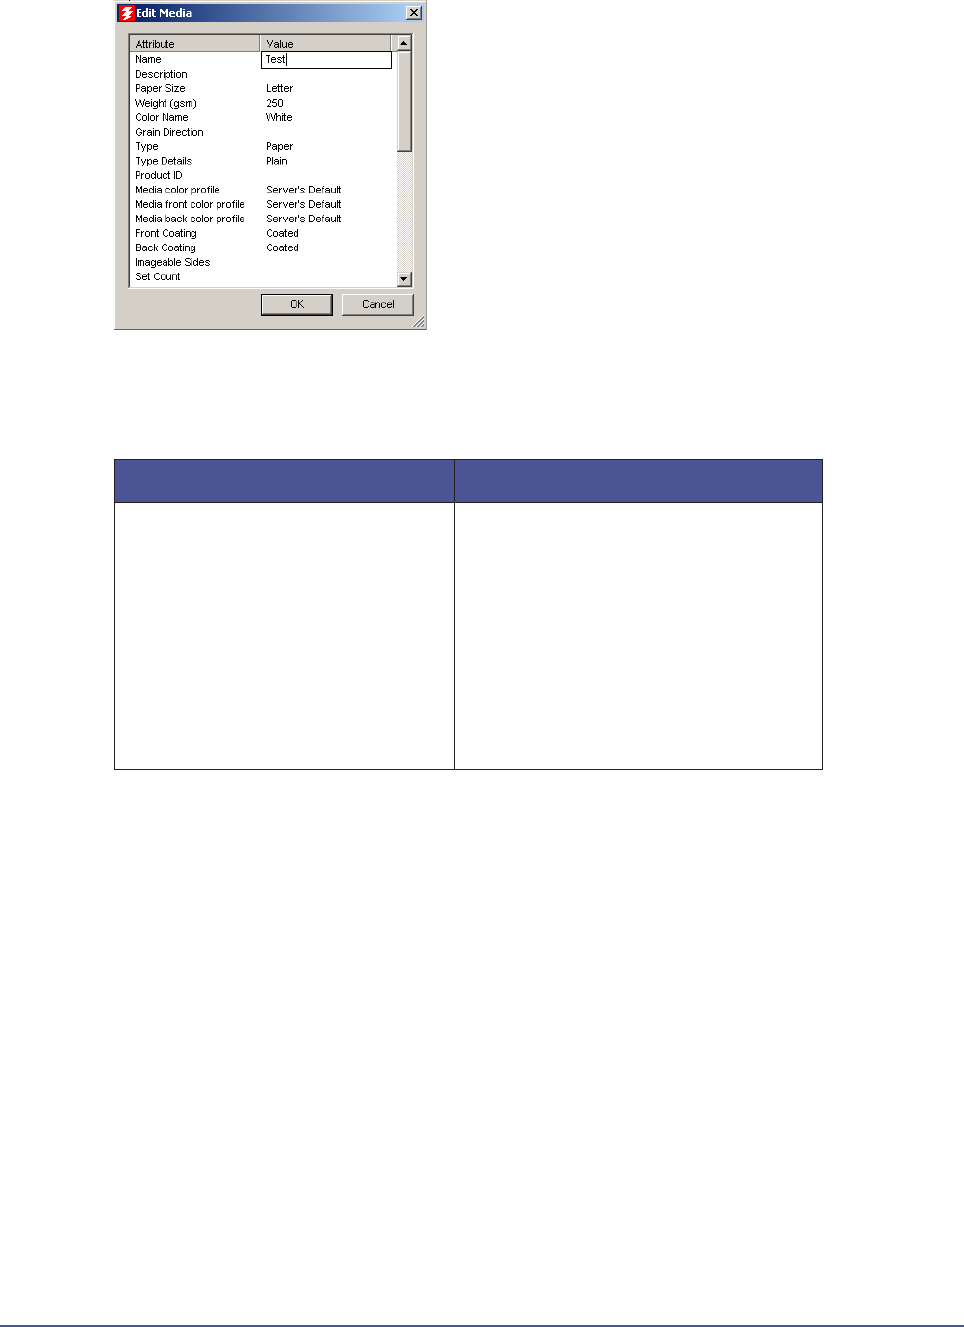
4.2.1. To congure a new entry
To configure a new entry to Paper Catalog, follow procedures as shown below. Only administrators can
access Paper Catalog setup.
[Note]
For more information on Paper Catalog, see Paper Catalog Help.

SelectabaseentryandthenclickNewicon.
Highlighttheattributesthatyouwanttoedit,andclicktheselectionintheValuearea,orselectan
appropriatevaluefromapull-downmenulist.

[Important]
・ You must enter all 8 attributes as shown below.
Paper Catalog Main Window Paper Catalog Edit Media Window
1. Description
2. Product ID
3. Paper Size
4. Grade
5. Media Unit
6. Type
7. Thickness
8. Weight (gsm)
1. Brand
2. Product ID
3. Dimension
4. Grade
5. Media Unit
6. Media Type
7. Thickness
8. Weight
・ Specify a unique value for Product ID.
4.2.2. To edit an entry
To edit an entry, follow either one of procedures as shown below.
・To edit a catalog entry within the Edit Media window
・To edit a catalog entry within the main Paper Catalog window
Only Administrators can access Paper Catalog setup.
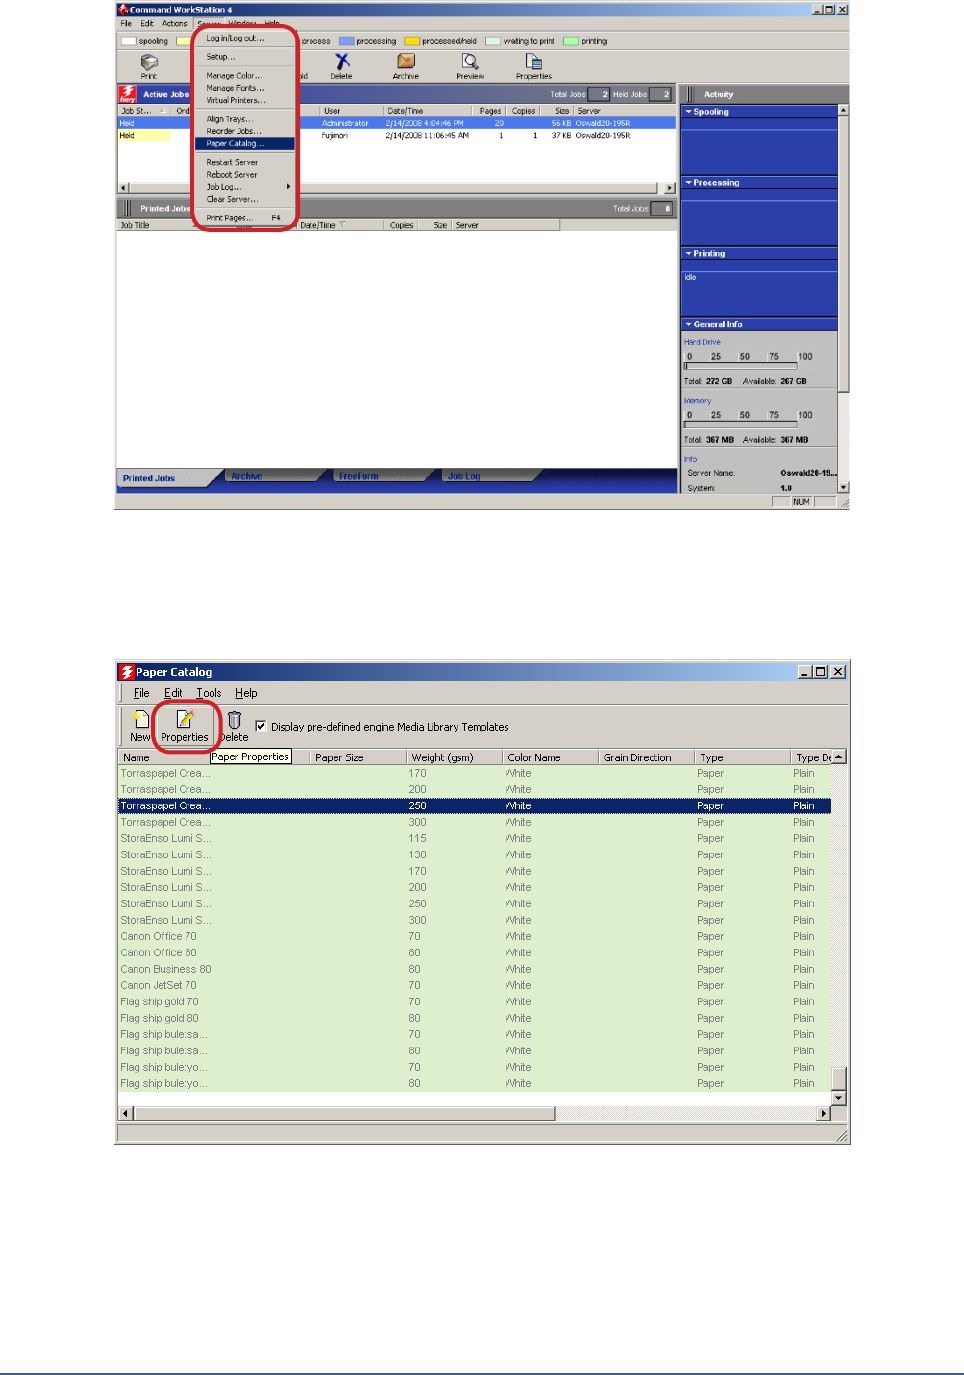
Highlighttheentrythatyouwanttoedit,andthenclickthePropertiesicon.
[Important]
・ You must enter all 8 attributes as shown below.
Paper Catalog Main Window Paper Catalog Edit Media Window
1. Description
2. Product ID
3. Paper Size
4. Grade
5. Media Unit
6. Type
7. Thickness
8. Weight (gsm)
1. Brand
2. Product ID
3. Dimension
4. Grade
5. Media Unit
6. Media Type
7. Thickness
8. Weight
・ Specify a unique value for Product ID.
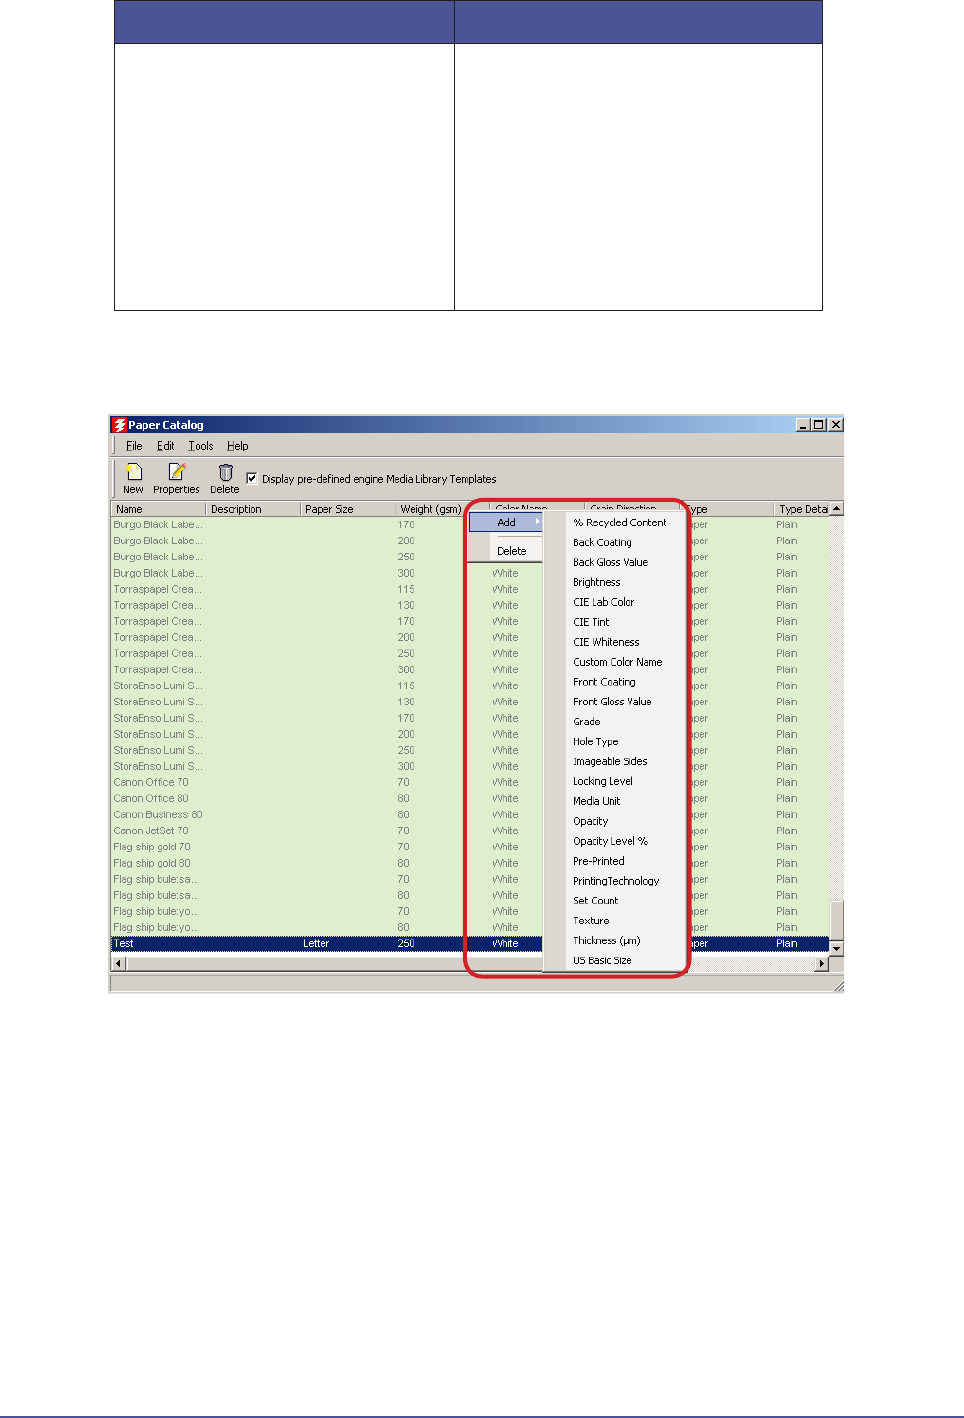
Highlighttheentrythatyouwanttoedit.Clickandholddownthemouseonanattributeinthe
entrylinetodisplaytheoptionsmenu.Enterthevalueorselectfromapull-downmenulist.All
changesareautomaticallysave.
[Important]
・ You must enter all 8 attributes as shown below.
Paper Catalog Main Window Paper Catalog Edit Media Window
1. Description
2. Product ID
3. Paper Size
4. Grade
5. Media Unit
6. Type
7. Thickness
8. Weight (gsm)
1. Brand
2. Product ID
3. Dimension
4. Grade
5. Media Unit
6. Media Type
7. Thickness
8. Weight
・ Right-click any column below the window title bar. Click Add and choose an item from the
menu to add to the columns.
・ Specify a unique value for Product ID.
To change the column display:

Youmustnamethelewithafollowingnameforthedatabase.
FileName:CanonPaperCatalog.xml
[Note]
To import the Paper Catalog database into your system, see manuals that accompany with
Heidelberger Prinect Digital Print Manager.

0
5. Trouble Shooting
A following reason can be the cause. Follow the instruction below to remove the cause of problem.
A) Check from the “JDF Job Definitions” dialog box of JDF Connector software if the correct
number of copies is specied.
If you still have trouble, please contact the Canon service personnel.
A following reason can be the cause. Follow the instruction below to remove the cause of problem.
A) From Command WorkStation, right-click the job and select “Property”. When “Property”
dialog opens, conrm the “Duplex” print option setting on the Layout. If the option is not set
properly, contact the Prinect system engineer.
If you still have trouble, please contact the Canon service personnel.
A following reason can be the cause. Follow the instruction below to remove the cause of problem.
A) From Command WorkStation, right-click the job and select “Property”. When “Property”
dialog opens, conrm the “Copies” print option setting on the Job Info. If the option is not set
properly, contact the Prinect system engineer.
If you still have trouble, please contact the Canon service personnel.
One of the following reasons can be the cause. Follow the instruction below to remove the cause of
problem.
A) Check the unsent (original) PDF file if the same problem can be seen. If you see the same
problem, please make corrections on the original PDF le data.
B) Check the job processed at the Prinect system if the same problem can be seen. If you see the
same problem, please contact the Prinect system engineer.
If you still have trouble, please contact the Canon service personnel.

1
One of the following reasons can be the cause. Follow the instruction below to remove the cause of
problem.
A) Check the unsent (original) PDF file if the same problem can be seen. If you see the same
problem, please make corrections on the original PDF le data.
B) Check the job processed at the Prinect system if the same problem can be seen. If you see the
same problem, please contact the Prinect system engineer.
If you still have trouble, please contact the Canon service personnel.
One of the following reasons can be the cause. Follow the instruction below to remove the cause of
problem.
A) Conrm if the specied paper type is correctly registered on the copier machine.
B) Conrm if the paper information registered on the copier machine and the one registered on
the imagePRESS Server Paper Catalog is identical.
C) Conrm if the paper information registered on the imagePRESS Server Paper Catalog and the
one registered on the JDF Connector is identical.
D) From the Command WorkStation, right-click the job and select “Properties”. In the job
property dialog, check the “Paper Catalog” print option if the correct paper type is specied. If
the incorrect paper source is specied, please contact the Prinect system engineer.
If you still have trouble, please contact the Canon service personnel.
One of the following reasons can be the cause. Follow the instruction below to remove the cause of
problem.
A) Select “Congure Printer Device “ from the JDF Connector menu. Click “New” after “Congure
Printer Device” dialog window appears. After “Available Servers” dialog window appears, click
“Refresh” in the “Auto Search” tab, and search for imagePRESS Server.
B) If you cannot nd the imagePRESS Server using A) method, select “Manual” tab in the “Available
Servers” dialog window, and specify Server Name or IP Address of the imagePRESS Server to
search the server.
C) If you still cannot nd the imagePRESS Server A) nor B) method, ping the imagePRESS Server to
ensure that the host computer you are trying to reach is actually operating. If you cannot ping
your host, check that the network set up is physically connected. In addition, if you could ping
the host, check if the router protocol set up has been properly done.

One of the following reasons can be the cause. Follow the instruction below to remove the cause of
problem.
A) Select “Congure Printer Device “ from the JDF Connector menu. Conrm if “Server name/IP
Address” is correctly specied. Also conrm if the path to the database is correctly specied.
The following reasons can be the cause. Follow the instruction below to remove the cause of problem.
A) Select “Congure Printer Device “ from the JDF Connector menu. The Printer Device Properties
dialog window appears when you click “Properties”. In the Device Properties dialog window,
conrm if “Auto Submit” option is correctly specied.

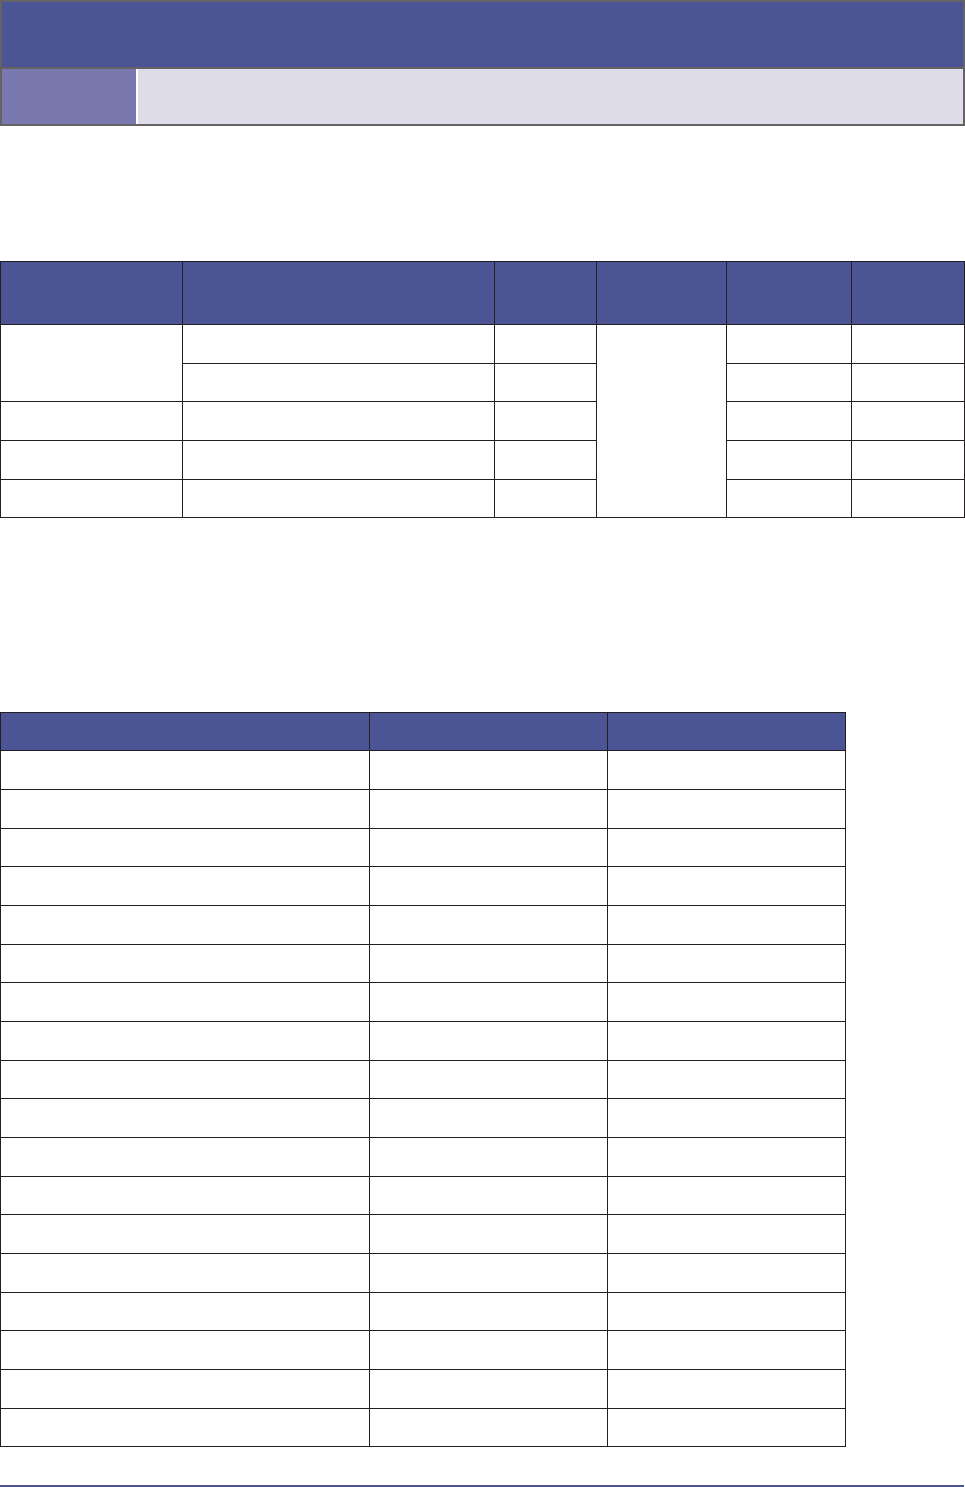
6. Device Capability File Conguration List
This Device Capability File comes with restrictions stated in an enclosed license.
Device Capability File provides system options information attached to your imagePRESS series to Prinect
Digital Print Manager.
Please install a Device Capability File that corresponds to a combination of system options attached to your
imagePRESS copier machine. For the details of installation procedure, refer to a user manual accompanying
the Prinect Digital Print Manager.
The "x" in the le name indicates a Device Capability File version and is dierent depending on the version.
Conguration
No.
Functionality Dev Cap le name
Stacker tray 1 Stacker tray 2 Stapling Saddle Stitching Punching Trimming
1 - - - - - - C7000VP_1_jmf-x.xxx.xml
23- - - - - C7000VP_81_jmf-x.xxx.xml
33 3 - - - - C7000VP_241_jmf-x.xxx.xml
4 - - 3- - - C7000VP_781_jmf-x.xxx.xml
5 - - 3 3 - - C7000VP_1805_jmf-x.xxx.xml
63-3- - - C7000VP_861_jmf-x.xxx.xml
73 3 3 - - - C7000VP_1021_jmf-x.xxx.xml
83-3 3 - - C7000VP_1885_jmf-x.xxx.xml
93 3 3 3 - - C7000VP_2045_jmf-x.xxx.xml
10 - - 3-3- C7000VP_2829_jmf-x.xxx.xml
11 - - 3 3 3 - C7000VP_3853_jmf-x.xxx.xml
12 3-3-3- C7000VP_2909_jmf-x.xxx.xml
13 3 3 3 -3- C7000VP_3069_jmf-x.xxx.xml
14 3-3 3 3 - C7000VP_3933_jmf-x.xxx.xml
15 3 3 3 3 3 - C7000VP_4093_jmf-x.xxx.xml
17 - - 3 3 -3C7000VP_5901_jmf-x.xxx.xml
20 3-3 3 -3C7000VP_5981_jmf-x.xxx.xml
21 3 3 3 3 -3C7000VP_6141_jmf-x.xxx.xml
23 - - 3 3 3 3 C7000VP_7949_jmf-x.xxx.xml
26 3-3 3 3 3 C7000VP_8029_jmf-x.xxx.xml
27 3 3 3 3 3 3 C7000VP_8189_jmf-x.xxx.xml
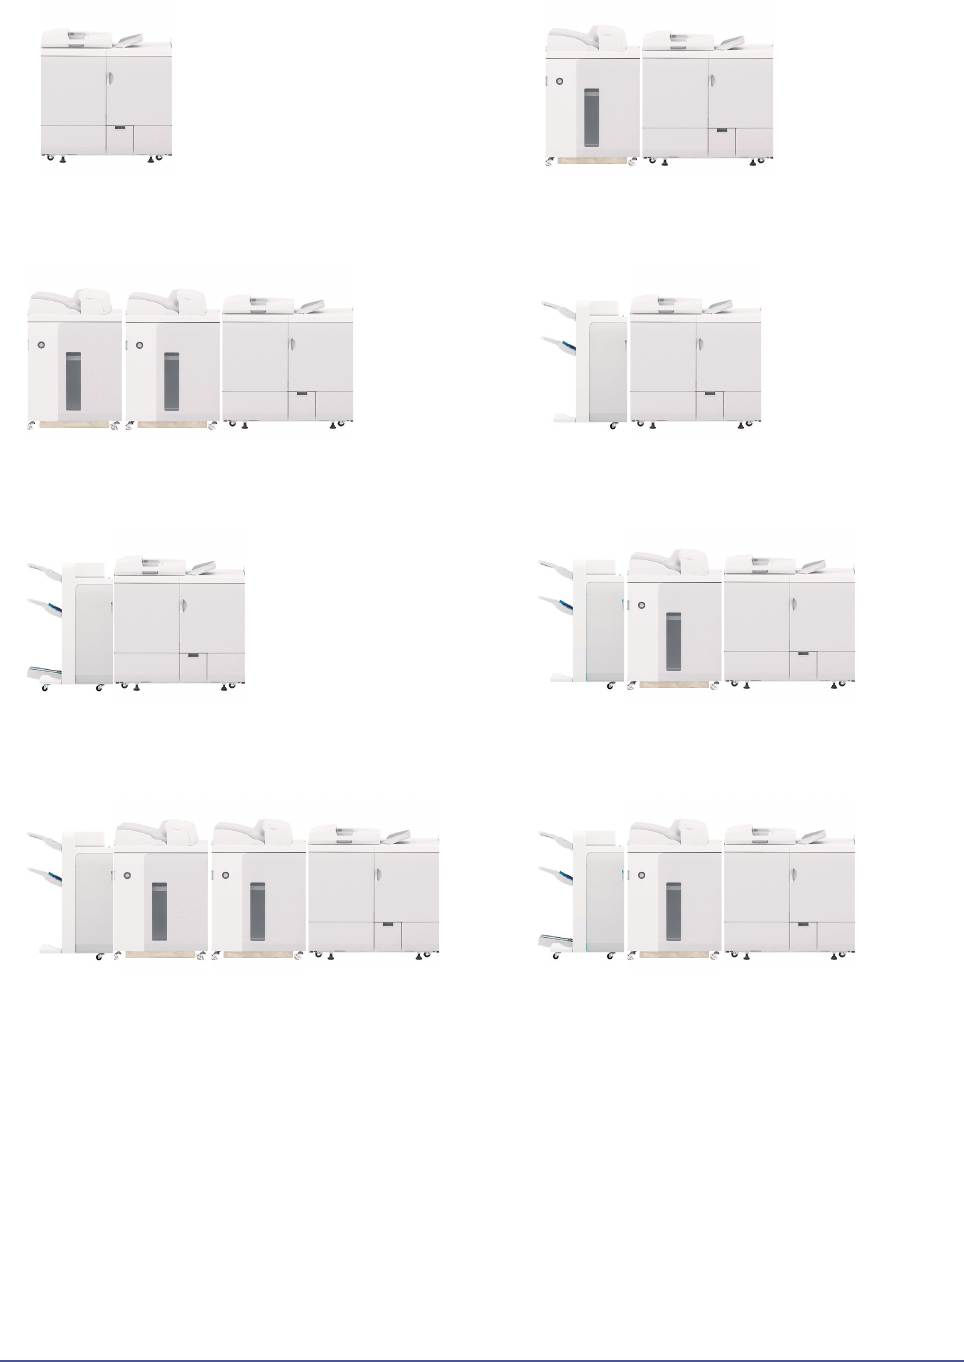
The pink box in the illustration indicates the puncher unit.
lConguration No.1 lConguration No.2
lConguration No.3 lConguration No.4
lConguration No.5 lConguration No.6
lConguration No.7 lConguration No.8
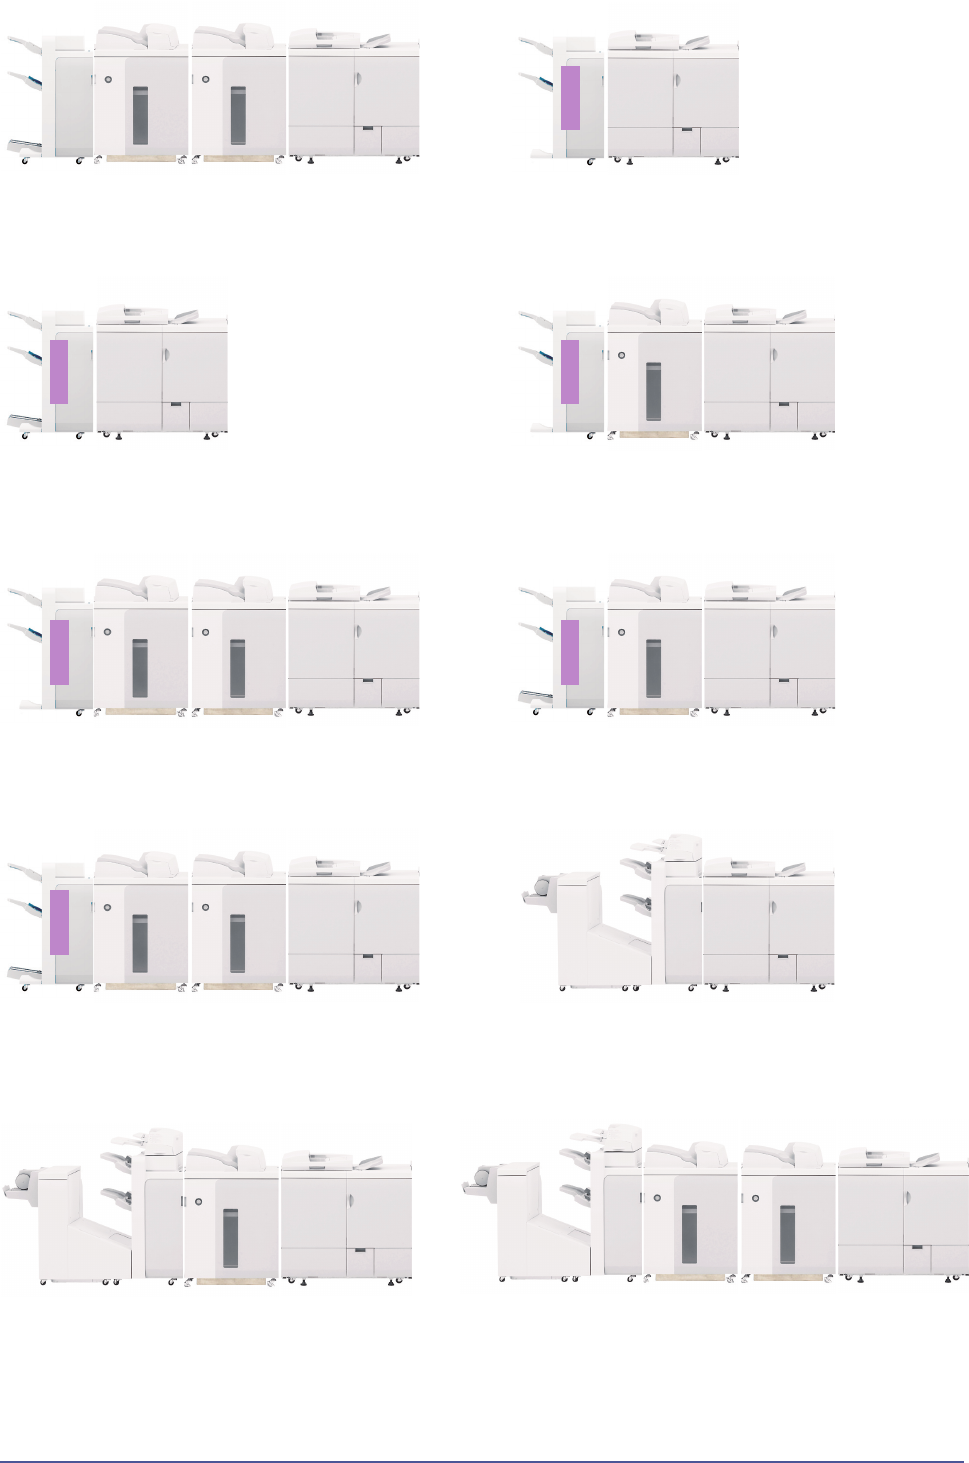
lConguration No.9 lConguration No.10
lConguration No.11 lConguration No.12
lConguration No.13 lConguration No.14
lConguration No.15 lConguration No.17
lConguration No.20 lConguration No.21

lConguration No.23 lConguration No.26
lConguration No.27
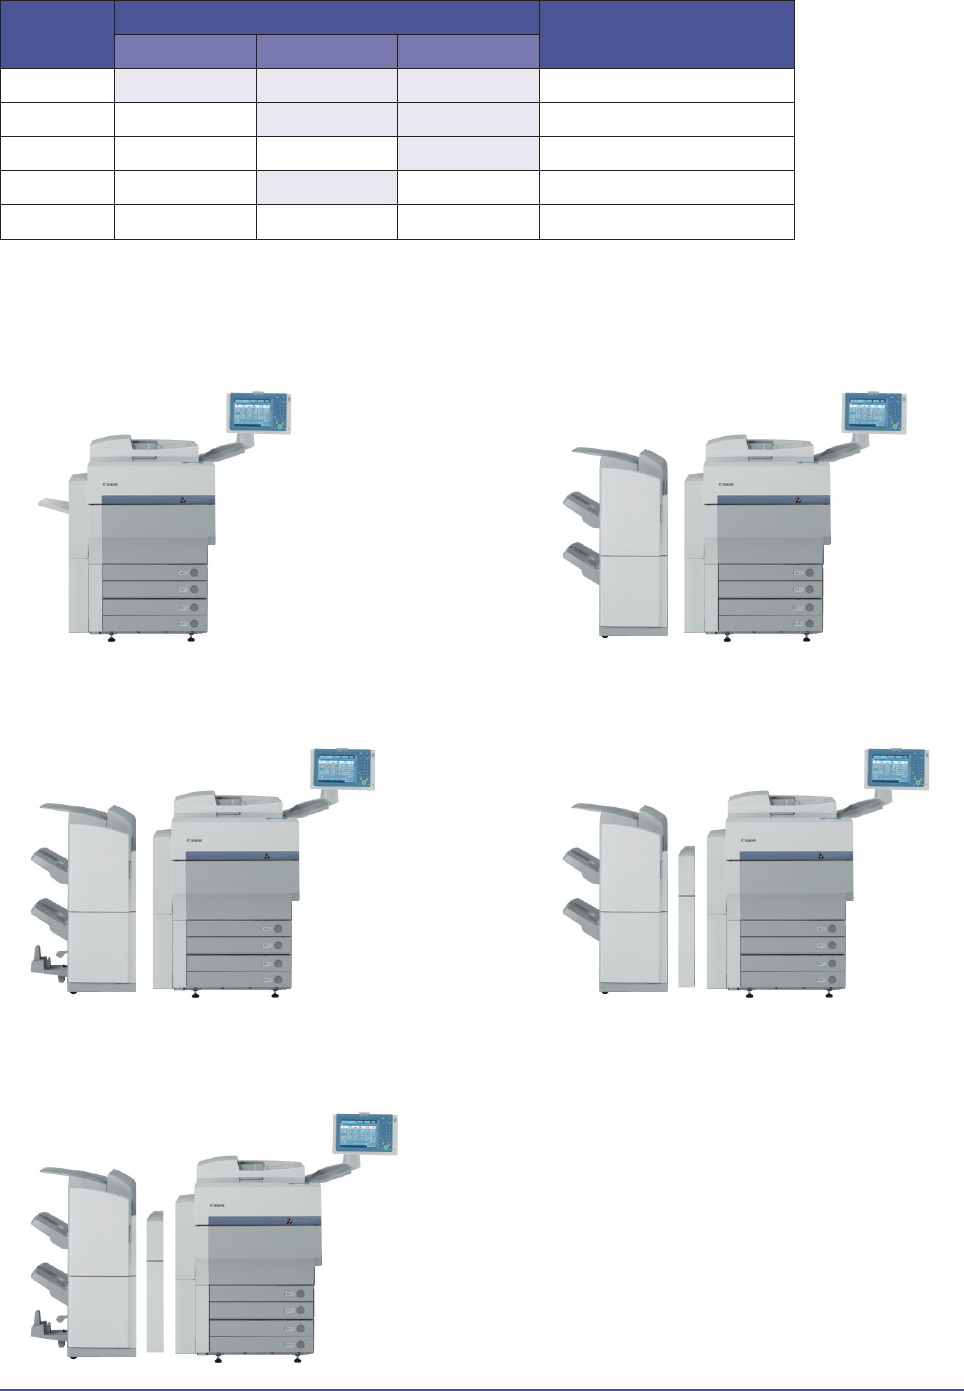
Conguration
No.
Functionality Dev Cap le name
Stapling Saddle Stitching Punching
1 - - - C1_1_jmf-x.xxx.xml
23- - C1_797_jmf-x.xxx.xml
33 3 - C1_1821_jmf-x.xxx.xml
43-3C1_2845_jmf-x.xxx.xml
5333C1_3869_jmf-x.xxx.xml
lConguration No.1 lConguration No.2
lConguration No.3 lConguration No.4
lConguration No.5