Canon Xl1S Owners Manual
2015-03-09
: Canon Canon-Xl1S-Owners-Manual-585675 canon-xl1s-owners-manual-585675 canon pdf
Open the PDF directly: View PDF ![]() .
.
Page Count: 58

キヤノン モノクロ
ビューファインダー ユニット
FU-1000
Canon Monochrome CRT
Viewfinder Unit FU-1000
Unité viseur CRT monochrome
Canon FU-1000
Canon Suchereinheit FU-1000 mit
Schwarzweiß-Kathodenstrahlröhre
Visor CRT monocromo
Canon FU-1000
Mirino a CRT monocolore
Canon FU-1000
2
Important Usage Instructions
WARNING:
TO REDUCE THE RISK OF FIRE OR ELECTRIC SHOCK, DO NOT EXPOSE THIS
PRODUCT TO RAIN OR MOISTURE.
This device complies with Part 15 of the FCC Rules. Operation is subject to the following two conditions: (1) This
device may not cause harmful interference, and (2) this device must accept any interference received, including
interference that may cause undesired operation.
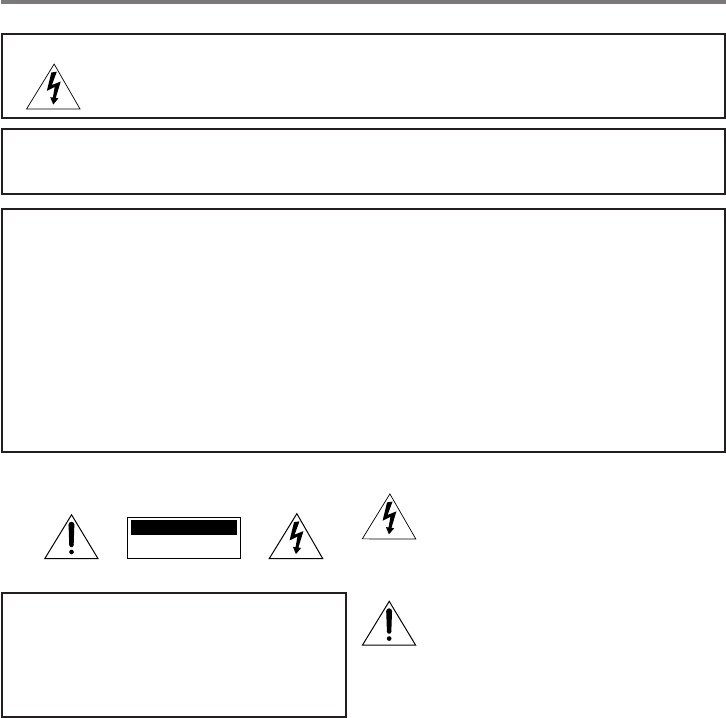
The lightning flash with arrowhead symbol,
within an equilateral triangle, is intended to alert
the user to the presence of uninsulated
“dangerous voltage” within the product’s
enclosure, that may be of sufficient magnitude
to constitute a risk of electric shock to persons.
The exclamation point, within an equilateral
triangle, is intended to alert the user to the
presence of important operating and
maintenance (servicing) instructions in the
literature accompanying the product.
CAUTION:
TO REDUCE THE RISK OF ELECTRIC
SHOCK, DO NOT REMOVE COVER (OR
BACK). NO USER SERVICEABLE PARTS
INSIDE. REFER SERVICING TO QUALIFIED
SERVICE PERSONNEL.
CAUTION
RISK OF ELECTRIC SHOCK
DO NOT OPEN
Important Warning
Note: This equipment has been tested and found to comply with the limits for Class B digital device, pursuant to
Part 15 of the FCC Rules. These limits are designed to provide reasonable protection against harmful interference
in a residential installation. This equipment generates, uses and can radiate radio frequency energy and, if not
installed and use in accordance with the instructions, may cause harmful interference to radio communications.
However, there is no guarantee that interference will not occur in a particular installation. If this equipment does
cause harmful interference to radio or television reception, which can be determined by turning the equipment off
and on, the user is encouraged to try to correct the interference by one or more of the following measures:
• Reorient or relocate the receiving antenna.
• Increase the separation between the equipment and receiver.
• Connect the equipment into an outlet on a circuit different from that to which the receiver is connected.
• Consult the dealer or an experienced radio/TV technician for help.
Use of shielded cable is required to comply with Class B limits in Subpart B of Part 15 of FCC Rules.
Do not make any changes or modifications to the equipment unless otherwise specified in the manual.
If such changes or modifications should be made, you could be required to stop operation of the equipment.
3
In these safety instructions the word “product”
refers to the Monochrome CRT Viewfinder Unit
FU-1000.
1. Read Instructions — All the safety and
operating instructions should be read before
the product is operated.
2. Retain Instructions — The safety and
operating instructions should be retained for
future reference.
3. Heed Warnings — All warnings on the
product and in the operating instructions
should be adhered to.
4. Follow Instructions — All operating and
maintenance instructions should be followed.
5. Cleaning — Unplug this product from the wall
outlet before cleaning. Do not use liquid or
aerosol cleaners. The product should be
cleaned only as recommended in this
manual.
6. Accessories — Do not use accessories not
recommended in this manual as they may be
hazardous.
7. Avoid magnetic or electric fields — Do not
use the camera close to TV transmitters,
portable communication devices or other
sources of electric or magnetic radiation.
They may cause picture interference, or
permanently damage the camera.
8. Water and Moisture — Hazard of electric
shock — Do not use this product near water
or in rainy/moist situations.
9. Placing or Moving — Do not place on an
unstable cart, stand, tripod, bracket or table.
The product may fall, causing serious injury
to a child or adult, and serious damage to the
product.
A product and cart combination should be
moved with care. Quick stops,
excessive force, and uneven
surfaces may cause the
product and cart combination
to overturn.
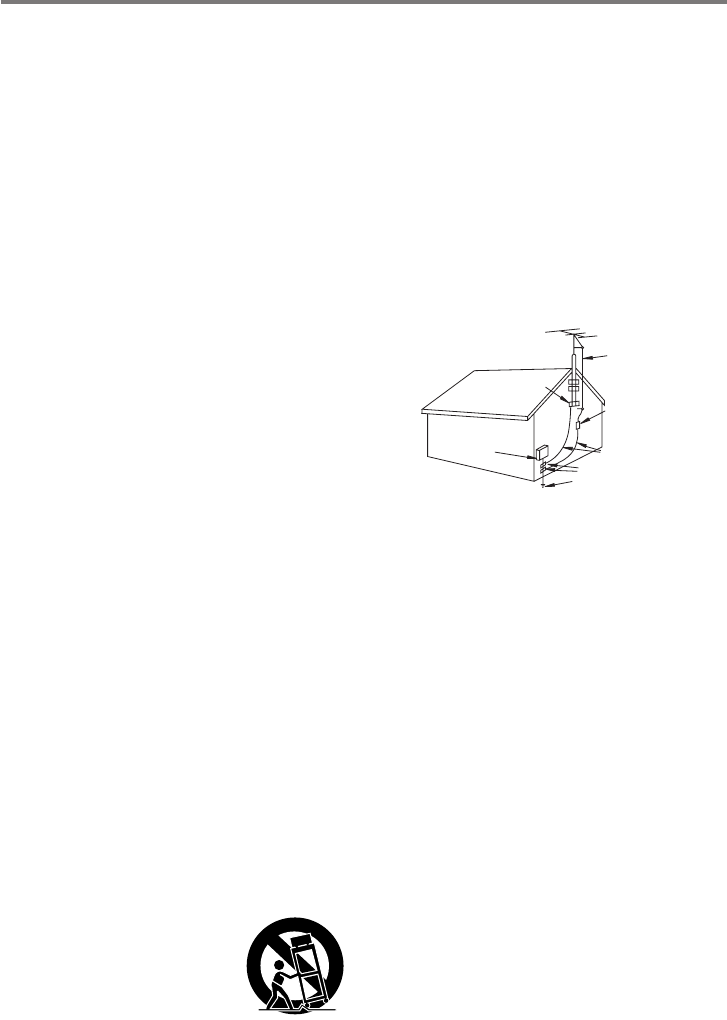
10.Outdoor Antenna Grounding — If an outside
antenna is connected to the product, be sure
the antenna is grounded so as to provide
some protection against voltage surges and
built-up static charges. Section 810 of the
National Electrical Code, ANSI/NFPA
No. 70—1984, provides information with
respect to proper grounding of the mast and
supporting structure, grounding of the lead-in
wire to an antenna discharge unit, size of
grounding conductors, location of antenna
discharge unit, connection to grounding
electrodes, and requirements for the
grounding electrode. See figure 1.
11.Lightning — For added protection of this
product during a lightning storm, or when it is
left unattended and unused for long periods
of time, disconnect it from the wall outlet and
disconnect the antenna. This will prevent
damage to the product due to lightning and
power-line surges.
12.Power Lines — An outside antenna system
should not be located in the vicinity of
overhead power lines or other electric light or
power circuits, or where it can fall into such
power lines or circuits. When installing an
outside antenna system, extreme care
should be taken to keep from touching such
power lines or circuits as contact with them
might be fatal.
13.Overloading — Do not overload wall outlets
and extension cords as this can result in a
risk of fire or electric shock.
EXAMPLE OF ANTENNA GROUNDING AS
PER NATIONAL ELECTRICAL CODE
ANTENNA
LEAD IN
WIRE
ANTENNA
DISCHARGE
UNIT
(NEC SECTION
810-20)
GROUNDING CONDUCTORS
(NEC SECTION 810-21)
GROUND CLAMPS
POWER SERVICE
GROUNDING ELECTRODE
SYSTEM
(NEC ART 250. PART H)
NEC - NATIONAL ELECTRICAL CODE
ELECTRIC
SERVICE
EQUIPMENT
GROUND
CLAMP
Fig. 1
IMPORTANT SAFETY INSTRUCTIONS
4
14.Objects and Liquid Entry — Never push
objects of any kind into this product through
openings as they may touch dangerous
voltage points or short out parts that could
result in a fire or electric shock. Be careful
not to spill liquid of any kind onto the product.
15.Servicing — Do not attempt to service this
product yourself as opening or removing
covers may expose you to dangerous
voltage or other hazards. Refer all servicing
to qualified service personnel.
16.Damage Requiring Service — Disconnect
this product from the wall outlet and all power
sources including battery, and refer servicing
to qualified service personnel under the
following conditions:
a. When the power-supply cord or plug is
damaged.
b. If any liquid has been spilled onto, or
objects have fallen into, the product.
c. If the product has been exposed to rain
or water.
d. If the product does not operate normally
even if you follow the operating
instructions. Adjust only those controls
that are covered by the operation
instructions. Improper adjustment of
other controls may result in damage and
will often require extensive work by a
qualified technician to restore the product
to its normal operation.
e. If the product has been dropped or the
cabinet has been damaged.
f. When the product exhibits a distinct
change in performance. This indicates a
need for service.
17.Replacement Parts — When replacement
parts are required, be sure the service
technician has used replacement parts that
are specified by Canon or that have the
same characteristics as the original part.
Unauthorized substitutions may result in fire,
electric shock or other hazards.
18.Safety Check — Upon completion of any
service or repairs to this product, ask the
service technician to perform safety checks
to determine that the product is in safe
operating order.
5
J日本語
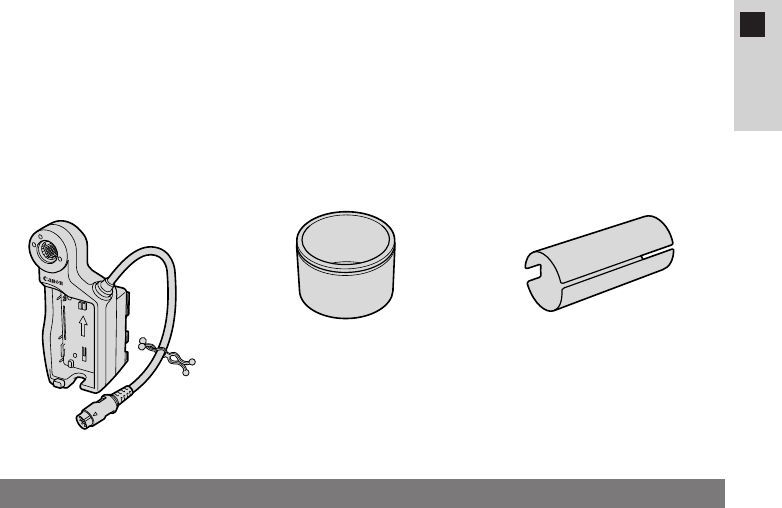
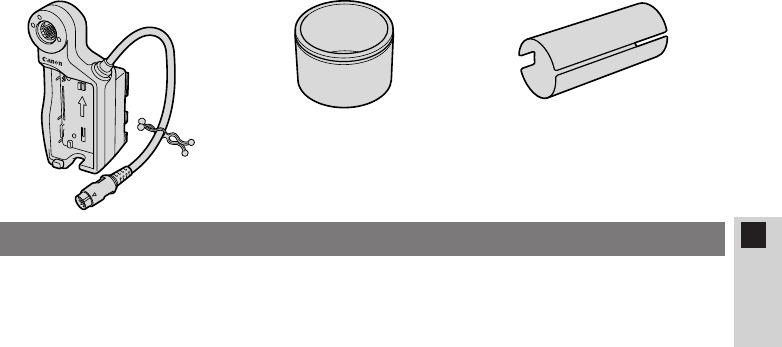
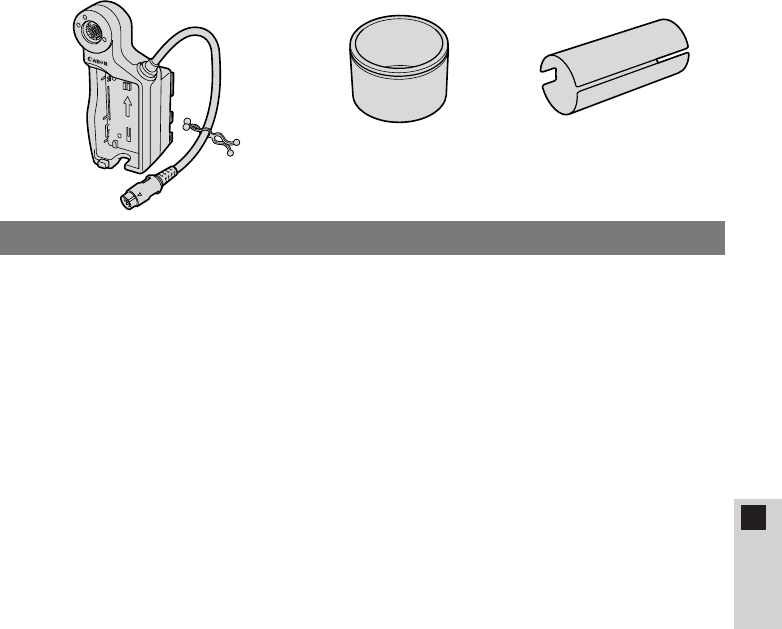
● バッテリーアダプター
BATT.RELEASE
● モノクロ ビューファインダー ユニット FU-1000をXL1Sに取り付けたときはバッテリーパッ
クで使用してください。コンパクトパワーアダプターCA-900シリーズによるAC電源やカーバッ
テリーアダプターCB-900シリーズによる車載電源では使用できません。
¡バッテリーパックの残量表示は出ませんが、消耗を警告する“k”は出ます。
なお、モノクロ ビューファインダー ユニット FU-1000をXL1Sに取り付けたときのバッテリー
パックの連続使用時間は次の通りです。
BP-930:約85分1)/約105分2)
BP-945:約135分1)/約155分2)
1) デジタルビデオカメラXL1Sに16倍ズームレンズXL5.5−88mm IS IIを組み合わせた場合
2) デジタルビデオカメラXL1Sに別売の14倍マニュアルズームレンズXL5.7−80mm、または
16倍マニュアルズームレンズXL5.4−86.4mmを組み合わせた場合
※ 別売のデュアルバッテリーチャージャー/ホルダーCH-900シリーズにバッテリーパックを2個
取り付けた場合は、連続使用時間は約2倍になります。
● 付属のマイクにマイクプロテクターを取り付けても、モノクロ ビューファインダー ユニットによ
るノイズが聞こえる場合は、別売のマイクロホンアダプター/ショルダーパッドMA-100を使用
して、バランスタイプのマイクをお使いになることをおすすめします。
● 延長チューブ ● マイクプロテクター
モノクロ ビューファインダー ユニット FU-1000使用時のご注意
このたびは、キヤノン モノクロ ビューファインダー ユニット FU-1000をお買い求めいただきまし
て、誠にありがとうございます。本機は、デジタルビデオカメラXL1Sに取り付けるモノクロ ビュー
ファインダー ユニットで、より正確なピント合わせなどが可能になります。
ご使用の前にこの使用説明書をよくお読みのうえ、正しくお使いください。お読みになった後は、大
切に保管してください。
保証書別添付
保証書は必ず「購入店・購入日」等の記入を確かめて、購入店よりお受け取りください。
本機をお使いになる前に、付属品をお確かめください。
6
J日本語
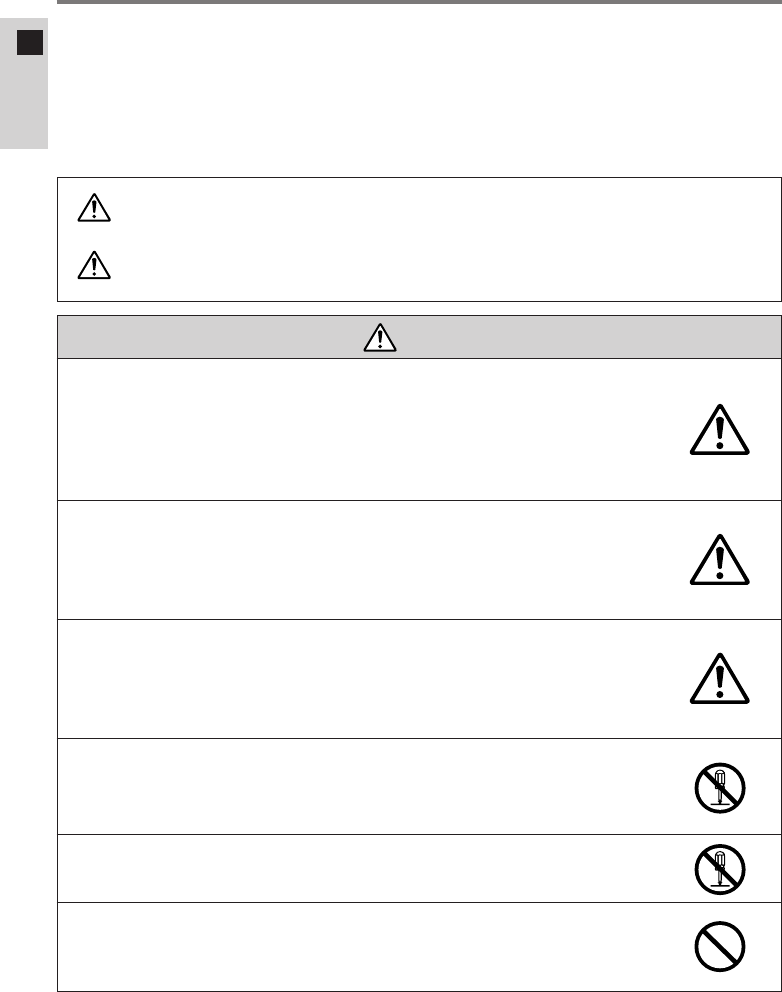
警告
● 煙が出ている、へんな臭いがするなどの異常が発生した場合、すぐに、
バッテリーパックを外してください。
そのまま使用すると、火災、感電の原因となります。
煙が出なくなるのを確認してから、ご購入になった販売店または
キヤノンサービスセンターに修理を依頼してください。
お客様による修理は危険ですからおやめください。
● 本機器を落としたり、外装を破損した場合は、バッテリーパックを外
してください。
ご購入になった販売店またはキヤノンサービスセンターに修理を
依頼してください。
そのまま使用した場合、火災、感電の原因となります。
● 本機器内部に水または異物が入った場合は、すぐに、バッテリーパッ
クを外してください。
そのまま使用した場合、火災、感電の原因となります。ご購入になっ
た販売店またはキヤノンサービスセンターにご連絡ください。
特にお子様のいるご家庭では、ご注意ください。
● 本機器の外装を外さないでください。
内部に高電圧の部分がありますので、感電の原因となります。
内部の点検・調整・修理は、ご購入になった販売店またはキヤノン
サービスセンターにご依頼ください。
● 本機器を分解、改造しないでください。
発熱、火災、感電、けがの原因となります。
● バッテリーパックから液漏れした時、皮膚や衣服につけたり、目に入
れたり、火気に近づけたりしないでください。
皮膚の障害、失明、発火の原因となります。
安全上のご注意
● ご使用の前にこの「安全上のご注意」をよくお読みのうえ、正しくお使いください。
● 絵表示について
この使用説明書および製品への表示では、製品を正しくお使いいただき、あなたや他の人々への
危害や財産への損害を未然に防止するために、いろいろな絵表示をしています。
その表示と意味は次のようになっています。
内容をよく理解してから本文をお読みください。
この表示を無視して、誤った取り扱いをすると、人が死亡または重傷を負う可能性が想定
される内容です。必ずお守りください。
この表示を無視して、誤った取り扱いをすると、人が傷害を負う可能性が想定される内容
および物的損害のみの発生が想定される内容です。
必ずお守りください。
警告
注意
7
J日本語
警告
● 本機器内部に水などが入ったり、濡らしたりしないようにご注意くだ
さい。
そのまま使用した場合、火災、感電、やけどの原因となります。雨天、
降雪中、海岸、水辺、湿度の高い場所などでの使用は、特にご注意く
ださい。
● バッテリーパックを金属製のネックレス、キーホルダー、ヘアピンな
どと一緒に、携帯や保管をしないでください。
電池などの「+」と「−」の端子がショートされ、高熱や液漏れによ
り、やけど、けがの原因となります。持ち運びや保存のときは、必ず
付属のショート防止キャップを取り付けてください。
● バッテリーパック、乾電池、ボタン型リチウム電池などを分解や加熱
をしたり、火や水の中へ投げ込まないでください。
電池の破裂により、やけど、けがの原因となります。
● 自動車などの運転中に、運転者は本機器を操作しないでください。
交通事故の原因となります。
● 撮影しているときは、周囲の状況にご注意ください。
けがや交通事故の原因となります。
● お子様が使用のときには、保護者が正しい使用方法を充分に教えてく
ださい。また、使用中にもご注意ください。
感電、けがの原因となります。
● 乳幼児の手の届かないところで、使用、保管してください。
感電、けがの原因となります。
● バッテリーパックの充電は、指定された充電器を使用してください。
それ以外のものを使用すると、電池の液漏れ、発熱、破裂より火災、
やけど、けがの原因となります。
● ケーブルを車のドア、窓、シートなどの間に、はさまないでください。
ケーブルが傷ついたり(芯線の露出や断線など)して、火災、感電の
原因となります。
● バッテリーパックは指定された機器にご使用ください。
それ以外のものに使用すると、電池の液漏れ、発熱、破裂の原因にな
ります。
● 本機器や付属の接続コードの接点部に金属類を差し込まないでくださ
い。
火災、けがの原因となります。
8
J日本語
警告
● バッテリーパックを充電器や機器に接続するときに、プラス、マイナ
スの向きを確認してください。
電池の液漏れ、発熱、破裂により火災、やけど、けがの原因となります。
● 本機器をぐらついた台の上や傾いた所など不安定な場所に置かないで
ください。
落ちたり、倒れたりして、けがの原因となります。
● バッテリーパックを電源コンセントや自動車のシガーライターソケッ
トなどに直接接続しないでください。
電池の液漏れ、発熱、破裂により火災、やけど、けがの原因となります。
注意
● 強い衝撃や振動を与えたり、投げつけないでください。
破損により、火災、やけど、けがの原因となることがあります。
● 本機器や電源コードを、ストーブなどの熱器具に近づけないでください。
外装が変形したり、コードの被覆が溶けて、火災、感電の原因となる
ことがあります。
● 直射日光下や発熱体のそばなど、60℃以上の高温の場所で使用や放置
しないでください。
電池の漏液、発熱、破裂により、火災、やけど、けがの原因となるこ
とがあります。
● 飛行機内で使用する場合は、乗務員の指示に従ってください。
機器から出る電磁波により、飛行機の計器に影響を与える恐れがあり
ます。
● テーブルクロス、じゅうたん、布団、クッションなどをかけたまま使
用しないでください。
内部に熱がこもり火災の原因となることがあります。
● バッテリーパック、ショルダーストラップ、グリップベルトなどを確
実に取り付けてください。
緩んで脱落すると、けがの原因となることがあります。
● 湿気やほこりの多い場所に保管しないでください。
火災、感電の原因となることがあります。
● 指定された電池を使用してください。
それ以外のものを使用すると、電池の破裂、液漏れにより、火災、け
がや周囲を汚す原因となることがあります。
9
J日本語
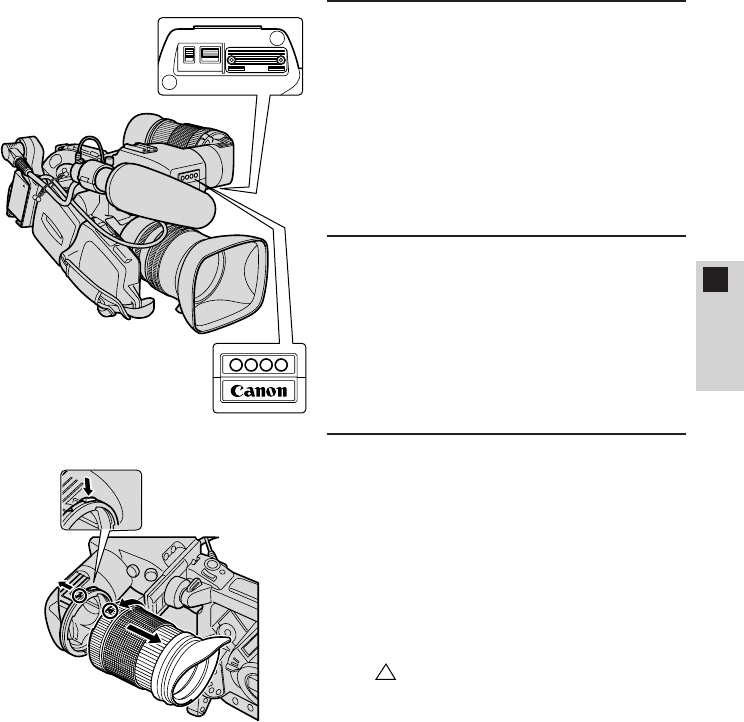
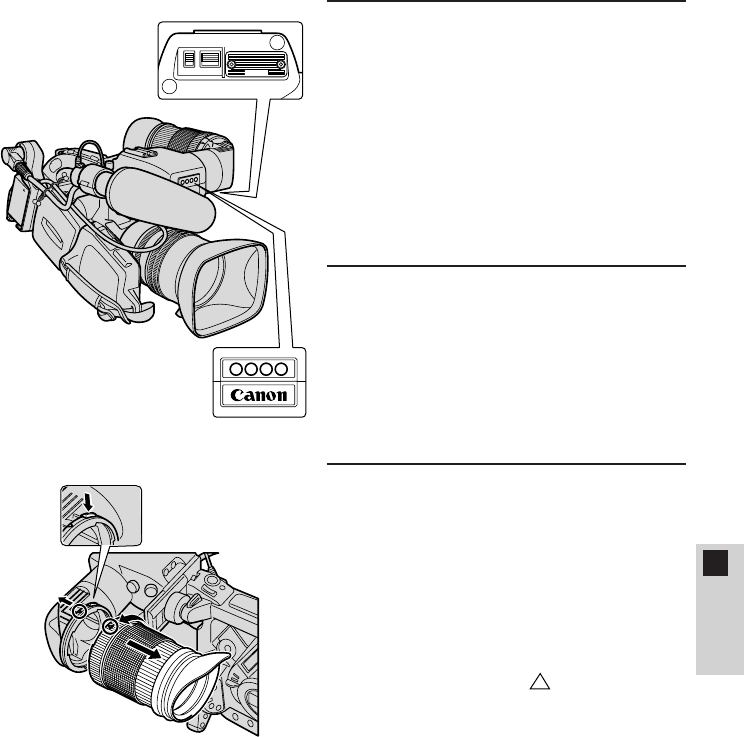
モノクロ ビューファインダー ユニットの取り付け
A
B
C
D
E
¡マイクはあらかじめ取りはずしてお
きます。
1カラーファインダーを
取りはずす。
qファインダーケーブルをはずす
(図A)。
w固定ネジを回してゆるめ、ファイン
ダー部をスライドさせてはずす
(図B)。
2モノクロ ビューファイン
ダーを取り付ける。
¡ファインダー取り付け部にスライド
させて取り付け、固定ネジを回して
固定する(図C)。
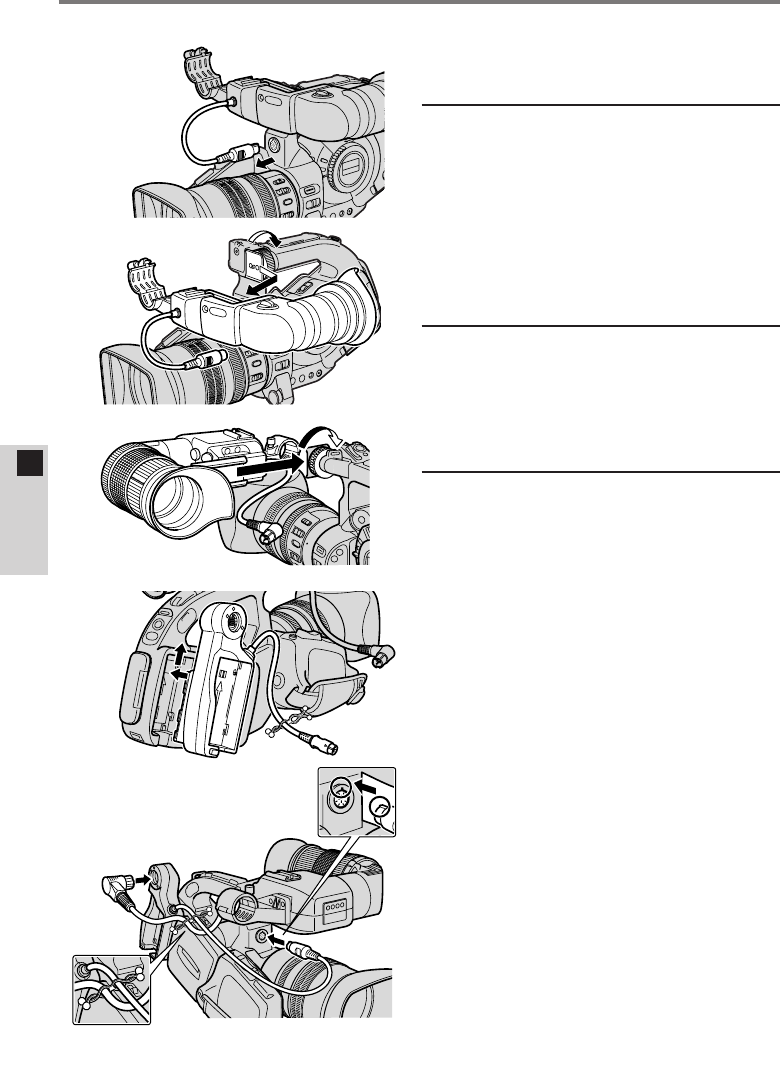
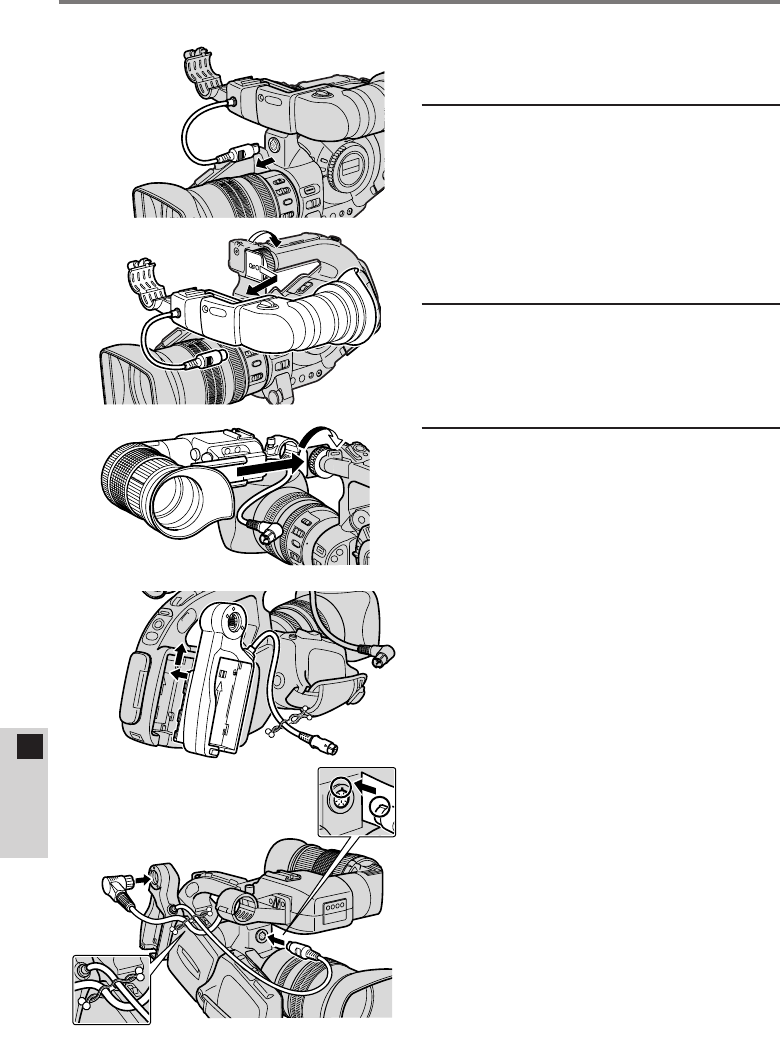
3バッテリーアダプターを
ビデオカメラの電源装着部
に取り付ける。
qバッテリーアダプターの先端を、電
源装着部のガイドラインに合わせ、
押しつけながらカチッと音がするま
でスライドさせる(図D)。
¡はずすときは、ビデオカメラの
BATT. RELEASEボタンを押し
ながら、バッテリーアダプター
をスライドさせてはずす。
w
モノクロ ビューファインダーのケー
ブルをバッテリーアダプターに接続
する(図E)。
eバッテリーアダプターのケーブルを
ビデオカメラに接続する(図E)。
r
ケーブルクリップでモノクロビュー
ファインダーのケーブルをバッテリー
アダプターのケーブルに固定する
(図E)。
¡ケーブルを差し込み、先端部を
ねじって固定する。
10
J日本語
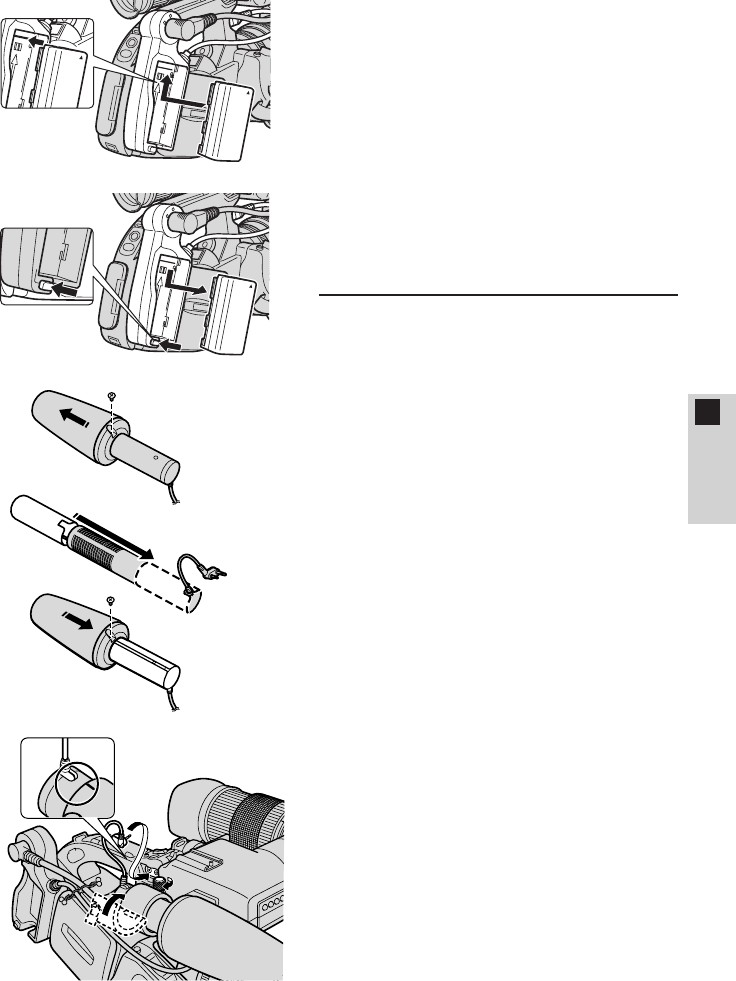
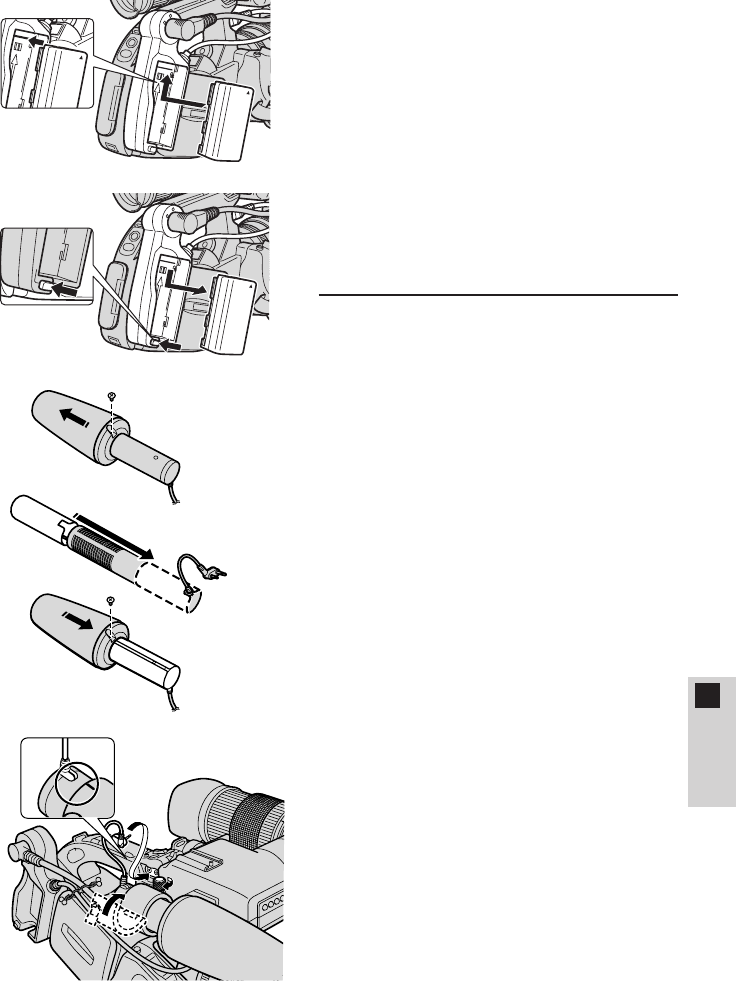
¡バッテリーパックの
取り付け/取りはずし
[取り付け]
バッテリーパックの先端を、電源装
着部のガイドラインに合わせ、押し
つけながら、カチッと音がするまで、
スライドさせる(図F)。
[取りはずし]
バッテリーアダプターのBATT.
RELEASEボタンを押しながら、
バッテリーパックをスライドさせて
はずす(図G)。
4マイクを取り付ける。
q細い+ドライバーでネジをはずし、
ウィンドスクリーンをはずす
(図H)。
wマイクプロテクターをマイクに差し
込み、上からウィンドスクリーンを
差し込み、ネジで固定する(図I)。
e指標を合わせて、マイクを取り付け
部に差し込み、固定する(図J)。
rマイクケーブルを接続する(図J)。
BATT.RELEASE
F
G
H
I
J
モノクロ ビューファインダー ユニットの取り付けーつづき

11
J日本語
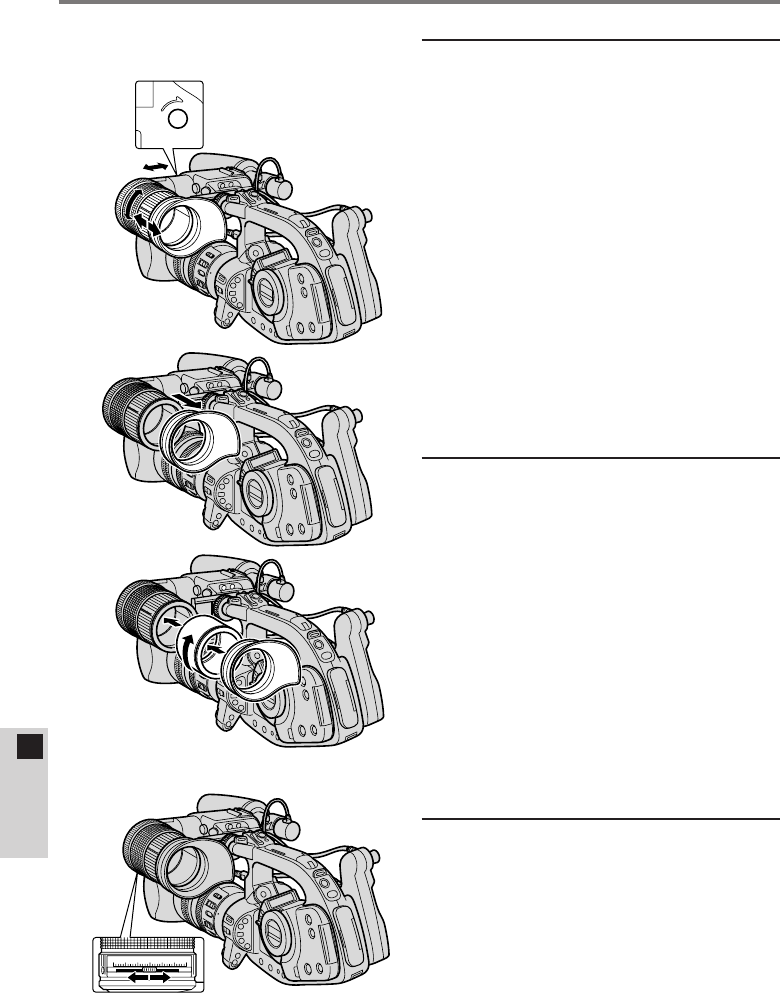
モノクロ ビューファインダー ユニットの調整
1アイピースの調整
qビデオカメラを構え、ビューファイ
ンダーユニットを動かして、見やす
い位置で、ビューファインダーユ
ニットの裏側にあるアイピースロッ
クネジを締めて固定する(図K)。
¡ビューファインダーは左右に0∼
2cm移動でき、上下に0∼250°
回転します。
w撮影するときの目の位置に合わせ、
アイピース調整リングでアイピース
の前後の位置を調整する(図K)。
¡アイピースは前後0∼2cmの範囲で
移動できます。
2延長チューブの取り付け
アイピース位置を調整しても、目の位
置に合わないときは延長チューブを取
り付けてください。
qアイカップをはずす(図L)。
w延長チューブをネジ溝に合わせ回し
て、固定する(図M)。
eアイカップを延長チューブの溝に合
わせ、取り付ける(図M)。
3ファインダーの視度調整
電源を入れ、ビューファインダーの表
示がはっきり見えるように調整しま
す。
¡視度調整つまみではっきり見える位
置を探す(図N)。
0123456
LOCK
K
L
M
N
12
J日本語
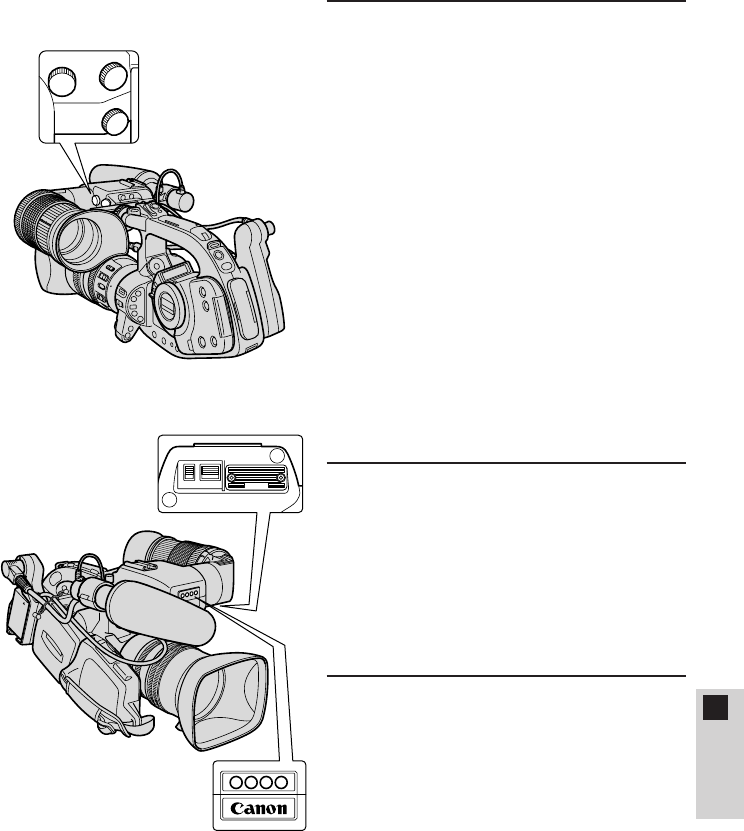
4画面の調整
ビューファインダー画面は明るさ
(B=ブライト)、濃淡(C=コントラス
ト)とピーキング(P)の調整ができ
ます(図O)。
¡明るさの調整
マニュアルで絞りを設定するとき
に、ビューファインダーの明るさが
目安になります。
グレースケールなど、階調のわかる
被写体を写しながら適切に調整して
ください。
¡ピーキングの調整
レンズのピントを合わせるときに、
画面が見やすくなるように調整して
ください。
•ビューファインダーのB、C、Pの
つまみを調整しても記録される映像
には影響ありません。
5録画ランプについて
録画ランプを点滅させるときは、ビデ
オカメラ本体のメニューで録画ランプ
を「入」にして、モノクロ ビューファ
インダーのTALLYスイッチも「入」
にしてください(図P)。
いずれか片方が「切」になっていると
点滅しません。
6レンズ上面照射ランプ
周囲が暗いときなど、レンズ操作部を
照明するランプです。
LIGHTスイッチで「入/切」してくだ
さい(図P)。
O
P
C
B
ON
TALLY LIGHT
ON
P
モノクロ ビューファインダー ユニットの調整ーつづき
アフターサービス
製品の保証について
1 本製品が万一故障したときは、本製品と保証
書をご持参のうえ、ご購入いただいた販売店
またはキヤノンサービスセンターにご相談く
ださい。
2 保証期間内でも保証の対象にならない場合も
あります。詳しくは保証書に記載されている
保証内容のご案内をご覧ください。
保証期間はご購入日より1年間です。
3 保証期間経過後の修理は原則として有料とな
ります。なお、運賃等の諸経費は保証期間内
でもお客様にご負担いただくことがあります。
4 本製品などの不具合により録画されなかった
場合の付随的損害(録画、録音に要した諸費
用および得べき利益の損失など)については、
保証致しかねます。
修理を依頼されるときは
5 修理品をご持参いただくときは、不具合の見
本となるビデオカセットを添付するなどした
うえ、不具合の内容/修理箇所を明確にご指
示ください。
補修用性能部品について
6 モノクロ ビューファインダー ユニット補修
用性能部品(製品の機能を維持するために必
要な部品)の最低保有期間は、製造の打ち切
り後8年です。従って期間中は原則として修
理をお受けいたします。なお、故障の原因や
内容によっては、期間中でも修理が困難な場
合と、期間後でも修理が可能な場合がありま
すので、その判断につきましてはご購入店、
またはキヤノンサービスセンターにお問い合
わせください。
修理料金について
7 修理料金は故障した製品を正常に修復するた
めの技術料と修理に使用する部品代との合計
金額からなります。
修理見積につきましては、窓口で現品を拝見
させていただいてから概算をお知らせいたし
ます。なお、お電話での修理見積依頼につき
ましては、おおよその仮見積になりますので、
その旨ご承知おきください。
13
J日本語
7アイピースの取りはずし/
取り付け
[取りはずし]
アイピース取りはずしボタンを押した
まま、アイピースを回す(図Q)。
[取り付け]
ビューファインダーとアイピースの△
を合わせ、カチッと音のするまで回す
(図Q)。
保証書とアフターサービス
●本機の保証は日本国内を対象としています。万一海外で故障した場合の現地でのアフターサービス
はご容赦ください。
保証書
本体には保証書が添付されています。必要事項が記入されていることをお確かめのうえ、大切に保存
してください。
Q

14
J日本語
主な仕様
モノクロビューファインダー
ファインダー: 1.5型白黒CRT使用
解像度: 中心約500TV本以上(CRT単体解像度)
視度調整範囲: +0.5∼−2.4ディオプター
+0.1∼−3.2ディオプター(延長チューブ装着時)
録画ランプ: あり(入/切スイッチ付き)
レンズ上面照射ランプ: あり(入/切スイッチ付き)
コントラスト調整: あり(ボリューム付き)
ピーキング調整: あり(ボリューム付き)
ブライト調整: あり(ボリューム付き)
電源電圧: DC9V(バッテリーアダプターでDC7.2Vを
DC9Vに昇圧して供給)
消費電力: 約11.2W(撮影時:16倍ズームレンズXL5.5−
88mm IS II装着時)
約9.5W(撮影時:14倍マニュアルズームレンズ
XL5.7−80mm、または16倍マニュアルズームレン
ズXL5.4−86.4mm装着時)
外形寸法: 約204 × 192 ×75mm
約204 × 251×75mm (マイクホルダー装着時)
質量: 約900g
バッテリーアダプター
使用電源: キヤノンバッテリーパックBP-900シリーズ
(コンパクトパワーアダプター、カーバッテリーアダ
プターは使用不可)
外形寸法: 約138 ×63 ×53mm
質量: 約130g
製品の仕様および外観は改善などの理由で予告なく変更することがありますが、
ご了承ください。
15
E
ENGLISH
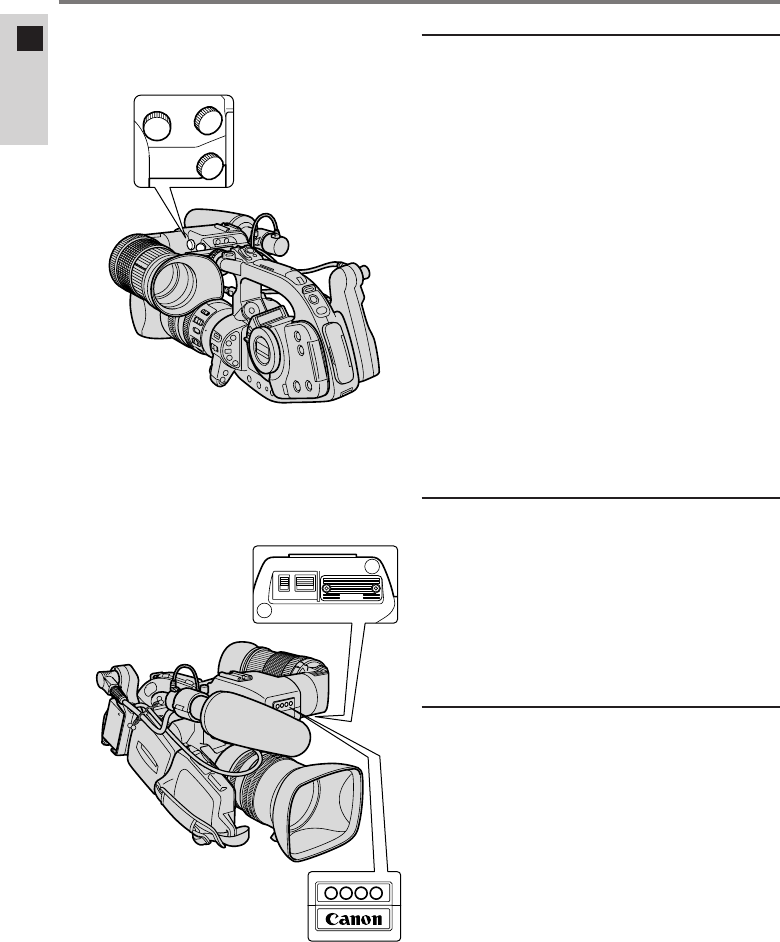
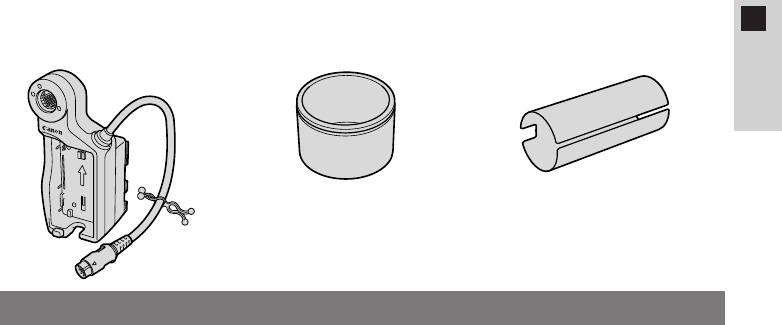
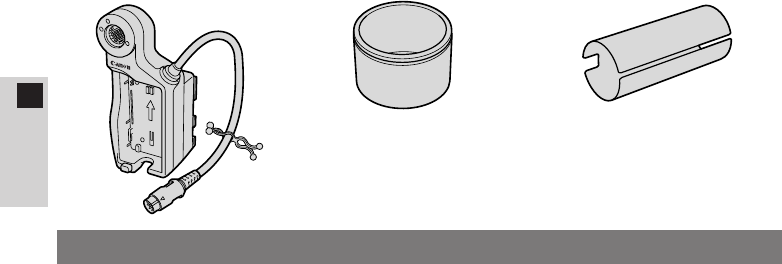
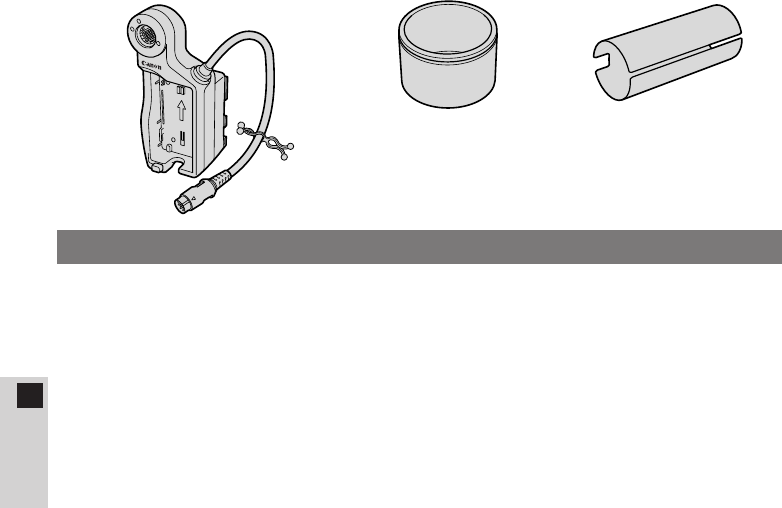
¡Battery adapter
(Cable clip attached)
BATT.RELEASE
¡The FU-1000 cannot be powered from an AC/mains outlet (with the CA-900
series Compact Power Adapter) or from your car battery (with the CB-900
series Car Battery Adapter). You must use a battery pack (or two with the
CH-900 series Dual Battery Charger/Holder* (sold separately)) to power and
use the FU-1000.
¡The remaining power indicator does not appear in the viewfinder until just
before the power is exhausted, when kappears.
The following are the approximate continued usage times when the FU-1000 is
used with the XL1S:
BP-930: 85 min.1) / 105 min.2)
BP-945: 135 min.1) / 155 min.2)
1) When the Video Lens 16×Zoom XL 5.5–88 mm IS II is mounted on the
XL1S.
2) When the Full-manual Video Lens 14×Zoom XL 5.7–80 mm or the Manual
Video Lens 16×Zoom XL 5.4–86.4 mm (both optional) is mounted on the
XL1S.
* When you attach two battery packs with the CH-900 series Dual Battery
Charger/Holder (sold separately), continuous usage time will be almost
doubled.
¡There may be times when you hear noise, despite having the microphone
protector attached to the microphone. If you do hear noise, we recommend
using the MA-100 Microphone Adapter/Shoulder Pad (sold separately) to
convert to a balanced microphone.
¡Extension tube ¡Microphone protector
Notes on using the FU-1000
Thank you for purchasing this Canon Monochrome CRT Viewfinder Unit
FU-1000. This monochrome viewfinder unit for the XL1S digital video camcorder
allows for even crisper focusing.
To get the most out of your FU-1000, we recommend that you read this manual
thoroughly before use. Keep these instructions in a safe place for quick reference
in the future.
The FU-1000 is supplied with the following accessories:
16
E
ENGLISH
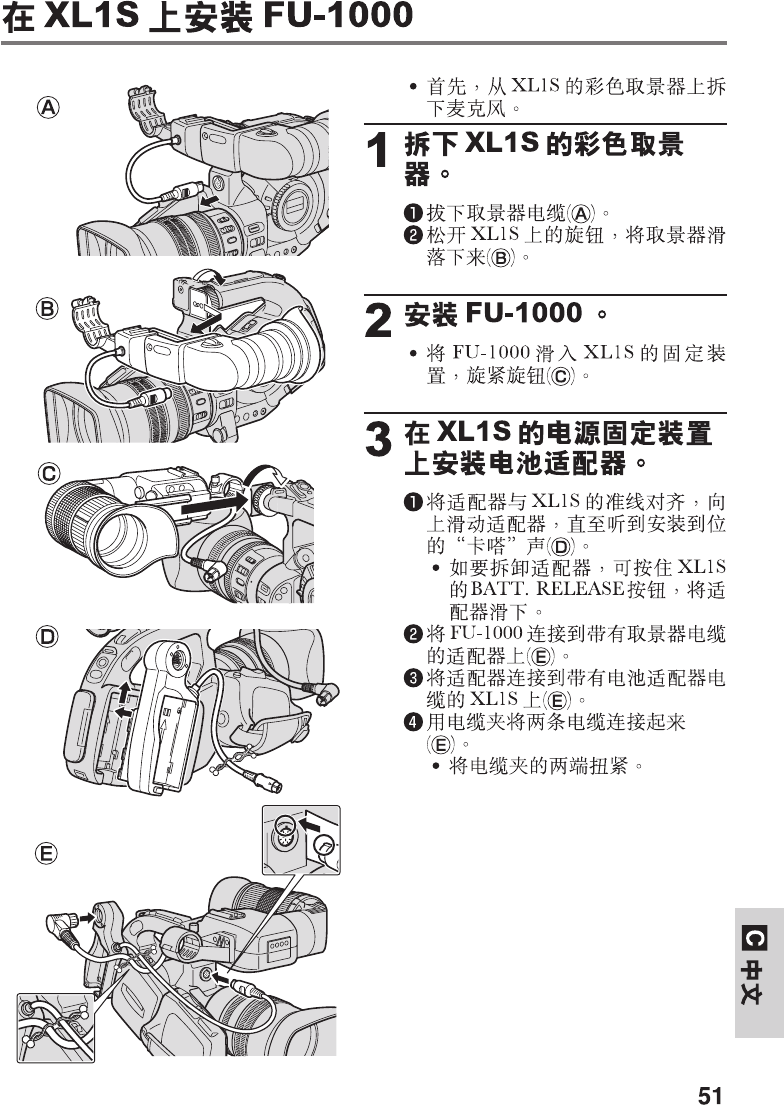
Mounting the FU-1000 to the XL1S
A
B
C
D
E
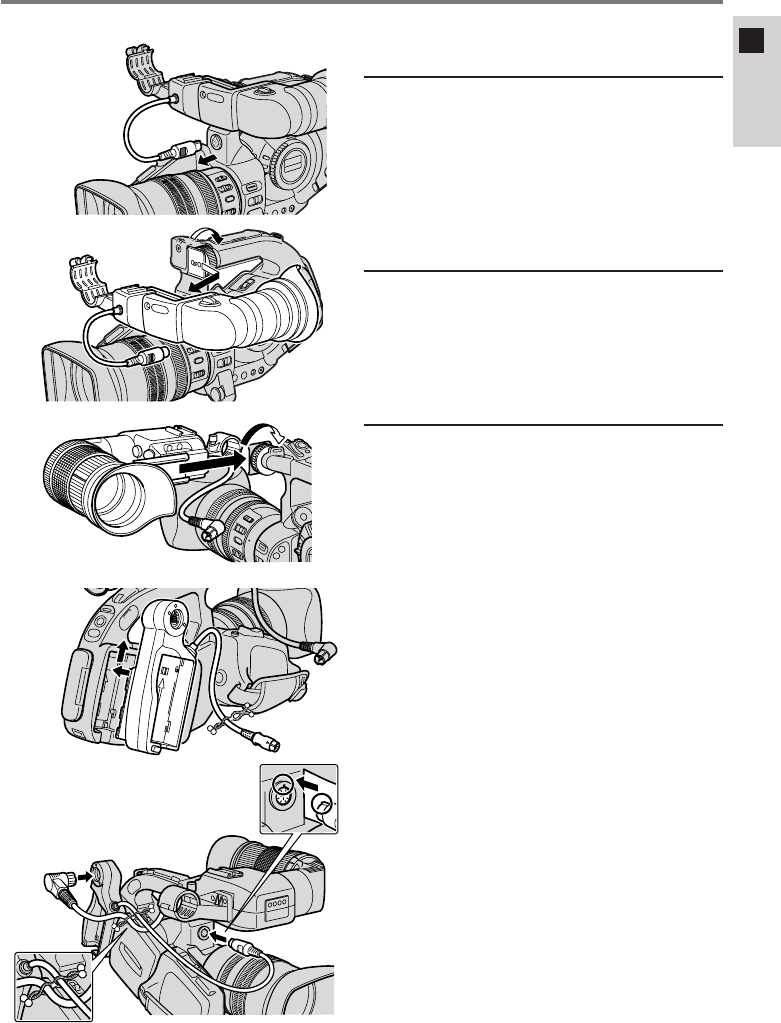
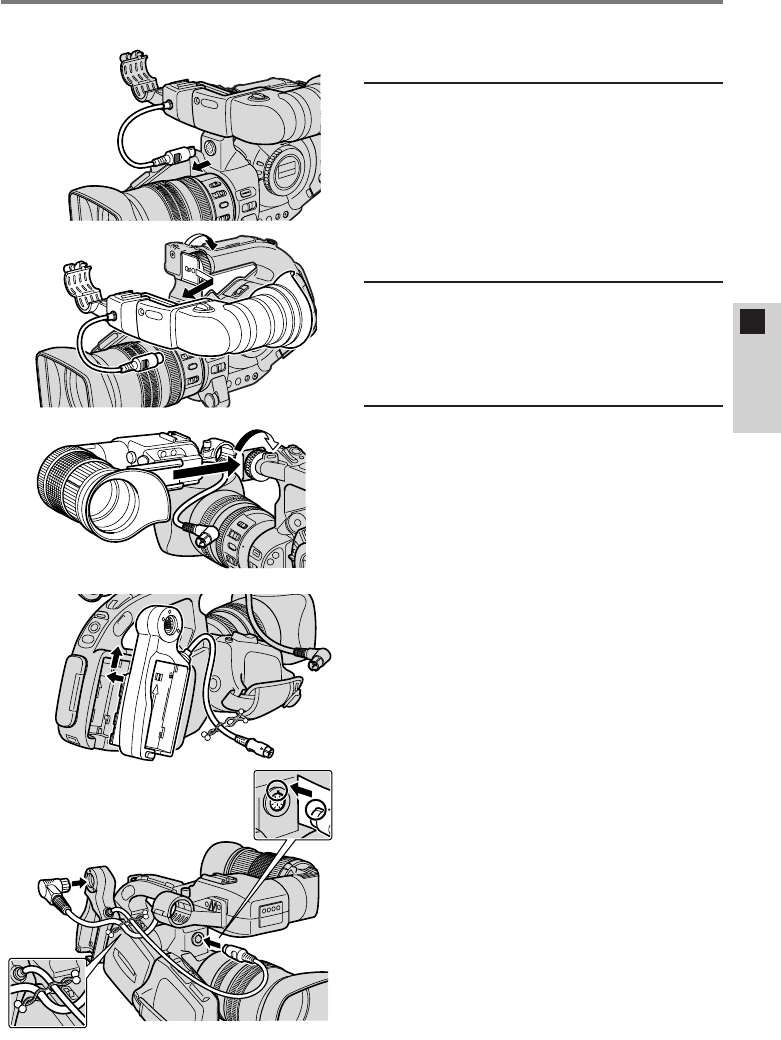
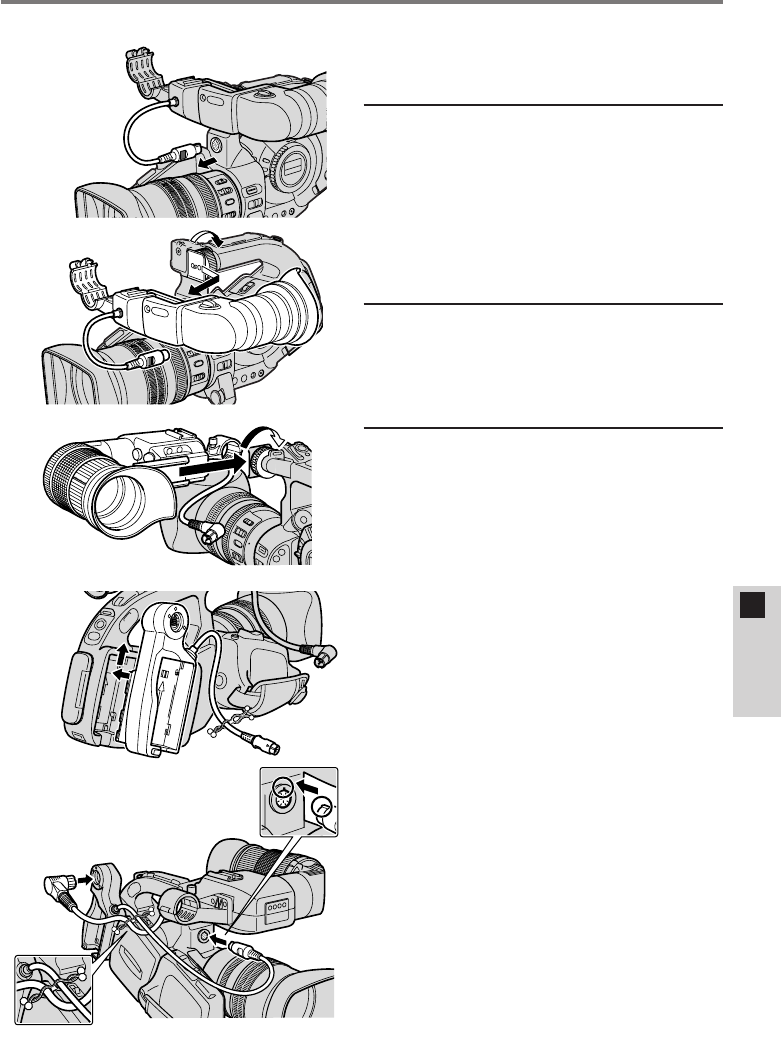
¡First, remove the microphone
from the XL1S’s color
viewfinder.
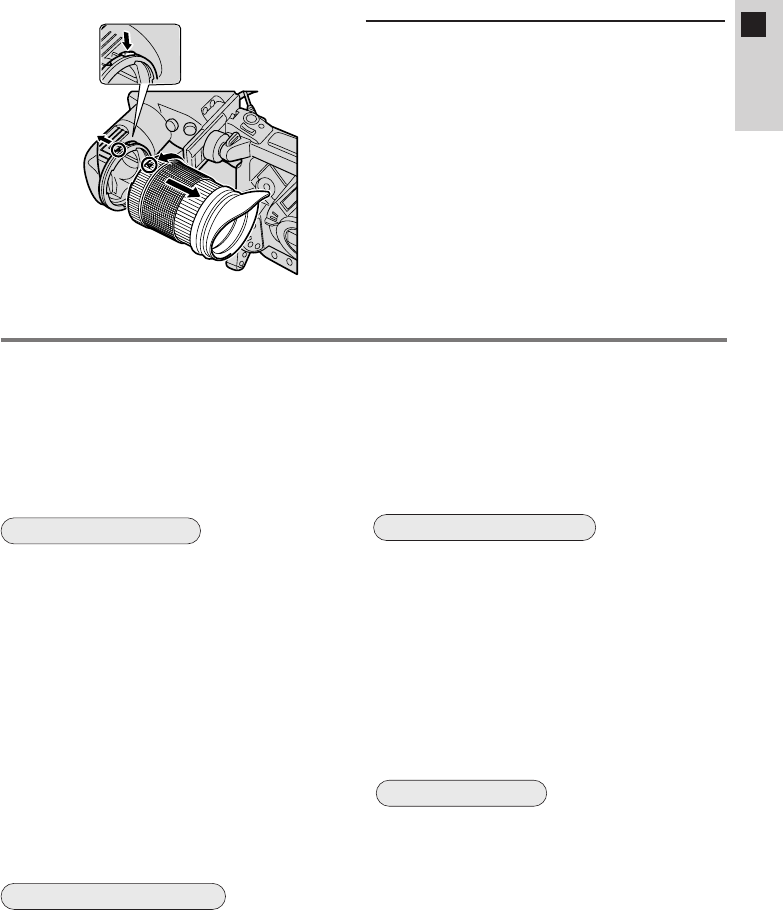
1Remove the XL1S’s
color viewfinder.
qDisconnect the viewfinder cable
(A).
wLoosen the knob on the XL1S
and slide the viewfinder off (B).
2Mount the FU-1000.
¡Slide the FU-1000 onto the
XL1S’s mounting unit and
tighten the knob (C).
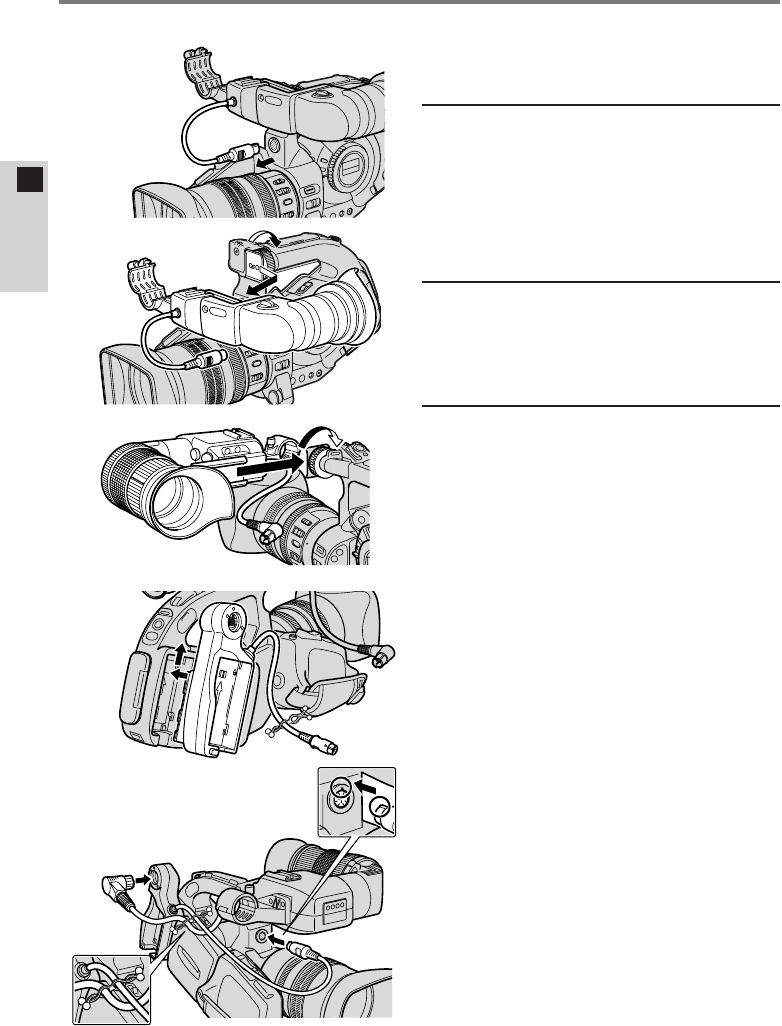
3Attach the battery
adapter to the XL1S’s
power source
attachment unit.
qAlign the adapter with the line on
the XL1S and slide it up until it
clicks into place (D).
¡To remove the adapter, press
and hold the XL1S’s BATT.
RELEASE button while
sliding the adapter down.
wConnect the FU-1000 to the
adapter with the viewfinder
cable (E).
eConnect the adapter to the
XL1S with the battery adapter
cable (E).
rJoin the two cables with the
cable clip (E).
¡Twist both ends of the clip to
secure.

17
E
ENGLISH
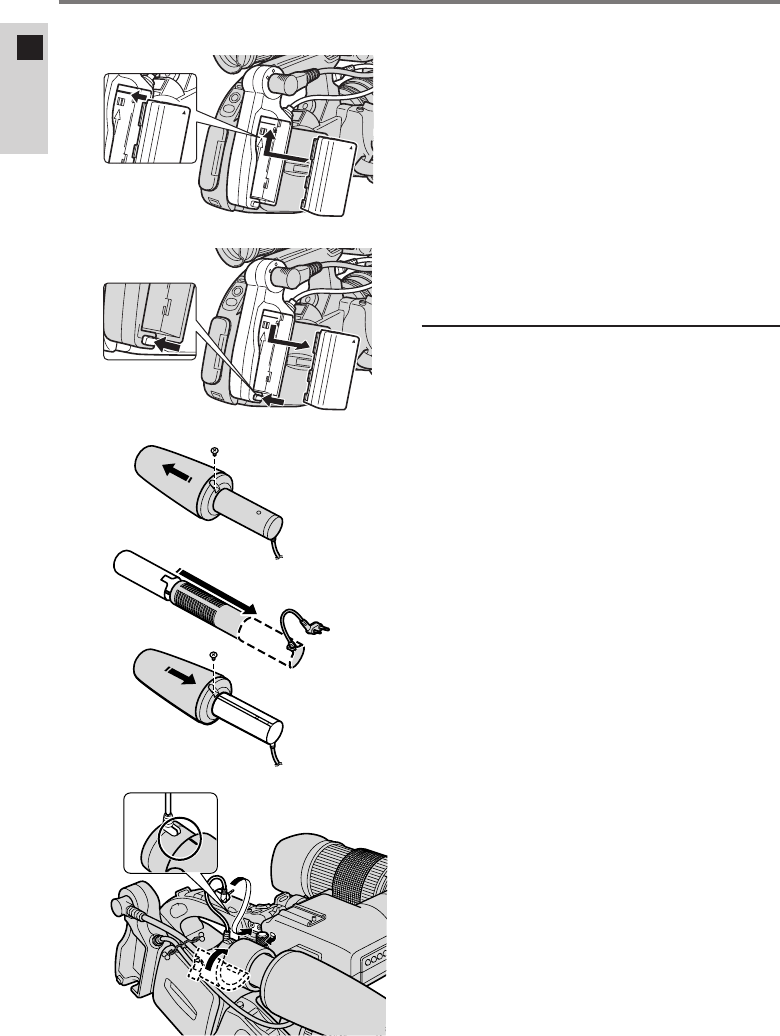
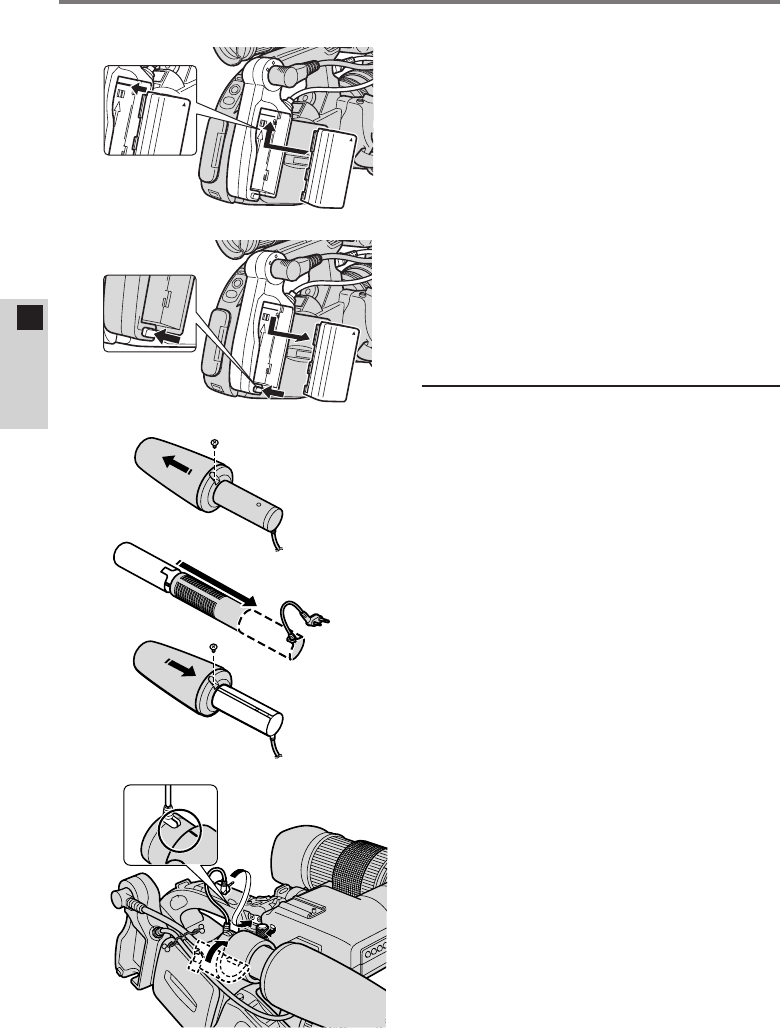
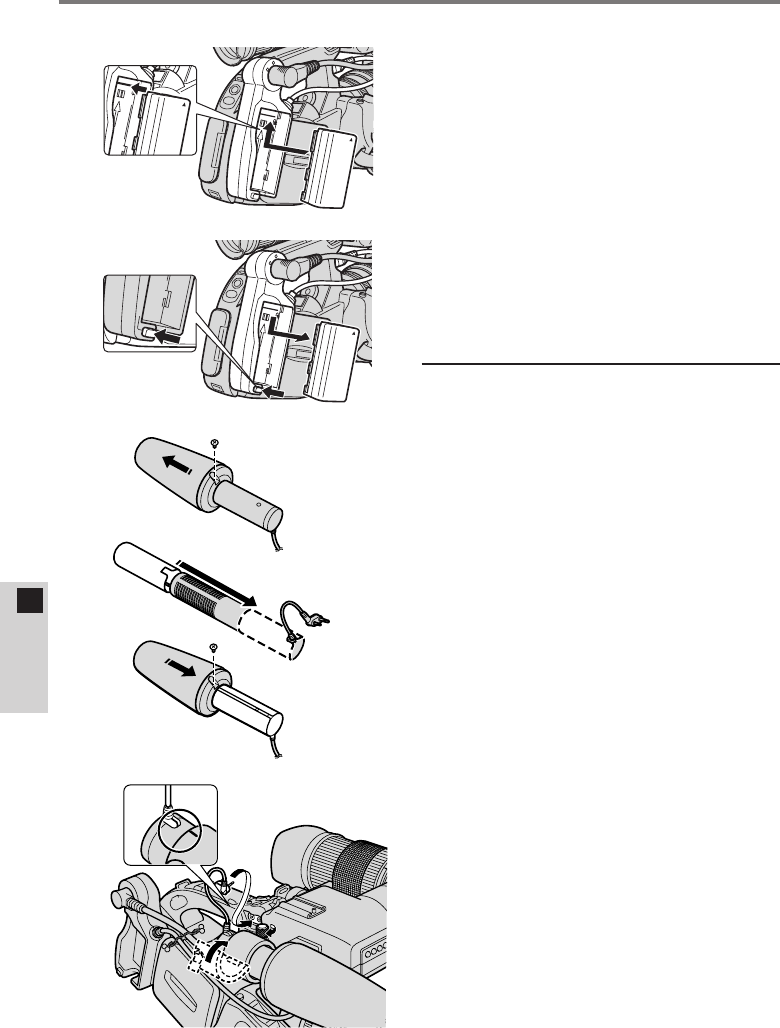
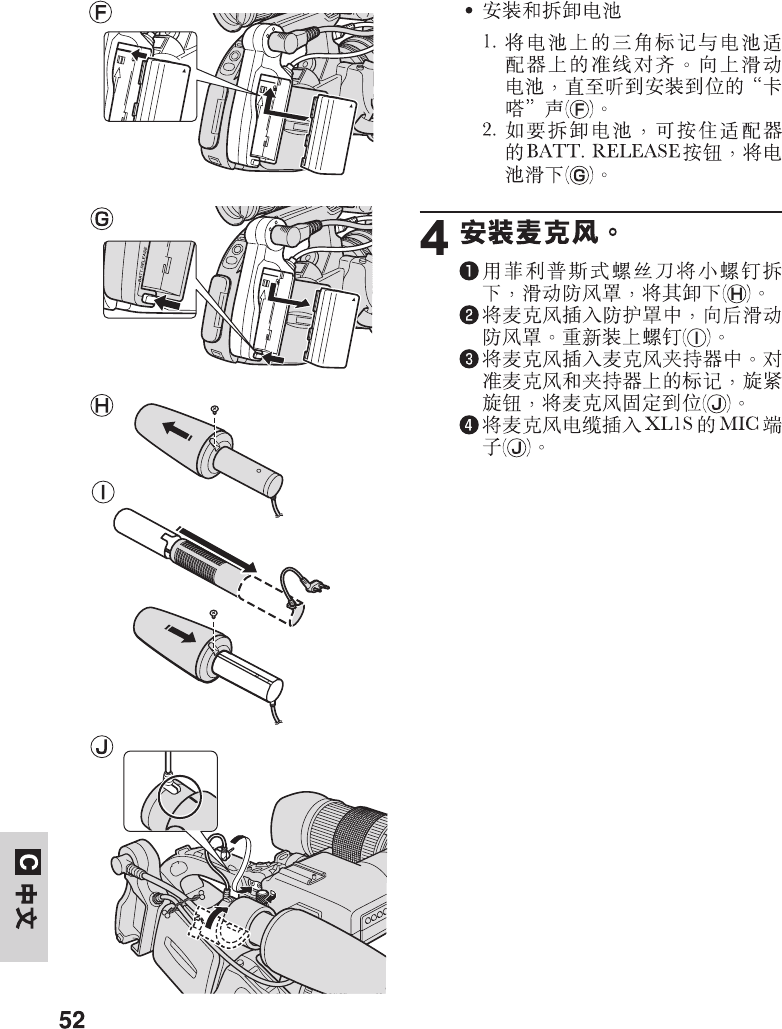
¡Attaching and removing the
battery pack
1. Align the triangle on the
battery pack with the line on
the battery adapter. Slide the
battery up until it clicks into
place (F).
2. Remove the battery by
pressing and holding the
adapter’s BATT. RELEASE
button while you slide the
battery down (G).
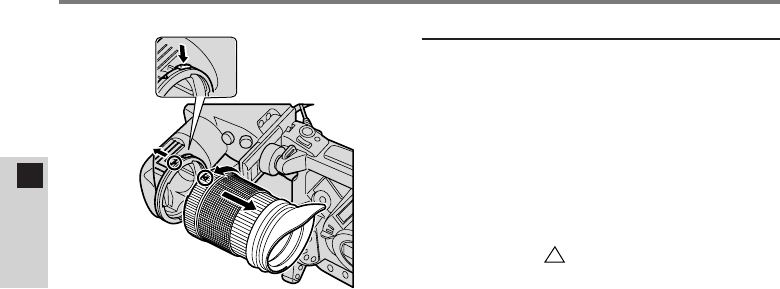
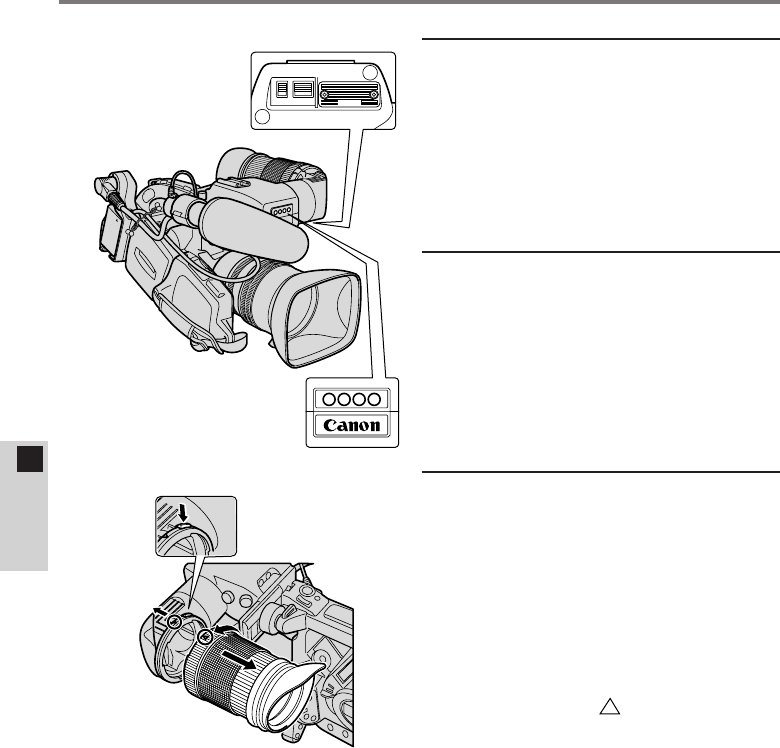
4Attach the microphone.
qRemove the small screw with a
Phillips screw driver and slide off
the wind screen (H).
wInsert the microphone into the
protector and slide the wind
screen back on. Replace the
screw (I).
eInsert the microphone into the
microphone clamp. Align the
marks on the microphone and
the clamp and tighten the knob
to hold the microphone firmly in
place (J).
rPlug the microphone cable to
the XL1S
’
s MIC terminals (J).
BATT.RELEASE
F
G
H
I
J
18
E
ENGLISH
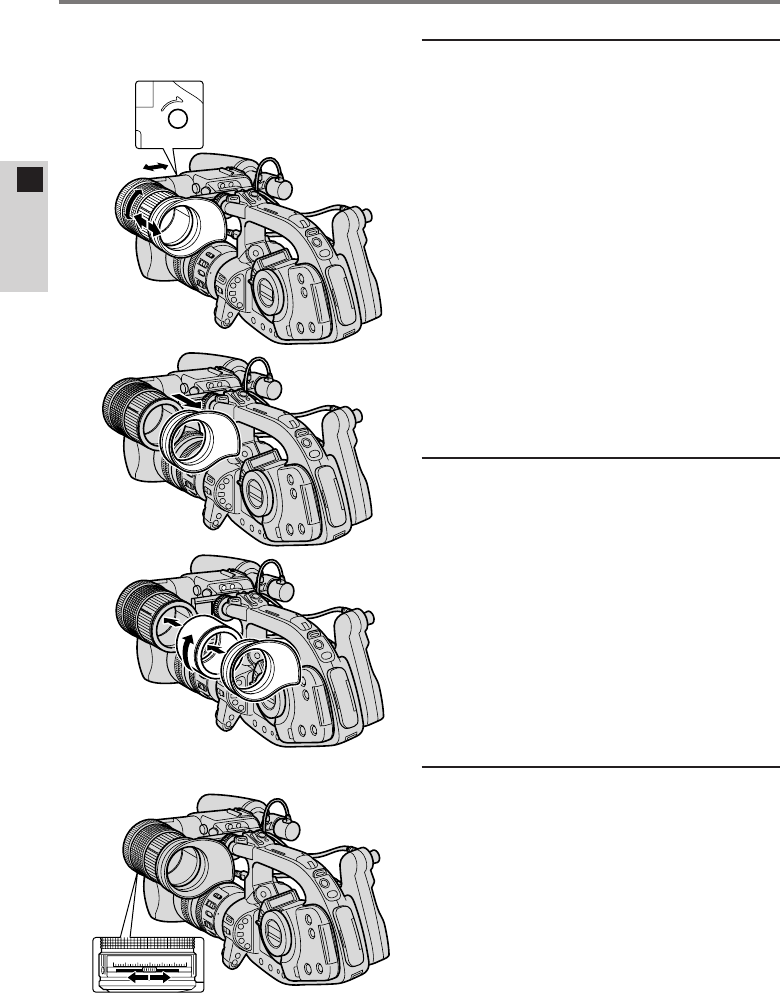
Adjusting the FU-1000
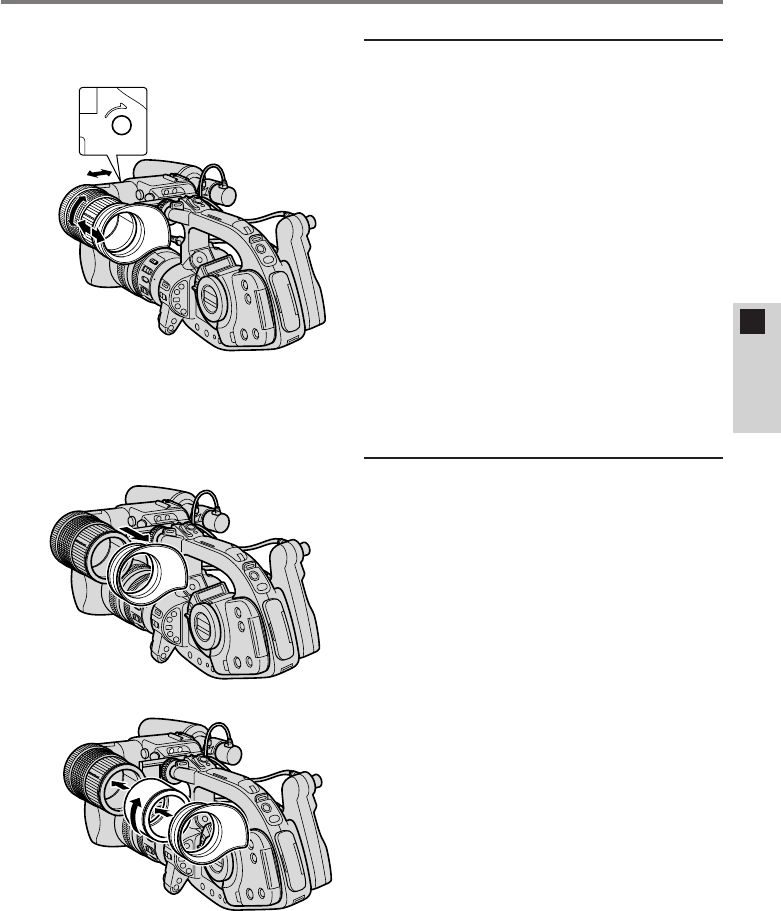
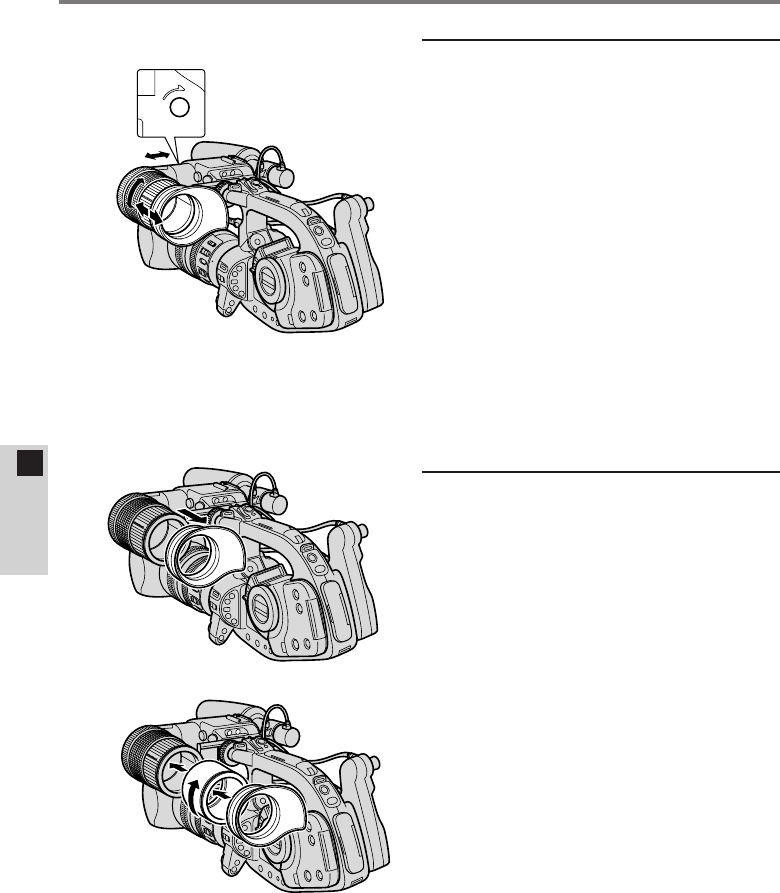
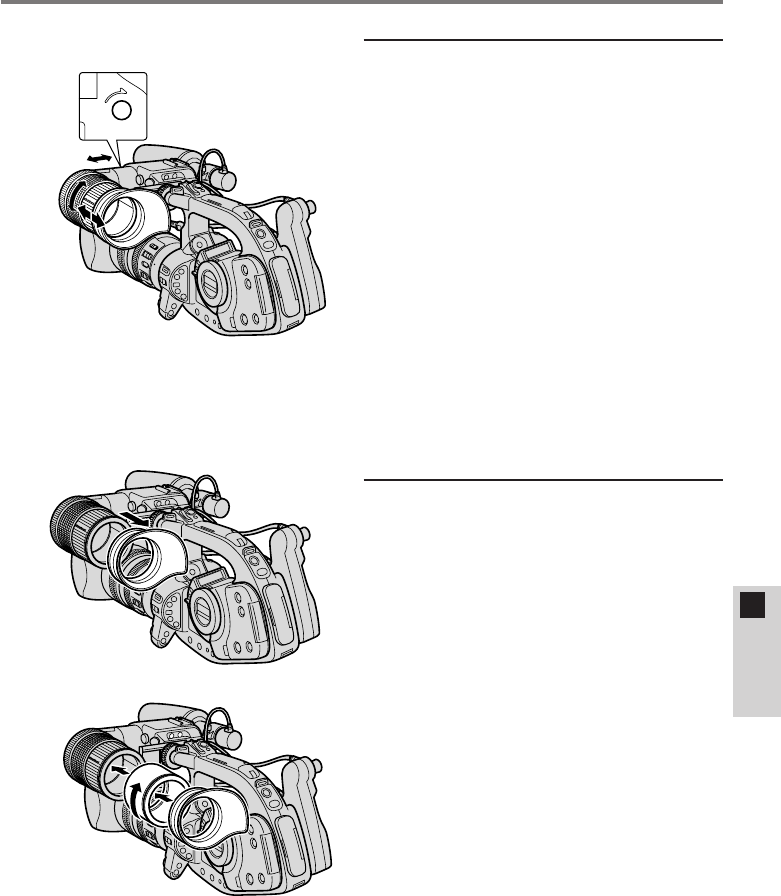
1Adjust the eyepiece
position.
qHold the XL1S in the shooting
position and adjust the eyepiece
to a comfortable viewing
position. Tighten the eyepiece
LOCK knob (underside of unit)
to hold the eyepiece in place
(K).
¡The viewfinder moves
horizontally up to 2 cm (3/4in),
and rotates vertically 250˚.
wTurn the eyepiece adjustment
ring to adjust the length of the
eyepiece (K).
¡The eyepiece extends up to
2 cm (3/4in).
2Attach the extension
tube (if necessary).
If the eyepiece doesn’t quite reach
your eye, you may need to attach
the extension tube.
qRemove the eye cup (L).
wAlign the extension tube to the
threads of the eyepiece, turn to
tighten (M).
eAttach the eyecup into the
groove of the extension tube
(M).
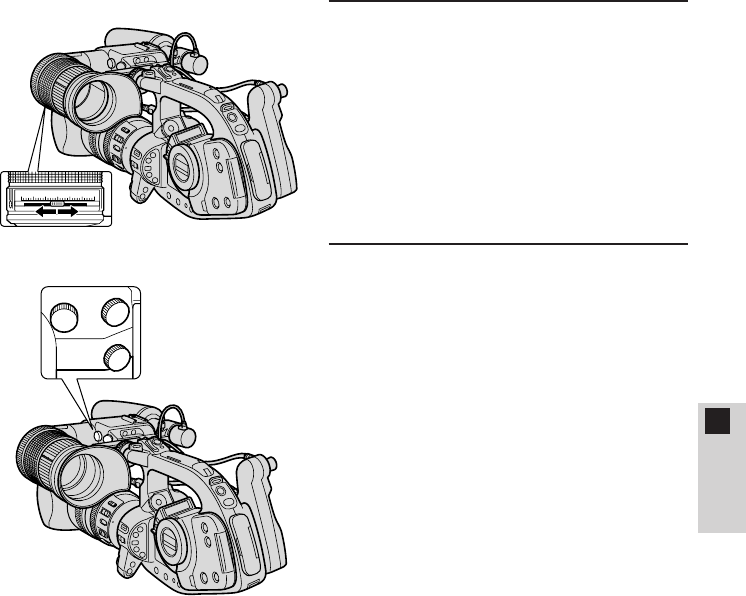
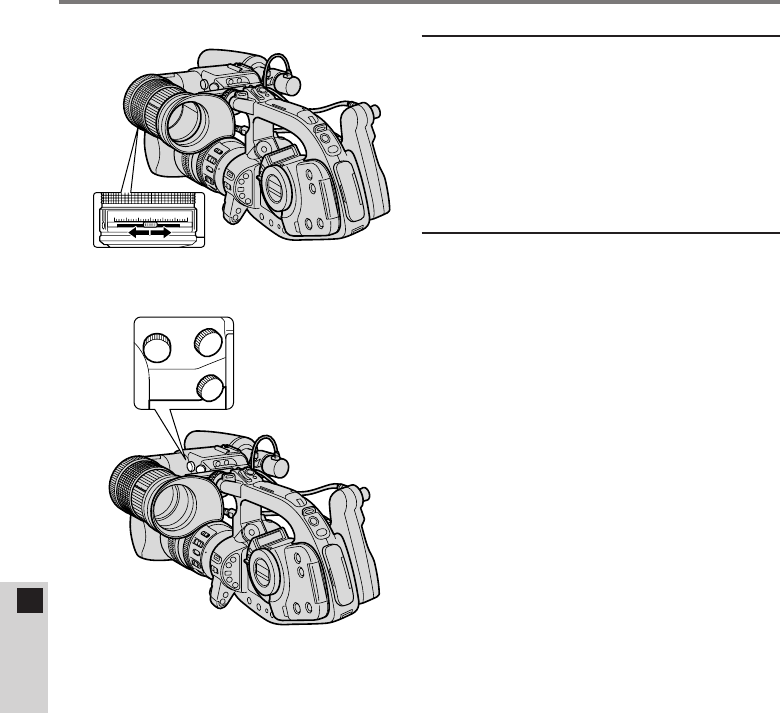
3Adjust the viewfinder to
your eyesight.
Turn on the power and adjust the
display to suit your eyesight.
¡Slide the viewfinder focusing
lever until the display comes into
focus (N).
0123456
LOCK
K
L
M
N
19
E
ENGLISH
ON
TALLY LIGHT
ON
P
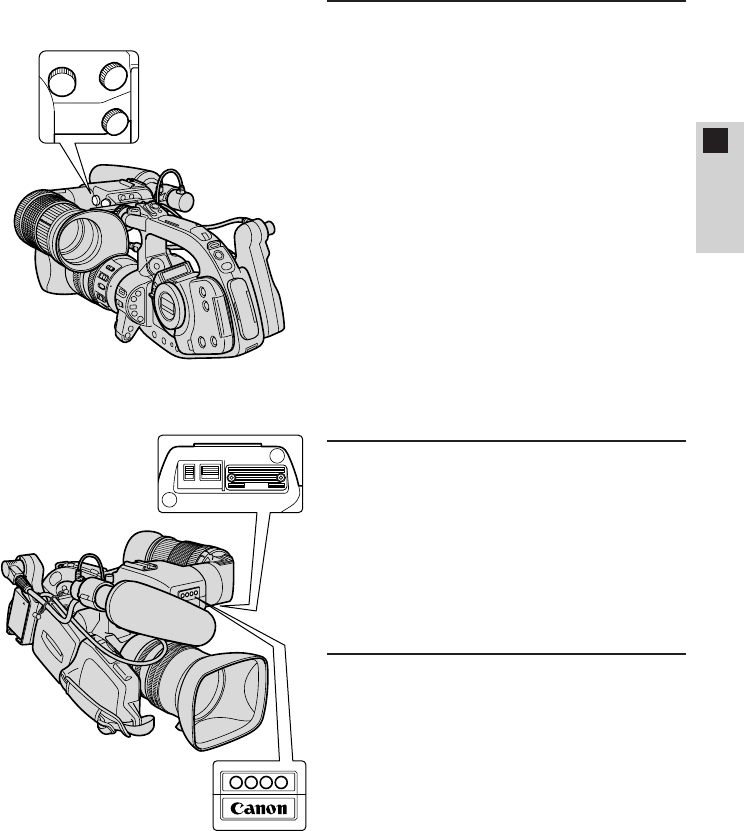
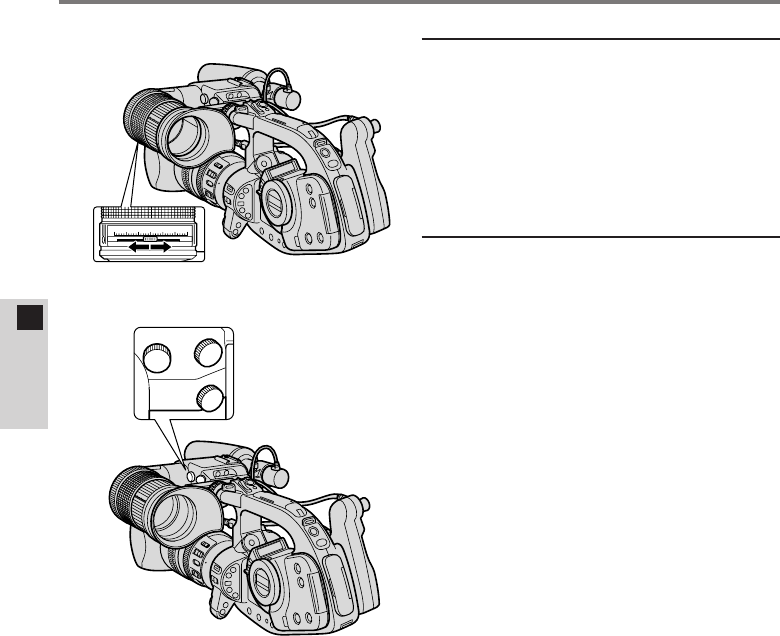
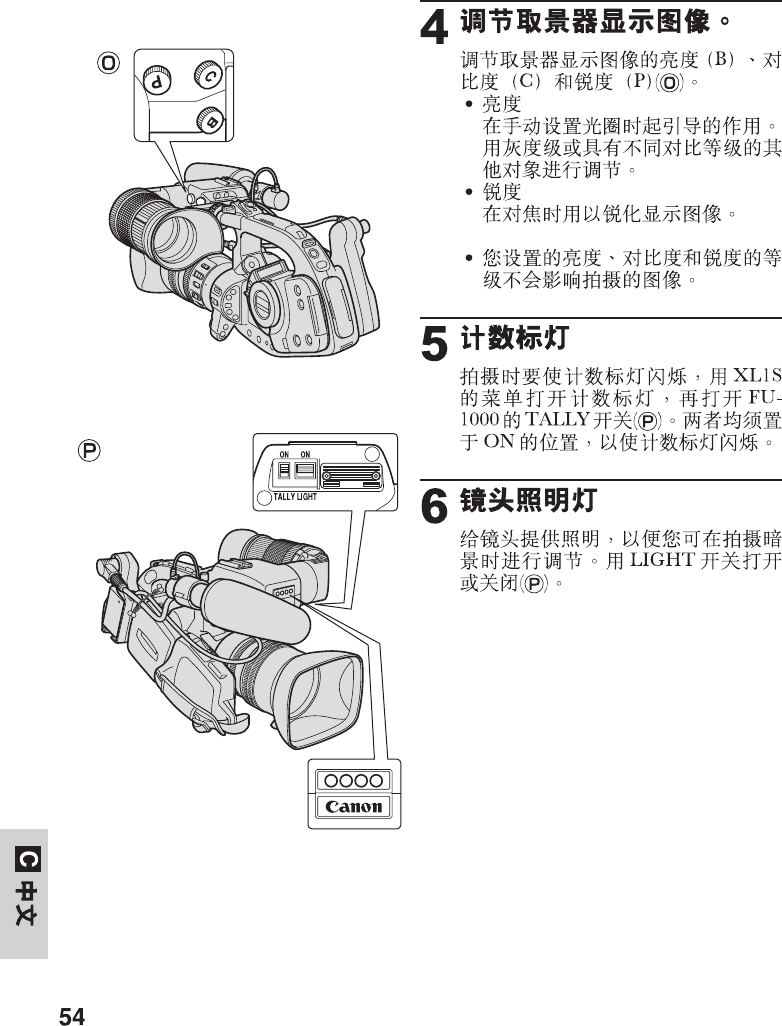
4Adjust the viewfinder
display.
Adjust the brightness (B), contrast
(C) and peaking (P) of the
viewfinder display (o).
¡Brightness
Serves as a guide when
manually setting the aperature.
Adjust using a gray scale or
other subject with differing
contrast levels.
¡Peaking
Use to sharpen the display when
focusing.
•The brightness, contrast and
peaking levels you set will not
effect the recorded image.
5Tally lamp
To have the tally lamp blink while
recording, turn the tally lamp on
through the XL1S’s menu and turn
on the TALLY switch on the
FU-1000 (P). Both must be set to
on in order for the tally lamp to
blink.
6Lens illumination lamp
Illuminates the lens, allowing you to
make adjustments in dark recording
situations. Turn on/off with the
LIGHT switch (P).
O
P
C
B
20
E
ENGLISH
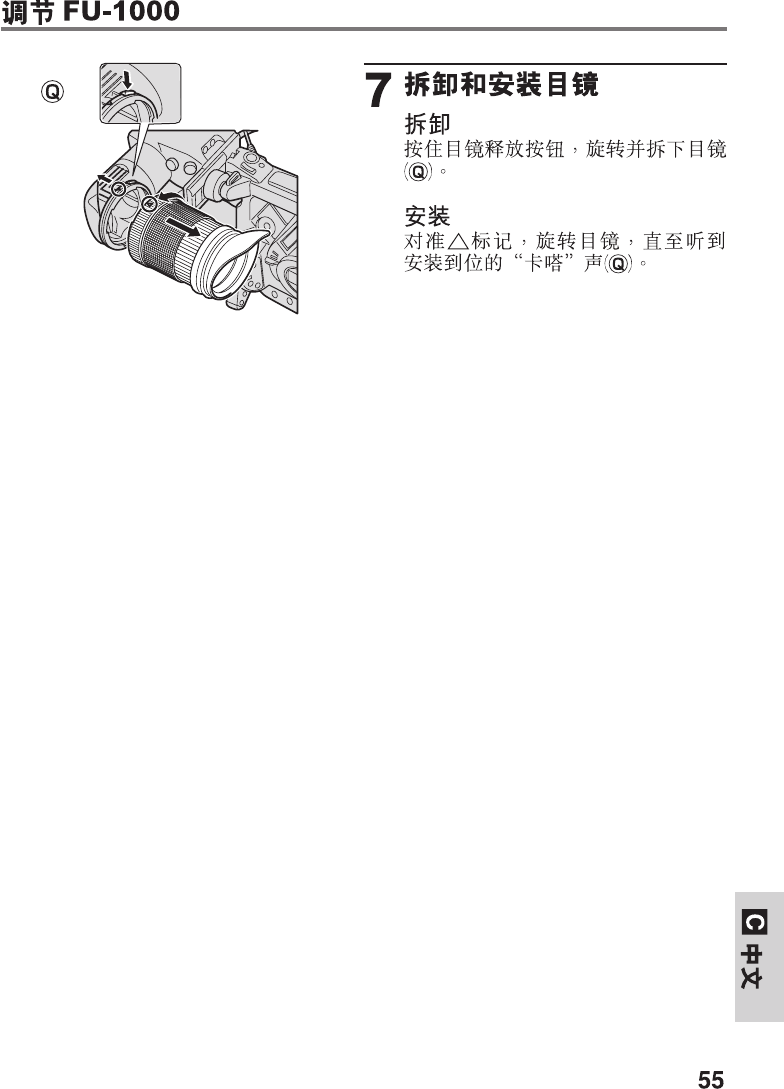
7Removing and
attaching the eyepiece
Removing
Push and hold the eyepiece release
button. Turn and remove the
eyepiece (Q).
Attaching
Align the marks and turn the
eyepiece until it clicks into place
(Q).
Q
Adjusting the FU-1000

21
E
ENGLISH
Specifications
Monochrome CRT Viewfinder Unit FU-1000
Viewfinder: 1.5-inch monochrome CRT
Resolution: Over 500 TV lines in center (CRT only)
Focus adjustment range: +0.5 to –2.4 diopter
+0.1 to –3.2 diopter (when extension tube is attached)
Tally lamp: On/off switch
Lens illumination lamp: On/off switch
Contrast: Adjustment knob
Peaking: Adjustment knob
Brightness: Adjustment knob
Power supply: 9 V DC (boosted from 7.2 V DC to 9 V DC by battery
adapter)
Power consumption: 11.2 W (when recording with the Video Lens 16×
Zoom XL 5.5–88 mm IS II)
9.5 W (when recording with the Full-manual Video
Lens 14×Zoom XL 5.7–80 mm or the Manual Video
Lens 16×Zoom XL 5.4–86.4 mm)
Dimensions: 204 × 192 × 75 mm (8 × 7 1/2× 3 in)
204 × 251 × 75 mm (8 × 9 7/8× 3 in) (microphone
holder attached)
Weight: 900 g (1 lb 15 3/4oz)
Battery adapter
Battery type: Canon BP-900 Series Battery Packs
(Not compatible with Compact Power Adapter or Car
Battery Adapter)
Dimensions: 138 × 63 × 53 mm (5 3/8× 2 1/2× 2 1/8in)
Weight: 130 g (4 5/8oz)
Weight and dimensions are approximate. Subject to change without notice. Errors
and omissions excepted.
22
F
FRANÇAIS
¡Adaptateur pour batterie
(Attache de câble fixée)
BATT.RELEASE
¡Le FU-1000 ne peut pas s’alimenter sur le CA/secteur (par l’adaptateur secteur
compact série CA-900) ni sur une batterie de voiture (par l’adaptateur pour
batterie de voiture série CB-900). Vous devez faire appel à une batterie
d’alimentation rechargeable (ou deux avec le Chargeur/Boîtier de batterie
double série CH-900*, vendu séparément) pour alimenter et utiliser le
FU-1000.
¡Le témoin de courant restant n’apparaît pas dans le viseur avant que la
batterie ne soit presque épuisée lorsque que kapparaît.
Voici les durées approximatives d’utilisation en continu du viseur FU-1000, utilisé
avec la XL1S:
BP-930: 85 min.1) / 105 min.2)
BP-945: 135 min.1) / 155 min.2)
1) Quand l’objectif vidéo zoom 16×XL 5.5–88 mm IS II est installé sur la XL1S.
2) Quand l’objectif vidéo zoom 14×XL 5.7–80 mm entièrement manuel ou
l’objectif vidéo manuel zoom 16×XL 5.4–86.4 mm (tous deux en option) est
installé sur la XL1S.
* Si vous raccordez deux batteries d’alimentation rechargeables avec le
Chargeur/Boîtier de batterie double série CH-900 (vendu séparément), la
durée d’utilisation en continu sera presque doublée.
¡Il arrive que des parasites soient audibles bien que le protecteur de
microphone soit installé sur le microphone. Dans ce cas, nous conseillons
d’utiliser l’Adaptateur de microphone/Portège-épaule MA-100 (vendu
séparément) afin de disposer d’un microphone équilibré.
¡Tube allonge ¡Protecteur de microphone
Remarques à l’utilisation du viseur FU-1000
Merci d’avoir achetté cette Unité viseur CRT monochrome Canon FU-1000. Cet
équipement destiné au camescope vidéo numérique XL1S permet d’effectuer
une mise au point très précise.
Pour bénéficier au maximum de votre FU-1000, nous vous conseillons de lire
attentivement ce mode d’emploi. Conservez en lieu sûr ces explications de
manière à pouvoir les consulter ultérieurement.
Le FU-1000 est fourni avec les accessoires suivants:
23
F
FRANÇAIS
Mise en place du FU-1000 sur le XL1S
A
B
C
D
E
¡Déposez d’abord le microphone
du viseur couleur de la XL1S.
1Déposez le viseur
couleur du XL1S.
qDébranchez le câble du viseur
(A).
wDesserrez la molette sur le
XL1S et faites glisser le viseur
pour le retirer (B).
2Installez le FU-1000.
¡Glissez le FU-1000 sur l’étrier
du XL1S et serrez la molette
(C).
3Fixez l’adaptateur pour
batterie sur l’unité de
fixation de la source
d’alimentation du XL1S.
qAlignez l’adaptateur avec la
ligne tracée sur le XL1S et
glissez-le jusqu’à l’émission du
déclic de mise en place (D).
¡Pour retirer l’adaptateur,
appuyez sur la touche BATT.
RELEASE du XL1S et
maintenez-la enfoncée
pendant que vous faites
glisser l’adaptateur vers le
bas.
wBranchez le FU-1000 sur
l’adaptateur avec le câble de
viseur (E).
eBranche l’adaptateur sur le
XL1S au moyen du câble
d’adaptateur pour batterie (E).
rReliez les deux câbles avec
l’attache de câble (E).
¡Torsadez les deux bouts de
l’attache pour les
immobiliser.
24
F
FRANÇAIS
¡Fixation et retrait de la batterie
d’alimentation rechargeable
1. Alignez le triangle de la
batterie rechargeable avec la
ligne sur l’adaptateur pour
batterie. Faites glisser la
batterie vers le haut jusqu’à
l’émission du déclic de mise
en place (F).
2. Retirez la batterie en
appuyant sur le bouton
BATT. RELEASE et ne le
maitenant enfoncé pendant
que vous faites glisser la
batterie vers le bas (G).
4Montage du
microphone.
qDéposez la petite vis avec un
tournevis cruciforme et faites
glisser le pare-vent pour le
retirer (H).
wInsérez le microphone dans le
protecteur et remettez le pare-
vent en place. Replacez la vis
(I).
eInsérez le microphone dans la
bride de microphone. Alignez les
repères du microphone et de la
bride et serrez la molette pour
maintenir le microphone
fermement en place (J).
rBranchez le câble du
microphone sur les bornes MIC
du XL1S (J).
BATT.RELEASE
F
G
H
I
J
Mise en place du FU-1000 sur le XL1S
25
F
FRANÇAIS
Réglage du FU-1000
1Réglage de la position
de l’oculaire.
qTenez le XL1S en position de
prise de vue et ajustez l’oculaire
à la position la plus confortable.
Serrez le bouton LOCK de
l’oculaire (sous l’unité) pour
immobiliser l’oculaire (K).
¡L’oculaire peut se déplacer de
2 cm au maximum dans le sens
horizontal et tourner de 250˚
dans le sens vertical.
wTournez la bague de réglage de
l’oculaire pour ajuster la
longueur de celui-ci (K).
¡L’oculaire peut s’allonger de
2 cm au maximum.
2Fixez le tube allonge
(si nécessaire).
Si l’oculaire n’arrive pas jusqu’à
votre œil, il est conseillé de fixer le
tube allonge.
qDéposez l’œilleton (L).
wAlignez le tube allonge sur le
filetage de l’oculaire et tournez
pour serrer (M).
eFixez l’œilleton dans la rainure
sur le tube allonge (M).
L
M
LOCK
K
26
F
FRANÇAIS
O
P
C
B
3Ajustez le viseur à
votre vue.
Mettez sous tension et ajustez
l’affichage à votre vue.
¡Glissez le levier de mise au
point du viseur juqsu’à ce que
l’affichage soit bien net (N).
4Ajustez l’affichage du
viseur.
Ajustez la luminosité (B), le
contraste (C) et l’alignement de
crête (P) de l’affichage du viseur
(O).
¡Luminosité
Sert de guide lors du réglage
manuel de l’ouverture. Ajustez
en utilisant une échelle des gris
ou un autre objet présentant des
niveaux de contraste différents.
¡Alignement de crête
Utilisez pour rendre l’affichage
plus net lors de la mise au point.
•Les niveaux de luminosité, de
contraste et l’alignement de
crête que vous avez ajustés
seront sans effet sur l’image
enregistrée.
Réglage du FU-1000
0123456
N
27
F
FRANÇAIS
5Lampe de signalisation
Pour que la lampe de signalisation
clignote au cours de
l’enregistrement, allumez celle-ci
sur le menu de la XL1S et allumez
l’interrupteur TALLY sur le
FU-1000 (P). Tous deux doivent
être en service pour que la lampe
de signalisation clignote.
6Lampe d’éclairage
d’objectif
Elle éclaire l’objectif, autorisant des
réglages même dans l’obscurité. La
mise sous/hors tension de cette
lampe est commandée par la
touche LIGHT (P).
7Dépose et fixation de
l’oculaire
Dépose
Poussez et maintenez le bouton de
déblocage d’oculaire. Tournez et
déposez l’oculaire (Q).
Fixation
Alignez les repères triangulaires
( ) et tournez l’oculaire jusqu’à
l’émission du déclic de mise en
place (Q).
ON
TALLY LIGHT
ON
P
Q

28
F
FRANÇAIS
Fiche technique
Unité viseur CRT monochrome FU-1000
Viseur: Tube cathodique monochrome de 1,5 pouce
Définition: Plus de 500 lignes TV au centre (Tube cathodique
seulement)
Plage de réglage de mise
au point: De +0,5 à –2,4 dioptries
De +0,1 à –3,2 dioptries
(quand le tube allonge est installé)
Lampe de signalisation: Interrupteur de marche/arrêt
Lampe d’éclairage
d’objectif: Interrupteur de marche/arrêt
Contraste: Bouton de réglage
Alignement de crête: Bouton de réglage
Luminosité: Bouton de réglage
Alimentation: CC de 9 V (porté de CC 7,2 V à CC 9 V par
adaptateur pour batterie)
Consommation: 11,2 W (lors de l’enregistrement avec l’objectif vidéo
zoom 16×XL 5.5–88 mm IS II)
9,5 W (lors de l’enregistrement avec l’objectif vidéo
zoom 14×XL 5.7–80 mm entièrement manuel ou
l’objectif vidéo manuel zoom 16×XL 5.4–86.4 mm)
Dimensions: 204 ×192 ×75 mm
204 ×251 ×75 mm (avec porte-microphone installé)
Poids: 900 g
Adaptateur pour batterie
Type de batterie: Batterie d’alimentation rechargeable Canon de série
BP-900 (non compatible avec Adaptateur secteur
compact ou Adaptateur pour batterie de voiture)
Dimensions: 138 ×63 ×53 mm
Poids: 130 g
Les poids et dimensions sont approximatifs. Sous réserve de changements sans
avis préalable. Sauf erreurs et omissions.
29
De
DEUTSCH
¡Batterieadapter
(mit Kabelbinder)
BATT.RELEASE
¡Die FU-1000 kann nicht von einer Netzsteckdose (mit dem Kompakt-Netz/
Ladegerät der CA-900 Serie) oder von der Autobatterie (mit dem Autobatterie-
Adapter der CB-900 Serie) gespeist werden. Sie müssen die FU-1000 beim
Betrieb mit einem Batteriepack (bzw. zwei Batteriepacks bei Verwendung des
Doppel-Ladegeräts/Batteriemagazins der CH-900 Serie* (Sonderzubehör)) mit
Strom versorgen.
¡Die Restladungs-Anzeige erscheint erst im Sucher, wenn das Batteriepack
beinahe erschöpft ist (k).
Die folgenden Angaben sind ungefähre Dauerbetriebszeiten bei Gebrauch der
FU-1000 mit dem XL1S:
BP-930: 85 Min.1) / 105 Min.2)
BP-945: 135 Min.1) / 155 Min.2)
1) Bei Gebrauch des XL1S mit dem Videoobjektiv 16×-Zoom XL 5,5–88 mm IS II.
2) Bei Gebrauch des XL1S mit dem vollmanuellen Videoobjektiv 14×-Zoom XL
5,7–80 mm oder dem manuellen Videoobjektiv 16×-Zoom XL 5,4–86,4 mm
(beides Sonderzubehör).
* Wenn Sie den Camcorder über das Doppel-Ladegerät/Batteriemagazin
der CH-900 Serie (Sonderzubehör) mit zwei Batteriepacks betreiben,
verlängert sich die maximale Dauerbetriebszeit auf annähernd das Doppelte.
¡Es kann vorkommen, dass Rauschen auch bei angebrachtem Mikrofonschutz
hörbar wird. In diesem Fall empfehlen wir den Gebrauch des Mikrofonadapters
MA-100 mit Schulterstütze (Sonderzubehör), über den ein Mikrofon mit
symmetrischem Stecker angeschlossen werden kann.
¡Zwischenring ¡Mikrofonschutz
Anmerkungen zum Gebrauch der FU-1000
Vielen Dank für den Kauf dieser Canon Suchereinheit FU-1000 mit Schwarzweiß-
Kathodenstrahlröhre. Diese Schwarzweiß-Suchereinheit für den Digital-Video-
Camcorder XL1S ermöglicht eine noch schärfere Fokussierung.
Damit Sie das Potential Ihrer FU-1000 voll ausschöpfen können, empfehlen wir
Ihnen, diese Anleitung vor Gebrauch vollständig durchzulesen. Heben Sie sie
dann zur späteren Bezugnahme an einem sicheren Ort auf.
Die FU-1000 wird mit den folgenden Zubehörteilen ausgeliefert:
30
Abringen der FU-1000 am XL1S
A
B
C
D
E
¡Entfernen Sie als erstes das
Mikrofon vom Farbsucher des
XL1S.
1Den Farbsucher des
XL1S entfernen.
qTrennen Sie das Sucherkabel
ab (A).
wLösen Sie die Arretierschraube
am XL1S, um den Sucher dann
aus der Halterung zu schieben
(B).
2Die FU-1000 anbringen.
¡Schieben Sie die FU-1000 auf
die Halterung am XL1S, um die
Arretierschraube dann wieder
anzuziehen (C).
3Den Batterieadapter
an den
Stromquellenanschluss
des XL1S anklemmen.
qRichten Sie den Adapter mit der
Linie am XL1S aus, und
schieben Sie ihn bis zum
Einrasten nach oben (D).
¡Zum Abnehmen halten Sie
den BATT. RELEASE-Knopf
am XL1S gedrückt und
schieben den Adapter nach
unten.
wSchließen Sie die FU-1000 mit
dem Sucherkabel an den
Batterieadapter an (E).
eVerbinden Sie den Adapter über
das Batterieadapterkabel mit
dem XL1S (E).
rSichern Sie die beiden Kabel mit
dem Kabelbinder (E).
¡Verdrillen Sie hierzu die
beiden Enden des
Kabelbinders.
De
DEUTSCH
31
De
DEUTSCH
¡Anbringen und Abnehmen des
Batteriepacks
1. Richten Sie das Pfeilsymbol
am Batteriepack mit der Linie
am Batterieadapter aus.
Schieben Sie das
Batteriepack bis zum
Einrasten nach oben (F).
2. Zum Abnehmen halten Sie
den BATT. RELEASE-Knopf
am Adapter gedrückt und
schieben das Batteriepack
nach unten (G).
4Das Mikrofon
anbringen.
qEntfernen Sie die kleine
Schraube mit einem
Kreuzschlitzschraubendreher
und nehmen Sie den
Windschirm ab (H).
wStecken Sie das Mikrofon in den
Mikrofonschutz, und bringen Sie
den Windschirm dann wieder
an. Sichern Sie den Windschirm
mit der Schraube (I).
eStecken Sie das Mikrofon in den
Mikrofonhalter. Richten Sie die
Markierungen an Mikrofon und
Halter aufeinander aus, und
ziehen Sie dann den Knopf an,
bis das Mikrofon fest sitzt (J).
rSchließen Sie das
Mikrofonkabel an die MIC-
Buchsen des XL1S an (J).
BATT.RELEASE
F
G
H
I
J
32
Einstellen der FU-1000
1Das Okular einstellen.
qHalten Sie den XL1S wie beim
Filmen, und stellen Sie das
Okular auf bequemen Sitz ein.
Ziehen Sie abschließend den
LOCK-Knopf (an der Unterseite
der Einheit) an, um das Okular
in dieser Position festzustellen
(K).
¡Der Sucher kann waagrecht um
bis zu 2 cm bewegt und
senkrecht um 250°gedreht
werden.
wDrehen Sie am Okular-
Einstellring, um die Länge des
Okulars einzustellen (K).
¡Das Okular kann um bis zu 2 cm
ausgefahren werden.
2Den Zwischenring
anbringen (sofern
erforderlich).
Wenn das Okular nicht bis zum
Auge reicht, können Sie zur
Verlängerung den Zwischenring
anbringen.
qNehmen Sie die Augenmuschel
ab (L).
wRichten Sie den Zwischenring
auf das Gewinde des Okulars
aus und schrauben Sie ihn fest
(M).
ePassen Sie die Augenmuschel
in die Nut des Zwischenrings ein
(M).
L
M
LOCK
K
De
DEUTSCH
33
De
DEUTSCH
3Den Sucher auf die
Sehstärke einstellen.
Schalten Sie den Camcorder ein,
und stellen Sie die Sucheranzeige
der Sehschärfe Ihrer Augen
entsprechend ein.
¡Verstellen Sie den Sucher-
Scharfstellhebel, bis die Anzeige
im Sucher scharf ist (N).
4Das Sucherbild
einstellen.
Stellen Sie die Helligkeit (B), den
Kontrast (C) und die
Spitzenanhebung (P) der
Sucheranzeige ein (
O
).
¡
Helligkeit
Dient als wichtiger Anhaltspunkt
bei der manuellen Einstellung der
Blende. Verwenden Sie zur
Einstellung eine Grauskala oder
ein anderes Motiv mit
unterschiedlichen Kontraststufen.
¡
Spitzenanhebung
Zur Anhebung der
Sucherbildschärfe beim
Scharfstellen des Objektivs.
•Die Helligkeits-, Kontrast- und
Spitzenanhebungseinstellung
des Suchers hat keinen Einfluß
auf das aufgenommene Bild.
O
P
C
B
0123456
N
34
5Kontrolleuchte
Wenn die Kontrolleuchte beim
Filmen blinken soll, müssen Sie die
Funktion sowohl im Menü des XL1S
als auch mit dem TALLY-Schalter
an der FU-1000 einschalten (P).
Die Kontrollleuchte blinkt nur, wenn
beides eingeschaltet ist.
6Objektiv-
beleuchtungslampe
Beleuchtet das Objektiv, so dass
Sie auch in dunkler Umgebung
Einstellungen vornehmen können.
Die Lampe wird mit dem LIGHT-
Schalter ein- und ausgeschaltet
(P).
7Abnehmen und
Anbringen des Okulars
Abnehmen
Halten Sie den Okular-
Entriegelungsknopf gedrückt.
Drehen Sie das Okular und nehmen
Sie es ab (Q).
Anbringen
Richten Sie die -Markierungen
aufeinander aus und drehen Sie
das Okular, bis es hörbar einrastet
(Q).
ON
TALLY LIGHT
ON
P
Q
De
DEUTSCH
Einstellen der FU-1000

35
De
DEUTSCH
Technische Daten
Suchereinheit FU-1000 mit Schwarzweiß-Kathodenstrahlröhre
Sucher: 1,5-Zoll-Schwarzweiß-Kathodenstrahlröhre
Auflösung: Mehr als 500 TV-Zeilen im Zentrum
(nur Kathodenstrahlröhre)
Scharfeinstellbereich:
+0,5 bis –2,4 Dioptrien
+0,1 bis –3,2 Dioptrien (mit angebrachtem Zwischenring)
Kontrolleuchte: Ein/Aus-Schalter
Objektiv-
beleuchtungslampe: Ein/Aus-Schalter
Kontrast: Einstellknopf
Entzerrung: Einstellknopf
Helligkeit: Einstellknopf
Stromversorgung: 9 V Gleichspannung (vom Batterieadapter von 7,2 V
auf 9 V verstärkt)
Stromaufnahme: 11,2 W (beim Filmen mit dem Videoobjektiv 16×-
Zoom XL 5,5–88 mm IS II)
9,5 W (beim Filmen mit dem vollmanuellen
Videoobjektiv 14×-Zoom XL 5,7–80 mm oder dem
manuellen Videoobjektiv 16×-Zoom XL 5,4–86,4 mm)
Abmessungen: 204 ×192 ×75 mm
204 ×251 ×75 mm (mit angebrachtem Mikrofonhalter)
Gewicht: 900 g
Batterieadapter
Batteriepack: Canon Batteriepacks der BP-900 Serie
(Nicht kompatibel mit dem Kompakt-Netz/Ladegerät
oder Autobatterie-Adapter)
Abmessungen: 138 ×63 ×53 mm
Gewicht: 130 g
Gewichte und Abmessungen sind ungefähre Werte. Änderungen vorbehalten.
Fehler und Auslassungen vorbehalten.
Hinweise für Deutschland
Batterien und Akkumulatoren gehören nicht in den Hausmüll !
Im Interesse des Umweltschutzes sind Sie als Endverbraucher gesetzlich verpflichtet
(Batterieverordnung), alte und gebrauchte Batterien und Akkumulatoren zurückzugeben.
Sie können die gebrauchten Batterien an den Sammelstellen der öffentlich-rechtlichen
Entsorgungsträger in Ihrer Gemeinde oder überall dort abgeben, wo Batterien der betreffenden Art
verkauft werden. Die Batterien werden unentgeltlich für den Verbraucher zurückgenommen.
36
Es
ESPAÑOL
¡Adaptador para baterías
(Con abrazadera para cable)
BATT.RELEASE
¡El FU-1000 no puede alimentarse desde una toma de la red de CA (con el
adaptador de alimentación compacto de la serie CA-900) ni desde la batería
de su automóvil (con el adaptador para baterías de automóviles de la serie
CB-900). Deberá utilizar una batería (o dos con el cargador de dos baterías/
soporte de la serie CH-900* (vendido separadamente) para alimentar y usar el
FU-1000.
¡El indicador de energía restante no aparece en el visor hasta el momento
en que se descarga la energía, que es cuando aparece k.
A continuación se indican los tiempos aproximados de uso continuo del FU-1000
cuando se lo utiliza con la XL1S:
BP-930: 85 min.1) / 105 min.2)
BP-945: 135 min.1) / 155 min.2)
1) Cuando el objetivo de vídeo zoom 16×XL 5,5–88 mm IS II se encuentra
montado en la XL1S.
2) Cuando el objetivo de vídeo zoom completamente manual 14×XL 5,7–80 mm
o el objetivo de vídeo zoom manual 16×XL 5,4–86,4 mm (ambos opcionales)
se encuentra montado en la XL1S.
* Si instala dos baterías con el cargador de dos baterías/soporte de la serie
CH-900 (vendido separadamente), el tiempo máximo de uso continuo podrá
ser prácticamente el doble.
¡En algunos casos se podrán escuchar ruidos, aún con el protector del
micrófono acoplado al micrófono. Si escucha ruidos, se recomienda utilizar el
adaptador para micrófono/almohadilla para el hombro MA-100 (vendido
separadamente) para convertirlo en un micrófono equilibrado.
¡Tubo de extensión¡Protector del micrófono
Notas sobre el uso del FU-1000
Gracias por adquirir el Visor CRT monocromo Canon FU-1000. Este visor
monocromo para la videocámara digital XL1S permite enfoques aún más vibrantes.
Para obtener el máximo rendimiento de su FU-1000, le recomendamos leer
completamente este manual antes del uso. Guarde estas instrucciones en un
lugar seguro para poderlas consultar rápidamente en cualquier momento.
El FU-1000 se suministra junto con los siguientes accesorios:
37
Es
ESPAÑOL
Instalación del FU-1000 en la XL1S
A
B
C
D
E
¡En primer lugar, extraiga el
micrófono del visor en color de
la XL1S.
1Extraiga el visor en
color de la XL1S.
qDesconecte el cable del visor
(A).
wAfloje el mando de la XL1S y
extraiga el visor deslizándolo
(B).
2Instale el FU-1000.
¡Deslice el FU-1000 sobre la
unidad de montaje de la XL1S y
apriete el mando (C).
3Coloque el adaptador
para baterías en la
unidad de fijación de la
fuente de alimentación
de la XL1S.
qHaga coincidir el adaptador con
la línea de la XL1S y deslícelo
hacia arriba hasta que encaje en
su lugar con un chasquido (D).
¡Para extraer el adaptador,
pulse y mantenga pulsado el
botón BATT. RELEASE de la
XL1S mientras lo desliza
hacia abajo.
wConecte el FU-1000 al
adaptador utilizando el cable del
visor (E).
eConecte el adaptador a la XL1S
utilizando el cable del adaptador
para baterías (E).
rUna los dos cables con la
abrazadera para cable (E)
¡Asegúrelos retorciendo
ambos extremos de la
abrazadera.
38
Es
ESPAÑOL
¡Fijación y extracción de la
batería
1. Haga coincidir el triángulo de
la batería con la línea del
adaptador para baterías.
Deslice la batería hacia
arriba hasta que encaje en
su lugar con un chasquido
(F).
2. Extraiga la batería pulsando
y manteniendo pulsado el
botón BATT. RELEASE del
adaptador mientras la desliza
hacia abajo (G).
4Instale el micrófono.
qQuite el tornillo pequeño con un
destornillador Phillips y extraiga
la pantalla contra el viento (H)
deslizándola.
wIntroduzca el micrófono en el
protector y reinstale la pantalla
contra el viento deslizándola.
Recoloque el tornillo (I).
eIntroduzca el micrófono en la
pinza de micrófono. Haga
coincidir las marcas del
micrófono y de la pinza y apriete
el botón para sostener
firmemente el micrófono en su
sitio (J).
rIntroduzca el cable del
micrófono en los terminales MIC
de la XL1S (J).
BATT.RELEASE
F
G
H
I
J
Instalación del FU-1000 en la XL1S
39
Es
ESPAÑOL
Ajuste del FU-1000
1Ajuste de la posición
del ocular.
qColoque la XL1S en la posición
de grabación y ajuste el ocular a
un ángulo de visión confortable.
Apriete el botón LOCK del
ocular (debajo de la unidad)
para mantener el ocular en su
lugar (K).
¡El visor se mueve
horizontalmente hasta 2 cm
(3/4pulg.), y gira verticalmente
en 250°.
wGire el anillo de ajuste del ocular
para ajustar el largo del ocular
(K).
¡El ocular se extiende hasta 2 cm
(3/4pulg.)
2Fijación del tubo de
extensión (si es
necesario).
Si el ocular no se acomoda bien a
su ojo, podría ser necesario acoplar
el tubo de extensión.
qExtraiga la copa del ocular (L).
wAlinee el tubo de extensión con
las roscas del ocular y gire
hasta que quede apretado (M).
eFije el ocular en la ranura del
tubo de extensión (M).
L
M
LOCK
K
40
Es
ESPAÑOL
Ajuste del FU-1000
3Ajuste el visor a su
vista.
Conecte la alimentación y ajuste la
pantalla de acuerdo con su vista.
¡Deslice la palanca de enfoque
del visor hasta que la pantalla
quede enfocada (N).
4Ajuste de la pantalla del
visor.
Ajuste el brillo (B), el contraste (C)
y la agudización (P) de la pantalla
del visor (O).
¡Brillo
Sirve como guía cuando realiza
el ajuste manual de la abertura.
Efectúe el ajuste utilizando la
escala de grises u otro sujeto
con diferentes niveles de
contraste.
¡Agudización
Se utiliza para dar énfasis a los
contornos para facilitar el
enfoque.
•Los niveles de brillo, de
contraste y de agudización
ajustados por usted no
afectarán a la imagen grabada.
O
P
C
B
0123456
N
41
Es
ESPAÑOL
5Lámpara indicadora de
grabación
Para que la lámpara indicadora de
grabación parpadee durante la
grabación, enciéndala a través del
menú de la XL1S y conecte el
interruptor TALLY del FU-1000 (P).
Ambos deberán ajustarse a ON
para que la lámpara indicadora de
grabación parpadee.
6Lámpara de
iluminación de la lente
Ilumina a la lente para que pueda
realizar ajustes en condiciones de
grabación en la oscuridad. Se
enciende/apaga con el interruptor
LIGHT (P).
7Extracción y fijación
del ocular
Extracción
Pulse y mantenga pulsado el botón
de desbloqueo del ocular. Gire y
extraiga el ocular (Q).
Fijación
Alinee las marcas y gire el
ocular hasta que encaje en su lugar
con un chasquido (Q).
ON
TALLY LIGHT
ON
P
Q

42
Es
ESPAÑOL
Especificaciones
Visor CRT monocromo FU-1000
Visor: CRT monocromo de 1,5 pulg.
Resolución: Más de 500 líneas de TV en el centro (sólo CRT)
Margen de ajuste del
enfoque: +0,5 a –2,4 dioptrías
+0,1 a –3,2 dioptrías (cuando está instalado el tubo
de extensión)
Lámpara indicadora de
grabación: Interruptor ON/OFF
Lámpara de iluminación
de la lente: Interruptor ON/OFF
Contraste: Mando de ajuste
Agudización: Mando de ajuste
Brillo: Mando de ajuste
Fuente de alimentación: 9 V CC (reforzada desde 7,2 V CC a 9 V CC
mediante el adaptador para baterías)
Consumo: 11,2 W (cuando se graba con el objetivo de vídeo
zoom 16×5,5–88 mm IS II)
9,5 W (cuando se graba con el objetivo de vídeo
zoom completamente manual 14×XL 5,7–80 mm o el
objetivo de vídeo zoom manual 16×XL 5,4–84,6 mm)
Dimensiones: 204 ×192 ×75 mm
204 ×251 ×75 mm (portamicrófono acoplado)
Peso: 900 g
Adaptador para baterías
Tipo de batería: Baterías de la serie BP-900 de Canon
(No es compatible con el adaptador de alimentación
compacto de CA ni con el adaptador para baterías de
automóviles)
Dimensiones: 138 ×63 ×53 mm
Peso: 130 g
El peso y las dimensiones son aproximados. Sujeto a cambios sin previo aviso.
Quedan exceptuados los errores y omisiones.
43
IITALIAN
¡Adattatore per batteria
(incluso un fermaglio per cavi)
BATT.RELEASE
¡L’FU-1000 non può venire alimentato da una presa di corrente alternata
(facendo uso di un adattatore compatto della serie CA-900) o della batteria
della propria automobile (facendo uso di un adattatore per batterie
d’automobile della serie CB-900). Per alimentare ed usare l’FU-1000 è
necessario fare uso di una batteria ricaricabile (o due se si possiede il doppio
caricabatterie/portabatterie della serie CH-900* (in vendita opzionalmente)).
¡L’indicatore dell’energia rimanente non appare nel mirino sino a che essa è
quasi terminata, ed allora appare l’indicazione k.
I seguenti sono i tempi approssimati di uso possibile quando l’FU-1000 viene
usato insieme all’XL1S:
BP-930: 85 min.1) / 105 min.2)
BP-945: 135 min.1) / 155 min.2)
1) Se sull’XL1S viene montato un obiettivo video IS II da 5,5–88 mm con Zoom
XL da ×16.
2) Se sull’XL1S viene montato un obiettivo video da 5,7–80 mm con zoom XL
del tutto manuale da ×14 o un obiettivo video da 5,4–86,4 mm con zoom XL
del tutto manuale da ×16 (ambedue opzionali).
* Se si inseriscono due batterie ricaricabili nel doppio caricabatterie/
portabatterie della serie CH-900 (in vendita opzionalmente), i tempi di uso
sono quasi il doppio.
¡A volte si possono sentire rumori nonostante il microfono sia dotato della sua
protezione. In tal caso, si raccomanda l’uso di un adattatore per microfono/
tracolla MA-100 (in vendita opzionalmente) per convertire il microfono in un
microfono equilibrato.
¡Tubo di estensione ¡Protezione per
microfono
Note sull’uso dell’FU-100
Vi ringraziamo per aver acquistato questo mirino a CRT monocolore Canon
FU-1000. Questo mirino a CRT monocolore per il camcorder digitale XL1S
permette di ottenere una messa a fuoco ancora migliore del solito.
Per ottenere il massimo dal vostro FU-1000, si raccomanda di leggere questo
manuale per intero e con attenzione prima di fare uso dell’apparecchio.
Conservarlo quindi in un luogo sicuro per poterne fare ancora uso al momento
del bisogno.
L’FU-1000 viene fornito con i seguenti accessori:
44
IITALIAN
Installazione dell’FU-1000 sull’XL1S
A
B
C
D
E
¡Per prima cosa, rimuovere il
microfono dal mirino a colori
dell’XL1S.
1Togliere il mirino a
colori dell’XL1S.
qScollegare il cavo del mirino
(A).
wAllentare la manopola sull’XL1S
e far scivolare il mirino,
togliendolo (B).
2Installare l’FU-1000.
¡Far scivolare l’FU-1000
sull’innesto dell’XL1S e stringere
la manopola (C).
3Applicare l’adattatore
della batteria all’unità di
collegamento alla
sorgente di energia
dell’XL1S.
qAllineare l’adattatore con la riga
sull’XL1S e farlo scivolare sino a
che non lo si sente scattare al
suo posto (D).
¡Per rimuovere l’adattatore,
mantenere premuto il
pulsante BATT. RELEASE
dell’XL1S mentre si fa
scivolare l’adattatore verso il
basso.
wCollegare l’FU-1000
all’adattatore col cavo del mirino
(E).
eCollegare l’adattatore all’XL1S
con il cavo dell’adattatore per
batterie (E).
rCollegare i due cavi con il
fermaglio per cavi (E).
¡Per chiuderlo, girare le due
estremità del fermaglio.
45
IITALIAN
¡Applicazione e rimozione delle
batterie ricaricabili
1. Allineare il triangolo della
batteria ricaricabile con la
riga dell’adattatore per
batterie. Inserire la batteria
sino a sentirla scattare in
posizione (F).
2. Rimuovere la batteria
mantenendo premuto il
pulsante BATT. RELEASE
mentre si fa scivolare la
batteria verso il basso (G).
4Collegare il microfono.
qRimuovere la piccola vite con un
cacciavite a stella e togliere il
paravento (H).
wInserire il microfono nella
protezione e rimettere al suo
posto il paravento. Rimettere al
suo posto la vite (I).
eInserire il microfono nel suo
morsetto. Allineare i marchi sul
microfono e stringere la
manopola in modo da fissare il
microfono al suo posto (J).
rCollegare il cavo del microfono
ai terminali MIC dell’XL1S (J).
BATT.RELEASE
F
G
H
I
J
46
IITALIAN
Regolazione dell’FU-1000
1Regolare la posizione
dell’oculare.
qTenere l’XL1S nella posizione di
ripresa e regolare l’oculare in
una posizione che sembri
comoda. Stringere la manopola
di blocco dell’oculare LOCK (sul
fondo dell’unità) per tenere
l’oculare in posizione (K).
¡Il mirino si nuove
orizzontalmente di sino a 2 cm e
verticalmente di 250°.
wGirare l’anello di regolazione
dell’oculare in modo da regolare
la lunghezza dell’oculare (K).
¡L’oculare si estende di sino a
2 cm.
2Applicare il tubo di
estensione (se
necessario).
Se l’oculare non raggiunge il vostro
occhio, installare il tubo di
estensione.
qRimuovere il paraocchi
dell’oculare (L).
wAllineare il tubo di estensione
con le filettature dell’oculare e
stringerlo per fissarlo (M).
eApplicare infine il paraocchi alla
scanalatura del tubo di
estensione (M).
3Regolare il mirino in
modo adatto alla
propria vista.
Accenderlo e regolare il display in
modo che sia bene a fuoco.
¡Spostare la leva di messa a
fuoco del mirino sino a che il
display non appare ben nitido
(N).
0123456
LOCK
K
L
M
N
47
IITALIAN
ON
TALLY LIGHT
ON
P
4Regolare il display del
mirino.
Regolare la luminosità (B), il
contrasto (C) e il peaking (P) del
display del mirino (o).
¡Luminosità
Serve da guida quando si regola
manualmente l’apertura.
Regolarla usando una scala di
grigi o un altro soggetto adatto
con livelli differenti di contrasto.
¡Peaking
Usarlo per aumentare la
nitidezza del display durante la
messa a fuoco.
•I livelli di luminosità, contrasto e
peaking non influenzano le
immagini registrate.
5Luce di controllo
Perché la luce di controllo lampeggi
durante la ripresa, accenderla col
menu dell’XL1S e quindi accendere
l’interruttore TALLY dell’FU-1000
(P). Perché la luce di controllo sia
accesa, ambedue devono essere
accesi.
6Luce di illuminazione
obiettivo
Illumina l’obiettivo, permettendo di
eseguire regolazioni anche al buio.
Va accesa e spenta con
l’interruttore LIGHT (P).
O
P
C
B

48
IITALIAN
7
Rimozione e
applicazione dell’oculare
Rimozione
Mantenere premuto il pulsante di
rilascio dell’oculare. Girare
quest’ultimo e quindi toglierlo (Q).
Applicazione
Allineare i triangoli e girare
l’oculare sino a che non lo si sente
scattare in posizione (Q).
Q
Regolazione dell’FU-1000

49
IITALIAN
Dati tecnici
Mirino a CRT monocolore Canon FU-1000
Mirino: CRT monocolore da 1.5”
Risoluzione: oltre 500 righe TV al centro (solo CRT)
Gamma regolazione fuoco: da +0,5 a –2,4 diottrie
da +0,1 a –3,2 diottrie (quando viene installato un
tubo di estensione)
Luce di controllo: interruttore di accensione e spegnimento
Luce illuminazione
obiettivo: Interruttore di accensione e spegnimento
Contrasto: regolazione a manopola
Peaking: regolazione a manopola
Luminosità: regolazione a manopola
Alimentazione: 9 V di c.c. (potenziata da 7,2 V di c.c. a 9 V di c.c.
dall’adattatore per batterie)
Consumo: 11,2 W (durante la registrazione con un obiettivo
video IS II da 5,5–88 mm con Zoom XL da ×16)
9,5 W (durante la registrazione con un obiettivo video
da 5,7–80 mm con zoom XL del tutto manuale da ×14
o un obiettivo video da 5,4–86,4 mm con zoom XL
del tutto manuale da ×16)
Dimensioni: 204 ×192 ×75 mm
204 ×251 ×75 mm (a innesto microfono montato)
Peso: 900 g
Adattatore batteria
Batterie utilizzabili: Batterie ricaricabili della serie Canon BP-900
(non compatibile con adattatori compatti di corrente
alternata o adattatori per batterie di automobile)
Dimensioni: 138 ×63 ×53 mm
Peso: 130 g
Il peso e le dimensioni sono approssimativi. Soggetto a modifiche senza
preavviso. Errori ed omissioni esclusi.


MEMO

PUB.DIM-321ic © CANON INC. 1999 PRINTED IN JAPAN
DY8-9120-229-000 IMPRIME AU JAPON
CANON INC.
キヤノン販売株式会社
CANON U.S.A., INC. NEW JERSEY OFFICE
100 Jamesburg Road, Jamesburg, NJ 08831 USA
CANON EUROPA N.V.
P.O Box 2262, 1180 EG Amstelveen, the Netherlands
