Canon K30218 Canon Bluetooth Unit BU-10 User Manual BU10 UG ENG
Canon Inc Canon Bluetooth Unit BU-10 BU10 UG ENG
Canon >
Contents
- 1. Manual BT
- 2. Manual printer
Manual printer
1
Safety Precautions
Safety PrecautionsSafety Precautions
Safety Precautions
Please read the safety warnings and cautions provided in this manual to
ensure that you use your printer safely. Do not attempt to use the printer in
any way not described in this manual since doing so may cause accidents,
electric shock or fire.
Warning provides information about incorrect handling that may lead to death or serious
injury. Please read warning to ensure that you use your printer safely.
Caution provides information about incorrect handling that may lead to injury or material
damage. Please read caution to ensure that you use your printer safely.
This product emits low level electromagnetic waves.
This product emits low level electromagnetic waves. This product emits low level electromagnetic waves.
This product emits low level electromagnetic waves. If you are using a cardiac pacemaker
If you are using a cardiac pacemaker If you are using a cardiac pacemaker
If you are using a cardiac pacemaker
and feel abnormalities, please move away from this product and consult your doctor.
and feel abnormalities, please move away from this product and consult your doctor.and feel abnormalities, please move away from this product and consult your doctor.
and feel abnormalities, please move away from this product and consult your doctor.
Do not use this product inside medical institutions such as hospitals or near electric
Do not use this product inside medical institutions such as hospitals or near electric Do not use this product inside medical institutions such as hospitals or near electric
Do not use this product inside medical institutions such as hospitals or near electric
medical equipment.
medical equipment.medical equipment.
medical equipment.
Electric waves may affect the operation of electric medical equipment.
Keep the printer at least 22 cm away from the pacemaker.
Keep the printer at least 22 cm away from the pacemaker.Keep the printer at least 22 cm away from the pacemaker.
Keep the printer at least 22 cm away from the pacemaker.
Electric waves may affect the operation of the cardiac pacemaker.
Do not use this product in aircraft.
Do not use this product in aircraft.Do not use this product in aircraft.
Do not use this product in aircraft.
Electric waves may cause malfunction, and lead to accidents
Do not use the printer near automatically controlled equipment such as the automated
Do not use the printer near automatically controlled equipment such as the automated Do not use the printer near automatically controlled equipment such as the automated
Do not use the printer near automatically controlled equipment such as the automated
door and fire alarm.
door and fire alarm.door and fire alarm.
door and fire alarm.
Radio waves may cause equipment malfunction, thus leading to accidents.
Do not attempt to disassemble or modify the product.
Do not attempt to disassemble or modify the product.Do not attempt to disassemble or modify the product.
Do not attempt to disassemble or modify the product.
Doing so may cause injury, electrical shock or fire.

2
Handling Precautions
Shipping the Product
This product may not be used in countries other than the country where it was
purchased due to local laws and regulations. Please note that the use of this product in
such countries may lead to punishment and that Canon should not be liable for such
punishment.
3
Using the Bluetooth Unit
Using the Bluetooth UnitUsing the Bluetooth Unit
Using the Bluetooth Unit
Bluetooth Unit
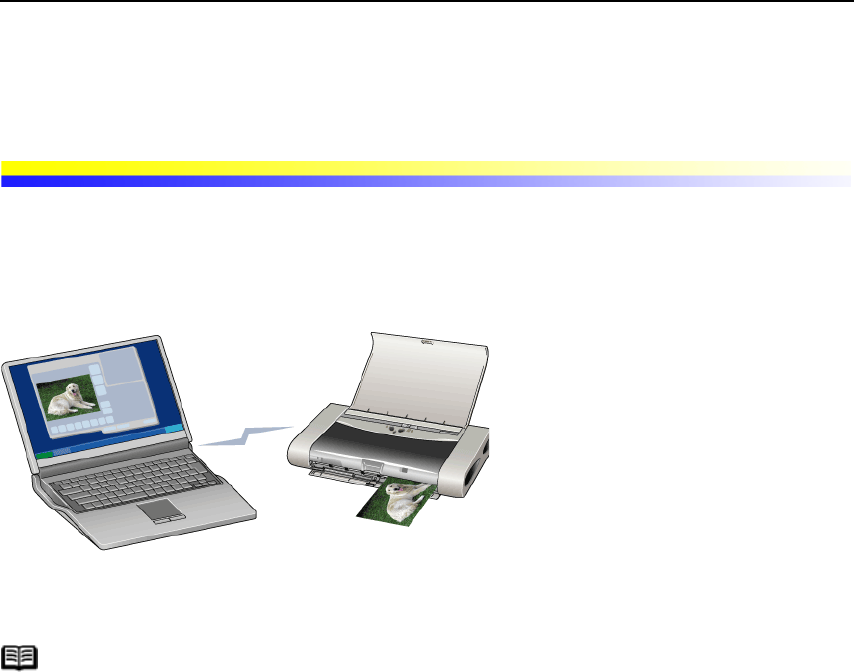
Bluetooth Unit BU-10 (hereafter referred to as the Bluetooth unit) is an
exclusive use Bluetooth adaptor for Canon Bubble Jet Printer i80.
By attaching the Bluetooth unit to i80, wireless printing from a Bluetooth
enabled computer is possible.
Note Communication is possible up to about 10 m depending on
the conditions below. The printing speed may change
depending on the following conditions.
zPresence of obstacles between communication
equipment and radio wave conditions.
zPresence of magnetic fields, static electricity or
electromagnetic interference.
zSoftware and operating systems in use.
zReceiver sensitivity and antenna performance of the
communication equipment.

4
Parts and Functions
(1) Printer connector
Printer connectorPrinter connector
Printer connector
Connects this connector to the printer.
* Be sure not to directly touch the printer connector. Doing so may cause a
failure.
Important zIf the printer connector is dirty, the Bluetooth unit may not
operate. Keep the electrodes clean. If they become dirty,
wipe them clean with a soft, dry cloth.
5
Attaching to and Removing from the Printer
Attaching the Bluetooth Unit to the Printer
Attach the Bluetooth unit to the printer in accordance with the following procedure.
1Turn the printer off.
Press the POWER button and wait until the POWER lamp stops flashing.
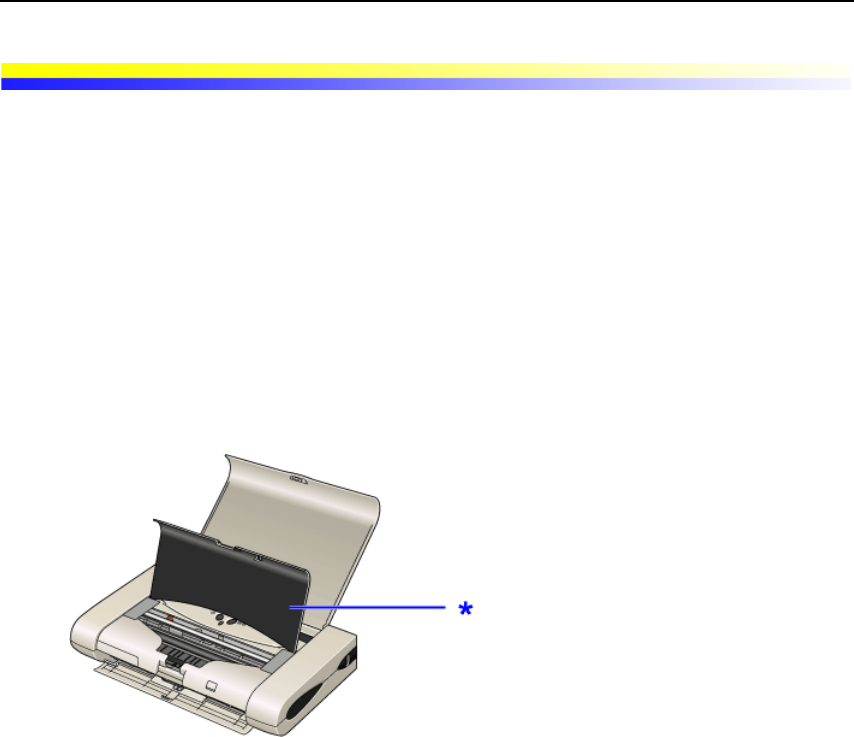
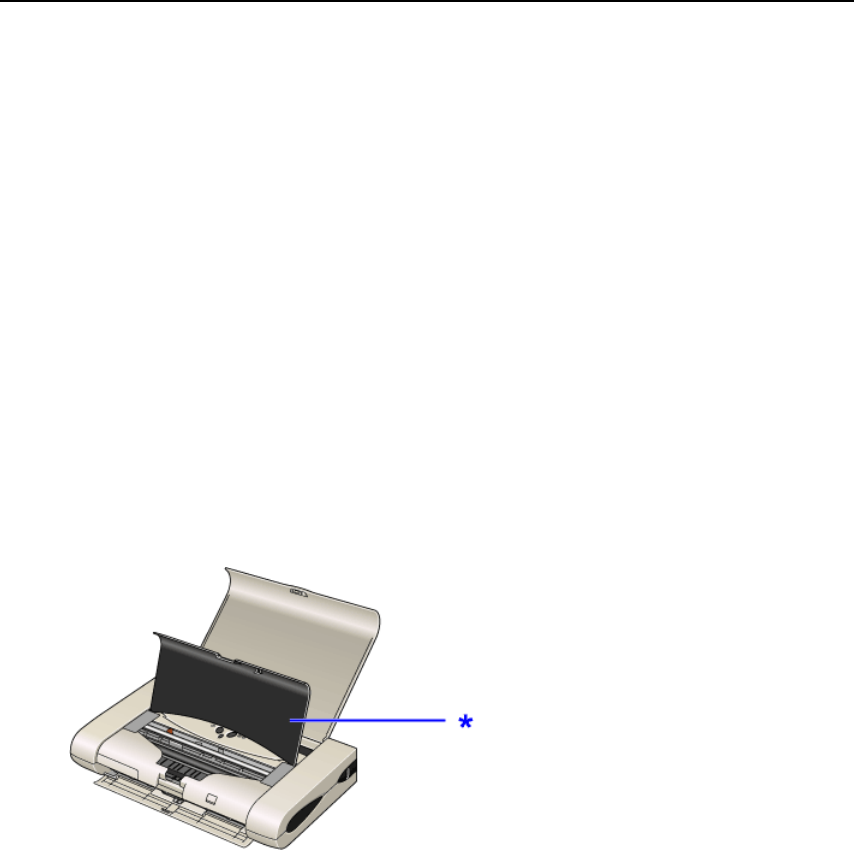
2Open the print head cover.
* print head cover
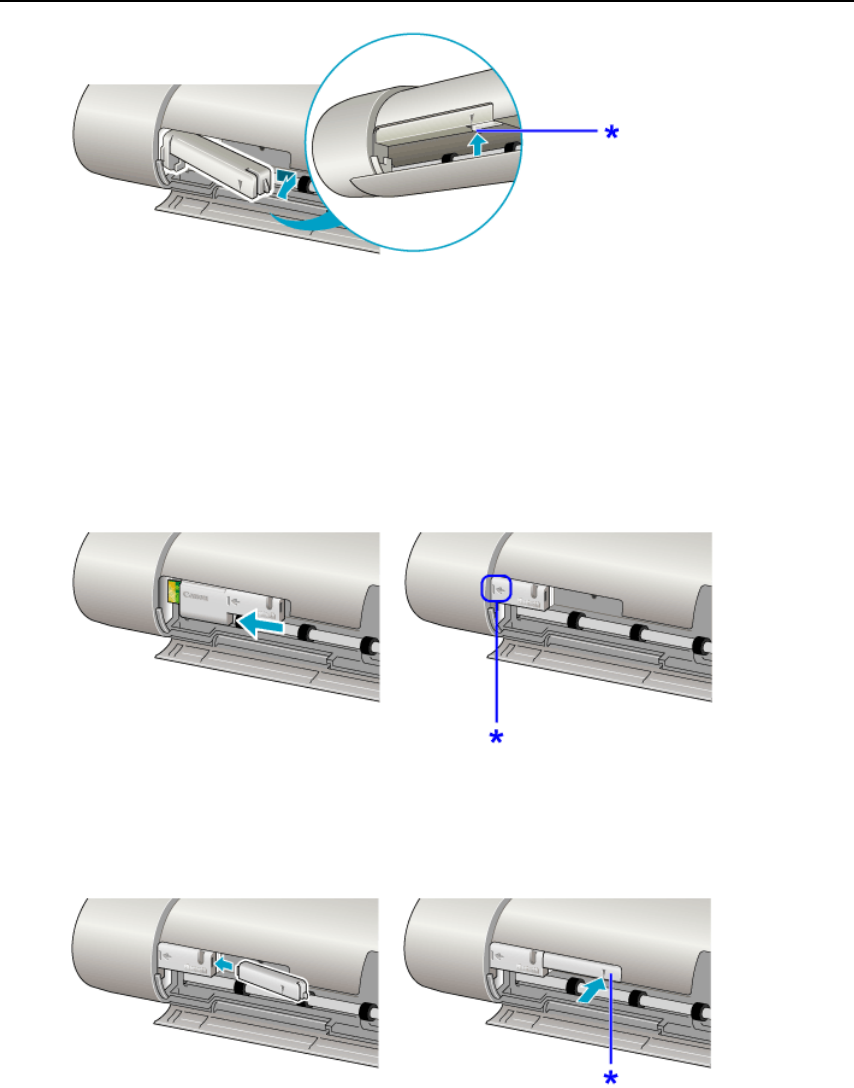
3Remove the Bluetooth connector cover.
Important Do not attach the Bluetooth unit while the printer is turned
on. A failure can result.
6
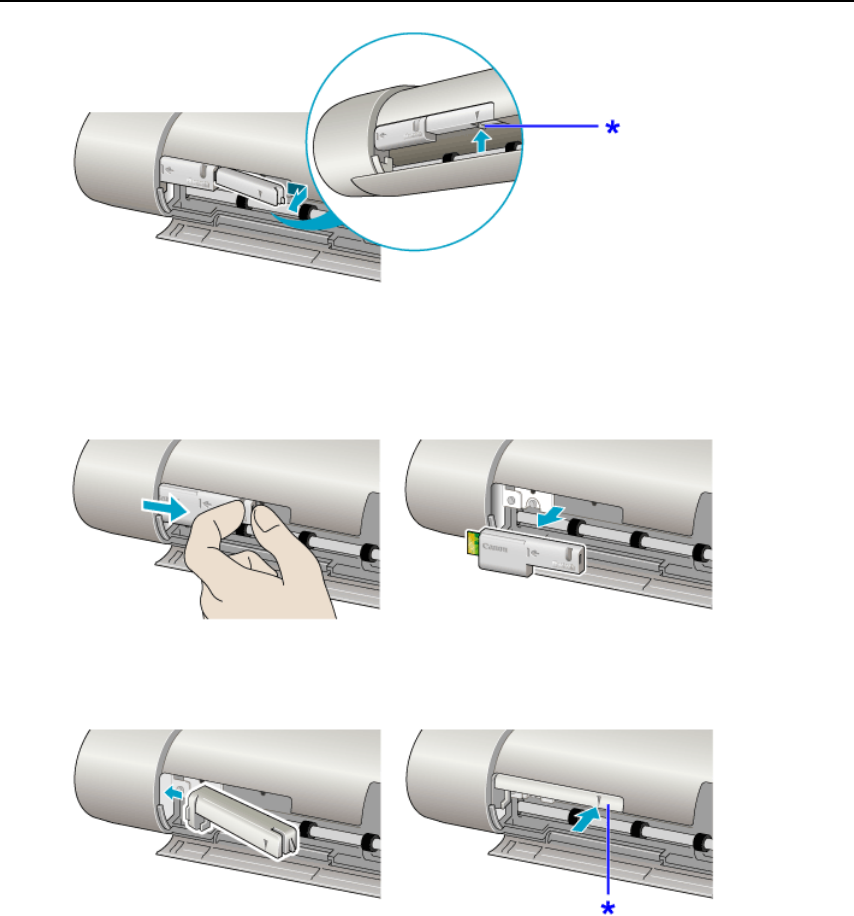
* Remove the cover by pressing it with your fingers.
4Insert the Bluetooth unit to the Bluetooth unit connector.
* Insert the device until its face plate aligns with this point.
5Insert the lock cover to the right of the Bluetooth unit.
Important Be sure to keep the removed Bluetooth connector cover in a
safe place. The Bluetooth connector cover needs to be
attached again to prevent dust on the Bluetooth unit
connector when the Bluetooth unit is removed.
7
* Insert the device until it snaps into place.
6Close the print head cover.
7Turn the printer on.
Removing the Bluetooth Unit from the Printer
Remove the Bluetooth unit from the printer in accordance with the following
procedure.
1Turn the printer off.
Press the POWER button and wait until the POWER lamp stops flashing.
2Open the print head cover.
* print head cover
3Remove the lock cover.
Important Do not remove the Bluetooth unit while the printer is turned
on. A failure can result.
8
* Remove the cover by pressing it with your fingers.
4Remove the Bluetooth unit from the Bluetooth unit connector.
5Insert the Bluetooth connector cover.
* Insert the device until it snaps into place.
6Close the print head cover.

9

10
Printing Data via Bluetooth
Printing Data via Bluetooth Printing Data via Bluetooth
Printing Data via Bluetooth
Communication
CommunicationCommunication
Communication
In order to connect the Bluetooth unit and print via Bluetooth
communication, the following preparatory steps are required.
STEP 1
STEP 1STEP 1
STEP 1
Connect the printer to the computer with the USB cable and install the printer driver
using the Setup Software & User’s Guide CD-ROM.
See Installing the Printer Driver
STEP 2
STEP 2STEP 2
STEP 2
Check the device name and MAC address using the i80 Setup Utility.
See Checking the Settings Using the i80 Setup Utility
STEP 3
STEP 3STEP 3
STEP 3
• When using Windows XP (with Service Pack 1 or higher)
Authenticate the printer through the wireless link in the control panel on Windows
XP.
See Registering the Printer through the Wireless Link
• When using Toshiba computers with Bluetooth (Windows XP)
Authenticating the printer using Bluetooth Settings
Bluetooth SettingsBluetooth Settings
Bluetooth Settings*.
*The printer can easily be authenticated using the program that comes with the
Toshiba computer with Bluetooth (Windows XP).
Bluetooth Settings
Bluetooth SettingsBluetooth Settings
Bluetooth Settings can be started by clicking Start
StartStart
Start and selecting All Programs
All ProgramsAll Programs
All Programs,
TOSHIBA
TOSHIBATOSHIBA
TOSHIBA, Bluetooth
BluetoothBluetooth
Bluetooth, and Bluetooth Settings
Bluetooth SettingsBluetooth Settings
Bluetooth Settings.
For details on Bluetooth Settings
Bluetooth SettingsBluetooth Settings
Bluetooth Settings, refer to your computer's operation manual.

11
Installing the Printer Driver
Before connecting the Bluetooth unit to the printer for wireless printing, the
USB cable must be connected between the printer and computer, and the
printer driver must be installed using the Setup Software & User’s Guide CD-
ROM.
• If the printer driver has not been installed
Install the printer driver according to the
Quick Start Guide
.
• If the printer driver has already been installed
Move to the next step.
See Checking the Settings Using the i80 Setup Utility

12
Checking the Settings Using the i80 Setup
Utility
The i80 Setup Utility software is used to set up the Bluetooth unit connected
to the printer. Installing the printer driver using the printer software CD-ROM
will automatically install the i80 Setup Utility.
This section describes the operation procedures for checking the settings of
the Bluetooth unit using the i80 Setup Utility as preparation for Bluetooth
printing.
For more information about the i80 Setup Utility, refer to Using the i80 Setup
Utility.
1Check that the printer and computer are connected by the USB cable.
2Click Start
StartStart
Start and select All Programs
All ProgramsAll Programs
All Programs, Canon Utilities
Canon UtilitiesCanon Utilities
Canon Utilities, i80 Setup Utility
i80 Setup Utilityi80 Setup Utility
i80 Setup Utility and i80
i80 i80
i80
Setup Utility
Setup UtilitySetup Utility
Setup Utility.
Alternatively, double-click the i80 Setup Utility
i80 Setup Utilityi80 Setup Utility
i80 Setup Utility icon on the desktop.
The i80 Setup Utility will start.
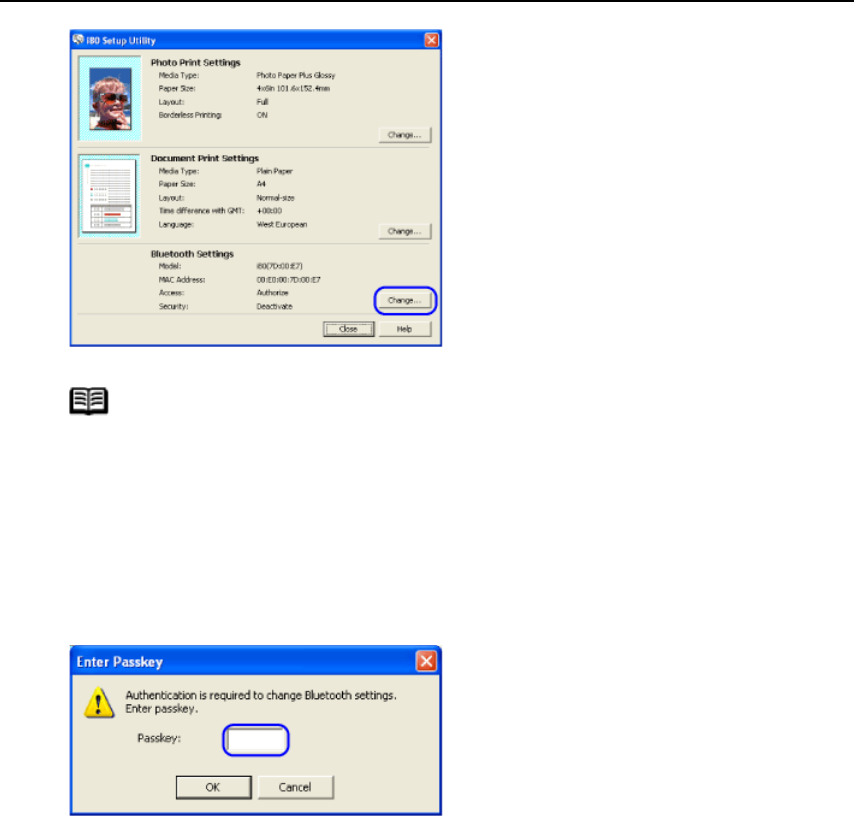
3Click Change
ChangeChange
Change from Bluetooth Settings.
Note The i80 Setup Utility is used to set up the media type, size
and print layout to print via infrared communication with the
PDA or a mobile telephone. For more information on settings
for printing via infrared communication, refer to the
Quick
Start Guide
.
13
4Enter the passkey.
The passkey, an identification number specified and entered by the user. It is used
to prevent interference from other Bluetooth device.
Enter the initial value, 0000, and click OK
OKOK
OK.
For more information about the settings of the passkey, refer to Using the i80 Setup
Utility.
5Check the Model.
Note If Bluetooth Settings
Bluetooth SettingsBluetooth Settings
Bluetooth Settings does not appear on the main i80 Setup
Utility screen, the Bluetooth unit may not be set up correctly.
Refer to Bluetooth Unit is Not Ready for Use and set up the
Bluetooth unit correctly.
If Bluetooth Settings
Bluetooth SettingsBluetooth Settings
Bluetooth Settings still does not appear, the Bluetooth unit
may be broken. In this case, contact a Canon service
representative.

14
The Model
ModelModel
Model is necessary to register the printer as the Bluetooth device using the
wireless link in the control panel. Be sure to note the Model
ModelModel
Model.
When the Model
ModelModel
Model has been checked, click cancel
cancelcancel
cancel and then proceed to the next step.
See Registering the Printer through the Wireless Link
Note To register and use multiple i80 units, changing the model
modelmodel
model
name is recommended for easy identification of the printer
you will use. Model
ModelModel
Model names can be changed using a maximum
of 24 characters. After changing the model
modelmodel
model name, click
Specify
SpecifySpecify
Specify.
15
Registering the Printer through the Wireless
Link
Register the printer as a Bluetooth device using the wireless link in the
control panel on Windows XP.
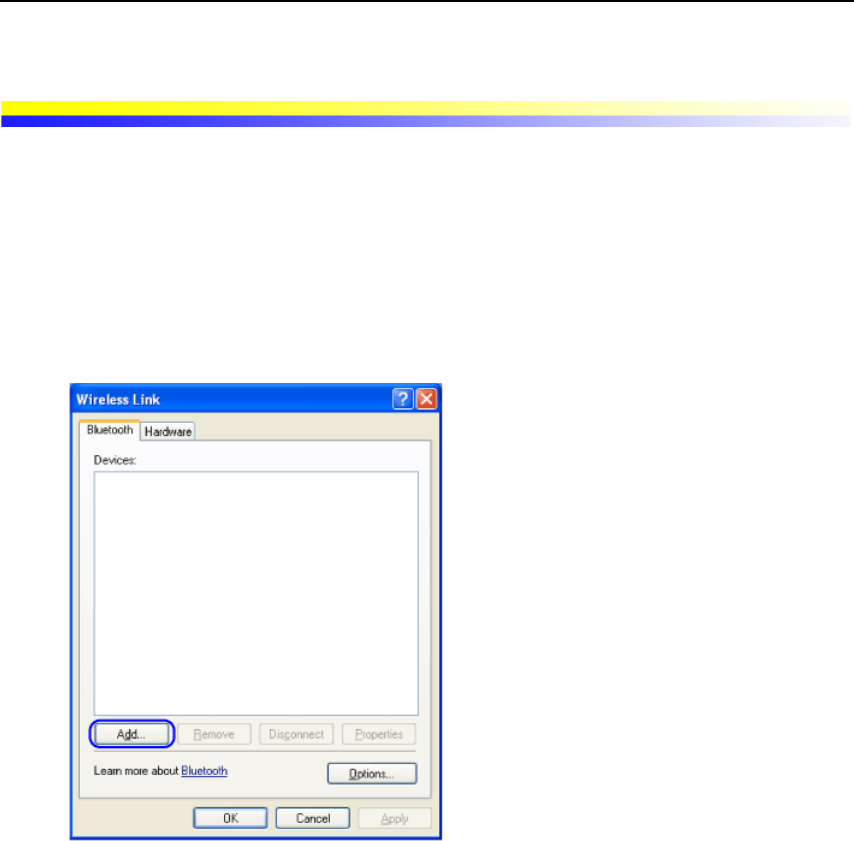
1Click Start
StartStart
Start and then click Control Panel
Control PanelControl Panel
Control Panel, Printers and Other Hardware
Printers and Other HardwarePrinters and Other Hardware
Printers and Other Hardware and
Wireless Link
Wireless LinkWireless Link
Wireless Link.
2Click Add
AddAdd
Add in the Bluetooth
BluetoothBluetooth
Bluetooth tab.
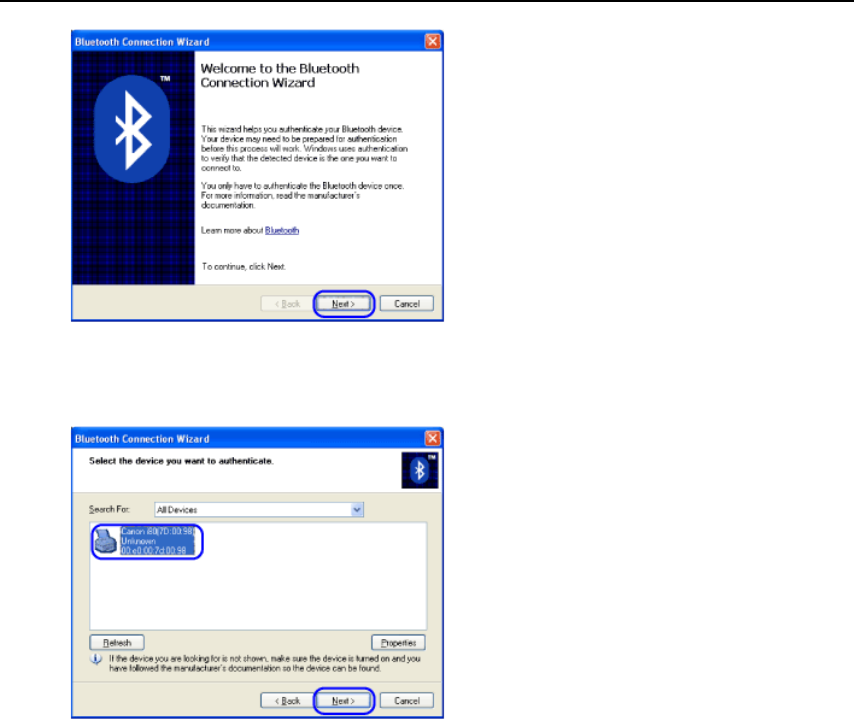
The Bluetooth connection wizard will start.
3Click Next
NextNext
Next.
16
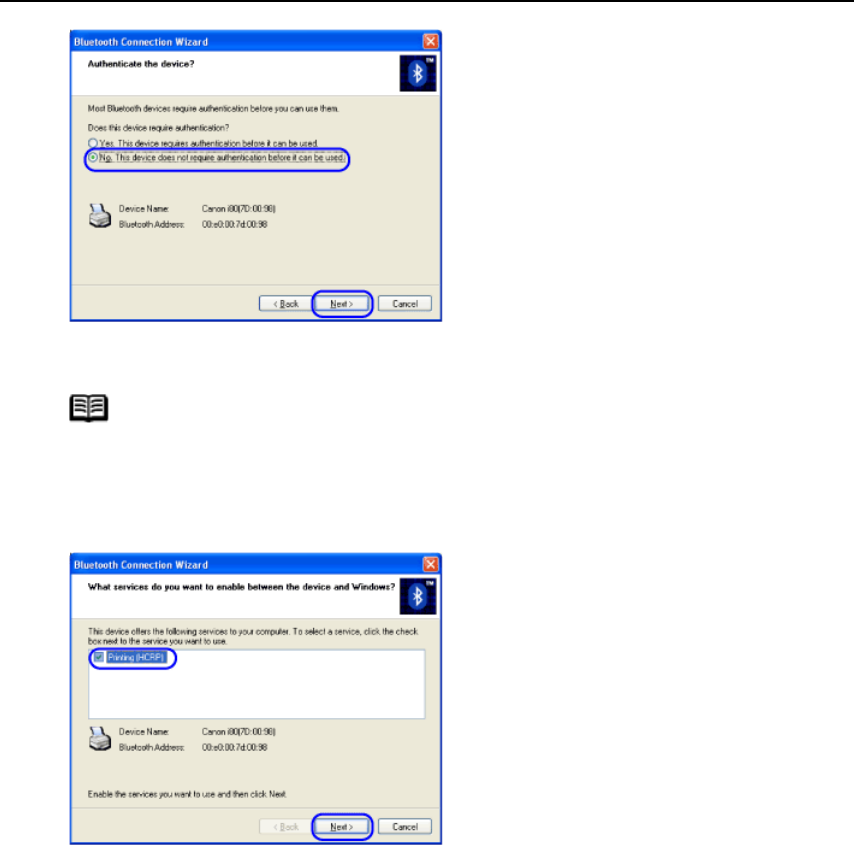
4Select Canon i80
Canon i80Canon i80
Canon i80 and Click Next
NextNext
Next.
Select the same device name (Model) as that checked under Checking the Settings
Using the i80 Setup Utility.
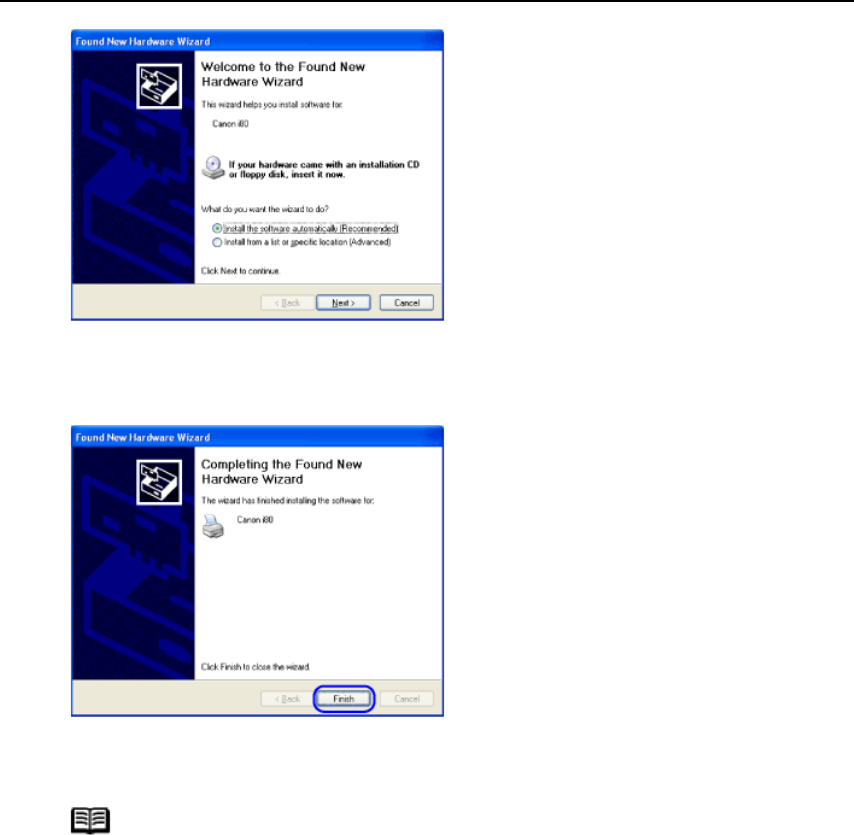
5Click No. This device does not require authentication before it can be used.
No. This device does not require authentication before it can be used.No. This device does not require authentication before it can be used.
No. This device does not require authentication before it can be used.
and then Next
NextNext
Next.
17
6Select the Printing (HCRP)
Printing (HCRP)Printing (HCRP)
Printing (HCRP) check box and then click Next
NextNext
Next.
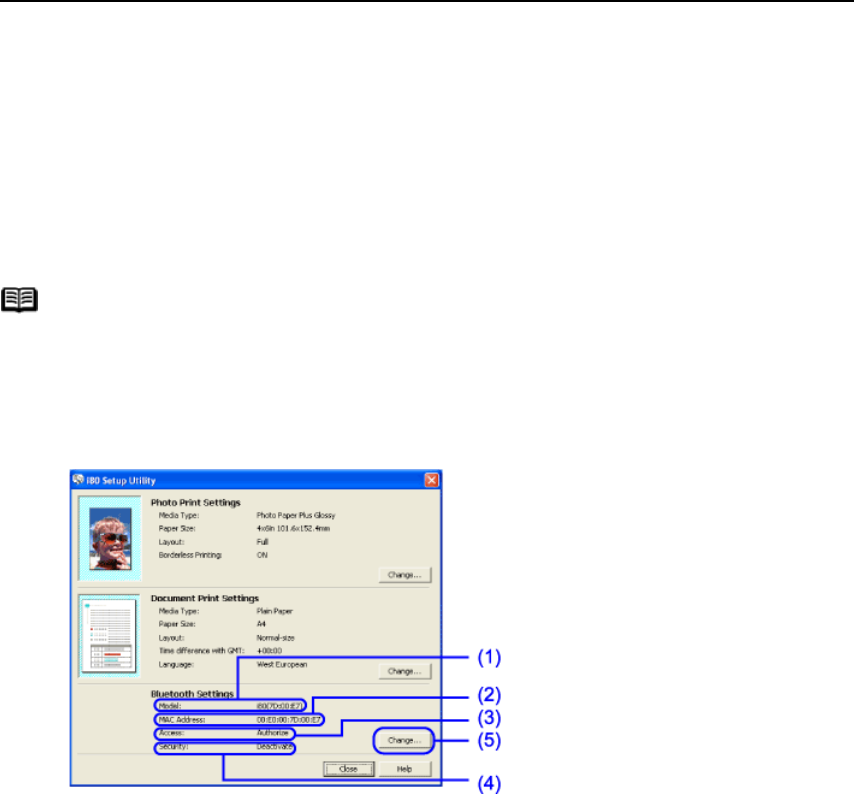
7Click Finish
FinishFinish
Finish.
When the Found New Hardware Wizard
Found New Hardware WizardFound New Hardware Wizard
Found New Hardware Wizard screen appears, follow the on-screen
instructions.
Note When a passkey is set in the printer, select Yes. This device
Yes. This device Yes. This device
Yes. This device
requires authentication before it can be used.
requires authentication before it can be used.requires authentication before it can be used.
requires authentication before it can be used. and click Next
NextNext
Next.
Then, enter a four-digit number in Passkey
PasskeyPasskey
Passkey and click Next
NextNext
Next.
18
8When the installation ends, click Finish
FinishFinish
Finish.
Now, the settings for printing via Bluetooth communication are ready.
Note Be sure to select Canon i80 (Copy 1)
Canon i80 (Copy 1)Canon i80 (Copy 1)
Canon i80 (Copy 1) as the printer name to
print via Bluetooth communication and select Canon i80
Canon i80Canon i80
Canon i80 to
print via the USB cable connection.
19
Using the i80 Setup Utility
Using the i80 Setup UtilityUsing the i80 Setup Utility
Using the i80 Setup Utility
The i80 Setup Utility software is used to set up the Bluetooth unit connected
to the printer. Installing the printer driver using the Setup Software & User’s
Guide CD-ROM will automatically install the i80 Setup Utility.
This section provides a screen-by-screen description of Bluetooth
communication settings to be done using the i80 Setup Utility.
Main screen
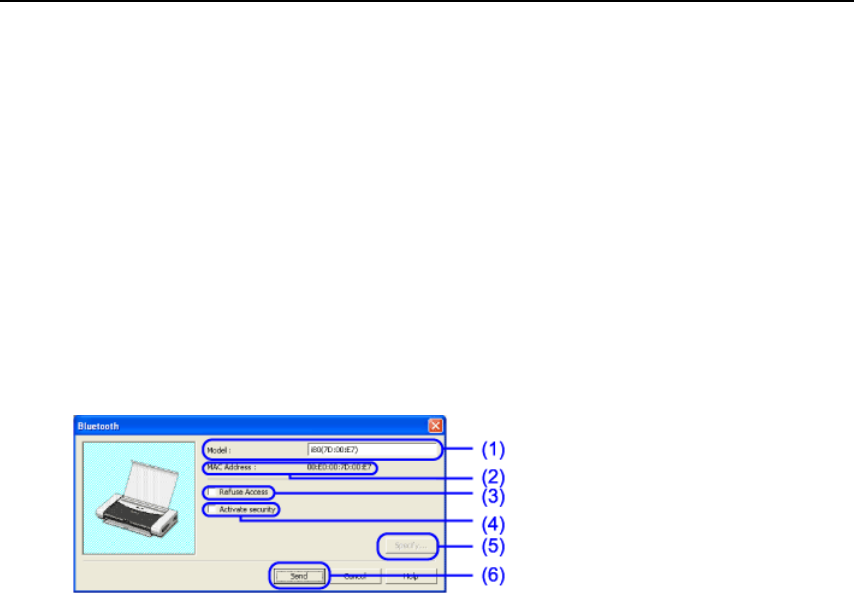
(1) Model
ModelModel
Model
Displays the device name of the printer to which the Bluetooth unit is
connected.
Example: Canon i80 (XX:XX:XX) (The address assigned to the printer is shown in
parentheses.)
(2) MAC Address
MAC AddressMAC Address
MAC Address
Displays the address of the printer to which the Bluetooth unit is connected.
This setting cannot be changed.
Note The i80 Setup Utility is used to set up the media type, size
and print layout to print via infrared communication with the
PDA or a mobile telephone. For more information on settings
for printing via infrared communication, refer to the
Quick
Start Guide
.
20
(3) Access
AccessAccess
Access
Displays the status of access permissions to the connected device. For more
information, refer to Refuse Access of Bluetooth screen.
(4) Security
SecuritySecurity
Security
Displays the current security settings. For more information, refer to Activate
security of Bluetooth screen.
(5) Change
ChangeChange
Change
Click to open the authentication dialog. The passkey must be entered to change
the settings. The passkey is set to the default of 0000. For more information,
refer to Passkey of Security screen.
Bluetooth screen
(1) Model
ModelModel
Model
Displays the device name of the printer to which the Bluetooth unit is
connected.
Example: Canon i80 (XX:XX:XX)
Although the device name can be changed (up to 24 characters can be entered).
(2) MAC Address
MAC AddressMAC Address
MAC Address
Displays the address of the device to which the Bluetooth unit is connected.
This setting cannot be changed.
(3) Refuse Access
Refuse AccessRefuse Access
Refuse Access
Clearing this check box will enable search and printing from Bluetooth device.
Selecting the check box will disable searches from Bluetooth device.
(4) Activate security
Activate securityActivate security
Activate security
21
Selecting this check box and clicking Details
DetailsDetails
Details will enable the setting or changing
of a passkey, and the deletion of the link key.
Setting a passkey will help prevent interference from other Bluetooth device.
(5) Specify
SpecifySpecify
Specify
This can be selected when the Activate security check box is selected. Click to
open the Security screen.
(6) Send
SendSend
Send
Be sure to click Send
SendSend
Send after changing a setting on the Bluetooth screen to send
the change to the printer.
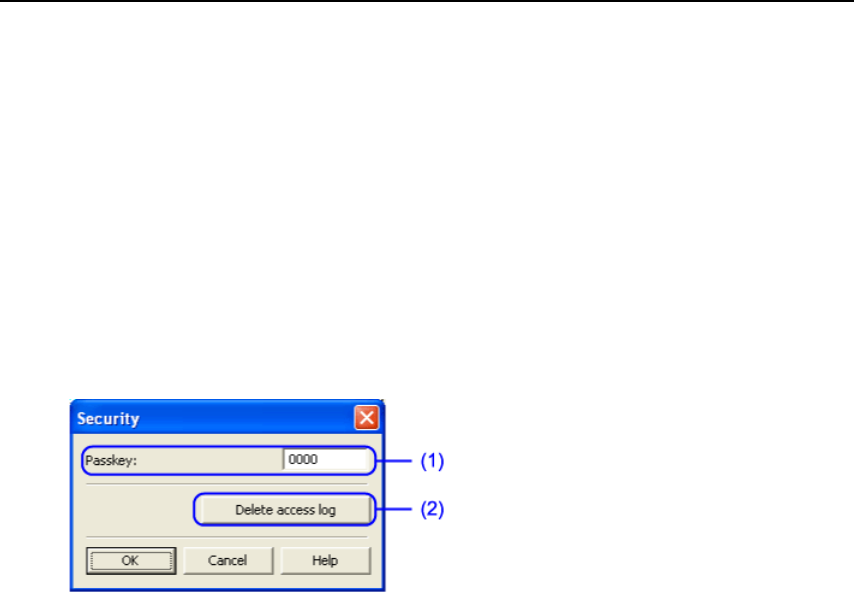
Security screen
(1) Passkey
PasskeyPasskey
Passkey
You can change the passkey. The passkey refers to an identification number
specified and entered by the user. It is used to prevent interference from other
Bluetooth device. The initial value set to 0000 can be changed to any four digit
number.
Changing the passkey will require the setting of new passkeys on other printers
run using the old passkey.
(2) Delete access log
Delete access logDelete access log
Delete access log
Deletes all the saved link keys for Bluetooth device at once.


23
Cannot Install Bluetooth Driver
If Using an Unsupported Bluetooth Driver
The i80 supports Microsoft Bluetooth drivers. Check whether the Bluetooth driver used
is supported, and refer to Printing Data via Bluetooth Communication to prepare for
printing.

24
Printing Does Not Start
•Bluetooth Unit is Not Ready for Use
•The Installation Place of the Printer or the Distance between the Printer and
Computer is not proper
•The Printer to be used is not Correctly Selected
•Access from a Bluetooth device is rejected
•Prior to Printer Driver Installation, the Printer has been Registered through the
Wireless Link
•After Printer Registration through the Wireless Link, the Printer Driver was Installed
Using the Setup Software & User’s Guide CD-ROM
Bluetooth Unit is Not Ready for Use
First, turn off the printer, then check that the Bluetooth unit is fully inserted into the
Bluetooth unit connector, and turn the printer on again to retry printing.
The Installation Place of the Printer or the Distance between the
Printer and Computer is not proper
Communication between the printer and computer is possible up to about 10 m
depending on the conditions below.
• Presence of obstacles between communication equipment and radio wave
conditions
• Presence of magnetic fields, static electricity or electromagnetic interferences
• Software and operating systems in use
• Receiver sensitivity and antenna performance of the communication equipment
Change the installation place of the printer or move the printer closer to the computer.
The Printer to be used is not Correctly Selected
Follow the steps described below to check the port of the printer for printing via
Bluetooth communication.

25
(1) Click Start
StartStart
Start and then click Control Panel
Control PanelControl Panel
Control Panel, Printers and Other Hardware
Printers and Other HardwarePrinters and Other Hardware
Printers and Other Hardware and
Printers and Faxes
Printers and FaxesPrinters and Faxes
Printers and Faxes.
(2) Click the icon of the printer used via Bluetooth communication.
(3) Select Properties
PropertiesProperties
Properties from the File
FileFile
File menu.
(4) Click the Ports
PortsPorts
Ports tab, then select BTHnnn (Canon i80(Copy 1))
BTHnnn (Canon i80(Copy 1))BTHnnn (Canon i80(Copy 1))
BTHnnn (Canon i80(Copy 1)) ("n" represents a
number) from the Port.
(5) Click OK
OKOK
OK.
Access from a Bluetooth device is rejected
Check the printer access settings using the i80 Setup Utility.
(1) Check that the printer and computer are connected by USB cable.
(2) Click Start
StartStart
Start and select All Programs
All ProgramsAll Programs
All Programs, Canon Utilities, i80 Setup Utility and i80
Setup Utility.
Or, double-click the i80 Setup Utility icon on the desktop.
The i80 Setup Utility launches.
(3) If Access is set to Refuse on the main screen, click Change
ChangeChange
Change.
(4) Enter a passkey on the Enter Passkey screen and click OK
OKOK
OK.
(5) Click Refuse Access
Refuse AccessRefuse Access
Refuse Access on the Bluetooth screen to clear the check mark and click
Specify
SpecifySpecify
Specify.
(6) When the confirmation message is displayed, click OK
OKOK
OK.
Prior to Printer Driver Installation, the Printer has been Registered
through the Wireless Link
If the printer has already been registered through the wireless link in the control panel,
first delete the printer registered through the wireless link.
Then, install the printer driver, and re-register the printer through the wireless link.
For details, refer to Printing Data via Bluetooth Communication.
After Printer Registration through the Wireless Link, the Printer
Driver was Installed Using the Setup Software & User’s Guide CD-
ROM
If the printer driver was installed using the Setup Software & User’s Guide CD-ROM
after the printer was registered through the wireless link in the control panel, first

26
delete the printer registered through the wireless link and then re-register the same
printer.

27
Print Quality is Poor
Priority is on the Printing Speed.
If the printed image looks too coarse, change the size of print data in the printer driver.
(1) Open the Printer Properties dialog box.
(1) In your application, select the command to print a document.
(2) Ensure that the Canon i80
Canon i80Canon i80
Canon i80 is selected. Then click Preferences
PreferencesPreferences
Preferences (or
Properties
PropertiesProperties
Properties).
(2) Click Print Options
Print OptionsPrint Options
Print Options in the Main
MainMain
Main tab.
(3) Clear the check box of Change the print data size to match the port
Change the print data size to match the portChange the print data size to match the port
Change the print data size to match the port and then
click OK
OKOK
OK.
Note Clearing the check box improves print image quality but
increases printing time. Specify these settings according to
the purpose of printing.

28
Specifications
SpecificationsSpecifications
Specifications
Communication method Bluetooth standard Ver1.1
Output Bluetooth standard Power Class 2
Communication distance Line-of-sight distance: approx. 10 m *
* It may vary depending on factors including the presence of
obstacles between communication equipment, radio wave
conditions, the presence of magnetic fields around
microwave ovens and locations where electrostatic and radio
interference occur, the types of software and operating
systems used, and receiver sensitivity and antenna
performance of communication equipment.
Compatible Bluetooth
profile
Serial Port Profile
Object Push Profile
Basic Imaging Profile
Hardcopy Cable Replacement Profile (for computers)
OS Windows XP Service Pack 1 or later, or Toshiba computers
with Bluetooth (Windows XP)
Bluetooth specified HCRP
Target models Computers, PDAs, mobile telephones and digital cameras
Bluetooth compatible equipment may not operate correctly
depending on machine models or software versions used.
Frequency band 2.4 GHz band (2.400 GHz to 2.4835 GHz)
Power supply Supplied from i80, 5 DCV±0.25 DCV
Power consumption 500 mW
Operating temperature 5°C to 35°C
Operating humidity 10%RH to 90%RH (no condensation)
Maximum outside
dimensions
21 mm x 58 mm x 8 mm (Width x Depth x Height)
Weight Approx. 5 g

29
Index