Canon Océ PRISMAprepare_User Guide PRISMAprepare User
User Manual: Canon PRISMAprepare User Guide Production Printing User Manuals
Open the PDF directly: View PDF ![]() .
.
Page Count: 354 [warning: Documents this large are best viewed by clicking the View PDF Link!]
- Contents
- Chapter 1 Introduction
- Chapter 2 Start using the application
- Open and close a document
- Supported file formats
- Save a document
- Close the application
- Undo and redo commands
- Start an external application
- Define the general options
- Define the clean document options
- Define the document options
- Use [Proof PDF]
- Use the color palette
- Use the clipboard
- Shortcut keys
- Icons
- List of concepts
- Chapter 3 The [Pages] workspace
- Introduction
- The toolbar
- The [Structure] view
- The [Preview] view
- Configure sections
- Repeated selection
- Collect pages
- Clean-up scanned pages
- Correct pages
- Introduction
- Change the page size
- Shift the page content
- Scale the page content
- The PDF boxes
- Mask parts of the page content
- Split the page
- Rotate a page
- Page content editing
- Mark or unmark a page
- Mark color pages with custom settings
- [Convert to grayscale]
- Edit the image perception
- Edit the color of text and graphics
- Enhance your document
- Chapter 4 The [VDP] workspace
- Chapter 5 The [Document] workspace
- Introduction
- The toolbar
- The [Structure] view
- The [Preview] view
- Configure sections
- Repeated selection
- Allocate pages
- Define your document
- Enhance your document
- Chapter 6 Manage media
- Chapter 7 Manage the templates
- Chapter 8 Manage stamps
- Chapter 9 Preflight documents
- Chapter 10 The Print dialog
- Chapter 11 Configure printer-related settings in the administration console
- Chapter 12 The command line interface
- Index
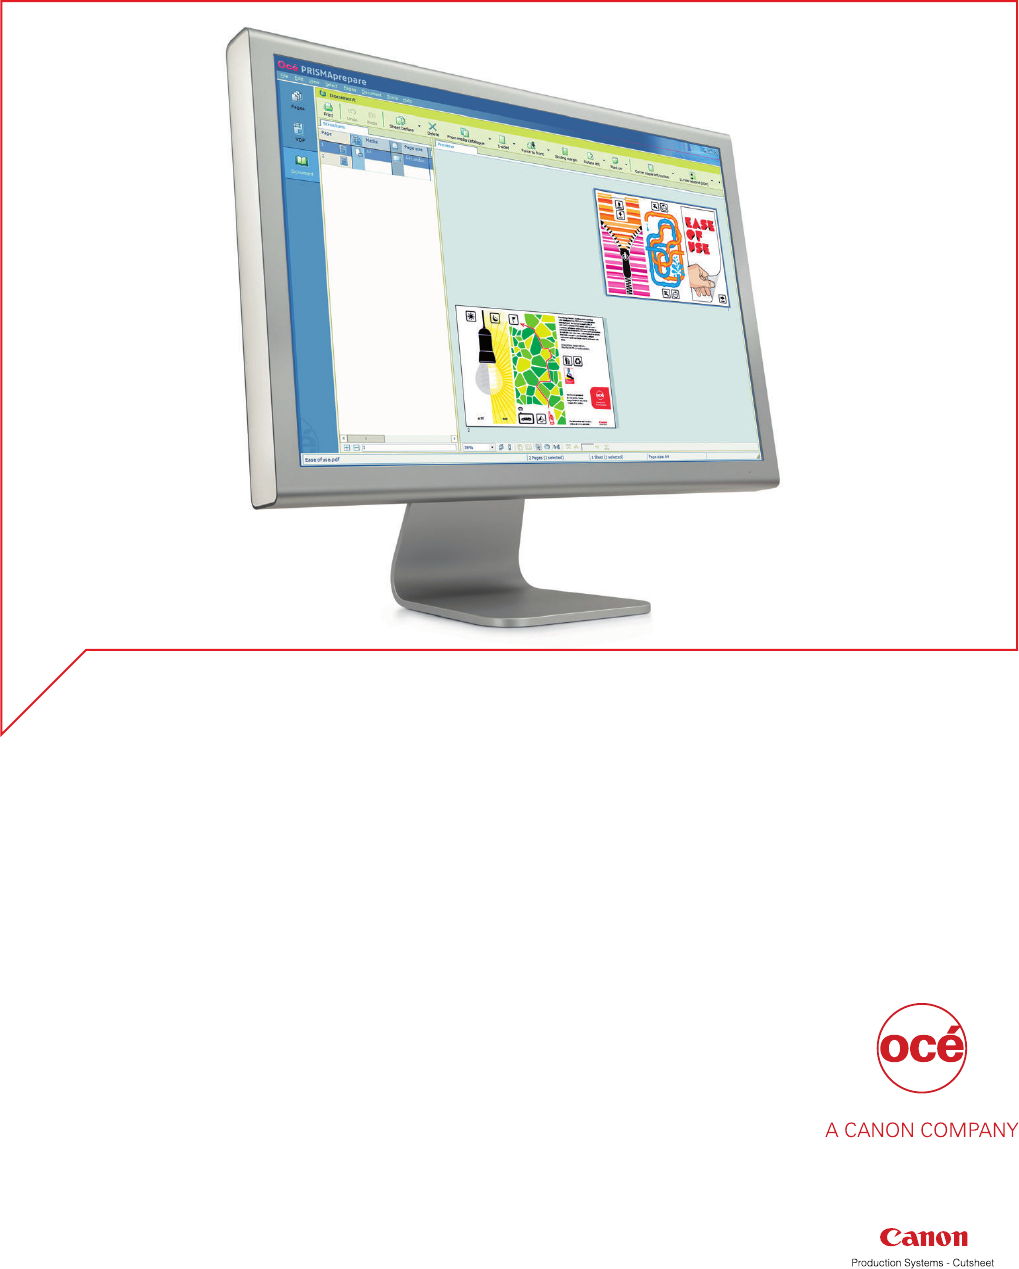
User guide
PRISMAprepare

Copyright
© 2015, Océ
All rights reserved. No part of this work may be reproduced, copied, adapted, or transmitted in
any form or by any means without written permission from Océ.
Océ makes no representation or warranties with respect to the contents hereof and specifically
disclaims any implied warranties of merchantability or fitness for any particular purpose.
Furthermore, Océ reserves the right to revise this publication and to make changes from time to
time in the content hereof without obligation to notify any person of such revision or changes.
Edition 2015-05 US
Trademarks
"Océ" and "PRISMA" are trademarks or registered trademarks of Océ.
Portions copyright © 2012 Enfocus BVBA; all rights reserved.
PostScript® 3™ is a registered trademark of Adobe® Systems Incorporated.
Microsoft®, Windows 7 ®, Windows 8 ®,Windows 8.1 ®, Windows Server 2008®, Windows Server
2012®, Windows Server 2012 R2® are either registered trademarks or trademarks of Microsoft®
Corporation in the United States and/or other countries.
PANTONE® Colors displayed in the software application or in the user documentation may not
match PANTONE-identified standards. Consult current PANTONE Color Publications for accurate
color. PANTONE® and other Pantone trademarks are the property of Pantone LLC. © Pantone
LLC, 2010
Pantone is the copyright owner of color data and/or software which are licensed to Océ for
distribution and use only in combination with PRISMAprepare. PANTONE Color Data and/or
Software may not be copied onto another disk or other form of memory unless done as part of
the execution of PRISMAprepare.
HKS® for HKS Warenzeichenverband e.V. is the copyright owner of color data and/or software
which are licensed to Océ for distribution and use only in combination with PRISMAprepare. HKS
Color Data and/or Software may not be copied onto another disk or other form of memory unless
done as part of the execution of PRISMAprepare.
Copyright © 2001-2009 The International Cooperation for the Integration of Processes in Prepress,
Press and Postpress (CIP4). All rights reserved.
Artifex, the Artifex logo, Ghostscript, and the Ghostscript logo are registered trademarks of
Artifex Software, Inc.
PCL is a trademark of Hewlett Packard Company.
XPS is a trademark of Microsoft.
Portions Copyright © 1998 Soft Horizons.
Portions Copyright © 2001 URW++.
This software is based in part on the work of the Independent JPEG Group.
Portions Copyright © 2005 LuraTech Imaging GmbH.
All rights reserved.
Copyright 2000-2010 Datalogics, Inc.
Copyright 1984-2007 Adobe Systems Incorporated and its licensors. All rights reserved.
Other third party notices provided upon request.
Products in this publication are referred to by their general trade names. In most, if not all cases,
these designations are claimed as trademarks or registered trademarks of their respective
companies.

Contents
Chapter 1
Introduction.......................................................................................................................11
Software version............................................................................................................................................ 12
What's new in software version 6.2..............................................................................................................13
Introduction.....................................................................................................................................................14
Chapter 2
Start using the application.............................................................................................. 15
Open and close a document..........................................................................................................................16
Open a document.....................................................................................................................................16
Close a document.................................................................................................................................... 17
Open a recently used document.............................................................................................................18
Revert to the last saved version of the document.................................................................................19
Supported file formats................................................................................................................................... 20
Save a document............................................................................................................................................22
Save a document..................................................................................................................................... 22
Save a document using a new file name............................................................................................... 23
Close the application......................................................................................................................................24
Undo and redo commands............................................................................................................................25
Undo a command.................................................................................................................................... 25
Redo a command..................................................................................................................................... 26
Start an external application......................................................................................................................... 27
Start an external application................................................................................................................... 27
Define the general options............................................................................................................................ 28
Define the clean document options.............................................................................................................. 30
Define the document options........................................................................................................................ 32
Use Proof PDF.................................................................................................................................................33
Define the Email server options..............................................................................................................33
Define the Proof PDF options..................................................................................................................35
Create a Proof PDF................................................................................................................................... 37
Use the color palette...................................................................................................................................... 39
Add or edit a color................................................................................................................................... 39
Use the clipboard........................................................................................................................................... 41
Export pages to clipboard....................................................................................................................... 41
Import pages from clipboard.................................................................................................................. 42
Shortcut keys.................................................................................................................................................. 43
Icons................................................................................................................................................................ 50
List of concepts...............................................................................................................................................53
Chapter 3
The Pages workspace.......................................................................................................59
Introduction.....................................................................................................................................................60
The toolbar......................................................................................................................................................62
The Structure view......................................................................................................................................... 64
The Preview view........................................................................................................................................... 66
Configure sections..........................................................................................................................................69
Create a section........................................................................................................................................69
Create a subsection..................................................................................................................................70
Replace a section..................................................................................................................................... 71
Contents
5
PRISMAprepare v6.2

Delete a (sub)section............................................................................................................................... 72
Show section levels................................................................................................................................. 73
Repeated selection......................................................................................................................................... 74
Enable repeated selection....................................................................................................................... 74
Change the number of pages in the repeated selection.......................................................................75
Remove repeated selection.....................................................................................................................76
Collect pages...................................................................................................................................................77
Introduction.............................................................................................................................................. 77
Insert pages.............................................................................................................................................. 78
Replace pages.......................................................................................................................................... 80
Delete pages............................................................................................................................................. 81
Move pages.............................................................................................................................................. 82
Move pages........................................................................................................................................82
Drag and drop pages.........................................................................................................................83
Copy and paste pages............................................................................................................................. 84
Import a file from a TWAIN scanner.......................................................................................................85
Clean-up scanned pages................................................................................................................................86
Introduction.............................................................................................................................................. 86
Rasterize a page....................................................................................................................................... 87
Questions and answers.....................................................................................................................87
Rasterize one or more pages via the clean-up button....................................................................88
Rasterize one or more pages via the Rasterize option................................................................... 89
Rotate the scanned page content........................................................................................................... 90
The settings for the Rotate 180° option........................................................................................... 90
Rotate the page content of scanned pages 180 degrees................................................................91
Despeckle the scanned page content..................................................................................................... 92
The settings for option Despeckle....................................................................................................92
Despeckle the scanned page content...............................................................................................94
Deskew the scanned page content......................................................................................................... 95
The settings for option Deskew........................................................................................................95
Deskew the scanned page content...................................................................................................96
Align the scanned page content............................................................................................................. 97
The settings for the Align option......................................................................................................97
Align the scanned page content.......................................................................................................98
Erase parts of the scanned page content...............................................................................................99
The settings for the Erase option..................................................................................................... 99
Erase parts of the scanned page content...................................................................................... 100
Correct pages................................................................................................................................................101
Introduction............................................................................................................................................ 101
Change the page size.............................................................................................................................102
Change the page size...................................................................................................................... 103
Reset your settings..........................................................................................................................104
Shift the page content........................................................................................................................... 105
Shift the page content..................................................................................................................... 105
Reset your settings..........................................................................................................................106
Scale the page content.......................................................................................................................... 107
Scale the page content....................................................................................................................107
Reset your settings..........................................................................................................................108
The PDF boxes........................................................................................................................................109
Trim box........................................................................................................................................... 110
Bleed box..........................................................................................................................................111
Crop box...........................................................................................................................................112
Media box.........................................................................................................................................113
Mask parts of the page content............................................................................................................ 114
Split the page......................................................................................................................................... 115
Rotate a page..........................................................................................................................................116
Page content editing.............................................................................................................................. 117
Copy / paste......................................................................................................................................117
Cut / paste.........................................................................................................................................119
Delete................................................................................................................................................120
Contents
6
PRISMAprepare v6.2

Edit text.............................................................................................................................................121
Shift...................................................................................................................................................122
Mark or unmark a page......................................................................................................................... 123
Marking and unmarking pages.......................................................................................................123
Mark pages as color page...............................................................................................................124
Mark pages as color pages with custom settings.........................................................................125
Unmark a page.................................................................................................................................126
Mark color pages with custom settings............................................................................................... 127
Mark pages as color pages with custom settings.........................................................................127
Reset your settings..........................................................................................................................129
Unmark a page.................................................................................................................................130
Convert to grayscale.............................................................................................................................. 131
Edit the image perception..................................................................................................................... 132
Edit the image..................................................................................................................................132
Edit the color of text and graphics........................................................................................................134
Change the color of an object.........................................................................................................134
Change one color in an area...........................................................................................................136
Change all colors in an area........................................................................................................... 137
Enhance your document..............................................................................................................................138
Apply a template.................................................................................................................................... 138
Apply a template from the template catalog.................................................................................138
Apply a template from the Pick list................................................................................................ 139
Define the document properties........................................................................................................... 140
Chapter 4
The VDP workspace........................................................................................................141
Introduction...................................................................................................................................................142
The toolbar....................................................................................................................................................144
The Structure view....................................................................................................................................... 146
The Preview view......................................................................................................................................... 148
Select a data source..................................................................................................................................... 151
Disconnect a data source.............................................................................................................................152
Import the VDP data..................................................................................................................................... 153
Export the VDP data..................................................................................................................................... 154
Validate the VDP data...................................................................................................................................155
Manage the variable data............................................................................................................................ 156
Set the header row.................................................................................................................................156
Reset the header row...................................................................................................................... 156
Select the variable data......................................................................................................................... 157
Set default formats................................................................................................................................ 158
Manage the frames...................................................................................................................................... 159
Add a text frame.....................................................................................................................................159
Add an image frame.............................................................................................................................. 162
Edit a frame............................................................................................................................................ 165
Copy a frame.......................................................................................................................................... 166
Change the order of the frames............................................................................................................167
Delete frames......................................................................................................................................... 168
Mark or unmark a page................................................................................................................................169
Marking and unmarking pages............................................................................................................. 169
Mark pages as color page..................................................................................................................... 170
Mark pages as VDP pages..................................................................................................................... 171
Unmark a page....................................................................................................................................... 172
Chapter 5
The Document workspace............................................................................................. 173
Introduction...................................................................................................................................................174
The toolbar....................................................................................................................................................176
The Structure view....................................................................................................................................... 178
The Preview view......................................................................................................................................... 180
Contents
7
PRISMAprepare v6.2

Configure sections........................................................................................................................................185
Create a section......................................................................................................................................185
Create a subsection................................................................................................................................186
Replace a section................................................................................................................................... 187
Delete a (sub)section............................................................................................................................. 188
Show section levels............................................................................................................................... 189
Repeated selection....................................................................................................................................... 190
Enable repeated selection..................................................................................................................... 190
Change the number of pages in the repeated selection.....................................................................191
Remove repeated selection...................................................................................................................192
Allocate pages.............................................................................................................................................. 193
Introduction............................................................................................................................................ 193
Insert blank sheets................................................................................................................................. 194
Insert a blank sheet..........................................................................................................................194
Insert multiple blank sheets............................................................................................................195
Insert blank pages.................................................................................................................................. 196
Insert a blank page.......................................................................................................................... 196
Insert multiple blank pages.............................................................................................................197
Insert pages............................................................................................................................................ 198
Replace pages........................................................................................................................................ 200
Delete pages........................................................................................................................................... 201
Move pages............................................................................................................................................ 202
Move pages......................................................................................................................................202
Drag and drop pages.......................................................................................................................203
Copy and paste pages........................................................................................................................... 204
Setting pages to 1-sided or 2-sided......................................................................................................205
Set a page to 1-sided.......................................................................................................................205
Set a page to 2-sided.......................................................................................................................206
Forcing pages to front or back.............................................................................................................. 207
Force a page to the front side of a sheet....................................................................................... 207
Force a page to the back side of a sheet........................................................................................208
Do not force a page to any side of the sheet....................................................................................... 209
Import a file from a TWAIN scanner.....................................................................................................210
Define your document................................................................................................................................. 211
Introduction............................................................................................................................................ 211
Assign media to pages.......................................................................................................................... 212
Assign media using the Pick list.....................................................................................................212
Assign media using the Document media list.............................................................................. 213
Assign media using the Media catalog..........................................................................................214
Define the page size........................................................................................................................ 215
Specify the binding margin...................................................................................................................216
Rotate a page..........................................................................................................................................217
Mark or unmark a page......................................................................................................................... 218
Marking and unmarking pages.......................................................................................................218
Mark pages as color page...............................................................................................................219
Unmark a page.................................................................................................................................220
Convert to grayscale.............................................................................................................................. 221
Define the staple setting........................................................................................................................222
Define the staple settings................................................................................................................222
Change the staple settings..............................................................................................................223
Change the staple settings for output groups...............................................................................224
Define the punch settings......................................................................................................................225
Define the fold settings..........................................................................................................................226
Define the fold settings on sheet level...........................................................................................226
Define the fold settings on document level...................................................................................227
Folded and unfolded view in animations...................................................................................... 228
Settings for the fold types...............................................................................................................229
Constraints..............................................................................................................................................230
Example 1.........................................................................................................................................230
Example 2.........................................................................................................................................231
Contents
8
PRISMAprepare v6.2

Example 3.........................................................................................................................................232
Define the header and footer................................................................................................................ 233
Include or exclude pages from page numbering..........................................................................234
Remove the header and footer............................................................................................................. 236
Set to default.......................................................................................................................................... 237
Enhance your document..............................................................................................................................238
Introduction............................................................................................................................................ 238
Apply a template.................................................................................................................................... 239
Apply a template from the template catalog.................................................................................239
Apply a template from the Pick list................................................................................................ 240
Create and edit the Tab captions.......................................................................................................... 241
Create the tab captions................................................................................................................... 242
Configure the tab captions..............................................................................................................243
Advanced tab captions options...................................................................................................... 244
Import the tab captions................................................................................................................... 245
Export the tab captions................................................................................................................... 246
Create and edit the Bleed tabs.............................................................................................................. 247
Create the Bleed tabs...................................................................................................................... 247
Configure the Bleed tabs.................................................................................................................249
Advanced Bleed tabs options......................................................................................................... 250
Import bleed tab captions............................................................................................................... 251
Export bleed tab captions............................................................................................................... 252
Define the document type..................................................................................................................... 253
Define the document type...............................................................................................................253
Settings for the document types.................................................................................................... 254
Remove the Bleed tabs..........................................................................................................................260
Create and edit the Spine caption........................................................................................................ 261
Apply a stamp........................................................................................................................................ 263
Apply a stamp from the stamp catalog......................................................................................... 263
Apply a stamp from the Pick list.....................................................................................................264
Define the document properties........................................................................................................... 265
Chapter 6
Manage media.................................................................................................................267
Manage the media catalog.......................................................................................................................... 268
Add media to the media catalog...........................................................................................................268
Edit media within the Media catalog....................................................................................................270
Delete media from the Media catalog.................................................................................................. 271
Add media to the Pick list......................................................................................................................272
Export the media catalog.............................................................................................................................273
Export the media catalogue to the printer(s).......................................................................................273
Export the media catalog to an XML file..............................................................................................274
Import the media catalog.............................................................................................................................275
Import the media catalog from the printer(s)...................................................................................... 275
Import the media catalog from an XML file.........................................................................................276
Order new media..........................................................................................................................................277
Chapter 7
Manage the templates................................................................................................... 279
Manage the templates................................................................................................................................. 280
Add a template to the template catalog...............................................................................................280
Rename a template in the template catalog........................................................................................ 282
Delete a template from the template catalog...................................................................................... 283
Add a template to the Pick list.............................................................................................................. 284
Export the templates.................................................................................................................................... 285
Import the templates....................................................................................................................................286
Contents
9
PRISMAprepare v6.2

Chapter 8
Manage stamps...............................................................................................................287
Manage the stamps in the stamp catalog.................................................................................................. 288
Add a stamp to the stamp catalog........................................................................................................288
Copy a stamp in the stamp catalog...................................................................................................... 290
Edit a stamp in the stamp catalog........................................................................................................ 291
Delete a stamp from the stamp catalog............................................................................................... 292
Manage the stamps in the document......................................................................................................... 293
Edit a stamp in the document............................................................................................................... 293
Remove a stamp from the selected page(s)........................................................................................ 294
Copy a stamp from the document to the stamp catalog.................................................................... 295
Export the stamps........................................................................................................................................ 296
Import the stamps........................................................................................................................................ 297
Chapter 9
Preflight documents....................................................................................................... 299
Preflight your document.............................................................................................................................. 300
Fix any found problems............................................................................................................................... 302
Undo the pre-flight of the document.......................................................................................................... 303
Enable automatic preflight.......................................................................................................................... 304
Chapter 10
The Print dialog...............................................................................................................305
Introduction...................................................................................................................................................306
Error avoidance............................................................................................................................................ 307
Define the print settings...............................................................................................................................308
Select a printer....................................................................................................................................... 308
Split and merge......................................................................................................................................309
Print preview window............................................................................................................................310
Optimize the printed document.................................................................................................................. 311
Define the Media settings......................................................................................................................311
Map the media.................................................................................................................................311
Define the Layout settings.....................................................................................................................313
Define the Image settings......................................................................................................................319
Colour settings.................................................................................................................................321
Define the Finishing settings.................................................................................................................326
Define the Delivery settings.................................................................................................................. 328
Define the Accounting settings.............................................................................................................330
Buttons.......................................................................................................................................................... 331
Chapter 11
Configure printer-related settings in the administration console............................. 333
Introduction...................................................................................................................................................334
Configure the printer settings..................................................................................................................... 335
Configure the finishing templates...............................................................................................................336
Configure the punch patterns......................................................................................................................337
Chapter 12
The command line interface.......................................................................................... 339
Index.................................................................................................................................349
Contents
10
PRISMAprepare v6.2
Chapter 1
Introduction

Software version
This documentation describes the functionality of PRISMAprepare v6.2.
Software version
12 Chapter 1 - Introduction
PRISMAprepare v6.2

What's new in software version 6.2
Soft Proof PDF
Precise representation of the finished product to be shared with your customer.
Allows validation of the prepared documents prior to production without the need for hardcopy
proof.
Generic PDF viewers can be used for annotation: remarks and questions.
Content editing
Make last-minute adjustments on Text, Image, and Graphic Objects:
• Fix text (typically typos of few characters).
• Copy and move graphical objects inside the same document.
• Select a bitmap area and copy or move it inside the same document.
Apply color adjustments to selected objects.
Delete selected objects.
PDF boxes
Extended support of PDF boxes, by an advanced visualization and parameterization.
Easy correction and modification of PDF boxes in your customers’ PDF.
Native file support
On opening MS Office/Open Office documents PRISMAprepare converts them to PDF
automatically .
Improved configuration
Discover and configure the printers automatically, including online finishers.
No need to install the printer driver for PDF/JDF printers.
Configure PRISMAprepare much easier and faster, without restarting the running instances of
PRISMAprepare.
Printer images automatic generation
Automatically generate the image associated to the printer, according to its configuration.
Improved licenses update
Possible automatic update of licenses.
Warning on maintenance expiry.
What's new in software version 6.2
Chapter 1 - Introduction 13
PRISMAprepare v6.2

Introduction
This application provides an easy way to prepare and print your document.
The workflow of this application contains the following steps:
•Collect all pages from analog or digital sources, do a Scan clean-up on the scanned pages, and
Correct minor imperfections.
You use the[Pages] workspace for this.
•Allocate pages onto sheets, Define media and binding settings, and Enhance your document.
You use the[Document] workspace for this.
•Route your job to a printer (and finisher) and Optimize the job for that route.
For this, you use the [Print] dialog.
Introduction
14 Chapter 1 - Introduction
PRISMAprepare v6.2
Chapter 2
Start using the application

Open and close a document
Introduction
This application can handle documents with format PDF v1.7 (and older) and Microsoft office
documents (if Microsoft office is installed).
For a complete overview and prerequisites see :
Supported file formats
on page 20
When you open a 'read-only' document a warning message will appear. If you continue, you will
not be able to save the changes that you make in your document.
The 'Open', 'Open recent' and 'Close' options are not available when this application is opened
via another application.
For example, a job management application offers the possibility to add page program settings to
a document. You open this application via the job management application to modify the
document. You can only modify the current document.
Missing fonts
In case of missing fonts in the PDF file, the tab caption, the spine caption or the page numbers, an
error message will appear. The 'Missing fonts' message indicates that required fonts are:
• Not embedded in the PDF document.
• Not installed on your computer.
• Installed on your computer, but the Adobe® Acrobat® setting called 'Local font' is deselected.
When you open the document, the missing fonts will be substituted according to the Adobe®
Acrobat® settings.
Document cannot be opened
If the PDF document cannot be opened due to PDF security restrictions, an error message
appears.
Open a document
Procedure
1. Click [File] - [Open]....
A [Browse] dialog will appear.
2. Browse to the location of the file to open.
See :
Supported file formats
on page 20
3. Select the file and click [Open].
NOTE
If you opened a document that did not contain any settings for the application, the default
settings will be added to the document. A default media size is assigned and any pdf bookmarks
are converted into sections in the document. Thus, even if you did not modify the document, a
message will appear which asks you to save the document including the specific settings for this
application.
Open and close a document
16 Chapter 2 - Start using the application
PRISMAprepare v6.2

Close a document
Procedure
1. Click [File] - [Close].
If you changed the document, you are asked to save the changes.
If you changed the print settings, you can [Save the print settings] for the document.
NOTE
If you opened a document that did not contain any settings for the application, the default
settings will be added to the document. A default media size is assigned and any pdf bookmarks
are converted into sections in the document. Thus, even if you did not modify the document, a
message will appear which asks you to save the document including the specific settings for this
application.
Close a document
Chapter 2 - Start using the application 17
PRISMAprepare v6.2

Open a recently used document
Procedure
1. Click [File] - Open recent.
The documents recently used will appear.
2. Select the document that you want to open.
NOTE
The
Define the general options
on page 28 dialog allows you to specify the number of recently
used documents that are listed. In this dialog you can also clear the list of recent documents with
the [Clear List] button.
Open a recently used document
18 Chapter 2 - Start using the application
PRISMAprepare v6.2

Revert to the last saved version of the document
Introduction
You can discard the changes to a document and return to the last saved version.
The [Revert to last saved] option is not available when this application is opened through another
application.
For example, a job management application offers the possibility to add page program settings to
a document. You open this application via the job management application to modify the
document. You can only modify the current document and save the changes.
When to do
To revert to the last saved version
Procedure
1. Click [File] - [Revert to last saved].
A dialog will appear that allows you to discard the changes.
2. Click [Yes].
The last saved version of the document will be opened.
Revert to the last saved version of the document
Chapter 2 - Start using the application 19
PRISMAprepare v6.2
Supported file formats
Introduction
Besides the PDF file formatPRISMAprepare can open a number of native (non-PDF) file formats.
These files are automatically converted to PDF when the files are opened. You can save a
converted document only as PDF file, not in the original format.
Overview of the file formats supported.
PDF
PDF is the native file format for PRISMAprepare.
PDF
Item Specification
PDF The application can handle documents with format PDF v1.7 and older
Special note for Hot folders
The Hot folders do not support the native file formats described below unless a change has been
made in component services.
This change in component services is described in the Technical Service Manual of
PRISMAprepare.
Microsoft Office
For native file support you need :
• Microsoft Office 2007 SP2 with the add-in “Microsoft Add-in Microsoft Save As PDF”.
• Or any newer versions of Microsoft Office (add-in not required).
NOTE
Microsoft Office > 2010 must be installed to convert the OpenDocument file formats.
When Microsoft Word is installed
Supported extensions Specification
.doc, .docx, .docm Word document
.rtf Rich text format
.txt Text file
.wps Works 6 – 9
.odt OpenDocument text
When Microsoft Excel is installed
Supported extensions Specification
.xls, .xlsx, .xlsm, .xlsb Excel worksheets
.ods OpenDocument spreadsheet
Supported file formats
20 Chapter 2 - Start using the application
PRISMAprepare v6.2

When Microsoft PowerPoint is installed
Supported extensions Specification
.ppt, .pptx, .pptm, .pps
, .ppsx, .ppsm
PowerPoint presentation
.odp OpenDocument presentation
Supported file formats
Chapter 2 - Start using the application 21
PRISMAprepare v6.2

Save a document
Introduction
When you save a document, the current file name will be used.
The 'Save as' command allows you to save your document using a new file name and/or another
folder. The 'Save as' option is not available when this application is opened via another
application. For example, a job management application offers the possibility to add page
program settings to a document. You open this application via the job management application
to modify the document. You can only modify the current document and save the changes.
When you save a variable data document, the reference to the data source file is saved as well.
Save a document
Procedure
1. Click [File] - [Save].
If you changed the print settings, you can [Save the print settings] for the document.
NOTE
If no changes have been made since the last save command, the [Save] command is disabled.
Save a document
22 Chapter 2 - Start using the application
PRISMAprepare v6.2

Save a document using a new file name
Procedure
1. Click [File] - [Save as...].
If you changed the print settings, you can [Save the print settings] for the document.
2. Specify the new file name and/or folder and click [Save].
Save a document using a new file name
Chapter 2 - Start using the application 23
PRISMAprepare v6.2

Close the application
Introduction
Use the 'Exit' command to close the application.
When to do
To close the application
Procedure
1. Click [File] - Exit.
or
2. Click the close button ('X') in the right top-corner.
Close the application
24 Chapter 2 - Start using the application
PRISMAprepare v6.2

Undo and redo commands
Introduction
Every command in this application can be undone or redone until you save the document.
Undo a command
Procedure
1. Click [Edit] - 'Undo'.
The previous command is undone.
2. Repeat step 1 until you have undone the desired commands.
NOTE
You can undo commands since the last moment you have saved the document.
Undo and redo commands
Chapter 2 - Start using the application 25
PRISMAprepare v6.2

Redo a command
Procedure
1. Click [Edit] - 'Redo'.
The previous undone command is redone.
2. Repeat step 1 until you have redone the desired commands.
NOTE
You can redo commands until there are no more commands to redo, or until you save the
document.
Redo a command
26 Chapter 2 - Start using the application
PRISMAprepare v6.2

Start an external application
Introduction
Use the Tools menu to start one of the configured external applications. You can modify the
selected pages in this external application. When you close the external application, you import
the updated pages into your document.
An external application can be configured to accept only 1 PDF page. When you select multiple
pages, the concerning external application is not available to you.
NOTE
The administrator defines which external applications are available in the 'Tools' menu.
Start an external application
Procedure
1. Select the pages that you want to use in the external application.
2. Click Tools and select the required external application.
The selected pages will be exported to the external application.
3. Use the external application to modify the selected pages.
4. Close and save the external application.
5. Click [Import] to import the selected pages into the application.
6. Click [Cancel] to discard the changes that you made in the external application.
Start an external application
Chapter 2 - Start using the application 27
PRISMAprepare v6.2

Define the general options
Introduction
Click [Tools] - [General options] to define general options for the application and the documents.
There are two types of general options available :
• The options for the application are applied when you click button [OK].
• The options for the document are applied when you open a document.
The [General options]
Options for the application are applied when you click [OK].
Setting Description
[Default media system] This setting defines the default media size and the media weight
unit used. You can select the following options:
• [Metric]
Use default media size 'A4' and media weight unit [g/m2].
• [Imperial]
Use default media size 'Letter' and media weight unit [lb bond].
[Recent files] Specify the number of files that appear in the [Open recent] list in
the [File] menu.
[Clear List] Removes the files from the [Open recent] list in the [File] menu.
[Enable overprint preview] The [Enable overprint preview] option simulates overprints in the
application. Use this option to get an estimation of how overprint
behavior appears in the printed document.
NOTE
Option [Enable overprint preview] is overruled by option
[Overprint simulation] in the [Print] dialogue.
[Color spaces] A color space is an intermediate color space used to define and
edit colors in Adobe applications. Each color model has an associ-
ated color space profile. Use this option to choose the default col-
or space profiles.
A color space profile acts as the source profile for newly created
documents that use the associated color model. For example, if
sRGB IEC61966-2.1 is the current RGB color space profile, each
new RGB document that you create will use colors within the
sRGB IEC61966-2.1 gamut. Color spaces also determine the ap-
pearance of colors in documents that do not use a color model.
When you open a document embedded with a color profile that
does not match the color space profile, the application keeps the
embedded profile.
The [Document options]
The options for the document are applied when you open a document.
Define the general options
28 Chapter 2 - Start using the application
PRISMAprepare v6.2

Setting Description
[Assign pick list media for
folded sheets]
Defines the media assignment when the [Document type] is set to
[Booklet].
You can select the following options:
• [To page(s)]
Assigns the media to the selected pages only.
• [To whole sheet(s)]
Assigns the media to the sheets of the selected pages. This
means that the media is also assigned to the pages that are lo-
cated in the other half of the booklet.
[PDF annotations] The option sets the default behavior for [PDF annotations] embed-
ded in PDF files. The application can only handle stamps and
markups.
You can select the following options:
• [Open 'PDF annotations' dialogue to select the default setting.]
If this option is enabled, the [PDF annotations] dialogue opens
when you open a PDF file. You can define how to handle
stamps and markups for the opened PDF file.
• [Display a warning when a file contains sticky notes.]
If this option is enabled, a warning is displayed when sticky
notes are used in the PDF file. The sticky notes are removed
when you save the PDF file in PRISMAprepare. Sticky notes are
not displayed or printed in PRISMAprepare.
Set the measurement settings
The application uses the measurement settings defined by Microsoft Windows.
You can change measurement setting in Windows 7 as follows:
1. Click 'Start' - 'Control Panel' - 'Region and Language'.
2. click the Additional settings...' button.
3. Set 'Measurement System' option to 'Metric' [mm] or 'U.S.' [inch].
NOTE
Standard media sizes always use their own measurement units regardless of the chosen
'Measurement System' value. The size of A4 media is always in [mm], the size of Letter media is
always in [inch].
Define the general options
Chapter 2 - Start using the application 29
PRISMAprepare v6.2

Define the clean document options
Introduction
Click [Tools] - [Clean document options] to define options used for non-page programmed
documents.
The [Clean document options]
Setting Description
[Open 'Save as' dialog for
converted documents]
This option enables the 'Save as' dialog for converted documents
when saved for the first time.
Documents are converted by the application when the original
document is:
• A non-page programmed PDF
• A PDF with an ODW 3.6.x page program
• A Microsoft Office document
Use the 'Save as' functionality to keep the original PDF document.
The 'Save' dialog is offered to the user by default.
[Display a warning when
the PDF boxes are changed
by the application.]
The PDF boxes are checked when you open a non-page program-
med PDF document. Invalid PDF boxes will be corrected.
This option shows a warning if the PDF boxes are corrected by the
application.
[1-sided or 2-sided] Define whether the application opens a non-page programmed
PDF as a 1-sided or 2-sided document.
[Binding edge] The position of the binding edge determines how the pages are
printed on the paper. You can select the following options:
• [Left]
The document will print so that the pages of the produced
document turn over the left side of the paper.
• [Top]
The job will print so that the pages of the produced document
turn over the top side of the paper.
• [Right]
The job will print so that the pages of the produced document
turn over the right side of the paper.
[Use default media] Use a default media for non-page programmed PDFs.
Click [Define default media] to select a default media for non-page
programmed PDFs.
[Convert PowerPoint to
PDF options]
The default options used when you import PowerPoint files.
[Full page slides] Import all slides as separate pages. The layout and page options
as defined in PowerPoint are used.
[Handouts] Combine one or more slides on one page.
Define the number of slides per page. You can also define the or-
der of the slides. 4
Define the clean document options
30 Chapter 2 - Start using the application
PRISMAprepare v6.2

Setting Description
[Notes pages] Put one slide and its notes per page.
You can use the [Page orientation] option in combination with this
option.
[Page orientation] Define which page orientation to use.
Options are [As in document], [Portrait] and [Landscape].
[Frame slides] Select this option to put a thin line around the slides.
[Open 'Convert PowerPoint
to PDF options' dialog]
This option allows you to enter the conversion settings when you
open a PowerPoint file.
When you make no selection, the default options are used.
Define the clean document options
Chapter 2 - Start using the application 31
PRISMAprepare v6.2

Define the document options
Introduction
Click 'Document' - [Document options...] to define a number of options for the currently opened
document. These options overrule any general settings, for example the [PDF annotations] option
as defined in
Define the general options
on page 28.
Define the document options
Setting Description
[PDF annota-
tions]
This setting defines which PDF annotations should be used in the document.
The options are:
• [None]
No PDF annotations are used.
• [Show and print stamps]
Show and print PDF annotation stamps.
• [Show and print stamps and markups]
Show and print PDF annotation stamps and markups.
• [Show stamps]
Only show PDF annotation stamps.
• [Show stamps and markups]
Only show PDF annotation stamps and markups.
[Add page pro-
gram content to
ghost page(s)]
This option defines if page programming should also be applied to ghost
pages.
[Include the
ghost page(s) for
page numbering]
• When you enable this option:
The document pages and the ghost pages receive page numbers. The
ghost pages become part of the document.
• When you disable this option:
The document pages receive page numbers. The ghost pages are ignor-
ed.
Define the document options
32 Chapter 2 - Start using the application
PRISMAprepare v6.2

Use [Proof PDF]
Introduction
A document prepared with PRISMAprepare can be proofed before production.
A PDF of the prepared document is generated, showing realistic pictures of the product, with all
the finishing artifacts (punched holes, staples, tabs …) and containing page media information.
This generated PDF file is called a [Proof PDF].
A proof PDF is used to show a customer the final layout of the product before final production.
Banner note contents
The banner note of the Proof PDF summarizes document metadata and statistics:
• The page programmed document (file) name
• The document properties as defined in PRISMAprepare, if specified.
(title, owner, account, address, banner message, special instructions, document creation date)
• The creation date of the Proof PDF.
• The number of pages in the Proof PDF.
• The number of sets
• The number of VDP instances
• The Proof PDF note (as specified in the Proof PDF options)
Before you can use [Proof PDF] some setting are needed
Use [Tools] - [Proof PDF] to define the options used for Proof PDF.
To use Proof PDF in PRISMAprepare you need to define the following settings.
•
Define the Email server options
on page 33.
This enables you to send Proof PDF files to a customer directly.
•
Define the Proof PDF options
on page 35
The default settings used for the generation of Proof PDFs.
Define the Email server options
Introduction
Click [Tools] - [Proof PDF] - [Email server...] to define Email server options.
The Email server options
[Email server type]
Setting Description
[Microsoft Outlook] Select this to use the Microsoft Outlook account to send Proof PDF
files.
This is the default.
[SMTP server] Select this to use a SMTP server account to send Proof PDF files.
You need to also fill in the [SMTP server configuration].
[SMTP server configuration]
Use [Proof PDF]
Chapter 2 - Start using the application 33
PRISMAprepare v6.2

Setting Description
[Server name] Enter the DNS name or IP address of the SMTP server.
[Port number] Enter the port number for the connection to the SMTP server.
[From] Enter the user name of the account on the SMTP server.
[Password] Enter the password of the account on the SMTP server.
Define the Email server options
34 Chapter 2 - Start using the application
PRISMAprepare v6.2

Define the Proof PDF options
Introduction
Click [Tools] - [Proof PDF] - [Proof PDF options...] to define Proof PDF options.
All of these settings are defaults and can be changed during the creation of a Proof PDF.
The [Proof PDF] options
[File settings]
Setting Description
[Background image] You can select a background image to be used on all the pages of
the proof PDF.
You can select a background:
• From a list of predefined images installed with PRISMAprepare.
• From an image of your own on your system.
Use the [New...] button to import your own picture in PRISMAp-
repare.
Preview the background image by clicking on the magnifier button
next to the image name.
Once used your image will stay in the presented list.
[Measurement system] The measurement system is used for the proof PDF information
inserted in the Proof PDF file.
The available options are
• [Metric]
• [Imperial]
The default value is [Metric].
[Image resolution] Set the image resolution:
All the images in the document (except the background image)
will be generated with the specified resolution in the proof PDF
document.
The available options are
• 72 pi
• 300 dpi
The default value is 72 dpi.
[Language] The language is used for the soft proof information inserted in the
soft proof file. The operator may choose any of the 18 supported
languages.
The default value is the operating system language. 4
Define the Proof PDF options
Chapter 2 - Start using the application 35
PRISMAprepare v6.2
Setting Description
Proof PDF filename Set a template for the default name of the generated Proof PDF.
You can compose it from free text and/or predefined tags inserted
using buttons :
• + [Filename]
The name of the source file.
• + [Date...]
The date in a number of different styles.
• + [Time...]
The time in a number of different styles.
• + [Version]
An auto increment proof file generation counter.
The Proof PDF filename shows a sample of the generated Proof
PDF filename after applying the template.
[Email settings]
Setting Description
[Subject] Set the default subject for the Email of the Proof PDF.
[Message] Set the default message that is in the Email of the Proof PDF.
Define the Proof PDF options
36 Chapter 2 - Start using the application
PRISMAprepare v6.2

Create a [Proof PDF]
The steps required to create a Proof PDF:
1. Open the file you want to create a Proof PDF file from.
2. Do all page programming required.
3. Start the print Dialog.
4. Click the [Proof PDF] button at the bottom.
5. Set the required options for this Proof PDF.
See the table below for the available options.
6. You determine how the Proof PDF is handled by the button at the bottom.
In the drop down list you can select these options:
• [Save]
Saves the proof PDF to the desired folder.
• [Save & send]
Saves the proof PDF to the desired folder and sends the Proof PDF to a customer via Email.
The save the [Proof PDF] options
[File settings]
Setting Description
[Filename] The Proof PDF filename generated using the template from "De-
fine the Proof PDF options".
Use the [ ...] button to change the proof PDF version number.
NOTE
The button is only available when the Filename template
contains a version tag.
[Folder] The folder used to store the Proof PDF.
By default this is the folder where the source file is located.
Use the [Browse...] button to select another folder if required.
[View the file] Use this option to automatically open the Proof PDF after it is gen-
erated.
The file is opened with your default PDF viewer.
[Background image] You can select a background image to be used on all the pages of
the proof PDF.
You can select a background:
• From a list of predefined images installed with PRISMAprepare.
• From an image of your own on your system.
Use the [New...]button to import your own picture in PRISMAp-
repare.
Preview the background image by clicking on the magnifier button
next to the image name.
Once used your image will stay in the presented list.
[Measurement system] The measurement system is used for the proof PDF information
inserted in the Proof PDF file.
The available options are :
• [Metric]
• [Imperial]
The default value is [Metric]. 4
Create a [Proof PDF]
Chapter 2 - Start using the application 37
PRISMAprepare v6.2

Setting Description
[Image resolution] Set the image resolution:
All the images in the document (except the background image)
will be generated with the specified resolution in the proof PDF
document.
The available options are
• 72 pi
• 300 dpi
The default value is 72 dpi.
[Language] The language is used for the proof PDF information inserted in the
proof PDF file. The operator can choose any of the 18 supported
languages.
The default value is the operating system language.
Create a [Proof PDF]
38 Chapter 2 - Start using the application
PRISMAprepare v6.2

Use the color palette
Introduction
The color palette offers users the possibility to store and manage colors within the application.
The palette can contain colors from the [RGB], [CMYK] and [Grayscale][Color space]. It is not a
complete library, but a means to quickly access the most-used colors and the colors from the
document. The user can add, copy, edit and delete colors from the palette. Pantone Spot Colors
libraries are automatically installed.
The available colors in the [Color palette] are shown in two tabs:
1. [My palette]
These colors are defined by the user.
2. [Document palette]
These colors are used in the current document for text and graphics. Colors of images are not
available. Tab [Document palette] is only available when the color palette is opened via the
[Edit colors] dialog.
The [Color palette] is available in the [Pages] workspace via:
• The button bar: click the button [Color palette].
• The menu: click 'Tools' - [Color palette...].
• Open the [Edit colors] dialog and click the [Color palette...] button.
Add or edit a color
Procedure
1. Click: 'Tools' - [Color palette...]
The [Color palette] dialog box appears.
2. Click the [New] button to add a new color to the color palette. The [New color] dialog box
appears.
Or select a color and click button [Edit] to edit a color. The [Change color] dialog box appears.
3. Create or edit the color. You can define the color manually or you can use the color picker.
Click the icon of the color picker to activate or deactivate the color picker. You can pick the color
of text and of graphical objects. The [Color space] of the selected object is used. The color picker
cannot retrieve the exact colors of an unsupported [Color space].
Setting Description
[Name] Define a name for the color.
[Color space] The [Color space] value can be:
• [CMYK]
Define the [CMYK] values for the color.
• [RGB]
Define the [RGB] values for the color.
• [Spot color]
You can define a custom [Spot color]. See the table below.
• [Grayscale]
Define the [Brightness]. With this setting, you can make the im-
age lighter or darker.
.
You can define a custom [Spot color].
Use the color palette
Chapter 2 - Start using the application 39
PRISMAprepare v6.2

Setting Description
[Name] Define a name for the color.
[Color space] Select the [Spot color] value.
[Spot color name] Define a name for the spot color.
The default name of the spot color is used when you select a spot
color from the [Spot color library].
NOTE
Do not use ‘All’ or ‘None’ as the [Spot color name]. ‘All’
and ‘None’ are reserved names. The print results be-
come unpredictable when you use these reserved
names.
[Tint] You can create a tint or lighter percentage of a spot color.
Default or custom spot col-
or
You can use a default spot color, or you can create a custom spot
color.
• From [Spot color library...]
Select this option if you want to use a default spot color.
Click the [Spot color library...] button to open the [Spot color li-
brary]. Select a library from the drop-down list. Select the spot
color from the list of colors. You can type - part of - a spot color
name in the [Name] field and click the [Filter] button. A subset
of the available spot colors is displayed. Click [OK] after you
have selected a spot color.
The name of the default spot color is automatically used for the
[Spot color name] option. It is recommended that you change
the [Spot color name] if you can change the [Tint] of the spot
color.
The [Custom spot color] option is disabled when you select this
option.
• [Custom spot color]
Use the [Input mode] to define the [Color space] of the custom
spot color. You can define the color manually or you can use
the color picker. You can change the [Tint] of the custom spot
color.
Add or edit a color
40 Chapter 2 - Start using the application
PRISMAprepare v6.2

Use the clipboard
Export pages to clipboard
Introduction
You can open PRISMAprepare multiple times in the same Microsoft Windows session. You can
use pages between instances of PRISMAprepare via the clipboard.
1. Export the selected pages to the clipboard of Microsoft Windows.
2. Import the pages into a document that is opened in another instance of PRISMAprepare. The
imported pages receive the page programmed settings of the selected pages in the
document. For example: the [Document type], page size, [Bleed tabs], [VDP frames], et cetera.
This option is available via:
• The menu: click [Pages] - [Export pages to clipboard].
• The context menu: right-click the selected page(s) and select option [Export pages to
clipboard].
Procedure
1. Select the pages that you want to use in another instance of PRISMAprepare.
2. Click [Pages] - [Export pages to clipboard].
The selected pages are exported to the Microsoft Windows clipboard.
Use the clipboard
Chapter 2 - Start using the application 41
PRISMAprepare v6.2

Import pages from clipboard
Introduction
You can open PRISMAprepare multiple times in the same Microsoft Windows session. You can
use pages between instances of PRISMAprepare via the clipboard.
1. Export the selected pages to the Microsoft Windows clipboard.
2. Import the pages into a document that is opened in another instance of PRISMAprepare. The
imported pages receive the page programmed settings of the selected pages in the
document. For example: the [Document type], page size, [Bleed tabs], [VDP frames], et cetera.
This option is available via:
• The menu: click [Pages] - [Import pages from clipboard].
• The context menu: right-click the selected page(s) and select option [Import pages from
clipboard].
Procedure
1. Select one or more pages in the document.
2. Click [Pages] - [Import pages from clipboard].
The [Import pages from clipboard] dialog opens.
3. Define the [Position] of the pages:
• [Before selection]
Insert the pages from the clipboard before the selected pages in the document. The inserted
pages receive the page programmed settings of the first selected page in the document.
• [After selection]
Insert the pages from the clipboard after the selected pages in the document. The inserted
pages receive the page programmed settings of the last selected page in the document.
• [Replace selection]
Replace the selected pages in the document with the pages from the clipboard. Each inserted
pages receives the page programmed settings of the corresponding selected page in the
document.
4. The pages from the clipboard can contain [VDP frames].
• [No frames]
The [VDP frames] are removed when you import the pages.
• [Keep frames of selected pages]
The [VDP frames] of the imported pages are kept. You must select a data source file to add the
variable data to the frames.
5. Click [OK].
Import pages from clipboard
42 Chapter 2 - Start using the application
PRISMAprepare v6.2

Shortcut keys
Introduction
This application supports keyboard shortcut keys.
General shortcut keys
General shortcut keys
Function Key(s) Precondition
Close the active window ALT + F4 Focus on application
Display the application help F1 Focus on application
Activate the selection tool ESC Focus on [Preview] view
Reset the cut pages ESC Focus on [Structure] view
Undo the last action. CTRL + Z Focus on application
Redo the last action CTRL + Y Focus on application
Cut CTRL + X Focus on application
Paste CTRL + V Focus on application
Open the Print dialog CTRL + P Focus on application
Open the Open dialog CTRL + O Focus on application
Select all CTRL + A Focus on application
Save CTRL + S Focus on application
Save as CTRL + SHIFT + S Focus on application
Delete the selected item DELETE Focus on application
Select the page with focus SPACEBAR Focus on [Preview] view / [Structure]
view
Add/remove the current page to/from
selection
CTRL + SPACE-
BAR
Focus on [Structure] view
Zoom in CTRL + + Focus on [Preview] view / [Structure]
view
Zoom out CTRL + - Focus on [Preview] view / [Structure]
view
Fit the page to the window CTRL + 0 Focus on [Preview] view / [Structure]
view
Zoom 100% CTRL + 1 Focus on [Preview] view / [Structure]
view
Zoom 200% CTRL + 2 Focus on [Preview] view / [Structure]
view
Activate the zoom out tool CTRL + W Focus on [Preview] view
Activate the zoom in tool CTRL + Q Focus on [Preview] view
Activate the selection tool CTRL + E Focus on [Preview] view 4
Shortcut keys
Chapter 2 - Start using the application 43
PRISMAprepare v6.2

Function Key(s) Precondition
Activate the drag tool CTRL + H Focus on [Preview] view
Activate the rectangle selection tool CTRL + R Focus on [Preview] view
Activate the area selection tool CTRL + T Focus on [Preview] view
Activate zoom out tool (temporary) SHIFT + W (hold) Focus on [Preview] view
Activate the zoom in tool (temporary) SHIFT + Q (hold) Focus on [Preview] view
Activate the drag tool (temporary) SHIFT + H (hold) Focus on [Preview] view
Select the inverse of a rectangle SHIFT (hold) +
draw an area
with the rectan-
gle selection tool
Focus on [Preview] view
Select the inverse of a selected area SHIFT (hold) + se-
lect an area be-
tween guidelines
Focus on [Preview] view
Show/hide columns CTRL + G Focus on [Preview] view
Show/hide contents outside of the
page
CTRL + J Focus on [Preview] view
Invert a selected area CTRL + I Focus on [Preview] view
Navigation in main menu and context menus
Every menu item is accessible with access keys. Access keys are keys used in combination with
the ALT key to activate a control. Access keys appear as underlined letters on a menu.
Navigation in main menu and context menus
Function Key(s) Precondition
Activate the menu bar and enter the
menu mode
ALT Focus on application
Activate the menu bar and enter the
menu mode
F10 Focus on application
Execute the corresponding com-
mand
ALT + access key Focus on application
Display the context menu for the se-
lected item
Context menu
button
Focus on [Preview] view / [Structure]
view
Display the context menu for the se-
lected item
SHIFT + F10 Focus on [Preview] view / [Structure]
view
Open the menu item, move to the
item below, or move to the top of the
menu if the focus is located in the
bottom of the menu.
DOWN ARROW Focus on menu
Move to the menu item above, or
move to the bottom of the menu if
the focus is located at the top of the
menu.
UP ARROW Focus on menu
4
Shortcut keys
44 Chapter 2 - Start using the application
PRISMAprepare v6.2
Function Key(s) Precondition
Open the next menu to the right, or
open a submenu
RIGHT ARROW Focus on menu
Open the next menu to the left, or
close a submenu.
LEFT ARROW Focus on menu
Execute the selected command ENTER Focus on menu
Navigation in main window
Navigation in main window
Function Key(s) Precondition
Move the focus forward through the
controls inside the view
TAB Focus on main window
Move the focus backward through
the controls inside the view
SHIFT + TAB Focus on main window
Move the focus to the next view CTRL + TAB Focus on main window
Move the focus to the next view F6 Focus on main window
Move the focus to the previous view CTRL + SHIFT +
TAB
Focus on main window
Move the focus to the previous view SHIFT + F6 Focus on main window
Navigation in secondary windows
The [OK] and [Cancel] buttons have no access keys. They are operated with the ENTER and ESC
keys.
Navigation in secondary windows
Function Key(s) Precondition
Move the focus forward through the
controls
TAB Focus on secondary window
Move the focus backwards through
the controls
SHIFT + TAB Focus on secondary window
Move focus to the next tab CTRL + TAB Focus on secondary window
Move focus to the next tab CTRL + SHIFT +
TAB
Focus on secondary window
Select the corresponding command ALT + access key Focus on secondary window
Move the focus or selection in a
group of controls or items
ARROW keys Focus on secondary window
Cancel ESC Focus on secondary window
OK ENTER Focus on secondary window
Execute the control with the focus SPACEBAR Focus on secondary window
Shortcut keys
Chapter 2 - Start using the application 45
PRISMAprepare v6.2

Keyboard selection in lists and list boxes
It is possible to select multiple items in a list with the keyboard. Besides focus, an anchor is used.
The item that has the focus also has the anchor.
Keyboard selection in lists and list boxes
Function Key(s) Precondition
Select previous item. Deselect all
other items
UP ARROW Focus on list
Select next item. Deselect all other
items
DOWN ARROW Focus on list
Move to previous item. Keep the se-
lection of all other items.
CTRL + UP AR-
ROW
Focus on list
Move to next item. Keep the selec-
tion of all other items.
CTRL + DOWN
ARROW
Focus on list
Select all items from the anchor to
the previous item(s). Deselect all oth-
er items
SHIFT + UP AR-
ROW
Focus on list
Select all items from the anchor to
the next item(s). Deselect all other
items
SHIFT + DOWN
ARROW
Focus on list
Select the item with focus. Deselect
all other items.
SPACEBAR Focus on list
Toggle the selection state of an item
with focus.
CTRL + SPACE-
BAR
Focus on list
Select all items from the anchor to
the focus. Deselect all other items
SHIFT + SPACE-
BAR
Focus on list
Select the first item of the list. Dese-
lect all other items
HOME Focus on list
Select the last item of the list. Dese-
lect all other items
END Focus on list
Move to the fist item of the list. Keep
the selection of all other items.
CTRL + HOME Focus on list
Move to the last item of the list. Keep
the selection of all other items.
CTRL + END Focus on list
Select all items from the anchor to
the first item of the list. Deselect all
other items
SHIFT + HOME Focus on list
Select all items from the anchor to
the last item of the list. Deselect all
other items
SHIFT + END Focus on list
Select the item with the same first
letter/number
Any printable key Focus on list
Shortcut keys
46 Chapter 2 - Start using the application
PRISMAprepare v6.2
Edit boxes
Edit boxes
Function Key(s) Precondition
Move the cursor to the beginning of
the line
HOME Focus on edit box
Move the cursor to the end of the
line
END Focus on edit box
Move the cursor to the beginning of
the previous word
CTRL + LEFT AR-
ROW
Focus on edit box
Move the cursor to the beginning of
the next word
CTRL + RIGHT
ARROW
Focus on edit box
Move the cursor to the beginning of
the previous line
CTRL + UP AR-
ROW
Focus on edit box
Move the cursor to the beginning of
the next line
CTRL + DOWN
ARROW
Focus on edit box
Move the cursor to the beginning of
the text
CTRL + HOME Focus on edit box
Move the cursor to the end of the
text
CTRL + END Focus on edit box
Select or extend the selection SHIFT + cursor
movement (AR-
ROW, HOME,
END)
Focus on edit box
Select or extend the selection with
complete words
SHIFT + CTRL +
cursor movement
(ARROW, HOME,
END)
Focus on edit box
Drop-down boxes
Drop-down boxes
Function Key(s) Precondition
Select the current item ENTER Focus on drop-down box
Move the selection to the previous
item
LEFT ARROW Focus on drop-down box
Move the selection to the previous
item
UP ARROW Focus on drop-down box
Move the selection to the next item RIGHT ARROW Focus on drop-down box
Move the selection to the next item DOWN ARROW Focus on drop-down box
Display or hide the list F4 Focus on drop-down box
Display the list ALT + DOWN AR-
ROW
Focus on drop-down box
Hide the list ALT + UPPER AR-
ROW
Focus on drop-down box
4
Shortcut keys
Chapter 2 - Start using the application 47
PRISMAprepare v6.2
Function Key(s) Precondition
Move the selection to the next item
with the same first letter/number
Any printable key Focus on drop-down box
Check box
Check box
Function Key(s) Precondition
Toggle the check box SPACEBAR Focus on check box
Set the value to true + Focus on check box
Set the value to false - Focus on check box
Radio buttons
Radio buttons
Function Key(s) Precondition
Select the previous value LEFT ARROW Focus on radio button group
Select the previous value UP ARROW Focus on radio button group
Select the next value RIGHT ARROW Focus on radio button group
Select the next value DOWN ARROW Focus on radio button group
Select the value with focus SPACEBAR Focus on radio button group
Slider
Slider
Function Key(s) Precondition
Set the slider to the previous value LEFT ARROW Focus on slider
Set the slider to the previous value UP ARROW Focus on slider
Set the slider to the next value RIGHT ARROW Focus on slider
Set the slider to the next value DOWN ARROW Focus on slider
Date/time
Date/time
Function Key(s) Precondition
Display the calendar F4 Focus on date/time
Display the calendar ALT + DOWN AR-
ROW
Focus on date/time
Hide the calendar ALT + UP AR-
ROW
Focus on date/time
Move to the previous month in the
calendar
PAGE UP Focus on date/time
Move to the next month in the calen-
dar
PAGE DOWN Focus on date/time
4
Shortcut keys
48 Chapter 2 - Start using the application
PRISMAprepare v6.2

Function Key(s) Precondition
Move to the previous year in the cal-
endar
CTRL + PAGE UP Focus on date/time
Move to the next year in the calendar CTRL + PAGE
DOWN
Focus on date/time
Move up/right/down/left in the calen-
dar
ARROW keys Focus on date/time
Shortcut keys
Chapter 2 - Start using the application 49
PRISMAprepare v6.2
Icons
Introduction
The [Structure] view uses the following icons to display the sheets and to give feedback about the
page settings.
Icons
Icons
Icons Description
Page column
The page icon refers to a single page.
This icon appears when you move a page.
This icon refers to a disabled page.
It appears when a page cannot be selected.
If the page is a scanned page, this icon is displayed on top of the page icon.
NOTE
This icon is only visible in the [Pages] workspace.
This icon is displayed on top of the page icon if the page is currently selec-
ted in the [Preview] view.
NOTE
This icon is only visible in the [Pages] workspace.
This icon is displayed on top of the page icon if the page is marked in the
[Preview] view.
The icon refers to a blank page.
This icon appears when you move a blank page.
This icon refers to a disabled blank page.
It appears if a blank page cannot be selected.
The icon refers to a group of pages.
This icon appears when you move a group of pages.
4
Icons
50 Chapter 2 - Start using the application
PRISMAprepare v6.2
Icons Description
This icon refers to a group of pages.
It appears when a group of pages consists completely of pages that cannot
be selected.
With these icons, you can expand or collapse a group of pages.
Page size column
This icon refers to portrait pages of A4-like size.
This icon refers to landscape pages of A4-like size.
This icon refers to portrait pages of A3-like size.
This icon refers to landscape pages of A3-like size.
These icons refer to pages with fold settings.
Media column
This icon refers to portrait pages of A4-like size.
This icon refers to landscape pages of A3-like size.
This icon refers to punched media.
This icon refers to Tab media.
This icons refers to inserts of A4-like size.
This icon refers to inserts of A3-like size.
4
Icons
Chapter 2 - Start using the application 51
PRISMAprepare v6.2
Icons Description
Section column
This icon refers to a section.
This icon refers to one or more collapsed sections.
Output group column
This icon appears when the finishing setting for this page is set to one sta-
ple.
This icon appears when the finishing setting for this page is set to two or
more staples.
This icon appears when the finishing setting for this page is set to [Other
binding].
Hole punch column
This icon appears when a page contains hole punch settings.
Icons
52 Chapter 2 - Start using the application
PRISMAprepare v6.2

List of concepts
Blank page
A blank page is an empty page created by the user and inserted in the PDF file. A blank page has
no content but can have tab caption, [Bleed tabs], stamps and header and footer.
Blank sheet
A blank sheet is a sheet for which each sheet side contains a blank page.
[Booklet]
In a [Booklet] there are multiple sheets folded in 4 panels with one fold in the centre. Each panel
is a separate PDF page. The sheets are folded inside each other.
This application puts the pages correctly on the sheets. For example, the pages 1 and 8 are
printed on one side of the sheet. The pages 2 and 7 are printed on the other side of the sheet.
[Booklet] is applied to all pages in the document.
Ghost page
This is an automatically created empty sheet side that can appear and disappear, depending on
the page allocation.
You cannot select a ghost page because you cannot perform any operation on it.
[Signature book]
In a [Signature book] there are multiple sheets folded in 4 or 8 panels with 2 or 4 folds. Each
panel is a separate PDF page. The sheets are folded inside each other.
• [Octavo signature book]: eight pages are imposed on the front and on the back of the sheets in
a way that, when each sheet sheets are folded twice, a booklet is generated. The cover media
wraps the folded pages (size is typically 2 x book block + spine). It can be composed by
imposing several pages on the cover sheet or using one pre-composed cover page.
• [Quarto signature book]: four pages are imposed on the front and on the back of the sheets in a
way that, when each sheet is folded twice, a booklet is generated. The cover media wraps the
folded pages (size is typically 2 x book block + spine). It can be composed by imposing several
pages on the cover sheet or using one pre-composed cover page.
[Signature book] is applied to all pages in the document.
List of concepts
Chapter 2 - Start using the application 53
PRISMAprepare v6.2
[Multi-booklet]
[Multi-booklet] (aka Quire, aka Kattern).
Two pages are imposed on the front and on the back of the sheets in a way that, when the sheets
are folded in half in groups (i.e. 3 sheets at a time), a booklet is generated. The cover media
wraps the folded pages (size is typically 2 x book block + spine). It can be composed by imposing
several pages on the cover sheet or using one pre-composed cover page.
Color
Setting Description
[Saturation] Saturation is the hue of a color relative to its own brightness. The
hue is the difference between a color and a gray background.
With this setting, you can add more or less color to the image.
[Brightness] Brightness is determined by the amount of light that is reflected
by a color.
With this setting, you can make the image lighter or darker.
[Grayscale] Grayscale images are also known as black-and-white images.
Such images are composed exclusively of shades of gray, varying
from black at the lowest intensity to white at the highest.
[RGB] The RGB color model is an additive color model in which red,
green, and blue are added together in various ways to reproduce a
broad array of colors.
[CMYK] The CMYK color model is a subtractive color model in which cyan,
magenta, yellow and key black are used in various ways to repro-
duce a broad array of colors.
[Color preset]
A color pre-set is a collection of color and quality settings that matches a specific document type,
workflow or color application. A color pre-set is defined at the printer controller and available at
the printer driver. Use the settings editor of the printer controller to create new color pre-sets.
Use this setting to print with an optimal print quality.
[Gatefold]
In a [Gatefold] there is one sheet folded in 8 panels. The left and right edges fold inward with
parallel folds and meet in the middle of the sheet without overlapping. The sheet is then folded
again along a fold in the middle of the sheet. Each side of a sheet is a PDF page.
List of concepts
54 Chapter 2 - Start using the application
PRISMAprepare v6.2
To allow the panels to nest inside each other properly, the outer panels are usually slightly
smaller than the inner panels. The outer panels fold in to the middle and cover the inner panels.
A variation is the [Simple gatefold]. One sheet folded in 8 panels. The left and right edges fold
inward with parallel folds and meet in the middle of the sheet without overlapping. Each side of a
sheet is a PDF page.
[Gatefold] and [Simple gatefold] are applied to all pages in the document.
Half Fold
In a [Half-fold] there is one sheet folded in 4 panels. The sheet is folded along a fold at the centre,
parallel to the short-edge of the page. Each side of a sheet is a PDF page.
A variation is the [Long Fold], where the fold is parallel to the long-edge of the page.
A variation is the [Multi half-fold]. Multiple sheets are folded in 4 panels along a fold at the centre.
Each side of a sheet is a PDF page. The sheets are folded inside each other.
[Half-fold], [Long Fold] and [Multi half-fold] are applied to all pages in the document.
Normal
The document consists of separate sheets. You can add finishing on a sheet level.
Page
This application presents the pages of a document to you. You can apply page program settings
to the pages of your document.
List of concepts
Chapter 2 - Start using the application 55
PRISMAprepare v6.2
Page programmed
A document is considered to be page programmed when it is opened and saved in
PRISMAprepare.
Panel
A panel is an area on a sheet which is delimited by:
• - The edge of the sheet and a fold line.
• - Two fold lines.
[Parallel fold]
In a [Parallel fold] there is one sheet folded in 8 panels. The sheet is folded in half and then folded
in half again with a fold parallel to the first fold. Each side of a sheet is a PDF page.
To allow the panels to nest inside each other properly, the two inside folded panels are slightly
smaller than the two outer panels.
[Parallel fold] is applied to all pages in the document.
[Perfect Binding]
[Perfect Binding] is a form of adhesive binding and gives a result similar to paperback books.
The document sheets are aligned to form a perfect stack. The sheets are then glued together at
the spine and a cover is glued to the sheets.
[Perfect Binding] is applied to all pages in the document.
Sheet
One sheet contains one or more pages.
You map the pages of your document to physical sheets.
For example, one A3 sheet can contains four A4 pages.
List of concepts
56 Chapter 2 - Start using the application
PRISMAprepare v6.2
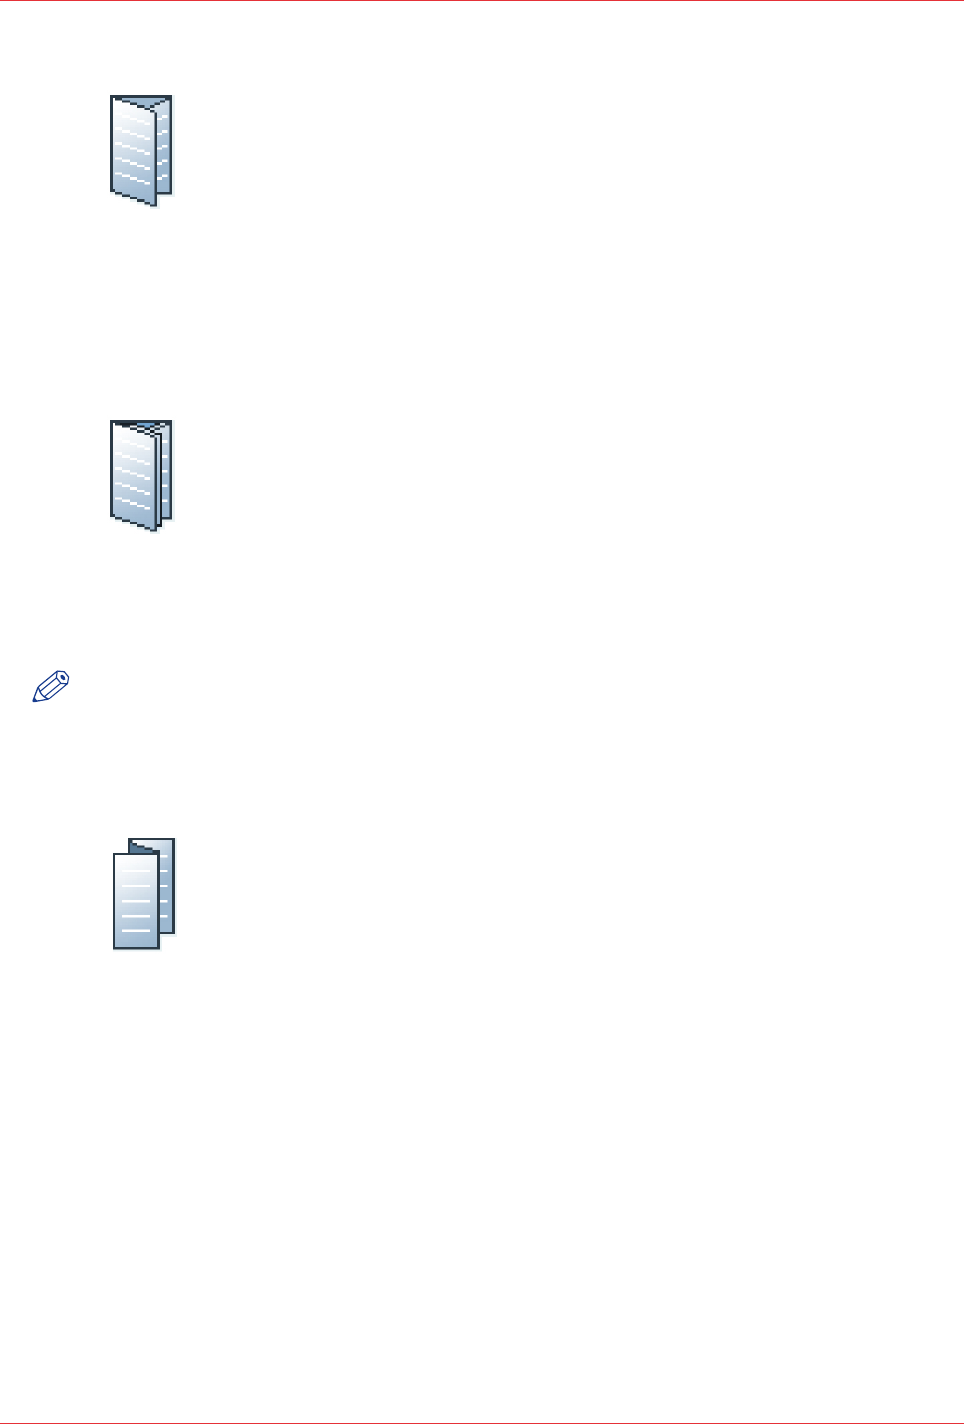
[Tri-fold in]
In a [Tri-fold in] there is one sheet folded in 6 panels with two parallel folds. Each side of a sheet
is a PDF page.
The right panel folds inward and the left panel folds over the right panel. To allow the panels to
nest inside each other properly, the folded in right panel is usually slightly smaller than the other
panels.
A variation is the [Multi tri-fold in]. Multiple sheets are folded in 6 panels with two parallel folds.
Each side of a sheet is a PDF page. The sheets are folded inside each other.
[Tri-fold in] and [Multi tri-fold in] are applied to all pages in the document.
NOTE
[Tri-fold in] and [Multi tri-fold in] documents can be folded on different finishers. Therefore, the
fold lines of these two document types can differ from each other.
[Tri-fold out]
In a [Tri-fold out] there is one sheet folded in 6 panels. The two parallel folds go in opposite
directions. Each side of a sheet is a PDF page.
This is a simple zig-zag fold where each panel is about the same size.
[Tri-fold out] is applied to all pages in the document.
[Z-fold]
The [Z-fold] is a variation of the [Tri-fold out]. In an [Z-fold] one panel is twice the size of the other
two.
[Z-fold] is applied to one sheet in the document.
List of concepts
Chapter 2 - Start using the application 57
PRISMAprepare v6.2

List of concepts
58 Chapter 2 - Start using the application
PRISMAprepare v6.2
Chapter 3
The [Pages] workspace
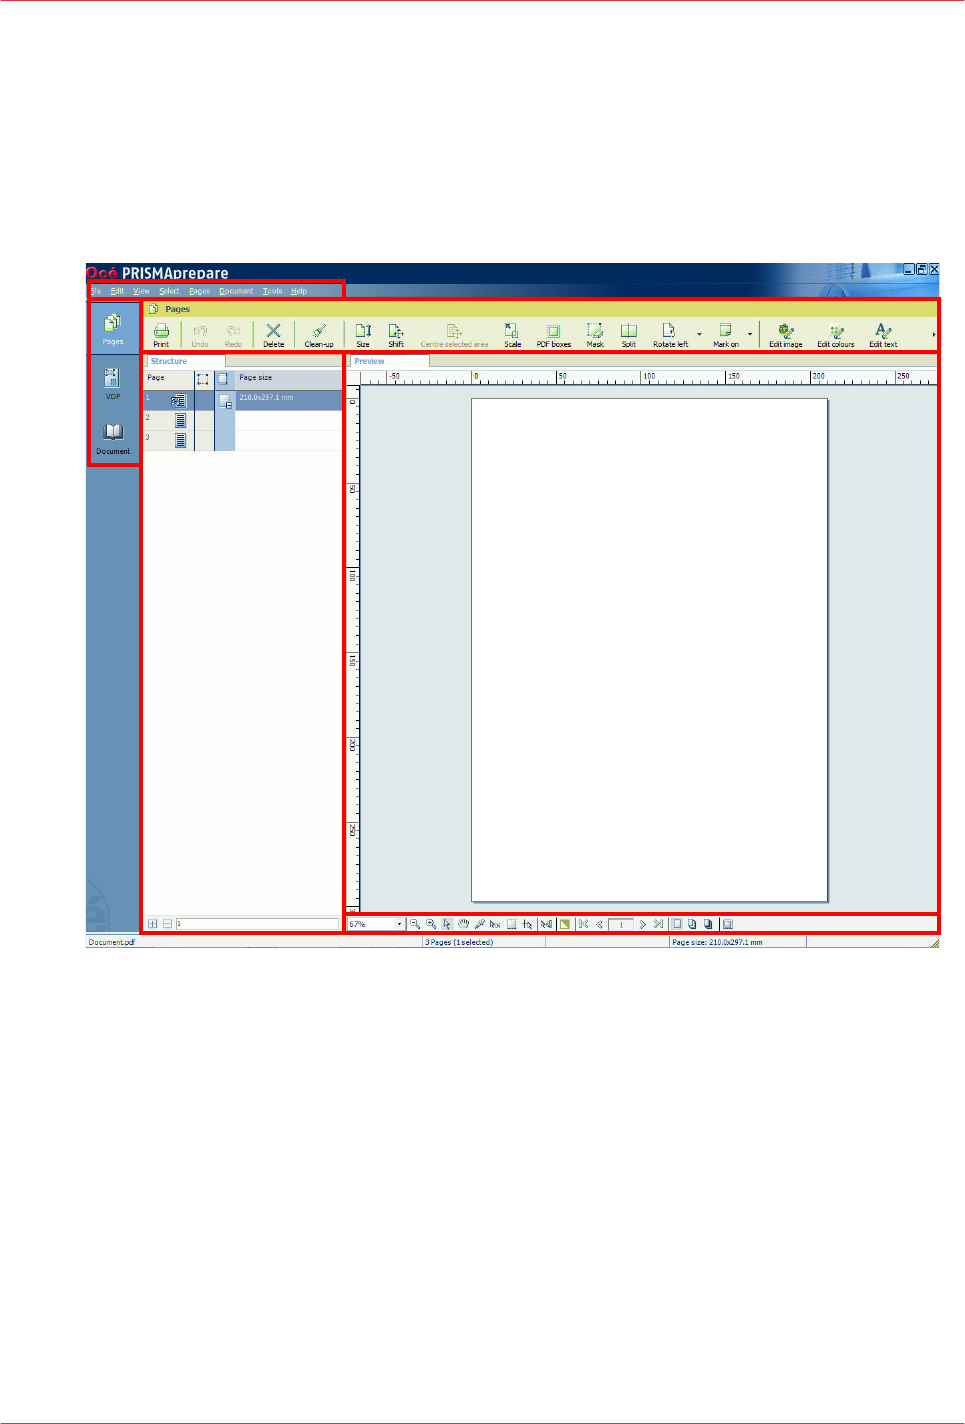
Introduction
Introduction
The [Pages] workspace offers the tools to collect the pages for your document and adjust the
content of the pages. You use the [Pages] workspace during the 'Collect pages', 'Clean-up
scanned pages' and 'Correct pages' phase.
1
5
3
2
4
6
The [Pages] workspace contains the following elements:
1. The menu bar
Use the menu bar to select an action and open the Help file.
2. The button bar
Use the button bar for quick access to the actions most often used.
3. The [Structure] view
The [Structure] view offers an overview of the structure of your document. You can navigate
within your document and select pages.
4. The [Preview] view
The [Pages] workspace offers a WYSIWYG preview that shows the pages one by one or
stacked (on top of each other).
5. The navigation bar
Use this navigation bar to switch between the available workspaces.
6. The footer
Introduction
60 Chapter 3 - The [Pages] workspace
PRISMAprepare v6.2

Use this footer to specify the zoom factor and to select the required tools.
Open the [Pages] workspace
Click the [Pages] button, or
Click [View] - [Pages workspace].
The context menu
You can access the context menu when you right-click on a page(s). This allows quick access to
the actions most often used. The context menu is available in the [Preview] and [Structure] view.
Introduction
Chapter 3 - The [Pages] workspace 61
PRISMAprepare v6.2
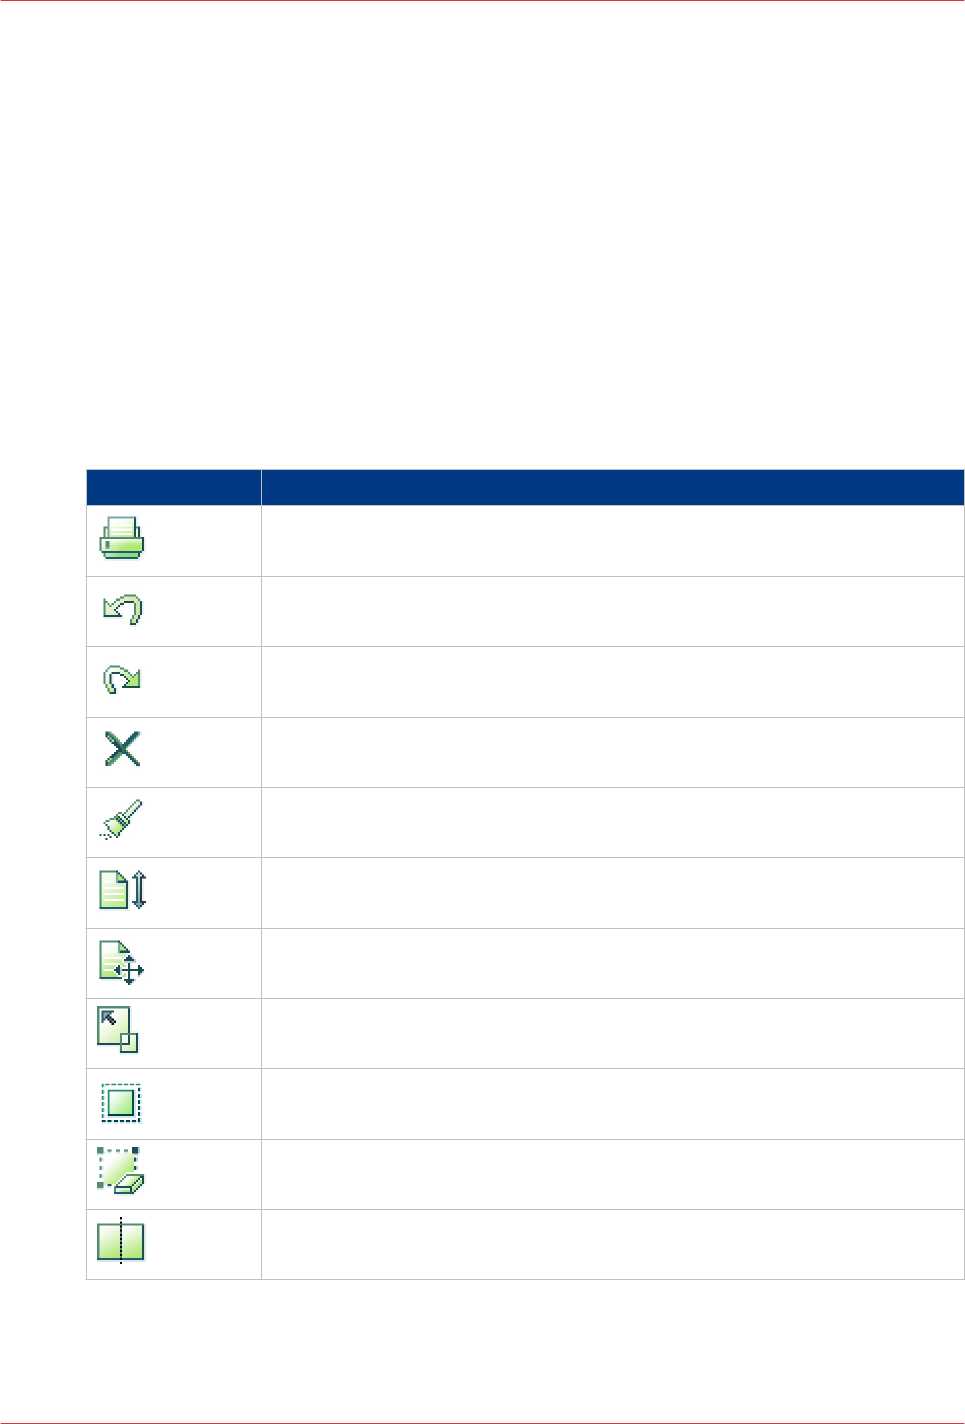
The toolbar
Introduction
The customizable toolbar allows you to add, move and remove buttons.
Do the following steps to customise the toolbar:
• Click [View] - [Customize toolbar...].
Or right-click the toolbar and select the [Customize toolbar...] option.
• A window opens that shows all the buttons that you can add to your toolbar.
• Drag and drop the button on the toolbar to add buttons or drag a button from the toolbar to
remove a button.
• In the view option you can select different sizes and layouts for the buttons.
• Use 'Revert to default layout' to get the default buttons and view option.
The toolbar
Button Description
Print
Print the job.
Undo
The previous command is undone.
Redo
The previous undone command is redone.
Delete
Delete pages
Clean-up
Clean-up scanned images
Size
Modify the page size
Shift
Shift the page content
Scale
Scale the page content
PDF boxes
Define the PDF boxes
Mask
Mask a specific area
Split
Split pages 4
The toolbar
62 Chapter 3 - The [Pages] workspace
PRISMAprepare v6.2
Button Description
Rotate
- Rotate the pages 90 degrees to the right.
- Rotate the pages 90 degrees to the left.
- Rotate the pages 180 degrees.
Mark
- Add a mark to pages.
- Remove a mark from pages.
- Add a mark to all color pages.
- Add a mark to all color pages. Define custom settings for the color detec-
tion.
Edit image
Change the overall appearance of an image. You can edit the saturation, the
brightness and the color values of an image.
Edit colors
Replace or change one specific color for text and graphic objects.
Edit text
Use this option to do small changes in the text of the document.
Color palette
The color palette offers you the possibility to store and manage colors with-
in the application.
The toolbar
Chapter 3 - The [Pages] workspace 63
PRISMAprepare v6.2

The [Structure] view
Introduction
The [Structure] view provides easy navigation and selection of pages in the document. It also
gives an overview of the page programmed settings that are used in your document.
You can drag and drop pages in the [Structure] view.
Horizontally, the [Structure] view displays columns. These columns describe properties on which
you can group pages. These groups allow you to easily select a range of pages that have the
same properties.
Vertically, the document is shown in pages and groups of pages. For every (sub)section of pages,
a bar is created. With these bars you can easily manage your (sub)sections.
Right-click anywhere in a column to get a context menu. The context menu depends on the
position where you right-click.
The available columns
You can group pages based on the following criteria:
• The [Page] column shows the pages and blank sheets of your document. The [Page] column
contains the logical page index.
• The [Selected objects] column shows how many objects are selected on each page.
• [Section]
You can group sequential pages that belong together (for example chapters) in a section. You
can divide a section into subsections. Up to 5 levels are possible here. The names of each
[Section] level are displayed.
• [Page size]
The sequential pages with the same page size and orientation. This column also shows any
fold settings.
Every column has icons and labels:
• The icon section displays icons that give feedback about the properties of the (group of) pages.
• The label section displays in text the properties of the (group of) pages.
You can show or hide the label when you double click on the column's header.
You can adjust the columns:
• Show or hide columns
Click [View] - [Show columns] to define if a column is visible or not. You can right-click the
column header and use its context menu.
• Column order
To change the order of the columns you can drag the column headers to a new position. The
active column is the first column behind the [Page] column. You can use this active column to
expand or collapse a group of pages.
• Column width
You can drag the separators in the column header to change the width of a column.
Feedback icons
Feedback
Icons
on page 50 are displayed in the columns.
Footer
Click the [Expand all groups] button to expand all groups of the active column.
The [Structure] view
64 Chapter 3 - The [Pages] workspace
PRISMAprepare v6.2

This option is also available via [View] - [Expand all groups].
Click the [Collapse all groups] button to collapse all groups of the active column.
This option is also available via [View] - [Collapse all groups].
NOTE
The active column is the first column behind the [Page] column.
Enter page numbers or page ranges in the [Pages] field to select pages. The character n is used to
define the last page. Character * defines all pages. For example: 1,5,9-n.
Note that disabled pages and blank sheets cannot be selected via the pages field.
Related information
Configure sections
on page 69
The [Structure] view
Chapter 3 - The [Pages] workspace 65
PRISMAprepare v6.2

The [Preview] view
Introduction
The [Preview] view displays:
• The current page ([Single page view]) or the selected pages on top of each other in see-
through mode ([Stacked view]).
• The additional content:
[Header and Footer], [Tab captions] and [Bleed captions], [Stamps].
• The finishing settings:
[Staple], [Fold], [Hole punch].
When a fold setting is applied, the fold lines are displayed in the [Preview] view.
The footer contains tools that you can use in the [Preview] view.
Rulers & guidelines
Rulers are displayed at the top and left of the [Preview] view. The units displayed in the rulers
depend on the [Region] setting (inches/mm).
Guidelines can be placed in the [Preview] view by dragging them from the rulers
• Horizontal ruler: horizontal guideline
• Vertical ruler: vertical guideline
• Intersection of horizontal and vertical ruler: horizontal and vertical guidelines.
Guidelines can also be numerically positioned.
Double-click the rulers or right-click in the [Preview] view. Then click View - [Add guideline]... for
the menu to add a guideline.
Right-click on an existing guideline to edit, center, or delete it.
Show or hide guidelines:
• Option 'Show guidelines' in menu 'View' is automatically enabled when you add a guideline.
• Click 'View' - 'Remove all guidelines' to delete all guidelines from the [Preview] view.
Footer
The footer contains tools that you can use in the [Preview] view.
Tools and icons in the footer
Tool Description
Zoom selection Use this to specify the zoom factor.
Or click 'View' - [Zoom].
Use these tools to [Zoom in] or [Zoom out].
Or click 'Tools' - [Zoom out].
Click 'Tools' - [Zoom in].
[Select page]
Or click 'Tools' - [Select pages]. 4
The [Preview] view
66 Chapter 3 - The [Pages] workspace
PRISMAprepare v6.2

Tool Description
[Drag] tool
Use this tool to drag the page in the [Preview] view.
Or click 'Tools' - [Drag].
[Color picker]
Point this tool to text and graphical objects to see the color information. The
color picker cannot retrieve the exact colors of an unsupported [Color
space].
Or click 'Tools' - [Color picker].
[Select object]
Use the [Select object] tool to select an object. A blue border is placed
around the selected object.
Press button 'CTRL' to select multiple objects.
Or click 'Tools' - [Select object].
[Select area with rectangle]
You can draw a selection rectangle using your mouse. The selected area is
visible by a dotted line around the selected area.
To reset a selection, click your mouse inside the [Preview] view.
Or click 'Tools' - [Select area with rectangle].
NOTE
Push 'Shift' on the keyboard and select with the mouse to select
and invert an area with one action.
[Select area inside guidelines]
You can select an area that is marked by guidelines and page-borders by
clicking inside this area. The selected area is visible by a dotted line around
the selected area.
To reset a selection, click your mouse inside the [Preview] view.
Or click 'Tools' - [Select area inside guidelines].
[Repeated selection]
Click the [Repeated selection] tool to define repeated selections. A spinbox
appears.
You can define the number of pages for the repeated selections with the
spinbox.
[Invert selected area]
Click the [Invert selected area] button to select the page content outside the
initially selected area.
For example, you select a Company logo. Then you click the [Invert selected
area] button. Now, the page content without the Company logo is selected.
[First page]
[Previous page]
Current page Shows the current page number.
[Next page]
[Last page] 4
The [Preview] view
Chapter 3 - The [Pages] workspace 67
PRISMAprepare v6.2
Tool Description
[Single page view]
Or click 'View' - [Single page view].
[Stacked view]
In a stacked view the selected pages are displayed on top of each other in
see-through mode (transparent background). The current page is displayed
in a green color to make it stand out in the stacked view.
Or click 'View' - [Stacked view].
[Mirrored stacked view]
In a stacked view the selected pages are displayed on top of each other in
see-through mode (transparent background). The current page is displayed
in a green color to make it stand out in the stacked view.
All selected pages are stacked with the even pages shown in a mirrored
way. In the [Mirrored stacked view] you can check the margins on all sides
of the pages.
Or click 'View' - [Mirrored stacked view].
[Show the content outside of the page]
Select this option if you want to show the content outside of the page.
In this view the bleed margin is indicated by a dotted line around the page.
Or click 'View' - 'Show content outside of page'.
Bleed size The define bleed size in mm or inches.
Click the [Bleed area] button.
The [Preview] view
68 Chapter 3 - The [Pages] workspace
PRISMAprepare v6.2

Configure sections
Introduction
You can group sequential pages that belong together (for example chapters) in a section. You can
divide a section into subsections. Up to 5 levels are possible here. A section is indicated by the
section
Icons
on page 50 in the [Structure] view. You can expand or collapse the section by
clicking the '+' or '-' of the section icon.
Sections can be used for quick document preparation. For example: insert a tab before each
chapter, set an appendix to [1-sided], or force each first page of a section to the front side of a
sheet.
When a document is opened any PDF bookmarks are converted into sections in the document.
Create a section
Procedure
1. Select the pages that you want to include in the section.
2. Click [Pages] - [Section] - [Create]....
The [Create section] dialog box appears.
3. Enter the section name and click [OK].
The selected pages are grouped in a section.
NOTE
You can add only complete subsections to a section.
Configure sections
Chapter 3 - The [Pages] workspace 69
PRISMAprepare v6.2

Create a subsection
Procedure
1. Select the pages within a section that you want to include in the subsection.
2. Click [Pages] - [Section] - Level x - [Create]....
The [Create section] dialog box appears.
3. Enter the subsection name and click [OK].
The selected pages are grouped in a subsection within the section.
NOTE
A subsection can only be a part of a single section.
Create a subsection
70 Chapter 3 - The [Pages] workspace
PRISMAprepare v6.2

Replace a section
Procedure
1. Select the (sub)sections and pages that you want to replace.
Now you can:
• Rename this (sub)section if you have selected only one (sub)section.
• Merge the selected (sub)sections and pages into a single new section.
• Split a partially selected (sub)section.
2. Click [Pages] - [Section] - Level x - Replace....
The [Replace section] dialog box appears.
3. Enter the new section name and click [OK].
Replace a section
Chapter 3 - The [Pages] workspace 71
PRISMAprepare v6.2

Delete a (sub)section
Procedure
NOTE
When you delete a (sub)section, the pages within that (sub)section are not deleted.
1. Select the section that you want to delete.
2. Click [Pages] - [Section] - 'Level x' - [Delete].
The (sub)section is deleted.
Delete a (sub)section
72 Chapter 3 - The [Pages] workspace
PRISMAprepare v6.2

Show section levels
Procedure
1. Click View - Show section levels.
2. Define how many section levels you want to show in the [Structure] view.
NOTE
You can create a (sub)section at a level that is currently not shown. This will cause all section
levels to be shown. When you create a (sub)section at a section level that is currently shown, all
hidden section levels remain hidden.
Show section levels
Chapter 3 - The [Pages] workspace 73
PRISMAprepare v6.2

Repeated selection
Introduction
You can make repeated selections in your document. The repeated selections are marked with
horizontal separation lines in the [Structure] view.
Your changes are applied to all pages in the active repeated selections.
Pages that are excluded from the repeated selections are grayed.
NOTE
The repeated selections are removed when you execute operations: [Size], [Shift], [Scale],
[Mask], [Edit image], [Edit colors].
Enable repeated selection
Procedure
1. Select the page where you want to start the repeated selections. The repeated selections continue
to the last page of the document.
When you select a page range, the repeated selections are active within the page range.
The last group of pages can contain less pages than defined in the pages spinbox.
NOTE
Cover pages are excluded from a repeated selection.
2. Click the 'Repeated selection' tool in the footer of the [Preview] view.
A spinbox appears.
3. Define the number of pages for the repeated selection in the spinbox.
The minimum number of pages is 2. The maximum number of pages is 99.
Repeated selection
74 Chapter 3 - The [Pages] workspace
PRISMAprepare v6.2

Change the number of pages in the repeated selection.
Procedure
1. Change the number of pages in the pages spinbox. Press 'Enter'.
Or:
2. Insert or delete pages within a repeated selection. The pages spinbox is updated.
Change the number of pages in the repeated selection.
Chapter 3 - The [Pages] workspace 75
PRISMAprepare v6.2

Remove repeated selection
Procedure
1. Click the 'Repeated selection' tool in the footer of the [Preview] view.
The repeated selections are removed. The icon of the 'Repeated selection' tool is disabled and the
pages spinbox disappears.
Remove repeated selection
76 Chapter 3 - The [Pages] workspace
PRISMAprepare v6.2

Collect pages
Introduction
Introduction
During the 'Collect pages' phase, you collect all pages for your document.
At the end of this phase your document contains all pages in the correct order.
Collect pages
During the 'Collect pages' phase, you can:
• Insert pages into your document.
• You can insert all pages of an external PDF file.
It is not possible to insert a subset from an external PDF file.
• You can insert pages imported from a twain scanner.
• Replace pages within your document.
• You can replace pages with the pages of an external document.
• You can replace pages with import pages from a twain scanner.
• Copy pages within your document.
• Move pages within your document.
• Delete pages from your document.
• Create sections or subsections of sequential pages that belong together (for example
chapters).
Collect pages
Chapter 3 - The [Pages] workspace 77
PRISMAprepare v6.2

Insert pages
Introduction
Use the [Insert pages]... command to insert one or more external file(s) into your document.
See :
Supported file formats
on page 20
Example scenarios:
• You want to combine multiple documents into one document. Open the first document and
insert every other document into this document.
• You want to add new chapters to a document which already has page programmed settings,
like page numbering. The new chapters are provided as separate documents. Open the
document and insert each new chapter at the right insertion point.
NOTE
It is only possible to insert whole file(s).
This option is available via:
• The menu: click 'Pages' - 'Insert pages...'.
• The context menu: right-click the selected page(s) and select option 'Insert pages...'.
Procedure
1. Select the location where you want to insert the file(s).
2. Click [Pages] - [Insert pages]....
The [Insert pages] dialog box appears.
3. Use the [Add file(s)] button to select the file(s) that you want to insert.
Or click the [Choose this option to insert pages from the TWAIN scanner into your document.]
button to
Import a file from a TWAIN scanner
on page 85.
4. Use the [Move file(s) up] and [Move file(s) down] buttons to set the order of the files. In this order
the files are added to your document.
NOTE
You can use the [Delete file(s)] button to remove a selected file from the list.
5. Use the [Position] setting to insert the file(s) before or after the selected pages.
6. For [Create section] setting:
• Select the [As new section] option to create a new section for the file(s) in your document.
• Select the [In current section] option to create a subsection in the current active section for the
file(s).
NOTE
Option [In current section] is available only if your document contains sections.
7. Different options for setting [Use page properties of] can be available:
Setting Description
[Inserted file(s)] The inserted file(s) keep their own page properties.
NOTE
A page programmed PDF file may include a
Define the
document type
on page 253 that is incompatible with
the current document. Option [Inserted file(s)] is then
disabled. The pages receive the page programd settings
of the current document. 4
Insert pages
78 Chapter 3 - The [Pages] workspace
PRISMAprepare v6.2

Setting Description
'Selected page' The inserted file(s) receive the page properties of the selected
page.
This option is available when you select one page as the location
to insert the pages.
'First selected page' The inserted file(s) receive the page properties of the first page of
the selected pages.
This option is available when:
• You select multiple pages as the location to insert the pages
and
• You select option 'Before selection' for setting [Position].
'Last selected page' The inserted file(s) receive the page properties of the last page of
the selected pages.
This option is available when:
• You select multiple pages as the location to insert the pages
and
• You select option 'After selection' for setting [Position].
8. Click [OK] to insert the file(s).
Insert pages
Chapter 3 - The [Pages] workspace 79
PRISMAprepare v6.2

Replace pages
Introduction
Use the [Replace pages]... command to replace a set of consecutive pages from your document
by an external file.
See :
Supported file formats
on page 20
NOTE
It is only possible to replace pages with a complete file.
This option is available via:
• The menu: click 'Pages' - 'Replace pages...'.
• The context menu: right-click the selected page(s) and select option 'Replace pages...'.
Procedure
1. Select the set of consecutive pages that you want to replace.
2. Click [Pages] - [Replace pages]....
The [Replace pages] dialog will appear.
3. You can replace the pages with an external file or with a scanned file.
• [File]
Use the [Browse...] button to select the external file that you want to use.
• [TWAIN scanner]
Select this option to
Import a file from a TWAIN scanner
on page 85.
4. Different options for setting [Use page properties of] can be available:
Setting Description
[Inserted file] The pages in the file keep their own page properties when they re-
place the selected pages.
NOTE
A page programmed PDF file may include a
Define the
document type
on page 253 that is incompatible with
the current document. Option [Inserted file] is then disa-
bled. The pages receive the page programd settings of
the current document.
'Selected page' Each page of the file receives the page properties of the selected
page.
This option is available when you select to replace one page.
NOTE
The pages of the file are inserted with the page proper-
ties of the selected page.
'Selected pages' Each page of the file receives the page properties of the corre-
sponding page in the page selection.
This option is available when you select to replace multiple pages.
NOTE
The pages of the file are inserted with the page proper-
ties of the last page of the page selection.
5. Click [OK] to replace the pages.
Replace pages
80 Chapter 3 - The [Pages] workspace
PRISMAprepare v6.2

Delete pages
Introduction
Use the [Delete] command to delete pages from your document.
This option is available via:
• The button bar: click the drop-down button [Delete].
• The menu: click [Pages] - [Delete pages].
• The context menu: right-click the selected page(s) and select option [Delete pages].
Procedure
1. Select the page(s) that you want to delete from your document.
NOTE
You can also delete blank sheet(s).
2. Click [Pages] - [Delete pages].
The selected page(s) will be deleted.
Delete pages
Chapter 3 - The [Pages] workspace 81
PRISMAprepare v6.2

Move pages
Introduction
You can change the order of the pages within your document. Use the [Cut pages] and [Paste
pages] commands to move pages within your document.
These options are available via:
• The menu: click [Pages] - [Cut pages].
• The menu: click [Pages] - [Paste pages].
• The context menu: right-click the selected page(s) and select option [Cut pages].
• The context menu: right-click the selected page(s) and select option [Paste pages].
Move pages
Procedure
1. Select the page(s) that you want to move.
2. click [Pages] - 'Cut pages'.
3. Navigate within your document and select the page where you want to insert the page(s).
4. click [Pages] - 'Paste pages'.
5. Specify whether you want to paste the page(s) 'before' or 'after' the selected page.
Move pages
82 Chapter 3 - The [Pages] workspace
PRISMAprepare v6.2

Drag and drop pages
Procedure
1. Use the drag tool to drag and drop pages.
You can drag and drop pages in the [Structure] view and in the [Preview] view.
Or click 'Tools' - [Drag].
Drag and drop pages
Chapter 3 - The [Pages] workspace 83
PRISMAprepare v6.2

Copy and paste pages
Introduction
Use the 'Copy pages' and 'Paste pages' commands to copy pages within your document.
These options are available via:
• The menu: click [Pages] - 'Copy pages'.
• The menu: click [Pages] - 'Paste pages'.
• The context menu: right-click the selected page(s) and select the 'Copy pages' option.
• The context menu: right-click the selected page(s) and select option 'Paste pages'.
Procedure
1. Select the page(s) that you want to copy.
2. Click [Pages] - 'Copy pages'.
3. Navigate within your document and select the page where you want to insert the page(s).
4. click [Pages] - 'Paste pages'.
5. Specify whether you want to paste the page(s) 'before' or 'after' the selected page.
Copy and paste pages
84 Chapter 3 - The [Pages] workspace
PRISMAprepare v6.2

Import a file from a TWAIN scanner
Introduction
You can scan and import paper documents with any scanner that supports the TWAIN interface.
The application automatically detects which color and B&W TWAIN scanners are available. The
original interface of the scanner is used. The interface can be different for each scanner.
The scanned pages are imported as an external PDF file. You can:
• Use the external PDF file as a new document.
•Use the [Insert pages]... command to insert one or more external PDF file(s) into your
document.
•Use the [Replace pages]... command to replace a set of consecutive pages from your document
by an external PDF file.
You can clean-up the scanned pages. Click the [Clean-up] button to have the scan clean-up
operations available.
Procedure
1. Click [File] - 'Import file from TWAIN scanner...'.
2. Select a TWAIN scanner and click 'Select'.
The original interface of the scanner is used. The interface can be different for each scanner.
3. If required, set any settings of the scanner.
4. Scan the file.
The file is imported as an external PDF file.
Import a file from a TWAIN scanner
Chapter 3 - The [Pages] workspace 85
PRISMAprepare v6.2

Clean-up scanned pages
Introduction
Introduction
You can clean-up scanned pages. Click the [Clean-up] button to have these operations available.
Fold lines and punches are not displayed in the [Clean-up] [Preview] view.
Some pages are not recognized as scanned pages. How can I clean-up these pages?
1. You must
Rasterize a page
on page 87 which are not recognized as scanned pages.
You can clean-up the rasterized pages.
NOTE
Any mask that you apply on page content disappears when you click the [Clean-up] button. After
you close the [Clean-up] dialog, the mask appears again. For example, you have masked some
page content. Then you click the [Clean-up] button. This causes the mask to disappear. In the
[Clean-up] dialog you align the content of the page. Then you close the [Clean-up] dialog and the
mask appears again. Now, the mask might cover some of the aligned page content. Therefore,
always do a clean-up before you mask any content.
Clean-up scanned pages
The scan [Clean-up] button offers the following operations:
• Rasterize a page.
• Rotate the scanned page content.
• Remove all speckles.
• Put scanned content straight on a page.
• Align the scanned content.
• Erase areas of the scanned content.
Clean-up scanned pages
86 Chapter 3 - The [Pages] workspace
PRISMAprepare v6.2

Rasterize a page
Introduction
Use the 'Rasterize' option for scanned pages that are not detected as scanned pages by the
application.
This option is available via:
• The button bar: click the button [Clean-up].
• The menu: click 'Pages' - [Rasterize].
• The menu: click 'Pages' - [Clean-up].
• The context menu: right-click the selected page(s) and select option [Rasterize].
• The context menu: right-click the selected page(s) and select option [Clean-up].
NOTE
Vector graphics, text documents, et cetera are converted into bitmaps when you rasterize a
page.
NOTE
When an image is rasterized, the quality of the image decreases.
NOTE
Select the rasterize mode which best describes the pages that you want to rasterize. The best
matching mode generates an optimal rasterize result and preview view.
Questions and answers
Procedure
1. Question: Why is the preview view of a rasterized page so poor?
Answer: When you rasterize an image you convert the image into a bitmap.
For example, you convert a grayscale vector image. The created bitmap can only contain black
and white pixels. The different shades of gray must be converted using black and white pixels.
Dark gray is represented with more black pixels in a certain area. Light gray is represented with
less black pixels in a certain area.
The bitmap in the preview view must be resized to fit the preview window. Usually the bitmap is
decreased and this results in the 'leaving out of pixels' in the preview view. This results in the
poor review quality.
2. Question: Is the print result of a rasterized page of the same poor quality as the preview view?
Answer: No. The print result is almost the same as a pdf page, as long as you select the correct
rasterize mode for the concerning page(s).
Rasterize a page
Chapter 3 - The [Pages] workspace 87
PRISMAprepare v6.2

Rasterize one or more pages via the clean-up button
Procedure
1. Click the [Clean-up] button.
The [Clean-up] dialog box appears.
2. Select option:
• [Continue scan clean-up with the scanned pages]
One or more of the selected pages are not detected as scanned pages.
Select this option to clean-up only the detected scanned pages.
• [Rasterize]
One or more of the selected pages are not detected as scanned pages.
Select this option if the selected pages are scanned pages, but some are not detected as
scanned pages.
[Mode] Select the rasterize mode which best describes the pages that you want to
rasterize:
• Black and white
Use this mode for text pages.
• [Grayscale]
Use this mode for text pages that contain grayscale images.
• [Color]
Use this mode for color pages.
NOTE
The different modes are designed to rasterize a specific type of da-
ta, such as grayscale pages.
[Resolution] Select the resolution that is used by your printer.
NOTE
The application becomes slower when you select a high resolu-
tion.
Rasterize one or more pages via the clean-up button
88 Chapter 3 - The [Pages] workspace
PRISMAprepare v6.2

Rasterize one or more pages via the Rasterize option
Procedure
1. Click [Pages] - [Rasterize].
The [Rasterize] dialog box appears.
2. Select which pages you want to rasterize.
NOTE
When an image is rasterized, the quality of the image decreases.
3. Define the following options:
[Mode] Select the rasterize mode which best describes the pages that you want to
rasterize:
• Black and white
Use this mode for text pages.
• [Grayscale]
Use this mode for text pages that contain grayscale images.
• [Color]
Use this mode for color pages.
NOTE
The different modes are designed to rasterize a specific type of da-
ta, such as grayscale pages.
[Resolution] Select the resolution that is used by your printer.
NOTE
The application becomes slower when you select a high resolu-
tion.
Rasterize one or more pages via the Rasterize option
Chapter 3 - The [Pages] workspace 89
PRISMAprepare v6.2

Rotate the scanned page content
Introduction
You can rotate the page content of scanned pages 180 degrees.
The settings for the Rotate 180° option
Procedure
1. You can define the following settings for the [Rotate 180°] option:
[Rotate 180°]
Setting Description
[Pages] Select if you want to rotate the scanned page content for:
• All pages
• Selected pages
• Current page
Rotate the scanned page content
90 Chapter 3 - The [Pages] workspace
PRISMAprepare v6.2

Rotate the page content of scanned pages 180 degrees
Procedure
1. Select the scanned pages for which you want to rotate the page content.
2. Click the [Clean-up] button.
3. Optionally:
Rasterize one or more pages via the clean-up button
on page 88.
4. Click the [Rotate 180°] button.
5. Click [Apply].
The page content of the scanned pages is rotated 180 degrees.
Rotate the page content of scanned pages 180 degrees
Chapter 3 - The [Pages] workspace 91
PRISMAprepare v6.2
Despeckle the scanned page content
Introduction
You can despeckle the page content of scanned pages.
Speckles are small defects in a scanned image. The small defects occur as extra pixels or
collections of extra pixels in the scanned image.
The defects can be caused by dust on the document or on the scanning surface.
The settings for option [Despeckle]
Procedure
1. You can define the following settings for the [Despeckle] option:
Despeckle
Setting Description
[Pages] Specify whether you want to despeckle the scanned page content for:
• All pages
• Selected pages
• Current page
[Area] Specify whether you want to despeckle:
• [Complete page]
Use this option if your scanned page contains text only.
• [Selected area]
Use this option if your scanned page contains both images and text.
Use any of the selection tools to select the area containing text.
NOTE
Do not despeckle images.
[Remove] Select to remove:
• [Noise with radius:]
Speckles that are equal to or smaller than the defined radius in pixels are
removed automatically by this application.
• [Objects smaller than:] a defined number of pixels.
You can define the number of pixel of a speckle manually. You can also
drag a box around an object to measure its size with the measurement
tool.
NOTE
Light gray areas can be considered as noise.
The [Objects smaller than:] option can only be applied to black and white pages.
The [Noise with radius:] option can be applied to:
• black and white pages,
• grayscale pages,
• color pages.
Option [Noise with radius:] can be applied multiple times for a better despeckle result.
Despeckle the scanned page content
92 Chapter 3 - The [Pages] workspace
PRISMAprepare v6.2

NOTE
Every time you apply option [Noise with radius:] gray images can become whiter and lines can
become thinner. Use you own judgment to determine when option [Noise with radius:] does not
improve the despeckle result anymore. You can always [Undo] option [Noise with radius:].
The settings for option [Despeckle]
Chapter 3 - The [Pages] workspace 93
PRISMAprepare v6.2

Despeckle the scanned page content
Procedure
1. Select the scanned pages that you want to despeckle.
2. Click the [Clean-up] button.
3. Optionally:
Rasterize one or more pages via the clean-up button
on page 88.
4. Click the [Despeckle] button.
5. Set the [Despeckle] settings.
6. Click [Apply] to despeckle the scanned page content.
Despeckle the scanned page content
94 Chapter 3 - The [Pages] workspace
PRISMAprepare v6.2

Deskew the scanned page content
Introduction
You can deskew the page content of scanned pages.
Why does [Automatic] deskew not deskew the page?
1. The page cannot be deskewed automatically when the deskew angle is greater than 20
degrees. First do a manual deskew and then an automatic deskew.
2. There is too little information or too many graphics on the page to deskew automatically.
Deskew manually.
3. Due to the skew algorithm, texts that use non-Latin fonts (e.g. Chinese and Japanese) do not
deskew automatically. Deskew manually.
Why is content lost after a deskew at a large angle?
1. The content is rotated during the deskew. Content that is rotated beyond the page boundaries
is lost permanently.
Click [Undo] to recover the lost content.
The settings for option Deskew
Procedure
1. You can define the following settings for the [Deskew] option:
Deskew
Setting Description
[Pages] Specify whether you want to deskew the scanned page content for:
• All pages
• Selected pages
• Current page
[Deskew] Select to deskew:
• [Automatic]
Deskewing is performed automatically by the application.
• [Manual]
You can define the deskew angle manually.
You can use the mouse to measure the angle in the preview view with the
angle tool. You can adjust the angle with the handles on each side of the
line.
Deskew the scanned page content
Chapter 3 - The [Pages] workspace 95
PRISMAprepare v6.2

Deskew the scanned page content
Procedure
1. Select the scanned pages that you want to deskew.
2. Click the [Clean-up] button.
3. Optionally:
Rasterize one or more pages via the clean-up button
on page 88.
4. Click the [Deskew] button.
5. Set the [Deskew] settings.
6. Click [Apply] to deskew the scanned page content.
Deskew the scanned page content
96 Chapter 3 - The [Pages] workspace
PRISMAprepare v6.2
Align the scanned page content
Introduction
You can align the page content of scanned pages.
The purpose of this action is to set the margin of each page at the same location.
Why is the content on some pages not aligned?
1. The content of the selected pages is aligned to the selected object on the current page. If the
object is not found on one or more pages, than the content of the concerning pages is not
aligned.
Tip: select [Stacked view] and make sure you see a green object in the selected area.
The settings for the Align option
Procedure
1. You can define the following settings for the [Align] option:
Align
Setting Description
[Pages] Specify whether you want to align the scanned page content for:
• All pages
• Selected pages
• Current page
[Alignment] • [Align object]
You select an object - for example the company logo - with the selection
tool. The object is then aligned to the same position for all selected pa-
ges. Be aware that the entire page content moves with the selected ob-
ject.
• [Align content to:]
The content of the page is aligned to a certain location on the page. You
define the location with the available guidelines.
NOTE
If you align an object, make sure the object is within the selected
area on ALL pages. Otherwise, the object will not be aligned.
NOTE
Page content is lost when it is shifted from the page. In this case,
[Undo] the alignment operation.
Align the scanned page content
Chapter 3 - The [Pages] workspace 97
PRISMAprepare v6.2

Align the scanned page content
Procedure
1. Select the scanned pages that you want to align.
2. Click the [Clean-up] button.
3. Optionally:
Rasterize a page
on page 87.
4. Click the [Align] button.
5. Set the [Align] settings.
6. Click [Apply] to align the scanned page content.
Align the scanned page content
98 Chapter 3 - The [Pages] workspace
PRISMAprepare v6.2

Erase parts of the scanned page content
Introduction
You can erase parts of the page content of scanned pages.
For example, the scanned page contains punch holes or black strips at the border.
The settings for the Erase option
Procedure
1. You can define the following settings for the [Erase] option:
[Erase]
Setting Description
[Pages] Specify whether you want to erase parts of the scanned page content for:
• All pages
• Selected pages
• Current page
Erase parts of the scanned page content
Chapter 3 - The [Pages] workspace 99
PRISMAprepare v6.2

Erase parts of the scanned page content
Procedure
1. Select the scanned pages for which you want to erase a part of the page content.
2. Click the [Clean-up] button.
3. Optionally:
Rasterize one or more pages via the clean-up button
on page 88.
4. Click the [Erase] button.
5. Use any of the selection tools to select the area that you want to erase.
6. Click [Apply] to permanently erase the selected area.
Erase parts of the scanned page content
100 Chapter 3 - The [Pages] workspace
PRISMAprepare v6.2

Correct pages
Introduction
Introduction
During the 'Correct pages' phase, you determine the layout of your document.
The content and layout of the pages within your document are correct at the end of this phase.
Correct pages
During the 'Correct pages' phase, you can:
• Change the page size
• Shift the page content
• Scale the page content
• Mask the page content
• Split the page
• Rotate the page content
• Mark pages to separate special pages (like pages with colour) from other pages.
NOTE
In the [Preview] view you can monitor the correction actions.
Correct pages
Chapter 3 - The [Pages] workspace 101
PRISMAprepare v6.2
Change the page size
Introduction
The [Size] button allows you to change the page size and the page content size simultaneously.
Or, you can change the page size without changing the page content size.
For example, you receive a document with [Letter] size pages. You want to print the document on
[A4]. So you must set the page size to [A4] and also scale the page content so that it fits.
NOTE
You cannot change the page size of tab sheets and pages with sheet folds.
NOTE
[VDP frames] are not scaled.
This option is available via:
• The button bar: click the button [Size].
• The menu: click [Pages] - [Size].
• The context menu: right-click the selected page(s) and select option [Size].
Size
Setting Description
[Pages] Specify whether you want to change the page size for:
• All pages
• Selected pages
• Current page
[Resize] Specify whether you want to change the [Page and content] size or just the
[Page] size.
NOTE
[VDP frames] are not scaled.
[Size] Select a predefined page size from the drop-down list. The width and length
of the selected page size is shown.
Set the page orientation for the predefined page sizes with the [Portrait] and
[Landscape] buttons.
You can also define a [Custom] page size yourself.
NOTE
You can drag the page borders with your mouse to set a page
size. 4
Change the page size
102 Chapter 3 - The [Pages] workspace
PRISMAprepare v6.2

Setting Description
[Position] Select option [Center page] to keep the page content always in the center of
the page.
Select the [Page shift] option to shift the page independently from the page
content:
• [Right]
Select a positive value for a horizontal shift to the right.
• [Left]
Select a negative value for a horizontal shift to the left.
• [Bottom]
Select a positive value for a vertical shift downward.
• [Top]
Select a negative value for a vertical shift upward.
NOTE
When the [Page shift] option is selected, you can move the page
with your mouse within the [Preview] view.
Change the page size
Procedure
1. Select the pages for which you want to change the page size.
2. Click the [Size] button.
The [Size] dialog box appears.
3. Specify the [Size] settings:
4. Click [Apply] to confirm the changes.
NOTE
You cannot change the page size of tab sheets and pages with sheet folds.
Change the page size
Chapter 3 - The [Pages] workspace 103
PRISMAprepare v6.2

Reset your settings
Procedure
1. Click the reset button to reset your settings in this dialog.
The reset button is placed just below the 'X' of the dialog.
Reset your settings
104 Chapter 3 - The [Pages] workspace
PRISMAprepare v6.2

Shift the page content
Introduction
The [Shift] button allows you to shift the content of the page. The whole content of the page
shifts with this action.
For example, you need to adjust the margins of the pages.
These options are available via:
• The button bar: click the button [Shift].
• The menu: click 'Pages' - [Shift].
• The context menu: right-click the selected page(s) and select option [Shift].
Shift
Setting Description
[Pages] Specify whether you want to shift the page content for:
• All pages
• Selected pages
• Current page
[Shift] Allows you to shift the content of the page to the:
• Right
Select a positive value for a horizontal shift to the right.
• Left
Select a negative value for a horizontal shift to the left.
• Bottom
Select a positive value for a vertical shift downward.
• Top
Select a negative value for a vertical shift upward.
Use any of the selection tools to select an area of the content. Click option
[Center selected area]. Now, the selected area is centered on the page.
NOTE
You can also drag the content of the page with your mouse in the
[Preview] view.
Shift the page content
Procedure
1. Select the pages for which you want to shift the page content.
2. Click the [Shift] button.
The [Shift] dialog box appears.
3. Specify the [Shift] settings:
4. Click [Apply] to confirm the changes.
Shift the page content
Chapter 3 - The [Pages] workspace 105
PRISMAprepare v6.2

Reset your settings
Procedure
1. Click the reset button to reset your settings in this dialog.
The reset button is placed just below the 'X' of the dialog.
Reset your settings
106 Chapter 3 - The [Pages] workspace
PRISMAprepare v6.2

Scale the page content
Introduction
The [Scale] button allows you to scale the content of the page. Scaling starts from the center of
the page. Page content that falls outside the page size after scaling will not be printed.
NOTE
[VDP frames] are not scaled.
These options are available via:
• The button bar: click the button [Scale].
• The menu: click 'Pages' - [Scale].
• The context menu: right-click the selected page(s) and select option [Scale].
Scale
Setting Description
[Pages] Specify whether you want to scale the content of the page for:
• All pages
• Selected pages
• Current page
[Scale] Specify the percentage by which you want to increase or decrease the con-
tent of the page.
You can also scale the page content with your mouse in the [Preview] view.
NOTE
[VDP frames] are not scaled.
Scale the page content
Procedure
1. Select the pages for which you want to scale the page content.
2. Click the [Scale] button.
The [Scale] dialog box appears.
3. Specify the [Scale] settings:
4. Click [Apply] to confirm the changes.
Scale the page content
Chapter 3 - The [Pages] workspace 107
PRISMAprepare v6.2

Reset your settings
Procedure
1. Click the reset button to reset your settings in this dialog.
The reset button is placed just below the 'X' of the dialog.
Reset your settings
108 Chapter 3 - The [Pages] workspace
PRISMAprepare v6.2
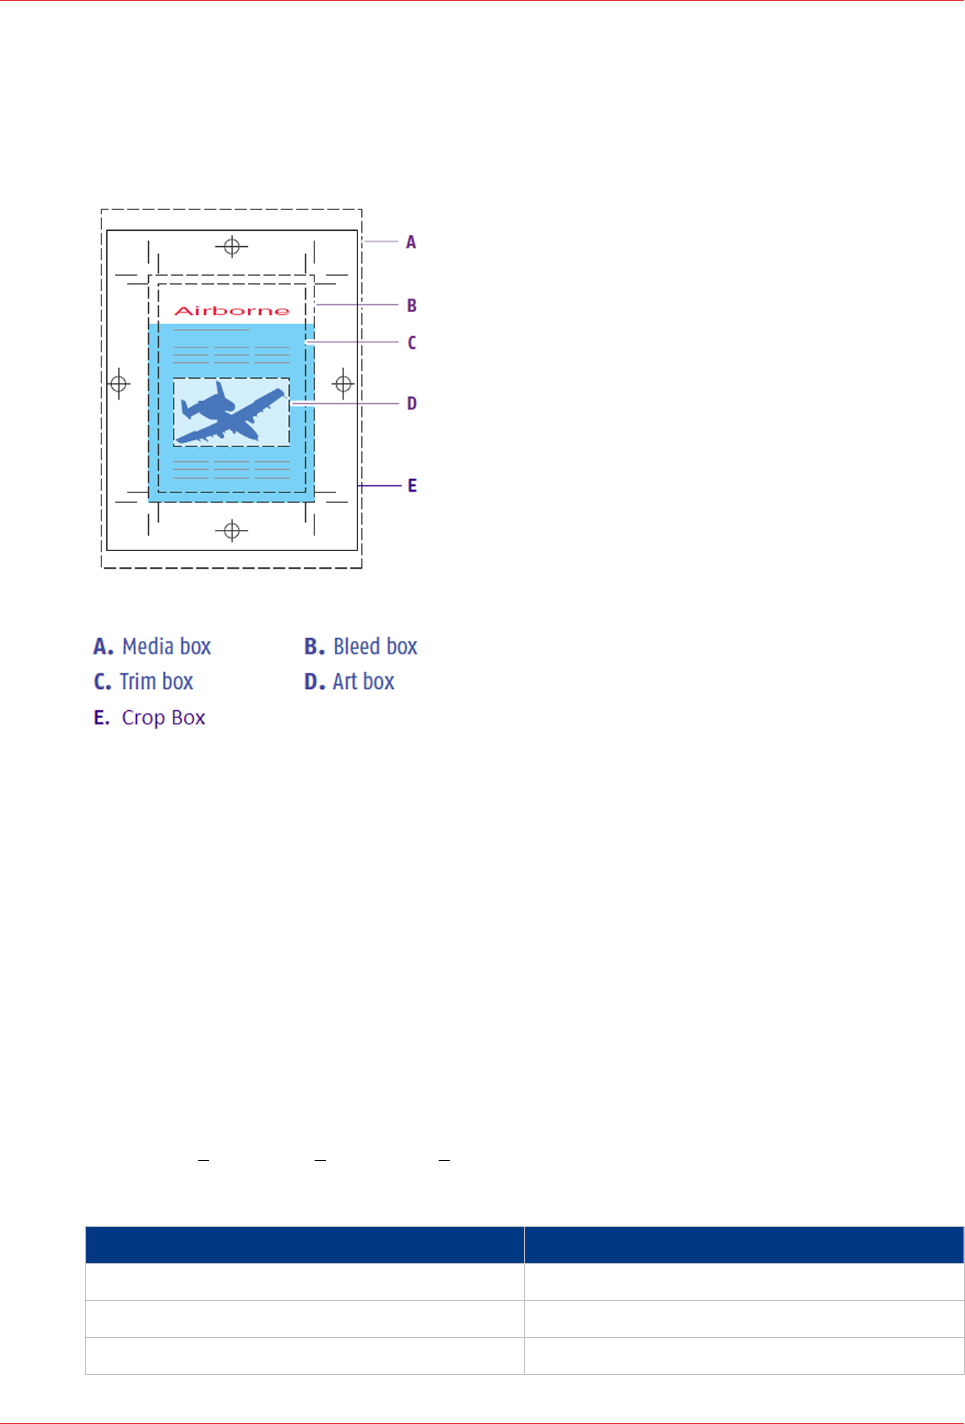
The PDF boxes
Introduction
The application supports the following [PDF boxes]:
• The [Media box] defines the width and the height of the page.
The [Media box] is always available and is the largest box.
The [Media box] is always centered on the [Trim box] (changing the [Trim box] also changes
the [Media box] )
• The [Crop box] defines the area to which the page content needs to be trimmed.
The trim marks and color strips can be inside the crop box.
• The [Bleed box] defines the area to which the page content is trimmed after your job is printed
and cut to the finished size. The bleed box is usually 3 to 5 millimeters larger than the trim box.
• The [Trim box] defines the intended dimensions of the finished page. It defines the actual page
size.
The application uses the trim box to position a page on a sheet.
• The application does not use the art box.
The following size rules apply:
[Media box] > [Crop box] > [Bleed box] > [Trim box].
For a normal document, the application maps the PDF boxes to the following concepts:
PDF box PRISMAprepare concept
[Media box] [Media size]
[Crop box] [Printable area]
[Bleed box] [Bleed area] 4
The PDF boxes
Chapter 3 - The [Pages] workspace 109
PRISMAprepare v6.2
PDF box PRISMAprepare concept
[Trim box] [Page size]
The application uses the [Media box] of a clean document to define the [Media size]. From then,
the media size is independent of the media box size.
Trim box
Introduction
The [Trim box] defines the intended dimensions of the finished page. It defines the actual page
size.
The application uses the trim box to position a page on a sheet.
By default, the trim box, the bleed box and crop box have the same size.
NOTE
Changing the [Trim box] also changes the [Media box] .
Available settings for [Trim box]
Setting Description
[Pages] Select if you want to change the trim box for:
• All pages
• Selected pages
• Current page
[Show all PDF
boxes]
Enable this option to show all PDF boxes, not just the trim box.
[Size] Select a predefined trim box size from the drop-down list. The width and
length of the selected trim box size is shown.
Set the page orientation for the trim box with the [Portrait] and [Landscape]
buttons.
You can also define a [Custom] trim box size yourself. Alternatively you can
drag the trim box to the desired size in the preview.
[Position] • [Center page]
Centre the trim box with respect to the page contents.
• [Page shift]
Shift the trim box over the page contents. Alternatively you can drag the
trim box in the preview.
Trim box
110 Chapter 3 - The [Pages] workspace
PRISMAprepare v6.2

Bleed box
Introduction
The [Bleed box] defines the area to which the page content is trimmed after your job is printed
and cut to the finished size. The bleed box is usually 3 to 5 millimeters larger than the trim box.
By default, the trim box, the bleed box and crop box have the same size.
Available settings for [Bleed box]
Setting Description
[Pages] Select if you want to change the bleed box for:
• All pages
• Selected pages
• Current page
[Show all PDF
boxes]
Enable this option to show all PDF boxes, not just the bleed box.
[Size] You can change the size of the bleed box with respect to the trim box. En-
large the bleed box to create a bleed area.
Enable the [On all trim box edges] option to create an equal distance for all
edges of the [Bleed box] with respect to the [Trim box].
Disable this option to define custom distances per edge of the [Bleed box]
with respect to the [Trim box].
[Bleed content] • [No bleed area]
Leave the bleed area empty.
• [Enlarge page content]
The page content is enlarged to create the content for the bleed area. The
defined bleed size is used to determine the scale factor to scale the page
content.
• [Fill with color]
Fill the bleed area with a color.
• [Color palette...]
Use the color palette
on page 39
• [Color picker...]
You can pick the color of text and of graphical objects. The [Color
space] of the selected object is used. The color picker cannot retrieve
the exact colors of an unsupported [Color space].
Bleed box
Chapter 3 - The [Pages] workspace 111
PRISMAprepare v6.2

Crop box
Introduction
The [Crop box] defines the area to which the page content needs to be trimmed.
The trim marks and color strips can be inside the crop box.
Available settings for [Crop box]
Setting Description
[Pages] Select if you want to change the crop box for:
• All pages
• Selected pages
• Current page
[Show all PDF
boxes]
Enable this option to show all PDF boxes, not just the crop box.
[Size] You can change the size of the crop box with respect to the trim box.
Enable the [On all trim box edges] option to create an equal distance for all
edges of the [Crop box] with respect to the [Trim box].
Disable this option to define custom distances per edge of the [Crop box]
with respect to the [Trim box].
Crop box
112 Chapter 3 - The [Pages] workspace
PRISMAprepare v6.2

Media box
Introduction
The [Media box] defines the width and the height of the page.
The [Media box] is always available and is the largest box.
The [Media box] is always centered on the [Trim box] (changing the [Trim box] also changes the
[Media box] )
Available settings for [Media box]
Setting Description
[Pages] Select if you want to change the media box for:
• All pages
• Selected pages
• Current page
[Show all PDF
boxes]
Enable this option to show all PDF boxes, not just the media box.
[Size] • [Fit to crop box]
Enable this option to use the same size for the [Media box] as for the
[Crop box].
• [On all crop box edges]
Enable the [On all crop box edges] option to create an equal distance for
all edges of the [Media box] with respect to the [Crop box].
Media box
Chapter 3 - The [Pages] workspace 113
PRISMAprepare v6.2

Mask parts of the page content
Introduction
Use the [Mask] button to mask those parts of the page content that you do not want to print.
For example, you want to remove a company logo from a document.
NOTE
Applied masks will be scaled, rotated, and shifted along with the content of the pages.
This option is available via:
• The button bar: click the button [Mask].
• The menu: click 'Pages' - [Mask].
• The context menu: right-click the selected page(s) and select option [Mask].
Mask
Setting Description
[Pages] Specify whether you want to mask the page content for:
• All pages
• Selected pages
• Current page
NOTE
Any mask that you apply on page content disappears when you click the [Clean-up] button. After
you close the [Clean-up] dialog, the mask appears again. For example, you have masked some
page content. Then you click the [Clean-up] button. This causes the mask to disappear. In the
[Clean-up] dialog you align the content of the page. Then you close the [Clean-up] dialog and the
mask appears again. Now, the mask might cover some of the aligned page content. Therefore,
always do a clean-up before you mask any content.
Procedure
1. Select the pages for which you want to mask a part of the page content.
2. Click the [Mask] button.
The [Mask] dialog box appears.
3. Use any of the selection tools to select the area that you want to mask.
4. Specify the [Mask] settings:
5. Click [Apply] to confirm the changes.
Mask parts of the page content
114 Chapter 3 - The [Pages] workspace
PRISMAprepare v6.2

Split the page
Introduction
Use the [Split] button to split the page.
For example, you have received a booklet document with [A3] pages. You want to split all pages
to [A4] page size.
This option is available via:
• The button bar: click the button [Split].
• The menu: click [Pages] - [Split].
• The context menu: right-click the selected page(s) and select option [Split].
Split
Setting Description
[Pages] Specify whether you want to split the page for:
• All pages
• Selected pages
• Current page
[Split] • Select the [In half] option to split the page at the longest or shortest page
side.
• Select the [At guideline] option. Then drag a horizontal or vertical guide-
line onto the page. The page is split at the position of the guideline.
Procedure
1. Select the pages that you want to split.
2. Click the [Split] button.
The [Split] dialog box appears.
3. Select your [Split] option.
4. Click [OK] to split the pages.
Split the page
Chapter 3 - The [Pages] workspace 115
PRISMAprepare v6.2

Rotate a page
Introduction
The [Rotate pages] option allows you rotate the page(s).
The following options are available:
• [Rotate right]
Rotate the page(s) 90 degrees to the right.
• [Rotate left]
Rotate the page(s) 90 degrees to the left.
• [Rotate 180 degrees]
Rotate the page(s) 180 degrees.
All pages of the booklet are rotated:
- If the selected pages are part of a [Booklet], or
- If a fold setting is applied to the whole document.
NOTE
If the selected pages have [Tab] media, you can only rotate the pages 180 degrees.
This option is available via:
• The button bar: click the drop-down button [Rotate pages].
• The menu: click 'Pages' - 'Rotate'.
• The context menu: right-click the selected page(s) and select option 'Rotate'.
Procedure
1. Select the page(s) that you want to rotate.
2. Click the [Rotate pages] drop-down button.
3. Select the rotation that you want to apply.
The selected pages are rotated.
NOTE
If the selected pages have [Tab] media, you can only rotate the pages 180 degrees.
Rotate a page
116 Chapter 3 - The [Pages] workspace
PRISMAprepare v6.2

Page content editing
Introduction
In PRISMAprepare Objects can be edited/manipulated within the pages.
Objects can be graphics, images or text.
The following actions can be done on selected objects:
• [Copy] / [Paste]
• [Cut] / [Paste]
• [Delete]
• [Edit text]
• [Shift]
Selection of the objects can be done by :
• Select object tool.
• Select area tool.
Restrictions
Action Applies to Text Image Partial
(Scanned)
image
Graphical
object
[Copy] /
[Paste]
[Cut] /
[Paste]
Copy / Cut : Multiple
selection on the same
page
Paste on the same
page or on another
one, in the same
document or in anoth-
er PRISMAprepare in-
stance
x V V V
[Delete] Multiple selection on
the same page or on
different pages
V V V V
[Edit text] Single selection V x x x
[Shift] Single selection on
the same page
V V V V
[Shift] Multiple selection on
different pages
V V x V
Copy / paste
Introduction
Use [Copy] / [Paste] to copy objects from one page to another, or even to another document.
Procedure
1. Select the objects.
Page content editing
Chapter 3 - The [Pages] workspace 117
PRISMAprepare v6.2

2. Use [Copy] to copy the original objects.
You can Copy using the following methods:
• Press Ctrl-c.
• Right mouse click - [Copy] on one of the objects.
• [Edit] - [Copy] in the menu.
3. Go to the destination page.
This can be another document in PRISMAprepare.
4. Use [Paste] to place the copied objects here.
You can paste using the following methods:
• Press Ctrl-v.
• Use [Edit] - [Paste] in the menu.
Copy / paste
118 Chapter 3 - The [Pages] workspace
PRISMAprepare v6.2

Cut / paste
Introduction
Use [Cut] / [Paste] to move object from one page to another, or even to another document.
Procedure
1. Select the objects.
2. Use [Cut] to remove the objects.
You can Cut using the following methods:
• Press Ctrl-x.
• Right mouse click - [Cut] on one of the objects.
• [Edit] - [Cut] in the menu.
3. Go to the destination page.
This can be another document in PRISMAprepare.
4. Use [Paste] to paste the cut objects.
You can paste using the following methods:
• Press Ctrl-v.
• Use [Edit] - [Paste] in the menu.
Cut / paste
Chapter 3 - The [Pages] workspace 119
PRISMAprepare v6.2

Delete
Introduction
Use [Delete] to remove object from one or more pages.
Procedure
1. Select the objects.
2. Use your [Delete] button to delete the objects.
You can also use
• Right mouse click - [Delete] on one of the objects.
• [Edit] - [Delete] in the menu.
3. The confirmation dialog appears.
4. Click [Yes] to confirm.
Delete
120 Chapter 3 - The [Pages] workspace
PRISMAprepare v6.2

Edit text
Introduction
Use [Edit text] to do small changes in the text of the document.
Procedure
1. Select a text line.
2. Click the [Edit text] button.
The [Edit text] dialog box appears.
3. Change the text to your liking.
Only basic text functions are allowed here. No layout options available.
Use the [Keep width of content box] option if you need to stay within the current context box. If
the text does not fit, the text is shrink or enlarged to make it fit.
4. Click [Apply] to confirm the changes.
Edit text
Chapter 3 - The [Pages] workspace 121
PRISMAprepare v6.2

Shift
Introduction
Use [Shift] to move object within one or more pages.
Procedure
1. Select the objects.
2. Use [Shift] to move the objects.
You can Shift using the following methods:
• Right mouse click - [Shift] on one of the objects.
• Use [Pages] - [Shift] in the menu.
3. The shift dialog appears.
4. Use this dialog to shift the objects or use your mouse to drag the objects.
5. Click [Apply] to confirm the shift.
Shift
122 Chapter 3 - The [Pages] workspace
PRISMAprepare v6.2

Mark or unmark a page
Introduction
You can mark or unmark pages. This allows you to:
• Define pages as special pages.
• Define pages as color pages.
You can process the marked pages separately from other pages of the document, for example:
• Print only the marked pages, or do not print the marked pages.
• Use inserts for the marked pages when you print your document.
• Use a different tray for the marked pages when you print your document.
NOTE
Option [Mark color] allows you to automatically mark all colour pages. You can then print only
the color marked sheets on a color machine.
These options are available via:
• The button bar: click the drop-down button [Mark pages].
• The menu: click [Pages] - 'Mark'.
• The context menu: right-click the selected page(s) and select option 'Mark'.
Marking and unmarking pages
Introduction
You can mark or unmark pages. This allows you to:
• Define pages as special pages.
• Define pages as color pages.
You can process the marked pages separately from other pages of the document, for example:
• Print only the marked pages, or do not print the marked pages.
• Use inserts for the marked pages when you print your document.
• Use a different tray for the marked pages when you print your document.
NOTE
Option [Mark color] allows you to automatically mark all colour pages. You can then print only
the color marked sheets on a color machine.
These options are available via:
• The button bar: click the drop-down button [Mark pages].
• The menu: click [Pages] - 'Mark'.
• The context menu: right-click the selected page(s) and select option 'Mark'.
Mark or unmark a page
Chapter 3 - The [Pages] workspace 123
PRISMAprepare v6.2

Mark pages as color page
Procedure
1. Click the [Mark pages] drop-down button.
2. Click [Mark color].
3. The automatic color detection marks all pages that contain color.
NOTE
If you want to unmark pages that were marked by the automatic color detection, use option
[Mark off].
Mark pages as color page
124 Chapter 3 - The [Pages] workspace
PRISMAprepare v6.2


Unmark a page
Procedure
1. Select the page(s) to unmark.
2. Click the [Mark pages] drop-down button.
3. Click [Mark off].
The mark is removed from all selected page(s).
Unmark a page
126 Chapter 3 - The [Pages] workspace
PRISMAprepare v6.2

Mark color pages with custom settings
Introduction
The [Mark color advanced...] option allows you to define custom settings for the color detection.
The custom settings define when a page is marked as a color page.
NOTE
This option is only available in the [Pages] workspace.
You can process the marked pages separately from other pages of the document, for example:
• Print only the marked pages, or do not print the marked pages.
• Print only the color marked sheets on a color machine.
• Use inserts for the marked pages when you print your document.
• Use a different tray for the marked pages when you print your document.
Define the minimum percentage of color on a page:
You can define a [Threshold] for the color detection. The threshold defines the percentage of
color pixels that must be detected on a page to mark that page as a color page.
The threshold can range from 0% to 20%.
Exclude grayscale images from the color detection:
Pages with grayscale images can be marked as color pages by the color detection process.
Increase the value of the [Grayscale tolerance] option to exclude grayscale values from the color
detection.
The threshold can range from 0% to 20%.
The preview view
The preview view shows the current page. The preview view displays the areas that are
considered as color according to the current settings. When the settings are changed, the preview
view is updated accordingly.
You can find the detected percentage of color on the current page below option 'Threshold'.
This option is available via:
• The button bar: click the drop-down button [Mark pages]. Select the [Mark color advanced...]
option.
• The menu: click 'Pages' - 'Mark'. Select the [Color advanced...] option.
• The context menu: right-click the selected page(s) and select option 'Mark'.
Mark pages as color pages with custom settings
Procedure
1. Click [Pages] - 'Mark' - [Color advanced...].
2. Define whether the color detection must be executed for:
• [All] pages
• [Selected] page(s)
3. Define whether the color detection must be executed for:
• [Complete page]
• [Selected area]
Use the 'Rectangle selection tool' to select the area for the color detection.
You can select the area in the preview view of the current page.
Mark color pages with custom settings
Chapter 3 - The [Pages] workspace 127
PRISMAprepare v6.2

4. Define the [Threshold] for the color detection.
A page is marked as a color page when the percentage of color on the page is larger than the
threshold.
[Color percentage] displays the percentage of color detected on the selected page.
Use the spin box or the slider to define the [Threshold]:
• [Threshold] = 0%:
The page is marked as a color page when one color pixel is detected.
• [Threshold] = 20%:
All pages with a color percentage of 20%, or larger, are marked as color pages.
5. Pages with grayscale images can be marked as color pages by the color detection process.
Increase the value of the [Grayscale tolerance] option to exclude grayscale values from the color
detection.
Use the spin box or the slider to define the [Grayscale tolerance]:
• [Grayscale tolerance] = 0%:
The page is marked as a color page when one grayscale pixel is detected.
• [Grayscale tolerance] = 20%:
All pages with a grayscale percentage of 20%, or larger, are marked as color pages.
6. You can exclude objects from the color detection.
• Enable the [Only process the contents of the page.] option:
The color detection is done on the content of the page(s).
• Disable the [Only process the contents of the page.] option:
The color detection is done on the content of the page(s) and on objects. Objects are user
defined content: [Stamps], [Bleed tabs], [Tab captions], [Spine caption], [Header and Footer].
7. Click [OK].
NOTE
All existing marks are removed prior to the new color detection. The marks are removed when
you click the [OK] button.
Mark pages as color pages with custom settings
128 Chapter 3 - The [Pages] workspace
PRISMAprepare v6.2

Reset your settings
Procedure
1. Click the reset button to reset your settings in this dialog.
The reset button is placed just below the 'X' of the dialog.
Reset your settings
Chapter 3 - The [Pages] workspace 129
PRISMAprepare v6.2

Unmark a page
Procedure
1. Select the page(s) to unmark.
2. Click the [Mark pages] drop-down button.
3. Click [Mark off].
The mark is removed from all selected page(s).
Unmark a page
130 Chapter 3 - The [Pages] workspace
PRISMAprepare v6.2

[Convert to grayscale]
Introduction
You can convert one ore more pages to grayscale.
For example, the document contains images with a [Color space] other than [RGB], [CMYK] or
[Grayscale]. You cannot edit these images. When you convert the pages with the images to
grayscale, you can also edit the images.
Grayscale images are also known as black-and-white images. Such images are composed
exclusively of shades of gray, varying from black at the lowest intensity to white at the highest.
Procedure
1. Select one or more pages.
2. Click [Pages] - [Convert to grayscale].
The selected pages are converted to grayscale.
[Convert to grayscale]
Chapter 3 - The [Pages] workspace 131
PRISMAprepare v6.2

Edit the image perception
Introduction
In the [Edit image] dialog, you can change the overall appearance of an image. You can edit the
[Saturation], the [Brightness] and the [Color values] of an image. Several images can be selected
and edited at the same time. If the color spaces are different, only the Saturation and Brightness
can be edited.
NOTE
You can edit images with an [RGB], [CMYK] and [Grayscale][Color space].
You can open the [Edit image] dialog while no image is selected. You can select and edit any
image while the dialog remains open.
A [Before] and an [After] preview are available in the [Edit image] dialog. The [Before] preview
shows the image before a change is applied. The [After] preview shows the effect of the current
changes to the image.
You can click the [Up] and [Down] arrow to display previous or next image when several images
are selected.
The [Edit image] options are available via:
• The button bar: click the button [Edit image].
• The menu: click 'Pages' - [Edit image].
• The context menu: right-click in the [Preview] view and select the [Edit image] option.
Edit the image
Procedure
1. Use the [Select object] tool to select images.
A blue border is placed around the selected images.
2. Click option [Edit image].
The [Edit image] dialog box appears.
3. You can edit the [Saturation], the [Brightness] and the [Color values] of an image.
Edit image options
Setting Description
[Saturation] With this setting, you can add more or less color to the image.
[Brightness] With this setting, you can make the image lighter or darker.
[Color values] You can edit images with an [RGB], [CMYK] and [Grayscale][Color space].
Zoom factor Select the zoom factor for the preview of the image.
[Proof print...] You can generate a proof document with all impacted pages.
Click the [Proof print...] button. The [Proof print] dialog box appears.
You can set the print settings. Click the [Proof print] button. The PDF proof
page is generated.
[Undo] and [Re-
do]
You can always [Undo] your changes.
4. Click [Apply] to confirm the changes.
The preview of the image is updated according to the changes.
Edit the image perception
132 Chapter 3 - The [Pages] workspace
PRISMAprepare v6.2


Edit the color of text and graphics
Introduction
In the [Edit colors] dialog, you can replace or change a specific color in text or graphic objects.
Graphic objects are images, line art, PDF objects, etc. When you edit an image in the [Edit colors]
dialog, the image becomes a monochrome image in tints of the selected color.
There are 3 different tabs with a different function.
1. Change the color of an object.
2. Change one color in an area.
3. Change all colors in an area.
NOTE
You can edit objects with an [RGB], [CMYK] and [Grayscale][Color space].
You can open the [Edit colors] dialog while no object is selected. You can select and edit any
object while the dialog remains open.
A [Before] and an [After] preview are available in the dialog. The [Before] preview shows the
color of an object before a change is applied. The [After] preview shows the effect of the current
changes to the object.
A red cross on a white field is displayed in the preview when:
• An image is selected.
• A graphical object with an unsupported [Color space] is selected.
• Multiple objects with different colors or [Color space] are selected.
The [Edit colors] options are available via:
• The button bar: click the button [Edit colors].
• The menu: click 'Pages' - [Edit colors].
• The context menu: right-click in the [Preview] view and select the [Edit colors] option.
Change the color of an object
Introduction
In the first tab of [Edit colors] you can change the color of a separate object.
Procedure
1. Click 'Pages' - [Edit colors].
The [Edit colors] dialog box appears.
2. Click on the first tab and define the settings to be used:
Edit the color of text and graphics
134 Chapter 3 - The [Pages] workspace
PRISMAprepare v6.2

Setting Description
[Select] • [Text]
You can select complete lines of text or only parts of the line.
• [Graphics]
Graphic objects are images, line art, PDF objects, etc.
You can select text and graphics with the:
• Draw rectangle with [Select object] tool:
you can select objects inside an area, drawing a rectangle with the [Select
object] tool.
• [Select object] tool:
The color is replaced or changed for all objects with the same [Color val-
ues] and [Color space] as the selected color. The objects are changed in
the selected page range.
[Replace color] You can replace a color with a color from the:
• [Color palette...]
Use the color palette
on page 39
• [Color picker...]
You can pick the color of text and of graphical objects. The [Color space]
of the selected object is used. The color picker cannot retrieve the exact
colors of an unsupported [Color space].
[Before] / [After]
pane
Here you see the color [Before] and [After] the color change.
You can also select what exactly to change
• [Fill]
Only the fill color is changed
• [Stroke]
Only the stroke color is changed
• [Fill same as stroke]
The fill color will be changed with the same color as the stroke color
• [Stroke same as fill]
The stroke color will be changed with the same color as the fill color
[Proof print...] You can generate a proof document with all impacted pages.
Click the [Proof print...] button. The [Proof print] dialog box appears.
You can set the print settings. Click the [Proof print] button. The PDF proof
page is generated.
[Apply] Click the [Apply] button to approve your changes.
[Close] Click the [Close] button to approve your changes.
[Undo] and [Re-
do]
You can always use the [Undo] and [Redo] button in the button bar to undo
or redo your changes.
[Reset] Click [Reset] button in the button bar to discard your changes.
Change the color of an object
Chapter 3 - The [Pages] workspace 135
PRISMAprepare v6.2

Change one color in an area
Introduction
In the second tab of [Edit colors] you can change one specific color in an area.
Procedure
1. Click 'Pages' - [Edit colors].
The [Edit colors] dialog box appears.
2. Click on the second tab and define the settings to be used:
Setting Description
[Pages] Define whether you want to replace or change the color on:
• All pages
• Selected pages
• Current page
[Select] • [Text]
You can select complete lines of text or only parts of the line.
• [Graphics]
Graphic objects are images, line art, PDF objects, etc.
You can select text and graphics with the:
• [Select area with rectangle] tool:
The color is replaced or changed for all objects in the selected area. The
objects in the selected area are changed in the selected page range.
[Replace color] You can replace a color with a color from the:
• [Color palette...]
Use the color palette
on page 39
• [Color picker...]
You can pick the color of text and of graphical objects. The [Color space]
of the selected object is used. The color picker cannot retrieve the exact
colors of an unsupported [Color space].
[Before] / [After]
pane
Here you see the color [Before] and [After] the color change.
You can also select what exactly to change
• [Fill]
Only the fill color is changed
• [Stroke]
Only the stroke color is changed
• [Fill and stroke]
The fill color will be changed with the same color as the stroke color
[Proof print...] You can generate a proof document with all impacted pages.
Click the [Proof print...] button. The [Proof print] dialog box appears.
You can set the print settings. Click the [Proof print] button. The PDF proof
page is generated.
[Apply] Click the [Apply] button to approve your changes.
[Close] Click the [Close] button to approve your changes.
[Undo] and [Re-
do]
You can always use the [Undo] and [Redo] button in the button bar to undo
or redo your changes.
[Reset] Click [Reset] button in the button bar to discard your changes.
Change one color in an area
136 Chapter 3 - The [Pages] workspace
PRISMAprepare v6.2

Change all colors in an area
Introduction
In the third tab of [Edit colors] you can change all colors of an area to another color.
Procedure
1. Click 'Pages' - [Edit colors].
The [Edit colors] dialog box appears.
2. Click on the third tab and define the settings to be used:
Setting Description
[Pages] Define whether you want to replace or change the color on:
• All pages
• Selected pages
• Current page
[Select] • [Text]
You can select complete lines of text or only parts of the line.
• [Graphics]
Graphic objects are images, line art, PDF objects, etc.
You can select text and graphics with the:
• [Select area with rectangle] tool:
The color is replaced or changed for all objects in the selected area. The
objects in the selected area are changed in the selected page range.
[Replace color] You can replace a color with a color from the:
• [Color palette...]
Use the color palette
on page 39
• [Color picker...]
You can pick the color of text and of graphical objects. The [Color space]
of the selected object is used. The color picker cannot retrieve the exact
colors of an unsupported [Color space].
[After] pane Here you see the color [After] the color change.
You can also select what exactly to change
• [Fill]
Only the fill color is changed
• [Stroke]
Only the stroke color is changed
• [Fill and stroke]
The fill color will be changed with the same color as the stroke color
[Proof print...] You can generate a proof document with all impacted pages.
Click the [Proof print...] button. The [Proof print] dialog box appears.
You can set the print settings. Click the [Proof print] button. The PDF proof
page is generated.
[Apply] Click the [Apply] button to approve your changes.
[Close] Click the [Close] button to approve your changes.
[Undo] and [Re-
do]
You can always use the [Undo] and [Redo] button in the button bar to undo
or redo your changes.
[Reset] Click [Reset] button in the button bar to discard your changes.
Change all colors in an area
Chapter 3 - The [Pages] workspace 137
PRISMAprepare v6.2

Enhance your document
Apply a template
Introduction
You can create templates for documents that need the same layout. Each template is added to the
template catalog.
The templates are displayed alphabetically in a list.
You can apply one template at a time to your document. After the template is applied, you can
apply an other template to your document.
NOTE
Use
The command line interface
on page 339 to apply multiple templates in one action.
Cancel the application of a template
When you apply a template, the [Apply template] dialog opens. The dialog shows a progress bar
and contains a [Cancel] button.
Click [Cancel] to cancel the application of the template. All settings, which are already applied by
the template, are undone.
Apply a template from the template catalog
Procedure
1. Click [Document] - 'Apply template'.
2. Click 'From template catalog...'
The [Apply template] dialog opens.
3. Select the template that you want to apply to your document.
4. Click [Apply].
The template is applied to your document.
A message appears when the template is applied. You can view the details when the template
was not applied successfully.
5. Click [Close].
The [Apply template] dialog opens.
You can apply another template to your document. Select the template that you want to apply to
your document and click [Apply].
Click [Close] to return to the application.
NOTE
Click [Undo] to undo all settings which are applied by the template.
Enhance your document
138 Chapter 3 - The [Pages] workspace
PRISMAprepare v6.2

Apply a template from the Pick list
Procedure
1. Click [Document] - 'Apply template'.
2. Select the template from the pick list.
The template is applied to your document.
A message appears when the template is applied. You can view the details when a template was
not applied successfully.
3. Click [Close].
NOTE
Click [Undo] to undo all settings which are applied by the template.
Apply a template from the Pick list
Chapter 3 - The [Pages] workspace 139
PRISMAprepare v6.2

Define the document properties
Introduction
The Document properties are initialized based on the corresponding PDF document properties.
Once you change the Document properties within this application, these properties will not be
overruled by the PDF properties in the future.
Click [Document] - [Properties] to specify the document properties.
Document properties
Setting Description
Title Enter the document title here.
Owner Enter the document owner here.
Account Enter your account here.
Addressee Enter your address here,
Banner message Specify the message that should appear on the banner page.
Special instruc-
tion
Specify the special instruction message.
Creation date Specify the creation date here.
Define the document properties
140 Chapter 3 - The [Pages] workspace
PRISMAprepare v6.2
Chapter 4
The [VDP] workspace

Introduction
Introduction
The [VDP] workspace offers basic functions to generate documents with variable data. The
variable data is retrieved from an external data source.
1
5
3
2
4
7
6
The [VDP] workspace contains the following elements:
1. The menu bar
Use the menu bar to select an action and open the Help file.
2. The button bar
Use the button bar for quick access to the actions most often used.
3. The [Structure] view
The [Structure] view offers an overview of the structure of your document. You can navigate
within your document and select pages.
4. The [Preview] view
The [VDP] workspace offers a WYSIWYG preview that shows the pages one by one or stacked
(on top of each other).
5. The navigation bar
Use this navigation bar to switch between the available workspaces.
6. The footer
Use this footer to specify the zoom factor and to select the required tools.
7. The data source view
Introduction
142 Chapter 4 - The [VDP] workspace
PRISMAprepare v6.2

The data source view shows all rows and fields of the selected data source.
Open the [VDP] workspace
Click the [VDP] button, or
Click [View] - [VDP workspace].
The context menu
You can access the context menu when you right-click on a page(s). This allows quick access to
the actions most often used. The context menu is available in the [Preview] and [Structure] view.
Introduction
Chapter 4 - The [VDP] workspace 143
PRISMAprepare v6.2

The toolbar
Introduction
The customizable toolbar allows you to add, move and remove buttons.
Do the following steps to customise the toolbar:
• Click [View] - [Customize toolbar...].
Or right-click the toolbar and select the [Customize toolbar...] option.
• You will get a window showing all the buttons that you can add to your toolbar.
• Drag and drop the button to and from the toolbar to change your toolbar.
• In the view option you can select different sizes and layouts for the buttons.
• Use 'Revert to default layout' to get the default buttons and view option.
The toolbar
Button Description
Print
Print the job.
Undo
The previous command is undone.
Redo
The previous undone command is redone.
[Add text frame]
Add a [Text frame] to the page(s) to create a document with variable data.
[Add image frame]
Add a [Image frame] to the page(s) to create a document with variable data.
[Delete all frames]
Delete all [VDP frames] from the document.
[Select data source]
Select a data source. The data source contains the variable data for the
document.
[Disconnect data source]
Disconnect the data source. The data source contains the variable data for
the document.
[Import VDP]
You can import the VDP data from an XML file.
[Export VDP]
You can export the VDP data to an XML file.
[Validate VDP]
Check if any rules are violated in the variable data document. The rules are
related to VDP frames. 4
The toolbar
144 Chapter 4 - The [VDP] workspace
PRISMAprepare v6.2
Button Description
Mark
Add mark to page(s)
Remove mark from page(s)
- Add mark to all color page(s)
- Add mark to all pages that contain [VDP frames]. [VDP frames] are frames
of type [Text frame] and/or [Image frame].
The toolbar
Chapter 4 - The [VDP] workspace 145
PRISMAprepare v6.2

The [Structure] view
Introduction
The [Structure] view provides easy navigation and selection of pages in the document. It also
gives an overview of the page programmed settings that are used in your document.
You can drag and drop pages in the [Structure] view.
Horizontally, the [Structure] view displays columns. These columns describe properties on which
you can group pages. These groups allow you to easily select a range of pages that have the
same properties.
Vertically, the document is shown in pages and groups of pages. For every (sub)section of pages,
a bar is created. With these bars you can easily manage your (sub)sections.
Right-click anywhere in a column to get a context menu. The context menu depends on the
position where you right-click.
The available columns
You can group pages based on the following criteria:
• The [Page] column shows the pages and blank sheets of your document. The [Page] column
contains the logical page index.
• [Section]
You can group sequential pages that belong together (for example chapters) in a section. You
can divide a section into subsections. Up to 5 levels are possible here. The names of each
[Section] level are displayed.
• [Page size]
The sequential pages with the same page size and orientation. This column also shows any
fold settings.
Every column has icons and labels:
• The icon section displays icons that give feedback about the properties of the (group of) pages.
• The label section displays in text the properties of the (group of) pages.
You can show or hide the label when you double click on the column's header.
You can adjust the columns:
• Show or hide columns
Click [View] - [Show columns] to define if a column is visible or not. You can right-click the
column header and use its context menu.
• Column order
To change the order of the columns you can drag the column headers to a new position. The
active column is the first column behind the [Page] column. You can use this active column to
expand or collapse a group of pages.
• Column width
You can drag the separators in the column header to change the width of a column.
Feedback icons
Feedback
Icons
on page 50 are displayed in the columns.
Footer
Click the [Expand all groups] button to expand all groups of the active column.
This option is also available via [View] - [Expand all groups].
The [Structure] view
146 Chapter 4 - The [VDP] workspace
PRISMAprepare v6.2

Click the [Collapse all groups] button to collapse all groups of the active column.
This option is also available via [View] - [Collapse all groups].
NOTE
The active column is the first column behind the [Page] column.
Enter page numbers or page ranges in the [Pages] field to select pages. The character n is used to
define the last page. Character * defines all pages. For example: 1,5,9-n.
Note that disabled pages and blank sheets cannot be selected via the pages field.
Related information
Configure sections
on page 69
The [Structure] view
Chapter 4 - The [VDP] workspace 147
PRISMAprepare v6.2

The [Preview] view
Introduction
The [Preview] view displays:
• The current page and its page content.
• The additional content:
[Header and Footer], [Tab captions] and [Bleed captions], [Stamps].
• The finishing settings:
[Staple], [Fold], [Hole punch].
When a fold setting is applied, the fold lines are displayed in the [Preview] view.
• The [VDP frames] and their content.
The content of the currently selected row is displayed in the frame(s).
The footer contains tools that you can use in the [Preview] view.
Rulers & guidelines
Rulers are displayed at the top and left of the [Preview] view. The units displayed in the rulers
depend on the [Region] setting (inches/mm).
Guidelines can be placed in the [Preview] view by dragging them from the rulers
• Horizontal ruler: horizontal guideline
• Vertical ruler: vertical guideline
• Intersection of horizontal and vertical ruler: horizontal and vertical guidelines.
Guidelines can also be numerically positioned.
Double-click the rulers or right-click in the [Preview] view. Then click View - [Add guideline]... for
the menu to add a guideline.
Right-click on an existing guideline to edit, center, or delete it.
Show or hide guidelines:
• Option 'Show guidelines' in menu 'View' is automatically enabled when you add a guideline.
• Click 'View' - 'Remove all guidelines' to delete all guidelines from the [Preview] view.
Footer
The footer contains tools that you can use in the [Preview] view.
Tools and icons in the footer
Tool Description
Zoom selection Use this to specify the zoom factor.
Or click 'View' - [Zoom].
Use these tools to [Zoom in] or [Zoom out].
Or click 'Tools' - [Zoom out].
Click 'Tools' - [Zoom in]. 4
The [Preview] view
148 Chapter 4 - The [VDP] workspace
PRISMAprepare v6.2
Tool Description
[Select page]
Or click 'Tools' - [Select pages].
[Drag] tool
Use this tool to drag the page in the [Preview] view.
Or click 'Tools' - [Drag].
[Select area with rectangle]
You can draw a selection rectangle using your mouse. The selected area is
visible by a dotted line around the selected area.
To reset a selection, click your mouse inside the [Preview] view.
Or click 'Tools' - [Select area with rectangle].
NOTE
Push 'Shift' on the keyboard and select with the mouse to select
and invert an area with one action.
[Select area inside guidelines]
You can select an area that is marked by guidelines and page-borders by
clicking inside this area. The selected area is visible by a dotted line around
the selected area.
To reset a selection, click your mouse inside the [Preview] view.
Or click 'Tools' - [Select area inside guidelines].
[Repeated selection]
Click the [Repeated selection] tool to define repeated selections. A spinbox
appears.
You can define the number of pages for the repeated selections with the
spinbox.
[Invert selected area]
Click the [Invert selected area] button to select the page content outside the
initially selected area.
For example, you select a Company logo. Then you click the [Invert selected
area] button. Now, the page content without the Company logo is selected.
[First page]
[Previous page]
Current page Shows the current page number.
[Next page]
[Last page]
[First variable data document]
Select the first row in the data source file.
[Previous variable data document]
Select the previous row in the data source file.
Current row Shows the number of the currently selected row. The content of the current-
ly selected row is displayed in the frames.
[Next variable data document]
Select the next row in the data source file. 4
The [Preview] view
Chapter 4 - The [VDP] workspace 149
PRISMAprepare v6.2

Tool Description
[Last variable data document]
Select the last row in the data source file.
[Show the content outside of the page]
Select this option if you want to show the content outside of the page.
In this view the bleed margin is indicated by a dotted line around the page.
Or click 'View' - 'Show content outside of page'.
Bleed size The define bleed size in mm or inches.
Click the [Bleed area] button.
The [Preview] view
150 Chapter 4 - The [VDP] workspace
PRISMAprepare v6.2

Select a data source
Introduction
The data source contains the variable data for the document.
The supported data source types are: *.accdb, *.mdb, *.xlsx, *.xls and *.csv. Password-protected
data sources of type *.xlsx, *.xls and *.csv are not supported. If special characters are used in a
*.csv file, you must define the encoding of the file to display the characters correctly. You must
create a schema.ini file at the same location of the *.csv file. The schema.ini file must contain:
1. Name of the data source file.
For example: [sourceFile.csv]
2. The [Text delimiter]. If a schema.ini file is used to define the encoding, the [Text delimiter]
must be defined in the file as well.
For example: Format=Delimited(,)
3. The encoding of the data source file. The encoding can be: ANSI, UTF-8 or Unicode.
For example: CharacterSet=ANSI
When you have selected a data source, you can define the frames for the variable data. If you
select another data source after the frames are defined, the frames remain valid when:
1. The new data source type is identical to the used data source type.
2. The new data source contains the same fields as used in the frames.
3. The field types in the new data source are identical to the field types in the used data source.
This option is available via:
• The button bar: click the button [Select data source].
• The menu: click [Variable data] - [Select data source].
• The context menu: right-click the selected page(s) and select option [Select data source].
Select a data source
1. Click [Variable data] - [Select data source].
A [Browse] dialog will appear.
2. Browse to the data source file.
3. Select the data source file and click [Open].
4. If the data source type is *.csv, you must define the [Text delimiter] and/or the [Text
separator].
5. Click [OK].
Select a data source
Chapter 4 - The [VDP] workspace 151
PRISMAprepare v6.2

Disconnect a data source
Introduction
All frames will be deleted when you disconnect the data source.
Procedure
1. Click [Variable data] - [Disconnect data source].
The data source is disconnected. The frames are deleted from the document.
Disconnect a data source
152 Chapter 4 - The [VDP] workspace
PRISMAprepare v6.2

Import the [VDP] data
Introduction
Import the [VDP] data to apply the same [VDP] layout to a document with other content. For
example, to create a weekly bulletin. You can import the [VDP] data from an XML file. The [VDP]
data contains:
• The properties of the frames which use the variable data.
• The location of the data source file.
This option is available in the [VDP workspace] via:
• The button bar: click the button [Import VDP].
• The menu: click [Variable data] - [Import VDP].
Procedure
1. Click [Variable data] - [Import VDP].
The [Import VDP] dialog box appears.
2. Browse to the location of the[VDP] data file.
3. Select the XML file.
4. Click [Open].
The [VDP] data is imported and applied to the document.
Import the [VDP] data
Chapter 4 - The [VDP] workspace 153
PRISMAprepare v6.2

Export the [VDP] data
Introduction
You can export the [VDP] data to an XML file. The [VDP] data contains:
• The properties of the frames which use the variable data.
• The location of the data source file.
This option is available in the [VDP workspace] via:
• The button bar: click the button [Export VDP].
• The menu: click [Variable data] - [Export VDP].
Procedure
1. Click [Variable data] - [Export VDP].
The [Export VDP] dialog box appears.
2. Browse to the location where you want to save the file.
3. Enter a file name and click [Open]. The XML file is saved to disk.
Export the [VDP] data
154 Chapter 4 - The [VDP] workspace
PRISMAprepare v6.2

Validate the [VDP] data
Introduction
The [Validate VDP] operation checks if any rules are violated in the variable data document. Only
the selected rows of the data source are validated. The [Validate VDP] operation cannot fix most
of the detected violations. It is recommended that you fix these problems manually before you
print the job. You can configure a number of rules which are used by the [Validate VDP]
operation.
The following rules cannot be configured:
• [The data source contains incompatible field type(s) and/or required fields are missing.]
• [The image folder is invalid or cannot be accessed.]
• [The field type or field format is invalid.]
• [The frame is too small to contain all text.]
[The frame is too small to contain the image.]
• [A font is invalid.]
• [The text contains non-printable character(s).]
The following rules can be configured in the [Preflight] dialogue:
• [Content too close to border rule]
This rule is used to check if frames are too close to the page border.
• [Image compression is too high rule]
• [Image resolution is too high rule]
The preflight operation can fix the violations detected by this rule.
• [Image resolution is too low rule]
• [Hairline rule]
This rule is used to check the line weight of the frame borders. The preflight operation can fix
the violations detected by this rule.
NOTE
When automatic preflight is enabled, the configured rules for automatic preflight are used. When
automatic preflight is disabled, the configured rules for manual preflight are used.
This option is available in the [VDP workspace] via:
• The button bar: click the button [Validate VDP].
• The menu: click [Variable data] - [Validate VDP].
• The context menu: right-click any of the page(s) and select option [Validate VDP].
Procedure
1. Click [Variable data] - [Validate VDP].
The [Validate VDP] operation checks if any rules are violated in the variable data document. Only
the selected rows of the data source are validated.
2. A [Validate VDP] report is generated. The report shows the problems that have been found.
• The [Validate VDP] operation cannot fix most of the detected violations. It is recommended that
you fix these problems manually before you print the job.
NOTE
The validation report is not updated when you fix a violation. Generate the report again to
update the report.
3. Click [Close].
Validate the [VDP] data
Chapter 4 - The [VDP] workspace 155
PRISMAprepare v6.2

Manage the variable data
Introduction
The [VDP] workspace offers basic functions to generate documents with variable data. The
variable data is retrieved from an external data source. You can select the variable data in the
data source view. The data source view shows the selected rows and fields of the data source file.
Set the header row
Introduction
You can set one of the rows in the data source as header row. The values in the header row are
used as column headers. The data in the rows above the header row is not used when the
variable data document is printed. The rows above the header row are hidden from the data
source view.
Click on a column header to sort the fields in the column. You can sort ascending and
descending. Click the [Revert to original order] option to use the order of the fields in the data
source file. The [Revert to original order] option is available in the footer of the data source view.
Procedure
1. Right-click a row in the data source view.
2. Select the [Set as header row] option from the context menu.
The row is set as custom header row.
Reset the header row
Procedure
1. Select the [Reset header row] option from the footer of the data source view.
The original header row from the data source file is used. All rows in the data source are available
in the data source view.
Manage the variable data
156 Chapter 4 - The [VDP] workspace
PRISMAprepare v6.2

Select the variable data
Introduction
The [VDP] workspace offers basic functions to generate documents with variable data. The
variable data is retrieved from an external data source. You can select the variable data in the
data source view. The data source view shows the rows and fields of the selected data source file.
By default, all rows are selected. You can unselect the rows that you do not want to print. Click
the [Hide unselected rows] option to hide the unselected rows in the data source view. Click the
[Show all rows from the data source] option to show all rows from the data source. These options
are available in the footer of the data source view.
Procedure
1. Enable the checkbox in front of a row to select the row. Disable the checkbox to unselect the row.
The variable data from the selected rows is printed.
NOTE
Enter row numbers or row ranges in the text field in the footer of the data source view to select
rows. The character n is used to define the last row. Character * defines all rows. For example:
1,5,9-n.
Select the variable data
Chapter 4 - The [VDP] workspace 157
PRISMAprepare v6.2

Set default formats
Introduction
The data source view shows the rows and fields of the selected data source file. You can set
default formats for the fields available in the data source file. The default format does not change
the format of fields that are already used in existing frames.
Procedure
1. Right-click a field in the data source view.
Based on the field type, you can select:
• [Default image folder]
• [Default date/time format]
• [Default number format]
2. Set the default format:
Setting Description
[Default image
folder]
Browse to the image folder.
NOTE
If you select a folder that does not contain images, a red cross is
displayed in the frame in the preview view.
[Default date/
time format]
You can define the [Time format] and the [Date format].
[Default number
format]
• [Integer digits]
You can define a minimum number of digits to express the numbers from
the selected field(s). Leading zeros are used to pad the number. If the de-
fined number of digits is too small to express the number, the actual
number from the field is used.
• [Decimal digits]
You can define the number of digits displayed behind the [Decimal sepa-
rator].
• You can define the [Decimal separator] and the [Thousands separator].
NOTE
The default format does not change the format of fields that are already used in existing frames.
3. Click [OK].
Set default formats
158 Chapter 4 - The [VDP] workspace
PRISMAprepare v6.2
Manage the frames
Add a text frame
Introduction
The [VDP] workspace offers basic functions to create documents with variable data. The variable
data is retrieved from an external data source. You can define one or more frames which use the
variable data. The settings of each frame are valid for all rows in the data source. A frame can be
positioned partially outside the page. For example, to use variable data on [Bleed tabs].
The [VDP] workspace does not offer automatic font detection. You must determine yourself which
font is used in the master document.
This option is available via:
• The button bar: click the button [Add text frame].
• The menu: click [Variable data] - [Add text frame].
• The context menu: right-click the selected page(s) and select option [Add text frame].
Before you begin
When you have selected a data source, you can define the frames for the variable data.
Procedure
1. Select tool [Select area with rectangle].
You can draw a selection rectangle using your mouse. The selected area is visible by a dotted line
around the selected area.
2. Click [Variable data] - [Add text frame].
The [Text frame] dialog opens.
3. Define on which pages you want to add the text frame:
Setting Description
[Pages] • All pages
• Selected pages
• Current page
4. [Fill and border color] of the text frame:
Setting Description
[Fill color] Click [Edit] to select the background colour of the frame.
You can define the transparency of the background of the frame.
[Border color] Click [Edit] to select the border colour of the frame.
You can define the transparency of the frame border.
[Line weight] You can define the line width of the border.
5. [Size and position] of the text frame:
Setting Description
[Width] / [Height] You can define the width and height of the frame.
You can also change the size of the frame with your mouse in the [Preview]
view. 4
Manage the frames
Chapter 4 - The [VDP] workspace 159
PRISMAprepare v6.2
Setting Description
[Horizontal shift] /
[Vertical shift]
You can define the exact position of the frame on the page(s).
[Rotation] You can rotate the frame.
6. Define the variable data:
Setting Description
[Insert field] The drop-down list contains the available column headers of the selected
data source. Select one or more column headers from the data source. For
each selected row, the variable data is taken from each field of the selected
column. The variable data is printed on the master document.
You can use fields of type:
• String
• Number
• Date and time
[Insert row num-
ber...]
You can add the number of each row in the data source to the variable data.
• [Number format]
Select the format for the row numbers.
• [Insert total number of rows]
Select this option to add the total number of rows of the data source to
the row numbering.
The row number is displayed as: <current row number>/<total number of
rows>.
• [Number of digits]
You can define a fixed number of digits to express the row number. Lead-
ing zeros are used to pad the row number. If the defined number of digits
is too small to express the number of rows, the actual number of rows is
used.
[Format number] • [Integer digits]
You can define a minimum number of digits to express the numbers from
the selected field(s). Leading zeros are used to pad the number. If the de-
fined number of digits is too small to express the number, the actual
number from the field is used.
• [Decimal digits]
You can define the number of digits displayed behind the [Decimal sepa-
rator].
• You can define the [Decimal separator] and the [Thousands separator].
[Format date/
time]
You can define the [Time format] and the [Date format].
[Font] Select several different font attributes that must be used for the variable da-
ta. The different font attributes can be specified at character level for fixed
text and per field for the variable data.
• Font and font size
The [VDP] workspace does not offer automatic font detection. You must
determine yourself which font is used in the master document.
• Bold / Italic / Underlined / Strikethrough.
• Different text colors.
• Alignment of the text. 4
Add a text frame
160 Chapter 4 - The [VDP] workspace
PRISMAprepare v6.2

Setting Description
Text The text in the text box is added to the frame. Click [Insert field] to insert one
or more fields from the data source. You can also type text directly in the
text box.
You can define the transparency of the text.
7. Click [OK].
The frame is added to the document on top of the page content. The frame is added on top of any
existing frames.
After you finish
If you select another data source after the frames are defined, the frames remain valid when:
1. The new data source type is identical to the used data source type.
2. The new data source contains the same fields as used in the frames.
3. The field types in the new data source are identical to the field types in the used data source.
Add a text frame
Chapter 4 - The [VDP] workspace 161
PRISMAprepare v6.2
Add an image frame
Introduction
The [VDP] workspace offers basic functions to create documents with variable data. The variable
data is retrieved from an external data source. You can define one or more frames which use the
variable data. The settings of each frame are valid for all rows in the data source. A frame can be
positioned partially outside the page. For example, to use variable data on [Bleed tabs].
The [VDP] workspace does not offer a color picker. You must determine yourself which colour is
used in the master document.
This option is available via:
• The button bar: click the button [Add image frame].
• The menu: click [Variable data] - [Add image frame].
• The context menu: right-click the selected page(s) and select option [Add image frame].
Before you begin
When you have selected a data source, you can define the frames for the variable data.
Procedure
1. Select tool [Select area with rectangle].
You can draw a selection rectangle using your mouse. The selected area is visible by a dotted line
around the selected area.
2. Click [Variable data] - [Add image frame].
The [Image frame] dialog opens.
3. Define on which pages you want to add the image frame:
Setting Description
[Pages] • All pages
• Selected pages
• Current page
4. [Fill and border color] of the image frame:
Setting Description
[Fill color] Click [Edit] to select the background color of the frame.
You can define the transparency of the background of the frame.
The [VDP] workspace does not offer a color picker. You must determine
yourself which colour is used in the master document.
[Border color] Click [Edit] to select the border color of the frame.
You can define the transparency of the frame border.
[Line weight] You can define the line width of the border.
5. [Size and position] of the image frame:
Setting Description
[Width] / [Height] You can define the width and height of the frame.
You can also change the size of the frame with your mouse in the [Preview]
view. 4
Add an image frame
162 Chapter 4 - The [VDP] workspace
PRISMAprepare v6.2
Setting Description
[Horizontal shift] /
[Vertical shift]
You can define the exact position of the frame on the page(s).
[Rotation] You can rotate the frame.
6. Define the variable data:
Setting Description
[Field] The drop-down list contains the available column headers of the selected
data source. Select one or more column headers from the data source. For
each selected row, the variable data is taken from each field of the selected
column. The variable data is printed on the master document.
You can use fields of type:
• Image
NOTE
If you select a field type other than "Image", a red cross is dis-
played in the frame in the preview view.
The image field must contain:
• The name of the image.
• The absolute path to the image or the path relative to the image folder.
Images of type BMP, GIF, TIFF, TIF, JPEG, JPG, PNG and EPS are supported.
[Image folder] Click the [Browse...] button. Browse to the image folder.
You can define one image folder per image frame.
NOTE
If you select a folder that does not contain images, a red cross is
displayed in the frame in the preview view.
[Transparency] You can define the transparency of the image.
7. [Scale and position] of the image:
Setting Description
[Scale] • [None]
• [Fit to frame]
The images are scaled up or down to fit the frame.
• [Shrink to frame]
The images are scaled down if the images are larger than the frame. The
images are not scaled up.
Option [Keep ratio] enabled: The image is scaled relative to its original size.
[Position] Use the arrows or the central dot to position the image in the frame.
8. Click [OK].
The frame is added to the document on top of the page content. The frame is added on top of any
existing frames.
After you finish
If you select another data source after the frames are defined, the frames remain valid when:
1. The new data source type is identical to the used data source type.
Add an image frame
Chapter 4 - The [VDP] workspace 163
PRISMAprepare v6.2

2. The new data source contains the same fields as used in the frames.
3. The field types in the new data source are identical to the field types in the used data source.
Add an image frame
164 Chapter 4 - The [VDP] workspace
PRISMAprepare v6.2

Edit a frame
Introduction
The [VDP] workspace offers basic functions to create documents with variable data. The variable
data is retrieved from an external data source. You can define one or more frames which contain
the variable data. You can edit the created frames.
This option is available via:
• The context menu: right-click the frame and select the [Edit] option.
• Double-click the frame.
Procedure
1. Double-click the frame.
The [Text frame] dialog or [Image frame] dialog opens.
2. Edit the frame.
3. Click [OK] to confirm the changes.
Edit a frame
Chapter 4 - The [VDP] workspace 165
PRISMAprepare v6.2

Copy a frame
Introduction
The [VDP] workspace offers basic functions to create documents with variable data. The variable
data is retrieved from an external data source. You can define one or more frames which contain
the variable data. You can copy the created frames.
This option is available via:
• The context menu: right-click the frame and select option [Copy].
• Double-click the frame.
Procedure
1. Double-click the frame.
The [Text frame] dialog or [Image frame] dialog opens.
2. Define the settings for the frame.
3. Click [OK].
The frame is added to the document on top of the page content. The frame is added on top of any
existing frames.
Copy a frame
166 Chapter 4 - The [VDP] workspace
PRISMAprepare v6.2

Change the order of the frames
Introduction
You can add a frame to the document on top of the page content. The frame is added on top of
any existing frames. You can change the order of the frames which are on top of the page
content.
You can move one or more frames behind the page content. You can change the order of the
frames which are behind the page content.
This option is available via:
• The context menu: right-click the frame that you want to bring to the front or send to the back.
Procedure
1. Right-click the frame that you want to bring to the front or send to the back. The context menu
opens.
• [Behind page content]
Move the frame behind the page content. You can change the order of the frames which are
behind the page content.
• [Bring to front]
The selected frame is placed on top of all frames.
• [Send to back]
The selected frame is placed at the bottom of all frames.
• [Bring forward]
The selected frame is moved one frame up.
• [Send backward]
The selected frame is moved one frame down.
Change the order of the frames
Chapter 4 - The [VDP] workspace 167
PRISMAprepare v6.2

Delete frames
Introduction
You can delete one or more frames from the document:
• You can delete a selected frame.
• You can delete all frames in one action.
Delete a selected frame
1. Right-click the frame that you want to delete.
The context menu opens.
2. Click [Delete].
The selected frame is deleted from the document.
Delete all frames
1. Click [Variable data] - [Delete all frames].
The frames are deleted from the document.
Delete frames
168 Chapter 4 - The [VDP] workspace
PRISMAprepare v6.2

Mark or unmark a page
Introduction
You can mark or unmark pages. This allows you to:
• Define pages as special pages.
• Define pages as color pages.
You can process the marked pages separately from other pages of the document, for example:
• Print only the marked pages, or do not print the marked pages.
• Use inserts for the marked pages when you print your document.
• Use a different tray for the marked pages when you print your document.
NOTE
Option [Mark color] allows you to automatically mark all colour pages. You can then print only
the color marked sheets on a color machine.
These options are available via:
• The button bar: click the drop-down button [Mark pages].
• The menu: click [Pages] - 'Mark'.
• The context menu: right-click the selected page(s) and select option 'Mark'.
Marking and unmarking pages
Introduction
You can mark or unmark pages. This allows you to:
• Define pages as special pages.
• Define pages as color pages.
You can process the marked pages separately from other pages of the document, for example:
• Print only the marked pages, or do not print the marked pages.
• Use inserts for the marked pages when you print your document.
• Use a different tray for the marked pages when you print your document.
NOTE
Option [Mark color] allows you to automatically mark all colour pages. You can then print only
the color marked sheets on a color machine.
These options are available via:
• The button bar: click the drop-down button [Mark pages].
• The menu: click [Pages] - 'Mark'.
• The context menu: right-click the selected page(s) and select option 'Mark'.
Mark or unmark a page
Chapter 4 - The [VDP] workspace 169
PRISMAprepare v6.2

Mark pages as color page
Procedure
1. Click the [Mark pages] drop-down button.
2. Click [Mark color].
3. The automatic color detection marks all pages that contain color.
NOTE
If you want to unmark pages that were marked by the automatic color detection, use option
[Mark off].
Mark pages as color page
170 Chapter 4 - The [VDP] workspace
PRISMAprepare v6.2

Mark pages as VDP pages
Procedure
1. Click the [Mark pages] drop-down button.
2. Click [Mark VDP].
3. All pages that contain [VDP frames] are marked. [VDP frames] are frames of type [Text frame]
and/or [Image frame].
Mark pages as VDP pages
Chapter 4 - The [VDP] workspace 171
PRISMAprepare v6.2

Unmark a page
Procedure
1. Select the page(s) to unmark.
2. Click the [Mark pages] drop-down button.
3. Click [Mark off].
The mark is removed from all selected page(s).
Unmark a page
172 Chapter 4 - The [VDP] workspace
PRISMAprepare v6.2
Chapter 5
The [Document] workspace
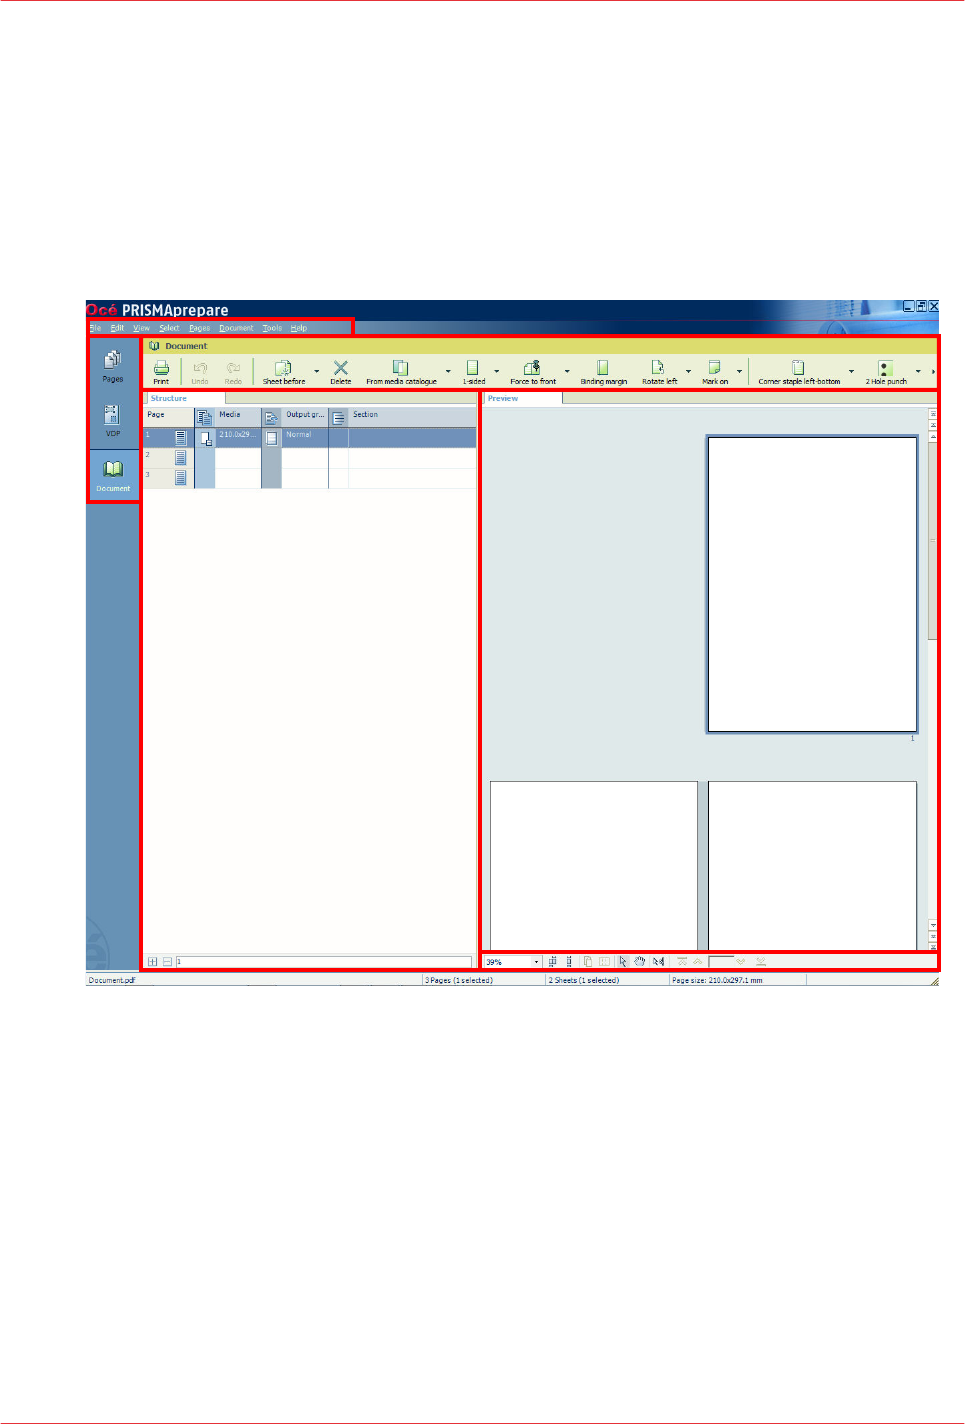
Introduction
Introduction
The [Document] workspace offers the tools to transform pages into a fully prepared print job. You
use the [Document] workspace during the 'Allocate pages', 'Define your document' and 'Enhance
your document' phase.
The [Document] workspace is the default workspace when opening a file.
1
5
3
2
4
6
The [Document] workspace contains the following elements:
1. The menu bar
Use the menu bar to select an action and open the Help file.
2. The button bar
Use the button bar for quick access to the actions most often used.
3. The [Structure] view
The [Structure] view offers an overview of the structure of your document. You can navigate
within your document and select pages.
4. The [Preview] view
The [Document] workspace offers a WYSIWYG preview that shows how your document looks
when all production steps are completed.
All settings that affect the appearance of your document are shown, for example staples, tab
captions, page numbers, and so on.
The pages of your document can be shown in different
The Preview view
on page 180.
5. The navigation bar
Introduction
174 Chapter 5 - The [Document] workspace
PRISMAprepare v6.2

Use this navigation bar to switch between the available workspaces.
6. The footer
Use this footer to specify the zoom factor and to select the required tools and views.
Open the [Document] workspace
Click the [Document] button, or
Click [View] - [Document workspace].
The context menu
You can access the context menu when you right-click on a page(s). This allows quick access to
actions, for example create sections, insert pages, assign media, and so on. The context menu is
available in the [Preview] and [Structure] view.
Introduction
Chapter 5 - The [Document] workspace 175
PRISMAprepare v6.2
The toolbar
Introduction
The customizable toolbar allows you to add, move and remove buttons.
Do the following steps to customise the toolbar:
• Click [View] - [Customize toolbar...].
Or right-click the toolbar and select option [Customize toolbar...].
• You will get a window showing all the buttons that you can add to your toolbar.
• Drag and drop the button to and from the toolbar to change your toolbar.
• In the view option you can select different sizes and layouts for the buttons.
• Use 'Revert to default layout' to get the default buttons and view option.
The toolbar
Button Description
Print
Print the job.
Undo
The previous command is undone.
Redo
The previous undone command is redone.
Insert sheet
- Insert sheet before selection
- Insert sheet after selection
Delete
Delete page(s)
Media
Assign media from the 'Media catalog' to page(s)
1-sided/2-sided
- Set page(s) to 1-sided
- Set page(s) to 2-sided
Force to
- Force the page(s) to the front side of the sheet
- Force the page(s) to the back side of the sheet
- Do not force the page(s) to any side of the sheet
Binding margin
Shift the binding margin 4
The toolbar
176 Chapter 5 - The [Document] workspace
PRISMAprepare v6.2
Button Description
Rotate
- Rotate the page(s) 90 degrees to the right
- Rotate the page(s) 90 degrees to the left
- Rotate the page(s) 180 degrees
Mark
Add mark to page(s)
Remove mark from page(s)
- Add mark to all color page(s)
Staple settings
- Add staples to pages.
- Add saddle stitches to pages.
- Remove any staple settings from pages.
Punch settings
- Define the punch type for one or more pages.
- Remove the punch type for one or more pages.
Fold settings
- Define the fold settings for one or more pages.
- Remove the fold settings for one or more pages.
Other binding
- Add other binding to pages.
Document type
Define the [Document type] for your document. The [Document type] is as-
signed to the entire document.
Tabs
You can define [Tab captions] and [Bleed tabs] to one or more pages.
The toolbar
Chapter 5 - The [Document] workspace 177
PRISMAprepare v6.2

The [Structure] view
Introduction
The [Structure] view provides easy navigation and selection of pages in the document. It also
gives an overview of the page programmed settings that are used in your document.
You can drag and drop pages in the [Structure] view.
Horizontally, the [Structure] view displays columns. These columns describe properties on which
you can group pages. These groups allow you to easily select a range of pages that have the
same properties.
Vertically, the document is shown in pages and groups of pages. For every (sub)section of pages,
a bar is created. With these bars you can easily manage your (sub)sections.
Right-click anywhere in a column to get a context menu. The context menu depends on the
position where you right-click.
The available columns
You can group pages based on the following criteria:
• The [Page] column shows the pages and blank sheets of your document. The [Page] column
contains the logical page index.
• [Section]
You can group sequential pages that belong together (for example chapters) in a section. You
can divide a section into subsections. Up to 5 levels are possible here. The names of each
[Section] level are displayed.
• [Media]
The sequential pages that have the same media are grouped within a [Media] group. If media
is present in your document but it was removed from the [Media Catalog], this media is shown
in grey.
• [Output group]
The sequential pages that are stapled or folded together are grouped within a [Output group]
group. This column also shows the document type.
• [Page size]
The sequential pages with the same page size, orientation and sheet fold.
• [Hole punch]
The sequential pages that have the same punch pattern are grouped within a [Hole punch]
group.
Every column has icons and labels:
• The icon section displays icons that give feedback about the properties of the (group of) pages.
• The label section displays in text the properties of the (group of) pages.
You can show or hide the label when you double click on the column's header.
You can adjust the columns:
• Show or hide columns
Click [View] - [Show columns] to define if a column is visible or not. You can right-click the
column header and use its context menu.
• Column order
To change the order of the columns you can drag the column headers to a new position. The
active column is the first column behind the [Page] column. You can use this active column to
expand or collapse a group of pages.
• Column width
You can drag the separators in the column header to change the width of a column.
The [Structure] view
178 Chapter 5 - The [Document] workspace
PRISMAprepare v6.2

Feedback icons
Feedback
Icons
on page 50 are displayed in the columns.
Footer
Click the [Expand all groups] button to expand all groups of the active column.
This option is also available via [View] - [Expand all groups].
Click the [Collapse all groups] button to collapse all groups of the active column.
This option is also available via [View] - [Collapse all groups].
NOTE
The active column is the first column behind the [Page] column.
Enter page numbers or page ranges in the [Pages] field to select pages. The character n is used to
define the last page. Character * defines all pages. For example: 1,5,9-n.
Note that disabled pages and blank sheets cannot be selected via the pages field.
The [Structure] view
Chapter 5 - The [Document] workspace 179
PRISMAprepare v6.2

The [Preview] view
Introduction
The [Preview] view shows how your document is prepared for print. Each page is displayed
within a box representing the page size, orientation, and the content of that page. The [Preview]
view displays:
• The [Document type].
• The additional content:
[Header and Footer], [Tab captions] and [Bleed captions], [Stamps].
• The finishing settings:
[Staple], [Fold], [Hole punch].
When a fold setting is applied, the fold lines are displayed in the [Preview] view.
• The [VDP frames] and their content.
The content of the currently selected row is displayed in the frame(s).
For all fold types which are applied on document level, animations are available to see how the
page(s) are folded. See procedure
Folded and unfolded view in animations
on page 228.
The footer contains tools that you can use in the [Preview] view.
Ghost page
A ghost page side is a side of a sheet to which no page has been allocated. The side remains
empty. This may be caused by:
• 1-sided media
In the [Media Catalog] you can specify media to be [1-sided]. The media must only be printed
on one side (for example transparent sheets).
This application allocates only one page to this sheet, leaving the other sheet side empty. The
ghost page is indicated by the following icon:
• 1-sided page
You can specify a page to be [1-sided]. This application will make sure that only this page is
allocated to the sheet, leaving the other sheet side empty. The ghost page side is indicated
with the following icon:
• Other
When pages have different media sizes, page sizes, or fold, staple, or punch settings, they
cannot be allocated to the same sheet. If necessary, this application automatically assigns such
pages to sheets with one ghost page. An automatically created ghost page is not indicated by
an icon, but with a specific pattern. This pattern will not be printed.
Important differences between a ghost page and a blank sheet:
• An automatically created ghost page can appear and disappear, depending on the page
allocation.
A blank sheet is defined by the user.
• You cannot select a ghost page because you cannot perform any operation on it.
However, you can select a blank sheet and perform operations on it.
• Ghost pages cannot contain any content. Ghost pages cannot, for example, contain a page
number or a tab caption. If you need content on a ghost page, you have to turn it into a blank
sheet.
• A ghost page is not shown in the [Structure] view.
A blank sheet is always shown in the [Structure] view.
The [Preview] view
180 Chapter 5 - The [Document] workspace
PRISMAprepare v6.2
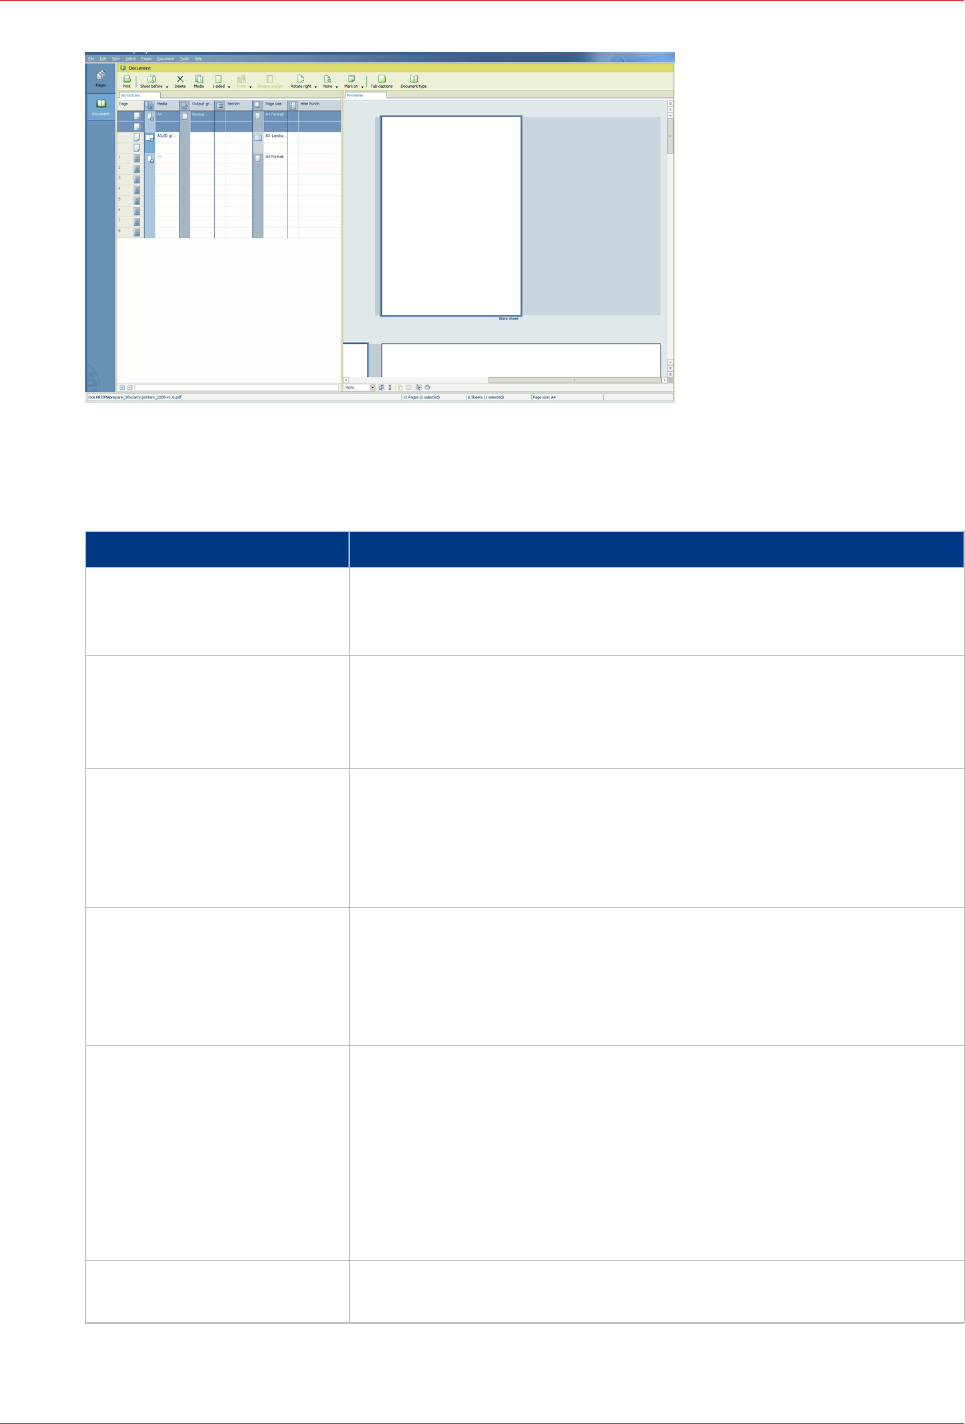
[1] Ghost page
Feedback in the [Preview] view
Feedback Description
Page Ids The consecutive pages of your document are numbered in the
[Preview] view.
ghost pages and blank sheets are not numbered.
Page numbers Next to the [Preview] view numbering of the pages, you can add
page numbers (including pre- and postfixes) to the content of the
pages. The [Preview] view shows you how the page numbers are
printed on the pages.
[Facing pages view] The pages are displayed as they appear in a book. You can fold or
unfold pages that have a sheet fold. Move your mouse over the
outermost fold pane of such a sheet. An arrow becomes available.
With this arrow, you can toggle between the folded and unfolded
view.
[Continuous pages view] The pages are displayed underneath each other. The pages are al-
ways shown unfolded.
This view is available when your [Document type] is set to [Nor-
mal] or to [Perfect Binding]. This view is also available when a
document fold is chosen that applies to all pages in the document.
Folded and unfolded view When a fold setting is applied, the fold lines are displayed in the
[Preview] view.
• [Folded pages view]
The pages with sheet fold settings are displayed folded. All pa-
ges are displayed as in the [Facing pages view] view.
• [Unfolded pages view]
The pages with sheet fold settings are displayed unfolded. All
pages are displayed as in the [Facing pages view] view.
[Hole punch] When a [Hole punch] setting is applied to the current page, the
punch holes are displayed in the [Preview] view. 4
The [Preview] view
Chapter 5 - The [Document] workspace 181
PRISMAprepare v6.2

Feedback Description
Media properties The following media properties are visible in the [Preview] view.
• Media color
The media color of a page is shown.
If the media color is unknown, the media color is shown as
gray.
• Media description
The media properties are displayed in a tool tip when you move
your mouse over a page border.
Tabs • Tabs and tab captions
Tabs and tab captions are displayed in the [Preview] view. The
tabs that are located before the left-hand page in the spread
view are displayed ‘behind’ this page. If these tabs contain a tab
caption at the back side of the sheet, this tab caption is dis-
played. The tabs that are located after the right-hand page in
the spread view are displayed ‘behind’ this page. If these tabs
contain a tab caption on the front side of the sheet, this tab cap-
tion is displayed.
• Multiple tab sets
If your document contains multiple tab sets, only the tab set to
which the page belongs will be displayed behind this page. The
tab set of the first page in the spread can differ from the tab set
of the second page. Tabs of a page with a different page size
than the page in the current spread view are not displayed.
If you move your mouse over the tab caption, the tab caption is
displayed. You can also use tab captions for navigation purposes.
You can double-click the tab caption to open the [Tab captions]
window.
[Spine caption] The [Spine caption] (only possible in case of [Booklet]) is dis-
played in the [Preview] view at the left or at the top of the first
page.
The [Spine caption] field appears in the background color of the
media. The width of the [Spine caption] field depends on the num-
ber of pages within your document. The [Spine caption] is dis-
played according to the location and format that you have speci-
fied. When you double-click the [Spine caption] field the [Spine
caption] editor will appear.
Feedback icons When you use the [Force page] setting or the [Mark pages] setting,
this is indicated in the [Preview] view by icons.
Selection and focus When you select a page, this is displayed in the [Preview] view by
a selection border around the page. The focus of a page is dis-
played in the [Preview] view by a dashed box around the page.
Hide and show the [Bleed
tabs]
• Hide [Bleed tabs]
The [Bleed tabs] are not displayed in the [Preview] view. The
[Bleed tabs] remain added to the document and are printed on
the pages.
• [Show bleed tabs]
The [Bleed tabs] are displayed in the [Preview] view.
The [Preview] view
182 Chapter 5 - The [Document] workspace
PRISMAprepare v6.2
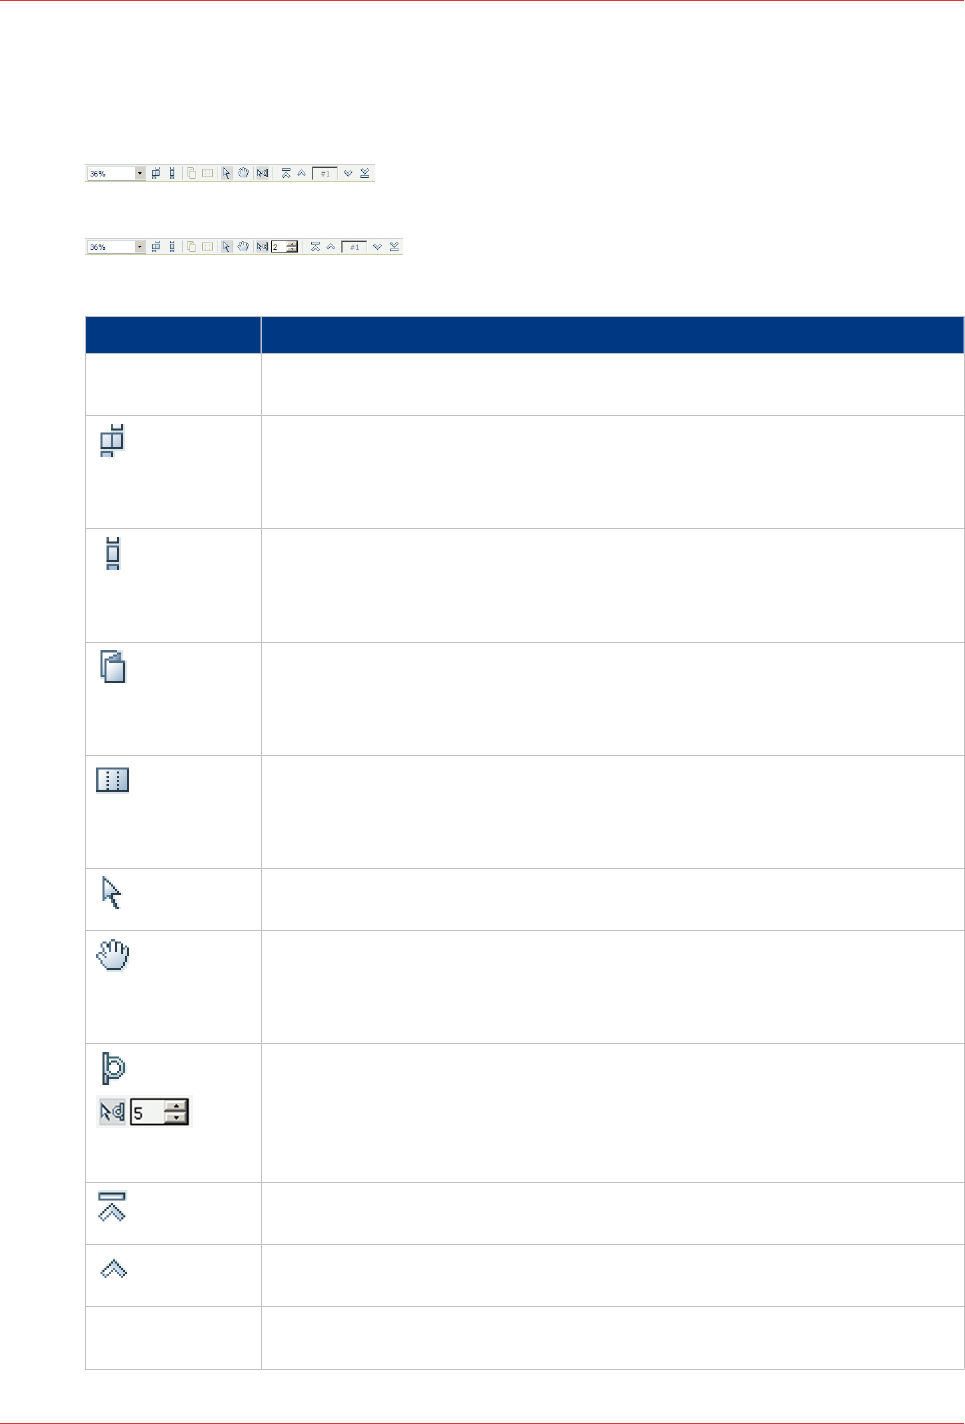
Footer
The footer contains tools that you can use in the [Preview] view.
The state (inactive or active) is displayed by the icon.
Tools and icons in the footer
Tool Description
Zoom selection Use this to specify the zoom factor.
Or click 'View' - [Zoom].
[Facing pages view]
The pages are displayed as they appear in a book. You can fold or unfold
pages that have a sheet fold.
Or click 'View' - [Facing pages view].
[Continuous pages view]
The pages are displayed underneath each other. The pages are always
shown unfolded.
Or click 'View' - [Continuous pages view].
[Folded pages view]
The pages with sheet fold settings are displayed folded. All pages are dis-
played as in the [Facing pages view] view.
Or click 'View' - [Folded pages view].
[Unfolded pages view]
The pages with sheet fold settings are displayed unfolded. All pages are dis-
played as in the [Facing pages view] view.
Or click 'View' - [Unfolded pages view].
Select page
Or click 'Tools' - [Select pages].
Drag tool
Use this tool to drag the page within the view when the page is not com-
pletely visible.
Or click 'Tools' - [Drag].
[Repeated selection]
Click the [Repeated selection] tool to define repeated selections. A spinbox
appears.
You can define the number of pages for the repeated selections with the
spinbox.
[First variable data document]
Select the first row in the data source file.
[Previous variable data document]
Select the previous row in the data source file.
Current row Shows the number of the currently selected row. The content of the current-
ly selected row is displayed in the frame(s). 4
The [Preview] view
Chapter 5 - The [Document] workspace 183
PRISMAprepare v6.2

Tool Description
[Next variable data document]
Select the next row in the data source file.
[Last variable data document]
Select the last row in the data source file.
The [Preview] view
184 Chapter 5 - The [Document] workspace
PRISMAprepare v6.2

Configure sections
Introduction
You can group sequential pages that belong together (for example chapters) in a section. You can
divide a section into subsections. Up to 5 levels are possible here. A section is indicated by the
section
Icons
on page 50 in the [Structure] view. You can expand or collapse the section by
clicking the '+' or '-' of the section icon.
Sections can be used for quick document preparation. For example: insert a tab before each
chapter, set an appendix to [1-sided], or force each first page of a section to the front side of a
sheet.
When a document is opened any PDF bookmarks are converted into sections in the document.
Create a section
Procedure
1. Select the pages that you want to include in the section.
2. Click [Pages] - [Section] - [Create]....
The [Create section] dialog box appears.
3. Enter the section name and click [OK].
The selected pages are grouped in a section.
NOTE
You can add only complete subsections to a section.
Configure sections
Chapter 5 - The [Document] workspace 185
PRISMAprepare v6.2

Create a subsection
Procedure
1. Select the pages within a section that you want to include in the subsection.
2. Click [Pages] - [Section] - Level x - [Create]....
The [Create section] dialog box appears.
3. Enter the subsection name and click [OK].
The selected pages are grouped in a subsection within the section.
NOTE
A subsection can only be a part of a single section.
Create a subsection
186 Chapter 5 - The [Document] workspace
PRISMAprepare v6.2

Replace a section
Procedure
1. Select the (sub)sections and pages that you want to replace.
Now you can:
• Rename this (sub)section if you have selected only one (sub)section.
• Merge the selected (sub)sections and pages into a single new section.
• Split a partially selected (sub)section.
2. Click [Pages] - [Section] - Level x - Replace....
The [Replace section] dialog box appears.
3. Enter the new section name and click [OK].
Replace a section
Chapter 5 - The [Document] workspace 187
PRISMAprepare v6.2

Delete a (sub)section
Procedure
NOTE
When you delete a (sub)section, the pages within that (sub)section are not deleted.
1. Select the section that you want to delete.
2. Click [Pages] - [Section] - 'Level x' - [Delete].
The (sub)section is deleted.
Delete a (sub)section
188 Chapter 5 - The [Document] workspace
PRISMAprepare v6.2

Show section levels
Procedure
1. Click View - Show section levels.
2. Define how many section levels you want to show in the [Structure] view.
NOTE
You can create a (sub)section at a level that is currently not shown. This will cause all section
levels to be shown. When you create a (sub)section at a section level that is currently shown, all
hidden section levels remain hidden.
Show section levels
Chapter 5 - The [Document] workspace 189
PRISMAprepare v6.2

Repeated selection
Introduction
You can make repeated selections in your document. The repeated selections are marked with
horizontal separation lines in the [Structure] view.
Your changes are applied to all pages in the active repeated selections.
Pages that are excluded from the repeated selections are grayed.
NOTE
The repeated selections are removed when you execute operations: [Size], [Shift], [Scale],
[Mask], [Edit image], [Edit colors].
Enable repeated selection
Procedure
1. Select the page where you want to start the repeated selections. The repeated selections continue
to the last page of the document.
When you select a page range, the repeated selections are active within the page range.
The last group of pages can contain less pages than defined in the pages spinbox.
NOTE
Cover pages are excluded from a repeated selection.
2. Click the 'Repeated selection' tool in the footer of the [Preview] view.
A spinbox appears.
3. Define the number of pages for the repeated selection in the spinbox.
The minimum number of pages is 2. The maximum number of pages is 99.
Repeated selection
190 Chapter 5 - The [Document] workspace
PRISMAprepare v6.2

Change the number of pages in the repeated selection.
Procedure
1. Change the number of pages in the pages spinbox. Press 'Enter'.
Or:
2. Insert or delete pages within a repeated selection. The pages spinbox is updated.
Change the number of pages in the repeated selection.
Chapter 5 - The [Document] workspace 191
PRISMAprepare v6.2

Remove repeated selection
Procedure
1. Click the 'Repeated selection' tool in the footer of the [Preview] view.
The repeated selections are removed. The icon of the 'Repeated selection' tool is disabled and the
pages spinbox disappears.
Remove repeated selection
192 Chapter 5 - The [Document] workspace
PRISMAprepare v6.2

Allocate pages
Introduction
Introduction
During the 'Allocate pages' phase, you allocate pages to sheets. You can also insert sheets to
your document.
At the end of this phase all pages are allocated to sheets within your document.
Allocate pages
During the 'Allocate pages' phase, you can:
• Set a page to [1-sided]. This means that the back side of the sheet stays empty.
• Set a page to [2-sided]. This means that the back side of the sheet is allowed to get content.
• Use the [Force to front] command to set pages to the front side of a sheet. For example, to start
a new chapter on the front side of a sheet.
• Use the [Force to back] command to set pages to the back side of a sheet.
• Insert blank sheets into your document. A blank sheet is a sheet with two blank pages.
• A blank page can be added before or after the current page.
• Insert sheets into your document. You can also delete or replace existing sheets of your
document.
• You can [Insert pages] in the document with pages from an external PDF file or imported pages
from a TWAIN scanner.
• You can [Replace pages] in the document with pages from an external PDF file or imported
pages from a TWAIN scanner.
• You can [Delete] pages from your document.
NOTE
You cannot set a page to [1-sided] when that page is set to [Force to back].
Allocate pages
Chapter 5 - The [Document] workspace 193
PRISMAprepare v6.2

Insert blank sheets
Introduction
You can insert blank sheets into your document. A blank sheet is shown as two blank pages in
the [Preview] view.
NOTE
Due to certain
Constraints
on page 230, it is not always possible to have different media sizes in
your document. If you change the media size of a page, a warning can appear. You are asked if
you want to convert all pages of the document to the new media size.
These options are available via:
• The button bar: click the drop-down button [Insert sheet].
• The menu: click 'Pages' - 'Insert sheet before'.
• The menu: click 'Pages' - 'Insert sheet after'.
• The context menu: right-click the selected page(s) and select option 'Insert sheet before' or
'Insert sheet after'.
The first time you use the drop-down button, the blank sheet receives the media of the first
selected page. From then on, the application uses the media, which was last inserted via the
menu, for the blank sheet.
When you want to define the media for the blank sheet yourself, you must use the menu.
Insert a blank sheet
Procedure
1. Select the page where you want to insert a blank sheet.
2. Click [Pages] - Insert sheet before.
NOTE
Use option Insert sheet after to insert the blank sheet after the selected page.
3. Select the media for the blank sheet.
Insert blank sheets
194 Chapter 5 - The [Document] workspace
PRISMAprepare v6.2

Insert multiple blank sheets
Procedure
1. Select the pages where you want to insert blank sheets.
For example, if you select 3 pages, 3 empty sheets will be inserted.
2. Click [Pages] - Insert sheet before.
NOTE
Use the Insert sheet after option to insert the blank sheets after the selected pages.
3. Select the media for the blank sheets.
Insert multiple blank sheets
Chapter 5 - The [Document] workspace 195
PRISMAprepare v6.2

Insert blank pages
Introduction
You can insert blank pages in your document.
NOTE
Due to certain
Constraints
on page 230, it is not always possible to have different media sizes in
your document. If you change the media size of a page, a warning can appear. You are asked if
you want to convert all pages of the document to the new media size.
The first time you use the drop-down button, the blank page receives the media of the first
selected page. From then on, the application uses the media, which was last inserted via the
menu, for the blank page.
When you want to define the media for the blank page yourself, you must use the menu.
Insert a blank page
Procedure
1. Select the page where you want to insert a blank page
2. Click [Pages] - [Insert page before].
NOTE
Use the [Insert page after] option to insert the blank page after the selected page.
3. Select the media for the blank page.
Insert blank pages
196 Chapter 5 - The [Document] workspace
PRISMAprepare v6.2

Insert multiple blank pages
Procedure
1. Select the pages where you want to insert blank pages
For example, if you select 3 pages 3 empty pages will be inserted.
2. Click [Pages] - [Insert page before].
NOTE
Use the [Insert page after] option to insert the blank page after the selected pages.
3. Select the media for the blank pages.
Insert multiple blank pages
Chapter 5 - The [Document] workspace 197
PRISMAprepare v6.2

Insert pages
Introduction
Use the [Insert pages]... command to insert one or more external file(s) into your document.
See :
Supported file formats
on page 20
Example scenarios:
• You want to combine multiple documents into one document. Open the first document and
insert every other document into this document.
• You want to add new chapters to a document which already has page programmed settings,
like page numbering. The new chapters are provided as separate documents. Open the
document and insert each new chapter at the right insertion point.
NOTE
It is only possible to insert whole file(s).
This option is available via:
• The menu: click 'Pages' - 'Insert pages...'.
• The context menu: right-click the selected page(s) and select option 'Insert pages...'.
Procedure
1. Select the location where you want to insert the file(s).
2. Click [Pages] - [Insert pages]....
The [Insert pages] dialog box appears.
3. Use the [Add file(s)] button to select the file(s) that you want to insert.
Or click the [Choose this option to insert pages from the TWAIN scanner into your document.]
button to
Import a file from a TWAIN scanner
on page 85.
4. Use the [Move file(s) up] and [Move file(s) down] buttons to set the order of the files. In this order
the files are added to your document.
NOTE
You can use the [Delete file(s)] button to remove a selected file from the list.
5. Use the [Position] setting to insert the file(s) before or after the selected pages.
6. For [Create section] setting:
• Select the [As new section] option to create a new section for the file(s) in your document.
• Select the [In current section] option to create a subsection in the current active section for the
file(s).
NOTE
Option [In current section] is available only if your document contains sections.
7. Different options for setting [Use page properties of] can be available:
Setting Description
[Inserted file(s)] The inserted file(s) keep their own page properties.
NOTE
A page programmed PDF file may include a
Define the
document type
on page 253 that is incompatible with
the current document. Option [Inserted file(s)] is then
disabled. The pages receive the page programd settings
of the current document. 4
Insert pages
198 Chapter 5 - The [Document] workspace
PRISMAprepare v6.2

Setting Description
'Selected page' The inserted file(s) receive the page properties of the selected
page.
This option is available when you select one page as the location
to insert the pages.
'First selected page' The inserted file(s) receive the page properties of the first page of
the selected pages.
This option is available when:
• You select multiple pages as the location to insert the pages
and
• You select option 'Before selection' for setting [Position].
'Last selected page' The inserted file(s) receive the page properties of the last page of
the selected pages.
This option is available when:
• You select multiple pages as the location to insert the pages
and
• You select option 'After selection' for setting [Position].
8. Click [OK] to insert the file(s).
Insert pages
Chapter 5 - The [Document] workspace 199
PRISMAprepare v6.2

Replace pages
Introduction
Use the [Replace pages]... command to replace a set of consecutive pages from your document
by an external file.
See :
Supported file formats
on page 20
NOTE
It is only possible to replace pages with a complete file.
This option is available via:
• The menu: click 'Pages' - 'Replace pages...'.
• The context menu: right-click the selected page(s) and select option 'Replace pages...'.
Procedure
1. Select the set of consecutive pages that you want to replace.
2. Click [Pages] - [Replace pages]....
The [Replace pages] dialog will appear.
3. You can replace the pages with an external file or with a scanned file.
• [File]
Use the [Browse...] button to select the external file that you want to use.
• [TWAIN scanner]
Select this option to
Import a file from a TWAIN scanner
on page 85.
4. Different options for setting [Use page properties of] can be available:
Setting Description
[Inserted file] The pages in the file keep their own page properties when they re-
place the selected pages.
NOTE
A page programmed PDF file may include a
Define the
document type
on page 253 that is incompatible with
the current document. Option [Inserted file] is then disa-
bled. The pages receive the page programd settings of
the current document.
'Selected page' Each page of the file receives the page properties of the selected
page.
This option is available when you select to replace one page.
NOTE
The pages of the file are inserted with the page proper-
ties of the selected page.
'Selected pages' Each page of the file receives the page properties of the corre-
sponding page in the page selection.
This option is available when you select to replace multiple pages.
NOTE
The pages of the file are inserted with the page proper-
ties of the last page of the page selection.
5. Click [OK] to replace the pages.
Replace pages
200 Chapter 5 - The [Document] workspace
PRISMAprepare v6.2

Delete pages
Introduction
Use the [Delete] command to delete pages from your document.
This option is available via:
• The button bar: click the drop-down button [Delete].
• The menu: click [Pages] - [Delete pages].
• The context menu: right-click the selected page(s) and select option [Delete pages].
Procedure
1. Select the page(s) that you want to delete from your document.
NOTE
You can also delete blank sheet(s).
2. Click [Pages] - [Delete pages].
The selected page(s) will be deleted.
Delete pages
Chapter 5 - The [Document] workspace 201
PRISMAprepare v6.2

Move pages
Introduction
You can change the order of the pages within your document. Use the [Cut pages] and [Paste
pages] commands to move pages within your document.
These options are available via:
• The menu: click [Pages] - [Cut pages].
• The menu: click [Pages] - [Paste pages].
• The context menu: right-click the selected page(s) and select option [Cut pages].
• The context menu: right-click the selected page(s) and select option [Paste pages].
Move pages
Procedure
1. Select the page(s) that you want to move.
2. click [Pages] - 'Cut pages'.
3. Navigate within your document and select the page where you want to insert the page(s).
4. click [Pages] - 'Paste pages'.
5. Specify whether you want to paste the page(s) 'before' or 'after' the selected page.
Move pages
202 Chapter 5 - The [Document] workspace
PRISMAprepare v6.2

Drag and drop pages
Procedure
1. Use the drag tool to drag and drop pages.
You can drag and drop pages in the [Structure] view and in the [Preview] view.
Or click 'Tools' - [Drag].
Drag and drop pages
Chapter 5 - The [Document] workspace 203
PRISMAprepare v6.2

Copy and paste pages
Introduction
Use the 'Copy pages' and 'Paste pages' commands to copy pages within your document.
These options are available via:
• The menu: click [Pages] - 'Copy pages'.
• The menu: click [Pages] - 'Paste pages'.
• The context menu: right-click the selected page(s) and select the 'Copy pages' option.
• The context menu: right-click the selected page(s) and select option 'Paste pages'.
Procedure
1. Select the page(s) that you want to copy.
2. Click [Pages] - 'Copy pages'.
3. Navigate within your document and select the page where you want to insert the page(s).
4. click [Pages] - 'Paste pages'.
5. Specify whether you want to paste the page(s) 'before' or 'after' the selected page.
Copy and paste pages
204 Chapter 5 - The [Document] workspace
PRISMAprepare v6.2

Setting pages to 1-sided or 2-sided
Set a page to 1-sided
Introduction
Use [1-sided] pages if the back side of the sheet must be empty.
This option is available via:
• The button bar: click the drop-down button [1-sided].
• The menu: click [Pages] - [1-sided].
• The context menu: right-click the selected page(s) and select option [1-sided].
Procedure
1. Select the page that must be on a [1-sided] sheet.
2. Select [1-sided] from the [Pages] menu.
NOTE
You cannot set a page to [1-sided] when that page is set to [Force to back].
Related information
Set a page to 2-sided
on page 206
Setting pages to 1-sided or 2-sided
Chapter 5 - The [Document] workspace 205
PRISMAprepare v6.2

Set a page to 2-sided
Introduction
Use [2-sided] pages if the back side of the sheet is allowed to get content.
This option is available via:
• The button bar: click the drop-down button [2-sided].
• The menu: click [Pages] - [2-sided].
• The context menu: right-click the selected page(s) and select option [2-sided].
Procedure
1. Select the page that must be on a [2-sided] sheet.
2. Select [2-sided] from the [Pages] menu.
Related information
Set a page to 1-sided
on page 205
Set a page to 2-sided
206 Chapter 5 - The [Document] workspace
PRISMAprepare v6.2

Forcing pages to front or back
Force a page to the front side of a sheet
Introduction
The [Force to front] command sets pages to the front side of a sheet.
You can also use the [Force to front] command if your [Document type] is [Booklet].
For example, you can use the [Force to front] command to begin a new chapter on the front side
of a sheet.
Procedure
1. Select the page(s) you want to force to the front side of a sheet.
2. Click the [Force page] drop-down button.
3. Select the [Force to front] option.
Or
Select [Pages] - 'Force to' - [Front].
NOTE
The [Preview] section displays the page with an icon that indicates the page is forced to front.
Related information
Force a page to the back side of a sheet
on page 208
Forcing pages to front or back
Chapter 5 - The [Document] workspace 207
PRISMAprepare v6.2

Force a page to the back side of a sheet
Introduction
The [Force to back] command sets pages to the back side of a sheet.
You can also use the [Force to back] command if your [Document type] is [Booklet].
Procedure
1. Select the page(s) you want to force to the back side of a sheet.
2. Click the [Force page] drop-down button.
3. Select the [Force to back] option.
Or
4. Select [Pages] - 'Force to' - [Back].
NOTE
The [Preview] section displays the page with an icon that indicates the page is forced to back.
Related information
Force a page to the front side of a sheet
on page 207
Force a page to the back side of a sheet
208 Chapter 5 - The [Document] workspace
PRISMAprepare v6.2

Do not force a page to any side of the sheet
Introduction
The [Force to none] command lets you remove the [Force to front] or [Force to back] settings of
the selected pages.
Procedure
1. Select the page(s) that are set [Force to front] or [Force to back].
2. Click the [Force page] drop-down button.
3. Select the [Force to none] option.
Or
4. Select [Pages] - 'Force to' - [None].
NOTE
The side of the sheet on which the page(s) is/are printed depends on the settings of the previous
pages.
Related information
Force a page to the front side of a sheet
on page 207
Force a page to the back side of a sheet
on page 208
Do not force a page to any side of the sheet
Chapter 5 - The [Document] workspace 209
PRISMAprepare v6.2

Import a file from a TWAIN scanner
Introduction
You can scan and import paper documents with any scanner that supports the TWAIN interface.
The application automatically detects which color and B&W TWAIN scanners are available. The
original interface of the scanner is used. The interface can be different for each scanner.
The scanned pages are imported as an external PDF file. You can:
• Use the external PDF file as a new document.
•Use the [Insert pages]... command to insert one or more external PDF file(s) into your
document.
•Use the [Replace pages]... command to replace a set of consecutive pages from your document
by an external PDF file.
You can clean-up the scanned pages. Click the [Clean-up] button to have the scan clean-up
operations available.
Procedure
1. Click [File] - 'Import file from TWAIN scanner...'.
2. Select a TWAIN scanner and click 'Select'.
The original interface of the scanner is used. The interface can be different for each scanner.
3. If required, set any settings of the scanner.
4. Scan the file.
The file is imported as an external PDF file.
Import a file from a TWAIN scanner
210 Chapter 5 - The [Document] workspace
PRISMAprepare v6.2

Define your document
Introduction
Introduction
During the 'Define your document' phase you define how your document should look like.
At the end of this phase the layout of your document is correct.
Define your document
During the 'Define your document' phase, you can:
• Assign media to the pages.
• Specify the binding margin.
• Rotate one or more pages.
• Mark pages to separate special pages (like pages with color) from other pages.
• Convert one ore more pages to grayscale.
• Define the staple settings.
• Define the punch settings.
• Define the fold settings.
• Define the header and footer.
• Define stamps.
• Set the default properties to selected page(s).
NOTE
There are constraints for certain settings to the document. See
Constraints
on page 230.
Define your document
Chapter 5 - The [Document] workspace 211
PRISMAprepare v6.2

Assign media to pages
Introduction
To assign media to pages you can:
• Select media from the
Manage the media catalog
on page 268. This is the quickest way.
• Select media from the [Document media] list.
• Select media from the complete [Media Catalog].
The [Media] button is used to assign media to the selected pages.
NOTE
You can assign only one type of media to the selected page(s).
NOTE
Due to certain
Constraints
on page 230, it is not always possible to have different media sizes in
your document. If you change the media size of a page, a warning can appear. You are asked if
you want to convert all pages of the document to the new media size.
Assign media using the Pick list
Procedure
1. Select the page(s).
2. Click [Pages] - [Assign media].
3. Select the media from the pick list.
4. Define the page size, if required. See the table below.
The [Page size] dialog opens if the size of the assigned media is not equal to the size of the
selected page(s).
NOTE
If the [Document type] is [Booklet], the media is assigned to the selected page(s), or to the
sheet(s) of the selected pages. This behavior is defined by setting [Assign pick list media for
folded sheets] in
Define the application options
on page 28.
Assign media to pages
212 Chapter 5 - The [Document] workspace
PRISMAprepare v6.2

Assign media using the [Document media] list
Procedure
NOTE
The [Document media] list contains an overview of all media that is currently used in your
document. This list is located above the
Manage the media catalog
on page 268. If the
document contains a media which is not defined in the media catalog, than this media is shown
in gray. This can occur when you have imported a document.
1. Select the page(s).
2. Click [Pages] - [Assign media].
3. Select the media from the [Document media] list.
4. Define the page size, if required. See the table below.
The [Page size] dialog opens if the size of the assigned media is not equal to the size of the
selected page(s).
Assign media using the [Document media] list
Chapter 5 - The [Document] workspace 213
PRISMAprepare v6.2

Assign media using the Media catalog
Procedure
1. Select the page(s).
2. Click [Pages] - [Assign media].
3. Click [From media catalogue].
The [Media Catalog] dialog will appear.
4. Select the media from the [Media Catalog] and click [Assign].
5. Define the page size, if required. See the table below.
The [Page size] dialog opens if the size of the assigned media is not equal to the size of the
selected page(s).
NOTE
You can select option [Assign to whole sheet(s)] in the [Media Catalog]. The selected media is
then assigned to all pages that are positioned to the same sheet(s) as the selected page(s).
Assign media using the Media catalog
214 Chapter 5 - The [Document] workspace
PRISMAprepare v6.2
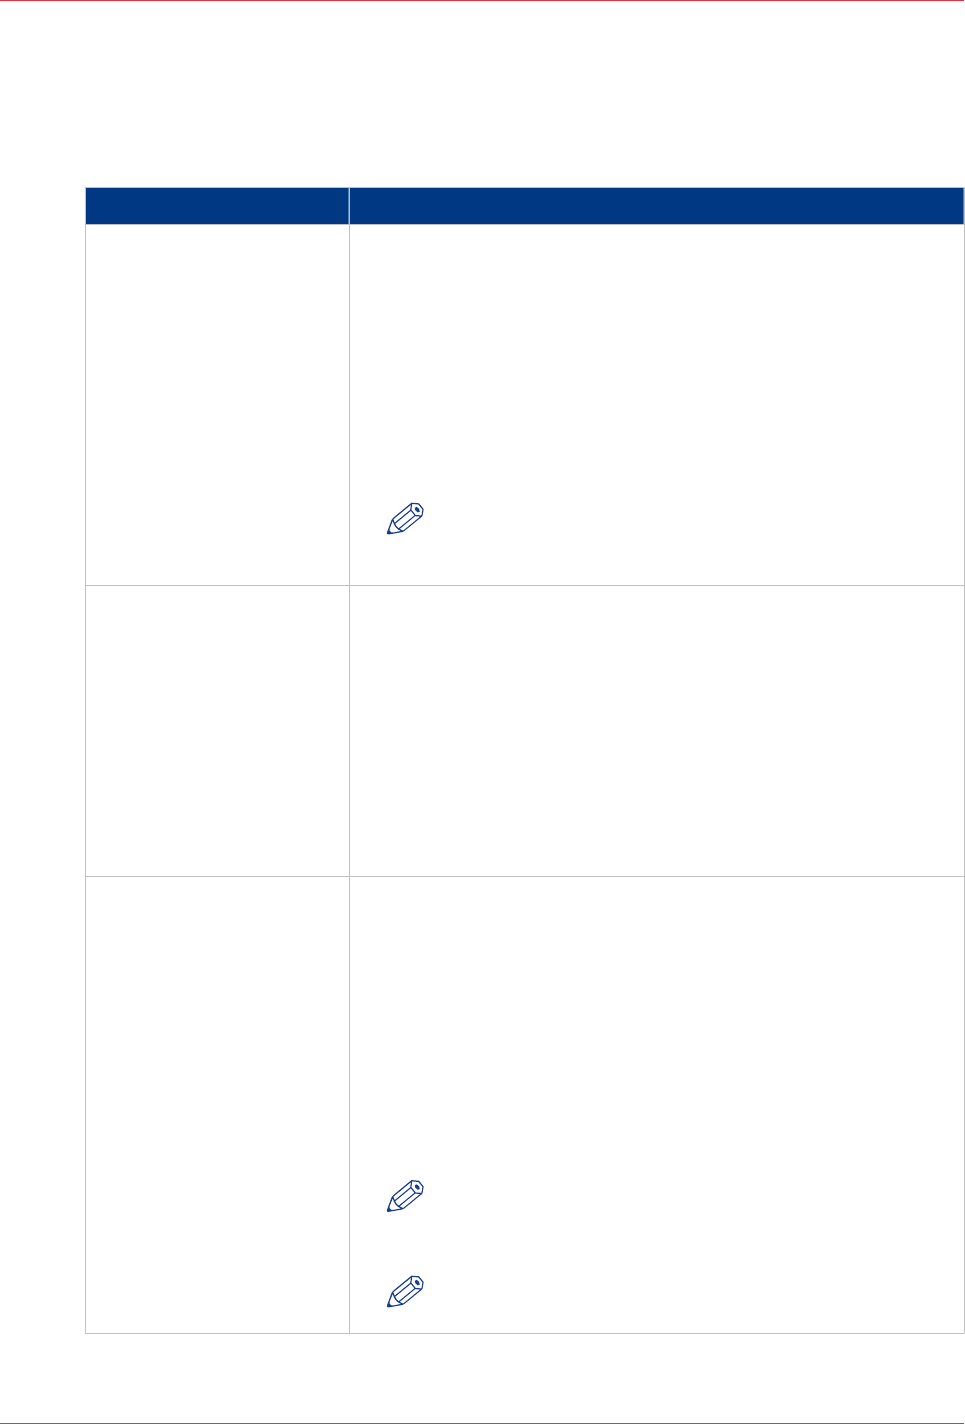
Define the page size
Procedure
1. The [Page size] dialog opens if the size of the assigned media is not equal to the size of the
selected page(s).
Option Description
[Keep page size] Select this option to keep the page size of the original media. Use
this option when you want to print the page on a larger media size
and cut it afterwards.
For example:
You select four pages with a media size of A4. You assign
228x305mm media to the selected pages. You select the [Keep
page size] option.
For each page, the original page size is kept. In the [Structure]
view, column [Page size] has value A4 for the selected pages. The
[Preview] view displays the four pages as A4.
NOTE
The [Keep page size] option is disabled when you assign
a smaller media to the selected page(s).
[Change page size] Select this option to change the page size of the original media in-
to the page size of the assigned media.
For example:
You select four pages with a media size of A4. You assign A3 me-
dia to the selected pages. You select the [Change page size] op-
tion. You do not select the [Scale pages] option.
For each page, the original page size is changed into the page size
of the assigned media. The content of the pages is not scaled to fit
the assigned media size. In the [Structure] view, column [Page
size] has value A3 for the selected pages. The [Preview] view dis-
plays the four pages as A3.
[Scale pages] Select this option to scale the content of the original pages to the
size of the assigned media.
For example:
You select four pages with a media size of A4. You assign A3 me-
dia to the selected pages. You select the [Change page size] op-
tion. You select the [Scale pages] option.
For each page, the original page size is changed into the page size
of the assigned media. The content of the pages is scaled to fit the
assigned media size. In the [Structure] view, column [Page size]
has value A3 for the selected pages. The [Preview] view displays
the four pages as A3.
NOTE
This option is available when the [Change page size] op-
tion is selected.
NOTE
[VDP frames] are not scaled.
Define the page size
Chapter 5 - The [Document] workspace 215
PRISMAprepare v6.2

Specify the binding margin
Introduction
You can specify the binding margin that is used for your document.
Use this option to create additional white space along the binding edge.
Procedure
1. Select the pages for which you want to specify the binding margin.
2. Click the [Margin] button.
Or
3. Click [Pages] - [Binding margin]....
Specify the binding margin
216 Chapter 5 - The [Document] workspace
PRISMAprepare v6.2

Rotate a page
Introduction
The [Rotate pages] option allows you rotate the page(s).
The following options are available:
• [Rotate right]
Rotate the page(s) 90 degrees to the right.
• [Rotate left]
Rotate the page(s) 90 degrees to the left.
• [Rotate 180 degrees]
Rotate the page(s) 180 degrees.
All pages of the booklet are rotated:
- If the selected pages are part of a [Booklet], or
- If a fold setting is applied to the whole document.
NOTE
If the selected pages have [Tab] media, you can only rotate the pages 180 degrees.
This option is available via:
• The button bar: click the drop-down button [Rotate pages].
• The menu: click 'Pages' - 'Rotate'.
• The context menu: right-click the selected page(s) and select option 'Rotate'.
Procedure
1. Select the page(s) that you want to rotate.
2. Click the [Rotate pages] drop-down button.
3. Select the rotation that you want to apply.
The selected pages are rotated.
NOTE
If the selected pages have [Tab] media, you can only rotate the pages 180 degrees.
Rotate a page
Chapter 5 - The [Document] workspace 217
PRISMAprepare v6.2

Mark or unmark a page
Introduction
You can mark or unmark pages. This allows you to:
• Define pages as special pages.
• Define pages as color pages.
You can process the marked pages separately from other pages of the document, for example:
• Print only the marked pages, or do not print the marked pages.
• Use inserts for the marked pages when you print your document.
• Use a different tray for the marked pages when you print your document.
NOTE
Option [Mark color] allows you to automatically mark all colour pages. You can then print only
the color marked sheets on a color machine.
These options are available via:
• The button bar: click the drop-down button [Mark pages].
• The menu: click [Pages] - 'Mark'.
• The context menu: right-click the selected page(s) and select option 'Mark'.
Marking and unmarking pages
Introduction
You can mark or unmark pages. This allows you to:
• Define pages as special pages.
• Define pages as color pages.
You can process the marked pages separately from other pages of the document, for example:
• Print only the marked pages, or do not print the marked pages.
• Use inserts for the marked pages when you print your document.
• Use a different tray for the marked pages when you print your document.
NOTE
Option [Mark color] allows you to automatically mark all colour pages. You can then print only
the color marked sheets on a color machine.
These options are available via:
• The button bar: click the drop-down button [Mark pages].
• The menu: click [Pages] - 'Mark'.
• The context menu: right-click the selected page(s) and select option 'Mark'.
Mark or unmark a page
218 Chapter 5 - The [Document] workspace
PRISMAprepare v6.2

Mark pages as color page
Procedure
1. Click the [Mark pages] drop-down button.
2. Click [Mark color].
3. The automatic color detection marks all pages that contain color.
NOTE
If you want to unmark pages that were marked by the automatic color detection, use option
[Mark off].
Mark pages as color page
Chapter 5 - The [Document] workspace 219
PRISMAprepare v6.2

Unmark a page
Procedure
1. Select the page(s) to unmark.
2. Click the [Mark pages] drop-down button.
3. Click [Mark off].
The mark is removed from all selected page(s).
Unmark a page
220 Chapter 5 - The [Document] workspace
PRISMAprepare v6.2

[Convert to grayscale]
Introduction
You can convert one ore more pages to grayscale.
For example, the document contains images with a [Color space] other than [RGB], [CMYK] or
[Grayscale]. You cannot edit these images. When you convert the pages with the images to
grayscale, you can also edit the images.
Grayscale images are also known as black-and-white images. Such images are composed
exclusively of shades of gray, varying from black at the lowest intensity to white at the highest.
Procedure
1. Select one or more pages.
2. Click [Pages] - [Convert to grayscale].
The selected pages are converted to grayscale.
[Convert to grayscale]
Chapter 5 - The [Document] workspace 221
PRISMAprepare v6.2

Define the staple setting
Introduction
The [Staple] option allows you to define the staple settings for one or more pages.
NOTE
There are
Constraints
on page 230 for the staple settings.
These options are available via:
• The button bar: click the drop-down button [Staple].
• The menu: click [Pages] - [Staple].
• The context menu: right-click the selected page(s) and select option [Staple].
Define the staple settings
Procedure
1. Select the page(s) for which you want to define a staple setting.
2. Click the drop-down button [Staple] in the button bar.
3. Define the staple setting.
If possible, select a staple setting which matches the capabilities of your finisher. For example: 2
Edge staples left-edge (<your finisher>).
• [None]
• Staple pattern
Select a staple pattern that matches the capabilities of your finisher.
• [Staple sections]
You can create stapled output groups for one or more sections. All pages of the concerning
sections must be selected.
In the [Staple sections] dialog you can define from which section level you want to apply the
staples.
The staples are applied to the selected level and deeper.
• [Other binding]
Select [Other binding] to create output groups for off-line finishing. For example, a group of
pages must be glued.
NOTE
The option [Staple sections] overrules any previously assigned staples.
Define the staple setting
222 Chapter 5 - The [Document] workspace
PRISMAprepare v6.2

Change the staple settings
Procedure
1. Select any page or any part of an output group.
2. Define the new staple setting.
NOTE
A partly selected output group is split.
Change the staple settings
Chapter 5 - The [Document] workspace 223
PRISMAprepare v6.2

Change the staple settings for output groups
Procedure
1. Select the output groups where you want to apply staples.
2. Select a staple setting.
The [Staple] dialog box appears.
3. Select option [Merge current output groups] to create one output group from the selected output
groups. The new output group gets the defined staple setting.
Select the [Keep current output groups] option if you want to keep the existing output groups. All
selected output groups get the defined staple setting.
NOTE
Partly selected output groups are automatically split.
Change the staple settings for output groups
224 Chapter 5 - The [Document] workspace
PRISMAprepare v6.2

Define the punch settings
Introduction
The [Hole punch] option allows you to define the punch type for one or more pages.
NOTE
There are
Constraints
on page 230 for the punch settings.
These options are available via:
• The button bar: click the drop-down button 'Punch'.
• The menu: click [Pages] - [Hole punch].
• The context menu: right-click the selected page(s) and select option [Hole punch].
Procedure
1. Select the page(s) for which you want to define a punch type.
2. Click the drop-down button 'Punch' in the button bar.
3. Define the punch type.
If possible, select a punch type which matches the capabilities of your finisher. For example: 2
Hole punch (<your finisher>).
NOTE
A punch type, which is shown in gray, is in use in the document, but is not configured in this
application.
Define the punch settings
Chapter 5 - The [Document] workspace 225
PRISMAprepare v6.2

Define the fold settings
Introduction
The [Fold] option allows you to define the staple settings for one or more pages.
All fold types are applied on document level, except the [Z-fold]. The [Z-fold] is applied on sheet
level.
NOTE
There are
Constraints
on page 230 for the fold types.
These options are available via:
• The button bar: click the drop-down button [Fold].
• The menu: click [Pages] - [Fold].
• The context menu: right-click the selected page(s) and select option [Fold].
Related information
List of concepts
on page 53
Define the fold settings on sheet level
Procedure
1. Select the page for which you want to define a fold type.
2. Right-click the selected page.
3. Define the desired sheet fold.
NOTE
The [Z-fold] is the only fold type which is applied on sheet level.
This sheet must be bigger than the other sheets of the document.
Related information
List of concepts
on page 53
Define the fold settings
226 Chapter 5 - The [Document] workspace
PRISMAprepare v6.2

Define the fold settings on document level
Procedure
1. Click the drop-down button [Fold] in the button bar.
2. Select a
List of concepts
on page 53.
Option [No fold] removes all folds from the document. Each set of folded sheet(s) becomes an
output group.
NOTE
All fold types are applied on document level, except the [Z-fold]. The [Z-fold] is applied on sheet
level.
3. Define the required settings for the fold type, see
Settings for the fold types
on page 229.
The required settings can differ between the available fold types.
4. Click the [OK] button.
Define the fold settings on document level
Chapter 5 - The [Document] workspace 227
PRISMAprepare v6.2

Folded and unfolded view in animations
Procedure
1. Click 'View' - 'Folded view' in the menu bar.
Or move your mouse over the top or bottom of the page in the [Preview] view. An arrow
becomes available. Click this arrow.
The [Fold preview] dialog box appears.
2. Click button [Fold] to view an animation of how the page(s) are folded in the finisher.
Click button [Unfold] to unfold the page(s).
You can select the following options:
• [Outside of folded sheet]
The first page is visible for the reader when a single sheet is folded.
• [Inside of folded sheet]
The first page is visible for the reader when a single is unfolded.
Folded and unfolded view in animations
228 Chapter 5 - The [Document] workspace
PRISMAprepare v6.2
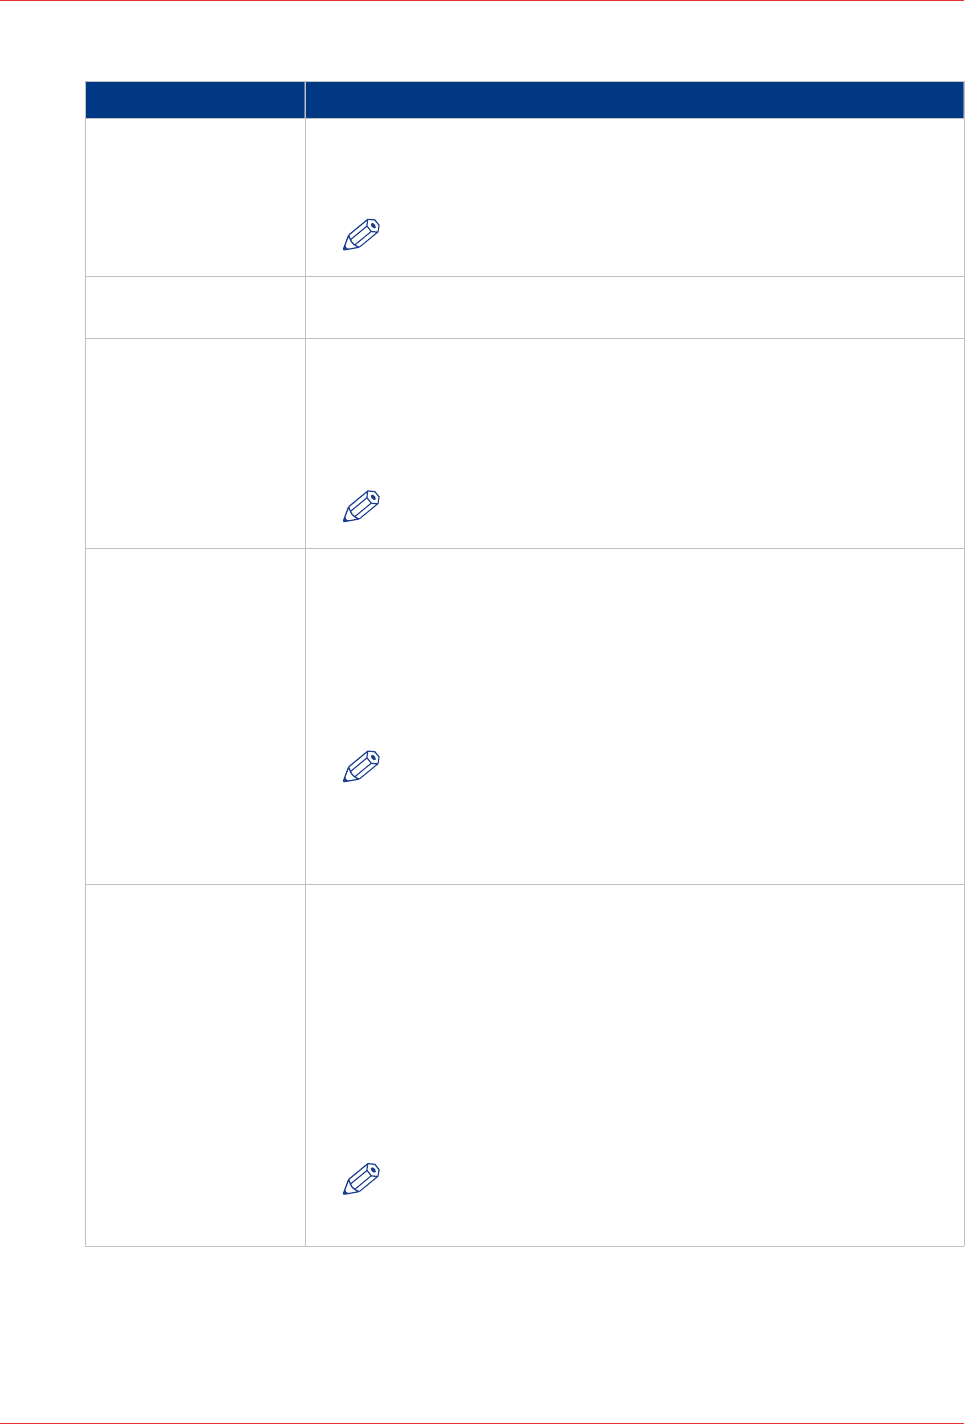
Settings for the fold types
Setting Description
[Finisher main tray] Select the intended finisher for this document. By selecting the inten-
ded finisher you can improve the preview of your document. In the
[Print] dialog, you decide to which finisher you send your document.
NOTE
The administrator configures which finishers are available.
[Pages] All fold types are applied on document level, except the [Z-fold]. The
[Z-fold] is applied on sheet level.
[Print first page on] You can select the following options:
• [Outside of folded sheet]
The first page is visible for the reader when a single sheet is folded.
• [Inside of folded sheet]
The first page is visible for the reader when a single is unfolded.
NOTE
Both settings apply to every odd page in an output group.
[Create output groups] You can select the following options for a multi fold setting:
• [Single output group]
The document is defined as one output group. This output group is
folded in its entirety.
• [pages per output group]
You define the number of pages per output group. Each output
group is folded separately.
NOTE
No warning is reported when the total number of pages in a
document is not an integer multiple of the output group size.
In case of a mismatch, the last output group contains fewer
pages.
[Staple] You can select the following options:
• [None]
• Staple pattern
Select a staple pattern that matches the capabilities of your finisher.
• [Staple sections]
You can create stapled output groups for one or more sections. All
pages of the concerning sections must be selected.
• [Other binding]
Select [Other binding] to create output groups for off-line finishing.
For example, a group of pages must be glued.
NOTE
The option [Staple sections] overrules any previously as-
signed staples.
Settings for the fold types
Chapter 5 - The [Document] workspace 229
PRISMAprepare v6.2
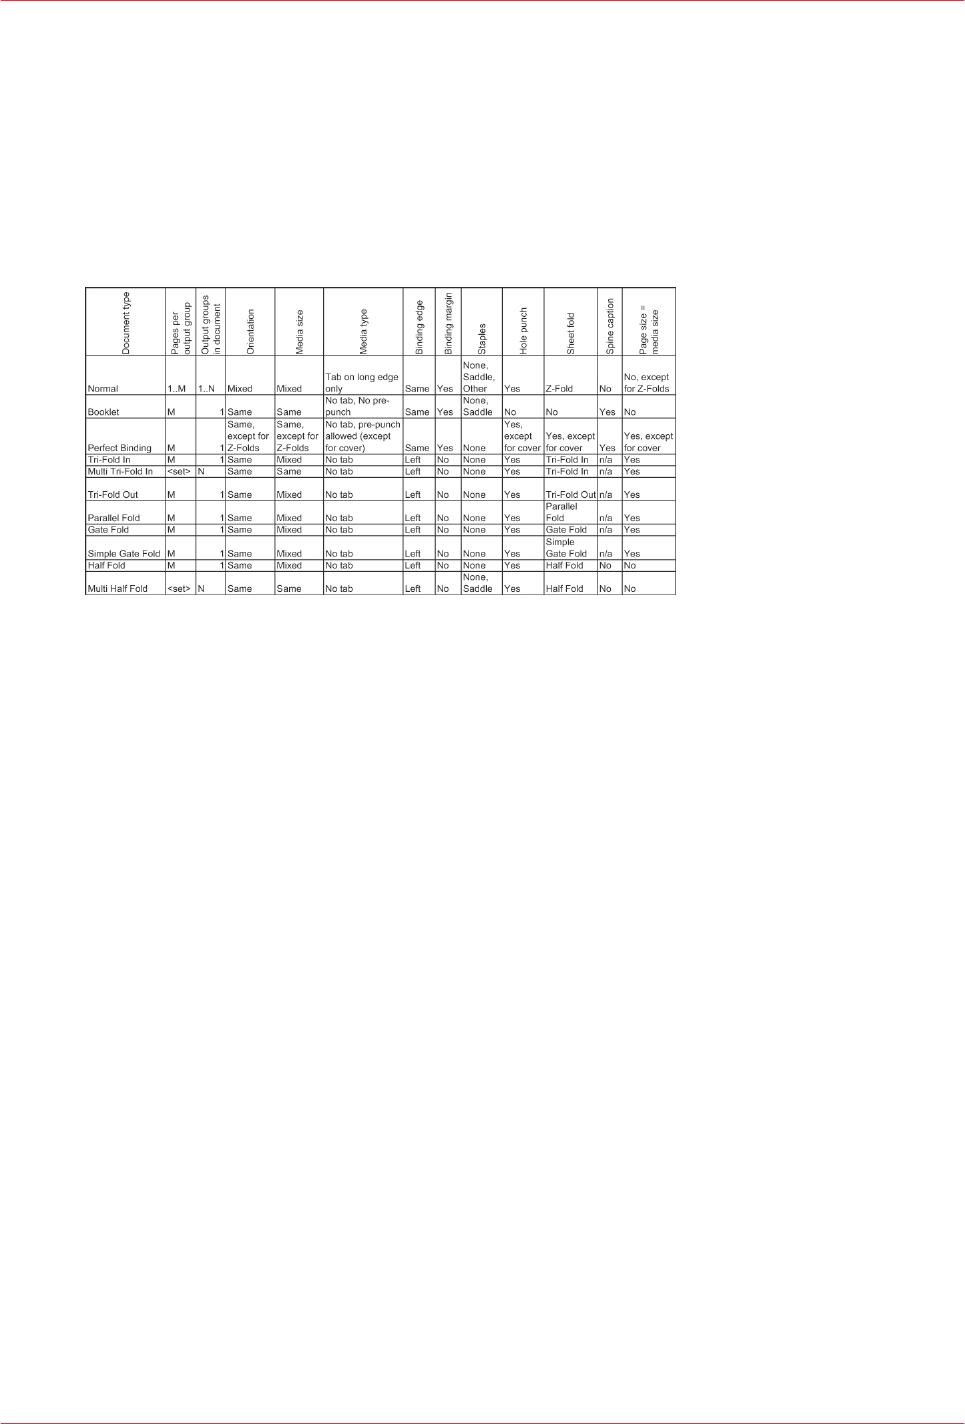
Constraints
Introduction
There are constraints for certain settings to the document.
Procedure
1. There are constraints for certain settings to the document:
Example 1
Procedure
1. You have chosen the [Tri-fold in] fold setting for your document.
You want to add a [Spine caption].
Now, you must change the [Document type] to [Booklet].
Constraints
230 Chapter 5 - The [Document] workspace
PRISMAprepare v6.2

Example 2
Procedure
1. You have chosen the [Multi tri-fold in] fold setting for your document. Your media size is A4.
You want to add two A3 sheets to your document, but you want to keep the same fold setting.
Now, you must change the [Document type] to [Tri-fold in].
Example 2
Chapter 5 - The [Document] workspace 231
PRISMAprepare v6.2

Example 3
Procedure
1. You have defined hole punch settings to a number of pages of your document.
You want to create a [Booklet].
The hole punch settings are removed.
Example 3
232 Chapter 5 - The [Document] workspace
PRISMAprepare v6.2

Define the header and footer
Introduction
You can add a header and footer to the pages of the document. The [Preview] view shows you
how the header and footer are printed on the pages.
This option is available via:
• The menu: click [Pages] - [Header and Footer].
• The context menu: right-click a page in the [Preview] view and select the [Header and Footer]
option.
The preview view
The [Preview] view shows you how the header and footer are printed on the pages.
At the top of the [Preview] pane, three text areas are available to define the header. At the bottom
of the [Preview] pane, three text areas are available to define the footer. The text for the [Header
and Footer] is not wrapped. Press 'Enter' to start the text on a new line. You can define different
fonts and colors for the text in each of the text areas.
NOTE
The text in a text area can overlap the text of other text areas. The text in a text area can also
overlap the text of the document.
Define the header and footer
Header and footer settings
Setting Description
[Font...] Select several different font attributes that must be used for the spine cap-
tion. The different font attributes can be specified at character level
• Font and font size
• Bold / Italic / Underlined / Strikethrough.
• Different text colors.
You can define different fonts and colors for each text area of the [Header
and Footer].
[Page number...] Add page numbers with the [Insert page number] dialog.
See the [Insert page number] procedure below.
[Filename] The [Filename] is added at the current position in the selected text area.
[Date...] Add the [Date...] with the [Insert date] dialog. Select the correct format for
the date.
The [Date...] is added at the current position in the selected text area. The
[Date...] is added as plain text.
[Section name] Add the [Section name] with the [Insert the section name] dialog.
The [Section name] is added at the current position in the selected text area.
The [Insert the section name] dialog does not appear if only one [Section
level] is defined in the document.
[Time...] Add the [Time...] with the [Insert time] dialog. Select the correct format for
the time.
The [Time...] is added at the current position in the selected text area. The
[Time...] is added as plain text. 4
Define the header and footer
Chapter 5 - The [Document] workspace 233
PRISMAprepare v6.2
Setting Description
[Document title] The [Document title] is added at the current position in the selected text
area.
[Margins] • [Left]
The margin between the left paper edge and the [Header and Footer].
• [Right]
The margin between the right paper edge and the [Header and Footer].
• [Top]
The margin between the top paper edge and the header.
• [Bottom]
The margin between the bottom paper edge and the footer.
[Print header/
footer on both
sides]
Define whether you want to add the [Header and Footer] on the [Front and
back side] or on the [Front side only].
[Mirror on back
side]
Enable this option to print the [Header and Footer]:
On the front side: <left text area> - <center text area> - <right text area>
On the back side: <right text area> - <center text area> - <left text area>
[Apply settings
to]
Define whether the [Header and Footer] are added to the [Whole document]
or just to the [Selected page(s)].
[Insert page number]
Setting Description
[Page number...] Select:
• [Start at] to define the first page number to use for the page numbering.
• [Continue from previous] page number.
[Page number
format]
Select the format for the page numbers.
[Number of dig-
its]
When applying a page number on one or several pages, you may specify a
fixed number of digits to be used to express the page number. Leading ze-
ros are used to pad the page number. The required number of digits may be
exceeded if more digits are necessary for the page number.
[Insert total num-
ber of pages of
the document]
Select this option to add the total number of pages of the document to the
page numbering.
The page numbering is displayed as: <current page number>/<total number
of pages>.
[Repeat page
number]
Select this option to use the same page number on a number of consecutive
pages.
For example: [Repeat page number] = 4. The selected page and the next
four pages receive the same page number.
Include or exclude pages from page numbering
Introduction
You can add a header and footer to the pages of the document. The page numbers are added to
the header or footer. You can include or exclude pages from the page numbering.
Include or exclude pages from page numbering
234 Chapter 5 - The [Document] workspace
PRISMAprepare v6.2

This option is available via:
• The button bar: click the button [Exclude from page numbering] / [Include for page numbering].
• The menu: click [Pages] - [Exclude from page numbering] / [Include for page numbering].
• The context menu: right-click the selected page(s) and select option [Exclude from page
numbering] / [Include for page numbering].
Procedure
1. Select the pages that you want to exclude from the page numbering.
2. Click [Pages] - [Exclude from page numbering].
The pages are excluded from the page numbering. The pages are also excluded from the total
number of pages of the document.
3. Select the pages that you want to include for the page numbering.
4. Click [Pages] - [Include for page numbering].
The pages are included in the page numbering. The pages are also included in the total number
of pages of the document.
Include or exclude pages from page numbering
Chapter 5 - The [Document] workspace 235
PRISMAprepare v6.2

Remove the header and footer
Introduction
Use the [Remove header and footer] command to remove the header and footer from your
document.
Procedure
1. Click [Pages] - [Remove header and footer].
The header and footer are removed from your document.
The settings in the [Header and Footer] dialog are removed.
Remove the header and footer
236 Chapter 5 - The [Document] workspace
PRISMAprepare v6.2

Set to default
Introduction
The set to default command applies the default properties to the selected page(s). Document
settings are not changed with this command.
Procedure
1. Click [Pages] - [Set to default].
The following default properties are applied to the selected page(s):
Setting Set to When
Fold settings [None] • [Sheet fold] = [Z-fold]
• Document fold ([Multi half-fold],
[Gatefold], et cetera) and all pages
are selected.
[Hole punch] settings [None] All situations
[Force to front]
[Force to back]
[Force to none] All situations
[Mark pages] Off All situations
[Binding margin] 0 All situations
[Media] Default media based on the
page size of the selected
page(s)
All situations
[1-sided]
[2-sided]
[2-sided] All situations
[Staple] settings [None] • [Document type] = [Normal].
• [Document type] = [Multi half-fold]
and all pages in the output group
are selected.
[Document type] [Normal] All pages are selected
[Bleed tabs] [None] All pages are selected
Keep [Bleed tabs] Not all pages are selected
[Header and Footer] [None] All situations
[Stamps] [None] All situations
Set to default
Chapter 5 - The [Document] workspace 237
PRISMAprepare v6.2

Enhance your document
Introduction
Introduction
During the 'Enhance your document' phase you enhance your document.
At the end of this phase you can print your document.
Enhance your document
During the 'Enhance your document' phase, you can:
• Create and edit the [Tab captions]
• Create and edit the [Bleed tabs]
• Define the document type.
For example, the document type can be defined as booklet.
• Create and edit the [Spine caption]
• Create and apply one or more templates to the document.
• Define the document properties.
Enhance your document
238 Chapter 5 - The [Document] workspace
PRISMAprepare v6.2

Apply a template
Introduction
You can create templates for documents that need the same layout. Each template is added to the
template catalog.
The templates are displayed alphabetically in a list.
You can apply one template at a time to your document. After the template is applied, you can
apply an other template to your document.
NOTE
Use
The command line interface
on page 339 to apply multiple templates in one action.
Cancel the application of a template
When you apply a template, the [Apply template] dialog opens. The dialog shows a progress bar
and contains a [Cancel] button.
Click [Cancel] to cancel the application of the template. All settings, which are already applied by
the template, are undone.
Apply a template from the template catalog
Procedure
1. Click [Document] - 'Apply template'.
2. Click 'From template catalog...'
The [Apply template] dialog opens.
3. Select the template that you want to apply to your document.
4. Click [Apply].
The template is applied to your document.
A message appears when the template is applied. You can view the details when the template
was not applied successfully.
5. Click [Close].
The [Apply template] dialog opens.
You can apply another template to your document. Select the template that you want to apply to
your document and click [Apply].
Click [Close] to return to the application.
NOTE
Click [Undo] to undo all settings which are applied by the template.
Apply a template
Chapter 5 - The [Document] workspace 239
PRISMAprepare v6.2

Apply a template from the Pick list
Procedure
1. Click [Document] - 'Apply template'.
2. Select the template from the pick list.
The template is applied to your document.
A message appears when the template is applied. You can view the details when a template was
not applied successfully.
3. Click [Close].
NOTE
Click [Undo] to undo all settings which are applied by the template.
Apply a template from the Pick list
240 Chapter 5 - The [Document] workspace
PRISMAprepare v6.2

Create and edit the [Tab captions]
Introduction
Use the [Tab captions] dialog to define the text on the tabs of the tab sheets in your document.
The [Preview] view shows how the tab captions are printed on the tabs.
You must create a group of tab captions for each different tab media that you use in your
document. You can define a maximum of 4 different tab groups.
Every tab media has a [Cycle length]. The number of tabs shown at one time in the [Preview]
view is equal to the [Cycle length] for this tab media.
The [Cycle length] is defined in the [Media Catalog] for every tab media.
For a correct position of the tab caption text you must define the [Top / bottom indent] in the
[Media Catalog]. The [Top / bottom indent] is the distance between the top of the tab media and
the top of its first tab.
You can define all tab captions before you add the tab sheets to your document.
This option is available via:
• The button bar:
Click the drop-down button [Tabs] and select [Tab captions].
• The menu: click [Document] - [Tab captions].
• The preview view: double-click a tab in the [Preview] view.
NOTE
A document can contain either [Bleed tabs] or tab media.
The tab caption dialog
The button bar of the tab caption dialog allows you to do the following:
•[Start set] or [Continue set]
Use the [Start set] button to start with a new set of tab sheets. The tab of the first tab sheet is at
the upper right corner in the case of portrait orientation. For landscape orientation the first tab
is at the bottom right corner.
For example, the tab set contains five tab sheets. Select the fourth tab caption. Click the [Start
set] button. Then the selected tab caption becomes the first tab caption of a new set of tab
sheets. The unused tab sheets of the previous set - in this example the tab sheets four and five
- are discarded. Now, the tab captions continue on a new set of tab sheets. The [Start set]
button changes into [Continue set] for the first tab of the new set of tab sheets. Click the
[Continue set] button to undo this action.
•[Delete]
Use this button to delete the selected tab caption.
The tab page in your document will not be removed.
•[Up] / [Down]
Use these buttons to move the selected tab caption up or down.
•[Insert]
Use this button to insert a new tab caption before the selected tab caption.
•[New group]
Use this button to create a new group of tab captions.
You must create a group of tab captions for each different tab media that you use in your
document. You can define a maximum of 4 different tab groups.
•[Delete group]
Use this button to delete the selected group of tab captions.
•[Import]
Create and edit the [Tab captions]
Chapter 5 - The [Document] workspace 241
PRISMAprepare v6.2

Click this button to import the tab captions from a txt file.
•[Export]
Click this button to export the tab captions to a txt file.
Create the tab captions
Procedure
1. Click the [Tab captions] button in the button bar.
The [Tab captions] dialog box appears.
2. Select a row and enter the tab caption.
NOTE
A tab caption can contain up to three lines of text.
3. Repeat step 2 to enter the text for the rest of the tab captions.
NOTE
Create the tab captions
242 Chapter 5 - The [Document] workspace
PRISMAprepare v6.2

Configure the tab captions
Procedure
1. You can configure the tab captions
Setting Description
[Media] Use the [Media] drop-down list to select the media that you want to use for
the tab sheet(s). You can only select [Tab] media here. You can also create
new media. Click the [New...] button to define new tab media, see
Manage
the media catalog
on page 268.
[Horizontal]
[Vertical]
Use the [Horizontal] and [Vertical] options to align the tab captions.
Use the associated [Margin] option to set the top distance and side distance
of the caption on the tab. The same value is used for the front side and the
back side of the tab sheet.
[Orientation] Define the [Orientation] of the tab caption.
[Print caption] Use the [Print caption] option to specify whether the captions must also be
printed on the back side of the tab.
Not all supported printer models can print on the back side of the tab. You
will be notified about this in the notification area when you select that print-
er.
[Rotate 180 de-
grees]
Use the [Rotate 180 degrees] option to define the orientation of the caption
on the back side of the tab.
Not all supported printer models can print on the back side of the tab. You
will be notified about this in the notification area when you select that print-
er.
[Crop text] A tab caption can contain up to three lines of text. Any additional lines of
text are printed outside the tab onto the tab sheet.
Select this option to crop the text. Now, only the text that fits on the tab is
printed.
[Font...] Click [Font...] to select the font that must be used for the tab caption.
[Color...] Click [Color...] to select the color that must be used for the tab caption.
[Advanced...] Click [Advanced...] to get advanced possibilities for your tab caption. See:
Advanced tab captions options
on page 244
2. Click [OK].
Configure the tab captions
Chapter 5 - The [Document] workspace 243
PRISMAprepare v6.2

Advanced tab captions options
Introduction
You can add text and/or images to the tabs.
Procedure
1. Enable the [Text] option to select and modify the text and its attributes.
• Font and font size.
• Bold / Italic / Underlined / Strikethrough.
• Vertical text
The selected text is printed vertically.
• Different text colors.
NOTE
The different font attributes can be specified at character level
2. Enable the [Image] option to add an image to your tab.
• Check the image box to add an image via the browse button.
Images of type BMP, GIF, TIFF, TIF, JPEG, JPG, PNG and EPS are supported.
• The vertical and horizontal options allow you to align the image on the tab.
• Rotate the image / Scale to fit / Rotate 180 degrees on back side.
NOTE
The text is placed over the image (if any).
3. Click [OK].
Advanced tab captions options
244 Chapter 5 - The [Document] workspace
PRISMAprepare v6.2

Import the tab captions
Procedure
1. Click the [Import] button.
The [Import tab captions] dialog box appears.
2. You can import the tab captions from:
• [File]
Click the '[Browse...]' button.
Select the tab captions file and click 'Open'.
• [Section names]
You can use the names of a [Section] level as tab caption. Select from which level you want to
use the [Section names].
• [Clipboard]
You can use the data on the clipboard as tab captions.
3. Define if you want to use the imported tab captions for:
• [This group]
The tab captions are added to the current group of tab captions. The tab captions are added
before the active row.
• [New group]
A new group of tab captions is created. The tab captions are added to the new group of tab
captions.
You must create a group of tab captions for each different tab media that you use in your
document. You can define a maximum of 4 different tab groups.
Import the tab captions
Chapter 5 - The [Document] workspace 245
PRISMAprepare v6.2

Export the tab captions
Procedure
1. Click the [Export] button.
The [Export tab captions] dialog box appears.
2. Click the '[Browse...]' button.
3. Specify the new file name and/or folder and click [Save].
4. Click [OK] to export the tab captions to a txt file.
Export the tab captions
246 Chapter 5 - The [Document] workspace
PRISMAprepare v6.2

Create and edit the [Bleed tabs]
Introduction
Use the [Bleed tabs] dialogue to define the page ranges for the [Bleed tabs] and the [Bleed tabs]
captions. The [Preview] view shows how the [Bleed tabs] are printed in your document.
This option is available via:
• The button bar:
Click the drop-down button [Tabs] and select [Bleed tabs].
• The menu:
Click [Document] - [Bleed tabs].
• The preview view:
Double-click a bleed tab in the [Preview] view.
NOTE
A document can contain either [Bleed tabs] or tab media.
The [Bleed tabs] dialogue
The button bar of the [Bleed tabs] dialog allows you to do the following:
•[Start set] or [Continue set]
Use the button [Start set] to start the [Bleed tabs] at the top of the page.
For example, you have defined a [Cycle length] of 5. This means that the [Bleed tabs] of five
page ranges run from top to bottom. The bleed tab of the sixth page range starts at the top of
the page again.
Select the fourth page range. Click the [Start set] button. The bleed tab of the fourth page
range starts at the top of the page. The [Start set] button changes into [Continue set] for the
fourth page range. Click the [Continue set] button to undo this action.
•[Delete]
Use this button to delete the selected page range. The deleted page range leaves a gap
between the defined page ranges.
The pages in your document will not be removed.
•[Insert]
Use this button to insert a new tab caption before the selected tab caption.
•[Up] / [Down]
Use these buttons to move the selected tab caption up or down. The color of the tab caption is
not moved up or down.
•[Import]
Click this button to import the tab captions from a txt file.
•[Export]
Click this button to export the tab captions to a txt file.
Create the [Bleed tabs]
Procedure
1. Click the drop-down button [Tabs] and select [Bleed tabs].
The [Bleed tabs] dialog box appears.
2. You can create [Bleed tabs] in the following ways:
• Select the [Use section level] option.
Select a [Section] level from the drop-down list. The page ranges of the selected [Section] level
are used to create the [Bleed tabs].
Create and edit the [Bleed tabs]
Chapter 5 - The [Document] workspace 247
PRISMAprepare v6.2

• Define the page ranges manually.
Enter each page range separated by a '-'. For example: 5-10. Each page range becomes a bleed
tab.
Page ranges are not allowed to overlap. Gaps are allowed between the page ranges.
NOTE
When the document contains sections, the 'Use section level' option is automatically selected.
3. Click the icon in front of the page range to select the color that must be used for the bleed tab.
The default color for the [Bleed tabs] captions is black.
Press key 'Shift' and right-click page ranges to select multiple page ranges.
4. Define the [Cycle length] option.
Option [Cycle length] is available in the [Preview] view.
For example, you have defined a [Cycle length] of 5. This means that the [Bleed tabs] of five page
ranges run from top to bottom. The bleed tab of the sixth page range starts at the top of the page
again.
5. Select the [Caption] option.
You can enter or edit the [Bleed tabs] captions for each page range. A tab caption can contain up
to three lines of text.
You can use the names of a [Section] level as tab caption. See 'Import the tab captions'.
NOTE
If the [Caption] option is not selected, the tab captions are not printed in the document.
6. Click the icon in front of the tab caption to select the color that must be used for the tab caption.
The default color for the tab captions is white.
Press key 'Shift' and right-click page ranges to select multiple page ranges.
Create the [Bleed tabs]
248 Chapter 5 - The [Document] workspace
PRISMAprepare v6.2

Configure the [Bleed tabs]
Procedure
1. Select the [Shape] of the [Bleed tabs].
2. Define the [Width] of the [Bleed tabs].
3. Define the [Top / bottom indent].
The [Top / bottom indent] is the distance between the top and bottom of the page and the top and
bottom of the [Bleed tabs].
4. Select the [Print bleed tabs on both sides] option to print the [Bleed tabs] on the front side and
the back side of the page.
5. Click [Font...] to select the font that must be used for the tab caption.
6. Click [Color...] to select the Color that must be used for the tab caption.
7. Click [Advanced...] to:
• Change the text settings of the [Bleed tabs] captions.
• Add an image to the [Bleed tabs].
See:
Advanced bleed tab options
on page 250
8. Define the [Orientation] of the tab caption.
9. Use the [Horizontal] and [Vertical] options to align the tab captions.
10. Use the associated [Margin] option to set the top distance and side distance of the caption on the
tab. The [Margins] are used for the front side and the back side of the page.
11. Use the [Rotate 180 degrees on reverse side] option to define the orientation of the caption on the
back side of the page.
NOTE
These options are the global ones, valid for all tabs. Using 'Advanced' will allow giving specific
options to the chosen tabs
Configure the [Bleed tabs]
Chapter 5 - The [Document] workspace 249
PRISMAprepare v6.2

Advanced [Bleed tabs] options
Introduction
You can add text and/or images to the bleed tabs.
Procedure
1. Enable the [Text] option to select and modify the text and its attributes.
• Font and font size
• Bold / Italic / Underlined / Strikethrough
• Vertical text
The selected text is printed vertically.
• Different text colors
NOTE
The different font attributes can be specified at character level
2. Enable the [Image] option to add an image to your bleed tab.
• Check the image box to add an image via the browse button.
Images of type BMP, GIF, TIFF, TIF, JPEG, JPG, PNG and EPS are supported.
• The vertical and horizontal options allow you to align the image on the bleed tab.
• Rotate the image / Scale to fit / Rotate 180 degrees on back side.
NOTE
The image is placed over the background color (if any) and the text is placed over the image (if
any)
3. Click [OK].
Advanced [Bleed tabs] options
250 Chapter 5 - The [Document] workspace
PRISMAprepare v6.2

[Import bleed tab captions]
Procedure
1. Click the [Import] button.
The [Import bleed tab captions] dialog box appears.
2. You can import the [Bleed tabs] captions from:
• [File]
Click the '[Browse...]' button.
Select the [Bleed tabs] captions file and click 'Open'.
• [Section names]
You can use the names of a [Section] level as tab caption. Select from which level you want to
use the [Section names].
• [Clipboard]
You can use the data on the clipboard as [Bleed tabs] captions.
[Import bleed tab captions]
Chapter 5 - The [Document] workspace 251
PRISMAprepare v6.2

[Export bleed tab captions]
Procedure
1. Click the [Export] button.
The [Export bleed tab captions] dialog box appears.
2. Click the '[Browse...]' button.
3. Specify the new file name and/or folder and click [Save].
4. Click [OK] to export the [Bleed tabs] captions to a txt file.
[Export bleed tab captions]
252 Chapter 5 - The [Document] workspace
PRISMAprepare v6.2

Define the document type
Introduction
You can define the [Document type] for your document. The [Document type] is assigned to the
entire document.
This chapter describes the possible document types, their constrains and their settings.
This application offers additional settings for some document types. For example, a spine caption
is only possible for option [Booklet] and option [Perfect Binding].
When you change the document type, the staple, fold and punch settings are set to [None]. Select
a new staple setting for the changed document type.
NOTE
There are
Constraints
on page 230 for the document type.
This option is available via:
• The button bar: click the button [Document type].
• The menu: click [Document] - [Document type].
Related information
List of concepts
on page 53
Define the document type
Procedure
1. Click the [Document type] button in the button bar. Or click [Document type] in the [Document]
menu
2. Select the
List of concepts
on page 53.
3. Define the required settings for the document type, see the table "Settings for the document
types".
The required settings can differ between the available document types.
4. Click the [OK] button.
Related information
List of concepts
on page 53
Define the document type
Chapter 5 - The [Document] workspace 253
PRISMAprepare v6.2
Settings for the document types
Introduction
Below an overview of the content of the different tabs.
[Normal] tab
Setting Description
[Binding edge] The position of the binding edge determines how the pages are printed
on the paper. You can select the following options:
• [Left]
The document will be printed so that the pages of the produced
document will turn over the left side of the paper.
• [Top]
The job will be printed so that the pages of the produced document
will turn over the top side of the paper.
• [Right]
The job will be printed so that the pages of the produced document
will turn over the right side of the paper.
[Tab ordering] Define the order of the tabs.
The available values for this option depend on the selected [Binding
edge].
The [Tab ordering] option is valid for tabs and [Bleed tabs].
[Booklet] tab
Setting Description
[Binding edge] The position of the binding edge determines how the pages are printed
on the paper. You can select the following options:
• [Left]
The document will be printed so that the pages of the produced
document will turn over the left side of the paper.
• [Top]
The job will be printed so that the pages of the produced document
will turn over the top side of the paper.
• [Right]
The job will be printed so that the pages of the produced document
will turn over the right side of the paper.
[Tab ordering] Define the order of the tabs.
The available values for this option depend on the selected [Binding
edge].
The [Tab ordering] option is valid for tabs and [Bleed tabs].
[Finisher] Select the intended finisher for this document. By selecting the inten-
ded finisher you can improve the preview of your document. In the
[Print] dialog, you decide to which finisher you send your document. 4
Settings for the document types
254 Chapter 5 - The [Document] workspace
PRISMAprepare v6.2
Setting Description
[Staple] You can select the following options:
• [None]
• Staple pattern
Select a staple pattern that matches the capabilities of your finisher.
• [Staple sections]
You can create stapled output groups for one or more sections. All
pages of the concerning sections must be selected.
• [Other binding]
Select [Other binding] to create output groups for off-line finishing.
For example, a group of pages must be glued.
Select [Other binding] to enable jogging of unstapled pages in the
[Print] dialog.
NOTE
The option [Staple sections] overrules any previously as-
signed staples.
[Page size] Define the [Page size]:
• Use [Keep page size] to keep the current page size for all pages with
the booklet layout. This means that if your current page size is A4,
each page within your booklet layout will be A4. In this case A3 sheet
is used when you print the booklet document.
You have an A3 sheet, if "include spine with" is not checked; other-
wise the sheet is larger.
• Use [Reduce page size] to resize the pages. This means that if your
current page size is A4, each page within your booklet layout will be-
come A5. In this case A4 sheets are used when you print the booklet
document.
[Cover] This option brings up another dialog window.
You can select the following options:
• [Included in current document]
The cover is defined in the current document.
• [From file]
The cover is not defined in the current document. The [Browse] but-
ton is enabled. You can browse to a file which contains a cover.
• [the cover is already created]
The cover is already prepared in the document.
• [the cover must be created]
The application defines a cover for you from the first two pages and
the last two pages of the document.
• [Print on both sides]
Print both front and rear of the page yes/no.
• [Print back cover]
Do you want to print the back cover yes/no.
[Media size] [Include spine width] allows you to include the spine width in the me-
dia size.
Particular case: booklet with cover already created: the media size of
the cover is used as reference size for all the pages in the document.
Settings for the document types
Chapter 5 - The [Document] workspace 255
PRISMAprepare v6.2
[Multi-booklet] tab
Setting Description
[Binding edge] The position of the binding edge determines how the pages are printed
on the paper. You can select the following options:
• [Left]
The document will be printed so that the pages of the produced
document will turn over the left side of the paper.
• [Top]
The job will be printed so that the pages of the produced document
will turn over the top side of the paper.
• [Right]
The job will be printed so that the pages of the produced document
will turn over the right side of the paper.
[Tab ordering] Define the order of the tabs.
The available values for this option depend on the selected [Binding
edge].
The [Tab ordering] option is valid for tabs and [Bleed tabs].
[Finisher] Select the intended finisher for this document. By selecting the inten-
ded finisher you can improve the preview of your document. In the
[Print] dialog, you decide to which finisher you send your document.
[Staple] You can select the following options:
• [None]
• Staple pattern
Select a staple pattern that matches the capabilities of your finisher.
• [Staple sections]
You can create stapled output groups for one or more sections. All
pages of the concerning sections must be selected.
• [Other binding]
Select [Other binding] to create output groups for off-line finishing.
For example, a group of pages must be glued.
Select [Other binding] to enable jogging of unstapled pages in the
[Print] dialog.
NOTE
The option [Staple sections] overrules any previously as-
signed staples.
[Page size] Define the [Page size]:
• Use [Keep page size] to keep the current page size for all pages with
the booklet layout. This means that if your current page size is A4,
each page within your booklet layout will be A4. In this case A3 sheet
is used when you print the booklet document.
• Use [Reduce page size] to resize the pages. This means that if your
current page size is A4, each page within your booklet layout will be-
come A5. In this case A4 sheets are used when you print the booklet
document.
[Create output groups] • [sheets per output group]
Select the number of sheets per output group here
•One set for a section level
Select level 1 up to 5 for the section levels. 4
Settings for the document types
256 Chapter 5 - The [Document] workspace
PRISMAprepare v6.2
Setting Description
[Cover] This option brings up another dialog window.
You can select the following options:
• [Included in current document]
The cover is defined in the current document.
• [From file]
The cover is not defined in the current document. The [Browse] but-
ton is enabled. You can browse to a file which contains a cover.
• [the cover is already created]
The cover is already prepared in the document.
• [the cover must be created]
The application defines a cover for you from the first two pages and
the last two pages of the document.
• [Print on both sides]
Print both front and rear of the page yes/no.
• [Print back cover]
Do you want to print the back cover yes/no.
[Perfect Binding] tab
Setting Description
[Binding edge] The position of the binding edge determines how the pages are printed
on the paper. You can select the following options:
• [Left]
The document will be printed so that the pages of the produced
document will turn over the left side of the paper.
• [Top]
The job will be printed so that the pages of the produced document
will turn over the top side of the paper.
• [Right]
The job will be printed so that the pages of the produced document
will turn over the right side of the paper.
[Tab ordering] Define the order of the tabs.
The available values for this option depend on the selected [Binding
edge].
The [Tab ordering] option is valid for tabs and [Bleed tabs].
[Finisher] Select the intended finisher for this document. By selecting the inten-
ded finisher you can improve the preview of your document. In the
[Print] dialog, you decide to which finisher you send your document.
NOTE
The administrator configures which finishers are available. 4
Settings for the document types
Chapter 5 - The [Document] workspace 257
PRISMAprepare v6.2
Setting Description
[Staple] You can select the following options:
• [None]
• Staple pattern
Select a staple pattern that matches the capabilities of your finisher.
• [Staple sections]
You can create stapled output groups for one or more sections. All
pages of the concerning sections must be selected.
• [Other binding]
Select [Other binding] to create output groups for off-line finishing.
For example, a group of pages must be glued.
Select [Other binding] to enable jogging of unstapled pages in the
[Print] dialog.
NOTE
The option [Staple sections] overrules any previously as-
signed staples.
[Cover] This option brings up another dialog window.
You can select the following options:
• [Included in current document]
The cover is defined in the current document.
• [From file]
The cover is not defined in the current document. The [Browse] but-
ton is enabled. You can browse to a file which contains a cover.
• [the cover is already created]
The cover is already prepared in the document.
• [the cover must be created]
The application defines a cover for you from the first two pages and
the last two pages of the document.
• [Print on both sides]
Print both front and rear of the page yes/no.
• [Print back cover]
Do you want to print the back cover yes/no.
[Signature book] tab
Setting Description
[Binding edge] The position of the binding edge determines how the pages are printed
on the paper. You can select the following options:
• [Left]
The document will be printed so that the pages of the produced
document will turn over the left side of the paper.
• [Top]
The job will be printed so that the pages of the produced document
will turn over the top side of the paper.
• [Right]
The job will be printed so that the pages of the produced document
will turn over the right side of the paper.
[Tab ordering] Define the order of the tabs.
The available values for this option depend on the selected [Binding
edge].
The [Tab ordering] option is valid for tabs and [Bleed tabs]. 4
Settings for the document types
258 Chapter 5 - The [Document] workspace
PRISMAprepare v6.2

Setting Description
[Signature book] Select the type of [Signature book]:
• [Octavo signature book]
• [Quarto signature book]
[Cover] This option brings up another dialog window.
You can select the following options:
• [Included in current document]
The cover is defined in the current document.
• [From file]
The cover is not defined in the current document. The [Browse] but-
ton is enabled. You can browse to a file which contains a cover.
• [the cover is already created]
The cover is already prepared in the document.
• [the cover must be created]
The application defines a cover for you from the first two pages and
the last two pages of the document.
• [Print on both sides]
Print both front and rear of the page yes/no.
• [Print back cover]
Do you want to print the back cover yes/no.
Settings for the document types
Chapter 5 - The [Document] workspace 259
PRISMAprepare v6.2

Remove the [Bleed tabs]
Introduction
Use the [Remove bleed tabs] command to remove the [Bleed tabs] from your document.
Procedure
1. The menu: click [Document] - [Remove bleed tabs].
The [Bleed tabs] are removed from your document.
The settings in the [Bleed tabs] dialog are removed.
Remove the [Bleed tabs]
260 Chapter 5 - The [Document] workspace
PRISMAprepare v6.2
Create and edit the [Spine caption]
Introduction
Use the [Spine caption] dialogue to define text, a background color and/or a background image
on the spine of your document.
NOTE
You can create a spine caption only if your Document type is [Booklet] or [Perfect Binding].
The spine caption is displayed in the [Preview] view on the left or right at the top of the first page.
This spine caption position depends on the binding of the document.
By default, the width of the spine caption depends on the number of pages in your document but
it can be set to a fixed value.
Create and edit the [Spine caption]
Click [Document] - [Spine caption] or double-click the spine caption in the [Preview] view.
The [Spine caption] dialog box appears.
Spine caption settings
Setting Description
[Transparency] /
[Use bleed]
• Button [Transparency] is available when a cover is imported from a file.
Click this button to add transparency to the spine of the imported cover.
The spine of the imported cover is used as background for the spine cap-
tion.
• Button [Use bleed] is available when the cover is created by the applica-
tion.
Click this button to use the available bleed for the spine of the cover.
Check if the available bleed is sufficient to fill the entire spine.
[Background col-
or]
Defines the background color for the spine caption.
You can select the background color or use the color picker tool.
[Font] Select several different font attributes that must be used for the spine cap-
tion. The different font attributes can be specified at character level
[Text] Enable the [Image] option to add text to the spine.
The spine caption can contain up to three lines of text.
• Font and font size
• Bold / Italic / Underlined / Strikethrough.
• Vertical text
The selected text is printed vertically.
• Different text colors.
[Vertical] This is the vertical alignment of the text on the spine caption.
[Horizontal] This is the horizontal alignment of the text on the spine caption.
[Orientation] Define the [Orientation] of the spine caption.
[Image] Enable the [Image] option to add an image to the spine. Click the checkbox
and then browse to the file you want to use as background image on the
spine caption.
Images of type BMP, GIF, TIFF, TIF, JPEG, JPG, PNG and EPS are supported.
[Vertical] This is the vertical alignment of the image on the spine. 4
Create and edit the [Spine caption]
Chapter 5 - The [Document] workspace 261
PRISMAprepare v6.2

Setting Description
[Horizontal] This is the horizontal alignment of the image on the spine.
[Rotation] You can rotate the image on the spine.
[Scale to fit] You can use [Scale to fit] to fit the image to the spine.
[Width] You can define the width of the caption automatically or use a custom
width.
NOTE
The image is placed over the background color and the text is placed over the image.
Create and edit the [Spine caption]
262 Chapter 5 - The [Document] workspace
PRISMAprepare v6.2

Apply a stamp
Introduction
Stamps can be configured as watermarks, stamps, logos, static barcodes, signatures, etc. You can
create multiple stamps. The stamps are added to the stamp catalog.
You can apply stamps to the pages of the document. Applied stamps become part of the page
programming of the document.
Apply a stamp from the stamp catalog
Procedure
1. Select the page(s).
2. Click [Pages] - 'Apply stamp'.
3. Click 'From stamp catalog...'
The 'Stamp catalog' dialog opens.
4. Select the stamp that you want to apply to your document.
5. Click [Apply].
The stamp is applied to the page(s).
6. Click [Close].
NOTE
You can apply more than one stamp to the page(s).
Apply a stamp
Chapter 5 - The [Document] workspace 263
PRISMAprepare v6.2

Apply a stamp from the Pick list
Procedure
1. Select the page(s).
2. Click [Pages] - 'Apply stamp'.
3. Select the stamp from the pick list.
The stamp is applied to the page(s).
NOTE
The pick list contains all stamps that are applied to your document.
Apply a stamp from the Pick list
264 Chapter 5 - The [Document] workspace
PRISMAprepare v6.2

Define the document properties
Introduction
The Document properties are initialized based on the corresponding PDF document properties.
Once you change the Document properties within this application, these properties will not be
overruled by the PDF properties in the future.
Click [Document] - [Properties] to specify the document properties.
Document properties
Setting Description
Title Enter the document title here.
Owner Enter the document owner here.
Account Enter your account here.
Addressee Enter your address here,
Banner message Specify the message that should appear on the banner page.
Special instruc-
tion
Specify the special instruction message.
Creation date Specify the creation date here.
Define the document properties
Chapter 5 - The [Document] workspace 265
PRISMAprepare v6.2

Define the document properties
266 Chapter 5 - The [Document] workspace
PRISMAprepare v6.2
Chapter 6
Manage media
Manage the media catalog
Introduction
This application offers a default [Media Catalog] which contains the most used media types. You
can assign the media to selected pages.
This topic shows you how to add, edit and delete media within the [Media Catalog].
You can add media to the [Pick list]. The [Pick list] is a subset of the [Media Catalog]. It allows
quick assignment of media to selected pages without having to open the [Media Catalog].
Click on a column header to sort the [Media Catalog]. You can sort ascending and descending.
Drag the separators to change the width of the columns.
Add media to the media catalog
Procedure
1. Click 'Tools' - [Media] - 'Media catalog...'.
The [Media Catalog] dialog will appear.
2. Click [New].
The [New media] dialog will appear.
3. Configure the media settings:
Setting Description
[Name] Enter the media [Name].
[Size] • You can select a default media size from the drop-down list, for example
'A4' and 'Letter'.
• You can create a custom media size. Select [Custom] from the drop-down
list and change the [Width] and [Height]. Define the unit for the custom
media.
NOTE
Due to tolerances of the paper size, some custom sizes will be
mapped on standard media sizes. See the preview view at the bot-
tom of the dialog.
[Insert] Select [Insert] if the media is used for insert sheets.
[Tab] Select [Tab] if the media is tabbed media.
The [Top / bottom indent] is the distance between the top of the tab media
and the top of its first tab.
[Cyclic] Select [Cyclic] if the media is part of a set (for example a set of tabs). Use
the [Cycle length] setting to specify the length of the set. For example, one
set of tabs contains 5 tab sheets.
[Weight] Specify the media [Weight]. For example '80 g/m2' for A4 and '16 lb bond'
for Letter.
[Type] Select the media [Type]. For example [Plain], [Glossy], or [Transparent].
Select [Custom] from the drop-down list to define a custom media type.
[Color] Select the media [Color]. For example [White], [Green], or [Orange].
Select [Custom] from the drop-down list to define a custom color. 4
Manage the media catalog
268 Chapter 6 - Manage media
PRISMAprepare v6.2

Setting Description
[Punched] Select [Punched] if the media is punched media.
Use the [Punch pattern] setting to define the number of holes in the
punched media. Select the correct punch pattern for pre-punched media to
improve the preview of your document.
[1-sided] Select [1-sided] if this media can only be used on one side. For example: the
media is transparent.
[Preprinted] Select [Preprinted] to indicate that the media is pre-printed (for example
with a company logo).
[Thickness] Specify the media [Thickness]. This media thickness is used to determine
the default [Creep compensation] in case of Booklets.
NOTE
The [Preview] section gives you a rough overview of the specified
media.
4. Click [OK] to add the media to the [Media Catalog].
NOTE
It is not mandatory to specify the name, weight, type, and color.
If the specified media already exists in the [Media Catalog] you will not be able to add it again.
Add media to the media catalog
Chapter 6 - Manage media 269
PRISMAprepare v6.2

Edit media within the Media catalog
Procedure
1. Click 'Tools' - [Media] - 'Media catalog...'.
The [Media Catalog] dialog will appear.
2. Select the media that you want to edit.
3. Edit the media properties and click [OK] to save the changes.
NOTE
You can edit the properties of any media in the [Media Catalog]. If the media is used in your
document, the media properties in the document are not changed. If you want to use the edited
media in the document, then you must assign the concerning media to the document.
Edit media within the Media catalog
270 Chapter 6 - Manage media
PRISMAprepare v6.2

Delete media from the Media catalog
Procedure
1. Click 'Tools' - [Media] - 'Media catalog...'.
The [Media Catalog] dialog will appear.
2. Select the media that you want to delete.
3. Click [Delete] to delete the media from the [Media Catalog].
NOTE
You can delete media from the [Media Catalog]. If the media is used in your document, the
media is not deleted from your document.
Delete media from the Media catalog
Chapter 6 - Manage media 271
PRISMAprepare v6.2

Add media to the Pick list
Procedure
1. Click 'Tools' - [Media] - 'Media catalog...'.
The [Media Catalog] dialog will appear.
2. Select the check-box in front of the media to add the media to the [Pick list].
Add media to the Pick list
272 Chapter 6 - Manage media
PRISMAprepare v6.2

Export the media catalog
Introduction
You can export the media catalogue directly to a printer or to an XML file.
A message is shown when a printer does not support the export, or merge, of a media catalogue
file.
You cannot export an empty media catalog.
Export the media catalogue to the printer(s)
Procedure
1. Click 'Tools' - [Media] - [Export media catalog].
The [Export media catalog] dialog box appears.
2. Select the [Export to printers] option.
3. Select the printer(s).
These printer(s) receive the media catalog of this application.
NOTE
The administrator configures which printers are available to you. The administrator also
configures which printers can import or export the media catalog.
4. You can select the following options:
• [Merge with the existing media catalog]
Merge the media catalog of the printer with the media catalog of this application. You can
replace or merge the media catalog on printers with controller version 2, or higher.
• [Replace the existing media catalog]
Replace the media catalog of the printer with the media catalog of this application. You can
replace the media catalog on printers with controller version 1, or higher.
• [Replace or merge depending on the printer capabilities]
The printer capabilities determine if the media catalog of the printer is replaced by or merged
with the media catalog of the application.
This option is valid only for Océ printers that are released after January 1, 2009.
5. Select the media for the [Banner page].
6. Select the [Default front cover].
With this option you define the default front cover in the media catalog of the printer.
7. Select the [Default back cover].
With this option you define the default back cover in the media catalog of the printer.
8. Click the [Export] button.
NOTE
The controller of the printer must be switched on during the export of the media catalog.
Export the media catalog
Chapter 6 - Manage media 273
PRISMAprepare v6.2

Export the media catalog to an XML file
Procedure
1. Click 'Tools' - [Media] - [Export media catalog].
The [Export media catalog] dialog box appears.
2. Select the [Export to file] option.
3. For option [Format] you can select the following values:
• 'Océ PRISMAprepare file'
A copy is made of the XML file which contains the media catalog of this application.
Use this format when you want to configure other installations of this application.
You can only use an XML file with this format in the
Import the media catalog
on page 275
scenario.
• [Printer file]
An XML file is created that contains the media catalog of this application.
Use this format if you want to configure an Océ printer that was released before January 1,
2009.
• [Printer file - new generation]
An XML file is created that contains the media catalog of this application.
Use this format if you want to configure an Océ printer that was released after January 1, 2009.
NOTE
It is recommended to use option [Export to printers] instead of creating an XML file with format
[Printer file] or [Printer file - new generation].
NOTE
Use the 'Settings Editor' to import an XML file with format [Printer file] or [Printer file - new
generation] into the printer.
4. Select the [Default front cover].
With this option you define the default front cover in the media catalog file.
5. Select the [Default back cover].
With this option you define the default back cover in the media catalog file.
6. Click the [Export] button.
Export the media catalog to an XML file
274 Chapter 6 - Manage media
PRISMAprepare v6.2

Import the media catalog
Introduction
You can import the media catalog file directly from one or more printers, or from an XML file.
The media catalog file must be created with the
Export the media catalog
on page 273 scenario.
Related information
Export the media catalog
on page 273
Import the media catalog from the printer(s)
Procedure
1. Click 'Tools' - [Media] - [Import media catalog].
The [Import media catalog] dialog box appears.
2. Select the [Import from printers] option.
3. Select the printer(s).
Only Océ printers that are released after January 1, 2009 are available in the list of printers.
The application imports the media catalog of these printers.
NOTE
The administrator configures which printers are available to you. The administrator also
configures which printers can import or export the media catalog.
4. You can select the following options:
• [Merge with the existing media catalog]
Merge the media catalog(s) of the selected printer(s) with the media catalog of the application.
It is recommended that you select this option when importing the media catalogs of more than
one printer.
• [Replace the existing media catalog]
Replace the media catalog of the application with the media catalog of the selected printer(s).
NOTE
The controller of the printer must be switched on during the import of the media catalog.
Related information
Export the media catalog
on page 273
Import the media catalog
Chapter 6 - Manage media 275
PRISMAprepare v6.2

Import the media catalog from an XML file
Procedure
1. Click 'Tools' - [Media] - [Import media catalog].
The [Import media catalog] dialog box appears.
2. Select the [Import from file] option.
3. Click the [Browse...] button.
4. Browse to the media catalog file.
The media catalog file is an XML file.
The XML file must have format 'Océ PRISMAprepare file'. See
Export the media catalog
on
page 273.
5. You can select the following options:
• [Merge with the existing media catalog]
Merge the imported media catalog with the media catalog of the application.
• [Replace the existing media catalog]
Replace the media catalog of the application with the imported media catalog.
6. Click [OK].
Import the media catalog from an XML file
276 Chapter 6 - Manage media
PRISMAprepare v6.2

Order new media
Introduction
On the 'Océ Media Guide' website you can find compatible Océ media for your printer, copier or
laminator. Detailed information is available on this website for all Océ media.
Procedure
1. Click 'Tools' - [Media] - 'Order media'.
The 'Océ Media Guide' website appears.
Order new media
Chapter 6 - Manage media 277
PRISMAprepare v6.2

Order new media
278 Chapter 6 - Manage media
PRISMAprepare v6.2
Chapter 7
Manage the templates
Manage the templates
Introduction
You can create templates for documents that need the same layout. Each template is added to the
template catalog.
The templates are displayed alphabetically in a list.
You can add a template to the [Pick list]. The [Pick list] is a subset of the [Template catalog]. You
can apply a template to a document without having to open the [Template catalog].
NOTE
The [VDP workspace] is disabled when you create a new template. You can apply templates to
variable data documents.
Add a template to the template catalog
Procedure
1. Click [Document] - 'Create new template'. Or:
Click 'Tools' - 'Templates' - 'Template catalog...'. Click [New].
The [Create template] dialog opens.
2. Create a new template:
Step Action
1 • Enable the [Do not print the document] option:
You are creating a template. You click [Print]. The document is not printed.
• Disable the [Do not print the document] option:
You are creating a template. You click [Print]. The document is printed, while you
create the template.
2 Click the [Create] button.
3 Define all page program settings that you want to add to the template. You can select
the settings via the menu, the [Structure] view and the [Preview] view.
You can add the operations to clean-up scanned pages to the template.
The feedback area displays the selections and the executed actions.
NOTE
You can add operation [Import VDP] to the template. You cannot add any
other [VDP] actions to the template. You can apply templates to variable da-
ta documents.
NOTE
Click button [Undo] to remove selections or actions from the template.
3. Stop to create the template:
Step Action
1 Click the [Stop] button.
The [Create template] dialog opens. 4
Manage the templates
280 Chapter 7 - Manage the templates
PRISMAprepare v6.2

Step Action
2 • Click [Yes] to save the template.
The [Save template] dialog opens.
• Click [No] to discard the template.
• Click [Cancel] to continue to create the template.
4. Save the template:
Step Action
1 Define the [Name] for the template.
2 Type a description for the template.
3 Optionally, you can enable the [Add to pick list] option to add the template to
the [Pick list].
4 Click [OK].
The template is saved and added to the template catalog.
NOTE
The template is saved to a fixed location on the hard disk.
Add a template to the template catalog
Chapter 7 - Manage the templates 281
PRISMAprepare v6.2

Rename a template in the template catalog
Procedure
1. Click 'Tools' - 'Templates' - 'Template catalog...'.
The [Template catalog] dialog opens.
2. Click [Rename].
The [Rename template] dialog opens.
3. Rename the template:
Step Action
1 Define the [Name] for the template.
2 Type a description for the template.
3 Enable the [Add to pick list] option to add the template to the [Pick list].
4 Click [OK].
The template is saved and added to the template catalog.
NOTE
The template is saved to a fixed location on the hard disk.
Rename a template in the template catalog
282 Chapter 7 - Manage the templates
PRISMAprepare v6.2

Delete a template from the template catalog
Procedure
1. Click 'Tools' - 'Templates' - 'Template catalog...'.
The [Template catalog] dialog opens.
2. Click [Delete].
The [Delete template] dialog opens.
3. Click [Yes].
The template is deleted and removed from the [Template catalog].
Delete a template from the template catalog
Chapter 7 - Manage the templates 283
PRISMAprepare v6.2

Add a template to the Pick list
Procedure
1. Click 'Tools' - 'Templates' - 'Template catalog...'.
The [Template catalog] dialog opens.
2. Click [Rename].
The [Rename template] dialog opens.
3. Enable the [Add to pick list] option to add the template to the [Pick list].
4. Click [OK].
Add a template to the Pick list
284 Chapter 7 - Manage the templates
PRISMAprepare v6.2

Export the templates
Introduction
You can create templates for documents that need the same layout. Each template is added to the
template catalog.
The user can export one or more templates from PRISMAprepare.
Procedure
1. Click 'Tools' - 'Templates' - 'Export templates...'.
The [Export templates] dialog opens.
2. Select the template(s) that you want to export.
Enable option [Export all] to select all templates.
3. Click the [Export] button.
The [Select template catalog file] dialog opens.
4. Specify the new file name and/or folder and click [Save].
The templates are saved in a zip file.
Export the templates
Chapter 7 - Manage the templates 285
PRISMAprepare v6.2

Import the templates
Introduction
You can create templates for documents that need the same layout. Each template is added to the
template catalog.
The user can import templates into PRISMAprepare.
Procedure
1. Click 'Tools' - 'Templates' - 'Import templates...'.
The [Import templates] dialog opens.
2. Click the [Browse...] button.
The [Select template catalog file] dialog opens.
3. Browse to the templates file.
The templates file is a zip file.
4. Select the zip file and click [Open].
5. You can select the following options:
• [Merge with the existing templates]
Merge the imported templates with the templates that are used by the application.
A template in the import file can have the same name as an existing template in the
application. You are asked if you want to keep or replace the existing template.
• [Replace the existing templates]
All templates of the application are deleted first. The imported templates are used by the
application.
6. Click [OK].
Import the templates
286 Chapter 7 - Manage the templates
PRISMAprepare v6.2
Chapter 8
Manage stamps
Manage the stamps in the stamp catalog
Introduction
Stamps can be configured as watermarks, stamps, logos, static barcodes, signatures, etc. You can
create multiple stamps. The stamps are added to the stamp catalog.
You can apply stamps to the pages of the document. Applied stamps become part of the page
programming of the document.
The application makes a distinction between stamps in the stamp catalogue and stamps that are
applied to the document. Once a stamp is applied to the document, the applied stamp becomes
part of the page programming of the document. When you edit the applied stamp, the stamp is
changed in the document. The original stamp in the stamp catalog is not changed.
When you edit the original stamp, the stamp is changed in the stamp catalog. The applied stamp
in the document is not changed.
Add a stamp to the stamp catalog
Procedure
1. Click 'Tools' - [Stamps] - 'Stamp catalog...'.
The 'Stamp catalog' dialog opens.
2. Click [New].
The 'New stamp' dialog opens.
3. Define the [Name] and the [Type] for the stamp:
Setting Description
[Name] Define the name of the stamp.
[Type] Define the type of stamp:
• [Text]
The stamp is user defined text.
• [Image]
The stamp is a image file.
4. When [Type] = [Text]:
Define the text of the stamp in the text area. You can configure the text.
Setting Description
[Font...] Select several different font attributes that must be used for the text stamp.
The different font attributes can be specified at character level
• Font and font size
• Bold / Italic / Underlined / Strikethrough.
• Different text colors.
[Alignment] Align the text:
• Align left
By default, the text is aligned to the left.
• Center
• Align right 4
Manage the stamps in the stamp catalog
288 Chapter 8 - Manage stamps
PRISMAprepare v6.2
Setting Description
[Scale text to
page]
Enable this setting to scale the text.
You can define the percentage to increase or decrease the size of the text.
The text is scaled relative to the size of the first selected page. If no page is
selected, the text is scaled relative to the size of the first page containing
content.
When [Type] = [Image]:
Setting Description
[Browse...] Browse to the image file. Images of type BMP, GIF, TIFF, TIF, JPEG, JPG,
PNG and EPS are supported.
[Scale image] Enable this setting to scale the image.
You can define the percentage to increase or decrease the size of the image.
The image is scaled relative to its original size.
5. Configure the stamp:
Header and footer settings
Setting Description
[Location] Define the location of the stamp:
• [In front of page content]
The stamp is printed over the page content.
• [Behind page content]
The page content is printed over the stamp.
[Transparency] You can define the transparency of the stamp.
[Rotation] Select the rotation that you want to apply to the stamp.
[Position] Align the stamp to a certain position on the page.
Use the [Horizontal shift] and [Vertical shift] to define the exact position of
the stamp.
[Print stamp on
both sides]
Define if you want to add the stamp on the [Front and back side] or on the
[Front side only].
[Mirror on back
side]
You have defined the position of the stamp on one side of the page.
Enable this option to mirror the position of the stamp on the other side of
the page.
6. Click [OK].
The stamp is saved and added to the stamp catalog.
Add a stamp to the stamp catalog
Chapter 8 - Manage stamps 289
PRISMAprepare v6.2

Copy a stamp in the stamp catalog
Procedure
1. Click 'Tools' - [Stamps] - 'Stamp catalog...'.
The 'Stamp catalog' dialog opens.
2. Click [Copy].
The 'New stamp' dialog opens.
3. Edit the settings of the copied stamp.
4. Click [OK].
The stamp is saved and added to the stamp catalog.
Copy a stamp in the stamp catalog
290 Chapter 8 - Manage stamps
PRISMAprepare v6.2

Edit a stamp in the stamp catalog
Procedure
1. Click 'Tools' - [Stamps] - 'Stamp catalog...'.
The 'Stamp catalog' dialog opens.
2. Click [Edit].
The 'Edit stamp' dialog opens.
3. Edit the settings of the stamp.
4. Click [OK].
The stamp is saved to the stamp catalog.
NOTE
This operation has no impact on stamps that are applied to the document.
Edit a stamp in the stamp catalog
Chapter 8 - Manage stamps 291
PRISMAprepare v6.2

Delete a stamp from the stamp catalog
Procedure
1. Click 'Tools' - [Stamps] - 'Stamp catalog...'.
The 'Stamp catalog' dialog opens.
2. Click [Delete].
The 'Delete stamp' dialog opens.
3. Click [Yes].
The stamp is deleted and removed from the stamp catalog.
NOTE
This operation has no impact on stamps that are applied to the document.
Delete a stamp from the stamp catalog
292 Chapter 8 - Manage stamps
PRISMAprepare v6.2

Manage the stamps in the document
Introduction
Stamps can be configured as watermarks, stamps, logos, static barcodes, signatures, etc. You can
create multiple stamps. The stamps are added to the stamp catalog.
You can apply stamps to the pages of the document. Applied stamps become part of the page
programming of the document.
The application makes a distinction between stamps in the stamp catalogue and stamps that are
applied to the document. Once a stamp is applied to the document, the applied stamp becomes
part of the page programming of the document. When you edit the applied stamp, the stamp is
changed in the document. The original stamp in the stamp catalog is not changed.
When you edit the original stamp, the stamp is changed in the stamp catalog. The applied stamp
in the document is not changed.
Edit a stamp in the document
Procedure
1. Click [Pages] - [Stamps] - [Edit].
A list of stamps appears. Each stamp in the list is applied to one or more pages of the document.
2. Click the stamp.
The 'Edit stamp' dialog opens.
3. Edit the settings of the stamp.
4. Click [OK].
The stamp is changed on all pages that contain the stamp.
NOTE
This operation has no impact on stamps in the stamp catalog.
Manage the stamps in the document
Chapter 8 - Manage stamps 293
PRISMAprepare v6.2

Remove a stamp from the selected page(s)
Procedure
1. Select the page(s).
2. Click [Pages] - [Stamps] - [Remove].
A list of stamps appears. Each stamp in the list is applied to the selected page(s).
3. You can:
• Click one of the stamps to remove the selected stamp from the selected page(s).
• Click [All] to remove all stamps from the selected page(s).
NOTE
This operation has no impact on stamps in the stamp catalog.
Remove a stamp from the selected page(s)
294 Chapter 8 - Manage stamps
PRISMAprepare v6.2

Copy a stamp from the document to the stamp catalog
Procedure
1. Click [Pages] - [Stamps] - 'Copy to catalog'.
A list of stamps appears. Each stamp in the list is applied to the document.
2. You can:
• Click one of the stamps to copy the selected stamp to the stamp catalog.
• Click [All] to copy all stamps to the stamp catalog.
NOTE
Stamps are greyed out when they are already available in the stamp catalog.
Copy a stamp from the document to the stamp catalog
Chapter 8 - Manage stamps 295
PRISMAprepare v6.2

Export the stamps
Introduction
Stamps can be configured as watermarks, stamps, logos, static barcodes, signatures, etc. You can
create multiple stamps. The stamps are added to the stamp catalog.
You can export one or more stamps from the stamp catalog.
Procedure
1. Click 'Tools' - [Stamps] - 'Export stamps...'.
The [Export stamps] dialog opens.
2. Select the stamp(s) that you want to export.
Enable option [Export all] to select all stamps.
3. Click the [Export] button.
The [Select stamp catalog file] dialog opens.
4. Specify the new file name and/or folder and click [Save].
The stamps are saved in a zip file.
Export the stamps
296 Chapter 8 - Manage stamps
PRISMAprepare v6.2

Import the stamps
Introduction
Stamps can be configured as watermarks, stamps, logos, static barcodes, signatures, etc. You can
create multiple stamps. The stamps are added to the stamp catalog.
You can import one or more stamps into the stamp catalog.
Procedure
1. Click 'Tools' - [Stamps] - 'Import stamps...'.
The [Import stamps] dialog opens.
2. Click the [Browse...] button.
The [Select stamp catalog file] dialog opens.
3. Browse to the stamp catalog file.
The stamp catalog file is a zip file.
4. Select the zip file and click [Open].
5. You can select the following options:
• [Merge with the existing stamps]
Merge the imported stamps with the stamps that are used by the application.
A stamp in the import file can have the same name as an existing stamp in the application. You
are asked if you want to keep or replace the existing stamp.
• [Replace the existing stamps]
All stamps of the application are deleted first. The imported stamps are used by the
application.
6. Click [OK].
Import the stamps
Chapter 8 - Manage stamps 297
PRISMAprepare v6.2

Import the stamps
298 Chapter 8 - Manage stamps
PRISMAprepare v6.2
Chapter 9
Preflight documents

Introduction
The preflight operation checks if any rules are violated in the document(s). The set of rules is
fixed.
Preflight is a function available under license. If the license is not available, the corresponding
menu items are grayed out.
If enabled, the automatic preflight operation is applied when a document is being opened,
inserted or replaced. You can always apply a manual preflight to an opened document.
A preflight report and an annotated file are generated. The preflight report shows a summary of
the problems that have been found. The annotated file shows the complete document with the
location of any found problems and fixes. The manual preflight operation automatically fixes the
violations according to the configured rules. The automatic preflight operation allows you to fix
the violations according to the configured rules or cancel the operation with that document.
Some problems are detected by the preflight operation, but cannot be fixed automatically. It is
recommended that you fix these problems manually before you print the job.
You can start the preflight operation via the menu bar and the button bar.
NOTE
All add-ons (Stamps, Header and Footer, [Bleed tabs], …) and images added by the operator (in
stamps, spine caption, tabs,…) are not preflighted.
Preflight your document
Introduction
The preflight operation checks if any rules are violated in the document(s). The available preflight
rules are:
• [PDF actions and scripting rule]
You can configure this rule. The preflight operation can fix the violations detected by this rule.
• [Content too close to border rule]
You can configure this rule. The preflight operation cannot fix the violations detected by this
rule. It is recommended that you fix these problems manually before you print the job.
• [Embedded fonts rule]
You can configure this rule. The preflight operation can fix the violations detected by this rule.
• [Hairline rule]
You can configure this rule. The preflight operation can fix the violations detected by this rule.
• [Image compression is too high rule]
You can configure this rule. The preflight operation cannot fix the violations detected by this
rule. It is recommended that you fix these problems manually before you print the job.
• [Image resolution is too high rule]
You can configure this rule. The preflight operation can fix the violations detected by this rule.
• [Image resolution is too low rule]
You can configure this rule. The preflight operation cannot fix the violations detected by this
rule. It is recommended that you fix these problems manually before you print the job.
• [Transparency rule]
You cannot configure this rule. The preflight operation cannot fix the violations detected by
this rule. It is recommended that you fix these problems manually before you print the job.
• [Overprint rule]
You cannot configure this rule. The preflight operation cannot fix the violations detected by
this rule. It is recommended that you fix these problems manually before you print the job.
• [Restricted permissions rule]
Preflight your document
300 Chapter 9 - Preflight documents
PRISMAprepare v6.2

This rule is always enabled. You cannot configure this rule. The preflight operation cannot fix
the violations detected by this rule. It is recommended that you fix these problems manually
before you print the job.
Procedure
1. Click: [Document] - [Preflight document].
2. Select the rules you want to use to preflight your document.
3. Configure the rules you want to use to preflight your document.
Click button [Edit] to configure a rule.
4. Click [OK] to start the preflight analysis.
The manual preflight operation automatically fixes the violations according to the configured
rules. Some problems are detected by the preflight operation, but cannot be fixed automatically.
It is recommended that you fix these problems manually before you print the job.
Preflight your document
Chapter 9 - Preflight documents 301
PRISMAprepare v6.2

Fix any found problems
Procedure
1. The preflight report shows a summary of the problems that have been found/fixed.
2. You can click button [View preflight report] and button [Save preflight report].
Any found problems are annotated in the PDF file.
3. Do:
• For manual preflight:
The manual preflight operation automatically fixes the violations according to the configured
rules.
Click [Close].
• For automatic preflight:
Click button [Yes] to fix the violations according to the configured rules.
Click button [No] to cancel the operation with that document.
Some problems are detected by the preflight operation, but cannot be fixed automatically. It is
recommended that you fix these problems manually before you print the job.
Fix any found problems
302 Chapter 9 - Preflight documents
PRISMAprepare v6.2

Undo the pre-flight of the document
Procedure
1. Undo is available after a manual preflight only if fixes were applied; it removes the fixes applied
on a document, except those concerning the fonts. However, Undo is always available in
template recording mode.
2. If not saved yet you can also open the file menu and use [Revert to last saved]
Undo the pre-flight of the document
Chapter 9 - Preflight documents 303
PRISMAprepare v6.2

Enable automatic preflight
Introduction
The preflight operation checks if any rules are violated in the document(s). The available preflight
rules are:
• [PDF actions and scripting rule]
You can configure this rule. The preflight operation can fix the violations detected by this rule.
• [Content too close to border rule]
You can configure this rule. The preflight operation cannot fix the violations detected by this
rule. It is recommended that you fix these problems manually before you print the job.
• [Embedded fonts rule]
You can configure this rule. The preflight operation can fix the violations detected by this rule.
• [Hairline rule]
You can configure this rule. The preflight operation can fix the violations detected by this rule.
• [Image compression is too high rule]
You can configure this rule. The preflight operation cannot fix the violations detected by this
rule. It is recommended that you fix these problems manually before you print the job.
• [Image resolution is too high rule]
You can configure this rule. The preflight operation can fix the violations detected by this rule.
• [Image resolution is too low rule]
You can configure this rule. The preflight operation cannot fix the violations detected by this
rule. It is recommended that you fix these problems manually before you print the job.
• [Transparency rule]
You cannot configure this rule. The preflight operation cannot fix the violations detected by
this rule. It is recommended that you fix these problems manually before you print the job.
• [Overprint rule]
You cannot configure this rule. The preflight operation cannot fix the violations detected by
this rule. It is recommended that you fix these problems manually before you print the job.
• [Restricted permissions rule]
This rule is always enabled. You cannot configure this rule. The preflight operation cannot fix
the violations detected by this rule. It is recommended that you fix these problems manually
before you print the job.
Procedure
1. Click: [Tools] - [Automatic preflight settings].
2. Click: [Enable automatic preflight].
3. Select the rules you want to use to preflight your document.
4. Configure the rules you want to use to preflight your document.
Click button [Edit] to configure a rule.
5. Click [OK] to start the preflight analysis.
The manual preflight operation automatically fixes the violations according to the configured
rules. Some problems are detected by the preflight operation, but cannot be fixed automatically.
It is recommended that you fix these problems manually before you print the job.
6. Click [OK] to save your settings.
The automatic preflight operation is applied when a document is opened, inserted or replaced.
The automatic preflight operation allows you to fix the violations according to the configured
rules or cancel the operation with that document. Some problems are detected by the preflight
operation, but cannot be fixed automatically. It is recommended that you fix these problems
manually before you print the job.
Enable automatic preflight
304 Chapter 9 - Preflight documents
PRISMAprepare v6.2
Chapter 10
The Print dialog

Introduction
Introduction
The print settings are retrieved from the document. You can optimize the printing process by
configuring the print settings.
Optimize
Tab Description
[Media] • Select on which media you want to print.
NOTE
You can rename the media in the page programmer for
easy recognition of job partitions.
[Layout] • Cover media
• Document media
• Imposition settings
• Same up settings
• Document type options
• Page marks
[Image] • Specify the printer resolution
• Specify color quality
• Color adjustment
• Color template
• And more...
[Finishing] • Stapling options
• Feed edge
• Trimming mode
[Delivery] • Define your [Output] Location (e.g. tray 1)
• Define your [Presentation] settings ( e.g. offset stacking)
[Accounting] • The accounting information
Introduction
306 Chapter 10 - The Print dialog
PRISMAprepare v6.2

Error avoidance
Introduction
At print time, PRISMAprepare informs you about requests impossible to produce on the selected
printer. This information is a warning. The warnings are displayed in the notification area just
below the job information.
Error avoidance is not available on all the supported printer models. You will be notified about
this in the notification area when you select that printer.
How does it work
The prerequisite to get correct error avoidance warnings is an up-to-date printer configuration
(i.e. which finishers are available at the printer).
During the preparation and printing of a document you choose the most appropriate resources to
obtain the requested result. Resources may be media, printers and finishers. Due to the
multiplicity and complexity of the possible combinations of resources your choice may be not
optimal or even impossible.
Also, a document may be prepared optimally for printer A and because this printer is not
available it can be printed on printer B. Printer A and B may have different capabilities and limits
that will impact the produced document.
At print time, PRISMAprepare informs you about requests impossible to produce on the selected
printer. This information is a warning. The document can still be printed on the target printer. The
exception is when the requested media is not supported; in this case the print job is blocked.
The error avoidance operation takes only the features of a printer into account that are supported
by PRISMAprepare. The media mapping is taken into account for all new VarioPrint, imagePRESS
and imageRUNNER printers.
The print settings requested via the printer driver are not covered by the error avoidance checks.
Offline finishing is ignored during the error avoidance checks.
Error avoidance
Chapter 10 - The Print dialog 307
PRISMAprepare v6.2

Define the print settings
Select a printer
Introduction
The printer selection pane is on the left hand side. The pane content can be changed by using the
buttons at the bottom of the pane. The left button will display the printer image and printer name.
The right button will display only the printer names. You can sort the printers ascending or
descending.
Procedure
1. Select the [Printer] that you want to send your document to.
2. If available, you can click the printer driver button to define options that are not available in the
[Print] dialogue. You can find this button next to the printer driver in the [Print] dialog.
For example, the printer driver of a color printer can offer color settings which are not supported
by PRISMAprepare.
If the [Print] dialogue offers all driver settings, then the driver settings button is not added to the
[Print] dialogue.
3. Specify the [Number of sets].
A message can appear behind the number of sets:
• [{0} sets printed as 1 copy]
The print file is sent to the printer. The file is printed once.
• [{0} sets printed as {1} copies]
The print file is sent to the printer along with an instruction to print the file {1} times.
4. Specify the [Job name].
NOTE
By default, the PDF file name is used.
5. Specify the [Operator note].
NOTE
The [Operator note] is displayed on the operator panel, if your printer supports this functionality.
6. Select the [Print range].
Define the print settings
308 Chapter 10 - The Print dialog
PRISMAprepare v6.2

Split and merge
Introduction
When you select option [Split], the document is printed without any finishing settings.
Split and merge
•[None]
The document is printed on one printer.
•[Split]
The printer only prints the marked sheets. For example, you have marked all color sheets in the
document. If one side of a sheet is a color page, then the complete sheet is printed on a color
printer.
The percentage of marked sheets is shown.
•[Merge]
This setting will print your document and insert the marked sheets at the right place in the
document.
When you select the [Split] or [Merge] option, you can select:
•[Use separate paper trays]
Select this option to allocate a separate paper tray for each type of insert sheet.
So, if you have five different insert sheets in your document, you need at least six paper trays.
One paper tray for the normal paper and five paper trays for the insert pages.
If you do not select this option, the different insert sheets must be put in one paper tray. So, if
you have two different insert sheets, then put the insert sheets cyclic (1-2, 1-2, ...) in one paper
tray.
Split and merge
Chapter 10 - The Print dialog 309
PRISMAprepare v6.2

Print preview window
Introduction
In the top section of the [Print] dialog, you can see a mini preview window.
Certain finishing settings can only be handled by a specific finisher. If the specific finisher is not
installed, the print preview will not show the concerning finishing settings.
Procedure
1. Click the magnifier button or left click on the mini preview to get a full size print preview window.
The preview allows you to scroll through the print job and zoom.
2. Click the [Save as...] button to save the print preview in a PDF file. The saved PDF file does not
contain any finishing settings.
Print preview window
310 Chapter 10 - The Print dialog
PRISMAprepare v6.2

Optimize the printed document
Define the [Media] settings
Introduction
The print settings are retrieved from the document. You can optimize the printing process by
configuring the print settings. This topic describes the [Media] settings.
Define the [Media] settings
Setting Description
[Media] All media that is used within your document is displayed here.
Use the selection-box to specify the media that you want to print. This al-
lows you to print your job in multiple batches and combine the job after-
wards.
Rename media for easy recognition of job partitions.
NOTE
The media name is displayed on the operator panel, if your printer
supports this functionality.
Column [Use
this]
In this column you can verify if the media in the document is correctly map-
ped to media in the printer.
Button [Map the
media]
You can map the media manually when the media in the document is not
correctly mapped to media in the printer.
Click the [Map the media] button to map the media manually.
Map the media
Introduction
The application maps the media in the document to media in the printer. In some cases, the
application cannot map the media automatically. You can map the media manually if the
automatic mapping is not correct or not possible. You can change the media properties that are
supported by the printer. The media properties that are not supported by the printer are grayed-
out. The values in the drop-down lists depend on the selected printer.
NOTE
You can send documents with page programmed settings to any printer. However, some
printers cannot process all programmed settings. In such a case a printer window appears. With
the printer window you can set the programmed settings to the capabilities of the selected
printer.
When to do
The application downloads the media catalog from the printer. Then, the application compares
the media used in the document with the media catalog from the printer. When possible, the
media in the document is mapped automatically to media from the printer catalog. You can map
the media manually if the automatic mapping is not correct or not possible.
Optimize the printed document
Chapter 10 - The Print dialog 311
PRISMAprepare v6.2

Procedure
1. Map the media manually:
NOTE
The printer model determines which settings you can configure.
Setting Description
[Catalog] • The selected media after mapping is displayed.
• [Undefined] is displayed when automatic mapping is incomplete or not
possible.
[Name] Enter the media [Name].
[Size] • You can select a default media size from the drop-down list, for example
'A4' and 'Letter'.
• You can create a custom media size. Select [Custom] from the drop-down
list and change the [Width] and [Height]. Define the unit for the custom
media.
[Weight] Specify the media [Weight]. For example '80 g/m2' for A4 and '16 lb bond'
for Letter.
[Type] Select the media [Type]. For example [Plain], [Glossy], or [Transparent].
Select [Custom] from the drop-down list to define a custom media type.
[Color] Select the media [Color]. For example [White], [Green], or [Orange].
Select [Custom] from the drop-down list to define a custom color.
[Insert] Select [Insert] if the media is used for insert sheets.
[Tab] Select [Tab] if the media is tabbed media.
[Preprinted] Select [Preprinted] to indicate that the media is pre-printed (for example
with a company logo).
[1-sided] Select [1-sided] if this media can only be used on one side. For example: the
media is transparent.
[Punched] Select [Punched] if the media is punched media.
Use the [Punch pattern] setting to define the number of holes in the
punched media.
[Cyclic] Select [Cyclic] if the media is part of a set (for example a set of tabs). Use
the [Cycle length] setting to specify the length of the set. For example, one
set of tabs contains 5 tab sheets.
Tray Select which tray of the printer must be used.
2. Click [OK].
Map the media
312 Chapter 10 - The Print dialog
PRISMAprepare v6.2

Define the [Layout] settings
Introduction
The print settings are retrieved from the document. You can optimize the printing process by
configuring the print settings. This topic describes the [Layout] settings. The [Layout] tab allows
the user to modify the position of the page content on a sheet.
NOTE
The layout tab settings are disabled if your document contains different media orientations. For
example: A4 landscape + A4 portrait.
Define the [Layout] settings
Setting Description
[Cover media] • [Media]:
You can change the [Media] size of your cover here.
• [Custom]:
Select [Custom] if you want to create a custom sized sheet size with the
[Width] and [Height] settings.
The [Portrait] and [Landscape] settings allow you to specify the sheet orien-
tation.
NOTE
The [Cover media] option is disabled if your document does not
have a cover.
[Document me-
dia]
• [Media]:
You can change the [Media] size of your document here. This sheet size is
applied to the whole document.
• [Custom]:
Select [Custom] if you want to create a custom sized sheet size with the
[Width] and [Height] settings.
The [Portrait] and [Landscape] settings allow you to specify the sheet orien-
tation. 4
Define the [Layout] settings
Chapter 10 - The Print dialog 313
PRISMAprepare v6.2

Setting Description
[Imposition] NOTE
A subset of the [Imposition] settings is available when different
media sizes are used in the document.
• [None]
• [2-up]
Two pages are placed on each sheet side in (left to right) reading order.
• [4-up], [9-up], [16-up]
4, 9, 16 pages are placed on each sheet side in the (left to right and top to
bottom) reading order.
• [ N-up]
Several pages are placed on one sheet side in the (left to right and top to
bottom) reading order. The number of pages per sheet side is computed
depending on the page size and media size.
• [VDP N-up]
Several pages with variable data are placed on one sheet side in the (left
to right and top to bottom) reading order. The number of pages per sheet
side is computed depending on the page size and media size.
• [Folio]
Four pages per sheet are placed in a way so that each sheet can be folded
in half. All the folded sheets are stacked.
• [Octavo]
Generates the same imposition as the [Octavo signature book] document
type.
• [Quarto]
Generates the same imposition as the [Quarto signature book] document
type. 4
Define the [Layout] settings
314 Chapter 10 - The Print dialog
PRISMAprepare v6.2

Setting Description
[Imposition]: [Cut
and stack]
• [Cut and stack]
The Cut & Stack imposition enhances printer productivity when printing
large documents. Two pages are printed per sheet side. The sheets are
cut in two parts. The left stack is stacked on top of the right stack to form
a perfect sequential order.
• [Cut and stack]
The left and right pages are printed in the same orientation.
• [Cut and stack with binding edge inside]
The left image(s) are rotated 180 degrees compared to the right im-
age(s). The binding edges of the images are on the inside of the sheet.
• [Cut and stack with binding edge outside]
The right image(s) are rotated 180 degrees compared to the left im-
age(s). The binding edges of the images are on the outside of the
sheet.
•[Cut and stack] (4)
Four pages per sheet side are placed in a way that, after cutting the pa-
per in 4 parts, the piles are stacked to create the full document.
•[Cut and stack] (N)
The number of pages per sheet side is computed depending on the
page size and media size. Pages are placed in a way that, after cutting
the paper, the piles are stacked to create the full document.
• [VDP cut and stack - N stacks]
The number of pages per sheet side is computed depending on the
page size and media size. Each page contains variable data. Pages are
placed in a way that, after cutting the paper, the piles are stacked to
create the full document.
[Imposition]:
[Same-up]
• [Same-up]
The same page is printed twice per sheet side.
• [Same-up with binding edge inside]
The same page is printed twice per sheet side. The left image(s) are rota-
ted 180 degrees compared to the right image(s). The binding edges of the
images are on the inside of the sheet.
• [Same-up with binding edge outside]
The same page is printed twice per sheet side. The right image(s) are ro-
tated 180 degrees compared to the left image(s). The binding edges of the
images are on the outside of the sheet.
For example, use this option when pre-punched paper is used with the
punched holes on both ends of the paper.
• [VDP same-up]
The same page with variable data is printed twice per sheet side. The pa-
ges are printed with one edge attached to each other. For example, use
this option when you want to print a ticket with ticket stub.
[Gutter] • Define the distance between the imposed pages on the sheet with the
[Horizontal] and [Vertical] settings. 4
Define the [Layout] settings
Chapter 10 - The Print dialog 315
PRISMAprepare v6.2

Setting Description
[Position on
sheet]
Use the [Same on both sides] option to keep front and rear the same.
You can handle the position on [Front side] and [Back side] separately if
[Same on both sides] is not enabled.
Horizontal position can be Left/Center/Right. Use the shift option to shift this
position Left or Right.
Vertical position can be Top/Center/Bottom. Use the shift option to shift this
position Up or Down.
[Print content] You can select which PDF box should printed. The content of the selected
PDF box will be printed. Or use a custom print area.
In this process the page contents are not scaled.
You can select one of the options listed below:
• [Crop box] Default option.
The content of the crop box will be printed.
• [Trim box]
The content of the trim box will be printed.
• [Bleed box]
The content of the bleed box will be printed.
• [Custom]
Click the edit icon to the right to enter a distance from the page edges.
That distance will be taken inward from the largest PDF box to determine
what the printed page content will be.
[Same-up] Select how many images you want to print on one side of the sheet.
• [1]:
One image.
• [Maximum]:
The application calculates the maximum number of images that fit on one
side of the sheet. For example, two A4 images on one A3 sheet.
The calculation takes several settings into account. For example, only one
A4 image on one A3 sheet if a bleed area is needed.
• [Custom]:
Define the number of images yourself with the [Horizontal] and [Vertical]
settings.
[Gutter] • Define the distance between the images on the sheet with the [Horizontal]
and [Vertical] settings. 4
Define the [Layout] settings
316 Chapter 10 - The Print dialog
PRISMAprepare v6.2

Setting Description
[Creep compen-
sation] and [In-
side creep com-
pensation]
Use [Creep compensation] to make sure that the margins on all pages are
equal after the booklet is folded and trimmed. The [Creep compensation]
factor is calculated from the [Thickness] of the paper.
• Select [Creep compensation] to shift the page content to the outside of
the booklet.
• Select [Creep compensation] and [Inside creep compensation] to shift the
page content to the inside of the booklet.
For example:
You have 30 sheets, which you fold to make a booklet. The sheets in the
middle of the booklet stick out compared with the cover of the booklet.
When you trim the sheets that stick out, the distance between the page con-
tent and the sheet edges is changed. This means that the page content
creeps towards the edge of the sheets due to the trim action.
NOTE
The [Thickness] of the used media must be defined when you ena-
ble option [Creep compensation].
[Gain]: With the [Gain] option you can increase or decrease the calculated [Creep
compensation] factor.
[Collating marks] Use this option to print black marks on the outside fold of each different sig-
nature in bookbinding.
The black marks are positioned differently on the outside fold of each differ-
ent signature in bookbinding to aid in collating. 4
Define the [Layout] settings
Chapter 10 - The Print dialog 317
PRISMAprepare v6.2

Setting Description
[Page marks] You can define which marks are printed on the output media.
• [Corner trim marks]
These marks are lines printed in the corners of the sheets to indicate
where to trim the paper.
You can define the size and the location of these marks.
• [Center marks]
Center marks are vertical lines used to indicate the centre of the printed
page. For example, the centre of the spine of a booklet.
You can define the size and the location of these marks.
• [Fold marks]
Fold marks are vertical lines used to indicate where the printed page must
be folded. The fold marks overwrite center marks.
You can define the size and the location of these marks.
• [Registration marks]
Registration marks print outside the trim area of printing. These may in-
clude bulls-eye targets, corner trim marks, etc. These marks allow the op-
erator to accurately align printed pages and better align cuts when trim-
ming.
• [File name]
Print the file name on each page.
• [Print date]
Print the print date on each page.
• [Remarks]
Print the remarks on each page.
• [Color strip]
You can add a color strip to the printed pages. You can select a color strip
from the drop-down list. You can define the location and the alignment of
the color strip.
• [Print marks]
You can define if the selected marks must be printed on all sheets or only
on the first sheet.
Select the [No marks on binding edge] option when you do not want to
print marks on the binding edge. For example, you can select this option
for perfect binding documents.
Define the [Layout] settings
318 Chapter 10 - The Print dialog
PRISMAprepare v6.2

Define the [Image] settings
Introduction
The print settings are retrieved from the document. You can optimize the printing process by
configuring the print settings. This topic describes the [Image] settings.
Define the [Color quality] settings
Setting Description
[Resolution] The resolution that you can select depends on the printer.
[Color manage-
ment]
• [No color management]
• [Printer\PostScript color management]
Color management is the controlled conversion between the color repre-
sentations of the document in the application to the Postscript file.
[Overprint simu-
lation]
By default, when you print opaque, overlapping colors, the top colour
knocks out the area underneath. Overprinting prevents knockouts and
makes the topmost overlapping printing ink appear transparent in relation
to the underlying ink.
This setting is used by Adobe Acrobat.
This setting is not available for all printer models.
[Use PDF output
intent]
The PDF output intent describes how you plan to print the entire document.
If the file contains device-independent colors, the output intent provides da-
ta which defines how the color data must be printed. The output intent pro-
vides all the information required to ensure that the file can be printed con-
sistently, even when device independent color data is used.
This setting is used by Adobe Acrobat.
This setting is not available for all printer models.
[Enhanced color
rendering]
Color rendering relates to the color appearance of printed color pages under
a given light source. You can select:
• [Printer default]
Use the color rendering algorithm of the selected printer.
• [On]
Use the color rendering algorithm of this application.
• [Off]
Disable color rendering.
This setting is not available for all printer models.
[Color bar] You can add a color bar to the printed pages. The drop-down list contains
the available color bars of the selected printer. You can define the location
and the alignment of the color bar.
This setting is not available for all printer models.
[Information bar] You can add an information bar to the printed pages. The drop-down list
contains the available information bars of the selected printer. You can de-
fine the location and the alignment of the information bar.
This setting is not available for all printer models.
[Trapping] Printer misregistration can cause gaps between colors on the printed pages.
You can enable [Trapping] to compensate for potential gaps between colors. 4
Define the [Image] settings
Chapter 10 - The Print dialog 319
PRISMAprepare v6.2

Setting Description
[Trapping pre-
sets]
A trapping preset is a collection of trap settings you can apply to pages in a
PDF. The drop-down list contains the available [Trapping pre-sets] of the se-
lected printer.
This setting is not available for all printer models.
[Image smooth-
ing]
[Image smoothing] blends adjacent colors in an image to make color transi-
tions less noticeable. Use this setting when the printer resolution is higher
than the image resolution.
This setting is not available for all printer models.
[Fattening] You can apply [Fattening] to the text and lines of the document. You can se-
lect:
• [Printer default]
Use the fattening algorithm of the selected printer.
• [On]
Use the fattening algorithm of this application.
• [Off]
Disable fattening.
This setting is not available for all printer models.
[Minimum line
width]
Select this option to print all lines with a minimum line width. This option
ensures that all lines are visible in the printed document. You can select:
• [Printer default]
Use the minimum line width of the selected printer.
• [Fine]
• [Normal]
• [Off]
Disable the [Minimum line width] option. Thin lines might not be printed
in the document.
This setting is not available for all printer models.
Define the [Color adjustment] settings
Setting Description
[Halftone] Select the [Halftone] setting.
A halftone image is made up of a series of dots rather than a continuous
tone. Larger dots are used to represent darker, more dense areas of the im-
age, while smaller dots are used for lighter areas.
As long as the resolution of the image is high enough, the dots appear as a
continuous image to the human eye.
This setting is not available for all printer models.
[Brightness] You can overrule the defined [Brightness] settings in the document, without
losing the original [Brightness] settings.
• [Printer default]
• [Custom]
This setting is not available for all printer models. 4
Define the [Image] settings
320 Chapter 10 - The Print dialog
PRISMAprepare v6.2

Setting Description
[Contrast] You can overrule the defined [Contrast] settings in the document, without
losing the original [Contrast] settings.
• [Printer default]
• [Custom]
This setting is not available for all printer models.
Define the [Color pre-set] settings
Setting Description
[Color pre-sets] The drop-down list contains the available color templates of the selected
printer.
When the printer is not available, the color templates cannot be loaded. In
this case, the default templates are loaded:
• [Black and white mode]
Select this template for black and white documents.
• [Office documents]
Select this template for documents that contain low quality images. For
example, graphs.
• [Photographic content]
Select this template for documents that contain high quality images. For
example, photos.
You can define custom color pre-sets. See
Colour settings
on page 321.
This setting is not available for all printer models.
Colour settings
Introduction
You can create color pre-sets for your document types, workflows or color applications with the
settings editor on the printer controller. You can use the new color pre-sets in the print dialog.
[Color preset]
A color pre-set is a collection of color and quality settings that matches a specific document type,
workflow or color application. A color pre-set is defined at the printer controller and available at
the printer driver. Use the settings editor of the printer controller to create new color pre-sets.
Use this setting to print with an optimal print quality.
[Custom color presets]
Use the [Custom color presets] to change the colour settings of the selected colour pre-set for the
current job only. When you click [Custom color presets], the [Custom color presets] window
opens. Use the settings editor of the printer controller to create new colour pre-sets.
[Custom color pre-sets] window
The printer controller uses the embedded color profiles and rendering intents of the objects in the
document. Objects with a color specification in DeviceRGB or DeviceCMYK have no embedded
Colour settings
Chapter 10 - The Print dialog 321
PRISMAprepare v6.2
color profile and rendering intent. For these objects a default input color profile and rendering
intent are defined by the printer driver for optimal print quality.
Setting Description
[Name] The name of the color pre-set. The default names of the color pre-sets are
the following.
• Black and white
• Office documents
• Photographic content
If you change a setting in the printer driver, the [Name] changes into [Cus-
tom color pre-sets].
[Description] The [Description] of the color pre-sets informs you when you can apply the
color pre-set.
Define the [Color] settings
Setting Description
[Color] Print in [Color] or [Black & white].
[Halftone for
graphics and im-
ages]
Defines the halftone screening for graphics and images. You are advised to
use the default option.
[Halftone for text] Defines the halftone screening for text. You are advised to use the default
option.
[Spot color
matching]
A spot color in a document is defined by a color name and an alternative
color specification. The printer controller uses the color name to match with
the closest color of the printer. The colors of the printer are defined in color
libraries on the printer controller.
• Select [No] to use the alternative color specification
• Select [Yes] (default) to match the document colors with the color library
of the printer controller
[Color mapping
group]
You can select a color mapping group to apply color transformations to the
image colors. Color mapping re-maps the image values to be suitable for
printing purposes.
You can select a color mapping group for RGB, CMYK or spot color to re-
map the images to a spot color.
[PDF/X output in-
tent]
The output intent is defined by a profile. The output intent represents what
the author had in mind for the final output of the document.
For example, the author creates the document in an RGB color space, but
the document must be printed on a SWOP press. In this case, you can select
a SWOP profile as the [PDF/X output intent].
[PDF overprint
simulation]
By default, when you print opaque, overlapping colors, the top colour
knocks out the area underneath. Overprinting prevents knockouts and
makes the topmost overlapping printing ink appear transparent in relation
to the underlying ink.
This setting is used by Adobe Acrobat.
This setting is not available for all printer models.
[Force black over-
print]
Enable this option to make sure that a black type always overprints colored
objects behind it.
Colour settings
322 Chapter 10 - The Print dialog
PRISMAprepare v6.2

Define the [DeviceRGB / Embedded profiles] settings
Setting Description
[Input profile] [Input profile] defines a reference color workspace for the color data of the
objects in the document. An [Input profile] is used to define colors in a de-
vice independent way.
The following DeviceRGB options are available.
• sRGB
Use this input profile in Windows Office or similar environments.
• [None]
Use this option to use the printer device colors.
• AdobeRGB1998
Use this input profile if the documents are prepared for use on high chro-
ma devices.
• AppleRGB
Use this input profile if the documents are prepared in Apple environ-
ments.
• ColorMatchRGB
Use this input profile if the color data was created in a very big color
workspace. Make sure you use [Perceptual] as [Rendering intent] to avoid
that color areas clip and to preserve details. 4
Colour settings
Chapter 10 - The Print dialog 323
PRISMAprepare v6.2
Setting Description
[Rendering in-
tent]
The [Rendering intent] defines the color conversion strategy that is needed
because colour gamuts differ per device (monitors, printers). The required
print quality determines the rendering intent you need for an optimal color
conversion.
The following options are available.
• [Absolute colorimetric]
The exact colors that are within the gamut of the printer are kept, even
the colors near the white point. Prints white areas with a light back-
ground. The out-of gamut colors are mapped to colors on the border of
the printer gamut. Details, continuity and contrast in colored areas can be
lost due to the mapping.
This setting is useful to map spot colors and it is useful to make proof
prints.
• [Relative colorimetric]
The exact colors that are within the gamut of the printer are kept, except
the colors near the white point. Prints white areas perfectly white (no to-
ner or ink is used). The out-of gamut colors are mapped to colors on the
border of the printer gamut. Details, continuity and contrast in colored
areas can be lost due to the mapping.
This setting is useful to make proof prints.
• [Perceptual] (default)
All colors are converted relative to each other, preserving details, continu-
ity and contrast. The out-of gamut colors are mapped to colors within the
printer gamut. Prints white areas perfectly white (no toner or ink is used).
This setting is useful to print images or photos.
• [Saturation]
All colors are converted relative to each other, preserving saturated col-
ors and pure colors as much as possible. The out-of gamut colors are
mapped to colors within the printer gamut. Prints white areas perfectly
white (no toner or ink is used).
This setting is useful for presentations, line-art, histograms, artist impres-
sions, business graphics, et cetera.
[Use embedded
profiles and Devi-
ceRGB settings]
Embedded color profiles are used. [Input profile] and [Rendering intent] set-
tings are used for objects in documents with DeviceRGB color specification.
[Overrule embed-
ded profiles with
DeviceRGB set-
tings]
Embedded color profiles are overruled with the [Input profile] and [Render-
ing intent] settings. [Input profile] and [Rendering intent] settings are used
for objects in documents with DeviceRGB color specification.
Define the [DeviceCMYK / Embedded profiles] settings
Setting Description
[Input profile] [Input profile] defines a reference color workspace for the color data of the
objects in the document. An [Input profile] is used to define colors in a de-
vice independent way.
The DeviceCMYK profiles list contains color profiles as defined by formal
standardization organizations. Select the same CMYK color profile that was
used to create the document. Select no color profile to leave the DeviceC-
MYK color specification as is. 4
Colour settings
324 Chapter 10 - The Print dialog
PRISMAprepare v6.2
Setting Description
[Rendering in-
tent]
The [Rendering intent] defines the color conversion strategy that is needed
because colour gamuts differ per device (monitors, printers). The required
print quality determines the rendering intent you need for an optimal color
conversion.
The following options are available.
• [Absolute colorimetric]
The exact colors that are within the gamut of the printer are kept, even
the colors near the white point. Prints white areas with a light back-
ground. The out-of gamut colors are mapped to colors on the border of
the printer gamut. Details, continuity and contrast in colored areas can be
lost due to the mapping.
This setting is useful to map spot colors and it is useful to make proof
prints.
• [Relative colorimetric]
The exact colors that are within the gamut of the printer are kept, except
the colors near the white point. Prints white areas perfectly white (no to-
ner or ink is used). The out-of gamut colors are mapped to colors on the
border of the printer gamut. Details, continuity and contrast in colored
areas can be lost due to the mapping.
This setting is useful to make proof prints.
• [Perceptual] (default)
All colors are converted relative to each other, preserving details, continu-
ity and contrast. The out-of gamut colors are mapped to colors within the
printer gamut. Prints white areas perfectly white (no toner or ink is used).
This setting is useful to print images or photos.
• [Saturation]
All colors are converted relative to each other, preserving saturated col-
ors and pure colors as much as possible. The out-of gamut colors are
mapped to colors within the printer gamut. Prints white areas perfectly
white (no toner or ink is used).
This setting is useful for presentations, line-art, histograms, artist impres-
sions, business graphics, et cetera.
[Use embedded
profiles and Devi-
ceCMYK settings]
Embedded color profiles are used. [Input profile] and [Rendering intent] set-
tings are used for objects in documents with DeviceCMYK color specifica-
tion.
[Overrule embed-
ded profiles with
DeviceCMYK set-
tings]
Embedded color profiles are overruled with the [Input profile] and [Render-
ing intent] settings. [Input profile] and [Rendering intent] settings are used
for objects in documents with DeviceCMYK color specification.
Colour settings
Chapter 10 - The Print dialog 325
PRISMAprepare v6.2

Define the [Finishing] settings
Introduction
The print settings are retrieved from the document. You can optimize the printing process by
configuring the print settings. This topic describes the [Finishing] settings.
Define the [Finishing] settings
Setting Description
[Finishing] You can overrule the defined finishing settings in the document, without
losing the original finishing settings.
• [As in document]
Print the document with the original finishing settings.
• 'No finishing'
Print the document without any finishing settings.
• [1 Edge staple]
Print the document with 1 staple, but without any fold and punch set-
tings.
• [2 Edge staples]
Print the document with 2 staples, but without any fold and punch set-
tings.
• [Corner staple]
Print the document with 1 staple in the corner, but without any fold and
punch settings.
For example, you make a test print with option [1 Edge staple]. The docu-
ment is printed with 1 staple, but without any fold and punch settings. Then
you select option [As in document] and print again. The document is printed
with the original finishing settings as defined in the application.
[Feed edge] The paper can be fed into the printer with the long edge or the short edge.
This depends how the paper is loaded in the paper tray.
• [Printer default]
Use paper from the default paper tray of the printer.
• [Short edge]
Use paper from a paper tray where the [Feed edge] is [Short edge].
• [Long edge]
Use paper from a paper tray where the [Feed edge] is [Long edge].
[Trimming mode] • [Off]
• [From]
Only the front edge of the page is cut. Use the [Finishing size] option to
define the page size after trimming. The drop-down list contains prede-
fined page sizes, e.g. A4. Or you can select the [Custom] value to define
the width of the page yourself.
• [Front, top, bottom]
The front edge and the top and bottom of the page are cut. Use the [Fin-
ishing size] option to define the page size after trimming. The drop-down
list contains predefined page sizes, e.g. A4. Or you can select the [Cus-
tom] value to define the width and the height of the page yourself. You
can also define the [Bottom offset]. 4
Define the [Finishing] settings
326 Chapter 10 - The Print dialog
PRISMAprepare v6.2

Setting Description
[Saddle press] Enable the [Saddle press] option to apply mechanical pressure to a folded
document. The result is a tightly folded document.
Use the [Adjustment] option to increase or decrease the mechanical pres-
sure.
NOTE
Check if your finisher supports this option.
Define the [Finishing] settings
Chapter 10 - The Print dialog 327
PRISMAprepare v6.2
Define the [Delivery] settings
Introduction
The print settings are retrieved from the document. You can optimize the printing process by
configuring the print settings. This topic describes the [Delivery] settings.
Define the [Output] settings
Setting Description
[Destination] Define to which queue of the selected printer you want to print.
[Output location] Depending on the configured output locations and the selected printer, you
can select an available [Output location].
[Unused cyclic
media]
Any unused cyclic media, such as tab media, is deposited in an [Output lo-
cation].
Depending on the configured output locations and the selected printer, you
can select an available [Output location].
Define the [Presentation] settings
Setting Description
[Sort] You can specify the sorting method:
• [By set]
The pages of a job will be sorted in the order 123, 123, 123.
• [By page]
The pages of a job will be sorted in the order 111, 222, 333.
• [By variable data document]
The pages with variable data will be sorted in the order 111, 222, 333.
[Offset stacking] You can select:
• [Off]
The job is stacked in the [Output location] as one straight stack.
• [By set]
The job is stacked in the [Output location] with a small offset between
each set.
• [By output group]
The job is stacked in the [Output location] with a small offset between
each output group. The output groups are defined in the [Document]
workspace.
• [By variable data document]
The job is stacked in the [Output location] with a small offset between
each variable data document.
[Reverse order] By default, the first sheet of the job is delivered first.
When you select the [Reverse order] setting, the last sheet of the job is de-
livered first.
Example
Normal order: 1-2 3-4 5-6 7-8 9-10
[Reverse order]: 10-9-8-7-6-5-4-3-2-1 4
Define the [Delivery] settings
328 Chapter 10 - The Print dialog
PRISMAprepare v6.2

Setting Description
[Swap pages] Use this setting to turn the pages in the [Output location].
Example
Normal order: 1-2 3-4 5-6 7-8 9-10
[Swap pages]: 2-1 4-3 6-5 8-7 10-9
NOTE
[Swap pages] & [Reverse order]: 9-10-7-8-5-6-3-4-1-2
[First sheet to
end]
Select this setting if you want to move the first sheet to the end of the job.
You can use this setting, for example, if the first A3 sheet is used as a cover
sheet for the rest of the A4 job.
[Rotate 180 de-
grees]
The [Output location] of a job can be an [External finisher]. Some external
finishers require a 180 degree rotation of the jobs before the jobs go into the
external finisher. The documentation of the external finisher describes how
a job must go into the external finisher.
If a 180 degree rotation is required, you select this setting.
[Separator sheet] Select this option to separate each set with a [Separator sheet].
Define the [Delivery] settings
Chapter 10 - The Print dialog 329
PRISMAprepare v6.2

Define the [Accounting] settings
Introduction
The print settings are retrieved from the document. You can optimize the printing process by
configuring the print settings. This topic describes the [Accounting] settings.
The accounting information is stored in a log file on the controller. The administrator configures
when the [Accounting] settings are available to you.
Define the [Accounting] settings
Setting Description
[Account ID] Type the [Account ID].
[Cost center] Type the [Cost center].
[Custom] Type any additional information.
Define the [Accounting] settings
330 Chapter 10 - The Print dialog
PRISMAprepare v6.2

Buttons
Introduction
The [Print] dialog contains buttons that allow you to restore the default print settings or restore
the last used print settings. You can create a test print and submit or cancel your print job.
Buttons
Button Description
[Print settings] Click this button to change the printer settings.
• [Defaults]
Restore the default print settings as defined in the application.
• [Last saved]
Restore the last saved print settings from the document.
• [Save]
Save the current print settings into memory. The saved print settings re-
main valid until you close the application.
You can save the print settings in the document. You must enable option
[Save the print settings] when you close or save the document.
[Proof PDF] Click this button to create a Proof PDF.
A proof PDF is used to show a customer the final layout of the product be-
fore final production.
See :
Use Proof PDF
on page 33 for a full explanation.
[Print] Click this button to print the job.
The [Print] dialog remains open.
[Test print]
Click this button to make one test print of the job.
The [Print] dialog remains open.
[Cancel] Click this button to cancel printing and close the [Print] dialog.
Buttons
Chapter 10 - The Print dialog 331
PRISMAprepare v6.2

Buttons
332 Chapter 10 - The Print dialog
PRISMAprepare v6.2
Chapter 11
Configure printer-related settings
in the administration console

Introduction
Users can configure printer-related settings in the administration console.
Introduction
Procedure
1. You can configure the [Printer settings] in the [Printer settings] administration console.
2. You can configure the [Finishing templates] in the [PRISMAprepare Administration].
3. You can configure the [Punch patterns] in the [PRISMAprepare Administration].
NOTE
You need system administration rights to configure any other settings in the [PRISMAprepare
Administration].
Introduction
334 Chapter 11 - Configure printer-related settings in the administration console
PRISMAprepare v6.2

Configure the printer settings
Introduction
You can configure the [Printer settings] in the [Printer settings] administration console.
Procedure
1. Open the [Printer settings] administration console via the Start menu.
2. Double-click the [Printer settings] option in the right-hand pane.
3. Configure the [Printer settings].
Click the [Help] button to read how you can configure the [Printer settings].
Configure the printer settings
Chapter 11 - Configure printer-related settings in the administration console 335
PRISMAprepare v6.2

Configure the finishing templates
Introduction
You can manage the specific finisher templates for the finishers that are available to the users.
The finisher template defines which fold, punch and staple options are available for a specific
finisher.
The related finishers can be in-line or off-line finishers.
Only the generic templates for staples is always available to the users. The generic templates for
punch, fold and booklet can be made available to the users.
You can configure the [Finishing templates] in the [PRISMAprepare Administration].
Procedure
1. Open the [PRISMAprepare Administration] via the Start menu.
2. Select the [Application settings] option.
3. Double-click the [Finishing templates] option in the right-hand pane.
4. Configure the [Finishing templates].
Click the [Help] button to read how you can configure the [Finishing templates].
Configure the finishing templates
336 Chapter 11 - Configure printer-related settings in the administration console
PRISMAprepare v6.2

Configure the punch patterns
Introduction
The punch patterns define the punch parameters for pre-punched media. You can also create
punch patterns for custom pre-punched media. The punch patterns are available in the media
catalog. Select the correct punch pattern for pre-punched media to improve the preview of your
document.
The punch patterns can also be read from finishing templates that contain punch patterns.
NOTE
Generic punch patterns cannot be removed or replaced.
You can configure the [Punch patterns] in the [PRISMAprepare Administration].
Procedure
1. Open the [PRISMAprepare Administration] via the Start menu.
2. Select the [Application settings] option.
3. Double-click the [Punch patterns] option in the right-hand pane.
4. Configure the [Punch patterns].
Click the [Help] button to read how you can configure the [Punch patterns].
Configure the punch patterns
Chapter 11 - Configure printer-related settings in the administration console 337
PRISMAprepare v6.2

Configure the punch patterns
338 Chapter 11 - Configure printer-related settings in the administration console
PRISMAprepare v6.2
Chapter 12
The command line interface
Introduction
You can print a job via the command line interface (CLI).
If you don't define any parameters in the CLI and the job is page programmed:
• The job is printed with the print settings that are saved in the job.
And
• The job is printed on the printer that is saved in the job.
If you don't define any parameters in the CLI and the job is not page programmed:
• The job is printed on the default printer with the default print parameters.
The syntax of the CLI
[cmd /C] PRISMAprepare.exe "<path\file name>" parameters
The available parameters are as specified in the table below.
NOTE
You can use the parameters in any order.
The command line interface
Setting Description
cmd /C Use parameter 'cmd /C' to launch 'PRISMAprepare.exe' synchro-
nously with the command shell. By default, 'PRISMAprepare.exe'
runs asynchronously.
• With parameter "cmd /C":
The "PRISMAprepare.exe" command is executed with the de-
fined parameters. Any preflight messages and automation mes-
sages are displayed in the [Command Prompt]. When the "PRIS-
MAprepare.exe" command terminates, the command line be-
comes available again.
• Without parameter "cmd /C":
The "PRISMAprepare.exe" command is executed in the back-
ground with the defined parameters. No messages are dis-
played in the [Command Prompt]. The command line is availa-
ble immediately.
NOTE
When you use this parameter, exit codes are returned.
PRISMAprepare.exe You must execute the command 'PRISMAprepare.exe' in the in-
stallation directory of this application.
<path\file name> The path and the name of the job. The path and the name must be
enclosed between double quotes. For example: "C:\My Folder\My
file.pdf".
See :
Supported file formats
on page 20
NOTE
This setting is mandatory. 4
340 Chapter 12 - The command line interface
PRISMAprepare v6.2

Setting Description
/F • With parameter "/F":
Preflight is applied when opening the document. The rules con-
figured for automatic preflight are used.
• Without parameter "/F":
No preflight is applied when opening the document, even if au-
tomatic preflight is enabled in the application.
Parameter "/F" can be overruled by parameter "/T".
• If only parameter "/T" is specified but one of the automation
templates contains an operation with preflight:
Preflight is applied when opening the document in the tem-
plate. The rules configured for automatic preflight are used.
• If parameter "/T" and parameter "/F" are specified but none of
the automation templates contain an operation with preflight:
No preflight is applied when opening the document in the tem-
plate, even if automatic preflight is enabled in the application.
/VDPS <VDPSourceFile> Use parameter '/VDPS' to define the path and the name of the data
source file for variable data documents. The path and the name
must be enclosed between double quotes. For example: "C:\My
Folder\My data source.xls".
The parameter '/VDPS' can overrule the data source file that is
saved in the master document.
If parameter '/T' and parameter '/VDPS' are used, the variable data
is added to the document before the template(s) are applied.
NOTE
Data source of type *.xlsx, *.xls or *.csv: the first sheet
is used if multiple sheets are available in the data source
file.
Data source of type *.accdb or *.mdb: the first table or
view is used if multiple tables or views are available in
the data source file.
See the log file for more information.
/VDPSD <VDPSourceDe-
tail>
Use the '/VDPSD' parameter to define which Excel sheet, Microsoft
Access table, or Microsoft Access view must be used from the da-
ta source. The name must be enclosed between double quotes.
Use the '/VDPSD' parameter in combination with the '/VDPS' pa-
rameter. If you do not use the '/VDPSD' parameter, the first - in al-
phabetical order - Excel sheet, Microsoft Access table, or Microsoft
Access view from the data source is used.
This parameter is ignored if the data source is of type *.csv or if
the '/VDPS' parameter is not used.
/VDPP <Password> Use parameter '/VDPP' to provide the password for a password-
protected data source of type *.accdb or *.mdb. Password-protec-
ted data sources of type *.xlsx, *.xls and *.csv are not supported.
The password must be enclosed between double quotes. 4
Chapter 12 - The command line interface 341
PRISMAprepare v6.2

Setting Description
/VDPL <VDPDataFile> Use parameter '/VDPL' to define the path and the name of the
[VDP] data file for variable data documents. The path and the
name must be enclosed between double quotes. For example: "C:
\My Folder\My VDP data file.xml".
• With parameter '/VDPS':
The data source file defined with parameter '/VDPS' is used in-
stead of the data source file defined in the [VDP] data.
• With parameter '/T':
The [VDP] data is applied to the document before the tem-
plate(s) are applied.
/VDPV Use parameter '/VDPV' to validate the [VDP] data. Parameter '/
VDPV' is applied only after the other [VDP] parameters have been
applied.
/T Use parameter '/T' to apply one or more templates to the job. The
templates are applied in the defined order. The templates must be
separated by a "|".
For example: /T "<template1>|<template2>|<template3>".
The following limitations to parameter '/T' apply:
• Parameter '/T' is used and none of the template(s) contain a
print action:
The job is not printed, not even when the parameters '/C' and/or
'/P' are used.
• Parameter '/T' is used and one or more template(s) contain a
print action:
The parameter '/C' overrules the number of copies that is de-
fined in the template(s).
The parameter '/P' overrules the printer that is defined in the
template(s).
If parameter '/T' and parameter '/I' are used, the application opens.
The automation templates are executed in the application. You
must close the application to continue with the "PRISMApre-
pare.exe" command.
/P <printer name> Define the printer that must be used to print.
The printer name must be enclosed between double quotes. For
example: /P "Oce 970C v2.1". The defined printer overrules the
printer which is saved in the job. If /P is not defined, the printer
which is saved in the job is used.
If parameter '/T' and parameter '/P' are used, the parameter '/P'
overrules the printer that is defined in the template(s).
If parameter '/I' and parameter '/P' are used, the print dialogue of
the application opens. The printer that is defined by parameter '/P'
is selected in the print dialogue. You can define the print settings.
Click button [Print] to continue with the "PRISMAprepare.exe"
command.
NOTE
When you define a printer, part of the print settings can
be reset to the default values. This depends on the capa-
bilities of the printer. 4
342 Chapter 12 - The command line interface
PRISMAprepare v6.2

Setting Description
/C <no of copies> The number of copies between 1 and 65535. The defined number
of copies overrules the number fo copies which is saved in the job.
If /C is not defined, the number of copies which is saved in the job
is used. Otherwise, one single copy is printed.
If parameter '/T' and parameter '/C' are used, the parameter '/C'
overrules the number of copies that is defined in the template(s).
If parameter '/I' and parameter '/C' are used, the print dialogue of
the application opens. The number of copies that is defined by pa-
rameter '/C' is used in the print dialogue. You can define the print
settings. Click button [Print] to continue with the "PRISMApre-
pare.exe" command.
/SP Use parameter '/SP' to generate a Proof PDF.
The Proof PDF generated by default is <Document folder>\<Docu-
ment name>_ProofPDF.pdf.
Use the /SPO parameter to change the Proof PDF file name.
When /SP is used there is no print except in conjunction with auto-
mation templates that requests printing.
A printer specified in the command line influences the result of the
Proof PDF. The following impacts are possible: BW or color con-
tent, representation of the finishing processed inline, mapped me-
dia.
The number of copies specified in the command line (/C parame-
ter) appears in the Proof PDF banner note.
The /SP parameter is ignored when combined with /T (a Proof PDF
is generated only if requested in an automation template).
/SPO <soft proof file name> Use parameter '/SPO' to specify the Proof PDF file name.
The file name can contain the following special characters
• a date stamp (%d)
• a timestamp (%t).
The path optionally specified in the /O parameter has no impact on
this default.
A file name containing special DOS characters must be specified
between double quotes (").
The parameter is ignored if the command line contains no Proof
PDF request be it via the /SP parameter or via a template (/T).
When combined with /T the parameter overrules the Proof PDF file
name(s) defined in the template(s).
When combined with /I the parameter is proposed in the Save
Proof PDF dialog opened as a result of the CLI command.
The parameter has no impact on the user settings or on further
manual Proof PDF requests. 4
Chapter 12 - The command line interface 343
PRISMAprepare v6.2

Setting Description
/SPM <Metric | Imperial> Use parameter '/SPM' to specify the metric system used during
the Proof PDF generation.
The parameter is followed by one of the values Metric or Imperial.
The strings are case-insensitive. If not specified, the default Proof
PDF metric system is used.
The parameter is ignored if the command line contains no Proof
PDF request be it via the /SP parameter or via a template (/T).
When combined with /T the parameter overrules the metric sys-
tem defined in the template(s).
When combined with /I the parameter is used exclusively for the
Proof PDF requested via the current command line.
The parameter has no impact on the user settings or on further
manual Proof PDF requests.
/SPR <DPI72 | DPI300> Use parameter '/SPR' to specify the resolution used during the
Proof PDF generation.
The parameter is followed by one of the values DPI72 | DPI300.
The strings are case-insensitive. If not specified, the default Proof
PDF resolution is used.
The parameter is ignored if the command line contains no Proof
PDF request be it via the /SP parameter or via a template (/T).
When combined with /T the parameter overrules the resolution
defined in the template(s).
When combined with /I the parameter is used exclusively for the
Proof PDF requested via the current command line.
The parameter has no impact on the user settings or on further
manual Proof PDF requests.
/SPL <CZ | DK | DE | GB |
US | ES | FI | FR | HU | IT |
JP | NO | NL | PL | PT | RU |
SE | CHZ>
Use the '/SPL' parameter to specify the language used during the
Proof PDF generation.
The parameter is followed by one of the values CZ, DK, DE, GB,
US, ES, FI, FR, HU, IT, JP, NO, NL, PL, PT, RU, SE, CHZ (Czech,
Danish, German, English, English, Spanish, Finish, French, Hun-
garian, Italian, Japanese, Norwegian, Dutch, Polish, Portuguese,
Russian, Swedish, Chinese). The strings are case-insensitive. If not
specified, the default soft proof language is used.
The parameter is ignored if the command line contains no Proof
PDF request be it via the /SP parameter or via a template (/T).
When combined with /T the parameter overrules the language de-
fined in the template(s).
When combined with /I the parameter is used exclusively for the
Proof PDF requested via the current command line.
The parameter has no impact on the user settings or on further
manual Proof PDF requests. 4
344 Chapter 12 - The command line interface
PRISMAprepare v6.2

Setting Description
/SPB <Background image> Use parameter '/SPB' to specify the background image used dur-
ing the Proof PDF generation.
The parameter is followed by the complete path to the file contain-
ing the background image. The supported file types are tif, tiff, jpg,
jpeg, bmp, gif and png. If not specified, the default background im-
age is used.
A path containing special DOS characters must be specified be-
tween double quotes (").
The parameter is ignored if the command line contains no Proof
PDF request be it via the /SP parameter or via a template (/T).
When combined with /T the parameter overrules the background
defined in the template(s).
When combined with /I the parameter is used exclusively for the
Proof PDF requested via the current command line.
The parameter has no impact on the user settings or on further
manual Proof PDF requests.
/SPN <Note text> Use parameter '/SPN' to specify the soft proof note used during
the Proof PDF generation.
The parameter is followed by a string corresponding to the note
text. If not specified, the note is empty.
A string containing special DOS characters must be specified be-
tween double quotes (").
The parameter is ignored if the command line contains no Proof
PDF request be it via the /SP parameter or via a template (/T).
When combined with /T the parameter overrules the note defined
in the template(s).
When combined with /I the parameter is used exclusively for the
Proof PDF requested via the current command line.
The parameter has no impact on the user settings or on further
manual Proof PDF requests.
/SPVDP Use parameter '/SPVDP' to generate the Proof PDF for all variable
data documents. If the parameter is not specified, the Proof PDF is
generated only for the first variable data document.
/O <OutputFile> Use parameter '/O' to define the path and the name for the output
file. The output file is created after the template(s) are applied to
the document. The path and the name must be enclosed between
double quotes.
The parameter '/O' must be used in combination with parameter
'/T'.
/L <LogFile> Use parameter '/L' to define the path and the name for the log file.
Any error, warning and information messages are logged in the
log file. The path and the name must be enclosed between double
quotes.
The name of the log file cannot be the same as the name of the
document file or the output file.
The parameter '/L' cannot be used in combination with parameter
'/I'. 4
Chapter 12 - The command line interface 345
PRISMAprepare v6.2
Setting Description
/I Use parameter '/I' to open this application. You can edit the job in
the application.
Parameter '/I' can be used in combination with other parameters.
See the descriptions of the parameters for detailed information.
Examples
• PRISMAprepare.exe "C:\Temp\10pages.pdf" /I
The application opens. You can edit the job.
• PRISMAprepare.exe "C:\Temp\10pages.pdf" /C 5 /I
The application opens. The print dialog opens. The printer which is saved in the job is selected.
The number of copies is 5. Define the print settings and print the job.
• PRISMAprepare.exe "C:\Temp\10pages.pdf" /P "Oce 970C v2.1" /C 50
Print 50 copies of the document on the defined printer. Use the other print settings which are
saved in the PDF file.
• PRISMAprepare.exe "C:\Temp\10pages.pdf" /T "MonthlyReport|CiceroPrint" /P "Oce VP6250" /C
50
Apply the template "MonthlyReport" to the document. Then apply template "CiceroPrint" to the
document. Print 50 copies and use the defined printer. Do not use the printer and number of
copies defined in the templates.
• PRISMAprepare.exe "C:\Temp\10pages.pdf" /VDPL "C:\My Folder\My VDP data file.xml" /VDPV /I
The application opens. The [VDP] data stored in file "My VDP data file.xml" is applied to
document "10pages.pdf". The [VDP] data is validated. You can edit the job in the application.
The exit codes
Setting Description
0 Operation successful.
1 Execution error.
2 The file cannot be found.
3 The path cannot be found.
4 The file cannot be opened.
5 Access is denied.
111 The file name is too long.
1056 The application is already running.
30000 The license is invalid.
30001 The license server contains an invalid floating license.
30002 Connection error for the license server. Cannot retrieve a floating
license.
30003 The license server encountered an error. Cannot retrieve a floating
license.
30004 The license is expired.
30005 The maximum number of users is reached for this floating license.
30009 The version is incorrect. 4
346 Chapter 12 - The command line interface
PRISMAprepare v6.2
Setting Description
40000 The template is executed. One or more warnings are reported.
50001 The file does not exist
50002 You have insufficient rights to execute this operation.
50003 Syntax error in the script.
50004 The automation license feature is not available.
50005 Generic error.
50010 Unknown template file.
50011 A parameter is used more than once in the command line inter-
face.
50020 One of the parameters is not supported.
50021 The value of one of the parameter is incorrect.
50022 Unknown finisher.
50023 A page programme setting cannot be applied.
50099 Unrecoverable error. The script cannot be recorded or replayed.
Chapter 12 - The command line interface 347
PRISMAprepare v6.2

348 Chapter 12 - The command line interface
PRISMAprepare v6.2

Index
Ghost page..............................................................53
1
1-sided or 2-sided................................................... 30
A
Absolute colorimetric...........................................321
AdobeRGB1998.....................................................321
AppleRGB..............................................................321
Area inside guidelines....................................66, 148
Area selection tool..........................................66, 148
Assign pick list media for folded sheets...............28
Automatic preflight operation............................. 304
B
Binding edge...........................................................30
Blank page...............................................................53
Blank sheet............................................................180
Bleed box.............................................................. 111
Booklet.....................................................................53
Bring frame forward.............................................167
Bring frame to front..............................................167
C
Change text........................................................... 121
Clean document options........................................30
Clear list...................................................................28
CLI.......................................................................... 340
Clipboard...........................................................41, 42
Color........................................................................ 53
Color picker............................................................. 66
Color pre-sets..........................................................53
Color Spaces........................................................... 28
ColorMatchRGB.................................................... 321
Colour profile........................................................ 321
Command line interface.......................................340
Concept................................................................... 53
Continuous pages view........................................181
Copy / paste.......................................................... 117
Copy a frame.........................................................166
Correct pages........................................................101
Create a Proof PDF................................................. 37
Create new template............................................ 280
Crop box................................................................112
Custom colour pre-sets........................................321
Cut / paste............................................................. 119
D
Data source type...................................................151
Default media size.................................................. 28
Delete.....................................................................120
Delete all frames...................................................168
Delete objects....................................................... 120
Delete one frame.................................................. 168
DeviceCMYK......................................................... 321
DeviceRGB............................................................ 321
Disconnect data source........................................152
Document preview view...................................... 180
Document type....................................................... 53
Document workspace...........................................174
Drag tool..................................................66, 148, 183
E
Edit a frame...........................................................165
Edit text................................................................. 121
Enable overprint preview.......................................28
Error avoidance.................................................... 307
Exclude from page numbering............................234
Export pages to clipboard......................................41
Export VDP data....................................................154
F
Facing pages view........................................ 181, 183
First page.........................................................66, 148
First row........................................................ 148, 183
Fix preflight violations......................................... 302
Folded pages view........................................181, 183
Footer.................................................................... 183
Force page.............................................................181
Frame behind page content.................................167
G
Gate Fold................................................................. 54
General options...................................................... 28
general shortcut keys............................................. 43
Ghost page............................................................180
Index
349
PRISMAprepare v6.2

H
Half Fold.................................................................. 55
Halftone................................................................. 321
Header and footer.................................................233
Header row
Reset................................................................156
Set................................................................... 156
Hide bleed tabs..................................................... 181
Hole punch............................................................ 181
I
Image frame..........................................................162
Import pages to clipboard..................................... 42
Import VDP data................................................... 153
Include for page numbering................................ 234
Input profile...........................................................321
Invert selected area........................................ 66, 148
K
Keyboard selection in check boxes.......................48
Keyboard selection in date/time............................48
Keyboard selection in drop-down boxes..............47
Keyboard selection in edit boxes.......................... 47
Keyboard selection in lists.....................................46
Keyboard selection in radio buttons.....................48
Keyboard selection in slider.................................. 48
Keyboard shortcuts in main window....................45
Keyboard shortcuts in main/context menus........ 44
Keyboard shortcuts in secondary windows......... 45
L
Last page......................................................... 66, 148
Last row.........................................................148, 183
Last saved print settings...................................... 331
Long Fold................................................................ 55
M
Manual preflight operation..................................300
Mark page............................................................. 181
Mark VDP pages................................................... 171
Marked sheets.......................................................309
Measurement settings (mm or inch).................... 29
Media box............................................................. 113
Media properties.................................................. 181
Merge.................................................................... 309
Mirrored stacked view............................................66
Modify text............................................................ 121
Modifying objects within a page.........................117
Move objects.........................................................122
Multi Half Fold........................................................ 55
Multi Tri-Fold In...................................................... 57
Multi-booklet...........................................................54
N
Next page........................................................ 66, 148
Next row........................................................148, 183
Normal.....................................................................55
Notification area................................................... 307
O
Open 'Save as' dialogue for converted documents
................................................................................. 30
Order of frames.................................................... 167
Overview of the PDF boxes................................. 109
P
Page......................................................................... 53
Page content editing............................................ 117
Page content editing restrictions........................ 117
Page Ids................................................................. 181
Page numbers.......................................................181
Pages preview view........................................66, 148
Pages workspace.................................................... 60
Panel........................................................................ 53
Parallel Fold............................................................ 56
Perceptual............................................................. 321
Perfect binding........................................................56
Preflight operation
Automatic....................................................... 304
Manual............................................................ 300
Preflight report......................................................302
Preview view
Document workspace.................................... 180
Pages workspace..............................................66
VDP workspace...............................................148
Previous page................................................. 66, 148
Previous row................................................. 148, 183
Print dialog............................................................306
Print preview window.......................................... 310
Print settings......................................................... 331
Proof PDF........................................................ 33, 331
Proof PDF - Define the Email server options........33
Proof PDF - Define the Email settings...................36
Proof PDF - Define the Proof PDF options............ 35
Proof PDF - Email server options.......................... 33
Proof PDF - SMTP server configuration................33
Proof PDF banner note...........................................33
Proof PDF requirements.........................................33
R
Recent files..............................................................28
Index
350
PRISMAprepare v6.2

Rectangle selection tool.................................66, 148
Relative colorimetric............................................ 321
Rendering intent................................................... 321
Repeated selection................................. 66, 148, 183
S
Saturation..............................................................321
Save & send Proof PDF.......................................... 37
Save document.......................................................22
Save Print preview to PDF................................... 310
Save Proof PDF....................................................... 37
Save the Proof PDF options...................................37
Save variable data document................................22
schema.ini............................................................. 151
Select data source................................................ 151
Select object tool.................................................... 66
Select page......................................................66, 148
Select pages..........................................................183
Select variable data.............................................. 157
Selected row......................................................... 157
Send frame backward.......................................... 167
Send frame to back.............................................. 167
Sheet........................................................................53
Shift objects.......................................................... 122
Show bleed tabs................................................... 181
Show content outside of page...................... 66, 148
Signature book....................................................... 53
Simple Gate Fold.................................................... 54
Single page view.................................................... 66
Sort column.......................................................... 156
Spine caption........................................................ 261
Spine captions...................................................... 181
Split........................................................................309
Spot colour matching...........................................321
sRGB...................................................................... 321
Stacked view........................................................... 66
T
Tabs....................................................................... 181
Test print............................................................... 331
Text frame............................................................. 159
The PDF boxes...................................................... 109
Toolbar
Document workspace.................................... 176
Pages workspace..............................................62
VDP workspace...............................................144
Tri-Fold In.......................................................... 53, 57
Tri-Fold Out............................................................. 57
Trim box................................................................ 110
U
Unfolded pages view................................... 181, 183
Unselected row.....................................................157
Use default media.................................................. 30
V
Validate VDP data................................................. 155
VDP data................................................................153
VDP workspace..................................................... 142
Z
Z-Fold.......................................................................57
Zoom....................................................... 66, 148, 183
Index
351
PRISMAprepare v6.2

Index
352
PRISMAprepare v6.2

Canon Inc.
www.canon.com
Canon U.S.A., Inc.
www.usa.canon.com
Canon Canada Inc.
www.canon.ca
Canon Europa Inc.
www.canon-europe.com
Canon Latin America Inc.
www.cla.canon.com
Canon Australia PTY. Ltd
www.canon.com.au
Canon China Co., Ltd
www.canon.com.cn
Canon Singapore PTE. Ltd
www.canon.com.sg
Canon Hongkong Co., Ltd
www.canon.com.hk
© CANON INC. & Océ Holding B.V. 2015
