Canon PRISMAsync V5.1 For ImagePRESS C850 Series Settings Editor Manual The Image PRESS
User Manual: Canon Settings Editor Manual for the imagePRESS C850 Series Production Printing User Manuals
Open the PDF directly: View PDF ![]() .
.
Page Count: 98
Settings editor
manual
PRISMAsync V5.1 for
imagePRESS C850 Series

Copyright
Copyright CANON INC. 2016
No part of this publication may be reproduced, transmitted, transcribed, stored in a retrieval
system, or translated into any language or computer language in any form or by any means,
electronic, mechanical, magnetic, optical, chemical, manual, or otherwise, without the prior
written permission of Canon Inc.
Edition 2016-07GB
Table of contents
1. Introduction ............................................................................................................ 2
2. Media ...................................................................................................................... 3
2.1 Media ............................................................................................................... 3
2.2 Media Families .............................................................................................. 10
2.3 Configuration ................................................................................................ 12
3. Color ..................................................................................................................... 13
3.1 Color defaults ................................................................................................ 13
3.2 Color presets .................................................................................................. 15
3.3 Input profiles ................................................................................................. 16
3.4 Output profiles ............................................................................................... 17
3.5 Spot color libraries ........................................................................................ 19
3.6 Spot colors ..................................................................................................... 19
3.7 Color mappings ............................................................................................. 21
3.8 Color & information bars .............................................................................. 23
3.9 Color calibration ............................................................................................ 25
4. Preferences ............................................................................................................ 28
4.1 System settings .............................................................................................. 28
4.2 Print job defaults ........................................................................................... 35
4.3 System adjustments ....................................................................................... 39
4.4 Postscript ....................................................................................................... 42
4.5 PDF ................................................................................................................ 45
4.6 PPML ............................................................................................................ 48
5. Workflow .............................................................................................................. 50
5.1 DocBox .......................................................................................................... 50
5.2 Automated workflows ................................................................................... 51
5.3 Hotfolders ...................................................................................................... 52
5.4 Remote printers ............................................................................................. 54
5.5 SMB Shares ................................................................................................... 55
5.6 Scan profiles .................................................................................................. 56
5.7 Fonts .............................................................................................................. 57
5.8 Remote Manager ........................................................................................... 57
6. Transaction Printing ............................................................................................. 59
6.1 Setups ............................................................................................................ 59
6.2 IPDS Setup .................................................................................................... 60
6.3 PCL setup ...................................................................................................... 64
6.4 Resource management ................................................................................... 65
6.5 Settings .......................................................................................................... 66
7. Configuration ........................................................................................................ 67
7.1 Connectivity .................................................................................................. 67
7.2 Security .......................................................................................................... 73
7.3 Domains ........................................................................................................ 76
7.4 Groups ........................................................................................................... 79
7.5 Users .............................................................................................................. 81
7.6 Accounting .................................................................................................... 83
7.7 Operator panel ............................................................................................... 84
8. Support .................................................................................................................. 85
8.1 About ............................................................................................................. 85
8.2 Software ........................................................................................................ 86
8.3 Software updates ........................................................................................... 88
8.4 Backups ......................................................................................................... 89
8.5 Counters ........................................................................................................ 90
8.6 Troubleshooting ............................................................................................ 91
9. Search box in the Settings Editor ......................................................................... 94
PRISMAsync V1.2 for imagePRESS C800 series
_____________________________________________________________________
1. Introduction
This document shortly describes the settings that are present in the Settings Editor. The goal of
the document is to have an overview of all the settings in the Settings Editor to help service
technicians, system administrator and key operators to find relevant configuration information.
The descriptions are valid for imagePRESS C850 series
Access to the Settings Editor
• Be sure the PRISMAsync controller is switched on.
• On a remote PC open an Internet Browser.
• In the address bar enter the IP-address or Hostname of the PRISMAsync.
• Hit “Enter”
If you have no access to a remote PC you can use a laptop and connect it directly to the
PRISMAsync controller.
• Disconnect the cross-over Ethernet cable from the copier and connect it to the Ethernet port
on your laptop.
• Set the IP-address of your laptop to 134.188.254.21
• Set the Subnet mask of your laptop to 255.255.255.0
• On the laptop open an Internet browser
• In the address bar, enter http://134.188.254.11
The Settings Editor will open and the first tab (Media) will be visible. Browse through the tabs
on the top side of the window to go to different sections.
The top sections are:
• Media
• Color
• Preferences
• Workflow
• Transaction Printing (If an IPDS License is installed)
• Configuration
• Support
In each tab you will find sub-sections describing their own topic.
To access most of these settings you need Key-operator, System Administrator or Service
privileges, therefore a password will be required.
2
PRISMAsync V1.2 for imagePRESS C800 series
_____________________________________________________________________
2. Media
In the Tab “Media” you can edit the media catalogue on the PRISMAsync.
The media catalog contains the media that users can select for printing jobs. You can add new
media, change media attributes or optimize the print quality. The “Media” tab contains 3 sub-
sections which are described in the next chapters.
2.1 Media
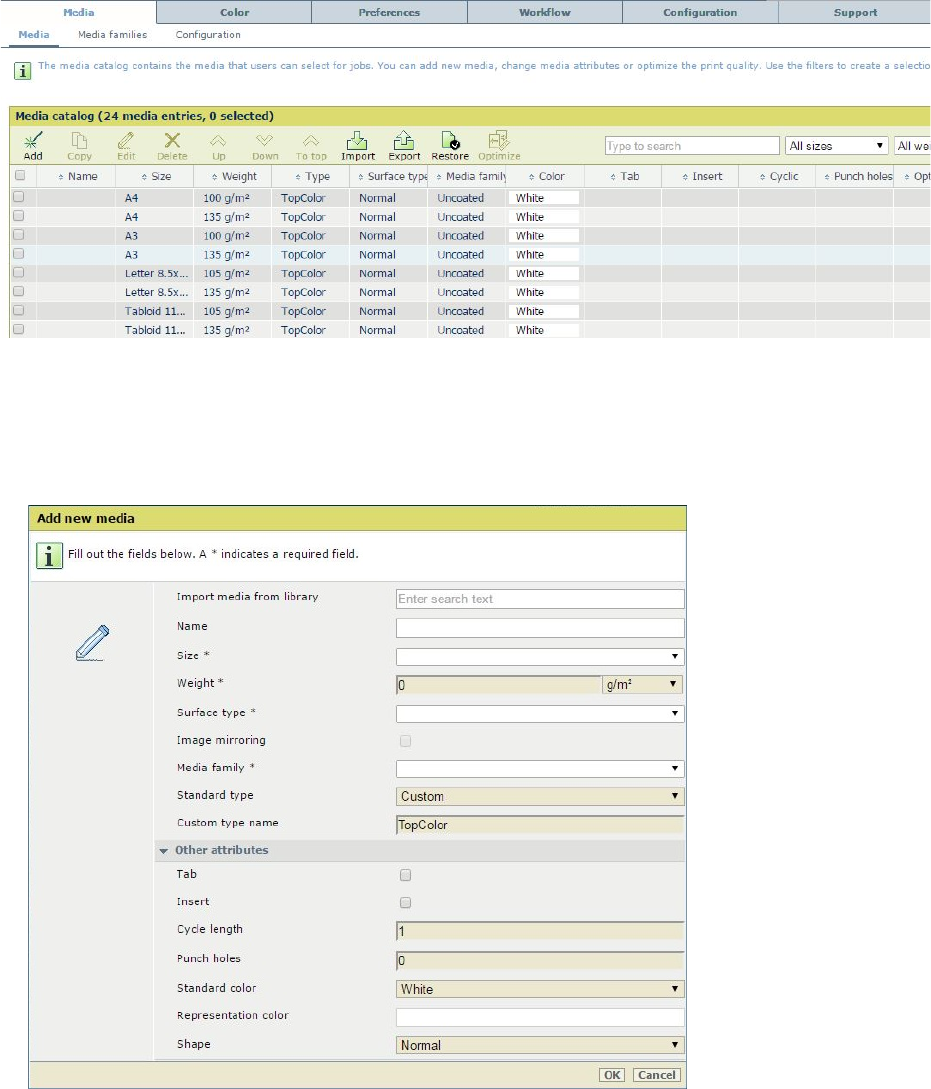
• Add
You can add a new media to the catalogue. In the pop-up window you can define the
attributes of this new media.
3
PRISMAsync V1.2 for imagePRESS C800 series
_____________________________________________________________________
o Name: Give the media a name (Any string)
o Type: Assign it to a mediatype (Any string)
o Size: From the pull-down menu select the size of the paper
o Width: In case size = custom give the width in 0.1 mm units
o Length: In case size = custom give the length in 0.1 mm units
o Tab sheet: Indicates if the media is a tab.
o Insert: On an insert nothing will be printed.
o Cycle length: The number of sheets in one cyclic set. (e.g. for tabs) If the number
of tabs in one set is smaller than the cycle length, the remaining sheets of the set
will be purged.
o Punch count: The number of punch holes in a pre-punched sheet.
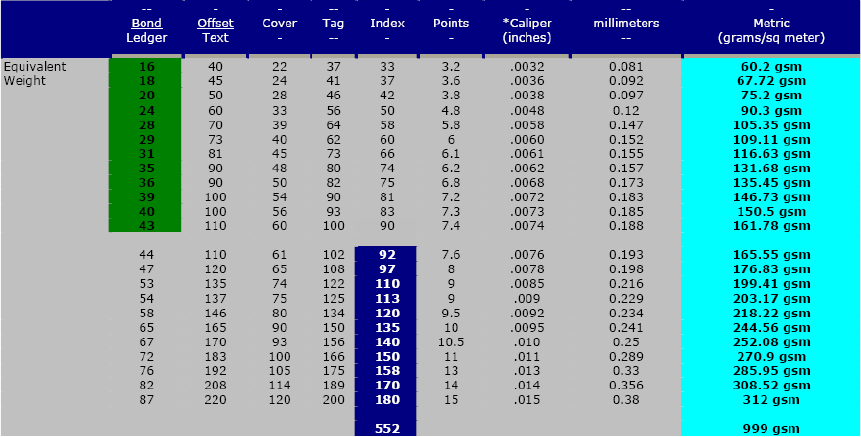
o Weight: The weight of the paper in g/m2.
When using “Imperial” as measurement system, then all media weights have to
be entered according to the following table. Media weights up to 161.78
grams/square meter must be entered in Bond and media with a higher media
weight must be entered as index.
o Color: Enter the color of the paper. Only a pre-defined set of values is possible
and can be used e.g. white, blue, red etc. Also the icon of the media on the
display will be in this color.
o Red: You can enter a value for the Red component of the color of the paper.
o Green: You can enter a value for the Green component of the color of the paper.
o Blue: You can enter a value for the Blue component of the color of the paper.
o Media family: The media family to which this media will be assigned.
o Surface type: From the pull-down menu select the surface of the paper. This item
is used by the engine to make the correct internal settings.
o Shape: This is equivalent to the “Type”-setting in the imageRUNNER ADV
C9000 series (non-S version). This information is used to determine its
processing attributes. E.g. Letterhead will run at ½ engine speed.
• Edit
Choose “Edit” to change attributes of the selected media.
4
PRISMAsync V1.2 for imagePRESS C800 series
_____________________________________________________________________
•Delete
Remove the selected media from the catalogue.
•Up
Move the selected media 1 position up.
•Down
Move the selected media 1 position down.
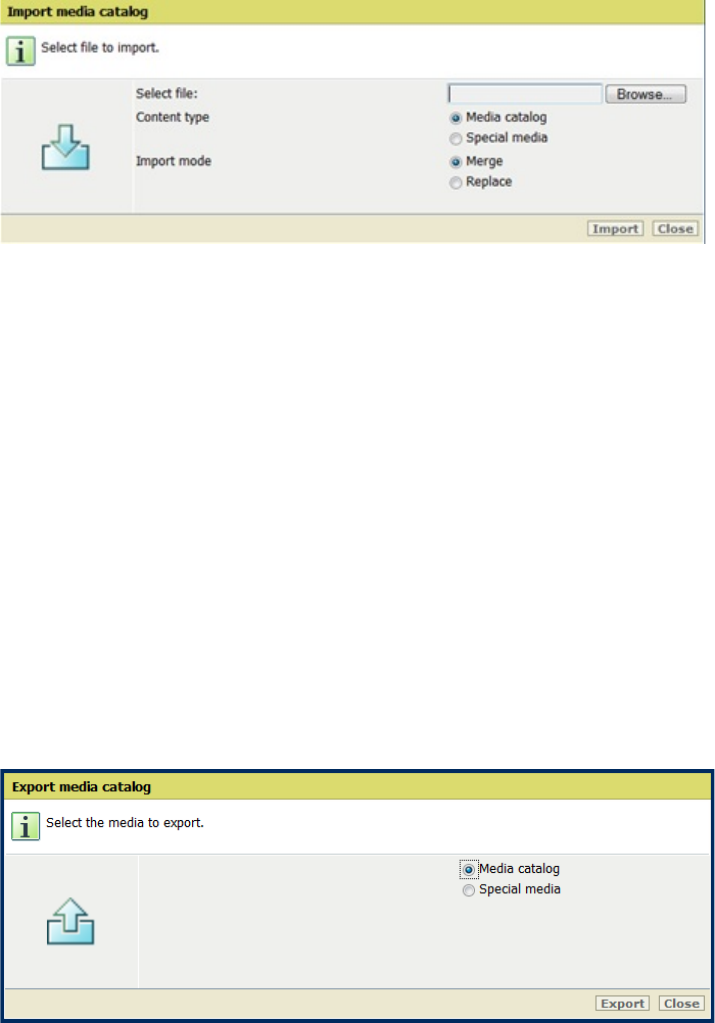
•Import
Import a media catalogue from your computer to the PRISMAsync.
In the pop-up window you can make the following selections:
oComplete media catalog
oSpecial media
Separator sheets
Front covers
Back covers
Banner & trailer & print ticket media
Calibration media
oMerge
Merge the current media catalog with the catalog to import. Media already
present in the current media catalog will remain.
oReplace
Replace entirely the current media catalogue with the one you want to import.
•Export
Export a media catalogue to use on another PRISMAsync or application. You can choose to
export all media or to export the special media. Special media is media used for covers,
slipsheets, calibration etc.
•Restore
Restore the factory default media catalogue.
5
PRISMAsync V1.2 for imagePRESS C800 series
_____________________________________________________________________
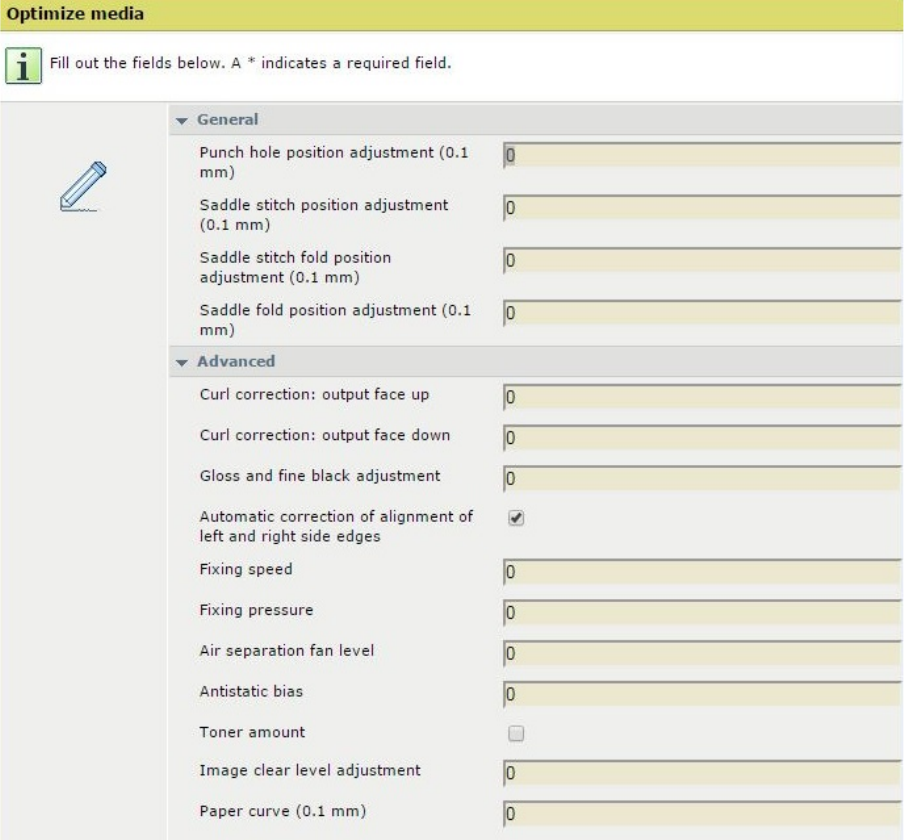
• Optimize Media
Select this to set the media specific attributes. These attributes describe the engine behavior
when printing on the specified media. After selecting a media in the catalog, you can click
the “Optimize media” button. The following window will pop-up.
o General: Punch hole position adjustment (mm): Fine-adjust the punch hole
position. Increase the value to shift the position of the punch holes down.
Decrease the value to shift the position of the punch holes up. (Value: -2.0 to
+2.0 mm, default 0 mm)
o General: Saddle stitch position adjustment (mm): Move the stitch position
towards the intended centre of the booklet. If necessary, perform the ‘Saddle
stitch fold position adjustment’ to move the fold towards the intended centre too.
Increase the value to shift to the right. Decrease the value to shift to the left.
(Value: -2.00 to +2.00 mm, default 0 mm)
o General: Saddle fold position adjustment (mm): Use the saddle fold function
of the saddle finisher to adjust the fold position. Increase the value to shift the
position to the left. Decrease the value to shift the position to the right.. (Value: -
2.00 to +2.00 mm, default 0 mm)
6
PRISMAsync V1.2 for imagePRESS C800 series
_____________________________________________________________________
oGeneral: Saddle stitch fold position adjustment (mm): Use the saddle stitch
function of the saddle finisher to adjust the fold position. Increase the value to
shift the position to the right. Decrease the value to shift the position to the left. If
necessary, perform the ‘Saddle stitch position adjustment’ first, to move the
stitch position towards the intended center.. (Value: -2.00 to +2.00 mm, default 0
mm)
oAdvanced: Output face up: Adjust the paper curl level for face- up output.
(Value: -15 to +15, default 0)
oAdvanced: Output face down: Adjust the paper curl level for face-down output.
(Value: -15 to +15, default 0)
oAdvanced: Gloss and fine black adjustment: Adjust the temperature of the
fixing units to change the glossiness. For black areas, this setting can also
improve the following: tiny white grainy dots appear and the paper fibers are
partly visible on the print. When you change the values, the paper can pass
through the primary fixing unit only or through both the primary and secondary
fixing units. It is advised to change the value in small steps. This setting can
affect the paper curl. If necessary, re-adjust the ‘Curl correction’ setting. Increase
the values to increase the gloss. Decrease the values to decrease the gloss.
Increase the values to improve black areas. The gloss and fine black values are
directly related to each other. Gloss -2 means Fine black +2, Gloss -1 means Fine
black +1. All other Gloss settings result in a Fine Black settings of 0. Do not use
this setting for media with surface types Transparency, 1-Sided Coated, 2-Sided
Coated and Vellum. (Value: -2 to +2, default 0)
oAdvanced: Automatic correction of alignment of left and right side edges
Enable or disable the automatic correction of alignment of left en right side
edges. (Value: Yes or No, default Yes)
oAdvanced: Fixing speed
Adjust the fixing speed
oAdvanced: Fixing pressure
Adjust the fixing pressure
oAdvanced: Paper separation fan level: Adjust the amount of air to improve the
media separation in the input trays. Decrease the value when high-density areas
are not printed evenly, or when the curl is exceptionally high due to a lack of
moisture, media characteristics and variable humidity of the environment.
Increase the value when paper jams occur frequently, or in case of high
temperature and humidity. (Value: 1 to 7, default 4)
oAdvanced: Antistatic bias
oAdvanced: Toner amount
Enable or disable the toner quantity control
oAdvanced: Image clear level adjustment: When automatic cleaning is not
sufficient to remove the toner residue from the transfer belt, toner residue may
transfer to the paper. This can affect the quality of the image adversely. Increase
the value to improve the situation. If the situation is not improved, even after you
increased or decreased the value, adjust the ‘Secondary transfer voltage’ setting
to a lower value. (Value: -10 to +10, default 0.
oAdvanced: Paper curve (mm)
Adjust the paper curce. (Value: -15mm to 15mm, step 0.5mm, default 0.0mm)
oAdvanced: Paper Realignment speed (0,1%)
Adjust the paper realignment speed
7
PRISMAsync V1.2 for imagePRESS C800 series
_____________________________________________________________________
oAdvanced: Paper reversal distance
Adjust the paper reversal distance.
oAdvanced: Lead margin (0,1 mm)
Adjust the lead margin
oAdvanced: Tail margin (0,1 mm)
Adjust the tail margin
oFront: X shift (0.1 mm): Correct the alignment of the image on the media
perpendicular to the feed direction. (Value: -50.0mm to +50.0mm, step 0.1mm,
default 0.0mm)
oFront: Y shift (0.1 mm): Correct the alignment of the image on the media in the
feed direction. (Value: -50.0mm to +50.0mm, step 0.1mm, default 0.0mm)
oFront: Y elongation (0.01%): To make adjustment (enlargement/reduction) of
image size in the feed direction. (Value: -1.00 to +1.00%, step 0.01%, default
0.00%)
oFront: X elongation (0.01%): To make adjustment (enlargement/reduction) of
image size perpendicular to the feed direction. (Value: -1.00 to +1.00%, step
0.01%, default 0.00%)
oFront: Bottom skew(0.1mm)
oFront: Left-hand skew (0.1mm)
oFront: Right-hand skew (0.1mm)
oFront: Trapezoid height (0.1mm)
oFront: Trapezoid bottom (0.1mm)
oFront: Trapezoid top (0.1mm)
oFront: Diamond shape length (0.1mm)
oFront: Diamond shape bottom (0.1mm)
oFront: Diamond shape top (0.1mm)
oFront: Tail end white patch correction: Improve the image quality on curled
media or curl-prone media types in 2-sided printing when, at the tail end of the
media, white areas or fading appears.
Treshold: Fading in high-density areas: choose negative values. White
patch: choose positive values (Value: -10 to +10, Default: 0)
Amount: Depending on the media type and curl, the size of the area on
the tail end of the media where white areas appear may differ. Use this
setting to adjust the starting position to correct the area. The default
position of the ‘Tail end white patch correction’ starts at 20 mm/0.8”
from the tail edge of the media. To make the area bigger, decrease the
value. To make it smaller, increase the value. (Value: -20 to +20, Default:
0)
oFront: Secondary transfer voltage:
When image blurring occurs, adjust the voltage that transfers toner to the paper.
This setting can affect the ‘Image clear level adjustment’ and ‘Tail end white
patch correction’ settings. If necessary, re-adjust these settings too. Decrease the
value when: 1) thin paper is used, 2) tiny white spots appear in low-density areas
(when density in high-density areas is normal), 3) white spots appear in high-
density areas and 4) the used paper has a rough surface (e.g embossed paper) and
white spots appear on the concave side. Increase the value when: 1) thick paper is
used, 2) the density level in high-density and low-density areas is low, 3) uneven
glossy areas occur in high-density images and 4) outlines in high-density images
blur. Change this setting in small steps and check the output after each
adjustment.
8
PRISMAsync V1.2 for imagePRESS C800 series
_____________________________________________________________________
Adjust the secondary transfer voltage for the front side of the paper (Value: -10
to +10, Default 0).
o Back: X shift (0.1 mm): Correct the alignment of the image on the media
perpendicular to the feed direction. (Value: -50.0mm to +50.0mm, step 0.1mm,
Default 0.0mm)
o Back: Y shift (0.1 mm): Correct the alignment of the image on the media in the
feed direction. (Value: -50.0mm to +50.0mm, step 0.1mm, default 0.0mm)
o Back: Y elongation (0.01%): To make adjustment (enlargement/reduction) of
image size in the feed direction. (Value: -1.00 to +1.00%, step 0.01%, Default
0.00%)
o Back: X elongation (0.01%): To make adjustment (enlargement/reduction) of
image size perpendicular to the feed direction. (Value: -1.00 to +1.00%, step
0.01%, Default 0.00%)
o Back: Bottom skew(0.1mm)
o Back: Left-hand skew (0.1mm)
o Back: Right-hand skew (0.1mm)
o Back: Trapezoid height (0.1mm)
o Back: Trapezoid bottom (0.1mm)
o Back: Trapezoid top (0.1mm)
o Back: Diamond shape length (0.1mm)
o Back: Diamond shape bottom (0.1mm)
o Back: Diamond shape top (0.1mm)
o Back : Tail end white patch correction: Improve the image quality on curled
media or curl-prone media types in 2-sided printing when, at the tail end of the
media, white areas or fading appears.
Treshold: Fading in high-density areas: choose negative values. White
patch: choose positive values (Value: -10 to +10, Default: 0)
Amount: Depending on the media type and curl, the size of the area on
the tail end of the media where white areas appear may differ. Use this
setting to adjust the starting position to correct the area. The default
position of the ‘Tail end white patch correction’ starts at 20 mm/0.8”
from the tail edge of the media. To make the area bigger, decrease the
value. To make it smaller, increase the value. (Value: -20 to +20, Default:
0)
o Back: Secondary transfer voltage:
When image blurring occurs, adjust the voltage that transfers toner to the paper.
This setting can affect the ‘Image clear level adjustment’ and ‘Tail end white
patch correction’ settings. If necessary, re-adjust these settings too. Decrease the
value when: 1) thin paper is used, 2) tiny white spots appear in low-density areas
(when density in high-density areas is normal), 3) white spots appear in high-
density areas and 4) the used paper has a rough surface (e.g embossed paper) and
white spots appear on the concave side. Increase the value when: 1) thick paper is
used, 2) the density level in high-density and low-density areas is low, 3) uneven
glossy areas occur in high-density images and 4) outlines in high-density images
blur. Change this setting in small steps and check the output after each
adjustment.
Adjust the secondary transfer voltage for the back side of the paper (Value: -10 to
+10, default 0).
Note: Primary Transfer Voltage
9
PRISMAsync V1.2 for imagePRESS C800 series
_____________________________________________________________________
PRISMAsync support Primary Transfer Voltage for Black which is a
countermeasure for wide sheets printed directly after a run of smaller size sheets.
It is connected to a media in the media catalogue.
It is destined to set BK's primary transfer voltage lower on wide sheets. Voltage
level depends on amongst other engine’s aging, ratio of wide sheets. The
customer needs to tweak the settings to achieve the best output.
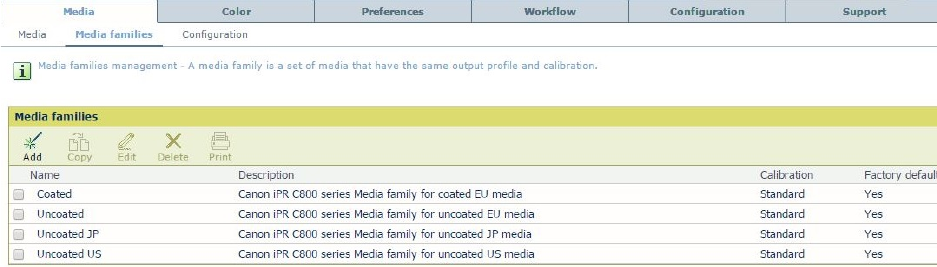
2.2 Media Families
A media family is a set of media that use the same output profile and calibration. When
calibrating a media that belongs to a specific media family, all of the media in this family is
calibrated.
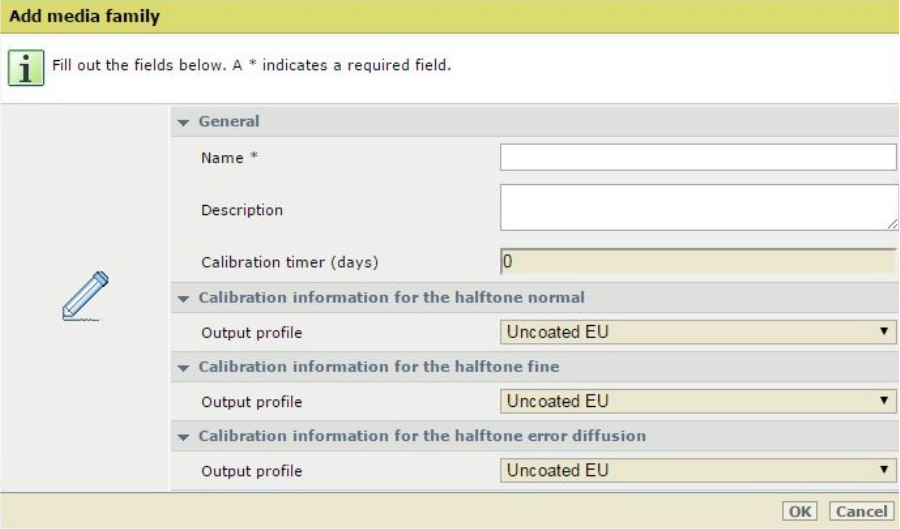
• Add
You can add your own media family. Properties of the family must be set: Name,
Description, and the output profiles for Normal, Fine and Error diffusion halftones.
A media family calibration expiration interval can be set between 0 and 365 days in steps of 1
day. The operator will be warned on the operator panel when printing jobs using media from
a family for which calibration has expired.
Media families calibration with an expiration interval set to ‘0’ will never expire.
A job is signalled for calibration at the start of the day (00:00) that required media family
calibration curves to expire.
10
PRISMAsync V1.2 for imagePRESS C800 series
_____________________________________________________________________
• Copy
Copy the selected media family and give it a new name. All the properties of the family are
copied to the new one.
• Edit
Change the attributes of the selected media family. In this window you can also restore the
default calibration curve.
• Delete
Remove the selected media family. If there is still media assigned to the selected family it is
impossible to delete the family. First you have to remove the media or move it to another
family. The media family should not be in use before deleting it.
• Print
Print the color reference chart for a selected media family. A pop-up occurs asking you to
enter the halftone and the media to print on.
11
PRISMAsync V1.2 for imagePRESS C800 series
_____________________________________________________________________
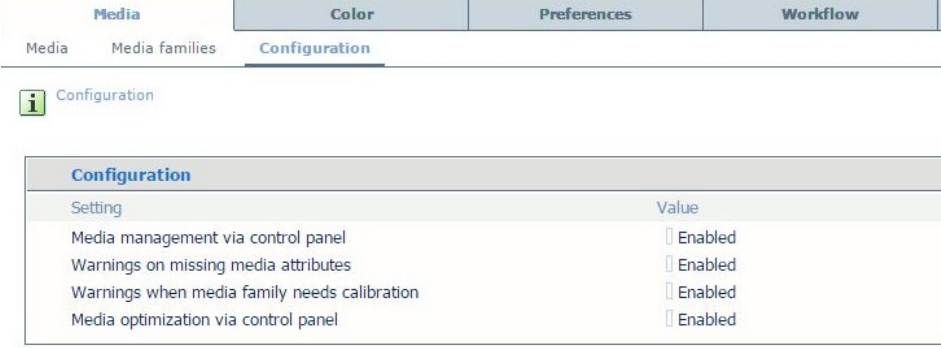
2.3 Configuration
In order to configure the system behaviour regarding media handling, some settings are added in
this section.
• Media management via control panel
Disable this setting if you do not want that operators to change and add media on the control
panel.
• Warnings on missing media attributes
Missing media attributes can lead to a decrease in the print quality. When warnings are
enabled, alerts are shown if all media attributes are not defined.
• Warning when media family needs calibration
An un-calibrated media family can lead to a decrease in the print quality. When warnings are
enabled, alerts are shown if a media family was never calibrated or when the last calibration
is too old.
• Media optimization via control panel
Disable this setting if you do not want that operators to perform media optimization
procedures via the control panel.
12
PRISMAsync V1.2 for imagePRESS C800 series
_____________________________________________________________________
3. Color
In the “Color” section you can find all color related settings of the PRISMAsync. It contains 9
different sub-sections, which are described in the next chapters.
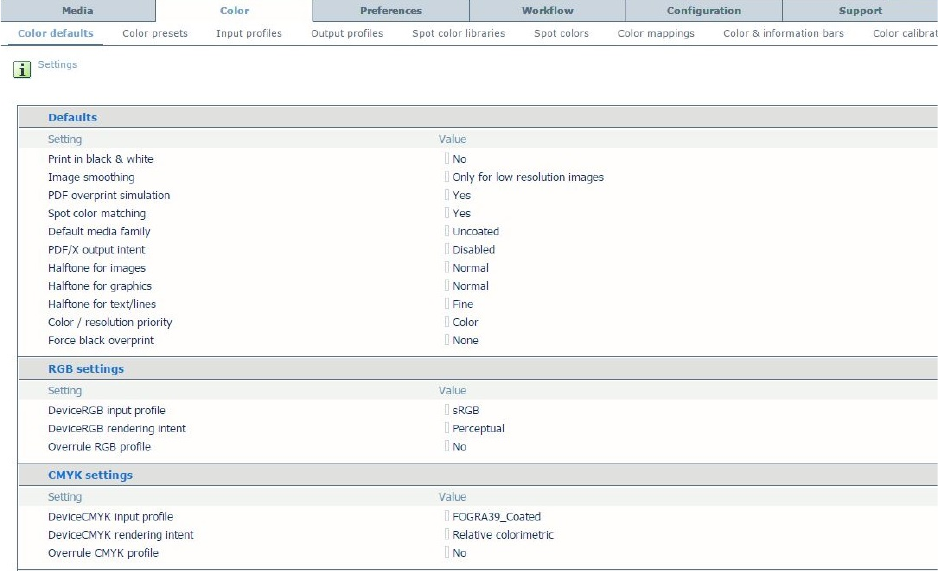
3.1 Color defaults
This section gives the default of the color settings, used when settings are not specified in the
file or the job ticket.
Defaults
•Print in black & white
Print in color or black & white (Default: No)
•Image smoothing
Smoothens images with a low resolution (Default: Yes)
•PDF overprint simulation
Makes opaque objects look transparent. Underlying objects are visible. Only used for pdf
documents. (Default: No)
•Spot color matching
Spot color matching indicates whether the spot colors in a job must be matched against the
spot color table in the printer. (Default: Yes)
•Default media family
A media family is a set of media that have the same output profile and calibration. (Default:
Uncoated)
13
PRISMAsync V1.2 for imagePRESS C800 series
_____________________________________________________________________
• PDF/X output intent
If this setting is enabled, a PDF file is printed according to its embedded 'output intent'. In
this case, the color space for device CMYK as specified in the system settings and the job
ticket is ignored. (Default: Disabled)
• Halftone for images
This setting defines the halftone pattern that will be used for images. Options:
o Normal (Default)
o Fine
o Error Diffusion
• Halftone for graphics
This setting defines the halftone pattern that will be used for graphics. Options:
o Normal (Default)
o Fine
o Error Diffusion
• Halftone for text/lines
This setting defines the halftone pattern that will be used for texts. Same values can be used
as for graphics/images. (Default: Fine)
• Color/resolution priority
Graphic objects with a high toner density may appear blurry at the edges of the graphic. Use
this setting for sharp edges. The graphic objects may become less saturated. (Default: Color)
• Force black overprint
Force black objects to overprint over background color to prevent registration artifacts
(Native PDF RIP only) (Default: None)
RGB settings
• DeviceRGB input profile
An input profile defines a reference color workspace for the color data of the objects in the
document. An Input profile is used to define colors in a device-independent way. (Default:
sRGB)
• DeviceRGB rendering intent
The rendering intent defines the color conversion strategy that is needed because color spaces
differ by device (monitors, printers). The required print quality determines the rendering
intent you need for optimal print quality. Settings:
o Perceptual (Default)
o Saturation
o Relative colorimetric
o Absolute colorimetric
• Overrule RGB profile
Overrules the embedded color profile (RGB) of a document with this selected default.
Default: No
CMYK settings
• DeviceCMYK input profile
An input profile defines a reference color workspace for the color data of the objects in the
document. An Input profile is used to define colors in a device-independent way. Default:
FOGRA39_Coated.
• DeviceCMYK rendering intent
The rendering intent defines the color conversion strategy that is needed because color
spaces differ by device (monitors, printers). The required print quality determines the
14
PRISMAsync V1.2 for imagePRESS C800 series
_____________________________________________________________________
rendering intent you need for optimal print quality. Same options as for RGB rendering
intent. (Default: Relative colorimetric)
•Overrule CMYK profile
Overrules the embedded color profile (CMYK) of a document, with this selected default.
(Default: No)
Color preset for printer driver and PRISMAprepare
•Default color pre-set
See “Color -> Color pre-sets”. (Default: Photographic content).
When you print with a Printer driver or PRISMAprepare this preset will be used if you do
not select another one.
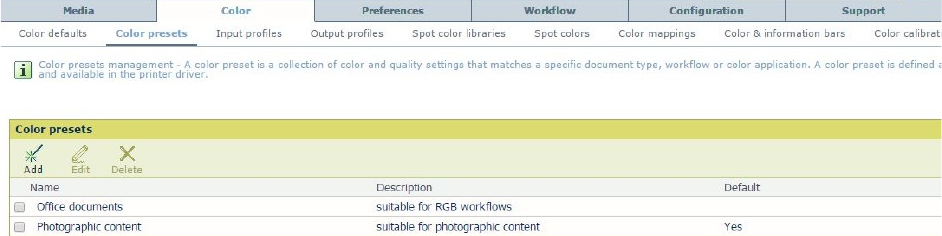
3.2 Color presets
A color preset is a collection of color and quality settings that matches a specific document type,
workflow or color application. A color preset is defined at the printer controller and available in
the printer driver.
•Add
Use this button to create a user defined Color preset. A window opens and you have to fill
different color attributes.
oName
The name of the Color Preset
oDescription
A short description of the preset
oDeviceRGB input profile
The input profile for RGB data in the document
oDeviceRGB rendering intent
The rendering intent defines the color conversion strategy that is needed because color
spaces differ by device (monitors, printers). The required print quality determines the
rendering intent you need for optimal print quality. This is the rendering intent for RGB
data.
oOverrule RGB profile
Overrules the embedded color profile (RGB) of a document
oDeviceCMYK input profile
The input profile for CMYK data in the document
oDeviceCMYK rendering intent
The rendering intent defines the color conversion strategy that is needed because color
spaces differ by device (monitors, printers). The required print quality determines the
15
PRISMAsync V1.2 for imagePRESS C800 series
_____________________________________________________________________
rendering intent you need for optimal print quality. This is the rendering intent for
CMYK data.
o Overrule CMYK profile
Overrules the embedded color profile (CMYK) of a document
o Halftone for text
Define the halftone used for printing text. If you always use a color preset you have to
change the half-tone setting in this preset. Changing the setting in the color defaults
section has no effect when using a color-preset.
o Halftone for images
Define the halftone used for printing images. If you always use a color preset you have
to change the half-tone setting in this preset. Changing the setting in the color defaults
section has no effect when using a color-preset.
o Halftone for graphics
Define the halftone used for printing graphics. If you always use a color preset you have
to change the half-tone setting in this preset. Changing the setting in the color defaults
section has no effect when using a color-preset.
o Spot color matching
Spot color matching indicates whether the spot colors in a job must be matched against
the spot color table in the printer.
o Color mapping group
Define the color mapping group used, if any. See description further in this document.
o Print in black & white
Print in color or black & white
o PDF overprint simulation
Makes opaque objects look transparent. Underlying objects are visible. Only used for
pdf documents.
o PDF/X output intent
If this setting is enabled, a PDF file is printed according to its embedded 'output intent'.
In this case, the color space for device CMYK as specified in the system settings and
the job ticket is ignored.
o Overprinting black
Force black objects to overprint over background color to prevent registration artifacts
(Native PDF RIP only)
• Edit
Use this button to change attributes of the color pre-sets.
• Delete
Delete a color pre-set. If the pre-set is in use it is impossible to delete it. The pre-set that is
defined as color default is always “in-use”.
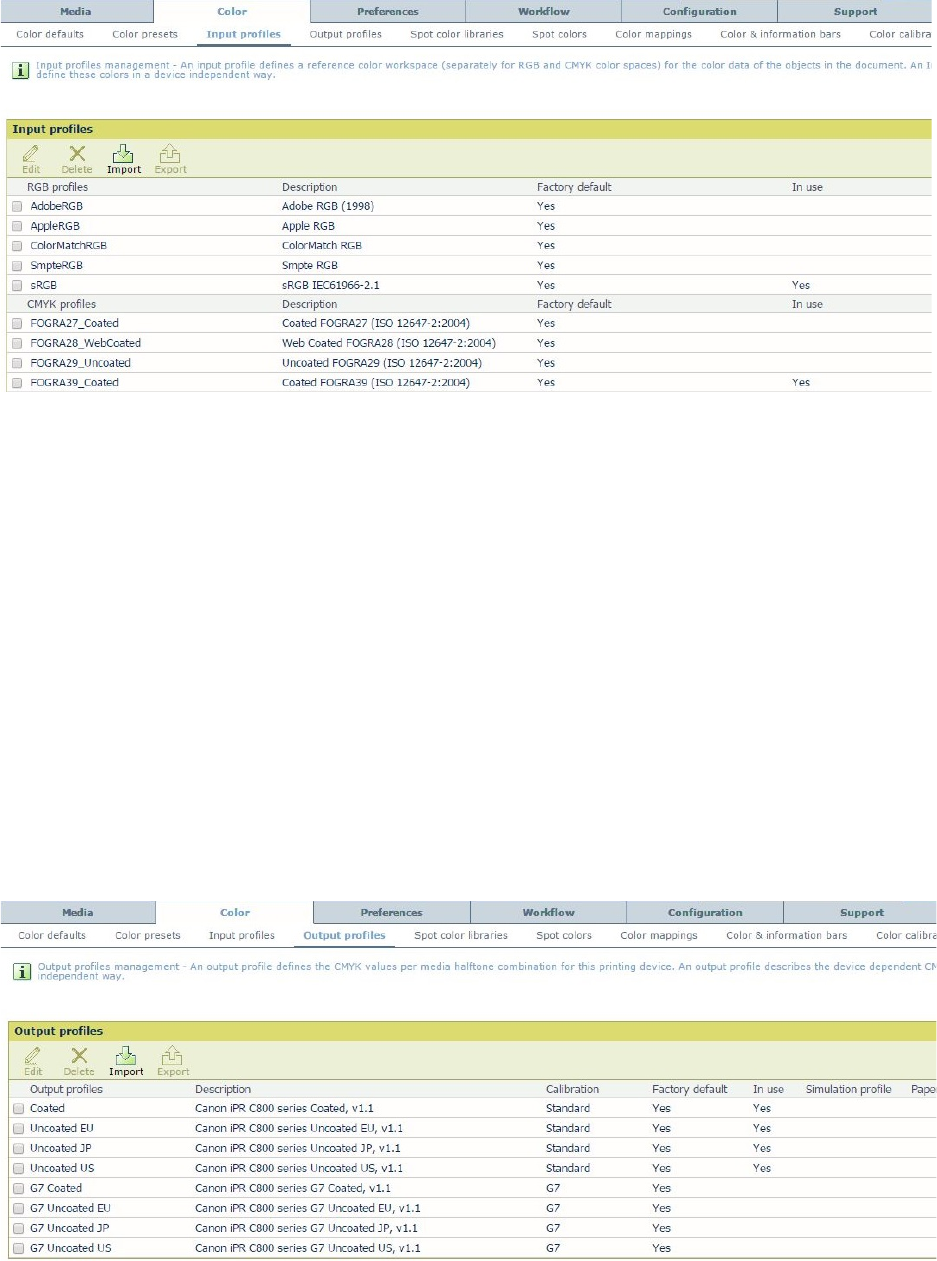
3.3 Input profiles
An input profile defines a reference color workspace for the color data of the objects in the
document. An Input profile is used to define colors in a device-independent way. There are
input profiles for RGB and CMYK colored objects.
16
PRISMAsync V1.2 for imagePRESS C800 series
_____________________________________________________________________
• Edit
With this button you can change the name and the description of the selected input profile.
• Delete
Remove the selected input profile. “In use” and “Factory default” profiles cannot be deleted.
• Import
After creating an Input profile (Special profiling software is needed) you can import the
profile to use it on the PRISMAsync.
• Export
The selected input profile can be used on another PRISMAsync. For that reason you can
export it to a file on your local computer.
3.4 Output profiles
An output profile defines the CMYK values per media halftone combination for this printing
device. An output profile describes the device dependent CMYK colors in a device independent
way.
• Edit
With this button you can change the name and the description of the selected output profile.
17

PRISMAsync V1.2 for imagePRESS C800 series
_____________________________________________________________________
• Delete
Remove the selected output profile. “In use” and “Factory default” profiles cannot be deleted.
• Import
After creating an Output profile (Special profiling software is needed) you can import the
profile to use it on the PRISMAsync.
• Export
The selected Output profile can be used on another PRISMAsync. For that reason you can
export it to a file on your local computer.
Note: G7 calibration is a color calibration method that is being promoted, in particular in the
U.S.A., by IDEAlliance. G7 stands for grayscale plus seven colors: the subtractive colors
(Cyan, Magenta, Yellow, and Black) and the additive colors (Red, Green, and Blue). It has its
origin in offset printing, but it is being promoted for digital processes as well. It has a
particular focus on the neutrality of the gray axis. Please find more information on G7 here:
http://www.idealliance.org/specifications/g7.
• To be able to use G7: G7 support must be enables first via the Settings Editor (Color > Color
Calibration > under G7 calibration).
G7 Calibration settings in the Settings Editor
• With G7 support enabled, G7 compliant factory default output profiles become accessible for
use, and listed in the output profiles section in Settings Editor (Color > Output profiles).
18
PRISMAsync V1.2 for imagePRESS C800 series
_____________________________________________________________________
3.5 Spot color libraries
In this section all the available spot colors in the system are listed.
• Edit
You can edit a sport color library.
• Import
You can import a new spot color library into the system.
• Export
The selected library can be used on another PRISMAsync. For that reason you can export it
to a file on your local computer.
• Delete
Remove the selected spot color library.
• Reset
Reset the spot colors of the selected libraries to the factory default.
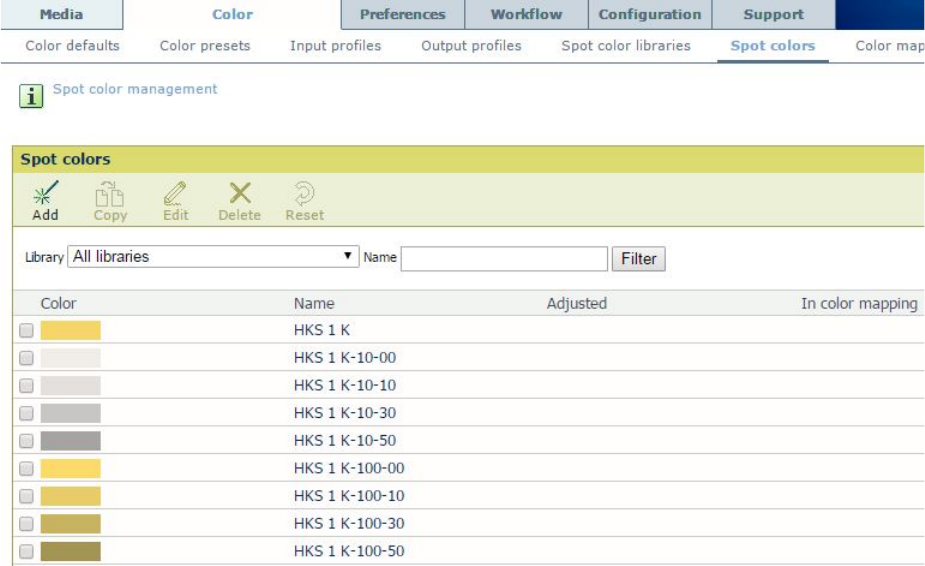
3.6 Spot colors
Spot color values are defined in spot color tables in the PRISMAsync. By selecting a spot color
in your document the value is looked up in the table and then printed.
19
PRISMAsync V1.2 for imagePRESS C800 series
_____________________________________________________________________
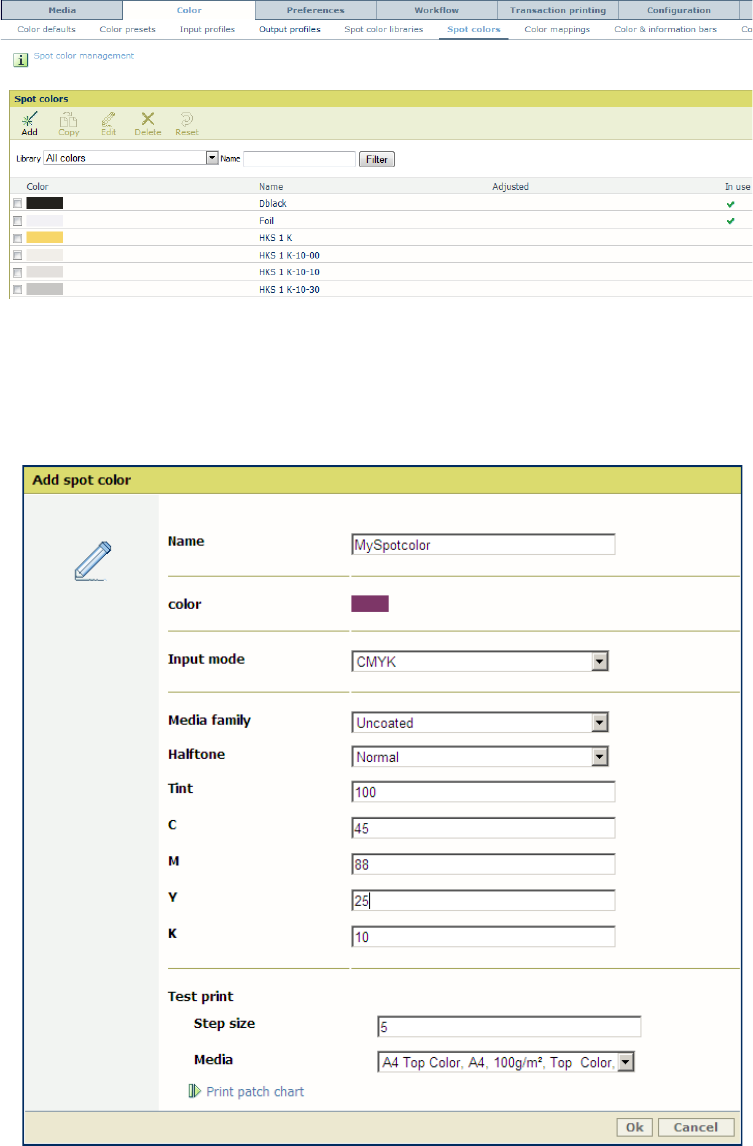
• Add
You can create your own spot color with this function. A pop-up appears to fill in the
attributes of the spot color. The new spot color will be stored in the “Custom colors” library.
o Name: Give the Spot color a unique name
o Color: Gives an indication how the color will be.
o Input mode: You can select if you want to enter the values for the colors in
CMYK or Lab.
o Media family: The spot color is defined for the specified media family only.
o Halftone: The spot color is defined for the specified halftone only (Normal, Fine,
Error diffusion)
o Tint: The percentage with which the color is printed
20
PRISMAsync V1.2 for imagePRESS C800 series
_____________________________________________________________________
o C, M, Y, K or Lab: The values for the color
o Test print:
The step-size between the patches
Media
After this you can print a patch chart. On this print the selected color is printed with
numerous patches around it each differing in step size per color. From this patch chart pick
the color that comes closest to the color you want and adjust the CMYK values of the newly
created Spot color.
• Copy
You can copy a selected spot color. This color will be stored in the “Custom colors” library.
Then you can edit the values of this spot color.
• Edit
With this button you can edit a selected spot color. This color will then appear in the custom
set.
• Delete
Delete the selected spot color. Only custom spot colors can be deleted
• Reset
Reset the selected spot colors to the factory default.
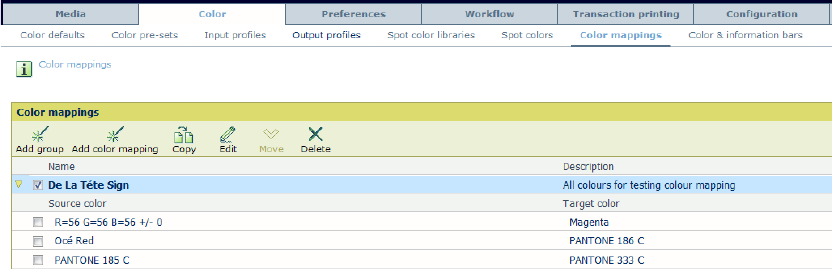
3.7 Color mappings
Note:
For this functionality the “Advanced Color Management” license is needed.
An operator can define color mappings via the Settings Editor. In order to define a color
mapping, the operator first has to define a color mapping group. This color mapping group can
contain multiple color mappings. Color mappings are part of the color presets and can be
selected in the windows driver and Automated WorkFlow by choosing a color preset (custom or
predefined).
A color mapping is only applied to print jobs (so not to e.g. copy jobs). Color mapping
functionality is available for both PDF and PS jobs.
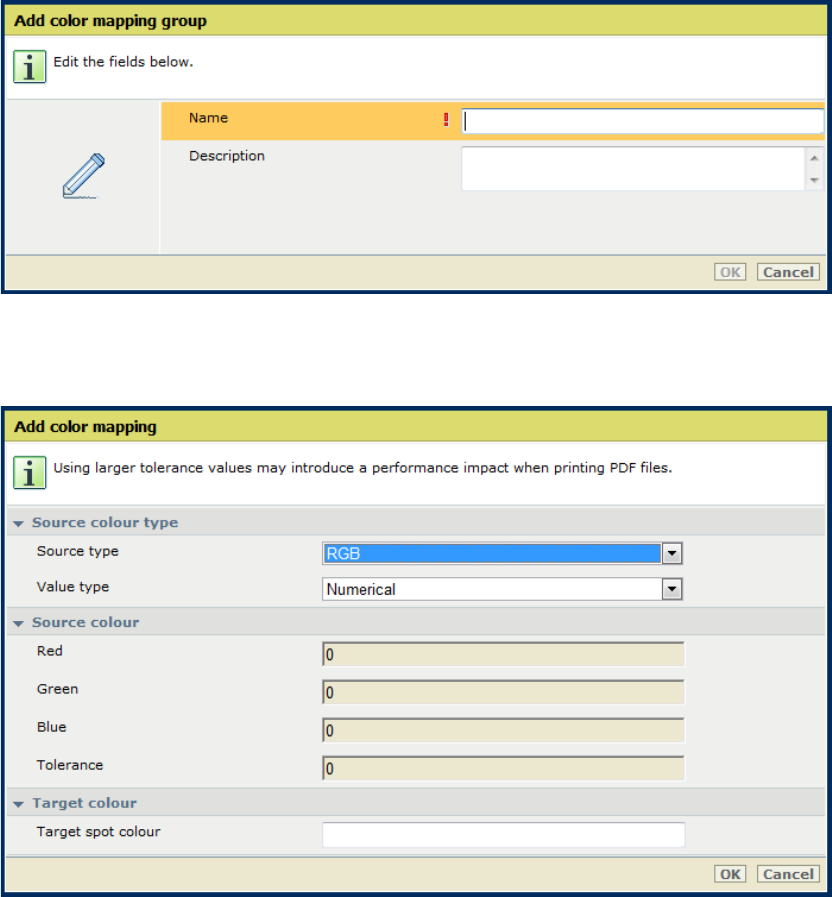
• Add Group
A group that contains 1 or more color mappings.
21
PRISMAsync V1.2 for imagePRESS C800 series
_____________________________________________________________________
• Add color mapping
Add a color mapping to a specific group
o Source type: Enter the type of the source color (RGB, CMYK, Spot color)
o Value type: Give the method in which the color is entered (numerical or percentage)
Only for RGB type. CMYK is always entered in percentage. For spot color, a name
must be entered.
o Source color: The values of the color or the name of the spot color
o Target color: The color that the source color is mapped to.
• Copy
Copy a color mapping or a color mapping group
• Edit
Change an existing color mapping or color mapping group
• Move
Move a color mapping to another color mapping group.
• Delete
Delete an existing color mapping or color mapping group
22
PRISMAsync V1.2 for imagePRESS C800 series
_____________________________________________________________________
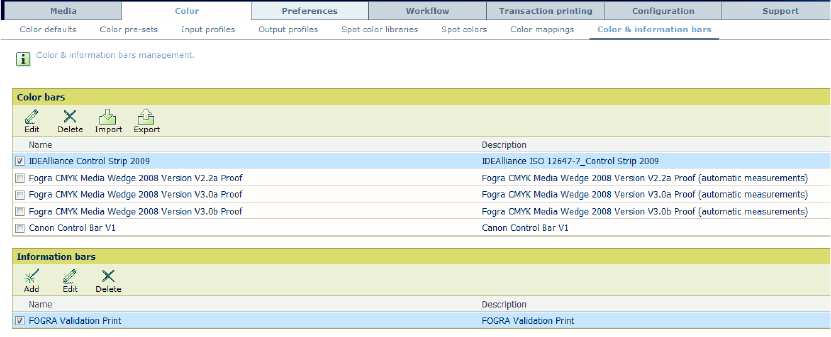
3.8 Color & information bars
Note:
For this functionality the “Advanced Color Management” license is needed.
The following pre-installed color bars available:
• IDEAlliance Control Strip 2009
• Fogra CMYK Media Wedge 2008 Version V2.2a Proof
• Fogra CMYK Media Wedge 2008 Version V3.0a Proof
• Fogra CMYK Media Wedge 2008 Version V3.0b Proof
• IDEAlliance Control Wedge 2013
The Color bar is selectable in windows driver, AWF, operator panel & PRISMAprepare. It is
also possible to Import & export user-installed color bars. Only eps files are allowed to be
imported as color bars. Color bars only available for print jobs (so not for e.g. copy jobs)
Each job, that contains a color bar, which will be printed from the waiting room will be re-
ripped. This way the correct color management is applied to both the color bar and the job.
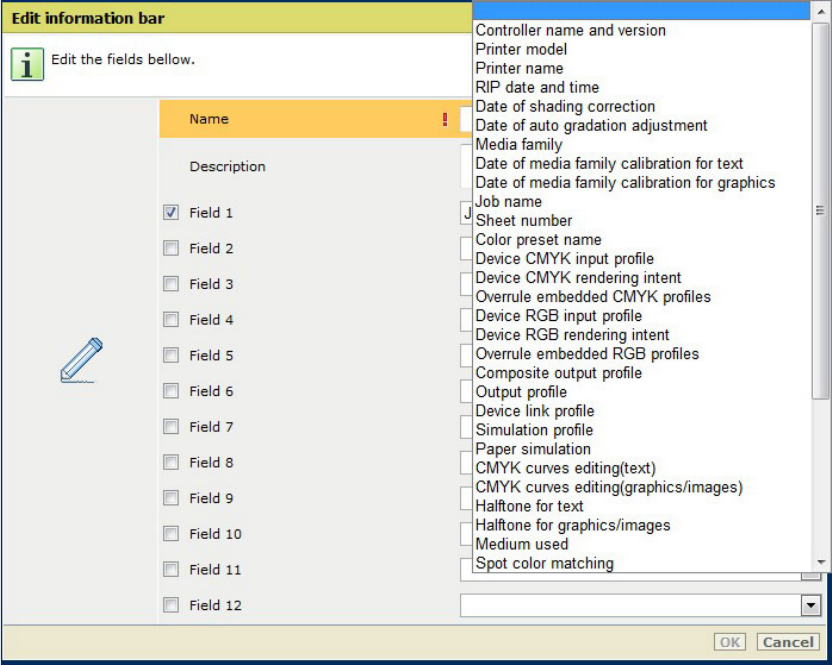
There is one pre-installed information bar (FOGRA validation print).
Information bars are only available for print jobs (so not for e.g. copy jobs).
The operator can define his own information bar. The bar can contain maximum 12 fields. The
size of the information bar on the sheet is always the size of 12 fields, regardless if 12 fields are
selected or not.
When selected in the job, the information bar will be printed on both sides of a sheet.
Information bar is selectable in windows driver, AWF, OPERATOR PANEL &
PRISMAprepare
Information bar and color bar can be used within one job; when they overlap, one of them will
knock-out the other one.
• Color bars – Edit
You can change the name and the description of the color bar.
• Color bars – Delete
Delete an existing color bar.
• Color bars – Import
Import a color bar
23
PRISMAsync V1.2 for imagePRESS C800 series
_____________________________________________________________________
• Color bars – Export
Export as user defined color bar. It is not possible to export a pre-installed color bar.
• Information bars – Add
Add an information bar.
o Field 1 – 12: You can fill in 12 fields that are displayed on the information bar. You
can pick the values from the list at the right.
• Information bars – Edit
You can edit a selected information bar.
• Information bars – Delete
Delete the selected information bar.
24
PRISMAsync V1.2 for imagePRESS C800 series
_____________________________________________________________________
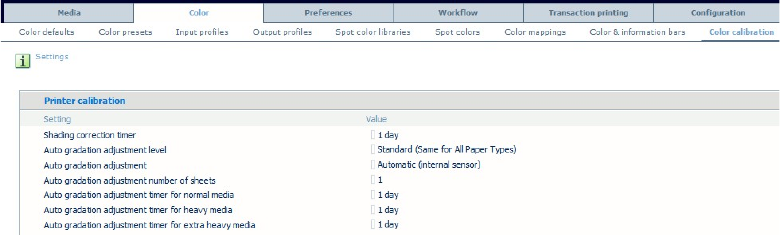
3.9 Color calibration
The customer can set alert timers for the shading correction and the Auto gradation adjustment.
When these timers expire a warning will be displayed on the Operator Panel that the calibration
is due.
Printer calibration
• Shading correction timer
When the shading correction timer is enabled, the system indicates that a shading correction
adjustment is required. The indication displays at the beginning of the last day of the time
interval. To disable the shading correction timer set the time interval to zero days. (Default:
1 Day)
• Level for Auto Gradation Adjustment
Set the preferred Auto gradation adjustment level. You can set it to apply the auto gradation
to all paper types or to a specific paper type group. (Default: Standard(Same for all paper
types))
• Method for Auto Gradation Adjustment
You can set which method you want to use for Auto gradation adjustment. Possibilities are
Automatic (using the internal sensor) or Scanner (using the glass plate). (Default:
Automatic)
• Media for Auto Gradation Adjustment
You can select the media for Auto Gradation Adjustment in the standard level. Custom
media and their locations are defined with the Auto Gradation Adjustment custom media
registration. (Default: Reference media)
• Number of sheets Auto gradation Adjustment
Number of copies of each gradation adjustment chart. Only the last copy of each gradation
adjustment chart should be measured. (Value: 1 to 5, Default:1)
• Auto gradation adjustment timer for normal media
When the auto gradation adjustment timer is enabled, the system automatically requests an
auto gradation adjustment at the beginning of the last day of the time interval. Set the time
interval to zero days to disable the auto gradation adjustment timer. (Default: 1 Day)
• Auto gradation adjustment timer for heavy media
When the auto gradation adjustment timer is enabled, the system automatically requests an
auto gradation adjustment at the beginning of the last day of the time interval. Set the time
interval to zero days to disable the auto gradation adjustment timer. (Default: 1 Day)
• Auto gradation adjustment timer for extra heavy media
When the auto gradation adjustment timer is enabled, the system automatically requests an
auto gradation adjustment at the beginning of the last day of the time interval. Set the time
interval to zero days to disable the auto gradation adjustment timer. (Default: 1 Day)
25
PRISMAsync V1.2 for imagePRESS C800 series
_____________________________________________________________________
Calibration media normal
• Calibration media normal (from media catalog)
This setting determines which media (from the media catalog) will be used for the media
independent calibration procedures for normal media. After selecting the media from the
catalogue all the attributes mentioned below are filled.
o Media name
o Media type
o Media size
o Tab
o Media width
o Media height
o Media weight
o Media color
o Punch count
o Insert
Calibration media heavy
• Calibration media heavy (from media catalog)
This setting determines which media (from the media catalog) will be used for the media
independent calibration procedures for heavy media. After selecting the media from the
catalogue all the attributes mentioned below are filled.
o Media name
o Media type
o Media size
o Tab
o Media width
o Media height
o Media weight
o Media color
o Punch count
o Insert
Calibration media extra heavy
• Calibration media extra heavy (from media catalog)
This setting determines which media (from the media catalog) will be used for the media
independent calibration procedures for extra heavy media. After selecting the media from
the catalogue all the attributes mentioned below are filled.
o Media name
o Media type
o Media size
o Tab
o Media width
o Media height
o Media weight
o Media color
o Punch count
o Insert
G7 calibration
• G7 support
26
PRISMAsync V1.2 for imagePRESS C800 series
_____________________________________________________________________
Enable this setting to support G7 calibration. When G7 media families are present in the
system, this setting will be enabled again. (Default: Disabled)
27
PRISMAsync V1.2 for imagePRESS C800 series
_____________________________________________________________________
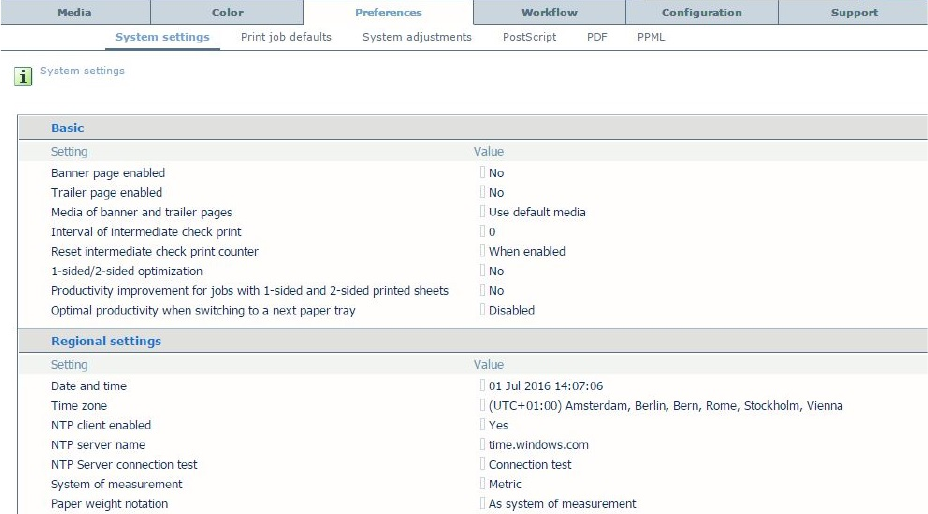
4. Preferences
4.1 System settings
Within this section you can change system related preferences.
Basic
• Banner page enabled
A banner page can separate the various jobs. Enable this setting, when you want the printer to
print a banner page before each job. Media for banner pages can be specified in the media
catalog. (Default: No)
• Trailer page enabled
A trailer page can be printed at the end of a job. A trailer page contains an overview of the
job settings. Enable this setting if you want the printer to print a trailer page at the end of
each job. Media for trailer pages are the same as for banner pages and can be specified in the
media catalog. (Default: No)
• Media of banner and trailer pages
Banner and trailer pages are printed by default on media as defined in the Settings Editor.
You can also print these pages on media as defined for the job. Then, the banner page is
printed on the media of the first job page and the trailer page on the media of the last job
page. However, if these job pages are inserts, tabs or cyclic media the default media are used
instead. (Default: Use default media)
• Interval of intermediate check print counter
Enter the number of sheets between two automatically made sample sheets; 0 for no
automatic sample sheets. (Value: 0 – 999999, Default: 0)
• Reset intermediate check print counter
If the intermediate check print is enabled, this setting specifies when the intermediate check
print counter is reset. (Value: When Enabled or Per Job, Default: When enabled)
• 1-sided/2-sided optimization
Improve productivity when jobs contain one or more 2-sided sheets combined with ranges of
1-sided sheets.(Default: No)
28
PRISMAsync V1.2 for imagePRESS C800 series
_____________________________________________________________________
• Productivity improvement of combined 1- and 2-sided jobs
This setting overrules simplex pages in a job to be printed via the duplex path in the print
engine. Especially when jobs contain single-sided and double-sided prints, performance may
be improved with this setting. If you enable this setting, all the prints are printed via the
duplex path. (Default: No)
• Optimal productivity when switching to a next paper tray
When media is loaded in more than one paper tray, you can enable improvement of
productivity during switching of trays. As a result some sheets remain in the paper tray
before the next tray is used. When you disable the setting, be aware that the system needs
time to switch. (Default: Disabled)
Regional Settings
• Date and time
Select the correct values to adjust the date and time of your system.
• Time zone
This setting allows you to select the time zone where the system is located. If you change the
time zone, the date and time of the system will be changed too.
• NTP client enabled
NTP is a protocol designed to synchronize the clocks of computers over a network. It stands
for Network Time Protocol. When NTP client is enabled it allows time synchronisation with
the specified server (Default: Yes)
• NTP client server name
A valid IP or domain for the NTP client server name (Default: time.windows.com)
• NTP Server connection test
Test if a NTP server is available on the configured server name.
• System of measurement
This setting defines how the weights and measures are displayed.
o Metric: work with g/m2 and mm (Default).
o Imperial: work with lbs. and inches.
• Paper weight notation
This setting defines which paper weight notation you want to use. The chosen system of
measurement determines the default paper weight notation. The metric system works with
g/m2. The imperial system works with lbs (Default: As system of measurement)
• Region
The setting defines the media formats that the system will use by default. Select 'Rest of the
World' to work with ISO media formats like A4. Select 'USA' to work with US media
formats like Letter. The system automatically determines the standard and custom sizes. The
system also adjusts the default media format of the default transaction printing setups, if
enabled. (Default: Rest of the World)
Printing Workflows
• Remote Manager enabled
Enable/Disable the Remote Manager
• LPD
You can select a printing workflow for LPD. Select 'Streaming' for large jobs. When the
system receives your job, the job becomes immediately available in the job queue and
RIPping starts immediately. As soon as the RIP of the first page is ready, the system starts to
print your job. Select 'Receive then print while RIP' for smaller jobs and if multiple copies of
document are required. When the system has received your job completely, the job becomes
29
PRISMAsync V1.2 for imagePRESS C800 series
_____________________________________________________________________
immediately available in the job queue. RIPping of the job starts when the system has
received your job completely. As soon as the RIP of the first page is ready, the system can
start to print your job. (Default: Receive, then print while RIP is in progress)
• Socket printing
You can select a printing workflow for socket printing. Select 'Streaming' for large jobs.
When the system receives your job, the job becomes immediately available in the job queue
and RIPping starts immediately. As soon as the RIP of the first page is ready, the system
starts to print your job. Select 'Receive then print while RIP' for smaller jobs and if multiple
copies of document are required. When the system has received your job completely, the job
becomes immediately available in the job queue. RIPping of the job starts when the system
has received your job completely. As soon as the RIP of the first page is ready, the system
can start to print your job. (Default: Streaming)
• Subset size for error recovery
If you use the printing workflow 'Streaming', a continuous flow of data is sent to the printer.
The printer divides the data flow into artificial subsets. You can use this setting to define the
maximum number of pages in a subset. In case of an error, this is the maximum number of
pages that is printed again after the error is solved. (Default: 150)
• WebDAV Hotfolder enabled
To Enable or Disable the Hotfolder functionality, go to the “Workflow” tab.
• Hotfolder user name
To edit the Hotfolder User name go to the “Workflow” tab.
• Processing order of hotfolder
Use this setting to indicate the order in which the jobs in the hotfolder are handled. You can
order the jobs based on either the arrival time in the hotfolder or alphabetical (file name).
(Default: Arrival time)
• Print from USB enabled
Enable/disable print from USB on the operator panel. (Default: Yes)
• SMB Hotfolder
To enable or disable the SMB hotfolder function go to the “Workflow” tab.
• Location RIP process
Use this setting to specify in which locations the RIP processes a job. When you select the
option that the RIP processes jobs in all locations, the RIP not only processes scheduled jobs,
but also jobs in the list of waiting jobs and in the DocBox.(Default: List of scheduled jobs)
Job management
• Job MIB enabled
The Job MIB (based on the RFC 2707) is used to monitor jobs (e.g. job status, job progress)
from a remote SNMP application. Enable Job MIB if an application requires job information
via SNMP. (Default: No)
• Original sides
This setting determines whether the copy jobs will be 1-sided or 2-sided by default. (Default:
2-sided)
• Deposit mode for copy jobs from glass plate
Copy jobs from glass plate will be deposited face-up by default. Use this setting to change the
default to face-down. (Default: Face-up)
30

PRISMAsync V1.2 for imagePRESS C800 series
_____________________________________________________________________
Printed jobs
• Printed jobs section on operator panel enabled
The 'Printed jobs' section allows you to quickly reprint a job. Enable the 'Printed jobs' section
when you want the system to move printed jobs from the 'Scheduled jobs' section to the
'Printed jobs' section when finished. You can then copy these jobs back to the 'Waiting jobs'
section. (Default: Yes)
• Keep printed jobs
Use this setting to define the period of time that the printed jobs must remain on the system.
(Default: 1 day)
Energy save modes
• Sleep mode timer enabled
This is an energy-saving mode into which the system will go when not used for a specified
amount of time. First, the system will go into the low-power mode and then into the sleep
mode. (Default: Yes)
• Sleep mode timer
When the sleep mode timers are enabled, the system automatically goes to sleep mode when
there has been no user activity during the sleep mode time interval. (Default: 1 min)
• Low power mode timer enabled
This is an energy-saving mode into which the system will go when not used for a specified
amount of time. First, the system will go into the low-power mode and then into the sleep
mode.
• Low power mode timer
When the sleep mode timers are enabled, the system automatically goes to low-power mode
when there has been no user activity during the low-power mode time interval. (Default: 0
min)
• Energy level during sleep mode
To define the energy level for the sleep mode (Default: Low)
• Energy level during low power mode
To define the energy reduction level for the low power mode (Default: -10%)
• Automatic wake-up enabled
Use this setting to indicate that the system must wake up automatically from the sleep mode
when new jobs arrive. If you disable the 'Automatic wake-up' function, you disable the
calendar 'Wake-up timers'. When this function is disabled, you must press the On/Off button
to turn on the machine. (Default: Yes)
• Wake up when new jobs arrive
Use this setting to indicate that the system must wake up automatically from the sleep mode
when new jobs arrive. (Default: Yes)
• Mode after automatic wake-up
Use this setting to indicate whether the system must go to the Sleep mode or to the Ready
mode when the 'wake-up timers' wake up the system. (Default: Ready)
• Automatic shut down enabled
Use this setting to indicate that the system must shutdown automatically when the
corresponding timer has exceeded. (Default: Yes)
Wake-up timers
• Wake-up Monday
When you want the system to be ready for use on this day, use this setting to enable the
wake-up timer. The system needs some time to wake up and warm up. (Default: No)
31
PRISMAsync V1.2 for imagePRESS C800 series
_____________________________________________________________________
• Wake-up time Monday
When the wake-up timer is enabled, you can enter the wake-up time (hours:minutes, for
example 06:30). (Default: 08:00)
• Shutdown Monday
Enable this setting to indicate that on this day the system must shut down automatically.
(Default:Yes)
• Shutdown time Monday
When the automatic shutdown function for this particular day is enabled, you must define the
shutdown time here (18:30, for example). (Default: 20:00)
• Wake-up Tuesday
When you want the system to be ready for use on this day, use this setting to enable the
wake-up timer. The system needs some time to wake up and warm up. (Default: No)
• Wake-up time Tuesday
When the wake-up timer is enabled, you can enter the wake-up time (hours:minutes, for
example 06:30). (Default: 08:00)
• Shutdown Tuesday
Enable this setting to indicate that on this day the system must shut down automatically.
(Default:Yes)
• Shutdown time Tuesday
When the automatic shutdown function for this particular day is enabled, you must define the
shutdown time here (18:30, for example). (Default: 20:00)
• Wake-up Wednesday
When you want the system to be ready for use on these days, use this setting to enable the
wake-up timer. The system needs some time to wake up and warm up. (Default: No)
• Wake-up time Wednesday
When the wake-up timer is enabled, you can enter the wake-up time (hours:minutes, for
example 06:30). (Default: 08:00)
• Shutdown Wednesday
Enable this setting to indicate that on this day the system must shut down automatically.
(Default:Yes)
• Shutdown time Wednesday
When the automatic shutdown function for this particular day is enabled, you must define the
shutdown time here (18:30, for example). (Default: 20:00)
• Wake-up Thursday
When you want the system to be ready for use on this day, use this setting to enable the
wake-up timer. The system needs some time to wake up and warm up. (Default: No)
• Wake-up time Thursday
When the wake-up timer is enabled, you can enter the wake-up time (hours:minutes, for
example 06:30). (Default: 08:00)
• Shutdown Thursday
Enable this setting to indicate that on this day the system must shut down automatically.
(Default:Yes)
• Shutdown time Thursday
When the automatic shutdown function for this particular day is enabled, you must define the
shutdown time here (18:30, for example). (Default: 20:00)
• Wake-up Friday
When you want the system to be ready for use on this day, use this setting to enable the
wake-up timer. The system needs some time to wake up and warm up. (Default: No)
32
PRISMAsync V1.2 for imagePRESS C800 series
_____________________________________________________________________
• Wake-up time Friday
When the wake-up timer is enabled, you can enter the wake-up time (hours:minutes, for
example 06:30). (Default: 08:00)
• Shutdown Friday
Enable this setting to indicate that on this day the system must shut down automatically.
(Default:Yes)
• Shutdown time Friday
When the automatic shutdown function for this particular day is enabled, you must define the
shutdown time here (18:30, for example). (Default: 20:00)
• Wake-up Saturday
When you want the system to be ready for use on these days, use this setting to enable the
wake-up timer. The system needs some time to wake up and warm up. (Default: No)
• Wake-up time Saturday
When the wake-up timer is enabled, you can enter the wake-up time (hours:minutes, for
example 06:30). (Default: 08:00)
• Shutdown Saturday
Enable this setting to indicate that on this day the system must shut down automatically.
(Default:Yes)
• Shutdown time Saturday
When the automatic shutdown function for this particular day is enabled, you must define the
shutdown time here (18:30, for example). (Default: 20:00)
• Wake-up Sunday
When you want the system to be ready for use on these days, use this setting to enable the
wake-up timer. The system needs some time to wake up and warm up. (Default: No)
• Wake-up time Sunday
When the wake-up timer is enabled, you can enter the wake-up time (hours:minutes, for
example 06:30). (Default: 08:00)
• Shutdown Sunday
Enable this setting to indicate that on this day the system must shut down automatically.
(Default:Yes)
• Shutdown time Sunday
When the automatic shutdown function for this particular day is enabled, you must define the
shutdown time here (18:30, for example). (Default: 20:00)
Accessibility
• Mouse usage
This setting enables you to use the local user interface in combination with a mouse
(optional). (Default: Disabled)
• Delay time for control panel buttons
The delay value indicates how long you can press a hardkey on the operator panel before the
key is repeated. You can set a value between 0.05 and 2 seconds. The value entered is in
milliseconds. (Default: 50)
• Beep sound
Use this setting if you want a beeping sound when you toggle (Default: Disabled)
Print quality settings
• Edge enhancement for text
Enhance edges of printed text. (Default: None)
33
PRISMAsync V1.2 for imagePRESS C800 series
_____________________________________________________________________
• Edge enhancement for graphics
Enhance edges of graphics. (Default: None)
• Print sharpness
Adjust sharpness of printed objects.(Default: Normal)
• Image compression optimization
Determines the amount of compression (Default: Optimize for productivity)
• Raster normal
Use this setting to link the PRISMAsync normal raster to the halftone screens that are used
by the print engine. After changing this setting, the complete calibration procedure (shading
correction, auto gradation adjustment, and media family calibration) must be performed. Be
aware to use the matching output profiles in the media family. Options: 140 dot/170 line/170
dot /190 dot/210 dot/230 dot (Default: 170 dot)
• Raster fine
Use this setting to link the PRISMAsync fine raster to the halftone screens that are used by
the print engine. After changing this setting, the complete calibration procedure (shading
correction, auto gradation adjustment, and media family calibration) must be performed. Be
aware to use the matching output profiles in the media family. Options: 140 dot/170 line/170
dot/ 190 dot/210 dot/230 dot (Default: 230 dot)
• Stroke width adjustment
With this setting you enable the thickening of characters and lines in two directions. In
addition, you can set a condition depending on used print job resolution (Default: Disabled)
• Width adjustment in horizontal direction
When the stroke width adjustment is enabled, you can tune the width of characters and lines
in a horizontal direction. The horizontal direction reflects elements parallel to the feed
direction in the print system. Adjustment level 2 has the strongest effect on the stroke width.
(Default: Adjustment level 1)
• Width adjustment in vertical direction
When the stroke width adjustment is enabled, you can tune the printed characters and lines in
a vertical direction. The vertical direction reflects elements perpendicular to the feed
direction in the print system. Adjustment level 2 has the strongest effect on the stroke width.
(Default: Adjustment level 1)
• Condition for stroke width adjustment
When the stroke width adjustment is enabled, you can set a condition for the adjustment
depending on the used print job resolution. (Default: Only adjustment for 1200 dpi print jobs)
34
PRISMAsync V1.2 for imagePRESS C800 series
_____________________________________________________________________
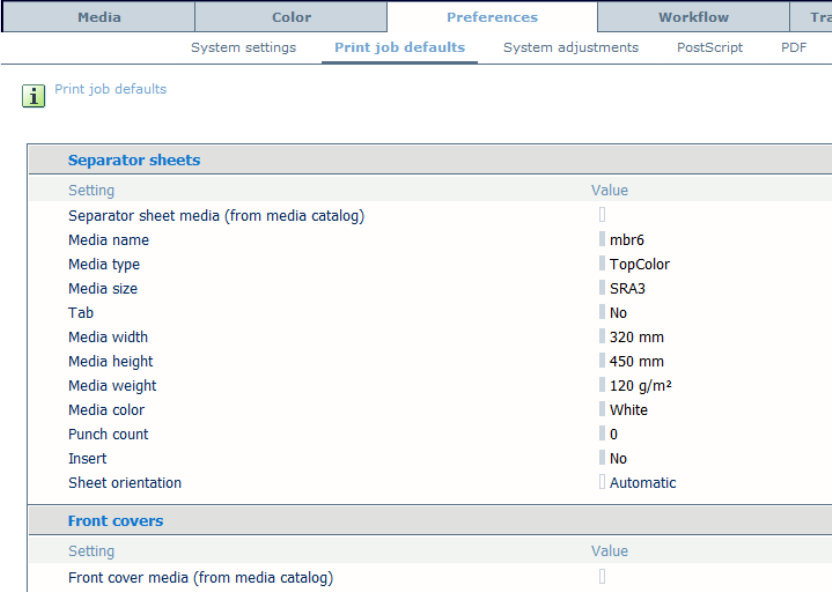
4.2 Print job defaults
Within this section you can change settings for special media like covers and separator sheets.
Separator sheets
• Separator sheet media (from media catalog)
This setting determines which media (from the media catalog) will be used for separator
sheets. You can indicate the use of separator sheets on the operator panel. After selecting the
media from the catalogue all the attributes mentioned below are filled.
o Media name
o Media type
o Media size
o Tab
o Media width
o Media height
o Media weight
o Media color
o Punch count
o Insert
o Sheet orientation
Front Covers
• Front cover media (from media catalog)
This setting determines which media (from the media catalog) will be used for front covers.
You can indicate the use of front covers on the operator panel. After selecting the media from
the catalogue all the attributes mentioned below are filled.
35
PRISMAsync V1.2 for imagePRESS C800 series
_____________________________________________________________________
o Media name
o Media type
o Media size
o Tab
o Media width
o Media height
o Media weight
o Media color
o Punch count
o Insert
Back Covers
• Back cover media (from media catalog)
This setting determines which media (from the media catalog) will be used for back covers.
You can indicate the use of back covers on the operator panel. After selecting the media from
the catalogue all the attributes mentioned below are filled.
o Media name
o Media type
o Media size
o Tab
o Media width
o Media height
o Media weight
o Media color
o Punch count
o Insert
Banner & trailers & print ticket
• Banner & trailer & print ticket sheet media (from media catalog)
This setting determines which media (from the media catalog) will be used for banner sheets
and/or trailer sheets and/or print ticket. You can activate the use of banner sheets or trailer
sheets in the Settings Editor.
After selecting the media from the catalogue all the attributes mentioned below are filled.
o Media name
o Media type
o Media size
o Tab
o Media width
o Media height
o Media weight
o Media color
o Punch count
o Insert
• External finisher
This read-only setting shows whether the external finisher is present (detected) or not.
• Error recovery method
This settings indicates how the external finisher must continue when an error has been
36
PRISMAsync V1.2 for imagePRESS C800 series
_____________________________________________________________________
solved. When you select 'By set', the last set is printed again. 'By page' means that the
recovery starts at the page after the last known correctly delivered sheet. (Default: By set)
• Preferred feed edge
The feed edge is the direction in which the printed documents are delivered to the external
finisher. You can only select the feed edge for A4-like or Letter-like media. The feed edge
for large media, A3 and Ledger for example, is always short-edge feed (SEF). (Default:
Long-edge feed (LEF)
• Face orientation
This setting indicates whether the front side of the printed documents points up or down.
When you select 'Face down', the front side of the sheet points down. 'Face up' means that
the front side of the sheet points up. (Default: Face down).
• Header orientation
This setting indicates whether the header of the printed documents points toward the back
or toward the front of the printer. When you select 'Header up', the header points toward the
back of the printer. 'Header down' means that the header points toward the front of the
printer. (Default: Header-up)
• Preferred sheet order
This setting allows you to determine the delivery order of the sheets to the finisher. When
you select 'First sheet first', for each delivered set, the first sheet is delivered to the finisher
first. 'Last sheet first' means that the last sheet of each delivered set is delivered first.
(Default: First sheet first)
• Name
You can assign a name to an external finisher. This can help you to easily identify this
output location among the other output locations.
• Finisher type
When an external finisher is connected to your printer. This settings shows the type of the
external output device. When you want to change this setting call service.
Stacker
• Stacker
This read-only setting shows whether the stacker is present (detected) or not.
• Top tray – preferred feed edge
The feed edge is the direction in which the printed documents are delivered to the top tray
of the stacker. You can only select the feed edge for A4-like or Letter-like media. The feed
edge for large media, A3 and Ledger for example, is always short-edge feed (SEF).
(Default: Long-edge feed)
• Top tray – Face orientation
This setting indicates whether the front side of the printed documents points up or down.
When you select 'Face down', the front side of the sheet points down. 'Face up' means that
the front side of the sheet points up. (Default: Face down)
• Top tray – Header orientation
This setting indicates whether the header of the printed documents points toward the back
or toward the front of the printer. When you select 'Header up', the header points toward the
back of the printer. 'Header down' means that the header points toward the front of the
printer. (Default: Header-up)
• Top tray – Preferred sheet order
This setting allows you to determine the delivery order of the sheets to the finisher. When
you select 'First sheet first', for each delivered set, the first sheet is delivered to the finisher
37
PRISMAsync V1.2 for imagePRESS C800 series
_____________________________________________________________________
first. 'Last sheet first' means that the last sheet of each delivered set is delivered first.
(Default: First sheet first)
• Stack tray – preferred feed edge
The feed edge is the direction in which the printed documents are delivered to the stack tray
of the stacker. You can only select the feed edge for A4-like or Letter-like media. The feed
edge for large media, A3 and Ledger for example, is always short-edge feed (SEF). In case
the stacker has a left and right stacktray, the setting only holds for the right tray. (Default:
Long-edge feed)
• Stack tray – Face orientation
This setting indicates whether the front side of the printed documents points up or down.
When you select 'Face down', the front side of the sheet points down. 'Face up' means that
the front side of the sheet points up. (Default: Face down)
• Stack tray – Header orientation
This setting indicates whether the header of the printed documents points toward the back
or toward the front of the printer. When you select 'Header up', the header points toward the
back of the printer. 'Header down' means that the header points toward the front of the
printer. (Default: Header-up)
• Stack tray –Preferred sheet order
This setting allows you to determine the delivery order of the sheets to the finisher. When
you select 'First sheet first', for each delivered set, the first sheet is delivered to the finisher
first. 'Last sheet first' means that the last sheet of each delivered set is delivered first.
(Default: First sheet first)
38
PRISMAsync V1.2 for imagePRESS C800 series
_____________________________________________________________________
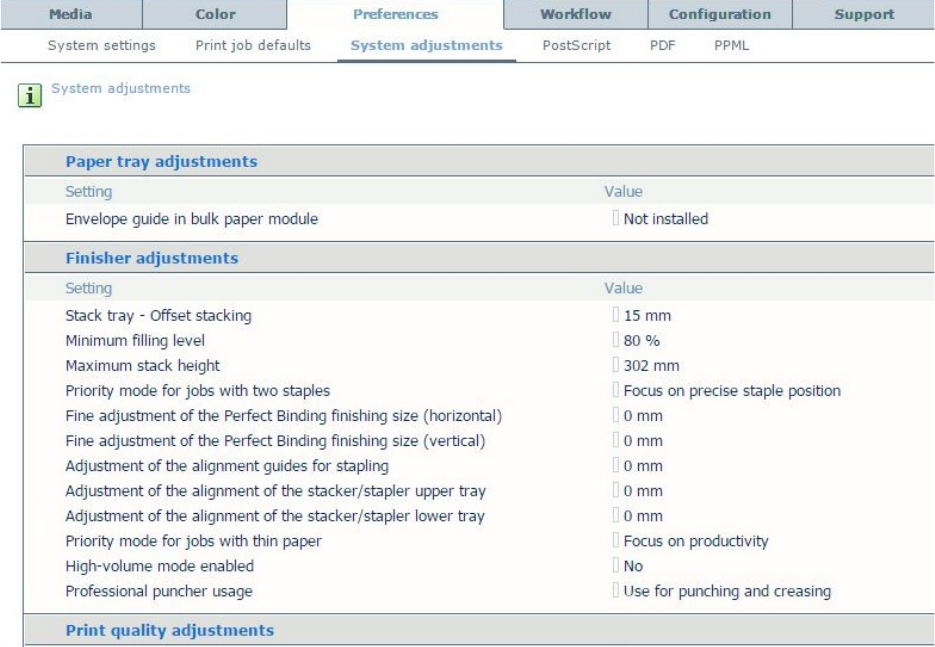
4.3 System adjustments
In the “System adjustments” section you can make engine specific settings.
Paper tray adjustments
• Envelope guide in bulk paper mode
Enable this setting after the installation of an envelope guide in the bulk paper module. An
installed envelope guide ensures optimally feeding of envelopes. Open and close the paper
tray once to effect this setting.
Finisher adjustments
• Stack tray - Offset stacking
This setting defines the offset for sets in the stack tray. When offset stacking is 0, the offset
functionality is disabled. Then all sheets are deposited in the middle of the stack tray. (Value:
0mm to 15 mm, Step 0.1mm, Default: 15mm)
• Minimum filling level
You can define a minimum filling level for all the stackers that are connected to your printer.
This filling level is only used when the workflow setting 'Next output tray' is set to 'When
tray is full' on the operator panel. The first job-end above this level forces a stack eject or
output location change. The last set-end above this level also forces a stack eject/output
location change when the next copy set does not fit anymore. (Value: 1% to 100%, Step 1%,
Default: 80%)
• Maximum stack height
When the stack has reached the specified height, the stacker will eject the stack. Note that
when you set the value close to the maximum value, there is an increasing risk that sets will
39

PRISMAsync V1.2 for imagePRESS C800 series
_____________________________________________________________________
become split when the tray is almost full. (Value: 10mm to 355 mm, Step 1mm, Default:
302mm)
• Adjust tri-fold in position
When tri-fold in folded sheets are not folded as desired, the fold position can be adjusted.
(Value: -7mm to 5 mm, Step 0.5mm, Default: 0mm)
• Adjust Z-fold position
When the back flap of Z-folded sheets does not have the correct size, the fold position can be
adjusted. (Value: -2mm to 1.5 mm, Step 0.5mm, Default: 0mm)
• Adjust tri-fold out fold position
When tri-fold out folded sheets are not folded as desired, the fold position can be adjusted.
(Value: -7mm to 5 mm, Step 0.5mm, Default: 0mm)
• Adjust half fold position
When half-folded sheets are not folded as desired, the fold position can be adjusted. (Value: -
2mm to 2 mm, Step 0.5mm, Default: 0mm)
• Adjust double parallel fold position: front flap
When double parallel folded sheets are not folded as desired, the fold position can be
adjusted. (Value: -2mm to 5 mm, Step 0.5mm, Default: 0mm)
• Adjust double parallel fold position: back
When double parallel folded sheets are not folded as desired, the fold position can be
adjusted. (Value: 0mm to 5 mm, Step 0.5mm, Default: 0mm)
• Double staple space adjustment
The space between the two staples when using double staples. (Value: 120mm to 150 mm,
Step 1mm, Default: 120mm)
• Priority mode for jobs with two staples
Double-stapled jobs printed on specific media (weight 64 – 128 g/m2 and maximum
dimension in feed direction 215 mm) can have an impact on your productivity requirements.
With this setting you give priority to either productivity or to the precise location of staples in
the output while printing such jobs.
(Default: Focus on precise staple position)
• Fine adjust perfect binding finishing size (horizontal)
• Fine adjust perfect binding finishing size (vertical)
• Adjustment of the alignment guides for stapling
This setting adjusts the alignment guides for stapling. Increase the value to set the alignment
guide closer to the media. If the alignment guide is too close to the media a paper jam or a
paper crease can occur.(Default: 0mm)
• Adjustment of the alignment of the stacker stapler/stapler upper tray
• Adjustment of the alignment of the stacker stapler/stapler upper tray
• Priority mode for jobs with thin paper
Jobs printed on thin paper (52 – 79 g/m2) can have an impact on your productivity
requirements. With this setting you give priority to either productivity or to the sheet
alignment in the output while printing such jobs. (Default: Focus on produictivity)
• High volume mode enabled
Enable this setting to link the output trays of the stacker/stapler and create an output capacity
of up to 5,000 sheets. The mode is not active when the trimmer is present. (Default: No)
• Professional puncher usage
Use this setting to indicate which function of the puncher you want to allow. Then, the printer
driver and the control panel show the related settings. There are two types of dies: crease dies
and punch dies. Only one die can be installed. If the puncher is used for both punching and
40
PRISMAsync V1.2 for imagePRESS C800 series
_____________________________________________________________________
creasing, a message appears when a job needs a die that is not placed. (Default: Use for
punching and creasing)
Print quality adjustments
• Fixing belt auto refresh level
The fixing belt is refreshed automatically after a certain number of sheets was printed. You
can adjust the frequency and the time used for each refreshing. See the Service Manual for
the exact meaning of the levels. (Default: 0)
• Color cast correction: Cyan
You can remove the cyan color cast that occurs on a white background during printing or
copying. Make sure to perform a calibration after changing the settings. (Default: 0)
• Color cast correction: Magenta
You can remove the magenta color cast that occurs on a white background during printing or
copying. Make sure to perform a calibration after changing the settings. (Default: 0)
• Color cast correction: Yellow
You can remove the yellow color cast that occurs on a white background during printing or
copying. Make sure to perform a calibration after changing the settings. (Default: 0)
• Color cast correction: Black
You can remove the black color cast that occurs on a white background during printing or
copying. Make sure to perform a calibration after changing the settings. (Default: 0)
• Tail end color fading / graininess correction
This feature improves the output quality of halftone images when color fading occurs at the
tail end of the output paper. This feature can also be used to eliminate the tiny white grainy
dots that appear on the output paper when copying or printing halftone images. Make sure to
perform a calibration after changing the settings. (Default: Off)
• White gap correction
If an area of intense colors is copied or printed immediately after a halftone area, a white gap
may occur between the images on the paper. You can use this feature to eliminate the white
gap between two areas. Make sure to perform auto gradation adjustment after changing the
settings. Value 1 and 2: Select when you want to eliminate the white gap Value 3: Select
when you want to return to the original image (default). (Default: 3)
• Low temperature environment mode
When printing on heavy paper under low temperature conditions, toners may not be properly
applied on areas of high density images on the first 10 or so sheets of paper. You can solve
this problem by slowing down the print speed for a specific period of time. On: The print
speed of the machine slows down for a set period of time. (Default: Off)
• Uneven gloss correction
If the temperature of the fixing unit rises excessively, uneven gloss may occur. Decrease the
value to reduce the uneven gloss. Possible values from -3 to 0. (Default: 0)
• Adjust drum temperature
In a high-temperature or high-humidity environment, partial distortions, or thin white lines
may appear on printed images. You can prevent this problem by adjusting the
photoconductor drum temperature. (Default: Standard)
• Special smoothing
(Default: Off)
• Productivity or quality priority for heavy media
(Default: Off)
• Coated paper productivity / Gloss quality priority
(Default: Normal)
41
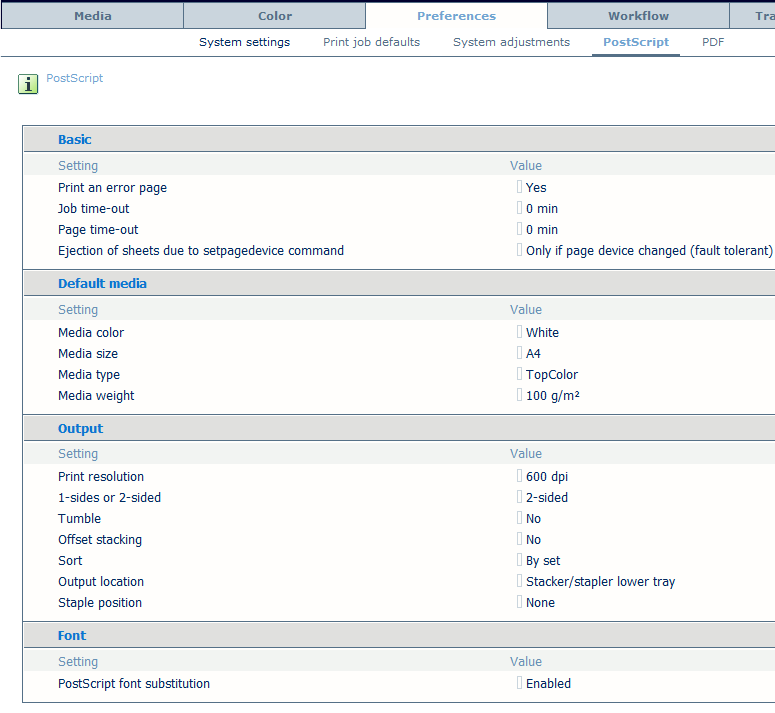
PRISMAsync V1.2 for imagePRESS C800 series
_____________________________________________________________________
• Prod/Image quality priority for mixed paper types
(Default: Productivity priority standard)
• Gradation adjustment during printing
This setting indicates after how many printed sheets the density adjustment is performed. The
system performs the density adjustment to maintain the stability of the image quality. If you
increase the frequency the image quality is more stable but the print speed decreases.
(Default: After 80 pages)
Scan quality adjustments
• Streak prevention
You can set whether or not to detect and prevent streaks when scanning documents. When
"On" is selected, extremely thin lines may be detected as streaks. (Default: On)
4.4 Postscript
In the “Postscript” section you can enter settings for PostScript files. These settings are applied
to the job if they are not defined in the file or job ticket.
Basic
• Job time-out
When the system processes a job, the system keeps track of the processing time. When the
processing time of a job expires, a job time-out counter can start to run. When the job time-
42
PRISMAsync V1.2 for imagePRESS C800 series
_____________________________________________________________________
out expires, the printer prints an error page. Enter a value for the job time-out. Make sure that
the setting 'Error page' is enabled.
(Default: 0 min)
• Page time-out
When the system processes a page, the system keeps track of the processing time. When the
processing time of this page expires, a page time-out counter can start to run. When the page
time-out expires, the printer prints an error page. Enter a value for the page time-out. Make
sure that the setting 'Error page' is enabled. (Default: 0 min)
• Ejection of sheets due to setpagedevice command
In older PostScript applications the setpagedevice command is not always used strictly
according to the PostScript definition. This may lead to unwanted sheet ejects. By default, the
system tolerates this. However, the system can be made to interpret it strictly. (Default: Only
if page device changed (fault tolerant))
Default Media
• Media color
Use this setting to define the color of your default media. When you enter a color name in
English, the operator panel shows the icon for that media type in the indicated color. When
you enter a color name in a different language, you can enter the RGB values for that color in
the media catalogue. The operator panel will display the icon for that media type in the
indicated color. (Default: White)
• Media size
You can overrule this in the printer driver or in an application. (Default: A3)
• Media type
Specify the 'Media type' that the printer must use by default. You can overrule this setting on
the operator panel, in the printer driver or in an application. (Default: TopColor)
• Media weight
Specify the 'Media weight’ that the printer must use by default. You can overrule this setting
on the operator panel, in the printer driver or in an application. (Default: 100 g/m²)
Output
• 1-sides or 2-sided
Select whether the printer must print the jobs '1-sided' or '2-sided' by default. You can
overrule this setting on the operator panel, in the printer driver or in an application. (Default:
2-sided)
• Tumble
'Tumble' specifies the orientation of page images on opposite sides of a sheet. This is only
possible when the setting '1-sided or 2-sided' is set to '2-sided'. When you set 'Tumble' to
'Yes', the 2 pages are oriented in such a way that the binding edge is at the top or bottom. The
image is rotated 180 degrees on alternate pages. If you set 'Tumble' to 'No', the binding is at
the left or right. The images are not rotated on alternate pages. (Default: No)
• Offset stacking
You can indicate that all sets of a print job must go into the selected output location in one
straight stack or with a small shift between the sets. The small shift is called offset stacking.
For the PostScript® interpreter, offset stacking is by factory default disabled. You can
overrule this setting on the operator panel, in the printer driver or in an application. (Default:
No)
43
PRISMAsync V1.2 for imagePRESS C800 series
_____________________________________________________________________
• Sort
You can define how a print job is delivered to the output location. If 'Sort' is 'By set', all print
jobs go to the output location by set. For example, when you have a document that contains 3
pages and you need 4 copies, the page order is 123, 123, 123. When you set 'Sort' to 'By
page', the output is sorted by page in the order 111, 222, 333. (Default: By set)
• Staple position
You can specify the number of staples and the position of the staples. The position of the
staples depends on the orientation of the page. However, you can overrule this setting on the
operator panel, in the printer driver or application. (Default: None)
• Print resolution
Use this setting to indicate the print resolution. This setting will only be effective for new
jobs, not for jobs already present on the system (Default: 600dpi)
• Output location
You can define the default output location for your job. The defined output location is used
when the print job does not specify the output location. The output locations you can select
depend on your system's configuration. You can always overrule the indicated value on the
operator panel, in the printer driver or application. (Default: Stacker/stapler lower tray)
Font
• PostScript font substitution
When enabled, Courier will replace any missing font. When disabled, if a missing font is
requested, the print job is interrupted and an error page is printed that informs you that a font
is missing. Make sure that the 'Error page' is enabled. (Default: Enabled)
44
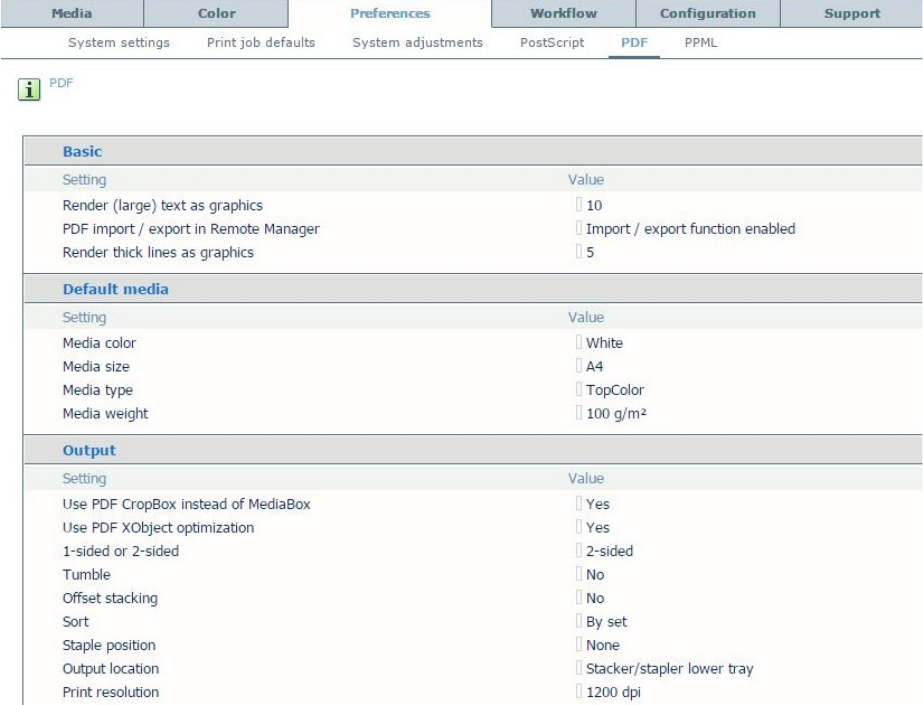
PRISMAsync V1.2 for imagePRESS C800 series
_____________________________________________________________________
4.5 PDF
In the “PDF” section you can enter settings for PDF files. These settings are applied to the job if
they are not defined in the file or job ticket.
Basic
• Render (large) text as graphics
This option improves the quality of large text. This option keeps the benefits of using the
text halftone screen for small text. Adjust the threshold value to optimize the quality for the
fonts used in your print jobs. The value sets a threshold for font size in points. For fonts
larger or equal to the threshold value the same halftone screen for text and graphics/images
is used. To disable this option set the threshold value to zero. (Default: 10)
• PDF import/export in Remote Manager
This setting enables the export and import of PDF files in Remote Manager. This allows
users of Remote Manager to preflight, inspect and edit PDF files with a PDF editor
application. (Default: Import / export function enabled)
• Render thick lines as graphics
With this setting, you can optimize the printing of thick lines, while keeping the halftone for
thin lines. The threshold value in points determines for which line thickness the halftone for
graphics will be applied. When the value is zero, the function is disabled.(Default: 5)
Default media
45
PRISMAsync V1.2 for imagePRESS C800 series
_____________________________________________________________________
• Media color
Use this setting to define the color of your default media. When you enter a color name in
English, the operator panel shows the icon for that media type in the indicated color. When
you enter a color name in a different language, you can enter the RGB values for that color
in the media catalogue. The operator panel will display the icon for that media type in the
indicated color. (Default: White)
• Media size
You can overrule this in the printer driver or in an application. (Default: A3)
• Media type
Specify the 'Media type' that the printer must use by default. You can overrule this setting
on the operator panel, in the printer driver or in an application. (Default: TopColor)
• Media weight
Specify the 'Media weight', that the printer must use by default. You can overrule this
setting on the operator panel, in the printer driver or in an application. (Default: 100 g/m²)
Output
• Use PDF CropBox instead of MediaBox
You can select to use the PDF CropBox or the MediaBox. The PDF MediaBox found in a
job defines the size of the media used for printing. (Default: Yes)
• Use PDF XObject optimization
Re-interpret XObject per page, or cache XObjects per document. (Default: No)
• 1-sides or 2-sided
Select whether the printer must print the jobs '1-sided' or '2-sided' by default. You can
overrule this setting on the operator panel, in the printer driver or in an application.
(Default: 2-sided)
• Tumble
'Tumble' specifies the orientation of page images on opposite sides of a sheet. This is only
possible when the setting '1-sided or 2-sided' is set to '2-sided'. When you set 'Tumble' to
'Yes', the 2 pages are oriented in such a way that the binding edge is at the top or bottom.
The image is rotated 180 degrees on alternate pages. If you set 'Tumble' to 'No', the binding
is at the left or right. The images are not rotated on alternate pages. (Default: No)
• Offset stacking
You can indicate that all sets of a print job must go into the selected output location in one
straight stack or with a small shift between the sets. The small shift is called offset stacking.
For the PostScript® interpreter, offset stacking is by factory default disabled. You can
overrule this setting on the operator panel, in the printer driver or in an application.
(Default: No)
• Sort
You can define how a print job is delivered to the output location. If 'Sort' is 'By set', all
print jobs go to the output location by set. For example, when you have a document that
contains 3 pages and you need 4 copies, the page order is 123, 123, 123. When you set
'Sort' to 'By page', the output is sorted by page in the order 111, 222, 333. (Default: By set)
• Output location
You can define the default output location for your job. The defined output location is used
when the print job does not specify the output location. The output locations you can select
depend on your system's configuration. You can always overrule the indicated value on the
operator panel, in the printer driver or application. (Default: Stacker/stapler lower tray)
• Staple position
You can specify the number of staples and the position of the staples. The position of the
46
PRISMAsync V1.2 for imagePRESS C800 series
_____________________________________________________________________
staples depends on the orientation of the page. However, you can overrule this setting on
the operator panel, in the printer driver or application. (Default: None)
• Print resolution
Use this setting to indicate the print resolution. This setting will only be effective for new
jobs, not for jobs already present on the system. (Default: 1200dpi)
Font
• PDF font substitution
When enabled, Courier will replace any missing font. When disabled, if a missing font is
requested, the print job is interrupted and an error page is printed that informs you that a
font is missing. Make sure that the 'Error page' is enabled. (Default: Enabled)
• Convert PDF TrueType fonts as Type42
When this setting is enabled (default), single-byte TrueType fonts embedded in PDF files
are converted into Type42 PostScript fonts. A conversion to Type42 fonts provides the best
print quality. When you disable this setting, faulty TrueType font hinting in some fonts
(Monotype BookAntiqua-BoldItalic, for example) can be solved. (Default: Enabled)
• Convert PDF TrueType fonts as CID font Type2
When this setting is disabled (default), double-byte TrueType fonts embedded in PDF files
are converted into CID Type0 fonts. A conversion to CID Type0 fonts provides the best
print quality. When you enable this setting, faulty TrueType font hinting in some fonts can
be solved. When this setting is enabled, double-byte TrueType fonts embedded in PDF files
are converted into CID Type2 PostScript fonts. (Default: Disabled)
• Include PDF fonts and resources on every page
When this setting is disabled (default) and jobs are converted from PDF to PostScript, all
fonts and resources are sent at the beginning of the job. When this setting is enabled and
pages are converted from PDF to PostScript, all fonts and resources are sent at the
beginning of each page. When you enable this setting, performance issues with PDF data
that repeatedly duplicate the same font on each page instead of using the same font for all
pages are solved. (Default: Disabled)
47
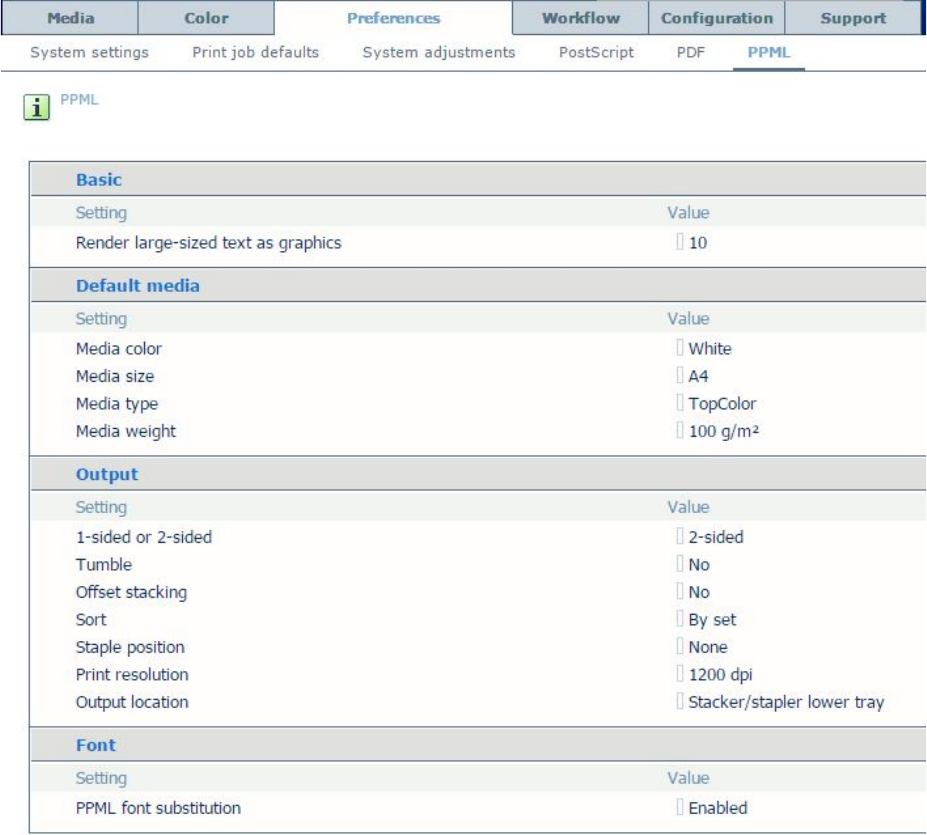
PRISMAsync V1.2 for imagePRESS C800 series
_____________________________________________________________________
4.6 PPML
In the “PPML” section you can enter settings for PPML files. These settings are applied to the
job if they are not defined in the file or job ticket.
Basic
• Render (large) text as graphics
This option improves the quality of large text. This option keeps the benefits of using the
text halftone screen for small text. Adjust the threshold value to optimize the quality for the
fonts used in your print jobs. The value sets a threshold for font size in points. For fonts
larger or equal to the threshold value the same halftone screen for text and graphics/images
is used. To disable this option set the threshold value to zero. (Default: 10)
Default media
• Media color
Use this setting to define the color of your default media. When you enter a color name in
English, the operator panel shows the icon for that media type in the indicated color. When
you enter a color name in a different language, you can enter the RGB values for that color
in the media catalogue. The operator panel will display the icon for that media type in the
indicated color. (Default: White)
48
PRISMAsync V1.2 for imagePRESS C800 series
_____________________________________________________________________
• Media size
You can overrule this in the printer driver or in an application. (Default: A3)
• Media type
Specify the 'Media type' that the printer must use by default. You can overrule this setting
on the operator panel, in the printer driver or in an application. (Default: TopColor)
• Media weight
Specify the 'Media weight' that the printer must use by default. You can overrule this
setting on the operator panel, in the printer driver or in an application. (Default: 100 g/m²)
Output
• 1-sides or 2-sided
Select whether the printer must print the jobs '1-sided' or '2-sided' by default. You can
overrule this setting on the operator panel, in the printer driver or in an application.
(Default: 2-sided)
• Tumble
'Tumble' specifies the orientation of page images on opposite sides of a sheet. This is only
possible when the setting '1-sided or 2-sided' is set to '2-sided'. When you set 'Tumble' to
'Yes', the 2 pages are oriented in such a way that the binding edge is at the top or bottom.
The image is rotated 180 degrees on alternate pages. If you set 'Tumble' to 'No', the binding
is at the left or right. The images are not rotated on alternate pages. (Default: No)
• Offset stacking
You can indicate that all sets of a print job must go into the selected output location in one
straight stack or with a small shift between the sets. The small shift is called offset stacking.
Offset stacking is by factory default disabled. You can overrule this setting on the operator
panel, in the printer driver or in an application. (Default: No)
• Sort
You can define how a print job is delivered to the output location. If 'Sort' is 'By set', all
print jobs go to the output location by set. For example, when you have a document that
contains 3 pages and you need 4 copies, the page order is 123, 123, 123. When you set
'Sort' to 'By page', the output is sorted by page in the order 111, 222, 333. (Default: By set)
• Output location
You can define the default output location for your job. The defined output location is used
when the print job does not specify the output location. The output locations you can select
depend on your system's configuration. You can always overrule the indicated value on the
operator panel, in the printer driver or application. (Default: Stacker/stapler lower tray)
• Staple position
You can specify the number of staples and the position of the staples. The position of the
staples depends on the orientation of the page. However, you can overrule this setting on
the operator panel, in the printer driver or application. (Default: None)
• Print resolution
Use this setting to indicate the print resolution. This setting will only be effective for new
jobs, not for jobs already present on the system. (Default: 1200dpi)
Font
• PPML font substitution
When enabled, Courier will replace any missing font. When disabled, if a missing font is
requested, the print job is interrupted and an error page is printed that informs you that a
font is missing. Make sure that the 'Error page' is enabled. (Default: Enabled)
49
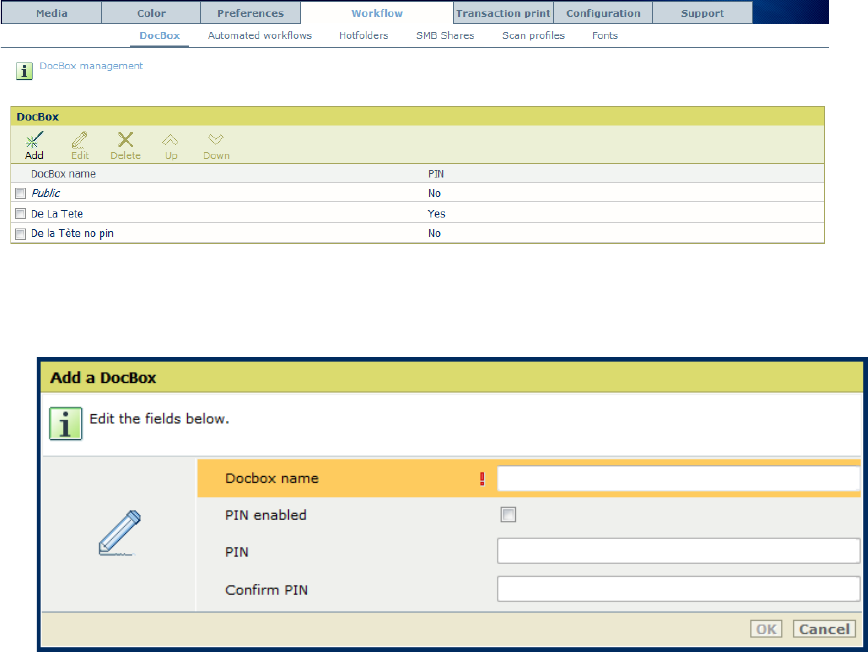
PRISMAsync V1.2 for imagePRESS C800 series
_____________________________________________________________________
5. Workflow
In the “Workflow” section settings can be made regarding the workflow and document streams
in PRISMAsync.
5.1 DocBox
DocBox is short for Document Box. The DocBox function, which is available through the
operator panel, creates a buffer between the preparation of a job, for example page
programming, and the printing of the job. The DocBox supports the operator by offering
comprehensive means to store, group, edit and reprint documents. These editing options are a
subset of the PRISMAprepare job preparation software.A DocBox can contain the following
jobs:
• Print jobs
• Scan jobs
You can use a DocBox:
• To carry out advanced job preparation actions.
• To correct settings when the proof print is not correct, for example change the print quality
or layout of a document.
• To combine analogue documents with digital documents.
• To store jobs that must be reprinted regularly, for examples reports or books.
• Add
You need the System Administrator password to add a DocBox
o Docbox name
Enter the name of the Docbox
50
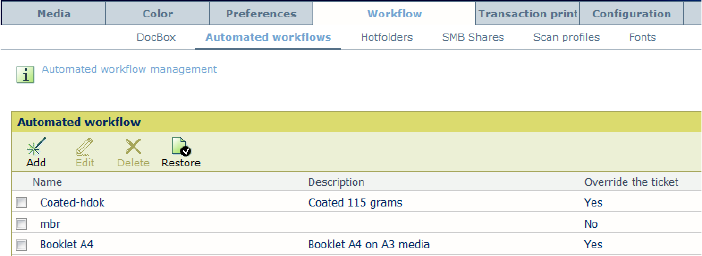
PRISMAsync V1.2 for imagePRESS C800 series
_____________________________________________________________________
o PIN enabled
You can decide to secure the Docbox with a PIN. To do so, check this field (Default:
Not checked)
o PIN
Enter the PIN. This must be a numerical value.
o Confirm PIN
Enter the PIN again
• Edit
Change the Docbox settings (name, PIN)
• Delete
Delete the Docbox
• Up
Move the selected Docbox up one position
• Down
Move the selected Docbox down one position
5.2 Automated workflows
An automated Workflow is a way of applying defined attributes to different jobs. You enter the
job settings in the workflow. This workflow is now accessible in 3 ways:
• By defining a printer that prints to an lpr-queue with the name of the workflow.
• Via a Hotfolder
• By entering the name of the Automated Workflow in the label field, in the Workflow section
of the driver.
• Add
You can add an automated workflow. A window opens to enter the job settings. Check the
“Overrule the job ticket” setting to make sure that other settings are ignored and only settings
of this workflow are used.
51
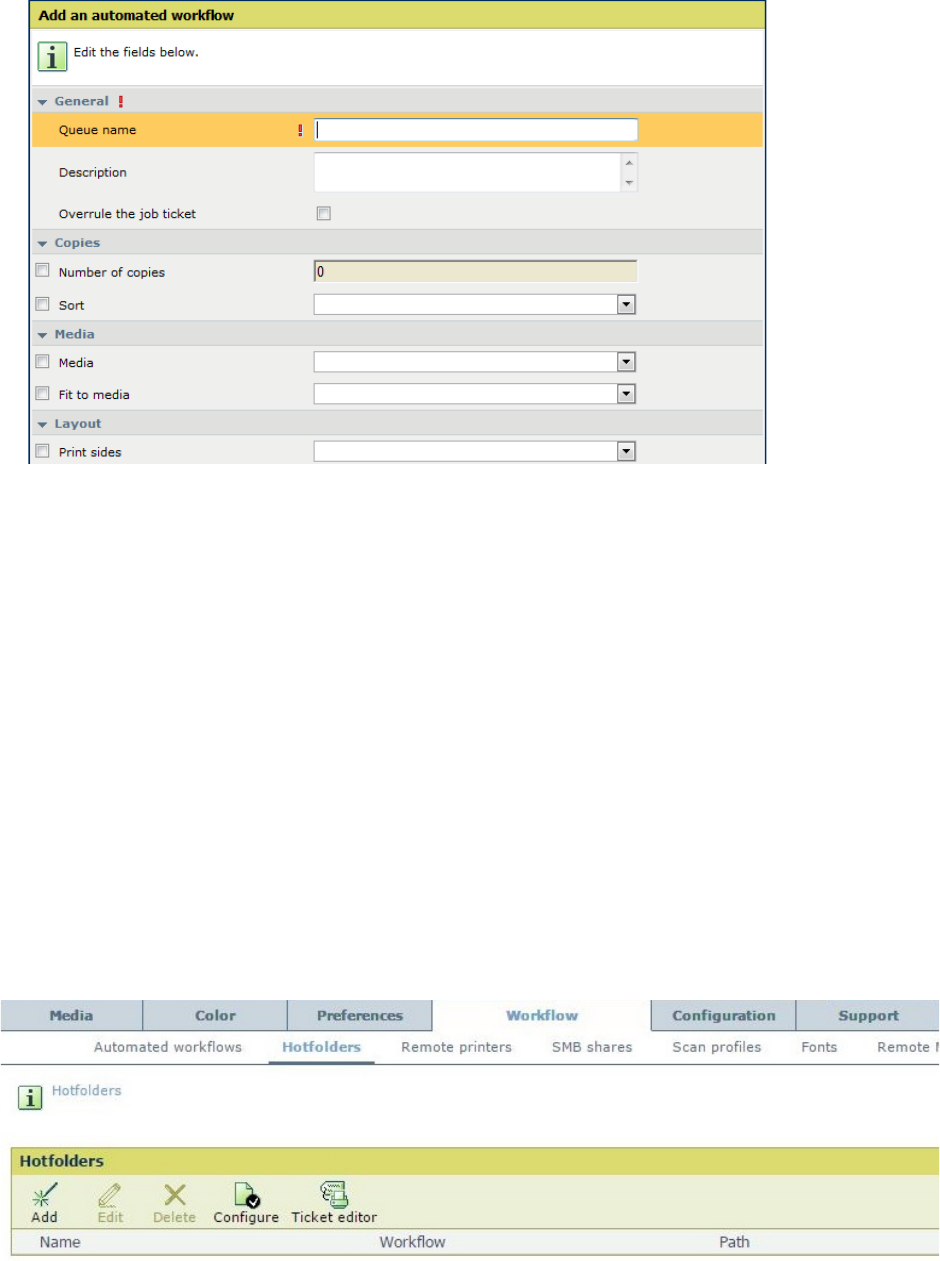
PRISMAsync V1.2 for imagePRESS C800 series
_____________________________________________________________________
• Edit
Change the settings of the selected automated workflow.
• Delete
Remove the selected automated workflow.
• Restore
Restore the factory installed default workflow.
5.3 Hotfolders
Technically, a hotfolder is a mapped network drive on a workstation that is linked to a shared
folder on the PRISMAsync controller.
For an operator, a hotfolder is a folder on a workstation where printable files can be dropped for
printing.
Hotfolders are primarily aimed at recurring PDF workflows. In these workflows, PDFs or other
printable files, with identical settings, are printed on a regular basis. The hotfolder functionality
should be enabled first and configured before you can use it.
• Add
Use this button to add a new hotfolder. You have to enter a name of the hotfolder and the
52
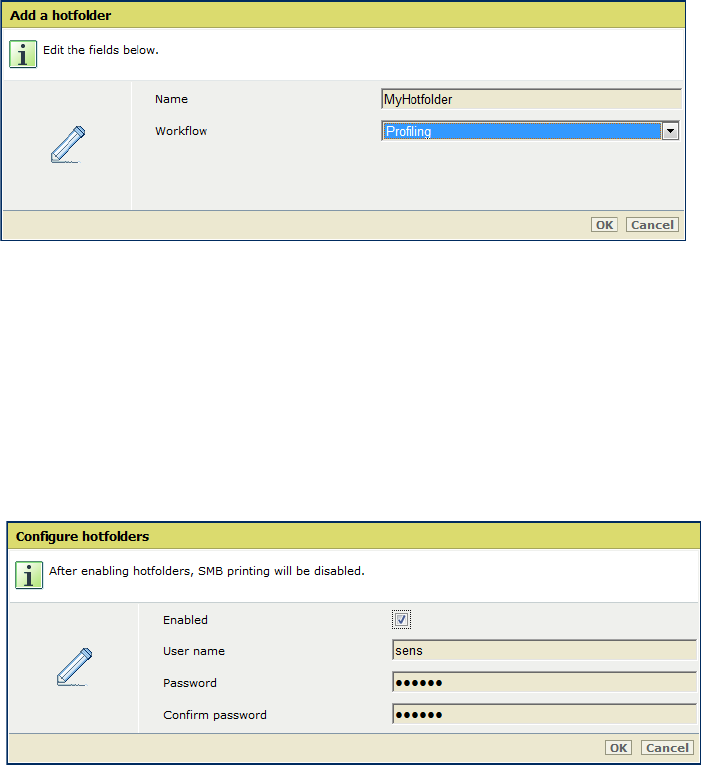
PRISMAsync V1.2 for imagePRESS C800 series
_____________________________________________________________________
automated workflow to which you want to connect it.
• Edit
Change the name of the hotfolder or the connected automated workflow.
• Delete
Remove the selected automated workflow.
• Configure
To use an automated workflow you first have to enable it. Then you can enter a username and
a password. This username is used when you want to connect to the hotfolder (Mount it).
After Configure is ready you have to reboot the system for the changes to take effect.
Note: The existing SMB hotfolder functionality is extended with WebDAV support. Web
Distributed Authoring and Versioning (WebDAV) is an extension of the Hypertext Transfer
Protocol (HTTP) that allows clients to perform remote content authoring operations. This
allows having 30 simultaneous SMB folders possible.After enabling WebDAV in the
configuration dialog (Settings Editor: Workflow > Hotfolder), it will work the same as SMB
hotfolders on the controllers side. WebDAV uses the same mechanism as SMB which means
workflow management and folder monitoring are the same.
The benefits for WebDAV folders:
o Easy hotfolders solution for the MAC. No need for the Mac Automator tool anymore
o The folders are accessible in HTTP and HTTPS mode.
• Ticket Editor
A ticket editor is available in this section to create a ticket (default_ticket.jdf). Copy the
resulting ticket into a hotfolder to create an automated workflow connected to that hotfolder.
Note:
53

PRISMAsync V1.2 for imagePRESS C800 series
_____________________________________________________________________
This functionality is the same as the driver functionality that allows saving the
ticket/template. The ticket editor provides this possibility without having a driver installed.
5.4 Remote printers
To be flexible in the way jobs are dealt with, the operator has the ability to forward an existing
print job to another print system. This functionality is available on the user interface and in
Remote Manager.
Main benefit: increase flexibility and productivity; be more productive in a multi-engine
environment.
Job forwarding on the user interface has the following characteristics:
• A copy of the job is made to the receiving print system
• The original job stays on the sending print system
• The original job ticket is sent along
Remote printers button in the Jobs workspace on the operator panel
54
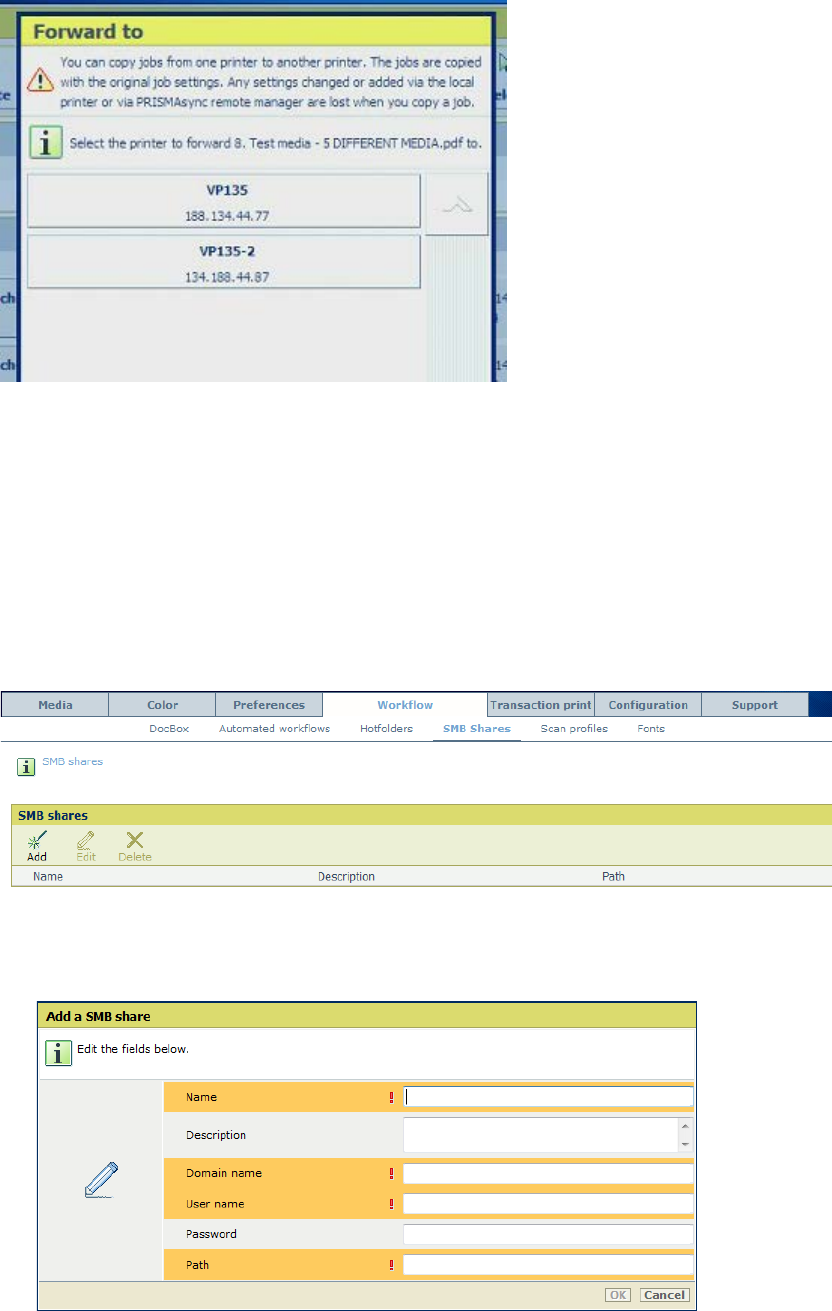
PRISMAsync V1.2 for imagePRESS C800 series
_____________________________________________________________________
Forward to dialog in the user interface
Job forwarding is supported for non-streaming, document printing jobs. Hence, copy, scan
and transaction jobs cannot be forwarded.
5.5 SMB Shares
Scan to SMB enables you to scan documents and store them on a shared drive on your local
computer. In this section you can manage these shared drives.
• Add
Add a shared drive.
o Name
The name of the SMB share
55
PRISMAsync V1.2 for imagePRESS C800 series
_____________________________________________________________________
o Description
Any text you would like to add for description
o Domain name
The domain name where the SMB-share resides
o User name
The user name of the person who is allowed to get access
o Password
If you want, you can enter a password here
o Path
The path on the SMB share were the file will be stored
• Edit
Edit the properties of the SMB share
• Delete
Delete the SMB share
5.6 Scan profiles
The 'Copy/Scan' section on the printer operator panel displays templates that give access to copy
and scan functions. The copy templates are factory default templates. To use scan templates, you
must first create scan-to-file and scan-to-email profiles in the scan profiles file (sjt.csv) on the
PRISMAsync controller. Proceed as follows:
• Download the file via the Settings Editor ('Workflow' -> 'Scan profiles' -> 'Download
scanprofiles').
• Edit the file in Microsoft® Excel®, for example.
• Upload the file via the Settings Editor ('Workflow' -> 'Scan profiles' -> 'Upload scan
profiles').
Each scan profile consists of a combination of individual settings for specific scan jobs, either
scan to file or scan to email. The display name you define for a scan profile is shown in the
'Copy/Scan' section on the printer operator panel.
The scan profiles file must contain a header line (mandatory) and at least 1 line with ascan
profile.
A "," or ";" separates the items in a record.
<CR> or <LF> separates records.
The header record shows the items that the scan profile uses (dispname, format,ilc, pre-fix,
minnr, maxnr, name_nr_title, cfname, subfolder, postfix, OrigOrientation, OrigDuplex,
OrigKind, OrigZoom, OrigFormat, DestFormat, DestQual, DestColor).
A profile record contains the unique settings for various scan job types. dispname, format,
ilc,prefix, minnr, maxnr, name_nr_title and cfname are mandatory. The other recorditems are
optional. Check the user manual for the detailed description of these items.
56
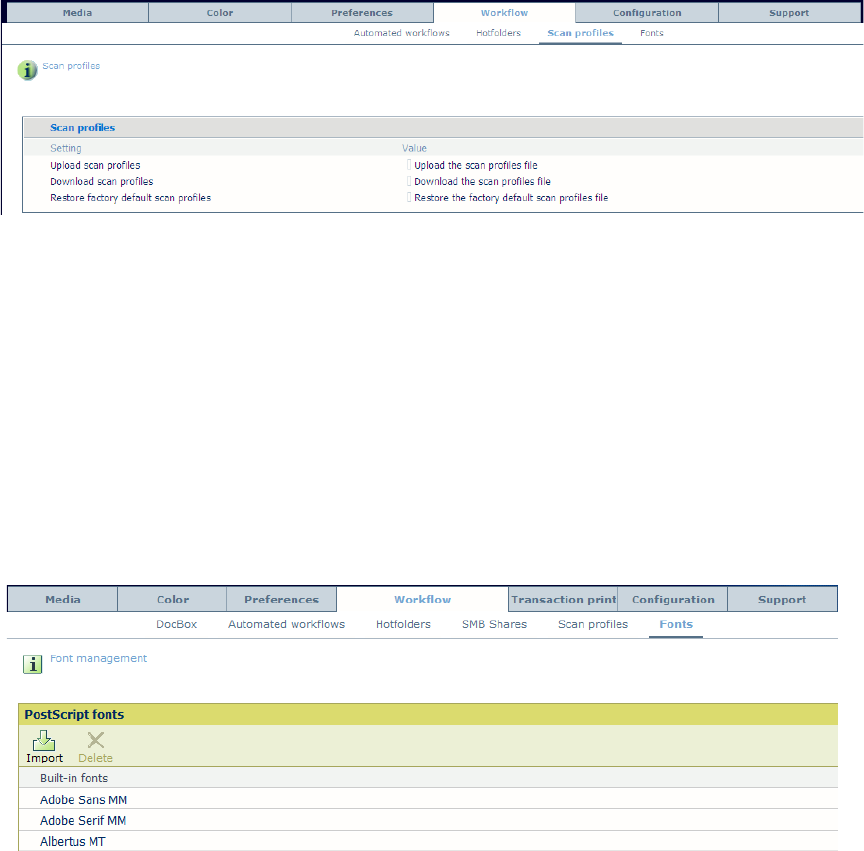
PRISMAsync V1.2 for imagePRESS C800 series
_____________________________________________________________________
• Upload scan profiles
Browse to a scan profiles file on your network to upload the file to the system.
• Download scan profiles
Click the button “Download the scan profiles file” to create a new scan profiles file. Click
the link to download and save the file.
• Restore factory default scan profiles
Restore the scan profiles to the factory default versions. Note that all scan profiles created or
edited after the installation of the system will be lost.
5.7 Fonts
In this section you can import fonts to the PRISMAsync.
• Import
Import a font file to the PRISMAsync. The imported fonts are stored in the “User fonts” part.
• Delete
Remove a selected font.
5.8 Remote Manager
This section enables you to manage your PRISMAsync driven engines remotely via the
PRISMAsync Remote Manager.
57
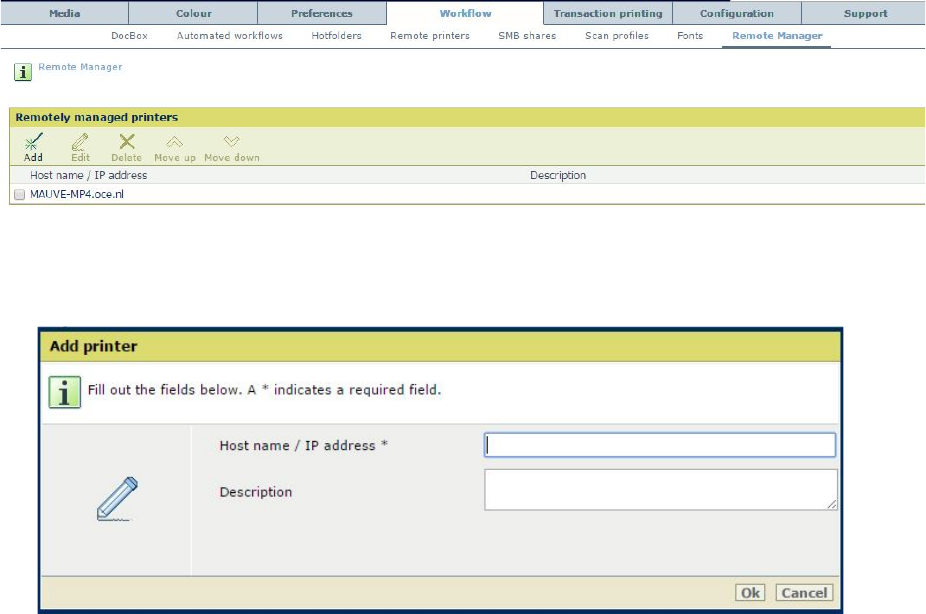
PRISMAsync V1.2 for imagePRESS C800 series
_____________________________________________________________________
• Add
Add a printer to the Remote Manager overview.
58
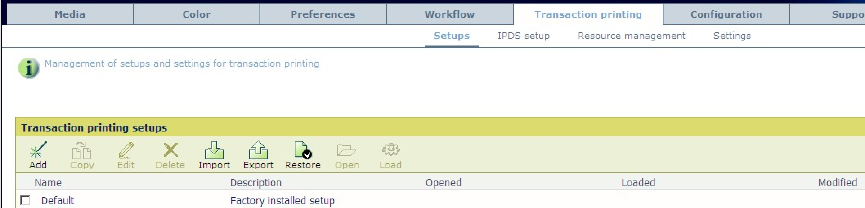
PRISMAsync V1.2 for imagePRESS C800 series
_____________________________________________________________________
6. Transaction Printing
With transaction printing, a server sends a stream of pages to the printer. Typically the server
closely monitors the status and progress of the printer to ensure that every sheet is printed
exactly once.
To the end-user, transaction printing concerns business critical data. For that reason, a dedicated
server is used to guard printing. For the PRISMAsync the IPDS-protocol (including PDF
containers) is used.
The server uses a bi-directional connection to enable feedback.
All data sent in one connection session is considered to be part of the same data stream. This
stream may contain job separators in this case the printer shows separate jobs.
From a server point of view, these jobs are part of the same stream. Therefore it is not allowed
to change the order or cancel one of these jobs. Instead, it is only possible to cancel the entire
stream.
The server uses the printer status data to determine when print data can be sent. Furthermore, the
printer status data contains the media currently loaded in the trays of the printer.
Whenever a sheet has been printed successfully, this sheet is reported ‘secured’ towards the
server.
The following settings regarding Transaction Printing are present in the Settings Editor.
6.1 Setups
A transaction printing setup is a set of parameters to be used in transaction printing. Multiple
setups can be defined by the operator, but only one setup can be loaded.
As long as Transaction printing is offline, one can load an active setup via the operator panel or
the Settings Editor.
• Add
Add a setup.
• Copy
Copy a setup
• Edit
Edit an existing setup
59
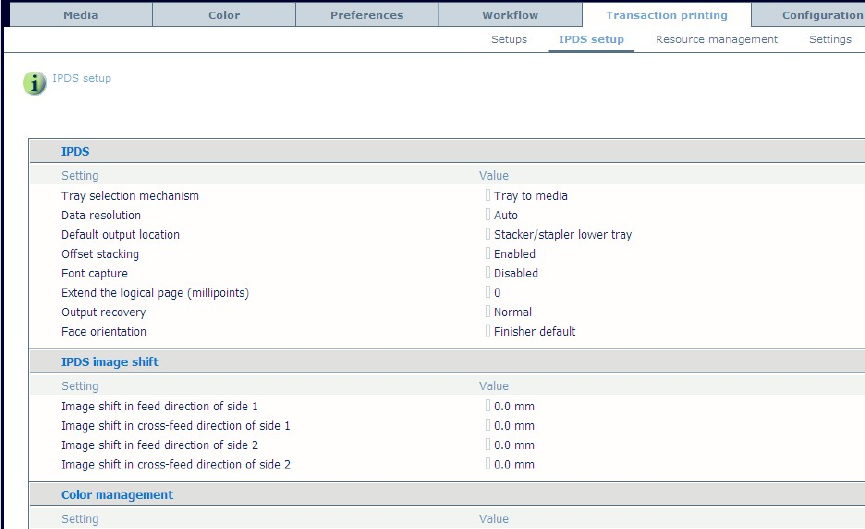
PRISMAsync V1.2 for imagePRESS C800 series
_____________________________________________________________________
• Delete
Delete the selected setup
• Import
Import a setup
• Export
Export a setup
• Restore
Restore the factory default setup
• Open
Open a setup for editing
• Load
Load Setup Settings
6.2 IPDS Setup
IPDS
• Tray selection mechanism
This setting defines the behavior of the paper trays. When you select 'Tray to media', the
logical tray numbers are mapped to media. When you select 'Tray to tray', the logical tray
numbers are mapped to physical trays. (Default: Tray to media)
• Data resolution
This setting allows you to specify the resolution of the bitmaps that the printer accepts.
(Default: Auto)
• Default output location
You can indicate the output location for your job on the operator panel, in the printer driver
or in an application. When the location is not indicated, the printer uses the default value.
Select the desired default value from the list. The output locations you can select depend on
60
PRISMAsync V1.2 for imagePRESS C800 series
_____________________________________________________________________
your system's configuration. You can always overrule the indicated value on the operator
panel, in the printer driver or in an application. (Default: Stacker/stapler lower tray)
• Offset stacking
Offset stacking means that all sets of a print job must go into the selected output location
with a small shift between the sets instead of in one straight stack. You can always overrule
this setting in the print stream. (Default: Enabled)
• Font capture
This setting allows you to specify if resources are automatically captured from jobs that are
sent to the printer for later reference. (Default: Disabled)
• Extend the logical page (millipoints)
The logical page size is virtually extended with the entered number of millipoints. This
makes it possible to print (slightly) larger page sizes without the controller reporting that
information could not be printed on a page. (Default: 0; Minimum: 0; Maximum: 24000)
• Output recovery
When output recovery is suppressed, the printer will not automatically make sure that the
output is correct after a recovery. The host system and the operator are responsible for the
recovery. Furthermore, printing intermediate check prints is disabled. (Default: Normal)
• Face orientation
With this setting, the default face orientation of the requested finisher can be overruled per
setup. This setting is only active for transaction printing jobs. (Default: Finisher default)
• Z-fold mode
Use Z-fold mode only, when a mixed-size set must both be Z-folded and stapled. This is to
prevent subsets within the stapled set. Do not use Z-fold mode in other situations. (Default:
Off)
IPDS Image Shift
• Image shift in feed direction of side 1
When you use pre-printed media with marked locations for specific text, for example, a
misalignment of the text can occur. To correct these misalignments, enter the desired value
to shift the image in the feed direction of side 1. (Default: 0 mm; Minimum: -4.2; Maximum:
4.2); Step: 0.1)
• Image shift in cross-feed direction of side 1
When you use pre-printed media with marked locations for specific text, for example, a
misalignment of the text can occur. To correct these misalignments, enter the desired value
to shift the image in the cross-feed direction of side 1. (Default: 0 mm; Minimum: -4.2;
Maximum: 4.2); Step: 0.1)
• Image shift in feed direction of side 2
When you use pre-printed media with marked locations for specific text, for example, a
misalignment of the text can occur. To correct these misalignments, enter the desired value
to shift the image in the feed direction of side 2. (Default: 0 mm; Minimum: -4.2; Maximum:
4.2); Step: 0.1)
• Image shift in cross-feed direction of side 2
When you use pre-printed media with marked locations for specific text, for example, a
misalignment of the text can occur. To correct these misalignments, enter the desired value
to shift the image in the cross-feed direction of side 2. (Default: 0 mm; Minimum: -4.2;
Maximum: 4.2); Step: 0.1)
61
PRISMAsync V1.2 for imagePRESS C800 series
_____________________________________________________________________
Color Management
• Default CMYK input profile
Default: FOGRA39_Coated
• Default monochrome CMYK input profile
Default: FOGRA39_Coated
• Default RGB input profile
Default: sRGB
• Default monochrome RGB input profile
Default: sRGB
• Rendering intent
Default: Perceptual
• Print full color or black&white
Default: Full color
• Ignore toner transfer curve from data stream
Default: Yes
• Ignore embedded output profile
Default: Yes
• Black preservation
Default: Yes
• Halftone
Set the halftone/screening to be used. Default: Normal
PDF specific
• PDF "all" to black
PDF has a number of pre-defined color names. The color name „all“ means that the rip will
use a 100% coverage of all the available colors. The color “all” is really intended for
printing of alignment marks, such as small crosses, when one color is misaligned you’ll see
a separate cross in that color. When everything is OK, there will be a single cross mark. A
color printer with toner, however, has problems printing areas with a 400% coverage. The
toner layer will simply be too thick. Therefore through this GUI option, the RIP can be
forced to rip the color “all” to only 100% black, instead of 100% of each of the four colors.
This is necessary when a PDF container specifies larger areas with the PDF color
“all”.(Default: No)
• PDF enable cache
Default: No
• PDF overprint simulation
Makes opaque objects look transparent. Underlying objects are visible. Default: Yes.
IPDS tray-to-tray mapping
(See also Tray Selection Mechanism)
• Logical tray for tray 1
This setting allows you to link a logical tray number to a physical paper tray of the machine.
In this way, you can change the logical order of the paper trays and change the order in
which the machine addresses the paper trays by entering a different tray number. (Default: 1;
Minimum: 1; Maximum: 16)
• Logical tray for tray 2
See “Logical tray for tray 1”
62

PRISMAsync V1.2 for imagePRESS C800 series
_____________________________________________________________________
• Logical tray for tray 3
See “Logical tray for tray 1”
• Logical tray for tray 4
See “Logical tray for tray 1”
• Logical tray for tray 5
See “Logical tray for tray 1”
• Logical tray for tray 6
See “Logical tray for tray 1”
• Logical tray for special feeder
See “Logical tray for tray 1”
• Logical tray for stacker/stapler, insert tray 1
See “Logical tray for tray 1”
• Logical tray for stacker/stapler, insert tray 2
See “Logical tray for tray 1”
IPDS tray to media for tray 1
(See also Tray Selection Mechanism)
• Media catalog item
Enter a media from the paper catalog. The items below are filled in automatically.
o Media name
o Media type
o Media size
o Media width
o Media height
o Media weight
o Media color
o Punch count
o Insert
o Feed direction
IPDS tray to media for tray 2 to 36
• The same as for tray 1.
Color names and numbers - Cyan color station
For every color station an IPDS color number setting (1 .. 254) must be supported within the
context of an IPDS setup, to enable IPDS selection by number of these colors.
For every color station (CMYK) six IPDS color name settings must be supported within the
context of an IPDS setup, to enable IPDS selection by name of these colors.
The names "Gray", "Cyan", "Magenta", "Yellow", "Black", "All", "None" are reserved for PDF
and may not be used.
By default, the list of color names is empty.
• Color number 1
• Name 1
• Name 2
• Name 3
• Name 4
• Name 5
63
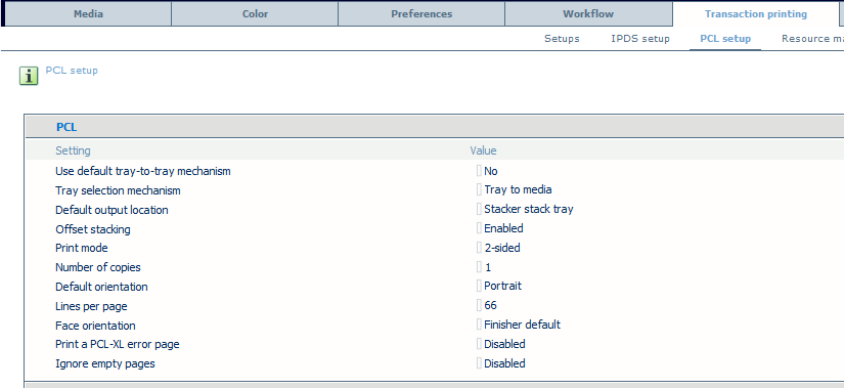
PRISMAsync V1.2 for imagePRESS C800 series
_____________________________________________________________________
• Name 6
Color names and numbers - Magenta color station
See “Cyan color station”.
Color names and numbers - Yellow color station
See “Cyan color station”.
Color names and numbers - Black color station
See “Cyan color station”.
6.3 PCL setup
PCL
• Use default tray-to-tray mechanism
In tray-to-tray mode, a default tray mapping table is used when enabling this setting. This
default tray mapping table cannot be changed. (Default: No)
• Tray selection mechanism
Select 'tray to tray', when you want to link a PDL logical tray to a printer physical tray. The
content of the physical tray is used for processing the job. Select 'Tray to media' when you
want to link a PDL logical tray to a media. This media is used for processing the job.
(Default: Tray to media)
• Default output location
On the operator panel, in the printer driver or in an application you can indicate the output
location for your job. When the location is not indicated, the printer uses the default value.
Select the desired default value from the list. The output locations you can select depend on
the configuration of your system. You can always overrule the indicated value in the printer
driver or in an application. (Default: Stacker stack tray)
• Offset stacking Enabled
• Print mode 2-sided
• Number of copies 1
• Default orientation Portrait
• Lines per page 66
64
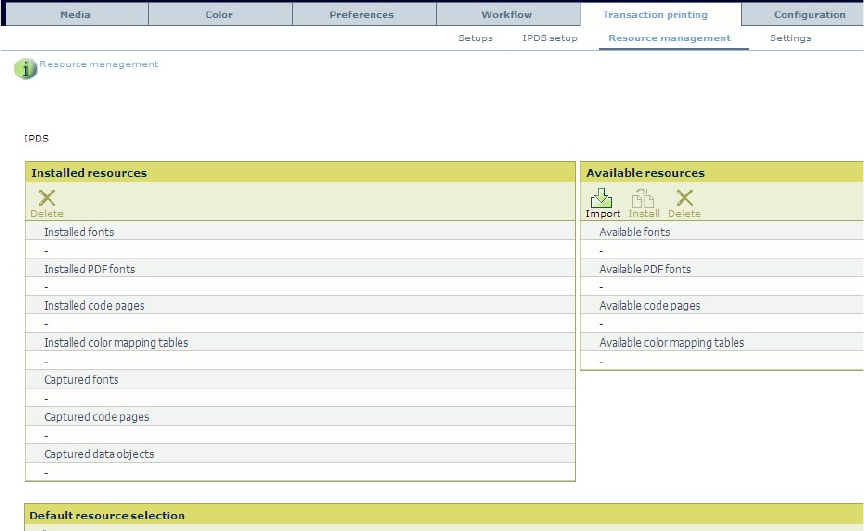
PRISMAsync V1.2 for imagePRESS C800 series
_____________________________________________________________________
• Face orientation Finisher default
• Print a PCL-XL error page Disabled
• Ignore empty pages Disabled
6.4 Resource management
Installed resources
The following resources can be installed. You can also delete an installed resource.
o Installed fonts
o Installed PDF fonts
o Installed code pages
o Installed color mapping tables
o Captured fonts
o Captured code pages
o Captured data objects
• Delete
Delete the selected resource
Available resources
An overview of the resources available.
• Import
Import the resource
• Install
Install the resource
65
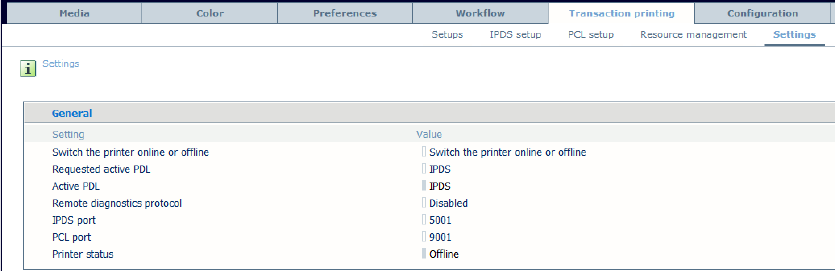
PRISMAsync V1.2 for imagePRESS C800 series
_____________________________________________________________________
• Delete
Delete the resource
Default resource selection
An overview of the default resources:
o Default font
o Default code page
o Default color table
o Default font size (5 - 20 points)
• Edit
Change one of the defaults.
6.5 Settings
General
• Switch the printer online or offline
Use this setting to toggle the active transaction printing mode.
• Requested active PDL
Select the requested active page description language (PDL) from the list. (Default: IPDS;
Values: IPDS, PCL)
• Active PDL
Read only. Gives the active PDL (Printer Description Language)
• Remote diagnostics protocol
Enable this setting to give Service access via a service laptop to perform troubleshooting
tasks on the machine. (Default: Disabled)
• IPDS port
Assign a port number to the IPDS port. (Default: 5001; Minimum: 5001; Maximum: 65535)
• PCL port
Assign a port number to the PCL port. (Default: 9001; Minimum: 5001; Maximum: 65535)
• Printer status
Read only. Displays if transaction printing is on-line or off-line
66
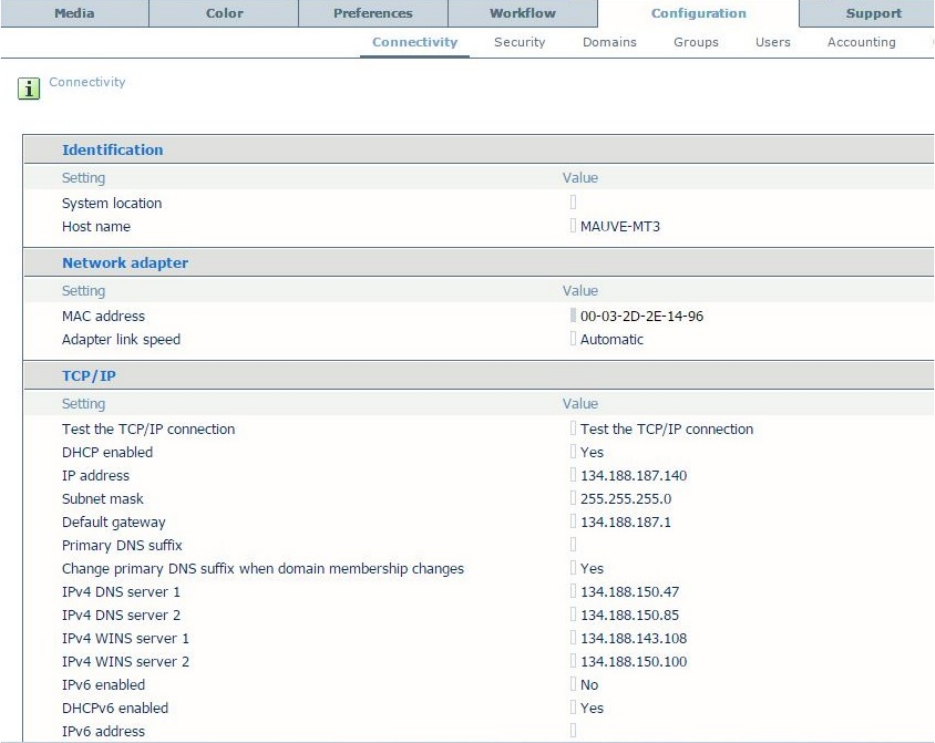
PRISMAsync V1.2 for imagePRESS C800 series
_____________________________________________________________________
7. Configuration
In the “Configuration” section you can adjust configuration settings of the system like
Connectivity-, Security- and Accounting settings.
7.1 Connectivity
Identification
• System location
Specify the physical location of the machine.
• Host name
Specify the host name that identifies the printer on your network.
Network adapter
• MAC address
Gives the MAC address of the PRISMAsync
• Adapter link speed
Select the link speed and duplex mode for the network adapter. Use 'Automatic' or change the
speed and connection type of the network interface card of the controller. (Default:
Automatic)
67
PRISMAsync V1.2 for imagePRESS C800 series
_____________________________________________________________________
TCP/IP
• Test the TCP/IP connection
Check if the network and Internet connections are OK. When the test fails, check the network
and TCP/IP settings
• DHCP enabled
When DHCP is enabled, the DHCP server automatically assigns an IP address to your
controller. When DHCP is disabled, you must manually set the IP address, subnet mask and
default gateway of the controller. (Default: Yes)
• IP address
Enter a static IP address for the controller. Make sure that DHCP is disabled.
(Default:192.168.1.2)
• Subnet mask
Enter the subnet mask that corresponds to the static IP address. Make sure that DHCP is
disabled. (Default:255.255.255.0)
• Default gateway
Enter the IP address of the default gateway. The default gateway passes data traffic from the
local subnet to other subnets and the Internet. Make sure that DHCP is disabled.
(Default:192.168.1.1)
• Primary DNS suffix
Specify the primary Domain Name System (DNS) suffix for a group of systems. The primary
DNS suffix is used in DNS name registration and DNS name resolution. If you do not enter a
correct primary DNS suffix, you may get problems with the name resolution, for example
when the system resolves the address of a host in your local subnet.
• Change primary DNS suffix when domain membership changes
Enable this setting when you want your system to automatically update the DNS suffix when
the domain name of the DNS server changes. (Default:Yes)
• IPv4 DNS server 1
IPv4 DNS server 1 address of the controller.
• IPv4 DNS server 2
IPv4 DNS server 1 address of the controller.
• IPv4 WINS server 1
IPv4 WINS server 1 address of the controller.
• IPv4 WINS server 2
IPv4 WINS server 1 address of the controller.
• IPv6 enabled
Enable/disable IPv6 on the controller. (Default: Yes)
• DHCPv6 enabled
Enable/disable DHCPv6 on the controller. (Default: Yes)
• IPv6 address
IPv6 address of the controller.
• IPv6 gateway
IPv6 gateway address of the controller.
• IPv6 prefix
IPv6 subnet prefix length of the controller. (Minimum: 4; Maximum: 128; Step 4; Default:
64)
• IPv6 link-local address
IPv6 link-local address of the controller.
68
PRISMAsync V1.2 for imagePRESS C800 series
_____________________________________________________________________
• IPv6 DNS server 1
IPv6 DNS server 1 address of the controller.
• IPv6 DNS server 2
IPv6 DNS server 1 address of the controller.
Multicast
• Multicast LLMNR enabled
When LLMNR multicast is enabled it allows both IPv4 and IPv6 hosts to perform name
resolution for hosts on the same local link, otherwise it is blocked. (Default: Yes)
• Multicast NetBIOS enabled
When NetBIOS multicast is enabled it allows registration of the computername via netbios
registration broadcast, otherwise it is blocked. (Default: Yes)
SNMP
• SNMP enabled
Enable SNMP (Simple Network Management Protocol) to access remote monitoring and
management functionalities for this device. Note that the default SNMP protocol version is
SNMP version 3 (SNMPv3). This version requires user authentication. (Default: Yes)
SNMP v1/v2c
• SNMP v1/v2c enabled
Currently 3 versions of SNMP exist. Enable this setting when you want to give public access
to your system. The community name 'public' is the default configuration. (Default:Yes)
• Write access enabled
Enable this setting when you want to use management functionalities (device management,
job management) for this system when you use SNMPv1/v2c. (Default: No)
• Community name
Specify the community name for third-party SNMP applications and legacy applications.
(Default: public)
• SNMP read community name
This is a specific community name dedicated for monitoring applications or drivers that use
SNMP. (Default: *****)
• SNMP read/write community name
This is a specific community name dedicated for monitoring and managing applications that
use SNMP. (Default: *****)
• Host name / IP address 1 for notification
SNMP managers receive the notifications of SNMP alerts. You can specify IP addresses or
host names for up to 3 SNMP managers. (Default: 127.0.0.1)
• Host name / IP address 2 for notification
SNMP managers receive the notifications of SNMP alerts. You can specify IP addresses or
host names for up to 3 SNMP managers. (Default: 127.0.0.1)
• Host name / IP address 3 for notification
SNMP managers receive the notifications of SNMP alerts. You can specify IP addresses or
host names for up to 3 SNMP managers. (Default: 127.0.0.1)
SNMP v3
• Customer user name
SNMP version 3 requires authentication. Use this setting to define a user name to access
SNMP information.
69
PRISMAsync V1.2 for imagePRESS C800 series
_____________________________________________________________________
• Customer password
SNMP version 3 requires authentication. Therefore, you can define a password to protect the
SNMP version 3 dedicated user. Note that the password is localized and secured with
HMAC-MD5. (Default: *****)
Proxy server
• Proxy server usage enabled
Enable proxy settings when a proxy server is used for internet traffic outside your
organization. E.g. Remote Service (Default: No)
• Proxy server name
The name of the proxy server used within your organization.
• Proxy server port
The port number that is used by the proxy server for client connections (default 80).
• Proxy server authentication required
Enable this setting if your organization's proxy server requires authentication. (Default: No)
• Proxy server authentication type
When authentication is enabled, you must set the authentication type for the proxy server.
(Default: AnySafe)
• User name for proxy authentication
If authentication is enabled, you must set the user name used for authentication by the proxy
server.
• Password for proxy authentication
If authentication is enabled, you must set the password used for authentication by the proxy
server. Note that the password is localized and secured with HMAC-MD5. (Default: *****)
• Proxy server domain
When authentication is enabled, you must set the domain of the proxy server.
LPD
• Test the LPR print path
Check if the LPR software correctly sends the print jobs to the LPD printer or the print
queue. When the test fails, check the network settings and the LPR software.
• LPD enabled
LPD (Line Printer Daemon) is a printing method that is commonly used in TCP/IP networks.
Enable 'LPD', to receive print jobs from the network. (Default: Yes)
• Page description language
Select the default page description language (PDL) for the LPD input channel. The printer
uses the PDL to address the correct interpreter when the job ticket does not specify the PDL.
Make sure that LPD is enabled. (Default: Automatic)
Socket printing
• Socket printing enabled
Enable this setting when you want to receive the print jobs from the network through the
socket. (Default: No)
• Socket printing time-out
The printer closes the socket connection when no data is received within a certain time frame.
Use this setting to change the time frame. (Default: 120 s)
• Port
If you use socket printing, you can specify the port number that must be used. (Default: 9100)
70
PRISMAsync V1.2 for imagePRESS C800 series
_____________________________________________________________________
• Default queue
If you use socket printing, you can specify the name of the default queue.
• Page description language
Select the default page description language (PDL) for the socket input channel. The printer
uses the PDL to address the correct interpreter when the job ticket does not specify the PDL.
Make sure that socket printing is enabled. (Default: Automatic)
IPP
• IPP printing enabled
Internet Printing Protocol. This option is used in conjunction with the DP-link license. When
this license is installed the automatic workflows and media catalog are exposed over IPP.
(Default: No)
Scan to file
• Connection test
Click the button to test if the scan-to-file connection is configured correctly.
• Scan to file and scan to email and scan to SMB enabled
Use this setting to enable scanning and export of scan jobs. (Default: No)
• Host name / IP address
Enter the host name or the IP address of the FTP server to which the scan jobs will be sent.
• Port
Enter the port number of the FTP server to which the scan jobs will be sent. (Default: 21)
• User name
Enter the user name which will be used for access to the FTP server when sending scan jobs.
• Password
Enter the password that belongs to the user name which will be used for access to the FTP
server when sending scan jobs. (Default: *****)
• Destination directory
Enter the destination directory of the FTP server to which the scan jobs will be sent.
• Prefix of the scan to USB destination directory
Enter the prefix of the destination directory on a USB stick to which the USB scan jobs will
be sent.
Email server
• Connection test
Click the button to test if the connection to your SMTP (email) server is configured correctly.
• Host name / IP address
Enter the host name or the IP address of the SMTP server that handles emailing the scan jobs.
• Port
Enter the port number of the SMTP server that handles the emailing of scan jobs. (Default:
25)
• User name
Enter the user name which will be used for access to the SMTP server that handles emailing
the scan jobs.
• Password
Enter the password that belongs to the user name which will be used for access to the SMTP
server that handles emailing the scan jobs. (Default: *****)
• Sender
Enter the name that will be shown as the sender of the email containing the scan job.
71

PRISMAsync V1.2 for imagePRESS C800 series
_____________________________________________________________________
• Maximum attachment size
Enter the maximum size (in Mb) for the scan job email attachment. Note that the value '0'
means unlimited. (Default: 5 MB)
JMF support
A customer can directly connect to a PRISMAsync controller from Agfa Apogee 9 & 10.
The functionality offered is alike the external PRISMAsync Workflow Connector Release
1.2.0.0.
Supported functionality:
o Job submission
o Media selection
o Virtual Printer / AWF Selection
o Status reporting
Benefit for the customer: It is no longer needed to run the external PRISMAsync Workflow
Connector application on his own PC/server.
To enable JMF support:
Note:
See existing external PRISMAsync WFC for rest of the specifications.
Remote Control
• Remote Control
Remote Control works with the Scheduler to send system alerts. To use this print system for
Remote Control, you must register this print system to the cloud. Use the link below to
register a print system and the operators that are allowed to see the system alerts. (Default:
Disabled)
• Register print system for Remote Control
By using this link the system administrator registers the current print system for receiving
system alerts. When this link is clicked, the Remote Control administrator site is opened and
the printer details needed for registration are automatically filled-in. To complete the
operation the system administrator will have to login with a Google or Microsoft account.
• Go to Remote Control administration
This link will direct you to the administration page for Remote Control which offers all
needed functionality to manage system alerts for defined print systems and operators.
(www.remotecontrol.oce.com)
Note:
Remote Control functionality has the following prerequisite:
-Remote Service licensed and configured. Check if remote connection is enabled in the system
configuration settings on the control panel.
72
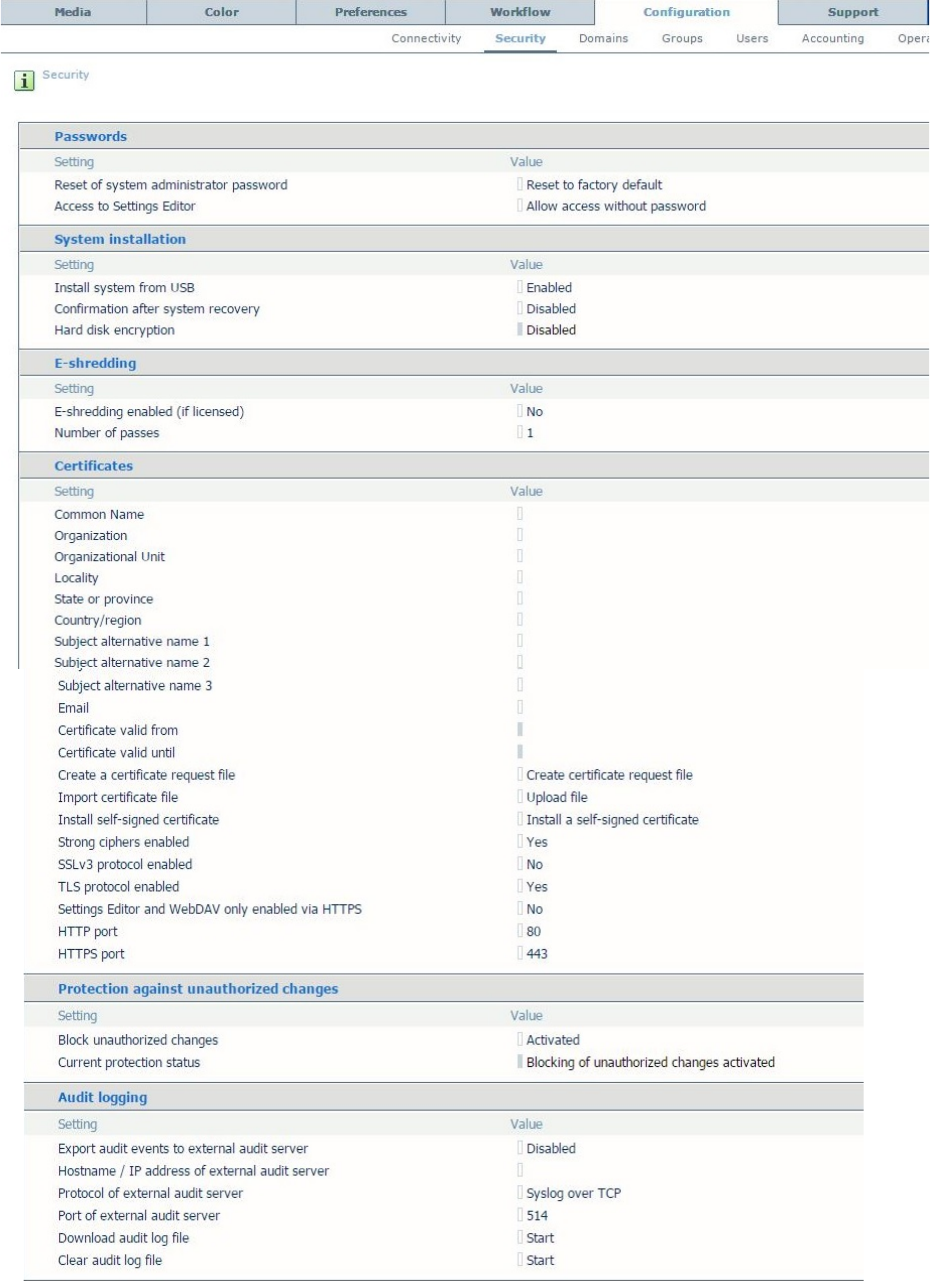
PRISMAsync V1.2 for imagePRESS C800 series
_____________________________________________________________________
7.2 Security
73
PRISMAsync V1.2 for imagePRESS C800 series
_____________________________________________________________________
Passwords
• Reset the system administrator password
With this button you can reset the password of the System Administrator to its default value
(71617000). To complete this operation you need the Service operator password.
• Access to Settings Editor
With this setting, you can prevent or allow an operator to access the settings in the Settings
Editor by means of a password. (Default: Allow access without password)
System installation
• Install system from USB
Updating via USB will be Enabled/Disabled by authorized personal only: the system
administrator or the service technician. Besides the Settings Editor, the setting will be
available in the installation wizard and operator panel. (Default: Enabled)
• Confirmation after system recovery
Enable this setting to show a confirmation window after a system recovery procedure.
(Default: Disabled)
E-shredding
• E-shredding enabled (if licensed)
The licensed E-shredding feature securely erases printed jobs from the system. This prevents
the possibility to recover data of printed jobs. (Default: Disabled)
• Number of passes
The licensed E-shredding feature securely erases printed jobs from the system. This prevents
the possibility to recover data of printed jobs. The number of passes specifies the intensity of
the E-shredding process. When you increase the number of passes the reliability of the
removal process becomes larger. However, the process can also take more time. (Default: 1)
Certificates
• Common name
Enter the fully qualified HostName/Path used in DNS lookups that the server runs on (for
example, HostName.Example.com).
• Organization
The name you specify for the Organization field must be the legal name for your organization
that is registered with the appropriate city, state, or country/region authority.
• Organizational Unit
The Organizational Unit field is used to differentiate between different divisions within an
organization, for example "Internet Security Unit" or "Human Resources." This field is also
recommended to be used for specifying a DBA (Doing Business As...) value.
• Locality
The Locality field denotes the city that the organization resides in. If the organization has
local standing only, by virtue of having a business license registered with the City Clerk for
the City of Cambridge in the State of Massachusetts, then the Locality field must contain
Cambridge.
• State or province
The state or province field specifies where the organization is physically located. If your
organization is incorporated in Delaware but has a DBA (Doing Business As...) within
California, use California. The State or Province field should not be an abbreviated field. For
example, "CA" is not a valid state name. "California" is the proper state name
74
PRISMAsync V1.2 for imagePRESS C800 series
_____________________________________________________________________
• Country/region
The X.500 Naming Scheme standard requires a 2-character country/region code. The
country/region code for the United States is US; the country/region code for Canada is CA.
• Subject alternative 1
Subject alternative name is an extension to X.509 that allows various values to be associated
with a security certificate. The alternative name typically is a host name or IP address.
• Subject alternative 2
• Subject alternative name is an extension to X.509 that allows various values to be associated
with a security certificate. The alternative name typically is a host name or IP address.
• Subject alternative 3
Subject alternative name is an extension to X.509 that allows various values to be associated
with a security certificate. The alternative name typically is a host name or IP address.
• Email
Email address is an extension to X.509 that allows various values to be associated with a
security certificate.
• Certificate valid from
Indicates the date from which the installed certificate is valid.
• Certificate valid until
Indicates the date until the installed certificate is valid.
• Create a certificate request file
Click the button to create a certificate request file. Click the link to download and save the
file.
• Import certificate file
Browse to a certificate file on your network to upload the file to the system. This imports the
certificate file for use in the system.
• Install self-signed certificate
If "Install self signed certificate" is checked, a valid https channel can be confirmed with the
controller. Via your internet browser the certificate can be downloaded and installed in the
certificate store.
• Strong ciphers enabled
When this setting is enabled, key generation will generate larger cryptographic keys and the
secure socket layer will use strong ciphers for its connection establishment and data
encryption. (Default: Yes)
• SSLv3 protocol enabled
When enabled the SSL will support SSLv3. (Default: Yes)
• TLS protocol enabled
When enabled the SSL will support TLS (TLSv1,TLSv1.1, TLSv1.2). (Default: Yes)
• Settings Editor and WedDAV only enabled
When enabled, the Settings Editor and webDAV are only accessible via HTTPS. (Default:
No)
• HTTP port
The port number that is used to communicate over HTTP. Do not use the selected port for
other functionality. (Default: 80)
• HTTPS port
The port number that is used to communicate over HTTPS. Do not use the selected port for
other functions. (Default: 443)
Protection against unauthorized changes
• Block unauthorized changes
75
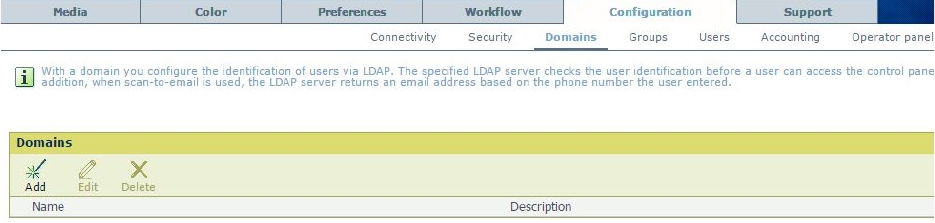
PRISMAsync V1.2 for imagePRESS C800 series
_____________________________________________________________________
Activate this licensed feature to protect your system from unknown software threads. Based
on whitelisting technology, a list of trusted software prevents that unauthorised programs run
on your system. (Default: Activated)
• Current protection status
As defined above. (Default: Blocking of unauthorized changes activated)
Audit logging
• Export audit events to an external audit server
When an external audit server is available to analyze and manage logged events, use this
setting to enable the export of audit events. (Default: Disabled)
• Hostname /IP adddress of external audit server
Enter the hostname of the IP address of the external audit server.
• Protocol of external audit server
Select the protocol to send audit events to the external audit server. The Syslog protocol is
generally used to log events. Events can be transported over UDP or TCP. Syslog over TCP
is the best guarantee that the external audit server receives all sent events. (Default: Syslog
over TCP)
• Port of external audit server
Enter the port number of the external audit server. (Default: 514)
• Download audit log file
When you download the audit log file, you can analyze all events stored in the audit log of
the PRISMAsync.
• Clear audit log file
When you clear the audit log file, all events stored in the audit log file of the PRISMAsync
are removed.
7.3 Domains
Within this section the system administrator can configure the domain controller/LDAP server
settings.
The specified Domain server checks the user identification before a user can access the Operator
Panel, Settings Editor or Remote Manager.
In addition, when scan-to-email is used, the Domain controller/LDAP server returns an email
address based on the default search field configured (for example the phone number the user
entered).
• Add
Fill out the following details to add a domain.
76
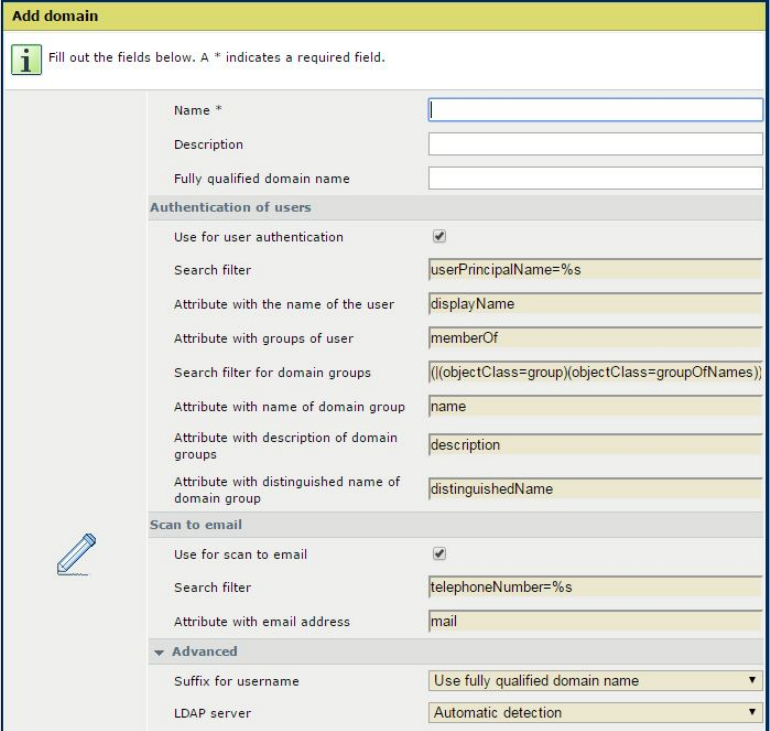
PRISMAsync V1.2 for imagePRESS C800 series
_____________________________________________________________________
o Name
Enter the name of this Domain controller/LDAP server
o Description
Enter the description of this Domain controller/LDAP server
o Fully qualified domain name
Enter the exact fully qualified name of the Domain controller which can to be used for
the identification of users.
Authentication of users
o Use for user authentication
With this setting you enable the authentication of users via this domain.
o Search filter
o Attribute with the name of the user
o Attribute with groups of users
o Search filter for main groups
o Attribute with name of domain group
o Attribute with description of domain groups
o Attribute with distinguished name of domain group
Scan to email
o Use for scan to email
Enables scan-to-email via the domain controller/LDAP server.
77
PRISMAsync V1.2 for imagePRESS C800 series
_____________________________________________________________________
o Search filter
Enter the search filter to be used for scan-to-email, this is default set to
“telephoneNumber=%s”, when desired the default search filter can be adjusted
o Attribute with email address
Enter the Domain controller/LDAP server email attribute, this is default set to “mail”.
Advanced
o Suffix for username
Enter the suffix for be used for the username, this is default set to use fully qualified
domain name
o LDAP server
Default set to automatic detection, set to custom when you require entering the LDAP
server manually (LDAP server name, LDAP server port)
o LDAP connection
This described how the connections should be made. The default value has been set to
Use credentials of current user.
o LDAP search database
Default set to Automatic detection, but the search database can also be filled in
manually.
o Maximum objects to retrieve
Enter the maximum objects to retrieve from the LDAP server. The default value has
been set to 10.
o LDAP server timeout(sec)
Enter the LDAP server timeout. The default value has been set to 60.
Test of domain settings
o Login username
Enter the user name which will be used for testing the access to the domain controller
/ LDAP server (default: empty)
o Login password
Enter the password that belongs to the user name which will be used for testing the
access to the domain controller/LDAP server. (Default: empty)
o User ID for scan to email
Fill in a User Id to test the scan to email procedure. The test will try to retrieve the
email address of the entered user ID.
o Execute domain test
The test button will check the connection and authentication when enabled. It will test
if the connection to your Domain controller/LDAP server can be set using the logging
username and password as entered in the test of domain settings section.
The test button will also test scan-to-email when enabled. The Test tries to retrieve the
Email address that belongs to the entered User ID.
• Edit
Use this setting to change attributes of a domain controller / LDAP server.
• Delete
Use this setting to delete a domain controller / LDAP server.
Note:
When a PRISMAsync v4.x is upgraded to PRISMAsync v5.1.0.0, scan-to-email LDAP settings
are converted to one domain on the Domains tab.
78
PRISMAsync V1.2 for imagePRESS C800 series
_____________________________________________________________________
The list of domains is included in the backup and is restored.
7.4 Groups
Access management from PRISMAsync V5 onwards is based on users and groups:
• Users are members of groups
• Groups have privileges attached
A group refers to a group of users which share the same access permissions.
In PRISMAsync V5.1 there are 6 pre-defined groups and 9 pre-defined access permissions.
The following table shows the defaulted assigned privileges of the pre-defined groups. These
are exactly the same permissions as provided in previous PRISMAsync releases, with the
exception of the Operators which now by default have access only to own jobs.
privileges →
↓ groups
Access only
personal jobs
Access all jobs
Local login
Remote login
Assisted hardware
maintenance
Configuration
Administration
Service
Operators
√
√
Central operators
√
√
√
√
Key operators
√
√
√
√
√
Maintenance operators
√
√
√
√
System administrators
√
√
√
√
√
√
√
Service operators
√
√
√
√
√
√
√
√
Next to the pre-defined groups the system administrator can add new local groups, delete or edit
the groups. The system administrator can also add groups that belong to one of the defined
domain controllers/LDAP servers.
However, the list of access permissions cannot be added, changed or deleted; the list is fixed and
managed by the system.
User Member
of Group(s) Has
certain Privileges
79
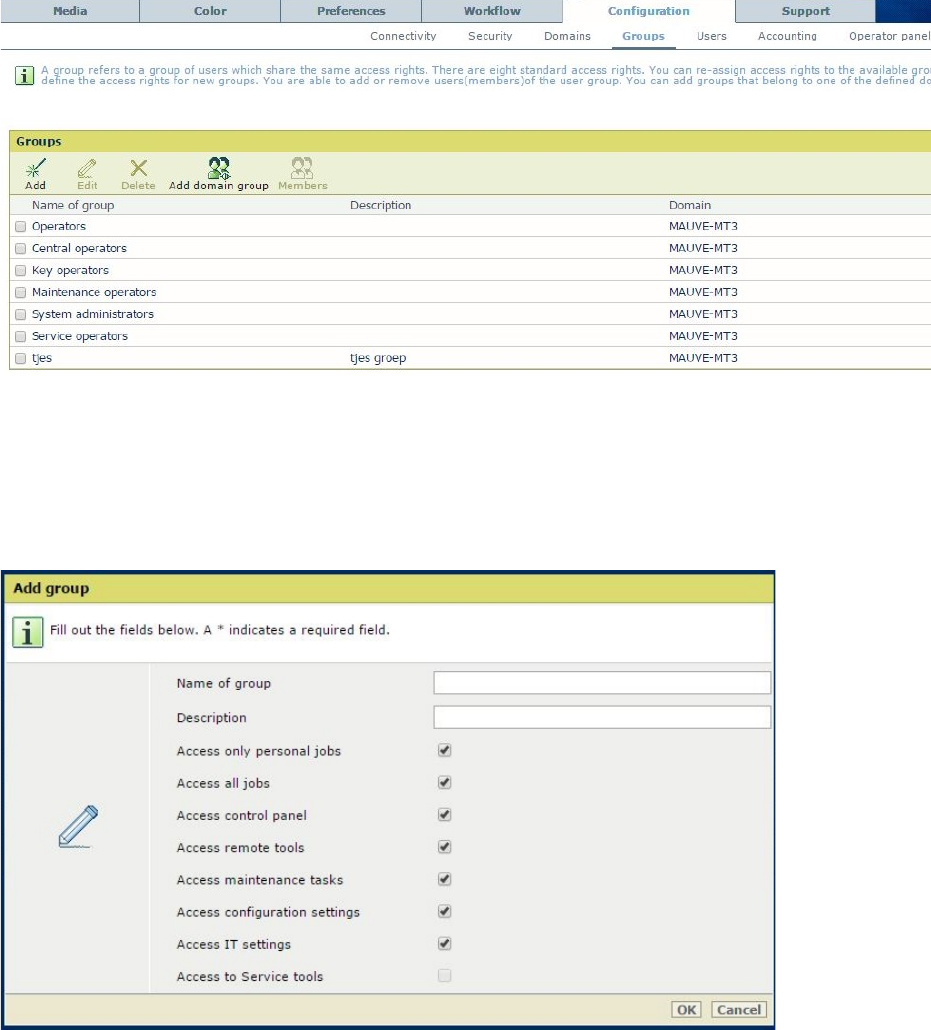
PRISMAsync V1.2 for imagePRESS C800 series
_____________________________________________________________________
• Add
Add a local group and define its attached privileges. These groups are added to the local
group database and are called “local groups”. A group has a name and description and a set
of attached privileges.
• Add domain group
Use this setting to retrieve all the groups that are defined on configured domain
controllers/LDAP servers. Select the group(s) you want to have added.
The complete user’s administration is done on the domain controllers/LDAP servers,
therefore you will not be able to add/edit/delete users from the domain group.
• Members
Use this setting to view or adjust the users that are members of the selected group.
• Edit
The systems administrator can use this setting to change the access permissions for the
selected group.
• Delete
The systems administrator can use this setting to delete the selected group.
80
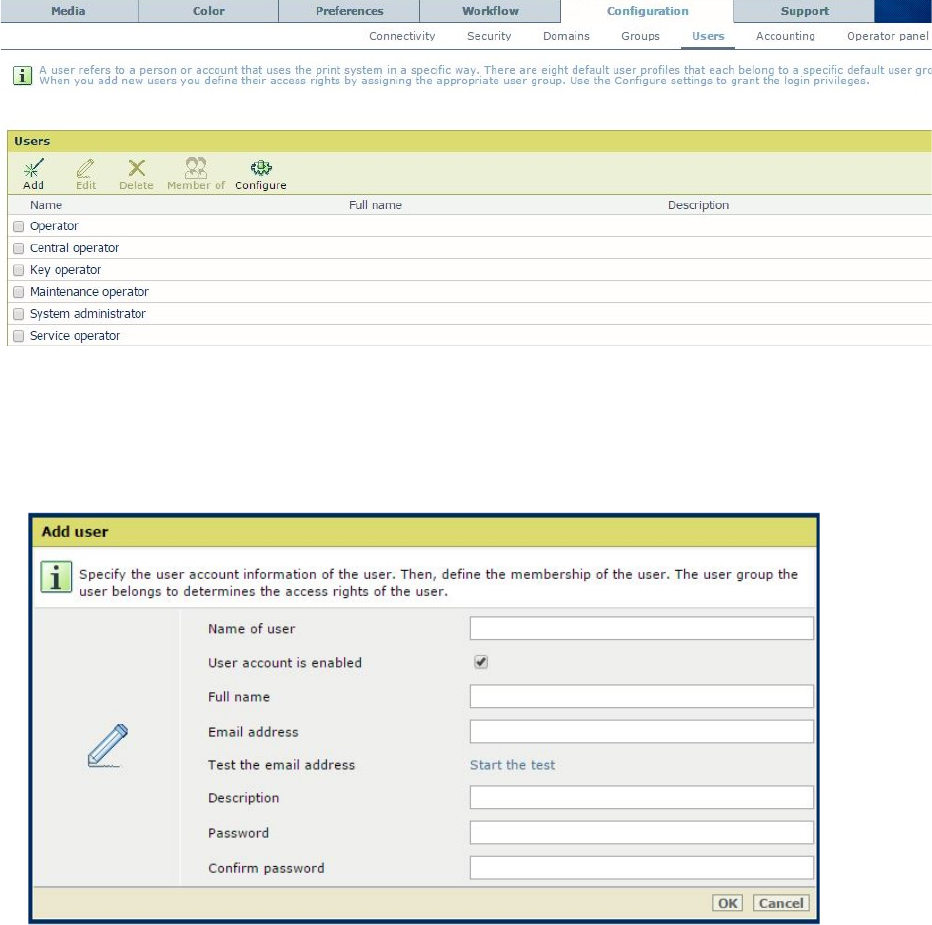
PRISMAsync V1.2 for imagePRESS C800 series
_____________________________________________________________________
7.5 Users
A user refers to a person or account that uses the system in a specific way. There are 7 default
users that each belong to a specific default user group. The predefined user names are translated
in the configured language.
When new users are added the system administrator must define their access permissions by
assigning the user to the appropriate user group.
• Add
Specify the user account information of the user. A user has a name, full name, description
and email address. These users are added to the local user database and are called “local
users”.
If the membership is not set, the new user will have no privileges to access the system.
Changes are applied as soon as the user logs in.
• Edit
The systems administrator can use this setting to change the users account information
• Delete
The systems administrator can use this setting to delete the selected users.
81
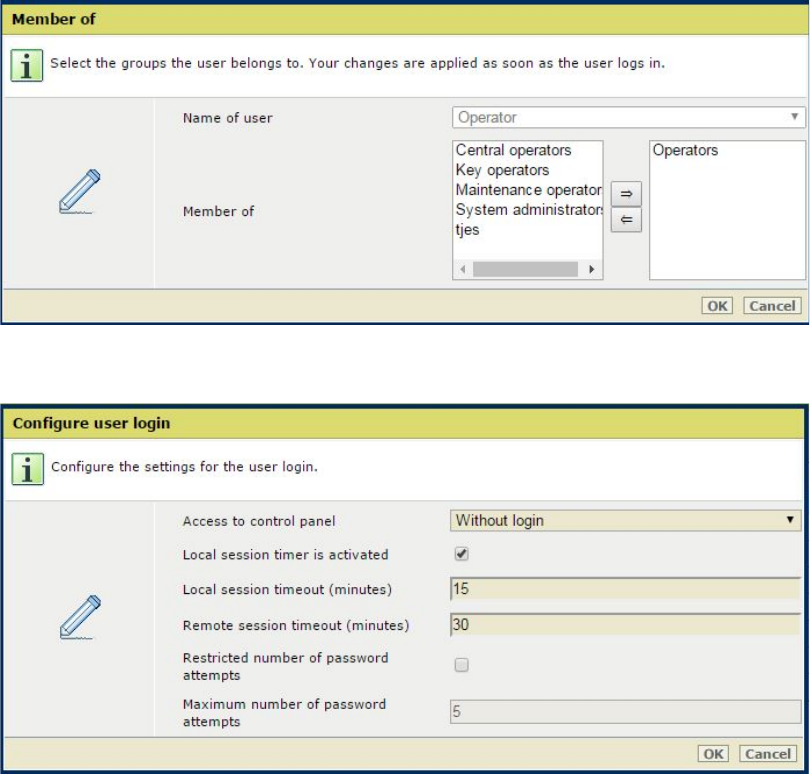
PRISMAsync V1.2 for imagePRESS C800 series
_____________________________________________________________________
• Member of
Select the groups the user belongs to.
• Configure
The system administrator can configure here the authentication (log-in) settings for all users.
Note: When a user is member of multiple groups he gets the combined privileges of all groups.
82
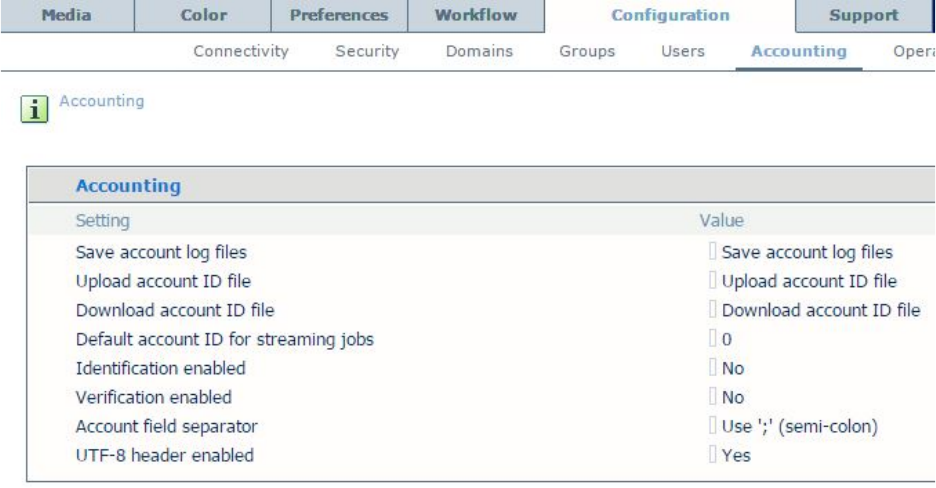
PRISMAsync V1.2 for imagePRESS C800 series
_____________________________________________________________________
7.6 Accounting
• Save account log files
An account log file registers job information. Use this setting to calculate the costs per
customer, project or department, for example. Each day, the system creates a new account log
file. The controller can store a maximum of 99 log files. The oldest file is removed when this
number is reached (Default: Save account log files)
• Upload account ID file
Upload a file with account IDs to make sure that submitted print jobs will only be printed
when they have a valid account ID. To use this functionality, verification of account IDs must
be activated.
• Download account ID file
Download the file with account IDs from the system, for example to update the file with new
IDs.
• Default account ID for streaming jobs
Use this setting to define the default account ID that is used when the system processes
streaming jobs. (Default: 0)
• Identification enabled
Enable this setting if every job which is printed/copied on the system must have an account
ID. (Default: No)
• Verification enabled
Enable this setting if the account ID of every job must be verified. For this verification, an
account ID file must be uploaded to the system. (Default: No)
• Account field separator
This setting allows you to select the character that is used in the accounting log files to
separate the information. (Default: Use ';' (semi-colon))
• UTF-8 header enabled
If you enable this setting, you indicate explicitly that the accounting log file is encoded in
UTF-8. (Default: Yes)
83
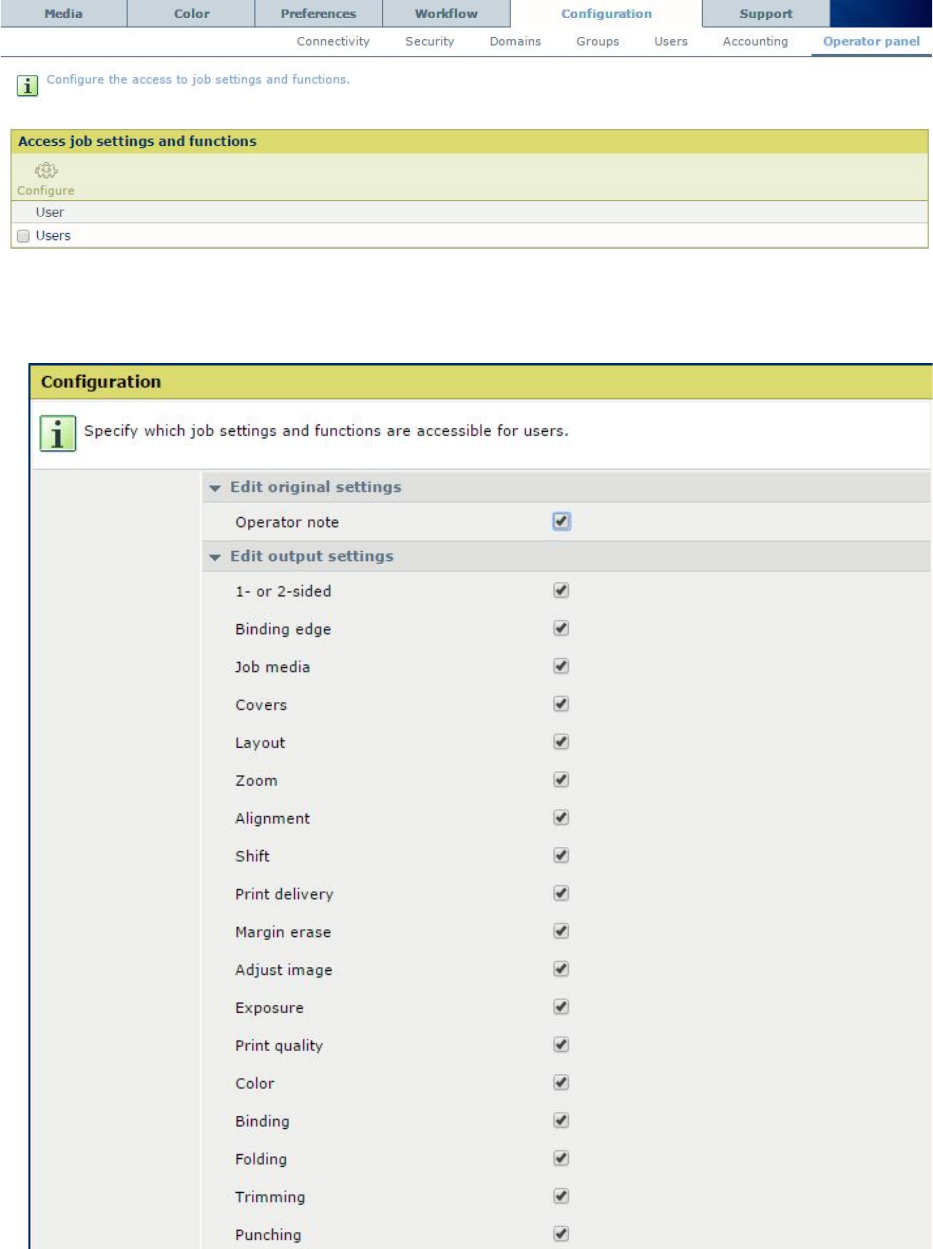
PRISMAsync V1.2 for imagePRESS C800 series
_____________________________________________________________________
7.7 Operator panel
Configure the access to job settings and functions from the operator panel.
• Configure
Specify in this window which job settings and functions are available for users.
84
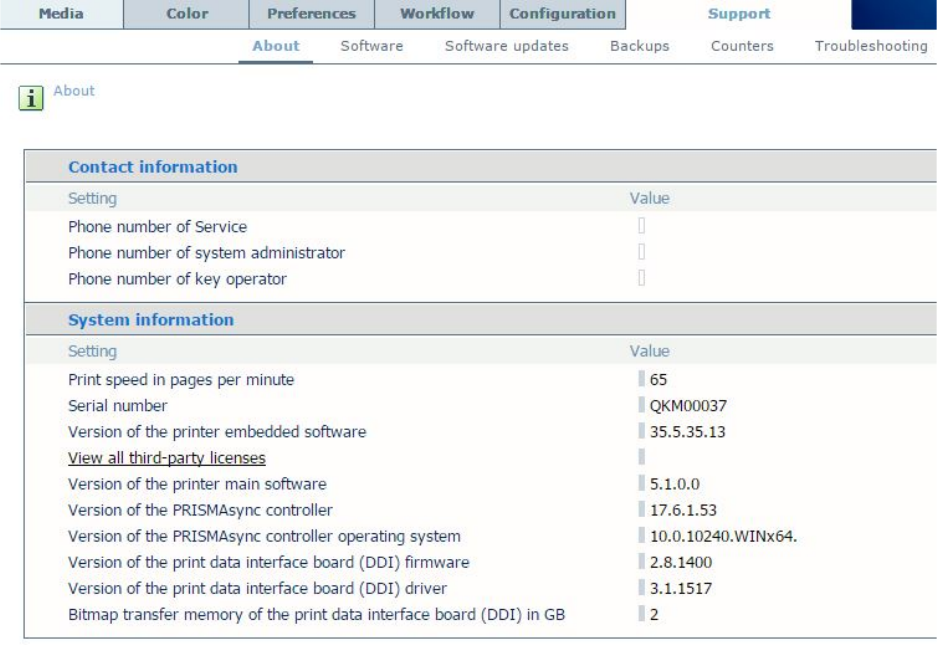
PRISMAsync V1.2 for imagePRESS C800 series
_____________________________________________________________________
8. Support
In the “Support” tab of the Settings Editor you can find information regarding overall system
information, licenses, counters, logging and restore.
8.1 About
Contact information
• Phone number of service
The telephone number of service is useful in case you need support.
• Phone number of system administrator
The telephone number of your system administrator is useful in case you need support.
• Phone number of key operator
The telephone number of your key operator is useful in case you need support.
System information
• Print speed in pages per minute
Rated engine speed of the machine.
• Serial number
The serial number of the Power Supply Unit of the engine. This is filled in automatically.
• Version of the printer embedded software
The version of the printer embedded software.
• View all third-party licenses
By selecting this a new window is opened summing up all the third party licenses that are
used in the PRISMAsync.
85
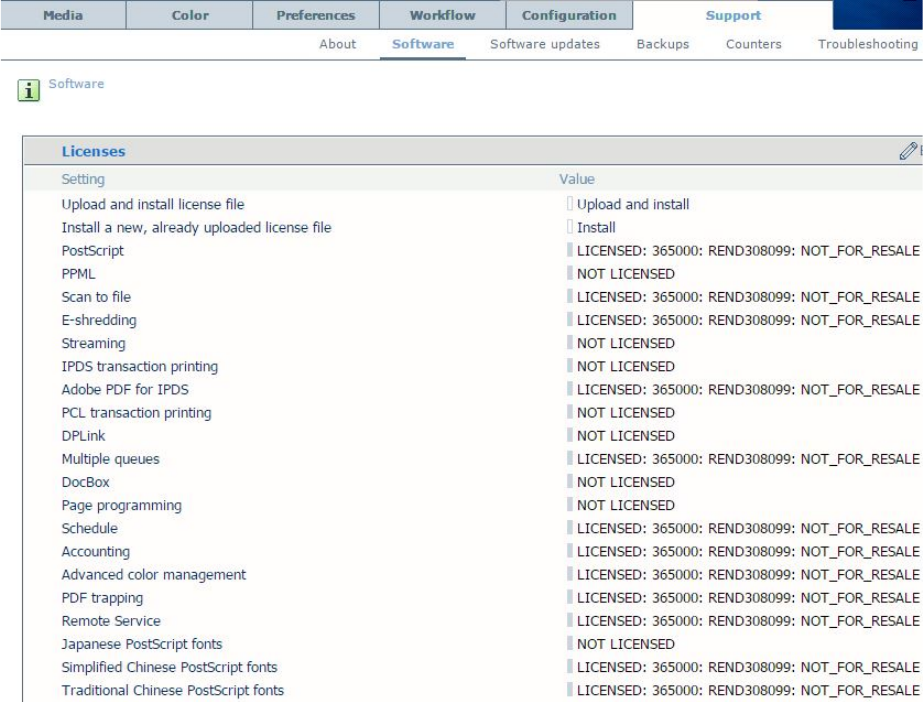
PRISMAsync V1.2 for imagePRESS C800 series
_____________________________________________________________________
• Version of the printer main software
The version of the System Software of the PRISMAsync.
• Version of the Océ PRISMAsync controller
Version of system software. Relevant for R&D.
• Version of the Océ PRISMAsync controller operating system
The version of the OS of the PRISMAsync.
8.2 Software
This section provides an overview of the available licenses and the possibility to upload a
license file. Also installation of patches and download of drivers is present on this part.
Licenses
• Upload license file
Upload a license file to activate software licenses. The licenses below are available:
o PostScript
o Scan to file
o E-shredding
o Streaming
o IPDS transaction printing
o Adobe PDF for IPDS
o PCL transaction printing
86
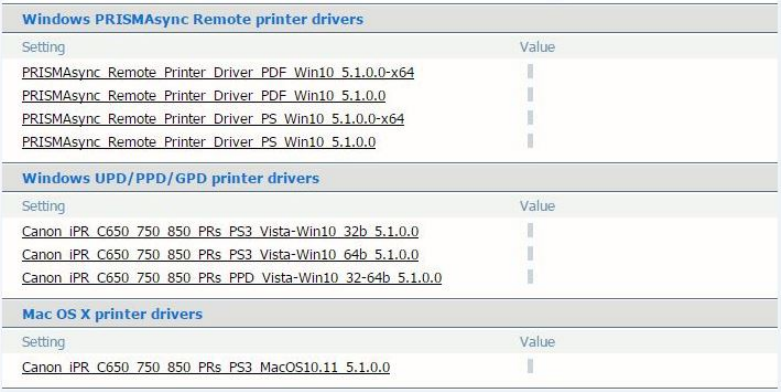
PRISMAsync V1.2 for imagePRESS C800 series
_____________________________________________________________________
o DPLink
o Multiple queues
o DocBox
o Page programming
o Schedule
o Accounting
o Advanced color management
o PDF trapping
o Remote viewer
o Remote Service
o Japanese PostScript fonts
o Simplified Chinese PostScript fonts
o Traditional Chinese PostScript fonts
o Korean PostScript fonts
Customer specific solutions
• Installed solution
Sometimes a specific solution for a customer is installed on the PRISMAsync. This option
gives an overview of the installed solutions.
Printer driver
• Download printer driver
Windows PRISMAsync Remote printer drivers
This section provides the Windows PRISMAsync Remote printer drivers. Click any of the
links to download the printer driver for your system/environment.
Windows UPD/PPD/GPD printer drivers
This section provides the Windows UPD / PPD / GPD printer drivers when available for the
concerning device. These drivers support Microsoft Windows 7 and higher, click any of the
links to download the right printer driver for your system/environment.
Mac OS X printer drivers
This section provides the MAC OS X printer drivers when available for the concerning
device. Click on the link to download the printer driver of your choice.
87
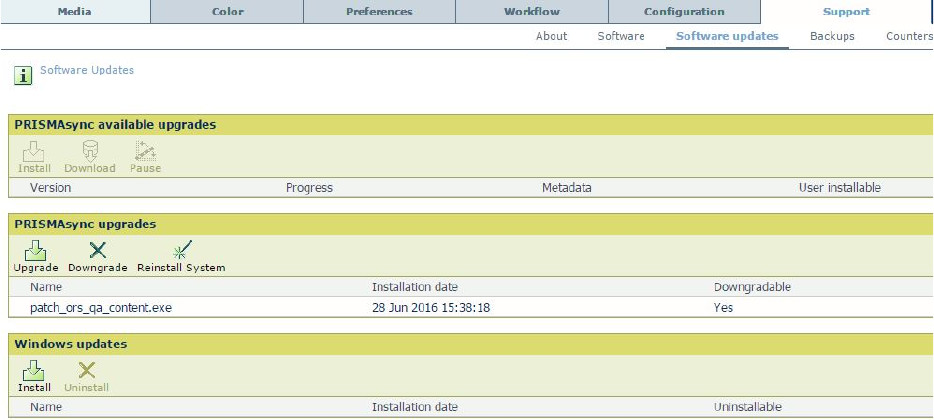
PRISMAsync V1.2 for imagePRESS C800 series
_____________________________________________________________________
8.3 Software updates
PRISMAsync available upgrades
Remote software upgrade by the customer from a server
• Install
Install is available after you downloaded an upgrade. Click install to install the downloaded
upgrade. It is recommended to finish and remove your jobs before you perform the upgrade.
• Download
Download the available version. When no version is visible, the printer dealer has made no
version available.
• Pause / resume
It is possible to pause downloading. After you clicked pause, ‘Pause’ is replaced by
‘Resume’. Use ‘Resume’ to resume the downloading.
PRISMAsync upgrades
Software upgrade by the customer from a location where the upgrade has been placed (by the
customer / service organization / printer dealer)
• Upgrade
Browse to location where the level/patch files are placed. The upgrade is installed after a
reboot of the system. It is recommended to finish and remove your jobs before you perform
the upgrade.
• Downgrade
After you upgraded the software, you can downgrade to the previous installed version. After
the downgrade is complete you must restart the system. The system will reinstall to the
previous installed version. This can take a while.
• Reinstall System
For future use. You cannot use this functionality yet.
• Name / Installation date / Downgradable
List of installed levels/patches with the indication whether the level/patch is downgradable.
Windows updates
Install the hotfixes from Microsoft® Windows that are downloaded by the customer.
88

PRISMAsync V1.2 for imagePRESS C800 series
_____________________________________________________________________
• Install
Browse to location where the Microsoft® Windows updates are placed. Install the available
update. It is recommended to finish and remove your jobs before you perform the upgrade.
• Uninstall
Uninstall the selected installed Windows updates. It is recommended to finish and remove
your jobs before you perform the upgrade. The system will reinstall to the previous installed
version. This can take a while.
8.4 Backups
• Create
Use this setting to store the current settings of the system. In case of problems, for example,
you can restore the current settings.
• Delete
Delete one or more previously created backups.
• Restore complete configuration
Use this setting to restore a previously stored configuration of the system. Only the service
organization is allowed to restore the complete configuration, which contains both the service
and the user configurations.
• Restore service configuration
Use this setting to restore a previously stored service configuration of the system. Only the
service organization is allowed to restore the service configuration.
• Restore user configuration
Use this setting to restore a previously stored user configuration of the system. Both system
administrator and service organization are allowed to restore the service configuration.
• Restore factory default settings
Use this setting to restore the factory defaults. Both system administrator and service
organization are allowed to restore the service configuration.
• Import
You can import a backup, which allows you to restore the configuration.
• Export
You can export a backup, which allows you to use the backup for other systems.
• Confidential data
Indicates whether the backup may include confidential data, such as passwords.
89
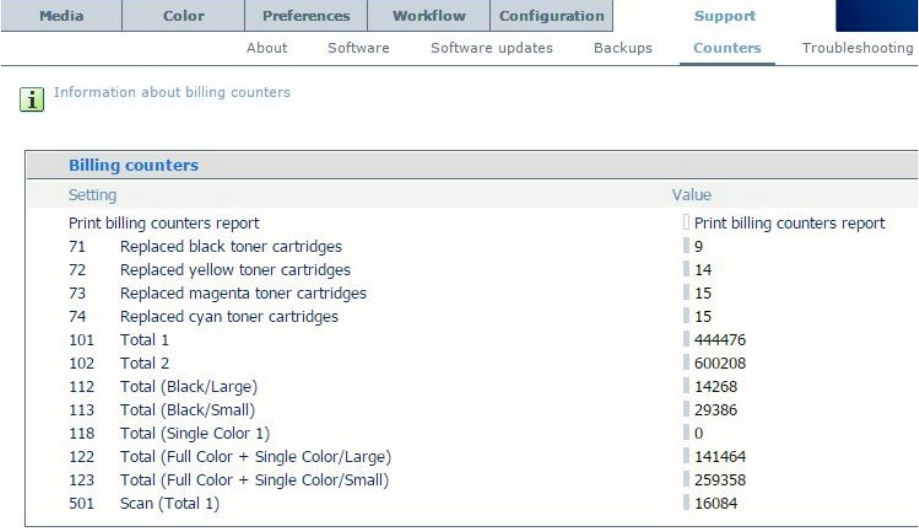
PRISMAsync V1.2 for imagePRESS C800 series
_____________________________________________________________________
8.5 Counters
This section gives an overview of the billing counters and gives the possibility to print them.
The counters displayed in this window must be first configured in Service Mode.
• Print billing counters report
Click the button to print a billing counters report.
90
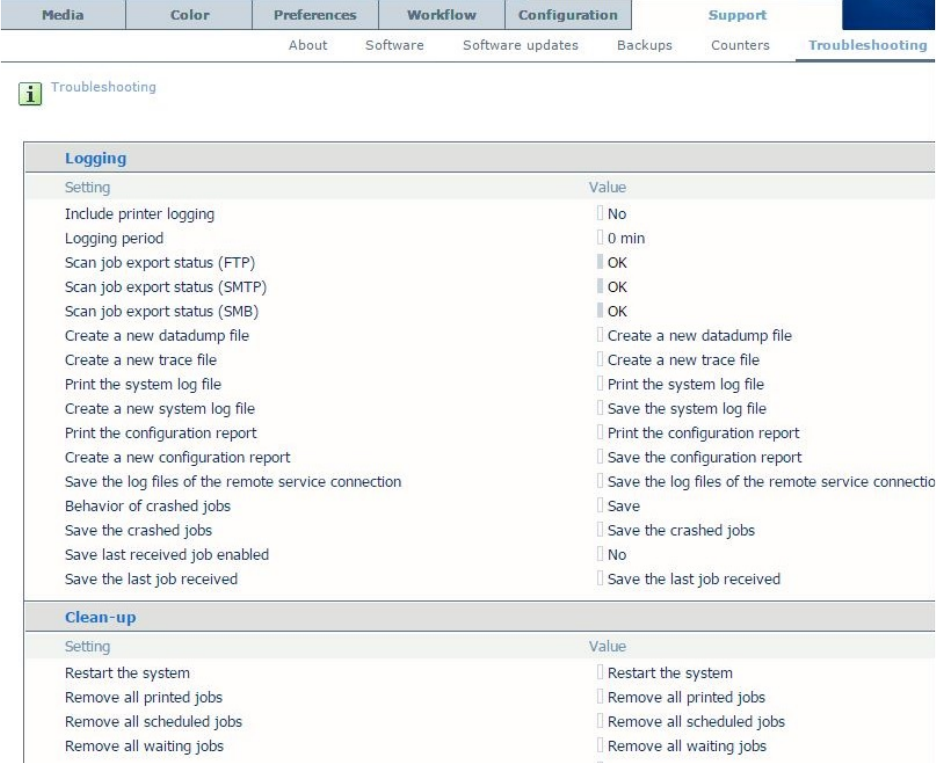
PRISMAsync V1.2 for imagePRESS C800 series
_____________________________________________________________________
8.6 Troubleshooting
This section enables you to extract all kind of logging out of the system or take actions to get the
system up and running again.
Logging
• Include printer logging
The tracelog file will include the logging that was generated by the engine.
The trace file becomes much longer when you include engine logging. However, a longer
trace file can help to identify problems. Including logging requires a system restart. (Default:
No)
• Logging period
You can indicate the period for which you want to retrieve logging data. Enter 0 to retrieve
all system logging (preferred). Enter a value in minutes to retrieve the system logging of a
specific last period. (Default: 0min)
• Scan job export status (FTP)
• Scan job export status (SMTP)
• Scan job export status (SMB)
91
PRISMAsync V1.2 for imagePRESS C800 series
_____________________________________________________________________
• Create a new datadump file
Click the 'Create a new datadump file' button to create a new datadump file. Click the link
below the button to download and save the file.
• Create a new trace file
Click the 'Create a new trace file' button to create a new trace file. Click on the desired link
below the button to download and save the trace file. A tracefile contains very detailed
information for R&D to analyze.
• Print the system log file
A system log file contains information about events in software. It is useful for doing a first
analysis. You can print or save the System log file.
• Create a new system log file
A system log file contains information about events in software. It is useful for doing a first
analysis.
• Print the configuration report
Print the configuration report of the PRISMAsync.
• Create a new configuration report
Click on the button 'Save the configuration report' to create a new configuration report. Click
the link below the button to download and save the file.
• Save the log files of the remote service connection
Logging of activities during Remote Service.
• Behavior of crashed jobs
This setting determines whether a job that crashes the system will be removed automatically
after 3 tries or will be saved for further analysis. (Default: Save)
• Save the crashed jobs
Click the link that refers to the job that crashed the system. You can download and save the
job for further analysis. Save the problematic jobs through the 'Behavior of crashed jobs'
setting.
• Save last received job enabled
Saving the last received job can be useful for analyzing problematic jobs (jobs that crashed
the controller or jobs that do not have the expected layout or behavior). When this function is
enabled, you should avoid submitting jobs in parallel to make sure that the last received job is
indeed the problematic job. Note that enabling this function degrades the performance of
print job handling. It is therefore recommended that you disable this function when no longer
needed. (Default: No)
• Save the last job received
Click the link to download and save the last received print job for further analysis. You must
enable the saving of the last received print job through the setting 'Save last job received
enabled'.
Clean-up
• Restart the system
Use this option to restart the system, for example after changing certain settings, after
updating the configuration or in case of a non-responsive system.
• Remove all printed jobs
Use this setting to empty the list of 'Printed jobs'.
• Remove all scheduled jobs
Use this setting to remove all the scheduled jobs from the system. These are the jobs that are
visible in the list of 'Scheduled jobs' on the operator panel. Only jobs that are not active can
be removed. So use this function when the system is not started with the “Moon”-button yet.
92
PRISMAsync V1.2 for imagePRESS C800 series
_____________________________________________________________________
• Remove all waiting jobs
Use this setting to remove all the waiting jobs from the system. These are the jobs that are
visible in the list of 'Waiting jobs' on the operator panel.
• Remove all jobs from all DocBoxes
Use this setting to remove all the jobs in the DocBoxes from the system. These are the jobs
that are visible in the configured 'DocBoxes' on the operator panel.
• Clean the scan job export buffer
Use this setting to remove all the scan jobs that have not yet been exported outside the
system. These are the jobs that are visible in the list of 'Scan jobs' on the operator panel.
Color configuration
• Print the latest calibration result
• Export color settings
Export all the color settings to an external destination.
• Import color settings
Import color settings from a previously exported file.
• Restore the default factory color settings
Use this setting to restore the default factory color settings.
• Print the color configuration report
93

PRISMAsync V1.2 for imagePRESS C800 series
_____________________________________________________________________
9. Search box in the Settings Editor
Search box in the Settings Editor
The Search box in the Settings Editor will search for the typed in string in:
• all settings
• actions (both the key, values and tooltip text),
• all (sub)tab names
• Docbox names
• color presets
• color mapping names
• hotfolder names
• information bar names
• SMB share names
• forwarding hostnames
• media names
• AWF-names
The search result will return a list of clickable items that contain the search string. Clicking on
an item will immediately take you to that setting, so you can change it (by opening the setting
dialog on the SE-page where that setting is located).
You may need to login first as Key Operator, System Administrator or Service. When a tab
name is searched, clicking on it will bring you to that tab. Read-only settings will have the OK
button disabled (you cannot change that setting) show the setting in its sub-section without
opening the dialog.
The Search box will search in the language files corresponding to the browser language.
Hovering over the list of found settings attached to the Search box also shows the relevant
tooltip. At least one character needs to be typed before a search result is returned.
94

Canon Inc.
www.canon.com
Canon U.S.A., Inc.
www.usa.canon.com
Canon Canada Inc.
www.canon.ca
Canon Europa Inc.
www.canon-europe.com
Canon Latin America Inc.
www.cla.canon.com
Canon Australia PTY. Ltd
www.canon.com.au
Canon China Co., Ltd
www.canon.com.cn
Canon Singapore PTE. Ltd
www.canon.com.sg
Canon Hongkong Co., Ltd
www.canon.com.hk
© CANON INC. 2016
