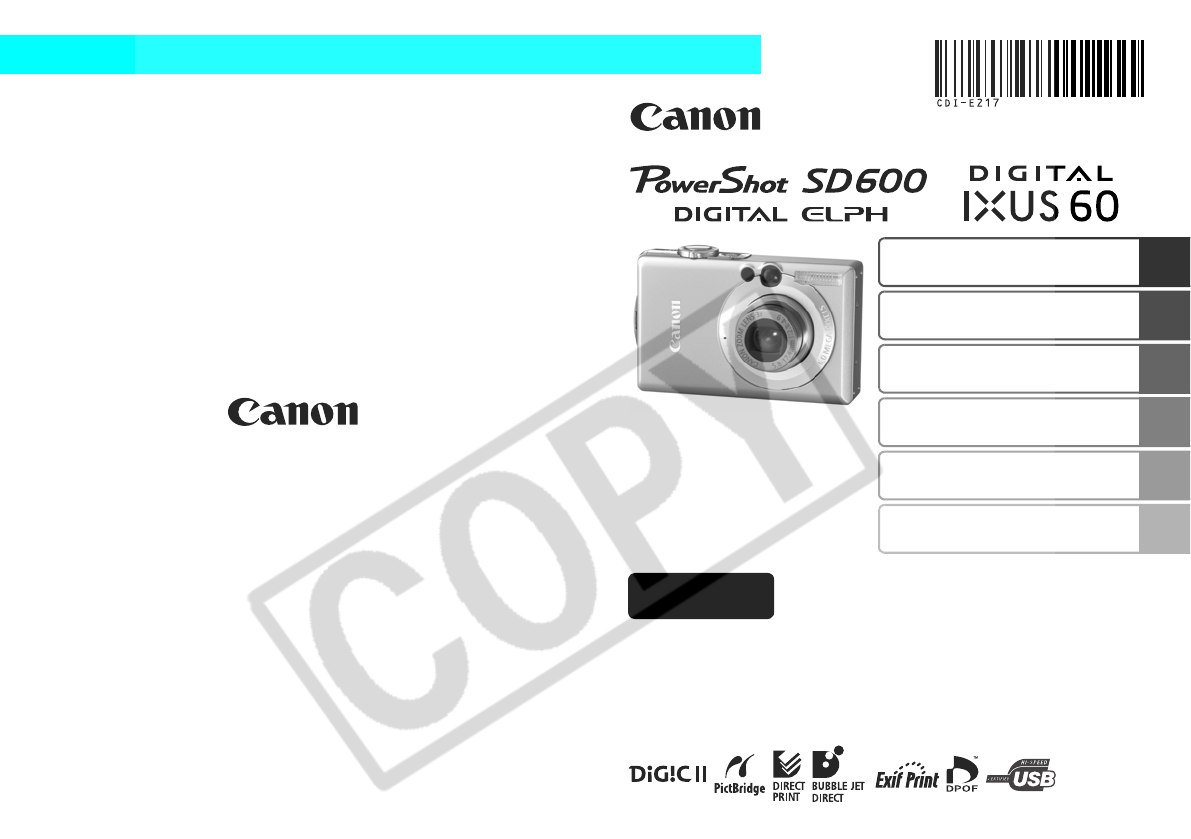
Canon Powershot Sd600 EC197 CUGBook(Basic Advanced) User Manual To The D984a3ca 4a60 45b5 93f4 4a3b960bd634
User Manual: Canon powershot sd600 to the manual
Open the PDF directly: View PDF ![]() .
.
Page Count: 27
Preparations
Shooting
Playback/Erasing
Menus and Settings
Printing
Downloading Images
to a Computer
CDI-E217-010 XX06XXX
Camera User Guide
Please Read This First
This guide explains how to prepare the camera and use its basic features.
© 2006 CANON INC. PRINTED IN JAPAN
ENGLISH
Basic
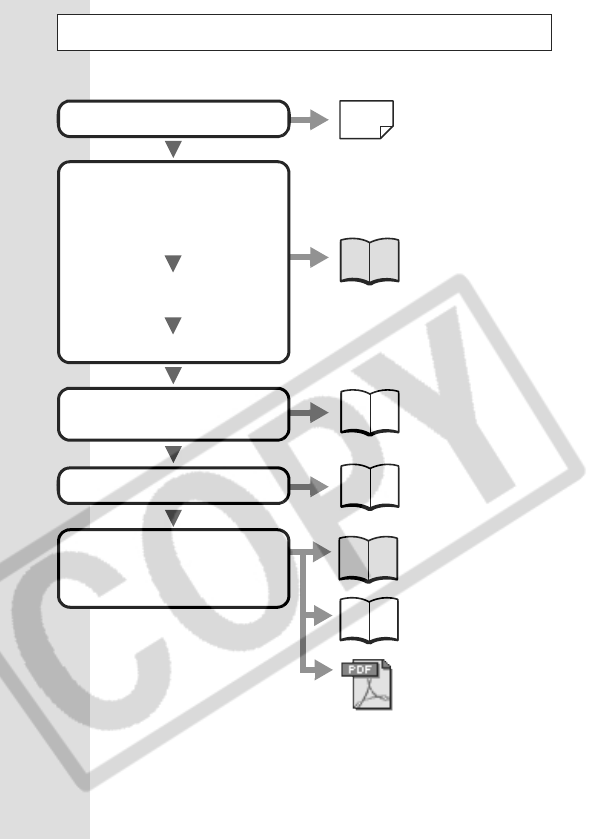
The following guides are available. Refer to them as necessary
according to the flowchart below.
Flowchart and Reference Guides
System Map
Basic Camera User
Guide (This Guide)
• Read this first.
Advanced Camera
User Guide
Direct Print User Guide
Basic Camera User
Guide (This Guide)
Software Starter Guide
ZoomBrowser EX/
ImageBrowser
Software User Guide
• PDF manuals available
on the Canon website.
http://web.canon.jp/
Imaging/information-
e.html
For information on included
items and items sold separately
Preparations
• Charging the battery
• Installing the battery and memory
card
• Setting the date, time and language
Shooting
Playback/Erasing
Menus and Settings
Handling precautions,
references to the various
shooting and playback functions
Printing
• Installing the software
• Downloading images to a
computer
• Using the software
In this guide, the Basic Camera User Guide is called the Basic Guide,
and the Advanced Camera User Guide is called the Advanced Guide.
Also, "battery" refers to the battery pack.
1
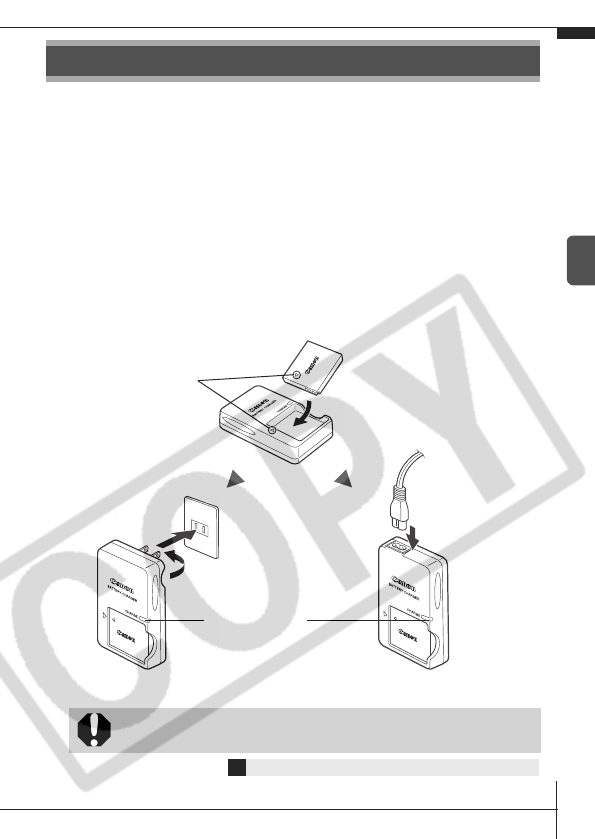
1.
Charging the Battery.
Charge the battery before use under the following circumstances.
• When using the battery for the first time.
• When the "Change the battery pack" message displays.
1. Insert the battery into the battery charger.
2. Plug the battery charger (CB-2LV) into a power outlet, or
attach the power cord to the battery charger (CB-2LVE) and
plug it into a power outlet.
• Battery charger model names and types vary by region.
The charge indicator will light orange while the battery is
charging. It will change to green when the charge is complete.
Charging takes approximately 1 hour 30 minutes.
Preparations
To protect the battery and prolong its life, do not charge it
for longer than 24 hours continuously.
ÎSee the Advanced Guide: Battery Handling (p. 107)
Charge Indicator
For CB-2LV For CB-2LVE
Align these symbols
Preparations
2
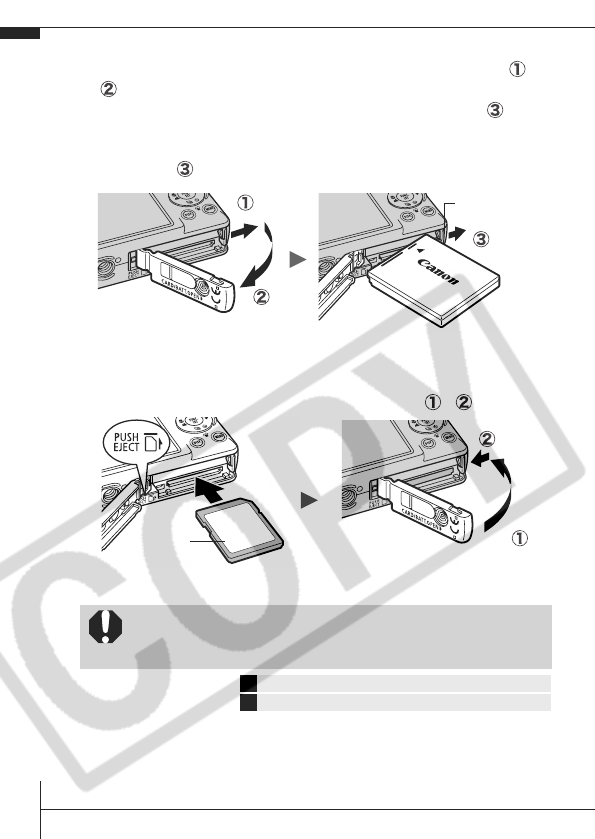
2.
Installing the Battery.
1. Slide the memory card slot/battery cover and open it ( ,
).
2. Push the battery lock in the direction of the arrow ( ) and
insert the battery until it locks.
To remove the battery, push the battery lock in the direction of
the arrow ( ) and hold it while pulling the battery out.
3.
Inserting the Memory Card.
1. Insert the memory card until it clicks into place.
2. Close the memory card slot/battery cover ( , ).
Ensure that the memory card is correctly oriented before
inserting it in the camera. It may damage the camera if
inserted incorrectly.
ÎSee the Advanced Guide: Handling the Memory Card (p. 109)
ÎSee the Advanced Guide: Formatting Memory Cards (p. 32)
Battery Lock
Front

3
To Remove the Memory Card
Push the memory card with your finger or the toggle on the wrist strap until
the memory card clicks and then release it.
You can use SD* memory cards and MultiMediaCards with this camera.
These cards are collectively called memory cards in this guide.
*SD stands for Secure Digital, a copyright protection system.
Preparations
4
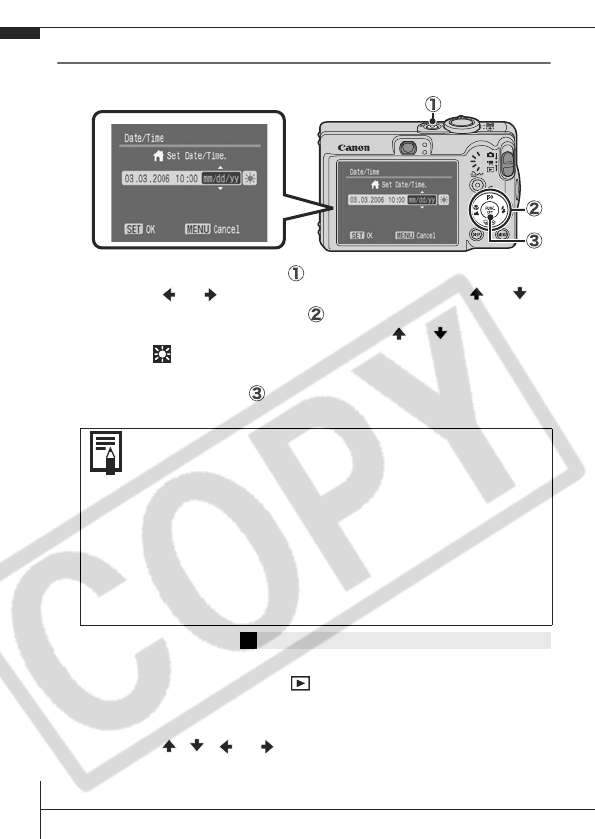
First Time Settings
Setting the Date/Time
1. Press the power button ( ).
2. Use the or button to select an item and the or
button to change its value ( ).
To set the daylight saving option, use the or button to
display .
3. Confirm that the correct time is displayed and press the
FUNC./SET button ( ).
The date and time can also be set in the Set up menu (p. 13).
Setting the Display Language
1. Slide the mode switch to (playback).
2. Hold down the FUNC./SET button and press the MENU
button.
3. Use the , , or button to select a language and
press the FUNC./SET button.
The display language can also be set in the Set up menu (p. 13).
• A rechargeable lithium battery is built into the camera to
save such settings as the date/time. This battery charges
when the main battery is in the camera. When you pur-
chase the camera, place the main battery in it for approx-
imately four hours or use AC Adapter Kit ACK-DC10
(sold separately) to charge the lithium battery. It will
charge even if the camera is turned off.
• The date/time settings may be lost after approximately
three weeks if you remove the main battery. Reset the
date/time settings if this occurs.
ÎSee the Advanced Guide: Setting the World Clock (p. 23).
5
1.
Press the power button.
The start-up sound will play and the
start-up image will display in the LCD
monitor.
• Pressing the power button again
turns the power off.
• To switch to the setting that mutes
all sounds (except for the warning sound), press and hold the
DISP. button while pressing the power button.
2.
Set the shooting mode to (Auto).
1. Slide the mode switch to (Rec.) ( ).
2. Press the FUNC./SET button ( ) and use the or
button ( ) to select (auto).
3. Press the FUNC./SET button ( ).
3.
Aim the camera at the subject.
4.
Focus and shoot.
1. Press the shutter button
halfway to focus.
When the camera focuses, the
camera beeps twice and the
indicator lights green.
Shooting
ÎSee the Advanced Guide: Using the LCD Monitor (p. 15)
ÎSee the Advanced Guide: Power Saving Function (p. 22)
ÎSee the Advanced Guide: Set up Menu (p. 28)
ÎSee the Advanced Guide: My Camera Menu (p. 30)
Power button
Indicators
Shooting
6
2. Press the shutter button fully
to shoot.
The shutter sound will play and the
image will record. The indicator will
blink green while the image is
recorded to the memory card.
Reviewing an Image Right After Shooting
After a shot is taken, the image appears in the LCD monitor for
approximately 2 seconds.
You can continue to display images regardless of the review duration
setting with the following procedures.
• Keeping the shutter button pressed after a shot.
•Pressing the FUNC./SET or DISP. button while the image is displayed in
the LCD monitor.
To stop displaying the image, press the shutter button halfway.
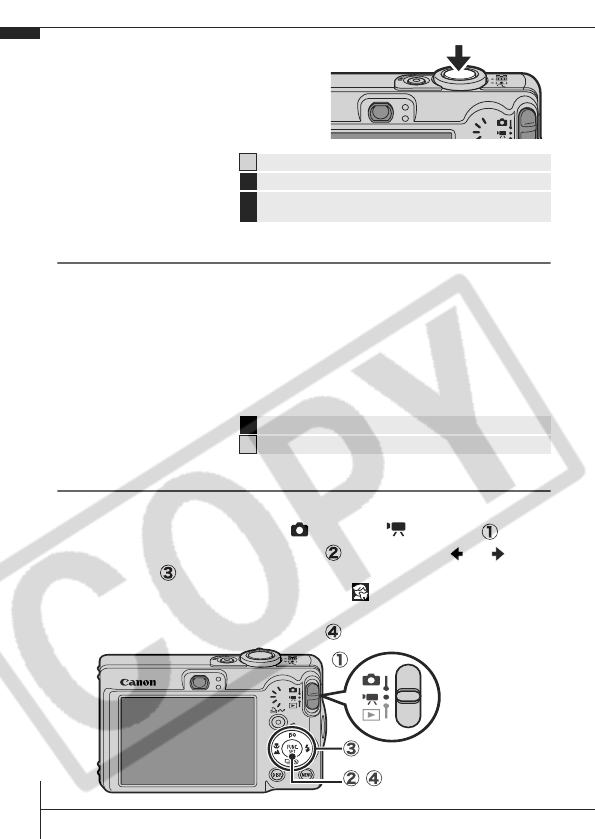
Basic Shooting Functions
Selecting a Shooting Mode
1. Slide the mode switch to (Rec.) or (Movie) ( ).
2. Press the FUNC./SET button ( ) and use the or
button ( ) to select a shooting mode.
For a scene mode (p. 7), select the mode (default setting)
and press the MENU button to select the desired mode.
3. Press the FUNC./SET button ( ).
ÎSee Basic Shooting Functions (p. 6).
ÎSee the Advanced Guide: Indicators (p. 22).
ÎSee the Advanced Guide for the various shooting methods
available.
ÎSee the Advanced Guide: Review (p. 27).
ÎSee Basic Erasing (p. 11).
7
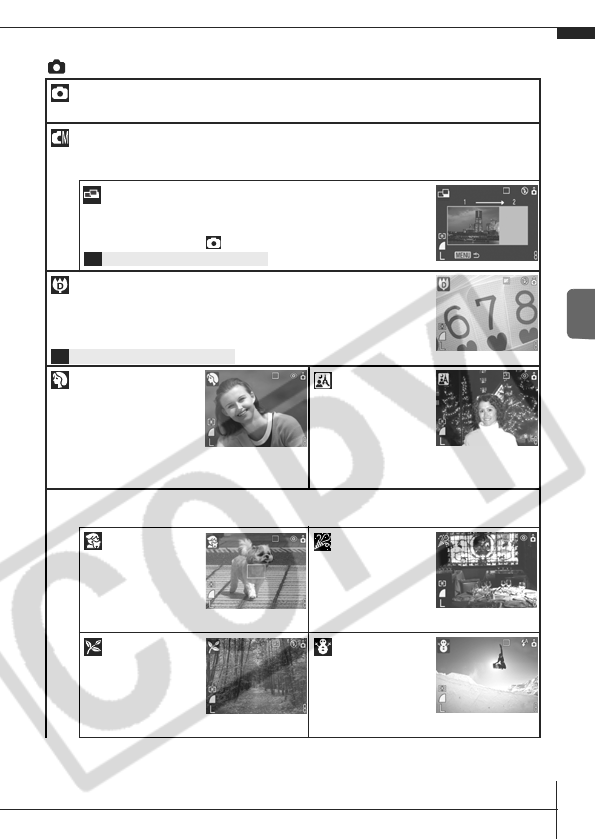
Shooting Modes
Still Images
Auto
The camera automatically selects settings.
Manual
Allows you to select settings yourself, such as the exposure compensation, white balance or
photo effect.
Stitch Assist
Allows you to shoot overlapping images that can later be merged
(stitched) to create one panoramic image on a computer. Select
[Stitch Assist] from the [ (Rec.)] menu.
Digital Macro
Allows you to shoot when the distance from the lens (at maximum wide
angle) to the subject is within 3 – 10 cm (1.2 – 3.9 in.). The subject can
be shown larger than in standard macro mode because the camera trims
the image edges and zooms in with the digital zoom.
Portrait
Produces a soft effect when
photographing people.
Night
Snapshot
Allows you to take
snapshots of people
against twilight or
night backgrounds by
reducing the effects of camera shake even
without using a tripod.
Scene Mode
You can shoot with the most appropriate settings for a scene.
Kids&Pets
Allows you to capture
subjects that move
around, such as
children and pets,
without missing
photo opportunities.
Indoor
Prevents camera
shake and maintains
the subject's true
color when shooting
under florescent or
tungsten lighting.
Foliage
Shoots trees and
leaves—such as new
growth, autumn
leaves or
blossoms—in vivid
colors.
Snow
Shoots without a blue
tinge and without
making people
appear dark against
a snowy background.
ÎSee the Advanced Guide (p. 44).
ÎSee the Advanced Guide (p. 34).
Shooting

8
Movie
Beach
Shoots without
making people
appear dark near
water or sand where
reflected sunlight is
strong.
Fireworks
Captures fireworks in
the sky sharply and
at optimal exposure.
Underwater
Appropriate for shooting images with Waterproof Case WP-DC4
(sold separately). This mode uses an optimal white balance
setting to reduce bluish tones and record images with a natural
hue.
Color Accent
Use this option to
have only the color
specified in the LCD
monitor remain and
to transform all
others to black and
white.
Color Swap
Use this option to
transform a color
specified in the LCD
monitor into another.
Movie
Shoots a movie when you press the shutter button.
You can select from the following modes: [ Standard]; [ Fast Frame Rate] suitable for
sports or fast motion; [ Compact] convenient for email attachments; [ Color Accent] for
recording all colors in black and white except for the selected color; and [ Color Swap] for
recording a selected color as a different color.
•The shutter speed is slow in mode. Always use a tripod
to avoid camera shake.
•In , , , , , , or mode, the ISO speed
may increase and cause noise in the image depending on
the scene being shot.
• In mode, shoot with the subject 1 m (3.3 ft.) or more from
the end of the lens.
•To shoot underwater, install the camera in Waterproof Case
WP-DC4 (sold separately).
•We recommend you use Waterproof Case WP-DC4 for
shooting at ski resorts or beaches.
ÎSee the Advanced Guide (p. 60).
ÎSee the Advanced Guide (p. 61).
ÎSee the Advanced Guide (p. 40).
9
Using the Zoom
1.
Press the zoom lever toward or .
The zoom can be adjusted from 35 – 105 mm (focal length) in
35mm film equivalent terms.
Wide Angle: Zooms out
from the subject.
Telephoto: Zooms in on
the subject.
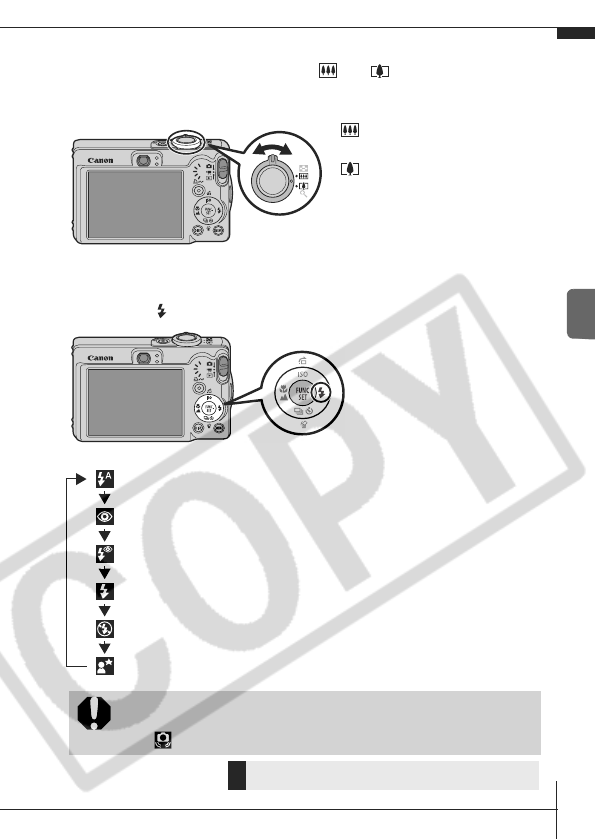
Using the Flash
1.
Press the button to cycle through flash settings.
Flash settings cannot be used
in some shooting modes.
You are recommended to shoot with the camera attached
to a tripod or other device if the camera shake warning
icon appears.
ÎSee the Advanced Guide: Functions Available in Each
Shooting Mode (p. 128).
Auto
Auto
Red-eye Reduction
Red-eye Reduction
On
On
Off
Slow synchro
Red-eye reduction
This feature reduces the effect of light
reflecting back from the eyes and
making them appear red.
Slow synchro
The flash timing is adjusted to a slow
shutter speed, allowing you to shoot
night scenes.
Shooting
10
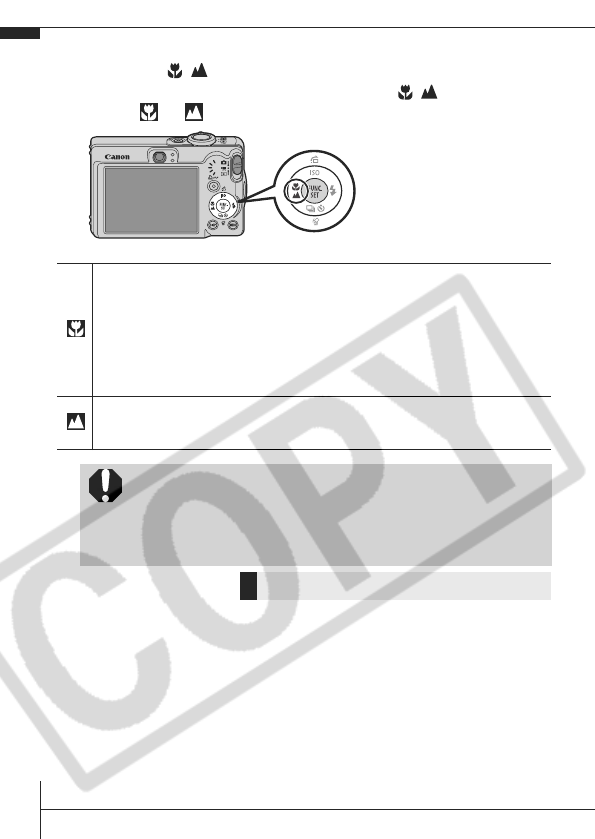
Shooting Close-Ups/Infinity Shots
1.
Press the / button to switch modes.
To cancel the macro/infinity mode: press the / button to
remove or from the display.
These settings cannot be set
in some shooting modes.
Macro
Use this mode to shoot close-ups of flowers or small items.
Image Area at Minimum Shooting Distance from End of Lens to Subject
• Maximum wide angle setting: 37 × 27 mm (1.5 × 1.1 in.)
Minimum shooting distance: 3 cm (1.2 in.)
• Maximum telephoto setting: 108 × 81 mm (4.3 × 3.2 in.)
Minimum shooting distance: 30 cm (12 in.)
Infinity
Use this mode to record subjects 3 m (9.8 ft.) or more from the end of
the lens.
•Use the LCD monitor to compose close-ups in macro
mode since images composed with the viewfinder may
be off-center.
•The exposure may not be optimal when the flash is used
in macro mode in the range of 3 – 30 cm (1.2 in. – 12 in.).
ÎSee the Advanced Guide: Functions Available in Each
Shooting Mode (p. 128).
11
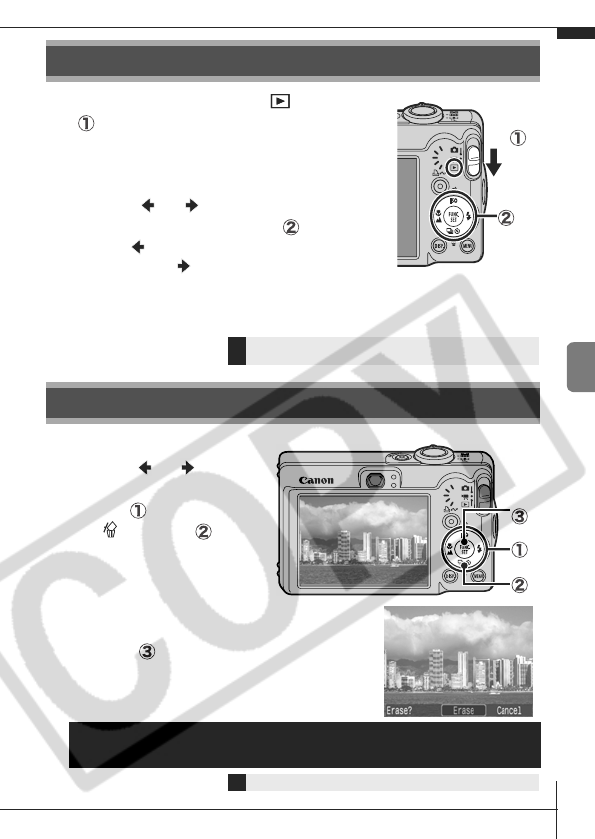
1.
Slide the mode switch to (playback)
()
.
The last recorded image will appear in the
LCD monitor.
2.
Use the or button to display the
image you wish to view ( ).
Use the button to move to the previous
image and the button to move the next
image.
Holding the button down advances the images more rapidly, but
shows them less clearly.
1.
In the playback mode,
use the or button
to select an image to
erase ( ) and press
the button ( ).
2.
Confirm that [Erase] is
selected and press the FUNC./SET
button ( ).
To exit instead of erasing, select [Cancel].
Playback
ÎSee the Advanced Guide for the various playback methods
available
Erasing
Please note that erased images cannot be recovered.
Exercise adequate caution before erasing an image.
ÎSee the Advanced Guide: Erasing All Images (p. 84).
Playback/Erasing
12
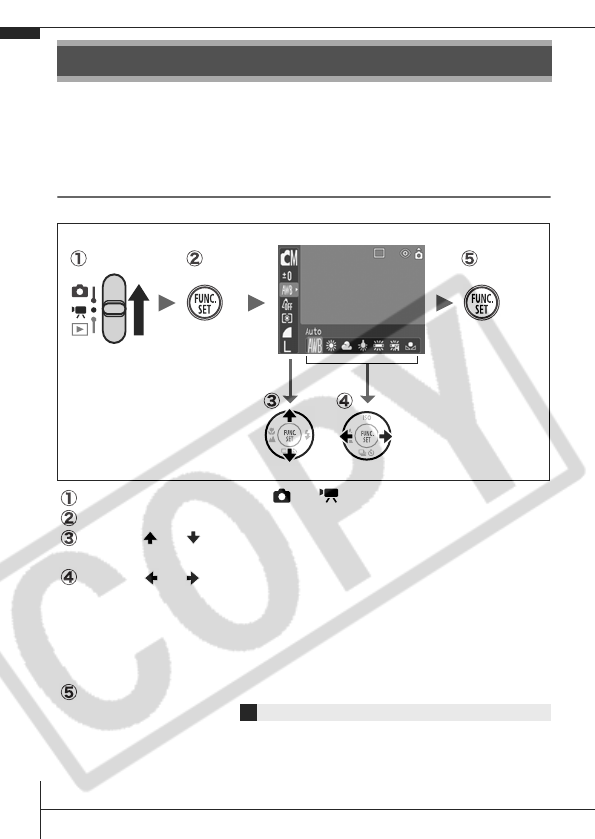
Settings for the shooting or playback modes or such camera settings as
the print settings, date/time and sounds are set using the FUNC. menu or
the Rec., Play, Print, Set up or My Camera menu.
FUNC. Menu
This menu sets many of the common shooting functions.
Slide the mode switch to or .
Press the FUNC./SET button.
Use the or button to select a menu item.
• Some items may not be selectable in some shooting modes.
Use the or button to select an option for the menu item.
• You can select further options with the MENU button for some
options.
• After selecting an option, you can press the shutter button to
shoot immediately. After shooting, this menu will appear again,
allowing you to adjust the settings easily.
Press the FUNC./SET button.
Menus and Settings
ÎSee the Advanced Guide: Menu List (p. 27).

13
Rec., Play, Print, Set up and My Camera Menus
Convenient settings for shooting, playback or printing can be set with these
menus.
Press the MENU button.
Use the or button to switch between menus.
• You can also use the zoom lever to switch between menus.
Use the or button to select a menu item.
• Some items may not be selectable in some shooting modes.
Use the or button to select an option.
• Menu items followed by an ellipsis (...) can only be set after
pressing the FUNC./SET button to display the next menu.
• Press the FUNC./SET button again to confirm the setting.
Press the MENU button.
ÎSee the Advanced Guide: Menu List (p. 27).
(My Camera) Menu
• This example shows the Rec. menu.
• In playback mode, the Play, Print, Set up and My Camera menus
display.
You can switch
between menus
with the or
button when this
part is selected.
(Rec.) Menu (Set up) Menu
Menus and Settings
14
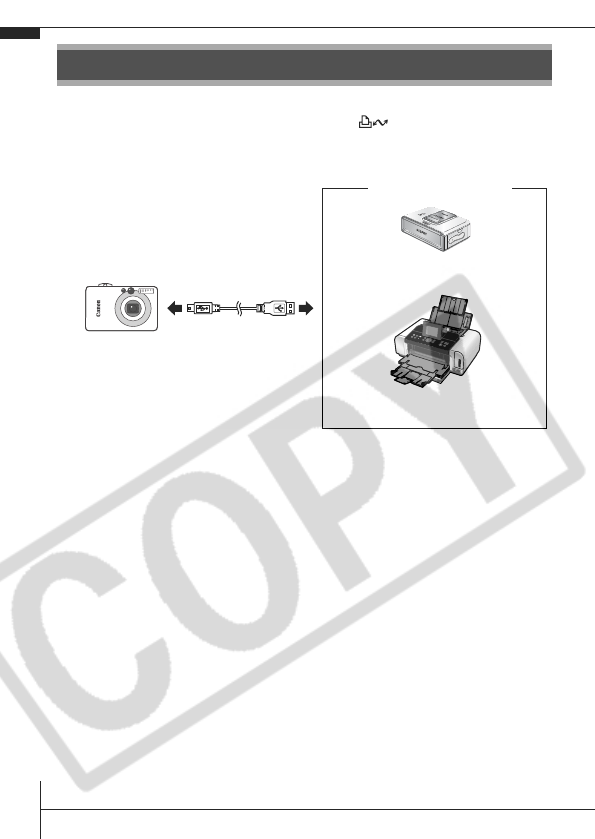
You can easily print by connecting the camera to a direct print compatible
printer*1 with a cable and simply pressing the button on the camera.
1.
Connect the camera to a Direct Print compatible printer
and turn on the printer's power.
*1 Since this camera uses a standard protocol (PictBridge), you can use it with other
PictBridge-compliant printers in addition to Canon-brand printers.
*2 You can also use card photo printers such as the CP-10/CP-100/CP-200/CP-300.
Printing
Canon Brand Printers
SELPHY CP Series
Compact Photo Printers*2
PIXMA Series/SELPHY DS
Series Bubble Jet Printers
Interface Cable
Camera
15
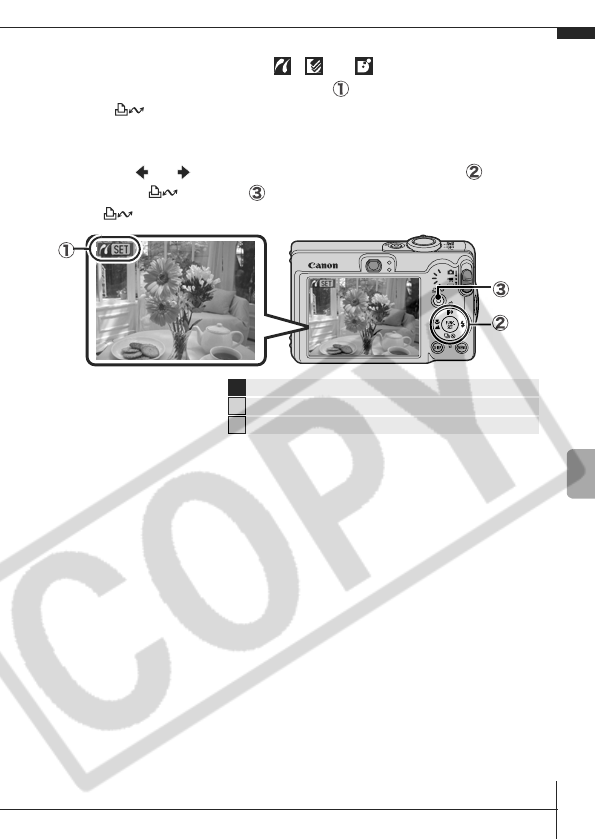
2.
Set the camera to the playback mode, turn on the
power and confirm that , or is displayed in the
upper left of the LCD monitor ( ).
• The button will light blue.
• The displayed icon will vary according to the printer model.
3.
Use the or button to select an image to print ( ) and
press the button ( ).
The button will blink blue and printing will start.
Î
See the Advanced Guide: Setting the DPOF Print Settings (p. 85).
ÎSee the Direct Print User Guide
ÎSee the user guide for your printer
Printing
16
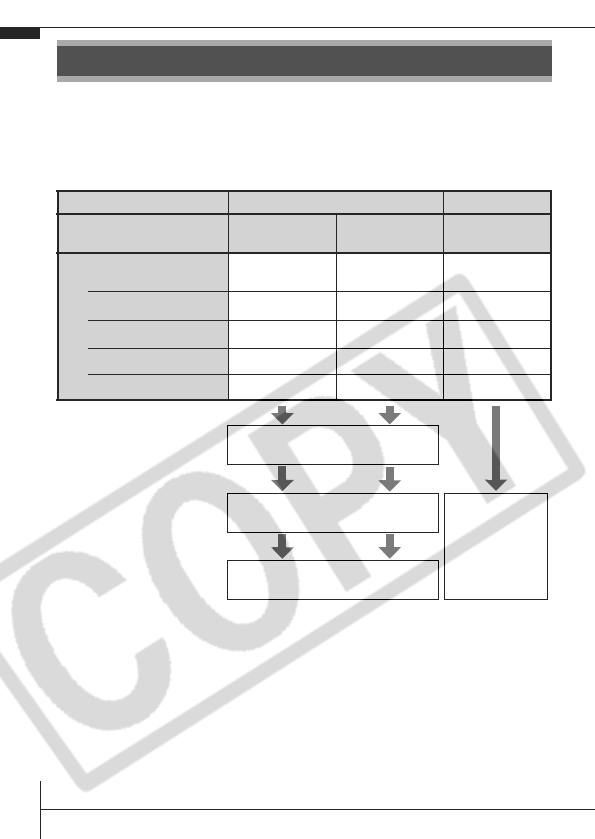
The following methods can be used to download images recorded by the
camera to a computer. Some methods, depending on the OS used, may
not be available. Please read System Requirements (p. 17) in advance.
Camera to Computer Connection
Using a Memory Card Reader
A memory card reader can be used with all the operating systems listed
above. See the Software Starter Guide for details.
Downloading Images to a Computer
Supplied Software Install It Do Not Install It
Downloading Method Computer
Procedure
Camera
Procedure
Computer
Procedure
OS Windows 98
Second Edition (SE) zz–
Windows 2000
zz–
Windows Me zz–
Windows XP zzz
Mac OS X zzz
Computer System
Requirements
•Basic Guide (p. 17)
•Software Starter Guide
Connecting the Camera to
a Computer
•Basic Guide (p. 19)
•Windows XP
and Mac OS X
Users leaflet
Downloading Images to
a Computer
•Basic Guide (pp. 20–21)
•Software Starter Guide
17
System Requirements
Please install the software on a computer meeting the following minimum
requirements.
Windows
Macintosh
OS
Windows 98 Second Edition (SE)
Windows Me
Windows 2000 Service Pack 4
Windows XP (including Service Pack 1 and Service Pack 2)
Computer Model
The above OS should be pre-installed on computers with built-in USB
ports.
CPU
Pentium 500 MHz or higher processor
RAM
Windows 98 SE/Windows Me 128 MB or more
Windows 2000/Windows XP 256 MB or more
Interface
USB
Free Hard Disk
Space
• Canon Utilities
- ZoomBrowser EX 200 MB or more
- PhotoStitch 40 MB or more
• Canon Camera TWAIN Driver 25 MB or more
• Canon Camera WIA Driver 25 MB or more
• ArcSoft PhotoStudio 50 MB or more
Display
1,024 x 768 pixels/High Color (16 bit) or better
OS
Mac OS X (v10.2–v10.4)
Computer Model
The above OS should be pre-installed on computers with built-in USB
ports.
CPU
PowerPC G3/G4/G5
RAM
256 MB or more
Interface
USB
Free Hard Disk
Space
• Canon Utilities
- ImageBrowser 200 MB or more
- PhotoStitch 40 MB or more
• ArcSoft PhotoStudio 50 MB or more
Display
1,024 x 768 pixels/32,000 Colors or better
Downloading Images to a Computer

18
Preparing to Download Images
Items to Prepare
• Camera and computer
• Canon Digital Camera Solution Disk supplied with the camera
• Interface cable supplied with the camera
1.
Install the software.
1. Place the Canon Digital Camera Solution Disk in the
computer's CD-ROM drive.
2. Click [Easy Installation].
Proceed with the installation while
reviewing installation settings.
3. When the installation is finished, the
[Finish] or [Restart] button appears.
Click the one that appears.
4. When the screen returns to the desktop display, remove the
Canon Digital Camera Solution Disk from the CD-ROM
drive.
Ensure that you install the software first before connecting the
camera to the computer.
Double-click the [Canon
Digital Camera Installer] icon in the
CD-ROM window. When the installer
panel appears, click [Install].
Select [Easy Installation] as
the setup type and click [Next].
When the installation is
finished, click [OK].
19
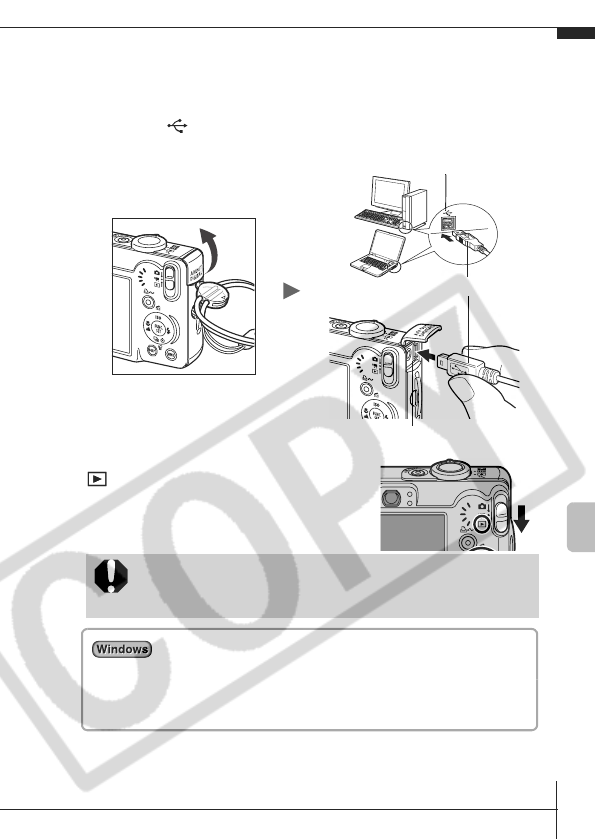
2.
Connecting the camera to a computer.
1. Connect the supplied interface cable to the computer's USB
port and to the camera's DIGITAL terminal.
1. Use the toggle on the wrist strap to open the terminal cover.
2. With the facing in the direction shown, insert the interface
cable all the way.
2. Slide the camera's mode switch to
(playback) and turn on the power.
The camera and computer will be able
to communicate.
Always grasp the sides of the connector when
disconnecting the interface cable from the camera's
DIGITAL terminal.
USB Port
Interface Cable
DIGITAL Terminal
If the Digital Signature Not Found window appears,
click [Yes]. The USB driver will automatically finish installing
onto the computer when you attach the camera and open a
connection.
Downloading Images to a Computer
20
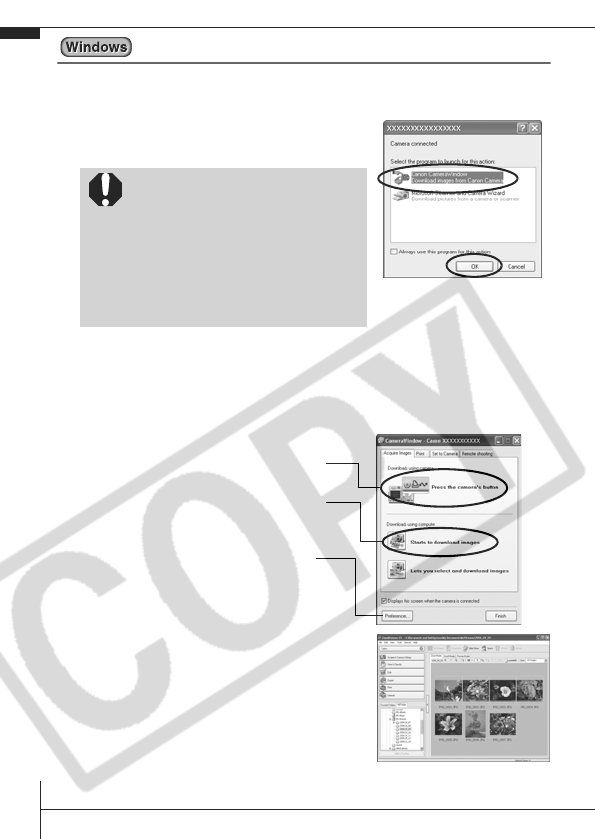
Downloading Images to a Computer
A window allowing you to set the preferences will appear when a
connection is established between the camera and computer.
1.
Select [Canon CameraWindow]
and click [OK] (first time only).
2.
Download the images.
• Download the images using the camera or the computer.
• By default, the downloaded images are saved into the [My
Pictures] folder.
Thumbnails (small versions) of the
downloaded images will display in the
ZoomBrowser EX Main Window. By
default, the downloaded images are
saved into subfolders according to their
shooting dates.
If the window to the right does
not appear, click the [Start]
menu and select [All Programs]
or [Programs], followed by
[Canon Utilities],
[CameraWindow], [PowerShot -
IXY - IXUS - DV 6] and
[CameraWindow].
Downloading Images Using the Camera
(p. 22).
Downloading Images Using a Computer.
By default, all images that have yet to be
downloaded will download.
You can set the type of image to
download and the destination folder.
21
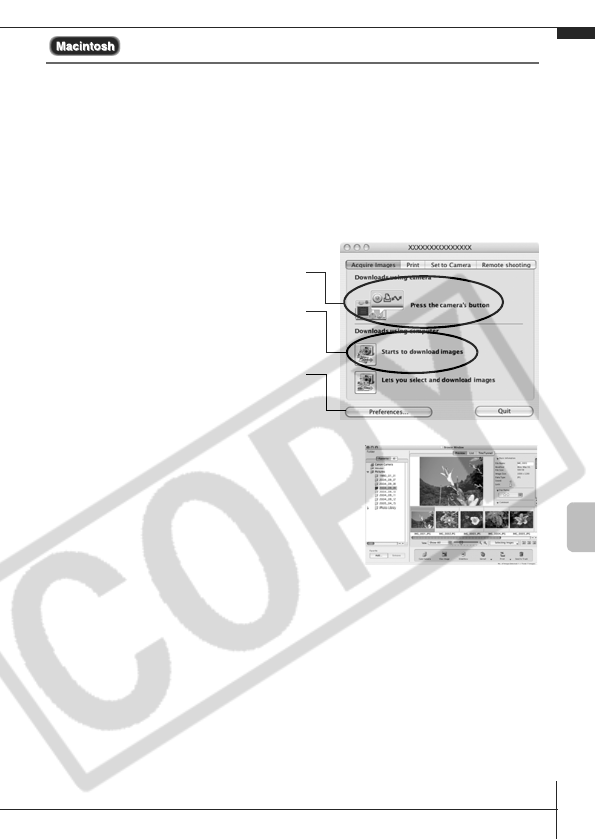
Downloading Images to a Computer
The following window will appear when you establish a connection
between the camera and computer.
If it fails to appear, click the [Canon
CameraWindow] icon on the Dock (the bar which appears at the bottom of
the desktop).
1.
Download the images.
• Download the images using the camera or the computer.
• By default, the downloaded images are saved into the [Pictures]
folder.
Thumbnails (small versions) of the
downloaded images will display in the
ImageBrowser Browser Window. By
default, the downloaded images are
saved into folders according to their
shooting dates.
Downloading Images Using the Camera
(p. 22).
Downloading Images Using a Computer.
By default, all images that have yet to be
downloaded will download.
You can set the type of image to
download and the destination folder.
Downloading Images to a Computer
22
Downloading Images Using the Camera
(Direct Transfer)
Use this method to download images using camera operations.
Install the supplied software and adjust the computer settings before using
this method for the first time (p. 18).
1.
Confirm that the Direct Transfer
menu is displayed on the camera's
LCD monitor.
• The button will light blue.
• Press the MENU button if the Direct
Transfer menu fails to appear.
All Images/New Images/DPOF Trans. Images
2.
Select , or and press the
button.
• The images will download. The
button will blink blue while downloading
is in progress. The display will return to
the Direct Transfer menu when the
download is complete.
• To cancel the download, press the FUNC./SET button.
All Images
Transfers and saves all images to the computer.
New Images
Transfers and saves to the computer only the
images that have not been previously
transferred.
DPOF Trans.
Images
Transfers and saves to the computer only the
images with DPOF Transfer Order settings
(Advanced Guide, p.88).
Select & Transfer Transfers and saves single images to the
computer as you view and select them.
Wallpaper
Transfers and saves single images to the
computer as you view and select them. The
transferred images display on the computer
desktop.
Direct Transfer Menu
23
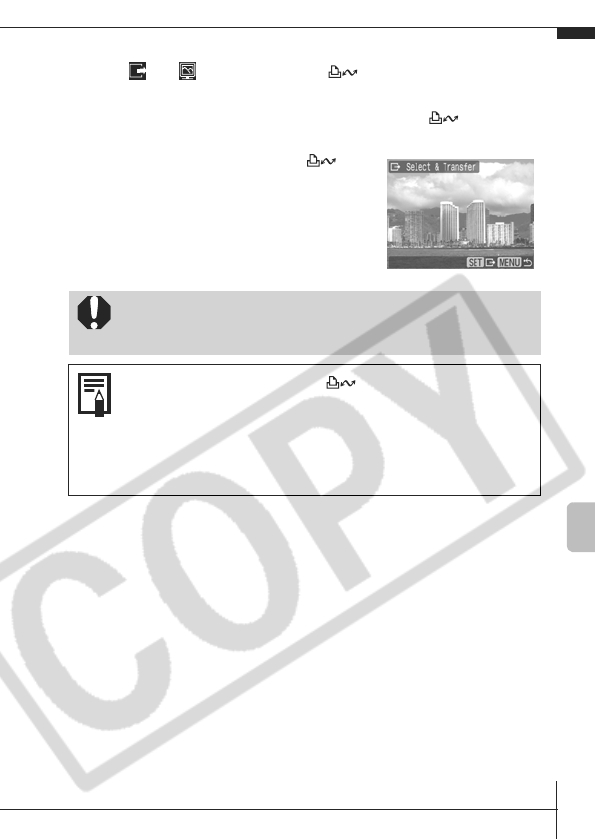
Select & Transfer/Wallpaper
2.
Select or and press the button (or the
FUNC./SET button).
3.
Select images to download and press the button
(or the FUNC./SET button).
• The images will download. The
button will blink blue while downloading
is in progress.
• Images can also be selected during
index playback (Advanced Guide p.70).
• Press the MENU button to return to the
Direct Transfer menu.
Only JPEG images can be downloaded as wallpaper for a
computer. On the Windows platform, the files are
automatically created as BMP images.
The option selected with the button is retained even
when the camera's power is turned off.
The previous setting will be in effect the next time the
Direct Transfer menu is displayed. The image selection
screen will appear directly when the [Select & Transfer] or
the [Wallpaper] option was last selected.
Downloading Images to a Computer

24
MEMO
Safety Precautions
Be sure to read, understand and follow the safety precautions below
when using the camera, in order to prevent injury, burns or electrical
shock to yourself and others.
Be sure to also read the safety precautions listed in the
Advanced Camera User Guide.
Warnings
• Do not trigger the flash in close proximity to human or animal eyes.
• Store this equipment out of the reach of children and infants.
• Avoid dropping or subjecting the camera to severe impacts. Do not
touch the flash portion of the camera if it has been damaged.
• Stop operating the equipment immediately if it emits smoke or noxious-
fumes.
• Do not handle the power cord if your hands are wet.
• Use only recommended batteries and accessories.
• The battery charger and compact power adapter are designed for exclu-
sive use with your camera. Do not use it with other products or batteries.
Caution
• Do not sit with the camera in a back pocket as it may cause the camera
to malfunction or damage the LCD monitor.
