Capital Prospect AD105 Remote control transceiver User Manual AD 105 UI
Capital Prospect Ltd Remote control transceiver AD 105 UI
User manual
Auto Dialer
MODEL: AD-105 / AD-106
USER’S INSTRUCTION
OVERVIEW
The dialer model AD-105 or AD-106 provides the same feature to dial the pre-programmed
phone numbers and sends a personalized pre-recorded message. The model number AD-105
or AD-106 is for different market strategy.
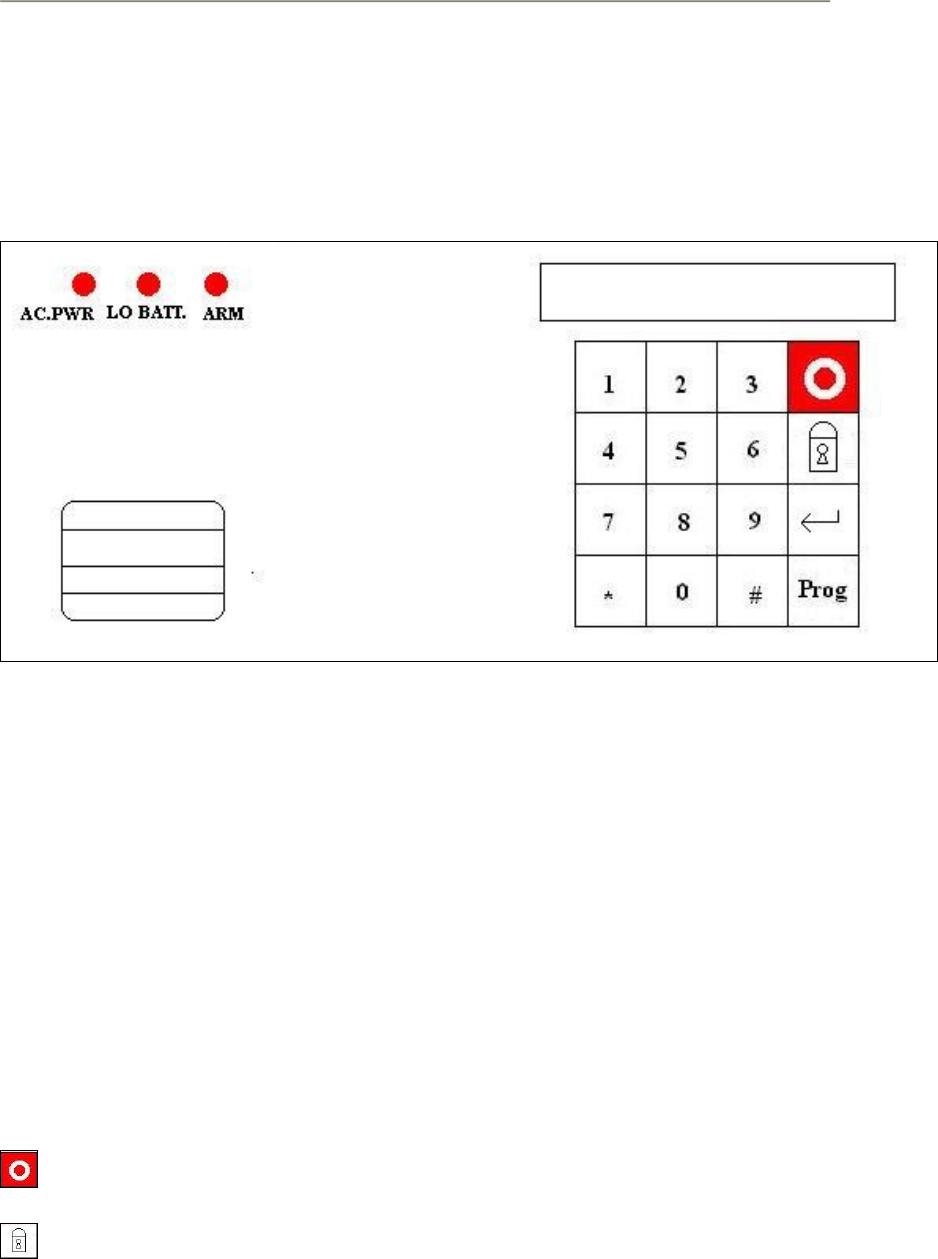
LAYOUT
LIGHTS
ACPWR light on - System is being powered by electrical current.
LOBATT light off – Backup battery is connected and working.
ARM light on – System is armed
SOUNDS
Short beep – you have pressed a key in the right order.
Two short beeps – dialer is turned on for the first time.
Long beep – you have made a mistake
Steady repeated beep – the dialer has been triggered in DELAY mode.
Keypads
Panic – call / end the emergency call
Arm – arm / disarm dialer

Enter – input the user option
Program – enter programming mode / cancel
STANDARD programming
All programming sequences begin with the Personal Identification Number (PIN). There is only
one MPIN which has been factory set at 0 0 0 0.
Message playback mode
The dialer can be compatible to old dialer. User can choose the message playback mode to
option 2. This enables the user to record one 40 seconds.
User can choose this mode to option1 such that the dialer can playback one more message to
the user to let user know which sensor / zone is triggered.
[PWD] + [PROG] + [1]
1 = 9 seconds message + 6*5 seconds messages
2 = 40 seconds message
Default is 2
Password change
[PWD] + [PROG] + [2]
Enter new password -> re-enter new password
Default password = 0000
Record a message
To record a voice message, press
[PWD] + [PROG] + [3] + [d] + [ENTER]
The display will show “rEcord” and a beep is generate which alerts you to begin recording.
After you are finished recording the message, press [ENTER] key, display will show”PLAY”
and play back the message. After playing the message, the display will return to standby
mode.
Messages record, related to
[PROG 1]
0 = main message, 9/40sec
1 = zone 1 message, 2=zone 2 message, 3=zone 3 message …., every zone messages can
record up to 5 seconds.
Playback pre-recorded message
[PWD] + [ENTER] + [3] + [d] + [ENTER]
Message playback, related to
[PROG 1]
0 = main message, 9/40sec
1 = zone 1 message, 2=zone 2 message, 3=zone 3 message ….
Programming Telephone numbers redial counts and repeat counts
[PWD] + [PROG] + [4] + [d] + [ENTER]
d= memory 1-9 to store telephone number
Telephone no can be 0-9, *, #, P, L
[PROG] delete phone no / pause
[ARM] pager pause, the display will show “L” as a pager pause. Every phone number can only
enter one pager pause.
After the telephone number has been stored, another message will appear on the display
asking for a redial count. The number of attempts can be changed to dial 1 to 9 times.
The repeat time is the number of times the message will be played for that certain phone
number. It can be changed from 1 to 9 times.
Delete a telephone number from memory
[PWD] + [PROG] + [4] + [d] + [PROG]
Once the phone number is deleted, the display will return to standby mode.
Learn sensor
[PWD] + [PROG] + [5] ->trigger sensor ->playback no. (1-6, 0 =disable)
Learn remote/sensor within 10 seconds
If the sensor is 64 bits sensor, user need to enter playback number after successfully learning
the sensor.
0=disable, 1= zone 1 message, 2= zone 2 message …6=zone 6 message
Erase sensor
User cannot erase only one specific sensor, the entire memory must be cleared.
[PWD] + [PROG] + [6] + [ENTER]
Erase remote/sensor, enter to confirm. If you hear a double beep, all transmitters and sensors
have been deleted.
Program the calling time
The calling time is the amount of time the phone will ring until the call is disconnected. If the
phone is not picked up within this period of time, the dialer will either call again or advance to
the next phone number. The calling time is currently set to 20 seconds.
[PWD] + [PROG] + [7] + [d]
1=10sec
2=20sec
3=30sec
4=40sec
5=50sec
Default = 2
Program delay duration
[PWD] + [PROG] + [8] + [d]
Entry/Exit delay
1=instant, enter arm mode instantly.
2=10sec, 3=20sec, 4=30sec, 5= 40sec
Default is 1
Program pager pause
[PWD] + [PROG] + [9] + [d]
User can only enter 1 pager pause in phone no.
1=1sec, 2=2sec,……, 9=9sec
Default is 5sec
Program dial sequence setting
The dialer can dial the preprogrammed phone numbers in two different sequences.
[PWD] + [PROG] + [0] + [d]
Dialing sequence
1= Dial each phone number once, then repeats sequence.
2= Finishes dialing first phone number, then begins the second number.
Default is 2
Standby mode
AD105 shows “not rEAdy” in the LCD display, user has to check
1. The main message is recorded properly
2. One of the Telephone no. is entered.
AD105 is ready to dial emergency when the LCD display shows “rEAdy”.
Arm the dialer
[MPIN] + [ARM]
Arm LED will goes on.
User can exit the premises within the preset delay duration. After this preset delay duration,
the dialer will be in arm mode.
When any sensor monitored by the dialer is triggered, the dialer will beep for preset duration.
This duration allow user to go to the dialer and deactivate it before it begins to dial. If you
successfully aborted the call, the display will go back to standby mode. If the dialer has not
been deactivated within the preset duration, the dialer will dial the emergency phone numbers.
Disarm the dialer
[MPIN] + [ARM]
Arm LED will goes off.
When the dialer is beep for entry, user can disarm the dialer. The dialer will stop beeping and
go back to standby mode.
But if the dialer is started to dial the emergency phone numbers in arm mode, user can enter
correct MPIN in order to terminate the call. User cannot hold the panic button to terminate the
call.
However, when the dialer is calling the emergency phone numbers in disarm mode, user can
hold the panic button to terminate the call. User cannot enter MPIN to terminate the call.
Receiving the emergency call
When the phone rings at the calling location, the person who answers the phone will hear a
message related to the emergency events. User can hear the main message first. If the dialer
received enough information from the sensor, user can also hear the second message. The
message may be repeated several times depending on how it was programmed.
User can enter “#” to terminate this call, this will also stop calling you.
User can also enter 4-digit password to terminate the call, this will also stop calling remain
emergency call. The dialer will enter standby mode.
Warranty
If, within one year from date of purchase, this product should become defective (except
battery), due to faulty workmanship or materials, it will be repaired or replaced, without charge.
Proof of purchase is required.
FCC
This device complies with Part 15 of the FCC Rules. Operation is subject to the following two
conditions: (1) This device may not cause harmful interference, and (2) This device must
accept any interference received, including interference that may cause undesired operation.
Warning: Changes or modifications to this unit not expressly approved by the party
responsible for compliance could void the user's authority to operate the equipment.

NOTE: This equipment has been tested and found to comply with the limits for a Class B digital
device, pursuant to Part 15 of the FCC Rules. These limits are designed to provide reasonable
protection against harmful interference in a residential installation. This equipment generates,
uses and can radiate radio frequency energy and, if not installed and used in accordance with
the instructions, may cause harmful interference to radio communications. However, there is
no guarantee that interference will not occur in a particular installation. If this equipment does
cause harmful interference to radio or television reception, which can be determined by turning
the equipment off and on, the user is encouraged to try to correct the interference by one or
more of the following measures:
Reorient or relocate the receiving antenna.
Increase the separation between the equipment and receiver.
Connect the equipment into an outlet on a circuit different from that to which the receiver is
connected.
Consult the dealer or an experienced radio/TV technician for help.
CUSTOMER SERVICE
If you would like to order Skylink’s products or have difficulty getting them to work, please :
1. visit our FAQ section at www.skylinkhome.com, or
2. email us at support@skylinkhome.com, or
3. call our toll free at 1-800-304-1187 from Monday to Friday, 9am to 5pm EST. Fax (800)
286-1320.
SKYLINK TECHNOLOGIES INC.,
17 Sheard Avenue, Brampton, Ontario, Canada L6Y 1J3
Email: support@skylinkhome.com
Website: http://www.skylinkhome.com
© 2010 Skylink Group