Capital Prospect PR318 Remote control/Security Device Transceiver User Manual mPR318
Capital Prospect Ltd Remote control/Security Device Transceiver mPR318
Contents
- 1. User manual_revised1
- 2. KUTPR318 User manual
User manual_revised1
1.INTRODUCTION
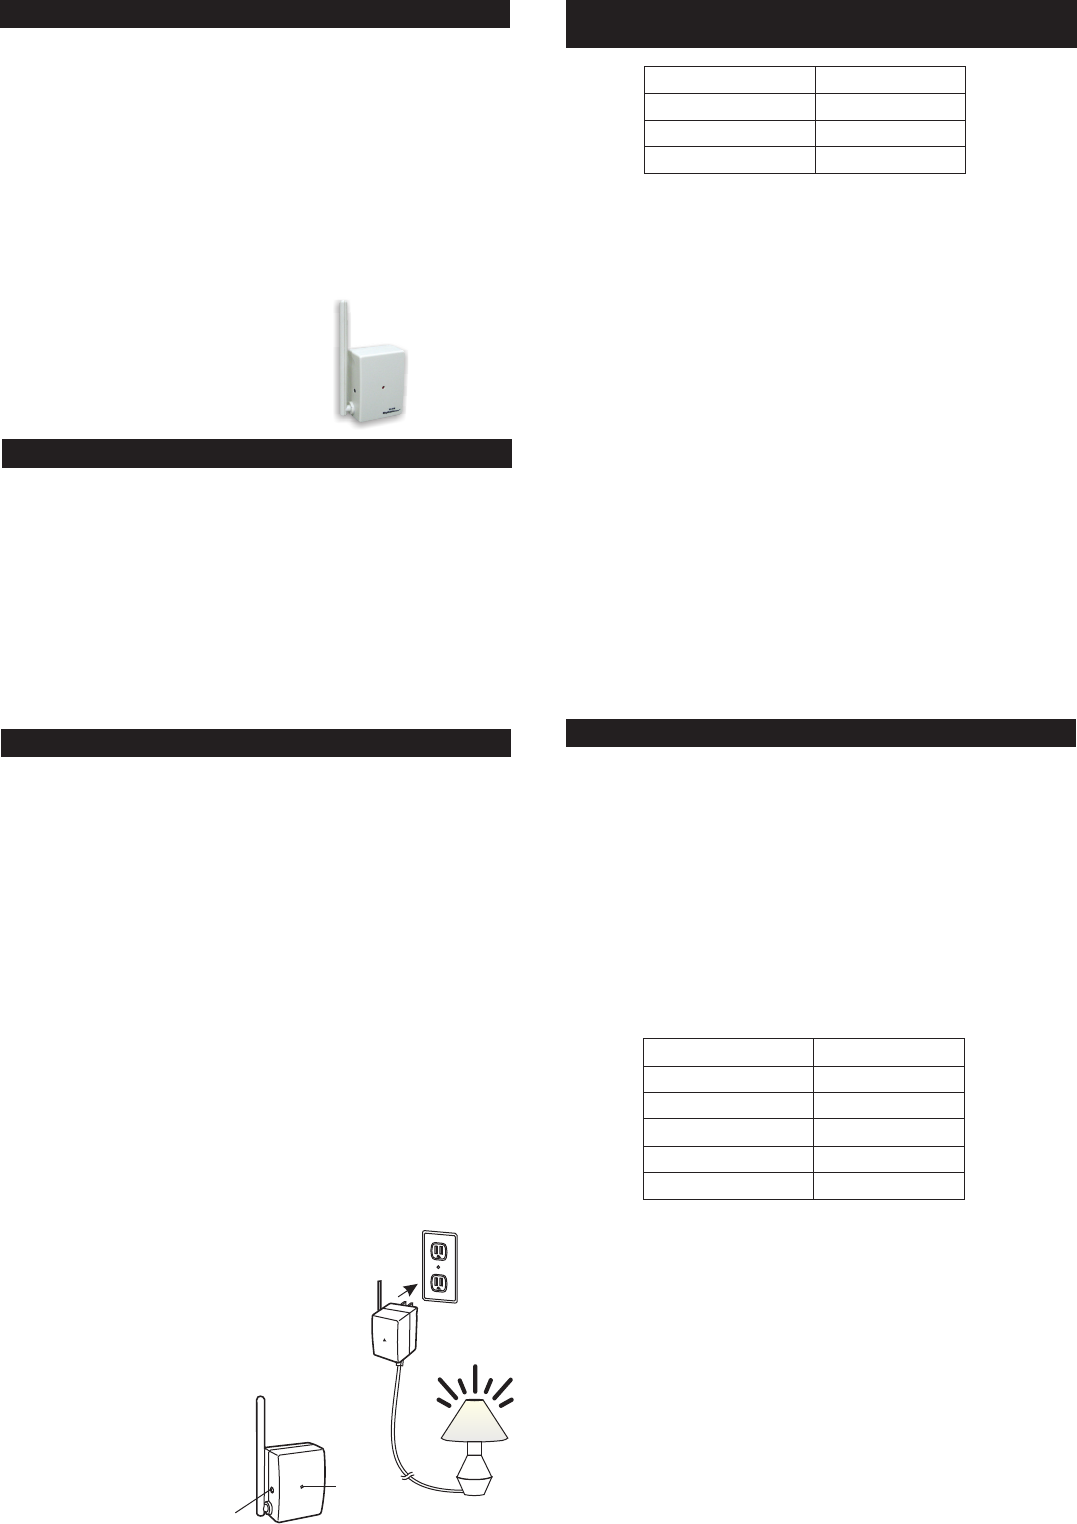
Plug-In Lighting Module
with Repeater
Red
LED Plug into AC socket,
load is on.
SET
ModelPR-318
Thank you for your purchase of a Skylink lighting receiver, Plug-In
Lighting Module with Repeater, Model PR-318. This receiver module
allows you to wirelessly turn on and off, dim and brighten different lighting
fixtures with the Skylink lighting transmitters. It also repeats signal
in order to extend the operating range.
The Plug-In Lighting Module with Repeater PR-318 can communicate
with up to 16 transmitters, so user has the option to add more transmitters
to the system, such as more remote controls, or motion sensors etc.
All wireless signal communications within the Skylink lighting system
are based on rolling code technology to ensure highest security is used.
User’s Instructions
Home
Home
Home
The following items are included in this package:
Plug-In Lighting Module with Repeater
TM
TM
TM
-
-
2.SETUP
Plug-InLightingModule
withRepeater
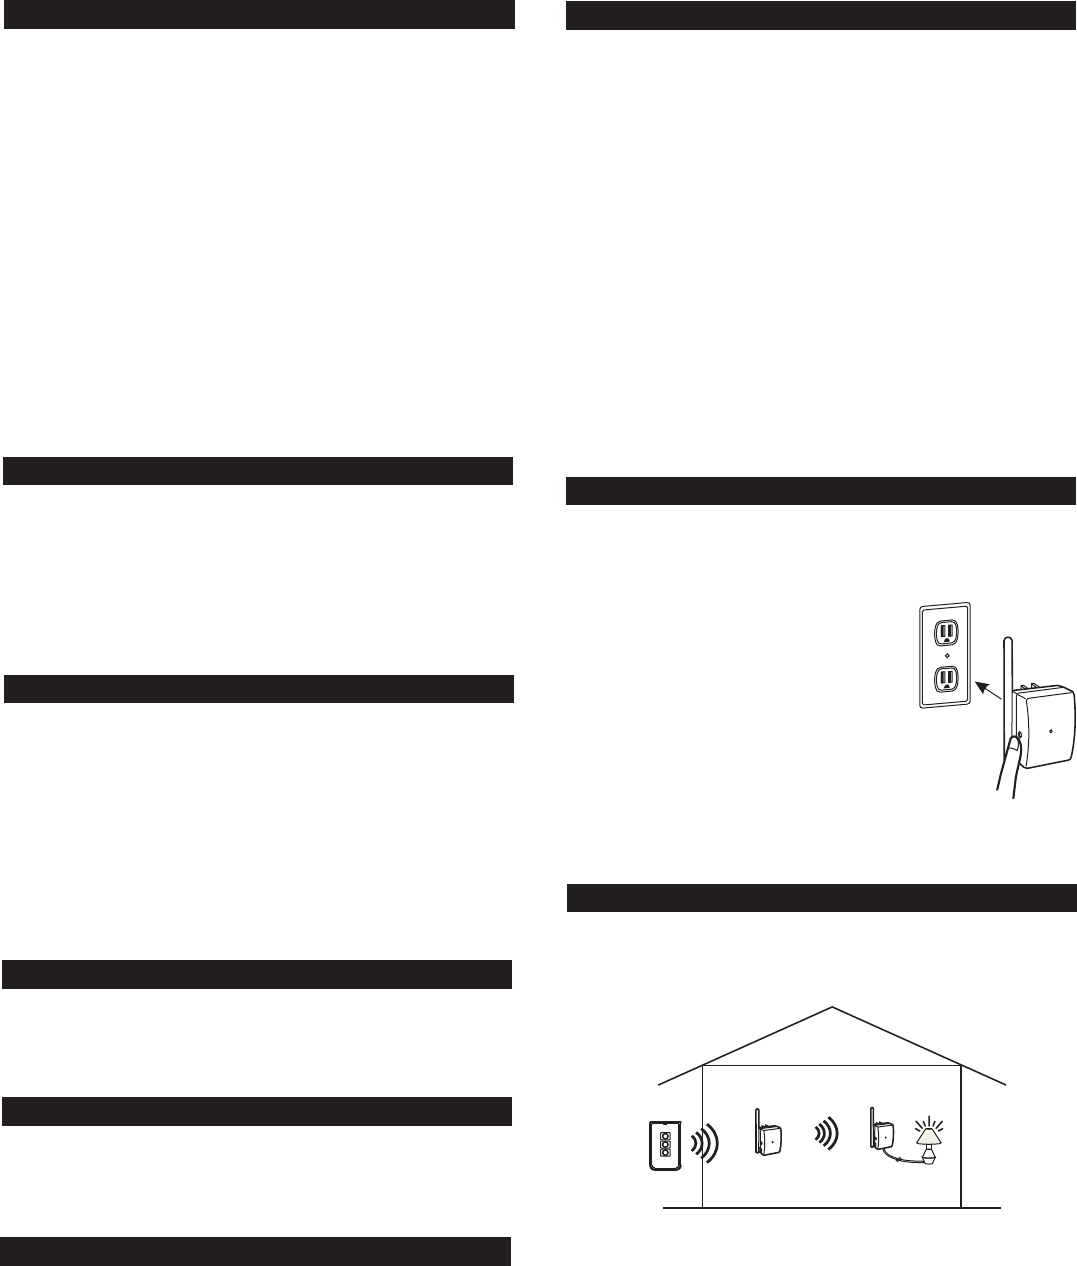
SimplyplugthePlug-InLightingModulewithRepeatertoan ACelectrical
outlet,thenpluginalightthatyouwouldliketooperatetothesocketon
thePlug-InLightingModulewithRepeater. Youmayplacetheantenna
intheuprightpositiontohavethebestreception.
Followtheprogramminginstructionsbelowtogetstarted.
Plug-InLightingModulewithRepeater
Note:LightingLoad
The isdesignedtooperate
maximumloadof300Wat120VAC.Itcandimincandescentlightand
designateddimmingcompactfluorescentlight.Donotconnectother
kindsofloadingorloadingthatexceedsthismaximumrating.
3. PROGRAMMINGTRANSMITTERS(TCSERIES)/SENSORS 4.SETTIMERDURATION
3. PROGRAMMINGTRANSMITTERS(TCSERIES)/
SENSORS(CONT)
In order to operate the Plug-In Lighting Module with Repeater remotely
with a transmitter or sensor, it must be programmed to the Plug-In Lighting
Module with Repeater. Each module can be operated by up to 16 different
transmitters (or 16 different command signals).
There are 3 operating modes with the Plug-In Lighting Module with
Repeater:
1) On / Off Mode - When a valid signal is received, it will toggle the load,
i.e. turning off or on the light
2) Flashing Mode - When a valid signal is received, the light will flash for
a specific period of time, which is the time defined in the timer duration.
This works as an alert indication.
3) Timer Mode - When a valid signal is received, the load will be on for
a specific period of time, from 1 minute, 5 minutes, 15 minutes, 30
minutes, and 60 minutes. This is mainly for energy saving, turning lights
on only when the movement is detected (with optional motion sensor)
or when a transmitter is activated.
Youcanprogrammultipletransmitters/sensorstothemoduleandeach
transmitter/sensorcanoperateinitsownmode.
Toprogramatransmitter/SensorintothePlug-InLightingModulewith
Repeater,followtheinstructionsbelow.
1.PluginaloadtothePlug-InLightingModule
withRepeater.
2.Pluginthemoduletoan ACelectricaloutlet,
theredLEDflashesoncequickly. The
connectedload(i.e.light)willbeon
automatically.
3.Pressandholdthe“SET”buttonforabout
3seconds,unittheredLEDflashesonce.
Youmaynowreleasethe
“SET”button.
4. TheredLEDwillcontinueto
flashforabout15seconds.
Youcannowdecidethe
operatingmodeofthe
transmitterthatyouplan
toprogram.
OperatingMode
On/Off
Flashing
Timer
NumberofFlash
1
2
3
4
5
LEDIndication
OneFlash
TwoFlashes
SteadilyOn
TimerDuration
1min.
5 min.
15min.
30min.
60min.
5. If you are programming a transmitter for On / Off operation, follow steps
A) to C). Otherwise, go to step 6.
A. Press the PROG button on the back of the TC transmitter with a sharp
object.
B. Press the button on the TC transmitter that you would like to program
into the module.
C. Once the transmitter is programmed, the red LED on the module
flashes quickly then stops flashing, indicating you have successfully
programmed the transmitter to the module.
D. You may operate the light with the programmed transmitter.
6. If you are programming a transmitter for Flashing operation, continue to
hold the “SET” button for another 6 seconds, until the LED flashes twice
at a time.
7. You may now follow steps 5A) to 5C) to complete the programming
sequence.
8. If you are programming a transmitter for Timer operation,
hold the “SET” button for another 6 seconds, until the LED is on steadily.
9. You may now follow steps 5A) to 5C) to complete the programming
sequence.
Note: You must complete the programming sequence within the 15-second
interval, otherwise, the module will quit from programming mode and you
need to start again from step 1 if the red LED is off.
You may follow the same instructions to program additional transmitters or
sensors to operate the receiver module.
Otherwise, go to step 8.
continue to
Note: To program other transmitters/sensors (besides TC transmitter),
please refer to the instructions of the transmitters/sensors.
As mentioned, the timer can be set to the following durations, 1 minute,
5 minutes, 10 minutes, 30 minutes, and 60 minutes.
There is only one timer setting, so all transmitters that are programmed
in timer mode and flashing mode will have the same timer duration. To
set the timer duration, follow the instructions below:
1. Plug in the module to an AC socket so it is powered on properly.
2. Turn off the connected load by a programmed transmitter. The load
must be off in order to set the timer duration.
3. Press and hold the SET button for 3 seconds, the red LED flashes
once. The number of flash indicates the timer duration:
4. Continue to hold the SET button until it reaches the desired setting. The
status will change every 6 seconds, i.e. hold onto the SET button for
another 6 seconds, you will see the number of flashes changes from 1
to 2, 2 to 3 etc.
This timer duration is used for both under Flashing Operation Mode and
Timer Operation Mode.
Note:Oncethenumberofflashreaches5,itwillstayatthissetting.If
youwouldliketogobacktoothersettings,suchas1flash,releasethe
buttonandrepeatfromstep1tostartover.
Onceatransmitter(button)isprogrammedintimermodeorflashing
mode,activatingthisprogrammedtransmitter(button)willturnonthe
lightforthespecifiedtimerduration.
Duringatimercountdown,ifthemodulereceivesanothersignalfortimer
operation,thetimerwillstartagainandoverridestheprevioustimer,
therefore,extendingtheonperiodbyanothertimerinterval.
5. OPERATINGMODES
The cancontrolthelightin2
differentoperatingmodes.
1)On/OffMode- Allowsoperatingthelighteitheronandoff,without
dimmingfunction.
2)DimmingMode- Allowsoperatingthelightinon,offanddimming
(dim/brighten)modes.Lightmustbeeitherincandescentlightand
designateddimmingcompactfluorescentlight.
ThefactorydefaultoperatingmodeisOn/Offmode.However,ifyour
lightisdimmable,youmaychangetheoperatingmodetoDimming
Mode. Tochangetheoperatingmodes,pleasefollowtheinstructions
below.
1. Turnonthelightbytheprogrammedtransmitter.
2.Pressandholdontoabuttononthetransmitterthatisprogrammedto
themodulefor10seconds.
3. Thelightwillflash.Ifitflashesonce,thatmeansitisinOn/OffMode.
Ifthelightflashestwice,thatmeansitisinDimmingMode.
4.Repeatingstep3abovewilltogglethesettingbetweenOn/OffMode
andDimmingMode.
Plug-InLightingModulewithRepeater
6.ON/OFFOPERATION
The PR-318 allows on / off operation,
when the programmed button is activate, it will transmit a signal to toggle
its current status. For example, if a signal is received when the light is off,
that signal will turn on the light.
Plug-In Lighting Module with Repeater
Note:
When used with Compact Fluorescent Light, if there is flickering when you
switch off the light, it is recommended you replace a different Compact
Fluorescent Light with higher quality.
7.BRIGHTNESSCONTROL OPERATION
8.FLASHINGOPERATINGMODE
Besidesturningonandoffthelight,youmayalsocontrolthebrightness
ofthelightifthereceivermoduleandthelightbulbisdimmable,i.e.either
incandescentlightanddesignateddimmingcompactfluorescentlight.
Tochangethebrightness,firstturnonthelight.
Pressandholdtheprogrammedbuttononthetransmitterwillchangeits
brightness.Holdontothebuttonuntilthedesiredbrightnessisreached,
thenreleasethebutton.
Pressandholdthesamebuttonagainonthetransmittertochangethe
brightnessagainintheoppositeway(i.e.Dimtobrightenorbrightento
dim),untilthedesiredbrightnessisreached,thenreleasethebutton.
10.ZONEOPERATION
10.ZONEOPERATION(CONT)
ZoneOperationOn/Off
A ZoneCommandallowsyoutooperatemultiplelightsatthesametime
inthesamezone. YoumayturnOnorOffazone.
Toactivatethezonecommand,simplypress“ZoneOn”or“ZoneOff”,
thenthezonenumber.
Pressing[ZoneOn]then[1]willturnonalllightsinzone1.
Pressing[ZoneOff]then[3]willturnoffalllightsinzone3.
ZoneOperationBrightnessControl
Youcanalsochangethebrightnessofallthelightsinthatzone,ifthe
receivermodulesandlightsconnectedaredimmable.
[ZoneOn]representsincreaseinbrightnesslevel,i.e.Brightening
[ZoneOff]representsdecreaseinbrightnesslevel,i.e.Dimming
Press[ZoneOn]thenhold[1]willbrightenalllightsinzone1,release
thebuttonatthedesiredbrightnessleveloritwillstopuntiltheyareat
themaximumbrightness.
Press[ZoneOff]thenhold[1]willdimalllightsinzone1,releasethe
buttonatthedesiredbrightnessleveloritwillstopuntiltheyareatthe
minimumbrightness.
11. ERASINGTRANSMITTERSFROMTHEMODULE
12.REPEATER
Youmayeraseatransmitterorsensorfromthemodule,butyoucannot
eraseaspecificdevice,youmusteraseallthewirelessdevices,then
programtheonesyouwanttokeep.Followtheinstructionsbelowto
eraseprogrammedtransmitters/sensors.
1.PoweroffthePlug-InLightingModulewith
Repeaterbyremovingitfromthe ACsocket.
2.PressandholdtheSET button,whileholding
ontotheSET button,pluginthemoduleto
an ACsocket.
3. TheredLEDwillbeonfirst,thenflashes
rapidlyfor1second.
4. YoumayreleasetheSET button,thelight
connectedtothemoduleisnowon,indicating
youhavesuccessfullyerasedallthedevices
fromthelightingreceiver.
5. Youmayremovethemodulefromthesocket
topoweritoffcompletely.
Press and hold the SET
button while plugging
it in to an AC socket
ThePlug-InLightingModulewithRepeatercanalsorepeatwireless
signalsfromotherSkylink lightingsystemdevices. Thisincreases
theoperatingdistanceoreliminatesdeadspots.
HomeTM
Asageneralruleofthumb,ifyouareexperiencingdeadspots,youmay
placethePlug-InLightingModulewithRepeaterinthemiddleofthe
housetoseeifyoucaneliminatethedeadspots.Ifso,youcanleave
thePlug-InLightingModulewithRepeaterinthemiddleofthehouse.If
thedeadspotstillexceeds,youcanplacethePlug-InLightingModule
withRepeatersomewherebetweenthetransmitterandthereceiveruntil
youexperiencenodeadspots.
Youcanhaveamaximumnumberof3repeatersoperatinginone
premises.However,unlessitisnecessary,itissuggestedtokeepthe
numberofrepeatertoasfewaspossibletoreducethenumberof
wirelesssignals.
IfatransmitterorasensorisprogrammedtothePlug-InLightingModule
withRepeaterundertheflashingmode,whenthattransmitterisactivated,
thelightconnectedwillflashforthepredeterminedtimerinterval. After
thetimerinterval,thelightwillbeoff.
9.TIMEROPERATINGMODE
IfatransmitterorasensorisprogrammedtothePlug-InLightingModule
withRepeaterunderthetimermode,whenthattransmitterisactivated,
thelightconnectedwillbeonforthepredeterminedtimerinterval. After
thetimerinterval,thelightwillbeoff.
TC Transmitter
Repeater
repeating signal
1st PR-318 2nd PR-318
Receiving signal
ProgrammingZoneCommand
Enter[ZoneOn]+[ZoneNumber]duringstep5Boftheprogramming
sequence(ensureon/offoperatingmodeisselected),theZone
Commandsignalwouldbeprogrammed.Repeatthisstepforallthe
receivermodulesinthesamezone.
13.REPEATER(CONT)
SwitchPosition
1(MostLeft)
4(MostRight)
2
3
Results
NoRepeatFunction
Veryslightdelay,~0.1second
Slightdelay,~0.5second
Longdelay,~1second
Whentousethissetting:
Ifyoudonotexperiencedeadspot
Forthefirstrepeater
Forthesecondrepeater
Forthethirdrepeater
Tochangethesetting,removethescrewonthebackofthePlug-In
LightingModulewithRepeaterandremovethedoor.Placetheswitch
positionatthedesiredsetting. Afterselectingtheswitchposition,secure
thedoorwiththescrew.
InputVoltage:120V AC,60Hz
StandbyCurrent:5mA
MaximumLoad:300Wat120AVC
OperatingFrequency:318MHz
14. TECHNICAL SPECIFICATIONS
15.FCC
TheRemoteControlisapprovedbytheFCCanditcomplieswithPart15ofthe
FCCRules.Itsoperationissubjecttothefollowingtwoconditions:
1. Thisdevicemaynotcauseharmfulinterference.
2. Thisdevicemustacceptanyinterferencethatmaycauseundesiredoperation.
Changesormodificationstothisunitnotexpresslyapprovedbythepartyresponsible
ofcompliancecouldvoidtheuser’sauthoritytooperatetheequipment.
WARNING:
16.CUSTOMERSERVICE
IfyouwouldliketoorderSkylink’sproductsorhavedifficultygettingthemtowork
ordownloadlatestinformationandusermanual,please:
1.visitourFAQsectionat ,or
2.emailusat ,or
3.callourtollfreeat1-800-304-1187fromMondaytoFriday,9amto5pmEST.
Fax(800)286-1320
www.skylinkhome.com
support@skylinkhome.com
17. ACCESSORIES
CUSTOMERSERVICE
17Sheard Avenue,Brampton,Ontario,CanadaL6Y 1J3
Email:support@skylinkhome.com
http://www.skylinkhome.com
P/N.101Z701
PatentPending
©2010SKYLINKGROUP
Remove
screws
to open
Most Left
No Repeat
1234
TheSkylink LightingSystemconsistsofmanyotherdevicesfrom
multiplebuttontransmitters,MotionSensor,variousreceiverssuchas
WallSwitchReceiver,Plug-inReceiverwithRepeater,OutdoorReceiver,
DimmerModuleetc.PleasevisitSkylinkwebsiteat
formoreinformation.
www.skylinkhome.com
HomeTM
Most Left
Longest Delay
Ifyoudonotexperiencedeadspot,itisrecommendedthatyouswitch
offtherepeatingfunction. Thefactorydefaultsettingisoffforthe
repeaterfunction. Youcanskipthisstepifyoudonotexperiencedead
spot.
Ifyouhavemultiplerepeaters,itisimportanttosetthedelaytimeof
eachrepeatertobedifferentinordertoavoidsignalcollision. Thedelay
timeishowsoonthesignalwillberepeatedafterreceivingit. Thereare
4settingsforthedelaytime.