Cardinal Health Commercial Technologies FUSE001 InPower Health and Wellness System User Manual Manual
Cardinal Health Commercial Technologies, LLC InPower Health and Wellness System Manual
Manual

Cat. FUSE-001
Instructions for Use
PERSONAL MEDICATION ASSISTANT
CAUTION – Investigational device. Limited by Federal law to investigational use.

Table of Contents
Preface ................................................................................................................................................................................ 1
Purpose .......................................................................................................................................................................1
Help Information .....................................................................................................................................................1
System Overview ............................................................................................................................................................ 2
System Description ................................................................................................................................................2
Intended Use ............................................................................................................................................................2
Contraindications ....................................................................................................................................................3
Components .............................................................................................................................................................4
Environmental Conditions ...................................................................................................................................5
General Warnings and Precautions .......................................................................................................................... 6
Warnings ....................................................................................................................................................................6
Precautions ................................................................................................................................................................ 7
User Interface ................................................................................................................................................................... 8
Exterior Screen .........................................................................................................................................................8
Home Screen ............................................................................................................................................................9
Health Information .............................................................................................................................................. 10
Medication List ...................................................................................................................................................... 11
Setup Instructions ....................................................................................................................................................... 12
Device Placement ................................................................................................................................................ 12
Device Setup .......................................................................................................................................................... 12
Connect a Health Device with the InPower™ Personal Medication Assistant .............................. 15
Operating Instructions .............................................................................................................................................. 16
Load a New Medication ..................................................................................................................................... 16
Take Medication ................................................................................................................................................... 18
Reload a Medication ........................................................................................................................................... 20
Access Medication Off Schedule .................................................................................................................... 24
Access Medication Anytime ............................................................................................................................. 25
Discontinue a Medication ................................................................................................................................. 27

Adjust Inventory ................................................................................................................................................... 29
View Health Information ................................................................................................................................... 30
Manage the Glucometer Log ........................................................................................................................... 31
Cleaning .......................................................................................................................................................................... 33
Screen ....................................................................................................................................................................... 33
Plastic Parts ............................................................................................................................................................ 33
Pod Trays ................................................................................................................................................................. 33
Troubleshooting .......................................................................................................................................................... 34
Powering the Device Off Then On.................................................................................................................. 34
Manual Access to Medications ........................................................................................................................ 34
Reset Device After Manual Access ................................................................................................................. 35
A Pod Tray Does Not Open or Close Properly ............................................................................................ 37
Error Messages ...................................................................................................................................................... 38
Appendix A: Status Indicators ................................................................................................................................ 39
Appendix B: Technical Specifications ................................................................................................................... 41
Appendix C: Electromagnetic Compatibility (EMC) ........................................................................................ 42
Appendix D: Symbols................................................................................................................................................. 43

1
Preface
Purpose
This manual provides directions to help users safely and effectively operate the InPower™ Personal
Medication Assistant. The manual also includes indications for use, contraindications, and trouble-
shooting information.
Note: All images of screens are subject to change.
Help Information
Contact Cardinal Health Technical Support at 1-855-946-7697 (1-855-9IN-POWR).
For the online instructions for use and other InPower™ resources, visit www.iaminpower.com.

2
System Overview
This section provides you with general information about the InPower™ Wellness System.
System Description
The InPower™ Wellness System consists of a solid medication dispenser (InPower™ Personal Medication
Assistant), single-use medication pods, control software, and a pharmacy interface application.
• The medication dispenser provides audible and/or visual alerts when it is time to take a medication.
• The medication dispenser communicates with the pharmacy to provide information on how well you
are taking your medication.
• The medication dispenser collects data via peripheral devices, such as glucometers, weight scales, etc.
Intended Use
The InPower™ Personal Medication Assistant is a solid medication dispensing device intended for medical
purposes that is used to issue solid (pills) medication. The device is designed solely for oral dosage forms
of medication and is also a medication reminder system built to provide alerts for one person’s medication
dosing schedules. The device incorporates wireless communication.

3
Contraindications
The InPower™ Personal Medication Assistant is contraindicated for patients who have been diagnosed
with Alzheimer’s disease, other dementia or cognitive limitations that prevent them from properly using
the device and following instructions from a licensed health care professional. The InPower™ Personal
Medication Assistant also is contraindicated for patients who reside in skilled nursing facilities or in
situations where they do not independently take medications (i.e., a caregiver gives medication to a patient).
The InPower™ Personal Medication Assistant must not be used to dispense medications that are not in solid
oral dosage form and prescription pain medications that have a high potential for abuse (i.e., medications
regulated by the U.S. Drug Enforcement Administration as C-II such as hydrocodone, morphine and
oxycodone). Patients who transfer medications from one pharmacy to another must ensure that the
prescriber and dispensers at both pharmacies are aware of the transfer to minimize any disruption in using
the InPower™ Personal Medication Assistant.
The InPower™ Personal Medication Assistant should only be used to dispense solid, oral medications.
It should not be used to dispense the following types of medications:
• Controlled substances (a drug or chemical whose manufacture, possession, or use is regulated
by a government, such as illicitly used drugs or prescription medications that are designated as
controlled drugs)
• Those that must be stored in their original packaging
• Extremely low weight pills that cannot be accurately weighed by the device
• PRN (pro re nata) (take as needed)
• Topicals, injectables, liquids, suppositories
• Inhalers, sprays
• Hygroscopic (attracts and hold water molecules from the surrounding environment)
• Pills to be cut
• Emergency drugs (e.g., nitroglycerin)
• Those with complex dosing schedules
4
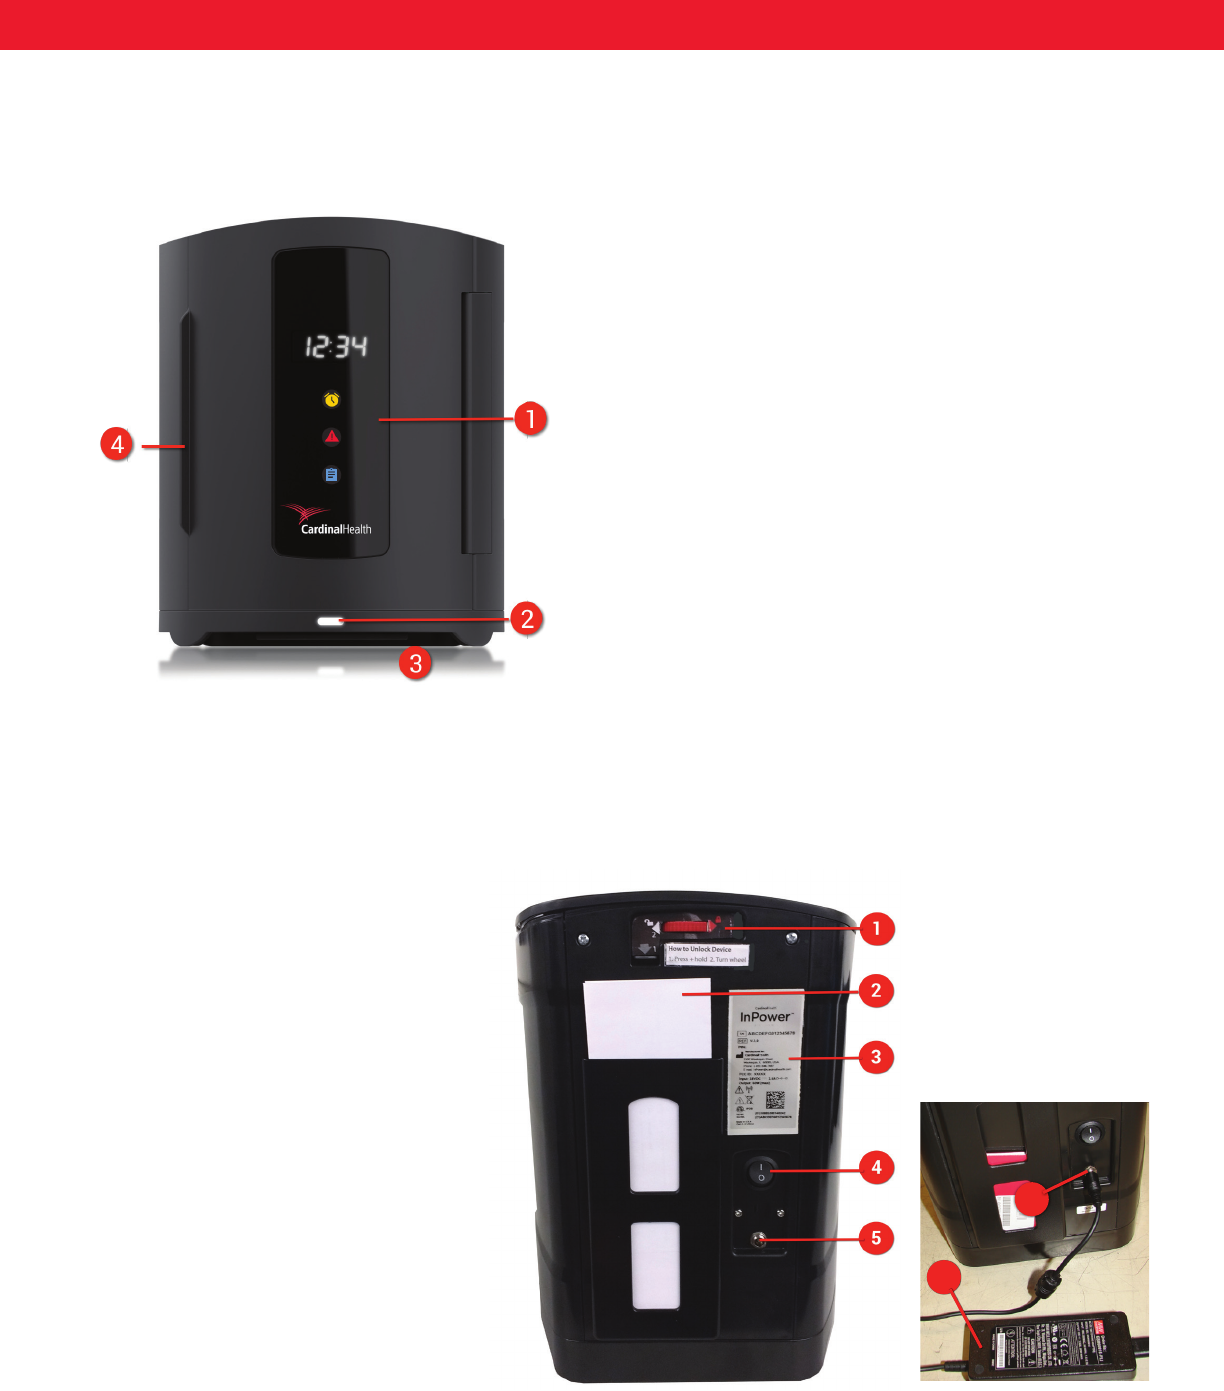
1. Exterior Screen: Displays time, alerts,
and reminders. For additional information,
refer to the User Interface section.
2. Power Light: Indicates that the InPower™
Personal Medication Assistant is powered on.
• White: AC (alternating current)
power adapter plugged in to wall socket.
• Red: Powered by the internal battery.
If this light is blinking from red to white,
call Customer Support as there could be
an issue with the device.
• Off: Powered off.
3. Alarm Lights: Flash when it is time to take
your medication. The alarm lights can be
accompanied by an audible alert.
4. Door: Pull from the left to access the
interior screen and medication pods.
1. Release Tab and Wheel: Release the
pod trays for manual access to your
medications.
2. Documentation Holder: Provides a
holder for your medications list and
other quick references.
3. Device Label (with PIN information):
Label containing device information,
including your PIN. Your PIN is under
lined within the serial number (SN).
You may have to input your PIN if the
device sleeps.
4. Device Button: Use only as directed
by Cardinal Health Technical Support
to reset the device.
5. Power Connector: Receives power
from the wall socket via the power
adapter.
6. Power Supply: Connect the one end
of the power adapter to wall and other
end to device.
InPower™ Personal Medication Assistant
Rear View
InPower™ Personal Medication Assistant
Front View
Components
6
6
5
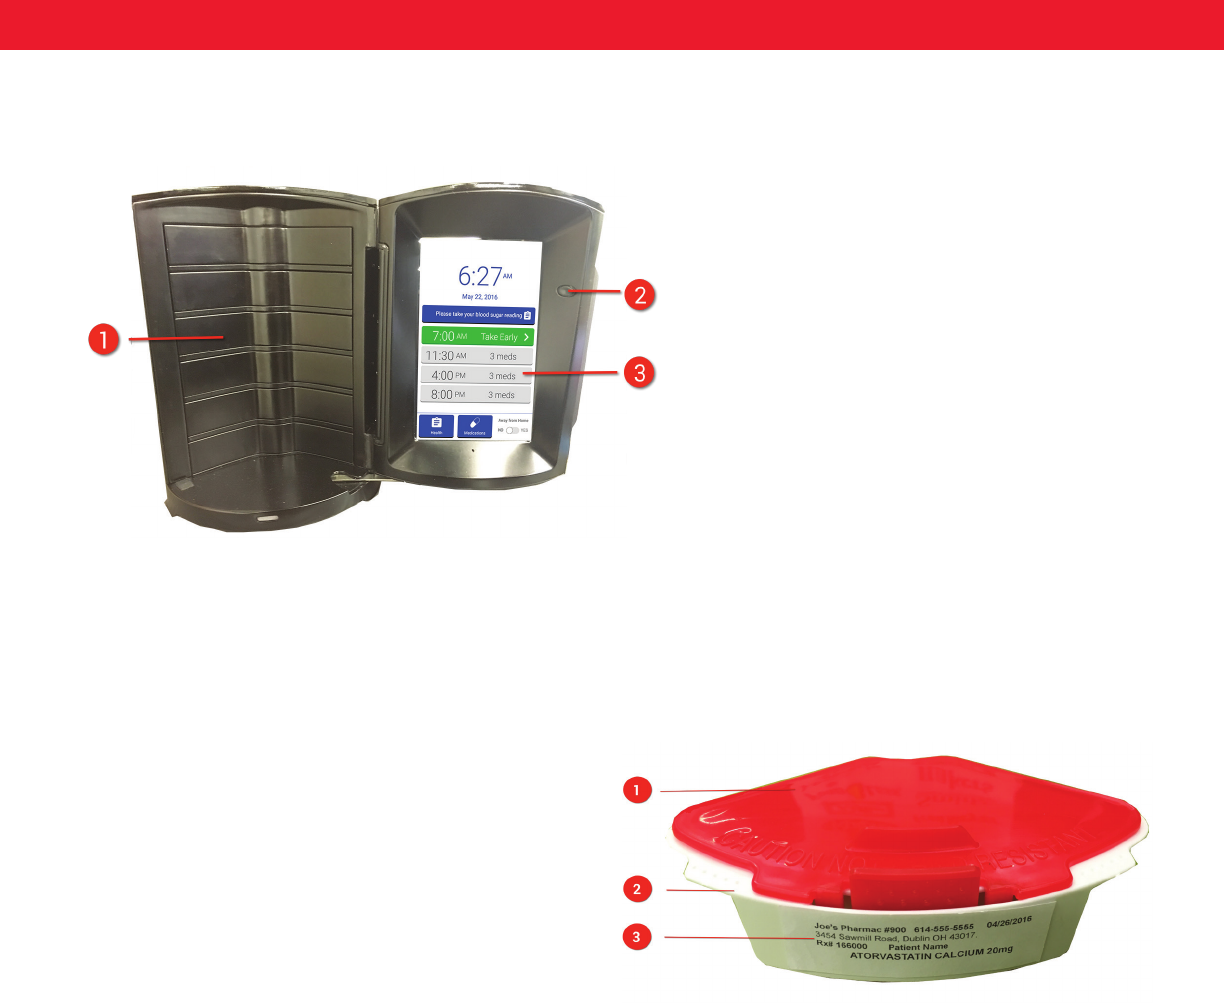
1. Pod Trays (6): Hold the medication pods.
Each tray holds two pods and opens to the
left or right, depending upon the pod you
need to access. The trays contain scales
that measure the weight of the medication
to determine the number of medications
added to or removed from the pod.
2. Screen Power Button: Powers the screen
on or off. The device should always be left
on when in normal use.
3. Screen: Allows you to interact with
the software.
1. Pod Lid: Take this off after you place the
pod into the device. Squeeze the tabs
and lift to remove the lid.
2. Medication Pod: A single-use container
for your medication.
3. Medication Strip Label: A label placed
on the pod that includes patient and
medication information. You should not
remove this label.
InPower™ Personal Medication Assistant
Interior Screen
InPower™ Wellness System Medication Pod
Environmental Conditions
The InPower™ Personal Medication Assistant should be operated under the following conditions:
• Temperature: 15 – 35° C (59 – 95° F).
o Temperature change should not exceed 5° C per hour
• Relative Humidity: 0 – 85%.

6
General Warnings and Precautions
This section lists the general warnings and precautions that provide critical information that should be
reviewed before using the InPower™ Personal Medication Assistant.
Warnings
To avoid the possibility of injury, death, or other serious adverse reaction associated with the use or
misuse of the InPower™ Personal Medication Assistant:
• Do not use the device for any purpose other than the stated intended use.
• Do not open the top cover. Caution: Risk of Electric Shock
• Use of accessories other than those specified or provided by the manufacturer of this
equipment could result in increased electromagnetic emissions or decreased electromagnetic
immunity of this equipment and result in improper operation.
• Do not attempt to service or repair the device.
• Do not use the device if maintenance is required.
• Do not attempt to repair or service the InPower™ device unless you are qualified to do so.
• Do not use the device near fire, flame, or sparks.
• Do not use the device if it is wet.
• Do not use the device in an environment that is at less than 0° C (32° F) because the device
contains a lithium-ion (Li-ion) battery, which can present a fire hazard when charging
at low temperatures.
• Do not place a combination of medications into a single medication pod.
• Only use InPower™ medication pods provided to you by your pharmacist.
• Do not leave the device unattended while the pod trays are open.
• Do not put your fingers near the pill dispenser tray is opening or closing.
• Use of this equipment adjacent to or stacked with other equipment should be
avoided because it could result in improper operation.
This device is not intended as a replacement for care-giving. It is meant to be an aid.
Cardinal Health will not be held liable for any damages sustained.
If the equipment is used in a manner not specified by the manufacturer, the protection
provided by the equipment may be impaired.
DO NOT use the InPower™ Personal Medication Assistant to dispense medication which is not in
compliance with the prescription or directions of your prescribing medical practitioner, pharmacy,
or drug manufacturer.
If you need to dispose of the device, please call Cardinal Health Technical Support at 1-855-946-7697,
and a technician will come to retrieve your device. Please do not dispose of the device on your own.

7
Precautions
To avoid the possibility of a problem with the InPower™ Personal Medication Assistant
associated with its use or misuse:
• Once the device is set up, it should remain in place so as not to drop it.
• The device is not childproof; place it in an area that is out of the reach of children.
• The device is meant for indoor use, only.
• The device is not waterproof:
o Do not place the device in a wet or humid area; for example, a bathroom.
o Do not allow the device to become wet.
o Do not immerse the device in water.
• The scales in the trays are very sensitive:
o Do not place the device in an area where it might be jolted.
o Do not place the device near an air vent, fan, or open window.
o Do not place the device near any sources of heat (i.e., stove, etc.)
o Do not place any item on top of the device.
o Do not place stickers on the medication pods.
• Do not place anything other than your medications into the device.
• The device may not operate properly if used higher than 3,000 meters above sea-level.
• The device may not operate properly if moved from a cold or hot environment.
• If the device does not operate as intended, contact Cardinal Health Technical Support at
1-855-946-7697 (1-855-9IN-POWR).
8
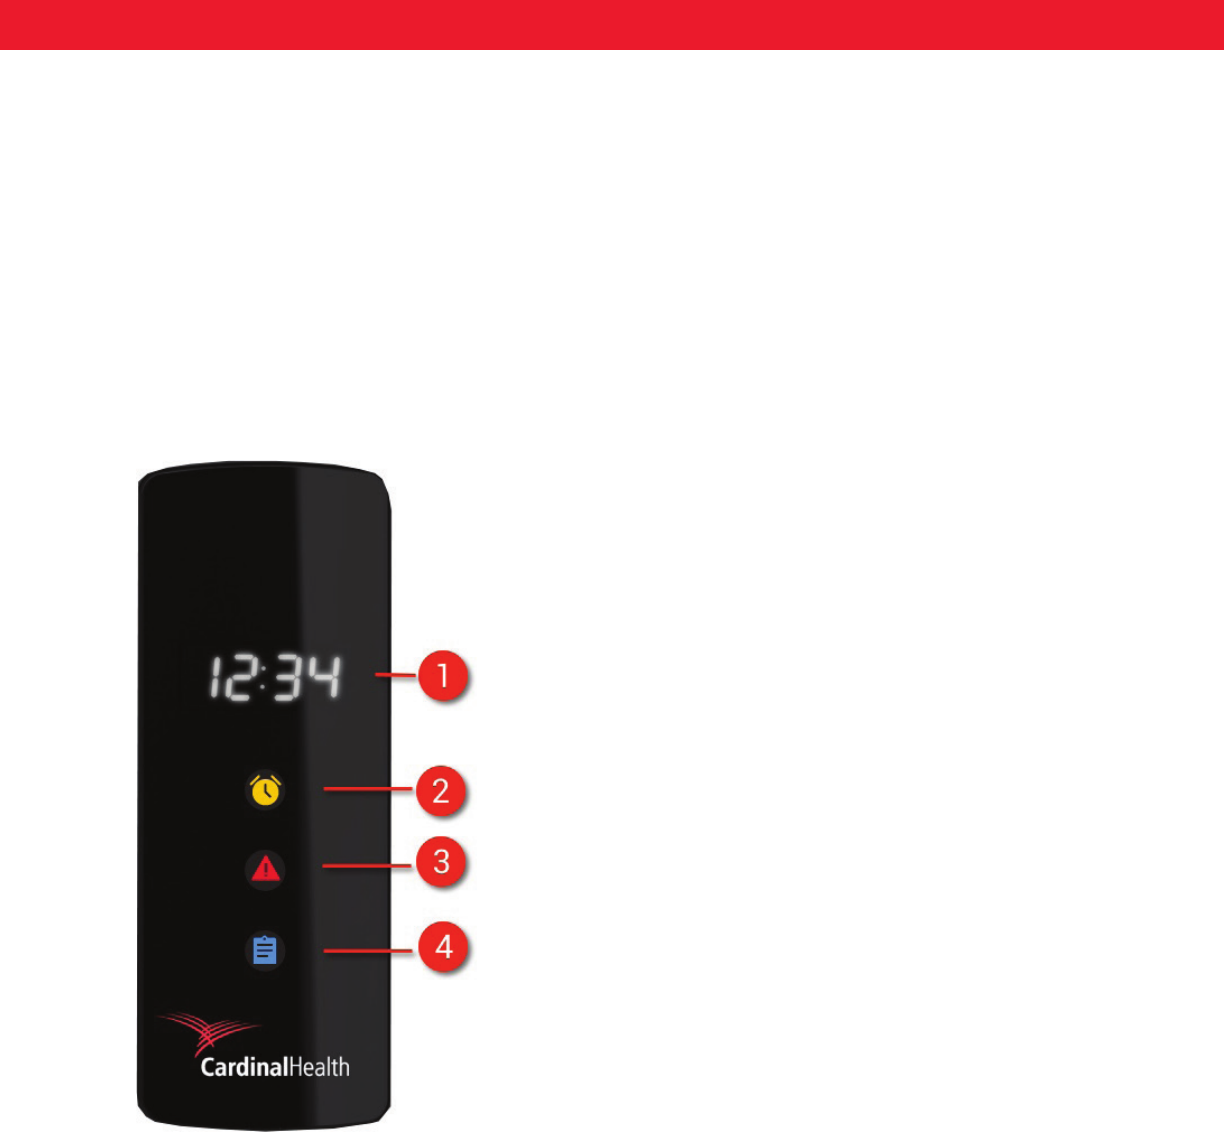
1. Clock: Displays the current time.
2. Medication Reminder: Displays at the preferred
time to take your medication. This is set up with
your pharmacist.
3. Attention Required: Displays if the device loses
cellular connection. You will not be able to load new
or refill medication pods into the device if this occurs.
You can continue to take any already loaded in to
the device.
4. Health Information Notification: Displays when
health information is available to you; for example,
a glucometer reading.
InPower™ Personal Medication
Assistant Exterior Screen
User Interface
This section provides an overview of the user interface.
Exterior Screen
The exterior screen always displays the current time. Alert and reminder icons display under
specific conditions.
9
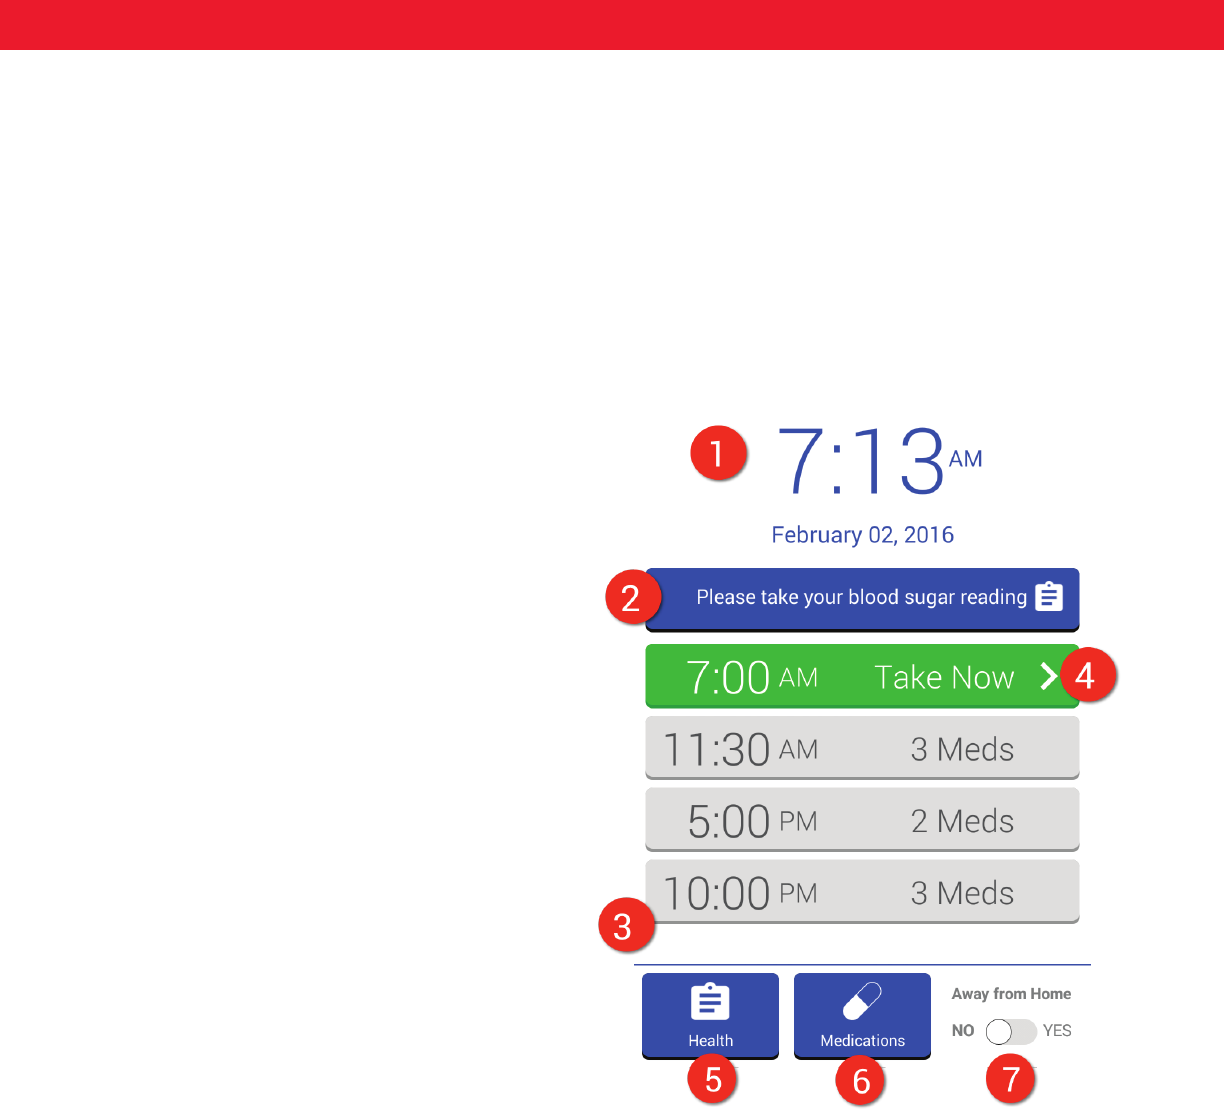
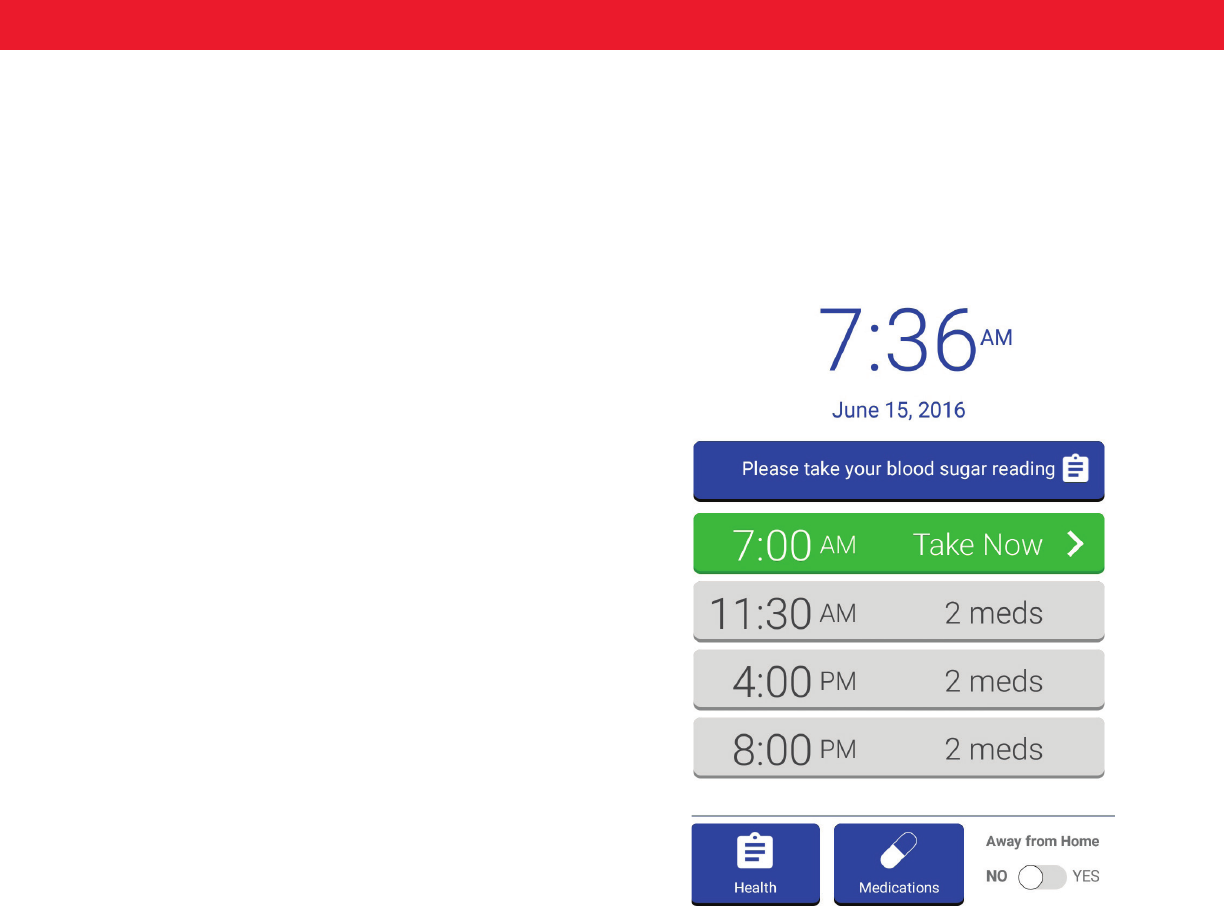
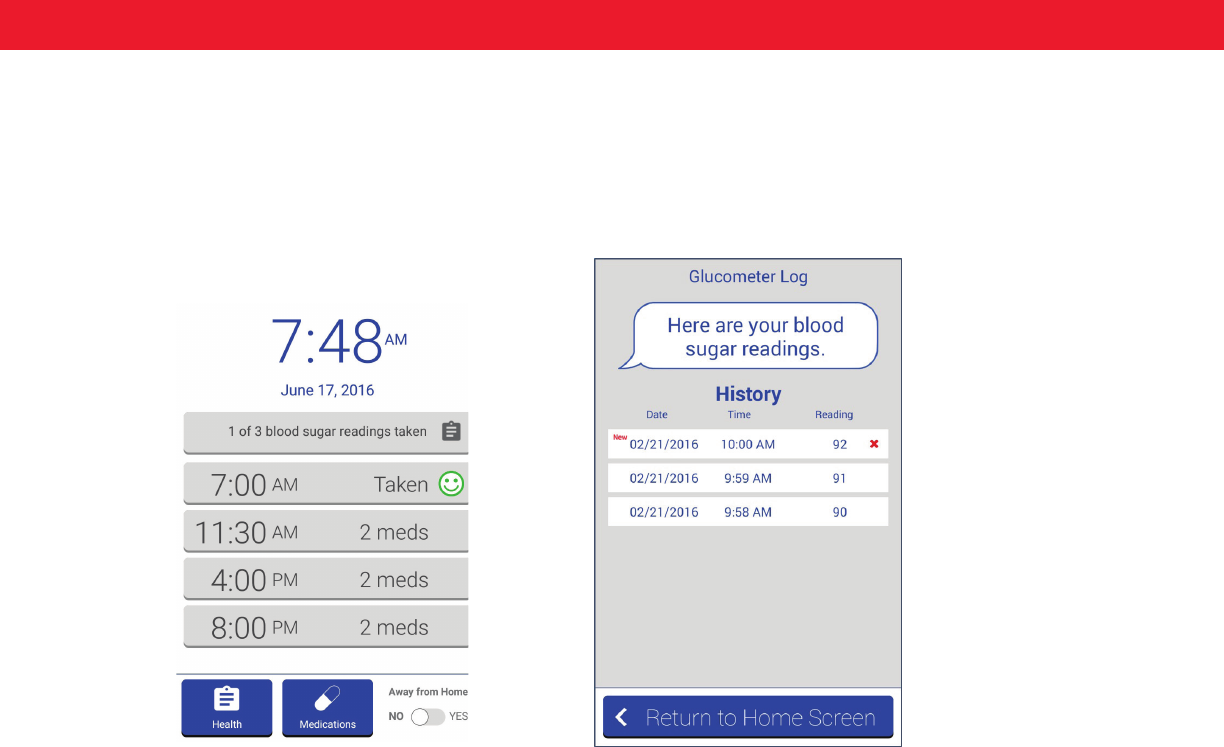
Home Screen
The home screen displays when you open the door or press the screen power button that is located inside
the door. To interact with the device, tap enabled icons and slide buttons.
The screen turns off after five minutes of inactivity. Open the device door or press the screen power button
to turn the screen back on. Once on, you may be required to input your PIN. Please refer to the Components
section to find this information.
1. The current date and time.
2. Messages related to your blood sugar
readings, if applicable.
3. A list of scheduled times to take your
medication that are set by you and your
pharmacist. Also, displays the number
of medications to take (this is blank if
none are required for that time).
4. Status messages display next to each
time to take your medication. For additional
information, refer to the Operating
Instructions > Take Medication section.
5. Health: Tap to view your health
information. For additional information,
refer to Health Information in this section.
6. Medications: Tap to view your medications
list and to access your medication off
schedule. For additional information, refer
to Medication List in this section.
7. Away from Home: Slide or tap the button to
YES when you will be away from home when
taking your medication. For additional
information, refer to the Operating
Instructions > Access Medication Anytime section.
Home Screen

10
Health Information
Health Information displays when you tap Health
on the home screen. From this screen, you can view
your health history and manage health device logs.
1. Health History: An indication of how well you
are keeping up with your medications. For
additional information, refer to the Operating
Instructions > View Health Information section.
2. Your Device Logs*: Tap to view and manage
information received from a connected device;
for example, a glucometer. For additional
information, refer to the Operating Instructions >
Manage the Glucometer Log section.
3. Return to Home Screen: Tap to return to
the home screen.
* Health Information is provided for informational
purposes only. A diagnosis should not be made using
this data. Please use the original medical device for
actual data prior to making a diagnosis. Health Information Screen
11
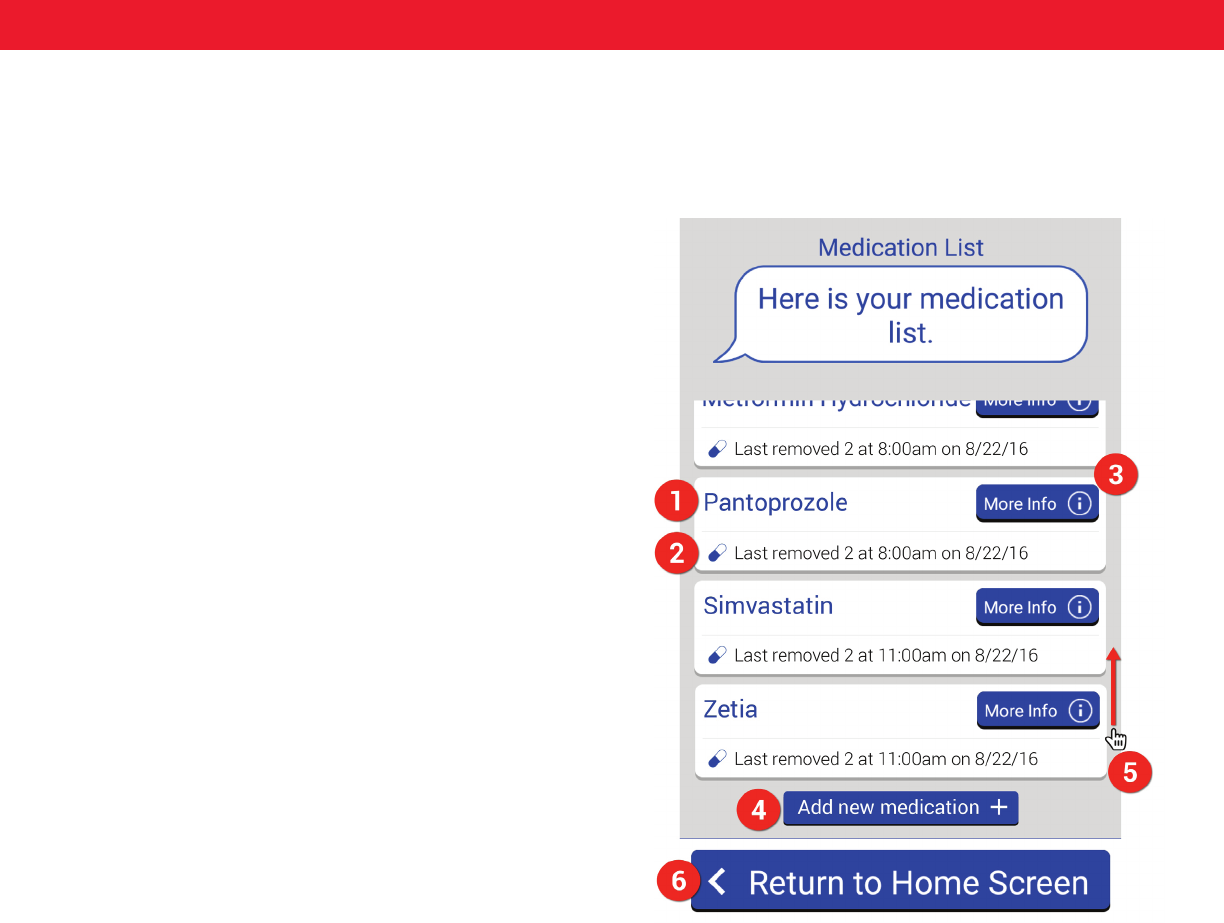
Medication List
The Medication List displays when you tap
Medications on the home screen. From this screen,
you can view your medications.
1. The name of the medication.
2. The last date, time, and amount that the
medication was removed from the device.
3. More Info: Tap to view detailed information
about the medication. Also, tap to take
medication outside of the preferred scheduled
time. For additional information, refer to the
Operating Instructions > Access Medication Off
Schedule or Anytime sections.
4. Add new medication +: Allows you to add a
new medication pod to the device.
5. You might have to swipe up and down to view
the full list of medications and the Add new
medication + button.
6. Return to Home Screen: Tap to return to the
home screen.
Note: The Medication List contains only those
medications that are managed by the InPower™
Personal Medication Assistant.
Medication List Screen

12
Setup Instructions
This section describes how to set up the InPower™ Personal Medication Assistant in your home and
load your first medications.
Device Placement
Allow two hours for the device to acclimate to the temperature and humidity of its new environment
after being unpacked and placed in your home. This is to ensure that the sensitive scales in the pod trays
can accurately measure the weight of the medications.
Cellular service is required in your area for the device to operate.
The InPower™ Personal Medication Assistant should be placed:
• in an area of your home where it will not be jolted.
• with enough room to open the door and pod trays.
• on a flat, level, and stable surface that is out of the reach of children.
• near a wall socket since it requires power.
Do NOT place:
• it near an air vent, fan, or open window because the airflow can adversely affect the sensitive
scales contained in the pod trays.
• objects on top of the device.
• the device near a ledge or in an area where you might easily drop medication onto the floor.
Once the device is set up in your home, you should avoid moving it.
Device Setup
After you have unpacked and placed the InPower™ Personal Medication Assistant in an appropriate place
in your home, plug the device into a wall socket. Then, follow these instructions to set up communications
between the device and your pharmacy, and load your first medications into the device.
Before performing this procedure, you should have with you the medication pods that you need to load now
given to you by your pharmacist in a polybag. Keep the pods in this bag until you are ready to load them into
the device. Make sure to inspect the bag and its contents prior to loading them.
CAUTION: Do not take or remove any medication from the pod until you have loaded
it into the device.
CAUTION: During initial setup, load medication pods into the device immediately when
you arrive home.
13
1. From the front left of the device, open the door, and then press the screen power button.
The screen turns on and then the setup screen displays.
2. If necessary, input your 4-digit PIN. Refer to the
Components section for detail on where to
find your PIN.
You may need to input this PIN to access your device
if it has gone to sleep.
3. At the Welcome! screen, tap Let’s Begin Setup.
A series of messages display that the device is pairing
and syncing. If an error occurs, you may need to
perform this step again.
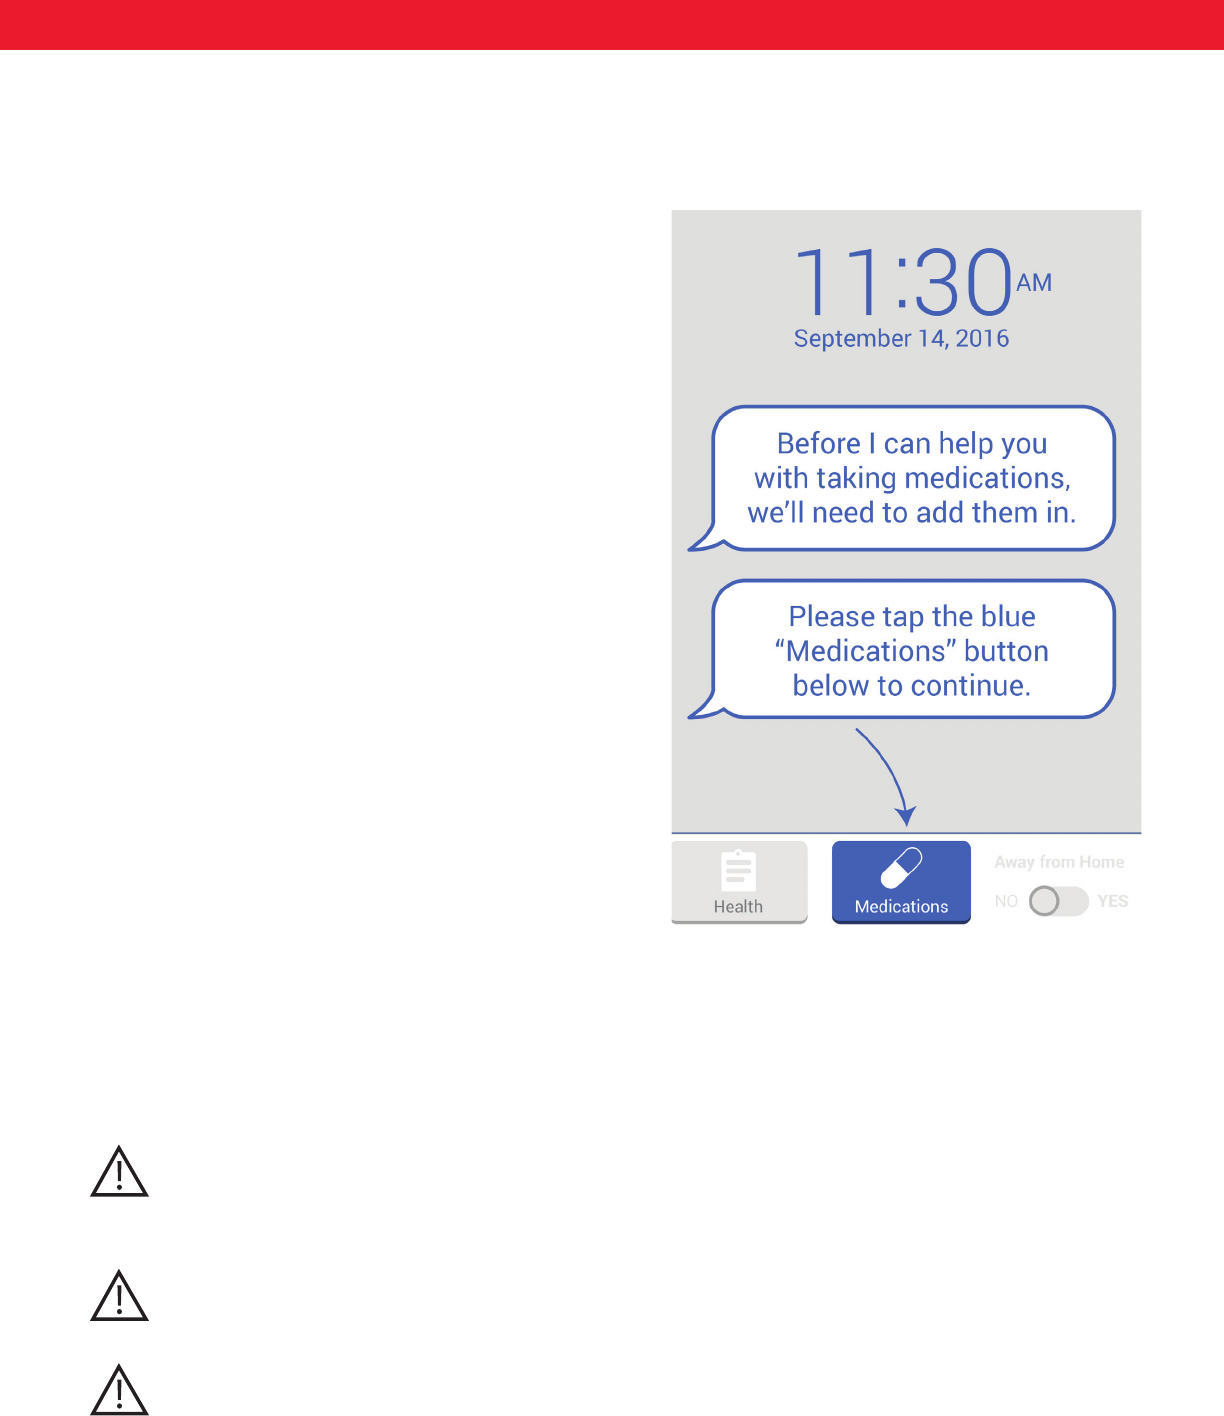
4. At the Initial Setup screen, tap Medications.
5. At the Medication List screen, tap
Add new medication +.
The next available pod tray opens.
A prompt to load the medication displays.
Note: If you prefer to load your new medication
at another time, tap I’ll load a pod later.
6. Refer to your Medication List that you received from your pharmacist. Place the first medication
listed into the pod tray. Then, remove the lid from the pod.
CAUTION: When placing the medication pod into the device and removing the lid, be careful
not to press down on the pod tray. By doing so, you might damage the sensitive scale located
at the bottom of the tray.
Do not attempt to manually manipulate the pod trays because you might damage the
mechanisms that automatically open and close the trays for you.
CAUTION: Keep your fingers away from the device as the door opens and closes so that
you do not catch your finger in a door or hinge. This could result in personal injury.
Initial Setup screen

14
REMINDER: You must remove the lid once the pod is placed in the device. Failure to do so
could result in damage to the device.
Note: Label the lid with the medication contained in the pod, and then store the lid in an easily
accessible location. If there is a problem with the device, you might have to remove the pods
from the device and replace the lids.
7. With the pod lid removed, tap Lid is off, pod is loaded.
The pod tray closes. The device reads the information on the medication pod.
A confirmation message displays.
8. Tap Confirm medication.
A message displays indicating that your medication has been loaded into the device.
Note: If the information is incorrect, tap Remove the pod and begin again.
9. Tap Tap to Continue.
The Medication List displays. If you wish to add additional medication, repeat Steps 6 – 9 for each
medication in the order they appear on the Medication List provided by your pharmacist.
10. Tap Return to Home Screen.
A confirmation screen displays.
11. Tap Finish.
Note: If you have a health device (for example, a glucometer) that can function with the InPower™
Personal Medication Assistant, you will receive a message that instructs you to connect it with the
device. Refer to the Connect a Health Device with the InPower™ Personal Medication Assistant section
to complete the process.
12. Close the device door.
13. Place your medication list in the documentation holder, located at the back of the device.
To fit in the holder, fold the list in half, twice.
15
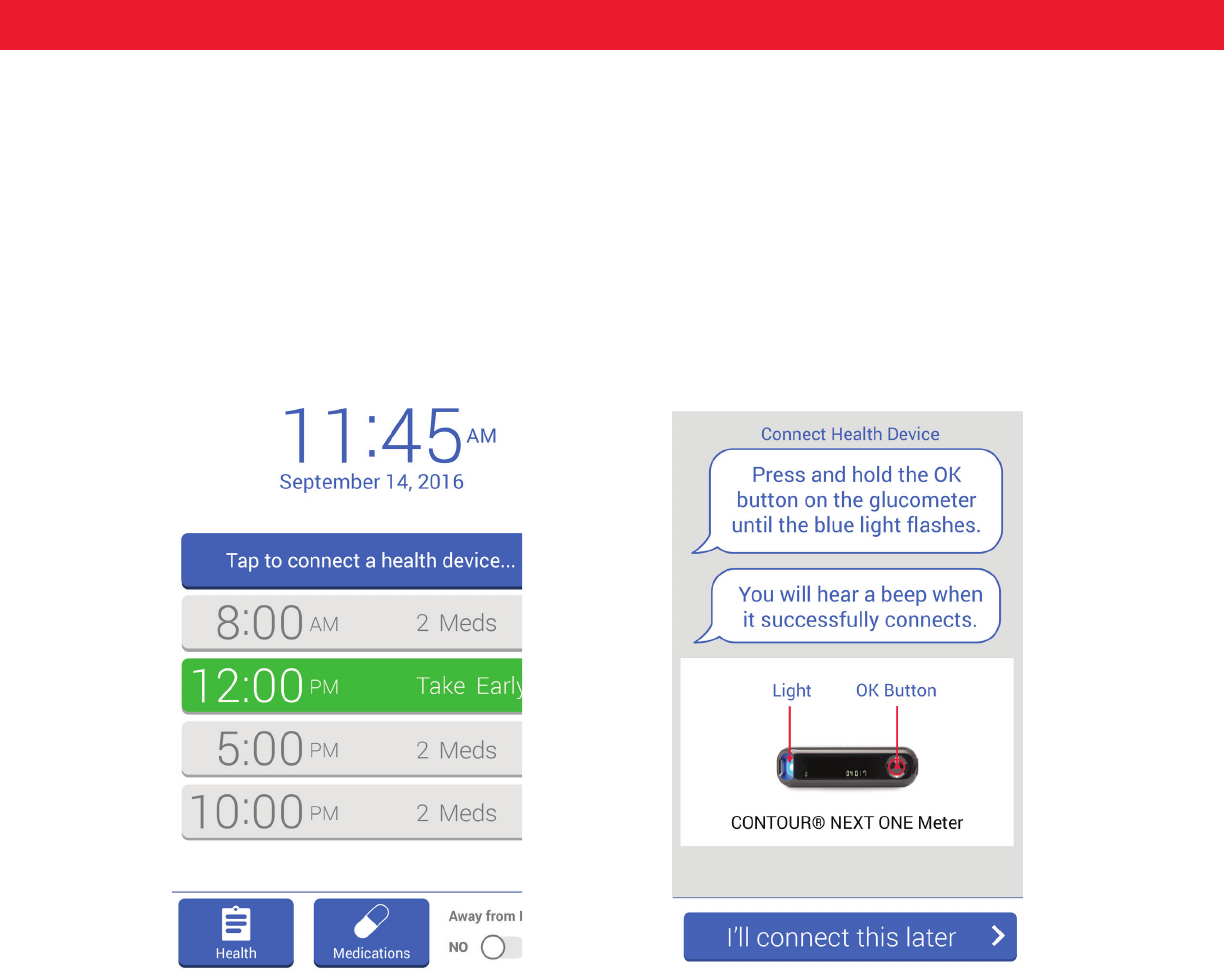
Connect a Health Device with the InPower™ Personal Medication Assistant
You can pair some Bluetooth-enabled devices with the InPower™ Personal Medication Assistant.
For example, pair a glucometer to maintain a log of your blood glucose readings. Please contact InPower™
Customer Support for a list of approved health devices.
The following instructions use the CONTOUR® NEXT ONE glucometer as an example.
1. Once you have loaded at least one medication pod and received the message to connect your health
device on the Home Screen, tap Tap to connect a health device.
Instructions to connect your glucometer display.
2. Follow the instructions on the screen to connect the device.
Note: If you prefer to connect your health device at another time, tap I’ll connect this later.
Note: If you receive a new glucometer or encounter problems during setup, contact Cardinal Health
Technical Support at 1-855-946-7697 (1-855-9IN-POWR).
* Health Information is provided for informational purposes only. A diagnosis should not be made using this
data. Please use the original medical device for actual data prior to making a diagnosis.
Setup Screen with Instructions
for Connected Device
Home Screen
16
Operating Instructions
This section describes the procedures for using the InPower™ Personal Medication System on a regular basis,
including loading and dispensing medications, discontinuing a medication, taking your medication at any time,
and working with your health information.
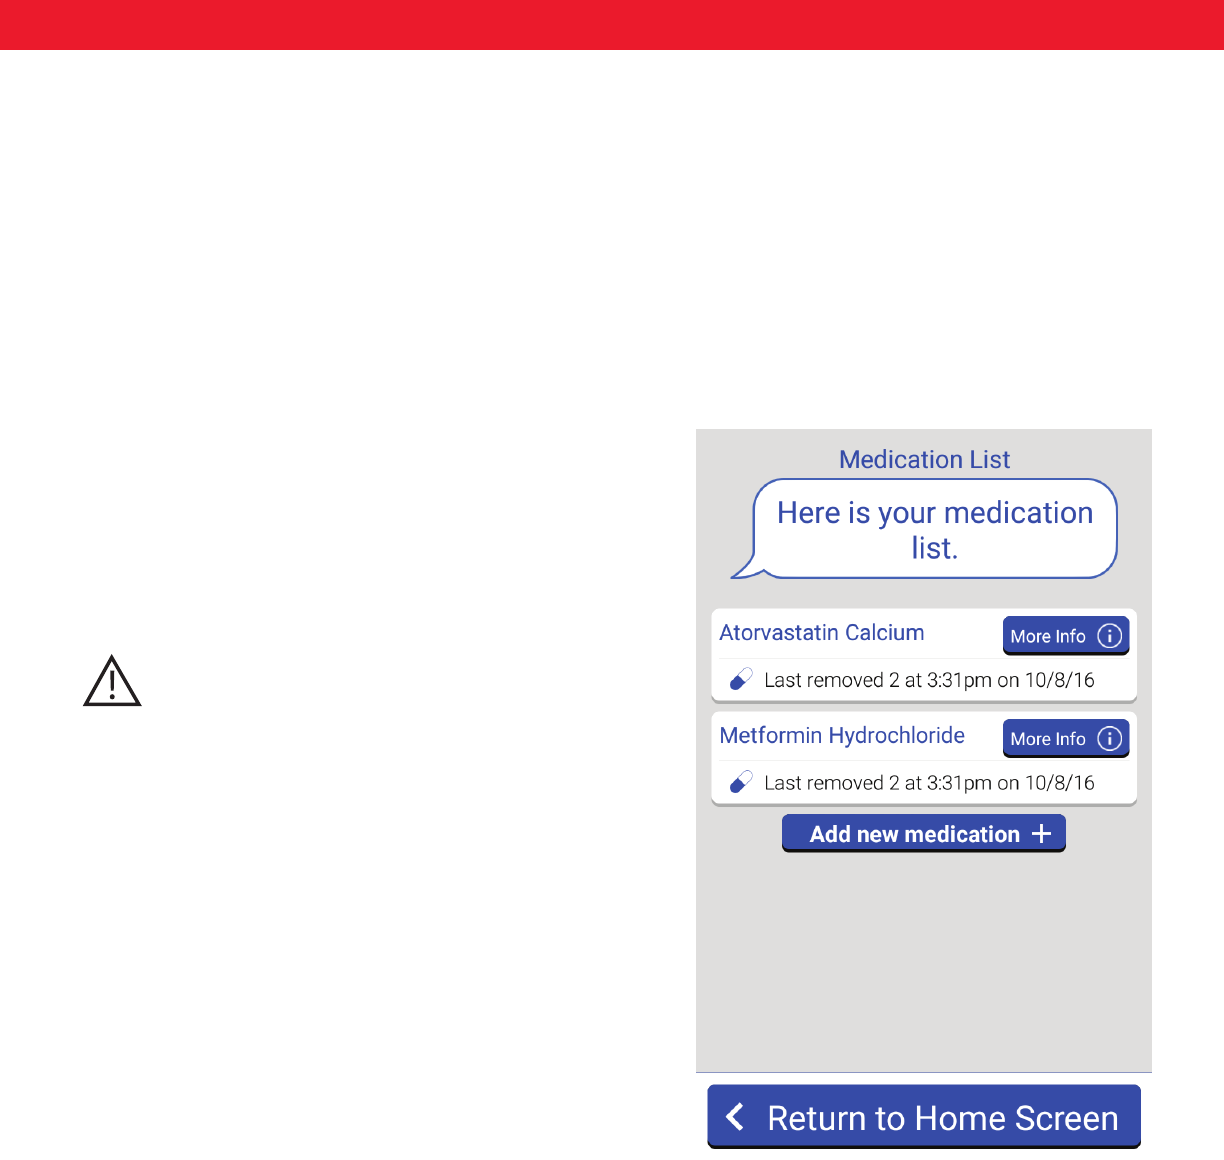
Load a New Medication
To load your device for the first time, see the instructions in the
Setup Instructions > Device Setup section of this document.
When you are prescribed a new medication, and pick up
your new medication pod from your pharmacy, you need to
load it into the InPower™ Personal Medication Assistant.
CAUTION: Do not take or remove any medication
from the pod until you have loaded it into
the device.
1. From the front left of the device, open the door
and input your PIN if necessary.
The screen turns on. The Home Screen displays.
2. Tap Medications.
The Medication List Screen displays.
3. Tap Add new medication +. You may need to
scroll to the end of your medication list to access
this button.
The next available pod tray opens. A prompt to load
the medication displays.
Note: If you prefer to load your new medication at
another time, tap I’ll load a pod later.
Medication List Screen

17
CAUTION: When placing the medication pod into the device and removing the lid, be careful not
to press down on the pod tray. By doing so, you might damage the sensitive scale located at the
bottom of the tray.
CAUTION: Do not attempt to manually manipulate the pod trays because you might damage
the mechanisms that automatically open and close the trays for you.
CAUTION: Keep your fingers away from the device as the door opens and closes so that you
do not catch your finger in a door or hinge. This could result in personal injury.
REMINDER: You must remove the lid once the pod is placed in the device. Failure to do so
could result in damage to the device.
Note: Label the lid with the medication contained in the pod, and then store the lid in an easily
accessible location. If there is a problem with the device, you might have to remove the pods from
the device and replace the lids.
4. Tap Lid is off, pod is loaded.
The pod tray closes. The device reads the information on the pod. A confirmation message displays.
5. Tap Confirm medication.
A message displays indicating that your medication was loaded into the device.
Note: If the information is incorrect, tap Remove the pod. Then, remove the pod from the device,
tap I’ve Removed the Pod, and begin again. Contact your pharmacist if you need additional help.
6. Tap Tap to Continue.
Note: If you have additional medications to load now, repeat Steps 3 – 6 until you have loaded
all your new medications into the device.
Note: If you have refills to load, a prompt to load the refill displays. In this case, refer to the
Reload a Medication procedure in this section.
Note: If this is the time to take this medication, a prompt to take the medication displays. In this case,
refer to the Take Medication procedure in this section.
7. Tap Return to Home Screen.
8. Once you have loaded all new medications, close the door.
9. Replace or update your medication list, located in the documentation holder at the back of the device.
18
Take Medication
Before you set up the InPower™ Personal Medication Assistant and whenever you are prescribed a new
medication, you and your pharmacist schedule your preferred times to take your medication. When it is
the preferred time to take a medication, the Medication Reminder icon displays on the exterior screen.
Also, depending upon what alerts you set up with your pharmacist, alarm lights at the bottom of the
device may flash and/or an audible alert may sound. If while you are taking your medication the tray
remains open for more than five minutes, an audible alert sounds until you perform an action with the
device or dose window closes.
1. When it is at or near the preferred time to take
your medication, take the appropriate action:
• If it is within one hour prior of the scheduled
time and you wish to take your medication
early, open the door. Then, input your PIN
if necessary, and tap Take Early from the
Home Screen.
• If it is time to take your medication and you
are viewing the Home Screen, tap
Take Now.
• If it is time to take your medication and you
are viewing the Initial Dispense Screen,
tap Tap to Begin or tap Remind me in
5 minutes to reset the popup message.
• If it is more than one hour past the
scheduled time, refer to the Access
Medication Off Schedule procedure in
this section to take your medication.
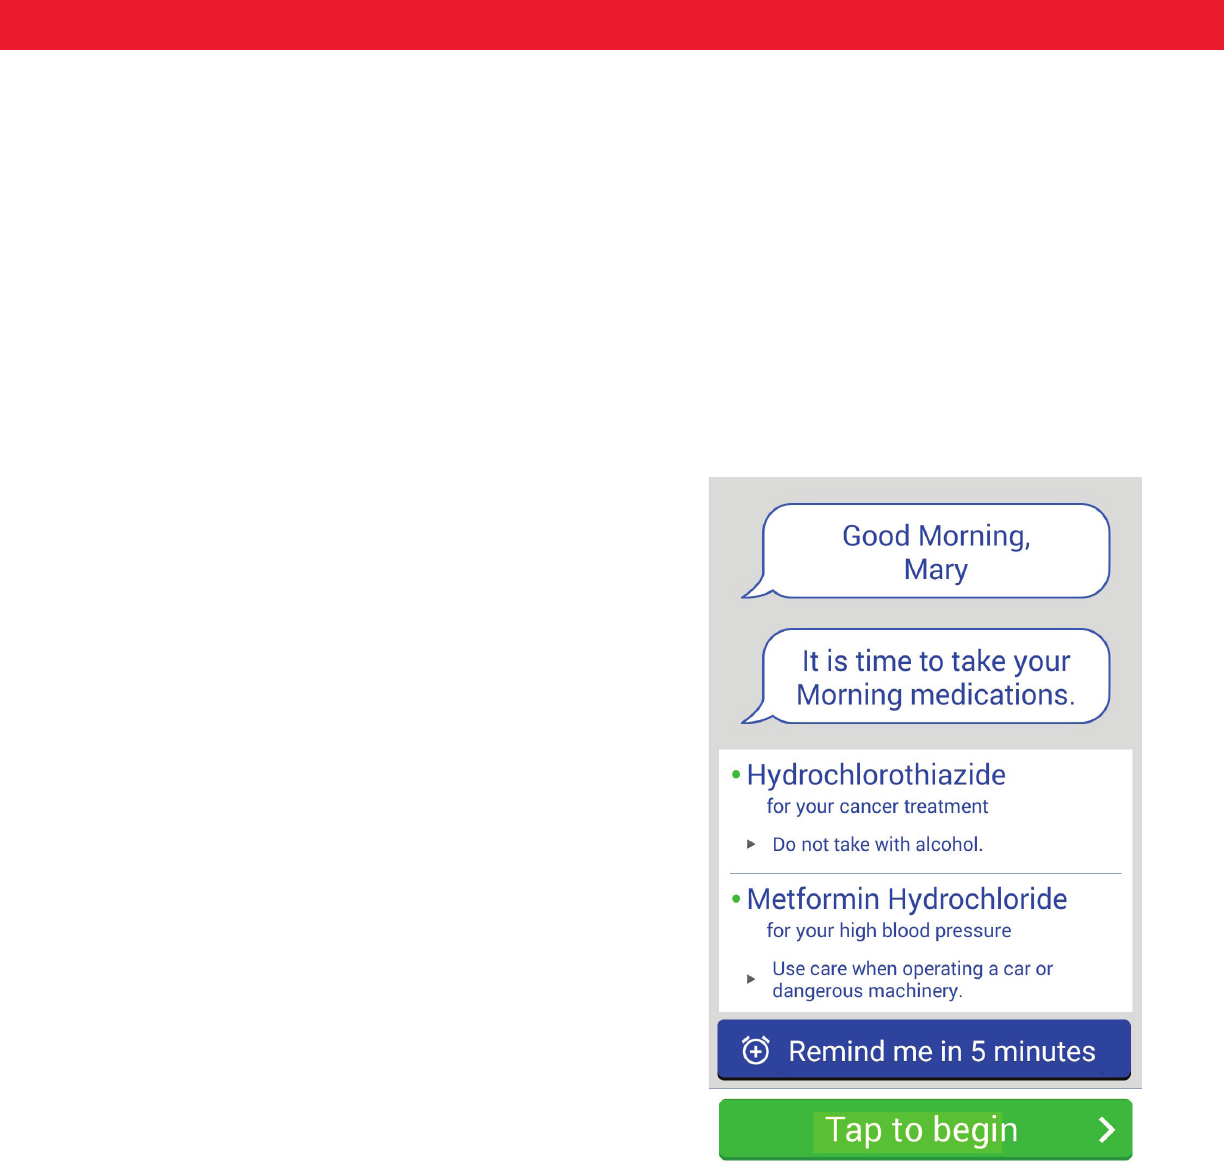
When your alarm(s) flash and/or sound, the Initial
Dispense Screen displays. It contains a list of
medications you need to take now, along with
any special instructions for taking each medication.
2. Tap Tap to Begin.
The appropriate pod tray opens. The screen for the first medication displays. It contains the dosage and
name of the medication. It might contain the purpose of the medication and special instructions for taking
the medication.
Initial Dispense Screen

19
Reminder: If you wish to reset the alarm for a short time, tap Remind me in 5 minutes.
3. Remove the appropriate number of medications from the pod.
CAUTION: When removing medications from the medication pod, be careful not to press
down on the pod tray. By doing so, you might damage the sensitive scale located at the
bottom of the tray
Do not attempt to manually manipulate the pod trays because you might damage the
mechanisms that automatically open and close the trays for you.
CAUTION: Keep your fingers away from the device as the door opens and closes so that you
do not catch your finger in a door or hinge. This could result in personal injury.
As you remove medications from the pod, the device weighs the pod. It determines how many
medications were removed.
• If you remove the correct number of medications from the pod, a message displays indicating
that you have taken the correct dosage. Proceed to Step 4.
• If you remove too few medications from the pod, a prompt to remove additional medications
from the pod displays. You have the option to skip this medication or indicate that you took
the correct amount. See WARNING below.
• If you remove too many medications from the pod, an alarm sounds and a prompt to put
the extra medications back into the pod displays. You have the option to indicate that a
medication was lost or damaged or that you took the correct amount. See WARNING below.
WARNING: If you removed the correct number of medications from the pod and the
device is prompting you to remove or add medications, tap I took the correct amount,
and then contact Cardinal Health Technical Support at 1-855-946-7697 (1-855-9IN-POWR).
Note: Do not remove the pod from the tray unless you are prompted to do so. If you do remove the
pod, a message displays prompting you to place the pod back into the tray. You cannot continue
taking your medication until you have done so. Once you return the pod to the tray, tap I’ve put
the pod back. The tray closes, the device verifies that the correct pod is in the tray, and then you are
prompted to continue taking your medication.
Note: If there is not enough medication in the pod to fulfill the correct dosage, you are prompted to
take what is available and reload the medication with a refill, if a refill is available for you. For
example, if your dose requires you to take two but only one remains. For additional information,
refer to the Reload a Medication procedure in this section.

20
Note: If there is no medication left in the pod after you take the correct dosage, you are prompted to
reload the medication with a refill, if a refill is available for you. For additional information, refer to the
Reload a Medication procedure in this section.
Note: If you do not wish to take this medication, tap Skip this Medication. A message displays
verifying that you skipped the medication and the device continues the process.
4. Tap Tap to Continue.
The tray closes. The final dosage summary screen displays, indicating which medications you took and
which you skipped.
• If you have another medication to take now, the appropriate tray opens and the screen for the
next medication displays. Repeat Steps 3 – 4 for each subsequent medication.
5. Tap Tap to Finish.
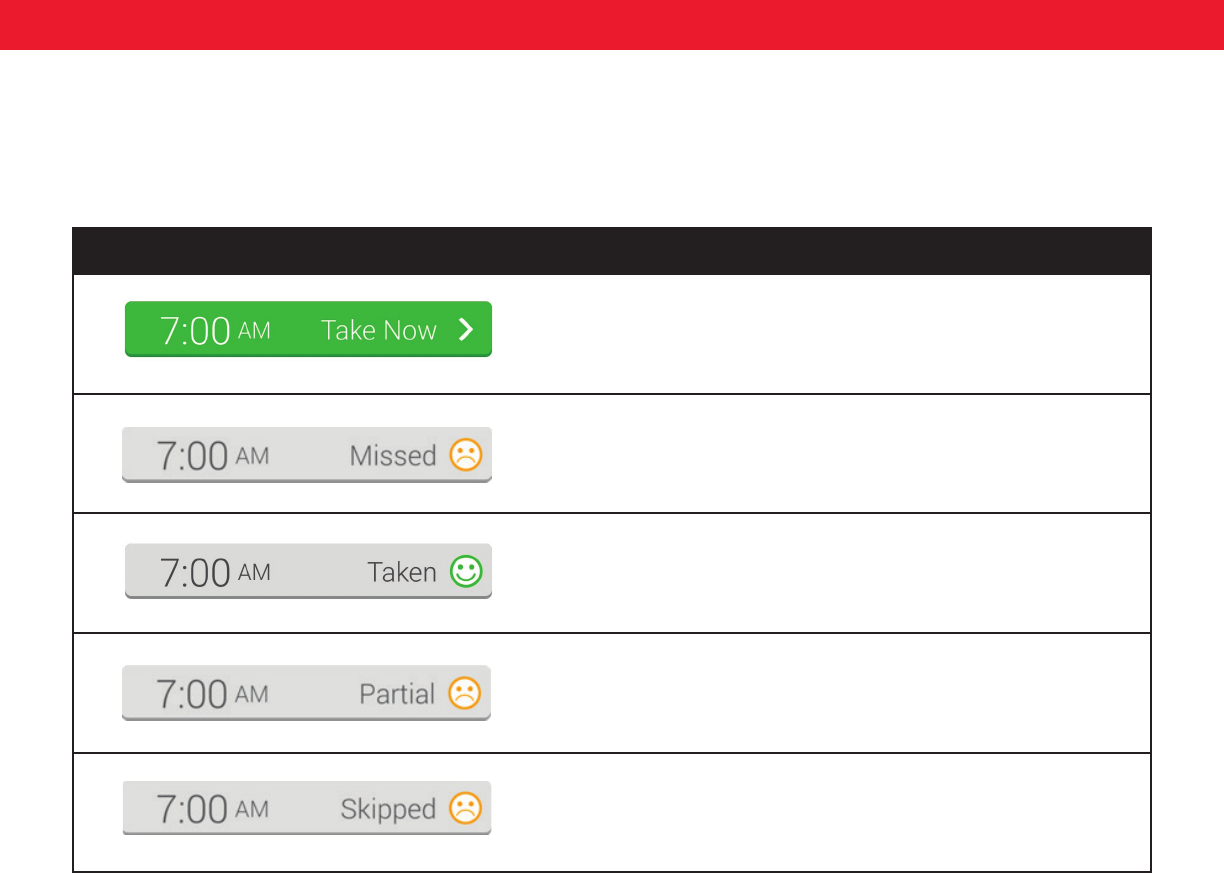
The Home Screen displays. The status message for this scheduled time is updated:
• Taken: You took all the scheduled medications for the scheduled time.
• Partial: You took some of the scheduled medications for the scheduled time; however, you
skipped and/or took a partial dose of one or more medications.
• Skipped: You did not take any of the scheduled medications for the scheduled time.
• Missed: You did not access the device during the dose window to take your medication.
Reload a Medication
When you pick up a refill of a medication from your pharmacy, load it into the InPower™ Personal
Medication Assistant when prompted to do so.
You might be prompted to reload a medication refill during a scheduled time to take your medication.
This might occur if there are not enough medications in the pod to fulfill the full dose or if there are no
medications left in the pod after you take the full dose.
CAUTION: Do not take or remove any medication from the pod until you have loaded it into
the device.
CAUTION: Do not add medications to the pod from another source; for example, another
medication pod or bottle.
21
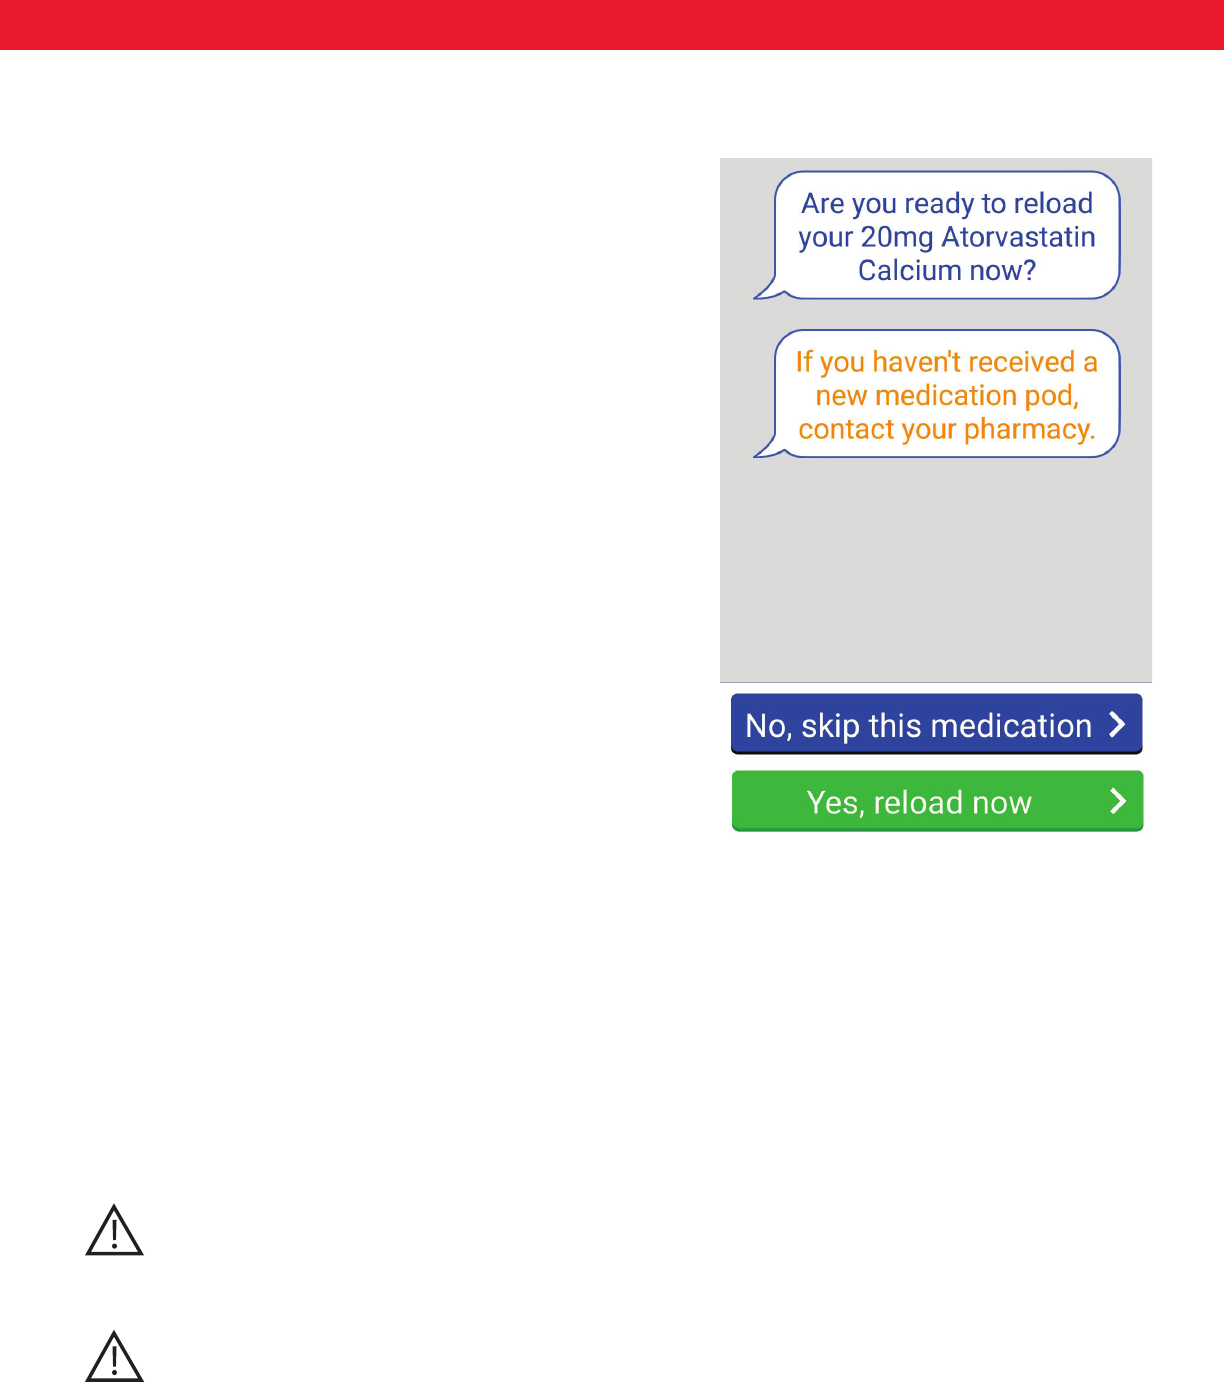
1. When you need to reload a medication refill, a
prompt displays.
2. At the Initial Reload screen, tap Yes, reload now.
The appropriate pod tray opens. A prompt to remove
the empty pod displays.
Note: If you do not wish to reload this medication,
tap No, skip this medication. A message displays
verifying that you skipped the medication. You either
return to the Home Screen, are prompted to reload
another medication, or continue with the procedure
to take your medication.
3. Remove the empty pod, and then tap I’ve removed
the pod.
The device verifies that the pod was removed. A prompt
to load the new pod displays.
Note: If you do not wish to reload this medication,
tap I’ll reload this pod later. The pod tray closes.
A message displays verifying that you skipped the
medication. You either return to the Home Screen,
are prompted to reload another medication, or
continue with the procedure to take your medication.
4. Verify that the tray is completely empty. If necessary, remove any foreign substance from the tray.
5. Place the pod that matches the medication name on the screen into the tray, and then
remove the lid from the pod.
CAUTION: When placing the medication pod into the device and removing the lid, be careful
not to press down on the pod tray. By doing so, you might damage the sensitive scale located
at the bottom of the tray.
CAUTION: Do not attempt to manually manipulate the pod trays because you might damage
the mechanisms that automatically open and close the trays for you.
Initial Reload Screen

22
CAUTION: Keep your fingers away from the device as the door opens and closes so that you
do not catch your finger in a door or hinge. This could result in personal injury.
REMINDER: You must remove the lid once the pod is placed in the device. Failure to do so
could result in damage to the device.
Note: Label the lid with the medication contained in the pod, and then store the lid in an easily
accessible location. If there is a problem with the device, you might have to remove the pods from
the device and replace the lids.
6. Tap Lid is off, pod is loaded.
The pod tray closes. The device reads the information on the medication pod and a confirmation
screen displays.
Note: If you do not wish to refill this medication, tap I’ll reload this pod later. The pod tray closes.
A message displays verifying that you skipped the medication. You either return to the Home
Screen, are prompted to reload another medication, or continue with the procedure to take
your medication.
7. Tap Confirm medication.
A message displays indicating that your medication was loaded into the device.
Note: If the information is incorrect, tap Remove the pod.
8. Tap Tap to Continue.
23
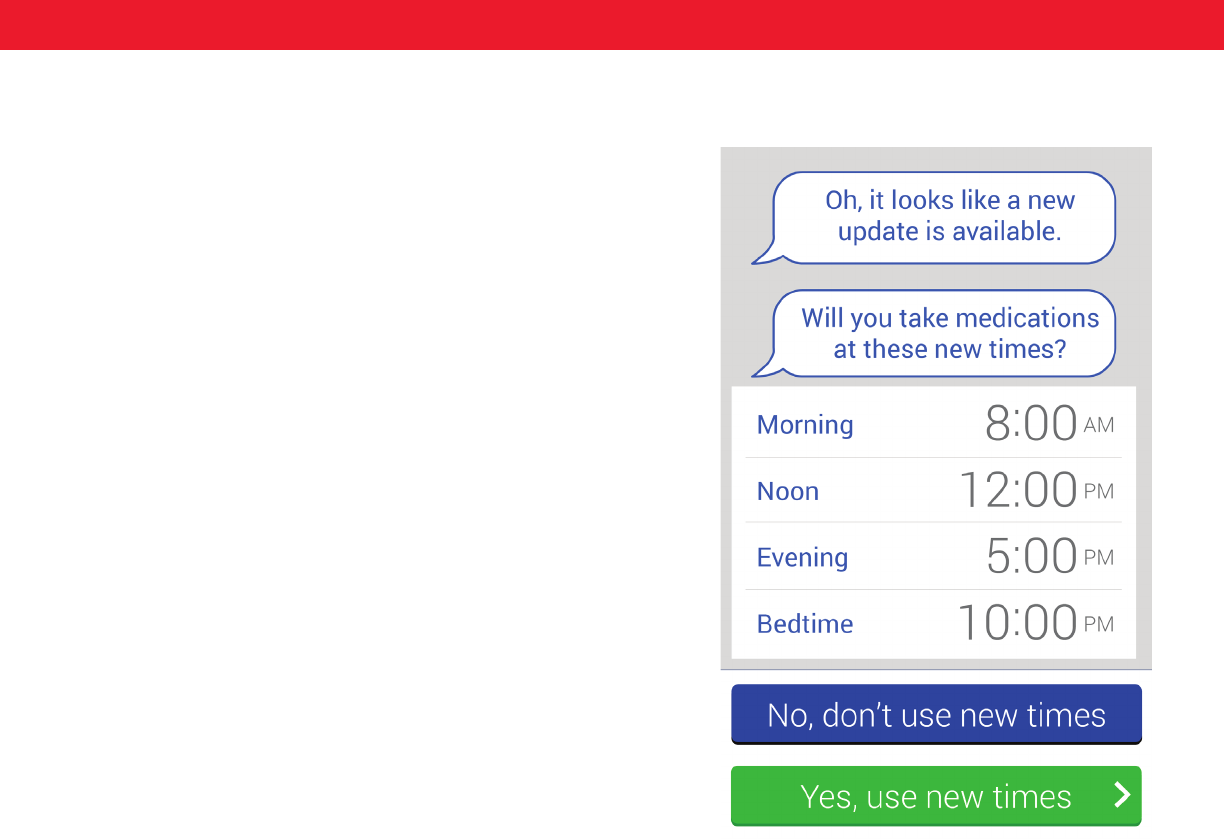
9. Confirm any changes made to your preferred time to
take your medication, if applicable.
If you and your pharmacist have made changes to your
preferred times to take your medication, at the Confirm
Reload screen, choose from the following:
• If you want to use the new times, tap Yes, use
new times.
• If you do not want to use the new times, tap No,
don’t use new times. You will be reminded to
use the new times when you load another pod
with these changes unless you tap Don’t remind me.
10. Tap Tap to Continue.
• If there are no other pods to reload and this is
not a scheduled time to take the medication,
the Home Screen displays.
• If you have additional refills to load now, a prompt
to load your next medication refill displays. In this
case, repeat Steps 2 – 9.
• If this is a scheduled time to take a medication, a
prompt to take a medication displays. In this case,
refer to the Take Medication procedure in this section.
11. Once you have loaded all refills and, if applicable,
taken your medications, close the door.
12. Dispose of the empty pods.
Confirm Reload Screen
24
Access Medication Off Schedule
There might be times when you need to access your medication outside of the preferred scheduled time:
• If you did not take a medication during the scheduled medication period – from one hour
before to one hour after the scheduled time – you can still take the medication before
the next scheduled time.
• See the Access Medication Anytime section if you plan on being away from home for an
extended period (for example, work or vacation).
1. From the front left of the device, open the door and input your PIN if necessary.
The Home Screen displays.
2. Tap Medications.
The Medication List displays.
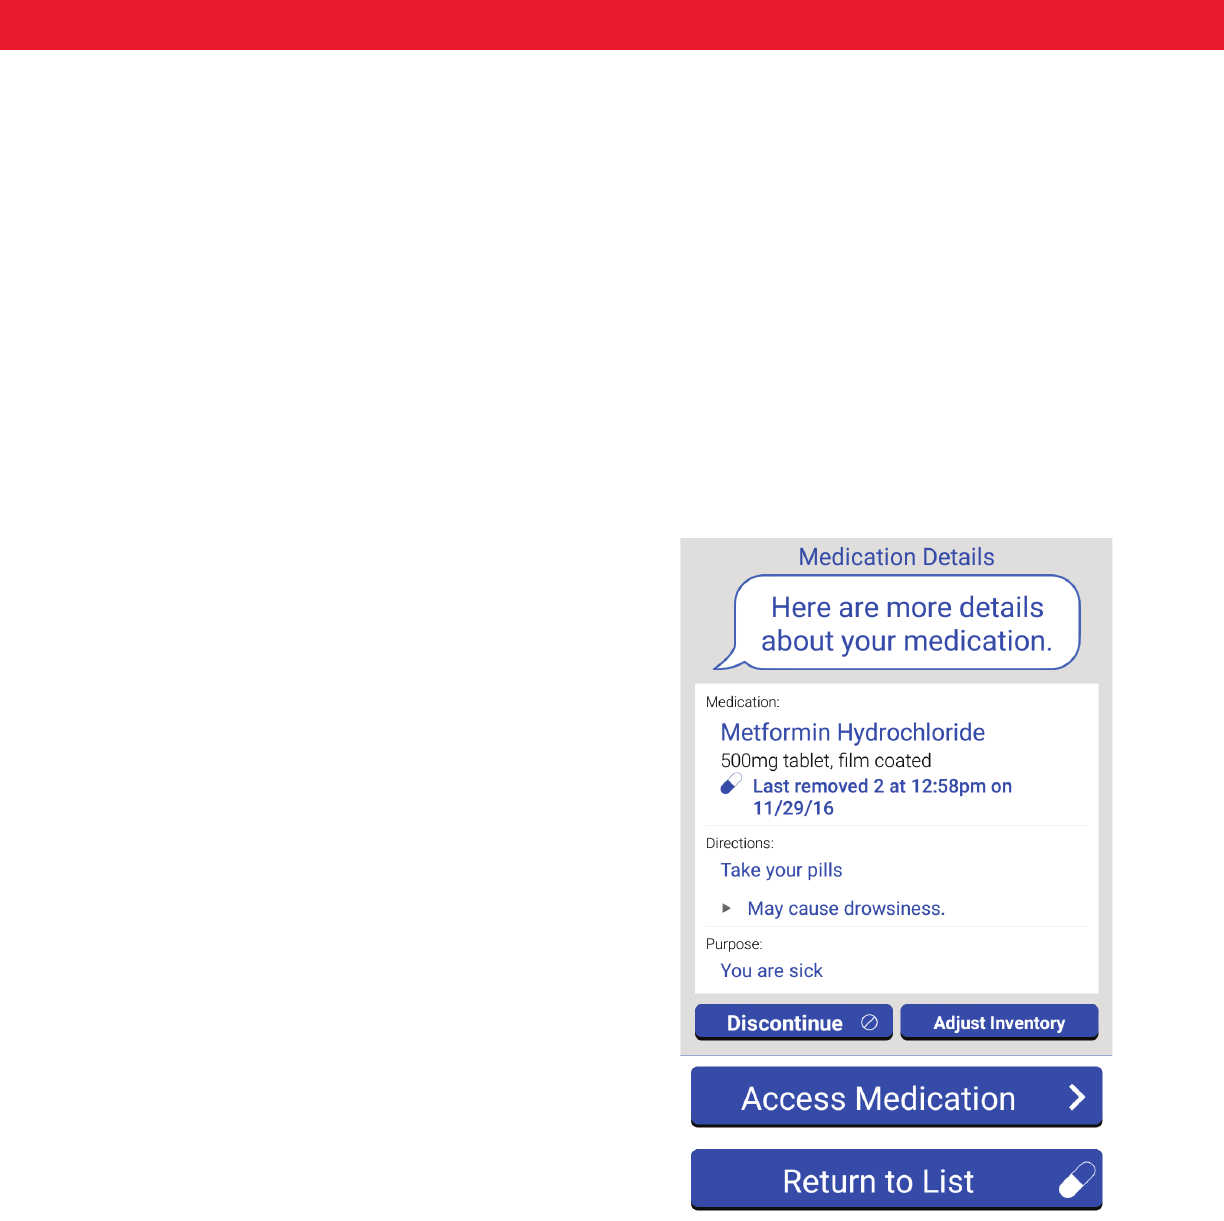
3. Find the medication you wish to take in the list.
Then, tap More Info, located to the right of the
name of the medication.
The Medications Details screen displays.
4. Tap Access Medication.
The appropriate pod tray opens. The screen for the
medication displays. It contains the dosage and
name of the medication.
5. Remove the appropriate number of
medications from the pod.
A prompt to enter the number of medications
you remove from the pod displays.
6. Tap the + and - icons to indicate the number of
medications you removed from the pod,
and then tap Tap to Continue.
The pod tray closes. A confirmation screen displays.
7. Verify that the number of medications you removed from the pod matches the number on the
confirmation screen, and then tap Yes, confirm & finish.
Medication Details Screen

25
The Medication List displays. If you wish to remove additional medications from the device,
repeat Steps 3 – 7 for each medication.
Note: If the numbers do not match, tap No, take me back. Then, reenter the correct number and/or
place the appropriate number of medications back into the pod.
8. Tap Return to Home Screen.
The Home Screen displays with a popup confirmation, prompting you to verify that you have removed all
the appropriate medications.
9. Tap No, I am not ready yet. Selecting this option keeps your device from functioning in travel mode.
The popup message closes and you return to the Home Screen.
10. Close the door.
Access Medication Anytime
There might be times when you need to access your medication outside of the preferred scheduled time:
• If you plan on being away from home for one or more scheduled times to take your medication,
you can remove the medications that you wish to take with you. This sets up the InPower™
Personal Medication assistant so that it does not expect you to be present for the scheduled times.
During this time, the alarms do not function.
1. From the front left of the device, open the door and input your PIN if necessary.
The Home Screen displays.
2. Tap Medications.
The Medication List displays.
3. Find the medication you wish to take with you in the list. Then, tap More Info, located to the right of
the name of the medication.
The Medications Details screen displays.
4. Tap Access Medication.
The appropriate pod tray opens. The screen for the medication displays. It contains the dosage and name
of the medication.
26
5. Remove the appropriate number of medications from the pod.
A prompt to enter the number of medications you remove from the pod displays.
6. Tap the + and - icons to indicate the number of medications you removed from the pod,
and then tap Tap to Continue.
The pod tray closes. A confirmation screen displays.
7. Verify that the number of medications you removed matches the number on the confirmation screen,
and then tap Yes, confirm & finish.
The Medication List displays. If you wish to remove additional medications from the device, repeat
Steps 3 – 7 for each medication.
Note: If the numbers do not match, tap No, take me back. Then, reenter the correct number
and/or place the appropriate number of medications back into the pod.
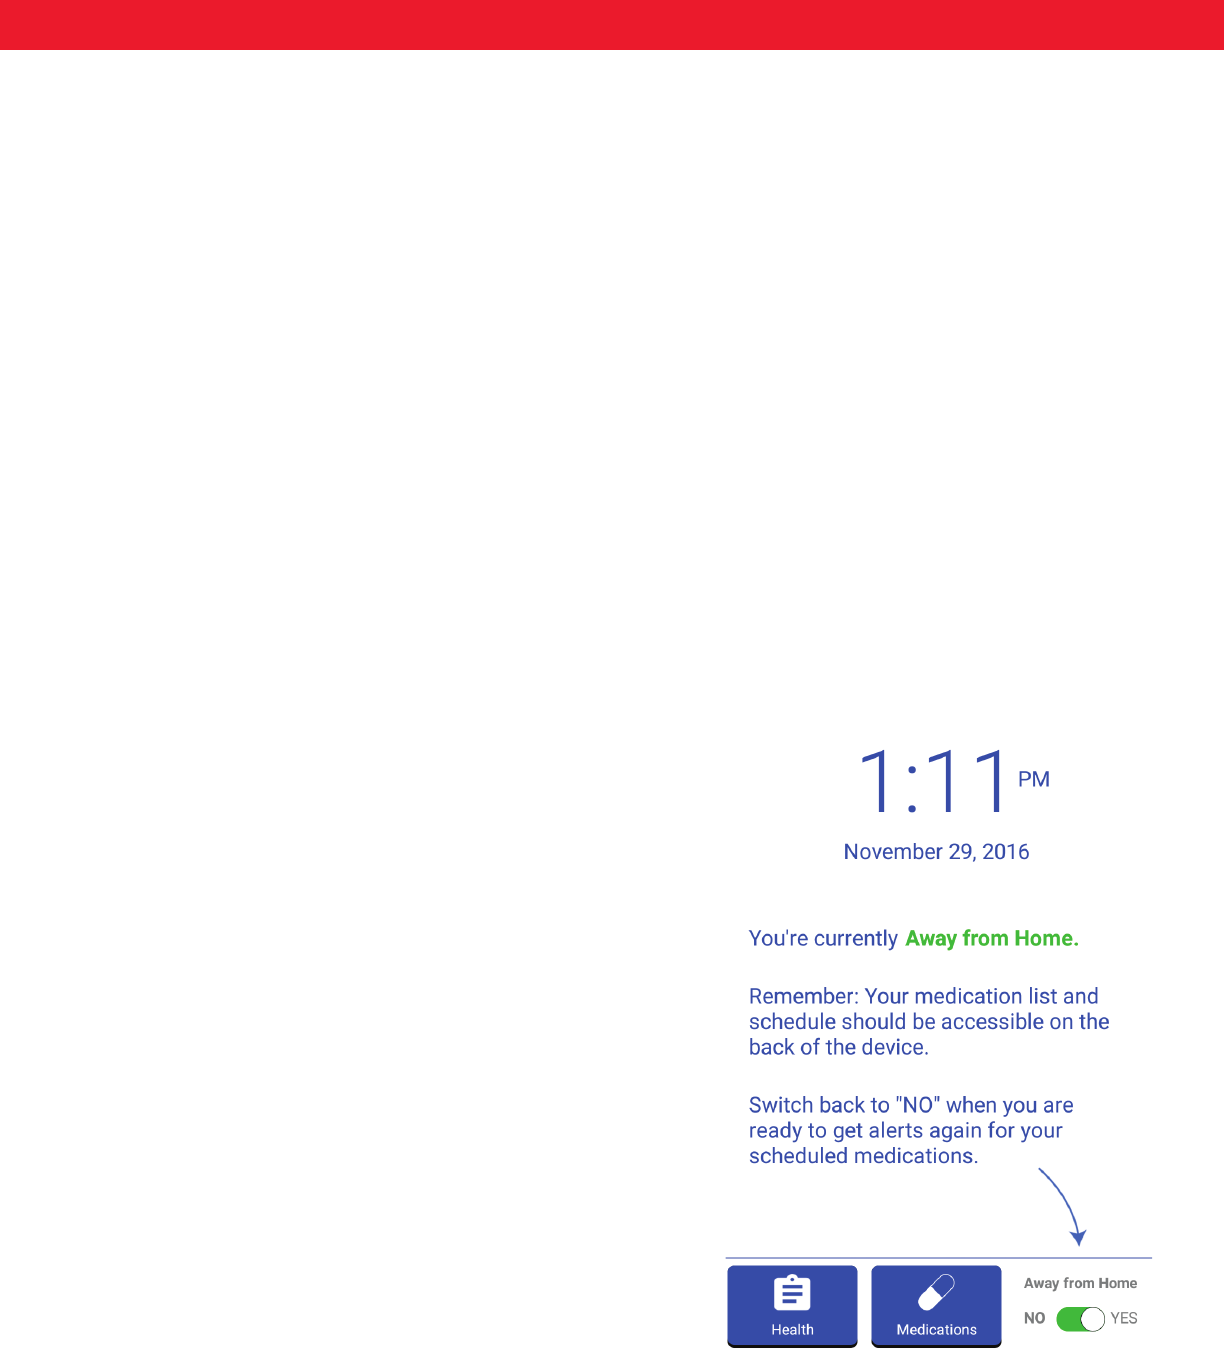
8. Tap Return to Home Screen.
The Home Screen displays with a popup confirmation,
prompting you to verify that you have removed all the
appropriate medications.
9. Tap Yes, I have them already.
The popup closes. At the bottom, right of the home screen,
the Away from Home button automatically slides to the
YES position. The device disables the alarms to take your
medication. A message indicating that you are currently
away from home displays.
Note: If you manually slide the button to the YES
position before removing any medication, you are
presented with the option to remove your medications.
10. Close the door.
Away from Home Screen
27
When you return home, slide the Away from Home button to the NO position. Then, tap Yes, I am ready
from the confirmation popup.
Note: If you return home with unused medication, continue taking the medication as prescribed before
changing the Away from Home setting back to NO. Do not return any unused medicine to the device.
If you have unused medication and require a different medication from the device at the next scheduled
time, you can perform either of the following options:
• Change the Away from Home setting to No. At the next scheduled time, select Skip this
Medication for the medication that you returned home with and take the other medication.
For additional information, refer to the Take Medication procedure in this section.
• Wait until after the next scheduled time expires (one hour after the scheduled time), and then
take the other medication outside the scheduled time.
Discontinue a Medication
If one of your medications is discontinued by your physician,
it is recommended that you contact your pharmacist to
inform him/her that you are no longer taking this
medication. Remove the pod of discontinued medication
before taking your other medications.
1. From the front left of the device, open the door
and input your PIN, if necessary.
The screen turns on.
2. From the Home Screen, tap Medications.
3. At the Medication List screen, tap the medication that
you need to discontinue. You may need to scroll to
find your medication.
4. At the Medication Details screen, tap Discontinue.
You may need to scroll to find the button.
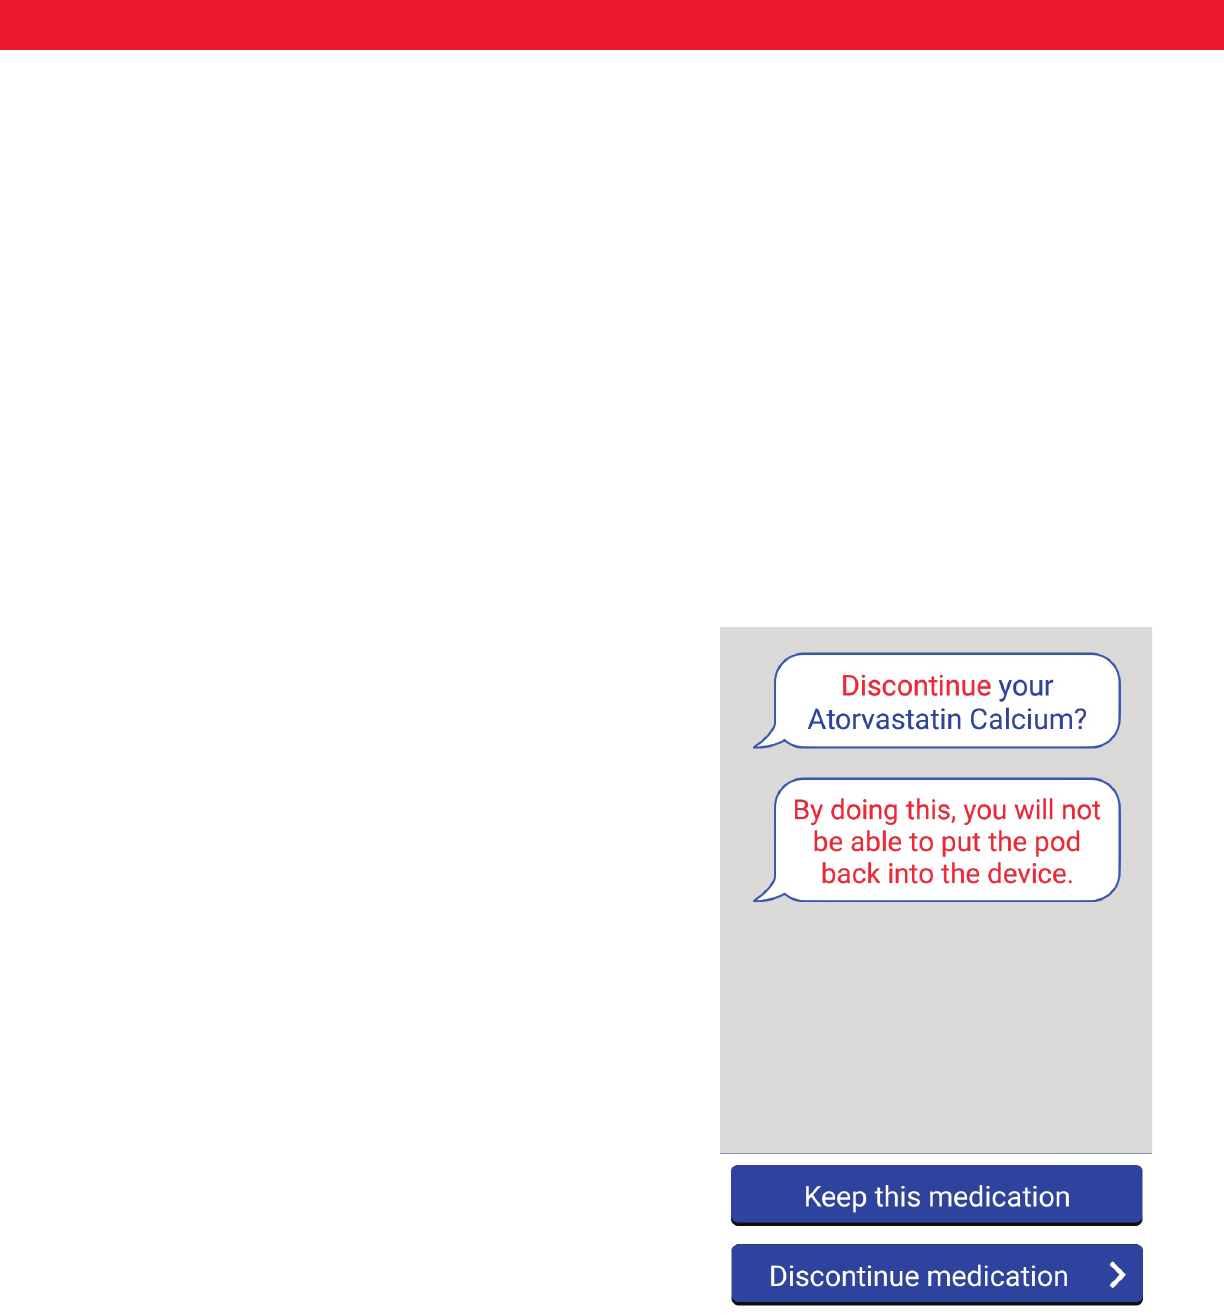
5. At the Discontinue Medication screen, verify the
medication that you are removing and tap
Discontinue Medication. Discontinue Medication Screen

28
Note: Tap Keep this medication if the medication selected is incorrect.
6. There is another chance to verify the medication to remove from the device.
Tap Discontinue Medication.
Note: Once you discontinue a medication, you cannot put the pod back in to the device.
The pod tray opens.
7. Remove the pod from the tray, and then tap I’ve removed the pod.
The tray closes. The device verifies that the pod was removed. A message displays indicating that
you removed the pod from the tray.
Note: If you did not remove the pod, the tray opens and the device prompts you to remove the pod.
Remove the pod, and then tap I’ve removed the pod.
8. Tap Tap to Continue.
The Medication List screen displays.

29
Adjust Inventory
There might be a time where the device has a different total
calculated than what is contained in the
medication pod. If that occurs, you can adjust the
inventory number on the device.
1. From the front left of the device, open
the door and input your PIN if necessary.
The Home Screen displays.
2. Tap Medications.
The Medication List displays.
3. Find the medication you wish to take
in the list. Then, tap More Info, located
to the right of the name of the medication.
The Medications Details screen displays.
4. Tap Adjust Inventory.
The appropriate pod tray opens. The screen
for the medication displays. It contains the
dosage and name of the medication.
5. Tap the + and - icons to indicate the number
of medications in the pod. Then, tap
Tap to Continue.
The pod tray closes. A confirmation screen displays.
6. Verify that the number of medications you removed matches the number on the
confirmation screen, and then tap Yes, confirm & finish.
The Medication List displays. If you wish to adjust additional medication amounts,
repeat Steps 3 – 6 for each medication.
Medication Details Screen
30
View Health Information
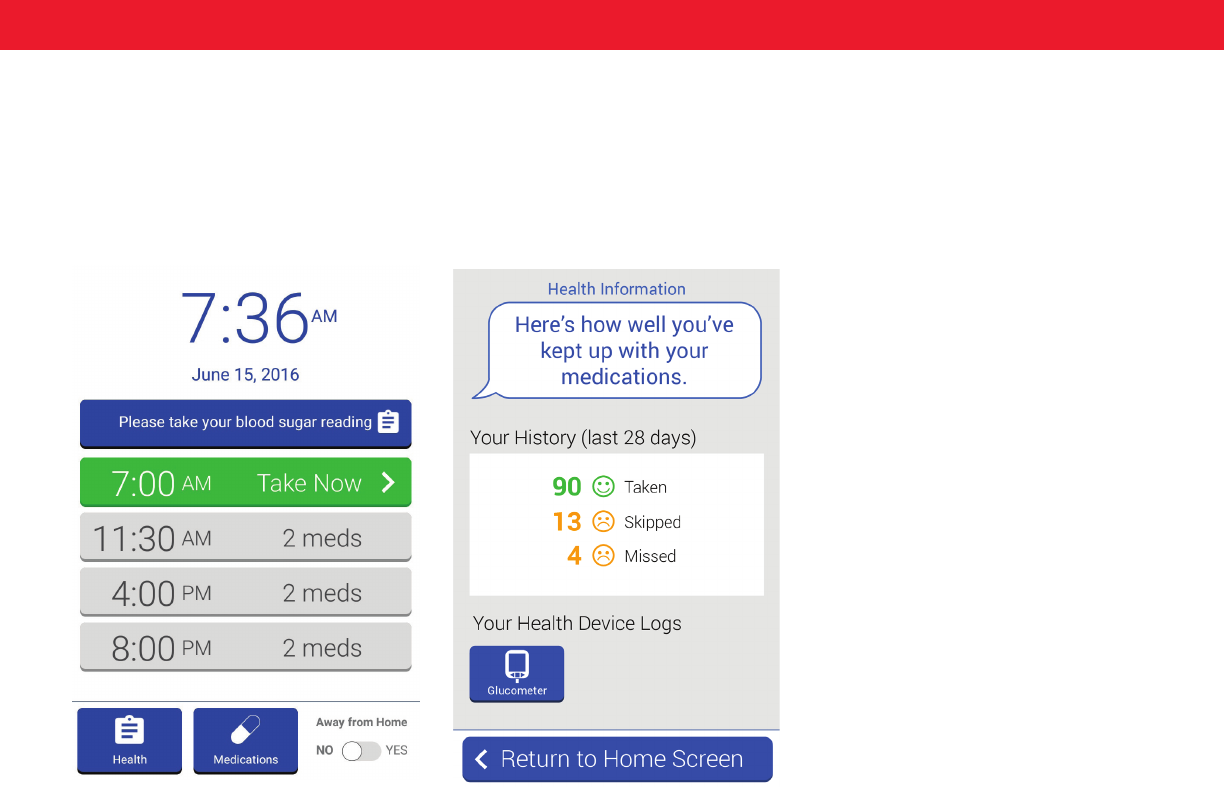
Your health score and information received from connected devices are stored in various logs.
Your History icons:
• 1 Taken = you took all
your medication
• 1 Skipped = you skipped
all your medication
• 1 Missed = you missed
taking medication during
your scheduled time
If you took a partial dose, this
is not reflected here.
1. From the front left of the device, open the door and input your PIN, if necessary.
The Home Screen displays.
2. Tap Health.
The Health Information screen displays, containing your health score. This is an indication of how well you
are keeping up with your medications. This screen also displays Your Health Device Logs icons.
3. If you wish to view a device log, tap the appropriate health device log icon; for example, Glucometer.
The selected device log displays.
4. Tap Return to Home Screen.
The Home Screen displays.
5. Close the door.
* Health Information is provided for informational purposes only. A diagnosis should not be made using this
data. Please use the original medical device for actual data prior to making a diagnosis.
Home Screen Health Information Screen
31
Manage the Glucometer Log
When you meet with your pharmacist to set up the
times to take your medication, you also set up the
number of times you should take your blood
sugar reading.
When you pair a glucometer with the InPower™
Personal Medication Assistant, you are prompted to
take a blood sugar reading at the beginning of your
first scheduled medication time.
When you have a glucometer reading to review, the
Health Information Notification icon displays on the
Exterior Screen of the device.
Note: You can view your glucometer log from the
Health tab on the Home Screen. If there are readings
available to view, you can also view from the banner
that displays directly under the date and time.
Home Screen
32
Your blood sugar readings are transmitted from the glucometer to the InPower™ Personal Medication
Assistant, and then stored in the glucometer log. On the day that you take the readings, you have the
option to delete readings.
1. From the front left of the device, open the door and input your PIN, if necessary.
The Home Screen displays.
2. From the Home Screen, tap the # of # blood sugar readings taken message, located directly below
the time and date.
The Glucometer Log displays. Blood sugar readings that you took on the current day or have not saved on
the current day are labeled with the word “New.” This displays in red text, to the left of the reading. These
readings also contain a red x, to the right of the reading.
3. If you wish to delete any of the new blood sugar readings, tap the red x, to the right of the reading.
The reading is deleted from the list.
4. Tap Return to Home Screen.
A popup confirmation displays. It contains a list of the new readings to save.
5. Tap Save Readings.
The new readings are saved to the glucometer log. The Home Screen displays.
6. Close the door.
Home Screen Glucometer Log

33
Cleaning
This section describes the InPower™ Personal Medication Assistant cleaning requirements.
Screen
• Clean the screen with a microfiber cloth.
• Dampen the cloth with water, if necessary.
CAUTION:
• Do not spray anything directly onto the screen.
• Limit force against the screen and support the door with your hand.
Plastic Parts
• Clean plastic with a dry cloth. This includes the outside of the device, front of the medication trays,
and inside the door.
• Dampen the cloth with water, if necessary.
• If you need to remove grease from the device and water doesn’t work, dampen the cloth with a mild
detergent, such as dishwashing liquid. Or, use one of the following appropriate solutions: Pine Sol,
Lysol, Formula 409, Simple Green All Purpose Cleaner, and Green Works All Purpose Cleaner.
CAUTION: Do not apply or spray anything directly onto the device because the mist can
penetrate the device.
Pod Trays
It is not recommended to clean the internal components of the device. If you need to clean the inside
of a pod tray, power off the device, and then gently clean the tray with a cotton cloth.
CAUTION:
• Do not use a paper cloth because it might leave residue behind. This can affect the sensitive
scales contained in the pod trays.
• Be very gentle and do not apply force to the tray. By doing so, you might damage the
sensitive scale located at the bottom of the tray.
34
Troubleshooting
This section describes general troubleshooting information, including solutions to common problems.
Powering the Device Off Then On
In some cases, cycling the power off and then back on might resolve the problem. contact Cardinal Health
Technical Support at 1-855-946-7697 (1-855-9IN-POWR) for assistance on this process.
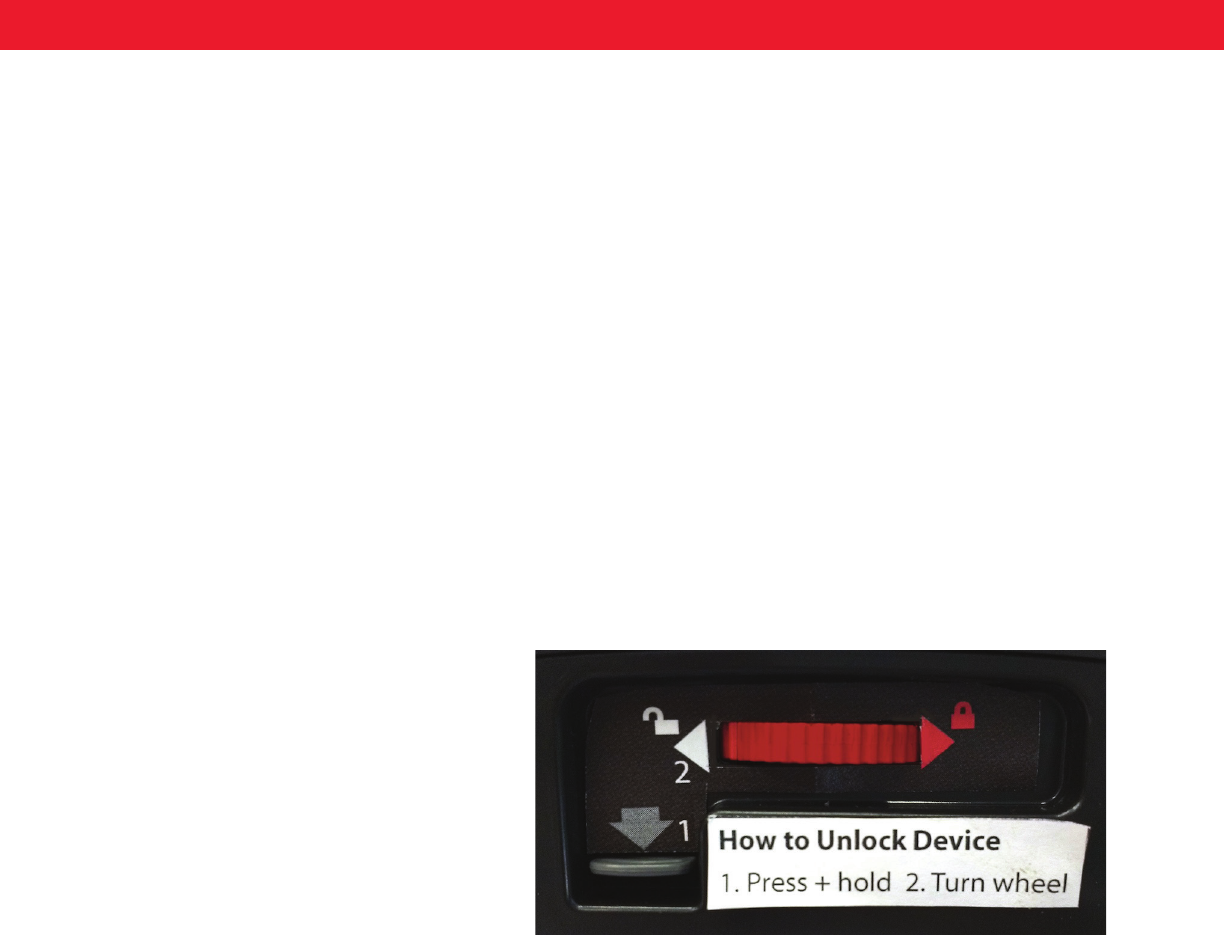
Manual Access to Medications
If you cannot power on the InPower™ Personal Medication Assistant (for example, due to a power outage),
you can manually open the pod trays to access your medications. Performing this procedure causes the
device to restart; you must reset the device to its normal operating condition.
1. At the back of the device, press
down on the grey release tab.
2. While holding down the release tab,
turn the red release wheel towards
the unlock icon.
The release wheel is now white.
The pod trays are released.
3. Release the tab.
4. At the front of the device,
open the door.
5. Push the appropriate pod tray open by pressing on the right or left side of the tray and allowing
it to swing open.
6. Refer to the medication list at the back of the device and remove the appropriate number of
medications from the pod tray.
Note: Make a note of how many medications you remove from the tray. You will need this information
when the device is returned to its normal operating condition.
7. Close the pod tray by pressing on the right or left side of the tray.
8. Repeat Steps 4 – 7 for each medication that you require now.
Release Tab and Wheel

35
9. At the back of the device, turn the release wheel toward the lock icon to lock the pod trays.
The release wheel is now red. The pod trays are locked.
10. Make sure that all pod trays are closed, locked, and no longer able to open.
11. Close the device door.
When the device is powered on, a message displays on the screen. This prompts you to restart the device
and return it to a normal operating condition. See Reset Device After Manual Access section for instruction.
Reset Device After Manual Access
Once you manually access the InPower™ Personal Medication Assistant, you are required to restart the de-
vice. When the device is powered on, complete the following steps to return it to normal operating condition.
1. Make sure that all pod trays are closed, locked and no longer able to open.
2. Close the device door.
3. From the back of the device, turn the white release wheel to the right, to return it to the
locked position.
The release wheel is now red. The pod trays are locked.
4. Open the device door, input PIN if necessary. From the Restart from Manual Access screen,
tap Restart device.
The device verifies active pods and the tray locations. You are prompted based on the results of
the verification.
5. If prompted, remove pod from device. Tap Ok, I’m ready. Otherwise proceed to Step 8.
A pod tray opens.
6. Remove the pod from the tray, and then tap I’ve removed the pod.
The tray closes. The device verifies that the pod was removed. A message displays indicating that you
re moved the pod from the tray and must now put the pod in to the device.
Repeat steps 6 – 7 to remove all pods from the device.
7. Tap Tap to Continue.
36
8. If prompted, load pods back in to the device. Tap Ok, I’m ready. Otherwise proceed to Step 11.
A pod tray opens.
9. Place correct pod in to the device. Tap Lid is off, pod is loaded.
Pod tray closes.
• If for some reason, you do not have the pod anymore, tap I don’t have this pod. Tap either
I have this pod or I don’t have this pod, Tap to Continue.
10. Tap Tap to Continue.
The tray closes. The device verifies that the pod was loaded. A message displays indicating that you loaded
the pod into the device and must now update the amount.
Repeat steps 9 – 10 to replace all pods in to the device.
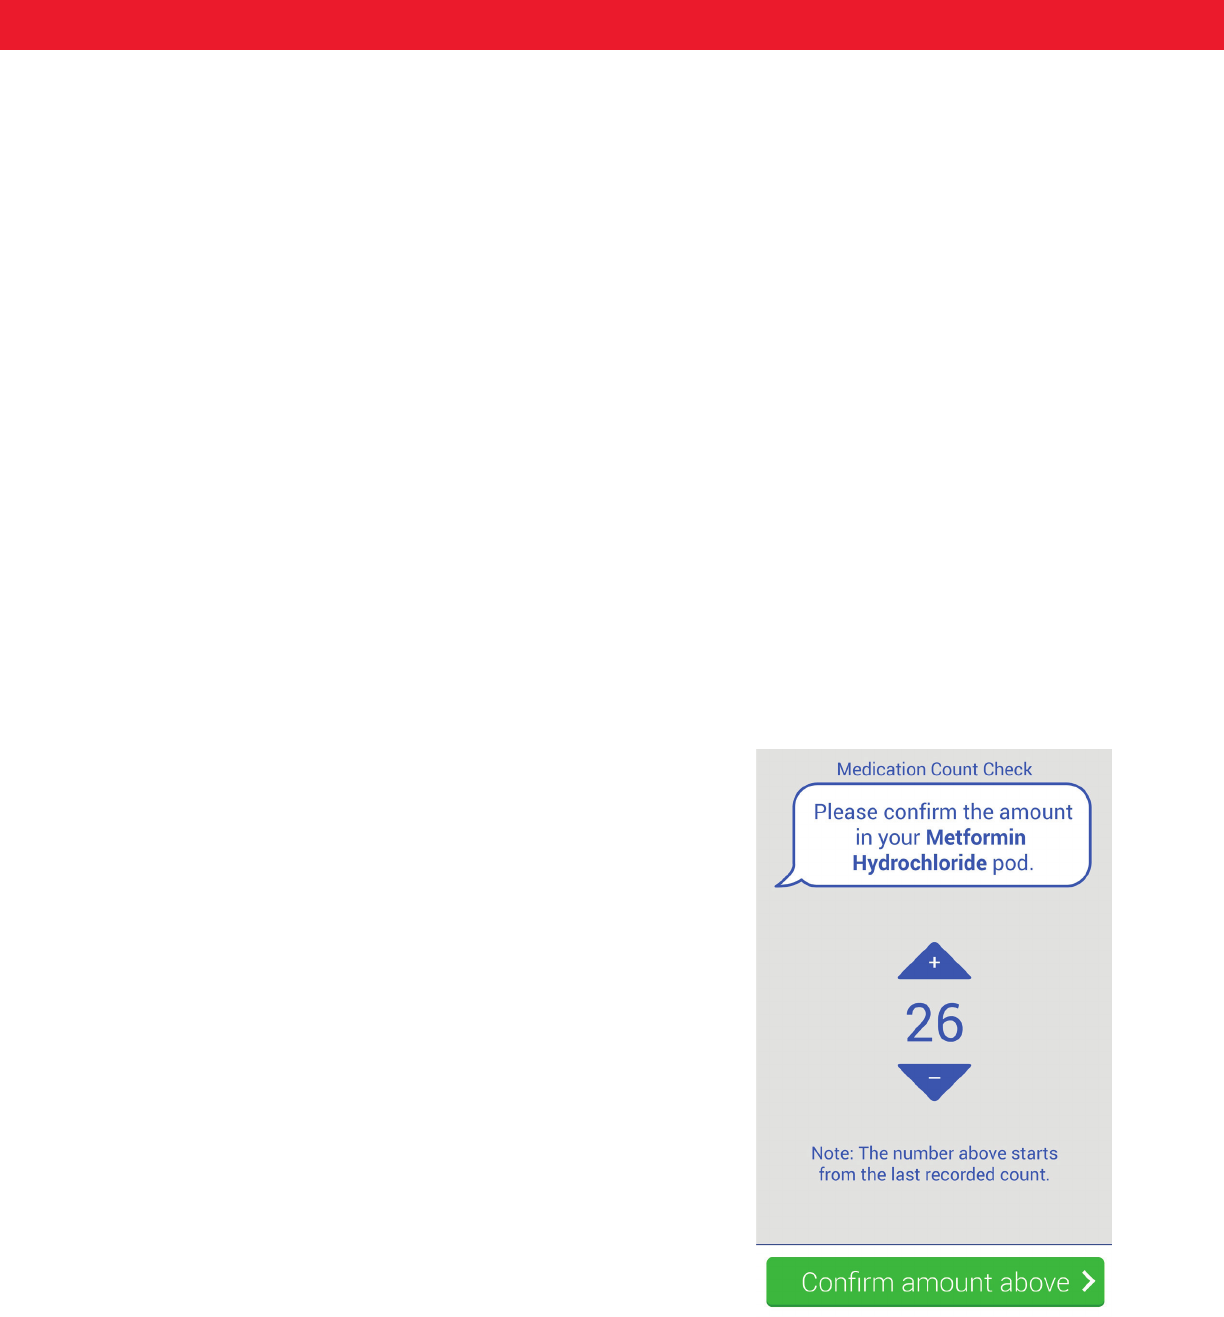
11. Update the device with the correct medication amount.
Tap Ok, I’m ready.
The Medication Count Check screen displays.
12. Tap the + and - icons to indicate the number of medications
remaining in the pod, and then tap Confirm amount above.
The pod tray closes. A confirmation screen displays.
13. Verify that the number of medications in the pod, matches
the number on the confirmation screen and then tap
Yes, confirm.
Repeat steps 12 – 13 to confirm amounts for all pods
in the device.
Note: If the numbers do not match, tap No, take me
back. Then, reenter the correct number and/or place
the appropriate number of medications back into the pod.
14. Tap Tap to Finish.
Medication Count Check Screen

37
A Pod Tray Does Not Open or Close Properly
If a pod tray does not fully open or close, or if the motor that controls the trays does not stop running,
an error message displays. Remove anything that is blocking the door. If the issue persists, turn the
device off, and then perform the Manual Access to Medications procedure, above. Performing the
procedure causes the device to reset; you must contact Cardinal Health Technical Support at
1-855-946-7697 (1-855-9IN-POWR) to return the device to its normal operating condition.
Device Does Not Recognize a Blood Sugar Reading
If you have taken a blood sugar reading with a connected glucometer and the device does not display
it, try to take the reading again. If the problem continues, contact Cardinal Health Technical Support at
1-855-946-7697 (1-855-9IN-POWR).
Device Has Fallen Over
If the device has fallen over, re-stand the device in the proper position. Your medications will remain
secure. If there are issues with using the device once you have corrected its position, contact
Cardinal Health Technical Support at 1-855-946-7697 (1-855-9IN-POWR).

38
Error Messages
Situation Error Message Corrective Action
While loading a new
medication or a refill of a
medication, you load the
wrong pod into the pod tray.
Oops. Please remove the pod
from the tray.
Sorry, the pod is invalid, could not
be read, or has been
discontinued.
Remove the incorrect pod, tap
I’ve removed the pod, and load
the correct pod.
While taking a medication,
you remove a pod when you
were not prompted to do so.
Oops. Something went wrong.
Make sure the X is loaded.
(Where X is the medication name.)
Place the pod back into the
pod tray, and then tap I’ve
put in the right pod.
While taking a medication,
you are prompted to take
more medications.
Please take X more tablets.
(Where X is the number of
additional medications the
device prompts you to take
from the pod).
If you wish to purposely take
less than the prescribed dosage,
tap Skip this Medication.
If you removed the correct
number of medications from
the pod, tap I took the correct
amount, and then contact
Cardinal Health Technical
Support.
While taking a medication,
you are prompted to
place medications back
into the pod.
It seems too many pills have been
removed. Please put X tablets
back.
(Where X is the number of
medications the device prompts
you to return to the pod).
This message is accompanied by an
audible alarm.
If you lost a medication or if a
medication is damaged, tap
A pill was lost/damaged.
If you removed the correct
number of medications from
the pod, tap I took the correct
amount, and then contact
Cardinal Health Technical
Support.
While refilling or
discontinuing a medication,
you did not remove the pod
when prompted but you did
tap I’ve removed the pod.
Please remove the pod from
the tray.
Remove the pod from
the tray, and then tap
I’ve removed the pod.
39
Appendix A: Status Indicators
Indicator Meaning
Device
Power Light Indicates that the InPower™ Personal Medication
Assistant is powered on.
• White: Powered by AC (wall socket).
• Red: Powered by the internal battery.
NOTE: If this light is blinking from red to white,
please call Customer Support as there could be an
issue with the device.
• Off: Powered off.
Alarm Lights Flash when it is time to take your medication.
The alarm lights can be accompanied by an a
audible alert.
Exterior Display
Displays when it is time to take your medication.
Displays when the device loses cellular connectivity.
Displays when health information is available to you;
for example, a glucometer reading.
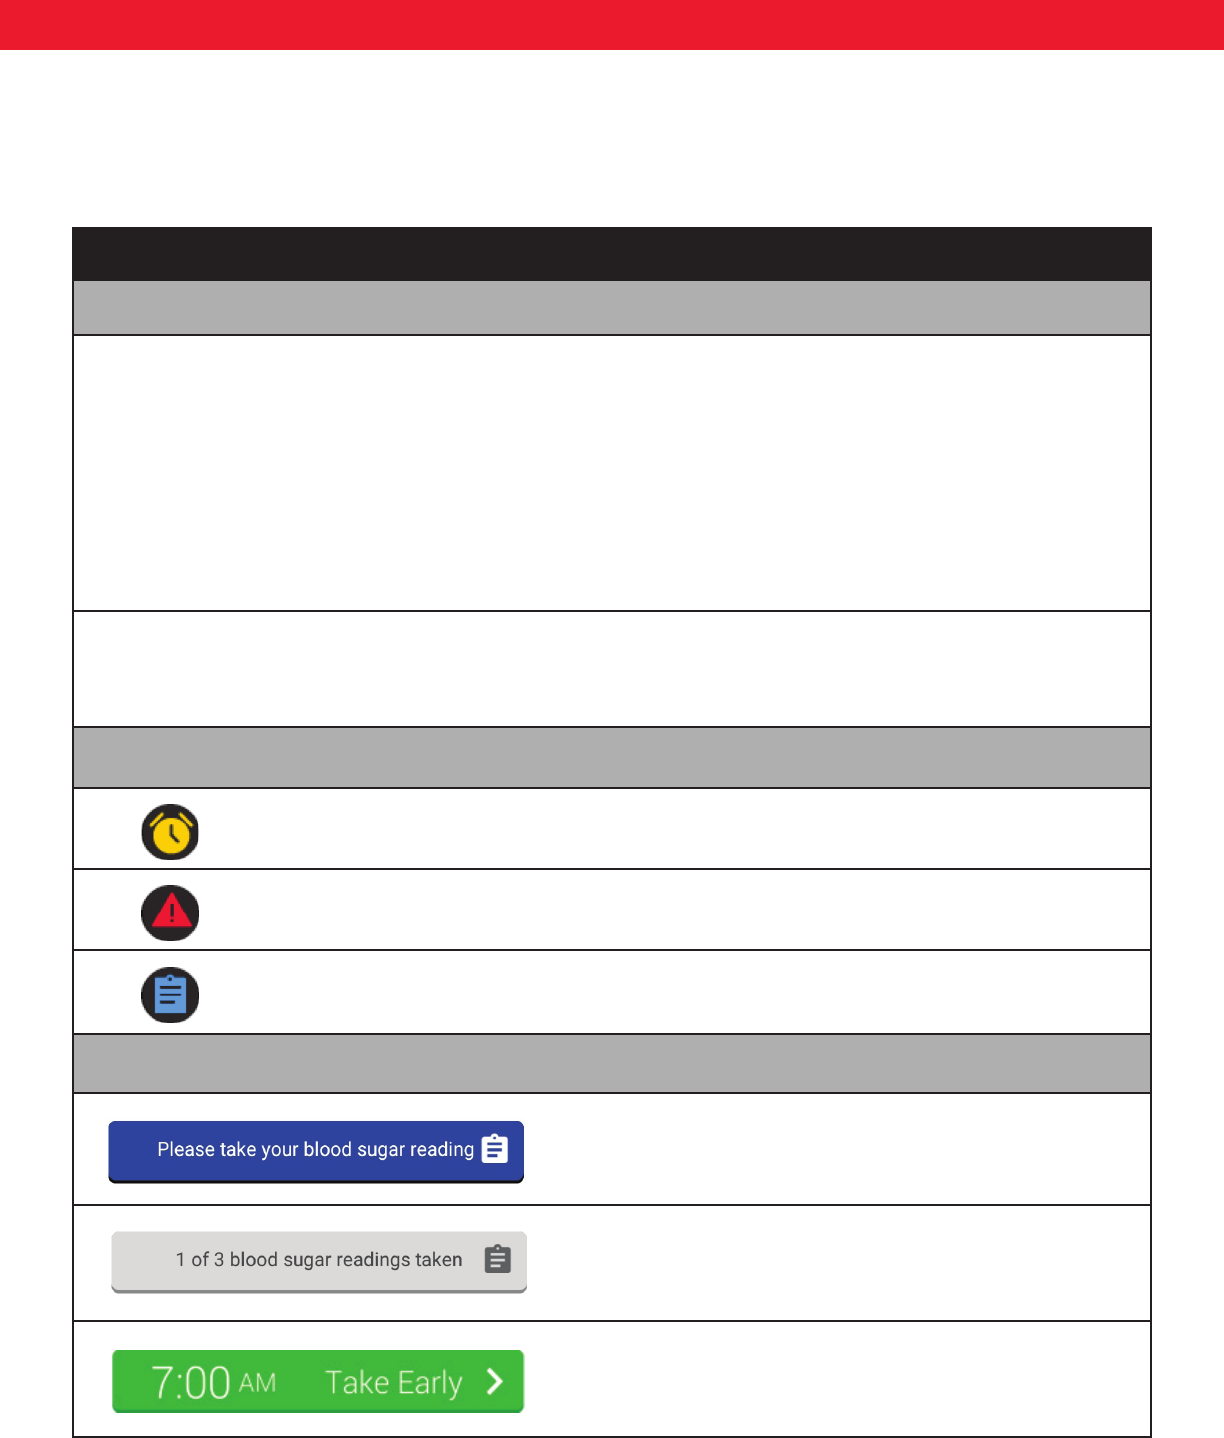
Home Screen
It is time to take a blood sugar reading.
New blood sugar readings were transmitted from
the glucometer to the device. Tap to view and
manage the new readings.
It is within one hour prior to the preferred
scheduled time to take your medication.
Tap to take your medications.
40
Indicator Meaning
It is time to take your medication. Tap to take your
medications.
It is more than one hour past the scheduled time to
take your medication and you did not take it.
You took all the scheduled medications during the
preferred time.
You took some of the scheduled medications during
the preferred time; however, you skipped and/or took
a partial dose of one or more medications.
You did not take any of the scheduled medications
during the preferred time.

41
Appendix B: Technical Specifications
Specification Range
General
Protection class IP 20
Enclosure material Plastic
Dimensions 12”(L) X 9” (W) X 11” (H)
Weight (without medications) 15.2 lbs.
Power Supply North America/Australia and Europe
Mains Connection 120 VAC/240 VAC
Nominal Frequency 50 Hz/60 Hz
Nominal Current (at 110 VAC) 1.6 A
Connected Load 60W (max)
Nominal Output Voltage 18 VDC
Protection Class Class I
Safety IEC 61010-1, Pollution Degree II
FCC IDD 2AKSZ-FUSE001
Transmitting Frequency 13.65MHz
Battery
Nominal Voltage 10.8 VDC
Nominal Capacity 6500 mAh
Type Li-ion
Ambient Conditions (Operation)
Temperature 59 – 95° F (15 – 35° C)
Relative Humidity 25 – 85%
Atmospheric Pressure 70 – 106 kPa
Altitude 3000m
Environments with Potentially Explosive Atmospheres No
Ambient Conditions (Transportation and Storage)
Temperature -9.5C – 45C
Relative Humidity Uncontrolled to 85% RH

42
Appendix C: Electromagnetic
Compatibility (EMC)
This InPower™ device has been tested and found to comply with the limits for a Class B digital device,
pursuant to part 15 of the FCC Rules. These limits are designed to provide reasonable protection against
harmful interference in a residential installation. This equipment generates uses and can radiate radio
frequency energy and, if not installed and used in accordance with the instructions, may cause harmful
interference to radio communications.
This device complies with Part 15 of the FCC Rules. Operation is subject to the following two conditions:
(1) this device may not cause harmful interference, and (2) this device must accept any interference
received, including interference that may cause undesired operation.
Changes or modifications made to this equipment not expressly approved by the party responsible for
compliance could void the user’s authority to operate the equipment.
Electrical safety classification: The equipment complies with the requirements according to IEC 61010-1.
However, there is no guarantee that interference will not occur in a particular installation. If this
equipment does cause harmful interference to radio or television reception, which can be determined
by turning the equipment o and on, the user is encouraged to try to correct the interference by one
or more of the following measures:
• Reorient or relocate the receiving antenna
• Increase the separation between the equipment and receiver
• Connect the equipment into an outlet on a circuit dierent from that to which the receiver is connected
• Consult the dealer or an experienced radio/TV technician for help.
43
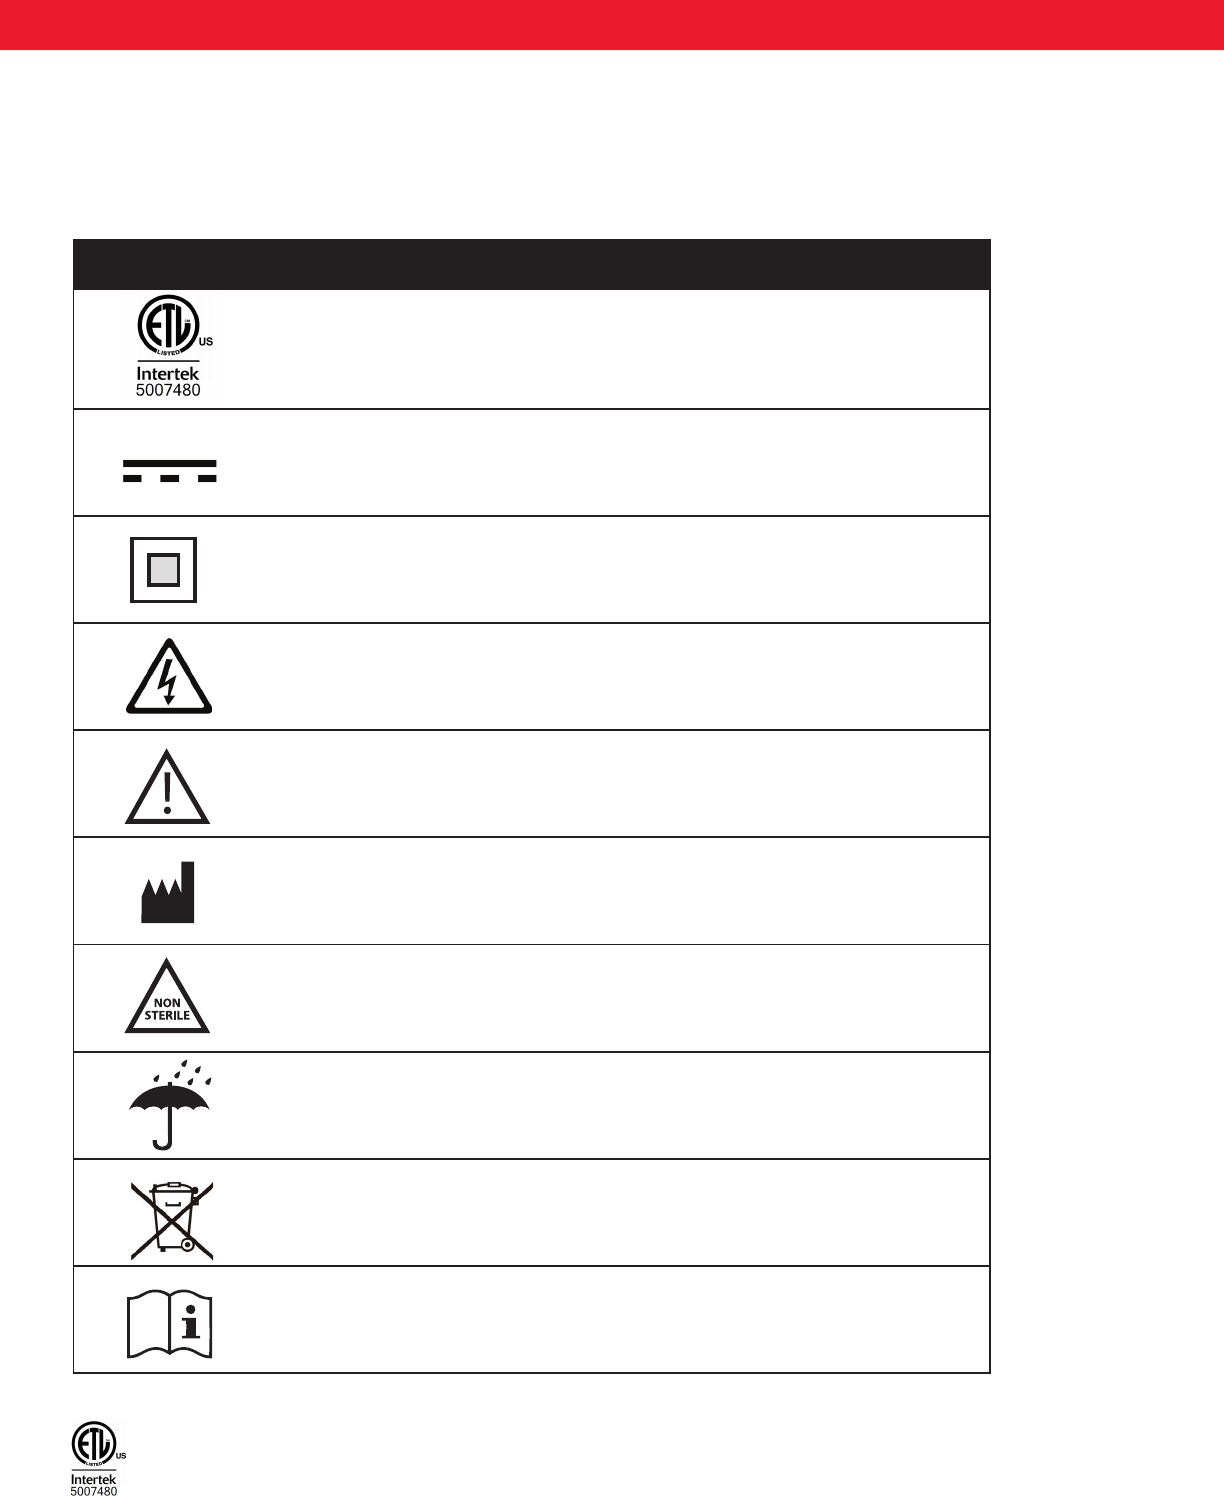
Appendix D: Symbols
Symbol Description
ETL Certification
Direct Current
Double insulated power supply
Caution, possibility of electric shock
Caution
Manufacturer
Non-sterile
Keep out of rain and damp conditions
Electrical or electronic equipment not to dispose in general waste
Consult Instructions for Use
Conforms to UL STD IEC61010-1
5007480
5007480

Distributed by:
Cardinal Health
1500 Waukegan Road
Waukegan, IL 60085 Rev. 0 2017-04
Phone: 1-855-946-7697 (1-855-9IN-POWR)
Document #: 36-6508
Version #: 1
© 2017 Cardinal Health. All Rights Reserved.
CARDINAL HEALTH, the Cardinal Health LOGO,
and INPOWER are trademarks or registered
trademarks of Cardinal Health. All other marks
are the property of their respective owners.