Cardionet 1010 Wireless Modem User Manual
Cardionet Wireless Modem
User manual

Patient Education Guide
CardioNet Ambulatory ECG System and Arrhythmia Detector
Manufactured by CardioNet Inc.
1010 Second Ave., Suite 700
San Diego, CA 92101
Copyright 2006
All rights reserved
Document number 101010 Revision B October 2006
MOBILE CARDIAC OUTPATIENT TELEMETRY

2
1
3
INTRODUCTION. . . . . . . . . . . . . . . . . . . . . . . .1
How the CardioNet Service Works. . . . . . . . . . . . . . . . . . . 2
Your CardioNet Monitoring Supplies . . . . . . . . . . . . . . . . . 4
Your Rights as a Patient. . . . . . . . . . . . . . . . . . . . . . . . . .6
Your Responsibilities as a Patient . . . . . . . . . . . . . . . . . . . 6
Who to Call with Questions . . . . . . . . . . . . . . . . . . . . . . . 6
In the Case of an Emergency. . . . . . . . . . . . . . . . . . . . . . 7
What to Do When your Monitoring is Over. . . . . . . . . . . . . 8
GETTING STARTED . . . . . . . . . . . . . . . . . . . . .9
Connecting from Home . . . . . . . . . . . . . . . . . . . . . . . . . 10
How to Install the CardioNet Base . . . . . . . . . . . . . . . . . 11
About the CardioNet Base . . . . . . . . . . . . . . . . . . . . . . . 14
How to Activate the CardioNet Sensor . . . . . . . . . . . . . . . 15
Tips for Wearing the CardioNet Sensor . . . . . . . . . . . . . . 18
How to Activate the CardioNet Monitor . . . . . . . . . . . . . . 19
USING THE Monitor . . . . . . . . . . . . . . . . . . . .25
How to Turn your Monitor On and Off . . . . . . . . . . . . . . . 26
How to Record an Event . . . . . . . . . . . . . . . . . . . . . . . . 28
How to Change Monitor Options . . . . . . . . . . . . . . . . . . . 30
How to Check Battery Power . . . . . . . . . . . . . . . . . . . . . 34
How to Check Cell Phone Coverage . . . . . . . . . . . . . . . . 35
Receiving Messages from CardioNet . . . . . . . . . . . . . . . . 36
How to Read a Text Message . . . . . . . . . . . . . . . . . . . . . 37
ii Table of Contents
TABLE OF CONTENTS

4
5
6
SENSOR CARE . . . . . . . . . . . . . . . . . . . . . . . .39
Tips for Changing Electrode Pads . . . . . . . . . . . . . . . . . . 40
How to Change Electrodes and Attach Sensor . . . . . . . . . 41
Remove Before Showering or Bathing . . . . . . . . . . . . . . . 44
How to Change the Sensor AA Battery . . . . . . . . . . . . . . 45
TROUBLESHOOTING . . . . . . . . . . . . . . . . . . .47
Responding to Monitor Alerts and Alarms . . . . . . . . . . . . 48
Troubleshooting Device Problems . . . . . . . . . . . . . . . . . . 51
Precautions . . . . . . . . . . . . . . . . . . . . . . . . . . . . . . . . . 53
Cautions . . . . . . . . . . . . . . . . . . . . . . . . . . . . . . . . . . . 54
Warnings . . . . . . . . . . . . . . . . . . . . . . . . . . . . . . . . . . . 55
SPECIFICATIONS, COMPLIANCE & SYMBOLS 57
Specications . . . . . . . . . . . . . . . . . . . . . . . . . . . . . . . . 58
Equipment Symbols. . . . . . . . . . . . . . . . . . . . . . . . . . . . 60
In Home Requirements . . . . . . . . . . . . . . . . . . . . . . . . . 60
FCC Compliance . . . . . . . . . . . . . . . . . . . . . . . . . . . . . . 62
Table of Contents iii

1
• How the CardioNet Service Works
• Your CardioNet Monitoring Supplies
• Your Rights as a Patient
• Your Responsibilities as a Patient
• Who to Call with Questions
• In the Case of an Emergency
• What to Do When your Monitoring is Over
INTRODUCTION
In this Chapter:
2 Introduction
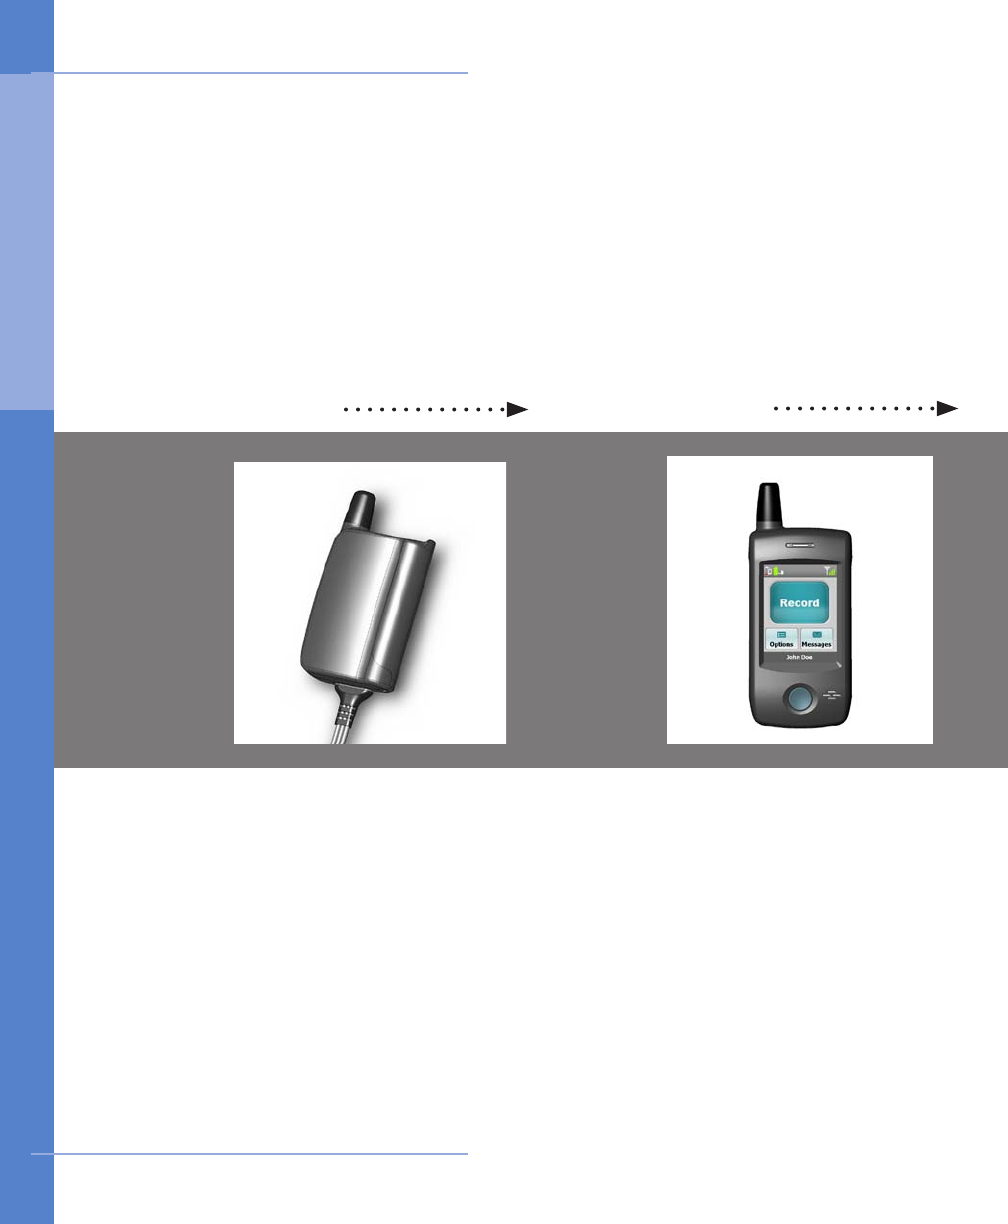
When you’re using the
CardioNet service, you’ll
wear a small, lightweight
sensor on your chest.
The sensor detects and
analyses each heartbeat
and sends data to the
portable CardioNet
monitor.
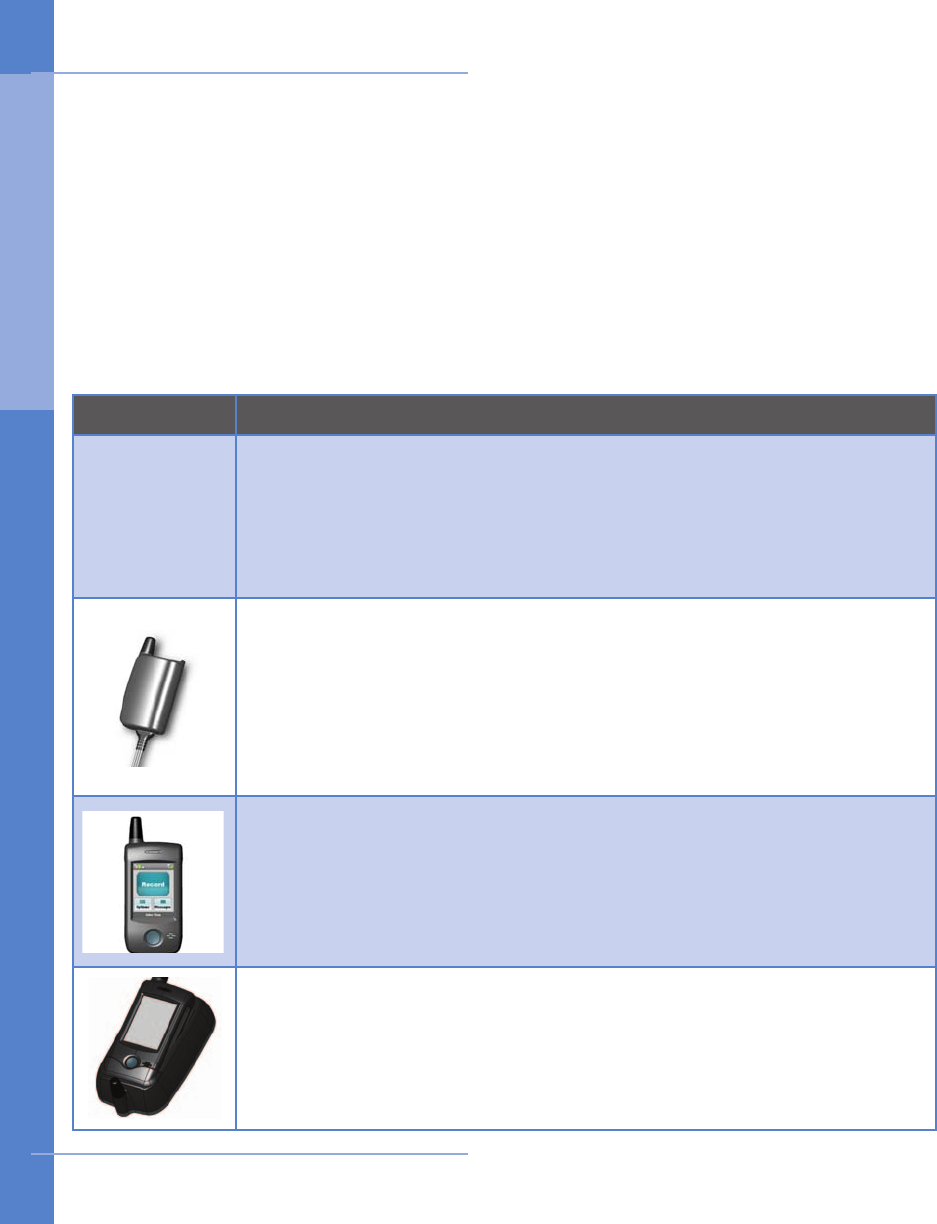
The CardioNet monitor can
be tucked away in a pocket
or purse. When the sensor
detects an event, or when
you report an event using
the touch screen on the
monitor, it transmits the
data to the CardioNet
Monitoring Center.
1 2
Monitor transmits eventsSensor detects and analyses heartbeats
How the CardioNet Service Works
1. I N T RODUC T ION

Introduction 3
3
The CardioNet Monitoring
Center operates 24 hours
a day, 7 days a week.
At the Center, specially
trained cardiac technicians
analyze your heart rhythms
and report results to your
physician.
Your physician reviews the
report, discusses results
with you and prescribes
or adjusts treatment as
needed.
4
CardioNet reports to your physician Your physician reviews your results
How the CardioNet Service Works
1. I N T RODUC T ION
4 Introduction
Picture Item and Description
CARDIONET SHIPPING KIT
The CardioNet shipping kit contains all the items you will need during
your monitoring service. You can also reference the inside lid of the kit
for information on where each item is located in the kit.
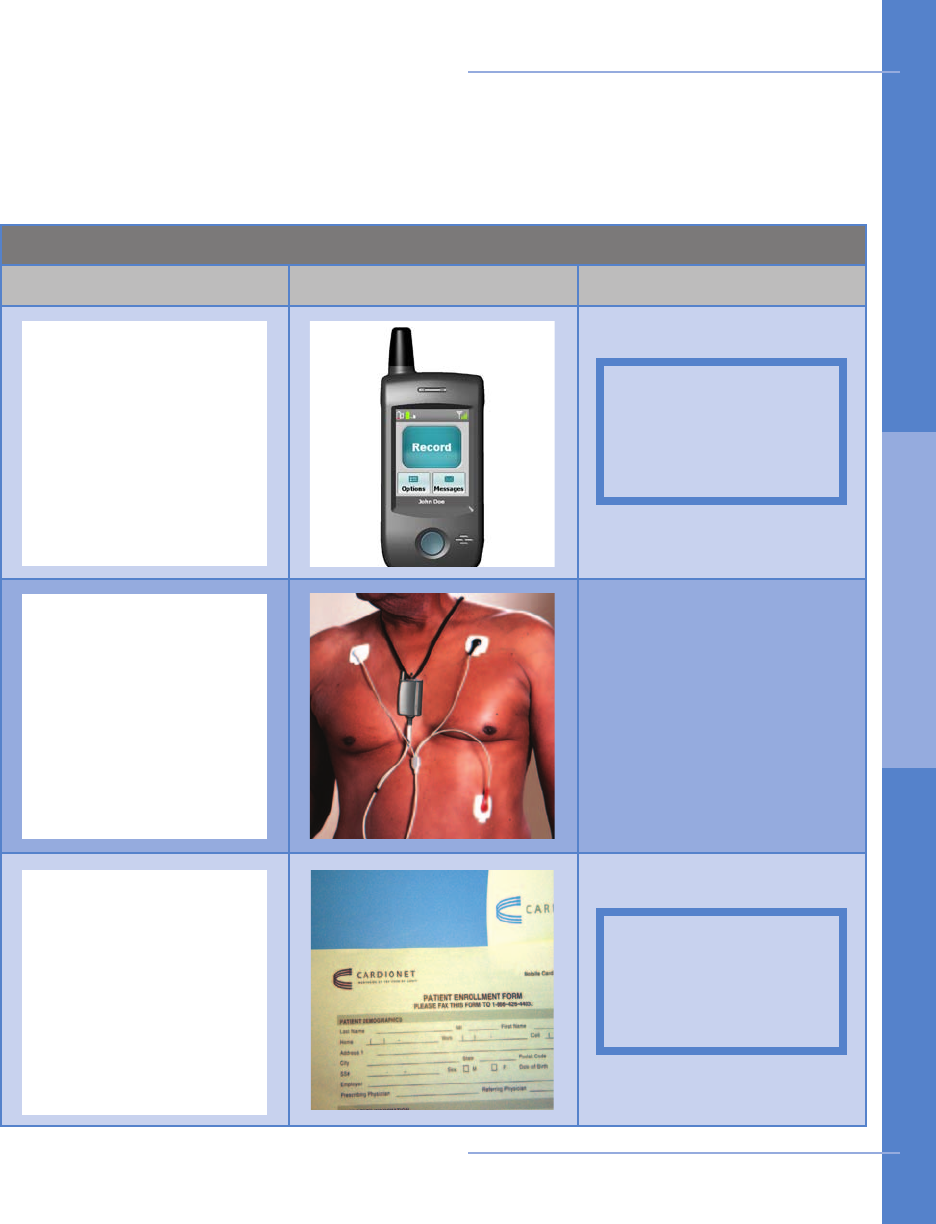
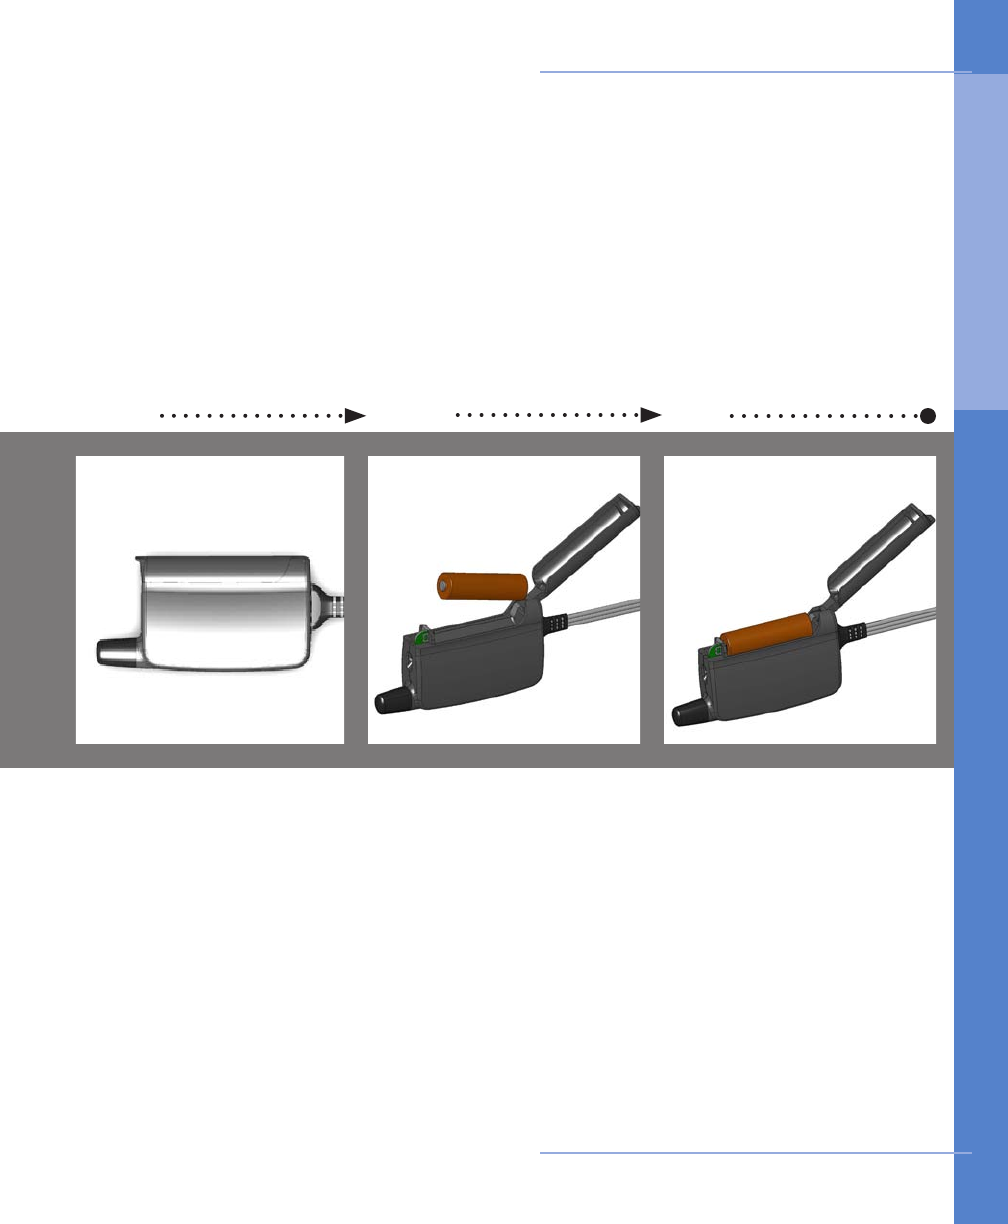
CARDIONET SENSOR
The sensor can be worn around the neck or on a belt. It detects each
heartbeat and sends data to the CardioNet monitor. To communicate
with the monitor, the sensor must remain close to the monitor. Walls
and other obstructions can interfere with the communications between
the sensor and the monitor. If you go out of communications range, the
sensor and monitor will beep to alert you.
CARDIONET Monitor
The monitor constantly analyzes data from the sensor and sends
events to the CardioNet Monitoring Center. The monitor uses wireless
communication when not in the base and uses the regular phone system
when the monitor is placed in the base. You will not be charged by the
telephone company for calls made by your monitor.
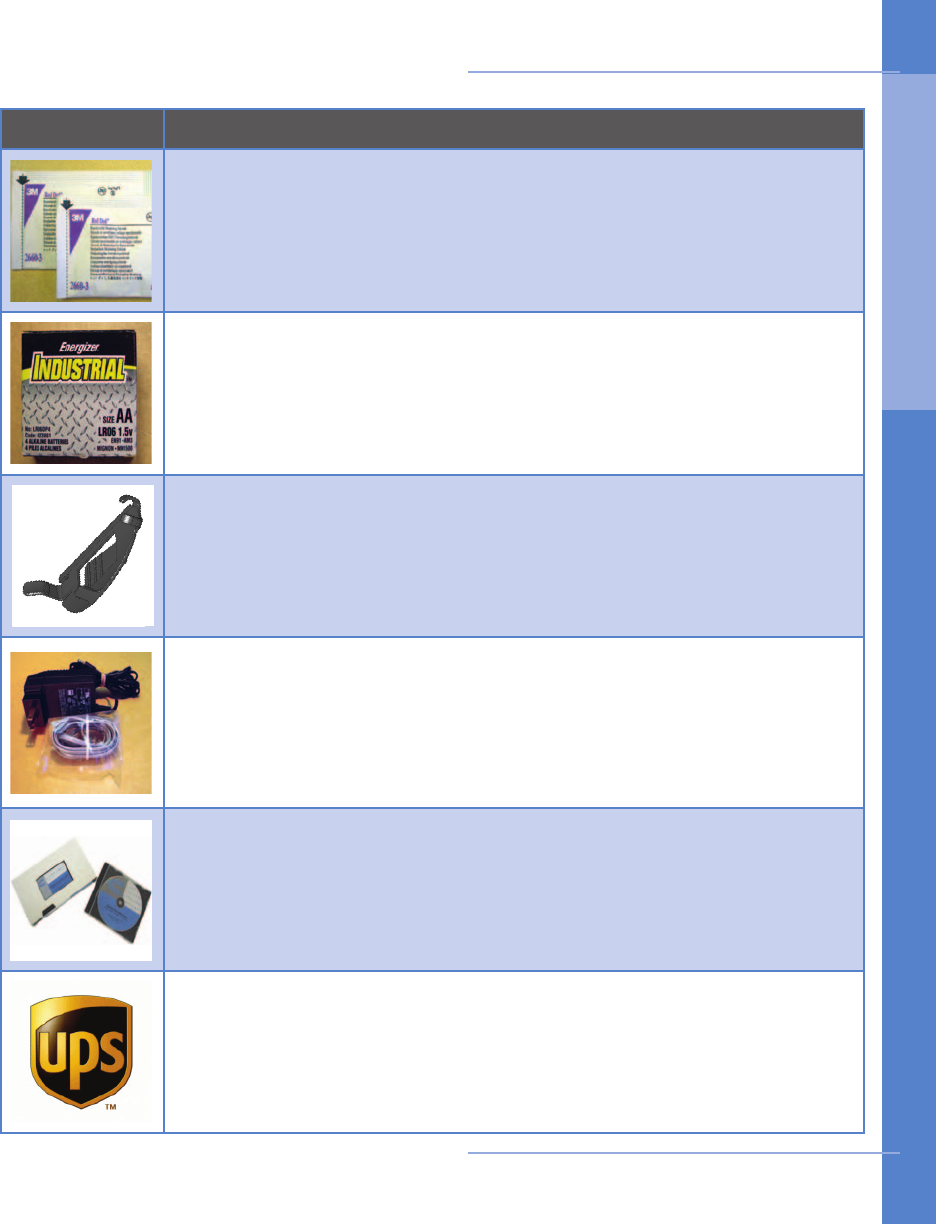
CARDIONET BASE
The base recharges the CardioNet monitor and allows the monitor to
communicate with the Monitoring Center using your home phone system.
The bases are connected to your phone line and plugged into electrical
outlets in your bedroom and another room in your home.
e CardioNet Kit
The CardioNet Kit contains the supplies you will need while you are on the CardioNet
Monitoring Service. If any items are missing or broken, or if you have any questions
about how to use them, please call CardioNet at 1-866-426-4401.
When service is ended, follow the detailed instructions in
What to Do When Your
Monitoring is Over
located in this chapter and please return the equipment promptly
to the CardioNet Monitoring Center.
Kit Photo
Here
Your CardioNet Monitoring Supplies
1. I N T RODUC T ION
Introduction 5
Picture Item and Description
ELECTRODES
Electrodes are disposable sticky pads that snap onto the three colored
lead wires on the CardioNet sensor. You remove the backing and stick
them to clean, dry, hairless skin. If you need more electrodes call
CardioNet at 1-866-426-4401.
AA BATTERIES
The AA batteries provide power to the CardioNet sensor. The battery must
be replaced each day. Please use only CardioNet-supplied AA batteries.
If you need more batteries call CardioNet at 1-866-426-4401.
SENSOR NECK STRAP & BELT CLIP
Use the neck strap if you prefer to wear the sensor around your neck.
Use the belt clip if you prefer to wear the sensor on your belt.
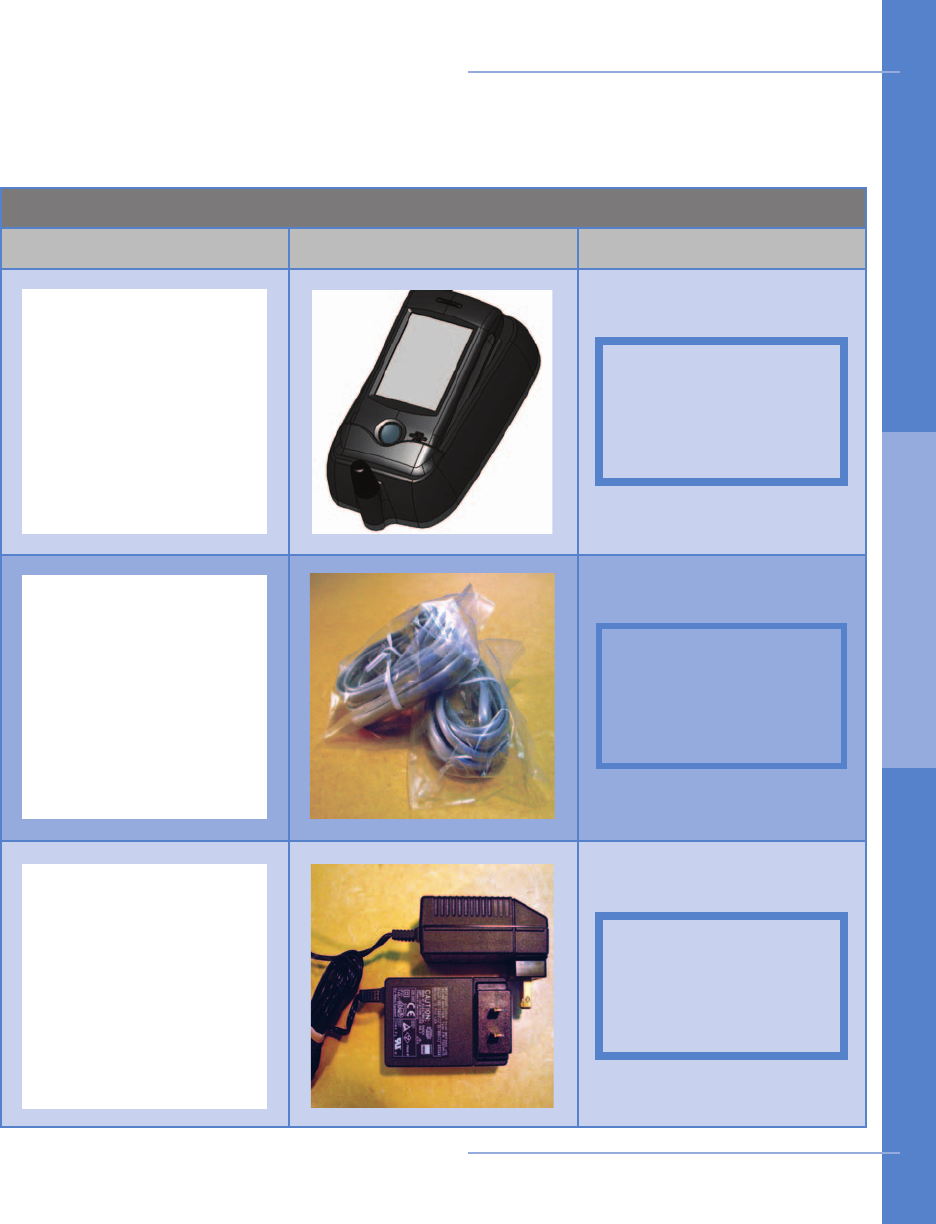
POWER PLUG & TELEPHONE CORD
Use the black power plug to connect the CardioNet base station to an
electrical outlet. Use the telephone cord to connect your CardioNet base
station into the telephone wall jack. Detailed information on how to
install your base is provided in Chapter 2:
How to Install the CardioNet
Base
.
PATIENT EDUCATION GUIDE & VIDEO
The Patient Education Guide and Patient Information Video contain
helpful information about the CardioNet service and important contact
numbers.
UPS SHIPPING LABEL
Put the kit in the white plastic bag, seal it and stick the UPS pre-paid
shipping label to the white plastic bag to return the kit after monitoring
is nished.
Your CardioNet Monitoring Supplies
1. I N T RODUC T ION

6 Introduction
You have the right to be treated with dignity, courtesy and respect.
You have the right to high quality service.
You have the right to excellent training on how to use the CardioNet
technology and service.
You have the right to receive high-quality service regardless of race, religion,
political belief, sex, sexual preference or source of payment.
You have the right to complain or suggest improvements in service without
worrying that CardioNet will stop providing service or provide a poorer quality
of service.
You have the right to refuse service.
1.
2.
3.
4.
5.
6.
Use the CardioNet equipment with care.
Return equipment to CardioNet immediately, when monitoring is completed.
Provide CardioNet with the information CardioNet needs to provide you with
quality care.
Treat CardioNet employees with respect.
1.
2.
3.
4.
If you have any questions about your monitoring service or billing, please call one
of our toll free numbers. Customer service is available 24 hours a day, 7 days a
week.
Customer Service: 1-866-426-4401
Monitoring Questions: 1-866-426-4401
Billing Questions: 1-866-426-4402
Your Rights as a Patient
Your Responsibilities as a Patient
Who to Call with Questions
1. I N T RODUC T ION

Introduction 7
CardioNet is not an emergency response service.
If you experience symptoms that concern you, seek medical help.
In the course of monitoring your heart, CardioNet may detect cardiac events which
are potentially life-threatening and were not anticipated by your physician. As
directed in the physician notication criteria, if CardioNet detects such an event,
CardioNet will attempt to contact you and your physician as soon as possible.
However, CardioNet’s ability to obtain information regarding a cardiac event and to
contact you or your physician in a timely manner is limited by a number of factors,
including:
• Transmission of information about a cardiac event to CardioNet‘s monitoring
center is potentially limited by the availability of standard telephone lines and/or
cellular phone coverage.
• There is an inherent time delay from the time that an event is detected to when
the events are analyzed and conrmed by a Certied Cardiac Technician (CCT).
• There is an inherent time delay from when the event is analyzed and conrmed by
the CCT to when CardioNet is able to make contact with you or your physician.
• If you or your physician are not accessible by telephone, CardioNet will not
succeed in making contact with you or your physician.
When CardioNet does detect a potentially serious cardiac event as dened by your
physician, CardioNet will attempt to contact your physician for direction. CardioNet
will also attempt to contact you and inform you of any cardiac event that has been
received that may require evaluation in the emergency room, per your physician’s
notication criteria. You may decide to seek medical help by calling your Emergency
Medical Services (EMS) directly or you may ask that CardioNet assist you in contacting
EMS.
The CardioNet system was designed to help physicians diagnose and treat heart
rhythm problems. There are other serious heart conditions that may not be detected
by the system. Because of this, and because of the limitations of the CardioNet
system described above, you should not delay seeking medical help if you experience
symptoms that concern you. Also, you should not rely on CardioNet as an emergency
response service.
In the Case of an Emergency
1. I N T RODUC T ION

8 Introduction
When your prescription is over and CardioNet has received data for the number
of days your physician has requested, the monitor will be deactivated in the
middle of the night. You may hear the monitor beep. If in the morning the screen
on your monitor states that your prescription has ended, turn the monitor off and
remove the battery in the sensor. Remove the electrodes from your body.
Pack items in the kit by following the instructions on the inside of the kit lid.
Before you close the kit, complete the Patient Satisfaction Survey and place it
with the Patient Education Guide, laminated reminder card and Pocket Guide on
the top of the contents of the kit. If you have not returned the Patient Enrollment
Form, include a signed copy with these items as well. After everything is in the
kit, close the lid and put the kit in the white plastic bag that was included in
the kit contents. Seal the white bag. Stick the UPS pre-paid mailing label on the
outside of the white plastic bag.
The kit is now ready to return and you can choose one of 3 ways to return it to
CardioNet:
You can call UPS 1-800-742-5877 and UPS will pick it up. If you call UPS you
will need to explain that it’s a pre-paid 2nd Day Air package. You will not be
charged anything.
You can drop off the kit at Staples, the UPS Store, or another location with
UPS drop-off.
You, or a family member, can bring it to your work if they have daily UPS
pick-up.
If you do not return the kit CardioNet will bill you for the contents.
Please return the kit as soon as you can so other patients can use the
equipment.
1.
2.
3.
What to Do When your Monitoring is Over
1. I N T RODUC T ION

2
GETTING STARTED
In this Chapter:
• Connecting from Home
• How to Install the CardioNet Base
• About the CardioNet Base
• How to Activate the CardioNet Sensor
• Tips for Wearing the CardioNet Sensor
• How to Activate the CardioNet Monitor

10 Getting Started
This chapter describes the steps you will need to take in order to set up the CardioNet
monitoring system and begin monitoring. You may want to ask for assistance from
a family member if you are not comfortable doing these steps on your own.
The rst step you (or a family member) needs to do is to install the base. The
instructions on the next few pages will assist you in completing the installation. The
base needs to be installed in the room where you sleep. When setting up a base,
you will need a phone jack and an electrical outlet. When your monitor is on the
base, your sensor will still be able to communicate with the monitor as long as they
are within range of each other. If you go out of communications range, the monitor
and sensor will beep to alert you. To ensure good communication, stay close to the
monitor while it is in the base or simply take the monitor out of the base and bring
it with you when you leave the room. You can go about your normal daily activities
- just wear your sensor and bring your monitor with you wherever you go.
At night keep the monitor in the base near your bed. The monitor will recharge and
it will also transmit your heart data to CardioNet’s Monitoring Center. As you sleep,
you can remove the sensor from the neck strap or belt clip and lay it on the bed next
to you on the same side of the bed as your monitor. The sensor will move with you
as you move. Try not to lie on top of the sensor. The monitor and sensor can not
communicate with one another through bodies (your own body, your partner’s, your
child’s, your pet’s, etc.) If the monitor beeps at night, sometimes just repositioning
the sensor near the monitor will stop the beeping. If the beeping continues, it might
be for another reason, like “lead disconnected.” You can read the message on the
screen for information on how to resolve the problem.
After the base is installed, connect yourself to the sensor using the instructions in
this chapter. After you are wearing the sensor, you will need to activate your monitor.
Activating the monitor will require a password which you can obtain by calling
CardioNet at 1-866-426-4401.
Connecting from Home
2 . GET T I NG S TA RT E D
Getting Started 11
Items You’ll Need for Base Installation
Item and Quantity Picture of Item Kit Location
The table below will help you gather all the items you will need to install each
CardioNet base. All items are located in your CardioNet kit.
1
1
1
Power Plug
Telephone Cord
CardioNet Base
Place shipper kit
image here
Place shipper kit
image here
Place shipper kit
image here
How to Install the CardioNet Base
2 . GET T I NG S TA RT E D
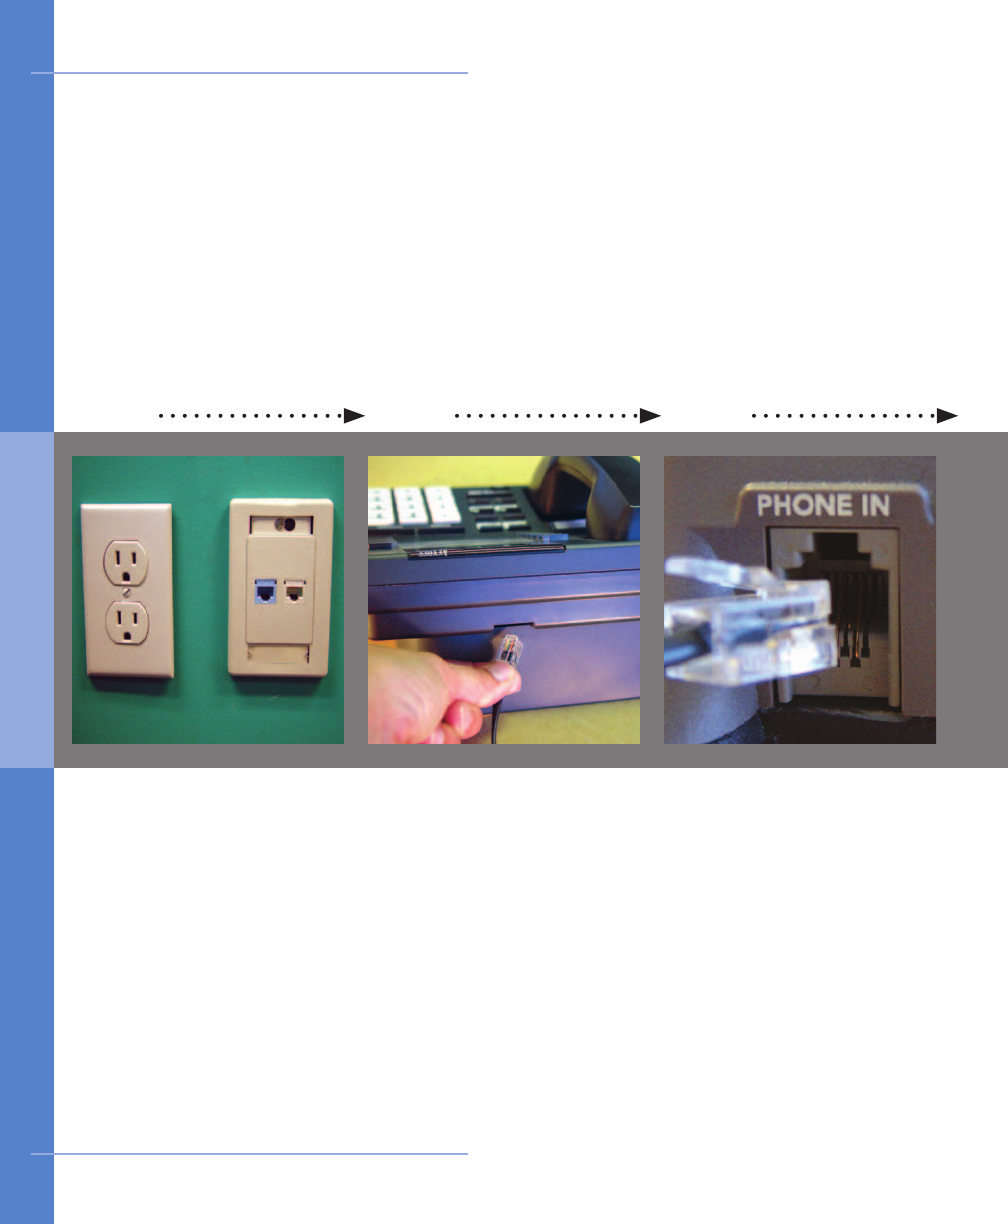
31 2
Find an electrical outlet
located close to a
telephone jack, preferably
in your bedroom.
Pick up the receiver of
your home phone and
listen to ensure there is a
dial tone.
On the CardioNet base,
locate the slot labeled
“Phone In” on the back
of the base. Take the
telephone cord you just
unplugged from the back
of your phone and plug it
into the slot on the base
labeled “Phone In”.
Locate the telephone cord
plugged into the back
of your home phone.
Unplug the telephone
cord from the back of
your telephone.
Look for outlet and jack Find your phone cord Plug phone cord into base
12 Getting Started
How to Install the CardioNet Base
2 . GET T I NG S TA RT E D
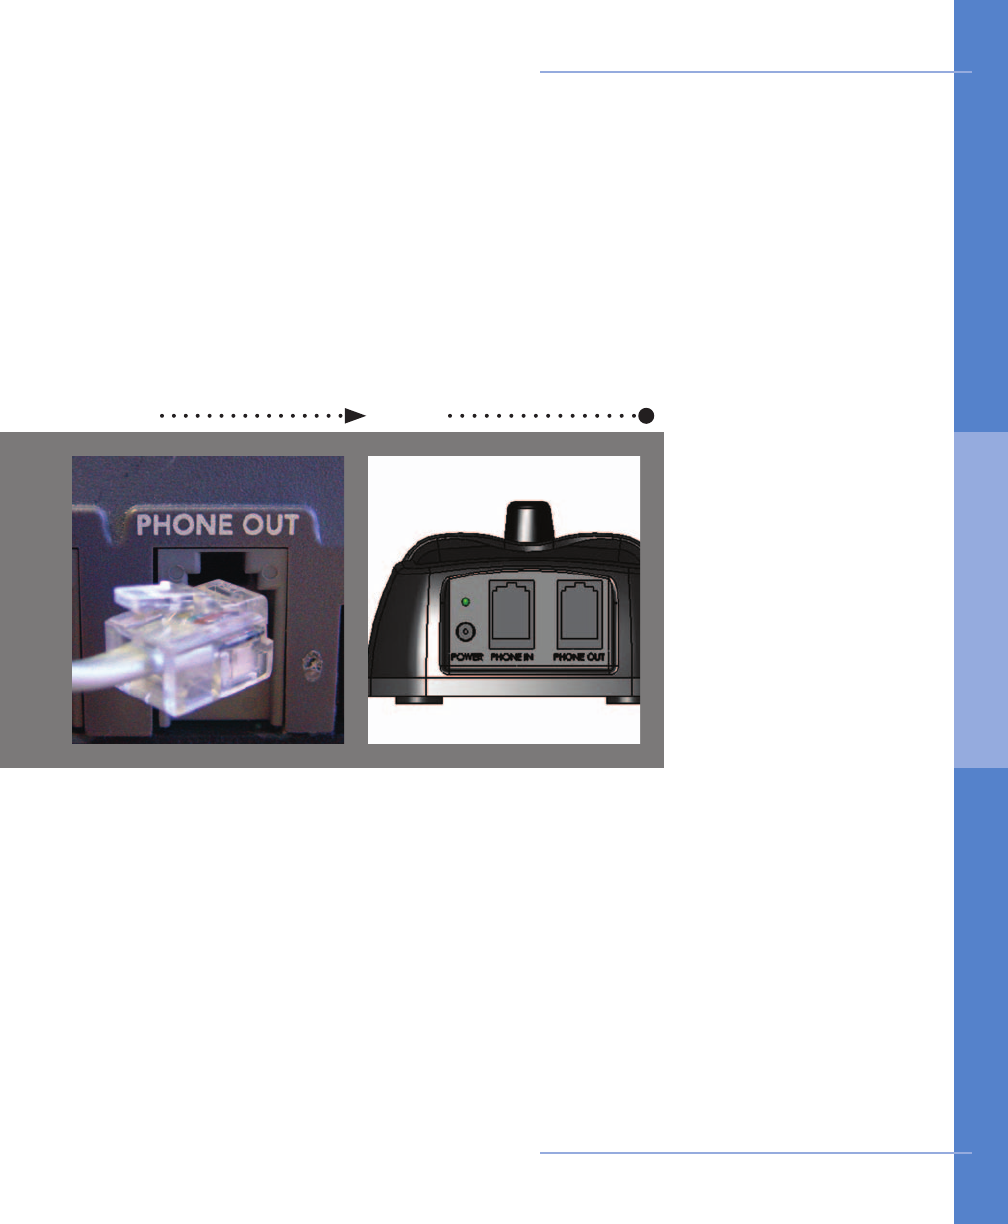
4 5
In the kit, locate the power
cord. On the back of the
base, locate the round
hole labeled “Power”. Plug
the small, round end of the
power cord into the slot on
the base labeled “Power”.
Plug the other end into
an electrical outlet.
Check your home phone
for a dial tone.
In the CardioNet kit,
nd the telephone cord.
Locate the slot labeled
“Phone Out” on the back
of the base. Plug one end
of this telephone cord
into the slot on the base
labeled “Phone Out”.
Plug the other end of this
cord into the back of your
telephone.
Plug in second phone cord Plug in power cord
Getting Started 13
How to Install the CardioNet Base
2 . GET T I NG S TA RT E D

e Base Transmits Events Using your Home Telephone
When your CardioNet monitor is in the base, it uses your home telephone system
for communications with the CardioNet Monitoring Center. When you are away from
home – or whenever your CardioNet monitor is out of the base station – the monitor
uses cell phone technology to contact the CardioNet Monitoring Center and transmit
data. You do not need a cell phone. The monitor uses its own cell phone.
As with consumer cellular phones, calls can sometimes be delayed or blocked by
coverage problems, heavy trafc on cell phone networks, or physical obstructions
such as buildings or mountains.
If the CardioNet monitor has data to transmit and is unable to communicate with
the CardioNet Monitoring Center through cellular communications, the monitor will
store the data and transmit it when cell coverage becomes available or through
your home telephone system when the monitor is placed in the base.
If you pick up your telephone while the monitor is in the base and transmitting
data, you will hear static, like the sound a fax machine makes. Hang up the phone
and wait a few minutes while the data is sent and then you will get a dial tone. If
you must use your phone and the monitor is transmitting data, take the monitor
out of the base and make your call. When you are done with the call, however, you
should return your monitor to the base right away to complete the transmission.
If you are on the phone and the monitor wants to transmit data, you might hear
clicking sounds. If you are using a dial-up connection to access the Internet on the
same phone line as the base, and the monitor is in the base transmitting data, it
may disconnect you from the Internet. Hang up and the monitor will transmit the
data. When the monitor is in the base and transmitting data, your telephone line
will have a busy signal for incoming calls. You will not be charged for any calls your
monitor makes to CardioNet.
14 Getting Started
e Base Recharges your Monitor
The base functions as a recharging station for your CardioNet monitor. When you
insert the monitor into the base correctly, “Monitor is Charging” will appear on the
screen. The monitor’s rechargeable battery provides between 12 to 16 hours of use.
If you plan to be away from home for more than 12 hours, you should bring one
of the black power cords with you. At some point during the day, plug the power
cord into an electrical outlet and charge your monitor by inserting the other end of
the power cord into the hole on the side of the monitor.
About the CardioNet Base
2 . GET T I NG S TA RT E D
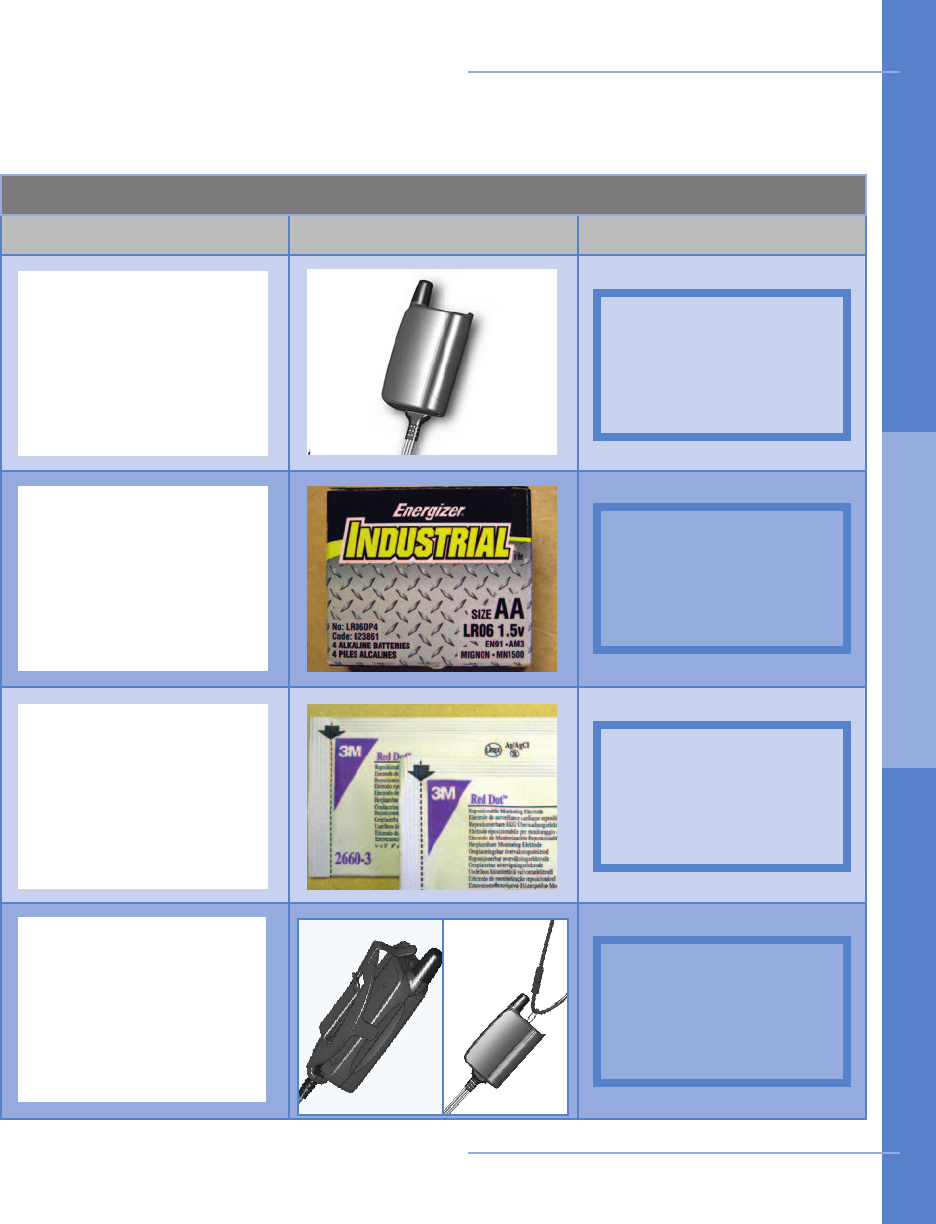
Items You’ll Need to Begin Using your CardioNet Sensor
Item and Quantity Picture of Item Kit Location
The table below will help you gather all the items you will need to begin using your
CardioNet sensor. All items are located in your CardioNet kit.
Getting Started 15
1
1
1
Pack of Electrode Pads
AA Battery
CardioNet Sensor
1
Neck Strap or Belt Clip
Place shipper kit
image here
Place shipper kit
image here
Place shipper kit
image here
Place shipper kit
image here
How to Activate the CardioNet Sensor
2 . GET T I NG S TA RT E D
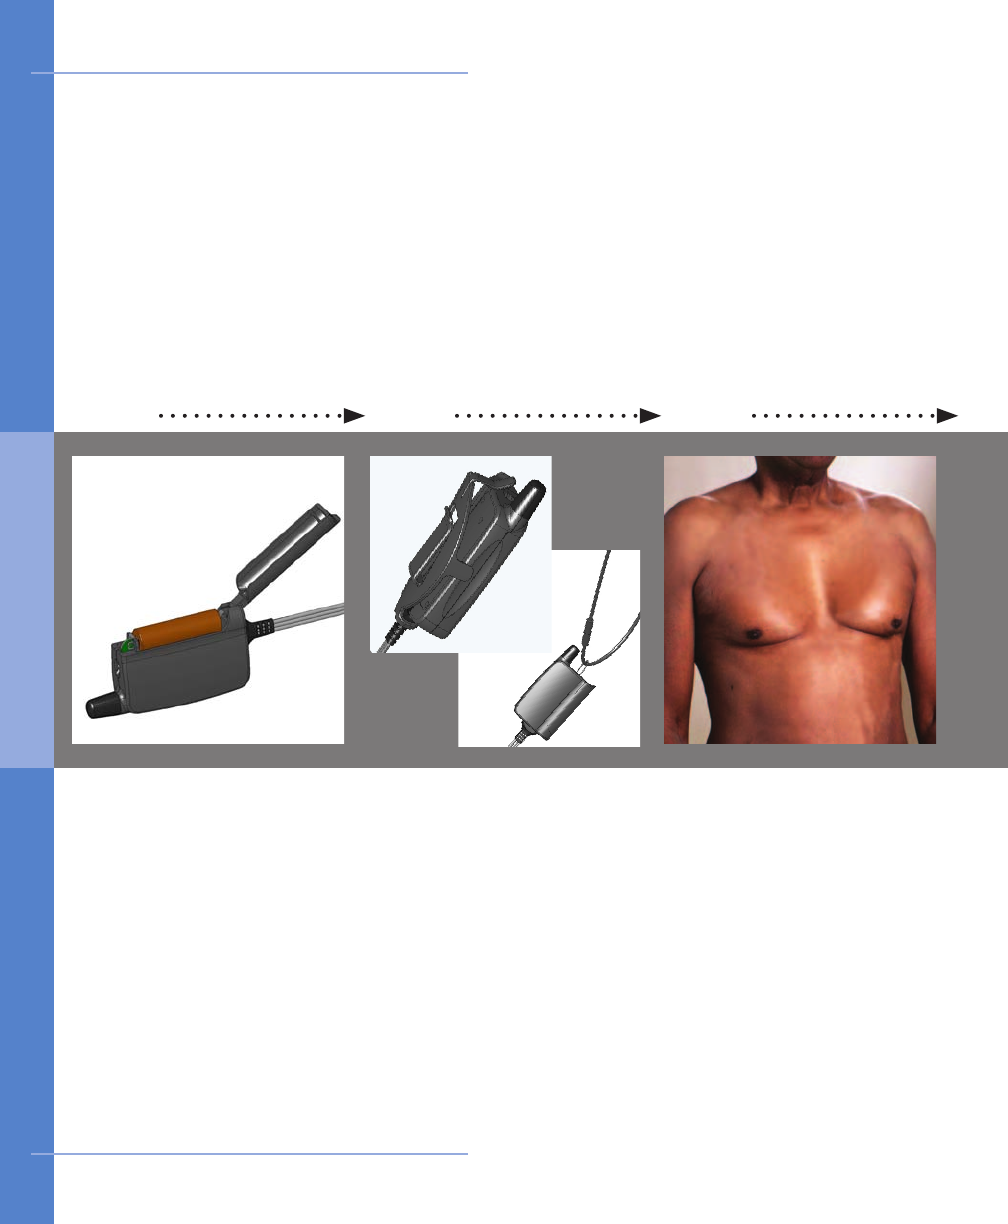
31 2
First make sure you do not
have any lotion, powder or
hair in the three locations
(steps 4-6). If you have
lotion or powder on, you
should wash off the areas
with soap and water and
dry the skin completely. If
you have any hair in these
locations, you must shave
it all off before putting the
electrodes in place.
Prepare your skin
Neck strap: unsnap the
neck strap and thread it
through the loop on the
sensor. Snap the ends
together and place it over
your head. The 2 tabs
allow you to adjust the
length of the strap.
Belt clip: attach the clip to
your pants, skirt or belt.
Snap the at side of the
sensor into the clip with
the wires pointing upward.
Belt clip or neck strap?
16 Getting Started
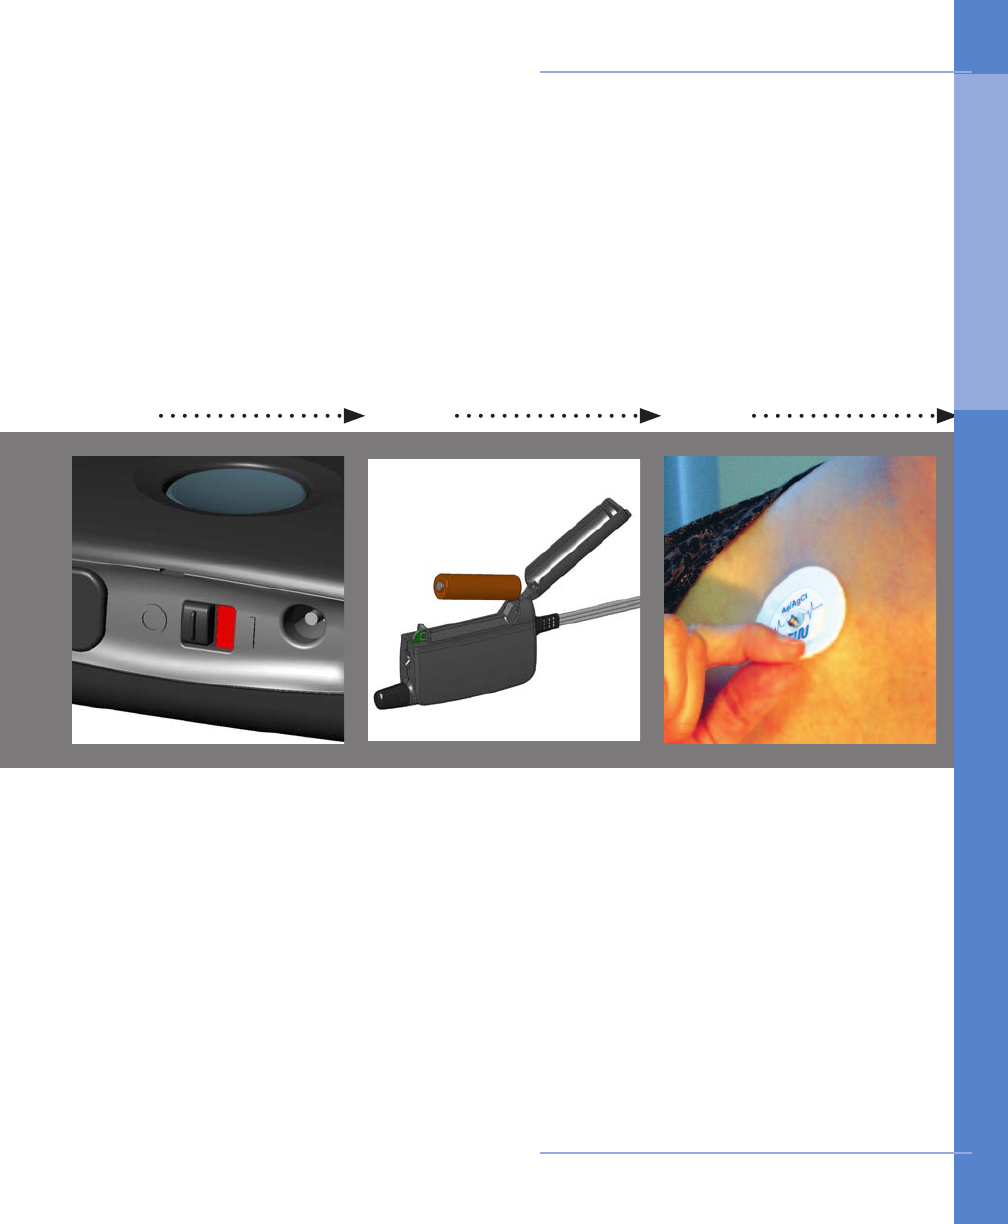
Insert the AA battery
Lift the lid of your sensor
and place one AA battery
inside. Use the diagram
on the inside of the
sensor to make sure you
insert the battery with
the proper positive and
negative orientation. If
you have inserted the
battery correctly, you will
hear a chime.
How to Activate the CardioNet Sensor
2 . GET T I NG S TA RT E D
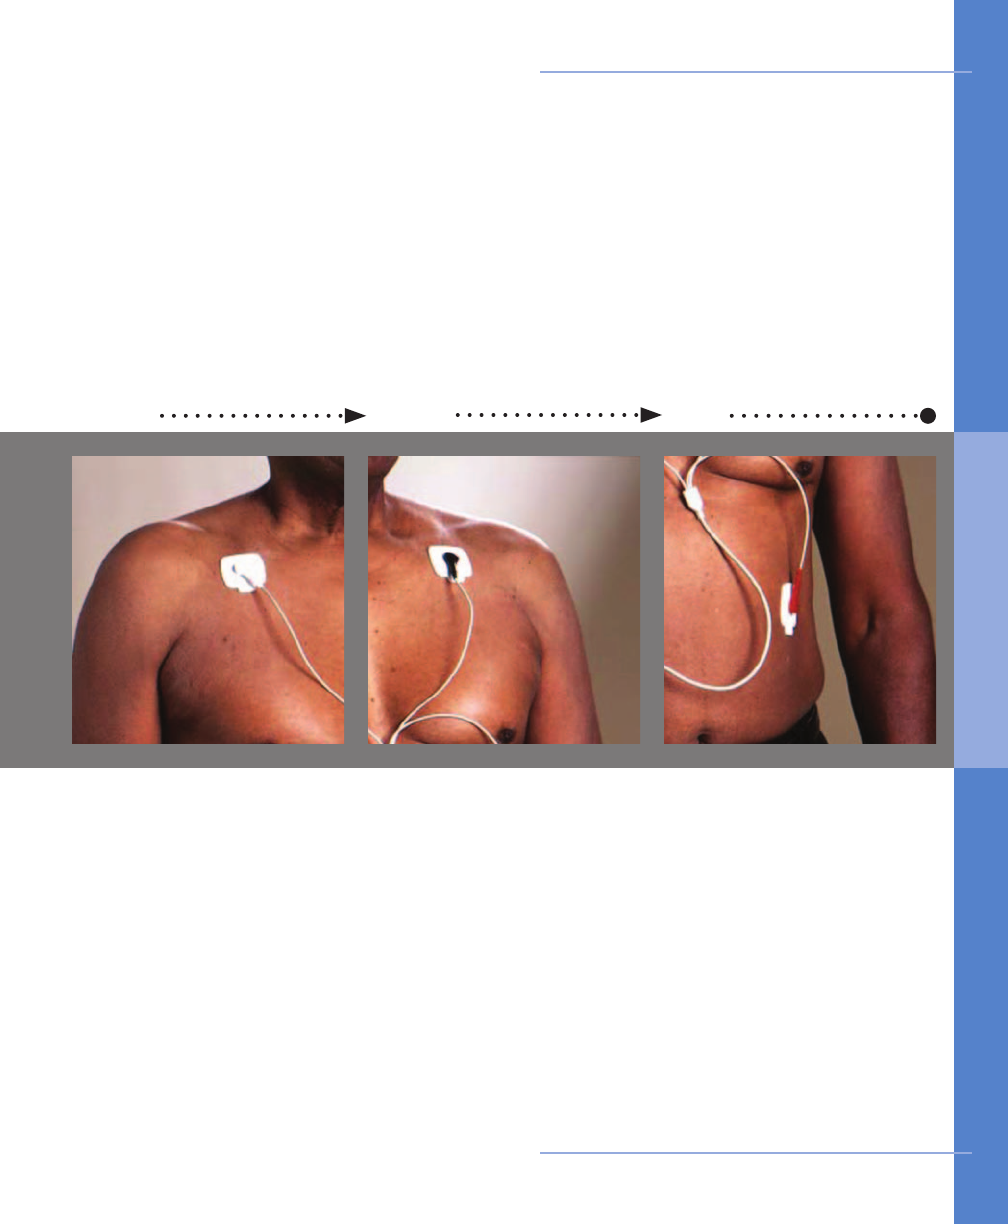
Peel off the electrode
from the backing with
the BLACK lead attached.
Place this electrode just
below the center of your
left collarbone. Press so
that the electrode is ad-
hered to your skin.
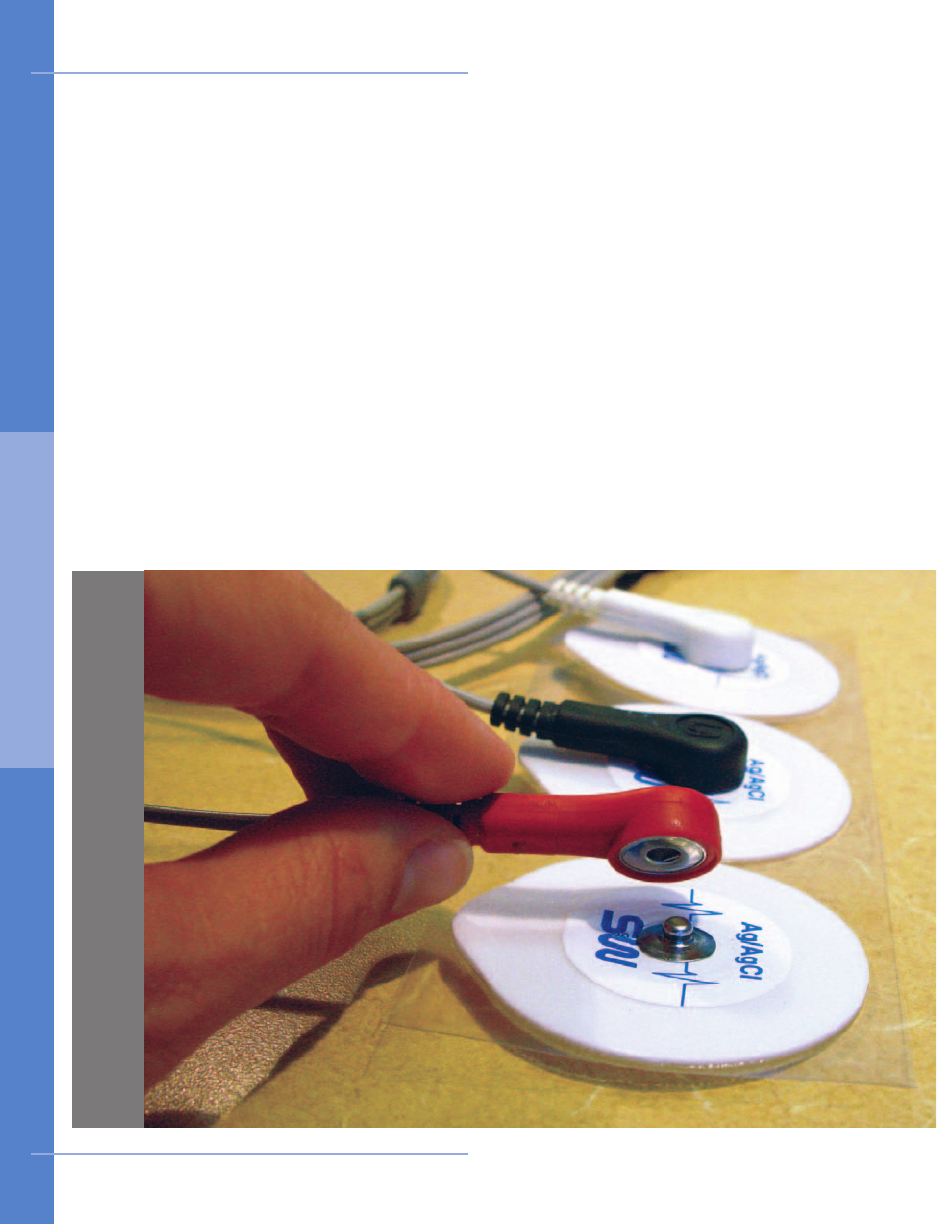
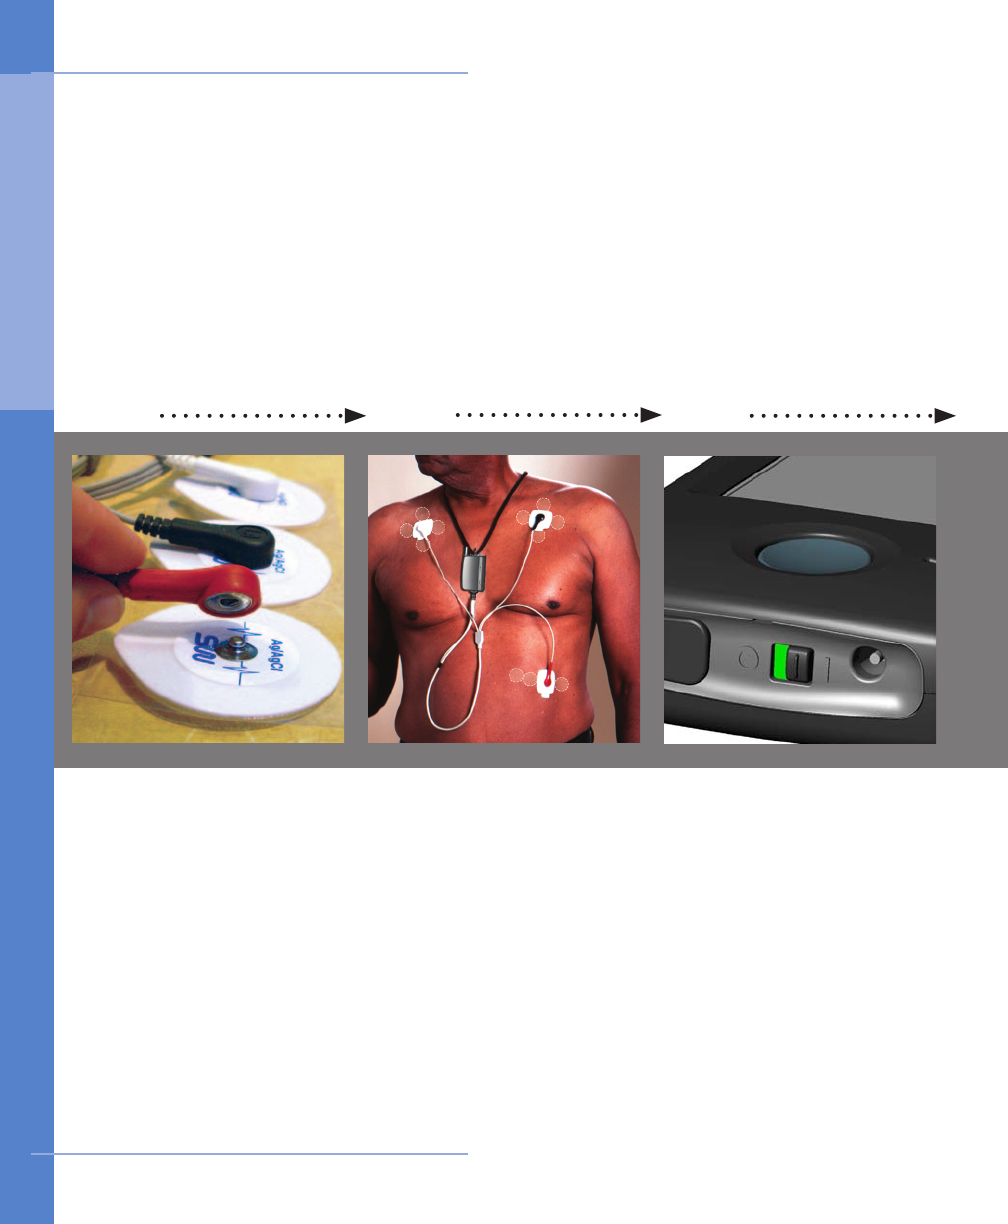
Open one pack of elec-
trodes. Snap the 3 leads
(from the end of your
sensor wires) onto the 3
electrodes. Peel off the
electrode from the back-
ing with the WHITE lead
attached. Place this elec-
trode just below the center
of your right collarbone.
Press so that the electrode
is adhered to your skin.
4 5 6
Peel off the electrode from
the backing with the RED
lead attached. Place this
electrode on your left side,
on the lower part of your
rib cage. RED on ribs.
Press so that the electrode
is adhered to your skin.
Red on ribs
Getting Started 17
White on right Black on left
How to Activate the CardioNet Sensor
2 . GET T I NG S TA RT E D
18 Getting Started
How the Electrodes Work
The CardioNet sensor uses three electrode pads, carefully placed on your body to
detect heartbeats by sensing electrical changes on the surface of your skin. The
electrode pads are attached to three leads - a white lead, a black lead and a red lead.
The leads can be snapped on and off the electrodes. This allows you to take off the
leads and sensor before showering – without removing the electrode pads.
It is very important that you follow the instructions in Chapter 4:
Changing Your
Electrodes
. By following these instructions carefully you are providing CardioNet
with a clear reading of your heartbeats while maintaining the health of your skin.
If You Experience Skin Irritation
If you experience skin irritation or a rash or at any time you experience discomfort
wearing the electrodes, please contact CardioNet at 1-866-426-4401.
Tips for Wearing the CardioNet Sensor
2 . GET T I NG S TA RT E D
Items You’ll Need to Activate your CardioNet Monitor
Item and Quantity Picture of Item Kit Location
Before proceeding, please contact a CardioNet Customer Service Representative at
1-866-426-4401. The table below will help you gather all the items you will need to
activate your CardioNet monitor. All items are located in your CardioNet kit.
1
1
1
Patient Enrollment Form
to sign
Sensor Attached
CardioNet Monitor
Getting Started 19
The sensor should be
attached to your body.
Place shipper kit
image here
Place shipper kit
image here
How to Activate the CardioNet Monitor
2 . GET T I NG S TA RT E D
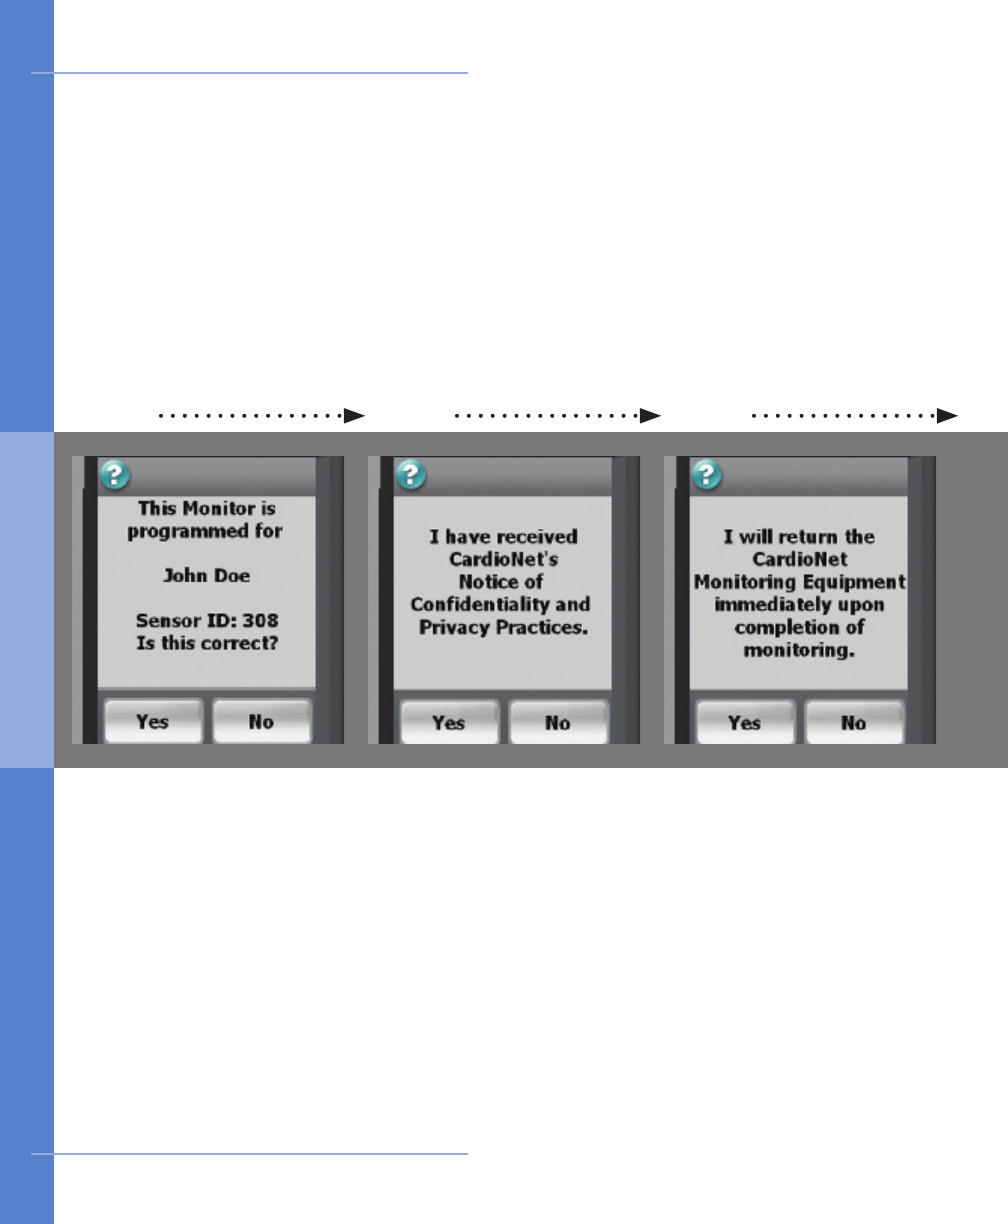
31 2
Switch the power switch
on the green/on posi-
tion. Wait for the monitor
to power up. Activation
screen 1 will appear. Your
name should appear on
the screen.
Look at the back of your
sensor. The 5 digit SNV
number should match the
number on this screen.
Touch Yes to proceed.
Conrm name and sensor
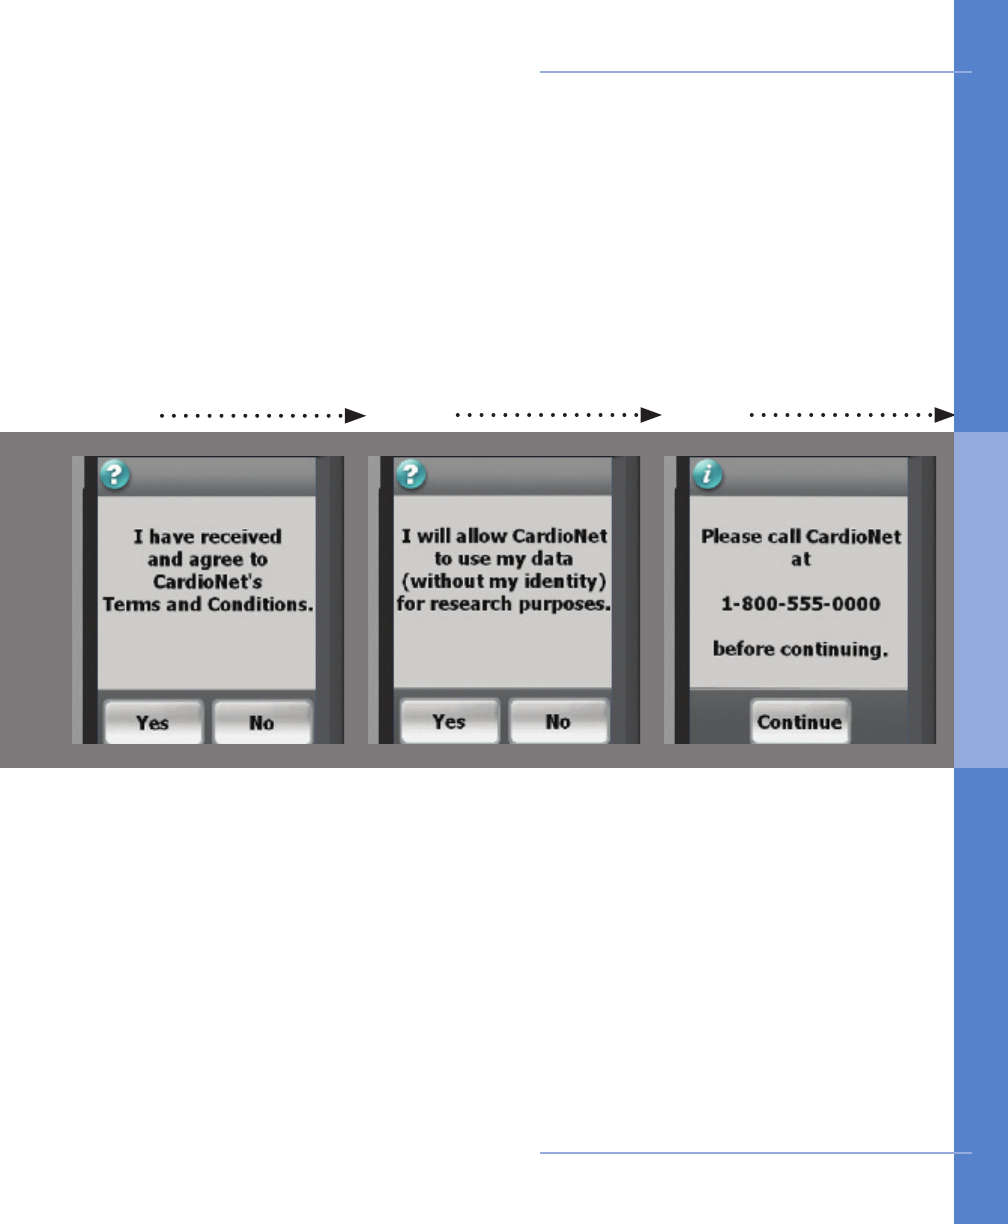
Activation screen 3 is
shown.
Touch Yes to indicate
that you agree to return
your CardioNet kit and all
its contents immediately
after your monitoring is
complete.
Activation screen 2 is
shown.
In the blue folder in your
kit, locate “CardioNet’s No-
tice of Condentiality and
Privacy Practices”.
Touch Yes to indicate that
you have received this
document.
Received Privacy Practices Agree to Return Equipment
20 Getting Started
How to Activate the CardioNet Monitor
2 . GET T I NG S TA RT E D
54
Activation screen 5 is
shown.
Touch Yes to indicate your
consent to allow CardioNet
to use your data for
research purposes. Your
identity will not be used
and will be kept private.
Activation screen 4 is
shown.
In your kit, locate the “Pa-
tient Enrollment Form.”
Touch Yes to indicate
that you agree with the
Terms and Conditions on
the form.
Agree to terms Agree to Share Data
6
Activation screen 6 is
shown.
If you are not already
speaking with a Customer
Service Representative,
please call CardioNet at
1-866-426-4401.
Touch Continue on your
screen to proceed.
Call CardioNet
Getting Started 21
How to Activate the CardioNet Monitor
2 . GET T I NG S TA RT E D
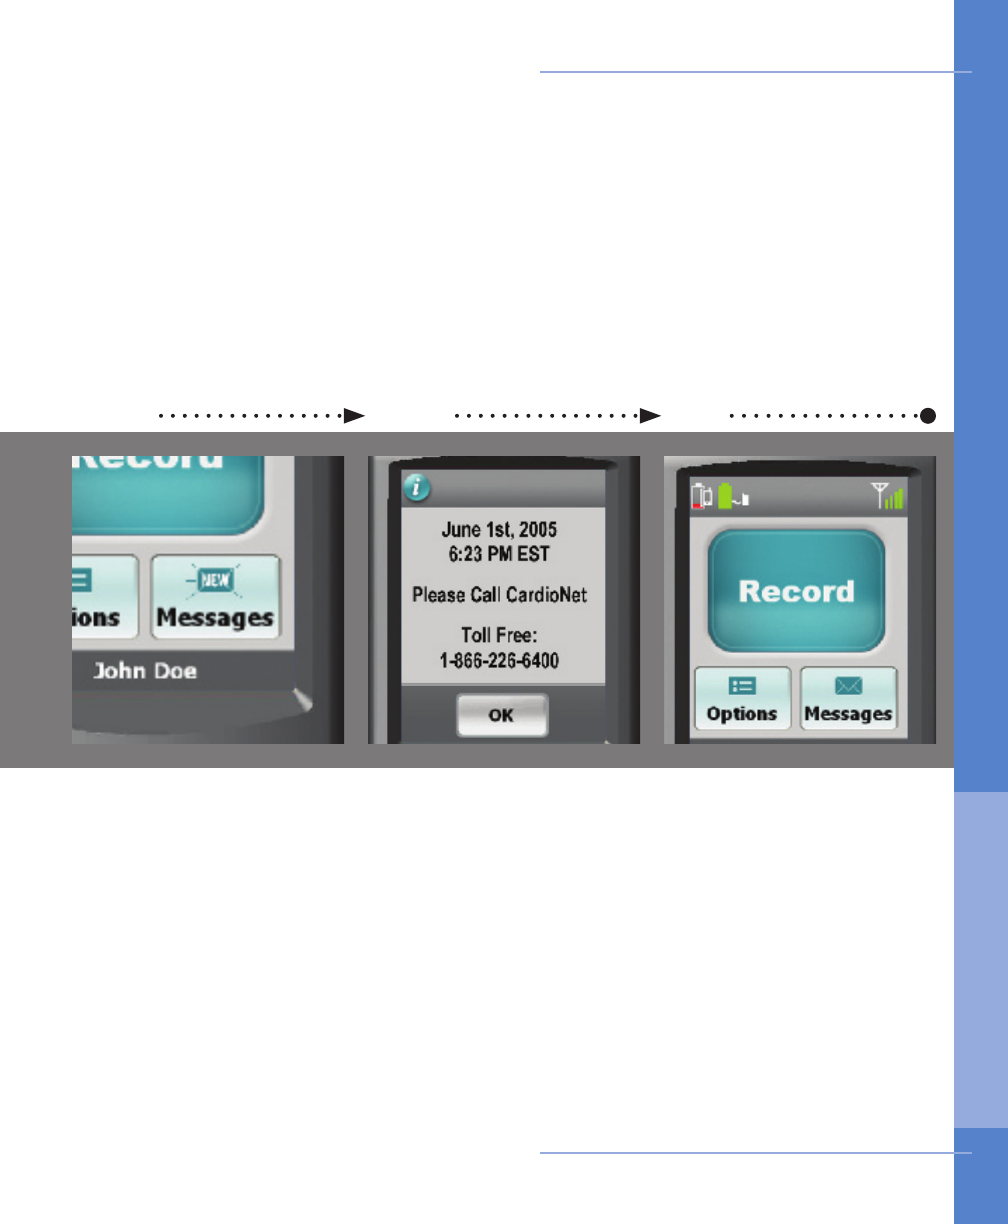
97 8
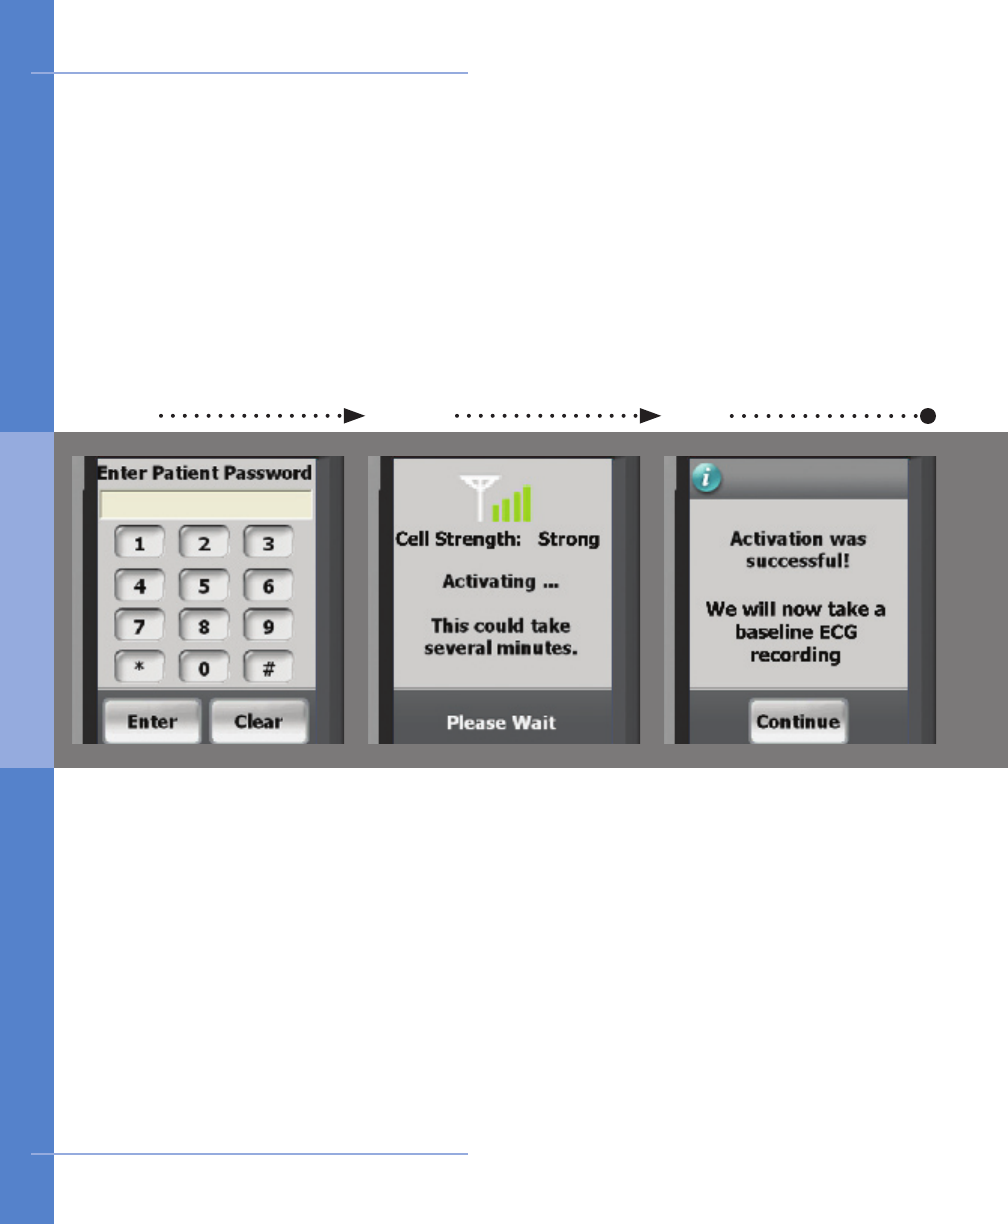
Activation screen 7 is
shown.
While you are talking with
our Customer Service Rep-
resentative, they will give
you a password to enter.
Enter the password and
touch Enter to continue.
Place the monitor in the
base. You may need to
hang up the phone now.
When the monitor has
connected and activation
is complete, the Activation
Successful screen is
shown.
Touch Continue to
proceed and begin the
process of recording a
baseline ECG.
The Activating Monitor
screen appears.
During this time, your
monitor is attempting to
connect with the center and
activate your prescription.
This could take several
minutes.
If activation fails, a screen
containing instructions will
appear (see page 25).
Enter password Activating... stand by Activated.
22 Getting Started
How to Activate the CardioNet Monitor
2 . GET T I NG S TA RT E D
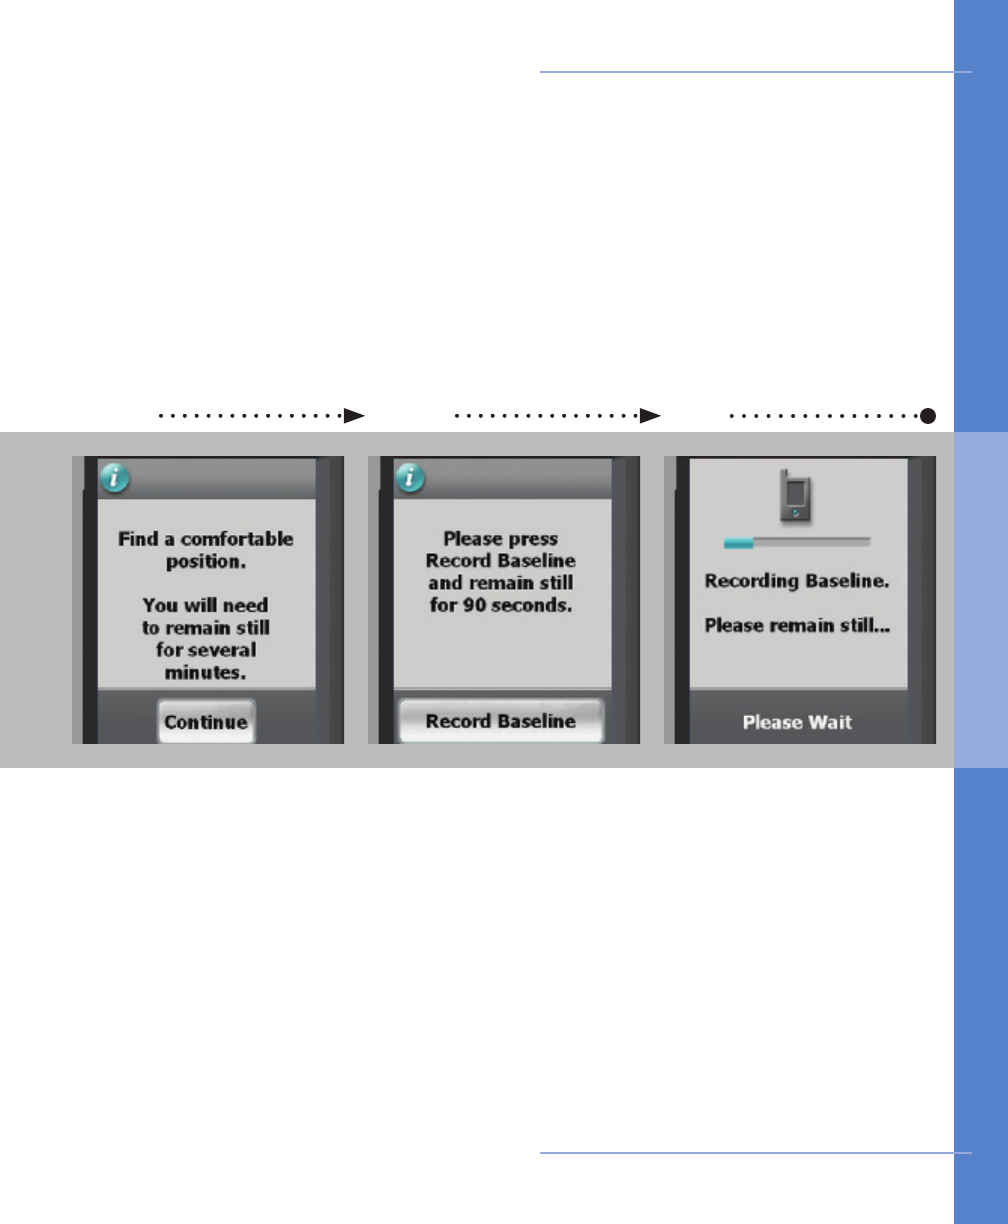
When you are comfort-
able and are certain you
can remain still for up to
2 minutes, press Record
Baseline on the screen.
While your baseline ECG
is recording the screen
will show you a blue bar
to indicate your progress.
Please wait and remain
still unitl this screen
changes.
Before you begin recording
your baseline ECG, find
a comfortable place to
sit or lay down. When
you are comfortable press
Continue on the screen.
Getting Started 23
1 2 3
How to Activate the CardioNet Monitor
Prepare to record Record baseline Recording... remain still
2 . GET T I NG S TA RT E D
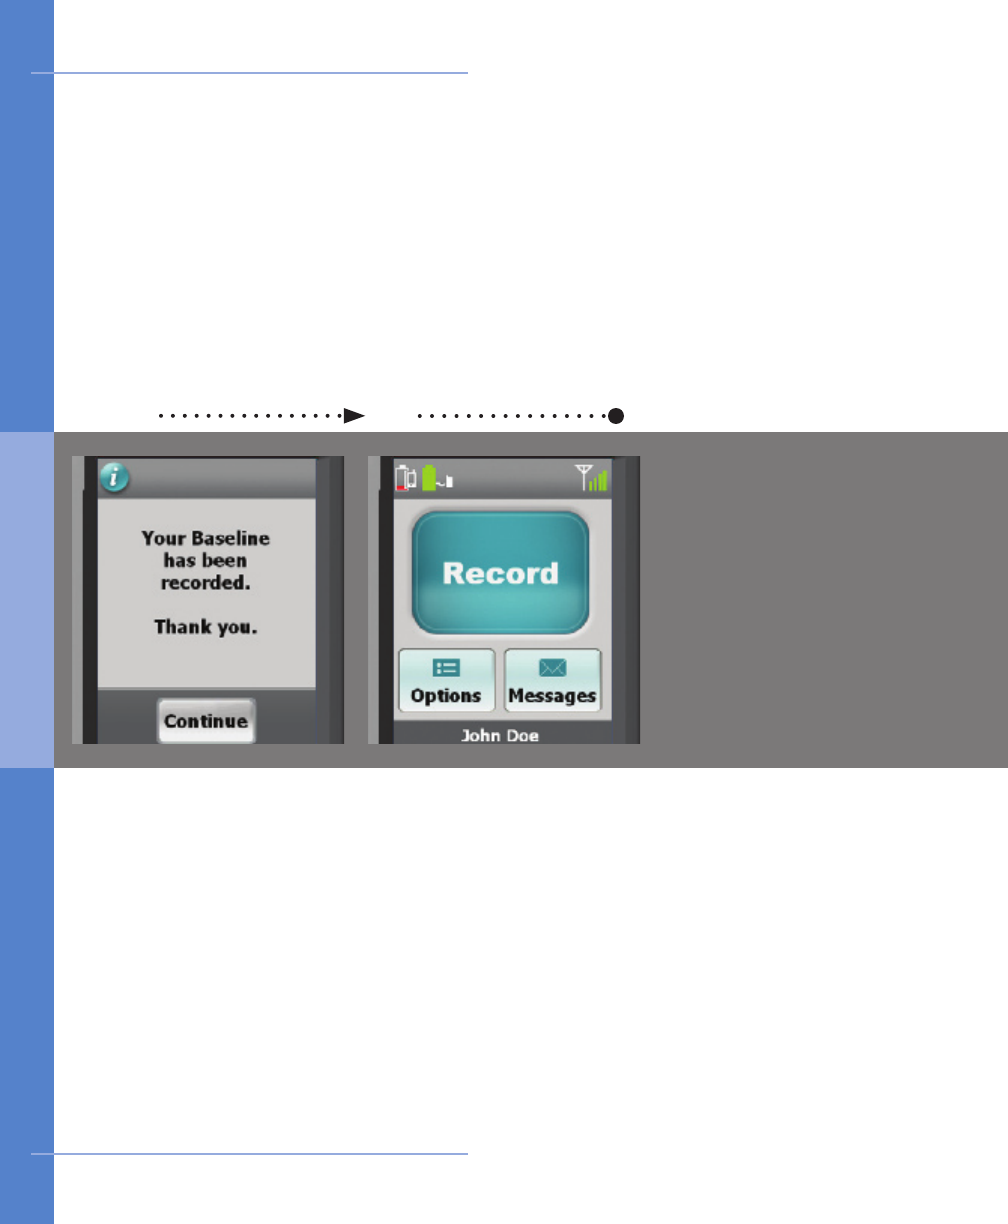
4 5
Once your baseline ECG
has been recorded,
the Baseline Recorded
confirmation screen wil
appear. Press Continue
to go to the Main Menu.
The Main Menu screen
is displayed. You are
now ready to begin your
monitoring session with
CardioNet.
Baseline Recorded Begin monitoring
24 Getting Started
How to Activate the CardioNet Monitor
2 . GET T I NG S TA RT E D
If you disagree with any of
the Activation screens you
may choose No. However,
if you do not consent
to all of the Activation
screens, CardioNet may
not be able to provide
monitoring to you. Please
call CardioNet at 1-866-
426-4401 to discuss your
options. Please do not call
your physician.
If you have questions or
need assistance at any
time, call CardioNet toll
free at 1-866-426-4401.
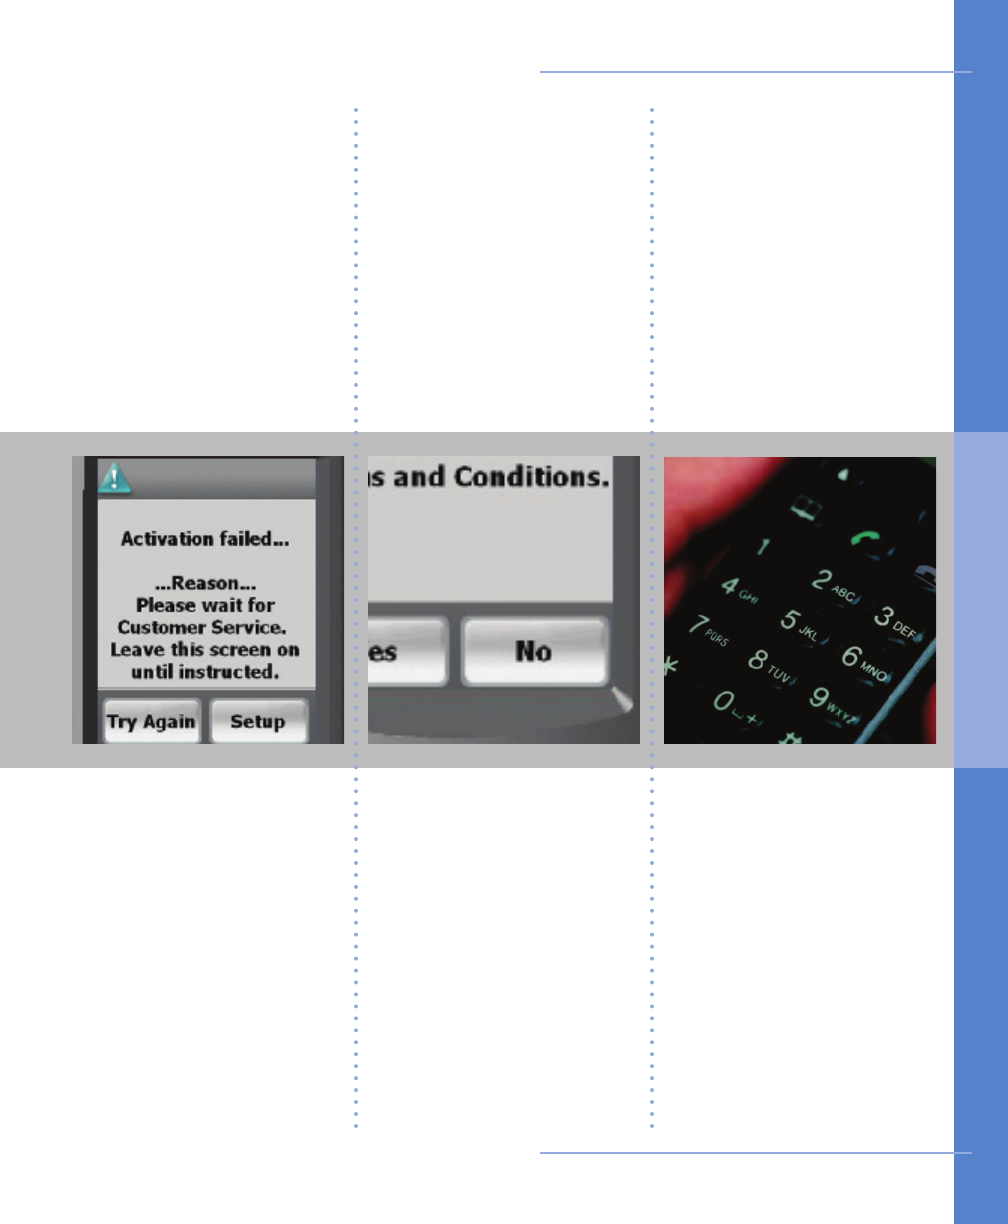
If the monitor is unable to
connect to the CardioNet
center, the activation will
fail.
If the “Activation failed”
screen appears, do
not proceed until you
have called CardioNet’s
Customer Service at 1-
866-426-4401.
Getting Started 25
If
Activation
Fails
If
You
Disagree
Need
Assistance?
How to Activate the CardioNet Monitor
2 . GET T I NG S TA RT E D

3
USING THE Monitor
In this Chapter:
• How to Turn your Monitor On and Off
• How to Record an Event
• How to Change Monitor Options
• How to Check Battery Power
• How to Check Cell Phone Coverage
• Receiving Messages from CardioNet
• How to Read a Text Message
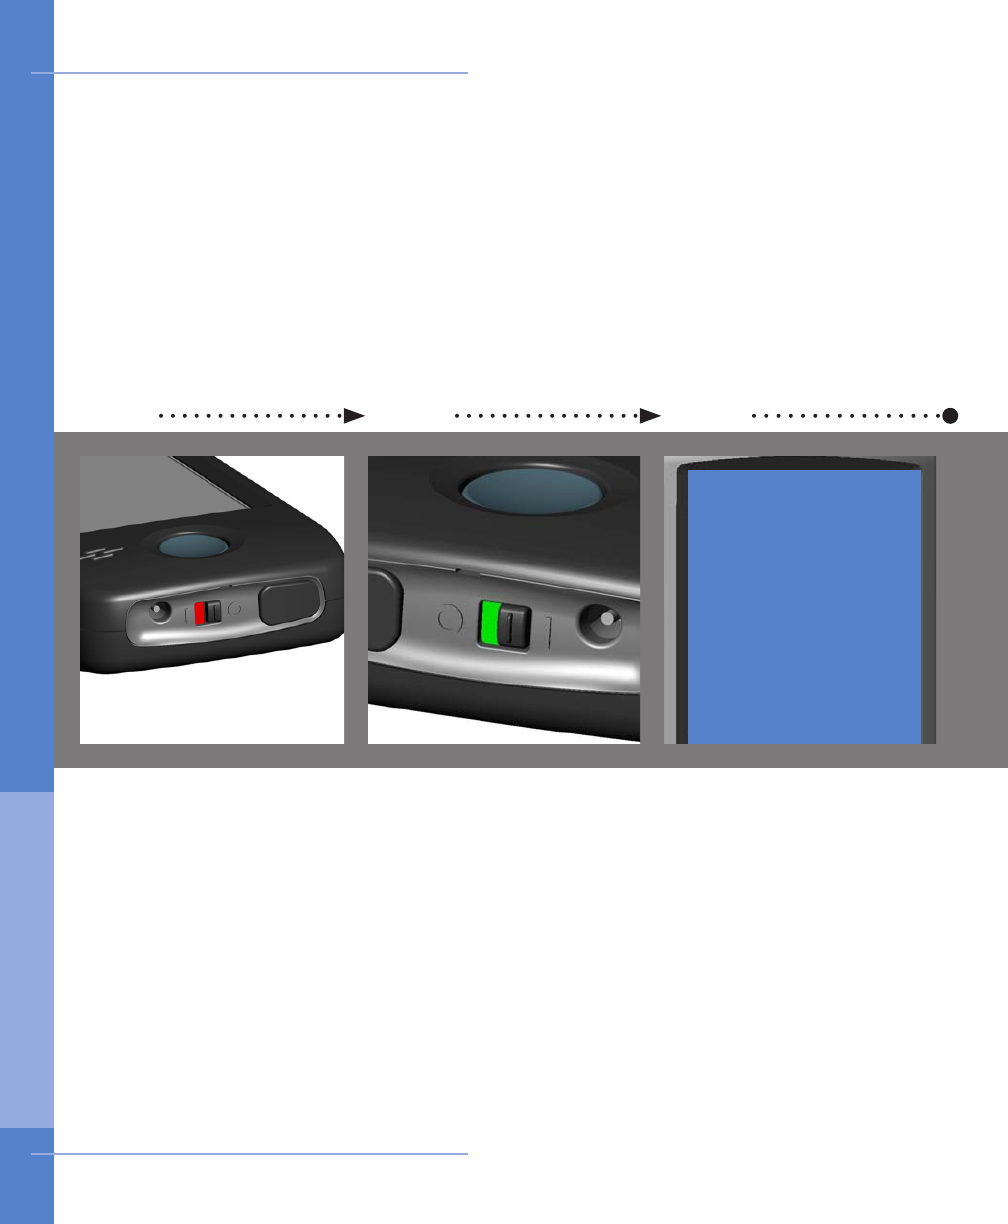
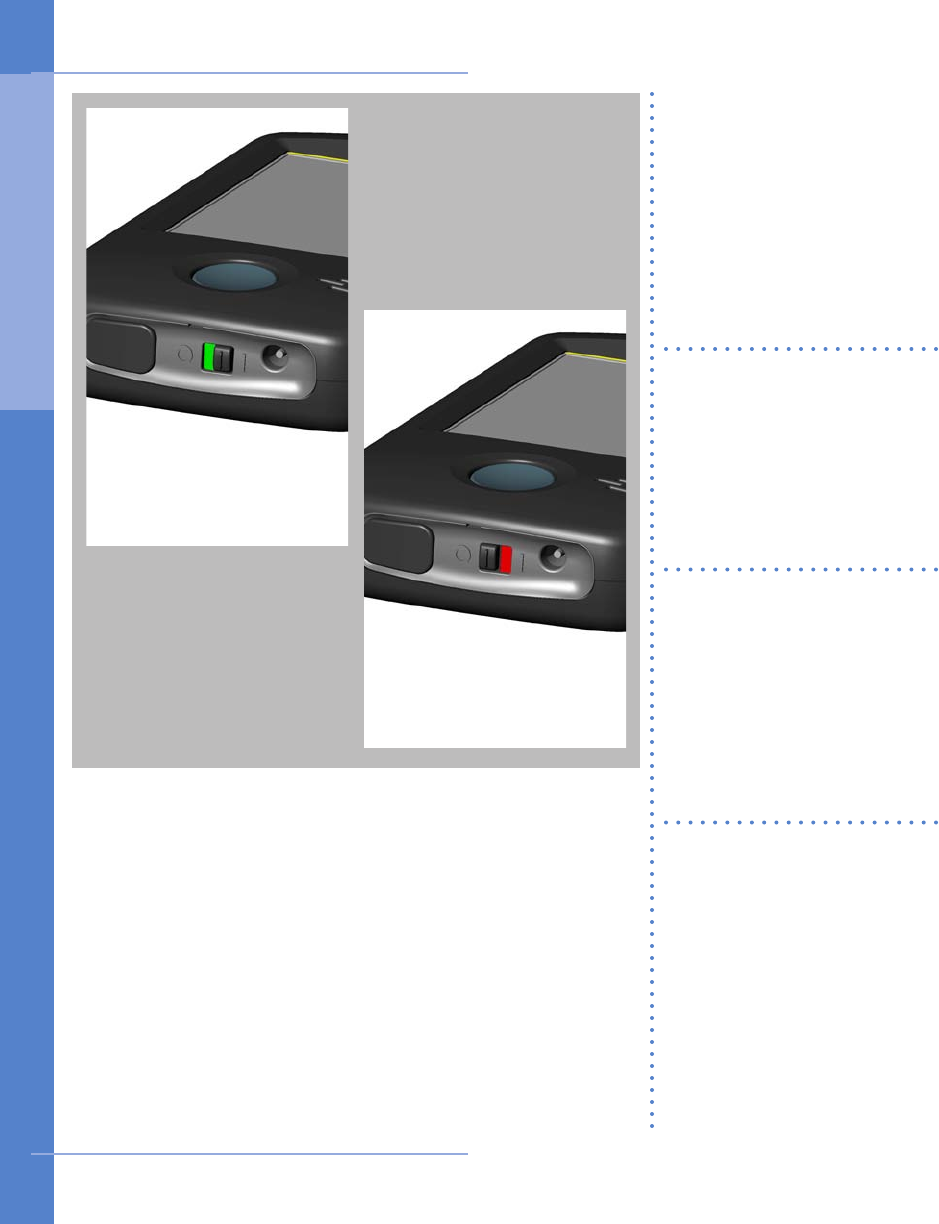
31 2
With your monitor on,
loocate the black toggle
switch on the bottom of
the device. It show green.
Move it to the left. It will
show red.
The “Good bye...” screen
will appear.
With your monitor off,
loocate the black toggle
switch on the bottom of
the device. It show red.
Move it to the right. It will
show green.
You will hear a start up
sound and the CardioNet
“C” logo will appear. When
the touch screen displays
the Main Menu, the monitor
is on and awake.
The “Good bye” screen
indicates that your device
is shutting down. Do not
move to toggle switch until
the screen is blank and the
device is completely off.
The only times you will
need to turn the monitor
off are when you change
the sensor battery, change
your electrodes, or take a
shower or bath.
OFF: Flip switch to red Powering DownON: Flip switch to green
28 Using the Monitor
Good bye...
How to Turn Your Monitor On and Off
3. USI NG T H E Mo n i tor
On &
Awake On &
Asleep Charging
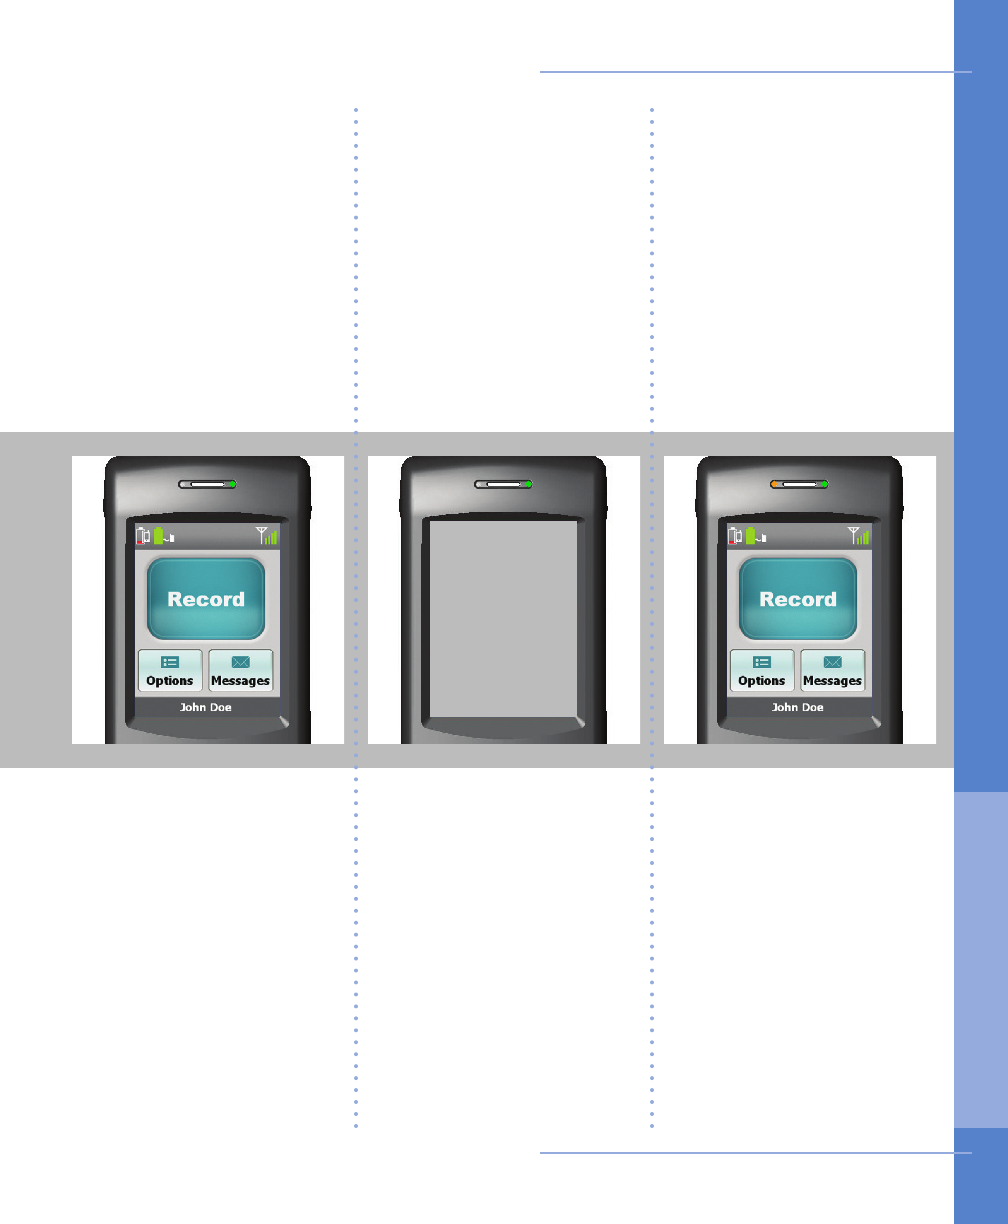
When the monitor is
asleep, the touch screen
is blank and not lit.
The LED light at the top
right side of the monitor
is on and blinking red or
green.
Sleeping helps the moni-
tor save battery power
while you are not using
the touch screen.
When the monitor is
charging, the LED light
at the top left side of the
monitor will illuminate
in orange. The monitor
battery icon, located on
the Main Menu in the
uper left corner will blink
and will change colors as
it recharges.
Always leave your monitor
on, even when charging.
When the monitor is awake,
the touch screen is lit and
the LED light at the top
right side of the monitor
blinks red or green.
A green blinking LED light
means you are being
monitored.
A red blinking LED light
means you are not being
monitored.
Using the Monitor 29
How to Turn Your Monitor On and Off
3. USI NG T H E Mo n i tor
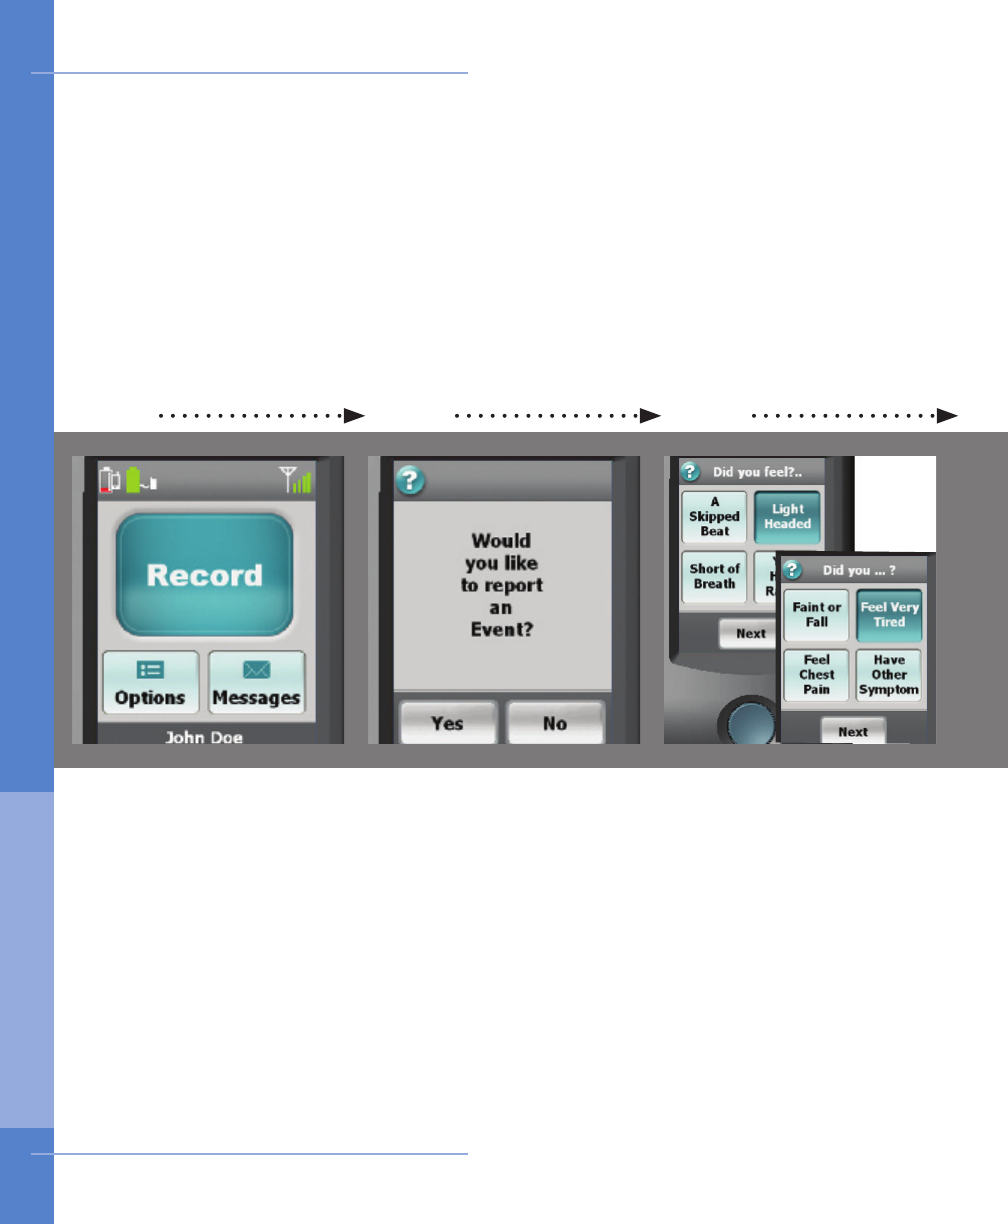
31 2
Follow these steps if you
are experiencing any
symptoms.
Ensure that your monitor
is on and awake.
On the Main Menu touch
the Record button.
The rst of two symptom
screens appears.
Select each symptom that
you feel. The button will
depress and change to a
dark blue color.
Touch Next and repeat
for the second symptom
screen.
When you are finished,
touch Next.
On the monitor’s touch
screen, a confirmation
screen will appear.
Touch the Yes buton to
continue to step 3.
If you have touched the
Record button by accident
and do not wish to record
an event, touch No and
you will return to the Main
Menu.
Touch Record Event Touch Yes to conrm Touch symptoms
30 Using the Monitor
How to Record an Event
3. USI NG T H E Mo n i tor
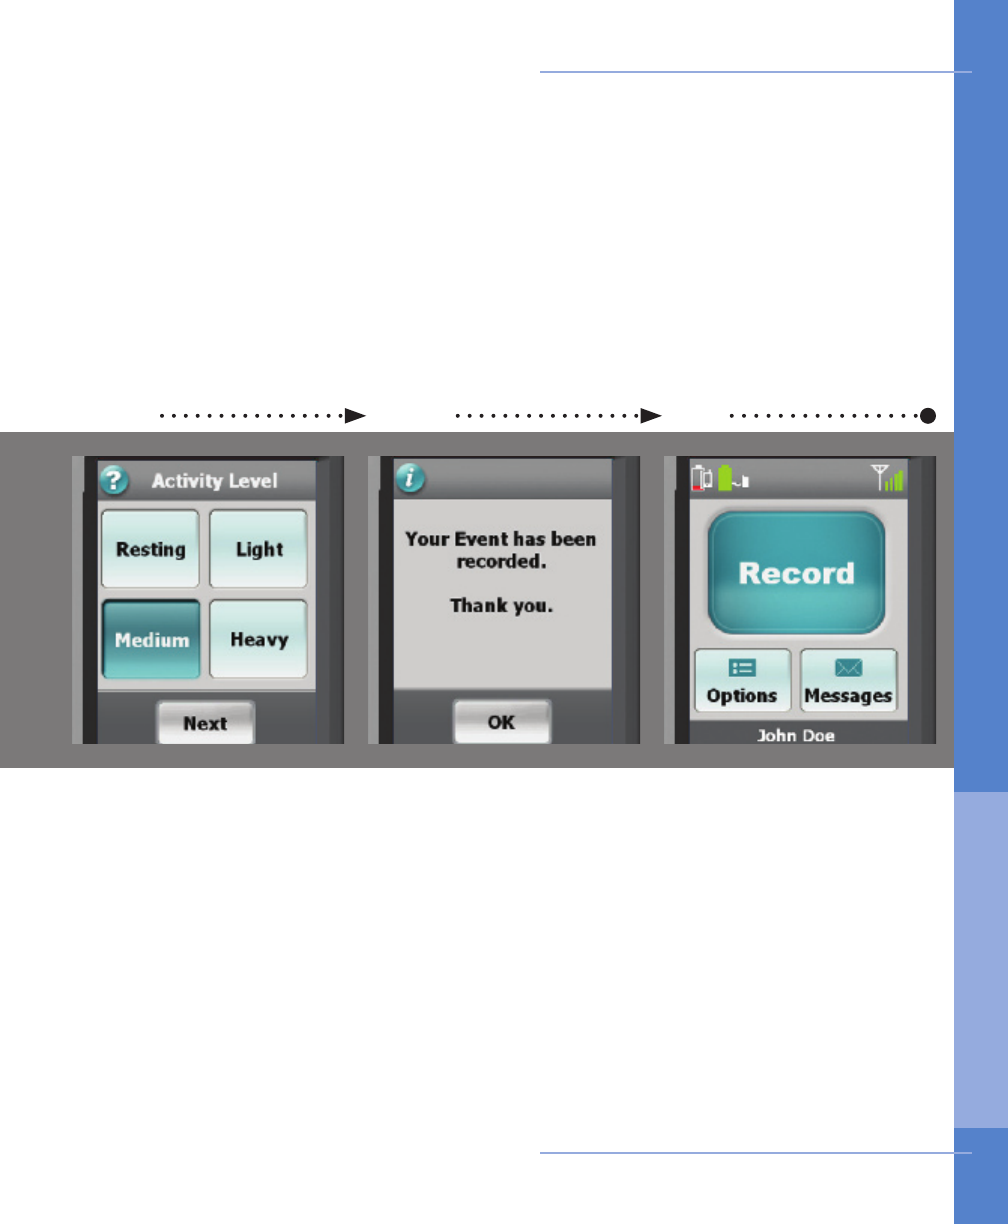
4 5 6
Your event information
has been recorded and
stored. The monitor will
then attempt to contact
and transmit the data to
the CardioNet Monitoring
Center.
Touch OK to return to the
Main Menu.
Choose the activity level
that best reects your level
of exertion when you felt
your symptom.
When you are finished,
touch Next.
Touch activity level Event recorded
Using the Monitor 31
Main menu
When you wish to record
another event, press the
Record button.
How to Record an Event
3. USI NG T H E Mo n i tor
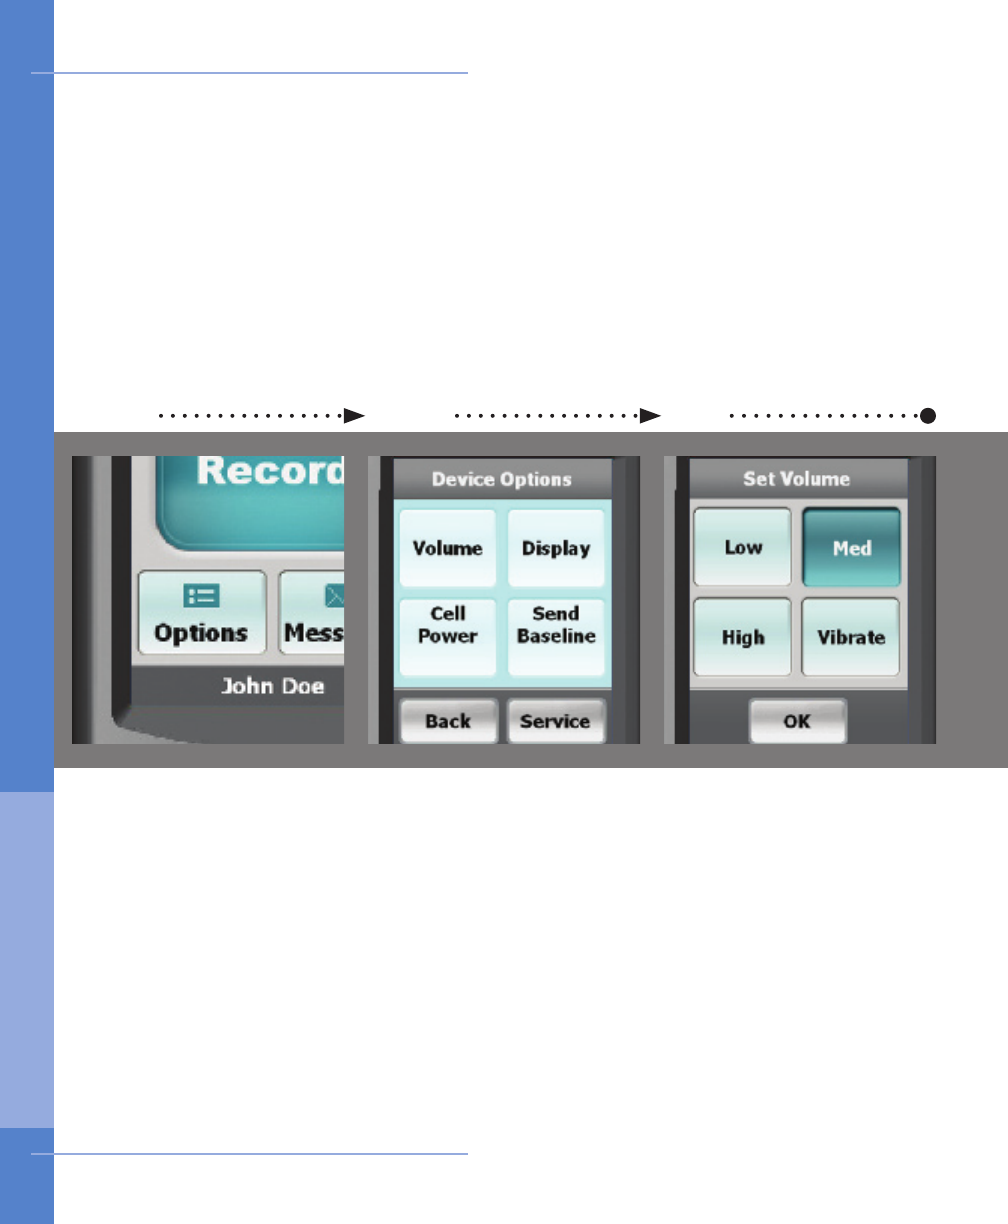
31 2
Ensure the monitor is on
and awake.
From the Main Menu, touch
the Options button.
Choose a desired volume.
Touching High, Medium
or Low places a check
mark next to your selec-
tion. You will hear a tone
for the volume you have
chosen. Vibrate disables
the audio sounds and
you will feel the monitor
vibrating.
Touch Conrm to save.
Touch the button labeled
Volume.
Touch View Options Touch Volume Choose desired volume
32 Using the Monitor
Volume
How to Change Monitor Options
3. USI NG T H E Mo n i tor
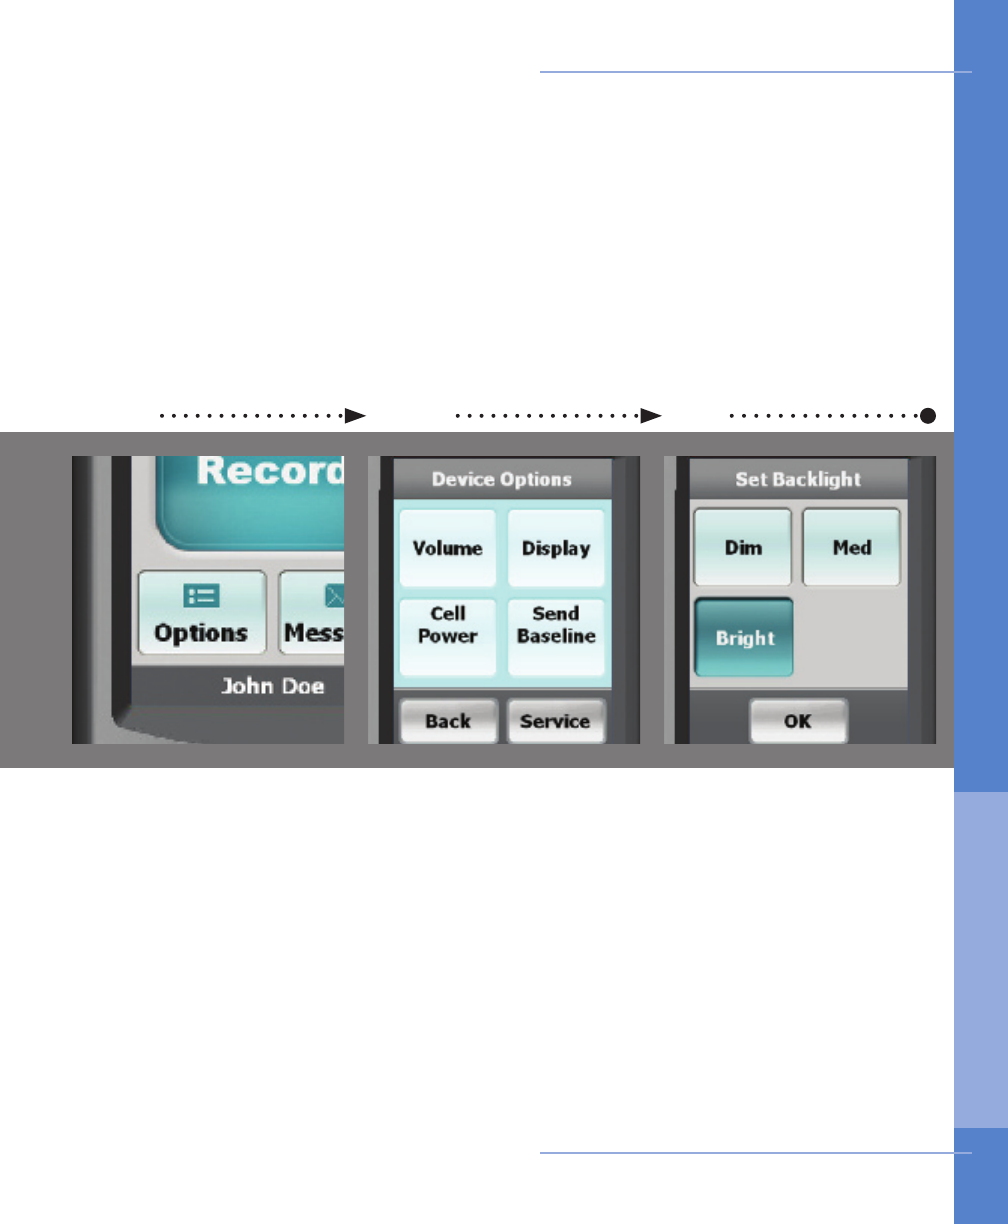
1 2 3
Touch the button labeled
Display.Choose a desired brightness
for the screen.
Touching the Bright,
Medium or Dim button
adjusts the LCD screen
brightness and you will see
the new setting you have
chosen.
Touch OK to save.
Ensure the monitor is on
and awake.
From the Main Menu, touch
the Options button.
Touch View Options Touch Display Choose desired brightness
Using the Monitor 33
Display
How to Change Monitor Options
3. USI NG T H E Mo n i tor
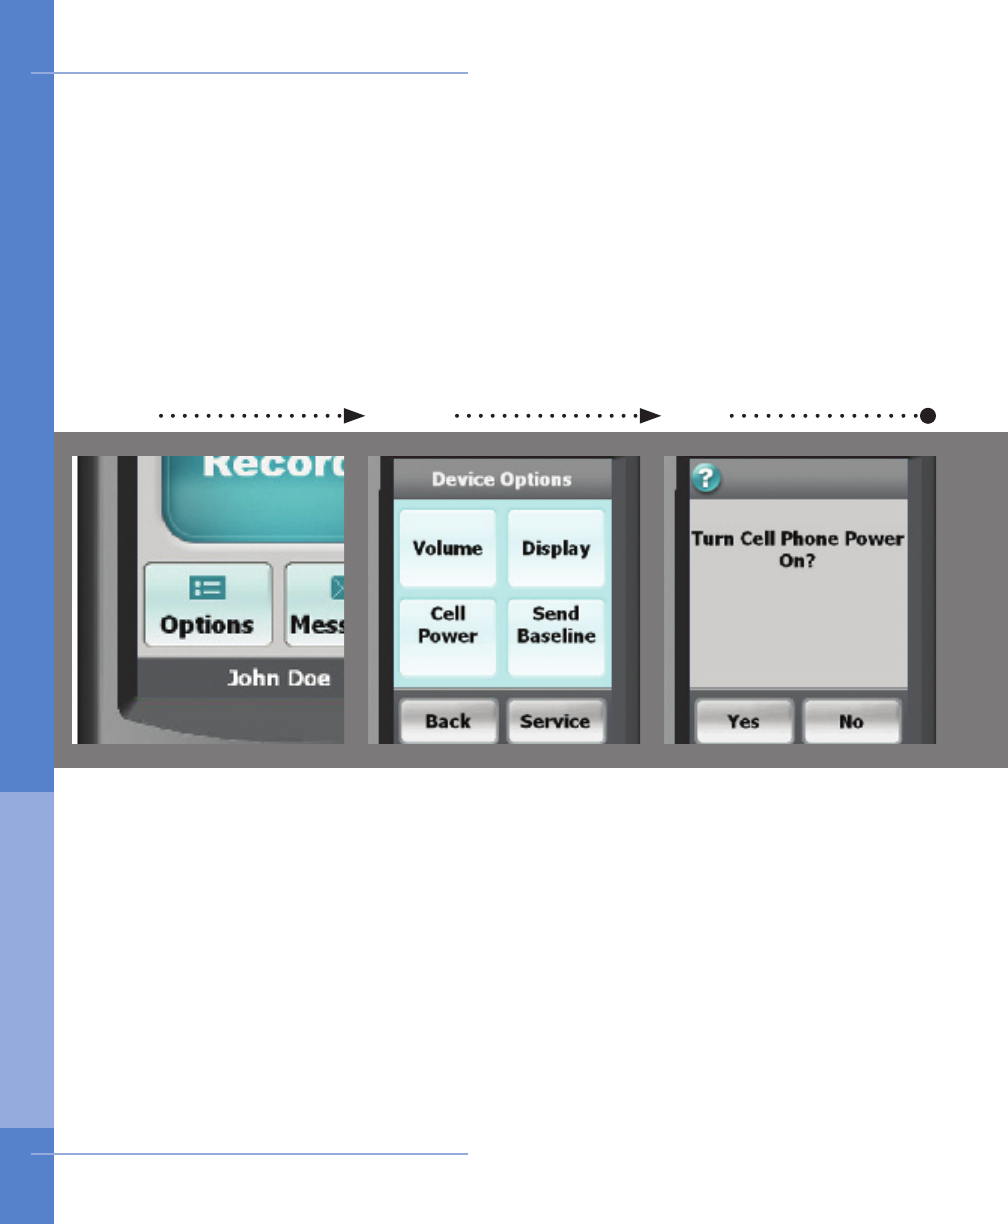
31 2
Ensure the monitor is on
and awake.
From the Main Menu, touch
the Options button.
Choose either Yes or
No.
When the cell phone is off,
monitoring continues, but
no data can be sent unless
the monitor is in the base
or the cell phone is turned
back on.
The cell icon on the
Main Menu now displays
“OFF”.
Touch the button labeled
Cell Power.
Touch Options Touch Cell Phone Choose On or Off
34 Using the Monitor
Cell Phone
Never turn off your cell phone. e cell phone
off feature is ONLY for use when flying.
How to Change Monitor Options
3. USI NG T H E Mo n i tor
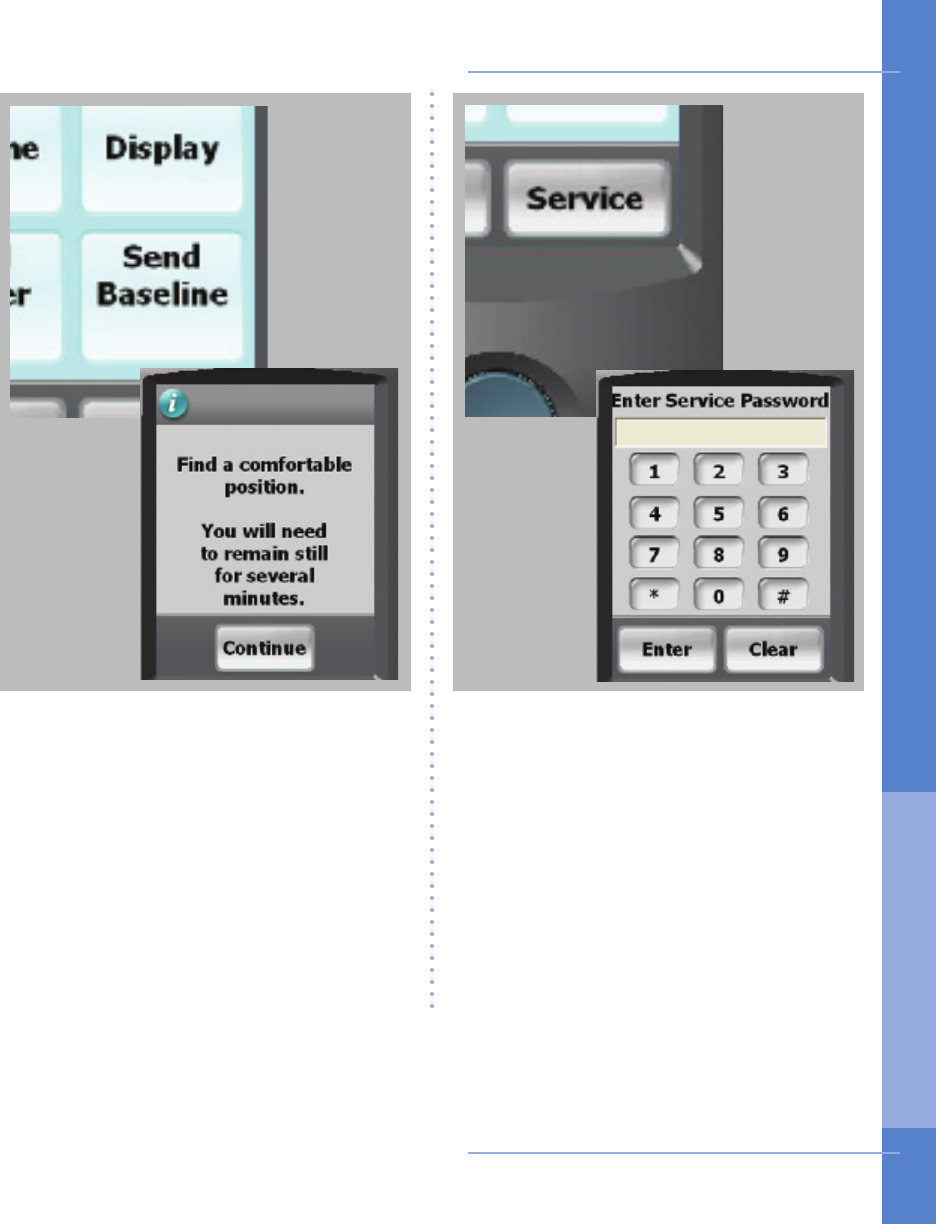
Pressing the Service button will display
a password screen. This screen allows
Cardionet personel to troubleshoot
your monitor. These screen can only
be accessed while you are speaking
with an authorized CardioNet Customer
Service Representative.
If you enter this screen by accident, exit
by touching Enter, then OK and you
will return to the Options Menu.
Using the Monitor 35
Service or Send...
Pressing the Record Baseline button
will display the first screenin this
process. You should only proceed when
speaking with an authorized CardioNet
Customer Service Representative.
If you enter this screen by accident, exit
by touching Back you will return to the
Options Menu.
How to Change Monitor Options
3. USI NG T H E Mo n i tor
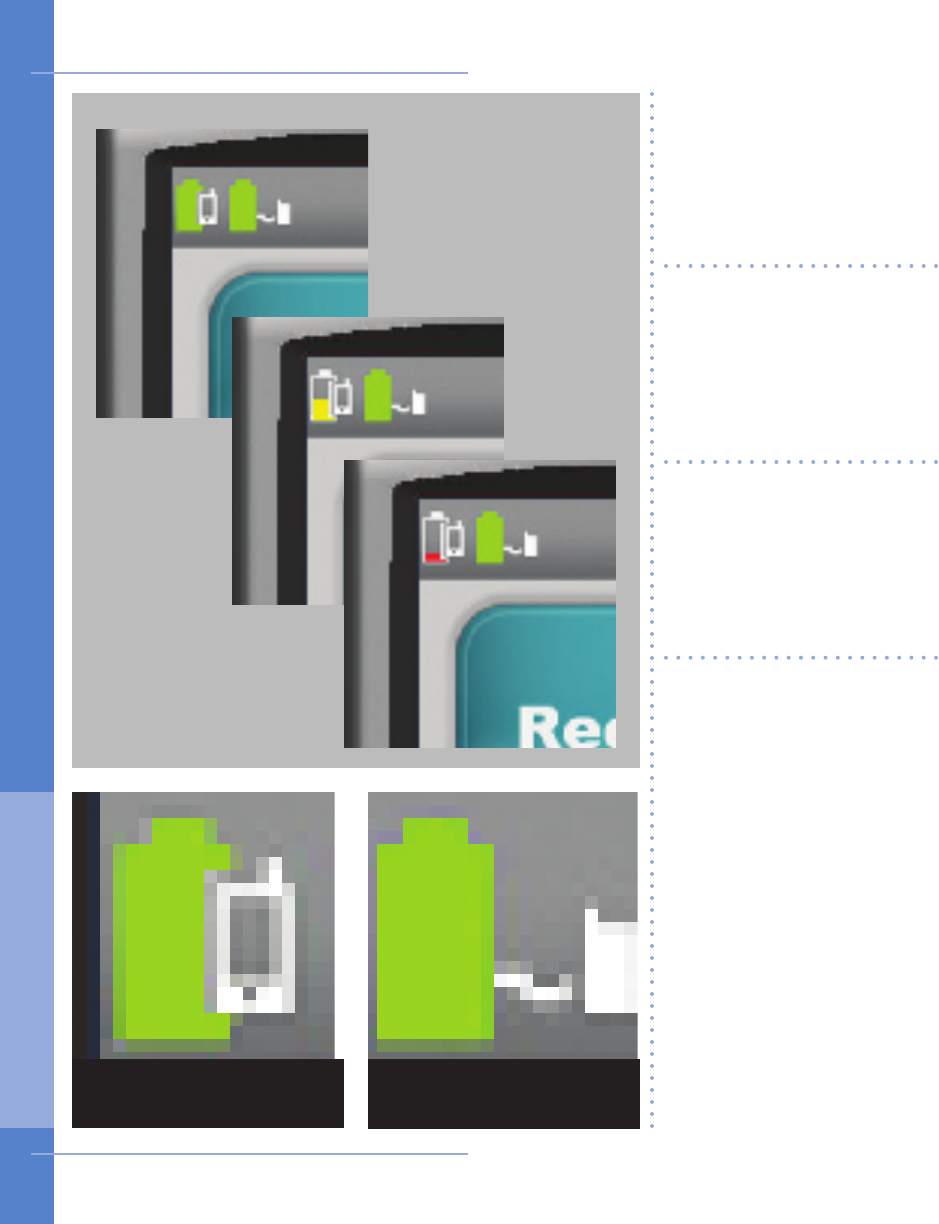
A battery icon that is lled
with a green color indicates
your monitor and / or
sensor have full power.
A battery icon that is
partially filled with a
yellow color indicates a
low battery in either your
monitor or sensor.
A battery icon that is
minimally lled with a red
color indicates either your
monitor or sensor battery
is empty.
The monitor’s rechargeable
battery provides 16 hours
of use for every 4 hours of
recharging.
The sensor AA battery
should be replaced at the
same time every day.
If your monitor or sensor
battery icon are red in
color you, should recharge
or replace the battery
immediately.
36 Using the Monitor
Monitor
Battery Icon Sensor
Battery Icon
How to Check Battery Power
3. USI NG T H E Mo n i tor
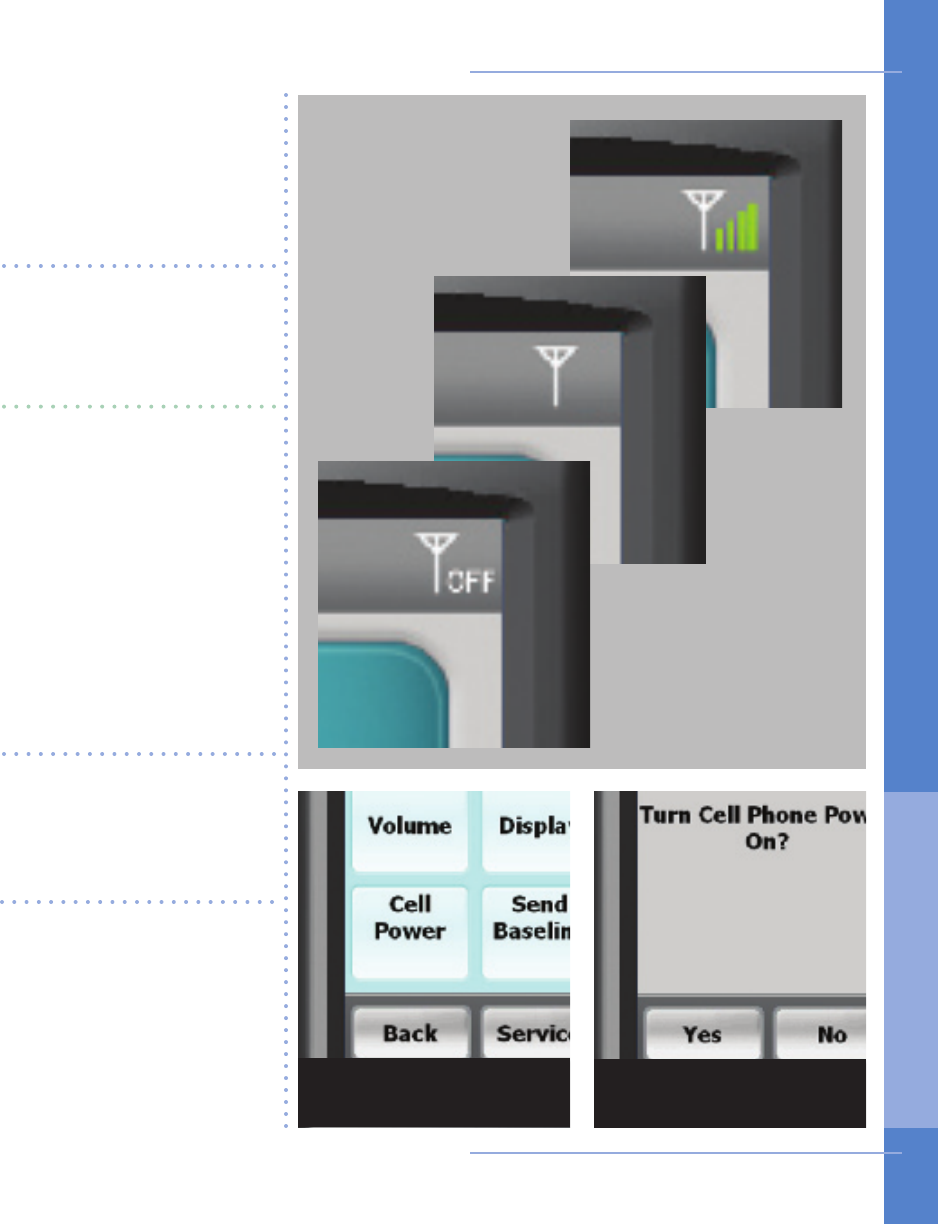
Using the Monitor 37
Four green bars located to
the right of the cell icon
indicate a very strong cell
signal.
No bars to the right of the
cell icon indicates no cel-
lular signal.
The word OFF to the right
of the cell signal indicates
your cell phone has been
turned off. To turn back
on, touch the Options
button on the Main Menu,
select Cell Power, then
select Yes. Please re-
member, the cell phone
off feature is only for use
when ying.
You can’t change your
cell strength unless you
change your current loca-
tion.
If the icon indicates no
cellular coverage and the
monitor is not in the base,
your data will be stored
until the monitor has a
cellular connection or is
placed in the base. Options Menu Yes for Cell Power
How to Check Cell Phone Coverage
3. USI NG T H E Mo n i tor
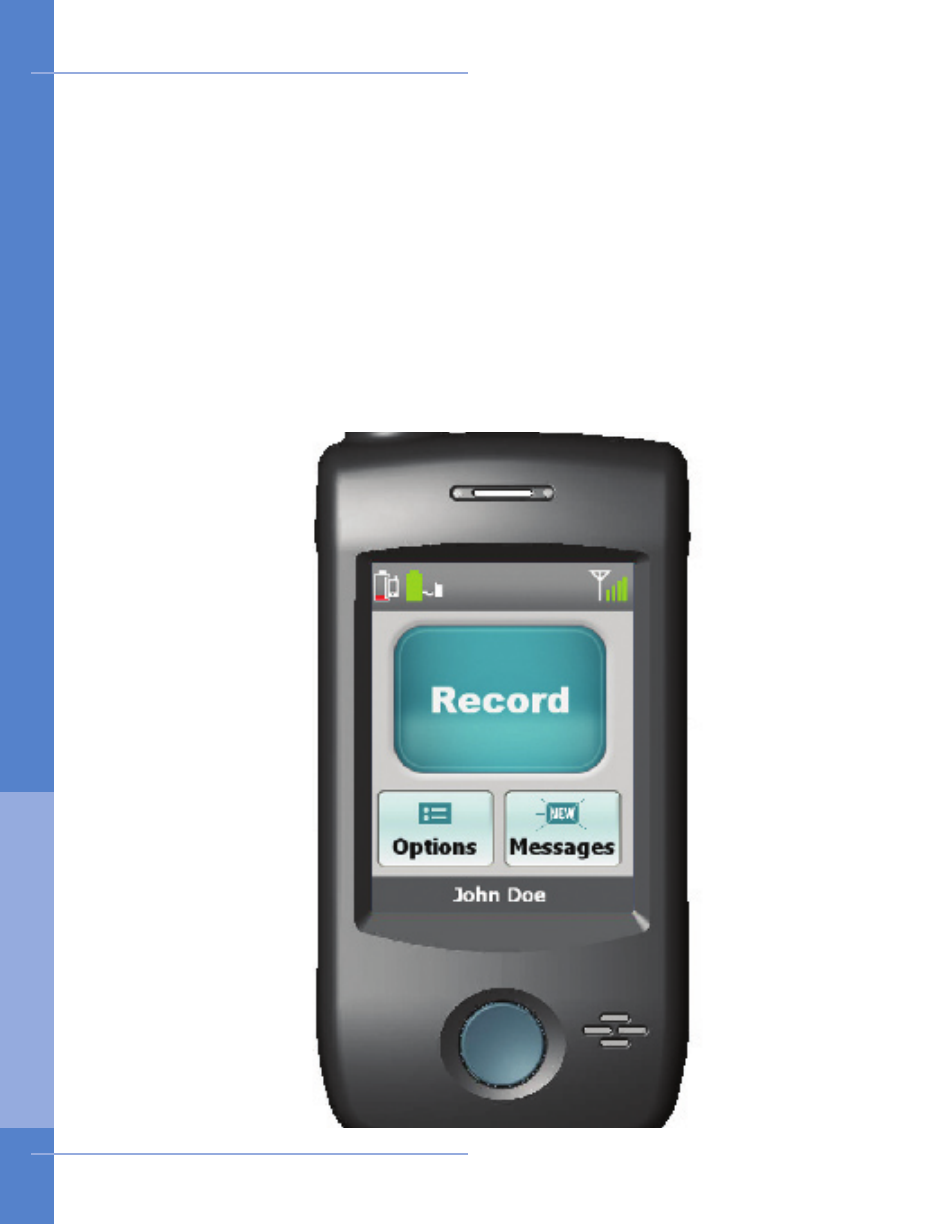
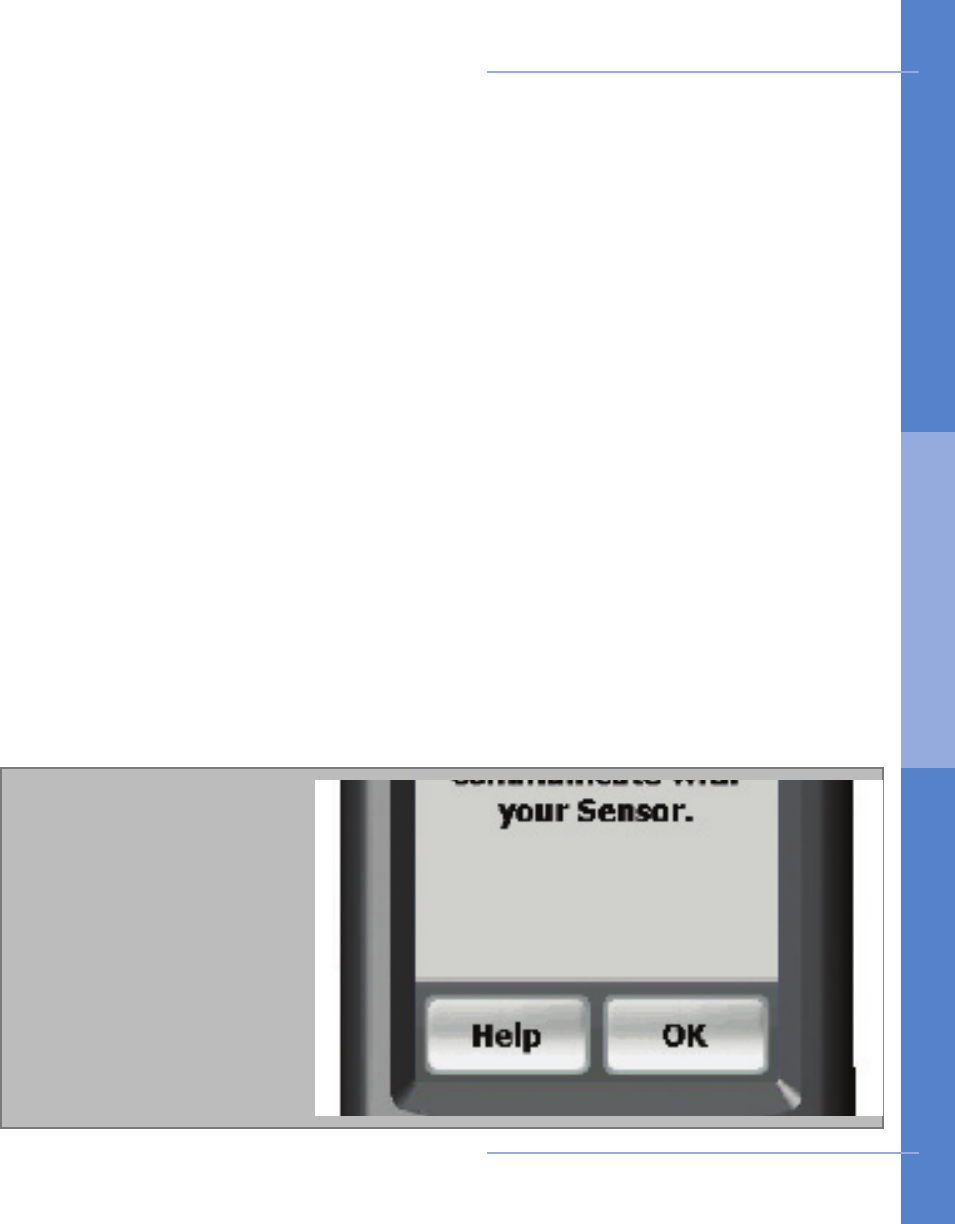
About Text Messages
There are times when CardioNet may want to send you a message regarding your
monitoring. If you see the blue envelope on the Messages button with the word
“NEW” blinking on it, you have received a text message. In order to read the mes-
sage, touch the Messages button and your message will appear on the screen.
When you are done reading and responding to the message, touch OK to return
to the Main Menu. The blue envelope will remain on the button and you can read
your message again at any time by pressing the button. If you receive another
message, the word “NEW” will appear and blink on your envelope. You will need
to touch the button again to read your new message.
38 Using the Monitor
Receiving Messages From CardioNet
3. USI NG T H E Mo n i tor
31 2
Ensure the monitor is on
and awake.
If you have received a new
text message, an envelope
will blink “NEW”.
From the Main Menu, touch
the “Messages” button
located at the bottom right
corner of the screen.
The envelope icon no
longer reads “NEW”. You
can regain access to the
text message by touching
the “Messages” button.
If you receive another text
message, the envelope
icon will change and blink
“NEW” again.
The date and time the text
message was sent to you
is displayed.
Read the text message
and follow any instructions
provided.
When you have nished,
touch OK to return to the
Main Menu.
Touch Messages button Read text message Return to Main Menu
Using the Monitor 39
How to Read a Text Message
3. USI NG T H E Mo n i tor

4
SENSOR CARE
In this Chapter:
• Tips for Changing Electrode Pads
• How to Change Electrodes and Attach Sensor
• Remove Before Showering or Bathing
• How to Change the Sensor AA Battery

42 Sensor Care
Changing your Electrode Pads and Keeping Your Skin Healthy
Change your electrodes every other day. If they come loose before that time, replace
them immediately. If you are showering or bathing on the day you need to change
them, remove them in the shower or bath. Lather them up with soap and water
and pull them off gently. When you are done with your shower, dry your skin and
follow the instructions in
How to Change your Electrodes
. If you do not remove
the electrodes in the shower or bath, you will still need to use soap and water to
loosen them. The goal is to be gentle with your skin. Never pull the electrodes off
quickly like a band-aid.
If the electrodes come loose or are moving around before the two days are over,
replace them immediately. It is very important that the electrodes adhere to your
skin at all times. You may want to press lightly on your electrodes in the morning
when you wake up and throughout the day to make sure they are adhered to your
skin.
Do not put the electrodes in the exact same location each time you change them.
It is very important that you rotate the locations near the original sites. This will
help preserve your skin. If, at any time, redness or irritation occurs, call CardioNet
at 1-866-426-4401. Do not wait until the irritation is severe before you call.
The “Skin Prep” in your kit can be used if you experience mild skin irritation. Wipe
the 3 areas with one skin prep. Let it dry and then apply the electrodes. The skin
prep provides a barrier between the electrodes and your skin. It is usually not nec-
essary to use the skin prep and should only be used if you have sensitive skin or
are experiencing mild skin irritation.
Adhesive remover is also included in your kit and can be used if you have any
adhesive residue left on your skin. The adhesive remover can irritate your skin
so make sure you wash it off after using. It is not necessary to use the adhesive
remover and should only be used if you can see visible adhesive still on your skin
after washing with soap and water.
Do not use lotion or powder on your chest while you are being monitored and re-
move all hair on your chest in the locations of the electrodes. Follow the instructions
in the next few pages on
How to Change Electrodes
.
Tips for Changing Electrode Pads
4 . S E N S O R C A R E
31 2
With your monitor on,
locate the black toggle
switch on the bottom of
you monitor. Move the
switch from green to red.
The blue “Good bye...”
screen will appear. Once
this screen disappears, the
monitor has completely
powerd down.
Unsnap the three leads
from the electrode pads.
Using soap and water,
gently lift the old electrode
pads off your skin. Never
pull them off quickly.
Throw the old electrode
pads away.
Open the battery door by
pushing the door snap
up.
Remove the battery by
grabbing both sides and
ling it out.
Turn monitor off Remove sensor battery Remove old electrodes
Sensor Care 43
How to Change Electrodes and Attach Sensor
4 . S E N S O R C A R E
6
Turn the sensor on by
inserting one AA battery
into the sensor battery
compartment. You will
hear a chime if the battery
is inserted correctly.
Turn your monitor on by
locating the black toggle
switch on the bottom of
your monitor. Move the
switch from red to green.
Monitor and sensor on
44 Sensor Care
4 5
It is very important that
you place each electrode
in another location near
the original site to protect
your skin. Open one pack
of electrodes. Snap the 3
leads to the electrodes.
Peel off one electrode at a
time from the backing and
apply them in the proper
location (see step 5) to
clean, dry, hairless skin.
WHITE ON RIGHT. Place
the electrode with the
WHITE lead on the right,
under your collar bone.
BLACK ON LEFT. Place
the electrode with the
BLACK lead on the left,
under your collar bone.
RED ON RIB. Place the
electrode with the RED
lead on your lower left rib
cage.
Apply new electrodes Placement of the leads
How to Change Electrodes and Attach Sensor
4 . S E N S O R C A R E
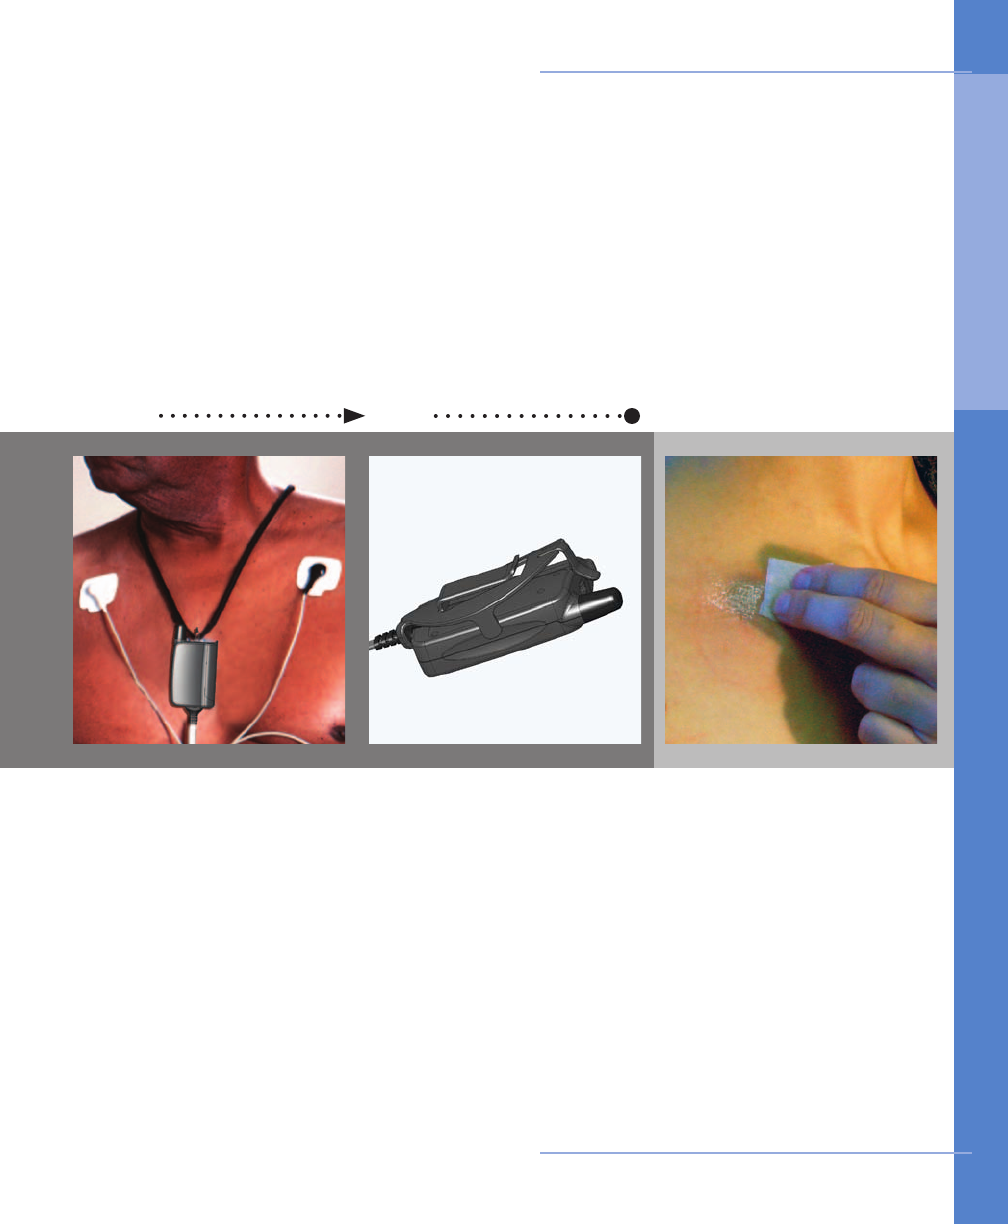
7 8
If you choose to wear the
sensor on your belt, you
will need the belt clip.
Attach the clip to your
pants, skirt or belt. Insert
the end of the sensor
with the loop pointing
downward into the narrow
opening on the clip. Snap
the other end into the wide
opening with the wires
pointing upward.
If you choose to wear the
sensor on your chest, you
will need the neck strap.
Unsnap the strap and
thread it through the loop
on the sensor. Snap the
ends together and place it
over your head. The 2 tabs
allow you to adjust the
length of the neck strap.
If you choose neck strap If you choose belt clip
If your skin is red or ir-
ritated, you can use the
“Skin Prep” located in your
kit. This provides a protec-
tive barrier between your
skin and the electrode.
Wipe all 3 locations with
one skin prep. Allow to
dry and place electrodes
on top. If the skin irritation
continues, call CardioNet
at 1-866-426-4401.
Sensor Care 45
Skin
Irritated?
How to Change Electrodes and Attach Sensor
4 . S E N S O R C A R E
1 2
With your monitor on,
press the blue power but-
ton located on the lower
right part of the monitor.
On the monitor’s touch
screen, a confirmation
screen will appear.
Press Yes to turn the moni-
tor off.
The sensor is not water
proof, but the electrodes
are. Therefore, you’ll need
to remove your sensor
before taking a bath or
shower, but you can keep
the electrode pads on.
To prevent the electrodes
from falling off while you
are in the shower, avoid
soaking the electrode
pads. Gently wash the skin
around the electrodes.
While you are drying off,
use your towel and press
the electrodes onto your
skin. This will help dry the
electrodes and to ensure a
tight surface contact with
your skin.
If your electrodes are 2
days old, remove the old
electrodes and apply new
electrodes. Removing the
old electrodes during your
shower - while they are
wet - may be gentler on
your skin.
46 Sensor Care
Remove Before Showering or Bathing
4 . S E N S O R C A R E
1 2 3
Remove the old battery by
placing your nger in the
recessed area, wedging
your finger underneath
the battery and lifting
upward.
Put in a new AA battery,
included in your CardioNet
kit. Note the battery
direction on the label on
the inside of the sensor
cover. If properly installed,
the sensor will chime.
If the sensor doesn’t
chime, recheck the battery
direction.
Close the sensor cover and
turn your monitor on.
Press the blue power
button located on the
lower right part of the
monitor.
On the monitor’s touch
screen, a confirmation
screen will appear.
Pressing Yes will turn the
monitor off.
Open the battery door by
pushing the door tab up.
Turn monitor off Remove old battery New battery, monitor on
Sensor Care 47
How to Change the Sensor AA Battery
4 . S E N S O R C A R E

5
TROUBLESHOOTING
In this Chapter:
• Responding to Monitor Alerts and Alarms
• Troubleshooting Device Problems
• Precautions, Cautions and Warnings

When the monitor or sensor beeps
When the monitor beeps it has nothing to do with the condition of your heart, so
don’t become concerned. The monitor will beep to alert you when it is unable to
function properly. The touch screen will explain what to do. With both alerts and
alarms you can always touch the Help button for further instructions.
Alerts display an information screen that will disappear after 15 seconds and have
an audio tone of two brief beeps. Alarms display an information screen that persists
and alarm tones that grow louder over time.
Alerts can sometimes x themselves, but alarms always require action on your part.
For alarms, you can immediately silence the audio tones by touching the Silence
button on the touch screen.
The table below will help you identify the possible problem and the actions you can
take to nd a solution for each monitor alert or alarm.
50 Troubleshooting
Screen Problem Possible Solutions
NO COMMUNICATIONS
The sensor you are wearing on
your body and the monitor are
not communicating.
Move closer to your monitor
or move the monitor closer
to you. OR
Check if the sensor battery
is empty or oriented
incorrectly.
LEAD DISCONNECTED
One or more leads are unsnapped
from the electrodes.
OR
One or more electrodes are not
stuck well to your skin.
Check that all leads are
snapped to the electrodes.
OR
Check all electrodes to
ensure they are stuck to your
skin. Apply new electrodes if
needed.
Responding to Monitor Alerts and Alarms
5. T ROU BL E SHO OT I NG

Troubleshooting 51
Screen Problem Possible Solutions
LOW MONITOR BATTERY
The rechargeable battery in the
monitor is low.
Return the monitor to the
base for recharging.
OR
Directly recharge the monitor
by plugging the base power
cable into the monitor.
LOW SENSOR BATTERY
The sensor AA battery is low. Install new battery.
OR
If the battery is new, inspect
battery compartment and
clean contacts if necessary.
INTERNAL MONITOR ERROR
The monitor is not functioning. Call the CardioNet Patient
Service Center for help. Call
Toll free: 1-866-426-4401.
INTERNAL SENSOR ERROR
The sensor is not functioning. Call the CardioNet Patient
Service Center for help. Call
Toll free: 1-866-426-4401.
Responding to Monitor Alerts and Alarms
5. T ROU BL E SHO OT I NG

52 Troubleshooting
Screen Problem Possible Solutions
INFORMATION TO SEND
The monitor needs to transmit
data but can not establish a con-
nection to CardioNet.
Put the monitor in the base.
OR
Move to an area with cell
phone coverage.
Responding to Monitor Alerts and Alarms
5. T ROU BL E SHO OT I NG
About Troubleshooting
Troubleshooting sometimes involves a bit of detective work, but usually the moni-
tor detects problems for you and can assist you with resolving the problem. The
monitor beeps to let you know there is a problem with the equipment. The touch
screen shows you a message on how to respond to the alert or alarm. For every
alert and alarm the touch screen has a help menu. Any time an alert or alarm ap-
pears and you do not know what to do, you can press the Help button to access
detailed instructions on how to troubleshoot the problem.
An alert prompts you to resolve a problem by displaying an information screen and
beeping an audio tone. With alerts the problem can x itself and you won’t need to
take any action. With alarms you will need to take some action and information on
how to resolve the problem will be provided on the touch screen. An alarm persists
to let you know that a problem has not been resolved and you must take action.
If your Problem Can’t be Resolved
If you experience additional problems with any components of the CardioNet
Monitoring System, review the problems and solutions listed in the troubleshoot-
ing section. If additional assistance is required contact customer support toll free
at 1-866-426-4401.
Troubleshooting 53
Most alerts or alarms have
a help screen. If you need
more information, press
the Help button to access
detailed instructions on
how to troubleshoot the
problem.
Troubleshooting Device Problems
5. T ROU BL E SHO OT I NG

Problem Possible Solutions
Monitor
battery
power drains
quickly
Ensure battery is being fully recharged every day. A full recharge
takes approximately 4 hours and will last 16 hours.
Ensure the monitor is being placed in the base correctly. If the
monitor does not make contact with the plug in the base, it may
not recharge.
Monitor
screen is
blank
It could be that the monitor is not turned on.
Ensure the monitor is turned on by conrming that the LED light
is ashing red or green. If the monitor is asleep, press the blue
button. The screen should light up. If it doesn’t, the monitor may
be low on power. Return the monitor to the base for recharging.
Monitor
beeps while
you are in
bed
It is possible for your body to block communications between the
sensor and monitor. This will cause warning beeps. To avoid beeps
and maintain the communications link, place the sensor near the
monitor on the bed next to you. Try not to lie on top of it or to get
between the sensor and monitor while you are sleeping.
Your phone
line is busy When the monitor is in the base station and sending information it
will use your telephone line. If someone calls you while the monitor
is using the line, they will get a busy signal. If you try to place a call
while the monitor is transmitting data, you will hear a high- pitched
sound. This is the sound of monitor data being transmitted.
Skin is
irritated or
reddened
If you notice that the skin under or around your electrode pads is
becoming sensitive, irritated or painful, or if you develop a rash,
please call the CardioNet Patient Service Center immediately at 1-
866-426-4401. Some people are sensitive or allergic to adhesives.
CardioNet will send you another type of electrode pad.
Sensor belt
clip is difcult
to put on
If you’re wearing a thicker belt and nding that it is difcult to
slide on the Sensor Belt Clip, rst remove the CardioNet Sensor
from the clip. Slide just the clip onto your belt and then reposition
the sensor on the clip.
54 Troubleshooting
Troubleshooting
5. T ROU BL E SHO OT I NG

PRECAUTIONS
DISPOSE OF BATTERIES PROPERLY
Observe all local laws for the disposal of alkaline batteries.
WHEN NOT IN USE, REMOVE SENSOR BATTERY
Do not leave the battery in the sensor when it is not in use.
AVOID ELECTROMAGNETIC INTERFERENCE
For the best recording results, you should avoid close proximity to heavy equipment or
other sources of electromagnetic interference such as electric blankets, heating pads,
water beds, etc.
POTENTIAL FOR ELECTROMAGNETIC INTERFERENCE
There is a potential for electromagnetic interference to other devices while using the
CardioNet Service.
USE WITH IMPLANTED PACEMAKERS AND ICDs ( DEFIBRILLATORS)
If you have an implanted pacemaker or debrillator (ICD), the manufacturer may have rec-
ommended you take certain precautions when using a cellular phone. Since the CardioNet
monitor contains a cellular phone, you should take the same precautions when carrying
and using the monitor. In general, most manufacturers recommend the following:
• You should keep a distance of at least six inches (15 cm) between the cellular phone
and a pacemaker or debrillator.
• You should hold the cellular phone on the opposite side of the body from the pace-
maker or debrillator.
• Don’t carry a cellular phone in a breast pocket or on a belt if that would place the
phone within six inches of the pacemaker or debrillator.
• You should refer to the manufacturer’s information for guidance regarding your pace-
maker or ICD and interference issues.
Troubleshooting 55
Precautions
5. T ROU BL E SHO OT I NG

CAUTIONS
POWER DOWN Monitor AND SENSOR BEFORE SHOWERING
Power down the monitor and remove the sensor before showering. The CardioNet sensor
and monitor are water resistant, not waterproof.
DO NOT GET THE Monitor AND SENSOR WET
Make sure the monitor and sensor stay dry at all times.
LIMITATIONS OF COVERAGE
CardioNet’s ability to obtain information regarding a cardiac event and to contact you or
your physician in a timely manner is limited by a number of factors including:
• Transmission of information about a cardiac event to CardioNet‘s Monitoring Center
is potentially limited by the availability of standard telephone lines and/or cellular phone
coverage.
• There is an inherent time delay from the time that an event is detected to when the
events are analyzed and conrmed by a Certied Cardiac Technician (CCT).
• There is an inherent time delay from when the event is analyzed and conrmed by
the CCT to when CardioNet is able to make contact with you or your physician.
• If you or your physician are not accessible by telephone, CardioNet will not succeed
in making contact with you or your physician
MAINTAIN MINIMUM DISTANCE FROM BASE
Due to RF exposure, maintain a minimum distance of 20cm from the base.
56 Troubleshooting
Cautions
5. T ROU BL E SHO OT I NG

WARNINGS
FOR ADULT USE ONLY
The CardioNet System is intended for Adult Use only. It shall not be use on infants weigh-
ing less than 22 pounds.
FOR USE WITH TELEPHONE SYSTEM
Any patient whose life may be put at signicant risk by the unavailability of the telephone
system should not be monitored by the CardioNet System.
NOT AN APNEA Monitor
The CardioNet monitor is not to be used as an apnea monitor.
USE ONLY WITH CARDIONET ELECTRODES
While wearing the CardioNet sensor, use only electrodes provided by CardioNet.
NOT AN EMERGENCY RESPONSE SERVICE
CardioNet is not an emergency response service. If you experience any symptoms that
concern you, seek medical help.
DO NOT TAMPER WITH DEVICE
There are no serviceable parts in the CardioNet System components. Removing the cover
of any component may alter device performance.
DO NOT TAMPER WITH Monitor BATTERY
The monitor battery can present a re or chemical burn hazard if mistreated. Do not
disassemble, heat above 80C (176 F), incinerate, or recharge using any device other than
the base or the CardioNet supplied power cord.
USE ONLY CARDIONET POWER CORD
Do not use any power cord for the base other than the one provided in the CardioNet
service kit.
DO NOT CONNECT ANY DEVICE TO THE PC PORT ON THE MONITOR
The PC port is to be used only by CardioNet personnel.
DO NOT USE NEAR FLAMMABLE ANESTHETIC
Units are not to be used in the presence of ammable anesthetic.
Troubleshooting 57
Warnings
5. T ROU BL E SHO OT I NG

6
SPECIFICATIONS,
COMPLIANCE &
SYMBOLS
In this Chapter:
• Specications
• Equipment Symbols
• In Home Requirements
• FCC Compliance

60 Specifications
PHYSICAL
Sensor 3 inches x 4 inches x 1 inch ; Weight: 4.0 oz. with battery
Sensor Neck Strap Adjustable 20 to 32 inches
Monitor 6 inches x 3 inches x 0.8 inches; Weight: 8 oz.
LCD 2.27 inches x 1.7 inches; Touch screen: color, backlit
Base 7 inches x 4 inches x 2.5 inches; Weight: 12 oz.
FUNCTIONAL
Sample Rate 250 samples per second
Resolution 12 bits
Dynamic range +/- 5 mV
Bandwidth 0.1 to 40 Hz
Channels 2
Battery Life: Monitor Up to 16 hrs (with cleared memory & fully recharged battery)
Battery Life: Sensor 24 hrs (1 AA Alkaline)
Leakage Current Less than .1 µ A Electrodes
TRANSMISSION
Sensor to Monitor 900 MHz ISM band RF transmission, digital error corrected.
150 foot range. Retransmission if data is corrupted.
Monitor to Center CDMA (PCS and cellular) wireless, digital error corrected. Tele-
phone line modem, digital error corrected.
OPERATING CONDITIONS
Operating Tempera- Sensor: 20 - 45 o C; Monitor ; 0 - 45 o C
Operating Humidity 10% - 95% noncondensing
Storage Temperature -20 - 65 o C noncondensing
Storage Humidity 5% - 95% noncondensing
Operation Altitude 700 - 1060 millibars
Specifications
6 . S PE C I F IC AT IONS

CONNECTIONS
Base Power in (15V, 1.2A max); Phone in (RJ-11); Phone out (RJ-11)
Monitor Power in (15V, 1.2A max)
WALL ADAPTOR
Manufacturer Friwo, Inc (15V, 1.0A)
Model Number FW755M/15
Note: Both the monitor and sensor are internally powered
STANDARDS COMPLIANCE
Monitor EN60601-1; AAMI EC-38; FCC Parts 2,15,22,24
Sensor EN60601-1; AAMI EC-38; FCC Part 15
Base EN60950; AAMI EC-38; FCC Part 15, 68
AECG Equipment Type I
Note: This equipment has been tested and found to comply with the limits for medical
devices to the IEC 601-1-2:1993, EN60601-1-2:1994, Medical Device Directive 93/42/EEC
or the Electromagnetic Compatibility Directive 89/336/EEC (use applicable directive).
These limits are designed to provide reasonable protection against harmful interference
in a typical medical installation. This equipment generates, uses and can radiate radio
frequency energy and, if not installed and used in accordance with the instructions, may
cause harmful interference to other devices in the vicinity. However, there is no guarantee
that interference will not occur in a particular installation. If this equipment does cause
harmful interference to other devices, which can be determined by turning the equipment
off and on, the user is encouraged to try to correct the interference by one or more of
the following measures:
• Reorient or relocate the receiving device
• Increase the separation between the equipment
• Connect the equipment into an outlet on a circuit different from that to which the
other device(s) are connected
• Consult the manufacturer or eld service technician for help
Specifications 61
Specifications
6 . S PE C I F IC AT IONS

Touch tone, pulse telephone or cellular / PCS wireless coverage suitable for
data transmission
AC powered outlet
1.
2.
FCC ID
Sensor ISM QBI-1008
Monitor ISM QBI-1009
Monitor Cell Modem Q9EQ2438F-M
Base QBI-1010
This device complies with part 15 and 68 of the FCC Rules. Operation is subject to the
following two conditions: (1) This device may not cause harmful interference and, (2) This
device must accept interference received including interference that may cause undesired
operation.
62 Specifications
SN
BF Type Equipment Consult Users Manual /
Patient Education Guide Serial Number
Equipment Symbols
In Home Requirements
FCC Compliance
6 . S PE C I F IC AT IONS

FCC COMPLIANCE
FCC RULES PART 15
The Model 1004 has been tested and complies with the limits for a class B digital Device,
pursuant to Part 15 of the FCC Rules. These limits are designed to provide reasonable
protection against harmful interference when the equipment is operated in a residential
environment. This equipment generates, uses, and can radiate radio frequency energy
and, if not installed and used in accordance with the instruction manual, can cause harm-
ful interference to radio communications.
CHANGES OR MODIFICATIONS NOT EXPRESSLY APPROVED BY CARDIONET INC. COULD
VOID THE USER’S AUTHORITY TO OPERATE THE EQUIPMENT
FCC RULES PART 68 REGISTRATION
Model 1004 complies with FCC Rules, Part 68. On this equipment is a label that contains,
among other information, the FCC Part 68 registration number.
REN
The Ringer Equivalence Number (REN) is used to determine the quality of devices that
may be connected to the telephone line. Excessive RENs on the telephone line may result
in the devices not ringing in response to an incoming call. In most, but not all areas, the
sum of RENs should not exceed ve (5.0). To be certain of the number of devices that
may be connected to a line, as determined by the total RENs, contact the local telephone
company.
NOTE: RENs are associated with loop-start and ground-start ports. It is not used for
E&M and digital ports. The REN assigned to the Model 1004 is 0.16. If requested, this
information must be given to the telephone company.
SERVICE
In the event of equipment malfunction, all repairs should be performed by
CardioNet, Inc. or an authorized agent. It is the responsibility of users requiring
service to report the need for service to CardioNet, Inc. or to one of our
authorized agents. Service can be facilitated through our ofce at: CardioNet, Inc.
1010 Second Avenue, Suite 700 San Diego, CA 92101 619-243-7500.
The telephone company can ask you to disconnect the equipment until the problem is
corrected or until you are sure that the equipment is not malfunctioning.
The Model 1004 interface connects to the Public Switched Telephone Network through a
FCC registered NCTE which species the type of network jack to be used.
Specifications 63
FCC Compliance
6 . S PE C I F IC AT IONS

FCC COMPLIANCE
DISRUPTION OF THE NETWORK
If the Model 1004 disrupts the telephone network, the telephone company can discon-
tinue your service temporarily. If possible, the telephone company will notify you in
advance. If advance notice is not practical, they will notify you as soon as possible. You
are also informed of your right to le a complaint with the FCC.
TELEPHONE COMPANY FACILITY CHANGES
The telephone company can make changes in its facilities, equipment, operations, or
procedures that can affect the operation of your equipment. If they do, you should be
notied in advance so you have an opportunity to maintain uninterrupted telephone
service.
FCC RADIO FREQUENCY EXPOSURE INFORMATION
In August 1996, the Federal Communications Commission (FCC) of the United States,
with its action in Report and Order FCC 96-326, adopted an updated safety standard for
human exposure to radio frequency (RF) electromagnetic energy emitted by FCC regu-
lated transmitters. Those guidelines are consistent with the safety standard previously
set by both U.S. and international standards bodies. The design of this device complies
with the FCC guidelines and these international standards. Use only the supplied an-
tenna. Unauthorized antennas, damaged antennas, modications, or attachments could
impair call quality, damage the device, or result in violation of FCC regulations. Please
contact CardioNet if damage to the unit is apparent.
BODY-WORN OPERATION
This device was tested and was found to comply with the FCC exposure requirements. The
device was also tested and found to comply with SAR (Specic Absorption Rate) testing.
For more information about RF exposure, please visit the FCC website at www.fcc.gov.
64 Specifications
FCC Compliance
6 . S PE C I F IC AT IONS