Cardo Systems AD02 Handsfree Adapter User Manual Revised
Cardo Systems, Inc. Handsfree Adapter Users Manual Revised
Users Manual Revised

CARDO BTA II
CARDO BTA II
Table of Contents
Contents of the Retail package:
•BTA II
•Travel charger
•Pop-PortTM connector for Nokia phones
•Velcro pad
•This Quick Start Guide
NOTE: Quick Start Guides in other languages can be
downloaded from our website.
•Stylus for SET pinhole
Warranty and Registration card
• Double side scotch tape
Product Specifications:
Typical Talk talk time: Up to 9 hours
Typical Standby standby time: In excess of
1one week
Typical charging time: 3 hours
Answer/End calls and Voice Dialing from the
headset (if supported by phone)
Bluetooth Version: 1.2
Weight: 14.4 g
Certificates: FCC, IC, CE, BluetoothTM
Velcro pad
Pop-Port connector for
Nokia phones
Double side
scotch type Stylus for SET
pinhole
1
2
3
5
4
Introduction
Congratulations and thank you for purchasing the Cardo
Bluetooth Adapter II. We hope that you will enjoy the device
and remain at your service for any query or problem you
may have.
The BTA II – the smallest of its kind - turns your standard
mobile phone into a Bluetooth powerhouse, allowing you to
enjoy the hands-free benefits and advantages of your
Bluetooth headset.
The Cardo BTA II is compatible with virtually every standard
mobile phone and works best with the Cardo Bluetooth
headsets.
If your phone does not have a standard 2.5mm headset jack,
you may need to purchase a conduit connector to connect
the BTA II to your particular phone. A Pop-Port connector
for Nokia phones is included in this package.
Please refer to the warranty and registration card for
safety and warranty instructions.
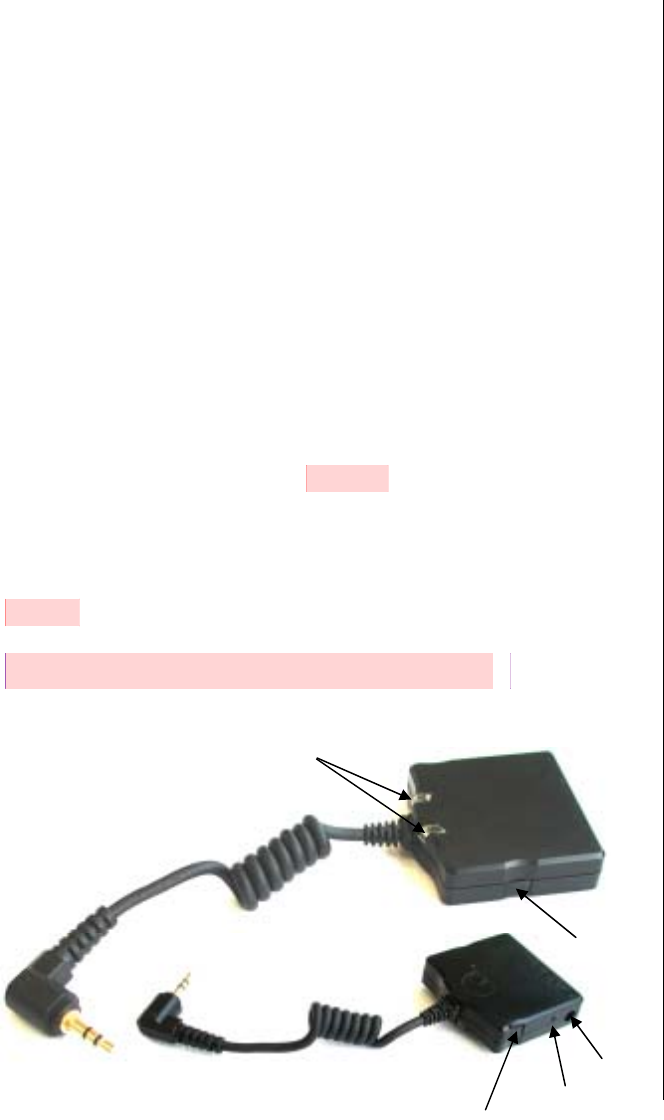
Detailed view of the Cardo BTA II
1. On / Off Button
2. SET Button (pinhole )
3. Charging port
4. Status lights (LEDs)
5. Gain Control Button
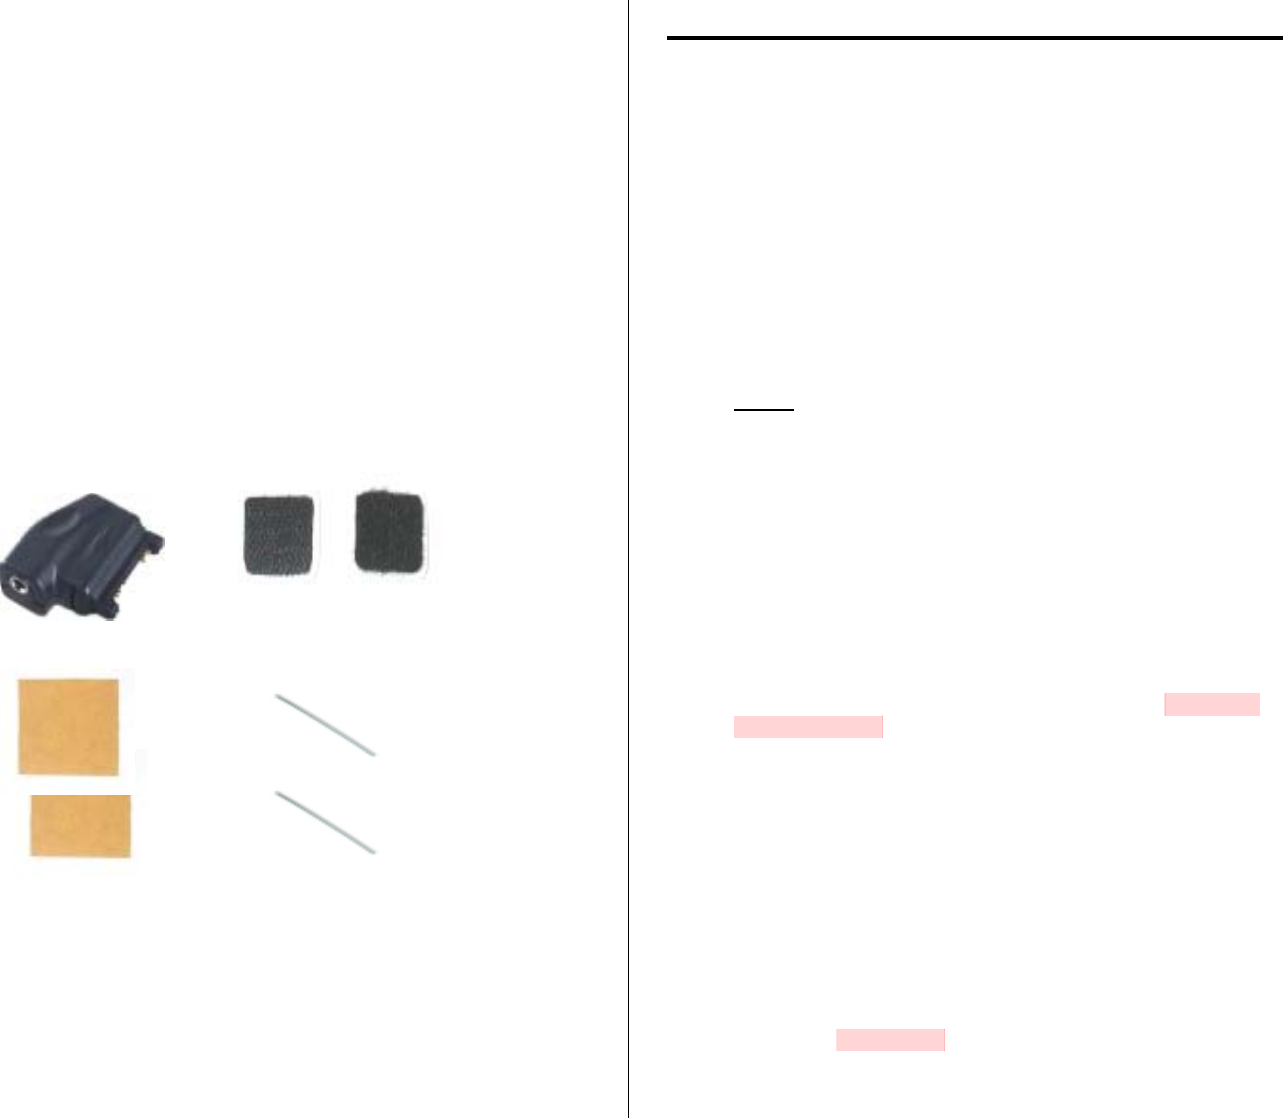
Contents of the Retail package:
• BTA II
• Travel charger
• Pop-PortTM connector for Nokia phones
• Velcro pad
• This Quick Start Guide
NOTE: Quick Start Guides in other
languages can be downloaded from
our website.
• Stylus for SET pinhole
• Warranty and Registration card
• Double sided scotch® tape
Getting Started with the Cardo BTA II
1. Charging your adapter
NOTE: You must fully charge the BTA II prior to
initial use!
1. Connect the enclosed AC Adapter to an electrical outlet,
and the cable of the AC Adapter into the charging port of
the BTA II. Charging begins when the red light (LED) turns
on.
2. Once charging is complete, the red LED will shut off.
Allow for no less than 3 hours for to completea a full charge
before initial use of the BTA II.
NOTE: When the BTA II battery is low, the red LED will start
flashing every 3 seconds.
2. Pairing your adapter
Since you are using your BTA II for the first time, you must pair
it to with your Bluetooth headset to make it work. If your BTA II
is part of a Combo retail box along with a Cardo headset, then
you can skip this section, since the headset and BTA II are
already factory paired.
TypicallyNormally you should only once have to perform
pairing between any particular headset and the BTA II.
Thereafter the devices remain paired until you cancel the
existing pairing or assign a new device to the BTA II.
1. Turn on the BTA II by pressing and holding the On/Off
button for 3 seconds, until you see 3 rapid blue flashes of
the LEDs.
2. Follow the instructions in the headset’s manual to put the
headset into Pairing mode. (If you are using the Cardo
scala-500 headset, this is done by pressing in and holding
the headset's MFW until the red and blue LEDs begin
alternating rapidly.)
3. Press and hold the SET button of the BTA II for 5 seconds
by inserting the enclosed Stylus gently into the BTA's
pinhole marked SET. When the LEDs begin rapidly flashing
rapidly red and blue, you may release the set button. The
BTA II is now in pairing mode.
Velcro pad
Pop-Port connector for
Nokia phones
Double sided
scotch tyape Stylus for SET
pinhole
Double sided
scotch tyape Stylus for SET
pinhole

4. Wait a few seconds until the blue LED on the BTA II begins
flashing every three seconds.
Congratulations! You have now paired your headset and BTA
II and are ready to begin using them!
Using the Cardo BTA II
Before you beginAs a first step, connect the Audio cable of the
BTA II to your mobile phone’s 2.5 mm headset jack.
If your phone does not have a standard 2.5mm headset jack,
you may need to purchase a suitable conduit connector to connect
the BTA II to your particular phone. A Pop-Port connector for Nokia
phones is included in your retail box.
To use a connector, first plug the connector into your mobile phone
then plug the audio cable of the BTA II into the connector.
For more information, visit our website at www.cardowireless.com.
3. Power On / Power Off
Power On: Press and hold the On/Off Button for 3 seconds,
until you see 3 rapid blue flashes of the LEDs.
Power Off: Press and hold the On/Off Button for 3 seconds,
until you see 3 rapid red flashes of the LEDs.
If the BTA II is already paired to your Bluetooth headset
(Section 2):
1. Turn on your Bluetooth headset and the BTA II. The
BTA II will begin flashing blue once every second while
it connects to the headset.
2. Once connected, the BTA II will begin flashing blue
every 3 seconds. You are now ready to use your
BTA II and Bluetooth headset!
NOTE: The BTA II will shut off automatically after 5 minutes if it
is not paired to a headset or if it is unable to find the headset
you are trying to pair it to.
4. Placing calls
USING YOUR PHONE’S KEYPAD:
1. Dial the number you wish to call on your phone’s keypad
and press SEND/TALK on your phone.
2. The call will be sent to the headset, and you may will
communicate using the headset instead of the mobile
phone.
USING VOICE COMMAND / VOICE DIAL:
(if supported by your phone)
1. Tap the headset’s appropriate button to dial a call using
Voice Dial (CTRL button at Cardo headsets).
2. At the prompt, speak pronounce the Voice Tag of the party
you wish to call.
Please refer to your phone’s manual for more information on its
Voice Dial feature.
TIP: If your phone supports Voice Dialing, yet it does not
respond to the Answer/End button as described above, please
refer to Section 6: Enhancing Functionality of the BTA II.
5. Receiving or ending calls
1. Tap the headset’s Answer/End button to Answer or End a
call.
2. If this does not Answer/End the call, then you must do so
manually by using your phone’s keypad.
Please refer to Section 6: Enhancing Functionality of the
BTA II for instructions on how to enable this feature (subject
to the phone's capabilities).

Advanced Features
6. Enhancing Functionality of the BTA II
Enhancement # 1 - AUTO-CONFIGURATION
It is recommended that you auto-configure your BTA II for
use with your mobile phone, as it is very likely to improve the
performance of the BTA II.
Auto-configuring your BTA II could provide you with the
following benefits:
−• Up to 40% extended battery life of the BTA II
−• Added support for Answer/End/Voice Dial using the
headset’s Answer/End button.
HOW TO AUTO-CONFIGURE THE BTA II FOR USE WITH
YOUR MOBILE PHONE:
1. Make sure the headset and BTA II are turned ON and
that the BTA II is plugged securely into the phone’s
headset jack. Keep Make sure the enclosed Stylus is
available for usewithin reach.
2. In USA Ccall 1-80088-GO CARDO10 onfrom your
mobile phone.
In Europe or internationally, call _____________). +49
180 GO CARDO.
If any of these access numbers don't work for you, visit
our website for updated phone numbers
http://www.cardowireless.com/adapter.php
2.When you begin to hear a recording through the headset,
gently insert the enclosed Stylus into the BTA’s pinhole
(marked SET). in order to press and hold the SET
Button for a few seconds until the LEDs turn solid
red, .
4.3. ReleaseRelease the SET Button Immediately.
Wait until the red LED shuts off and the blue LED
begins flashing every 3 seconds. This process may take
up to 2 minutes.
5.4. Your BTA II is now configured to its optimal settings for
your mobile phone.
5. You should now test the device by using the headset’s
Answer/End button for Answer, End, and Voice Dial.
If these features still do not work, thaen your mobile
phone does not support them and you will always have
to use your mobile phone’s keypad whenever you wish
to use these functions.

Enhancement # 2 - GAIN CONTROL
The BTA II comes equipped with a Gain Control feature
that allows you to increase the volume heard by the party
you are calling.
NOTE: Turning On Gain Control may also result in an
echo being heard. If this occurs, turn Off Gain Control to
fix this problem.
HOW TO ADJUST GAIN CONTROL ON THE BTA II:
1. To turn On/Off Gain Control, press and hold
the Gain Control button for 7 seconds.
- A single flash of the red LED indicates
that you have turned Off Gain Control.
- A double flash of the red LED indicates
that you have turned On Gain Control.
7. Resetting your BTA II
To reset the BTA II to its factory defaults:
1. Put the BTA II into Auto-Configuration mode while it is
not plugged into a mobile phone.
2. Wait until the red LED shuts off and the blue LED
begins flashing every 3 seconds.
For more information, visit our website at
www.cardowireless.com.
Troubleshooting and Reference
8. Troubleshooting your BTA II
1. PROBLEM:
When powered ON, the BTA II flashes blue
every second and doesn’t ever switch to a slow
blue flashing (STANDBY Mode); after 5 minutes
of flashing blue every second, it shuts off.
SOLUTIONACTION:
a. Your BTA II is not able to find or connect to the
headset. Make sure that the headset is turned ON
and that they have been paired correctly. To re-
pair your headset and adapter, refer to Section 2:
Pairing your adapter.*
* Cardo is not responsible for problems arising
from difficulties with non-Cardo headsets.
2. PROBLEM:
After ending a call, I can still hear some sound
coming from the headset’s speaker for about a
minute.
ACTIONSOLUTION:
A. By default, the BTA II will stay connected to the
headset for up to one minute after a call is ended.
B. If you auto-configure your BTA II, you may be
able (subject to the phone’s capabilities.) to greatly
significantly shorten the time it takes for your
headset to stop transmitting audio after the end of
a call.
Please refer to Section 6: Enhancing
Functionality of the BTA II for instructions on
how to auto-configure your BTA II to its optimal
settings for your mobile phone.
3. PROBLEM:
I am not able to Answer/End calls or Voice Dial
using the headset’s Answer/End button.
ACTIONSOLUTION:

A. Please refer to Section 6: Enhancing
Functionality of the BTA II for instructions on
how to enable this feature (subject to the phone’s
capabilities.)
B. If after performing the auto-configuration you are
still unable to answer/end calls or Voice Dial via
the headset, your phone does not support this
feature and you must always use your phone’s
keypad to answer/end calls.
4. PROBLEM: can be merged with Problem 3
I am not able to Voice Dial calls using the
headset’s Answer/End button.
SOLUTION:
A. Please refer to Section 6: Enhancing
Functionality of the BTA II for instructions on
how to enable this feature (subject to the phone’s
capabilities.)
B. If after performing the auto-configuration you
are still unable to Voice Dial calls via the
headset, your phone does not support this feature.
4. PROBLEM:
I can’t hear anything through the headset when
I place a call.
ACTIONSOLUTION:
A. Make sure your headset and BTA II are both ON,
within the 30 foot range and paired to each other.
If the BTA II is flashing blue every second, it is out
of range of the headset or not paired to the
headset.
B. Check that your BTA II audio cable is plugged
securely into the headset jack of your phone.
C. Turn up the volume on your headset and handset.
D. If you use a connector with the BTA II, first plug
the connector to the phone and then insert the
BTA II audio cable to the connector.
5. PROBLEM:
I can’t hear the person on the other side, but
they can hear me.
ACTIONSOLUTION:
A. Turn up the volume on your headset and handset.
B. Your phone may require the use of a connector in
order to adapt its headset jack for use with the
BTA II 2.5 mm audio cable.
C. If you are already using this connector, you should
troubleshoot the headset to ensure its speaker
and/or microphone are functioning properly.
6. PROBLEM:
I can hear the person on the other side, but
they can’t hear me.
ACTIONSOLUTION:
A. Make sure that your headset’s MUTE function is
not turned ON.
B. Your phone may require the use of a connector in
order to adapt its headset jack for use with the
BTA II 2.5 mm audio cable.
C. If you are already using this connector, you should
troubleshoot the headset to ensure its speaker
and/or microphone are functioning properly.
7. PROBLEM:
The party I call using my headset and BTA II
hear me at a very low volume.
ACTIONSOLUTION:
A. The BTA II comes equipped with a Gain Control
feature that allows you to increase the volume
heard by the party you are calling.
B. Please refer to Section 6: Enhancing
Functionality of the BTA II for instructions on
how to turn ON Gain Control.
8. PROBLEM:
The party I call using my headset and BTA II
can hear an echo.
ACTIONSOLUTION:
A. The BTA II comes equipped with a Gain Control
feature that allows you to increase the volume
heard by the party you are calling.
B. If Gain Control is turned ON, an echo may be
heard by the party you are speaking to.
C. Please refer to Section 6: Enhancing
Functionality of the BTA II for instructions on
how to turn OFF Gain Control.
9. PROBLEM:
When I receive a call, my phone rings but my
headset doesn’t.
ACTIONSOLUTION:
A. When receiving a call, some phones do not
transmit their ringtone to the headset.
B. Answer the call normally as specified in Section 5:
Receiving or ending calls.
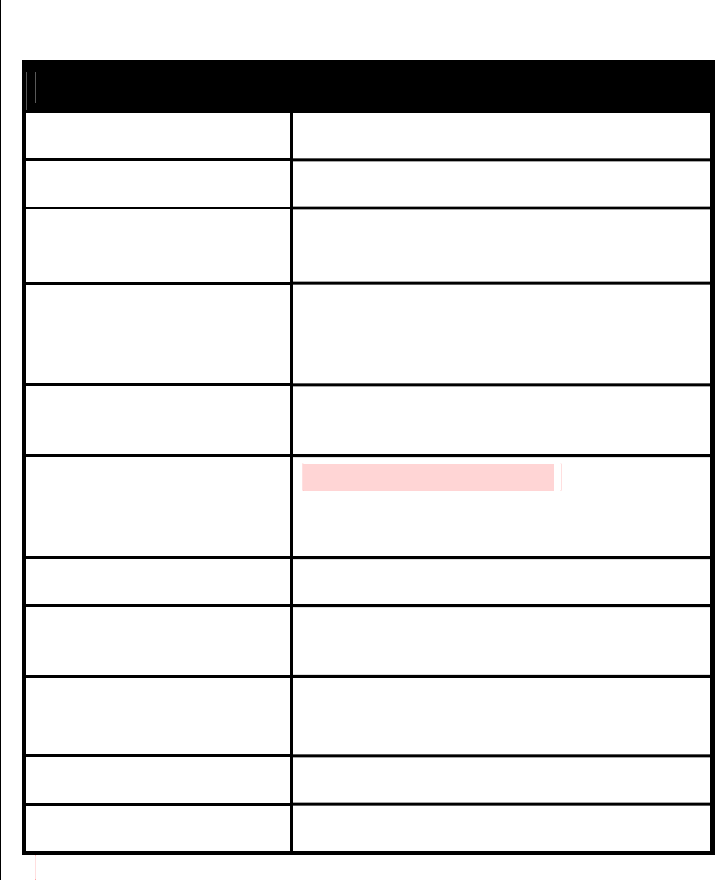
9. LED Status Indicators
Status What you see
Powering ON 3 rapid blue flashes
Powering OFF 3 rapid red flashes
STANDBY:
Not on a call.
Single blue flash every 3 seconds
ACTIVE:
On a call / connecting a
call.
Double blue flash every 3 seconds
Low Battery Single red flash every 3 seconds.
(Double red flash while ACTIVE)
Searching:
Adapter is trying to find
a paired headset.
Blue flash every second
Pairing Mode Rapid red/blue alternating flash
Charging Solid red light
(shuts off when charging is complete)
Auto-configure
Mode
Solid red light
Gain Control ON Single red flash
Gain Control OFF Double red flash

10. Product Specifications:
Typical talk time: Up6 to 10 hours (subject to your
phone's particular attributes capabilities and
performing implementation of the Auto-
Configuration procedure)
*Auto-Configuration is highly recommended. it increases
battery performance for many phones.
Typical standby time: In excess of one week
Typical charging time: 3 hours
Answer/End calls and Voice Dialing from the
headset (if supported by phone)
Bluetooth Version: 1.2
Weight: 14.4 g
Certificates: FCC, IC, CE, BluetoothTM
15.21
You are cautioned that changes or modifications not expressly
approved by the part responsible for compliance could void the
user’s authority to operate the equipment.
15.105(b)
This equipment has been tested and found to comply with the
limits for a Class B digital device, pursuant to part 15 of the FCC
rules. These limits are designed to provide reasonable protection
against harmful interference in a residential installation. This
equipment generates, uses and can radiate radio frequency
energy and, if not installed and used in accordance with the
instructions, may cause harmful interference to radio
communications. However, there is no guarantee that
interference will not occur in a particular installation. If this
equipment does cause harmful interference to radio or television
reception, which can be determined by turning the equipment off
and on, the user is encouraged to try to correct the interference
by one or more of the following measures:
-Reorient or relocate the receiving antenna.
-Increase the separation between the equipment and receiver.
-Connect the equipment into an outlet on a circuit different from
that to which the receiver is connected.
-Consult the dealer or an experienced radio/TV technician for
help.
Operation is subject to the following two conditions:
1) this device may not cause interference and
2) this device must accept any interference, including interference
that may cause undesired operation of the device.
Note: The user must place the base 8” (20cm) or more from any
personnel in order to comply with FCC RF exposure requirements.
Note: This transmitter must not be co-located or operating in
conjunction with any other antenna or transmitter.
For more information, visit our website at
www.cardowireless.com.