Cardo Systems ER01 Bluetooth Motorcycle Headset User Manual Manual
Cardo Systems, Inc. Bluetooth Motorcycle Headset Manual
Manual
scala-rider manual DRAFT APRIL 25, 2005
Page 1 of 31
scala-rider
User Manual

scala-rider manual DRAFT APRIL 25, 2005
Page 2 of 31
Table of contents
1 INTRODUCTION ..................................................................................................... 4
2 WAIVER AND GENERAL RELEASE ..................................................................... 4
3 RETAIL PACKAGE CONTENTS. ........................................................................... 7
4 BEFORE USING THE HEADSET ........................................................................... 8
4.1 Charging Batteries .....................................................................................................................................9
4.2 Attaching and removing the scala-rider from your helmet .............................................................9
4.2.1 First installation ........................................................................................................................................9
4.2.2 Removing the headset from the helmet. ............................................................................................11
4.2.3 Re-attaching the headset to the helmet. ............................................................................................11
5 GETTING STARTED WITH THE SCALA-RIDER HEADSET ............................... 12
5.1 Pairing process.........................................................................................................................................12
5.2 Power On/Off .............................................................................................................................................13
5.3 Renewed Pairing.......................................................................................................................................13
5.4 Reconnecting the scala-rider headset to a paired phone..............................................................13
6 HANDLING CALLS............................................................................................... 14
6.1 Initiating calls by using your phone’s keypad..................................................................................14
6.2 Voice Dialing..............................................................................................................................................14
6.3 Answering Calls (including Special Voice Recognition)................................................................14
6.4 Terminating Calls .....................................................................................................................................15
6.5 Volume Control .........................................................................................................................................15
6.6 Call Reject ..................................................................................................................................................16
7 VOICE RECOGNITION FEATURE ....................................................................... 16
7.1 Enable/Disable the Voice Recognition feature .................................................................................16
7.2 Answering calls using Voice Recognition.........................................................................................17
7.3 Rejecting calls using Voice Recognition ...........................................................................................17
scala-rider manual DRAFT APRIL 25, 2005
Page 3 of 31
8 OPERATING THE RADIO..................................................................................... 17
8.1 Turning the radio on/off..........................................................................................................................17
8.1.1 Turn the radio on .................................................................................................................................17
8.1.2 Turn the radio off.................................................................................................................................17
8.2 Switching preset radio station..............................................................................................................17
8.3 Searching for and saving a new radio station ..................................................................................18
8.3.1 Enter search mode..............................................................................................................................18
8.3.2 Saving radio station............................................................................................................................18
9 OPERATING THE REMOTE CONTROL .............................................................. 19
9.1 CTRL_RC button usage ..........................................................................................................................19
9.1.1 Power Off...............................................................................................................................................19
9.1.2 Initiate voice dial..................................................................................................................................19
9.1.3 Answering Calls...................................................................................................................................19
9.1.4 Terminating Calls ................................................................................................................................19
9.1.5 Rejecting Calls .....................................................................................................................................20
9.2 Radio_RC button usage..........................................................................................................................20
9.2.1 Power ON/OFF......................................................................................................................................20
9.2.2 Change radio station ..........................................................................................................................20
9.2.3 Search radio station............................................................................................................................20
9.3 Remote control functionality table ......................................................................................................20
10 LIGHT AND SOUND SIGNALS......................................................................... 21
11 FAQS ................................................................................................................. 22
12 LIMITED WARRANTY ....................................................................................... 24
13 TROUBLESHOOTING....................................................................................... 27
14 FCC NOTICE ..................................................................................................... 29
15 TECHNICAL SPECIFICATION.......................................................................... 29
16 EUROPEAN CE NOTICE .................................................................................. 30
17 CONTACT INFORMATION ............................................................................... 31
18 SERVICE ........................................................................................................... 31
19 PATENT, COPYRIGHT, TRADEMARK INFORMATION .................................. 31
scala-rider manual DRAFT APRIL 25, 2005
Page 4 of 31
1 Introduction
Congratulations and thank you for purchasing the scala-rider™ Bluetooth
headset for motorcycle helmets. Now you can wear your helmet while
talking hands-free on your Bluetooth enabled mobile phone, made possible
by the short-range wireless connection between your cell phone and the
scala-rider headset. If you are using a standard non-Bluetooth mobile
phone, you can still enjoy the headset’s advantages by connecting our BT
Adapter to your mobile phone (purchased separately).
The scala-rider headset is compatible with the latest Bluetooth v1.2
specifications, as well as the earlier Bluetooth v1.1 specifications.
Please read and familiarize yourself with all the instructions, components
and controls of your scala-rider headset prior to first use.
We wish you a great scala-rider experience.
2 Waiver and General Release
By using the scala-rider you will waive substantial legal rights including the right to sue.
Please read the following carefully before deciding to open the retail package and using the
Device. If you do not accept the terms of this agreement, you should immediately return
the product for a full refund. By opening the package you agree to be bound to this
agreement and forfeit the right for a full refund.
Using any tool or device including but not limited to situations such as riding a motorcycle,
scooter, moped, ATV, quad-bike or any other vehicle, whether on land, water or air (jointly
referred to as “Vehicle”) requires your complete und undivided attention. Cardo Systems, Inc.,
including its Officers, Directors, Affiliates, Parent Company, Representatives, Agents,
Contractors, Sponsors, Employees, Suppliers and Resellers (jointly referred to as the
“Company” or “Cardo”) strongly advises you to take all necessary precautions and remain alert
to the traffic, weather and road conditions when using the scala-rider headset, including all
derivative models irrespective of its commercial name or branding (the “Device”), and stop your
Vehicle on the roadside prior to initiating or receiving calls or listening to the radio that is
provided by a particular model of the Device. Any publications, advertisements, announcements
or similar notes that refer to using the Device while riding a Vehicle are solely intended to
address its technical capabilities and should not be misconstrued as if encouraging users to
using it while actively involved in traffic.
By way of purchasing this Device and not returning it for a full refund (see below), you are
irrevocably releasing, indemnifying from any liability, loss, claim and expense (including
attorneys' reasonable fees) and holding Cardo harmless for any bodily injuries, harm or death

scala-rider manual DRAFT APRIL 25, 2005
Page 5 of 31
as well as losses or damages in goods, to any Vehicles including your own, or to any property
or assets that belong to you or third parties, any of which may result from using the Device
under any circumstances or conditions and irrespective of jurisdiction. Cardo will not be
responsible for any physical damages, irrespective of reasons, conditions or circumstances,
including malfunctioning of the Device, and all risks associated with the using it rest solely and
entirely with the user of this Device, irrespective of whether the Device is used by the original
purchaser or any third party.
Cardo hereby notifies you that using this Device may also be in contravention to local, federal,
state or national laws or regulations, and that any use of the Device is entirely at your sole risk
and responsibility.
1. You, your heirs, legal representatives, successors or assigns, hereby voluntarily and
forever release, discharge, indemnify and hold harmless Cardo from any and all litigation,
claims, debts, demands, actions and liability which may arise, directly or indirectly, from using
the Device for any distress, pain, suffering, discomfort, loss, injury, death, damages to or in
respect to any person or property however caused, WHETHER ARISING FROM THE
NEGLIGENCE OR OTHERWISE, and which may hereafter accrue to you on some future date
as a result of said usto the fullest extent permitted by law.
2. You fully understand and assume the risks in using the Device, including risk of
negligent acts or omissions by others and accept the terms and conditions upon which you have
chosen to use it.
3. You confirm that you are physically capable to use the Device and that you have no
medical conditions or needs that may infringe upon your abilities to do so in a safe manner. You
confirm that you are at least eighteen (18) years of age and that you have been advised of the
risks associated with the use of the Device. You further confirm that you will not consume any
alcohol that may affect your alertness or any mind-altering substance, and will not carry, use or
consume these substances before or during the use of the Device.
4. You fully acknowledge our warnings and understand that: (a) risks and dangers exist in
using the Device while in traffic, incl. but not limited to injury or illness, strains, fractures, partial
and/or total paralysis, death or other ailments that could cause serious disability; (c) these risks
and dangers may be caused by the negligence of the manufacturers or its agents or any third
party involved in designing the Device; (d) these risks and dangers may arise from foreseeable
or unforeseeable causes. You hereby assume all risks and dangers and all responsibility for any
losses and/or damages, whether caused in whole or in part by the negligence or other conduct
of others, including the Company.
5. You confirm that you have read this release of liability and fully understand its terms and
that you have given up substantial rights by not returning the Device for a full refund (see refund
option below).

scala-rider manual DRAFT APRIL 25, 2005
Page 6 of 31
Disclaimer of Warranty
CARDO DISCLAIMS ALL EXPRESS AND IMPLIED WARRANTIES WITH REGARD TO THE ENCLOSED DEVICE,
INCLUDING WITHOUT LIMITATION ANY IMPLIED WARRANTIES OF MERCHANTABILITY, FITNESS FOR A
PARTICULAR PURPOSE, AND NON-INFRINGEMENT. THE DEVICE AND ITS ACCESSORIES ARE PROVIDED "AS IS"
AND "AS AVAILABLE" WITHOUT WARRANTY OF ANY KIND BETOND THOSE ASSUMED IN THE ENCLOSED MANUAL.
Limitation of Liability
IN NO EVENT SHALL CARDO BE LIABLE FOR ANY SPECIAL, INDIRECT, PUNITIVE, INCIDENTAL, EXEMPLARY OR
CONSEQUENTIAL DAMAGES, OR ANY DAMAGES WHATSOEVER RESULTING FROM THE USE OF THE DEVICE,
WHETHER BASED ON BREACH OF CONTRACT, TORT (INCLUDING NEGLIGENCE), PRODUCT LIABILITY OR
OTHERWISE, EVEN IF ADVISED OF THE POSSIBILITY OF SUCH DAMAGES. YOU ACKNOWLEDGE AND AGREE THAT
THE LIMITATIONS SET FORTH ABOVE ARE FUNDAMENTAL ELEMENTS OF THIS AGREEMENT AND THE DEVICE
WOULD NOT BE PROVIDED TO YOU ABSENT SUCH LIMITATIONS. SOME STATE STATUTES MIGHT APPLY
REGARDING LIMITATION OF LIABILITY.
RETURN FOR FULL REFUND
IF YOU ARE UNWILLING TO ACCEPT AND AGREE TO THE ABOVE CONDITIONS, YOU MAY
RETURN THIS DEVICE TO CARDO FOR A FULL REFUND, PROVIDED THAT YOU DO SO NO
LATER THAN 7 BUSINESS DAYS FOLLOWING THE PURCHASE OF THE DEVICE (proof of
purchase required) AND SUBJECT TO THE WRAPPING BEING INTACT. WHEN DOING SO,
PLEASE REFER TO THIS SECTION.
BY NOT RETURNING THE DEVICE FOR REFUND WITHIN THE PERIOD PROVIDED, YOU ARE
EXPLICITELY IN AGREEMENT WITH THE ABOVE, AND RENOUNCE ALL RIGHTS TO FUTURE
CLAIMS AND DEMANDS AGAINST CARDO AS DEFINED ABOVE.
scala-rider manual DRAFT APRIL 25, 2005
Page 7 of 31
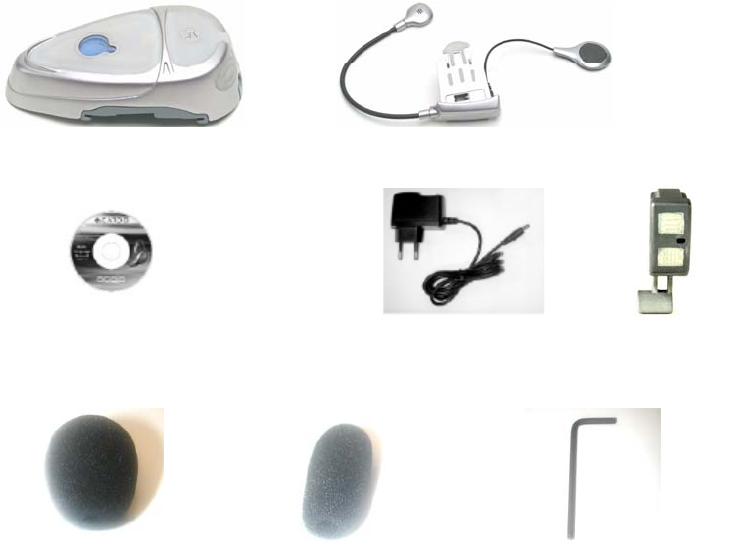
3 Retail Package Contents.
Your retail package contains the following items:
• Headset
• Clamp
• Remote control
• Big microphone sponge
• small microphone sponge
• plastic extension for the helmet unit
• Allen wrench
• Wall Charger (universal travel version)
• CD-Manual & Quick Guide
• Warranty + Registration Card
Headset
Allen wrench Small sponge
Big sponge
Wall Charger
Quick guide and multilingual
manual on mini-VD
Clamp
Remote Control
scala-rider manual DRAFT APRIL 25, 2005
Page 8 of 31
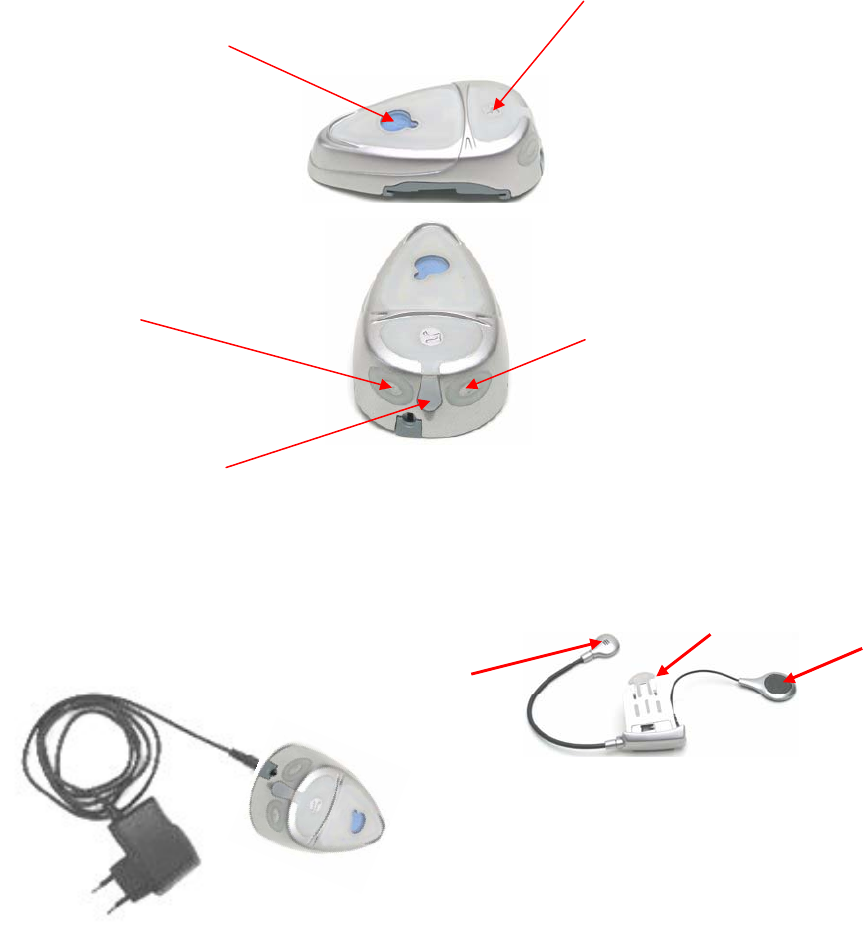
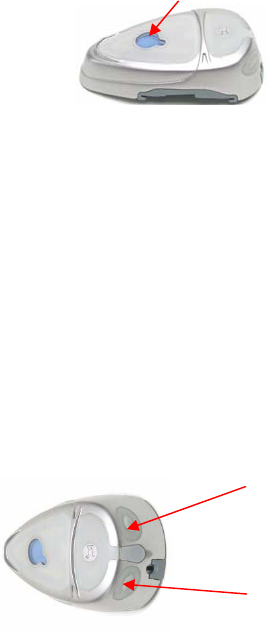
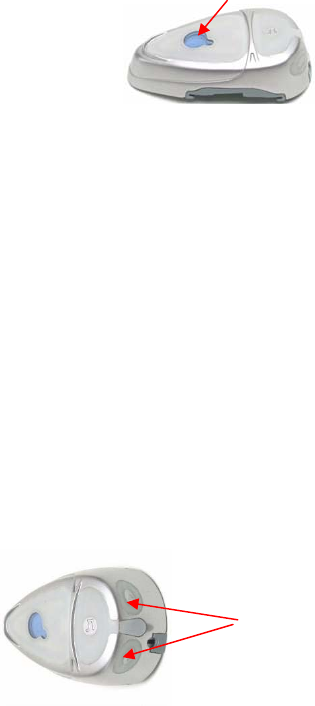
CTRL (control button) –
Press on the logo.
• Accept/initiate calls
End/Reject calls
• Power ON/OFF
Radio button –
• Radio ON/OFF
• Changing radio stations
4 Before using the headset
Read and familiarize yourself with all instructions, components and controls
of your scala-rider headset prior to first use.
Charging socket
Volume down button –
Press to decrease the
volume
Volume Up button –
Press to increase the
volume
Microphone
Speaker
Reel of the
clamp
Charge the headset by inserting the
Wall-charger into the charging socket

scala-rider manual DRAFT APRIL 25, 2005
Page 9 of 31
4.1 Charging Batteries
Make sure the headset is fully charged prior to initial use. Allow at
least six hours for a full charge before using for the first time.
Normally 5-6 hours will suffice for complete charge. The headset
should be off the helmet when being charged (solely for purposes of
convenience)
• Plug the Wall Charger into the charging socket of the headset and
connect it to an electrical outlet.
• The Red Light Indicator (LED) on the scala-rider will turn on when
charging begins. Allow the headset to charge until the Red LED turns
off.
• When charging is complete, release the headset from the charger.
NOTE: You may leave the unit connected even if charging is completed.
There is no danger of over-charging.
4.2 Attaching and removing the scala-rider from your helmet
4.2.1 First installation
Once the headset is fully charged you should proceed to pair it to
your mobile phone (see section 5 below). When done, you can
proceed with attaching the unit to your helmet.
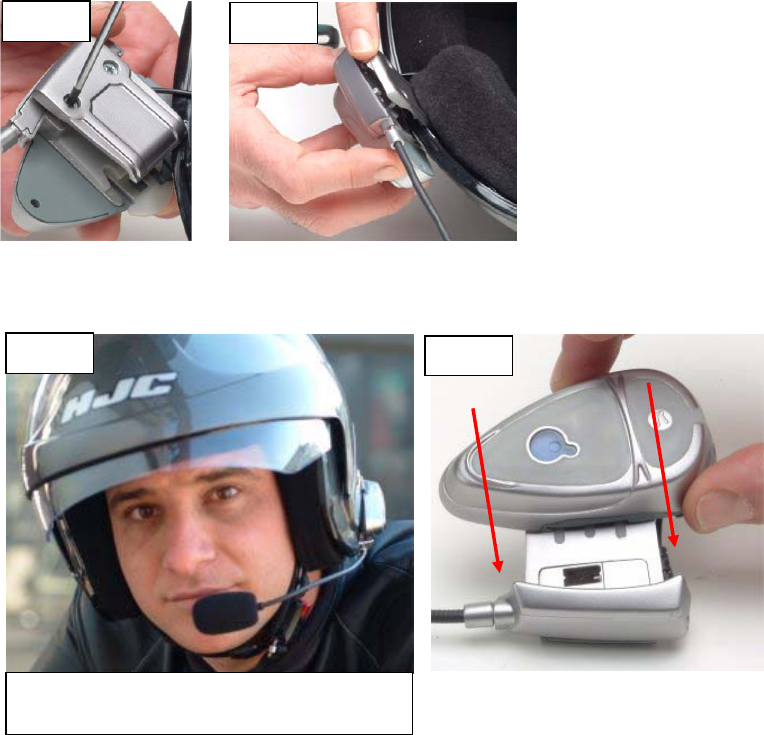
• The clamp serves as the base-cradle for the headset and must
be attached to your helmet before using the headset
• Use the enclosed Allen wrench to loosen the two screws of the
clamp (FIG. 1). Then slide the back-plate of the clamp between
the internal padding and the external shell of the helmet (FIG.
2).
• Before fastening the screws, make sure to adjust the clamp’s
location to an ideal position, i.e. to the spot where the attached
speaker and microphone are respectively opposite your ear and
just slightly off the corner of your mouth (FIG. 3). You may need
to re-position the clamp repeatedly until you identify the ideal
spot. The speaker can be easily placed into position and
removed by means of the Velcro layer that attaches to the inner
padding of your helmet.
• Once you have identified the ideal position for the clamp, use
the Allen wrench to fasten the clamp.
• Now slide the scala-rider headset downward along the reel of
the clamp (FIG. 4) until a light clicking sound indicates that the
headset has reached its proper operational position.
scala-rider manual DRAFT APRIL 25, 2005
Page 10 of 31
• Turn on the headset by pressing and holding CTRL for at least
6 seconds until the Blue LED flashes three times and an
ascending alert tone is heard. Quickly release the button.
• You are ready to go!
FIG 4
FIG 2
FIG 1
FIG 3
microphone should be placed just
sli
g
htl
y
off the corner of
y
our mouth
scala-rider manual DRAFT APRIL 25, 2005
Page 11 of 31
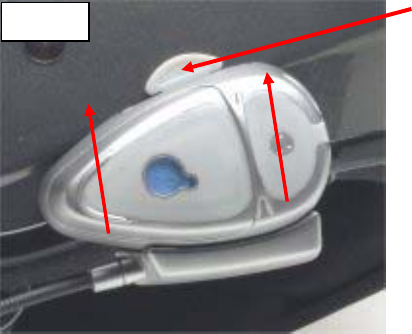
4.2.2 Removing the headset from the helmet.
The clamp usually stays attached to the helmet, but you can also
easily remove it by proceeding in the reverse order of the attachment
procedure (see 4.2.1 above)
• To remove the headset from the clamp, press your finger firmly
against the arched tip of the back-plate (FIG. 5) and use the
other hand to slide the headset upwards along the reel (FIG. 5)
4.2.3 Re-attaching the headset to the helmet.
• To re-attach the headset, simply slide it downwards along the
reel of the clamp (FIG. 4) until a light clicking sound indicates
that the headset has reached its proper operational position.
FIG 5 Press here and
than slide the
headset unit up.

scala-rider manual DRAFT APRIL 25, 2005
Page 12 of 31
5 Getting Started with the scala-rider headset
Before you can use your headset for the first time, the pairing process
between your headset and mobile phone must be completed. Pairing is
the required process of mutual recognition between your headset and
mobile phone. Please note: Your headset will not work prior to
successful completion of the pairing process!
5.1 Pairing process
5.1.1 Turn on the phone and make sure its Bluetooth function is activated.
5.1.2 Press and hold the CTRL button for six seconds until the red and
blue LEDs begin flashing rapidly alternating.
5.1.3 On your Bluetooth phone, search for Bluetooth devices by following
your phone’s instructions. Usually this is done by selecting the
Search or Discover option in the Bluetooth or Connection menu.
Refer to your phone’s manual for detailed instructions on how to pair
your specific phone.
5.1.4 After a few seconds of searching, your phone will list the “scala-rider”
as a discovered device. Select it, and when asked, follow your
phone’s instructions to accept pairing.
5.1.5 When prompted by your phone, enter 0000 (4 zeros) as your PIN or
passkey.
5.1.6 Your phone will confirm when pairing has been successfully
completed.
NOTE: If pairing is not completed within two minutes, the headset will return to
Standby mode (flashing Blue every 3 seconds). To pair again, turn off the
headset by pressing and holding the CTRL button until the red led flashes three
times and repeat the process as shown above (5.1).
Congratulations! You have now successfully completed your Bluetooth
pairing process and are able to use your scala-rider™ headset with your
mobile phone. From now on, when using your headset, you will no longer
need to pair the headset to the phone. The two devices will remain paired
until you delete that pairing from the phone.
scala-rider manual DRAFT APRIL 25, 2005
Page 13 of 31
5.2 Power On/Off
To turn ON, press and hold the CTRL button for at least 6 seconds until
the Blue LED flashes three times and an ascending alert tone is heard.
Quickly release the button.
To turn OFF the headset, press and hold the CTRL button for at least 3
seconds until the Red LED flashes three times and an alert tone is heard.
5.3 Renewed Pairing
If you wish to use different phone or in case you need to repeat the pairing
process for any other reason, please proceed as follows:
6.3.1 Turn the headset off.
6.3.2 Press the CTRL button for 10 seconds until the red and blue LEDs
begin flashing rapidly alternating.
6.3.3 Follow sections 5.1.3 to 5.1.6 above
5.4 Reconnecting the scala-rider headset to a paired phone
Although you may have previously paired your headset to your phone,
each time you turn one of them off, some phones require that you re-
establish the connection.
Reconnecting may also be necessary when your headset and phone have
lost the radio signal because the distance between them has exceeded 30
feet or 10 meters. After you have turned on your mobile phone, there are
several methods to reestablish the connection:
• Turning the headset on should reconnect it automatically to the phone.
• With some mobile phones you need to reestablish the link to your headset
by using your phone’s menu. Please refer to your mobile phone’s manual
for operating instructions.
• Assuming your mobile phone features voice activation, tap the CTRL
button on your scala-rider headset. This will activate your voice dial
function on the phone, indicating that the connection is established.
• Do nothing. Once a call is received, answer by pressing the CTRL button.
scala-rider manual DRAFT APRIL 25, 2005
Page 14 of 31
6 Handling Calls
NOTE: Certain advanced features of the scala-rider are only
accessible to phones equipped with the hands-free profile. Please
check if your phone supports both the headset and the hands-free
profile.
6.1 Initiating calls by using your phone’s keypad
a. Dial the phone number on your phone’s keypad.
b. Press “Talk” or “Send” on your phone to dial the number.
6.2 Voice Dialing
While your phone is ON but no call is in progress, tap the CTRL button,
which will be followed by a tone. Now pronounce the name of the party you
wish to call and wait for feedback from the phone. The type of feedback
depends on your phone.
To improve voice tag recognition, use the headset to record voice tags on
your phone (if possible).
6.3 Answering Calls (including Special Voice Recognition)
The ringtone for incoming calls increases gradually. When hearing
the ring tone (on the headset), there are two ways you can answer
the call:
- Tap the CTRL button on your headset once (FIG. 6)
- If the Voice Recognition (VR) feature is, you have 7 seconds
available to utter any word of your choice in order to accept the
call. If you remain silent for 7 seconds the call will be automatically
rejected and the ringing will stop.
scala-rider manual DRAFT APRIL 25, 2005
Page 15 of 31
6.4 Terminating Calls
To terminate a call, tap the CTRL button, followed by a tone
confirming the termination. If the other party terminates the call first,
you don't have to do anything.
Wait at least three seconds before pressing the CTRL button again to
start voice dialing.
6.5 Volume Control
The scala-rider headset comes equipped with AGC technology to
automatically adjust itself to the optimal speaker volume. Its
embedded sensors continuously measure the ambient noise and
driving speed to make manual adjustment of the volume buttons
unnecessary.
You can override the automatic volume adjustment anytime by
manual control of the volume buttons one step at a time (FIG. 8).
For each step of adjustment, you will hear a short beep.
Press here to decrease
the volume
Press here to increase
the volume
FIG.8
Tap here to terminate
the call
FIG. 7
scala-rider manual DRAFT APRIL 25, 2005
Page 16 of 31
6.6 Call Reject
While you hear the ring tone on the headset, there are two ways you
can reject the call:
- Press the CTRL button on your headset for three seconds to reject
the call (FIG. 9).
- Assuming the VR feature is enabled (see section 7 below), remain
silent for 7 seconds to reject the incoming call.
7 Voice Recognition feature
The VR feature allows you to answer or reject the call without
removing your hands from the handlebars.
The default mode of this feature is OFF
To activate the VR feature please refer to section 7.1 below.
7.1 Enable/Disable the Voice Recognition feature
Press the Volume Up and Volume Down buttons simultaneously for
3 seconds to activate / deactivate the VR feature. You will hear a
brief tone confirming the change each time you switch ON/OFF
modes.
Tap here to reject the
call
FIG. 9
Press both buttons for 3
seconds to enable/disable
the VR feature
FIG.10
scala-rider manual DRAFT APRIL 25, 2005
Page 17 of 31
7.2 Answering calls using Voice Recognition
When hearing the ring tone of an incoming call through the headset
speaker, you have 7 seconds available to utter any word of your
choice in order to accept the call.
7.3 Rejecting calls using Voice Recognition
When hearing the ring tone of an incoming call through the headset
speaker, remain silent during the next 7 seconds in order to reject the
call and cause the ringing the cease.
8 Operating the Radio
The scala-rider enables you to listen to FM radio while you do not use the
headset for a phone conversation.
While listening to the radio, you do not have to worry about missing phone
calls, as the scala-rider automatically switches to Bluetooth headset
operation when the phone rings or when you decide to initiate a call. When
the conversation is over, the scala-rider automatically returns to radio mode.
8.1 Turning the radio on/off
8.1.1 Turn the radio on
While no call is on the headset, press and hold the Radio button on
your headset for three seconds to turn on the radio. The radio turn on
set to the last radio station you were listening to.
8.1.2 Turn the radio off
While the radio is turned on and no call is in progress, press and hold
the Radio button for three seconds to turn the radio off.
8.2 Switching preset radio station
There are 6 pre-set radio stations available on your headset.
While the radio is on, tap the Radio button to cycle between saved
stations.
8.3 Searching for and saving a new radio station
scala-rider manual DRAFT APRIL 25, 2005
Page 18 of 31
8.3.1 Enter search mode
While the radio is on, press and hold for 3 seconds the Volume Up or
Volume Down button on your headset to start searching.
Pressing Volume Up will search upwards (higher frequency) and
pressing Volume Down will search downwards (lower frequency).
Once the radio finds a station it will stop and you will be able to hear
this station.
To save this station refer to section 8.3.2.
To continue searching, press the Volume Up/Volume Down again for
three seconds.
Within 20 seconds of finding a station, if you don’t save the station
and don’t search for another station the radio will exit search mode
without saving the current station. You can still continue listen to the
current unsaved station. Pressing the Radio button in this case will
move to the next saved station.
8.3.2 Saving radio station
Before searching for a station to save, tap the Radio button until you
find the station you want to replace.
When you find a radio station you want to save by searching as
describes in section [8.3.1, tap the Radio button to save the current
station.
scala-rider manual DRAFT APRIL 25, 2005
Page 19 of 31
9 Operating the remote control
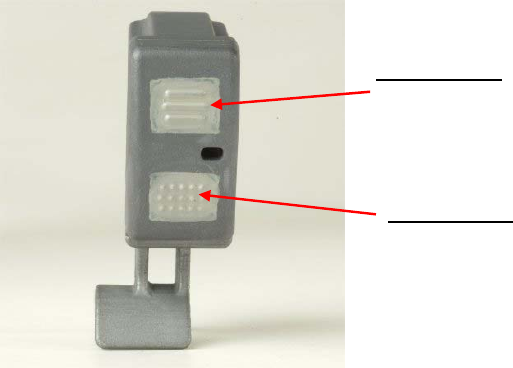
The remote control has two buttons which can be easily operated by a
short movement of the left hand finger.
1. CTRL_RC.
2. Radio_RC.
9.1 CTRL_RC button usage
9.1.1 Power Off
While your phone is ON but no call is in progress, press the
CTRL_RC button for 3 seconds. You will hear a descending tone as
the headset turns OFF. This will turn off the headset and the radio. In
order to turn ON the headset you must use the CTRL button on the
headset itself.
9.1.2 Initiate voice dial
While your phone is ON but no call is in progress, tap the CTRL_RC
button. Wait for a sound and speak the name of the party you wish to
call and wait for feedback from the phone. The type of feedback
depends on your phone.
9.1.3 Answering Calls
When you hear the ring tone either on the headset or on the phone,
tap the CTRL_RC to answer the call.
9.1.4 Terminating Calls
To terminate a call, tap the CTRL_RC button, followed by a tone,
which confirms the termination. Wait at least three seconds before
pressing again the CTRL button to activate voice dial.
9.1.5 Rejecting Calls
CTRL_RC-
Accept/ terminate calls
Voice dial
Radio_RC-
Radio ON/OFF
Changing radio stations

scala-rider manual DRAFT APRIL 25, 2005
Page 20 of 31
When you hear the ring tone on the headset, press and hold
CTRL_RC for three seconds on your remote control to reject the call.
9.2 Radio_RC button usage
9.2.1 Power ON/OFF
While no call on headset, press and hold the Radio_RC for three
seconds to turn the radio ON or OFF.
9.2.2 Change radio station
Tap the Radio_RC button to change the radio station to the next
saved station.
9.2.3 Search radio station
Searching is not possible using the Remote Control. Use the headset
Radio button perform search.
9.3 Remote control functionality table
Feature Headset
status
Headset buttons Remote control buttons
Power on Off CTRL (six seconds)
Power off On CTRL (three seconds)
Voice dial Standby CTRL (short) CTRL_RC (short)
Answer calls Standby CTRL (short) CTRL_RC (short)
Terminate
calls
On call CTRL (short) CTRL_RC (three seconds)
Reject calls Ringing CTRL (three seconds) CTRL_RC (three seconds)
Radio on/off Standby Radio (three seconds) Radio_RC (Three seconds)
Change radio
station
Radio on Radio (short) Radio_RC (Short)

scala-rider manual DRAFT APRIL 25, 2005
Page 21 of 31
10 Light and Sound Signals
LED indication Audio Feedback Status
Triple blue flash ascending tone (low-high) headset being turned on
Triple red flash descending tone (high-low) headset being turned off
Single blue flash every 3
seconds
STANDBY:
Not on a call
Double blue flash every 3
seconds
ACTIVE:
On a call or initiating a
connection.
Rapid red-blue alternating
flash
PAIRING MODE
Single red flash every 3
seconds
Low bat beep Low battery while in STANDBY
Double red flash every 3
seconds
Low bat beep Low battery while a call in
progress
Steady red CHARGING
Steady red turns off FULLY CHARGED
None High Tone Toggle VR feature (On/Off)
11 FAQs

scala-rider manual DRAFT APRIL 25, 2005
Page 22 of 31
What is the Cardo scala-rider™ headset?
The scala-rider ™ wireless Headset is a comfortable, stylish and easy to
use accessory to a Bluetooth™ mobile phone or smart-PDA when traveling
on a motorcycle that enables you to hear and speak without holding your
mobile phone near to your ear.
Do I need an Adapter if I already have a Bluetooth™ enabled cell phone?
No. Your scala-rider ™ device communicates with virtually every
Bluetooth™ phone.
How does the scala-rider ™ Headset work?
Once, the scala-rider ™ Headset is “paired” to your Bluetooth™ enabled
mobile phone, the two devices communicate wirelessly using Bluetooth™
technology.
If I want to keep my non-Bluetooth™ mobile phone, can I still use the
scala-rider ™ with my mobile phone?
You can hold on to your non-Bluetooth™ mobile phone and still enjoy the
benefits of the Headset, if you also purchase the scala Bluetooth™ Adapter.
The BT Adapter plugs directly into the headset jack of most non-
Bluetooth™ phones, thereby enabling that phone to communicate
wirelessly with your headset.
Is the battery removable?
The battery is not removable and you should never try to open the Headset.
Let only Authorized Service Centers maintain or service your device.
Please refer to our website for instructions at the end of your battery life.
What if have trouble hearing?
The scala-rider ™ headset comes with volume control, adjustable to suit
your preferred volume level.
What if I need more help?
Please access our website at:www.cardowireless.com/
Do I need to turn my headset off or leave it on when it is recharging?
Your headset may stay on or off during the charging process, according to

scala-rider manual DRAFT APRIL 25, 2005
Page 23 of 31
your preference.
When I turn on my cell phone, do I need to pair or link my cell phone
and headset again?
Once your mobile phone and headset are paired, you will not have to pair it
again. You will only need to implement the simple steps of reconnecting
your phone and headset each time either or both are turned off or have
moved more than approximately 30 feet (10 meters) apart from each other.
Please refer to section 5.4 for further details.
Will other Bluetooth™ phones interfere with my scala-rider ™ headset?
Can they eavesdrop?
No. Once you are paired, your identity is known only to the mobile phone
you use and no other Bluetooth™ phone can hear your audio signals.
Can the headset cause interference with my car radio?
No, the Bluetooth™ standard does not interfere with car radios.
Can I wear scala-rider ™ in the rain?
Yes, the scala-rider is waterproof.
12 Limited warranty

scala-rider manual DRAFT APRIL 25, 2005
Page 24 of 31
Your scala-rider ™ headset is covered with a One-Year Limited product
warranty from the date of original purchase. Please retain the retail sales
receipt and your registration data for proof of purchase.
What this limited warranty covers and for how long
Cardo Systems, Inc. (the “Company” or “Cardo“) warrants the scala-rider ™
headset and charger against defects in material and workmanship under
normal use and service for a period of one (1) year from date of purchase
(proof of purchase and registration required). The Company at its sole
discretion, will at no charge either repair, replace or refund the purchase
price of the product to the original purchaser during the warranty period,
provided the product has not been damaged or tampered with and has
been returned in accordance with the terms of this warranty to an
authorized Company Repair Center. Repair, at the Company’s option, may
include the replacement of parts, boards or batteries with functionally
equivalent reconditioned or new parts.
Warranty Conditions
This express limited warranty is extended by Cardo Systems, Inc. solely to
the original purchaser and is not assignable or transferable to others. This
is the complete warranty for your scala-rider ™ headset and charger. The
Company assumes no obligation or liability for additions or modifications to
this warranty unless made in writing and signed by an officer of the
company.
Batteries are warranted only if the battery capacity falls below 70% of
rated capacity or if the battery develops leakage.
This warranty becomes void if:
a. any of the seals on the case or battery are broken or device or
battery show signs of tampering.
b. The battery is used in equipment other than the equipment for
which it was intended.
The Company disclaims all responsibility for any equipment not furnished
by Cardo Systems Inc., which is attached to or used in connection with the
scala-rider ™ headset. Furthermore, the Company is not responsible for
any damage to any part of the scala-rider ™ headset resulting from the use
of ancillary equipment not furnished by the Company for use with the
Product.
What this warranty does not cover
1. Defects or damage resulting from the use of this product in other than

scala-rider manual DRAFT APRIL 25, 2005
Page 25 of 31
its normal and customary manner.
2. Defects or damage from misuse, accident or neglect.
3. Defects caused by improper operation, maintenance, installation,
adjustment or modification of any kind.
4. Products opened, disassembled or repaired non-authorized parties.
5. Defects or damage due to exposure to excessive temperatures, adverse
weather conditions, external impacts or spills of solid or liquid substances.
6. All plastic surfaces and all other externally exposed parts that are
scratched or damaged after purchase.
Warranty Service
To receive warranty service, your product
must be registered. Fax the attached
registration card to the numbers listed on the
card, or register online at: http://www.cardowireless.com/registration.php
For services, please present the product, along
with your registration number, bill of sale (receipt)
at any authorized Service Center or at
the store from which you have
purchased the product. Returns to the
Company pursuant to the limited
warranty can only be accepted with a
Return Authorization number obtained
from Cardo’s customer service
department.
General Provisions
This warranty is given in lieu of all other
express or implied warranties, including
without limitation, implied warranties
of merchantability and fitness for a
particular purpose. Cardo’s obligations
under this section are limited to the
duration of this limited warranty.
a. Certain limited-life components that
are subject to normal wear and tear,
such as eyeglass clips, ear clips,
decorative finishes, batteries, panels,
cradles, or other accessories, are
exempt from any warranty.
scala-rider manual DRAFT APRIL 25, 2005
Page 26 of 31
b. Cardo is not liable for any incidental
or consequential damages arising from
the use or misuse of any of the
Company’s products.
c. The user should never attempt to
perform service, adjustments or repairs
of the Product by him/herself. Doing so
will void all warranties. During the term
of the warranty, all products must be
returned to the point of purchase or
the authorized service center for all
necessary work.
d. The Company is not responsible for
any loss or damage incurred during
shipping. All repair work on scala-rider ™
products by parties not explicitly
authorized by the Company will void
any and all warranties.
e. The information in this Manual is
furnished strictly for informational
purposes and is subject to change
without notice. Cardo assumes no
liability or responsibility for any errors
or inaccuracies that may appear in this
Manual or the Quick Guide.
NOTE: Look for appropriate displays to
verify that you are being serviced by an
Authorized Cardo Dealer or Service
Center. Cardo Systems, Inc. retains the right to
amend and change its products, manuals
and specifications at any time without
notice.

scala-rider manual DRAFT APRIL 25, 2005
Page 27 of 31
g
13 Troubleshooting
Problem
Pairing fails
Action:
1. Delete scala-rider from your paired device list in your phone (if it is listed)
2. Turn off the mobile phone and headset
3. Take out the battery of the phone (some phones have shown problems
with pairing that are solved only if the battery is temporarily unplugged)
4. Repeat the pairing process as shown in section 5.2.
Problem
Can’t answer phone calls or perform voice dialing
Action (assuming your mobile phone supports this feature)
1. Make sure your scala-rider ™ headset is turned
ON and in standby mode while the blue light
indicator flashes slowly. םייתדוקנ
2. Verify that the Bluetooth function on your
phone is set to ON.
3. Verify that the scala-rider ™ headset is the
correctly paired Headset to your mobile phone
(refer to phone manual)
4. Link the headset to the phone as described above
5. Check Definitions or Settings on your mobile phone.
6. Perform pairing process and check again.
Problem
Battery does not provide at least five hours talk time.
Action
Make sure your scala-rider ™ Headset is fully
charged. Charging time is up to 6 hours for an empty battery. When fully
charged and charger is connected to Headset, the red light
indicator turns off.

scala-rider manual DRAFT APRIL 25, 2005
Page 28 of 31
Problem
Red LED does not light steady when charger
is connected.
Action
1. Make sure DC jack is firmly plugged in
2. Disconnect DC jack, wait a few seconds
and plug it back in.
3. If the scala-rider ™ Headset is fully charged the red light turns off.
Problem
Bad sound quality
Action
1. Possibly caused by nearby interference
2. If you have a GSM phone and your
headset is to close to phone, noises may be
heard
3. Headset and mobile phone are more than
30ft (10m) apart or there are major obstacles
between headset and mobile phone (e.g.
concrete walls or similar).
Problem
Sound deteriorates when the phone is in my
back pocket.
Action
Some mobile phones emit weaker Bluetooth
signals than others, resulting in reduced sound
quality, especially when the phone is close to
your body.
Suggestion: Move the phone to your
breast pocket or at least to a front pocket
on the same side you wear your headset.
scala-rider manual DRAFT APRIL 25, 2005
Page 29 of 31
14 FCC notice
This equipment complies with Part 15 of the FCC Rules. Operation is
subject to the following two conditions: (1) this device may not cause
harmful interference, and (2) this device must accept any interference
received, including interference that may cause undesired operation.
Warning: Changes or modifications to this unit not expressly approved by
the party responsible for compliance could void the User’s authority to
operate the equipment. Use only approved batteries and chargers. This
equipment has been tested and found to comply with Part 15 of the FCC
rules. These limits are designed to provide reasonable protection against
harmful interference in a residential installation. This equipment generates
and can radiate radio frequency energy, and if not installed and used in
accordance with the instructions, may cause harmful interference to radio
communications. However, there is no guarantee that interference will not
occur in a particular installation.
Your scala-rider™ headset is designed to operate at the maximum
strength allowed by the FCC. This means that your headset and or base
unit can communicate only over a certain distance subject on the location
of the cell phone, base unit and headset, your vehicle, the construction and
layout of your home or office. Weather conditions can also affect
performance.
CAUTION
RISK OF EXPLOSION IF BATTERY IS REPLACED BY AN INCORRECT TYPE
DISPOSE OF USED BATTERIES ACCORDING TO THE INSTRUCTIONS.
Tech Specs and Regulations
15 Technical Specification
Technology: Compliant with Bluetooth™ ver 1.1 / 1.2
Maximum power: 2.5 dbm
Maximum link distance: 30 feet or 10 meters
Typical talk time: up to 6 hours
Typical standby time: up to 6 days
Typical charging time: 6 hours
Power Source: Rechargeable Lithium Polymer battery
Weight: 1.12 oz or 33 g (without the clamp).
Approvals: FCC Part 15, CE, Bluetooth™
Wind blocking: Up to 16km/h (10miles/h)
Note: Design and specifications are subject to change without notice.
Your rated standby-time is subject to the amount of talk-time used.
scala-rider manual DRAFT APRIL 25, 2005
Page 30 of 31
ALERTE
Risque d'explosion si la batterie est
remplacée par un model qui ne convient
pas. Il faut traiter les batteries usées
selon les instructions.
NOTE: This equipment has been tested and found to comply with the limits
for a Class B digital device, pursuant to part 15 of the FCC Rules. These
limits are designed to provide reasonable protection against harmful
interference in a residential installation.
This equipment generates, uses and can radiate radio frequency energy
and, if not installed and used in accordance with the instructions, may
cause harmful interference to radio communications.
However, there is no guarantee that interference will not occur in a
particular installation. If this equipment does cause harmful interference to
radio or television reception, which can be determined by turning the
equipment off and on, the user is encouraged to try to correct the
interference by one or more of the following measures:
• Reorient or relocate the receiving antenna.
• Increase the separation between the equipment and receiver.
• Connect the equipment into an outlet on a circuit different from that to
which the receiver is connected.
• Consult the dealer or an experienced radio/ TV technician for help.
16 European CE Notice
Certification and Safety Approvals/ General Information
This product is CE marked according to the provisions of the R & TTE
Directive (99/5/EC). Hereby Cardo Systems, Inc. declares that this product
is in compliance with the essential requirements and other relevant
provisions of Directive 1999/5/EC.
For further information please visit http://www.cardowireless.com
Please note that this product uses radio frequency bands not harmonized
within the European Union (“EU”). Within the EU this product is intended to
be used in Austria, Belgium, Denmark, Finland, France, Germany, Greece,
Ireland, Italy, Luxembourg, The Netherlands, Portugal, Spain, Sweden, The
United Kingdom and within EFTA in Iceland, Norway and Switzerland.
Users are not permitted to make changes or modify the device in any
way. Changes or modifications not expressly approved by Cardo will void
the users authority to operate the equipment.
Regulations and Notices
scala-rider manual DRAFT APRIL 25, 2005
Page 31 of 31
17 Contact Information
Cardo Systems, Inc.,
100 High Tower Blvd., Pittsburgh, PA. 15205 (USA)
North America: Call toll-free: 1 800 488-0363
or 412 788-4533, Fax: 412 788-0270
International: Call +49 89 450 36-819, Fax: +49 89 404-817
18 Service
North America: Call toll-free: 1 800 488-0363 or 412 788-4533
International: Call +49 89 450 36-819
Service is provided under limited warranty. Cardo Systems, Inc. will only
accept devices returned in compliance with our Warranty Provisions and
submitted with a Return Authorization Number issued by a Cardo
authorized service department. The Company retains the right to return all
shipments not in compliance with our Warranty Provisions.
19 Patent, Copyright, Trademark Information
U.S. and Worldwide Patent Pending;
©2004 Cardo Systems Inc.
Assembled in China.
Bluetooth™ is a trademark owned by Bluetooth™ SIG, Inc.,
scala-rider ™ is a trademark owned by Cardo Systems, Inc.
All rights reserved by Cardo Systems, Inc.