Cardo Systems ER21 scala rider SMARTH User Manual
Cardo Systems, Inc. scala rider SMARTH
User Manual

SMARTH
Manual

SMARTH Manual
- 2 -
Place QR Code here
Scan this QR code or go to cardosystems.com/quick-guides/ to download a Pocket Guide that can be viewed on your
smartphone/tablet, or printed and folded for easy reference while on the road.
This is version 3 of the SMARTH Manual. Please visit cardosystems.com/product-manuals/ for the latest version of this
manual in your preferred language, as well as other manuals and tutorials.

SMARTH Manual
- 3 -
Table of Contents
1.
Introduction 6
1.1
Abbreviations 6
2.
Charging the SMARTH 7
3.
Getting Started 8
3.1
Getting to Know Your Headset 8
3.2
Switching Your Headset On/Off 8
3.3
Different Ways to Operate Your SMARTH 8
3.4
Basic Functions 9
3.5
Pairing Your Headset to Bluetooth Devices 9
3.5.1
Pairing through the Headset Buttons 9
3.5.2
Pairing through the Headset Voice-Assisted Menu 10
3.6
Pairing the Bluetooth Intercom 11
3.6.1
Pairing the Bluetooth Intercom to other Cardo Headsets 11
3.6.2
Pairing the Bluetooth Intercom to non-Cardo Headsets 12
3.7
Using One+8 Intercom 14
3.7.1
Managing Your One+8 Intercom Buddy List 14
4.
Before You Ride 16
4.1
Configuring Your SMARTH through Cardo SmartSet 17
4.1.1
Configuring Your SMARTH Basic Settings 18
4.1.2
Configuring Speed Dial Numbers 19
4.1.3
Configuring Your FM Radio Manually 20
4.1.4
Configuring Your FM Radio Using Auto Tuning 21
4.1.5
Configuring FM Radio RDS Retuning through Cardo SmartSet 23
4.2
Configuring Your SMARTH through the Cardo Community 23
4.2.1
Installing the Cardo Updater on Your Computer 23
4.2.2
Configuring Your SMARTH Basic Settings 24
4.2.3
Configuring Your FM Radio through Cardo Cardo Community 24
4.2.4
Upgrading Firmware for New Features 25
4.3
Configuring Your SMARTH through the Headset Voice-Assisted Menus 25
4.4
Checking Battery Status through Cardo SmartSet 25
4.5
Setting the Default Mobile Phone 26
4.6
Using Voice Commands 27
4.7
Creating Groups for DMC Intercom 28
4.7.1
Starting DMC intercom Groups 28
4.7.2
Joining DMC intercom Groups 29

- 4 -
SMARTH Manual
4.7.3
Leaving DMC intercom Groups 30
4.7.4
Deleting DMC intercom Groups 31
4.7.5
Switching to Bluetooth Intercom 31
5.
On the Road 32
5.1
Making and Receiving Phone Calls 32
5.1.1
Making Phone Calls 32
5.1.2
Answering Phone Calls 32
5.1.3
Rejecting Phone Calls 33
5.1.4
Ending Phone Calls 33
5.1.5
Toggling Between Two Calls on Two Mobile Phones Paired to Your Headset 33
5.1.6
Disconnecting the Current Call and Switching To The Second Call 33
5.2
Using DMC intercom 34
5.2.1
Muting DMC intercom Groups 34
5.2.2
Unmuting DMC intercom Groups 34
5.2.3
Streaming Music in DMC intercom Mode 35
5.2.3.1
Background Audio Level and Audio Source Priorities 35
5.3
Making and Receiving Bluetooth Intercom Calls 35
5.3.1
Receiving Bluetooth Intercom Calls 36
5.3.2
Bluetooth Intercom Busy Signal 36
5.3.3
Click-To-Link Calls 36
5.3.3.1
Incoming Click-to-Link Intercom Calls 37
5.4
Making and Receiving One+8 Intercom Calls 37
5.4.1.1
Making One+8 Intercom Calls 37
5.4.1.2
Receiving One+8 Intercom Calls 38
5.4.1.3
Ending One+8 intercom call 38
5.5
Listening to Music and Radio 38
5.5.1
Listening to Music 38
5.5.1.1 Switching Music Sources 39
5.5.2
Listening to FM Radio 40
5.5.3
Sharing Music and Radio 41
5.5.4
Audio Source Priorities 43
6.
Troubleshooting 44
6.1
Soft Reset 44
6.2
Reset Pairing 44
6.3
Reset to Factory Settings 44
6.4
FAQ 44


- 6 -
SMARTH Manual
1. Introduction
1.
Introduction
Thank you for choosing the Cardo SMARTH Bluetooth® communication and entertainment system for motorcycle
helmets.
This Manual describes the features of your SMARTH and how to use them.
We wish you a great SMARTH experience with your SMARTH and encourage you to write to us at
support@cardosystems.com regarding any questions, suggestions or comments you may have.
If you have not yet installed the SMARTH headset in your helmet, please install it as described in the SMARTH
Installation Guide provided in the package.
1.1 Abbreviations
The following abbreviations are used in this manual:
Abbreviation
Description
A2DP
Advanced Audio Distribution Profile (Bluetooth profile)
AGC
Automatic Gain Control
IC
Intercom
RDS
Radio Data System
VOX
Voice Operated Control
- 7 -
SMARTH Manual
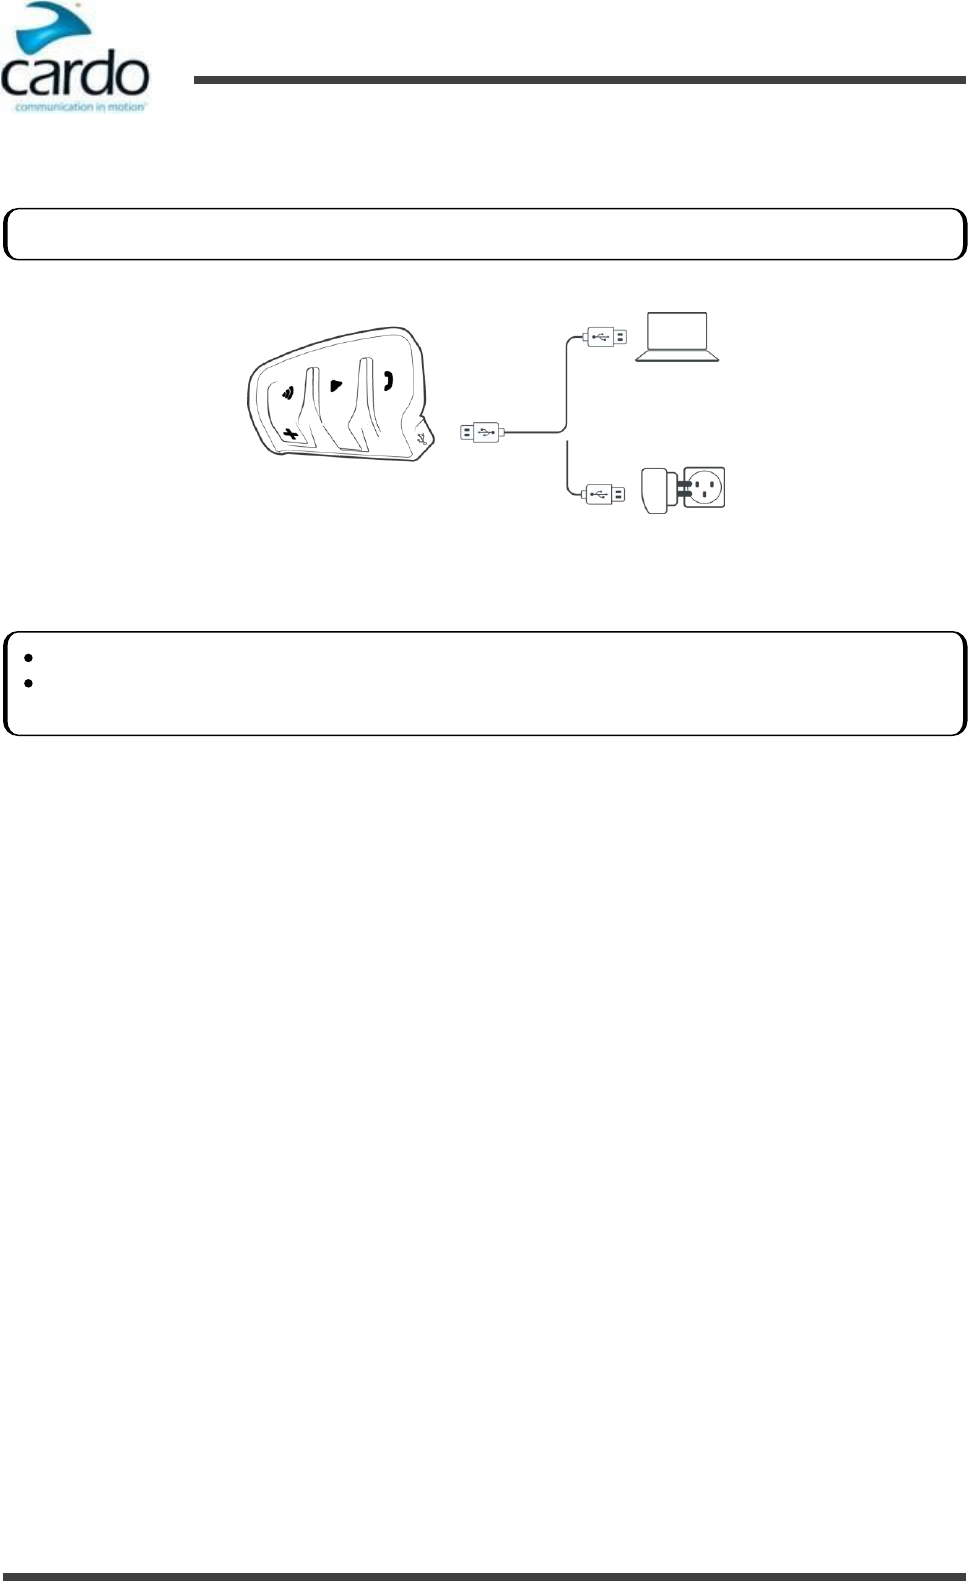
2. Charging the SMARTH
2.
Charging the SMARTH
To charge the SMARTH:
1.
Connect the USB cable Type A plug to either the wall charger supplied with your SMARTH, or to a computer USB
port.
2.
Connect the USB cable Type B plug to the SMARTH USB port.
During charging, the LED indicates charging status as follows:
●
red LED on - charging
●
red LED off - charging complete
Make sure that your SMARTH battery is fully charged for at least 4 hours before initial use.
Charging with the wall charger is faster than via a computer USB port.
Charging your headset switches it off automatically. To use your headset while it is being charged, switch it on.
(see Section 3.2 - Switching Your Headset On/Off).
- 8 -
SMARTH Manual
3. Getting Started
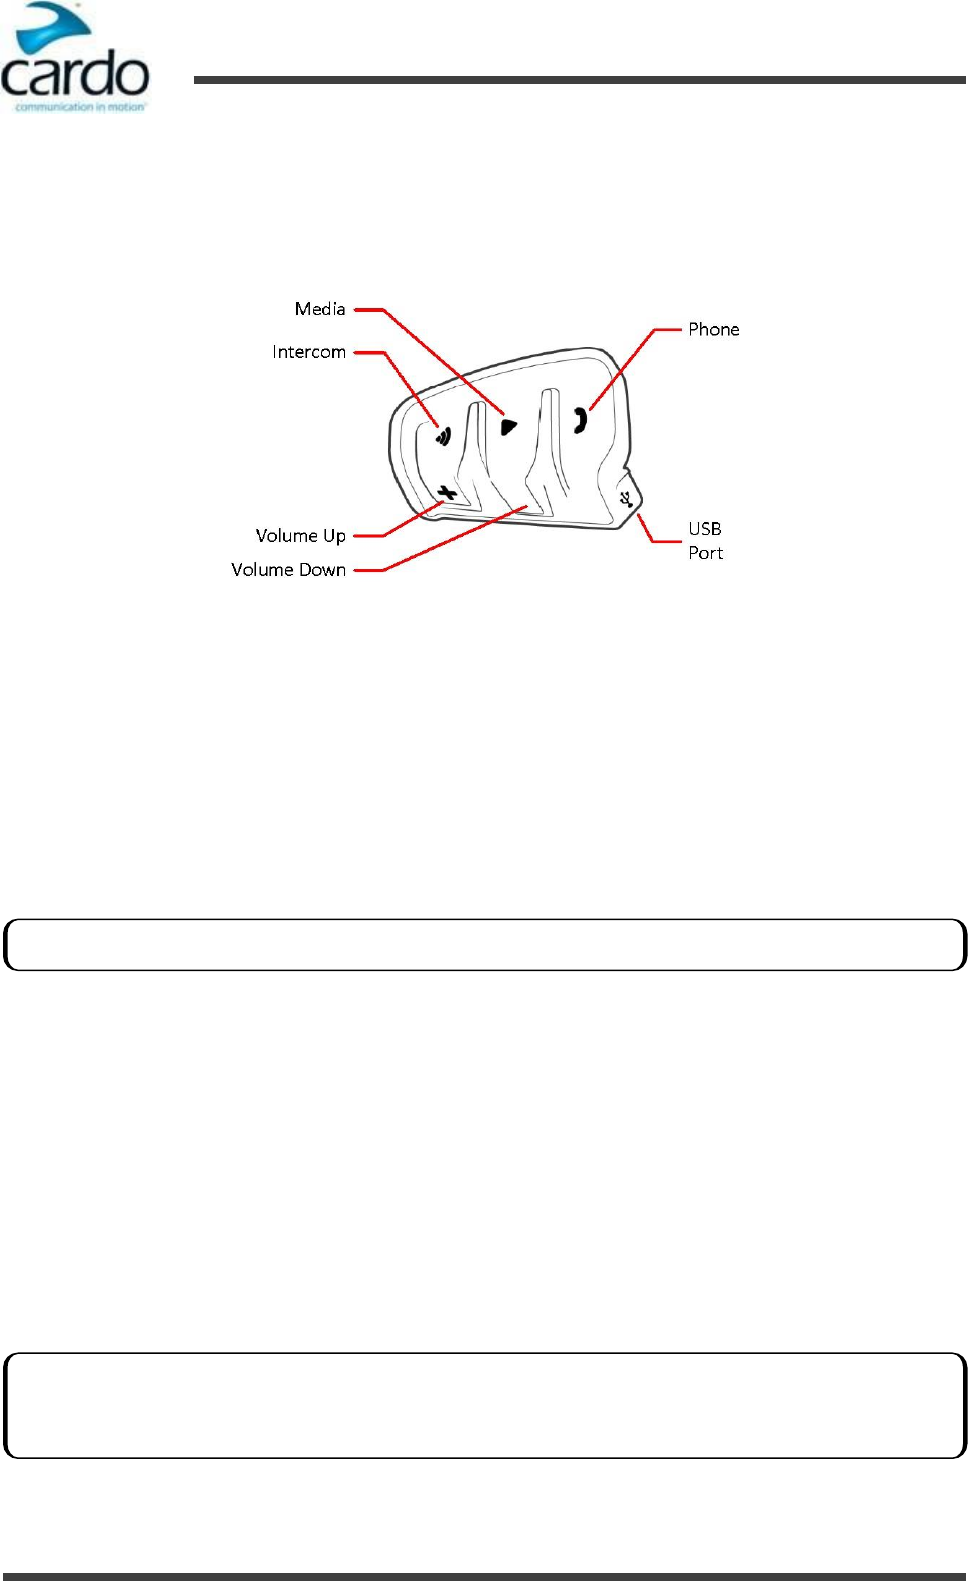
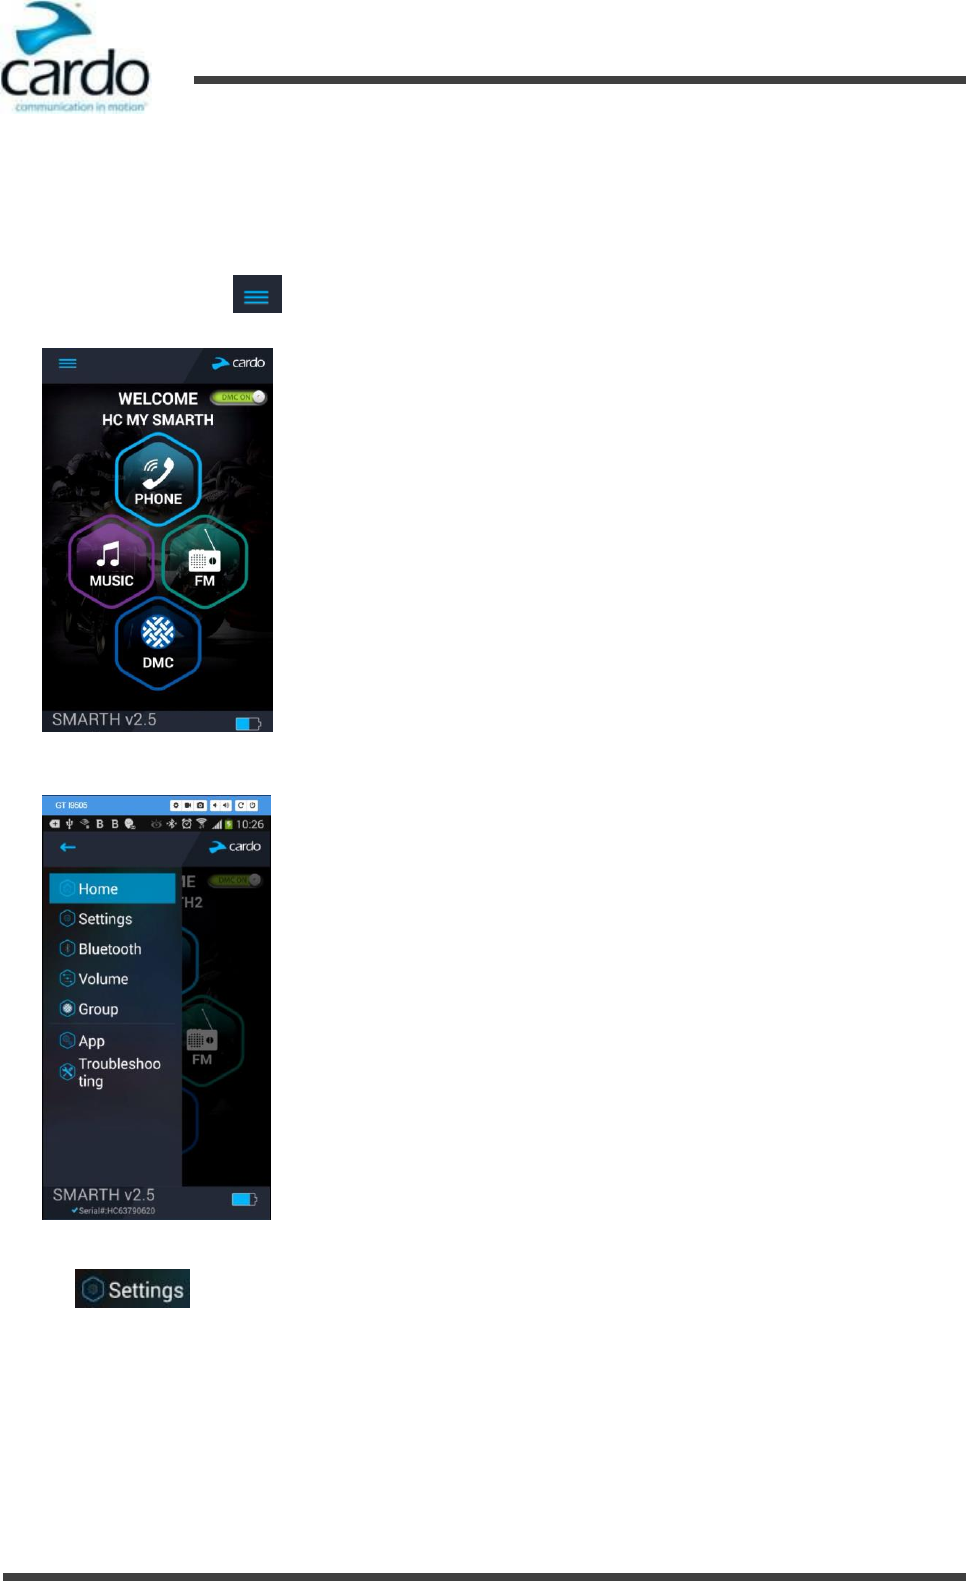
3.
Getting Started
3.1
Getting to Know Your Headset
The SMARTH headset has the following items for operating the unit:
3.2
Switching Your Headset On/Off
To switch your SMARTH on:
●
Tap ~Audio and ~Phone. The speaker plays an ascending tone and a voice message "Hello SMARTH".
The LED confirms your SMARTH is on:
■
Normal and low battery states - LED flashes blue three times.
■
Charging - LED flashes purple three times.
To switch your SMARTH off:
●
Tap ~Audio and ~Phone. The speaker plays a descending tone and a voice message "Goodbye".
3.3
Different Ways to Operate Your SMARTH
You can operate the various features by any of the following methods:
●
Pressing a button or combination of buttons on the headset.
●
Using the SmartSet app on your mobile device (once it is paired with the headset).
●
Using the Voice-Assisted Menu in combination with either headset buttons or with the VOX (by saying a word
loudly, see the note below).
●
Automatic voice recognition (by saying a command, for example "radio on").
This manual describes the most suitable method or methods to operate each feature.
LEDs indicates modes and events for the battery states. For more information, see Modes and Events SMARTH
You hear voice announcements on your headset for mode changes and events.
VOX (voice operated control) is for hands free operation of your SMARTH. You can say a word or phrase loudly and
your SMARTH performs that function. You can also adjust VOX sensitivity for the microphone, see "Configuring
Your SMARTH Basic Settings" on page 18
Connecting your headset to a charge switches off the headset.
- 9 -
SMARTH Manual
3. Getting Started
3.4
Basic Functions
To turn the volume up for current audio source:
●
Tap ~Volume Up.
With each tap, a louder tone is played on the speaker.
To turn the volume down for current audio source:
●
Tap ~Volume Down.
With each tap, a quieter tone is played on the speaker.
To mute the microphone completely and lower the speaker volume for the current state:
●
Tap ~Volume Up and ~Volume Down.
The red LED comes on for 2 seconds and a descending tone is played on the speaker.
3.5
Pairing Your Headset to Bluetooth Devices
Your SMARTH has two Bluetooth channels for connection to mobile phones, GPS devices and music players with A2DP.
To connect your SMARTH to a Bluetooth device, you must first pair them. Once paired, they automatically recognize
each other whenever they are within range (10m / 33ft).
3.5.1
Pairing through the Headset Buttons
To pair Bluetooth channel 1 to a device:
1.
Enable Bluetooth on the device.
2.
Press ~Phone for 5 seconds.
3.
Search for Bluetooth devices on your device as described in your device's instructions.
4.
After a few seconds the device lists your SMARTH. Select it.
5.
If prompted for a PIN or Passkey, enter 0000 (four zeros).
6.
The device confirms that pairing has succeeded and the LED flashes purple for 2 seconds.
To pair Bluetooth channel 2 to another device:
1.
Enable Bluetooth on the device.
2.
Press ~Audio for 5 seconds.
3.
Tap ~Phone twice until the LED start flashing red and green.
4.
Search for Bluetooth devices on your device as described in your device's instructions.
5.
After a few seconds the device lists your SMARTH. Select it.
6.
If prompted for a PIN or Passkey, enter 0000 (four zeros).
7.
The device confirms that pairing has succeeded and the LED flashes purple for 2 seconds.
You can automatically adjust your volume to reduce noise by using AGC (automatic gain control). AGC adjusts your
volume according to ambient noise and riding speed. You can also adjust AGC sensitivity, see "Configuring Your
SMARTH Basic Settings" on page 18.
If you are pairing more than one device, Cardo recommends that you pair the mobile phone to channel 1, and the
GPS or music player to channel 2.
- 10 -
SMARTH Manual
3. Getting Started
To pair a Bluetooth channel to a GPS device:
1.
Enable Bluetooth on the device.
2.
Press ~Phone for 5 seconds.
3.
Tap ~Volume Up.
4.
The device confirms that pairing has succeeded and the LED flashes purple for 2 seconds.
To cancel the pairing process:
●
Press ~Phone until the LED stops flashing red and blue or green and blue.
To reset all Bluetooth device pairing:
1.
Press ~ and ~Phone for 5 seconds and your SMARTH LED confirms pairing reset:
■
Normal and low battery states - LED flashes purple slowly 5 times.
■
Charging - LED flashes purple and red slowly 5 times.
3.5.2
Pairing through the Headset Voice-Assisted Menu
To pair your SMARTH with Cardo headsets through the headset voice-assisted menu:
1.
Tap ~ and ~Volume Up twice.
2.
When the voice-assisted menu reaches "Advanced Features", tap ~ or use VOX.
3.
When the voice-assisted menu reaches the required option, tap ~ or use VOX.
If you want to pair the GPS device to Bluetooth channel 2, tap ~Phone twice.
If pairing is not completed within 2 minutes, the headset automatically returns to Standby.
If you have paired two different mobile phones directly to your SMARTH, set one as default for making calls
(see "Setting the Default Mobile Phone" on page 26).
If your GPS supports it, you can pair the second mobile phone directly to the GPS and then pair the GPS to
your SMARTH, and so connect both mobile phones and the GPS to your SMARTH.
Not all Bluetooth mobile phones broadcast Bluetooth Stereo music (A2DP), even if the phone has an MP3
player function. Consult your mobile phone’s user manual for more information.
Not all Bluetooth GPS devices allow connection to Bluetooth audio devices. Consult your GPS User Manual for
more information.
To reset all Bluetooth intercom pairing, select the menu option "Reset Mobiles and GPS Pairing".
- 11 -
SMARTH Manual
3. Getting Started
3.6
Pairing the Bluetooth Intercom
The SMARTH allows full-duplex Bluetooth intercom communication for chatting with up to three riders on Cardo or
non-Cardo devices.
To connect your SMARTH to another device with a Bluetooth intercom, you must first pair their channels. Once paired,
the headsets automatically recognize each other whenever they are in range (line of sight up to 1.2 km / 3,900 ft
subject to terrain).
3.6.1
Pairing the Bluetooth Intercom to other Cardo Headsets
To pair your SMARTH with Cardo headsets through the headset buttons:
1.
Confirm your SMARTH is in Bluetooth intercom mode:
■
Normal battery state - LED flashes blue slowly.
■
Low battery state - LED flashes red slowly.
■
Charging - LED flashes purple slowly.
2.
On your headset, press ~ for 5 seconds.
3.
Select the Bluetooth intercom channel you would like to pair:
■
Channel A - do not tap anything (default channel).
■
Channel B - tap ~ twice.
4.
On the other Cardo headset, activate Bluetooth pairing mode (see the other Cardo headset user manual).
5.
The device confirms that pairing has succeeded and the LED flashes purple for 2 seconds.
To pair your SMARTH with Cardo headsets through SmartSet:
1.
Confirm your SMARTH is in Bluetooth intercom mode:
■
Normal battery state - LED flashes blue slowly.
■
Low battery state - LED flashes red slowly.
Pairing a channel replaces any existing paired device on that channel with the new device.
If you have purchased the SMARTH MultiSet, the retail package contains two prepaired units configured to
communicate on Channel A.
Your SMARTH is compatible with most Cardo models for Bluetooth intercom calls. In addition, it is also
compatible with the Schuberth SRC-System™. Intercom range with other models is limited to the distance of
the device with the shorter range.
For details on how to pair and use your SMARTH with other SMARTH models, go to
www.cardosystems.com/compatibility.
If your SMARTH is not in Bluetooth intercom mode, press ~Intercom and ~Audio. For more information see,
"Switching to Bluetooth Intercom" on page 31.
To cancel the pairing process, press ~Phone until the LED stops flashing.
If pairing is not completed within 2 minutes, the headset automatically returns to Standby.
To reset all Bluetooth intercom pairing, while in Bluetooth intercom pairing mode, press ~ and ~Phone for 2
seconds.

- 12 -
SMARTH Manual
3. Getting Started
■
Charging - LED flashes purple slowly.
2.
Open SmartSet and tap .
3.
Tap Bluetooth
4.
Tap Add for the required channel. and follow the on screen menus.
To pair your SMARTH with Cardo headsets through the headset voice-assisted menu:
1.
Confirm your SMARTH is in Bluetooth intercom mode:
■
Normal battery state - LED flashes blue slowly.
■
Low battery state - LED flashes red slowly.
■
Charging - LED flashes purple slowly.
2.
Tap ~ and ~Volume Up twice.
3.
When the voice-assisted menu reaches "Advanced Features", tap ~ or use VOX.
4.
When the voice-assisted menu reaches your required option ("Pair Intercom A", "Pair Intercom B", or "Pair
Intercom C"), tap ~ or use VOX.
3.6.2
Pairing the Bluetooth Intercom to non-Cardo Headsets
The Cardo gateway enables Cardo headsets to connect to non-Cardo over Bluetooth.
To pair your SMARTH with non- Cardo headsets through the headset buttons:
1.
Confirm your SMARTH is in Bluetooth intercom mode:
■
Normal battery state - LED flashes blue slowly.
■
Low battery state - LED flashes red slowly.
■
Charging - LED flashes purple slowly.
2.
On your headset, press ~ for 5 seconds.
3.
Select the Bluetooth intercom channel you would like to pair:
■
Channel A - do not tap anything (default channel).
■
Channel B - tap ~ twice.
4.
Tap ~Phone to activate the Cardo gateway.
If your SMARTH is not in Bluetooth intercom mode, press ~Intercom and ~Audio. For more information see,
"Switching to Bluetooth Intercom" on page 31.
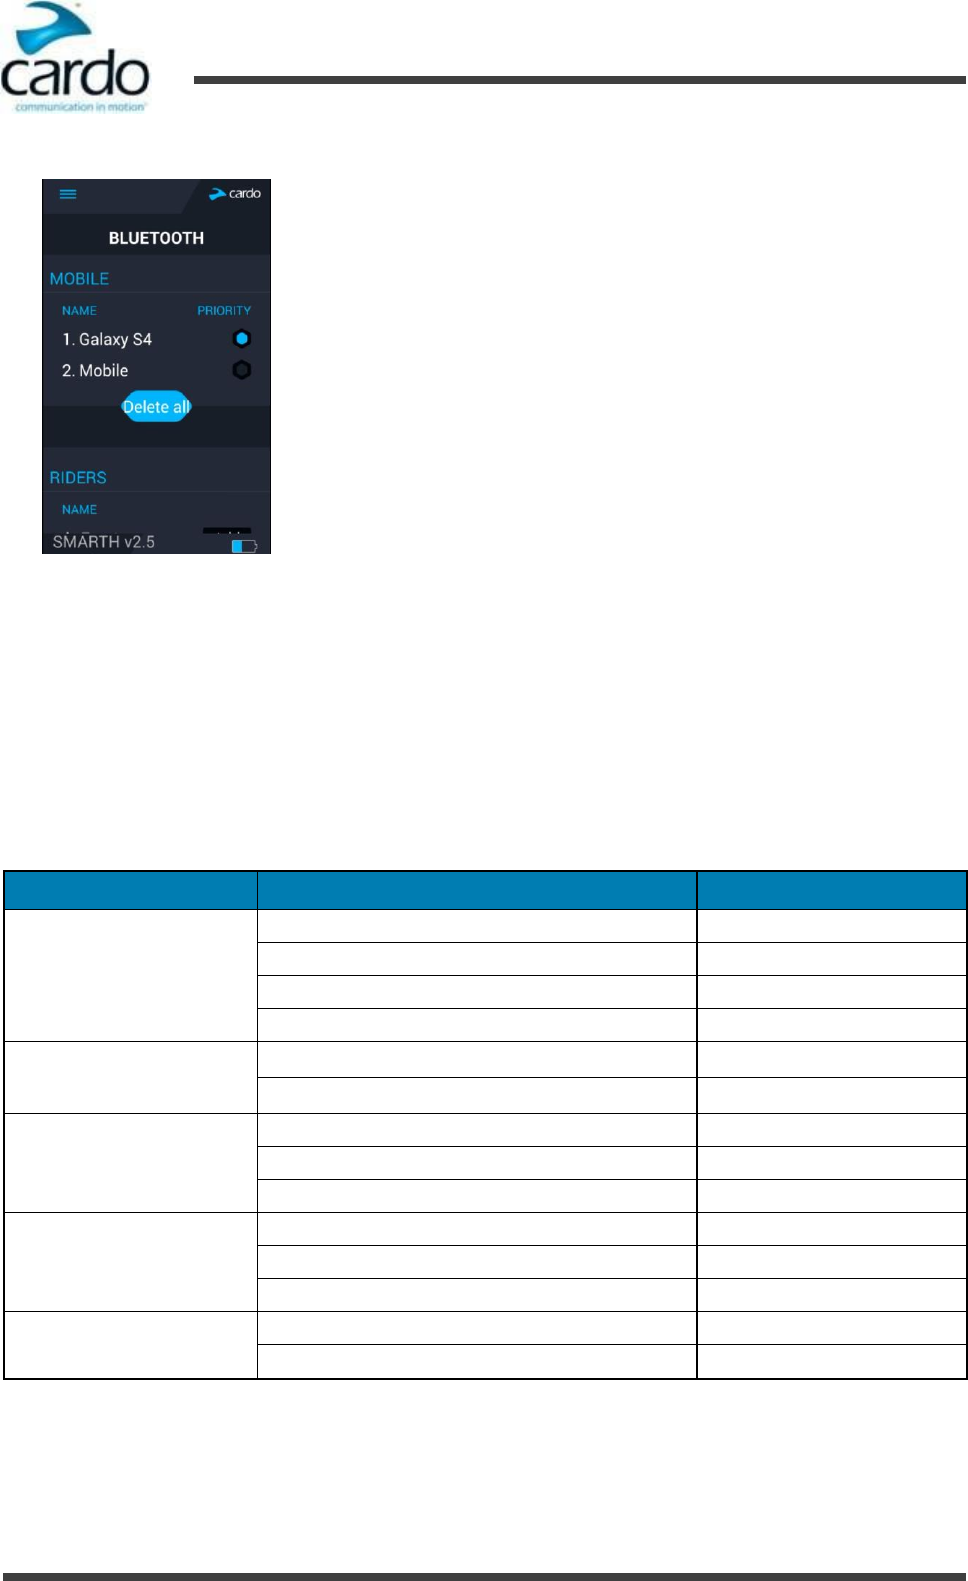
To reset all Bluetooth intercom pairing, tap Delete all.
If your SMARTH is not in Bluetooth intercom mode, press ~Intercom and ~Audio. For more information see,
"Switching to Bluetooth Intercom" on page 31.
To reset all Bluetooth intercom pairing, select the menu option "Reset Channel A & B Pairing".
If your SMARTH is not in Bluetooth intercom mode, press ~Intercom and ~Audio. For more information see,
"Switching to Bluetooth Intercom" on page 31.
- 13 -
SMARTH Manual
3. Getting Started
5.
On the non-Cardo headset, activate Bluetooth pairing mode (see the non- Cardo headset user manual).
6.
The device confirms that pairing has succeeded and the LED flashes purple for 2 seconds.
To pair your SMARTH with non-Cardo headsets through SmartSet:
1.
Confirm your SMARTH is in Bluetooth intercom mode:
■
Normal battery state - LED flashes blue slowly.
■
Low battery state - LED flashes red slowly.
■
Charging - LED flashes purple slowly.
2.
Open SmartSet and tap .
3.
Tap Bluetooth.
4.
Tap Add for the required channel. and follow the on screen menus.
To pair your SMARTH with non- Cardo headsets through the headset voice-assisted menu:
1.
Confirm your SMARTH is in Bluetooth intercom mode:
■
Normal battery state - LED flashes blue slowly.
■
Low battery state - LED flashes red slowly.
■
Charging - LED flashes purple slowly.
2.
Tap ~ and ~Volume Up twice.
3.
When the voice-assisted menu reaches "Advanced Features", tap ~ or use VOX.
4.
When the voice-assisted menu reaches your required option ("Pair Mobile phone to Channel 1", "Pair Mobile
phone to Channel 2", or "Pair GPS to Channel 1 ), tap ~ or use VOX.
To cancel the pairing process, press ~Phone until the LED stops flashing.
If pairing is not completed within 2 minutes, the headset automatically returns to Standby.
To reset all Bluetooth intercom pairing, while in Bluetooth intercom pairing mode, press ~ and ~Phone for 2
seconds.
If your SMARTH is not in Bluetooth intercom mode, press ~Intercom and ~Audio. For more information see,
"Switching to Bluetooth Intercom" on page 31.
To reset all Bluetooth intercom pairing, tap Delete all.
When using voice-assisted menus, you can only pair through Channel B.
If your SMARTH is not in Bluetooth intercom mode, press ~Intercom and ~Audio. For more information see,
"Switching to Bluetooth Intercom" on page 31.
To reset all Bluetooth intercom pairing, select the menu option "Reset Channel A & B Pairing".
- 14 -
SMARTH Manual
3. Getting Started
3.7
Using One+8 Intercom
You can use One+8 Intercom for conference calls with up to 8 riders. The riders are called "buddies". You preset your
buddies in your "buddy list" with any name you chose. You can connect with your buddies directly using a buddy name
on your buddy list.
If your buddy is not in intercom range, One+1 Intercom automatically makes a phone to the buddy. You use Cardo
Community to set each buddy's phone number.
3.7.1
Managing Your One+8 Intercom Buddy List
You must add riders to your One+1 buddy list before using One+8 Intercom.
To add a buddy to your One+8 buddy list:
●
To use Cardo Community:
●
To use the headset buttons:
a.
Make sure that your headset is paired to the mobile device on which SmartSet is installed.
b.
Tap ~Intercom and ~Volume Up for 5 seconds.
c.
xxx
●
To use SmartSet:
a.
Make sure that your headset is paired to the mobile device on which SmartSet is installed.
b.
Tap .
c.
Tap Bluetooth.
d.
In BUDDIES, tap . xxx
e.
SmartSet prompts you to confirm you are entering Buddy Pairing mode. Tap YES.
To change a buddy on your One+8 buddy list:
●
To use the headset buttons:
●
To use SmartSet:
a.
Make sure that your headset is paired to the mobile device on which SmartSet is installed.
b.
Tap .
c.
Tap Bluetooth.
d.
In BUDDIES, tap xxx. xxx
e.
xxx
●
To use the headset voice-assisted menu:
To remove a buddy from your One+8 buddy list:
●
To use the headset buttons:
You add yourself to the buddy list so other riders on the buddy list can call you.
If your SMARTH is not in Bluetooth intercom mode, SmartSet prompts you to change to Bluetooth intercom. Tap
OK.

- 15 -
SMARTH Manual
3. Getting Started
●
To use SmartSet:
a.
Make sure that your headset is paired to the mobile device on which SmartSet is installed.
b.
Tap .
c.
Tap Bluetooth.
d.
In BUDDIES, tap xxx. xxx
e.
xxx
●
To use the headset voice-assisted menu:

- 16 -
SMARTH Manual
4. Before You Ride
4.
Before You Ride
Get the most out of your SMARTH by changing the settings and customizing your headset according to your own
personal preferences.
You can customize your SMARTH using either of the following methods:
●
Cardo SmartSet App on iOS / Android (see "Configuring Your SMARTH through Cardo SmartSet" on the next page).
●
Cardo Community on Windows / Mac - minimum requirements - Windows® XP™ / Mac OS X 10.8 (see
"Configuring Your SMARTH through the Cardo Community" on page 23).
●
Headset buttons
●
Voice-assisted menu on your device
Object
Default
Value
Description
SmartSet App
(iOS/Android)
Cardo
Community
Voice-
Assisted
Menu
AGC sensitivity for the
speakers
(Off/Low/Medium/High)
Medium
Automatic Gain Control
allowing the automatic
adjustment of volume
according to ambient noise
and riding speed.
ü
ü
ü
Audio priority
(A2DP/Bluetooth
intercom/ DMC intercom)
Intercom
Priority of audio source
playing through speakers
and preventing current
intercom call from
interruption.
ü
ü
ü
Click-to-Link settings
(Enable/Disable)
Enable
Spontaneous way to instantly
initiate one-on-one intercom
calls with other riders near
you, without being paired.
ü
ü
ü
Create, join or leave a
group of riders
Empty
DMC intercom groups. For
more information, see
"Creating Groups for
DMC Intercom" on page 28.
ü
û
ü
Download the latest
firmware upgrade
N/A
For new features, your
Cardo headset software may
periodically require
upgrades. Firmware
upgrades implement
software upgrades. For
more information, see
"Upgrading Firmware for
New Features" on page 25.
û
ü
û
FM Band
If you are in Japan, select
Japan. Otherwise, select
Worldwide.
ü
û
ü
Cardo recommends customizations and settings before setting out on the road.
- 17 -
SMARTH Manual
4. Before You Ride
Object
Default
Value
Description
SmartSet App
(iOS/Android)
Cardo
Community
Voice-
Assisted
Menu
Intercom Mode
(DMC/Bluetooth)
Bluetooth
Intercom
DMC intercom and
Bluetooth intercom.
ü
û
ü
Intercom-to-Phone
(Enable/Disable)
Enable
Automatically divert
intercom calls to mobile
calls.
ü
ü
û
Language
According
to Your
Region
Voice-assisted menu
language.
ü
û
ü
Background Audio Level
(Enable/Disable)
N/A
xxx.
ü
û
û
RDS (Enable/Disable)
Disable
Radio Data System allows the
radio to automatically retune
to the strongest frequency
available for the FM station
you are listening to when
the signal becomes too weak
ü
ü
ü
Set speed dial numbers
Empty
Pre-set phone numbers for
automatic dialing.
ü
ü
û
Set the 6 FM radio presets
90.0
Pre-set FM radio stations for
automatic tuning.
ü
ü
û
Spoken Status
Announcements
(Enable/Disable)
Enable
Voice announcements so
you always know to whom
or to what device you are
connected.
ü
ü
ü
VOX operation
Enable
Hands-free operation using a
voice activity director.
ü
ü
ü
VOX sensitivity for the
microphone
(Low/Medium/High)
Medium
Automatically adjusts the
level of ambient noise for
your microphone while you
riding.
ü
ü
ü
4.1
Configuring Your SMARTH through Cardo SmartSet
You can configure your SMARTH through your mobile phone by installing the Cardo SmartSet available at Google Play
Store and Apple App Store.
The minimum operating system requirements for SmartSet are:
●
Android: 4.0 and higher
●
IOS: 10.8 and higher
VOX and AGC performance vary based on environmental conditions, including driving speed, helmet type and
ambient noise. For improved performance, minimize the wind impact on the microphone by using the large
microphone sponge and closing the visor.
- 18 -
SMARTH Manual
4. Before You Ride
4.1.1
Configuring Your SMARTH Basic Settings
To configure your SMARTH through the SmartSet app:
1.
Make sure that your headset is paired to the mobile device on which SmartSet is installed.
2.
Open SmartSet and tap :
3.
The settings screen appears.
4.
Use the appropriate menu to configure your SMARTH settings:
■ - SMARTH features
*
MY DEVICE - change Device Name
*
LANGUAGE - set Language, enable/disable Spoken Status Announcements
*
VOX - enable/disable VOX Activation, set VOX Sensitivity (low, medium, or high), set VOX Operation
(Voice command or Intercom call)
*
AGC - enable/disable AGC Activation, set AGC Sensitivity (low, medium, or high)
- 19 -
SMARTH Manual
4. Before You Ride
*
FEATURES - enable/disable Click-to-link, enable/disable IC to Phone, enable/disable Background Audio
Level , set A2DP/IC Priority (A2DP or Intercom), Reset to Factory, set FM Band Region (Worldwide or
Japan)
■ - connected devices and riders, manage One+8 Buddy List
■ - sets the level for each audio source (mobile phone, intercom, music, FM, announcements,
background audio-level).
■ - DMC intercom group manager - list of groups you created, list of groups you joined, active
groups, create a New Group, Join Group an existing group
■ - SmartSet preferences and general information
■ - FAQ, email Cardo SUPPORT, FEEDBACK
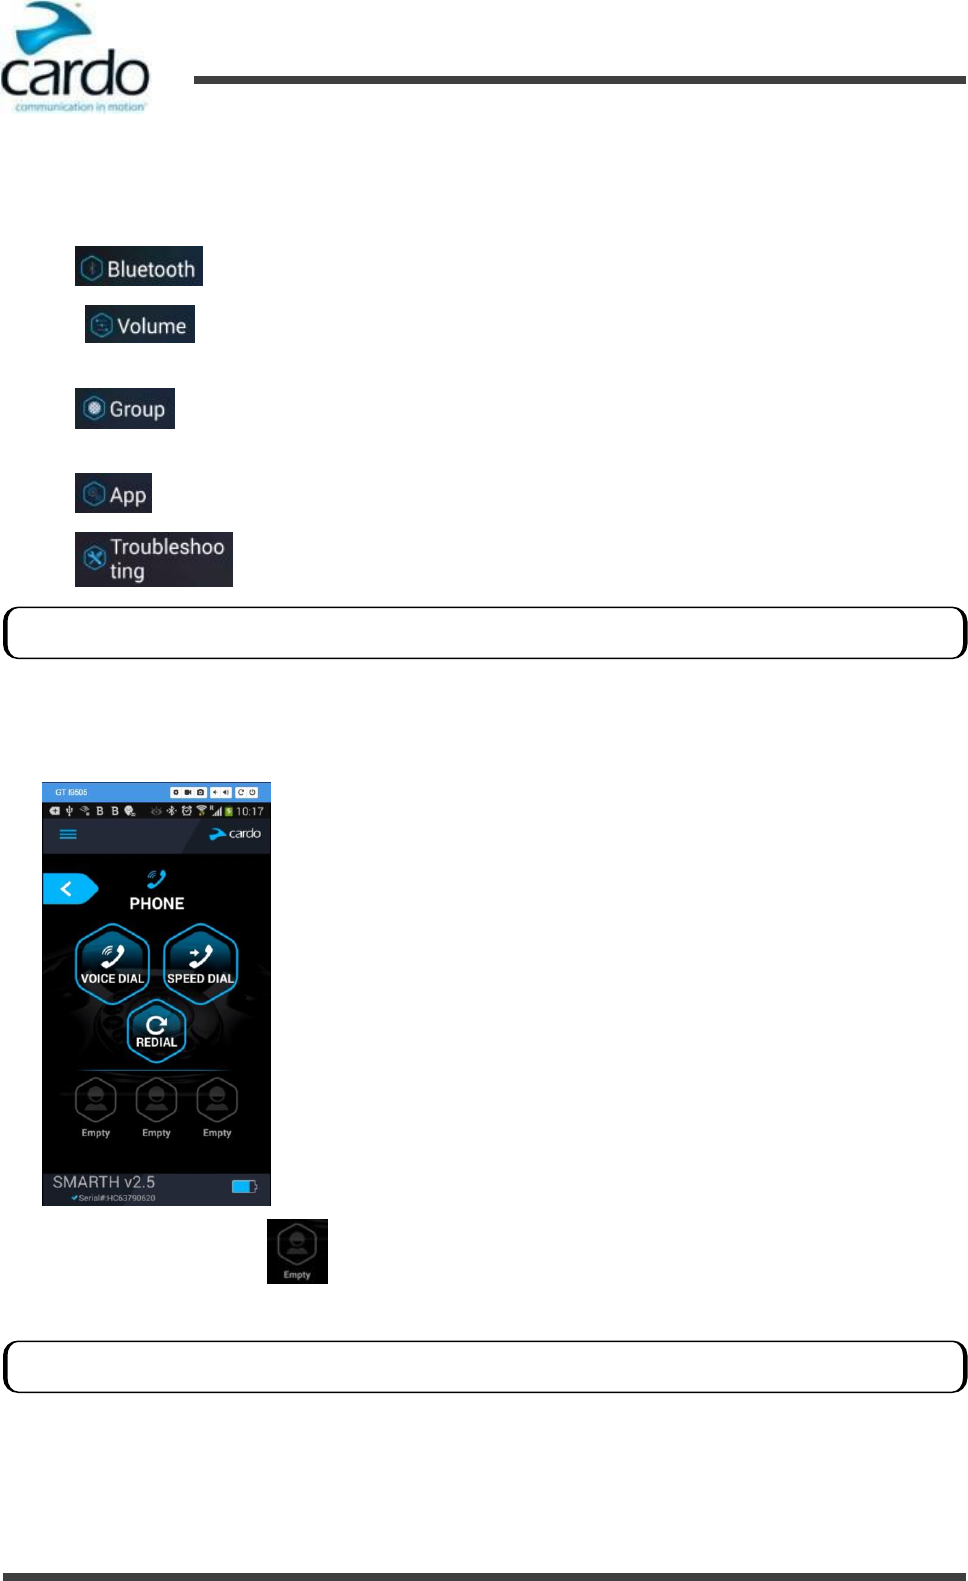
4.1.2
Configuring Speed Dial Numbers
To configure the speed dial numbers:
1.
In the Home screen, tap PHONE.
2.
Press SPEED DIAL or one of until the following screen appears:
3.
Enter the desired phone number and tap OK.
Streaming more than one audio source is known as parallel audio streaming.
The speed dial numbers are only available only through SmartSet.
SMARTH Manual
4. Before You Ride
- 20 -
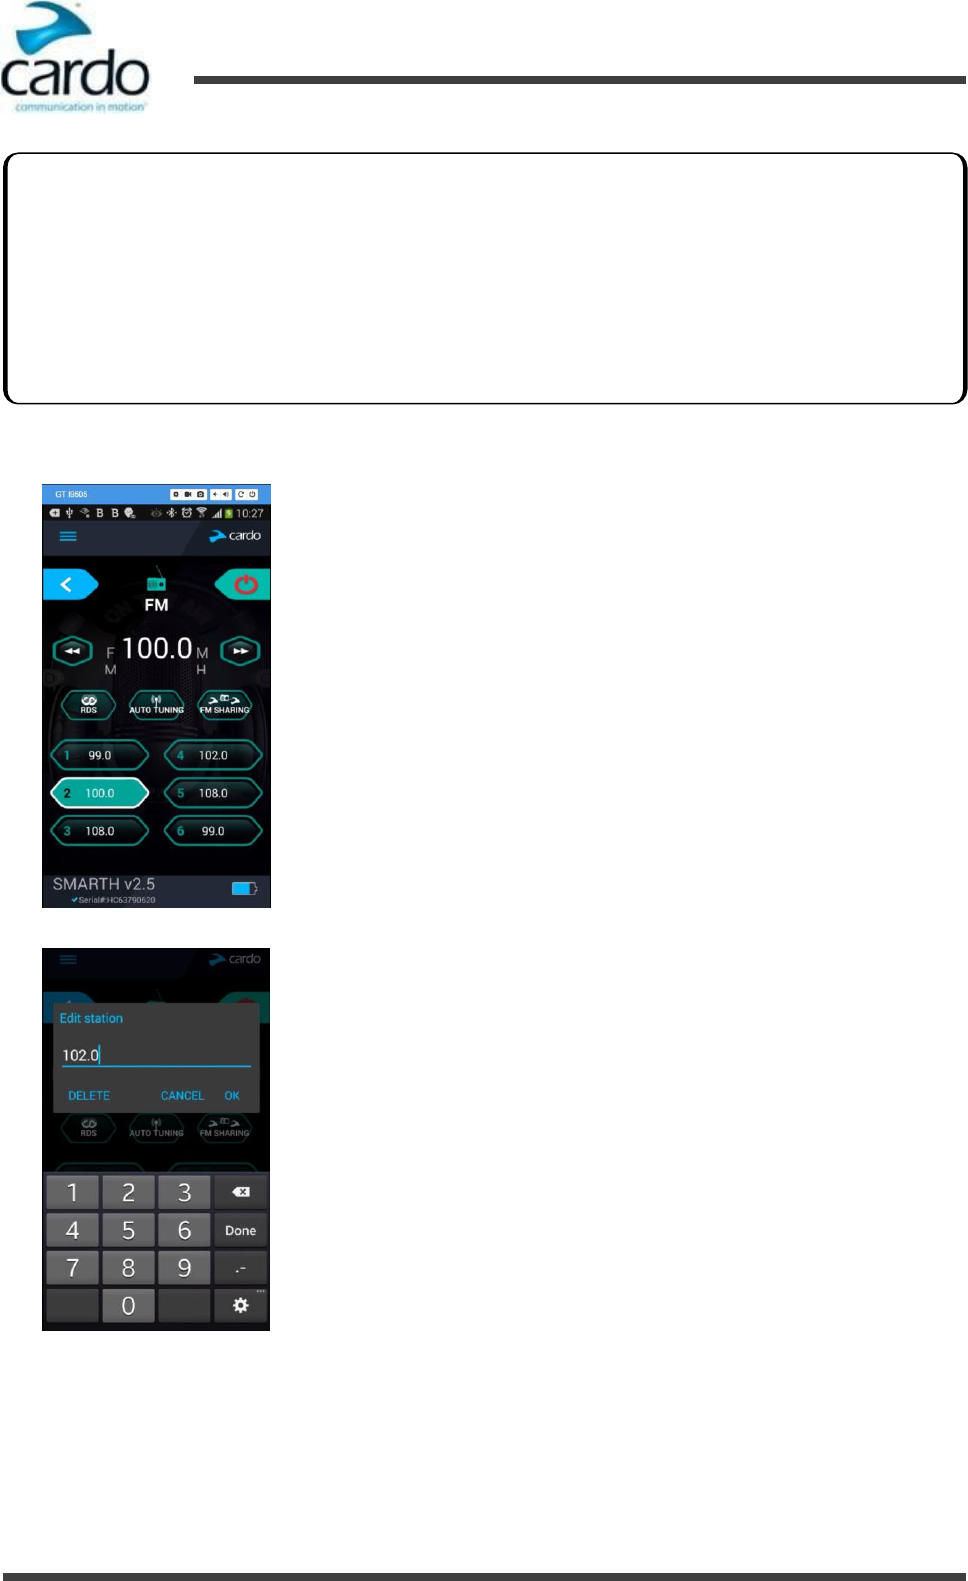
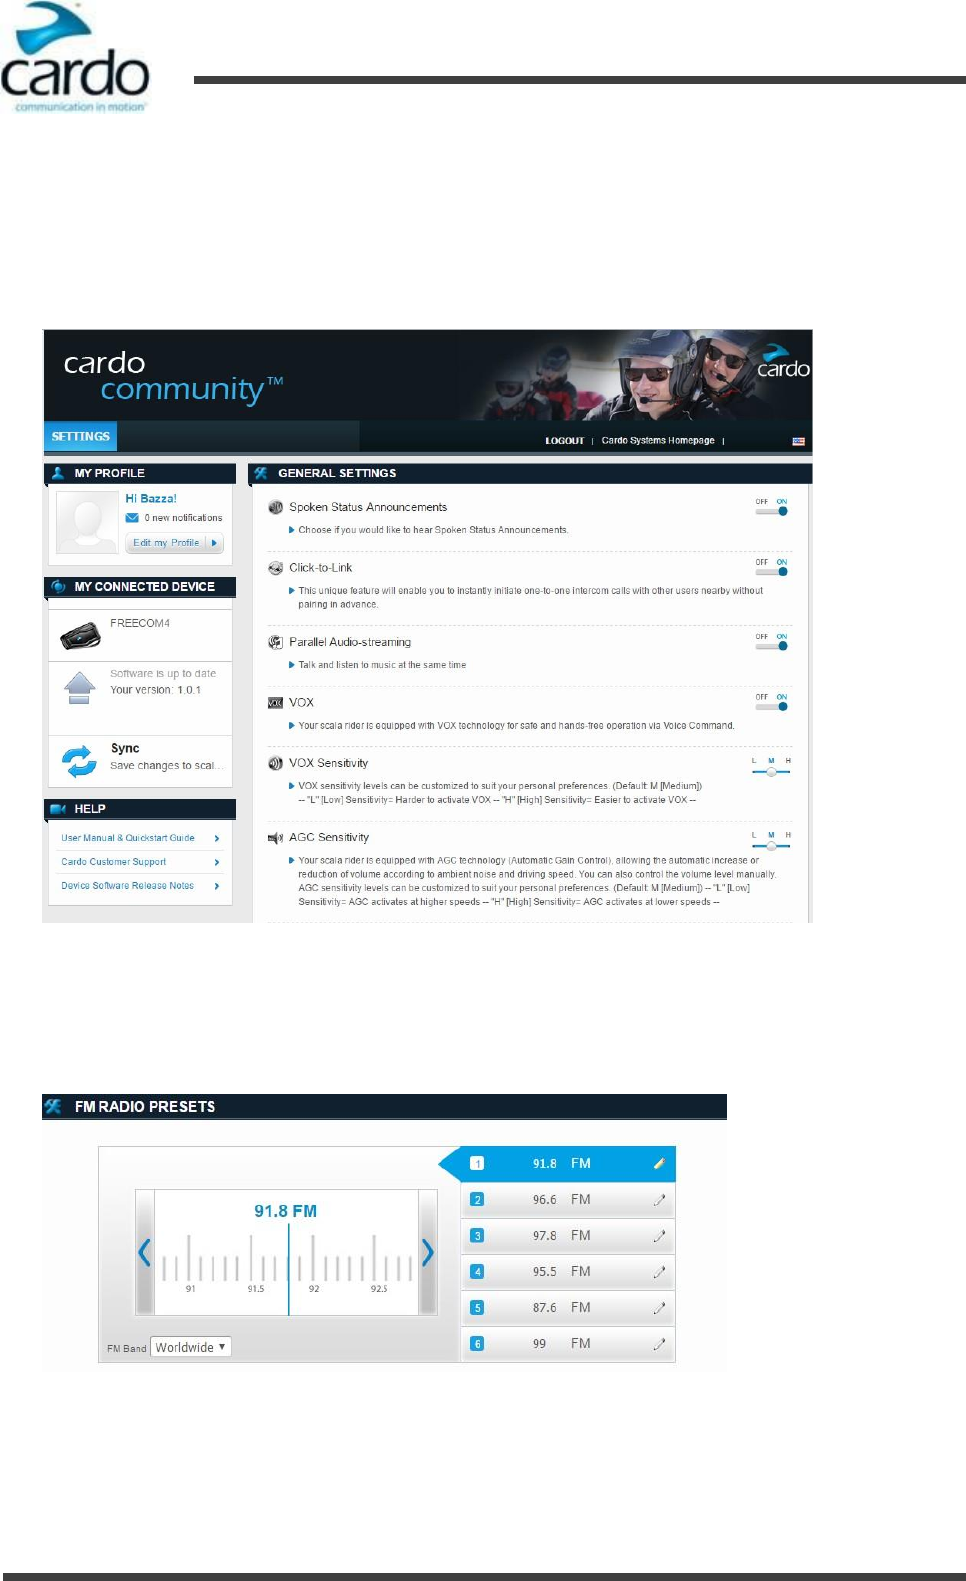
To configure the six FM radio preset radio stations manually:
1.
In the Home screen, tap FM.
2.
Press the required preset until the following screen appears:
3.
Enter the desired FM station's frequency and tap OK.
4.
To delete a preset station, tap DELETE in Step 2
4.1.3 Configuring Your FM Radio Manually
Your SMARTH includes a built-in FM radio with a six presets and Radio Data System (RDS). RDS allows the FM radio
to automatically retune to the strongest frequency available for the FM station you are listening to when the signal
becomes too weak.
You can configure your FM radio preset stations manually or using auto tuning. To configure the FM radio presets
using auto tuning, see "Configuring Your FM Radio Using Auto Tuning" on the next page.
To configure RDS see, "Configuring FM Radio RDS Retuning through Cardo SmartSet" on page 23.
SMARTH Manual
4. Before You Ride
- 21 -
4.1.4
Configuring Your FM Radio Using Auto Tuning
You can configure your SMARTH FM radio preset stations using auto tuning. Auto tuning automatically locates FM
stations.
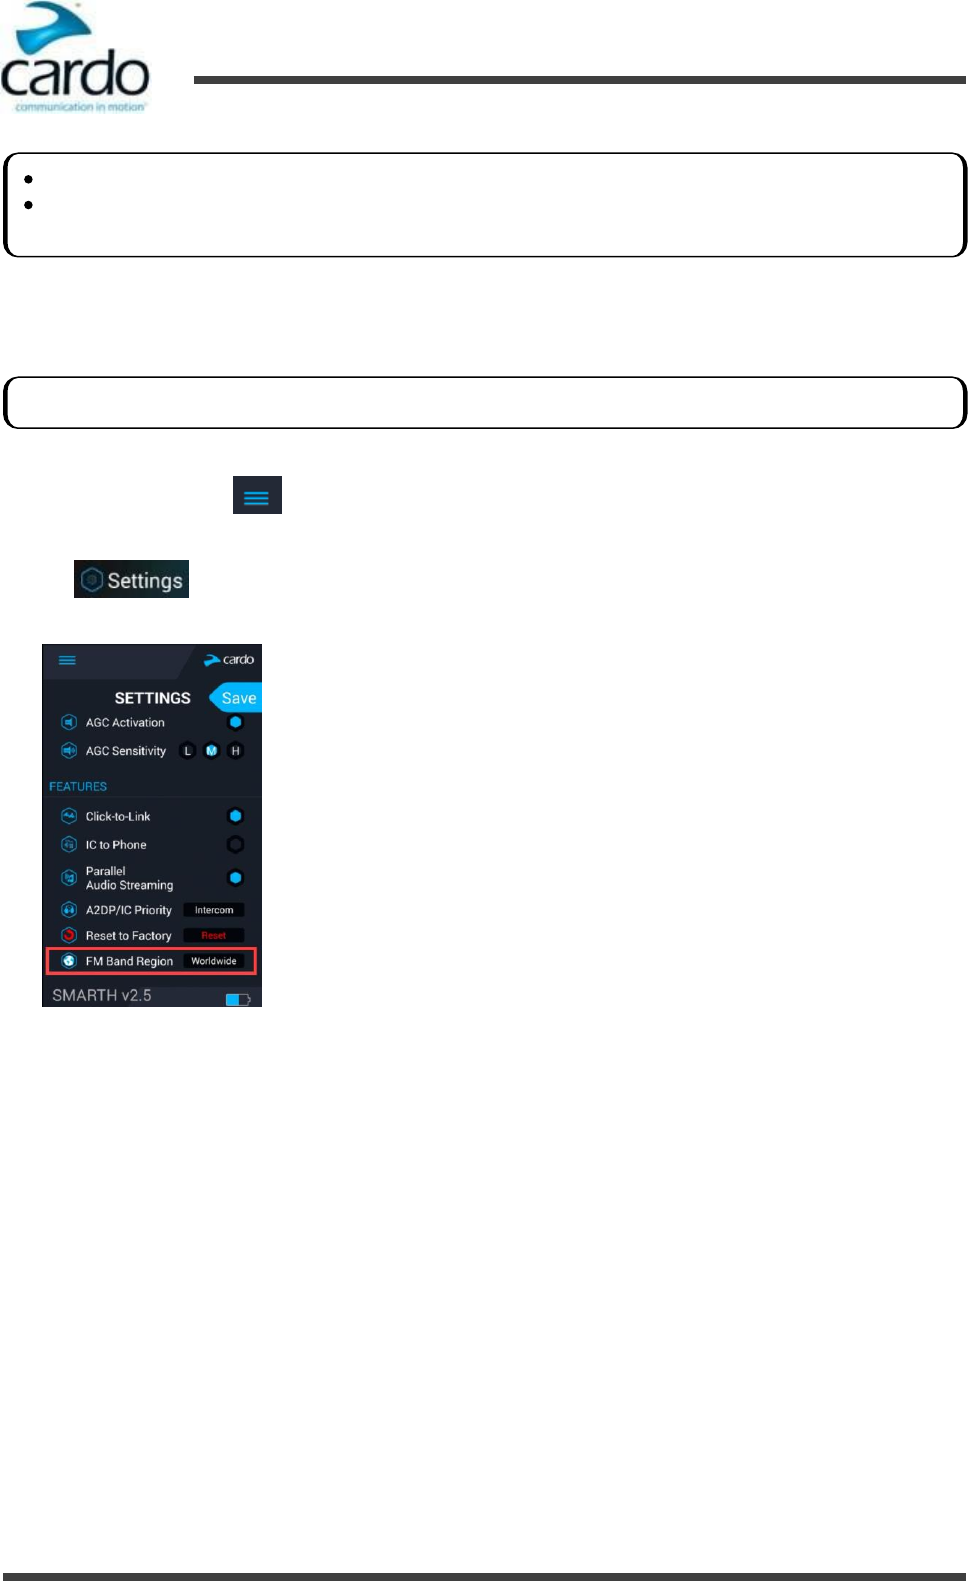
To set the FM Band:
1.
Open SmartSet and tap :
2.
Tap .
3.
Scroll to the FEATURES section and tap Worldwide or Japan to toggle your FM Band Region.
Preset radio station 1 cannot be deleted.
During a station scan, deleted preset radio stations are skipped. The station scan automatically advanced to the
next defined preset station. For more information, see "Listening to FM Radio" on page 40.
The FM Band Frequency is set to Worldwide FM frequencies by default. In Japan, you must change the FM Band.

SMARTH Manual
4. Before You Ride
- 22 -
To configure the six FM radio preset radio stations using Auto Tuning:
1.
In the Home screen, tap FM.
2.
Press . The preset is automatically reset to the FM station with the strongest signal available.
SMARTH Manual
4. Before You Ride
- 23 -
4.1.5
Configuring FM Radio RDS Retuning through Cardo SmartSet
To enable/disable RDS:
1.
Open SmartSet and tap :
2.
In the Home screen, tap FM.
3.
Tap . RDS enables/disables.
4.2
Configuring Your SMARTH through the Cardo Community
You can configure your SMARTH through your computer by connecting it to the headset with the provided USB cable
and running the Cardo Updater while your computer is connected to the Cardo Community website.
The minimum operating system requirements for the Cardo Updater are:
●
Windows® XP™
●
Mac OS X 10.7.
4.2.1
Installing the Cardo Updater on Your Computer
To install the Cardo Updater on your computer:
1.
Go to http://cardosystems.com/cardo-community/, register and login.
2.
Download the Cardo Updater from the provided links and install it on your computer.
SMARTH Manual
4. Before You Ride
- 24 -
4.2.2
Configuring Your SMARTH Basic Settings
To configure your SMARTH through the Cardo Community:
1.
Run the Cardo Updater.
2.
Using the USB cable provided with your SMARTH, connect your headset to the computer USB port. The
GENERAL SETTINGS window appears:
3.
Set the options you require for each feature, using the provided explanations as a guide.
4.2.3
Configuring Your FM Radio through Cardo Cardo Community
To configure the six FM radio preset radio stations using Cardo Community:
1.
Scroll down to FM RADIO PRESETS.
2.
On FM Band:
■
If in Japan, select Japan.
■
Otherwise, select Worldwide.
SMARTH Manual
4. Before You Ride
- 25 -
3.
On the preset station you want to edit, click .
4.
Enter the desired FM station's frequency and press Enter.
4.2.4
Upgrading Firmware for New Features
For new features, Cardo may periodically update the SMARTH firmware.
To update the firmware:
1.
Go to http://cardosystems.com/cardo-community/, register and login.
2.
Download the Cardo Updater from the provided links and install it on your computer.
3.
Connect the USB cable Type A plug to your computer USB port. 2.
4.
Connect the USB cable Type B plug to the SMARTH USB port.
4.3
Configuring Your SMARTH through the Headset Voice-Assisted Menus
You can configure your SMARTH using the headset's voice-assisted menu in combination with either headset buttons
or use VOX.
To configure your SMARTH through the voice-assisted menus:
1.
Confirm your SMARTH is in Bluetooth intercom mode:
■
Normal battery state - LED flashes blue slowly.
■
Low battery state - LED flashes red slowly.
■
Charging - LED flashes purple slowly.
2.
Tap ~Phone and ~Volume Down for 5 seconds.
3.
When the voice-assisted menu reaches your required option ("Language", "A2DP Audio Priority", "Spoken Status
Announcements", "Click-to-Link", "AGC", "RDS", "VOX Sensitivity", "VOX", "Background Audio Level "), tap ~ or use
VOX.
4.4
Checking Battery Status through Cardo SmartSet
Battery Status on Your Mobile Phone
If you installed SmartSet on your mobile phone, you can check the battery status as follows:
You can also use the left and right blue arrows on the frequency scale to update the preset frequency.
If your SMARTH is not in Bluetooth intercom mode, press ~Intercom and ~Audio. For more information see,
"Switching to Bluetooth Intercom" on page 31.
SMARTH Manual
4. Before You Ride
- 26 -
●
Android - the headset battery indicator appears in the app bottom right-corner, as well as in the notification bar:
●
iOS - the headset battery indicator appears next to the iPhone battery indicator.
4.5
Setting the Default Mobile Phone
If you paired your headset to two mobile phones, you must set one of them as the default phone for outgoing calls.
To set the default phone through SmartSet:
1.
Confirm your SMARTH is in Bluetooth intercom mode:
■
Normal battery state - LED flashes blue slowly.
■
Low battery state - LED flashes red slowly.
■
Charging - LED flashes purple slowly.
2.
Open SmartSet and tap :
If your SMARTH battery level reaches 20%, you hear a battery status voice announcement warning you that your
battery is low.
If your SMARTH is not in Bluetooth intercom mode, press ~Intercom and ~Audio. For more information see,
"Switching to Bluetooth Intercom" on page 31.
SMARTH Manual
4. Before You Ride
- 27 -
3.
Under BLUETOOTH, tap PRIORITY for the default mobile phone.
To set the default phone through the Cardo Community
To set the default phone through the headset:
●
During a mobile call, press ~Phone for 5 seconds.
4.6
Using Voice Commands
You can use voice commands for hands free operation of certain SMARTH features. Voice commands use voice
recognition. You loudly say a command and SMARTH performs the action. Voice commands are available in various
languages. English is the default language. You can change the language to another available language.
SMARTH uses pre-defined voice commands. The voice commands for each mode are as follows:
In Mode
To Perform The Action
Say
Standby mode
Hear voice the command list
"Command List"
Start A2DP
"Music On"
Turn on the FM radio
"Radio On"
Check battery status
"Battery Status"
Standby / FM / A2DP mode
Connect an One+8 Intercom call
<<Say Buddy Name>>1
Connect an intercom conference call with A and B
"Call Intercom"2
FM Radio
Turn off the FM radio
"Radio Off"
Jump forward to the next preset station
"Next Station"
Jump backward to the previous preset station
"Previous Station"
A2DP Music
Stop/pause A2DP
"Music Off"
Play the next music track
"Next Track"
Play the previous music track
"Previous Track"
DMC intercom
Mute the DMC intercom group
"Mute the Pack"2
Unmute the DMC intercom group
"Unmute the Pack"2
1You must be in DMC intercom mode. For more information, see "Creating Groups for DMC Intercom" on the next
page
2You must be in Bluetooth intercom mode.
SMARTH Manual
4. Before You Ride
- 28 -
To use a voice command:
1.
Confirm you are in the correct mode for your desired voice command.
2.
Say the voice command loudly.
4.7
Creating Groups for DMC Intercom
The SMARTH uses Dual DMC™ (Dynamic Meshwork Communication) technology. DMC creates a spontaneous and fluid
virtual network of riders providing seamless group communications. DMC is a more stable connection in a group of
riders than the Bluetooth intercom mode. DMC range is 3.6 km / 2.2 m.
In DMC intercom mode, each rider acts as an autonomous hub that maintains simultaneous and independent
communication links with each of the other members in the group, operating in a mesh network.
Whenever a SMARTH a group member cannot directly connect with group members beyond his DMC intercom range,
DMC readjusts within split seconds re-connecting to the most suitable other group member in order to "leapfrog" to
the remote member.
Any rider can start a new SMARTH DMC group. DMC automatically searches for other riders in DMC intercom grouping
mode and in range then automatically adds them to the group.
Other riders can join, leave, and rejoin existing DMC groups without compromising the integrity of the ongoing multi-
point conference call among the other group members.
4.7.1
Starting DMC intercom Groups
You can start a new DMC intercom group.
To create a new DMC group for SMARTH with Cardo headsets through the headset buttons:
1.
Confirm your SMARTH is in DMC intercom mode:
■
Normal battery state - LED flashes green slowly.
■
Low battery state - LED flashes red slowly.
■
Charging - LED flashes purple slowly.
2.
Press ~Intercom. The DMC group is created.
To create a new DMC group for SMARTH with Cardo headsets through SmartSet:
1.
Make sure that your headset is paired to the mobile device on which SmartSet is installed.
Under tough environmental conditions (dense forest, narrow buildings, heavy traffic), DMC intercom range may
be reduced. Once conditions improve, the range increases again.
SMARTH DMC intercom mode:
is limited to a maximum of four riders
a group can only have one “Group Creator”
a group can have up to three "Group Members"
a "Group Creator" can create up to 6 groups
a "Group Member" can join up to 6 groups
all members should be within 3 meters of the creator for pairing
the group continues functioning even if the Group Creator is no longer available
if a rider's connection is lost the rider remains part of the group and reconnects automatically once in range.
If your SMARTH is not in DMC intercom mode, press ~Intercom and ~Audio.
SMARTH Manual
4. Before You Ride
- 29 -
2.
Slide to . SMARTH is in DMC intercom mode
3.
Tap .
4.
Tap Group.
5.
Tap New Group.
6.
Enter your New Group name and tap OK. Your DMC intercom group appears in group list.
To create a new DMC group for SMARTH with Cardo headsets through the headset voice-assisted menu:
1.
Confirm your SMARTH is in DMC intercom mode:
■
Normal battery state - LED flashes green slowly.
■
Low battery state - LED flashes red slowly.
■
Charging - LED flashes purple slowly.
2.
Tap ~ and ~Volume Up twice.
3.
When the voice-assisted menu reaches "Advanced Features", tap ~Intercom or use VOX.
4.
When the voice-assisted menu reaches the required option, tap ~Intercom or use VOX.
4.7.2
Joining DMC intercom Groups
You can join a DMC intercom group created by another rider. If you leave a group, see "Leaving DMC intercom Groups"
on the next page
To join an existing DMC group for SMARTH with Cardo headsets through the headset buttons:
1.
Confirm your SMARTH is in DMC intercom mode:
■
Normal battery state - LED flashes green slowly.
■
Low battery state - LED flashes red slowly.
■
Charging - LED flashes purple slowly.
2.
On your headset, press ~Intercom for 5 seconds.
To join an existing DMC group for SMARTH with Cardo headsets through SmartSet:
1.
Make sure that your headset is paired to the mobile device on which SmartSet is installed.
2.
Slide to . SMARTH is in DMC intercom mode.
3.
Tap .
4.
Tap Group.
5.
Tap Join Group. SmartSet confirms groups starts.
6.
{cannot see next in }
7.
Enter your New Group name and tap OK. Your DMC intercom group appears in group list.
If your SMARTH is not in DMC intercom mode, press ~Intercom and ~Audio.
If your SMARTH is not in DMC intercom mode, press ~Intercom and ~Audio.
SMARTH Manual
4. Before You Ride
- 30 -
To join an existing DMC group for SMARTH with Cardo headsets through the headset voice-assisted menu:
1.
Confirm your SMARTH is in DMC intercom mode:
■
Normal battery state - LED flashes green slowly.
■
Low battery state - LED flashes red slowly.
■
Charging - LED flashes purple slowly.
2.
Tap ~ and ~Volume Up twice.
3.
When the voice-assisted menu reaches "Advanced Features", tap ~Intercom or use VOX.
4.
When the voice-assisted menu reaches the required option, tap ~Intercom or use VOX.
4.7.3
Leaving DMC intercom Groups
You can leave a DMC intercom group without deleting the DMC intercom group. For example, you may leave a group
to create a new group or join another group. You can rejoin a group later, see "Joining DMC intercom Groups" on the
previous page.
To leave an existing DMC group for SMARTH with Cardo headsets through the headset buttons:
1.
Confirm your SMARTH is in DMC intercom mode:
■
Normal battery state - LED flashes green slowly.
■
Low battery state - LED flashes red slowly.
■
Charging - LED flashes purple slowly.
To leave an existing DMC group for SMARTH with Cardo headsets through SmartSet:
To leave an existing DMC group for SMARTH with Cardo headsets through the headset voice-assisted menu:
1.
Confirm your SMARTH is in DMC intercom mode:
■
Normal battery state - LED flashes green slowly.
■
Low battery state - LED flashes red slowly.
■
Charging - LED flashes purple slowly.
2.
Tap ~ and ~Volume Up twice.
3.
When the voice-assisted menu reaches "Advanced Features", tap ~Intercom or use VOX.
If your SMARTH is not in DMC intercom mode, press ~Intercom and ~Audio.
If your DMC group connection is lost, you remain part of the group. Once in range of any other group member,
you automatically reconnect.
If your DMC group splits with some group members remaining in range of each other but not in range of all group
members, you can continue speaking with the members still in range. Once in range of any other group member,
you automatically reconnect.
If you join a new DMC group, you automatically leave your existing DMC group.
If your SMARTH is not in DMC intercom mode, press ~Intercom and ~Audio.
If your SMARTH is not in DMC intercom mode, press ~Intercom and ~Audio.
SMARTH Manual
4. Before You Ride
- 31 -
4.
When the voice-assisted menu reaches the required option, tap ~Intercom or use VOX.
4.7.4
Deleting DMC intercom Groups
You can delete a DMC intercom group. You must join the deleted group again after deleting the group, see "Joining
DMC intercom Groups" on page 29.
To delete an existing DMC group for SMARTH with Cardo headsets through the headset buttons:
1.
Confirm your SMARTH is in DMC intercom mode:
■
Normal battery state - LED flashes green slowly.
■
Low battery state - LED flashes red slowly.
■
Charging - LED flashes purple slowly.
2.
On your headset, tap ~Intercom.
3.
Press ~Intercom for 5 seconds.
To delete an existing DMC group for SMARTH with Cardo headsets through SmartSet:
1.
Make sure that your headset is paired to the mobile device on which SmartSet is installed.
2.
Open SmartSet and tap :
3.
Tap Group. The Group Manager appears.
4.
Locate your required group and tap .
To delete an existing DMC group for SMARTH with Cardo headsets through the headset voice-assisted menu:
4.7.5
Switching to Bluetooth Intercom
Your SMARTH operates in two intercom modes:
■
Bluetooth intercom
■
DMC intercom
You use DMC intercom in DMC intercom mode and Bluetooth intercom in Bluetooth intercom mode. The LED
indicates your current intercom mode. You must be DMC intercom mode to use DMC intercom features. For other
feature, you must be in Bluetooth intercom mode.
To switch from DMC intercom to Bluetooth intercom for SMARTH with Cardo headsets through the headset
buttons:
1.
Confirm your SMARTH is in DMC intercom mode:
■
Normal battery state - LED flashes green slowly.
■
Low battery state - LED flashes red slowly.
■
Charging - LED flashes purple slowly.
2.
On your headset, press ~Intercom and ~Audio.
To switch from DMC intercom to Bluetooth intercom for SMARTH with Cardo headsets through SmartSet:
To switch from DMC intercom to Bluetooth Intercom for SMARTH with Cardo headsets through the headset voice-
assisted menu:
If your SMARTH is not in DMC intercom mode, press ~Intercom and ~Audio.

- 32 -
SMARTH Manual
5. On the Road
5.
On the Road
5.1
Making and Receiving Phone Calls
5.1.1
Making Phone Calls
To make a phone call using SMARTH with Cardo headsets through the headset buttons:
●
with your mobile phone's voice dialing - press ~Phone .
●
dialing the default speed dial number - press ~Phone three times.
●
redialing the last number called - press ~Phone twice (not available during mobile or Bluetooth intercom calls).
To make a phone call using SMARTH with Cardo headsets through SmartSet:
●
In SmartSet, either:
■
tap Phone then tap the required speed dial (to define speed dials, see "Configuring Speed Dial Numbers" on
page 19).
or
■
tap REDIAL.
To make a phone call using SMARTH with Cardo headsets through the headset voice-assisted menu:
1.
Confirm your SMARTH is in Bluetooth intercom mode:
■
Normal battery state - LED flashes blue slowly.
■
Low battery state - LED flashes red slowly.
■
Charging - LED flashes purple slowly.
2.
Tap ~ and ~Volume Up twice.
3.
When the voice-assisted menu reaches "xxx", tap ~Intercom or use VOX.
4.
When the voice-assisted menu reaches the required option, tap ~Intercom or use VOX.
5.1.2
Answering Phone Calls
To answer a phone call using SMARTH with Cardo headsets through the headset buttons:
●
Tap ~Phone or ~.
To answer a phone call using SMARTH with Cardo headsets through SmartSet:
●
In SmartSet, tap xxx.
To answer a phone call using SMARTH with Cardo headsets through VOX:
●
Say "xxx" loudly.
You can use your mobile phone normally to make and receive phones while paired to your SMARTH.
If your SMARTH is not in Bluetooth intercom mode, press ~Intercom and ~Audio. For more information see,
"Switching to Bluetooth Intercom" on the previous page.

- 33 -
SMARTH Manual
5. On the Road
5.1.3
Rejecting Phone Calls
To reject a phone call using SMARTH with Cardo headsets through the headset buttons:
●
Press ~Phone for 2 seconds.
To reject a phone call using SMARTH with Cardo headsets through SmartSet:
●
In SmartSet, tap xxx.
To reject a phone call using SMARTH with Cardo headsets through VOX:
●
Remain silent for 30 seconds.
5.1.4
Ending Phone Calls
To end a phone call using SMARTH with Cardo headsets through the headset buttons:
●
Tap ~Phone.
To end a phone call using SMARTH with Cardo headsets through SmartSet:
●
In SmartSet, tap xxx.
To end a phone call using SMARTH with Cardo headsets through VOX:
●
Say "xxx' loudly.
5.1.5
Toggling Between Two Calls on Two Mobile Phones Paired to Your Headset
Your SMARTH can toggle between two calls on two mobile phones when both mobile phones are paired to your
headset.
To toggle between two calls on two mobile phones using SMARTH with Cardo headsets through the headset
buttons:
●
Tap ~Phone twice.
To toggle between two calls on two mobile phones using SMARTH with Cardo headsets through SmartSet:
●
In SmartSet, tap xxx.
To toggle between two calls on two mobile phones using SMARTH with Cardo headsets through VOX:
●
Say "xxx' loudly.
5.1.6
Disconnecting the Current Call and Switching To The Second Call
You can disconnect the current call and switch to the second phone when both mobile phones are paired to your
headset.
To disconnect the current call and switch to the call on the second phone when two mobile phones paired to your
headset using SMARTH with Cardo headsets through the headset buttons:
●
Tap ~Phone.
To disconnect the current call and switch to the call on the second phone when two mobile phones paired to your
headset using SMARTH with Cardo headsets through SmartSet:
●
In SmartSet, tap xxx.
To disconnect the current call and switch to the call on the second phone when two mobile phones paired to your
headset using SMARTH with Cardo headsets through VOX:
●
Say "xxx' loudly.
- 34 -
SMARTH Manual
5. On the Road
5.2
Using DMC intercom
You can use DMC intercom to speak with other riders in your DMC group (for more information on creating DMC
intercom groups, see "Creating Groups for DMC Intercom" on page 28
"Creating Groups for DMC Intercom" on page 28
■
mute/unmute DMC intercom groups, see "Muting DMC intercom Groups" below.
■
leave DMC intercom groups, see "Leaving DMC intercom Groups" on page 30.
■
delete DMC intercom groups, see "Deleting DMC intercom Groups" on page 31
■
stream music in DMC intercom groups, see "Streaming Music in DMC intercom Mode" on the next page
■
switch between DMC intercom and Bluetooth intercom, see "Switching to Bluetooth Intercom" on page 31
5.2.1
Muting DMC intercom Groups
To mute the DMC group for SMARTH with Cardo headsets through the headset buttons:
1.
Confirm your SMARTH is in DMC intercom mode:
■
Normal battery state - LED flashes green slowly.
■
Low battery state - LED flashes red slowly.
■
Charging - LED flashes purple slowly.
2.
On your headset, press ~Intercom for 2 seconds.
To mute the DMC group for SMARTH with Cardo headsets through SmartSet:
1.
Make sure that your headset is paired to the mobile device on which SmartSet is installed.
2.
Open SmartSet and tap the DMC
3.
Tap MUTE GROUP.
To mute the DMC group for SMARTH with Cardo headsets through the headset voice-assisted menu:
5.2.2
Unmuting DMC intercom Groups
To unmute the DMC group for SMARTH with Cardo headsets through the headset buttons:
1.
Confirm your SMARTH is in DMC intercom mode:
■
Normal battery state - LED flashes green slowly.
■
Low battery state - LED flashes red slowly.
■
Charging - LED flashes purple slowly.
2.
On your headset, tap ~Intercom.
You must enable VOX when using DMC intercom. To enable VOX, see "Configuring Your SMARTH Basic Settings" on
page 18.
If your SMARTH is not in DMC intercom mode, press ~Intercom and ~Audio.
Muting DMC intercom mutes your microphone and speaker.
If your SMARTH is not in DMC intercom mode, press ~Intercom and ~Audio.
- 35 -
SMARTH Manual
5. On the Road
To unmute the DMC group for SMARTH with Cardo headsets through SmartSet:
1.
Make sure that your headset is paired to the mobile device on which SmartSet is installed.
2.
Open SmartSet and tap the DMC.
3.
Tap MUTE GROUP.
To unmute the DMC group for SMARTH with Cardo headsets through the headset voice-assisted menu:
5.2.3
Streaming Music in DMC intercom Mode
5.2.3.1 Background Audio Level and Audio Source Priorities
The SMARTH can stream audio from two connected sources simultaneously, so that you can listen to your music or the
FM radio while holding a DMC intercom conversation. Background Audio Level is automatically disabled during mobile
phone conversations and GPS directions instructions.
By default, Background Audio Level is enabled. See Section 4 - Before You Ride to adjust the settings. If disabled, the
SMARTH automatically determines which audio source to play based on the priority of the connected devices.
Priority
Audio Source
Higher Priority
↑
Lower Priority
Mobile phone 1, GPS device instructions1
Mobile phone 2, GPS device instructions1
Intercom (Click-to-Link/DMC and Bluetooth modes) or A2DP music2
A2DP music or Intercom (Click-to-Link/DMC and Bluetooth modes)2
FM Radio
1Phone calls and GPS temporarily mute DMC intercom, but group members remain part of the DMC intercom group.
2Depends on your A2DP/IC Priority setting, as configured in SmartSet (see "Configuring Your SMARTH through Cardo
SmartSet" on page 17).
5.3
Making and Receiving Bluetooth Intercom Calls
Intercom modes all have the same priority, so ongoing intercom calls will not be interrupted by any other
intercom call.
Bluetooth intercom and Click-to-Link calls have the same priority, so Click-to-Link calls will not interrupt any
Bluetooth intercom call in progress, and vice versa.
In DMC intercom, if no group member is speaking and music is playing, the music volume automatically
increases. When a DMC intercom group member speaks, the music volume automatically reduces.
To make and receive Bluetooth intercom calls, you must first pair the Bluetooth, see "Pairing the Bluetooth
Intercom" on page 11.
During a 3 or 4-way Bluetooth intercom conference call while riders are range (1.2 km / 3,900 ft), riders using
both Bluetooth intercom channels cannot receive phone calls or GPS instructions while the call is in progress.
For more information see, "Making and Receiving Bluetooth Intercom Calls" above.
If DMC intercom is active while making or receiving a phone call, DMC intercom automatically resumes after
the call ends.

- 36 -
SMARTH Manual
5. On the Road
To start a Bluetooth intercom call, do one of the following:
●
To use the headset buttons :
■
To start a call with rider A or add rider A to a call, tap ~.
■
To start a call with rider B or add rider B to a call, tap ~ twice.
■
To start a conference call with riders A and B, press ~ for two seconds.
●
Use VOX. If you are paired and connected (within range), a Bluetooth intercom call with riders A, B or A+B is
started.
●
To use SmartSet: On the INTERCOM screen, select the required channel (A, B, or A+B).
●
To use the headset voice-assisted menu:
a.
Tap ~ and ~Volume Up twice.
b.
When the voice-assisted menu reaches "Call Intercom", tap ~ or use VOX.
To end a Bluetooth intercom call, do one of the following:
●
To use the headset buttons:
■
To disconnect rider A, tap ~.
■
To disconnect rider B, tap ~ twice.
■
To end all active Bluetooth intercom connections, press ~ for 2 seconds.
●
If you initiated the Bluetooth intercom call using VOX: remain silent for at least 30 seconds. Any open call is
disconnected.
●
To use SmartSet: On the INTERCOM screen, select the required channel to disconnect.
5.3.1
Receiving Bluetooth Intercom Calls
●
If another paired headset calls you via Bluetooth intercom, the call begins instantly.
●
To receive Bluetooth intercom calls from unpaired headsets, see "Click-To-Link Calls" below.
5.3.2
Bluetooth Intercom Busy Signal
A busy signal is heard when you attempt a Bluetooth intercom call when the other rider is in:
●
phone call
●
Bluetooth intercom call with Channels A and B
●
One+8 intercom call
●
Click-to-Link call
5.3.3
Click-To-Link Calls
Click-to-Link is a spontaneous way to instantly initiate one-on-one intercom calls with other riders near you, without
being paired.
If a single rider (A or B) is connected, a Bluetooth intercom call is opened to the connected rider.
If riders A and B are connected, a Bluetooth intercom conference call is opened with Riders A and B.
If other Cardo users are nearby, your next Click-to-Link call may randomly connect to any of them.

- 37 -
SMARTH Manual
5. On the Road
To make a Click-to-Link call through SmartSet:
1.
Open SmartSet and tap Intercom.
2.
Tap CLICK TO LINK.
To end a Click-to-Link call through the headset buttons:
●
Tap ~.
To end a Click-to-Link call through VOX:
●
Remain silent for at least 30 seconds. Any open intercom call to a single rider (A, B or C) is disconnected.
5.3.3.1 Incoming Click-to-Link Intercom Calls
To accept a Click-to-Link call through the headset buttons:
●
Tap ~.
To reject a Click-to-Link call through the headset buttons:
●
Press ~ for 2 seconds.
To accept a Click-to-Link call through VOX:
●
Say a word loudly.
5.4 Making and Receiving One+8 Intercom Calls
5.4.1.1
Making One+8 Intercom Calls
To make an One+8 Intercom call using SMARTH with Cardo headsets through the headset buttons:
1.
Change to One+1 Mode
2.
Press ~Intercom and ~Volume Up for 2 seconds.
3.
When you hear the name of your desired buddy, tap ~Intercom. Your buddy connects.
To make an One+8 Intercom call using SMARTH with Cardo headsets through SmartSet:
●
To use SmartSet:
To make a phone call using SMARTH with Cardo headsets through the headset voice-assisted menu:
1.
Confirm your SMARTH is in Bluetooth intercom mode:
■
Normal battery state - LED flashes blue slowly.
■
Low battery state - LED flashes red slowly.
■
Charging - LED flashes purple slowly.
2.
When the voice-assisted menu reaches "xxx", tap ~Intercom or use VOX.
3.
When the voice-assisted menu reaches your buddy's name "Language"), tap ~Intercom or use VOX.
To block incoming Click-to-Link calls, disable Click-to-Link (see "Before You Ride" on page 16).
If your SMARTH is not in Bluetooth intercom mode, press ~Intercom and ~Audio. For more information see,
"Switching to Bluetooth Intercom" on page 31.
- 38 -
SMARTH Manual
5. On the Road
5.4.1.2
Receiving One+8 Intercom Calls
To make an One+8 Intercom call using SMARTH with Cardo headsets through the headset buttons:
To make an One+8 Intercom call using SMARTH with Cardo headsets through SmartSet:
To make a phone call using SMARTH with Cardo headsets through the headset voice-assisted menu:
●
To use SmartSet:
●
To use the headset voice-assisted menu:
5.4.1.3
Ending One+8 intercom call
To make an One+8 Intercom call using SMARTH with Cardo headsets through the headset buttons:
To make an One+8 Intercom call using SMARTH with Cardo headsets through SmartSet:
To make a phone call using SMARTH with Cardo headsets through the headset voice-assisted menu:
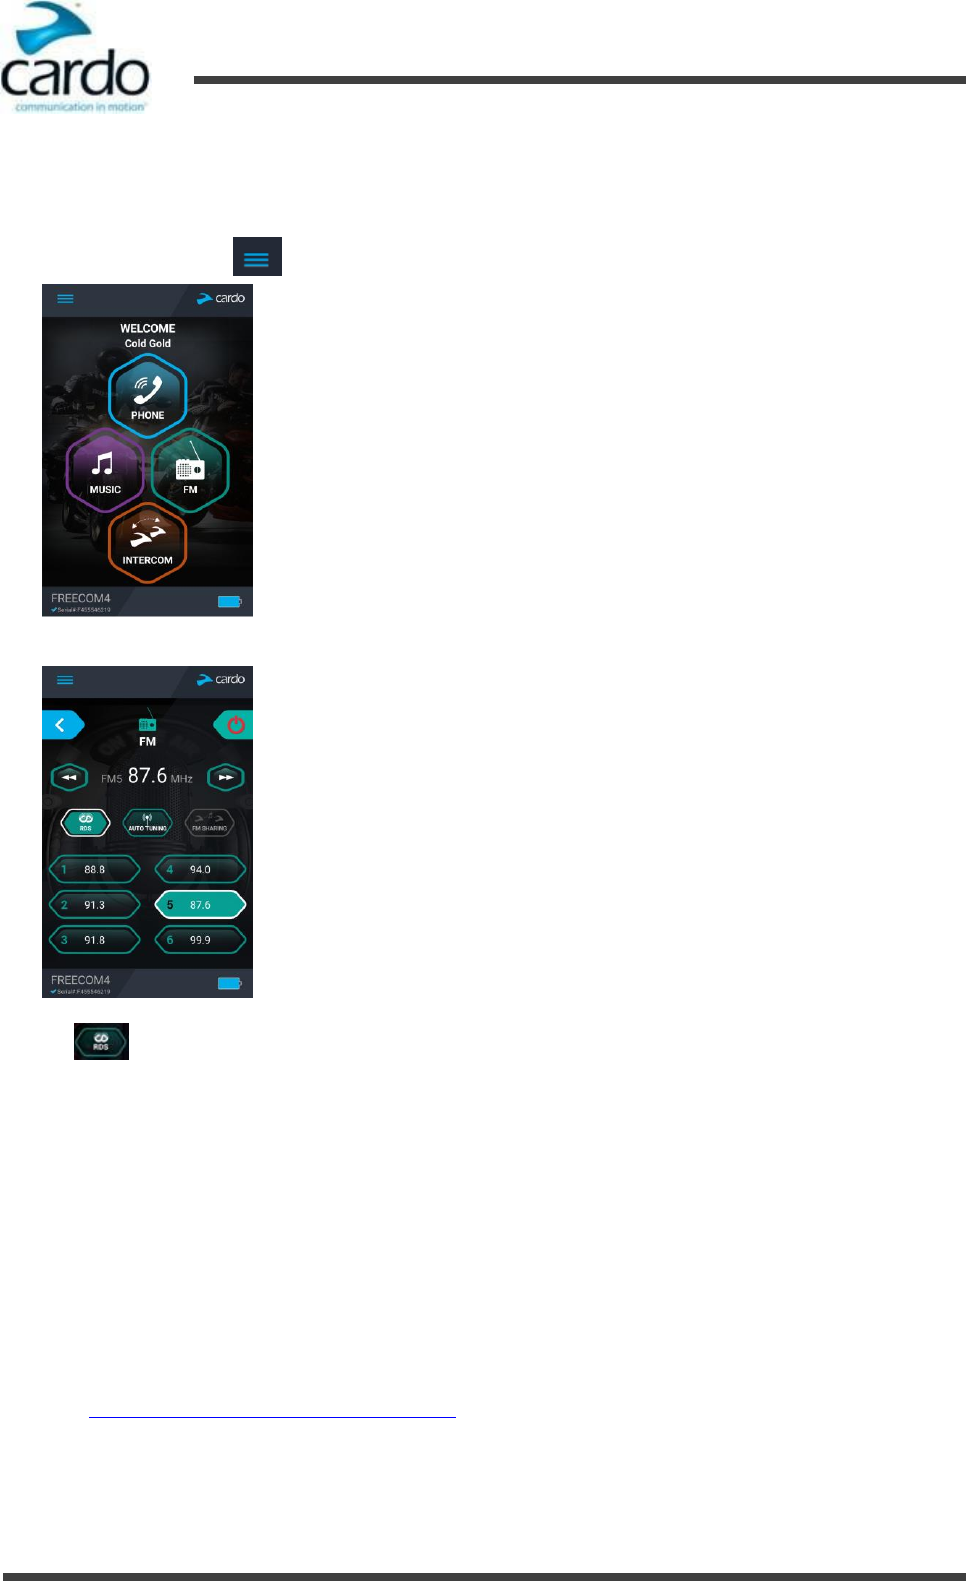
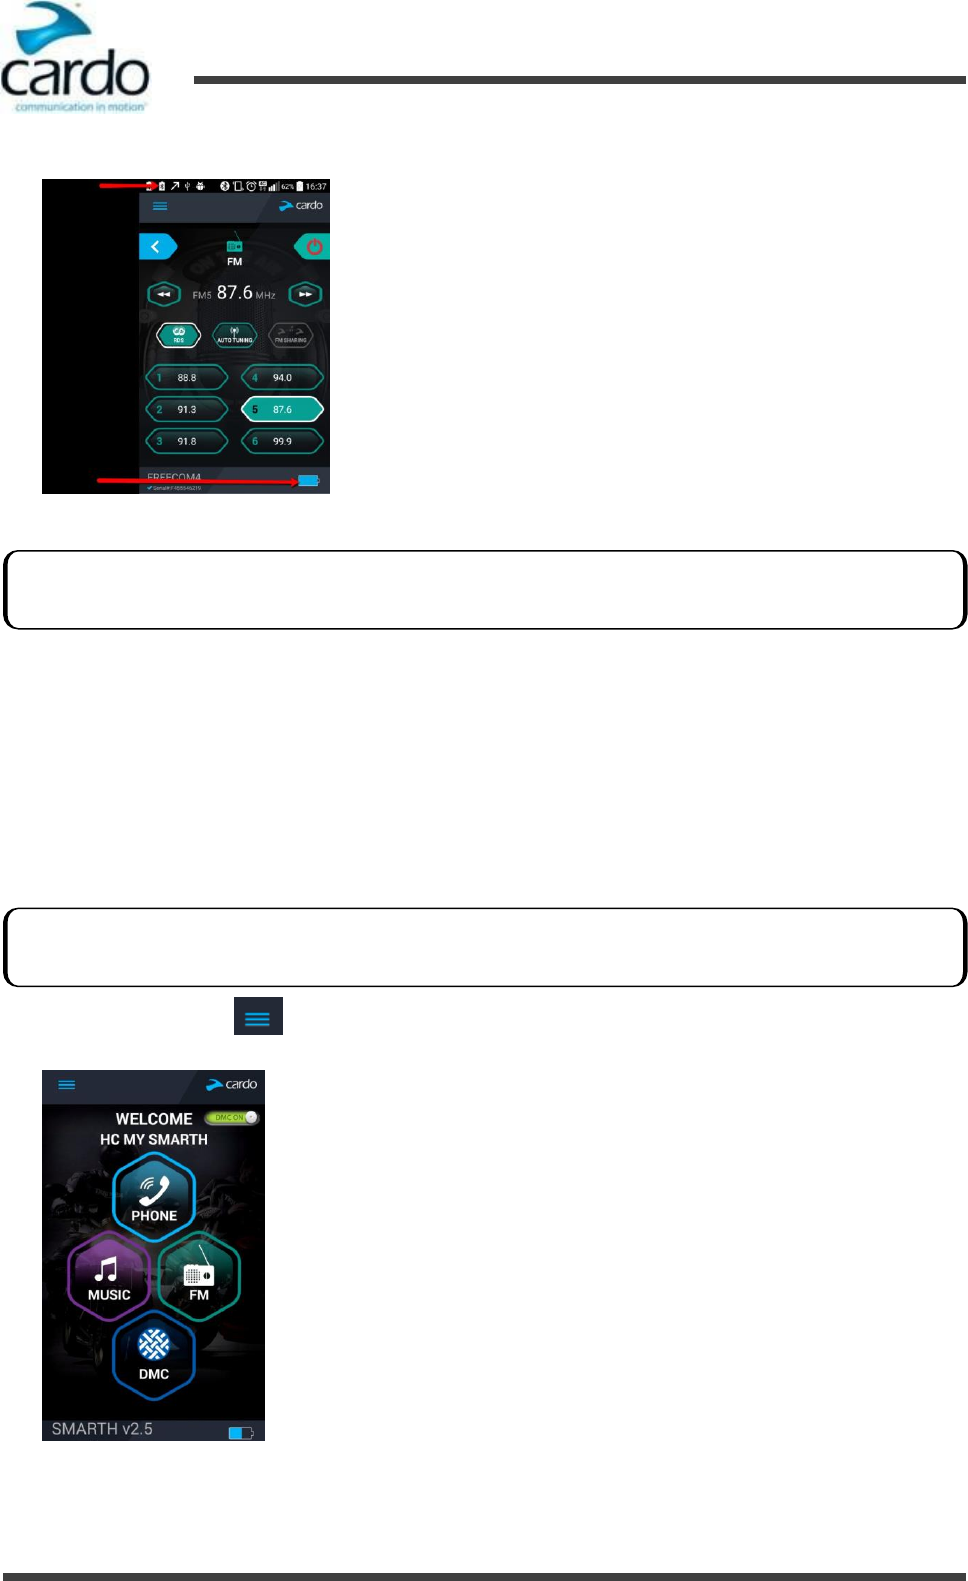
5.5
Listening to Music and Radio
5.5.1
Listening to Music
To start music streaming from your paired device, do one of the following:
●
To use the headset buttons: tap ~Audio.
●
To use SmartSet: on the MUSIC screen, tap .
●
To use the headset voice-assisted menu:
a.
Tap ~ and ~Volume Up twice.
b.
When the voice-assisted menu reaches "Music On", tap ~ or use VOX.
To stop music streaming from your paired device, do one of the following:
●
To use the headset buttons: press ~Intercom for 2 seconds.
●
To use SmartSet: on the MUSIC screen, tap .
●
To use the headset voice-assisted menu:
a.
Tap ~ and ~Volume Up twice.
b.
When the voice-assisted menu reaches "Music Off", tap ~ or use VOX.
To skip to the next track (while streaming music):
●
To use the headset buttons: tap ~Audio.
●
To use SmartSet: on the MUSIC screen, tap .
●
To use the headset voice-assisted menu:
You can mute the DMC intercom while listening to the music by pressing ~Intercom for 2 seconds. Unmute DMC
intercom by pressing ~Intercom
Music streaming plays in the background during an active DMC intercom call.
- 39 -
SMARTH Manual
5. On the Road
a.
Tap ~ and ~Volume Up twice.
b.
When the voice-assisted menu reaches "Next Track", tap ~ or use VOX.
To skip to the previous track (while streaming music):
●
To use the headset buttons: tap ~Audio twice.
●
To use SmartSet: on the MUSIC screen, tap .
●
To use the headset voice-assisted menu:
a.
Tap ~ and ~Volume Up twice.
b.
When the voice-assisted menu reaches "Precious Track", tap ~ or use VOX.
To forward auto scan tracks (while streaming music) and then play your desired track:
●
To use the headset buttons:
a.
Press ~Phone and ~Volume Up. Forward scan plays a few seconds of each track.
b.
When you hear a track you want to play, tap ~Audio.
●
To use SmartSet:
a.
On the MUSIC screen, under MUSIC SCAN, tap . Forward scan plays a few seconds of each track.
b.
When you hear a track you want to play, on the MUSIC screen, under MUSIC SCAN, tap .
●
To use the headset voice-assisted menu:
a.
Tap ~ and ~Volume Up twice.
b.
When the voice-assisted menu reaches "Scan tracks up", tap ~ or use VOX.
To backward auto scan tracks (while streaming music) and then play your desired track:
●
To use the headset buttons:
a.
Press ~Phone and ~Volume Down. Backward scan plays a few seconds of each track.
b.
When you hear a track you want to play, tap ~Audio.
●
To use SmartSet:
a.
On the MUSIC screen, under MUSIC SCAN, tap . Backward scan plays a few seconds of each track.
b.
When you hear a track you want to play, on the MUSIC screen, under MUSIC SCAN, tap .
●
To use the headset voice-assisted menu:
a.
Tap ~ and ~Volume Up twice.
b.
When the voice-assisted menu reaches "Scan tracks down", tap ~
c.
When you hear a track you want to play, use VOX.
5.5.1.1 Switching Music Sources
If two A2DP audio sources are paired, SMARTH uses the A2DP audio sources from which you last played music.

SMARTH Manual
5. On the Road
- 40 -
To switch to the other audio source:
1.
Stop A2DP playback from the current device (see " Listening to Music" on page 38).
2.
Start A2DP streaming from the other device (see " Listening to Music" on page 38).
SMARTH automatically remembers your last played device.
5.5.2
Listening to FM Radio
To turn on the FM radio, do one of the following:
●
To use the headset buttons: tap and ~Audio twice.
●
To use SmartSet: on the FM screen, tap the On/Off button.
●
To use the headset voice-assisted menu:
a.
Tap ~ and ~Volume Up twice.
b.
When the voice-assisted menu reaches "Radio On", tap ~ or use VOX.
To turn the FM radio off, do one of the following:
●
To use the headset buttons: press ~Audio for 2 seconds.
●
To use SmartSet: on the FM screen, tap the On/Off button.
●
To use the headset voice-assisted menu:
a.
Tap ~ and ~Volume Up twice.
b.
When the voice-assisted menu reaches "Radio Off", tap ~ or use VOX.
To play a different preset station:
●
To use the headset buttons, do one of the following:
■
tap ~Audio for the next preset
■
tap ~Audio twice for the previous preset
●
To use SmartSet: On the FM screen, tap the desired preset.
To seek the next available station:
●
To use SmartSet: On the FM screen, do one of the following:
■
tap .
■
tap .
●
To use the headset voice-assisted menu:
a.
Tap ~ and ~Volume Up twice.
b.
When the voice-assisted menu reaches "Next Station", tap ~ or use VOX.
To auto scan available stations and select your desired station:
●
To use the headset buttons:
You can mute the DMC intercom while listening to the FM radio by pressing ~Intercom for 2 seconds. Unmute
DMC intercom by pressing ~Intercom
When you switch on your FM radio, the station that was playing when you last switched off resumes playing.
SMARTH Manual
5. On the Road
- 41 -
a.
Tap ~Phone and ~Volume Up. The FM radio plays each station that it finds for several seconds.
b.
When you hear a track you want to play, tap ~Audio.
●
To use SmartSet:
●
To use the headset voice-assisted menu:
a.
Tap ~ and ~Volume Up twice.
b.
When the voice-assisted menu reaches "Previous Station", tap ~ or use VOX.
c.
When you hear a track you want to play, use VOX.
To store a scanned station in the active preset:
●
To use the headset buttons: tap ~Audio within 20 seconds of stopping the scan.
●
Use VOX.
Temporarily Storing New FM Radio Preset Stations Using Auto Tuning
You can temporarily store new FM radio stations in the presets using auto tuning. You can restore the original presets.
To temporarily store new stations in the presets (auto tuning):
●
To use the headset buttons: press ~Volume Down for 5 seconds.
●
To use SmartSet: on the FM screen, tap AUTO TUNING.
●
To use the headset voice-assisted menu:
a.
Tap ~ and ~Volume Up twice.
b.
When the voice-assisted menu reaches "Auto scan 6 stations", tap ~ or use VOX.
To restore the original presets (following auto tuning):
●
To use the headset buttons: switch your headset off then turn it back on.
●
To use SmartSet: on the FM screen, tap .
5.5.3
Sharing Music and Radio
You can share music and FM radio with other riders/passengers. Music can be shared up to a range of 33 ft / 10m, and
is more suitable for rider/passenger combinations. FM radio can be shared up to a range of 4250 ft / 1300 m, and can
also be used for rider/rider scenarios.
To start/stop sharing, do one of the following:
●
To use the headset buttons:
a.
Confirm your SMARTH is in Bluetooth intercom mode:
*
Normal battery state - LED flashes blue slowly.
*
Low battery state - LED flashes red slowly.
To set all presets efficiently using SmartSet, see "To configure the six FM radio preset radio stations manually:" on
page 20
To set all presets efficiently using Cardo Community, see Configuring Your FM Radio Using Auto Tuning
You cannot share music in DMC intercom mode.
SMARTH Manual
5. On the Road
- 42 -
*
Charging - LED flashes purple slowly.
a.
Start playing music over A2DP (see " Listening to Music" on page 38) or the FM radio (see "Listening to FM
Radio" on page 40).
b.
Pair the Bluetooth intercom on Channel A or B. (If you do not pair with a channel, Channel A is automatically
paired by default.)
c.
Tap ~Volume Down.
●
To use SmartSet:
a.
Confirm your SMARTH is in Bluetooth intercom mode:
*
Normal battery state - LED flashes blue slowly.
*
Low battery state - LED flashes red slowly.
*
Charging - LED flashes purple slowly.
a.
Either:
*
on the MUSIC screen, tap MUSIC SHARING
or
*
on the FM screen, tap FM SHARING.
a. Tap ~Volume Down.
●
To use the headset voice-assisted menu:
a.
Confirm your SMARTH is in Bluetooth intercom mode:
*
Normal battery state - LED flashes blue slowly.
*
Low battery state - LED flashes red slowly.
*
Charging - LED flashes purple slowly.
a.
Tap ~ and ~Volume Up twice.
b.
When the voice-assisted menu reaches:
*
"Start Music Sharing" / "Stop Music Sharing", tap ~ or use VOX.
or
*
"Start Radio Sharing" / "Stop Radio Sharing", tap ~ or use VOX.
If your SMARTH is not in Bluetooth intercom mode, press ~Intercom and ~Audio. For more information see,
"Switching to Bluetooth Intercom" on page 31.
If your SMARTH is not in Bluetooth intercom mode, press ~Intercom and ~Audio. For more information see,
"Switching to Bluetooth Intercom" on page 31.
If your SMARTH is not in Bluetooth intercom mode, press ~Intercom and ~Audio. For more information see,
"Switching to Bluetooth Intercom" on page 31.
SMARTH Manual
5. On the Road
- 43 -
5.5.4
Audio Source Priorities
SMARTH automatically determines which audio source to play through the speakers based on the following priority:
Priority
Audio Source
Higher Priority
↑
Lower Priority
Mobile phone 1, GPS device instructions1
Mobile phone 2, GPS device instructions1
Intercom (Click-to-Link/DMC and Bluetooth modes) or A2DP music2
A2DP music or Intercom (Click-to-Link/DMC and Bluetooth modes)2
FM Radio
1Phone calls and GPS temporarily mute DMC intercom, but group members remain part of the DMC intercom group.
2Depends on your A2DP/IC Priority setting, as configured in SmartSet (see "Configuring Your SMARTH through Cardo
SmartSet" on page 17).
Phone and GPS audio navigation temporarily mute music playback.
GPS audio navigation temporarily mutes phone.
GPS audio navigation reduces Bluetooth intercom and music playback volume, but Bluetooth intercom and
music are not muted.
You hear Bluetooth intercom calls in the background during music sharing.
Music sharing does not transmit voice audio and cannot be used as a Bluetooth intercom call.
If you paired your headset to two mobile phones, music will be shared from the mobile phone through which
you last played music.
When sharing FM radio, either rider can change station.
Intercom modes all have the same priority, so ongoing intercom calls will not be interrupted by any other
intercom call.
Bluetooth intercom and Click-to-Link calls have the same priority, so Click-to-Link calls will not interrupt any
Bluetooth intercom call in progress, and vice versa.
In DMC intercom, if no group member is speaking and music is playing, the music volume automatically
increases. When a DMC intercom group member speaks, the music volume automatically reduces.

- 44 -
SMARTH Manual
6. Troubleshooting
6.
Troubleshooting
6.1
Soft Reset
If your SMARTH stops responding, reset it by either:
■
Turning it off and then on again (see "Switching Your Headset On/Off" on page 8
■
Connecting the USB cable Type A plug to either the wall charger supplied with your SMARTH, or to a
computer USB port.
6.2
Reset Pairing
To reset pairing:
■
Press ~Intercom and ~Phone for 5 seconds.
6.3
Reset to Factory Settings
To perform a factory reset through the headset, do one of the following:
●
To use the headset buttons:
a.
Check that your SMARTH is in Standby (see "Features and System Modes" on page 1).
b.
Simultaneously press ~+~Volume Up+~Volume Down for 5 seconds
●
To use SmartSet:
a.
Check that your SMARTH is in Standby (see "Modes and Events SMARTH" on page 1).
b.
Open SmartSet and tap .
c.
Tap Settings.
d.
Tap Reset to Factory.
●
To use the headset voice-assisted menu:
a.
Tap ~ and ~Volume Up twice.
b.
When the voice-assisted menu reaches "Advanced features menu", tap ~ or use VOX.
c.
When the voice-assisted menu reaches "Reset to factory settings", tap ~ or use VOX.
6.4
FAQ
Additional answers to common problems can be found at www.cardosystems.com/faqs.
This option deletes all paired devices and all configuration settings.

- 45 -
SMARTH Manual
7. Support
7.
Support
For additional information:
:
www.cardosystems.com
*
support@cardosystems.com
(
USA and Canada: 1-800-488-0363 / International: +49 89 450 36819
Multinational E-commerce companies and online auction websites are not authorized to sell Cardo products and
purchases from such sites are at your own risk. To receive warranty or customer service, you must submit original
receipts from authorized Cardo dealers.
Products that were imported from North America must be serviced in the USA.

- 46 -
SMARTH Manual
8. Glossary
8.
Glossary
Term/Abbreviation
Description
A2DP
Advanced Audio Distribution Profile (Bluetooth profile)
AGC
Automatic Gain Control
AGC sensitivity for the speakers
Automatic Gain Control allowing the automatic adjustment of volume
according to ambient noise and riding speed.
Audio priority (A2DP/Bluetooth intercom/
DMC intercom)
Priority of audio source playing through speakers and preventing current
intercom call from interruption.
Background Audio Level
xxx.
Click-to-Link settings
Spontaneous way to instantly initiate one-on-one intercom calls with
other riders near you, without being paired.
FM Band
If you are in Japan, select Japan. Otherwise, select Worldwide.
IC
Intercom
Intercom Mode (DMC/Bluetooth)
DMC intercom and Bluetooth intercom.
Intercom-to-Phone
Automatically divert intercom calls to mobile calls.
Language
Voice-assisted menu language.
RDS
Radio Data System allows the radio to automatically retune to the
strongest frequency available for the FM station you are listening to
when the signal becomes too weak
Speed dial numbers
Pre-set phone numbers for automatic dialing.
FM radio presets
Pre-set FM radio stations for automatic tuning.
Spoken Status Announcements
Voice announcements so you always know to whom or to what device
you are connected.
VOX
Voice Operated Control
VOX operation
Hands-free operation using a voice activity director.
VOX sensitivity for the microphone
Automatically adjusts the level of ambient noise for your microphone
while you riding.
- 47 -
SMARTH Manual
Appendix A. Modes and Events SMARTH
Appendix A. Modes and Events SMARTH
The features you can use at any given moment depend on SMARTH's current mode, as indicated by the headset LEDs.
The following table shows LED indications for modes and events according to the current battery state.
LED
Flashing
Battery State
Mode or Event
Off
Off
Normal or
Low Battery
●
Off
Green
Fast three times (repeating every 1
second)
Normal or
Low Battery
●
Active DMC intercom call
Green
Fast (repeating)
Normal or
Low Battery
●
Pairing DMC intercom
Green
For 2 seconds
Charging
●
Rider C connected
Blue
For 2 seconds
Normal or
Low Battery
●
Rider B connected
●
Set VOX to enabled
Blue
Fast (3 times)
Normal or
Low Battery
●
Power on
Blue
Fast (repeating fast)
Normal or
Low Battery
●
Pairing intercom rider B
Blue
Fast (repeating every 3 seconds)
Normal
●
Active mobile call, voice via mobile
●
Standby
Blue
Slow twice (repeating slow, every 3
seconds)
Normal
●
Incoming/outgoing call (intercom or
mobile)
●
Audio active (intercom, FM, A2DP,
GPS, Feature/Settings menu)
Red
For 2 seconds
Normal or
Low Battery
●
DMC intercom pairing failed
Red
Remains on
Charging
●
Rider A connected
●
Pairing intercom rider A
●
Power off
●
Off
Red
For 2 seconds
Normal or
Low Battery
●
Rider A connected
●
Set VOX to disabled
Red
Fast (3 times)
Normal or
Low Battery
●
Power off
Red
Fast (repeating fast)
Normal or
Low Battery
●
Pairing intercom rider A
Red
Fast (repeating slow, every 3 seconds)
Low Battery
●
Active mobile call, voice via mobile
●
Standby DMC intercom
Red
Slow twice (repeating slow, every 3
seconds)
Low Battery
●
Incoming/outgoing call (intercom
ormobile)
●
Audio active (intercom, FM, A2DP,
GPS, Feature/Settings menu)
Purple
Slow (5 times)
Normal or
Low Battery
●
Reset pairing

- 48 -
SMARTH Manual
Appendix A. Modes and Events SMARTH
LED
Flashing
Battery State
Mode or Event
Purple
For 2 seconds
Normal or
Low Battery
●
Mobile pairing successful
●
Mobile connected
●
IC pairing successful
Purple
For 2 seconds
Charging
●
Mobile pairing successful
●
Mobile connected
●
Rider B connected
●
Intercom pairing successful
●
Set VOX to enabled
●
Set VOX to disabled
Purple
Fast (3 times)
Charging
●
Power on
Purple
Fast (repeating fast)
Normal or
Low Battery
●
Click-to-Link
Yellow
For 2 seconds
Normal or
Low Battery
●
Rider C connected
●
DMC intercom pairing successful
Yellow
Fast (repeating)
Normal,
Low Battery,
or Charging
●
Incoming/outgoing Click-to-Link
Orange
Fast (repeating fast)
Normal,
Low Battery,
or
Charging
●
DMC intercom Grouping
Orange
Fast (repeating slow)
Normal or
Charging
●
DMC intercom Active mobile call,
voice via mobile
●
DMC intercom Standby
Orange
Slow twice (repeating slow, every 3
seconds)
Normal or
Charging
●
DMC intercom Incoming/outgoing
call (intercom or mobile)
●
DMC intercom Audio active
(intercom, FM, A2DP, GPS,
Feature/Settings menu)
Purple/Red
Fast purple and then red for 3 seconds
(repeating)
Charging
●
Active mobile call, voice via mobile
●
Standby
Purple/Red
Slow purple, fast red, slow purple, and
then red for 3 seconds (repeating)
Charging
●
Incoming/outgoing call (intercom or
mobile)
●
Audio active (intercom, FM, A2DP,
GPS, Feature/Settings menu)
Purple/Red
Alternating slow (5 times)
Charging
●
Reset pairing
Purple/Red
Alternating slow (repeating)
Normal,
Low Battery,
or
Charging
●
Pairing GPS
Purple/Red
Alternating fast (repeating)
Charging
●
Pairing intercom rider B
Blue/Red
Alternating fast (repeating)
Normal,
Low Battery,
or
Charging
●
Pairing Mobile

SMARTH Manual
Appendix A. Modes and Events SMARTH
- 50 -
Federal Communications Commission (FCC) Statement
15.21
You are cautioned that changes or modifications not expressly approved by the part responsible for compliance could
void the user’s authority to operate the equipment.
15.105 (b)
This equipment has been tested and found to comply with the limits for a Class B digital device, pursuant to part 15 of
the FCC rules. These limits are designed to provide reasonable protection against harmful interference in a residential
installation. This equipment generates, uses and can radiate radio frequency energy and, if not installed and used in
accordance with the instructions, may cause harmful interference to radio communications. However, there is no
guarantee that interference will not occur in a particular installation. If this equipment does cause harmful
interference to radio or television reception, which can be determined by turning the equipment off and on, the user
is encouraged to try to correct the interference by one or more of the following measures:
●
Reorient or relocate the receiving antenna.
●
Increase the separation between the equipment and receiver.
●
Connect the equipment into an outlet on a circuit different from that to which the receiver is connected.
●
Consult the dealer or an experienced radio/TV technician for help.
This device complies with part 15 of the FCC rules. Operation is subject to the following two conditions:
1.
this device may not cause interference and
2.
this device must accept any interference, including interference that may cause undesired operation of the
device.
FCC RF Radiation Exposure Statement:
This equipment complies with FCC/IC radiation exposure limits set forth for an uncontrolled environment. End users
must follow the specific operating instructions for satisfying RF exposure compliance. The antenna used for this
transmitter must not transmit simultaneously with any other antenna or transmitter, except in accordance with FCC/IC
multi-transmitter product procedures.
Instructions concerning human exposure to radio frequency electromagnetic fields - to comply with FCC Section 1.310
for human exposure to radio frequency electromagnetic fields, while using the equipment it should be mounted on
helmet. a distance of at least 2 cm. between the equipment and all persons should be maintained during the
operation of the equipment.
Industry Canada (IC) FVIN: V1.0.0
This device complies with Industry Canada license-exempt RSS standard(s). Operation is subject to the following two
conditions:
1.
this device may not cause interference and
2.
this device must accept any interference, including interference that may cause undesired operation of the device.
Le present appareil est conforme aux CNR d'Industrie Canada applicables aux appareils radio exempts de licence.
L'exploitation est autorisee aux deux conditions suivantes :(1) l'appareil ne doit pas produire de brouillage, et (2)
l'utilisateur de l'appareil doit accepter tout brouillage radioelectrique subi, meme si le brouillage est susceptible d'en
compromettre le fonctionnement.
IC RF Radiation Exposure Statement:
This equipment complies with the RSS-102 exemption from routine RF exposure evaluation for use in an uncontrolled
environment.

SMARTH Manual
Appendix A. Modes and Events SMARTH
- 51 -
European CE Notice
Your Cardo product (the “Product”) is in conformity with the following essential requirements of Council Directive
1999/5/EC (referred to as R&TTE Directive): Articles 3.1a, 3.1.b and 3.2. The Product is manufactured in accordance
with Annex II of the above directive.
Operating temperature: The Product is designed to work in temperatures between -20° and 55° C (-4° and 131° F).
Charging temperature: Battery charging temperature limits: 0° - 45°C (32°-113°F)
AC/DC Adapters: When charging from a wall outlet, make sure that the plug-in AC/DC adapter meets the following
criteria:
Input: 100-240 V, 50/60 Hz, 0.2 A maximum Output: 5 V DC, 1 A maximum.
Declaration of Conformity (DOC)
The Product is compliant with and adopts the Bluetooth® Specification 4.0 and has successfully passed all
interoperability tests that are specified in the Bluetooth® specification. However, interoperability between the device
and other Bluetooth®-enabled products is not guaranteed.
Copyright
The contents of the Manual, including all text, illustrations and drawings are the exclusive intellectual property of Cardo
Systems, Inc. (the “Company”) and are protected by copyright laws. They are not in the public domain. Any partial or
total reproduction, translation and or dissemination, without the prior written authorization by the Company are
strictly prohibited. Any rights not expressly granted herein are reserved.
WARNING:
You are hereby notified that your complete and undivided attention is required when using a communication device
(the “Product”) while riding. Failure to avoid potentially hazardous situations could result in accident resulting in
serious injury or death.
Cardo advises you to take all necessary precautions and remain alert to the traffic, weather and all road conditions. Do
not perform pairing, linking or any complex operations while riding. All publications are intended to address technical
capabilities and should not be construed as encouraging the operation of Cardo’s Products in any manner that is unsafe
or prohibited by law.
Exercise all due caution while using this Product and obey all applicable traffic laws. Always ride and use the Product in
a safe manner and do not become distracted by the Product while riding. Do not operate the Product if it becomes
unsafe to do so.
In some regions or states, the use of mobile communications systems is prohibited or restricted. Check all local, state
and federal laws and regulations (the “Laws”) that apply to your region before using the Product and be mindful that
compliance with all Laws is the user’s responsibility. Use the Product in motion only where and in the manner that
such devices are permitted by applicable Law.
No part of the body should come in contact with the antenna during operation of the equipment. Use Product only
where safe, and avoid usage at gas stations, fuel depots or around explosives. Use with hearing aids and medical
devices only after consulting a physician or specialist. Make sure to install and mount the Product in a stable manner.
Health Warnings:
Hearing Loss: Audio devices can cause hearing loss. Employ care and avoid exposure to excessive volume levels that
may damage or impair hearing or lead to hearing loss. Permanent hearing loss may occur if Products are used at high
volume for prolonged periods.
RF Signals: Most electronic equipment is shielded from RF signals. However, certain electronic equipment may not be
shielded against the RF signals emanating from your wireless equipment.
Pacemakers: The Health Industry Manufacturers Association recommends that a minimum separation of about six
inches (or 16 cm) to be maintained between a mobile phone or wireless device and a pacemaker to avoid potential
interference with the pacemaker. Be sure not to interfere with the functionality of personal medical devices.

SMARTH Manual
Appendix A. Modes and Events SMARTH
- 52 -
Hearing Aids: Some devices may interfere with certain hearing aids. In the event of such interference, you should
consult your hearing aid manufacturer to discuss alternatives.
Other Medical Devices: If you use any other personal medical device, consult the manufacturer of your device and/ or
your physician to determine if it is adequately shielded from interference caused by external RF energy. Your
physician may be able to assist you in obtaining this information.
LIMITED WARRANTY
Subject to the applicable laws and regulations in your jurisdiction, your Product is covered by a Two-Year Limited
product warranty from the date of original purchase. Please retain and submit the retail sales receipt and your
registration data for proof of purchase.
In no event shall Cardo be liable for any incidental, special, indirect, punitive, exemplary or consequential damages,
whether resulting from the use, misuse, or inability to use this product or from defects in the product, or for any
damages whatsoever resulting from the use of the product, whether based on breach of contract, tort (including
negligence), product liability or otherwise even if advised of the possibility of such damages. You acknowledge and
agree that the limitations set forth above are fundamental elements of this agreement to which you consent and
without which the product would not be provided to you absent such limitations. Cardo retains the exclusive right to
repair or replace (with a new or newly-refurbished replacement Product) the device or software or give a refund of
the purchase price at its sole discretion. SUCH REMEDY SHALL BE YOUR SOLE AND EXCLUSIVE REMEDY FOR ANY
BREACH OF WARRANTY.
Subject to the aforementioned, Cardo hereby represents that this Product is warranted to be free from defects in
materials or workmanship. Within the subject period, Cardo will, at its sole option, repair or replace any components
that fail in normal use. Such repairs or replacements will be made at no charge to the customer for parts or labor,
provided that the customer shall be responsible for any shipping cost and applicable fees to any official authorities. This
warranty does not cover failures due to abuse, misuse, accident, loss or unauthorized alteration or repairs.
This Product is intended to be used only as a communication and entertainment device and should not be employed in
any location or jurisdiction where its use is prohibited.
The warranties and remedies contained herein are exclusive and in lieu of all other warranties express, implied or
statutory, including any liability arising under any warranty of merchantibility or fitness for a particular purpose,
statutory or otherwise that Cardo specifically disclaims. This warranty gives you specific legal rights which may vary
from jurisdiction to jurisdiction. Cardo makes no other warranties express or implied beyond those stated specifically
herein. This warranty is extended by Cardo solely to the original purchaser and is not assignable or transferable to
others. Cardo assumes no obligation or liability for additions or modifications to this warranty unless made in writing
and signed by an officer of the company.
Batteries are warranted only if the battery capacity falls below 50% of rated capacity or if the battery develops leakage.
Do not store your Product without charging it from time to time for periods in excess of six months, as this may cause
irreversible damage to the capacity of your battery. Your warranty will not cover such events.
This warranty also becomes void if: a) Any of the seals on the case or battery are broken or Product or battery show
signs of tampering, b) the battery is used in equipment other than the equipment for which it was intended. c) the
Product is used in contravention of its intended purpose. d) the Product was purchased from online auctions
Cardo assumes no responsibility resulting from the use of non-Cardo components, accessories or devices in
conjunction with its Products.
Caution: Do not tamper with batteries as there are risk of explosion if battery is replaced by an incorrect type.
Not covered by the warranty:
1.
Defects or damage resulting from the use of this Product in other than its normal and customary manner.
2.
Defects or damage from misuse, accident or neglect.

SMARTH Manual
Appendix A. Modes and Events SMARTH
- 53 -
3.
Defects caused by improper operation, maintenance, installation, adjustment or modification of any kind (incl.
long-term storage without periodic charging of the battery)
4.
Products opened, disassembled or repaired by non-authorized parties.
5.
Defects or damage due to exposure to excessive temperatures, adverse weather conditions, external impacts or
spills of food or liquid.
6.
All plastic surfaces and all other externally exposed parts that are scratched or damaged after purchase.
Disclaimer of Warranty
The device and its accessories are provided “as is” and “as available” without warranty of any kind beyond those
assumed in the enclosed manual.
Warranty Service
To obtain warranty service, please present the Product, along with your registration number, bill of sale (receipt) at
any authorized Service Center or at the store from which you have purchased the Product. To obtain warranty service,
contact Cardo’s product support and obtain an RMA tracking number, or contact your local Cardo authorized dealer.
Ship securely with a copy of the original sales receipt which is required as proof of purchase for warranty repairs. The
RMA tracking number should be written on the outside of the package. Send the Product freight charges prepaid, to
the Cardo address as directed by Cardo.
Online Auction Purchases: Online auction confirmations are not accepted for warranty verification. To obtain warranty
service, an original or copy of the sales receipt from the original retailer is required. Cardo will not replace missing
components from online auction sites.
WAIVER AND GENERAL RELEASE
By using the Product, you will waive substantial legal rights including the right to sue. Please read the following
carefully before using the Product.
By using the Product, you are irrevocably releasing, indemnifying from any liability, loss, claim and expense (including
attorneys fees) and holding Cardo harmless for any bodily injuries, harm or death as well as losses or damages in
goods, to any vehicles including your own, or to any property or asset that belong to you or to third parties, any of
which may result from using the Product under any circumstances or conditions and irrespective of jurisdiction.
1.
You, your heirs, legal representatives, successors or assigns, hereby voluntarily and forever release, discharge,
indemnify and hold harmless Cardo from any and all litigation, claims, debts, demands, actions and liability which
may arise, directly or indirectly, from using the Product for any distress, pain, suffering, discomfort, loss, injury,
death, damages to or in respect to any person or property however caused, WHETHER ARISING FROM THE
NEGLIGENCE OR OTHERWISE, and which may hereafter accrue to you on some future date as a result of said use,
to the fullest extent permitted by law.
2.
You fully understand and assume the risks in using the Product, including risk of negligent acts or omissions by
others. All risks for operating the Product are assumed solely by the user of the Product.
3.
You confirm that you are physically capable to use the Product and that you have no medical conditions or needs
that may infringe upon your abilities to do so in a safe manner. You further confirm that you will not consume any
alcohol that may affect your alertness or any mind-altering substance, and will not carry, use or consume these
substances before or during the use of the Product.
4.
You fully acknowledge our warnings and understand that:
a.
risks exist in using the Product while in traffic, including but not limited to injury or illness, strains, fractures,
partial and/or total paralysis, death or other ailments that could cause serious disability;
b.
these risks may be caused by the negligence of the manufacturers or its agents or any third party involved in
the Product;

SMARTH Manual
Appendix A. Modes and Events SMARTH
- 54 -
c.
these risks and dangers may arise from foreseeable or unforeseeable causes.
You hereby assume all risks and dangers and all responsibility for any losses and/or damages, whether caused in
whole or in part by the negligence or other conduct of others, including Cardo.
5.
By using the Product, you confirm that you have read this release of liability and fully understand and accept its
terms and conditions.
© 2016 Cardo Systems Inc.
All rights reserved. Cardo, the Cardo logo and other Cardo marks are owned by Cardo and may be registered. All other
trademarks are the property of their respective owners. Cardo Systems Inc. assumes no responsibility for any errors
that may appear in this document. Information contained herein is subject to change without notice.
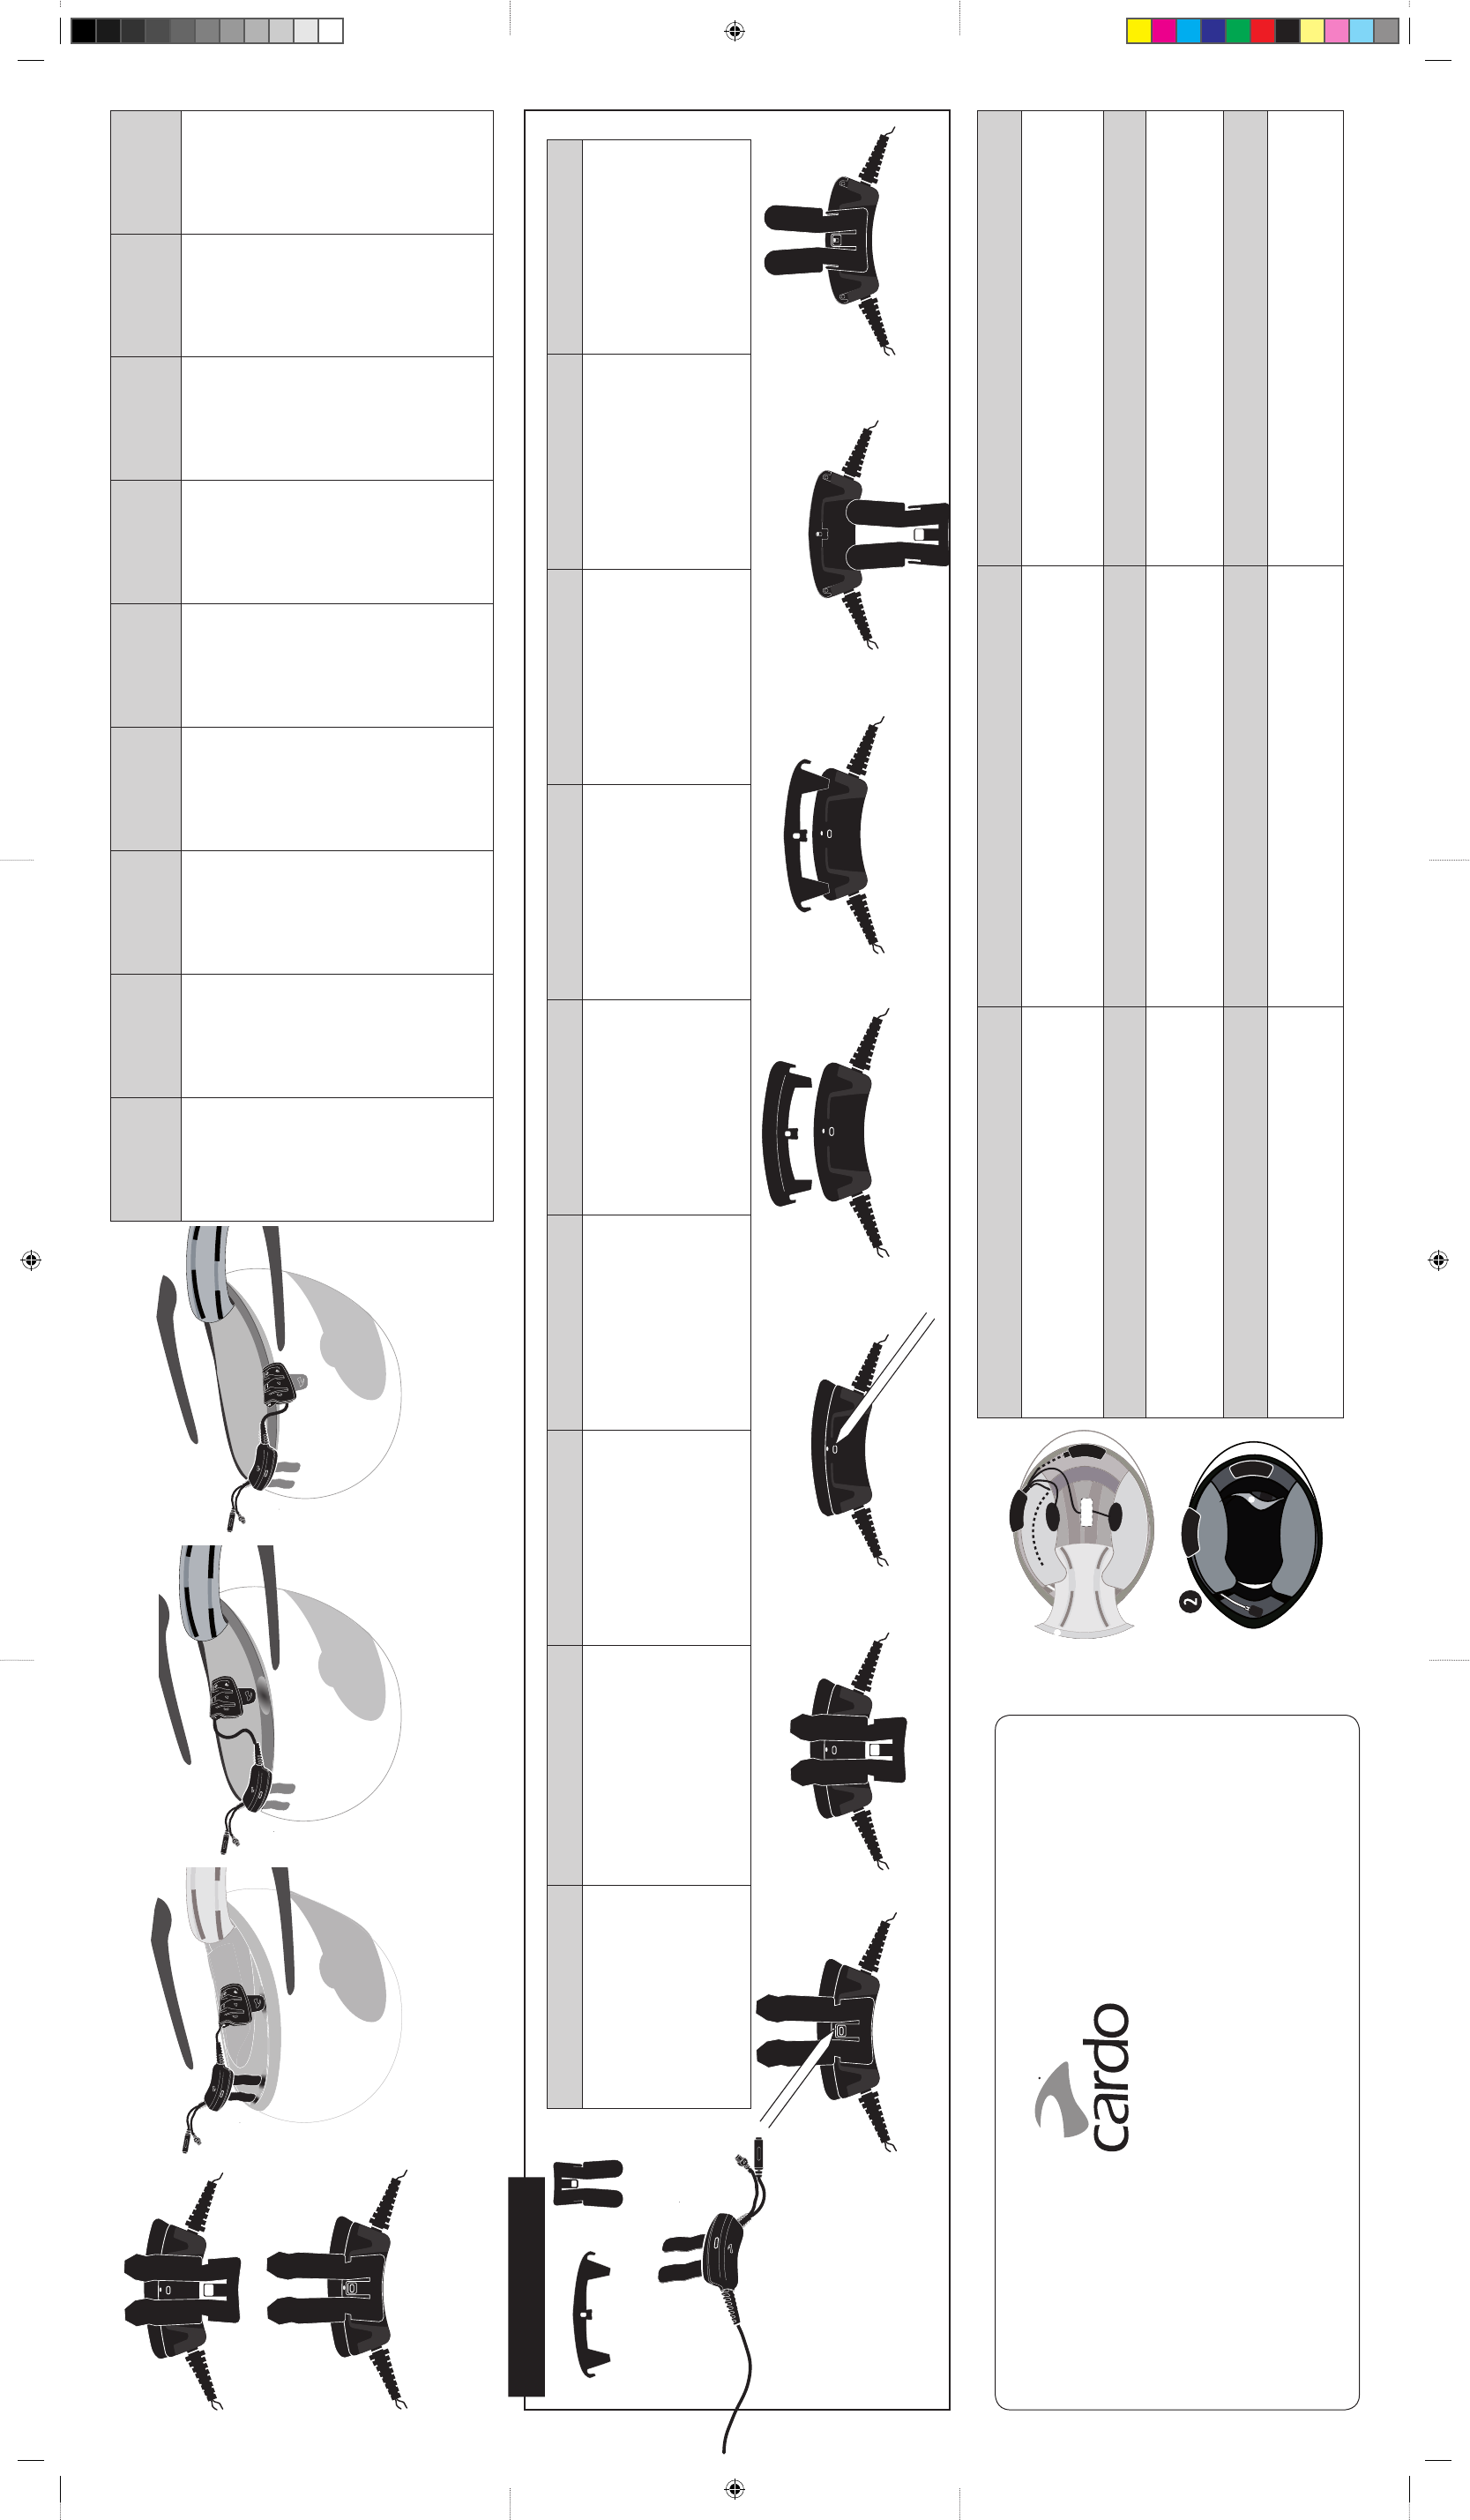
EN |
FINAL STEPS
DE |
ANBRINGEN UND ABLÖSEN DER EINHEIT
FR |
ATTACHER ET RETIRER L’UNITÉ
➊
Connect the speakers and microphone to the back unit connectors.
➋
Return the pads to their position in the helmet, taking care to secure all wires under
the liner and pads.
➌
Switch the headset on, as described in the Pocket Guide or User Guide.
➊
Schließen Sie die Lautsprecher und das Mikrofon an die Anschlüsse der hinteren Einheit an.
➋
Setzen Sie das Futter und die Kissen an ihre Position im Helm zurück. Achten Sie darauf, alle
Kabel unter dem Futter und den Kissen zu sichern.
➌
Schalten Sie das Headset ein, wie in der Kurzanleitung oder der Bedienungsanleitung
beschrieben.
➊
Connectez les écouteurs et le microphone aux connecteurs de l’unité de base.
➋
Repositionnez les coussins à leur emplacement dans le casque, de sorte à xer tous les câbles
sous le doublage du casque et sous les coussins.
➌
Allumez le casque comme décrit dans le Guide de poche ou Guide d’utilisation.
IT |
OPERAZIONI FINALI
ES |
FIJACIÓN Y RETIRO DE LA UNIDAD
PT |
FINALIZAÇÃO
➊
Collegare gli auricolari e il microfono ai connettori dell’unità posteriore.
➋
Riportare i cuscinetti nella loro posizione nel casco, accertandosi di ssare tutti i cavi
sotto il rivestimento e i cuscinetti.
➌
Accendere il dispositivo, come descritto nella Guida Tascabile o la Guida per l’Utente.
➊
Conecte los altavoces y el micrófono a los conectores de la unidad posterior.
➋
Devuelva las almohadillas a su lugar en el casco, cuidando de asegurar todos los cables en
su lugar debajo del forro y de las almohadillas.
➌
Encienda el intercomunicador en la forma descrita en la Guía de Bolsillo o en la Guía de
Usuario.
➊
Conecte os alto-falantes e o microfone nos conectores da unidade de suporte.
➋
Recoloque as almofadas em sua posição original no capacete assegurando-se de que todos os
os estejam sob a forração.
➌
Ligue o fone de ouvido, como descrito no Guia de Bolso ou Guia do Usuário.
NL |
LAATSTE STAPPEN
RU |
ЗАВЕРШЕНИЕ
SV |
SISTA STEGEN
➊
Verbind de luidsprekers en microfoon met de connectoren van de backunit.
➋
Breng de voering in de helm weer op zijn plaats, zorg ervoor dat alle draden onder
de voering zitten.
➌
Schakel de headset in zoals beschreven in de pocketgids of gebruikershandleiding.
➊
.
➋
,
.
➌
.
➊
Anslut högtalaren och mikrofonen till nackenhetens kontakter.
➋
Sätt tillbaka dynorna på plats i hjälmen och se till att säkra alla kablar under dem.
➌
Slå på headsetet i enlighet med ckguiden eller användarmanualen.
➊
EN |
ADAPTING THE BACK UNIT FOR CL-17
HELMET
DE |
HINTERE EINHEIT FÜR CL-17-HELM
ANPASSEN
FR |
ADAPTER L’UNITÉ DE BASE AUX
CASQUES CL-17
IT |
ADATTAMENTO DELL’UNITÀ POSTERI-
ORE PER CASCO CL-17
ES |
ADAPTACIÓ DE LA UNIDAD POSTE-
RIOR AL CASCO CL-17
PT |
COMO ADAPTAR A UNIDADE DE
SUPORTE EM CAPACETES CL-17
NL |
DE BACKUNIT VOOR DE CL-17 HELM
AANPASSEN
RU |
УСТАНОВКА ПЕРЕХОДНИКА НА
ЗАДНИЙ БЛОК ДЛЯ ШЛЕМА CL-17
SV |
ANPASSNING AV NACKENHETEN FÖR
CL-17-HJÄLMEN
➊
Using a pen, release the catch securing the
clamp to the back unit.
➋
Slide the clamp out.
➌
Using a pen, release the catch securing the
adapter to the back unit.
➍
Remove the existing adapter from the back
unit.
➎
Insert the CL-17 adapter in the back unit.
➏
Insert the CL-17 clamp in the back unit.
➊
Lösen Sie mittels eines Kugelschreibers die
Sperre, welche die Zwinge an der hinteren
Einheit sichert.
➋
Schieben Sie die Zwinge heraus.
➌
Lösen Sie mittels eines Kugelschreibers die
Sperre, welche den Adapter an der hinteren
Einheit sichert.
➍
Entfernen Sie den vorhandenen Adapter von der
hinteren Einheit.
➎
Fügen Sie den CL-17-Adapter in die hintere
Einheit ein.
➏
Fügen Sie die CL-17-Zwinge in die hintere
Einheit ein.
➊
Ouvrez la prise d’attache de la pince de
l’unité de base avec un stylo.
➋
Détachez la pince.
➌
Ouvrez la prise d’attache de l’adaptateur de
l’unité de base avec un stylo
➍
Détachez l’adaptateur fournis de l’unité
de base.
➎
Attachez l’adaptateur CL-17 à l’unité de
base.
➏
Attachez la pince CL-17 à l’unité de base.
➊
Usando una penna, staccare il gancio che
assicura il morsetto all’unità posteriore.
➋
Fare scivolare fuori il morsetto.
➌
Usando una penna, staccare il gancio che
assicura l’adattatore all’unità posteriore.
➍
Rimuovere l’adattatore esistente dall’unità
posteriore.
➎
Inserire l’adattatore del CL-17 nell’unità
posteriore.
➏
Inserire il morsetto del CL-17 nell’unità
posteriore.
➊
Con un lapicero, abra el cierre que asegura
el sujetador a la unidad posterior.
➋
Deslice el sujetador hacia afuera.
➌
Con un lapicero, abra el cierre que asegura
el adaptador a la unidad posterior.
➍
Retire el adaptador existente de la unidad
posterior.
➎
Inserte el adaptador para CL-17 en la
unidad posterior.
➏
Inserte el sujetador para CL-17 en la unidad
posterior.
➊
Com o auxílio de uma caneta libere a
presilha que prende o grampo na unidade
de suporte.
➋
Deslize o grampo para fora.
➌
Com o auxílio da caneta libere a presilha
que prende o adaptador à unidade de
suporte.
➍
Remova o adaptador existente da unidade
de suporte.
➎
Insira o adaptador do CL-17 na unidade
de suporte. 6 Insira o grampo do CL-17 na
unidade de suporte.
➊
Maak met een pen de grendel los die de
klem tegen de backunit houdt.
➋
Schuif de klem naar buiten.
➌
Maak met een pen de grendel los die de
adapter tegen de backunit houdt.
➍
Verwijder de bestaande adapter uit de
backunit.
➎
Schuif de CL-17 adapter in de backunit.
➏
Schuif de CL-17 klem in de backunit.
➊
, ,
.
➋
.
➌
, ,
.
➍
,
.
➎
CL-17.
➏
CL-17.
➊
Lossa med hjälp av en penna haken som
säkrar klämman vid nackenheten.
➋
Dra ut klämman.
➌
Lossa med hjälp av en penna haken som
säkrar adaptern vid nackenheten.
➍
Ta bort den bentliga adaptern från
nackenheten.
➎
För in CL-17-adaptern i nackenheten.
➏
För in CL-17-klämman i nackenheten.
➍➎➏
➌➋
➊
EN |
MOUNTING THE
HEADSET AND
BACK UNIT ON THE
HELMET
DE |
MONTAGE DES
HEADSETS UND
RÜCKENHEITHEIT
AM HELM
FR |
MISE EN PLACE DES
ÉCOUTEURS ET DE
L’UNITÉ DE BASE
AU CASQUE
IT |
MONTAGGIO DEL
DISPOSITIVO E
DELL’UNITÀ POSTE-
RIORE SUL CASCO
ES |
MONTAJE DEL
INTERCOMUNICA-
DOR Y LA UNIDAD
POSTERIOR EN EL
CASCO
PT |
INSTALAÇÃO DO
FONE DE OUVIDO
E DA UNIDADE DE
SUPORTE NO
CAPACETE
NL |
DE HEADSET EN
BACKUNIT OP DE
HELM MONTEREN
RU |
УСТАНОВКА
ГАРНИТУРЫ И
ЗАДНЕГО БЛОКА
НА ШЛЕМ
SV |
MONTERING AV
HEADSETET OCH
NACKENHETEN
➊
Insert the clamp in the
back unit.
➋
Position the back
unit at the rear of the
helmet.
➌
Insert the back unit
clamp between the
helmet shell and liner
and then push all the
way in.
➍
Insert the headset
clamp between the
helmet shell and
padding and then
push all the way in.
➎
Insert the wires
connecting the
headset to the back
unit between the
helmet shell and liner.
➊
Fügen Sie die Zwinge
in die hintere Einheit
ein.
➋
Platzieren Sie die
hintere Einheit an der
Rückseite des Helms.
➌
Fügen Sie die
Zwinge der hinteren
Einheit zwischen der
Helmschale und dem
Futter ein und drücken
Sie sie vollständig
hinein.
➍
Die Zwinge des
Headsets zwischen
Helmschale und
Polsterung einfügen
und komplett
hineindrücken.
➎
Fügen Sie die Kabel
ein, welche das
Headset an die hintere
Einheit zwischen
Helmschale und Futter
anschließen.
➊
Attachez la pince à
l’unité de base
➋
Positionnez l’unité de
base sur l’arrière du
casque.
➌
Insérez la prise
d’attache de l’unité de
base entre la coque
et le doublage du
casque et enfoncez
entièrement.
➍
Insérez la prise
d’attache des
écouteurs entre la
coque et le doublage
du casque et enfoncez
entièrement.
➎
Attachez les câbles
de connexion des
écouteurs à l’unité de
base entre la coque et
le doublage du casque.
➊
Inserire il morsetto
nell’unità posteriore.
➋
Posizionare l’unità
posteriore sulla parte
posteriore del casco.
➌
Inserire il morsetto
dell’unità posteriore
fra la calotta del casco
e il rivestimento e poi
premere no in fondo.
➍
Inserire il morsetto del
casco fra la calotta del
casco e l’imbottitura
e poi premere no in
fondo.
➎
Inserire i cavi che
collegano il dispositivo
all’unità posteriore fra
la calotta del casco e il
rivestimento.
➊
Inserte el sujetador en
la unidad posterior.
➋
Coloque la unidad
posterior en su lugar
en la parte de atrás
del casco.
➌
Inserte el sujetador
de la unidad posterior
entre la carcasa y
el revestimiento
del casco y luego
empújelo hasta el
fondo.
➍
Inserte el sujetador
del intercomunicador
entre la carcasa y el
acolchado del casco y
luego empújelo hasta
el fondo .
➎
Inserte los cables
que conectan al
intercomunicador con
la unidad posterior
entre la carcasa y el
revestimiento del
casco.
➊
Insira o adaptador na
unidade de suporte.
➋
Posicione a unidade
de suporte na parte
traseira do capacete.
➌
Insira o grampo da
unidade de suporte
entre a casca e a
forração do capacete e
empurre.
➍
Insira o grampo do
fone de ouvido entre
a casca e a forração do
capacete e empurre.
➎
Insira os os que
conectam o fone de
ouvido à unidade de
suporte entre a casca e
a forração do capacete.
➊
Schuif de klem in de
backunit.
➋
Plaats de backunit aan
de achterkant van de
helm.
➌
Plaats de klem van de
backunit tussen de
helmschaal en voering
en duw deze helemaal
naar binnen.
➍
Plaats de klem van
de headset tussen de
helmschaal en voering
en duw deze helemaal
naar binnen.
➎
Plaats de draden die
de headset met de
backunit verbinden
tussen de helmschaal
en voering.
➊
➋
.
➌
.
.
➍
.
.
➎
.
➊
För in klämman i
nackenheten.
➋
Placera nackenheten
på baksidan av
hjälmen
➌
För in nackenhetens
klämma mellan
hjälmens skal och
fodring och tryck den
hela vägen in.
➍
För in headsetets
klämma mellan
hjälmens skal och
fodring och tryck den
hela vägen in.
➎
Sätt i kablarna som
ansluter headsetet till
nackenheten mellan
hjälmens skal och
fodring.
➊
➋
➌ ➍ ➎
ONLY FOR CL-17 TYPE HELMET
Inserte el sujetador para
CL-17 en la unidad
posterior.
MAN14015 SMARTH Installation Guide_004
www.cardosystems.com
support@cardosystems.com
USA & Canada: 1-800-488-0363
International: +49 89 450 36819
communication in motion®
MAN14015 SMARTH Installation Guide_004.indd 1 1/5/17 5:44 PM
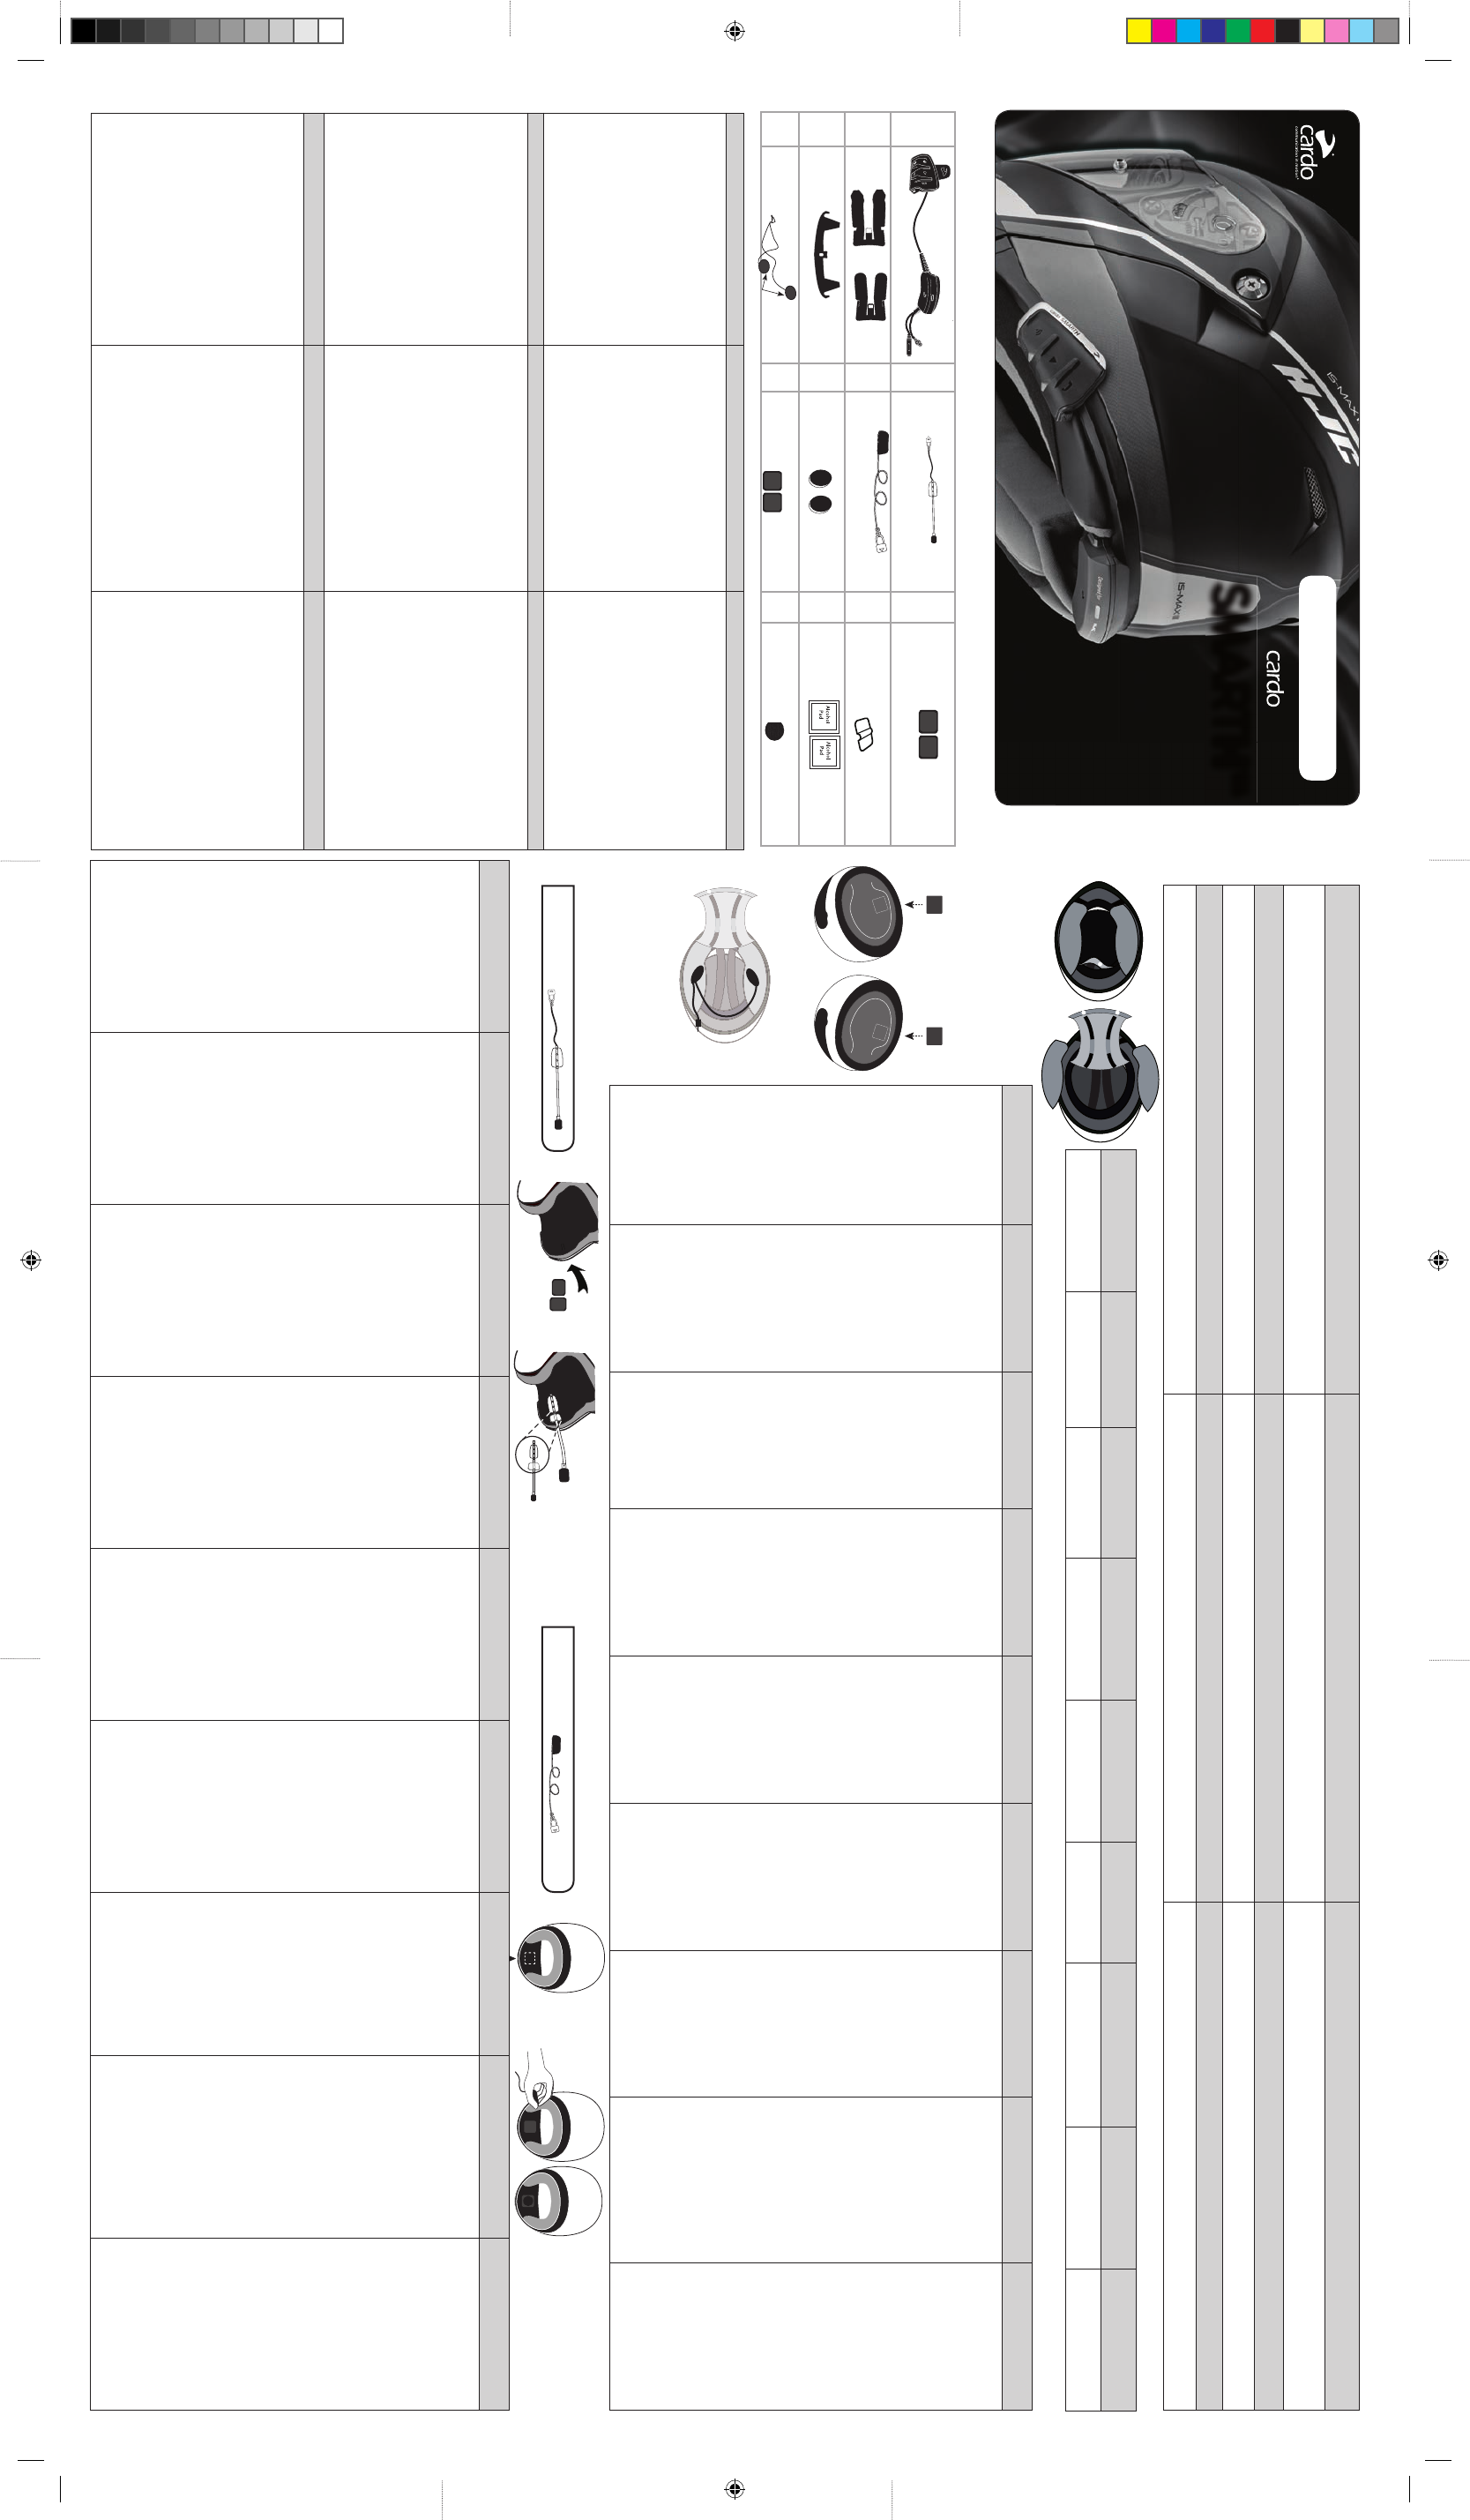
EN |
CONTENTS OF BOX
DE |
INHALT LIEFERKARTON
FR |
CONTENU DU COFFRET
➊
Headset
and back unit with mic and speaker jacks
➋
Clamp (x2)
➌
Adapter for CL-17 helmet
➍
Speakers
➎
Hybrid mic
➏
Corded mic
➐
Velcro booster pad for
speakers
➑
Square Velcro pads for speakers (x2)
➒
Rectangular Velcro pads for hybrid mic (x2)
➓
Hybrid mic clip
⓫
Alcohol pads (x2)
⓬
Hybrid
mic replacement sponge
➊
Headset und hintere Einheit mit Mikrofon- und
Lautsprecheranschlüssen
➋
Zwinge (x2)
➌
Adapter für CL-17-Helm
➍
Lautsprecher
➎
Hybridmikrofon
➏
Kabelmikrofon
➐
Verstärkerpads mit Klettkissen für Lautsprecher
➑
Quadratische Klettkissen für Lautsprecher (x2)
➒
Rechteckige Klettkissen für Hybridmikrofon (x2)
➓
Hybridmikrofon-Clip
⓫
Alkoholtupfer (x2)
⓬
Ersatzschwamm für Hybridmikrofon
➊
Ecouteurs et unité avec prises pour microphone et
haut-parleurs
➋
Pince (x2)
➌
Adaptateur pour casque CL-17
➍
Haut-parleurs
➎
Microphone hybride
➏
Microphone laire
➐
Coussins de boostage velcro pour haut-parleurs
➑
Coussins velcro pour haut-parleurs carrés (x2)
➒
Coussins velcro pour microphone hybride rectangulaires (x2)
➓
Clip microphone hybride
⓫
Tampons d’alcool (x2)
⓬
Bonnette de remplacement pour microphone hybride
IT |
CONTENUTO DELLA CONFEZIONE
ES |
CONTENIDO DEL ESTUCHE DE VENTA
PT |
CONTEÚDO DA EMBALAGEM
➊
Dispositivo e unità posteriore con microfono e
prese per l’auricolare
➋
Morsetto (x2)
➌
Adattatore per casco CL-17
➍
Auricolari
➎
Microfono ibrido
➏
Microfono cablato
➐
Cuscinetti di rinforzo di Velcro per auricolari
➑
Cuscinetti quadrati di Velcro per auricolari (x2)
➒
Cuscinetti rettangolari di Velcro per microfono
ibrido (x2)
➓
Clip per il microfono ibrido
⓫
Salviette imbevute di alcool (x2)
⓬
Spugnetta di ricambio per il microfono ibrido
➊
Intercomunicador y unidad posterior con tomas para
micrófono
y altavoces.
➋
Sujetador (x2)
➌
Adaptador para casco CL-17
➍
Altavoces
➎
Micrófono híbrido
➏
Micrófono con cable
➐
Almohadilla elevadoras de velcro para altavoces
➑
Almohadillas cuadradas de velcro para altavoces (x2)
➒
Almohadillas rectangulares de velcro para micrófono
híbrido (x2)
➓
Clip para micrófono híbrido
⓫
Toallitas con alcohol (x2)
⓬
Esponja de remplazo para micrófono híbrido
➊
Fone de ouvido e unidade de suporte com entradas para
microfone e alto-falante
➋
Grampo (x2)
➌
Adaptador para capacete CL-17
➍
Alto-falantes
➎
Microfone híbrido
➏
Microfone com o
➐
Almofada amplicadora com Velcro para os alto-falantes
➑
Almofadas quadradas com Velcro para os alto-falantes
(x2)
➒
Almofadas retangulares com Velcro para o microfone
híbrido (x2)
➓
Grampo do microfone híbrido
⓫
Esponjas com álcool (x2)
⓬
Espuma de reposição do microfone híbrido
NL |
DE INHOUD VAN DE VERPAKKING
RU |
СОДЕРЖИМОЕ УПАКОВКИ
SV |
INNEHÅLL I VARULÅDAN
➊
headset en backunit met microfoon en
luidsprekeraansluitingen
➋
klem (x2)
➌
adapter voor CL-17 helm
➍
luidsprekers
➎
hybride microfoon
➏
microfoon met kabel
➐
velcro boosterpad voor luidsprekers
➑
vierkante velcropads voor luidsprekers (x2)
➒
rechthoekige velcropads voor hybride microfoon (x2)
➓
clip voor hybride microfoon
⓫
alcoholpads (x2)
⓬
reservespons voor hybride microfoon
➊
➋
(x2)
➌
CL-17
➍
➎
➏
➐
-
➑
-
(2 .)
➒
-
(2 .)
➓
⓫
(2 .)
⓬
➊
Headset och nackenhet med uttag för mikrofon och
högtalare
➋
Klämma (x2)
➌
Adapter för CL-17-hjälmen
➍
Högtalare
➎
Hybridmikrofon
➏
Mikrofon med sladd
➐
Kardborreförsedda stöddynor för högtalarna
➑
Fyrkantiga kardborreförsedda dynor för högtalarna (x2)
➒
Rektangulära kardborreförsedda dynor för
hybridmikrofonen (x2)
➓
Klämma för hybridmikrofon
⓫
Våtservetter (x2)
⓬
Ersättningssvamp för hybridmikrofonen
English
Deutsch
Français
Italiano
Español
Português
Nederlands
Русский
Svenska
EN |
INTRODUCTION
IT |
INTRODUZIONE
PT |
INTRODUÇÃO
This installation guide will guide you in attaching the SMARTH headset and back unit to your motorcycle helmet. Questa guida di installazione spiega come attaccare l’unità posteriore e il dispositivo SMARTH al casco per
motocicletta. Este guia de instalação irá orientá-lo(a) em como xar o fone de ouvido SMARTH e a unidade de suporte em seu
capacete de motociclista.
DE |
EINFÜHRUNG
NL |
TER INTRODUCTIE
RU |
ВВЕДЕНИЕ
Diese Montageanleitung zeigt Ihnen, wie Sie das SMARTH Headset und die hintere Einheit an Ihren Motor-
radhelm befestigen. Deze installatiegids begeleidt u bij het bevestigen van uw SMARTH-headset en backunit aan uw motorhelm. SMARTH .
FR |
INTRODUCTION
ES |
INTRODUCCIÓN
SV |
INTRODUKTION
Ce guide d’installation vous guidera dans la mise en place du casque SMARTH ainsi que de l’unité de base sur Esta guía de instalación le ayudará a jar su intercomunicador SMARTH y la unidad posterior en su casco de
motocicleta. Denna installationsguide kommer att vägleda dig vid fästandet av SMARTHs headset och nackenhet på din
motorcykelhjälm.
EN |
PREPARING THE
HELMET
DE |
HELM VORBEREITEN
FR |
PREPARATION DU
CASQUE
IT |
PREPARAZIONE DEL
CASCO
ES |
PREPARACIÓN DEL
CASCO
PT |
PREPARAÇÃO DO
CAPACETE
NL |
HET VOORBEREIDEN VAN
DE HELM
RU |
ПОДГОВИТЬ ШЛЕМ
SV |
FÖRBEREDA
HJÄLMEN
Remove the helmet pads. Entfernen Sie die
Helmkissen Retirer les rembourrages
de casque Rimuovere i cuscinetti del
casco. Retire las almohadillas para
el casco Remova a forração do
capacete Verwijder de helmkussentjes Ta bort hjälmens dynor
EN |
INSTALLING THE
SPEAKERS
DE |
MONTAGE DER
LAUTSPRECHER
FR |
INSTALLATION DES
HAUT-PARLEURS
IT |
INSTALLAZIONE DEGLI
AURICOLARI
ES |
INSTALACIÓN DE
ALTAVOCES
PT |
INSTALAÇÃO DOS
ALTO-FALANTES
NL |
DE LUIDSPREKERS
INSTALLEREN
RU |
УСТАНОВКА НАУШНИКОВ
SV |
INSTALLATION AV
HÖGTALARNA
For best sound clarity,
place the speakers directly
opposite and as close as
possible to your ears.
Note: If using two speakers
in a helmet is prohibited in
your jurisdiction, position
both speakers on one side of
the helmet.
➊
Clean the speaker
locations with the
alcohol pad.
➋
If the speaker recesses
are deep, attach both
Velcro booster pads for
speakers to the helmet.
➌
Attach both square
Velcro pads to the
helmet / booster pads.
➍
On the same side as
the cradle, attach the
speaker with the shorter
wire to the speaker pad,
and attach the speaker
with the longer wire to
the speaker pad on the
other side.
Für beste Klangschärfe
platzieren Sie die Lautsprecher
direkt gegenüber und so nah
wie möglich an Ihren Ohren.
Hinweis: Ist die Verwendung
zweier Lautsprecher in einem
Helm in Ihrer Gerichtsbarkeit
verboten, positionieren Sie
beide Lautsprecher auf einer
Helmseite.
➊
Reinigen Sie die Plätze
der Lautsprecher mit dem
Alkoholtupfer.
➋
Sind die Aussparungen
für die Lautsprecher
tief, bringen Sie beide
Lautsprecherverstärker-
Klettkissen am Helm an.
➌
Bringen Sie beide
quadratischen Klettkissen
am Helm / an den
Verstärkerkissen an
➍
Bringen Sie den
Lautsprecher mit dem
kürzeren Kabel an das
Klettkissen auf der selben
Seite wie die Halterung
und den Lautsprecher mit
dem längeren Kabel an das
Klettkissen auf der anderen
Seite an
Pour une meilleure
qualité du son, placez les
écouteurs l’un en face de
l’autre, aussi près que
possible de vos oreilles.
N.B.: Si l’utilisation de deux
haut-parleurs dans un
casque est interdit par la
loi, placez les deux haut-
parleurs du même côté du
casque.
➊
Nettoyez
l’emplacement des
haut-parleurs avec les
tampons d’alcool.
➋
Si les haut-parleurs
sont encastrés
profondément,
attachez les coussins
de boostage velcro
des haut-parleurs au
casque.
➌
Attachez les deux
coussins velcro carrés
au casque / au coussin
de boostage.
➍
Attachez le haut-
parleur avec le câble le
plus court au coussin
et le haut-parleur avec
le plus long câble au
haut-parleur.
Per il suono più chiaro, mettere
gli auricolari direttamente di
fronte e più vicini possibile alle
orecchie.
Nota: Se l’uso di due auricolari
in un casco è proibito nella
giurisdizione di appartenenza,
mettere i due auricolari sullo
stesso lato del casco.
➊
Pulire la posizione
per l’auricolare con la
salvietta imbevuta di
alcool.
➋
Se gli incavi per
l’auricolare sono profondi,
attaccare entrambi i
cuscinetti di rinforzo di
Velcro per gli auricolari
al casco.
➌
Attaccare entrambi
i cuscinetti quadrati
di Velcro al casco / ai
cuscinetti di rinforzo.
➍
Dallo stesso lato
dell’intelaiatura di
sostegno, attaccare
l’auricolare con il cavo
più corto al cuscinetto
dell’auricolare, e attaccare
l’auricolare con il cavo più
lungo all’auricolare.
Para obtener la mejor
claridad de sonido, coloque
los altavoces directamente al
frente y lo más cerca posible
de sus oídos.
Nota: Si el uso de dos
altavoces en un casco está
prohibido en su jurisdicción,
coloque a ambos altavoces en
el mismo lado del casco.
➊
Limpie el lugar destinado
a los altavoces con la
toallita con alcohol.
➋
Si las cavidades para
altavoces son profundas,
je a ambas almohadillas
elevadoras de velcro para
altavoces en el casco.
➌
Fije las dos almohadillas
cuadradas de velcro
en el casco / sobre las
almohadillas elevadoras.
➍
En el lado donde está el
soporte, je el altavoz
con el cable corto sobre la
almohadilla para altavoz,
y je el altavoz con el
cable largo al altavoz.
Para obter uma melhor
qualidade de som posicione
os alto-falantes diretamente
em oposição e o mais
próximo possível de seus
ouvidos.
Nota: Caso seja proibido o uso
de dois alto-falantes em sua
jurisdição, posicione ambos os
alto-falantes em um dos lados
do capacete.
➊
Limpe o local onde
irá posicionar os alto-
falantes com a esponja
com álcool.
➋
Caso o local para o
microfone seja profundo
utilize as almofadas
amplicadoras com Velcro
xando-as no capacete.
➌
Fixe ambas as almofadas
quadradas com Velcro
no capacete / ou nas
almofadas amplicadoras.
➍
Fixe o alto-falante com
o o mais curto na
almofada no mesmo lado
do encaixe e xe o alto-
falante com o o mais
longo no alto-falante.
Plaats de luidsprekers voor
maximale geluidskwaliteit
tegenover en zo kort
mogelijk bij uw oren.
Opmerking: Als twee
luidsprekers in een helm
verboden zijn in het
rechtsgebied waarin u
zich bevindt, plaats beide
luidsprekers dan een kant van
de helm.
➊
Reinig de plaats van de
luidsprekers met de
alcoholpad.
➋
Als de uitsparingen voor
de luidsprekers diep zijn,
bevestig dan beide velcro
boosterpads voor de
luidsprekers aan de helm.
➌
Bevestig beide vierkante
velcropads aan de helm /
boosterpads.
➍
Bevestig de korte
draad aan dezelfde
kant van de houder aan
de luidsprekerpad en
bevestig de luidspreker
met de lange draad aan
de luidspreker
,
.
Примечание: Если
использование в шлеме
динамиков наушников с двух
сторон запрещено местным
законодательством, то
разместите оба наушника на
одной стороне шлема.
➊
.
➋
,
-
.
➌
-.
➍
.
.
Placera högtalarna direkt
motsatt varandra och så nära
dina öron som möjligt för
bästa ljudkvalitet.
Obs: Om det är förbjudet att
använda två högtalare i ditt
land skall båda högtalarna
placeras på ena sidan av
hjälmen.
➊
Rengör platserna
för högtalarna med
våtservetterna.
➋
Om skrymslena där
högtalarna ska placeras
är djupa fäster du båda
de kardborreförsedda
stöddynorna för
högtalarna vid hjälmen.
➌
Fäst båda de fyrkantiga
kardborreförsedda
dynorna vid hjälmen/
stöddynorna.
➍
Fäst högtalaren med
den kortare kabeln på
högtalarens dyna på
samma sida som hållaren
och fäst högtalaren med
den längre kabeln vid
högtalaren
➊
➎➒
➋➏➓
➌➐⓫
➍➑⓬
OPTION B
OPTION A
Installation Guide
EN |
INSTALLING THE MICROPHONE
DE |
MONTAGE DES MIKROFONS
FR |
INSTALLATION DU MICROPHONE
IT |
INSTALLAZIONE DEL MICROFONO
ES |
INSTALACIÓN DEL MICRÓFONO
PT |
INSTALAÇÃO DO MICROFONE
NL |
DE MICROFOON INSTALLEREN
RU |
УСТАНОВКА МИКРОФОНА
SV |
INSTALLATION AV MIKROFONEN
OPTION A –
HYBRID MICROPHONE
(FOR OPEN-FACE AND MODULAR
HELMETS)
➊
On the inner right side of the
helmet, position the hybrid
microphone so that the microphone
itself is opposite your mouth, and
note the position of the boom
relative to the helmet.
➋
Clean the hybrid microphone
location with the alcohol pad.
➌
Attach both rectangular Velcro
pads, adjacent to each other, near
the helmet rim.
➍
Attach the hybrid microphone and
clip to the Velcro pads, with the
yellow arrow facing your mouth.
OPTION B – CORDED MICROPHONE
(FOR FULL-FACE HELMETS)
➊
Clean the corded microphone
location with the alcohol pad.
➋
Attach the rectangular Velcro pad
near the helmet rim, opposite your
mouth.
➌
Attach the microphone to the
Velcro pad.
OPTION A – HYBRIDMIKROFON
(FÜR JETHELME UND
KLAPPHELME)
➊
Positionieren Sie auf den
inneren rechten Helmseite
das Hybridmikrofon, so dass
das Mikrofon selbst vor Ihrem
Mundsitzt, und beachten Sie die
position des Auslegers relativ
zum Helm.
➋
Reinigen Sie den Platz des
Hybridmikrofons mit dem
Alkoholtupfer.
➌
Bringen Sie beide rechteckigen
Klettkissen nebeneinander in der
Nähe der Helmkante an.
➍
Bringen Sie Hybridmikrofon und
Klemme an die Klettkissen an,
wobei der gelbe Pfeil auf Ihren
Mund zeigt.
OPTION B – KABELMIKROFON
(FÜR INTEGRALHELME)
➊
Reinigen Sie den Platz des
Kabelmikrofons mit dem
Alkoholtupfer.
➋
Bringen Sie das rechteckige
Klettkissen in der Nähe der
Helmkante vor Ihrem Mund an.
➌
Bringen Sie das Mikrofon auf das
Klettkissen an.
OPTION A – MICROPHONE HYBRIDE
(POUR CASQUES OUVERTS OU
MODULAIRES)
➊
Positionnez le microphone hybride
à l’intérieur du casque de façon à
ce que le microphone se trouve en
face de votre bouche et marquez la
position du support sur le casque.
➋
Nettoyez l’emplacement du
microphone avec les tampons
d’alcool.
➌
Attachez les deux coussins velcro
rectangulaires, de façon adjacente
près du bord du casque.
➍
Attachez le microphone hybride et
attachez les coussins velcro avec la
èche jaune en direction de votre
bouche.
OPTION B – MICROPHONE FILAIRE
(POUR CASQUES INTÉGRAUX)
➊
Nettoyez l’emplacement du
microphone laire avec les
tampons d’alcool.
➋
Attachez les coussins velcro au bord
du casque, en face de votre bouche.
➌
Attachez le microphone aux
coussins velcro.
OPZIONE A – MICROFONO IBRIDO
(PER CASCHI APERTI E
MODULARI)
➊
Sul lato destro interno del casco,
posizionare il microfono ibrido
in modo che il microfono stesso
sia di fronte alla bocca, e notare
la posizione del braccio rispetto
al casco.
➋
Pulire la posizione del microfono
ibrido con la salvietta imbevuta
di alcool.
➌
Attaccare entrambi i cuscinetti
rettangolari di Velcro, uno vicino
all’altro, vicino al bordo del casco.
➍
Attaccare il microfono ibrido e
ssarlo ai cuscinetti di Velcro, con la
freccia gialla di fronte alla bocca.
OPZIONE B – MICROFONO CABLATO
(PER CASCHI INTEGRALI
➊
Pulire la posizione del microfono
cablato con la salvietta imbevuta
di alcool.
➋
Attaccare il cuscinetto rettangolare
di Velcro vicino al bordo del casco,
di fronte alla bocca.
➌
Attaccare il microfono al cuscinetto
di Velcro.
OPCIÓN A – MICRÓFONO HÍBRIDO
(PARA CASCOS ABIERTOS Y
MODULARES)
➊
Coloque el micrófono híbrido en el
lado derecho interior del casco, de
manera que el micrófono mismo
esté frente a su boca, y tome
nota de la posición del brazo con
relación al casco.
➋
Limpie el lugar destinado al
micrófono híbrido con la toallita
con alcohol.
➌
Fije las dos almohadillas
rectangulares de velcro una al
lado de la otra, cerca del borde
del casco.
➍
Fije el micrófono híbrido y su clip
sobre las almohadillas de velcro,
apuntando la echa amarilla hacia
su boca.
OPCIÓN B – MICRÓFONO CON CABLE
(PARA CASCOS INTEGRALES)
➊
Limpie el lugar destinado al
micrófono con cable usando la
toallita con alcohol.
➋
Fije la almohadilla rectangular de
velcro cerca del borde del casco,
frente a su boca.
➌
Fije el micrófono sobre la
almohadilla de velcro.
OPÇÃO A–MICROFONE HÍBRIDO
(PARA CAPACETES DE FACE ABERTA
E MODULARES)
➊
Posicione o microfone híbrido na
parte interna direita do capacete
de forma que o microfone que
defronte de sua boca e verique
a posição do arco em relação ao
capacete.
➋
Limpe o local do microfone híbrido
utilizando a esponja com álcool.
➌
Fixe ambas as almofadas
retangulares com Velcro, uma
próxima da outra junto à borda do
capacete.
➍
Fixe o microfone híbrido e
prenda-o nas almofadas com
Velcro, com a exa amarela voltada
para a sua boca.
OPÇÃO B- MICROFONE COM
FIO (PARA CAPACETES DE FACE
INTEIRA)
➊
Limpe o local onde irá xar o
microfone utilizando a esponja
com álcool.
➋
Fixe a almofada retangular
com Velcro próximo à borda do
capacete, defronte à sua boca.
➌
Prenda o microfone na almofada
com Velcro.
OPTIE A – HYBRIDE MICROFOON
(VOOR OPEN EN MODULAIRE
HELMEN)
➊
Plaats de hybride microfoon aan
de rechter binnenkant van de
helm zodat de microfoon zich
tegenover uw mond bevindt en
let op de positie van de antenne
tegenover de helm.
➋
Reinig de locatie van de hybride
microfoon met de alcoholpad.
➌
Bevestig beide rechthoekige
velcro pads naast elkaar bij de
helmrand.
➍
Bevstig de hybride microfoon en
clip aan de velcropads met de
gele pijl naar uw mond gericht.
OPTIE B – MICROFOON MET
KABEL (FOR GESLOTEN HELMEN)
➊
Reinig de locatie van de
microfoon met kabel met de
alcoholpad.
➋
Bevestig de rechthoekige
velcropad bij de helmrand
tegenover uw mond.
➌
Bevestig de microfoon aan de
velcropad.
ВАРИАНТ А: ГИБРИДНЫЙ
МИКРОФОН (ДЛЯ ОТКРЫТЫХ И
МОДУЛЬНЫХ ШЛЕМОВ)
➊
,
.
.
➋
.
➌
-
.
➍
-.
.
ВАРИАНТ Б: ПРОВОДНОЙ
МИКРОФОН (ДЛЯ ШЛЕМОВ-
ИНТЕГРАЛОВ)
➊
.
➋
-
.
➌
-
.
ALTERNATIV A –
HYBRIDMIKROFON (FÖR
VISIRLÖSA OCH MODULHJÄLMAR)
➊
Placera hybridmikrofonen på den
inre högra sidan av hjälmen så att
mikrofonen själv är mittemot din
mun och observera placeringen av
stången i förhållande till hjälmen.
➋
Rengör platsen för
hybridmikrofonen med
våtservetterna.
➌
Fäst de båda rektangulära
kardborrdynorna mitt emot
varandra och nära hjälmens kant.
➍
Fäst hybridmikrofonen och
klämman vid karborrdynorna med
den gula pilen riktad mot din mun.
ALTERNATIV B – MIKROFON MED
SLADD (FÖR INTEGRALHJÄLMAR)
➊
Rengör platsen för mikrofonen
med våtservetterna.
➋
Fäst den rektangulära
kardborrdynan nära hjälmens kant,
framför munnen.
➌
Fäst mikrofonen vid kardborrdynan.
➌
➍
➌➍
➋➌
SMARTH™
MAN14015 SMARTH Installation Guide_004.indd 2 1/5/17 5:44 PM