Casa Tunes Music Server For Nuvo Quick Start
2010-04-14
: Casatunes Casatunes Music Server For Nuvo Quick Start CasaTunes Music Server for Nuvo Quick Start s
Open the PDF directly: View PDF ![]() .
.
Page Count: 4
- Warning: There are high voltages inside the Music Server. If you decide to make any modifications to the Music Server you should always unplug the AC Power and wait for at least 5-10 seconds for any voltages to bleed off before removing the cover. See...
- Note: Your Casatunes and Windows license numbers are located on the bottom of the chassis.
- Hardware Installation
- Using the Nuvo Configurator Software to configure the
- NuvoNet Adapter
- Setting up the NuvoNet Adapter Hardware
- Tips
V1.0
CasaTunes™ Music Server for Nuvo Quick Start Guide
This quick start assumes the computer will only be used for CasaTunes whole house music distribution. We
recommend that you follow these directions to get the most out of CasaTunes. When done, you will be able to use
the computer to listen to your music throughout the house using the built-in CasaTunes software and your Nuvo
Controller/Amplifier. You will also be able to “rip” (copy from CDs) music to the storage built in to the computer or
plug an iPod, iPhone or iPod touch into the computer and listen to the music throughout the house. With the
computer set up in this way, you will find that the computer is stable and reliable. With a good Uninterruptible Power
Supply (UPS) you should never need to reboot the computer. If you decide to use the computer for other uses, such
as word processing or financial planning you may compromise the reliability or stability of the system, depending on
the quality of the programs you are running.
Warning: There are high voltages inside the Music Server. If you decide to make any modifications to the Music Server
you should always unplug the AC Power and wait for at least 5-10 seconds for any voltages to bleed off before removing the
cover. See the Computer’s User Guide for more important safety information.
As mentioned in the Computer user manual supplied with the Music Server, changes to the Music Server could cause harmful
RF interference. If changes cause interference to other devices, such as radios or TVs in your home, you should try removing
the modifications that you made and reorienting the computer and cables coming in and out of the computer.
Note: Your Casatunes and Windows license numbers are located on the bottom of the chassis.
Hardware Installation
• Carefully remove the Music Server from its box.
• If you are using the CasaTunes keyboard or other keyboard/mouse, plug them in at this time. Depending on
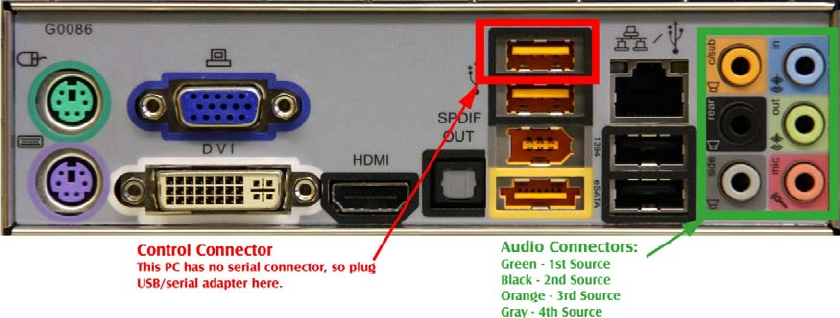
the type of keyboard and mouse, they can be plugged into the PS2 sockets (green and purple) or USB sockets
in the rear of the computer. (see Fig 1 or 2 for location of connectors).
• Plug four of the included audio cables from the back of the Music Server to the appropriate Nuvo Source
inputs. The 3.5mm plugs go into the Green, Black, Orange and Gray connectors on the back of the Music
Server (Fig. 1) and the RCA ends into the Nuvo controller. The green goes to the source input that you will be
using for the first CasaTunes player, Black for 2nd, etc.
• If you wish to have five CasaTunes Player sources, plug the 5th supplied cable into the green speaker jack in
the front of the Music Server and the other end into the appropriate Nuvo Source input.
Fig. 1, Back connector panel of Music Server
CasaTunes
XL Music Server Quick Start Guide

V1.0
• Plug a monitor into the VGA, DVI or HDMI connector in the lower left of the back panel. (Note: all audio
cables must be plugged into the Music Server’s audio jacks before starting the computer!)
• Plug the supplied USB to serial connector into the USB port as shown in Fig. 1. This will be your serial port for
configuring and controlling the Nuvo controller
• You can now start your computer by tapping on the power button on the front of the Music Server.
• Once Windows has started, click on the Start button and type in “Device Manager” in the “Search Programs
and files” window just above the Start button. Find the Device Manager at the top of the list and run it.
• In Device Manager, click on “Ports” and find the COM port number used by the USB/serial adapter. Write this
down. In the following example, the COM port number is 5:
Using the Nuvo Configurator Software to configure the
NuvoNet Adapter
Before you can use the NuvoNet Adapter with CasaTunes, you must configure the Grand Concerto or Essentia using
the Nuvo provided Configurator software. You should configure the Grand Concerto or Essentia before connecting
the NuvoNet Adapter, as these systems cannot be programmed with the NV-NNA connected.
To configure the Grand Concerto or Essentia to use the NuvoNet Adapter:
1. Connect the serial end of the USB/serial adapter coming from the CasaTunes Music server to the Nuvo Grand
Concerto/Essentia Controller.
2. Start the Grand Concerto or Essentia Configurator software.
3. Retrieve the configuration from the controller.
4. Select the Sources tab. Select the first CasaTunes player source you want to use with the NuvoNet Adapter.
Since you can have as many as 5 sources of music from CasaTunes, you could set up the first five sources of
the Nuvo as CasaTunes Players.
5. If the source is already defined as an existing source, click on the clear button to delete the existing source.
6. Click on the select button to select the source component.
7. In the component window, expand the Nuvo source components, and select the NV-NNA component from
the list of Nuvo components.
You must specify to use the NV-NNA component even if you are using a Multi-Port (NV-MP) device
8. Repeat steps 4 through 6 for each CasaTunes source. Make sure you record the CasaTunes Player sources
that are being used (you will need to configure these for CasaTunes later using the CasaTunes Setup
application).
9. After you have completed configuring your sources (and any other settings you require), select the Update
System tab and click on the Download Update to the Grand Concerto or Essentia button to download any
firmware updates and configuration changes to your controller. We recommend you save your configuration
in case you need to reload the controller configuration at a later date.
The next step is to install the NuvoNet Adapter in your setup.
V1.0
Setting up the NuvoNet Adapter Hardware
The NuvoNet Adapter (NV-NNA) sits between the USB/serial adapter from the CasaTunes Music Server and the
Grand Concerto or Essentia. There are three connections that need to be made:
1. Connect the 9-pin M/F serial cable between the USB/serial adapter and the Controller port on the NV-NNA.
2. Connect the Cat5e cable from the NuvoNet port on the NV-NNA to an available NuvoNet device port.
3. Connect a 9-pin M/F serial cable from the Nuvo RS-232 port on the NV-NNA to the RS-232 port on the Grand
Concerto or Essentia.
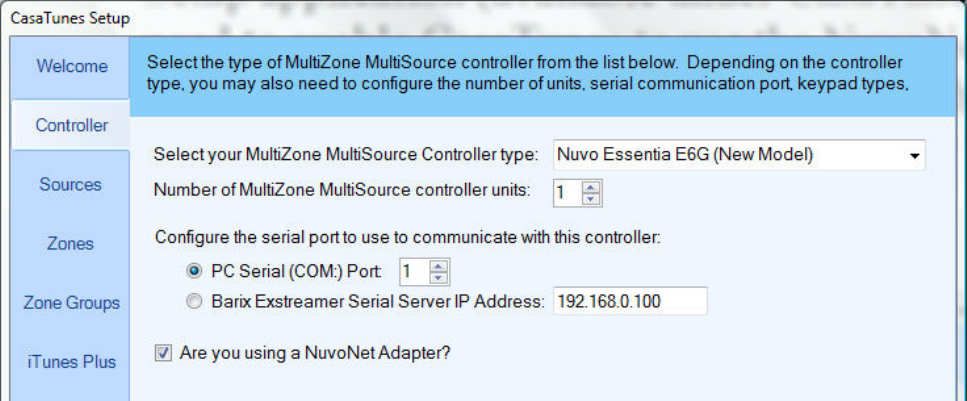
• Go to CasaTunes Setup (on the Windows desktop). You will find that the controller tab should be pre-setup at
our factory to show a Nuvo Grand Concerto. Please change this if you are using a different Nuvo controller.
Add the COM: port number used by the USB/serial adapter and check the “Are you using a NuvoNet
Adapter?” checkbox as shown:
• At our factory, we have set the CasaTunes software so that the four audio outputs on the back of the Music
Server are assigned to Source Inputs one through four on the Nuvo and the front Headphone output of the
Music Server is assigned as the fifth source input on the Nuvo. If you would like to change this, follow the
next step. Otherwise, skip the next step.
• In the Sources tab, set the sources to match the way that you have wired your Nuvo. Music coming from the
Music Server to the Nuvo controller are called CasaTunes Players. We have set the first five sources in
CasaTunes Setup to be CasaTunes Players, but you can change them in the following manner: For the first
source that you will be using as a CasaTunes Player, select “CasaTunes Player” as “the type of source”,
“Speakers (Realtek High Definition Audio)” as “the Audio Device to use” and “Speakers 1&2 (Front
Right/Left)” as the “Speakers to use”. For the 2nd Player source, set it up the same except that the “Speakers
to use” should be “Speakers 3&4 (Rear Surrounds)”. Keep going in this manner for the 3rd and 4th Players,
using Speakers 5&6 and 7&8 respectively. If you are using the front headphones as a 5th CasaTunes Player,
select “CasaTunes Player” for the source associated with the Nuvo source input you are using, select “Realtek
V1.0
HD Audio 2nd Output (Realtek High Definition Audio)” as “the Audio Device to use” and select “Default
Speaker Selection” as the “Speakers to use”.
• Now set the non-CasaTunes Player sources to match the devices you have connected to the other source
inputs on the Nuvo. If we do not show a device to match the sources you are using, pick “unknown”.
• In the Source tab and the Zone tab, you can rename the zones to room names and the sources to names that
make sense to you. For example, you could assign sources to different people in the house and name the
sources to match. Some people pick one source to constantly play all of their PC music randomly and call that
source “All Music”. Once you are done customizing CasaTunes, click on Summary and Finish.
Tips
• Since the audio server built into CasaTunes will not function when the computer is in standby or sleep, we
have also set the computer to not time out and shutdown or go to sleep automatically.
• Automatic updates for Windows 7, Windows Media Player and iTunes have been disabled to prevent
interruption of your music. You should manually check for updates occasionally.
• We have placed a link to LogMeIn.com on your Windows desktop. Their LogMeIn program is excellent for
remotely accessing your server and it is free in its basic, but very complete version.
• We highly recommend that you use an uninterruptable power supply to keep your Music Server from
powering off during a power outage.
