Getting Started Guide
2009-05-08
: Casatunes Getting Started Guide Getting Started Guide s
Open the PDF directly: View PDF ![]() .
.
Page Count: 14

CasaTunes
Getting Started Guide
Version:
Date:
1.0
May 19, 2007

CasaTunes
Multi-Room Music Server
CasaTools, Inc.
P.O. Box 947810 Maitland FL 32794-7810
Phone: (866) 622.0894 (Toll Free) (321) 206.0544
Email: support@CasaTools.com
Windows XP, Windows Media Player, Windows Media, Windows Vista, Windows Media Center, .Net Framework are either registered
trademarks or trademarks of Microsoft Corporation.
Apple iTunes, Apple iPod are registered trademarks of Apple Computer, Inc.
Russound CAV, CAM, UNO, ST2 are either registered trademarks or trademarks of Russound.
Grand Concerto, Concerto and Essentia are either registered trademarks or trademarks of Nuvo Technologies
Barix Exstreamer is a registered trademark of Barix Corporation.
Copyright © 2007 CasaTools, Inc. All rights reserved.
Getting Started Guide
Copyright © CasaTools, Inc. 2006-7 3
Getting Started Guide
Thank you for you interest in CasaTunes. The purpose of this guide is to take
you step-by-step through the CasaTunes installation. These steps include:
1. Determining your configuration setup
2. Completing your CasaTunes worksheets
3. Setting up your hardware for CasaTunes
4. Installing the CasaTunes software
5. Configuring your CasaTunes software
Determining your configuration setup
Before proceeding to use CasaTunes, you need to decide which PC you are
going to install the CasaTunes Multi-Room Music Server on. This guide assumes
your multi-room music system is already installed.
In order for CasaTunes to function correctly, you must connect the audio
outputs from your music server to the source inputs on your music system, and
you must also setup a serial connection from your music server to your music
system in order for CasaTunes to be able to control your music system.
There are two different installation options to choose from.
Option 1
You can physically locate your CasaTunes Music Server PC next to your multi-
room music system. With this option you must connect the outputs from your
sound card to the source inputs on your music system. If you are using a sound
card that supports more than one stereo output, you can connect each of these
stereo outputs to a different input source on your music system.
Your CasaTunes Music Server PC will also need to have at least one serial port
(sometimes referred to as a COM or RS232 port). You must connect a serial
cable from the serial port on the PC to the serial port on the music system.
The serial port on your music system is typically located on the rear of the
device.
Option 2
You can use one or more Barix Exstreamer devices, or networked music players
with CasaTunes. The advantage of using these devices is it allows you to use
any PC in your home as your CasaTunes music server, and you do not have to
physically locate the PC next to your music system.
To connect the audio and serial control to your music system, you only have to
locate the small Exstreamer devices next to your music system, and hook the
audio stereo outputs and serial connection on the Exstreamer device to your

Getting Started Guide
Copyright © CasaTools, Inc. 2006-7 4
music system. You will need one Exstreamer device for each input source on
your music system. Since these Exstreamer devices are networked devices,
they will need access to a network connection.
Regardless of the option you choose, the machine you select to use as your
CasaTunes Multi-Room Music Server PC does not have to be dedicated to
CasaTunes and can be used to run other applications. For example, the
machine could be a Windows Media Center PC that is used as your Home
Theater PC (HTPC), or it could be the PC in your home office, etc.
If you are using a Nuvo Technologies tuner, you will need an additional
serial port connection for each tuner.
Your CasaTunes Multi-Room Music Server software supports the following
Microsoft operating systems:
• Windows XP Professional
• Windows XP Media Center Edition
• Windows Vista Home Premium
• Windows Vista Business
• Windows Vista Ultimate
Completing your CasaTunes worksheets
To simplify the installation and to document your setup, we strongly
recommend completing your CasaTunes worksheets. A blank worksheet is
available as Appendix A. An example of a completed worksheet is shown as
Appendix B.
Complete the following information on the worksheet:
1. The type of multi-room system being used.
2. The type of serial port you are going to use to control your multi-room
music system. The serial port can either be a PC based serial port or the
serial port located on the Barix Exstreamer device.
If you are using a PC based serial port, enter the COM port address. This
is typically 1 or 2 for built in serial ports.
If you are using the serial port on a Barix Exstreamer device, enter the IP
address of the Exstreamer device (refer to the section “Configuring Barix
Exstreamer Devices”).
3. Enter the number of multi-room music systems that are linked together.
CasaTunes supports linking six Russound CAV systems and two Nuvo
Concerto/Grand Concerto systems.
4. For each source input, enter the type of device that is connected and
the source configuration. You should only enter all the non-CasaTunes
music server sources that are connected, for example, any tuners,

Getting Started Guide
Copyright © CasaTools, Inc. 2006-7 5
satellite, CD-changers, etc. You will enter the information on the
CasaTunes music server sources in the next section.
5. Enter the information for each zone (or room).
Setting up your hardware for CasaTunes
Now that you have selected the machine you are going to use for your
CasaTunes Multi-Room Music Server PC and where this PC will be located, you
are ready to complete the hardware setup.
Option 1
If you decided to co-locate your CasaTunes PC next to your multi-room music
system, then move, if necessary, your CasaTunes PC to this location and
connect the stereo output(s) from your sound card(s) to the source input(s) on
your multi-room music system.
Next, record the name of the Windows DirectSound Driver associated with each
stereo output and source input on your CasaTunes worksheet. If you are using
multiple sound cards, or a sound card with multiple stereo outputs, you will
need to correctly identify which Windows DirectSound Driver is being used for
each stereo output. Typically, this information is included in the product
manual, or is easily determined by the name of the driver.
If you are not sure of the correct DirectSound driver for a particular stereo
output, you can discover the correct driver by connecting the stereo output to
your input source, use the keypads to select this source for a zone, and use
Windows Media Player to play a song using this DirectSound driver. If you do
not hear any music playing in this zone, then select a different DirectSound
driver until you hear the music playing. Record the name of this DirectSound
driver for this stereo output and input source.
Next, connect the serial port on your CasaTunes PC to the serial port on your
music system.
If you are using a Nuvo Technologies tuner, connect a second serial port
cable from your CasaTunes PC to your tuner (on the rear of the device).
Record the serial port/COM port used for this source on the worksheet. This
step is not required for Russound tuners.
Option 2
First, you must configure each Barix Exstreamer device.
Repeat the following steps for each Exstreamer device:

Getting Started Guide
Copyright © CasaTools, Inc. 2006-7 6
Setup and record the IP address used by the Exstreamer device
1. Locate the Exstreamer device next to your multi-room music system and
connect the device to your network
2. Decide how this device is going to be used. The device can be used as:
a. A source input to your multi-room music system
b. A serial port to control you multi-room music system or tuner
c. Or both
3. Connect the ear piece to the Exstreamer device
4. Connect power and listen to and record the IP address the device is
using on your worksheet.
a. If the serial port on the device is to be used to control the music
system, enter the IP address in the controller section of the
worksheet
b. If the serial port on the device is to be used to control a Nuvo
tuner, enter the IP address in the source setup section of the
worksheet for the tuner source
c. If the device is being used as a source to play your PC based
music, enter the IP address for the device in the source setup
section of the worksheet for the Exstreamer Media Player source
type
Configure the Exstreamer Media Player device for use with CasaTunes
5. Type in the Address bar, using Internet Explorer, http:// followed by the
IP address you recorded in the previous step, for example,
http://192.168.0.12
6. Select ‘Config’ from the web page
7. Under ‘Settings’ select ‘Streaming’
8. Select ‘4 - Streaming Receiver’ as the ‘Mode’
9. Select ‘Apply’ (the Exstreamer will re-boot)
Configure the Exstreamer Serial Server settings
10. If you are not going to use the serial port on this Exstreamer device then
skip to Step 14.
11. On the ‘Config’ page select ‘Serial’ under ‘Settings’
12. Select the following baud rate depending on which device is being
controlled by the serial port on this Exstreamer device:
a. Russound CAM/V music system – 19,200 baud
b. Nuvo Concerto music system – 9,600 baud
c. Nuvo Tuner – 9,600 baud
d. Nuvo Grand Concerto music systems – 57,600 baud
e. The remainder of the settings should be as follows:
i. 8 Data Bits
ii. No Parity
iii. 1 Stop Bit
iv. Set the ‘Local Port’ to 12303

Getting Started Guide
Copyright © CasaTools, Inc. 2006-7 7
13. Select ‘Apply’ (the Exstreamer device will re-boot)
14. Repeat for each Exstreamer device
For each Exstreamer device, connect the stereo output to the input source on
your music system. In the source setup section of the worksheet, record which
source input this device is connected to and the IP address for this device.
If you are using the serial port on this device to control the music system or
tuner, connect the serial port cable from this device to the music system or
tuner, and record on the worksheet the IP address of this device in the
‘Controller Setup’ or ‘Source Setup’ sections, respectively.
The 9-pin serial cable that ships with the Barix Exstreamer device is
terminated on both ends with a female connector (Serial 9-pin F/F cable). You
will need to replace these cables with a 9-pin serial cable that is terminated
with a male connector on one end, and a female connector on the other (Serial
9-pin F/M cable). If you purchase your Exstreamer from the CasaTunes store,
the correct cable is included.
You have now completed the hardware setup.
Installing the CasaTunes software
Before installing the CasaTunes Multi-Room Music Server software you must
install and/or configure the following Microsoft components:
• Microsoft Internet Information Server (IIS)
• Microsoft .Net Framework 2.0
• Microsoft AJAX ASP.NET
Installing Internet Information Services (IIS)
On Microsoft Windows XP
• Open the Control Panel and select Add or Remove Programs
• Select Add/Remove Windows Components
• Check the checkbox next to “Internet Information Services (IIS)”, and
click on next
• Follow the prompts to complete the installation of IIS
On Microsoft Vista
• Open the Control Panel
• Click on ‘Programs’
• Click on ‘Turn Windows features on or off’
• Enable ‘Internet Information Services’
• Expand ‘Internet Information Services’, ‘World Wide Web Services’ and
‘Application Development Features’
• Make sure the following items are enabled
o .Net Extensibility
o ASP.Net

Getting Started Guide
Copyright © CasaTools, Inc. 2006-7 8
o ISAPI Extensions
o ISAPI Filters
• Expand ‘Web Management Tools’
o Enable ‘IIS 6 Management Compatibility’
• Select ‘OK’ and follow the instructions to install IIS
Installing Microsoft .Net Framework 2.0
If you are installing the CasaTunes software on a Microsoft Vista PC you can
skip this step, since the framework comes pre-installed.
To download and install the Microsoft .Net Framework 2.0 from the Microsoft
web site on to your Windows XP machine click here and follow the online
instructions.
Installing Microsoft ASP.Net AJAX 1.0
Click here to download and install Microsoft ASP.Net AJAX 1.0 from the
Microsoft web site and follow the online instructions.
Installing CasaTunes on a machine that does not require a password to
log on
If the machine where you are installing CasaTunes does not require a password
to log on, then you will need to change the following security setting, or
alternatively you can add a password to your logon account (which Microsoft
recommends).
To change the security setting:
• Open the Control Panel, select "Performance and Maintenance" and
select Administrative Tools
• Open the "Local Security Policy" applet Double-click "Security Settings",
"Local Policies" and "Security Options"
• Double-click in the right tab on the item "Accounts: limit local accounts
use of blank passwords to console logon only" and make sure it is
"disabled"
You are now ready to install the CasaTunes software.
Installing the CasaTunes Software
If you are installing CasaTunes on a Windows Vista PC, you must start
Microsoft Internet Explorer in the 'Run As Administrator' mode. Right-click on
the Internet Explorer icon and select 'Run as Administrator'.
Start Internet Explorer.
Enter http://www.casatools.com/setup.aspx in the Internet Explorer address
bar.
Getting Started Guide
Copyright © CasaTools, Inc. 2006-7 9
Click on ‘Download Software’ and follow the prompts on the screen.
The installation application will download the latest version of the product
from the CasaTools website, so you can always be sure that you are running the
latest version of the product.
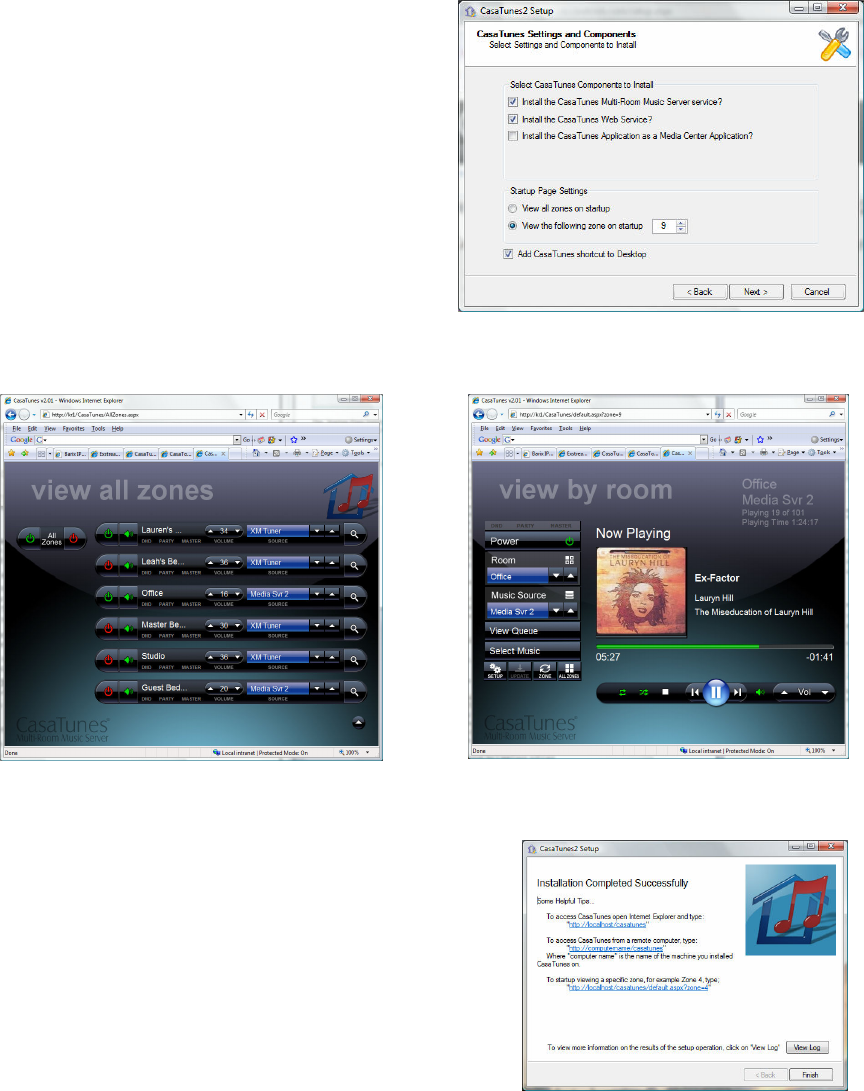
On the CasaTunes Settings and
Components page check on the ‘Install
CasaTunes Application as a Media
Center Application’ if you want to be
able to control CasaTunes from within
Media Center.
The ‘Startup Page Settings’ allows you
to configure the startup page, that is
the page that is displayed when you
launch CasaTunes from the browser or
from within Media Center. The two
different pages are shown below.
Figure 1 - The All Zones Page Figure 2 - The Zone Page
After the installation completes, the
application will display whether the install
completed successfully or not. You can check
the log file (‘View Log’) for more information
on any installation errors and warnings. In
addition, the ‘Expert Zone’ knowledge base
on the CasaTools web site contains an
installation trouble shooting section that
discusses common installation issues.
Getting Started Guide
Copyright © CasaTools, Inc. 2006-7 10
After you have successfully completed the installation, the CasaTunes Multi-
Room Music Server will be automatically started.
Configuring the CasaTunes Software
To start the CasaTunes User Interface, double-click the CasaTunes icon on the
Desktop.
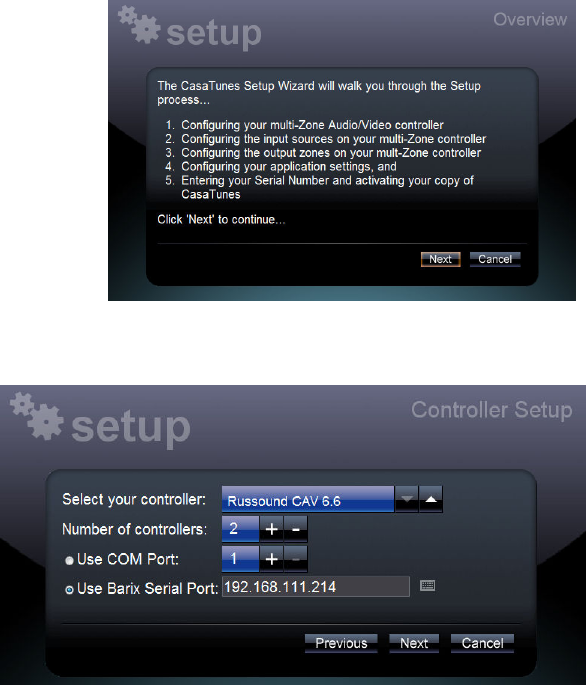
If this is the first time you started
CasaTunes, the browser will
automatically start the Setup
Wizard.
This wizard will walk you through
the process of configuring your
CasaTunes software … Use the
information from your CasaTunes
worksheet to help complete your
Setup.
Click ‘Next’ to configure
your multi-room music
system controller.
In this step you select
the type of multi-room
controller you have, the
number of units that are
linked together and how
CasaTunes will
communicate with the
controller.
You control your multi-room controller using either a serial port (COM/RS232
port) attached to your CasaTunes PC or using the serial port located on your
Barix Exstreamer device.
Enter either the COM port number (typically 1 or 2) or the IP address of the
Barix Exstreamer device. This information should be recorded on your
worksheet.
Getting Started Guide
Copyright © CasaTools, Inc. 2006-7 11
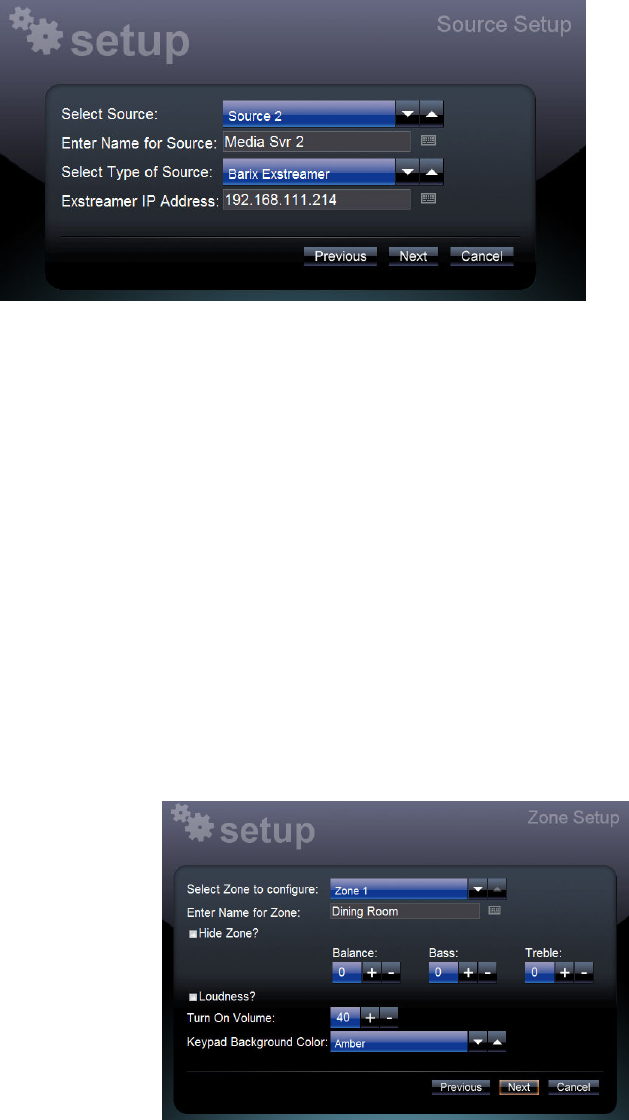
The next step in the
Setup process is to
configure your input
sources for your multi-
room music system.
CasaTunes supports
several different
sources, including:
1. None – Select this
option if there is
no source attached to this input. Setting the Source to None will avoid
displaying the source in the CasaTunes UI.
2. Windows Media Player – Select this option if the source connected to
this input is from a stereo output on your PC sound card. You will need
to specify the Windows DirectSound driver associated with this stereo
output.
3. Exstreamer Media Player – Select this option if the source connected to
this input is from a stereo output on your Barix Exstreamer device. You
will need to specify the IP address associated with this Exstreamer
device (as in the example above)
4. Russound AM/FM, XM, and Sirius Radio – Select these options if the
input source is connected to an output on your Russound tuner.
5. Nuvo AM/FM/WX, and XM Tuner – Select these options if the input
source is connected to an output of your Nuvo Technologies tuner.
To select the next source to configure, click the up/down Select Source
spinner. Repeat these steps until you have configured all the input sources.
The next step is to configure the zones.
The zone settings will vary depending
on the multi-room music system
installed.
To select the next zone to configure,
click the up/down ‘Select Zone to
configure’ spinner.
Repeat these steps until you have
configured all the zones.
If a zone is not being used, check the ‘Hide Zone’ checkbox to avoid the zone
from being displayed in the CasaTunes UI.
Getting Started Guide
Copyright © CasaTools, Inc. 2006-7 12
Click ‘next’ to configure various
application settings, including
whether to enable iPod support,
and if so, select the drive letter
that corresponds to your ‘docked’
iPod drive.
You can also configure the size of
the albums to be displayed when
viewing your music collection by
Album Cover.
The default is to view albums using the ‘small album’ cover size. The smaller
the album cover size, the more albums you can view at a time on the screen.
The album cover sizes are displayed to scale.
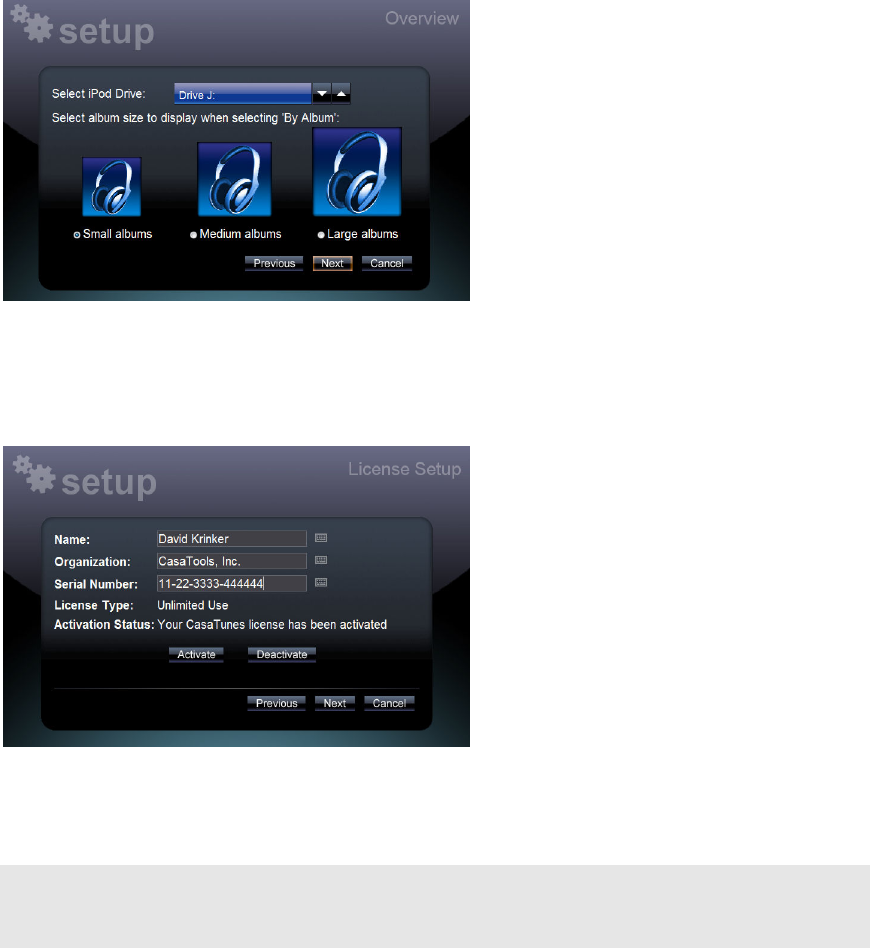
The next step in the setup process
is where you enter your CasaTunes
licensing information.
Once you enter the Serial Number
that was provided to you by
CasaTools or by your Reseller,
click on the ‘Activate’ button to
activate your software license.
If you do not activate your
software license within the 14 day evaluation period, the software will cease to
function, and the next time you start CasaTunes it will automatically redirect
you to the license activation screen.
If you decide to move CasaTunes to a different machine, you must first
deactivate your license on the current machine, and then re-activate your
license on the new machine.
The Summary page provides a summary of your configuration settings. If the
information is correct, click on ‘Finish’ to complete the setup. You can also
click on ‘Cancel’ at any time to quit the setup without making the changes,
and you can use ‘Next’ and ‘Previous’ to move to the setup page where you
want to makes changes. Once you have finished setup your settings are
automatically saved.
Congratulations! You have completed the installation of CasaTunes.
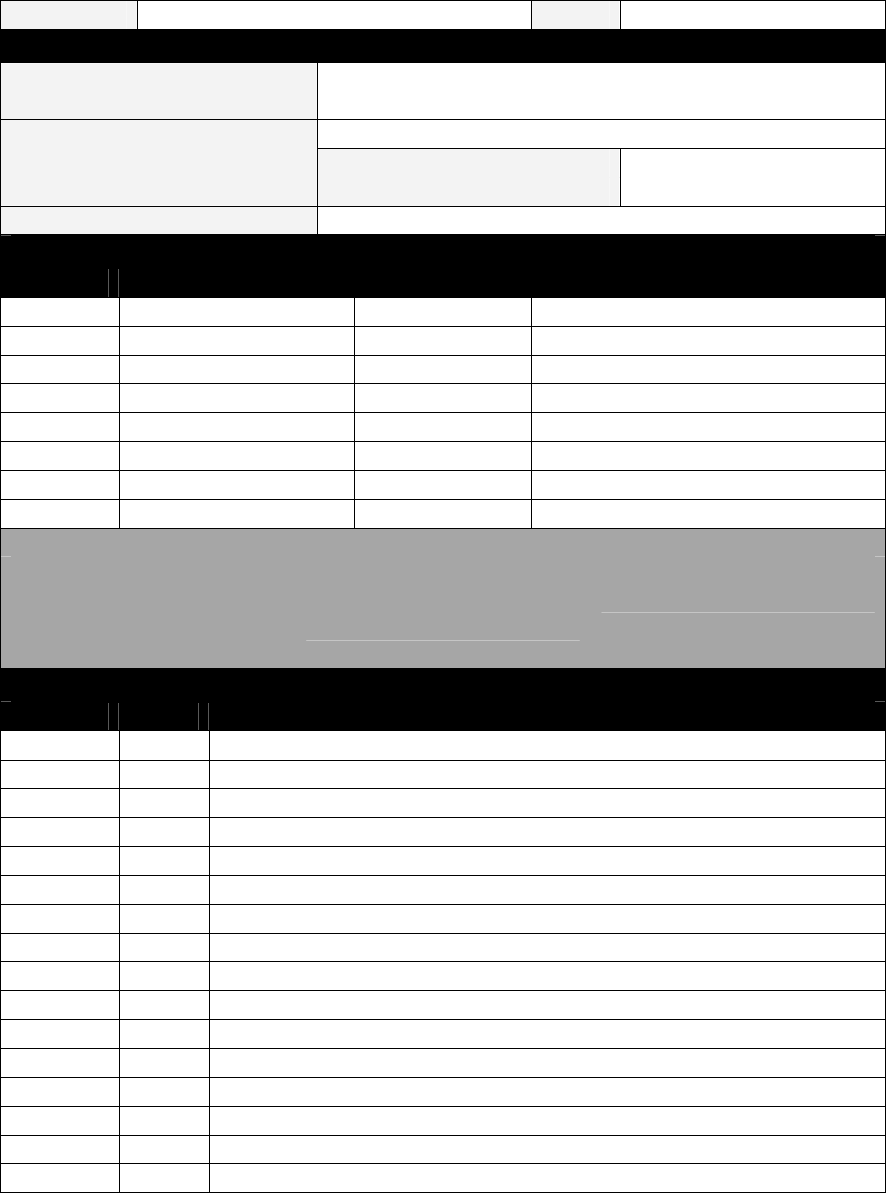
Appendix A – CasaTunes Worksheet
Copyright © CasaTools, Inc. 2006-7 13
Job Name:
Date:
Multi-Room Music System Setup Information
Multi-Room Controller Russound CAM/V 6.6
Nuvo Concerto
Nuvo Grand Concerto
PC Serial Port Serial Port on Exstreamer
COM Port or
Serial Communication
Exstreamer IP Address:
Number of linked units
Source Setup Information
Source # Source Name Source Type Source Configuration Info
1
2
3
4
5
6
7
8
Source Types Available:
None
Barix Media Player
Exstreamer Media Player
Other
Russound AM/FM Radio
Russound XM Radio
Russound Sirius Radio
Nuvo AM/FM/WX Tuner
Nuvo XM Tuner
Zone Setup Information
Zone # Used Zone Name
1
2
3
4
5
6
7
8
9
10
11
12
13
14
15
16
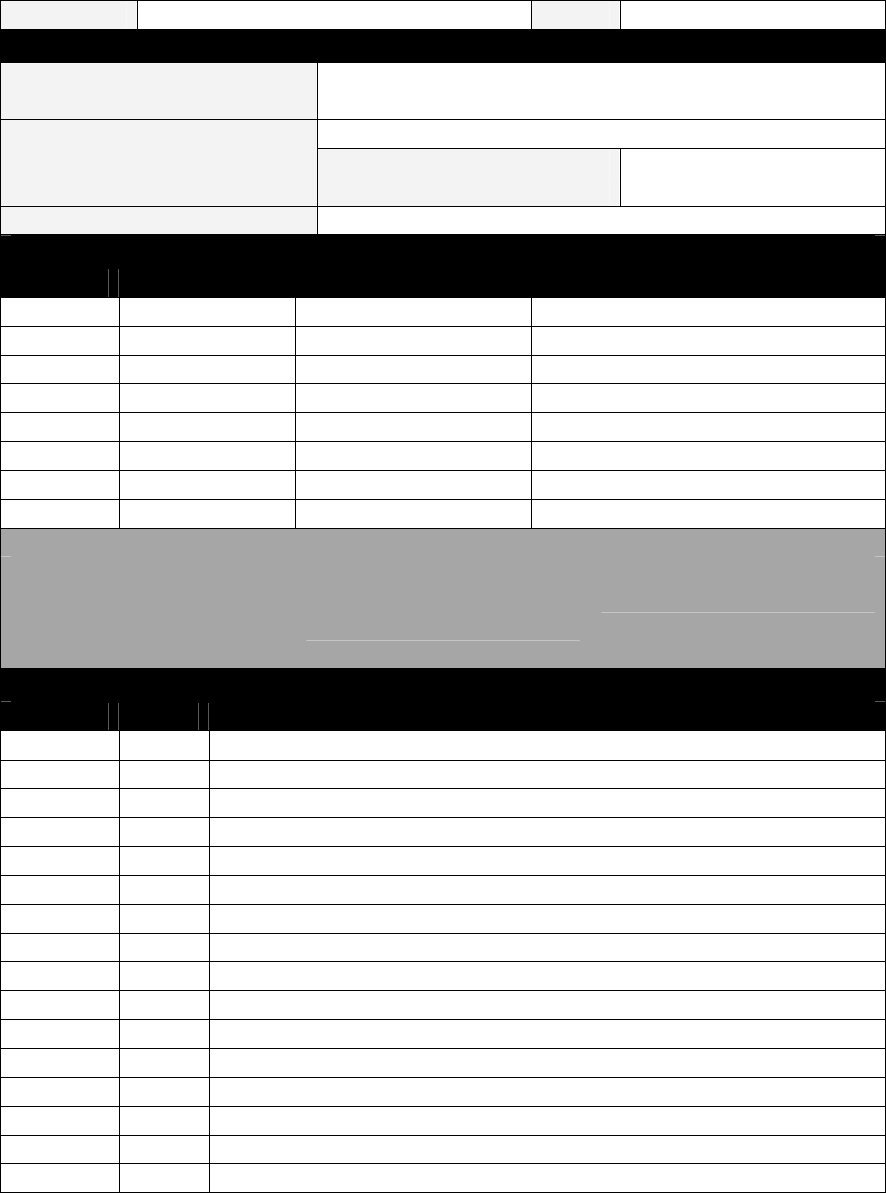
Appendix B – Completed Sample CasaTunes Worksheet
Copyright © CasaTools, Inc. 2006-7 14
Job Name:
The Fitzgerald Family Date: 5/1/2007
Multi-Room Music System Setup Information
Multi-Room Controller Russound CAM/V 6.6
Nuvo Concerto
Nuvo Grand Concerto
PC Serial Port Serial Port on Exstreamer
COM Port or
Serial Communication
Exstreamer IP Address:
192.168.0.20
Number of linked units 2
Source Setup Information
Source # Source Name Source Type Source Configuration Info
1 AM/FM Tuner Russ AM/FM Radio Orlando Stations File
2 XM Tuner Russ XM Radio XM Stations File
3 Media Svr 1 Barix Media Player 192.168.0.20
4 Media Svr 2 Barix Media Player 192.168.0.21
5 Media Svr 3 Barix Media Player 192.168.0.22
6 Media Svr 4 Barix Media Player 192.168.0.23
7
8
Source Types Available:
None
Barix Media Player
Exstreamer Media Player
Other
Russound AM/FM Radio
Russound XM Radio
Russound Sirius Radio
Nuvo AM/FM/WX Tuner
Nuvo XM Tuner
Zone Setup Information
Zone # Used Zone Name
1 Dining Rm
2 Kitchen
3 Great Rm
4 Play Rm
5 Pool
6 Backyard
7 Master
8 Master Bath
9 Office
10 BR 2
11 BR 3
12 Guest BR
13
14
15
16
