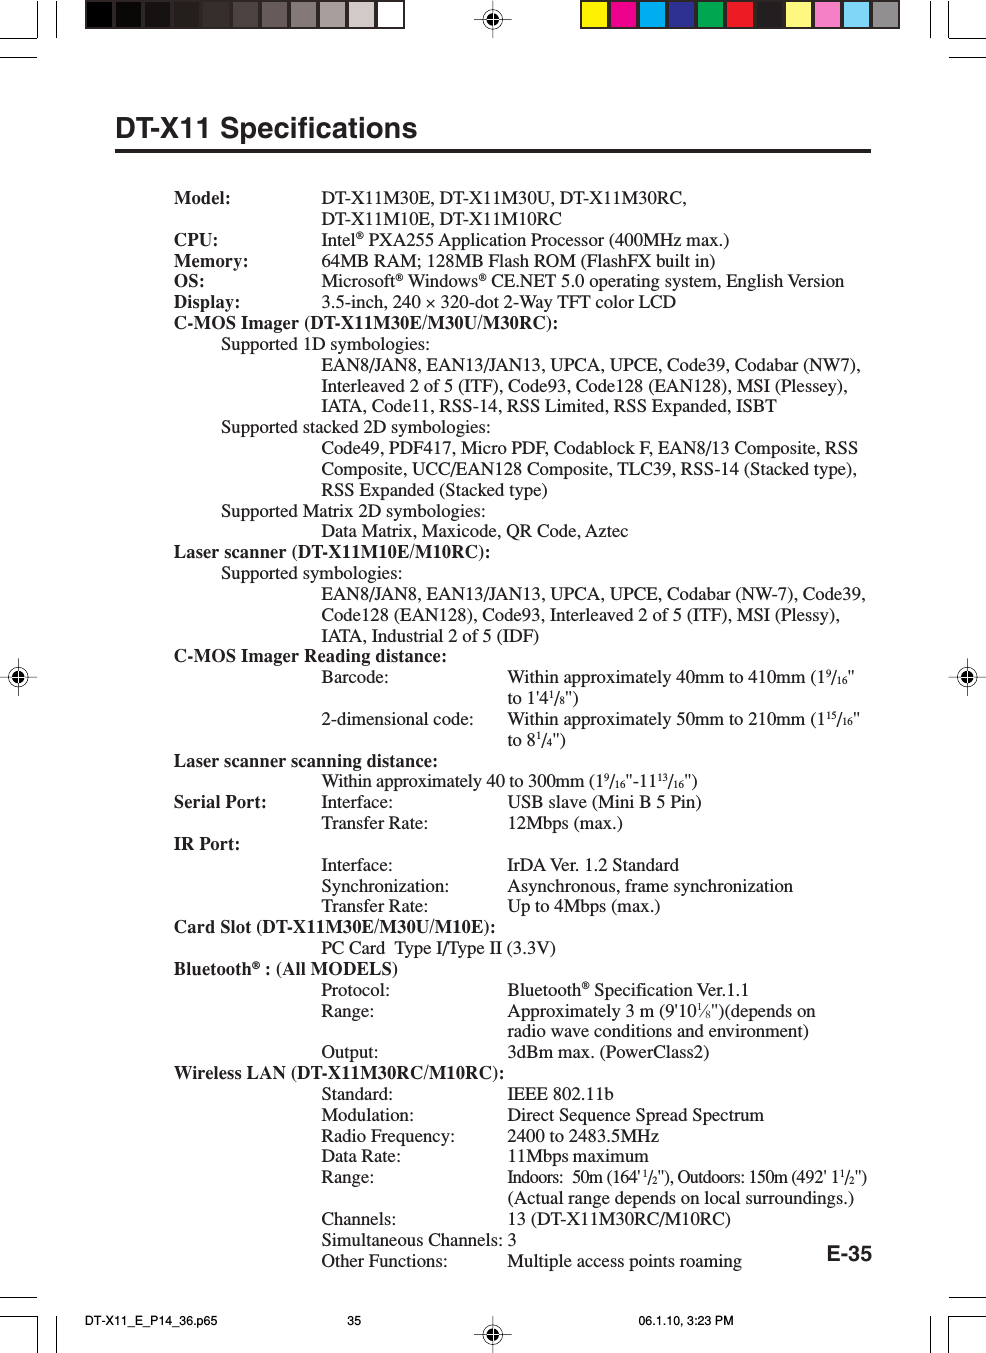
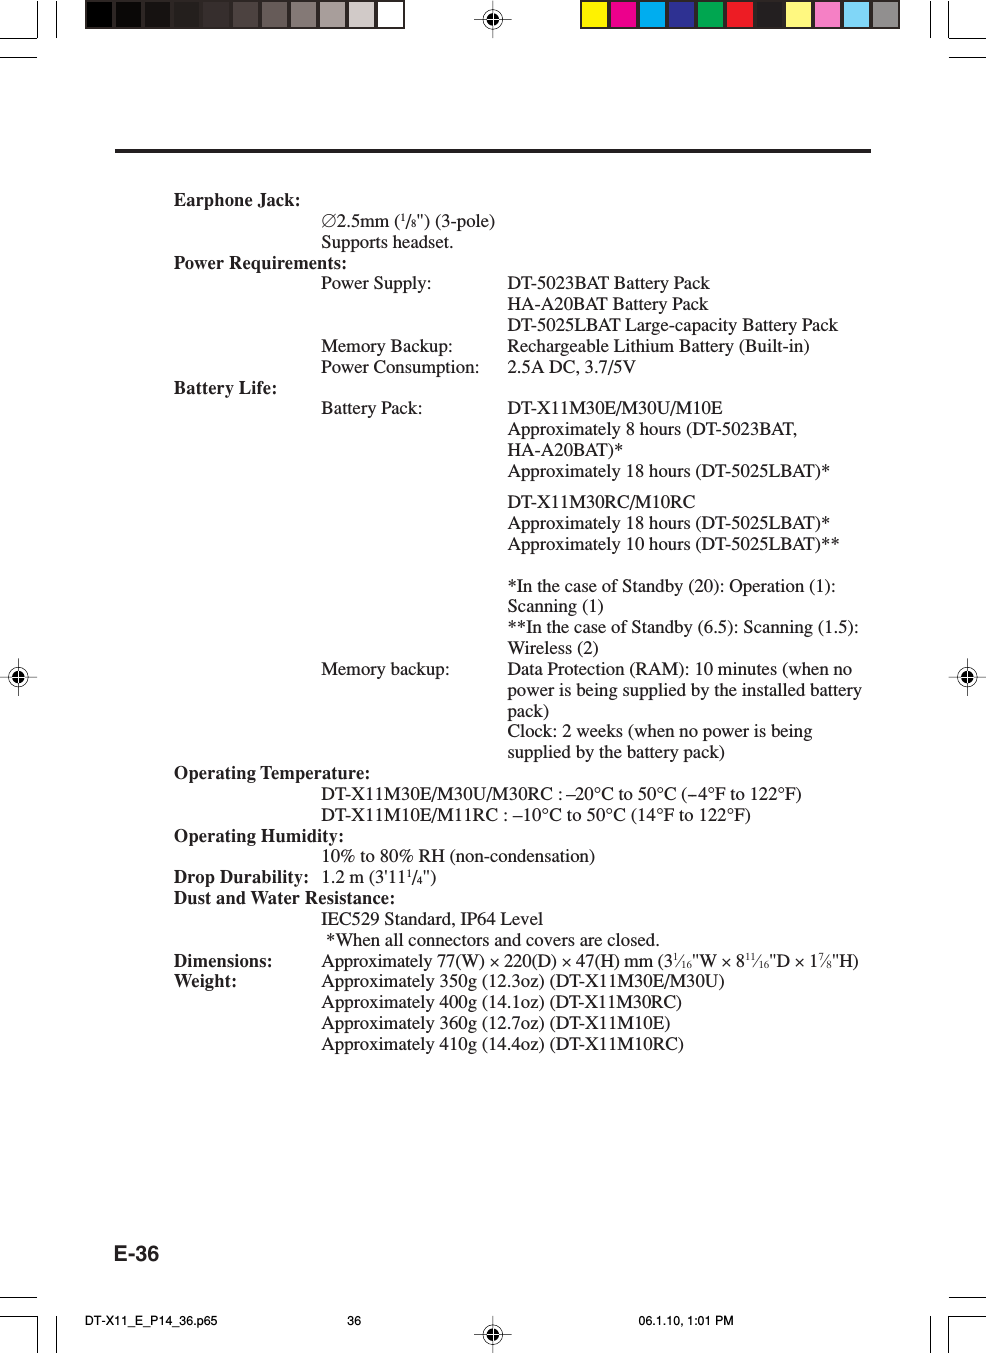
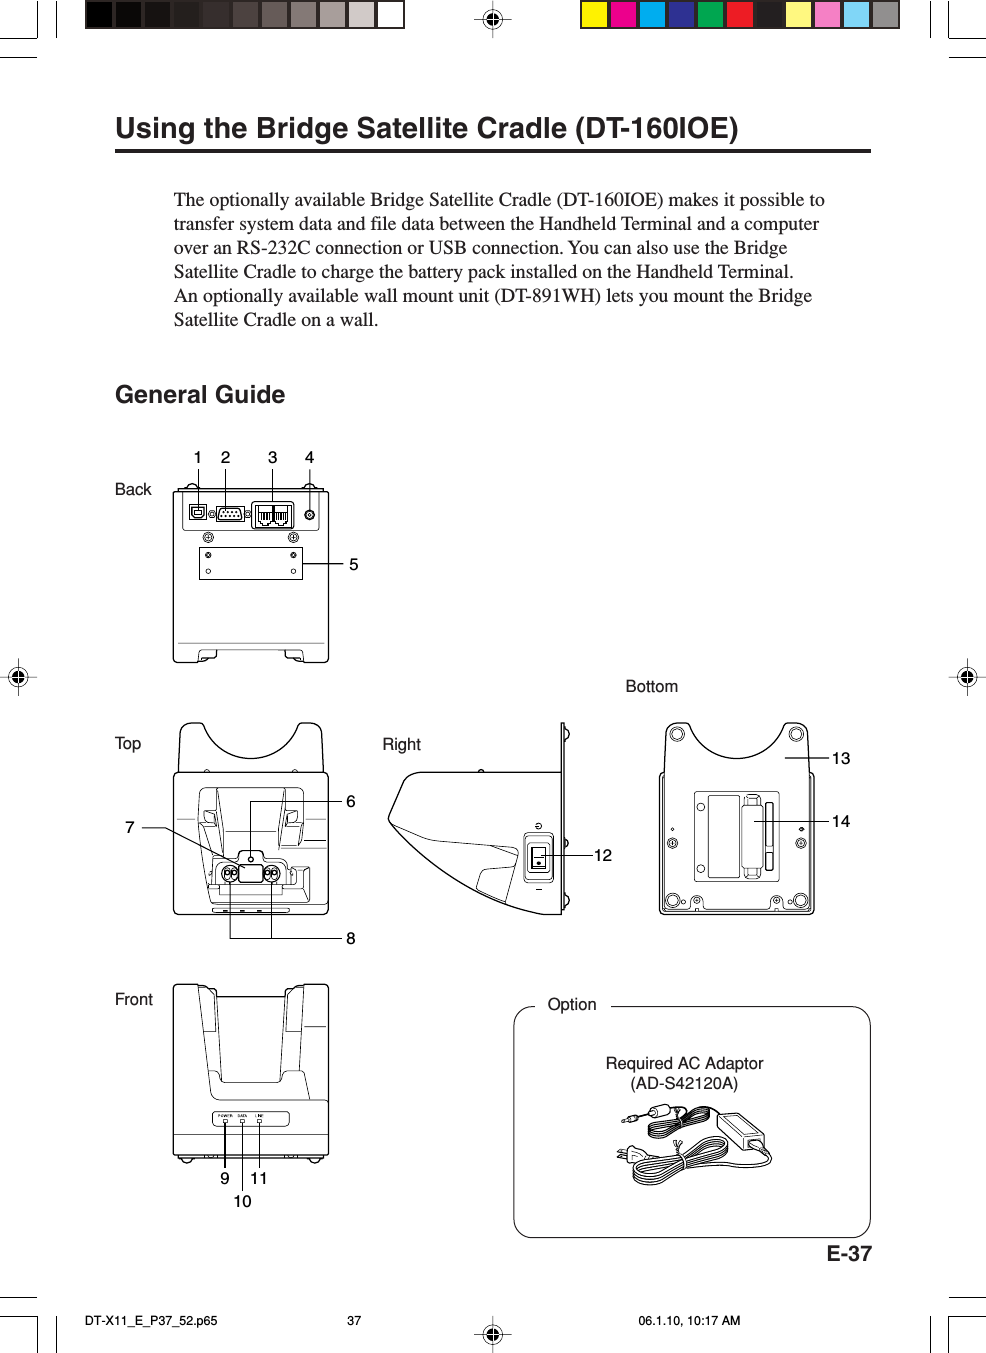
Casio Computer DTX11M30U Handheld Terminal User Manual DT X11 E Hyo 1 4 p65

Casio Computer Co Ltd Handheld Terminal DT X11 E Hyo 1 4 p65

Manual

PN410401-001FnBL ABC DEFGHI JKL MNOPQRSBS AlphaTUV WXYZHandheld TerminalUser’s GuideSeriesBe sure to read  “Safety Precautions” inside this guide before trying to use your Handheld Terminal. After reading this guide, keep it in a safe place for future reference.EDT-X11_E_Hyo_1_4.p65 06.1.10, 10:13 AM3
•This Product includes BRYCEN Co., Ltd’s BL-RAPPORE Stack and My WirefreeNetwork Bluetooth User Interface Application, which use is governed by a licensegranted by BRYCEN Co., Ltd.•BLUETOOTH is a trademark owned by Bluetooth SIG, Inc. and licensed to CASIOCOMPUTER CO., LTD.•Microsoft and Windows are either registered trademarks or trademarks of MicrosoftCorporation in the United States and/or other countries.•Compact Flash is a trademark of SanDisk Corporation in the United States.•Datalight is a registered trademark of Datalight, Inc.•FlashFXTM is a trademark of Datalight, Inc.Copyright 1993-2000 Datalight, Inc., All Rights Reserved.U.S. Patent Office 5,860,082•Other company names and product names used in this guide are trademarks or registeredtrademarks of their respective owners.DT-X11_E_P00.p65 06.1.10, 10:14 AM2
E-1WarningCautionDangerSafety PrecautionsCongratulations upon your selection of this CASIO product. Be sure to read thefollowing Safety Precautions before trying to use it for the first time.Markings and SymbolsThe following are the meanings of the markings and symbols used in these SafetyPrecautions.This symbol indicates information that, if ignored or appliedincorrectly, creates the danger of death or serious personal injury.This symbol indicates information that, if ignored or appliedincorrectly, creates the possibility of death or serious personalinjury.This symbol indicates information that, if ignored or appliedincorrectly, creates the possibility of personal injury or propertydamage.•A diagonal line indicates something you should not do. The symbol shownhere indicates you should not try to take the unit apart.•A black circle indicates something you should do. The symbol shown hereindicates you should unplug the unit from the wall outlet.Precautions During UseWarningDisassembly and Modification•Never try to disassemble or modify the Handheld Terminal and its options inany way. High voltage inside creates the danger of electric shock.Abnormal Conditions•Should the Handheld Terminal and its options become hot or start to emitsmoke or a strange odor, immediately turn off the power, and contact youroriginal vendor or an authorized CASIO service provider. Continued usecreates the danger of fire and electric shock.DT-X11_E_P01_07.p65 06.1.10, 1:00 PM1
E-2WarningForeign Objects•Should any foreign matter get into the Handheld Terminal and its options,immediately turn off the power and contact your original vendor or anauthorized CASIO service provider. Continued use creates the danger of fireand electric shock.Dropping and Damage•Should you drop the Handheld Terminal and its options and damage them,immediately turn off the power and contact your original vendor or anauthorized CASIO service provider. Continued use creates the danger of fireand electric shock.Moisture•Though your Handheld Terminal is water splash-resistant, its BridgeSatellite Cradle and other optional peripherals are not. Keep loose metalobjects and containers filled with liquids away from your HandheldTerminal and the optional peripherals.Also, never connect or disconnect peripherals to the Handheld Terminalwhile they are wet. Water getting into the Handheld Terminal or itsperipherals creates the danger of fire and electric shock.Laser Light•This product scans bar codes using laser light.  Never look directly into thelaser light or shine the laser light into the eyes.WarningInterference with the Operation of Other Equipment(Using Wireless Data Communication)•Keep your Handheld Terminal at least 22 centimeters (811/16") away fromanyone wearing a pacemaker. Radio waves emitted by the HandheldTerminal can affect the operation of a pacemaker.DT-X11_E_P01_07.p65 06.1.10, 1:00 PM2
E-3CautionForeign Objects•Take care to ensure that metals or combustible objects are not inserted intothe openings of the Handheld Terminal and its options. Such the objectsinside of the Handheld Terminal and its options create the danger of fire andelectric shock.Location•Do not locate the Handheld Terminal and its options on a surface that isunstable or uneven. Doing so creates the danger of the Handheld Terminalfalling, which can cause personal injury.•Do not locate the Handheld Terminal and its options in an area subject tolarge amounts of humidity or dust. Doing so creates the danger of fire andelectric shock.•Do not leave the Handheld Terminal and its options for a long period in a carparked in direct sunlight.Heavy Objects•Never place heavy objects on top of the Handheld Terminal and its options.Doing so creates the danger of loss of balance and the objects falling, whichcan cause personal injury.LCD Screen•Never apply strong pressure to the screen or subject it to strong impact.Doing so can crack the screen or LCD panel glass, which can cause thedanger of personal injury.•Should the LCD panel glass break, never touch the liquid inside. Doing socan cause skin inflammation.–Should liquid from the LCD panel accidentally get into your mouth,immediately wash your mouth with water and then consult a physician.–Should liquid from the LCD panel accidentally get into your eyes or ontoyour skin, immediately rinse for at least 15 minutes with clean tap waterand then consult a physician.DT-X11_E_P01_07.p65 06.1.10, 1:00 PM3
E-4Optional Lithium-ion Battery PackDanger•Never allow the battery pack to become wet. Water can create the danger ofbattery pack heat emission, explosion, and fire.•Never use or leave the battery pack next to open flame, near a stove, or anyother area exposed to high heat. Doing so creates the danger of battery packheat emission, explosion, and fire.•Never use the battery pack with any device other than the HandheldTerminal. Doing so can create the danger of battery pack heat emission,explosion, and fire.•Note that the battery pack’s positive (+) and negative (–) polarities must beoriented correctly when it is loaded into battery charger or the HandheldTerminal. Connecting the battery pack with its polarities reversed creates thedanger of battery pack fluid leakage, heat emission, explosion, and fire.•Never dispose of the battery pack by incinerating it or otherwise expose it toheat. Doing so creates the danger of battery pack heat emission, explosion,and fire.•Never allow the positive (+) and negative (–) terminals of the battery pack tobecome connected (shorted) by metal. Doing so creates the danger of batterypack heat emission, explosion, and fire.•Never transport or store the battery pack together with a necklace, hair pinsor other metal objects. Doing so can short battery pack terminals, creatingthe danger of battery pack heat emission, explosion, and fire. Be sure toplace the battery pack in its case whenever transporting or storing it.•Never throw the battery pack or otherwise subject it to strong impact. Doingso creates the danger of battery pack heat emission, explosion, and fire.•Never pierce the battery pack with nails, hit it with a hammer, or step on it.Doing so can create the danger of battery pack heat emission, explosion, andfire.•Never try to take apart the battery pack or modify it in any way. Doing socreates the danger of battery pack heat emission, explosion, and fire.•Use only the specified battery charger to charge the battery pack. Use ofother type of battery charger creates the danger of battery pack heatemission, explosion, and fire.DT-X11_E_P01_07.p65 06.1.10, 1:00 PM4
E-5Warning•Never place the battery pack in a microwave oven or any other high-voltagedevice. Doing so creates the danger of battery pack heat emission,explosion, and fire.•Should the battery pack emit a strange odor or heat, change color or shape,or exhibit any other abnormal behavior, immediately stop using it.Continued use creates the danger of battery pack heat emission, explosion,and fire.•If the amount of time period the battery pack can serve becomesconsiderably short, stop using it. It may indicate the possibility of amalfunction in the battery pack. Continued charging the battery packcreates the danger of heat emission, explosion, and fire.•If the battery pack does not achieve full charge after the normal chargingtime has passed, stop charging it. Continued charging creates the danger ofbattery pack heat emission, explosion, and fire.•Should the battery pack start to leak or emit a strange odor, immediatelymove it away from any nearby flame. Leaking battery fluid is combustible,and exposure to flame creates the danger of explosion and fire.•Should fluid from the battery pack accidentally get into your eyes, do notrub them. Immediately rinse your eyes with clean tap water and thenconsult a physician immediately.Caution•Never use or leave the battery pack in an area exposed to direct sunlight, ina car parked in direct sunlight, or any other very hot area. Doing so createsthe danger of heat emission and fire, as well as deterioration of battery packperformance and shortening of its service life.•Do not use the battery pack in areas where static electricity is beinggenerated. Doing so creates the danger of battery pack heat emission,explosion, and fire.•Danger of explosion if the battery pack is incorrectly replaced.Replace only with same or equivalent type recommended by CASIO.Dispose of used batteries according to the CASIO instruction.•Should fluid from the battery pack accidentally get onto clothing or yourskin, immediately rinse it off with clean tap water. Prolonged contact withbattery pack fluid can cause skin irritation.•Keep the battery pack out of the reach of small children. Do not let smallchildren remove the battery pack from battery charger or the HandheldTerminal while it is powered on.DT-X11_E_P01_07.p65 06.1.10, 1:00 PM5
E-6AC Power SupplyWarning•Do not use the Handheld Terminal at a voltage other than the specifiedvoltage. Also, do not connect the Handheld Terminal to a multi-plug powerstrip. Doing so creates the danger of fire and electric shock.•Avoid conditions that can cause damage or breaks in the power cord. Do notplace heavy objects on the power cord and keep it away from sources ofheat. Any of these conditions can damage the power cord, creating thedanger of fire and electric shock.•Never modify, sharply bend, twist, or pull on the power cord. Doing socreates the danger of fire and electric shock.•When using the battery charger and Bridge Satellite Cradle, be sure to usethe respective AC adaptors (sold separately). Use of other AC adaptor modelcreates the danger of fire and electric shock.•Should the power cord become severely damaged (to the point that wires areexposed or broken), contact your original vendor or an authorized CASIOservice provider about repair or replacement. Use of a damaged electricalcord creates the danger of fire and electric shock.Caution•Keep the power cord away from stoves and other sources of extreme heat.Heat can melt the covering of the power cord and create the danger of fireand electric shock.•Never pull on the power cord when unplugging it. Doing so can damage thecord and create the danger of fire and electric shock. (Always hold the plugwhen unplugging it from the wall outlet.)•Never touch the plug while your hands are wet. Doing so can create thedanger of electric shock.•Be sure to unplug the power cord from the wall outlet before moving thebattery charger and Bridge Satellite Cradle. Failure to do so can result indamage to the power cord caused by pulling it, which creates the danger offire and electric shock.•Be sure to unplug the power cord from the wall outlet before cleaning thebattery charger and Bridge Satellite Cradle.•Be sure to turn the power off and unplug the power cord after use.•Unplug the power cord from the wall outlet whenever leaving the batterycharger and Bridge Satellite Cradle unattended for a long period.DT-X11_E_P01_07.p65 06.1.10, 1:00 PM6
E-7AC AdaptorCaution•The housing of the AC adaptor can become warm during normal use.•Take normal precautions against electric shock.•At least once a year, unplug the AC adaptor from the wall outlet and cleanany dust that builds up between the prongs of the plug.Dust built up between the prongs can lead to the danger of fire.Backup Copies of All Important DataCaution•Note that CASIO Computer Co., Ltd. shall not be held liable to you or anythird party for any damages or loss caused by deletion or corruption of datadue to use of the Handheld Terminal, malfunction or repair of the HandheldTerminal or its peripherals, or due to the batteries going dead.•The Handheld Terminal employs electronic memory to store data, whichmeans that memory contents can be corrupted or deleted if power isinterrupted due to the batteries going dead or incorrect battery replacementprocedures. Data cannot be recovered once it is lost or corrupted. Be sure tomake backup copies of all important data. One way to do this is to use theseparately sold Bridge Satellite Cradle to transfer data to a computer.DT-X11_E_P01_07.p65 06.1.10, 1:00 PM7
E-8Operating PrecautionsYour Handheld Terminal and its options are precision digital instruments. Improperoperation or rough handling can cause problems with data storage and other problems.Note and observe the following precautions to ensure proper operation.•Do not continue operating the Handheld Terminal when battery power is low.Doing so can cause data to be lost. When the battery goes low, charge it as soon aspossible.•Do not leave dead batteries in the Handheld Terminal for a long period.Dead batteries can leak, leading to malfunction and damage to the HandheldTerminal.•Use the Handheld Terminal and its options only within the specifiedtemperature range.Use outside of the specified temperature range creates the risk of malfunction.•Avoid using the Handheld Terminal and its options in areas subject to thefollowing conditions.The following conditions create the risk of damage to the Handheld Terminal.— Large amounts of static electricity— Extreme heat or extreme cold— High humidity— Sudden temperature extremes— Large amounts of dust•Use only the special stylus that comes with the Handheld Terminal to operate itstouch screen and reset button.•Do not use any tool other than the special stylus to operate the touch screen.Other tools can scratch the touch screen and lead to malfunction.•Never use thinner, benzene, cosmetic cleaning fluids, or other volatile agents toclean the Handheld Terminal.To clean the Handheld Terminal, wipe it with a dry cloth, or a cloth moistened ina weak solution of water and a mild neutral detergent. Wring all excess moisturefrom the cloth before wiping.DT-X11_E_P08_11.p65 06.1.10, 10:16 AM8
E-9Important•The contents of this guide are subject to change without notice.•Note that CASIO COMPUTER CO., LTD. shall not be held liable to you or any thirdparties for any losses or damages arising from the use of this guide.•This guide does not include any information about programming and downloadprocedures. See the applicable separate documentation for information about theprocedures.Warranty and After Service•Should this product ever malfunction, contact your original retailer providinginformation about the product name, the date you purchased it, and details about theproblem.  This mark applies in EU countries only.DT-X11_E_P08_11.p65 06.1.10, 10:16 AM9
E-10GUIDELINES LAID DOWN BY FCC RULES FOR USE OF THIS UNIT IN THE U.S.A.  (notapplicable to other areas).NOTICEThis equipment has been tested and found to comply with the limits for a Class B digital device, pursuantto Part 15 of the FCC Rules. These limits are designed to provide reasonable protection against harmfulinterference in a residential installation. This equipment generates, uses and can radiate radio frequencyenergy and, if not installed and used in accordance with the instructions, may cause harmful interferenceto radio communications. However, there is no guarantee that interference will not occur in a particularinstallation. If this equipment does cause harmful interference to radio or television reception, which canbe determined by turning the equipment off and on, the user is encouraged to try to correct the interferenceby one or more of the following measures:•Reorient or relocate the receiving antenna.•Increase the separation between the equipment and receiver.•Connect the equipment into an outlet on a circuit different from that to which the receiver is connected.•Consult the dealer or an experienced radio/TV technician for help.FCC WARNINGChanges or modifications not expressly approved by the party responsible for compliance could void theuser’s authority to operate the equipment.Proper connectors must be used for connection to host computer and/or peripherals in order to meet FCCemission limits.Peripherals and CablesBattery Pack (DT-5023BAT)Large-capacity Battery Pack (DT-5025LBAT)AC Adaptor (AD-S42120A)Communication Card Cover (DT-892TCV)Communication Card Cover (Large size) (DT-893LTCV)CF Card Extension Unit (DT-894CFU)Cables (DT-887AXA, DT-888RSC, DT-380USB)Declaration of ConformityModel Numbers: DT-X11M30U, DT-160IOE, DT-167CHGE, DT-169CHGE, DT-5022CHGTrade Name: CASIOResponsible party: CASIO, INC. Industrial Handheld DivisionAddress: 2700 Augustine Drive Suite 155, Santa Clara, California 95054Telephone number: 408-727-6300This device complies with Part 15 of the FCC Rules. Operation is subject to the following two conditions:(1) This device may not cause harmful interference, and (2) this device must accept any interferencereceived, including interference that may cause undesired operation.The equipment generates and radiates radio-frequency energy.SAR (Specific Absorption Rate) for this device was measured in accordance with FCC OETBulletin 65, Supplement C and guidelines established in IEEE C95.1-1991.We, the undersigned.Company CASIO Europe GmbHAddress, City Bornbarch 10, D-22848 NorderstedtCountry GermanyPhone number +49(0)40-528-65-0Fax number +49(0)40-528-65-424certify and declare under our sole responsibility that the following equipments:DT-X11_E_P08_11.p65 06.1.10, 10:16 AM10
E-11Product description / Intended useEU/EFTA member states intended for use EU: Austria, Belgium, Denmark, Finland, France,Germany, Greece, Ireland, Italy, Luxembourg, TheNetherlands, Portugal, Spain, Sweden, UnitedKingdom, Czech Republic, Hungary, Poland, Slovenia,Slovakia, Estonia, Latvia, Lithuania, Cyprus, MaltaEFTA: Switzerland, Iceland, Lichtenstein, NorwayMember states with restrictive use NONEManufacturer CASIO COMPUTER CO., LTD.Brand CASIOType DT-X11M30E, DT-X11M30U, DT-X11M30RCDT-X11M10RC, DT-X11M10Eare tested and found to conform with the essential requirements for protection of health and the safety ofthe user and any other persons and Electromagnetic Compatibility, as included in following standards:Standard lssue dateEN60950 1992A1, 1993A2, 1993A3, 1995A4, 1997A11, 1997EN301 489-1, 2001-09EN301 489-17 2000and are tested and found to conform with the essential radio test suites so that they effectively use thefrequency spectrum allocated to terrestrial/space radio communication and orbital resources so to as toavoid harmful interference, as included in following standards:Standard lssue dateEN300-328-1 2000-07EN300-328-2 2001-12and therefore comply with the essential requirements and provisions of the Directive 1999/5/EC of theEuropean Parliament and of the council of March 9, 1999 on Radio equipment and TelecommunicationsTerminal Equipment and the mutual recognition of their conformity and with the provisions of Annex III(Conformity Assessment procedure referred to in article 10).The technical documentation as required by the Conformity Assessment procedure is kept at the followingaddress:Company CASIO Europe GmbHAddress, City Bornbarch 10, D-22848 NorderstedtCountry GermanyPhone number +49(0)40-528-65-0Fax number +49(0)40-528-65-424Products are for distribution withinall member states of the EU.France limited to 2446.5-2483.5 Mhz Indoor use.Belgium limited to 2400-2483.5 Mhz Indoor, 2460-2483.5 Mhz Outdoor use.The Netherlands limited to 2400-2483.5 Mhz Indoor use with no license, 2451-2471.0Mhz Outdoor use with license.0984DT-X11_E_P08_11.p65 06.1.10, 10:16 AM11
E-12Safety Precautions .........................................................................................E-1Operating Precautions ...................................................................................E-8Important .........................................................................................................E-9Before Getting Started .................................................................................E-14Handheld Terminal System Configuration .................................................E-16Options ............................................................................................................. E-16General Guide ...............................................................................................E-19Replacing the Battery ..................................................................................E-21Replacing the Battery Pack............................................................................... E-21Attaching the Wrist Strap ............................................................................E-24Configuring Handheld Terminal Settings ...................................................E-25Calibrating Touch Screen Alignment................................................................ E-25Adjusting Display Contrast .............................................................................. E-26Adjusting Display Brightness ........................................................................... E-26Display Auto Dimmer ....................................................................................... E-26Using the C-MOS Imager (C-MOS Imager models only) ........................... E-27About the Class 1 LED Label ........................................................................... E-28Using the Laser Scanner (Laser Scanner models only) ........................... E-29Warning Label .................................................................................................. E-30Bar Code Scanning Position ............................................................................. E-30Performing Communication ........................................................................E-31IR Communication ........................................................................................... E-31Bluetooth® Communication .............................................................................. E-32Resetting the Handheld Terminal ...............................................................E-33Performing a Full Reset (Initialization) ............................................................ E-34DT-X11 Specifications .................................................................................. E-35ContentsDT-X11_E_P12_13.p65 06.1.10, 10:16 AM12
E-13Using the Bridge Satellite Cradle (DT-160IOE) .......................................... E-37General Guide ................................................................................................... E-37Option ............................................................................................................... E-37Connecting the AC Adaptor and Connecting to Computer .............................. E-39Configuring DIP Switch Settings ..................................................................... E-41Using Wall Mount Unit .................................................................................... E-42Connecting Multiple Bridge Satellite Cradles (DT-160IOE) ........................... E-44Bridge Satellite Cradle (DT-160IOE) Specifications ....................................... E-45Using the Cradle-type Battery Charger ......................................................E-46General Guide ................................................................................................... E-46Option ............................................................................................................... E-46Connecting the AC Adaptor for Cradle-type Battery Charger ......................... E-48Using Wall Mount Unit .................................................................................... E-49Cradle-type Battery Charger (DT-169CHGE) Specifications .......................... E-49Using the Dual Battery Charger ..................................................................E-50General Guide ................................................................................................... E-50Option ............................................................................................................... E-50Charging a Battery Pack ................................................................................... E-52Connecting Multiple Dual Battery Chargers .................................................... E-53Dual Battery Charger (DT-5022CHG) Specifications ...................................... E-54Using PC Card (DT-X11M30E / M30U / M10E) ............................................ E-55Affixing a PC Card Remover ........................................................................... E-55To load a PC card .............................................................................................. E-55Using CF Card Extension Unit ....................................................................E-57Bundled Item .................................................................................................... E-57Attaching the CF Card Extension Unit ............................................................. E-57Loading a CF Card ........................................................................................... E-58CF Card Extension Unit (DT-894CFU) Specifications .................................... E-58Using Rechargeable Battery Pack ..............................................................E-59Battery Pack Specifications .............................................................................. E-59Large-capacity Battery Pack Specifications ..................................................... E-59DT-X11_E_P12_13.p65 06.1.10, 10:16 AM13
E-14Before Getting StartedBe sure to perform the following steps before trying to use the Handheld Terminal forthe first time.1. When unpacking, make sure that everything is included.Open the box and make sure that all the items shown here are included.Handheld Terminal StylusWrist StrapPC Card Remover (2 pcs) User's Guide (this manual)2. Charge the battery pack.Charge the separately available battery pack (DT-5023BAT or DT-5025LBAT). Youcan use the Dual Battery Charger, or the Cradle-type Battery Charger, or the BridgeSatellite Cradle to charge a battery pack.For information using these options for charging, see pages 37, 46, and 50.3. Load the battery pack into the Handheld Terminal.1Slide the two battery pack lock switches at the right and left sides to the “FREE”position, and then remove the battery pack cover.FnBL ABC DEFGHI JKL MNOPQRSBS AlphaTUV WXYZLarge-capacity battery packCoverDT-X11_E_P14_36.p65 06.1.10, 1:01 PM14
E-152Load a battery pack (DT-5023BAT) or a large-capacity battery pack (DT-5025LBAT).Take care that the battery pack is oriented correctly when you load it.3Replace the rechargeable battery pack cover as shown in the diagram and thenreturn the rechargeable battery pack cover switches (two places) to the "LOCK"positions. When loading a large-capacity rechargeable battery pack, mount thelarge-capacity rechargeable battery pack cover.12334. Hold down the power key for about one second to turn on the Handheld Terminal.Start up the application you want to run.Using the stylusTap: Lightly tap with the stylus once on the touch screen.Tap and Hold: Hold the tip of the stylus on the touch screen without moving it.Drag: Hold the tip of the stylus on the touch screen as you drag from one location toanother. This operation is the same as writing with a pencil on a piece of paper.FnBL ABC DEFDT-X11_E_P14_36.p65 06.1.10, 1:01 PM15
E-16Handheld Terminal System ConfigurationOptionsDT-X11 SeriesDT-160IOEBridge Satellite CradleRequired AC Adaptor(AD-S42120A)FnBL ABC DEFGHI JKL MNOPQRSBS AlphaTUV WXYZCradle-type Battery ChargerRequired AC Adaptor(AD-S42120A)DT-891WH RequiredScrewsRequiredScrewsDT-169CHGEWall Mount UnitLaser Scanner models•DT-X11M10E•DT-X11M10RCC-MOS Imager models•DT-X11M30E•DT-X11M30U*•DT-X11M30RC*This model isavailable in theUSA and CanadaDT-X11_E_P14_36.p65 06.1.10, 1:01 PM16
E-17DT-5023BAT(Battery Pack)DT-5025LBAT(Large-capacity Battery Pack)Dual Battery ChargerDT-5022CHGBattery PackRequired AC Adaptor(AD-S45150AE)HA-A20BAT(Battery Pack)DT-X11_E_P14_36.p65 06.1.10, 1:01 PM17
E-18CablesBridge Satellite Cradle Cable/RS-232C Cable (Dsub-9Pin, Female)RS-422 CableUSB CableDT-887AXADT-888RSCDT-380USBCF Card Extension UnitDT-894CFUBundled ItemsLarge Card Cover4 screwsCommunication Card CoversDT-892TCVDT-893LTCVDT-X11_E_P14_36.p65 06.1.10, 1:01 PM18
E-191Indicator 12Indicator 23LCD Panel/TouchScreen4Buzzer5Power Key6Cursor Keys7Programmable Key8Numeric Keys9Execute Key10 Function KeysIndicates the result of a barcode or other read operation.Red: Read errorGreen: Read successfulThis lamp indicates the charge status of the battery pack.Red: ChargingGreen: Charging completeShows text, operation indicators, etc. Also, operations can beperformed and text can be input using the supplied stylus.Sounds a buzzer.Hold down for about one second to turn the power on or off.These keys operate much like a computer’s cursor keys. Theycan be used to select items, scroll screen contents, etc.This key can be assigned with any function available.Use these keys to input numbers and letters.Press to register an input value and advance to the next step.These keys can be assigned any function other than barcodereading. The following are the initial default settings.F1: Deletes one character to the left.F2: Inputs a hyphen (-).F3: Inputs a period (.).F4: Toggles to switch between numbers and alphabets.General GuideLeft Front Right BackFnBL ABC DEFGHI JKL MNOPQRSBS AlphaTUV WXYZ2211112 21216 3546810 971925232417182013181415DT-X11_E_P14_36.p65 06.1.10, 1:01 PM19
E-2011 IR Port12 Power Contacts13 CLR Key14 Fn Key15 PC Card Slot16 USB Port17 Headset Jack18 Battery PackCover LockSwitches19 R Trigger Key20 L Trigger Key21 Wrist Strap Hole22 C-MOS Imager(C-MOS Imagermodels only)Reader Port(Laser Scannermodels only)23 Reset Switch24 CF Card Slot UnitTerminal25 Battery PackCoverThis port is used for IR communication with another HandheldTerminal or the Bridge Satellite Cradle.Contact point for supplying power from the Bridge SatelliteCradle and Cradle-type Battery Charger.Press to clear all key inputs.Press this key and then a function key or number key toconfigure settings or to run previously registered applications.For insertion of a separately available PC card.For connection to a computer or other device using a USB cable.For connection of a commercially available headset (∅2.5mm).Slide these switches to lock and release the battery pack cover.Press to perform a code read operation. This is also pressed toperform a full reset.Press to perform a code read operation.This is also pressed tocancel a full reset.Connect the wrist strap here.Reads bar codes and 2-dimensional codes.Reads bar codes.Press to reset the Handheld Terminal.For connection of a separately available CF Card ExtensionUnit.Covers the compartment that holds the battery pack.DT-X11_E_P14_36.p65 06.1.10, 1:01 PM20
E-21Replacing the BatteryYour Handheld Terminal uses two types of battery: a battery pack and a memorybackup battery.The battery pack is used to power normal operations and to store data, while thememory backup battery provides the power required to maintain memory contentswhen the battery pack power is unable to supply power for some reason.The operating power is supplied by a battery pack. You can choose between a batterypack (DT-5023BAT, HA-A20BAT) and a large-capacity battery pack (DT-5025LBAT).When using the CF Card Extention Unit (DT-894CFU) or a PC card (such as a datacommunication card), it is recommended that you use the large-capacity battery pack(DT-5025LBAT) instead of the standard battery pack (DT-5023BAT, HA-A20BAT).The backup battery is installed inside of the Handheld Terminal.This guide uses the following terms to refer to the batteries.Battery Pack: Rechargeable battery pack (DT-5023BAT, DT-5025LBAT,HA-A20BAT) for normal operations and data storageBackup Battery: Built-in battery for memory backupWhen the battery pack power goes low, immediately charge it or replace it with acharged battery pack.You can use the Dual Battery Charger, the Cradle-type Battery Charger, or the BridgeSatellite Cradle to charge a battery pack. See the sections of this guide that cover theDual Battery Charger, the Cradle-type Battery Charger, and the Bridge Satellite Cradlefor information about how to use them for charging.Replacing the Battery PackImportant!Always keep backup copies of all important data!•The main battery powers normal operation and also provides power required tomaintain memory contents, while the backup battery provides backup power tomaintain memory contents. Because of this, you should not remove the mainbattery while the backup battery is dead. Removing the battery pack while thebackup battery is dead causes data in the memory to be corrupted or lost. Notethat once data is lost it cannot be recovered. Always keep separate backup copiesof all important data.•The charge of a battery pack when you purchase it may be depleted due totesting at the factory or natural discharge during shipment and storage. Be sureto charge the battery pack before you use it.•The life of a battery pack is limited, and charging a battery pack causes it togradually lose its ability to maintain the charge. If your battery pack seems torequire charging very frequently, it probably means it is time to purchase a new one.•A fully charged backup battery can maintain memory (RAM) contents for about10 minutes, even when the main battery is removed.•The backup battery achieves a full charge in about four days when the batterypack is loaded.DT-X11_E_P14_36.p65 06.1.10, 1:01 PM21
E-22To replace the battery pack1. Make sure that the Handheld Terminal is turned off.If the power is on, press the power key to turn it off.2. Turn over the Handheld Terminal.3. Slide the two battery pack lock switches on both sides of the Handheld Terminal tothe “FREE” position, and then remove the battery pack cover.4. Remove the battery pack as shown in the illustration.5. Taking care to ensure it is oriented correctly, load a new battery pack into theHandheld Terminal.DT-X11_E_P14_36.p65 06.1.10, 1:01 PM22
E-23Loading the large-capacity battery pack into the HandheldTerminalAfter loading the large-capacity battery pack, you need to use the special large-capacitybattery pack cover in place of the standard battery cover.Attachment and removal of the large-capacity battery pack cover are the same as thosefor the standard battery pack cover.Important!•When replacing the battery pack, make sure you do not leave the HandheldTerminal without a battery pack for more than about 10 minutes. Doing so cancause data in the memory to be deleted.•When replacing the battery, be sure you carefully follow the proper procedureas explained in this guide.•Never try to use other type of battery than those specified for this product.6. Replace the rechargeable battery pack cover as shown in the diagram and then returnthe rechargeable battery pack cover switches (two places) to the "LOCK" positions.1233DT-X11_E_P14_36.p65 06.1.10, 1:01 PM23
E-24Attaching the Wrist StrapBe sure to attach the wrist strap and use it to protect against dropping the HandheldTerminal when carrying it around.To attach the wrist strap1. Pass the thin cord of the wrist strap through the wrist strap hole on the back of theHandheld Terminal.2. Pass the other end of the strap (the part where you insert your wrist) through the loopformed by the thin cord.Important!Do not swing the Handheld Terminal around holding the wrist strap.DT-X11_E_P14_36.p65 06.1.10, 1:01 PM24
E-25Configuring Handheld Terminal SettingsCalibrating Touch Screen AlignmentWhenever you feel that touch screen response is poor or that the operations beingexecuted do not match the location you are tapping on the touch screen, perform eitherof the following operations to calibrate the alignment of the touch screen.•Press the “Fn” key and then press the “4” key after confirming that “F” is displayedin the lower right corner of the screen.*The following screen can also be displayed by consecutively tapping “Stylus” on thecontrol panel.•Press the stylus against the center of the target mark (+ mark) as indicated on thescreen. The screen shown below appears after you press stylus against the target atfive different locations.•Press the Execute key or tap anywhere on the touch screen.DT-X11_E_P14_36.p65 06.1.10, 1:01 PM25
E-26Adjusting Display ContrastPerform the following steps to adjust display contrast to make display colors more vividand easier to see.•Press the “Fn” key and then press the “2” key or “3” key after confirming that “F” isdisplayed in the lower right corner of the screen.  Pressing the “2” key adjusts formore contrast, while pressing the “3” key adjusts for less contrast.* In order to continue to make adjustments, press the “2” key or “3” key after againfirst pressing the “Fn” key.*Contrast settings can also be made by consecutively tapping “Brightness” on thecontrol panel.Adjusting Display BrightnessYou can use the following procedure to adjust screen brightness to make it easier toread under different lighting conditions.•Press the “Fn” key and then press the “5” key or “6” key after confirming that “F” isdisplayed in the lower right corner of the screen.  Pressing the “5” key adjustsbrightness for a darker display, while pressing the “6” key adjusts brightness for abrighter display.* In order to continue to make adjustments, press the “5” key or “6” key after againfirst pressing the “Fn” key.* Brightness settings can also be made by consecutively tapping “Brightness” on thecontrol panel.Important!•If you use your Handheld Terminal in a location where it is hot, it automaticallydims the brightness to protect the screen against damage.Display Auto DimmerThe display auto dimmer automatically lowers display brightness if you do not performany operation for a specific amount of time. This helps to conserve battery power.You can use the following procedure to specify the amount of that should be allowed topass before auto dimming is performed.•Select “Control Panel” on the “Settings” menu after tapping the “Start” button in thelower left corner of the screen.  Next, consecutively tap the “Brightness” icon andthen tap “Backlight” to set the displayed parameters.DT-X11_E_P14_36.p65 06.1.10, 1:01 PM26
E-27Using the C-MOS Imager (C-MOS Imager models only)1. Turn on the Handheld Terminal, position its C-MOS Imager reader port near thebarcode or 2-dimensional code, and then press the Trigger Key (R or L).2-dimensionalcodeGreen lightRed light2. The Handheld Terminal LED emits light and reads the code.Indicator 1 (read operation indicator lamp) lights in green when the reading is successful.Barcode and 2-dimensional code Reading GuideWhen you press the Trigger key (R or L), LEDs in the Handheld Terminal emit greenand red lights. Align the green light with the center of the barcode or 2-dimensionalcode you are trying to read. Take particular care aligning the light when there areother barcodes nearby.When reading a large code, adjust the position of the Handheld Terminal so that theentire code is enclosed within the red light.Important!•If you have problem not properly reading a code, change the angle and/or the distancebetween the label and the Handheld Terminal and try reading the code again.•A code can be read from a distance of 40mm to 410mm (19/16" to 1'41/8"), and a 2-dimensional code can be read from a distance of  50mm to 210mm (11515151515⁄⁄⁄⁄⁄1616161616" to 811111⁄⁄⁄⁄⁄44444").The actual reading distance depends on the code type and code resolution.•For smaller codes, move the Handheld Terminal closer to the code.•To read a large code, move the Handheld Terminal further away from the code.•Note that a special reader application is required to read barcodes and 2-dimensionalcodes.•The DT-X11M30E/M30U/M30RC support reading of 2-dimensional codes andbar codes.•Fingerprints, dust, dirt, or other foreign matter on the C-MOS Imager readerport can cause abnormal reading. Should the code reader port become dirty,wipe it clean with a soft, dry cloth.•DT-X11M30U is available in the USA and Canada, and the rest of the C-MOSImager models are not.DT-X11_E_P14_36.p65 06.1.10, 1:01 PM27
E-28About the Class 1 LED Label•This label identifies the Handheld Terminal as a Class 1 LED product underIEC60825-1: 1997.DT-X11_E_P14_36.p65 06.1.10, 1:01 PM28
E-29Using the Laser Scanner (Laser Scanner models only)1. After turning on the power, position the laser scanner close to a bar code and thenpress the trigger key.2. The laser emits light and scans the bar code.  If scanning is completed normally,Indicator 1 displays a green light and a buzzer sound.  If the bar code was notscanned properly, Indicator 1 indicates a red light.Important!•If you are unable to scan a bar code, try changing the angle at which the scanneris held or distance from the scanner to the bar code, and then try scanningagain.•This Handheld Terminal is capable of scanning bar codes at a distance ofabout 40-300 mm (19/16"-1113/16").  Furthermore, the distance at whichscanning is possible may vary according to the bar code symbology.•The laser scanner models are not available in the USA and Canada.DT-X11_E_P14_36.p65 06.1.10, 1:01 PM29
E-30Warning Label•This label is a warning label for Class 2 laser products that comply withIEC60825-1:1993+A1:1997.•Although Class 2 laser light is only emitted momentarily, never look directly intothe beam light.•CAUTIONUse of controls or adjustments or performance of procedures other than thosespecified herein may result in hazardous radiation exposure.•The laser light emitted by this laser scanner has a maximum output of less than1 mW and a wavelength of 650 nm.Bar Code Scanning PositionPosition the laser scanner close to the bar code when scanning small bar codes.Position the laser scanner at a distance from the bar code so that the bars enter the lightwhen scanning large bar codes. Warning!  Never look directly into the laser light.•This product scans using laser light.  Never look directly into the laser lightor shine the laser light into the eyes.Margin MarginGood Good GoodBad Bad Bad BadDT-X11_E_P14_36.p65 06.1.10, 1:01 PM30
E-31Performing CommunicationIR CommunicationIR communication can be used to transfer data between two Handheld Terminals.When performing IR communication, orient the IR ports of both Handheld Terminalsso they are pointing directly at each other.The ports can be in direct contact with each other, or they can be separated by up to 1meter (3'33⁄8") (up to 25cm (913⁄16") for 4Mbps communication).Important!•A high-sensitivity communication element is used for IR communication.•In order to ensure successful communication, avoid using cellular phones orother devices that emit radio wave in the area where you are performing IRcommunication.•If you need to use such a device, move away from the communicating HandheldTerminals. In case of a cellular phone, keep it at least 30cm (111313131313⁄⁄⁄⁄⁄1616161616") away.DT-X11_E_P14_36.p65 06.1.10, 1:01 PM31
E-32Bluetooth® CommunicationBluetooth® protocol can also be used to transfer data between two Handheld Terminals.With Bluetooth® the two Handheld Terminals should be located within about threemeters (9'101⁄8") from each other, as long as there is nothing blocking the path betweenthem.Important!Observe the following precautions to help ensure that data communication issuccessful.•Make sure the Bluetooth® devices are located within three meters (9'1011111⁄⁄⁄⁄⁄88888") ofeach other. Surroundings (obstacles) may require a shorter distance between thetwo devices.•Make sure there is at least two meters (6' 633333⁄⁄⁄⁄⁄44444") between this device and otherdevices (electrical appliances, audio-visual equipment, OA equipment, anddigital cordless telephones, facsimile machines, etc.). (Take special care withmicrowave ovens. Allow at least three meters (9' 1011111⁄⁄⁄⁄⁄88888") between communicatingdevices and a microwave oven.) When approaching such a device when itspower is turned on, proper data communication may prove impossible while thismay also cause interference with TV and radio reception (images produced bycertain UHF and broadcast satellite channels may become blurry).•Normal data communication may not be possible in an area near a broadcasttransmitter or wireless transmitter. If this happens, move to a different location.Normal data communication may not be possible in areas exposed to strongradio waves.•Wireless LAN InterferenceBecause Bluetooth® and Wireless LAN use the same frequency band (2.4GHz),radio interference can occur if there is a Wireless LAN device nearby. This canresult in lower data communication speeds, or even make it impossible toestablish a connection. If this happens, try the following countermeasures.•Move at least 10 meters (32' 911⁄16") away from the Wireless LAN device.•If you cannot keep the distance at least 10 meters (32' 911⁄16") or more between theHandheld Terminal and a Wireless LAN device, turn off the power of either theHandheld terminal or the Wireless LAN device.•Set the Wireless LAN mode of the Handheld Terminal to off.DT-X11_E_P14_36.p65 06.1.10, 1:01 PM32
E-33Resetting the Handheld TerminalResetting the Handheld Terminal is the same as restarting a computer. Performing areset causes all unsaved inputs and edits to be lost, but data that is already stored in thememory as well as all settings should be unaffected.Use reset to restore normal operation whenever the Handheld Terminal operatesabnormally due to misoperation or some other reason.Use the stylus to press the reset switch on the back of the Handheld Terminal.This starts the reset operation.If reset does not find a memory problemThe Handheld Terminal restarts, and normal operation is restored.If reset finds a memory problemA message like the one shown below appears on the display when the reset operationdiscovers a memory problem.When this message appears, press the R Trigger key to continue with the resetoperation. Note, however, that reset may not be successful depending on the conditionof the memory. In this case, perform the full reset operation described on the next page.Memory Corruption WarningA problem with memory contents has been found. Press [R trigger key] to continue with the reset procedure which restoresnormal system operation.Note that if the system determines that user memory cannot be repaired it will delete all user data currently in memory.See the User's Guide for details about initializing memory.FnR trigger keyL trigger keyDT-X11_E_P14_36.p65 06.1.10, 1:01 PM33
E-34Performing a Full Reset (Initialization)Performing a full reset initializes memory. This means that all data stored in thememory (RAM) is deleted and all the settings are returned to their initial factorydefaults.Perform a full reset whenever any one of the following conditions exists.•When you want to delete all memory contents and return the settings to their initialfactory defaults.•When you are no longer able to use the Handheld Terminal because you forgot yourpassword.•When the Handheld Terminal does not operate normally due to a memory problem.•When the message “A problem with memory contents has been found. ...” appears.To perform a full resetImportant!Performing a full reset deletes all data currently stored in the memory (RAM). Ifpossible, backup data of the Handheld Terminal to a computer, Flash Memory, amemory card, or some other medium before performing a full reset.1. While the Handheld Terminal is turned on, hold down the power key and push downthe reset button for about one second, until the message shown below appears on thedisplay.•To cancel the full reset operation, press the L Trigger key instead of the R Trigger key.2. Press the R Trigger key. This causes the message shown below to appear.•To cancel the full reset operation, press the L Trigger key instead of the R Trigger key.3. Press the R Trigger key again.•Full reset is performed, all data in the memory (RAM) are erased and the start-upscreen is displayed.Memory All Clear WarningProceeding with this operation initializes memory.Press [R trigger key] to proceedor [L trigger key] to cancel.Memory All Clear WarningProceeding with this operation deletes all data stored in memory.Press [R trigger key] to proceedor [L trigger key] to cancel.FnR trigger keyL trigger keyFnR trigger keyL trigger keyDT-X11_E_P14_36.p65 06.1.10, 1:01 PM34
E-35DT-X11 SpecificationsModel: DT-X11M30E, DT-X11M30U, DT-X11M30RC,DT-X11M10E, DT-X11M10RCCPU: Intel® PXA255 Application Processor (400MHz max.)Memory: 64MB RAM; 128MB Flash ROM (FlashFX built in)OS: Microsoft® Windows® CE.NET 5.0 operating system, English VersionDisplay: 3.5-inch, 240 × 320-dot 2-Way TFT color LCDC-MOS Imager (DT-X11M30E/M30U/M30RC):Supported 1D symbologies:EAN8/JAN8, EAN13/JAN13, UPCA, UPCE, Code39, Codabar (NW7),Interleaved 2 of 5 (ITF), Code93, Code128 (EAN128), MSI (Plessey),IATA, Code11, RSS-14, RSS Limited, RSS Expanded, ISBTSupported stacked 2D symbologies:Code49, PDF417, Micro PDF, Codablock F, EAN8/13 Composite, RSSComposite, UCC/EAN128 Composite, TLC39, RSS-14 (Stacked type),RSS Expanded (Stacked type)Supported Matrix 2D symbologies:Data Matrix, Maxicode, QR Code, AztecLaser scanner (DT-X11M10E/M10RC):Supported symbologies:EAN8/JAN8, EAN13/JAN13, UPCA, UPCE, Codabar (NW-7), Code39,Code128 (EAN128), Code93, Interleaved 2 of 5 (ITF), MSI (Plessy),IATA, Industrial 2 of 5 (IDF)C-MOS Imager Reading distance:Barcode: Within approximately 40mm to 410mm (19/16"to 1'41/8")2-dimensional code: Within approximately 50mm to 210mm (115/16"to 81/4")Laser scanner scanning distance:Within approximately 40 to 300mm (19/16"-1113/16")Serial Port: Interface: USB slave (Mini B 5 Pin)Transfer Rate: 12Mbps (max.)IR Port:Interface: IrDA Ver. 1.2 StandardSynchronization: Asynchronous, frame synchronizationTransfer Rate: Up to 4Mbps (max.)Card Slot (DT-X11M30E/M30U/M10E):PC Card  Type I/Type II (3.3V)Bluetooth® : (All MODELS)Protocol: Bluetooth® Specification Ver.1.1Range: Approximately 3 m (9'101⁄8")(depends onradio wave conditions and environment)Output: 3dBm max. (PowerClass2)Wireless LAN (DT-X11M30RC/M10RC):Standard: IEEE 802.11bModulation: Direct Sequence Spread SpectrumRadio Frequency: 2400 to 2483.5MHzData Rate: 11Mbps maximumRange:Indoors: 50m (164' 1/2"), Outdoors: 150m (492' 11/2")(Actual range depends on local surroundings.)Channels: 13 (DT-X11M30RC/M10RC)Simultaneous Channels: 3Other Functions: Multiple access points roamingDT-X11_E_P14_36.p65 06.1.10, 3:23 PM35
E-36Earphone Jack:∅2.5mm (1/8") (3-pole)Supports headset.Power Requirements:Power Supply: DT-5023BAT Battery PackHA-A20BAT Battery PackDT-5025LBAT Large-capacity Battery PackMemory Backup: Rechargeable Lithium Battery (Built-in)Power Consumption: 2.5A DC, 3.7/5VBattery Life:Battery Pack: DT-X11M30E/M30U/M10EApproximately 8 hours (DT-5023BAT,HA-A20BAT)*Approximately 18 hours (DT-5025LBAT)*DT-X11M30RC/M10RCApproximately 18 hours (DT-5025LBAT)*Approximately 10 hours (DT-5025LBAT)***In the case of Standby (20): Operation (1):Scanning (1)**In the case of Standby (6.5): Scanning (1.5):Wireless (2)Memory backup: Data Protection (RAM): 10 minutes (when nopower is being supplied by the installed batterypack)Clock: 2 weeks (when no power is beingsupplied by the battery pack)Operating Temperature:DT-X11M30E/M30U/M30RC : –20°C to 50°C (--4°F to 122°F)DT-X11M10E/M11RC : –10°C to 50°C (14°F to 122°F)Operating Humidity:10% to 80% RH (non-condensation)Drop Durability: 1.2 m (3'111/4")Dust and Water Resistance:IEC529 Standard, IP64 Level *When all connectors and covers are closed.Dimensions: Approximately 77(W) × 220(D) × 47(H) mm (31⁄16"W × 811⁄16"D × 17⁄8"H)Weight: Approximately 350g (12.3oz) (DT-X11M30E/M30U)Approximately 400g (14.1oz) (DT-X11M30RC)Approximately 360g (12.7oz) (DT-X11M10E)Approximately 410g (14.4oz) (DT-X11M10RC)DT-X11_E_P14_36.p65 06.1.10, 1:01 PM36
E-37BottomFrontRightBackTo p172 3 458111214136109Using the Bridge Satellite Cradle (DT-160IOE)The optionally available Bridge Satellite Cradle (DT-160IOE) makes it possible totransfer system data and file data between the Handheld Terminal and a computerover an RS-232C connection or USB connection. You can also use the BridgeSatellite Cradle to charge the battery pack installed on the Handheld Terminal.An optionally available wall mount unit (DT-891WH) lets you mount the BridgeSatellite Cradle on a wall.General GuideRequired AC Adaptor(AD-S42120A)OptionDT-X11_E_P37_52.p65 06.1.10, 10:17 AM37
E-381USB Port2RS-232C Port3RS-422C Port4AC Adaptor Jack5Wall Mount UnitFastening Plate6Terminal DetectSwitch7IR Port8Power Contacts9Power IndicatorLamp10 CommunicationIndicator Lamp11 System StatusIndicator Lamp12 Power Switch13 Desktop Unit14 DIP SwitchesThis port accepts connection of a USB cable for connection to acomputer for transfer of system data and file data. Use of theUSB port requires installation of a special driver on the PC.This port accepts connection of an RS-232C cable forconnection to a computer for transfer of system data and filedata. Use of the RS-232C port requires installation of a specialdriver on the PC.This port is used when connecting to another Bridge SatelliteCradle.Connect the AC adaptor here.The holes in this plate accept screws that secure the wall mountunit in place.This switch detects when the Handheld Terminal is not seatedcorrectly on the Bridge Satellite Cradle.This port transfers data with the Handheld Terminal IR port non-contact data communication.Power is supplied to the Handheld Terminal via these contacts.This lamp indicates the power status and the mounting status ofthe Handheld Terminal.Off: Power offGreen: Power on, Handheld Terminal mounted correctlyRed: Power on, Handheld Terminal not mountedThis lamp shows when the Handheld Terminal is performingdata communication.Off: No data communication being performedGreen flashing: Data communication in progressRed: Problem with a connection between two Bridge SatelliteCradlesThis lamp indicates whether the system is operating normally.Regardless of whether or not a Handheld Terminal is mountedthis lamp indicates the system status and whether or not acommunication operation with the system can be performed.Off: System is not operating.Green: System is operating.Turns the power on and off.This is the base when using the Bridge Satellite Cradle in adesktop configuration. Remove the desktop unit in the case of awall-mount configuration.Use these switches to configure the Bridge Satellite Cradle asrequired.DT-X11_E_P37_52.p65 06.1.10, 10:17 AM38
E-39POWER DATA LINEConnecting the AC Adaptor and Connecting to ComputerUse the AC adaptor available as option for the Bridge Satellite Cradle to supply thepower to it. Always make sure that the power is being supplied to the Bridge SatelliteCradle by the AC adaptor before performing any type of data communication operationwith the Handheld Terminal. The Handheld Terminal draws the power via the BridgeSatellite Cradle during data communication.1. After making sure that the Bridge Satellite Cradle power switch is turned off, plugthe AC adaptor into the AC adaptor jack on the back.2. Next, plug the AC adaptor into a power outlet.3. After making sure that the Bridge Satellite Cradle and your computer are both turnedoff, remove the cap from the Bridge Satellite Cradle connection ports, and thenperform one of the following steps to connect to your computer.Be sure to keep the Bridge Satellite Cradle connection ports covered whenever youare not using them.RS-232C Connection•Connect an RS-232C cable (DT-887AXA) to the RS-232C port of the BridgeSatellite Cradle. Connect the other end to your computer’s RS-232C port.USB Connection•Connect a USB cable (DT-380USB) to the USB port of the Bridge Satellite Cradle.Connect the other end to your computer’s USB port.When using theRS-232C portPower contactsPower switch (ON)Communication Indicator LampPower switch (OFF)Power Indicator Lamp System Status Indicator LampDT-X11_E_P37_52.p65 06.1.10, 10:17 AM39
E-404. Turn on the power. This causes the Bridge Satellite Cradle power indicator lamp tolight in red.5. Making sure that their two IR ports come into contact with each other, place theHandheld Terminal onto the Bridge Satellite Cradle. This causes the Bridge SatelliteCradle power indicator lamp to light in green.•If the system is operating normally and data communication is enabled, the systemstatus indicator lamp lights in green.•The communication indicator lamp flashes in green when data communication starts.When charging is initiated, indicator 2 on the DT-X11 lights up in red. When charginghas been completed, indicator 2 on the DT-X11 changes color from red to green.Important!•A high-sensitivity communication element is used for IR communication.In order to ensure successful communication, avoid using cellular phones orother devices that emit radio wave in the area where you are performing IRcommunication.If you need to use such a device, move away from the communicating HandheldTerminals. In case of a cellular phone, keep it at least 30cm (111313131313⁄⁄⁄⁄⁄1616161616") away.•Take care to avoid allowing the Bridge Satellite Cradle power contacts tobecome connected to each other, which creates a short.Shorting the power contacts can damage the Bridge Satellite Cradle.DT-X11_E_P37_52.p65 06.1.10, 10:17 AM40
E-41Configuring DIP Switch SettingsDismounting the bottom cover of the Bridge Satellite Cradle exposes the DIP switches.You can change the ON/OFF settings of the DIP switches to set the configuration.Please, set after first switching OFF the power.12345678Not used (Always off)Not used (Always off)Host Computer InterfaceSettingRS-232CUSB6OFFONSettingIntermediate UnitDaisy Chain Disabled/Termination5OFFONSettingHost ComputerDaisy Chain3OFFON4OFFOFFDaisy ChainConnection TypeSetting115,200bps*Initial factory default setting1ON2OFFBridge Satellite Cradle Data Rate****Important!Note that other DIP settings are used for testing and inspection purposes. Becauseof this, you should never use any DIP settings other than those described above.DT-X11_E_P37_52.p65 06.1.10, 10:18 AM41
E-42Using Wall Mount UnitThe following procedure explains how to use the optional wall mount unit (DT-891WH) to configure the Bridge Satellite Cradle for a wall-mounted configuration.1. Remove the screws on the bottom of the Bridge Satellite Cradle, and remove thedesktop unit.2.Affix the wall mount unit to the bottom of the Bridge Satellite Cradle, and secure it inplace with the wall mount unit screws.3. Drive one of the provided screws into the wall at the location where the upper hole ofthe wall mount unit to be when you mount the unit on the wall.Do not drive the screw into the wall all the way. Keep a space of about 2mm (1⁄16")between the head of the screw and the wall surface.4. Hook the upper wall mount unit hole onto the upper screw.ScrewsScrews2mm (1⁄16")DT-X11_E_P37_52.p65 06.1.10, 10:18 AM42
E-435. Drive the other screw into the wall at the location where the lower hole is located.6. Drive the upper screw and lower screw into the wall the rest of the way.To remove the Bridge Satellite Cradle from the wall1. Loosen the upper screw and lower screw.2. Raise the Bridge Satellite Cradle and remove it from the screws.Important!•While the Bridge Satellite Cradle is mounted on a wall, be sure to check the wallscrews periodically for looseness. Tighten them as required.•Note use of the RS-232C cable is not supported by the wall-mountedconfiguration. Connect using a USB cable or RS-422 cable.DT-X11_E_P37_52.p65 06.1.10, 10:18 AM43
E-44Connecting Multiple Bridge Satellite Cradles (DT-160IOE)Use the modular cable for the connections.You can daisy chain multiple Bridge Satellite Cradles by connecting the C-OUT port ofthe first unit that is the nearest to the host computer to the C-IN port of the next unitthat is sitting to the first unit with DT-888RSC cable (RS-422 cable) as shown in thefigure below.To  host computerDaisy chain connection cables(DT-888RSC)RS-232C cable or USB cableImportant!You can use optional RS-422 cables (DT-888RSC) to link up to eight BridgeSatellite Cradles.DT-X11_E_P37_52.p65 06.1.10, 10:18 AM44
E-45Bridge Satellite Cradle (DT-160IOE) Specifications1. IR CommunicationInterface: IR interfaceProtocol: IrDA Ver. 1.1 StandardSynchronization: Asynchronous, frame synchronizationTransfer Rate: 9,600, 115,200, 4Mbps(4Mbps is possible during a  USB connection with the hostcomputer only.)2. USBProtocol: USB Ver1.1 StandardTransfer Rate: 12Mbps (max.)3. RS-232CProtocol: Full duplexSynchronization: AsynchronousTransfer Rate: 115,200bps4. RS-422Protocol: Full duplexSynchronization: AsynchronousTransfer Rate: 115,200bps5. ChargingCharging System: Fixed-voltage (with current limiter)Charge Time: Approximately 2.5 hours (standard battery pack)Approximately 5.0 hours (large-capacity battery pack)6. Power SupplyPower Requirement: AC adaptor (AD-S42120A)Power Consumption: DC12V approximately 1600mAOutput Handheld Terminal: DC5V 2500mA (max.)7. AC AdaptorModel: AD-S42120AInput: 100V to 240V AC 50/60HzOutput: 12V DC 3500mA8. Dimensions and WeightDimensions: Desktop: Approximately 110(W) × 139(D) × 129(H) mm(45⁄16"W × 51⁄2"D × 51⁄16"H)Wall Mount: Approximately 110(W) × 148(D) × 153(H) mm(45⁄16"W × 513⁄16"D × 6"H)Weight: Desktop: Approximately 490g (17.3oz)Wall Mount: Approximately 650g (22.9oz)8. Operating EnvironmentTemperature: 0°C to 40°C (32°F to 104°F)Humidity: 30% to 80% RH (non-condensation)DT-X11_E_P37_52.p65 06.1.10, 10:18 AM45
E-46Using the Cradle-type Battery ChargerThe optionally available Cradle-type Battery Charger (DT-169CHGE) lets you chargethe Handheld Terminal’s battery simply by placing the Handheld Terminal onto thecharger.An optional wall mount unit lets you mount the Cradle-type Battery Charger on a wall.General GuideBackTo pFrontRight Bottom1436527OptionRequired AC Adaptor(AD-S42120A)DT-X11_E_P37_52.p65 06.1.10, 10:18 AM46
E-471AC Adaptor Jack2Wall Mount UnitFastening Plate3Terminal DetectSwitch4Power Contacts5Power IndicatorLamp6Power Switch7Desktop UnitConnect the AC adaptor here.The holes in this plate accept screws that secure the wall mountunit in place.This switch detects when the Handled Terminal is not seatedcorrectly on the Cradle.Power is supplied to the Handheld Terminal via these contacts.This lamp indicates the power status and the mounting status ofthe Handheld Terminal.Off: Power offRed: Power on, Handheld Terminal not mountedGreen: Power on, Handheld Terminal mounted correctlyTurns the power on and off.This is the base when using the Cradle in a desktopconfiguration. Remove the desktop unit in the case of a wall-mount configuration.DT-X11_E_P37_52.p65 06.1.10, 10:18 AM47
E-48Connecting the AC Adaptor for Cradle-type Battery ChargerUse the special AC adaptor for the Cradle-type Battery Charger to connect to a walloutlet.1. After making sure that the Cradle-type Battery Charger power switch is turned off,plug the AC adaptor into the AC adaptor jack on the back of the charger.2. Next, plug the AC adaptor into a power outlet.3. Turn on the power. This causes the Cradle-type Battery Charger power indicator lampto light in red.POWER4. Making sure that their power contacts come into contact with each other, place theHandheld Terminal onto the Cradle-type Battery Charger. This causes the Cradle-type Battery Charger power indicator lamp to light in green.When charging is initiated, indicator 2 on the DT-X11 lights up in red. Whencharging has been completed, indicator 2 on the DT-X11 changes color from red togreen.Important !Take care to avoid allowing the Cradle-type Battery Charger power contacts tobecome connected to each other, which creates a short.Shorting the power contacts can damage the Cradle-type Battery Charger.Power switch (OFF)Power contactsPower switch (ON)Power Indicator LampDT-X11_E_P37_52.p65 06.1.10, 10:18 AM48
E-49Using Wall Mount UnitTo wall mount the Cradle-type Battery Charger, use the same procedure as thatdescribed for the Bridge Satellite Cradle (DT-160IOE) on page 42.Cradle-type Battery Charger (DT-169CHGE) Specifications1. ChargingCharging System: Fixed-voltage (with current limiter)Charge Time: Approximately 2.5 hours (standard battery pack)Approximately 5.0 hours (large-capacity battery pack)2. Power SupplyPower Requirement: AC adaptor (AD-S42120A)Power Consumption: 12V DC, approximately 1,400mAOutput Handheld Terminal: 5V DC 2500mA (max.)3. AC AdaptorModel: AD-S42120AInput: 100V to 240V AC 50/60HzOutput: 12V DC 3500mA4. Dimensions and WeightDimensions: Desktop: Approximately 110(W) X 139(D) X 129(H) mm(45⁄16"W × 51⁄2"D ×  51⁄16"H)Wall Mount: Approximately 110(W) × 148(D) × 153(H) mm(45⁄16"W × 513⁄16"D ×  6"H)Weight: Desktop: Approximately 470g (16.6oz)Wall Mount: Approximately 630g (22.2oz)5. Operating EnvironmentTemperature: 0°C to 40°C (32°F to 104°F)Humidity: 30% to 80% RH (non-condensation)DT-X11_E_P37_52.p65 06.1.10, 10:18 AM49
E-50Using the Dual Battery ChargerThe optionally available Dual Battery Charger (DT-5022CHG) allows charging of twobattery packs at the same time.General GuideFront BackTop1144443233Bundled ItemsConnection Bracket2 screwsOptionAC AdaptorAD-S45150AEDT-X11_E_P37_52.p65 06.1.10, 10:18 AM50
E-511Charge IndicatorLamp2AC Adaptor Jack3Dual BatteryChargerConnection Port4ConnectionBracketAttachment HolesThis lamp indicates the charge status of the battery pack(s).Off: Not chargingRed: ChargingRed Flashing: Battery pack problemGreen: Charging completeConnect the AC adaptor here.Use this port to connect multiple Dual Battery Chargers to eachother.The connection bracket attaches here when you connect multipleDual Battery Chargers to each other.Important!Each Dual Battery Charger comes with one connection bracket.Since only one connection bracket is required when you connect two Dual BatteryChargers, you will always have one left over.Simply keep the other connection bracket on hand as an extra, in case you everneed it.DT-X11_E_P37_52.p65 06.1.10, 10:18 AM51
E-52Charging a Battery Pack1. Plug the optional AC adaptor into the AC adaptor jack of the Dual Battery Charger.2. Plug the other end of the AC adaptor into a wall outlet.3. Taking care that the battery pack is oriented correctly, insert it into the Dual BatteryCharger.This causes the Charge Indicator Lamp to light in red, indicating that charging hasstarted.Charge Indicator LampOff: Not chargingRed: ChargingRed Flashing: Battery pack problemGreen: Charging completeDT-X11_E_P37_52.p65 06.1.10, 10:18 AM52
E-53Connecting Multiple Dual Battery ChargersYou can connect up to three Dual Battery Chargers. Doing so makes it possible tosupply power to all the Dual Battery Chargers using the AC adaptor.1. As shown in the illustrations below, remove the connector covers of the Dual BatteryChargers you want to connect to each other.2. Connect the two Dual Battery Chargers as shown below.3. Turn over the connected Dual Battery Chargers and attach a connection bracket,securing it in place with screws.You can repeat the above steps to connect up to three Dual Battery Chargers.Connector coverDT-X11_E_P53_59.p65 06.1.10, 1:01 PM53
E-54Dual Battery Charger (DT-5022CHG) Specifications1. Model: DT-5022CHG2. Charging:Charging System: Fixed-voltage (with current limiter)Charge Time: Approximately 2.5 hours for one battery packApproximately 5.0 hours for one large-capacity battery packCharging Two Battery PacksApproximately 5.0 hours for two battery packs (DT-5023BAT×2)Approximately 10 hours for two large-capacity battery packs(DT-5025LBAT×2)3. Power Supply:Power Requirement: AC adaptor AD-S45150AEConsumption Current: Approximately 3,000mA4. Operating Environment:Temperature: 0°C to 40°C (32°F to 104°F)Humidity: 30% to 80% RH (non-condensation)5. Dimensions and Weight:Dimensions:Approximately 110(W) × 100(D) × 49(H) mm (45⁄16"W × 315⁄16"D ×115⁄16"H)Weight: Approximately 154g (5.4oz)DT-X11_E_P53_59.p65 06.1.10, 1:01 PM54
E-55Using PC Card (DT-X11M30E / M30U / M10E)Your Handheld Terminal supports use of PC cards (PCMCIA card, compact flash cardwith a CF card adaptor). Use the following procedure to load and remove PC cards.Affixing a PC Card RemoverOnce loaded, the PC card may be difficult to remove from the PC card slot.Affixing a PC card remover (a piece of tape) to the PC card before you load it makes iteasier to pull the card out of the slot later.Important!When you use a compact flash card, always affix the PC card remover to the PCcard adaptor, not on the compact flash card itself whenever loading into theHandheld Terminal. If you affix the tape to the compact flash card instead of theadaptor, pulling the remover may end up pulling out the compact flash card only,and make it impossible to remove the adaptor.To load a PC card1. Carefully lift up either end of the rubber PC card slot cover, and remove the fourscrews that secure it in place.Important!Be gentle when lifting up the ends of the PC card slot cover rubber to expose thescrews. Pulling on the rubber or other rough handling can cause the rubber tobreak.•Installing a large-size PC card such as communication card may cause the PC cardslot cover rubber not to be put back. If you face to such the accident use either thecommunication card cover (DT-892TCV) or the large-size communication card cover(DT-893LTCV) both optional to protect the slot and the installed PC card itself.PC Card RemoverDirection to insertDT-X11_E_P53_59.p65 06.1.10, 1:01 PM55
E-562. Remove the PC card slot cover.3. Slide a PC card with a remover tape affixed into the Handheld Terminal.Make sure that the top surface of the card is facing in the same direction as theHandheld Terminal display. You will not be able to insert the card all the way into theslot if it is not oriented correctly.Be sure to fold the tab part of the remover tape affixed to the card so it is notdamaged when you replace the card compartment cover.4. Replace the PC card compartment cover, and secure it in place with its screws.Important!If you cannot eject a PC card from the slot for some reason, carefully use a flatblade screwdriver to pull out the lever located at the right of the card, as shown inthe illustration. While pulling out on the tab, pull the card from the slot. Never tryto pull on the tab with your fingernail. Doing so can cause your fingernail to break.DT-X11_E_P53_59.p65 06.1.10, 1:02 PM56
E-57Using CF Card Extension UnitThe CF Card Extension Unit (DT-894CFU) supports use of Compact flash (CF) Type Icards and Type II cards (3.3).Use the procedure below to load and remove CF cards.Important!•Installing some cards will make it impossible to close the card slot cover. Whenthat happens, you can either use the Large Card Cover or you can use theHandheld Terminal and CF card without a card slot cover. Keep the card slotcover in a safe place where you will not lose it. Note that the Handheld Terminalis not water resistant if its card slot cover is removed. Exercise special care whenusing the Handheld Terminal without its card slot cover attached.•When using a CF storage card, be sure to close the card slot cover.Attaching the CF Card Extension UnitAttach the CF Card Extension Unit to the back of the Handheld Terminal. The CF CardExtension Unit connector is located under a protective cover.1. Loosen two screws and detach the protector from the connector.2. Attach the CF Extension Card Unit after peeling off the seals (2) on the back, andthen firmly secure it by fastening all the way down on the back of the HandheldTerminal with the screws 1, 2, 3 and 4 provided.  Although screws 3 and 4may be particularly difficult to insert, make sure they are inserted all the way in.DT-894CFU Large Card Cover1234Bundled ItemUse this cover when youhave a data communicationcard or other large cardinstalled in the card slot.ProtectorAttach to the connector part.4 screwsDT-X11_E_P53_59.p65 06.1.10, 1:02 PM57
E-58Loading a CF Card1. Wipe the surfaces of the card so it is free of any dirt, dust, or oil.2.Remove the screws that secure CF Extension Unit in place, and then remove the card slot cover.3. Making sure that the top surface of the card is facing in the same direction as theHandheld Terminal display, slide the card into the slot.You will not be able to insert the card all the way into the slot if it is not oriented correctly.4. Replace the CF card compartment cover, and secure it in place with its screws.When removing a card, hook your finger on the rim of the card and pull.CF Card Extension Unit (DT-894CFU) SpecificationsCard Slot: Compact Flash Card Type I/Type II (3.3V)Dimensions: Using Standard Card Cover: Approximately70(W) × 78(D) × 13(H) mm (23⁄4"W × 31⁄16"D × 1⁄2"H)Using Large Card Cover: Approximately85(W) × 78(D) × 13(H) mm (33⁄8"W × 31⁄16"D × 1⁄2"H)Weight: Using Standard Card Cover: Approximately 40g (1.4oz)Using Large Card Cover: Approximately 45g (1.6oz)DT-X11_E_P53_59.p65 06.1.10, 1:02 PM58
E-59Using Rechargeable Battery PackYour Handheld Terminal supports use of two battery pack types of different capacity.You can select the one that best suits your needs in terms of operating time, the type ofoptions you need to use, etc.When using the large-capacity battery pack, you need to use the special large-capacitybattery pack cover that comes with the battery pack (DT-5025LBAT).Important!• Store a battery pack in its special soft case whenever you are not using it.•If the battery pack has been left over unused for a long period of time, thecapacity remained decreases due to spontaneous discharge or chemicaldecomposition by the battery pack itself. If the battery pack fails to hold itsoperating duration after it has been fully charged, replace it with a new one. Thebattery pack may reach the end of its service life.Battery Pack SpecificationsModel: DT-5023BAT/HA-A20BATRated Capacitance: 1550mAh (DT-5023BAT)1700mAh (HA-A20BAT)Rated Voltage: 3.7VDimensions:Approximately 37(W) × 57(D) × 13(H) mm (17⁄16"W × 21⁄4"D × 1⁄2"H)Weight: Approximately 45g (1.6oz)Bundled Item: Soft caseLarge-capacity Battery Pack SpecificationsModel: DT-5025LBATRated Capacitance: 3400mAhRated Voltage: 3.7VDimensions:Approximately 37(W) × 57(D) × 24(H) mm (17⁄16"W × 21⁄4"D × 15⁄16"H)Weight: Approximately 87g (3.1oz)Bundled Item: Soft caseDT-X11_E_P53_59.p65 06.1.10, 1:02 PM59
CASIO COMPUTER CO., LTD.6-2, Hon-machi 1-chomeShibuya-ku, Tokyo 151-8543, JapanPrinted on recycled paper.PN410401-001MO0504-F Printed in JapanDT-X11_E_Hyo_1_4.p65 06.1.10, 10:13 AM2

Navigation menu