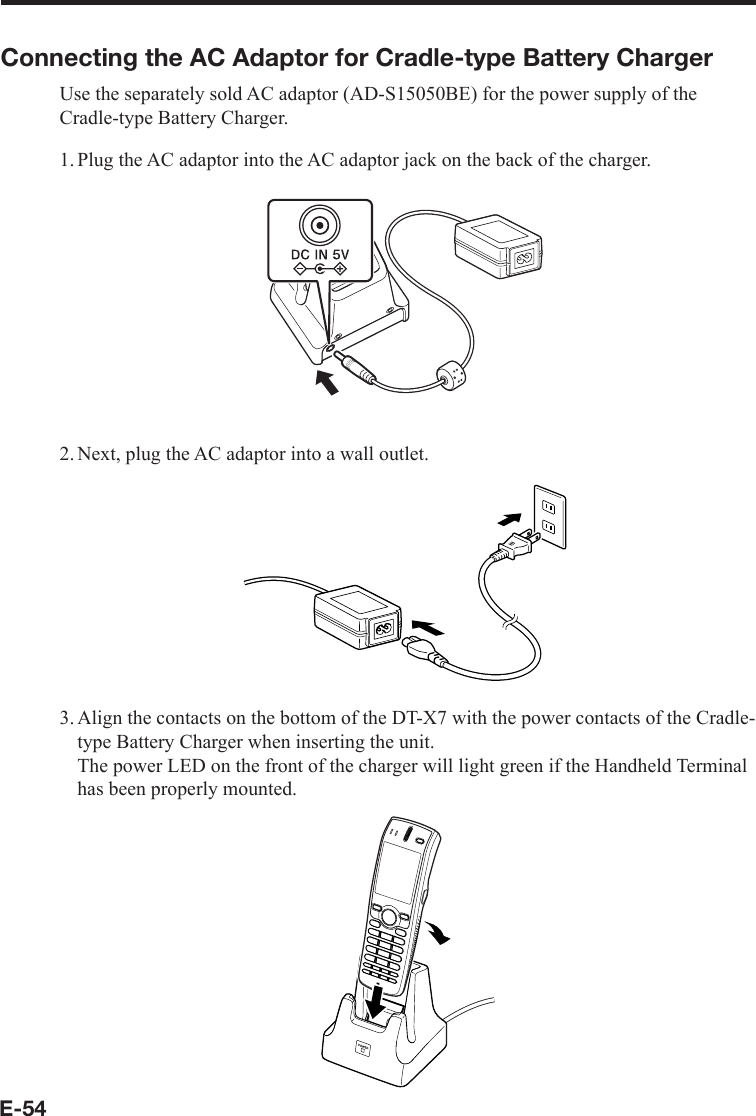
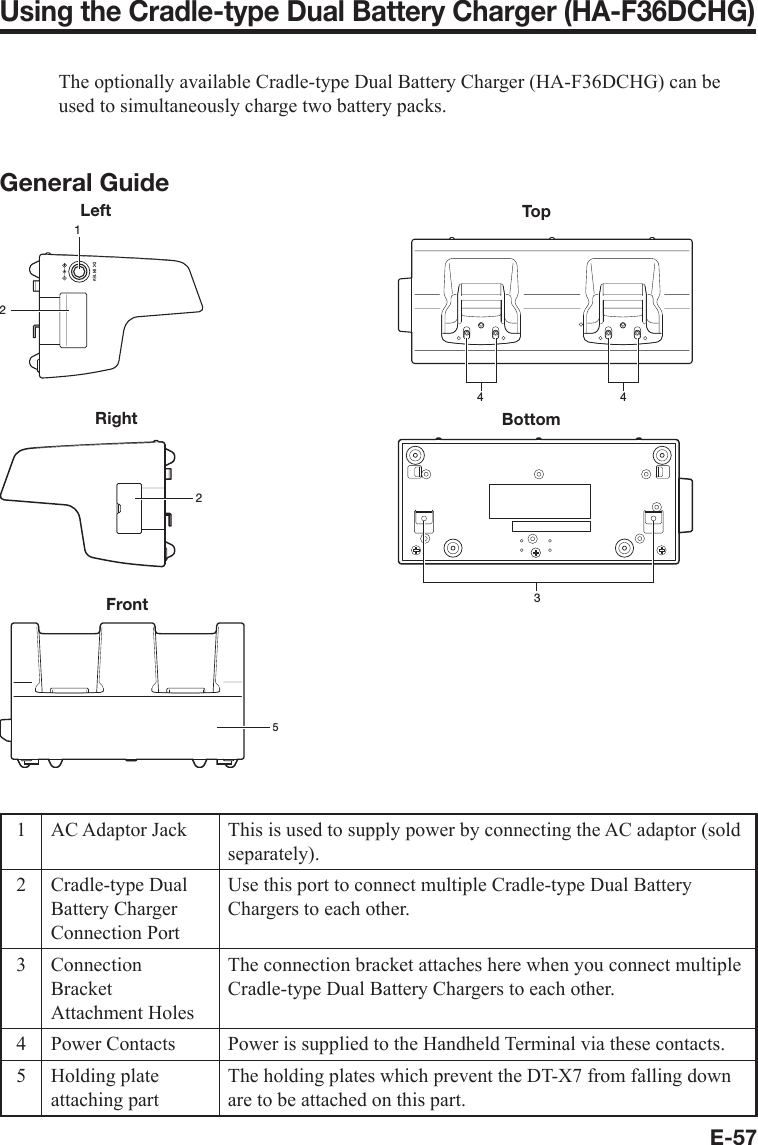
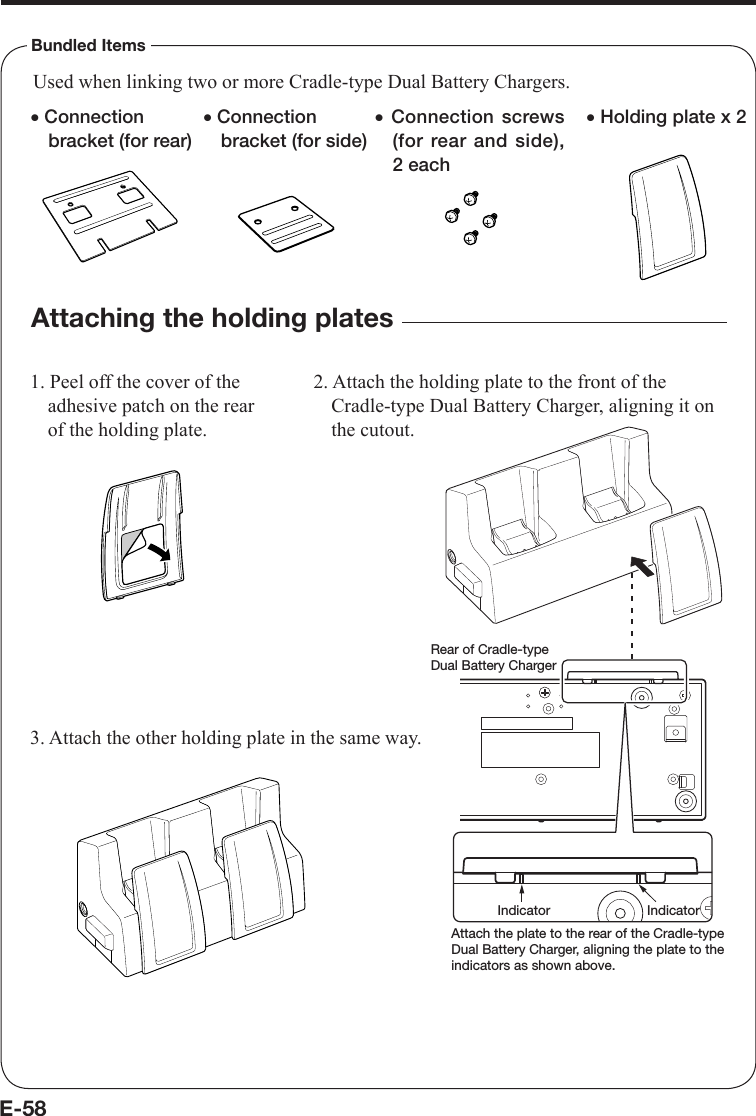
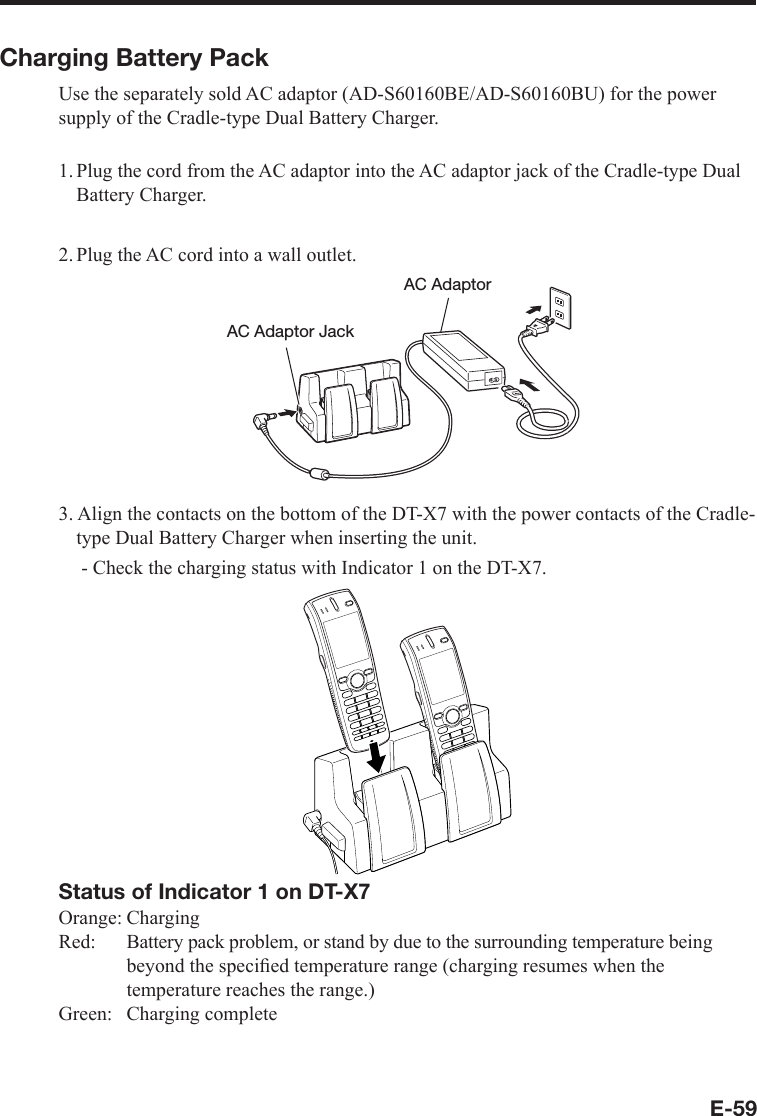
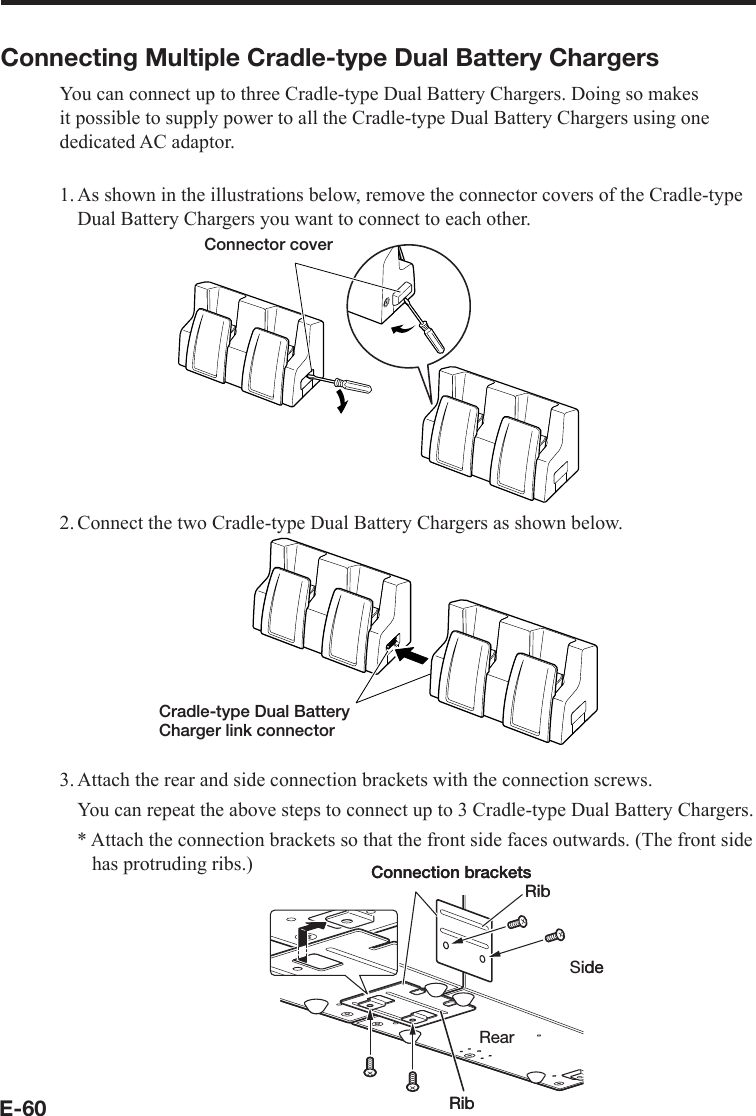
Casio Computer DTX7M10U Handheld Terminal User Manual Users manual
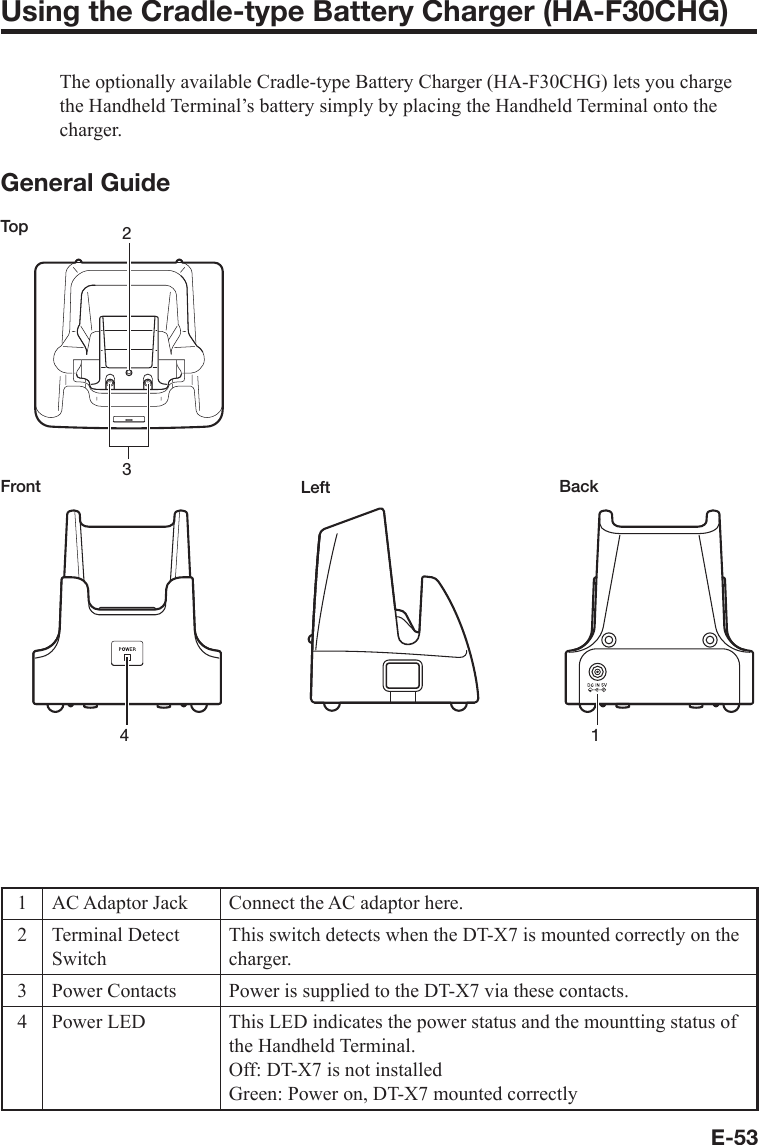
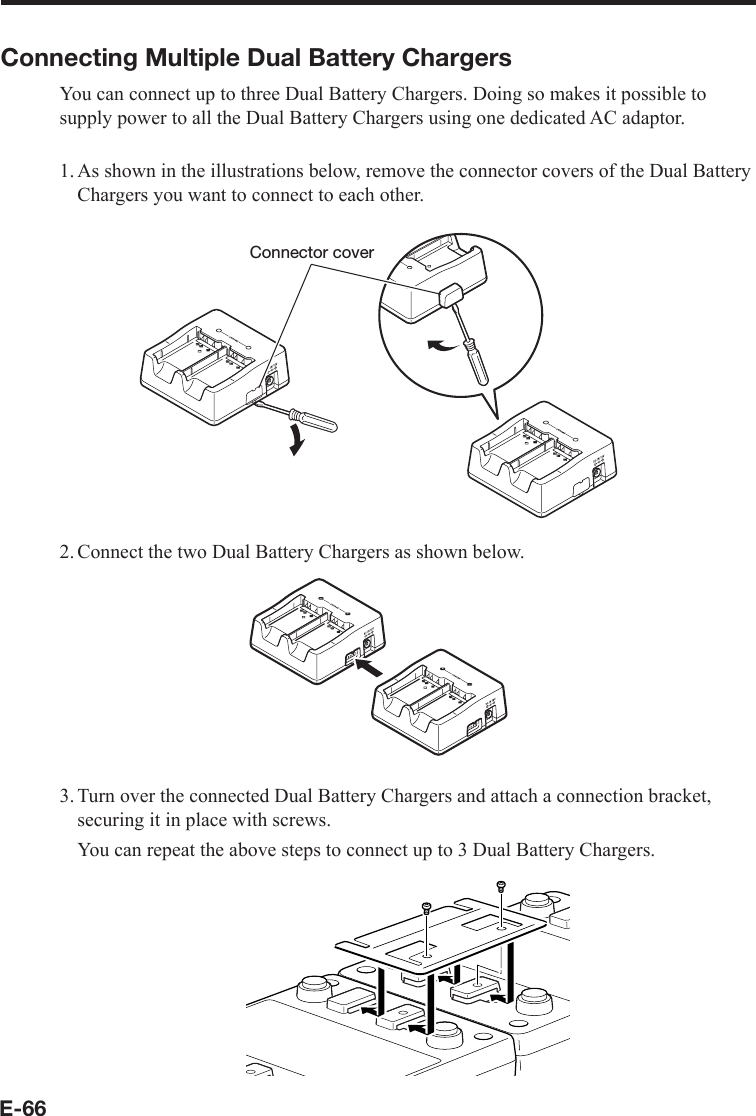
Casio Computer Co Ltd Handheld Terminal Users manual
UserManual.wiki
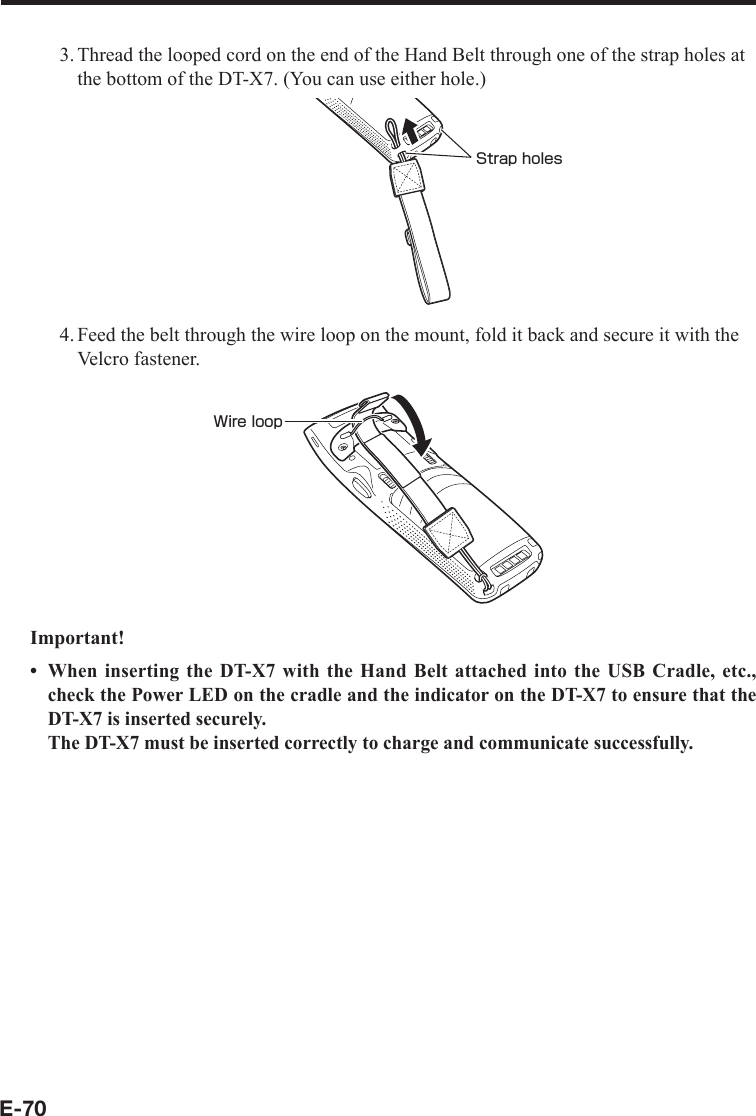
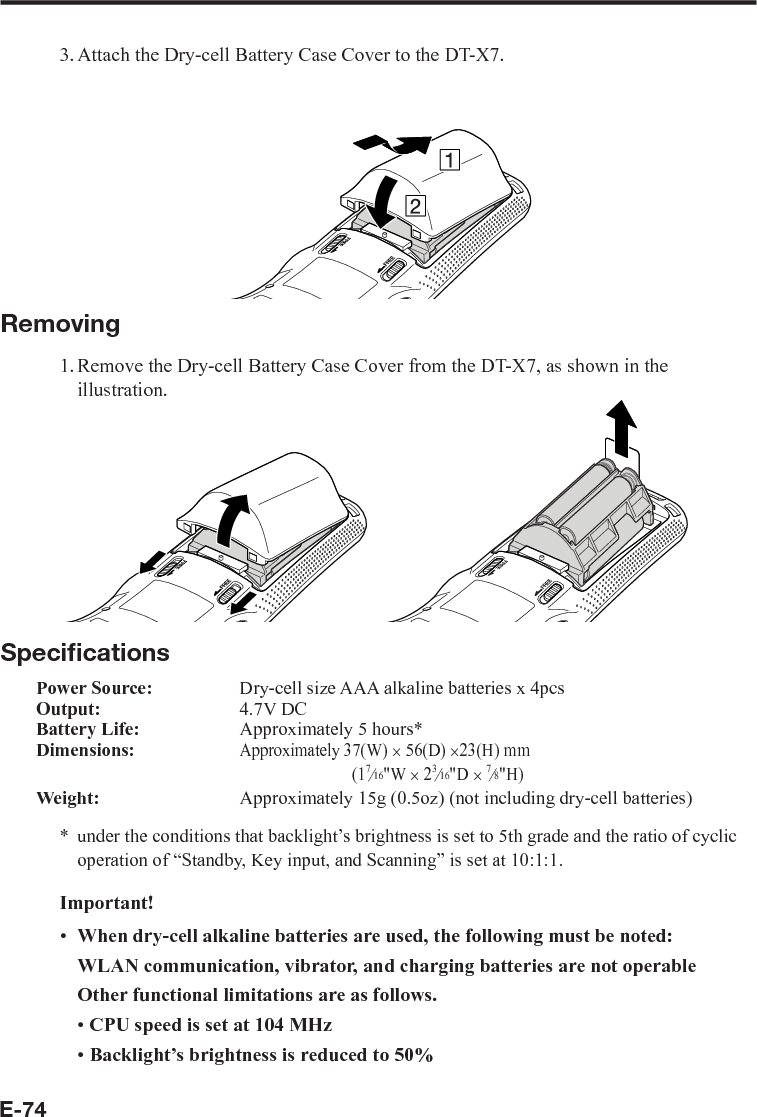
>
Casio Computer
>
DTX7M10U User Manual
Users manual
Navigation menu
Upload a User Manual
Namespaces
Wiki Guide
HTML
PDF
Info
Views
User Manual
Discussion / Help
Navigation


![E-13The CASIO DT-X7M10E, DT-X7M10R, and DT-X7M10U models are designed, tested and found to meet the relevant regulatory standards described below.DT-X7M10E, DT-X7M10RRegulatory standards:IEC 60825-1IEC 60529, IP54 levelUSA standards:FCC Part 15BFCC Part 15CUL 60950-1Europe standards:EN 60950-1EN 60825-1EN 300 328EN 301 489-17China standards:GB 4943GB 9254GB 17625.1[2002] 353Taiwan standards:CNS 14336CNS 13438LP 0002Australia and New Zealand standards:AS/NZS CISPR22DT-X7M10URegulatory InformationIEC 60529, IP54 levelIEC 60825-1USA standards:FCC Part 15BFCC Part 15CUL 60950-1Canada standards:RSS-GEN, RSS-210cUL 60950-1](https://usermanual.wiki/Casio-Computer/DTX7M10U/User-Guide-843363-Page-15.png)

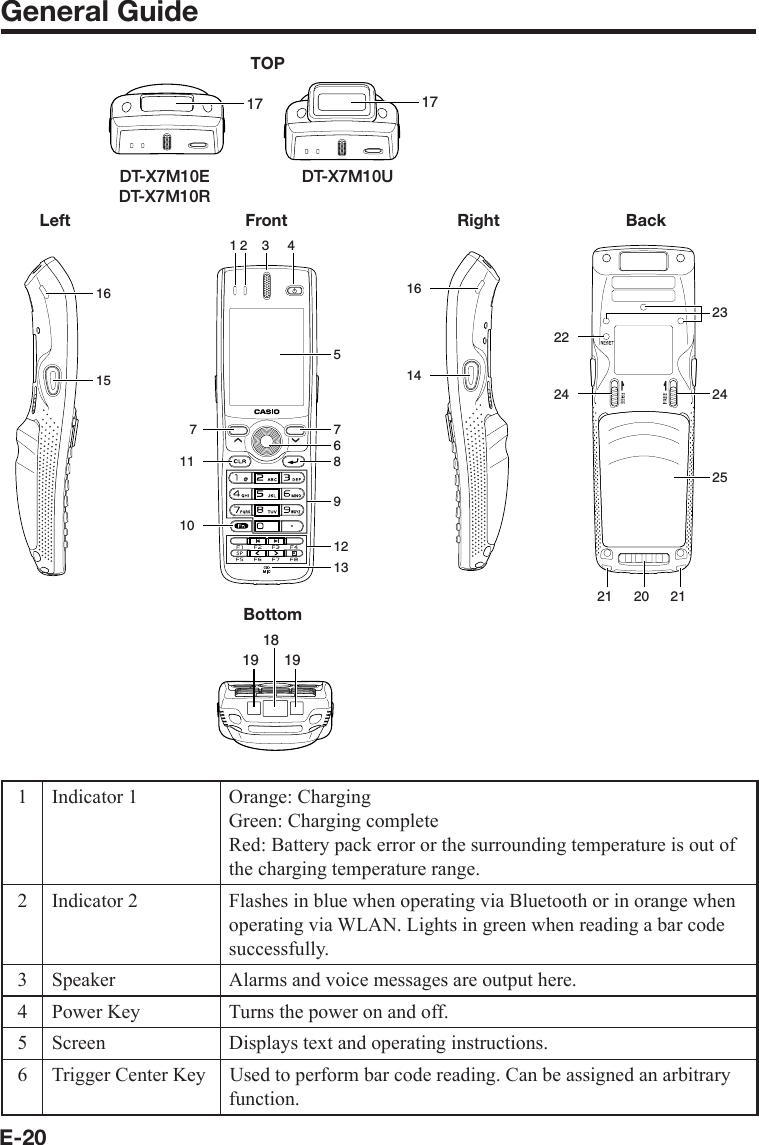
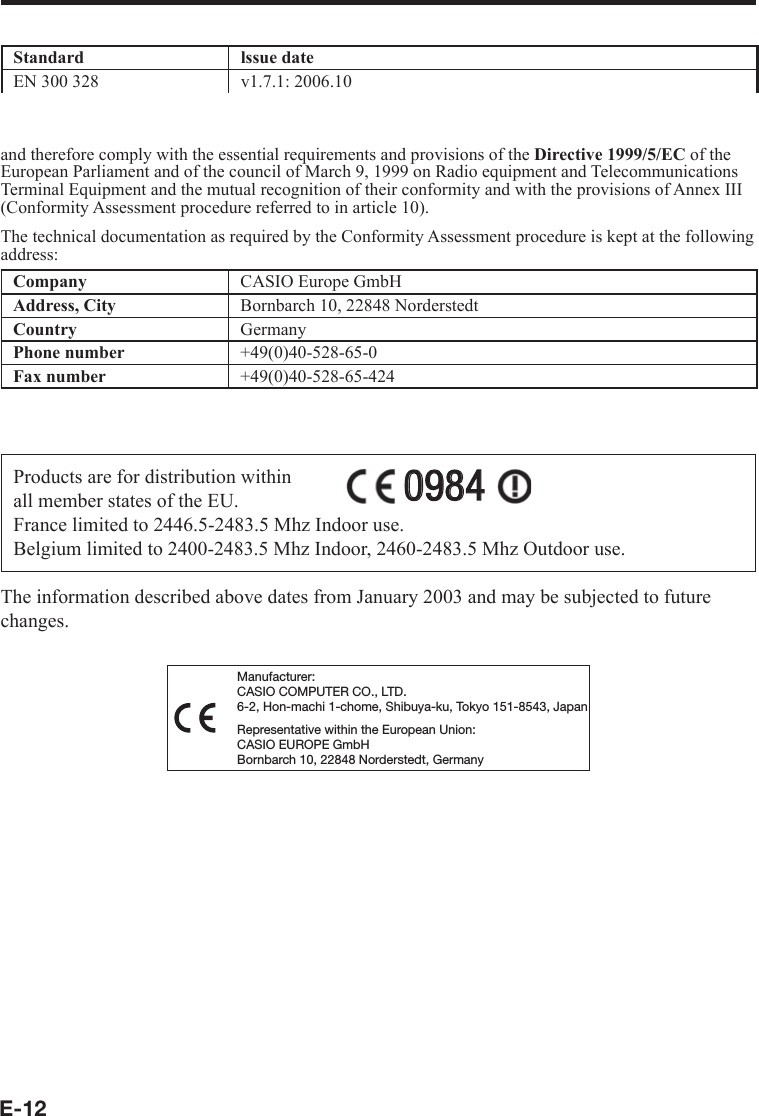
![E-217 Cursor Keys Perform the same functions as the up and down arrow keys on a PC keyboard.8 Enter Key Press when fi nishing entering numerical values or when moving to the next step.9 Numeric Keys Used to enter numeric values and decimal points.10 Fn Key Used to make various settings in combination with the function keys or numeric keys or when starting a pre-registered application.11 CLR Key Used to clear one letter to the left of the cursor.12 Function Keys Various functions other than bar code reading can be assigned to these keys.The default key assignments are as follows.F1: Similar function as the Alt key on a PC keyboard.F2: Similar function as the Shift+Tab keys combination on a PC keyboard. Used to move the cursor among entry or selection items.F3: Similar function as the Tab key on a PC keyboard. Used to move the cursor among entry or selection items.F4: Not assigned.F5: Enter a space.F6: Similar function as the cursor left key on a PC keyboard.F7: Similar function as the cursor right key on a PC keyboard.F8: Select text entry mode.(The mode changes in order of Numeric ➝ Alphabet [upper case] ➝ Alphabet [lower case])13 Microphone Used to input a sound including voice.14 Trigger R Key Used to perform bar code reading.15 Trigger L Key Used to perform bar code reading.16 Contact Scanning Guide Attachment HolesUsed to mount the contact scanning guide attachment.(DT-X7M10E/DT-X7M10R)17Barcode Reader PortLaser light or LED light is emitted from this window that reads barcodes.18 IR Port Used for communication with another Handheld Terminal.19 Power Contacts Used to receive power provided by the USB Cradle or Ethernet Cradle.20Data Communication TerminalUsed for data communications.](https://usermanual.wiki/Casio-Computer/DTX7M10U/User-Guide-843363-Page-23.png)

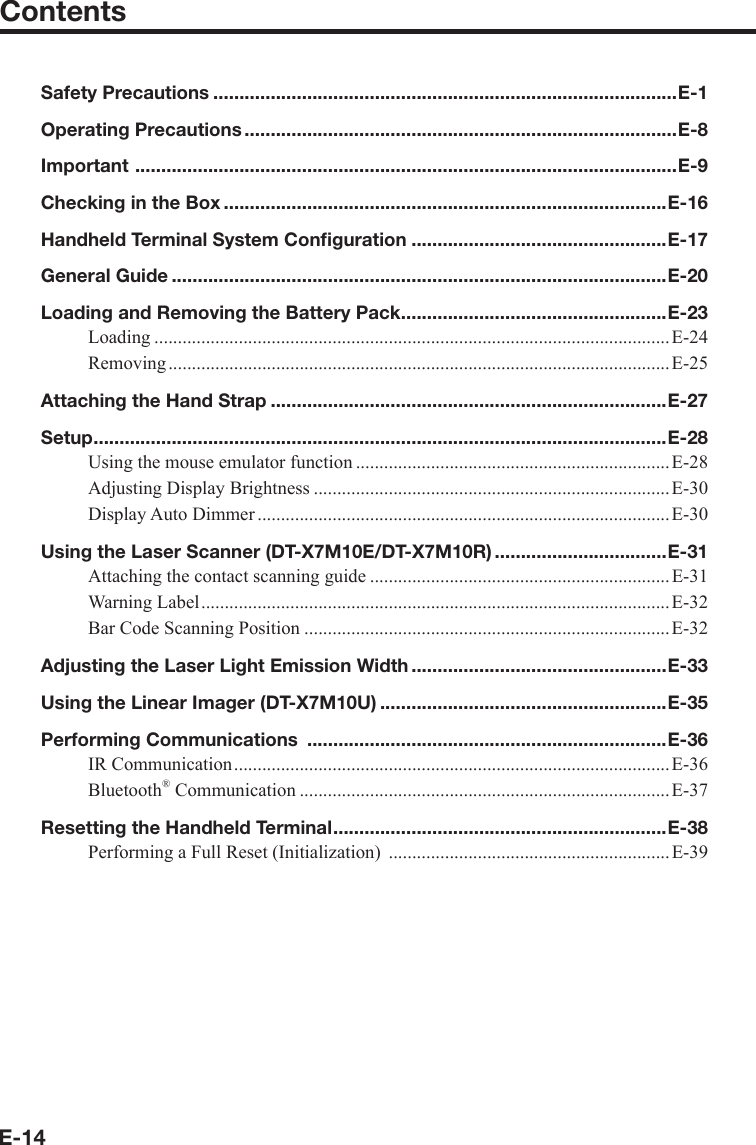
![E-30Adjusting Display BrightnessYou can use the following procedures to adjust display brightness to make it easier to read under different lighting conditions.Press the “Fn” key and then press the “5” key or “6” key after confi rming that “F” is displayed in the lower right corner of the screen. Pressing the “5” key adjusts brightness for a darker display, while pressing the “6” key adjusts brightness for a lighter display.In order to continue to make adjustments, press the “5” key or “6” key after again fi rst pressing the “Fn” key.Display Auto DimmerThe display auto dimmer automatically lowers display brightness if you do not perform any operation for a specifi c period of time. This helps the battery power to be conserved.You can use the following procedure to specify a period of time that should be allowed to elapse until when the auto dimming is initiated.1. Use the “ ”/“ ” keys to move the focus to the [Start] icon and press the Enter key. Then select Set ➝Control Panel with the Enter key to bring up the Control Panel.Focus2. Move the focus to the “Brightness” icon and press the Enter key. Then use the “ ”/“ ” keys to move the focus to the tabs and use the “<”/ “>” keys to select the [Backlight] tab. Adjust the displayed items.The mouse emulator function can also be used to make the adjustment.x**](https://usermanual.wiki/Casio-Computer/DTX7M10U/User-Guide-843363-Page-32.png)
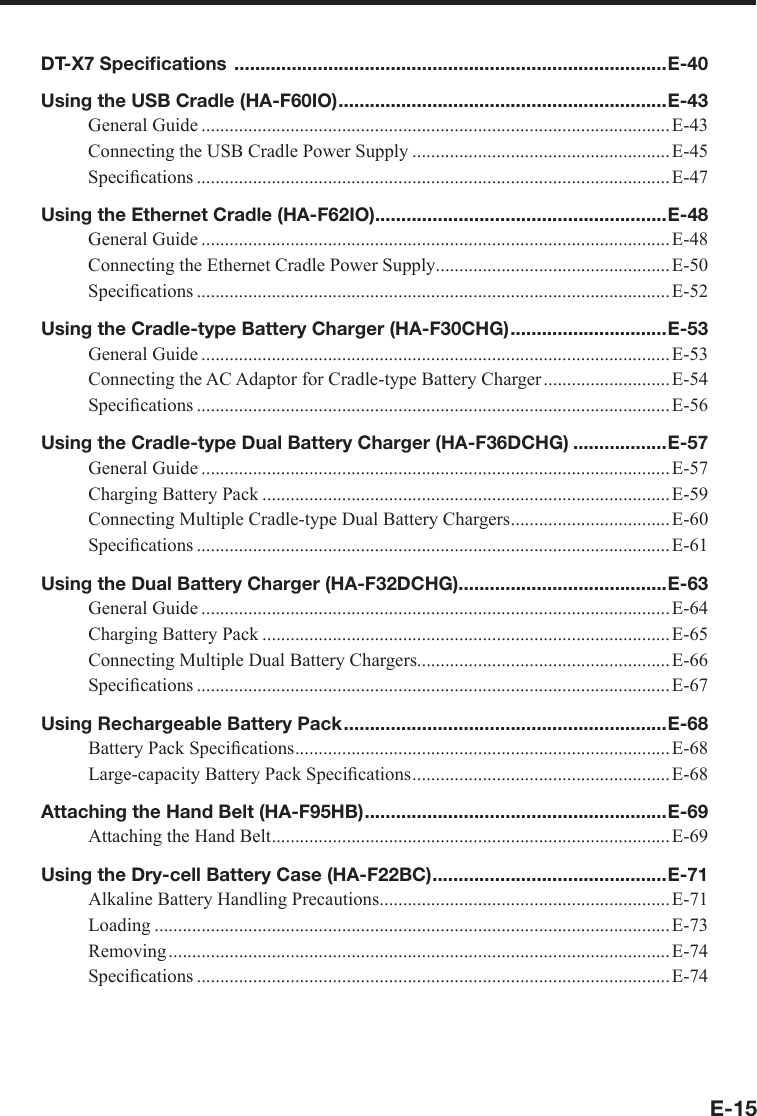
![E-33Adjusting the Laser Light Emission WidthThe emission width of the laser light emitted by the Handheld Terminal can be adjusted. Adjust the emission width when it has been changed.The mouse emulator function can also be used to make the adjustment.1. Use the “ ”/“ ” keys to move the focus to the [Start] icon and press the Enter key. Then select Set ➝Control Panel with the Enter key to bring up the Control Panel.2. Move the focus to the [Scanner Setting] icon and press the Enter key. The display appears as shown at right.3. Use the “ ”/“ ” keys to move the focus to the tabs and use the “<”/“>” keys to select the [Others] tab.*](https://usermanual.wiki/Casio-Computer/DTX7M10U/User-Guide-843363-Page-35.png)
![E-344. Use the “ ”/“ ” keys to move the focus to [Calibration] and press the Enter key. The message appears as shown at right.5. Press the Trigger Key to emit laser light, and align the light with the barcode for adjusting emission width.Align the laser light with the narrow bars on both sides.The display appears as shown at right when adjustment is completed.Repeat the setting if “Setting failed” message appears.Emission Width Adjustment Bar codexxx](https://usermanual.wiki/Casio-Computer/DTX7M10U/User-Guide-843363-Page-36.png)