Casio Computer EXFR100 DIGITAL CAMERA User Manual EXFR100 M29 FA 150730 EN shinsei
Casio Computer Co Ltd DIGITAL CAMERA EXFR100 M29 FA 150730 EN shinsei
UserManual.wiki
>
Casio Computer
>
EXFR100 User Manual
Users Manual
Navigation menu
Upload a User Manual
Namespaces
Wiki Guide
HTML
PDF
Info
Views
User Manual
Discussion / Help
Navigation


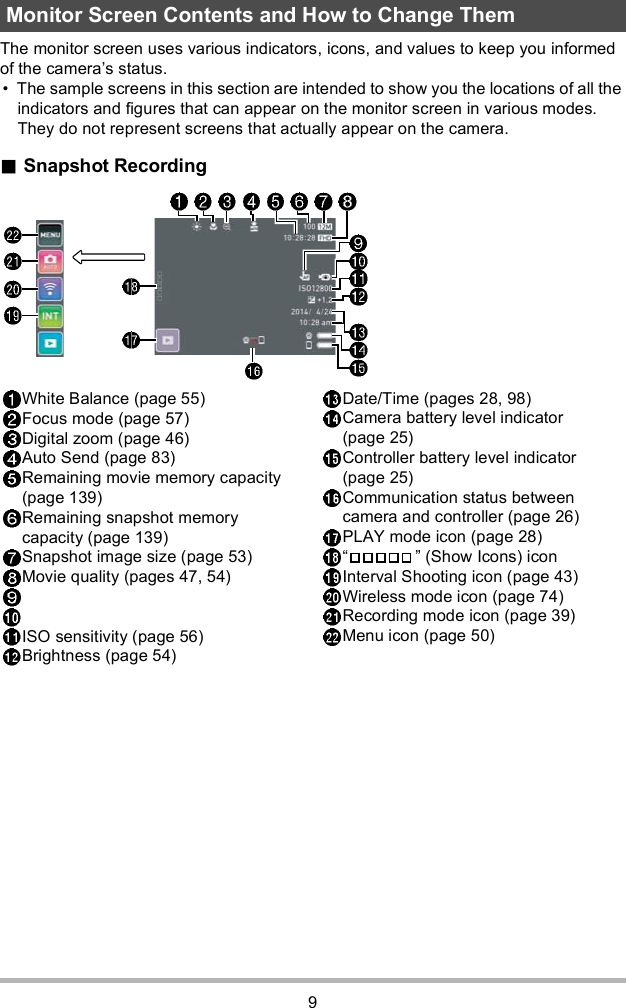
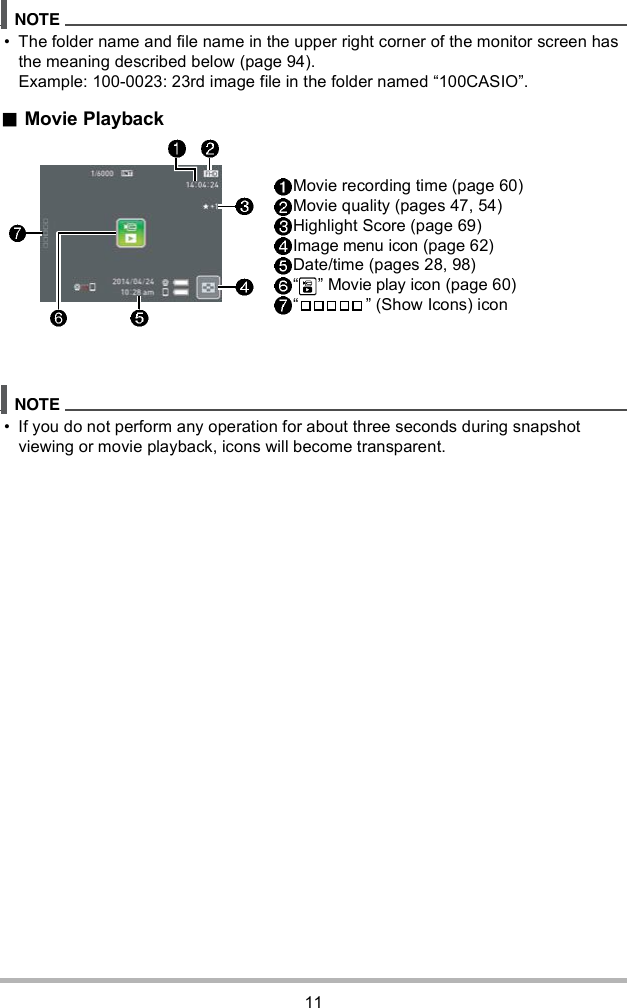
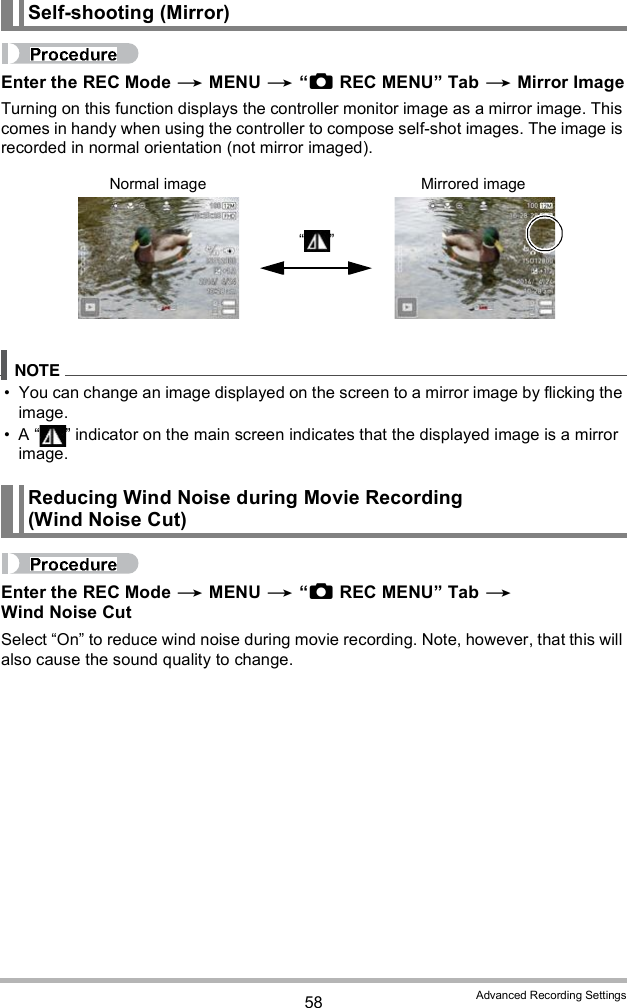
![8The numbers in parentheses indicate the pages where each item is explained.General GuideCameraWireless LAN connection lamp (page 78)Operation lamp (pages 20, 23)[] (Power) (page 26)Memory card slot (page 31)[RESET] button (page 134)[CARD] cover (page 31)SpeakerLens (page 17)Microphone (pages 17, 49)Shutter button (page 34)[] (Movie) (page 47)[FREE] lever (page 15)[USB] port (pages 19, 22)[USB] cover (pages 19, 22)Strap holes (page 17)Controller[USB] cover (pages 19, 22)[RELEASE] button (page 14)[RESET] button (page 134)[USB] port (pages 19, 22)Carabiner strap attachment bar (page 17)Strap holes (page 17)[] (Movie) (page 47)Shutter button (page 34)Operation lamp (pages 20, 23)[] (Power) (page 26)Hinge unit slot (page 14)Camera Controller](https://usermanual.wiki/Casio-Computer/EXFR100/User-Guide-2819923-Page-8.png)

![14 Quick Start BasicsYou can configure the camera to suit your specific needs by attaching the hinge unit, which enables attachment of the controller, and other included and optionally available attachments. This way you can configure the camera to suit your specific needs. Do not apply strong pressure to the surface of the monitor screen. Doing so can damage it. Never touch the lens with your fingers. Finger smudges, dirt, and other foreign matter on the lens can interfere with proper operation of the camera. Use a blower or other means to keep the lens and flash window free of dirt and dust, and wipe gently with a soft, dry cloth.You can attach the controller to the camera and use the camera as a normal camera.To attach the controller1. With the camera lens pointed in the same direction as the controllers monitor screen, slide the hinge unit into the controllers hinge unit slot.2. Push the hinge unit in until you hear it click into place.To detach the controller1. While holding down the controllers [RELEASE] button, pull it out of the camera.Using the AttachmentControllerHinge unit slotAlign the mark on the end of the hinge unit with the mark next to the hinge unit slot.[RELEASE] button](https://usermanual.wiki/Casio-Computer/EXFR100/User-Guide-2819923-Page-14.png)
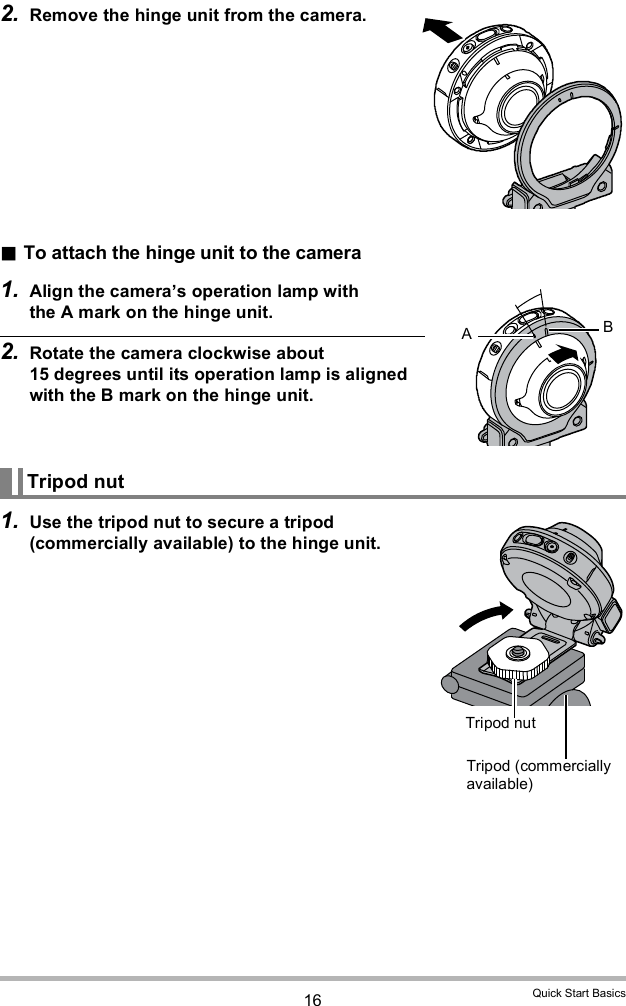
![15 Quick Start BasicsTo use the hinge unit as a standTo change the shooting direction by 90 degrees1. While pulling down on the cameras [FREE] lever, rotate the camera clockwise 90 degrees until you hear a click. Align the cameras operation lamp with the C mark on the hinge unit. The indentations in the lens ring indicate the orientation of the long dimension of the image being shot.To remove the hinge unit from the camera1. While pulling down on the cameras [FREE] lever, rotate the camera counterclockwise about 15 degrees until its operation lamp is aligned with the A mark on the hinge unit.Hinge UnitLens ring[FREE] leverIndentationsA B CA[FREE] lever](https://usermanual.wiki/Casio-Computer/EXFR100/User-Guide-2819923-Page-15.png)
![19 Quick Start Basics Applying a commercially available LCD protective sheet will reduce the operation sensitivity of the monitor screen. The camera will have a hard time interpreting a screen operation made using your fingernails. Use the fleshy pad of your finger.The camera and the controller each have a built-in rechargeable lithium ion battery. The batteries are not charged when you purchase the camera, so you will need to charge both the camera and controller before using them.You can use either of the two following methods to charge the batteries. USB-AC adaptor USB connection to a computer (Using the included micro USB cable.) To charge with the USB-AC adaptorWhile the camera and controller are turned off, connect in the sequence shown below.Charging time: Approximately X hours XX minutes When disconnecting the USB-AC adaptor from the camera, be sure to disconnect from the camera first. If you turn on the camera or controller while charging with the USB-AC adaptor, you will be able to perform normal recording operations. In this case, however, charging of the camera will be stopped while it is turned on.First, charge the battery prior to use.USB-AC adaptor(AD-C53U)When plugging in the connectors, orient this marking as described below.Camera : Towards the lens sideController: Towards the monitor screen side[USB] portMicro USB cable (included with camera)Power cord[USB] cover](https://usermanual.wiki/Casio-Computer/EXFR100/User-Guide-2819923-Page-19.png)
![22 Quick Start BasicsTo charge using a USB connection to a computerWhile the camera and controller are turned off, connect in the sequence shown below ( , ). If the camera or controller is on, hold down [] (Power) to turn it off before connecting it to your computer.Charging time: Approximately X hours XX minutes If you turn on the camera while charging over a USB connection to a computer is in progress, the camera will establish a USB connection with the computer. Charging will continue. Charging will also continue if you turn on the controller. Note that certain types of computers or connection environments may stop charging if supply power is low.Micro USB cable (included with camera)[USB] portUSB portComputer (power turned on)When plugging in the connectors, orient this marking as described below.Camera : Towards the lens sideController: Towards the monitor screen side[USB] cover](https://usermanual.wiki/Casio-Computer/EXFR100/User-Guide-2819923-Page-22.png)
![26 Quick Start BasicsCamera-Controller Wireless Connection (Bluetooth)The camera and controller communicate over a Bluetooth wireless technology connection. Once you perform the pairing operation required for Bluetooth wireless technology connection, the camera and controller will automatically connect to each other whenever you turn them on. Note that the connection will be lost when the distance between the camera and controller becomes too great. The controller will turn off after a preset amount of time after the Bluetooth wireless technology connection is lost. The camera will remain on, so you can shoot images by pressing its shutter button. Your camera has Bluetooth wireless technology communication functionality built in. Avoid operating the camera (including camera standalone operations) inside of aircraft or anywhere else where wireless data communication is restricted.To turn on powerBoth the camera and controller need to be turned on in order to use them. Turning on the camera causes the camera and controller operation lamps to light green, and automatically starts an operation to establish a Bluetooth wireless technology connection between the camera and controller. An image appears on the controller and shooting is enabled. The connection between the camera and controller is affected by their orientation and by the distance between them. The maximum range for shooting with the controllers shutter button is around XX meters (XX.X'). The maximum range for viewing the image on the controllers monitor screen is around XX meters (XX.X'). If the connection is poor, the controller operation lamp will flash green and (Communication status between camera and controller) will appear on the monitor screen. Camera response may be slow if you perform an operation on the controller while communication conditions are bad. If this happens, try adjusting the orientation and the distance between the camera and controller.Turning Power On and OffCameraPress [] (Power).ControllerPress [] (Power).[] (Power)Operation lamp[] (Power)Operation lamp](https://usermanual.wiki/Casio-Computer/EXFR100/User-Guide-2819923-Page-26.png)
![27 Quick Start BasicsSleep ModeIf you press [] (Power) on the controller or if you do not perform any controller operation for the time specified by the Sleep setting on the Setup menu (page 99) while there is a Bluetooth wireless technology connection between the camera and controller, the controller and camera will enter a sleep state. The operation lamp slowly flashes green while the camera is in the sleep mode. To restore the controller display, press any controller button. The Bluetooth wireless technology connection between the camera and controller is maintained even while they are in the sleep mode, so they can quickly recover when you press a button. If the distance between the camera and controller becomes to great or if communication conditions become bad while the camera is in the sleep mode, the connection may be dropped between them.](https://usermanual.wiki/Casio-Computer/EXFR100/User-Guide-2819923-Page-27.png)
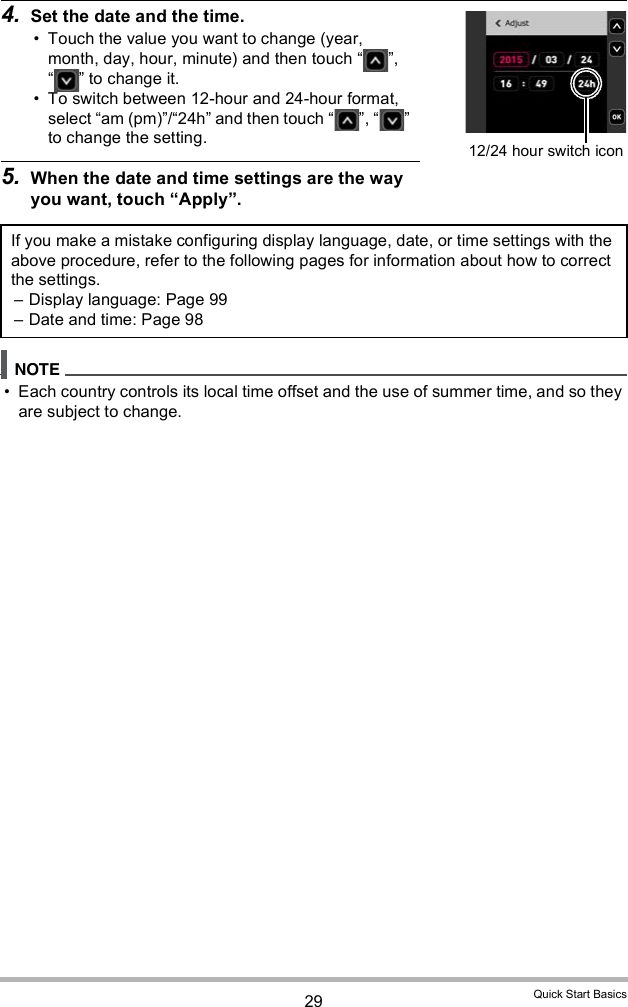
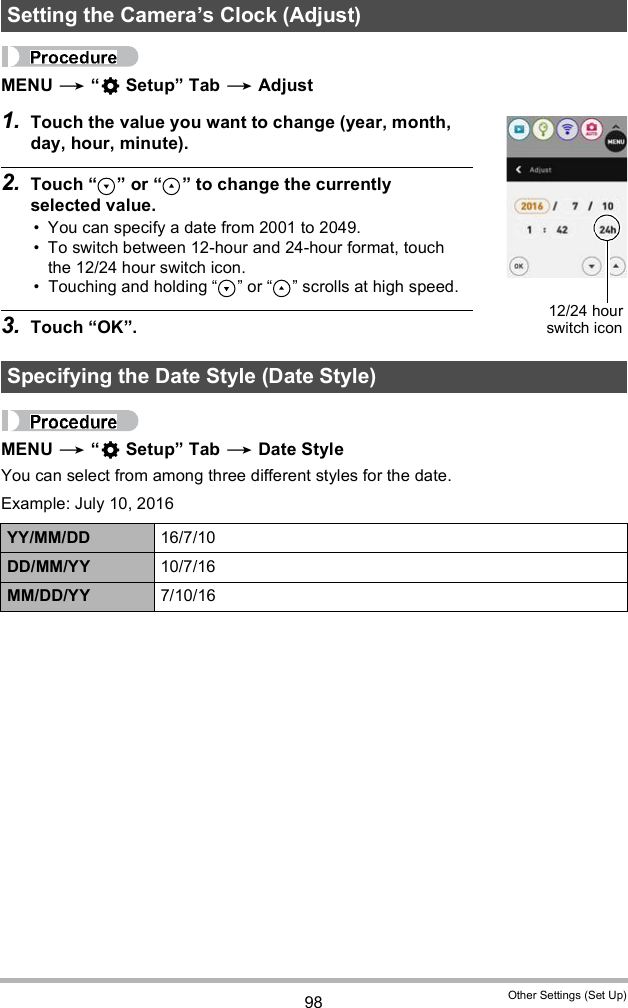
![28 Quick Start BasicsToggling Between the REC Mode and PLAY ModeTo turn off powerOn the camera or the controller, hold down [] (Power). Turning off the camera will cause the controller to turn off automatically.The first time you turn on the camera, a screen appears for configuring the display language, date, and time settings. Failure to set the date and time correctly will cause the wrong date and time data to be recorded with images. Camera models sold in certain geographic areas may not support display language selection.1. Turn on the camera and controller (page 26). If this is the first time you are turning on power, a language selection screen will appear. If the screen does not appear, check to make sure that the camera is turned on.2. Flick (page 18) the controller screen upwards and downwards or touch , until you find the language you want, and then touch to select it.3. Touch the date display format you want.Example: July 10, 2016YY/MM/DD 16/7/10DD/MM/YY 10/7/16MM/DD/YY 7/10/16To enter the PLAY modeIn the REC mode, touch (PLAY). If (PLAY) is not displayed on the screen, you can touching the Review image (page 59), or switch to the PLAY mode by touching (Show Icons) and then touching (PLAY).To enter the REC modeIn the PLAY mode, touch (Show Icons). On the screen image that appears, touch (REC).Configuring Basic Settings the First Time You Turn On the Camera (Show Icons)Screen after (Show Icons) is touched (PLAY) / (REC)](https://usermanual.wiki/Casio-Computer/EXFR100/User-Guide-2819923-Page-28.png)
![31 Quick Start Basics1. Holding down cameras [] (Power) to turn off the camera and then open the [CARD] cover.2. Load a memory card.Positioning the memory card so its back is facing upwards (towards the lens side of the camera), slide it into the card slot all the way in until you hear it click securely into place.3. Close the [CARD] cover. Never insert anything besides a supported memory card (page 30) into the memory card slot. Should water or any foreign object ever get into the card slot, immediately turn off the camera, and contact your retailer or nearest CASIO authorized service center.To load a memory cardBackFront Back](https://usermanual.wiki/Casio-Computer/EXFR100/User-Guide-2819923-Page-31.png)
![34 Quick Start Basics1. Point the camera at the subject.If you are using Premium Auto Pro, an icon will appear on the monitor screen describing the type of shot the camera has detected. You can change the zoom factor by spreading your thumb and forefinger on the display (page 46).2. Press the camera or controller shutter button.The camera will automatically adjust exposure and focus, and then shoot the snapshot.Shooting a MoviePress [] (Movie) on the camera or controller to start movie recording.To stop movie recording, press [] (Movie) again.See page 47 for details. You also touch a location on the screen to focus on it, and then shoot the image (page 51). You can specify the image size for snapshots. See page 53 for more information.Shooting with the Camera AloneYou can use the camera in a stand-alone configuration without turning on the controller or otherwise establishing a connection between it and the camera. If an Interval Shooting (page 43) operation or movie recording (page 47) is in progress, it will continue to shoot images even when controller power is turned off.To shoot a snapshotType of shot+ (Telephoto) (Wide Angle)Shutter buttonCameraController[] (Movie)[] (Movie)Shutter button](https://usermanual.wiki/Casio-Computer/EXFR100/User-Guide-2819923-Page-34.png)
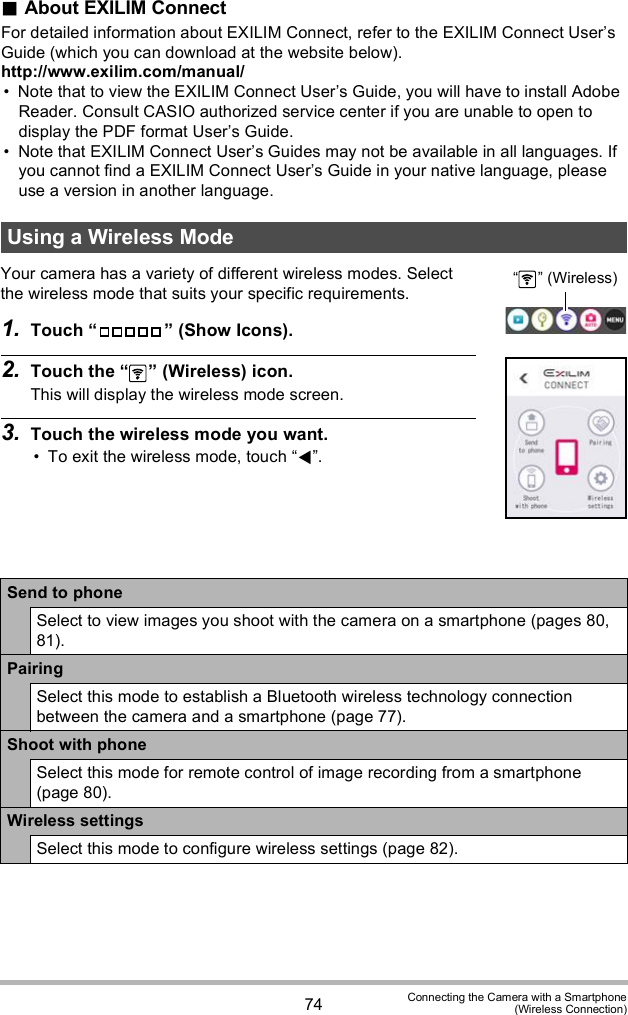
![38 Recording ImagesRecording ImagesTouching the monitor screen in the REC mode will display a screen for configuring REC mode settings.1. Press [] (Power) to turn on the camera and enter the REC mode. If the camera is in the PLAY mode, touch (REC) to enter the REC mode.2. Touch (Show Icons).3. Touch the item whose setting you want to change.To configure REC mode settingsMenu (page 50)*Recording mode (page 39)Wireless mode (page 74)Interval Shooting mode (page 43)PLAY mode (page 28)*Depending on the recording mode, some of the items on the menu that appears may not be usable.[] (Power)](https://usermanual.wiki/Casio-Computer/EXFR100/User-Guide-2819923-Page-38.png)
![44 Recording Images7. Touch Start.This starts the operation. Starting Interval Shooting operation causes the camera and controller to enter a sleep state and standby for recording of the images. This will be indicated by the cameras operation lamp flashing green. Note that the camera will not enter the sleep state if 5 sec is selected for the Interval setting. To recover from the sleep state, press any controller button. Next, touching on the monitor screen will display the number of recorded images. Though the maximum displayed image count is 9999 images, an Interval Shooting operation can shoot more than 9999 images as long as the camera is supplied with power using the supplied USB-AC adaptor, etc. Anti-shake is applied during movie recording with this function. However, image anti-shake is not applied. The current shooting setup, including zoom, cannot be changed while shooting with this function. If the camera battery goes dead during an Interval Shooting operation, the operation will terminate. The controller battery going dead does not affect an ongoing operation. To stop the Interval Shooting operation in this case, hold down [] (Power) on the camera. If you are performing manual camera operations or if the camera is out of the sleep state when the Interval Shooting operation reaches a shooting interval, Interval Shooting recording for that interval will be skipped. Pressing the controllers [] (Power) button while the camera is out of the sleep state will return to the sleep state and restart the Interval Snapshot operation.](https://usermanual.wiki/Casio-Computer/EXFR100/User-Guide-2819923-Page-44.png)
![45 Recording ImagesTo stop an Interval Shooting operation1. On the controller, press any button to recover from the sleep state.2. Touch STOP icon.3. Touch Yes.This stops the Interval Shooting operation.To shoot images manually during an Interval Shooting operationYou can shoot snapshots and movies manually even while an Interval Shooting operation is in progress.1. On the controller, press any button to recover from the sleep state.2. Perform the required controller or camera operation to shoot the image you want. You can also press the cameras shutter button or [] (Movie) button to shoot while the camera is in the sleep state.](https://usermanual.wiki/Casio-Computer/EXFR100/User-Guide-2819923-Page-45.png)
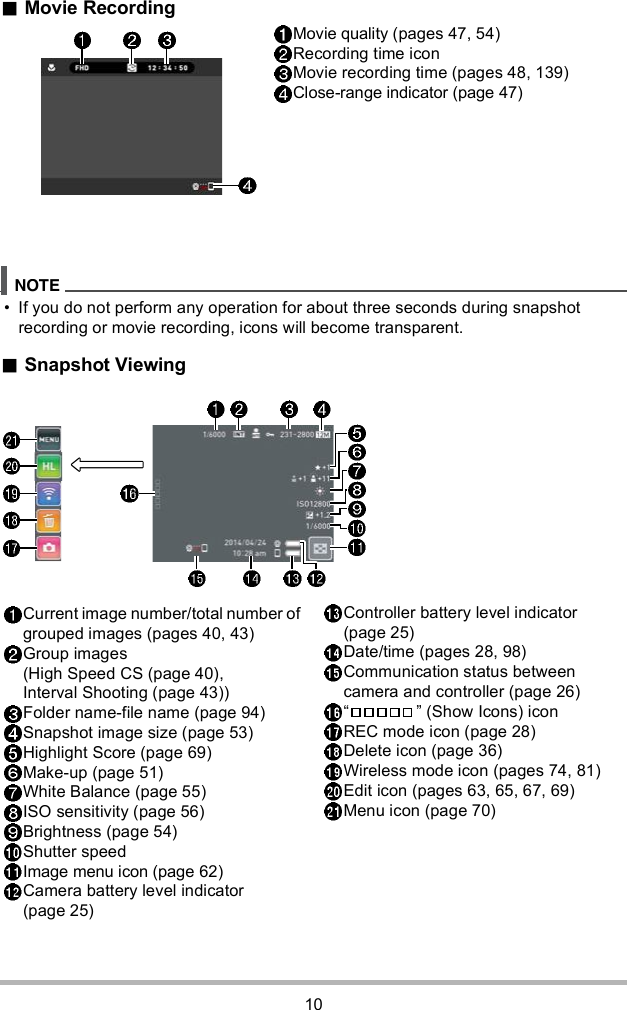
![48 Recording Images6. Press [] (Movie).This will start recording. Monaural audio is also recorded during movie recording while Full HD or STD is selected for the movie quality setting. When Full HD or STD is selected for the movie quality setting, you can touch a point on the controller screen while movie recording is in progress to focus on that point.7. Press [] (Movie) to stop recording. Each movie can be up to 29 minutes long. Movie recording stops automatically after 29 minutes of recording. Movie recording also will stop automatically if memory becomes full before you stop movie recording.Minimizing the Effects of Camera Movement during Movie RecordingWhile the image quality setting is Full HD or STD, you can reduce blur due to camera movement during movie recording by selecting the Standard or Strong setting for Movie Anti Shake. (page 52). Note, however, that image stabilization does not prevent image blur due to subject movement during movie recording. Also, image stabilization results in a narrower angle of view during movie recording.High Speed Movie Recording Precautions When shooting a high speed movie, shoot in a well-lit environment. When recording a high speed movie, light source flicker can cause horizontal bands to appear in the image. This does not indicate malfunction of the camera.Recording time/Remaining recording time](https://usermanual.wiki/Casio-Computer/EXFR100/User-Guide-2819923-Page-48.png)
![49 Recording Images Spending a long time using movie recording will cause the camera to become slightly warm to the touch. This is normal and does not indicate malfunction. The camera also records audio along with Full HD and STD movies. Note the following points when shooting a movie. Take care that the microphone is not blocked by your fingers, etc. Good audio recording results are not possible when the camera is too far away from what you are trying to record. Shooting movies for long periods in areas where temperature is relatively high can cause digital noise (dots of light) to appear in the movie image. A rise in the cameras internal temperature also may force movie recording to stop automatically. If this happens, stop recording and allow the camera to cool down, which should cause normal operation to resume. Use of the cameras built-in memory or certain types of memory cards can slow down processing speeds. In particular, high-quality movies may not be able to be stored correctly. A slow memory card can take too much time to record data and result in breaks in the image and/or audio during playback. Zoom operations are disabled during movie recording. To use zoom, perform the zoom operation before you press [] (Movie) to start recording. During High Speed Movie recording, focus is fixed at the position where it was when recording started. To focus an image, half-press the shutter button for Auto Focus before you touch the controllers monitor screen to start recording. The Make-up function cannot be used during movie recording.Microphone](https://usermanual.wiki/Casio-Computer/EXFR100/User-Guide-2819923-Page-49.png)


![77 Connecting the Camera with a Smartphone(Wireless Connection)The first time you establish a wireless connection between the camera and a smartphone, you need to use the procedure below to configure wireless connection settings. This operation is required for the first connection only.Smartphone that supports Bluetooth SmartConnecting the camera to a smartphone using Bluetooth wireless technology (pairing) makes it simple to configure wireless connection settings. Performing this operation automatically configures your smartphones wireless LAN connection settings (page 78). Some smartphone models may not be compatible with this camera. If you want to re-pair the camera with the smartphone it is already paired with, first unpair them and then pair again. Re-pairing the camera and smartphone will result in all pending unsent images to remain unsent.Camera (Controller) Operation1. Touch the (Wireless) icon.This will display the wireless mode screen.2. Touch Pairing.3. Touch Start. You can start pairing by performing an operation on the camera, without using the controller.Turn off the camera.On the camera, hold down [] (Power) for about six seconds.Smartphone Operation4. Start up the EXILIM Connect app.5. Tap Pairing.6. Perform the required connection operation as instructed by the app and your smartphone.This establishes a Bluetooth wireless technology connection between the camera and smartphone. For information about how to configure wireless connection settings, refer to the EXILIM Connect manual (page 74).Establishing a Wireless Connection for the First Time](https://usermanual.wiki/Casio-Computer/EXFR100/User-Guide-2819923-Page-77.png)
![78 Connecting the Camera with a Smartphone(Wireless Connection) Auto Send (page 83) will be turned on after you configure wireless connection settings on the camera and smartphone. After the camera is paired, Bluetooth wireless technology operation will consume battery power even when the camera it turned off. Because of this, it is recommended that you charge the cameras battery before you plan to use it. Removing the cameras battery will terminate the Bluetooth wireless technology connection. However, the connection will be re-established when you load a battery into the camera and turn on the power again.Smartphone that does not support Bluetooth SmartConfigure smartphone wireless LAN connection settings (input the camera SSID and password).1. Touch the (Wireless) icon.2. Touch Shoot with phone.3. Touch Start.This will enable connection with a smartphone and the camera will display a screen for input of an SSID and password.4. For the smartphone Wi-Fi setting, input the camera SSID: and Password:.When the message Start up the phone app. appears on the cameras monitor screen, it means that the smartphone has established a wireless connection with the camera. Starting up EXILIM Connect will cause the cameras Wireless LAN connection lamp to light. What you need to do to establish a wireless LAN connection depends on the type of smartphone you are using. For details about how to establish a wireless LAN connection see the user documentation that comes with your smartphone. After you finish configuring camera and smartphone connection settings, you can use the procedure below to establish a wireless LAN connection between the camera and smartphone.Turn off the camera.On the camera, while holding down [] (Movie), hold down [] (Power) for about one second.On the smartphone, select the cameras SSID.SSIDPassword](https://usermanual.wiki/Casio-Computer/EXFR100/User-Guide-2819923-Page-78.png)


![83 Connecting the Camera with a Smartphone(Wireless Connection) (Wireless) Wireless settings Auto SendWhile On is selected for this setting, images are sent to the paired smartphone automatically. Images are sent to the smartphone while the camera is in the sleep mode. If there is no wireless connection between the camera and smartphone, the images will be sent as soon as a connection is established. Auto Send cannot be enabled unless the camera is paired with a smartphone (page 77). Auto Send can be used only with a smartphone that supports Bluetooth Smart. Both a Bluetooth and wireless LAN connection are required between the camera and smartphone to auto send camera images. The icons below are displayed on the camera screen while the camera and smartphone are connected. Wireless LAN connection: Bluetooth wireless technology connection: You can specify the size of the image sent to the smartphone using Resize When Sending (page 84). You can use the smartphone apps below to view snapshots after sending them. iPhone: Camera Roll Android terminal: Gallery, Photo, or another photo browser app Images shot while the Auto Send setting is On will be sent to the smartphone, even if the Auto Send setting is changed to Off before they are sent. When On is selected for Auto Send, a message will appear whenever you try to delete a file or turn off the camera. If you try to turn off the camera while there are unsent images in memory, a message will appear to alert you. If you want the images to be sent, leave the camera on until the send operation is complete. Pressing [] (Power) again will turn off the camera. Note that if the connection between the camera and smartphone is lost while there are unsent images in memory, the camera will turn off after about three minutes. In this case, the camera will try to send the images again after it is turned back on.Sending Images from the Camera to a Smartphone as They are Recorded (Auto Send)](https://usermanual.wiki/Casio-Computer/EXFR100/User-Guide-2819923-Page-83.png)

![88 Using the Camera with a ComputerYou can connect the camera to your computer in order to view and store images (snapshot and movie files). Never unplug the USB cable, or operate the camera while viewing or storing images. Doing so can cause data to become corrupted. You also can use your computers card slot (if it has one) or a commercially available card reader to access image files directly from the cameras memory card. For details, see the user documentation that comes with your computer.To connect the camera to your computer and save files1. Turn off the camera and then use the micro USB cable that comes with the camera to connect it to your computer. For details about connecting to the camera and precautions when connecting, see page 23.2. Press [] (Power) to turn on the camera.When you turn on the camera, check to make sure that the color of its operation lamp changes from red to green or amber (page 23). Note that in this case the monitor screen will remain blank. The first time you connect the camera to your computer with the USB cable, an error message may appear on your computer. If this happens, disconnect and then reconnect the USB cable.3. Windows 10 users: Click Desktop and then Explorer. Next, in the sidebar, click PC.Windows 8.1, Windows 8 users: Click Desktop and then Explorer.Windows 7, Windows Vista users: Click Start and then Computer.Viewing and Storing Images on a ComputerNever use your computer to modify, delete, move, or rename any image files that are in the cameras built-in memory or on its memory card.Doing so can cause problems with the cameras image management data, which will make it impossible to play back images on the camera and can drastically alter remaining memory capacity. Whenever you want to modify, delete, move, or rename an image, do so only on images that are stored on your computer.Micro USB cable (included with camera)[USB] port](https://usermanual.wiki/Casio-Computer/EXFR100/User-Guide-2819923-Page-88.png)
![92 Using the Camera with a ComputerTo connect the camera to your computer and save files1. Turn off the camera and then use the micro USB cable that comes with the camera to connect it to your Macintosh. For details about connecting to the camera and precautions when connecting, see page 23.2. Press [] (Power) to turn on the camera.When you turn on the camera, check to make sure that the color of its operation lamp changes from red to green or amber (page 23). Note that in this case the monitor screen will remain blank. In this mode, your Macintosh recognizes the memory card loaded in the camera (or the cameras built-in memory if it does not have a memory card loaded) as a drive. The appearance of the drive icon depends on the Mac OS version you are using. The first time you connect the camera to your Macintosh with the USB cable, an error message may appear on your computer. If this happens, disconnect and then reconnect the USB cable.3. Double-click the cameras drive icon.4. Drag the DCIM folder to the folder to which you want to copy it.5. After the copy operation is complete, drag the drive icon to Trash.6. Disconnect the camera from the computer.After the copy or read progress dialog on the computers screen indicates that the process is complete, close the displayed image and then disconnect the USB cable.Micro USB cable (included with camera)[USB] port](https://usermanual.wiki/Casio-Computer/EXFR100/User-Guide-2819923-Page-92.png)


![104 AppendixWARNINGSmoke, abnormal odor, overheating, and other abnormalities Continued use of the camera while it is emitting smoke or strange odor, or while it is overheating creates the risk of fire and electric shock. Immediately perform the following steps whenever any of the above symptoms are present.1. Turn off the camera.*If the camera will not turn off for some reason, press the [RESET] button (page 8).2. If you are using the USB-AC adapter to power the camera, unplug the power plug from the power outlet.3. Contact your retailer or nearest CASIO authorized service center.Keep Away From Fire Never expose the camera to fire, which can cause it to explode and creates the risk of fire and personal injury.Avoid Use While In Motion Never use the camera to record or play back images while operating an automobile or other vehicle, or while walking. Looking at the monitor while in motion creates the risk of serious accident.USB-AC Adapter Misuse of USB-AC adapter creates the risk of fire and electric shock. Be sure to observe the following precautions. Use only the specified USB-AC adapter. Never use the USB-AC adapter with another device. Use a power outlet that matches the power supply specified for the USB-AC adapter. Never plug the USB-AC adapter or power cord into a wall outlet that is shared by other devices, or into a shared extension cord. Never locate the USB-AC adapter near a stove or other heating device. Misuse of the USB-AC adapter can cause them to become damaged, creating the risk of fire and electric shock. Be sure to observe the following precautions. Never place heavy objects on the USB-AC adapter or subject it to direct heat. Do not modify the USB-AC adapter, allow it to become damaged, or forcibly bend it. Do not twist or pull on the power cord. When in use, locate the cord where it will not be tripped over.](https://usermanual.wiki/Casio-Computer/EXFR100/User-Guide-2819923-Page-104.png)
![105 Appendix Never touch the power plug while your hands are wet. Doing so creates the risk of electric shock. Should the power cord or power plug become damage, contact your retailer or nearest CASIO authorized service center. Do not use the USB-AC adapter in areas where liquids* might spill on them. Liquids create the risk of fire and electric shock.*Liquids: Water, sports drinks, seawater, animal or pet urine, etc. Do not place a flower vase or any other liquid container on top of the USB-AC adapter. Water creates the risk of fire and electric shock. Do not touch the camera or USB-AC adapter during lightning storms.If a power cord was included with your camera The power cord that comes with the camera is designed for use in the country where the camera was purchased. If you use the camera in another country, be sure to use a power cord that conforms to that countrys ratings and power supply voltage. Use of an improper power cord creates the risk of fire and electric shock. Before going out, be sure to unplug the USB-AC adapter from the power outlet and put in a place away from objects used by animals and pets. An animal or pet chewing on the power cord can cause it short, leading to the risk of fire.Water and Foreign Matter Water, other liquids, or foreign matter (especially metal) getting inside the camera creates the risk of fire and electric shock. Immediately perform the following steps whenever any of the above symptoms are present. Particular care is required when using the camera where it is raining or snowing, near the ocean or other body of water, or in a bathroom.1. Turn off the camera.*If the camera will not turn off for some reason, press the [RESET] button (page 8).2. If you are using the USB-AC adapter to power the camera, unplug the power plug from the power outlet.3. Contact your retailer or nearest CASIO authorized service center.Disassembly and Modification Except when disposing of the camera, never try to take it apart or modify it in any way. Doing so creates the risk of electric shock, burn injury, and other personal injury. Be sure to leave all internal inspection, maintenance, and repair up to your retailer or nearest CASIO authorized service center.WARNING](https://usermanual.wiki/Casio-Computer/EXFR100/User-Guide-2819923-Page-105.png)
![106 AppendixDropping and Rough Treatment Continued use of the camera after it is damaged by dropping or other rough treatment creates the risk of fire and electric shock. Immediately perform the following steps whenever any of the above symptoms are present.1. Turn off the camera.*If the camera will not turn off for some reason, press the [RESET] button (page 8).2. If you are using the USB-AC adapter to power the camera, unplug the power plug from the power outlet.3. Contact your retailer or nearest CASIO authorized service center.Memory Cards Memory cards are small and present a risk of accidentally being swallowed by infants and young children. Keep memory cards out of the reach of infants and young children. If a memory card is ever swallowed accidentally, contact a physician immediately.Precaution when Camera is On Do not touch the camera for long periods while it is on. The camera becomes warm when on, and long term contact creates the risk of low-temperature burns.Interference with other digital devices Should you notice radio interference or other problems on other devices is being caused while using this product, do not use the wireless functions of this product. Use of wireless functions creates the risk of radio interference and abnormal operation of other devices. When in a medical facility or aircraft, comply with instructions of personnel in charge. Electromagnetic waves and other signals emitted by the cameras wireless function create the risk of accident. Do not use the cameras wireless function while in the vicinity of high precision digital devices or digital devices that use weak signals. Doing so can interfere with proper operation of such digital devices and create the risk of accident. When using the cameras wireless function, keep it away from any person wearing a pacemaker. Magnetism emitted by the camera may affect cardiac pacemakers and other medical devices. Should you ever notice any abnormality, immediately move away from the product and contact a physician. On a crowded train or any other crowded location where there is the possibility of being in the vicinity of a person wearing a cardiac pacemaker, turn off the camera. Radio waves emitted by the cameras wireless function may affect pacemaker operation.WARNING](https://usermanual.wiki/Casio-Computer/EXFR100/User-Guide-2819923-Page-106.png)
![109 AppendixThis camera is designed to be shock resistant, splashproof, and dustproof as described below.Shock resistant:Passes testing based on CASIO independent standards*1 formulated according to MIL-Standard 810F Method 516.5-Shock.*2*1 Drop testing from a height of 2 meters (6.56 feet) onto plywood (lauan), 10 directions (6 faces, 4 corners)*2 Though the camera is designed to withstand the effects of impact occurring during normal daily use, very strong impact due to very rough handling such as throwing the camera or dropping it from excessive heights can result in serious damage. Even if a drop does not result in functional problems, it can cause scratching and other cosmetic damage to the camera.Splashproof:Splashproof equivalent to IEC/JIS Class 8 (IPX8)*3 and Class 6 (IPX6). Allows continuous use during immersion in water to a depth up to 1.5 meters (4.92 feet) for 60 minutes*4 and protection against jet spray from all directions.*5*3 Signifies underwater use when immersed for a duration and at a pressure specified by CASIO. Touch panel operation is not supported under water.*4 Test conditions defined by CASIO.*5 Use during high-speed travel on water during motor sports, while riding a personal watercraft, etc. is not supported.Dustproof:Corresponds to IEC/JIS Protection Class 6 (IP6X) dustproofing. The shock resistance, splashproofing, and dustproofing of this product are based on CASIO test results, and do not constitute any guarantee that the product will perform, will not be damaged, or will not malfunction under such conditions.Precautions before Underwater UseThis camera can be used to shoot images underwater up to a depth of 1.5 meters (4.92 feet). However, the following precautions should be kept in mind before using the camera underwater. Check the contact surfaces of the [CARD] cover and [USB] cover gaskets for dirt, sand, and any other foreign matter. Clean contact surfaces by wiping them with a soft, clean, dry cloth. Note that a single strand of hair or a single grain of sand can allow water to leak into the camera. Check the [CARD] cover and [USB] cover splashproofing gaskets are free of cracks, scratches, and other damage. Close the [CARD] cover and [USB] cover securely into place. Never open or close the [CARD] cover or [USB] cover while near water or in an area exposed to sea breezes. Also avoid opening or closing the covers while your hands are wet.Shock resistant, Splashproof, Dustproof](https://usermanual.wiki/Casio-Computer/EXFR100/User-Guide-2819923-Page-109.png)
![110 Appendix This camera will sink if dropped underwater. Use the strap or some other means to avoid dropping. The splashproofing of this camera protects it against salt water and fresh water only. Protection is not provided against hot spring water. Never leave the camera for long periods in a location subjected to very low temperatures or very high temperatures in excess of 40°C (104°F). In particular, avoid leaving the camera in areas exposed to strong direct sunlight, in a motor vehicle on a hot day, etc. Any of these conditions can result in a deterioration of splashproofing. Wireless communication with wireless LAN or Bluetooth wireless technology is not supported under water. Connection between a submerged camera and a controller or smartphone is not supported. Use of the controllers touch panel is not supported while the controller is submerged.Precautions during Underwater Use The camera is designed for use at depths no greater than 1.5 meters (4.92 feet) and at water temperatures within the range of 0°C to 40°C (32°F to 104°F). Do not leave the camera submerged for more than 60 minutes. When repeatedly immersing the camera for underwater user, allow at least 15 minutes to elapse between immersions. Never open the [CARD] cover or [USB] cover while the camera is submerged. Do not dive into water while holding the camera. Also, do not use the camera in rapids, under a waterfall, or in any other rough water condition. Exposing the camera to strong water pressure can cause leaking and malfunction. Take care that you do not drop the camera into water or allow it to strike the surface of the water. Doing so can cause leaking.Precautions after Underwater Use Before opening the [CARD] cover and [USB] cover, use a clean, dry, soft cloth to wipe the camera free of all moisture and dirt. If you open the [CARD] cover and [USB] cover while the camera is wet, be sure to wipe its inside surfaces free of all moisture before closing it.](https://usermanual.wiki/Casio-Computer/EXFR100/User-Guide-2819923-Page-110.png)
![111 AppendixCleaning Your Camera after UsePerform the following steps to clean the camera after using it under water or after it becomes soiled with sand, dirt, or mud. Note that the [CARD] cover and [USB] cover must be closed securely when performing these steps.1. Immerse the camera in fresh water. Fill a bucket or other container with tap water or other fresh water, and immerse the camera for about 10 minutes. Gently wipe dust, dirt, sand, and other matter from the camera with your fingers. Do not rub the lens surface or monitor screen while dirty.2. Wipe the camera dry. Use a clean, dry, soft cloth to wipe off the camera, and leave it in a shady place to dry. The temperature of the water used to wash the camera should be no greater than 30°C (86°F). Never use detergent, hot water, or strongly running water to clean the camera. Doing so creates the risk of leaking and malfunction. Never swing the camera around to remove water, and never use a dryer or other intense heat to dry it. Never place the camera in a washing machine to wash it.Precautions after Use Do not leave the camera in an area exposed to extreme heat (40°C (104°F) or greater) or cold (10°C (14°F) or lower). Doing so can cause loss of splashproofing. Never use chemical agents for the purpose of cleaning, rust proofing, moisture proofing, etc. Doing so can cause loss of splashproofing. Use fresh water to clean the camera within 60 minutes after using it underwater. Failure to do so can cause deterioration of the exterior finish and splashproofing properties. In order to maintain splashproofing, replacement of the cameras gaskets is recommended once each year. Note that you will be charged for gasket replacement. Contact a CASIO authorized service center or your original retailer for gasket replacement.](https://usermanual.wiki/Casio-Computer/EXFR100/User-Guide-2819923-Page-111.png)
![114 AppendixLens Never apply too much force when cleaning the surface of the lens. Doing so can scratch the lens surface and cause malfunction. You may sometimes notice some distortion in certain types of images, such as a slight bend in lines that should be straight. This is due to the characteristics of lenses, and does not indicate malfunction of the camera.Caring for your camera Never touch the lens with your fingers. Finger smudges, dirt, and other foreign matter on the lens can interfere with proper operation of the camera. Use a blower or other means to keep the lens and flash window free of dirt and dust, and wipe gently with a soft, dry cloth. To clean the camera, wipe it with a soft, dry cloth.Closing the cameras [CARD] cover or [USB] coverWhen closing a cover, press down with your thumbs on the left and right, applying equal force. Pressing down on either end with one hand only may not close the cover completely and leave one end out of position.[CARD] cover or[USB] cover](https://usermanual.wiki/Casio-Computer/EXFR100/User-Guide-2819923-Page-114.png)

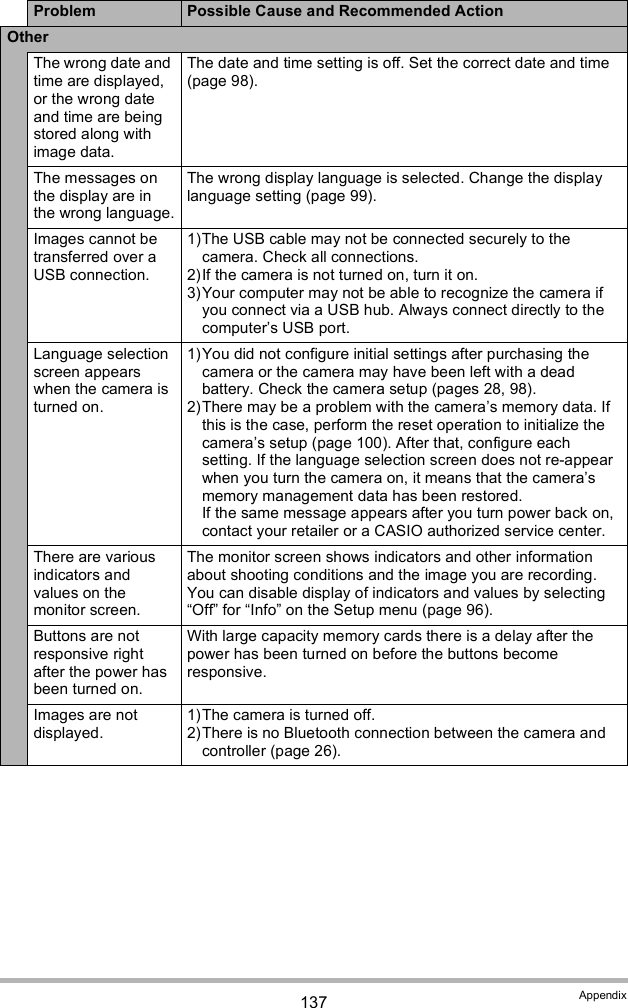
![134 AppendixWhen things dont go right... TroubleshootingProblem Possible Cause and Recommended ActionPower SupplyPower does not turn on.1)The battery of new camera is not charged. Charge the battery before using the camera.2)The camera battery may be dead. Charge the battery (page 19). If this does not resolve the problem, contact your retailer or a CASIO authorized service center.The camera suddenly powers down.1)The battery may be dead. Charge the battery (page 19).2)The cameras protection function may have activated because camera temperature is too high. Turn off the camera and wait until it cools down before trying to use it again.3)If, after you turn on power, the operation lamp flashes red and power turns off, it could mean a lens error or some other error occurred. Check to make sure that the battery is charged and try turning power on again a number of times. If power still does not turn on, contact your retailer or a CASIO authorized service center.Power will not turn off. Nothing happens when a button is pressed.Use a thin object to press the [RESET] buttons (page 8) near the cameras memory card slot and controllers [USB] port to turn the camera off and then turn on the camera again.ChargingThe operation lamp does not light red and the battery wont charge.1)Unplug the USB cable from the camera and controller, and then plug it back in again.2)Make sure the camera and controller are turned off when you connect the USB cable. Charging may not start if you connect the USB cable while power is turned on.Image RecordingImage is not recorded when the shutter button is pressed.1)If the camera is in the PLAY mode, touch (REC) to enter the REC mode.2)If the message Memory Full appears, transfer images to your computer, delete images you no longer need, or use a different memory card.Images are out of focus.1)If the lens is dirty, clean it off.2)You may be moving the camera when shooting. When shooting, place the camera on a tabletop or some other stable surface, or find some way to fix the camera in place.](https://usermanual.wiki/Casio-Computer/EXFR100/User-Guide-2819923-Page-134.png)
![136 AppendixFile DeletionA file cannot be deleted.The file may be protected. A protected image cannot be deleted.Wireless ConnectionI cant establish a wireless connection. The wireless LAN connection is broken.1)The camera cannot connect with a smartphone if they are too far apart from each other.2)The smartphone may be connected with another wireless device. Check the smartphones Wi-Fi settings and confirm that the camera is selected for wireless LAN connection (page 79).3)Connection may have been lost due to interference caused by a nearby microwave oven, cordless phone, or other wireless device. Move the camera away from the device causing the problem.I forgot my SSID and password.On the camera, hold down [] (Movie) as you hold down the shutter button and [] (Power) for about six seconds to return the SSID and password to their initial defaults. For information about the initial default SSID and password settings, see page 78.Bluetooth wireless technologyA connection cannot be established between the camera and controller.1)The camera cannot connect with a smartphone if they are too far apart from each other.2)A Bluetooth connection cannot be established with the camera while it is connected to a smartphone by wireless LAN. Terminate the wireless LAN connection.3)If the camera is connected to a computer, unplug the USB cable to terminate the connection.4)If, you still cannot establish a connection, hold down the shutter buttons on the camera and controller as you hold down [] (Power) for about six seconds. This will start the pairing operation required for Bluetooth connection.Problem Possible Cause and Recommended Action](https://usermanual.wiki/Casio-Computer/EXFR100/User-Guide-2819923-Page-136.png)