Casio Computer EXFR10CT DIGITAL CAMERA User Manual EXFR10 M29 EN
Casio Computer Co Ltd DIGITAL CAMERA EXFR10 M29 EN
UserManual.wiki
>
Casio Computer
>
EXFR10CT User Manual
User Manual
Navigation menu
Upload a User Manual
Namespaces
Wiki Guide
HTML
PDF
Info
Views
User Manual
Discussion / Help
Navigation

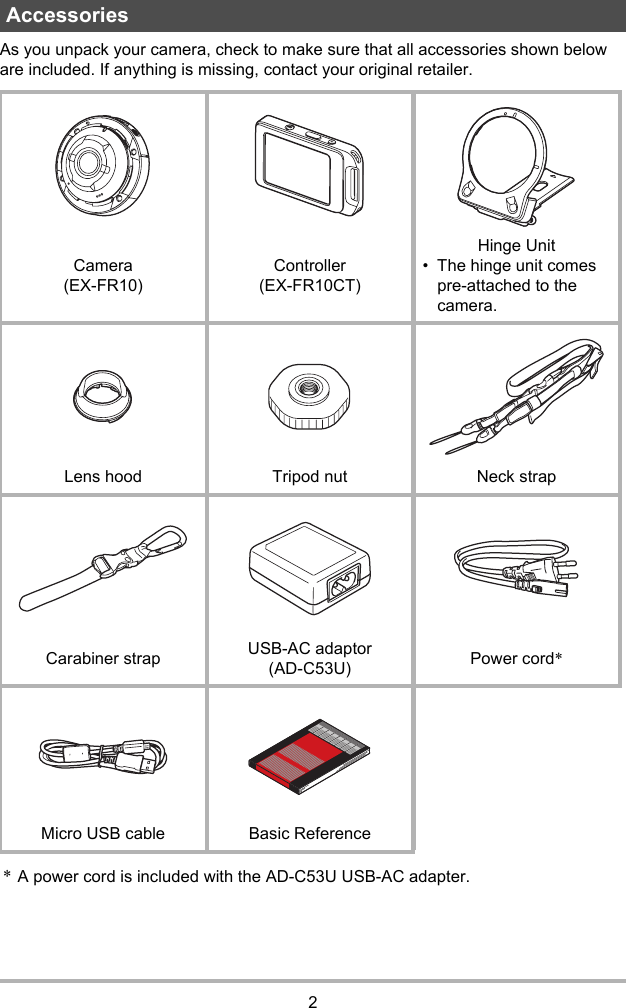
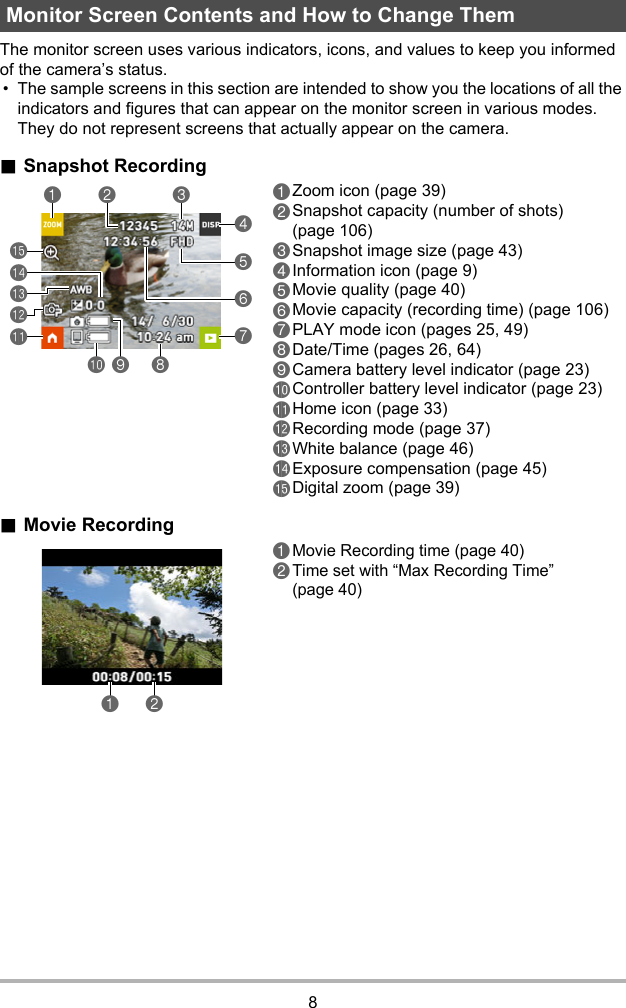
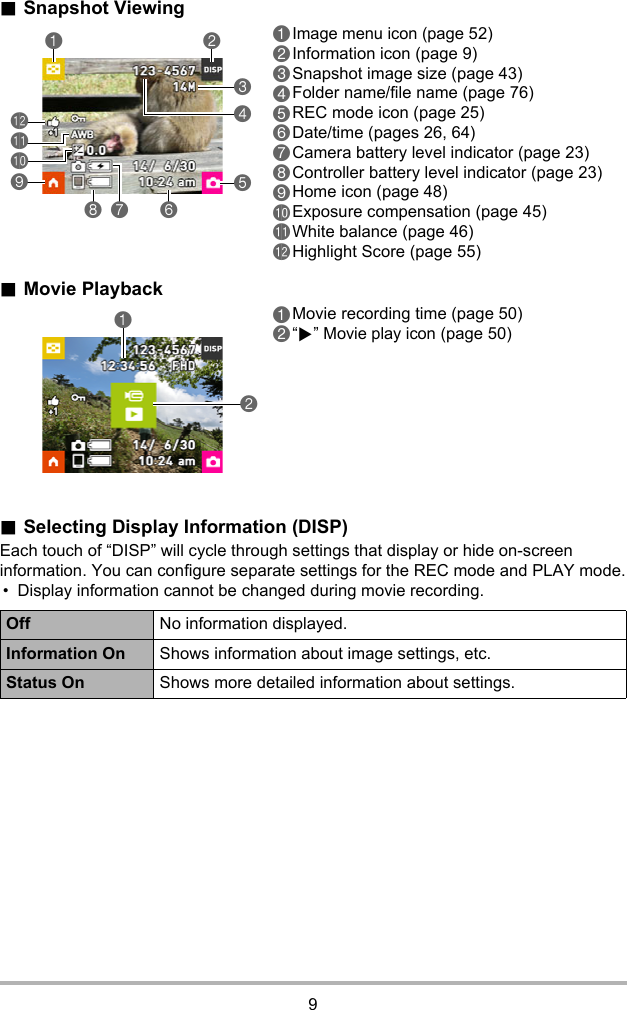
![4ContentsContentsAccessories . . . . . . . . . . . . . . . . . . . . . . . . . . . . . . . . . . . . . . . . . . . . . . . . . . . . 2Read this first! . . . . . . . . . . . . . . . . . . . . . . . . . . . . . . . . . . . . . . . . . . . . . . . . . . 3General Guide . . . . . . . . . . . . . . . . . . . . . . . . . . . . . . . . . . . . . . . . . . . . . . . . . . 7Monitor Screen Contents and How to Change Them . . . . . . . . . . . . . . . . . . . . 8]\Quick Start Basics 10What you can do with your CASIO camera . . . . . . . . . . . . . . . . . . . . . . . . . . . 10Using the Attachment . . . . . . . . . . . . . . . . . . . . . . . . . . . . . . . . . . . . . . . . . . . 12]Controller . . . . . . . . . . . . . . . . . . . . . . . . . . . . . . . . . . . . . . . . . . . . . . . . . . . . . . 12]Hinge Unit . . . . . . . . . . . . . . . . . . . . . . . . . . . . . . . . . . . . . . . . . . . . . . . . . . . . . . 13]Lens hood . . . . . . . . . . . . . . . . . . . . . . . . . . . . . . . . . . . . . . . . . . . . . . . . . . . . . . 14]Tripod nut . . . . . . . . . . . . . . . . . . . . . . . . . . . . . . . . . . . . . . . . . . . . . . . . . . . . . . 14]Strap . . . . . . . . . . . . . . . . . . . . . . . . . . . . . . . . . . . . . . . . . . . . . . . . . . . . . . . . . . 15Using the Touch Panel. . . . . . . . . . . . . . . . . . . . . . . . . . . . . . . . . . . . . . . . . . . 17First, charge the battery prior to use.. . . . . . . . . . . . . . . . . . . . . . . . . . . . . . . . 18Turning Power On and Off. . . . . . . . . . . . . . . . . . . . . . . . . . . . . . . . . . . . . . . . 24]Camera-Controller Wireless Connection (Bluetooth) . . . . . . . . . . . . . . . . . . . . . 26Configuring Basic Settings the First Time You Turn On the Camera. . . . . . . . 26Preparing a Memory Card . . . . . . . . . . . . . . . . . . . . . . . . . . . . . . . . . . . . . . . . 28]Supported Memory Cards. . . . . . . . . . . . . . . . . . . . . . . . . . . . . . . . . . . . . . . . . . 28]To load a memory card . . . . . . . . . . . . . . . . . . . . . . . . . . . . . . . . . . . . . . . . . . . . 29]To format (initialize) a new memory card . . . . . . . . . . . . . . . . . . . . . . . . . . . . . . 30Shooting a Snapshot . . . . . . . . . . . . . . . . . . . . . . . . . . . . (Premium Auto) . . 31Snapshot Shooting Precautions . . . . . . . . . . . . . . . . . . . . . . . . . . . . . . . . . . . 32]\Recording Images 33REC Mode Screen. . . . . . . . . . . . . . . . . . . . . . . . . . . . . . . . . . . . . . . . . . . . . . 33Shooting Multiple Images at a specified Interval . . . . (Interval Snapshot) . . 34Self-shooting . . . . . . . . . . . . . . . . . . . . . . . . . . . . . . . . . . . . . . . . . .(Mirror) . . 36Changing the Recording Mode . . . . . . . . . . . . . . . . . . . . . . . . . . . . . . . . . . . . 37Using the Self-timer . . . . . . . . . . . . . . . . . . . . . . . . . . . . . . . . .(Self-timer) . . 38Shooting with Zoom . . . . . . . . . . . . . . . . . . . . . . . . . . . . . . . . . . . . . . . . . . . . . 39Recording a Movie. . . . . . . . . . . . . . . . . . . . . . . . . . . . . . . . . . . . . . . . . . . . . . 40]\Advanced Recording Settings 42Recording Beautiful Portraits . . . . . . . . . . . . . . . . . . . . . . . . . . (Make-up) . . 43Using Touch Shutter . . . . . . . . . . . . . . . . . . . . . . . . . . . . . (Touch Shutter) . . 43Changing the Image Size . . . . . . . . . . . . . . . . . . . . . . . . . . . (Image Size) . . 43Specifying the Maximum Movie Recording Time . . (Max Recording Time) . . 44Shooting with Brightness Compensation . . . . . . . . . . . . . . . . . . (EV Shift) . . 45Adjusting Hue when Shooting . . . . . . . . . . . . . . . . . . . . . . (White Balance) . . 46Enabling Auto Rotation of Images to Match Camera Orientation . . . . . . . . . . . . . . . . . . . . . . . . . . (Auto Rotate) . . 47](https://usermanual.wiki/Casio-Computer/EXFR10CT/User-Guide-2338651-Page-4.png)
![5Contents]\Viewing Snapshots and Movies 48Play Mode Screen . . . . . . . . . . . . . . . . . . . . . . . . . . . . . . . . . . . . . . . . . . . . . . 48Viewing Snapshots . . . . . . . . . . . . . . . . . . . . . . . . . . . . . . . . . . . . . . . . . . . . . 49Viewing a Movie. . . . . . . . . . . . . . . . . . . . . . . . . . . . . . . . . . . . . . . . . . . . . . . . 50Deleting Snapshots and Movies . . . . . . . . . . . . . . . . . . . . . . . . . . . . . . . . . . . 50Zooming an On-screen Image . . . . . . . . . . . . . . . . . . . . . . . . . . . . . . . . . . . . . 51Viewing the Image Menu . . . . . . . . . . . . . . . . . . . . . . . . . . . . . . . . . . . . . . . . . 52Rotating an Image (Rotation). . . . . . . . . . . . . . . . . . . . . . . . . . . . . . . . . . . . . . 52Creating a Collage of a Day’s Snapshots . . . . . . . . . . . . (Highlight Photo) . . 53Creating a Movie of a Day’s Images . . . . . . . . . . . . . . . . (Highlight Movie) . . 54Changing the Highlight Score of an Image . . . . . . . . . . . . . . . . . . . . . . . . . . . 55]\Connecting the Camera with a Smartphone (Wireless LAN) 56Controlling Your Camera with a Connected Smartphone . . . . . . . . . . . . . . . . 56Establishing a Connection between a Smartphone and Your Camera . . . . . . 57]Installing the EXILIM Link App on Your Smartphone . . . . . . . . . . . . . . . . . . . . . 57]Configuring Wireless LAN Settings. . . . . . . . . . . . . . . . . . . . . . . . . . . . . . . . . . . 58Using a Smartphone as a Camera Remote Controller . . . . . . . . . . . . . . . . . . 59Sending a Snapshot or Movie File from Camera Memory to a Smartphone . . 60Changing the Camera SSID and Password . . . . . . . . . . . . . . . . . . . . . . . . . . 61]\Other Settings (Set Up) 63Configuring Camera Sound Settings . . . . . . . . . . . . . . . (Camera Sound) . . 63Using the Vibration Function . . . . . . . . . . . . . . . . . . . . . . . . . . . (Vibration) . . 63Controller Startup Using a Flick Operation . . . . . . . . . . . . . . . (Flick Start) . . 63Setting the Camera’s Clock . . . . . . . . . . . . . . . . . . . . . . . . . . . . . (Adjust) . . 64Specifying the Date Style . . . . . . . . . . . . . . . . . . . . . . . . . . . . (Date Style) . . 64Specifying the Display Language . . . . . . . . . . . . . . . . . . . . . . (Language) . . 65Formatting Built-in Memory or a Memory Card . . . . . . . . . . . . . . .(Format) . . 65Resetting the Camera to Factory Defaults . . . . . . . . . . . . . . . . . . .(Reset) . . 66]\Printing 67Printing with a Computer . . . . . . . . . . . . . . . . . . . . . . . . . . . . . . . . . . . . . . . . . 68]\Using the Camera with a Computer 69Things you can do using a computer... . . . . . . . . . . . . . . . . . . . . . . . . . . . . . . 69Using the Camera with a Windows Computer . . . . . . . . . . . . . . . . . . . . . . . . . 69]Viewing and Storing Images on a Computer. . . . . . . . . . . . . . . . . . . . . . . . . . . . 70]Playing Movies . . . . . . . . . . . . . . . . . . . . . . . . . . . . . . . . . . . . . . . . . . . . . . . . . . 72Using the Camera with a Macintosh . . . . . . . . . . . . . . . . . . . . . . . . . . . . . . . . 73]Connecting the Camera to Your Computer and Saving Files . . . . . . . . . . . . . . . 73]Playing a Movie. . . . . . . . . . . . . . . . . . . . . . . . . . . . . . . . . . . . . . . . . . . . . . . . . . 75](https://usermanual.wiki/Casio-Computer/EXFR10CT/User-Guide-2338651-Page-5.png)
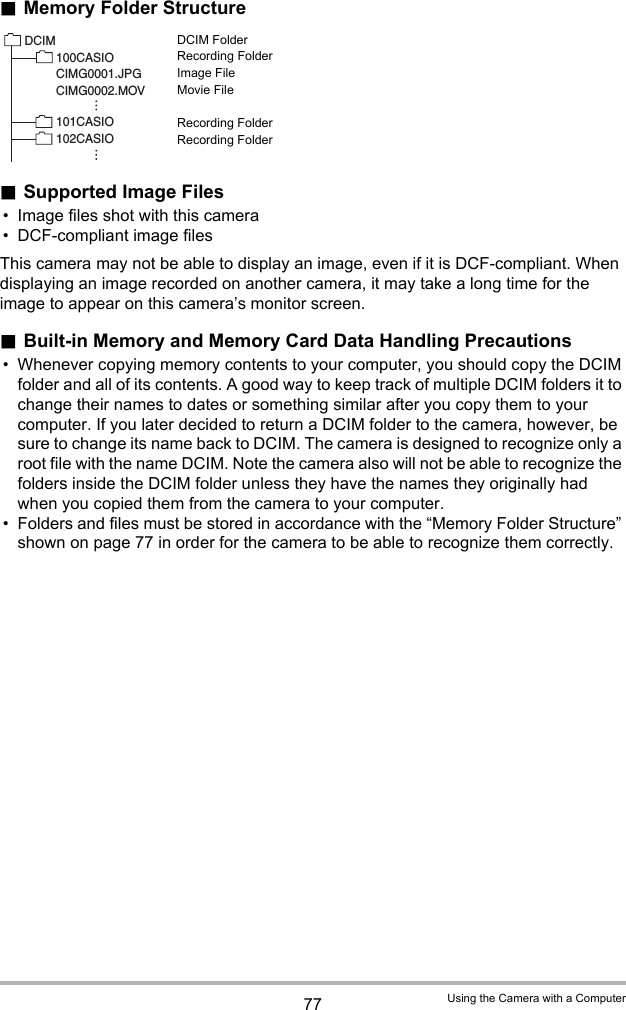
![6ContentsFiles and Folders . . . . . . . . . . . . . . . . . . . . . . . . . . . . . . . . . . . . . . . . . . . . . . . 76Memory Card Data . . . . . . . . . . . . . . . . . . . . . . . . . . . . . . . . . . . . . . . . . . . . . 76]\Appendix 78Safety Precautions. . . . . . . . . . . . . . . . . . . . . . . . . . . . . . . . . . . . . . . . . . . . . . 78Shock resistant, Waterproof, Dustproof . . . . . . . . . . . . . . . . . . . . . . . . . . . . . . 85Precautions During Use. . . . . . . . . . . . . . . . . . . . . . . . . . . . . . . . . . . . . . . . . . 89Power Supply. . . . . . . . . . . . . . . . . . . . . . . . . . . . . . . . . . . . . . . . . . . . . . . . . . 93]Charging . . . . . . . . . . . . . . . . . . . . . . . . . . . . . . . . . . . . . . . . . . . . . . . . . . . . . . . 93]Battery Precautions. . . . . . . . . . . . . . . . . . . . . . . . . . . . . . . . . . . . . . . . . . . . . . . 94]Using the Camera in another Country . . . . . . . . . . . . . . . . . . . . . . . . . . . . . . . . 94Disposing of the Camera . . . . . . . . . . . . . . . . . . . . . . . . . . . . . . . . . . . . . . . . . 95Using a Memory Card . . . . . . . . . . . . . . . . . . . . . . . . . . . . . . . . . . . . . . . . . . . 98Reset Initial Default Settings . . . . . . . . . . . . . . . . . . . . . . . . . . . . . . . . . . . . . . 99When things don’t go right... . . . . . . . . . . . . . . . . . . . . . . . . . . . . . . . . . . . . . 100]Troubleshooting . . . . . . . . . . . . . . . . . . . . . . . . . . . . . . . . . . . . . . . . . . . . . . . . 100]Display Messages. . . . . . . . . . . . . . . . . . . . . . . . . . . . . . . . . . . . . . . . . . . . . . . 104Number of Snapshots/Movie Recording Time . . . . . . . . . . . . . . . . . . . . . . . . 106Specifications. . . . . . . . . . . . . . . . . . . . . . . . . . . . . . . . . . . . . . . . . . . . . . . . . 107](https://usermanual.wiki/Casio-Computer/EXFR10CT/User-Guide-2338651-Page-6.png)
![7The numbers in parentheses indicate the pages where each item is explained.General GuideCamera1[USB] cover (pages 18, 20)2USB port (pages 18, 20, 70, 74)3[FREE] lever (page 13)4[0] (Movie) (page 40)5Shutter button (page 31)6Operation lamp (pages 16, 19, 22)7Lens (page 16)8Microphone (pages 16, 41)9SpeakerbkReset button (page 100)bl[p] (Power) (page 24)bmMemory card slot (page 29)bn[CARD] cover (page 29) boStrap holes (page 15)Controllerbp[USB] cover (pages 18, 20)bq[RELEASE] button (page 12)brReset button (page 100)bsUSB port (pages 18, 20)btCarabiner strap attachment bar (page 15)ckStrap holes (page 15)cl[0] (Movie) (page 40)cmShutter button (page 31)cnOperation lamp (pages 19, 22)co[p] (Power) (page 24)cpHinge unit slot (page 12)bp 1 2345678brbsbtbqclbo bn bmcm cn co 9 bk blcpckCameraController](https://usermanual.wiki/Casio-Computer/EXFR10CT/User-Guide-2338651-Page-7.png)
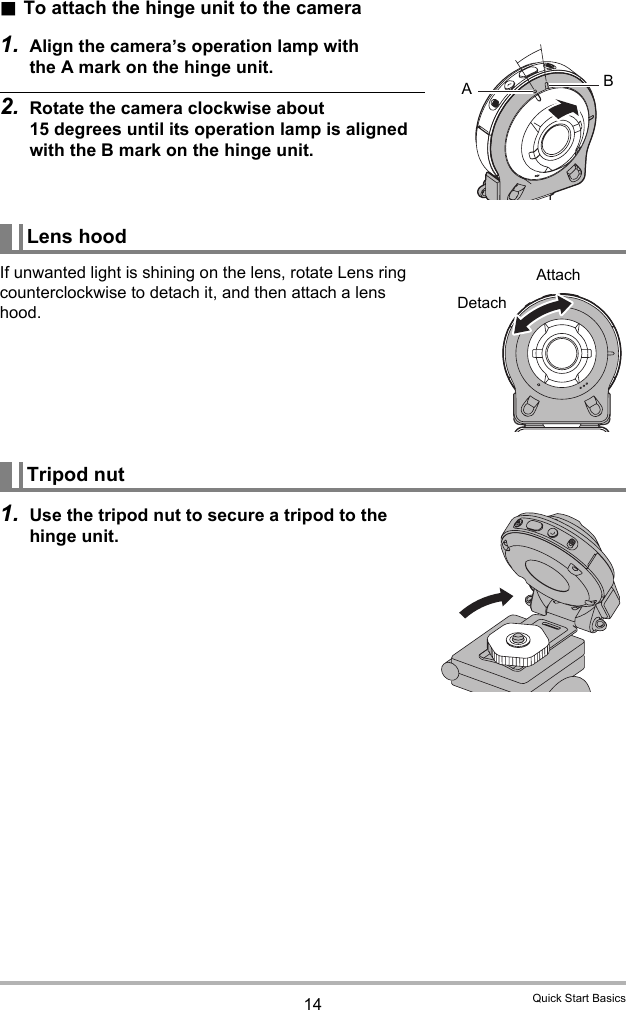
![12 Quick Start BasicsYou can configure the camera to suit your specific needs by attaching the hinge unit, which enables attachment of the controller, and other included and optionally available attachments. This way you can configure the camera to suit your specific needs.IMPORTANT!• Do not apply strong pressure to the surface of the monitor screen. Doing so can damage it.• Never touch the lens with your fingers. Finger smudges, dirt, and other foreign matter on the lens can interfere with proper operation of the camera. Use a blower or other means to keep the lens and flash window free of dirt and dust, and wipe gently with a soft, dry cloth.You can attach the controller to the camera and use the camera as a normal camera..To attach the controller1. With the camera lens pointed in the same direction as the controller’s monitor screen, slide the hinge unit into the controller’s hinge unit slot.2. Push the hinge unit in until you hear it click into place..To detach the controller1. While holding down the controller’s [RELEASE] button, pull it out of the camera.Using the AttachmentControllerHinge unit slot[RELEASE] button](https://usermanual.wiki/Casio-Computer/EXFR10CT/User-Guide-2338651-Page-12.png)
![13 Quick Start Basics.To use the hinge unit as a stand.To change the shooting direction by 90 degrees1. While pulling down on the camera’s [FREE] lever, rotate the camera clockwise 90 degrees until you hear a click. • The white lines on the lens ring indicate the horizontal orientation of the camera..To remove the hinge unit from the camera1. While pulling down on the camera’s [FREE] lever, rotate the camera counterclockwise about 15 degrees until its operation lamp is aligned with the A mark on the hinge unit.2. Remove the hinge unit from the camera.Hinge UnitWhite linesA[FREE] lever](https://usermanual.wiki/Casio-Computer/EXFR10CT/User-Guide-2338651-Page-13.png)
![18 Quick Start BasicsThe camera and the controller each have a built-in rechargeable lithium ion battery. The batteries are not charged when you purchase the camera, so you will need to charge both the camera and controller before using them.You can use either of the two following methods to charge the batteries.• USB-AC adaptor• USB connection to a computer.To charge with the USB-AC adaptorWhile the camera and controller are turned off, connect in the sequence shown below.Charging time: Approximately XXX minutes• When disconnecting the USB-AC adaptor from the camera, be sure to disconnect from the camera first.First, charge the battery prior to use.32133USB-AC adaptor(AD-C53U)When plugging in the connectors, orient this marking as described below. Camera : Towards the lens sideController: Towards the monitor screen side[USB] portMicro USB cable (included with camera)Power cord[USB] cover](https://usermanual.wiki/Casio-Computer/EXFR10CT/User-Guide-2338651-Page-18.png)
![20 Quick Start Basics• Make sure that you insert the cable connector into the USB port until you feel it click securely into place. Failure to insert the connector fully can result in poor communication or malfunction.• Note that even while the connector is fully inserted, you still will be able to see the metal part of the connector as shown in the illustration..To charge using a USB connection to a computerWhile the camera and controller are turned off, connect in the sequence shown below (1, 2).• If the camera or controller is on, hold down [p] (Power) to turn it off before connecting it to your computer.Charging time: Approximately XXX minutesUSB211Micro USB cable (included with camera)[USB] portUSB portComputer (power turned on)When plugging in the connectors, orient this marking as described below. Camera : Towards the lens sideController: Towards the monitor screen side[USB] cover](https://usermanual.wiki/Casio-Computer/EXFR10CT/User-Guide-2338651-Page-20.png)

![24 Quick Start Basics.To turn off power• Turning on the camera causes the camera and controller operation lamps to light green, and automatically starts an operation to establish a Bluetooth wireless technology connection between the camera and controller. An image appears on the controller and shooting is enabled.• If you press [p] (Power) on the controller or if you do not perform any controller operation for about 30 seconds while there is a Bluetooth wireless technology connection between the camera and controller, the controller image will go blank, and the camera and controller will enter a sleep mode. The operation lamp slowly flashes green while the camera is in the sleep mode. To restore the controller display, press the controller button. The Bluetooth wireless technology connection between the camera and controller is maintained even while they are in the sleep mode, so they can quickly recover when you press a button.• The connection between the camera and controller is affected by their orientation and by the distance between them.• The controller operation lamp will flash green when the connection is poor. Camera response may be slow if you perform an operation on the controller while communication conditions are bad. If this happens, try adjusting the orientation and the distance between the camera and controller.• If the distance between the camera and controller becomes to great or if communication conditions become bad while the camera is in the sleep mode, the connection may be dropped between them. Turning Power On and OffCameraPress [p] (Power).ControllerPress [p] (Power).[p] (Power)Operation lamp[p] (Power)Operation lamp](https://usermanual.wiki/Casio-Computer/EXFR10CT/User-Guide-2338651-Page-24.png)
![25 Quick Start BasicsToggling Between the REC Mode and PLAY ModeTouch the icon in the lower right corner of the screen or flick the screen upwards or downwards to toggle between the REC mode and PLAY mode.NOTE• If “ ” (PLAY) and/or “ ” (REC) is not displayed, touch “ ”..To turn off powerOn the camera or the controller, hold down [p] (Power). • Turning off the camera will cause the controller to turn off automatically after about 5 minutes.REC mode PLAY mode“ ” (PLAY)“”(REC)](https://usermanual.wiki/Casio-Computer/EXFR10CT/User-Guide-2338651-Page-25.png)
![29 Quick Start Basics1. Holding down camera’s [p] (Power) to turn off the camera and then open the [CARD] cover.2. Load a memory card.Positioning the memory card so its back is facing upwards (towards the lens side of the camera), slide it into the card slot all the way in until you hear it click securely into place.3. Close the [CARD] cover.IMPORTANT!• Never insert anything besides a supported memory card (page 28) into the memory card slot.• Should water or any foreign object ever get into the card slot, immediately turn off the camera, and contact your retailer or nearest CASIO authorized service center..To replace the memory cardPress the memory card and then release it. This will cause it to pop out of the memory card slot slightly. Pull the card out the rest of the way and then insert another one.• Never remove a card from the camera while the operation lamp is flashing green. Doing so can cause the image save operation to fail and even damage the memory card.To load a memory cardBackFront Back](https://usermanual.wiki/Casio-Computer/EXFR10CT/User-Guide-2338651-Page-29.png)
![31 Quick Start BasicsYour camera has a variety of different recording modes to suit various shooting conditions and objectives (page 37). This section explains general shooting procedures using Premium Auto.With Premium Auto recording, the camera automatically determines whether you are shooting a subject or scenery, and other conditions. Premium Auto recording delivers higher image.1. Turn on the camera and controller (page 24).This causes the camera and controller to start up on the REC mode.• The factory default recording mode when you purchase the camera is “Premium Auto”. You can use the procedure on page 37 to change the recording mode.• If the camera is in the PLAY mode, touch “”(REC). 2. Point the camera at the subject.• A focus frame will appear and the location where the camera is focusing.3. Press the camera or controller shutter button.The camera will automatically adjust exposure and focus, and then shoot the snapshot.• Pressing the camera shutter button will shoot a snapshot even if the controller is turned off, and even if the camera and controller are in the sleep mode (page 24).Shooting a MoviePress [0] (Movie) on the camera or controller to start movie recording.To stop movie recording, press [0] (Movie) again.See page 40 for details.NOTE• You also can shoot a snapshot by touching a point on the monitor screen (page 43).• You can specify the image size for snapshots. See page 43 for more information.Shooting a Snapshot (Premium Auto)Premium Auto iconFocus frameShutter button[0] (Movie)](https://usermanual.wiki/Casio-Computer/EXFR10CT/User-Guide-2338651-Page-31.png)
![35 Recording Images.To shoot images manually during an Interval Snapshot operationPressing the shutter button on the camera during an Interval Snapshot operation will shoot a snapshot. Pressing [0] (Movie) on the camera will record a five-second movie.NOTE• Nothing is displayed on the monitor screen during an Interval Snapshot operation.• Interval Snapshot images are shot using Auto Focus.• Camera anti-shake is applied during movie recording by an Interval Snapshot operation. However, image anti-shake is not applied.• The current shooting setup, including zoom, cannot be changed while an Interval Snapshot operation is in progress. A snapshot can be recorded with camera operations only, and not by operating the controller.• If the camera battery goes dead during an Interval Snapshot operation, the operation will terminate. The controller battery going dead does not affect an ongoing Interval Snapshot operation. To stop the Interval Snapshot operation in this case, hold down [p] (Power) on the camera.• If you are performing manual camera operations when the Interval Snapshot operation reaches a shooting interval, Interval Snapshot recording for that interval will be skipped.](https://usermanual.wiki/Casio-Computer/EXFR10CT/User-Guide-2338651-Page-35.png)
![40 Recording ImagesYour camera lets you record Full HD movies. Movie quality details are shown in the table below.1. Select “Premium Auto” as the recording mode.2. On the REC mode main screen, touch the “ ” (Home) icon.3. On the home screen, touch “MENU”.4. Touch “ ”, “ ” to display “Max Recording Time”.5. Touch the recording time you want to select.6. Press [0] (Movie).This starts movie recording.• To stop an ongoing movie recording operation, press [0] (Movie).• Each movie can be up to 29 minutes long. If you select “OFF” in step 5, movie recording stops automatically after 29 minutes of recording. Movie recording also will stop automatically if memory becomes full before you stop movie recording by pressing [0] (Movie) again.NOTE• Movie recording is disabled while shooting with ART SHOT.Minimizing the Effects of Camera Movement during Movie RecordingYou can configure the camera to minimize the effects of camera movement. Note, however, that this does not prevent image blur due to subject movement.Recording a MovieMovie Quality Full HDFrame Rate 30fpsImage Size (Pixels) 1920x1080Aspect Ratio 16:915 sec Movie recording automatically stops after 15 seconds.OFF Movie recording can continue up to 29 minutes.](https://usermanual.wiki/Casio-Computer/EXFR10CT/User-Guide-2338651-Page-40.png)
![41 Recording ImagesIMPORTANT!• Spending a long time using movie recording will cause the camera to become slightly warm to the touch. This is normal and does not indicate malfunction.• The camera also records audio along with movies. Note the following points when shooting a movie.– Take care that the microphone is not blocked by your fingers, etc.– Good audio recording results are not possible when the camera is too far away from what you are trying to record.• Shooting movies for long periods in areas where temperature is relatively high can cause digital noise (dots of light) to appear in the movie image. A rise in the camera’s internal temperature also may force movie recording to stop automatically. If this happens, stop recording and allow the camera to cool down, which should cause normal operation to resume.• Using the camera’s built-in memory or certain types of memory cards can slow down processing speed. Whenever possible use an Ultra High-Speed Type memory card. Note, however, that not all operations can be guaranteed even if an Ultra High-Speed Type memory card is used. An operation that requires time to record data can result in breaks in the image and/or audio.NOTE• Zoom operations are disabled during movie recording. To use zoom, perform the zoom operation before you press [0] (Movie) to start recording.Microphone](https://usermanual.wiki/Casio-Computer/EXFR10CT/User-Guide-2338651-Page-41.png)

![48 Viewing Snapshots and MoviesViewing Snapshots and MoviesWhile in the PLAY mode, you can use the controller screen to view images your have recorded. You can also press the camera’s shutter button or [0] (Movie) button to record new images..Main ScreenThe main screen appears whenever you switch from the REC mode to the PLAY mode..Home ScreenThe home screen appears when you touch the “ ” (Home) icon on the main screen.Play Mode Screen41321Image Menu (page 52)2Information (page 9)3Go to REC mode (page 25)4Go to home screen6145231Highlight Movie (page 54)2Highlight Photo (page 53)3Highlight Score (page 55)4Menu (page 42)5Delete (page 50)6Go to main screen](https://usermanual.wiki/Casio-Computer/EXFR10CT/User-Guide-2338651-Page-48.png)
![52 Viewing Snapshots and MoviesThe image menu shows multiple images on a single screen.1. On the PLAY mode main screen, touch “]”.This displays the image menu.• While the main screen is displayed, spread (to enlarge) or squeeze (to reduce) your fingers on the screen to zoom the displayed image.• Touch “ ” or “ ” or flick upwards or downwards to scroll to the next page of images.• To view the normal (single image) display mode, touch the image your want to view.• In the case of a movie, the first image in the movie is displayed.• A question mark (?) will be displayed for images that cannot be displayed for some reason.1. On the PLAY mode main screen, touch the “ ” (Home) icon.2. On the home screen, touch “MENU”.3. Touch “Rotation”.4. Touch “ ”.This will rotate the image 90 degrees to the left.5. When the image is in the orientation you want, touch “ ”.NOTE• For information about menu operations, see page 42.Viewing the Image MenuRotating an Image (Rotation)](https://usermanual.wiki/Casio-Computer/EXFR10CT/User-Guide-2338651-Page-52.png)
![58 Connecting the Camera with a Smartphone (WirelessLAN)Use the procedure below to establish a wireless LAN connection between the camera and a smartphone for the first time. This operation is required for the first connection only.1. If the camera is on, hold down [p] (Power) to turn it off.2. On the camera, hold down [0] (Movie) as you hold down [p] (Power) until the camera’s operation lamp flashes green.This will enable connection with a smartphone.• While the camera is connected with a smartphone, its shutter button and [0] (Movie) button are disabled.3. For the smartphone Wi-Fi setting, input the camera SSID and password.This will connect the smartphone to the camera, which is indicated by the camera’s operation lamp lighting green.• The initial default SSID and password settings are shown below.SSID: * * * *Password: * * * *• The SSID and password can be changed from a smartphone that has the EXILIM Link app installed.• What you need to do to establish a wireless LAN connection depends on the type of smartphone you are using. For details about how to establish a wireless LAN connection see the user documentation that comes with your smartphone.IMPORTANT!• Note that the wireless LAN connection between the camera and smartphone is maintained even while the EXILIM Link app is not running on the smartphone or when the app is running in the background. Leaving a wireless LAN connection in effect will shorten camera battery life and cause the camera to become warm. Shut down the EXILIM Link app and turn off the camera to terminate the wireless LAN connection whenever you are not using it.• Terminating a wireless LAN connection will cause the camera to enter connection standby. If no connection is established within three minutes, the camera will shut off automatically.Configuring Wireless LAN Settings](https://usermanual.wiki/Casio-Computer/EXFR10CT/User-Guide-2338651-Page-58.png)
![59 Connecting the Camera with a Smartphone (WirelessLAN)This function lets you remotely shoot a snapshot or movie with the camera using a smartphone (Remote Capture). You also can perform remote zoom, self-timer, and other operations as well.1. If the camera is on, hold down [p] (Power) to turn it off.2. On the camera, hold down [0] (Movie) as you hold down [p] (Power) until the camera’s operation lamp flashes green.3. On your smartphone, start up the EXILIM Link app.4. On the smartphone, tap “Connect”.This will connect the smartphone to the camera, which is indicated by the camera’s operation lamp lighting green.• If this is the first time you started up the app, its terms of use will appear on the smartphone screen. Read the terms and then tap “I agree”.5. On the smartphone, tap “ ”.6. Compose the image on your smartphone’s screen as you shoot.• After you are finished using Remote Capture exit the app on your smartphone..Controlling Your Camera with a SmartphoneDuring Remote Capture shooting, you can use the EXILIM Link app to control the camera from a smartphone. This manual explains EXILIM Link operations based on screens that appear using the iPhone version. Some operations may differ depending on your smartphone type.NOTE• Images shot with Remote Capture can also be stored on the smartphone at the time when the image is shot. To do so, tap 1, select “Synchronous Save”, and then select “On”.Using a Smartphone as a Camera Remote Controller1Configures REC settings.2Flips the screen image horizontally.3Performs a zoom operation.4Displays what is being picked up by the camera’s lens.5Displays current settings.6Toggles between snapshot and movie shooting.7Shoots an image.8Shows the image that was just shot.32418567](https://usermanual.wiki/Casio-Computer/EXFR10CT/User-Guide-2338651-Page-59.png)
![60 Connecting the Camera with a Smartphone (WirelessLAN)You can select one or more snapshot and/or movie file in camera memory and send it to a smartphone. You can select up to 99 files, totaling no more than 1500MB for a single send.1. If the camera is on, hold down [p] (Power) to turn it off.2. On the camera, hold down [0] (Movie) as you hold down [p] (Power) until the camera’s operation lamp flashes green.3. On your smartphone, start up the EXILIM Link app.4. On the smartphone, tap “Connect”.This will connect the smartphone to the camera, which is indicated by the camera’s operation lamp lighting green. The smartphone display shows a list of images stored in camera memory.• If this is the first time you started up the app, its terms of use will appear on the smartphone screen. Read the terms and then tap “I agree”.5. Tap the images of the files you want to have sent to the smartphone.6. After selecting the images of all of the files you want to send to the smartphone, touch “ ”.This will send the images you selected to the smartphone. You can view the sent images with “ ”.IMPORTANT!• Some smartphone models may not be able to play back movie files. • Depending on your smartphone model, its operating system version, and/or its remaining storage capacity can cause failure of a movie or snapshot save operation. After send operation, perform the required operation on your smartphone to ensure that the movie or snapshot was saved properly.• Viewing a movie received on an Android terminal:Note that movies are not displayed by Gallery. Movies are stored in a folder named “EXILIM Link”. A separate movie player is required to playback movies (whose files have the file name extension MOV). Depending on your movie player, you may not be able to playback movies and/or audio.Sending a Snapshot or Movie File from Camera Memory to a Smartphone](https://usermanual.wiki/Casio-Computer/EXFR10CT/User-Guide-2338651-Page-60.png)
![61 Connecting the Camera with a Smartphone (WirelessLAN)NOTE• You can use the smartphone apps below to view snapshots after sending them.– iPhone: Camera Roll– Android terminal: Gallery or another photo browser app• In the case of an iPhone, sent snapshots cannot be deleted with the EXILIM Link app. To delete an image, use Camera Roll.Use the procedure below to change the SSID and password you use when establishing a wireless LAN connection between the camera and a smartphone.1. If the camera is on, hold down [p] (Power) to turn it off.2. On the camera, hold down [0] (Movie) as you hold down [p] (Power) until the camera’s operation lamp flashes green.3. On your smartphone, start up the EXILIM Link app.4. On the smartphone, tap “Connect”.This will connect the smartphone to the camera, which is indicated by the camera’s operation lamp lighting green.• If this is the first time you started up the app, its terms of use will appear on your smartphone. Read the terms and then tap “I agree”.5. Tap “ ”6. Enter the new SSID and password.• For the SSID and password, enter from eight to 32 single-byte characters and symbols.7. Tap “OK”.The new SSID and password will become effective the next time you turn on the camera.Changing the Camera SSID and PasswordSSID](https://usermanual.wiki/Casio-Computer/EXFR10CT/User-Guide-2338651-Page-61.png)
![62 Connecting the Camera with a Smartphone (WirelessLAN)NOTE• Note that after changing the SSID and password on the camera, you will also need to change the Wi-Fi settings of the smartphone.• If you forget your camera SSID and password, you can perform the procedure below to return them to their initial defaults.1Turn off the camera.2While holding down [0] (Movie) and the shutter button on the camera, hold down [p] (Power) for about six seconds.](https://usermanual.wiki/Casio-Computer/EXFR10CT/User-Guide-2338651-Page-62.png)


![70 Using the Camera with a ComputerYou can connect the camera to your computer in order to view and store images (snapshot and movie files).IMPORTANT!• Never unplug the USB cable, or operate the camera while viewing or storing images. Doing so can cause data to become corrupted.NOTE• You also can use your computer’s card slot (if it has one) or a commercially available card reader to access image files directly from the camera’s memory card. For details, see the user documentation that comes with your computer..To connect the camera to your computer and save files1. Turn off the camera and then use the micro USB cable that comes with the camera to connect it to your computer.• For details about connecting to the camera and precautions when connecting, see page 20.2. Press [p] (Power) to turn on the camera.When you turn on the camera, check to make sure that the color of its operation lamp changes from red to green or amber (page 22). Note that in this case the monitor screen will remain blank.• The first time you connect the camera to your computer with the USB cable, an error message may appear on your computer. If this happens, disconnect and then reconnect the USB cable.3. Windows 8.1, Windows 8 users: Click “Desktop” and then “Explorer”.Windows 7, Windows Vista users: Click “Start” and then “Computer”.Viewing and Storing Images on a ComputerNever use your computer to modify, delete, move, or rename any image files that are in the camera’s built-in memory or on its memory card.Doing so can cause problems with the camera’s image management data, which will make it impossible to play back images on the camera and can drastically alter remaining memory capacity. Whenever you want to modify, delete, move, or rename an image, do so only on images that are stored on your computer.USBMicro USB cable (included with camera)[USB] port](https://usermanual.wiki/Casio-Computer/EXFR10CT/User-Guide-2338651-Page-70.png)
![74 Using the Camera with a Computer.To connect the camera to your computer and save files1. Turn off the camera and then use the micro USB cable that comes with the camera to connect it to your Macintosh.• For details about connecting to the camera and precautions when connecting, see page 20.2. Press [p] (Power) to turn on the camera.When you turn on the camera, check to make sure that the color of its operation lamp changes from red to green or amber (page 22). Note that in this case the monitor screen will remain blank. In this mode, your Macintosh recognizes the memory card loaded in the camera (or the camera’s built-in memory if it does not have a memory card loaded) as a drive. The appearance of the drive icon depends on the Mac OS version you are using.• The first time you connect the camera to your Macintosh with the USB cable, an error message may appear on your computer. If this happens, disconnect and then reconnect the USB cable.3. Double-click the camera’s drive icon.4. Drag the “DCIM” folder to the folder to which you want to copy it.5. After the copy operation is complete, drag the drive icon to Trash.6. Disconnect the camera from the computer.After confirming that the operation lamp is not flashing red, disconnect the USB cable.USBMicro USB cable (included with camera)[USB] port](https://usermanual.wiki/Casio-Computer/EXFR10CT/User-Guide-2338651-Page-74.png)
![85 AppendixThis camera is designed to be shock resistant, waterproof, and dustproof as described below.0Shock resistant:This camera has passed drop testing from a height of 2.13 meters/7 feet* onto a plywood (lauan material)*1.*Based on CASIO test equivalent to MIL-Standard 810F Method 516.5-Shock. (6 faces, 8 corners, 12 edges: Total of 26 drops.)0Waterproof: Corresponds to IEC/JIS Protection Class 7 (IPX7)*2 and Protection Class 5 (IPX5) equivalent waterproofing that allows immersion up to 3.0 meters for 60 minutes and protection against jet spray from all directions.*30Dustproof: Corresponds to IEC/JIS Protection Class 6 (IP6X) dustproofing.*1 Though the camera is designed to withstand the effects of impact occurring during normal daily use, very strong impact due to very rough handling such as throwing the camera or dropping it from excessive heights can result in serious damage. Even if a drop does not result in functional problems, it can cause scratching and other cosmetic damage to the camera.*2 Signifies underwater use when immersed for a duration and at a pressure specified by CASIO.*3 Test conditions defined by CASIO. Does not include cases where battery life is shortened due to use conditions. IMPORTANT!• The shock resistance, waterproofing, and dustproofing of this product are based on CASIO test results, and do not constitute any guarantee that the product will perform, will not be damaged, or will not malfunction under such conditions..Precautions before Underwater UseThis camera can be used to shoot images underwater up to a depth of 3.0 meters. However, the following precautions should be kept in mind before using the camera underwater.• Check the contact surfaces of the [CARD] cover and [USB] cover gaskets for dirt, sand, and any other foreign matter. Clean contact surfaces by wiping them with a soft, clean, dry cloth. Note that a single strand of hair or a single grain of sand can allow water to leak into the camera.• Check the [CARD] cover and [USB] cover waterproofing gaskets are free of cracks, scratches, and other damage.• Close the [CARD] cover and [USB] cover securely into place.• Never open or close the [CARD] cover or [USB] cover while near water or in an area exposed to sea breezes. Also avoid opening or closing the covers while your hands are wet.Shock resistant, Waterproof, Dustproof](https://usermanual.wiki/Casio-Computer/EXFR10CT/User-Guide-2338651-Page-85.png)
![86 Appendix• This camera will sink if dropped underwater. Use the strap or some other means to avoid dropping.• The waterproofing of this camera protects it against salt water and fresh water only. Protection is not provided against hot spring water.• Never leave the camera for long periods in a location subjected to very low temperatures or very high temperatures in excess of 40°C. In particular, avoid leaving the camera in areas exposed to strong direct sunlight, in a motor vehicle on a hot day, etc. Any of these conditions can result in a deterioration of waterproofing..Precautions during Underwater Use• The camera is designed for use at depths no greater than 3.0 meters and at water temperatures within the range of 0°C to 40°C.• Do not leave the camera submerged for longer than 60 minutes.• When repeatedly immersing the camera for underwater user, allow at least 15 minutes to elapse between immersions.• Never open the [CARD] cover or [USB] cover while the camera is submerged.• Do not dive into water while holding the camera. Also, do not use the camera in rapids, under a waterfall, or in any other rough water condition. Exposing the camera to strong water pressure can cause leaking and malfunction.• Take care that you do not drop the camera into water or allow it to strike the surface of the water. Doing so can cause leaking..Precautions after Underwater Use• Before opening the [CARD] cover and [USB] cover, use a clean, dry, soft cloth to wipe the camera free of all moisture and dirt.• If you open the [CARD] cover and [USB] cover while the camera is wet, be sure to wipe its inside surfaces free of all moisture before closing it.](https://usermanual.wiki/Casio-Computer/EXFR10CT/User-Guide-2338651-Page-86.png)
![87 Appendix.Cleaning Your Camera after UsePerform the following steps to clean the camera after using it under water or after it becomes soiled with sand, dirt, or mud. Note that the [CARD] cover and [USB] cover must be closed securely when performing these steps.1. Immerse the camera in fresh water.• Fill a bucket or other container with tap water or other fresh water, and immerse the camera for about 10 minutes. Gently wipe dust, dirt, sand, and other matter from the camera with your fingers.• Do not rub the lens surface or monitor screen while dirty.2. Wipe the camera dry.• Use a clean, dry, soft cloth to wipe off the camera, and leave it in a shady place to dry.IMPORTANT!• The temperature of the water used to wash the camera should be no greater than 30°C. Never use detergent, hot water, or strongly running water to clean the camera. Doing so creates the risk of leaking and malfunction.• Never swing the camera around to remove water, and never use a dryer or other intense heat to dry it.• Never place the camera in a washing machine to wash it..Precautions after Use• Do not leave the camera in an area exposed to extreme heat (40°C or greater) or cold (–10°C or lower). Doing so can cause loss of waterproofing.• Never use chemical agents for the purpose of cleaning, rust proofing, moisture proofing, etc. Doing so can cause loss of waterproofing.• Use fresh water to clean the camera within 60 minutes after using it underwater. Failure to do so can cause deterioration of the exterior finish and waterproofing properties.• In order to maintain waterproofing, replacement of the camera’s gaskets is recommended once each year. Note that you will be charged for gasket replacement. Contact a CASIO authorized service center or your original retailer for gasket replacement.](https://usermanual.wiki/Casio-Computer/EXFR10CT/User-Guide-2338651-Page-87.png)

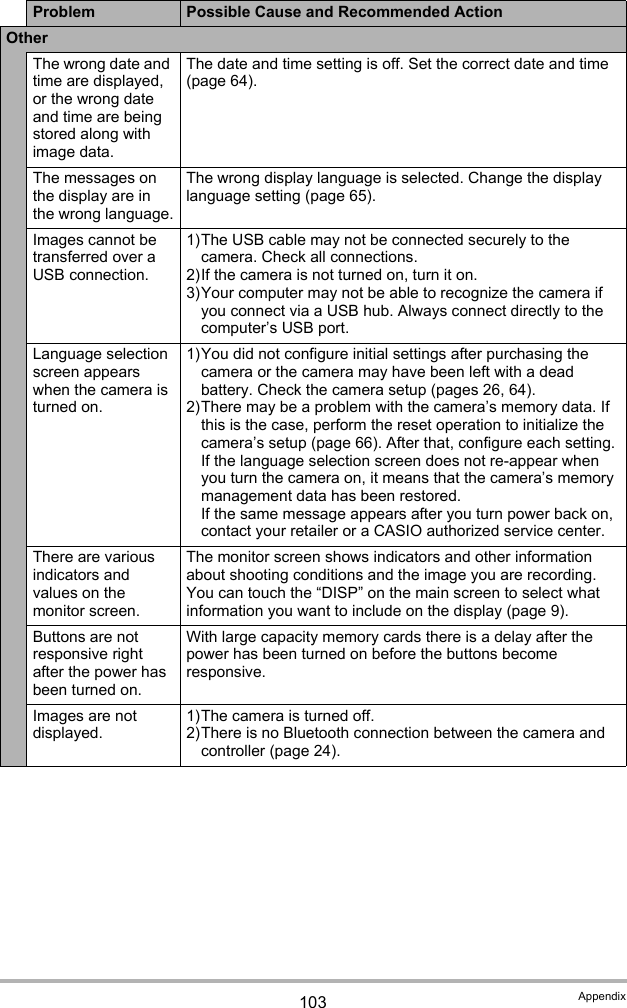
![100 AppendixWhen things don’t go right... TroubleshootingProblem Possible Cause and Recommended ActionPower SupplyPower does not turn on.1)The battery of new camera is not charged. Charge the battery before using the camera.2)The camera battery may be dead. Charge the battery (page 18). If this does not resolve the problem, contact your retailer or a CASIO authorized service center.The camera suddenly powers down.1)The battery may be dead. Charge the battery (page 18).2)The camera’s protection function may have activated because camera temperature is too high. Turn off the camera and wait until it cools down before trying to use it again.Power will not turn off. Nothing happens when a button is pressed.Use a thin object to press the reset buttons (page 7) near the camera’s memory card slot and controller’s [USB] port to turn the camera off and then turn on the camera again. Unlike the reset operation (page 66), pressing the reset button near the memory card slot does not initialize camera settings.ChargingThe operation lamp does not light red and the battery won’t charge.1)Unplug the USB cable from the camera and controller, and then plug it back in again.2)Make sure the camera and controller are turned off when you connect the USB cable. Charging will not start if you connect the USB cable while power is turned on.Image RecordingImage is not recorded when the shutter button is pressed.1)If the camera is in the PLAY mode, touch “ ” (REC) on the main screen to enter the REC mode.2)If the message “Memory Full” appears, transfer images to your computer, delete images you no longer need, or use a different memory card.Images are out of focus.1)If the lens is dirty, clean it off.2)The subject may not be in the center of the focus frame when you compose the image.3)You may be moving the camera when shooting. When shooting, place the camera on a tabletop or some other stable surface, or find some way to fix the camera in place.](https://usermanual.wiki/Casio-Computer/EXFR10CT/User-Guide-2338651-Page-100.png)
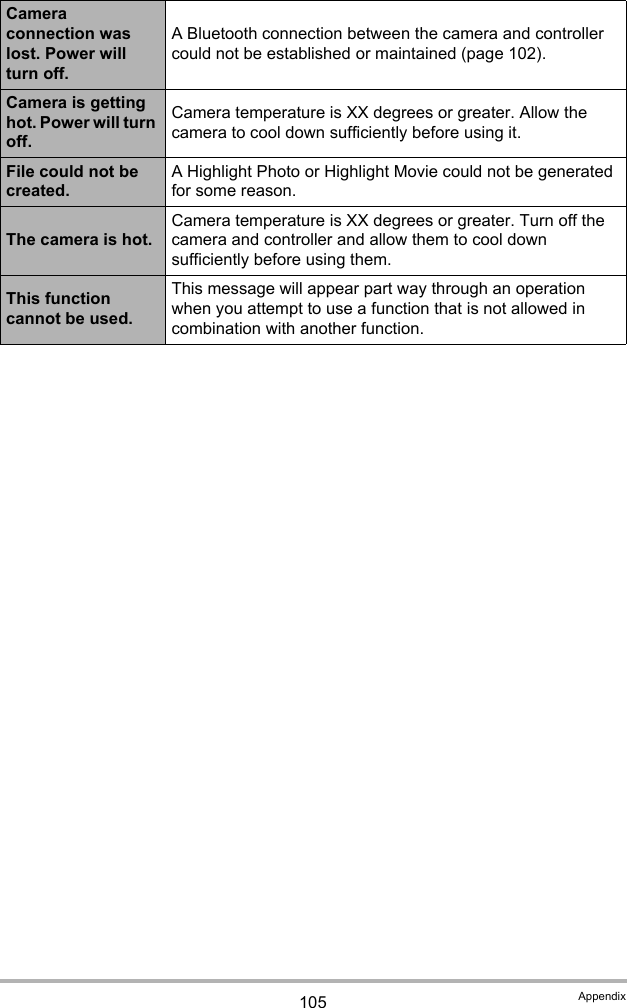
![102 AppendixFile DeletionA file cannot be deleted.The file may be protected. A protected image cannot be deleted.Wireless LANI can’t establish a wireless LAN connection. The wireless LAN connection is broken.1)The camera cannot connect with a smartphone if they are too far apart from each other.2)The smartphone may be connected with another wireless LAN. Check the smartphone’s Wi-Fi settings and confirm that the camera is selected for wireless LAN connection (page 58).3)Connection may have been lost due to interference caused by a nearby microwave oven, cordless phone, or other wireless LAN device. Move the camera away from the device causing the problem.I forgot my SSID and password.On the camera, hold down [0] (Movie) as you hold down the shutter button and [p] (Power) for about six seconds to return the SSID and password to their initial defaults. For information about the initial default SSID and password settings, see page 58.Bluetooth wireless technologyA connection cannot be established between the camera and controller.1)The camera cannot connect with a smartphone if they are too far apart from each other.2)A Bluetooth connection cannot be established with the camera while it is connected to a smartphone by wireless LAN. Terminate the wireless LAN connection.3)If the camera is connected to a computer, unplug the USB cable to terminate the connection.4)If, you still cannot establish a connection, hold down the shutter buttons on the camera and controller as you hold down [p] (Power) for about six seconds. This will start the pairing operation required for Bluetooth connection.Problem Possible Cause and Recommended Action](https://usermanual.wiki/Casio-Computer/EXFR10CT/User-Guide-2338651-Page-102.png)