Casio Computer IT3100 Handheld Printer Terminal User Manual
Casio Computer Co Ltd Handheld Printer Terminal
User manual
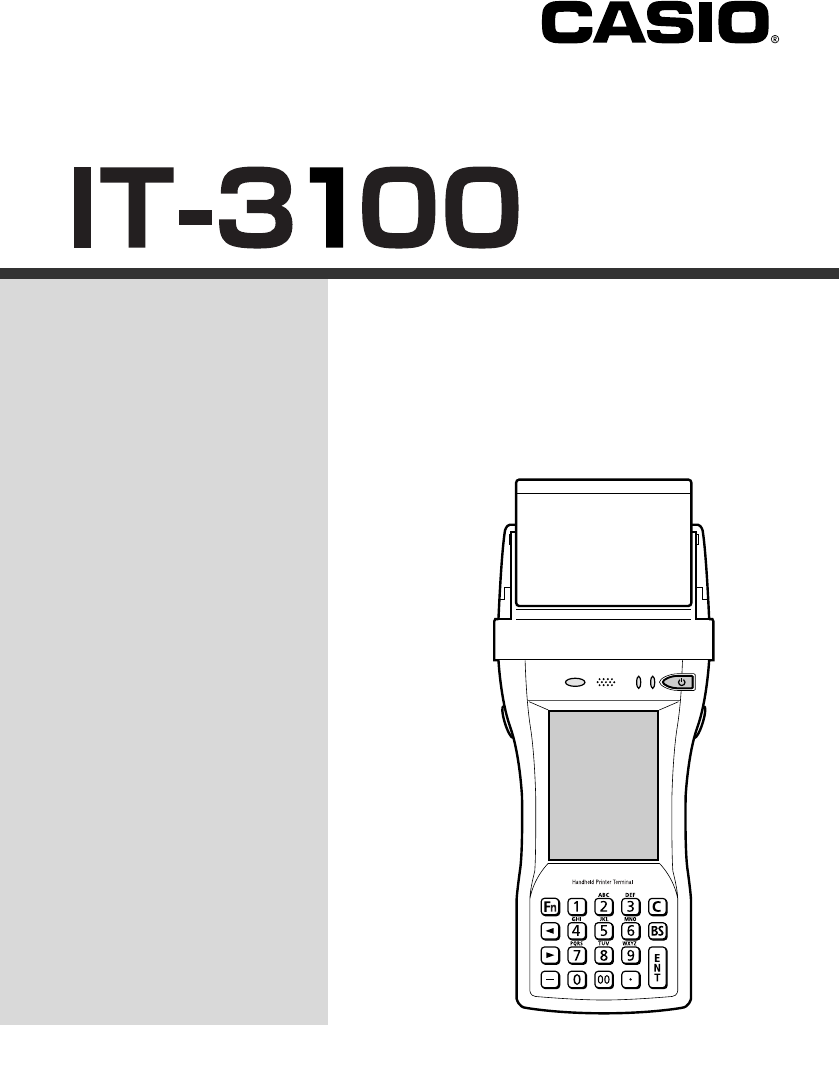
Handheld Printer Terminal
User’s Guide
Series
Be sure to read “Safety
Precautions” inside this
guide before trying to use
your Handheld Terminal.
After reading this guide,
keep it in a safe place for
future reference.
For product detail, refer also
to http://world.casio.com/
system/pa/UsersGuide/
sup85_e.html
E
PN410433-001
•This Product is equipped with the Brycen B-RAPPORE Stack and My Wirefree
Network Bluetooth User Interface Application, the use of which is governed by a license
granted by Brycen Co., Ltd.
®
•BLUETOOTH is a registered trademark owned by Bluetooth SIG, Inc. and licensed to
CASIO COMPUTER CO., LTD.
•Microsoft and Windows are either registered trademarks or trademarks of Microsoft
Corporation in the United States and/or other countries.
•Datalight is a registered trademark of Datalight, Inc.
•FlashFX® is a registered trademark of Datalight, Inc.
Copyright 1993-2000 Datalight, Inc., All Rights Reserved.
U.S. Patent Office 5,860,082
•Other company names and product names used in this guide are trademarks or registered
trademarks of their respective owners.
Information in this document is subject to change without advance notice. CASIO Computer Co.,
Ltd. makes no representations or warranties with respect to the contents or use of this manual and
specifically disclaims any express or implied warranties of merchantability or fitness for any
particular purpose.
E-1
Congratulations upon your selection of this CASIO product. Be sure to read the
following Safety Precautions before trying to use it for the first time.
Your neglect or avoidance of the warning and caution statements in the
subsequent pages causes the danger of fire, electric shock, malfunction and
damage on the goods as well as personal injury.
Markings and Symbols
The following are the meanings of the markings and symbols used in these Safety
Precautions.
This symbol indicates information that, if ignored or applied
incorrectly, creates the danger of death or serious personal injury.
This symbol indicates information that, if ignored or applied
incorrectly, creates the possibility of death or serious personal
injury.
This symbol indicates information that, if ignored or applied
incorrectly, creates the possibility of personal injury or property
damage.
•A diagonal line indicates something you should not do. The symbol shown
here indicates you should not try to take the unit apart.
•A black circle indicates something you should do. The symbol shown here
indicates you should unplug the unit from the wall outlet.
Warning
Disassembly and Modification
•Never try to disassemble or modify the Handheld Printer Terminal and its
options including battery pack and battery in any way.
Abnormal Conditions
•Should the Handheld Printer Terminal and/or its options including battery
pack and battery become hot or start to emit smoke or a strange odor,
immediately turn off the power and contact your dealer or distributor whom
you purchased the product from, or an authorized CASIO service provider.
Warning
Caution
Danger
Safety Precautions
E-2
Safety Precautions
Warning
Dust and Moisture
•Though the Handheld Printer Terminal is dust and water splash resistant, its
options including the battery pack are not. Keep loose metal objects and
containers filled with liquid away from your Handheld Printer Terminal and
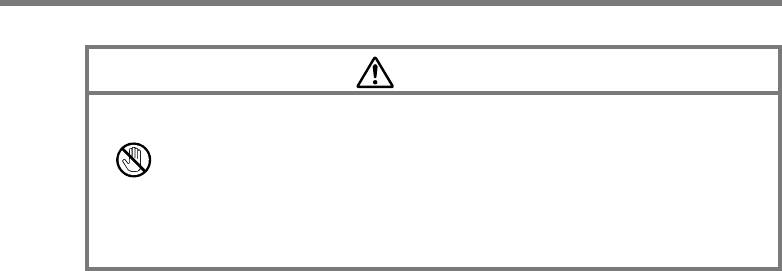
the options. Also, never handle the Handheld Printer Terminal and the
options while your hands are wet.
Laser Light
•This product with the integrated laser scanning module scans bar codes
using laser light. Never look directly into the laser light or shine the laser
light into the eyes.
Warning
Interference with the Operation of Other Equipment
(Using Wireless Data Communication Function)
•Keep your Handheld Printer Terminal at least 22 centimeters (85/8") away
from anyone wearing a pacemaker. Radio waves emitted by the Handheld
Printer Terminal can affect the operation of a pacemaker.
•Before the use in aircraft, be sure to consult with cabin crew for interference
the Handheld Printer Terminal emits.
•Before the use in medical facility, be sure to consult with the facility
management or the manufacture of a specific medical equipment that the
Handheld Printer Terminal may interfere with.
Caution
Foreign Objects
•Take care to ensure that metals or combustible objects are not inserted into the
openings of the Handheld Printer Terminal or its options, and not to allow
moisture to get inside of them.
Location
•Install the cradle properly on a flat and stable surface so that it cannot fall
down onto floor.
LCD Screen
•Never apply strong pressure to the screen or subject it to strong impact.
Doing so can crack the screen or LCD panel glass.
E-3
Caution
Printer
•Do not touch the areas around the printer motor or head since they can
become very hot. Doing so can cause burns.
•Touching any of the gears while they are turning with unprotected hands can
cause personal injury. Be careful not to come in contact with turning gears.
•Contact with the blade installed in the paper outlet can cause personal injury.
Be careful not to touch the blade.
E-4
Safety Precautions
Lithium-ion Battery Pack
Danger
•Never use the Handheld Printer Terminal and its option including the battery
pack and battery next to open flame, near a stove, or any other area exposed
to high heat, or leave them for a long period of time in a vehicle parked in
direct sunlight.
•Never use the battery pack with any device other than the Handheld Printer
Terminal.
•Never dispose of the battery pack by incinerating it or otherwise expose it to
heat.
•Never transport or store the battery pack together with metal objects that
may result in shorting positive (+) and negative (–) terminals of the battery
pack. Be sure to place the battery pack in its case whenever transporting or
storing it.
•Never throw the battery pack or otherwise subject it to strong impact.
•Never pierce the battery pack with nails, hit it with a hammer, or step on it.
•Use only the specified battery charger to charge the battery pack.
Warning
•Never place the battery pack in a microwave oven or any other high-voltage
device.
•If the amount of time period the battery pack can serve becomes
considerably short even after it has been fully charged for the specified time
period, stop using it.
•Should the battery pack start to leak or emit a strange odor, immediately
move it away from any nearby flame. Leaking battery fluid is combustible.
•Should fluid from the battery pack accidentally get into your eyes or on the
skin, do not rub it. Immediately rinse it off with clean tap water and then
consult a physician.
Caution
•Replace only with the same type of battery pack recommended by CASIO.
Dispose of used battery packs according to the local regulation.
•Keep the battery pack out of the reach of small children.
E-5
Power Supply / AC Adaptor
Warning
•
Do not use the Handheld Printer Terminal at a voltage other than the
specified voltage. Also, do not connect the Handheld Printer Terminal to a
multi-plug power strip.
•Never modify, sharply bend, twist, or pull on the power cord.
•Never use a detergent to clean AC adaptor and its power cable, especially on
the plug and the jack.
•When using the battery charger and Bridge Satellite Cradle, be sure to use
the respective AC adaptors.
Caution
•Never pull on the power cord when unplugging it. Always hold the plug
when unplugging it from the wall outlet.
•Never touch the plug while your hands are wet.
•Be sure to unplug the power cord from the wall outlet before cleaning the
battery charger and Bridge Satellite Cradle.
•Unplug the power cord from the wall outlet whenever leaving the battery
chargers and the cradles unattended for a long period.
•The housing of the AC adaptor can become warm during normal use.
•At least once a year, unplug the AC adaptor from the wall outlet and clean
any dust that builds up between the prongs of the plug.
Dust built up between the prongs can lead to the danger of fire.
E-6
Safety Precautions
Backup Copies of All Important Data
Caution
•Note that CASIO Computer Co., Ltd. shall not be held liable to you or any
third party for any damages or loss caused by deletion or corruption of data
due to use of the Handheld Printer Terminal, malfunction or repair of the
Handheld Printer Terminal or its peripherals, or due to the batteries going
dead.
•The Handheld Printer Terminal employs electronic memory to store data,
which means that memory contents can be corrupted or deleted if power is
interrupted due to the batteries going dead or incorrect battery replacement
procedures. Data cannot be recovered once it is lost or corrupted. Be sure to
make backup copies of all important data.

E-7
Your Handheld Printer Terminal and its options are precision digital instruments.
Improper operation or rough handling can cause problems with data storage and other
problems. Note and observe the following precautions to ensure proper operation.
•Do not leave dead batteries in the Handheld Printer Terminal for a long period.
Dead batteries can leak, leading to malfunction and damage to the Handheld Printer
Terminal.
•Stop or avoid using the Handheld Printer Terminal and its options in areas and
conditions subject to the following.
— Large amounts of static electricity
— Extreme heat or cold or humidity
— Sudden temperature change
— Large amount of dust
— After large amount of rain or water falls on the Handheld Printer Terminal
— Pressing the screen or keys with excessive force when using in the rain
•Use only the dedicated stylus that comes with the Handheld Printer Terminal to
operate its touch screen and reset switch.
Operating Precautions

E-8
•This guide does not include any information about programming and download
procedures. See the applicable separate documentation for information about the
procedures.
After Service
•Should this product ever malfunction, contact your original retailer providing
information about the product name, the date you purchased it, and details about the
problem.
This mark applies to EU countries and Turkey only.
Important
E-9
GUIDELINES LAID DOWN BY FCC RULES FOR USE OF THIS UNIT IN THE U.S.A. (not
applicable to other areas).
NOTICE
This equipment has been tested and found to comply with the limits for a Class B digital device, pursuant
to Part 15 of the FCC Rules. These limits are designed to provide reasonable protection against harmful
interference in a residential installation. This equipment generates, uses and can radiate radio frequency
energy and, if not installed and used in accordance with the instructions, may cause harmful interference
to radio communications. However, there is no guarantee that interference will not occur in a particular
installation. If this equipment does cause harmful interference to radio or television reception, which can
be determined by turning the equipment off and on, the user is encouraged to try to correct the interference
by one or more of the following measures:
•Reorient or relocate the receiving antenna.
•Increase the separation between the equipment and receiver.
•Connect the equipment into an outlet on a circuit different from that to which the receiver is connected.
•Consult the dealer or an experienced radio/TV technician for help.
FCC WARNING
Changes or modifications not expressly approved by the party responsible for compliance could void the
user’s authority to operate the equipment.
Proper connectors must be used for connection to host computer and/or peripherals in order to meet FCC
emission limits.
Caution Exposure to radio frequency radiation (below is for portable device)
To comply with FCC RF exposure compliance requirements, this device must not be co-located or operating
in conjunction with any other antenna or transmitter.
Declaration of Conformity
Model Numbers: IT-3100M53E, IT-3100M54E, HA-B61IO, HA-B30CHG
Trade Name: CASIO
Responsible party: Casio America, Inc. Industrial Handheld Division
Address: 10710 Baxter Avenue, Los Altos, California 94024 USA
Telephone number: 408-738-8220
This device complies with Part 15 of the FCC Rules. Operation is subject to the following two conditions:
(1) This device may not cause harmful interference, and (2) this device must accept any interference
received, including interference that may cause undesired operation.
For Users in Canada
These Class B digital apparatuses comply with Canadian ICES-003.
Cet appareil numériqué de la classes B est conformé à la norme NMB-003 du Canada.
These devices comply with RSS 210 of Industry Canada (IC).
Operation is subject to the following two conditions:
(1) These devices may not cause interference, and
(2) These devices must accept any interference, including interference that may cause undesired
operation of this device.
Regulatory Information
The USA and Canada

E-10
L’utilisation de ce dispositif est autorisée seulement aux conditions suivantes :
(1) il ne doit pas produire de brouillage et
(2) I’utilisateur du dispositif doit étre prêt à accepter tout brouillage radioélectrique reçu, même si ce
brouillage est susceptible de compromettre le fonctionnement du dispositif.
Exposure to radio frequency radiation
The installer of this radio equipment must ensure that the antenna is located or pointed such that it does
not emit RF field in excess of Health Canada limits for the general population;
consult Safety Code 6, obtainable from Health Canada's website at
http://www.hc-sc.gc.ca/ewh-semt/pubs/radiation/99ehd-dhm237/index_e.html
Europe
DECLARATION OF CONFORMITY
We, the under signed, CASIO Europe GmbH, hereby declare that the following equipment:
Product: Handheld Printer Terminal
Models: IT-3100M53E, IT-3100M54E, IT-3100M55E,
IT-3100M56E, IT-3100M75E
Brand: CASIO
are in conformity with all the provisions of the following EC directive with meeting the
related test standards:
Council Directive: 1999/5/EC (R&TTE Directive):
Standards for all models:
EN60950-1:2001+A11:2004
EN 301 489-17 v1.2.1 (2002-08)
EN 300 328 v1.7.1 (2006-10)
Hereunder, that this declaration is based on the above standards have been complied fully,
constructing into a Technical File.
Manufacturer:
CASIO COMPUTER CO., LTD.
6-2, Hon-machi 1-chome, Shibuya-ku, Tokyo 151-8543, Japan
Representative within the European Union:
CASIO Europe GmbH
Bornbarch 10, 22848 Norderstedt, Germany
Optional models HA-B61IO and HA-B30CHG, are in conformity with the Council Directives
89/336/EEC,92/31/EEC,93/68/EEC.
Regulatory Information

E-11
Contents
Safety Precautions .........................................................................................E-1
Operating Precautions...................................................................................E-7
Important .........................................................................................................E-8
After Service ....................................................................................................... E-8
Regulatory Information..................................................................................E-9
Before Getting Started .................................................................................E-12
Handheld Printer Terminal System Configuration ....................................E-14
Options ............................................................................................................. E-14
General Guide ...............................................................................................E-17
IT-3100 ............................................................................................................. E-17
Key Functions ................................................................................................... E-19
Replacing the Battery ..................................................................................E-20
Replacing the Battery Pack............................................................................... E-20
Attaching the Hand Strap ............................................................................E-23
Attaching the Neck Strap ............................................................................E-24
Attaching the Stylus Holder ............................................................................. E-25
Configuring Handheld Printer Terminal Settings ......................................E-27
Calibrating Touch Screen Alignment ................................................................ E-27
Using the Printer ..........................................................................................E-28
When Using Roll Paper .................................................................................... E-28
Warning Label............................................................................................... E-31
Magnetic Card Reader .................................................................................E-32
Resetting the Handheld Printer Terminal ...................................................E-33
Performing a Full Reset (Initialization) ............................................................ E-34
Charging the Battery Pack ..........................................................................E-35
Using the Cradle ............................................................................................... E-35
Using the AC Adaptor (AD-S10095AE/AU) .................................................... E-35
Using PC Cards ............................................................................................E-36
Attaching the PC Card Removal Tape to a PC Card ........................................ E-36
Inserting a PC Card (When Using the Roll Paper Holder) ............................... E-36
Using SD Memory Cards .............................................................................E-38
Inserting an SD Memory Card .......................................................................... E-38
Removing an SD Memory Card ....................................................................... E-38
E-12
Be sure to perform the following steps before trying to use the Handheld Printer
Terminal for the first time.
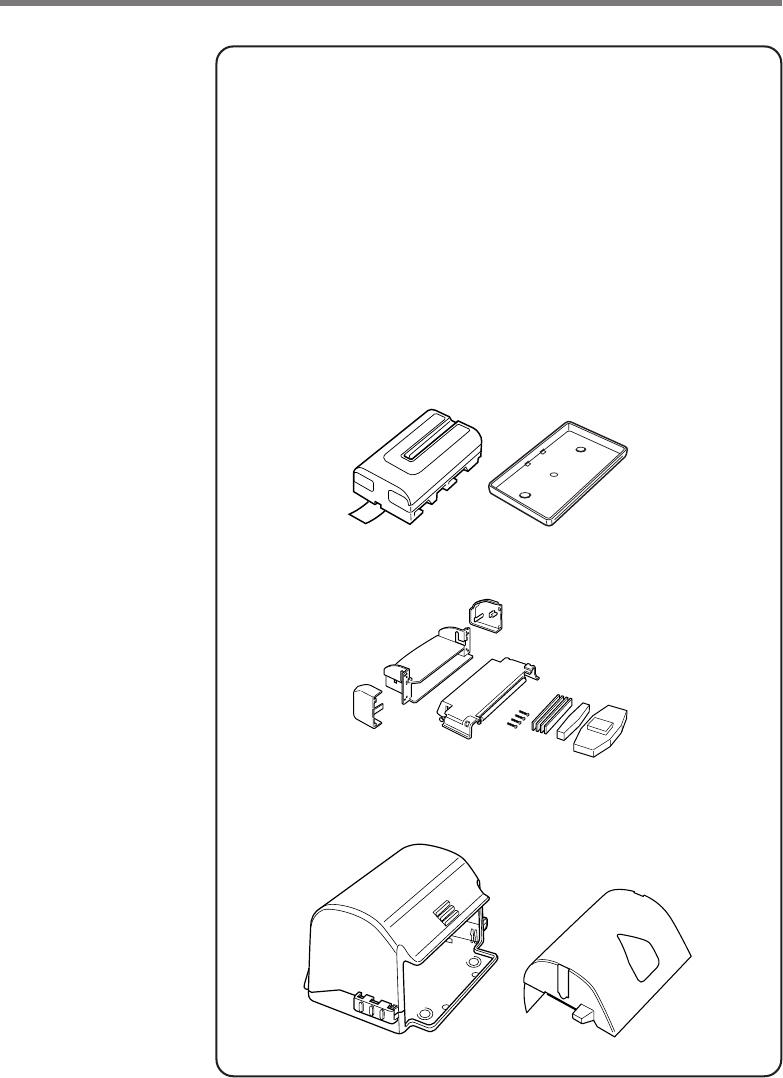
1. When unpacking, make sure that everything is included.
Open the box and make sure that all the items shown here are included.
2. Charge the battery pack.
To charge the battery pack, use either the AC Adaptor (AD-S10095AE/AU) for direct
charging, or Cradle-type Battery Charger or Bridge Satellite Cradle. Before charging
the battery pack with one of these options, first install the battery pack in the
Handheld Printer Terminal. For information how to charge, see page 35.
Handheld Printer Terminal
n
Handheld Printer Terminal
Stylus
Hand strap
Battery pack
Roll paper*
Neck strap and stylus holder
PC card fixers
User's Guide (this manual)
58mm Paper Width Adjuster*
PC Card Remover (2 pcs)
Before Getting Started
Neck strap rings
*Not included with IT-3100M75E.
E-13
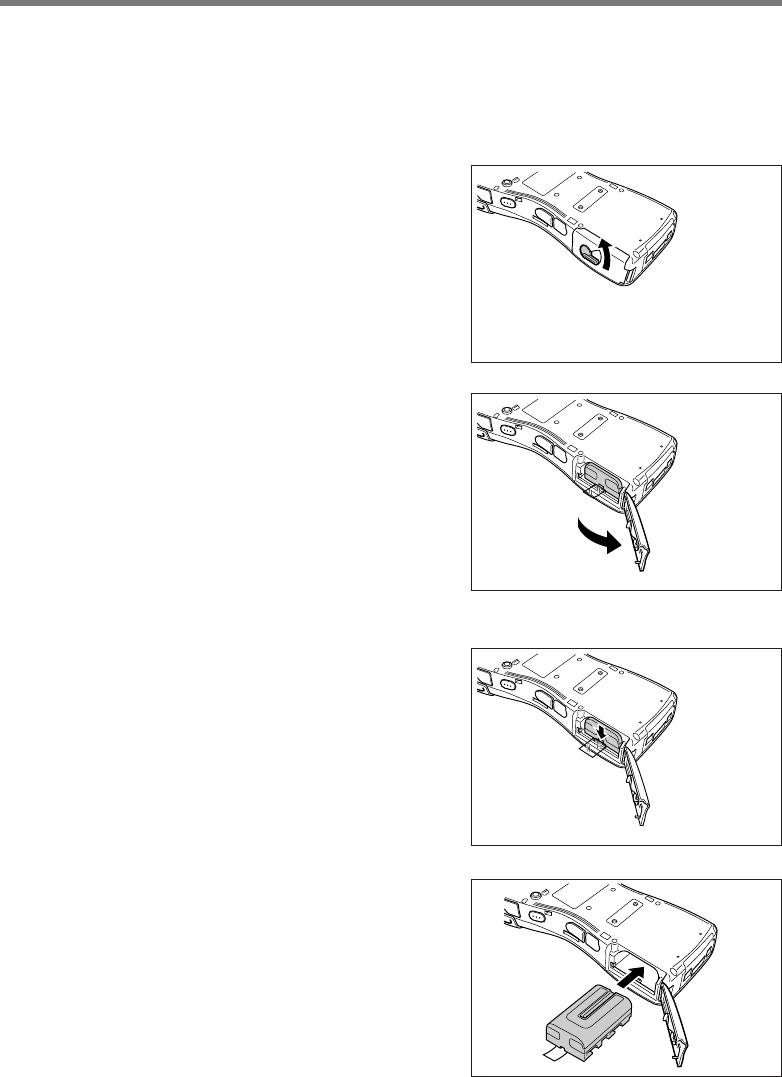
3. Load the battery pack into the Handheld Printer Terminal.
1Turn the battery pack cover lock
switch on the side of the Handheld
Printer Terminal to the “FREE”
position.
2
Open the battery pack cover.
3Install the battery pack(DT-9723LIC).
Push it all way to the end inside the
compartment until the eject button at
the front of the battery compartment
comes up (and sounds).
Make sure the battery pack is aligned
correctly when you install it.
4Return the battery pack cover to its
original position as shown in the
illustration, and then turn the battery
pack cover lock switch to the
“LOCK” position.
4. Hold down the power key for about one
second to turn on the power. Start up
the application you want to run.
E-14
Options
Required AC Adaptor for Bridge Satellite Cradle /
Cradle-type Battery Charger
AD-S42120BE
Cradle-type Battery Charger
HA-B30CHG
Bridge Satellite Cradle
HA-B61IO
Handheld Printer Terminal System Configuration
IT-3100 Series
AD-S42120B-N
E-15
Battery Pack
DT-9723LIC
Paper Holder*
HA-B93PH
Splash Protect Cover*
HA-B92PCV
AC Cord for Europe
AC-CORD-EU
AC Cord for North America
AC-CORD-US
AC Code for Taiwan
AC-CORD-TW
AC Code for Korea
AC-CORD-KR
AC Code for Australia
AC-CORD-AU
*Not available for IT-3100M75E.
E-16
AC Adaptor
AD-S10095AE
AD-S10095AU
Screen Protect Cover*
HA-B90DCV
Cables
DT-887AXA Dsub 9-Pin (Female) RS-232C Cross Cable for Bridge
Satellite Cradle
DT-888RSC RS-422 Modular Cable for connecting Bridge Satellite
Cradle
DT-380USB USB Cable for connecting Bridge Satellite Cradle and
PC
HA-B80AX RS-232C Cross Cable for connecting Handheld Printer
Terminal and PC
*Not available for IT-3100M75E.
Handheld Priter Terminal System Configuration
E-17
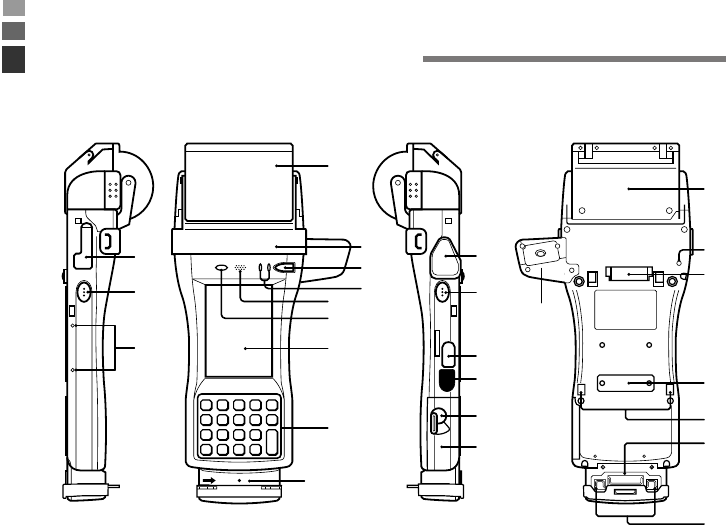
General Guide
25
3
4
5
6
7
8
9
10
1
2
24
11
12
13
14
15
16
17
18
23
19
20
18
21
22
IT-3100
*The above illustrations show a model with C-MOS Imager and
Magnetic Card Reader installed.

E-18
General Guide
1 SD Memory Card Slot
2Program Key (L)
3Roll Paper Holder
4Splash Protect Cover and Paper Cutter
5Power Key
6Indicator 1 (Left Side)
Indicator 2 (Right Side)
7 Speaker
8Brightness Sensor
9LCD Panel/Touch Screen
10 Stroke Keys
11 RS-232C Interface Connector (IT-3100M53E/M54E)
12 Program Key (R)
13 Power Jack
14 IR Port
15 Battery Pack Cover Lock Switch
16 Battery Pack Cover
17 PC Card Slot
18 Hand Strap Hook
19 14-pin Serial Interface Connector
20 Power Terminals
21 Neck Strap Hooks
22 Magnetic Card Reader (IT-3100M54E/M55E/M55U/M75E)
23 Reset Switch
24 Screen Protect Cover Mounting
25 C-MOS Imager (IT-3100M55E/M55U/M56E/M56U/M75E)
E-19
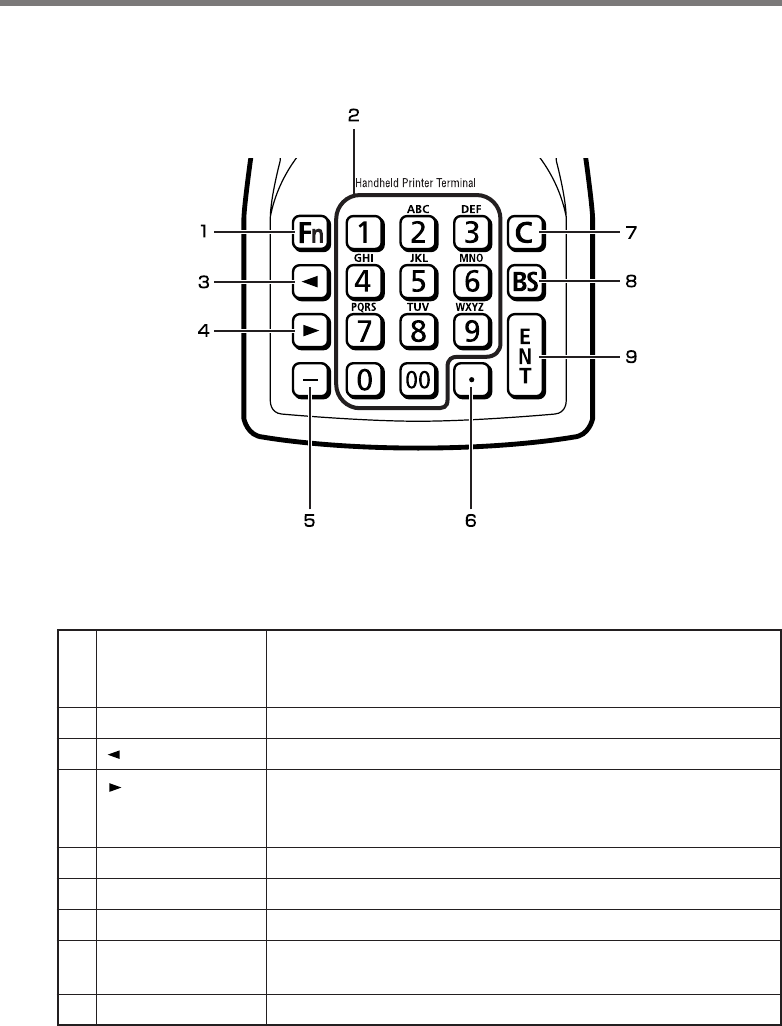
1Fn Key
2Numeric Keys
3 (Cursor Key)
4 (Cursor Key)
5-
6.
7C
8BS
9ENT
This key is used to switch the character input mode or make
various settings in combination with other keys, or start up a
pre-registered application.
These keys are used to input numbers and letters.
Moves the cursor to the left.
Moves the cursor to the right. This is also used to feed paper
when pressed after pressing the Fn key when printing paper is
loaded.
This key is pressed when inputting a hyphen or bar.
This key is pressed when inputting a decimal point.
This key is pressed when canceling an operation and input.
This key is pressed when deleting the character to the left of the
cursor.
This key is pressed when entering an input.
Key Functions
* Each numeral and symbol on the key buttons in the table above is backlit.

E-20
Replacing the Battery
Your Handheld Printer Terminal uses two types of battery: a battery pack and a memory
backup battery.
A battery pack (DT-9723LIC) is used for the main battery. A backup battery is housed
inside the Handheld Printer Terminal.
This guide uses the following terms to refer to the batteries.
Battery Pack: Rechargeable battery pack for normal operations and data storage
Backup Battery: Built-in battery for memory backup
When the battery pack power goes low, immediately charge it or replace it with a
charged battery pack.
For information how to charge battery pack, see page 35.
Replacing the Battery Pack
Important!
Always keep backup copies of all important data!
•The main battery powers normal operation and also provides power required to
maintain memory contents, while the backup battery provides backup power to
maintain memory contents. Because of this, you should not remove the main
battery while the backup battery is dead. Removing the battery pack while the
backup battery is dead causes data in the memory to be corrupted or lost. Note
that once data is lost it cannot be recovered. Always keep separate backup copies
of all important data.
•The charge of a battery pack when you purchase it may be depleted due to
testing at the factory or natural discharge during shipment and storage. Be sure
to charge the battery pack before you use it.
•The life of a battery pack is limited, and charging a battery pack causes it to
gradually lose its ability to maintain the charge. If your battery pack seems to
require charging very frequently, it probably means it is time to purchase a new one.
•A fully charged backup battery can maintain memory (RAM) contents for about
10 minutes, even when the main battery is removed.
•The backup battery achieves a full charge in about four days when the battery
pack is loaded.
Important!
•Make sure to attach the contact cover provided when removing the Battery Pack
from the Handheld Printer Terminal and storing.
•If the battery pack has been left over unused for a long period of time, the
capacity remained decreases due to spontaneous discharge or chemical
decomposition by the battery pack itself. If the battery pack fails to hold its
operating duration after it has been fully charged, replace it with a new one. The
battery pack may reach the end of its service life.
E-21
To replace the battery pack
1. Make sure that the Handheld Printer Terminal is turned off.
If the power is on, press the power key to turn it off.
2. Turn the battery pack cover lock switch
on the side of the Handheld Printer
Terminal to the “FREE” position.
3. Open the battery pack cover.
4. Remove the battery pack.
Press down the battery pack eject button
(see the arrow).
Remove the battery pack by pulling on
the tape.
5. Install a charged battery pack in the
Handheld Printer Terminal. Make sure
the battery pack is aligned correctly
when you install it.
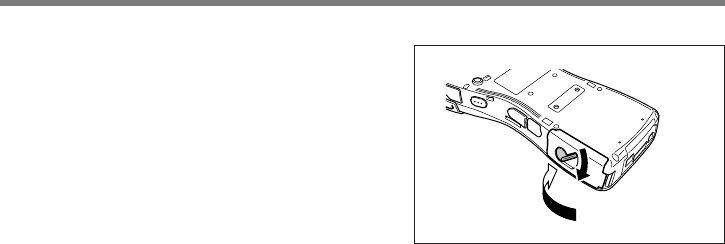
E-22
Important!
•When replacing the battery pack, make sure you do not leave the Handheld
Printer Terminal without a battery pack for more than about 10 minutes. Doing
so can cause data in the memory to be deleted.
•Never try to use other type of battery than the one that is specified for this
product.
6. Return the battery pack cover to its
original position as shown in the
illustration, and then turn the battery
pack cover lock switch to the “LOCK”
position.
Replacing the Battery
E-23
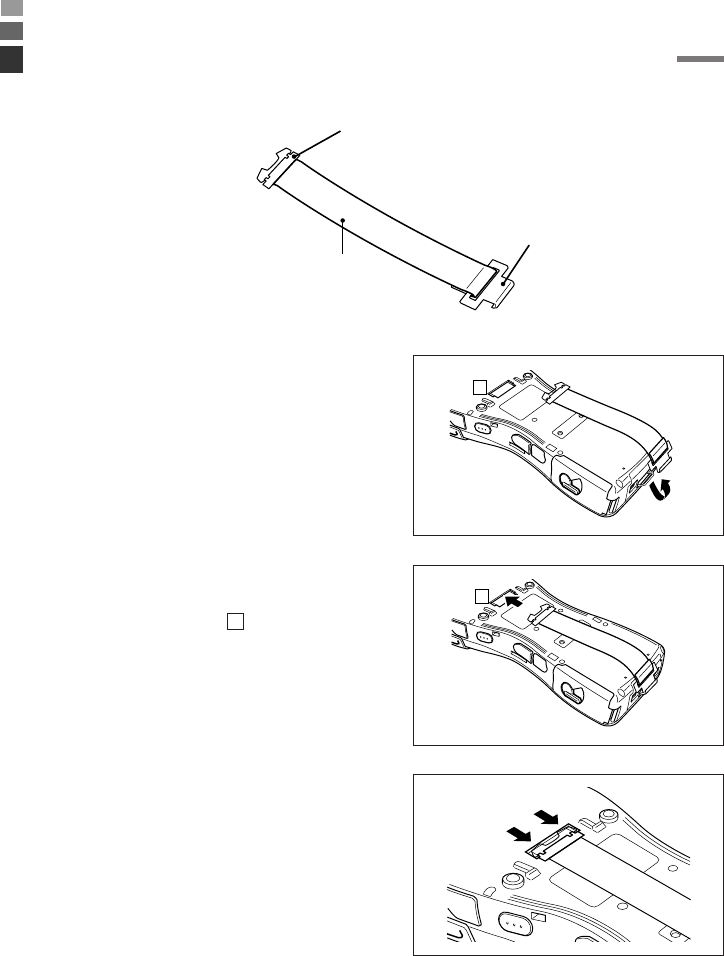
A flexible hand strap can be attached to the Handheld Printer Terminal.
Hook A
Hand Strap
Hook B
Attach the hand strap following the procedure described below.
1. Attach Hook B of the hand strap to the
hand strap hook located on the bottom of
the Handheld Printer Terminal.
2. Pull on the hand strap in the direction
shown in the illustration, and then fasten
Hook A onto hook ( ) on the back of
the Handheld Printer Terminal.
3. Fasten the wire of Hook A by inserting
into the indentation in the Handheld
Printer Terminal.
•Pull up on the center of the wire when
unfastening.
Attaching the Hand Strap
1
1
1
* The illustration shows the IT-3100M53E.
E-24
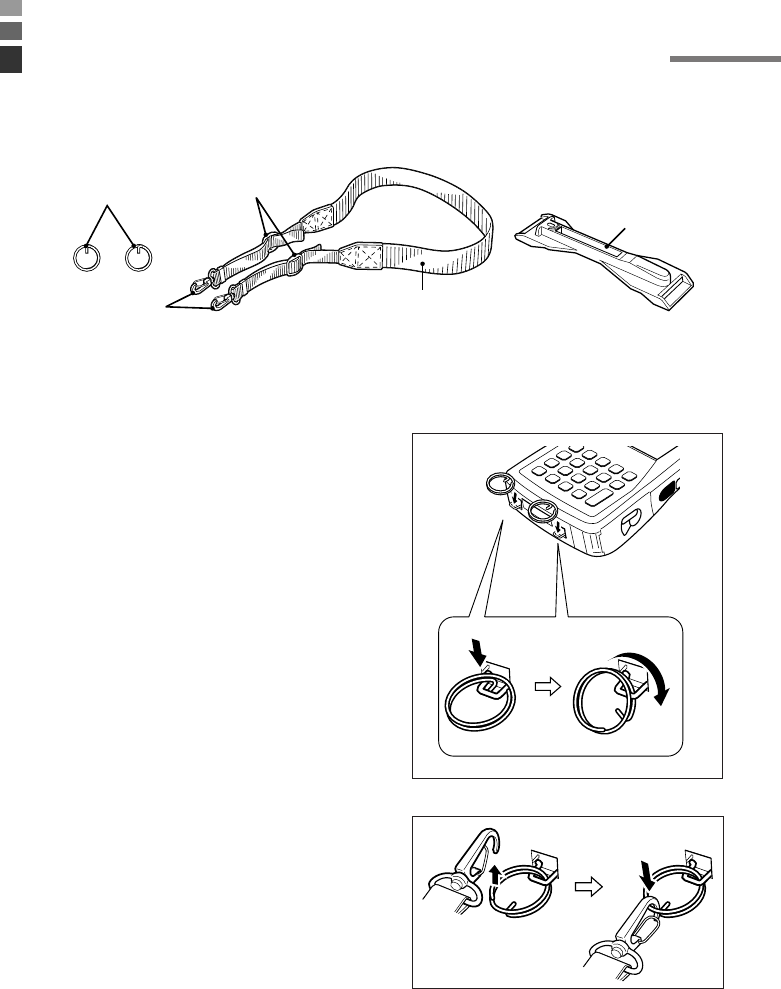
A neck strap can be attached to the Handheld Printer Terminal to keep it from being
dropped while being carried. The stylus holder provided can also be attached.
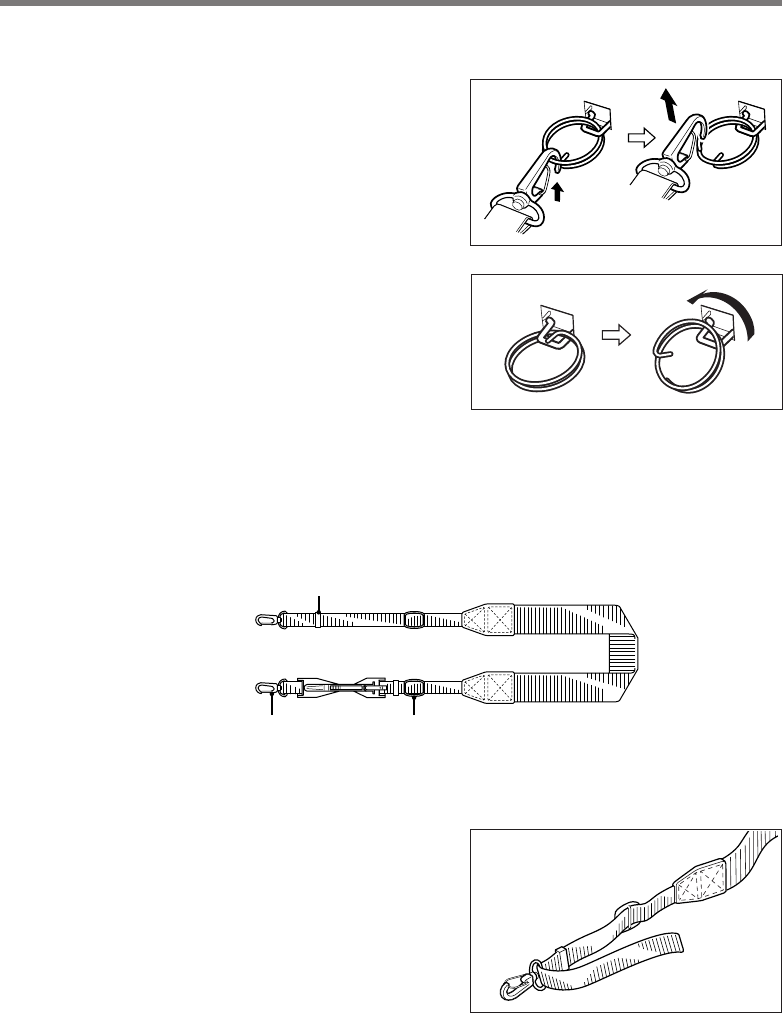
Attach the neck strap following the
procedure described below.
Attachment Procedure
1. Pull out the neck strap mounting hooks
out of each silo on the bottom of the
Handheld Printer Terminal using the tip
of stylus. Hook the protrusive part (**)
of the ring on the neck strap mounting
hook as shown in the illustration. While
slightly pushing the ring, turn the ring
until all part of it is fully hooked.
** The ring is very stiff for the first time. A
small flat screw driver is helpful by
inserting it into overlapped part of the
ring to make a room when hooking the
protrusive part.
2. Pull back the locking bar of the neck
strap mounting hook and then hook the
mounting hook onto the ring as shown in
the illustration.
Neck strap
Adjust length here
Mounting
hooks
Stylus holder
Attaching the Neck Strap
The illustration shows the IT-3100M53E.
* ; The rings give an extra mechanical strength for
the Neck Strap. The metallic hooks of the Neck
Strap can, in rare case, be worn by abrasion
induced by swinging the IT-3100 terminal
specifically when it is hung from the operator's
neck with the Neck Strap. For those who often
use the IT-3100 terminal in a hanging position, it
is recommended to use the rings to secure the
Neck Strap.
Neck strap rings*
E-25
Removal Procedure
1. Pull back the locking bar of the neck
strap mounting hook and then release
the hook from each ring as shown in the
illustration.
2. Following the attachment procedure in
reverse way, remove the neck strap rings
from each neck strap mounting hook on
the Handheld Printer Terminal and then
push back the neck strap mounting
hooks into each silo.
Attaching the Stylus Holder
The stylus holder provided can be attached to the neck strap as necessary. When
attaching the stylus holder, first remove the neck strap from the Handheld Printer
Terminal. In addition, remove the stylus from the stylus holder.
Bracket AMounting Hook C
Bracket B
Attach the stylus holder following the
procedure described below.
1. Remove the end of the strap from
Bracket A and Bracket B.
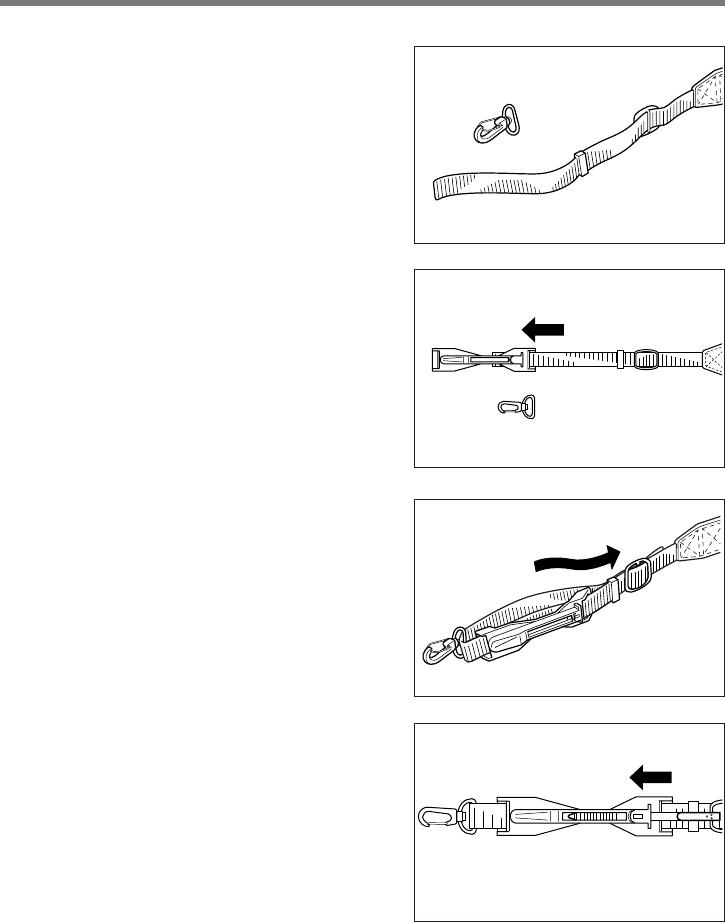
E-26
2. Remove Mounting Hook C.
3. Pass the stylus holder through the strap
as shown in the illustration.
4. Fold back the strap after passing through
Bracket C, and then fasten in the same
way it was originally fastened with
Bracket A and Bracket B.
•Do not pass the strap through the stylus
holder when folding it back.
•Place the stylus in the stylus holder after
first re-attaching the neck strap to the
Handheld Printer Terminal.
Important!
•Do not swing the Handheld Printer Terminal with the neck strap.
Attaching the Neck Strap
E-27
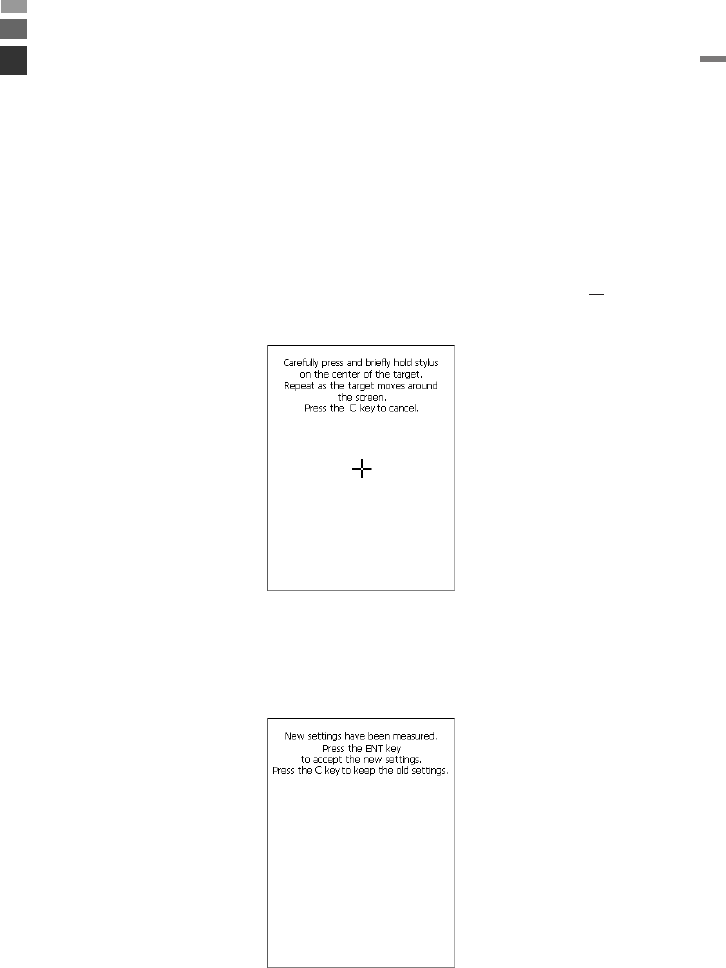
Calibrating Touch Screen Alignment
Whenever you feel that touch screen response is poor or that the operations being
executed do not match the location you are tapping on the touch screen, perform the
following operations to calibrate the alignment of the touch screen.
•Press the “Fn” key and then make sure that “F” appears in the lower right corner of
the screen. If the “F” appears, press the “4” key.
*The following screen can also be displayed by navigating to Start → Settings →
Stylus and Calibration tab.
•Press the stylus against the center of each target mark (total of five marks) as
indicated on the screen. The screen shown below appears after you press stylus
against the target at five different locations.
Configuring Handheld Printer Terminal Settings
•Press the ENTER key or tap anywhere on the touch screen.

E-28
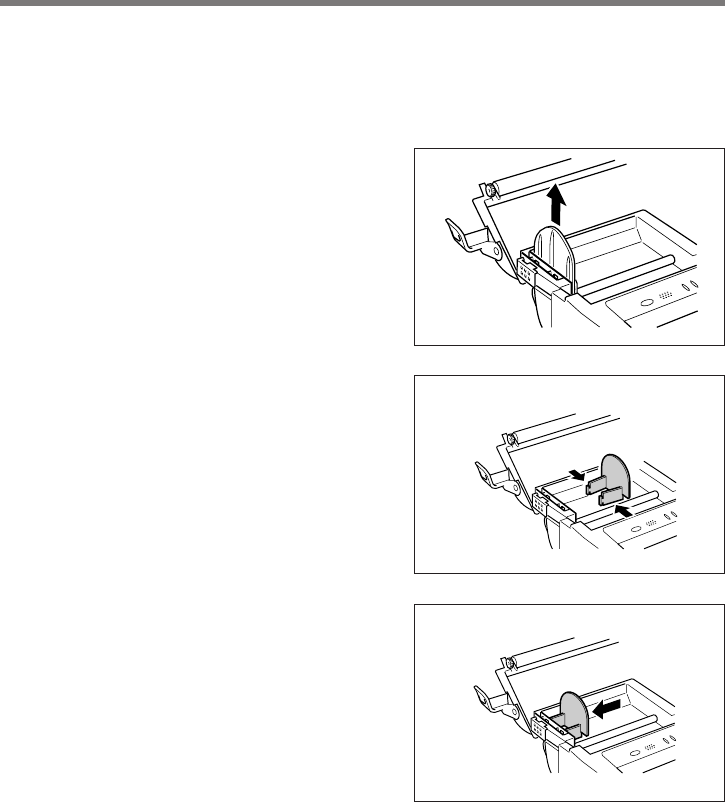
The printer can print on roll paper (80 mm or 58 mm wide)* or 80 mm wide formed
sheet paper. When printing on formed sheet paper, use the paper holder (HA-B93PH)
sold separately.
When Using Roll Paper
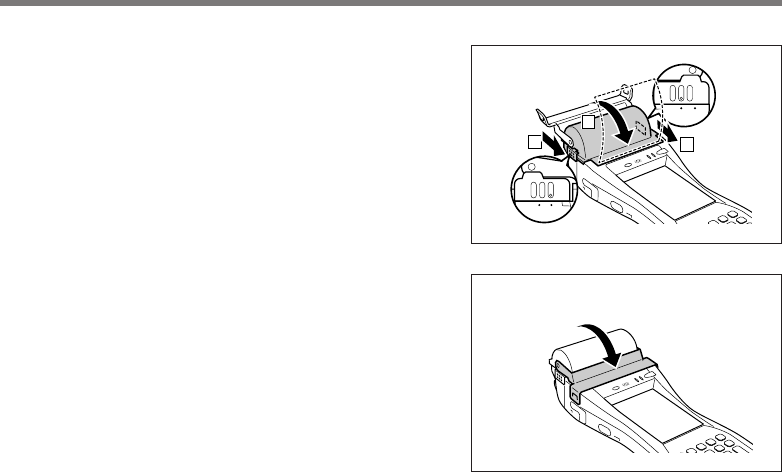
Installing the Roll Paper
1. Check that the power is off. If the power is on, always make sure to turn it off by
pressing the power key.
2. Press the ridged ( ) portions ( ) of
the splash protect cover while spreading
apart the locks on the left and right sides
( ) to disengage them as shown in the
illustration followed by opening the
splash protect cover ( ).
3. Slide the lock knobs on the left and right
sides of the roll paper holder as shown
in the illustration to align at the FREE
position ( ), and then push up the
ridged ( ) portion ( ) to open.
•Please note that the positions of the
lock knobs on the left and right sides
are different.
4. Peel off the seal from the roll paper and
install as shown in the illustration.
1
2
3
1
2
Using the Printer
1
3
2
2
1
1
2
1
LOCK FREE
LOCKFREE
*IT-3100M75E prints on 82.55mm width roll paper only.
E-29
5. Close the roll paper holder, slide the
lock knobs on the left and right sides as
shown in the illustration to align at the
“LOCK” position to lock the roll paper
holder in position, and then tear off the
protruding roll paper.
•Please note that the positions of the
lock knobs on the left and right sides
are different.
6. Close the splash protect cover as
necessary.
•Open the splash protect cover when
printing with the printer.
•Close the splash protect cover when
using outdoors in the rain and so forth.
Important!
•Always print with the roll paper properly installed. Printing without properly
installing roll paper can damage the printer.
•If the roll paper should happen to become jammed in the printer, open the roll
paper holder by following the procedure described in steps 1 and 3 of the
procedure for “Installing the Roll Paper”, and then remove the jammed paper.
Be careful not to touch the printer at this time since it may have become hot
during the course of printing.
•The printer is not protected against splashing water when the splash protect
cover is closed with roll paper present outside the roll paper holder.
•The drip-proof of the splash protect cover is not sufficient if the cover is not
installed.
•If the end of the roll paper has become curled making it difficult to install the
paper, first flatten out the paper by bending it back in the opposite direction
before installing.
LOCK FREE
2
1
2
LOCKFREE
E-30
Attaching the 58 mm Paper Width Adjuster
Attach the 58 mm Paper Width Adjuster* inside the roll paper holder when using 58
mm wide roll paper. Refer to the procedure described in “Installing the Roll Paper” for
information on opening and closing the roll paper holder.
1. Remove the 80 mm Paper Width
Adjuster as shown in the illustration.
•Store the 80 mm Paper Width Adjuster
in a safe place after it has been
removed.
2. Press the attachments of the 58 mm
Paper Width Adjuster from the left and
right sides as shown in the illustration.
3. Insert the attachment of the 58 mm
Paper Width Adjuster into the mounting
holes inside the left side of the roll paper
holder to lock in position.
Important!
•Always make sure to attach the 58 mm Paper Width Adjuster when using 58
mm wide roll paper. Failure to attach the 58 mm Paper Width Adjuster may
cause the paper to jam or the printer to malfunction.
•58 mm wide roll paper can only be used when the installed application is for use
with 58 mm wide paper only.
*Not available for IT-3100M75E.
Using the Printer
E-31
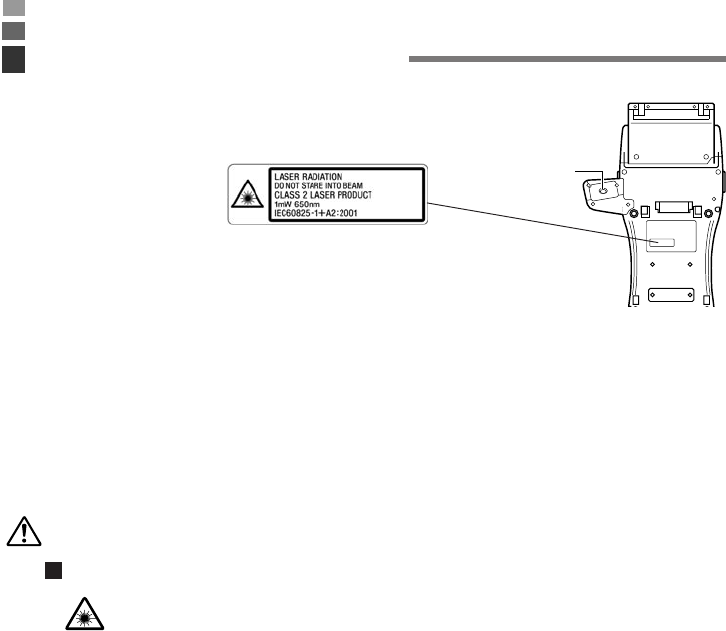
•This label is a warning label for Class 2 laser products that comply with
IEC60825-1+A2:2001
CAUTION
•Use of controls or adjustments or performance of procedures other than those
specified herein may result in hazardous radiation exposure.
•The laser light emitted by the C-MOS Imager has a maximum output of less
than 1 mW and a wavelength of 650 nm.
Warning!
Never look directly into the laser light.
•This product with the integrated laser scanning module scans bar codes
using laser light. Never look directly into the laser light or shine the laser
light into the eyes.
Laser light is emitted
from this port
IT-3100M55U/M56U/
M55E/M56E
Warning Label

E-32
The Magnetic Card Reader comes as standard with IT-3100M54E/M55E/M55U/M75E.
Only use cards that are compatible with the ISO standards. The procedure for reading
cards is described below.
1. Remove the cover as shown in the illustration.
2. Insert the card all the way into the reader as shown in the illustration, and steadily
pass the card through the reader in the direction of the arrow.
Precautions During Use
•Cards may not be able to be read if they are passed through the reader rapidly.
•A reading error may occur if the speed at which the card is passed through the
reader changes suddenly.
•Do not allow magnets to come in close proximity to the magnetic card since this
can prevent data on the card from being read. In addition, do not stack
magnetic cards on top of each other.
•Cards that have been excessively misshaped or bent may not be able to be read.
•Soiling of the magnetic strip may make it difficult to read the card. If a card has
become soiled, wipe with a clean and soft cloth.
•Regularly clean the magnetic card reader by passing a cleaning card through
the reader to prevent excessive friction with cards. When using in a location
where there are low levels of dust, clean once a week or about once every 500
passes through the card reader.
•Install the cover when not using the magnetic card reader. The drip-proof of the
magnetic card reader is not sufficient if the cover is not installed.
Magnetic Card Reader
E-33
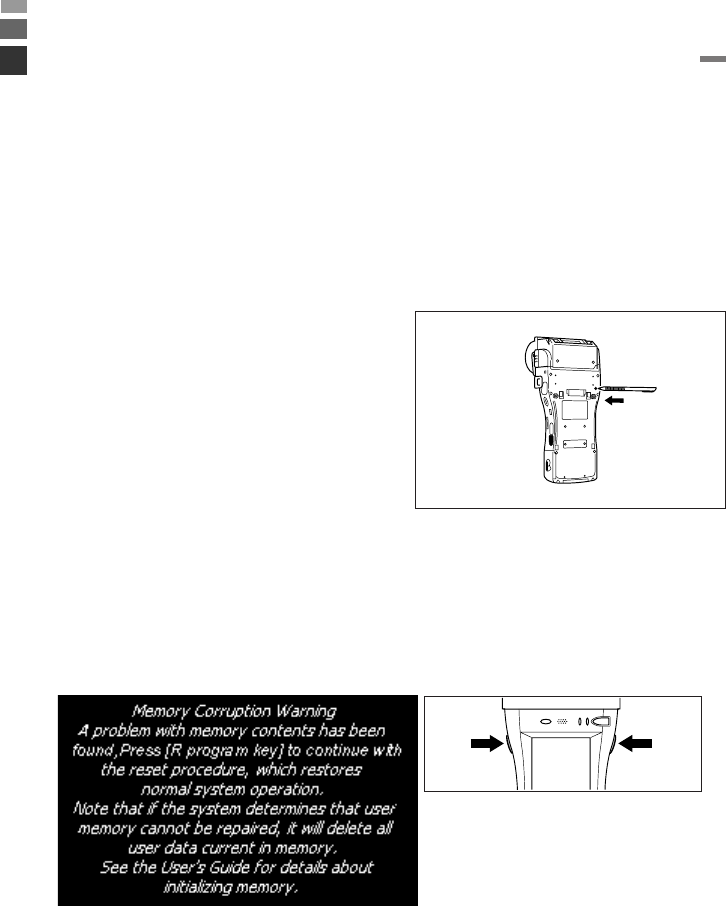
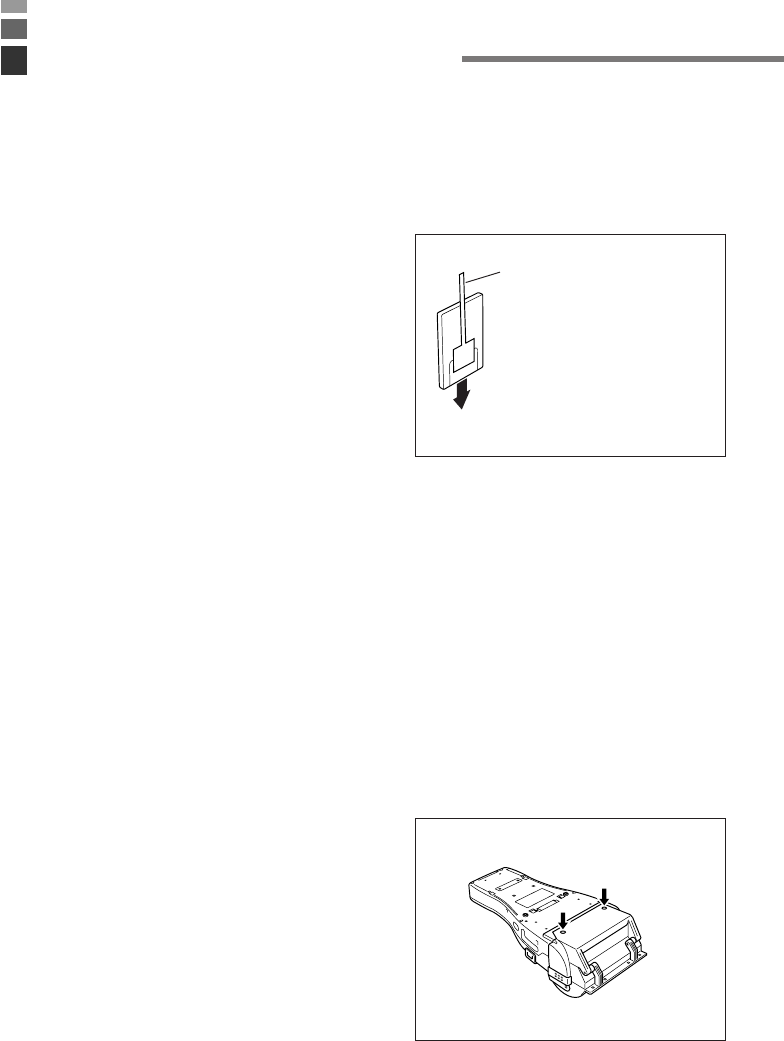
Resetting the Handheld Printer Terminal is the same as restarting a computer.
Performing a reset causes all unsaved inputs and edits to be lost, but data that is already
stored in the memory as well as all settings should be unaffected.
Use reset to restore normal operation whenever the Handheld Printer Terminal operates
abnormally due to misoperation or some other reason.
Use the stylus to press the reset switch
on the back of the Handheld Printer
Terminal.
This starts the reset operation.
If reset does not find a memory problem
The Handheld Printer Terminal restarts, and normal operation is restored.
If reset finds a memory problem
A message like the one shown below appears on the display when the reset operation
discovers a memory problem.
When this message appears, press the program key (R) to continue with the reset
operation. Note, however, that reset may not be successful depending on the condition
of the memory. In this case, perform the full reset operation described on the next
page.
the program
key (R)
the program
key (L)
Resetting the Handheld Printer Terminal
E-34
Performing a Full Reset (Initialization)
Performing a full reset initializes memory. This means that all data stored in the
memory (RAM) is deleted and all the settings are returned to their initial factory
settings.
Perform a full reset whenever any one of the following conditions exists.
•When you want to delete all memory contents and return the settings to their initial
factory settings.
•When you are no longer able to use the Handheld Printer Terminal because you
forgot your password.
•When the Handheld Printer Terminal does not operate normally due to a memory
problem.
•When the message “A problem with memory contents has been found. ...” appears.
To perform a full reset
Important!
Performing a full reset deletes all data currently stored in the memory (RAM). If
possible, backup data of the Handheld Printer Terminal to a computer, Flash
Memory, a memory card, or some other medium before performing a full reset.
1. The message shown below appears on the display when the reset switch is pressed
for about 1 second with the stylus while simultaneously pressing the power key and
cancel key.
•
To cancel the full reset operation, press the program key (L) instead of the program key (R).
2. Press the program key
(R)
. This causes the message shown below to appear.
•
To cancel the full reset operation, press the program key (L) instead of the program key (R).
3. Press the program key (R) again.
•Full reset is performed, all data in the memory (RAM) are erased and the start-up
screen is displayed.
the program
key (R)
the program
key (L)
the program
key (R)
the program
key (L)
Resetting the Handheld Printer Terminal
E-35
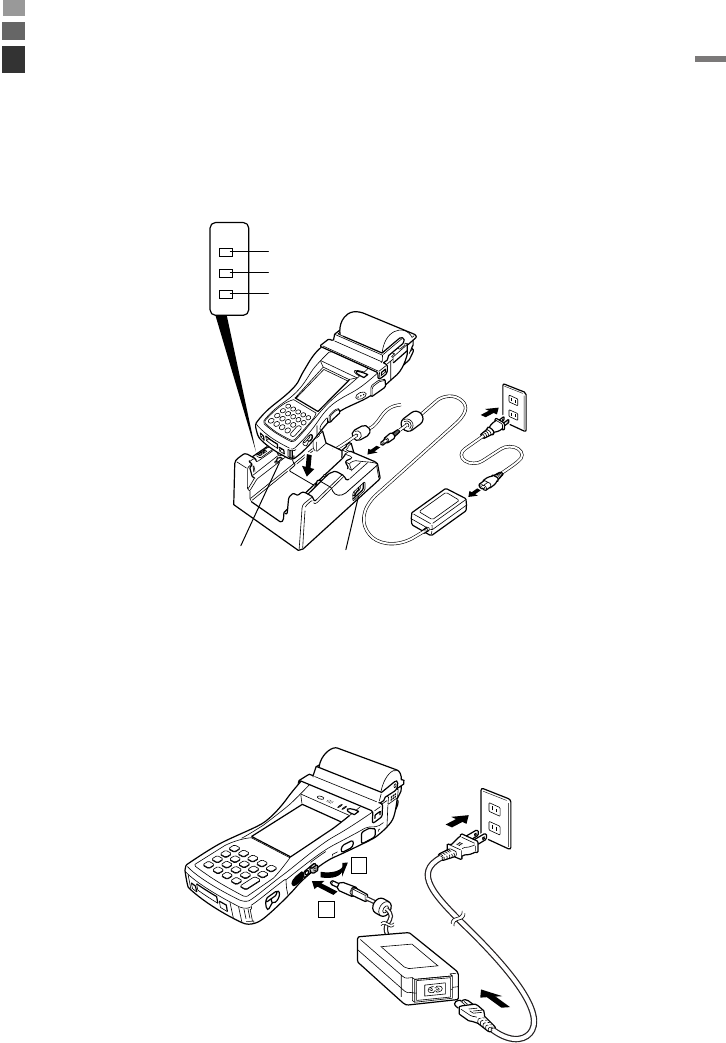
Charging the Battery Pack
The following two methods, “Using the Cradle” and “Using the AC Adaptor (AD-
S10095AE/AU)”, show how to charge the battery pack. Before starting, the battery
pack must be in the Handheld Printer Terminal.
Using the Cradle
POWER
DATA
LINE
System Status Indicator Lamp
Power indicator Lamp
Communication Indicator Lamp
Power contacts Power switch
1
2
Status of Indicator 1 on IT-3100
Red: Charging
Green: Charging complete
Charge Period: Approximately 8 hours
Using the AC Adaptor (AD-S10095AE/AU)
Status of Indicator 1 on IT-3100
Red: Charging
Green: Charging complete
Charge Period: Approximately 8 hours
E-36
PC card compatible with the PCMCIA(Type I/II) standard can be installed in the PC
Card slot on the Handheld Printer Terminal. Insert a PC card according to the
procedure described below.
Attaching the PC Card Removal Tape to a PC Card
There are some PC cards that may be
difficult to remove from the PC card slot
once they have been inserted. In the case
of such PC cards, attach the PC card
removal tape provided before inserting the
PC card.
Important!
When inserting a CF card and so forth using the PC Card Adapter, always make
sure to attach the PC card removal tape to the PC Card Adapter. If the PC card
removal tape is mistakenly attached to the CF card and so forth, only the CF card
will come out when the PC Card Adapter is attempted to be removed, preventing
the PC Card Adapter from being able to be removed.
Inserting a PC Card (When Using the Roll Paper Holder)
1. Check that the power is off. If the power is on, always make sure to turn it off by
pressing the power key.
2. Turn over the Handheld Printer Terminal.
3. Loosen the two screws shown in the
illustration (the screws cannot be
removed off).
Using PC Cards
Direction of insertion
PC card removal tape
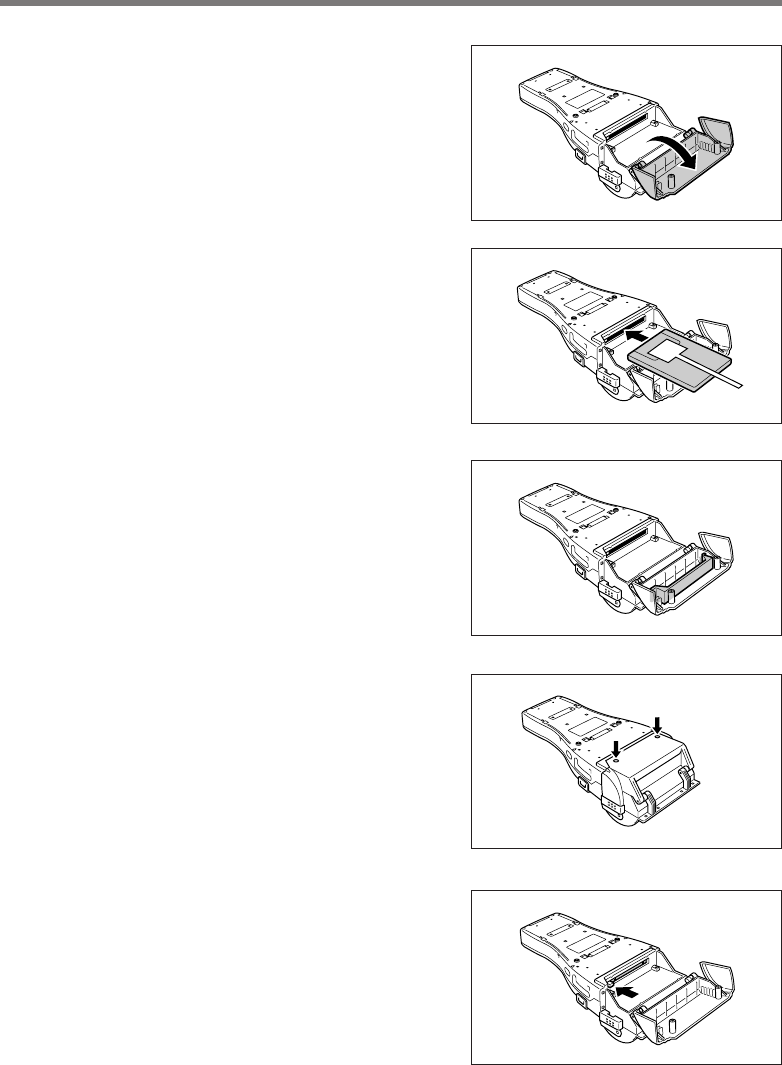
E-37
4. Open the cover (PC card slot cover) as
shown in the illustration.
5. Insert a PC card having PC card removal
tape attached. Insert the PC card all the
way in with the top of the card facing
towards the top of the Handheld Printer
Terminal.
Fold up the end of the PC card removal
tape so that it does not get caught in the
way when closing the cover.
6. Attach the PC Card Holder to lock the
end of the PC card and prevent it from
coming out due to impacts and so forth.
Decide on the type of PC Card Holder
Fixer (three types are available) and the
orientation and attachment position of
the holder according to the location of
the end of the PC card.
7. Close the cover (PC card slot cover) and
fasten with the two screws.
Removing a PC Card
Press the eject button on the left side of PC
card slot with the stylus as shown by the
arrow, and pull out the PC card while
holding onto the end of the PC card
removal tape.
E-38
1
2
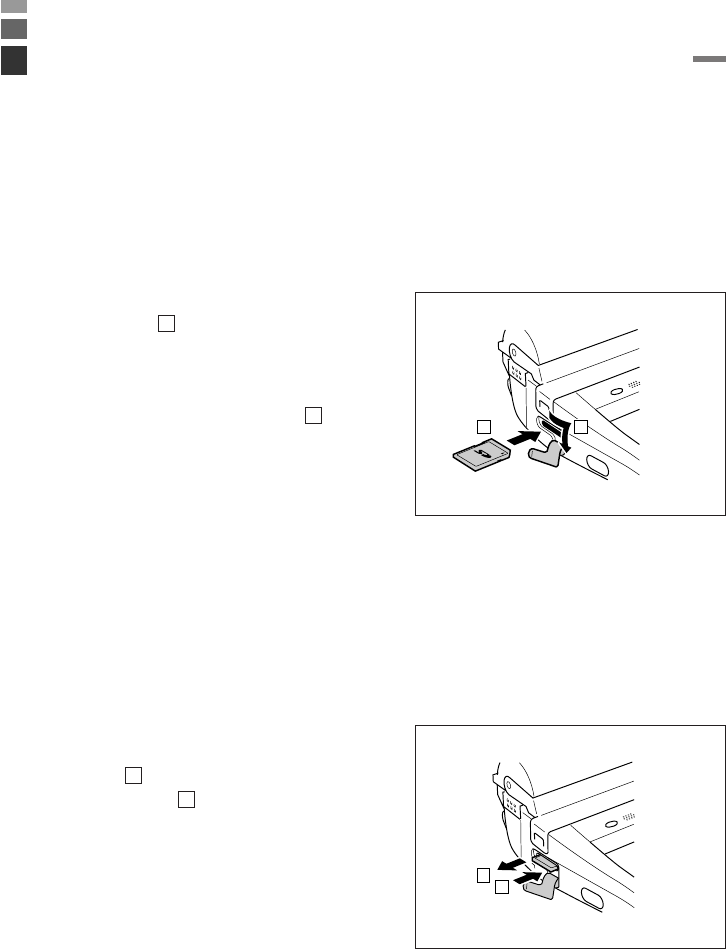
SD memory card can be installed in the SD Memory Card slot on the Handheld Printer
Terminal. Insert (or remove) an SD memory card according to the procedure described
below.
Inserting an SD Memory Card
1. Check that the power is off. If the power is on, always make sure to turn it off by
pressing the power key.
2. Open the cover of the SD memory
card slot ( ) and insert an SD
memory card all the way in until the
top of the SD memory card aligns
with the entrance of the slot of the
Handheld Printer Terminal ( ).
3. Close the cover of the SD memory card slot.
Removing an SD Memory Card
1. Check that the power is off. If the power is on, always make sure to turn it off by
pressing the power key.
2. Open the cover of the SD memory
card slot and press on the SD memory
card ( ). The SD memory card is
pushed out ( ).
3. Pull out the SD memory card and close the cover of the SD memory card slot.
1
2
Using SD Memory Cards
21
1
2

CASIO COMPUTER CO., LTD.
6-2, Hon-machi 1-chome
Shibuya-ku, Tokyo 151-8543, Japan
Printed on recycled paper.
PN410433-001
MO0806-000501A Printed in Japan