Casio Computer XJH1650 DATA PROJECTOR User Manual XJ H1600 XJ H1650 XJ ST145 XJ ST155
Casio Computer Co Ltd DATA PROJECTOR XJ H1600 XJ H1650 XJ ST145 XJ ST155
UserManual.wiki
>
Casio Computer
>
XJH1650 User Manual
>
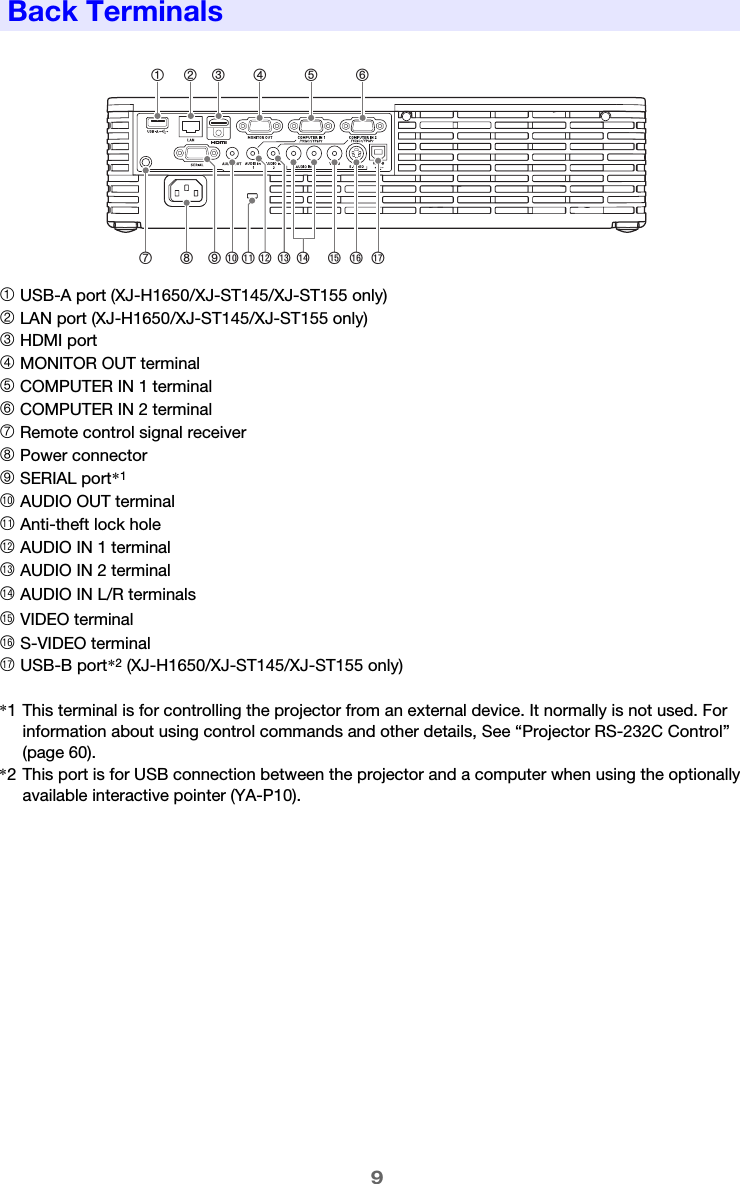
User Manual 1
Contents
1.
User Manual 1
2.
User Manual 2
User Manual 1
Navigation menu
Upload a User Manual
Namespaces
Wiki Guide
HTML
PDF
Info
Views
User Manual
Discussion / Help
Navigation
![3ContentsAbout this manual... ...............................................................................5Projector Overview ......................................................... 6Projector Features and Main Functions .................................................6Remote Controller and Projector Keys...................................................8Back Terminals.......................................................................................9Operation During Projection ........................................ 10Selecting the Input Source ...................................................................10To select a different input source .............................................................................. 103D Input Mode ........................................................................................................... 11Horizontal Flipping in the 3D Input Mode .................................................................. 12Image Operations During Projection ....................................................13Adjusting Image Brightness....................................................................................... 13Selecting the Color Mode .......................................................................................... 14Zooming an Image..................................................................................................... 14Momentarily Cutting Off the Input Source Image ...................................................... 15Freezing an Image...................................................................................................... 15Displaying a Pointer in the Projected Image.............................................................. 16Changing the aspect ratio of the projected image .................................................... 17Adjusting the Volume Level..................................................................18To adjust the volume level ......................................................................................... 18To mute the audio...................................................................................................... 18Eco Mode (Power Saving, Low Noise) .................................................19To select the Eco Mode............................................................................................. 19Using the [FUNC] Key ..........................................................................20](https://usermanual.wiki/Casio-Computer/XJH1650.User-Manual-1/User-Guide-1490831-Page-3.png)
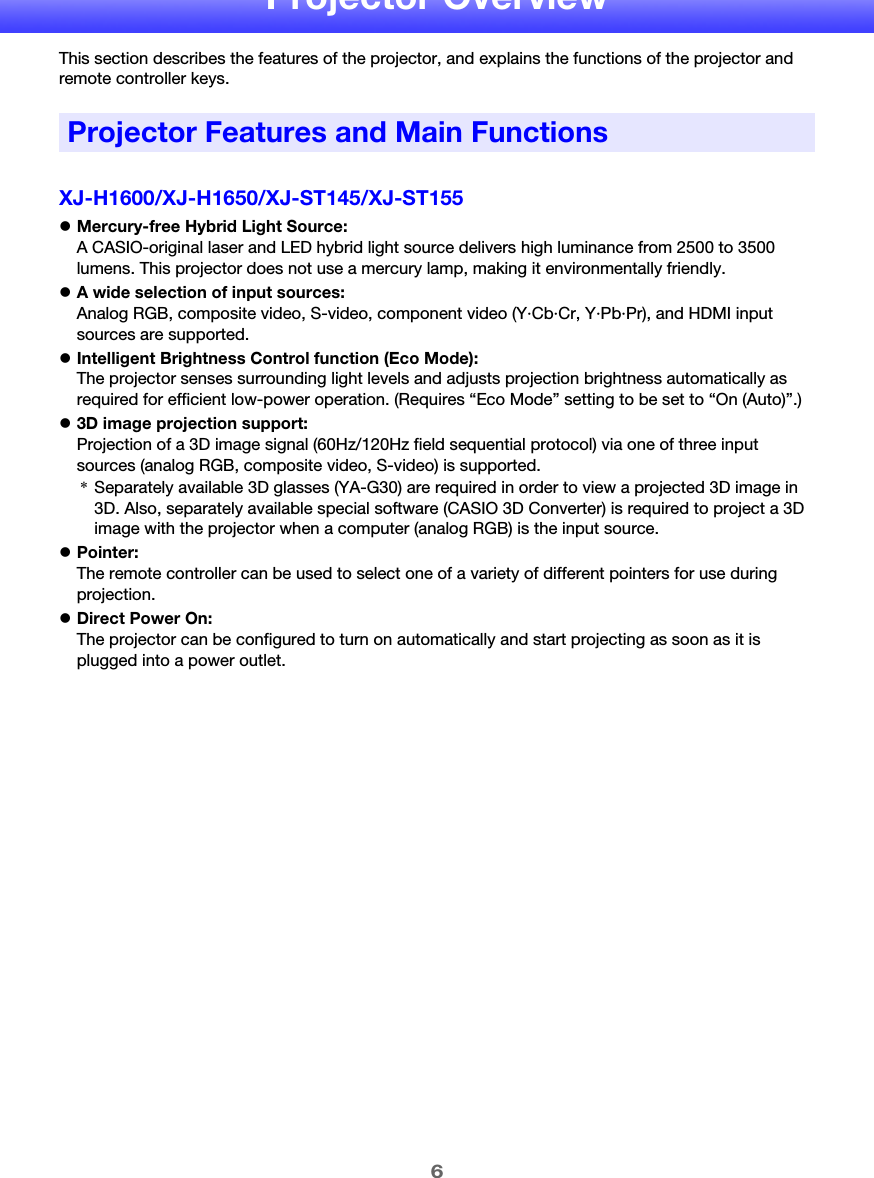
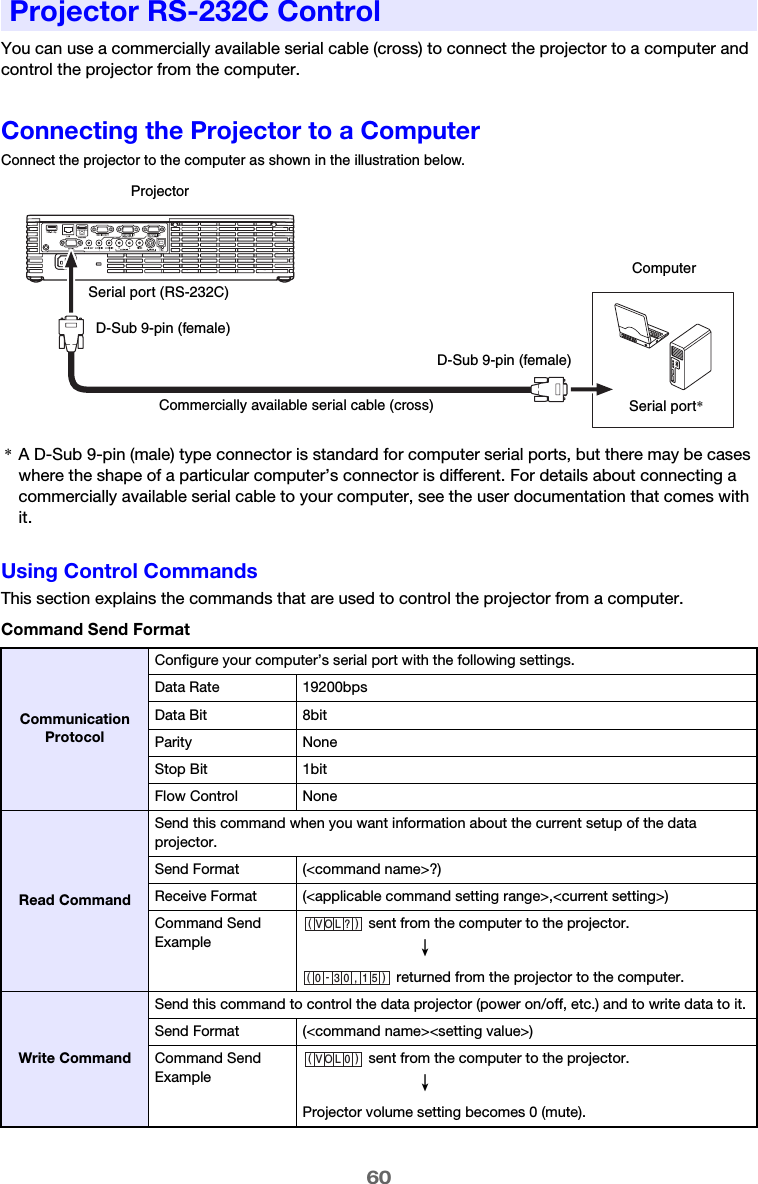
![8Operations in this manual are presented based on the remote controller that comes with the projector. Major operation keys are also provided on the projector unit, so the most of the same procedures can also be performed directly on the projector.Remote Controller KeysThe remote controller does not come with batteries loaded. You need to load the two supplied batteries before use.Important!To avoid running down the batteries, store the remote control unit so its keys are not pressed inadvertently.Projector Keys and IndicatorsRemote Controller and Projector KeysRemote control signal emitterCLASS 1 LED PRODUCTCursor keys (S/T/W/X)[ENTER] key ([STYLE] key)[D-ZOOM +] [D-ZOOM –] keys[KEYSTONE +] [KEYSTONE –] keys[POINTER] key[FUNC] key[AUTO] key[BLANK] key[FREEZE] key[COLOR MODE] key[VOLUME] key[BRIGHT] key ([O] key)[ECO] key ([f] key)[ASPECT] key ([Z] key)[INPUT] key[MENU] key[P] (Power) key[ESC] keyTEMP indicatorLIGHT indicator[ENTER] keyPOWER/STANDBY indicator[MENU] key[P] (Power) key [ESC] key[INPUT] key Cursor keys (q/w/U/I)[AUTO] key](https://usermanual.wiki/Casio-Computer/XJH1650.User-Manual-1/User-Guide-1490831-Page-8.png)
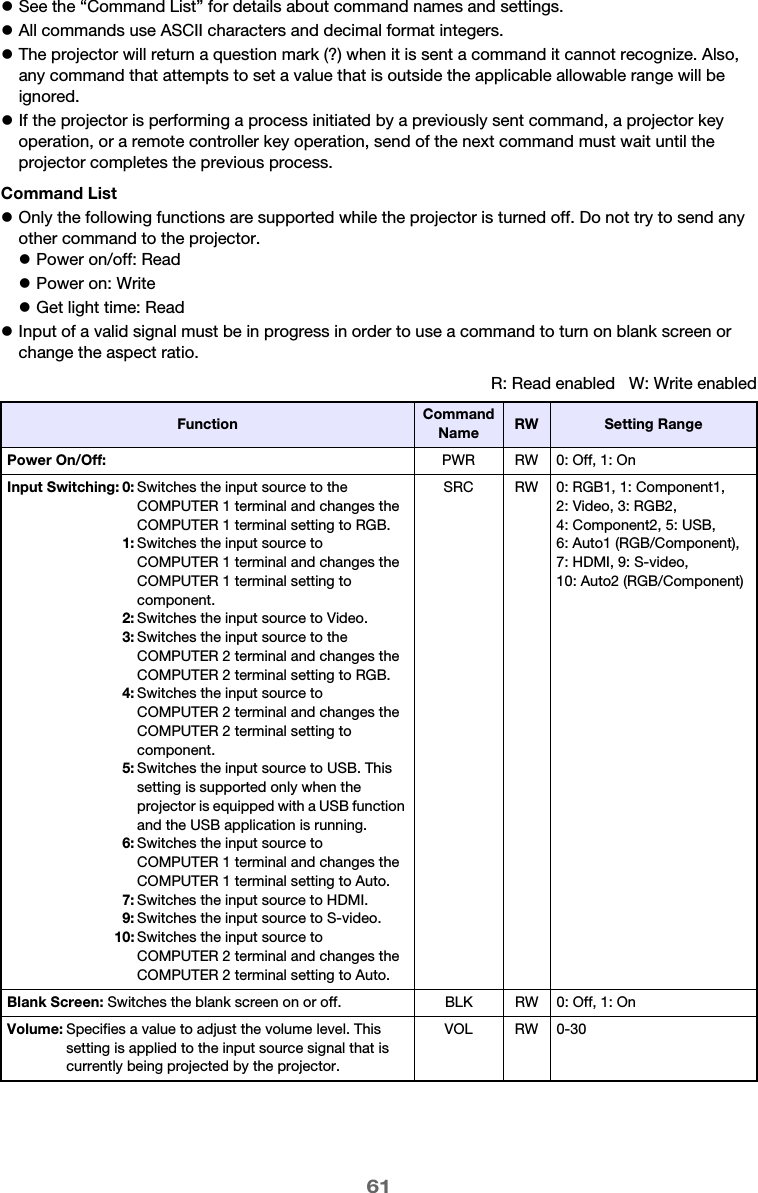
![10Operation During ProjectionTurning on the projector initially causes the same input source that was selected the last time it was turned off to be selected.To select a different input source1.Press the [INPUT] key.zThis displays the input source selection screen.2.Select either the Normal Input Mode or 3D Input Mode depending on the type of image you want to project.zFor details about the 3D Input Mode, see the explanation in the following section.3.Use the [T] and [S] keys to select the name of the input source you want to select and then press the [ENTER] key.zThe name of the input source you select appears in the upper right corner of the projection screen for a few seconds.zThe message “No signal input.” will appear if no input signal can be selected.NoteThe table below shows how the input source selection affects the projector’s MONITOR OUT terminal and speaker (or AUDIO OUT terminal)*1 output signals.Selecting the Input SourceWhen this input source is selected:The video input signal from this terminal is output to the MONITOR OUT terminal:The audio input signal from this terminal is output to the speaker (or AUDIO OUT terminal):Computer 1 COMPUTER IN 1*2AUDIO IN 1Computer 2 COMPUTER IN 2*2AUDIO IN 2S-video *2 *3AUDIO IN L/RVideo *2 *3AUDIO IN L/RHDMI *2 *3HDMIUSB *2 *3USB*1 Audio is output from either the speaker or AUDIO OUT terminal in accordance with the setup menu “Option Settings 2 J Audio Output” setting.*2 Output is proper only when the input signal is an RGB signal. Output is not guaranteed when the input signal is a component signal.*3 The video input signal is output from either Computer 1 or Computer 2, in accordance with the last selected input source (COMPUTER IN 1 terminal or COMPUTER IN 2 terminal). For example, even if the input source is switched from Computer 1 to S-video, the MONITOR OUT terminal continues output the video input signal from COMPUTER IN 1.](https://usermanual.wiki/Casio-Computer/XJH1650.User-Manual-1/User-Guide-1490831-Page-10.png)
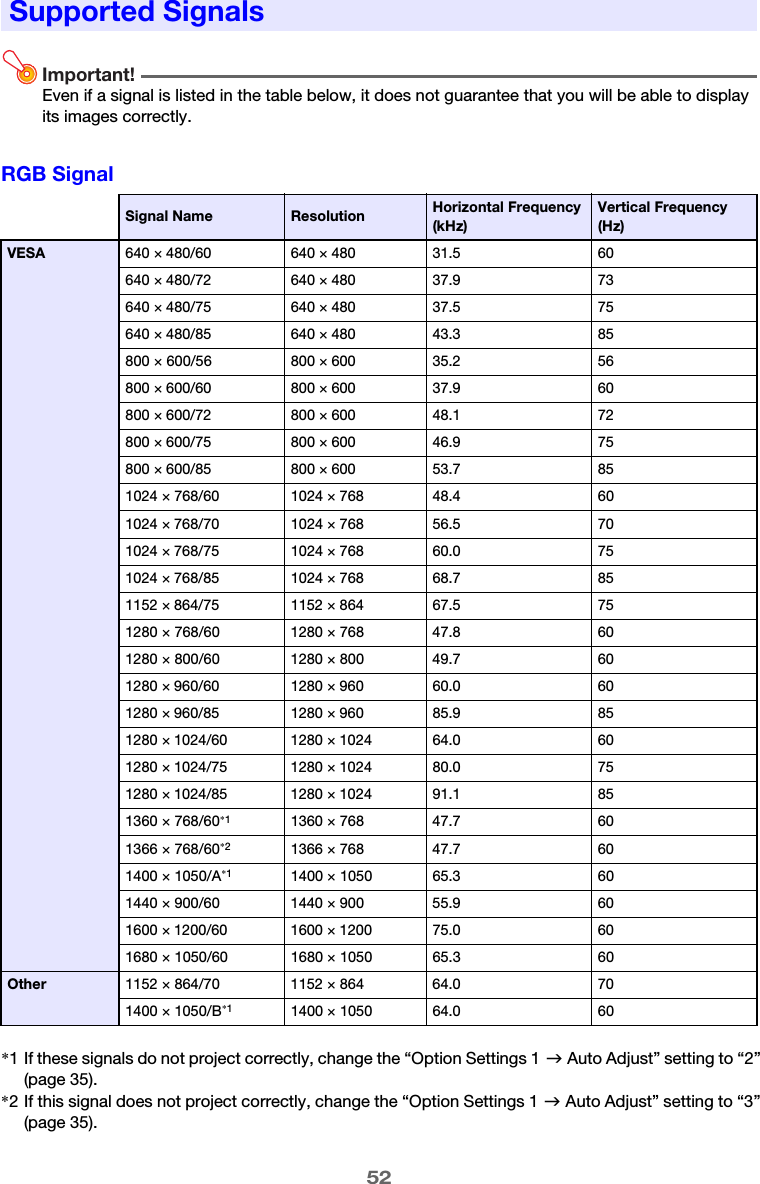
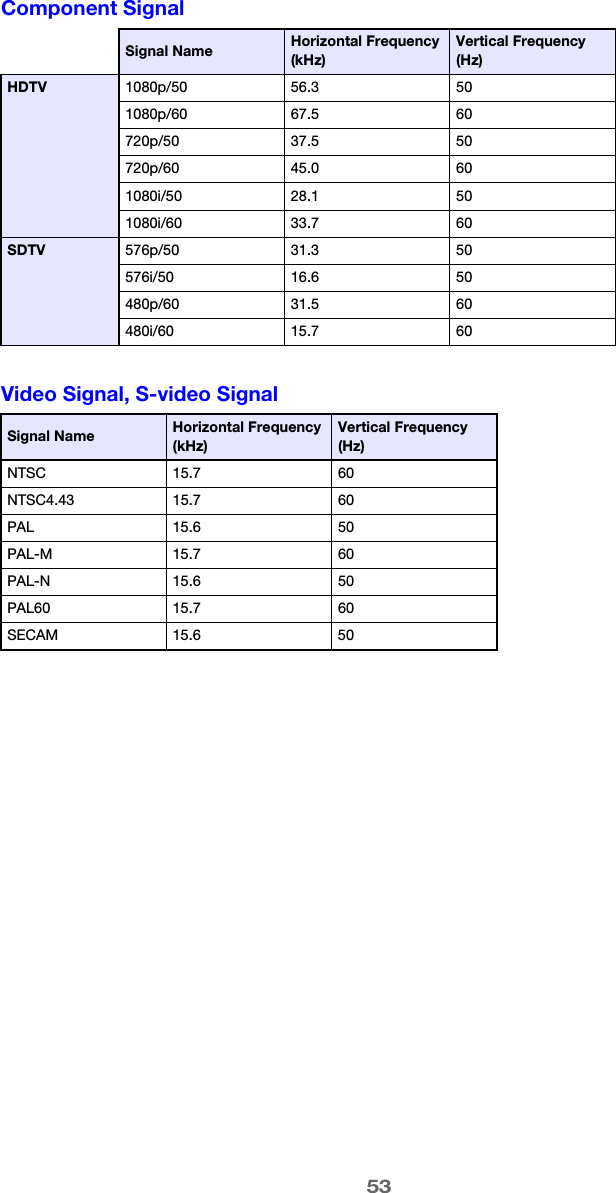
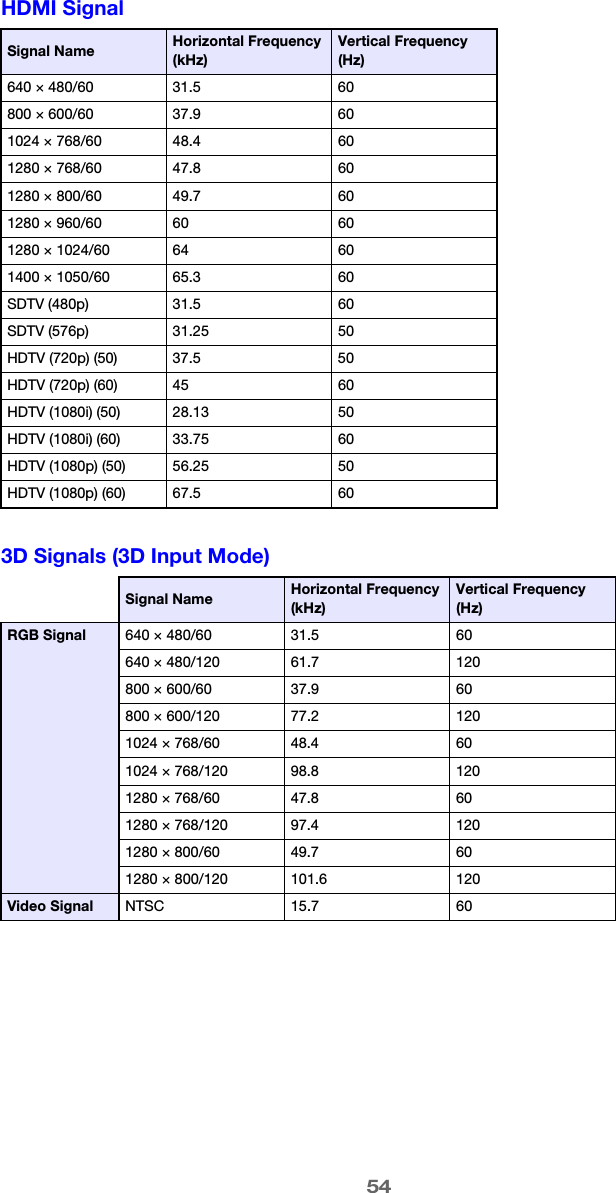
![113D Input ModeYour projector supports projection of 3D images. To project a 3D image, first enter the projector’s 3D input mode, and then select the input source.Important!zSeparately available 3D glasses (YA-G30) are required in order to view a projected 3D image in 3D.zSeparately available special software (CASIO 3D Converter) is required to project a 3D image with the projector when a computer (analog RGB) is the input source.The input sources described below can be selected for projection in the 3D Input Mode.NoteSee “3D Signals (3D Input Mode)” (page 54) for a list of 3D image signals supported by this projector.Entering the 3D Input Mode1.Press the [INPUT] key to display the input source selection screen.2.Select Computer 1 (RGB), Computer 2 (RGB), S-video, or Video as the input source.3.Use the [T] and [S] keys to move the highlighting to “To 3D input mode” and then press the [ENTER] key.zThis enters the 3D input mode and closes the input source selection screen.Important!zYou cannot select HDMI or USB as the input source in the 3D input mode. To use either of these input sources, change the input source setting back to normal input mode.zWhen Computer 1 (or Computer 2) is selected as the input source in the 3D input mode, a component video signal input through the projector’s COMPUTER IN 1 (or COMPUTER IN 2) terminal is treated as an RGB signal resulting in abnormal image projection.zExcept when using the projector for 3D image projection, you should normally leave it in the normal input mode.Input Source Projection ConditionsComputer (Analog RGB) zAny of the following types of 3D image data played back using separately available special software (CASIO 3D Converter).– 2D image file converted to a 3D image file using CASIO 3D Converter– Side-by-side 3D format fileszSignal with 60Hz/120Hz vertical scan frequencyComposite Video, S-video zField sequential 3D format files recorded with field sequential DVD software, etc.zSignal with 60Hz vertical scan frequency](https://usermanual.wiki/Casio-Computer/XJH1650.User-Manual-1/User-Guide-1490831-Page-11.png)
![12Returning to the Normal Input Mode from the 3D Input Mode1.Press the [INPUT] key to display the input source selection screen.2.Use the [T] and [S] keys to move the highlighting to “To normal input mode” and then press the [ENTER] key.zThis enters the normal input mode and closes the input source selection screen.Horizontal Flipping in the 3D Input ModeIn side-by-side 3D, a full frame consists of two halves on the left and right for each eye. In rare cases, the left and right images may be reversed, which causes a loss of 3D depth. If this happens, try using the following procedure to swap the left and right images with each other.To swap the left and right imagesIn the 3D input mode, press the [ENTER] key.](https://usermanual.wiki/Casio-Computer/XJH1650.User-Manual-1/User-Guide-1490831-Page-12.png)
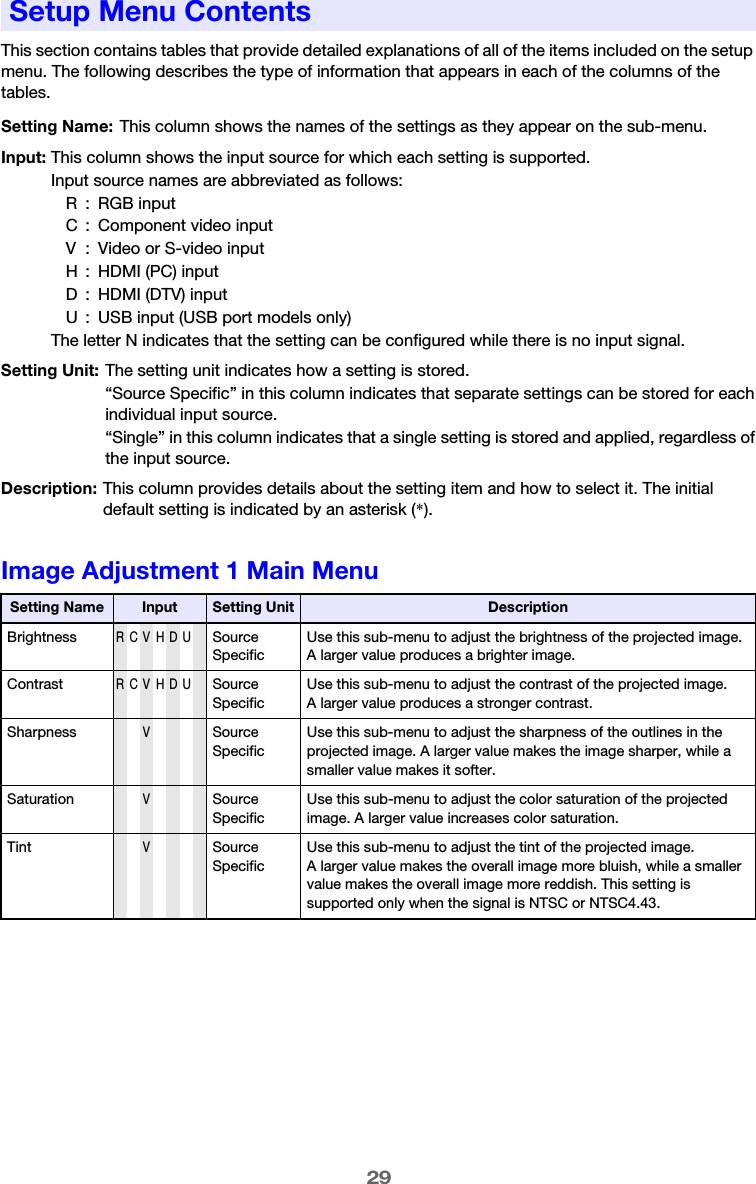
![13You can perform the following operations while projecting an image.zImage brightness adjustmentzColor mode selectionzImage zoomingzMomentary cut off of the input source image and projection of a black or blue screen, or a logozImage freezezPointer display in the projected imagezAspect ratio switchingAdjusting Image BrightnessNote(for USB port model users)Use the setup menu (page 21) to adjust image brightness when the input source is an external device connected to the USB-A port.To adjust image brightness1.Press the [BRIGHT] key.zThis displays the brightness adjustment window.2.Use the [W] and [X] keys to adjust image brightness.3.To hide the window, press the [ESC] key.Image Operations During Projection](https://usermanual.wiki/Casio-Computer/XJH1650.User-Manual-1/User-Guide-1490831-Page-13.png)
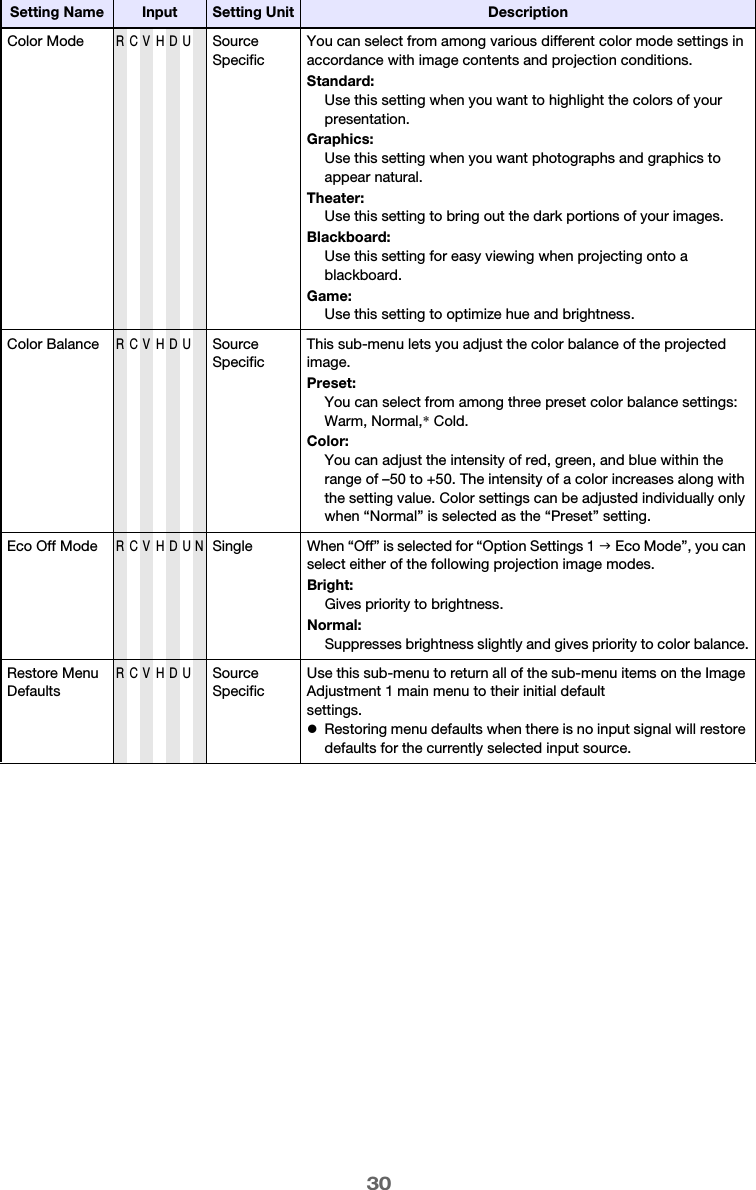
![14Selecting the Color ModeYou can select from among various different color mode settings in accordance with image contents and projection conditions.Important!zThe color mode cannot be selected in the following cases.zThe color mode cannot be selected while “On” is selected for the setup menu “Option Settings 2 J Interactive Pointer” setting. Though the color mode change operation may be possible on some projector models, doing so may cause problems with the optional interactive pointer (YA-P10) in some color modes.To change the color mode1.Press the [COLOR MODE] key.zThis displays the color mode selection window. The currently selected color mode is the one whose button is selected (filled in).2.Use the [T] and [S] keys to move the highlighting to the color mode you want to select, and then press the [ENTER] key.zThis will select the button next to the highlighted color mode name.zFor details on what each color mode does, see “Color Mode” under “Image Adjustment 1 Main Menu” on page 30.3.To hide the window, press the [ESC] key.Zooming an Image1.Press the [D-ZOOM +] key.zThis will enlarge the center of the projected image one step.2.To zoom in on the center of the projected image more, press the [D-ZOOM +] key again. To zoom out, press the [D-ZOOM –] key.zEach press of [D-ZOOM +] zooms in (increases the zoom factor), while [D-ZOOM –] zooms out. Holding down either key continuously scrolls the zoom factor.3.While an image is zoomed, use the [S], [T], [W], and [X] keys to scroll the view to other parts of the image.4.To exit the zoom operation, press the [ESC] key.zWhen “Off” is selected for the Eco Mode setting (page 19)zWhen the projector is in the 3D input mode. See “3D Input Mode” (page 11).](https://usermanual.wiki/Casio-Computer/XJH1650.User-Manual-1/User-Guide-1490831-Page-14.png)
![15Momentarily Cutting Off the Input Source Image1.Press the [BLANK] key.zThis temporarily cuts off the image from the input source and projects a black screen in its place.2.To resume projection of the image from the input source, press the [BLANK] key (or [ESC] key).NoteYou can specify projection of a black screen or blue screen, or a logo. For details, see “Blank Screen” under “Screen Settings Main Menu” on page 33.Freezing an ImagePressing the [FREEZE] key freezes the projected image.To freeze the projected image1.While an image is being projected from an input source, press the [FREEZE] key.zThis will capture the image that is on the screen at the moment you press [FREEZE] and stores it in projector memory. That image remains projected on the screen.2.To restore projection of the image from an input source, press the [ESC] key.](https://usermanual.wiki/Casio-Computer/XJH1650.User-Manual-1/User-Guide-1490831-Page-15.png)
![16Displaying a Pointer in the Projected ImageYou can select from among different pointer styles, including various arrow styles, for display in the projected image. Pointers can be used during a presentation to indicate or highlight a specific part of the image.NoteDepending on the pointer style you are using, the pointer may not display properly when you are using keystone correction. If this happens, use the [KEYSTONE +] and [KEYSTONE –] keys to change the keystone correction value to zero.To display a pointer in the image1.Press the [POINTER] key.zThis will cause a pointer to appear in the image.zYou also can use the setup menu to specify the pointer type that appears first when you press the [POINTER] key. For details, see “Pointer” under “Option Settings 2 Main Menu” on page 36.2.Use the cursor keys to move the pointer to the location you want.zHolding down a cursor key moves the cursor at high speed.3.To modify the pointer as described below, press the [STYLE] key.To select the pointer type1.Press the [POINTER] key to display the pointer.2.Keep pressing the [POINTER] key until the pointer you want is displayed.zEach press of the [POINTER] key cycles through the available pointer types.To clear the pointer from the imagePress the [ESC] key.For this pointer type: Pressing [STYLE] will change it like this: J J J J J J J J J J J J Toggle between flashing and not flashing](https://usermanual.wiki/Casio-Computer/XJH1650.User-Manual-1/User-Guide-1490831-Page-16.png)
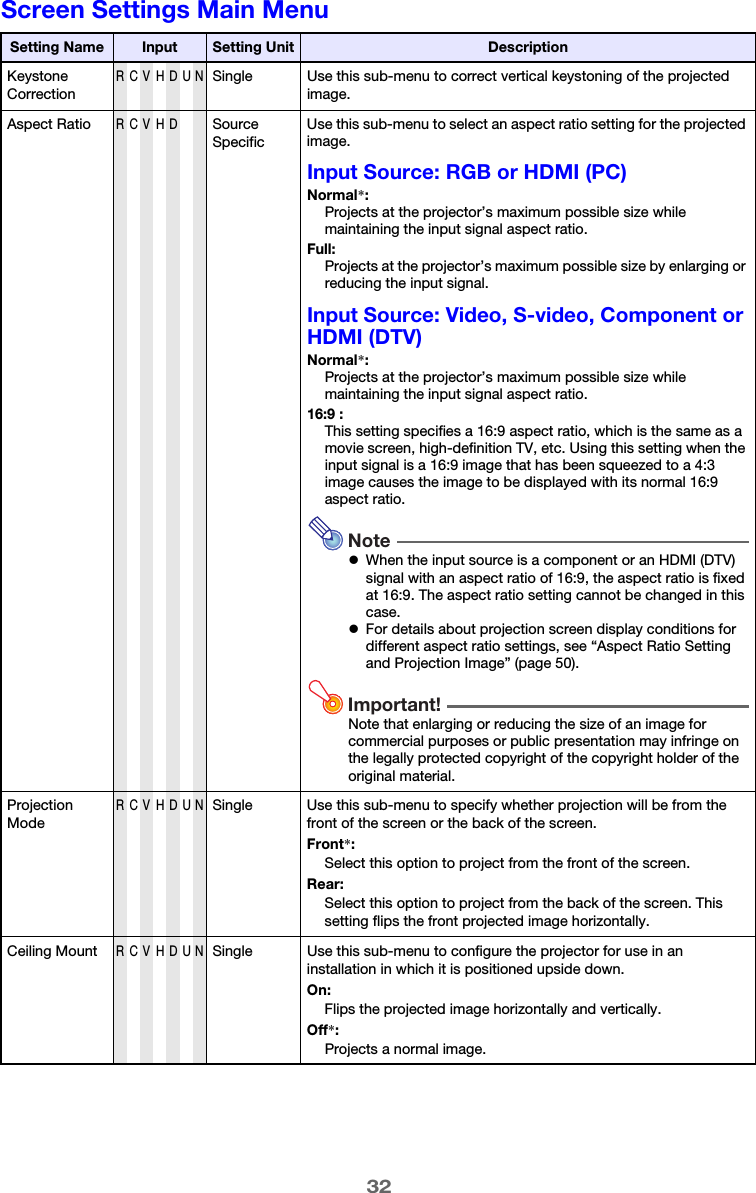
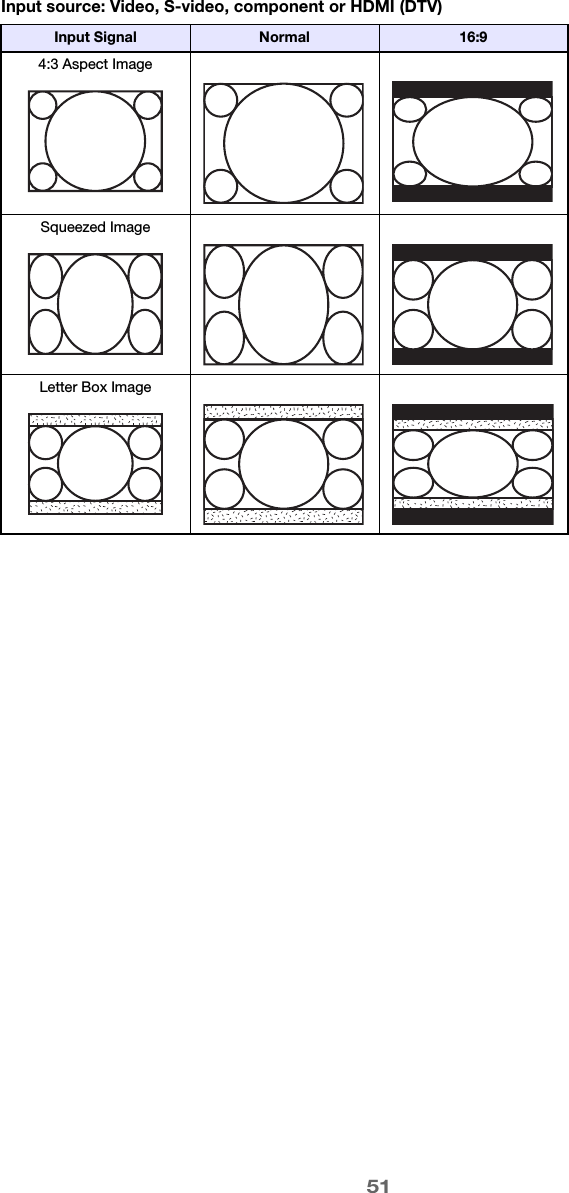
![17Changing the aspect ratio of the projected imagePress the [ASPECT] key to cycle through the aspect ratio settings for the projected image.Available settings are as shown below. For details about the meaning of each setting, see the “Aspect Ratio” setting under “Screen Settings Main Menu” on page 32.NotezWhen the input source is a component or an HDMI (DTV) signal with an aspect ratio of 16:9, the aspect ratio is fixed at 16:9. In this case, pressing the [ASPECT] key will not change the aspect ratio setting.zFor details about how the aspect ratio setting affects the projected image, see “Aspect Ratio Setting and Projection Image” (page 50).zYou also can change the aspect ratio setting using the setup menu. For details, see “Aspect Ratio” under “Screen Settings Main Menu” on page 32.Important!Note that enlarging or reducing the size of an image using the [ASPECT] key for commercial purposes or public presentation may infringe on the legally protected copyright of the copyright holder of the original material.Input Source Pressing [ASPECT] will toggle between these settings:Video, S-video, Component, HDMI (DTV) Normal 16:9RGB, HDMI (PC) Normal Full](https://usermanual.wiki/Casio-Computer/XJH1650.User-Manual-1/User-Guide-1490831-Page-17.png)
![18You can use the remote controller keys to adjust the volume level of the audio that is output from the projector’s speaker.To adjust the volume level1.Press the [VOLUME] key.zThis causes the [Volume] screen to appear on the projected image.2.Press the [X] key to increase the volume, or the [W] key to lower the volume.3.After the setting is the way you want, press the [ESC] key.zThis causes the [Volume] screen to disappear.NoteYou also can use the setup menu to adjust the volume level. For details, see “Volume Adjustment Main Menu” on page 31.To mute the audio1.Press the [VOLUME] key.2.Press the [ENTER] key.zThis stops output from the speaker.3.To restore the audio, press the [VOLUME] key again.Adjusting the Volume Level](https://usermanual.wiki/Casio-Computer/XJH1650.User-Manual-1/User-Guide-1490831-Page-18.png)
![19The following three Eco Mode settings are available to specify whether priority should be given to low-power, low-noise operation or to projection brightness.Important!zWhile “On (Auto)” is selected as the Eco Mode setting, make sure that the brightness sensor on the top of the projector is not blocked by anything.zThe local environment and setup conditions affect the brightness sensor, so operation when “On (Auto)” is selected for the Eco Mode depends on these factors.To select the Eco Mode1.Press the [ECO] key.zThis causes “Eco Mode” window to appear on the projection screen.2.Use the [W] and [X] keys to select the setting you want.zIf you select “On (Manual)” here, go to step 3. If you select another setting, jump to step 4.3.Perform the following steps to adjust the “Eco Level” (the balance between low-power, quiet operation and projection brightness).4.To hide the window, press the [ESC] key.Eco Mode (Power Saving, Low Noise)On (Auto) : A brightness sensor on the top of the projector senses surrounding light, and automatically adjusts projection brightness and color accordingly. Brightness is reduced for darker surroundings, which saves power and reduces operation noise.On (Manual): Enables manual adjustment to balance the needs of low-power, quiet operation and projection brightness.Off : Give top priority to projection brightness.1Press the [T] key to move the highlighting to the Eco Level.2Use the [W] and [X] keys to adjust the Eco Level to the setting you want.Fewer marks gives higher priority to projection brightness. A greater number gives high priority to low-power, quiet operation.](https://usermanual.wiki/Casio-Computer/XJH1650.User-Manual-1/User-Guide-1490831-Page-19.png)
![20Important!zThe Eco Mode setting automatically changes to “Off” whenever the projector is in the 3D input mode (“3D Input Mode”, page 11) or “On” is selected for the “Option Settings 2 J Interactive Pointer” setting.zThe “On (Auto)” setting cannot be selected for the Eco Mode while “On” is selected for “Screen Settings J Ceiling Mount” on the setup menu. If the “Ceiling Mount” setting is changed to “On” while “On (Auto)” is selected for the Eco Mode setting, the Eco Mode setting will automatically change to “On (Manual)”.zThe “On (Auto)” setting cannot be selected for the Eco Mode while “Rear” is selected for “Screen Settings J Projection Mode” on the setup menu. If the “Projection Mode” setting is changed to “Rear” while “On (Auto)” is selected for the Eco Mode setting, the Eco Mode setting will automatically change to “On (Manual)”.NotezWhile “Off” is selected for the Eco Mode setting, you also can specify whether brightness or color should be given emphasis. For details, see “Eco Off Mode” under “Image Adjustment 1 Main Menu” (page 30).z(for USB port model users)Use the setup menu (page 21) to select the Eco Mode when the input source is an external device connected to the USB-A port.Pressing the [FUNC] key displays the menu shown below.You can use this menu to perform the operations described below.zAdjust image brightnessHighlight “Brightness” and then press the [ENTER] key.zTurn the Eco Mode on or offHighlight “Eco Mode” and then press the [ENTER] key.zSelect the aspect ratio of the projected imageHighlight “Aspect Ratio” and then press the [ENTER] key.Note(for USB port model users)When the input source is an external device connected to the USB-A port, use the [FUNC], [O], [f], and [Z] keys to control the connected device. For details, see the “USB Function Guide” and “Wireless Function Guide” on the bundled CD-ROM.Using the [FUNC] KeyJ This performs the same operation as pressing the [BRIGHT] key (O key) described on page 13.J This performs the same operation as pressing the [ECO] key (f key) described on page 19.J This performs the same operation as pressing the [ASPECT] key (Z key) described on page 17.](https://usermanual.wiki/Casio-Computer/XJH1650.User-Manual-1/User-Guide-1490831-Page-20.png)
![21Configuring Advanced Projector SettingsYour projector has a setup menu that you can use to configure advanced settings.Displaying the Setup MenuPressing the [MENU] key displays the menu shown below in the center of the projection screen.To exit the setup menuPress the [MENU] key.Configuring Setup Menu Settings1.Press the [MENU] key to display the setup menu.2.Use the [T] and [S] keys to select the main menu item you want by highlighting it.3.Press the [ENTER] key.4.Use the [T] and [S] keys to select the sub-menu item you want by highlighting it.5.Perform the required operation on the selected sub-menu item screen.zThe guidance text explains the operations you need to perform to configure each setting.6.To return to the main menu from the sub-menu, press the [ESC] key.7.To exit the setup menu, press the [MENU] key.Basic Setup Menu OperationsMain menuPressing the [MENU] key displays the main menu. The currently selected menu item is the one that is highlighted.Sub-menuThe sub-menu shows each individual setting under each main menu item, and its current setting.Guidance textGuidance text provides a brief description of the main key operations available for the operation you are currently performing.](https://usermanual.wiki/Casio-Computer/XJH1650.User-Manual-1/User-Guide-1490831-Page-21.png)
![22Basic Setup Menu ExampleThe procedure below shows how to configure the following three settings:zImage Adjustment 1 J ContrastzImage Adjustment 1 J Color ModezInput Settings J Signal Name IndicatorNotezThe setup menu items that you can change depend on whether or not an image signal is being input to the projector, and on the currently selected input source. Perform the procedure below after starting projection of an image from an input source in the normal input mode. See “3D Input Mode” on page 11 for information about how to do this.zThis example covers basic steps only. For more detailed information, see “Setup Menu Contents” on page 29.To configure the “Image Adjustment 1 J Contrast” setting1.Press the [MENU] key to display the setup menu.2.“Image Adjustment 1” is initially selected on the main menu, so simply press the [ENTER] key.3.Use the [T] key to select “Contrast”.4.Use the [W] (lighter) and [X] (darker) keys to adjust contrast.](https://usermanual.wiki/Casio-Computer/XJH1650.User-Manual-1/User-Guide-1490831-Page-22.png)
![23To configure the “Image Adjustment 1 J Color Mode” setting5.Use the [T] key to select “Color Mode”.6.Press the [ENTER] key.zThis displays the color mode menu.7.Use the [T] and [S] keys to select the color mode you want, and then press the [ENTER] key.8.After selecting the color mode you want, press the [ESC] key.To configure the “Input Settings J Signal Name Indicator” setting9.Press the [ESC] key.10.Use the [T] key to select “Input Settings”.11.Press the [ENTER] key.12.Use the [T] key to select “Signal Name Indicator”.13.Use the [W] and [X] keys to select “On” or “Off”.14.After you are finished, press the [MENU] key to exit the setup menu.Direct Power OnYou can configure the projector so it powers up automatically as soon as you plug it into a power source. With this “Direct Power On” feature, you do not even need to press the [P] (Power) key. To enable Direct Power On, display the setup menu, and then change the “Direct Power On” setting to “On”.Important!When you have Direct Power On enabled, do not leave the projector plugged into an electrical outlet while it is turned off. If you do, there is the chance that it (and the light source unit) might turn on automatically when power is restored after being cut off by a power outage, tripping of a breaker, etc.NotezDirect Power On causes the projector to turn on automatically as soon as it is plugged into a power outlet. This greatly reduces the amount of time it takes until you are ready to start projecting. Note, however, that the actual startup sequence (Standby State J Power On J Projection Starts) that the projector performs is the same, regardless of whether Direct Power On is enabled or disabled. The only difference is what triggers the sequence (plugging in or pressing the [P] (Power) key).zFor details about configuring the Direct Power On setting, see “Direct Power On” under “Option Settings 1 Main Menu” on page 35.](https://usermanual.wiki/Casio-Computer/XJH1650.User-Manual-1/User-Guide-1490831-Page-23.png)
![24The password feature lets you keep unauthorized individuals from using the projector. You can specify whether password input is required whenever you turn on the projector, and you can specify and change the password as required. Use the setup menu “Option Settings 1 J Power On Password” setting to configure power on password settings.Inputting a PasswordThe password of your projector is not really a “word” made up of letters, but rather a sequence of remote controller key inputs. The following is the 8-key sequence that represents the initial factory default password.Using the Password FeatureNote the following precautions whenever you use the password feature.zThe password feature protects against unauthorized use of the projector. Note that it is not an anti-theft measure.zYou will need to enter the initial factory default password the first time you use the projector after turning on the password feature. Change the initial factory default password to a different one of your choice as soon as possible after turning on the password feature.zRemember that password operations are always performed using the remote controller, so you should take care not to lose or misplace the remote controller.zAlso note that you will not be able to input the password if the remote controller batteries are dead. Replace the remote control batteries as soon as possible after it starts to go low.If you forget your password...You will not be able to use the projector if you forget the password for some reason. If you forget the password, you will need to bring the following two items to your CASIO distributor to have the password cleared. Note that you will be charged to have the password cleared.Note that your CASIO distributor will not be able to clear the password of your projector unless you bring both of the items listed above.Also, keep the projector’s warranty in a safe place.Important!Having your password cleared using the procedure described above will return all of the settings of your projector, except for the Light Time, to their initial factory defaults.Password Protecting the Projector[INPUT] [AUTO] [BLANK] [FREEZE] [S] [T] [W] [X]1. Personal identification (original or copy of your driver’s license, employee I.D., etc.)2. Projector unit](https://usermanual.wiki/Casio-Computer/XJH1650.User-Manual-1/User-Guide-1490831-Page-24.png)
![25Keep a written record of your password!You will not be able to use the projector if you forget its password. We strongly suggest that you keep a written or other type of record of the password so you can look it up when necessary.To change the password1.Press the [MENU] key to display the setup menu.2.Use the [T] key to select “Option Settings 1”, and then press the [ENTER] key.3.Use the [T] key to select “Power On Password”, and then press the [ENTER] key.zThis will display a dialog box prompting you to enter the current password.4.Enter the current password.zIf the projector is still protected by the factory default password, perform the key operation shown below to enter it.5.After entering the current password, press the [ENTER] key.zThis displays the Power On Password setting screen.6.Use the [T] key to select “Change Password”, and then press the [ENTER] key.zThis will display a dialog box prompting you to enter the new password.7.Enter a key sequence up to eight key operations long.zYou can use any of the following keys as part of your password key sequence. [INPUT], [AUTO], [BLANK], [FREEZE], [VOLUME], [COLOR MODE], [D-ZOOM +], [D-ZOOM –], [KEYSTONE +], [KEYSTONE –], [MENU], [POINTER], [O], [f], [Z], [S], [T], [W], [X], [FUNC]8.After entering the new password, press the [ENTER] key.zThis will display a dialog box prompting you to enter the same password again.9.Re-enter the same password key sequence you entered in step 7 and then press the [ENTER] key.zThe message “Your new password has been registered.” indicates that the password has been changed. Press the [ESC] key.zIf the password you entered in this step is different from the one you entered in step 7, the message “The password you input is wrong.” appears. Press the [ESC] key to return to step 7.[INPUT] [AUTO] [BLANK] [FREEZE] [S] [T] [W] [X]](https://usermanual.wiki/Casio-Computer/XJH1650.User-Manual-1/User-Guide-1490831-Page-25.png)
![26To turn password protection on and off1.Display the Power On Password setting screen by performing steps 1 through 5 of the procedure under “To change the password” on page 25.zAt this time, make sure that “Power On Password” is selected on the Power On Password setting screen.2.Use the [W] and [X] keys to select “On” or “Off”.zChanging the power on password setting from “Off” to “On” causes the confirmation dialog box shown below to appear.Press the [ENTER] key to confirm that you want to turn on power on password protection, or [ESC] to exit the dialog box without doing anything.3.After you are finished, press the [MENU] key to exit the setup menu.Entering the Password when Turning On the ProjectorWhen you turn on the projector while password protection is turned on will cause a password input dialog box to appear on the projection screen. All projector operations will be accessible to you after you input the correct password and press the [ENTER] key.](https://usermanual.wiki/Casio-Computer/XJH1650.User-Manual-1/User-Guide-1490831-Page-26.png)
![27You can use the procedures in this section to restore all of the settings on a particular main menu or all of the settings on the setup menu to their initial factory defaults.To restore all settings on a particular main menu to their initial factory defaults1.Press the [MENU] key to display the setup menu.2.Use the [T] and [S] keys to select the main menu whose settings you want to restore to their initial factory defaults.zYou can select Image Adjustment 1, Image Adjustment 2, Volume Adjustment, Screen Settings, Input Settings, Option Settings 1, or Option Settings 2.3.Press the [ENTER] key.4.Use the [T] key to select “Restore Menu Defaults”.5.Press the [ENTER] key.zThis will display a confirmation screen like the screen shown below.6.Use the [S] key to select “Yes”.7.To restore the settings of the main menu to their initial defaults, press the [ENTER] key.zTo exit the operation without doing anything, press [ESC] instead of [ENTER].8.After you are finished, press the [MENU] key to exit the setup menu.NotezThe language setting and the password are not returned to their initial factory defaults if you select Option Settings 1 in step 2.zFor details about how the above procedure initializes settings, see the explanations of the settings under “Setup Menu Contents” on page 29.Restoring Projector Settings to Their Initial Factory Defaults](https://usermanual.wiki/Casio-Computer/XJH1650.User-Manual-1/User-Guide-1490831-Page-27.png)
![28To restore all settings on the setup menu to their initial factory defaults1.Press the [MENU] key to display the setup menu.2.Use the [T] key to select “Restore All Defaults” and then press the [ENTER] key.3.After confirming that “Restore All Defaults” sub-menu is selected, press the [ENTER] key.zThis displays a confirmation message asking if you want to initialize all settings.4.Use the [S] key to select “Yes”.5.To restore all settings on the setup menu to their initial defaults, press the [ENTER] key.zThis will restore all of the settings to their initial factory defaults, except for the Language, Light Time, Unit Operating Time and password settings.zTo exit the operation without doing anything, press [ESC] instead of [ENTER].6.After you are finished, press the [MENU] key to exit the setup menu.](https://usermanual.wiki/Casio-Computer/XJH1650.User-Manual-1/User-Guide-1490831-Page-28.png)
![31Image Adjustment 2 Main MenuAbout the “Signal Specific” Setting UnitFor the items that have “Signal Specific” in the “Setting Unit” column of the above table, the setting is saved for the specific type of signal (XGA/60Hz, SXGA/60Hz, etc.) that is being input when the setting is performed, and not for a specific input source.Volume Adjustment Main MenuSetting Name Input Setting Unit DescriptionVertical PositionRCVSignal SpecificUse this sub-menu to adjust the vertical position of the input source image within the projection area.Horizontal PositionRCVSignal SpecificUse this sub-menu to adjust the horizontal position of the input source image within the projection area.FrequencyRSignal SpecificWhen vertical bands appear in the projected image while RGB is selected as the input source, it means that the frequency setting is not correct. When this happens, use this setting to adjust the frequency manually.Important!If, for some reason, your manual frequency settings cause the image input from the computer to disappear from the projection, you can press the [AUTO] key to perform an auto adjust operation, which should cause the image to appear.PhaseRSignal SpecificWhen there is flickering in the projected image while RGB is selected as the input source, it means that the phase setting is not correct. When this happens, use this setting to adjust the phase manually.Restore Menu DefaultsRCVSource SpecificUse this sub-menu to return all of the sub-menu items on the Image Adjustment 2 main menu to their initial default settings.zRestoring menu defaults will restore defaults for the current signal type (XGA/60Hz, SXGA/60Hz, etc.) only.Setting Name Input Setting Unit DescriptionVolumeRCVHDUNSource SpecificUse this sub-menu to adjust the volume level of the projector’s speaker.zChanging this setting when there is no input signal changes the volume setting of the currently selected signal source.Restore Menu DefaultsRCVHDUNSource SpecificUse this sub-menu to return Volume to its initial default setting.zRestoring menu defaults when there is no input signal will restore defaults for the currently selected input source.](https://usermanual.wiki/Casio-Computer/XJH1650.User-Manual-1/User-Guide-1490831-Page-31.png)
![33Startup ScreenRCVHDUNSingle Use this sub-menu to specify whether or not a startup screen should be projected whenever the projector is turned on.Logo:Select this option to project the projector’s built-in logo screen at startup.None*:Select this option when you do not want to project a startup screen.No Signal ScreenRCVHDUNSingle Use this sub-menu to specify what should be projected when there is no input signal to the projector.Blue*:Select this option to project a blue screen.Black:Select this option to project a black screen.Logo:Select this option to project the projector’s built-in logo screen.Blank ScreenRCVHDUNSingle Use this sub-menu to specify what should be projected after the [BLANK] key is pressed.Blue:Select this option to project a blue screen.Black*:Select this option to project a black screen.Logo:Select this option to project the projector’s built-in logo screen.Restore Menu DefaultsRCVHDUNSource SpecificUse this sub-menu to return all of the sub-menu items on the Screen Settings main menu to their initial default settings.zRestoring menu defaults when there is no input signal will restore defaults for the currently selected input source.zNote that the “Keystone Correction”, “Projection Mode”, “Ceiling Mount”, “Startup Screen”, “No Signal Screen”, and “Blank Screen” settings are always returned to their initial defaults, regardless of the currently selected input source.Setting Name Input Setting Unit Description](https://usermanual.wiki/Casio-Computer/XJH1650.User-Manual-1/User-Guide-1490831-Page-33.png)
![36Option Settings 2 Main MenuLanguageRCVHDUNSingle Use this sub-menu to specify the language to use for messages, setup menus, etc.English / French / German / Italian / Spanish / Swedish / Portuguese / Turkish / Russian / Chinese (Simplified) / Chinese (Traditional) / Korean / JapaneseNote(for USB port model users)If you have Portuguese, Turkish, or Russian selected as the projector’s language, selecting an external device connected to the projector’s USB-A port as the input source will cause some menus and messages to be displayed in English.Restore Menu DefaultsRCVHDUNSingle This sub-menu returns all of the sub-menu items on the Option Settings 1 main menu to their initial default settings.zThe language setting and the password are not returned to their initial factory defaults.zThe “Auto Adjust” item is returned to its initial default only when RGB input is selected for the input source. All of the other items are returned to their initial defaults regardless of the currently selected input source.Setting Name Input Setting Unit DescriptionPointerRCVHDUNSingle Use this sub-menu to specify the type of pointer that appears first when you press the [POINTER] key.Plug and Play(USB port models only)RCVHDUNSingle Use this sub-menu to turn plug-and-play*1 on or off.On*:Select this option to turn on plug-and-play. This will allow the projector detect when an external USB device is connected and make that device the input source automatically.Off:Select this option to turn off plug-and-play.NoteRegardless of the setting of this item, plug-and-play is disabled while the projector is in the 3D input mode. See “3D Input Mode” on page 11 for information.Audio OutRCVHDUNSingle Specifies whether the input audio signal should be output from the projector’s built-in speaker or to the line output.Speaker*:Outputs the audio signal being input to the projector from the speaker.Line:Outputs the audio signal being input to the projector from the AUDIO OUT terminal.Setting Name Input Setting Unit Description](https://usermanual.wiki/Casio-Computer/XJH1650.User-Manual-1/User-Guide-1490831-Page-36.png)

![41Error Indicators and Warning MessagesWarning messages and indicators let you know what the problem is when a projector error occurs.When an error occurs, wait until the fan stops before unplugging the AC power cord. If you unplug the AC power cord while the fan is still operating, an error may occur when you plug the AC power cord back in.Indicator/Error Message Description and Required ActionPOWER : Green steady The projector’s internal temperature is very high. Press the [ESC] key to clear the warning message and perform the following steps.1Check for any blocking of the projector’s vents, and make sure that there is sufficient space around the projector. See “Setup Precautions” in the “Setup Guide”.2If there is dust accumulated around the vents, turn off the projector and remove it. See “Cleaning the Projector” (page 40).LIGHT : –TEMP : –Message : Internal temperature is too high. Check projector air vents for blockage.POWER : Amber flashing J Amber steadyPower has turned off automatically due to internal overheating. Perform the following steps.1Check for any blocking of the projector’s vents, and make sure that there is sufficient space around the projector. See “Setup Precautions” in the “Setup Guide”.2If there is dust accumulated around the vents, remove it. See “Cleaning the Projector” (page 40).If there is no problem with the projector’s vents, confirm that the POWER/STANDBY indicator is lit amber (without flashing), and then turn power back on again. If the error occurs again when you turn power back on, contact your retailer or nearest authorized CASIO Service Center.LIGHT : –TEMP : –Message : Internal temperature is too high. The projector will turn off.POWER : Amber flashing J Red steadyPower has turned off automatically due to a fan problem. Confirm that the POWER/STANDBY indicator is lit red (without flashing) and that the fan has stopped. After checking the POWER/STANDBY indicator, disconnect the power cord from the projector and wait for all of the projector’s indicators to go out. Next, reconnect the power cord and turn projector power back on.If the error occurs again when you turn power back on, contact your retailer or nearest authorized CASIO Service Center.LIGHT : Red steadyTEMP : Red steadyMessage : There is a problem with the fan. The projector will turn off.POWER : Amber flashing J Red steadyPower has turned off automatically due to a system problem. After confirming that the POWER/STANDBY indicator is lit red (without flashing), disconnect the power cord from the projector and wait for all of the projector’s indicators to go out. Next, reconnect the power cord and turn the projector back on.If the error occurs again when you turn power back on, contact your retailer or nearest authorized CASIO Service Center.LIGHT : –TEMP : Red steadyMessage : A system problem has occurred. The projector will turn off.](https://usermanual.wiki/Casio-Computer/XJH1650.User-Manual-1/User-Guide-1490831-Page-41.png)
![42POWER : Green steady A system problem has occurred, which may cause problems with some functions. Turn off the projector, disconnect the power cord from the projector and wait for all of the projector’s indicators to go out. Next, reconnect the power cord and turn the projector back on.If the error occurs again when you turn power back on, contact your retailer or nearest authorized CASIO Service Center.Press the [ESC] key to clear the warning message.LIGHT : –TEMP : –Message : A system problem has occurred. Normal projection is not possible.POWER : Green steadyLIGHT : –TEMP : –Message : There is some problem with the system.The audio function may not operate correctly.POWER : Green steady The USB or LAN connection was terminated because of a problem with the USB port or LAN port. To use the USB or LAN function, turn off the projector and then turn it back on again.If the error occurs again when you turn power back on, contact your retailer or nearest authorized CASIO Service Center.Press the [ESC] key to clear the warning message.LIGHT : –TEMP : –Message : Some problem occurred with the USB port or LAN terminal.POWER : Amber flashing J Red steadyThe projector was turned off automatically due to some problem that was probably caused by external digital noise or some other reason. Confirm that the POWER/STANDBY indicator is lit red (without flashing). After checking the POWER/STANDBY indicator, disconnect the power cord from the projector and wait for all of the projector’s indicators to go out. Next, reconnect the power cord and turn projector power back on.If the error occurs again when you turn power back on, contact your retailer or nearest authorized CASIO Service Center.LIGHT : –TEMP : Red steadyMessage : –POWER : Amber flashing J Red steadyThe projector was turned off automatically because the light source unit turned off or did not turn on. After confirming that the POWER/STANDBY indicator is lit red (without flashing), unplug the power cord. Wait for a short while and then plug it back in and turn on the projector again.If the error occurs again when you turn power back on, contact your retailer or nearest authorized CASIO Service Center.LIGHT : Red flashing (0.5-second interval)TEMP : Red flashing (0.5-second interval)Message : –POWER : Amber flashing J Red steadyPower has turned off automatically due to a projector memory error. Confirm that the POWER/STANDBY indicator is lit red (without flashing). After checking the POWER/STANDBY indicator, disconnect the power cord from the projector and wait for all of the projector’s indicators to go out. Next, reconnect the power cord and turn projector power back on.If the error occurs again when you turn power back on, contact your retailer or nearest authorized CASIO Service Center.LIGHT : Not lit or red flashingTEMP : Red flashing (2-second interval)Message : –Indicator/Error Message Description and Required Action](https://usermanual.wiki/Casio-Computer/XJH1650.User-Manual-1/User-Guide-1490831-Page-42.png)
![562.Look up the projector’s IP address.zPerform the following steps to look up the projector’s current IP address.3.On the computer, start up a Web browser.4.In the Web browser address bar, input the projector’s IP address and then press the [Enter] key.zIf the projectors current IP address is 192.168.100.10, for example, you would input: “http://192.168.100.10”.zThis displays the top page of the projector’s System Admin page.zFor information about what you should do next, see “To control the projector using the Wireless Presentation System control panel” (page 57).Important!Under initial default settings, the projector is configured to obtain its IP address automatically from the DHCP server. This means that an IP address will be assigned automatically whenever the projector is connected to a DHCP environment network.Depending on the network environment being connected to, there may be cases where you will need to assign a projector’s IP address manually. In such cases, you will need to configure projector’s network settings.If you are unable to display the projector’s System Admin page with your browser using the above procedure, it may mean that there is some problem with your network settings. Refer to the Wireless Function Guide on the CD-ROM that comes with the projector and establish a wireless LAN connection between the projector and your computer. After configuring the projector’s network settings, try performing the above procedure again. For details about the projector’s network settings, see “To configure projector’s network settings and wireless LAN connection settings” in the Wireless Function Guide.1. Press the [MENU] key to display the setup menu.2. Use the [T] and [S] keys to select “Wired LAN settings” and then press the [ENTER] key.3. Use the [T] and [S] keys to select “Wired LAN info” and then press the [ENTER] key.](https://usermanual.wiki/Casio-Computer/XJH1650.User-Manual-1/User-Guide-1490831-Page-56.png)
![57To control the projector using the Wireless Presentation System control panel1.Depending on the type of LAN connection you are using, perform either of the following operations to display the top page of the projector’s System Admin page.2.Click “System Admin”. On the password input screen that appears, enter the password.zThe initial default password is “admin”.3.Click the [Login] button.zThis logs in to the System Admin page and displays the Status screen.4.Click “Control Panel” on the left side of the screen.zThis will display a control panel screen like the one shown below.zThe table below explains the status information and the projector operations included on the control panel screen.Wired LAN Connection :“To establish a wired LAN connection between the projector and a computer” (page 55)Wireless LAN Connection : Steps 1 and 2 under “To log in to the projector’s System Admin page” of the Wireless Function Guide on the CD-ROM that comes with the projectorGroup Item DescriptionRefresh (Button) Click to refresh the screen with the latest information.Status Projector status Shows the projector’s current status as either “On” or “Standby”.Error info Shows one of the following.Normal: Operating normally.Temperature error: Temperature error occurred.Fan error: Fan error occurred.Light error: Light source unit error occurred.Other error: Error other than above occurred.Power On/Power Off (Buttons)Turn the projector on/off.[Power On] button operation is supported only when the projector is connected to a computer of a wired LAN connection, and “Enable” is selected for the “Remote on” setting (pages 38).](https://usermanual.wiki/Casio-Computer/XJH1650.User-Manual-1/User-Guide-1490831-Page-57.png)
![58Image Input Specifies the input source. The following are the available input source options.3D Puts the projector into the 3D input mode or normal input mode.On: 3D input modeOff: Normal input modezNote that this setting cannot be change while the currently selected input source is “Computer 1 (Component)”, “Computer 2 (Component)”, “HDMI”, or “USB”.Color mode Specifies the color mode.zFor details about this setting, see “Selecting the Color Mode” (page 14).Blank Selecting “On” for this setting temporarily blocks the image from the input source. “Off” causes the image from the input source to be projected.zThe operation of this item is identical to that of the remote controller’s [BLANK] key. For details, see “Momentarily Cutting Off the Input Source Image” (page 15).Aspect ratio Changes the aspect ratio of the projected image.zFor details about this setting, see “Changing the aspect ratio of the projected image” (page 17).Brightness This corresponds to the “Image Adjustment 1 J Brightness” setting of the setup menu. Input a value into the box and then click the [Apply] button. This will change the projector’s “Brightness” setting accordingly.Contrast This corresponds to the “Image Adjustment 1 J Contrast” setting of the setup menu. Input a value into the box and then click the [Apply] button. This will change the projector’s “Contrast” setting accordingly.Eco Mode Switches the Eco mode.zFor details about this setting, see “Eco Mode (Power Saving, Low Noise)” (page 19).Audio Volume Input a value into the box and then click the [Apply] button. This will change the volume setting accordingly.Mute Specifies the mute setting. Audio is output while “Off” is selected for this setting, and muted when “On” is selected.Audio Output Specifies either output from the projector’s speaker output or AUDIO OUT terminal for audio.Speaker: Audio output from the speakerLine: Audio output from the AUDIO OUT terminalFactory Defaults (Button) Clicking to return all control panel items, except for the “Projector status” item, to their initial factory defaults.Group Item Description3D Off 3D OnComputer 1/2 (Auto) Computer 1/2 (RGB)Computer 1/2 (RGB) VideoComputer 1/2 (Component) S-videoVideoS-videoHDMIUSB](https://usermanual.wiki/Casio-Computer/XJH1650.User-Manual-1/User-Guide-1490831-Page-58.png)