Casio Watch 2109 Users Manual QW 1909/2109/2209
2209-1 to the manual 224b3c45-9957-4561-ae1c-5bb8a341cdde
2015-01-21
: Casio Casio-Casio-Watch-2109-Users-Manual-244038 casio-casio-watch-2109-users-manual-244038 casio pdf
Open the PDF directly: View PDF ![]() .
.
Page Count: 2
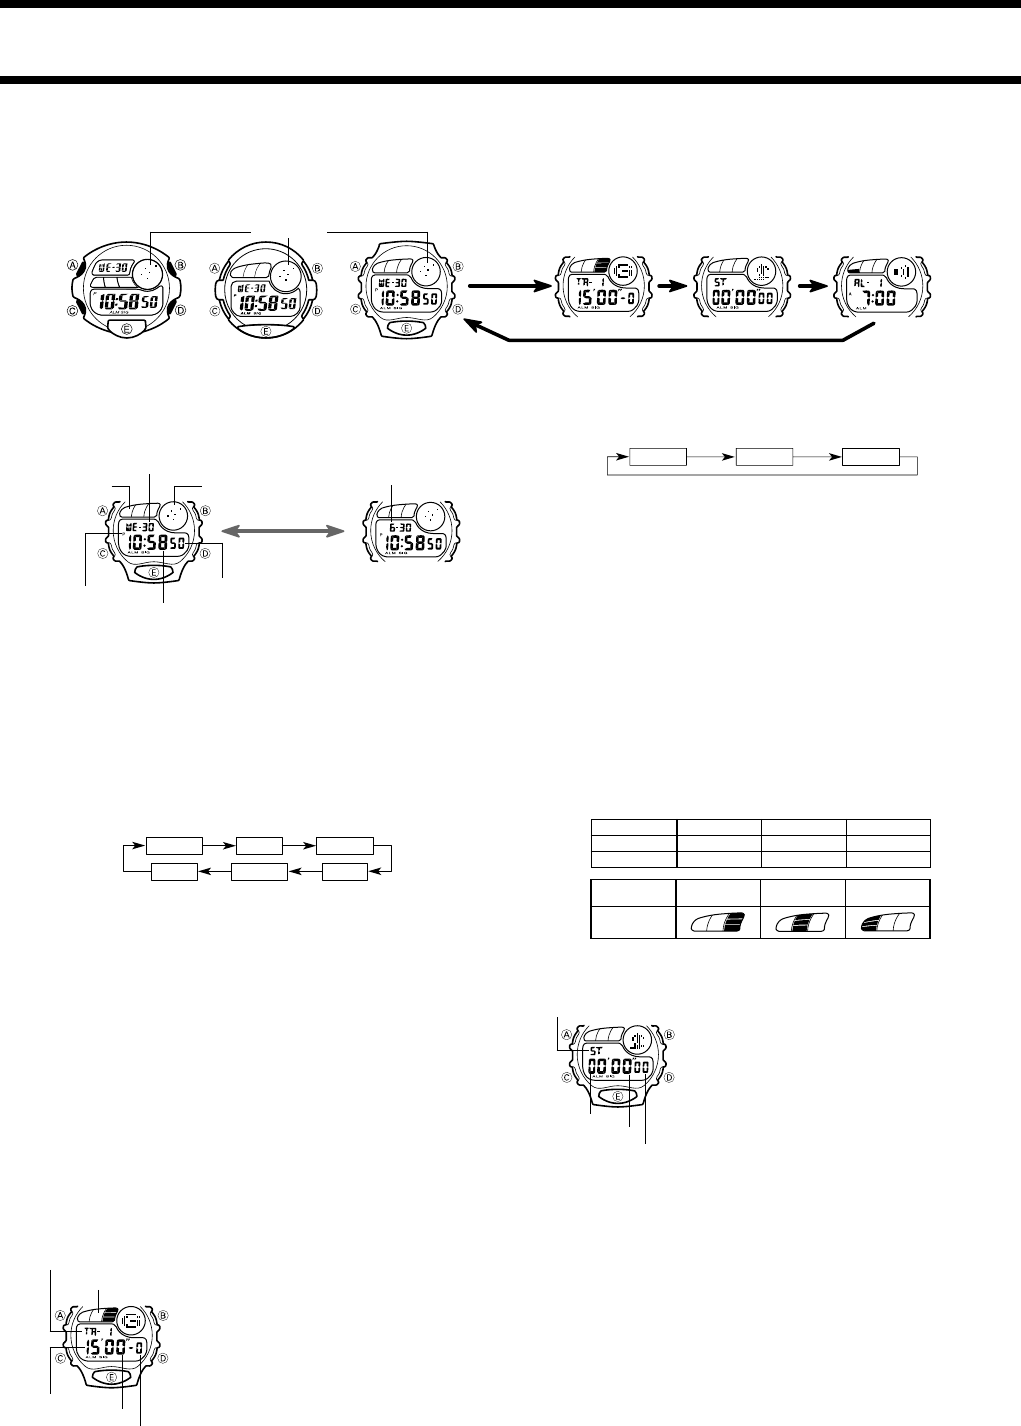
1909/2109/2209-1
•In the Timekeeping Mode, press BB
BB
B to switch between the day of the week and
month screens.
•In the Timekeeping Mode, press EE
EE
E to illuminate the display for about two seconds.
•In the Timekeeping Mode, press DD
DD
D to switch between the 12-hour and 24-hour
formats.
•When the 12-hour format is selected, “p.m.” times are indicated on the display by P,
while “a.m.” times are indicated by A. No indicators are used with the 24-hour for-
mat.
•The graphic area of the Timekeeping Mode screens shows patterns that indicate
the passage of seconds.
•The figures in the animation area of the Timekeeping Mode screens perform vari-
ous different animated patterns.
To set the time and date
1. Hold down AA
AA
A while in the Timekeeping Mode until the seconds digits start to flash
on the display. The seconds flash because they are
selected
.
2. Press CC
CC
C to change the selection in the following sequence.
3. While the seconds digits are selected (flashing), press DD
DD
D to reset the seconds to
00.
•If you press DD
DD
D while the seconds count is in the range of 30 to 59, the seconds are
reset to 00 and 1 is added to the minutes. If the seconds count is in the range of 00
to 29, the minutes count is unchanged.
4. While any other digits (besides seconds) are selected (flashing), press DD
DD
D to in-
crease the number. Holding down DD
DD
D changes the current selection at high speed.
5. After you set the time and date, press AA
AA
A to return to the Timekeeping Mode.
•The day of the week is automatically set in accordance with the date.
•The date can be set within the range of January 1, 1995 to December 31, 2039.
•If you do not operate any button for a few minutes while a selection is flashing, the
flashing stops and the watch goes back to the Timekeeping Mode automatically.
About the backlight
A backlight that uses an EL (electro-luminescent) panel causes the entire display to
glow for easy reading in the dark. Depending on the mode, pressing EE
EE
E or BB
BB
B turns on
the backlight for about two seconds. See the sections that cover each mode for infor-
mation on whether you should press EE
EE
E or BB
BB
B.
•The backlight of the watch employs an electro-luminescent (EL) light, which loses
illuminating power after very long use.
•The illumination provided by the backlight may be hard to see when viewed under
direct sunlight.
•The watch will emit an audible sound whenever the display is illuminated. It does
not indicate malfunction of the watch.
•The backlight automatically turns off whenever an alarm sounds.
COUNTDOWN ALARM MODE
The Countdown Alarm Mode has three 60-minute timers
whose starting time can be set in one-minute increments.
When the countdown reaches zero, an alarm sounds.
•In the Countdown Alarm Mode, press BB
BB
B to illuminate
the display for about two seconds. To illuminate the dis-
play while setting the countdown time (while the min-
utes digits are flashing), press EE
EE
E.
•The starting times of the countdown timers are preset to
15, 30, and 60 minutes when you purchase it. You can
use these settings as they are, or you can change to
different starting times if you want.
GENERAL GUIDE
•Press CC
CC
C to change from mode to mode.
•The animation area shows different animated characters and graphics, depending on the mode and the operation being performed.
•The operational procedures for Modules 1909, 2109, and 2209 are identical. All of the illustrations in this manual show Module 1909.
To use a countdown timer
1. Press DD
DD
D while in the Countdown Alarm Mode to select the timer whose time you
want to use.
•Pressing DD
DD
D does not change the timer selection if a countdown timer operation is
currently in progress or is paused. You must stop the ongoing countdown operation
before you can change to another timer.
2. Press EE
EE
E to start the countdown timer.
•When the countdown reaches zero, an alarm sounds for 10 seconds or until you
stop the alarm by pressing any button. The countdown time is automatically reset
to its starting value after the alarm stops.
•Press EE
EE
E while a countdown operation is in progress to pause it. Press EE
EE
E again to
resume the countdown.
•To completely stop a countdown operation, first pause it (by pressing EE
EE
E), and then
press DD
DD
D. This returns the countdown time to its starting value.
To change a countdown time
1. Press DD
DD
D while in the Countdown Alarm Mode to select the timer whose time you
want to change.
2. After you select a timer, hold down AA
AA
A until the minutes digits start to flash on the
display.
3. Press DD
DD
D to increase the minutes. Holding down DD
DD
D changes the minutes at high
speed.
4. After you set the countdown time, press AA
AA
A to return to the Countdown Alarm Mode.
•If you do not operate any button for a few minutes while a selection is flashing, the
flashing stops and the watch goes back to the Countdown Alarm Mode automati-
cally.
About countdown indicators
An audible beep, the EL backlight, and the graphic area on the display keep you
informed about the progress of the countdown as noted in the following table.
TIMEKEEPING MODE
This section provides information on setting the time and using the backlight.
STOPWATCH MODE
The Stopwatch Mode lets you measure elapsed time, split
times, and two finishes. You also get Auto-Start function.
The range of the stopwatch is 59 minutes, 59.99 seconds.
•In the Stopwatch Mode, press BB
BB
B to illuminate the dis-
play for about two seconds.
To measure elapsed time
1. Press EE
EE
E to start the stopwatch.
2. Press EE
EE
E to stop the stopwatch.
•You can resume the measurement operation by press-
ing EE
EE
E again.
3. Press DD
DD
D to clear the stopwatch to all zeros.
To record split times
1. Press EE
EE
E to start the stopwatch.
2.
Press
DD
DD
D
to display the timing up to that point. Stopwatch timing continues internally.
3. Press DD
DD
D to clear the split time and to continue time measurement on the display.
•You can repeat steps 2 and 3 as many times as you want.
4. Press EE
EE
E to stop the time measurement.
5. Press DD
DD
D to clear the stopwatch to all zeros.
To time first and second place finishes
1. Press EE
EE
E to start the stopwatch.
2. Press DD
DD
D when the first finisher crosses the line, and record the time.
3. Press EE
EE
E when the second finisher crosses the line.
4. Press DD
DD
D to display the finishing time of the second finisher.
5. Press DD
DD
D again to clear the stopwatch to all zeros.
About the Auto-Start function
With the Auto-Start function, the watch performs a 5-second countdown. When the
countdown reaches zero, stopwatch operation starts automatically. During the final
three seconds of the countdown, a beeper sounds with each second.
Seconds
Day
Hour Minutes
YearMonth
Timer 1 Timer 3Timer 2
Module No. 1909/2109/2209
Month ScreenDay of the week Screen
Day of week – Day Month – Day
Animation areaGraphic area
Press BB
BB
B
PM indicator
Hour : Minutes
Seconds
Indication More than Less than Time Up
5 minutes 5 minutes
Graphic Area
Indication Start 5'00"0 Time Up
Beep 1 second 1 second 10 seconds
Backlight 1 second 1 second 2 seconds
Graphic area
Mode indicator – Timer No.
Seconds
Minutes
1/10 second
Seconds
Minutes
1/100 second
Mode indicator
Stopwatch Mode Alarm Mode
Timekeeping Mode Countdown Alarm Mode
[Module 2109] [Module 1909]
Animation area
[Module 2209]
1909/2109/2209-2
To use the Auto-Start function
1.While the stopwatch display is showing all zeros
(00'00"00) in the Stopwatch Mode, press DD
DD
D.
•At this time the auto-start indicator appears on the dis-
play to indicate that auto-start is on. Press DD
DD
D again to
turn auto-start off (indicated when the auto-start indica-
tor is not on the display).
2. Press EE
EE
E to start the countdown.
•Pressing EE
EE
E also causes the countdown time to appear
on the display.
•When the countdown reaches zero, a tone sounds, the backlight illuminates the
display, and a stopwatch timing operation starts automatically.
•To stop the Auto-Start countdown and return to the all-zeros display, press DD
DD
D.
•Pressing EE
EE
E while the Auto-Start countdown is in progress immediately start the
stopwatch.
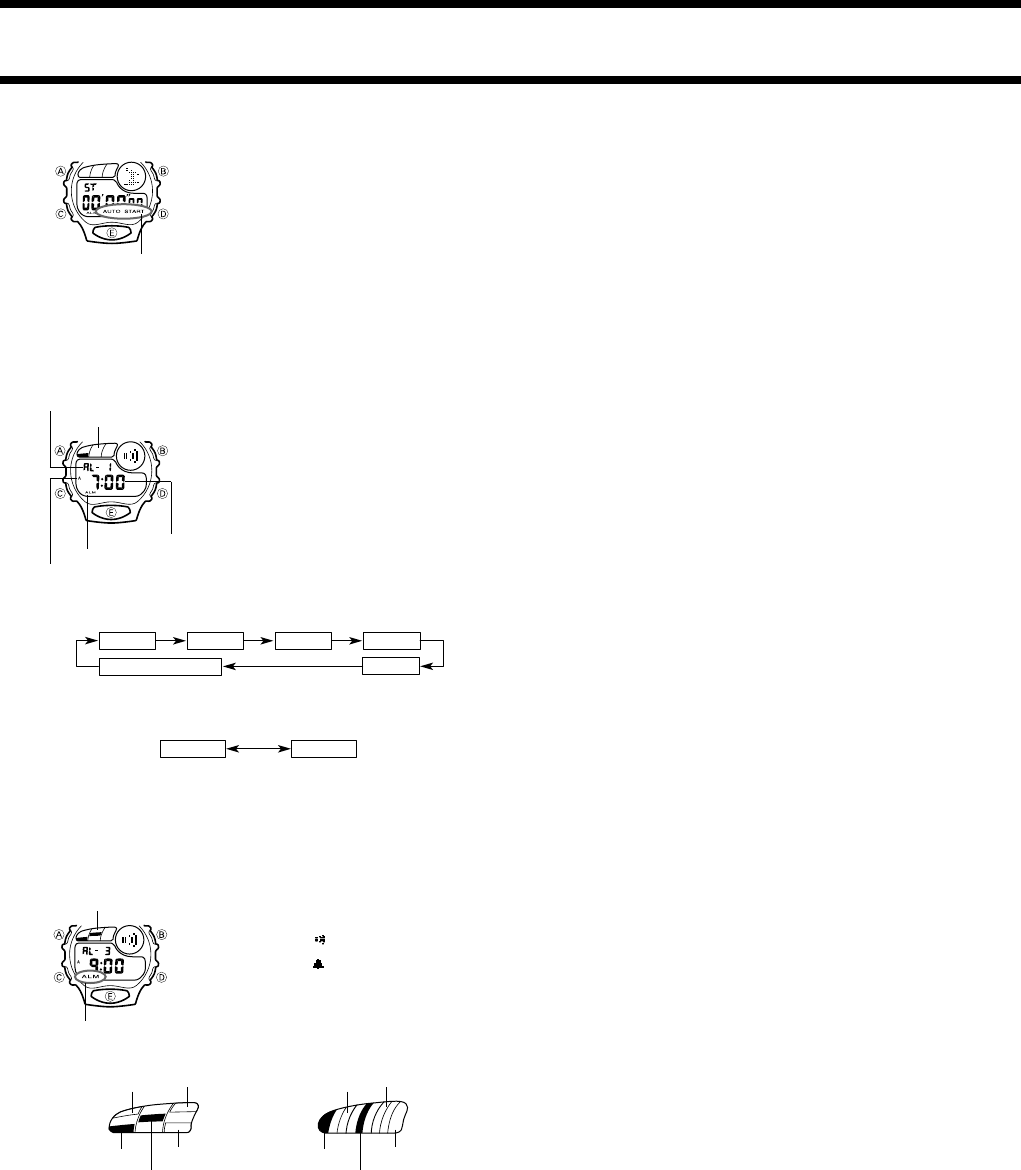
ALARM MODE
Five independent Daily Alarms can be set. Each alarm
lets you set the hour and minutes. When the Daily Alarm
is turned on, the alarm sounds for 20 seconds at the pre-
set time each day. Press any button to stop the alarm
after it starts to sound.
When the Hourly Time Signal is turned on, the watch beeps
every hour on the hour.
•In the Alarm Mode (including alarm time setting), press
EE
EE
E to illuminate the display for about two seconds.
•The graphic area in the Alarm Mode shows the current
on/off status of each of the five alarms.
To set an alarm time
1. Press DD
DD
D while in the Alarm Mode to select the alarm whose time you want to set.
2. After you select an alarm, hold down AA
AA
A until the hour digits start to flash on the
display. The hour digits flash because they are
selected
.
•This operation automatically turns on the alarm.
3. Press CC
CC
C to change the selection in the following sequence.
4. Press DD
DD
D to increase the selected digits. Holding down DD
DD
D changes the selection at
high speed.
•The format (12-hour and 24-hour) of the alarm time matches the format you select
for normal timekeeping.
•When setting the alarm time using the 12-hour format, take care to set the time
correctly as a.m. (A indicator) or p.m. (P indicator).
5. After you set the alarm time, press AA
AA
A to return to the Alarm Mode.
•If you do not operate any button for a few minutes while a selection is flashing, the
flashing stops and the watch goes back to the Alarm Mode automatically.
To turn an alarm and the Hourly Time Signal on and off
1. In the Alarm Mode, press DD
DD
D to select an alarm or the
Hourly Time Signal.
2. Press BB
BB
B to toggle the select item on and off.
•The indicators ALM and appear on the display when-
ever an alarm is turned on.
•The indicators SIG and appear on the display when-
ever the Hourly Time Signal is turned on.
•In other modes (besides the Alarm Mode), the ALM in-
dicator remains on the display as long as at least one of
the alarms is on, while the SIG indicator remains on the
display while the Hourly Time Signal is on.
•Indicators in the graphic area of the Alarm Mode show which alarms are turned on.
<Graphic Area>
To test the alarm
Hold down BB
BB
B while in the Alarm Mode to sound the alarm.
Alarm 1 Alarm 4
Alarm 5
Alarm 2 Alarm 3
Hourly Time Signal
Hour Minutes
[Module 1909] [Modules 2109/2209]
AL-2 (off) AL-4 (off)
AL-1 (on) AL-5 (off)
AL-3 (on)
AL-2 (off) AL-5 (off)
AL-1 (on) AL-4 (off)
AL-3 (on)
Alarm on indicator
Graphic area
Auto-start indicator
Mode indicator – Alarm No.
Graphic area
Alarm on indicator
AM indicator
Hour : Minutes
