Casio Stylus Users Manual
Stylus to the manual 12a9f2d9-7181-479e-b457-fe4e377027b4
IT-10 IT-10_EN IT-10 | Handheld Terminals | Manuals | CASIO
2015-01-21
: Casio Casio-Stylus-Users-Manual-243536 casio-stylus-users-manual-243536 casio pdf
Open the PDF directly: View PDF ![]() .
.
Page Count: 126 [warning: Documents this large are best viewed by clicking the View PDF Link!]
1
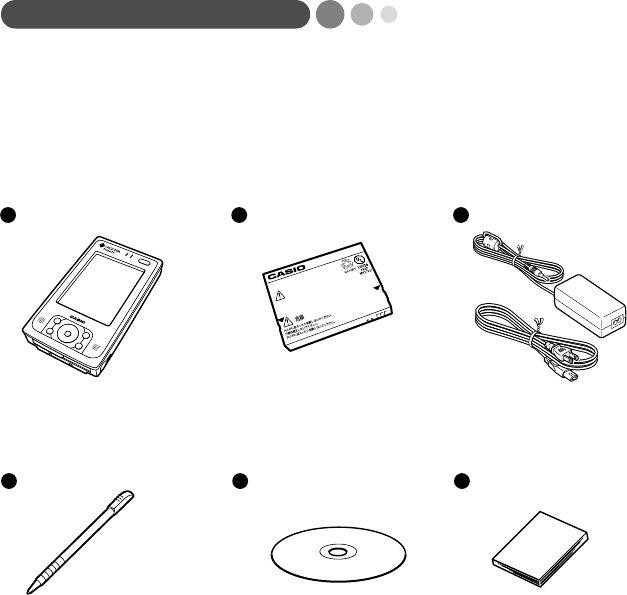
Packing List
Thank you for purchasing the Pocket PC "the Rugged PDA". A list of the items included with
this product is given below. Confirm that nothing is missing or damaged.
If anything is missing or damaged, contact the dealer from which you purchased this product.
Rugged PDA
Stylus
AC AdaptorBattery Pack
User's Guide
(Two power cords, one for
North America and one for Europe.)
However the IT-10M30B provided
with only one power cord.
User's
Guide
CD-ROM
Companion
CD
HA-C21BAT
Li-ion 3.7V 2300mAh
DANGER
.Never dispose of the battery by incineration
and never expose it to heat.
.Never try to take the battery apart ot otherwise try to modify
.Never try to take the battery apart ot otherwise try to modify
Do not dispose of the box and packing materials. Use the box and packing materials for
storage and transport.
Printed materials other than those listed here may be included with the product also.
×1
×1
×1
×2
IT-10/01-E.p65 06.6.15, 6:43 PM1

2
CASIO
®
End-User software License Agreement
Please read carefully before using this equipment.
The main CASSIOPEIA unit and the items that come bundled with it include the Software Products (application programs,
related documentation, etc.), the rights to which belong to CASIO COMPUTER CO., LTD.
Rights in the "Software Product" are offered only on the condition that you agree to all terms and conditions of this EULA.
By installing, copying, downloading, or otherwise using the software product, you agree to be bound by the terms of this
EULA.
1. License
The Software Programs, including the Software embedded in the accompanying CD-ROM, the programs embedded in
theequipment and the accompanying documentation ("Documentation"), are licensed, not sold, to you by CASIO
COMPUTER CO,. LTD. ("CASIO") for use solely under the terms of this License Agreement.
This non-exclusive license permits you to use the Software on the CD-ROM on a single hardware device at any one
time.
Installing the Software onto a network server is a violation of this License Agreement.
2. Copying and Alteration
You may not copy, alter, modify, adapt, translate, or create derivative works based upon the Software or Documenta-
tion or any part of them.
3. Transfer
You may transfer all of your rights in the Software under this license to a third party only if (a) you transfer the Software
CDROM and all Documentation to the third party, (b) you show the third party this End-User Software License Agree-
ment and the third party agrees to abide by its terms and conditions, and (c)you transfer all current and past versions
of the Software and Documentation to the third party. By accepting the Software CD-ROM, the third party consents to
be legally bound by all terms and conditions of this License Agreement. You may not sublicense, rent, lease, distribute,
transmit, make available on a network or transfer the Software or Documentation to a third party except as provided in
this paragraph.
4. Reverse Engineering
You may not de-compile, reverse engineer, disassemble, or otherwise reduce the Software Programs to a human
readable form.
5. Limitation of Liability
CASIO will in no event be liable for indirect, special, consequential, or incidental damages resulting from any defect,
error or omission in the Software or Documentation or from any other events including, but not limited to, any interrup-
tion of service, loss of business, loss of profits or good will, legal action or any other consequential damages. You
assume all responsibility arising from the use of the Software and/or Documentation. CASIO's liability for damages to
you or a third party will in no event exceed the total amount paid by you to obtain the rights to use the Software. THE
SOFTWARE IS FURNISHED AS IS, WITHOUT WARRANTY OF MERCHANTABILITY OR FOR ANY PARTICULAR
PURPOSE. If any of the Software programs is defective the CD-ROM will be replaced without charge if returned to the
place of purchase with proof of purchase within thirty days after it is purchased.
6. Termination
This license is effective until terminated. You may terminate this license at any time by informing CASIO in writing of
your intention to do so, and destroying the Software CD-ROM and Documentation so that they are unusable.
7. Cancellation
This license shall terminate immediately without any notice from CASIO if you fail to comply with any of its terms.
8. Action Following Termination or Cancellation
Upon termination or cancellation of this license in accordance with paragraph 6 or 7 above, you agree to destroy the
Software CD-ROM and the Documentation so that they are no longer usable, and to make no further use of either the
Software or the Documentation.
9. Other
a. This License Agreement shall be governed by and construed in accordance with the laws of Japan.
b. Any disputes arising under this License Agreement shall be referred to the SOLE AND EXCLUSIVE JURISDICTION
OF THE TOKYO DISTRICT COURT IN TOKYO, JAPAN.
c. The Software and Documentation may not be exported outside the country where they were purchased, either
physically or by means of transmission over an international network.
Copyright © 2004, CASIO COMPUTER CO., LTD. All Rights Reserved.
IT-10/02-04-E.p65 06.6.15, 6:44 PM2
3
Microsoft® Pocket PC Software 2003
End User License Agreement
• You have acquired a device ("DEVICE") that includes software licensed by CASIO COMPUTER CO,. LTD. ("CASIO")
from Microsoft Licensing Inc. or its affiliates ("MS"). Those installed software products of MS origin, as well as
associated media, printed materials, and "online" or electronic documentation ("SOFTWARE") are protected by
international intellectual property laws and treaties. The SOFTWARE is licensed, not sold. All rights reserved.
• IF YOU DO NOT AGREE TO THIS END USER LICENSE AGREEMENT ("EULA"), DO NOT USE THE DEVICE OR
COPY THE SOFTWARE. INSTEAD, PROMPTLY CONTACT CASIO FOR INSTRUCTIONS ON RETURN OF THE
UNUSED DEVICE(S) FOR A REFUND. ANY USE OF THE SOFTWARE, INCLUDING BUT NOT LIMITED TO USE
ON THE DEVICE, WILL CONSTITUTE YOUR AGREEMENT TO THIS EULA (OR RATIFICATION OF ANY PREVI-
OUS CONSENT).
•GRANT OF SOFTWARE LICENSE. This EULA grants you the following license:
• SOFTWARE includes software already installed on the DEVICE ("DEVICE Software") and MS software contained
on the CD-ROM disk ("Desktop Software").
SYSTEM Software. You may use the DEVICE Software as installed on the DEVICE.
Desktop Software. Desktop Software is included with your DEVICE, and you may install and use the Microsoft®
ActiveSync® 3.7 component on one (1) or more computers to exchange information with one (1) or more com-
puting devices that contain a compatible version of the Microsoft® Pocket PC Software 2003 operating system.
For other software component(s) contained in the Desktop Software, you may install and use such components
only in accordance with the terms of the printed or online end user license agreement(s) provided with such
component(s). In the absence of an end user license agreement for particular component(s) of the Desktop
Software, you may install and use only one (1) copy of such component(s) on the DEVICE or a single computer
with which you use the DEVICE.
Back-up Copy. If Manufacturer has not included a back-up copy of the DEVICE Software with the DEVICE, you may
make asingle back-up copy of the DEVICE Software. You may use the back-up copy solely for archival pur-
poses.
Security Update/Digital Rights Management. Content providers are using the digital rights management technology
contained in this SOFTWARE ("DRM") to protect the integrity of their content ("Secure Content") so that their
intellecutual property, including copyright, in such content is not misappropriated. Portions of this SOFTWARE
and third party applications such as media players use DRM to play Secure Content ("DRM Software"). If the
DRM Software's security has been compromised, owners of Secure Contents ("Secure Content Owners") may
request that MS revoke the DRM Software's right to copy, display and/or play Secure Content. Revocation does
not alter the DRM Software's ability to play unprotected content. A list of revoked DRM Software is sent to your
computer whenever you download a license for Secure Content from the Internet. You therefore agree that MS
may, in conjunction with such license, also download revocation lists onto your computer on behalf of Secure
Content Owners. MS will not retrieve any personally identifiable information, or any other information, from your
computer by downloading such revocation lists. Secure Content Owners may also require you to upgrade some
of the DRM components in this Software ("DRM Upgrades") before accessing their content. When you attempt
to play such content. MS DRM Software will notify you that a DRM Upgrade is required and then ask for your
content before the DRM Upgrade is downloaded. Third party DRM Software may do the same. If you decline the
upgrade, you will not be able to access content that requires the DRM Upgrade, however, you will still be able to
access unprotected content and Secure Content that does not require the upgrade.
DESCRIPTION OF OTHER RIGHTS AND LIMITATIONS.
•Speech/Handwriting Recognition. If the SOFTWARE includes speech and/or handwriting recognition component(s),
you should understand that speech and handwriting recognition are inherently statistical processes; that recognition
errors are inherent in the processes; that it is your responsibility to provide for handling such errors and to monitor
the recognition processes and correct any errors. Neither Manufacturer nor its suppliers shall be liable for any
damages arising out of errors in the speech and handwriting recognition processes.
•Limitations on Reverse Engineering, Decompilation and Disassembly. You may not reverse engineer, decompile,
or disassemble the SOFTWARE, except and only to the extent that such activity is expressly permitted by applicable
law notwithstanding this limitation.
•Single DEVICE. The DEVICE Software is licensed with the DEVICE as a single integrated product. The DEVICE
Software installed in read only memory ("ROM") of the DEVICE may only be used as part of the DEVICE.
•Single EULA. The package for the DEVICE may contain multiple versions of this EULA, such as multiple transla-
tions and/or multiple media versions (e.g., in the user documentation and in the software). Even if you receive
multiple versions of the EULA, you are licensed to use only one (1) copy of the DEVICE Software.
•Notice Regarding the MPEG-4 Visual Standard. The SOFRWARE may include MPEG-4 visual decoding technol-
ogy MPEG LA, L.L.C. requires the following notice.
IT-10/02-04-E.p65 06.6.15, 6:44 PM3
4
USE OF THIS SOFTWARE IN ANY MANNER THAT COMPLIES WITH THE MPEG-4 VISUAL STANDARD IS
PROHIBITED, EXCEPT FOR USE DIRECTLY RELATED TO (A) DATA OR INFORMATION (i) GENERATED BY
AND OBTAINED WITHOUT CHARGE FROM A CONSUMER NOT THEREBY ENGAGED IN A BUSINESS ENTER-
PRISE, AND (ii) FOR PERSONAL USE ONLY; AND (B) OTHER USES SPECIFICALLY AND SEPARATELY LI-
CENSED BY MPEG LA,L.L.C.
If you have questions regarding this Notice, please content MPEG LA, L.L.C., 250 Steele Street, Suite 300, Denver,
Colorado 80206;
Telephone 303 331.1880; FAX 303 331.1879
•Rental. You may not rent or lease the SOFTWARE.
•LEASED HARDWARE. In the event that you receive the DEVICE under the terms of a lease from [COMPANY] or
[COMPANY'S] third-party representative, the following additional terms shall apply: (i) you may not transfer the
SOFTWARE to another user as part of the transfer of the DEVICE, whether or not a permanent transfer of the
SOFTWARE with the DEVICE is otherwise allowed in this EULA; (ii) your rights with respect to any SOFTWARE
upgrades shall be as determined by the lease you signed for the DEVICE; and (iii) you may not use the SOFTWARE
after your lease terminates, unless you purchase the DIVICE from [COMPANY].
•Software Transfer. You may permanently transfer all of your rights under this EULA only as part of a sale or transfer
of the DEVICE, provided you retain no copies, you transfer all of the SOFTWARE (including all component parts, the
media and printed materials, any upgrades or backup copies, this EULA and, if applicable, the Certificate(s) of
Authenticity), and the recipient agrees to the terms of this EULA. If the SOFTWARE is an upgrade, any transfer must
include all prior versions of the SOFTWARE.
•Termination. Without prejudice to any other rights, Manufacturer or MS may terminate this EULA if you fail to
comply with the terms and conditions of this EULA. In such event, you must destroy all copies of the SOFTWARE
and all of its component parts.
UPGRADES AND RECOVERY MEDIA.
•DEVICE Software. If the DEVICE Software is provided by Manufacturer separate from the DEVICE on media such
as a ROM chip, CD ROM disk(s) or via web download or other means, and is labeled "For Upgrade Purposes Only"
or "For Recovery Purposes Only", you may install one copy of such DEVICE Software onto the DEVICE as a
replacement copy for the existing DEVICE Software and use it in accordance with Section 1 of this EULA.
•Desktop Software. If any Desktop Software component(s) is provided by Manufacturer separate from the DEVICE
on CD ROM disk(s) or via web download or other means, and labeled "For Upgrade Purposes Only" or "For Recov-
ery Purposes Only", you may (i) install and use one copy of such component(s) on the computer(s) you use to
exchange data with the DEVICE as a replacement copy for the existing Desktop Software component(s).
COPYRIGHT. All title and intellectual property rights in and to the SOFTWARE (including but not limited to any images,
photographs, animations, video, audio, music, text and "applets," incorporated into the SOFTWARE), the ac-
companying printed materials, and any copies of the SOFTWARE, are owned by MS or its suppliers (including
Microsoft Corporation). You may not copy the printed materials accompanying the SOFTWARE. All title and
intellectual property rights in and to the content which may be accessed through use of the SOFTWARE is the
property of the respective content owner and may be protected by applicable copyright or other intellectual
property laws and treaties. This EULA grants you no rights to use such content. All rights not specifically granted
under this EULA are reserved by MS and its suppliers (including Microsoft Corporation).
EXPORT RESTRICTIONS. You agree that you will not export or re-export the SOFTWARE to any country, person, or
entity subject to U.S. export restrictions. You specifically agree not to export or re-export the SOFTWARE: (i) to
any country to which the U.S. has embargoed or restricted the export of goods or services, which as of May
1999 include, but are not necessarily limited to Cuba, Iran, Iraq, Libya, North Korea, Sudan, Syria, and the
Federal Republic of Yugoslavia (including Serbia, but not Montenegro), or to any national of any such country,
wherever located, who intends to transmit or transport the products back to such country; (ii) to any person or
entity who you know or have reason to know will utilize the SOFTWARE or portion thereof in the design, devel-
opment or production of nuclear, chemical or biological weapons; or (iii) to any person or entity who has been
prohibited from participating in U.S. export transactions by any federal agency of the U.S. government.
PRODUCT SUPPORT. Product support for the SOFTWARE is not provided by MS, its parent corporation, Microsoft
Corporation, or their affiliates or subsidiaries. For product support, please refer to CASIO support number pro-
vided in the documentation for the DEVICE. Should you have any questions concerning this EULA, or if you
desire to contact CASIO for any other reason, please refer to the address provided in the documentation for the
DEVICE.
NO LIABILITY FOR CERTAIN DAMAGES. EXCEPT AS PROHIBITED BY LAW, MS SHALL HAVE NO LIABILITY
FOR ANYINDIRECT, SPECIAL, CONSEQUENTIAL OR INCIDENTAL DAMAGES ARISING FROM OR IN CON-
NECTION WITH THE USE OR PERFORMANCE OF THE SOFTWARE. THIS LIMITATION SHALL APPLY
EVEN IF ANY REMEDY FAILS OF ITS ESSENTIAL PURPOSE.
FOR APPLICABLE LIMITED WARRANTIES AND SPECIAL PROVISIONS PERTAINING TO YOUR PARTICULAR
JURISDICTION, PLEASE REFER TO YOUR WARRANTY BOOKLET INCLUDED WITH THIS PACKAGE OR PRO-
VIDED WITH THE SOFTWARE PRINTED MATERIALS.
IT-10/02-04-E.p65 06.6.15, 6:44 PM4

5
Safety Precautions
•To use this product safely and correctly, read this User’s Guide
thoroughly and operate as instructed.
After reading this guide, keep it close at hand for easy reference.
Please keep all informations for future reference.
•Always observe the warnings and cautions indicated on the product.
•If this Guide is misplaced or damaged so as to be unreadable, you
can access "http://www.casio.co.jp/English/system/" for the online
guide or downloading the guide into your PC.
About the icons
In this Guide various icons are used to highlight safe operations with
the product and to prevent injury to the operator and other persons
nearby and also to prevent damage to property including the
product.
Indicates that there is a risk of severe injury if used incorrectly.
Indicates that injury or damage may result if used incorrectly.
Icon examples
To bring attention to risks and possible damage, the following icons
are used.
The symbol indicates that it includes
some symbol for attracting attention
(including warning). In this triangle the
actual precautions to be taken (electric
shock, in this case) is indicated.
The symbol indicates a prohibited
action. In this symbol the actual prohib-
ited actions (disassembly, in this case)
will be indicated.
The symbol indicates that a restriction.
In this symbol the actual restriction
(removal of the power plug from an
outlet, in this case) is indicated.
Warning!
Caution!
IT-10/05-20-E.p65 06.6.15, 6:44 PM5
6
Handling the Rugged PDA
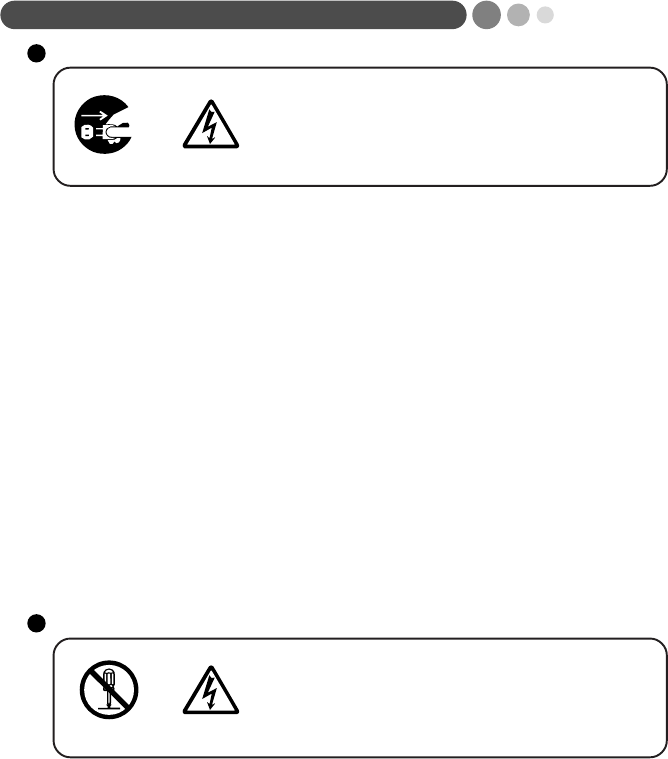
Stop using the Rugged PDA and turn it off in
places where its operation is prohibited.
The effects of electromagnetic radiation may
result in an accident.
Should the Rugged PDA malfunction, start to
emit smoke or a strange odor, or otherwise
behave abnormally, immediately shut down the
power, remove the battery pack, and unplug
the AC adaptor from the power outlet. Contin-
ued use creates the danger of fire and electric
shock.
❒Contact your original dealer or authorized CASIO dis-
tributor.
Do not place containers of liquids near the
Rugged PDA and do not allow any foreign
matter to get into it. Should water or other for-
eign matter get into the Rugged PDA, imme-
diately shut down the power and unplug the
AC adaptor from the power outlet. Continued
use creates the danger of shorting, fire and
electric shock.
❒Contact your original dealer or authorized CASIO dis-
tributor.
Never bring in the Rugged PDA a bathroom
or any other location where the possibility of
splashing or high humidity exists. Use of the
Rugged PDA in such an area creates the dan-
ger of electric shock. Be especially carefully
when using the Rugged PDA while rain or
snow is falling, or in beach areas.
Never try to take the Rugged PDA apart or
modify it in any way. Doing so creates the dan-
ger of fire and electric shock.
❒Contact your authorized CASIO distributor for repair
and maintenance.
Warning!
IT-10/05-20-E.p65 06.6.15, 6:44 PM6
7
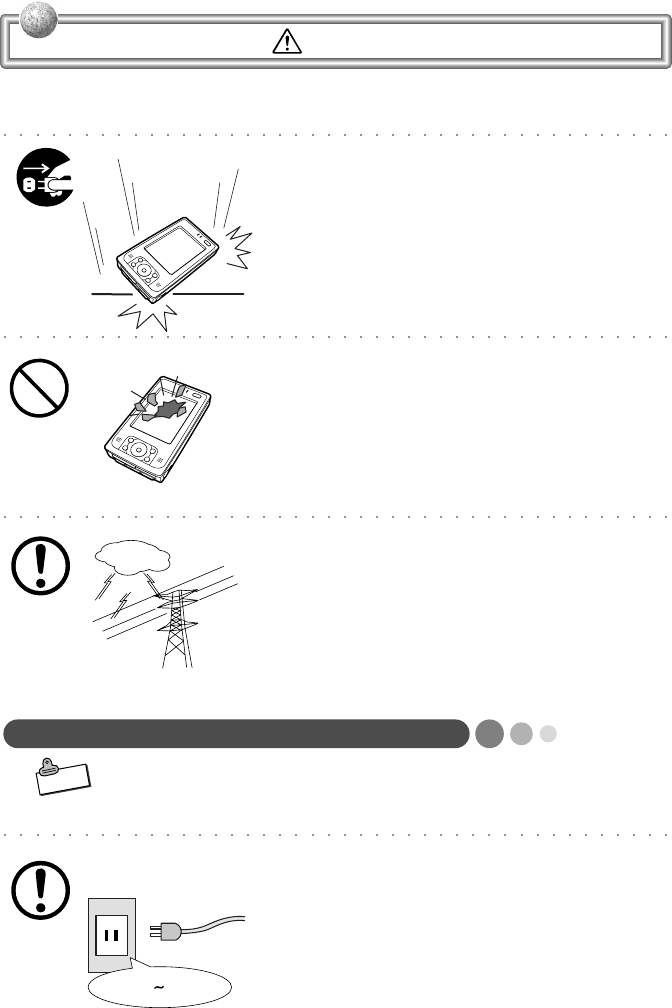
Warning!
Should you drop the Rugged PDA and dam-
age it, immediately shut down the power and
unplug the AC adaptor from the power outlet.
Continued use creates the danger of shorting,
fire and electric shock.
❒Attempting to repair the Rugged PDA yourself is ex-
tremely dangerous. Contact your authorized CASIO
distributor for repair and maintenance.
The liquid inside the LCD is harmful to humans.
Never touch it or allow it to get in your mouth.
❒Should liquid from the LCD panel accidentally get
into your mouth immediately wash out your mouth
with clean water. If it gets onto your skin, immedi-
ately rinse for at least 15 minutes with clean tap water.
In either case, consult a physician.
Should lightning strike nearby, stop using the
Rugged PDA, and disconnect the modular
cable or the power cord from the power outlet.
Continued use creates the danger of electric
shock or damage.
Power Plug and AC Adaptor
AC cord plug and wall outlet illustrated in this User's Guide show
the two-pin plug type. It may not be the same shape of AC cord plug
used in your area.
Use only a proper AC electric outlet
(100V~240V) when powering the Rugged PDA
with the AC adaptor. Use of an outlet with a
different voltage from the rating creates the
danger of malfunction, fire, and electric shock.
Overloading an electric outlet creates the dan-
ger of overheating and fire.
AC100 240V
Note
IT-10/05-20-E.p65 06.6.15, 6:44 PM7
8
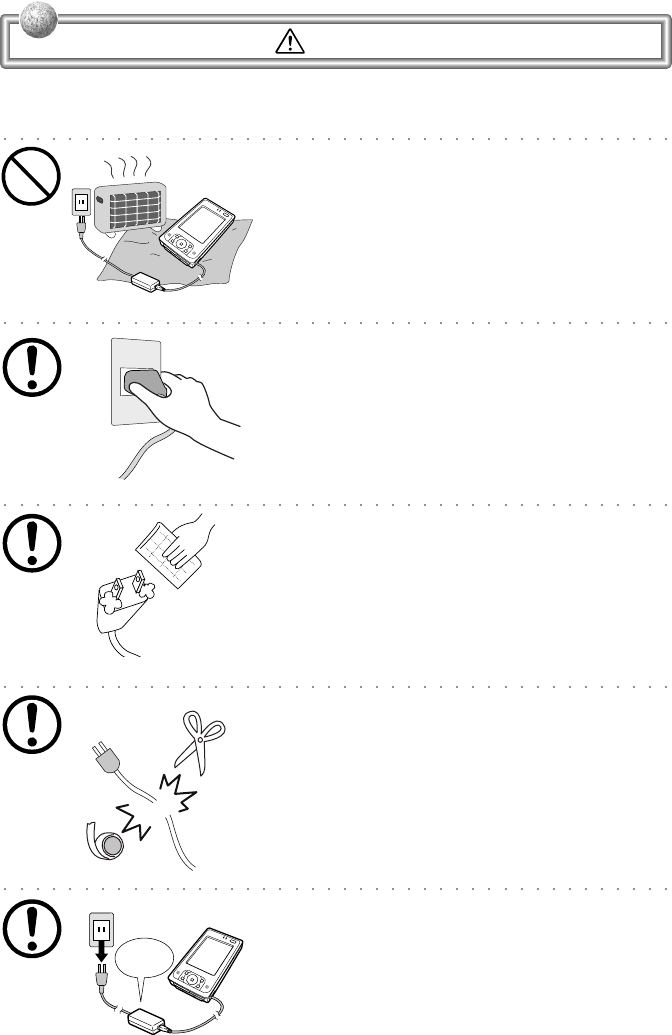
Warning!
Do not place bedding materials on top of the
AC adaptor while it is on or place the Rugged
PDA on heated flooring or near other heating
apparatus during charging.
Doing so might cause it to deform, or result in
a fire or malfunction.
Make sure the power plug and AC adaptor plug
are inserted as far as they will go. Loose plugs
create the danger of electric shock, overheat-
ing, and fire.
❒Do not use the adaptor if the plug is damaged. Never
connect to a power outlet that is loose.
Use a dry cloth to periodically wipe off any dust
built up on the prongs of the plug. Humidity
can cause poor insulation and create the dan-
ger of electric shock and fire if dust stays on
the prongs.
Do not allow the power cord or plug to become
damaged, and never try to modify them in any
way. Continued use of a damaged power cord
can cause deterioration of the insulation, ex-
posure of internal wiring, and shorting, which
creates the danger of electric shock and fire.
❒Contact your authorized CASIO distributor whenever
the power cord or plug requires repair or maintenance.
Use only the AC adaptor specified by CASIO
for this product. Use of other type of AC adap-
tor creates the danger of fire.
Specified
AC Adaptor
IT-10/05-20-E.p65 06.6.15, 6:44 PM8
9
Warning!
Battery Pack
Use only the battery pack that comes with the
Rugged PDA. When the battery pack reaches
the end of its life, replace it with a new battery
pack as specified by CASIO. Other types of
the battery pack have different voltage rating
and polarity, which creates the danger of fire
and bursting of the batteries.
Never try to take the battery pack apart or
modify it in any way. Doing so creates the dan-
ger of overheating, fire, and bursting of the
battery pack.
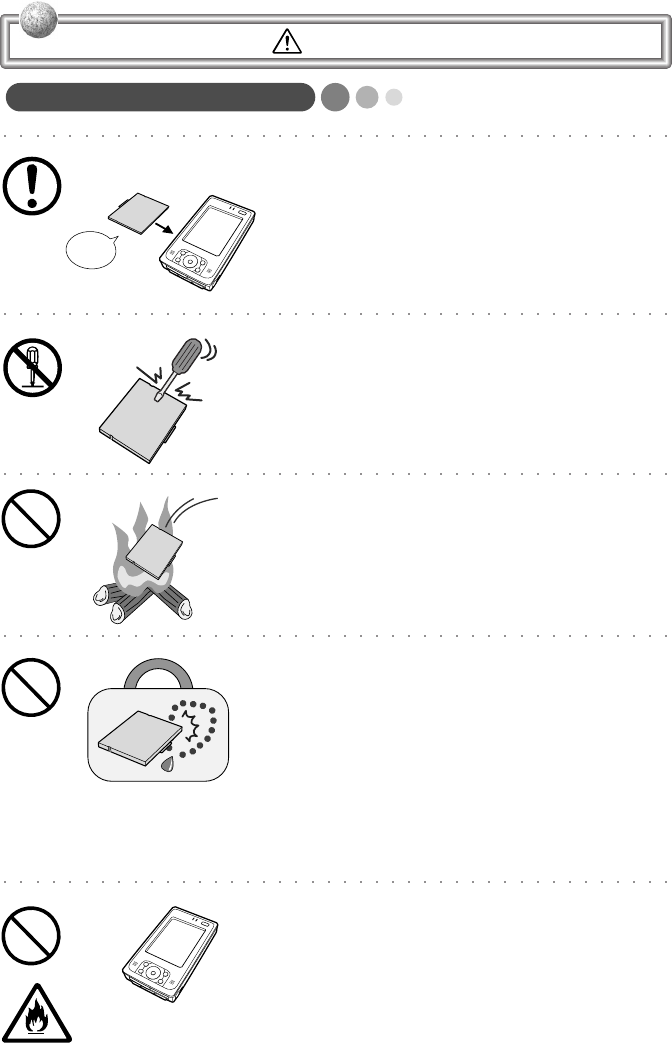
Never throw the battery pack into fire or other-
wise expose it to direct flame. Doing so cre-
ates the danger of fire and explosion.
Never allow the positive (+) and negative (-)
poles of the battery to become connected by
metal. Do not store or transport the battery
pack together with metal necklaces, hairpins,
or other metal items. Connection of the bat-
tery pack poles creates the danger of over-
heating, fire, and explosion.
❒When transporting or storing the battery pack, wrap it
in plastic to keep the poles away from metal items
that might cause a short.
If the amount of time period the battery pack
can serve becomes considerably short, stop
using it. It may indicate the possibility of a
malfunction in the battery pack. Continued
charging the battery pack creates the danger
of heat emission, explosion, and fire.
Battery
(included)
IT-10/05-20-E.p65 06.6.15, 6:44 PM9
10
Caution!
the Rugged PDA
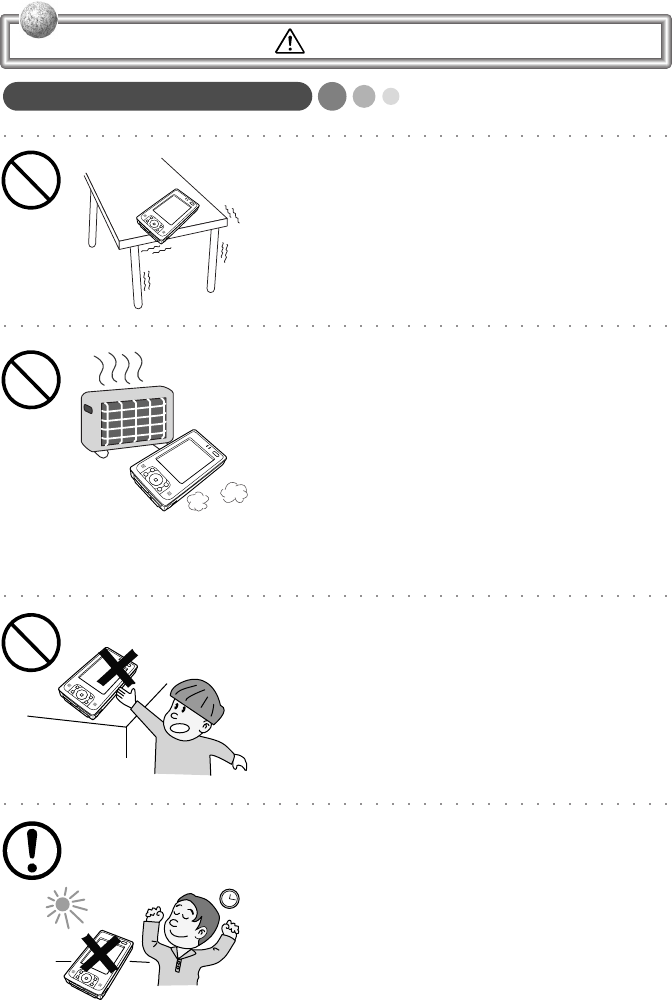
Do not place the Rugged PDA on an unstable
or uneven surface. Doing so can cause the
Rugged PDA to fall, creating the danger of mal-
function, fire, and electric shock.
Do not leave the Rugged PDA in the following
areas.
•Areas where the Rugged PDA will be sub-
ject to large amounts of humidity or dust, or
directly exposed to hot or cold air.
•Areas exposed to direct sunlight, in a close
motor vehicle, or any other area subject to
very high temperatures.
The above conditions can cause malfunction
or deformation of the Rugged PDA, which cre-
ates the danger of fire.
Keep the Rugged PDA out of the reach of chil-
dren.
The stylus or other sharp object may cause
an unexpected injury.
Avoid use in areas where the brightness
around the display is very different from sur-
rounding lighting, or where the sunlight is shin-
ing directly on the display. Such the conditions
can cause eye fatigue.
IT-10/05-20-E.p65 06.6.15, 6:44 PM10
11
Caution!
Power Cord and Peripherals
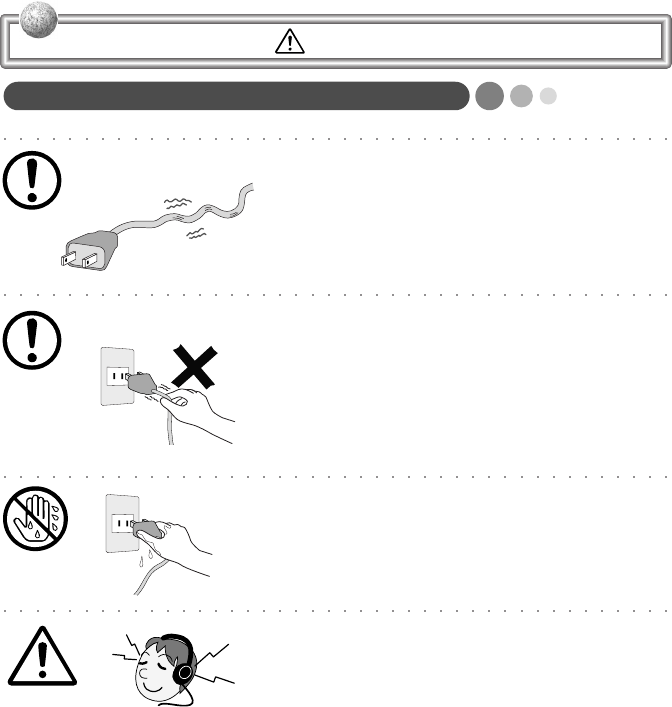
Do not overly bend the power cord, do not al-
low it to be caught between desks or other fur-
niture, and never place heavy objects on the
power cord. Doing so can cause shorting or
breaking of the power cord, creating the dan-
ger of fire and electric shock.
Be sure to grasp the plug when unplugging
the power cord from the wall outlet. Pulling on
the cord can damage it, break the wiring, or
cause short, creating the danger of fire and
electric shock.
Never touch the plug while your hands are wet.
Doing so creates the danger of electric shock.
Pulling on the cord can damage it, break the
wiring, or cause short, creating the danger of
fire and electric shock.
When using headphone, make sure you do
not turn up the volume too high. Doing so can
cause hearing damage.
IT-10/05-20-E.p65 06.6.15, 6:44 PM11
12
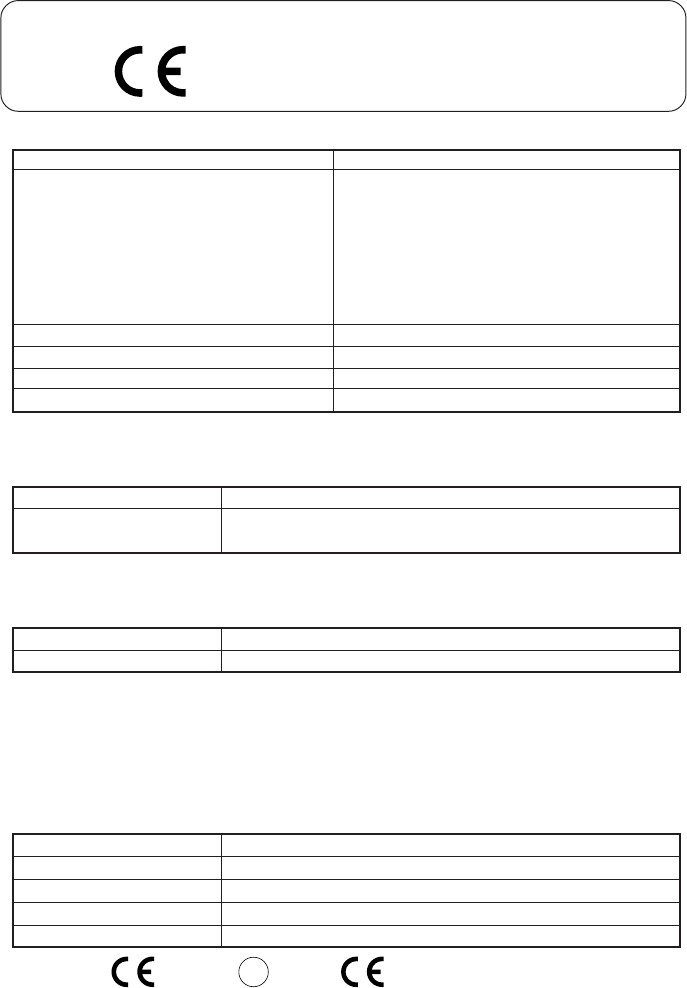
The CE marking indicates compliance to applicable European Directives and Norms declared by;
CASIO Europe GmbH
Bornbarch 10, D-22848 Norderstedt, Germany
certify and declare under our sole responsibility that the following equipments:
are tested and found to conform with the essential requirements for protection of health and the
safety of the user and any other persons and Electromagnetic Compatibility, as included in
following standards:
and are tested and found to conform with the essential radio test suites so that they effectively
use the frequency spectrum allocated to terrestrial/space radio communication and orbital re-
sources so to as to avoid harmful interference, as included in following standards:
and therefore comply with the essential requirements and provisions of the Directive 1999/5/EC
of the European Parliament and of the council of March 9, 1999 on Radio equipment and Tele-
communications Terminal Equipment and the mutual recognition of their conformity and with
the provisions of Annex III (Conformity Assessment procedure referred to in article 10).
The technical documentation as required by the Conformity Assessment procedure is kept at
the following address:
The information described above dates from January 2004 and may be subjected to future
changes.
Standard Issue date
EN60950-1
EN301 489-1/V1.4.1 2002-08
Standard Issue date
EN300 328V 1.4.1 2003-04
Company CASIO Europe GmbH
Address, City Bornbarch 10, D-22848 Norderstedt
Country Germany
Phone number +49(0)40-528-65-0
Fax number +49(0)40-528-65-424
EU: Austria, Belgium, Germany, Denmark,
Spain, Finland, France, United Kingdom,
Greece, Ireland, Italy, Luxembourg, The Neth-
erlands, Portugal, Sweden, Czech Republic,
Hungary, Poland, Slovenia, Slovakia, Estonia,
Latvia, Lithuania, Cyprus, Malta
EFTA: Switzerland, Iceland, Norway
NONE
CASIO COMPUTER CO., LTD.
CASIO
IT-10M20, IT-10M20BR
Product description / Intended use
EU/EFTA member states intended for use
Member states with restrictive use
Manufacturer
Brand
Type
0560 !
IT-10/05-20-E.p65 06.6.15, 6:44 PM12

13
GUIDELINES LAID DOWN BY FCC RULES FOR USE OF THIS UNIT IN THE U.S.A.
(not applicable to other areas.)
NOTICE
This equipment has been tested and found to comply with the limits for a Class
B digital device, pursuant to Part 15 of the FCC Rules. These limits are de-
signed to provide reasonable protection against harmful interference in a
residential installation. This equipment generates, uses and can radiate radio
frequency energy and, if not installed and used in accordance with the
instructions, may cause harmful interference to radio communications. How-
ever, there is no guarantee that interference will not occur in a particular
installation. If this equipment does cause harmful interference to radio or
television reception, which can be determined by turning the equipment off
and on, the user is encouraged to try to correct the interference by one or
more of the following measures:
•Reorient or relocate the receiving antenna.
•Increase the separation between the equipment and receiver.
•Connect the equipment into an outlet on a circuit different from that to which
the receiver is connected.
•Consult the dealer or an experienced radio/TV technician for help.
FCC WARNING
Changes or modifications not expressly approved by the party responsible for
compliance could void the user’s authority to operate the equipment.
Declaration of Conformity
Model Number: IT-10M20
Trade Name: CASIO
Responsible party: CASIO INC.
Address: 570 Mt. Pleasant Avenue, Dover, New Jersey 07801.
Telephone number: 973.361.5400
This device complies with part 15 of the FCC Rules. Operation is subject
to the following two conditions: (1)This device may not cause harmful
interference, and (2)this device must accept any interference received,
including interference that may cause undesired operation.
IT-10/05-20-E.p65 06.6.23, 11:02 AM13
14
Industry Canada
“This digital apparatus does not exceed the Class B limits for
radio noise emissions from digital apparatus as set out in the
interference-causing equipment standard entitled “Digital Appara-
tus”, ICES-003 of the Department of Communications.”
Industrie Canada
“Cet appareil numérique respecte les limites de bruits
radioélectriques applicables aux appareils numeriques de Classe
B prescrites dans la norme sur le matériel brouilleur : “Appareils
Numériques”, NMB-003 édictée par le ministre des Communica-
tions.”
IT-10/05-20-E.p65 06.6.15, 6:44 PM14

15
Before Using the Rugged PDA
• This product has been designed and manufactured under stringent quality control.
Should you suspect the Rugged PDA is defective or malfunctioning, contact your
original dealer or authorized distributor. Repair and maintenance are subject to the
terms and conditions of the Warranty.
The mis-operation of electronic product may create a risk of injury caused by a fire
or electric shock, etc. To avoid the accident, be sure to follow the instructions below.
Follow the cautions
The cautions for the Rugged PDA are described on pages from 5 to 11.
Do not use the Rugged PDA if it does not work correctly
Contact your original dealer or authorized CASIO distributor.
If the Rugged PDA works abnormally
If the Rugged PDA malfunctions, or emits smoke, strange odor or noise, etc., imme-
diately shut down the power, remove the battery pack, and unplug the power cord of
the AC adaptor from the power outlet. Contact your original dealer or authorized
CASIO distributor.
• CASIO COMPUTER CO., LTD. shall not be held liable for any loss or claims due to
the use of this product.
• CASIO COMPUTER CO., LTD. shall not be held liable for any loss or claims (lost
profits, interruption of business, corruption or loss of memory data, etc.) by you or
any third party due to the use of this product or the inability to use this product for a
specific purpose, except as specifically stipulated by law.
• Unauthorized copying of this product or its software is prohibited.
Product Application
• This product is intended for use as a general office computing device.
• CASIO makes no warranties that this product is fault-tolerant.
The Rugged PDA
Power Requirements
• Plug the AC adaptor into a power outlet rated for 100V to 240V AC, 50/60Hz only.
• Do not connect the Rugged PDA to the same outlet of other device that generates
electrical noise. Such a device can corrupt data in the Rugged PDA.
IT-10/05-20-E.p65 06.6.15, 6:44 PM15

16
The Rugged PDA and AC adaptor may become warm during
use.
• This is caused by the CPU operation or the current when the Rugged PDA's battery
is charged. This is not malfunction. The heating value charges according to the con-
dition of use.
• When the Rugged PDA or the AC adaptor is warmer than usual, shut down the power,
unplug the power cord of the AC adaptor and remove the battery pack. Contact your
original dealer or authorized CASIO distributor.
Do not continue operating the Rugged PDA until the battery
completely discharges.
• Doing so may result in loss of or damage to your data. Recharge the battery before it
discharges completely.
Use the stylus provided.
• When writing on the screen, be sure to use only the stylus provided (or a similar
product with a soft tip that is not sharp). Remove any dust or dirt from the screen and
the tip of the stylus before writing on the screen. Dirt or dust makes it difficult to
write on the screen and may scratch it.
Avoid using the Rugged PDA in the following locations.
• Places where there is a lot of dust.
• Be careful when using the Rugged PDA in locations where the surrounding tempera-
ture is extremely hot or cold, such as in a car in direct sunlight, in front of heater.
• Places that are very humid or damp.
Avoid vibration and strong impact.
• Strong vibration or impact may damage the Rugged PDA or important data. It also
might damage the LCD screen.
Do not use the Rugged PDA in the rain or places where water
may get on it.
• The Rugged PDA is water splash-resistant, however water entering through the gaps
around buttons and switches may cause a malfunction.
• If rain or water gets on the Rugged PDA, carefully wipe it with a dry cloth.
IT-10/05-20-E.p65 06.6.15, 6:44 PM16

17
Cautions when carrying the Rugged PDA
• Do not put the Rugged PDA into the hip pocket of your trousers and then sit down.
Doing so may break it and cause a malfunction.
• Do not carry the Rugged PDA around in a bag containing hard objects with protru-
sions. If these objects bump against the Rugged PDA or force is applied from above,
the display may be scratched or the Rugged PDA may malfunction.
• Before moving the Rugged PDA, be sure to shut down the power, and make sure that
all peripheral devices are disconnected. Then, move the Rugged PDA separately
from these devices. Carrying devices around holding them by their connector cables
may cause cables to break or devices to malfunction.
• When carrying the Rugged PDA around or when the Rugged PDA is not used, shut
down the power, and put it in a protective case, for example, to prevent the display
from being scratched.
Periodically back up data stored on the Rugged PDA
We recommend periodically writing down or transferring data (transfer data with
ActiveSync) to a personal computer to create a backup of important data. Data may be
lost in the following situations.
• If the battery is completely depleted.
• If incorrect operations are done.
• During repairs to correct a malfunction.
Options
Non-CASIO options
• Check with each manufacturer for compatibility before using any non-CASIO op-
tions with this product.
• CASIO assumes no responsibility for any loss (including but not limited to personal
injury, material loss, damage to the Rugged PDA) suffered by you or other arising
out of the use of a non-CASIO option.
Use only as directed
• Be sure to connect or disconnect an option only as expressly directed in the docu-
mentation that comes with the option.
• Incorrect use of options can cause malfunction and serious damage to the Rugged
PDA, which can result in extensive repair work to correct.
IT-10/05-20-E.p65 06.6.15, 6:44 PM17
18
Notes on transfer of ownership of this product
Transferring ownership (selling) this product should be done in compliance with item 1
below.
Accepting ownership (buying) this product should be done in compliance with item 2
below.
1) If you transfer ownership of this product
When transferring ownership of this device to a third party, hand over everything
that was included with it (including CD-ROMs, manuals, END-USER LICENSE
AGREEMENT, and any backup copies) and completely dispose of all copies of any
related software in your possession.
2) If you accept ownership of this product
To accept ownership of this device, you must accept the END-USER LICENSE
AGREEMENT for the software. Accepting ownership of this device is considered
acceptance of the END-USER LICENSE AGREEMENT.
Disposal
When it comes time to dispose of the Rugged PDA, do so in accordance with local
regulations in your area. Contact your local government authorities for details about
proper disposal methods.
When disposing of or transferring ownership of this device, erase all important data and
applications in its memory by doing a full reset.
If you do not erase all the data before disposing of or transferring ownership of the
device, then someone may recover and use any valuable data in unintended and mali-
cious ways.
Battery disposal
The product that you have purchased contains a rechargeable bat-
tery. The battery is recyclable.
Affix tape to the battery contacts before disposing of the battery. At
the end of its useful life, under various state and local laws, it may
be illegal to dispose of this battery into the municipal waste stream.
Check with your local solid waste officials for details in your area
for recycling options or proper disposal.
This mark applies in EU countries only.
IT-10/05-20-E.p65 06.6.15, 6:45 PM18
19
Maintenance and Care
Normal care
Shut down the power and unplug the power
cord from the power outlet before cleaning
the Rugged PDA. Cleaning the Rugged
PDA with the power on creates the danger
of electric shock.
• Clean the Rugged PDA by wiping it with a soft, dry cloth. If the Rugged PDA is very
dirty, wipe it with a cloth that has been moistened with a weak solution of water and
a mild neutral detergent. Wring out all excess of moisture before wiping.
• Thinner, benzene, or other organic agents can cause deformation or discoloration of
the Rugged PDA's case, and even malfunction of the Rugged PDA. Never use such
agents when cleaning.
• Use only the stylus accompanied with the Rugged PDA (or specified by CASIO) for
inputting on the LCD screen. Before using the stylus, remove any dirt from the tip of
it and on the screen. Dirt if any may make an input with the stylus more difficult or
damage on the screen. Also take care that you do not misplace or lose the stylus.
• Clean the Rugged PDA's LCD screen by wiping it with a soft, clean cloth. Never use
water, neutral detergents, or chemically treated cloths to clean the screen. A dirty
screen can interfere with response to stylus operations, and smooth movement of the
stylus tip. The screen is easily scratched, so take care that you do not apply to much
pressure when cleaning it.
Maintenance
Never remove the Rugged PDA's outer
cover or otherwise try to take it apart or
modify it in any way. High voltage inside
the case creates the danger of electric
shock.
In the following instances, immediately shut down the power, remove the battery pack,
unplug the power plug from the power outlet, and contact your original dealer or autho-
rized CASIO distributor:
• Damaged power cord or plug
• Liquid leaking from the Rugged PDA
• Unit being dropped
• Damaged unit cover
• Very abnormal function
Never try to make any adjustments except as specifically instructed by this User's Guide.
Improper adjustment or modification on the Rugged PDA can permanently damage it
and make it impossible to restore normal operation.
Never attempt to repair or modify this product in any way.
IT-10/05-20-E.p65 06.6.15, 6:45 PM19

20
Storage
Follow the procedure below to put the Rugged PDA into storage.
If you have used the Rugged PDA for a long period, it will have
become dusty. We recommend cleaning it before putting it into stor-
age. You can find information about cleaning in the previous section
“Maintenance and Care.”
1. Back up all the data on the Rugged PDA to a computer if it is neces-
sary.
2. Turn off the power, remove all cables and remove the Rugged PDA
from the Basic Cradle and AC adaptor.
3. Remove the battery pack and insulate the battery pack terminals with
cellophane tape when you store it.
4. Carefully package the Rugged PDA so it does not get dirty or dam-
aged. The box that the Rugged PDA originally came in is a good box
into which it can be packed.
Consumables
The following items are consumables.
You will need to inform your original dealer or authorized CASIO distributor of the
model number of your unit when purchasing the stylus and battery pack.
Stylus
• Purchase a new stylus whenever the tip of your stylus becomes damaged.
Battery Pack
• Long use of the battery pack causes it to deteriorate and lose its ability to recharge. If
you feel your battery pack is not providing enough operating time, it may be time to
contact your dealer or authorized CASIO distributor about purchasing a new one.
The Rugged PDA includes components that have a limited service life (LCD, etc.).
Such components require replacement after very long use.
Note
IT-10/05-20-E.p65 06.6.15, 6:45 PM20

21
Contents
Packing List ....................................................................................................................1
Safety Precautions ........................................................................................................ 5
Before Using the Rugged PDA ....................................................................................15
Maintenance and Care .................................................................................................19
Storage .........................................................................................................................20
Consumables ...............................................................................................................20
Chapter 1 Getting Ready
Names of Parts and Their Functions ................................................. 26
Names of Parts and Their Functions ............................................................26
Operating the Rugged PDA .........................................................................29
Using the Stylus ...........................................................................................29
Connecting the Strap ...................................................................................31
Attaching the Screen Protect Sheet .............................................................31
Power Supply .................................................................................... 33
Battery Pack .................................................................................................33
Attaching and Removing the Battery Pack ..................................................34
Charging the Battery Pack ...........................................................................36
Using the AC Adaptor...................................................................................39
Initial Setup ........................................................................................ 40
Initial Setup Procedure .................................................................................40
Various Screen Adjustments ........................................................................43
When Initial Setup Is Finished .....................................................................44
Button Operation Settings ............................................................................64
Connecting to a Computer ................................................................. 65
Compatible Computers ................................................................................65
Connecting to a Computer ...........................................................................66
Using the CASIO Companion CD ................................................................66
IT-10/21-24-E.p65 06.6.15, 6:45 PM21

22
Chapter 2 Basic Operations
PIM .................................................................................................... 68
About Pocket Outlook ................................................................................. 68
Calender ......................................................................................................70
Contacts .......................................................................................................72
Tasks ............................................................................................................73
Programs ........................................................................................... 74
Programs Covered in this Section ...............................................................74
Adding Programs .........................................................................................75
Pockets Word .............................................................................................. 75
Pocket Excel ................................................................................................76
Windows Media ............................................................................................77
MSM Messenger ..........................................................................................79
Calculator .....................................................................................................80
Game ...........................................................................................................80
Card Backup ................................................................................................81
Pictures ........................................................................................................81
File Explorer .................................................................................................82
FLCE ............................................................................................................84
Menu ............................................................................................................84
Find and Help .............................................................................................. 85
Setup Overview ................................................................................. 87
Personal Tab Settings ................................................................................. 87
System Tab Settings ....................................................................................88
Connections Tab Settings ............................................................................90
Infrared Communication .................................................................... 91
Infrared Communication ...............................................................................91
Transferring Data .........................................................................................91
Bluetooth ........................................................................................... 94
Wireless LAN ..................................................................................... 96
Reset and Full Reset ......................................................................... 97
Reset ............................................................................................................97
Full Reset (Memory Initialization) .................................................................98
IT-10/21-24-E.p65 06.6.15, 6:45 PM22

23
Chapter 3 Connecting Peripherals
AC Adaptor ...................................................................................... 102
Connecting the AC Adaptor to the Rugged PDA ....................................... 102
Connecting the AC Adaptor to the Basic Cradle ....................................... 102
Specifications ............................................................................................ 103
Basic Cradle .................................................................................... 104
General Guide ........................................................................................... 104
To Mount the Rugged PDA onto the Basic Cradle .....................................105
To Remove the Rugged PDA from the Basic Cradle .................................106
Specifications ............................................................................................ 106
Bridge Satellite Cradle ..................................................................... 107
General Guide ........................................................................................... 107
Using the Bridge Satellite Cradle ...............................................................109
Linking Multiple Bridge Satellite Cradles .................................................... 110
Configuring DIP Switch Settings ................................................................ 111
Specifications ............................................................................................. 112
Dual Battery Charger ....................................................................... 113
General Guide ............................................................................................ 113
Handling Precautions ................................................................................. 114
Connecting Dual Battery Chargers Together ............................................. 114
Charging a Battery Pack ............................................................................ 115
Specifications ............................................................................................. 116
Communication Card Cover ............................................................ 117
Cards ............................................................................................... 118
Using Compact Flash (CF) Card ................................................................ 118
Loading and Removing a Compact Flash Card ......................................... 119
Using an SD card or a MultiMedia Card ................................................... 121
Appendix
Specifications .................................................................................. 124
Options List ...................................................................................... 126
IT-10/21-24-E.p65 06.6.15, 6:45 PM23
24
IT-10/21-24-E.p65 06.6.15, 6:45 PM24

1
Getting Ready
IT-10_1/25-39-E.p65 06.6.15, 6:40 PM25
26
Names of Parts and Their Functions
Names of Parts and Their Functions
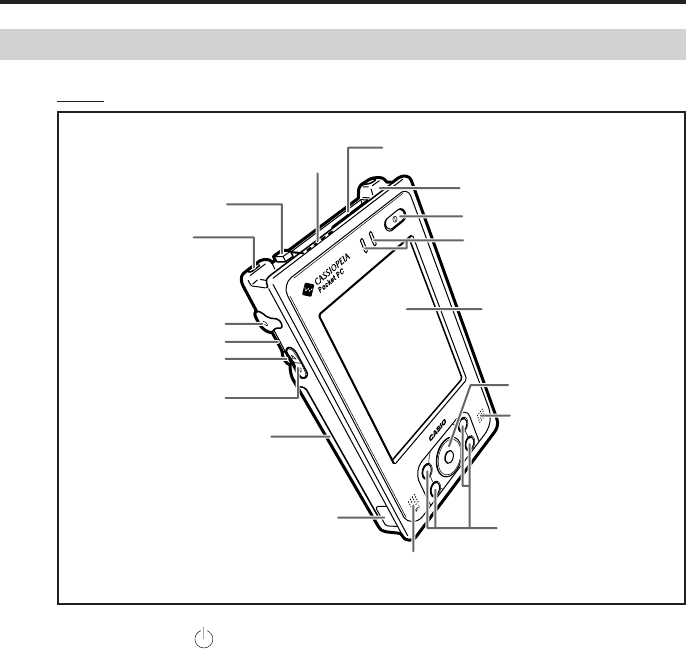
Front
qPower switch ( )
Press this key to turn the power on or off. Once the power is turned on, it cannot
be turned off for 10 seconds.
wIndicator lamps
Right side: Flashes green when the CF card or SD card is being used. It also
flashes red for the alarm and is used as an indicator.
Left side: When the AC adaptor or Basic Cradle is attached, it lights orange
when the battery is charging and lights green when the battery is
fully charged.
eLCD screen
The LCD screen displays information and the stylus can be used to enter
information or operate the Rugged PDA.
rCursor button
Moves the cursor and similar items up, down, left and right on the computer
screen. Pressing the center of this button straight down performs the same
operation as the Enter key.
uMicrophone
iInfrared communication port
oBattery pack cover
!0UP/DOWN button
!1Action button
!2Reset switch
!3Headphone jack
!4Strap hole
!5Eject button
!6SD card slot
qPower switch
wIndicator lamps
eLCD screen
rCursor button
tSpeaker
yProgram buttons
!7CF card slot
!8Stylus holder
IT-10_1/25-39-E.p65 06.6.15, 6:40 PM26
27
1
Names of Parts and Their Functions
tSpeaker
Sounds such as the alarm come out of the speaker. Sound does not come out
of the speaker when earphones or headphones are connected to the head-
phone jack.
yProgram buttons
Pushing the program buttons starts the program assigned to that button. The
four default settings are, from the upper left, Menu [ ], Calendar [ ],
Contacts [ ], and Inbox [ ].
uMicrophone (MIC)
Direct your voice here when recording on the Pocket Word or Memo screen.
iInfrared communication port
Used for data communications by the IrDA interface. (See page 91)
oBattery pack cover
This is the cover for the battery pack. Be sure to keep the battery pack cover
locked.
!0 UP/DOWN button ( )
Moves the cursor and similar items up and down on the computer screen.
(See page 29)
!1 Action button
Operates as the Enter key on the computer. Also, it has several functions when
the Cursor button r is pressed at the same time. (See page 29)
!2 Reset switch
This switch resets the Rugged PDA, similar to turning off and on the power
switch. Reset the Rugged PDA when some abnormality occurs, such as if the
buttons or tap operations stop working. (See page 97)
!3 Headphone jack ( )
You can attach commercially available earphones or headphones (3.5 mm dia)
to the headphone jack.
Remove the rubber cover to use it.
!4 Strap hole
You can attach a commercially available strap.
!5 Eject button
Use the eject button to remove CF (Compact Flash) card.
!6 SD card slot
You can insert either one SD card or one multimedia card.
!7 CF card slot
You can insert a CF (Compact Flash) card.
!8 Stylus holder
The stylus is stored here.
IT-10_1/25-39-E.p65 06.6.15, 6:40 PM27
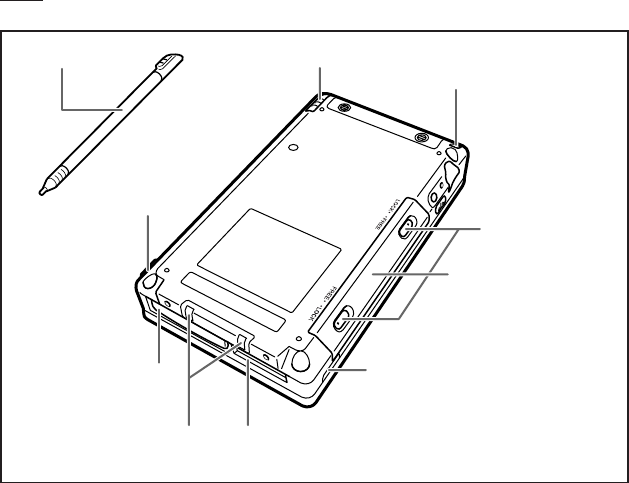
28
!9Stylus
@0Strap hole
@1Battery pack cover
@2Battery pack cover
lock switch
@3Infrared communication port
@4Serial connector
@5Power terminals
@7Power adaptor port
!9Stylus
@6Serial connector cover
!9 Stylus
Use this pen for entering items on the touch panel screen. (See page 29)
@0 Strap hole
You can attach a commercially available strap. (See page 31)
@1 Battery pack cover
This is the cover for the battery pack.
@2 Battery pack cover lock switch
Be sure to keep the lock switch locked. Locking the lock switch prevents the
battery pack from falling out.
@3 Infrared communication port
Used for data communications by the IrDA interface. (See page 91)
@4 Serial connector
Connect peripheral device via RS-232/USB interface.
Remove the rubber cover and store it before use.
@5 Power terminals
Terminals for supplying power from the Cradle.
Rear
IT-10_1/25-39-E.p65 06.6.15, 6:40 PM28
29
1
Names of Parts and Their Functions
@6 Serial connector cover
Use this rubber cover when not using the serial I/F.
@7 Power adaptor port ( )
Connect the power cord from the AC adaptor to this port.
Remove the rubber cover to use it. (See page 37)
UP
DOWN
Operating the Rugged PDA
About Buttons on the Side
The buttons on the side of the Rugged PDA can be used for the following opera-
tions.
Operates in the same way as the Enter key on a
computer.
For example, press the Action button to accept
the item selected on the menu.
Moves the cursor and similar items up and down
on the computer screen. For example, to scroll
the screen down, press the (DOWN) button.
Using the Stylus
Entering data and most other operations on the Rugged PDA are done with the
stylus. The stylus holder is located on the upper left of the back of the Rugged
PDA.
To use the stylus, remove it from the holder and use it when you make an input on
the screen.
Pressing the
Action button
Pressing the
UP/DOWN
button
IT-10_1/25-39-E.p65 06.6.15, 6:40 PM29
30
• Take care to avoid misplacing the stylus. Be sure to put back the
stylus into its holder when you are not using it.
• Take care to avoid damaging or breaking the tip of the stylus.
• Never use pen, pencil, or other writing tool to avoid scratches on the
screen.
• Keep the tip of the stylus and the Rugged PDA screen clean and free
of dirt. Performing stylus operations when the stylus or screen is dirty
can damage the screen.
• Use of an optional screen protect sheet is recommended to protect
the screen against scratching.
Stylus Operations
The Rugged PDA has hardware buttons that control actions, scroll functions, and a
stylus for selecting items and entering information.
Tap Touch the screen once with the stylus to
open items and select options.
Tap and hold Tap and hold the stylus on an item to see
a list of actions available for that item.
Before a pop-up menu appears, you will
see a blue circle of dots to notify you of
where on the screen you are pressing.
On the pop-up menu that appears, tap
the action you want to perform.
Drag Hold the stylus on the screen and drag
across the screen to select text and
images. Drag in a list to select multiple
items.
Important
Hold
IT-10_1/25-39-E.p65 06.6.15, 6:40 PM30
31
1
Names of Parts and Their Functions
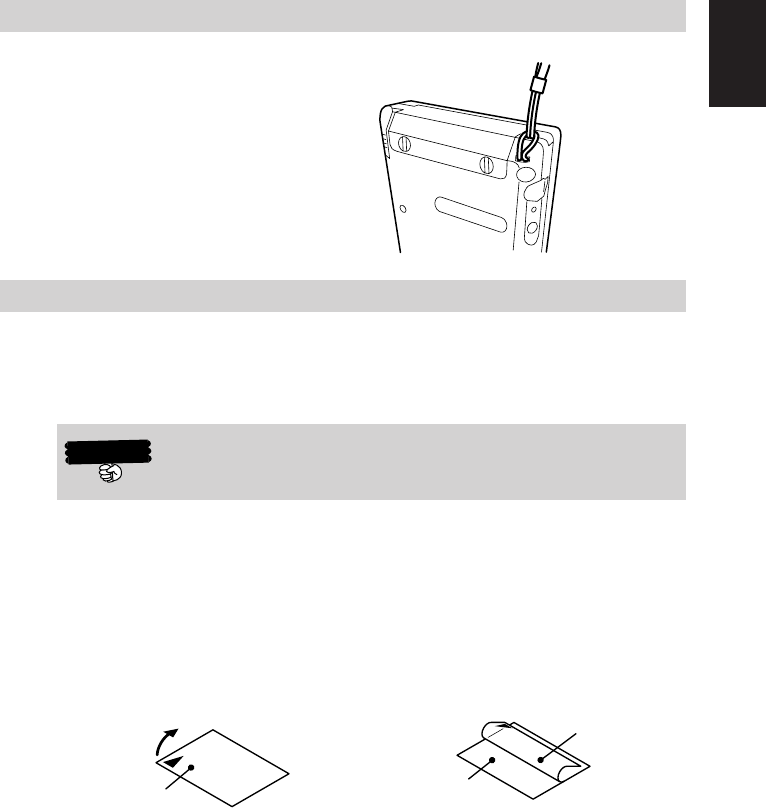
Connecting the Strap
It is possible to attach a commercially available strap.
See the illustration below.
Attaching the Screen Protect Sheet
Follow the procedure below to attach the optional screen protect sheet (HA-
C90PS5B).
Do not press strongly on the LCD screen when attaching the screen
protect sheet. Doing so may break the screen.
qBefore you attach the protect sheet to the LCD screen, hold it up to the LCD
screen to check the positioning.
wUse a lens-cleaning cloth to clean off the LCD screen.
ePull the clear film (the triangle indicates adhesive surface) in the direction of the
arrow about half way off of the protect sheet as shown in Fig. 2. It is easy to
peel off if you use the pad of your thumb.
Note: Do not let your fingers touch the adhesive surface when you are doing this.
Important
Clear film Fig. 1
Adhesive surface
* Don't touch this side.
Clear film
Fig. 2
IT-10_1/25-39-E.p65 06.6.15, 6:40 PM31
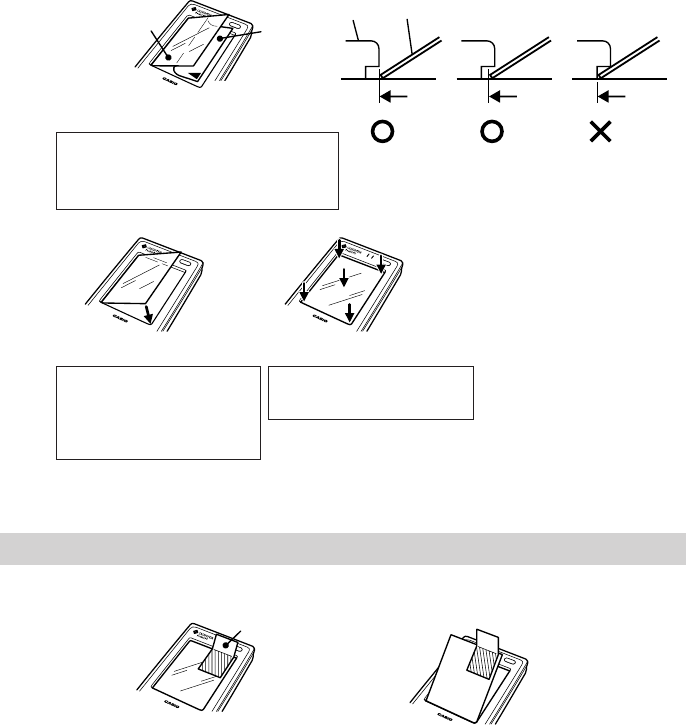
32
rWith the adhesive side facing down, put the edge of the protect sheet along the
edge of the screen frame as shown in Fig. 3.
* Do not put it too far under the edge.
* Air bubbles caught under the protect sheet will not affect the input operability.
Removing the protect sheet
qStick a piece of tape to the edge on the protect sheet to remove it.
Protect
sheet Clear film
Fig. 3
Fig. 5 Fig. 6
* If the protect sheet is caught
on the edge, press it down
with the stylus provided.
Tape
Fig. 7 Fig. 8
Protect sheetEdge
Fig. 4
* Stick about 1 cm of the protect sheet's
long side to the frame's edge and then
remove the rest of the clear film.
* Release the protect sheet
and let it fall on its own to
stick to the LCD screen as
shown in Fig. 5.
* Press the protect sheet
down completely.
IT-10_1/25-39-E.p65 06.6.15, 6:40 PM32
33
1
Power Supply
Power Supply
The Rugged PDA uses an AC adaptor to connect to an outside power source or to
recharge the batteries. Attach the battery pack and charge the Rugged PDA's battery
until it is full to do the initial setup when using it for the first time or after not using it for a
long period, and when the battery is low.
Caution!
Use the battery pack provided or a battery pack specified
by the manufacture. Using a battery pack that is not
specified by the manufacturer may cause a fire.
Battery Pack
The Rugged PDA operates on a battery pack (lithium-ion battery) as its main
battery, and has an internal backup battery to protect its memory when removing
the battery pack. Note the following points when using the Rugged PDA.
Important! Read This Information!
• Turn off the Rugged PDA before replacing batteries.
• When the battery discharges beyond a set level, "Main battery remaining
capacity low" or "Backup battery remaining capacity low" message appears. If
this kind of messages appears, immediately charge either the battery pack or
the backup battery depending on the displayed message.
• The "Main battery remaining capacity low" message's title bar can be shown in
either blue when the remaining capacity is 30% or less or red when the remain-
ing capacity is 10% or less. Do not replace the battery pack when the "Backup
battery remaining capacity low" message appears. Data in the memory may be
lost if it is replaced while the message appears on the screen.
If the Rugged PDA with the battery pack being discharged has been
left over for a long period, or if the battery pack is replaced incorrectly,
data in the memory may be lost accidentally. We recommend backing
up data in the memory to other memory device, such as the hard disk
of a computer or a memory card. Refer to Help for ActiveSync for
information about how to back up data to a computer.
Important
IT-10_1/25-39-E.p65 06.6.15, 6:40 PM33
34
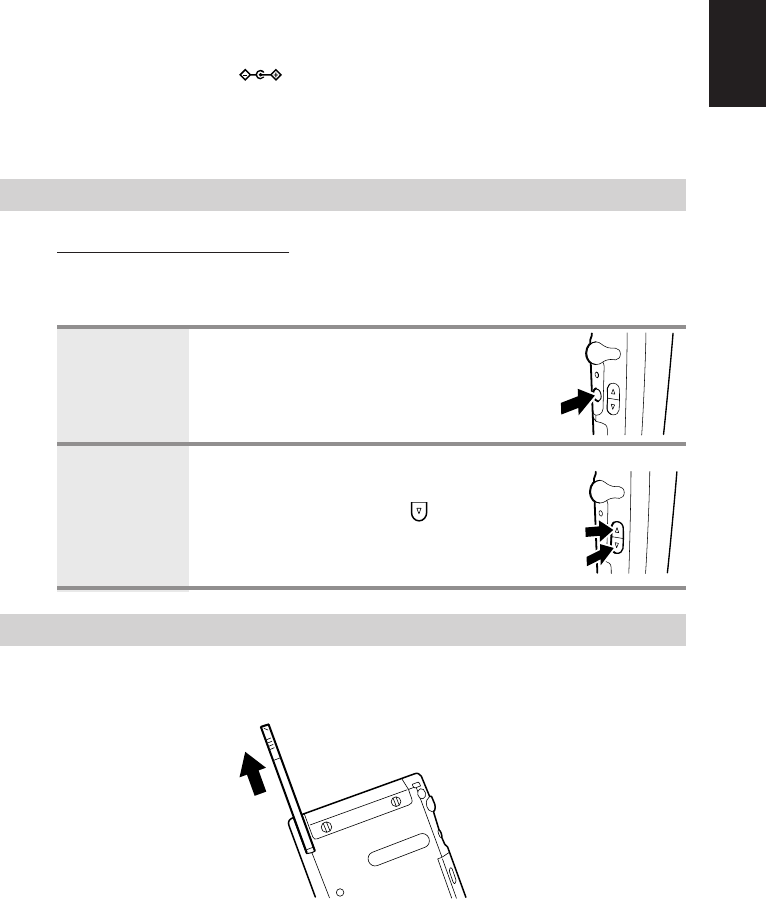
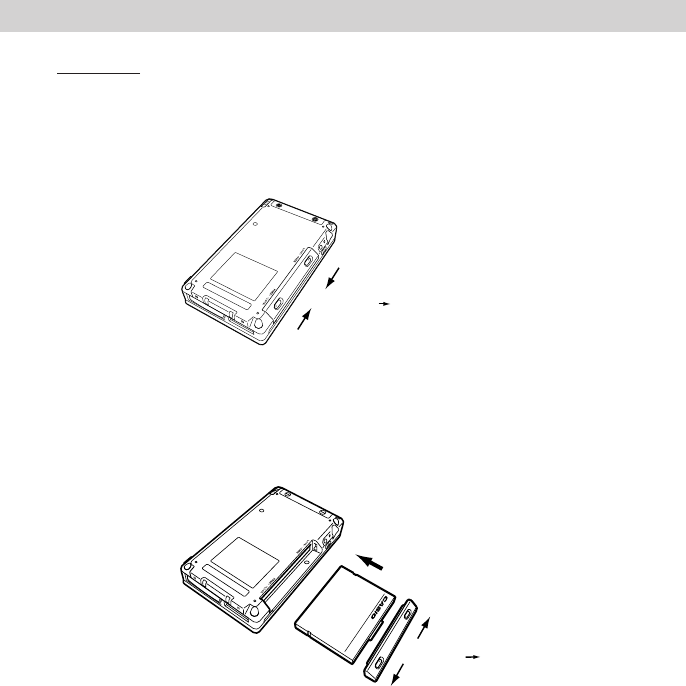
Attaching and Removing the Battery Pack
Attaching
1. Turn off the Rugged PDA, and turn it over. Slide the battery pack cover
lock switches with the end of the stylus to FREE (q), and remove the
battery pack cover.
2. Align the battery pack with the slot and insert it into the slot (w). Next,
reattach the battery pack cover, and slide the lock switch from FREE to
LOCK (e).
• Be sure to slide the battery pack cover lock switch to the LOCK
position. If it is not attached correctly, it may fall out while you are
carrying the Rugged PDA and cause a malfunction or injury.
w Insert the battery pack
e FREE LOCK
HA-C21BAT
q LOCK FREE
IT-10_1/25-39-E.p65 06.6.15, 6:40 PM34
35
1
Power Supply
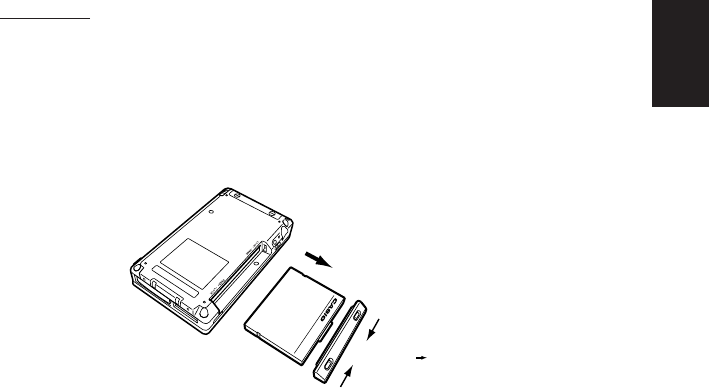
Removing
1. Turn off the Rugged PDA, and turn it over.
2. Slide the battery pack cover lock switches with the end of the stylus to
FREE (q), and remove the battery pack cover. Next, remove the battery
pack (w).
• The internal backup battery can maintain the data in the memory
for up to 30 minutes (if the backup battery is full) when the battery
pack is removed. If the backup battery is being discharged, the
data in the memory may be lost, it is best to attach or remove the
battery pack quickly.
• After removing the battery pack, cover the positive and negative
terminals with cellophane tape or something similar so they are
insulated before storing it.
w Remove the battery pack
q LOCK FREE
HA-C21BAT
IT-10_1/25-39-E.p65 06.6.15, 6:40 PM35
36
Charging the Battery Pack
The AC adaptor is used not only to supply power from the AC power outlet but
also to charge the battery pack. The battery pack is also charged while the
Rugged PDA is in use (power is on) if the AC adaptor (provided) is connected with
the battery pack inserted in the Rugged PDA.
A warning label like the one shown below is affixed to the battery pack. This
warning label is intended to make you aware of possible dangers that you should
always keep in mind whenever handling the battery pack.
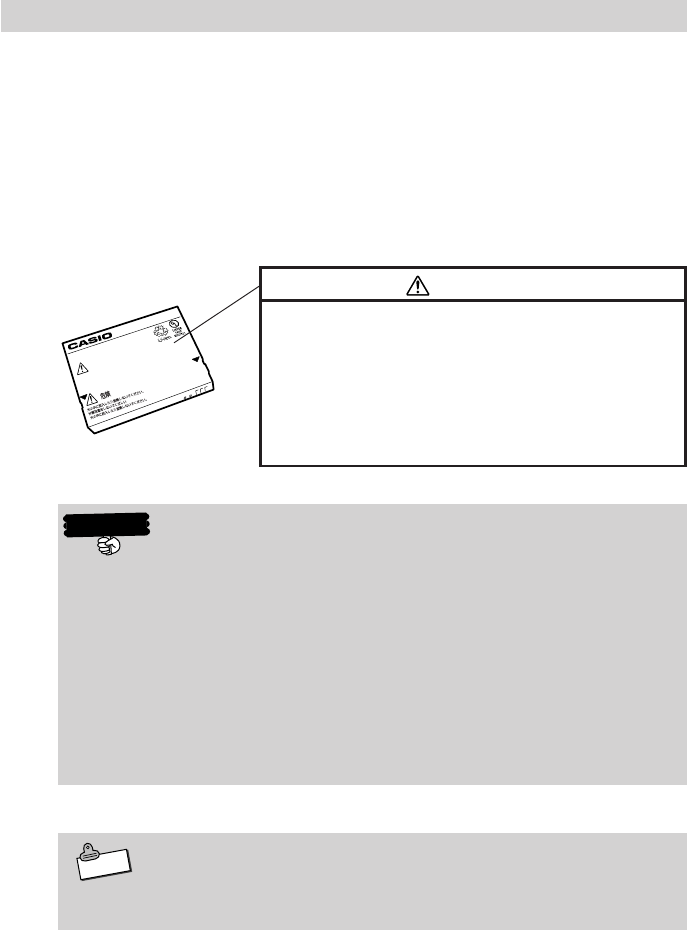
DANGER!
• Never dispose of the battery by incineration and
never expose it to heat.
• Never try to take the battery apart or otherwise try to
modify it.
• Never allow (+) and (-) battery terminate to become
shorted. For details, refer to Hardware Manual.
• Charge the battery in a location where the temperature is between
0˚C to 40˚C. Charging the battery in an extremely cold location or in
direct sunlight causes the battery to deteriorate or to leak fluid.
• If the battery is correctly charged, but the Rugged PDA operates for
only a short time, the battery pack may have reached the end of its
service life. If this happens, you need a new one to replace with the
run-down battery pack.
• The battery pack may become warm while it is being charged or be-
ing used. This is normal for the battery pack and is not a malfunction.
The internal backup battery and the battery pack (main battery) have
low capacity remained at time of purchase. Fully charge the batteries
before using the Rugged PDA for the first time.
HA-C21BAT
Li-ion 3.7V 2300mAh
DANGER
.Never dispose of the battery by incineration
and never expose it to heat.
.Never try to take the battery apart ot otherwise try to modify
.Never try to take the battery apart ot otherwise try to modify
Important
Note
IT-10_1/25-39-E.p65 06.6.15, 6:40 PM36
37
1
Power Supply
Charging the Battery with the AC Adaptor
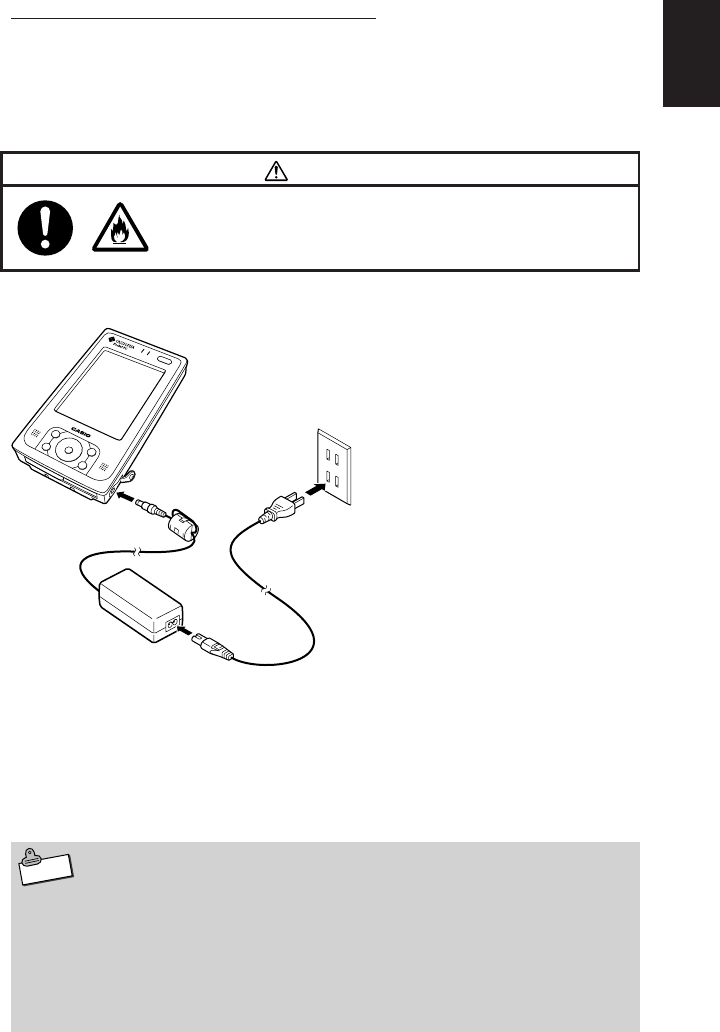
Pull back the rubber cover from the AC adaptor jack and insert the cable. The
battery pack takes about 5 hours (when the Rugged PDA is turned off) to fully
charge, and then the left side indicator LED lights green. Under the same condi-
tions, the built in backup battery takes four hours to fully charge.
Remove the AC adaptor cable in the following order q ➔ w ➔ e.
If the left side indicator LED goes out during charging, then the internal protection
circuit may have terminated charging. If this happens, remove the AC adaptor and
the battery pack from the Rugged PDA and then reattach them again and then
start charging again. If this happens frequently it may indicate a malfunction,
contact your original dealer or authorized CASIO distributor.
• You can use the Rugged PDA while it is charging. However, the time
to charge the Rugged PDA may vary greatly depending on the opera-
tions performed on the Rugged PDA (and the surrounding tempera-
ture or other factors).
• Charging requires a longer than normal time when doing initial setup
after purchase or when charging a newly purchased battery pack for
the first time.
q
e
w
Warning!
Use the AC adaptor specified by CASIO. Using the AC
adaptor that is not specified may cause a fire.
Note
When the battery pack is fully
charged, remove the AC adaptor
cable and be sure to replace the
rubber cover to its original position.
IT-10_1/25-39-E.p65 06.6.15, 6:40 PM37
38
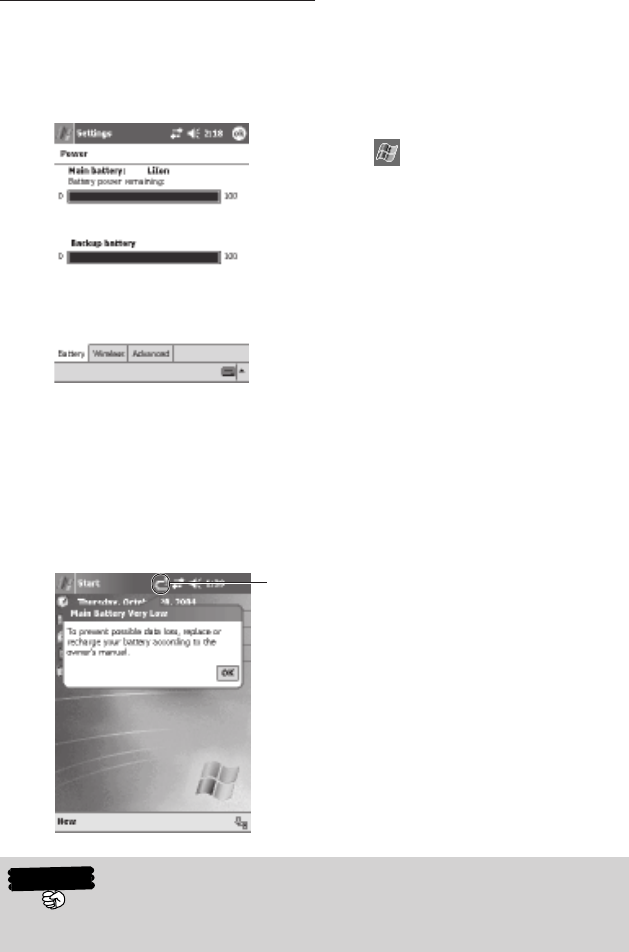
Checking Remaining Battery Power
•You can check the remaining power level in the batteries on the "Power" screen.
The battery loses power slowly even if the Rugged PDA is not being used. The
battery may lose all power if the Rugged PDA is stored for a long period of time.
We recommend checking the power level in the battery from time to time.
Check the remaining battery power while the Rugged PDA is not connected to
the AC adaptor.
•When the battery discharges beyond a certain level, an icon(status icon)
indicating each battery's remaining capacity appears in the navigation bar.
Even if you are not using the Rugged PDA you should charge the
batteries once every two weeks to prevent them from deteriorating.
•Tap the ➔ Settings ➔ System ➔
Power icons, in that order, to display the
screen on the left.
Status Icon (See page 45)
Important
IT-10_1/25-39-E.p65 06.6.15, 6:40 PM38
39
1
Power Supply
Using the AC Adaptor
The battery attached to the Rugged PDA charges when the AC adaptor is at-
tached. Besides charging the battery pack with the AC adaptor, we recommend
attaching the AC adaptor to the Rugged PDA when performing one of the follow-
ing operations that consume power from the battery pack.
•When using the Rugged PDA hooked up to a computer.
•When operating wireless LAN on the Rugged PDA.
•When using the Rugged PDA with a compact flash card (especially when
backing up data on the Rugged PDA to the card).
• Be careful not to trip on the AC adaptor's power cord.
• Hold the Rugged PDA's power cord by the connector (not the cable)
and pull it straight out of the power adaptor jack.
• Dust may collect on the AC adaptor's power cord if it is plugged into
an electric power socket for a long time. Clean off the dust periodi-
cally.
Warning!
Use the AC adaptor specified by CASIO. Using the AC
adaptor that is not specified may cause a fire.
Important
IT-10_1/25-39-E.p65 06.6.15, 6:40 PM39
40
Initial Setup
Initial Setup Procedure
The first time you use the Rugged PDA, fully charge the battery, then perform the
following procedure (if possible connect the AC adaptor to the Rugged PDA
during this operation) according to the instructions appeared on the screen to set
the initial setup.
Doing Initial Setup
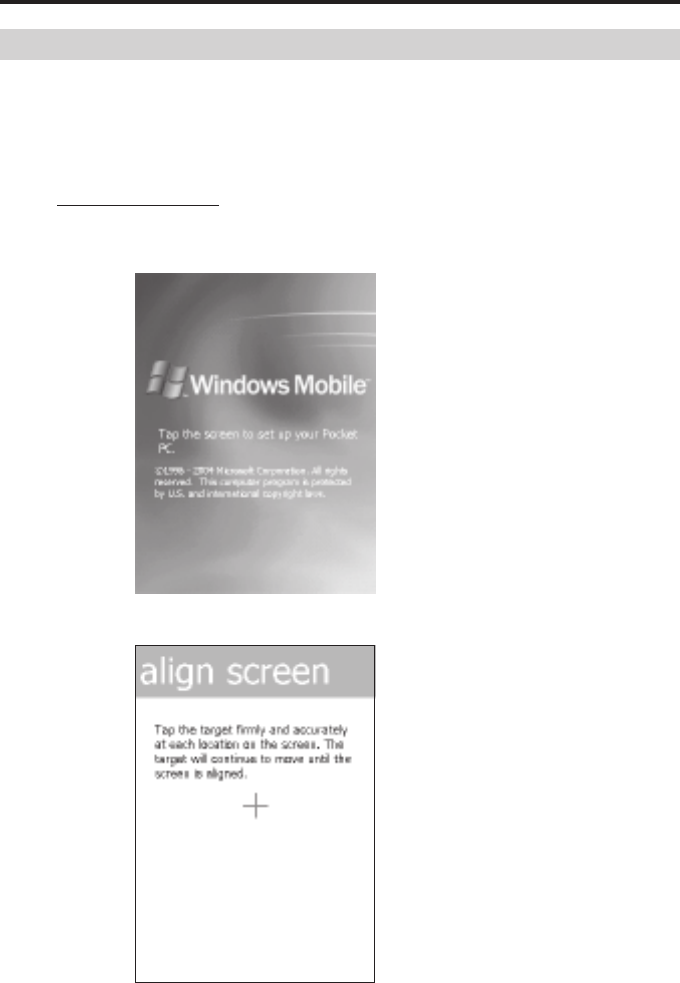
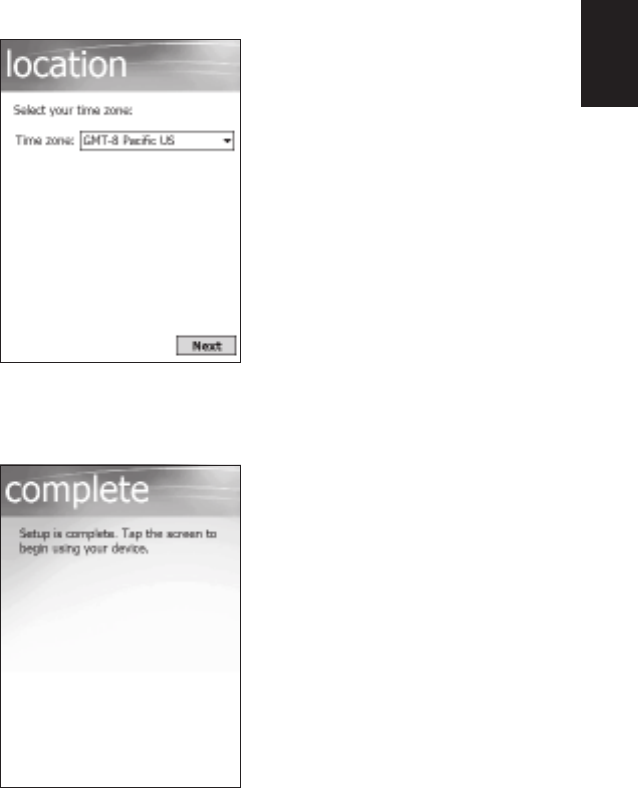
1. Push the power switch to turn the power ON.
2. Tap on the screen to display the "Align screen" screen.
Use the stylus to tap the center of
the (+) in sequence each time it ap-
pears.
After the startup screen appears, the
setup screen appears.
IT-10_1/40-66-E.p65 06.6.15, 6:41 PM40
41
1
Initial Setup
3. Set the time zone in which the Rugged PDA is used.
4. Initial setup is finished.
Tap the appropriate area on the screen.
IT-10_1/40-66-E.p65 06.6.15, 6:41 PM41
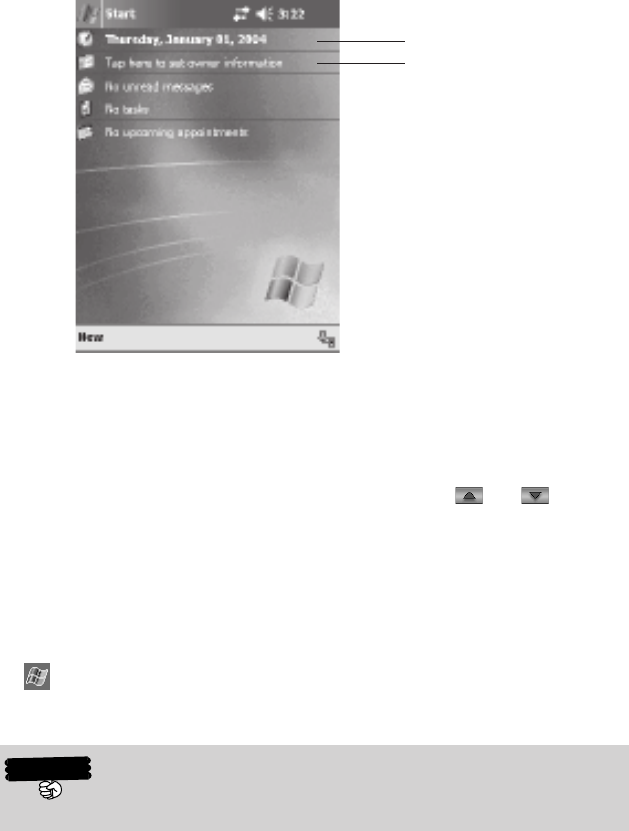
42
5. The "Today" screen appears, you can start using the Rugged PDA.
If tapping on the screen has no effect, or if the screen is blank, first
do a "Full reset (initialize memory)." (See page 98)
• After initial setup, or after Full reset, set the q"Clock&Alarms," w"Owner
information" or e"Password" if necessary.
qClock&Alarms
On the "Today" screen, tap the date q, and then use the and buttons to
input the your world’s time zones, time, and date.
wOwner information
On the "Today" screen, tap Tap here to set owner information (w), and
input information about the owner of the Rugged PDA (name, address, phone
number, etc.)
ePassword
➔ Settings ➔ Personal tab, tap Password and configure the required
settings.
q
w
Important
IT-10_1/40-66-E.p65 06.6.15, 6:41 PM42
43
1
Initial Setup
Various Screen Adjustments
Do the following adjustments, if the screen is difficult to see or to operate after the
initial setup.
Adjusting the Screen Brightness
You can adjust the screen brightness with the Action button and the Cursor button
to make the screen easier to see when operating the Rugged PDA in dark loca-
tions. Pressing the Action button and the right side together makes the screen
brighter, in the same way, pushing the left side makes the screen darker. (See
page 88)
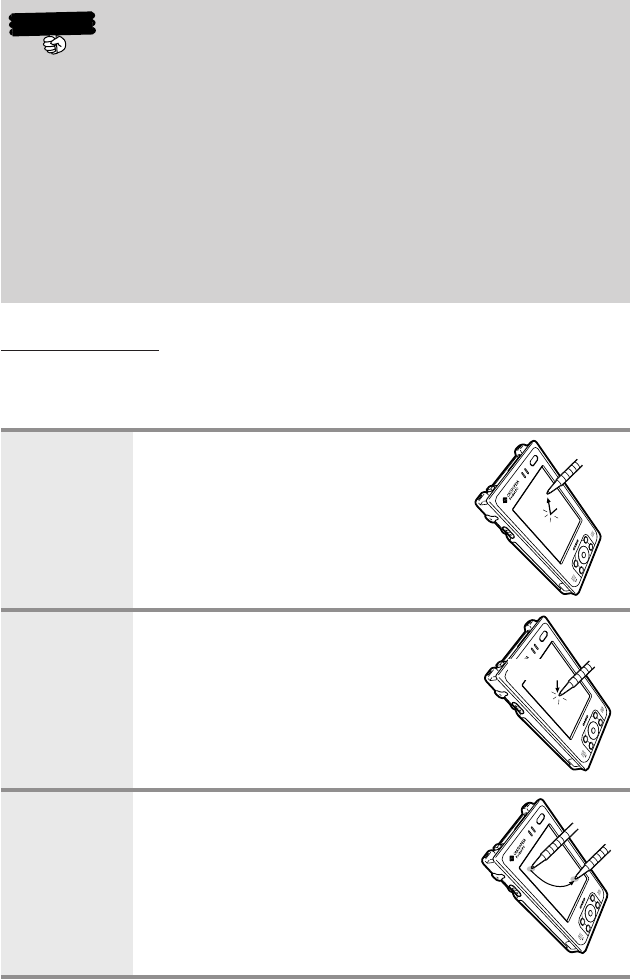
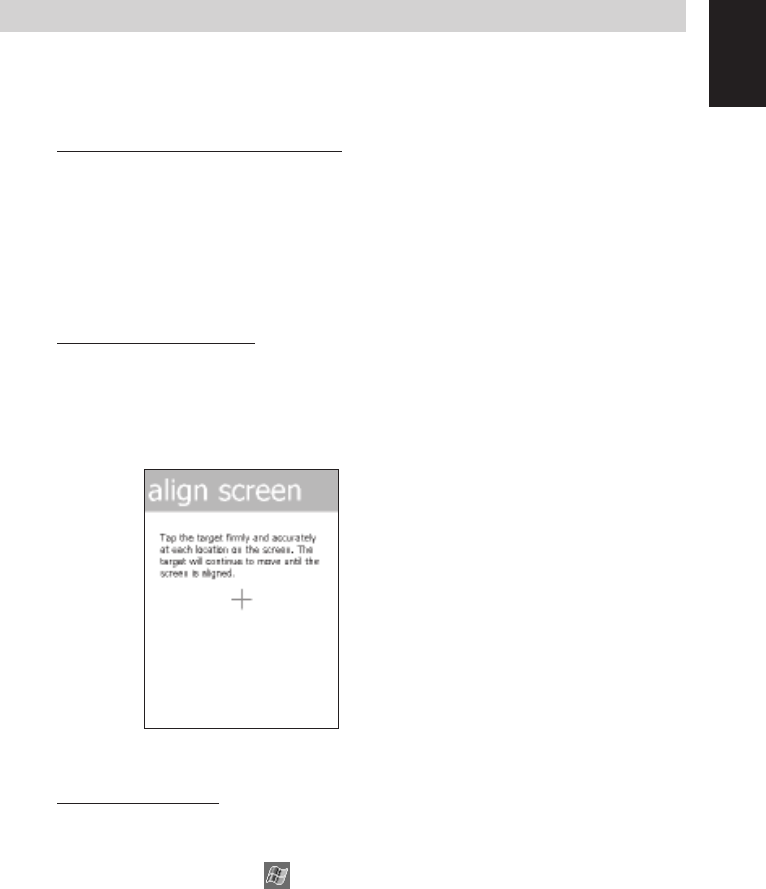
Calibrating the Screen
You can calibrate the screen if it is not responsive or if the position you tap and the
operation you wish to perform do not match.
Press the power button and the Action button at the same time to display the
screen for calibrating the screen.
Screen orientation
You can change the screen to one of three orientations vertical, horizontal (right-
handed), horizontal (left-handed) for easier operation.
To do the changes, tap the and then Settings. In the System tab, tap
Screen and follow the on screen instructions.
Use the stylus to tap the center of the target (+ sign).
The target moves each time you tap it, the calibra-
tion ends after you tap five times.
IT-10_1/40-66-E.p65 06.6.15, 6:41 PM43
44
When Initial Setup Is Finished
This section describes the Rugged PDA's basic operations after initial setup is fin-
ished.
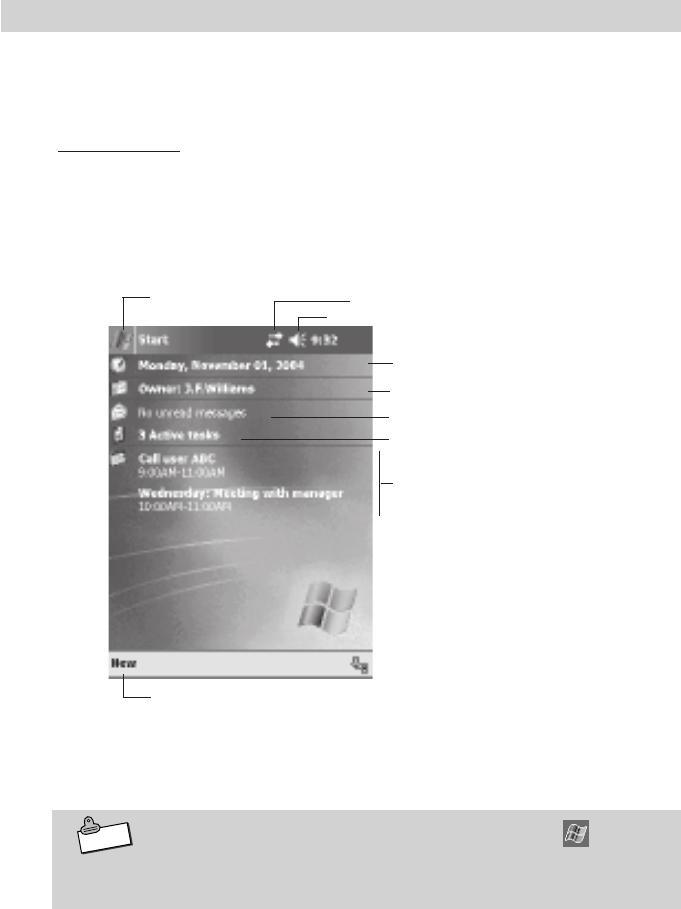
Today Screen
When you turn on the Rugged PDA for the first time each day (or after 4 hours of
inactivity), you'll see the Today screen. You can also display it by tapping the
Today's icon. On the Today screen, you can see at a glance important information
for the day.
Following are some of the status icons you may see.
To display the Today screen from another screen, tap in the up-
per left corner of the display and then tap Today at the top of the
menu that appears.
Tap to switch to a
program. Tap to view connection status.
Tap to change volume or mute all sounds.
Tap to change date and time.
Tap to open an item.
Your e-mail messages.
Your active tasks.
Your day at a glance.
Tap to create a new item.
Note
IT-10_1/40-66-E.p65 06.6.15, 6:41 PM44
45
1
Initial Setup
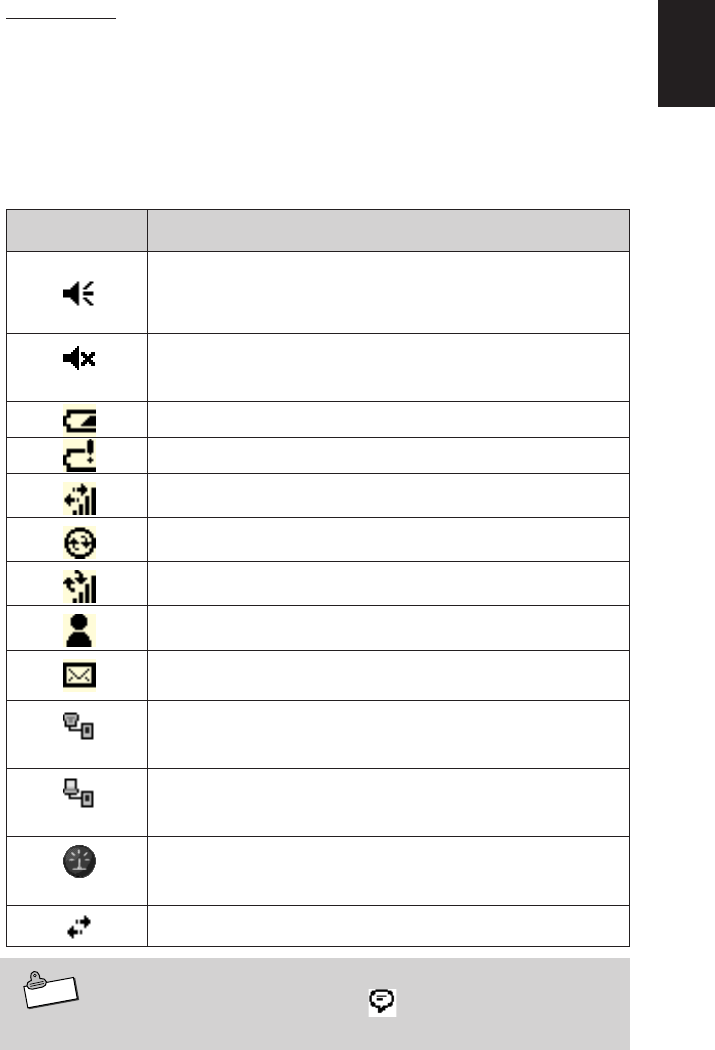
If more notification icons need to be displayed than there is room to
display them, the Notification icon, , will display. Tap the icon to
view all notification icons.
Status Icons
Status icons in the navigation bar* or the command bar* indicate the current
status of the Rugged PDA. Clicking a status icon displays the applicable setting
screen, which you can use to configure settings.
* The bar along the top of the display is the navigation bar, while the bar along
the bottom of the display is the command bar.
The table below explains the meaning of each of the status icons.
Status Icon Meaning
Specified sound output (screen tap sound, alarm sound,
etc.) is turned on. Tapping this icon turns off all the sound
outputs.
All the sound outputs are off. Tapping this icon turns on
all the sound outputs.
Main battery is low.
Main battery is very low.
Connecting.
Synchronization is starting or stopping.
Synchronization is in progress.
Notification that an instant message is received.
Notification that an e-mail message is received.
The Rugged PDA is connected to the Internet via a
cellular phone, etc.
The Rugged PDA is connected to a computer using the
basic cradle and cable, etc.
Indicates the current Bluetooth on/off status. A red X
indicates that Bluetooth is turned off.
Indicates connection to a network is being established.
Note
IT-10_1/40-66-E.p65 06.6.15, 6:41 PM45
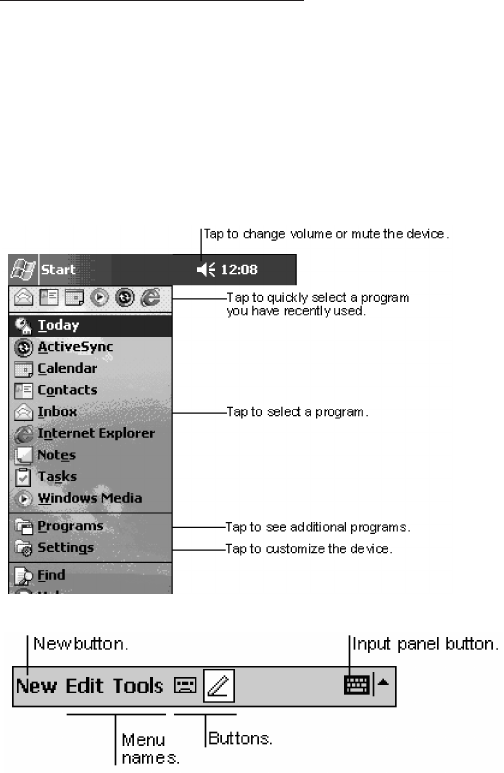
46
Navigation Bar and Command Bar
The navigation bar is located at the top of the screen. It displays the active
program and current time, and allows you to switch to programs and close
screens.
Use the command bar at the bottom of the screen to perform tasks in programs.
The command bar includes menu names, buttons, and the Input Panel button. To
create a new item in the current program, tap New. To see the name of a button,
tap and hold the stylus on the button. Drag the stylus off the button so that the
command is not carried out.
A scroll bar and a scroll button are displayed on the right side (and bottom) of the
screen depending on the program. You can display parts of the screen that are
hidden by tapping the scroll button or dragging the scroll bar.
IT-10_1/40-66-E.p65 06.6.15, 6:41 PM46
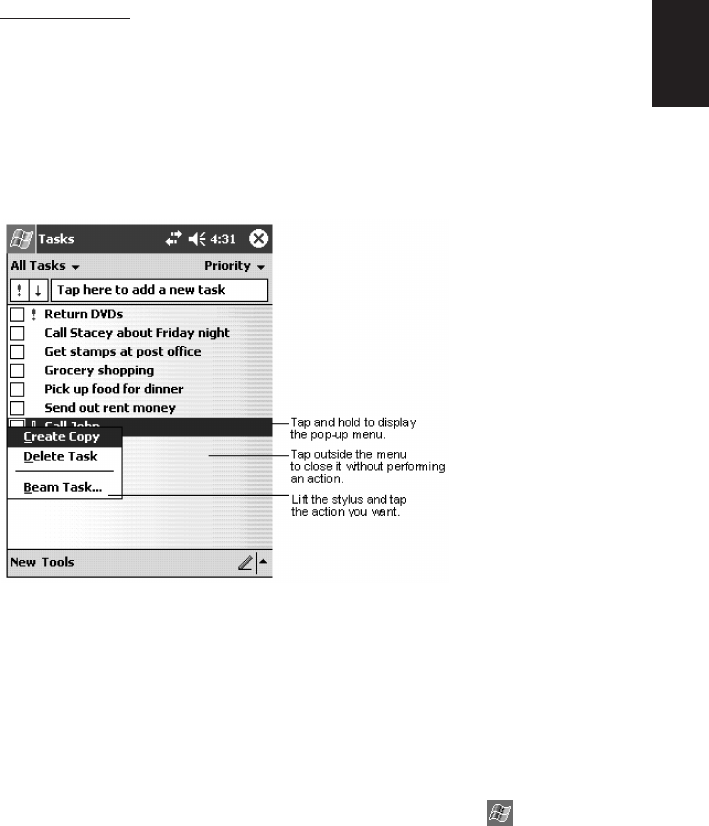
47
1
Initial Setup
Pop-up Menus
With pop-up menus, you can quickly choose an action for an item. For example,
you can use the pop-up menu in the contact list to quickly delete a contact, make
a copy of a contact, or send an e-mail message to a contact. The actions in the
pop-up menus vary from program to program. To access a pop-up menu, tap and
hold the stylus on the item name that you want to perform the action on. When the
menu appears, lift the stylus, and tap the action you want to perform. Or tap
anywhere outside the menu to close the menu without performing an action.
The Rugged PDA reminds you in a variety of ways when you have something to
do. For example, if you've set up an appointment in Calendar, a task with a due
date in Tasks, or an alarm in Clock, you'll be notified in any of the following ways:
•A message box appears on the screen.
•A sound, which you can specify, is played.
•A light flashes on the Rugged PDA.
•The device vibrates.
To choose reminder types and sounds for the Rugged PDA, tap and then
Settings. In the System tab, tap Sounds & Notifications. The options you
choose here apply throughout the Rugged PDA.
IT-10_1/40-66-E.p65 06.6.15, 6:41 PM47
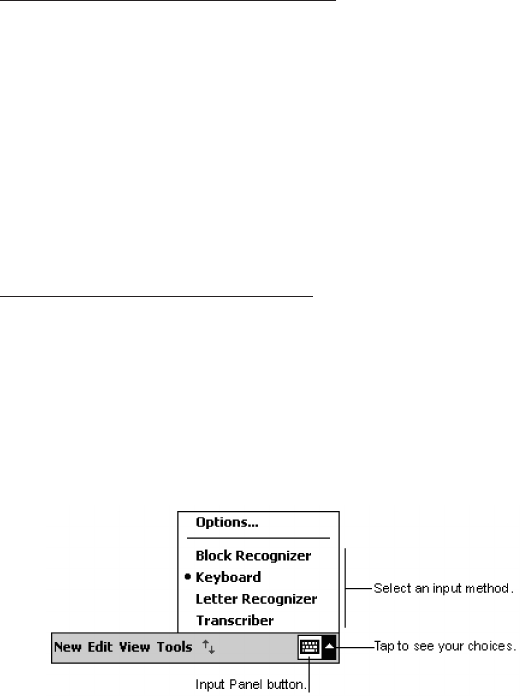
48
Enter Information on the Rugged PDA
You have several options for entering new information:
•Use the input panel to enter typed text, either by using the soft keyboard or
other input method.
•Write directly on the screen.
•Draw pictures on the screen.
•Speak into the Rugged PDA microphone to record a message.
Use Microsoft® ActiveSync® to synchronize or copy information from your desktop
computer to the Rugged PDA. For more information on ActiveSync, see
ActiveSync Help on your desktop computer.
Entering Text Using the Input Panel
Use the input panel to enter information in any program on the Rugged PDA. You
can either type using the soft keyboard or write using Letter Recognizer, Block
Recognizer, or Transcriber. In either case, the characters appear as typed text on
the screen.
To show or hide the input panel, tap the Input Panel button. Tap the arrow next to
the Input Panel button to see your choices.
IT-10_1/40-66-E.p65 06.6.15, 6:42 PM48
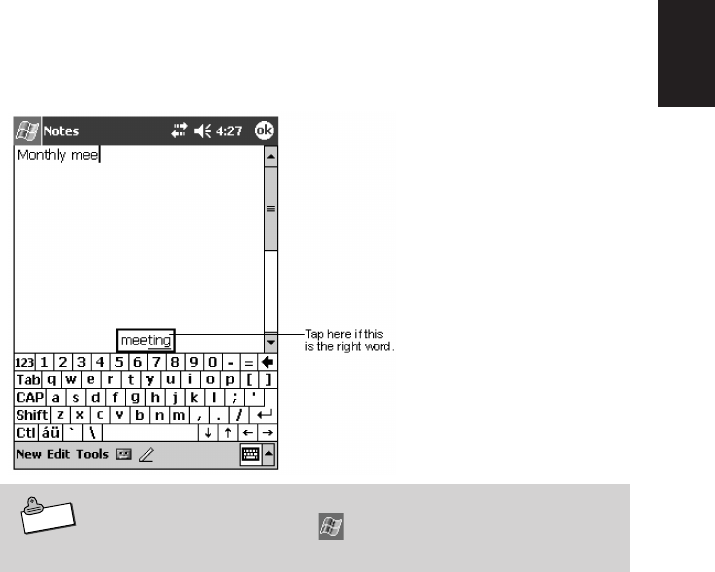
49
1
Initial Setup
When you use the input panel, the Rugged PDA anticipates the word you are
typing or writing and displays it above the input panel. When you tap the dis-
played word, it is inserted into your text at the insertion point. The more you use
the Rugged PDA, the more words it learns to anticipate.
To change word suggestion options, such as the number of words
suggested at one time, tap , Settings, System tab, Input, and
then the Word Completion tab.
Note
IT-10_1/40-66-E.p65 06.6.15, 6:42 PM49
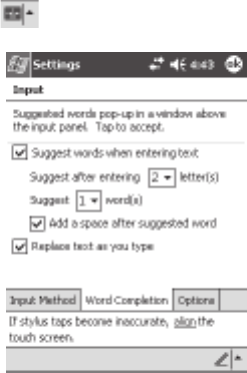
50
Word Completion options:
The Rugged PDA intelligently will attempt to guess at or predict the full word that
you're entering by doing a dictionary lookup. When you purchase the Rugged
PDA, a default set of words is installed. However, as you begin using the Rugged
PDA and begin using words not in that dictionary, they are automatically added to
a custom user dictionary that is also searched by the word completion feature. To
change how word completion works, select the arrow icon in the SIP chooser area
and tap Options. Tap the Word Completion tab.
These options allow you to turn word completion on or off, allow you to adjust at
what point the full word should be predicted, and whether or not text should be
replaced while you type.
IT-10_1/40-66-E.p65 06.6.15, 6:42 PM50
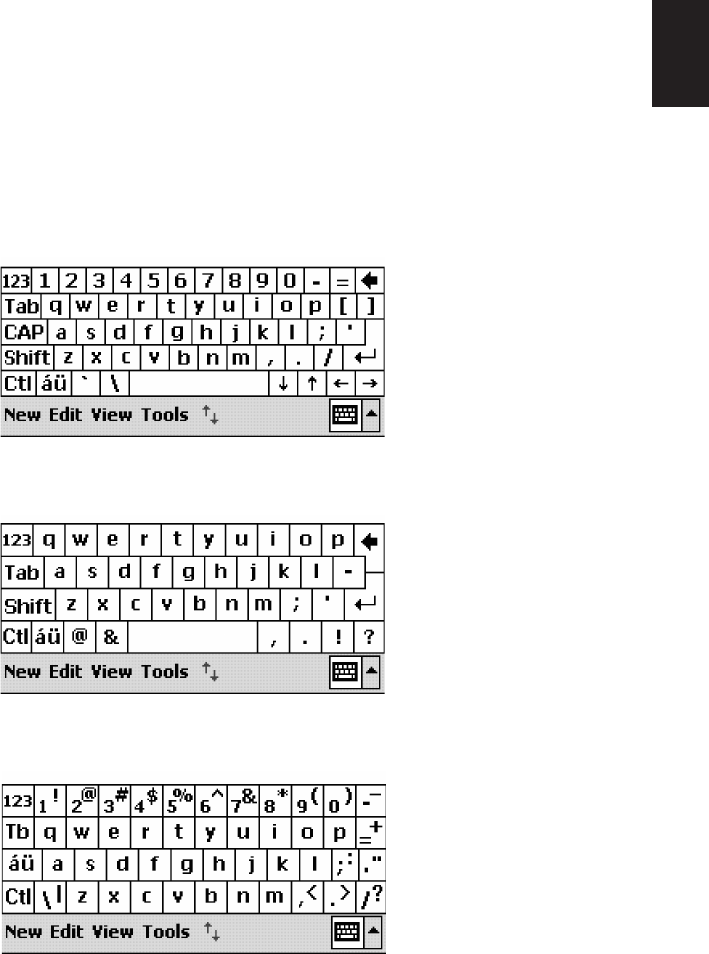
51
1
Initial Setup
To type with the soft keyboard:
1. Tap the arrow next to the Input Panel button and then Keyboard.
2. On the soft keyboard that is displayed, tap the keys with your stylus.
The soft keyboard can be used in two modes: large and small. Large mode gives
the advantage of larger keys and therefore higher accuracy; small mode gives
you special commands like backspace and forward space in the form of on-
screen keys rather than stylus-based gestures.
By default, small keyboard with on-screen special commands is provided. This
looks much like a standard QWERTY keyboard found on your desktop PC.
Here is the large keyboard without gestures enabled. Notice the absence of
numerical keys.
Finally, here is large keyboard with gestures enabled.
IT-10_1/40-66-E.p65 06.6.15, 6:42 PM51
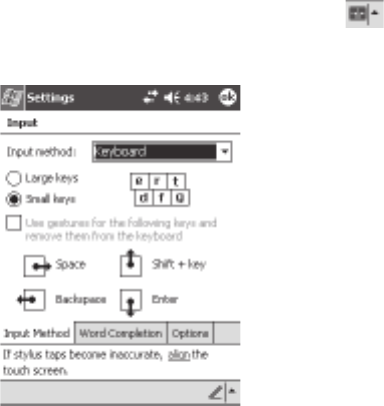
52
1. To space forward, swipe horizontally in a forward direction with stylus on
the keyboard.
2. To move backwards, swipe horizontally in a backwards direction with
stylus on the keyboard.
3. To carriage return, swipe vertically downwards with stylus on the
keyboard.
4. To shift + key, swipe vertically upwards with stylus on the keyboard and
hit any key on the keyboard.
To adjust soft keyboard options:
Select the arrow icon in the SIP chooser area and tap Options. Be sure
Keyboard is selected as the input method.
This screen allows you to make the keyboard small or large and enable gestures
with large keyboard as described above.
IT-10_1/40-66-E.p65 06.6.15, 6:42 PM52
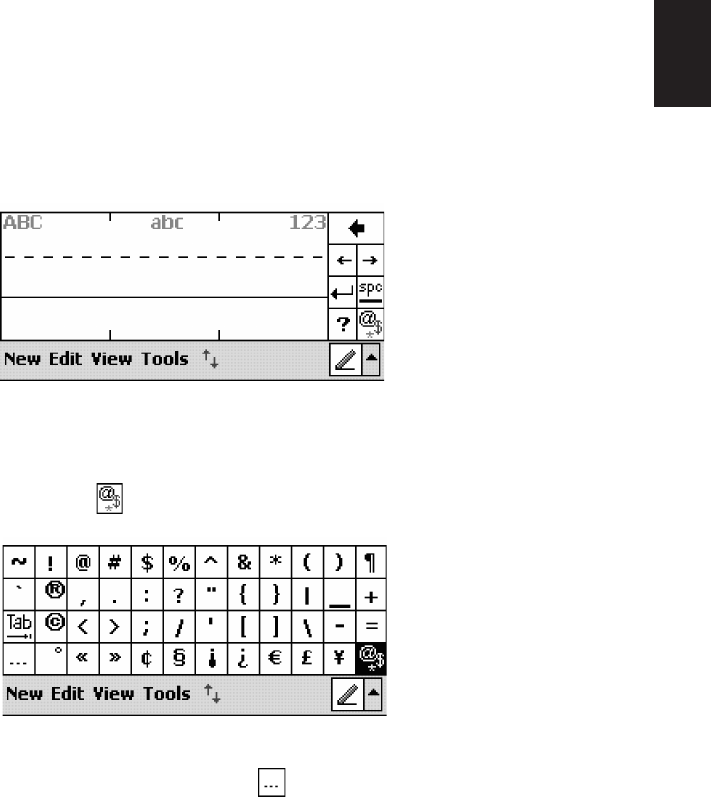
53
1
Initial Setup
To use Letter Recognizer:
With Letter Recognizer you can write letters using the stylus just as you would on
paper.
1. Tap the arrow next to the Input Panel button and then Letter Recog-
nizer.
2. Write a letter in the box.
As you can see, the screen has been broken into three segments. The first allows
you to enter upper-case letters; the second lower-case letters, and the third
numbers. This is done to increase accuracy of recognition of your handwriting.
Click on the button to open a panel of symbols and special characters to
enter into your text.
This is the resulting panel. Foreign characters as well as general purpose special
characters are included. Tap the button to return to the Letter Recognizer
pane.
When you write a letter, it is converted to typed text that appears on the screen.
IT-10_1/40-66-E.p65 06.6.15, 6:42 PM53
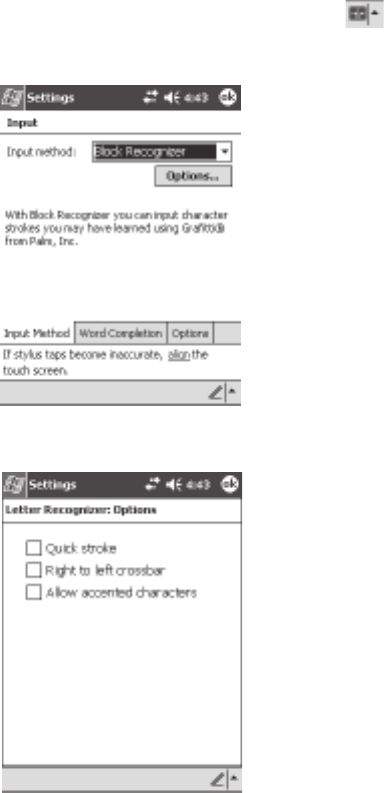
54
To adjust Letter Recognizer options:
Select the arrow icon in the SIP chooser area and tap Options. Be sure
Letter Recognizer is selected as the input method.
Select the Options button.
Quick Stroke lets you write all letters using one stroke. While this method will allow
you to write faster, it requires learning how to form letters in a new way.
Right to left crossbar should be enabled if you form crossbars on the letters 't', 'f',
and '+' from right to left instead of left to right.
Allow accented characters will force the recognizer to predict whether your
inputted characters should have accent marks. For example, á.
IT-10_1/40-66-E.p65 06.6.15, 6:42 PM54

55
1
Initial Setup
To use Block Recognizer:
With Block Recognizer you can input character strokes using the stylus that are
similar to those used on other devices.
1. Tap the arrow next to the Input Panel button and then Block Recog-
nizer.
2. Write a letter in the box.
When you write a letter, it is converted to typed text that appears on the screen.
Click on the button to open a panel of symbols and special characters to
enter into your text.
To adjust Block Recognizer options
Currently there are no options for this input method.
To use Transcriber:
With Transcriber you can write anywhere on the screen using the stylus just as
you would on paper. Unlike Letter Recognizer and Block Recognizer, you can
write a sentence or more of information. Then, pause and let Transcriber change
the written characters to typed characters.
1. Tap the arrow next to the Input Panel button and then Transcriber.
2. Write anywhere on the screen.
For specific instructions on using Transcriber, with Transcriber open, tap the
question mark in the lower right hand corner of the screen.
IT-10_1/40-66-E.p65 06.6.15, 6:42 PM55
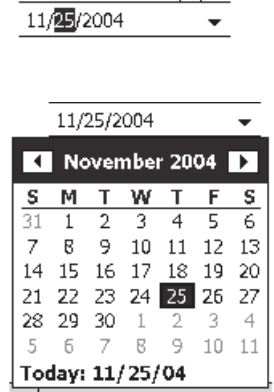
56
To select typed text
If you want to edit or format typed text, you must select it first.
• Drag the stylus across the text you want to select.
You can cut, copy, and paste text by tapping and holding the selected words and
then tapping an editing command on the pop-up menu, or by tapping the
command on the Edit menu.
Entering a date in an application
Many applications ask you for a date as input, such as "September 14, 1981". All
the standard Rugged PDA applications use the same form to assist in this
process.
First, click on the arrow to the right of the date field.
Next, select the date by moving among months using the arrows in the upper left-
and right-hand corners. You can always select the current day by clicking
Today: ...
IT-10_1/40-66-E.p65 06.6.15, 6:42 PM56
57
1
Initial Setup
Writing on the Screen
In any program that accepts writing, such as the Notes program, and in the
Notes tab in Calendar, Contacts, and Tasks, you can use your stylus to write
directly on the screen. Write the way you do on paper. You can edit and format
what you've written and convert the information to text at a later time.
To write on the screen:
• Tap the Pen button to switch to writing mode. This action displays lines on the
screen to help you write.
Some programs that accept writing may not have the Pen button.
See the documentation for that program to find out how to switch to
writing mode.
To select writing:
If you want to edit or format writing, you must select it first.
1. Tap and hold the stylus next to the text you want to select until the
insertion point appears.
2. Without lifting, drag the stylus across the text you want to select.
Note
IT-10_1/40-66-E.p65 06.6.15, 6:42 PM57
58
If you accidentally write on the screen, tap Tools, then Undo and try again. You
can also select text by tapping the Pen button to deselect it and then dragging
the stylus across the screen.
You can cut, copy, and paste written text in the same way you work with typed
text: tap and hold the selected words and then tap an editing command on the
pop-up menu, or tap the command on the Edit menu.
To convert writing to text:
• Tap Tools and then Recognize.
If you want to convert only certain words, select them before tapping Recognize
on the Tools menu (or tap and hold the selected words and then tap Recog-
nize on the pop-up menu). If a word is not recognized, it is left as writing.
If the conversion is incorrect, you can select different words from a list of alter-
nates or return to the original writing. To do so, tap and hold the incorrect word
(tap one word at a time). On the pop-up menu, tap Alternates. A menu with a
list of alternate words appears. Tap the word you want to use, or tap the writing at
the top of the menu to return to the original writing.
IT-10_1/40-66-E.p65 06.6.15, 6:42 PM58
59
1
Initial Setup
Tips for getting good recognition:
• Write neatly.
• Write on the lines and draw descenders below the line. Write the cross of the "t"
and apostrophes below the top line so that they are not confused with the word
above. Write periods and commas above the line.
• For better recognition, try increasing the zoom level to 300% using the Tools
menu.
Write the letters of a word closely and leave big gaps between words so that
the device can easily tell where words begin and end.
• Hyphenated words, foreign words that use special characters such as accents,
and some punctuation cannot be converted.
• If you add writing to a word to change it (such as changing a "3" to an "8") after
you attempt to recognize the word, the writing you add will not be included if
you attempt to recognize the writing again.
IT-10_1/40-66-E.p65 06.6.15, 6:42 PM59
60
Drawing on the Screen
You can draw on the screen in the same way that you write on the screen. The
difference between writing and drawing on the screen is how you select items and
how they can be edited. For example, selected drawings can be resized, while
writing cannot.
To create a drawing:
•Cross three ruled lines on your first stroke. A drawing box appears. Subsequent
strokes in or touching the drawing box become part of the drawing. Drawings
that do not cross three ruled lines will be treated as writing.
You may want to change the zoom level so that you can more easily
work on or view your drawing. Tap Tools and then select a zoom
level.
Note
IT-10_1/40-66-E.p65 06.6.15, 6:42 PM60
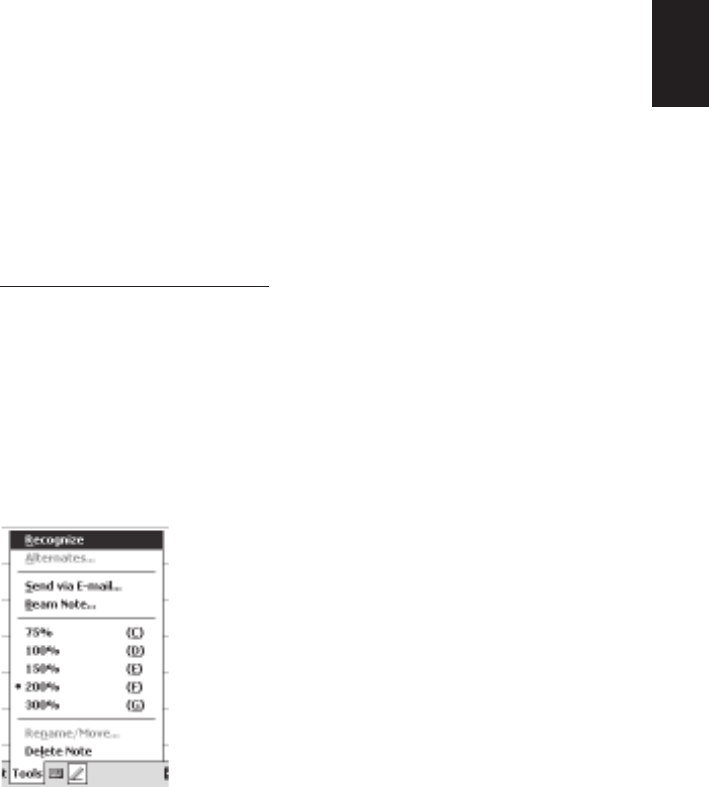
61
1
Initial Setup
To select a drawing:
If you want to edit or format a drawing, you must select it first.
• Tap and hold the stylus on the drawing until the selection handle appears. To
select multiple drawings, deselect the Pen button and then drag to select the
drawings you want.
You can cut, copy, and paste selected drawings by tapping and holding the
selected drawing and then tapping an editing command on the pop-up menu, or
by tapping the command on the Edit menu. To resize a drawing, make sure the
Pen button is not selected, and drag a selection handle.
Support for Clip-on Keyboards
The Rugged PDA works to make your computing session more productive when
you've installed a snap-on keyboard on the Rugged PDA. Not only does entering
text become much faster with a physical keyboard, but a large number of standard
keyboard shortcut commands (like CTRL+C, copy; CTRL+Z, undo; CTRL+V, paste;
etc.) are just a few easy clicks away. Additionally, most the Rugged PDA applica-
tions built for the latest operating system now support keyboard mnemonics, mean-
ing menu items are accessible without ever needing to use the stylus on the screen.
Consider the above pop-up menu from the Notes application. As you can see, by
merely tapping the "R" key on the keyboard, any selected text will be recognized.
No need to use the stylus! Keyboard support will allow you to keep one hand free to
perform other tasks.
IT-10_1/40-66-E.p65 06.6.15, 6:42 PM61

62
Recording a Message
In any program where you can write or draw on the screen, you can also quickly
capture thoughts, reminders, and phone numbers by recording a message. In Cal-
endar, Tasks, and Contacts, you can include a recording in the Notes tab. In the
Notes program, you can either create a stand-alone recording or include a record-
ing in a written note. If you want to include the recording in a note, open the note
first. In the Inbox program, you can add a recording to an e-mail message.
To create a recording:
1. Hold your device's microphone near your mouth or other source of
sound.
2. Press and hold the Record hardware button on your device until you
hear a beep.
3. While holding down the Record button, make your recording.
4. To stop recording, release the Record button. Two beeps will sound. The
new recording appears in the note list or as an embedded icon.
You can also make a recording by tapping the Record button on the
Recording toolbar.
To play a recording, tap it in the list or tap its icon in the note.
Note
IT-10_1/40-66-E.p65 06.6.15, 6:42 PM62
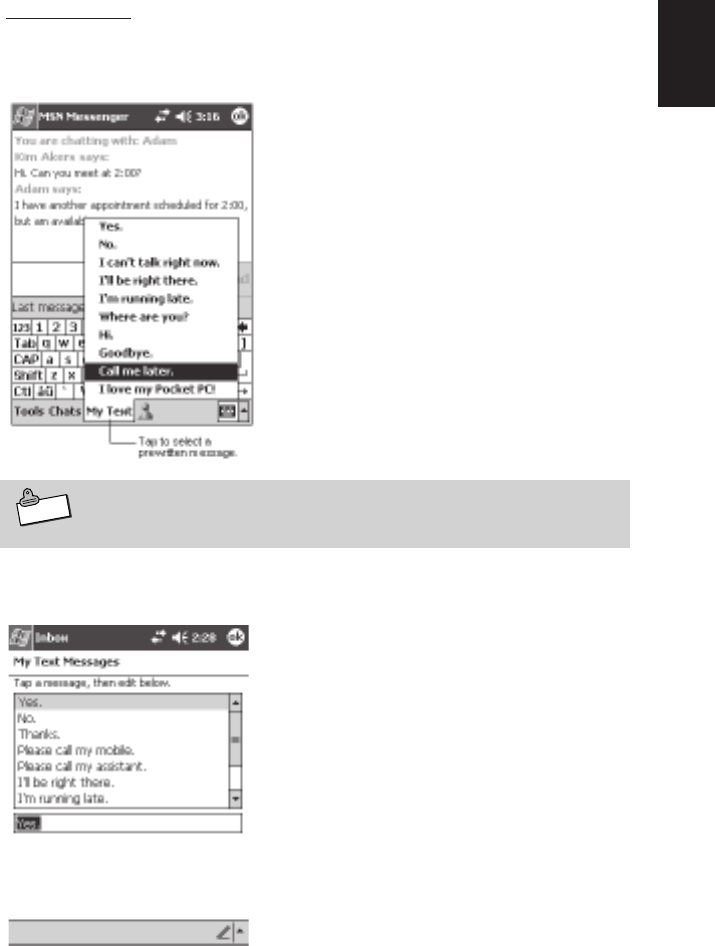
63
1
Initial Setup
Using My Text
When using Inbox or MSN Messenger, use My Text to quickly insert preset or
frequently used messages into the text entry area. To insert a message, tap My
Text and tap a message.
You can add text after inserting a My Text message before sending
it.
To edit a My Text message, in the Tools menu, tap Edit and then tap My Text
Messages.
Select the message you wish to edit and make desired changes. Click ok to save
changes.
Note
IT-10_1/40-66-E.p65 06.6.15, 6:42 PM63

64
Button Operation Settings
Pushing the Program button on the front of the Rugged PDA while it is turned off
automatically turns the power on. You can use the "Program Button" to set whether
or not pushing the Program button turns on the power. Using the Program button to
disable the power on operation can be used to prevent the power from coming on
if the Program button is accidentally pressed when the Rugged PDA is in your bag
or pocket.
Tap ➔ Settings ➔ Personal ➔ Program Button then follow the on
screen instructions to do the operations.
On the "Program Button" screen, tap OK to change the settings, then
turn off the Rugged PDA and then on again. This enables the set-
tings.
Note
IT-10_1/40-66-E.p65 06.6.15, 6:42 PM64

65
1
Connecting to a Computer
Connecting to a Computer
Connecting to a computer allows you to share data with the computer, transfer files to and
from the computer and back up files to the computer.
Compatible Computers
Computers must meet the following minimum conditions to connect to and
exchange data with the Rugged PDA. The following conditions describe the
operating environment necessary to use ActiveSync (the computer program that
exchanges data between the Rugged PDA and the computer), which is included
on the Companion CD provided with the Rugged PDA.
Minimum operating system requirements
•Microsoft® Windows® XP, Windows® 2000, Windows® Millennium Edition,
Microsoft® Windows® 98, Windows® NT
•Desktop or laptop computer with Microsoft® Outlook 98 or later able to run
Inbox, Calendar, Contacts, Tasks and Notes at the same time.
•Microsoft® Internet Explorer 4.01 Service Pack 1 or later version
•12 to 65 MB of available hard disk space (actual requirements vary depending
on system configuration and selected functions)
•USB port/RS-232C port (Windows 98, Windows 2000, Windows Me or Windows
XP only)
•Infrared communication port if using infrared connection
•CD-ROM drive
•256 color VGA graphics card or compatible video graphics adapter
•Keyboard
•Microsoft Mouse or compatible pointing device
Windows XP, Windows 2000, Windows Me, Windows 98, Windows
NT options
•Audio card/speakers for audio
•Microsoft® Office 97, Microsoft® Office 2000 or Microsoft Office XP
•Modem for remote synchronization
•Ethernet LAN connection for remote synchronization
• ActiveSync may not be compatible with all types of computers.
• Refer to Help for ActiveSync for information about how to use the
infrared communication port to connect the Rugged PDA with a com-
puter.
Note
IT-10_1/40-66-E.p65 06.6.15, 6:42 PM65
66
Connecting to a Computer
Do not connect the Rugged PDA to the computer before installing ActiveSync.
The Rugged PDA and the computer can be connected in the following way.
•When connecting via the Basic Cradle or Bridge Satellite Cradle, connect the
Basic Cradle or Bridge Satellite Cradle to the USB port or RS-232C port on the
computer, and then put the Rugged PDA in the optional cradle. Leaving the
Rugged PDA connected to the computer via the Basic Cradle or Bridge
Satellite Cradle makes it easy to connect the Rugged PDA to the computer
whenever it is necessary.
When connecting the Rugged PDA to the computer, tap ➔
ActiveSync ➔ Tools ➔ Options, in that order to check the connec-
tion to the computer. For more information refer to Help for the Rug-
ged PDA.
Using the CASIO Companion CD
The Companion CD-ROM contains software.
Put the CD-ROM into the CD drive of the computer and it will start automatically
and display a menu. From the menu screen, you can install the application or look
at the various documents.
Follow the procedure below to access information on the Companion CD-ROM.
To use the Companion CD-ROM, you must agree to the END-USER
LICENSE AGREEMENT. Read the END-USER LICENSE AGREE-
MENT and agree with it before using the Companion CD-ROM.
You need to install Active Sync 3.7 to the computer before you can connect the
Rugged PDA to the computer and exchange data.
Important
Note
IT-10_1/40-66-E.p65 06.6.15, 6:42 PM66

2
Basic Operations
IT-10/67-100.p65 06.6.15, 6:46 PM67
68
PIM
The letters "PIM" stand for "Personal Information Manager," which is a program for control-
ling personal information. The Rugged PDA comes with Microsoft Pocket Outlook (Pocket
Outlook) built in. Pocket Outlook is the pocket version of Microsoft Outlook, which is used
as the PIM on many of today's personal computers. "Pocket Outlook" is a general term that
encompasses the five programs of the Rugged PDA: Calendar, Contacts, Tasks, Notes,
and Inbox.
The PC version of Outlook includes the following functions: Calen-
dar, Contacts, Tasks, Notes, Mail, and Outlook Today (which corre-
sponds to "Today" on the Rugged PDA. Your Rugged PDA's Pocket
Outlook is designed to sync with the PC version of Outlook.
About Pocket Outlook
"Pocket Outlook" is a general term that encompasses the five programs of the
Rugged PDA: Calendar, Contacts, Tasks, Notes, and Inbox. It provides the
programs described below.
Calendar ...... This program helps you manage your schedule. Appointments
and meetings in Calendar can be viewed using a variety of
different formats, and you can set alarms to notify you of
upcoming appointment times.
Contacts ....... Use Contacts to store and manage the names, addresses,
phone numbers, and e-mail addresses of friends, co-workers,
customers, etc.
Tasks ............ Tasks helps you manage jobs you need to perform.
Notes ............ Notes is a program that lets you easily jot down or record voice
memos of your ideas.
Inbox ............ This program provides you with the means to send and receive
mail, and to manage your e-mail messages.
Note
IT-10/67-100.p65 06.6.15, 6:46 PM68
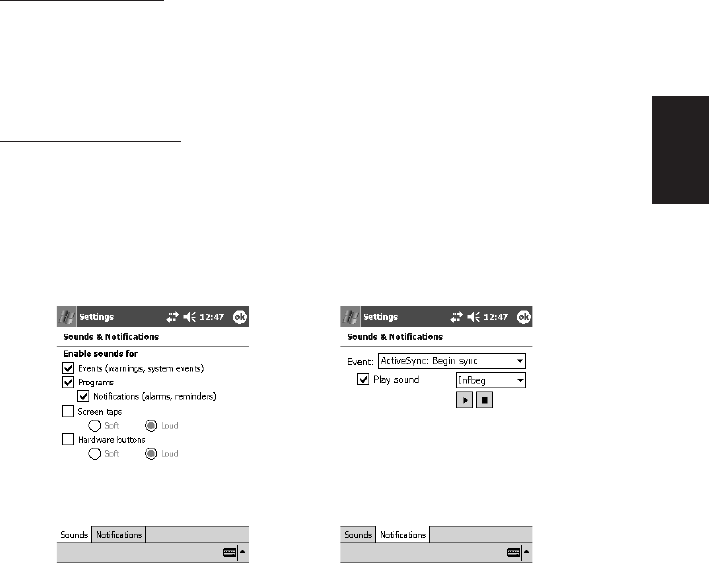
69
PIM
2
Syncing with a PC
The Rugged PDA can be connected to a PC for syncing the program contents of
the Rugged PDA Pocket Outlook with Outlook or Exchange running on the PC.
This data can also be directly synced with an Exchange server.
Notification Settings
The following settings can be used to set up the Rugged PDA to notify you of
upcoming tasks and appointments.
•Message box display
•Alarm with selectable alarm sound
• Flashing red indicator
Sounds Notifications
IT-10/67-100.p65 06.6.15, 6:46 PM69
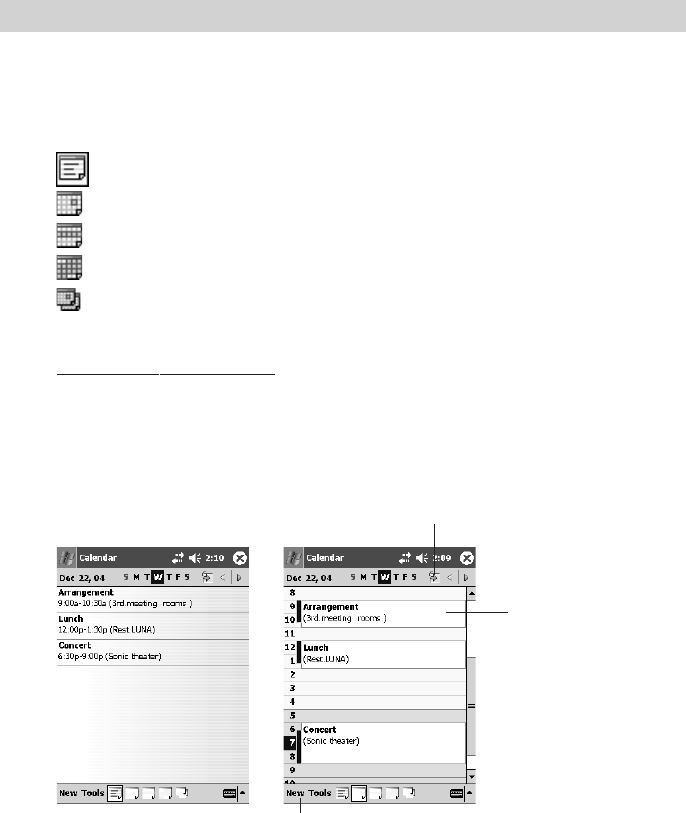
70
Calender
Calendar is a program that helps you manage your schedule. Appointments and
meetings in Calendar can be viewed using a variety of different formats, and you
can set alarms to notify you of upcoming appointment times. Command bar
buttons are used to select the Calendar view you want.
......... Agenda View
........... Day View
........... Week View
........... Month View
........... Year View
Agenda View / Day View
Agenda View and Day View both show the appointments for a specific day.
Agenda View can be used to view a list of appointments only, while Day View
arranges appointments in a timetable.
Tap go to Today.
Tap go to Display or
edit the appointment
details.
Tap go to create a new
appointment.
IT-10/67-100.p65 06.6.15, 6:46 PM70
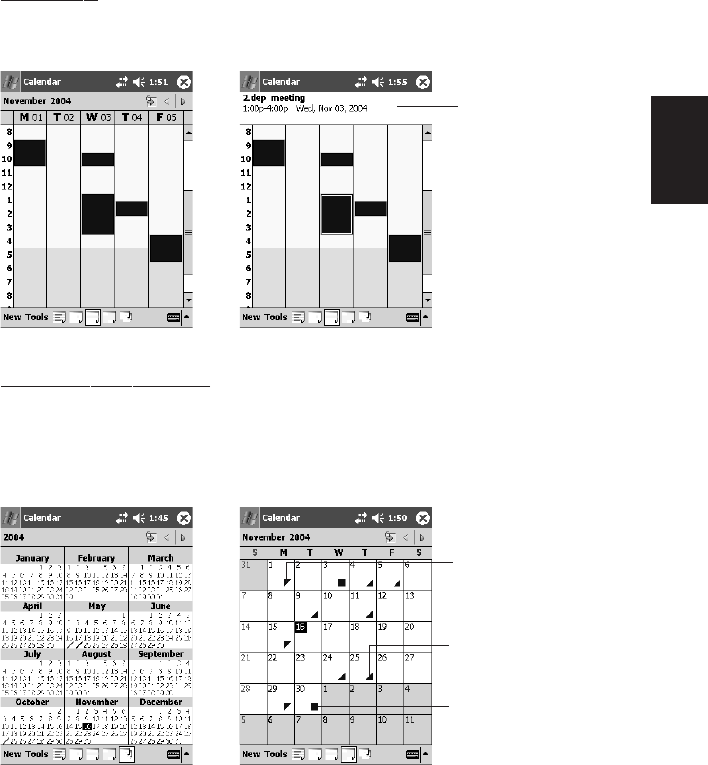
71
PIM
2
Week View
Week View shows appointments for a full week.
Month View / Year View
Month View shows a full month calendar, while Year View shows calendars for a full
year. The Month View also shows whether or not you have appointments sched-
uled on each day.
Indicates a morning
(AM) appointment.
Indicates an afternoon
(PM) appointment.
Indicates an all-day ap-
pointment.
The details of the ap-
pointment you tap ap-
pear here.
IT-10/67-100.p65 06.6.15, 6:47 PM71

72
Contacts
Use Contacts to store and manage the names, addresses, phone numbers, and e-
mail addresses of friends, co-workers, customers, etc.
The Contacts screen lists the names and phone numbers of the entries, as shown
below.
Each line of the list represents one record of "Contacts data."
Typing characters here im-
mediately recalls the names
that contain the characters.
The far right characters ("w,"
"f," "m," etc.) indicate the
contact information (phone
number, etc.) that is cur-
rently displayed. You can
specify the contact informa-
tion that should appear in
this list by tapping here and
selecting the information
you want from the list that
appears.
Tap here to select options,
etc.
Tap here to change the sort
order (name order, company
order) of the list.
Tap here to create a new
Contacts record.
Tapping and holding here
displays a pop-up menu of
data handling commands.
Tap here to display a list of
categories (company, per-
sonal, etc.), which you can
use to select the one you
want.
IT-10/67-100.p65 06.6.15, 6:47 PM72
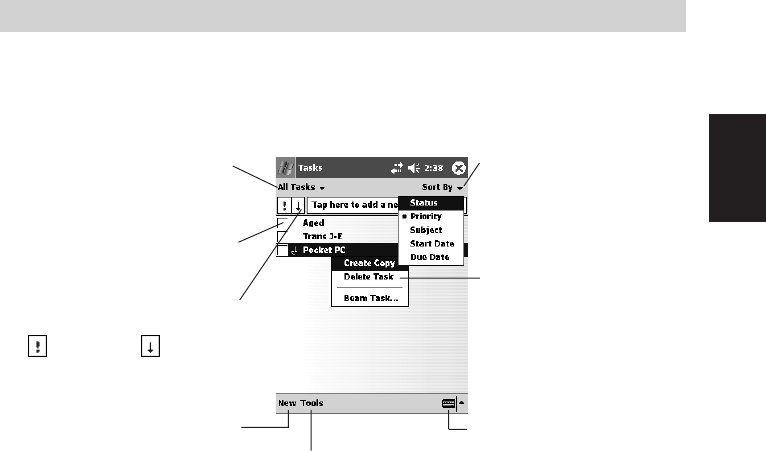
73
PIM
2
Tasks
Tasks lets you keep track of jobs and tasks you need to do. The list shown below
appears first whenever you start up Tasks.
Click here to select the cat-
egory ("Pending," "Com-
pleted," etc.) of the tasks you
want to display.
Completed tasks can be in-
dicated with a check mark.
This symbol indicates prior-
ity.
------ High ------ Low
You can use this menu to
sort the displayed tasks list
by "Priority," "Due Date," etc.
(A task is red if its due date
is already past.)
Tapping and holding here
displays a pop-up menu of
data handling commands.
Tap here to create a new
Tasks record. Tap here to select the input
bar, options, etc.
Tap here to toggle display of
the input panel on and off.
IT-10/67-100.p65 06.6.15, 6:47 PM73
74
Programs
Programs Covered in this Section
In addition to Inbox and other programs that let you use the Internet, and PIM
programs and Calendar, the Rugged PDA also comes bundled with the programs
described below.
Pocket Word
This is the pocket version of Microsoft Word word processing program.
Pocket Excel
This is the pocket version of the Microsoft Excel spreadsheet program.
Windows Media
This is a program for playing back MP3 and Windows Media Audio music files. It
can also play back Windows Media Video format files.
MSN Messenger
This is an instant messaging program.
Calculator
The program can be used to operate nine-digit calculator.
Games
The Rugged PDA comes with two games: Solitaire and Jawbreaker.
Card Backup
This program lets you back up the Rugged PDA data to a memory card. Backed
up data can be restored when you need it.
File Explorer
The program provides you with a variety of different file management tools.
FLCE
This program can be used to transfer specific files to a specific folder.
Menu
This program makes it possible to start up programs and open files by tapping
buttons on the screen.
Pictures
This application is for browsing images recorded with a digital camera.
Find and Help
This program lets you find character strings in registered data. Help provides you
with useful advice about basic operations.
IT-10/67-100.p65 06.6.15, 6:47 PM74

75
Programs
2
Note
Adding Programs
The Rugged PDA comes with a built-in Microsoft Windows CE operating system
(OS). You can install programs that are compatible with Windows CE. Note that the
Rugged PDA must be connected to a PC in order to add programs.
•For information about connecting the Rugged PDA to a PC, see "Connecting to
a Computer" on page 65.
•In order to add programs to the Rugged PDA, the PC connected to it must have
ActiveSync installed. For information about using ActiveSync, see ActiveSync
help.
•Note that CASIO does not provide any support for commercially available
programs, etc. Contact the developer of the program or your retailer for support.
Pocket Word
With Pocket Word, you can store typed characters, drawings made with the stylus,
and sounds within the same file. Other features include a variety of styles and
attributes for text and graphics, find and replace capabilities, etc. You can transfer
word and text files from your PC and open them in Pocket Word, and also transfer
Pocket Word files to your PC and open them in Word.
Only files in the "My Documents" folder in the Rugged PDA main
memory or a "My Documents" folder on a memory card can be opened
from Pocket Word. Files in folders that are not inside of the "My Docu-
ments" folder do not appear in the file list and so they cannot be
opened. (See "Accessing Files on a Memory Card" on page 119 for
more information.)
IT-10/67-100.p65 06.6.15, 6:47 PM75

76
Note
Four Pocket Word Modes
Pocket Word has the fours modes described below. You can switch between
modes as required to input text into a document.
Typing Mode ................... Use this mode to input and edit text using the input
panel. In this mode, you can also use a variety of text
styles and attributes, including bold, italic, text color,
numbering and bullets, etc.
Writing Mode ................... Use this mode when you want to handwrite text and
figures on the screen with the stylus. This mode comes
in handy when jotting down a quick memo. As with input
panel input, you can edit text later if you want, change
the thickness and color of lines, etc.
Drawing Mode................. This mode is for freehand drawing of figures on the
screen with the stylus.
When drawing, you can specify line color and thickness,
and the fill color. You can change your specifications
after the drawing is complete, and also move or reshape
figures.
Recording Mode ............. Use this mode to embed an audio recording in a
document.
Pocket Excel
Pocket Excel is a spreadsheet program that lets you perform basic calculations,
high-level function calculations, and arrange data in tabular form. Use it to keep
track of your traveling and other expenses during business trips. Or create a
database of product data you can take along anywhere. The range of possible
uses for Pocket Excel is virtually unlimited. Data can be exchanged between
Pocket Excel and the PC version of Excel.
•A file created with Pocket Excel is called a "book."
•Only files in the "My Documents" folder in the Rugged PDA main
memory or a "My Documents" folder on a memory card can be opened
from Pocket Excel. Files in folders that are not inside of the "My Docu-
ments" folder do not appear in the file list and so they cannot be
opened. See "Accessing Files on a Memory Card" on page 119 for
more information.
IT-10/67-100.p65 06.6.15, 6:47 PM76
77
Programs
2
Pocket Excel Screen
•To maximize the amount of data on the display, tap View and then Full
Screen. This will hide the tool bar, scroll bars, and other display elements, and
use the entire display area to display data.
•In attention to the full screen, you can also turn display of each individual display
elements on or off. On the View menu, tap each element from Toolbar to
Row/Column Headings to toggle its display on and off.
•You can tap Freeze Panes on the View menu to freeze specific rows/
columns so they do not change when you scroll the screen. For example, you
might freeze the first line in the upper right of the screen so it remains un-
changed while the rows below it scroll.
Assigning a Password to a File
If you tap Password on the Tools menu and specify a password, the file will not
open unless the correct password is input first. A password helps to keep file
contents private. It is a good idea to password protect files that you don't want
others to view.
Windows Media
Windows Media (Pocket PC Version) is a program for playing back digital audio
files and video files. Playback of Windows Media and MP3 files in the Rugged PDA
memory or on a network is supported.
Widows Media running on a PC can be used to copy files to the Rugged PDA.
Movie and audio playback consumes large amounts of battery power.
Continued playback over a long period can cause the Rugged PDA
case to become warm. This does not indicate malfunction.
IT-10/67-100.p65 06.6.15, 6:47 PM77
78
Using the Player Screen
After starting up Windows Media, you can use onscreen buttons that are similar to
those found on a CD player to control playback.
•Once started, Windows Media playback continues even if you switch
to a different program.
•Tap the stop button to stop playback. If you turn off the Rugged PDA
power while playback is in progress, power will turn back on again
automatically when the built-in clock reaches midnight.
•Windows Media Player may not be able to play back certain MP3 file
formats.
Note
Shows the progress of the
track that is currently play-
ing.
Use (+) and (-) to adjust
the volume level.
Tap here to jump to the
next track.
Tap here to start and stop
playback.
Tap to connect to a
network.
Tap here to jump to the
previous track.
IT-10/67-100.p65 06.6.15, 6:47 PM78
79
Programs
2
Note
MSN Messenger
The MSN
®
Messenger of the Rugged PDA is a program that uses instant messages.
The following functions are supported.
•Checking to see who is online
•Sending and receiving instant messages
•Using instant message to chat within a contact group
A Microsoft Passport TM account or Microsoft Exchange mail account is required to
use the MSN Messenger service. You also need to obtain a passport. If you have a
Hotmail® account or an MSN account, you already have a passport.
You can get a Passport account from the following URL.
Sign up for a Microsoft Passport account at http://www.passport.com.
Get a free Microsoft Hotmail e-mail address at http://www.hotmail.com.
The main MSN Messenger window classifies all members into two groups: on line
and off line. While you are connected you can chat, and send and receive mail
from this window. You can also disable chat, delete members, and perform other
operations.
•To view online members while remaining off line, tap My Status on
the Tools menu, and then select Appear Offline.
•Blocking contact from a member makes you appear offline on that
member's screen. To unblock a member, tap and hold the member's
name and then tap Unblock on the pop-up menu that appears.
Tapping a member name starts a chat session
with that member.
Tapping and holding displays a pop-up menu.
IT-10/67-100.p65 06.6.15, 6:47 PM79
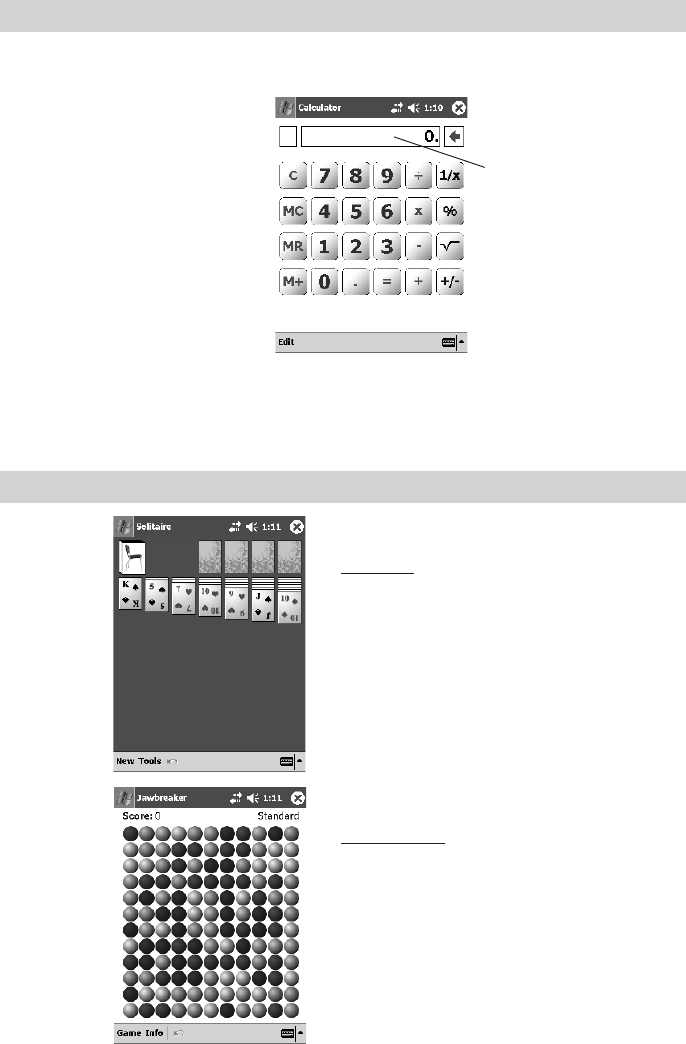
80
Calculator
You can operate the nine-digit on-screen calculator by tapping its keys.
•Tap [=] to execute a calculation.
•You can also use the input panel to input values for calculation.
Game
Input box
Solitaire
The object of Solitaire is to use all the cards
in the deck to build up the four suit stacks in
ascending order, beginning with the aces.
Jawbreaker
The objective is to align similar jawbreakers
in order to form large blocks of jawbreakers
before bursting them. The more jawbreakers
in the block before they are burst, the greater
number of points you will receive.
IT-10/67-100.p65 06.6.15, 6:47 PM80

81
Programs
2
Card Backup
The Rugged PDA data can be backed up to a Compact Flash (CF) card, and SD/
MMC card, or to the Rugged PDA's FlashDisk. Backed up data can be restored to
the Rugged PDA when required.
Periodic backup is recommended to protect against the corruption or loss of
important data.
The following data can be backed up.
• Files Files in the folders in the database.
• Database The following Microsoft Pocket Outlook database data can be
backed up: Calendar, Notes, Contacts, Recordings, Tasks,
Inbox.
• Registry information (operating system and program settings)
The Rugged PDA can also be backed up and restored using Active Sync running
on a connected PC.
•"Settings" information (password, dialup connection settings, etc.)
cannot be backed up/restored.
•Certain applications may not run correctly after restore. If this hap-
pens, reinstall the application.
Pictures
You can set an image as the background for the Today screen by using an
application for viewing JPEG images taken with a digital camera.
IT-10/67-100.p65 06.6.15, 6:47 PM81

82
File Explorer
You can use File Explorer to perform the following operations on files stored in
main memory or on a memory card.
•Create a new folder.
•Delete a file or folder.
Note that a file or folder delete operation cannot be undone.
•Move a file or folder.
Moving a folder moves all of the files and folders inside along with it.
After performing a cut operation on a file, you will be able to paste it only once.
Unlike Copy, multiple pasting of the same file is not supported.
Some folders and files cannot be renamed or deleted.
•Duplicate a file or folder.
Pasting a file in the folder where the original file is located creates a duplicate of
the original file. The duplicated file name will be the same as the original file,
with "Copy of" added at the beginning.
After copying a file, it can be pasted any number of times until you perform
another file "copy" or "cut" operation.
•Rename a file or folder.
•Send a file using Inbox.
From File Explorer, you can specify a file to attach to an e-mail message and
create an outgoing message to send from Inbox.
•Send a file using infrared communication.
From File Explorer, you can send a file from the Rugged PDA to another Pocket
PC using infrared communication.
IT-10/67-100.p65 06.6.15, 6:47 PM82
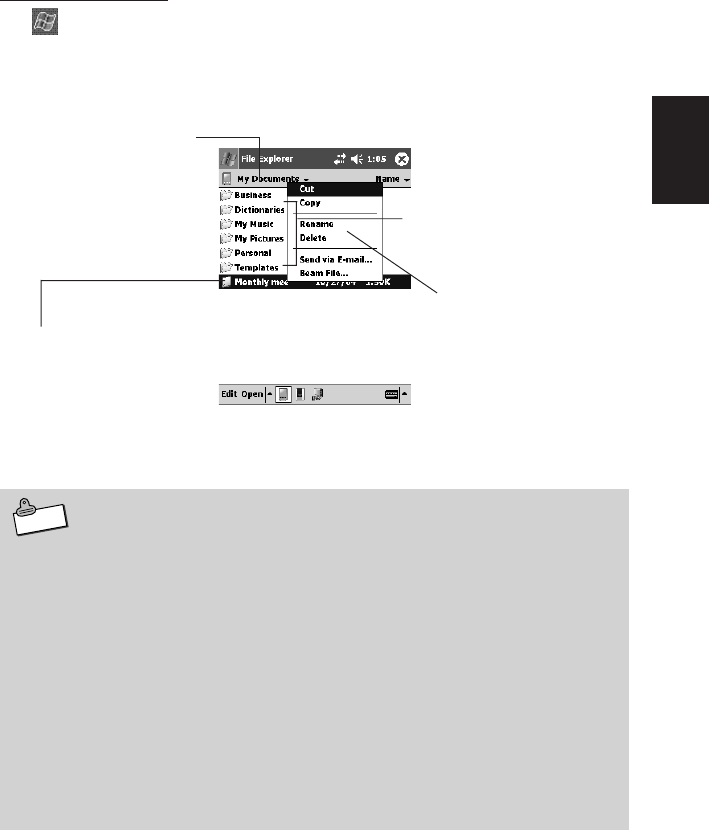
83
Programs
2
Note
Using File Explorer
Tap ➔ Programs ➔ File Explorer to start up File Explorer. This will initially
display a list of files and folders located in the My Documents folder in the Rugged
PDA main memory.
•Some system files will not appear in File Explorer. You can view such
files using ActiveSync on your computer.
•File Explorer does not display file name extensions. Also, the file size
may not be visible in the case of very large files.
•To view file name extensions or file sizes that are not visible on the
File Explorer screen, connect the Rugged PDA to a PC and use
ActiveSync Explorer. For information about using ActiveSync, see
ActiveSync help.
•If you want to view this information on the Rugged PDA, tap Tools
➔ Add Attachment on the mail message composition window. You
will be able to see the file Size and Type on the file list that ap-
pears. See help for information about mail operations.
Tap here to move up one
level from the currently dis-
played level.
Tapping a folder displays
its contents.
Tapping a file starts up
the associated applica-
tion and opens the file.
Tapping and holding the
area to the right of the file
and folder icons displays a
pop-up menu, which con-
tains commands for file
and folder operations.
IT-10/67-100.p65 06.6.15, 6:47 PM83
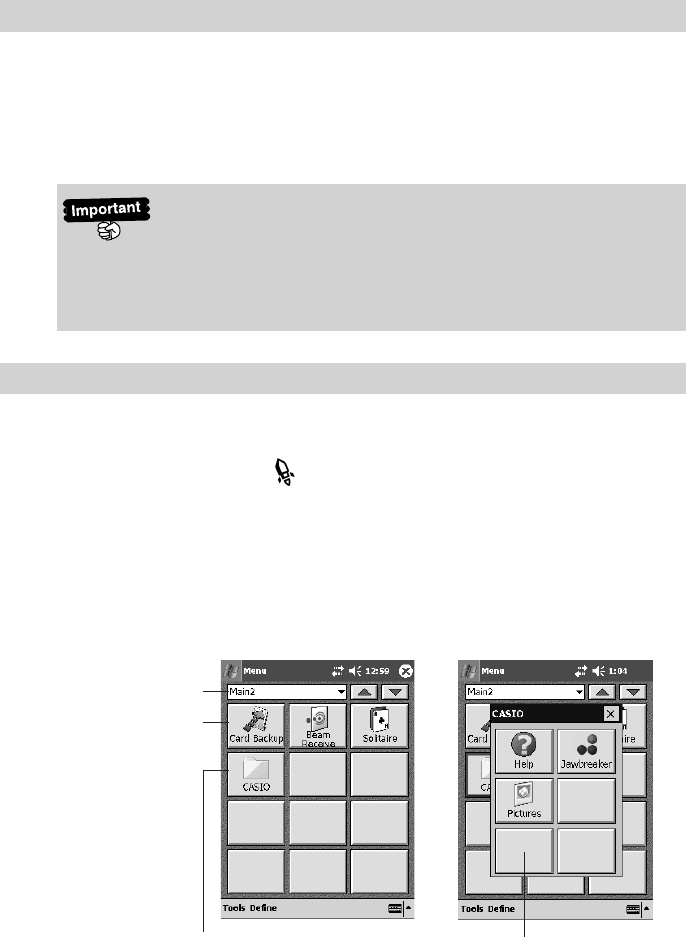
84
FLCE
FLCE is a program for transferring a specified file to a specified folder. In addition,
file transfer can be performed not only between two Rugged PDAs but also
between the Rugged PDA and a PC connected via the cradle or via USB cable
directly. The file and folder specified for transmission, the operation method and
the destination are specified with the relevant parameters.
Before starting up FLCE, make sure that the battery pack on the Rug-
ged PDA is sufficiently charged.
A low battery power during data communication can cause unstable
communication, loss of data being used and the power shut down on
the Rugged PDA.
Menu
Menu can be used to start up programs and open files by tapping buttons on the
screen. You can assign programs and files to buttons as you like.
To start up Menu, press the button on the front of the Rugged PDA. This will
turn on the Rugged PDA and start up Menu.
•One Menu screen is called a "page." Menu lets you create up to 10 pages of
buttons. Each page can have up to 12 buttons, which means quite a large
number of programs and files can be grouped by type for easy management.
•In place of a program or file, you can also assign a sub-menu to a button.
Sub-menu button
Current page name
Program button
Sub-menu
IT-10/67-100.p65 06.6.15, 6:47 PM84
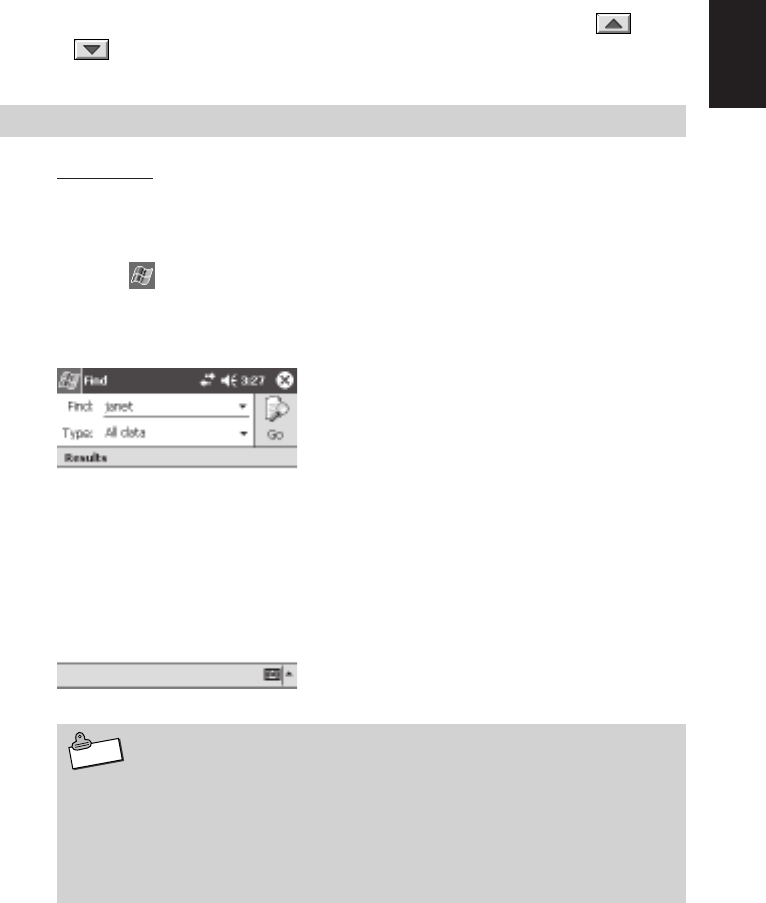
85
Programs
2
Note
Starting Up a Program from Menu
•To start up a program assigned to a Menu button, tap the button. To start up a
program assigned to a button on a sub-menu, first tap the sub-menu button and
then tap the program button on the sub-menu that appears.
•To display another Menu page, tap the down arrow button to the right of the
page name and then select the page you want. You can also tap the and
buttons to scroll through Menu page.
Find and Help
Using Find
Search lets you instantly find data you stored using the Rugged PDA's built-in
programs. You can search by file name or file contents.
The Find feature on your device helps you quickly locate information.
• On the ➔ Programs, tap Find. Enter the text you want to find, select a
data type, and then tap Go to start the search. You can specify to search among
Pocket Office documents, PIM information, or Notes documents.
•Besides Pocket Outlook (Calendar, Contacts, Tasks, Inbox, Notes)
data, search also searches the files and folders located in the My
Documents folder (only).
•You can use File Explorer to check the files in the Rugged PDA main
memory (or on a memory card inserted in the Rugged PDA card slot).
For information about File Explorer, see page 82.
IT-10/67-100.p65 06.6.15, 6:47 PM85

86
Viewing Help
Help is your source of useful information about how to use the Rugged PDA. You
can reference help to learn the basics you need to know in order to use the
Rugged PDA's built-in programs. It is the perfect way to look up operational
information when you are on the road and don't have your user's guide with you.
Help can be accessed at any time by tapping Help on the menu that appears
when you tap the button. The window that appears first shows help information
about the program or screen you are currently using.
IT-10/67-100.p65 06.6.15, 6:47 PM86
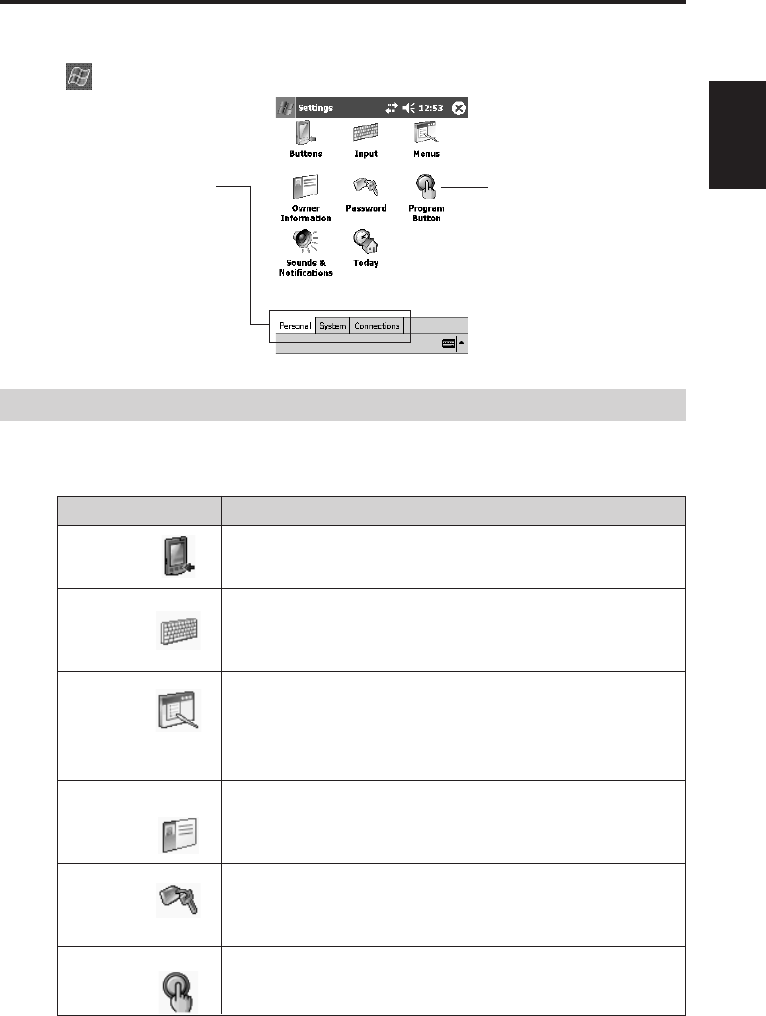
87
Setup Overview
2
Setup Overview
The basic operating environment of the Rugged PDA can be configured, and its hard-
ware, system, and other components can be adjusted as required.
Tapping ➔Settings displays a screen like the one shown below.
Personal Tab Settings
The Personal tab contains settings that you can use to personal the Rugged
PDA to suit your particular needs.
Tapping an icon dis-
plays the setting screen
for that item.
Settings are grouped
on three tabs named
Personal, Sys-
tem, and Connec-
tions. Tap a tab to
display its settings.
Items
Buttons
Input
Menus
Owner Information
Password
Program Button
Description
Use this item to specify the program that starts up when the
Rugged PDA program button is pressed.
Use this item to configure Writing mode input options, to
configure Recording mode sound quality and recording
format settings, etc.
Use this item to specify the programs that appear in the
Start menu, and the contents of the pop-up menu that
appear when you press the New button on the Today
screen.
Use this item to input your personal information. You can
also configure the Rugged PDA to display the information
you input whenever it is turned on.
Use this item to register a Rugged PDA password. Once
you do, data cannot be accessed until you input the
password when you turn on power.
Use this item to specify whether the Rugged PDA should
turn on when the program button is pressed.
IT-10/67-100.p65 06.6.15, 6:47 PM87
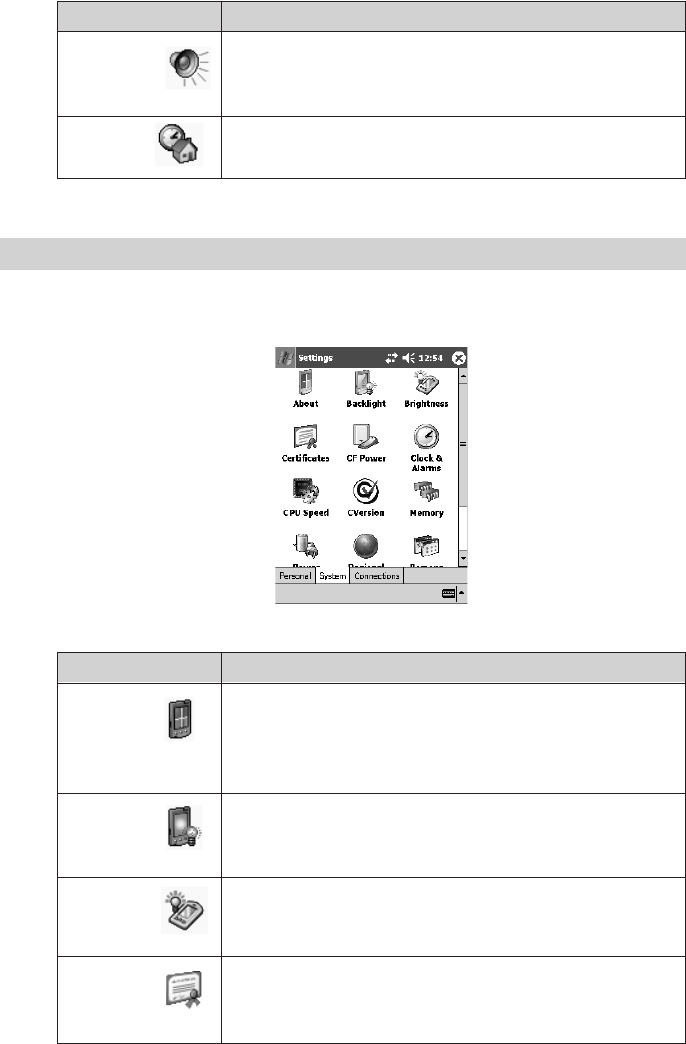
88
System Tab Settings
The System tab contains various setting for the Rugged PDA hardware and
system settings.
Description
This item displays version and copyright information about
the system built into the Rugged PDA. You can also set the
device ID (Rugged PDA name), which is used to distin-
guish the Rugged PDA from other terminals.
Use this item to configure the auto dimmer time and other
settings.
Use this item to adjust screen brightness.
Use this item to check the identity of a communication
partner, and to manage your digital ID for securing your
own identity.
Items
About
Backlight
Brightness
Certificates
Items
Sounds &
Notifications
Today
Description
Use this item to adjust the audio volume level, and to
customize the different sounds produced for various
specific events.
Use this item to select the information you want to appear
on the Today screen.
IT-10/67-100.p65 06.6.15, 6:47 PM88
89
Setup Overview
2
Items
CF Power
Clock & Alarms
CPU Speed
CVersion
Memory
Power
Regional
Settings
Remove
Programs
Screen
Storage
Manager
Description
Use this item to configure Compact Flash card and
wireless LAN settings, and power saving settings.
Use this item to specify a home city and a visiting city, and
to configure date and time settings. This item can also be
used to configure alarm settings.
Use this setting to switch the CPU clock frequency in
order to reduce power consumption so that the life of the
battery pack can be extended.
This item displays version information about the CPU, etc.
Use this item to change the main memory allocation for
data storage and program execution, and to exit pro-
grams that are currently running. You can also check how
much unused memory is available on a memory card
(when using one).
Use this item to check the current remaining levels of the
battery pack and backup battery. You can also specify the
auto power off trigger time for powering down the Rugged
PDA when you do not perform any operation.
Use this item to specify the region where you are using the
Rugged PDA, and the date, time, number, and monetary
unit display format. You can configure individual settings
for each display format, if you want.
Use this item to delete add-on programs installed on the
Rugged PDA.
Use this item to switch between portrait and landscape
touch screen orientation, and to adjust the tap points
(touch screen calibration).
This item displays the file capacity of a peripheral device
connected to the Rugged PDA.
IT-10/67-100.p65 06.6.15, 6:47 PM89
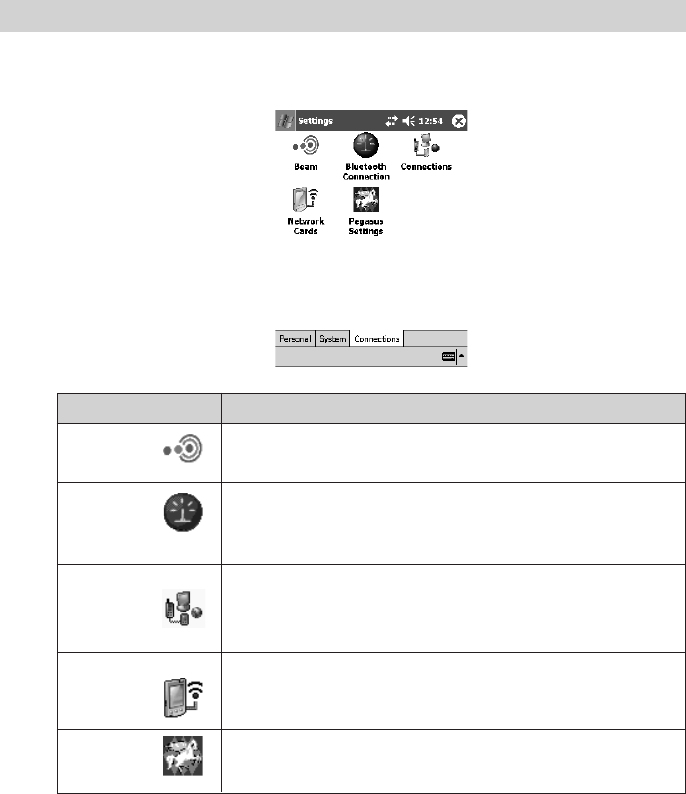
90
Connections Tab Settings
The Connections tab includes setting items that control the Rugged PDA
connection to the Internet or an external computer using a cable or modem.
Description
Use this item to enable and disable receipt of infrared
communication.
Use this item to enable data exchange using Bluetooth
short-distance wireless communication.
Use this item to configure settings for connecting to the
Internet or a company network, and dialup connection
settings.
Use this item to select a network card for data communi-
cation.
Use this item to configure wireless LAN settings.
Items
Beam
Bluetooth
Connection
Connections
Network Cards
Pegasus
Settings
IT-10/67-100.p65 06.6.15, 6:47 PM90
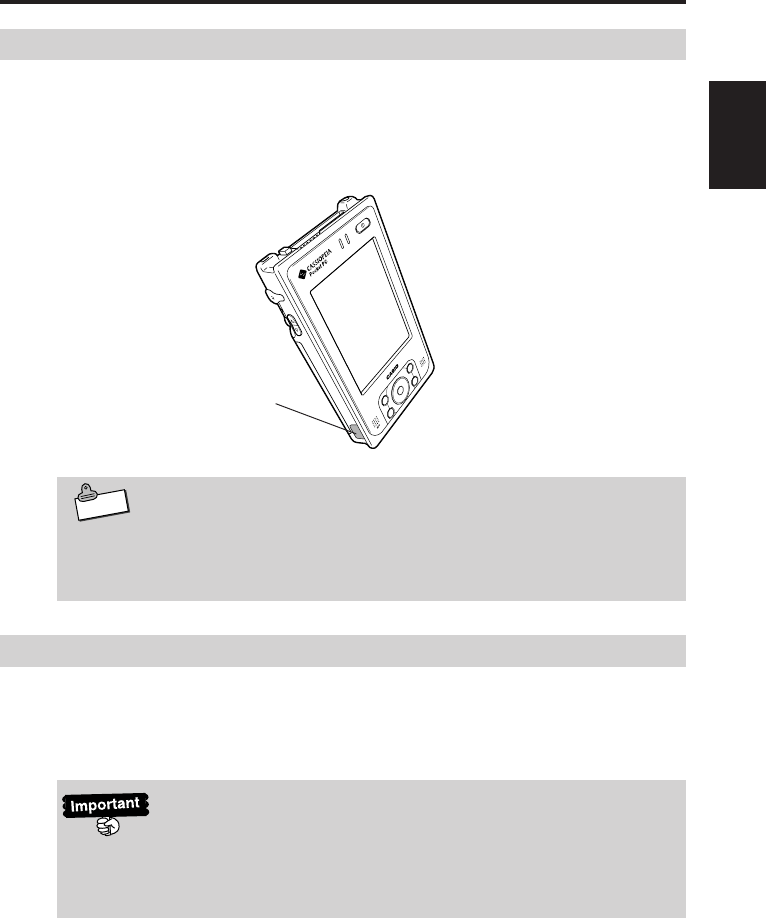
91
Infrared Communication
2
Note
Infrared Communication
Infrared Communication
The Rugged PDA has an infrared communication port that can be used for IR
transfer of data between two Rugged PDAs, or between the Rugged PDA and
other type of Pocket PC. You can also use infrared communication to transfer data
and perform data synchronization between the Rugged PDA and a PC.
The information in this section covers infrared communication opera-
tions between two Rugged PDAs only.
For information about infrared communication to transfer or synchro-
nize data between the Rugged PDA and a PC, see ActiveSync help.
Transferring Data
This section explains how to use infrared communication to transfer data between
two Rugged PDAs. To transfer data, you will need to perform different operations
respectively at the original and destination sides.
Note that you cannot use infrared communication when the Rugged
PDA is connected to a PC by cable. Before trying to perform infrared
communication, first disconnect the cable from the Rugged PDA or
remove the Rugged PDA from the Cradle.
Infrared Communication port
IT-10/67-100.p65 06.6.15, 6:47 PM91
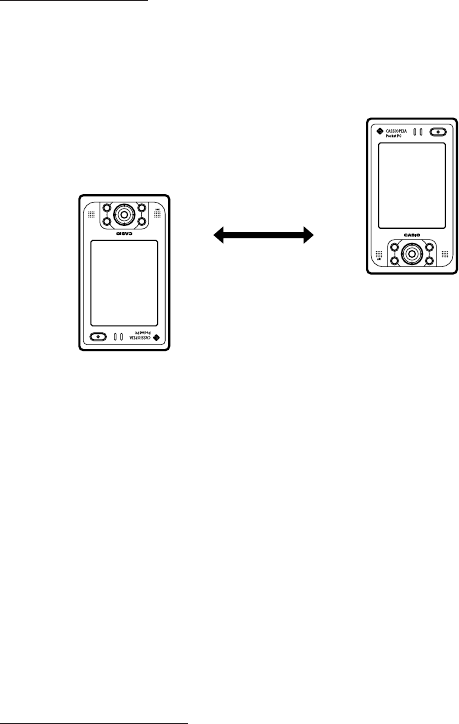
92
To Transfer Data
Perform the following procedure to transfer data.
1. Position the two Rugged PDAs no further than about 30 cm from each
other, and so their infrared communication ports are facing each other.
2. On the original side, tap and hold the data item or file you want to send.
Then on the shortcut menu that appears, tap Beam File....
•The data send operation can be performed from the program that
created the data or from File Explorer.
3. Data transfer will start. A message will remain on the display to indicate
that data transfer is in progress.
4. Completion of data transfer will be indicated by a message on the
displays of both the original and the destination sides.
•Tap the Close button on the message screen.
Data Send Operation
Data can be sent using infrared communication using either of the two methods
described below.
•Sending from the program used to created the data or file
Files created using Calendar, Contacts, Tasks, Notes, Pocket Word, or Pocket
Excel can be sent from the applicable program.
•Sending from File Explorer
File Explorer can be use to send files stored in the Rugged PDA main
memory or on a memory card.
IT-10/67-100.p65 06.6.15, 6:47 PM92
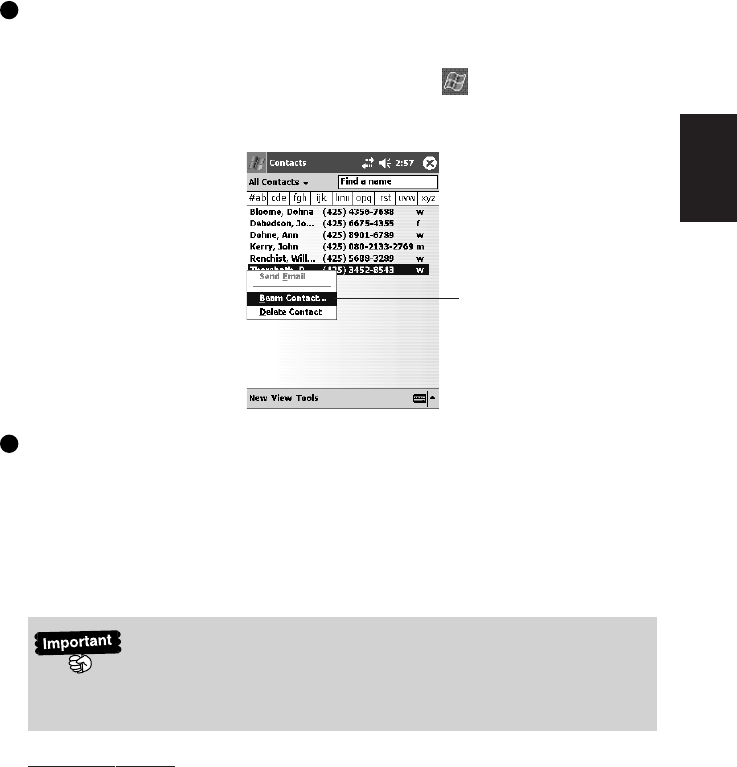
93
Infrared Communication
2
To send from a program
1. Start up the program whose data you want to send.
•To send Contacts data, for example, tap ➔ Contacts.
2. Tap and hold the data you want to send.
To send from File Explorer
1. Start up File Explorer.
2. Tap and hold the file you want to send.
3. On the shortcut menu, tap Beam Contact....
•You cannot send a folder using infrared communication.
•Only files can be sent from File Explorer. To send Contacts, Calen-
dar, or Tasks data, perform the send operation from the applicable
program.
To Receive Data
1. Aligning the infrared communication ports of the two Rugged PDAs,
position them close to each other taking care there is nothing blocking
the path between them.
2. On the sending unit, perform the required send procedure. The data will
be received automatically by the destination side.
•When a confirmation message asking whether you want to receive
the data appears, perform the required operation as instructed by
the message.
On the pop-up menu, tap
Beam Contact....
IT-10/67-100.p65 06.6.15, 6:47 PM93
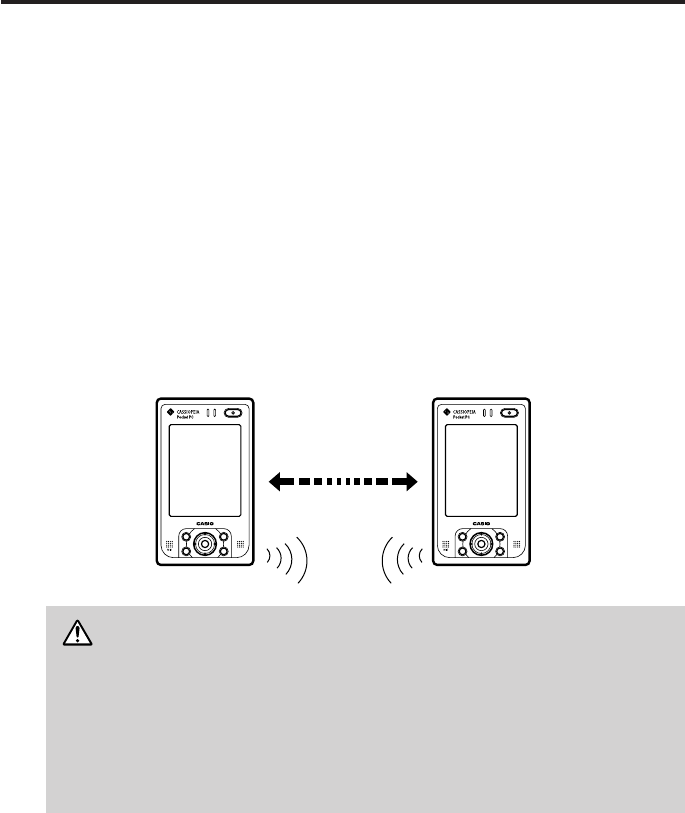
94
Bluetooth®
Bluetooth® is wireless communication technology that uses the 2400MHz to 2483.5MHz
band to transfer data. The Rugged PDA comes with Bluetooth® technology built in, which
provides it with the capability of performing high-speed, high-stability short-range wireless
communication.
Two Rugged PDAs with Bluetooth® intehrated do not need to be aligned with each other in
order to connect.
When Bluetooth® is turned on, two Rugged PDAs that are within three meters distance of
each other will be able to perform the following types of data send and receive opera-
tions.
•Calendar, Tasks, Contacts, etc. exchange
•File transfer
•Connection to a Bluetooth® wireless LAN
•Connection with another Bluetooth® device
Important Precautions
The radio waves emitted by a Bluetooth® device can affect the operation of
medical equipment, etc. In some cases, this can even lead to a serious
accident. To prevent this, turn off either the Rugged PDA or the Bluetooth®
functions in the areas described below. In hospital, train, aircraft, in gasoline
station or any other area where flammable gas is generated, near automatic
door, or fire alarm devices.
IT-10/67-100.p65 06.6.15, 6:47 PM94

95
Bluetooth
2
Tips to Help Ensure Successful Communication
Note the following information, which can help you ensure successful Bluetooth®
data communication.
•Make sure the Rugged PDA is visible from and within about 3 meters of the
other Bluetooth® devices. The communication range may be shorter depend-
ing on the local environment (if there are walls and furniture in the path, or
radio wave is emitted by other Bluetooth® device, etc.), and the structure of
the building where you are located.
Ferroconcrete structures in particular can cause problems, because iron
reinforcements between floors and in walls can make communication
impossible. Perform data communication at least two meters from other
devices (electric appliances, AV equipment, office equipment, digital
cordless telephones, facsimiles, etc.) Microwave ovens in particular can
cause problems, so the distance should be increased to at least three
meters. Turning on the power of another device that is too close can interfere
with proper communication, TV and radio interference, and reception
interference (in particular, distortion of certain UHF or broadcast satellite
channel TV images). If proper communication is not possible in the vicinity of
a transmitter, wireless device, or other device, move to another location. Very
strong radio waves in the area can make proper communication impossible.
Wireless LAN Radio Interference
Since Bluetooth® devices and wireless LANs (IEEEE802.11b/g) use the same
frequency band, using the Rugged PDA in the vicinity of a wireless LAN enabled
device can generate radio interference, which can result in slower communication
speeds and even make connection impossible. If this happens, take the following
steps.
•Move the Rugged PDA so it is at least 10 meters from the wireless LAN enabled
device.
•If you must use one of the two devices within 10 meters of the other, turn off
either the Rugged PDA or the wireless LAN.
The Bluetooth Version 1.2 built into the Rugged PDA allows simulta-
neous use of wireless LAN and Bluetooth communication. However,
communication may not be possible due to the surrounding electro-
magnetic fields.
IT-10/67-100.p65 06.6.15, 6:48 PM95
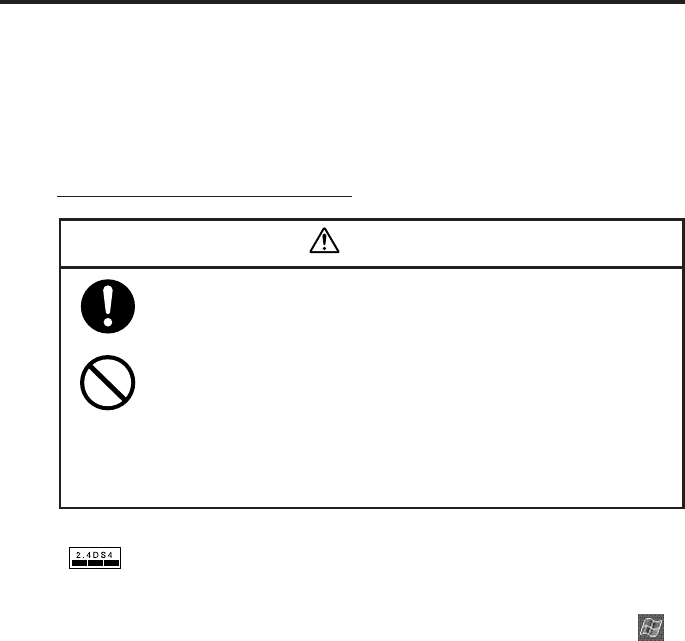
96
Wireless LAN
The IT-10M20BR* supports connection to an 802.11b wireless LAN, or to a wireless LAN
compatible peripheral. For example, you could connect to a hot spot at a train station or
other public facility, access the Internet and send or receive e-mail, or access a company
network. See "Tips to Help Ensure Successful Communication" on page 95 for more
information.
Using a Wireless Communication
Warning
•The use of wireless communication devices and electronic
devices in aircraft is recommended to consult first with flight
attendant prior to the use.
•Do not use wireless communication devices in the vicinity of
automatic doors, fire alarm devices, or other automatic control
equipment. Radio waves from wireless communication devices
can cause mis-operation of the equipment, leading to serious
accident.
This wireless transmitter uses the 2.4GHz band. It employs the DS-
SS modulation system and has an interfering range of 40m.
You need to turn on wireless LAN in order to use it. On the Rugged PDA, tap ➔
Settings ➔ System. On the CF Power tab, select the W-LAN Power
Enable check box. After that, you will need to start up Pegasus Settings and
configure network settings required for connection.
* : the model is not available in the USA and Canada.
IT-10/67-100.p65 06.6.15, 6:48 PM96
97
Reset and Full Reset
2
Reset and Full Reset
Reset
You should reset the Rugged PDA whenever it stops operating correctly due to
user mis-operation or some abnormality. The following are examples of symptoms
that indicate reset is required.
•Nothing happens when you tap the screen or press a button.
•The busy icon continues to rotate for a long time without stopping.
"Reset" is the same thing as restarting a computer. Resetting the Rugged PDA will
result in loss of any input or edited data that has not been saved yet, but saved
data and settings are, as a rule, retained.
•Whenever possible, be sure to quit all programs ( ➔ Settings
➔ System ➔ Memory ➔ Running Programs) before resetting.
•Though saved data is normally not lost when you reset the Rug-
ged PDA, certain data abnormalities or other problems can cause
all data to be cleared from memory. Whenever possible, it is rec-
ommended that you back up data to a memory card or some other
medium before resetting.
To Reset the Rugged PDA
1. Use the stylus to press the reset
switch about one second on the left
side of the Rugged PDA.
•To avoid damaging the tip of
the stylus, be sure to press
straight down on the button.
•Use only the stylus to press
the reset switch . Using a
ballpoint pen or other object
can damage the reset switch
and cause malfunction.
Reset switch
IT-10/67-100.p65 06.6.15, 6:48 PM97

98
2. The Rugged PDA restarts and displays the Today screen.
•The reset process starts as soon as you press the reset switch.
•If there is no problem with memory data, the Today screen will
appear a few seconds after the startup screen. All saved data in
memory and all settings in effect prior to the reset will remain
unchanged, and you should be able to access them normally.
If reset does not restore normal the Rugged PDA operation, try per-
forming a full reset (which will initialize memory).
Full Reset (Memory Initialization)
Performing a full reset initializes the Rugged PDA memory, causing all data stored
in it to be lost, and returns all settings to their initial defaults.
A full reset is required in the following cases.
•You want to clear the Rugged PDA memory and return to its initial default
settings.
•You forgot your password and cannot access the Rugged PDA data.
•The Rugged PDA does not operate correctly due to a memory abnormality.
•After leaving the Rugged PDA without the battery pack installed for a few weeks,
you reload the battery pack and want to use the Rugged PDA again.
To Perform a Full Reset
•If there is a memory card loaded in the Rugged PDA, remove it before perform-
ing the full reset.
•Performing the following procedure will delete all data currently stored in
memory. If possible, back up the Rugged PDA data to a PC, memory card, or
some other medium.
1. While holding down the power button, press the reset switch on the left
side of the Rugged PDA.
2. Perform the operations as instructed by the message that appears on the
display.
Proceeding with this operation initializes memory.
Press Action to proceed or Cursor to cancel.
IT-10/67-100.p65 06.6.15, 6:48 PM98

99
Reset and Full Reset
2
•The screen will change as shown below. Configure the Rugged
PDA initial settings.
(1) Startup Screen ➔ (2) Calibrate Screen
3. After configuring settings, press the power button to turn off the Rugged
PDA.
•If you have back up data, you can restore it after performing the
above procedure and confirming that the Rugged PDA is operat-
ing normally. For information about restoring back up data, see
ActiveSync help.
•Even if you back up data to a PC, do not restore the backed up
data to the Rugged PDA after performing the operation below. Data
that is backed up while the Rugged PDA system is unstable can
contain the elements that caused the instability. Restoring such data
from the PC may cause symptoms of the system instability to re-
surface.
•In order to avoid resurfacing of unstable system operation, use the
following method to back up data on a PC, perform Calendar, Con-
tacts, and other data synchronization to transfer the data to the PC.
Next, transfer other files to the PC one by one using drag and drop.
•Even if you have performed a full reset on your Rugged PDA the screen still
freezes, perform the following operations.
1. While you are holding down the center of the Cursor button and the
Power switch, press the Reset switch on the left side with stylus.
2. Indicator lamp on the right side lights in red. Wait until it goes off, and
then press the Power switch.
Your Rugged PDA shows the following screens sequentially. Follow each
guidance appeared in the screen and perform the initial setup.
Setup screen (“Windows Mobile”) ➔ Align screen (for display calibration)
3. When you have completed the initial setups in the step above, press the
Power switch to turn off. If you wish to restore backed up data in PC or
memory card, make sure first that all the initial setups described in the
step 2 are complete and your Rugged PDA runs normally, and then
restore the backed up data into the Rugged PDA. For restoration method,
refer to “Help” of ActiveSync.
IT_10/067-100-E.p65 06.6.30, 5:22 PM99
100
IT-10/67-100.p65 06.6.15, 6:48 PM100

3
Connecting Peripherals
IT-10_3/101-122.p65 06.6.15, 6:48 PM101
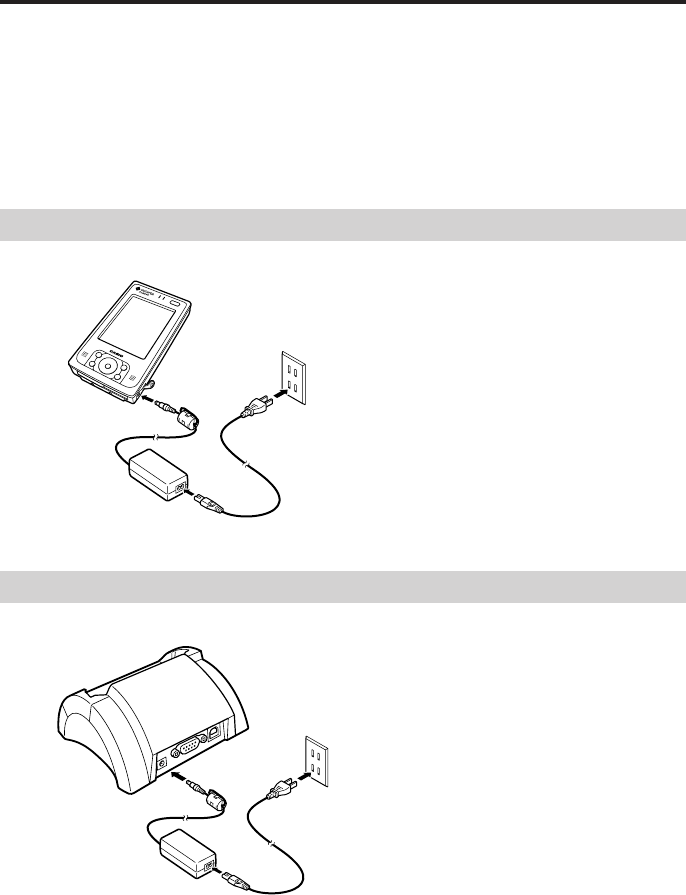
102
AC Adaptor (AD-S15050AE)
The AC adaptor can be used with the Rugged PDA or the optional Basic Cradle (HA-
C60IO).
Before using the AC adaptor, be sure to read "Safety Precautions" (page 5) to ensure you
use it correctly.
The case of the AC adaptor may become warm during use. This does not indicate
malfunction. To ensure safety, be sure to unplug the AC adaptor from the power outlet if
you do not use it for a long time.
Connecting the AC Adaptor to the Rugged PDA
Connect the AC adaptor as shown in the illustration below (q ➔ w ➔ e).
q
e
w
Connecting the AC Adaptor to the Basic Cradle (HA-C60IO)
Connect the AC adaptor as shown in the illustration below (q ➔ w ➔ e).
q
w
e
IT-10_3/101-122.p65 06.6.15, 6:48 PM102

103
AC Adaptor
3
Specifications
Items Specifications
Rated Voltage/Frequency Input 100 to 240V 50/60Hz
Rated Output Voltage DC5V
Power Cord Length 200cm(Input) 150cm(Output)
Dimensions 40(W) × 94(D) × 31(H) mm
Weight Approx. 250g (with power cords)
Operating environment Temperature 0 - 40˚C,
Humidity 30 - 80% (no condensation)
Two power cords are provided with the Rugged PDA, use the power cord that is
appropriate for your region.
IT-10_3/101-122.p65 06.6.15, 6:48 PM103
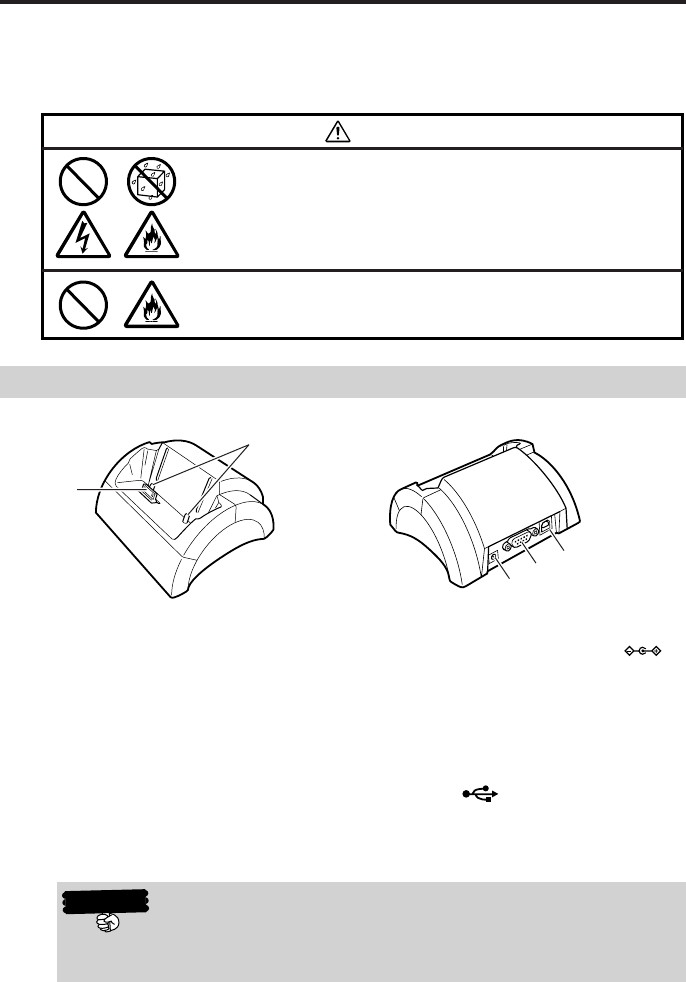
104
Basic Cradle (HA-C60IO)
Data can be transferred between a PC and the Rugged PDA using the Basic Cradle's
USB interface or RS-232C interface. Also, the Rugged PDA charges while it is mounted on
the Basic Cradle.
Never bring in Rugged PDA a bathroom or any other location
where the possibility of splashing or high humidity exists.
Mounting the Rugged PDA on the Basic Cradle while it is wet
creates the risk of fire, electric shock, and serious accident.
Use only the specified AC adaptor with the Basic Cradle.
Use of other type of AC adaptor creates the risk of fire.
Warning
General Guide
Keep the serial connector clean by wiping it with a soft, dry cloth or a
cotton swab. A dirty serial connector can cause poor contact and de-
crease charging efficiency.
qSerial connector
This connector mates with the serial
connector on the bottom of the Rugged
PDA.
The power is also supplied to the
Rugged PDA via this connector.
wAlignment pegs
Align the Rugged PDA with these two pegs
when mounting it on the Basic Cradle.
ePower adaptor port (DC IN 5V )
Connect the AC adaptor's power cord
here.
rRS-232C port (RS-232C)
This port is used when connecting to a
PC for data transfer.
tUSB port ( )
This port is used when connecting to a
PC for data transfer.
Important
q
w
ert
IT-10_3/101-122.p65 06.6.15, 6:48 PM104
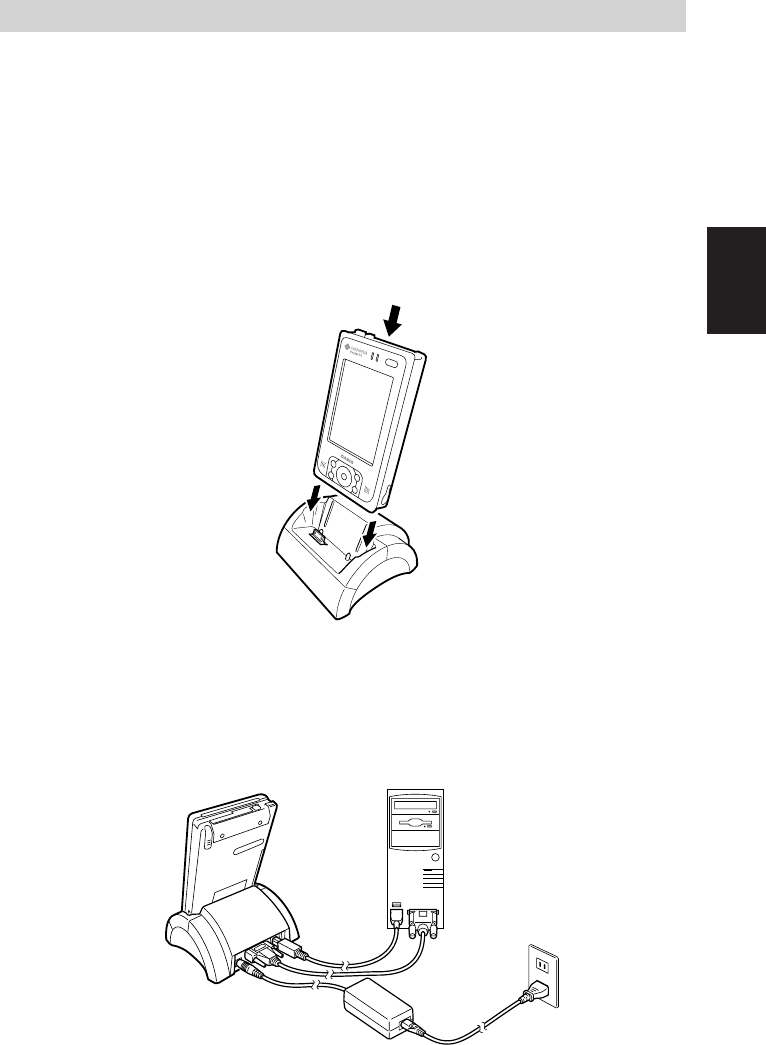
105
Basic Cradle
3
To Mount the Rugged PDA onto the Basic Cradle
1. Place the Basic Cradle on a desk or some other flat, stable surface.
2. Turn off the Rugged PDA.
Rotate the serial connector cover on the bottom of the Rugged PDA one
turn, and store it on the opposite side.
Aligning the Rugged PDA with the grooves of the Basic Cradle (q), slide
it straight down onto the cradle (w).
Taking care to ensure the serial connectors and pegs are aligned
correctly, press the Rugged PDA down onto the Basic Cradle so it
connects securely.
3. Connect the specified AC adaptor (AD-S15050AE) to the Basic Cradle
(e).
4. Connect the USB cable that comes with the Basic Cradle or an optional
RS-232C cable (DT-887AX or DT-882RSC or DT-883RSC) (r).
e
r
q
w
IT-10_3/101-122.p65 06.6.15, 6:48 PM105
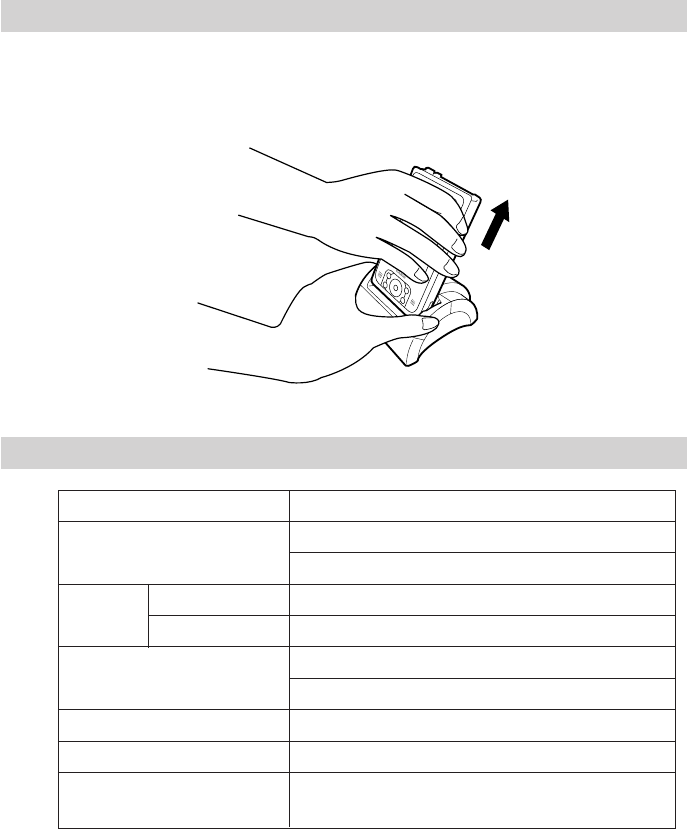
106
To Remove the Rugged PDA from the Basic Cradle
1. While holding the Basic Cradle with one hand, remove the Rugged PDA
straight up.
Specifications
Items Specifications
Interface USB × 1port (TYPE-B)
RS-232C × 1port
Charging Charging system Fixed voltage (with current limiter)
Charging time Approx. 5 hours
Power AC adaptor (AD-S15050AE)
AC100 - 240V 50/60Hz, DC5V
Dimensions 114(W) × 107(D) × 60(H) mm
Weight Approx. 150g
Operating environment Temperature 0 - 40˚C,
Humidity 30 - 80% (no condensation)
IT-10_3/101-122.p65 06.6.15, 6:49 PM106
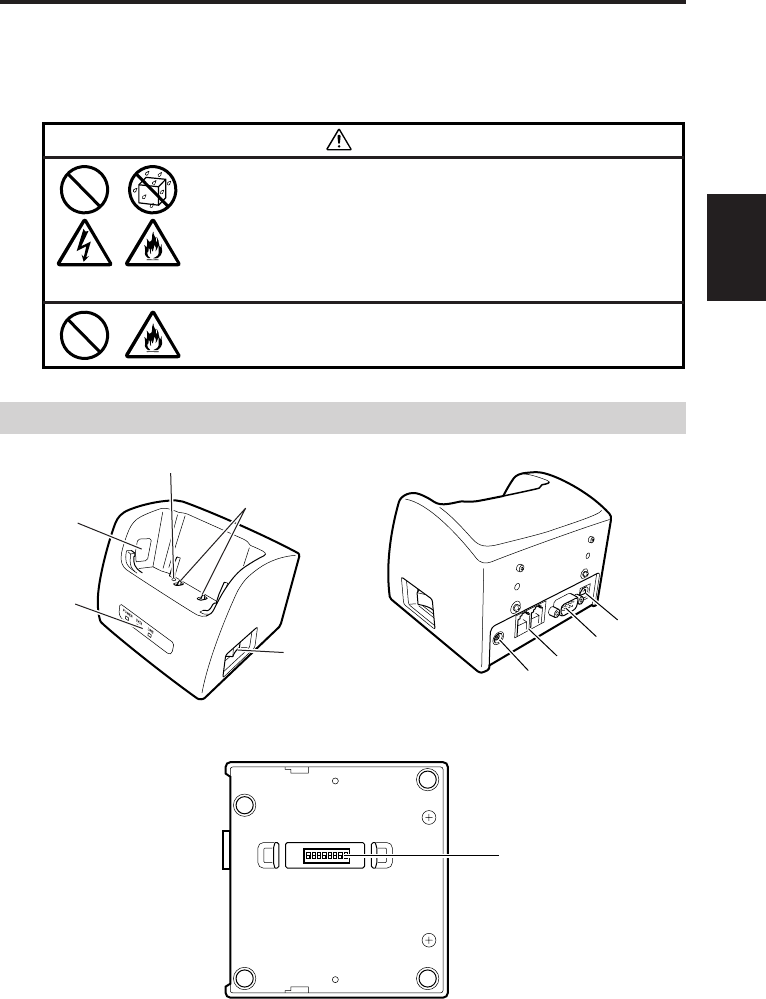
107
Bridge Satellite Cradle
3
Bridge Satellite Cradle (HA-C61IO)
Data can be transferred between a PC and the Rugged PDA using the Bridge Satellite
Cradle's USB interface or RS-232C interface, and the Rugged PDA's infrared communica-
tion port.
The Bridge Satellite Cradle also can be used to charge the Rugged PDA.
Use only the specified AC adaptor with the Bridge Satellite Cradle.
Use of other type of AC adaptor creates the risk of fire.
warning
Never bring in Rugged PDA a bathroom or any other location
where the possibility of splashing or high humidity exists.
Mounting the Rugged PDA on the Bridge Satellite Cradle while
it is wet creates the risk of fire, electric shock, and serious
accident.
General Guide
q
t
e
r
w
yuio
1 2 3 4 5 6 7 8
OFF !0
IT-10_3/101-122.p65 06.6.15, 6:49 PM107
108
Keep the power contacts clean by wiping them with a soft, dry cloth or
a cotton swab. Dirty power contacts can cause poor contact and de-
crease charging efficiency.
qInfrared communication port
Align this port with the infrared communication port of the Rugged PDA for IrDA data
communication.
wThe Rugged PDA detection switch
This switch detects when the Rugged PDA is correctly mounted on the Bridge Satellite
Cradle.
eStatus lamp
POWER OFF: Power OFF
Green: Power on, the Rugged PDA is mounted correctly
Red: Power on, the Rugged PDA is not mounted
DATA Indicates the data communication status.
Off: No communication
Flashing Green: Communicating
Red: Bridge Satellite Cradle connection problem
LINE Off: System not operational
Green: System operational
rPower contacts
These terminals supply power to the Rugged PDA.
tPower switch
Turns Bridge Satellite Cradle power on and off.
yPower adaptor port (DC IN 12V )
Connect the AC adaptor's power cord here.
uRS-422 ports (C-OUT, C-IN)
Use these ports when connecting up to eight Bridge Satellite Cradles in series.
iRS-232C port (RS-232C)
This port is used when connecting to a PC for data transfer.
oUSB port ( )
This port is used when connecting to a PC for data transfer.
!0 DIP switches
Use these switches to configure Bridge Satellite Cradle basic settings (See page 111).
Important
IT-10_3/101-122.p65 06.6.15, 6:49 PM108
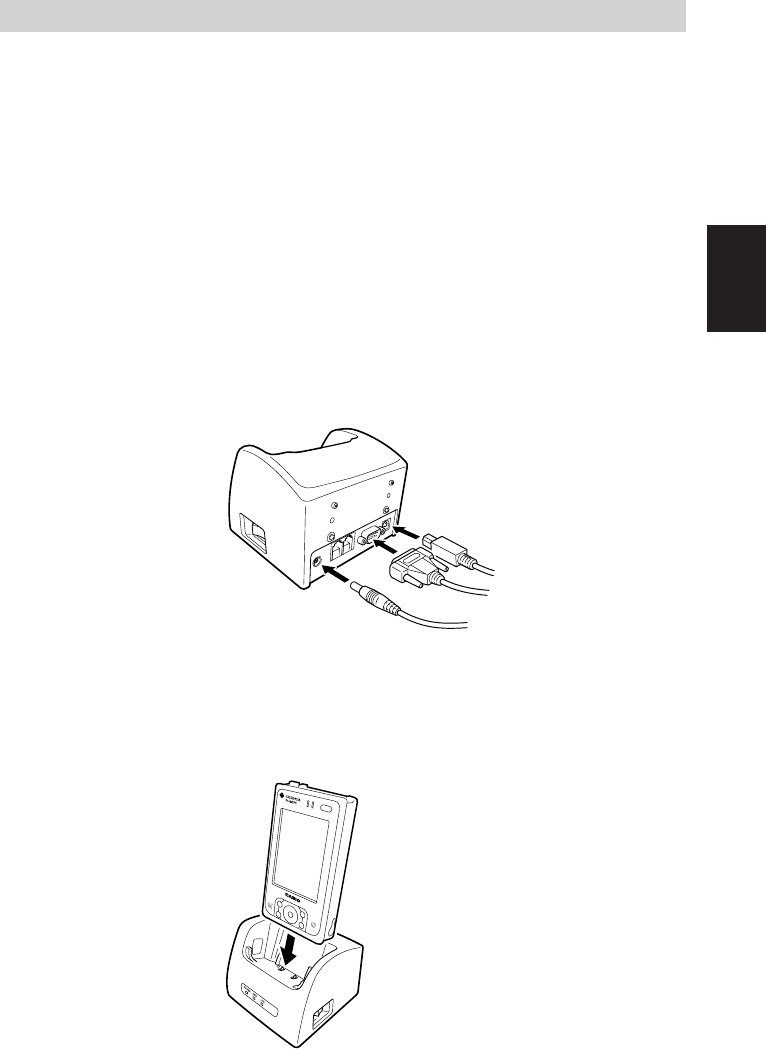
109
Bridge Satellite Cradle
3
Using the Bridge Satellite Cradle
The optional AC adaptor (AD-S42120AE) is used to supply power to the Bridge
Satellite Cradle. Note that you cannot use the AC adaptor (AD-S15050AE) that
comes with the Rugged PDA.
1. Turn off the Bridge Satellite Cradle and the PC you will be connecting to
it.
2. Connect the specified AC adaptor to the Bridge Satellite Cradle connec-
tor.
On the back of the Bridge Satellite Cradle, remove the cover cap from the
USB port or the RS-232C connector. Take care not to lose the cap.
Connect an optional USB cable (DT-380USB) to the USB port, and an
optional RS-232 cable (DT-887AX or DT-882RSC or DT-883RSC) to the
RS-232C connector.
3. Turn on Bridge Satellite Cradle power.
The POWER lamp on the front of the cradle will light red.
4. Mount the Rugged PDA on the Bridge Satellite Cradle.
The POWER lamp on the front of the cradle will change to green.
IT-10_3/101-122.p65 06.6.15, 6:49 PM109
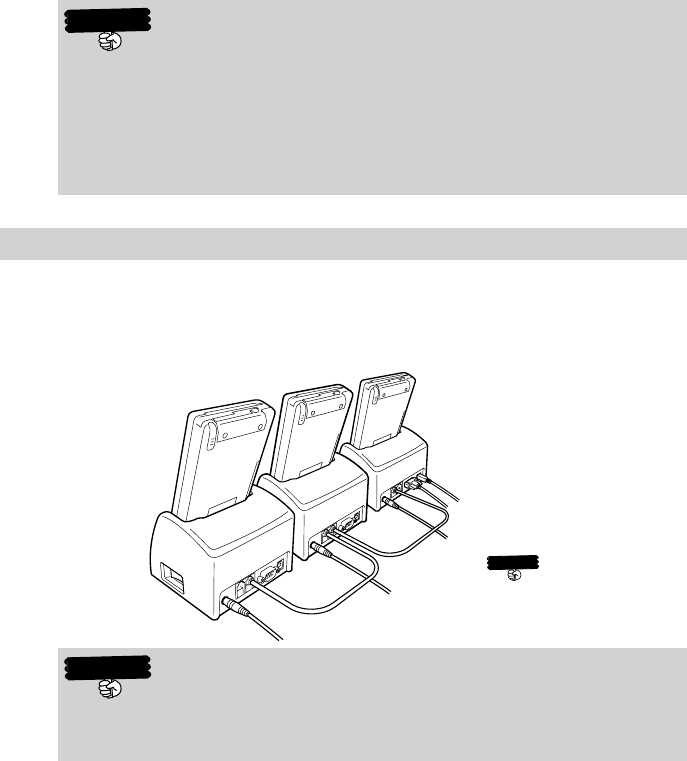
110
Linking Multiple Bridge Satellite Cradles
The C-OUT port of the Bridge Satellite Cradle that is connected to the PC can be
connected to the C-IN port of another Bridge Satellite Cradle using the optional
daisy chain connection cable (DT-888RSC).
You can daisy chain up to eight Bridge Satellite Cradles.
The infrared communication function uses a high-sensitivity commu-
nication element. To ensure proper communication, avoid using de-
vices that generate radio waves (cellular phones, etc.) in the vicinity
of the Rugged PDA while communication is in progress.
Make sure the power contacts of the Bridge Satellite Cradle do not
become wet. Moisture can cause shorts, which create the risk of fire
and serious accident.
Do not connect to a telephone line.
Never connect the wrong type of cable (telephone modular cable,
etc.) to the C-OUT and C-IN ports. Improper connection can damage
the connector and cause malfunction.
The RS-232C port and
USB port cannot be used
simultaneously.
•If the system is operational and the communication mode is
entered successfully, the LINE (system indicator) lamp will light
green.
•When communication starts, the DATA (communication indicator)
lamp will flash green while data communication is being per-
formed.
The Rugged PDA is charged while it is mounted on the Bridge Satellite Cradle,
regardless of whether the power on the Rugged PDA is off or on.
When charging starts, the left side of the indicator lamp on the top of the
Rugged PDA lights amber. The indicator lamp changes to green when charging
is complete.
Important
Important
Important
IT-10_3/101-122.p65 06.6.15, 6:49 PM110
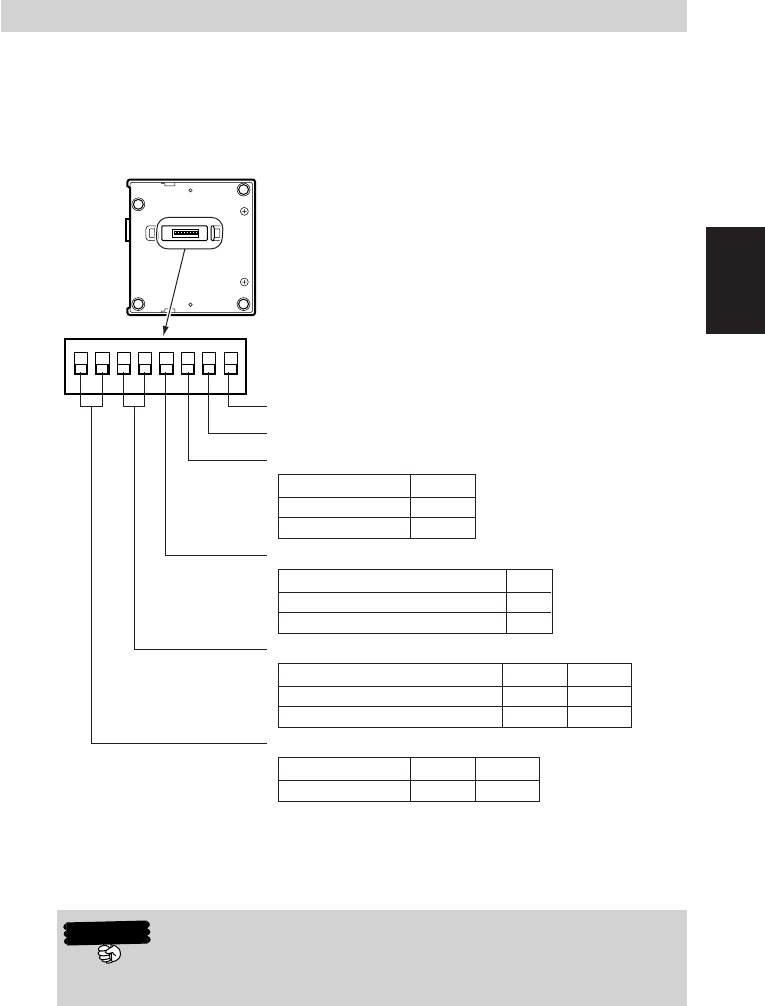
111
Bridge Satellite Cradle
3
Configuring DIP Switch Settings
The DIP switches are located under the cover on the bottom of the Bridge Satellite
Cradle.
Make sure Bridge Satellite Cradle power is turned off before changing DIP switch
settings.
Though it is possible for the user to configure DIP switch settings, it is
recommended that this operation be left up to qualified personnel of
your authorized CASIO distributor.
1 2 3 4 5 6 7 8
OFF
1 2 3 4 5 6 7 8
OFF
Switch Number 6
RS-232C OFF
USB ON*
Switch Number 5
Intermediate Connection OFF
Daisy Chain Off/Termination ON*
Switch Number 3 4
Host Computer OFF* OFF*
Daisy Chain ON OFF
Inter-Cradle Data Rate
Switch Number 1 2
115,200bps ON* OFF*
Daisy Chain Termination
Connection
Not used (always OFF)
Not used (always OFF)
Host Computer Interface
* Initial default setting
Important
IT-10_3/101-122.p65 06.6.15, 6:49 PM111

112
Specifications
Items Specifications
Interface USB × 1port (TYPE-B)
RS-232C × 1port
RS-422 × 2port (IN/OUT port)
Infrared (IrDA)
Charging Charging system Fixed voltage (with current limiter)
Charging time Approx. 5 hours
Power AC adaptor (AD-S42120AE)
AC100 - 240V 50/60Hz, DC12V
Dimensions 110(W) × 103(D) × 87.5(H) mm
Weight Approx. 380g
Operating environment Temperature 0 - 40˚C,
Humidity 30 - 80% (no condensation)
IT-10_3/101-122.p65 06.6.15, 6:49 PM112
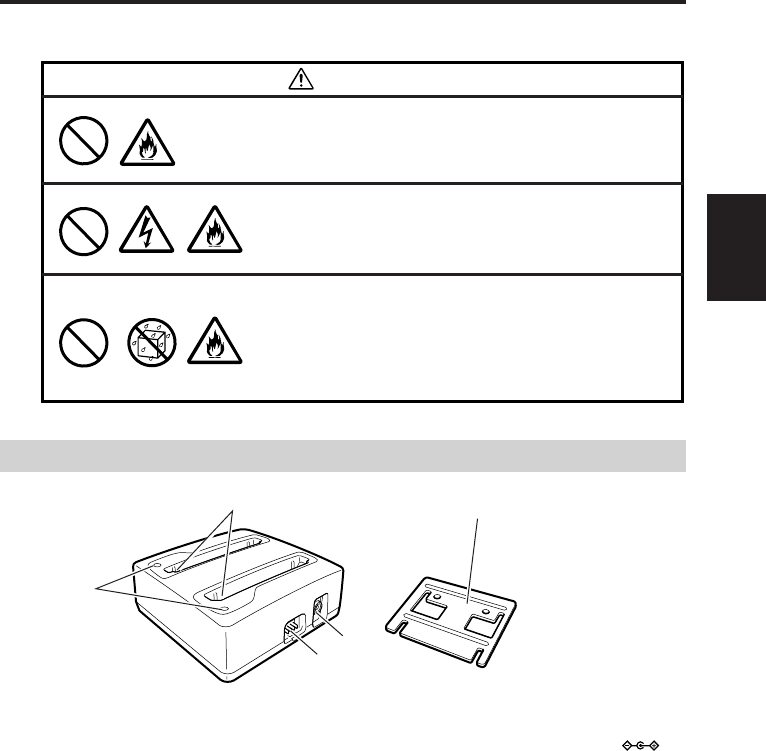
113
Dual Battery Charger
3
Dual Battery Charger (HA-C32DCHG)
A battery pack (HA-C21BAT) can be charged by loading it into the Dual Battery Charger.
Use only the battery pack specified (HA-C21BAT) for
the Rugged PDA.
Using a non-specified battery pack may cause it to
smoke, or flame resulting in electric shock or fire.
Never bring in the Dual Battery Chager a bathroom or
any other location where the possibility of splashing
or high humidity exists.
Mounting the Battery pack on the Dual Battery
Charger while it is wet creates the risk of fire, electric
shock, and serious accident.
Use only the specified AC adaptor (AD-S42120AE)
with the Dual Battery Charger.
Use of other type of AC adaptor creates the risk of
fire.
Warning
General Guide
qCharging status indicator lamp
Green: Charging complete
Red: Charging
Flashing Red: Charging problem
Flashing Green: Charge standby
Off: No battery pack
wPower contacts
These contacts provide connection with
the battery packs.
ePower Adaptor Port (DC IN 12V )
Connect the AC adaptor's power cord
here.
rSeries Connection Terminal
This terminal makes it possible to link
multiple charger units together.
tCoupling plate
q
r
e
w
t
IT-10_3/101-122.p65 06.6.15, 6:49 PM113
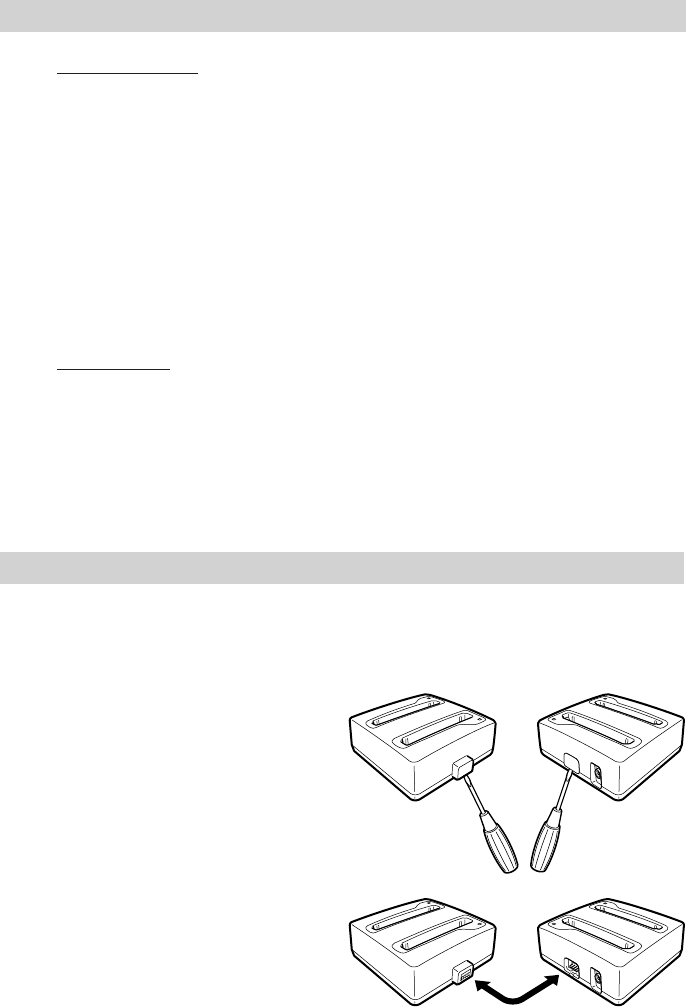
114
Connecting Dual Battery Chargers Together
You can connect up to three battery chargers together for simultaneous charging
of six battery packs. You need only one AC adaptor, even if you have multiple
battery chargers connected together. Do not connect more than three battery
chargers together.
1. Use a screwdriver or a
similar tool to remove the
connection terminal covers.
Do not use the stylus.
Positioning the battery
chargers in the same
direction, insert the male
connector of one into the
female connector of the
other.
Handling Precautions
Battery Charger
•Water or any other liquid on the power contacts creates the risk of electric shock
and fire. Dirt causes poor contact and decreases charging efficiency. After
unplugging the AC adaptor from the battery charger to ensure safety, wipe the
power contacts with a dry cloth, cotton swab, etc.
•A battery pack in the charger may become warm. This is normal.
•Do not place anything on top of the battery charger while charging is in progress.
•Do not remove the battery pack or disconnect the AC adaptor while charging is
in progress.
•Repeated loading and unloading of a battery pack can cause it to deteriorate.
Battery Pack
•A battery pack is not charged when you purchase it. Before using a new battery
pack or one that you have not used for a very long time, fully charge it first.
•A battery pack is a consumable item. If the amount of operation you get from the
battery pack after charging it is very short or if the battery pack does not recover
no matter how many times you charge it, it probably means that the battery pack
has reached the end of its life. Replace the battery pack with a new one.
IT-10_3/101-122.p65 06.6.15, 6:49 PM114
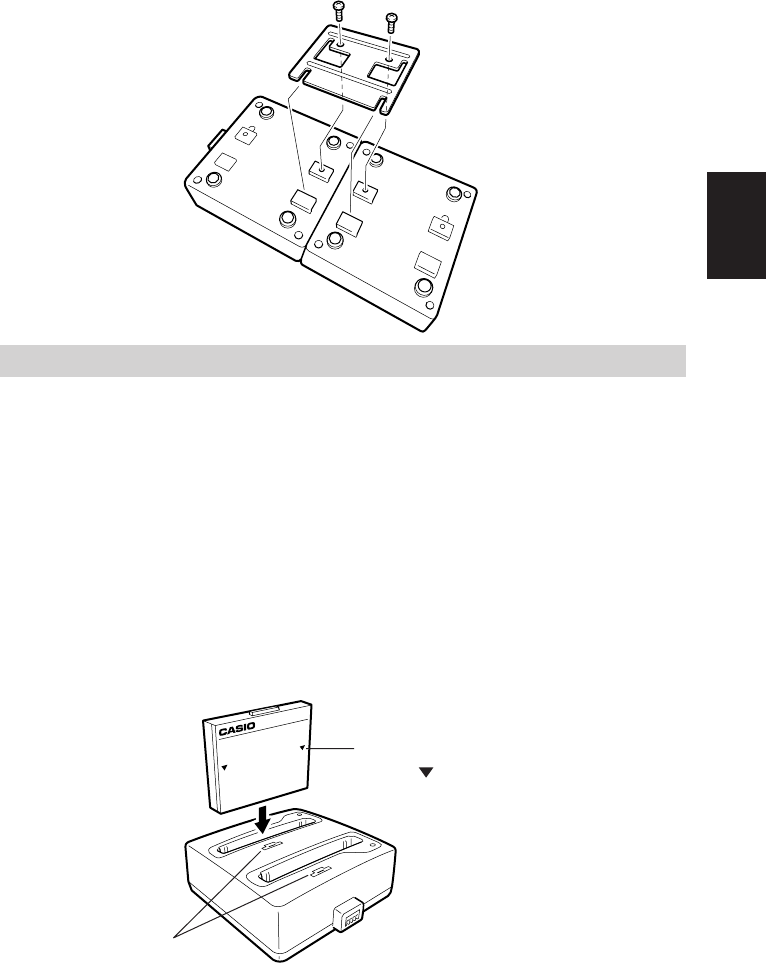
115
Dual Battery Charger
3
Charging a Battery Pack
The optional AC adaptor (AD-S42120AE) is used to supply power to the battery
charger.
A battery pack can be inserted into either of the slots, or two battery packs can be
charged at the same time.
1. Connect the AC adaptor to the AC adaptor port of the battery charger.
2. Insert a battery pack into the battery charger.
Note that a battery pack must be oriented correctly when you insert it into
the battery charger. Orienting the battery pack as indicated by the
illustration on the battery charger, make sure its power terminals are
positioned correctly as you insert it straight down into the battery charger.
2. Turn over the battery chargers, and secure them together with the
coupling plate and screws that come with the chargers.
HA-C21BAT
Indicates
battery pack
orientation.
Press down on the battery pack
until the mark is reached.
IT-10_3/101-122.p65 06.6.15, 6:49 PM115
116
Specifications
Items Specifications
Charging system Fixed-voltage fixed-current system
Charging time One battery pack per battery charger: Approx. 2 hours
Two battery packs per battery charger: Approx. 4 hours
Power AC adaptor AD-S42120AE
AC100 - 240V 50/60Hz, DC12V
Dimensions 100(W) × 104(D) × 42(H) mm
Weight Approx. 170g
Operating environment Temperature 0 - 40˚C,
Humidity 30 - 80% (no condensation)
•If the charge status indicator lamp starts to flash red during charging,
immediately remove the battery pack(s) and check the following points.
a) Is the operating temperature in the range of 0˚C to 40˚C?
➔ Wait until the operating temperature is within the allowable range
and charge again.
b) Are the power contacts dirty or rusty?
➔ Wipe the power contacts with a dry cloth, etc.
c) Does the same thing continue to happen even if you move to another
location for charging?
➔ It could mean that the battery pack is defective.
3. The charge status indicator lamp will light red, indicating that charging
has started.
A green flashing charge status indicator lamp while a battery pack is inserted in
the battery charger indicates charge standby. The indicator lamp will turn red and
charging will start when the ambient temperature returns to the range of 0˚ to 40˚C.
A green charge status indicator lamp indicates that charging is complete. Remove
the battery pack from the battery charger.
The time required for charging depends on whether you are charging one battery
pack or two battery packs per battery charger.
About two hours is required for a full charge when charging one battery pack per
charger, while about four hours is required for a full charge in the case of two
battery packs per charger.
If two battery packs are inserted into a single battery charger, it will take four hours
to charge the two battery packs fully. If two battery chargers are connected
together and one battery pack is inserted into each of the chargers, however, it will
take only about two hours to charge the two battery packs fully.
Important
IT-10_3/101-122.p65 06.6.15, 6:49 PM116
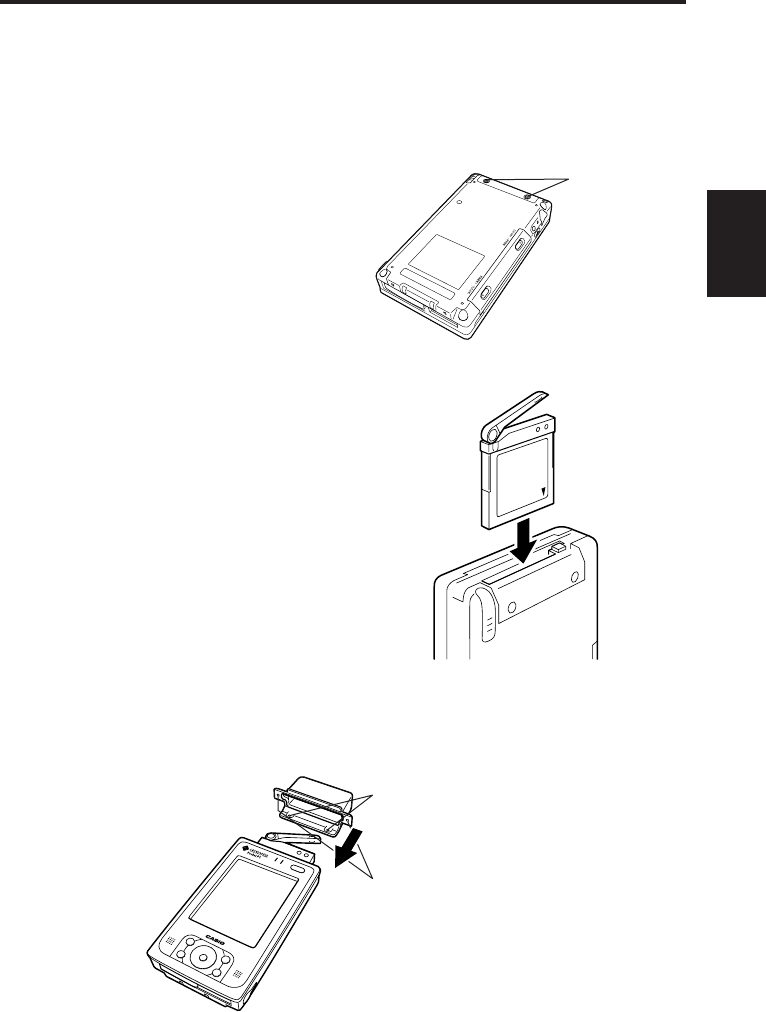
117
Communication Card Cover
3
Communication Card Cover (HA-C92TCV)
Loading a communication card into the card slot of the Rugged PDA makes it possible to
perform mobile Internet browsing in a train station, hotel, etc.
A communication card cover is provided to cover the raised card antenna to avoid
unexpected accidents, to protect the antenna from impact, and to keep out dust and rain
while using the card.
1. Use a coin or similar object
to remove the two screws
that secure the card cover,
and remove it from the
Rugged PDA. Store the card
cover in a safe place and
make sure you do not lose it.
2. Taking care that the card is oriented
correctly, carefully slide it into the
card slot as far as it will go.
3. Being careful with the raised communication card antennal, install the
communication card cover and secure it in place with the two different
kinds of screw, each with two screws.
Tighten the two screws you
removed in step 1 from the
bottom.
Tighten the two screws
accompanied with the card
cover from the left and right
sides.
Remove these
two screws.
IT_10/101-122-E.p65 06.7.5, 6:28 PM117

118
Cards
Using a Compact Flash (CF) Card
The Rugged PDA supports use of Type I and Type II (3.3V) Compact Flash cards.
The following are the types of Compact Flash cards supported by the Rugged
PDA.
Memory Card
A memory card works the same way as the data storage memory of the Rugged
PDA. You can use a memory card to store files created with the Rugged PDA, and
install programs on a memory card. Since data stored on a memory card is
retained even when the card is removed from the Rugged PDA, a memory card
can be used to transfer data between the Rugged PDA and a PC or other devices,
or to backup the Rugged PDA data.
Modem Card
A modem card can be used to connect the Rugged PDA to a general telephone
line (household modular jack, public phone equipped with a modular jack, etc.)
LAN Card
A LAN card (Ethernet card) makes it possible to connect the Rugged PDA to an
Ethernet network.
Communication Card
A cell phone or PHS communication card provides data communication capabili-
ties using a cell phone or PHS circuit.
•Before using a modem, LAN, communication, or similar card, make
sure that the Rugged PDA's battery pack is charged sufficiently. Low
battery power during communication can cause unstable communi-
cation, loss of the data that is being used, and powering down of the
Rugged PDA.
•Never turn off power or remove a memory card from the Rugged PDA
while data is being written to or read from the card. Doing so can
damage the memory card or its data.
Important
IT-10_3/101-122.p65 06.6.15, 6:49 PM118

119
3
Cards
Accessing Files on a Memory Card
In order for the Rugged PDA's built-in programs to access files on a memory card,
a folder named "My Documents" must be created on the memory card (using File
Explorer), and the files to be accessed must be moved to the "My Documents"
folder. Note the following points.
•Create the "My Documents" folder in the top directory of the memory card. Do not
create it inside of any other folder. Use single-byte characters to input the "My
Documents" name, and be sure to include a single-byte space between the words
"My" and "Documents."
•Placing a file inside of the "My Documents" folder allows it to be opened by
various types of programs (Notes, Pocket Word, Pocket Excel). The programs
cannot open any file that is outside of the "My Documents" folder.
When there are memory cards loaded in both the CF card slot and
the SD card slot, applications and setting operations are able to ac-
cess only one card or the other (normally the first one that was loaded).
Loading and Removing a Compact Flash Card
Precautions when Loading and Removing Cards
•The card has a front and back, and it must be oriented correctly when loading it
into the card slot. Attempting to force the card while it is oriented incorrectly can
damage the connectors or the slot. Exercise care when loading a card.
•When inputting or editing data, it is recommended that you store any unsaved
data in main memory before loading or removing a card.
•In some cases, the Rugged PDA may not be able to recognize a card correctly
(indicated when programs cannot be started up using normal operations). If this
happens, try reloading the Compact Flash card, and then press the reset switch.
•Using an I/O card that consumes a large amount of the current while battery
power is low can cause the Rugged PDA to power down momentarily and then
power back up again immediately.
Important
IT-10_3/101-122.p65 06.6.15, 6:49 PM119
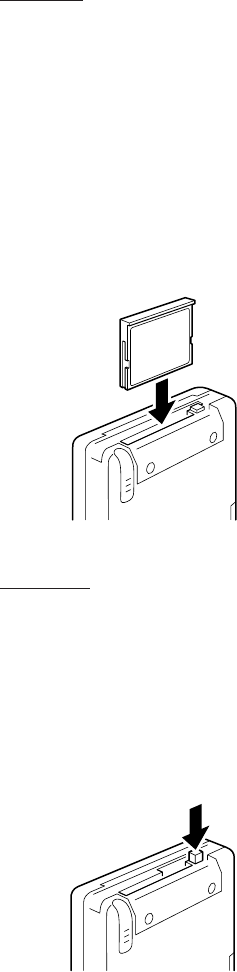
120
Attaching
1. Check to make sure that the Rugged PDA is turned off.
•If it is turned on, press the power button to turn it off.
2. Carefully note which side of the card is the front and which side is the
back. With the front of the card facing the display side of the Rugged
PDA and with the card carefully positioned in the slot, load it into the slot.
•You may feel some resistance when sliding the card into the slot.
Carefully slide the card along the grooves on both sides of the slot
as far as it will go, until it is securely in place.
After loading the card, turn on the Rugged PDA and check the status of the card slot.
Removing
1. Stop access of the Compact Flash card and turn off the Rugged PDA.
2. Use the stylus to press the eject button next to the slot where the Com-
pact Flash card is loaded.
This will cause the Compact Flash card to pop part way out of the slot.
Grasp it with your fingers and pull it the rest of the way out.
•Never pull on a connection cable to remove a Compact Flash
card. Doing so can break the cable and cause malfunction.
•If the eject button is not raised, press and release it.
Make sure the card is not at an angle
as you load it.
IT-10_3/101-122.p65 06.6.15, 6:49 PM120
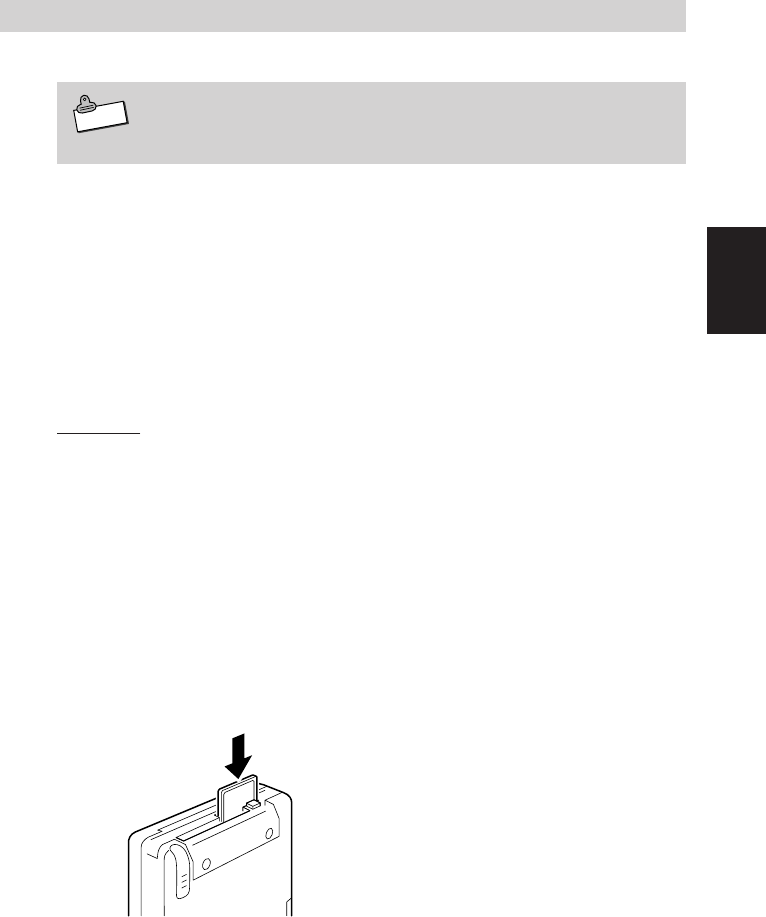
121
3
Cards
Using an SD card or a MultiMedia Card
The Rugged PDA supports use of SD cards and MultiMedia cards.
For information about using a memory card, see "Accessing Files on
a Memory Card" on page 119.
Precautions when Loading and Removing Cards
•A card has its front and back, it must be oriented correctly when loading it into
the card slot. Attempting to force the card while it is oriented incorrectly can
damage the connectors and/or the slot. Exercise care when loading it. Exercise
care when loading it.
•When inputting or editing data, it is recommended that you store any unsaved
data in main memory before loading or removing a card.
Attaching
1. Check to make sure that the Rugged PDA is turned off.
•If it is turned on, press the power button to turn it off.
2. Carefully note which side of the card is the front and which side is the
back. With the front of the card facing the display side of the Rugged
PDA and with the card carefully positioned in the slot, load it into the slot.
•You may feel some resistance when sliding the card into the slot.
Carefully slide the card in as far as it will go, until it is securely in
place.
•Make sure to load the card straight down, not angle it.
Note
IT-10_3/101-122.p65 06.6.15, 6:49 PM121
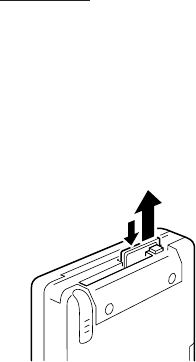
122
Removing
1. Stop access of the card and turn off the Rugged PDA.
2. Use your finger to press gently in on the card until you hear a click, and
then release it. This will cause the card to pop out part way. Grasp the
card with your fingers and pull it the rest of the way out.
IT-10_3/101-122.p65 06.6.15, 6:49 PM122

Appendix
IT-10/App-123-126.p65 06.6.15, 6:50 PM123
124
Item
OS
CPU
Display functions
Memory ROM
RAM
Bluetooth *3
Wireless LAN *3
Standard external interfaces
Infrared
CF card
SD card
Basic Cradle
Headphone
Speaker
Microphone
Power input
Operating battery *5
Type
Operating period
Charge period
Backup battery
Memory backup
Drop Durability
Dust/Water-splash proof
Weight
Dimensions
Operating environment
IT-10M20 IT-10M20BR*1
Microsoft® Windows Mobile 2003 second edition software for Pocket PC
Intel
®
PXA270 Application Processor 416MHz
480 ✕ 640 dots
3.7-inch transflective TFT color LCD (65,536 colors) *2
Resistive film touch panel with built-in LED backlight
64MB Flash memory
64MB
OS, including enough memory to start program
Ver.1.2 Communication speed
1Mbps, 3dbm max
Communication range:
Approximately 3m
IEEE802.11b Standard
Wireless frequency:
2,400 - 2,483.5MHz
Communication Speed:
11Mbps max
Communication range:
50m (indoors),
150m (outdoors)
IrDA FIR (4Mbps max) / SIR (115.2kbps max) *4
Communication range: 30cm (or 11.81”) max
1slot Compact flash card TYPE I / II (3.3V)
1slot SD card / multimedia card
Connect to Basic Cradle to supply power to the Rugged PDA.
Compatible with 3.5 mm diameter mini stereo plug
Monaural
Monaural
AC adaptor DC5V (100- 240V AC, 50/60Hz input)
Lithium ion battery pack (HA-C21BAT) 2300mAH
Approx. 27 hours *6*7
Approx. 5 hours
NiMH battery built-in
• Approx. 30 minutes with the battery pack fully charged
• Approx. 4 hours to charge fully with the battery pack installed
1.0m (or 3.3ft)
Complies with IEC60529, level IP54 (with all slots and connectors closed)
Approx. 290g (or 10.2 oz) (with the battery pack installed)
80 (W) X 140 (D) X 25 (H) mm (or 3.14”(W) X 5.51”(D) X 0.98”(H))
Temperature: 0˚C-40˚C(32˚F-104˚F) Humidity: 10-85%
Specifications
IT_10/123-126-E.p65 06.7.11, 5:34 PM124
125
Specifications
*1 The model is not available in the USA and Canada.
*2 Though TFT screens are made using extremely high-grade technology, uneven
brightness or fine dots sometimes occurs on these screens. Also, some dots on the
screen do not light or stay continually lit. These, however, are not malfunctions.
*3 The distance varies depending on the surrounding environment (such as walls,
appliances and other sources of radio waves).
*4 Incompatibility between devices may make it impossible to connect FIR.
*5 Operating time and charging time using the battery pack sometimes differ from the
above values depending on the operating environment and the options that are
connected.
*6 Time until 10% power remaining warning message (red title bar) appears, for a new
battery (normal temperature), continuous data input (60 characters input in one
minute) and display in a 1:10 ratio, backlight off, CPU speed set to low power
consumption.
*7 The battery pack discharges a small amount of current for maintaining the memory
even when the power is turned off.
IT-10/App-123-126.p65 06.6.15, 6:50 PM125
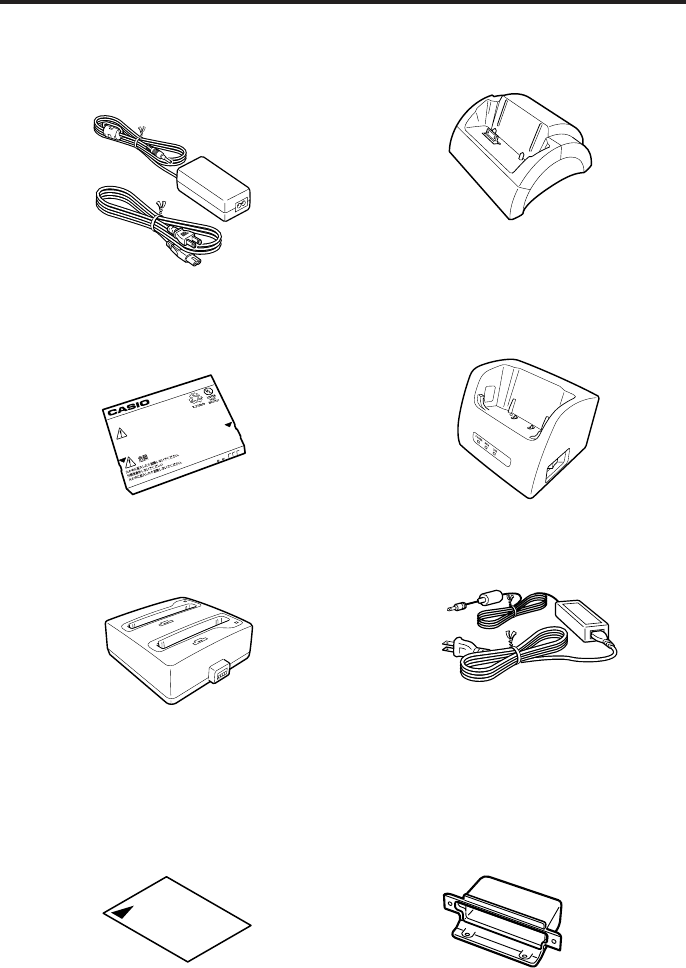
126
Options List
The dedicated options shown below are available for use with the Rugged PDA.
AC Adaptor: AD-S15050AE
Battery Pack: HA-C21BAT
Dual Battery Chager:
HA-C32DCHG
Screen Protect Sheet:
HA-C90PS5B
Basic Cradle: HA-C60IO
Bridge Satellite Cradle: HA-C61IO
AC Adaptor: AD-S42120AE
Communication Card Cover:
HA-C92TCV
•Five sheets in one set.
•Connect AC adaptor (AD-S15050AE)
to use
•Connect to Dual Battery Charger or
Bridge Satellite Cradle to use.
•AC adaptor is not included
HA-C21BAT
Li-ion 3.7V 2300mAh
DANGER
.Never dispose of the battery by incineration
and never expose it to heat.
.Never try to take the battery apart ot otherwise try to modify
.Never try to take the battery apart ot otherwise try to modify
IT_10/123-126-E.p65 06.6.30, 5:21 PM126
