Casio Wk1600 Users Manual
Wk-1800-01-E wk-1800-01-e
WK-1800 wk_1800_01_e
WK1630 to the manual cf3fc5e3-2047-4aa1-b96a-3432213e0ab4
WK1800 WK1800_EN WK-1800 | Electronic Musical Instruments | Manuals | CASIO
2015-01-21
: Casio Casio-Wk1600-Users-Manual-243493 casio-wk1600-users-manual-243493 casio pdf
Open the PDF directly: View PDF ![]() .
.
Page Count: 96
USER’S GUIDE
英
WK1800-E-1
P
WK1800_E_Cov1-2.p65 03.7.31, 5:20 PMPage 1 Adobe PageMaker 6.5J/PPC
733A-E-002A
GUIDELINES LAID DOWN BY FCC RULES FOR USE OF THE UNIT IN THE U.S.A. (not applicable to other
areas).
NOTICE
This equipment has been tested and found to comply with the limits for a Class B digital device, pursuant to Part
15 of the FCC Rules. These limits are designed to provide reasonable protection against harmful interference in
a residential installation. This equipment generates, uses and can radiate radio frequency energy and, if not
installed and used in accordance with the instructions, may cause harmful interference to radio communications.
However, there is no guarantee that interference will not occur in a particular installation. If this equipment does
cause harmful interference to radio or television reception, which can be determined by turning the equipment off
and on, the user is encouraged to try to correct the interference by one or more of the following measures:
• Reorient or relocate the receiving antenna.
• Increase the separation between the equipment and receiver.
• Connect the equipment into an outlet on a circuit different from that to which the receiver is connected.
• Consult the dealer or an experienced radio/TV technician for help.
FCC WARNING
Changes or modifications not expressly approved by the party responsible for compliance could void the user’s
authority to operate the equipment.
WK1800_E_Cov1-2.p65 03.7.31, 5:20 PMPage 2 Adobe PageMaker 6.5J/PPC
E-1
CASIO ELECTRONICS CO., LTD.
Unit 6, 1000
North Circular Road
London NW2 7JD, U.K.
This mark is valid in the EU countries only.
Please keep all information for future reference.
733A-E-003A
Welcome...
To the happy family of satisfied CASIO electronic musical instrument owners! To get the most
out of the many features and functions of the keyboard, be sure to carefully read this manual
and keep it on hand for future reference.
Important!
When using batteries, be sure to replace them or shift to one of the alternate power sources
whenever you notice any of the following symptoms.
• Dim power supply indicator
• Instrument does not turn on
• Display that is flickering, dim, or difficult to read
• Abnormally low speaker/headphone volume
• Distortion of sound output
• Occasional interruption of sound when playing at high volumes
• Sudden power failure when playing at high volumes
• Flickering or dimming of the dispaly when playing at high volume
• Continued sound output even after you release a key
• A totally different tone may sound
• Abnormal rhythm pattern and demo tune play
• Loss of power, sound distortion, or low volume when playing from a connected computer
or MIDI device
• Sudden power failure while reading from or writing to a diskette (WK-1800 only)
WK-1800/1600(E)-01~07 03.7.31, 5:20 PMPage 1 Adobe PageMaker 6.5J/PPC
E-2
Safety Precautions
733A-E-004A
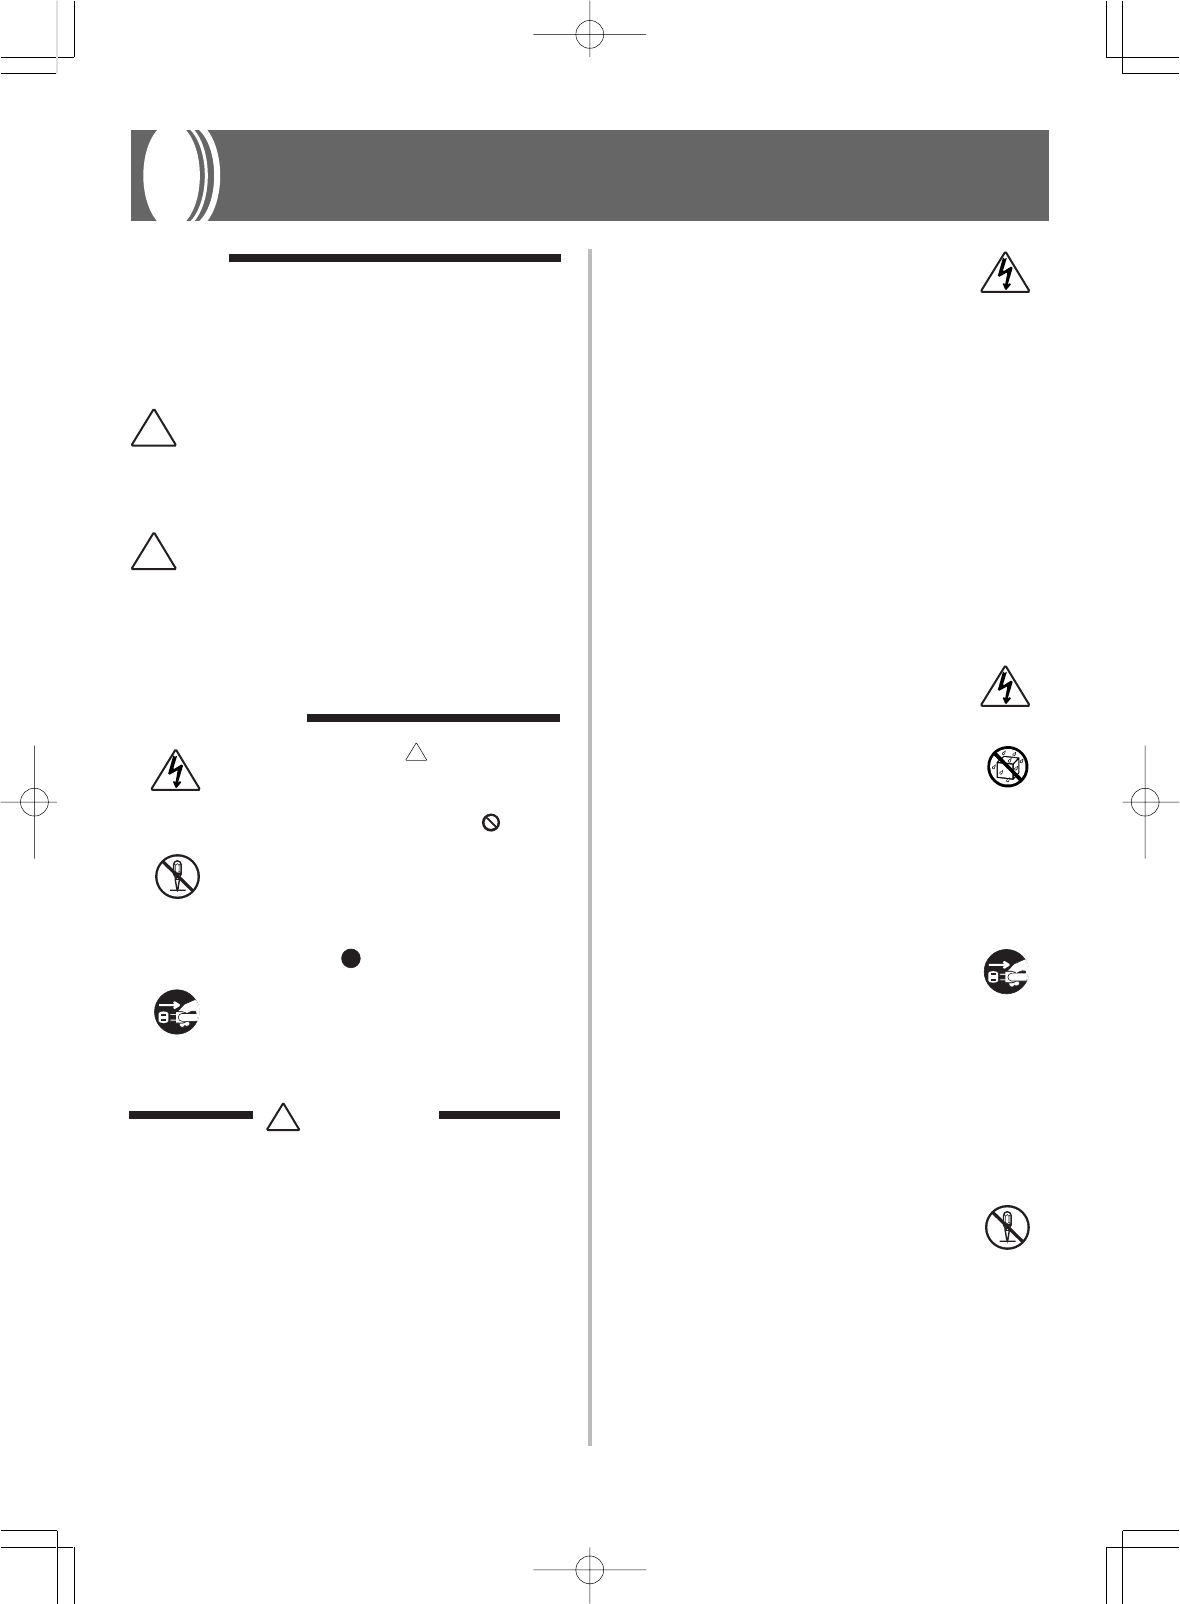
Symbols
Various symbols are used in this operating manual and
on the product itself to ensure that the product is used
safely and correctly, and to prevent injury to the user
and other persons as well as damage to property. Those
symbols along with their meanings are shown below.
Symbol Examples
This triangle symbol ( ) means that the
user should be careful. (The example at left
indicates electrical shock caution.)
This circle with a line through it ( ) means
that the indicated action must not be per-
formed. Indications within or nearby this
symbol are specifically prohibited. (The ex-
ample at left indicates that disassembly is
prohibited.)
The black dot ( ) means that the indicated
action must be performed. Indications within
this symbol are actions that are specifically
instructed to be performed. (The example at
left indicates that the power plug must be
unplugged from the electrical socket.)
!
WARNING
This indication stipulates matters that have the risk
of causing death or serious injury if the product is
operated incorrectly while ignoring this indication.
!
CAUTION
This indication stipulates matters that have the risk
of causing injury as well as matters for which there is
the likelihood of occurrence of physical damage only
if the product is operated incorrectly while ignoring
this indication.
!
WARNING
Please use caution regarding the handling of the AC
adaptor.
•Do not use a voltage other than the indi-
cated power supply voltage. Use of a volt-
age other than that indicated may cause
fire or electrical shock.
•If the power cord should become damaged
(exposed wires, disconnection, etc.), pur-
chase a new AC adaptor. Use of a damaged
power cord may cause fire or electrical
shock.
•Do not cut or damage the power cord. Also
do not place heavy objects on top of it or
subject it to excessive heat. Damage to the
power cord may cause fire or electrical
shock.
•Do not attempt to shape the power cord or
subject it to excessive bending, twisting or
pulling. This may cause fire or electrical
shock.
•Please use the adaptor specified for this in-
strument. Use of another adaptor may cause
fire, electrical shock, or malfunction.
Do not locate the instrument or its stand on an uneven
or unstable surface.
•Locating the instrument or its stand on an
uneven or unstable surface can cause it to
fall, creating the danger of personal injury.
Do not place containers containing water or other liq-
uids on the instrument.
•Do not place the following objects on the
instrument. Placing such objects on the in-
strument may cause fire or electrical shock
if they spill and get inside the instrument.
•Containers filled with water or other liq-
uids (including vases, potted plants, cups,
cosmetics and medicines)
•Small metal objects (including hairpins,
sewing needles and coins)
•Flammable objects
In the event a foreign object should happen
to get inside the instrument, please take the
following actions:
1. Turn power off.
2. Unplug the AC adaptor from the wall
outlet.
3. If there are any batteries loaded in the
keyboard, remove them.
•Do not touch the batteries directly with
your hands when removing them. They
may be hot or battery fluid may be leak-
ing from them.
4. Consult with the dealer where you pur-
chased the keyboard or with an autho-
rized CASIO service provider.
Do not disassemble or modify the instrument.
•Never attempt of take apart or modify the
instrument, its accessories, or separately
sold options. Doing so may cause fire, elec-
trical shock or malfunction. Consult your
dealer concerning all inspection, adjustment
or repair of internal components.
WK-1800/1600(E)-01~07 03.7.31, 5:20 PMPage 2 Adobe PageMaker 6.5J/PPC

E-3
733A-E-005A
!
CAUTION
AC Adaptor
•Do not locate the power cord in close prox-
imity to heaters or other heating appliances.
This may cause the cord to melt leading to
possible fire or electrical shock.
•When unplugging the AC adaptor from an
electrical outlet, always make sure to pull
on the adaptor itself and not the cord. Pull-
ing excessively on the cord may cause it to
be damaged or break leading to possible
fire or electrical shock.
•Do not touch the AC adaptor with wet
hands when it is plugged in. This may cause
electrical shock.
•When not using the instrument for an ex-
tended period such as when traveling, al-
ways make sure to unplug the AC adaptor
from the electrical outlet for safety reasons.
•After use turn off the power switch of the
instrument and unplug the AC adaptor
from the electrical outlet.
•
At least once a year, unplug the AC adaptor
from the power outlet and clean the area around
the prongs of the plug. Dust build up around
the prongs can create the danger of fire.
Batteries
•Improper battery use may cause batteries
to rupture and leak. This may cause injury,
malfunction of the instrument or discolora-
tion of furniture and other articles that come
into contact with battery fluid. Take care to
observe the following.
•Install batteries so their polarity (+/–)
matches that indicated on the instrument.
•For safety and to prevent possible leakage
of battery fluid, always make sure to re-
move batteries from the instrument when
you do not plan to use it for a long time.
•Always make sure that the batteries mak-
ing up a set are all of the same type.
•Never combine new batteries with old ones.
•
Never dispose of batteries by incinerating
them. Never short or disassemble batteries,
and do not expose them to excessive heat.
•Replace dead batteries as soon as possible.
•Never attempt to recharge batteries.
Transport
•When transporting the instrument, always
make sure to unplug the AC adaptor from
the electrical outlet and confirm that all
other external connections have been dis-
connected. Only then should the instrument
be transported. If the above is not done, the
cord may be damaged leading to possible
fire or electrical shock.
Care
•Whenever caring, make sure to first un-
plug the AC adaptor from the electrical out-
let. Also remove the instrument’s batteries
if battery power is being used.
Do not use if there is an abnormality or malfunction.
•Do not use the instrument if there appear
to be abnormalities such as the presence of
smoke or abnormal odor. Also do not use
the instrument if there appear to be mal-
functions such as the power not coming on
or sound not being produced. Use under
such conditions may cause fire or electrical
shock. In such cases, take the following ac-
tions immediately. Never attempt to repair
the instrument yourself.
1. Turn power off.
2. Unplug the AC adaptor from the wall
outlet.
3. If there are any batteries loaded in the
keyboard, remove them.
•Do not touch the batteries directly with
your hands when removing them. They
may be hot or battery fluid may be leak-
ing from them.
4. Consult with the dealer where you pur-
chased the keyboard or with an autho-
rized CASIO service provider.
When the instrument has been dropped:
•In the case the instrument has been dropped
or damaged, take the following actions.
Continued use may cause fire or electrical
shock.
1. Turn power off.
2. Unplug the AC adaptor from the wall
outlet.
3. If there are any batteries loaded in the
keyboard, remove them.
•Do not touch the batteries directly with
your hands when removing them. They
may be hot or battery fluid may be leak-
ing from them.
4. Consult with the dealer where you pur-
chased the keyboard or with an autho-
rized CASIO service provider.
Be careful of the bags around children.
•Never allow anyone to place the plastic bags
of the instrument, its accessories, and its
separately sold options over their heads.
Doing so may cause suffocation. Particular
caution is required in homes with small
children.
WK-1800/1600(E)-01~07 03.7.31, 5:20 PMPage 3 Adobe PageMaker 6.5J/PPC
E-4
733A-E-006A
Avoid strong impact and rough handling.
Your keyboard is made of precision components that can malfunc-
tion when subjected to strong impact and rough handling.
Avoid heat, humidity or direct sunlight.
Do not overexpose the instrument to direct sunlight, or place it near
an air conditioner, or in any extremely hot place.
Do not use near a TV or radio.
This instrument can cause video or audio interference with TV and
radio reception. If this happens, move the instrument away from the
TV or radio.
Do not use lacquer, thinner or similar chemi-
cals for cleaning.
Clean the keyboard with a soft cloth dampened in a weak solution of
water and a neutral detergent. Soak the cloth in the solution and
squeeze until it is almost dry.
Avoid use in areas subjected to temperature
extremes.
Extremely high or low temperature can cause figures on the LCD
screen to become dim and difficult to read. This condition should
correct itself when the keyboard is brought back to normal tempera-
ture.
Lithium Battery Precautions
The keyboard comes with a built-in lithium battery that supplies
power to the memory to retain Song Sequencer, Pattern Sequencer
and other data while keyboard power is turned off. If the power of
the lithium battery is low, turning off keyboard power can result in
deletion of all data stored in its memory.
The normal life of the original battery is five years from the time it is
loaded at the factory. Due to time spent in transit and storage, the
original battery probably will not provide a full five years of service
life. It is up to you to contact your nearest CASIO service provider
about having the lithium battery replaced periodically.
*CASIO COMPUTER CO., LTD. shall not be held responsible for
any losses to you or any third party due to loss or corruption of
data caused by malfunction or repair of this keyboard, or by bat-
tery replacement.
❚
NOTE
❚
You may notice lines in the finish of the case of this keyboard. These lines
are a result of the molding process used to shape the plastic of the case.
They are not cracks or breaks in the plastic, and are no cause for concern.
Care of your
keyboard
Location
•Never locate the instrument in areas sub-
ject to high humidity or heavy accumula-
tion of dust. Doing so may cause fire or
electrical shock.
•Never locate the instrument in areas sub-
ject to grease splatters or steam, such as in
a kitchen or near a humidifier. Doing so
may cause fire or electrical shock.
Do not place keyboard on lacquered furniture.
•The instrument’s silicone rubber feet may
eventually blacken or scar lacquered sur-
faces. Use felt cloth pads to insulate the feet
or preferably use a CASIO musical instru-
ment stand designed for your keyboard.
Do not place heavy objects on the instrument.
•Do not place heavy objects on the instru-
ment. This may cause the instrument to tip
over or break resulting in injury.
Volume
•Very high volume levels can damage hear-
ing. Avoid using the instrument at very high
volume settings for long periods. Consult with
a physician immediately if you experience
impaired hearing or ringing in the ears.
Liquid Crystal Display (LCD) Precautions
•Avoid subjecting the keyboard's LCD to
strong impact, which can crack or break
the LCD's glass creating the danger of per-
sonal injury.
•Should the LCD glass ever crack or break,
do not allow the liquid inside the LCD to
come into contact with your skin, which
can cause inflammation and reddening.
*Should the LCD liquid get into your
mouth, immediately wash out your mouth
with water and then consult a physician.
*Should the LCD liquid get in your eyes or
on your skin, immediately flush with wa-
ter for at least 15 minutes and then consult
a physician.
Do not get onto the instrument or stand.*
•Do not crawl on top of the instrument or its
optional stand. Particular caution is re-
quired in homes having small children. This
may cause the instrument or stand to tip
over and break resulting in injury.
Optional Stand*
•Carefully assemble the stand following the
assembly instructions that come with it. Se-
curely tighten all bolts, nuts, and fasteners,
and make sure that you mount the instru-
ment correctly onto the stand. Incorrectly
or insufficiently tightening screws, or in-
correctly mounting the instrument onto the
stand can cause the stand to tip over or the
instrument to fall off the stand, possibly
leading to injury.
* The stand is available as an option.
WK-1800/1600(E)-01~07 03.7.31, 5:20 PMPage 4 Adobe PageMaker 6.5J/PPC

E-5
❐Song Sequencer
A built-in six-track sequencer gives you full control over the tone, volume, pan position, and other parameters for each recorded track. Use in
combination with Auto Accompaniment, the Song Sequencer provides you with all the tools you need to create your own full-fledged ensembles.
❐Pattern Sequencer
Alter any of the 120 built-in rhythm patterns to create your own, original patterns. You can even store up to 10 of your patterns in memory for later
recall.
❐130 rhythms
120 built-in rhythms include rock, pops, jazz, and other rhythms specially arranged for piano accompaniment. You can even store up to 10 of your
own rhythm patterns in memory for later recall.
❐Auto Accompaniment
Simply play a chord and the corresponding rhythm, bass, and chords parts play along automatically. One Touch Presets instantly recalls the most
suitable tone and tempo settings to match the rhythm you are using, while Free Session automatically produces pre-programmed chord progres-
sions so you can play ensembles with yourself.
❐232 tones
Choose from among a versatile collection of 200 built-in orchestra tones, synthesized sounds, drum sets and more. You can even store up to 32 of
your own original sound creations in memory for instant recall when you need them.
❐Synthesizer
Change the parameters of any of the built-in sounds to produce your own original creations. Up to 32 of original sounds can be stored in memory
for later recall.
❐General MIDI compatibility
General MIDI compatible tones let you connect to a personal computer for quick and easy “desktop music” capabilities. This keyboard can be used
as a desktop music input device or sound source.
❐Mixer
You can specify tone, volume, pan position, and other parameters for each built-in Auto Accompaniment part and each track recorded with the
Pattern Sequencer or Song Sequencer. You can also control the same parameters for each channel during MIDI input.
❐Registration Memory
Keyboard setups can be stored in memory for later recall and instant settings whenever you need them. Up to 20 setups (5 setups x 4 banks) can be
stored in registration memory.
❐DSP Effects
10 DSP effects such as reverb and chorus come built in.
❐Built-in floppy disk drive (WK-1800 only)
Save original tones and rhythms, or songs you created with the Song Sequencer to disk for long-term storage. You can also load a disk with a
standard MIDI file (SMF) and play it back on the keyboard.
733A-E-007A
Main Features
WK-1800/1600(E)-01~07 03.7.31, 5:20 PMPage 5 Adobe PageMaker 6.5J/PPC
E-6
733A-E-008A
Contents
Welcome.................................E-1
Safety Precautions ................E-2
Care of your keyboard ..........E-4
Main Features ........................E-5
Contents.................................E-6
General Guide........................E-8
About the Display.....................................E-10
Connections.........................E-12
Phones and Line Out Terminals ..............E-12
Phones/Output Terminal ..........................E-12
Sustain/Assignable Jack Terminal ...........E-13
Accessories and Options .........................E-13
Power Supply.......................E-14
Using Batteries ........................................E-14
Using the AC Adaptor ..............................E-14
Auto Power Off.........................................E-15
Settings and Memory Contents ...............E-15
Basic Operations .................E-16
Getting Started.........................................E-16
Selecting a Tone ......................................E-16
Using Layer..............................................E-17
Using Split ................................................E-17
Using Layer and Split Together ...............E-18
Using Touch Response ............................E-18
Transposing the Keyboard.......................E-19
Tuning the Keyboard ...............................E-19
Using DSP Effects ...................................E-19
Tuning DSP Effects On and Off ...............E-20
Using the PITCH BEND Wheel ...............E-20
Using the MODULATION Wheel..............E-20
Auto Accompaniment .........E-21
About the MODE Button ..........................E-21
Selecting a Rhythm..................................E-21
Playing a Rhythm.....................................E-21
Adjusting the Tempo ................................E-22
Using Auto Accompaniment .....................E-22
Using an Intro Pattern ..............................E-24
Using a Fill-in Pattern ..............................E-24
Using Variation Rhythm Patterns .............E-25
Synchro Starting Accompaniment with
Rhythm Play ............................................E-25
Finishing with an Ending Pattern .............E-25
Using Auto Harmonize .............................E-25
Using One-touch Preset ..........................E-26
Using Free Session .................................E-26
Turning Auto Accompaniment Parts On
and Off .....................................................E-27
Adjusting the Accompaniment Volume ....E-27
Mixer Function .....................E-28
Mixer Features .........................................E-28
Mixer Modes ............................................E-28
Turning Channels On and Off ..................E-29
Changing the Parameters of a Channel ..E-30
Synthesizer Mode ................E-32
Synthesizer Functions .............................E-32
Creating a User Tone ...............................E-34
Naming a User Tone and Storing It In
Memory ....................................................E-35
Registration Memory...........E-37
Registration Memory Features ................E-37
WK-1800/1600(E)-01~07 03.7.31, 5:20 PMPage 6 Adobe PageMaker 6.5J/PPC
E-7
733A-E-009A
To Save a Setup in Registration Memory ...
E-38
To Recall a Setup from Registration
Memory ....................................................E-38
Using the Song Sequencer......
E-39
Songs and Tracks ....................................E-39
Recording.................................................E-39
Global Settings and Operations...............E-39
Song Sequencer Data .............................E-39
Song Sequencer Memory Capacity .........E-40
Song Sequencer Memory Precautions....E-40
Song Sequencer Modes ..........................E-40
Real-time Recording ................................E-40
Punch-in Recording .................................E-42
To Delete the Contents of a
Specific Track ..........................................E-44
Playing Back from Song Sequencer
Memory ....................................................E-45
Song Sequencer and Mixer Operations .....
E-45
Global Settings and Operations...............E-45
Pattern Sequencer...............E-48
Pattern Sequencer Basics .......................E-48
Using the Pattern Create Mode ...............E-50
Using the Pattern Edit Mode....................E-52
Exiting the Pattern Sequencer Mode.......E-56
Keyboard Settings...............E-58
Using the Keyboard Settings Menu .........E-58
Setting Screens .......................................E-59
MIDI.......................................E-60
What is MIDI? ..........................................E-60
General MIDI ...........................................E-60
Making MIDI Settings...............................E-61
MIDI Messages ........................................E-62
MIDI Functions and Mixer Functions .......E-64
Bulk Sending Keyboard Data ..................E-65
Using the Floppy Disk Drive
(WK-1800 Only) .......................
E-67
Floppy Disk Drive Features .....................E-67
About Floppy Diskettes ............................E-67
Basic Diskette Operation .........................E-68
Playing Back an SMF ..............................E-69
Saving and Recalling Memory Data ........E-70
Using the Utilities .....................................E-71
Disk Drive Error Messages ......................E-74
Troubleshooting ..................E-75
Specifications ......................E-77
Appendix ............................... A-1
Note Table ..................................................A-1
Free Session Chord Progression Chart ....A-2
Drum Assignment List ................................A-5
Fingered Chord Chart ................................A-6
Chord Conversion Table ............................A-8
MIDI Implementation Chart
WK-1800/1600(E)-01~07 03.7.31, 5:20 PMPage 7 Adobe PageMaker 6.5J/PPC

E-8
733A-E-010A
General Guide
Playing a Demo Tune
Pressing the DEMO button starts demo tune play. There are two demo tunes, which continuously play in sequence. To stop demo tune
play, press either the DEMO button or the START/STOP button.
❚
NOTES
❚
• Pressing the [+]/[–] keys skips to the next demo tune.
• You can select a tone for the keyboard (page E-16) before starting demo tune play, and then use that tone to play along with the demo tune.
• MIDI are disabled while a demo tune is playing.
• Auto Harmonize, layer, split, and Auto Accompaniment Mode settings are automatically cancelled whenever demo tune is playing. These settings
are restored after demo tune play is complete.
AMP ENVELOPE
00 FLAT
01-17 VIBRATO
18-45 OTHERS
DECAY
SUSTAIN
PITCH ENVELOPE
MIN
MAX
FULL RANGE
CHORD
CASIO CHORD
SONG
FINGERED
PATTERN
EXTERNAL
INTERNAL UPPER1
CH 1
UPPER2
CH 2
LOWER1
CH 3
LOWER2
STOREBANK
CH 4
ACC VOL.
CH 5
CHORD1
CH 6
CHORD2
CH 7
CHORD3
CH 8
BASS
CH 9
RHYTHM
CH 10
TR1
CH 11
TR2
CH 12
TR3
CH 13
TR4
CH 14
TR5
CH 15
TR6
CH 16
789
456
1
0
23
PARAMETER RESET:
DELETE
/YESS/NO
MAIN MANU/
CHANNEL VOLUME:
SUB MANU/
CHANNEL SELECT:
SONG PATTERN
789
456
1
0
23
DELETE
/YESS/NO
EXTERNAL
INTERNAL UPPER1
CH 1
UPPER2
CH 2
LOWER1
CH 3
LOWER2
CH 4
ACC VOL.
CH 5
CHORD1
CH 6
CHORD2
CH 7
CHORD3
CH 8
BASS
CH 9
RHYTHM
CH 10
TR1
CH 11
TR2
CH 12
TR3
CH 13
TR4
CH 14
TR5
CH 15
TR6
CH 16
STOREBANK
3
4
5
60
8
1 1
※
D
CB ER
F
G
H
I
Q
a
b
c
d
e
2 7 9 A
a b c
J
K
a b c
L
ab
a
b
d
b
c
a
d
c
b
a
T
S
U
N
MO P
WK-1800/1600(E)-08~15 03.7.31, 5:20 PMPage 8 Adobe PageMaker 6.5J/PPC
E-9
733A-E-011A
1Speakers
2Sequencer
(a) RECORD button
(b) SONG button
(c) PATTERN button
3POWER button
4Rhythm list
5MODE button
6MAIN VOLUME slider
7(a) DSP (digital effect) button
(b) CONTRAST button
(c) FREE SESSION button
(d) ONE TOUCH PRESET button
8Display
9(a) TONE button
(b) RHYTHM button
(c) LAYER button
(d) SPLIT button
0Tone list
A(a) Number keys
(b) [+]/[–] keys (YES/NO keys)
BPITCH BEND wheel
CMODULATION wheel
DCHORD name
EINTRO button
VMIDI OUT terminal
WMIDI IN terminal
XSUSTAIN/ASSIGNABLE JACK terminal
YLINE OUT R, LINE OUT L/MONO terminal
ZDC 12V terminal
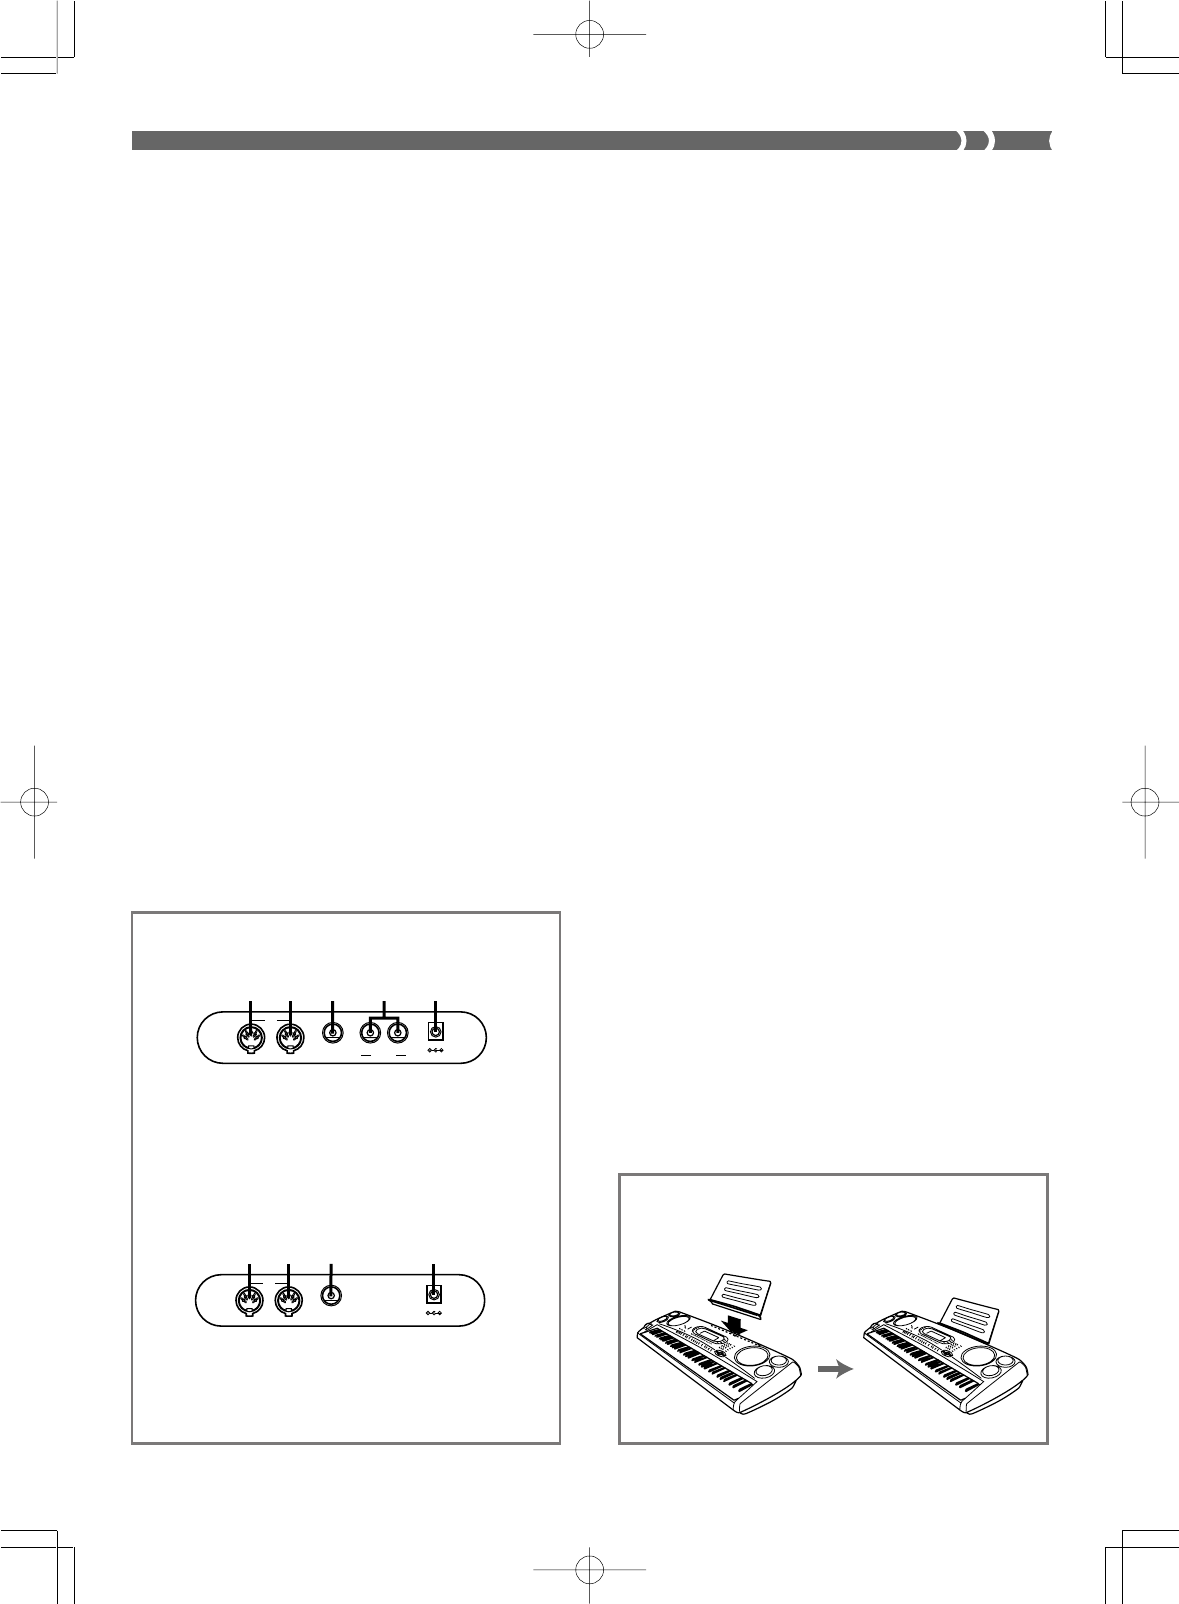
Rear Panel
• WK-1800
*
Attaching the Score Stand
Insert the music stand into the slot in the top of the key-
board.
•Key, button, and other names are indicated in the text of this manual using bold type.
•Illustrations in this User’s Guide shows the WK-1800.
FNORMAL/FILL-IN button
GVARIATION/FILL-IN button
HSYNCHRO/ENDING button
ISTART/STOP button
JTEMPO buttons
K(a) BANK button
(b) REGISTRATION buttons (A to E)
(c) STORE button
L(a) MIXER SELECT button
(b) CHANNEL buttons (CH1 to CH16)
MTRANSPOSE button
NAUTO HARMONIZE button
OENTER button
PCursor keys
In this User’s Guide, cursor key operations are indi-
cated as: [왗], [왘], [왖], [왔].
Q•WK-1800
(a) DEMO button
(b) SYNTH button
(c) TUNE/MIDI button
(d) TOUCH RESPONSE button
(e) DISK button
•WK-1600/1630
(a) DEMO button
(b) SYNTH button
(c) TUNE button
(d) MIDI button
(e) TOUCH RESPONSE button
RPercussion instrument indicators
SAccess lamp
TEject button
U•WK-1800
PHONES terminal
•WK-1600/1630
PHONES/OUTPUT terminal
V W X Y
OUT IN
SUSTAIN/
ASSIGNABLE JACK
MIDI
DC 12V
V W X Y Z
OUT IN
SUSTAIN/
ASSIGNABLE JACK
MIDI
LINE OUT
R L/MONO DC 12V
VMIDI OUT terminal
WMIDI IN terminal
XSUSTAIN/ASSIGNABLE JACK terminal
YDC 12V terminal
• WK-1600/1630
WK-1800/1600(E)-08~15 03.7.31, 5:20 PMPage 9 Adobe PageMaker 6.5J/PPC
E-10
733A-E-012A
GrandPno
4 7532 8 9
6
1314 11
12
17 10
18
19
1
15
16
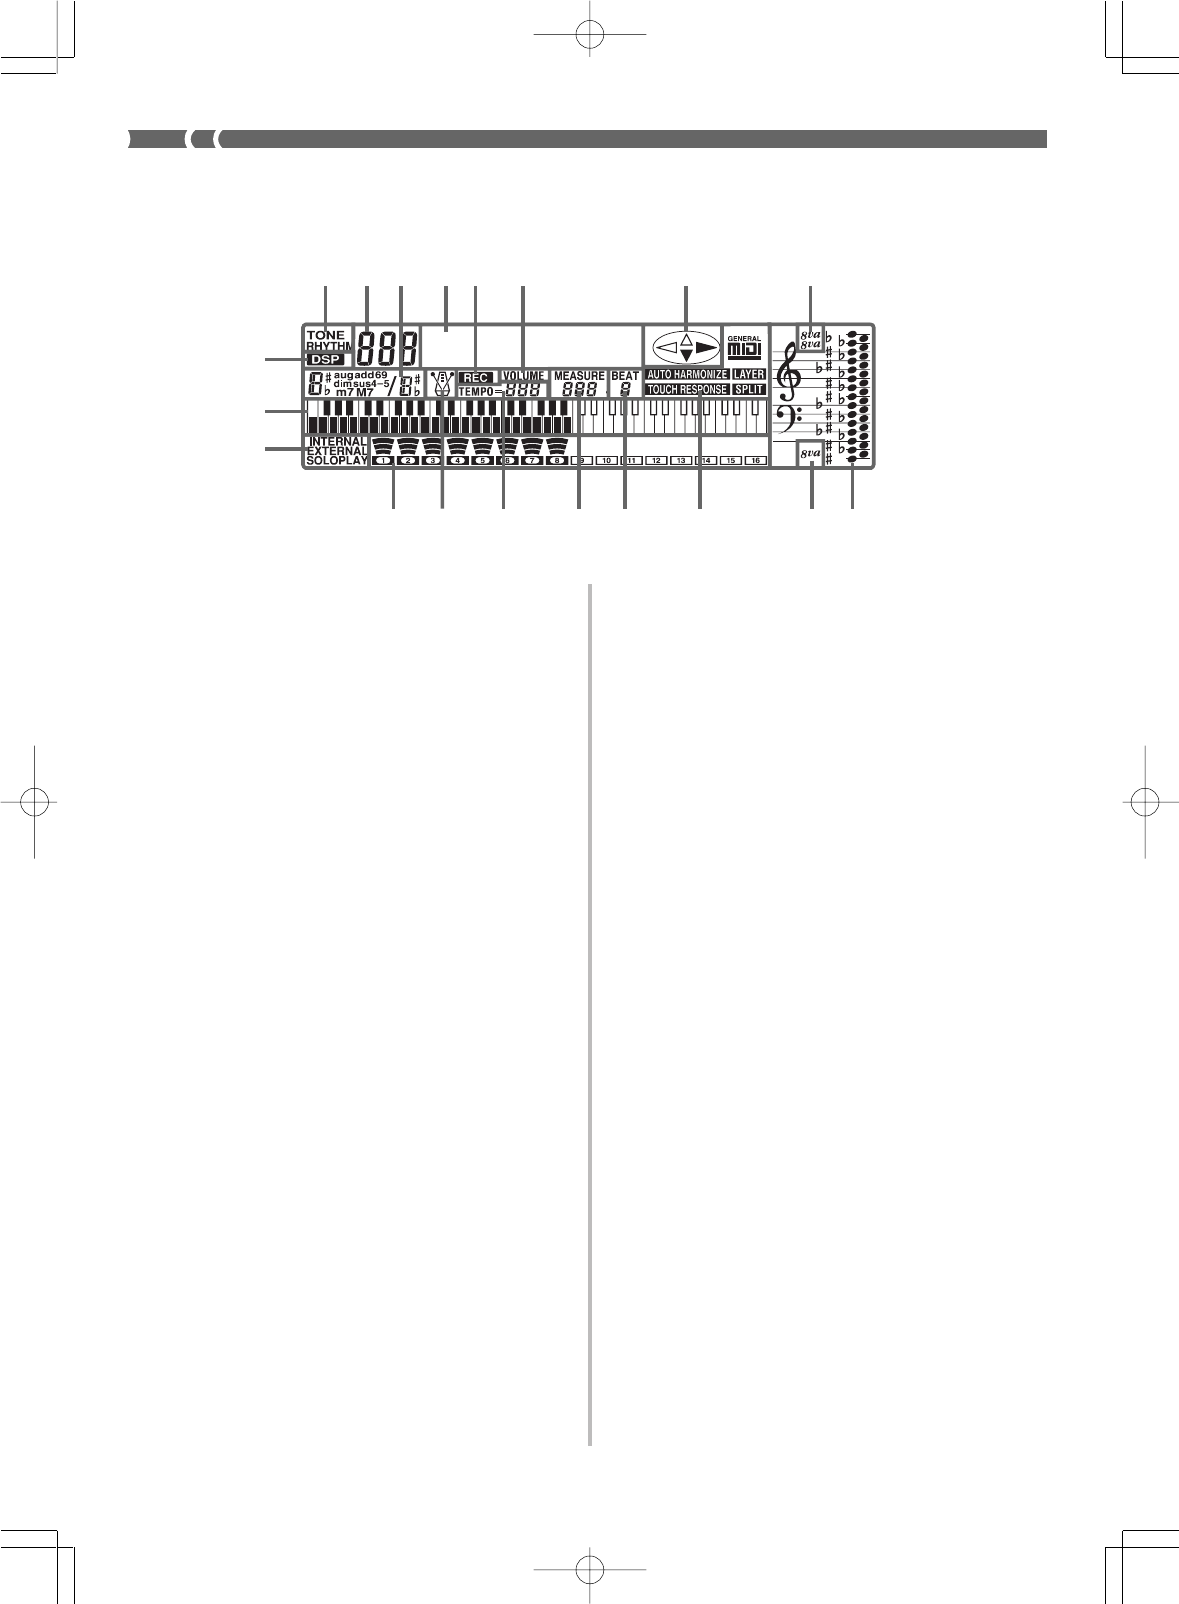
About the Display
1
DSP indicator
Appears when a DSP effect is turned on.
2
TONE/RHYTHM indicator
TONE is shown during tone selection and display, while
RHYTHM is shown during rhythm selection and display.
3
Tone/Rhythm number
Number of currently selected tone or rhythm. The TONE/
RHYTHM indicator shows whether the number is a tone or
rhythm. This display area also shows other information when
you are using the Pattern Sequencer and Song Sequencer.
4
Chord name display
Shows chord names while Auto Accompaniment is being used.
5
Tone/Rhythm name
Name of currently selected tone or rhythm. The TONE/
RHYTHM indicator shows whether the name is a tone or
rhythm. This area also shows other information in other modes.
6
Record indicator
While the Song Sequencer or Pattern Sequencer is turned on,
this indicator flashes to indicate record standby and remains on
the display without flashing while recording is in progress.
7
VOLUME indicator
Appears when you are using the Mixer to change the volume
parameter of a specific channel.
8
Cursor key indicators
Indicated keys are those that are operational for the function
you are currently performing.
9
Octave symbol 1
One symbol indicates the note being produced by the keyboard
is one octave higher than the note shown in the staff notation
area 10. Two symbols indicate two octaves higher.
10
Staff notation area
Notes you play on the keyboard, notes played back from mem-
ory, chord forms, and received MIDI data* are shown here.
11
Octave symbol 2
One symbol indicates the note being produced by the keyboard
is one octave lower than the note shown in the staff notation
area 10.
12
Indicators
An indicator appears to indicate that a function (Layer, Auto
Harmonize, Split, General MIDI Mode, Touch Response) is cur-
rently in use.
13
Beat number
Shows the beat number during rhythm and Auto Accompani-
ment play, and while the Song Sequencer or Pattern Sequencer
is turned on.
14
Measure
Shows the measure number from the start of play during rhythm
and Auto Accompaniment play, and while the Song Sequencer
or Pattern Sequencer is turned on. In the Mixer Mode, displays
the current channel's on/off status.
15
Tempo indicator
Shows the tempo as a value indicating the number of beats per
minute during rhythm and Auto Accompaniment play, and
while the Song Sequencer or Pattern Sequencer is turned on.
This display area also shows other information in other modes.
16
Metronome
You can turn on the metronome to provide a reference beat for
your keyboard play.
17
Level meter
The numbers 1 through 16 correspond to Mixer channels. The
level meter indicates which channels are on and off, and also
indicates the volume level.
18
Mixer mode indicator
Indicates the current Mixer mode (Internal, External, External/
Solo, External/Play).
19
Graphic keyboard
Notes you play on the keyboard, notes played back from mem-
ory, and received MIDI data* are indicated on the graphic key-
board.
* Any receive data outside the range of E1 to G7 is not displayed.
WK-1800/1600(E)-08~15 03.7.31, 5:20 PMPage 10 Adobe PageMaker 6.5J/PPC
E-11
❚
NOTES
❚
•Display examples shown in this User’s Guide are intended for illustra-
tive purposes only. The actual text and values that appear on the dis-
play may differ from the examples shown in this User’s Guide.
•Backlight brightness may appear somewhat unstable immediately after
the keyboard is turned on. This does not indicate malfunction, and bright-
ness will stabilize after a few seconds.
The back lighting of the display is provided by a fluorescent light,
which loses its brightness over very long periods of use. When this
happens, contact your original dealer or a CASIO service provider
about having the backlight replaced. Note that you will be charged for
such replacement.
Adjusting Display Contrast
•Display contrast can be adjust to one of 100 levels for easy view-
ing.
•Adjusting display contrast helps to make figures easier to read from
any viewing angle.
•Within five seconds after pressing the CONTRAST button, press [+]
to increase the contrast value (making the display darker) or [–] to
decrease it (making the display lighter).
•After you release CONTRAST, the message “Contrast” remains on
the display for a few moments, during which you can change the
contrast setting further using [+] and [–] or by inputting a contrast
value with the number keys.
The contrast can be set to a value from 0 to 99. The initial default
setting is 50.
733A-E-013A
WK-1800/1600(E)-08~15 03.7.31, 5:20 PMPage 11 Adobe PageMaker 6.5J/PPC
E-12
733A-E-014A
Connections
• WK-1800
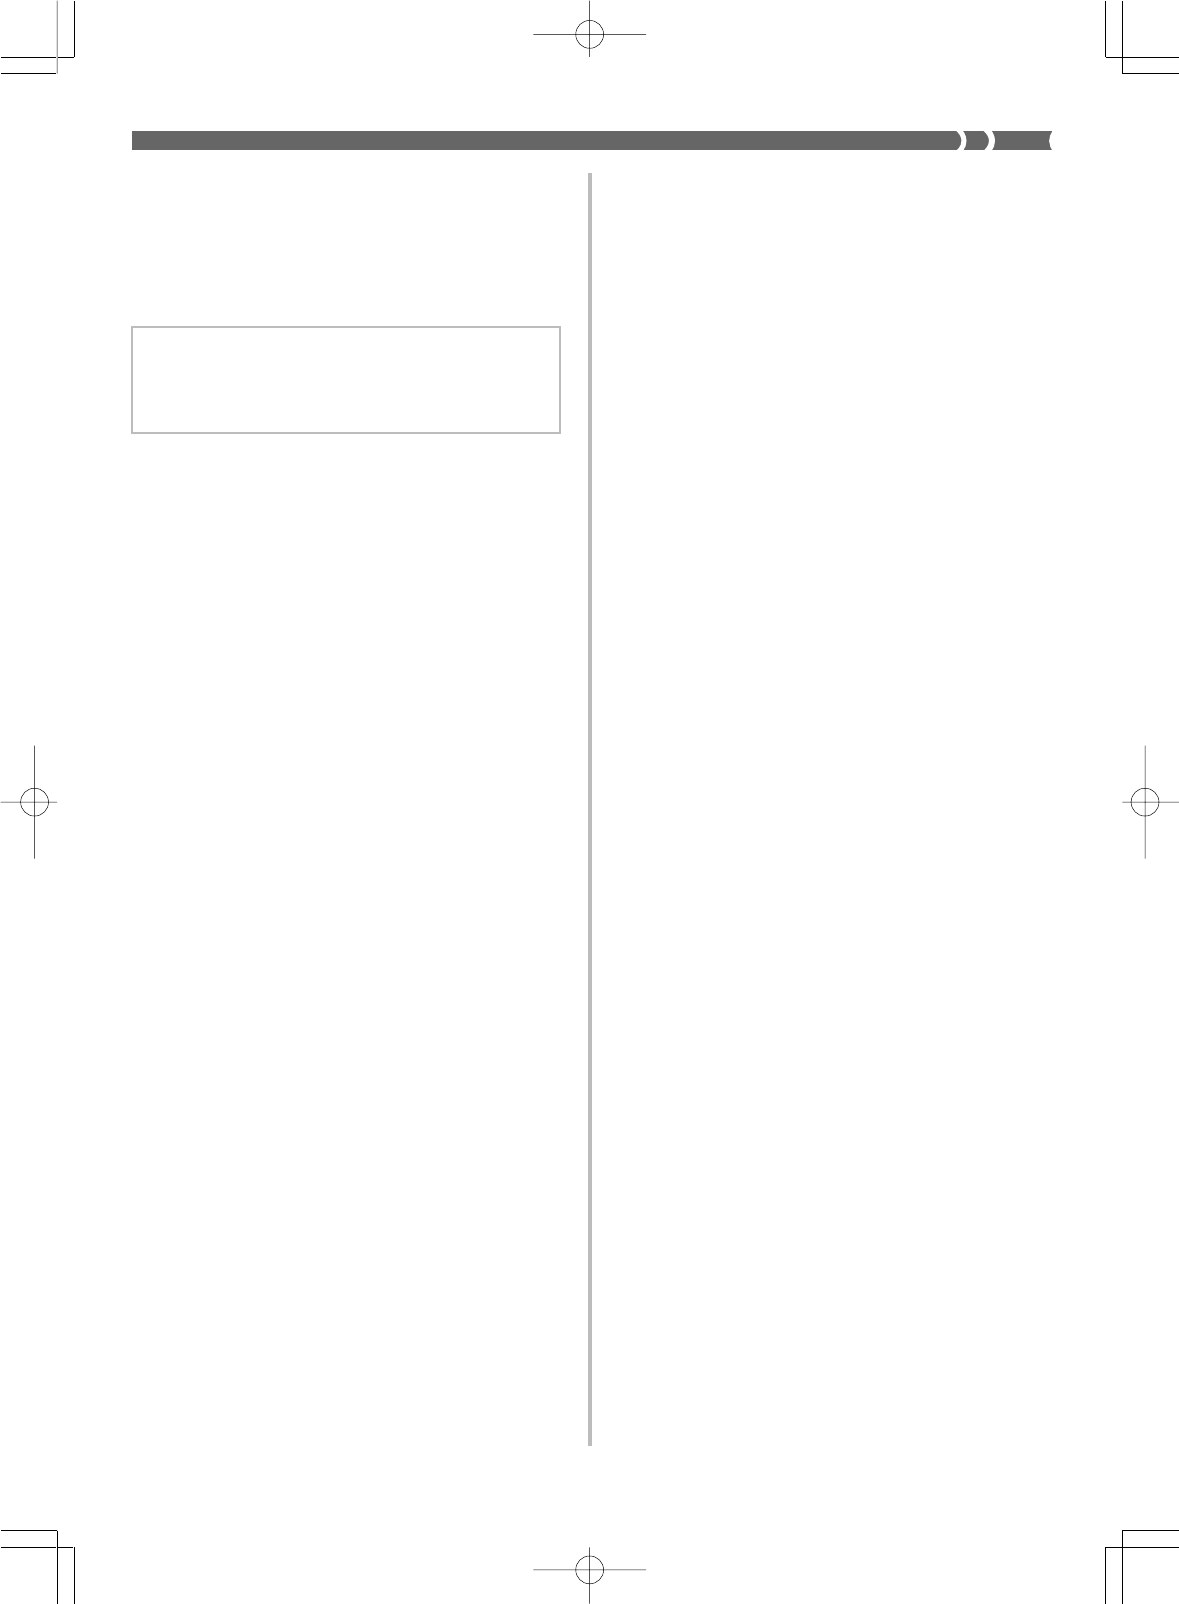
Phones and Line Out Terminals
Before connecting phones or other external equipment, be sure to first
turn down the volume settings of the keyboard and the connected
equipment. You can then adjust volume to the desired level after con-
nections are complete.
[Front]
Connecting Phones (Figure 11
11
1)
Connecting phones cuts off output from the keyboard’s built-in speak-
ers, so you can play even late at night without disturbing anyone.
[Rear Panel]
Connecting to Audio Equipment 22
22
2
Use commercially available cords to connect to the two jacks as shown
in Figure 2. It is up to you to purchase connecting cables like the
ones shown in the illustration for connection. Normally in this
configuration, you must set the audio equipment’s input selector to
the setting that specifies the terminal (such as AUX IN) that the key-
board is connected to. Use the keyboard’s VOLUME slider to adjust
the volume level.
Connecting to a Musical Instrument Amplifier 33
33
3
Use commercially available cords to connect to the two jacks as shown
in Figure 3. It is up to you to purchase connecting cables like the
ones shown in the illustration for connection. Use the keyboard’s VOL-
UME slider to adjust the volume level.
•If your amplifier has only one input jack, use an adapter like the
one shown below.
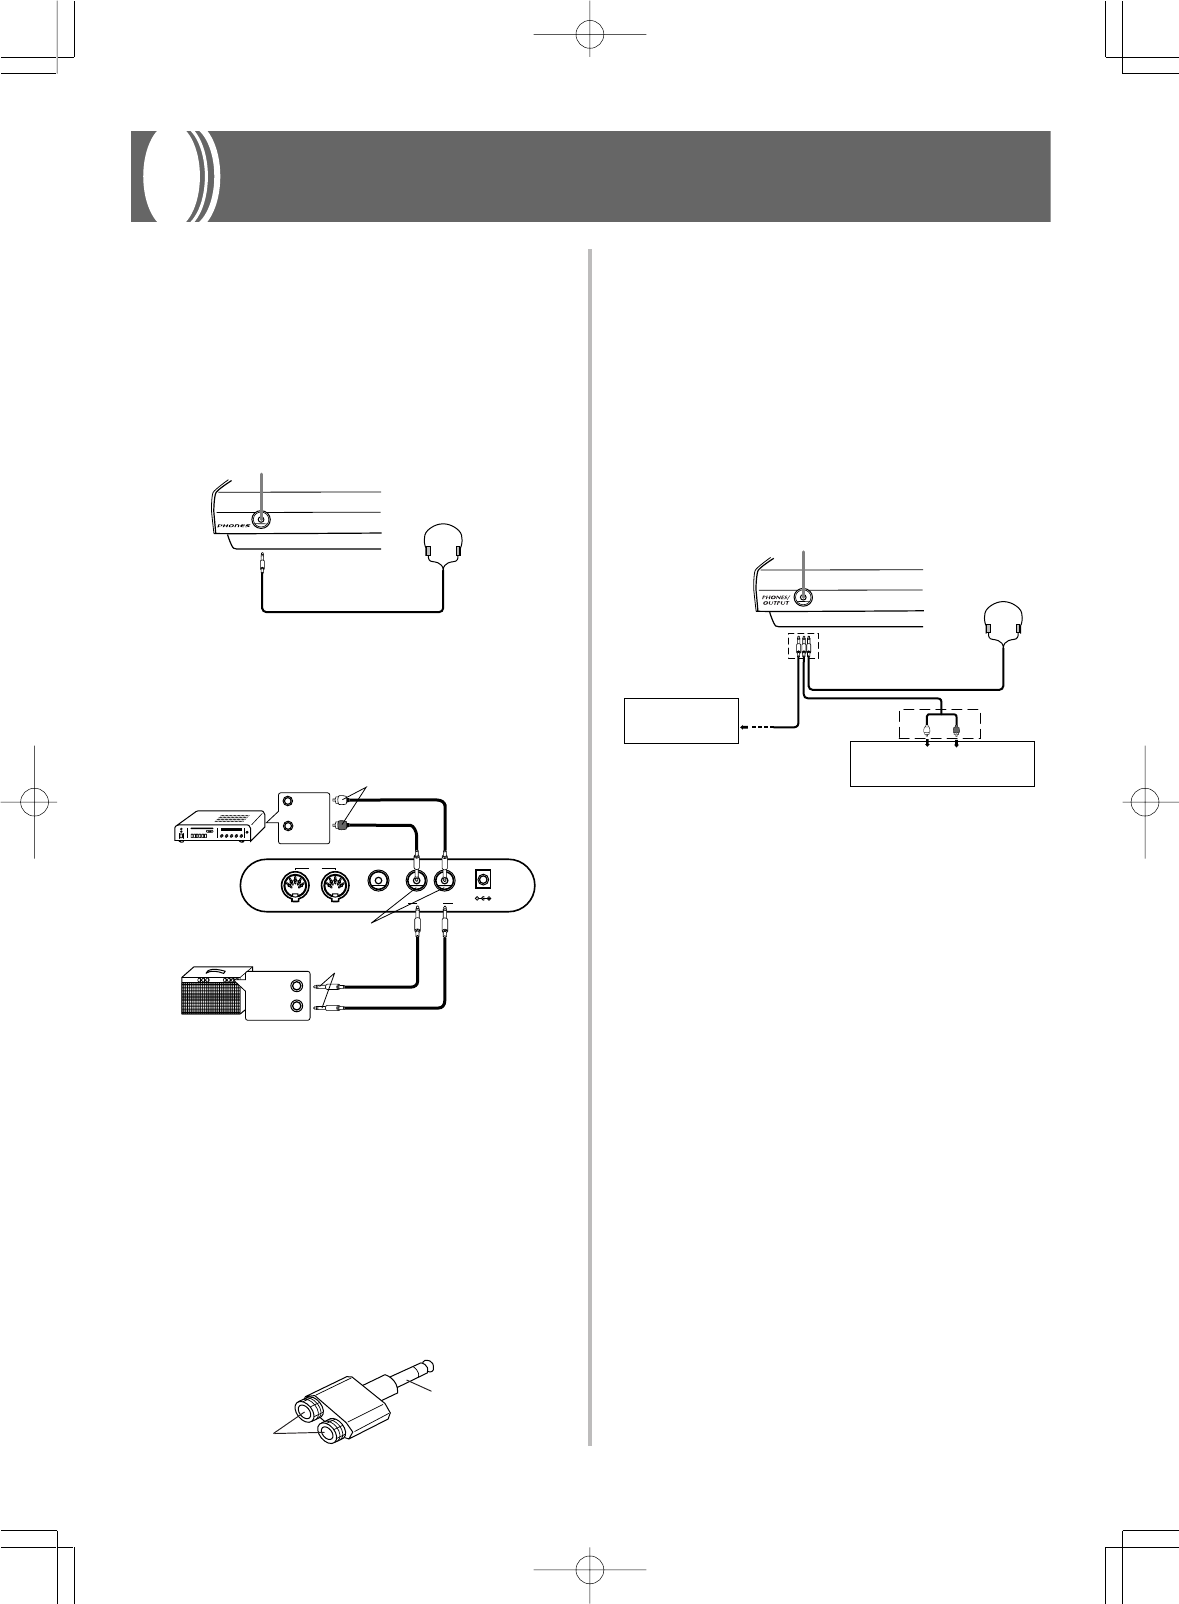
• WK-1600/1630
Phones/Output Terminal
Before connecting phones or other external equipment, be sure to first
turn down the volume settings of the keyboard and the connected
equipment. You can then adjust volume to the desired level after con-
nections are complete.
[Front]
Connecting Phones (Figure 11
11
1)
Connecting phones cuts off output from the keyboard’s built-in speak-
ers, so you can play even late at night without disturbing anyone.
Audio Equipment (Figure 22
22
2)
Connect the keyboard to a audio equipment using a commercially
available connecting cord with a standard plug on one end and two
PIN plugs on the other end. Note that the standard plug you connect
to the keyboard must be a stereo plug, otherwise you will be able to
output only one of stereo channels. In this configuration, you nor-
mally set the input selector of the audio equipment to the terminal
(usually marked AUX IN or something similar) where the cord from
the keyboard is connected. See the user documentation that comes
with your audio equipment for full details.
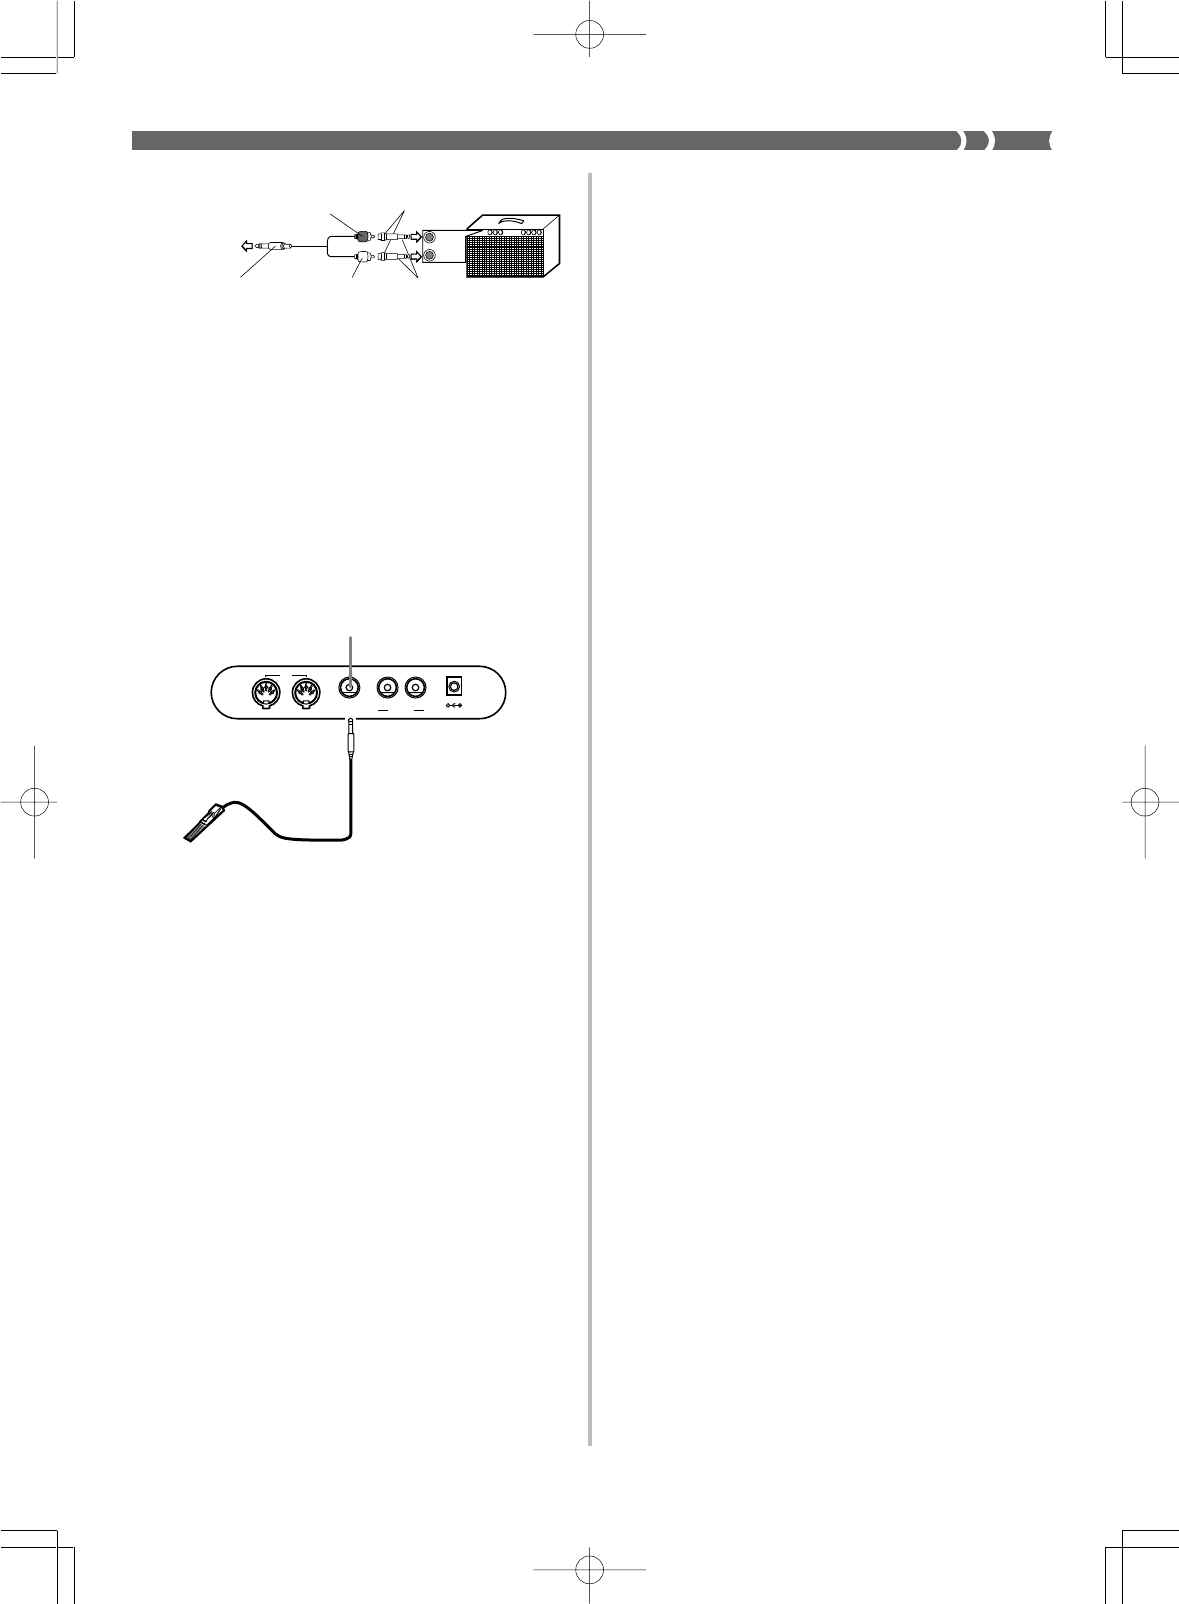
Musical Instrument Amplifier (Figure 33
33
3)
Use a commercially available connecting cord to connect the keyboard
to a musical instrument amplifier.
❚
NOTE
❚
Be sure to use a connecting cord that has a stereo standard plug on the
end you connect to the keyboard, and a connector that provides dual chan-
nel (left and right) input to the amplifier to which you are connecting. The
wrong type of connector at either end can cause one of the stereo chan-
nels to be lost.
When connected to a musical instrument amplifier, set the volume of
the keyboard to a relatively low level and make output volume ad-
justments using the amplifier’s controls.
1
2
3
LEFT RIGHT
AUX IN or similar terminal
of audio amplifier
White Red
PIN plug
Stereo standard plug
PHONES/OUTPUT Terminal
Keyboard amp,
guitar amp, etc.
1
PHONES Terminal
Stereo standard plug
❚
NOTE
❚
You can also connect the keyboard’s MIDI terminal to a computer or se-
quencer. See “MIDI” on page E-60 for details.
Standard plug
Standard jack
OUT IN
SUSTAIN/
ASSIGNABLE JACK
MIDI
LINE OUT
R L/MONO DC 12V
Standard plugs
Guitar amplifier,
keyboard amplifier, etc.
Audio amplifier AUX IN, etc.
3
2
PIN plug
Standard jacks
INPUT 1
INPUT 2
LEFT
(White)
RIGHT
(Red)
WK-1800/1600(E)-08~15 03.7.31, 5:20 PMPage 12 Adobe PageMaker 6.5J/PPC
E-13
Sustain Pedal
•With piano tones, depressing the pedal causes notes to linger, much
like a piano’s damper pedal.
•With organ tones, depressing the pedal causes notes to continue to
sound until the pedal is released.
Sostenuto Pedal
•As with the sustain pedal function described above, depressing
the sostenuto pedal causes notes to be sustained.
•The difference between a sostenuto pedal and sustain pedal is the
timing. With a sostenuto pedal, you press the keys and then de-
press the pedal before you release the keys. Only the notes that are
sounding when the pedal is depressed are sustained.
Soft Pedal
Depressing the pedal softens the sound of the notes being played.
Rhythm Start/Stop Pedal
In this case, the pedal performs the same functions as the START/
STOP button.
OUT IN
SUSTAIN/
ASSIGNABLE JACK
MIDI
LINE OUT
R L/MONO DC 12V
SP-10
SUSTAIN/ASSIGNABLE JACK Terminal
INPUT 1
INPUT 2
PIN jack
PIN plug (red)
PIN plug (white) Standard plug
Stereo standard plug
To keyboard's
PHONES/OUTPUT
terminal
Keyboard
or
guitar amp
733A-E-015A
❚
NOTE
❚
You can also connect the keyboard’s MIDI terminal to a computer or se-
quencer. See “MIDI” on page E-60 for details.
Sustain/Assignable Jack Terminal
You can connect an optional sustain pedal (SP-2 or SP-10) to the SUS-
TAIN/ASSIGNABLE JACK terminal to enable the capabilities de-
scribed below.
For details on how to select the pedal function you want, see “As-
signable Jack Function” on page E-59.
Connection Example
Accessories and Options
Use only the accessories and options specified for this keyboard. Use
of non-authorized items creates the danger of fire, electrical shock,
and personal injury.
WK-1800/1600(E)-08~15 03.7.31, 5:20 PMPage 13 Adobe PageMaker 6.5J/PPC
E-14
733A-E-016A
Power Supply
This keyboard can be powered by current from a standard house-
hold wall outlet (using the specified AC adaptor) or by batteries. Al-
ways make sure you turn the keyboard off whenever you are not
using it.
Using Batteries
Always make sure you turn off the keyboard before loading or re-
placing batteries.
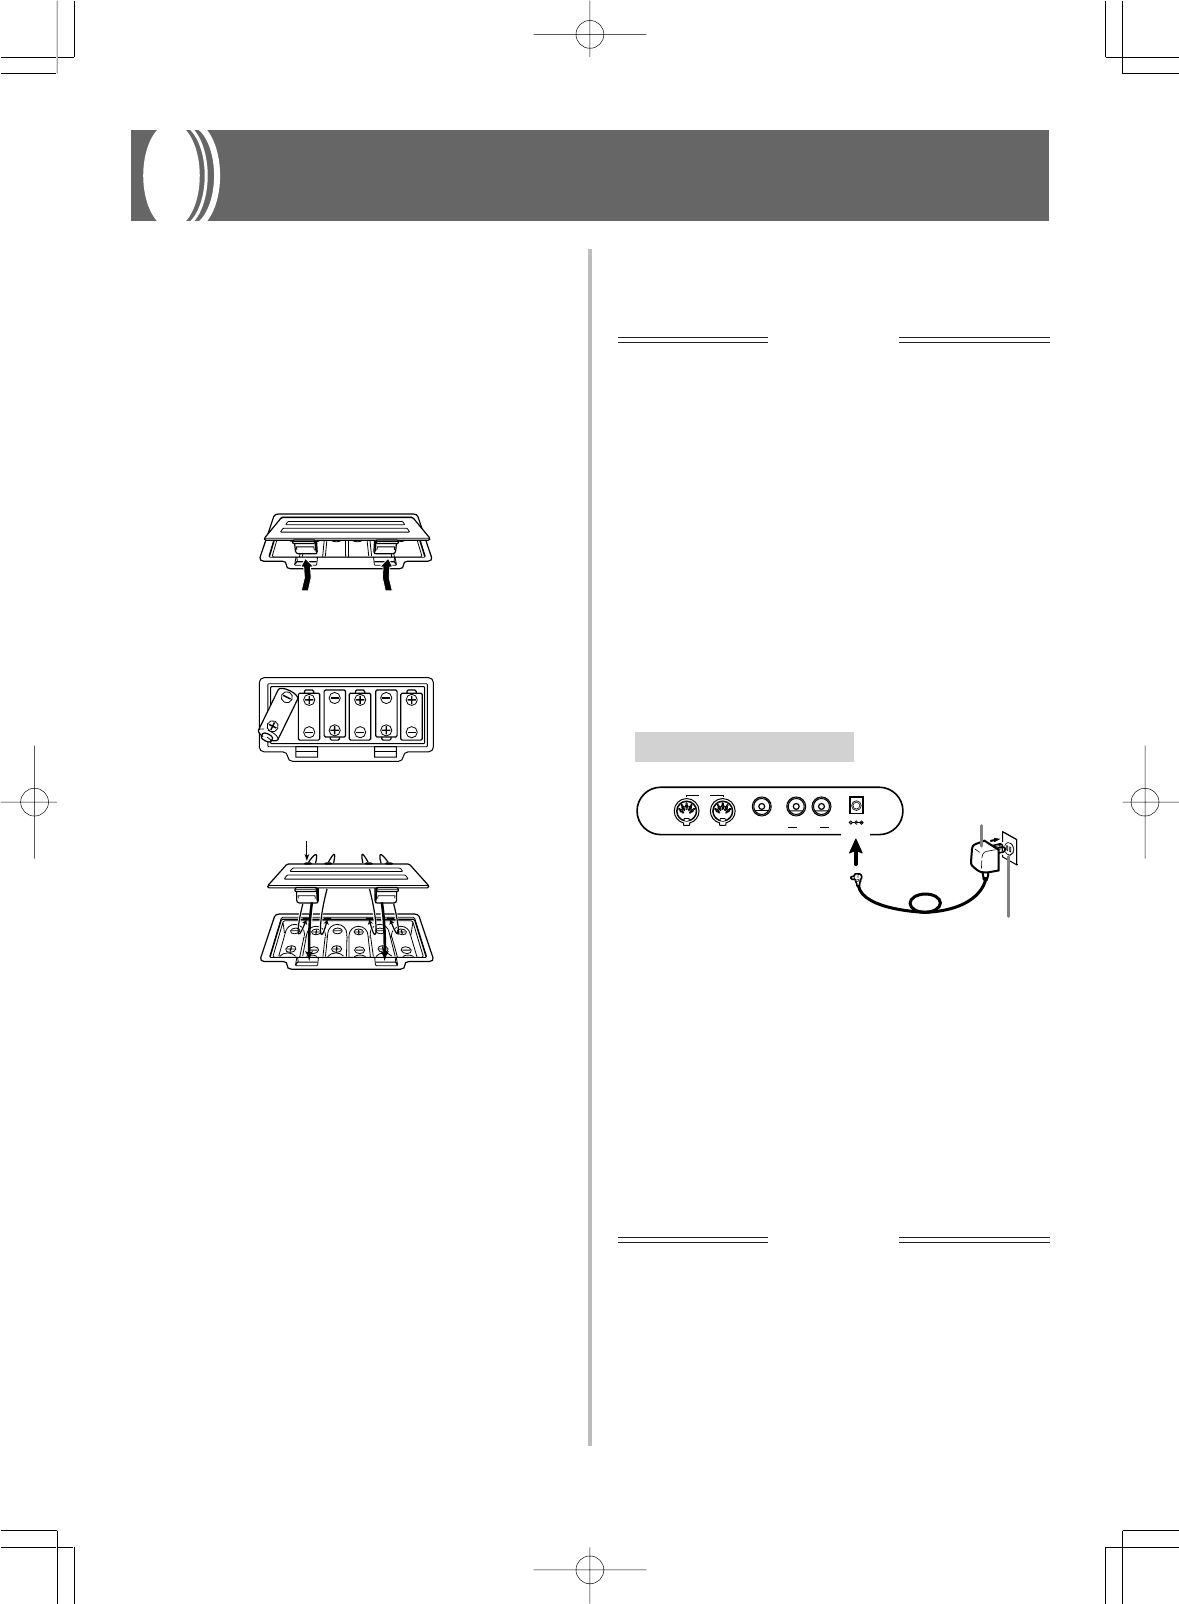
To load batteries
1.
Remove the battery compartment cover.
2.
Load six D-size batteries into the battery compartment.
•Make sure that the positive (+) and negative (–) ends are fac-
ing correctly.
3.
Insert the tabs on the battery compartment cover into
the holes provided and close the cover.
The keyboard may not function correctly if you load or replace bat-
teries with power turned on. If this happens, turning the keyboard
off and then back on again should return functions back to normal.
Important Battery Information
■
The following shows the approximate battery life.
Alkaline batteries ............................................... 2 hours
The above value is standard battery life at normal temperature,
with the keyboard volume at medium setting. Temperature ex-
tremes or playing at very loud volume settings can shorten bat-
tery life.
■
Any of the following symptoms indicate low battery power. Re-
place batteries as soon as possible whenever any of the following
occurs.
•Dim power supply indicator
•Instrument does not turn on
•Display that is flickering, dim, or difficult to read
•Abnormally low speaker/headphone volume
•Distortion of sound output
•Occasional interruption of sound when playing at high volumes
•Sudden power failure when playing at high volumes
•Flickering or dimming of the dispaly when playing at high vol-
ume
•Continued sound output even after you release a key
•A totally different tone may sound
•Abnormal rhythm pattern and demo tune play
•Loss of power, sound distortion, or low volume when playing
from a connected computer or MIDI device
•Sudden power failure while reading from or writing to a dis-
kette (WK-1800 only)
IMPORTANT!
Improper handling of batteries can cause them to burst and leak,
which creates the danger of personal injury or damage due to con-
tact with battery fluid. Be sure to note the following important precau-
tions.
•Always make sure that the positive (+) and negative (–) poles are
facing correctly as indicated inside the battery compartment.
•To avoid damage caused by leaking batteries, be sure to remove
batteries from the keyboard whenever you leave it unattended for
long periods (such as when leaving on a trip).
•Never mix batteries of different types.
•Never mix old batteries with new ones.
•Never discard batteries by incinerating them, do not allow their
poles to be shorted (connected to each other), never take batteries
apart, and do not expose batteries to direct heat.
•Replace batteries as soon as possible after any sign they are get-
ting weak.
•Never attempt to recharge batteries.
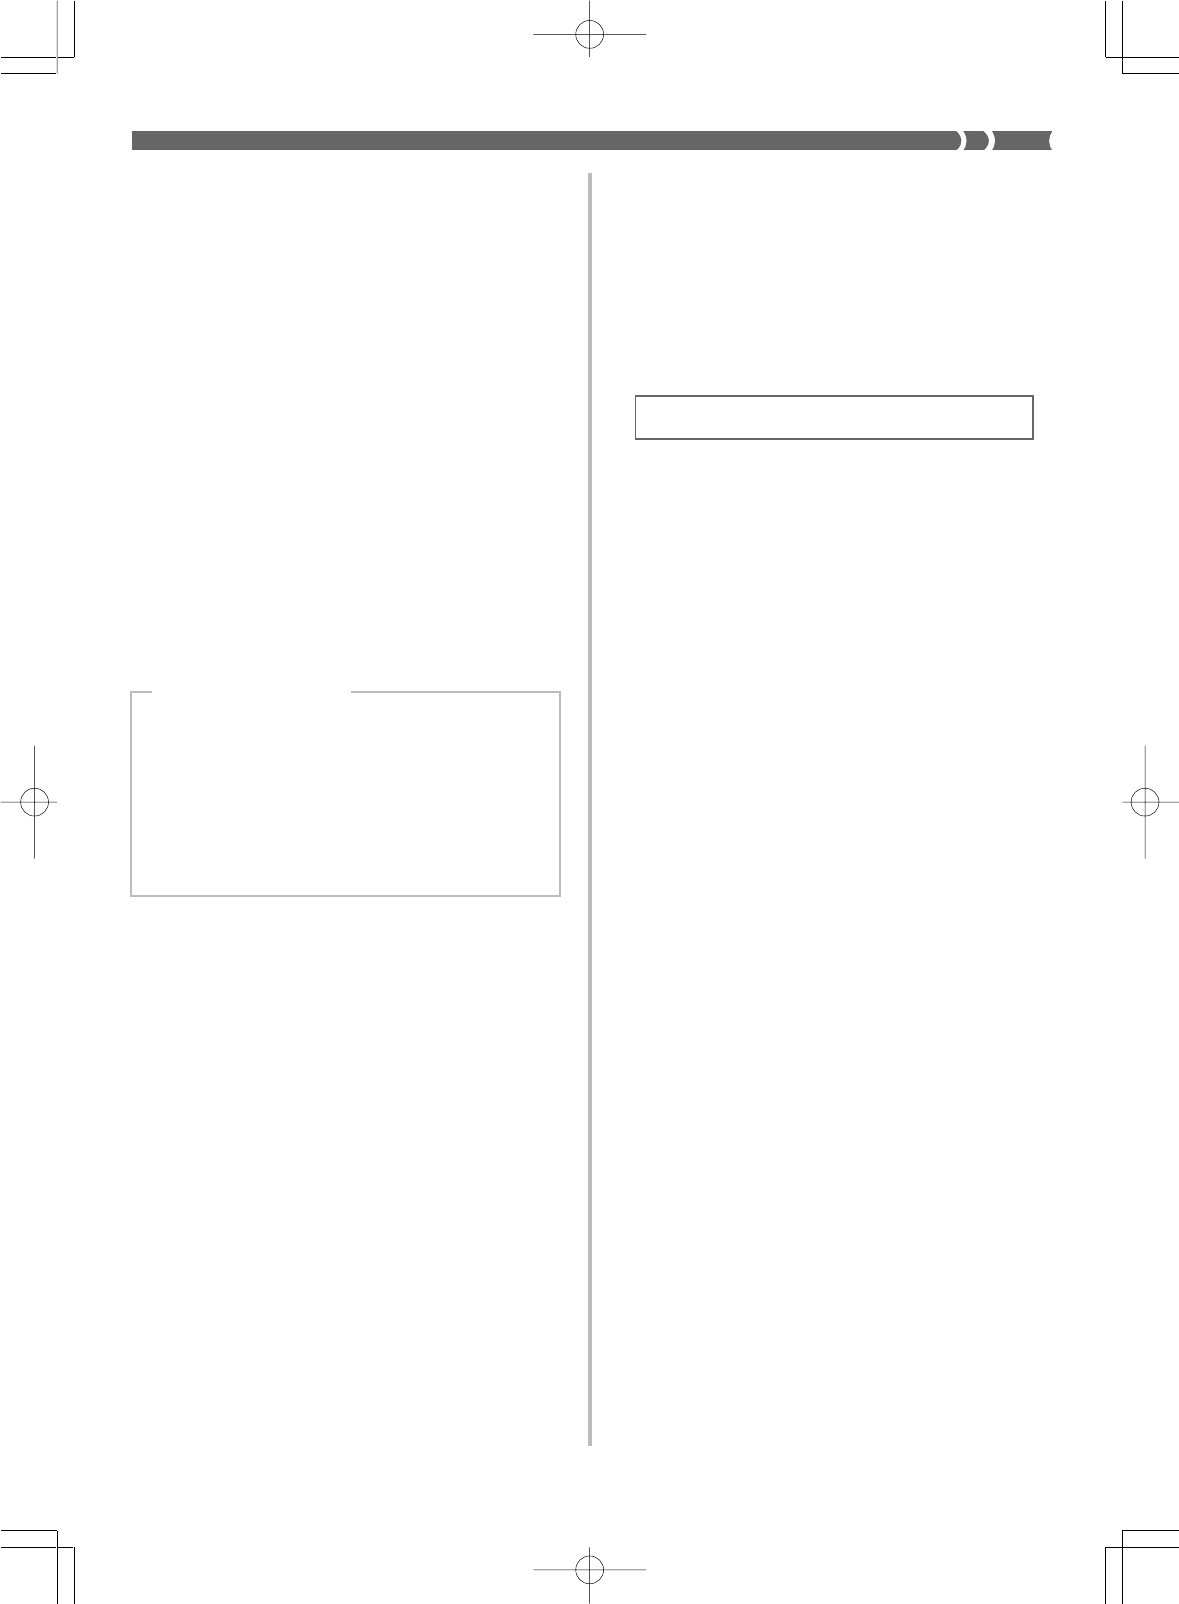
Using the AC Adaptor
Make sure that you use only the AC adaptor specified for this key-
board.
Specified AC Adaptor: AD-12
Also note the following important warnings and precautions when
using the AC adaptor.
WARNING!
•Take care to avoid any damage to or breakage of the power cord. Never
place any heavy objects on the power cord or expose it to direct heat.
Doing so creates the danger of power cord damage, fire, and electrical
shock.
•Use only the specified AC adaptor. Use of another type of adaptor cre-
ates the danger of fire and electrical shock.
CAUTION!
•For safety sake, be sure to unplug the AC adaptor from the wall outlet
whenever leaving the keyboard unattended for a long time (such as
when leaving on a trip).
•Always turn off the keyboard and unplug the AC adaptor from the wall
outlet when you are not using the keyboard.
IMPORTANT!
•Make sure that the keyboard is turned off before connecting or
disconnecting the AC adaptor.
•Using the AC adaptor for a long time can cause it to become warm
to the touch. This is normal and does not indicate malfunction.
tab
OUT IN
SUSTAIN/
ASSIGNABLE JACK
MIDI
LINE OUT
R L/MONO DC 12V
AC adaptor AD-12
AC outlet
WK-1800/1600(E)-08~15 03.7.31, 5:20 PMPage 14 Adobe PageMaker 6.5J/PPC
E-15
733A-E-017A
To initialize the keyboard and delete all data
You can either fully initialize the keyboard or initialize parameters
only.
Full Initialization
Use this procedure to return all keyboard settings to what they were
when you purchased it. Note that this procedure clears all data from
memory.
1.
While holding down the ENTER button, turn on key-
board power.
2.
Press YES to initialize the keyboard or NO to turn on
power without changing any settings.
•The above procedure restores registration memory to its fac-
tory default contents. Any setup data stored in registration
memory is deleted by the above procedure.
Parameter Initialization
Use this procedure to return all keyboard settings to what they were
when you purchased it. Note that this procedure does not affect user
tones, user rhythms, registration memory contents, and display con-
trast settings.
While keyboard power is on, press the [+], [–], and ENTER buttons at
the same time.
Reset?
Auto Power Off
When you are using battery power, keyboard power turns off auto-
matically whenever you leave it on without performing any opera-
tion for about 6 minutes. When this happens, press the POWER but-
ton to turn power back on.
❚
NOTE
❚
Auto Power Off is disabled (it does not function) when you are using the
AC adaptor to power the keyboard.
To disable Auto Power Off
Hold down the TONE button while turning on the keyboard to dis-
able Auto Power Off.
•When Auto Power Off is disabled, the keyboard does not turn off
automatically no matter how long it is left with no operation being
performed.
Settings and Memory Contents
The following describes what happens to settings and memory con-
tents when power is turned off.
Settings
Tone, rhythm, and other “main keyboard settings” in effect when the
keyboard is turned off manually by pressing POWER or automati-
cally by Auto Power Off are still in effect the next time you turn pow-
er back on.
Main Keyboard Settings
Tone number, rhythm number, touch response on/off, touch
response sensitivity, accompaniment mode, DSP on/off, DSP
selection, assignable jack setting, tempo, Mixer parameters
(tone, volume, pan, effect send, channel on/off, accompani-
ment volume), keyboard channel, General MIDI on/off,
Pitch Bend range, accomp MIDI out on/off, MIDI in chord
judge on/off, registration bank, layer on/off, auto harmo-
nize on/off, split on/off, split point, Song Sequencer set-
tings (song number, metronome, quantize), Pattern Sequenc-
er settings (metronome, quantize), sound range shift on/off,
contrast setting, SMF playback settings (WK-1800 only)
Memory Contents
In addition to the above settings, Registration, Song Sequencer, Pat-
tern Sequencer, and Synthesizer memory contents are also retained
when power is turned off.
Power Requirements
The keyboard comes with a built-in lithium battery that supplies
power to the memory to retain Song Sequencer, Pattern Sequencer
and other data while keyboard power is turned off. If the power of
the lithium battery is low, turning off keyboard power can result in
deletion of all data stored in its memory.
The normal life of the original battery is five years from the time it is
loaded at the factory. Due to time spent in transit and storage, the
original battery probably will not provide a full five years of service
life. It is up to you to contact your nearest CASIO service provider
about having the lithium battery replaced periodically.
Note that you will be charged separately for lithium battery replace-
ment.
To protect against loss of valuable memory data, we strongly suggest
that you use either of the following methods to back it up.
•Perform a MIDI dump of the data to a computer or other external
device for storage. See “Bulk Sending Keyboard Data” on page E-
65 for details.
•Save the data to diskette (WK-1800 only). See “Using the Floppy
Disk Drive” on page E-67 for details.
WK-1800/1600(E)-08~15 03.7.31, 5:20 PMPage 15 Adobe PageMaker 6.5J/PPC
E-16
733A-E-018A
Basic Operations
This section provides information on performing basic keyboard op-
erations.
Getting Started
To play the keyboard
1.
Press the POWER button to turn the keyboard on.
2.
Use the MAIN VOLUME slider to set the volume to a
relatively low level.
3.
Play something on the keyboard.
Selecting a Tone
This keyboard comes with 200 built-in tones. Use the following pro-
cedure to select the tone you want to use.
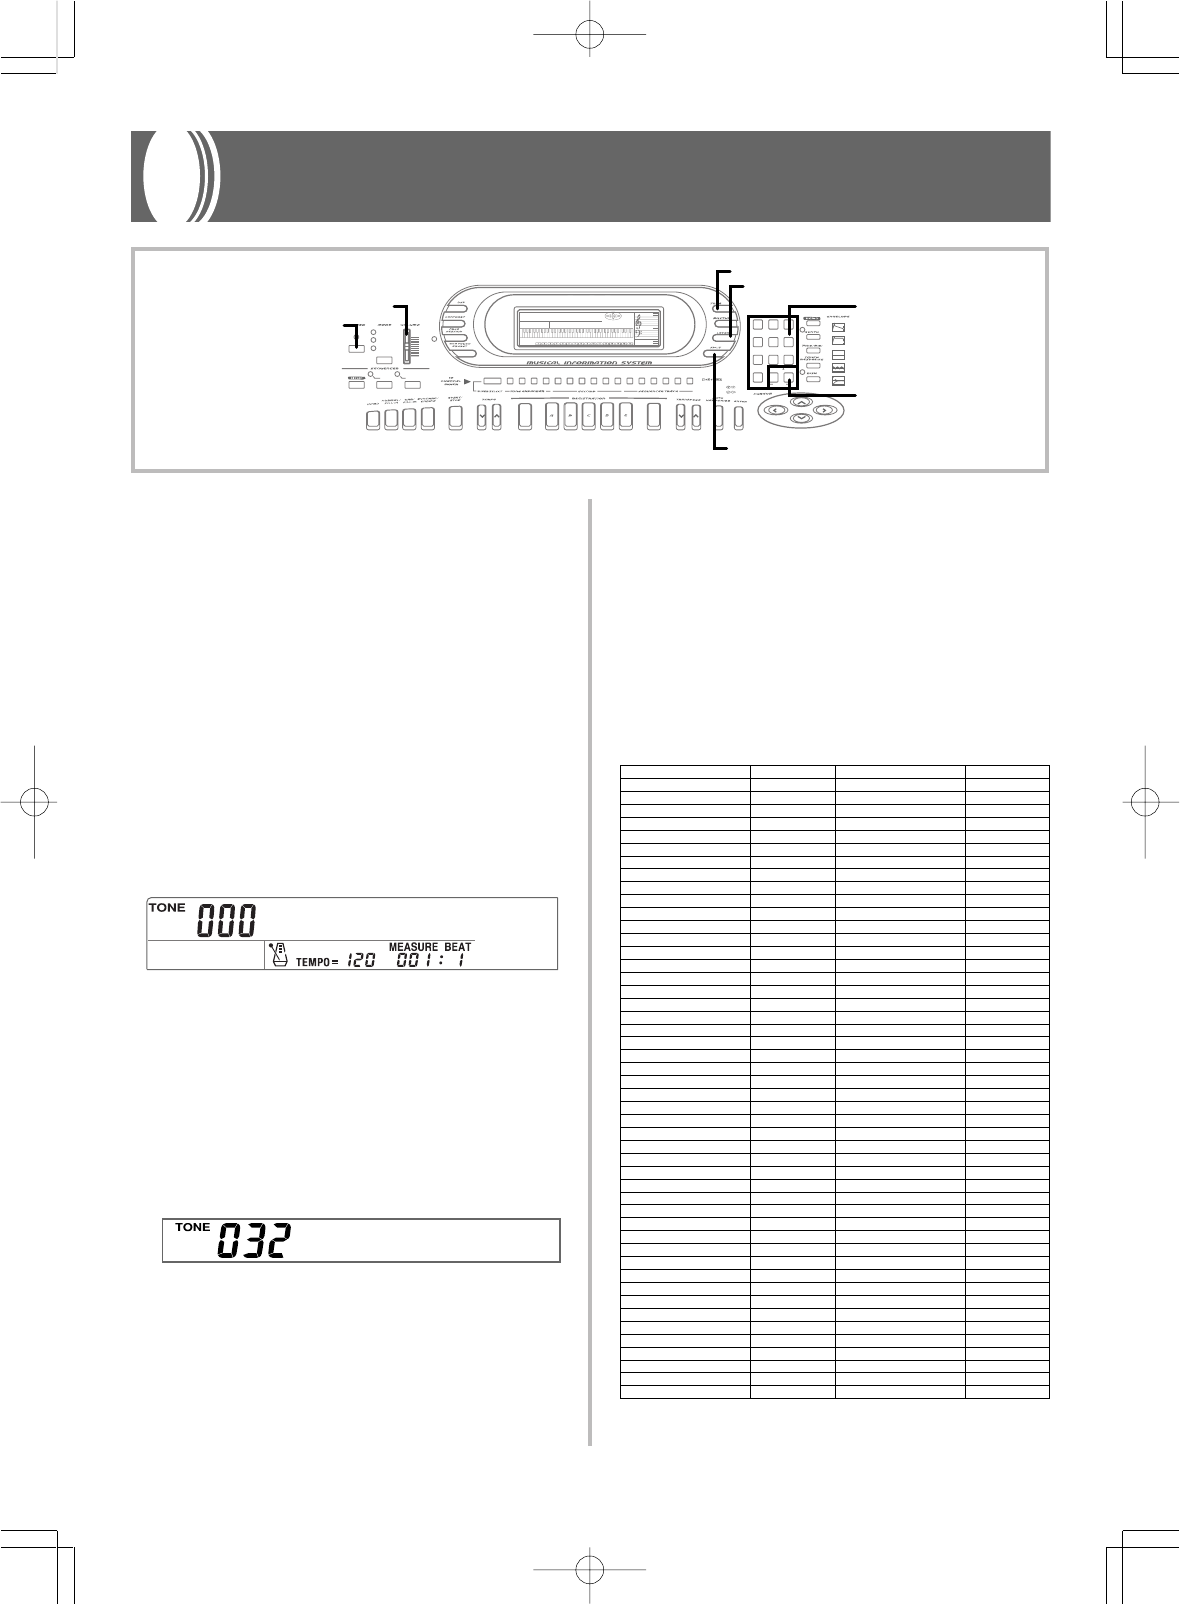
To select a tone
1.
Find the tone you want to use in the keyboard’s Tone
List and note its tone number.
2.
Press the TONE button.
3.
Use the number keys to input the three digit tone num-
ber for the tone you want to select.
Example: To select “032 ACOUSTIC BASS”, input 0, 3 then 2.
❚
NOTES
❚
•Always input all three digits for the tone number, including leading zeros
(if any). If you input one or two digits and stop, the display will automat-
ically clear your input after a few seconds.
•You can also increment the displayed tone number by pressing [+] and
decrement it by pressing [–].
•When one of the drum sets is selected (tone numbers 192 through 199),
each keyboard key is assigned a different percussion sound. See page
A-5 for details.
•The 32 tones number 200 through 231 are for storage of original tones
created using the synthesizer (page E-32). Once original tones are
stored, they can be recalled and used just like the built-in tones.
When the keyboard is shipped from the factory, tones 200 through 231
contain the same contents as tone number 128 to 159.
Names of tone numbers 128 through 199
Aco .Bass
GrandPno
AMP ENVELOPE
00 FLAT
01-17 VIBRATO
18-45 OTHERS
DECAY
SUSTAIN
PITCH ENVELOPE
MIN
MAX
FULL RANGE
CHORD
CASIO CHORD
SONG
FINGERED
PATTERN
EXTERNAL
INTERNAL UPPER1
CH 1
UPPER2
CH 2
LOWER1
CH 3
LOWER2
STOREBANK
CH 4
ACC VOL.
CH 5
CHORD1
CH 6
CHORD2
CH 7
CHORD3
CH 8
BASS
CH 9
RHYTHM
CH 10
TR1
CH 11
TR2
CH 12
TR3
CH 13
TR4
CH 14
TR5
CH 15
TR6
CH 16
789
456
1
0
23
PARAMETER RESET:
DELETE
/YESS/NO
MAIN MANU/
CHANNEL VOLUME:
SUB MANU/
CHANNEL SELECT:
TONE
LAYER
SPLIT
Number key
s
POWER
MAIN VOLME
[+]/[
–]
*What you hear differs according to how strongly you press the
keyboard.
No. Tone Name
DCO
polyphony
OCTAVE PIANO
BREATHY SAX
STEREO PIANO
ELEC PIANO 3
DETUNED EP 1
DETUNED EP 2
DETUNED EP 3
DETUNED CLAVI
ELEC ORGAN 1
ELEC ORGAN 2
ELEC ORGAN 3
ELEC ORGAN 4
ELEC ORGAN 5
PIPE ORGAN
STEREO GUITAR
12 STR GUITAR
SLAP BASS 3
SYNTH–BASS 3
SYNTH–BASS 4
SYNTH–BASS 5
STRINGS 3
TRUMPET 2
BRASS SECTION
SYNTH–BRASS 3
STRINGS PIANO
STRINGS EP
STR HARPSI
STR CELESTA
STR KALIMBA
STRINGS HORN
STEREO STR GTR
SITAR AAH
HARP ENS
VOICE ENS
BRASS ENS
OCTAVE SAX
PIPE ENS
PERC ENS
VIBES ENS
REVERSE ORCH
128
129
130
131
132
133
134
135
136
137
138
139
140
141
142
143
144
145
146
147
148
149
150
151
152
153
154
155
156
157
158
159
160
161
162
163
164
165
166
167
2
1
2
1
2
2
2
2
1
1
1
1
2
2
2
2
1
1
1
1
2
1
2
2
2
2
2
2
2
2
2
2
2
2
2
2
2
2
2
2
16
32
16
32
16
16
16
16
32
32
32
32
16
16
16
16
32
32
32
32
16
32
16
16
16
16
16
16
16
16
16
16
16
16
16
16
16
16
16
16
No. Tone Name
DCO
polyphony
TOUCH STR PNO
*
TOUCH STRINGS
*
TOUCH VIB PNO
*
TOUCH BASS
*
BRASS FALL
BASS SLIDE
FEEDBACK
PIANO ¤ STR
SYNTH–PAD 1
SYNTH–PAD 2
SYNTH–PAD 3
SYNTH–PAD 4
SYNTH–PAD 5
SYNTH–PAD 6
SYNTH–PAD 7
SYNTH–PAD 8
SYNTH–LEAD 1
SYNTH–LEAD 2
SYNTH–SFX 1
SYNTH–SFX 2
SYNTH–SFX 3
SYNTH–SFX 4
SEQUENCE 1
SEQUENCE 2
DRUM SET 1
DRUM SET 2
DRUM SET 3
DRUM SET 4
DRUM SET 5
DRUM SET 6
DRUM SET 7
DRUM SET 8
168
169
170
171
172
173
174
175
176
177
178
179
180
181
182
183
184
185
186
187
188
189
190
191
DRUM SET
192
193
194
195
196
197
198
199
2
2
2
2
2
1
2
2
2
2
2
2
2
2
2
2
2
2
2
2
2
2
2
2
16
16
16
16
16
32
16
16
16
16
16
16
16
16
16
16
16
16
16
16
16
16
16
16
STANDARD SET
ROOM SET
POWER SET
ELECTRONIC SET
SYNTH SET
JAZZ SET
BRUSH SET
ORCHESTRA SET
WK-1800/1600(E)-16~20 03.7.31, 5:20 PMPage 16 Adobe PageMaker 6.5J/PPC
E-17
Polyphony
The term polyphony refers to the maximum number of notes you can
play at the same time. The keyboard has 32-note polyphony, which
includes the notes you play as well as the rhythms and auto-accom-
paniment patterns that are played by the keyboard. This means that
when a rhythm or auto-accompaniment pattern is being played by
the keyboard, the number of notes (polyphony) available for key-
board play is reduced. Also note that some of the tones offer only 16-
note polyphony.
Digital Sampling
A number of the tones that are available with this keyboard have
been recorded and processed using a technique called digital sam-
pling. To ensure a high level of tonal quality, samples are taken in the
low, mid, and high ranges and then combined to provide you with
sounds that are amazingly close to the originals. You may notice very
slight differences in volume or sound quality for some tones when
you play them at different positions on the keyboard. This is an un-
avoidable result of multiple sampling, and it is not a sign of malfunc-
tion.
Using Layer
With layer you can assign two different tones (a main tone and a lay-
ered tone) to the keyboard, both of which play whenever you press a
key. For example, you could layer the FRENCH HORN tone on the
BRASS tone to produce a rich and brassy sound.
To layer two tones
1.
Select the main tone and layered tone.
•Use the Mixer to select the tones, following the procedure
under “Changing the Parameters of a Channel” on page E-
30. The main tone is UPPER1, while the layered tone is UP-
PER2.
•If you don’t want to use the Mixer, select a keyboard tone as
you normally would (page E-16). This is the main tone. Next,
proceed to step 2.
2.
Press LAYER to turn on tone layering.
•This causes the LAYER indicator to appear on the display.
•The layered tone name and number appear on the display
for about five seconds. During this time you can use the num-
ber keys to input a tone number to change the layered tone if
you want. After about five seconds, the display changes to
the main tone name and number.
3.
Now try playing something on the keyboard.
•Both tones are played at the same time.
4.
Press LAYER to unlayer the tones and return the key-
board to normal.
•This causes the LAYER indicator to disappear.
❚
NOTE
❚
Layering is produced by sounding Mixer internal mode CH 1 (UPPER1)
and CH 2 (UPPER2) at the same time. This means you can use the Mixer
to change the volume balance and stereo pan position parameters for both
the main tone and layered tone. See “Mixer Function” on page E-28 for
details.
Main tone (UPPER1) + Layered tone (UPPER2)
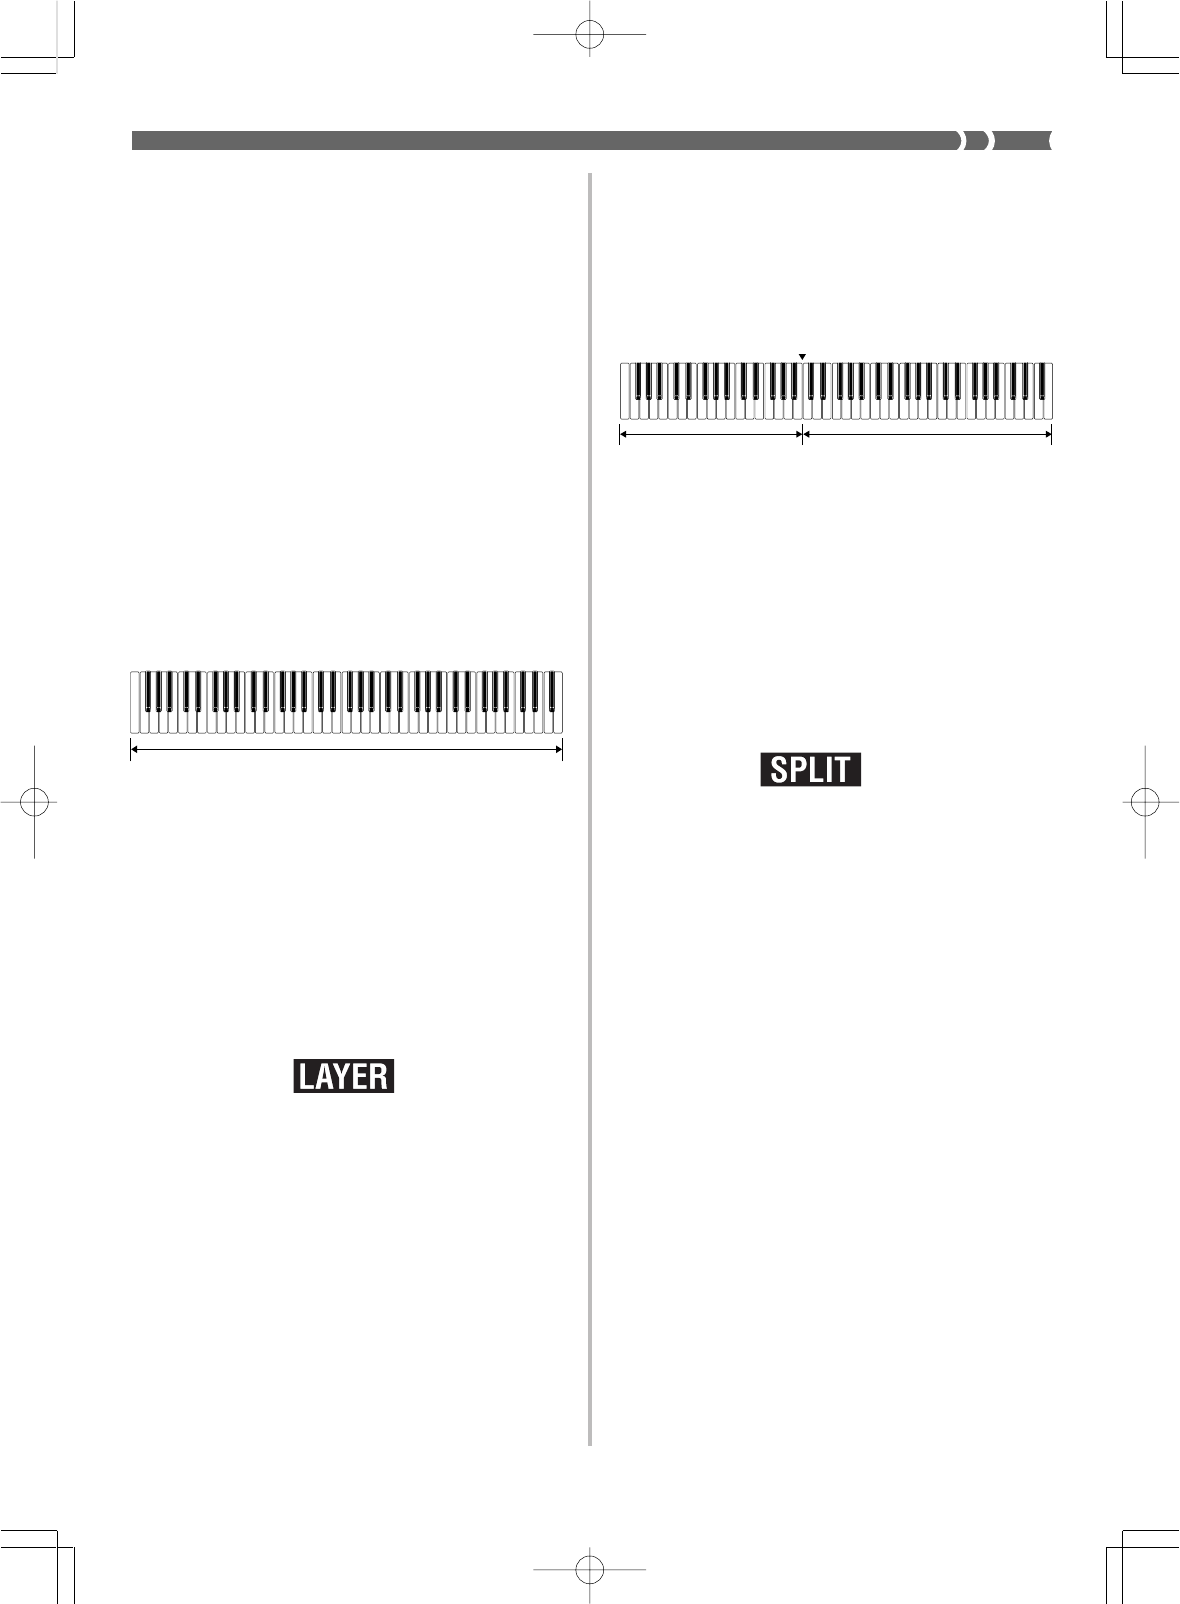
Using Split
With split you can assign two different tones (a main tone and a split
tone) to either end of the keyboard, which lets you play one tone
with your left hand and another tone with your right hand. For ex-
ample, you could select STRINGS as the main (high range) tone and
PIZZICATO as the split (low range) tone, putting an entire string
ensemble at your fingertips.
To split the keyboard
1.
Select the main tone and split tone.
•Use the Mixer to select the tones, following the procedure
under “Changing the Parameters of a Channel” on page E-
30. The main tone is UPPER1, while the split tone is LOW-
ER1.
•If you don’t want to use the Mixer, select a keyboard tone as
you normally would (page E-16). This is the main tone. Next,
proceed to step 2.
2.
Press SPLIT.
•This causes the SPLIT indicator to appear on the display.
•The split tone name and number appear on the display for
about five seconds. During this time you can use the num-
ber keys to input a tone number to change the split tone if
you want. After about five seconds, the display changes to
the main tone name and number.
3.
Now try playing something on the keyboard.
•The lower range (left side) of the keyboard is assigned the
split tone, while the upper range (right side) is assigned the
main tone.
•The location on the keyboard where the changeover between
the two tones occurs is called the split point. See “To change
the location of the split point” on page E-18 for details on
changing the location of the split point.
4.
Press SPLIT again to unsplit the keyboard and return
it to normal.
•This causes the SPLIT indicator to disappear.
733A-E-019A
Main tone (UPPER1)
Split tone (LOWER1)
Split point
WK-1800/1600(E)-16~20 03.7.31, 5:20 PMPage 17 Adobe PageMaker 6.5J/PPC
E-18
❚
NOTE
❚
Split is produced by using Mixer internal mode CH 1 (UPPER1) and CH 3
(LOWER1) at the same time. This means you can use the Mixer to change
the volume balance and stereo pan position parameters for both the main
tone and split tone. See “Mixer Function” on page E-28 for details.
To change the location of the split point
While holding down the SPLIT button, press the keyboard key where
you want the lowest note (the leftmost key) of the upper range (right
side range) to be.
Using Layer and Split Together
You can use layer and split together to created a layered split key-
board. When you use layer and split in combination, the high range
of the keyboard is assigned two tones (main tone + layered tone),
and the low range two tones (split tone + layered split tone).
To layer-split the keyboard
1.
Select the main tone, layered tone, split tone, and lay-
ered split tone.
•Use the Mixer to select the tones, following the procedure
under “Changing the Parameters of a Channel” on page E-
30. The main tone is UPPER1, the layered tone is UPPER2,
the split tone is LOWER1, and the layered split tone is LOW-
ER2.
2.
Turn on both layer and split to layer split the keyboard.
•Press LAYER once to turn on layer.
•Press SPLIT once to turn on split.
•The LAYER and SPLIT indicators should be on the display
to indicate that they are turned on.
•The layered split tone name and number appear on the dis-
play for about five seconds. During this time you can use
the number keys to input a tone number to change the lay-
ered split tone if you want. After about five seconds, the dis-
play changes to the main tone name and number.
3.
Now try playing something on the keyboard.
4.
Press LAYER once and SPLIT once to unlayer split the
keyboard and return it to normal.
❚
NOTES
❚
•Layer-split is produced by using Mixer internal mode CH 1 (UPPER1),
CH 2 (UPPER2), CH 3 (LOWER1), and CH 4 (LOWER2) at the same
time. This means you can use the Mixer to change the volume balance
and stereo pan position parameters for each of the tones. See “Mixer
Function” on page E-28 for details.
•You can use the Mixer to turn off individual channels (layer split tones).
This means you could turn off CH 4 (LOWER2), for example, to sound a
single tone in the lower range and two layered tones in the upper range.
See “Turning Channels On and Off” on page E-29 for details.
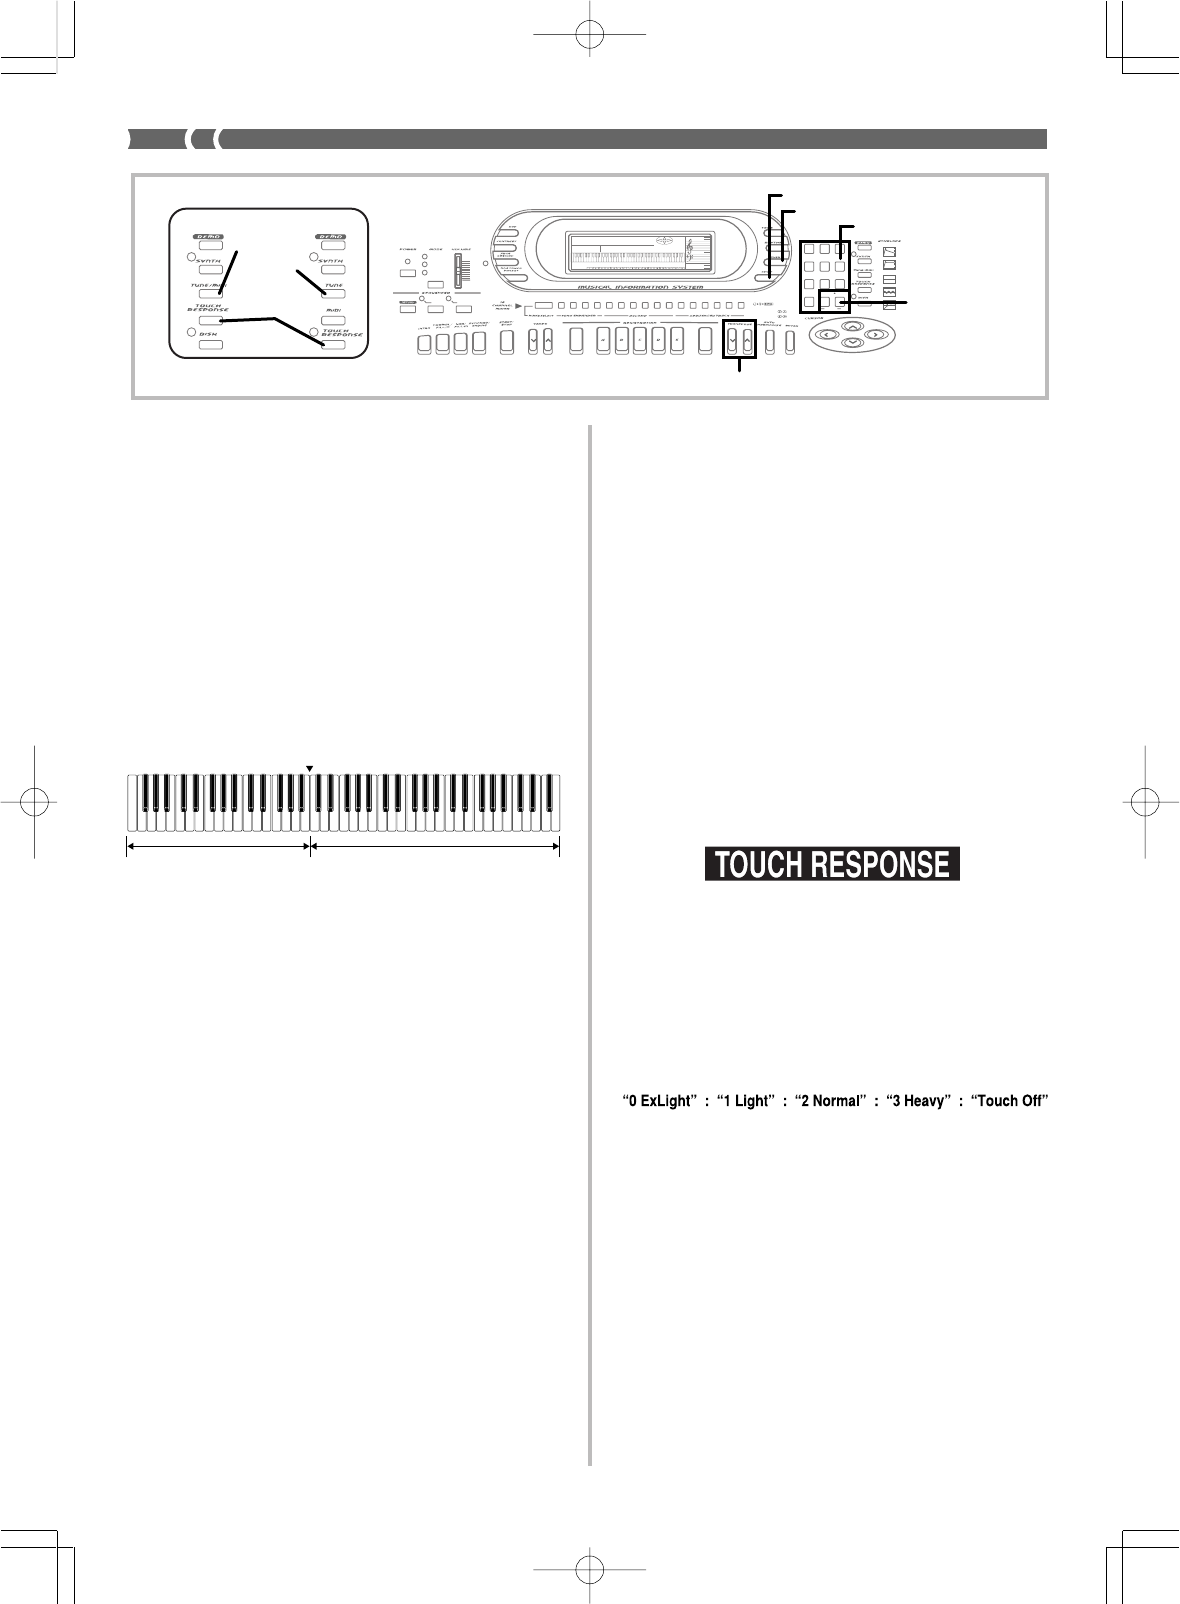
Using Touch Response
Turning on touch response causes the volume and sound quality of
keyboard output to change in accordance with the amount of pres-
sure applied to the keyboard.
To turn touch response on and off
Press the TOUCH RESPONSE button to toggle touch re-
sponse on and off.
•Turning on touch response causes the TOUCH RESPONSE indica-
tor to appear on the display.
To set the touch response sensitivity
1.
Press TOUCH RESPONSE to turn on touch response.
•The TOUCH RESPONSE indicator appears on the display.
2.
Within five seconds after pressing TOUCH RESPONSE,
use [+] and [–] or number keys [0] to [3] to select the
sensitivity setting you want to use.
•“ExLight” outputs powerful sound even with light key pres-
sure, while “Heavy” requires very heavy key pressure to out-
put powerful sound.
•Pressing [+] and [–] at the same time returns sensitivity to
the “Normal” setting.
•In addition to pressing the TOUCH RESPONSE button, you
can also turn off touch response by selecting “Touch Off” as
the sensitivity setting.
❚
NOTES
❚
•Touch response operations affect the keyboard’s internal sound source
as well as MIDI OUT data.
•Touch response settings do not affect Song Sequencer playback, ac-
companiment, or MIDI note data received from an external source.
•Touch response affects different tones in different ways.
733A-E-020A
AMP ENVELOPE
00 FLAT
01-17 VIBRATO
18-45 OTHERS
DECAY
SUSTAIN
PITCH ENVELOPE
MIN
MAX
FULL RANGE
CHORD
CASIO CHORD
SONG
FINGERED
PATTERN
EXTERNAL
INTERNAL UPPER1
CH 1
UPPER2
CH 2
LOWER1
CH 3
LOWER2
STOREBANK
CH 4
ACC VOL.
CH 5
CHORD1
CH 6
CHORD2
CH 7
CHORD3
CH 8
BASS
CH 9
RHYTHM
CH 10
TR1
CH 11
TR2
CH 12
TR3
CH 13
TR4
CH 14
TR5
CH 15
TR6
CH 16
789
456
1
0
23
PARAMETER RESET:
DELETE
/YESS/NO
MAIN MANU/
CHANNEL VOLUME:
SUB MANU/
CHANNEL SELECT:
SPLIT
WK-1600/1630WK-1800
TOUCH
RESPONSE
TUNE/MIDI
TUNE
LAYER
Number keys
TRANSPOSE
[+]
/[
–
]
Split tone +
Layered split tone
(LOWER1 + LOWER2)
Main tone + Layered tone
(UPPER1 + UPPER2)
Split point
WK-1800/1600(E)-16~20 03.7.31, 5:20 PMPage 18 Adobe PageMaker 6.5J/PPC
E-19
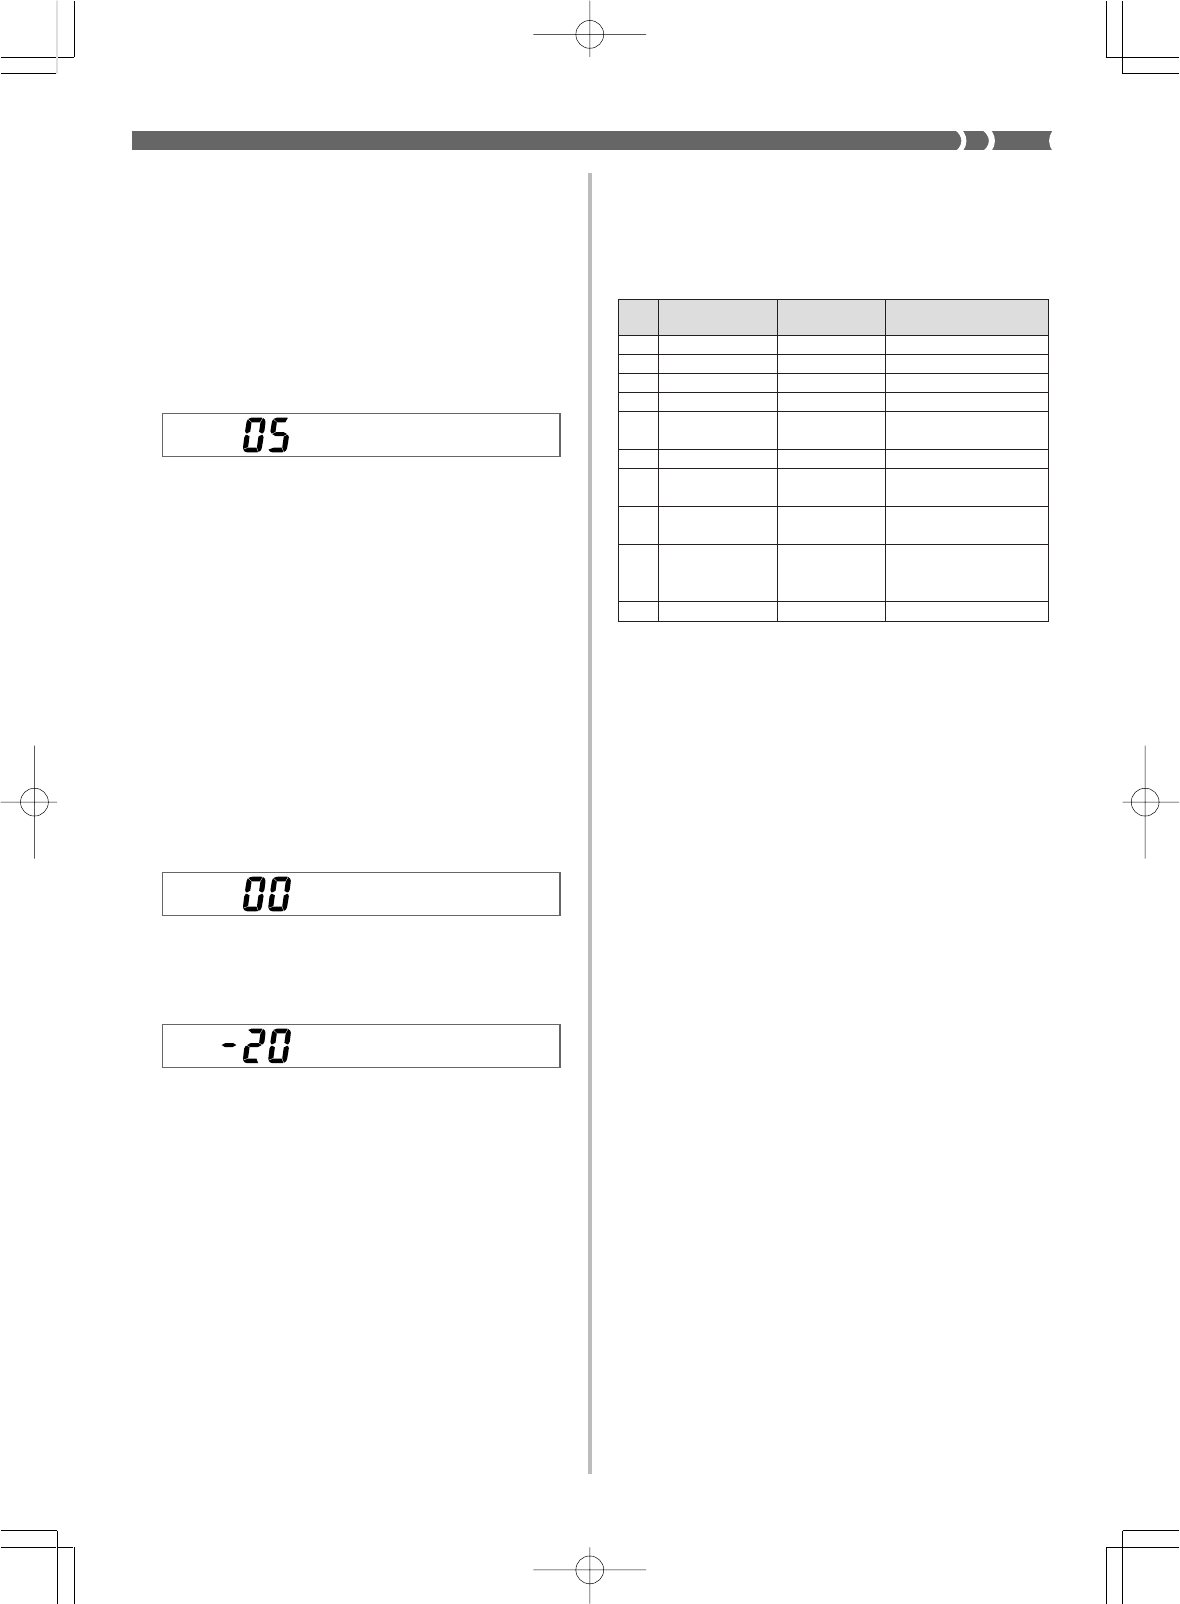
Transposing the Keyboard
Transpose lets you raise and lower the overall key of the keyboard in
semitone units. If you want to play accompaniment for a vocalist
whose sings in a specific key, for example, you can use transpose to
change the key of the keyboard without having to learn to play the
song in another key.
To transpose the keyboard
Use the TRANSPOSE buttons (왖 and 왔) to change the trans-
pose setting of the keyboard.
Example: To transpose the keyboard five semitones upwards.
❚
NOTES
❚
•The keyboard can be transposed within a range of –12 (one octave
downwards) to +12 (one octave upwards).
•The default transpose setting is 00 when keyboard power is turned on.
•The display changes from the transpose screen back to its normal screen
if you do not perform any key operation for about three seconds.
•To return the transpose setting its initial default of 00, display the trans-
pose screen and press the TRANSPOSE buttons (왖 and 왔) at the same
time.
•The transpose setting also affects the sequencer and Auto Accompani-
ment. It does not, however, affect Auto Accompaniment drum parts.
Tuning the Keyboard
The tuning feature lets you fine tune the keyboard to match the tun-
ing of another musical instrument.
To tune the keyboard
1.
Press the TUNE/MIDI button to display the tuning
screen.
•With the WK-1600/1630, this button is named TUNE.
2.
Use [+] and [–] buttons to change the tuning setting
of the keyboard.
Example: To lower the tuning by 20.
❚
NOTES
❚
•The keyboard can be tuned within a range of –50 cents to 50 cents (±50
cents*).
* 100 cents is equivalent to one semitone.
•The default tuning setting is 00 when keyboard power is turned on.
•The display changes from the tuning screen back to its normal screen if
you do not perform any key operation for about five seconds.
•To return the tuning setting to its initial default of 00, display the tuning
screen and press the [+] and [–] buttons at the same time.
•The tuning setting also affects the sequencer and Auto Accompaniment.
It does not, however, affect Auto Accompaniment drum parts.
Trans .
Tune
Tune
Using DSP Effects
DSP effects make it possible for you to add a variety nuances to your
music quickly and easily. The following is a list of 10 DSP effects that
are available. Try using each one to find out how it changes the sound
produced by the keyboard. Note that only one effect can be applied
at a time.
No. Effect Name Display Description
Indicator
0 Reverb 1 Reverb1 Deep reverb
1 Reverb 2 Reverb2 Medium reverb
2 Reverb 3 Reverb3 Shallow reverb
3 Chorus Chorus More depth and breadth
4 Tremolo Tremolo Slight modulation of vol-
ume
5 Phase Shifter Phaser Rotary speaker effect
6 Organ Speaker Organ Speaker Electronic organ rotary
speaker effect
7 Enhancer Enhancer Attack effect by enhanc-
ing high harmonics
8 Flanger Flanger
Jet plane effect that caus-
es the sound to build and
then decay
9 EQ Loudness Loudness Enhanced lower tones
733A-E-021A
WK-1800/1600(E)-16~20 03.7.31, 5:20 PMPage 19 Adobe PageMaker 6.5J/PPC
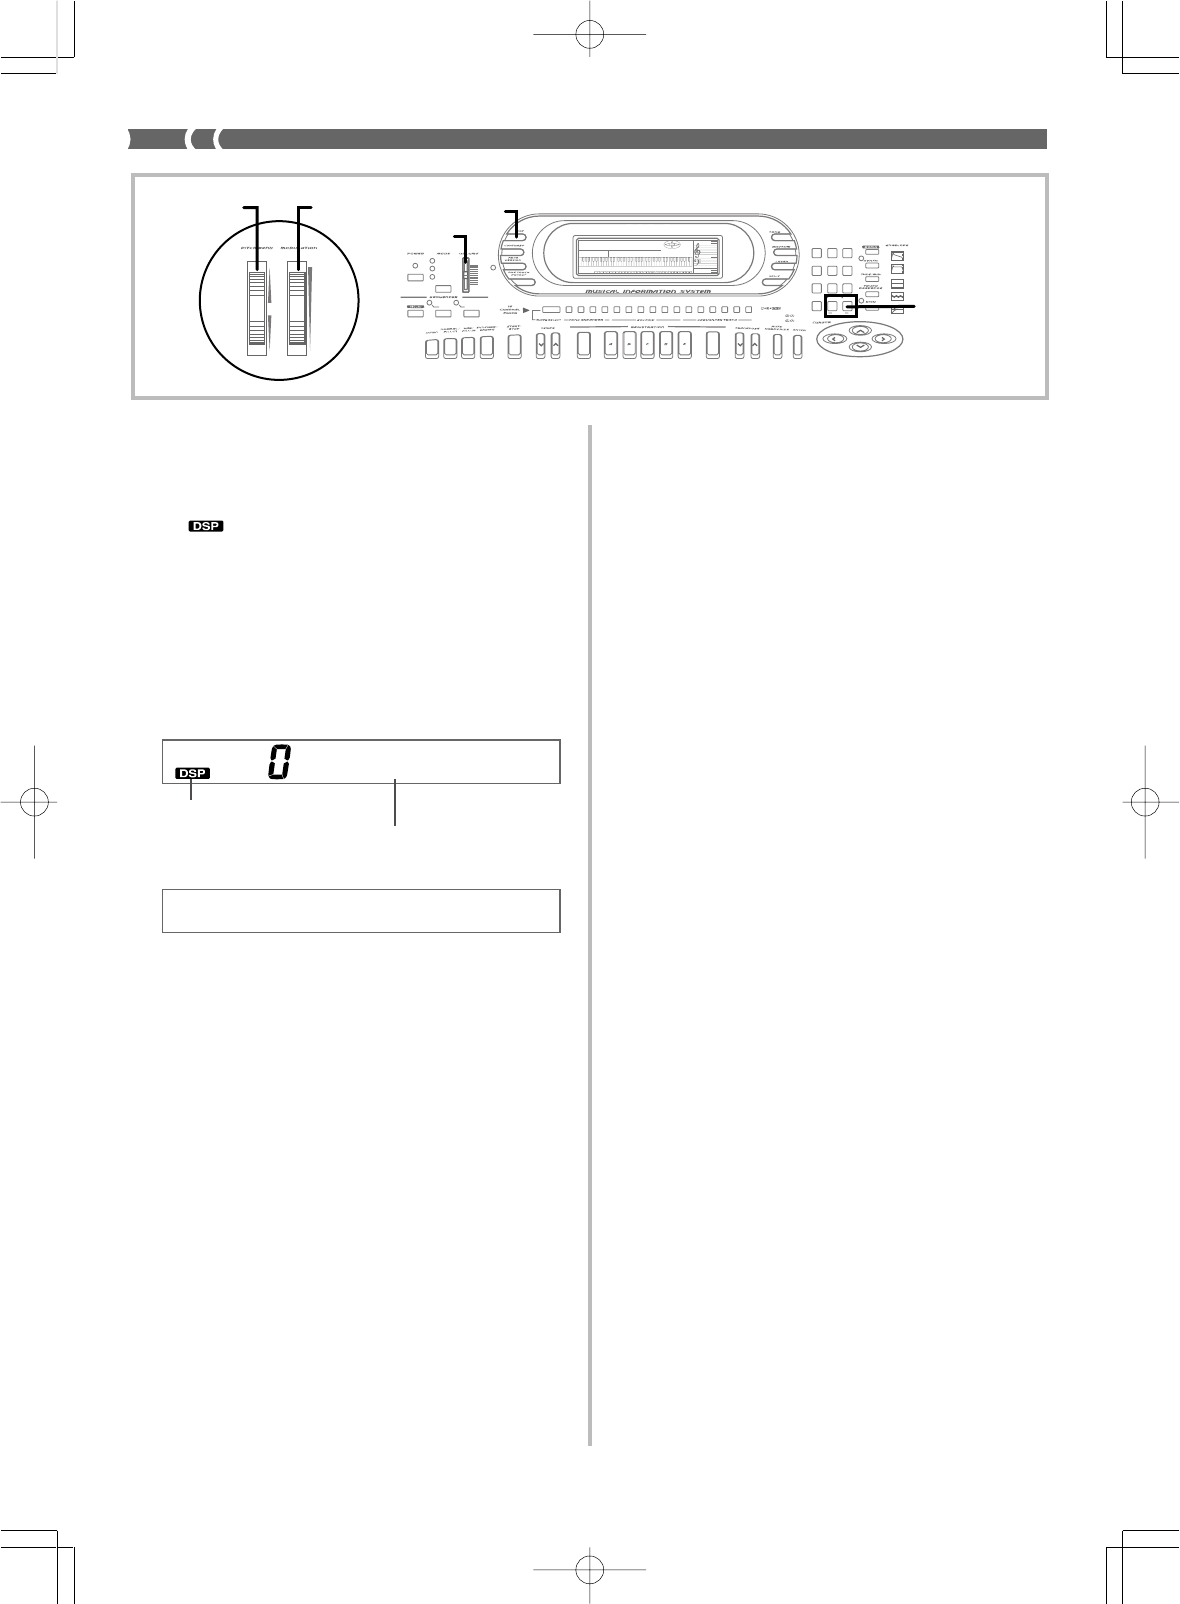
E-20
Using the PITCH BEND Wheel
As its name suggests, the PITCH BEND wheel lets you “bend” the
pitch of a sound. This makes it possible to add a touch of realism to
saxophone and other tones.
To use the PITCH BEND wheel
While holding down a keyboard key with your right hand,
use your left hand to rotate the PITCH BEND wheel up and
down.
•Releasing the PITCH BEND wheel returns the note to its original
pitch.
❚
NOTES
❚
•With saxophone and electrical guitar tones, the most realistic sounding
effects can be produced if you play notes and operate the PITCH BEND
wheel simultaneously.
•See “Pitch Bend Range (Initial Default: 02)” on page E-59 for changing
the bend range of the PITCH BEND wheel.
•Never turn on keyboard power while the PITCH BEND wheel is rotated.
Using the MODULATION Wheel
Modulation applies vibrato, which modulates the pitch of a note. It
works best with notes that are sustained (held) by keeping a key-
board key held down, especially when playing the melody with a
violin or other similar tone.
To use the MODULATION Wheel
While playing melody notes with your right hand, rotate
the MODULATION wheel with your left to apply vibrato
to the notes.
•The amount of vibrato applied depends on how far you rotate the
MODULATION wheel upwards. Setting the wheel to its neutral
position (rotated as far downwards as it can go) turns vibrato off.
❚
NOTES
❚
•Modulation can be used to add greater expression to sustained melody
notes being played using a violin, synthetic reed, or other similar tone.
•Modulation affects different tones in different ways.
733A-E-022A
AMP ENVELOPE
00 FLAT
01-17 VIBRATO
18-45 OTHERS
DECAY
SUSTAIN
PITCH ENVELOPE
MIN
MAX
FULL RANGE
CHORD
CASIO CHORD
SONG
FINGERED
PATT ER N
EXTERNAL
INTERNAL UPPER1
CH 1
UPPER2
CH 2
LOWER1
CH 3
LOWER2
STOREBANK
CH 4
ACC VOL.
CH 5
CHORD1
CH 6
CHORD2
CH 7
CHORD3
CH 8
BASS
CH 9
RHYTHM
CH 10
TR1
CH 11
TR2
CH 12
TR3
CH 13
TR4
CH 14
TR5
CH 15
TR6
CH 16
789
456
1
0
23
PARAMETER RESET:
DELETE
/YESS/NO
MAIN MANU/
CHANNEL VOLUME:
SUB MANU/
CHANNEL SELECT:
DSP
MAIN VOLUME
MODULATIONPITCH BEND
[+]/
[
–]
Turning DSP Effects On and Off
You can turn the currently selected DSP effect on and off by pressing
the DSP button.
•The current DSP effect’s on/off status is indicated on the display
by the indicator. The digital effect is on while this indicator
is displayed, and off when it is not displayed.
•Press the DSP button to toggle the currently selected digital effect
on and off.
To turn the DSP effect on and off
1.
Press the DSP button.
•This causes one of the two digital effect screens shown be-
low to appear.
When the current digital effect is turned on
When the current digital effect is turned off
•The above screens clear if you do not perform any operation
within about five seconds.
2.
While a digital effect screen is on the display, use the
[+] and [–] buttons to scroll through the digital ef-
fects, until the one you want is displayed.
❚
NOTES
❚
•Playing a demo tune (page E-8) automatically changes the effect to the
one that is assigned to the tune. You cannot change or cancel a demo
tune effect.
•Changing the effect setting while sound is being output by the keyboard
causes a slight break in the sound when the effect changes.
•The DSP effect is applied not only to the notes you play on the key-
board, but also to rhythms and Auto Accompaniment patterns. Note that
effects 3 through 6, and effect 8 can produce a mood that is not suitable
for certain types of music when they are applied to rhythms and Auto
Accompaniment. When this happens, you can turn off application of the
effect to the rhythm and Auto Accompaniment by using the Mixer to set
the effect send volume of the accompaniment channel to zero. For de-
tails on the actual procedure for doing this, see “Changing the Parame-
ters of a Channel” on page E-30.
•Setting the keyboard’s MAIN VOLUME slider to high volume when Ef-
fect 9 (EQ Loudness) is being applied can cause distortion for certain
tones and rhythm patterns. When this happens, lower the MAIN VOL-
UME setting.
DSP Of f
Reverb1
y
Indicates effect is turned on
Effect number and name
WK-1800/1600(E)-16~20 03.7.31, 5:20 PMPage 20 Adobe PageMaker 6.5J/PPC
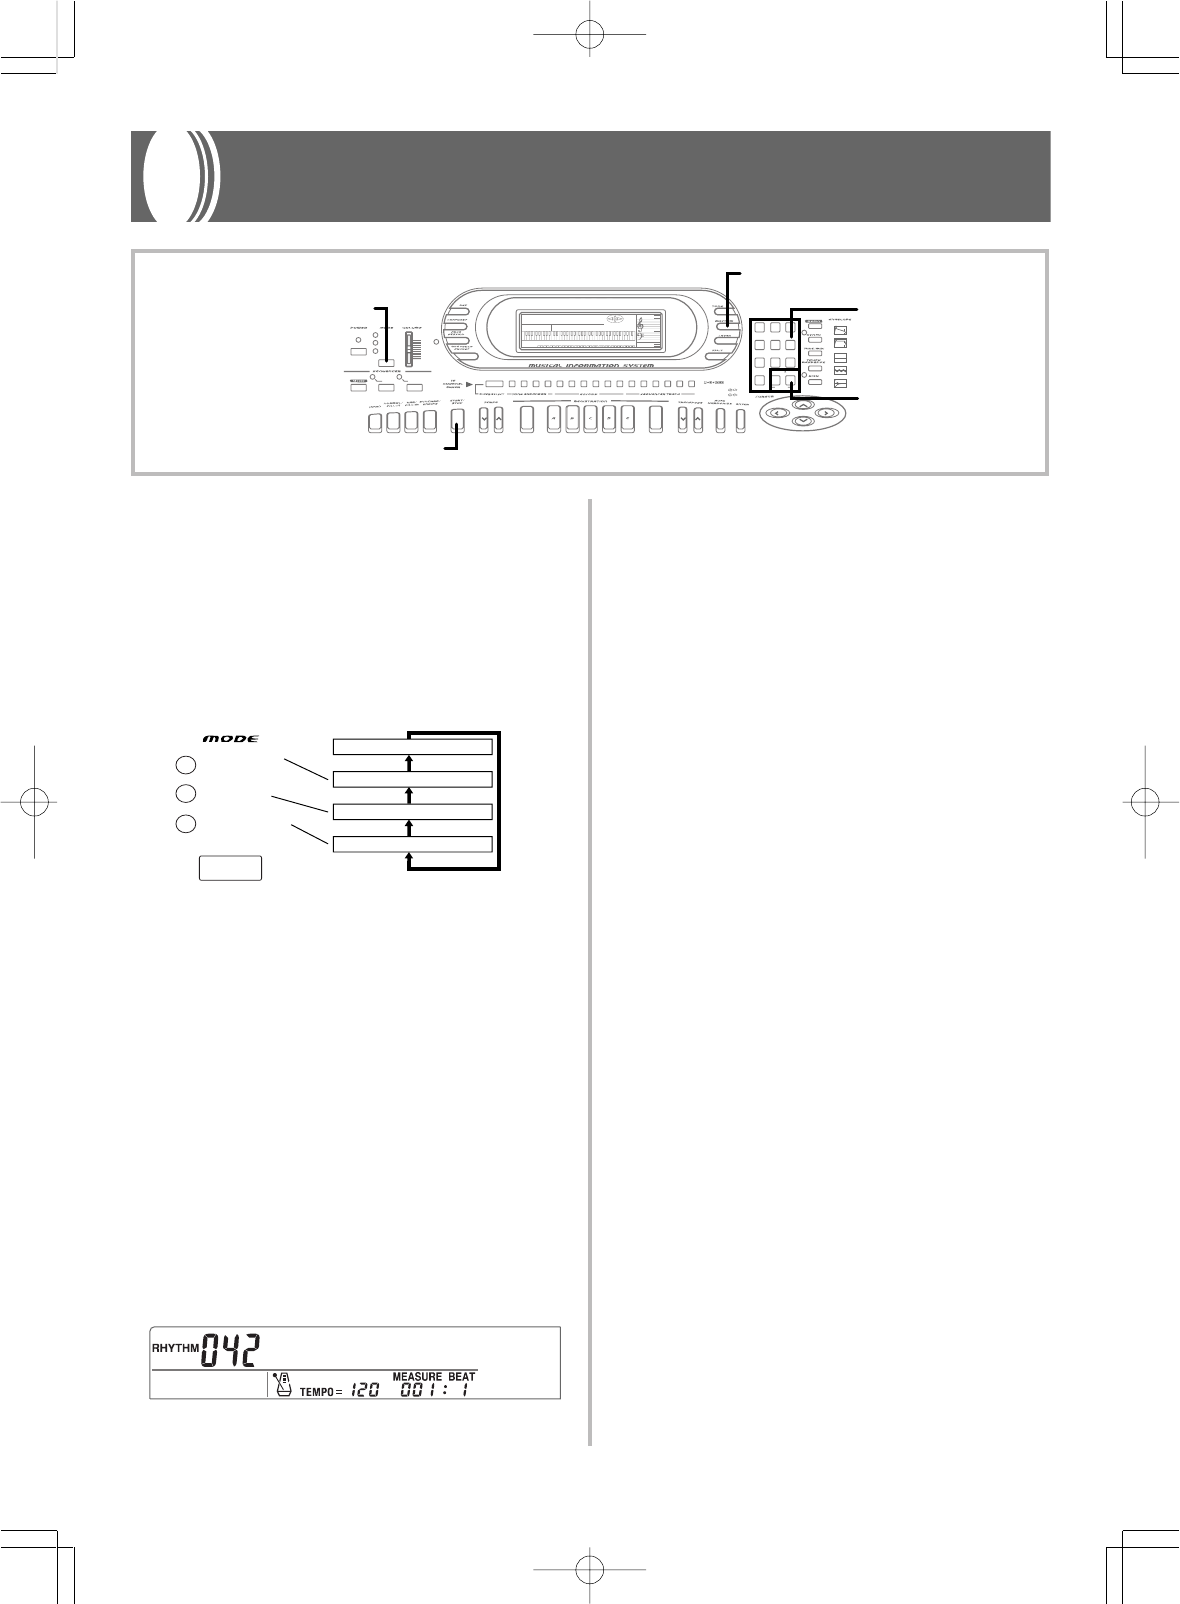
E-21
733A-E-023A
Auto Accompaniment
This keyboard automatically plays bass and chord parts in accordance
with the chords you finger. The bass and chord parts are played us-
ing sounds and tones that are automatically selected in accordance
with the rhythm you are using. All of this means that you get full,
realistic accompaniments for the melody notes you play with your
right hand, creating the mood of an one-person ensemble.
About the MODE Button
Use the MODE button to select the accompaniment mode you want
to use. Each press of the MODE button cycles through the available
accompaniment modes as shown in the illustration below.
•Only rhythm sounds are produced when all accompaniment mode
lamps are off.
•The currently selected accompaniment mode is shown by the mode
lamps above the MODE button. Information on using each of these
modes starts from page E-22.
Selecting a Rhythm
This keyboard provides you with 120 exciting built-in rhythms that
you can select using the following procedure.
To select a rhythm
1.
Find the rhythm you want to use in the keyboard’s
Rhythm List and note its rhythm number.
2.
Press the RHYTHM button.
3.
Use the number keys to input the three-digit rhythm
number for the rhythm you want to select.
Example: To select “042 JUNGLE” press 0, 4 then 2.
❚
NOTES
❚
•Always input three digits for rhythm numbers, including any leading ze-
ros if necessary (as in 032). The rhythm number input display clears
after a few seconds if you don’t input three digits.
•You can also change the displayed rhythm number using [+] and [–].
•The 10 rhythm numbers 120 to 129 are provided for storage of rhythm
patterns created by you using the Pattern Sequencer. You can also re-
call these rhythms using the procedure described above. Simply input a
rhythm number from 000 to 119.
•Rhythms 110 through 119 (FOR PIANO II) are made up of chord ac-
companiments only, without drum or other rhythm sounds. Because of
this, these rhythms do not sound while auto accompaniment is turned
off (all the indicator lamps above the MODE button are off). You can
specify chords by using these rhythms while auto accompaniment is
turned on (indicated when one of the indicator lamps above the MODE
button is lit) or with Free Session.
Playing a Rhythm
Press the START/STOP button to start play of the currently selected
rhythm. You can then play along with the rhythm on the keyboard.
To stop rhythm play, press START/STOP again.
❚
NOTE
❚
Chords will sound along with the rhythm if any of the three accompani-
ment mode lamps above the MODE button is lit. If you want to play the
rhythm pattern without chords, press the MODE button until all of the lamps
are off.
Jun
g
le
FULL RANGE
CHORD
CASIO CHORD
FINGERED
Auto Accompaniment off
FULL RANGE CHORD
FINGERED
CASIO CHORD
AMP ENVELOPE
00 FLAT
01-17 VIBRATO
18-45 OTHERS
DECAY
SUSTAIN
PITCH ENVELOPE
MIN
MAX
FULL RANGE
CHORD
CASIO CHORD
SONG
FINGERED
PATT ER N
EXTERNAL
INTERNAL UPPER1
CH 1
UPPER2
CH 2
LOWER1
CH 3
LOWER2
STOREBANK
CH 4
ACC VOL.
CH 5
CHORD1
CH 6
CHORD2
CH 7
CHORD3
CH 8
BASS
CH 9
RHYTHM
CH 10
TR1
CH 11
TR2
CH 12
TR3
CH 13
TR4
CH 14
TR5
CH 15
TR6
CH 16
789
456
1
0
23
PARAMETER RESET:
DELETE
/YESS/NO
MAIN MANU/
CHANNEL VOLUME:
SUB MANU/
CHANNEL SELECT:
RHYTHM
MODE
START/STOP
Number ke
ys
[+]/[
–]
WK-1800/1600(E)-21~27 03.7.31, 5:20 PMPage 21 Adobe PageMaker 6.5J/PPC
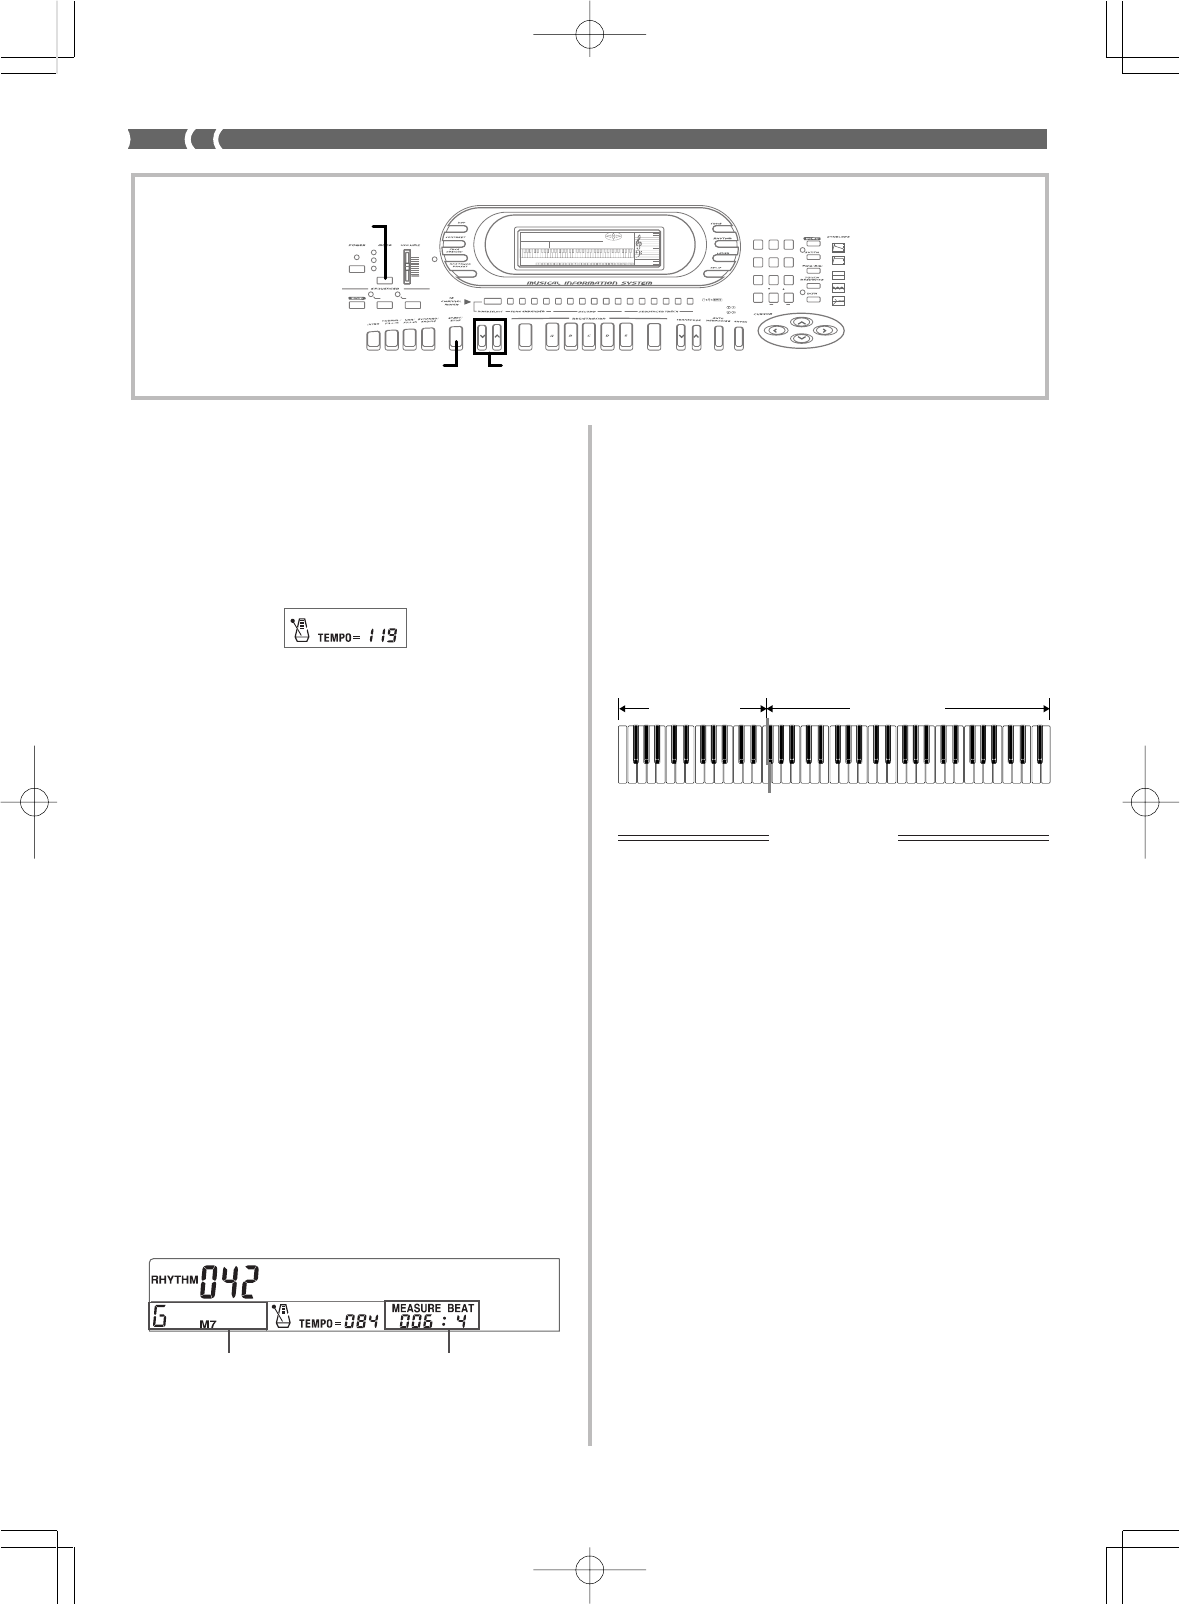
E-22
Adjusting the Tempo
You can adjust the tempo (number of beats per minute) of rhythm
play within a range of 30 to 255.
To adjust the tempo
Press one of the TEMPO buttons to increase [왖] or de-
crease [왔] the tempo setting.
❚
NOTES
❚
•Pressing both TEMPO buttons (왖 and 왔) at the same time resets the
tempo to the default value of the currently selected rhythm.
•The tempo value indicates the number of quarter note beats per minute.
Using Auto Accompaniment
The following procedure describes how to use the keyboard’s Auto
Accompaniment feature. Before starting, you should first select the
rhythm you want to use and set its tempo to the value you want.
To use Auto Accompaniment
1.
Use the MODE button to select FULL RANGE
CHORD, FINGERED, or CASIO CHORD as the ac-
companiment mode.
•The currently selected accompaniment mode is the one whose
lamp is lit. See “About the MODE Button” on page E-21 for
details.
2.
Press the START/STOP button to start play of the cur-
rently selected rhythm.
3.
Play a chord to start Auto Accompaniment.
•The actual procedure you should use to play a chord depends
on the currently selected accompaniment mode. Refer to the
following pages for details on chord play.
CASIO CHORD........................... Page E-22
FINGERED ................................... Page E-23
FULL RANGE CHORD ............. Page E-23
733A-E-024A
4.
To stop Auto Accompaniment play, press the START/
STOP button again.
■
CASIO CHORD
This method of chord play makes it possible for anyone to easily play
chords, regardless of previous musical knowledge and experience.
The following describes the CASIO CHORD “Accompaniment key-
board” and “Melody keyboard”, and tells you how to play CASIO
CHORDs.
CASIO CHORD Accompaniment Keyboard and Melody
Keyboard
Melody keyboard
Accompaniment
keyboard
IMPORTANT!
The accompaniment keyboard can be used for playing chords only. No
sound will be produced if you try playing single melody notes on the ac-
companiment keyboard.
Name of chord being played Current measure and beat
Jun
g
le
AMP ENVELOPE
00 FLAT
01-17 VIBRATO
18-45 OTHERS
DECAY
SUSTAIN
PITCH ENVELOPE
MIN
MAX
FULL RANGE
CHORD
CASIO CHORD
SONG
FINGERED
PATTERN
EXTERNAL
INTERNAL UPPER1
CH 1
UPPER2
CH 2
LOWER1
CH 3
LOWER2
STOREBANK
CH 4
ACC VOL.
CH 5
CHORD1
CH 6
CHORD2
CH 7
CHORD3
CH 8
BASS
CH 9
RHYTHM
CH 10
TR1
CH 11
TR2
CH 12
TR3
CH 13
TR4
CH 14
TR5
CH 15
TR6
CH 16
789
456
1
0
23
PARAMETER RESET:
DELETE
/YESS/NO
MAIN MANU/
CHANNEL VOLUME:
SUB MANU/
CHANNEL SELECT:
MODE
TEMPOSTART/STOP
WK-1800/1600(E)-21~27 03.7.31, 5:20 PMPage 22 Adobe PageMaker 6.5J/PPC
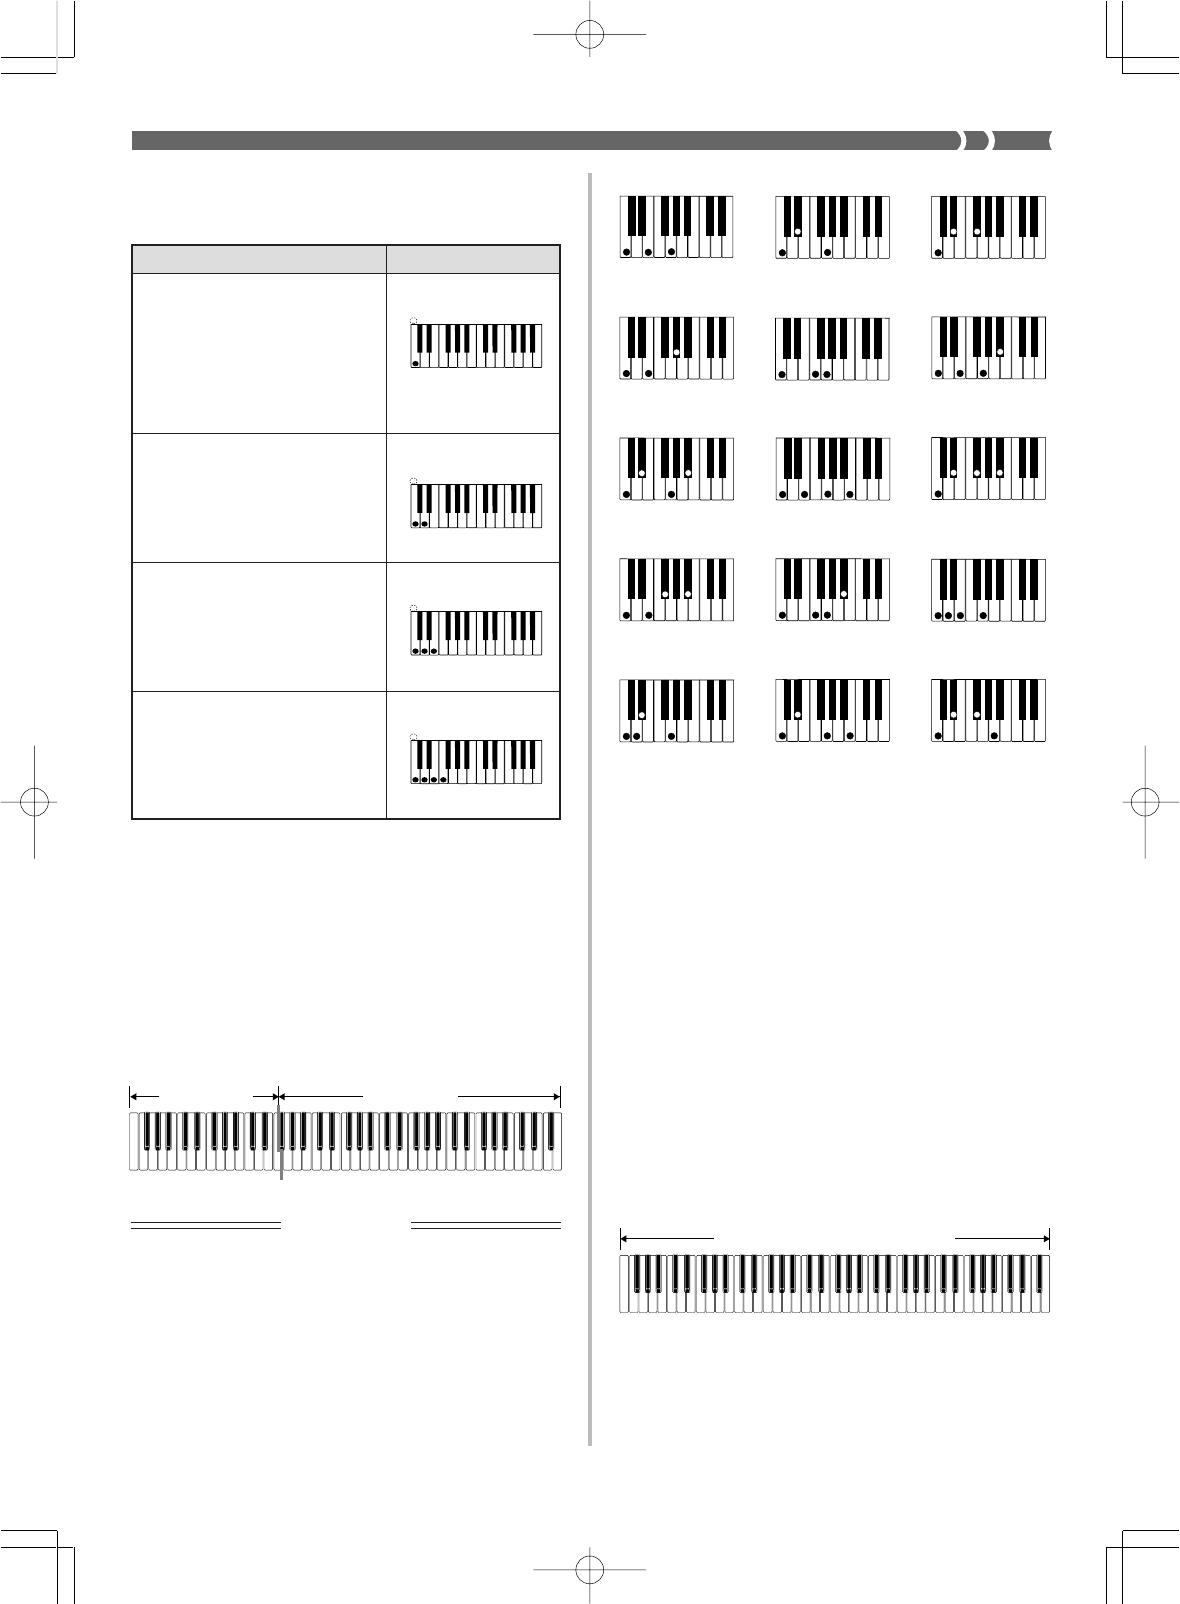
E-23
733A-E-025A
Chord Types
CASIO CHORD accompaniment lets you play four types of chords
with minimal fingering.
❚
NOTE
❚
It makes no difference whether you press black or white keys to the right
of a major chord key when playing minor and seventh chords.
■
FINGERED
FINGERED provides you with a total of 15 different chord types. The
following describes the FINGERED “Accompaniment keyboard” and
“Melody keyboard”, and tells you how to play a C-root chord using
FINGERED.
FINGERED Accompaniment Keyboard and Melody Key-
board
Major chords
Major chord names are marked above
the keys of the accompaniment key-
board. Note that the chord produced
when you press an accompaniment
keyboard does not change octave, re-
gardless of which key you use to play
it.
Minor chords (m)
To play a minor chord, keep the ma-
jor chord key depressed and press any
other accompaniment keyboard key
located to the right of the major chord
key.
Seventh chords (7)
To play a seventh chord, keep the
major chord key depressed and press
any other two accompaniment key-
board keys located to the right of the
major chord key.
Minor seventh chords (m7)
To play a minor seventh chord, keep
the major chord key depressed and
press any other three accompaniment
keyboard keys located to the right of
the major chord key.
ExampleChord Types
C Major (C)
C seventh (C7)
C minor (Cm)
C minor seventh (Cm7)
IMPORTANT!
The accompaniment keyboard can be used for playing chords only. No
sound will be produced if you try playing single melody notes on the ac-
companiment keyboard.
Melody keyboard
Accompaniment
keyboard
See the “Fingered Chord Chart” on page A-6 for details on playing
chords with other roots.
*1: Inverted fingerings cannot be used. The lowest note is the root.
*2: The same chord can be played without pressing the 5th G.
❚
NOTES
❚
•Except for the chords specified in note*1 above, inverted fingerings (i.e.
playing E-G-C or G-C-E instead of C-E-G) will produce the same chords
as the standard fingering.
•Except for the exception specified in note*2 above, all of the keys that
make up a chord must be pressed. Failure to press even a single key
will not play the desired FINGERED chord.
■
FULL RANGE CHORD
This accompaniment method makes it possible to play a total of 38
chord variations: the 15 available with FINGERED plus 23 addition-
al variations. The keyboard interprets any input of three or more keys
that matches a FULL RANGE CHORD pattern to be a chord. Any
multi-key input that is not a FULL RANGE CHORD pattern is inter-
preted as melody play. Because of this, there is no need for a separate
accompaniment keyboard, and the entire keyboard from end-to-end
can be used for both melody and chords.
FULL RANGE CHORD Accompaniment Keyboard and
Melody Keyboard
C7 *2
Cm7 *2
C Cm Cdim
Caug *1Csus4
Cmaj7 *2Cm7-5
C7-5 *1C7sus4 Cadd9 *2
Cmadd9 *2CmM7 *2Cdim7 *1
Accompaniment keyboard/Melody keyboard
CCDE FF
#
E
#
GA
AB
B
CCDE F
E
#
CCDE FF
#
E
#
GA
AB
B
CCDE F
E
#
CCDE FF
#
E
#
GA
AB
B
CCDE F
E
#
CCDE FF
#
E
#
GA
AB
B
CCDE F
E
#
WK-1800/1600(E)-21~27 03.7.31, 5:20 PMPage 23 Adobe PageMaker 6.5J/PPC
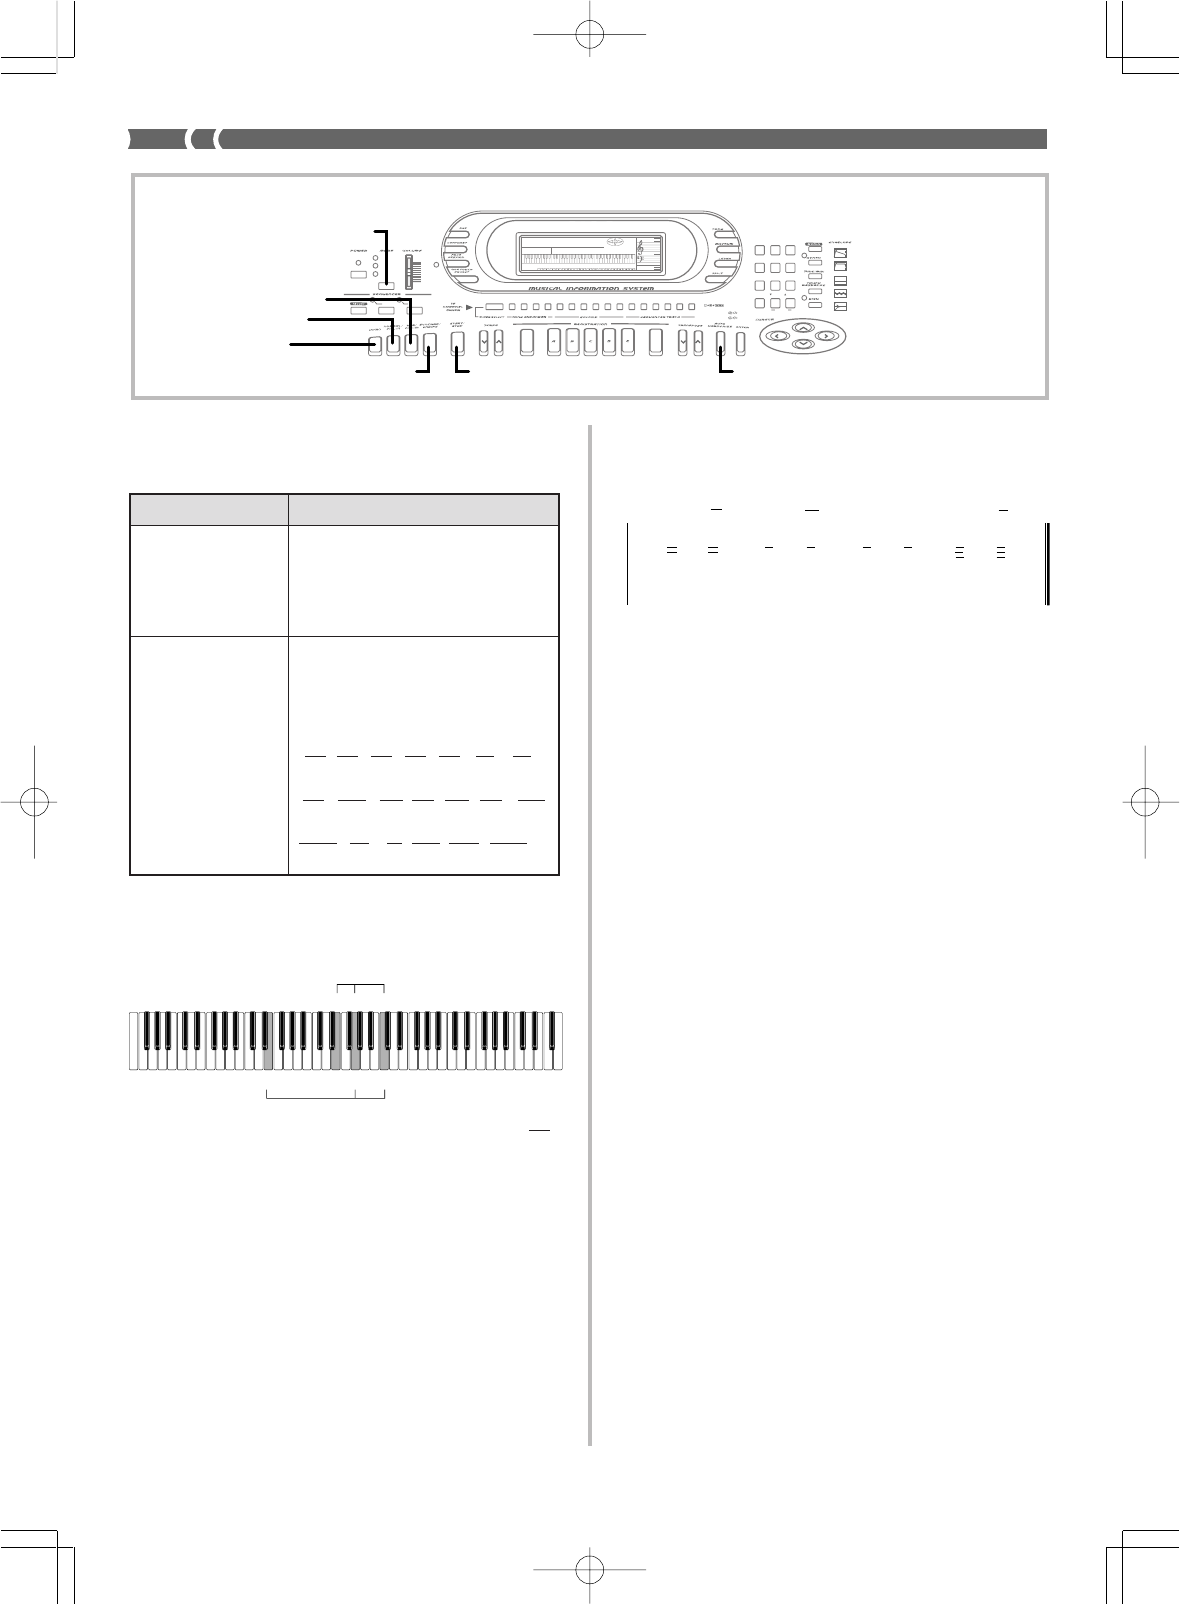
E-24
733A-E-026A
Example: To play the chord C major.
Either of the fingerings shown in the illustration below will produce
C major.
11
11
1........ Chord C
22
22
2........ Chord C
C
E
Chords Recognized by This Keyboard
The following table identifies patterns that are recognized as chords
by FULL RANGE CHORD.
E
EG C
GC
2
1
Music Example
Tone: 016
Rhythm: 002
Tempo: 072
Using an Intro Pattern
This keyboard lets you insert a short intro into a rhythm pattern to
make startup smoother and more natural.
The following procedure describes how to use the Intro feature. Be-
fore starting, you should first select the rhythm you want to use, and
set the tempo.
PREPARATION
•Select a rhythm and set its tempo.
•Select the accompaniment mode you want to use.
To insert an intro
1.
Press the INTRO button to start the selected rhythm
with an intro pattern.
•With the above setup, the intro pattern is played and the auto
accompaniment with intro pattern starts as soon as you play
chords on the accompaniment keyboard.
❚
NOTE
❚
The standard rhythm pattern starts to play after the intro pattern is com-
plete.
Using a Fill-in Pattern
Fill-in patterns let you momentarily change the rhythm pattern to
add some interesting variation to your performances.
The following procedure describes how to use the Fill-in feature.
To insert a fill-in
1.
Press the START/STOP button to start rhythm play.
2.
Press the NORMAL/FILL-IN button to insert a fill-in
pattern for the rhythm you are using.
❚
NOTE
❚
The fill-in pattern does not play if you press the NORMAL/FILL-IN button
while an intro pattern is playing.
❚
NOTES
❚
•As with the FINGERED mode (page E-23), you can play the notes that
form a chord in any combination (1).
•When the lowest note of a chord is separated from its neighboring note
by six or more semitones, the lowest note becomes the bass note (2).
4
4
DBmGA
4
4
D
C
#
Bm
A
A
G
Pattern Type
FINGERED
Number of Chord Variations
The 15 chord patterns shown under
“FINGERED” on page E-23. See the
“Fingered chord chart” on page A-6 for
details on playing chords with other
roots.
23 standard chord fingerings. The fol-
lowing are examples of the 23 chords
available with C as the bass note.
Standard Fingerings D
C
E
C
F
C
G
C
A
C
B
C
B
C
C#m
C
Dm
C
Fm
C
Gm
C
Am
C
B
m
C
Dm7-5
C
A
7
C
F7
C
Fm7
C
Gm7
C
A
add9
C
C6 • Cm6 • C69
••••• •
•••• •
••••••
C#
C
AMP ENVELOPE
00 FLAT
01-17 VIBRATO
18-45 OTHERS
DECAY
SUSTAIN
PITCH ENVELOPE
MIN
MAX
FULL RANGE
CHORD
CASIO CHORD
SONG
FINGERED
PATTERN
EXTERNAL
INTERNAL UPPER1
CH 1
UPPER2
CH 2
LOWER1
CH 3
LOWER2
STOREBANK
CH 4
ACC VOL.
CH 5
CHORD1
CH 6
CHORD2
CH 7
CHORD3
CH 8
BASS
CH 9
RHYTHM
CH 10
TR1
CH 11
TR2
CH 12
TR3
CH 13
TR4
CH 14
TR5
CH 15
TR6
CH 16
789
456
1
0
23
PARAMETER RESET:
DELETE
/YESS/NO
MAIN MANU/
CHANNEL VOLUME:
SUB MANU/
CHANNEL SELECT:
MODE
NORMAL/FILL-IN
VARIATION/FILL-IN
INTRO
START/STOP AUTO HARMONIZ
E
SYNCHRO/ENDING
WK-1800/1600(E)-21~27 03.7.31, 5:21 PMPage 24 Adobe PageMaker 6.5J/PPC
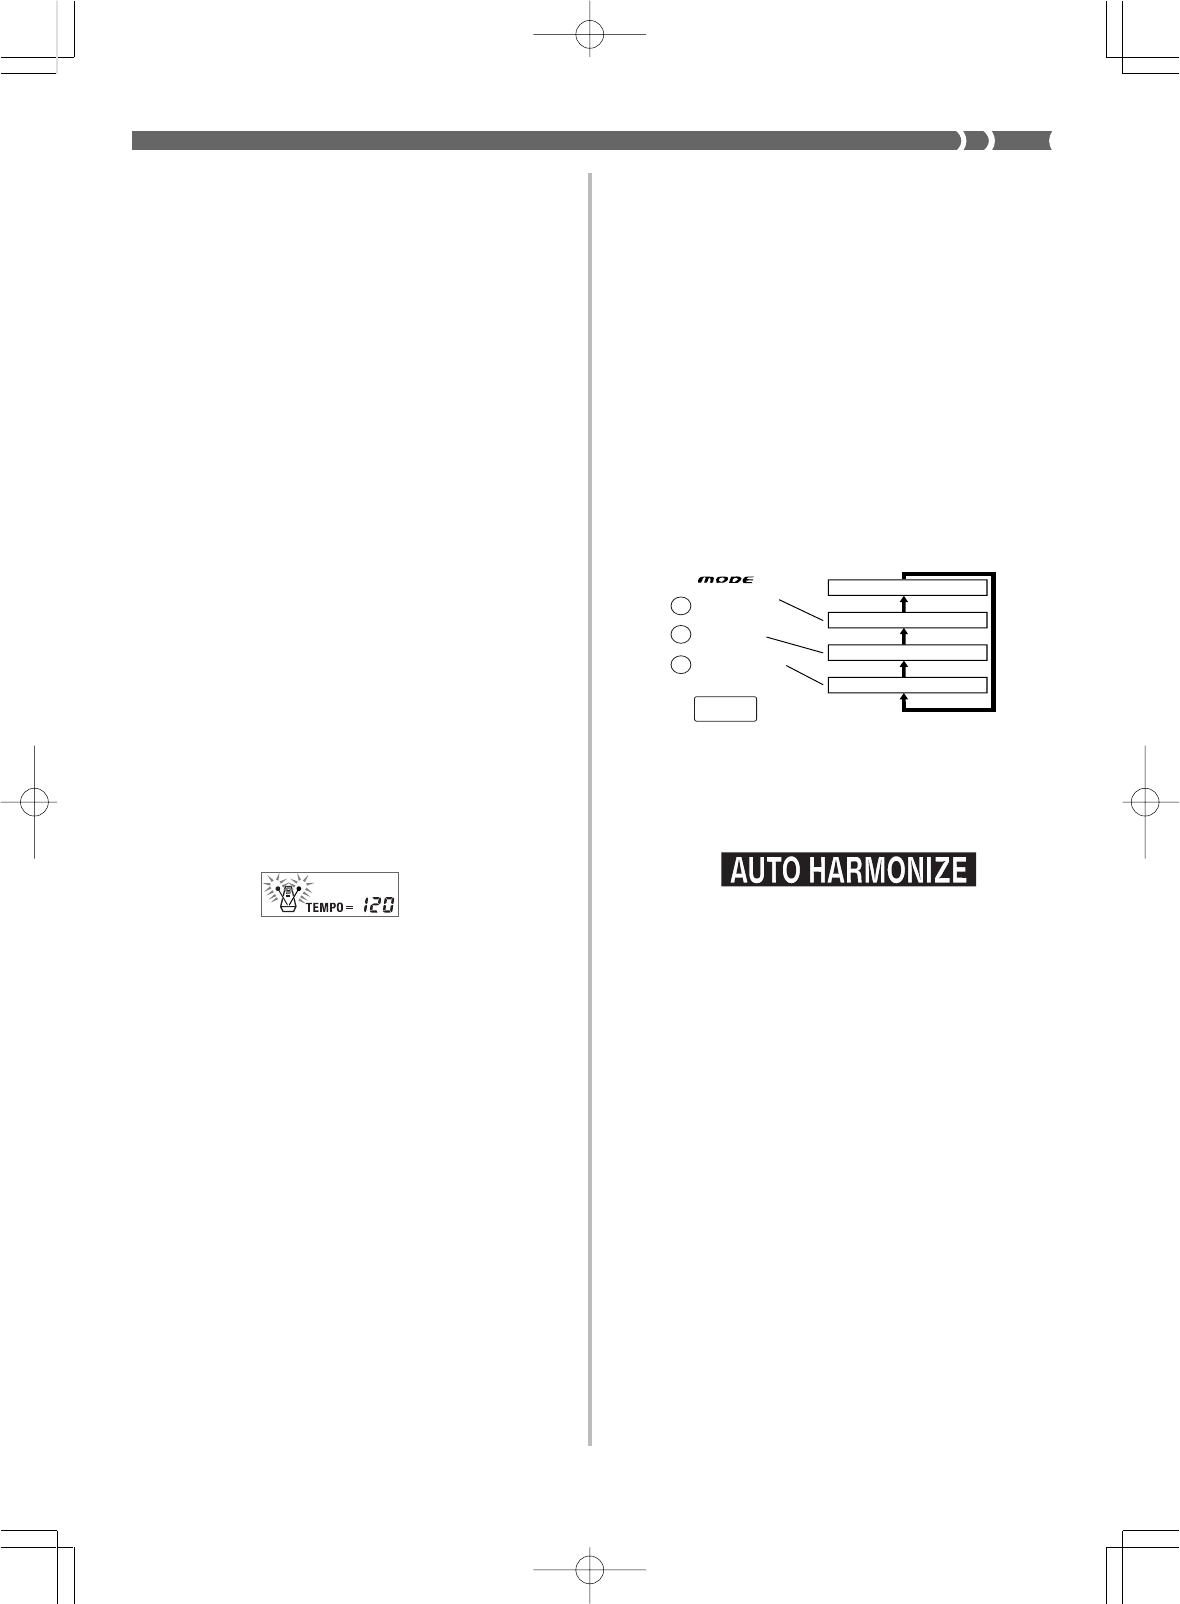
E-25
❚
NOTE
❚
The timing when the ending pattern starts depends on when you press the
SYNCHRO/ENDING button. If you press the button before the second beat
of the current measure, the ending pattern starts playing immediately. Press-
ing the button at any point in the measure after the second beat results in
the ending pattern playing from the beginning of the following measure.
Using Auto Harmonize
When you are using Auto Accompaniment, Auto Harmonize auto-
matically adds three additional notes to your melody in accordance
with the chord that is being played. The result is a harmony effect
that makes your melody line richer and fuller.
To use Auto Harmonize
1.
Use the MODE button to select FINGERED or CASIO
CHORD as the accompaniment mode.
•The currently selected accompaniment mode is the one whose
lamp is lit. See “About the MODE Button” on page E-21 for
details.
2.
Press AUTO HARMONIZE to turn on Auto Harmo-
nize.
•This causes the AUTO HARMONIZE indicator to appear on
the display.
3.
Start Auto Accompaniment play, and play something
on the keyboard.
4.
To turn off Auto Harmonize, press AUTO HARMO-
NIZE.
•This causes the AUTO HARMONIZE indicator to disappear.
❚
NOTES
❚
•Auto Harmonize turns off temporarily whenever you start demo tune
play, or perform a Synthesizer or floppy disk operation (WK-1800 only).
It turns back on as soon as the operation or function that caused it to
turn off is finished.
•Note that you cannot use Auto Harmonize and layer at the same time.
•Auto Harmonize is enabled only when the Auto Accompaniment mode
is FINGERED or CASIO CHORD.
733A-E-027A
Using Variation Rhythm Patterns
In addition to the standard rhythm pattern, you can also switch to a
secondary “variation” rhythm pattern for a bit of variety .
To change to the variation rhythm pattern
1.
Press the START/STOP button to start rhythm play.
2.
Press the VARIATION/FILL-IN button to switch to the
variation pattern for the rhythm you are using.
❚
NOTE
❚
To switch back to the normal (non-variation) rhythm pattern, press the
NORMAL/FILL-IN button.
To insert a fill in into a variation rhythm
While a variation rhythm pattern is playing, press the VARI-
ATION/FILL-IN button to insert a fill in pattern for the vari-
ation rhythm you are using.
Synchro Starting Accompaniment with
Rhythm Play
You can set up the keyboard to start rhythm play at the same time
you play the accompaniment on the keyboard.
PREPARATION
•Select a rhythm and set its tempo.
•Select the accompaniment mode you want to use.
To use synchro start
1.
Press the SYNCHRO/ENDING button to put the key-
board into synchro start standby.
2.
Play a chord on the accompaniment keyboard.
•The rhythm pattern starts to play automatically as soon as
you play a chord.
❚
NOTES
❚
•Only the rhythm plays (without chords) if all the lamps above the MODE
button are off.
•If you press the INTRO button before playing anything on the keyboard,
the rhythm starts automatically with an intro pattern when you play some-
thing on the keyboard.
•To cancel synchro start standby, press the SYNCHRO/ENDING button
one more time.
Finishing with an Ending Pattern
You can end your performances with an ending pattern that brings
the rhythm you are using to a natural-sounding conclusion.
To finish with an ending pattern
While the rhythm is playing, press the SYNCHRO/END-
ING button.
•This causes the ending pattern to play, which brings rhythm ac-
companiment to an end.
FULL RANGE
CHORD
CASIO CHORD
FINGERED
Auto Accompaniment off
FULL RANGE CHORD
FINGERED
CASIO CHORD
WK-1800/1600(E)-21~27 03.7.31, 5:21 PMPage 25 Adobe PageMaker 6.5J/PPC
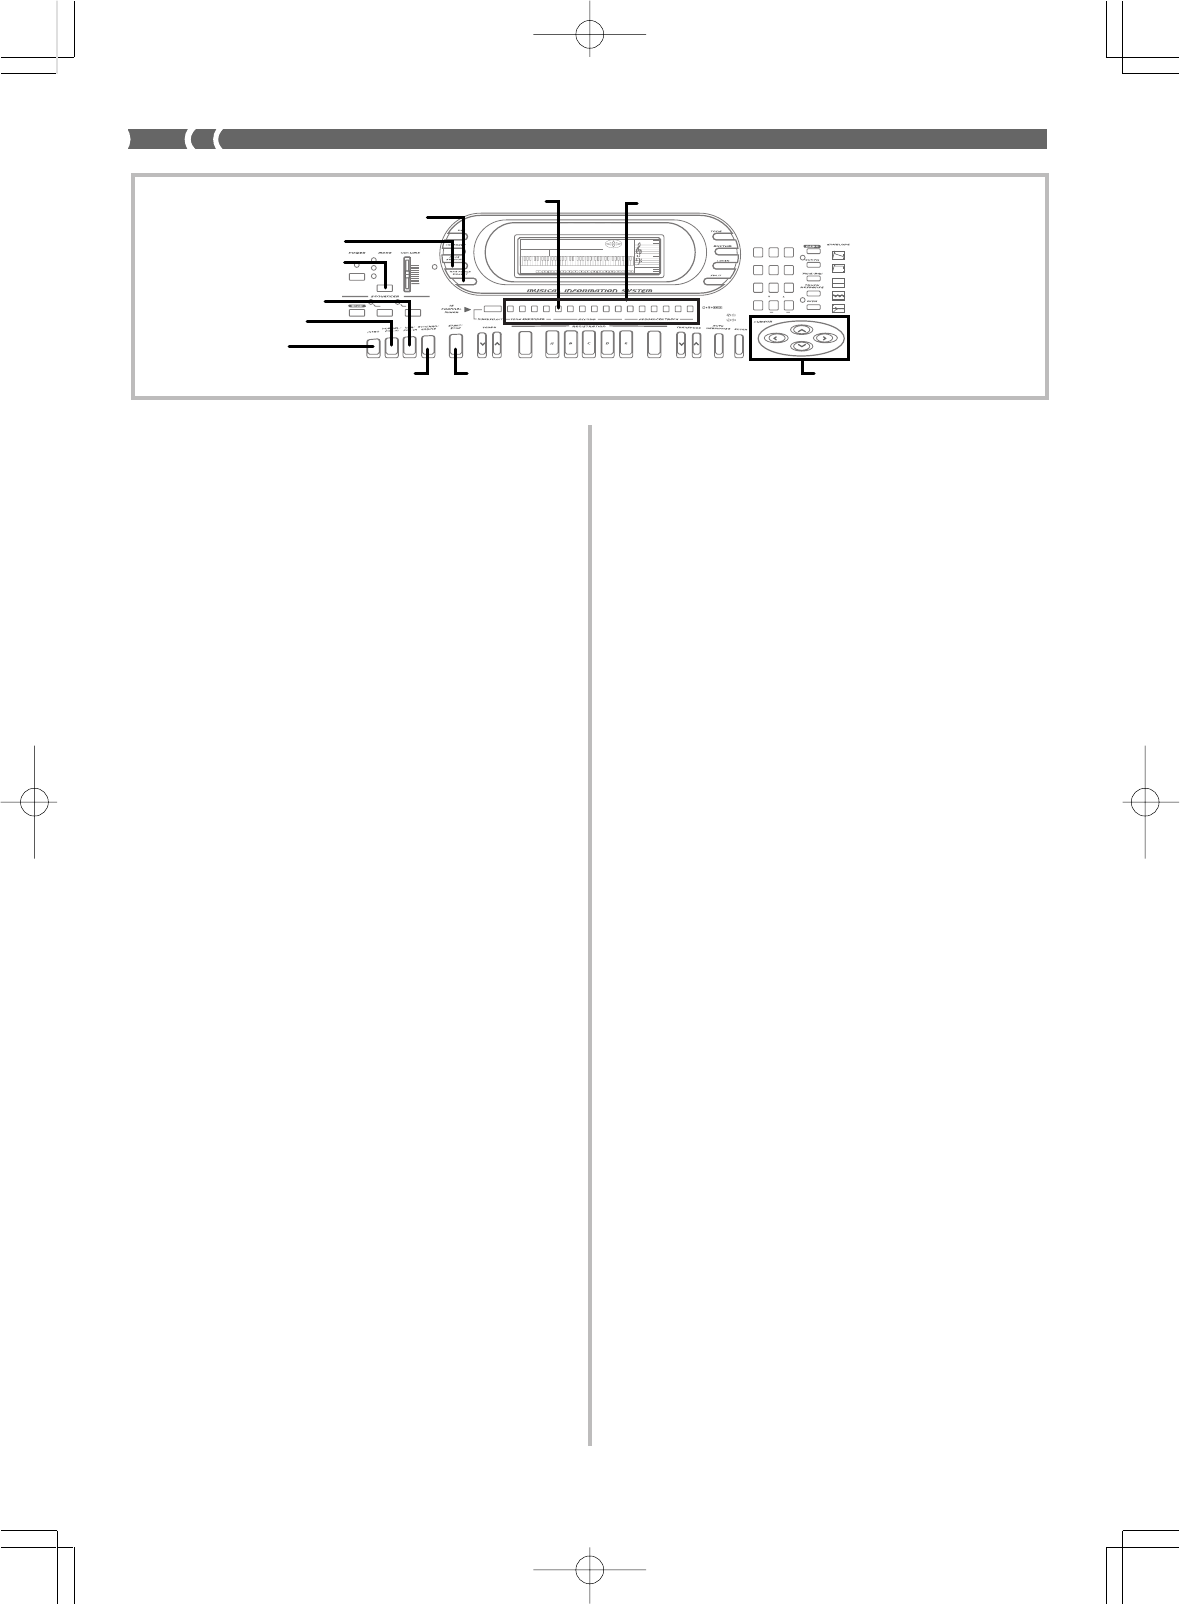
E-26
733A-E-028A
About Auto Harmonize notes and tones
The notes you play on the keyboard are called “melody notes,” while
the notes added to the melody by Auto Harmonize is called the “har-
monize notes.” Auto Harmonize normally uses the tone you selected
for the melody notes as the tone for the harmonize notes, but you can
use the Mixer (page E-28) to specify a different tone for the harmo-
nize notes.
The harmonize note tone is assigned to Mixer Channel 2, so change
Channel 2 to the tone you want to use for the harmonize notes.
In addition to the tone, you can also use the Mixer to change a num-
ber of other parameters, such as volume balance. See “Changing the
Parameters of a Channel” on page E-30 for details on these proce-
dures.
❚
NOTES
❚
•The default harmonize note tone when you first turn on Auto Harmonize
is the same tone as the melody note tone.
•Changing the melody tone setting automatically changes the harmo-
nize note tone to the same setting.
Using One-touch Preset
One-touch preset automatically makes the settings listed below in
accordance with the rhythm pattern you are using.
•Keyboard tone and volume
•Layer or Auto Harmonize on/off
•Layered tone and volume (when layer is turned on) or harmonize
tone and volume (when harmonize is turned on).
•Tempo
•Accompaniment volume
To use one-touch preset
1.
Select the rhythm you want to use.
2.
Use the MODE button to select the accompaniment
mode you want to use.
3.
Press the ONE TOUCH PRESET button.
•This automatically makes the one-touch preset settings in ac-
cordance with the rhythm you selected.
4.
Start rhythm and Auto Accompaniment, and play
something on the keyboard.
•Accompaniment is played using the one touch preset set-
tings.
Using Free Session
This keyboard comes pre-programmed with a collection of “Free Ses-
sions,” which are Auto Accompaniments that automatically match
chord progression, tone, tempo and other settings to the currently
selected rhythm pattern. Starting a Free Session causes the entire key-
board to become a melody keyboard for play along with the repeat-
ing chord progression of the Free Session.
Pre-programmed settings in accordance with the selected rhythm
pattern are used whenever Free Session is turned on.
•Chord progression
•Keyboard tone and volume
•Layer or Auto Harmonize on/off
•Layered tone and volume (when layer is turned on) or harmonize
tone and volume (when harmonize is turned on).
•Tempo
•Accompaniment volume
To use Free Session
1.
Select the rhythm you want to use.
2.
Press the FREE SESSION button.
•The lamp above the button lights to indicate that Free Ses-
sion is turned on.
3.
Press the START/STOP button.
•This starts the repeating chord progression of the preset Auto
Accompaniment to match the selected rhythm.
•Press START/STOP again if you want to stop the progres-
sion.
4.
To turn off Free Session, press the FREE SESSION but-
ton again.
•The lamp above the FREE SESSION button is not lit when
Free Session is turned off.
❚
NOTES
❚
•The default root note of the first chord is C (See “Free Session Chord
Progression Chart” on page A-2 for details). You can change to a differ-
ent root by pressing the corresponding key within the accompaniment
keyboard instead of START/STOP in the above procedure.
•You can also use the INTRO, NORMAL/FILL-IN, VARIATION/FILL-IN,
and SYNCHRO/ENDING buttons while Free Session accompaniment
is playing.
•Tone and tempo settings can be changed while a Free Session Auto
Accompaniment is playing. The rhythm pattern can also be changed
while a Free Session Auto Accompaniment is playing, but the chord
progression does not change in this case unless you stop Auto Accom-
paniment and restart it.
•You must stop the Auto Accompaniment to change the root note of the
first chord.
•Changing to a rhythm pattern with a different meter can affect chord
change timing.
AMP ENVELOPE
00 FLAT
01-17 VIBRATO
18-45 OTHERS
DECAY
SUSTAIN
PITCH ENVELOPE
MIN
MAX
FULL RANGE
CHORD
CASIO CHORD
SONG
FINGERED
PATTERN EXTERNAL
INTERNAL UPPER1
CH 1
UPPER2
CH 2
LOWER1
CH 3
LOWER2
STOREBANK
CH 4
ACC VOL.
CH 5
CHORD1
CH 6
CHORD2
CH 7
CHORD3
CH 8
BASS
CH 9
RHYTHM
CH 10
TR1
CH 11
TR2
CH 12
TR3
CH 13
TR4
CH 14
TR5
CH 15
TR6
CH 16
789
456
1
0
23
PARAMETER RESET:
DELETE
/YESS/NO
MAIN MANU/
CHANNEL VOLUME:
SUB MANU/
CHANNEL SELECT:
ONE TOUCH PRESET
MODE
FREE SESSION
CH5 (ACC VOL.) CHANNEL
NORMAL/FILL-IN
VARIATION/FILL-IN
INTRO
START/STOP Cursor ke
ys
SYNCHRO/ENDING
WK-1800/1600(E)-21~27 03.7.31, 5:21 PMPage 26 Adobe PageMaker 6.5J/PPC

E-27
733A-E-029A
Turning Auto Accompaniment Parts On
and Off
Auto Accompaniment patterns are made up of five parts, named:
Chord 1, Chord 2, Chord 3, Bass, and Rhythm. You can turn these
parts on and off to create exactly the type of accompaniment pattern
you want. Parts are turned on and off using channel buttons 6 through
10. The table below shows the relationship between accompaniment
parts and channel buttons.
Auto Accompaniment Part Channel Button
Chord 1 CH6
Chord 2 CH7
Chord 3 CH8
Bass CH9
Rhythm CH10
See “Turning Channels On and Off“ on page E-29 for full details on
how to turn Auto Accompaniment parts on and off.
❚
NOTE
❚
With some rhythm patterns, some parts are assigned all rests (which mean
they normally do not play even when turned on).
Adjusting the Accompaniment Volume
The following procedure adjusts the overall volume of all the accom-
paniment parts by specifying a value in the range of 000 (minimum)
to 127 (maximum).
•Accompaniment volume can be changed in the Internal Mode only.
See “Mixer Modes” on page E-28 for details on the Internal Mode.
1.
Press the CH5 (ACC VOL.) button.
2.
Use the [왖] and [왔] cursor keys to increase or de-
crease the displayed value.
❚
NOTES
❚
•You can also use the Mixer to adjust the volume for each individual Auto
Accompaniment part. See “Mixer Function” on page E-28 for details.
•The accompaniment volume setting screen is cleared if you do not input
anything for about five seconds.
Acom Vol
p
New accompaniment volume setting
WK-1800/1600(E)-21~27 03.7.31, 5:21 PMPage 27 Adobe PageMaker 6.5J/PPC
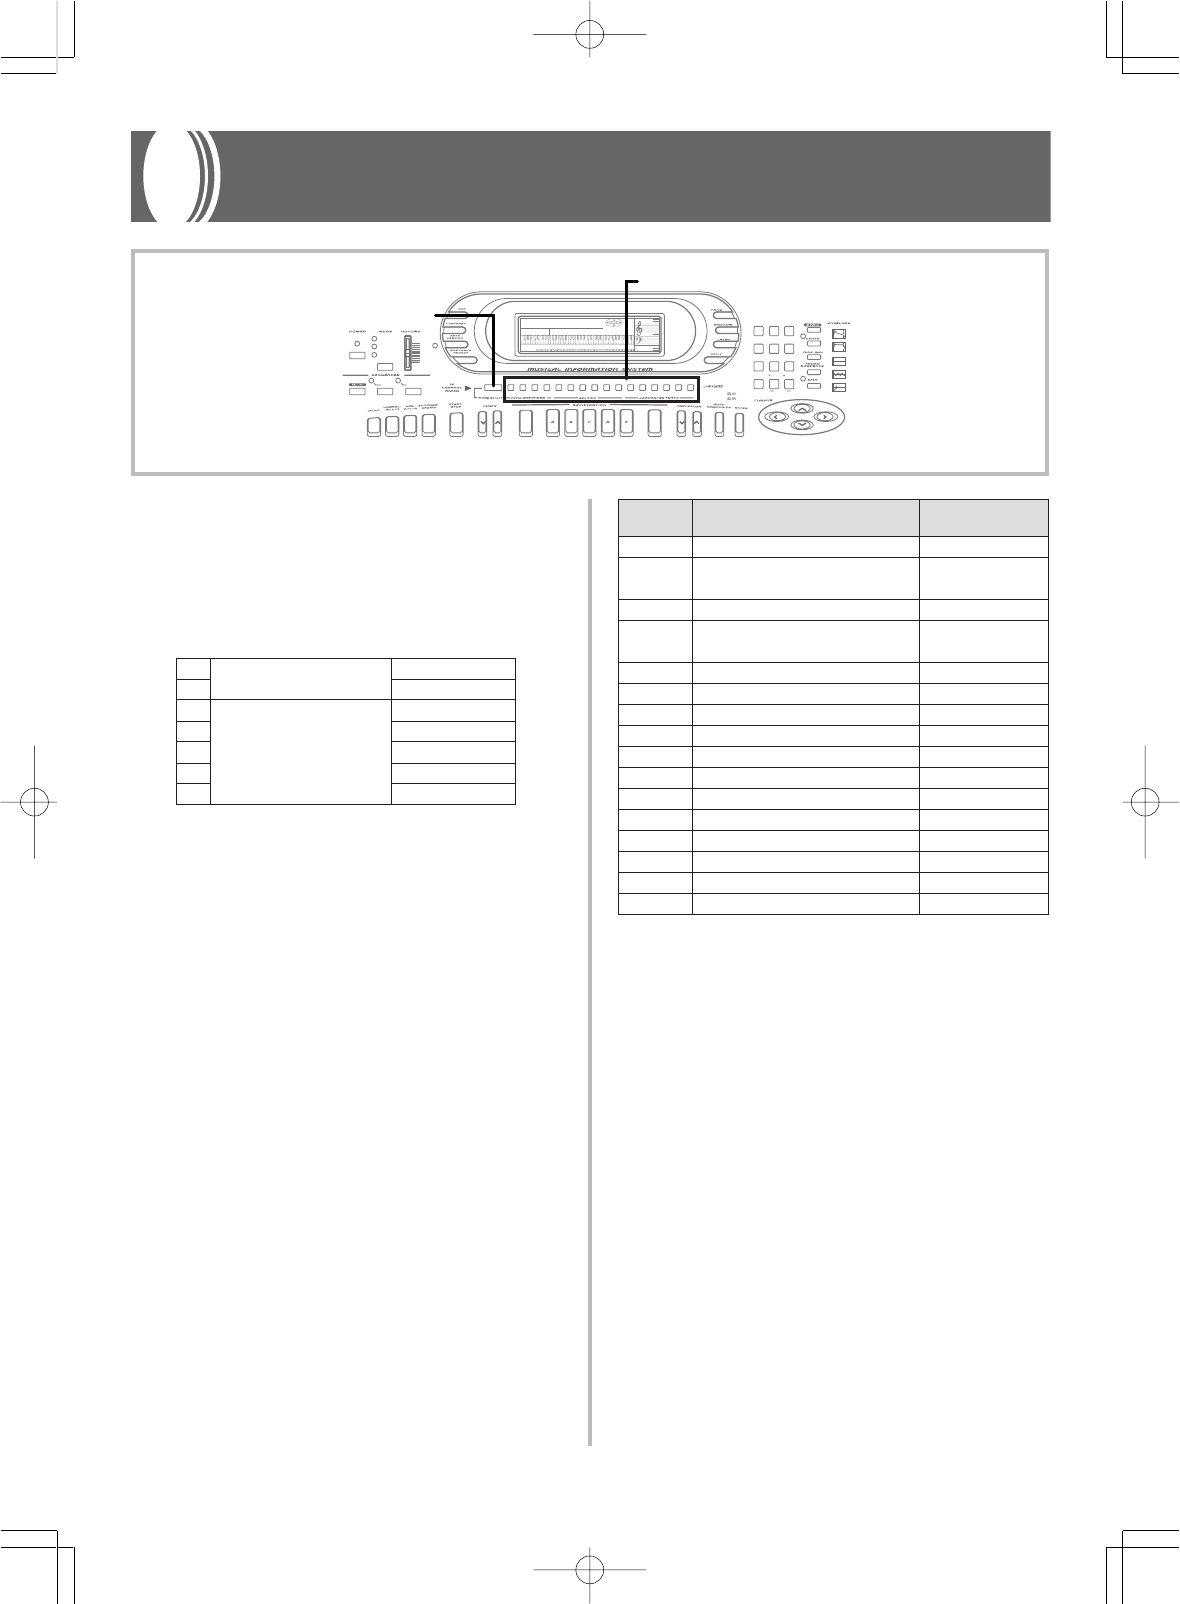
E-28
733A-E-030A
Mixer Function
Mixer Features
The Auto Accompaniment feature and sequencers of this keyboard
can play up to 16 different musical instrument parts at the same time.
You can also play along on the keyboard, and even use layer and
split to add even more instrument parts.
For example, the following table shows the seven parts that would
play if you use layer to play two tones on the keyboard while Auto
Accompaniment play is in progress.
(1)
(2)
(3)
(4)
(5)
(6)
(7)
Main tone
Layered tone
Chord 1
Chord 2
Chord 3
Bass
Rhythm
Keyboard
Auto Accompaniment
The Mixer makes it possible for you to turn each of the above parts
on and off, and also specify the tone, volume, stereo (pan) point, and
DSP effect for each.
❚
NOTE
❚
The above explanation applies to the Mixer’s Internal Mode.
Parts and Channels
Each part for keyboard play, Auto Accompaniment patterns and Song
Sequencer tunes is assigned to one of 16 channels. You can use the
Mixer to select a channel and adjust various parameters of the as-
signed part. The following table shows the parts assigned to each
channel.
Channel Part Channel Button
Number Name
CH1 Main tone UPPER1
CH2 Layered tone UPPER2
Auto Harmonize harmony tone
CH3 Split tone LOWER1
CH4 Layered/split tone LOWER2
Auto Harmonize split tone
CH5 Main accompaniment volume ACC VOL.
CH6 Auto Accompaniment chord 1 CHORD1
CH7 Auto Accompaniment chord 2 CHORD2
CH8 Auto Accompaniment chord 3 CHORD3
CH9 Auto Accompaniment bass BASS
CH10 Auto Accompaniment rhythm RHYTHM
CH11 Song Sequencer track 1 TR1
CH12 Song Sequencer track 2 TR2
CH13 Song Sequencer track 3 TR3
CH14 Song Sequencer track 4 TR4
CH15 Song Sequencer track 5 TR5
CH16 Song Sequencer track 6 TR6
❚
NOTES
❚
•In this manual, “channel” is abbreviated as “CH,” which matches the
channel numbers marked on the keyboard above the CHANNEL but-
tons.
•The CHANNEL button name in the above table corresponds to the text
marked on the keyboard below the CHANNEL buttons.
•The part names shown in the “Part” column of the above table corre-
spond to the parts that can be selected using the Mixer’s internal mode.
In the case of the External Mode (see following section), the part as-
signed to each channel corresponds to each MIDI channel.
Mixer Modes
The Mixer has two main modes, an Internal mode and an External
Mode, each of which is described in detail below.
Internal Mode
This mode lets you control each channel (internal channels) when
using the keyboard internal control (keyboard play, Auto Accompa-
niment, Song Sequencer playback). This is the default Mixer mode
whenever you turn on keyboard power.
AMP ENVELOPE
00 FLAT
01-17 VIBRATO
18-45 OTHERS
DECAY
SUSTAIN
PITCH ENVELOPE
MIN
MAX
FULL RANGE
CHORD
CASIO CHORD
SONG
FINGERED
PATTERN
EXTERNAL
INTERNAL UPPER1
CH 1
UPPER2
CH 2
LOWER1
CH 3
LOWER2
STOREBANK
CH 4
ACC VOL.
CH 5
CHORD1
CH 6
CHORD2
CH 7
CHORD3
CH 8
BASS
CH 9
RHYTHM
CH 10
TR1
CH 11
TR2
CH 12
TR3
CH 13
TR4
CH 14
TR5
CH 15
TR6
CH 16
789
456
1
0
23
PARAMETER RESET:
DELETE
/YESS/NO
MAIN MANU/
CHANNEL VOLUME:
SUB MANU/
CHANNEL SELECT:
MIXER SELECT
CHANNEL
WK-1800/1600(E)-28~31 03.7.31, 5:21 PMPage 28 Adobe PageMaker 6.5J/PPC
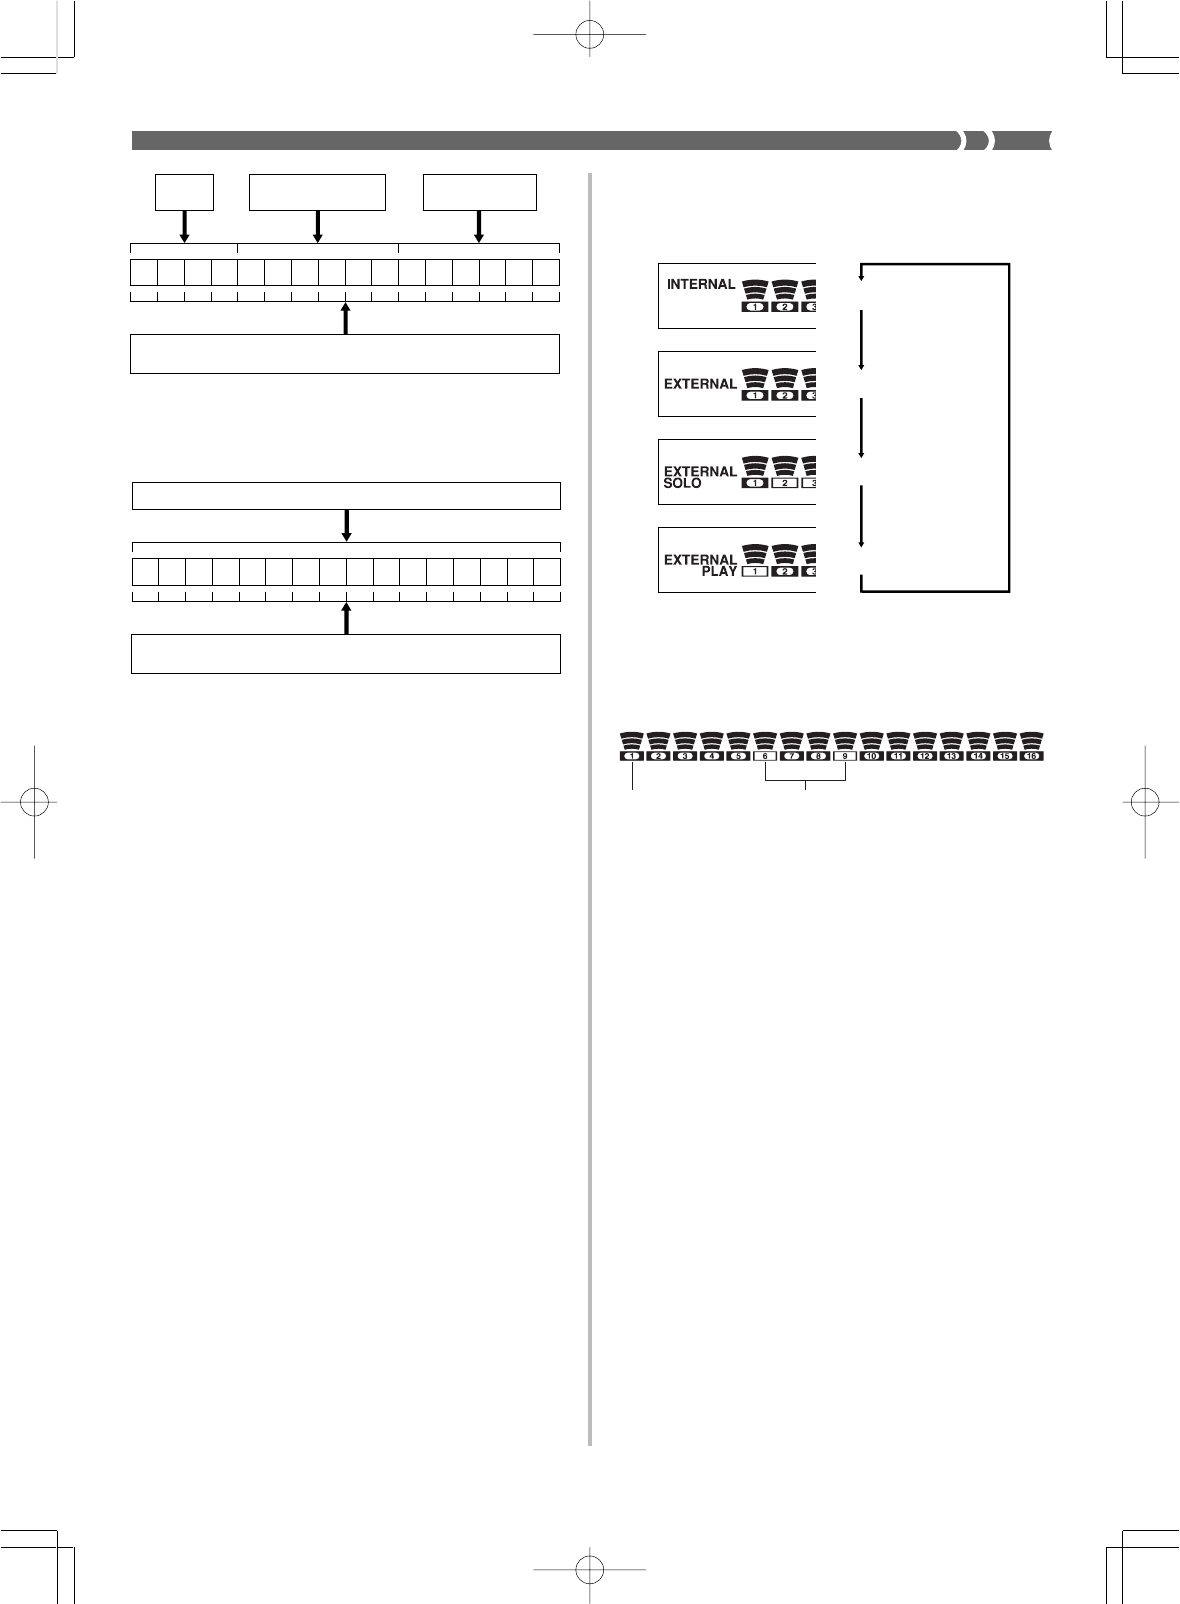
E-29
733A-E-031A
123456789
10 11 12 13 14 15 16
External Mode
The External Mode provides control of each channel (external chan-
nels) when the keyboard’s sound source is under control (MIDI in-
put, SMF playback*) of an external device.
123456789
10 11 12 13 14 15 16
The External Mode has three sub-modes: External, External/Solo, and
External/Play.
External ................... This is the basic External Mode, which is used
for most external channel parameters.
External/Solo ........ This mode turns one channel on and all other
channels off. It is used playing MIDI input (or
SMF playback*) that simultaneously uses multi-
ple channels of the keyboard’s sound source.
External/Play ........ This mode is a mirror of the External/Solo Mode.
It turns one channel off and all other channels on.
It comes in handy, for example, when you want
to turn off a specific part of SMF playback* and
play along on the keyboard.
❚
NOTES
❚
•The internal channels controlled by the internal mode are completely
different from the external channels controlled by the external mode.
This means that there are a total of 32 different channels. The Mixer
mode saves internal mode and External Mode parameters separately
from each other.
•The External Mode is for MIDI (or SMF playback*). Operation of the
External/Play Mode is particularly suited to MIDI play. See “MIDI” on
page E-60 for information about how the Mixer is used during MIDI op-
erations.
*SMF Playback (WK-1800 only)
The built-in disk drive of the WK-1800 allows playback of SMF
(standard MIDI files) from diskette. See “Using the Floppy Disk
Drive (WK-1800 Only)” on page E-67 for details.
To select the Mixer mode
Press the MIXER SELECT button to toggle between the Mixer mode
sub-modes as shown in the illustration below. The currently selected
mode is indicated on the display.
Turning Channels On and Off
Press the CHANNEL buttons to toggle individual channels on and
off. Indicators on the display show the current on/off status of each
channel.
The channel affected and the operation performed when a CHAN-
NEL button is pressed depends on what Mixer mode you are in, as
described below.
Internal Mode
•Each press of a CHANNEL button toggles the applicable channel
on and off (except CH5).
•The on/off status of each channel determines the on/off status of
the corresponding part for keyboard play, Auto Accompaniment,
and Song Sequencer playback.
•Changing to a different rhythm causes Mixer Settings for CH6
through CH10 to change to the default settings assigned to the new
rhythm. These settings also change to the defaults for the currently
selected rhythm pattern whenever you switch between the Intro,
Normal, Variation, Fill-in, and Ending patterns.
External Mode
On/off settings in this mode affect MIDI input and SMF playback
channels (WK-1800 only).
•In the External Mode, each press of CHANNEL button CH1 through
CH16 toggles the applicable channel on and off.
•In the External/Solo Mode, pressing a CHANNEL button turns on
that channel and turns all the other channels off.
•In the External/Play Mode, pressing a CHANNEL button turns off
that channel and turns all the other channels on.
Internal
External
External/Solo
External/Play
Channel on Channel off
Keyboard
play Auto Accompaniment
play Song Sequencer
play
Internal Channel
The internal mode allows independent control of there 16 internal channels.
External Channel
The External Mode allows independent control of there 16 external channels.
MIDI input or SMF plauback*
WK-1800/1600(E)-28~31 03.7.31, 5:21 PMPage 29 Adobe PageMaker 6.5J/PPC
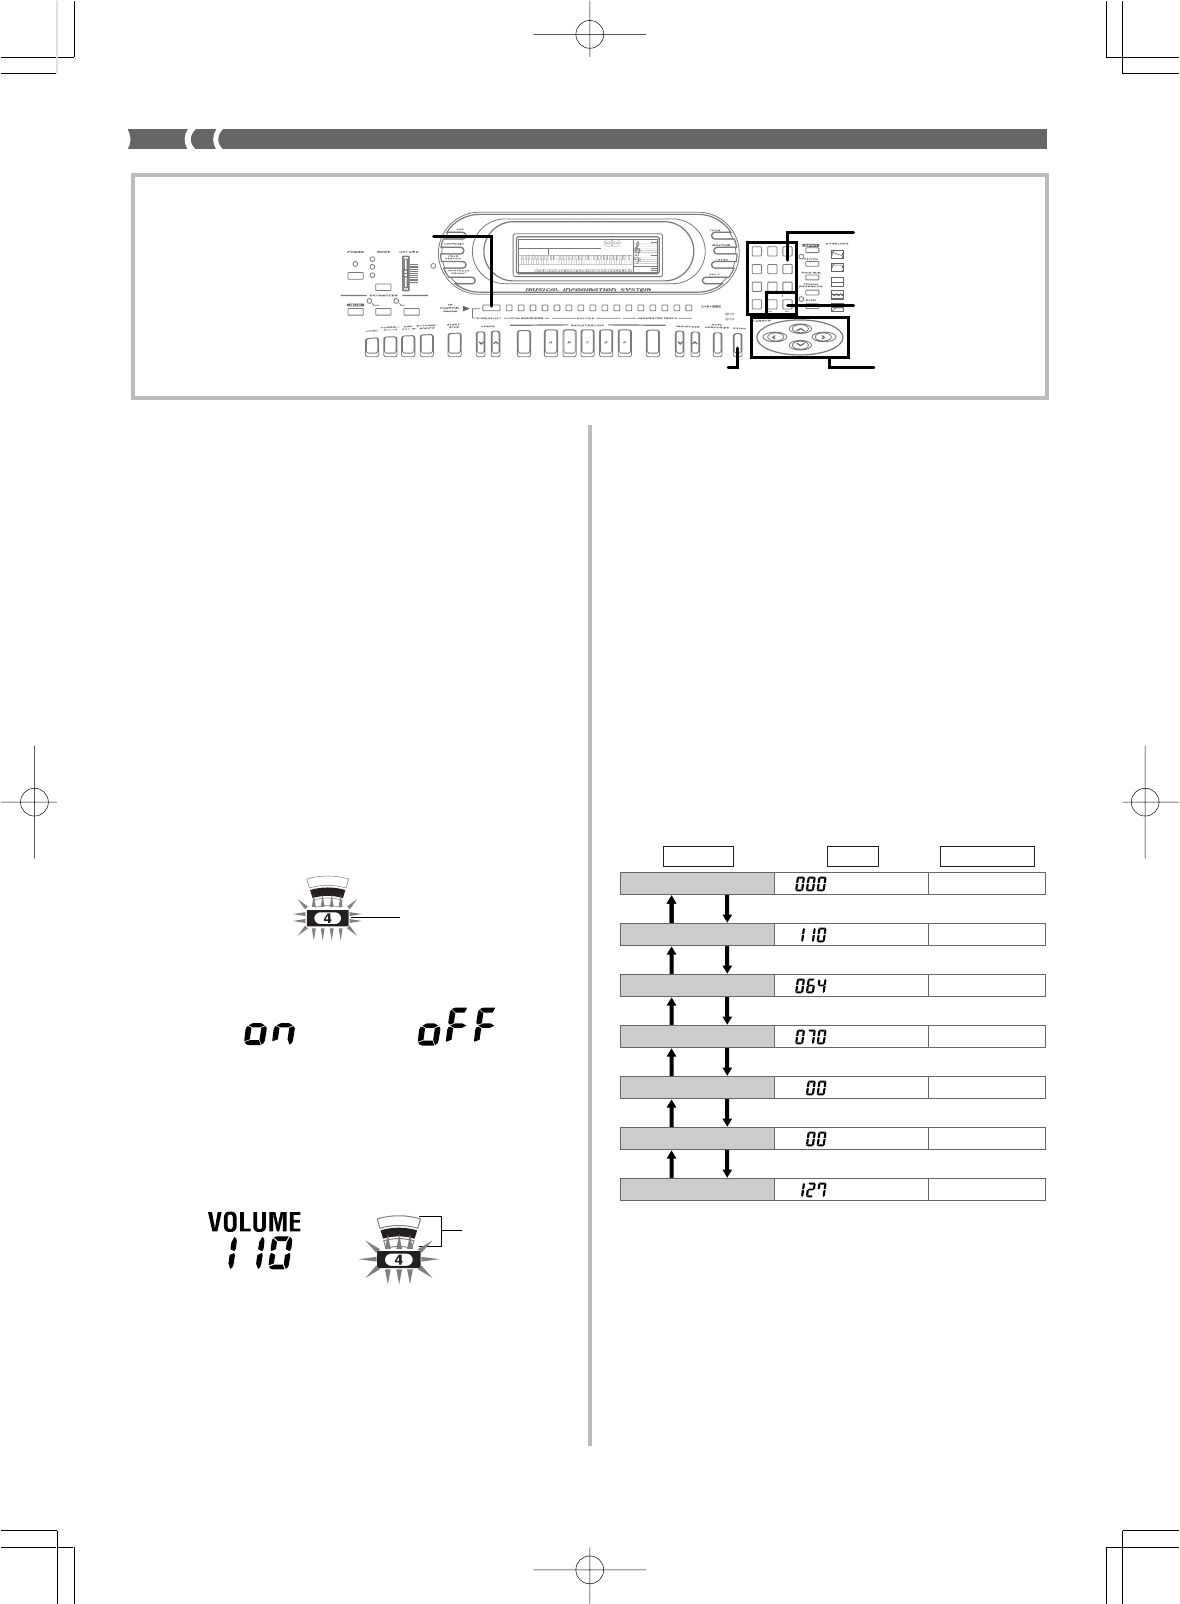
E-30
733A-E-032A
Changing the Parameters of a Channel
Use the following procedure to change the parameters of each indi-
vidual channel.
PREPARATION
•Turn off the Synthesizer, Song Sequencer, or Pattern Sequencer if any
of them are turned on.
To change channel parameters
1.
Press the MIXER SELECT button to select the Mixer
mode you want to use.
•Select the internal mode to make layer, split, Auto Accompa-
niment, or Song Sequencer settings.
•Select the External Mode to make MIDI settings.
•You can also make settings using the External/Solo or Exter-
nal/Play Modes, but we recommend using the External
Mode.
2.
Use the [왗] and [왘] cursor keys to select the channel
whose parameters you want to change.
•See page E-28 for details on layer, split, Auto Accompani-
ment, and Song Sequencer channel assignments.
•The frame around the currently selected channel (the cur-
rent channel) flashes, to indicate that it is selected.
•The on/off status of the current channel is indicated in the
measure number area of the display (item 11 on page E-10).
On ......... Off .........
3.
Change the current channel’s tone and volume pa-
rameters while a channel number frame is flashing, if
you want.
•Use the number keys or [+] and [–] keys to change the tone.
•Use [왖] and [왔] to change the volume. The current volume
setting is shown as a value in the metronome area of the dis-
play (item 15 on page E-10), and by the level indicator.
3-segment level
indicator shows
volume level of
each channel.
and
5.
After making additional settings in step 4, press the
ENTER button.
•If you do not perform any operation for about five seconds
while a channel number frame is flashing, the display re-
turns to that in step 1 of the above procedure automatically.
❚
NOTES
❚
•Internal Mode and External Mode settings you make with the above
procedure are stored separately.
•You can change the parameters of a channel regardless of whether the
channel is on or off.
•Changing a Mixer internal mode channel setting causes the MIDI mes-
sage that corresponds to the change to be output through the MIDI OUT
terminal.
To make additional channel parameter settings
When making channel parameter settings, press the ENTER button
to display the first additional channel parameter screen.
Use the [왖] and [왔] cursor keys to scroll through the setting screens
shown below.
While any setting screen is on the display, use the number keys or [+]
and [–] to change the parameter to the value you want.
4.
To make additional settings for the current channel,
press the ENTER button while a channel number frame
is flashing.
•See “To make additional channel parameter settings” for
details on making additional channel parameters.
000
∼
231
000
∼
127
000
∼
127
000
∼
127
–
50
∼
00
∼
50
–
12
∼
00
∼
12
000
∼
127
[
▲
][
▼
]
[
▲
][
▼
]
[
▲
][
▼
]
[
▲
][
▼
]
[
▲
][
▼
]
[
▲
][
▼
]
Pro
g
.No.
Vo l ume
Pan
Ef fect
Fin
eTune
C.Tune
Ex
p
ress
Parameter Screen Setting Range
Program Change Number
Volume
Pan
Effect
Send
Fine Tune
Coarse Tune
Expression
See the following section titled “Additional Channel Mode Parame-
ters” on page E-31 for details on what each of these parameters con-
trols.
❚
NOTES
❚
•The first screen is normally the pan screen. If you used the additional
channel parameter screens since turning on power, the last setting you
used appears first.
•You can use the [왗] and [왘] cursor keys to change the current channel
while an additional channel parameter screen is on the display.
•Channel 10 is reserved for drum sounds, so only tone number 192 to
199 can be selected.
Channel number frame
AMP ENVELOPE
00 FLAT
01-17 VIBRATO
18-45 OTHERS
DECAY
SUSTAIN
PITCH ENVELOPE
MIN
MAX
FULL RANGE
CHORD
CASIO CHORD
SONG
FINGERED
PATTERN
EXTERNAL
INTERNAL UPPER1
CH 1
UPPER2
CH 2
LOWER1
CH 3
LOWER2
STOREBANK
CH 4
ACC VOL.
CH 5
CHORD1
CH 6
CHORD2
CH 7
CHORD3
CH 8
BASS
CH 9
RHYTHM
CH 10
TR1
CH 11
TR2
CH 12
TR3
CH 13
TR4
CH 14
TR5
CH 15
TR6
CH 16
789
456
1
0
23
PARAMETER RESET:
DELETE
/YESS/NO
MAIN MANU/
CHANNEL VOLUME:
SUB MANU/
CHANNEL SELECT:
MIXER SELECT Number keys
[+]/[
–]
Cursor key
s
ENTER
WK-1800/1600(E)-28~31 03.7.31, 5:21 PMPage 30 Adobe PageMaker 6.5J/PPC

E-31
733A-E-033A
Additional Channel Mode Parameters
The following describes each of the additional channel mode param-
eters.
Program Change Number
This parameter controls the tone assigned to the channel.
Volume
This is the parameter that controls the volume of the selected chan-
nel.
Pan
This parameter controls the pan pot, which is the center point of the
left and right stereo channels. Setting 064 specifies center, a value
less than 064 moves the point left and a value greater than 064 moves
it right.
Effect Send
This parameter controls the depth of the digital effect (DSP) for each
channel. Enhancer and Loudness, however, are not changed.
Fine Tune
This parameter controls the fine tuning of the selected channel’s pitch
in cent units.
Coarse Tune
This parameter controls the coarse tuning of the selected channel’s
pitch in semitone units.
Expression
This parameter controls the volume of the selected channel. Though
this parameter is identical to the volume parameter, it is used for
desktop music applications.
WK-1800/1600(E)-28~31 03.7.31, 5:21 PMPage 31 Adobe PageMaker 6.5J/PPC
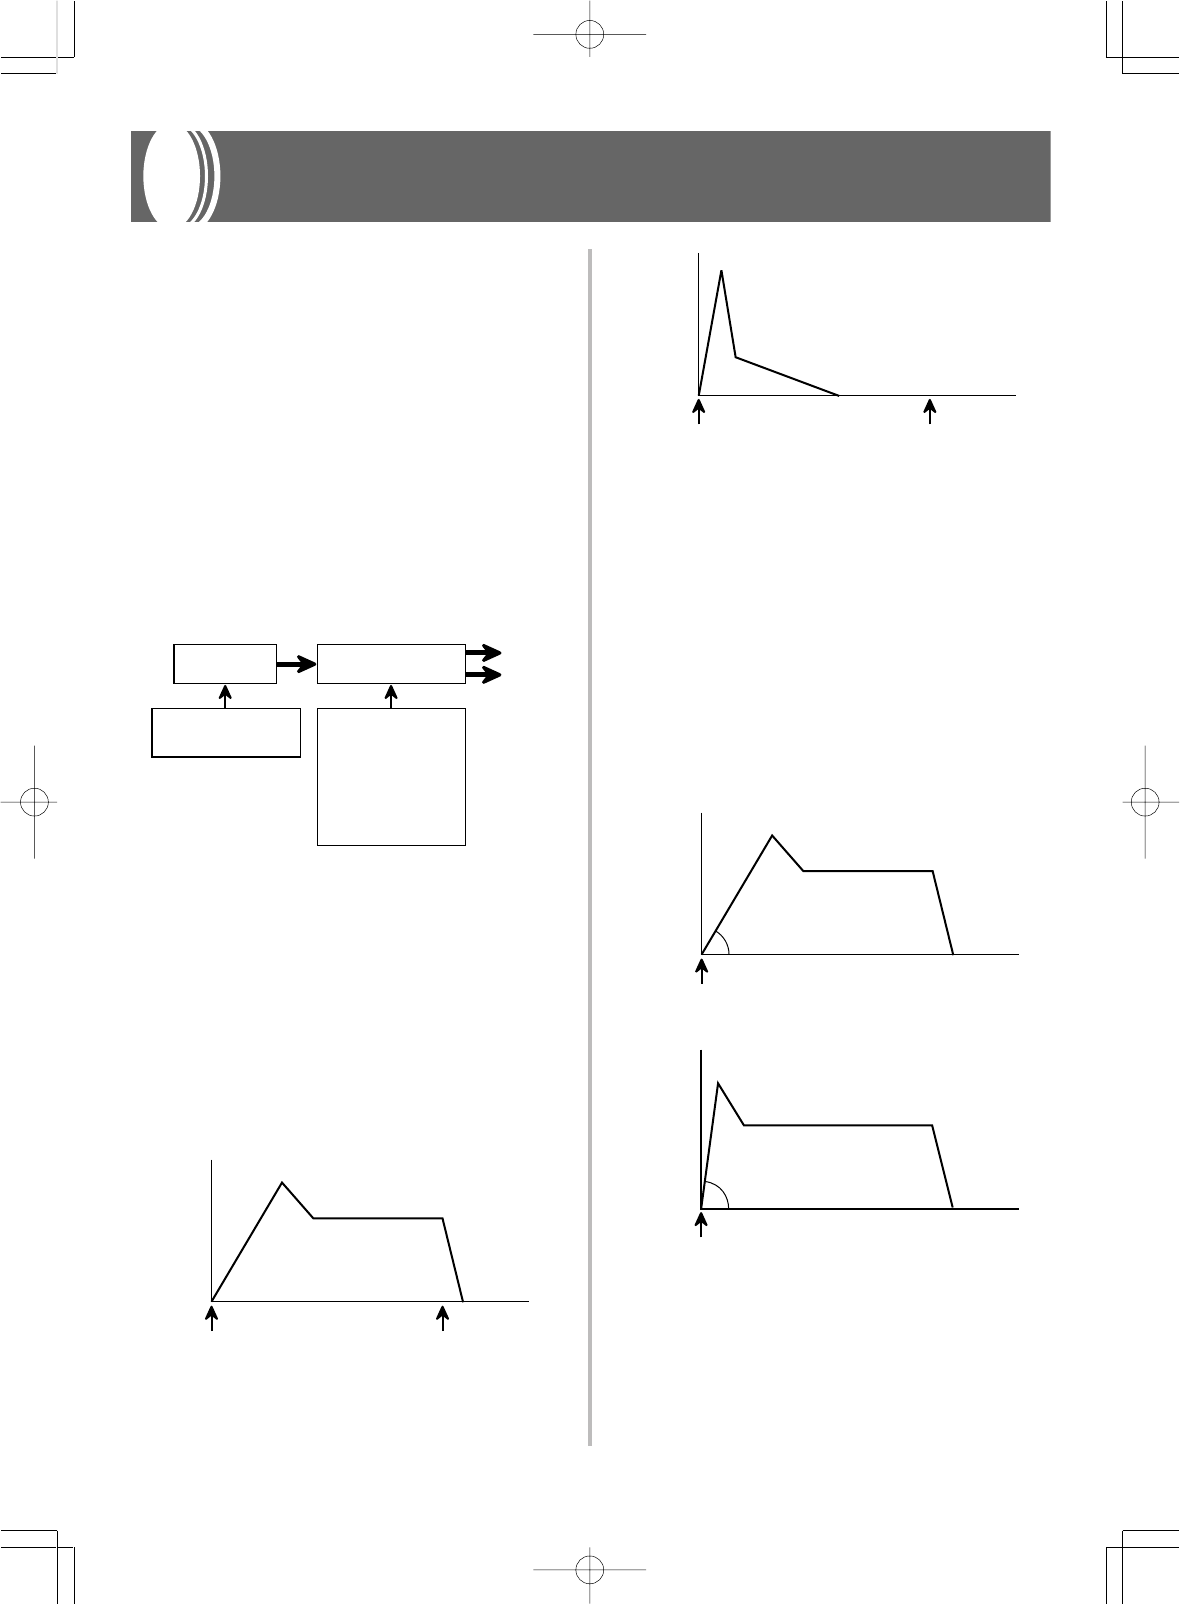
E-32
733A-E-034A
Synthesizer Mode
The Synthesizer of this keyboard provides all the tools you need for
creating your own original tones. Simply select one of the built-in
tones and change its parameters to create your own original sound.
You can even store your sounds in memory for later recall using the
same procedure as that used to select a preset tone.
Synthesizer Functions
The following describes how to use each of the functions available
with the Synthesizer.
Synthesizer Parameters
The sounds of the preset tones built into this keyboard are controlled
by settings called “parameters.” To create a user tone, you first recall
a preset tone and then change its parameters. Note that drum set
tones (192 through 199) cannot be used as the basis of a user tone.
The figure below shows the parameters that make up the preset tones
and what each parameter does. As you can see, these parameters can
be divided into four groups, each of which is described in detail in
the following pages.
This parameter affects
tone characteristics.
● PCM set
This parameter affects
volume.
●
Amp envelope set
These parameters affect
pitch.
● Pitch
● Pitch envelope set
These parameters affect
volume, tone quality, and
how notes are sounded.
● Attack rate
● Release rate
● Level
● Touch sensitivity
● Filter sensitivity
● Filter level
● Pan
● Transpose
Output
(1) Tone Characteristic Parameter
■
PCM Set
This parameter determines the characteristics of a tone by switching
its digitally sampled waveform. You can select a piano, guitar, syn-
thesizer, or any other of a variety of musical instrument and digitally
sampled waveforms.
(2) Volume Characteristic Parameter
■
Amp Envelope Set
This set gives you a choice of a variety of different volume envelopes
(changes in volume over time): slow attack when a key is pressed,
quick attack when a key is pressed, continued sound while a key is
depressed, etc.
(3) Tone Pitch Parameters
■
Pitch
This parameter controls the overall pitch of the tone.
■
Pitch Envelope Set
This parameter provides a variety of pitch envelopes from which you
can choose.
❚
NOTE
❚
Pitch envelope 00 selects “No change (flat),” 01 through 17 selects “Vibra-
to,” and 18 through 45 selects “Other.”
(4) Volume, Tone Quality, Parameters
■
Attack Rate
This parameter lets you set the speed of the attack (the period from
the point when you press a key to the point that the tone reaches its
maximum volume). Use this parameter to make fine adjustments to
the tone characteristics of the amp envelope you are using.
Press key Release key
Time
Volume
●
Gradual attack, followed by a lingering tone.
●
●
Sudden attack, followed by a gradual decay.
●
Press key Release key
Time
Volume
Press key
Time
Volume
Attack Rate
● Tone with slow attack ●
● Tone with quick attack ●
Press key
Time
Volume
Attack Rate
WK-1800/1600(E)-32~38 03.7.31, 5:21 PMPage 32 Adobe PageMaker 6.5J/PPC
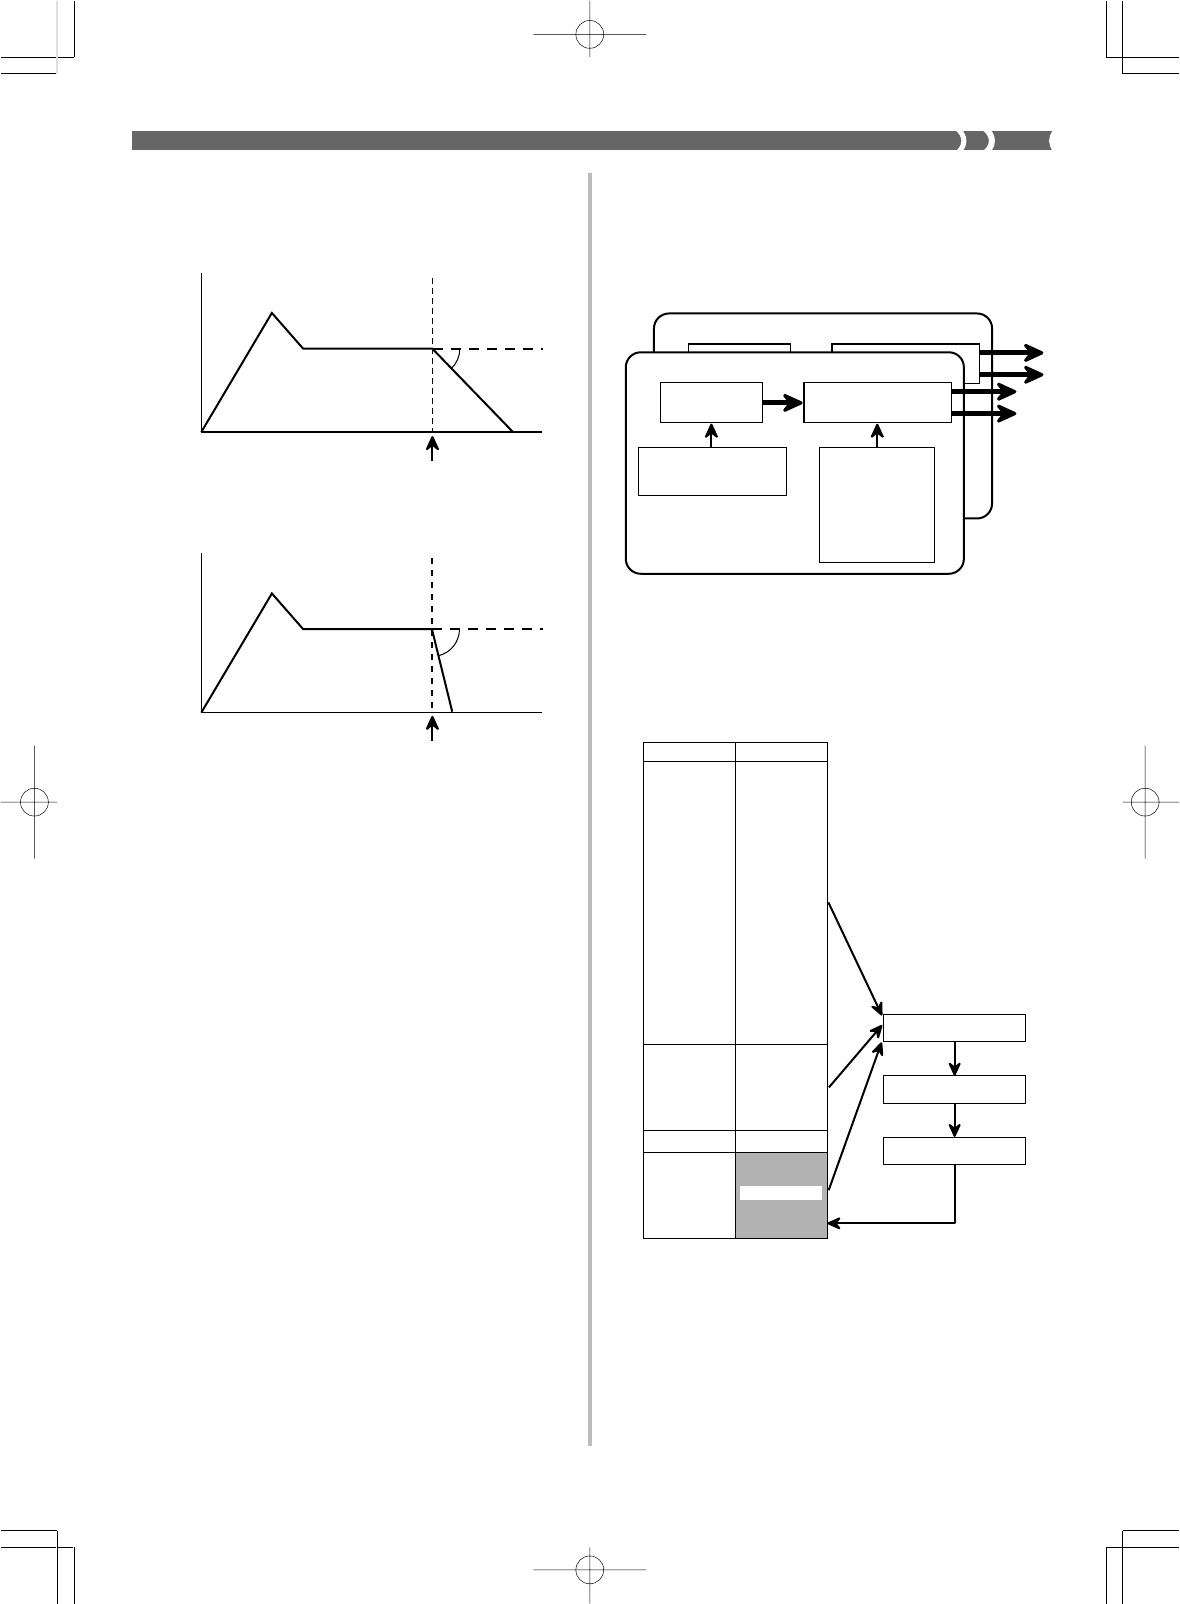
E-33
733A-E-035A
■
Release Rate
This parameter controls the speed of a tone’s release (the period from
the point when you release a key to the point that the tone stops sound-
ing). Use this parameter to make fine adjustments to the tone charac-
teristics of the amp envelope you are using.
■
Level
This parameter controls the overall volume of the tone.
■
Touch Sensitivity
This parameter controls changes in the volume of the tone in accor-
dance with pressure applied to the keyboard keys. You can specify
more volume for stronger and less volume for lighter pressure, less
volume for stronger pressure, or the same volume regardless of how
much pressure is applied to the keys.
■
Filter Sensitivity
This parameter uses a digital filter to controls change in the quality
of the tone in accordance with pressure applied to the keyboard keys.
■
Filter Level
This parameter controls how the digital filter is applied.
■
Pan
This parameter controls the stereo center point when using the key-
board’s built in speakers and when otherwise producing stereo out-
put.
■
Transpose
This parameter controls how much the key of the keyboard should
be raised or lowered.
Release Rate
Release Rate
Release
key
Time
Volume
● Tone with slow release ●
● Tone with quick release ●
Release
key
Time
Volume
1DCO and 2DCO Tones
“DCO” stands “Digitally Controlled Oscillator,” and it represents the
smallest unit of sound output by this keyboard. Some of the built-in
tones are simple tones (1DCO), and some are layered tones (2DCO).
Whenever you select a 2DCO tone as the basis for creating a user
tone, remember that you must change the parameters of both of the
tones (DCO1 and DCO2) that make up the layered 2DCO tone.
DCO2
● PCM set
●
Amp envelope set
● Pitch
● Pitch envelope set
● Attack rate
● Release rate
● Level
●
Touch sensitivity
● Pan
● Transpose
DCO1
Saving User Tones
The group of tone numbers from 200 through 231 (USER01 through
USER32) is called the “user area” because they are reserved for stor-
age of user tones. After you recall a preset tone and change its pa-
rameters to create your own user tone, you can store it in the user
area for later recall. You can recall your tones using the same proce-
dure that you use when selecting a preset tone.
Tone numbers
000
∼
127
128
∼
191
192
∼
199
200
∼
231
Tone
GM Tone
Synthesized
tone
Drum Set
User Area
Select the preset tone
Change parameters
Save as an original tone
WK-1800/1600(E)-32~38 03.7.31, 5:21 PMPage 33 Adobe PageMaker 6.5J/PPC
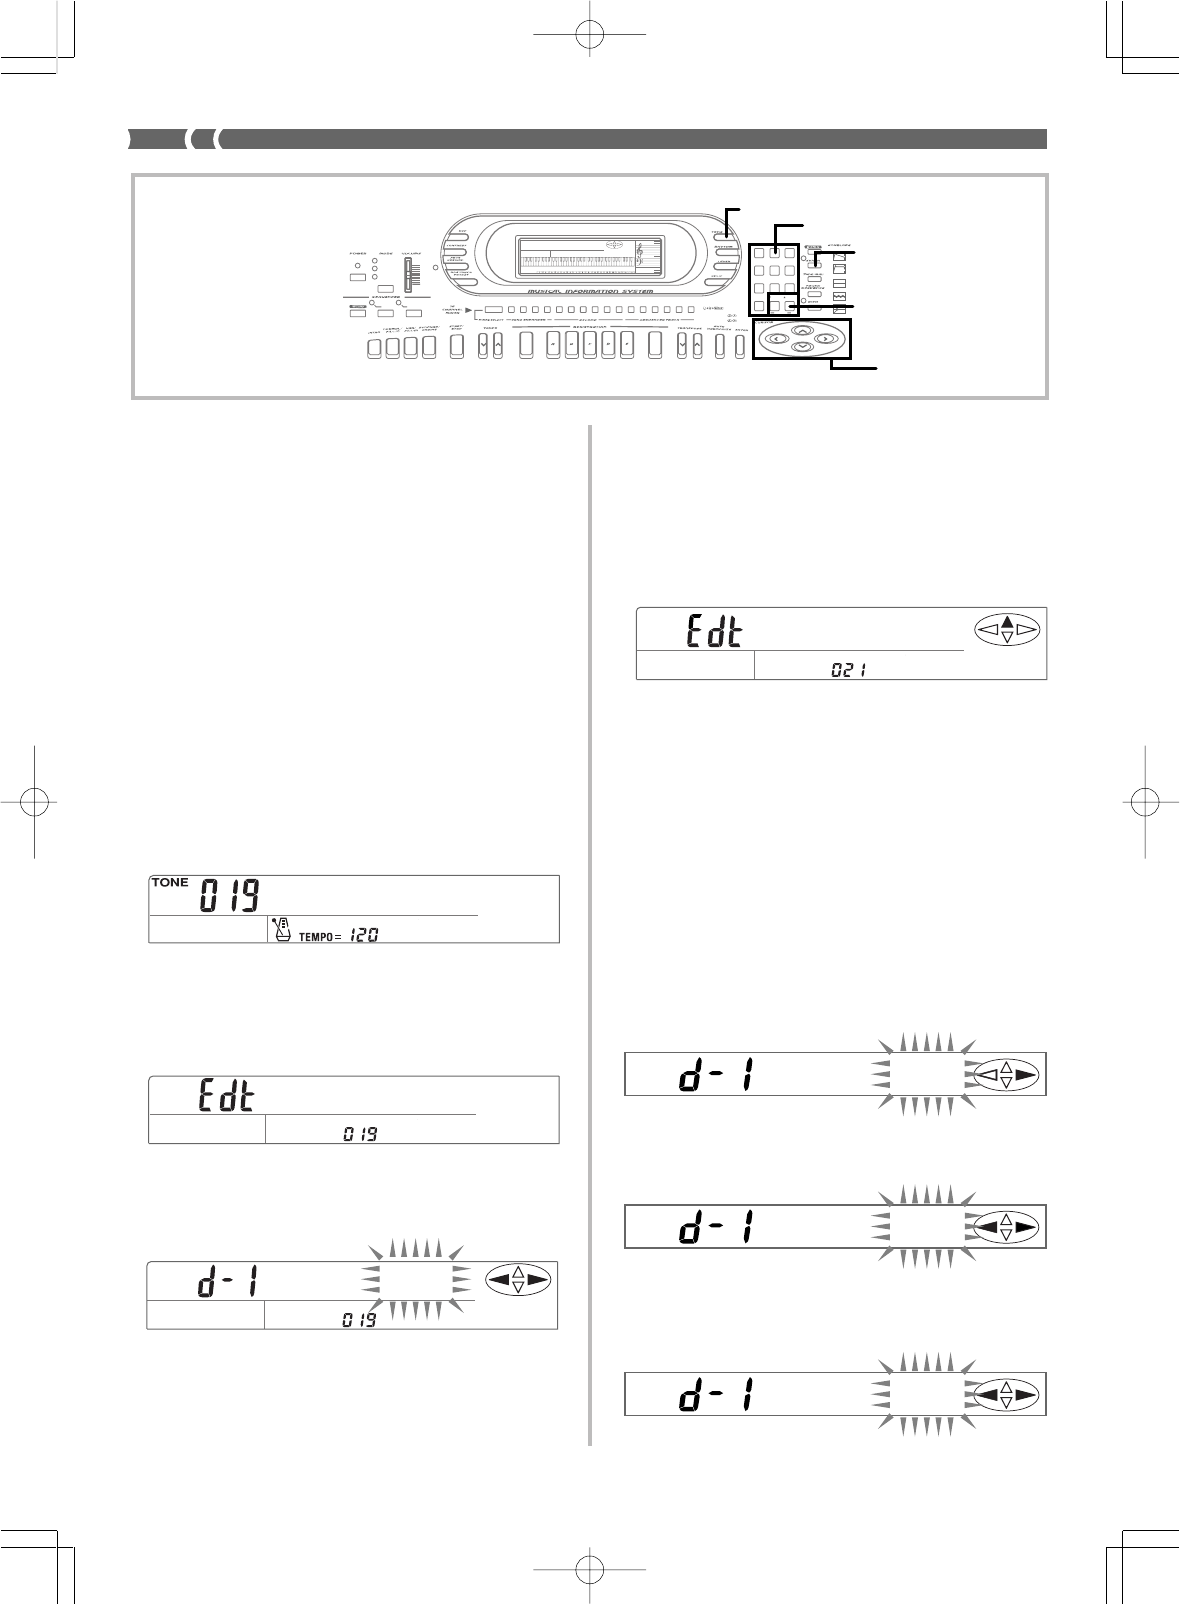
E-34
733A-E-036A
❚
NOTES
❚
•When the keyboard is shipped from the factory, the user area (tones
200 to 231) contain the same tones as tones 128 through 159.
•You cannot use a drum set tone (192 to 199) as the basis of a user tone.
•Whenever you save a tone and assign it one of the tone numbers in the
user area, any tone data previously assigned to that number is replaced
with the new data.
•The keyboard comes with a built-in lithium battery that supplies power
to the memory to retain memory contents while keyboard power is turned
off. See “Lithium Battery Precautions” on page E-4 for important infor-
mation about the lithium battery.
•You can use the keyboard’s MIDI capabilities to save your original tones
to a computer or other external storage device. See “Bulk Sending Key-
board Data” on page E-65 for details.
•With the WK-1800, you can use the built-in disk drive to save original
tones to diskette. See “Using the Floppy Disk Drive (WK-1800 Only)” on
page E-67 for details.
Creating a User Tone
Use the following procedure to select a preset tone and change its
parameters to create a user tone.
1.
First, select the preset tone you want to use as a basis
for your user tone.
2.
Press the SYNTH button.
•This causes the indicator lamp next to the SYNTH button to
light and displays a screen that shows whether the tone you
selected is a DCO1 or DCO2 tone.
3.
Use [왗 ] and [왘] to display the parameter whose set-
ting you want to change.
•Each press of [왗] or [왘] changes to the next parameter. See
“Parameters and Their Settings” on this page for informa-
tion about each parameter.
4.
Use [+] and [–] to change the setting of the currently
displayed parameter.
•You can also use the number keys to input a value to change
a parameter setting. See “Parameters and Their Settings” be-
low for information on setting range for each parameter.
5.
If the preset tone you selected in step 1 is a 2DCO
tone, press [왔] twice to display the DCO2 parame-
ters.
6.
Repeat steps 3 and 4 to set the DCO2 parameters.
•Press [왖] two more times to return to the DCO1 parameters.
7.
Play something on the keyboard.
•To save the tone you created, perform the procedure under
“Naming a User Tone and Storing It In Memory” (page E-
35), starting from step 2.
•To exit user tone creation and return the tone to its original
parameters, press the SYNTH button twice or the TONE but-
ton once.
Parameters and Their Settings
The following describes the function of each parameter and also shows
its setting range.
■
PCM Set (000 to 288)
This parameter switches the digitally sampled waveform.
■
Amp Envelope Set (000 to 288)
This parameter controls volume characteristics over time.
■
Attack Rate (001 to 127)
This parameter controls the speed of the attack. The greater the val-
ue, the faster the attack of the selected amp envelope.
ChrchOr
g
Aenv=026
PCM=050
Atk
R=127
Aenv=050
AMP ENVELOPE
00 FLAT
01-17 VIBRATO
18-45 OTHERS
DECAY
SUSTAIN
PITCH ENVELOPE
MIN
MAX
FULL RANGE
CHORD
CASIO CHORD
SONG
FINGERED
PATT ER N
EXTERNAL
INTERNAL UPPER1
CH 1
UPPER2
CH 2
LOWER1
CH 3
LOWER2
STOREBANK
CH 4
ACC VOL.
CH 5
CHORD1
CH 6
CHORD2
CH 7
CHORD3
CH 8
BASS
CH 9
RHYTHM
CH 10
TR1
CH 11
TR2
CH 12
TR3
CH 13
TR4
CH 14
TR5
CH 15
TR6
CH 16
789
456
1
0
23
PARAMETER RESET:
DELETE
/YESS/NO
MAIN MANU/
CHANNEL VOLUME:
SUB MANU/
CHANNEL SELECT:
Number keys
TONE
SYNTH
[+]/[
–]
Cursor key
s
DCO 1
Dco 2
WK-1800/1600(E)-32~38 03.7.31, 5:21 PMPage 34 Adobe PageMaker 6.5J/PPC
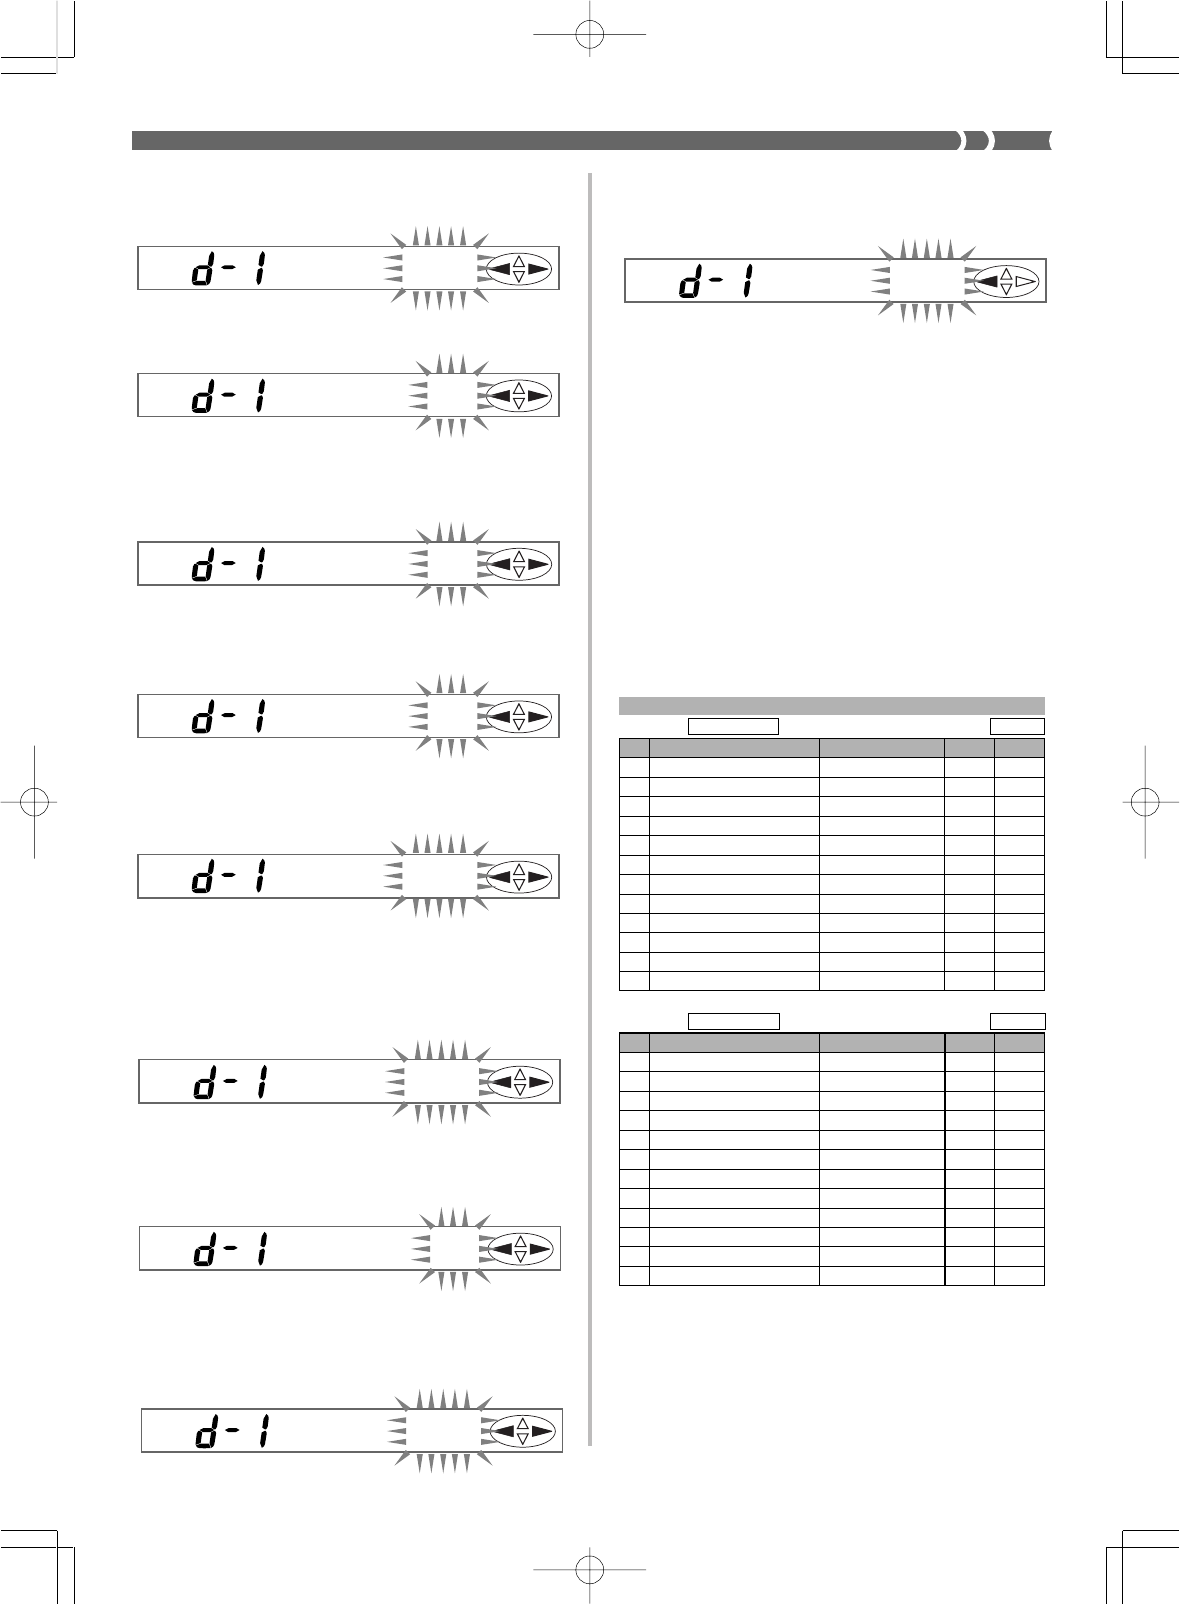
E-35
■
Release Rate (001 to 127)
This parameter controls the speed of a tone’s release. The greater the
value, the faster the release of the selected amp envelope.
■
Pitch Envelope Set (00 to 45)
This parameter controls the pitch of a tone over time.
■
Pitch (–64 to 63)
This parameter controls the overall pitch of the tone. A greater posi-
tive value raises the pitch from standard, while a negative value low-
ers the pitch. A setting of zero sets the pitch to the standard setting
for the selected tone.
■
Transpose (–12 to 12)
This parameter raises and lowers overall tuning by semitone units. A
setting of –12 is one octave lower, while 12 is 1 octave higher.
■
Level (000 to 127)
This parameter controls the overall volume of the tone. The greater
the value, the greater the volume. Setting a level of zero means that
the tone does not sound at all.
■
Touch Sensitivity (–64 to 63)
This parameter controls changes in the volume of the tone in accor-
dance with the pressure applied to the keyboard keys. A greater pos-
itive value increases the volume of the output as pressure increases,
while a negative value decreases volume with increased keyboard
pressure. A setting of zero specifies no change in output volume in
accordance with keyboard pressure.
■
Pan (–64 to 63)
This parameter controls the stereo center point when using the key-
board's built-in speakers and when otherwise producing stereo out-
put. A larger value moves the center point to the right, while a small-
er value moves it to the left.
■
Filter Sensitivity (000 to 127)
This parameter controls changes in the quality of the tone in accor-
dance with pressure applied to the keyboard keys. A greater value
increases the change in tone quality as pressure increases, while a
smaller value decreases the change in tone quality. A setting of zero
specifies no change.
733A-E-037A
User Tone Creation Hints
The following hits provide helpful advice on making user tone cre-
ation a bit quicker and easier.
Use a preset tone that is similar to the one you are trying to create.
Whenever you already have a rough idea of the tone you are trying
to create, it is always a good idea to start with a preset tone that is
similar. If you want to use a layered tone, start out with a 2DCO tone.
Determine the most important parameter.
The PCM Set and Amp Envelope Set parameters are the major fac-
tors that determine the overall personality of a tone. Start out with
these two parameters to get the general sound you want, and then
use the other parameters to add the finishing touches.
Experiment with various different settings.
There are no real rules about what a tone should sound like. Let your
imagination run free and experiment with different combinations.
You may be surprised at what you can achieve.
DATA EXAMPLE
No.
1
2
3
4
5
6
7
8
9
10
11
12
Parameter
PCM Set
Amp Envelope Set
Attack Rate
Release Rate
Pitch Envelope Set
Pitch
Transpose
Level
Touch Sense
Pan
Filter Sense
Filter Level
Range of Value
000 ~ 288
000 ~ 288
001 ~ 127
001 ~ 127
00 ~ 45
–64 ~ 00 ~ 63
–12 ~ 00 ~ 12
000 ~ 127
–64 ~ 00 ~ 63
–64 ~ 00 ~ 63
000 ~ 127
000 ~ 127
DCO1
244
244
087
027
00
00
00
087
–09
–63
000
079
DCO2
245
245
087
027
00
00
00
090
59
63
118
087
Base tone number 169
Tone Name Strings + S.Sax
◆Press keys hard/soft
No.
1
2
3
4
5
6
7
8
9
10
11
12
Parameter
PCM Set
Amp Envelope Set
Attack Rate
Release Rate
Pitch Envelope Set
Pitch
Transpose
Level
Touch Sense
Pan
Filter Sense
Filter Level
Range of Value
000 ~ 288
000 ~ 288
001 ~ 127
001 ~ 127
00 ~ 45
–64 ~ 00 ~ 63
–12 ~ 00 ~ 12
000 ~ 127
–64 ~ 00 ~ 63
–64 ~ 00 ~ 63
000 ~ 127
000 ~ 127
DCO1
112
112
089
028
00
–04
00
087
63
00
019
075
DCO2
113
113
115
028
00
04
00
095
63
00
019
095
◆Hold down keys
Base tone number 088
Tone Name LFO Bell + Saw
Re lR=012
Ptch= 00
Tran= 00
Lvel=096
Tsns=-32
Fsns=127
Fle
v=127
■
Filter Level (000 to 127)
This parameter controls the extent to which the digital filter is ap-
plied. The greater the value, the more open the filter and the clearer
the sound produced. A smaller value softens the sound.
Pan=00
Penv= 00
Naming a User Tone and Storing It In
Memory
The following procedure shows how to assign a name to a user tone
and store the tone in memory. Once a tone is stored, you can call it up
just as you do with a preset tone.
WK-1800/1600(E)-32~38 03.7.31, 5:21 PMPage 35 Adobe PageMaker 6.5J/PPC
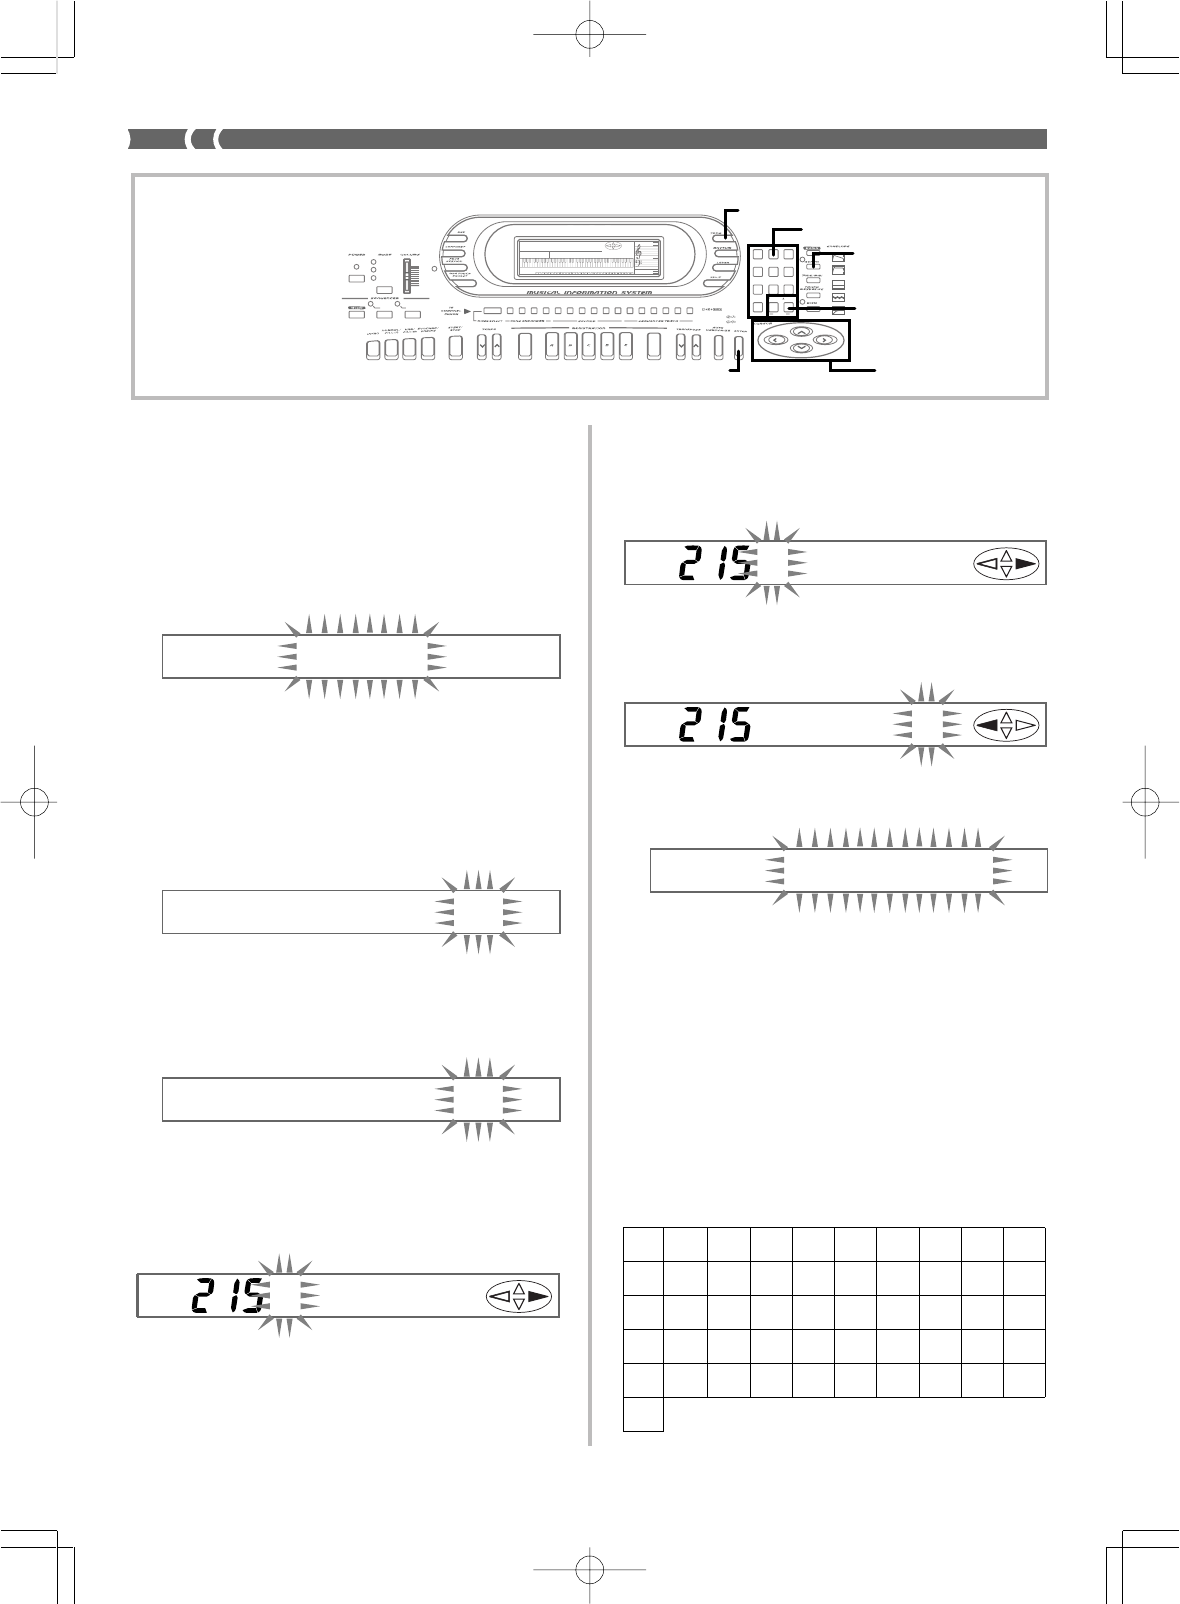
E-36
6.
Use [+] and [–] and the number keys to display the
first character of the name.
•[+] and [–] input alpha characters, while the number keys
input numerals.
7.
Press [왘] to move to the next character. Repeat step 6
to input the rest of the characters of the name.
8.
Press ENTER to save the user tone.
•Press YES to save the new tone and replace any tone data
already assigned to the tone number you selected. Pressing
NO does not save the tone and returns to the screen in step
2, above.
•To cancel the save operation and exit the Synthesizer, press
SYNTH or TONE. Pressing the SYNTH button again (before
selecting another tone) returns to the Synthesizer with all of
your parameter settings still in place.
❚
NOTE
❚
Auto Harmonize, layer, split, Auto Accompaniment, demo tunes, Song
Sequencer, Pattern Sequencer, MIDI, and floppy disk (WK-1800 only) op-
erations are all disabled while you are using the Synthesizer.
Letters and Numerals
The table below shows the letters and numerals that you can input
for a tone name.
To name a user tone and store it in memory
1.
Select a preset tone to use as the basis for the user
tone. Next, press the SYNTH button and change the
parameter settings to create your tone.
2.
After making parameter settings to create the user tone,
press the SYNTH button.
•This causes the message “Save?” to appear on the display.
•To abort the save operation without saving anything, press
NO, which causes the message “Delete?” to appear on the
display. Press NO to return to the parameter setting screen
without deleting the tone.
•Pressing YES while the “Delete?” message is on the screen
deletes the tone and exits the Synthesizer.
3.
Press YES in response to the “Save?” message to dis-
play the destination user area tone number.
4.
Use the number keys to change the user area tone
number on the display until the one where you want
to store the tone is shown.
•You can select any tone number from 200 to 231.
5.
Press ENTER.
•This displays the user tone input screen to appear, with the
first character of the default tone name flashing, which indi-
cates that you can input letters.
•If you do not want to assign a name, skip steps 6 and 7.
Save?
No . =200
No . =215
USER16
MSER16
MYSYNTH
J
T
%
}
8
I
S
$
{
7
H
R
#
—
6
G
Q
!
^
5
F
P
Z
@
4
E
O
Y
—
3
D
N
X
)
2
C
M
W
(
1
B
L
V
’
0
A
K
U
&
、
9
733A-E-038A
Re
p
lace?
AMP ENVELOPE
00 FLAT
01-17 VIBRATO
18-45 OTHERS
DECAY
SUSTAIN
PITCH ENVELOPE
MIN
MAX
FULL RANGE
CHORD
CASIO CHORD
SONG
FINGERED
PATTERN EXTERNAL
INTERNAL UPPER1
CH 1
UPPER2
CH 2
LOWER1
CH 3
LOWER2
STOREBANK
CH 4
ACC VOL.
CH 5
CHORD1
CH 6
CHORD2
CH 7
CHORD3
CH 8
BASS
CH 9
RHYTHM
CH 10
TR1
CH 11
TR2
CH 12
TR3
CH 13
TR4
CH 14
TR5
CH 15
TR6
CH 16
789
456
1
0
23
PARAMETER RESET:
DELETE
/YESS/NO
MAIN MANU/
CHANNEL VOLUME:
SUB MANU/
CHANNEL SELECT:
Number keys
TONE
SYNTH
[+]/[
–] (YES/NO)
Cursor key
s
ENTER
WK-1800/1600(E)-32~38 03.7.31, 5:21 PMPage 36 Adobe PageMaker 6.5J/PPC
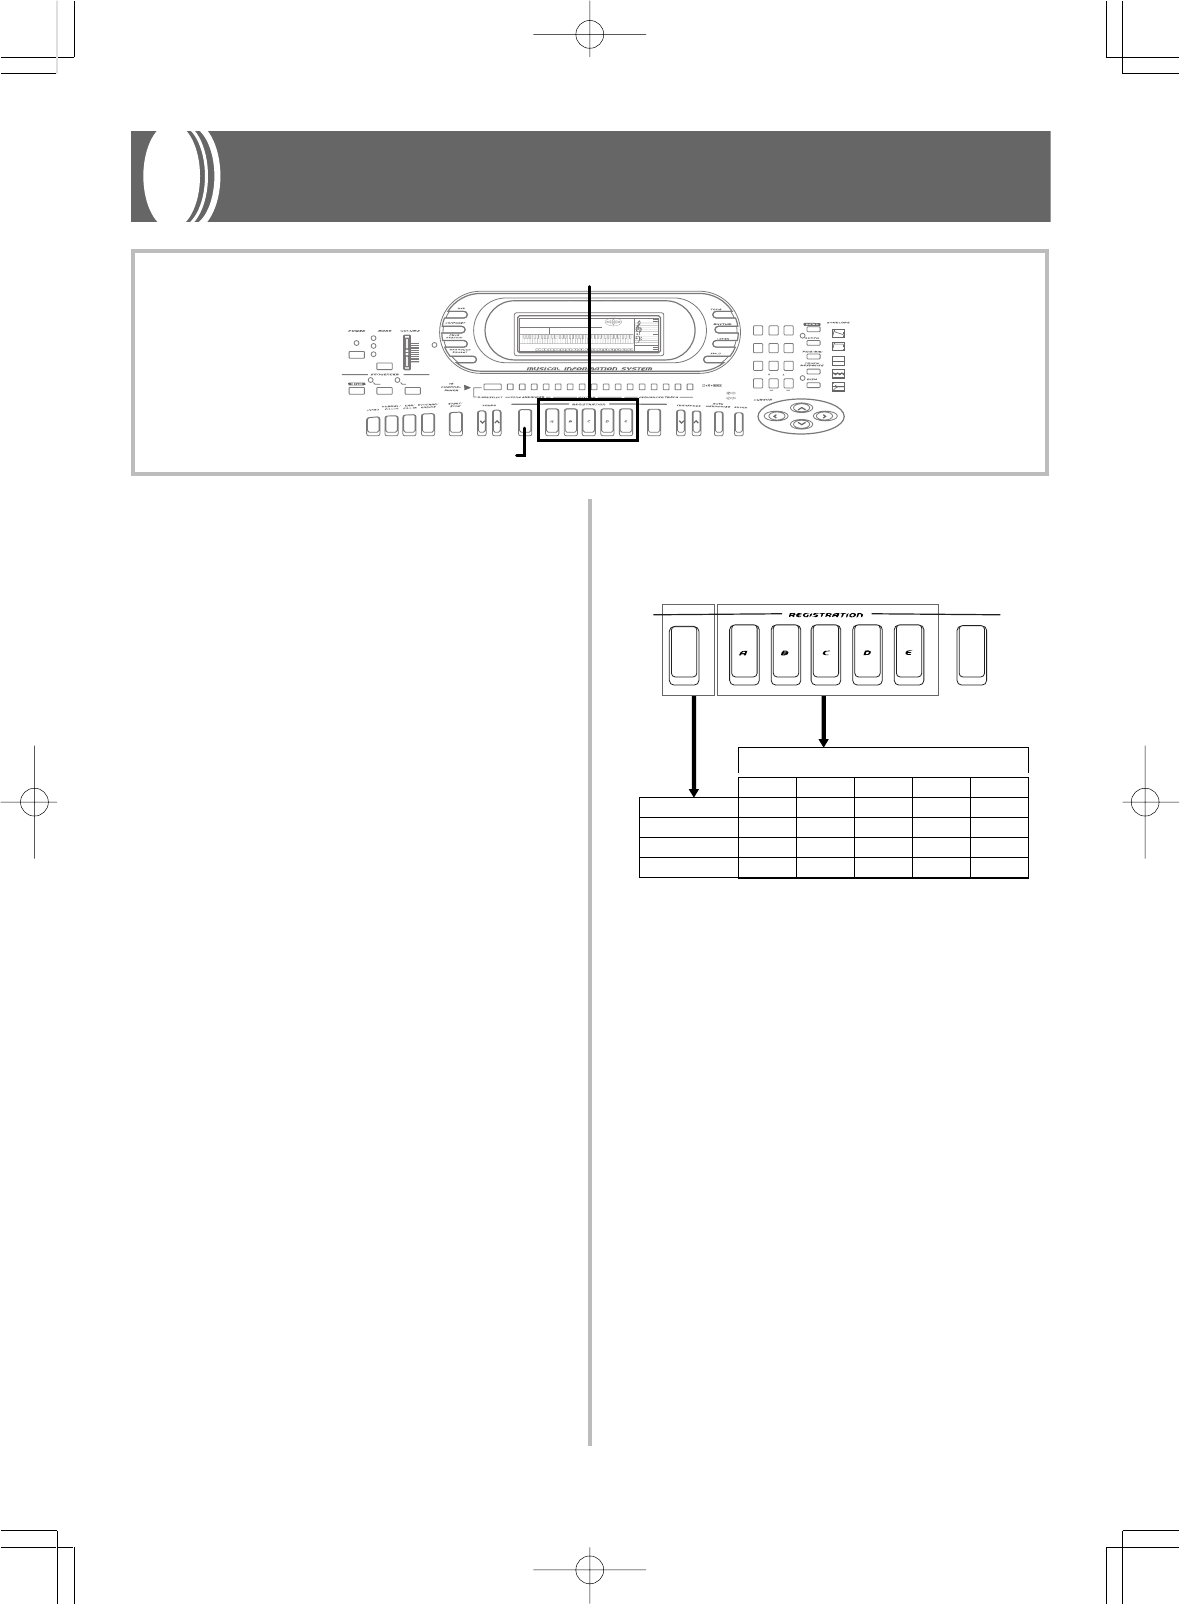
E-37
0-ABANK 0 0-B 0-C 0-D 0-E
1-ABANK 1 1-B 1-C 1-D 1-E
3-ABANK 3 3-B 3-C 3-D 3-E
2-ABANK 2 2-B 2-C 2-D 2-E
ABCDE
21
STOREBANK
733A-E-039A
Registration Memory
Registration Memory Features
Registration memory lets you store up to 20 (5 sets x 4 banks) key-
board setups for instant recall whenever you need them. The follow-
ing is a list of settings that are saved in registration memory.
Registration Memory Settings
•Tone
•Rhythm
•Tempo
•Split on/off
•Split point
•Layer on/off
•Auto Harmonize on/off
•Mixer settings
•Keyboard channel on/off
•DSP (digital effect) on/off
•DSP (digital effect) settings
•Accompaniment mode
•Touch Response settings
•Assignable jack setting
•Transpose
•Tuning
•Pitch Bend range
•Sound range shift on/off
❚
NOTES
❚
•Registration memory functions are disabled while you are using the Syn-
thesizer, Song Sequencer, Pattern Sequencer, demo tune function, or
floppy disk operations (WK-1800 only).
•Registration memory contains factory default setups when you first pur-
chase the keyboard and after you initialize the keyboard (page E-15).
Try recalling some of the default setups to see what they do.
Setup Names
Set ups are stored into registration memory by assigning them names.
Each setup name consists of a bank number from 0 to 3, followed by
a letter from A to E. The 20 setup names range from 0A through 3E as
shown below.
1Use the BANK button to select the bank. Each press of BANK cy-
cle through the bank numbers from 0 to 3.
2Use the REGISTRATION buttons to specify the letter part of the
setup name.
❚
NOTES
❚
•Whenever you save a setup and assign it a setup name, any setup data
previously assigned to that name is replaced with the new data.
•The keyboard comes with a built-in lithium battery that supplies power
to the memory to retain memory contents while keyboard power is turned
off. See “Lithium Battery Precautions” on page E-4 for important infor-
mation about the lithium battery.
•You can use the keyboard’s MIDI capabilities to save your setup data to
a computer or other external storage device. See “Bulk Sending Key-
board Data” on page E-65 for details.
•With the WK-1800, you can use the built-in disk drive to save setup data
to diskette. See “Using the Floppy Disk Drive (WK-1800 Only)” on page
E-67 for details.
AMP ENVELOPE
00 FLAT
01-17 VIBRATO
18-45 OTHERS
DECAY
SUSTAIN
PITCH ENVELOPE
MIN
MAX
FULL RANGE
CHORD
CASIO CHORD
SONG
FINGERED
PATTERN
EXTERNAL
INTERNAL UPPER1
CH 1
UPPER2
CH 2
LOWER1
CH 3
LOWER2
STOREBANK
CH 4
ACC VOL.
CH 5
CHORD1
CH 6
CHORD2
CH 7
CHORD3
CH 8
BASS
CH 9
RHYTHM
CH 10
TR1
CH 11
TR2
CH 12
TR3
CH 13
TR4
CH 14
TR5
CH 15
TR6
CH 16
789
456
1
0
23
PARAMETER RESET:
DELETE
/YESS/NO
MAIN MANU/
CHANNEL VOLUME:
SUB MANU/
CHANNEL SELECT:
REGISTRATION
BANK
WK-1800/1600(E)-32~38 03.7.31, 5:21 PMPage 37 Adobe PageMaker 6.5J/PPC
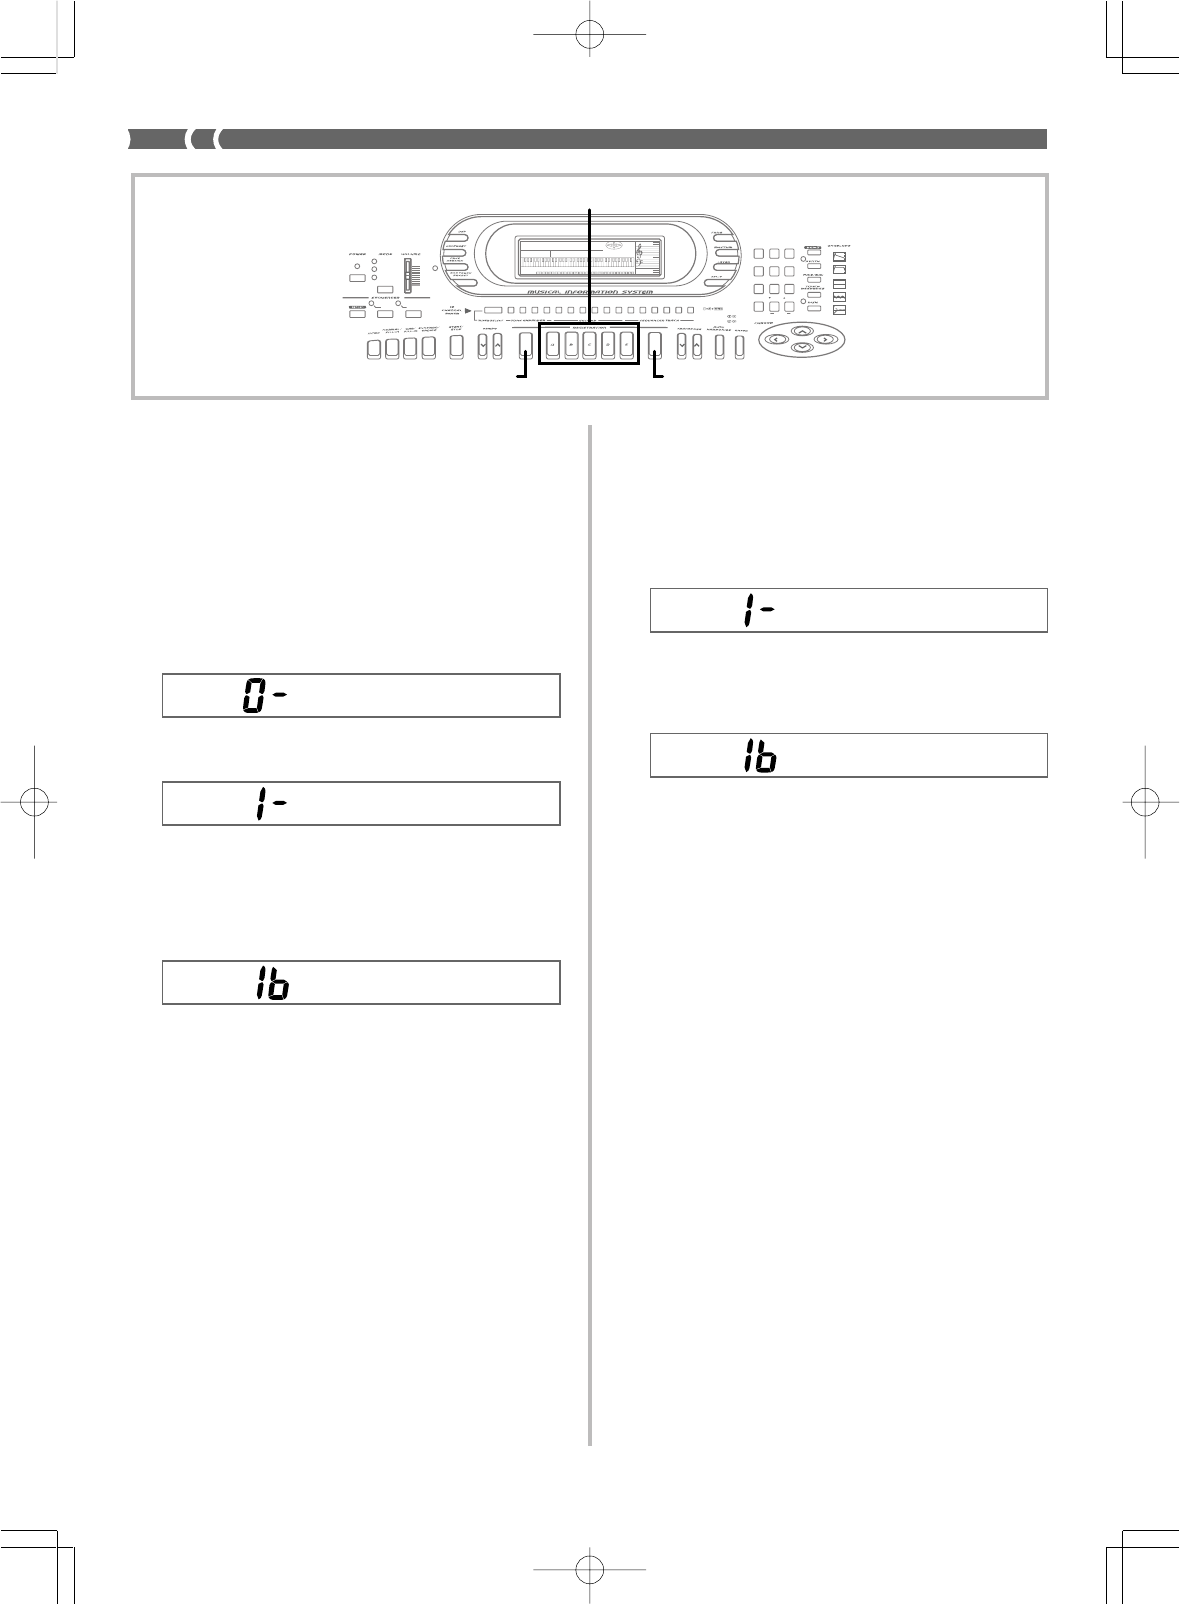
E-38
733A-E-040A
Bank
Bank
Store
To Recall a Setup from Registration
Memory
1.
Use the BANK button to select the bank.
•If you do not perform any operation for about five seconds
after pressing the BANK button, the keyboard automatical-
ly clears the registration memory recall screen.
2.
Press the REGISTRATION button to input the letter
part of the setup name.
•The setup name along with the message “Recall” appear on
the display for about five seconds.
❚
NOTE
❚
If you press a REGISTRATION button without using the BANK button to
select a bank first, the last bank number selected is used.
Bank
Recal l
To Save a Setup in Registration Memory
1.
Select a tone and rhythm, and otherwise set up the
keyboard the way you want it.
•See “Registration Memory Settings” on page E-37 for details
on what data is stored in the registration memory.
2.
Use the BANK button to select the bank you want.
•If you do not perform any operation for about five seconds
after pressing the BANK button, the display returns to the
contents in step 1, above.
•Bank 0 selected.
•Bank 1 selected.
3.
While holding down the STORE button, press a REG-
ISTRATION button.
•The following display appears when you press the B button.
4.
Release the STORE and REGISTRATION button.
❚
NOTES
❚
•The setup is saved as soon as you press a REGISTRATION button in
step 3, above.
•With the WK-1800, you can batch save all setups to diskette. See “Us-
ing the Floppy Disk Drive (WK-1800 Only)” on page E-67 for details.
AMP ENVELOPE
00 FLAT
01-17 VIBRATO
18-45 OTHERS
DECAY
SUSTAIN
PITCH ENVELOPE
MIN
MAX
FULL RANGE
CHORD
CASIO CHORD
SONG
FINGERED
PATTERN
EXTERNAL
INTERNAL UPPER1
CH 1
UPPER2
CH 2
LOWER1
CH 3
LOWER2
STOREBANK
CH 4
ACC VOL.
CH 5
CHORD1
CH 6
CHORD2
CH 7
CHORD3
CH 8
BASS
CH 9
RHYTHM
CH 10
TR1
CH 11
TR2
CH 12
TR3
CH 13
TR4
CH 14
TR5
CH 15
TR6
CH 16
789
456
1
0
23
PARAMETER RESET:
DELETE
/YESS/NO
MAIN MANU/
CHANNEL VOLUME:
SUB MANU/
CHANNEL SELECT:
REGISTRATION
BANK STORE
WK-1800/1600(E)-32~38 03.7.31, 5:21 PMPage 38 Adobe PageMaker 6.5J/PPC
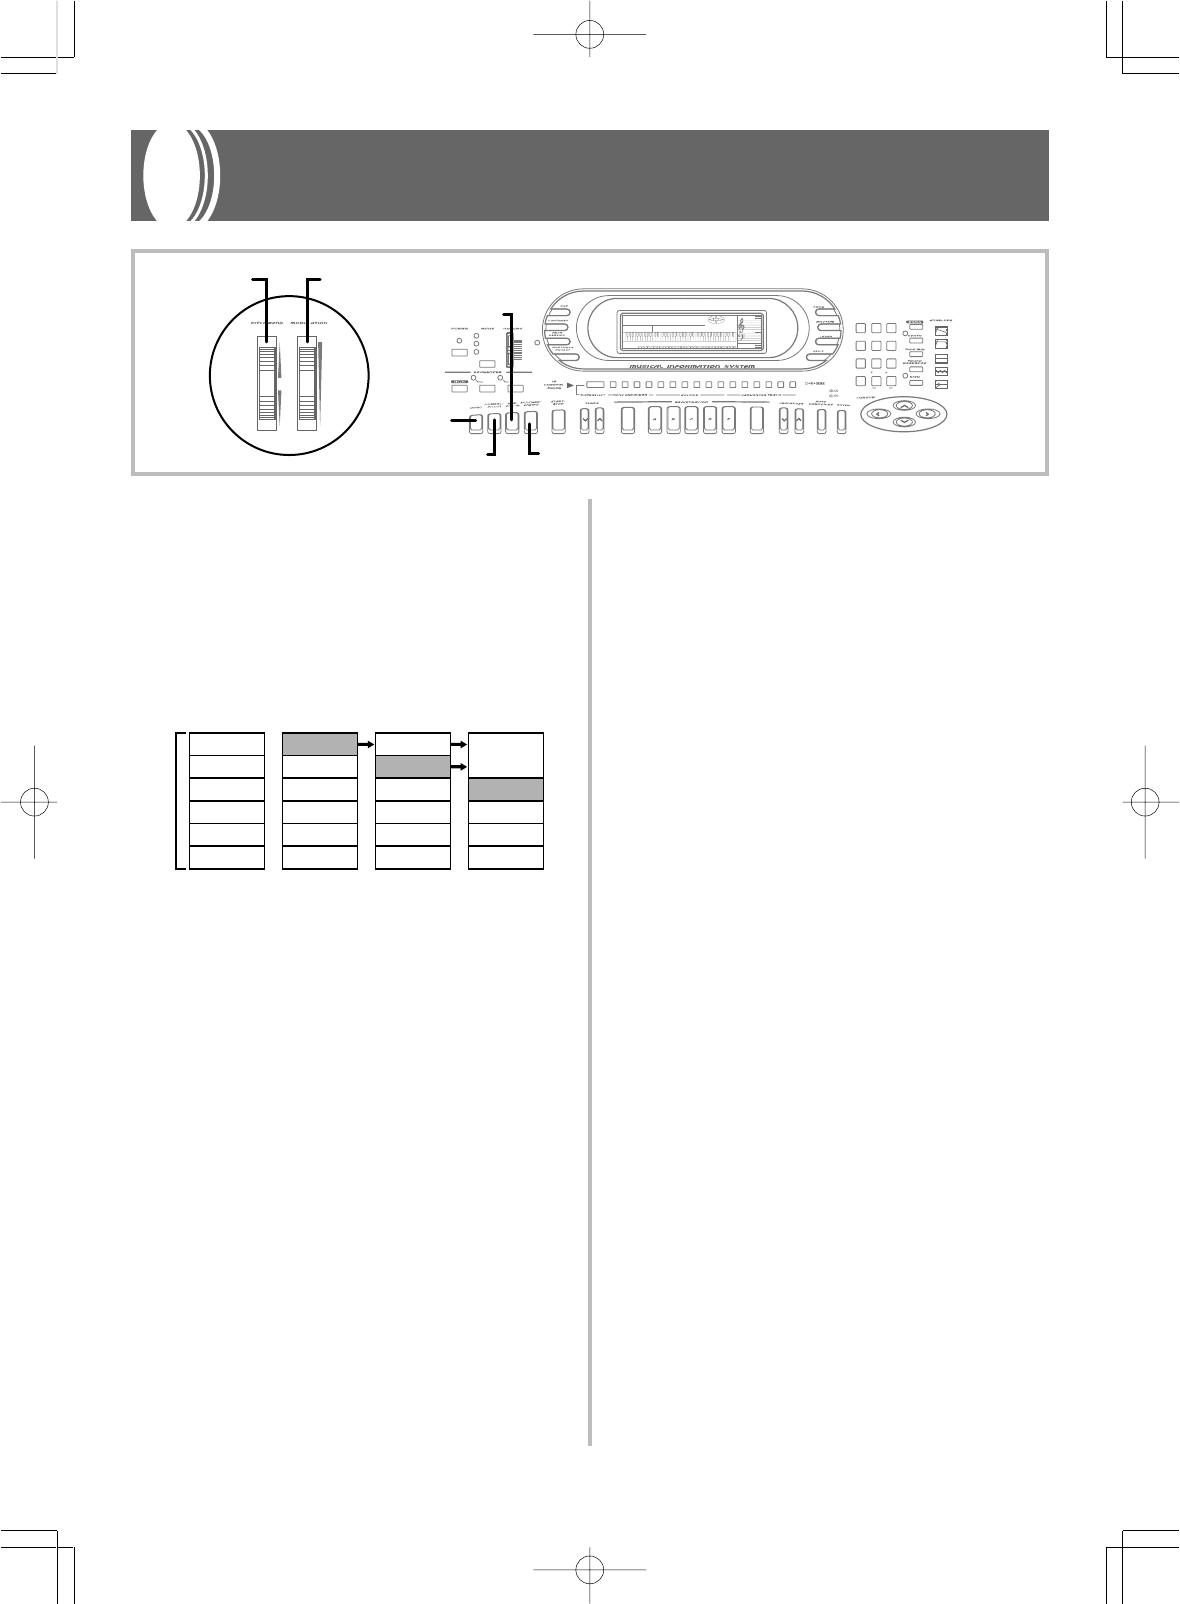
E-39
Using the Song Sequencer
733A-E-041A
The built-in Song Sequencer lets you record up to two separate songs
in memory for later playback.
Songs and Tracks
The Song Sequencer records and plays back much like a standard
tape recorder. You can have up to two separate, independent songs
in Song Sequencer memory at the same time.
Each song is make up of a total of six tracks, each of which can be
recorded separately. Then when you play back the tracks together, it
sounds like an entire group of musicians, each playing a different
part.
・・・
・・・
・・・
Song
Track 1
Track 2
Track 3
Track 4
Track 5
Track 6
Recording
Recording
Recording
Playing back Playing back
As shown in the illustration above, you add tracks one-by-one while
listening to the tracks you recorded previously.
❚
NOTES
❚
•With this keyboard, Track 1 can be used to record keyboard play and
Auto Accompaniment. Tracks 2 through 6 can be used for keyboard
play only, so they are called melody tracks. As shown in the illustration
above, you record Tracks 2 through 6 while listening to what you have
already recorded up to that point.
•Note that each track is independent of the others. This means that even
if you make a mistake while recording, you only need to re-record the
track where the mistake was made.
•Tone settings can be changed during recording, and each tone change
is recorded in the applicable track. This means you can have up to six
different instrument parts in one song.
Recording
There are two methods you can use to record with the Song Sequenc-
er: real-time recording and punch-in recording.
Real-time Recording
With this method, notes are recorded as you play them on the key-
board.
Punch-in Recording
This method lets you re-record from a specific section of a song that
is already in memory. You can use punch-in recording to correct mis-
takes you made during real-time recording.
Global Settings and Operations
A global setting or operation is one that affects all the tracks that make
up a song. The following is a list of the global settings and opera-
tions.
•Metronome setting
•Song delete
•Meter setting
•Initial tempo value
•Quantize setting after recording
See “Global Settings and Operations” on page E-45 for full details on
what each setting and operation does, and how to use them.
Song Sequencer Data
The type of data that is stored by the Song Sequencer during a re-
cording operation depends on whether you are using real-time re-
cording or punch-in recording. The same type of data is recorded
regardless of the track, except that only Track 1 records Auto Accom-
paniment.
Real-time Recording – Track 1 Only
The following data is recorded by Track 1 in addition to the data list-
ed described under “Real-time Recording – All Tracks” below.
•Rhythm pattern and rhythm pattern changes during recording
•INTRO, SYNCHRO/ENDING, NORMAL/FILL-IN, VARIATION/
FILL-IN button operations
•Chords played on the accompaniment keyboard
Real-time Recording – All Tracks
•Notes played on the keyboard
•Initial tone setting and any changes made during recording
•PITCH BEND Wheel operations
•MODULATION Wheel operations
•Pedal operations (when an optional pedal is connected)
Punch-in Recording – Track 1 Only
The following data is recorded by Track 1 only during punch-in re-
cording.
•Rhythm pattern changes during recording
•Chord specifications
•INTRO, SYNCHRO/ENDING, NORMAL/FILL-IN, VARIATION/
FILL-IN button operations
AMP ENVELOPE
00 FLAT
01-17 VIBRATO
18-45 OTHERS
DECAY
SUSTAIN
PITCH ENVELOPE
MIN
MAX
FULL RANGE
CHORD
CASIO CHORD
SONG
FINGERED
PATTERN
EXTERNAL
INTERNAL UPPER1
CH 1
UPPER2
CH 2
LOWER1
CH 3
LOWER2
STOREBANK
CH 4
ACC VOL.
CH 5
CHORD1
CH 6
CHORD2
CH 7
CHORD3
CH 8
BASS
CH 9
RHYTHM
CH 10
TR1
CH 11
TR2
CH 12
TR3
CH 13
TR4
CH 14
TR5
CH 15
TR6
CH 16
789
456
1
0
23
PARAMETER RESET:
DELETE
/YESS/NO
MAIN MANU/
CHANNEL VOLUME:
SUB MANU/
CHANNEL SELECT:
MODULATIONPITCH BEND
VARIATION/FILL-IN
NORMAL/FILL-IN
INTRO
SYNCHRO/ENDING
WK-1800/1600(E)-39~47 03.7.31, 5:21 PMPage 39 Adobe PageMaker 6.5J/PPC
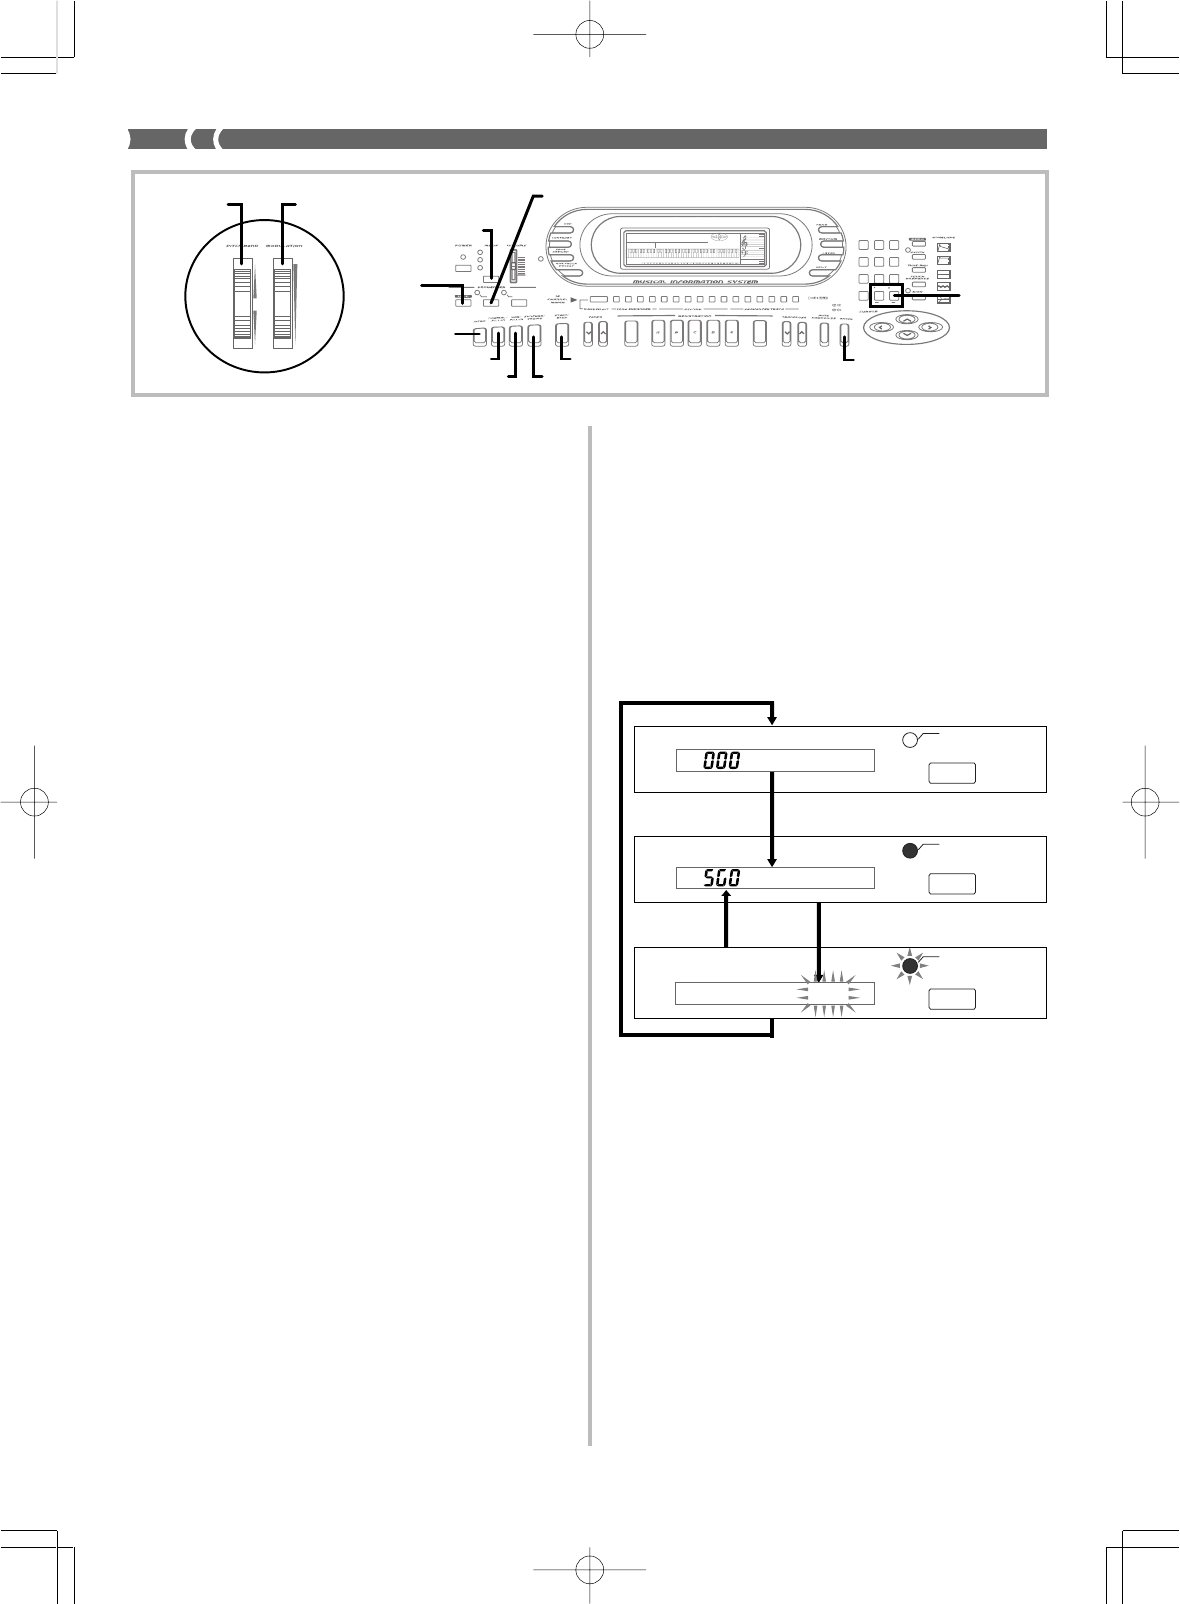
E-40
733A-E-042A
Punch-in Recording – Tracks 1 through 6
•Notes played on the keyboard
•Initial tone setting and any changes made during recording
•PITCH BEND Wheel operations
•MODULATION Wheel operations
•Pedal operations (when an optional pedal is connected)
Unrecorded Data
The following data is not recorded by the Song Sequencer.
•Touch Response on/off setting
•One-touch preset operations
•Registration memory operations
•Free Session
•Layer, split, Auto Harmonize settings
One-time Only Settings
Tempo
Only one tempo setting can be made at the beginning of the record-
ing. Tempo cannot be changed while recording is in progress.
Mixer (CH11 to CH16)
Mixer settings can be made at the beginning of the recording only,
but they can be changed after the recording is complete. The Mixer
settings in effect when you enter record standby are the ones that are
recorded.
Song Sequencer Memory Capacity
Song Sequencer memory capacity depends on the keyboard model.
WK-1800 : 8,000 notes
WK-1600/1630 : 4,900 notes
•Available notes can all be used for a single song, or divided be-
tween two songs.
•The measure number (item 11 on page E-10) and beat number (item
10 on page E-10) flashing on the display during recording indi-
cates that memory is almost full (space for about 100 notes or less
remaining).
•Recording stops automatically as soon as memory becomes full.
Auto Accompaniment and rhythm pattern play also stops at this
time if you are using them.
Song Sequencer Memory Precautions
Note the following important points about data stored in Song Se-
quencer Memory.
•Recording to a track that already contains data replaces the previ-
ous recording with the new one.
•The keyboard comes with a built-in lithium battery that supplies
power to the memory to retain Song Sequencer memory data. If
this lithium battery goes dead, memory contents are deleted any
time keyboard power is turned off. The normal life of the original
battery is five years from the time it is loaded at the factory. It is up
to you to contact your nearest CASIO service provider about hav-
ing the lithium battery replaced periodically. Note that the cost for
battery replacement will be charged to you.
•The indicator lamp above the SONG button is off when the Song
Sequencer is turned off.
•Pressing the SONG button once turns on the Song Sequencer and
enters the Record/Playback Mode. The indicator lamp above the
SONG button turns on at this time.
•Pressing the SONG button again changes to the Global Mode, which
causes the indicator lamp above the SONG button to flash.
•Pressing the SONG button exits the Global Mode.
•Pressing the ENTER button in the Global Mode returns to the
Record/Playback Mode.
Real-time Recording
Note that the procedure you use for Track 1 is different from that for
Tracks 2 through 6.
PREPARATION
•Determine the tones and rhythms (if any) that you want to use.
•Use the MODE button to select the Auto Accompaniment mode you want
to start recording with. If you do not want to start with Auto Accompani-
ment, select OFF.
•Set the tempo that you want to use during recording.
•Turning off the keyboard while a record operation is in progress
causes any data partially recorded to a track to be deleted.
•Song Sequencer memory contents can be sent to a computer or other
external device as MIDI data for storage. See “Bulk Sending Key-
board Data” on page E-65 for details.
•With the WK-1800, you can also store Song Sequencer memory data
on a floppy diskette. See “Using the Floppy Disk Drive (WK-1800
Only)” on page E-67 for details.
Song Sequencer Modes
The song sequencer has two modes: a Record/Playback Mode for
real-time recording, punch-in recording, and song playback, and a
Global Mode. The following illustration shows how each of these
modes is indicated.
AMP ENVELOPE
00 FLAT
01-17 VIBRATO
18-45 OTHERS
DECAY
SUSTAIN
PITCH ENVELOPE
MIN
MAX
FULL RANGE
CHORD
CASIO CHORD
SONG
FINGERED
PATTERN
EXTERNAL
INTERNAL UPPER1
CH 1
UPPER2
CH 2
LOWER1
CH 3
LOWER2
STOREBANK
CH 4
ACC VOL.
CH 5
CHORD1
CH 6
CHORD2
CH 7
CHORD3
CH 8
BASS
CH 9
RHYTHM
CH 10
TR1
CH 11
TR2
CH 12
TR3
CH 13
TR4
CH 14
TR5
CH 15
TR6
CH 16
789
456
1
0
23
PARAMETER RESET:
DELETE
/YESS/NO
MAIN MANU/
CHANNEL VOLUME:
SUB MANU/
CHANNEL SELECT:
[+]
/[
–
]
MODE
RECORD
NORMAL/FILL-IN
VARIATION/FILL-IN
INTRO
SYNCHRO/ENDING
SONG
START/STOP ENTER
MODULATIONPITCH BEND
TUNE1
Me t r=Rec
SONG
SONG
SONG
Song Sequencer Off
Global Mode
Record/Playback Mode
Unlit
Lit
Flash
WK-1800/1600(E)-39~47 03.7.31, 5:21 PMPage 40 Adobe PageMaker 6.5J/PPC
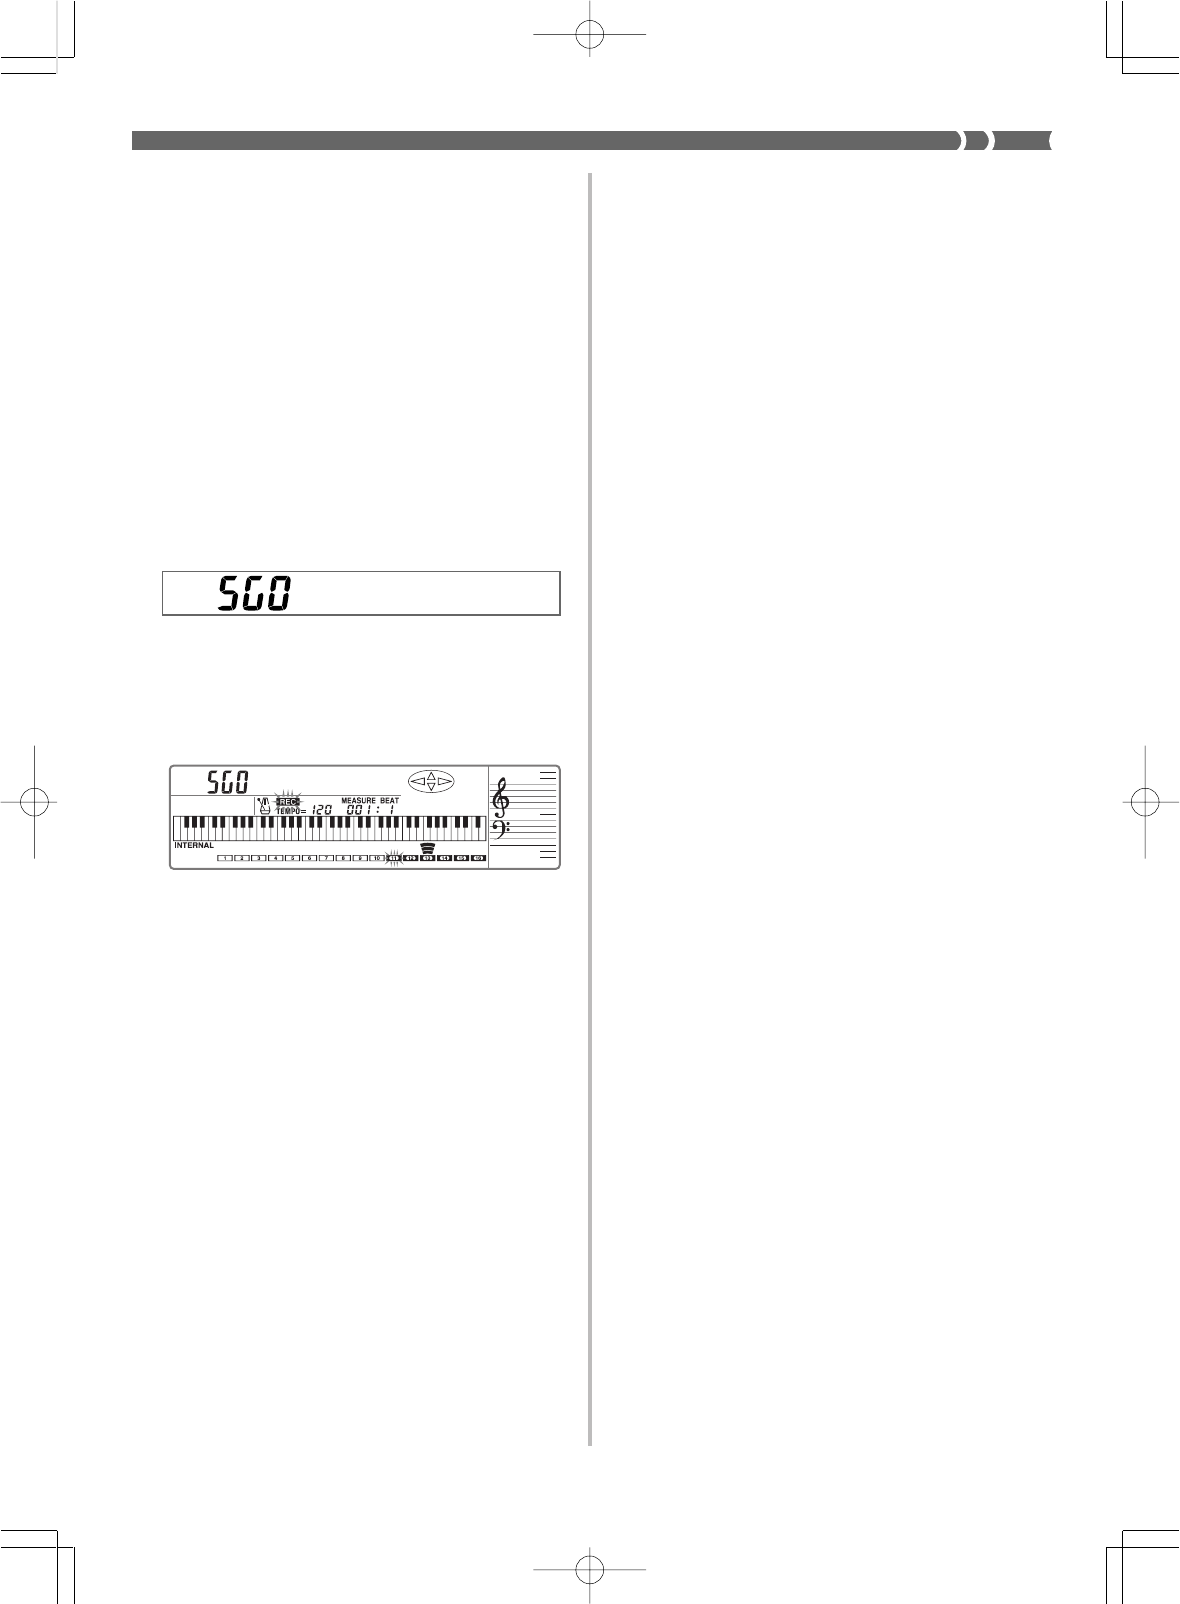
E-41
733A-E-043A
7.
After you are finished playing, press START/STOP
again to stop recording.
•The REC indicator clears from the display when recording is
stopped.
•Pressing START/STOP again at this point plays back the song
that you just finished recording. See “Playing Back from Song
Sequencer Memory” on page E-45 for details on song play-
back.
❚
NOTES
❚
•Real-time recording to a track that already contains data replaces the
previous recording with the new one.
•If you make a mistake while recording, you can either record over again
from step 1, or you can use punch-in recording (page E-42) to correct
them.
•If you change the rhythm pattern part way through real-time recording,
the meter value indicated on the display remains unchanged, even if
the new rhythm has a different meter.
Track 1 Real-time Recording Variations
The following describes a number of different variations you can use
when recording to Track 1 using real-time recording. All of these vari-
ations are based upon the procedure described under “To use real-
time recording in Track 1” on this page.
●
To record without rhythm
Skip step 5. Real-time recording without a rhythm starts when you
press a keyboard key.
●
To start recording with synchro start
In place of step 5, press the SYNCHRO/ENDING button. Auto-accom-
paniment and recording will both start when you play a chord on the
accompaniment keyboard.
●
To record using an intro, ending, or fill-in
During recording, the INTRO, SYNCHRO/ENDING, NORMAL/
FILL-IN, and VARIATION/FILL-IN buttons (page E-24 to 25) can all
be used to perform their normal operation.
●
To synchro start Auto Accompaniment with an intro
pattern
In place of step 5, press the SYNCHRO/ENDING button and then
the INTRO button. Auto Accompaniment will start with the intro
pattern when you play a chord on the accompaniment keyboard.
●
To start Auto Accompaniment part way into a record-
ing
In place of step 5, press the SYNCHRO/ENDING button and then
start playing on the melody keyboard to start recording without ac-
companiment. When you reach the point where you want accompa-
niment to start, play a chord on the accompaniment keyboard to start
Auto Accompaniment.
TUNE 1
❚
NOTES
❚
•You can change the tone and rhythm while recording is in progress. Any
changes you make become part of the recorded data.
•The tempo you use for recording does not affect the tempo of the play-
back. This means you can record at a very slow tempo for easy play,
and then speed up the tempo for playback.
•If you are using a rhythm pattern, notes are recorded using the meter
(time) of the rhythm pattern. If you are not using a rhythm pattern, you
must set the meter yourself using the procedure under “Meter (3)” on
page E-46.
•The following procedure shows the most basic operations for real-time
recording to Track 1. For other variations, see “Track 1 Real-time Re-
cording Variations” on this page.
To use real-time recording in Track 1
1.
Press the SONG button once.
•This causes the indicator lamp above the SONG button to
light.
2.
Select the user song area to which you want to record.
•Use [+] and [–] to select User Song Area 0 (SG0) or User Song
Area 1 (SG1).
•Change Mixer settings (CH1) if you want. The Mixer settings
you make for CH1 are copied to Track 1 during recording.
3.
Press the RECORD button to enter record standby.
•The REC indicator and the frame around the CH11 (Track 1)
flashes on the display.
•Track 1 (CH11) is automatically selected as the record track
whenever you enter record standby.
•Channels CH 11 through CH 16 of the level meter show which
tracks already contain recorded data. See “Level Meter Dur-
ing Record Operations” on page E-44 for details on how to
read the level meter.
4.
Make any tone, rhythm, or accompaniment mode set-
ting you want.
5.
Press the START/STOP button to start recording.
•At this time the REC indicator stops flashing.
•The metronome normally sounds during recording. If you
want to turn off the metronome, use the procedure under
“Metronome Setting (1)” on page E-46.
6.
Play the notes you want to record on the keyboard.
•Chords played on the accompaniment keyboard in accor-
dance with the accompaniment method selected with the
MODE button are also recorded in Track 1.
•PITCH BEND Wheel and pedal operations are also record-
ed. See “Real-time Recording–All Tracks” on page E-39 for
details.
TUNE1
WK-1800/1600(E)-39~47 03.7.31, 5:21 PMPage 41 Adobe PageMaker 6.5J/PPC
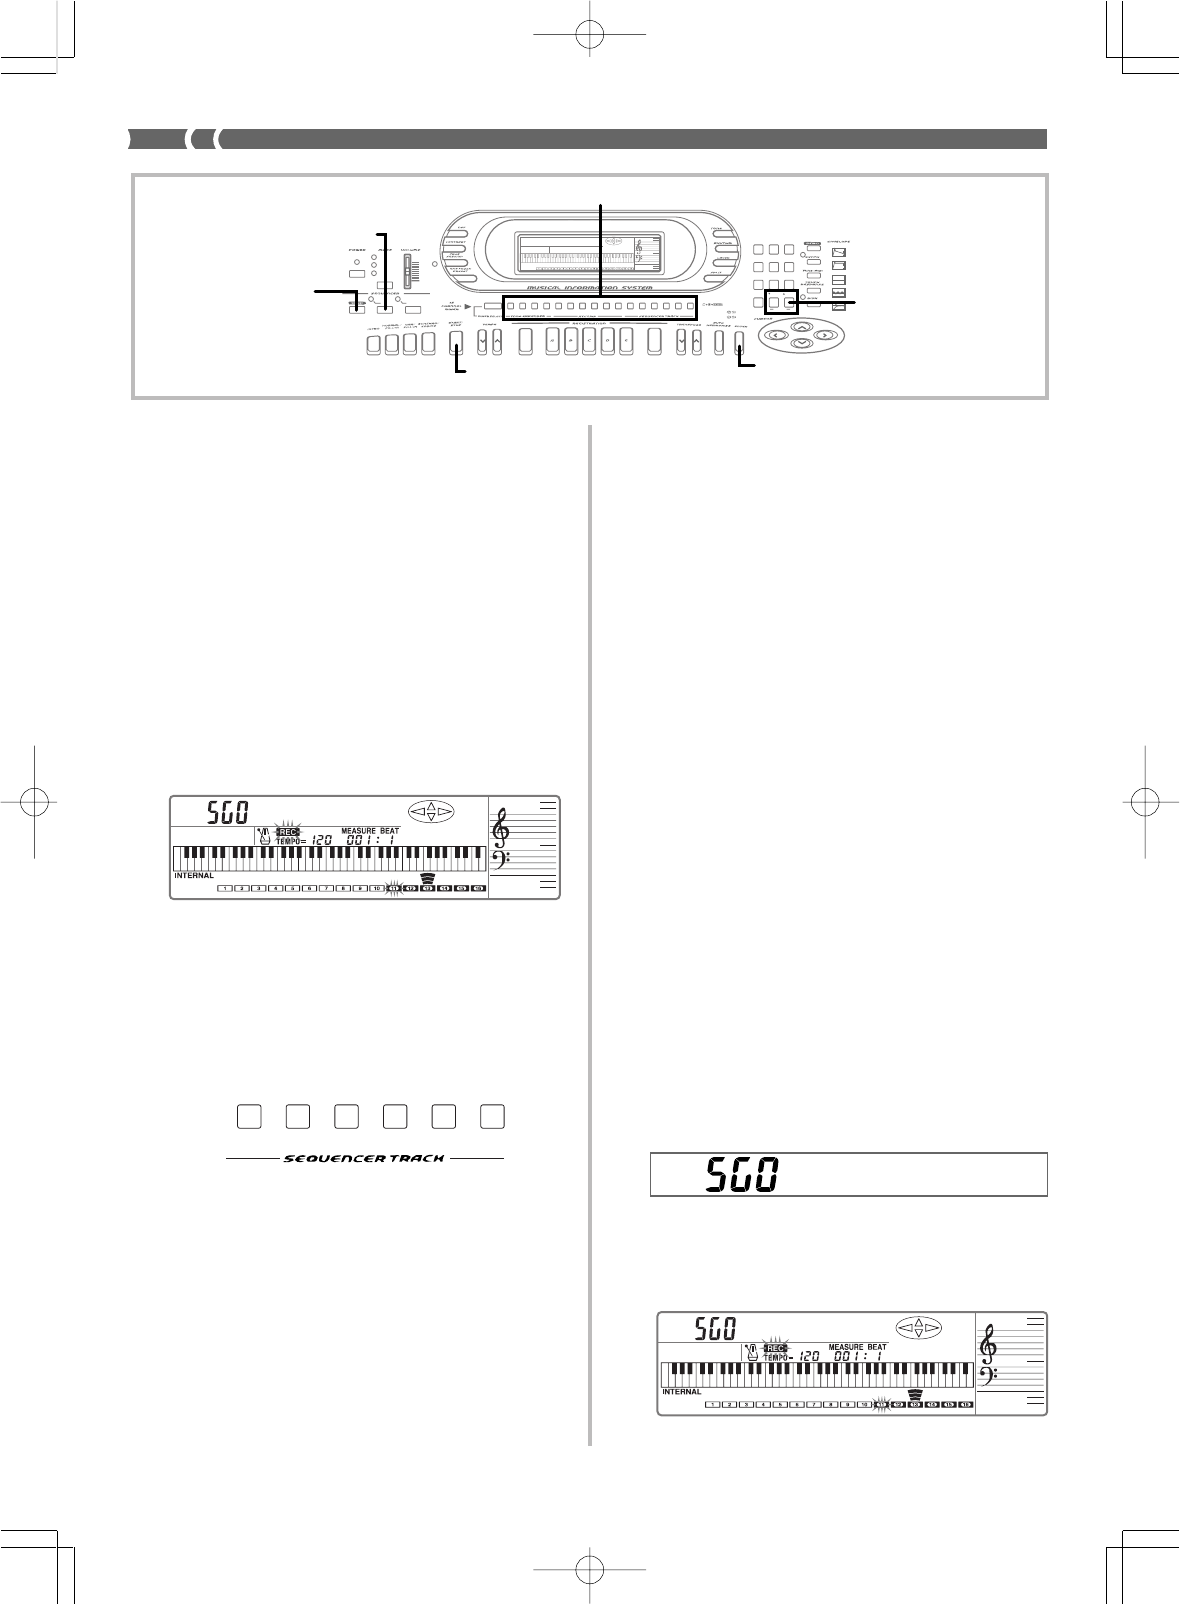
E-42
TR1
CH 11
TR2
CH 12
TR3
CH 13
TR4
CH 14
TR5
CH 15
TR6
CH 16
8.
After you are finished, press START/STOP to stop re-
cording.
•The REC indicator disappears from the display when record-
ing is stopped.
9.
At this point you can repeat steps 3 through 8 for oth-
er tracks, if you want.
Punch-in Recording
Note that the procedure you use for Track 1 is different from that for
Tracks 2 through 6.
PREPARATION
•Determine the tones that you want to use.
•Set the tempo that you want to use during recording.
❚
NOTES
❚
•You can change tone and rhythm while recording is in progress.
•The previously recorded rhythm pattern is automatically selected at first,
but you can change the rhythm during punch-in recording. Changing
the rhythm during punch-in recording, however, may cause the metro-
nome display and rhythm beat to be out of synch with the rhythm that is
playing.
•The tempo you use for recording does not affect the tempo of the play-
back. This means you can record at a very slow tempo for easy play,
and then speed up the tempo for playback.
To use punch-in recording in Track 1
1.
Press the SONG button once.
•This causes the indicator lamp above the SONG button to
light.
2.
Select the user song area that contains the song whose
contents you want to change using punch-in record-
ing.
•Use [+] and [–] to select User Song Area 0 (SG0) or User Song
Area 1 (SG1).
3.
Press the RECORD button to enter record standby.
•The REC indicator appears, and the frame around the CH11
(Track 1) flashes on the display.
733A-E-044A
To use real-time recording in Tracks 2 through 6
❚
NOTE
❚
If you are performing real-time recording in Tracks 2 through 6 immediate-
ly after you finished real-time recording in Track 1, skip steps 1 and 2 of
the following procedure.
1.
Press the SONG button once.
•This causes the indicator lamp above the SONG button to
light.
2.
Select the user song area to which you want to record.
•Use [+] and [–] to select User Song Area 0 (SG0) or User Song
Area 1 (SG1).
•Change Mixer settings for the channel if you want. The Mix-
er settings you make for the channel are copied to applica-
ble track during recording.
3.
Press the RECORD button to enter record standby.
•The REC indicator appears, and the frame around the cur-
rently selected channel (track) flashes on the display.
•Channels CH 11 through CH 16 of the level meter show which
tracks already contain recorded data. See “Level Meter Dur-
ing Record Operations” on page E-44 for details on how to
read the level meter.
4.
Select the track to which you want to record.
•Use CHANNEL buttons CH12 (Track 2) through CH16 (Track
6) to select the track you want.
5.
Make any tone setting you want.
6.
Press the START/STOP button to start recording.
•At this time the REC indicator stops flashing.
•The metronome normally sounds during recording. If you
want to turn off the metronome, use the procedure under
“Metronome Setting (1)” on page E-46.
7.
Play the notes you want to record on the keyboard.
TUNE 1
TUNE 1
TUNE1
AMP ENVELOPE
00 FLAT
01-17 VIBRATO
18-45 OTHERS
DECAY
SUSTAIN
PITCH ENVELOPE
MIN
MAX
FULL RANGE
CHORD
CASIO CHORD
SONG
FINGERED
PATTERN
EXTERNAL
INTERNAL UPPER1
CH 1
UPPER2
CH 2
LOWER1
CH 3
LOWER2
STOREBANK
CH 4
ACC VOL.
CH 5
CHORD1
CH 6
CHORD2
CH 7
CHORD3
CH 8
BASS
CH 9
RHYTHM
CH 10
TR1
CH 11
TR2
CH 12
TR3
CH 13
TR4
CH 14
TR5
CH 15
TR6
CH 16
789
456
1
0
23
PARAMETER RESET:
DELETE
/YESS/NO
MAIN MANU/
CHANNEL VOLUME:
SUB MANU/
CHANNEL SELECT:
[+]
/[
–
]
ENTER
SONG
CHANNEL
RECORD
START/STOP
WK-1800/1600(E)-39~47 03.7.31, 5:21 PMPage 42 Adobe PageMaker 6.5J/PPC
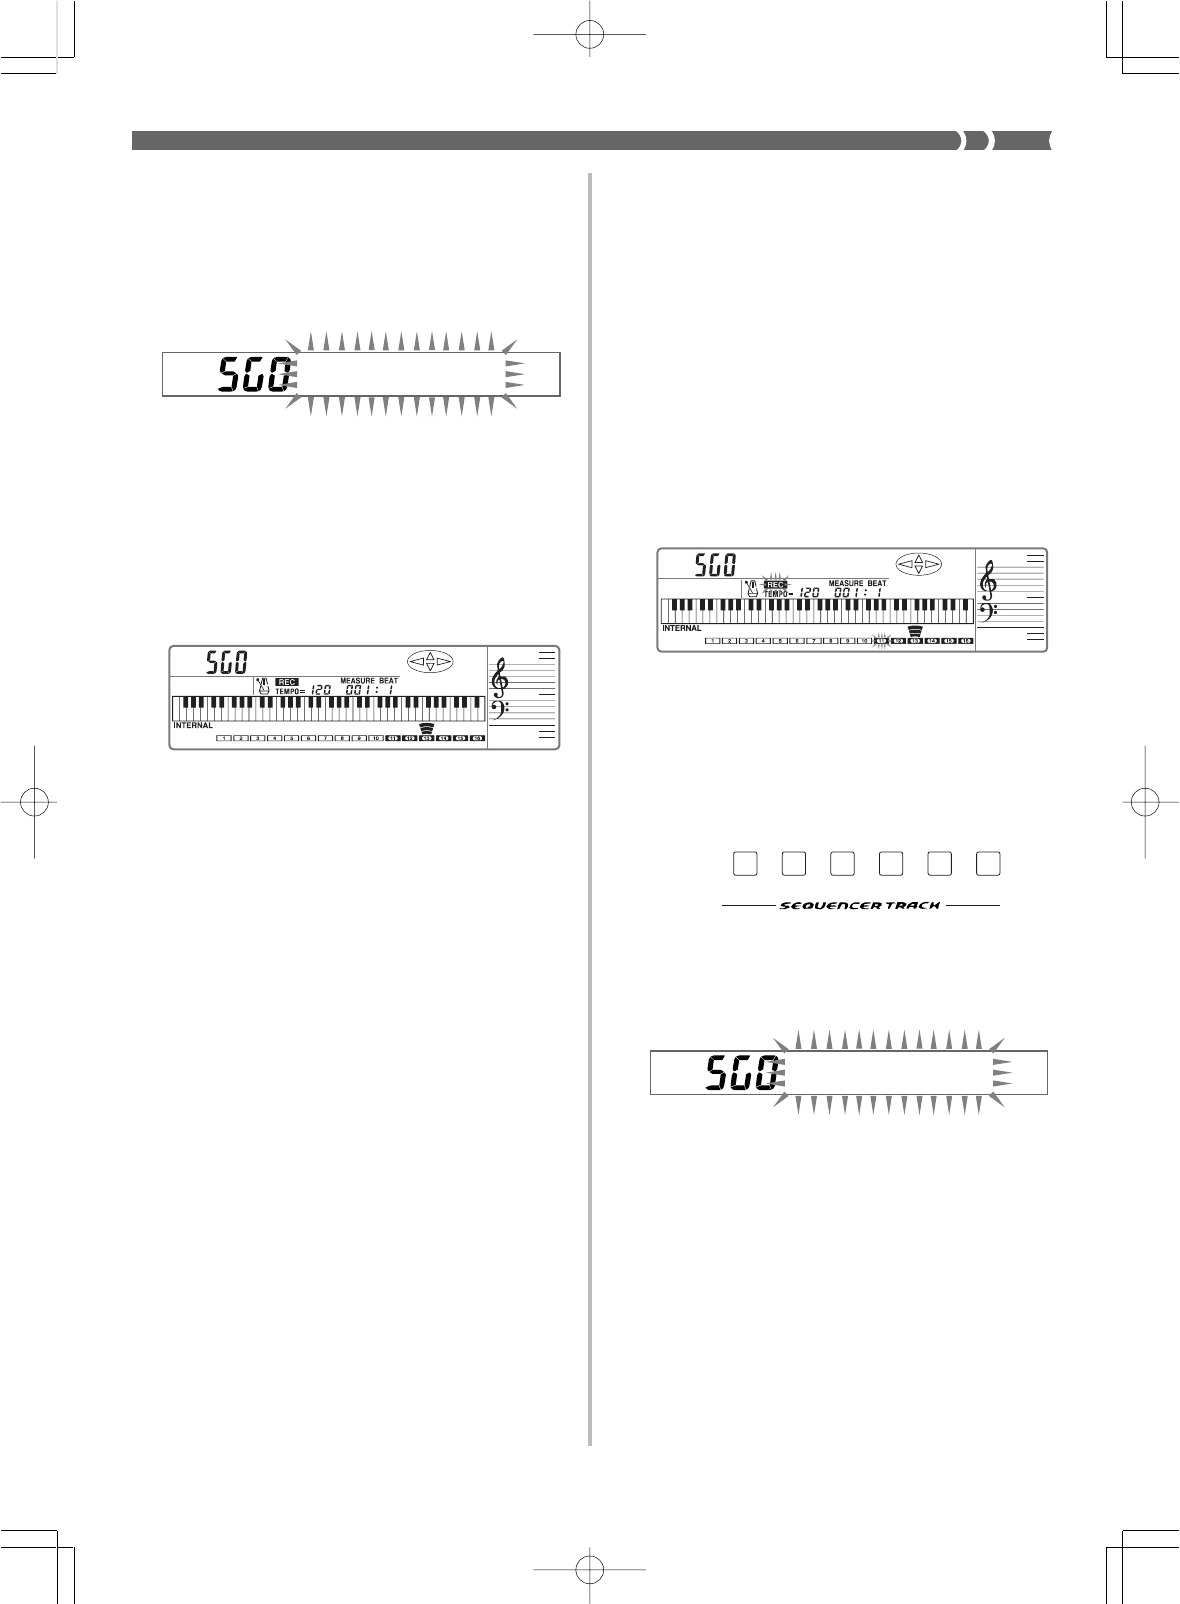
E-43
•Channels CH 11 through CH 16 of the level meter show which
tracks already contain recorded data. See “Level Meter Dur-
ing Record Operations” on page E-44 for details on how to
read the level meter.
4.
Make any tone setting you want.
5.
Press the ENTER button to enter the Punch-in Mode.
6.
Press the START/STOP button to start playback of the
song in the user song area you selected in step 2.
7.
When playback reaches the part you want to change,
play the new part on the keyboard.
•Playback from memory stops and recording begins as soon
as you play something on the keyboard.
•You can change the rhythm setting while recording is in
progress.
•Continue playing until the end of the song.
•You can also change Auto Accompaniment chords during
punch-in recording by playing chords on the accompaniment
keyboard.
•If a synchro start operation is already recorded in Track 1,
playing something on the accompaniment keyboard starts
rhythm play and records it.
See “Synchro Starting Accompaniment with Rhythm Play”
on page E-25 or details on using synchro start.
8.
After you are finished, press START/STOP to stop re-
cording.
•The REC indicator disappears from the display when record-
ing is stopped.
•After recording is stopped, you can press the START/STOP
button to playback what you have just recorded. See “Play-
ing Back from Song Sequencer Memory” on page E-45 for
details on the type of data recorded to Song Sequencer mem-
ory.
TR1
CH 11
TR2
CH 12
TR3
CH 13
TR4
CH 14
TR5
CH 15
TR6
CH 16
733A-E-045A
Punch In
To use punch-in recording in Tracks 2 through 6
❚
NOTE
❚
If you are performing punch-in recording in Tracks 2 through 6 immediate-
ly after you finished punch-in recording in Track 1, skip steps 1 and 2 of
the following procedure.
1.
Press the SONG button once.
•This causes the indicator lamp above the SONG button to
light.
2.
Select the user song area that contains the song whose
contents you want to change using punch-in record-
ing.
•Use [+] and [–] to select User Song Area 0 (SG0) or User Song
Area 1 (SG1).
3.
Press the RECORD button to enter record standby.
•The REC indicator appears, and the frame around the CH11
(Track 1) flashes on the display.
•Channels CH 11 through CH 16 of the level meter show which
tracks already contain recorded data. See “Level Meter Dur-
ing Record Operations” on page E-44 for details on how to
read the level meter.
4.
Select the track whose contents you want to change.
•Use CHANNEL buttons CH12 (Track 2) through CH16 (Track
6) to select the track you want.
5.
Make any tone setting you want.
6.
Press the ENTER button to enter the Punch-in Mode.
•Pressing the ENTER button again exits the Punch-in Mode.
7.
Press the START/STOP button to start playback of the
song in the user song area you selected in step 2.
8.
When playback reaches the part you want to change,
play the new part on the keyboard.
•Playback of the current track stops and punch-in recording
starts as soon as you play something on the keyboard.
•Pressing the ENTER button instead of playing something on
the keyboard starts recording of a blank in the selected track
(except for the accompaniment of Track 1) until you play
something.
•Continue playing until the end of the song.
Punch In
TUNE 1
Punch In
WK-1800/1600(E)-39~47 03.7.31, 5:21 PMPage 43 Adobe PageMaker 6.5J/PPC
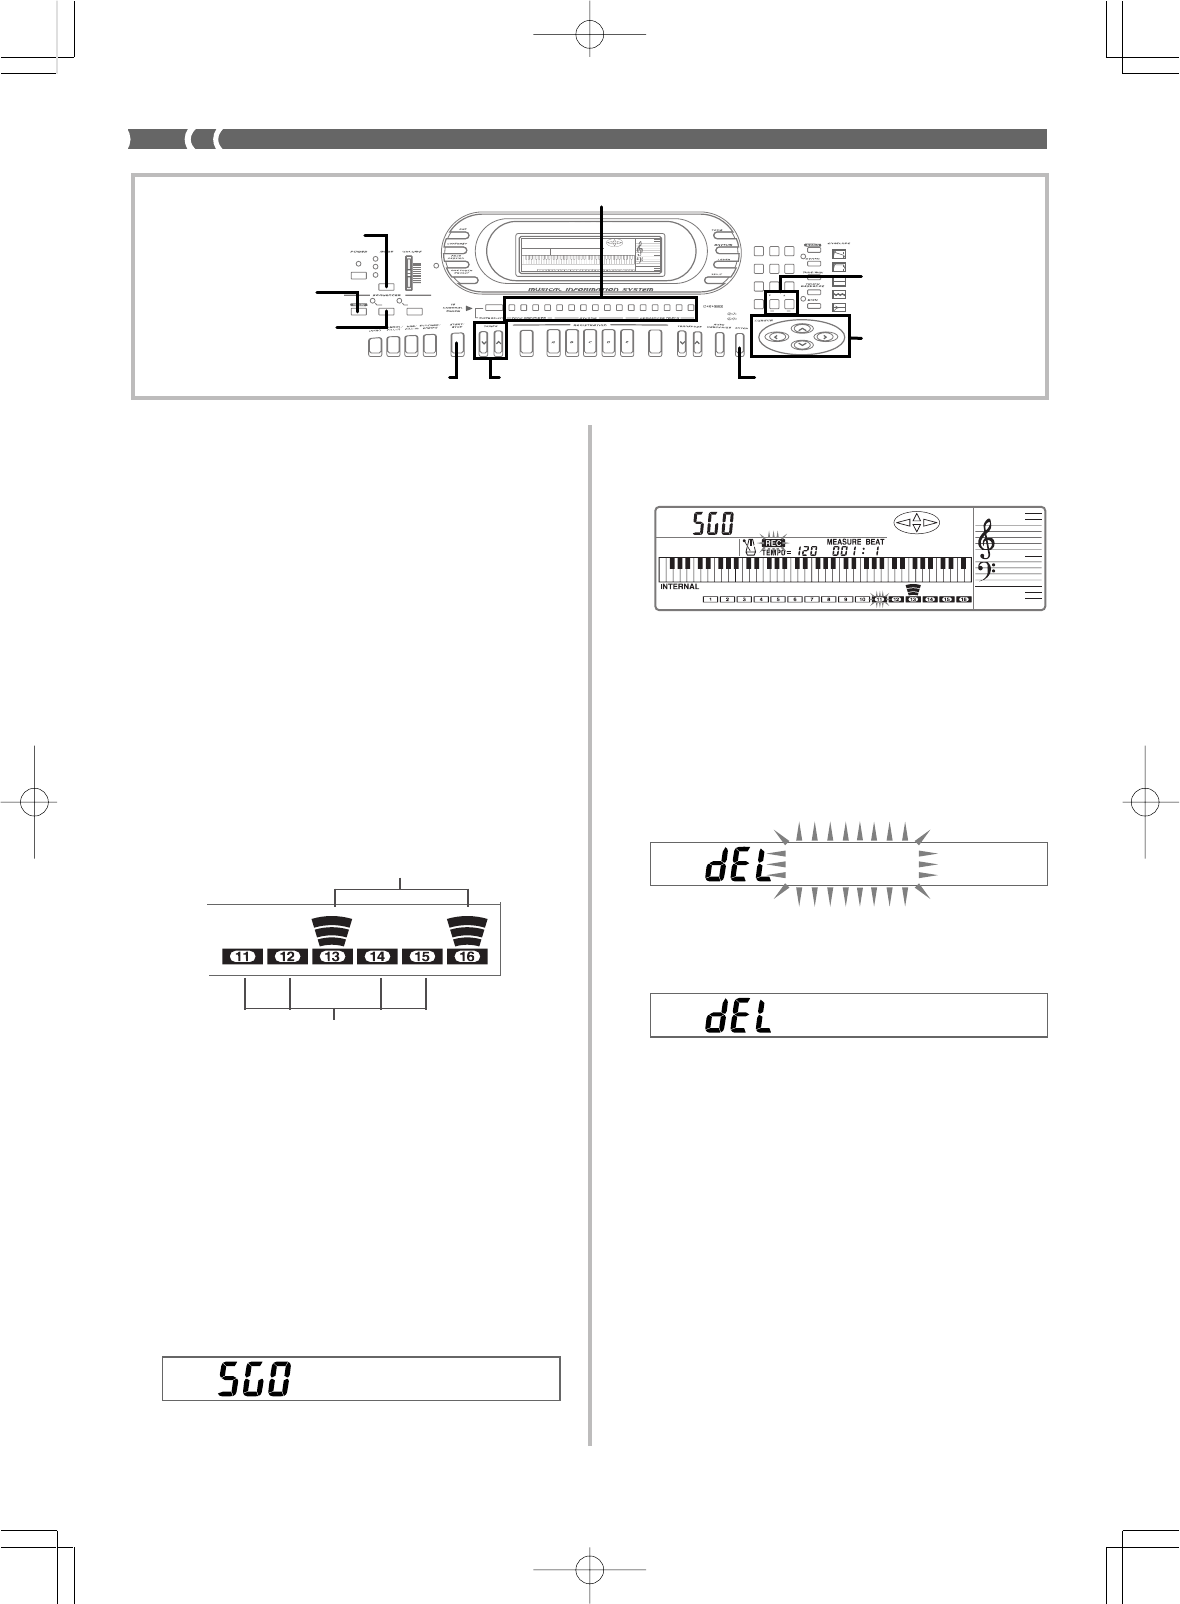
E-44
3.
Press the RECORD button to enter record standby.
•The REC indicator appears, and the frame around the CH11
(Track 1) flashes on the display.
•Channels CH 11 through CH 16 of the level meter show which
tracks already contain recorded data. See “Level Meter Dur-
ing Record Operations” on this page for details on how to
read the level meter.
4.
Select the track whose contents you want to delete.
•Use CHANNEL buttons CH11 (Track 1) through CH16 (Track
6) to select the track you want.
5.
Press [+] and [–] at the same time.
6.
Press YES to delete the selected track or NO to abort
the delete operation.
•After a few moments, the keyboard exits the record opera-
tion.
•The message “dEL No Data” appears on the display for about
one second if the track you selected in step 4 does not con-
tain any data.
TUNE1
TUNE 1
Su re?
733A-E-046A
9.
After you are finished, press START/STOP to stop re-
cording.
•The REC indicator disappears from the display when record-
ing is stopped.
10
.
At this point you can repeat steps 3 through 9 for oth-
er tracks, if you want.
Playback Tracks
When recording to a track with the Song Sequencer, the contents of
any tracks that are already recorded normally play back. These are
called playback tracks. You can turn playback tracks on (so they play
during recording) or off (so they don’t play). See “Turning Channels
On and Off” on page E-29 for details.
Level Meter During Record Operations
Channels CH11 through CH16 correspond to Tracks 1 through 6.
During record standby, the level meter shows which tracks are al-
ready recorded. Three level meter segments indicate a channel is al-
ready quoted, while no segment indicates that the channel is empty
(unrecorded).
Recorded tracks
Empty (unrecorded) tracks
Com
p
le te
To Delete the Contents of a Specific
Track
Note that a track delete operation cannot be undone. Make sure you
no longer need the contents of a track before you delete them.
1.
Press the SONG button once.
•This causes the indicator lamp above the SONG button to
light.
2.
Select the user song area that contains the track whose
contents you want to delete.
•Use [+] and [–] to select User Song Area 0 (SG0) or User Song
Area 1 (SG1).
AMP ENVELOPE
00 FLAT
01-17 VIBRATO
18-45 OTHERS
DECAY
SUSTAIN
PITCH ENVELOPE
MIN
MAX
FULL RANGE
CHORD
CASIO CHORD
SONG
FINGERED
PATTERN
EXTERNAL
INTERNAL UPPER1
CH 1
UPPER2
CH 2
LOWER1
CH 3
LOWER2
STOREBANK
CH 4
ACC VOL.
CH 5
CHORD1
CH 6
CHORD2
CH 7
CHORD3
CH 8
BASS
CH 9
RHYTHM
CH 10
TR1
CH 11
TR2
CH 12
TR3
CH 13
TR4
CH 14
TR5
CH 15
TR6
CH 16
789
456
1
0
23
PARAMETER RESET:
DELETE
/YESS/NO
MAIN MANU/
CHANNEL VOLUME:
SUB MANU/
CHANNEL SELECT:
[+]/[
–] (YES/NO)
Cursor keys
ENTER
SONG
MODE
CHANNEL
RECORD
START/STOP TEMPO
WK-1800/1600(E)-39~47 03.7.31, 5:21 PMPage 44 Adobe PageMaker 6.5J/PPC
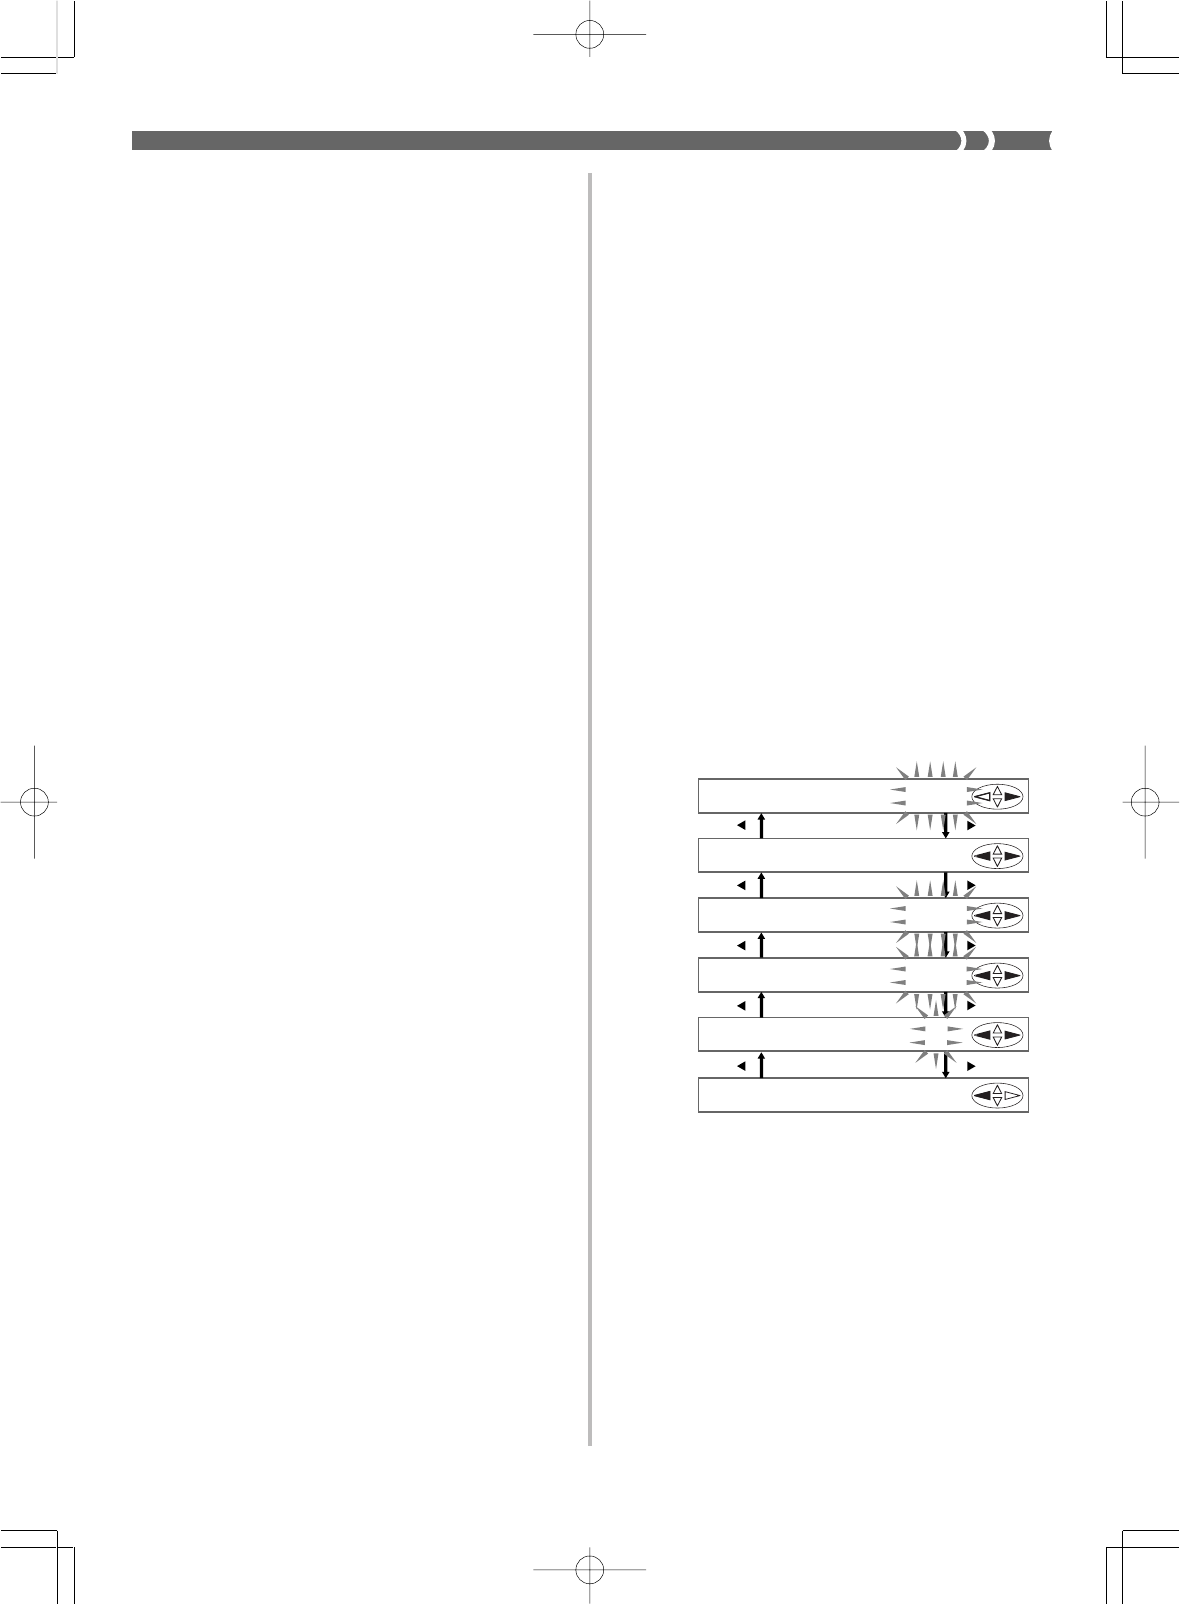
E-45
733A-E-047A
Playing Back from Song Sequencer
Memory
Use the following procedure when you want to play back the con-
tents of Song Sequencer memory.
•Skip steps 1 and 2 of the following procedure if you have just fin-
ished a real-time recording operation.
To play back from Song Sequencer memory
1.
Press the SONG button once.
•This causes the indicator lamp above the SONG button to
light.
2.
Select the user song area that contains the song you
want to play back.
•Use [+] and [–] to select User Song Area 0 (SG0) or User Song
Area 1 (SG1).
3.
Press the START/STOP button to start playback.
•Use the TEMPO buttons to adjust the playback tempo.
•See the notes below for other operations you can perform
during playback.
4.
Press the START/STOP button again to stop playback.
❚
NOTES
❚
•Pressing the START/STOP button starts playback from the beginning of
the selected song.
•You can play along on the keyboard during Song Sequencer playback.
You can use layer, and split for keyboard play.
•You can use the Mixer to adjust the volume level and stereo points of
the playback track. Such settings are output from MIDI OUT when they
are made.
•You cannot change the MODE button setting during Song Sequencer
playback.
Song Sequencer and Mixer Operations
During Song Sequencer playback standby and playback, all four cur-
sor keys and the ENTER button function as Mixer operation buttons.
This means you can change Mixer settings for each track for both
recording and playback.
Mixer Settings Recorded by Each Track
Mixer settings are recorded independently for each track. Mixer set-
tings are recorded as track data under either of the following two
conditions.
•Mixer and bend range settings made for CH1 during Song Sequenc-
er playback standby are recorded to the track selected for record-
ing.
•Mixer settings are saved for the applicable channels regardless of
whether they are made during recording or playback.
Mixer Settings During Playback
Selecting a song area causes the Mixer settings recorded for each track
to be recalled and assigned to their corresponding channels.
Turning Tracks On and Off
•During playback standby or actual playback, you can turn Tracks
1 through 6 on and off using CHANNEL buttons CH11 through
CH16. This means you can select which channels (parts) you want
to play or even play back a single channel.
•You can also turn the playback of previously recorded channels on
and off during real-time recording.
❚
NOTE
❚
During real-time recording standby, CHANNEL buttons CH11 through CH16
are used to select the record track. This means you cannot use the CHAN-
NEL buttons to turn playback channels on and off during record standby.
Global Settings and Operations
A global setting or operation is one that affects all the tracks that make
up a song. The following is a list of the global settings and opera-
tions.
1Metronome setting
2Song delete
3Meter setting
4Initial tempo value
5Quantize setting after recording
6Quantize execution
To make global settings
1.
Press the SONG button once.
•This causes the indicator lamp above the button to light.
2.
Select the user song area that contains the song whose
global settings you want to change.
•Use [+] and [–] to select User Song Area 0 (SG0) or User Song
Area 1 (SG1).
3.
Press the SONG button again.
•This causes the indicator lamp above the button to flash, and
the first global setting screen to appear on the display.
4.
Use the [왗
] and [왘
] cursor keys to scroll through the
global setting and operation screens.
•The numbers shown to the left of the sample displays below
correspond to the following sections that provide details on
each setting.
[
][
]
[
][
]
[
][
]
[
][
]
1
Me t r=Rec
2
Son
g
0De l
3
Bt= 4/4
4
Tm
p
o=120
5
Qtz=4
[
][
]
6
Qtz Exe?
5.
When the item you want is on the screen, change it to
the setting you want.
•See the explanations following this procedure for details on
making each global setting.
6.
After you are finished making a particular setting, press
the ENTER button to return to the Record/Playback
Mode screen.
•Press [왗
] or [왘
] in place of ENTER if you want to change to
another setting screen and make other settings.
WK-1800/1600(E)-39~47 03.7.31, 5:21 PMPage 45 Adobe PageMaker 6.5J/PPC
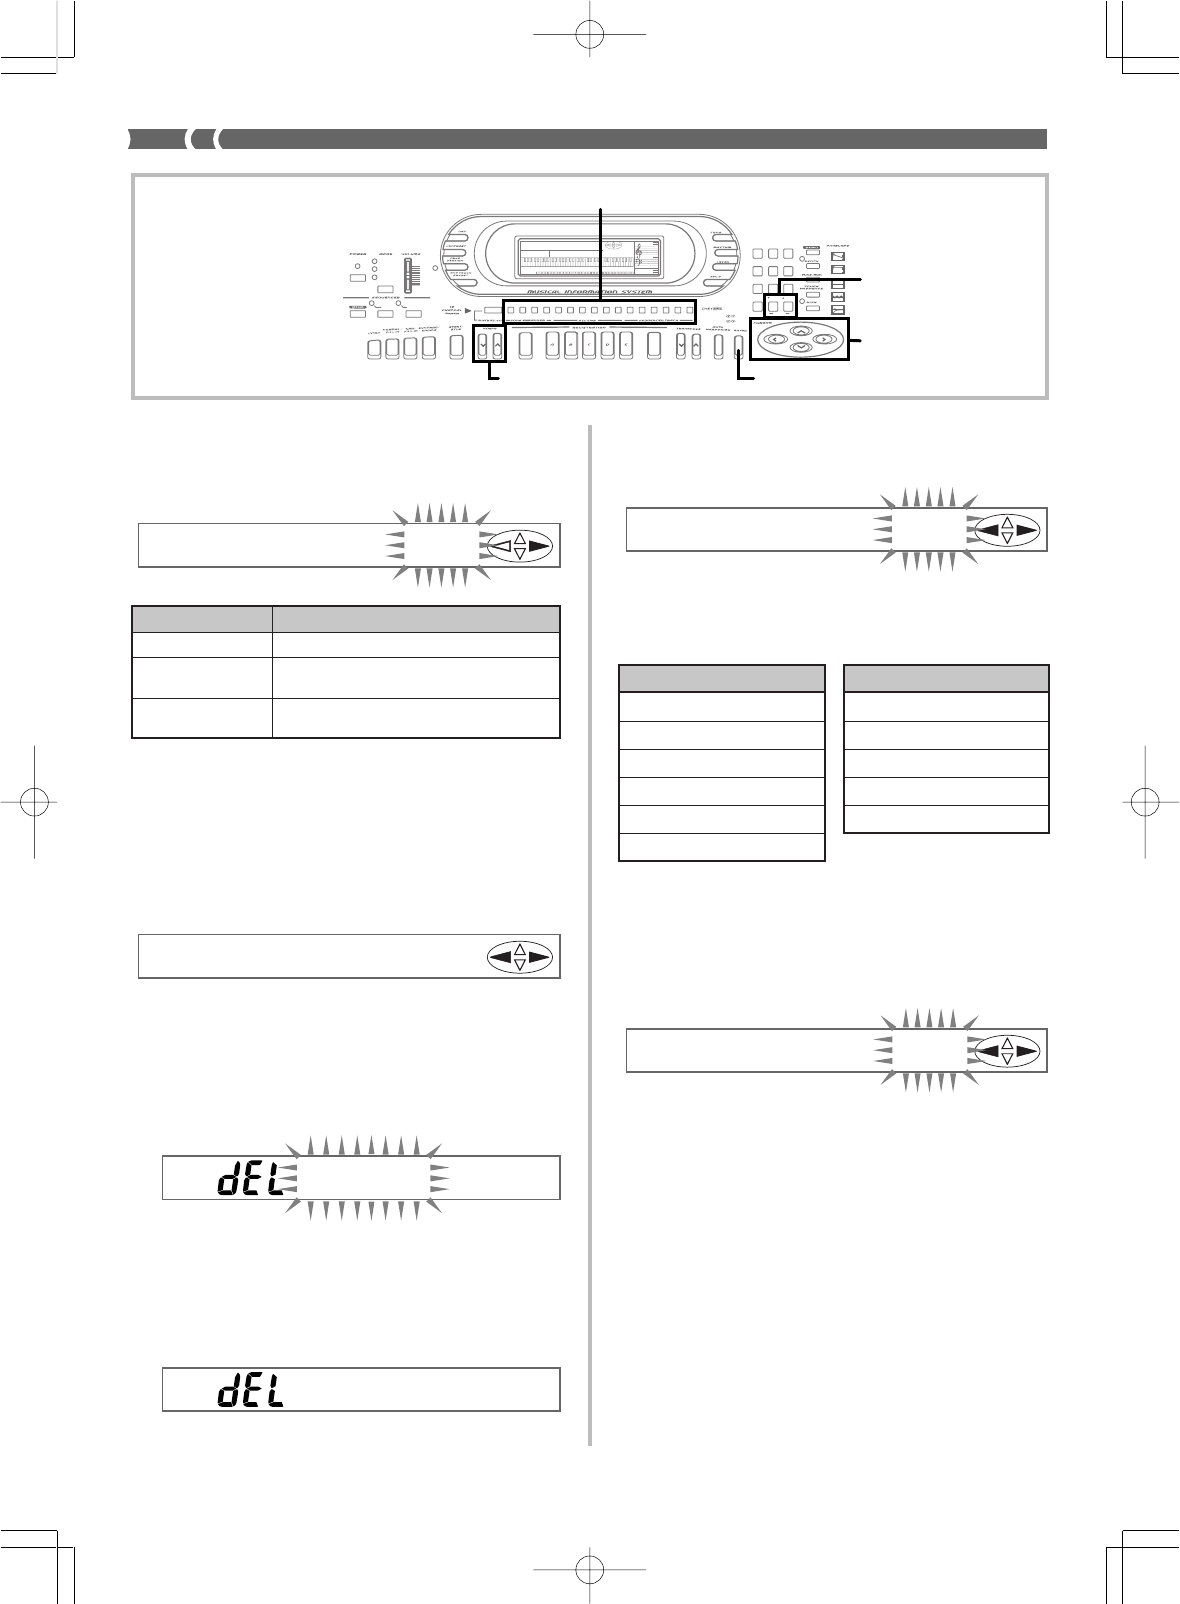
E-46
Meter (33
33
3)
This setting specifies the meter of the song.
❚
NOTE
❚
If a song is already recorded with a rhythm, the meter of the rhythm is set
automatically.
•Use [+] and [–] to change the setting.
Initial Tempo (44
44
4)
This setting specifies the initial tempo value for song playback.
•Use [+] and [–] to set the initial tempo value within the range of
030 to 255.
•The setting you make here does not affect the tempo during real-
time recording.
•You can use the TEMPO buttons to change the tempo of a song
while it is playing. Pressing both the TEMPO buttons at the same
time during song playback returns the tempo to the initial default
value you set here.
Bt= 4/4
Metronome Setting (11
11
1)
This setting controls whether or not the metronome sounds during
Song Sequencer real-time recording and playback.
Metronome sound: The first beat is a chime, followed by a standard
metronome click for the other beats.
•Use [+] and [–] to change the metronome setting.
Song Delete (22
22
2)
Use this operation to delete a song from a specific user song area.
1.
From the Global menu, use [왗
] and [왘
] to display
the “Song0Del” screen, and then press [+] and [–] at
the same time.
•A message appears to confirm whether you want to delete
the song.
2.
Press YES to delete the song or NO to abort the delete
operation without deleting anything.
•Pressing YES causes the message shown below to appear for
about one second. Next, the display returns to the Record/
Playback Mode screen.
Tm
p
o=120
733A-E-048A
Com
p
lete
Me t r=Rec
Display Indicator Meaning
Off Metronome off
Rec Metronome sounds during recording
only (initial default setting)
R&P Metronome sounds during recording and
playback
Setting
3 / 8
5 / 8
6 / 8
7 / 8
9 / 8
Setting
2 / 4
3 / 4
4 / 4 (initial value)
5 / 4
6 / 4
7 / 4
Son
g
0De l
Su re?
AMP ENVELOPE
00 FLAT
01-17 VIBRATO
18-45 OTHERS
DECAY
SUSTAIN
PITCH ENVELOPE
MIN
MAX
FULL RANGE
CHORD
CASIO CHORD
SONG
FINGERED
PATTERN EXTERNAL
INTERNAL UPPER1
CH 1
UPPER2
CH 2
LOWER1
CH 3
LOWER2
STOREBANK
CH 4
ACC VOL.
CH 5
CHORD1
CH 6
CHORD2
CH 7
CHORD3
CH 8
BASS
CH 9
RHYTHM
CH 10
TR1
CH 11
TR2
CH 12
TR3
CH 13
TR4
CH 14
TR5
CH 15
TR6
CH 16
789
456
1
0
23
PARAMETER RESET:
DELETE
/YESS/NO
MAIN MANU/
CHANNEL VOLUME:
SUB MANU/
CHANNEL SELECT:
[+]/[
–] (YES/NO)
Cursor keys
ENTER
CHANNEL
TEMPO
WK-1800/1600(E)-39~47 03.7.31, 5:21 PMPage 46 Adobe PageMaker 6.5J/PPC
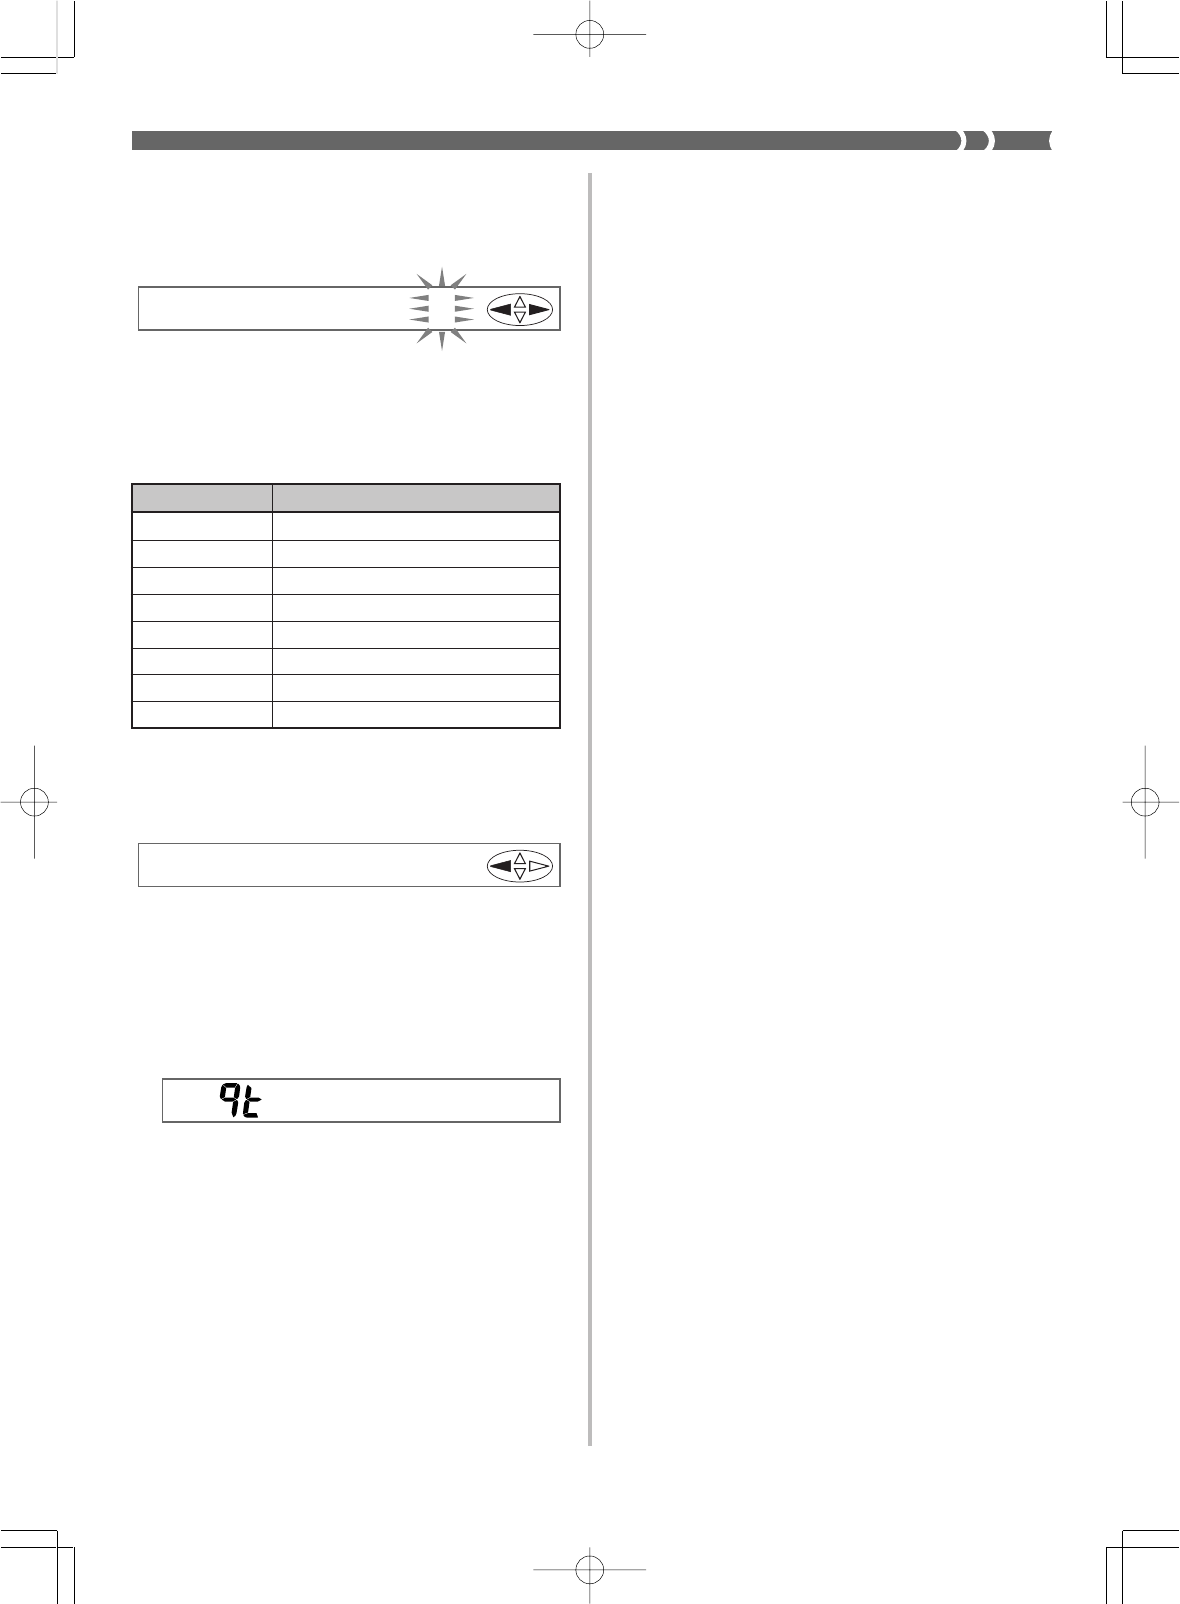
E-47
Record Quantize Setting (55
55
5)
This setting determines the quantize value after recording. After re-
cording, quantize adjusts the timing of notes input to each track on
the keyboard to match those selected by the setting you make here.
1.
Use the CHANNEL buttons to select the channel
whose quantize setting you want to change.
2.
Use [+] and [–] to change the setting.
733A-E-049A
Quantize Execute (66
66
6)
Use this procedure to execute the quantize setting made under “Record
Quantize Setting (5)” on this page.
1.
Use the [왗
] and [왘
] cursor keys to display the “Qtz
Exe?”.
•A message appears to confirm whether you want to execute.
2.
Press YES to execute or NO to abort the operation.
•Pressing YES causes the message “qt Pls Wait” to appear for
about one second. Next, the display returns to the record/
playback mode.
Qtz=Exe?
Com
p
lete
Qtz=4
Display Indicator Meaning
4Quantize quarter notes (initial value)
8Quantize 8 th notes
8T Quantize 8 th triplicate notes
16 Quantize 16 th notes
16T Quantize 16 th triplicate notes
32 Quantize 32 nd notes
32T Quantize 32 nd triplicate notes
64 Quantize 64 th notes
WK-1800/1600(E)-39~47 03.7.31, 5:21 PMPage 47 Adobe PageMaker 6.5J/PPC
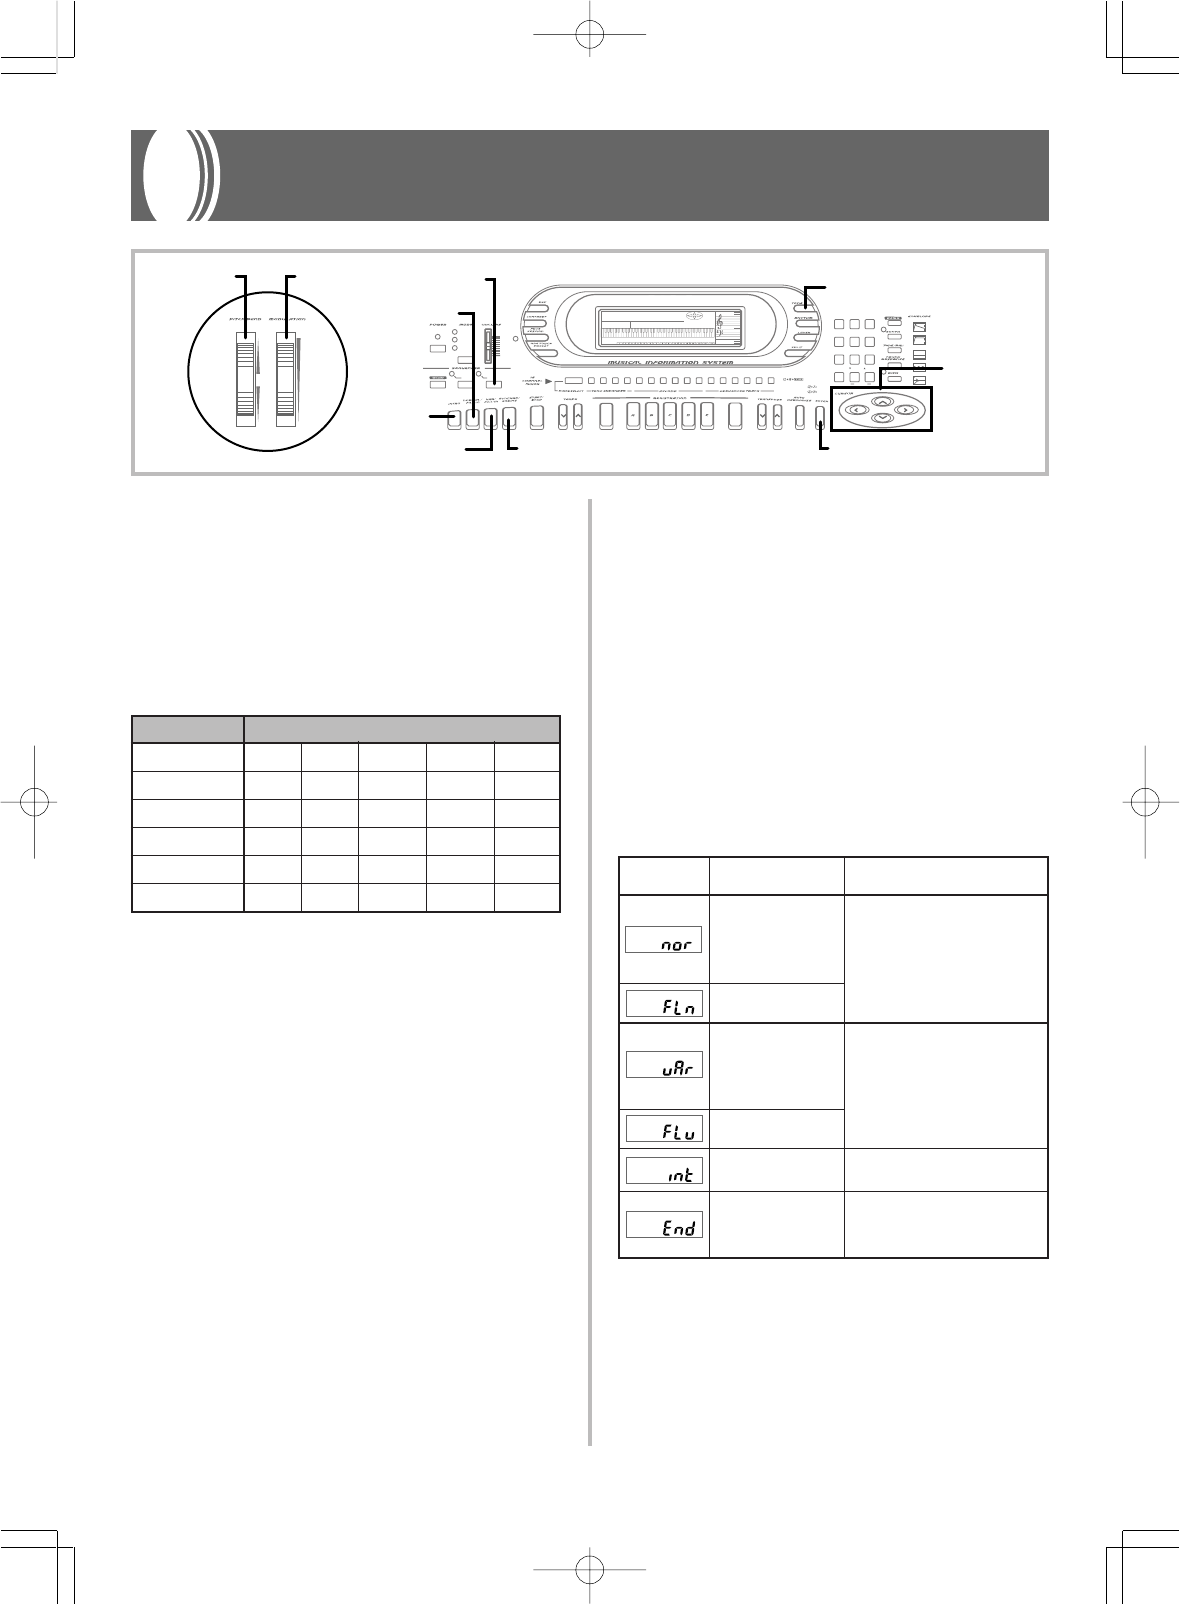
E-48
Pattern Sequencer
733A-E-050A
The Pattern Sequencer lets you modify the keyboard’s 120 built-in
Auto Accompaniment patterns or create your own original pattern
from scratch.
Pattern Sequencer Basics
Each Auto Accompaniment pattern is actually a group of six differ-
ent elements named: normal, intro, variation, normal fill in, varia-
tion fill in, and ending. Each element is made up of five parts, named:
Rhythm, Bass, Chord 1, Chord 2, and Chord 3. The following table
shows the makeup of each element.
Pattern Sequencer Recording Contents
The Pattern Sequencer lets you record notes for each of the parts that
makes up an element. You can alter any of the elements of a built-in
Auto Accompaniment, or you can create one or more of your own
original elements from scratch.
Content that can be recorded to each part within each
element using real-time recording
•Notes played on the keyboard
•PITCH BEND wheel operation (Bend range fixed at 2 for user pat-
tern creation)
•MODULATION wheel operation
•Pedal operation (when an optional pedal is connected)
Content that can be recorded once for each pattern
•Tempo
•Beat (Only when work area is empty.)
Content that can be recorded to each element
•Number of measures
The number of measures for Intro, Normal, Variation, and Ending
can specified only when recording to a blank element. Fill-in is
always one measure long, and cannot be changed.
•Fill-in (Cannot change inside one measure.)
•Original key
Element Parts
Intro Rhythm Bass Chord 1 Chord 2 Chord 3
Normal Rhythm Bass Chord 1 Chord 2 Chord 3
Variation Rhythm Bass Chord 1 Chord 2 Chord 3
Normal fill-in Rhythm Bass Chord 1 Chord 2 Chord 3
Variation fill-in Rhythm Bass Chord 1 Chord 2 Chord 3
Ending Rhythm Bass Chord 1 Chord 2 Chord 3
Content that can be recorded to each part of each ele-
ment
•Tone (TONE button or Mixer function setting. Cannot change in-
side element.)
•Pan (Set using Mixer.)
•Effect send (Set using Mixer.)
•Expression (Set using Mixer.)
•Chord conversion table
•Break point
Pattern Sequencer Memory Capacity
WK-1800 : Approximately 6,800 notes
WK-1600/1630 : Approximately 5,800 notes
•The measure number (item 11 on page E-10) and beat number (item
10 on page E-10) flashing on the display during recording indi-
cates that memory is almost full (space for about 100 notes or less
remaining).
•Recording stops automatically as soon as memory becomes full.
Element Display Indicators
Indicator Element How to Select
Normal Press the NORMAL/FILL-IN
button to toggle between nor-
mal and normal fill in.
Normal Fill In
Variation Press the VARIATION/FILL-
IN button to toggle between
variation and variation fill in.
Variation Fill In
Intro Press the INTRO button.
Ending Press the SYNCHRO/END-
ING button.
AMP ENVELOPE
00 FLAT
01-17 VIBRATO
18-45 OTHERS
DECAY
SUSTAIN
PITCH ENVELOPE
MIN
MAX
FULL RANGE
CHORD
CASIO CHORD
SONG
FINGERED
PATTERN
EXTERNAL
INTERNAL UPPER1
CH 1
UPPER2
CH 2
LOWER1
CH 3
LOWER2
STOREBANK
CH 4
ACC VOL.
CH 5
CHORD1
CH 6
CHORD2
CH 7
CHORD3
CH 8
BASS
CH 9
RHYTHM
CH 10
TR1
CH 11
TR2
CH 12
TR3
CH 13
TR4
CH 14
TR5
CH 15
TR6
CH 16
789
456
1
0
23
PARAMETER RESET:
DELETE
/YESS/NO
MAIN MANU/
CHANNEL VOLUME:
SUB MANU/
CHANNEL SELECT:
ENTER
Cursor ke
ys
TONE
MODULATION
P
ITCH BEND PATTERN
NORMAL/FILL-IN
VARIATION/FILL-IN
INTRO
SYNCHRO/ENDING
WK-1800/1600(E)-48~57 03.7.31, 5:21 PMPage 48 Adobe PageMaker 6.5J/PPC
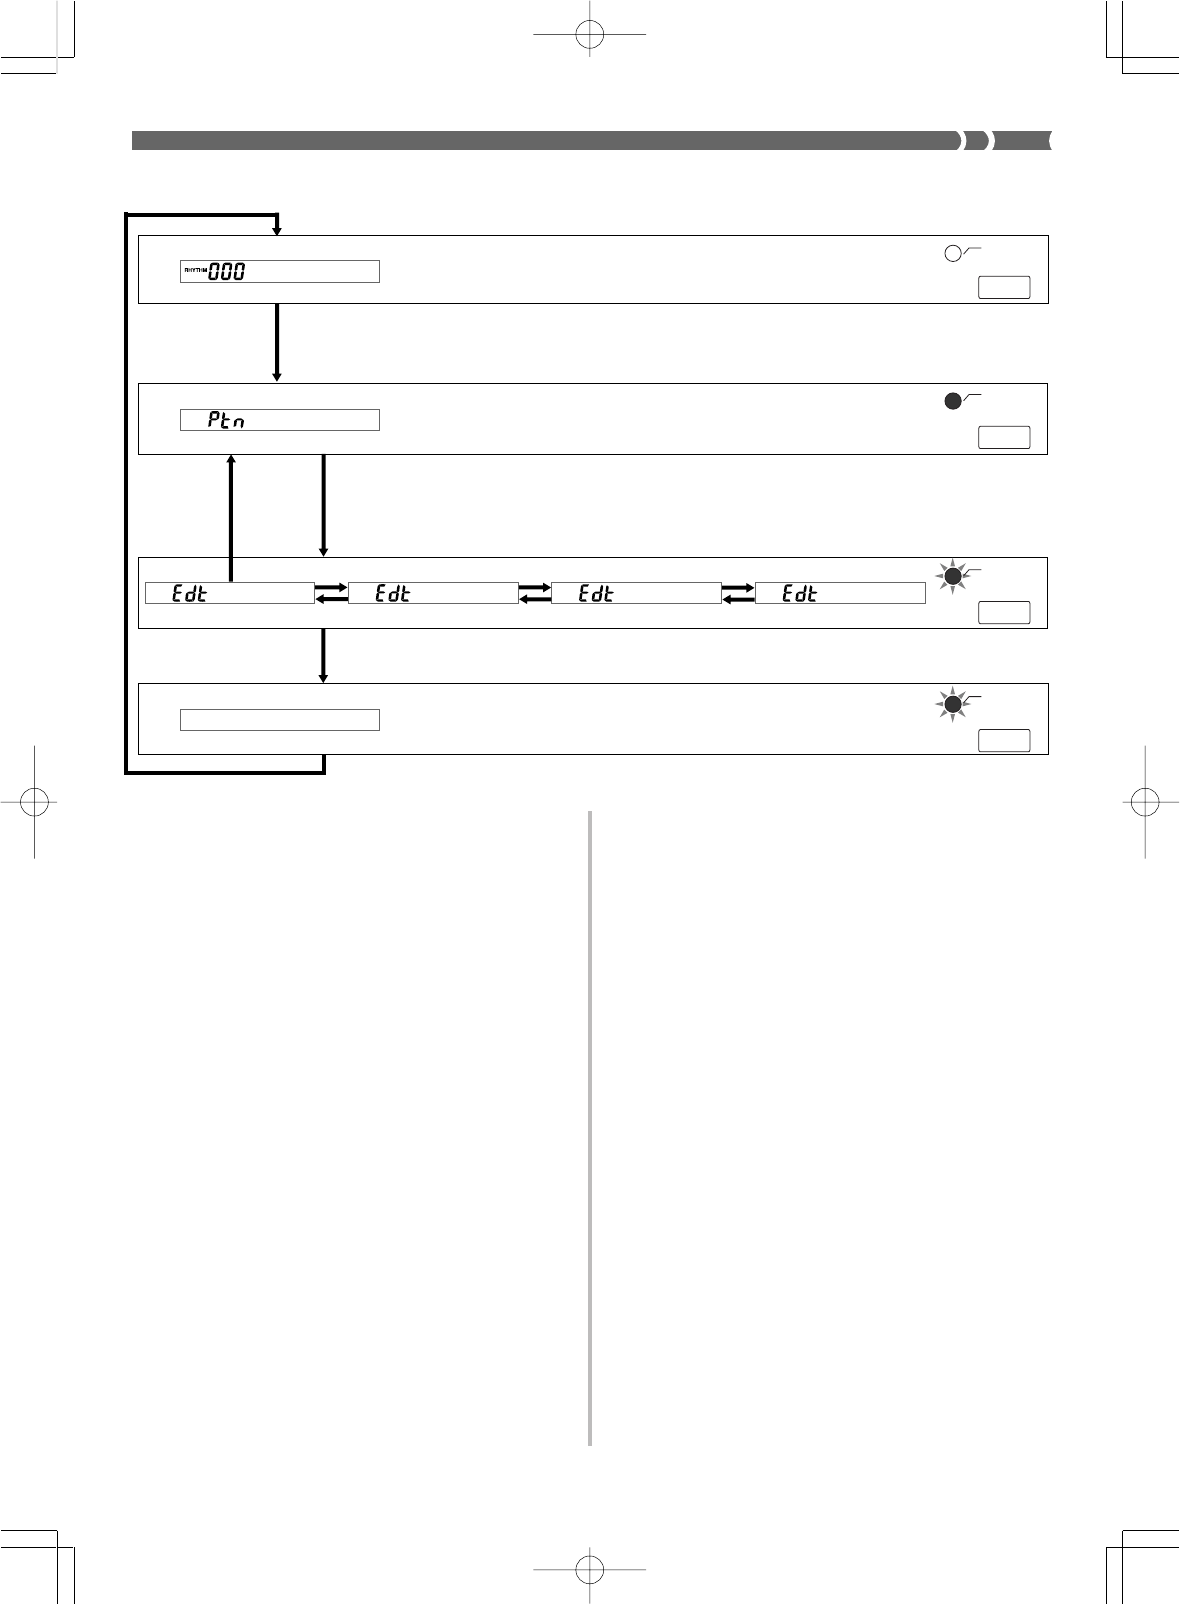
E-49
Pattern Sequencer Modes
The Pattern Sequencer has two modes: a Pattern Create Mode for
recording a new pattern, and a Pattern Edit Mode for changing the
settings of a pattern.
After you finish creating or editing a pattern, you store it in memory
and assign it a number for later recall.
The following procedure provides the basics for navigating between
Pattern Sequencer modes.
To navigate between Pattern Sequencer
modes
1.
Before turning on the Pattern Sequencer, select the
rhythm you want to use as a base for your original
rhythm.
2.
Press the PATTERN button.
•This enters the Pattern Create Mode, which is indicated when
the indicator lamp above the PATTERN button is lit. The in-
dicator “Ptn” in the tone/rhythm number area of the dis-
play (item 3 on page E-10) also indicates that the Pattern Cre-
ate Mode.
•Entering the Pattern Create Mode copies the rhythm you se-
lected in Step 1 into the Song Sequencer work area. Opera-
tions you perform with the Pattern Sequencer affect the pat-
tern that is currently in the work area.
•If the rhythm pattern you selected in step 1 is too large to fit
in the work area, the Message “Ptn Mem Full” appears on
the display for about three seconds. After that, the keyboard
enters to the Pattern Create Mode with the work area empty.
To make more room in the work area for the rhythm pattern,
delete user rhythm patterns stored in the user area (pattern
numbers 100 through 109) that you no longer need.
•In the Pattern Create Mode, you can play back the accompa-
niment pattern in the work area and even record along with
the playback. See “Using the Pattern Create Mode” on page
E-50 for full details on using the Pattern Create Mode.
3.
Press the PATTERN button again.
•This enters the Pattern Edit Mode, which is indicated when
the indicator lamp above the PATTERN button is flashing.
The indicator “Edt” in the tone/rhythm number area of the
display (item 3 on page E-10) also indicates the Pattern Edit
Mode.
•The Pattern Edit Mode screen can be scrolled between the
following three menus with the [왖] and [왔] cursor keys:
“Global”, “Element”, and “Part”. In addition to the menus,
there is also an Escape screen for exiting the Pattern Edit
Mode. Each contains parameters for making settings for the
accompaniment pattern in the Pattern Sequencer work area.
See “Using the Pattern Edit Mode” on page E-52 for full de-
tails on using the Pattern Edit Mode.
•Displaying the Pattern Edit Mode’s “Escape” screen and then
pressing the ENTER button returns to the Pattern Create
Mode in step 2.
4.
Press the PATTERN button again.
•The indicator lamp above the PATTERN button continues to
flash, and the message “Save?” appears on the display. See
“Exiting the Pattern Sequencer Mode” on page E-56 for de-
tails on how to save Pattern Sequencer data.
* Work Area
•The work area is an area of memory where rhythm pattern data is
stored temporarily during recording and editing. After you are fin-
ished recording or editing, you can specify whether you want to
save work area contents or delete them without saving.
733A-E-051A
Unlit
Pattern Edit Mode
Pattern Create Mode
Normal
Press
ENTER.
Press PATTERN.
Press PATTERN.
Press PATTERN.
Press PATTERN.
8be
at1
No rma l
Save?
Esca
p
eec Globa l ec Ele
me n t cPa r t=Rec
[▼]
[▲]
[▼]
[▲]
[▼]
[▲]
PATTERN
PATTERN
PATTERN
PATTERN
Lit
Flash
Flash
WK-1800/1600(E)-48~57 03.7.31, 5:21 PMPage 49 Adobe PageMaker 6.5J/PPC
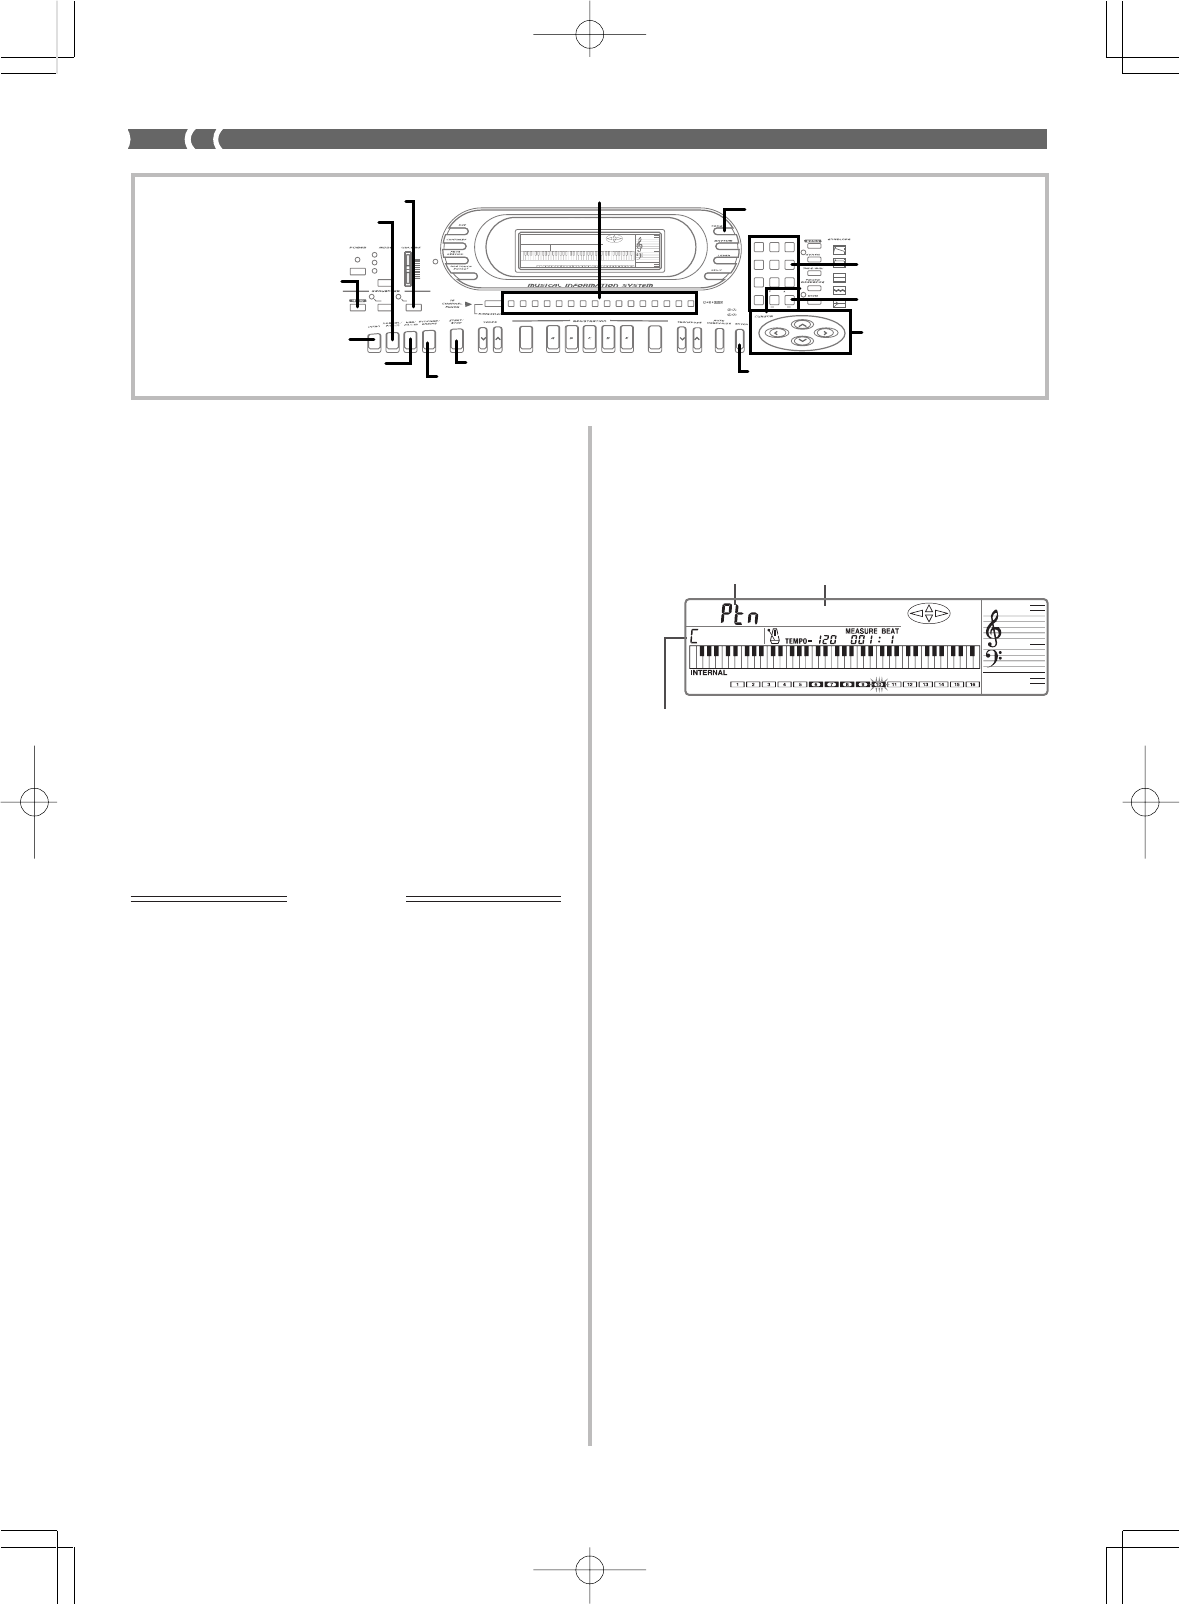
E-50
Saving an Edited Pattern
•The 10 rhythm numbers 120 through 129 make up the user rhythm
area, where you can store your original rhythms. You can recall a
user rhythm with the same operation as that for recalling a built-in
pattern, and you can even use a user rhythm pattern as the base for
creating a new rhythm pattern.
•The keyboard comes with a built-in lithium battery that supplies
power to the memory to retain memory contents while keyboard
power is turned off. See “Power Requirements” on page E-15 for
important information about the lithium battery.
•You can use the keyboard’s MIDI capabilities to save your original
accompaniment patterns to a computer or other external storage
device. See “Bulk Sending Keyboard Data” on page E-65 for de-
tails.
•With the WK-1800, you can use the built-in disk drive to save orig-
inal accompaniment patterns to diskette. See “Using the Floppy
Disk Drive (WK-1800 Only)” on page E-67 for details.
•You can store up to 10 accompaniment patterns in the user area,
but the actual number of patterns you will be able to store depends
on their sizes. If the patterns you store are relatively large, memo-
ry become full after fewer than 10 patterns are stored.
Using the Pattern Create Mode
This section describes how to use the Pattern Create Mode to create
an original accompaniment pattern.
IMPORTANT!
The procedures in this section all assume that you have read and are
familiar with the information under “Pattern Sequencer Basics” on
page E-48, and that you already know how to navigate between Pat-
tern Sequencer modes.
❚
NOTE
❚
Be sure to save your work whenever you quit an accompaniment pattern
creation session. See “Exiting the Pattern Sequencer Mode” on page E-56
for details.
Pattern Creation Techniques
You can use either of the two following techniques to create an ac-
companiment pattern.
•Base Pattern Editing
While playing back the part of a built-in pattern or previously cre-
ated user pattern, you can add or delete notes, or completely de-
lete a part and replace it with a new one.
•From Scratch
With this method, you must input all the parts for all the elements
you want to use. With this method, you must use the procedure
under “Work Area Clear” on page E-54 to clear the Pattern Sequenc-
er work area before you start recording.
The record procedure is identical, no matter which of the above meth-
ods you use.
The following procedure tells you how to play back individual ele-
ments of the accompaniment pattern currently stored in the Pattern
Sequencer work area. If you are going to use the base pattern editing
method described above, you can use this procedure to become fa-
miliar with all the parts that make up the pattern before you actually
start editing it.
To play back elements of the accompaniment
pattern in the work area
1.
While the Pattern Sequencer is turned off, press the
PATTERN button once to enter the Pattern Create
Mode.
2.
Select the element you want to play back.
•The Normal element is always selected first when you ini-
tially turn on the Pattern Sequencer.
•Use the following buttons to select the other elements.
NORMAL/FILL-IN ...... Toggles between Normal and Nor-
mal Fill-In elements.
VARIATION/FILL-IN .. Toggles between Variation and Vari-
ation Fill-In elements.
INTRO ............................. Selects Intro element.
SYNCHRO/ENDING ... Selects Ending element.
3.
Press the START/STOP button.
•The selected element plays in a loop, repeating itself.
•The display shows measure and beat numbers during ele-
ment playback.
•You can perform the following operations during element
playback.
•Tempo changes
•Part on and off
•Mixer operations*1
•Tone operations*2
4.
To stop playback, press START/STOP again.
*1 The cursor keys and ENTER button function as Mixer operation
buttons during playback. Auto Accompaniment uses internal chan-
nels CH6 through CH10, which can be used when making part
settings. See “Changing the Parameters of a Channel” on page E-
30 for details on using the Mixer to make settings.
*2 You can change the tone setting by pressing TONE button, and
then using the number keys, [+], and [–] to specify a tone number.
The Pattern Sequencer turns off automatically if you do not per-
form any operation for about five seconds. You can change the
tone settings of each part inside each element.
❚
NOTES
❚
•Pressing the PATTERN button while a pattern is playing stops accom-
paniment playback and enters the Pattern Edit Mode.
•Use the Mixer to adjust the volume balance between channels. First set
the Global Volume parameter to 127. Next, adjust the Expression pa-
rameter volume balance. See “Additional Channel Mode Parameters”
on page E-31 for details.
733A-E-052A
Indicates the Pattern
Create Mode. Indicates the currently
selected element.
Original Key
AMP ENVELOPE
00 FLAT
01-17 VIBRATO
18-45 OTHERS
DECAY
SUSTAIN
PITCH ENVELOPE
MIN
MAX
FULL RANGE
CHORD
CASIO CHORD
SONG
FINGERED
PATTERN
EXTERNAL
INTERNAL UPPER1
CH 1
UPPER2
CH 2
LOWER1
CH 3
LOWER2
STOREBANK
CH 4
ACC VOL.
CH 5
CHORD1
CH 6
CHORD2
CH 7
CHORD3
CH 8
BASS
CH 9
RHYTHM
CH 10
TR1
CH 11
TR2
CH 12
TR3
CH 13
TR4
CH 14
TR5
CH 15
TR6
CH 16
789
456
1
0
23
PARAMETER RESET:
DELETE
/YESS/NO
MAIN MANU/
CHANNEL VOLUME:
SUB MANU/
CHANNEL SELECT:
ENTER
Cursor key
s
[+]/[
–]
Number ke
ys
TONE
PATTERN
RECORD
CHANNEL
NORMAL/FILL-IN
VARIATION/FILL-IN
INTRO
SYNCHRO/ENDING
START/STOP
Normal
WK-1800/1600(E)-48~57 03.7.31, 5:21 PMPage 50 Adobe PageMaker 6.5J/PPC
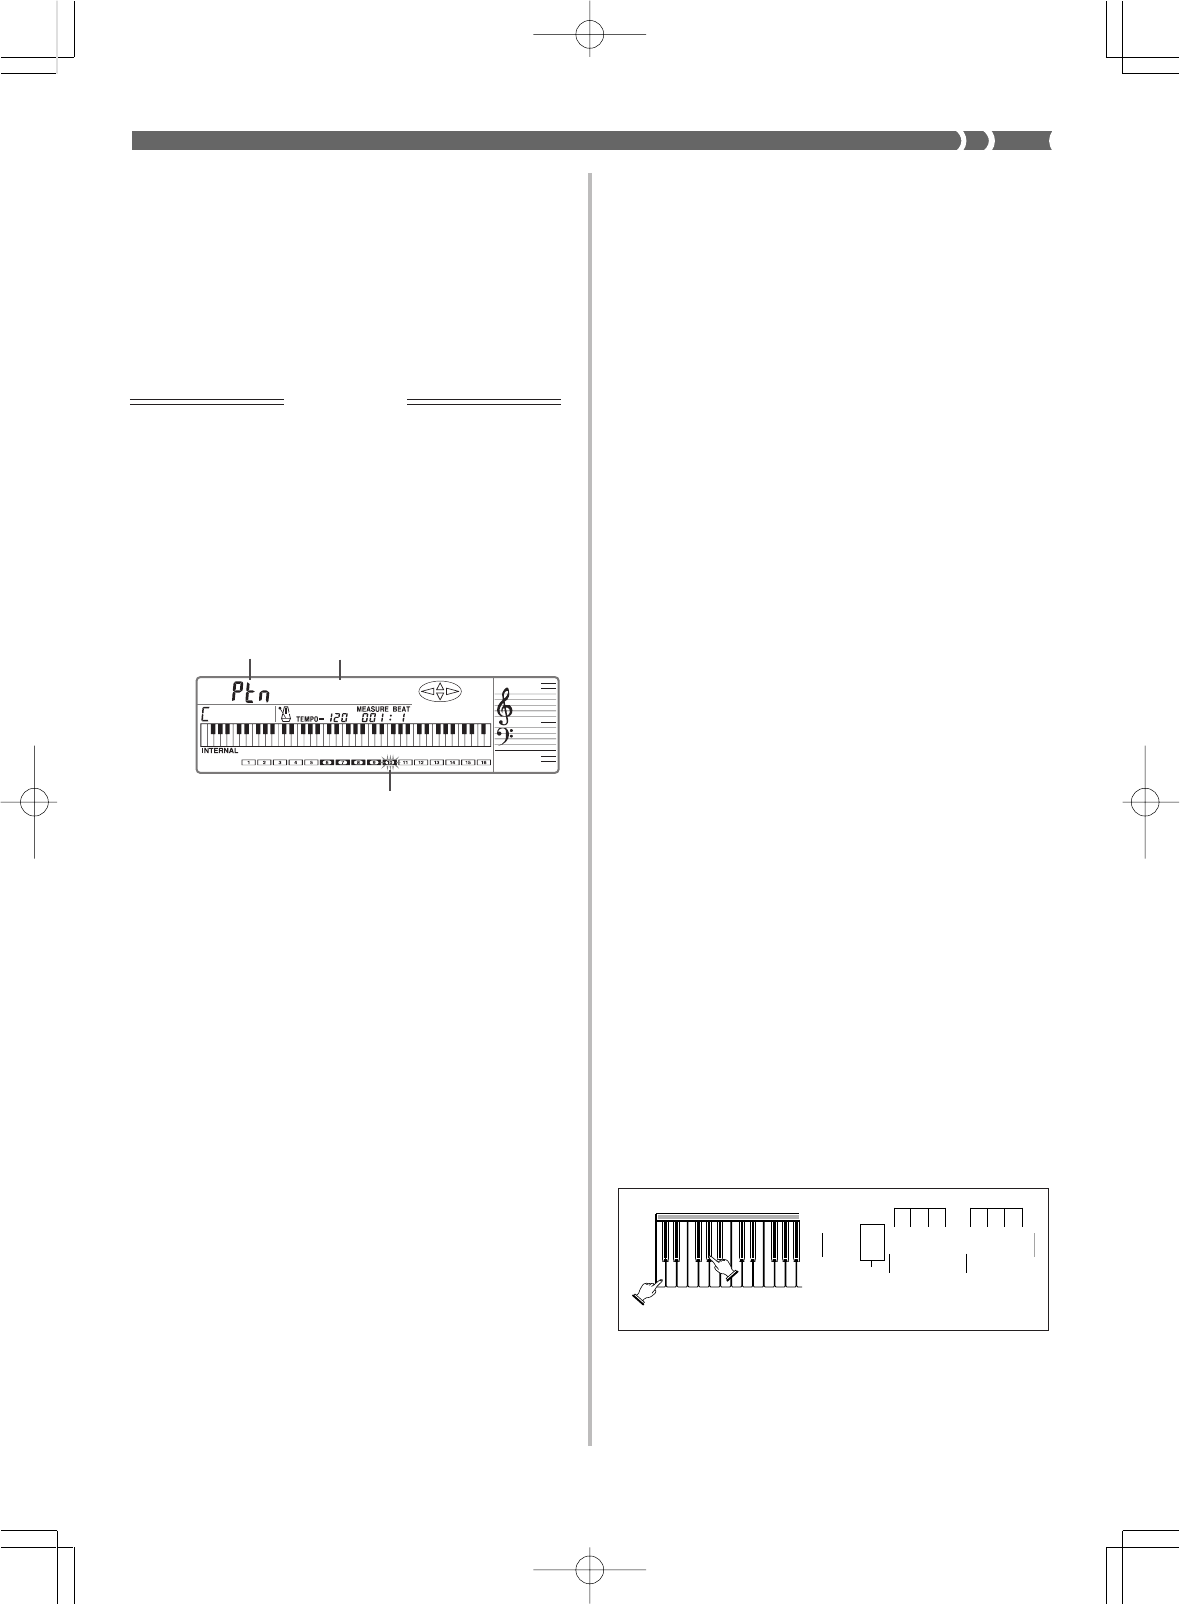
E-51
To record an accompaniment pattern
PREPARATION
•Select the accompaniment pattern (rhythm) that you want to use as a
base.
•Use the procedure under “To play back elements of the accompaniment
pattern in the work area” on page E-50 to play back the pattern and
become familiar with its elements and parts. During playback, you can
practice playing the notes you plan to record.
•Determine the number (120 to 129) you will assign to the new pattern.
•If you want to use the metronome, use the procedure under “Metro-
nome Setting” on page E-53 to select the metronome setting you want.
IMPORTANT!
You cannot record accompaniment patterns converted using the
Pattern Conversion Disk. See “Using the Utillities” on page E-71 for
details.
❚
NOTE
❚
If you playback the base pattern before recording, skip step 1 in the follow-
ing procedure.
1.
While the Pattern Sequencer is turned off, press the
PATTERN button once to enter the Pattern Create
Mode.
2.
Select the element you want to record.
•Use the same procedures as those described for step 2 under
“To play back elements of the accompaniment pattern in the
work area” on page E-50.
3.
Press the RECORD button to enter record standby.
•This causes the REC indicator to appear on the display.
•If the accompaniment pattern is once converted using the
Pattern Conversion Disk, the message “NotCASIO” appears
on the display, indicating that it cannot be recorded (WK-
1800 only).
4.
Select the parts you want to record.
•The Rhythm part (CH10) is selected initially whenever you
turn on the Pattern Sequencer. Use CHANNEL buttons CH6
through CH10 to select parts.
•The frames around the channel numbers that conform to the
currently selected parts flash to show they are selected.
•Note that you cannot select parts once recording starts. Be
sure to select the parts you want before you start recording.
5.
Press the START/STOP button.
•At this time the REC indicator stops flashing.
•All parts of the selected element play back in an endless loop.
You can record notes in the currently selected parts.
•Measure and beat numbers are shown on the display during
recording.
•Pressing any keyboard key starts actual recording.
6.
Record in part in sequence.
•You can perform the following operations during element
recording.
•Turn parts (channels) to be recorded on and off
•Tempo changes
•Tone operations*1
•See “Recording Parts” on this page for details on recording
to each part.
7.
After you finish recording, press the START/STOP but-
ton again.
•This stops recording, which causes the REC indicator to dis-
appear from the display.
8.
Repeat steps 2 through 7 for each of the elements of
the accompaniment pattern.
9.
See “To exit the Pattern Sequencer Mode and save
work area contents” on page E-56 for details on how
to save patterns.
•If you want to turn off the Pattern Sequencer without saving
anything, perform the procedure under “To exit the Pattern
Sequencer Mode without saving work area contents” on page
E-57.
*1 You can change the tone setting by pressing TONE button, and
then using the number keys to specify a tone number. The tone
number input display clears automatically if you do not perform
any operation for about five seconds.
❚
NOTES
❚
•You cannot change the selected parts and element while recording is in
progress.
•If you are having problems getting the timing right when trying to input
notes starting from the first beat of the first measure, skip step 5 (pres-
sing the START/STOP button) of the above sequence. As soon as you
play something on the keyboard, recording starts right at the first beat
of the first measure.
Recording Parts
The following describes how to record each part. Perform these op-
erations when you reach step 6 of the procedure under “To record an
accompaniment pattern” on this page.
❚
NOTES
❚
•See “To delete specific notes” on page E-52 for details on deleting spe-
cific notes.
•See “To delete a part” on page E-52 for details on deleting an entire
part.
•Bass, Chord 1, Chord 2, and Chord 3 are all normally recorded with a
root note of C. Use the procedure under “Setting the Original Key for
Each Element” on page E-55 for information about recording with a dif-
ferent root note.
To record the Rhythm part
1.
Press CHANNEL button CH10 to select the rhythm
part.
2.
Select a drum sound (tone number 192 through 199).
3.
Use the keyboard to play the rhythm part. Use the
measure and beat values that appear on the display
for timing.
733A-E-053A
Normal
Frames around the channel numbers that correspond
to the currently selected parts flash.
Indicates the Pattern
Create Mode. Indicates the currently
selected element.
×
×
×
4
4
×
×
×
×
×
HH
BD
SD
HI-HAT
SNARE DRUM
BASS DRUM
WK-1800/1600(E)-48~57 03.7.31, 5:21 PMPage 51 Adobe PageMaker 6.5J/PPC
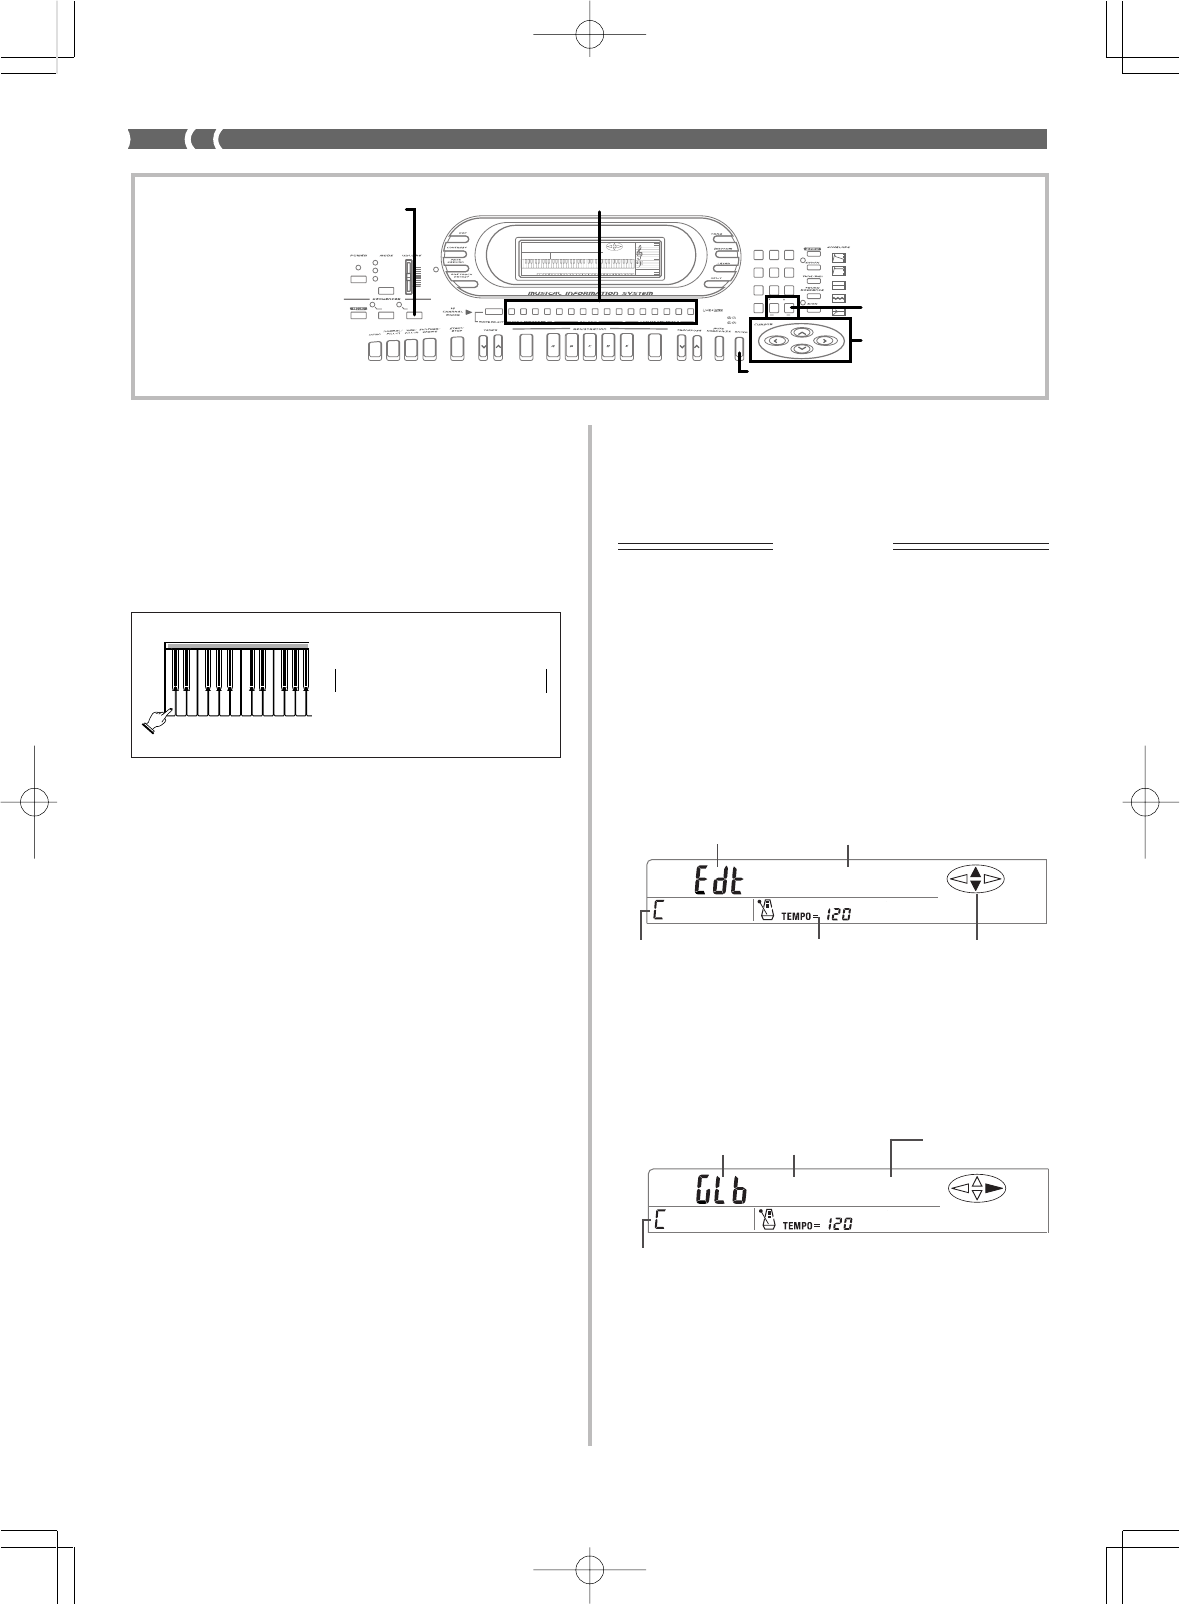
E-52
To record the Bass part
1.
Press CHANNEL button CH9 to select the bass part.
2.
Select a bass tone.
3.
Use the keyboard to play the bass part. Use the mea-
sure and beat values that appear on the display for
timing.
To record Chord 1, 2, and 3 parts
1.
Use CHANNEL buttons CH6, CH7, and CH8 to se-
lect a chord part.
2.
Select a chord tone. Use any tone besides the drum
sounds.
3.
Use the keyboard to play the chord part. Use the mea-
sure and beat values that appear on the display for
timing.
To delete specific notes
•Play the accompaniment pattern.
•While holding down [+] and [–], press the keyboard key that corre-
sponds to the note you want to delete at the time the note sounds
in order to delete it. To get the timing right, you probably should
press the keyboard key just before the note sounds. This will de-
lete that single note only.
To delete a part
•During record standby, select the part you want to delete and then
press [+] and [–] at the same time. In response to the message “dEL
Sure?” that appears on the display, press the YES button to delete
all of the contents of the part or NO to abort the delete procedure
without deleting anything.
733A-E-054A
Using the Pattern Edit Mode
This section describes how to use the Pattern Edit Mode to change
various settings for a pattern you are currently creating or are about
to create.
IMPORTANT!
The procedures in this section all assume that you have read and are
familiar with the information under “Pattern Sequencer Basics” on
page E-48, and that you already know how to navigate between Pat-
tern Sequencer modes.
To select main menus and sub-menus in the
Pattern Edit Mode
1.
While in the Pattern Create Mode, press the PATTERN
button once to enter the Pattern Edit Mode.
•This causes the indicator lamp above the PATTERN button
to flash, and the Global menu to appear on the display.
2.
Perform the key operations described below to dis-
play a different main-menu or sub-menu.
•Use the [왖] and [왔] cursor keys to move between main-
menus.
•Press the ENTER button, [왗], or [왘] to scroll through the
sub-menu of the current main-menu. The sample display
below is the Global menu’s metronome sub-menu.
•Use [+] and [–] to change the setting of the sub-menu on the
display.
•To return to a main menu from one of its sub-menus, press
the ENTER button.
3.
To return to the Pattern Create Mode, maneuver to
the “Escape” screen and then press ENTER.
AMP ENVELOPE
00 FLAT
01-17 VIBRATO
18-45 OTHERS
DECAY
SUSTAIN
PITCH ENVELOPE
MIN
MAX
FULL RANGE
CHORD
CASIO CHORD
SONG
FINGERED
PATTERN
EXTERNAL
INTERNAL UPPER1
CH 1
UPPER2
CH 2
LOWER1
CH 3
LOWER2
STOREBANK
CH 4
ACC VOL.
CH 5
CHORD1
CH 6
CHORD2
CH 7
CHORD3
CH 8
BASS
CH 9
RHYTHM
CH 10
TR1
CH 11
TR2
CH 12
TR3
CH 13
TR4
CH 14
TR5
CH 15
TR6
CH 16
789
456
1
0
23
PARAMETER RESET:
DELETE
/YESS/NO
MAIN MANU/
CHANNEL VOLUME:
SUB MANU/
CHANNEL SELECT:
ENTER
Cursor keys
[+]/[
–] (YES/NO)
PATTERN
CHANNEL
4
4
Global
Indicates the Pattern
Edit Mode. Menu title (Global in
this case).
Tempo display Indicates currently
enabled cursor keys.
Original key
Metr=Off
Original key
Indicates the
Global menu Abbreviation of
sub-menu name Current setting of
displayed sub-menu
WK-1800/1600(E)-48~57 03.7.31, 5:21 PMPage 52 Adobe PageMaker 6.5J/PPC
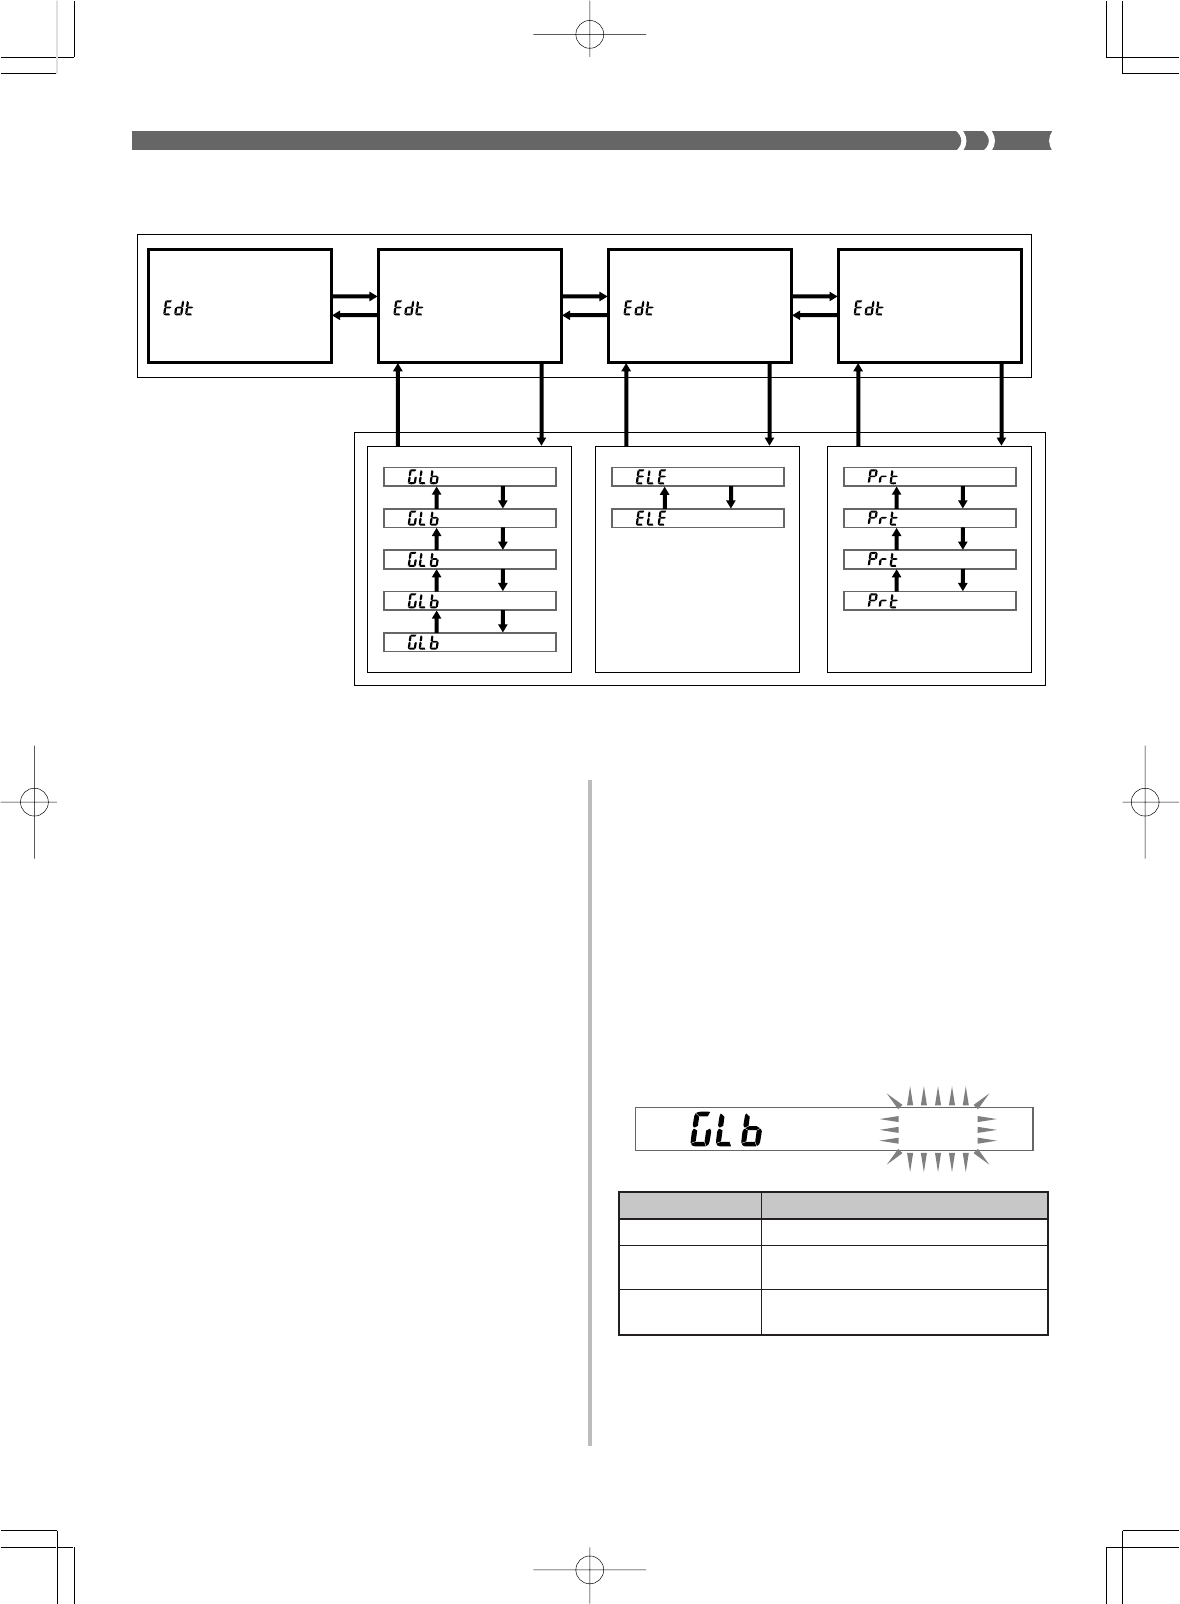
E-53
Main-menu and Sub-menu Screens
Me t r=Rec
Oc t =0
[ ]
[ ]
Wo r kDDe l
[ ]
[ ]
Bt=e4/4
[ ]
[ ]
Tm
p
o=120
[ ]
[ ]
Me a s=02
OrKe
y
=C
[ ]
[ ]
Cho rd=00
BkPnt=G
[ ]
[ ]
Qtz=4
[ ]
[ ]
QtzEExe?
[ ]
[ ]
4123
Esca
p
e Globa l Ele
me n t Pa r t
[ ENTER ] [ ENTER ] [ ENTER ]
[
▲
]
[
▲
]
[
▲
]
[
▲
]
[
▲
]
[
▲
]
▲▲▲▲
▲
▲
▲
▲
▲
▲
▲
▲
▲
▲▲▲
Main-menu
Sub-menu
The above shows the main-menu and sub-menu screens. The text inside the frames are the main-menu and sub-menu names that appear on the
display.
11
11
1
Global Menu
This menu is for making settings that affect all sub-menus that make
up the accompaniment pattern. The letters “GLb” indicate the Glo-
bal menu, while the other letters are abbreviations of sub-menu names,
as listed below.
•Metr ........... Metronome
•Oct .............. Octave Shift
•Work Del ... Work area clear (All Delete)
•Bt ................ Meter (beat)
•Tmpo ......... Tempo
For details on what each sub-menu controls and its available settings,
see “Global Setting Sub-menus” on this page.
22
22
2
Element Menu
This menu is for making settings for individual elements that make
up an accompaniment pattern. The letters “ELE” indicate the Ele-
ment menu, while the other letters are abbreviations of sub-menu
names, as listed below.
•Meas ........ Measure
•OrKey ...... Original Key
For details on what each sub-menu controls and its available settings,
see “Element Sub-menus” on page E-55.
33
33
3
Part Menu
This menu contains sub-menus for specifying how chords played on
the accompaniment keyboard will be sounded during pattern play-
back. Settings can be made for each part of an accompaniment pat-
tern. The letters “Prt” indicate the Part menu, while the other letters
are abbreviations of sub-menu names, as listed below.
•Chord ........... Chord conversion table
•BkPnt ............ Break point
•Qtz ................ Quantize
•Qtz Exe? ....... Quantize Execute
For details on what each sub-menu controls and its available settings,
see “Part Sub-menus” on page E-55.
44
44
4
Escape Screen
When this screen is on the display, press the ENTER button to return
to the Pattern Create Mode.
Global Setting Sub-menus
After displaying the Global menu in the Pattern Edit Mode, use the
[왗] and [왘] cursor keys to scroll through the Global sub-menus.
Metronome Setting
This setting controls whether or not the metronome sounds during
pattern recording and playback.
Metronome sound: The first beat is a chime, followed by a standard
metronome click for the other beats.
733A-E-055A
Display Indicator Meaning
Off Metronome off
Rec Metronome sounds during recording only
(initial default setting)
R&P Metronome sounds during recording and
playback
Me t r=Rec
WK-1800/1600(E)-48~57 03.7.31, 5:21 PMPage 53 Adobe PageMaker 6.5J/PPC
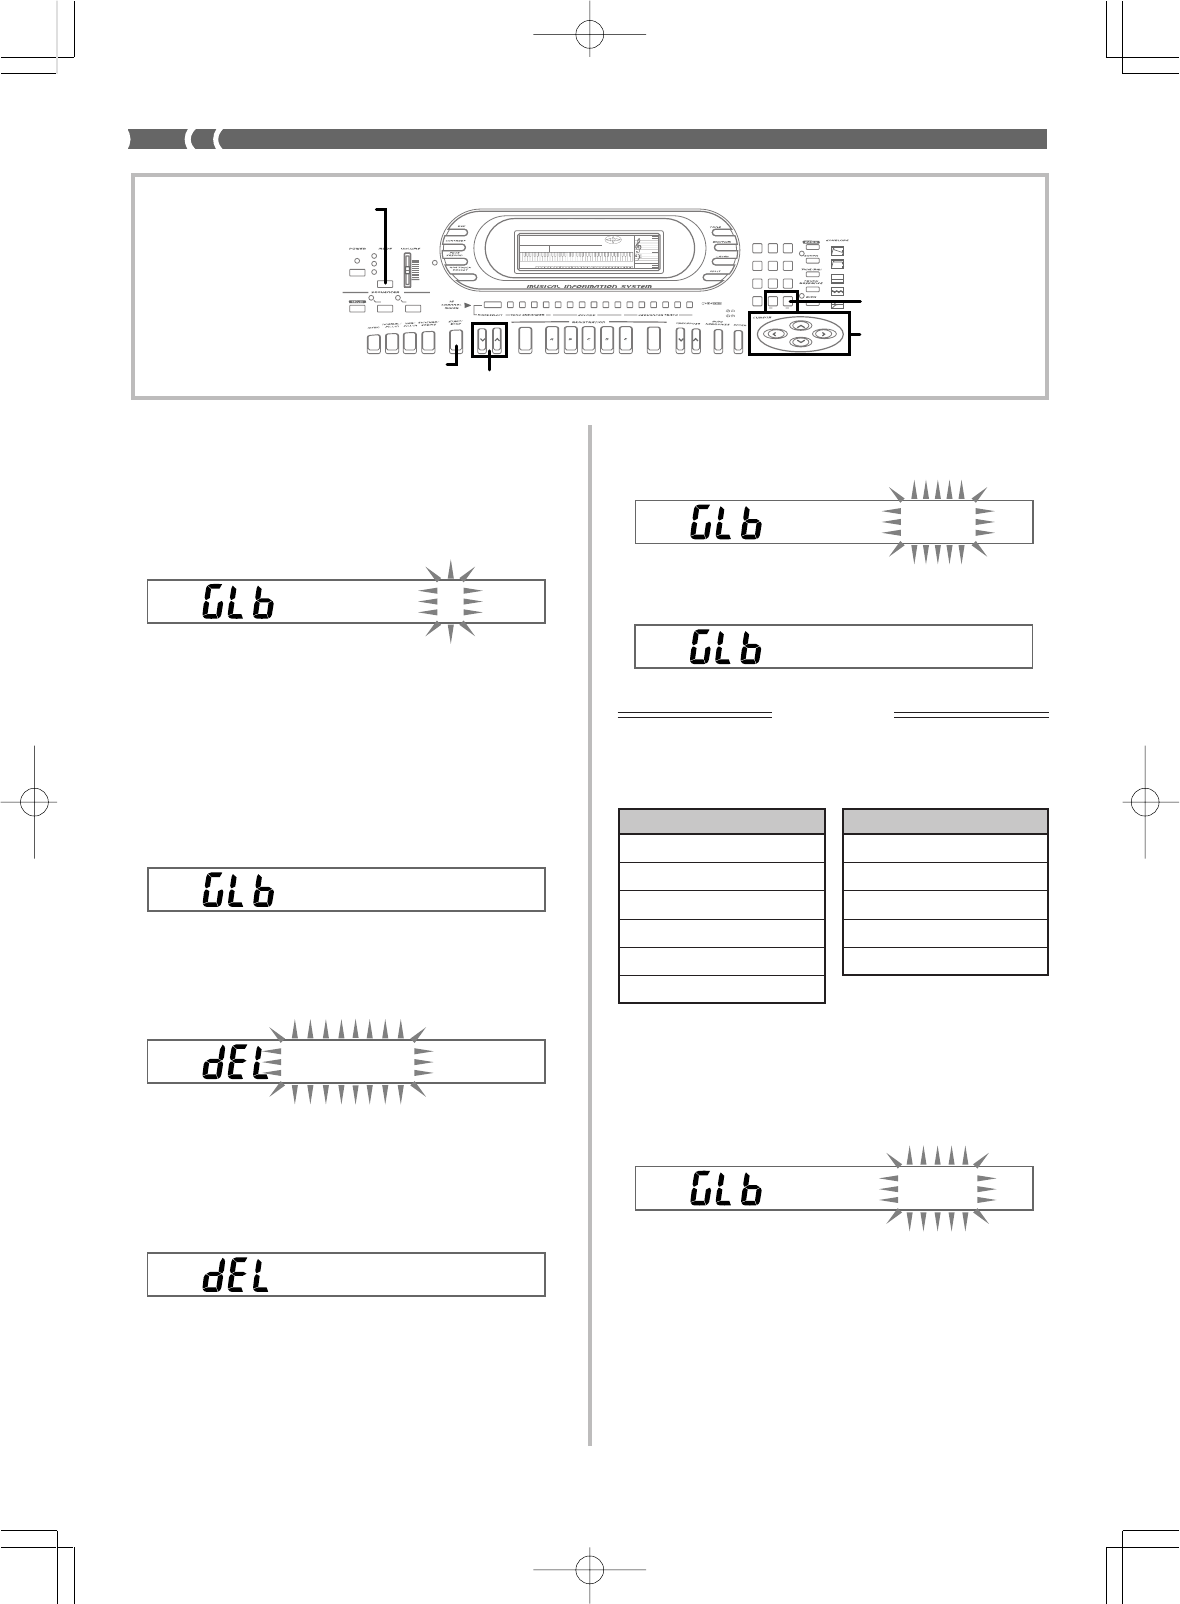
E-54
Octave Shift
When using the piccolo tone, there may be cases when very high notes
you want to play are not included within the range of the keyboard.
When this happens, you can use octave shift to shift the keyboard
range one octave up. In this case you can use octave shift to shift the
range of the tone up or down.
Note that octave shift is available with the Pattern Sequencer only.
Use [+] and [–] to select the octave shift setting you want.
-1: Range shifted one octave down.
0: No shift
1: Range shifted one octave up.
Work Area Clear
Use this operation to clear Pattern Sequencer work area contents. You
must clear the work area when you plan to create an original accom-
paniment pattern from scratch.
1.
In the Global menu, use [왗] and [왘] to display the
“Work Del” screen, and then press the [+] and [–]
buttons at the same time.
•This message confirms whether or not you really what to
clear work area contents.
2.
Press YES to clear work area contents or NO to abort
the clear operation without clearing anything.
•The message shown below appears for about one second and
then the display returns to the Global menu.
Wo r kDel
Oc t =0
Su re?
Com
p
lete
Bt= 4/4
Bt= ––––
Tm
p
o=120
733A-E-056A
Setting
3 / 8
5 / 8
6 / 8
7 / 8
9 / 8
Setting
2 / 4
3 / 4
4 / 4 (initial value)
5 / 4
6 / 4
7 / 4
Meter (Beat)
This setting specifies the meter of the accompaniment pattern.
The display shown here appears when you specify a meter that is not
included in the table below.
IMPORTANT!
You can set the meter immediately after clearing the Pattern Se-
quencer work area only (see above). In other cases, the meter of the
accompaniment pattern currently in the work area is used, and can-
not be changed. In this case the display does not flash.
•Use [+] and [–] to change the setting.
Tempo
This setting specifies the initial tempo value for the accompaniment
pattern.
•Use [+] and [–] to set the initial tempo value within the range of
030 to 255.
•If the accompaniment pattern is playing when you change this set-
ting, the tempo of the pattern does not change immediately. The
value you specify becomes the current pattern’s default tempo val-
ue, so you need to press both TEMPO buttons at the same time to
have the newly set tempo take effect for an ongoing pattern.
❚
NOTE
❚
When you turn on the Pattern Sequencer, the initial default tempo
value of the accompaniment pattern you are using as a base is ap-
plied first.
AMP ENVELOPE
00 FLAT
01-17 VIBRATO
18-45 OTHERS
DECAY
SUSTAIN
PITCH ENVELOPE
MIN
MAX
FULL RANGE
CHORD
CASIO CHORD
SONG
FINGERED
PATTERN EXTERNAL
INTERNAL UPPER1
CH 1
UPPER2
CH 2
LOWER1
CH 3
LOWER2
STOREBANK
CH 4
ACC VOL.
CH 5
CHORD1
CH 6
CHORD2
CH 7
CHORD3
CH 8
BASS
CH 9
RHYTHM
CH 10
TR1
CH 11
TR2
CH 12
TR3
CH 13
TR4
CH 14
TR5
CH 15
TR6
CH 16
789
456
1
0
23
PARAMETER RESET:
DELETE
/YESS/NO
MAIN MANU/
CHANNEL VOLUME:
SUB MANU/
CHANNEL SELECT:
MODE
START/STOP TEMPO
Cursor keys
[+]/[
–] (YES/NO
)
WK-1800/1600(E)-48~57 03.7.31, 5:21 PMPage 54 Adobe PageMaker 6.5J/PPC
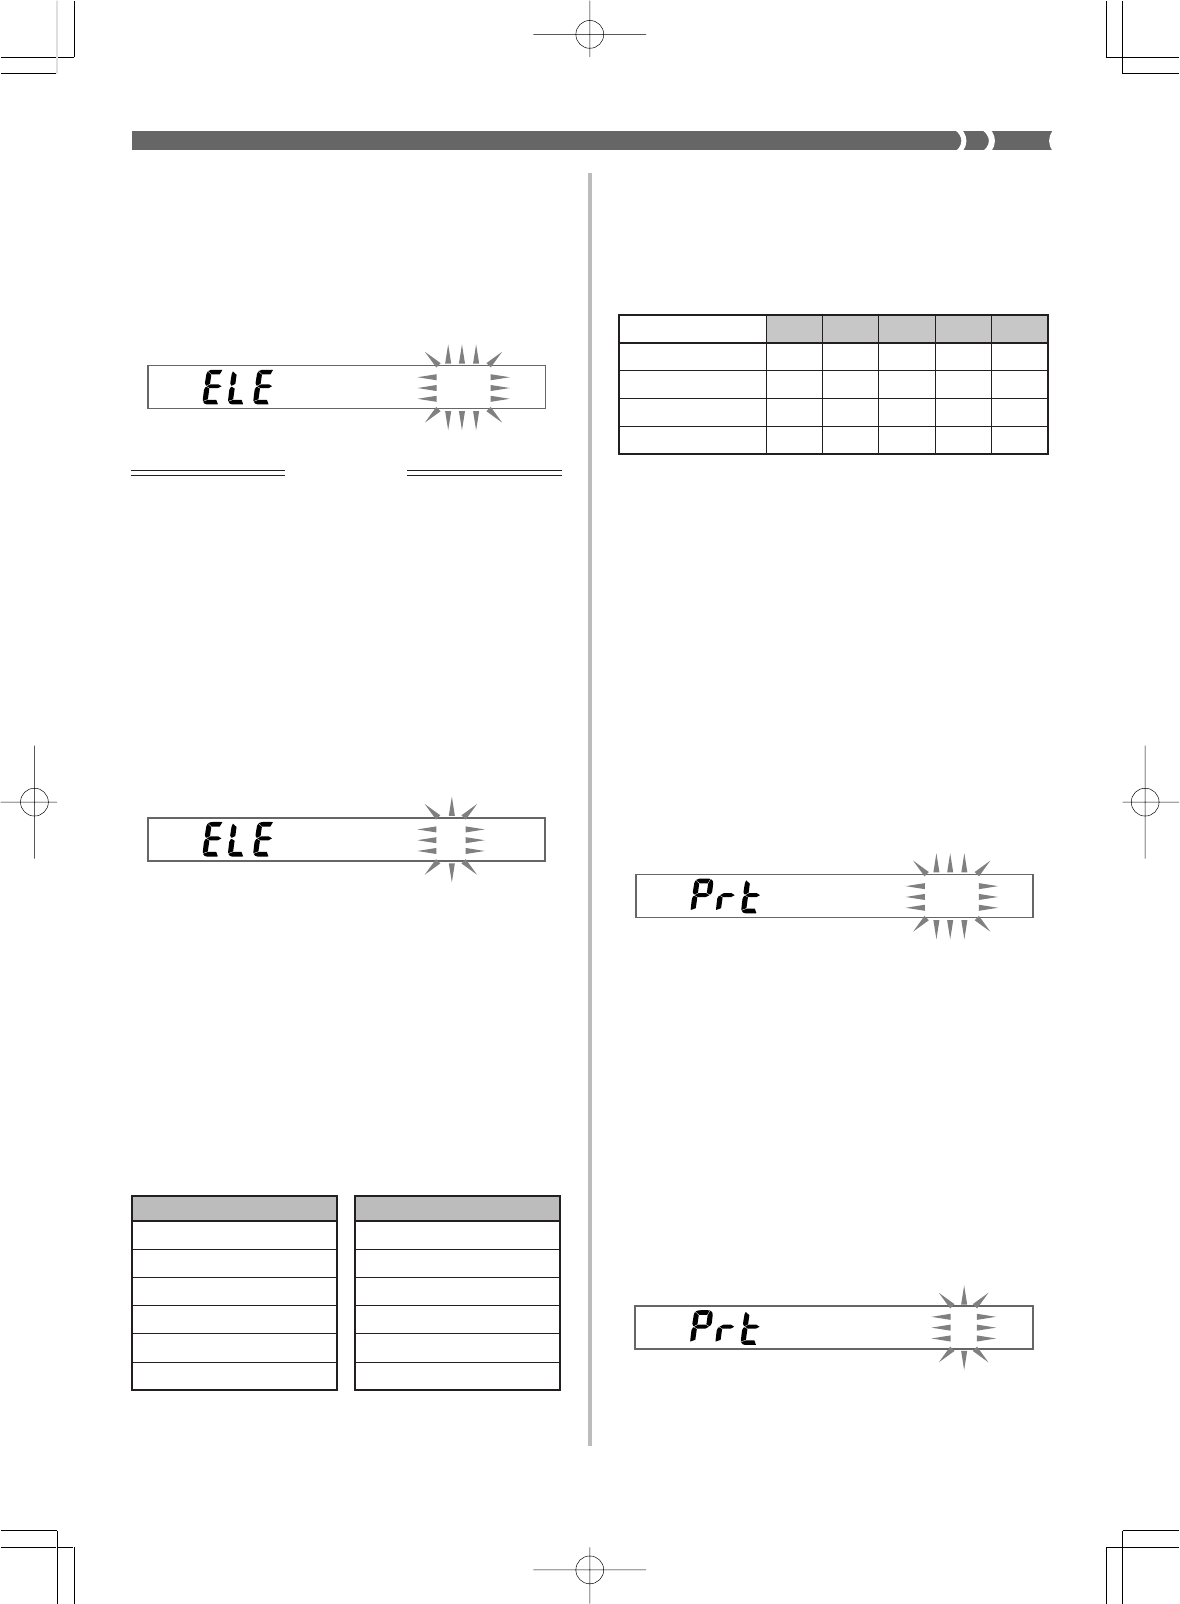
E-55
Element Sub-menus
After displaying the Element menu in the Pattern Edit Mode, use the
[왗] and [
왘] cursor keys to scroll through the Element sub-menus.
Setting the Number of Measures for Each Element
You can specify the number of measures for each element (except for
the fill-in element) of an accompaniment pattern before you start re-
cording it.
IMPORTANT!
You can specify the number of measures for each element only in the
following cases.
•Immediately after clearing Pattern Sequencer work area contents
(page E-54).
•After all the parts of the element whose number of measures you
want to change have been deleted using the Pattern Create Mode.
In all other cases, the number of measures that is pre-programmed
for the base accompaniment pattern cannot be changed.
•Use [+] and [–] to input a value of 01 to 16 for the number of mea-
sures.
Setting the Original Key for Each Element
You can set the basic key for each element when recording an accom-
paniment pattern. The default setting for the original key is C.
When you play the chord that is set as the element’s original key
while playing back an accompaniment pattern, all notes recorded on
the element are played back exactly as they are recored (and are not
affected by chord conversion table).
❚
NOTES
❚
•You can change the Original Key setting for each element in the follow-
ing cases only.
•Immediately after clearing the Pattern Sequencer work area.
See “Work Area Clear” on page E-54 for details on the work area
clear operation.
•After all parts of the element whose Original Key you want to change
have been deleted using the Pattern Create Mode (page E-52).
In all other cases, the Original Key setting of the accompaniment pat-
tern used as the base pattern is used, and cannot be changed. In this
case the display does not flash.
•Set the original key to C if you want your pattern to be compatible with
built-in patterns.
Me a s= 02
OrKe
y
=C
Setting
F
G
A
A
B
B
Setting
C
C
D
E
E
F
See “To play back elements of the accompaniment pattern in the work
area” on page E-50 for details on how to select elements and parts to
make settings.
Accompaniment Pattern Playback During Part Setting
Pressing the START/STOP button while setting Part menu parame-
ters starts playback of the Auto Accompaniment pattern, so you can
immediately hear how a change in a parameter affects the accompa-
niment. You can perform the following operations while Auto Ac-
companiment is playing.
•You can specify chords using the chord play method (CASIO
CHORD, FINGERED, FULL RANGE CHORD) that suits the ac-
companiment mode selected with the MODE button.
•You can change sub-menu settings, and immediately hear how
changes affect the accompaniment pattern.
Chord Conversion Table Sub-menu
Use this sub-menu to specify the chord conversion table of the ac-
companiment pattern for each part of an element.
Accompaniment patterns are normally recorded in the key of C. When
you select an accompaniment pattern and specify a key by with the
accompaniment keyboard, the pattern is transposed from the key of
C to the specified key. Simply transposing chords on a one-to-one
basis, however, can result in mechanical, unnatural sounding pat-
terns. To compensate for this, the keyboard has 19 built-in chord con-
version tables that make chord progressions in different keys sound
more natural.
•Select the part of an element whose setting you want to change,
and then use [+] and [–] to specify a value in the range of 00 to 18,
which specifies the chord conversion table number.
•See “Chord Conversion Table” on page A-8 for details on chord
conversion table numbers and contents.
Break Point Sub-menu
Use this sub-menu to specify the break point of the accompaniment
pattern for each part of an element.
Cho rd=00
733A-E-057A
•Use [+] and [–] to change settings.
Rhythm
Bass
Chord 1 Chord 2 Chord 3
Chord Conversion Table
~
Break Point ~
Quantize Setting
Quantize Execute
Part Sub-menus
After displaying the Part menu in the Pattern Edit Mode, use the
[왗] and [왘] cursor keys to scroll through the Part sub-menus.
Part Settings
All Part menu settings can be made separately for each part. The fol-
lowing shows which parameters can be set for each part.
BkPnt= G
WK-1800/1600(E)-48~57 03.7.31, 5:21 PMPage 55 Adobe PageMaker 6.5J/PPC
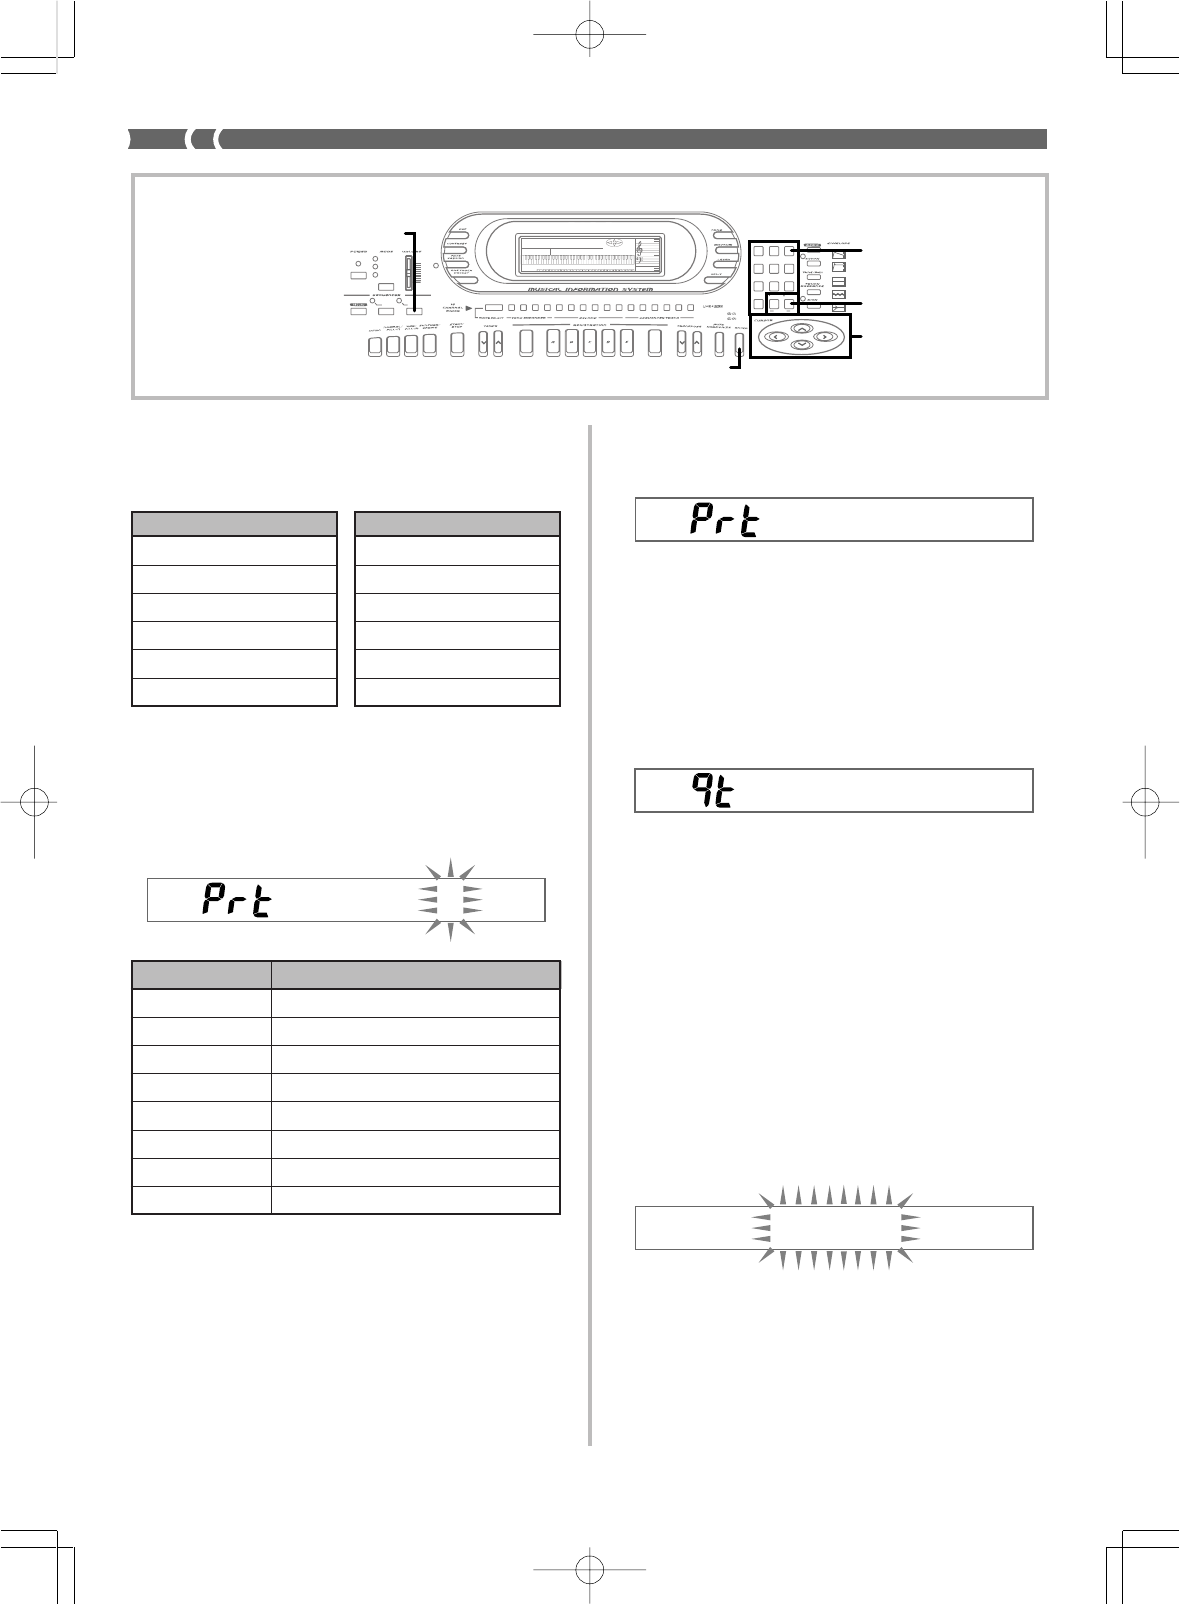
E-56
•Use [+] and [–] to change settings.
Quantize Setting
This setting determines the quantize value after recording. The tim-
ing of notes previously recorded from the keyboard can be matched
with the note timing made with this setting.
Setting
F
G
A
A
B
B
Setting
C
C
D
E
E
F
Qtz=4
733A-E-058A
Com
p
lete
Qtz Exe?
Display Indicator Meaning
4Quantize quarter notes (initial value)
8Quantize 8 th notes
8T Quantize 8 th triplicate notes
16 Quantize 16 th notes
16T Quantize 16 th triplicate notes
32 Quantize 32 nd notes
32T Quantize 32 nd triplicate notes
64 Quantize 64 th notes
❚
NOTE
❚
The length of the last note of the accompaniment pattern you create may
be altered by the quantize setting.
AMP ENVELOPE
00 FLAT
01-17 VIBRATO
18-45 OTHERS
DECAY
SUSTAIN
PITCH ENVELOPE
MIN
MAX
FULL RANGE
CHORD
CASIO CHORD
SONG
FINGERED
PATTERN
EXTERNAL
INTERNAL UPPER1
CH 1
UPPER2
CH 2
LOWER1
CH 3
LOWER2
STOREBANK
CH 4
ACC VOL.
CH 5
CHORD1
CH 6
CHORD2
CH 7
CHORD3
CH 8
BASS
CH 9
RHYTHM
CH 10
TR1
CH 11
TR2
CH 12
TR3
CH 13
TR4
CH 14
TR5
CH 15
TR6
CH 16
789
456
1
0
23
PARAMETER RESET:
DELETE
/YESS/NO
MAIN MANU/
CHANNEL VOLUME:
SUB MANU/
CHANNEL SELECT:
ENTER
PATTERN
Cursor keys
[+]/[
–] (YES/NO)
Number keys
* Break Point
•Once you specify a break point, any chord above the break point is
played in the next lower octave when playing back chords using
CASIO CHORD, FINGERED, and FULL RANGE CHORD.
Quantize Execute
Use the following procedure to execute the quantize operation in ac-
cordance with current quantize settings.
1.
In the Global menu, use the [왗
] and [왘] cursor keys
to display the message “Prt Qtz Exe?”.
2.
Press the YES key to execute the quantize operation
or NO to abort the operation.
•Pressing YES causes the “qt Pls Wait” message to appear and
remain on the display until the quantize operation is com-
plete. The message shown below appears for about 1 second
after the quantize operation is complete. Then the keyboard
returns to the part menu.
Exiting the Pattern Sequencer Mode
Use the following procedures to exit the Pattern Sequencer Mode.
The procedure you should use depends on whether you want to save
or discard the contents of the work area.
To exit the Pattern Sequencer Mode and save
work area contents
❚
NOTE
❚
Perform this operation only after you have finished creating the pattern
you want to save.
1.
Press the PATTERN button.
•This causes the message shown below to appear, which asks
if you want to save work area contents.
2.
Press the YES key to save the pattern.
•See “To exit the Pattern Sequencer Mode without saving work
area contents” on page E-57 for details on what how to exit
without saving.
Save?
WK-1800/1600(E)-48~57 03.7.31, 5:22 PMPage 56 Adobe PageMaker 6.5J/PPC
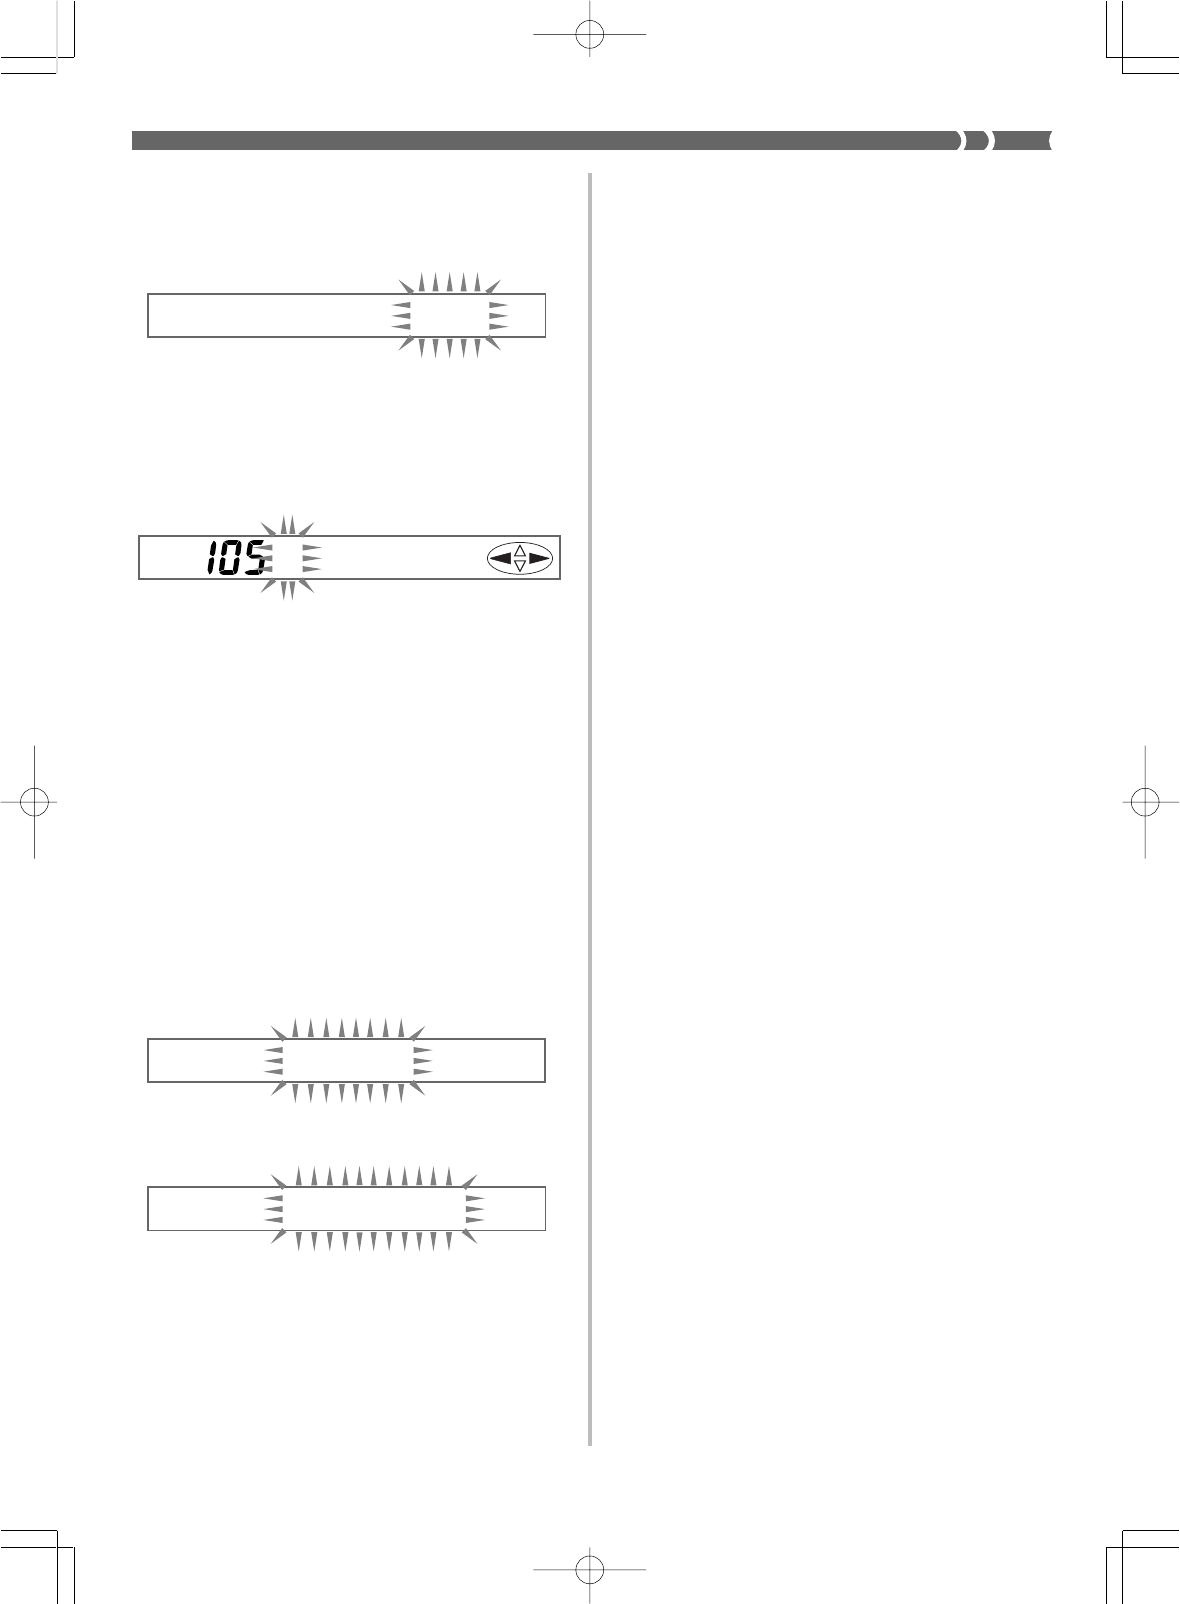
E-57
4.
Press the [왗] or [왘] cursor key to move the cursor to
the rhythm name input area, and input a name for the
rhythm.
•Use [+] and [–] to scroll through letters at the current cursor
location.
•Use the [왗
] and [왘] cursor keys to move the cursor left and
right.
5.
After you are finished inputting the name, press the
ENTER button to save the rhythm pattern under the
name you specified.
•The message “Complete” appears on the display for about
one second, and then the Pattern Sequencer turns off. The
currently selected rhythm at this time is the one you just
saved.
•If the rhythm number you specified already contains a
rhythm, the message “Replace?” appears when you press
ENTER in step 5 above, to ask whether you want to replace
the existing rhythm with the new one. Press YES to replace
or NO to return to step 1 of the above procedure so you can
specify a different rhythm number.
To exit the Pattern Sequencer Mode without
saving work area contents
1.
Press the PATTERN button.
•This causes the message shown below to appear, which asks
if you want to save work area contents.
2.
Press the NO key.
•The above message asks if you really want to delete work
area contents.
3.
Press the YES key to exit without saving work area
contents, or NO to abort this operation and return to
the Pattern Sequencer Mode.
Save?
De l ete?
733A-E-059A
USER01
No . =120
3.
Use the number keys or [+] and [–] to specify the user
rhythm number where you want to save the pattern,
and then press the ENTER button.
•You can input any number in the range of 120 to 129.
WK-1800/1600(E)-48~57 03.7.31, 5:22 PMPage 57 Adobe PageMaker 6.5J/PPC
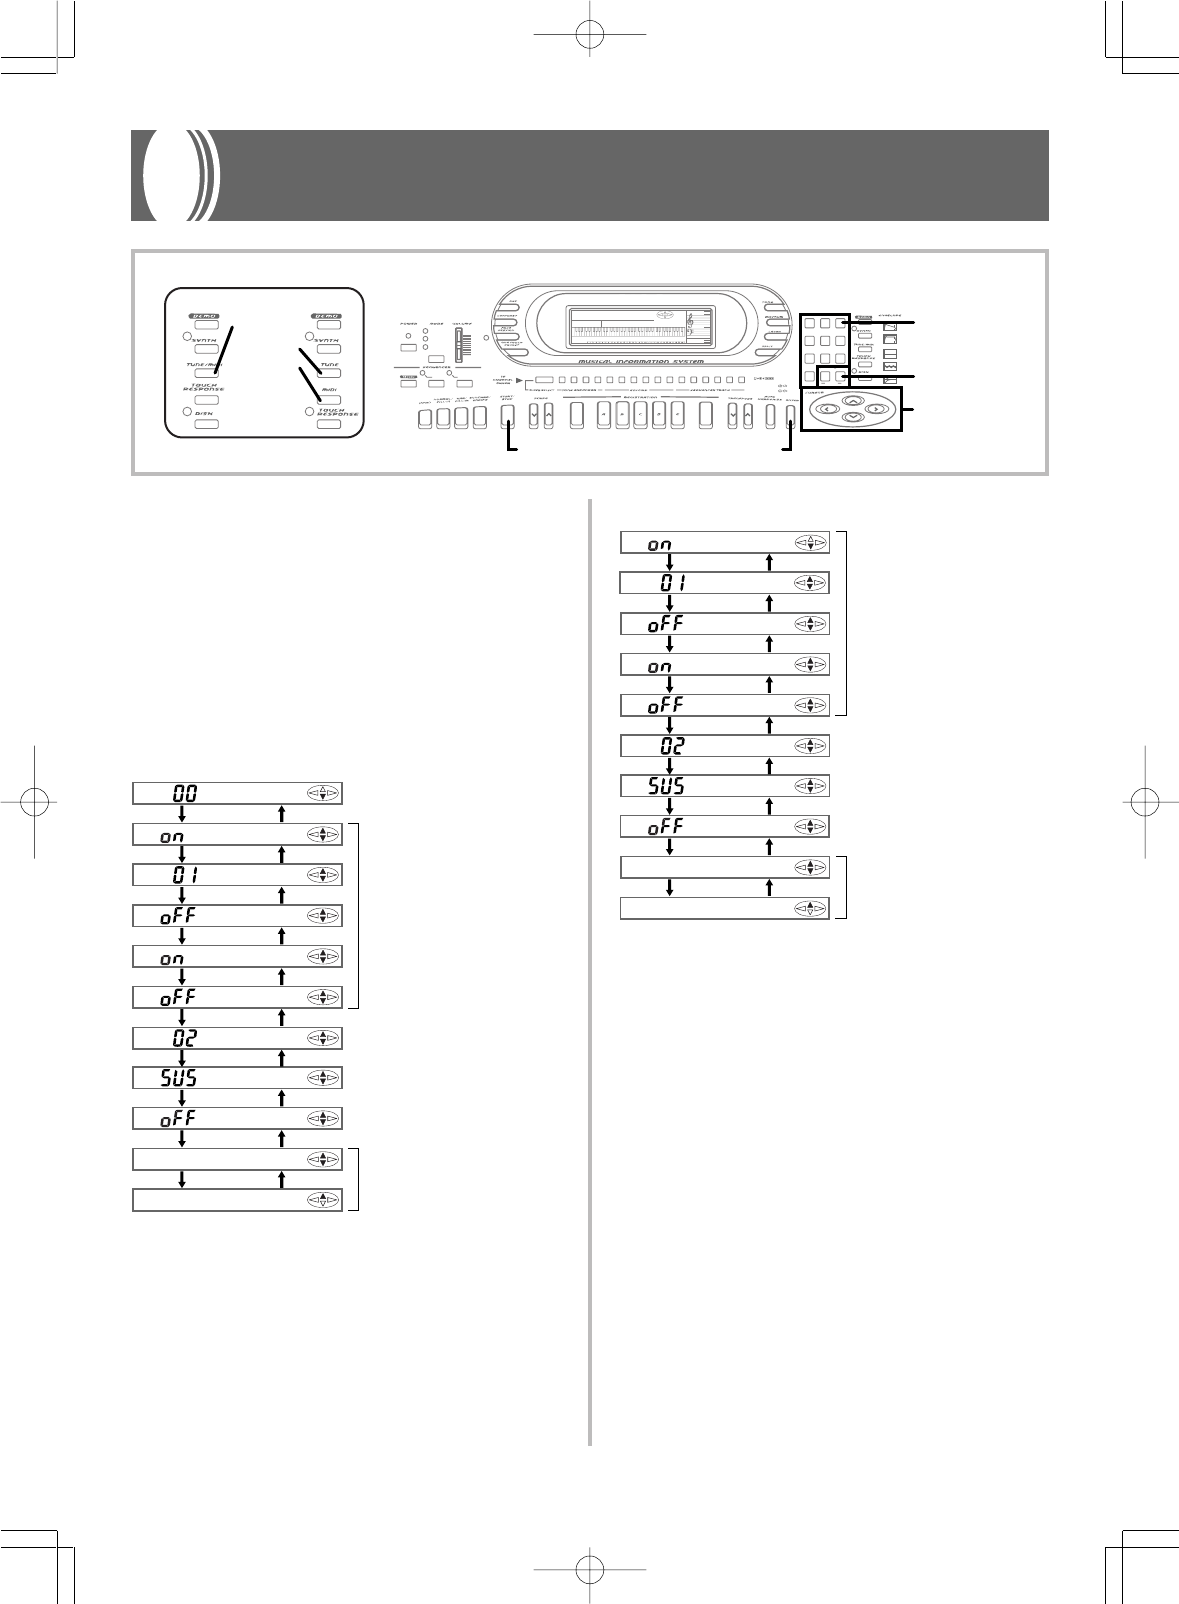
E-58
733A-E-060A
Keyboard Settings
Using the Keyboard Settings Menu
The following describes how to use the keyboard settings menu to
change the bend range, the assignable jack function, and the sound
range shift setting.
To use the keyboard settings menu
1.
Press the TUNE/MIDI button.
With the WK-1600/1630, this button is named MIDI.
2.
Use the [왖] and [왔] cursor keys to display the screen
for the setting you want to make, as shown below.
WK-1800
Tune
GM Mod e
Ke
y
bd Ch
Cho rd
Local
Aco
m
p
Ou t
Bend
Jack
Sh i ft
Bu l kSnd?
Bu l kRcv?
[
▲
]
[
▼
]
[
▲
]
[
▼
]
[
▲
]
[
▼
]
[
▲
]
[
▼
]
[
▲
]
[
▼
]
[
▲
]
[
▼
]
[
▲
]
[
▼
]
[
▲
]
[
▼
]
[
▲
]
[
▼
]
[
▲
]
[
▼
]
Tuning screens (page E-19)
MIDI settings (page E-62)
Pitch Bend range
Assignable jack function
Sound range shift setting
Bulk send, receive (page E-65)
3.
Use [+] and [–] or the number keys to change the
setting.
•Settings you make are applied even if you do not press the
ENTER button.
•Pressing [+] and [–] at the same time returns the display val-
ue to its initial default.
•See the following section titled “Setting Screens” for details
on each setting.
4.
After making the settings you want, press the TUNE/
MIDI button (MIDI button on the WK-1600/1630) to
clear the setting screen.
•The setting screen also clears automatically if you do not per-
form any operation for about five seconds.
AMP ENVELOPE
00 FLAT
01-17 VIBRATO
18-45 OTHERS
DECAY
SUSTAIN
PITCH ENVELOPE
MIN
MAX
FULL RANGE
CHORD
CASIO CHORD
SONG
FINGERED
PATTERN
EXTERNAL
INTERNAL UPPER1
CH 1
UPPER2
CH 2
LOWER1
CH 3
LOWER2
STOREBANK
CH 4
ACC VOL.
CH 5
CHORD1
CH 6
CHORD2
CH 7
CHORD3
CH 8
BASS
CH 9
RHYTHM
CH 10
TR1
CH 11
TR2
CH 12
TR3
CH 13
TR4
CH 14
TR5
CH 15
TR6
CH 16
789
456
1
0
23
PARAMETER RESET:
DELETE
/YESS/NO
MAIN MANU/
CHANNEL VOLUME:
SUB MANU/
CHANNEL SELECT:
WK-1600/1630WK-1800
TUNE/MIDI
TUNE
MIDI
ENTERSTART/STOP
Cursor keys
[+]/[
–]
Number key
s
WK-1600/1630
GM Mod e
Ke
y
bd Ch
Cho rd
Local
Aco
m
p
Ou t
Bend
Jack
Sh i ft
Bu l kSnd?
Bu l kRcv?
[
▲
]
[
▼
]
[
▲
]
[
▼
]
[
▲
]
[
▼
]
[
▲
]
[
▼
]
[
▲
]
[
▼
]
[
▲
]
[
▼
]
[
▲
]
[
▼
]
[
▲
]
[
▼
]
[
▲
]
[
▼
]
MIDI settings (page E-62)
Pitch Bend range
Assignable jack function
Sound range shift setting
Bulk send, receive (page E-65)
WK-1800/1600(E)-58~59 03.7.31, 5:22 PMPage 58 Adobe PageMaker 6.5J/PPC
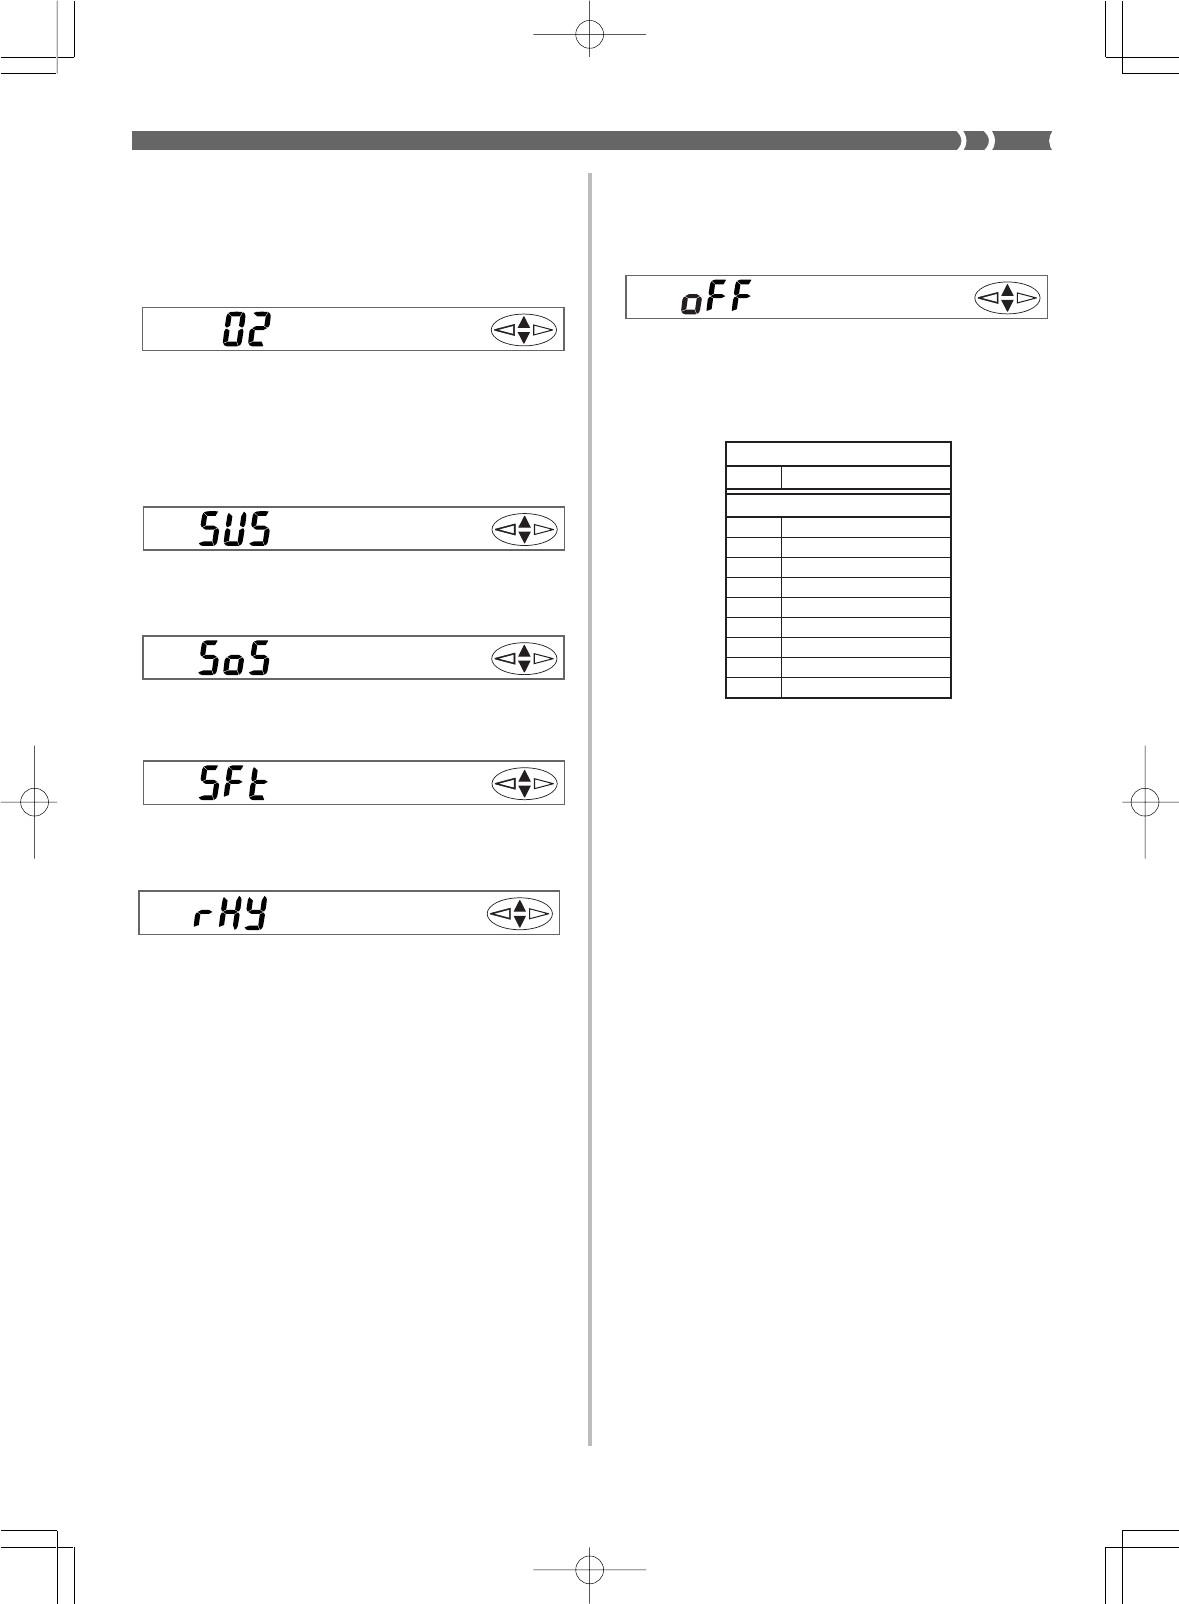
E-59
Setting Screens
Pitch Bend Range (Initial Default: 02)
This setting specifies the change in pitch caused when the pitch bender
is at its maximum position. You can set a value in the range of 00 (no
change) to 12 (12 semitones).
Assignable Jack Function (Initial Default: SUS)
This setting specifies the function of the foot pedal as: sustain, soste-
nuto, soft, or rhythm pedal.
Sustain Pedal (SUS)
Applies a sustain effect*1 when the pedal is pressed.
Sostenuto Pedal (SoS)
Applies a sostenuto effect*2 when the pedal is pressed.
Soft Pedal (SFt)
Softens notes played while pedal is depressed.
Rhythm Pedal (rHy)
Pedal performs same operations as the START/STOP button.
*1 Sustain Effect
With piano tones and other sounds that decay, the pedal acts as a
damper pedal, with sounds being sustained longer when the pedal
is depressed. With organ tones and other continuous sounds, notes
played on the keyboard continue to sound until the pedal is re-
leased. In either case, the sustain effect is also applied to any notes
that are played while the pedal is depressed.
*2 Sostenuto Effect
This effect performs the same way as sustain, except that it is ap-
plied only to notes that are sounding already when the pedal is
depressed. It does not affect notes that are played after the pedal
is depressed.
Bend
Jack
Jack
Jack
Sound Range Shift (Initial Default: oFF)
This setting shifts the range of a specific tone one octave up or down.
This makes it possible to shift the piccolo tone range so you can play
it within the keyboard range. You can also shift bass and other low-
range tones so they can be played within the keyboard range.
Sound Range Shift Off
•Sound within range specified by General MIDI.
Sound Range Shift On
Sh i ft
Jack
733A-E-061A
1 octave up
072 Piccolo
1 octave down
032 Acoustic Bass
033 Fingered Bass
034 Picked Bass
035 Fretless Bass
036 Slap Bass 1
037 Slap Bass 2
038 Synth Bass 1
039 Synth Bass 2
043 Contrabass
WK-1800/1600(E)-58~59 03.7.31, 5:22 PMPage 59 Adobe PageMaker 6.5J/PPC
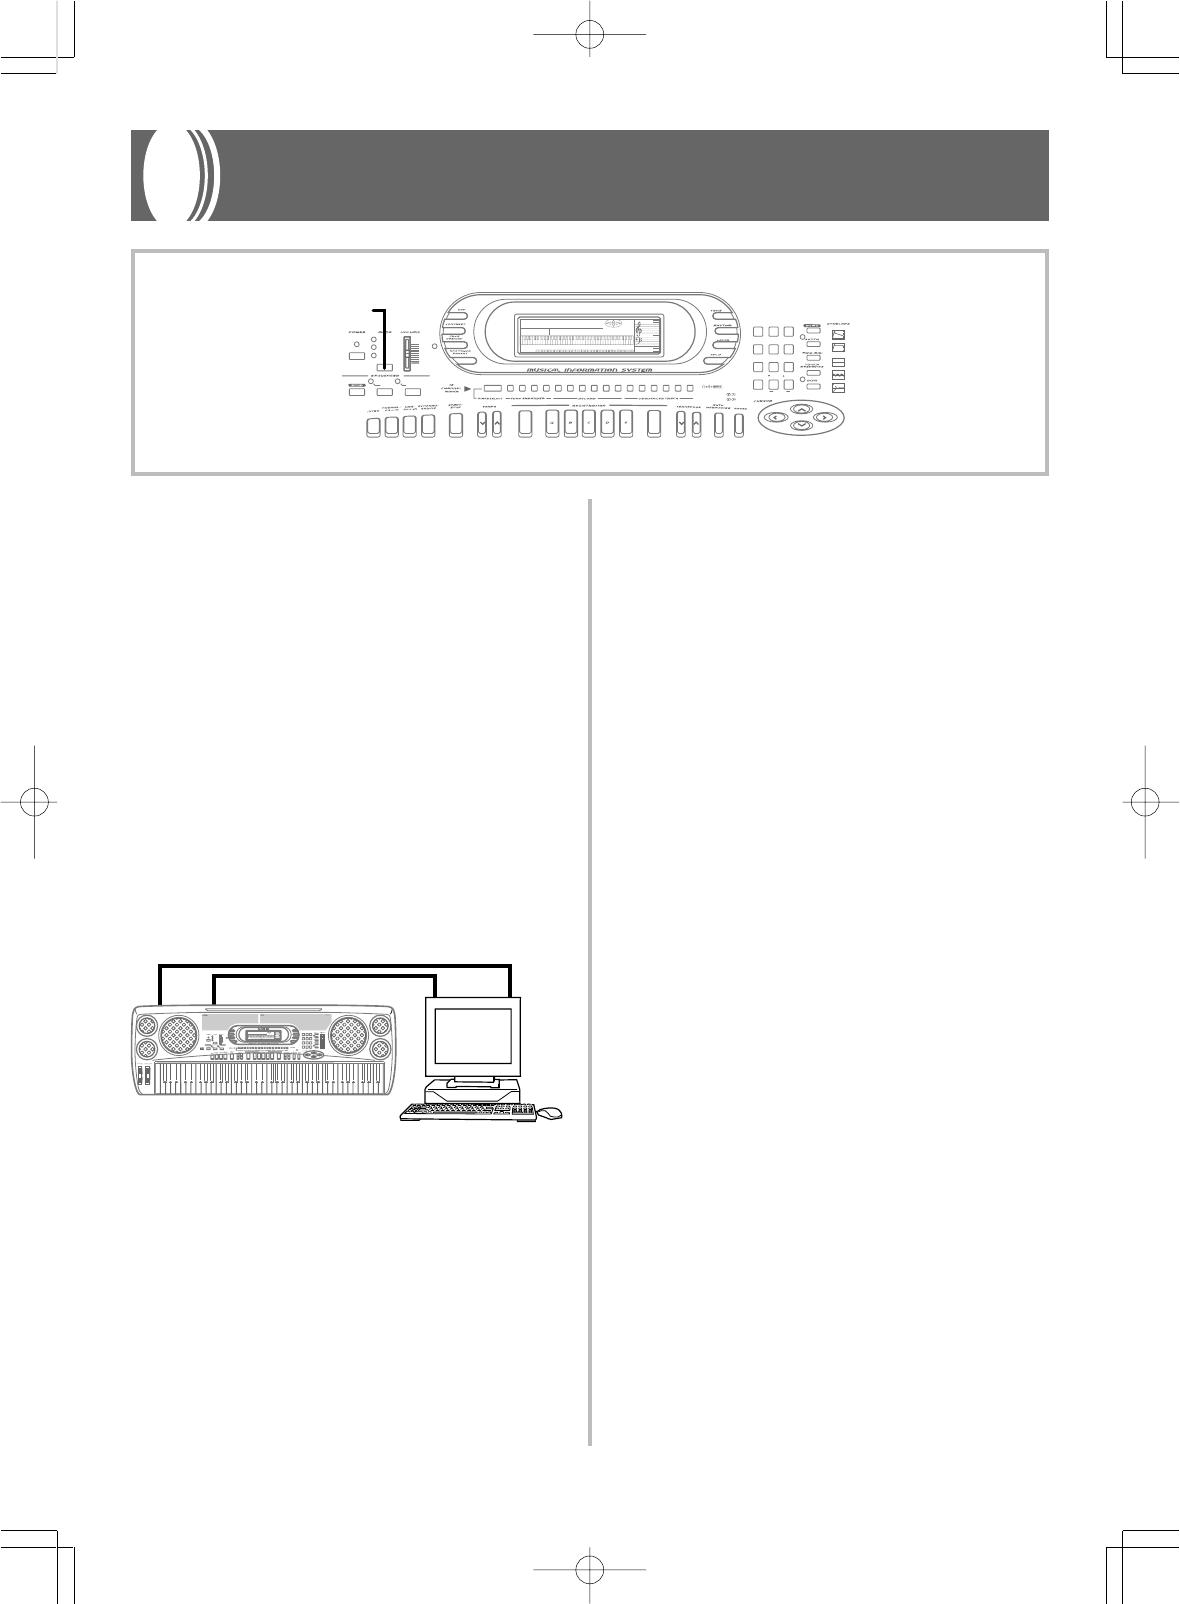
E-60
733A-E-062A
MIDI
What is MIDI?
The letters MIDI stand for Musical Instrument Digital Interface, which
is the name of a worldwide standard for digital signals and connec-
tors that makes it possible to exchange musical data between musi-
cal instruments and computers (machines) produced by different
manufacturers. MIDI compatible equipment can exchange keyboard
key press, key release, tone change, and other data as messages.
Though you do not need any special knowledge about MIDI to use
this keyboard as a stand-alone unit, MIDI operations require a bit of
specialized knowledge. This section provides you with an overview
of MIDI that will help to get you going.
MIDI Connections
MIDI messages are send out through the MIDI OUT terminal of one
machine to the MIDI IN terminal of another machine over a MIDI
cable. To send a message from this keyboard to another machine, for
example, you must use a MIDI cable to connect the MIDI OUT termi-
nal of this keyboard to the MIDI IN terminal of the other machine. To
send MIDI messages back to this keyboard, you need to use a MIDI
cable to connect the other machine’s MIDI OUT terminal to the MIDI
IN terminal of this keyboard.
To use a computer or other MIDI device to record and playback the
MIDI data produced by this keyboard, you must connect the MIDI
IN and MIDI OUT terminals of both machines in order send and re-
ceive data.
MIDI Channels
MIDI allows you to send the data for multiple parts at the same time,
with each part being sent over a separate MIDI channel. There are 16
MIDI channels, numbered 1 through 16, and MIDI channel data is
always included whenever you exchange data (key press, pedal op-
eration, etc.).
This keyboard is equipped with multi-timbre capabilities, which
means it can receive messages over all 16 MIDI channels and play up
to 16 parts at the same time.
Keyboard and pedal operations performed on this keyboard are sent
out by selecting a MIDI channel (1 to 16) and then sending the appro-
priate message.
General MIDI
As we have already seen, MIDI makes is possible to exchange musi-
cal data between devices produced by different manufacturers. This
musical data does not consist of the notes themselves, but rather in-
formation on whether a keyboard key is pressed or released, and the
tone number.
If tone number 1 on a keyboard produced by Company A is PIANO
while tone number 1 on a Company B's keyboard is BASS, for exam-
ple, sending data from Company A's keyboard to Company B's key-
board produces a result entirely different from the original. If a com-
puter, sequencer or other device with auto accompaniment capabili-
ties is used to produce music data for the Company A keyboard which
has 16 parts (16 channels) and then that data is sent to the Company
B keyboard which can receive only 10 parts (10 channels), the parts
that cannot be played will not be heard.
The standard for the tone numbering sequence, the number of parts,
and other general factors that determine the sound source configura-
tion, which was arrived at by mutual consultations by manufactur-
ers, is called General MIDI.
The General MIDI standard defines the tone numbering sequence,
the drum sound numbering sequence, the number of MIDI channels
that can be used, and other general factors that determine the sound
source configuration. Because of this, musical data produced on a
General MIDI sound source can be played back using similar tones
and identical nuances as the original, even when played on another
manufacturers sound source.
This keyboard conforms with General MIDI standards, so it can be
connected to a computer or other device and used to play back Gen-
eral MIDI data that has been purchased, downloaded from the Inter-
net, or obtained from any other source.
MIDI IN MIDI OUT MIDI IN MIDI OUT
AMP ENVELOPE
00 FLAT
01-17 VIBRATO
18-45 OTHERS
DECAY
SUSTAIN
PITCH ENVELOPE
MIN
MAX
FULL RANGE
CHORD
CASIO CHORD
SONG
FINGERED
PATTERN
EXTERNAL
INTERNAL UPPER1
CH 1
UPPER2
CH 2
LOWER1
CH 3
LOWER2
STOREBANK
CH 4
ACC VOL.
CH 5
CHORD1
CH 6
CHORD2
CH 7
CHORD3
CH 8
BASS
CH 9
RHYTHM
CH 10
TR1
CH 11
TR2
CH 12
TR3
CH 13
TR4
CH 14
TR5
CH 15
TR6
CH 16
789
456
1
0
23
PARAMETER RESET:
DELETE
/YESS/NO
MAIN MANU/
CHANNEL VOLUME:
SUB MANU/
CHANNEL SELECT:
Computer etc.
AMP ENVELOPE
00 FLAT
01-17 VIBRATO
18-45 OTHERS
DECAY
SUSTAIN
PITCH ENVELOPE
MIN
MAX
FULL RANGE
CHORD
CASIO CHORD
SONG
FINGERED
PATTERN
EXTERNAL
INTERNAL UPPER1
CH 1
UPPER2
CH 2
LOWER1
CH 3
LOWER2
STOREBANK
CH 4
ACC VOL.
CH 5
CHORD1
CH 6
CHORD2
CH 7
CHORD3
CH 8
BASS
CH 9
RHYTHM
CH 10
TR1
CH 11
TR2
CH 12
TR3
CH 13
TR4
CH 14
TR5
CH 15
TR6
CH 16
789
456
1
0
23
PARAMETER RESET:
DELETE
/YESS/NO
MAIN MANU/
CHANNEL VOLUME:
SUB MANU/
CHANNEL SELECT:
MODE
WK-1800/1600(E)-60~66 03.7.31, 5:22 PMPage 60 Adobe PageMaker 6.5J/PPC
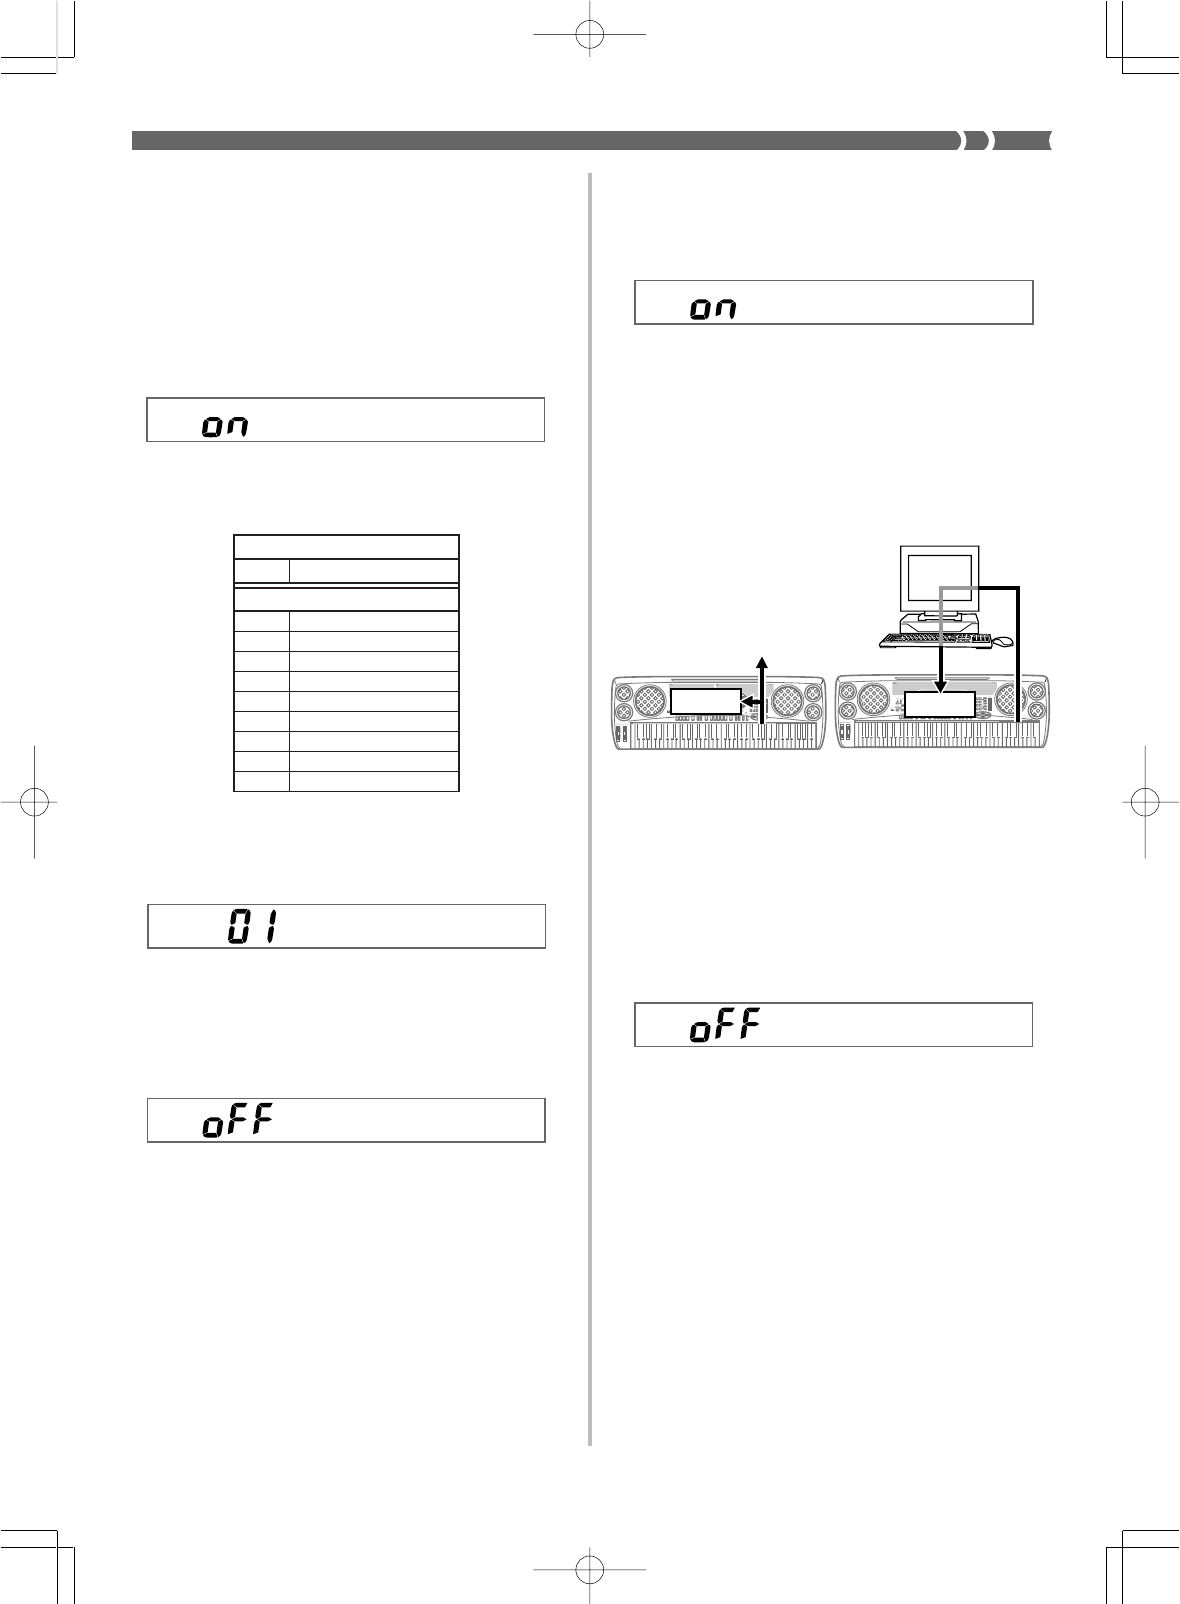
E-61
KEYBOARD CHANNEL (Default: 01)
This parameter sets the channel for MIDI messages to an external
device. You can set any MIDI channel in the range of 01 to 16 as the
keyboard channel.
MIDI IN CHORD JUDGE ON/OFF (Default: oFF)
Use MIDI IN CHORD JUDGE when you want to use note data re-
ceived from an external device through MIDI IN to play chords. It
comes in handy when you want to control Auto Accompaniment
chord progressions from a computer or other external device.
on: Turns MIDI IN CHORD JUDGE on, which allows chord settings
to be made using keyboard channel note data input through the
MIDI IN terminal when the chord fingering method is selected
by the MODE button.
oFF: Turns MIDI IN CHORD JUDGE off.
Ke
y
bdaCh
Cho rdaCh
ACCOMP MIDI OUT (Default: oFF)
on: Auto Accompaniment is played by the keyboard and the corre-
sponding MIDI message is output from the MIDI OUT termi-
nal.
oFF: Auto Accompaniment MIDI messages are not output from the
MIDI OUT terminal.
Aco
m
p
Ou t
733A-E-063A
GMMMod e ?
on: Tones sound within the range prescribed by General MIDI.
oFF: Causes the range of “072 Piccolo” to be raised one octave, and
the range of “032 Acoustic Bass” to be lowered one octave.
LOCAL CONTROL (Default: on)
This setting determines whether or not the keyboard and sound source
of this keyboard are connected internally. When recording to a com-
puter or other external device connected to this keyboard’s MIDI IN/
OUT terminal, it helps if you turn LOCAL CONTROL off.
on: Anything played on the keyboard is sounded by the internal
sound source and simultaneously output as a MIDI message from
the MIDI OUT terminal.
oFF: Anything played on the keyboard is output as a MIDI message
from the MIDI OUT terminal, without being sounded by the in-
ternal sound source. Turn LOCAL CONTROL off whenever you
are using the MIDI THRU function of a computer or other exter-
nal device. Also note that no sound is produced by the keyboard
if LOCAL CONTROL is turned off and no external device is con-
nected.
Making MIDI Settings
This section describes the MIDI settings you need to make when con-
necting this keyboard to a sequencer, synthesizer, or other external
device. Once connected, you can send and receive data, and even
play back commercially available General MIDI data.
MIDI Settings
GM SYSTEM ON/OFF (Default: on)
The parameters of the executable channel are always initialized when-
ever the GM SYSTEM ON/OFF setting is changed.
LocalaCh
LOCAL CONTROL On
Notes played on the keyboard are
sounded by the internal sound
source and output as MIDI mes-
sages from the MIDI OUT termi-
nal.
LOCAL CONTROL Off
Notes played on the keyboard are
output as MIDI messages from
the MIDI OUT terminal, but not
sounded directly by the internal
sound source. The MIDI THRU
terminal of the connected device
can be used to return the MIDI
message and sound it on this key-
board’s sound source.
AMP ENVELOPE
00 FLAT
01-17 VIBRATO
18-45 OTHERS
DECAY
SUSTAIN
PITCH ENVELOPE
MIN
MAX
FULL RANGE
CHORD
CASIO CHORD
SONG
FINGERED
PATTERN EXTERNAL
INTERNAL UPPER1
CH 1
UPPER2
CH 2
LOWER1
CH 3
LOWER2
STOREBANK
CH 4
ACC VOL.
CH 5
CHORD1
CH 6
CHORD2
CH 7
CHORD3
CH 8
BASS
CH 9
RHYTHM
CH 10
TR1
CH 11
TR2
CH 12
TR3
CH 13
TR4
CH 14
TR5
CH 15
TR6
CH 16
789
456
1
0
23
PARAMETER RESET:
DELETE
/YESS/NO
MAIN MANU/
CHANNEL VOLUME:
SUB MANU/
CHANNEL SELECT:
Sound Source
MIDI OUT
AMP ENVELOPE
00 FLAT
01-17 VIBRATO
18-45 OTHERS
DECAY
SUSTAIN
PITCH ENVELOPE
MIN
MAX
FULL RANGE
CHORD
CASIO CHORD
SONG
FINGERED
PATTERN
EXTERNAL
INTERNAL UPPER1
CH 1
UPPER2
CH 2
LOWER1
CH 3
LOWER2
STOREBANK
CH 4
ACC VOL.
CH 5
CHORD1
CH 6
CHORD2
CH 7
CHORD3
CH 8
BASS
CH 9
RHYTHM
CH 10
TR1
CH 11
TR2
CH 12
TR3
CH 13
TR4
CH 14
TR5
CH 15
TR6
CH 16
789
456
1
0
23
PARAMETER RESET:
DELETE
/YESS/NO
MAIN MANU/
CHANNEL VOLUME:
SUB MANU/
CHANNEL SELECT:
Sound Source
MIDI OUT
MIDI INMIDI THRU
MIDI IN
MIDI OUT
1 octave up
072 Piccolo
1 octave down
032 Acoustic Bass
033 Fingered Bass
034 Picked Bass
035 Fretless Bass
036 Slap Bass 1
037 Slap Bass 2
038 Synth Bass 1
039 Synth Bass 2
043 Contrabass
WK-1800/1600(E)-60~66 03.7.31, 5:22 PMPage 61 Adobe PageMaker 6.5J/PPC
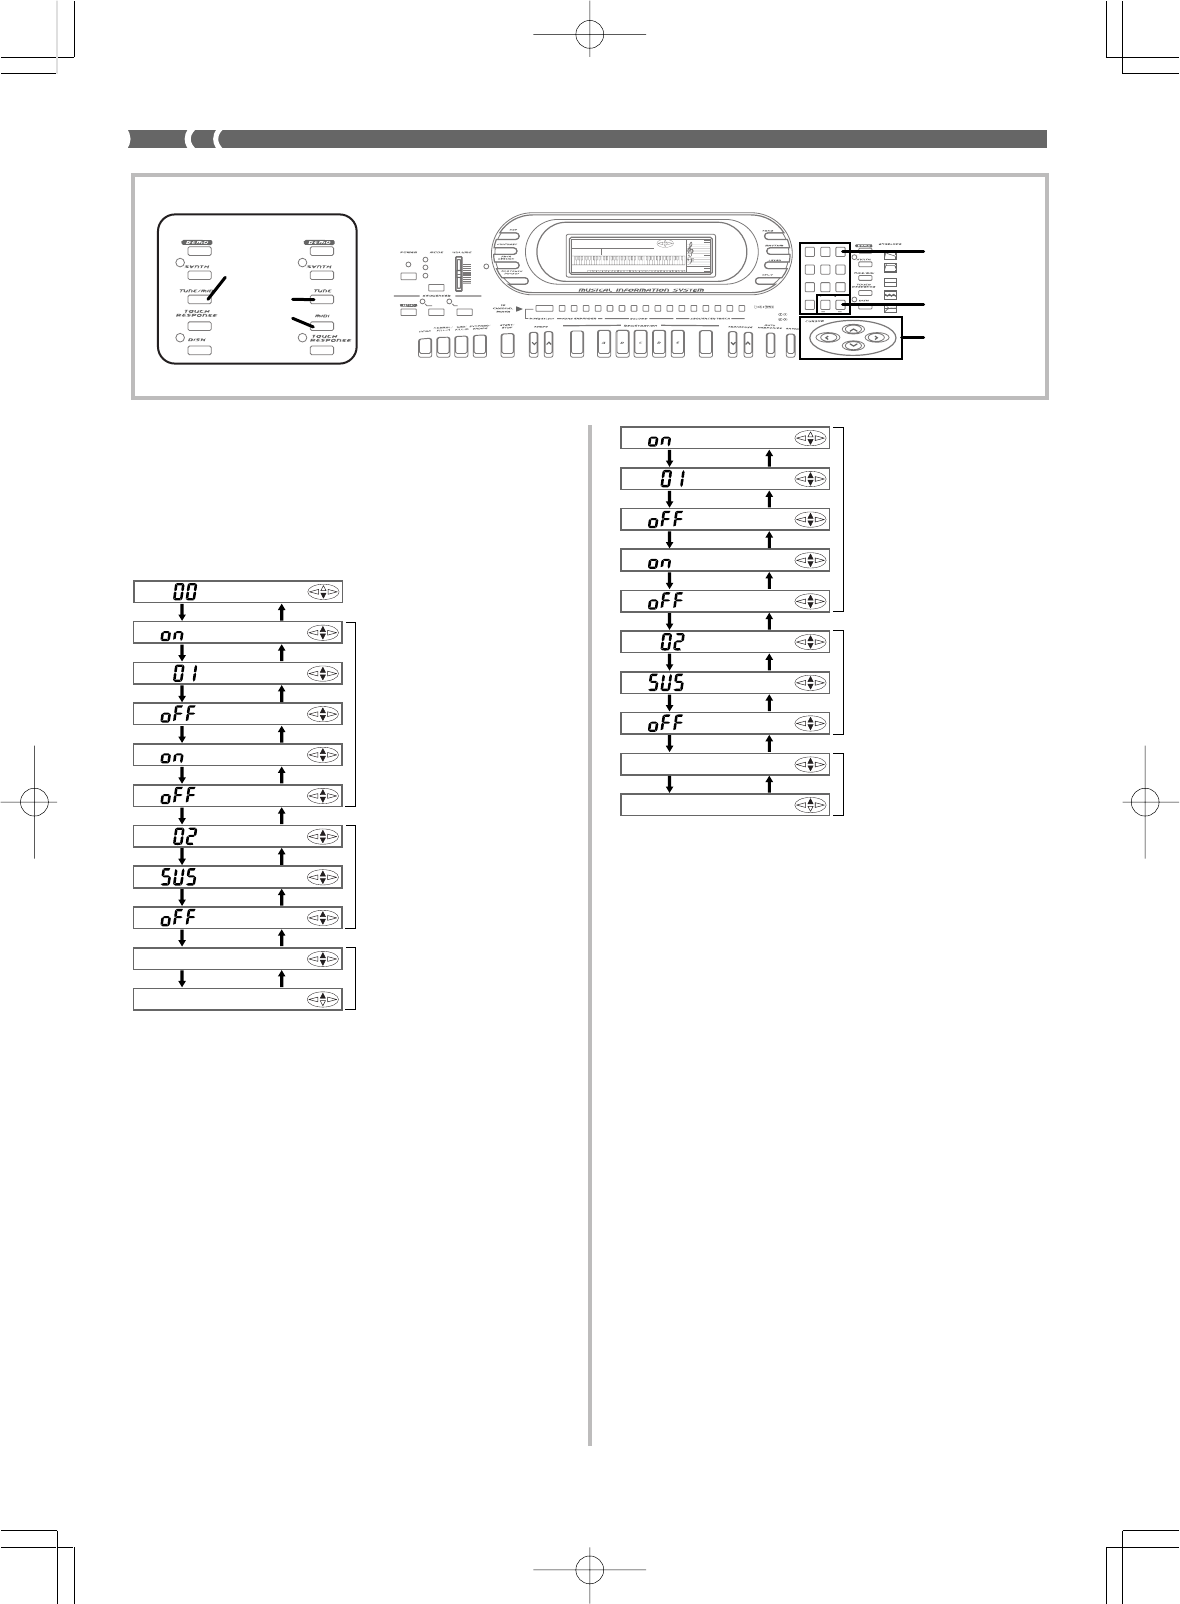
E-62
733A-E-064A
3.
Use [+] and [–] or the number keys to change the
setting.
•Settings you make are applied even if you do not press the
ENTER button.
4.
Press the TUNE/MIDI button to clear the setting
screen. The setting screen also clears automatically if
you do not perform any operation for about five sec-
onds.
To make MIDI settings on the WK-1600/1630
1.
Press the MIDI button.
2.
Use the [왖] and [왔] cursor keys to display the MIDI
screen for the setting you want to make, as shown
below.
Tune
GM Mod e
Ke
y
bd Ch
Cho rd
Local
Aco
m
p
Ou t
Bend
Jack
Sh i ftift
Bu l kSnd?
Bu l kRcv?
[
▲
]
[
▼
]
[
▲
]
[
▼
]
[
▲
]
[
▼
]
[
▲
]
[
▼
]
[
▲
]
[
▼
]
[
▲
]
[
▼
]
[
▲
]
[
▼
]
[
▲
]
[
▼
]
[
▲
]
[
▼
]
[
▲
]
[
▼
]
Tuning screens (page E-19)
Bulk send, receive (page E-65)
MIDI settings
See “Keyboard Settings” on
page E-58 for details on set-
tings.
To make MIDI settings on the WK-1800
1.
Press the TUNE/MIDI button.
2.
Use the [왖] and [왔] cursor keys to display the MIDI
screen for the setting you want to make, as shown
below.
AMP ENVELOPE
00 FLAT
01-17 VIBRATO
18-45 OTHERS
DECAY
SUSTAIN
PITCH ENVELOPE
MIN
MAX
FULL RANGE
CHORD
CASIO CHORD
SONG
FINGERED
PATTERN
EXTERNAL
INTERNAL UPPER1
CH 1
UPPER2
CH 2
LOWER1
CH 3
LOWER2
STOREBANK
CH 4
ACC VOL.
CH 5
CHORD1
CH 6
CHORD2
CH 7
CHORD3
CH 8
BASS
CH 9
RHYTHM
CH 10
TR1
CH 11
TR2
CH 12
TR3
CH 13
TR4
CH 14
TR5
CH 15
TR6
CH 16
789
456
1
0
23
PARAMETER RESET:
DELETE
/YESS/NO
MAIN MANU/
CHANNEL VOLUME:
SUB MANU/
CHANNEL SELECT:
[+]/[–]
Number ke
ys
Cursor keys
WK-1600/1630WK-1800
TUNE/MIDI
TUNE
MIDI
GM Mod e
Ke
y
bd Ch
Cho rd
Local
Aco
m
p
Ou t
Bend
Jack
Sh i ftift
Bu l kSnd?
Bu l kRcv?
[
▲
]
[
▼
]
[
▲
]
[
▼
]
[
▲
]
[
▼
]
[
▲
]
[
▼
]
[
▲
]
[
▼
]
[
▲
]
[
▼
]
[
▲
]
[
▼
]
[
▲
]
[
▼
]
[
▲
]
[
▼
]
Bulk send, receive (page E-66)
MIDI settings
See “Keyboard Settings” on
page E-58 for details on set-
tings.
3.
Use [+] and [–] or the number keys to change the
setting.
•Settings you make are applied even if you do not press the
ENTER button.
4.
Press the MIDI button to clear the setting screen. The
setting screen also clears automatically if you do not
perform any operation for about five seconds.
MIDI Messages
There is a wide variety of messages defined under the MIDI stan-
dard. This section details the particular messages that can be sent
and received by this keyboard. An asterisk (*) is used to mark mes-
sages that affect the entire keyboard, while messages without an as-
terisk are those that affect only a particular channel.
NOTE ON/OFF
This message sends data when a key is pressed (NOTE ON) or re-
leased (NOTE OFF).
A NOTE ON/OFF message includes a note number (to indicate the
note whose key is being pressed or released) and velocity (keyboard
pressure as a value from 1 to 127). NOTE ON velocity is always used
to determine the relative strength of the note. This keyboard does not
receive NOTE OFF velocity data.
Pressing a keyboard key sends the corresponding NOTE ON mes-
sage from the MIDI OUT terminal, while releasing the key sends the
corresponding NOTE OFF message.
WK-1800/1600(E)-60~66 03.7.31, 5:22 PMPage 62 Adobe PageMaker 6.5J/PPC
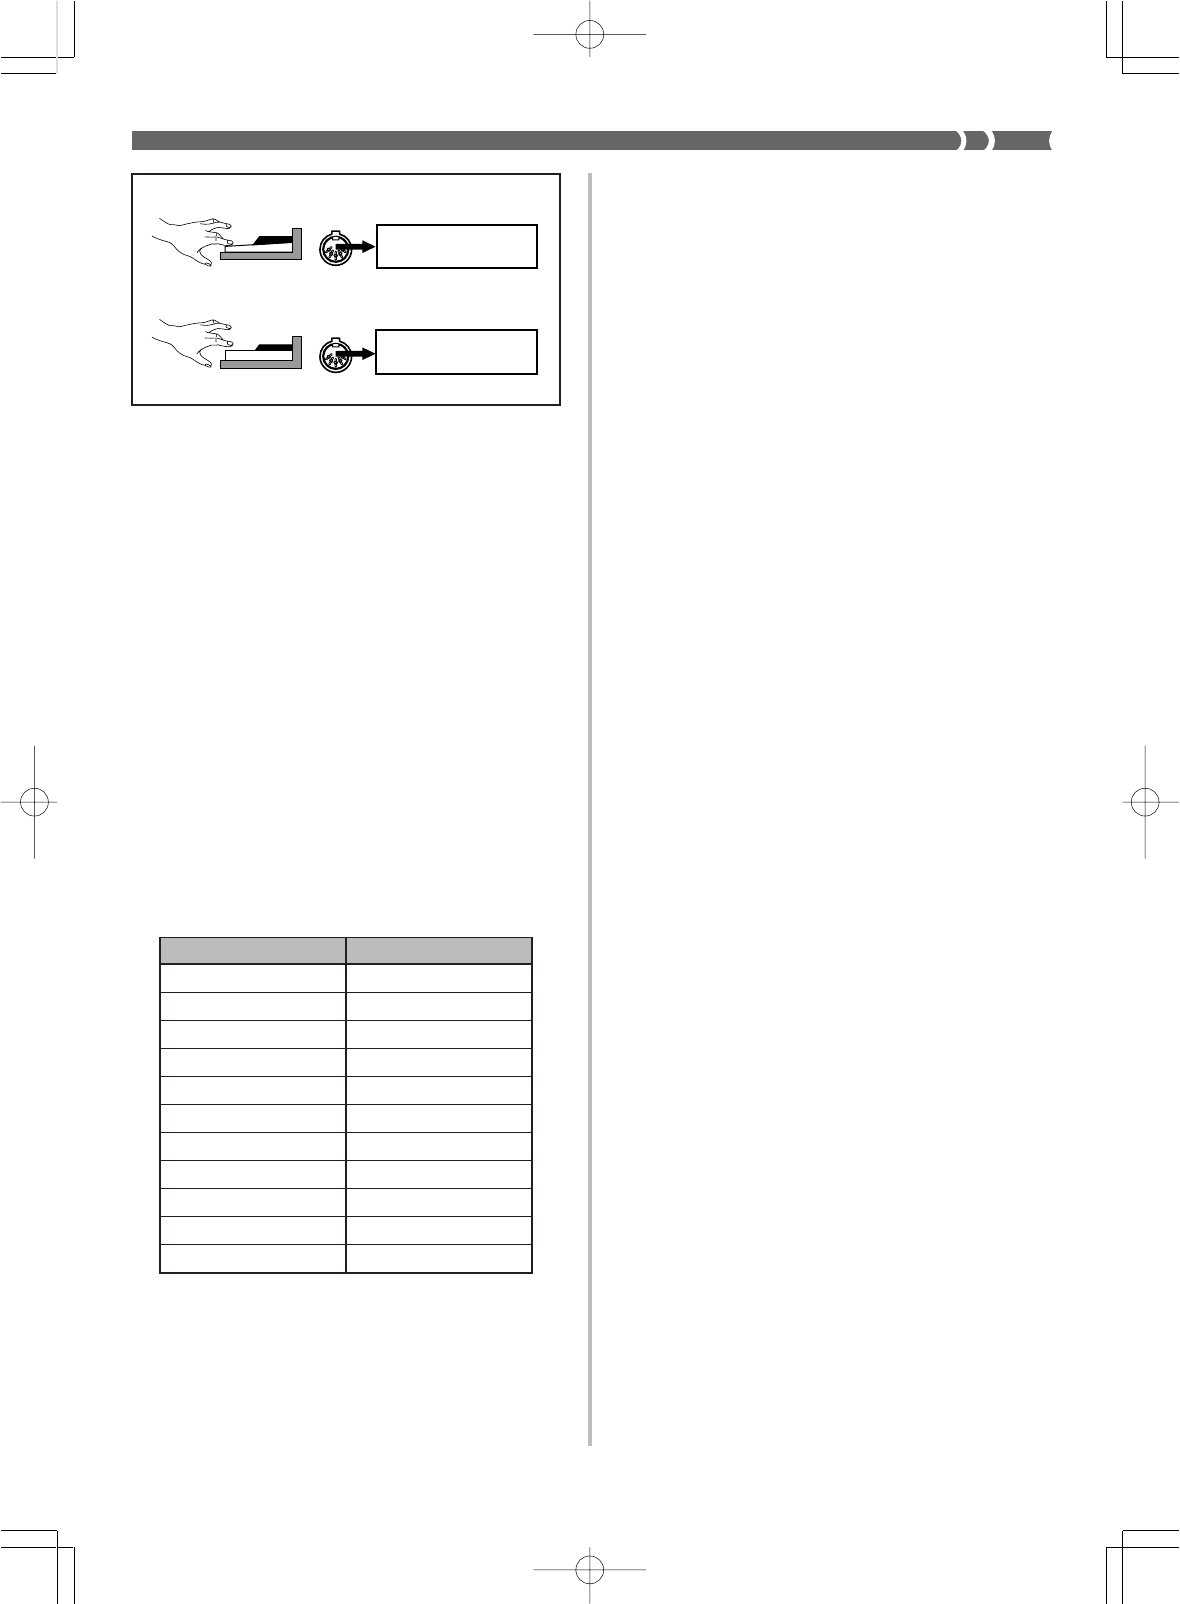
E-63
*1 The BANK SELECT setting of PROGRAM CHANGE can be used
to access any of this keyboard’s 232 tones when selecting tones on
this keyboard from an external device. The 232 tones are divided
between four banks, as described below.
Bank 0: 128 General MIDI tones (PROGRAM CHANGE 0 to 127)
Bank 1: 64 variation tones (PROGRAM CHANGE 0 to 63)
Bank 2: 8 drum sets (PROGRAM CHANGE 0 to 7)
Bank 3: 32 user tones (PROGRAM CHANGE 0 to 31)
Effect Control Number
BANK SELECT*10/32
Modulation 1
Volume 7
Pan 10
Expression 11
Hold1 64
Sostenuto 66
Soft Pedal 67
Effect depth 91
RPN*2100 / 101
Data Entry 6 / 38
733A-E-065A
Immediately prior to sending the PROGRAM CHANGE message,
send two successive CONTROL CHANGE messages containing
the following data.
CONTROL NUMBER=0 CONTROL VALUE=<bank number>
CONTROL NUMBER=32 CONTROL VALUE= 0
❚
NOTE
❚
Data received by the sound source of this keyboard over MIDI Channel 10
is always treated as drum set data, and can be sounded using one of the
eight drum set sounds only. Because of this, PROGRAM CHANGE 0
through 7 always corresponds to drum set tones, so BANK SELECT data
is not necessary when PROGRAM CHANGE is received over channel 10.
*2 “RPN” stands for “Registered Parameter Number”, which is a spe-
cial control change number used when combining multiple con-
trol changes. The parameter being controlled is selected using the
control values of control numbers 100 and 101, and then settings
are made using the control values of DATA ENTRY (control num-
bers 6 and 38).
This keyboard supports pitch bend sense, coarse tune, and fine
tune RPNs sent from other MIDI machines.
❚
NOTE
❚
Sustain (CONTROL NUMBER 64), sostenuto (CONTROL NUMBER 66),
and soft (CONTROL NUMBER 67) effects applied using the foot pedal
can also be sent and received.
ALL SOUND OFF
This message forces all sound being produced over the current chan-
nel to stop.
ALL NOTES OFF
This message causes all notes being produced over the current chan-
nel due to NOTE ON messages to stop. This message is valid only for
MIDI data notes.
RESET ALL CONTROLLERS
This messages initializes pitch bend and all other control changes.
SYSTEM EXCLUSIVE
*
This message is used to control system exclusives, which are fine ad-
justments that are unique to a particular MIDI device. Originally, sys-
tem exclusives were unique to a particular model, but now there are
also universal system exclusives that are applicable to machines that
are different models and even produced by different manufacturers.
The following are the system exclusive messages supported by this
keyboard.
GM SYSTEM ON ([F0] [7E] [7F] [09] [01] [F7])
GM SYSTEM ON is used by an external machine to turn on this key-
board’s GM system. “GM” stands for “General MIDI”.
•GM SYSTEM ON takes more time to process than other messages,
so it can take more than 100 msec until the next message is pro-
cessed.
GM SYSTEM OFF ([F0] [7E] [7F] [09] [02] [F7])
GM SYSTEM OFF is used by an external device to turn off this key-
board’s GM system.
EFFECT CHANGE ([F0] [44] [0B] [09] [XX] [F7])
EFFECT CHANGE switches between the keyboard’s internal digital
effects. The “XX” parameter in the syntax shown above stands for a
hexadecimal value that represents an effect number sent from an ex-
ternal machine. A list of the hexadecimal values that can be specified
and their meanings is shown below.
NOTE ON
NOTE OFF
Press the key
Release the key
MIDI OUT Terminal
MIDI OUT Terminal
• Note number (tone)
• Velocity (volume)
• Note number (tone)
• Velocity (00)
❚
NOTE
❚
The pitch of a note depends on the tone that is being used, as shown in
the “Note Table” on page A-1. Whenever this keyboard receives a note
number that is outside its range for that tone, the same tone in the nearest
available octave is substituted.
PROGRAM CHANGE
This is the tone select message. PROGRAM CHANGE can contain
tone data within the range of 0 to 127.
A PROGRAM CHANGE message is sent out through the keyboard’s
MIDI OUT terminal whenever you manually change its tone num-
ber. Receipt of a PROGRAM CHANGE message from an external
device changes the tone setting of this keyboard.
PITCH BEND
This message carries pitch bend information for sliding pitch upwards
or downwards during keyboard play.
Performing a pitch bend operation on this keyboard simultaneously
changes the pitch of the built-in sound source and sends a PITCH
BEND message out through the MIDI OUT terminal.
CONTROL CHANGE
This message adds effects such as vibrato and volume changes. CON-
TROL CHANGE data includes a control number (to identify the ef-
fect type) and a control value (to specify the on/off status and depth
of the effect).
The following is a list of data that can be send or received using CON-
TROL CHANGE.
WK-1800/1600(E)-60~66 03.7.31, 5:22 PMPage 63 Adobe PageMaker 6.5J/PPC
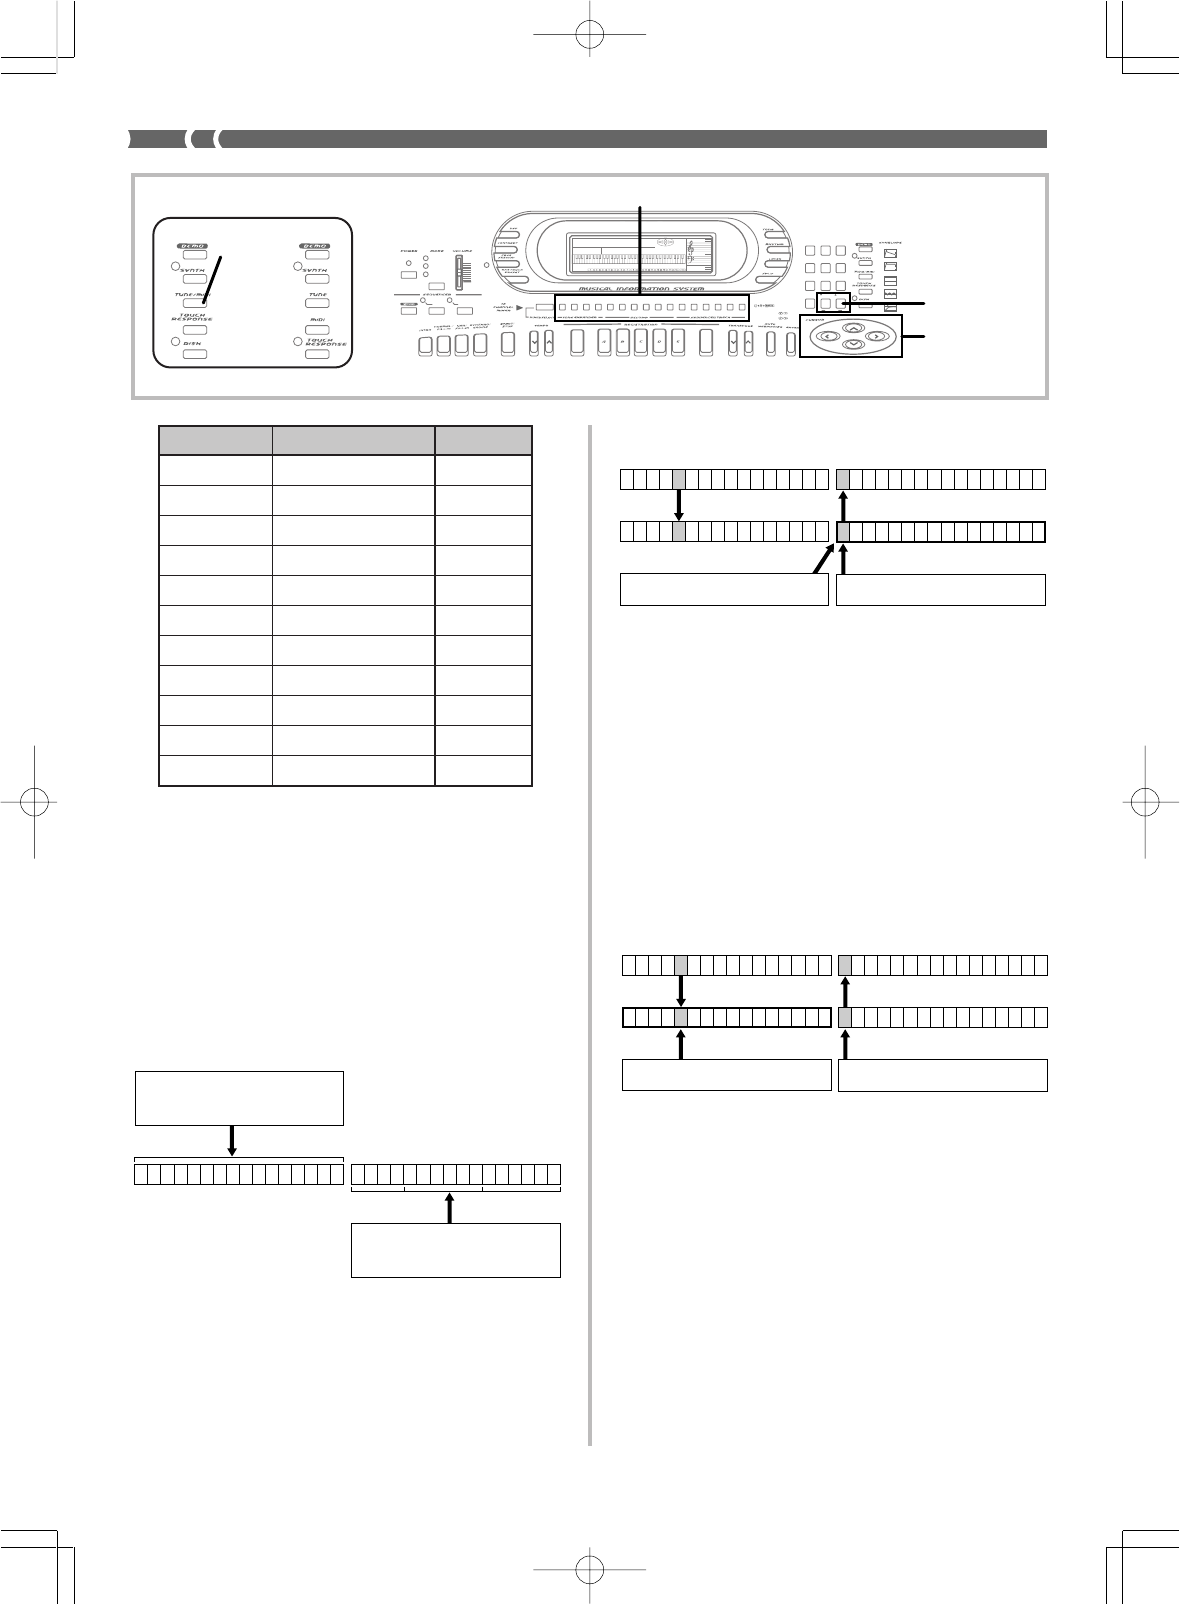
E-64
733A-E-066A
MIDI Functions and Mixer Functions
As explained under “Mixer Modes” on page E-28, this keyboard has
a total of 32 channels: 16 internal channels and 16 external channels.
Of these, you can use the external channels to play notes on the key-
board in accordance with received MIDI data and select tones. Inter-
nal channel settings have no affect on MIDI receive data. (Excluding
External/Play)
❚
NOTE
❚
The above explanation applies to the External/Solo and Internal Modes
only. It does not apply to the External/Play Mode.
The Mixer can be used in combination with MIDI functions to per-
form a variety of operations. The following examples show how to
use each Mixer mode for controlling MIDI send and receive opera-
tions.
❚
NOTE
❚
The following examples assume that you are already familiar with Mixer
operations, especially how to change and use the Mixer modes. If you
aren’t, see “Mixer Function” on page E-28 for details.
1 2 3 4 5 6 7 8 9 10 11 12 13 14 15 16
12345678910111213141516
Internal Channels
External Channels
Channels sounded by received
MIDI data
Channels sounded by keyboard
play or other internal operation
In the External Mode, Mixer functions affect the external channels,
so they also have a direct affect on the corresponding MIDI input
channels. Because of this, the External Mode is best for the following
types of applications.
•To control MIDI input channel on/off settings. The CH1 through
CH16 CHANNEL buttons correspond to MIDI channels 1 through
16, so channels can be toggled on and off by pressing the corre-
sponding button.
•You can use the Mixer to change the tone and volume for each chan-
nel, and to make a variety of other settings. See “Changing the Pa-
rameters of a Channel” on page E-30.
❚
NOTES
❚
•All settings except for Channel on/off are changed at the next MIDI
message receive after the setting is made.
•Though you can play on the keyboard without affecting MIDI input as
with the Internal Mode, you cannot change keyboard settings. Except
for when a channel other than the current channel is selected, you can
change the main tone setting using the standard tone selection proce-
dure shown under “Selecting a Tone” on page E-16.
1 2 3 4 5 6 7 8 9 10111213141516 12345678910111213141516
1 2 3 4 5 6 7 8 9 10111213141516 1 2 3 4 5 6 7 8 9 10111213141516
MIDI-IN ch MIDI-OUT ch
Internal Channels
External Channels
Ch 1 through 16 can be
turned on and off.
Mixer functions
(tone, volume, etc.) Keyboard play
External Mode
Operations are different in the External, External/Solo, and Exter-
nal/Play Modes.
External Mode
In the Internal Mode, Mixer settings (channel on/off, volume, and
other settings) are affected by internal channel settings only. MIDI
input can be controlled using the external channels only, so the Mix-
er can be used without affecting MIDI input. Because of this, the In-
ternal Mode is best for the following type of application.
•When you want to use the multi-timbre capabilities of the key-
board’s sound source to play along on the keyboard with playback
of external MIDI data, and make separate settings for the keyboard
notes. You can use the Internal Mode to change the tone, layer, split
and other settings for keyboard play, without affecting MIDI in-
put.
1 2 3 4 5 6 7 8 9 10111213141516 1 2 3 4 5 6 7 8 9 10 11 12 13 14 15 16
1 2 3 4 5 6 7 8 9 10111213141516 12345678910111213141516
MIDI-IN ch MIDI-OUT ch
Internal Channels
External Channels Ch 1 through 16 can be turned
on and off.
Mixer functions
(tone, volume, etc.) Keyboard play
Internal Mode
AMP ENVELOPE
00 FLAT
01-17 VIBRATO
18-45 OTHERS
DECAY
SUSTAIN
PITCH ENVELOPE
MIN
MAX
FULL RANGE
CHORD
CASIO CHORD
SONG
FINGERED
PATTERN
EXTERNAL
INTERNAL UPPER1
CH 1
UPPER2
CH 2
LOWER1
CH 3
LOWER2
STOREBANK
CH 4
ACC VOL.
CH 5
CHORD1
CH 6
CHORD2
CH 7
CHORD3
CH 8
BASS
CH 9
RHYTHM
CH 10
TR1
CH 11
TR2
CH 12
TR3
CH 13
TR4
CH 14
TR5
CH 15
TR6
CH 16
789
456
1
0
23
PARAMETER RESET:
DELETE
/YESS/NO
MAIN MANU/
CHANNEL VOLUME:
SUB MANU/
CHANNEL SELECT:
YES/NO
Cursor key
s
CHANNEL
WK-1600/1630WK-1800
TUNE/MIDI
Effect Number Digital Effect Hex. Value
0 REVERB 1 00
1 REVERB 2 01
2 REVERB 3 02
3 CHORUS 03
4 TREMOLO 04
5 PHASE SHIFTER 05
6 ORGAN SPEAKER 06
7 ENHANCER 07
8 FLANGER 08
9 EQ LOUDNESS 09
oFF OFF 0F
WK-1800/1600(E)-60~66 03.7.31, 5:22 PMPage 64 Adobe PageMaker 6.5J/PPC
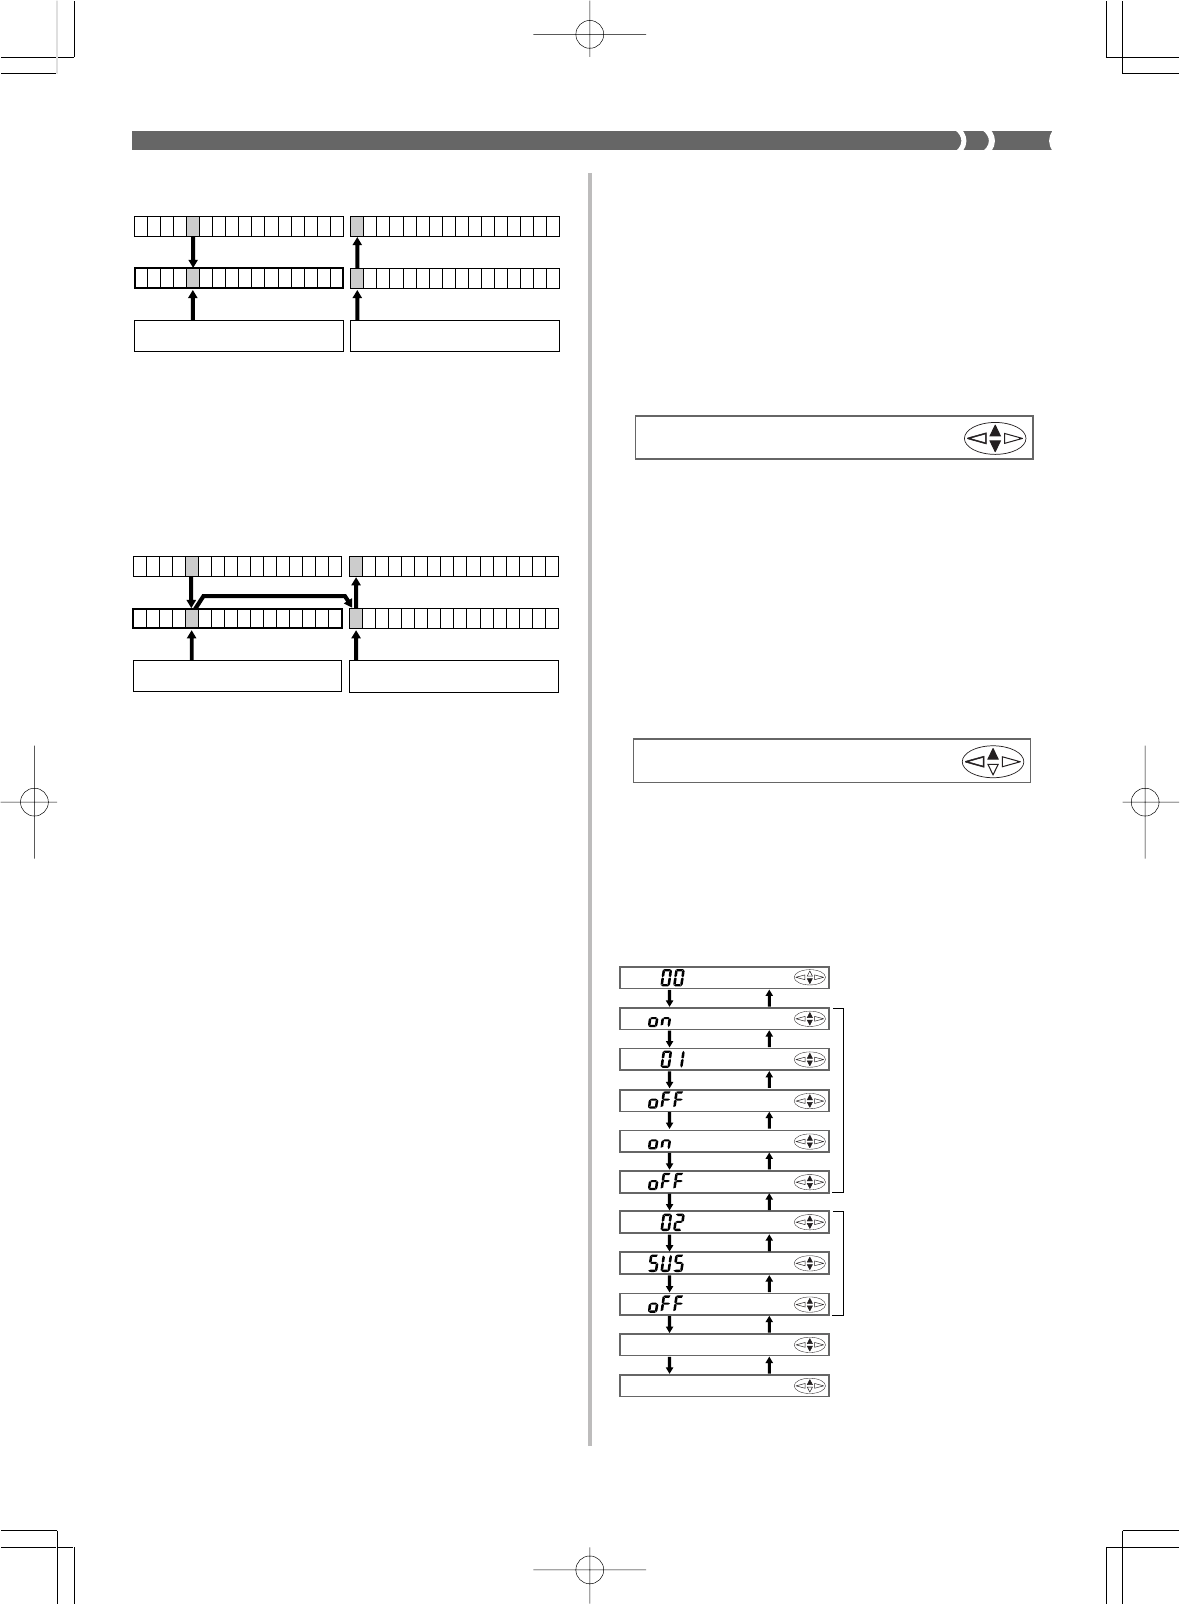
E-65
This mode is the opposite of the External/Solo Mode in that pressing
a CHANNEL button turns off only the channel assigned to that but-
ton and turns all other channels on. This capability comes in handy
when you want to cut out a part of the MIDI receive data and play
that part on the keyboard. This is different from the play along capa-
bility of the Internal Mode, where you play along as all the parts of
the MIDI receive data play.
For example, let’s say the keyboard is receiving a tune that uses MIDI
Channels 1 through 10, and you want to play the horn section part on
Channel 5 on the keyboard. Simply enter the External/Play Mode
and press the CH5 CHANNEL button. This turns off CH5 and copies
its Mixer settings (tone, control changes, and other data) to internal
channel CH1, which is the channel that controls the keyboard tone
(main tone). Now you can use the keyboard to play the horn section
part on the keyboard, using the appropriate MIDI data settings.
Bulk Sending Keyboard Data
This keyboard stores a variety of internal data, including data re-
corded with the sequencers and synthesizer. This data can be sent
and received in bulk as MIDI exclusive data through the MIDI termi-
nals. This capability makes it possible for you use a computer or oth-
er MIDI machine as an external storage device for your data.
Before performing the following procedures, you must first connect
this keyboard’s MIDI IN and MIDI OUT terminals to an external
machine using MIDI cables.
❚
NOTE
❚
Some software does not support MIDI exclusive data.
To bulk send data from the keyboard to an
external device with the WK-1800
1.
Set up the other device by putting it in its receive stand-
by mode.
•See the documentation that comes with the other device for
details.
2.
Press the TUNE/MIDI button.
3.
Press the [▼] cursor key to display the bulk send
screen.
4.
Press the YES key to start the bulk send operation.
•The bulk send screen is automatically cleared from the dis-
play of the keyboard after the operation is complete.
To bulk import data from another device with
the WK-1800
1.
Press the TUNE/MIDI button.
2.
Press the [왔] cursor key to display the bulk receive
screen.
3.
Press the YES key to enter bulk receive standby.
4.
Perform the bulk send operation on the other device.
•See the documentation that comes with the other device for
details.
•The bulk receive screen is automatically cleared from the dis-
play of the keyboard after the operation is complete.
1 2 3 4 5 6 7 8 9 10111213141516 1 2 3 4 5 6 7 8 9 10111213141516
1 2 3 4 5 6 7 8 9 10111213141516 1 2 3 4 5 6 7 8 9 10111213141516
MIDI-IN ch MIDI-OUT ch
Internal Channels
External
Channels
Ch 1 through 16 can be
turned on and off.
Mixer functions
(tone, volume, etc.) Keyboard play
Program Change, etc.
1 2 3 4 5 6 7 8 9 10111213141516 1 2 3 4 5 6 7 8 9 10111213141516
1 2 3 4 5 6 7 8 9 10111213141516 1 2 3 4 5 6 7 8 9 10111213141516
MIDI-IN ch MIDI-OUT ch
Internal Channels
External Channels
Ch 1 through 16 can be
turned on and off.
Mixer functions
(tone, volume, etc.) Keyboard play
733A-E-067A
External/Solo Mode
In this mode, only the channel on/off method is different from the
External Mode. Pressing a CHANNEL button turns on only the chan-
nel assigned to that button and turns all other channels off.
This mode is normally used for checking the contents of a specific
channel during MIDI receive. You can change settings, play on the
keyboard, and perform other operations just as you do in the Exter-
nal Mode.
External/Play Mode
Bu l kSnd?
Tune
GM Mod e
Ke
y
bd Ch
Cho rd
Local
Aco
m
p
Ou t
Bend
Jack
Sh i ft
Bu l kSnd?
Bu l kRcv?
[
▲
]
[
▼
]
[
▲
]
[
▼
]
[
▲
]
[
▼
]
[
▲
]
[
▼
]
[
▲
]
[
▼
]
[
▲
]
[
▼
]
[
▲
]
[
▼
]
[
▲
]
[
▼
]
[
▲
]
[
▼
]
[
▲
]
[
▼
]
Tuning screens (page E-19)
Bulk send
MIDI settings (page E-62)
See “Keyboard Settings” on
page E-58 for details on set-
tings.
Bulk receive
Bu l kRcv?
WK-1800/1600(E)-60~66 03.7.31, 5:22 PMPage 65 Adobe PageMaker 6.5J/PPC
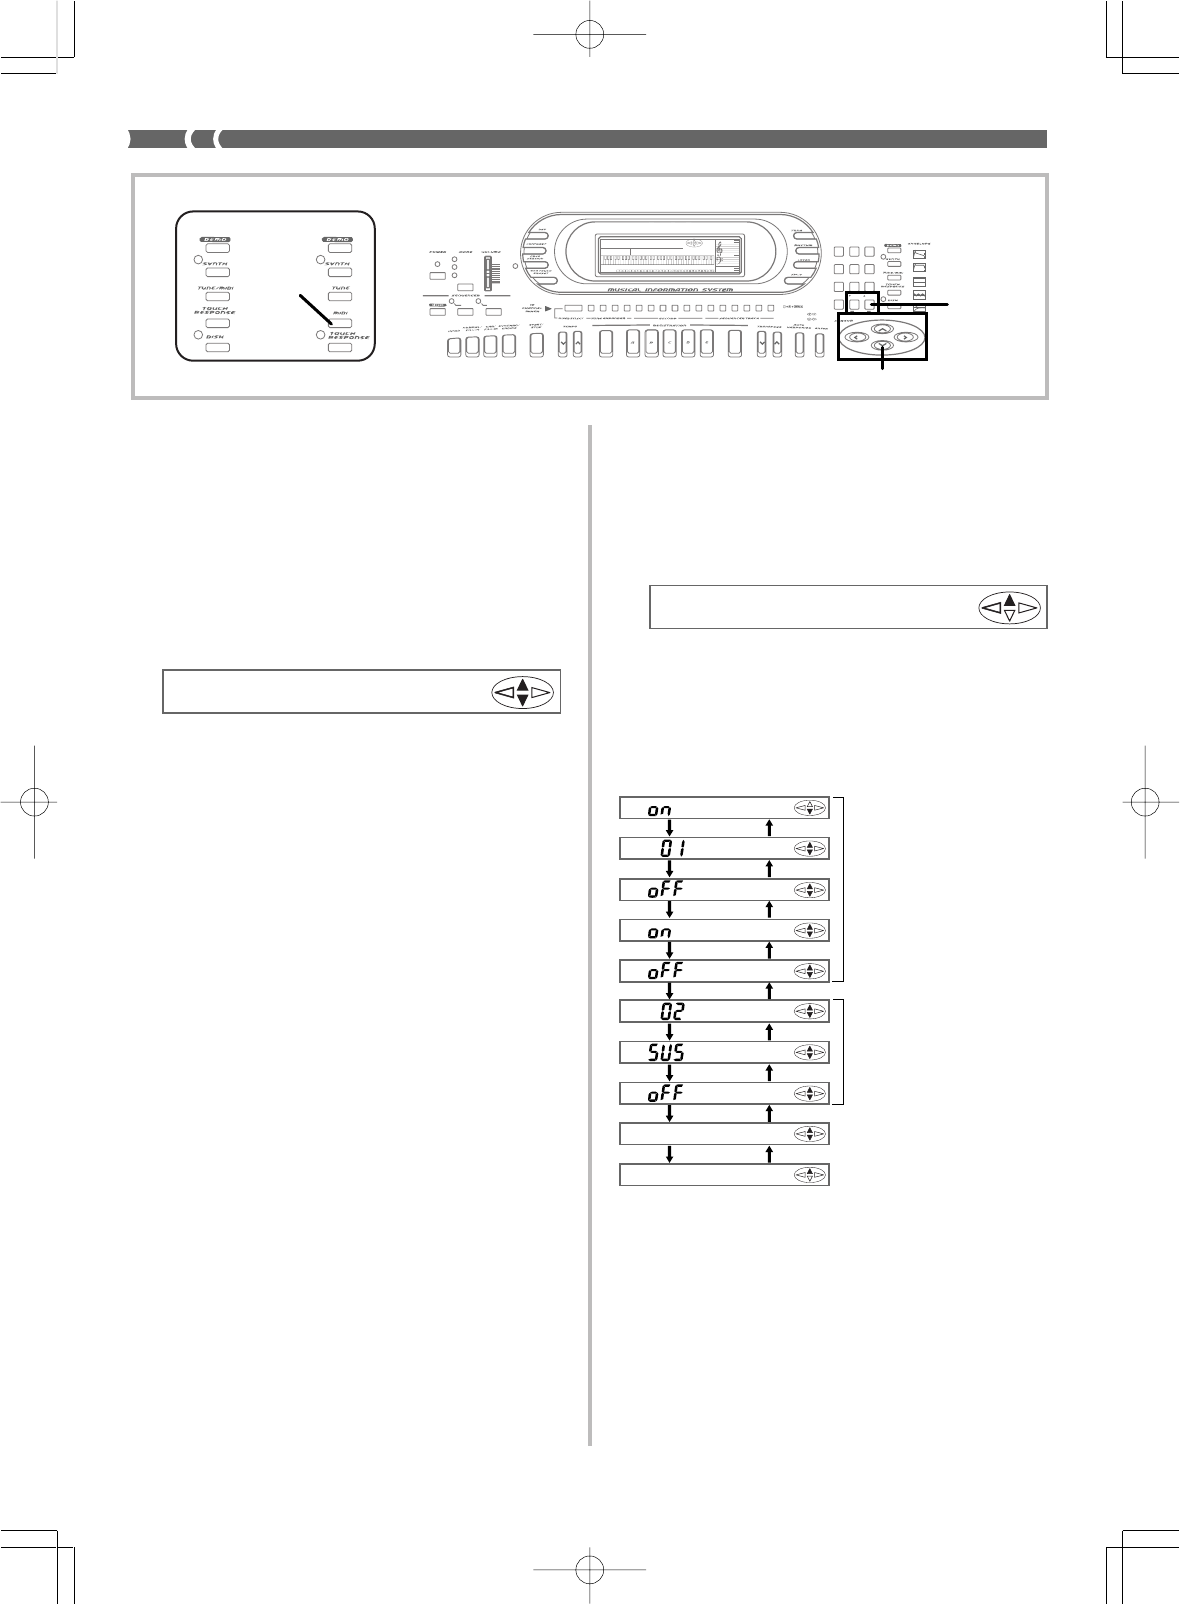
E-66
733A-E-068A
AMP ENVELOPE
00 FLAT
01-17 VIBRATO
18-45 OTHERS
DECAY
SUSTAIN
PITCH ENVELOPE
MIN
MAX
FULL RANGE
CHORD
CASIO CHORD
SONG
FINGERED
PATTERN EXTERNAL
INTERNAL UPPER1
CH 1
UPPER2
CH 2
LOWER1
CH 3
LOWER2
STOREBANK
CH 4
ACC VOL.
CH 5
CHORD1
CH 6
CHORD2
CH 7
CHORD3
CH 8
BASS
CH 9
RHYTHM
CH 10
TR1
CH 11
TR2
CH 12
TR3
CH 13
TR4
CH 14
TR5
CH 15
TR6
CH 16
789
456
1
0
23
PARAMETER RESET:
DELETE
/YESS/NO
MAIN MANU/
CHANNEL VOLUME:
SUB MANU/
CHANNEL SELECT:
YES/N
O
Cursor keys
WK-1600/1630WK-1800
MIDI
To bulk send data from the keyboard to an
external device with the WK-1600/1630
1.
Set up the other device by putting it in its receive stand-
by mode.
•See the documentation that comes with the other device for
details.
2.
Press the MIDI button.
3.
Press the [왔] cursor key to display the bulk send
screen.
4.
Press the YES key to start the bulk send operation.
•The bulk send screen is automatically cleared from the dis-
play of the keyboard after the operation is complete.
GM Mod e
Ke
y
bd Ch
Cho rd
Local
Aco
m
p
Ou t
Bend
Jack
Sh i ft
Bu l kSnd?
Bu l kRcv?
[
▲
]
[
▼
]
[
▲
]
[
▼
]
[
▲
]
[
▼
]
[
▲
]
[
▼
]
[
▲
]
[
▼
]
[
▲
]
[
▼
]
[
▲
]
[
▼
]
[
▲
]
[
▼
]
[
▲
]
[
▼
]
Bulk send
MIDI settings (page E-62)
See “Keyboard Settings” on
page E-58 for details on set-
tings.
Bulk receive
Bu l kSnd?
Bu l kRcv?
To bulk import data from another device with
the WK-1600/1630
1.
Press the MIDI button.
2.
Press the [왔] cursor key to display the bulk receive
screen.
3.
Press the YES key to enter bulk receive standby.
4.
Perform the bulk send operation on the other device.
•See the documentation that comes with the other device for
details.
•The bulk receive screen is automatically cleared from the dis-
play of the keyboard after the operation is complete.
WK-1800/1600(E)-60~66 03.7.31, 5:22 PMPage 66 Adobe PageMaker 6.5J/PPC
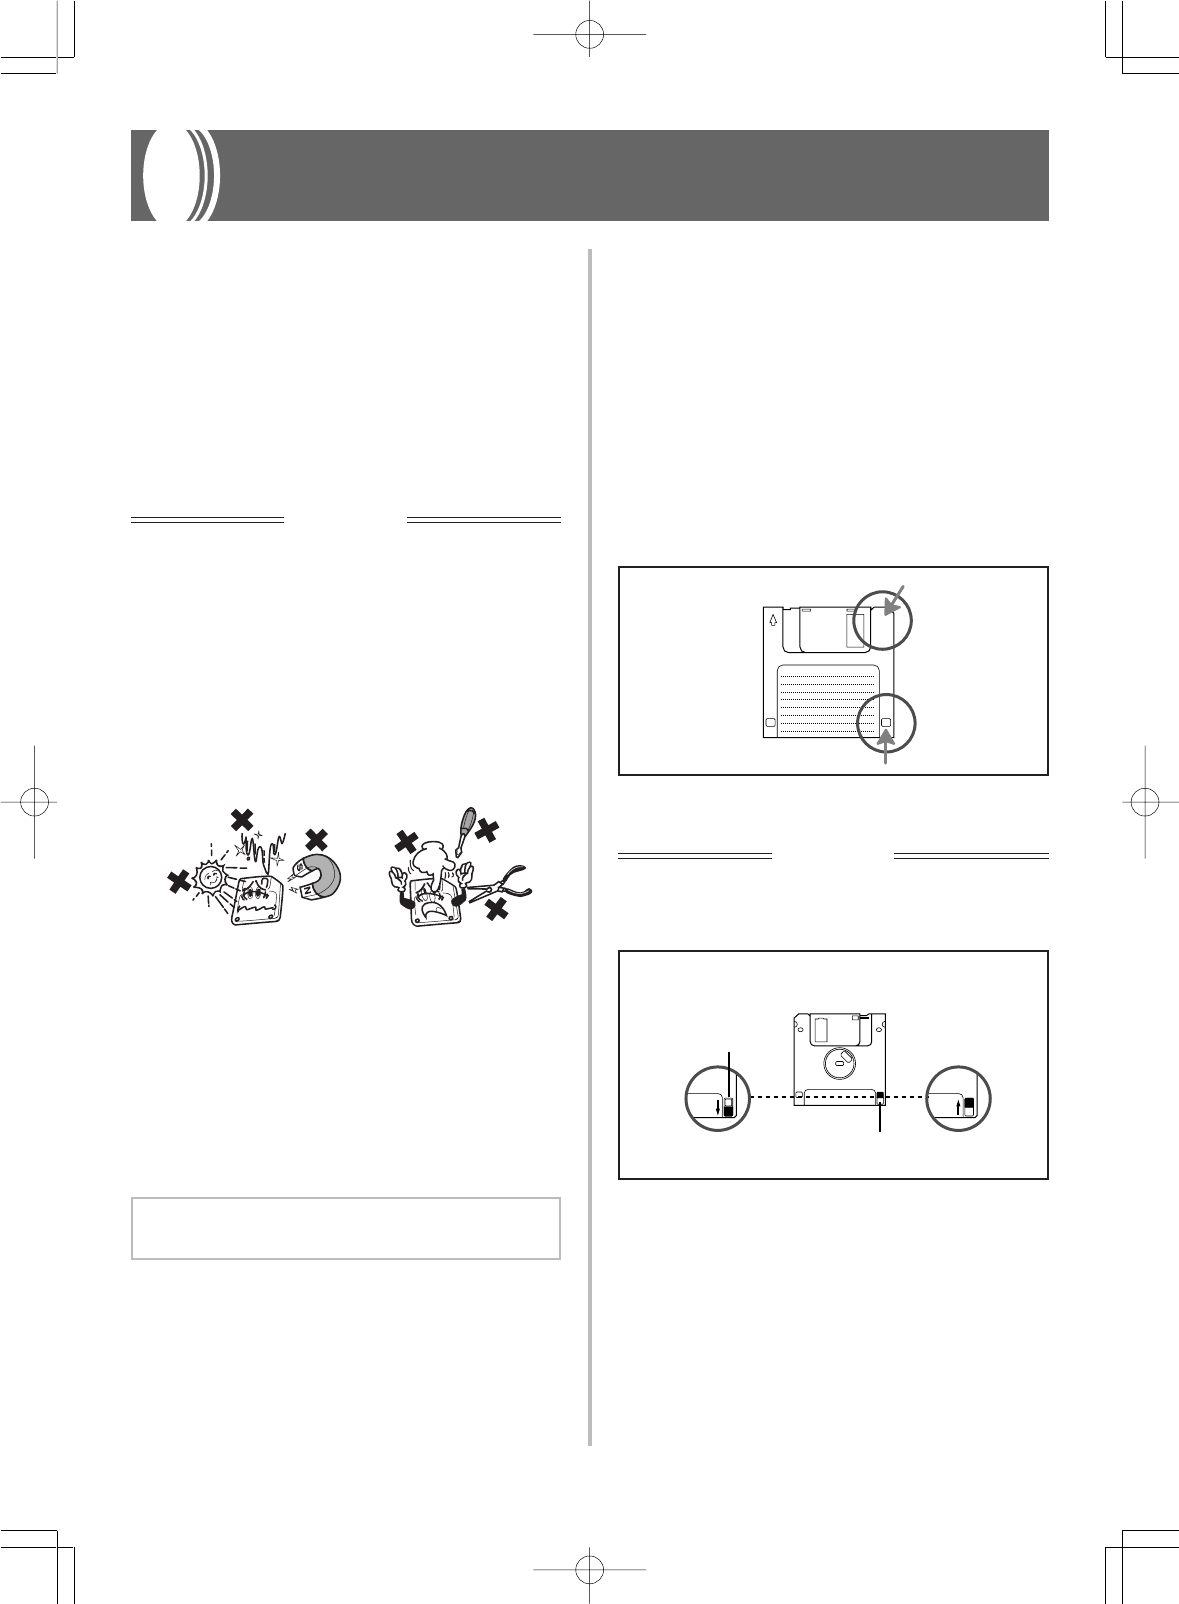
E-67
Using the Floppy Disk Drive (WK-1800 Only)
733A-E-069A
HD
•When the write protect hole is open as shown in the illustration,
you can read the contents of the diskette, but you cannot write data
to or delete data from the diskette. After saving important data to
a diskette, be sure to open its write protect hole to protect the data
against accidental changes or deletion.
•The diskette that comes with the keyboard contains sample data
and programs. It is write protected to avoid accidental erasure or
formatting. Make sure you handle this diskette carefully to avoid
damaging or erasing its data.
Write protect (hole open)
Hole open
Write enabled
(hole blocked with tab)
Data save, data delete,
disk formatting are all
enabled.
Write protect tab
Write Protection
IMPORTANT!
•You can write protect a diskette so data on it cannot be deleted and
no new data can be stored on the diskette. Also, a write protected
diskette cannot be formatted. You can read data from a diskette
regardless of whether or not it is write protected.
Floppy Disk Drive Features
The WK-1800 comes with a built-in disk drive, which provides you
with the capabilities described below.
•You can save sequencer and synthesizer data on a floppy diskette
for long-term storage. When you need the data again, simply in-
sert the diskette into the disk drive and load it.
•You can play back SMF (standard MIDI file) data created on a per-
sonal computer and saved to diskette.
•You can convert rhythm data saved to diskette from another make
of electronic musical instrument (Roland, Technics) and save it as
user rhythm data.
Floppy Diskette Precautions
IMPORTANT!
•Avoid the following locations when storing and using diskettes.
Any of the conditions noted below can cause data stored on the
diskette to become corrupted.
•Near TVs, on top of audio equipment, or in any area exposed to
magnetism. Take special care to keep diskettes away from any
source of magnetism.
•Areas exposed to direct sunlight, or subject to high humidity or
temperature extremes.
•Failure to observe any of the following precautions can cause data
stored on the diskette to become corrupted.
•Never try to take a diskette apart.
•Never open the shutter of the diskette or touch the film inside
with your fingers.
•Never bend a diskette or otherwise subject it to rough handling.
•Affix labels in the spaces provided only, and do not affix labels
on top of previous ones.
•Do not eject the diskette from the drive while the access lamp is lit
or flashing or turn off keyboard power with a diskette in the drive.
Doing either can cause data on the diskette to become corrupted
and can even cause malfunction of the disk drive.
•Never insert any foreign objects into the disk drive. Doing so can
cause it to malfunction.
•The disk drive uses a magnetic head. A dirty head cannot read data
from a diskette properly and can corrupt existing data on the dis-
kette. To avoid this, be sure to use a commercially available head
cleaning diskette to periodically clean the head.
•Do not use a computer, another electronic musical instrument, or
any other device to change a file name or file contents created with
this keyboard. Doing so can make the data unusable by this key-
board and even cause malfunction of the keyboard.
Note that CASIO COMPUTER CO., LTD. shall not be held liable
for any loss to you or any third party due to corruption or acci-
dental erasure of data on a diskette.
About Floppy Diskettes
This section contains important information about handling diskettes.
Be sure to read it before going any further.
Diskette Types
The WK-1800 supports use of both 3.5” 2HD (1.44MB formatted) and
2DD (720KB formatted) diskettes. Use of other disk sizes and capac-
ities is not supported.
Diskette Type Indicators
2HD ..... A 2HD diskette is marked with the letters “HD” in the up-
per right corner of the front side. Also, there is a square hole
in the lower right corner.
2DD ...... This type of diskette does not have a hole in the lower right
corner.
WK-1800/1600(E)-67~74 03.7.31, 5:22 PMPage 67 Adobe PageMaker 6.5J/PPC
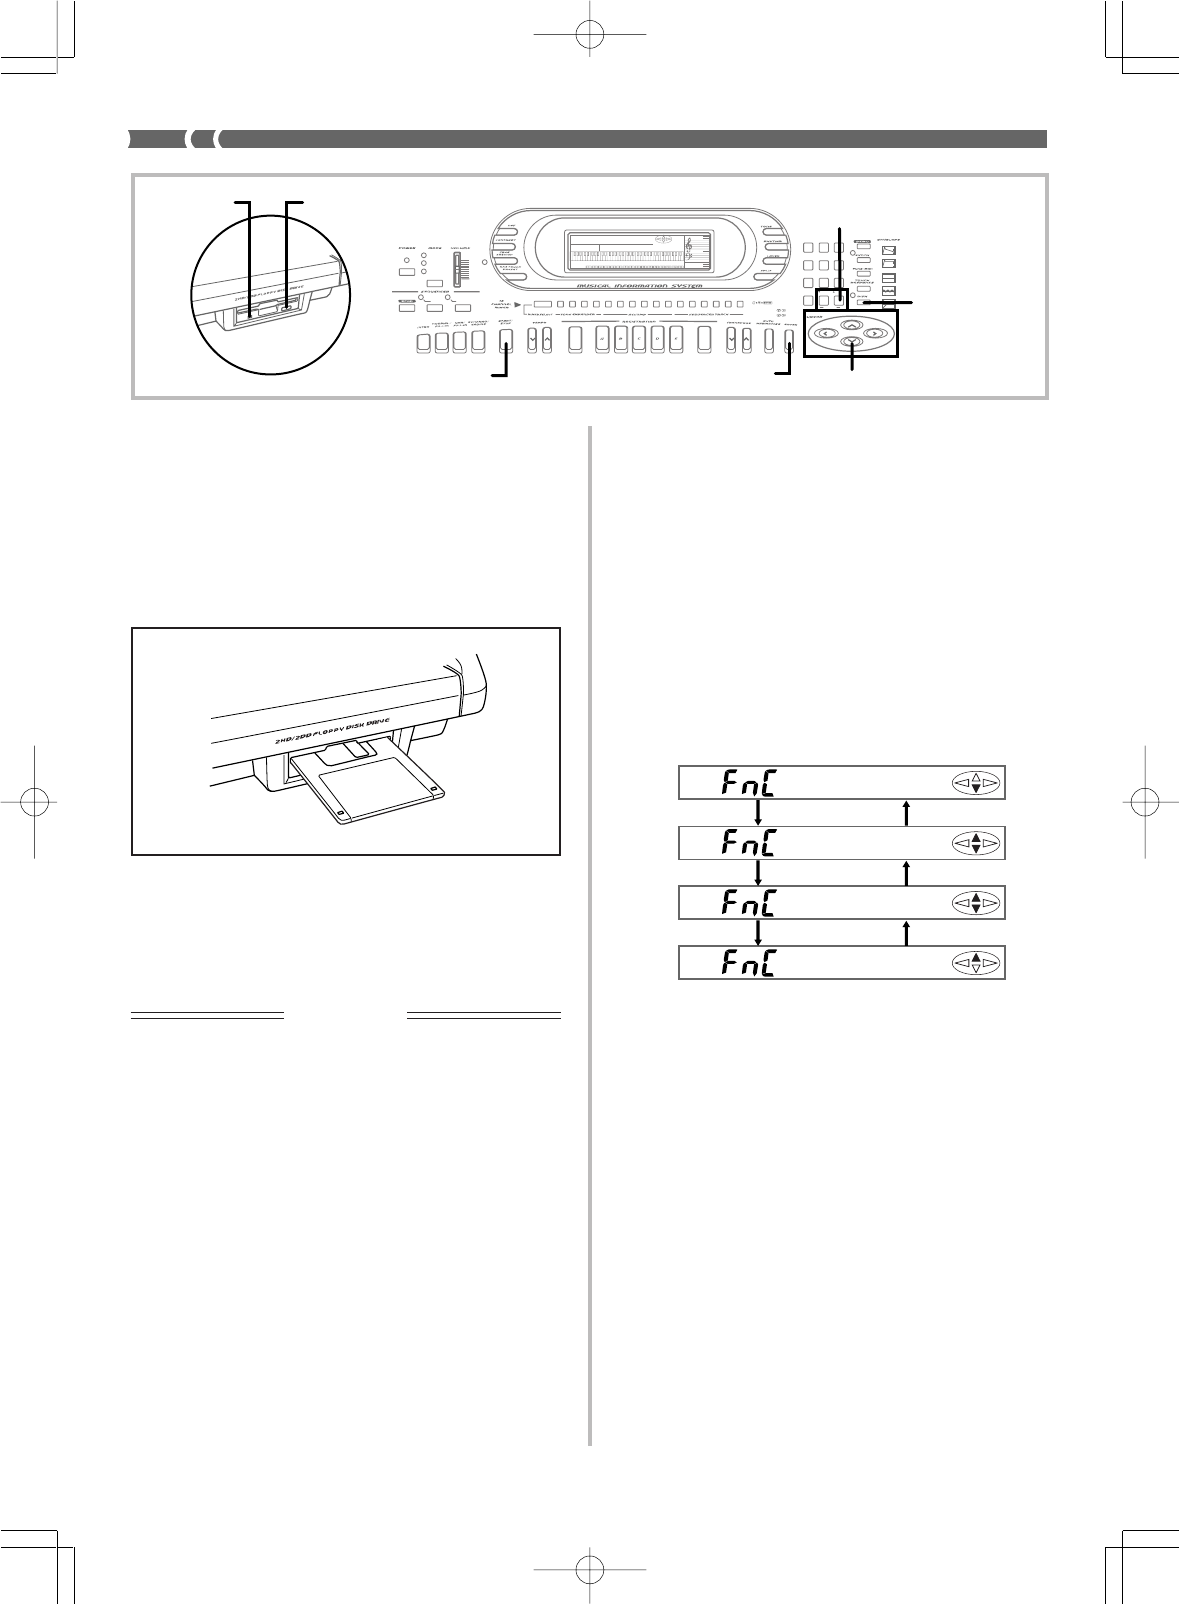
E-68
733A-E-070A
Basic Diskette Operation
The following is the basic procedure when using a diskette.
1.
Insert a diskette into the keyboards disk drive.
2.
Press the DISK button.
•This causes the indicator lamp above the DISK button to light,
which indicates the SMF Play Mode. See “Playing Back an
SMF” on page E-69 for details on using this mode.
3.
Press the DISK button again to display the first disk
operation screen.
•The indicator lamp above the DISK button flashes at this time.
4.
Scroll through the disk operation screens.
•Use the [▲] and [▼] cursor keys to scroll through the four
available screens.
•Option … Use this screen to set SMF playback options. See
“Playing Back an SMF” on page E-69.
•DiskLoad … Use this screen to load a file created with the
WK-1800. See “To load keyboard data from a diskette” on
page E-71.
•DiskSave … Use this screen to save data created with the
WK-1800. See “To save keyboard data to diskette” on page
E-70.
•Utility … Use this screen to access utilities that let you con-
vert rhythm data, delete data from a diskette, and format a
diskette. See “Using the Utilities” on page E-71.
5.
Perform the operation for the displayed disk opera-
tion screen.
•Use the [왗] and [왘] cursor keys to make settings.
•See the sections that follow this procedure for full details on
performing disk operations.
6.
After you are finished, press the DISK button.
•This causes the indicator lamp above the DISK button to go
out.
❚
NOTE
❚
You will be able to start the above procedure even when there is no dis-
kette in the disk drive.
[
▲
][
▼
]
O
p
tion
DiskLoad
[
▲
][
▼
]
DiskSave
[
▲
][
▼
]
Ut i lit
y
Inserting and Ejecting a Diskette
The following describes how to insert a diskette into the disk drive
and how to eject it.
To insert a diskette into the floppy disk drive
1.
With the label area of the diskette facing up, insert
the diskette shutter first into the disk drive, as shown
in the illustration.
2.
Slide the diskette into the drive as far as it will go,
until it clicks into place.
To eject a diskette from the floppy disk drive
IMPORTANT!
Before ejecting a diskette, always check to make sure that the ac-
cess lamp is not lit or flashing. A lit or flashing access lamp means
that the keyboard is performing a data read or write operation. Eject-
ing a diskette while it is being accessed can cause its data to become
corrupted.
1.
Press the Eject button.
•This causes the diskette to be partially ejected from the disk
drive.
2.
Remove the diskette from the drive by hand.
AMP ENVELOPE
00 FLAT
01-17 VIBRATO
18-45 OTHERS
DECAY
SUSTAIN
PITCH ENVELOPE
MIN
MAX
FULL RANGE
CHORD
CASIO CHORD
SONG
FINGERED
PATT ER N
EXTERNAL
INTERNAL UPPER1
CH 1
UPPER2
CH 2
LOWER1
CH 3
LOWER2
STOREBANK
CH 4
ACC VOL.
CH 5
CHORD1
CH 6
CHORD2
CH 7
CHORD3
CH 8
BASS
CH 9
RHYTHM
CH 10
TR1
CH 11
TR2
CH 12
TR3
CH 13
TR4
CH 14
TR5
CH 15
TR6
CH 16
789
456
1
0
23
PARAMETER RESET:
DELETE
/YESS/NO
MAIN MANU/
CHANNEL VOLUME:
SUB MANU/
CHANNEL SELECT:
Eject button
DI
SK
[+]/[
–]
Cursor keys
A
ccess lamp
START/STOP ENTER
WK-1800/1600(E)-67~74 03.7.31, 5:22 PMPage 68 Adobe PageMaker 6.5J/PPC

E-69
To play back all files on a diskette
Insert the diskette that contains the files into the keyboard’s disk drive.
PREPARATION
•The diskette that comes with the keyboard contains files you can use
for this procedure.
1.
Press the DISK button twice.
•This causes the “Option” disk operation screen to appear on
the display. The indicator lamp above the DISK button flashes
at this time.
2.
Use the [왗] and [왘] cursor keys to select the play-
back type.
•Single … Plays the currently selected file only.
•Chain … Plays back all files on the diskette.
3.
While “Chain” is on the display, press the ENTER but-
ton to start playback.
•The name of the file that is playing is shown on the display.
4.
Press the START/STOP button to start playback.
5.
To stop SMF play, press START/STOP again.
•If you do not press START/STOP, SMF play plays one file
after the other in an endless loop.
❚
NOTE
❚
After you stop SMF play part way through by pressing the START/STOP
button, you can exit the disk operation screen by pressing the DISK button
twice.
Operations During Playback
You can change the following settings while a file is playing from
diskette.
•Mixer settings (See “Mixer Function” on page E-28.)
•Tempo settings
❚
NOTES
❚
•Even after you make Mixer and tempo settings during SMF playback,
they may change to other settings if the data in the file contains such
settings.
•File data is played over External Channels.
Playing Back an SMF
SMF (standard MIDI file) is a data format that makes it possible to
port MIDI data between sequencers and synthesizers of different type
and brand. There are actually three different SMF formats, named 0,
1, and 2. This keyboard supports SMF Format 0, which is the most
common. Most synthesizers, sequencers, and commercially available
pre-recorded software and MIDI files use SMF Format 0.
The built in disk drive of the WK-1800 lets you play back files created
with a personal computer or other device and saved to diskette.
To play a specific file from diskette
1.
Insert the diskette that contains the file into the key-
board’s disk drive.
•The diskette labeled “WK1800 ACCESSORY DISK” that
comes with the keyboard contains files you can use for this
procedure.
2.
Press the DISK button.
•This causes the indicator lamp above the DISK button to light,
which indicates the SMF Play Mode.
•At this time the name of one of the files contained on the
diskette appears on the display.
3.
Use [+] and [–] to select the file you want to play.
4.
Press the START/STOP button to start play of the file
whose name is flashing on the display.
5.
To stop file play, press START/STOP again.
•File play also stops automatically when the end of the file is
reached.
❚
NOTE
❚
After you stop file play part way through by pressing the START/STOP
button, you can exit the file play mode by pressing the DISK button twice.
O
p
tion
[
▲
][
▼
]
Sin
g
le
Cha in
▼
▼
*
*
*
**
*
**
File name
*
*
*
**
*
**
File name
733A-E-071A
WK-1800/1600(E)-67~74 03.7.31, 5:22 PMPage 69 Adobe PageMaker 6.5J/PPC
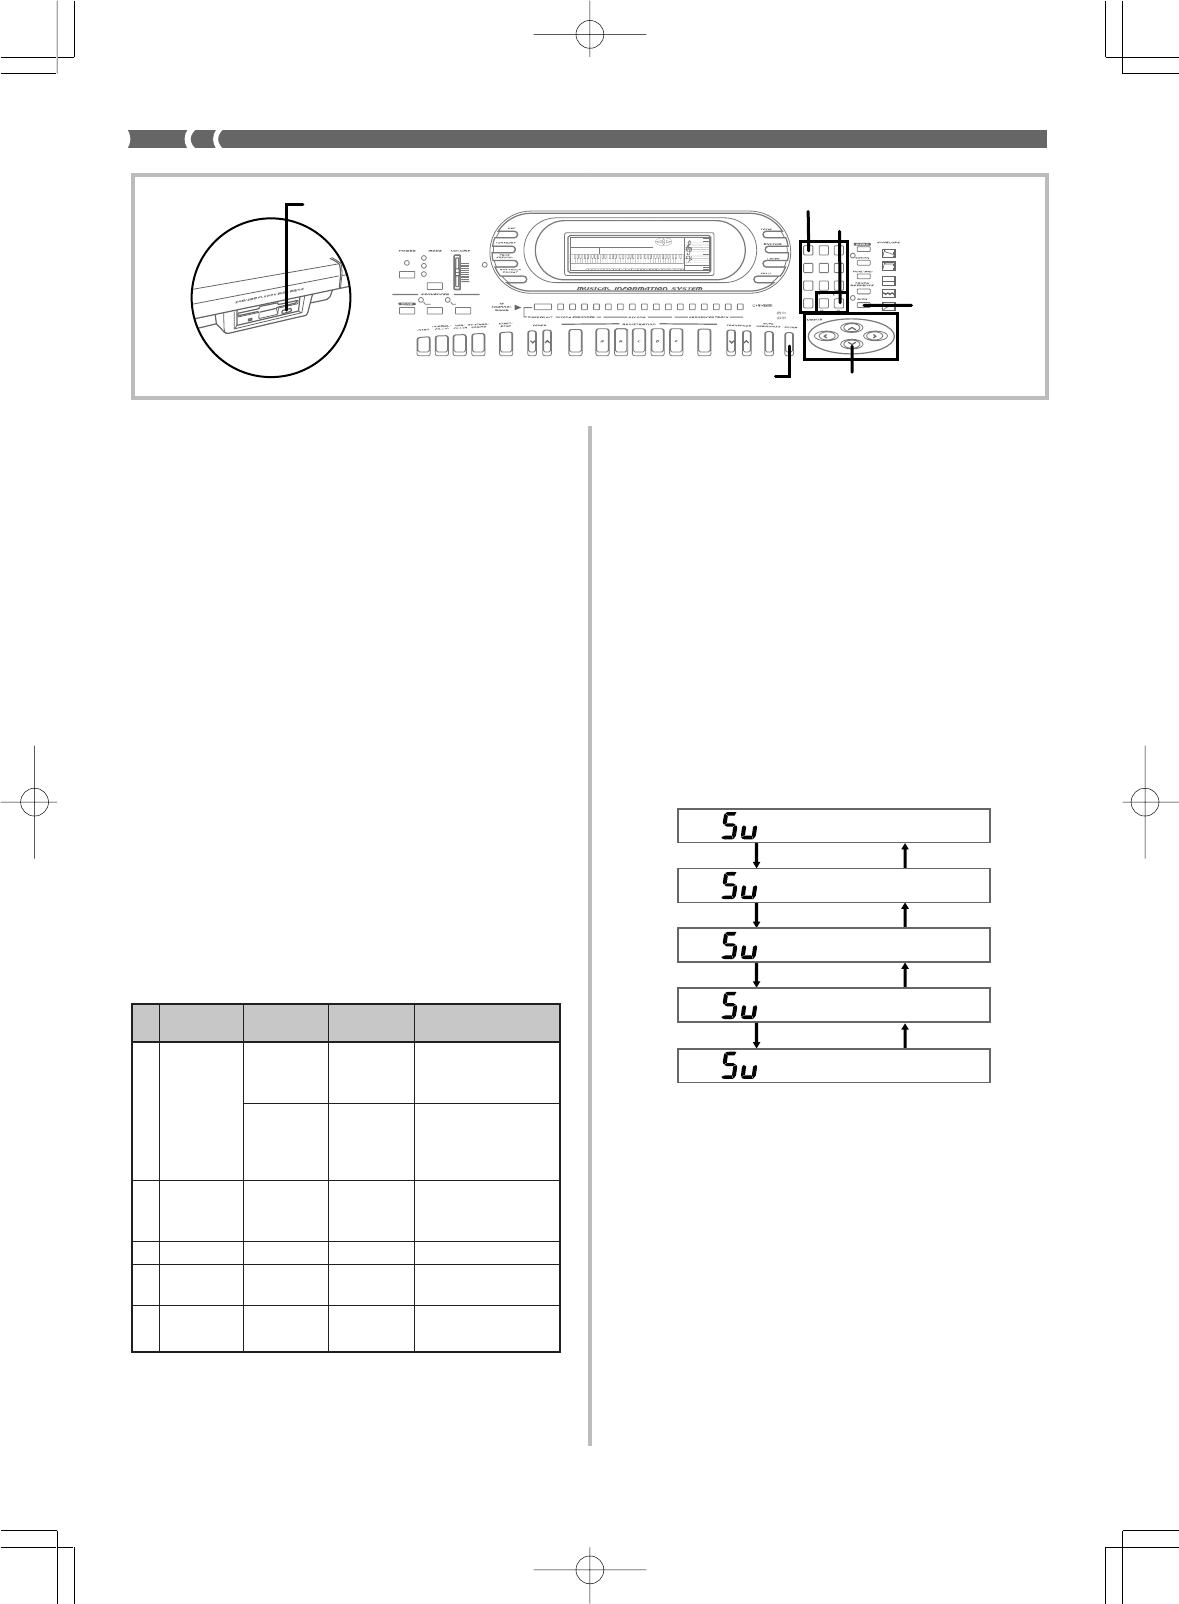
E-70
733A-E-072A
Saving and Recalling Memory Data
The built-in disk drive lets you save sequencer, synthesizer, and oth-
er data from the keyboard’s memory to diskette for later recall when
you need it.
Savable Data
The following is a list of keyboard data that can be saved to diskette.
(1) User rhythms created using the Pattern Sequencer
(2) User song data created using the Song Sequencer
(3) User tones created using the Synthesizer
(4) Setups saved in registration memory
•Saving tone, rhythm, or song data only causes each tone, rhythm,
or song to be saved as a separate file.
•Saving registration memory data only causes all 20 setups (5 set-
ups x 4 banks) in registration memory to be saved as a single file.
•Using the save all operation causes all the data currently in key-
board memory to be saved as a single file.
❚
NOTES
❚
•You can save individual tones, rhythms and songs in separate files only.
You cannot save all tones, or all rhythms, or both songs in a single file.
•All registration memory data can be batch saved in a single file only.
You cannot save individual banks or setups.
File Name Extensions
A three-letter extension is automatically added to file names to iden-
tify the type of data the file contains. The keyboard does not display
extensions, but they will appear if you view the file names on a com-
puter.
To save keyboard data to diskette
1.
Check the data you want to save.
•Make sure that everything is set up and configured the way
you want to save it.
•If you want to save a user tone, rhythm, or song, note its
number.
2.
Insert the diskette to which you want to save the data
into the keyboard’s disk drive. At this time close the
diskette’s write protect tab to enable writing.
3.
Press the DISK button twice.
4.
Press the [왔] cursor key twice to display the “Disk
Save” screen.
5.
Use the [왗] and [왘] cursor keys to display the screen
for the type of data you want to save, and then press
ENTER.
[
▲
][
▼
]
[
▲
][
▼
]
[
▲
][
▼
]
Pa t tern
Son
g
Tone
Re
g
ist
[
▲
][
▼
]
Al l
▼▼
▼▼
▼▼▼▼
No.
Data Type Extension Screen File Contents
Indication
1 CPt Pattern Single user rhythm
created with the Pat-
tern Sequencer
EPt Pattern Single user rhythm
converted from data
created on another
make keyboard
2 Cs3 Song Single user song cre-
ated with the Song
Sequencer
3 User Tones Ct3 Tone Single user tone
4
Registration
Cr3 Regist 20 setups (5 setups x
4 banks)
5 Save All CA3 All File produced by a
save all operation
Pattern
Sequencer
Song
Sequencer
•The remainder of this example is based on selecting “Tone”
in the above step.
6.
Specify the location (tone number) of the data you
want to save, and then press ENTER.
•Use the number keys to input a two-digit number, or use [+]
and [–] to increase and decrease the displayed number.
•Inputting a user tone number displays the name assigned to
the tone. You can leave this as the name of the file you are
saving, or you can assign a different name.
•Skip this step if you are saving registration memory data or
all data.
7.
Input the name of the file.
•Use [+] and [–] to scroll through letters at the current cursor
location.
•Use the [왗] and [왘] cursor keys to move the cursor left and
right.
AMP ENVELOPE
00 FLAT
01-17 VIBRATO
18-45 OTHERS
DECAY
SUSTAIN
PITCH ENVELOPE
MIN
MAX
FULL RANGE
CHORD
CASIO CHORD
SONG
FINGERED
PATTERN
EXTERNAL
INTERNAL UPPER1
CH 1
UPPER2
CH 2
LOWER1
CH 3
LOWER2
STOREBANK
CH 4
ACC VOL.
CH 5
CHORD1
CH 6
CHORD2
CH 7
CHORD3
CH 8
BASS
CH 9
RHYTHM
CH 10
TR1
CH 11
TR2
CH 12
TR3
CH 13
TR4
CH 14
TR5
CH 15
TR6
CH 16
789
456
1
0
23
PARAMETER RESET:
DELETE
/YESS/NO
MAIN MANU/
CHANNEL VOLUME:
SUB MANU/
CHANNEL SELECT:
Eject button
DI
SK
[+]/[
–]
Cursor keys
Number keys
ENTER
WK-1800/1600(E)-67~74 03.7.31, 5:22 PMPage 70 Adobe PageMaker 6.5J/PPC
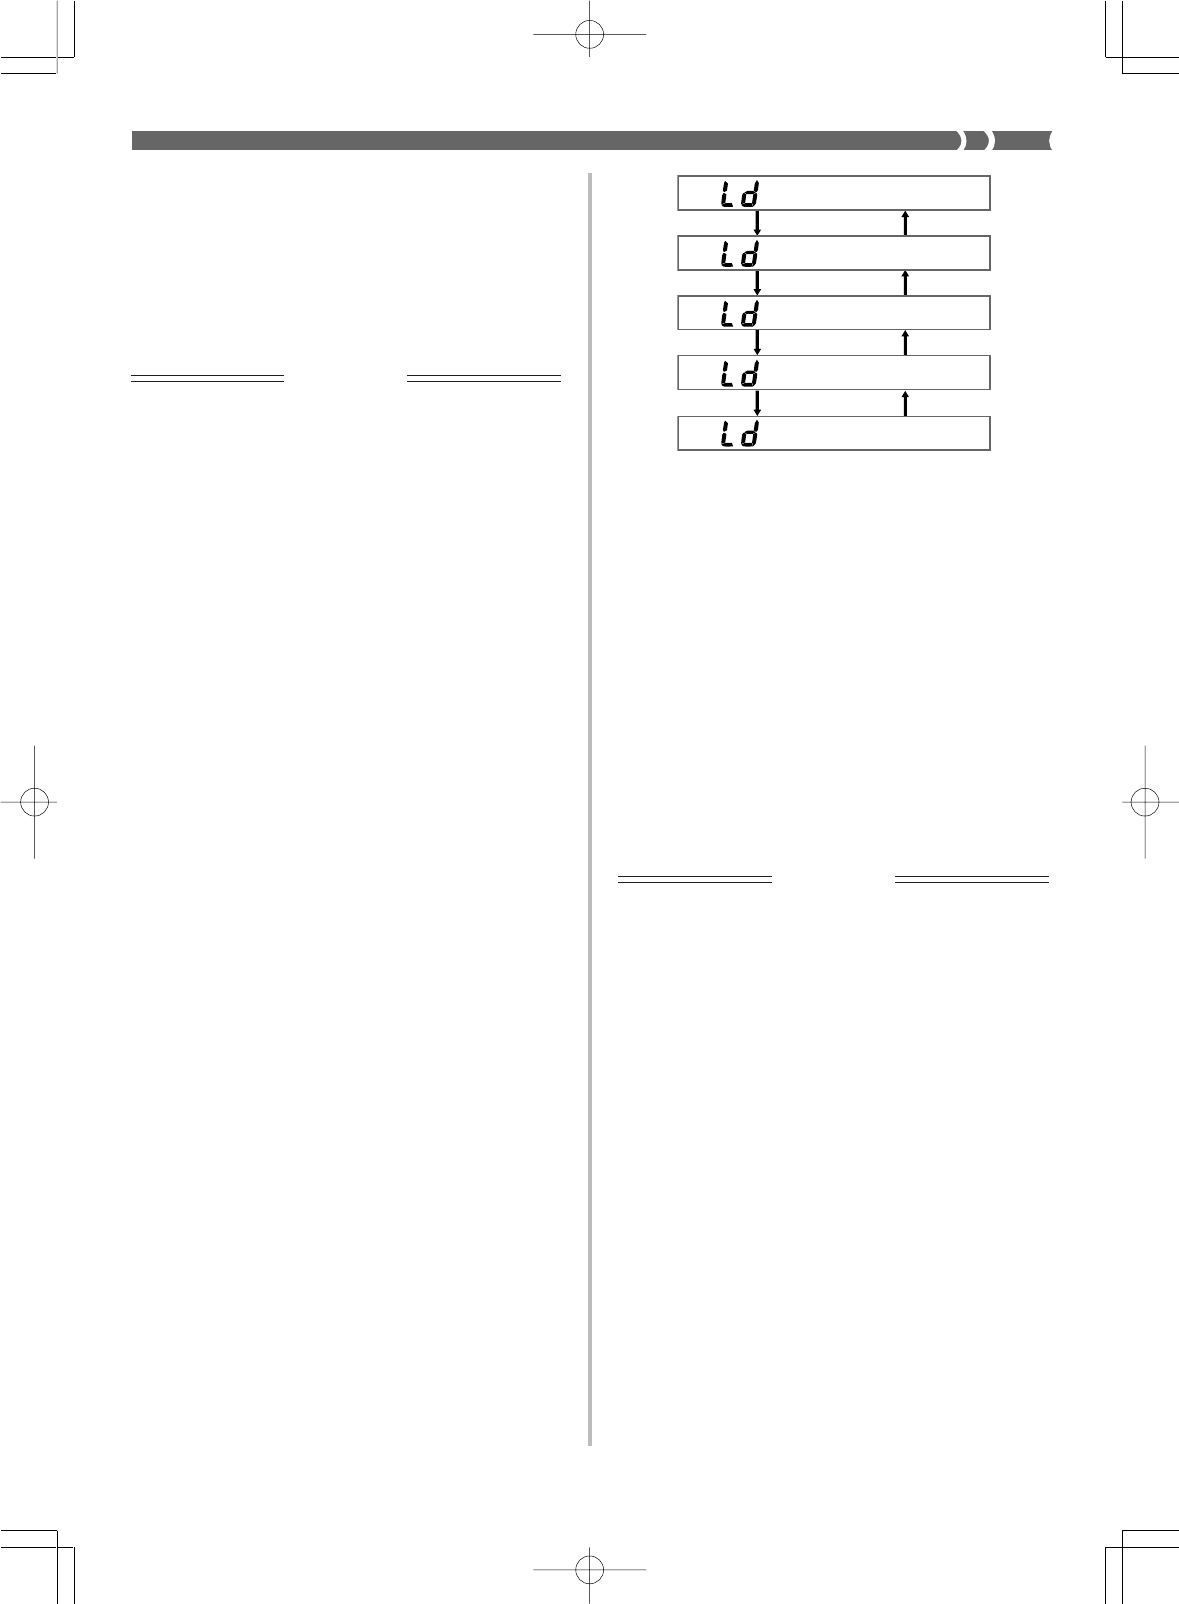
E-71
[
▲
][
▼
]
[
▲
][
▼
]
[
▲
][
▼
]
Pa t tern
Son
g
Tone
Re
g
ist
[
▲
][
▼
]
Al l
▼
▼▼▼▼
▼▼▼
733A-E-073A
8.
After inputting the file name, press the ENTER button
to start the save operation.
•If the diskette already contains a file with the name you spec-
ified in step 7, the message “Replace?” appears, asking if you
want to replace the existing file with the new one. Press the
YES button to replace the existing file, or NO to return to
step 7 of this procedure.
•The message “Pls Wait” remains on the display while the
file save operation is being performed.
IMPORTANT!
•Do not perform any key operation while the message “Pls Wait” is
on the display. In particular, never turn off keyboard power. Doing
so can cause all data on the disk to become corrupted and unus-
able.
•Sudden power loss due to low battery power during the data save
operation can corrupt the data on a diskette. Because of this, use
of the specified AC adaptor is recommended whenever you are
saving data to diskette.
9.
The message “Complete” appears on the display for
about one second when the data save operation is
complete.
•The keyboard returns to step 5 of this procedure after the
“Complete” message clears from the display.
•Repeat steps 5 through 9 if you want to save more data.
•After you finish your diskette operations, press the DISK
button so the indicator lamp above it goes out. Next, press
the eject button to eject the diskette, and then remove it by
hand.
❚
NOTES
❚
•When saving registration memory data or all data, simply skip step 6 of
the above procedure.
•See “Letters and Numerals” on page E-36 for the characters that can be
input for the file name.
•We recommend that you make a separate record of the names of files
and their contents to make it easier to find the data you need when you
need it.
•To exit the disk operation screens at any time during the above proce-
dure, press the DISK button so the indicator lamp above it goes out.
•When saving Pattern type data (single user rhythm), each file can hold
a maximum of about 5,000 notes. To save a user rhythm pattern that
has more than 5,000 notes, select All in step 5 of the above procedure
to save all keyboard data. See “File Name Extensions” on page E-70 for
details on the extensions appended to file names.
To load keyboard data from a diskette
❚
NOTE
❚
The following procedure describes how to load a user tone as an example
of the load operation. The procedures for loading other types of data is
identical, except where noted.
1.
Insert the diskette that contains the data you want to
load into the keyboard’s disk drive.
2.
Press the DISK button twice.
3.
Press the [왔] cursor key once to display the “Disk
Load” screen.
4.
Use the [왗] and [왘] cursor keys to display the screen
for the type of data you want to load, and then press
ENTER.
•Pressing ENTER causes the name of the first file of the type
you specify to appear on the display.
•The remainder of this example is based on selecting “Tone”
in the above step.
5.
Use [+] and [–] to display the name of the file you
want to load, and then press ENTER.
6.
Specify the location (tone number) where you want
to store the data.
•Use the number keys to input a two-digit number, or use [+]
and [–] to increase and decrease the displayed number.
•Skip this step if you are saving registration memory data or
all data.
7.
Press the ENTER button to start the load operation.
•The message “Replace?” appears, asking if you want to re-
place the existing data with the loaded data. Press the YES
button to replace the existing data, or NO to return to step 4
of this procedure.
•The message “Pls Wait” remains on the display while the
file save operation is being performed.
IMPORTANT!
Do not perform any key operation while the message “Pls Wait” is on
the display. In particular, never turn off keyboard power. Doing so
can cause all data on the disk to become corrupted and unusable.
8.
The message “Complete” appears on the display for
about one second when the data load operation is
complete.
•The keyboard returns to step 4 of the above procedure after
the “Complete” message clears from the display.
•Repeat steps 4 through 8 if you want to load more data.
•You can quit diskette operations at any time during the above
operation by pressing the DISK button so the indicator lamp
above it goes out.
❚
NOTES
❚
•When loading registration memory data or all data, simply skip step 6 of
the above procedure.
•To exit the disk operation screens at any time during the above proce-
dure, press the DISK button so the indicator lamp above it goes out.
•If an error occurs while data saved to a diskette by a Save All operation
is being loaded back into keyboard memory, user tones, user rhythms,
Song Sequencer data, and registration memory data that was in memo-
ry when the load operation started will all be deleted.
Using the Utilities
This section describes the utilities that are provided to convert rhythm
pattern data from another keyboard, to delete data from a diskette,
and to format a diskette.
WK-1800/1600(E)-67~74 03.7.31, 5:22 PMPage 71 Adobe PageMaker 6.5J/PPC

E-72
733A-E-074A
Converting Rhythm Pattern Data From Anoth-
er Keyboard
Use the procedure described here to convert rhythm pattern data cre-
ated on a Technics, or Roland brand keyboard so it can be used on
the WK-1800.
IMPORTANT!
•The data conversion capabilities of this keyboard are intended for
personal, non-commercial purposes only.
•The sound source and accompaniment system of this keyboard is
different from those used by other manufacturers, so converted
data played on this keyboard may sound different from what it
sounds like when played on its equipment.
•You may not be able to convert some accompaniment patterns
created on other keyboards.
•Please direct all inquiries concerning accompaniment pattern con-
version to CASIO COMPUTER CO., LTD.
❚
NOTES
❚
•Data can be converted one files at a time.
•Converted data is stored in the user rhythm area of this keyboard’s mem-
ory.
To convert rhythm data
Before getting started…
•Prepare the diskette labeled “WK1800 ACCESSORY DISK”, which
comes with the WK-1800.
•Prepare the diskette that contains the rhythm pattern data you want
to convert.
•Eject and remove any diskette currently in the WK-1800 disk drive.
•Make sure there is a user rhythm number available to store the
converted data.
1.
Press the DISK button twice.
•This displays the first disk operation screen.
2.
Press the [▼] cursor key three times to display the
“Utility” screen.
3.
Use the [왗] and [왘] cursor keys to display the “Pt-
nConv” (pattern conversion) screen.
4.
Press the ENTER button.
•This causes a data type selection screen to appear on the dis-
play.
T
yp
e=Tec
5.
Use [+] and [–] to display the indicator for the type of
data you are converting from, and then press the EN-
TER button.
•The following shows the display indicator for each data type.
6.
Insert the “WK1800 ACCESSORY DISK” into the disk
drive of the WK-1800, and then press the ENTER but-
ton.
•The message “Pls Wait” appears, followed by the message
shown below.
7.
Eject and remove the “WK1800 ACCESSORY DISK”
and insert the diskette that contains the data you want
to convert. Next, press the ENTER button.
•Inserting the data disk causes the message “Select” to ap-
pear on the display for about one second. Next the name of
one of the files on the disk appears.
8.
Use [+] and [–] to display the name of the file you
want to convert, and then press the ENTER button.
9.
Specify the file characteristics.
•File characteristic depend on the type of data you are con-
verting. See “File Characteristics” on page E-73 for details
on how to set file characteristics for each type of data.
•The conversion starts as soon as you specify the file charac-
teristics. The message “Pls Wait” indicates that conversion
is being performed.
10
.
Specify the user rhythm number where you want to
store the converted data.
•Use [+] and [–] to specify a number in the range of 120 to 129.
11
.
Press the ENTER button to load the converted data.
•If the rhythm number you specify already contains data, the
message “Replace?” appears, asking if you want to replace
the existing data with the converted data. Press the YES but-
ton to replace the existing data, or NO to return to step 10 of
this procedure.
12
.
The message “Complete” appears when the conver-
sion is complete. Next, the message “Continu?” ap-
pears to ask if you want to convert more data.
•Press the YES button if you want to convert more data from
the same manufacturer, or NO to return to step 3 of this pro-
cedure.
•To exit the procedure, press the DISK button so the indicator
lamp above it goes out.
❚
NOTE
❚
To exit the above procedure at any time, press the DISK button so the
indicator lamp above it goes out.
Ch
g
PtnFD
Display Manufacturer Name
Tec Technics
Rol Roland
Ins
ConFD
AMP ENVELOPE
00 FLAT
01-17 VIBRATO
18-45 OTHERS
DECAY
SUSTAIN
PITCH ENVELOPE
MIN
MAX
FULL RANGE
CHORD
CASIO CHORD
SONG
FINGERED
PATTERN
EXTERNAL
INTERNAL UPPER1
CH 1
UPPER2
CH 2
LOWER1
CH 3
LOWER2
STOREBANK
CH 4
ACC VOL.
CH 5
CHORD1
CH 6
CHORD2
CH 7
CHORD3
CH 8
BASS
CH 9
RHYTHM
CH 10
TR1
CH 11
TR2
CH 12
TR3
CH 13
TR4
CH 14
TR5
CH 15
TR6
CH 16
789
456
1
0
23
PARAMETER RESET:
DELETE
/YESS/NO
MAIN MANU/
CHANNEL VOLUME:
SUB MANU/
CHANNEL SELECT:
DI
SK
[+]/[
–] (YES/NO)
Cursor keys
Number keys
ENTER
WK-1800/1600(E)-67~74 03.7.31, 5:22 PMPage 72 Adobe PageMaker 6.5J/PPC
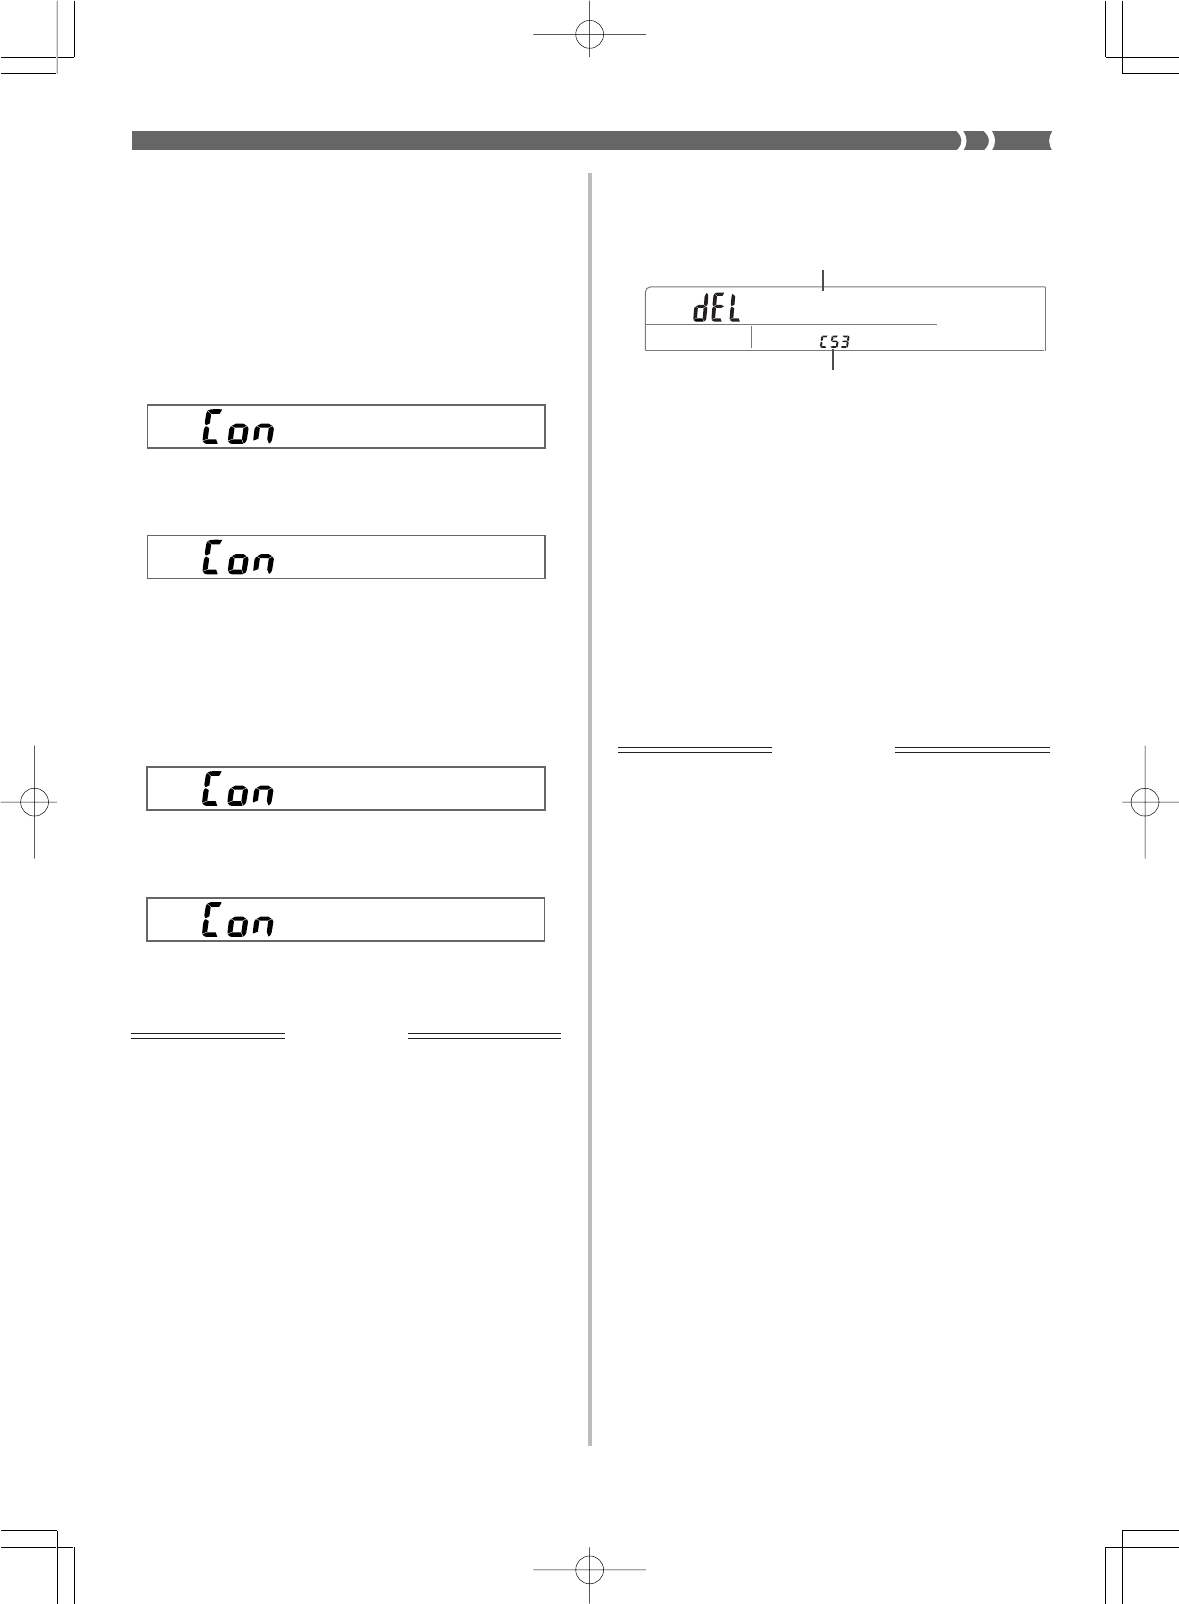
E-73
File Characteristics
Use the following procedures to specify the file characteristics for
each type of data during the rhythm data conversion procedure. These
steps should be performed for step 9 of the procedure under “Con-
verting Rhythm Pattern Data From Another Keyboard” on page E-
72.
(A) To specify Technics file characteristics
1.
Use [+] and [–] to specify Bank A, B, or C, and then
press ENTER.
2.
Use [+] and [–] to specify Area 0 or 1, and then press
ENTER.
(B) To specify Roland file characteristics
1.
Use [+] and [–] to select either basic (B) or advanced
(A) and the chord type (M, m, 7th). Various combina-
tions are available, so scroll through the selections
until you find the one you want, and then press EN-
TER.
2.
Use [+] and [–] to specify one of the three available
conversion processes, and then press ENTER.
To delete a file from a diskette
IMPORTANT!
The file delete operation cannot be undone. Make sure you no longer
need a file before you delete it.
1.
Insert the diskette that contains the file you want to
delete into the keyboard’s disk drive. At this time close
the diskette’s write protect tab to enable writing.
2.
Press the DISK button twice.
•This causes the “Option” disk operation screen to appear on
the display. The indicator lamp above the DISK button flashes
at this time.
3.
Press [왔] three times to display the “Utility” screen.
Mode=B–M
Proces=0
4.
Use [왗] and [왘] to display the “FileDel” (file delete)
screen, and then press the ENTER button.
•This causes a file name to appear on the screen as shown
below.
5.
Use [+] and [–] to display the name of the file you
want to delete, and then press the ENTER button.
•The message “Sure?” appears on the display to confirm
whether or not you really want to delete the file.
6.
Press YES to delete the file or NO to abort the opera-
tion without deleting anything.
•After the file is deleted, the message “Complete” appears on
the display for about one second. Then the keyboard returns
to step 4 of the above procedure.
❚
NOTES
❚
•To exit the above procedure at any time, press the DISK button so the
indicator lamp above it goes out.
•This keyboard cannot delete an SMF from a disk.
To format a floppy diskette
IMPORTANT!
Formatting a diskette that contains data deletes the data. Make sure
you no longer need any data that may be on a diskette before you
format it.
1.
Press the DISK button twice.
•This causes the “Option” disk operation screen to appear on
the display. The indicator lamp above the DISK button flashes
at this time.
2.
Press [왔] three times to display the “Utility” screen.
3.
Use [왗] and [왘] to display the “Format” screen, and
then press the ENTER button.
•This causes the message “Insert FD” to appear, prompting
you to insert the diskette you want to format into the disk
drive.
4.
Insert the diskette that you want to format into the
keyboard’s disk drive, and then press the ENTER but-
ton.
•The message “Sure?” appears on the display to confirm
whether or not you really want to format the diskette.
5.
Press YES to format the diskette or NO to abort the
operation.
•The message “Pls Wait” remains on the display while the
format operation is being performed.
•After the diskette is formatted, the message “Complete” ap-
pears on the display for about one second. Then the key-
board returns to step 3 of the above procedure.
❚
NOTES
❚
•To exit the above procedure at any time, press the DISK button so the
indicator lamp above it goes out.
•A diskette formatted by MS-DOS or Windows can be used as it is on
WK-1800. Diskettes formatted for other types of computers are not com-
patible.
Bank=A
733A-E-075A
Area=0
TUNE1
File name extension
File name
WK-1800/1600(E)-67~74 03.7.31, 5:22 PMPage 73 Adobe PageMaker 6.5J/PPC
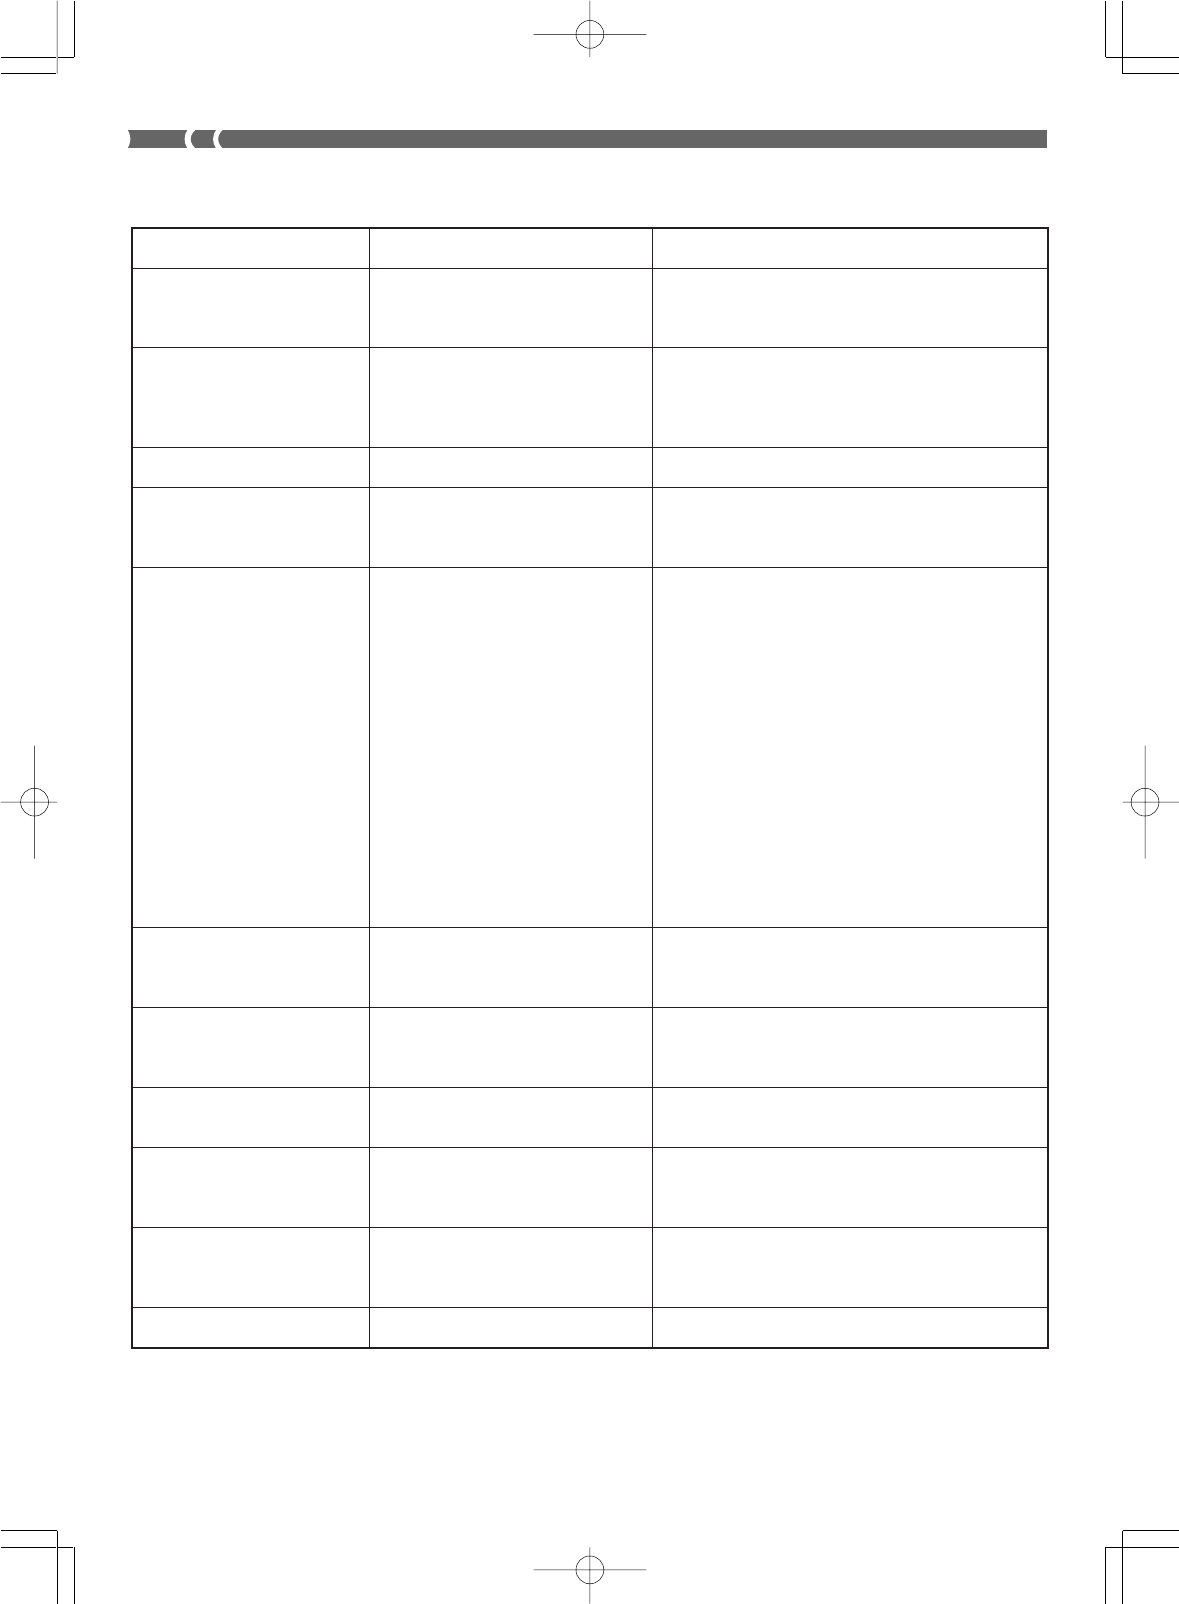
E-74
Disk Drive Error Messages
733A-E-076A
Err ReadOnly
Err Format
Err Disk R/W
Err DiskFull
Err Mem Full
Err Not SMF0
Err No Disk
Err No File
Err Protect
Err Convert
Err WrongDat
Attempt to save a file using the same
name as an existing file that is read
only.
1. The format of the diskette is not
compatible with this keyboard.
2. The diskette is not formatted.
3. The diskette is damaged.
The diskette is damaged.
The diskette is full.
Keyboard memory became full while
importing data from diskette.
The file you are reading is not an SMF
0 format file.
1. The diskette is not loaded in the
drive correctly.
2. No diskette is loaded in the drive.
The keyboard cannot find any file it can
read on the diskette.
The diskette is write protected.
The accompaniment pattern data you
are trying to convert is of a type that
cannot be converted by this keyboard.
The data on the diskette is corrupted.
Save the new file to a different diskette or use another
name.
1. Change to a diskette that has the proper format.
................................................................................E-67
2. Format the diskette. ............................................. E-73
3. Use a different diskette.
Use a different diskette.
1. Use a different diskette.
2. Delete any files you no longer need in order to make
room for the data you want to save. .................E-73
1. If you have user patterns stored in Pattern Sequenc-
er memory, use the following procedure to delete
user patterns you no longer need from the user area
(patterns 120 to 129).
1Clear the work area using the procedure under
“Work Area Clear” on page E-54.
2 While the work area empty (cleared), use the pro-
cedure under “To exit the Pattern Sequencer
Mode and save work area contents” on page E-
56 to save the work area to the accompaniment
pattern user area accompaniment numbers that
contain patterns you no longer need. Saving the
empty work area effectively deletes data currently
stored in memory.
2. If you have song data stored in Song Sequencer
memory (SG0, SG1), delete the song data you no
longer need. ..........................................................E-46
Use SMF 0 format files only. ...................................E-69
1. Eject the diskette from the drive and reload it.
................................................................................E-68
2. Load a diskette into the drive.
Use a diskette that contains data stored by this key-
board or compatible data from another device.
1. Use a different diskette.
2. Close the diskette’s write protect hole to enable data
storage. ..................................................................E-67
Try converting other accompaniment pattern data.
Use other data or another diskette.
Message Cause Action
WK-1800/1600(E)-67~74 03.7.31, 5:22 PMPage 74 Adobe PageMaker 6.5J/PPC
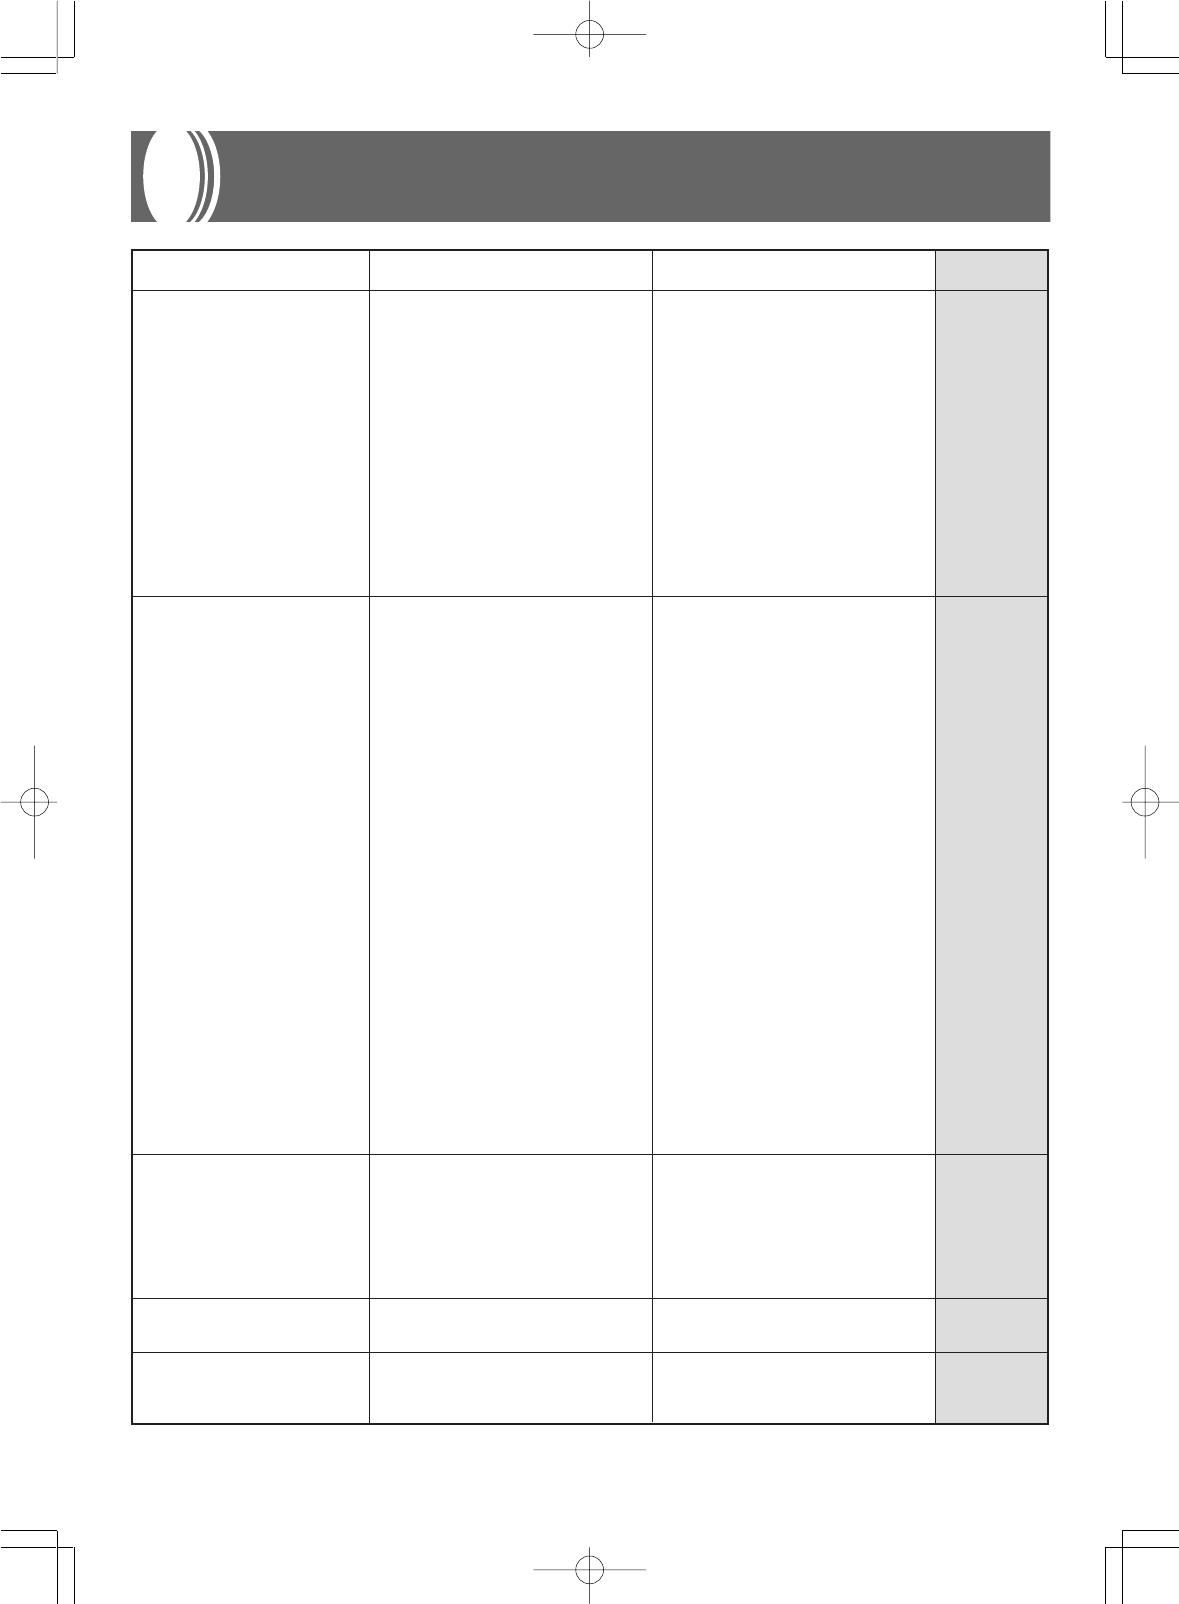
E-75
Problem
No sound when keyboard keys
are pressed.
Any of the following symptoms
while using battery power.
•Dim power supply indicator
•Instrument does not turn on
•Display that is fllckering,
dim, or difficult to read
•Abnormally low speaker/
headphone volume
•Distortion of sound output
•Occasional interruption of
sound when playing at high
volumes
•Sudden power failure when
playing at high volumes
•Flickering or dimming of the
dispaly when playing at high
volume
•Continued sound output
even after you release a key
•A totally different tone may
sound
•Abnormal rhythm pattern
and demo tune play
•Loss of power, sound distor-
tion, or low volume when
playing from a connected
computer or MIDI device
•Sudden power failure while
reading from or writing to a
diskette (WK-1800 only)
Auto Accompaniment does not
sound.
Sound output does not change
when key pressure is varied.
The key or tuning does not
match when playing along with
another MIDI machine.
Possible Cause
1. Batteries are not loaded correctly.
2. Power is not turned on.
3. MAIN VOLUME setting is too low.
4. Playing in the accompaniment key-
board area while the MODE button
setting is CASIO CHORD or FIN-
GERED.
5. LOCAL CONTROL is off.
6. Mixer Channel 1 is off.
7. Mixer Channel 1 volume or expres-
sion setting is too low.
Low battery power
1. Accompaniment volume is set to
000.
2. Auto Accompaniment part Chan-
nels 6 through 10 are turned off.
3. Auto Accompaniment part Chan-
nels 6 through 10 volume or expres-
sion setting is too low.
Touch response is turned off.
The tuning or transpose parameter is
set to a value other than 00.
Action
1. Check to make sure the AC adaptor
is connected correctly, and that the
+/– ends of the batteries are facing
correctly. Check for dead batteries.
2. Press the POWER button to turn on
power.
3. Use the MAIN VOLUME slider to
increase volume.
4. None of the accompaniment mode
indicators are lit, which means Auto
Accompaniment is turned off.
5. Turn LOCAL CONTROL on.
6. Turn on Mixer Channel 1.
7. Use the Mixer to raise the volume
or expression setting for channel 1.
Replace the batteries with a set of new
ones or use the AC adaptor.
1. Use the CH5 (ACC VOL.) button to
increase the volume.
2. Use the Mixer to turn the channels
on.
3. Use the Mixer to raise the volume
or expression setting for the appli-
cable channel.
Press the TOUCH RESPONSE button
to turn it on.
Change the transpose or tuning param-
eter value to 00.
733A-E-077A
Troubleshooting
See page
Page E-14
Page E-16
Page E-16
Page E-21
Page E-61
Page E-29
Page E-30
Page E-14
Page E-27
Page E-29
Page E-30
Page E-18
Page E-19
WK-1800/1600(E)-75~78 03.7.31, 5:22 PMPage 75 Adobe PageMaker 6.5J/PPC
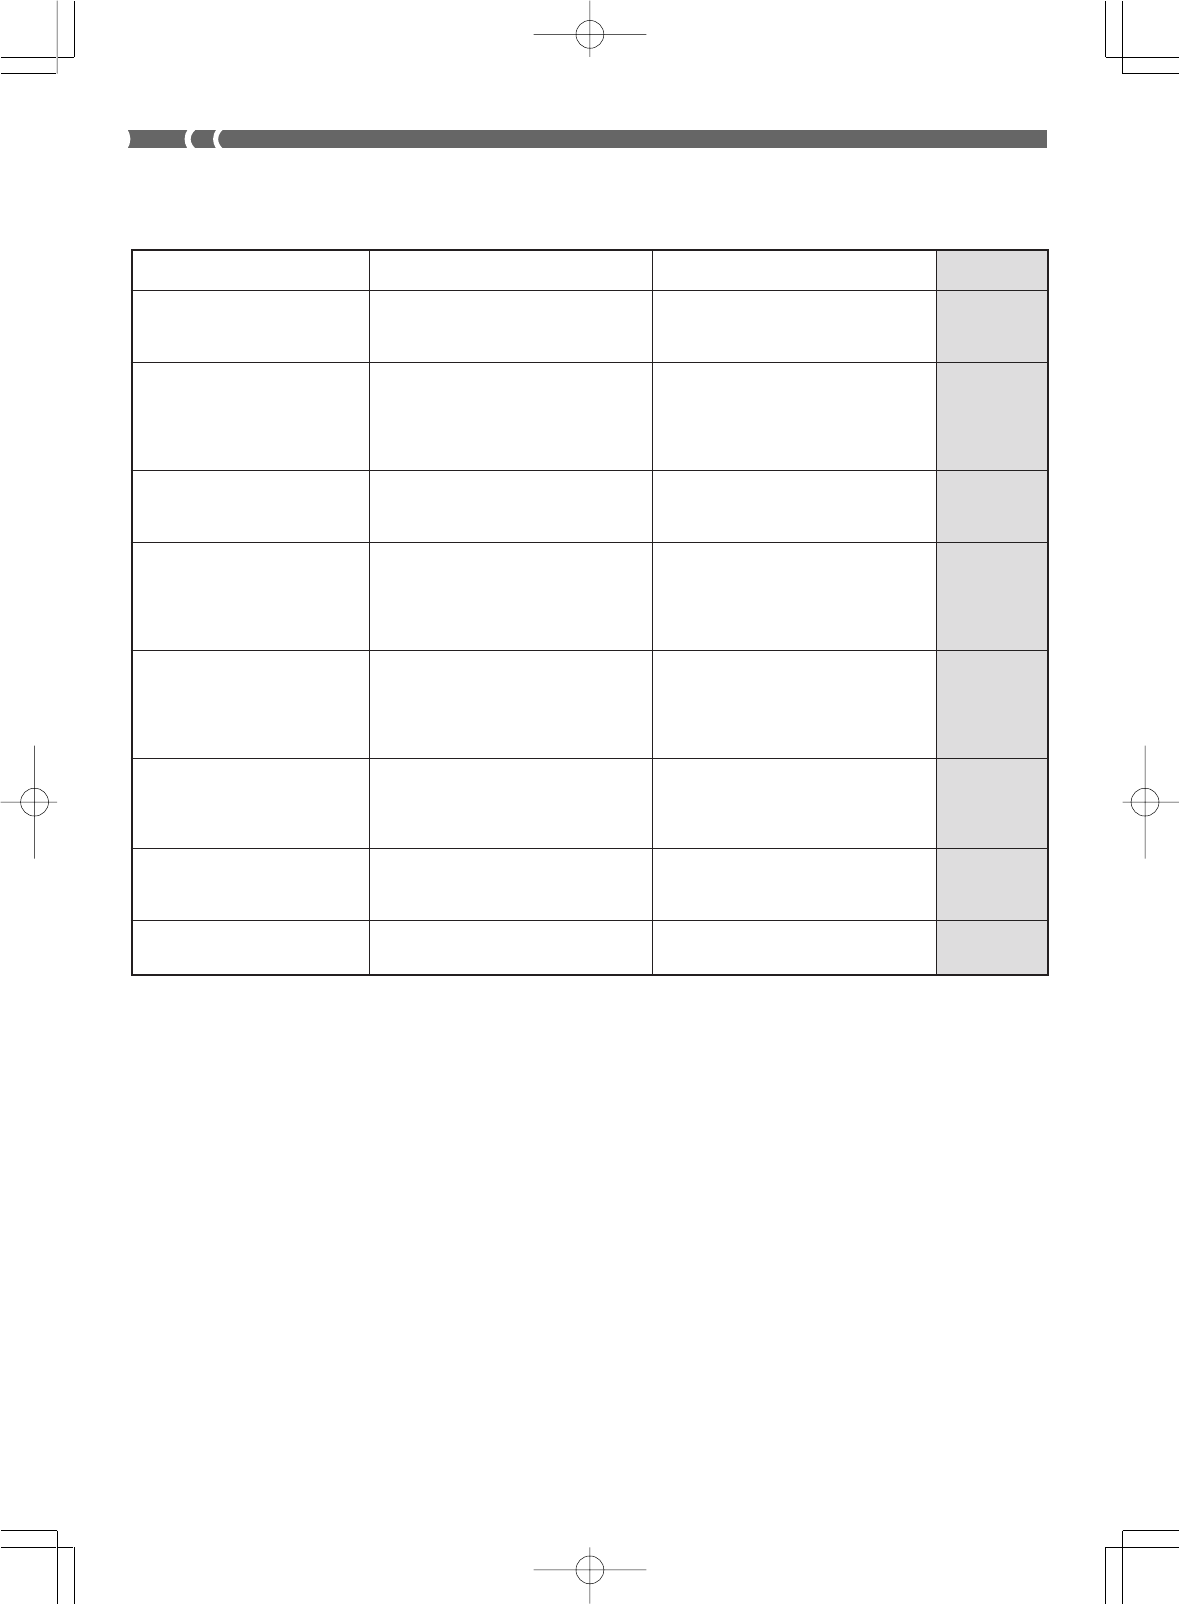
E-76
Page E-45
Page E-29
Page E-30
Pages E-40, 42
Page E-29
Page E-30
Page E-60
Pages E-29 to 30
Page E-61
Page E-61
Page E-61
Some parts stop playing at some
point during Sequencer play-
back.
Some parts don’t play at all dur-
ing Sequencer playback.
Cannot record Auto Accompa-
niment or rhythm.
Nothing happens when the
LAYER or SPLIT button is
pressed.
No sound is produced when
playing MIDI data from a com-
puter.
The bass notes of General MIDI
data being played back by a
computer are one octave too
low.
Playing on the keyboard pro-
duces an unnatural sound when
connected to a computer.
Cannot record chord accompa-
niment data on a computer.
Playback exceeds the maximum po-
lyphony of the keyboard.
1. The Mixer mode setting for the cor-
responding channel is off or Exter-
nal/Solo.
2. Volume or expression setting is too
low.
Track other than Track 1 is selected as
the recording track. Tracks 2 through
6 are melody tracks.
1. One or more of the melody channels
(2 through 4) is turned off.
2. The volume or expression setting of
one or more of the melody channels
(2 through 4) is too low.
1. MIDI cables are not connected prop-
erly.
2. Channel is turned off, or volume or
expression setting is too low.
GM SYSTEM is turned off.
The computer’s MIDI THRU function
is turned on.
ACCOMP MIDI OUT is turned off.
Use the Song Sequencer to decrease the
number of parts playing at the same
time by turning off channels.
1. Use the Mixer to make sure that
channels are turned on.
2. Use the Mixer to check the volume
or expression setting.
Use the track select buttons to select
Track 1.
1. Use the Mixer to turn on Channels
2 through 4.
2. Use the Mixer to raise the volume
or expression setting of Channels 2
through 4.
1. Connect MIDI cables properly.
2. Use the Mixer to turn the channel
on, or raise the volume or expres-
sion setting.
Turn on the GM SYSTEM.
Turn off the MIDI THRU function on
the computer or turn off LOCAL CON-
TROL on the keyboard.
Turn on ACCOMP MIDI OUT.
Problem Possible Cause Action See page
733A-E-078A
WK-1800/1600(E)-75~78 03.7.31, 5:22 PMPage 76 Adobe PageMaker 6.5J/PPC
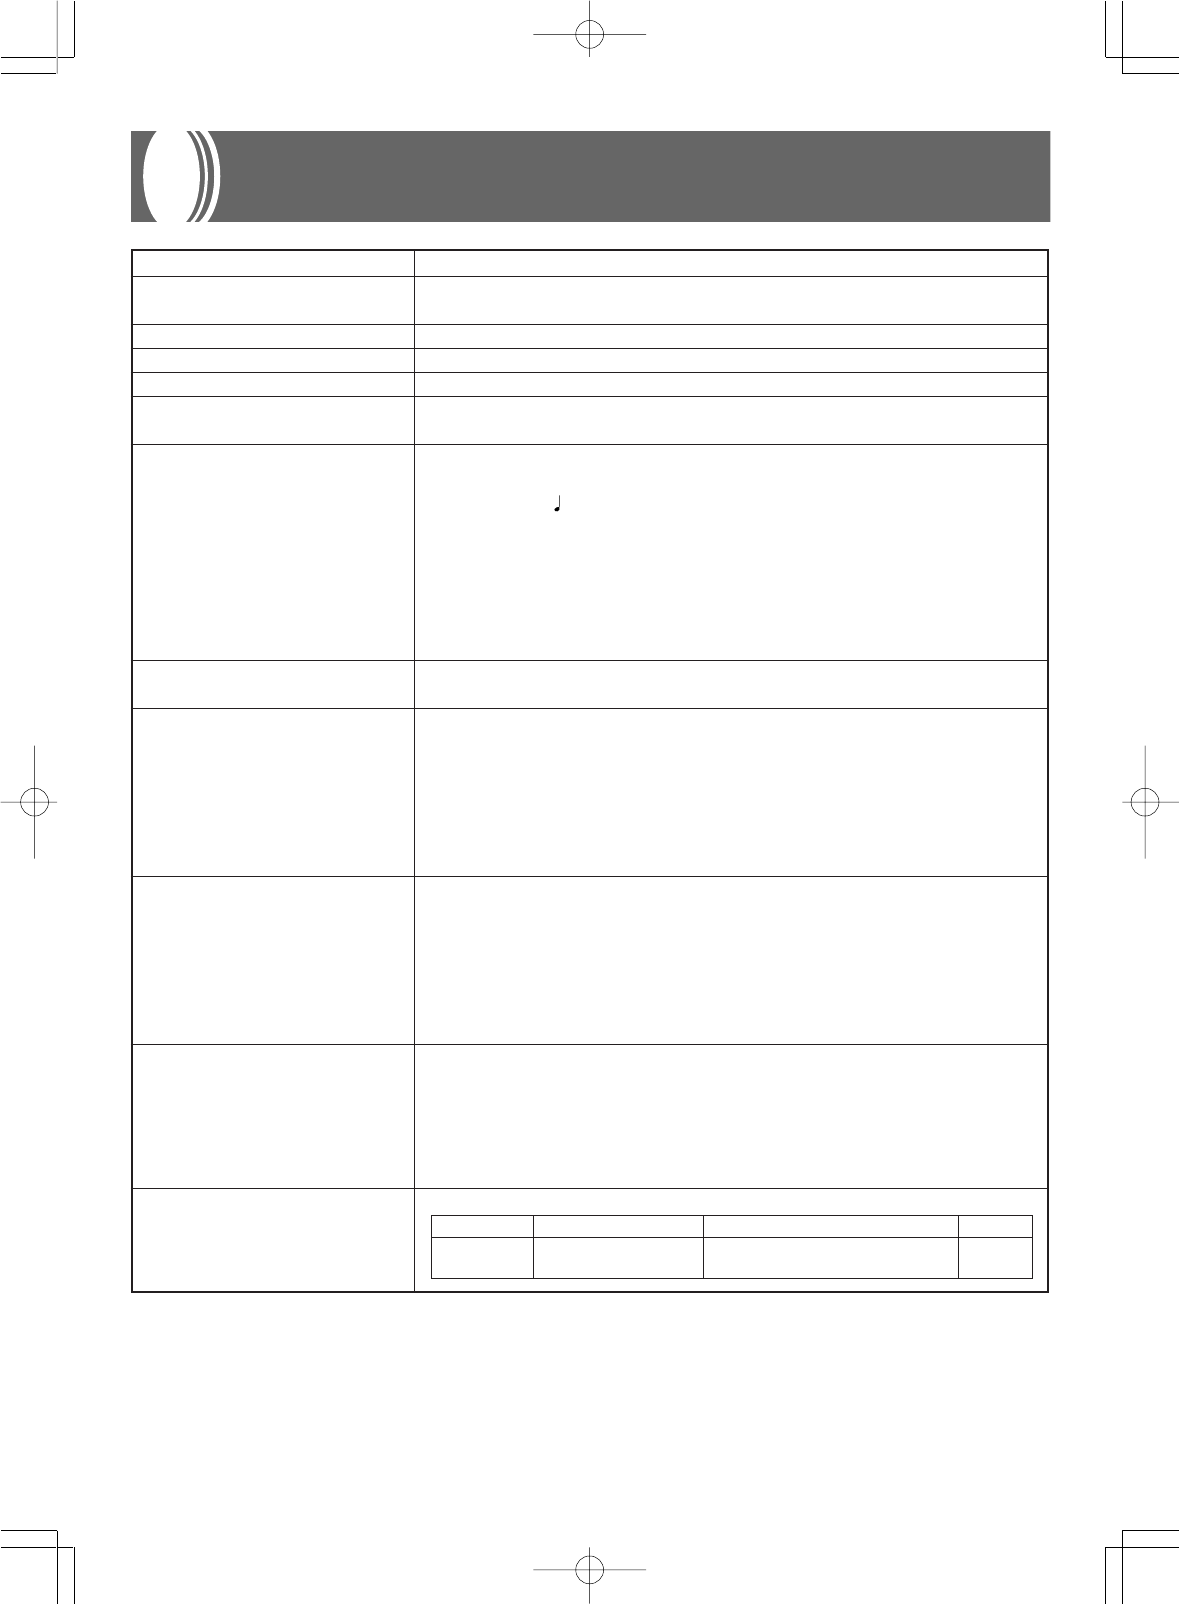
E-77
733A-E-079A
Specifications
Model: WK-1800/WK-1600/WK-1630
Keyboard: 76 standard-size keys, 6 1/4 octaves (with touch response on/off; ExLight/Light/Normal/Heavy
touch)
Tones: 232 (128 General MIDI, 64 variation, 8 drum, 32 user); with layer and split
Rhythm Instrument Tones: 61
Polyphony: 32 notes maximum (16 for certain tones)
Digital Effects: 10 (REVERB 1, 2, 3; CHORUS; TREMOLO; PHASE SHIFTER; ORGAN SPEAKER; ENHANCER;
FLANGER; EQ LOUDNESS)
Auto Accompaniment
Rhythm Patterns: 130 (120 + 10 user rhythms)
Tempo: Variable (226 steps, = 30 to 255)
Chords: 3 fingering methods (CASIO CHORD, FINGERED, FULL RANGE CHORD)
Rhythm Controller: Start/Stop, Intro, Normal/Normal Fill-In, Variation/Variation Fill-In, Synchro/Ending
Accomp Volume: 0 to 127 (128 steps)
One Touch Presets: Recalls settings for tone, tempo, layer, and Auto Harmonize in accordance with rhythm.
Auto Harmonize: Automatic addition of notes that harmonize with melody note in accordance with specified Auto
Accompaniment chords.
Free Session
Number of Patterns: 120 (Auto Accompaniment function based on preset chord progressions.)
Song Sequencer
Songs: 2
Recording Tracks: 6 (2 through 6 are melody tracks)
Recording Method: Real-time
Memory Capacity (total for two songs)
: Approximately 8,000 notes (WK-1800)
Approximately 4,900 notes (WK-1600/1630)
Punch In: Supported
Pattern Sequencer
Number of Patterns: 10 (Rhythm numbers 120 to 129)
Memory Capacity: Approximately 6,800 notes (WK-1800)
Approximately 5,800 notes (WK-1600/1630)
Elements: Intro, Normal, Variation, Normal Fill-In, Variation Fill-In, Ending
Parts: Chord 1, 2, 3; Bass; Rhythm
Recording Method: Real-time
Registration Memory
Number of Setups: 20 (5 setups x 4 banks)
Memory Contents: Tone, Rhythm, Tempo, Split on/off, Split point, Layer on/off, Auto Harmonize on/off, Mixer set-
tings, Keyboard channel on/off, DSP (digital effect) on/off, DSP (digital effect) settings, Accompa-
niment mode, Touch Response settings, Assignable jack setting, Transpose, Tuning, Pitch Bend
range, Sound range shift on/off
Demo Tunes: 2
Tune Number Title Composer Time
1 Over The Edge TECH-NOTE INTERNATIONAL LTD. 2’20”
2 Night Breeze Hage Software 1’56”
WK-1800/1600(E)-75~78 03.7.31, 5:22 PMPage 77 Adobe PageMaker 6.5J/PPC
E-78
Synthesizer
Parameters: PCM set, amp envelope set, attack rate, release rate, pitch envelope set, pitch, level, touch sensitiv-
ity, pan, filter sensitivity, filter level, transpose
Mixer
Channels: 16
Modes: Internal, External, External/Solo, External/Play
Parameters: Program change number, volume, expression, pan, coarse tuning, fine tuning, Effect Send
MIDI: 16-channel multi-timbre receive, General MIDI Level 1
Other Functions
Pitch Bend Range: Adjustable (12 semitones upwards and downwards)
Modulation: Equipped
Transpose: 25 steps (–12 semitones to +12 semitones)
Tuning: Adjustable (A4 = approximately 440Hz ±50 cents)
Terminals
MIDI Terminal: IN, OUT
Sustain/Assignable Jack: Standard jack (sustain, sostenuto, soft, rhythm start/stop)
•WK-1800
Headphones: Stereo standard jack
Output Impedance : 200Ω
Output Voltage : 220mV (RMS) MAX
Line Out (R, L/MONO): Standard jack x 2
Output Impedance : 3kΩ
Output Voltage : 1.5V (RMS) MAX
•WK-1600/1630
Headphones/Output: Stereo standard jack
Output Impedance: 200Ω
Output Voltage: 5.5V (RMS) MAX
Power: 12V DC
Floppy Disk Drive (WK-1800 only)
Type: 3.5" FDD
Formats: 2DD (720KB MS-DOS format)
2HD (1.44MB MS-DOS format)
Functions: Save and load of user tones, user rhythms, sequencer, and registration data; playback of SMF; disk
formatting; file delete; accompaniment pattern style conversion
Power Supply: Dual power supply system
Batteries: Six D-size batteries
Battery Life: Approximately 2 hours continuous operation on alkaline batteries
AC Adapter: AD-12
Auto Power Off: Turns power off approximately six minutes after last key operation. Enabled under battery power
only, can be disabled manually.
Speaker Output: 5W + 5W
Power Consumption: 12V 18W
Dimensions: 122.5 x 42.3 x 16.7 cm (48 1/4 x 16 11/16 x 6 9/16 inch)
Weight (without batteries): Approximately 9.8kg (21.6 lbs) (WK-1800)
Approximately 9.3kg (20.5 lbs) (WK-1600/1630)
733A-E-080A
WK-1800/1600(E)-75~78 03.7.31, 5:22 PMPage 78 Adobe PageMaker 6.5J/PPC
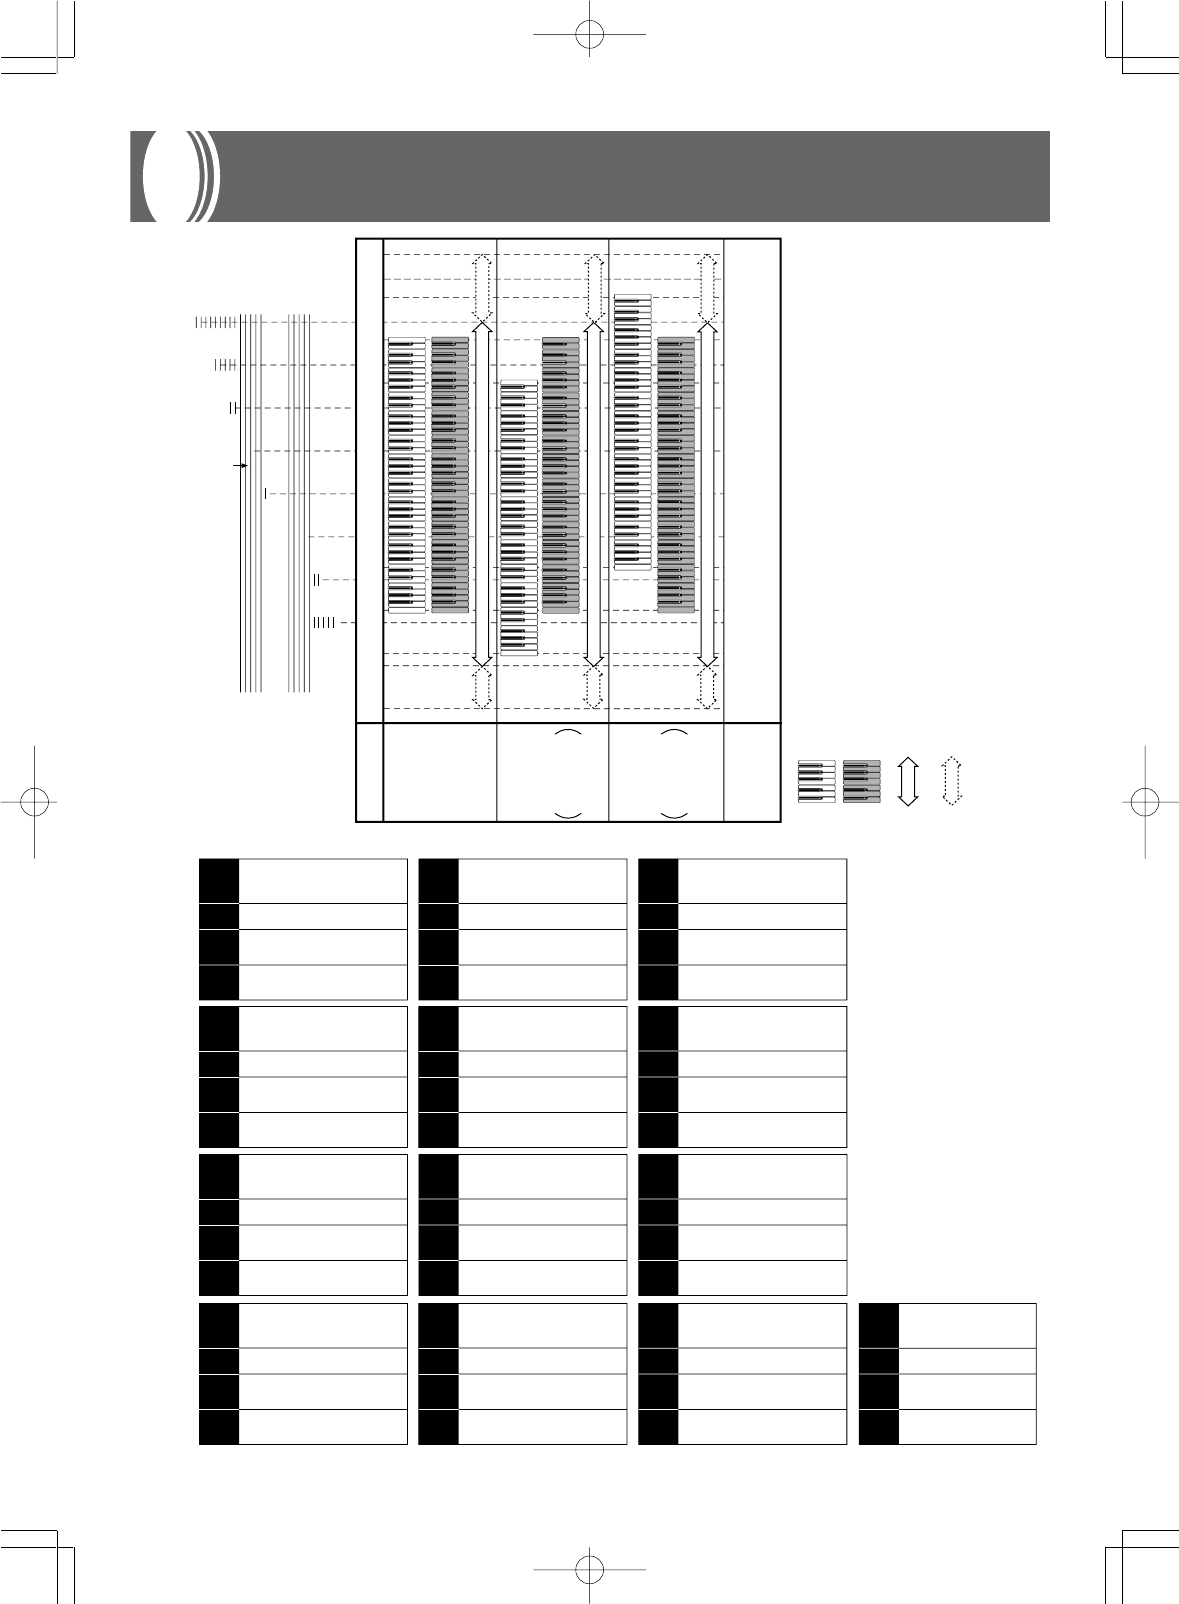
A-1
Appendix
733A-E-081A
Note Table
(1) (4)(3)(2)
(1) (4)(3)(2) (1) (4)(3)(2) (1) (4)(3)(2) (1) (4)(3)(2)
(1) (4)(3)(2) (1) (4)(3)(2) (1) (4)(3)(2) (1) (4)(3)(2)
(1) (4)(3)(2) (1) (4)(3)(2) (1) (4)(3)(2) (1) (4)(3)(2)
000
001
002
003
004
005
006
007
008
009
32
32
16
16
32
32
32
32
32
16
A
A
A
A
A
A
A
A
A
A
A0 - C8
A0 - C8
A0 - C8
A0 - C8
E1 - G7
E1 - G7
F2 - F6
C2 - C7
C4 - C8
C5 - C8
010
011
012
013
014
015
016
017
018
019
16
32
32
32
32
16
16
16
16
32
A
A
A
A
A
A
A
A
A
A
C4 - C6
F3 - F6
C3 - C6
F4 - C7
C4 - F5
C4 - C6
C2 - C7
C2 - C7
C2 - C7
A0 - C8
020
021
022
023
024
025
026
027
028
029
32
16
32
16
32
32
32
32
32
32
A
A
A
A
A
A
A
A
A
A
C2 - C7
F3 - F6
C4 - C6
F3 - F6
E2 - C6
E2 - C6
E2 - D6
E2 - D6
E2 - D6
E2 - D6
030
031
032
033
034
035
036
037
038
039
32
32
32
32
32
32
32
32
32
32
A
A
B
B
B
B
B
B
B
B
E2 - D6
E2 - D6
E1 - G3
E1 - G3
E1 - G3
E1 - G3
E1 - G3
E1 - G3
E1 - G3
E1 - G3
080
081
082
083
084
085
086
087
088
089
16
16
16
16
16
16
16
16
16
32
A
A
A
A
A
A
A
A
A
A
A0 - C8
A0 - C8
C2 - C7
C2 - C7
C2 - C7
C2 - C7
C2 - C7
A0 - C8
C2 - C7
C2 - C7
*120
*121
*122
*123
*124
*125
*126
*127
32
32
16
32
32
32
16
32
D
A
D
D
D
D
D
D
C4 - C5
C4 - C5
C4 - C5
C4 - C5
C4 - C5
C4 - C5
C4 - C5
C4 - C5
090
091
092
093
094
095
096
097
098
099
16
16
16
16
16
16
16
16
16
16
A
A
A
A
A
A
A
A
A
A
C2 - C7
C2 - C7
C2 - C7
C2 - C7
C2 - C7
C2 - C7
C2 - C7
C2 - C7
C2 - C7
C2 - C7
100
101
102
103
104
105
106
107
108
109
16
16
16
16
32
32
32
32
32
16
A
A
A
A
A
A
A
A
A
A
C2 - C7
C2 - C7
C2 - C7
C2 - C7
C3 - F5
C3 - C6
D3 - G5
G3 - C6
C3 - G5
C2 - F5
110
111
112
113
114
*115
*116
*117
*118
*119
16
32
32
32
16
32
32
32
16
32
A
A
A
A
A
D
D
D
D
D
G3 - C7
C3 - C5
C5 - C6
C4 - C5
E3 - E5
C4 - C5
C4 - C5
C4 - C5
C4 - C5
C4 - C5
040
041
042
043
044
045
046
047
048
049
32
32
32
32
32
32
32
32
32
32
A
A
A
B
A
A
A
A
A
A
G3 - C7
C3 - C6
C2 - C5
E1 - G3
E1 - C7
E1 - C7
B0 - G7
C2 - A3
E1 - C7
E1 - C7
050
051
052
053
054
055
056
057
058
059
32
16
32
32
16
16
32
32
32
32
A
A
A
A
A
A
A
A
A
A
C2 - C7
C2 - C7
C3 - G5
C3 - G5
C3 - C6
C3 - C5
A3 - A6
A1 - D5
F1 - G3
A3 - A5
060
061
062
063
064
065
066
067
068
069
16
32
16
16
32
32
32
32
32
32
A
A
A
A
A
A
A
A
A
A
F2 - F5
C2 - C7
C2 - C7
C2 - C7
F3 - D6
C3 - G5
F2 - D5
C2 - G4
A3 - G6
E3 - A5
070
071
072
073
074
075
076
077
078
079
32
32
32
32
32
32
16
32
32
32
A
A
C
A
A
A
A
A
A
A
A 1 - C5
D3 - G6
D5 - C8
C4 - C7
C4 - C7
C4 - C7
C4 - C7
G3 - C6
C4 - C7
C4 - C6
Range Type
Cー1C9C8C7 G7C6C5C4C3C2C1C0E0 E1 E2 G6 G8 G9
D
(Sound Effect)
a
b
c
d
A=440Hz
No scale for tones.
C
"072 PICCOLO"
only
B
Low pitch
instruments
A
(Standard type)
........Playable range (Transpose, when receiving MIDI data)
........Range of keyboard play (SOUND RANGE SHIFT tuned on)
........Range of keyboard play (SOUND RANGE SHIFT tuned off)
........Range in which same note is played in nearest octave as a result of
transpose and MIDI data receive operation.
(Transpose, when receiving MIDI data)
(1):Tone number
(2):Maximum polyphony
(3):Range type
(4):Recommended sound range for General MIDI
❚
NOTES
❚
•The meaning of each range type is described to the right.
•The pitch of tones marked with an asterisk do not change, no matter
which keyboard key is pressed.
•Turning on SOUND RANGE SHIFT (Page E-59) causes range type B
and C tones to shift by one octave.
WK-1800/1600(E)-Appendix 03.7.31, 5:22 PMPage 1 Adobe PageMaker 6.5J/PPC
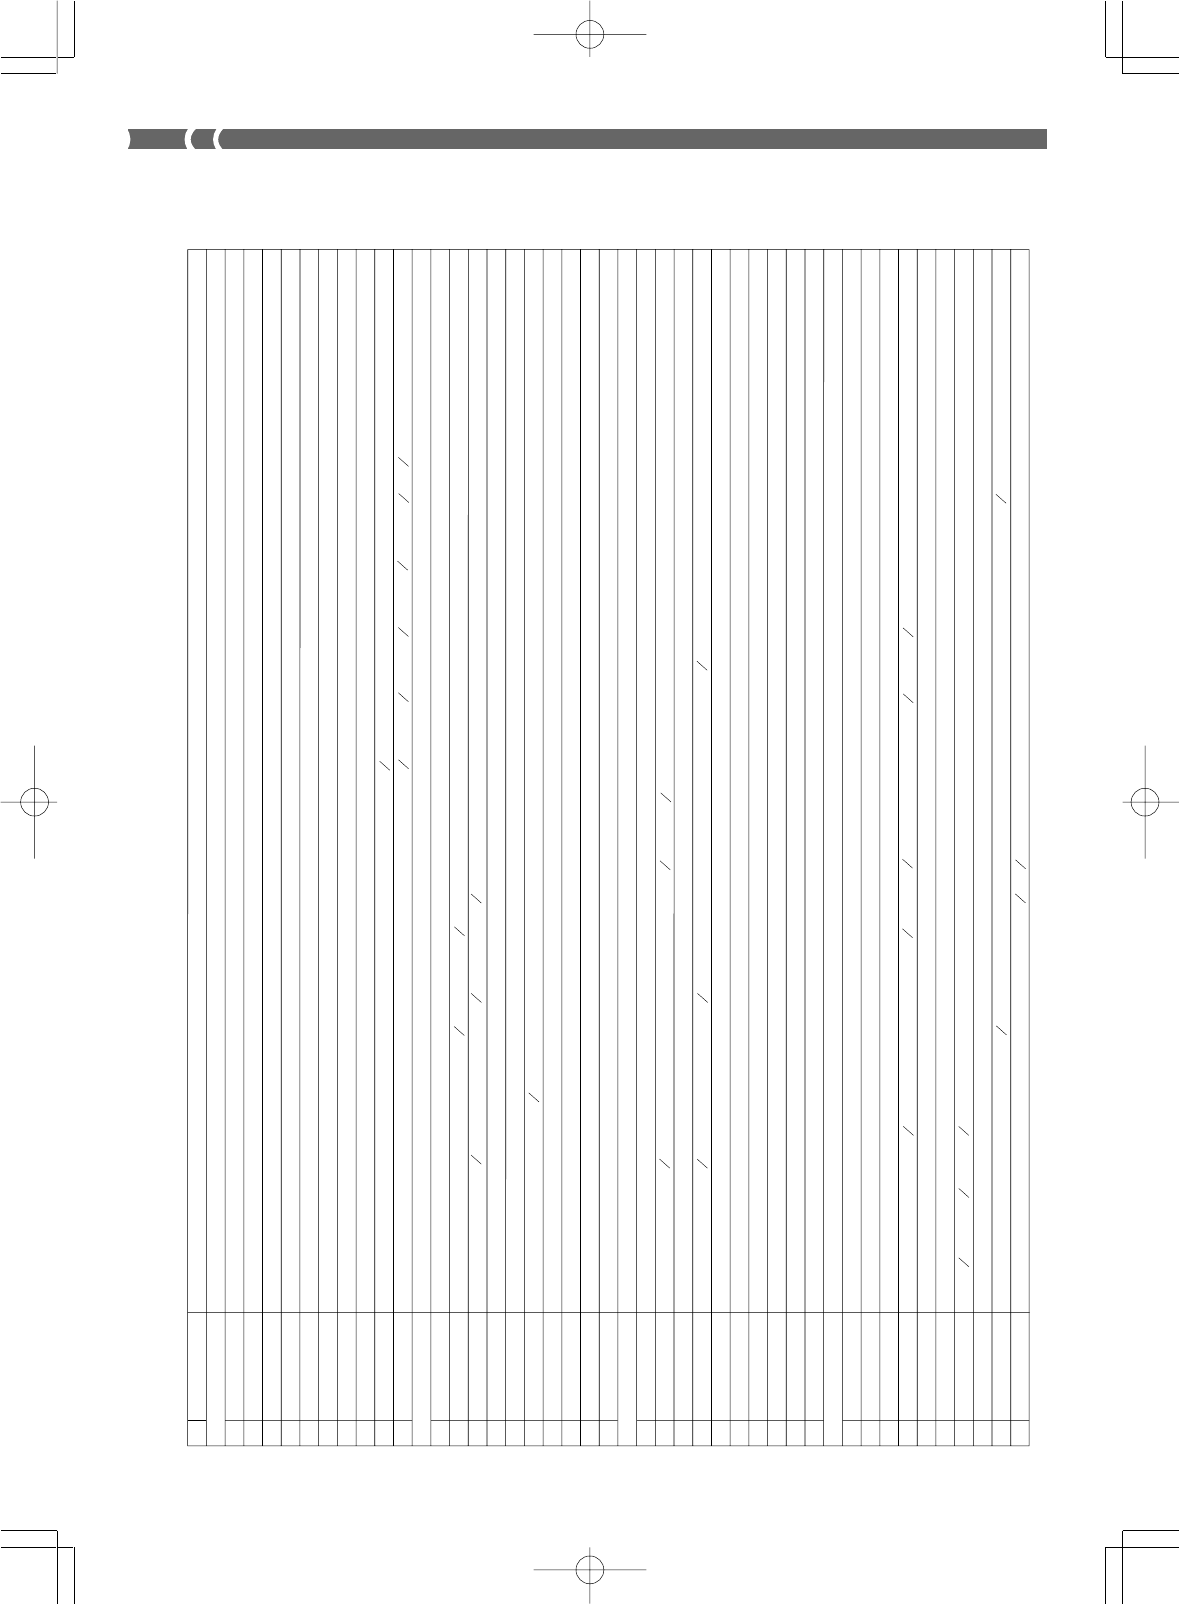
A-2
Free Session Chord Progression Chart: Key of C
No.
000
001
002
003
004
005
006
007
008
009
010
011
012
013
014
015
016
017
018
019
020
021
022
023
024
025
026
027
028
029
030
031
032
033
034
035
036
037
038
039
PATTERN NAME
8 BEAT
8 BEAT 1
8 BEAT 2
8 BEAT BALLAD 1
8 BEAT BALLAD 2
8 BEAT BALLAD 3
PIANO ROCK
POP ROCK 1
POP ROCK 2
70’S 8 BEAT
60’S 8 BEAT
16 BEAT
16 BEAT 1
16 BEAT 2
16 BEAT SHUFFLE
16 BEAT BALLAD 1
16 BEAT BALLAD 2
16 BEAT BALLAD 3
16 BEAT SOUL
BIG BAND ROCK
FUNKY POP 1
FUNKY POP 2
ROCK
SHUFFLE ROCK
8 BEAT ROCK
70’S ROCK
80’S ROCK
HEAVY METAL
R & B
ROCK
50’S R&R
NEW ORLNS R&R
TWIST
POPS I
MODERN R&B
POP
POP SHUFFLE
80’S POP
SOUL POP
WORLD POP
SLOW ROCK
6/8 BALLAD
SOUL BALLAD
ROCK WALTZ
C
CM
7
C
C
CM
7
C
C
C
C
C
CM
7
C
C
CM
7
CM
7
CM
7
CM
7
Cm
C
7
C
C
C
C
C
C
C
7
C
C
C
7
C
C
C
C
C
CM
7
CM
7
C
C
C
C
Am
7
Em
7
E
7
Em
7
Em
Am
7
F
FM
7
FM
7
Am
Gm
Em
7
Em
B
Em
B
E
7
F
F
Am
Bm
7
G B
Asus
Dm
7
5
Dm
7
Am
7
Am
7
F
FM
7
F
C
G
C
CM
7
CM
7
CM
7
Fm
7
B
Am
7
A
Am
7
FM
7
F
F
F
B
Am
C
C
G
6
Am
7
Am
A
E
7
F
G
Dm
7
D
7
C
Em
7
G
7
Am
7
Em
Dm
7
Dm
7
Em
7
F
Fm
Fm
7
Dm
7
C
Dm
C
Am
G
7
C
7
F
FM
7
Dsus
7
Em G
Dm
Am
7
G
Gm
G
7
Gm
7
Asus
Dm
7
F
Am
FM
7
Em D
A
7
Gm
7
Dm
7
Gm
7
Cm
F
7
C
F
7
F G
F G
B
F
7
G
F
F
7
F
F
C
Dm
7
Gm
7
G
F
G
Gm
7
F
A
7
C
C
7
Am
Dm
7
G
7
F
Fm
7
FM
7
Dm
7
Dm
7
C
7
Gm
Am
Am
C
F
A
7
F
F
F G
F G
F
C
G
Dm
Em
7
F
Dm
7
Gsus
Gsus
C
C
G
Em
7
Em
7
FM
7
G
7
Am
7
F G
CM
7
A
C
7
Dm
7
5
C
Em
Em
C
C
7
F
C
C
7
C
Dm
G
C
C
CM
7
G
Em
F
6
C
E
7
Am
7
Ab
G
7
G
G
7
C
7
C
A
7
Dm
7
Em
7
C
D
7
Fm
Gsus
F
F
B
G
G
Am
Am
C
Am
F
dim
Am
Dm
7
Bb
Am
G
F
F
Dm
7
F G
Dm
7
Gm
7
A
M
7
E
G
7
G
7
G
7
C
Dm
F
G
7
Am
G
7
G
7
G
E
7
C
G
G
6
A
M
7
G
Dm
7
C G
Am
7
G
7
Dm
7
C
G
7
C
F G
Em
7
5
A
F
7
Am
F G
C
F
7
F
7
F
7
F
Am
F
F
FM
7
G
7
A
7
C
7
Dm
Em
7
G
7
F
C
Em
Em
7
Fm
7
C
Am
7
CM
7
E
C
7
F
7
Em
FM
7
B
C
7
B
C
C
7
C
E
7
C
C
Dm
7
CM
7
D
7
F
Fm
7
F
m
7
Am
Am
7
F G
D
7
A
F
7
F
Em
7
F
F
Am
F
F G
G
7
G
C
B
7
C
F
Dm
7
F G
Gm
7
A
M
7
E
F
7
Dm
7
Am
D
7
B
C
A
A
M
7
E
7
F A
Dm
7
Em
7
G
7
G
D
7
C
7
A
F G
Em
7
G
Dm
F
G
7
B
A
A
7
G B
G
7
Dm
7
C
Em
CM
7
F
Gsus
Dm
7
5
C
G
FM
7
C
Csus
Dm
C
Gm
7
Gsus
D
7
C
C
G
7
A
G
G
7
G F
Em
7
C
G
7
C
Csus
7
G
G
7
Gsus
7
C
Em
7
F G
G A
B
Em
7
Dm
7
F
C
C
7
C
F
m
7
Am
C
G
Dm
7
Em
7
C
A
Bm
7
5
B
7
G A
FM
7
G
B
A
E
7
Em
7
Am
F G
E
Am
7
A
7
C D
F G
Gm
7
Dm
7
Dm
C
G
7
C D
F
6
Dm
F
dim
G A
C G
Am G
A
7
G
7
D
7
G
7
CF
7
C Gau
g
733A-E-082A
WK-1800/1600(E)-Appendix 03.7.31, 5:22 PMPage 2 Adobe PageMaker 6.5J/PPC
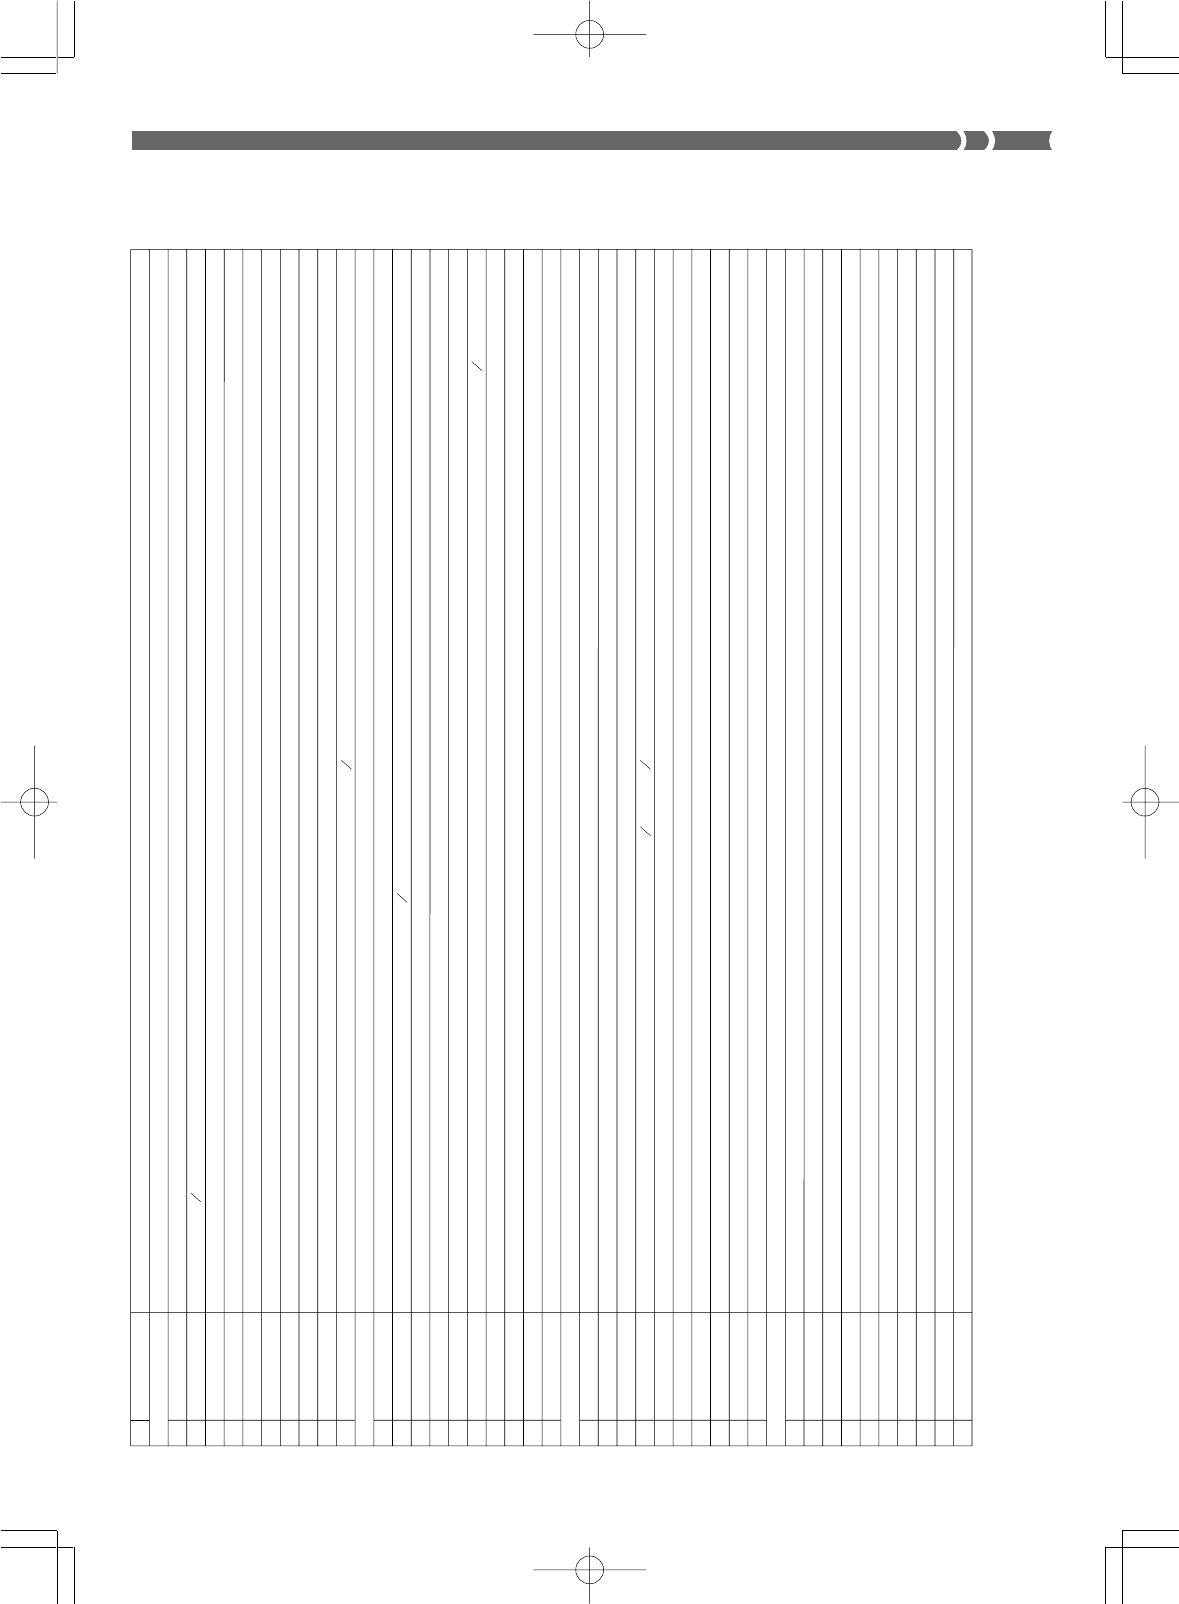
A-3
No.
040
041
042
043
044
045
046
047
048
049
050
051
052
053
054
055
056
057
058
059
060
061
062
063
064
065
066
067
068
069
070
071
072
073
074
075
076
077
078
079
PATTERN NAME
POPS II
70’S DISCO
80’S DISCO
JUNGLE
TECHNO
RAP
DANCE FLOOR
HOUSE
DANCE
OLDIES POP
OLDIES SHUFFLE
JAZZ
BIG BAND 1
BIG BAND 2
SWING 1
SWING 2
SWING 3
SLOW SWING
ORCH SWING
JAZZ COMBO 1
JAZZ WALTZ 1
JAZZ WALTZ 2
EUROPEAN
POLKA 1
POLKA 2
MARCH 1
MARCH 2
MARCH 3
WALTZ 1
FRENCH WALTZ
BALL WALTZ
VIENNESE WALTZ
TANGO
LATIN I
BOSSA NOVA 1
BOSSA NOVA 2
RHUMBA 1
RHUMBA 2
MAMBO
SAMBA 1
SAMBA 2
BOLERO
CHA-CHA-CHA
MERENGUE
C
C
Csus
7
CM
7
Cm
CM
7
Cm
C
C
C
C
CM
7
CM
7
C
C
C
C
C
C
C
C
C
C
C
C
C
C
CM
7
C
Cm
CM
7
C
C
C
Cm
CM
7
C
C
C
C
Em
7
D
7
Gm
B
Am
Am
Am
7
FM
7
CM
7
E
7
Am
7
CM
7
C
dim
Bm
7
5
Dm
C
7
CM
7
Dm
Em
7
CmM
7
CM
7
CmM
7
Cm
7
E
C
6
Dm
7
FM
7
Esus
7
Cm
Am
F
F
Dm
CM
7
Dm
7
Am
7
A
7
Dm
7
Am
7
Dm
Bdim
E
7
G
7
F
F
F
Am
7
Em
E
m
7
Cm
7
FM
7
Bm
7
5
F
Dm
7
Cm
7
Bm
7
Dm
7
Em
7
G
CM
7
G
F G
Gm
G
G
CM
7
G
7
Am
7
G
7
C
G
7
C
D
dim
E
7
Am
7
G
7
C
G
7
C
C
Dm
7
Am
7
5
E
7
G
7
Am
7
5
E
7
G
7
C
6
Fm
F
7
sus
4
Em
7
Fm
C
B
C
Dm
7
Faug
CM
7
Em
7
F
Dm
7
C
Dm
7
Em
Am
7
A
7
F
C
G
7
C
Dm
7
F
G
Fm
6
Em
7
Am
7
C
Dm
7
Fm
7
Am
7
C
Dm
7
C
C
Em
Gm
B
G
7
Am
Am
7
A
7
FM
7
G
7
Am
7
Em
7
C
7
D
7
Gm
7
C
G
7
C
G
7
CM
7
E
m
7
G
7
Fm
6
D
7
A
7
G
7
C
6
Dm
7
Bsus
7
Cm
Em
Cm
F
Dm
7
C
7
Dm
7
D
7
Dm
7
C
Dm
7
FM
7
FM
7
Gm
7
C
7
D
7
C
D
7
G
Faug
C
Am
7
Dm
G
7
Dm
7
GM
7
Dm
7
CM
7
G
7
GM
7
Dm
7
C
G
Dm
7
Gsus
G
G
7
F
G
7
D
7
F
A
7
G
7
Dm
7
B
7
C
7
FM
7
C
G
7
C
7
G
7
Am
7
Dm
7
Cm
G
7
C
7
G
7
C
6
Am
7
G
7
G
7
G
Esus
7
Gm
7
F
A
Am
C
Fm
6
Dm
7
CM
7
G
D
7
C
G
7
C
F
Fm
7
F
F
C
C
F
m
7
5
F
G
7
G
7
FM
7
C
D
7
C
FM
7
C
Dm
7
G
C
DmM
7
G
7
G
7
Em
7
5
A
7
Fm
B
7
G
7
C
7
FM
7
Fm
CM
7
C
7
F
G
7
Asus
7
Gsus
B
Am
Am
Dm
7
FM
7
Em
7
F
6
Dm
7
Em
E
m
7
C
C
F
F
G
C
G
7
B
7
Dm
7
F
Fm
7
B
7
Em
7
G
F
CM
7
Dm
Fm
7
Am
7
Fm
6
G
7
A
7
E
m
7
C
Fm
C
G
7
Fm
Em
A
7
Dsus
7
C
Dm
7
G
F G
Em
7
Dm
7
Em
7
C
D
7
A
7
G
7
F
C
G
7
Dm
Em
7
Dm
7
Em
7
Em
7
A
7
Dm
7
B
G
7
G
7
A
7
G
E
7
A
7
G
7
D
M
7
F
dim
G
G
G
A
7
Gsus
7
E
m
7
A
7
Dm
7
G
7
Bsus
7
Csus
C
CM
7
Dm
7
C
Dm
7
Dm
7
C
Dm
7
5
C
C E
C
C
Dm
7
G
7
Dm
7
Dm
7
C
C
C
6
G
7
G
7
G
7
G
7
G
7
C
Am
G
7
G
7
CM
7
G
7
G
7
G
7
F G
CM
7
C
Em
7
C G
C
6
C
CM
7
Dm
7
Am
7
E
7
D
7
A
7
Gaug
G
7
Dm
7
Dm
7
G
7
Dm
7
G
7
G
7
C
G
7
CAm
7
Dm
7
G
7
CEm
7
5
F
6
Fm
6C G
G
7
C
733A-E-083A
WK-1800/1600(E)-Appendix 03.7.31, 5:22 PMPage 3 Adobe PageMaker 6.5J/PPC
A-4
No.
080
081
082
083
084
085
086
087
088
089
090
091
092
093
094
095
096
097
098
099
100
101
102
103
104
105
106
107
108
109
110
111
112
113
114
115
116
117
118
119
PATTERN NAME
LATIN II / VARIOUS I
SALSA
PASODOBLE
REGGAE 1
REGGAE 2
BEGUINE
SKA
EURO FOX
BALLROOM FOX
QUICKSTEP
FOX TROT
VARIOUS II
FAST GOSPEL
SLOW GOSPEL
CHICAGO BLUES
BLUEGRASS
COUNTRY
50’S BALLAD
HAWAIIAN
BROADWAY
ADANI
BALADI
FOR PIANO I
PIANO BALLAD 1
PIANO BALLAD 2
PIANO BALLAD 3
EP BALLAD 1
EP BALLAD 2
BLUES BALLAD
MELLOW JAZZ
JAZZ COMBO 2
RAGTIME
BOOGIE-WOOGIE
FOR PIANO II
ARPEGGIO 1
ARPEGGIO 2
ARPEGGIO 3
PIANO BALLAD 4
6/8 MARCH
MARCH 4
2 BEAT
WALTZ 2
WALTZ 3
WALTZ 4
C
C
C
C
C
C
C
C
C
C
C
C
C
7
C
C
C
C
C
C
C
C
C
C
C
CM
7
CM
7
CM
7
C
7
C
C
C
C
C
CM
7
C
C
C
CM
7
CM
7
CM
7
C
6
F
Dm
Dm
7
Am
C
7
F
C
dim
F G
C
7
E
F
G
C
aug
E
7
B
Cm
7
CM
7
Am
7
FM
7
FM
7
F
7
C
7
Caug
FM
7
F
E
F
F
7
Em
7
Dm
7
D
C
Em
G
7
Dm
7
F
C
Dm
C
F
6
C
F
F
Dm
7
F
G
Am
F
Dm
7
C
7
Dm
7
CM
7
Em
7
C
7
F
C
6
Em
7
C
F
F
G
C
Am
G
7
FM
7
G
7
C
G
Dm
C
G
7
C
G
7
G
7
F G
C
G
C
G
7
Am
C
G
7
C
6
D
7
A
7
F
dim
C
7
FM
7
G
Dm
7
C
C
7
CM
7
Dm
7
C
C
G
Faug
C
C
C
F
7
C
Em
F
F
Dm
7
C
C
G
C
C
FM
7
CM
7
FM
7
Dm
7
F
7
Dm
7
F
F
C
C
G
7
C
F
7
FM
7
Am
7
Dm
7
G
7
F
Dm
Am
Am
F
C
dim
D
7
Gsus
7
F
Dm
G
G
7
F
B
Cm
7
Em
7
Am
7
G
7
Fdin
G
7
Faug
FM
7
F
FM
7
Fm
7
Fm
7
G
7
CM
7
C
Em
C
Gm
7
Am
7
C
Dm
7
Gsus
7
G
7
C
7
C
G
7
C
G
7
A
aug
G
D
G
F
Dm
7
Dm
7
Dm
7
CM
7
CM
7
C
7
C
C
F
6
Em
7
Dm
7
Fm
7
G
Em
7
Dm
7
E
7
Em
7
C
6
G
Dm
C
7
D
7
G
G
7
G
7
C
G
C
C
C
G
Em
7
C
Em
7
G
7
G
7
FM
7
C
Faug
A
7
G
7
Em
7
A
7
D
7
Am
7
C
C
C
F
FM
7
G
7
C
Gm
7
C
C
7
E
G
7
C
F
G
G
7
C
A
7
E
M
7
Fm
7
C
Em
7
Dm
7
Em
7
Dm
7
C
7
Dm
Dm
7
Dm
7
C
A
7
C
Dm
7
FM
7
Dm
7
C
6
Dm
Fm
Fm
6
C
7
C
7
E
F
6
F
7
G
F
C
7
Dm
7
F
G
7
CM
7
Am
7
G
7
A
7
G
7
F
G
G
7
G
7
Dm
7
Dm
7
Em
C
C
FM
7
F
C
C
7
C
C
F
F
G
7
B
C
7
Dm
7
CM
7
Dm
7
C
7
F
dim
C
Em
7
Em
7
G
7
F
D
7
Fm
7
D
G
7
Dm
Am
B
7
Dm
7
5
C G
F
F
Csus
C
C
6
Em
7
G
7
D
7
A
7
A
7
CM
7
Dm
7
C
G
Dm
7
C G
C G
G
7
C
C
C
C
E
M
7
FM
7
FM
7
Em
7
G
Dm
7
Dm
7
C
C
Em
7
CM
7
G
7
Dm
G
7
GM
7
D
7
C
G
7
G
7
G
F
Em
7
G
7
A
7
C
D
7
D
7
G
CM
7
Em
C
G
7
G
7
C
C
C
B
Dm
7
Em
7
Dm
7
C
7
CM
7
CM
7
C
Dm
7
C
6
F G
C
C
C
Em
7
A
7
G
7
F
G
7
G
7
Dm
7
C
Fm
7
Dm
7
Em
7
F
dim
G
7
Dm
Em
7
Em
7
A
7
Dm
7
Em
7
Em
Dm
7
Fm
7
Dm
7
G
7
A
7
Dm
Em
7
G
7
D
7
C
Dm
7
C
FM
7
C
C
7
G
7
Dm
Em
7
D
F
CM
7
Em
Dm
7
C
Fm
Am
7
F G
Em
7
D
Dm
7
Dm
7
FM
7
G
7
G
7
Em
7
C
Em
7
Dm
7
A
7
G
7
Dm
7
C
G
7
C
733A-E-084A
WK-1800/1600(E)-Appendix 03.7.31, 5:22 PMPage 4 Adobe PageMaker 6.5J/PPC
A-5
➝
Drum Assignment List
“ ” indicates the same sound as STANDARD SET.
Key/Note Number STANDARD SET ROOM SET POWER SET ELECTRONIC SET
HIGH Q
SLAP
SCRATCH PUSH
SCRATCH PULL
STICKS
SQUARE CLICK
METRONOME CLICK
METRONOME BELL
STANDARD KICK 2
STANDARD KICK 1
SIDE STICK
STANDARD SNARE 1
HAND CLAP
STANDARD SNARE 2
LOW TOM 2
CLOSED HI-HAT
LOW TOM 1
PEDAL HI-HAT
MID TOM 2
OPEN HI-HAT
MID TOM 1
HIGH TOM 2
CRASH CYMBAL 1
HIGH TOM 1
RIDE CYMBAL 1
CHINESE CYMBAL
RIDE BELL
TAMBOURINE
SPLASH CYMBAL
COWBELL
CRASH CYMBAL 2
VIBRA-SLAP
RIDE CYMBAL 2
HIGH BONGO
LOW BONGO
MUTE HIGH CONGA
OPEN HIGH CONGA
LOW CONGA
HIGH TIMBALE
LOW TIMBALE
HIGH AGOGO
LOW AGOGO
CABASA
MARACAS
SHORT HI WHISTLE
LONG LOW WHISTLE
SHORT GUIRO
LONG GUIRO
CLAVES
HIGH WOOD BLOCK
LOW WOOD BLOCK
MUTE CUICA
OPEN CUICA
MUTE TRIANGLE
OPEN TRIANGLE
SHAKER
JINGLE BELL
BELL TREE
CASTANETS
MUTE SURDO
OPEN SURDO
-
←
←
←
←
←
←
←
←
POWER KICK 2
POWER KICK 1
←
ROOM SNARE 1
←
ROOM SNARE 2
ROOM LOW TOM 2
←
ROOM LOW TOM 1
←
ROOM MID TOM 2
←
ROOM MID TOM 1
ROOM HI TOM 2
←
ROOM HI TOM 1
←
←
←
←
←
←
←
←
←
←
←
←
←
←
←
←
←
←
←
←
←
←
←
←
←
←
←
←
←
←
←
←
←
←
←
←
←
-
←
←
←
←
←
←
←
←
POWER KICK 2
POWER KICK 1
←
POWER SNARE 1
←
POWER SNARE 2
ROOM LOW TOM 2
←
ROOM LOW TOM 1
←
ROOM MID TOM 2
←
ROOM MID TOM 1
ROOM HI TOM 2
←
ROOM HI TOM 1
←
←
←
←
←
←
←
←
←
←
←
←
←
←
←
←
←
←
←
←
←
←
←
←
←
←
←
←
←
←
←
←
←
←
←
←
←
-
←
←
←
←
←
←
←
←
POWER KICK 2
ELEC KICK
←
ELEC SNARE
←
DANCE SNARE
ELEC LOW TOM 2
←
ELEC LOW TOM 1
←
ELEC MID TOM 2
←
ELEC MID TOM 1
ELEC HI TOM 2
←
ELEC HI TOM 1
←
REVERSE CYMBAL
←
←
←
←
←
←
←
←
←
←
←
←
←
←
←
←
←
←
←
←
←
←
←
←
←
←
←
←
←
←
←
←
←
←
←
-
28
29
31
33
35
36
38
40
41
43
45
47
48
50
52
53
55
57
59
60
62
64
65
67
69
71
72
74
76
77
79
81
83
84
86
88
E1
F1
G1
A1
B1
C2
D2
E2
F2
G2
A2
B2
C3
D3
E3
F3
G3
A3
B3
C4
D4
E4
F4
G4
A4
B4
C5
D5
E5
F5
G5
A5
B5
C6
D6
E6
E
b
1
F#1
A
b
1
B
b
1
C#2
E
b
2
F#2
A
b
2
B
b
2
C#3
E
b
3
F#3
A
b
3
B
b
3
C#4
E
b
4
F#4
A
b
4
B
b
4
C#5
E
b
5
F#5
A
b
5
B
b
5
C#6
E
b
6
27
30
32
34
37
39
42
44
46
49
51
54
56
58
61
63
66
68
70
73
75
78
80
82
85
87
Key/Note Number
28
29
31
33
35
36
38
40
41
43
45
47
48
50
52
53
55
57
59
60
62
64
65
67
69
71
72
74
76
77
79
81
83
84
86
88
E1
F1
G1
A1
B1
C2
D2
E2
F2
G2
A2
B2
C3
D3
E3
F3
G3
A3
B3
C4
D4
E4
F4
G4
A4
B4
C5
D5
E5
F5
G5
A5
B5
C6
D6
E6
E
b
1
F#1
A
b
1
B
b
1
C#2
E
b
2
F#2
A
b
2
B
b
2
C#3
E
b
3
F#3
A
b
3
B
b
3
C#4
E
b
4
F#4
A
b
4
B
b
4
C#5
E
b
5
F#5
A
b
5
B
b
5
C#6
E
b
6
27
30
32
34
37
39
42
44
46
49
51
54
56
58
61
63
66
68
70
73
75
78
80
82
85
87
SYNTH SET JAZZ SET BRUSH SET ORCHESTRA SET
←
←
←
←
←
←
←
←
SYNTH KICK
SYNTH KICK
SYNTH RIM SHOT
SYNTH SNARE
←
SYNTH SNARE
SYNTH LOW TOM 2
SYNTH CHH 1
SYNTH LOW TOM 1
SYNTH CHH 2
SYNTH MID TOM 2
SYNTH OHH
SYNTH MID TOM 1
SYNTH HI TOM 2
SYNTH CYMBAL
SYNTH HI TOM 1
←
←
←
←
←
SYNTH COWBELL
←
←
←
←
←
SYNTH HIGH CONGA
SYNTH MID CONGA
SYNTH LOW CONGA
←
←
←
←
←
SYNTH MARACAS
←
←
←
←
SYNTH CLAVES
←
←
←
←
←
←
←
←
←
←
←
←
-
←
←
←
←
←
←
←
←
JAZZ KICK 2
JAZZ KICK 1
←
JAZZ SNARE 1
←
JAZZ SNARE 2
←
←
←
←
←
←
←
←
←
←
←
←
←
←
←
←
←
←
←
←
←
←
←
←
←
←
←
←
←
←
←
←
←
←
←
←
←
←
←
←
←
←
←
←
←
←
←
-
←
←
←
←
←
←
←
←
JAZZ KICK 2
JAZZ KICK 1
←
BRUSH TAP
BRUSH SLAP
BRUSH SWIRL
←
←
←
←
←
←
←
←
←
←
←
←
←
←
←
←
←
←
←
←
←
←
←
←
←
←
←
←
←
←
←
←
←
←
←
←
←
←
←
←
←
←
←
←
←
←
←
-
CLOSED HI-HAT
PEDAL HI-HAT
OPEN HI-HAT
RIDE CYMBAL 1
←
←
←
←
JAZZ KICK 1
CONCERT BASS DRUM
←
CONCERT SNARE
CASTANETS
CONCERT SNARE
TIMPANI F
TIMPANI F#
TIMPANI G
TIMPANI A
TIMPANI A
TIMPANI B
TIMPANI B
TIMPANI c
TIMPANI c#
TIMPANI d
TIMPANI e
TIMPANI e
TIMPANI f
←
←
←
CONCERT CYMBAL 2
←
CONCERT CYMBAL 1
←
←
←
←
←
←
←
←
←
←
←
←
←
←
←
←
←
←
←
←
←
←
←
←
←
←
←
←
APPLAUSE
733A-E-085A
WK-1800/1600(E)-Appendix 03.7.31, 5:22 PMPage 5 Adobe PageMaker 6.5J/PPC
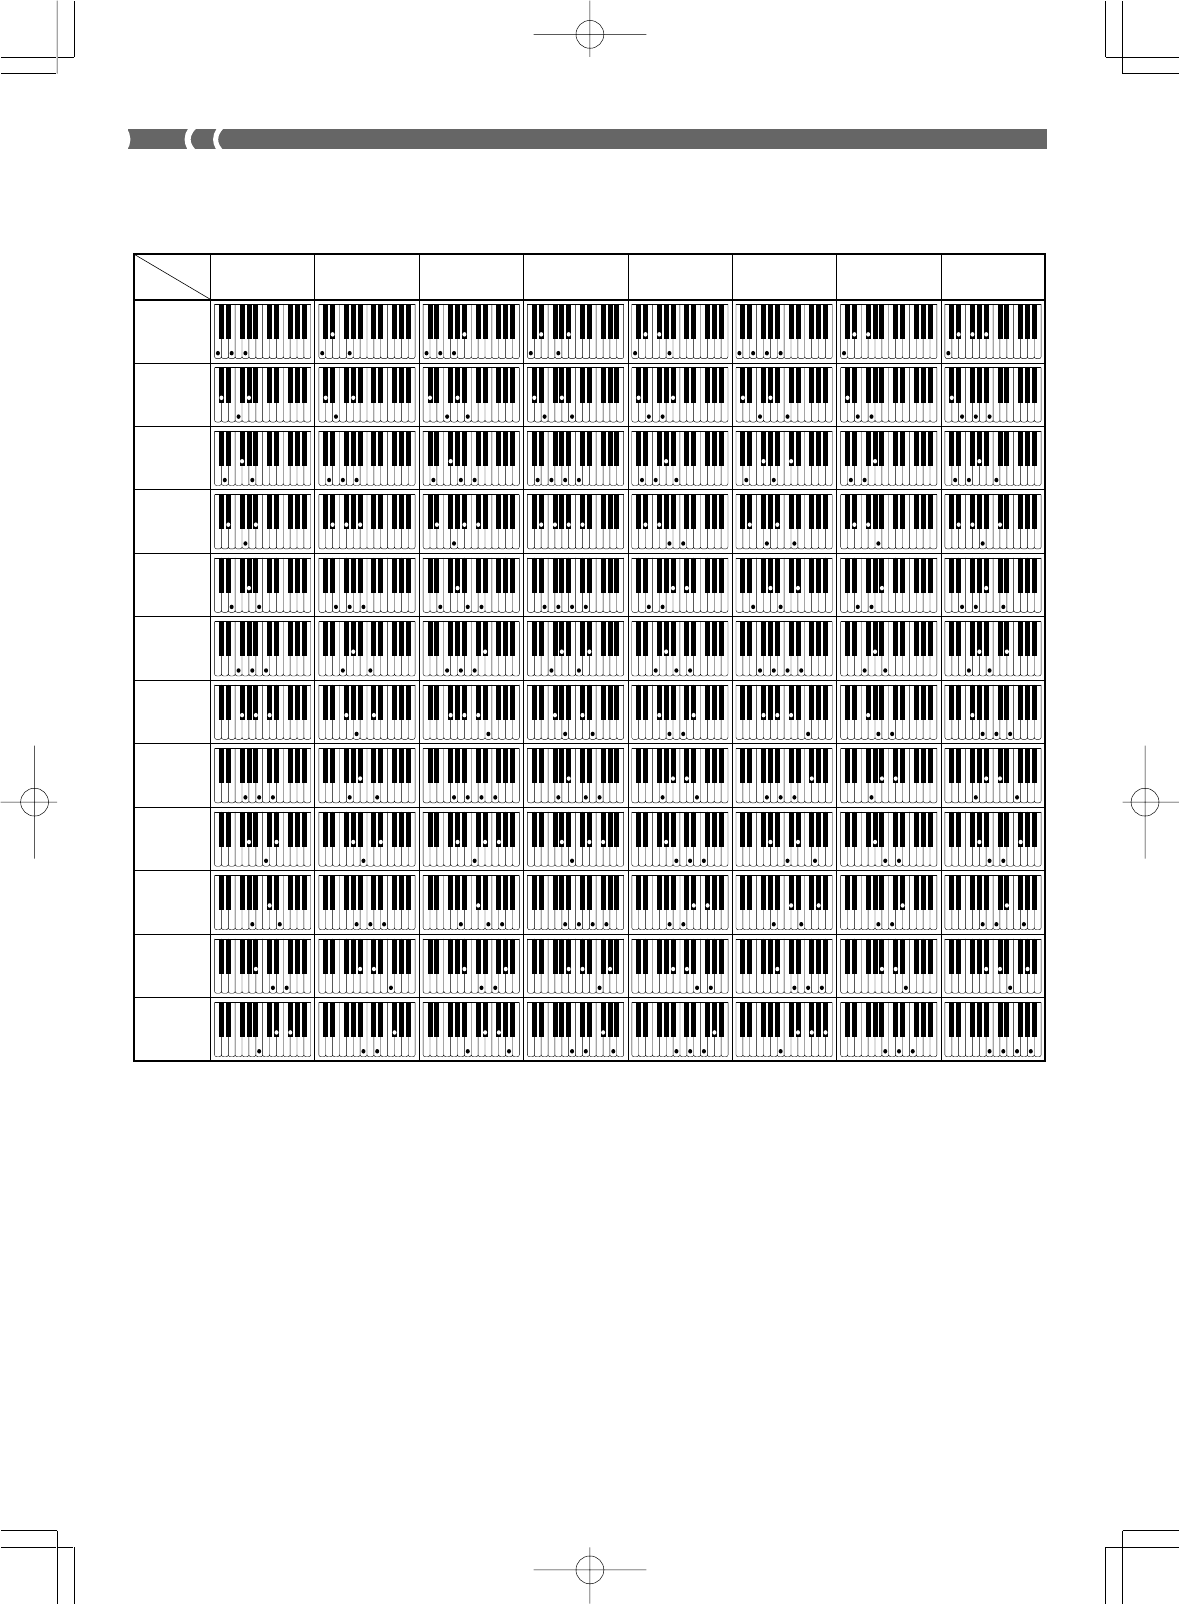
A-6
Fingered Chord Chart
733A-E-086A
dim m7
-5
M7
Mm7m7 dim7
Chord
Type
Root
C
D
E
F
G
A
B
C /(D )
(D )/E
F /(G )
(G )/A
(A )/B
❚
NOTE
❚
You can use the above fingerings to finger chords within the accompaniment keyboard range.
WK-1800/1600(E)-Appendix 03.7.31, 5:22 PMPage 6 Adobe PageMaker 6.5J/PPC
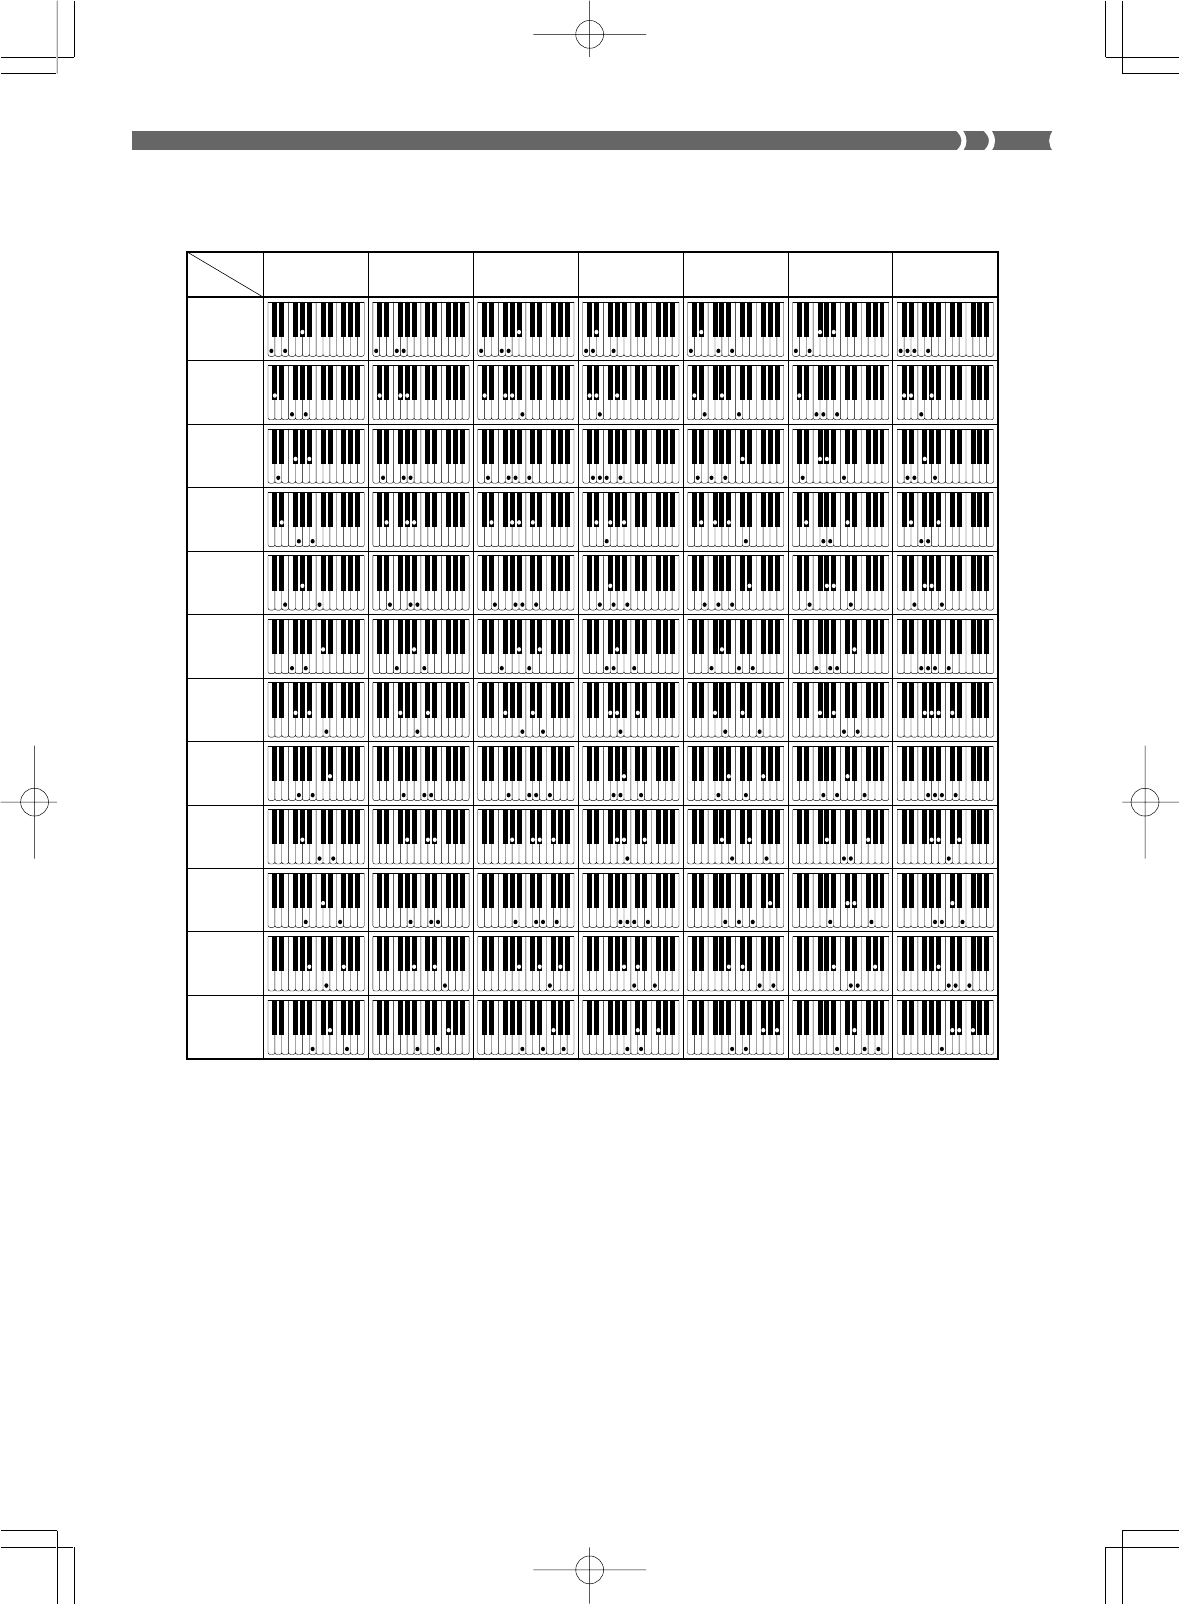
A-7
733A-E-087A
aug sus4
C
D
E
F
G
A
B
C /(D )
(D )/E
F /(G )
(G )/A
(A )/B
m add9
7sus4 mM7 7-5 add9
Chord
Type
Root
WK-1800/1600(E)-Appendix 03.7.31, 5:22 PMPage 7 Adobe PageMaker 6.5J/PPC
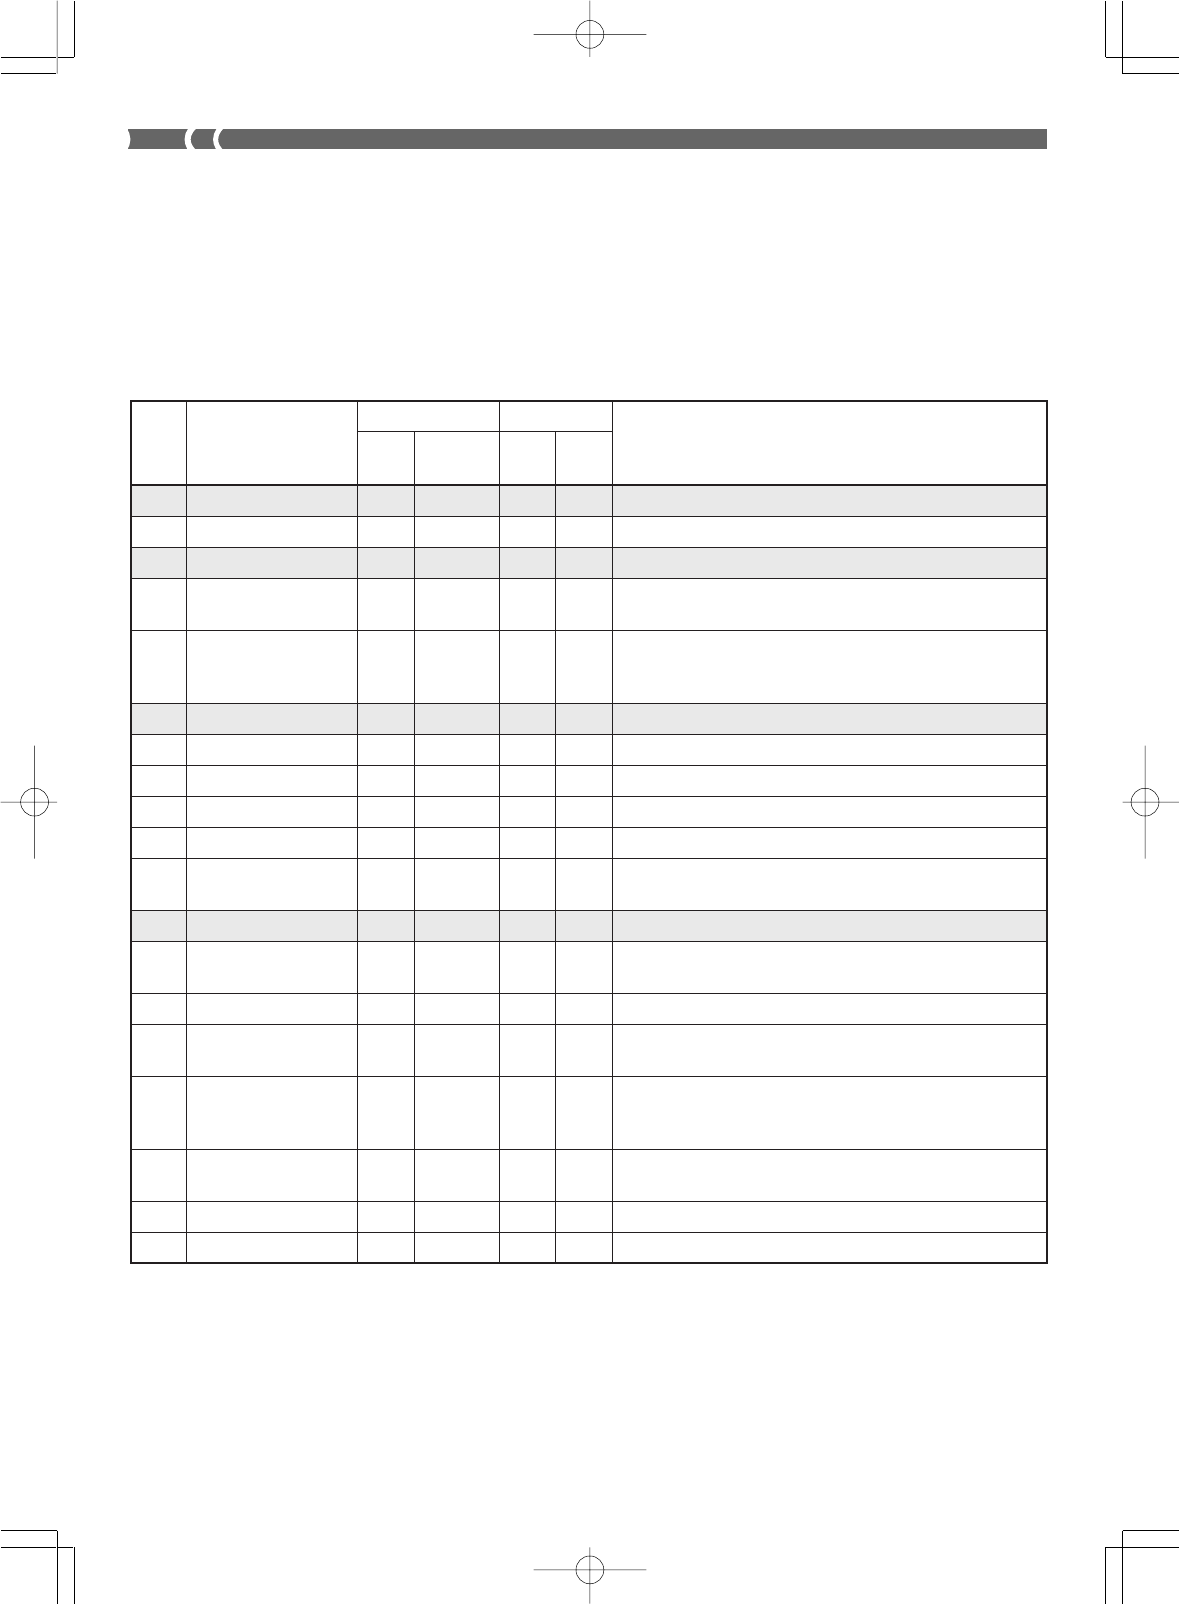
A-8
733A-E-088A
Chord Conversion Table
•The applicable chord conversion table depends on the particular combination of elements and parts. The symbol 쑗 in the table
below indicates that a chord table is applicable, while ҂ indicates that a chord table is not applicable.
•The explanations in the “Description” column all assume the following conditions for the recorded accompaniment pattern.
Root: C
Major chords, unless specified otherwise.
•The explanations in the “Description” column describe how the recorded accompaniment (12 notes from C to B) are modified
when an accompaniment chord is specified.
•The shaded rows are the default numbers for each element and part.
Intro,
Ending
Bass Chord 1
Chord 2
Chord 3
Normal, Variation,
Normal/Fill-in,
Variation/Fill-in
No. Names
Element Names Part Names
Description
00 Basic Bass ҂쑗쑗҂Normally used for the bass part.
01 7th Bass ҂쑗쑗҂Used for a bass part recorded by a 7th chord.
02 Basic Chord ҂쑗҂쑗Normally used for the chord part.
03 Basic Chord2 ҂쑗҂쑗A variation of Number 02 with different conversion when Gm7/C
is specified during accompaniment.
Specifying a 7th chord during play transforms the 5th note of the
04 Variation Chord1 ҂쑗҂쑗scale to the 7th note of the scale. In the case of C7, for example, G
becomes B.
05 Variation Chord2 ҂쑗҂쑗Variation of number 04 (Variation Chord 1)
06 7th Chord ҂쑗҂쑗Used for the chord part when a 7th chord is recorded.
07 Minor Chord ҂쑗҂쑗Used for the chord part when a minor chord is recorded.
08 Major Phrase ҂쑗҂쑗Used for the chord part when a phrase is recorded in a major scale.
09 Minor Bass Phrase ҂쑗쑗҂Used for the bass part when a phrase is recorded in a minor scale.
10 Penta Phrase ҂쑗҂쑗Used for the chord part when a phrase is recorded in a penta scale
(CDEGA).
11 Natural Minor 쑗҂쑗쑗Transforms to natural minor when a minor chord is played.
12 Melodic Minor 쑗҂쑗쑗
Transforms to melodic minor (ascending) when a minor chord is
played.
13 Harmonic Minor 쑗҂쑗쑗Transforms to harmonic minor when a minor chord is played.
14 No Change 쑗҂쑗쑗
Original chord as recorded in response to chord that is played,
without transformation to minor or major.
Variation of number 12 (Melodic Minor). Playing a major chord
15 Melodic Minor 2 쑗҂쑗쑗causes recorded B notes to be transformed to B, while playing a
minor chord plays B as it is.
16 Dorian Scale 쑗҂쑗쑗
Play of a minor chord is transformed to the Dorian scale. The Dorian
scale lowers the major scale E and B one semitone.
17 Minor ➛ Major 쑗҂쑗쑗Used for intro and ending recorded with minor chords.
18 Tension chord ҂쑗҂쑗Used for the tension chord part used in jazz, bossa nova, etc.
WK-1800/1600(E)-Appendix 03.7.31, 5:22 PMPage 8 Adobe PageMaker 6.5J/PPC
733A-E-089A
WK-1800/1600(E)-Appendix 03.7.31, 5:22 PMPage 9 Adobe PageMaker 6.5J/PPC
733A-E-090A
WK-1800/1600(E)-Appendix 03.7.31, 5:22 PMPage 10 Adobe PageMaker 6.5J/PPC

733A-E-091A
WK-1800/1600(E)-Appendix 03.7.31, 5:22 PMPage 11 Adobe PageMaker 6.5J/PPC

733A-E-092A
WK-1800/1600(E)-Appendix 03.7.31, 5:22 PMPage 12 Adobe PageMaker 6.5J/PPC

733A-E-093A
WK-1800/1600(E)-Appendix 03.7.31, 5:22 PMPage 13 Adobe PageMaker 6.5J/PPC
A-2
733A-E-094A
Basic Default
Channel Changed
Default
Mode Messages
Altered
Note
Number: True voice
Velocity Note ON
Note OFF
After Key's
Touch Ch's
Pitch Bender
0, 32
1
6, 38
7
10
Control 11
Change 64
66
67
91
100, 101
Function Transmitted Recognized Remarks
1 - 16
*
1
1 - 16
Mode 3
X
❊❊❊❊❊❊❊❊❊❊❊❊❊❊
28 - 103
❊❊❊❊❊❊❊❊❊❊❊❊❊❊
O
9nH v = 1 - 127
X
9nH v = 0
X
X
O
O
O
O*
4
O
O
O
O*
5
O*
5
O*
5
O
O*
4
XX
= no relation
Bank select
Modulation
Data entry
Volume
Pan
Expression
Hold1
Sostenuto
Soft pedal
Effect send
RPN LSB, MSB
*
1
Hold in memory as long as
the power is supplied
*
2
See page A-1.
1 - 16
1 - 16
Mode 3
X
❊❊❊❊❊❊❊❊❊❊❊❊❊❊
0 - 127
12 - 108
*
2
O
9nH
v = 1 - 127
X
9nH
v = 0, 8nH
v =
XX
X
O*
3
O
O
O*
3
O*
4
O
O
O
O
O
O
O
O*
4
MIDI Implementation Chart
Model WK-1800/WK-1600/WK-1630 Version: 1.0
WK-1800/1600(E)-MIDI Chart 03.7.31, 5:22 PMPage 2 Adobe PageMaker 6.5J/PPC

A-3
733A-E-095A
91
100, 101
120
121
Program
Change: True #
System Exclusive
System : Song Pos
Common : Song Sel
: Tune
System : Clock
Real Time :
Commands
Aux
: Local ON/OFF
: All notes OFF
Messages : Active Sense
: Reset
Remarks
O
O*
4
X
X
O
0 - 127
❊❊❊❊❊❊❊❊❊❊❊❊❊❊
O*
6
X
X
X
O
O
X
X
X
X
Effect send
RPN LSB, MSB
All sound off
Reset all controller
O
O*
4
O
O
O
0 - 127
❊❊❊❊❊❊❊❊❊❊❊❊❊❊
O*
6
X
X
X
X
X
X
O
O
X
Mode 1 : OMNI ON, POLY Mode 2 : OMNI ON, MONO
O
: Yes
Mode 3 : OMNI OFF, POLY Mode 4 : OMNI OFF, MONO
X
: No
*
3
Modulation and after touch for each channel are the same effect.
*
4
Pitch bend sense, fine tune, coarse tune send/receive, and RPN Null receive
*
5
In accordance with assignable jack setting
*
6
GM on/off GM ON : [F0] [7E] [7F] [09] [01] [F7] GM OFF : [F0] [7E] [7F] [09] [02] [F7]
Effect change [F0] [44] [0B] [09] [XX] [F7]
XX=00 : Reverb1, 01 : Reverb2, 02 : Reverb3, 03 : Chorus, 04 : Tremolo, 05 : Phaser,
06 : Organ Sp, 07 : Enhancer, 08 : Flanger, 09 : Loudness, 0F : OFF
Bulk dump
[F0] [44] [YY] [YY] [0L
0
][0H
0
] [0L
1
] [0H
1
]
…
[0L
126
] [0H
126
] [0L
127
] [0H
127
] [0L
CS
] [0H
CS
] [F7] X 1070 : WK-1800
[F0] [44] [YY] [YY] [0L
0
][0H
0
] [0L
1
] [0H
1
]
…
[0L
126
] [0H
126
] [0L
127
] [0H
127
] [0L
CS
] [0H
CS
] [F7] X 814 : WK-1600/1630
ID No. Data (128 x 2 = 256 bytes) Checksum
Block
[YY] [YY]=[0F] [06] : WK-1800 [0F] [05] : WK-1600/WK-1630
WK-1800/1600(E)-MIDI Chart 03.7.31, 5:22 PMPage 3 Adobe PageMaker 6.5J/PPC
WK1800-E-1
This recycle mark indicates that the packaging conforms to
the environmental protection legislation in Germany.
MA0003-A Printed in Malaysia
P
CASIO COMPUTER CO.,LTD.
6-2, Hon-machi 1-chome
Shibuya-ku, Tokyo 151-8543, Japan
英
WK1800_E_Cov4.p65 03.7.31, 5:22 PMPage 1 Adobe PageMaker 6.5J/PPC
