Casio Cpmanagerver300 Eng ClassPad Manager Version 3.0_E
CPManagerver300 CPManagerver300_EN ClassPad | Calculators | Manuals | CASIO
2014-07-05
: Casio Cpmanagerver300-Eng cpmanagerver300-eng casio pdf
Open the PDF directly: View PDF ![]() .
.
Page Count: 113 [warning: Documents this large are best viewed by clicking the View PDF Link!]
- ClassPad Manager 3.0 Version Types
- Getting Started
- Contents
- Chapter 1 Installing or Updating the Software
- Chapter 2 ClassPad Manager Overview
- Chapter 3 Using the ClassPad Window
- Chapter 4 Using the Exchange Window
- Exchange Window Overview
- Active Document Folder and Home Folder
- Establishing Data Communication between Your ClassPad and ClassPad Manager
- Transferring Files between the ClassPad and Your PC
- Using Handheld Assistant
- Backing Up and Restoring Data
- Installing an Add-in Application or Language onto a ClassPad Unit
- Using Virtual ClassPad (vcp) Files
- Handling Individual Data (xcp) Files
- Toolbar Buttons
- Menu Bar Menu Commands
- Shortcut Menu Commands
- Appendix

Note
Display examples shown in this User’s Guide are intended for illustrative purposes only.
The actual text and values that appear on display may differ from the examples shown in this
User’s Guide.

E-1
20060301
ClassPad Manager 3.0 Version Types
Type Features
ClassPad Manager
Version 3.0 Basic • Fixed size window
ClassPad Manager
Version 3.0 Professional
• Deluxe version
• Resizable window for easy text input and the ability to view long
math expressions without scrolling
• eActivity copy and paste into a word processor for editing
• Copy of window pane or math expression as MathML content
• Import of pictures as backgrounds or for use in the Picture
application, export of expressions to a MathML fi le
Important!
• Unless noted otherwise, all instructions and information given in this manual apply to both the
Basic and Professional versions.
• Exchange Window functionality is the same in the Basic and Professional versions.
E-2
20060301
Getting Started
• You can use ClassPad Manager to develop programs and eActivities using the same commands
as those available on the ClassPad. You can store your programs and eActivities on your
computer, and use the ClassPad Manager’s data communication functions to transfer them to
your ClassPad when you need them.
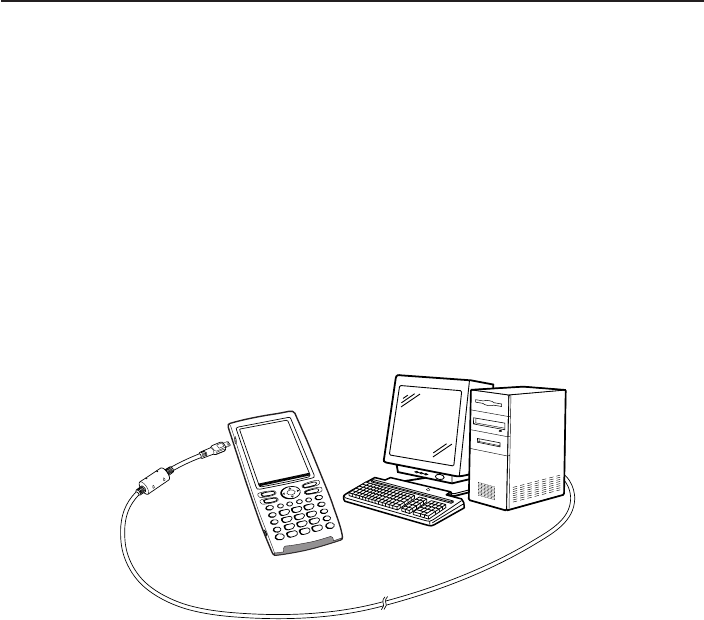
• Once you establish a link with your computer over the USB cable that comes bundled with the
ClassPad, you can use easy-to-understand Microsoft Explorer-like operations to transfer data
(programs, variable data, and eActivities) between them.
• You can transfer data by putting the ClassPad into its communication standby state and then
performing all operations on your connected computer.
• ClassPad Manager provides the following capabilities.
· ClassPad emulation, which lets you perform ClassPad operations on your computer
· ClassPad emulation screen capture (to the clipboard) and screen printing
· Copy and paste of data (text, values, expressions, images, etc.) between ClassPad
Manager and other Windows applications
· Transfer of data between your ClassPad and computer
You can connect multiple ClassPads to a single PC. This makes it possible to easily copy
fi les from the PC to multiple ClassPads, and use your PC to copy fi les from one ClassPad to
another.
· ClassPad data storage
· Installation of add-in applications to ClassPads
· Update of the ClassPad Manager Version 2.0 or 2.2 (Single License or School License) to
Version 3.0
Important!
• Be sure to install the ClassPad Manager before you connect the ClassPad to your computer.
Connecting before you install the ClassPad Manager can result in improper operation.
Note
• Use only the USB cable that comes with ClassPad whenever connecting your ClassPad to a
computer to exchange data between them. Data exchange with ClassPad Manager will not be
possible if you use a commercially available USB cable.
• See your ClassPad User’s Guide for details about operating the on-screen ClassPad unit
emulator.
• Calculation results produced by ClassPad Manager may be different from those produced by
the ClassPad. This is due to the way that computers perform fl oating-point calculations. Also,
ClassPad Manager cannot handle values that exceed ±1E+309 in decimal mode or ±1E+611 in
standard mode.
E-3
20060301
System Requirements
Computer: Minimum required Intel® Pentium® II 200 with USB
Recommended Intel® Pentium® II 300 with USB
CPU: Minimum required Intel® Pentium® II or AMD DuronTM
Operating Systems: Windows® 98SE/Me or Windows® 2000/XP
Disk Space: 25 MB available for installation
Memory: Recommended 64 MB (Minimum 32 MB)
Does not include memory required for Operating System.
Video Display: Video adaptor and monitor must support resolution of 800 × 600 or higher.
Other
Required Applications: Microsoft
® Internet Explorer 4.01 or later, Adobe Acrobat Reader
Note
• Microsoft and Windows are either registered trademarks or trademarks of Microsoft Corporation in
the United States and/or other countries.
• Intel and Pentium are trademarks or registered trademarks of Intel Corporation or its subsidiaries
in the United States and other countries.
• AMD Duron is either registered trademark or trademark of Advanced Micro Devices, Inc. in the
United States and/or other countries.
• Company and product names used herein are trademarks of their respective owners.
User Registration
• Before using the ClassPad Manager, be sure to read the contents of the fi le named Readme.html,
which is on the bundled CD-ROM. There you will fi nd the URL for a Website where you can
register as an offi cial user.
https://classpad.net/register/regist_form.html
E-4
20060301
Contents
Chapter 1 Installing or Updating the Software .......................................... E-5
Accessing the User’s Guides ......................................................................... E-14
Chapter 2 ClassPad Manager Overview ................................................... E-15
ClassPad Window and Exchange Window ..................................................... E-15
ClassPad Manager Data ................................................................................. E-17
Chapter 3 Using the ClassPad Window .................................................... E-18
ClassPad Window Overview ........................................................................... E-18
ClassPad Window Operations ......................................................................... E-20
Using ClassPad Window in the Fixed-size Mode ............................................ E-29
Fixed-size Mode Menu Commands ................................................................. E-30
Using ClassPad Window in the Resizable Mode ............................................. E-31
Resizable Mode Menu Commands ................................................................. E-39
Using the Picture Application .......................................................................... E-44
Chapter 4 Using the Exchange Window ................................................... E-61
Exchange Window Overview ........................................................................... E-61
Active Document Folder and Home Folder ..................................................... E-64
Establishing Data Communication between Your ClassPad and
ClassPad Manager .......................................................................................... E-66
Transferring Files between the ClassPad and Your PC ................................... E-72
Using Handheld Assistant ............................................................................... E-82
Backing Up and Restoring Data ...................................................................... E-91
Installing an Add-in Application or Language onto a ClassPad Unit ............... E-93
Using Virtual ClassPad (vcp) Files .................................................................. E-94
Handling Individual Data (xcp) Files ................................................................ E-98
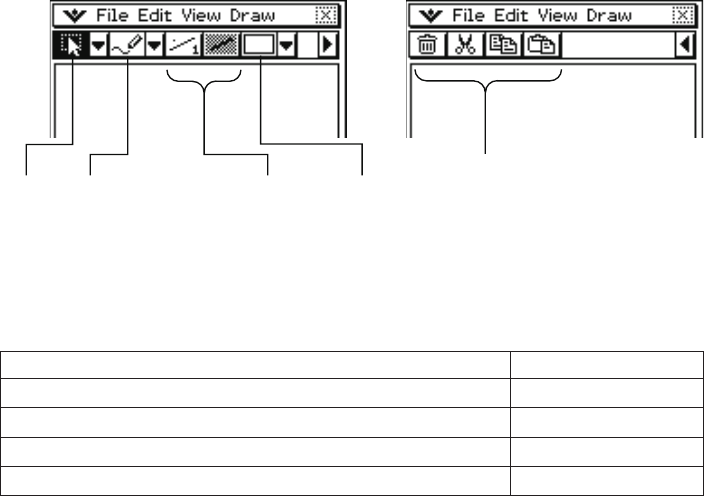
Toolbar Buttons ............................................................................................. E-100
Menu Bar Menu Commands ......................................................................... E-101
Shortcut Menu Commands ........................................................................... E-103
Appendix ................................................................................................... E-110
ClassPad Window Shortcut Keys .................................................................. E-110
E-5
20060301
Chapter 1
Installing or Updating the Software
This chapter covers the following points:
• Installing ClassPad Manager Version 3.0
• Connecting a ClassPad unit to a computer
• Starting up and exiting ClassPad Manager
Installing
Note
The following procedures apply to the installation of both the Professional and Basic versions of
ClassPad Manager. They also apply if you have an earlier version of ClassPad Manager already on
your computer.
k To install ClassPad Manager Version 3.0
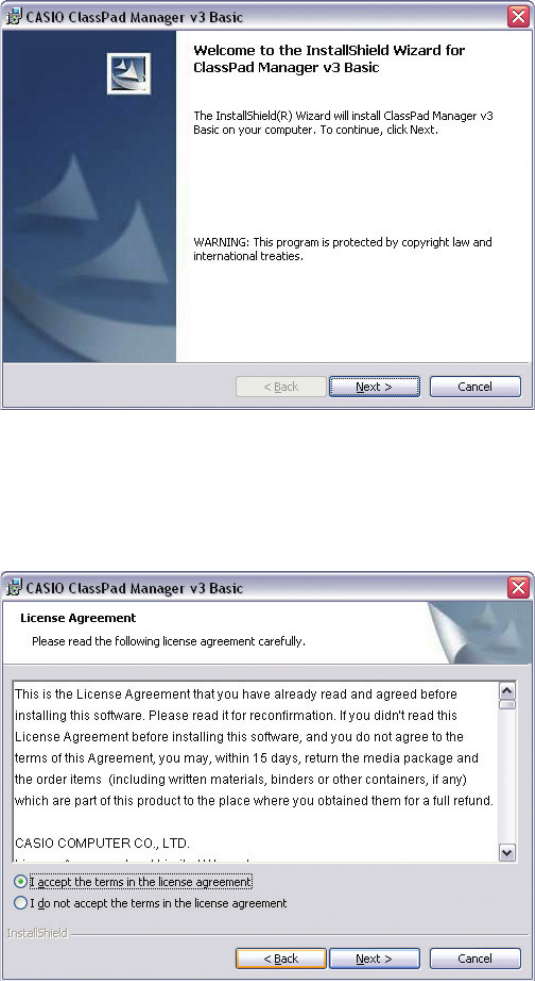
1. Place the bundled CD-ROM into your computer’s CD-ROM drive.
2. On the menu that appears, click “ClassPad Manager ver. 3.0”, and then click “INSTALL”.
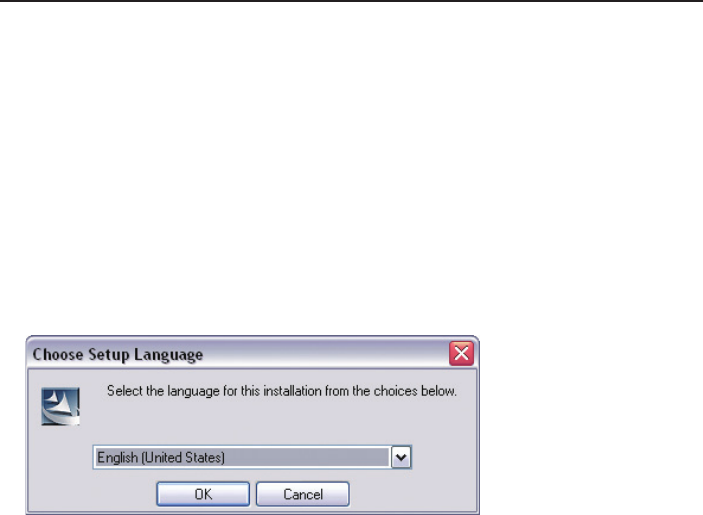
3. Choose the language you want for the ClassPad and ClassPad Manager manuals installed with
ClassPad Manager.
E-6
20060301
4. Click [OK].
5. Carefully read the terms and conditions of the license agreement. If you agree to be bound by
the terms and conditions of the license agreement, choose “I accept the terms in the license
agreement” and then click the [Next] button.
• If you do not agree to be bound by the terms and conditions of the license agreement click
“I do not accept the terms in the license agreement” and then click the [Cancel] button to exit
the install procedure.
E-7
20060301
6. Choose one of these options to specify the drive and folder where you want to install ClassPad
Manager.
• To use the default setting, simply click the [Next] button.
• To choose a different folder, click the [Change] button. Specify the folder you want and then
click the [Next] button.
7. Click the [Install] button to start installation.
E-8
20060301
8. On the screen that appears after installation is complete, click the [Finish] button.
• This fi nalizes the installation of the software on your computer.

E-9
20060301
Uninstalling
Perform the following steps if you ever need to remove ClassPad Manager (PROGRAM-LINKTM)
from your computer.
k To uninstall
1. Display the Windows Control Panel.
2. Click [Add/Remove Programs].
3. In the list of applications on the dialog box that appears, select “ClassPad Manager v3 Basic” or
“ClassPad Manager v3 Professional,” depending on which version you currently have installed.
4. Click the [Add/Remove] button to start a program maintenance wizard.
5. Click the [Yes] button.
• This completes the uninstall procedure.
E-10
20060301
Connecting your ClassPad to a computer
k To connect your ClassPad to a computer
Important!
• Be sure to install the ClassPad Manager before you connect the ClassPad to your computer.
Connecting before you install the ClassPad Manager can result in improper operation.
1. Turn off your ClassPad.
2. Connect the USB cable that comes with your ClassPad to the computer.
3. Connect the USB cable to your ClassPad.
• This will automatically cause your ClassPad to turn on and enter data communication standby.
• If your ClassPad does not enter communication standby at this time, perform the steps under
“Troubleshooting a Connection” on page E-68.
Attention Windows XP Users (After installing the ClassPad Manager Limited
Version)
• See page E-11 after performing the above three steps.
E-11
20060301
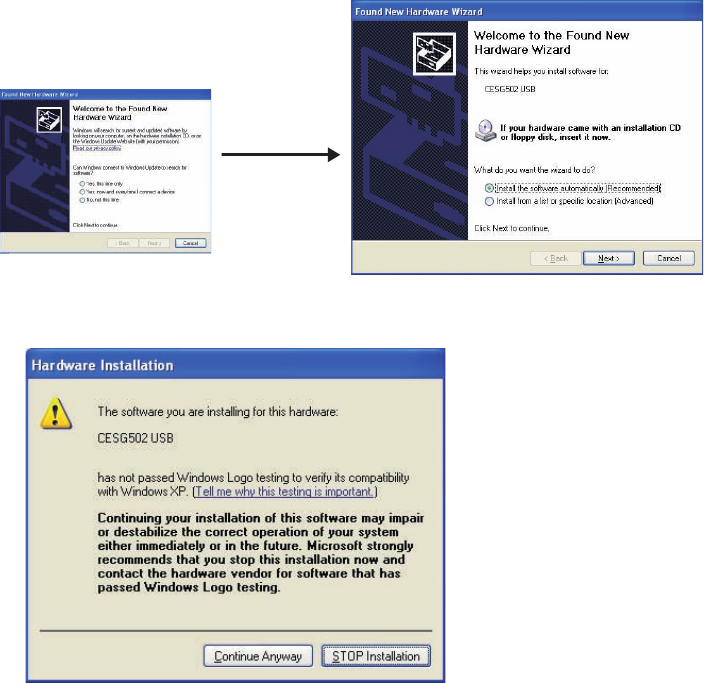
u Windows XP Users
After installing the ClassPad Manager Limited Version, perform the following steps to install the
USB driver on your computer.
1. Connecting ClassPad to a computer running Windows XP causes the screen shown below to
appear on your computer display.
2. Select “Install the software automatically (Recommended)” and then click [Next].
Select “No, not this
time”.
(Windows XP SP2 only)
E-12
20060301
3. Though a message appears to let you know that the software has not passed the “Windows
Logo Test”, there is no need for concern. Simply click [Continue Anyway] and proceed with
installation.
4. Click [Finish].
k To disconnect your ClassPad from a computer
1. Disconnect the USB cable from your ClassPad.
E-13
20060301
Starting Up and Quitting ClassPad Manager
k To start up and quit ClassPad Manager
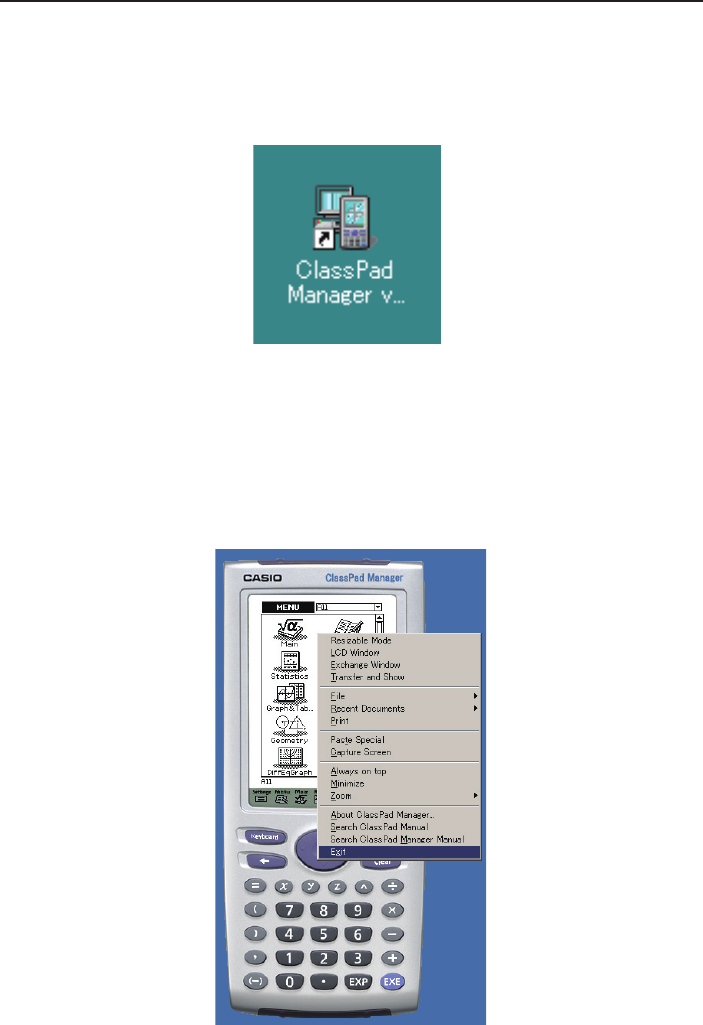
1. On your computer’s desktop, double-click “ClassPad Manager”.
• This starts up ClassPad Manager.
• The fi rst time you double-click the “ClassPad Manager” icon you will be asked to input the
install key provided with your software.
2. On ClassPad Manager, perform the data exchange and management tasks you want.
3. To quit ClassPad Manager, move the cursor to the ClassPad Manager window, right-click your
mouse, and then select [Exit] on the shortcut menu that appears. You can also click o to
quit ClassPad Manager.
• This quits ClassPad Manager.
• The Resizable Mode option is available only with the Professional version.
E-14
20060301
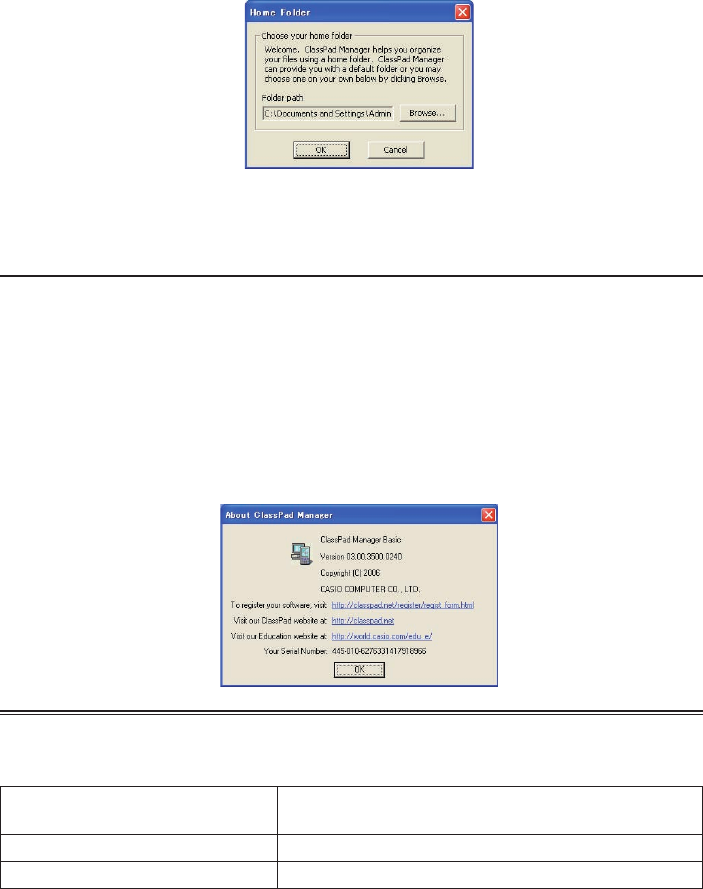
Clicking [OK] will confi gure My Documents\CASIO\ClassPad Manager as the ClassPad Manager
home folder. You could also click [Browse] and select a different folder as the home folder. For
details about confi guring the home folder, see “Home Folder” on page E-28.
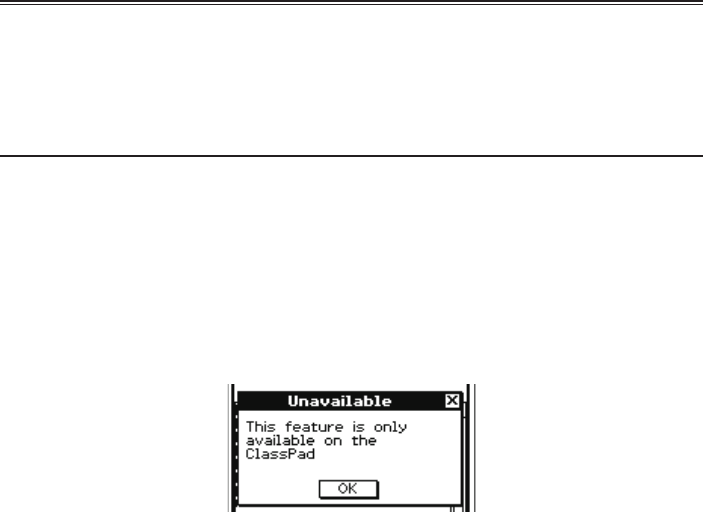
Viewing “About ClassPad Manager” Information
“About ClassPad Manager” is a dialog box that shows version information about ClassPad Manager,
and your serial number.
You can use either of the following two procedures to display “About ClassPad Manager”
information.
• Right-click the ClassPad Manager window. On the menu that appears, select “About ClassPad
Manager”.
• On the Resizable Mode Window (see page E-31) or the Exchange Window (see page E-61), click
[Help], and then select “About ClassPad Manager”.
Note
The dialog box shown below appears when you start up ClassPad Manager for the fi rst time.
Accessing the User’s Guides
You can use the operations shown below to access the User’s Guides from ClassPad Manager.
To access this User’s Guide: Right-click the ClassPad Manager window. Then on the
menu that appears, select this menu item:
ClassPad User’s Guide Search ClassPad Manual
ClassPad Manager User’s Guide Search ClassPad Manager Manual

E-15
20060301
Chapter 2
ClassPad Manager Overview
This chapter covers the following points.
• Operation of the two ClassPad Manager windows (ClassPad Window and Exchange Window),
and the contents of each
• ClassPad Manager data
ClassPad Window and Exchange Window
ClassPad Manager has two windows named the ClassPad Window and the Exchange Window,
each of which performs specifi c roles.
When you want to do this: Use this window:
• Operate the ClassPad application the same way as your ClassPad
• Create or edit an eActivity
• Automatically transfer data from a connected ClassPad and show it for
demonstration
• Copy a screen to the Windows clipboard
• Copy an eActivity or MathML data to the Windows clipboard
• Import bitmap data stored on your computer as ClassPad data
• Print a ClassPad application screen
ClassPad Window
• Transfer data between your ClassPad and ClassPad Manager
• Back up ClassPad data to your computer or restore backed up data to
your ClassPad
• Manage ClassPad Manager data
• Convert a fi le created using a previous version to Version 3.0 data
• Install add-in applications
• Attach fi les and other data to an email
• Use the Handheld Assistant to perform the following operations on
multiple ClassPads
- Copy data
- Restore backed-up data
- Install add-in applications
Exchange Window

E-16
20060301
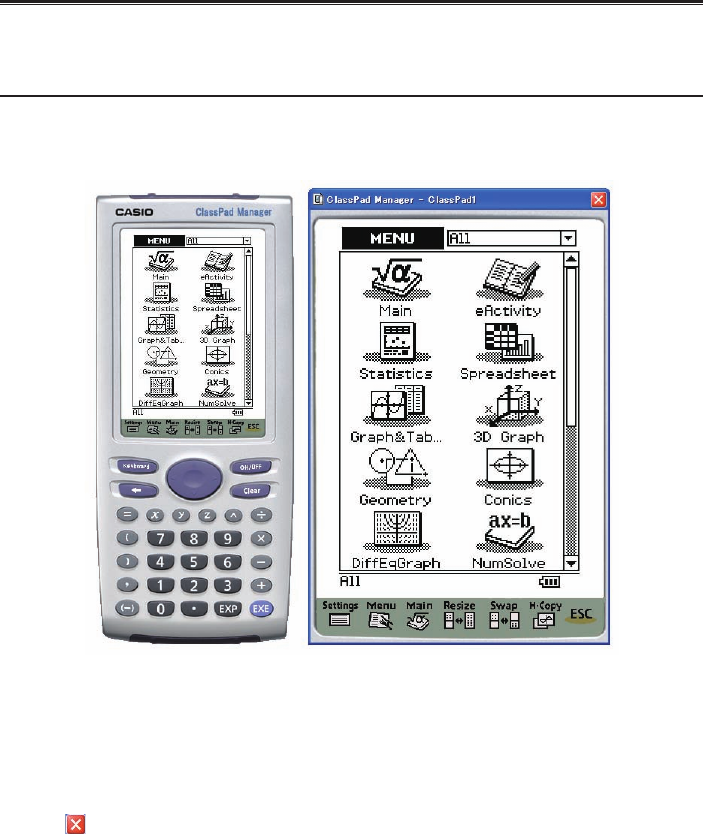
Displaying the ClassPad Window
The ClassPad Window appears fi rst whenever you start up ClassPad Manager.
ClassPad Window (Fixed-size Mode)
• The display mode (Fixed-size Mode or Resizable Mode) of the ClassPad Window that appears
when you start up ClassPad Manager is the same mode that was in effect when you last exited
ClassPad Manager. For information about display modes, see page E-19.
• If the Exchange Window is on the display, you can switch to the ClassPad Window by clicking
[File] - [Close].
Note
For details about the ClassPad Window, see Chapter 3.

E-17
20060301
Displaying the Exchange Window
To display the Exchange Window, right-click anywhere within the ClassPad Window and then click
[Exchange Window] on the shortcut menu that appears.
Note
For details about the Exchange Window, see Chapter 4.
ClassPad Manager Data
Your ClassPad stores eActivity data in one memory area, and all other data (programs,
presentations, variables, etc.) in a different memory area. eActivity data is stored in “Flash memory”,
while other data is stored in “MCS memory”.
ClassPad Manager 3.0 stores both types of data on your computer’s hard drive in “virtual ClassPad”
(.vcp) format fi les. Under initial default settings, a fi le named “default.vcp” is created automatically
for use as the ClassPad Manager’s “Active Document”.
Previous versions of ClassPad Manager stored different types of data in separate fi les (fl s fi le and
mcs fi le). fl s and mcs fi les can be converted to vcp format to make them compatible with ClassPad
Manager 3.0.
Tip
You can convert an older fi le to a vcp fi le by double-clicking it, or by right-clicking and selecting [File]
and then [Open] from the shortcut menu.
E-18
20060301
Chapter 3
Using the ClassPad Window
This chapter covers the following points.
• ClassPad Window display mode (Fixed-size Mode and Resizable Mode)
• Operations supported by each display mode
• Using the Picture application
Note
For details about ClassPad applications and operations, see the ClassPad User’s Guide.
ClassPad Window Overview
The ClassPad Window puts a virtual ClassPad on your computer screen, which you can use to
perform almost all of the operations that are available on your ClassPad. This section explains the
differences between ClassPad Window operations and the ClassPad unit, and between the two
ClassPad Window modes.
Differences between the ClassPad Window and the Functions of ClassPad
Applications
The following are the differences between the ClassPad Window and the functions of the ClassPad
applications.
• The ClassPad Window includes a Picture application, which is not available on your ClassPad. For
more information, see “Using the Picture Application” on page E-44.
• Certain ClassPad settings and functions that are not required when running on a computer
(such as touch panel calibration) are disabled on the ClassPad Window. Attempting to access a
disabled setting or function will cause the message “Unavailable” to appear on the display.

E-19
20060301
ClassPad Window Display Mode (Fixed-size Mode and Resizable Mode)
The ClassPad Window has two display modes: a Fixed-size Mode and a Resizable Mode.
• The Fixed-Size Mode displays a virtual ClassPad that looks almost the same as your ClassPad
unit.
• The Resizable Mode provides functionality that is virtually identical to that as the ClassPad, but
in a typical Windows operating environment. The Resizable Mode also provides a number of
special extended functions that are not available on the Fixed-size Mode. For details, see “Using
ClassPad Window in the Resizable Mode” on page E-31.
Fixed-size Mode Resizable Mode
Important!
The Resizable Mode is supported by “ClassPad Manager Professional” only. It is not supported by
“ClassPad Manager Basic”.
■ To select the display mode (ClassPad Manager Professional Only)
Right-click anywhere within the ClassPad Window and then click [Resizable Mode] or [Fixed-size
Mode] on the shortcut menu that appears.
• Note that [Resizable Mode] is displayed on the shortcut menu when the current mode is Fixed-
size Mode, while [Fixed-size Mode] is displayed when the current mode is [Resizable Mode].
• You can also switch from the Resizable Mode to the Fixed-size Mode by clicking [Fixed-size
Mode] on the [Window] menu.

E-20
20060301
ClassPad Window Operations
This section explains the operations you can perform on the Fixed-size Mode and Resizable Mode
screens of the ClassPad Window.
Computer Keyboard Operations
The following are the operations you can perform on your computer keyboard to control the
ClassPad application that is currently running in the ClassPad Window.
• Alphanumeric input
• Cursor key operations (The cursor keys of your computer correspond to the ClassPad cursor
keys.)
• Input of special characters (like π) and commands using shortcut key operations
Note
For information about shortcut keys, see “ClassPad Window Shortcut Keys” in the Appendix on
page E-110.
Mouse Scroll Wheel Operations
You can use the scroll wheel of your mouse to perform the following operations on the ClassPad
Window.
On this window: Rotating the scroll wheel
performs this operation:
Main application, Stat Editor, spreadsheet, or other window with a
scroll bar on the right side
Scrolls the window
vertically.
Any graph window except for the 3D Graph application 3D graph
window
Scrolls the window
vertically.
3D graph window Rotate the graph upwards
and downwards
Presentation application window while manual play is being
executed. Scrolls between pages.
Copy and Paste
■ To copy a screen image to the Windows clipboard
1. Display the image you want to copy.
2. Right-click anywhere within the ClassPad Window and then click [Capture Screen] on the
shortcut menu that appears.
• The above procedure copies an image of the screen you displayed in step 1 to the Windows
clipboard.
• After that, you can then paste the image into another Windows application.
E-21
20060301
Tip
• In Fixed-size Mode you can tap h on the Icon Panel to copy the screen image.
• If Resizable Mode is selected as the display mode, select [Capture Screen] on the [Edit] menu in
step 2 instead of using the shortcut menu.
• If you have two application windows on the display in the Resizable Mode, the above [Capture
Screen] command will copy both windows as they appear on your computer screen. If you want
to copy a specifi c application window, click the window to make it active and then click [Capture
Current Panel] on the [Edit] menu in step 2 of the above procedure.
■ To copy alphanumeric text from the screen to the Windows clipboard
1. On the ClassPad Window, drag your mouse pointer across the range of text you want to select,
so it becomes highlighted.
2. On your computer keyboard, press [Ctrl] + [C] to copy the selected text.
• This copies the text you selected in step 1 to the Windows clipboard (as Unicode text).
• After that, you can paste the text you copied into another Windows application (as Unicode
text).
■ To paste text from the Windows clipboard into the ClassPad Window
1. In a Windows application, copy the text you want to the Windows clipboard.
2. On the ClassPad Window, open the ClassPad application into which you want to paste the
clipboard text.
3. Right-click anywhere within the ClassPad Window and then click [Paste Special] on the shortcut
menu that appears.
• This pastes the text on the Windows clipboard into the ClassPad Window.
Note
“Paste Special” detects what is on the Windows clipboard and then pastes it as bitmap, Windows
text, or MathML data.
Picture application: You can use “Paste Special” to paste bitmap data created with a Windows
application, such as Paint, directly into the Picture application.
eActivity and other applications: You can use “Paste Special” to paste text or MathML data
created by other Windows applications.
Important Warning
When the ClassPad detects MathML data on the clipboard, the ClassPad will attempt to paste it
in a 2D math form (natural input form) without warning you. There is no guarantee that the pasted
form will be identical to what was copied from other applications.
E-22
20060301
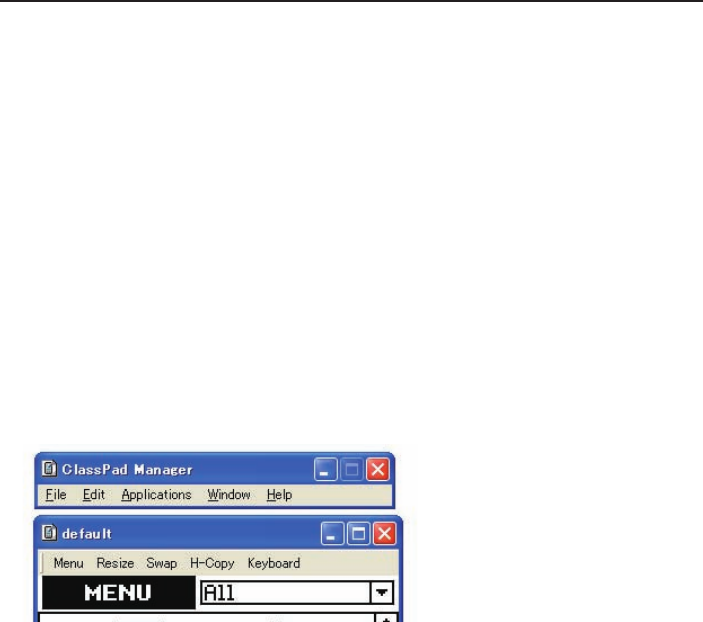
Printing the ClassPad Window
You can use the procedures in this section to print the contents of the ClassPad application that is
displayed on the ClassPad Window or a screen capture.
• When you open an eActivity, Main or Program by itself, selecting Print will print the contents of
the application. If you have a sub-window open within eActivity or Main, selecting Print will print a
screen capture instead of all the contents.
Printing Example (eActivity)
Original Screen Printout
• When you open an application other than eActivity, Main or Program, selecting Print will print a
screen capture.
■ To print the ClassPad Window
1. On the ClassPad Window, display the screen you want to print.
2. Right-click anywhere within the ClassPad Window and then click [Print] on the shortcut menu
that appears.
• This displays a Windows Print dialog box.
E-23
20060301
3. After confi guring the required settings on the Print dialog box, click [OK].
• This prints the current contents (or screen capture) of the ClassPad Window.
vcp File Operations (New, Open, Save, Save As)
This section explains how to perform the following vcp fi le operations on the ClassPad Window:
New, Open, Save, and Save As.
■ To create a new vcp fi le
1. Right-click anywhere within the ClassPad Window and then click [File] - [New] on the shortcut
menu that appears.
• This displays the Create New Document dialog box.
2. Type the name of the new fi le into the “File Name” box.
3. Click [Save].
• This creates a new vcp fi le and makes it the active document.
• You can check the name of the current active document by opening the “Active Document”
folder on the “Exchange Window”. For information about Exchange Window operations, see
Chapter 4.
• When the display mode is Resizable Mode, the active document name is displayed in the
ClassPad Window title bar.
■ To open an existing vcp fi le using drag and drop
Drop the vcp fi le into the ClassPad Window.
■ To open an existing vcp fi le using the menu command
1. Right-click anywhere within the ClassPad Window and then click [File] - [Open] on the shortcut
menu that appears.
• This displays the Open dialog box.
2. On the dialog box, select the fi le you want to open and then click [Open].
• This opens the fi le you selected and makes it the active document.
E-24
20060301
Note
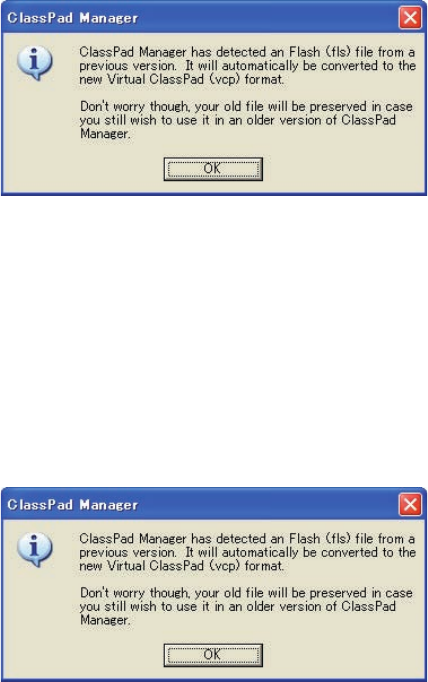
You can also use the above procedures to open an mcs or fl s fi le created using a previous
ClassPad Manager version. Doing so, however, will convert the fi le to vcp format automatically. See
“To open an old version mcs or fl s fi le” below.
■ To open an old version mcs or fl s fi le using drag and drop
Drag the fl s or mcs fi le to the ClassPad Window.
• This converts the fi le to a vcp fi le and makes it the active document. A dialog box like the one
shown below will appear.
■ To open an old version mcs or fl s fi le using the menu command
1. Right-click anywhere within the ClassPad Window and then click [File] - [Open] on the shortcut
menu that appears.
• This displays the Open dialog box.
2. On the Open dialog box, click the [File Type] box down arrow button and select the fi le format (*.fl s
or *.mcs) from the list that appears.
3. Select the fi le you want to open and then click [Open].
• This converts the selected fl s or mcs fi le to a vcp fi le and makes it the active document. This
displays a dialog box like the one shown below.
4. Click [OK].

E-25
20060301
■ To save the currently open vcp fi le
Right-click anywhere within the ClassPad Window and then click [File] - [Save] on the shortcut
menu that appears.
Note
The current active document is saved automatically whenever you quit ClassPad Manager. When
you start up ClassPad Manager the next time, the active document that was open during your last
session opens automatically.
■ To save the currently open vcp fi le under a different name
1. Right-click anywhere within the ClassPad Window and then click [File] - [Save As] on the
shortcut menu that appears.
• This displays the Save As dialog box.
2. Type the new name into the “File Name” box.
3. Click [Save].
• This saves the currently open vcp fi le under the new name and makes the new fi le the active
document.
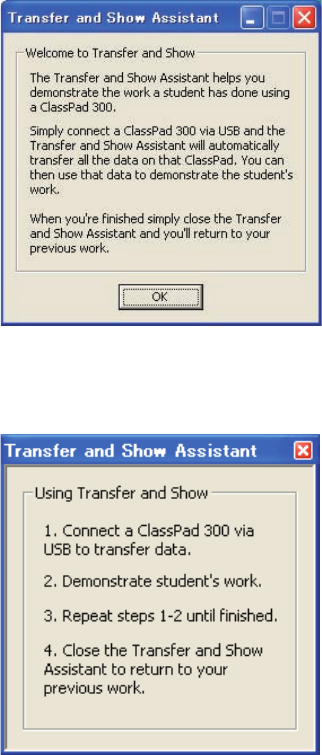
Using Transfer and Show
With Transfer and Show, simply connecting your ClassPad to your computer causes all the data
in your ClassPad to be stored in a vcp fi le on your computer, which is then opened as the active
document automatically. This function makes it possible to use ClassPad Manager to instantly
display eActivity or other data you create on your ClassPad.
Note
Disconnect any connected ClassPads before beginning Transfer and Show.
■ To execute Transfer and Show
Example: To display an eActivity you created on a ClassPad with ClassPad Manager
1. Create an eActivity on a ClassPad.
2. On the ClassPad application menu, click A to start up the eActivity application.
E-26
20060301
3. Right-click anywhere within the ClassPad Window and then click [Transfer and Show] on the
shortcut menu that appears.
• This displays the fi rst Transfer and Show Assistant dialog box.
4. Click [OK].
• This displays the second Transfer and Show Assistant dialog box, which describes the steps
for using Transfer and Show.
E-27
20060301
5. While the dialog box is displayed, use the ClassPad’s bundled USB cable to connect it to your
computer.
• The ClassPad will establish a connection with ClassPad Manager automatically, and then
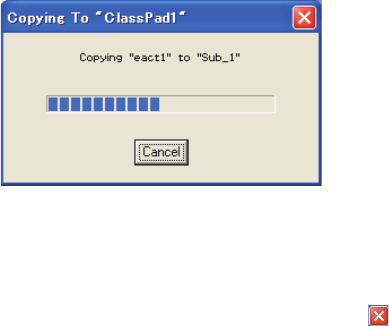
transfer all of the data in ClassPad memory to ClassPad Manager. A dialog box remains on
your computer screen while data transfer is in progress.
• After data transfer is complete, the connection is closed automatically. At this time, the
eActivity application starts up automatically in the ClassPad Window and displays the last
eActivity you created on the ClassPad.
6. You can repeat this with as many ClassPads as you wish. When you are fi nished, close the
Transfer and Show Assistant dialog box by clicking the in the upper right corner. The eActivity
window will now display the fi le that was open before you started Transfer and Show.
Note
• A vcp fi le created using Transfer and Show is stored in a folder named “Transfer and Show” with a
name based on the name of the attached ClassPad, which is located inside the home folder. See
“Home Folder” on page E-28 for more information.
• Under initial default settings, the current vcp fi le for a particular named ClassPad in the Transfer
and Show folder is overwritten each time you execute Transfer and Show with that ClassPad.
• You can use any one of the following procedures to open the original vcp fi le (active document
before executing Transfer and Show).
• “To open an existing vcp fi le” (page E-23)
• “To change the active document” (page E-64)
• “To make a particular vcp fi le in the home folder the active document” (page E-65)
E-28
20060301
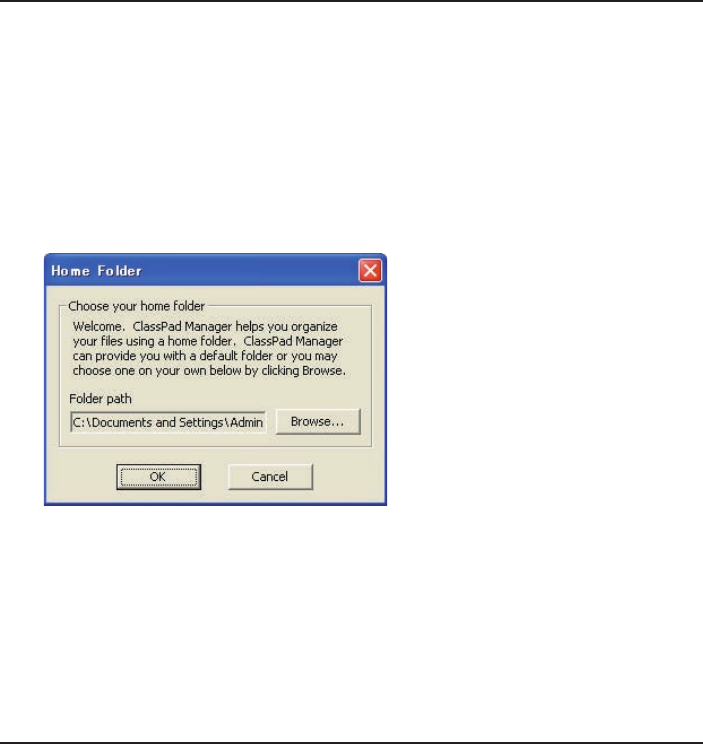
Home Folder
The home folder is where ClassPad Manager creates your default document. It also is the folder
displayed in the Exchange Window so you can easily manage fi les and data.
By default, the home folder is located in My Documents\CASIO\ClassPad Manager.
■ To change the home folder
1. Right-click anywhere within the ClassPad Window and then click [File] - [Change Home Folder]
on the shortcut menu that appears.
• This will display a Home Folder dialog box like the one shown below.
2. Click [Browse].
• This displays the Browse Folder dialog box.
3. Select the folder you want to use as the home folder and then click [OK].
• This returns to the Home Folder dialog box.
4. Click [OK].
• This registers the folder you selected in step 3 as your home folder.
Clearing MCS Memory (Reset)
Except for eActivity fi les, MCS memory is the location where all ClassPad data is stored. See
“ClassPad Manager Data” on page E-17 for more information.
■ To clear all data, except for eActivity fi les
1. Right-click anywhere within the ClassPad Window and then click [File] - [Reset] on the shortcut
menu that appears.
• This will display a confi rmation dialog box with the message “Reset Memory? Are you sure?”.
2. To clear memory, click [Yes]. To cancel the operation without clearing anything, click [No].
E-29
20060301
Using ClassPad Window in the Fixed-size Mode
This section explains operations that are specifi c to the Fixed-size Mode.
LCD Window
In the Fixed-size Mode, you can display only the screen portion (including the Icon Panel) of the
ClassPad in a separate window, called the “LCD Window”.
ClassPad Window LCD Window
■ To open the LCD Window
Right-click anywhere within the ClassPad Window and then click [LCD Window] on the shortcut
menu that appears.
■ To close the LCD Window
Click the button in the upper right corner of the LCD Window.
Note
The LCD Window and ClassPad Window are displayed at the same time. The ClassPad Window
cannot be closed.

E-30
20060301
Controlling the Window Zoom Settings
The ClassPad Window has two zoom settings: ×1 (normal size) and ×2, while the LCD Window has
three zoom settings: ×2 (normal size), ×3, and ×4.
■ Changing the ClassPad Window Zoom Setting
Right-click anywhere within the ClassPad Window and then click [Zoom] - [×1] or [Zoom] - [×2].
■ Changing the LCD Window Zoom Setting
Right-click anywhere within the LCD Window and then click [Zoom] - [×2], [Zoom] - [×3], or
[Zoom] - [×4].
Fixed-size Mode Menu Commands
■ ClassPad Window Shortcut Menu Commands
To do this: Select this menu item:
Change to the Resizable Mode Resizable Mode
Display a separate LCD Window LCD Window
Display the Exchange Window Exchange Window
Transfer the contents of a ClassPad unit to ClassPad Manager Transfer and Show
Create a new vcp (virtual ClassPad) fi le File - New
Open an existing vcp fi le File - Open
Save changes to the current vcp fi le File - Save
Save the current vcp fi le with a new name File - Save As
Change the home folder File - Change Home Folder
Clear MCS memory File - Reset
Reopen one of the four most recently opened fi les Recent Documents
Print the current screen Print
Paste text from the Windows clipboard Paste Special
Capture a screenshot and store it on the Windows clipboard Capture Screen
Keep the ClassPad Manager window and all its sub-windows on
top of other windows Always on top
Minimize the ClassPad Manager window Minimize
Change the window size Zoom
Show ClassPad Manager version and other information About ClassPad Manager
Open the ClassPad manual Search ClassPad Manual
Open the ClassPad Manager Manual Search ClassPad Manager
Manual
Quit ClassPad Manager Exit
E-31
20060301
Using ClassPad Window in the Resizable Mode
This section explains operations that are specifi c to the Resizable Mode.
This mode is available only in the Professional version of ClassPad Manager.
Resizable Mode Screen Structure
The following shows the structure of the ClassPad Window in the Resizable Mode.
ClassPad Window
ClassPad Window
The ClassPad Window size can be changed by clicking border and then dragging it to the size you
want.
Floating Menu Bar The menu bar has fi ve menus: File, Edit, Applications, Window, and
Help. The menu bar “fl oats”, which mean that you can move it around
independent of the ClassPad Window.
Function Bar The function bar includes four buttons that correspond to the ClassPad’s
icon panel (Menu, Resize, Swap, H-Copy), along with a “Keyboard”
button that corresponds to the ClassPad’s k key.
Floating Menu Bar
Function Bar
ClassPad OS screen
Status Bar

E-32
20060301
Status Bar The status bar shows the following information.
1 ClassPad Manager status and other messages
2 Current zoom setting (×1 or ×2)
For more information, see “Changing the ClassPad OS Screen Zoom
Setting (Zoom)” on page E-33.
3 Size of ClassPad OS screen displayed on the current ClassPad
Window
Note
When Fixed-size Mode is selected for the ClassPad Window, the
ClassPad OS screen size is 198 × 294, which is the same as the
ClassPad.
■ Function Bar Button Operations
The table below explains what you can do with the function bar buttons.
When you want to do this:
Click this
function bar
button:
Or select this menu
item:
Display the application menu Menu [Applications] - [Menu]
Resize the currently active window (when there are
two windows displayed) so it fi lls the entire display, or
return to the dual window display again
Resize [Window] - [Resize]
Swap the upper and lower windows, or swap full size
windows when one is open behind another Swap [Window] - [Swap]
Capture the currently displayed screen for transfer to
the Windows clipboard or for use with the ClassPad’s
Presentation application
H-Copy [Edit] - [Capture Screen]
Click to toggle display of the ClassPad’s soft
keyboard on and off Keyboard [Window] - [Keyboard]
Using the Floating Menu Bar to Start Up a ClassPad Application
You can start up an application by clicking the [Applications] menu and then the name of the
application on the menu.
E-33
20060301
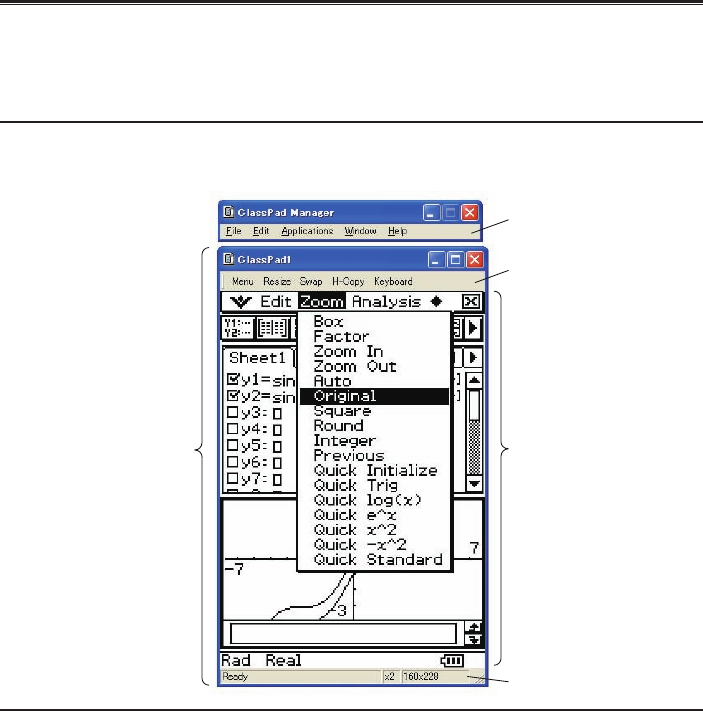
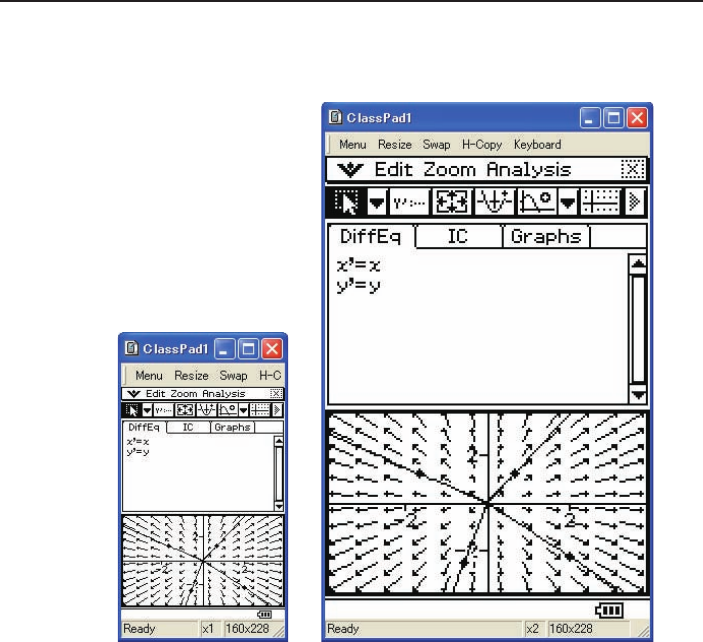
Changing the ClassPad OS Screen Zoom Setting (Zoom)
To change the ClassPad OS screen zoom setting, right-click anywhere within the ClassPad Window
and then click [Zoom] - [×1] or [Zoom] - [×2].
[Zoom] - [×1] [Zoom] - [×2]
Note
You can also change the zoom setting by clicking [Zoom] - [×1] or [Zoom] - [×2] on the fl oating
menu bar’s [Window] menu.
E-34
20060301
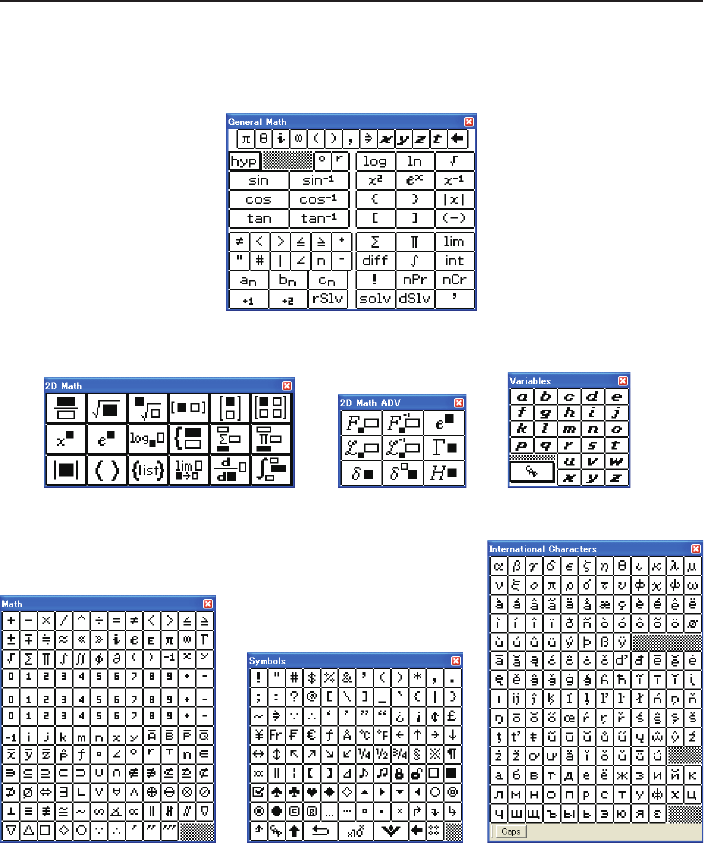
Displaying Key Palettes
Clicking [Window] - [Palette] on the fl oating menu bar will display a submenu of key palettes.
Click a key palette name to display it. Each key palette can be opened, closed and repositioned
independently.
[General Math]
[2D Math] [2D Math ADV] [Variables]
[Math] [Symbols] [International Characters]
Note
You can also display a soft keyboard by clicking the [Keyboard] button on the function bar, just like
on your ClassPad.

E-35
20060301
Importing a Bitmap Image
You can use the procedure below to import a monochrome binary bitmap (.bmp) image into
ClassPad Manager. The imported fi le is stored in Variable Manager, in a folder named “Imported”.
■ To import a bitmap image into ClassPad Manager
1. Prepare the image fi le that you want to import.
2. Click [File] - [Import Bitmap].
• This displays the Bitmap Import Wizard dialog box.
3. Click the [Choose Bitmap] button.
• This displays the Open dialog box.
4. Select the fi le you want to import, and then click [Open].
• This returns to the Bitmap Import Wizard dialog box.
5. Click [Next] and then follow the instructions that appear on your screen.
Note
• After importing an image, you can use the ClassPad Manager Picture application to open and edit
it. For more information, see “Using the Picture Application” on page E-44.
• An imported image can be used as the ClassPad ending screen. For more information, see
“Specifying the Ending Screen Image” in Chapter 16 of the ClassPad User’s Guide.
Generating MathML Data
Mathematical Markup Language (MathML) allows encoding of mathematical symbols and formulas
so they can be integrated into documents for publication on the World Wide Web. MathML is quickly
becoming the standard for scientifi c publication on the Web.
ClassPad Manager can output algebraic expressions and text you input with the Main application,
eActivity application, or other application as a MathML fi le (.mml). You can also copy algebraic
expressions and text as MathML data (content, presentation, or combined format) to the Windows
clipboard.
E-36
20060301
■ To export a selected algebraic expression to a MathML fi le
Example: To output an algebraic expression input with the Main application to a MathML fi le
1. Click [Applications] - [Main] to start up the Main application.
2. Input the algebraic expression you want to output to the MathML fi le.
3. Drag your mouse pointer across the expression to select (highlight) it.
4. Click [File] - [Export MathML].
• This displays the Save As dialog box.
5. Type in the fi le name, and then click [Save].
• This saves the expression you selected in step 3 as an mml fi le.
■ To copy a selected algebraic expression as MathML data to the Windows
clipboard
1. Select (highlight) the expression you want to copy by dragging your mouse pointer across it.
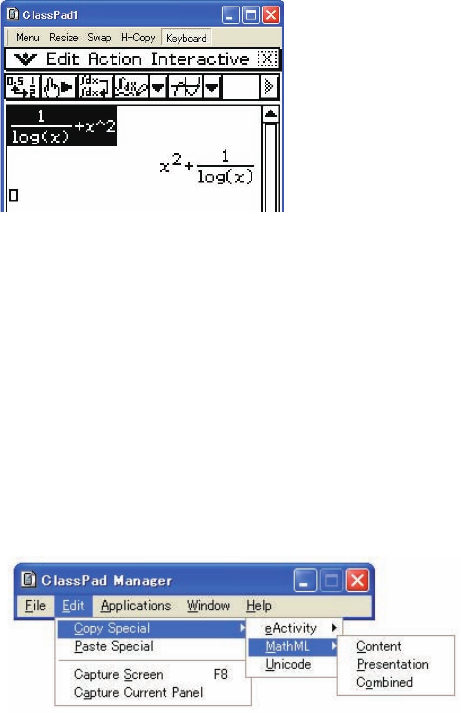
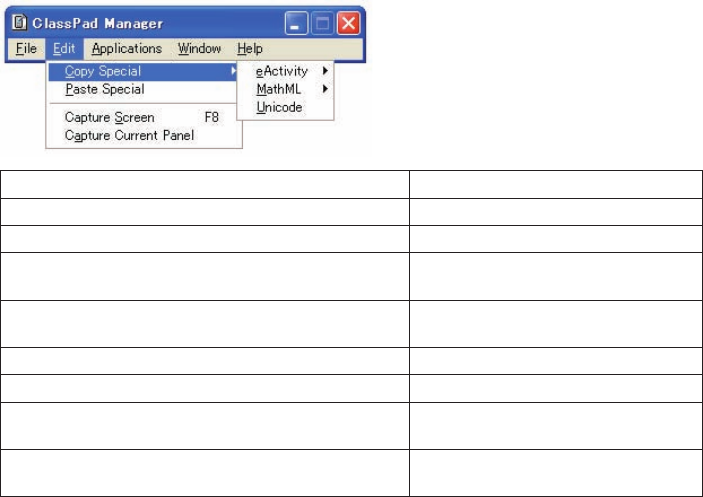
2. Click [Edit] - [Copy Special] - [MathML].
• This displays the sub-menu shown below.
E-37
20060301
3. Click the sub-menu item you want.
To copy data using this type of MathML markup: Select this option:
Content
• Content markup captures the mathematical structure. Content
Presentation
• Presentation markup captures notational structure. Presentation
Combined
• Combined uses content markup whenever possible. Otherwise, it uses
presentation markup.
Combined
• Please consult the Internet or other publications for full details about MathML content markup
and presentation markup.
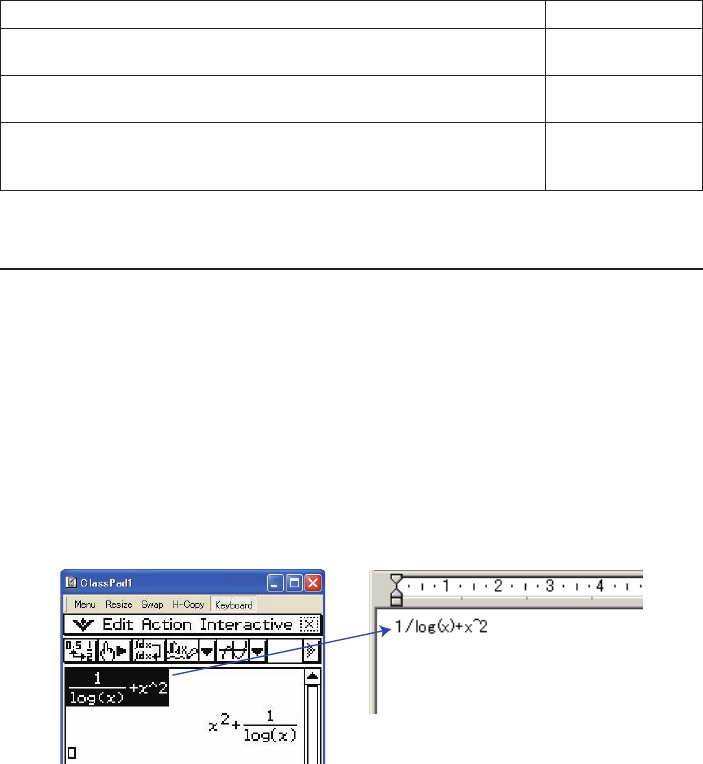
Copying algebraic Expressions and Text as Unicode Text
You can use the procedure below to copy text or an algebraic expression you selected on the
ClassPad application to the Windows clipboard as Unicode text.
■ To copy algebraic expressions or text as Unicode text
1. Select (highlight) the expression or text you want to copy by dragging your mouse pointer
across it.
2. Click [Edit] - [Copy Special] - [Unicode].
• This copies the selected expression or text to the Windows clipboard as Unicode text.
• You can paste the copied text into any Windows application that supports text editing.
E-38
20060301
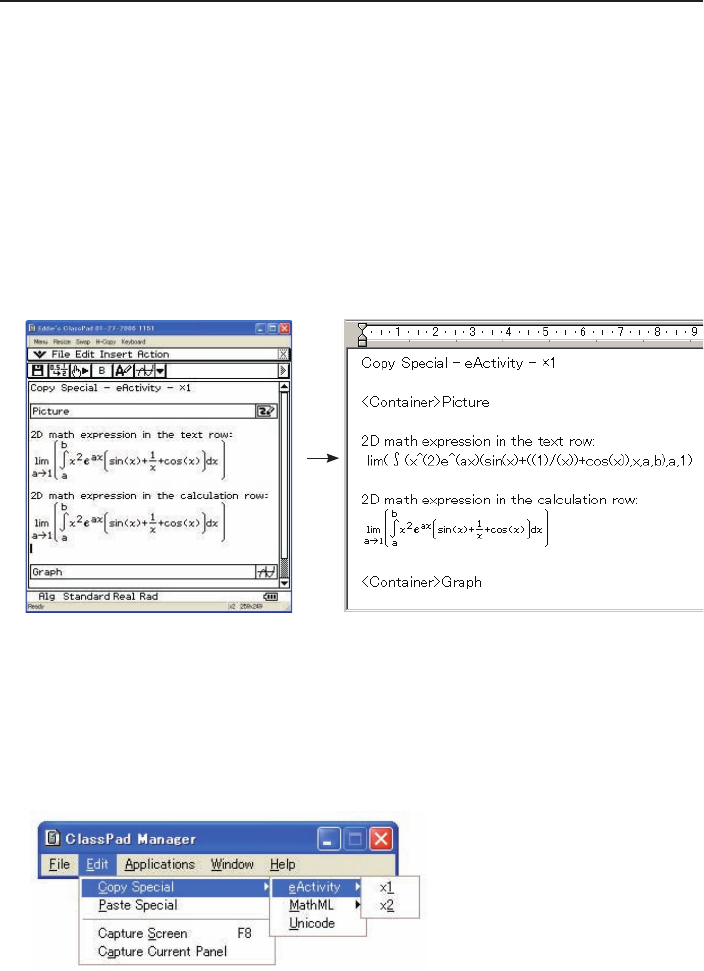
Copying an Entire eActivity
You can copy the entire content of an eActivity that is currently opened with the eActivity application
to the Windows clipboard. The format of the copied data depends on whether it comes from a text
row, calculation row, or strip.
text row Copied as Unicode text. Since a natural display expression that was input with
the 2D Keyboard into a text row is copied as Unicode text, the natural display
format is lost. Text rows can be edited within other applications.
calculation row Both the calculation expression and its result are copied as bitmaps. Because
of this, a natural display expression that was input with the 2D Keyboard into
a calculation row is copied as an image, just as it appears on the ClassPad
Window. Calculation rows cannot be edited within other applications.
strip The string “<Container>” is inserted in place of the strip. If the strip has a title,
the title is appended to the right of “<Container>”.
Original eActivity Data Pasted in WordPad
■ To copy an entire eActivity
1. Open the eActivity whose content you want to copy.
2. Click [Edit] - [Copy Special] - [eActivity].
• This displays the sub-menu shown below.

E-39
20060301
3. Click the sub-menu item you want.
To specify this option: Select this option:
Calculation rows copied as actual size (×1) bitmaps ×1
Calculation rows copied as double size (×2) bitmaps ×2
• Clicking ×1 or ×2 copies all of the content of the currently open eActivity to the Windows clipboard.
• You can paste the copied text and bitmaps into WordPad or any other Windows application that
supports text editing and bitmaps.
Resizable Mode Menu Commands
■ ClassPad Window Shortcut Menu Commands
To do this: Select this menu item:
Change to the Fixed-size Mode Fixed-size Mode
Display the Exchange Window Exchange Window
Transfer the contents of the ClassPad unit to ClassPad
Manager Transfer and Show
Create a new vcp (virtual ClassPad) fi le File - New
Open an existing fi le File - Open
Save changes to the current vcp fi le File - Save
Save the current vcp fi le with a new name File - Save As
Change the home folder File - Change Home Folder
Clear MCS memory File - Reset
Reopen one of the four most recently opened fi les Recent Documents
Print the current screen Print
Paste the text on the Windows clipboard Paste Special
Capture a screenshot of the virtual ClassPad screen to the
Windows clipboard Capture Screen
Keep the ClassPad Manager window and all of its sub-
windows on top of all other windows Always on top
Minimize the ClassPad Manager window Minimize
Change the ClassPad OS screen zoom setting Zoom
Show ClassPad Manager version and other information About ClassPad Manager
Open the ClassPad manual Search ClassPad Manual
Open the ClassPad Manager manual Search ClassPad Manager Manual
Quit the ClassPad Manager application Exit
E-40
20060301
■ [File] Menu Commands
To do this: Select this menu item:
Create a new vcp (virtual ClassPad) fi le New
Open an existing vcp fi le Open
Save changes to the current vcp fi le Save
Save the current vcp fi le with a new name Save As
Clear MCS memory Reset
Change the home folder Change Home Folder
Import a monochrome bitmap into ClassPad Manager Import Bitmap
Export selected math expressions and text to an mml fi le Export MathML
Print the current screen Print
Reopen one of the four most recently opened fi les
1 <fi le name>
2 <fi le name>
3 <fi le name>
4 <fi le name>
Quit the ClassPad Manager application Exit
E-41
20060301
■ [Edit] Menu Commands
To do this: Select this menu item:
Copy an entire eActivity Copy Special - eActivity
Copy the selected math expression with content markup Copy Special - MathML - Content
Copy the selected math expression with presentation
markup Copy Special - MathML - Presentation
Copy the selected math expression with combined
content and presentation markup Copy Special - MathML - Combined
Copy the selected text as Unicode Copy Special - Unicode
Paste text from the Windows clipboard Paste Special
Capture a screenshot of the virtual ClassPad screen to
the Windows clipboard Capture Screen
Capture a screenshot of the current active panel to the
Windows clipboard Capture Current Panel

E-42
20060301
■ [Applications] Menu Commands
To do this: Select this menu item:
Display the Application menu Menu
Start up an application Applicable menu item
E-43
20060301
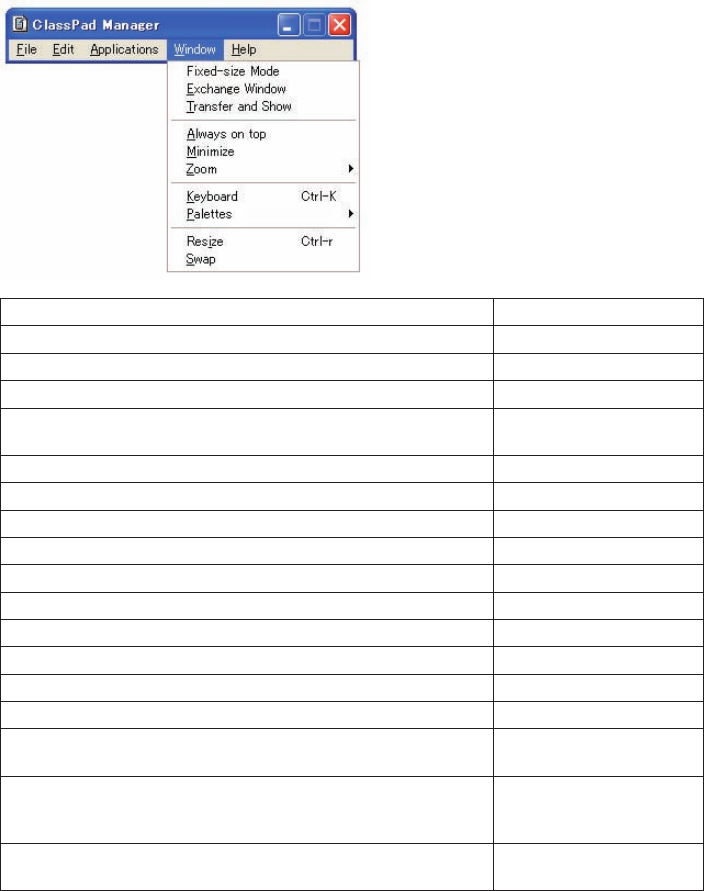
■ [Window] Menu Commands
To do this: Select this menu item:
Change to the Fixed-size Mode Fixed-size Mode
Display the Exchange Window Exchange Window
Transfer contents of the ClassPad unit to ClassPad Manager Transfer and Show
Keep the ClassPad Manager Window and all of its sub-windows on
top of all other windows Always on top
Minimize the ClassPad Manager Window Minimize
Change the ClassPad OS screen zoom setting to 1X Zoom - ×1
Change the ClassPad OS screen zoom setting to 2X Zoom - ×2
Open the ClassPad keyboard Keyboard
Open the General Math key palette Palettes - General Math
Open the 2D Math key palette Palettes - 2D Math
Open the 2D Math ADV key palette Palettes - 2D Math ADV
Open the Variables key palette Palettes - Variables
Open the Math key palette Palettes - Math
Open the Symbols key palette Palettes - Symbols
Open the International Characters key palette Palettes - International
Characters
Resize the currently active window (when there are two windows
displayed) so it fi lls the entire display, or return to the dual window
display again
Resize
Swap the upper and lower windows, or swap full size windows
when one is open behind another Swap
E-44
20060301
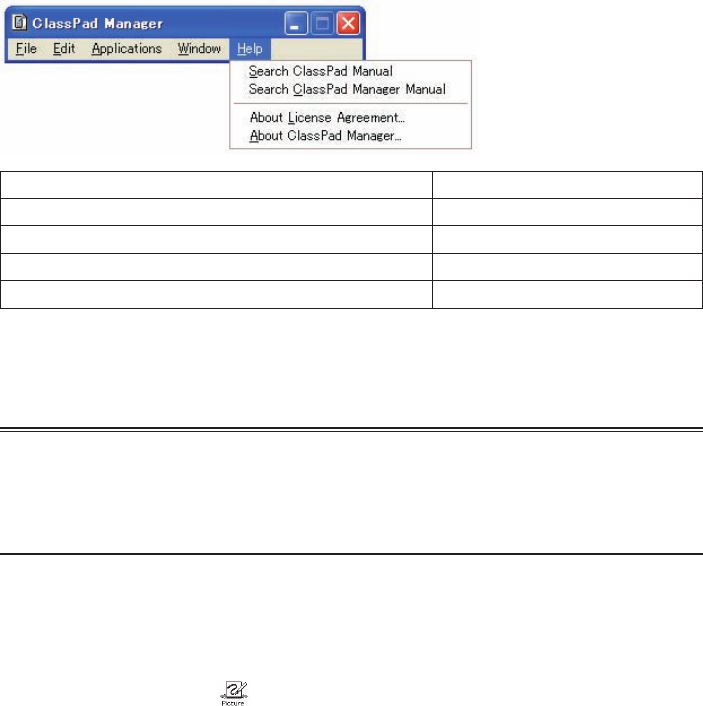
■ [Help] Menu Commands
To do this: Select this menu item:
Open the ClassPad manual Search ClassPad Manual
Open the ClassPad Manager manual Search ClassPad Manager Manual
Show information about the license agreement About License Agreement
Show ClassPad Manager version and other information About ClassPad Manager
Note
Adobe Acrobat Reader must be installed on your computer in order to view the ClassPad and
ClassPad Manager manuals.
Using the Picture Application
Important!
The Picture application is only available within the ClassPad Manager.
Picture Application Overview
This section describes the confi guration of the Picture application window, and provides basic
information about its menus and commands.
■ To start up the Picture application
On the application menu, click .
This starts the Picture application and displays the Picture application screen.
• The initial default tool will be the pencil (M) if you start up the Picture application from the
application menu.
• The initial default tool will be the select tool (G) if you start up the Picture application from an
eActivity.
E-45
20060301
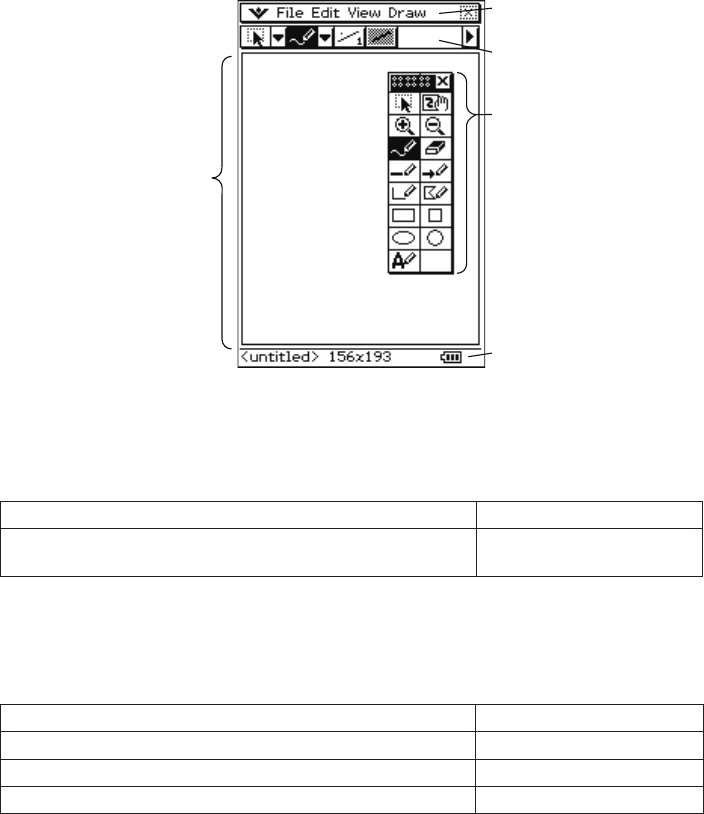
■ Picture Application Window
Starting up the Picture application displays the screen shown below.
Drawing Area
Menu Bar
Toolbar
Floating Toolbar
The fl oating toolbar
contains the most
commonly used buttons
of the toolbar. The fl oating
toolbar is hidden when
you fi rst start up the
Picture application, but
you can turn its display on
or off as required.
Status Bar
■ Picture Application Menus
This section explains the operations you can perform using the menus of the Picture application
window.
O Menu
To do this: Select this O Menu item:
Select an image to be displayed when ClassPad power is turned
off Ending Screen
Note
For details about the O menu items, see “Using the O Menu” in Chapter 1 of the ClassPad
User’s Guide.
File Menu
To do this: Select this File Menu item:
Create a new fi le New
Open an existing fi le Open
Save a fi le Save

E-46
20060301
Edit Menu
To do this: Select this Edit Menu item:
Undo or redo the last operation Undo/Redo
Cut the currently selected items and place them onto the
clipboard Cut
Copy the currently selected items to the clipboard Copy
Paste the current clipboard contents into the drawing area Paste
Select everything in the drawing area Select All
Flip the currently selected items horizontally Flip Horizontal
Flip the currently selected items vertically Flip Vertical
Rotate the currently selected items 180 degrees Rotate 180°
Invert the colors (black-white) of the currently selected items Invert Colors
Change the size of the drawing area (bitmap size of the currently
open fi le) Resize
Clear the drawing area Clear All
View Menu
To do this: Select this View Menu item:
Show/hide the fl oating toolbar Floating Toolbar
Draw Menu
To do this: Select this Draw Menu item:
Draw a point or curve Pencil
Erase a point Eraser
Draw a line Line
Draw an arrow Vector
Draw a polygon Polygon
Draw a square Square
Draw a rectangle Rectangle
Draw a circle Circle
Draw an ellipse Ellipse
Insert text Text
Toggle the status of closed fi gures between opaque (this menu
item checked) and translucent (this menu item unchecked) Draw Opaque
E-47
20060301
■ Picture Application Buttons
This section explains the operations you can perform using the toolbar buttons of the Picture
application window.
Picture application toolbar buttons are arranged into fi ve groups, on two toolbar pages.
Page 1 Page 2
Note
• Group 1 and Group 2 buttons can also be displayed on the fl oating toolbar.
• Group 4 buttons are available only when certain drawing tools (a, c, etc.) are selected. Group
4 buttons are not displayed when you fi rst start up the Picture application.
Page 1 - Group 1
To do this: Click this button:
Select an area by dragging across it in the drawing area G
Enable the Pan mode for drag scrolling of the screen V
Zoom in on the drawing area (×1 R ×2 R ×4) W
Zoom out on the drawing area (×4 R ×2 R 1) E
Group 5
Group 1 Group 2 Group 3 Group 4

E-48
20060301
Page 1 - Group 2
To do this: Click this button:
Draw a point or curve M
Erase a point }
Draw a line i
Draw an arrow o
Draw a rectangle line N
Draw a polygon X
Draw a rectangle Z
Draw a square a
Draw an ellipse b
Draw a circle c
Insert text u
Page 1 - Group 3
To do this: Click this button:
Change the thickness of lines and outlines
• Each click cycles through four available thickness settings. F
Toggle line, outline, and text color between black and white d / e
Page 1 - Group 4
To do this: Click this button:
Select the fi ll pattern of closed fi gures (polygon, rectangle, square,
ellipse, or circle)
f, g, h, i, j,
k, l, m, n
Toggle the status of closed fi gures between opaque and translucent o
Page 2 - Group 5
To do this: Click this button:
Clear the drawing area e
Cut the currently selected items and place them onto the clipboard r
Copy the currently selected items to the clipboard t
Paste the current clipboard contents into the drawing area y

E-49
20060301
Status Bar Information
The following shows the information that appears in the Picture application status bar.
File name
<untitled> indicates that the fi le
has not been saved yet.
Size of the image of the fi le
being edited.
Creating and Saving a File
Important!
Performing an operation to create a new fi le or open an existing fi ll will display the Clear All dialog
box shown below.
Clicking [OK] will clear everything in the drawing area. If you want to save the edits you have made
up to this point before opening a new fi le, click [Cancel] and save the data to a fi le.
Note that the Clear All dialog box always appears when you create a new fi le or open an existing
fi le, regardless of whether there are unsaved edits in the drawing area.
■ To create a new fi le
1. Click [File] - [New].
• On the Clear All dialog box that appears, click [OK]. This displays an image size setting dialog
box.
2. Input values for the width and height (from 1 to 1000) and then click [OK].
• This creates a new fi le.
E-50
20060301
■ To open an existing fi le
1. Click [File] - [Open].
• This displays the Files dialog box.
2. On the dialog box, select the fi le you want to open and then click [Open].
• On the Clear All dialog box that appears, click [OK]. This will open the fi le.
■ To save an unsaved fi le
1. Click [File] - [New].
• This displays the Files dialog box with the cursor located in the fi le name input box.

E-51
20060301
2. Type in the fi le name, and then click [Save].
• This saves the image under the fi le name you input.
■ To replace an existing fi le with the new version
1. Click [File] - [Save] to display the Files dialog box.
2. Without changing anything on the dialog box, click [Save].
• This will cause the message “Overwrite?” to appear.
3. To overwrite the current fi le with the new version, click [OK]. To cancel the save operation and
return to the Files dialog box, click [Cancel].
■ To save a fi le under a new name
1. Click [File] - [Save] to display the Files dialog box.
2. Click the fi le name input box, and input the new fi le name.
3. Click [Save].
• This saves the image under the fi le name you input.
Resizing a Bitmap
You can use the procedure below to resize the bitmap you are currently editing. When resizing a
bitmap, the upper left corner of the bitmap is fi xed.
■ To resize a bitmap
1. Click [Edit] - [Resize].
• This displays an image size setting dialog box.
2. Input values for the width and height (from 1 to 1000) and then click [OK].
Note
You can undo a resize operation immediately after completing it by clicking [Edit] - [Undo].

E-52
20060301
Scroll and Pan
The procedures in this section explain how to scroll and pan the Picture application screen when
the image does not fi t within the screen area.
■ To scroll an image
Use the scroll bar(s) to scroll the image.
■ To pan an image
1. On the toolbar, click V.
2. Drag the mouse pointer within the drawing area.
• The image will pan in the direction you drag.
Note
The image will not pan if there are no scroll bars displayed.
Drawing Operations
This section explains the various fi gure and text operations you can perform with the Picture
application.
■ Drawing Figures
Based on the type of image you want to draw, select the applicable drawing tool from the tool bar,
fl oating toolbar or [Draw] menu. Next, drag and click in the drawing area to draw the fi gure. The
following explains which drawing tool you need to use draw each type of fi gure.
To draw this
type of fi gure:
Click this
button:
And perform this
operation in the drawing
area:
Which will do this in the drawing
area:
point or curve MClick or drag. Draw a point where you click or a curve
where you drag.
line iClick one point and then
another point.
(You could also drag from
one point to the next.)
Draw a line connecting the two points.
arrow oDraw a vector connecting the two
points.
rectangle line NDraw a rectangle line starting from the
fi rst point and ending near the second
point.
square aDraw a square starting from the fi rst
point with the angle opposite the fi rst
point near the second point.
rectangle ZDraw a rectangle with opposite angles
at the two points.
circle cDraw a circle whose center point is at
the fi rst point and whose radius is the
distance between the two points.
E-53
20060301
To draw this
type of fi gure:
Click this
button:
And perform this
operation in the drawing
area:
Which will do this in the drawing
area:
ellipse bClick one point and then
another point.
(You could also drag from
one point to the next.)
Draw an ellipse inscribed in a rectangle
whose opposite angles are at the two
points.
polygon XSequentially click points
you want to specify as
vertices of the polygon.
Draw a polygon by attaching the current
click point with the last click point. The
fi rst click point and last click point are
always connected by a straight line.
Note
• After you are fi nished using a drawing tool, click the G button or select a different drawing tool.
• Right after you draw a fi gure there will be points (small o points) indicating the points you specifi ed
when drawing it. You can drag these points to resize or reshape the fi gure, if you want.
The small o points will disappear when you start drawing another fi gure with the same drawing tool
or if you select a different tool.
E-54
20060301
■ To use the eraser tool
1. Click [Eraser] on the [Draw] menu, or click the } button on the toolbar.
• This selects the eraser tool.
2. Click F to select the width of the eraser.
• Each click of F cycles through the four available width settings (indicated by the value on the
right side of the button). The values indicate the eraser width in number of pixels.
3. Drag the eraser across the area of the drawing that you want to erase.
• The width of the erasure corresponds to the width setting you specifi ed in step 2.
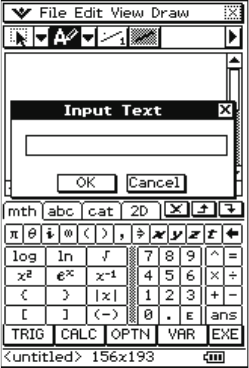
■ To insert text into a drawing
1. Click [Text] on the [Draw] menu, or click the u button on the toolbar.
• This selects the text tool.
2. Click the location in the drawing area where you want the text to be located.
• This displays the Input Text dialog box.
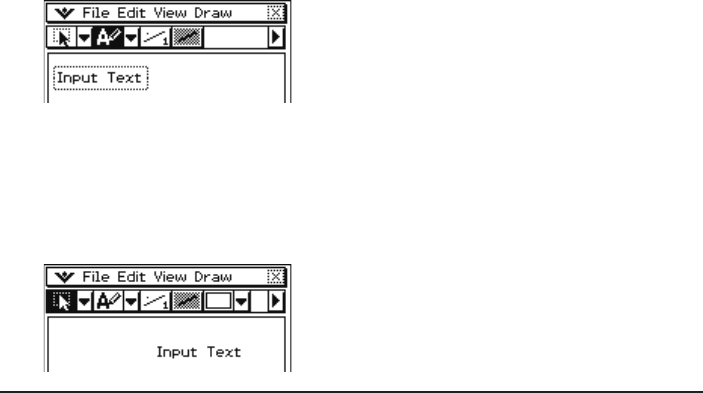
E-55
20060301
3. Type in up to 39 characters of text, and then click [OK].
• This will display the text in a broken line frame at the location you input in step 2.
4. Click and hold inside the broken line frame, and drag the text to the location you want.
5. After you are fi nished locating the text where you want, click the G button or select a different
drawing tool.
• This will cause the frame to disappear and fi x the text at its current location.
Specifying the Figure Line Width and Fill Pattern
The procedures in this section explain how to specify the thickness and color (white or black) of
the lines and fi gure outlines you draw with the drawing tools, the fi ll pattern of closed fi gures, and
whether the area within a closed fi gure is translucent or opaque.
■ To specify the line thickness
1. Click F.
• Each click of F cycles through the four available width settings (indicated by the value on the
right side of the button). The values indicate the line width in number of pixels.
2. Perform the procedure under “Drawing Figures” on page E-52 to draw the fi gure you want.
• The fi gure will be drawn using the line thickness you specifi ed in step 1.
■ To toggle lines, outlines, and text color between black and white
1. Click d (or e).
• Each time you click the button it toggles between d (black) and e (white).
2. Perform the procedure under “Drawing Figures” on page E-52 to draw a fi gure or “To insert text
into a drawing” on page E-54 to input text.
• The text or fi gure will be the color you specifi ed in step 1.

E-56
20060301
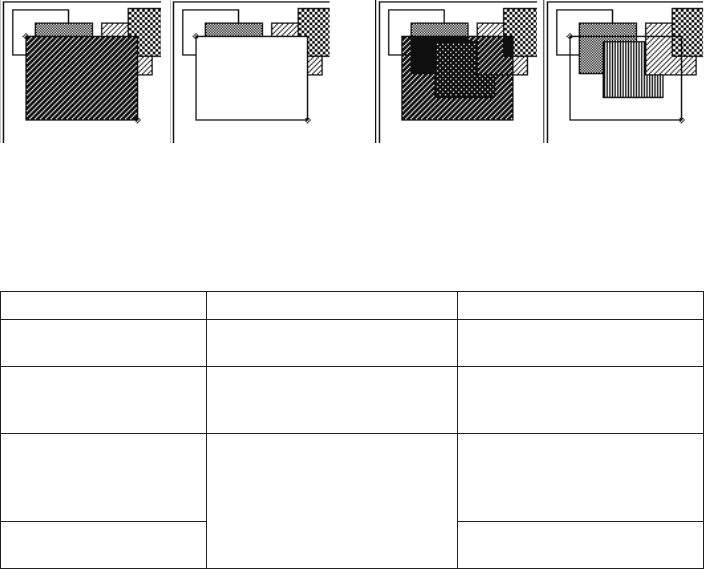
■ To select the fi ll pattern of a closed fi gure (polygon, rectangle, square, ellipse,
or circle)
1. Select the polygon, rectangle, square, ellipse, or circle drawing tool.
• This will cause a button with a down arrow button (v) to appear on the right side of page 1 of
the toolbar.
2. Click the down arrow button and then select the fi ll pattern you want from the menu of patterns
that appears.
• The number of fi ll patterns available will depend on the type of drawing tool you selected in
step 1.
Rectangle or square Polygon, ellipse, or circle
3. Perform the procedure under “Drawing Figures” on page E-52 to draw the fi gure you want.
• The fi gure you draw will be fi lled with the fi ll pattern you selected in step 2.
(Fill examples)
E-57
20060301
■ To make a closed fi gure (polygon, rectangle, square, ellipse, or circle)
translucent or opaque
1. On the [Draw] menu, click [Draw Opaque] so the [Draw Opaque] command does not have a
check mark next to it.
• Figures you draw are opaque when there is a check mark next to [Draw Opaque], and
translucent when there is no check mark.
2. Perform the procedure under “Drawing Figures” on page E-52 to draw the fi gure you want.
• The fi gure is either opaque or translucent, depending on the setting you selected in step 1.
[Draw Opaque] On [Draw Opaque] Off
■ Changing Settings after Drawing a Figure
Right after you draw a fi gure there will be points (small o points) indicating the points you specifi ed
when drawing it. You can change the line thickness, line color (black or white), fi ll pattern, and
opaque/translucent settings while these points are still on the display.
To change this attribute: After using this drawing tool: Perform this operation:
Line thickness line, arrow, rectangle line, square,
rectangle, circle, ellipse, polygon
Click F.
Line or text color (white,
black)
line, arrow, rectangle line, square,
rectangle, circle, ellipse, polygon,
text
Click d (or e).
Figure fi ll pattern square, rectangle, circle, ellipse,
polygon
Click the down arrow button (v)
on the right side of page 1 of
the toolbar, and then click the fi ll
pattern you want.
Opaque/translucent setting
of a fi gure
Click [Draw] - [Draw Opaque].
E-58
20060301
Editing Figures
■ To select an area in the drawing area for editing
1. On the toolbar, click G.
2. Drag the mouse pointer across the area you want to edit.
• This encloses the area in a selection boundary.
Note
To clear the selection boundary, click anywhere outside of it.
■ To select the entire bitmap
Click [Edit] - [Select All].
This selects the G tool automatically, and selects the entire bitmap.
Note
To cancel a Select All operation, select any other tool besides G.
■ To fl ip, rotate, or invert the selected image
1. Select the image(s) you want to manipulate.
2. Perform one of the following operations.
To do this: Click this Edit menu command:
Flip the selected image(s) horizontally Flip Horizontal
Flip the selected image(s) vertically Flip Vertical
Rotate the selected image(s) 180 degrees Rotate 180°
Invert the black and white areas of the image Invert Colors

E-59
20060301
■ To clear the drawing area
1. Click [Edit] - [Clear All].
• This causes a Clear All confi rmation dialog box to appear.
2. Click [OK] to clear the drawing area or [Cancel] to cancel the clear operation.
Copying and Pasting Images between a Windows Application and the
Picture Application
■ To paste something copied from a Windows application into the Picture
application
1. Copy an image or text from a Windows image editing application, word processor, etc.
2. Start up the Picture application in the ClassPad Window.
3. Right-click anywhere within the ClassPad Window and then click [Paste Special] on the shortcut
menu that appears.
• This pastes a monochrome bitmap image of what you copied in step 1 into the Picture
application.
Copied Image Pasted Image

E-60
20060301
■ To paste something copied from the Picture application into a Windows
application
1. In the Picture application, drag the mouse pointer across the area you want to copy so it is
selected.
• See “To select an area in the drawing area for editing” on page E-58, or “To select the entire
bitmap” on page E-58.
2. Click [Edit] - [Copy].
3. Open a Windows application that supports pasting of bitmap images (Paint, WordPad, etc).
4. In the Windows application, perform the required operation to paste the data.
Confi guring Ending Screen Settings
You can use an image you created and stored with the Picture application as the ending screen
image.
After selecting the ending screen image, in the Picture application click O - [Ending Screen] to
display the dialog box shown below.
The operation procedures of this dialog box are the same as those used with the System
application. For more information, see “Specifying the Ending Screen Image” in Chapter 16 of the
ClassPad User’s Guide.
E-61
20060301
Chapter 4
Using the Exchange Window
This chapter covers the following points.
• Data transfer between your ClassPad and computer
• Backup of ClassPad data to your computer, restoration of backed up data from your computer to
your ClassPad
• Virtual ClassPad data operations
• Conversion of old version ClassPad data fi les (fl s and mcs format) to vcp fi les
• Saving eActivity and program and other virtual ClassPad data to your computer (xcp fi les)
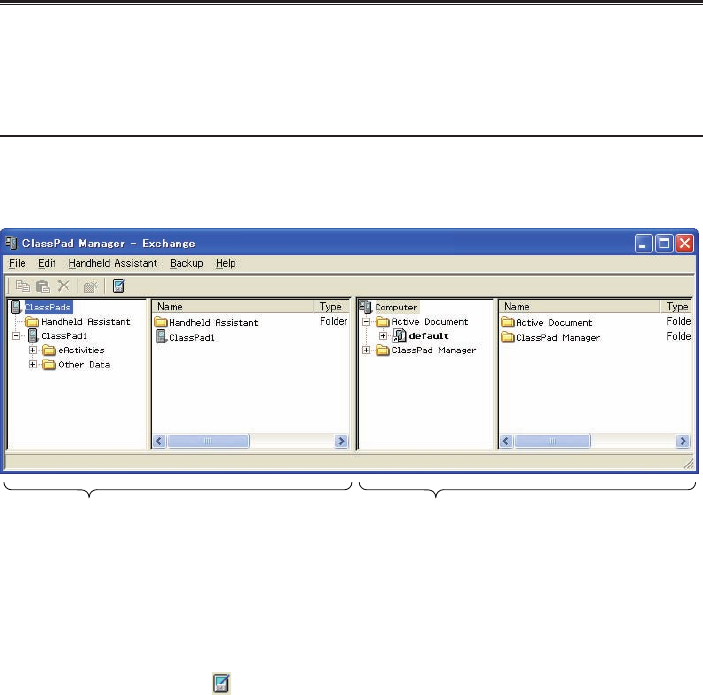
Exchange Window Overview
This section shows the structure of the Exchange Window and explains the meanings of its folders
and icons. To display the Exchange Window, right-click anywhere within the ClassPad Window and
then click [Exchange Window] on the shortcut menu that appears.
Exchange Window Structure
The basic layout of the Exchange Window is similar to that of Windows Explorer. It is divided
between two areas.
ClassPad Area
This area shows the data in the memory
of the ClassPad unit that is connected to
the computer.
Computer Area
This area shows the data in the virtual
ClassPad on the computer.
Note
Only the Computer area will appear if you open the Exchange Window while there is no ClassPad
unit connected to the computer. The ClassPad area will appear when you connect a ClassPad unit
to the computer or if you click .
E-62
20060301
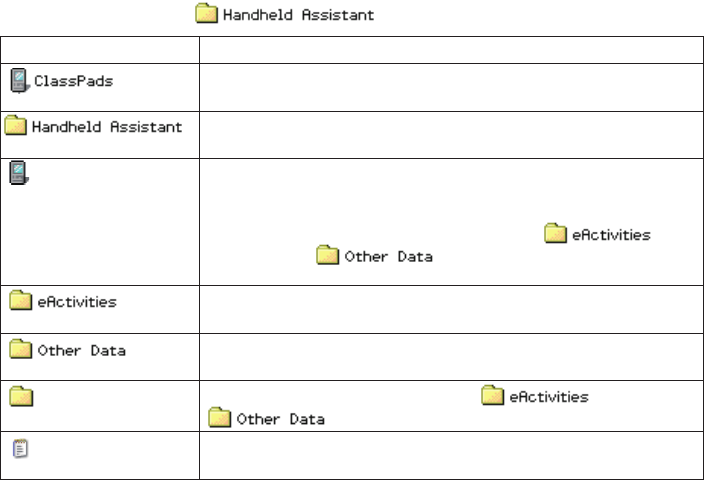
■ ClassPad Area Icons
The icons in this are represent all of the data in the memory of the ClassPad unit that is connected
to the computer, except for .
Icon Description
This is the ClassPad area root directory. It includes the Handheld
Assistant folder and all ClassPad units connected to the computer.
This is a folder that is generated automatically by ClassPad Manager.
For more information, see “Using Handheld Assistant” on page E-82.
<ClassPad name> This icon represents a ClassPad unit that is connected to computer
and with which the computer has established a connection. The text
to the right of the icon is the name of the ClassPad unit. Clicking this
icon will display the ClassPad’s Flash memory ( ) and
MCS memory ( ) contents in the next pane to the
right.
This folder represents the ClassPad unit storage location for eActivity
data (Flash memory).
This folder represents the ClassPad unit storage location for non-
eActivity data (MCS memory).
<Folder name> These are the individual folders inside and
.
<File name> These are the fi les that contain eActivity data, programs,
presentations, and variables.

E-63
20060301
■ Computer Area Icons
The icons in this area represent the virtual ClassPad data stored on your computer.
Icon Description
This is the Computer area root directory. It contains two folders: the
Active Document folder and the ClassPad Manager folder.
This folder contains the vcp fi le that is currently opened by ClassPad
Manager.
This is the fi le that is currently opened by ClassPad Manager.
This folder represents the virtual ClassPad unit storage location for
eActivity data.
This folder represents the virtual ClassPad unit storage location for
non-eActivity data.
This icon represents the folder in computer memory that is specifi ed
as the ClassPad Manager home folder. See “Home Folder” on page
E-28 for more information.
This is the icon for the Backups folder inside the Home Folder. vcp
fi les created with the backup function are stored in this folder.
<Virtual ClassPad name>
This icon represents vcp fi les in the Home Folder. The text to the right
of the icon is the fi le name. Clicking this icon will display the virtual
ClassPad’s eActivities folder and Other Data folder contents in the
next pane to the right.
<Folder name> These are the individual folders inside and
.
<File name> These are the fi les that contain eActivity data, programs,
presentations, and variables.

E-64
20060301
Active Document Folder and Home Folder
The Exchange Window can be used to manipulate multiple virtual ClassPads (vcp fi les). The vcp fi le
whose contents are displayed when the ClassPad Window is open is called the “active document”.
The active document is displayed in the Active Document folder of the Exchange Window, while
other vcp fi les are displayed in the home folder (Default: “ClassPad Manager”).
Active Document Folder
You will fi nd the currently active vcp fi le in the Active Document folder. Each vcp fi le has an
eActivity folder and Other Data folder. The ClassPad Window displays all the data in the currently
active vcp fi le.
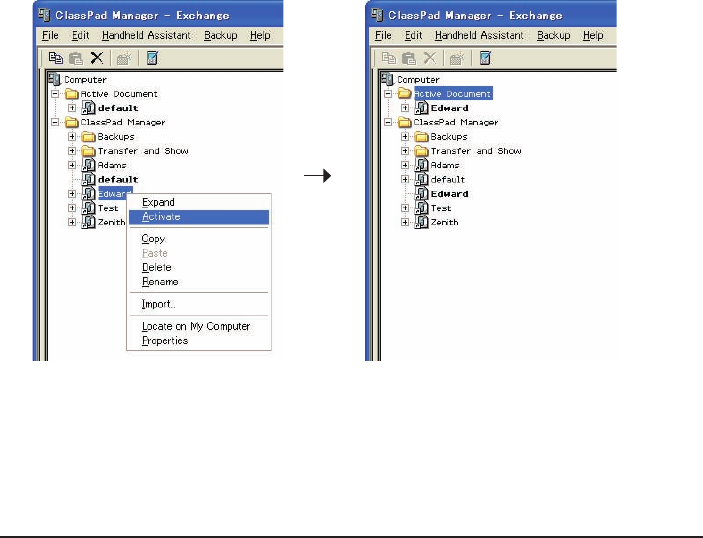
■ To change the active document
1. Right-click the Active Document Folder and then click [Active Document] on the shortcut menu
that appears.
• This displays the “Choose the Virtual ClassPad to Activate” dialog box.
2. On the dialog box, select the vcp fi le you want to activate and then click [Open].
• This will cause the vcp fi le you selected to appear in the Active Document folder.
E-65
20060301
■ To make a particular vcp fi le in the home folder the active document
1. Right-click the vcp fi le you want to make the active document.
2. On the shortcut menu that appears, click [Activate].
• This will cause the vcp fi le you right-clicked in step 1 to appear in the Active Document folder.
Note
You can also change the active document by selecting [Open] on the [File] menu of the ClassPad
Window (fl oating menu bar or shortcut menu). For more information, see “To open an existing vcp
fi le” on page E-23.
Home Folder
You can fi nd the home folder in the Exchange Window just below the Active Document folder. The
default home folder is “ClassPad Manager” located in the My Documents\CASIO folder.
E-66
20060301
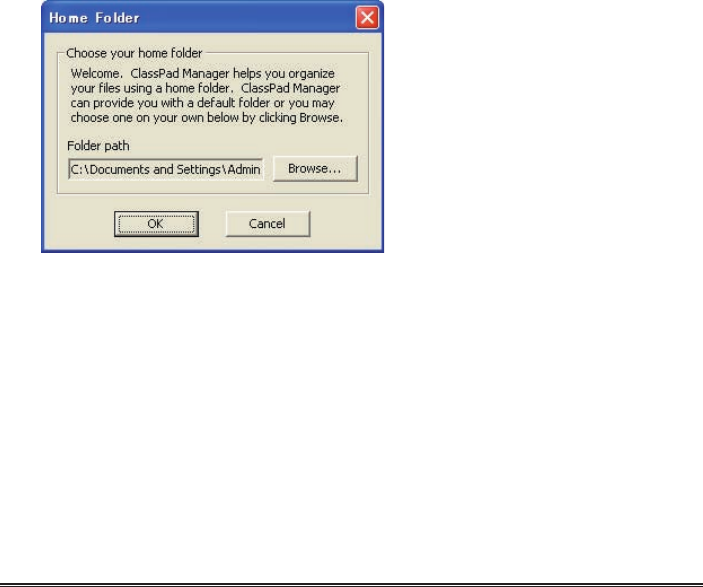
■ To change the home folder
1. Click [File] - [Change Home Folder] or right-click the home folder and then click [Change Home
Folder] on the shortcut menu that appears.
• This will display a Home Folder dialog box like the one shown below.
2. Click [Browse].
• This displays the Browse Folder dialog box.
3. Select the folder you want to use as the home folder and then click [OK].
• This returns to the Home Folder dialog box.
4. Click [OK].
• This registers the folder you selected in step 3 as your home folder.
Note
You can also change the home folder by selecting [File] and then [Change Home Folder] from the
fl oating menu bar.
Establishing Data Communication between Your
ClassPad and ClassPad Manager
In order to be able to transfer data between a ClassPad unit and your computer, you must fi rst
establish a connection between the ClassPad and ClassPad Manager.

E-67
20060301
To establish a connection between one or more ClassPad unit and
ClassPad Manager
■ ClassPad Manager Operation
1. On your computer, start up ClassPad Manager.
• This displays the ClassPad Window.
2. Right-click anywhere within the ClassPad Window and then click [Exchange Window] on the
shortcut menu that appears.
• This displays the Exchange Window, which will show the Computer area only.
■ ClassPad Operation
3. Use the USB cable that comes bundled with the ClassPad to connect it to the computer.
• The ClassPad will establish a connection with ClassPad Manager automatically, and then
display the message shown below.
• At this time, the ClassPad area will appear on the Exchange Window, showing the icon of the
connected ClassPad.
E-68
20060301
4. If you want to establish a connection with multiple ClassPad units, repeat step 3 for each
ClassPad unit.
• Each time you establish a connection between a new ClassPad and ClassPad Manager, that
icon of that ClassPad will be added to the ClassPad area of the Exchange Window.
Note
Closing the Exchange Window will automatically disconnect the ClassPad units from ClassPad
Manager.
Precautions when Connecting Multiple ClassPad Units to a Computer
• When establishing connections between multiple ClassPad units and ClassPad Manager, you
need either a computer with multiple USB ports or a USB hub with enough ports to support
connection of the required number of ClassPad units.
• If you plan to use a hub, refer to the manufacturer’s instructions for installation and use.
Performance may vary depending on the type of USB hub you use.
■ Troubleshooting a Connection
If step 3 above fails, try performing the following steps on the ClassPad unit.
1. On the application menu, tap B.
• This starts the Communication application.
2. Tap [Setup] - [Open Setup Menu].
• This displays the Communication dialog box.
3. Confi gure the above dialog box with the following settings.
• Cable Type : USB cable
• Wakeup Enable : On
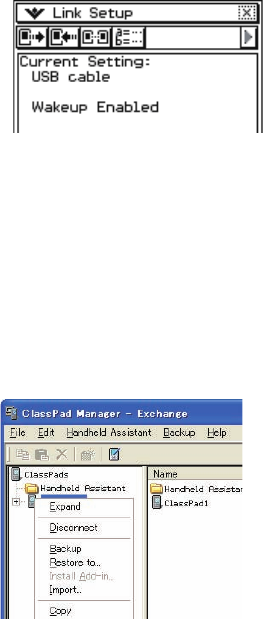
E-69
20060301
5. Repeat steps 1-3 under “To establish a connection between one or more ClassPad unit and
ClassPad Manager”.
■ Disconnecting a ClassPad Unit from ClassPad Manager Manually
You can use the procedures in this section to disconnect a particular ClassPad unit from ClassPad
Manager without disconnecting the USB cable. You can accomplish this by performing either a
ClassPad Manager operation or a ClassPad unit operation.
To disconnect a ClassPad unit using the ClassPad Manager operation
1. On the Exchange Window, right-click the icon of the ClassPad unit you want to disconnect.
2. On the shortcut menu that appears, click [Disconnect].
• This will disconnect the ClassPad unit. At this time, the message “Complete!” will appear on
the ClassPad unit.
To disconnect a ClassPad unit using the ClassPad operation
Press the c key. This disconnects the ClassPad unit and displays “Terminate!” on its display.
4. Tap [Set] to close the dialog box.
• Confi rm that the ClassPad screen changes to show something like the one shown below.
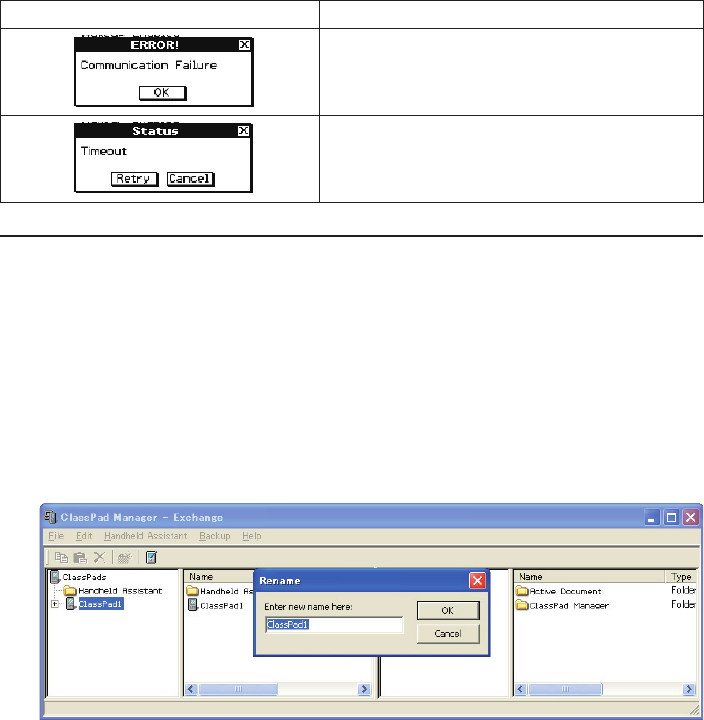
E-70
20060301
■ Communication Errors
When this error message is displayed: You should do this:
Check that the ClassPad and computer are
connected correctly by the USB cable. After
confi rming that the connection is correct, perform
the above procedure again.
This error message appears and communication is
terminated when there is no data communication
between the ClassPad and ClassPad Manager for a
long time. Tap [Retry] to try again.
ClassPad Names (Displayed in the Exchange Window)
Whenever you establish a connection with ClassPad units and ClassPad Manager, they are
displayed in the Exchange Window using sequential temporary names like: ClassPad1, ClassPad2,
etc., unless you choose to change the name. You can change these temporary names to something
more descriptive for each ClassPad.
■ To rename a ClassPad unit
1. On the Exchange Window, right-click the icon of the ClassPad unit you want to rename, and
then click [Rename] on the shortcut menu that appears.
• This displays the Rename dialog box.
2. Type in the name you want to assign to the ClassPad unit.
• The name can be up to 90 characters long.
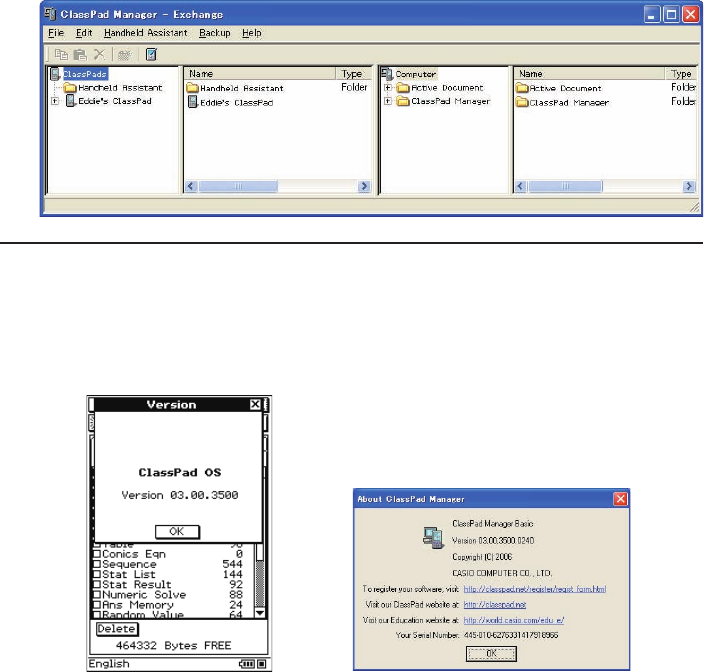
E-71
20060301
3. Click [OK].
• This changes the name of the ClassPad unit whose icon you clicked in step 1 to the name you
input. After you use the above procedure to assign a name to a ClassPad unit, it will appear in
the Exchange Window whenever you establish a connection between that ClassPad unit and
ClassPad Manager.
Transferring eActivity Files
You can use ClassPad Manager to transfer eActivity fi les between your ClassPad and computer.
Before doing so, however, you should check the version numbers of the ClassPad Manager
application running on your computer and the operating system running on your ClassPad to make
sure they are compatible with each other. Never try to transfer fi les from a higher version number (like
03.00) to a lower version number (like 02.20).
ClassPad Version Dialog Box ClassPad Manager Version Dialog Box
• See the ClassPad User’s Guide for information about viewing the ClassPad version number.
• See page E-14 for information about viewing the ClassPad Manager version number.
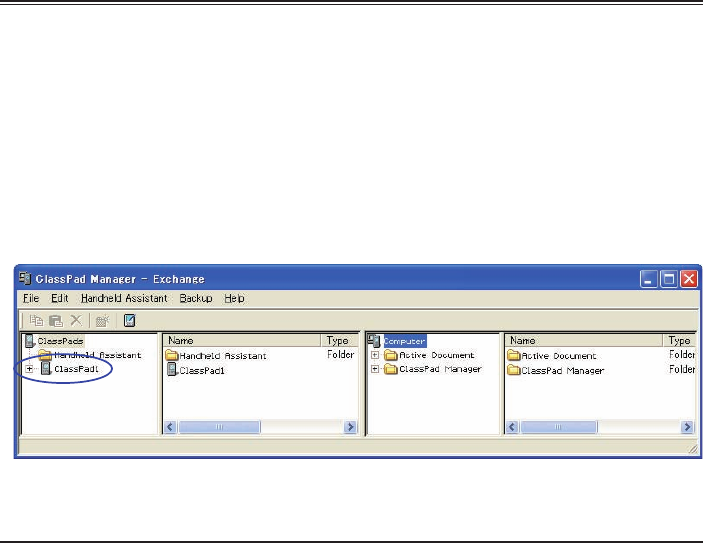
E-72
20060301
Warning!
• eActivities created with an earlier version can be opened in Version 3.00. Settings that do not exist
in earlier versions will be set to their defaults automatically.
• Do not try to transfer eActivities created with Version 3.00 to an earlier version.
Transferring Files between the ClassPad and Your PC
You can use the Exchange Window to transfer (copy) data between a ClassPad unit with which a
connection has been established with ClassPad Manager.
Important!
• This section explains how to transfer data between a single ClassPad unit and ClassPad Manager.
For information about transferring data from ClassPad Manager to multiple ClassPad units, see
“Using Handheld Assistant” on page E-82.
• Before performing the procedures in this section, refer to “Establishing Data Communication
between Your ClassPad and ClassPad Manager” on page E-66 and make sure that the icon of the
ClassPad unit you want to transfer data with is displayed in the Exchange Window.
• The explanations in this section refer to the four panes of the Exchange Window as Pane 1, Pane
2, Pane 3, and Pane 4, from left to right.
Batch Transferring (Copying) a Set of ClassPad Unit Data
Batch transfer refers to transferring more than one fi le at once. The following types of operations
are supported.
• Batch transfer of all ClassPad unit data to ClassPad Manager and store it in a newly created vcp
fi le
• Batch transfer of all ClassPad unit data to a current virtual ClassPad displayed in the ClassPad
Manager Exchange Window
• Batch transfer of all data of a current virtual ClassPad displayed in the ClassPad Manager
Exchange Window to a ClassPad unit
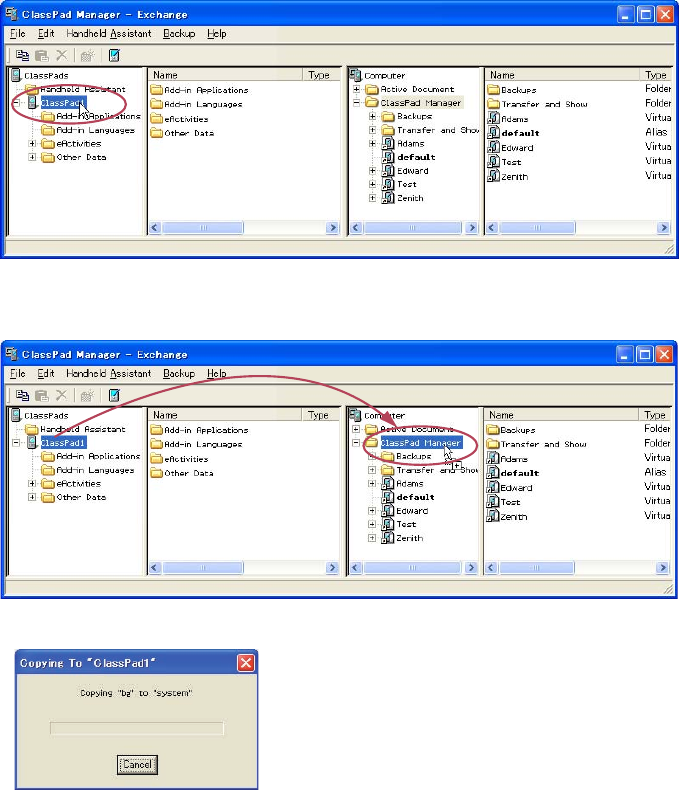
E-73
20060301
■ To batch transfer all ClassPad unit data to ClassPad Manager and store it in a
newly created vcp fi le
1. In Pane 1 of the Exchange Window, click the icon of the ClassPad unit you want to transfer
from.
2. Drag the icon from Pane 1 and drop it onto the home folder in Pane 3 (Default: “ClassPad
Manager”).
• A dialog box remains on your computer screen while data transfer is in progress.
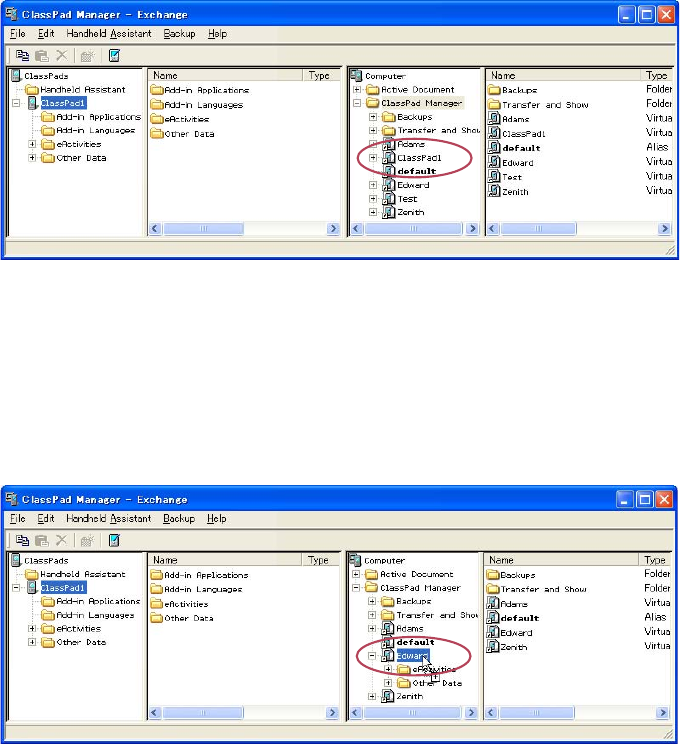
E-74
20060301
• The data transfer dialog box will close when data transfer is complete. Confi rm that a vcp fi le
icon with the same name as the original ClassPad that you copied the data from is displayed
in Pane 3 of the Exchange Window.
■ To batch transfer of all ClassPad unit data to a current virtual ClassPad
displayed in the ClassPad Manager Exchange Window
1. In Pane 1 of the Exchange Window, click the icon of the ClassPad unit you want to transfer
from.
2. Drag the icon and drop it onto the icon of the virtual ClassPad in Pane 3 to which you want to
transfer the data.
• This will cause the vcp fi le name to become highlighted.
3. Drop the ClassPad unit icon onto the virtual ClassPad icon by releasing the mouse button.
• A dialog box remains on your computer screen while data transfer is in progress.
• The data transfer dialog box will close when data transfer is complete.

E-75
20060301
Note
Performing the above procedure does not affect the fi les (except fi les with the same name that you
specify to be overwritten) that are already stored on the virtual ClassPad being transferred to.
Overwrite Existing File? Dialog Box
The “Overwrite Existing File?” dialog box will appear if a fi le that is being transferred from a
ClassPad unit has the same name as a fi le that already exists on the virtual ClassPad being
transferred to (like eActivities\main\, for example).
• To overwrite the existing fi le with the one being transferred, click [Overwrite]. Click [Skip] to
skip transfer of the fi le and leave the fi le on the virtual ClassPad as-is, or [Cancel] to cancel the
transfer operation.
• If you want to apply the [Overwrite] or [Skip] operation to all fi les that have the same name, select
the [Apply to all] check box and then click [Overwrite] or [Skip].
■ To batch transfer all data of a current virtual ClassPad displayed in the ClassPad
Manager Exchange Window to a ClassPad unit
1. In Pane 3 of the Exchange Window, click the icon of the virtual ClassPad you want to transfer
from.
2. Drag the icon and drop it onto the icon of the ClassPad unit in Pane 1 to which you want to
transfer the data.
• This causes the ClassPad name to become highlighted.
3. Drop the virtual ClassPad icon onto the ClassPad unit icon by releasing the mouse button.
• A dialog box remains on your computer screen while data transfer is in progress.
• The “Overwrite Existing File?” dialog box will appear if a fi le in the data being transferred from
the virtual ClassPad has the same name as a fi le already stored in ClassPad unit memory.
See “Overwrite Existing File? Dialog Box” above for more information about this dialog box.
• The data transfer dialog box will close when data transfer is complete.
Note
Performing the above procedure does not affect the fi les (except fi les with the same name that you
specify to be overwritten) that are already stored on the ClassPad being transferred to.
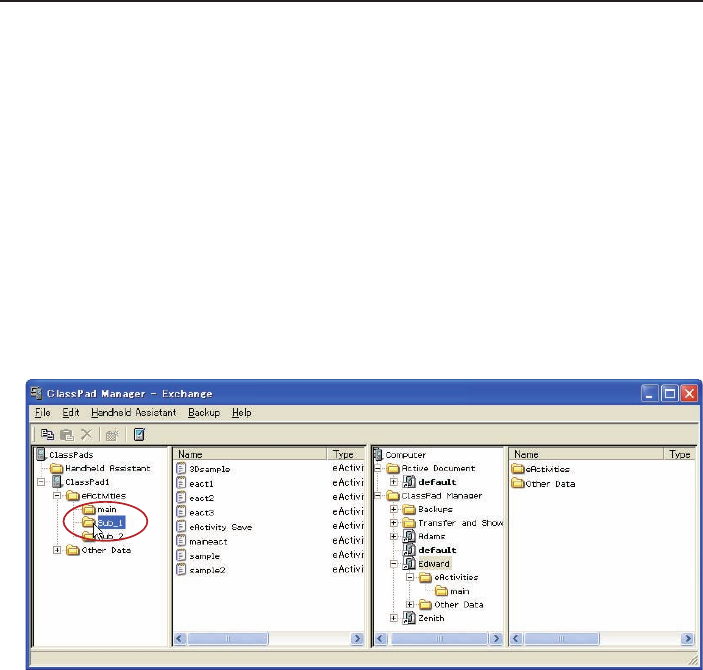
E-76
20060301
Transferring (Copying) Specifi c Folders
You can use the procedures in this section to transfer specifi c data folders between a ClassPad
unit and a virtual ClassPad in the Exchange Window.
Important!
• A folder in the eActivities folder cannot be transferred to an Other Data folder, and vice versa.
Note
Unlike Windows Explorer, transferring a folder to a location that already has a folder with the same
name does not overwrite the existing folder with the new one. Instead, the fi les inside the existing
folder are overwritten with the fi les with the same name that are located inside the folder being
transferred. This means that the fi les in the existing folder that are not overwritten are retained.
■ To transfer a specifi c folder from a ClassPad unit to a virtual ClassPad
1. Click the icon of the folder you want to transfer in Pane 1 or Pane 2 of the Exchange Window.
• You can click any folder inside the eActivities folder or the Other Data folder.
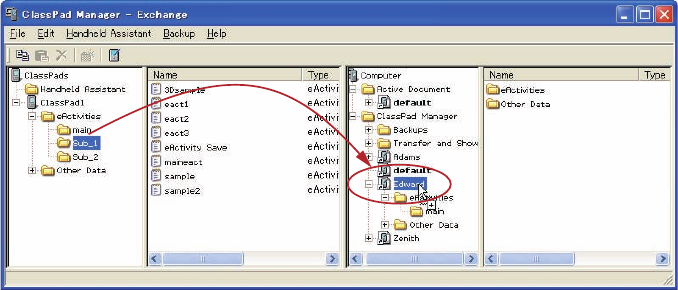
E-77
20060301
2. Drag the icon and drop it onto the icon of the virtual ClassPad in Pane 3 to which you want to
transfer it.
• This starts data transfer. All of the fi les in the folder you selected in step 1 will be transferred
to the same level in the directory of the virtual ClassPad. If you selected the eActivities\main
folder in step 1 for example, the eActivity fi les in the selected folder will be transferred to the
eActivities\main folder of the virtual ClassPad.
• A dialog box remains on your computer screen while data transfer is in progress.
• The “Overwrite Existing File?” dialog box will appear if a fi le in the data being transferred from
ClassPad folder has the same name as a fi le already stored in the virtual ClassPad folder.
See “Overwrite Existing File? Dialog Box” on page E-75 for more information about this dialog
box.
• The data transfer dialog box will close when data transfer is complete.
Note
• Instead of dropping the icon onto the virtual ClassPad icon in step 2, you could also drop it into
the virtual ClassPad’s eActivities folder or Other Data folder. Just make sure you drop a folder
containing eActivities into the eActivities folder, and a folder containing Other Data fi les into the
Other Data folder.
• If there is no folder with the same name in the virtual ClassPad you drop the folder into, a folder
with that name is created automatically.

E-78
20060301
■ To transfer a specifi c folder from a virtual ClassPad to a ClassPad unit
1. Click the icon of the folder you want to transfer in Pane 3 or Pane 4 of the Exchange Window.
• You can click any folder inside the eActivities folder or the Other Data folder.
2. Drag the icon and drop it onto the icon of the ClassPad in Pane 1 to which you want to transfer
it.
• The remainder of this operation is the same as that under “To transfer a specifi c folder from a
ClassPad unit to a virtual ClassPad”, but in reverse.
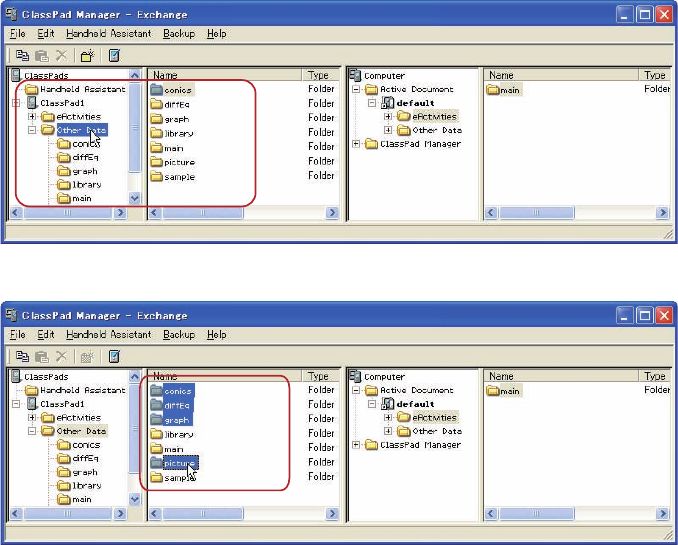
E-79
20060301
■ To transfer multiple folders from a ClassPad unit to a virtual ClassPad
1. In Pane 1 of the Exchange Window, select the folder (eActivities or Other Data) that contains
the folders you want to transfer.
• Pane 2 will show a list of the folders contained in the folder you select in Pane 1.
2. In Pane 2, select all of the folders you want to transfer.
• The remainder of this operation is the same as that from step 2 under “To transfer a specifi c
folder from a ClassPad unit to a virtual ClassPad” on page E-76.
■ To transfer multiple folders from a virtual ClassPad to a ClassPad unit
1. In Pane 3 of the Exchange Window, select the folder (eActivities or Other Data) that contains
the folders you want to transfer.
• Pane 4 will show a list of the folders contained in the folder you select in Pane 3.
2. In Pane 4, select all of the folders you want to transfer.
• The remainder of this operation is the same as that from step 2 under “To transfer a specifi c
folder from a virtual ClassPad to a ClassPad unit” on page E-78.
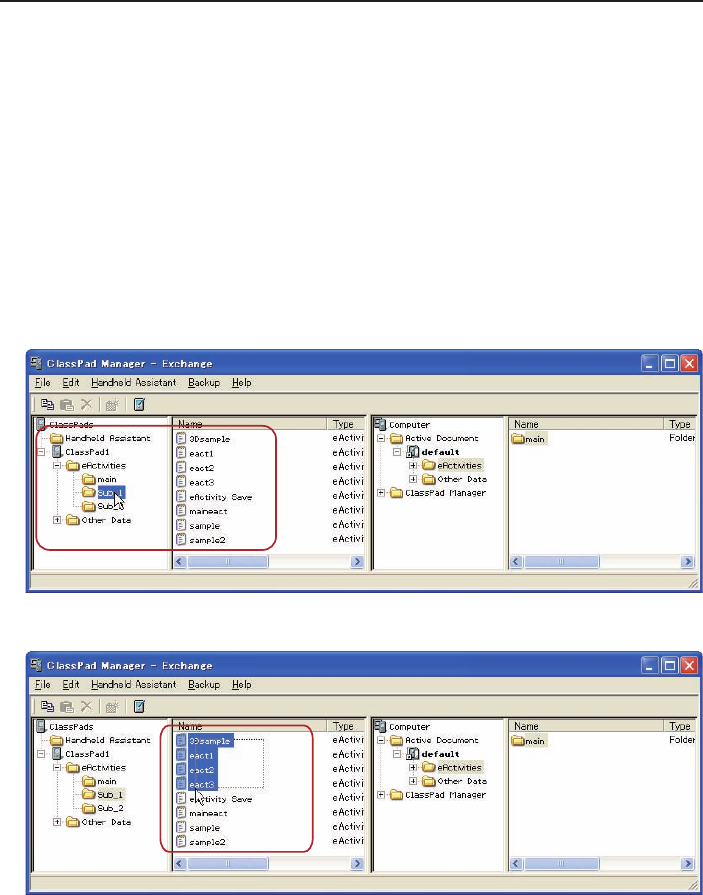
E-80
20060301
Transferring (Copying) Specifi c Files
You can use the procedures in this section to transfer specifi c data fi les between a ClassPad unit
and a virtual ClassPad in the Exchange Window.
Important!
• You cannot transfer fi les to the eActivities folder or to the Other Data folder. You should specify a
folder that inside the eActivities folder or the Other Data folder.
• A fi le in a folder in the eActivities folder cannot be transferred to a folder in the Other Data folder,
and vice versa.
■ To transfer one or more fi les from a ClassPad unit to a virtual ClassPad
1. In Pane 1 of the Exchange Window, select the folder (eActivities or Other Data) that contains
the fi le(s) you want to transfer.
• Pane 2 will show a list of the fi les contained in the folder you select in Pane 1.
2. In Pane 2, select all of the fi les you want to transfer.
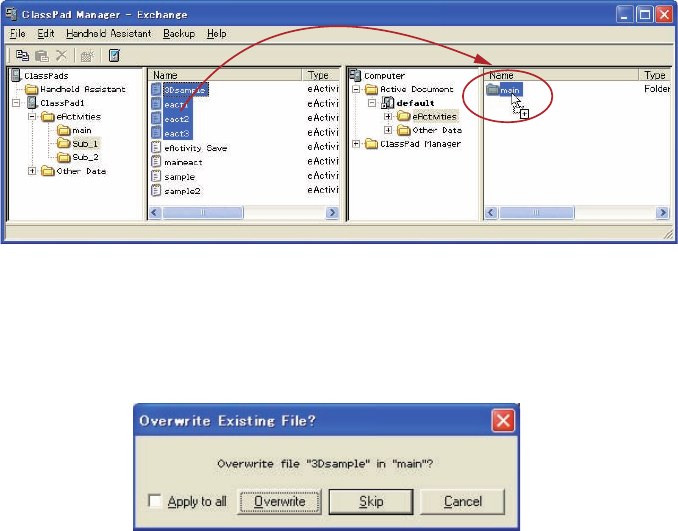
E-81
20060301
3. Drag the icon of the selected fi les and drop it onto the icon of the folder in Pane 4 (or Pane 3) to
which you want to transfer it.
• A dialog box remains on your computer screen while data transfer is in progress.
• The data transfer dialog box will close when data transfer is complete.
Overwrite Existing File? Dialog Box
The “Overwrite Existing File?” dialog box will appear if a fi le in the data being transferred has the
same name as a fi le that already exists in the folder being transferred to.
• To overwrite the existing fi le with the one being transferred, click [Overwrite]. Click [Skip] to
skip transfer of the fi le and leave the fi le in the destination folder as-is, or [Cancel] to cancel the
transfer operation.
• If you want to apply the [Overwrite] or [Skip] operation to all fi les that have the same name, select
the [Apply to all] check box and then click [Overwrite] or [Skip].
■ To transfer one or more fi le from a virtual ClassPad to a ClassPad unit
1. In Pane 3 of the Exchange Window, select the folder (eActivities or Other Data) that contains
the fi le(s) you want to transfer.
• Pane 4 will show a list of the fi les contained in the folder you select in Pane 3.
2. In Pane 4, select all of the fi les you want to transfer.
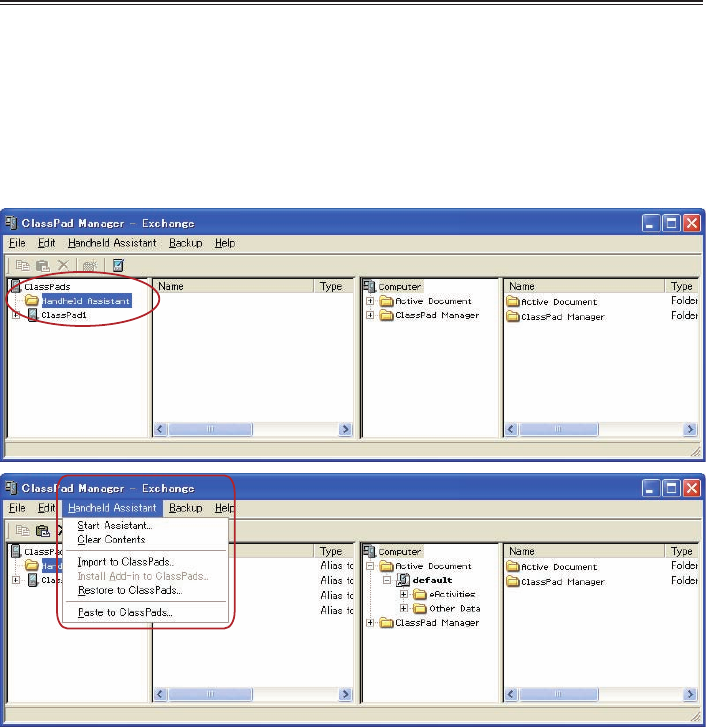
E-82
20060301
3. Drag the icon of the selected fi les and drop it onto the icon of the folder in Pane 1 (or Pane 2) to
which you want to transfer it.
• A dialog box remains on your computer screen while data transfer is in progress.
• The “Overwrite Existing File?” dialog box will appear if a fi le in the data being transferred has
the same name as a fi le that already exists in the folder being transferred to. See “Overwrite
Existing File? Dialog Box” on page E-81 for more information about this dialog box.
• The data transfer dialog box will close when data transfer is complete.
Using Handheld Assistant
Handheld Assistant can be used to batch transfer selected data to a single or multiple ClassPad
units connected to a computer. Transfer using Handheld Assistant is performed automatically to all
ClassPad units connected to the computer, which simplifi es transfer of the same data to multiple
ClassPad units. Handheld Assistant can be accessed using the Handheld Assistant folder and the
Handheld Assistant menu.
• Use the Handheld Assistant folder with [Copy] and [Paste] or drag and drop. The same basic
rules for copying as described for the Exchange Window can be applied to multiple ClassPads.
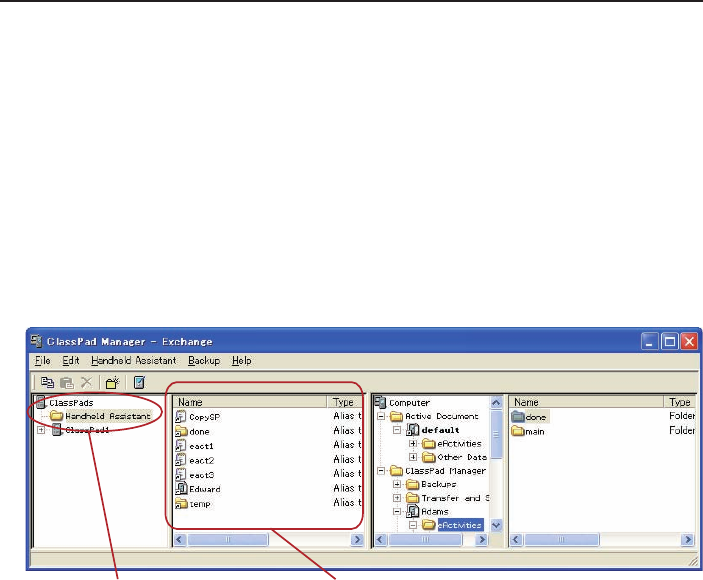
E-83
20060301
You can use Handheld Assistant to perform the following data transfers by placing the data in the
Handheld Assistant folder and then starting the Assistant.
• Transfer of all data currently in the Handheld Assistant folder to all ClassPad units
• Import of xcp fi les (page E-98) or old version ClassPad data fi les (fl s or mcs) to the Handheld
Assistant folder for transfer to all ClassPad units
• Installation of all add-in applications or languages on the ClassPad units
• Restoration of all ClassPad units with a specifi ed backup fi le
Batch Transferring Virtual ClassPad Data to Connected ClassPad Units
You can use the procedure below to batch transfer specifi c virtual ClassPad data (one or more
fi les, all fi les in one or more folders, one or more vcp fi les) to all ClassPad units that are connected
to ClassPad Manager.
■ To batch transfer fi les to connected ClassPad unit(s) using the Handheld
Assistant folder
1. Drop the data you want to batch transfer to the connected ClassPad unit(s) into the Handheld
Assistant folder in Pane 1 of the Exchange Window. The data is now ready to be transferred.
• Of all the items in the Computer area (Panes 3 and 4) of the Exchange Window, you can drag
a vcp fi le or any of the folders and fi les it contains to the Handheld Assistant folder. Dropping
an item into the Handheld Assistant folder will create a shortcut to that item in the Handheld
Assistant folder.
Handheld Assistant folder Created shortcut
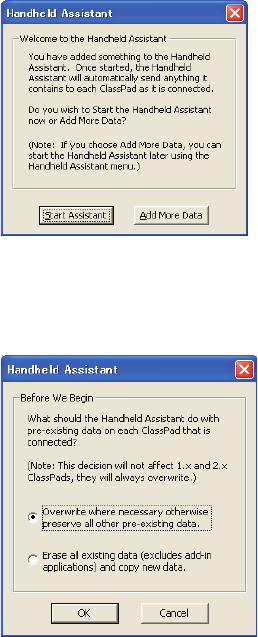
E-84
20060301
• The dialog box shown below will appear the fi rst time you drop a fi le or folder into the
Handheld Assistant folder.
Follow the instructions on the dialog box.
2. Click [Handheld Assistant] - [Start Assistant].
• This displays a screen like the one shown below.
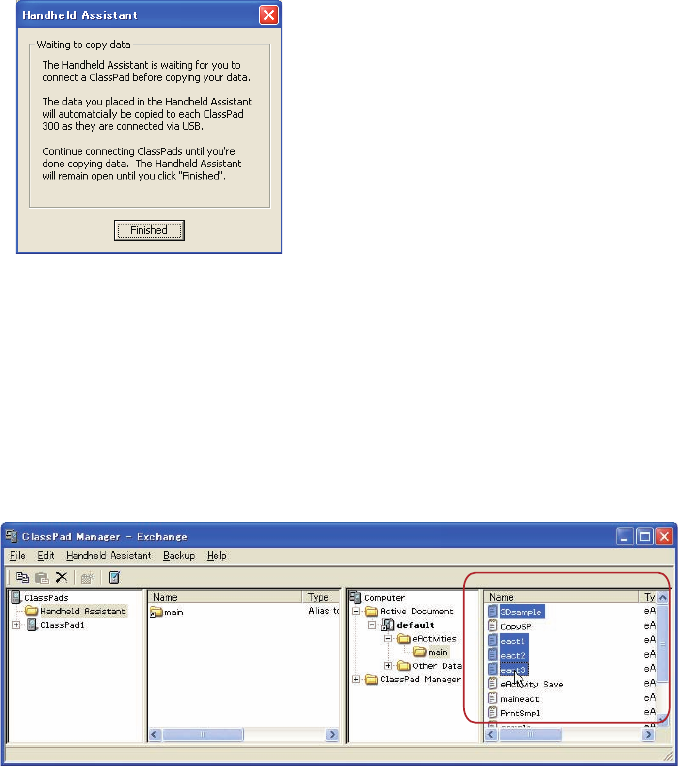
E-85
20060301
3. Select the option you want, and then click [OK].
• This displays a dialog box letting you know that data is being transferred to all of the
connected ClassPad units.
• When the dialog box shown below appears, each ClassPad unit you connect will automatically
have the data copied to it.
• While the dialog box shown below is on the display, data will be copied automatically to
each ClassPad unit you connect to the computer. The data will be transferred to any newly
connected ClassPad unit until you close the dialog box.
For details about this dialog box, see “Waiting to copy data dialog box” on page E-90.
4. Click [Finished] to close the dialog box and return to normal operations.
■ To batch transfer copied virtual ClassPad data to all connected ClassPad units
1. In Pane 3 of the Exchange Window, select the folder (eActivities or Other Data) that contains
the fi le(s) you want to transfer.
• Pane 4 will show a list of the folders contained in the folder you select in Pane 3.
2. In Pane 4, select all of the fi les you want to transfer.
3. Click [Edit] - [Copy].

E-86
20060301
4. Click [Handheld Assistant] - [Paste to ClassPads].
• This displays the Handheld Assistant dialog box.
• From this point, perform the same steps starting from step 3 under “To batch transfer fi les to
connected ClassPad unit(s) using the Handheld Assistant folder” on page E-83.
Deleting Shortcuts from the Handheld Assistant Folder
■ To delete shortcuts from the Handheld Assistant folder
1. In Pane 1, click the Handheld Assistant folder.
• This will display all the shortcuts contained on the Handheld Assistant folder in Pane 2.
2. Select the shortcuts you want to delete.
3. Right-click any one of the selected shortcuts, and then select [Delete] on the shortcut menu that
appears.
• This deletes all of the shortcuts you selected in step 2.
■ To delete all shortcuts from the Handheld Assistant folder
Click [Handheld Assistant] - [Clear Contents].
Batch Transferring xcp File or Old Version ClassPad Image Files (fl s or
mcs) to All Connected ClassPad Units
You can use the following procedures to transfer one or more xcp, fl s, or mcs fi le to all or connected
ClassPad units.
■ To transfer one xcp, fl s, or mcs fi le to all connected ClassPad units
1. Click [Handheld Assistant] - [Import to ClassPads].
• This displays the Open dialog box.
2. Select the xcp, fl s, or mcs fi le you want to transfer, and then click [Open].
• This displays the Handheld Assistant dialog box.
• From this point, perform the same steps starting from step 3 under “To batch transfer fi les to
connected ClassPad unit(s) using the Handheld Assistant folder” on page E-83.
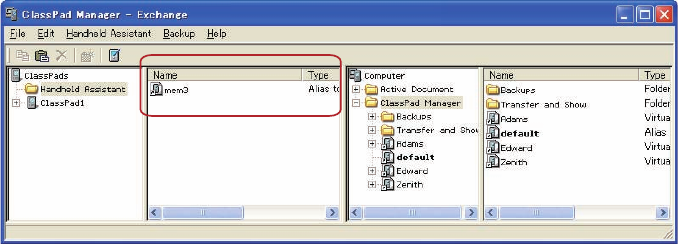
E-87
20060301
■ To transfer multiple xcp, fl s, or mcs fi les to all connected ClassPad units
1. Right-click the Handheld Assistant folder and then click [Import] on the shortcut menu that
appears.
• This displays the Open dialog box.
2. Select one of the xcp, fl s, or mcs fi les you want to transfer, and then click [Open].
• If the “Welcome to the Handheld Assistant” dialog box appears here, click [Continue].
• This will create a shortcut to the fi le you selected on the Open dialog box in the Handheld
Assistant folder.
3. Repeat steps 1 and 2 for all of the xcp, fl s, and mcs fi les you want to transfer.
4. After adding shortcuts to the Handheld Assistant for all of the fi les you want to transfer, click
[Handheld Assistant] - [Start Assistant].
• This displays the Handheld Assistant dialog box.
• From this point, perform the same steps starting from step 3 under “To batch transfer fi les to
connected ClassPad unit(s) using the Handheld Assistant folder” on page E-83.
Note
In place of steps 1 and 2 of the above procedure, you could also drag one or more xcp, fl s, mcs
fi les from Windows Explorer or an email program and drop them into the Handheld Assistant folder
of the Exchange Window.

E-88
20060301
Batch Installing Add-in Applications or Languages onto All Connected
ClassPad Units
You can use the following procedures to install one or more add-in application onto all connected
ClassPad units.
Note
These procedures can also be used to install add-in language fi les (.lng) onto a ClassPad.
■ To install one add-in application onto all connected ClassPad units
1. Click [Handheld Assistant] - [Install Add-in to ClassPads].
• This displays the Open dialog box.
2. Select one of the add-in application fi les (.cpa) you want to install, and then click [Open].
• This displays the Handheld Assistant dialog box.
• From this point, perform the same steps starting from step 3 under “To batch transfer fi les to
connected ClassPad unit(s) using the Handheld Assistant folder” on page E-83.
■ To install multiple add-in applications onto all connected ClassPad units
1. Right-click the Handheld Assistant folder and then click [Install Add-in] on the shortcut menu
that appears.
• This displays the Open dialog box.
2. Select one of the add-in application fi les (.cpa) you want to install, and then click [Open].
• If the “Welcome to the Handheld Assistant” dialog box appears here, click [Continue].
• This will create a shortcut to the fi le you selected on the Open dialog box in the Handheld
Assistant folder.
3. Repeat steps 1 and 2 for all of the add-in application fi les you want to install.
4. After adding shortcuts to the Handheld Assistant for all of the fi les you want to transfer, click
[Handheld Assistant] - [Start Assistant].
• This displays the Handheld Assistant dialog box.
• From this point, perform the same steps starting from step 3 under “To batch transfer fi les to
connected ClassPad unit(s) using the Handheld Assistant folder” on page E-83.
Note
In place of steps 1 and 2 of the above procedure, you could also drag one or more add-in
application fi le from Windows Explorer and drop it into the Handheld Assistant folder of the
Exchange Window.
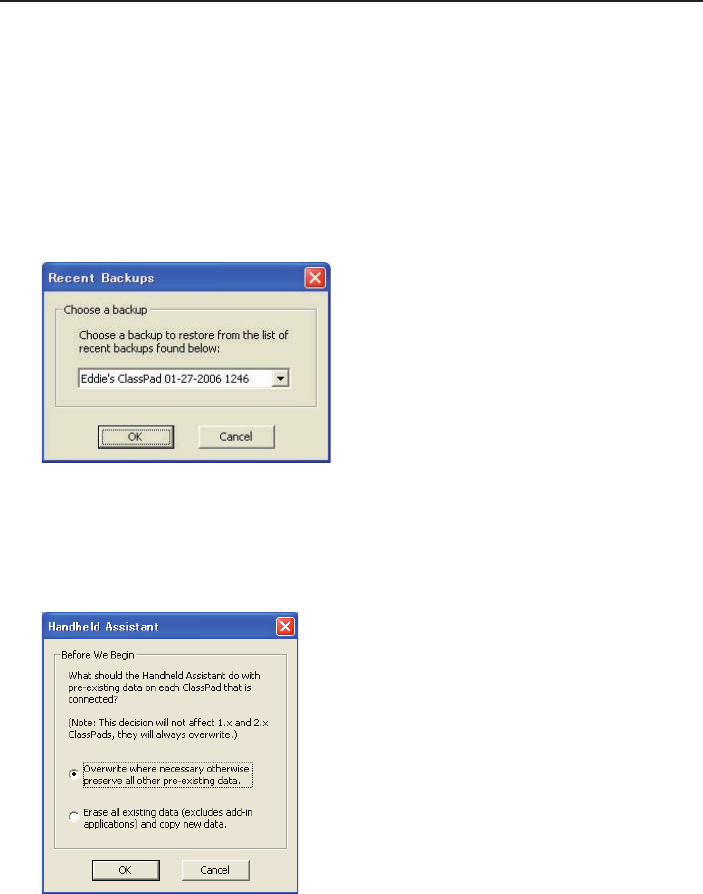
E-89
20060301
Restoring All Connected ClassPad Units with Backed Up Data
You can restore all connected ClassPad units with a previously created backup data fi le.
Note
For details about backing up ClassPad unit data, see “Backing Up and Restoring Data” on page
E-91.
■ To restore all connected ClassPad units with backed up data
1. Click [Handheld Assistant] - [Restore to ClassPads].
• This displays a screen like the one shown below.
2. Click the down arrow button next to the text box. Next, from the list that appears, select the
backup fi le you want to restore to the connected ClassPad(s).
3. Click [OK].
• This displays a screen like the one shown below.
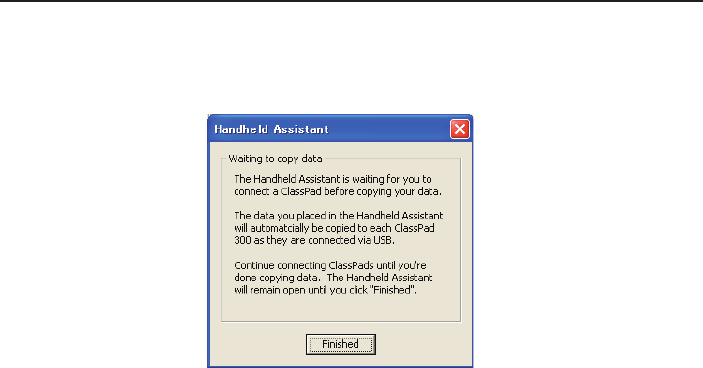
E-90
20060301
4. Select the option you want, and then click [OK].
• A dialog box will remain on the display as the backup fi le you selected in step 2 is transferred
to all of the connected ClassPad units.
• The “Waiting to copy data” dialog box will appear to let you know that data transfer is
complete. Click [Finished].
Waiting to copy data dialog box
The dialog box shown below will appear between data transfer operations using Handheld
Assistant. It will be on the display after a data transfer operation is complete and when there is no
ClassPad unit attached to computer.
You can perform either of the two following operations while this dialog box is displayed.
• To exit data transfer, click [Finished].
• To continue with data transfer, connect a ClassPad unit to the computer. Data transfer will start
automatically.
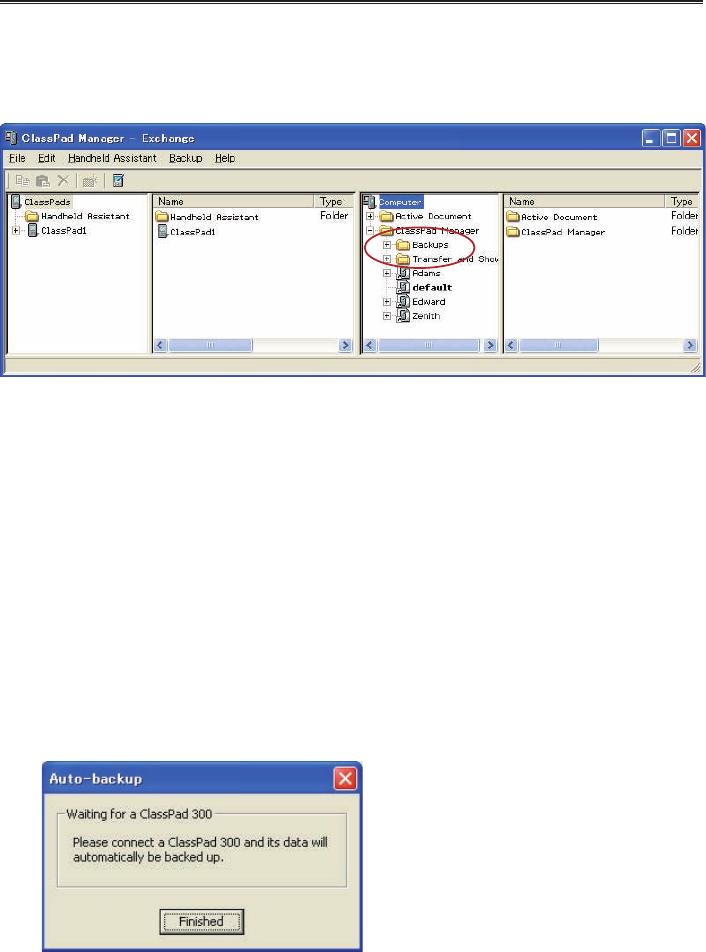
E-91
20060301
Backing Up and Restoring Data
After you back up all of the data in a ClassPad unit to a fi le, you can later restore the backed up
data to a ClassPad unit. Backup fi les are stored in the “Backups” folder, which is created inside of
the ClassPad Manager home folder.
Note
A backup fi le is a vcp fi le, which you can manipulate using the same Exchange Window operations
as those you use with vcp fi les.
■ To back up the data of all connected ClassPad units
1. Connect the ClassPad unit(s) whose data you want to back up to the computer and establish a
connection between it and ClassPad Manager.
• You can connect one or more than one ClassPad unit.
2. Click [Backup] - [Start Auto-backup].
• This starts back up of all connected ClassPad units and displays a dialog box showing that
data transfer is in progress. Once backup is started, any ClassPad unit that is connected will
have all of its data backed up in the Backups sub-folder of the home folder. It will create a fi le
named after the ClassPad unit, with the current date and time appended.
• The dialog box shown below appears when data transfer is complete.
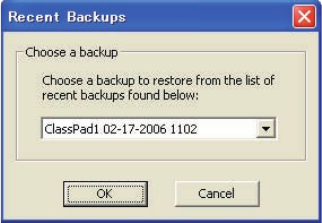
E-92
20060301
• This dialog box indicates that ClassPad Manager is waiting for connection of a ClassPad unit
for data backup. Connecting a ClassPad unit to the computer at this time will start back up
automatically.
• To exit data backup, click [Finished].
■ To backup a specifi c ClassPad unit
1. In Pane 1 of the Exchange Window, click the icon of the ClassPad unit you want to back up.
2. Click [Backup] - [Backup <ClassPad name>*].
* <ClassPad name> will show the name of the ClassPad unit you selected in step 1.
• This starts back up of the selected ClassPad unit and displays a dialog box showing that data
transfer is in progress. The dialog box will close automatically when data transfer is complete.
• A backup fi le will be created in the Backups sub-folder of the home folder. It will be named
after the ClassPad unit that you backed-up, with the current date and time appended.
Tip
You can also right-click the icon of the ClassPad you wish to back up and choose [Backup] from
the menu that appears.
■ To restore a specifi c ClassPad unit with a backup fi le
1. In Pane 1 of the Exchange Window, click the icon of the ClassPad unit you want to restore.
2. Click [Backup] - [Restore to <ClassPad name>*].
* <ClassPad name> will show the name of the ClassPad unit you selected in step 1.
• This displays a screen like the one shown below.
3. Click the down arrow button next to the text box. Next, from the list that appears, select the
backup fi le you want to restore.
4. Click [OK].
• This starts restore to the selected ClassPad unit and displays a dialog box showing that data
transfer is in progress. The dialog box will close automatically when data transfer is complete.

E-93
20060301
■ To batch restore a multiple ClassPad units with a backup fi le
See “Restoring All Connected ClassPad Units with Backed Up Data” on page E-89.
■ To browse backup fi les with Windows Explorer
Click [Backup] - [Browse Backups].
This opens an Explorer window of the fi les in the Backups folder.
Installing an Add-in Application or Language onto a
ClassPad Unit
Use the procedure in this section to install an add-in application onto a ClassPad unit you select on
the Exchange Window.
Note
• These procedures can also be used to install an add-in language fi le (.lng) onto a ClassPad.
• For information about how to batch install an add-in application onto all ClassPad units connected
to the computer, see “Batch Installing Add-in Applications or Languages onto All Connected
ClassPad Units” on page E-88.
■ To install an add-in application onto a ClassPad unit
1. In Pane 1 of the Exchange Window, click the icon of the ClassPad unit where you want to install
the add-in application.
2. Click [File] - [Install Add-in to <ClassPad name>*].
* <ClassPad name> will show the name of the ClassPad unit you selected in step 1.
• This displays the Open dialog box.
3. Select one of the add-in application fi les (.cpa) you want to install, and then click [Open].
• This starts installation of the add-in application onto the selected ClassPad unit and displays
a dialog box showing that data transfer is in progress. The dialog box will close automatically
when data transfer is complete.
• After installation is complete, click the Add-ins folder of the ClassPad unit to confi rm that the
add-in application is present.
Tip
You can also install an add-in application by right-clicking the icon of the ClassPad and choosing
[Install Add-in] from the menu.

E-94
20060301
Using Virtual ClassPad (vcp) Files
This section explains the following operations, which you can perform using virtual ClassPad (vcp)
fi les.
• Creating, deleting, renaming vcp fi les
• Copying fi les between virtual ClassPads
• Converting old-version ClassPad data fi les (fl s or mcs) to vcp fi les
Virtual ClassPad (vcp) File Operations
The procedures in this section can be used to create, delete, and rename vcp fi les.
Note
For information about making a specifi c vcp fi le the active document, see “Active Document Folder”
on page E-64.
■ To create a new vcp fi le
1. On the Exchange Window, right-click the home folder (Default: “ClassPad Manager”).
2. On the shortcut menu that appears, click [Add Virtual ClassPad].
• This displays the “Create A New Virtual ClassPad” dialog box.
3. Type in a fi le name for the new virtual ClassPad in the [File Name] box, and then click [Open].
• On the “A fi le with this name does not exist. Create a new fi le using this name?” dialog box
that appears, click [Yes].
• This creates a new vcp fi le and displays it in the Exchange Window home folder.
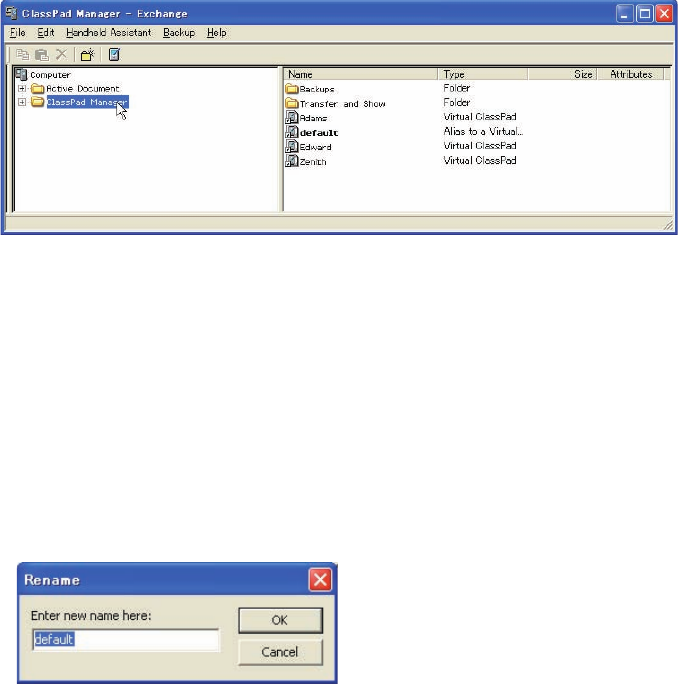
E-95
20060301
■ To delete a vcp fi le
1. On the Exchange Window, click the home folder to select it.
• This displays the vcp fi les in home folder in the pane to the right.
2. Select the ClassPad fi le(s) you want to delete.
3. Right-click any one of the selected fi les, and then select [Delete] on the shortcut menu that
appears.
• This displays the “Delete selected item(s)? Are you sure?” dialog box.
4. Click [Yes] to delete the fi le(s), or [No] to cancel the delete operation.
■ To rename a virtual ClassPad
1. Right-click the icon of the virtual ClassPad unit you want to rename, and then click [Rename] on
the shortcut menu that appears.
• This displays the Rename dialog box.
2. Type in up to 90 characters for the name and then click [OK].
E-96
20060301
Copying Files Between Virtual ClassPads
■ To copy fi les from one virtual ClassPad to another
1. In the virtual ClassPad that contains the fi les you want to copy, click the folder that contains the
fi les to select it.
• All of the fi les in the folder you clicked will appear in the pane to the right.
2. Select all of the fi les you want to copy.
3. Drag one of the selected fi les into a folder on the virtual ClassPad to which you want to copy
them.
• This copies the fi les to the folder where you dropped them.

E-97
20060301
Converting Old-version ClassPad Data Files (fl s or mcs) to vcp Files
You can convert an fl s or mcs fi le to a vcp fi le by importing it into the home folder, or by double-
clicking the fl s or mcs fi le.
■ To convert an fl s or mcs fi le to a vcp fi le by importing it into the home folder
1. On the Exchange Window, click the home folder to select it.
• In this example, the home folder name is the default “ClassPad Manager”.
2. Click [File] - [Import to “ClassPad Manager”].
• This displays the Open dialog box.
3. Select the fl s or mcs fi le you want to convert to a vcp fi le, click [Open].
• This converts the selected fl s or mcs fi le to a vcp fi le and stores it in the ClassPad Manager
folder.
E-98
20060301
Note
• Using ClassPad Window to open an fl s or mcs fi le will convert it automatically to a vcp fi le. For
more information, see “To open an old version mcs or fl s fi le” on page E-24.
• Double-clicking an fl s or mcs fi le in any Windows folder also will convert it to a vcp fi le, which is
added to the folder that contains the original fi le.
• You can also convert an fl s or mcs fi le to a vcp fi le by dropping it into the Exchange Window.
• No matter what procedure you use to convert an fl s or mcs fi le to a vcp fi le, both the original fi le
and the conversion result will be available.
Handling Individual Data (xcp) Files
In addition to the virtual ClassPad (vcp) fi les described up to this point, ClassPad Manager 3.0 also
allows you handle individual data (xcp) fi les. A vcp fi le contains a set of all the data (eActivity and
all other data) of a single ClassPad unit, while an xcp fi le contains a particular fi le (eActivity fi le,
program fi le, variable fi le, etc.) of a ClassPad unit.
When you double-click an xcp fi le, its data is restored to your Active Document folder. Double-
clicking an eActivity fi le, will start up the eActivity application automatically. This feature enables you
to put individual eActivities into a document and open them directly.
■ To create an individual data (xcp) fi le
1. On the Exchange Window, click the fi le in the virtual ClassPad that you want to save as an xcp
fi l e .
2. Drag the selected fi le to any folder in Windows Explorer (or the Windows desktop).
• This creates an xcp fi le where you dropped it (folder or Windows desktop).
E-99
20060301
■ To open an individual data (xcp) fi le
Double-click the xcp fi le you want to open. This starts up ClassPad Manager, automatically imports
the data in the xcp fi le into the Active Document folder.
• Clicking [OK] after double-clicking an xcp fi le that contains an eActivity will open the eActivity
automatically.
• Clicking [OK] after double-clicking a non-eActivity xcp fi le will display the application menu. You
can check the imported data using Variable Manager or the Exchange Window.
Note
For details about Variable Manager operations, see the ClassPad User’s Guide.
■ To import a single individual data (xcp) fi le into a particular virtual ClassPad
1. On the Exchange Window, click the icon of the virtual ClassPad into which you want to import
the fi le.
2. Click [File] - [Import to "<Virtual ClassPad name>"*].
* <Virtual ClassPad name> will show the name of the virtual ClassPad unit you selected in step 1.
• This displays the Open dialog box.
3. Click the xcp fi le you want to import and then click [Open].
• This imports data of the selected xcp fi le into the vcp fi le you selected in step 1.
Tip
• You can drag xcp fi les from Windows Explorer and drop them onto Virtual ClassPads, ClassPads,
or folders.
• You can also drag xcp fi les to the Handheld Assistant to automatically install them on multiple
ClassPads.
E-100
20060301
Toolbar Buttons
To do this: Click this toolbar button:
Copy the currently selected fi le(s)
Paste copied fi le(s)
Delete the currently selected folder(s) or fi le(s)
Create a new folder
Toggle display of Exchange Window ClassPad area on and off
(if no ClassPad units are connected)
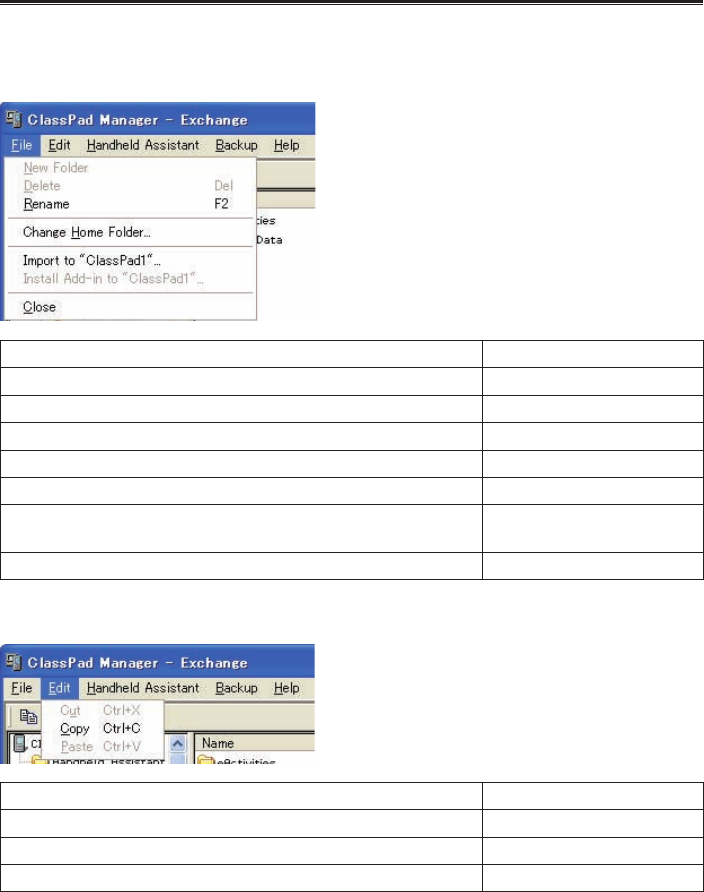
E-101
20060301
Menu Bar Menu Commands
■ [File] Menu Commands
To do this: Select this menu item:
Create a new folder New Folder
Delete selected items Delete
Rename a selected vcp or xcp fi le, or ClassPad Rename
Change the home folder Change Home Folder
Import fl s and mcs fi les Import to "Name"
Install add-ins to connected ClassPad unit Install Add-in to "<ClassPad
name>"
Close the Exchange Window and open the ClassPad Window Close
■ [Edit] Menu Commands
To do this: Select this menu item:
Cut the selected fi le to the clipboard Cut
Copy the selected fi le Copy
Paste the copied fi le Paste
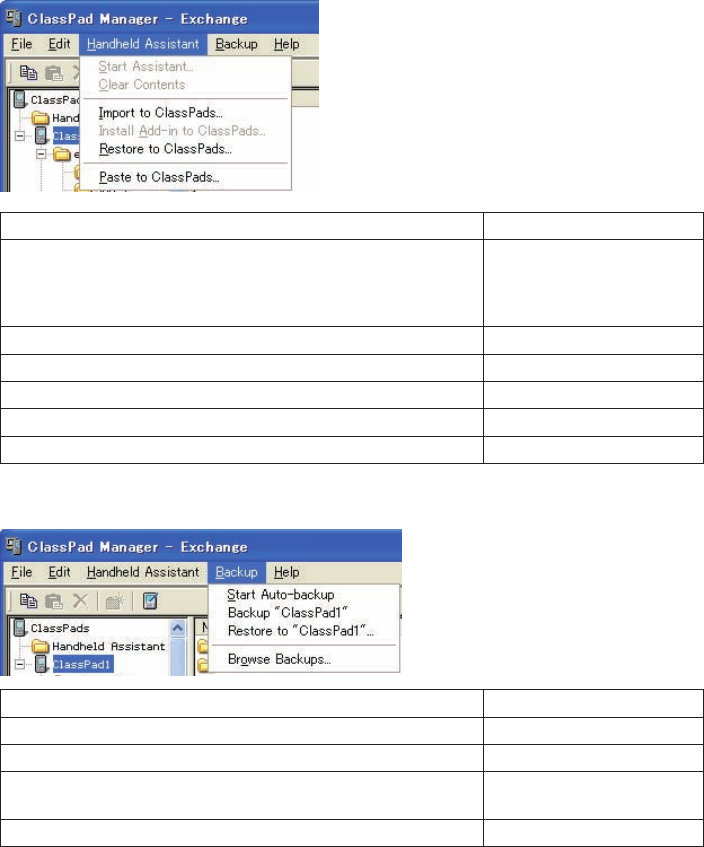
E-102
20060301
■ [Handheld Assistant] Menu Commands
To do this: Select this menu item:
Start Handheld Assistant
• Any data that you copied to the Handheld Assistant folder will be
transferred automatically to all ClassPads that are connected via
USB
Start Assistant
Remove all data from the Handheld Assistant folder Clear Contents
Shortcut to send an xcp (or fl s or mcs) fi le to multiple ClassPads Import to ClassPads
Install an add-in to multiple ClassPads Install Add-in to ClassPads
Restore a backup fi le to multiple ClassPads Restore to ClassPads
Paste the current clipboard to multiple ClassPads Paste to ClassPads
■ [Backup] Menu Commands
To do this: Select this menu item:
Start an auto backup Start Auto-Backup
Back up the data of the selected ClassPad Backup "<ClassPad name>"*
Copy a backup fi le to selected ClassPad Restore to "<ClassPad
name>"*
Open Windows Explorer to display the fi les in the Backups folder Browse Backups
* <ClassPad name> will show the name of the ClassPad unit you selected in Pane 1 of the
Exchange Window.
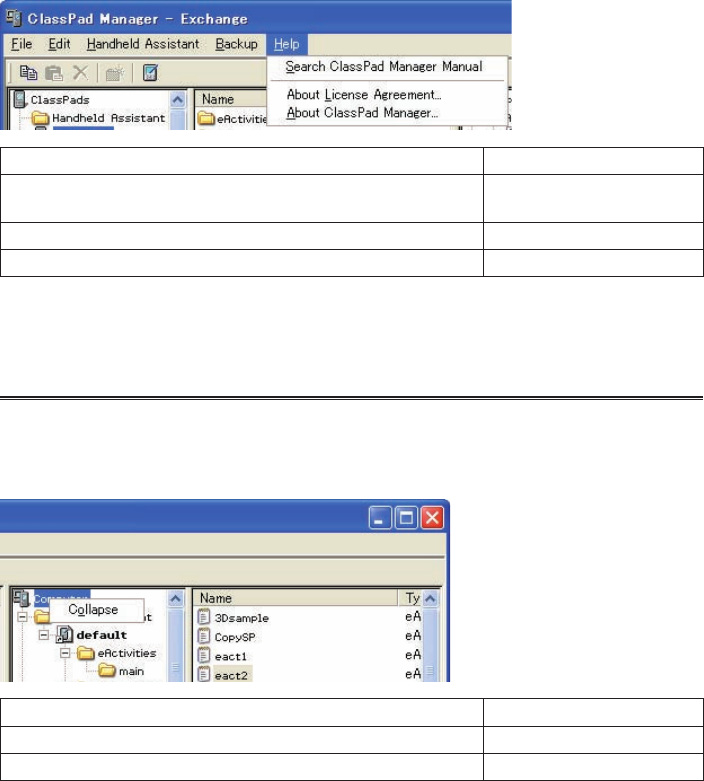
E-103
20060301
■ [Help] Menu Commands
To do this: Select this menu item:
Open the ClassPad Manager manual Search ClassPad Manager
Manual
Show information about the license agreement About License Agreement
Show ClassPad Manager version and other information About ClassPad Manager
Note
To open the ClassPad Manager manuals, Adobe Acrobat Reader must be installed on your
computer.
Shortcut Menu Commands
■ Computer Icon Shortcut Menu
To do this: Select this menu item:
Hide all folders Collapse
Show all folders Expand
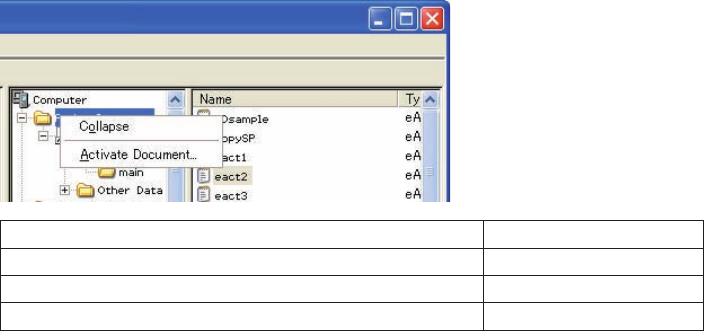
E-104
20060301
To do this: Select this menu item:
Open the folder Expand
Close the folder Collapse
Browse to a vcp fi le and set it as the active document Activate Document
■ Active Document Folder Icon Shortcut Menu
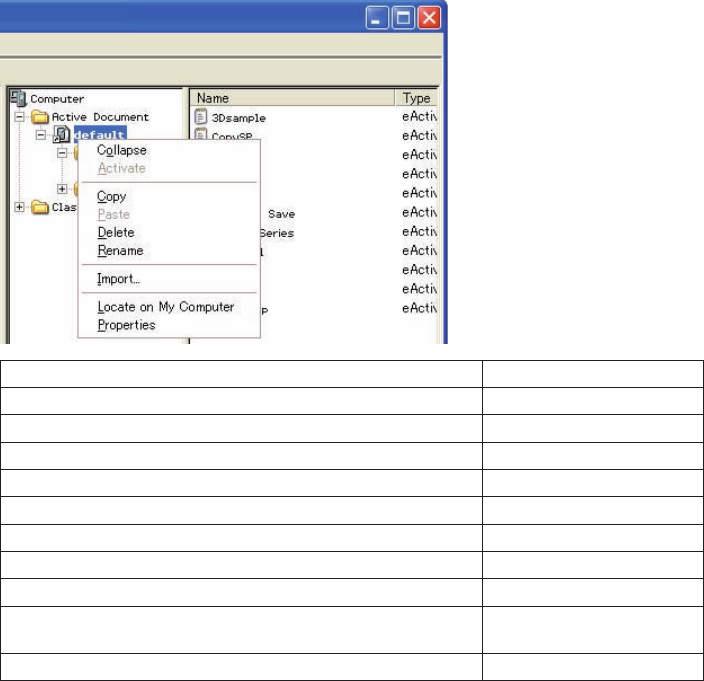
E-105
20060301
■ Shortcut Menu of a virtual ClassPad in the Active Document Folder
To do this: Select this menu item:
Open the folder Expand
Close the folder Collapse
Make the vcp fi le active Activate
Copy the vcp fi le Copy
Paste into the vcp fi le Paste
Delete the shortcut to the vcp fi le and delete the actual fi le Delete
Rename the fi le Rename
Import an xcp fi le (eActivity or variable) Import
Use Windows Explorer to open the folder that contains the vcp fi le
whose icon you right-clicked Locate on My Computer
Show the properties of the vcp fi le Properties

E-106
20060301
To do this: Select this menu item:
Open the folder Expand
Close the folder Collapse
Create a new folder New Folder
Add a new vcp fi le Add Virtual ClassPad
Import fl s and mcs fi les Import
Copy the contents of the Backups folder Copy
Paste a fi le Paste
Delete the Backups folder if it is empty Delete
■ Folder Shortcut Menu
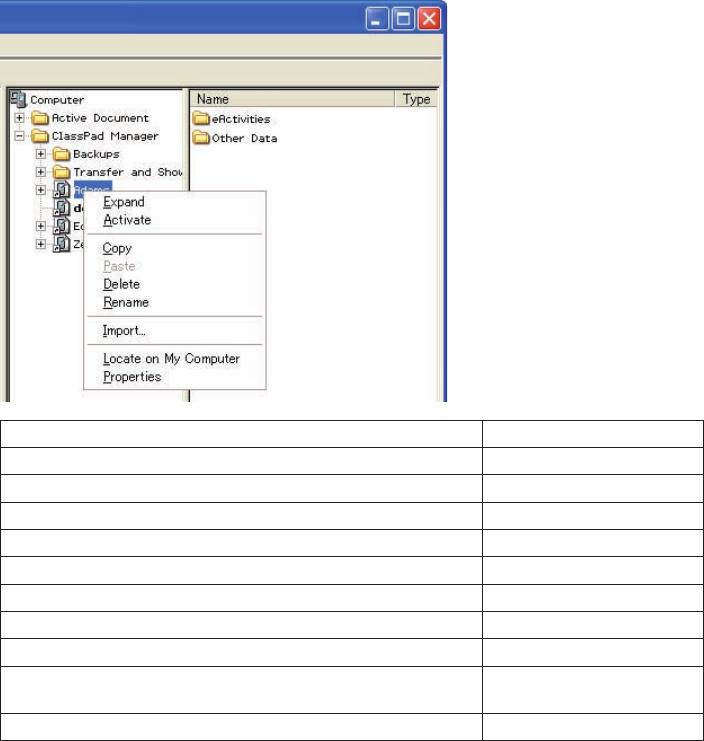
E-107
20060301
■ Shortcut Menu of a virtual ClassPad icon in the ClassPad Manager Folder
To do this: Select this menu item:
Open the folder Expand
Close the folder Collapse
Make the vcp fi le active Activate
Copy the vcp fi le Copy
Paste into the vcp fi le Paste
Delete the shortcut to the vcp fi le and delete the actual fi le Delete
Rename the fi le Rename
Import an xcp fi le (eActivity or variable) Import
Use Windows Explorer to open the folder that contains the vcp fi le
whose icon you right-clicked Locate on My Computer
Show the properties of the vcp fi le Properties
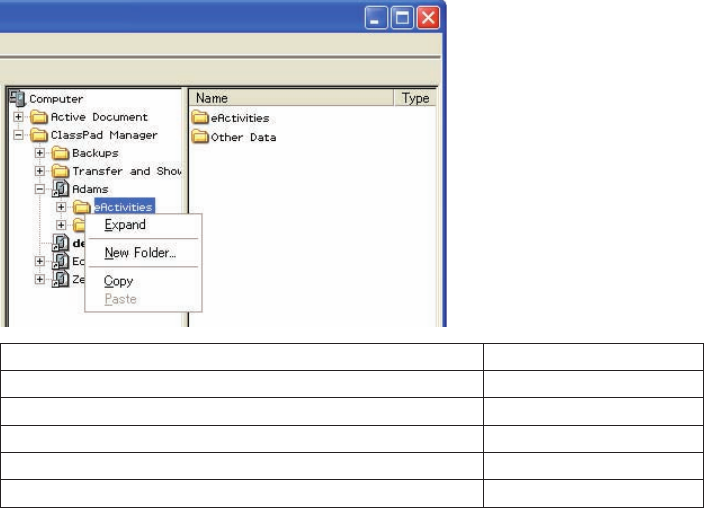
E-108
20060301
■ eActivities folder / Other Data folder Icon Shortcut Menu
To do this: Select this menu item:
Open the folder Expand
Close the folder Collapse
Create a new folder New Folder
Copy the folder Copy
Paste into the folder Paste
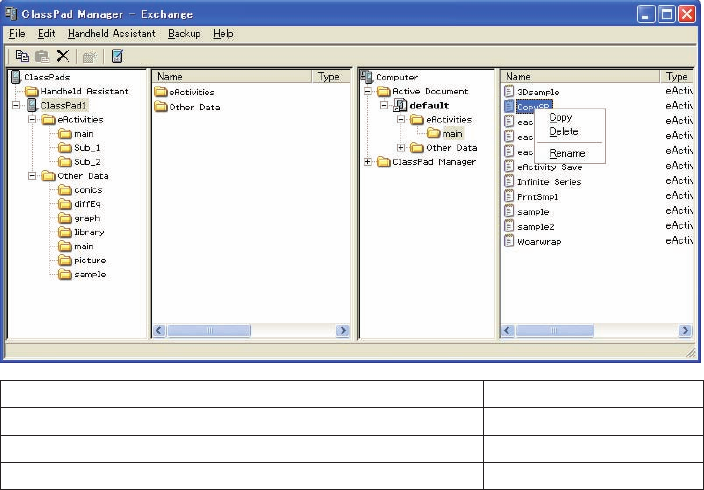
E-109
20060301
■ Individual Data File Icon Menu
To do this: Select this menu item:
Copy the fi le Copy
Delete the fi le Delete
Rename the fi le Rename

E-110
20060301
Appendix
ClassPad Window Shortcut Keys
Shortcut Key Function
Ctrl+b Bold
Ctrl+c Copy
Ctrl+x Cut
Ctrl+v Paste
Ctrl+i Inputs imaginary unit
Ctrl+p Inputs π
Ctrl+e Inputs e
Ctrl+a Select all
Ctrl+t Inputs θ
Ctrl+z Undo
F8 Identical to the H-Copy button (see page E-31)
Ctrl+r Identical to the Resize button (see page E-31)
Ctrl+k Displays the keyboard
Ctrl+n Creates a new document
Ctrl+o Opens an existing document
Alt+x Inputs single-character variable x
Alt+y Inputs single-character variable y
Alt+z Inputs single-character variable z
Alt+Shift+e Inputs E for exponential value
Alt+i Inputs infi nity
Alt+s Inputs the square root function (in natural input format)
Alt+F4 Closes the ClassPad Manager

CASIO COMPUTER CO., LTD.
6-2, Hon-machi 1-chome
Shibuya-ku, Tokyo 151-8543, Japan
SA0606-A
